
Punch Lists
8.0 Punch List
A punch list is a list of items or tasks that need to be done before a piping project is completed. The Punch Lists menu in the home page of the cuteQM app helps to create and view the punch lists in Piping project.
8.1 Create a New Punch List
If you want to create a punch list, do the following steps,
- Click Create New Punch List in the Punch lists menu.
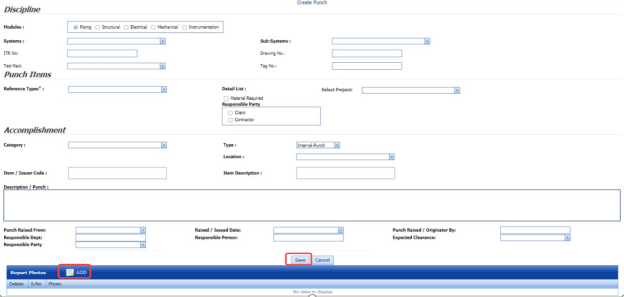
The Create Punch page opens.

Figure 8.1: Create Punch page
-
In the Modules box, select a module from the given modules.
-
In the Systems box, select a system from a drop-down list.
-
In the Sub-Systems box, select a sub-system from a drop-down list.
-
In the ITR No box, enter the ITR number.
-
In the Drawing No box, enter the drawing number.
-
In the Test Pack box, select a test pack from a drop-down list.
-
In the Tag No box, enter the tag number.
-
In the Reference Types box, select the reference type from the given options.
-
In the Select Project box, select a project from a drop-down list.
-
In the Category box, select any category from the given categories such as A, B, and C.
A - Item to be cleared before hydrostatic test.
B - Item to be cleared after hydrostatic test.
C - Item which can be cleared after hydrostatic test but before final acceptance of the whole plant.
-
In the Type box, select the type of punch such as whether internal or external.
- In the Item box, enter the item details.
-
In the Location box, select a location from a drop-down list.
-
In the Description/ Punch box, enter the description for the punch list.
- In the Punch Raised From box, select the detail such as from where the punch has been raised.
-
In the Date Raised box, select the date when the punch has been raised.
-
In the Punch Raised By box, enter the name of a person who has raised the punch.
-
In the Responsible Dept box, enter the department name, which is responsible for the punch.
-
In the Responsible Person box, enter the name of a person who is responsible for the punch.
-
In the Expected Clearance box, select the expected date of clearing the punch list.
-
Click Save.
The punch list is successfully added.
8.1.1 Add Report Photos
If you want to add any report photos for the punch list,
- Click
 (ADD button) in the Report Photos box.

-
Click
 (Browse button) to browse a photo stored in your computer.
 -
Click Upload.


The selected photo will be updated.
8.2 View Punch Lists
The View Punch Lists tab helps you to view and edit the punch list, which is added by using the Create New Punch List tab.
- Click View Punch Lists in the Punch Lists menu.
The Punch List page opens with added punch lists.

Figure 8.2: Punch List page
 Note: If you want to verify the added punch list item, click the checkbox provided in the Verify column.
 If you want to clear the added punch list item, click the checkbox provided in the Clear column.


8.2.1 View a Punch List Report
If you want to view a punch list report, click  (Print button) provided in the upper side of the Punch List page. See Fig 11.2.
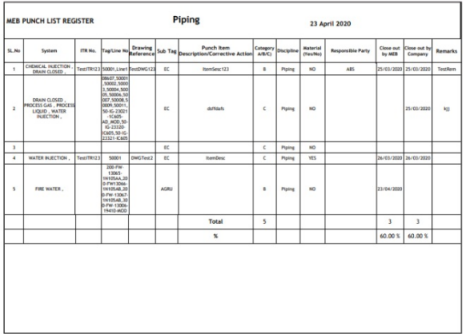
8.2.2 View a Punch List Register
If you want to view a punch list register, click  (Punch List Register button) provided in the upper side of the Punch List page. See Fig 8.2.
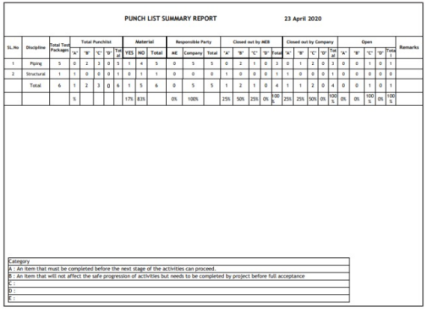
8.2.3 View a Punch List Summary
If you want to view a punch list summary, click  (Punch List Summary button) provided in the upper side of the Punch List page. See Fig 8.2.
8.2.4 Attach a File into a Punch List
If you want to attach any file with any punch list listed in the Punch List page, you can attach the file by using  (Attach icon) in the Attachment column. To know how to attach, follow the procedures given in the topic “Attach a file into P&ID”.
8.2.5 Edit a Punch List
If you want to edit any existing punch list in the Punch List page, click  (Edit icon) in the Edit column for the respective punch list. See Fig 8.2. Edit the details in the respective box you want.
8.2.6 Export Punch Lists
You can export a list of punch lists added in the Punch List page in both the pdf and excel formats by using  (PDF button) and
  (Excel button). To know how to export, see the topic, “Export P&ID list”.
8.2.7 Filter a Punch List
If you want to filter any punch list in the Punch List page, you can use  (FILTER button) located on the Punch List page. To know how to filter, see the topic, “Filter P&ID”.
8.3 Punch List Detail Report
The Punch List Detail Report tab in the Punch Lists menu helps you to view a detailed report of the punch lists. To view the punch list detail report,
- Click Punch List Detail Report in the Punch Lists menu.
The Punch List Detail Report page opens.

Figure 11.3: Punch List Detail Report page
- In the Modules field, select Piping from the given modules.
-
In the Systems box, select a system from a drop-down list.
-
In the Sub Systems box, select a sub-system from a drop-down list.
-
In the ITR No box, enter the ITR number.
-
In the Drawing box, enter the drawing number.
-
In the Category box, select a category from a list.
-
In the Status box, select a status from a drop-down list.
-
In the Punch Raised From box, select a person who has raised the punch list.
-
In the Responsible Party box, select a responsible party from a drop-down list.
-
In the Test Pack box, select a test pack from a drop-down list.
-
In the Tag No box, enter the tag number.
-
In the Raised Date box, select a raised date of the punch list.
The punch list report opens based on the selected data.

8.3.1 Print a Punch List Detail Report
If you want to print the punch list detail report, use  and
and  (print icons) provided in the Punch List Detail Report page.
- If you want to print the current page of the punch list detail report, click
 (print icon including the page number).
 - If you want to print all the pages of the punch list detail report, click
 (print icon).


8.3.2 View a Punch List Detail Report
You can view the punch list detail report in various formats by using the option  provided in the upper right corner of the punch list detail report page.
8.4 Punch List System Report
The Punch List System Report tab in the Punch Lists menu helps you to view a punch list system report. To view the punch list system report,
- Click Punch List System Report in the Punch Lists menu.
The Punch List System Report page opens.
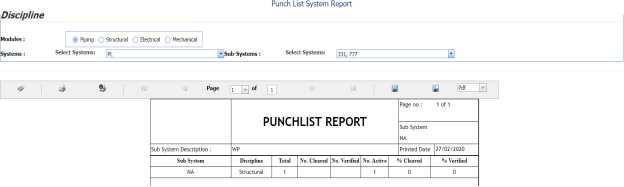
Figure 8.4: Punch List System Report page
-
In the Modules field, select Piping from the given modules.
-
In the Systems box, select a system from a drop-down list.
-
In the Sub Systems box, select a sub-system from a drop-down list.
The punch list system report opens based on the selected data.

8.4.1 Print a Punch List System Report
If you want to print the punch list system report, use  and
and  (print icons) provided in the Punch List system Report page.
- If you want to print the current page of the punch list system report, click
 (print icon including the page number).
 - If you want to print all the pages of the punch list system report, click
 (print icon).


8.4.2 View a Punch List System Report
You can view the punch list system report in various formats by using the option  provided in the upper right corner of the punch list system report page.
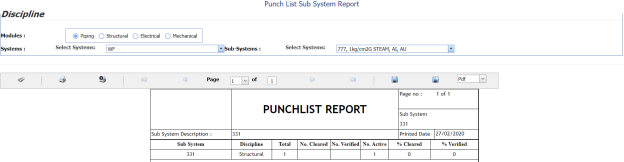
8.5 Punch List Sub System Report
The Punch List Sub System Report tab in the Punch Lists menu helps you to view a punch list sub system report. To view the punch list sub system report,
- Click Punch List Sub System Report in the Punch Lists menu.
The Punch List Sub System Report page opens.

Figure 8.5: Punch List Sub System Report page
-
In the Modules field, select Piping from the given modules.
-
In the Systems box, select a system from a drop-down list.
-
In the Sub Systems box, select a sub-system from a drop-down list.
The punch list sub system report opens based on the selected data.
8.5.1 Print a Punch List Sub System Report
If you want to print the punch list sub system report, use  and
and  (print icons) provided in the Punch List Sub System Report page.
- If you want to print the current page of the punch list sub system report, click
 (print icon including the page number).
 - If you want to print all the pages of the punch list sub system report, click
 (print icon).


8.5.2 View a Punch List Sub System Report
You can view the punch list sub system report in various formats by using the option  provided in the upper right corner of the punch list sub system report page.
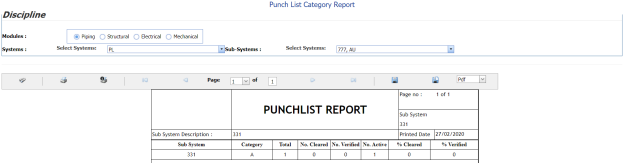
8.6 Punch List Category Report
The Punch List Category Report tab in the Punch Lists menu helps you to view a punch list category report. To view the punch list category report,
- Click Punch List Category Report in the Punch Lists menu.
The Punch List Category Report page opens.

Figure 8.6: Punch List Category Report page
-
In the Modules field, select Piping from the given modules.
-
In the Systems box, select a system from a drop-down list.
-
In the Sub Systems box, select a sub-system from a drop-down list.
The punch list category report opens based on the selected data.
8.6.1 Print a Punch List Category Report
If you want to print the punch list category report, use  and
and  (print icons) provided in the Punch List Category Report page.
- If you want to print the current page of the punch list category report, click
 (print icon including the page number).
 -
If you want to print all the pages of the punch list category report, click
 (print icon).


8.6.2 View a Punch List Category Report
You can view the punch list category report in various formats by using the option  provided in the upper right corner of the punch list category report page.
No Comments