
NDT
11.0 NDT
|
Users assigned with cuteQM_NDT role only can view and access the NDT menu and their functionalities. |
11.1 RT Report
If you have chosen the NDT request type as RT while adding NDT request in the NDT Request – RFI tab, the RT inspection request will be added here.
The RT Report tab in the NDT menu used to add the RT inspection result for the added request.
1. Click RT Report in the NDT
The RT Report page opens.

Figure 11.1: RT Report page
11.1.1 Add an RT Report
If you want to add an RT report, do the following steps,
1. Click  (ADD button) in the RT Report
The page shows a new window to add the details of RT report.

 Note: The fields notified with a symbol (*) are mandatory. You must enter the relevant details in that fields before saving.
 Tip: A report number for a new RT report will be updated automatically in the Report Number box. If you want change the report number, you can change.
2. In the NDT By box, select who has requested the NDT whether by third party or internal from a drop-down list.
3. In the Joints box, select a joint from a drop-down list.
4. In the Prepared By box, enter the name of a person who has prepared the RT report.
5. In the Prepared Date box, select the prepared date of the RT report.
6. In the Reviewed By box, enter the name of a person who has reviewed the RT report.
7. In the Reviewed Date box, select the reviewed date of the RT report.
8. In the Accepted/Approved By boxes, enter the name of a person who has accepted/approved the RT report.
9. In the Accepted/Approved Date box, select the accepted/approved date of the RT report.
10. Click Save
The RT report is successfully added. Once you have added the RT report, you must add RT inspection results.
 Note: If you want to lock any RT report, click the respective checkbox provided in the Lock Report? column.
11.1.2 Add RT Inspection Result
If you want to add the RT inspection result details,
1. Click (Edit icon) in the Edit Report column for the respective request.
The Joint Results, RT Results, and Report Photos windows open.
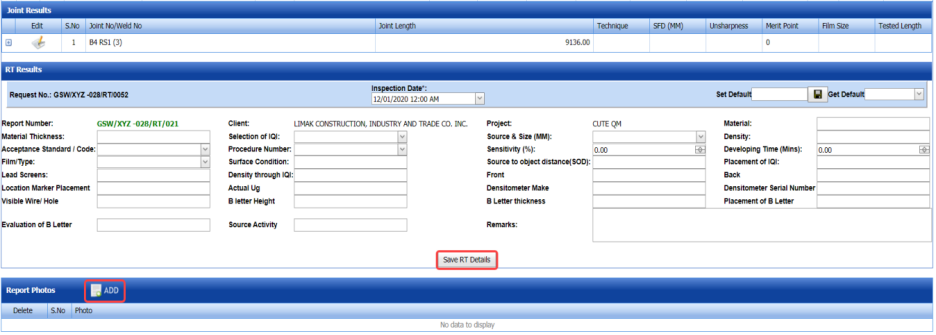
The Joint Results window shows a list of added joints for the RT request.
2. If you want to edit the joint length, click (Edit icon) of the respective joint and change the joint length.
3. To add the RT inspection result, click (Add icon) of the respective joint.
The Marker Results window opens.

4. Click  (ADD button) in the Marker Results

5. In the Marker box, enter the marker number.
6. In the Sensitivity box, enter the sensitivity value.
7. In the Result box, select the result of RT inspection.
|
Accepted – If you select Accepted, the respective joint will be moved for further process. Rejected – If you select Rejected, the respective joint will be rejected in the NDT Request – RFI page and moved to Weld visual page with the sub name of suffix 'R1', for example if the joint J1 means it will be added as J1 R1. Reshoot – If you select Reshoot, the respective joint will be moved into the NDT Request – RFI page. |
8. In the Defect box, select the defect detail.
9. In the Defect Length box, enter the defect length.
10. In the Remarks box, enter your remarks if any.
11. Click Save.
12. In the RT Results window, enter the RT result details.
13. Click Save RT Details.
14. In the Report Photos window, click (ADD button) and add the report photos.
11.1.3 View a RT Inspection Report
If you want to view the RT inspection report, click (Print icon) provided in the Report column.
11.1.4 Attach a File into a RT inspection Report
If you want to attach a file with any RT inspection report in the RT Report page, you can use  (Attach icon) provided in the Attachment column for the respective report. To know how to attach, see the topic, “Attach a file into a PQR”.
11.2 UT Report
If you have chosen the NDT request type as UT while adding NDT request in the NDT Request – RFI tab, the UT inspection request will be added here.
The UT Report tab in the NDT menu used to add the UT inspection result for the added request.
1. Click UT Report in the NDT
The UT Report page opens.

Figure 11.2: UT Report page
11.2.1 Add an UT Report
If you want to add an UT report, do the following steps,
1. Click  (ADD button) in the UT Report
The page shows a new window to add the details of UT report.

Note: The fields notified with a symbol (*) are mandatory. You must enter the relevant details in that fields before saving.
 Tip: A report number for a new UT report will be updated automatically in the Report Number box. If you want change the report number, you can change.
2. In the NDT By box, select who has requested the NDT whether by third party or internal from a drop-down list.
3. In the Joints box, select a joint from a drop-down list.
4. In the Prepared By box, enter the name of a person who has prepared the UT report.
5. In the Prepared Date box, select the prepared date of the UT report.
6. In the Reviewed By box, enter the name of a person who has reviewed the UT report.
7. In the Reviewed Date box, select the reviewed date of the UT report.
8. In the Accepted/Approved By boxes, enter the name of a person who has accepted/approved the UT report.
9. In the Accepted/Approved Date box, select the accepted/approved date of the UT report.
10. Click Save.
The UT report is successfully added. Once you have added the UT report, you must add UT inspection results.
Note: If you want to lock any UT report, click the respective checkbox provided in the Lock Report? column.
11.2.2 Add UT Inspection Result
If you want to add the UT inspection result details,
1. Click (Edit icon) in the Edit Report column for the respective request.
The Probe & Cable Details, Reference Setting Details, UT Results, and Report Photos windows open.
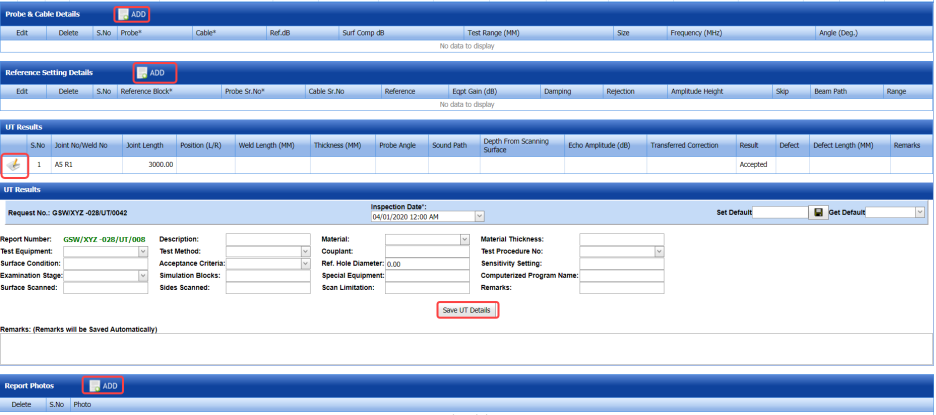
The UT Results window shows a list of added joints for the UT request.
2. Click (ADD button) in the Probe & Cable Details window.
3. Enter the probe and cable details and click Save.
4. Click (ADD button) in the Reference Setting Details window.

5. Enter the reference setting details and click Save.
6. Click (ADD button) in the UT Results

7. Enter the UT result details.
8. In the Result box, select the result for UT inspection.
|
Accepted – If you select Accepted, the respective joint will be moved for further process. Rejected – If you select Rejected, the respective joint will be rejected in the NDT Request – RFI page and moved to Weld visual page with the sub name of suffix 'R1', for example if the joint J1 means it will be added as J1 R1. |
9. Click Save.
10. In the UT Results window, enter the UT result details.
11. Click Save UT Details.
12. In the Report Photos window, click (ADD button) and add the report photos.
11.2.3 View an UT Inspection Report
If you want to view the UT inspection report, click (Print icon) provided in the Report column.
11.2.4 Attach a File into an UT inspection Report
If you want to attach a file with any UT inspection report in the UT Report page, you can use (Attach icon) provided in the Attachment column for the respective report. To know how to attach, see the topic, “Attach a file into a PQR”.
11.3 MT Report
If you have chosen the NDT request type as MT while adding NDT request in the NDT Request – RFI tab, the MT inspection request will be added here.
The MT Report tab in the NDT menu used to add the MT inspection result for the added request.
1. Click MT Report in the NDT
The MT Report page opens.

Figure 11.3: MT Report page
11.3.1 Add a MT Report
If you want to add a MT report, do the following steps,
1. Click (ADD button) in the MT Report
The page shows a new window to add the details of MT report.

Note: The fields notified with a symbol (*) are mandatory. You must enter the relevant details in that fields before saving.
Tip: A report number for a new MT report will be updated automatically in the Report Number box. If you want change the report number, you can change.
2. In the NDT By box, select who has requested the NDT whether by third party or internal from a drop-down list.
3. In the Joints box, select a joint from a drop-down list.
4. In the Prepared By box, enter the name of a person who has prepared the MT report.
5. In the Prepared Date box, select the prepared date of the MT report.
6. In the Reviewed By box, enter the name of a person who has reviewed the MT report.
7. In the Reviewed Date box, select the reviewed date of the MT report.
8. In the Accepted/Approved By boxes, enter the name of a person who has accepted/approved the MT report.
9. In the Accepted/Approved Date box, select the accepted/approved date of the MT report.
10. Click Save.
The MT report is successfully added. Once you have added the MT report, you must add MT inspection results.
Note: If you want to lock any MT report, click the respective checkbox provided in the Lock Report? column.
11.3.2 Add MT Inspection Result
If you want to add the MT inspection result details,
1. Click (Edit icon) in the Edit Report column for the respective request.
The MPT Results and Report Photos windows open.
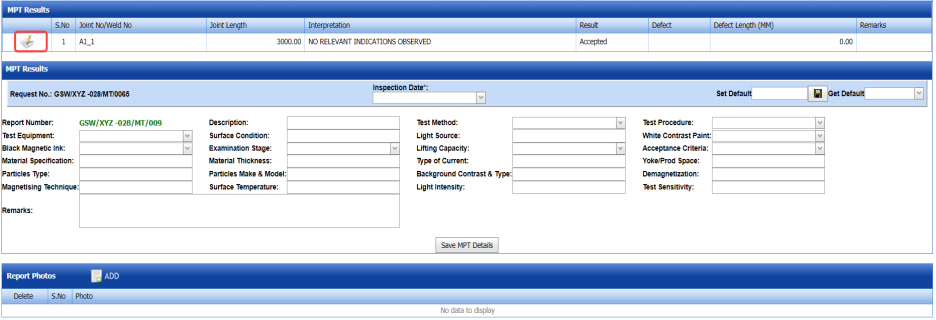
The MPT Results window shows a list of added joints for the MT request.
2. Click (Edit icon) in the MPT Results

3. Enter the MPT result details
4. In the Result box, select the result for MT inspection.
|
Accepted – If you select Accepted, the respective joint will be moved for further process. Rejected – If you select Rejected, the respective joint will be rejected in the NDT Request – RFI page and moved to Weld visual page with the sub name of suffix 'R1', for example if the joint J1 means it will be added as J1 R1. |
5. In the MPT Results window, enter the MPT result details.
6. Click Save MPT Details.
7 In the Report Photos window, click (ADD button) and add the report photos.
11.3.3 View a MT Inspection Report
If you want to view the MT inspection report, click (Print icon) provided in the Report column.
11.3.4 Attach a File into a MT inspection Report
If you want to attach a file with any MT inspection report in the MT Report page, you can use (Attach icon) provided in the Attachment column for the respective report. To know how to attach, see the topic, “Attach a file into a PQR”.
11.4 PT Report
If you have chosen the NDT request type as PT while adding NDT request in the NDT Request – RFI tab, the PT inspection request will be added here.
The PT Report tab in the NDT menu used to add the PT inspection result for the added request.
1. Click PT Report in the NDT
The PT Report page opens.

Figure 11.4: PT Report page
11.4.1 Add a PT Report
If you want to add a PT report, do the following steps,
1. Click (ADD button) in the PT Report page.
The page shows a new window to add the details of PT report.

Note: The fields notified with a symbol (*) are mandatory. You must enter the relevant details in that fields before saving.
Tip: A report number for a new PT report will be updated automatically in the Report Number box. If you want change the report number, you can change.
2. In the NDT By box, select who has requested the NDT whether by third party or internal from a drop-down list.
3. In the Joints box, select a joint from a drop-down list.
4. In the Prepared By box, enter the name of a person who has prepared the PT report.
5. In the Prepared Date box, select the prepared date of the PT report.
6. In the Reviewed By box, enter the name of a person who has reviewed the PT report.
7. In the Reviewed Date box, select the reviewed date of the PT report.
8. In the Accepted/Approved By boxes, enter the name of a person who has accepted/approved the PT report.
9. In the Accepted/Approved Date box, select the accepted/approved date of the PT report.
10. Click Save.
The PT report is successfully added. Once you have added the PT report, you must add PT inspection results.
Note: If you want to lock any PT report, click the respective checkbox provided in the Lock Report? column.
11.4.2 Add PT Inspection Result
If you want to add the PT inspection result details,
1. Click (Edit icon) in the Edit Report column for the respective request.
The DPT Results and Report Photos windows open.
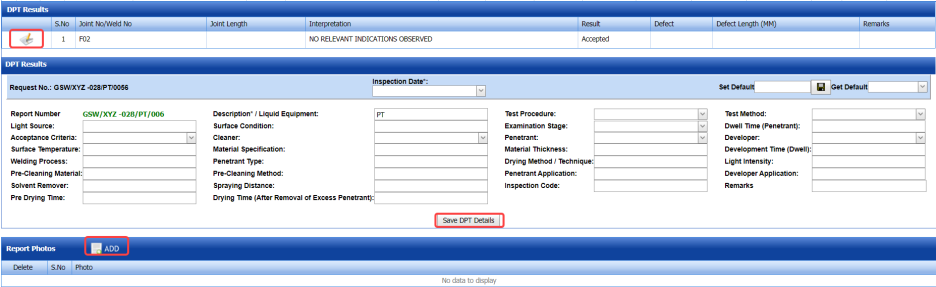
The DPT Results window shows a list of added joints for the PT request.
2. Click (Edit icon) in the DPT Results window

3. Enter the DPT result details.
4. In the Result box, select the result for PT inspection.
|
Accepted – If you select Accepted, the respective joint will be moved for further process. Rejected – If you select Rejected, the respective joint will be rejected in the NDT Request – RFI page and moved to Weld visual page with the sub name of suffix 'R1', for example if the joint J1 means it will be added as J1 R1. |
5. In the DPT Results window, enter the DPT result details.
6. Click Save DPT Details.
7. In the Report Photos window, click (ADD button) and add the report photos.
11.4.3 View a PT Inspection Report
If you want to view the PT inspection report, click (Print icon) provided in the Report column.
11.4.4 Attach a File into a PT inspection Report
If you want to attach a file with any PT inspection report in the PT Report page, you can use (Attach icon) provided in the Attachment column for the respective report. To know how to attach, see the topic, “Attach a file into a PQR”.
11.5 PMI Report
If you have chosen the NDT request type as PMI while adding NDT request in the NDT Request – RFI tab, the PMI inspection request will be added here.
The PMI Report tab in the NDT menu used to add the PMI inspection result for the added request.
1. Click PMI Report in the NDT
The PMI Report page opens.

Figure 11.5: PMI Report page
11.5.1 Add a PMI Report
If you want to add a PMI report, do the following steps,
1. Click (ADD button) in the PMI Report
The page shows a new window to add the details of PMI report.

Note: The fields notified with a symbol (*) are mandatory. You must enter the relevant details in that fields before saving.
Tip: A report number for a new PMI report will be updated automatically in the Report Number box. If you want change the report number, you can change.
2. In the NDT By box, select who has requested the NDT whether by third party or internal from a drop-down list.
3. In the Joints box, select a joint from a drop-down list.
4. In the Prepared By box, enter the name of a person who has prepared the PMI report.
5. In the Prepared Date box, select the prepared date of the PMI report.
6. In the Reviewed By box, enter the name of a person who has reviewed the PMI report.
7. In the Reviewed Date box, select the reviewed date of the PMI report.
8. In the Accepted/Approved By boxes, enter the name of a person who has accepted/approved the PMI report.
9. In the Accepted/Approved Date box, select the accepted/approved date of the PMI report.
10. Click Save.
The PMI report is successfully added. Once you have added the PMI report, you must add PMI inspection results.
Note: If you want to lock any PMI report, click the respective checkbox provided in the Lock Report? column.
11.5.2 Add PMI Inspection Result
If you want to add the PMI inspection result details,
1. Click (Edit icon) in the Edit Report column for the respective request.
The PMI Elements, PMI Joint Details, PMI Results, and Report Photos windows open.
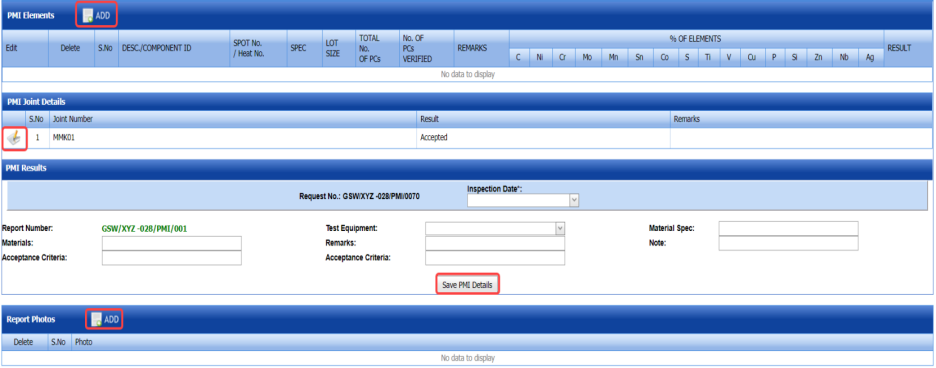
The PMI Joint Details window shows a list of added joints for the PMI request.
2. In the PMI Elements window, click (ADD button) and add the PMI elements.
3. Click (Edit icon) in the PMI Joint Details window.

4. Enter the joint number.
5. In the Result box, select the result for PMI inspection.
|
Accepted – If you select Accepted, the respective joint will be moved for further process. Rejected – If you select Rejected, the respective joint will be rejected in the NDT Request – RFI page and moved to Weld visual page with the sub name of suffix 'R1', for example if the joint J1 means it will be added as J1 R1. |
6. In the PMI Results window, enter the PMI result details.
7. Click Save PMI Details.
8. In the Report Photos window, click (ADD button) and add the report photos.
11.5.3 View a PMI Inspection Report
If you want to view the PMI inspection report, click (Print icon) provided in the Report column.
11.5.4 Attach a File into a PMI inspection Report
If you want to attach a file with any PMI inspection report in the PMI Report page, you can use (Attach icon) provided in the Attachment column for the respective report. To know how to attach, see the topic, “Attach a file into a PQR”.
11.6 PAUT Report
If you have chosen the NDT request type as PAUT while adding NDT request in the NDT Request – RFI tab, the PAUT inspection request will be added here.
The PAUT Report tab in the NDT menu used to add the PAUT inspection result for the added request.
1. Click PAUT Report in the NDT
The PAUT Report page opens.

Figure 11.6: PAUT Report page
11.6.1 Add a PAUT Report
If you want to add a PAUT report, do the following steps,
1. Click (ADD button) in the PAUT Report
The page shows a new window to add the details of PAUT report.

Note: The fields notified with a symbol (*) are mandatory. You must enter the relevant details in that fields before saving.
Tip: A report number for a new PAUT report will be updated automatically in the Report Number box. If you want change the report number, you can change.
2. In the NDT By box, select who has requested the NDT whether by third party or internal from a drop-down list.
3. In the Joints box, select a joint from a drop-down list.
4. In the Prepared By box, enter the name of a person who has prepared the PAUT report.
5. In the Prepared Date box, select the prepared date of the PAUT report.
6. In the Reviewed By box, enter the name of a person who has reviewed the PAUT report.
7. In the Reviewed Date box, select the reviewed date of the PAUT report.
8. In the Accepted/Approved By boxes, enter the name of a person who has accepted/approved the PAUT report.
9. In the Accepted/Approved Date box, select the accepted/approved date of the PAUT report.
10. Click Save.
The PAUT report is successfully added. Once you have added the PAUT report, you must add PAUT inspection results.
Note: If you want to lock any PAUT report, click the respective checkbox provided in the Lock Report? column.
11.6.2 Add PAUT Inspection Result
If you want to add the PAUT inspection result details,
1. Click (Edit icon) in the Edit Report column for the respective request.
The Joint Results, PAUT Results, and Report Photos windows open.
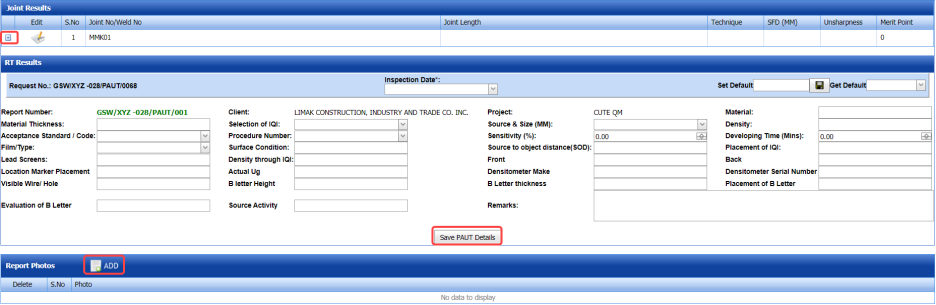
The Joint Results window shows a list of added joints for the PAUT request.
2. If you want to edit the joint length, click (Edit icon) of the respective joint and change the joint length.
3. To add the PAUT inspection result, click (Add icon) of the respective joint.
The Marker Results window opens.

4. Click (ADD button) in the Marker Results window.

5. In the Marker box, enter the marker number.
6. In the Sensitivity box, enter the sensitivity value.
7. In the Result box, select the result of PAUT inspection.
|
Accepted – If you select Accepted, the respective joint will be moved for further process. Rejected – If you select Rejected, the respective joint will be rejected in the NDT Request – RFI page and moved to Weld visual page with the sub name of suffix 'R1', for example if the joint J1 means it will be added as J1 R1. |
8. In the Defect box, select the defect detail.
9. In the Defect Length box, enter the defect length.
10. In the Remarks box, enter your remarks if any.
11. Click Save.
12. In the PAUT Results window, enter the PAUT result details.
13. Click Save PAUT Details.
14. In the Report Photos window, click (ADD button) and add the report photos.
11.6.3 View a PAUT Inspection Report
If you want to view the PAUT inspection report, click (Print icon) provided in the Report column.
11.6.4 Attach a File into a PAUT inspection Report
If you want to attach a file with any PAUT inspection report in the PAUT Report page, you can use (Attach icon) provided in the Attachment column for the respective report. To know how to attach, see the topic, “Attach a file into a PQR”.
11.7 PWHT Report
If you have chosen the NDT request type as PWHT while adding NDT request in the NDT Request – RFI tab, the PWHT inspection request will be added here.
The PWHT Report tab in the NDT menu used to add the PWHT inspection result for the added request.
1. Click PWHT Report in the NDT
The PWHT Report page opens.

Figure 11.7: PWHT Report page
11.7.1 Add a PWHT Report
If you want to add a PWHT report, do the following steps,
1. Click (ADD button) in the PWHT Report page.
The page shows a new window to add the details of PWHT report.

Note: The fields notified with a symbol (*) are mandatory. You must enter the relevant details in that fields before saving.
Tip: A report number for a new PWHT report will be updated automatically in the Report Number box. If you want change the report number, you can change.
2. In the NDT By box, select who has requested the NDT whether by third party or internal from a drop-down list.
3. In the Joints box, select a joint from a drop-down list.
4. In the Prepared By box, enter the name of a person who has prepared the PWHT report.
5. In the Prepared Date box, select the prepared date of the PWHT report.
6. In the Reviewed By box, enter the name of a person who has reviewed the PWHT report.
7. In the Reviewed Date box, select the reviewed date of the PWHT report.
8. In the Accepted/Approved By boxes, enter the name of a person who has accepted/approved the PWHT report.
9. In the Accepted/Approved Date box, select the accepted/approved date of the PWHT report.
10. Click Save.
The PWHT report is successfully added. Once you have added the PWHT report, you must add PWHT inspection results.
Note: If you want to lock any PWHT report, click the respective checkbox provided in the Lock Report? column.
11.7.2 Add PWHT Inspection Result
If you want to add the PWHT inspection result details,
1. Click (Edit icon) in the Edit Report column for the respective request.
The Joint Results, PWHT Results, and Report Photos windows open.
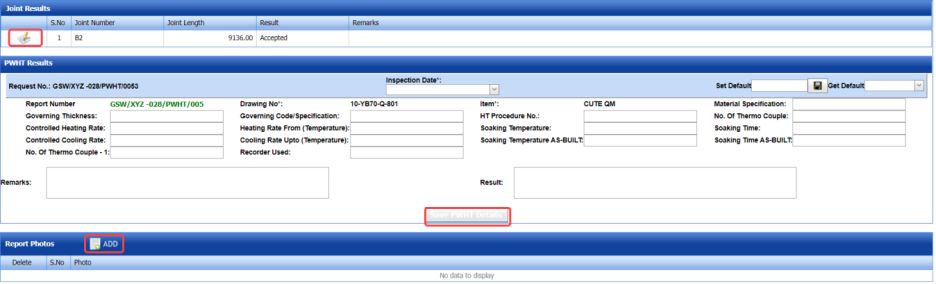
The Joint Results window shows a list of added joints for the PWHT request.
2. Click (Edit icon) in the Joint Results window.

3. Enter the PWHT result details.
4. In the Result box, select the result for PWHT inspection.
|
Accepted – If you select Accepted, the respective joint will be moved for further process. Rejected – If you select Rejected, the respective joint will be rejected in the NDT Request – RFI page and moved to Weld visual page with the sub name of suffix 'R1', for example if the joint J1 means it will be added as J1 R1. |
5. In the PWHT Results window, enter the PWHT result details.
6. Click Save PWHT Details.
7. In the Report Photos window, click (ADD button) and add the report photos.
11.7.3 View a PWHT Inspection Report
If you want to view the PWHT inspection report, click (Print icon) provided in the Report column.
11.7.4 Attach a File into a PWHT inspection Report
If you want to attach a file with any PWHT inspection report in the PWHT Report page, you can use (Attach icon) provided in the Attachment column for the respective report. To know how to attach, see the topic, “Attach a file into a PQR”.
11.8 TOFD Report
If you have chosen the NDT request type as TOFD while adding NDT request in the NDT Request – RFI tab, the TOFD inspection request will be added here.
The TOFD Report tab in the NDT menu used to add the TOFD inspection result for the added request.
1. Click TOFD Report in the NDT
The TOFD Report page opens.

Figure 11.8: TOFD Report page
11.8.1 Add a TOFD Report
If you want to add a TOFD report, do the following steps,
1. Click  (ADD button) in the TOFD Report
The page shows a new window to add the details of TOFD report.

 Note: The fields notified with a symbol (*) are mandatory. You must enter the relevant details in that fields before saving.
 Tip: A report number for a new TOFD report will be updated automatically in the Report Number box. If you want change the report number, you can change.
2. In the NDT By box, select who has requested the NDT whether by third party or internal from a drop-down list.
3. In the Joints box, select a joint from a drop-down list.
4. In the Prepared By box, enter the name of a person who has prepared the TOFD report.
5. In the Prepared Date box, select the prepared date of the TOFD report.
6. In the Reviewed By box, enter the name of a person who has reviewed the TOFD report.
7. In the Reviewed Date box, select the reviewed date of the TOFD report.
8. In the Accepted/Approved By boxes, enter the name of a person who has accepted/approved the TOFD report.
9. In the Accepted/Approved Date box, select the accepted/approved date of the TOFD report.
10. Click Save.
The TOFD report is successfully added. Once you have added the TOFD report, you must add TOFD inspection results.
Note: If you want to lock any TOFD report, click the respective checkbox provided in the Lock Report? column.
11.8.2 Add TOFD Inspection Result
If you want to add the TOFD inspection result details,
1. Click(Edit icon) in the Edit Report column for the respective request.
The Joint Results, TOFD Results, and Report Photos windows open.
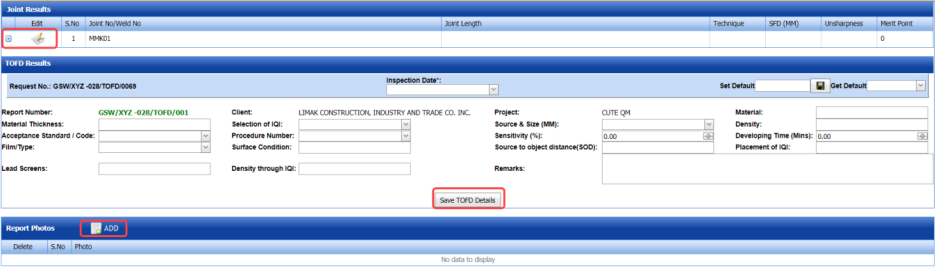
The Joint Results window shows a list of added joints for the TOFD request.
2. If you want to edit the joint length, click (Edit icon) of the respective joint and change the joint length.
3. To add the TOFD inspection result, click (Add icon) of the respective joint.
The Segment Details window opens.

4. Click (ADD button) in the Segment Details window.

5. In the Segment box, enter the segment number.
6. In the Sensitivity box, enter the sensitivity value.
7. In the Result box, select the result of TOFD inspection.
|
Accepted – If you select Accepted, the respective joint will be moved for further process. Rejected – If you select Rejected, the respective joint will be rejected in the NDT Request – RFI page and moved to Weld visual page with the sub name of suffix 'R1', for example if the joint J1 means it will be added as J1 R1. |
8. In the Defect box, select the defect detail.
9. In the Defect Length box, enter the defect length.
10. In the Remarks box, enter your remarks if any.
11. Click Save.
12. In the TOFD Results window, enter the TOFD result details.
13. Click Save TOFD Details.
14. In the Report Photos window, click (ADD button) and add the report photos.
11.8.3 View a TOFD Inspection Report
If you want to view the TOFD inspection report, click  (Print icon) provided in the Report column.
11.8.4 Attach a File into a TOFD inspection Report
If you want to attach a file with any TOFD inspection report in the TOFD Report page, you can use  (Attach icon) provided in the Attachment column for the respective report. To know how to attach, see the topic, “Attach a file into a PQR”.
11.9 Ferrite Report
If you have chosen the NDT request type as ferrite while adding NDT request in the NDT Request – RFI tab, the ferrite inspection request will be added here.
The Ferrite Report tab in the NDT menu used to add the ferrite inspection result for the added request.
1. Click Ferrite Report in the NDT
The Ferrite Report page opens.

Figure 11.9: Ferrite Report page
11.9.1 Add a Ferrite Report
If you want to add a ferrite report, do the following steps,
1. Click  (ADD button) in the Ferrite Report page.
The page shows a new window to add the details of ferrite report.

 Note: The fields notified with a symbol (*) are mandatory. You must enter the relevant details in that fields before saving.
Tip: A report number for a new ferrite report will be updated automatically in the Report Number box. If you want change the report number, you can change.
2. In the NDT By box, select who has requested the NDT whether by third party or internal from a drop-down list.
3. In the Joints box, select a joint from a drop-down list.
4. In the Prepared By box, enter the name of a person who has prepared the ferrite report.
5. In the Prepared Date box, select the prepared date of the ferrite report.
6. In the Reviewed By box, enter the name of a person who has reviewed the ferrite report.
7. In the Reviewed Date box, select the reviewed date of the ferrite report.
8. In the Accepted/Approved By boxes, enter the name of a person who has accepted/approved the ferrite report.
9. In the Accepted/Approved Date box, select the accepted/approved date of the ferrite report.
10. Click Save.
The ferrite report is successfully added. Once you have added the ferrite report, you must add ferrite inspection results.
Note: If you want to lock any ferrite report, click the respective checkbox provided in the Lock Report? column.
11.9.2 Add Ferrite Inspection Result
If you want to add the ferrite inspection result details,
1. Click  (Edit icon) in the Edit Report column for the respective request.
The Ferrite Inspection Details, Joint Results, Ferrite Results, and Report Photos windows open.
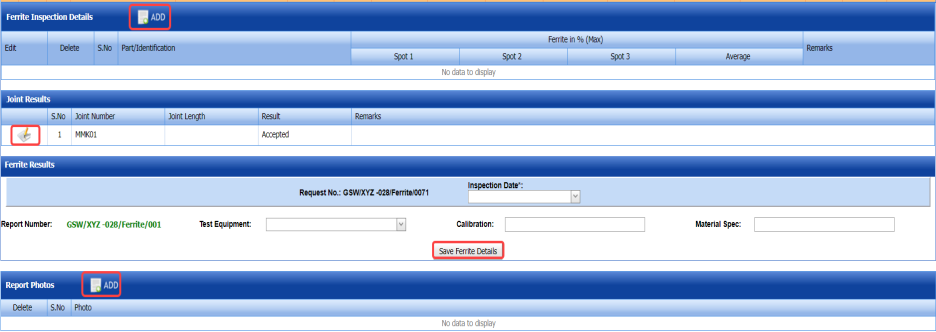
The Joint Results window shows a list of added joints for the ferrite request.
2. In the Ferrite Inspection Details window, click (ADD button) and add the ferrite inspection details.
3. In the Joint Results window, click  (Edit icon) of the respective joint.

4. In the Result box, select the result of ferrite inspection.
|
Accepted – If you select Accepted, the respective joint will be moved for further process. Rejected – If you select Rejected, the respective joint will be rejected in the NDT Request – RFI page and moved to Weld visual page with the sub name of suffix 'R1', for example if the joint J1 means it will be added as J1 R1. |
5. Click Save.
6. In the Ferrite Results window, enter the ferrite result details.
7. Click Save Ferrite Details.
8. In the Report Photos window, click (ADD button) and add the report photos.
11.9.3 View a Ferrite Inspection Report
If you want to view the ferrite inspection report, click  (Print icon) provided in the Report column.
11.9.4 Attach a File into a Ferrite inspection Report
If you want to attach a file with any ferrite inspection report in the Ferrite Report page, you can use  (Attach icon) provided in the Attachment column for the respective report. To know how to attach, see the topic, “Attach a file into a PQR”.
11.10 Hardness Report
If you have chosen the NDT request type as Hardness while adding NDT request in the NDT Request – RFI tab, the hardness inspection request will be added here.
The Hardness Report tab in the NDT menu used to add the hardness inspection result for the added request.
1. Click Hardness Report in the NDT
The Hardness Report page opens.

Figure 11.10: Hardness Report page
11.10.1 Add a hardness Report
If you want to add a hardness report, do the following steps,
1. Click  (ADD button) in the Hardness Report
The page shows a new window to add the details of hardness report.

 Note: The fields notified with a symbol (*) are mandatory. You must enter the relevant details in that fields before saving.
Tip: A report number for a new hardness report will be updated automatically in the Report Number box. If you want change the report number, you can change.
2. In the NDT By box, select who has requested the NDT whether by third party or internal from a drop-down list.
3. In the Joints box, select a joint from a drop-down list.
4. In the Prepared By box, enter the name of a person who has prepared the hardness report.
5. In the Prepared Date box, select the prepared date of the hardness report.
6. In the Reviewed By box, enter the name of a person who has reviewed the hardness report.
7. In the Reviewed Date box, select the reviewed date of the hardness report.
8. In the Accepted/Approved By boxes, enter the name of a person who has accepted/approved the hardness report.
9. In the Accepted/Approved Date box, select the accepted/approved date of the hardness report.
10. Click Save.
The hardness report is successfully added. Once you have added the hardness report, you must add hardness inspection results.
Note: If you want to lock any hardness report, click the respective checkbox provided in the Lock Report? column.
11.10.2 Add Hardness Inspection Result
If you want to add the hardness inspection result details,
1. Click  (Edit icon) in the Edit Report column for the respective request.
The Joint Results, Hardness Results, and Report Photos windows open.
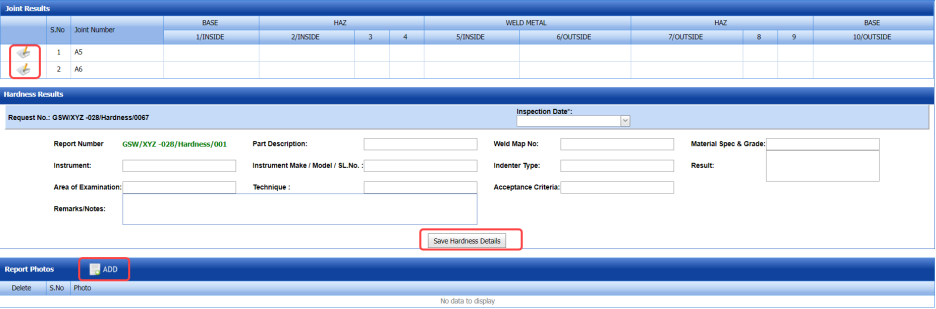
The Joint Results window shows a list of added joints for the hardness request.
2. Click  (Edit icon) in the Joint Results window and add the joint details.
3. In the Hardness Results window, enter the hardness result details.
4. In the Result box, enter the result for hardness inspection.
|
Accepted – If you select Accepted, the respective joint will be moved for further process. Rejected – If you select Rejected, the respective joint will be rejected in the NDT Request – RFI page and moved to Weld visual page with the sub name of suffix 'R1', for example if the joint J1 means it will be added as J1 R1. |
5. Click Save Hardness Details.
6. In the Report Photos window, click (ADD button) and add the report photos.
11.10.3 View a Hardness Inspection Report
If you want to view the hardness inspection report, click  (Print icon) provided in the Report column.
11.10.4 Attach a File into a Hardness inspection Report
If you want to attach a file with any hardness inspection report in the Hardness Report page, you can use  (Attach icon) provided in the Attachment column for the respective report. To know how to attach, see the topic, “Attach a file into a PQR”.
11.11 RT Summary Report
If you want to view the RT summary report, navigate to the RT Summary Report tab in the NDT menu.
1. Click RT Summary Report in the NDT
The NDT – RT Summary Report page opens.
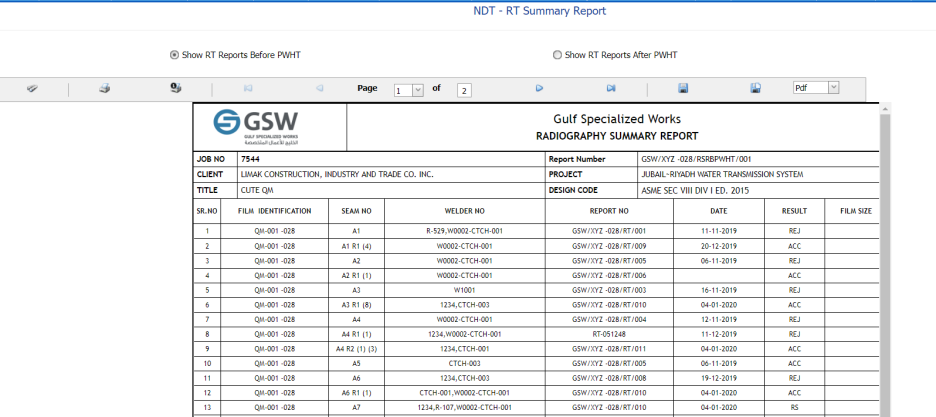
Figure 11.11: RT Summary Report page
11.11.1 Print RT Summary Report
If you want to print the RT summary report, use  and
and  (print icons) provided in the RT Summary Report page.
1. If you want to print the current page of the summary report, click (print icon including the page number).
2. If you want to print all the pages of the summary report, click (print icon).
11.11.2 Export RT Summary Report
You can export the RT summary report in various formats by using the option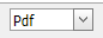 provided in the upper right corner of the RT Summary Report page.
11.12 PT Summary Report
If you want to view the PT summary report, navigate to the PT Summary Report tab in the NDT menu.
1. Click PT Summary Report in the NDT
The NDT – PT Summary Report page opens.
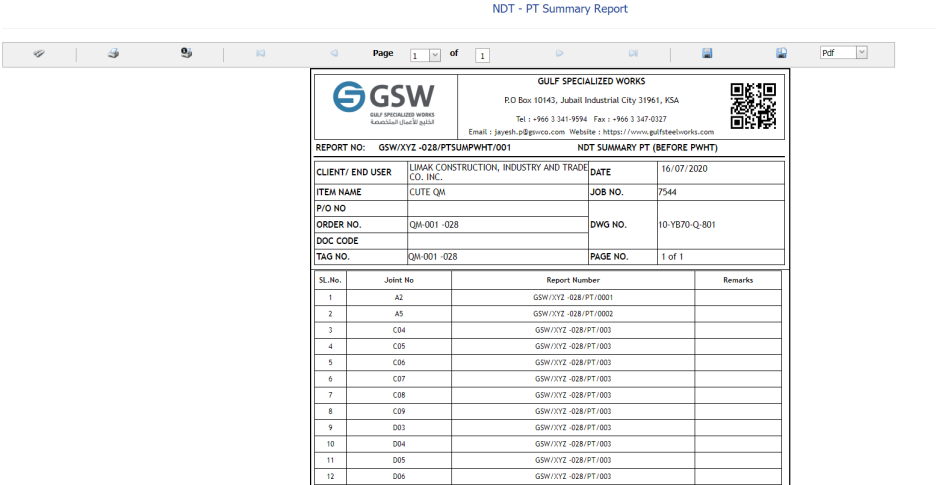
Figure 11.12: PT Summary Report page
11.12.1 Print PT Summary Report
If you want to print the PT summary report, use and (print icons) provided in the PT Summary Report page.
1. If you want to print the current page of the summary report, click (print icon including the page number).
2. If you want to print all the pages of the summary report, click (print icon).
11.12.2 Export PT Summary Report
You can export the PT summary report in various formats by using the option provided in the upper right corner of the PT Summary Report page.
11.13 NDT Summary Report
If you want to view the NDT summary report, navigate to the NDT Summary Report tab in the NDT menu.
1. Click NDT Summary Report in the NDT
The NDT Summary Report page opens.
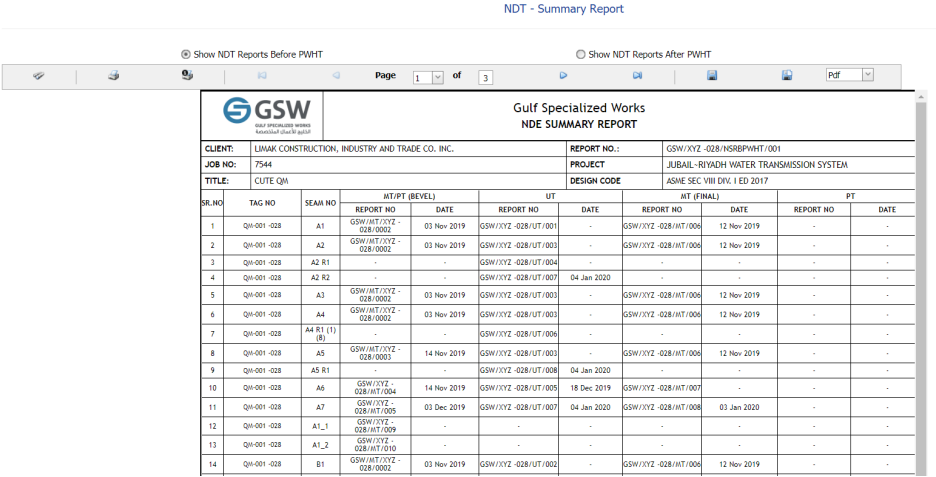
Figure 11.13: NDT Summary Report page
11.13.1 Print NDT Summary Report
If you want to print the NDT summary report, use and (print icons) provided in the NDT Summary Report page.
1. If you want to print the current page of the summary report, click (print icon including the page number).
2. If you want to print all the pages of the summary report, click (print icon).
11.13.2 Export NDT Summary Report
You can export the NDT summary report in various formats by using the option provided in the upper right corner of the NDT Summary Report page.
No Comments