
Heat Exchanger
12.0 Heat Exchanger
A Heat Exchanger is a device used with the Pressure Vessel to transfer heat between two or more fluids. Heat exchangers are used in both cooling and heating processes. The fluids may be separated by a solid wall to prevent mixing or they may be in direct contact.
The Heat Exchanger menu in the app used to add the various inspection requests to be done in the Heat exchanger, and also add the inspection result after completing the inspection based on the request.
|
Users assigned with Production role only can view and access the following RFI functionalities in the Heat Exchanger menu, and can add the following inspection requests. |
12.1 Final Dimensional Report – RFI
The Final Dimensional Report – RFI tab in the Heat Exchanger menu used to add the final dimensional inspection request. To add the final dimensional inspection request,
1. Click Final Dimensional Report – RFI in the Heat Exchanger
The Final Dimensional Report page opens.

Figure 12.1: Final Dimensional Report page
12.1.1 Add a Final Dimensional Request
If you want to add a final dimensional request, do the following steps,
1. Click (ADD button) in the Final Dimensional Report
The page shows a new window to add the details of the final dimensional request.

 Tip: A report number and an RFI number for a new final dimensional report will be updated automatically in the Report Number and the RFI Report Number boxes, respectively.
2. In the Drawing box, select a drawing from a drop-down list.
3. In the Prepared By box, enter the name of a person who has prepared the final dimensional request.
4. In the Reviewed By box, enter the name of a person who has reviewed the final dimensional request.
5. In the Approved By box, enter the name of a person who has approved the final dimensional request.
6. In the Prepared Date box, choose the prepared date of the final dimensional request.
7. In the Reviewed Date box, choose the reviewed date of the final dimensional request.
8. In the Approved Date box, choose the approved date of the final dimensional request.
9. In the Title box, enter the title name.
10. Click Save.
The final dimensional request is added and listed in the Final Dimensional Report page.
12.1.2 Submit a Final Dimensional Request
Once you have added the final dimensional inspection request, the Submission column in the Final Dimensional Report page is appeared with (Submit and Reject icons). See Fig 12.1.
1. If you want to submit the final dimensional inspection request, click  (Submit icon) in the Submission Otherwise click
  (Reject icon) to reject the request.
The submitted request will be moved to for the final dimensional inspection. The request submitted status will be updated in the Submitted column. Once the final dimensional inspection results are updated, the completed status will be updated in the Completed column.
12.1.3 Edit a Final Dimensional Request
|
Note that if the final dimensional request has been submitted, you cannot edit the respective request. |
If you want to edit any existing final dimensional request in the Final Dimensional Report page, do the following steps,
1. Click  (Edit icon) in the Edit column for the respective final dimensional request. See Fig 12.1.
The page shows the details of added final dimensional request.

2. Click on any box where you want to edit the details, and then edit the details in the respective box.
3. Click Save.
12.1.4 Add RFI Data for a Final Dimensional Request
If you want to add the details of RFI data for the added final dimensional request, do the following steps,
1. Click (Add icon) in the RFI Data column of the Final Dimensional Report See Fig 12.1.
The RFI Inspection Request List window opens.

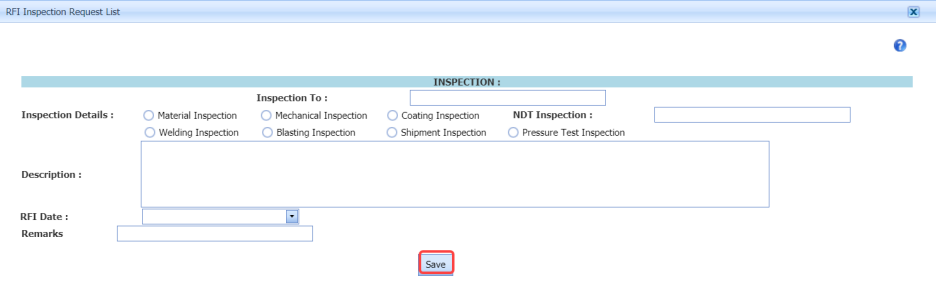
2. In the Inspection To box, enter the detail to where the inspection should end.
3. In the Inspection Details option, select what type of inspection to be performed based on your requirement.
4. In the NDT Inspection box, enter the NDT inspection detail.
5. In the Description box, enter the description for the inspection request.
6. In the RFI Date box, choose the RFI date.
7. In the Remarks box, enter your remarks if any.
8. Click Save.
12.1.5 View RFI Report for a Final Dimensional Request
If you want to view the RFI report for the final dimensional request, click  (Print icon) provided in the RFI Report column.
12.1.6 Attach a File into a Final Dimensional Request
If you want to attach a file with any final dimensional request listed in the Final Dimensional Report page, you can use (Attach icon) provided in the Attachment column for the respective final dimensional request. To know how to attach, see the topic, “Attach a file into a PQR”.
12.2 Nozzle Marking Report – RFI
This Nozzle Marking Report – RFI tab in the Heat Exchanger menu used to add the nozzle marking inspection request.
1. Click Nozzle Marking Report – RFI in the Heat Exchanger
The Nozzle Marking Inspection page opens.

Figure 12.2: Nozzle Marking Inspection page
12.2.1 Add a Nozzle Marking Inspection Request
If you want to add a nozzle marking inspection request, do the following steps,
1. Click (ADD button) in the Nozzle Marking Inspection page
The page shows a new window to add the details of the nozzle marking inspection request.

Tip: A report number and an RFI number for a new nozzle marking inspection request will be updated automatically in the Report Number and the RFI Report Number boxes, respectively.
2. In the Drawing box, select a drawing from a drop-down list.
3. In the Prepared By box, enter the name of a person who has prepared the nozzle marking inspection
4. In the Reviewed By box, enter the name of a person who has reviewed the nozzle marking inspection
5. In the Approved By box, enter the name of a person who has approved the nozzle marking inspection
6. In the Prepared Date box, choose the prepared date of the nozzle marking inspection request.
7. In the Reviewed Date box, choose the reviewed date of the nozzle marking inspection
8. In the Approved Date box, choose the approved date of the nozzle marking inspection
9. Click Save.
The nozzle marking inspection request is added and listed in the Nozzle Marking Inspection page.
12.2.2 Submit a Nozzle Marking Inspection Request
Once you have added the nozzle marking inspection request, the Submission column in the Nozzle Marking Inspection page is appeared with (Submit and Reject icons). See Fig 12.2.
1. If you want to submit the nozzle marking inspection request, click (Submit icon) in the Submission Otherwise click
(Reject icon) to reject the request.
The submitted request will be moved to for the nozzle marking inspection. The request submitted status will be updated in the Submitted column. Once the nozzle marking inspection results are updated, the completed status will be updated in the Completed column.
12.2.3 Edit a Nozzle Marking Inspection Request
|
Note that if the nozzle marking inspection request has been submitted, you cannot edit the respective request. |
If you want to edit any existing nozzle marking inspection request in the Nozzle Marking Inspection page, do the following steps,
1. Click (Edit icon) in the Edit column for the respective nozzle marking inspection See Fig 12.2.
The page shows the details of added nozzle marking inspection request.

2. Click on any box where you want to edit the details, and then edit the details in the respective box.
3. Click Save.
12.2.4 Add RFI Data for a Nozzle Marking Inspection Request
If you want to add the details of RFI data for the added nozzle marking inspection request, do the following steps,
1. Click  (Add icon) in the RFI Data column of the Nozzle Marking Inspection page. See Fig 12.2.
The RFI Inspection Request List window opens.
2. In the Inspection To box, enter the detail to where the inspection should end.
3. In the Inspection Details option, select what type of inspection to be performed based on your requirement.
4. In the NDT Inspection box, enter the NDT inspection detail.
5. In the Description box, enter the description for the inspection request.
6. In the RFI Date box, choose the RFI date.
7. In the Remarks box, enter your remarks if any.
8. Click Save.
12.2.5 View RFI Report for a Nozzle Marking Inspection Request
If you want to view the RFI report for the nozzle marking inspection request, click (Print icon) provided in the RFI Report column.
12.2.6 Attach a File into a Nozzle Marking Inspection Request
If you want to attach a file with any nozzle marking inspection request listed in the Nozzle Marking Inspection page, you can use  (Attach icon) provided in the Attachment column for the respective nozzle marking inspection request. To know how to attach, see the topic, “Attach a file into a PQR”.
12.3 Shell Side Hydrostatic – RFI
The Shell Side Hydrostatic– RFI tab in the Heat Exchange menu used to add the shell side hydrostatic pressure test request. To add the shell side hydrostatic pressure test request,
1. Click Shell Side Hydrostatic Test – RFI in the Heat Exchange
The Shell Hydrostatic Pressure Test Report page opens.

Figure 12.3: Shell Hydrostatic Pressure Test Report page
12.3.1 Add a Shell Side Hydrostatic Pressure Test Request
If you want to add a shell side hydrostatic pressure test request, do the following steps,
1. Click (ADD button) in the Shell Hydrostatic Pressure Test Report
The page shows a new window to add the details of the shell side hydrostatic pressure test request.

Tip: A report number and an RFI number for a new shell side hydrostatic pressure test report will be updated automatically in the Report Number and the RFI Report Number boxes, respectively.
2. In the Drawing box, select a drawing from a drop-down list.
3. In the Prepared By box, enter the name of a person who has prepared the shell side hydrostatic pressure test request.
4. In the Reviewed By box, enter the name of a person who has reviewed the shell side hydrostatic pressure test request.
5. In the Approved By box, enter the name of a person who has approved the shell side hydrostatic pressure test request.
6. In the Prepared Date box, choose the prepared date of the shell side hydrostatic pressure test request.
7. In the Reviewed Date box, choose the reviewed date of the shell side hydrostatic pressure test request.
8. In the Approved Date box, choose the approved date of the shell side hydrostatic pressure test request.
9. Click Save.
The shell side hydrostatic pressure test request is added and listed in the Shell Hydrostatic Pressure Test Report page.
12.3.2 Submit a Shell Side Hydrostatic Pressure Test Request
Once you have added the shell side hydrostatic pressure test request, the Submission column in the Shell Hydrostatic Pressure Test Report page is appeared with (Submit and Reject icons). See Fig 12.3.
1. If you want to submit the shell side hydrostatic pressure test inspection request, click (Submit icon) in the Submission Otherwise click (Reject icon) to reject the request.
The submitted request will be moved to for the shell side hydrostatic pressure test. The request submitted status will be updated in the Submitted column. Once the shell side hydrostatic pressure test results are updated, the completed status will be updated in the Completed column.
12.3.3 Edit a Shell Side Hydrostatic Pressure Test Request
|
Note that if the shell side hydrostatic pressure test request has been submitted, you cannot edit the respective request. |
If you want to edit any existing shell side hydrostatic pressure test request in the Shell Hydrostatic Pressure Test Report page, do the following steps,
1. Click (Edit icon) in the Edit column for the respective shell side hydrostatic pressure test request. See Fig 12.3.
The page shows the details of added shell side hydrostatic pressure test request.

2. Click on any box where you want to edit the details, and then edit the details in the respective box.
3. Click Save.
12.3.4 Add RFI Data for a Shell Side Hydrostatic Pressure Test Request
If you want to add the details of RFI data for the added shell side hydrostatic pressure test request, do the following steps,
1. Click (Add icon) in the RFI Data column of the Hydrostatic Pressure Test Report See Fig 12.3.
The RFI Inspection Request List window opens.

2. In the Inspection To box, enter the detail to where the inspection should end.
3. In the Inspection Details option, select what type of inspection to be performed based on your requirement.
4. In the NDT Inspection box, enter the NDT inspection detail.
5. In the Description box, enter the description for the inspection request.
6. In the RFI Date box, choose the RFI date.
7. In the Remarks box, enter your remarks if any.
8. Click Save.
12.3.5 View RFI Report for a Shell Side Hydrostatic Pressure Test Request
If you want to view the RFI report for the shell side hydrostatic pressure test request, click  (Print icon) provided in the RFI Report column.
12.3.6 Attach a File into a Shell Side Hydrostatic Pressure Test Request
If you want to attach a file with any shell side hydrostatic pressure test request listed in the Shell Hydrostatic Pressure Test Report page, you can use (Attach icon) provided in the Attachment column for the respective shell side hydrostatic pressure test request. To know how to attach, see the topic, “Attach a file into a PQR”.
12.4 Leak Test – RFI
In Heat Exchanger, Leak Test is performed to identify any leakage.
The Leak Test – RFI tab in the Heat Exchanger menu used to add the leak test request. To add the leak test request,
1. Click Leak Test – RFI in the Heat Exchanger
The Leak Test Report page opens.

Figure 12.4: Leak Test Report page
12.4.1 Add a Leak Test Request
If you want to add a leak test request, do the following steps,
1. Click (ADD button) in the Leak Test Report page.
The page shows a new window to add the details of the leak test request.

 Tip: A report number and an RFI number for a new leak test report will be updated automatically in the Report Number and the RFI Report Number boxes, respectively.
2. In the Drawing box, select a drawing from a drop-down list.
3. In the Prepared By box, enter the name of a person who has prepared the leak test request.
4. In the Reviewed By box, enter the name of a person who has reviewed the leak test request.
5. In the Approved By box, enter the name of a person who has approved the leak test request.
6. In the Prepared Date box, choose the prepared date of the leak test request.
7. In the Reviewed Date box, choose the reviewed date of the leak test request.
8. In the Approved Date box, choose the approved date of the leak test request.
9. Click Save.
The leak test request is added and listed in the Leak Test Report page.
12.4.2 Submit a Leak Test Request
Once you have added the leak test request, the Submission column in the Leak Test Report page is appeared with (Submit and Reject icons). See Fig 12.4.
1. If you want to submit the leak test inspection request, click (Submit icon) in the Submission Otherwise click (Reject icon) to reject the request.
The submitted request will be moved to for the leak test. The request submitted status will be updated in the Submitted column. Once the leak test results are updated, the completed status will be updated in the Completed column.
12.4.3 Edit a Leak Test Request
|
Note that if the leak test request has been submitted, you cannot edit the respective request. |
If you want to edit any existing leak test request in the Leak Test Report page, do the following steps,
1. Click  (Edit icon) in the Edit column for the respective leak test request. See Fig 12.4.
The page shows the details of added leak test request.

2. Click on any box where you want to edit the details, and then edit the details in the respective box.
3. Click Save.
12.4.4 Add RFI Data for a Leak Test Request
If you want to add the details of RFI data for the added leak test request, do the following steps,
1. Click (Add icon) in the RFI Data column of the Leak Test Report See Fig 12.4.
The RFI Inspection Request List window opens.

2. In the Inspection To box, enter the detail to where the inspection should end.
3. In the Inspection Details option, select what type of inspection to be performed based on your requirement.
4. In the NDT Inspection box, enter the NDT inspection detail.
5. In the Description box, enter the description for the inspection request.
6. In the RFI Date box, choose the RFI date.
7. In the Remarks box, enter your remarks if any.
8. Click Save.
12.4.5 View RFI Report for Leak Test Request
If you want to view the RFI report for the leak test request, click (Print icon) provided in the RFI Report column.
12.4.6 Attach a File into a Leak Test Request
If you want to attach a file with any leak test request listed in the Leak Test Report page, you can use (Attach icon) provided in the Attachment column for the respective leak test request. To know how to attach, see the topic, “Attach a file into a PQR”.
12.5 Tube Expansion – RFI
The Tube Expansion – RFI tab in the Heat Exchanger menu used to add the tube expansion inspection request. To add the tube expansion inspection request,
1. Click Tube Expansion – RFI in the Heat Exchanger
The Tube Expansion Report page opens.

Figure 12.5: Tube Expansion Report page
12.5.1 Add a Tube Expansion Inspection Request
If you want to add a tube expansion inspection request, do the following steps,
1. Click (ADD button) in the Tube Expansion Report
The page shows a new window to add the details of the tube expansion inspection request.

Tip: A report number and an RFI number for a new tube expansion inspection report will be updated automatically in the Report Number and the RFI Report Number boxes, respectively.
2. In the Drawing box, select a drawing from a drop-down list.
3. In the Prepared By box, enter the name of a person who has prepared the tube expansion inspection request.
4. In the Reviewed By box, enter the name of a person who has reviewed the tube expansion inspection request.
5. In the Approved By box, enter the name of a person who has approved the tube expansion inspection request.
6. In the Prepared Date box, choose the prepared date of the tube expansion inspection request.
7. In the Reviewed Date box, choose the reviewed date of the tube expansion inspection request.
8. In the Approved Date box, choose the approved date of the tube expansion inspection request.
9. In the Title box, enter the title of the request.
10. Click Save.
The tube expansion inspection request is added and listed in the Tube Expansion Report page.
12.5.2 Submit a Tube Expansion Inspection Request
Once you have added the tube expansion inspection request, the Submission column in the Tube Expansion Report page is appeared with (Submit and Reject icons). See Fig 12.5.
1. If you want to submit the tube expansion inspection request, click (Submit icon) in the Submission Otherwise click (Reject icon) to reject the request.
The submitted request will be moved to for the tube expansion inspection. The request submitted status will be updated in the Submitted column. Once the tube expansion inspection results are updated, the completed status will be updated in the Completed column.
12.5.3 Edit a Tube Expansion Inspection Request
|
Note that if the tube expansion inspection request has been submitted, you cannot edit the respective request. |
If you want to edit any existing tube expansion inspection request in the Tube Expansion Report page, do the following steps,
1. Click (Edit icon) in the Edit column for the respective tube expansion inspection request. See Fig 12.5.
The page shows the details of added tube expansion inspection request.

2. Click on any box where you want to edit the details, and then edit the details in the respective box.
3. Click Save.
12.5.4 Add RFI Data for a Tube Expansion Inspection Request
If you want to add the details of RFI data for the added tube expansion inspection request, do the following steps,
1. Click (Add icon) in the RFI Data column of the Tube Expansion Report See Fig 12.5.
The RFI Inspection Request List window opens.

2. In the Inspection To box, enter the detail to where the inspection should end.
3. In the Inspection Details option, select what type of inspection to be performed based on your requirement.
4. In the NDT Inspection box, enter the NDT inspection detail.
5. In the Description box, enter the description for the inspection request.
6. In the RFI Date box, choose the RFI date.
7. In the Remarks box, enter your remarks if any.
8. Click Save.
12.5.5 View RFI Report for Tube Expansion Inspection Request
If you want to view the RFI report for the tube expansion inspection request, click (Print icon) provided in the RFI Report column.
12.5.6 Attach a File into a Tube Expansion Inspection Request
If you want to attach a file with any tube expansion inspection request listed in the Tube Expansion Report page, you can use (Attach icon) provided in the Attachment column for the respective tube expansion inspection request. To know how to attach, see the topic, “Attach a file into a PQR”.
12.6 Tube Mock Up – RFI
The Tube Mock Up – RFI tab in the Heat Exchanger menu used to add the tube mock up inspection request. To add the tube mock up inspection request,
1. Click Tube Mock Up – RFI in the Heat Exchanger
The Tube Mock Up Report page opens.

Figure 12.6: Tube Mock Up Report page
12.6.1 Add a Tube Mock Up Inspection Request
If you want to add a tube mock up inspection request, do the following steps,
1. Click (ADD button) in the Tube Mock Up Report
The page shows a new window to add the details of the tube mock up inspection request.

Tip: A report number and an RFI number for a new tube mock up inspection report will be updated automatically in the Report Number and the RFI Report Number boxes, respectively.
2. In the Drawing box, select a drawing from a drop-down list.
3. In the Prepared By box, enter the name of a person who has prepared the tube mock up inspection request.
4. In the Reviewed By box, enter the name of a person who has reviewed the tube mock up inspection request.
5. In the Approved By box, enter the name of a person who has approved the tube mock up inspection request.
6. In the Prepared Date box, choose the prepared date of the tube mock up inspection request.
7. In the Reviewed Date box, choose the reviewed date of the tube mock up inspection request.
8. In the Approved Date box, choose the approved date of the tube mock up inspection request.
9. In the Title box, enter the title of the request.
10. Click Save.
The tube mock up inspection request is added and listed in the Tube Mock UP Report page.
12.6.2 Submit a Tube Mock Up Inspection Request
Once you have added the tube mock up inspection request, the Submission column in the Tube Mock Up Report page is appeared with (Submit and Reject icons). See Fig 12.6.
1. If you want to submit the tube mock up inspection request, click (Submit icon) in the Submission Otherwise click (Reject icon) to reject the request.
The submitted request will be moved to for the tube mock up inspection. The request submitted status will be updated in the Submitted column. Once the tube mock up inspection results are updated, the completed status will be updated in the Completed column.
12.6.3 Edit a Tube Mock Up Inspection Request
| Note that if the tube mock up inspection request has been submitted, you cannot edit the respective request. |
If you want to edit any existing tube mock up inspection request in the Tube Mock Up Report page, do the following steps,
1. Click (Edit icon) in the Edit column for the respective tube mock up inspection request. See Fig 12.6.
The page shows the details of added tube mock up inspection request.

2. Click on any box where you want to edit the details, and then edit the details in the respective box.
3. Click Save.
12.6.4 Add RFI Data for a Tube Mock Up Inspection Request
If you want to add the details of RFI data for the added tube mock up inspection request, do the following steps,
1. Click (Add icon) in the RFI Data column of the Tube Expansion Report See Fig 12.6.
The RFI Inspection Request List window opens.

2. In the Inspection To box, enter the detail to where the inspection should end.
3. In the Inspection Details option, select what type of inspection to be performed based on your requirement.
4. In the NDT Inspection box, enter the NDT inspection detail.
5. In the Description box, enter the description for the inspection request.
6. In the RFI Date box, choose the RFI date.
7. In the Remarks box, enter your remarks if any.
9. Click Save.
12.6.5 View RFI Report for Tube Mock Up Inspection Request
If you want to view the RFI report for the tube mock up inspection request, click (Print icon) provided in the RFI Report column.
12.6.6 Attach a File into a Tube Mock Up Inspection Request
If you want to attach a file with any tube mock up inspection request listed in the Tube Mock Up Report page, you can use (Attach icon) provided in the Attachment column for the respective tube mock up inspection request. To know how to attach, see the topic, “Attach a file into a PQR”.
12.7 Pickling and Passivation – RFI
The Pickling and Passivation – RFI tab in the Heat Exchange menu used to add the pickling and passivation inspection request. To add the pickling and passivation inspection request,
1. Click Pickling and Passivation – RFI in the Heat Exchange
The Pickling and Passivation Report page opens.

Figure 12.7: Pickling and Passivation Report page
12.7.1 Add a Picking and Passivation Inspection Request
If you want to add a pickling and passivation inspection request, do the following steps,
1. Click (ADD button) in the Pickling and Passivation Report
The page shows a new window to add the details of the pickling and passivation inspection request.

Tip: A report number and an RFI number for a new pickling and passivation inspection report will be updated automatically in the Report Number and the RFI Report Number boxes, respectively.
2. In the Drawing box, select a drawing from a drop-down list.
3. In the Prepared By box, enter the name of a person who has prepared the pickling and passivation inspection request.
4. In the Reviewed By box, enter the name of a person who has reviewed the pickling and passivation inspection request.
5. In the Approved By box, enter the name of a person who has approved the pickling and passivation inspection request.
6. In the Prepared Date box, choose the prepared date of the pickling and passivation inspection request.
7. In the Reviewed Date box, choose the reviewed date of the pickling and passivation inspection request.
8. In the Approved Date box, choose the approved date of the pickling and passivation inspection request.
9. Click Save.
The pickling and passivation inspection request is added and listed in the Picking and Passivation Report page.
12.7.2 Submit a Picking and Passivation Inspection Request
Once you have added the pickling and passivation inspection request, the Submission column in the Picking and Passivation Report page is appeared with (Submit and Reject icons). See Fig 12.7.
If you want to submit the pickling and passivation inspection request, click (Submit icon) in the Submission column. Otherwise click (Reject icon) to reject the request.
The submitted request will be moved to for the pickling and passivation inspection. The request submitted status will be updated in the Submitted column. Once the pickling and passivation inspection results are updated, the completed status will be updated in the Completed column.
12.7.3 Edit a Picking and Passivation Inspection Request
|
Note that if the pickling and passivation inspection request has been submitted, you cannot edit the respective request. |
If you want to edit any existing pickling and passivation inspection request in the Picking and Passivation Report page, do the following steps,
1. Click (Edit icon) in the Edit column for the respective pickling and passivation inspection request. See Fig 12.7.
The page shows the details of added pickling and passivation inspection request.

2. Click on any box where you want to edit the details, and then edit the details in the respective box.
3. Click Save.
12.7.4 Add RFI Data for a Picking and Passivation Inspection Request
If you want to add the details of RFI data for the added picking and passivation inspection request, do the following steps,
1. Click (Add icon) in the RFI Data column of the Picking and Passivation Report See Fig 12.7.
The RFI Inspection Request List window opens.

2. In the Inspection To box, enter the detail to where the inspection should end.
3. In the Inspection Details option, select what type of inspection to be performed based on your requirement.
4. In the NDT Inspection box, enter the NDT inspection detail.
5. In the Description box, enter the description for the inspection request.
6. In the RFI Date box, choose the RFI date.
7. In the Remarks box, enter your remarks if any.
8. Click Save.
12.7.5 View RFI Report for a Picking and Passivation Inspection Request
If you want to view the RFI report for the pickling and passivation inspection request, click (Print icon) provided in the RFI Report column.
12.7.6 Attach a File into a Picking and Passivation Inspection Request
If you want to attach a file with any pickling and passivation inspection request listed in the Picking and Passivation Report page, you can use (Attach icon) provided in the Attachment column for the respective pickling and passivation inspection request. To know how to attach, see the topic, “Attach a file into a PQR”.
12.8 Baffle/Support Plate/Tube Sheet Inspection Report – RFI
The Baffle/Support Plate/Tube Sheet Inspection Report – RFI tab in the Heat Exchange menu used to add the baffle/support plate/tube sheet inspection request. To add the baffle/support plate/tube sheet inspection request,
1. Click Baffle/Support Plate/Tube Sheet Inspection Report – RFI in the Heat Exchange
The Baffle/Support Plate/Tube Sheet Inspection Report page opens.

Figure 12.8: Baffle/Support Plate/Tube Sheet Inspection Report page
12.8.1 Add a Baffle/Support Plate/Tube Sheet Inspection Request
If you want to add a baffle/support plate/tube sheet inspection request, do the following steps,
1. Click (ADD button) in the Baffle/Support Plate/Tube Sheet Inspection Report
The page shows a new window to add the details of the baffle/support plate/tube sheet inspection request.

Tip: A report number and an RFI number for a new baffle/support plate/tube sheet inspection report will be updated automatically in the Report Number and the RFI Report Number boxes, respectively.
2. In the Drawing box, select a drawing from a drop-down list.
3. In the Prepared By box, enter the name of a person who has prepared the baffle/support plate/tube sheet inspection request.
4. In the Reviewed By box, enter the name of a person who has reviewed the baffle/support plate/tube sheet inspection request.
5. In the Approved By box, enter the name of a person who has approved the baffle/support plate/tube sheet inspection request.
6. In the Prepared Date box, choose the prepared date of the baffle/support plate/tube sheet inspection request.
7. In the Reviewed Date box, choose the reviewed date of the baffle/support plate/tube sheet inspection request.
8. In the Approved Date box, choose the approved date of the baffle/support plate/tube sheet inspection request.
9. Click Save.
The baffle/support plate/tube sheet inspection request is added and listed in the Baffle/Support Plate/Tube Sheet Inspection Report page.
12.8.5 Submit a Baffle/Support Plate/Tube Sheet Inspection Request
Once you have added the baffle/support plate/tube sheet inspection request, the Submission column in the Baffle/Support Plate/Tube Sheet Inspection Report page is appeared with (Submit and Reject icons). See Fig 12.8.
1. If you want to submit the baffle/support plate/tube sheet inspection request, click (Submit icon) in the Submission Otherwise click (Reject icon) to reject the request.
The submitted request will be moved to for the baffle/support plate/tube sheet inspection. The request submitted status will be updated in the Submitted column. Once the baffle/support plate/tube sheet inspection results are updated, the completed status will be updated in the Completed column.
12.8.6 Edit a Baffle/Support Plate/Tube Sheet Inspection Request
|
Note that if the baffle/support plate/tube sheet inspection request has been submitted, you cannot edit the respective request. |
If you want to edit any existing baffle/support plate/tube sheet inspection request in the Baffle/Support Plate/Tube Sheet Inspection Report page, do the following steps,
1. Click (Edit icon) in the Edit column for the respective baffle/support plate/tube sheet inspection request. See Fig 12.8.
The page shows the details of added baffle/support plate/tube sheet inspection request.

2. Click on any box where you want to edit the details, and then edit the details in the respective box.
3. Click Save.
12.8.4 Add RFI Data for a Baffle/Support Plate/Tube Sheet Inspection Request
If you want to add the details of RFI data for the added baffle/support plate/tube sheet inspection request, do the following steps,
1. Click (Add icon) in the RFI Data column of the Baffle/Support Plate/Tube Sheet Inspection Report See Fig 12.8.
The RFI Inspection Request List window opens.

2. In the Inspection To box, enter the detail to where the inspection should end.
3. In the Inspection Details option, select what type of inspection to be performed based on your requirement.
4. In the NDT Inspection box, enter the NDT inspection detail.
5. In the Description box, enter the description for the inspection request.
6. In the RFI Date box, choose the RFI date.
7. In the Remarks box, enter your remarks if any.
8. Click Save.
12.8.5 View RFI Report for a Baffle/Support Plate/Tube Sheet Inspection Request
If you want to view the RFI report for the baffle/support plate/tube sheet inspection request, click  (Print icon) provided in the RFI Report column.
12.8.6 Attach a File into a Baffle/Support Plate/Tube Sheet Inspection Request
If you want to attach a file with any baffle/support plate/tube sheet inspection request listed in the Baffle/Support Plate/Tube Sheet Inspection Report page, you can use (Attach icon) provided in the Attachment column for the respective baffle/support plate/tube sheet inspection request. To know how to attach, see the topic, “Attach a file into a PQR”.
12.9 Tube Bundle Skeleton Inspection Report – RFI
The Tube Bundle Skeleton Inspection Report – RFI tab in the Heat Exchanger menu used to add the tube bundle skeleton inspection request. To add the tube bundle skeleton inspection request,
1. Click Tube Bundle Skeleton Inspection Report – RFI in the Heat Exchanger
The Tube Bundle Skeleton Inspection Report page opens.

Figure 12.9: Tube Bundle Skeleton Inspection Report page
12.9.1 Add a Tube Bundle Skeleton Inspection Request
If you want to add a tube bundle skeleton inspection request, do the following steps,
1. Click (ADD button) in the Tube Bundle Skeleton Inspection Report
The page shows a new window to add the details of the tube bundle skeleton inspection request.

 Tip: A report number and an RFI number for a new tube bundle skeleton inspection report will be updated automatically in the Report Number and the RFI Report Number boxes, respectively.
2. In the Drawing box, select a drawing from a drop-down list.
3. In the Prepared By box, enter the name of a person who has prepared the tube bundle skeleton inspection request.
4. In the Reviewed By box, enter the name of a person who has reviewed the tube bundle skeleton inspection request.
5. In the Approved By box, enter the name of a person who has approved the tube bundle skeleton inspection request.
6. In the Prepared Date box, choose the prepared date of the tube bundle skeleton inspection request.
7. In the Reviewed Date box, choose the reviewed date of the tube bundle skeleton inspection request.
8. In the Approved Date box, choose the approved date of the tube bundle skeleton inspection request.
9. Click Save.
The tube bundle skeleton inspection request is added and listed in the Tube Bundle Skeleton Inspection Report page.
12.9.2 Submit a Tube Bundle Skeleton Inspection Request
Once you have added the tube bundle skeleton inspection request, the Submission column in the Tube Bundle Skeleton Inspection Report page is appeared with (Submit and Reject icons). See Fig 12.9.
1. If you want to submit the tube bundle skeleton inspection request, click (Submit icon) in the Submission Otherwise click
 (Reject icon) to reject the request.
The submitted request will be moved to for the tube bundle skeleton inspection. The request submitted status will be updated in the Submitted column. Once the tube bundle skeleton inspection results are updated, the completed status will be updated in the Completed column.
12.9.3 Edit a Tube Bundle Skeleton Inspection Request
|
Note that if the tube bundle skeleton inspection request has been submitted, you cannot edit the respective request. |
If you want to edit any existing tube bundle skeleton inspection request in the Tube Bundle Skeleton Inspection Report page, do the following steps,
1. Click (Edit icon) in the Edit column for the respective tube bundle skeleton inspection request. See Fig 12.9.
The page shows the details of added leak test request.

2. Click on any box where you want to edit the details, and then edit the details in the respective box.
3. Click Save.
12.9.4 Add RFI Data for a Tube Bundle Skeleton Inspection Request
If you want to add the details of RFI data for the added tube bundle skeleton inspection request, do the following steps,
1. Click (Add icon) in the RFI Data column of the Tube Bundle Skeleton Inspection Report See Fig 12.9.
The RFI Inspection Request List window opens.

2. In the Inspection To box, enter the detail to where the inspection should end.
3. In the Inspection Details option, select what type of inspection to be performed based on your requirement.
4. In the NDT Inspection box, enter the NDT inspection detail.
5. In the Description box, enter the description for the inspection request.
6. In the RFI Date box, choose the RFI date.
7. In the Remarks box, enter your remarks if any.
8. Click Save.
12.9.5 View RFI Report for a Tube Bundle Skeleton Inspection Request
If you want to view the RFI report for the tube bundle skeleton inspection request, click (Print icon) provided in the RFI Report column.
12.9.6 Attach a File into a Tube Bundle Skeleton Inspection Request
If you want to attach a file with any tube bundle skeleton inspection request listed in the Tube Bundle Skeleton Inspection Report page, you can use (Attach icon) provided in the Attachment column for the respective tube bundle skeleton inspection request. To know how to attach, see the topic, “Attach a file into a PQR”.
12.10 Tube Bundle Final Dimension Report – RFI
The Tube Bundle Final Dimension Report – RFI tab in the Heat Exchanger menu used to add the tube bundle final dimension inspection request. To add the tube bundle final dimension inspection request,
1. Click Tube Bundle Final Dimension Report – RFI in the Heat Exchanger
The Tube Bundle Final Dimension Report page opens.

Figure 12.10: Tube Bundle Final Dimension Report page
12.10.1 Add a Tube Bundle Final Dimension Inspection Request
If you want to add a tube bundle final dimension inspection request, do the following steps,
1. Click  (ADD button) in the Tube Bundle Final Dimension Report
The page shows a new window to add the details of the tube bundle final dimension inspection request.

Tip: A report number and an RFI number for a new tube bundle final dimension inspection report will be updated automatically in the Report Number and the RFI Report Number boxes, respectively.
2. In the Drawing box, select a drawing from a drop-down list.
3. In the Prepared By box, enter the name of a person who has prepared the tube bundle final dimension inspection request.
4. In the Reviewed By box, enter the name of a person who has reviewed the tube bundle final dimension inspection request.
5. In the Approved By box, enter the name of a person who has approved the tube bundle final dimension inspection request.
6. In the Prepared Date box, choose the prepared date of the tube bundle final dimension inspection request.
7. In the Reviewed Date box, choose the reviewed date of the tube bundle final dimension inspection request.
8. In the Approved Date box, choose the approved date of the tube bundle final dimension inspection request.
9. Click Save.
The tube bundle final dimension inspection request is added and listed in the Tube Bundle Final Dimension Report page.
12.10.2 Submit a Tube Bundle Final Dimension Inspection Request
Once you have added the tube bundle final dimension inspection request, the Submission column in the Tube Bundle Final Dimension Report page is appeared with (Submit and Reject icons). See Fig 12.10.
1. If you want to submit the tube bundle final dimension inspection request, click (Submit icon) in the Submission Otherwise click
 (Reject icon) to reject the request.
The submitted request will be moved to for the tube bundle final dimension inspection. The request submitted status will be updated in the Submitted column. Once the tube bundle final dimension inspection results are updated, the completed status will be updated in the Completed column.
12.10.3 Edit a Tube Bundle Final Dimension Inspection Request
|
Note that if the tube bundle final dimension inspection request has been submitted, you cannot edit the respective request. |
If you want to edit any existing tube bundle final dimension inspection request in the Tube Bundle Final Dimension Report page, do the following steps,
1. Click (Edit icon) in the Edit column for the respective tube bundle final dimension inspection request. See Fig 12.10.
The page shows the details of added leak test request.

2. Click on any box where you want to edit the details, and then edit the details in the respective box.
3. Click Save.
12.10.4 Add RFI Data for a Tube Bundle Final Dimension Inspection Request
If you want to add the details of RFI data for the added tube bundle final dimension inspection request, do the following steps,
1. Click (Add icon) in the RFI Data column of the Tube Bundle Final Dimension Report See Fig 12.10.
The RFI Inspection Request List window opens.

2. In the Inspection To box, enter the detail to where the inspection should end.
3. In the Inspection Details option, select what type of inspection to be performed based on your requirement.
4. In the NDT Inspection box, enter the NDT inspection detail.
5. In the Description box, enter the description for the inspection request.
6. In the RFI Date box, choose the RFI date.
7. In the Remarks box, enter your remarks if any.
8. Click Save.
12.10.5 View RFI Report for a Tube Bundle Final Dimension Inspection Request
If you want to view the RFI report for the tube bundle final dimension inspection request, click (Print icon) provided in the RFI Report column.
12.10.6 Attach a File into a Tube Bundle Final Dimension Inspection Request
If you want to attach a file with any tube bundle final dimension inspection request listed in the Tube Bundle Final Dimension Report page, you can use (Attach icon) provided in the Attachment column for the respective tube bundle final dimension inspection request. To know how to attach, see the topic, “Attach a file into a PQR”.
|
Users assigned with cuteQM_QAQC role only can view and access the following Report functionalities in the Heat Exchanger menu. |
12.11 Final Dimensional Report
The Final Dimensional Report tab in the Heat Exchanger menu used to add the final dimensional inspection result for added request.
1. Click Final Dimensional Report in the Heat Exchanger
The Final Dimensional Report page opens.

Figure 12.11: Final Dimensional Report page
The page shows a list of added final dimensional requests.
12.11.1 Add Final Dimension Report Details
If you want to add the final dimension report details,
1. Click (Edit icon) in the Edit Report column for the respective request.
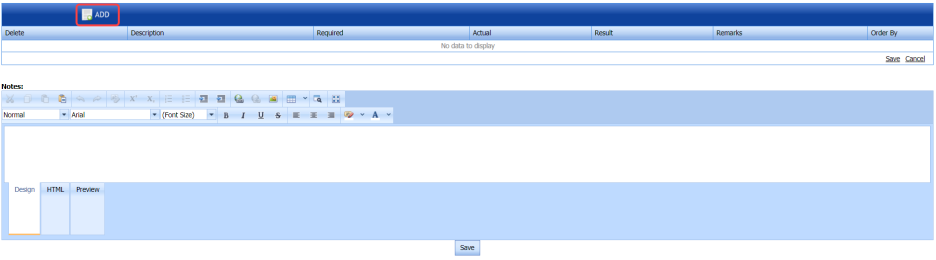
The Final Dimension Variables and Final Dimension Result windows open.
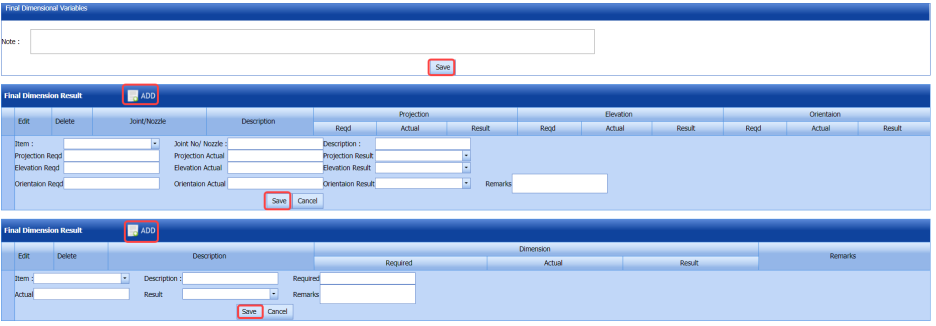
2. In the Note box, enter your notes.
3. Click (ADD button) in the Final Dimension Result
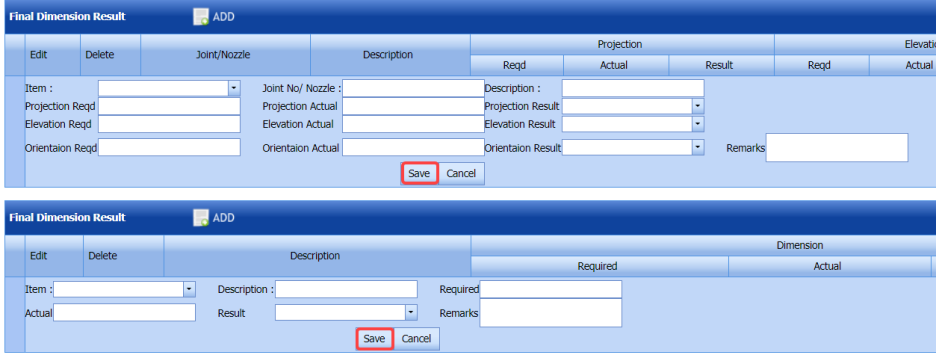
4. In the Item box, select an item from a drop-down list.
5. In the Joint No/Nozzle box, enter the joint number or nozzle number.
6. In the Description box, enter the description for the request.
7. In the Projection Reqd box, enter the required projection value.
8. In the Projection Actual box, enter the actual projection value.
9. In the Projection Result box, select the projection result.
10. In the Elevation Reqd box, enter the required elevation value.
11. In the Elevation Actual box, enter the actual elevation value.
12. In the Elevation Result box, select the elevation result.
13. In the Orientation Reqd box, enter the required orientation value.
14. In the Orientation Actual box, enter the actual orientation value.
15. In the Orientation Result box, select the orientation result.
16. In the Item box, select an item from a drop-down list.
17. In the Required box, enter the required dimension.
18. In the Actual box, enter the actual dimension.
19. In the Result box, select the result of final dimension inspection.
20. In the Remarks box, enter your remarks if any.
21. Click Save.
12.11.2 Add Final Dimension Inspection Result Details
If you want to add the final dimension inspection result details,
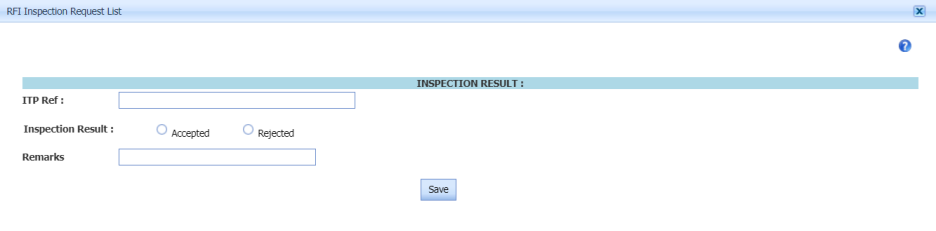
1. Click (Add icon) in the RFI Data column for the respective request.
The RFI Inspection Request List window opens.

2. In the ITP Ref box, enter the ITP reference detail.
3. In the Inspection Result field, select the inspection result.
4. In the Remarks box, enter your remarks if any.
5. Click Save.
12.11.3 Submit Final Dimension Inspection Result
Once you have added the final dimension inspection result, the Request Status column in the Final Dimensional Report page is appeared with (Submit and Reject icons). See Fig 12.11.
1. If you want to submit the final dimension inspection result, click (Submit icon) in the Request Status Otherwise click
 (Reject icon) to reject the request.
Once the final dimension inspection result is updated, the completed status will be updated in the Completed column.
12.11.4 View an RFI Report for Final Dimension Inspection
If you want to view the RFI report for any final dimension inspection, click (Print icon) provided in the RFI Report column.
12.11.5 View a Final Dimension Inspection Report
If you want to view the final dimension inspection report, click (Print icon) provided in the Report column.
12.11.6 Attach a file into a Final Dimension Inspection Report
If you want to attach a file with any final dimension inspection report in the Final Dimension Report page, you can use (Attach icon) provided in the Attachment column for the respective report. To know how to attach, see the topic, “Attach a file into a PQR”.
12.12 Nozzle Marking Report
The Nozzle Marking Report tab in the Heat Exchanger menu used to add the nozzle marking inspection result for added request.
1. Click Nozzle Marking Report in the Heat Exchanger menu.
The Nozzle Marking Inspection page opens.

Figure 12.12: Nozzle Marking Inspection page
The page shows a list of added nozzle marking inspection requests.
12.12.1 Add Nozzle Marking Report Details
If you want to add the nozzle marking report details,
1. Click (Edit icon) in the Edit Report column for the respective request.
The Nozzle Marking Result and Report Photos windows open.
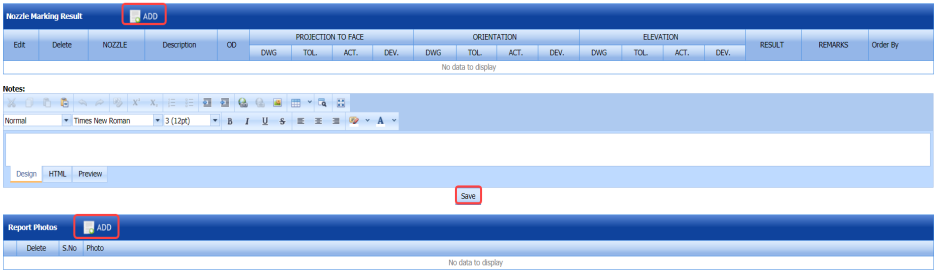
2. Click  (ADD button) in the Nozzle Marking Result

3. In the Nozzle box, select a nozzle from a drop-down list.
4. In the Description box, enter the description for the request.
5. Enter the projection, orientation, and elevation value.
6. In the Result box, select the result.
7. In the Remarks box, enter your remarks if any.
8. Click Save.
9. In the Report Photos window, click (ADD button) and attach a photo.
12.12.2 Add Nozzle Marking Inspection Result Details
If you want to add the nozzle marking inspection result details,
1. Click  (Add icon) in the RFI Data column for the respective request.
The RFI Inspection Request List window opens.

2. In the ITP Ref box, enter the ITP reference detail.
3. In the Inspection Result field, select the inspection result.
4. In the Remarks box, enter your remarks if any.
5. Click Save.
12.12.3 Submit Nozzle Marking Inspection Result
Once you have added the nozzle marking inspection result, the Request Status column in the Nozzle Marking Inspection page is appeared with (Submit and Reject icons). See Fig 12.12.
1. If you want to submit the nozzle marking inspection result, click (Submit icon) in the Request Status Otherwise click (Reject icon) to reject the request.
Once the nozzle marking inspection result is updated, the completed status will be updated in the Completed column.
12.12.4 View an RFI Report for Nozzle Marking Inspection
If you want to view the RFI report for any nozzle marking inspection, click (Print icon) provided in the RFI Report column.
12.12.5 View a Nozzle Marking Inspection Report
If you want to view the nozzle marking inspection report, click (Print icon) provided in the Report column.
12.12.6 Attach a file into a Nozzle Marking Inspection Report
If you want to attach a file with any nozzle marking inspection report in the Nozzle Marking Inspection page, you can use (Attach icon) provided in the Attachment column for the respective report. To know how to attach, see the topic, “Attach a file into a PQR”.
12.13 Shell Side Hydrostatic Report
The Shell Side Hydrostatic Report tab in the Heat Exchanger menu used to add the shell side hydrostatic test result for added request.
1. Click Shell Side Hydrostatic Report in the Heat Exchanger
The Shell Side Hydrostatic Pressure Test Report page opens.

Figure 12.13: Shell Side Hydrostatic Pressure Test Report page
The page shows a list of added shell side hydrostatic test requests.
12.13.1 Add Shell Side Hydrostatic Test Report Details
If you want to add the shell side hydrostatic test report details,
1. Click (Edit icon) in the Edit Report column for the respective request.
The Test Parameters window, Metal Details window, and the Equipment Details window open.
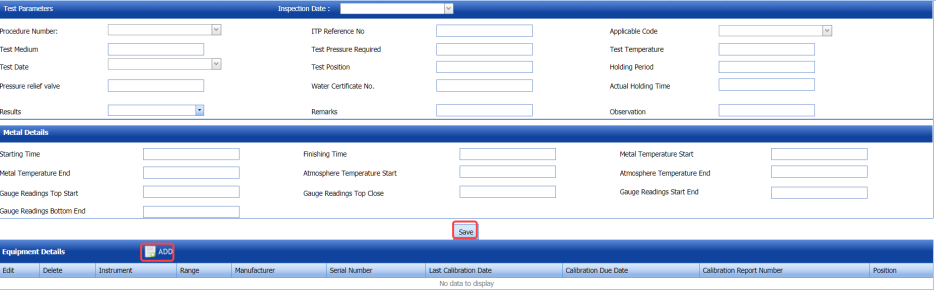
2. In the Inspection Date box, select the inspection date.
3. In the Test Parameters window, enter the test parameter data.
4. In the Metal Details window, enter the metal details.
5. Click Save.
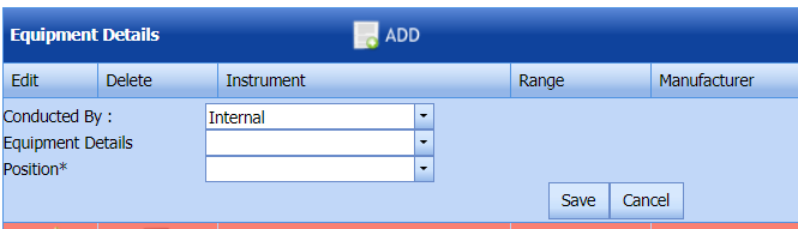
6. Click  (ADD button) in the Equipment Details

7. In the Conducted By box, select whether the hydrostatic test is conducted Internally or Externally.
8. In the Equipment Details box, select the equipment detail from a drop-own list.
9. In the Position box, select a position from a drop-down list.
10. Click Save.
12.13.2 Add Shell Side Hydrostatic Test Result Details
If you want to add the shell side hydrostatic test result details,
1. Click (Add icon) in the RFI Data column for the respective request.
The RFI Inspection Request List window opens.

2. In the ITP Ref box, enter the ITP reference detail.
3. In the Inspection Result field, select the inspection result.
4. In the Remarks box, enter your remarks if any.
5. Click Save.
12.13.3 Submit Shell Side Hydrostatic Test Result
Once you have added the shell side hydrostatic test result, the Request Status column in the Shell Side Hydrostatic Pressure Test Report page is appeared with (Submit and Reject icons). See Fig 12.13.
1. If you want to submit the shell side hydrostatic test result, click (Submit icon) in the Request Status Otherwise click
 (Reject icon) to reject the request.
Once the shell side hydrostatic test result is updated, the completed status will be updated in the Completed column.
12.13.4 View an RFI Report for Shell Side Hydrostatic Test
If you want to view the RFI report for any shell side hydrostatic test, click (Print icon) provided in the RFI Report column.
12.13.5 View a Shell Side Hydrostatic Test Report
If you want to view the shell side hydrostatic test report, click (Print icon) provided in the Report column.
12.13.6 Attach a file into a Shell Side Hydrostatic Test Report
If you want to attach a file with any shell side hydrostatic test report in the Shell Side Hydrostatic Pressure Test Report page, you can use (Attach icon) provided in the Attachment column for the respective report. To know how to attach, see the topic, “Attach a file into a PQR”.
12.14 Leak Test Report
The Leak Test Report tab in the Heat Exchanger menu used to add the leak test result for added request.
1. Click Leak Test Report in the Heat Exchanger menu.
The Leak Test Report page opens.

Figure 12.14: Leak Test Report page
The page shows a list of added leak test requests.
12.14.1 Add Leak Test Report Details
If you want to add the leak test report details,
1. Click (Edit icon) in the Edit Report column for the respective request.
The Test Parameters window and the Equipment Details window opens.

2. In the Inspection Date box, select the inspection date.
3. Check and edit the leak test report details in the Test Parameters
4. Click Save.
5. Click (ADD button) in the Equipment Details
6. In the Conducted By box, select whether the leak test is conducted Internally or Externally.
7. In the Equipment Details box, select the equipment detail from a drop-own list.
8. In the Position box, select a position from a drop-down list.
9. Click Save.
12.14.2 Add Leak Test Result Details
If you want to add the leak test result details,
1. Click (Add icon) in the RFI Data column for the respective request.
The RFI Inspection Request List window opens.

2. In the ITP Ref box, enter the ITP reference detail.
3. In the Inspection Result field, select the inspection result.
4. In the Remarks box, enter your remarks if any.
5. Click Save.
12.14.3 Submit Leak Test Result
Once you have added the leak test result, the Request Status column in the Leak Test Report page is appeared with
(Submit and Reject icons). See Fig 12.14.
1. If you want to submit the leak test result, click (Submit icon) in the Request Status Otherwise click
 (Reject icon) to reject the request.
Once the leak test result is updated, the completed status will be updated in the Completed column
12.14.4 View an RFI Report for Leak Test
If you want to view the RFI report for any leak test, click (Print icon) provided in the RFI Report column.
12.14.5 View a Leak Test Report
If you want to view the leak test report, click (Print icon) provided in the Report column.
12.14.6 Attach a file into a Leak Test Report
If you want to attach a file with any leak test report in the Leak Test Report page, you can use (Attach icon) provided in the Attachment column for the respective report. To know how to attach, see the topic, “Attach a file into a PQR”.
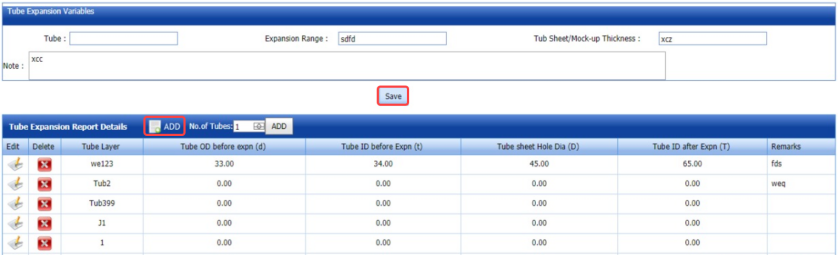
12.15 Tube Expansion Report
The Tube Expansion Report tab in the Heat Exchanger menu used to add the tube expansion inspection result for added request.
1. Click Tube Expansion Report in the Heat Exchanger
The Tube Expansion Report page opens.

Figure 12.15: Tube Expansion Report page
The page shows a list of added tube expansion inspection requests.
12.15.1 Add Tube Expansion Inspection Report Details
If you want to add the tube expansion inspection report details,
1. Click (Edit icon) in the Edit Report column for the respective request.
The Tube Expansion Variables window and the Tube Expansion Report Details window opens.
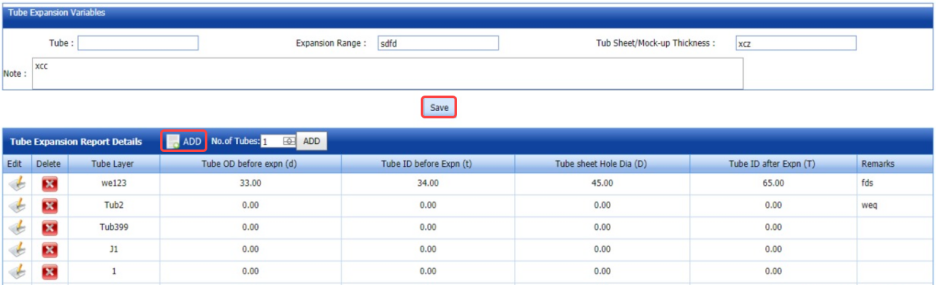
2. In the Tube Expansion Variables window, enter the tube expansion variables detail.
3. Click Save.
4. Click  (ADD button) in the Tube Expansion Report Details window and add the tube expansion report details.
12.15.2 Add Tube Expansion Inspection Result Details
If you want to add the tube expansion inspection result details,
1. Click (Add icon) in the RFI Data column for the respective request.
The RFI Inspection Request List window opens.

2. In the ITP Ref box, enter the ITP reference detail.
3. In the Inspection Result field, select the inspection result.
4. In the Remarks box, enter your remarks if any.
5. Click Save.
12.15.3 Submit Tube Expansion Inspection Result
Once you have added the tube expansion inspection result, the Request Status column in the Tube Expansion Report page is appeared with (Submit and Reject icons). See Fig 12.15.
1. If you want to submit the tube expansion inspection result, click (Submit icon) in the Request Status Otherwise click
 (Reject icon) to reject the request.
Once the tube expansion inspection result is updated, the completed status will be updated in the Completed column.
12.15.4 View an RFI Report for Tube Expansion Inspection
If you want to view the RFI report for any tube expansion inspection, click (Print icon) provided in the RFI Report column.
12.15.5 View a Tube Expansion Inspection Report
If you want to view the tube expansion inspection report, click (Print icon) provided in the Report column.
12.15.6 Attach a file into a Tube Expansion Inspection Report
If you want to attach a file with any tube expansion inspection report in the Tube Expansion Report page, you can use (Attach icon) provided in the Attachment column for the respective report. To know how to attach, see the topic, “Attach a file into a PQR”.
12.16 Tube Mock Up Report
The Tube Mock Up Report tab in the Heat Exchanger menu used to add the tube mock up inspection result for added request.
1. Click Tube Mock Up Report in the Heat Exchanger
The Tube Mock Up Report page opens.

Figure 12.16: Tube Mock Up Report page
The page shows a list of added tube mock up inspection requests.
12.16.1 Add Tube Mock Up Inspection Report Details
If you want to add the tube mock up inspection report details,
1. Click (Edit icon) in the Edit Report column for the respective request.
The Tube Expansion Variables window and the Tube Expansion Report Details window opens.
2. In the Tube Expansion Variables window, enter the tube expansion variables detail.
3. Click Save.
4. Click  (ADD button) in the Tube Expansion Report Details window and add the tube expansion report details.
12.16.2 Add Tube Mock Up Inspection Result Details
If you want to add the tube mock up inspection result details,
1. Click (Add icon) in the RFI Data column for the respective request.
The RFI Inspection Request List window opens.

2. In the ITP Ref box, enter the ITP reference detail.
3. In the Inspection Result field, select the inspection result.
4. In the Remarks box, enter your remarks if any.
5. Click Save.
12.16.3 Submit Tube Mock Up Inspection Result
Once you have added the tube mock up inspection result, the Request Status column in the Tube Mock Up Report page is appeared with (Submit and Reject icons). See Fig 12.16.
1. If you want to submit the tube mock up inspection result, click (Submit icon) in the Request Status Otherwise click
 (Reject icon) to reject the request.
Once the tube mock up inspection result is updated, the completed status will be updated in the Completed column.
12.16.4 View an RFI Report for Tube Mock Up Inspection
If you want to view the RFI report for any tube mock up inspection, click (Print icon) provided in the RFI Report column.
12.16.5 View a Tube Mock Up Inspection Report
If you want to view the tube mock up inspection report, click (Print icon) provided in the Report column.
12.16.6 Attach a file into a Tube Mock Up Inspection Report
If you want to attach a file with any tube mock up inspection report in the Tube Mock Up Report page, you can use (Attach icon) provided in the Attachment column for the respective report. To know how to attach, see the topic, “Attach a file into a PQR”.
12.17 Pickling and Passivation Report
The Pickling and Passivation Report tab in the Heat Exchanger menu used to add the pickling and passivation inspection result for added request.
1. Click Pickling and Passivation Report in the Heat Exchanger
The Pickling and Passivation Report page opens.

Figure 12.17: Pickling and Passivation Report page
The page shows a list of added pickling and passivation inspection requests.
12.17.1 Add Pickling and Passivation Inspection Report Details
If you want to add the pickling and passivation inspection report details,
1. Click (Edit icon) in the Edit Report column for the respective request.
The Pickling and Passivation Details window opens.

2. Click (ADD button) in the Pickling and Passivation Details
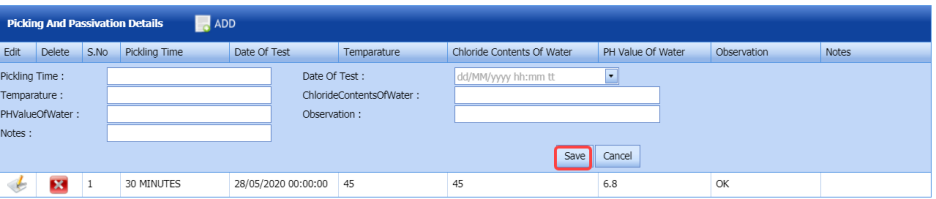
3. In the Pickling Timebox, enter the pickling time range.
4. In the Date of Test box, select the date of test.
5. In the Temperature box, enter the temperature range.
6. In the PH value of Water box, enter the PH value of water.
7. Click Save.
12.17.2 Add Pickling and Passivation Inspection Result Details
If you want to add the pickling and passivation inspection result details,
1. Click (Add icon) in the RFI Data column for the respective request.
The RFI Inspection Request List window opens.

2. In the ITP Ref box, enter the ITP reference detail.
3. In the Inspection Result field, select the inspection result.
4. In the Remarks box, enter your remarks if any.
5. Click Save.
12.17.3 Submit Pickling and Passivation Inspection Result
Once you have added the pickling and passivation inspection result, the Request Status column in the Pickling and Passivation Report page is appeared with (Submit and Reject icons). See Fig 12.17.
1. If you want to submit the pickling and passivation inspection result, click (Submit icon) in the Request Status Otherwise click
 (Reject icon) to reject the request.
Once the pickling and passivation inspection result is updated, the completed status will be updated in the Completed column.
12.17.4 View an RFI Report for Pickling and Passivation Inspection
If you want to view the RFI report for any pickling and passivation inspection, click (Print icon) provided in the RFI Report column.
12.17.5 View a Pickling and Passivation Inspection Report
If you want to view the pickling and passivation inspection report, click (Print icon) provided in the Report column.
12.17.6 Attach a file into a Pickling and Passivation Inspection Report
If you want to attach a file with any pickling and passivation inspection report in the Pickling and Passivation Report page, you can use (Attach icon) provided in the Attachment column for the respective report. To know how to attach, see the topic, “Attach a file into a PQR”.
12.18 Baffle/Support Plate/Tube Sheet Inspection Report
The Baffle/Support Plate/Tube Sheet Inspection Report tab in the Heat Exchanger menu used to add the baffle/support plate/tube sheet inspection result for added request.
1. Click Baffle/Support Plate/Tube Sheet Inspection Report in the Heat Exchanger
The Baffle/Support Plate/Tube Sheet Inspection Report page opens.

Figure 12.18: Baffle/Support Plate/Tube Sheet Inspection Report page
The page shows a list of added baffle/support plate/tube sheet inspection requests.
12.18.1 Add Baffle/Support Plate/Tube Sheet Inspection Report Details
If you want to add the baffle/support plate/tube sheet inspection report details,
1. Click (Edit icon) in the Edit Report column for the respective request.
The Baffle/Support Plate/Tube Sheet Inspection Details window opens.

2. Click (ADD button) and edit the inspection details.
12.18.2 Add Baffle/Support Plate/Tube Sheet Inspection Result Details
If you want to add the baffle/support plate/tube sheet inspection result details,
1. Click (Add icon) in the RFI Data column for the respective request.
The RFI Inspection Request List window opens.
2. In the ITP Ref box, enter the ITP reference detail.
3. In the Inspection Result field, select the inspection result.
4. In the Remarks box, enter your remarks if any.
5. Click Save.
12.18.3 Submit Baffle/Support Plate/Tube Sheet Inspection Result
Once you have added the baffle/support plate/tube sheet inspection result, the Request Status column in the Baffle/Support Plate/Tube Sheet Inspection Report page is appeared with (Submit and Reject icons). See Fig 12.18.
1. If you want to submit the baffle/support plate/tube sheet inspection result, click (Submit icon) in the Request Status column. Otherwise click
 (Reject icon) to reject the request.
Once the baffle/support plate/tube sheet inspection result is updated, the completed status will be updated in the Completed column.
12.18.4 View an RFI Report for Baffle/Support Plate/Tube Sheet Inspection
If you want to view the RFI report for any baffle/support plate/tube sheet inspection, click (Print icon) provided in the RFI Report column.
12.18.5 View a Baffle/Support Plate/Tube Sheet Inspection Report
If you want to view the baffle/support plate/tube sheet inspection report, click (Print icon) provided in the Report column.
12.18.6 Attach a file into a Baffle/Support Plate/Tube Sheet Inspection Report
If you want to attach a file with any baffle/support plate/tube sheet inspection report in the Baffle/Support Plate/Tube Sheet Inspection Report page, you can use (Attach icon) provided in the Attachment column for the respective report. To know how to attach, see the topic, “Attach a file into a PQR”.
12.19 Tube Bundle Skeleton Inspection Report
The Tube Bundle Skeleton Inspection Report tab in the Heat Exchanger menu used to add the tube bundle skeleton inspection result for added request.
1. Click Tube Bundle Skeleton Inspection Report in the Heat Exchanger
The Tube Bundle Skeleton Inspection Report page opens.

Figure 12.19: Tube Bundle Skeleton Inspection Report page
The page shows a list of added tube bundle skeleton inspection requests.
12.19.1 Add Tube Bundle Skeleton Inspection Report Details
If you want to add the tube bundle skeleton inspection report details,
1. Click (Edit icon) in the Edit Report column for the respective request.
The Tube Bundle Skeleton Inspection Details window opens.
2. Click (ADD button) and edit the inspection details.
12.19.2 Add Tube Bundle Skeleton Inspection Result Details
If you want to add the tube bundle skeleton inspection result details,
1. Click (Add icon) in the RFI Data column for the respective request.
The RFI Inspection Request List window opens.

2. In the ITP Ref box, enter the ITP reference detail.
3. In the Inspection Result field, select the inspection result.
4. In the Remarks box, enter your remarks if any.
5. Click Save.
12.19.3 Submit Tube Bundle Skeleton Inspection Result
Once you have added the tube bundle skeleton inspection result, the Request Status column in the Tube Bundle Skeleton Inspection Report page is appeared with (Submit and Reject icons). See Fig 12.19.
1. If you want to submit the tube bundle skeleton inspection result, click (Submit icon) in the Request Status Otherwise click
 (Reject icon) to reject the request.
Once the tube bundle skeleton inspection result is updated, the completed status will be updated in the Completed column.
12.19.4 View an RFI Report for Tube Bundle Skeleton Inspection
If you want to view the RFI report for any tube bundle skeleton inspection, click (Print icon) provided in the RFI Report column.
12.19.5 View a Tube Bundle Skeleton Inspection Report
If you want to view the tube bundle skeleton inspection report, click (Print icon) provided in the Report column.
12.19.6 Attach a file into a Tube Bundle Skeleton Inspection Report
If you want to attach a file with any tube bundle skeleton inspection report in the Tube Bundle Skeleton Inspection Report page, you can use (Attach icon) provided in the Attachment column for the respective report. To know how to attach, see the topic, “Attach a file into a PQR”.
12.20 Tube Bundle Final Dimension Report
The Tube Bundle Final Dimension Inspection Report tab in the Heat Exchanger menu used to add the tube bundle final dimension inspection result for added request.
1. Click Tube Bundle Final Dimension Inspection Report in the Heat Exchanger
The Tube Bundle Final Dimension Inspection Report page opens.

Figure 12.20: Tube Bundle Final Dimension Inspection Report page
The page shows a list of added tube bundle final dimension inspection requests.
12.20.1 Add Tube Bundle Final Dimension Inspection Report Details
If you want to add the tube bundle final dimension inspection report details,
1. Click (Edit icon) in the Edit Report column for the respective request.
The Tube Bundle Final Dimension Inspection Details window opens.

2. Click (ADD button) and edit the inspection details.
12.20.2 Add Tube Bundle Final Dimension Inspection Result Details
If you want to add the tube bundle final dimension inspection result details,
1. Click (Add icon) in the RFI Data column for the respective request.
The RFI Inspection Request List window opens.

2. In the ITP Ref box, enter the ITP reference detail.
3. In the Inspection Result field, select the inspection result.
4. In the Remarks box, enter your remarks if any.
5. Click Save.
12.20.3 Submit Tube Bundle Final Dimension Inspection Result
Once you have added the tube bundle final dimension inspection result, the Request Status column in the Tube Bundle Final Dimension Inspection Report page is appeared with (Submit and Reject icons). See Fig 12.20.
1. If you want to submit the tube bundle final dimension inspection result, click (Submit icon) in the Request Status Otherwise click
 (Reject icon) to reject the request.
Once the tube bundle final dimension inspection result is updated, the completed status will be updated in the Completed column.
12.20.4 View an RFI Report for Tube Bundle Final Dimension Inspection
If you want to view the RFI report for any tube bundle final dimension inspection, click (Print icon) provided in the RFI Report column.
12.20.5 View a Tube Bundle Final Dimension Inspection Report
If you want to view the tube bundle final dimension inspection report, click (Print icon) provided in the Report column.
12.20.6 Attach a file into a Tube Bundle Final Dimension Inspection Report
If you want to attach a file with any tube bundle final dimension inspection report in the Tube Bundle Final Dimension Inspection Report page, you can use (Attach icon) provided in the Attachment column for the respective report. To know how to attach, see the topic, “Attach a file into a PQR”.
No Comments