
Engineering
1 Drawings
The Drawings tab in the Data menu used to add the drawings related with the pressure vessel.
1. Click Drawings
The Drawings page opens.
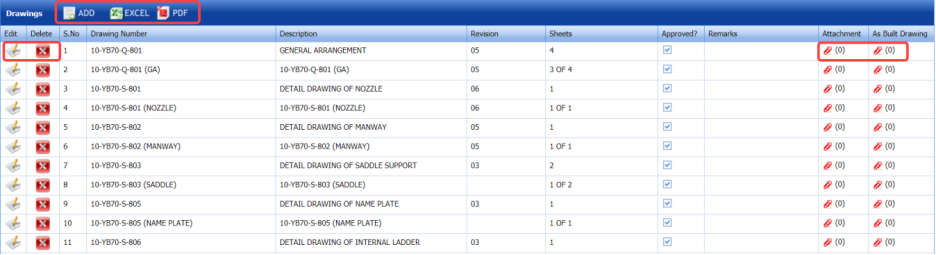
Figure 1.1: Drawings page
Add a Drawing
If you want to add a drawing, do the following steps,
1. Click  (ADD button) in the Drawings See Fig 1.1.
The page shows a new box to add the details of the drawing.

2. In the Drawing Number box, enter the drawing number.
3. In the Description box, enter the description for the added drawing.
4. In the Revision box, enter the revision number of the drawing.
5. In the Approved box, if the drawing has approved, select Yes otherwise select No. If there is no need for approval means select NA.
6. In the Sheets box, enter the sheet number.
7. In the Remarks box, enter your remarks if any.
8. Click Save.
The drawing is successfully added.
Edit a Drawing
If you want to edit any existing drawing in the Drawings page, do the following,
1. Click (Edit icon) in the Edit column for the respective drawing. See Fig 7.1.
The page shows the details of added drawing.

2. Click on any box where you want to edit the details, and then edit the details in the respective box.
3. Click Save.
Production users will be notified if there are any changes to the drawing.
Delete a Drawing
If you want to delete any specific drawing from the list of drawings, you can use  (Delete icon) provided in the Delete field of the Drawings page.
Attach a File into a Drawing
If you want to attach a file with any drawing listed in the Drawings page, you can use  (Attach icon) provided in the Attachment column for the respective drawing.
Attach a File into a Pressure Vessel Built Drawing
If you want to attach a file with any pressure vessel built drawing listed in the Drawings page, you can use (Attach icon) provided in the As Built Drawing column for the respective drawing.
Export Drawings List
You can export a list of drawings added in the Drawings page in the excel formats by using ![]() (Excel button).
(Excel button).
2 Bill of Material
Bill of Material is a comprehensive inventory of the raw materials, assembles, sub assembles, parts and components, as well as the quantity of each, needed to the pressure vessel module.
The Bill of Material menu used to add the bill of material details.
1. Click Bill of Material
The Bill of Materials page opens.
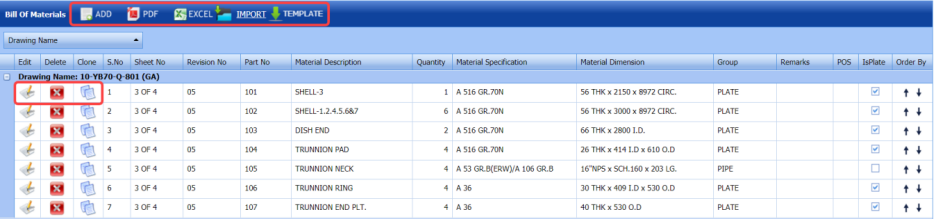
Figure 1.2: Bill of Materials page
Add a Bill of Material
If you want to add a bill of material, do the following steps,
1. Click  (ADD button) in the Bill of Materials See Fig 7.2.
The page shows a new box to add the details of the bill of material.
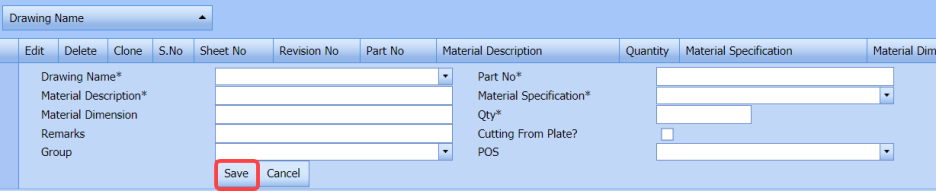
2. In the Drawing Number box, select the drawing number from a drop-down list.
3. In the Part No box, enter the part number.
4. In the Material Description box, enter the description for the bill of material.
5. In the Material Specification box, select the material specification.
6. In the Material Dimension box, enter the material dimension.
7. In the Qty box, enter the quantity of the material.
8. In the Remarks box, enter your remarks if any.
9. If the material is cut from a plate, select the checkbox of the Cutting from Plate? option.
10. In the Group box, select the group from a drop-down list.
11. In the Point of Sale (POS)box, select the POS from a drop-down list.
12. Click Save.
The bill of material is successfully added.
Edit a Bill of Material
If you want to edit any existing bill of material in the Bill of Materials page, do the following,
1. Click  (Edit icon) in the Edit column for the respective bill of material. See Fig 7.2.
The page shows the details of added bill of material.

2. Click on any box where you want to edit the details, and then edit the details in the respective box.
3. Click Save.
Clone a Bill of Material
The Clone option in the Clone column of the Bill of Materials page used to add a bill of material as a copy of the previously added bill of material, See Fig 7.2.
1. Click (Clone icon) in the Clone column of the Bill of Materials
A new box opens to add the bill of material.
2. Enter the details of the bill of material.
The new bill of material will be added.
Delete a Bill of Material
If you want to delete any specific bill of material from the list of bill of materials, you can use  (Delete icon) provided in the Delete field of the Bill of Materials page.
Export Bill of Materials List
You can export a list of bill of materials added in the Bill of Materials page in the excel formats by using ![]() (Excel button).
(Excel button).
Import Multiple Bill of Materials
If you want to import multiple bill of materials together, do the following,
1. Click  (TEMPLATE button) on the Bill of Materials See Fig 1.2.
A template will be downloaded as an excel worksheet to enter the details of bill of materials.
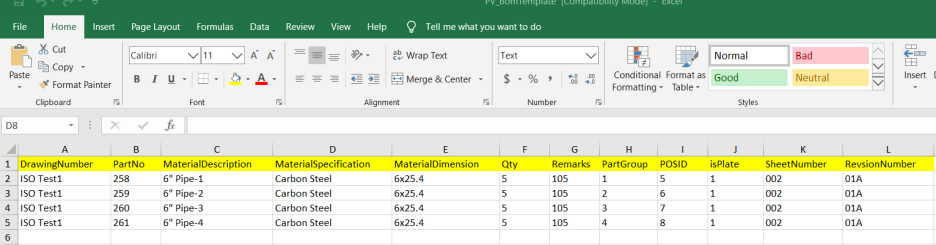
2. Enter the relevant details in the required columns on the excel worksheet.
3. Once you have added the bill of materials details in the excel worksheet, save the excel worksheet on your computer.
4. Click  (IMPORT button). See Fig 1.2.
A new box opens for importing the excel worksheet saved on your computer.
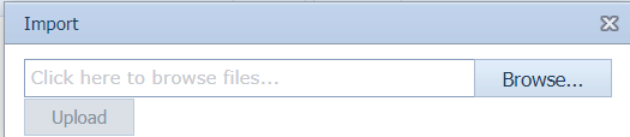
5. Click  (Browse button) to select the excel worksheet to be uploaded.
6. Select the excel worksheet you want to upload from your computer.
7. Click  (Upload button) to export the bill of materials details that are included in the excel worksheet.
The details of the bill of materials in the worksheet will be displayed in the Bill of Materials page.
3 Joints
In Pressure Vessel, joints are formed by welding two or more workpieces (metal or plastic) according to a particular geometry. If you want to add a joint,
The Joints tab in the Engineering menu used to the weld joints.
1. Click Joints in the Engineering
The Weld Joints page opens.
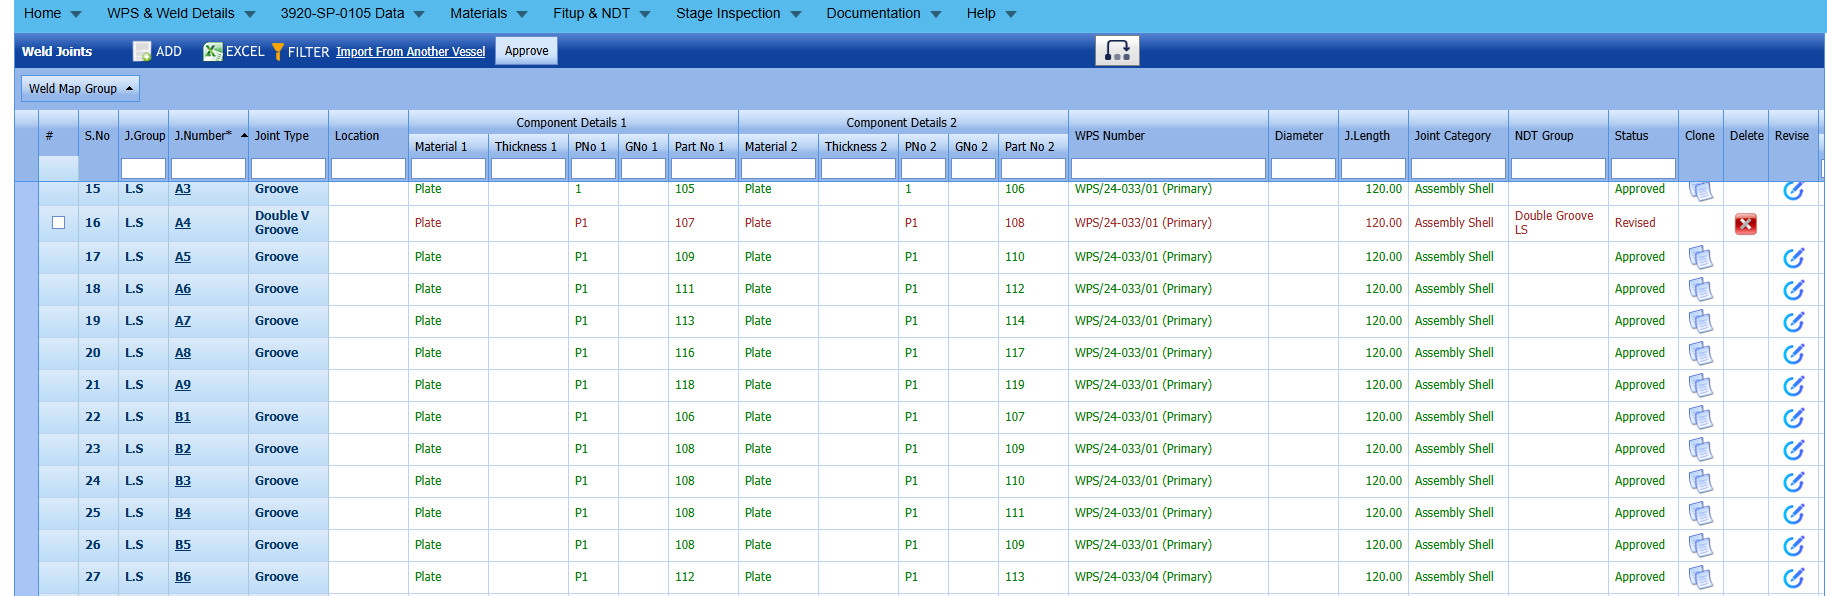
Figure 1.3: Weld Joints page
Add a Weld Joint
If you want to add a weld joint, do the following steps,
1. Click  (ADD button) in the Weld Joints
The page shows a new box to add the details of the weld joint.
2. In the Joint Group box, select the joint group name.
3. In the Joint Number box, enter the joint number.
4. In the Joint Type box, select the joint type.
5. In the WPS Number box, select the WPS number from a drop-down list and click
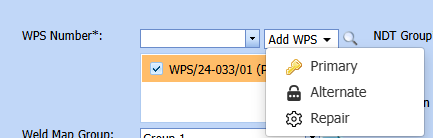 either Primary or Alternate or Repair as type.
The selected WPS number will be added.
6. In the NDT Group box, select the NDT Group name.
7. In the Location box, enter the location name.
8. In the Nozzle Details box, enter the nozzle details.
9. In the Joint Length (mm) box, enter the joint length.
10. In the Material 1 box, select the first material and enter their group number, thickness and part number in the respective boxes.
11. In the Material 2 box, select the second material and enter their group number, thickness and part number in the respective boxes.
12. In the Position box, select the position of the weld joint.
13. If the joint to be done is T joint, select the checkbox of the Is T Joint
14. In the Remarks box, enter your remarks if any.
15. Click Save.
17. Select the NDE Plan Tab and if required change the NDT to be performed in the Before Fit up, Back Chipping, Before PWHT, PWHT, and Other NDT fields.
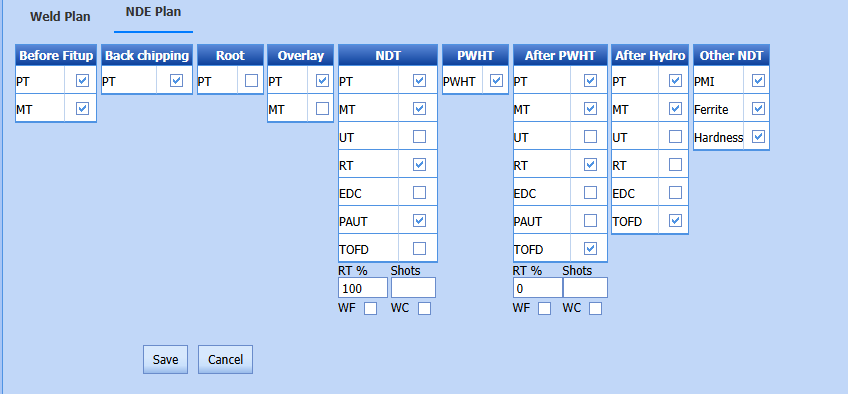
 Note: The NDT type displayed in all above fields can be modified based on your requirement. For example, you can add and remove the NDT type by navigating into the NDT Requirements tab. To know in detail, see the topic, “NDT Requirements”.
|
Before Fit up – If you select any NDT type listed in the Before Fit up option for a joint, the selected NDT type should be completed before adding the Fit up inspection request for the joint. For example, if you select both RT and MT, you must do both RT and MT.
Back Chipping - If you select any NDT type listed in the Back Chipping option for a joint, the selected NDT type should be completed before adding the weld visual inspection request for the joint.
NDT - If you select any NDT type listed in the NDT option for a joint, the selected NDT type should be completed after performing the weld visual inspection for the joint.
PWHT - If you select any NDT type listed in the PWHT option for a joint, the selected NDT type should be completed after performing the above NDT.
Other NDT - If you select any NDT type listed in the Other NDT option for a joint, the selected NDT type should be completed after performing the above PWHT. |
The weld joint is successfully added.
Edit a Weld Joint
If you want to edit any existing weld joint in the Weld Joints page, do the following,
1. Click on the joint number for the respective weld joint to edit. See Fig 1.3.
The page shows the details of added weld joint.
2. Click on any box where you want to edit the details, and then edit the details in the respective box.
3. Click Save.
Duplicate a Weld Joint
If you want to duplicate any existing weld joint,
1. Click  (Add icon) of the respective weld joint.
The selected weld joint will be added as duplicated one including the revised joint number.
Delete a Weld Joint
If you want to delete any specific weld joint from the list of added weld joints, you can use  (Delete icon) provided in the Delete field of the Weld Joints page.
View Welding Work Instruction Detail
If you want to view the welding work instruction detail, click  (Print icon) provided in the Report column.
Export Weld Joints List
You can export a list of weld joints added in the Weld Joints page in the excel formats by using ![]() (Excel button).
(Excel button).
Import Weld Joints from Another Vessel
You can import the weld joints of another vessel into the current vessel by using the specific functionality given in the Weld Joints page.
1. Click Import from Another Vessel option in the Weld Joints
The Import from Another Vessel window opens.
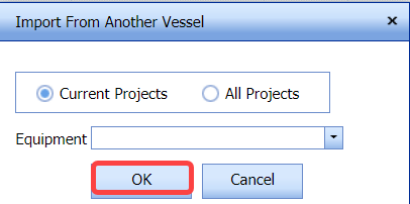
2. If you want to import the pressure vessel joints from current project, select Current Projects or if you want to import the pressure vessel joints from any other project, select All Projects.
3. In the Equipment box, select an equipment from which you want to import the joints.
4. Click OK.
The joints of the selected equipment will be added in the Weld Joints page.
No Comments