
RFI FITUP INSPECTION
7.0 RFI FITUP INSPECTION
The RFI FITUP INSPECTION tab helps you to check and approve the RFI fitup request raised in the web application, by adding and updating your inspection details. This RFI fitup inspection feature automatically updates and synchronizes your inspection details with the RFI Fitup report that is uploaded in the web application.

 Note: when you click the RFI FITUP INSPECTION tab in the dashboard, the RFI Fitup Inspection page displays a list of reports corresponding to today and previous day. However, if you want to view the reports for other dates, you must navigate to the TAKE OFFLINE DATA option. (See " TAKE OFFLINE DATA" for more details.)
1. Tap RFI FITUP INSPECTION.See Fig 2.3.
The RFI Fitup Inspection page opens with a list of reports for the selected date.
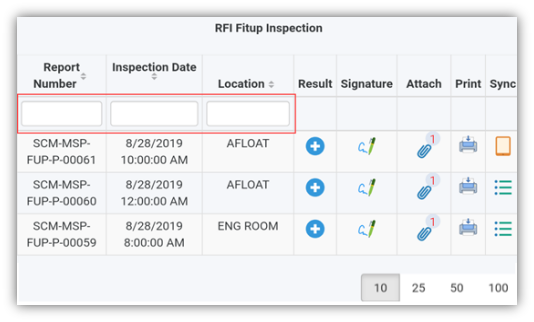
Figure 8.1 RFI Fitup Inspection page
 Tip: 1. You can configure displaying of the number of reports per page by selecting 10, 25, 50 or 100, accordingly.
2. If you want to filter one report among the list of reports, you must enter the report number, inspection date or location details in the respective boxes given in the RFI Fitup Inspectionpage.
The RFI Fitup Inspection page contains multiple fields such as Report Number, Inspection Date, Location, Result, Signature, Attach, Print, and Sync. (See the topic “The MIR page contains the following fields“ for more details about each field in the RFI Fitup Inspection page.)
To add your RFI fitup inspection result
1. Once you find out the report where you need to add your inspection details, tap  (Result icon) to add your inspection results, See Fig 8.1.
The Result page opens with a list of reports with the material details. Each report shows material specifications such as system details, line numbers, heat numbers, spool number, components name, MIR details, etc.
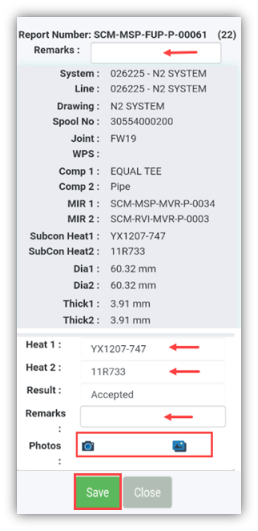
2. In the Remarksbox, type your remarks if any.
3. Check and reenter the heat numbers of the respective report where you want to add your inspection details.
4. In the Resultbox, tab and choose Pending, Accepted, Rejected or Cancelled from a drop-down list based on your inspection details.
5. In the Remarksbox, type your remarks if any.
6. If you want to add any photo with the report, do the following steps,
a. Tab  (photo capturing icon).
Your mobile camera starts to capture the image.
b. Capture the material part, which you want to add.
The captured images are automatically saved in the image’s gallery.
c. Tab (Images icon) to view the captured images.
 Note: The captured images are automatically updated with the web application.
- Tab Save.
To add your signature
Once you have saved your inspection results, the Result page automatically redirects you into the Signature page. Otherwise, tap
 (Signature icon), See Fig 8.1.
To know how to add your signature, see the topic “To add your signature“.
No Comments