
Welding
Welding is a part of the Pressure Vessel manufacturing process. Welding on pressure vessels must be extremely high quality to withstand working conditions. Properly preparing for welding can reduce or even eliminate reworking.
1 Preliminary Welding Procedure Specification (PWPS)
A pWPS (Preliminary Welding Procedure Specification) is a preliminary or draft welding procedure prepared before the actual qualification of a welding process. It is mainly used as a guideline for conducting welding during the Procedure Qualification stage. In industries such as pressure vessels, piping, structural fabrication, offshore, and oil & gas, welding procedures must be qualified and approved before they can be used for production welding. The pWPS is the first step in this qualification process.
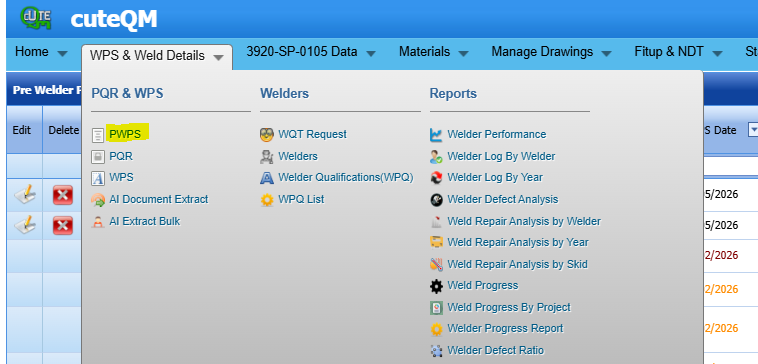
The PWPS tab in the WPS & Weld Details menu used to add the details of pwps.
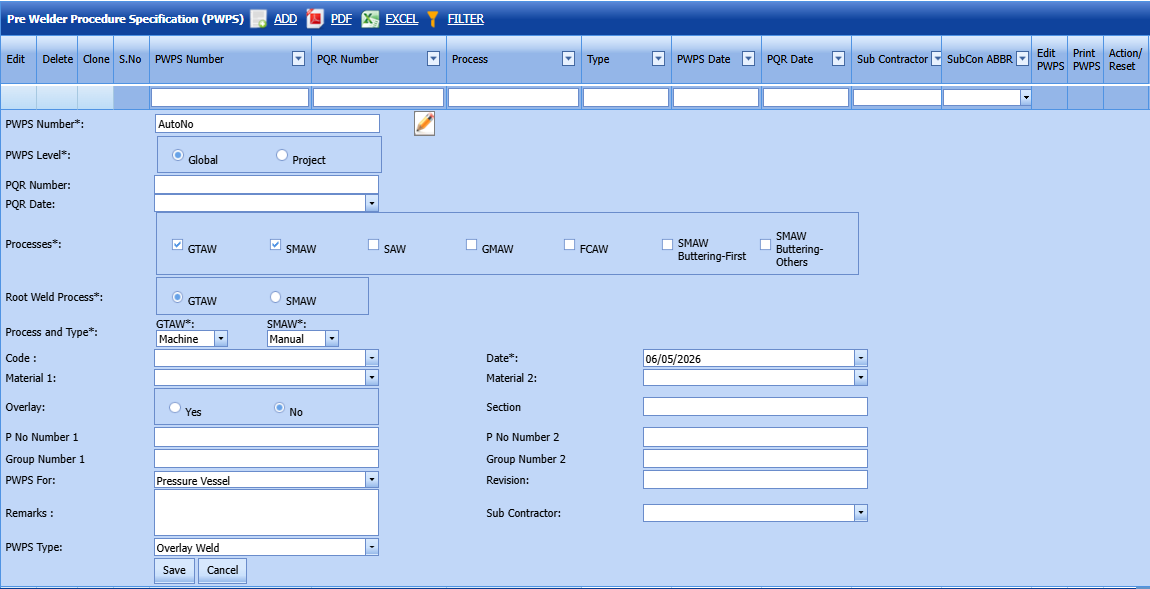
Add a PWPS
If you want to add aPWPS, do the following steps,
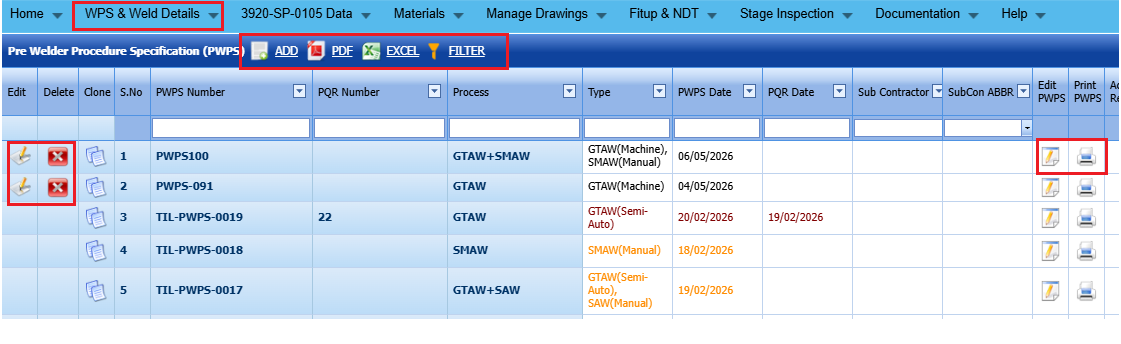
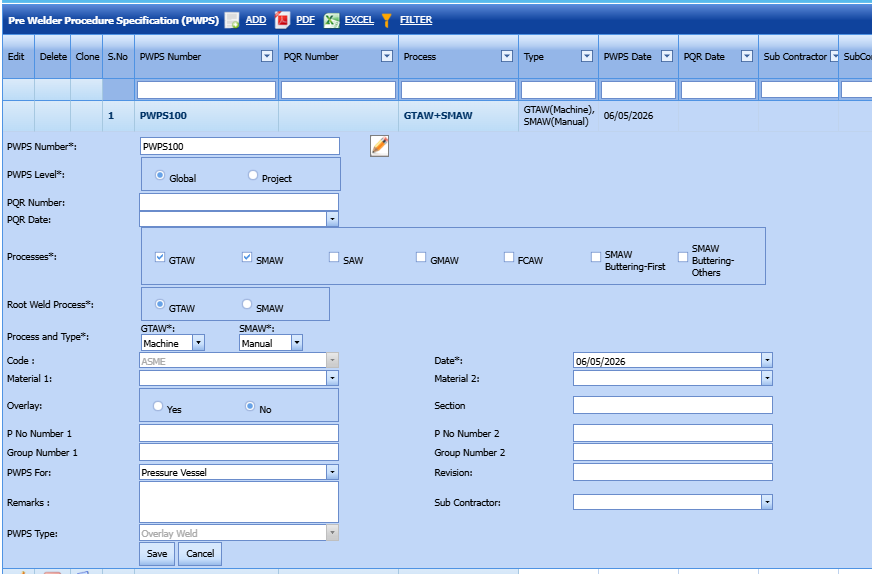
1. Click  (ADD button) in the pwps See below fig
The page shows a new box to add the details of a pwps.
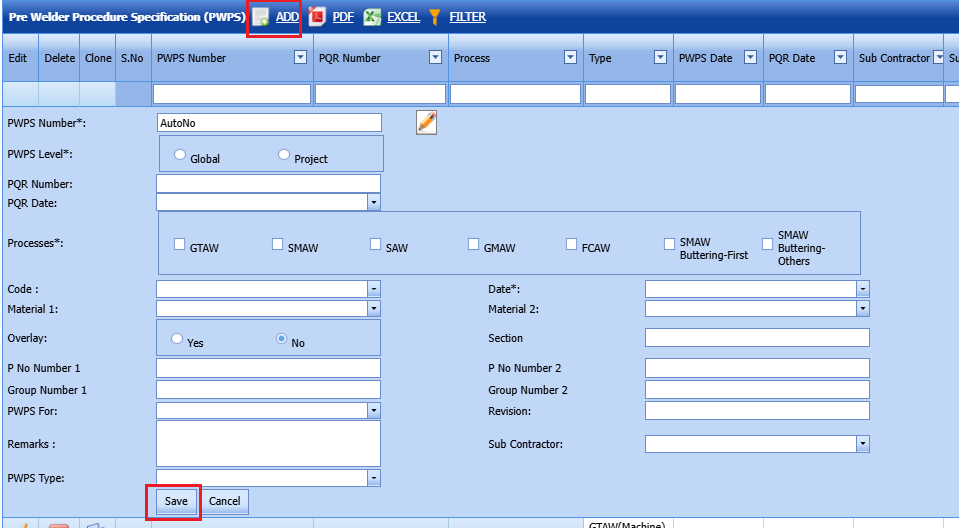
 Note: The fields notified with the symbol (*) are mandatory. You must enter the relevant details in that fields before saving.
2. In the PWPS Name box, enter the name of a PWPS. If not entered, the system will create a new number in a systematic manner.
3.Select the PWPS level (Global or Project)
4.Enter PQR number
5.Enter PQR date
6. In the Processes field, select the welding process that you want to do.
7.Select the appropriate code from dropdown list
8.Select the PWPS date
9.Select material 1 and material 2
10.Enter section name
11.Enter P No 1 and 2
12.Enter Group no 1 &2
13.Select the PWPS for as pressure vesse
14.Enter revision number
15.Enter Remarks
16.Select pwps type
17.Select subcontractor name-if any
After all mandatory fields entered,click save button.
PWPS created successfully.
Once you have added the pwps, you can add the pwps parameters.
Add PWPS Parameters
To add parameters for the added PWPS,
1. Click  (Edit icon) in the Edit PWPS column. See Fig below
The page redirects you to another page to add the PWPS parameters.
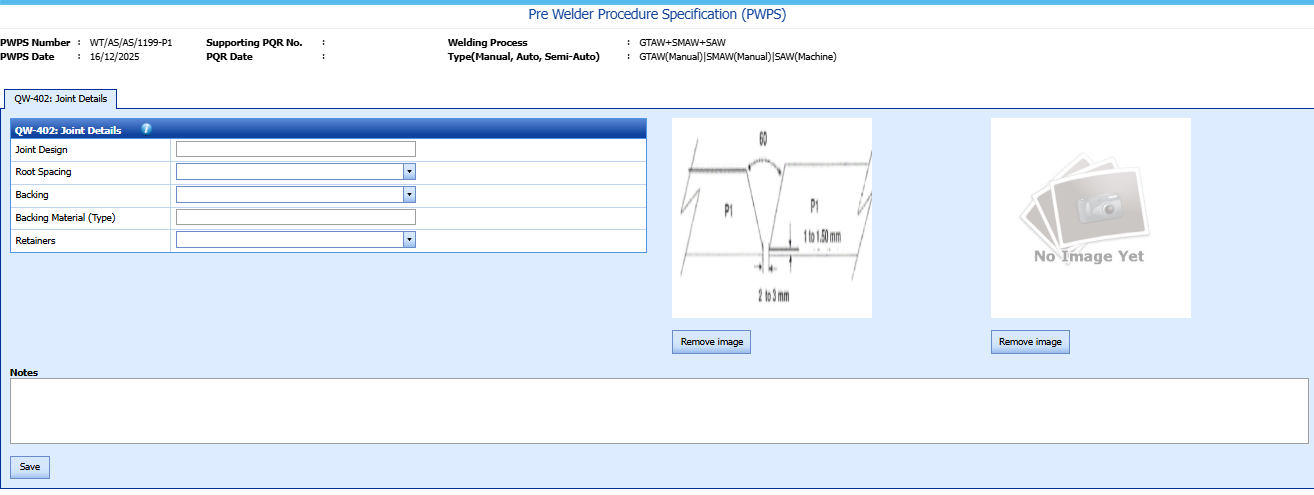
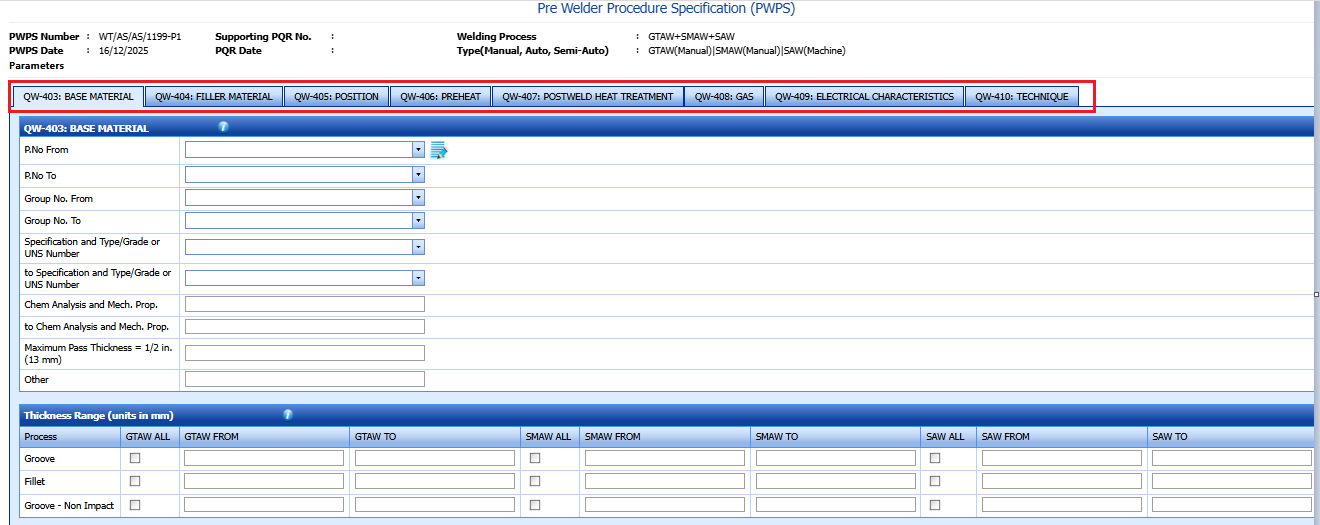
Enter all the parameter values for all the sections and save.
Edit a PWPS
If you want to edit any existing PWPS in the PWPS page, do the following,
1. Click  (Edit icon) in the Edit column for the respectivePWPS.
The page shows the details of added PWPS.
2. Click on any field where you want to update the details, and enter the value.
3. Click Save.
PWPS updated successfully.
Delete a PWPS
If you want to delete any specific PWPS from the list of added PWPS, you can use  (Delete icon) provided in the Delete field of the PWPS page. T
Print a PWPS Report
If you want to print a PWPS report, click  (Print icon) provided in the Print PWPS column.
Attach a File into a PWPS
If you want to attach any file with any PWPS listed in the PWPS page,
1. Click  provided in the Attachment column for the respective PWPS
The File Upload (PWPS) page opens.
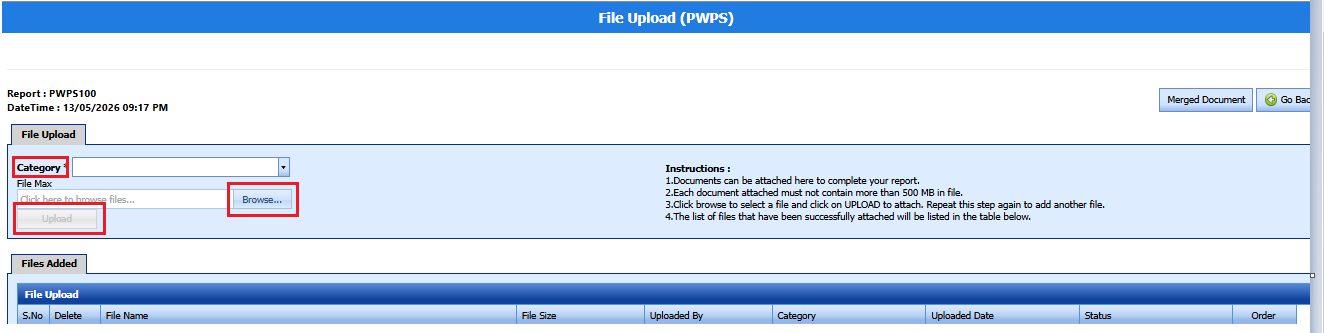
 Note: Before uploading any file, read the instructions given in the File Upload (PWPS) page.
2.Enter the category of the attachment.
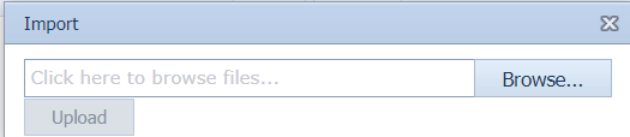
3. Click  (Browse button) to select a file to be uploaded.
4. Select any file which you want to upload, from your computer.
5. Click  (Upload button) to attach the file.
The uploaded file will be displayed in the screen.
Export PWPS List
You can export a list of PWPS added in the PWPS page in the pdf and excel formats by using ![]() (PDF button) and
(PDF button) and
![]() (Excel button).
(Excel button).
PWPS Clone
You can clone a pwps by clicking clone button in clone column of the pwps list screen.
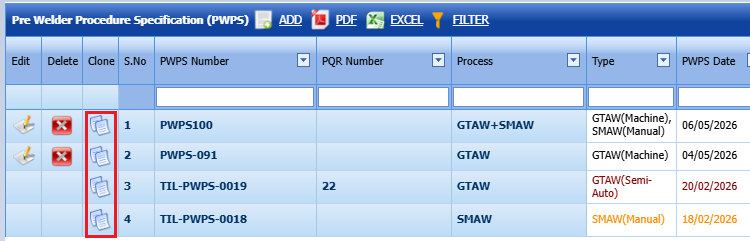
2.Do the changes if required
PWPS Workflow
Once pwps created, it will goes to the three level approval workflow with respect to the clients.
1.After all the parameters entered, click send for approval button in Action column.
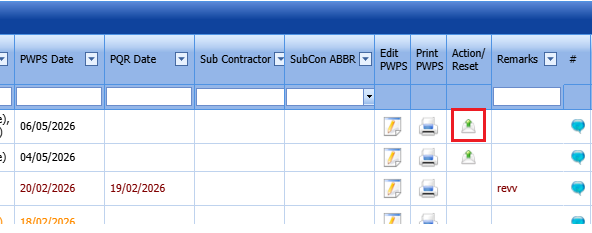
2.Once PWPS send for approval, we cant edit/update/delete/attach the pwps details.
3.Reveiwer and Approver will do their approval in their dashboard screen.
4.Once the approver approves the PWPS, if any modification or revision is required, click the Reset Workflow button, make the necessary changes, and then send it again for approval.
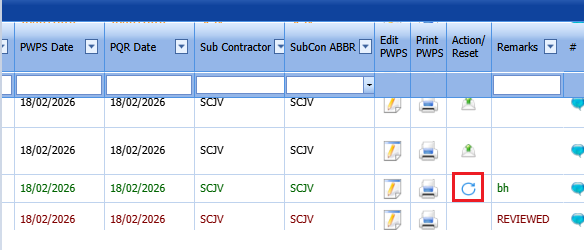
Note : The Approved pwps only can be used in the PQR.
2 Procedure Qualification Record (PQR)
A Procedure Qualification Record (PQR) is required when it is necessary to demonstrate that your company can produce welds with the required mechanical and metallurgical properties. A welding procedure must be qualified in accordance with the requirements of the applicable welding procedure standard (such as ASME Section IX, ISO 15614, etc.).
Each welder is separately qualified for a particular welding process, position, and range of parameters through a Welder Performance Qualification (WPQ). Therefore, weld testing for procedure qualification is typically performed by a competent welder, while individual welder qualification tests are carried out to ensure each welder meets the acceptance criteria for the process.
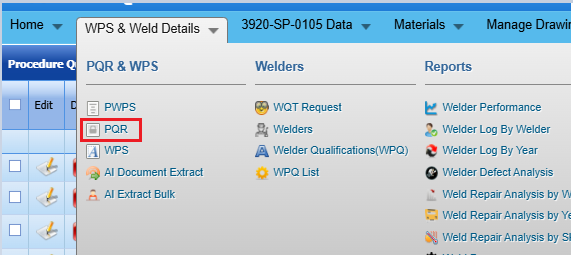
The PQR tab in the WPS & Weld Details menu used to add the details of PQR. To navigate to PQR,
1. Click PQR
The PQR page opens.
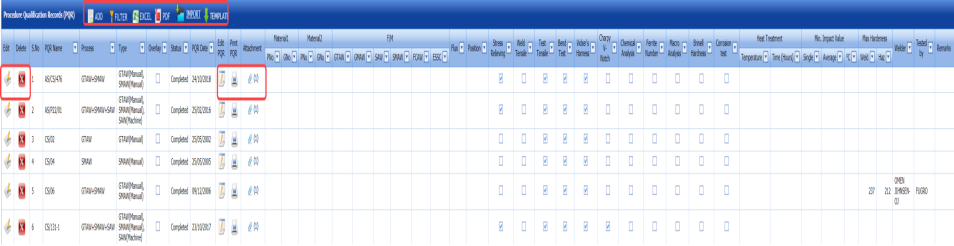
Figure 1.1: PQR Page
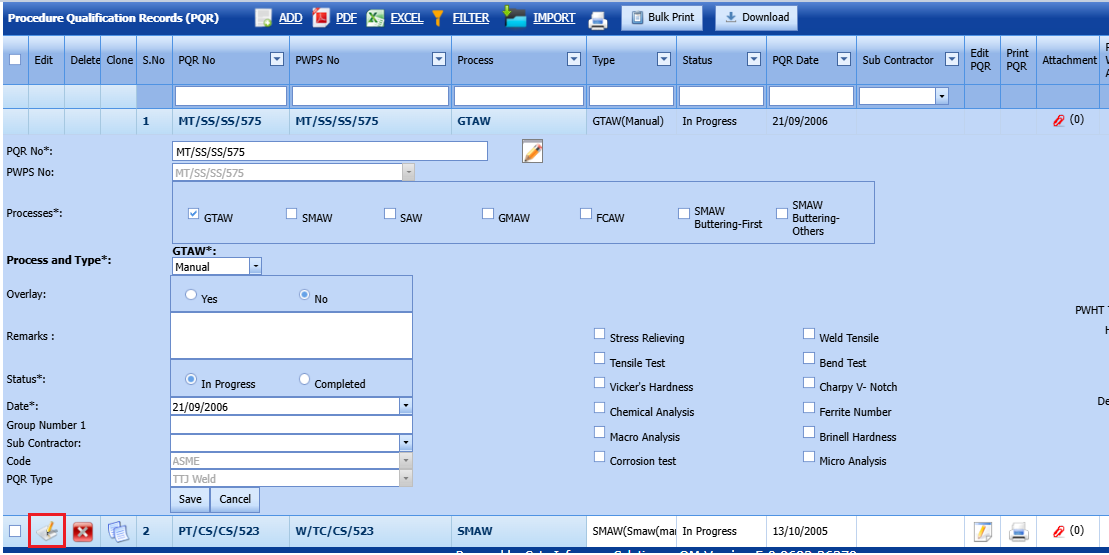
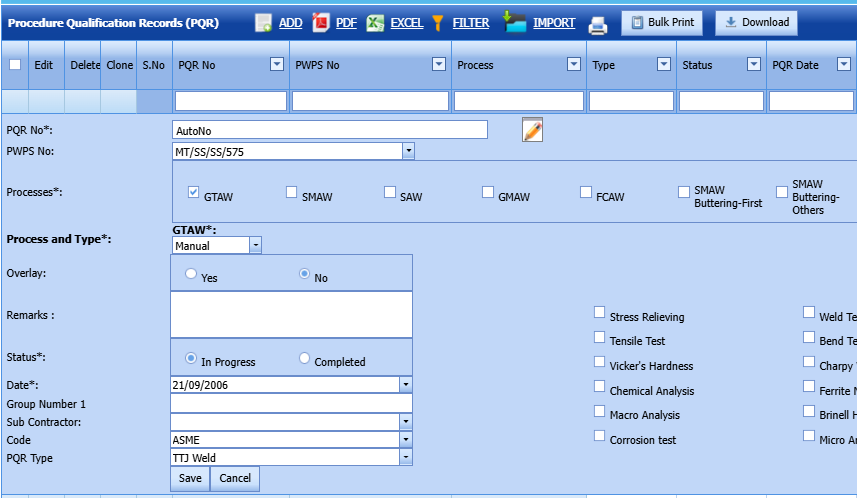
Add a PQR
If you want to add a PQR, do the following steps,
1. Click (ADD button) in the PQR See Fig 1.1.
The page shows a new box to add the details of a PQR.
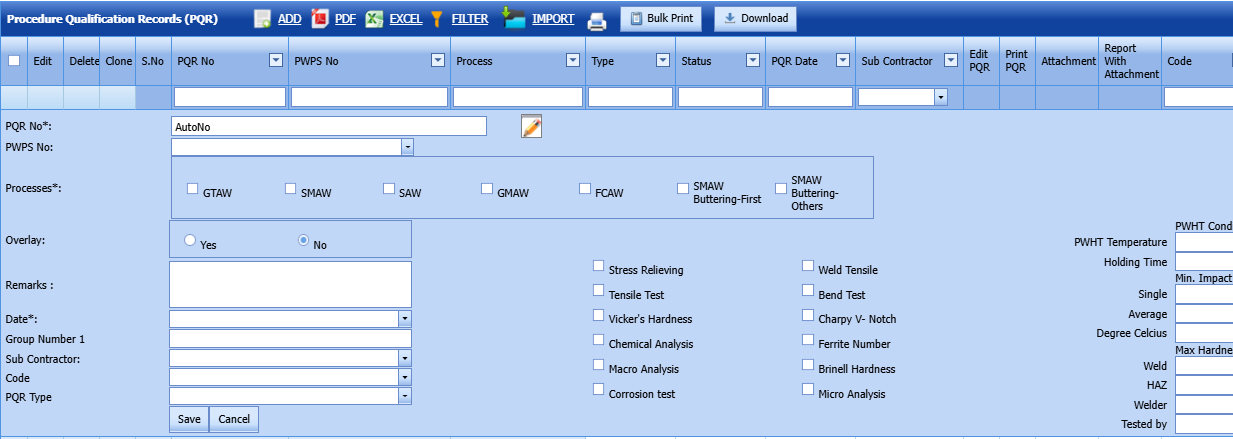
Note: The fields notified with the symbol (*) are mandatory. You must enter the relevant details in that fields before saving.
2. In the PQR Name box, enter the name of a PQR. If not entered, the system will create a new number in a systematic manner.
3. In the Processes field, select the welding process that you want to do.
Once you have selected the weld process, the page shows the Process and Type box for the selected welding process.
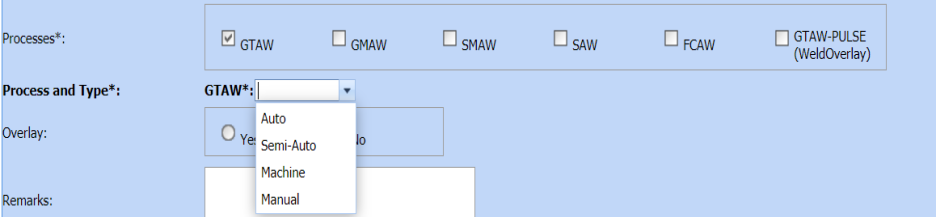
a. In the Process and Type box, select the type of weld process from a drop-down list.
4. In the Overlay box, if you want to conduct the weld overlay process select Yes else select No.
5. Select the tests you want to conduct from the list of Required Properties Tests and Weld Quality Tests.
6. In the Temperature box, enter the heat temperature value.
7. In the Timebox, enter the heating time.
8. Enter the minimum impact value details in the Impact Value field.
9. Enter the maximum harness details in the Hardness field.
10. In the Remarks box, enter your remarks if any.
11.Enter group number
12.Select the subcontractor
13.Select the code
14.Select the PQR type
15. Click Save.
The PQR is successfully added and will be listed in the PQR page. Once you have added the PQR, you can add the PQR parameters.
Add PQR Parameters
To add parameters for the added PQR,
1. Click (Edit icon) in the Edit PQR column. See Fig 1.1.
The page redirects you to another PQR page to add the PQR parameters.


2. If you want add any image, click Browse and add the image.
3. In the Notes box, enter the notes.
4. Click Save.
5. In the Joint Details window, enter the relevant details the respective boxes.
6. Click Save.
7 .In the Base Material window, enter the details of material 1 and material 2.
8. In the Diameter of Test Coupon box, enter the diameter value of test coupon.
9. In the Maximum Pass Thickness box, enter the maximum value of pass thickness.
10. In the Notes box, enter your notes.
11. Click Save.
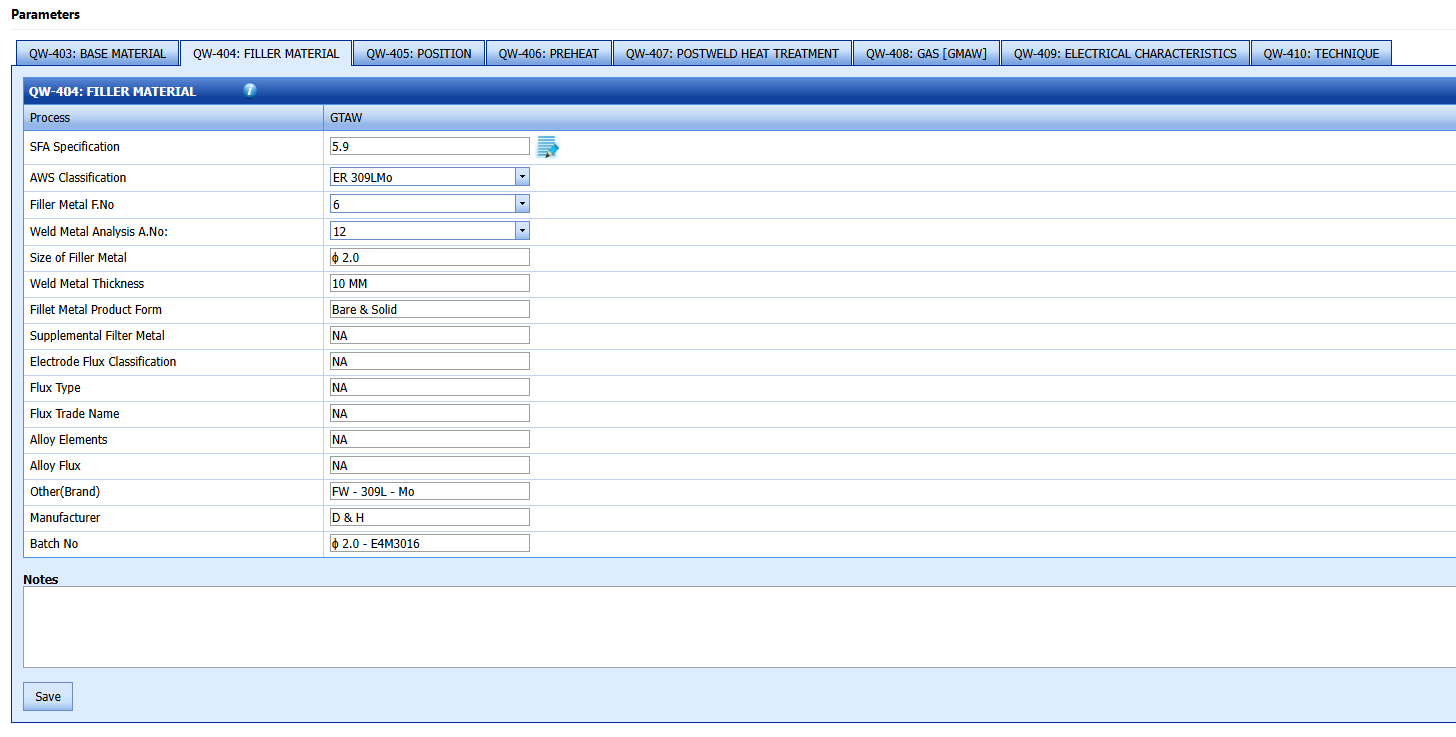
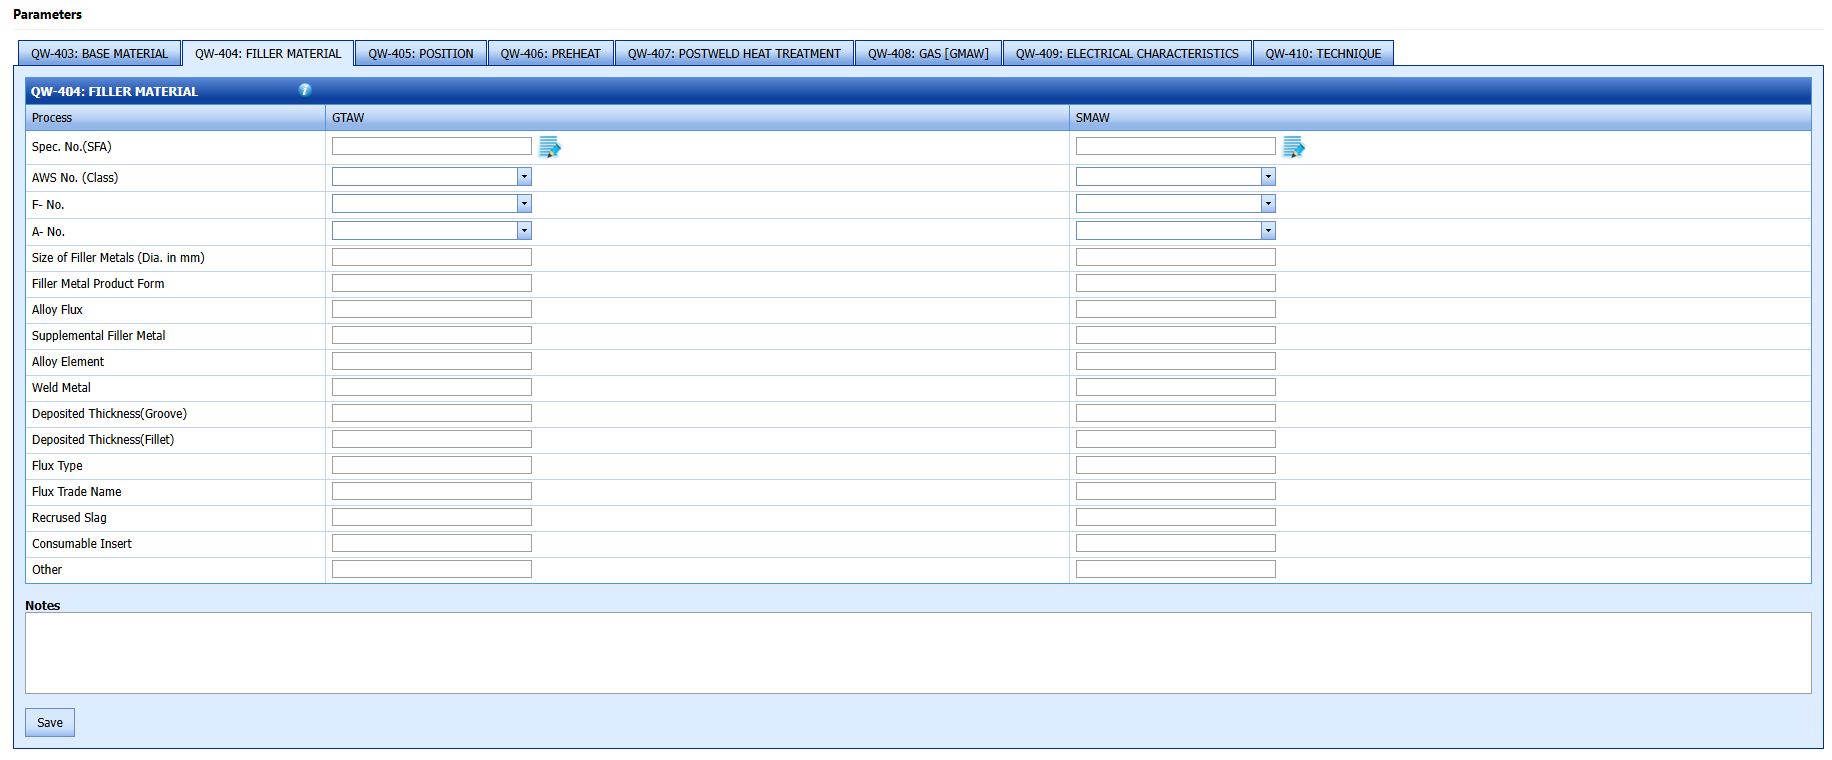
12. In the Filler Material window, enter the details of filler material.
13. Click Save.
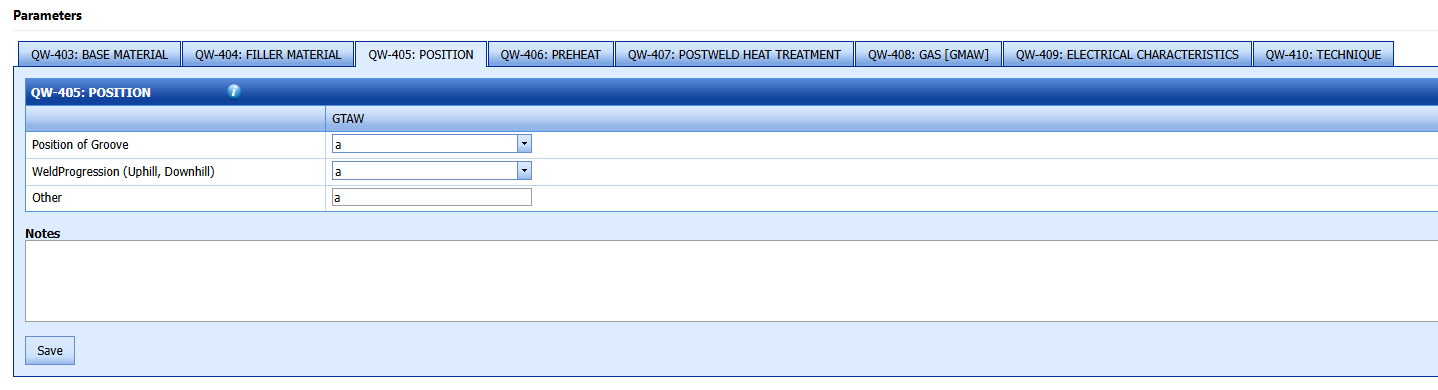
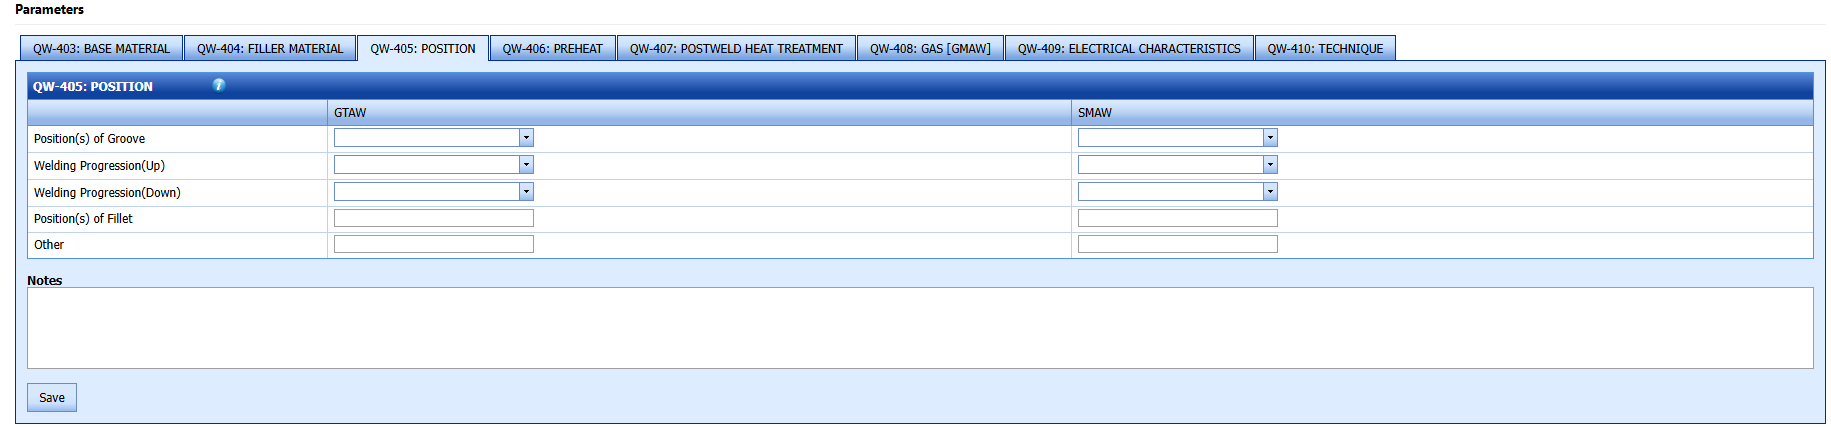
14. In the Position window, enter the position detail.
15. In the Notes box, enter your notes if any.
16. Click Save.
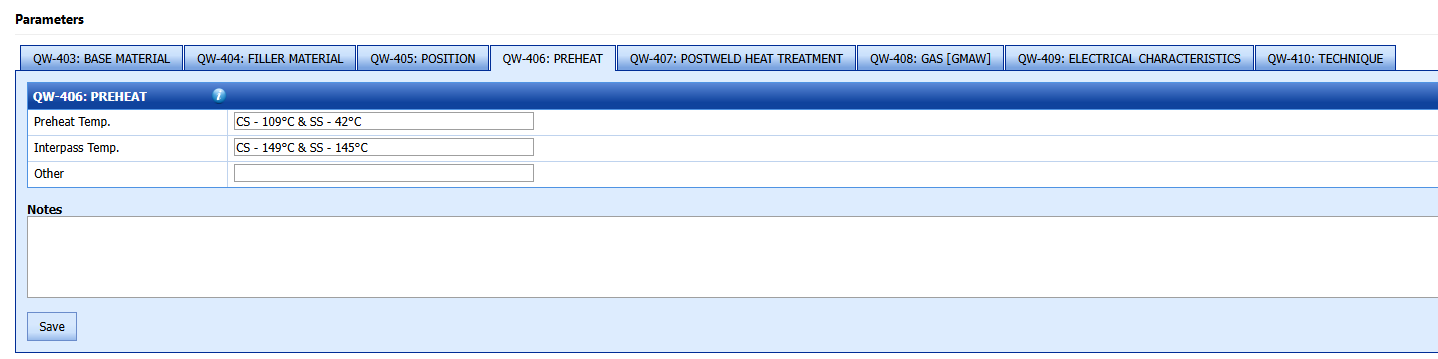
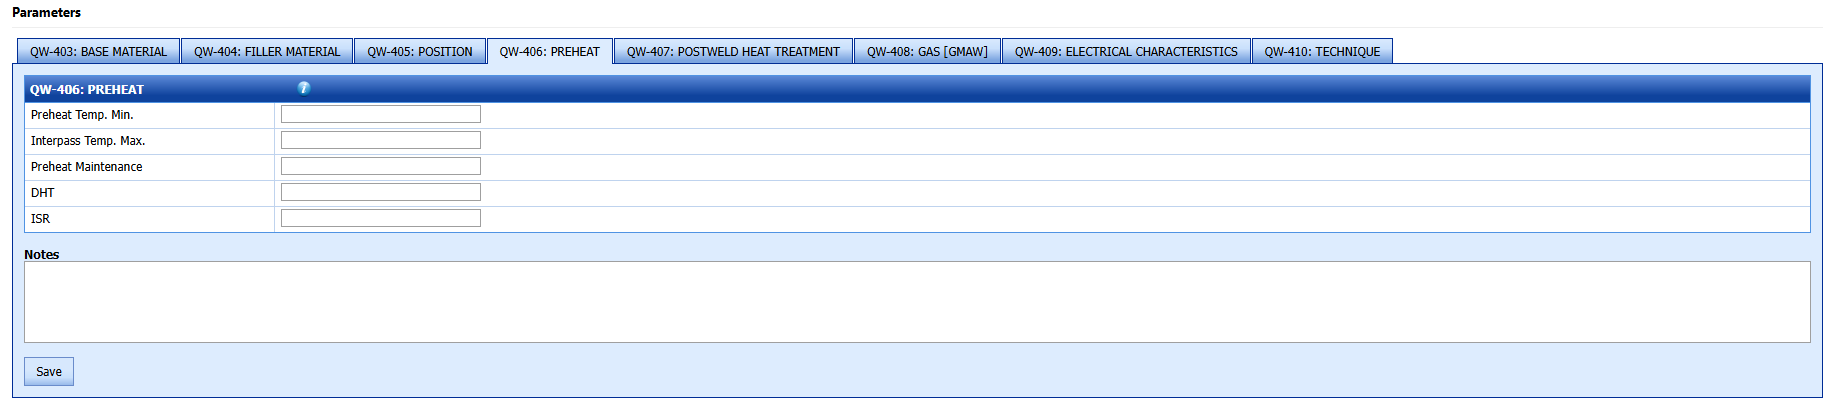
17. In the PREHEAT window, enter the preheat details and click Save.
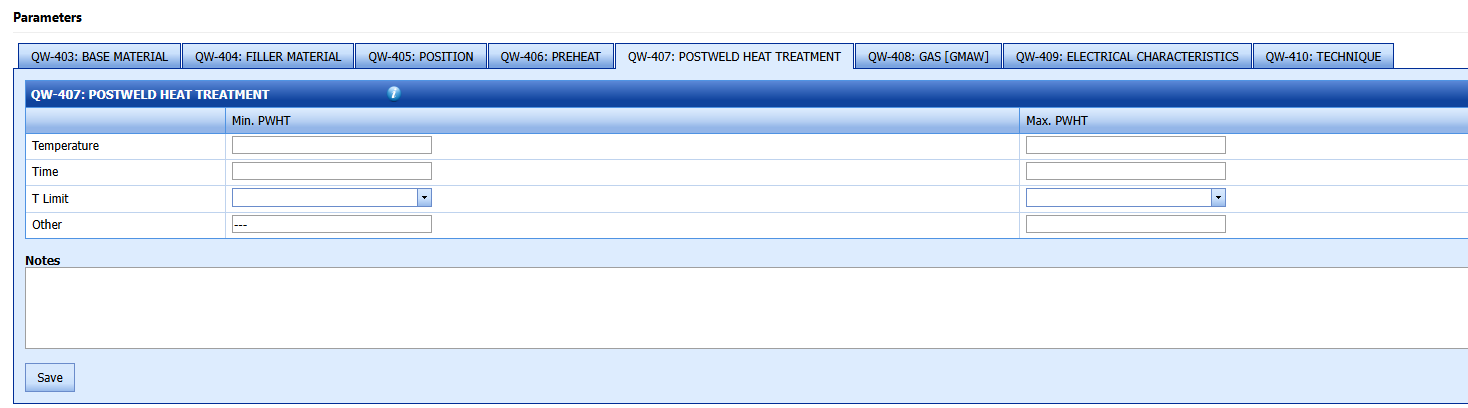
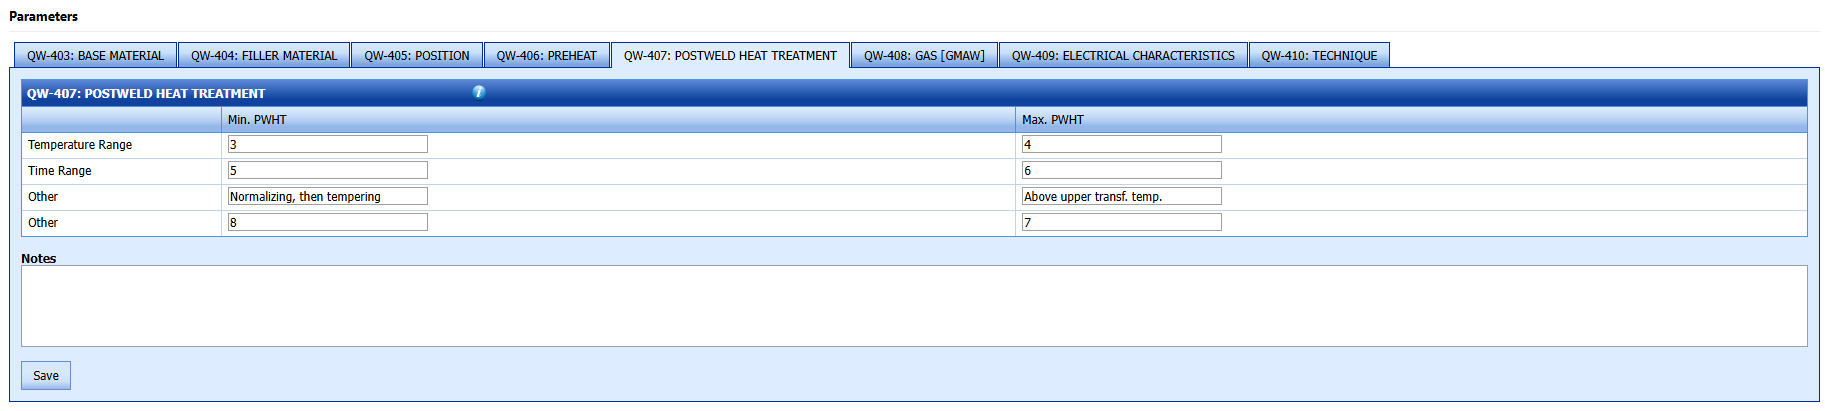
18. In the POSTWELD HEAT TREATMENT window, enter the post weld heat treatment details.
19. Click Save.
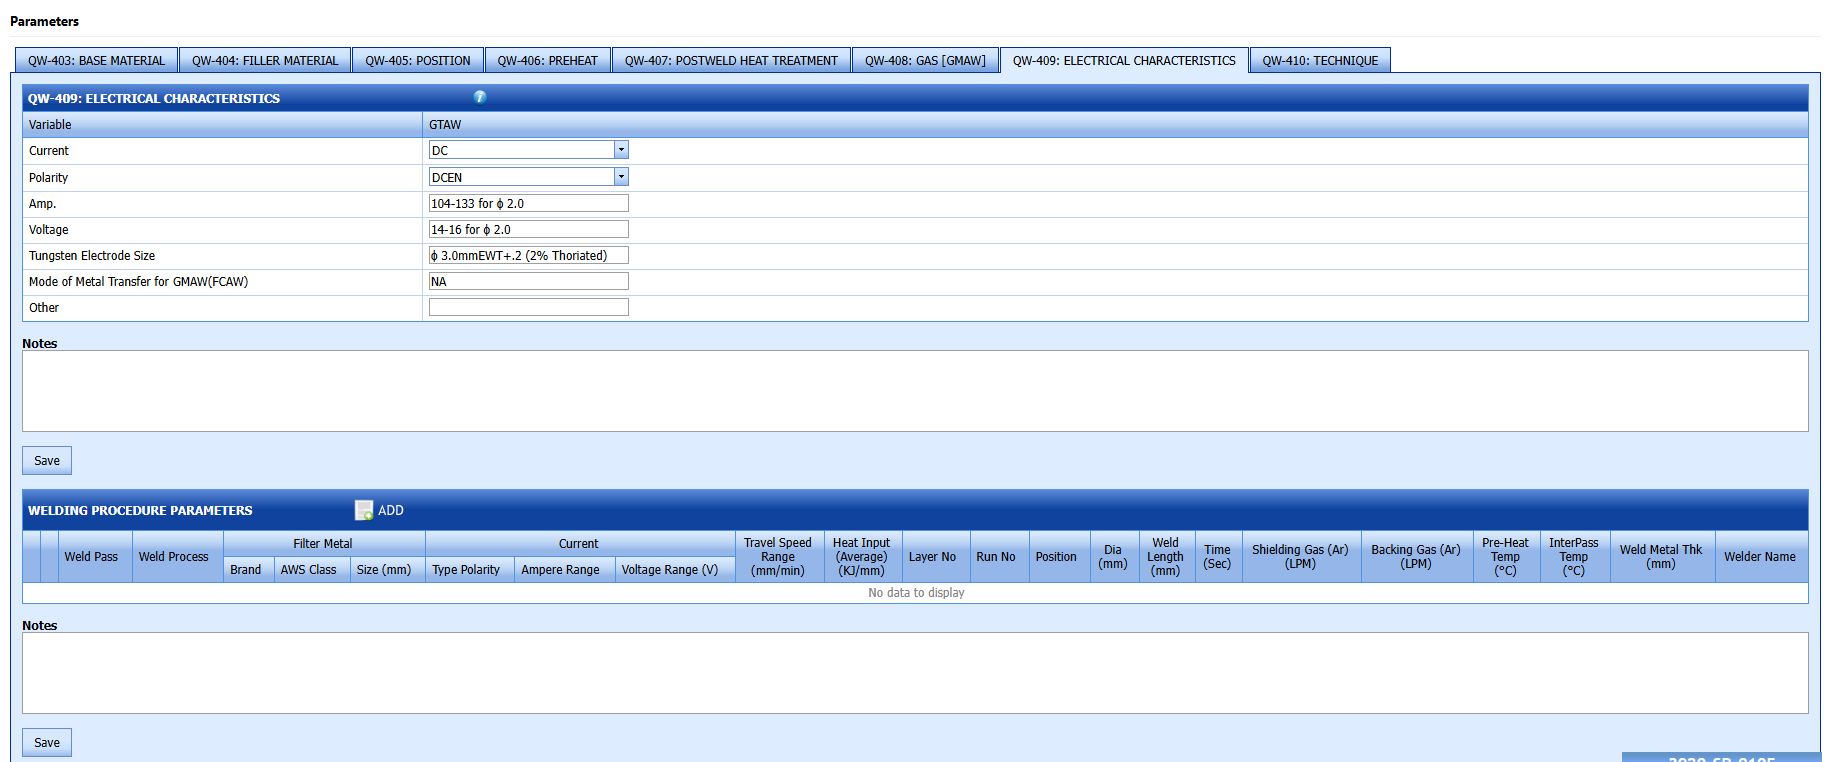
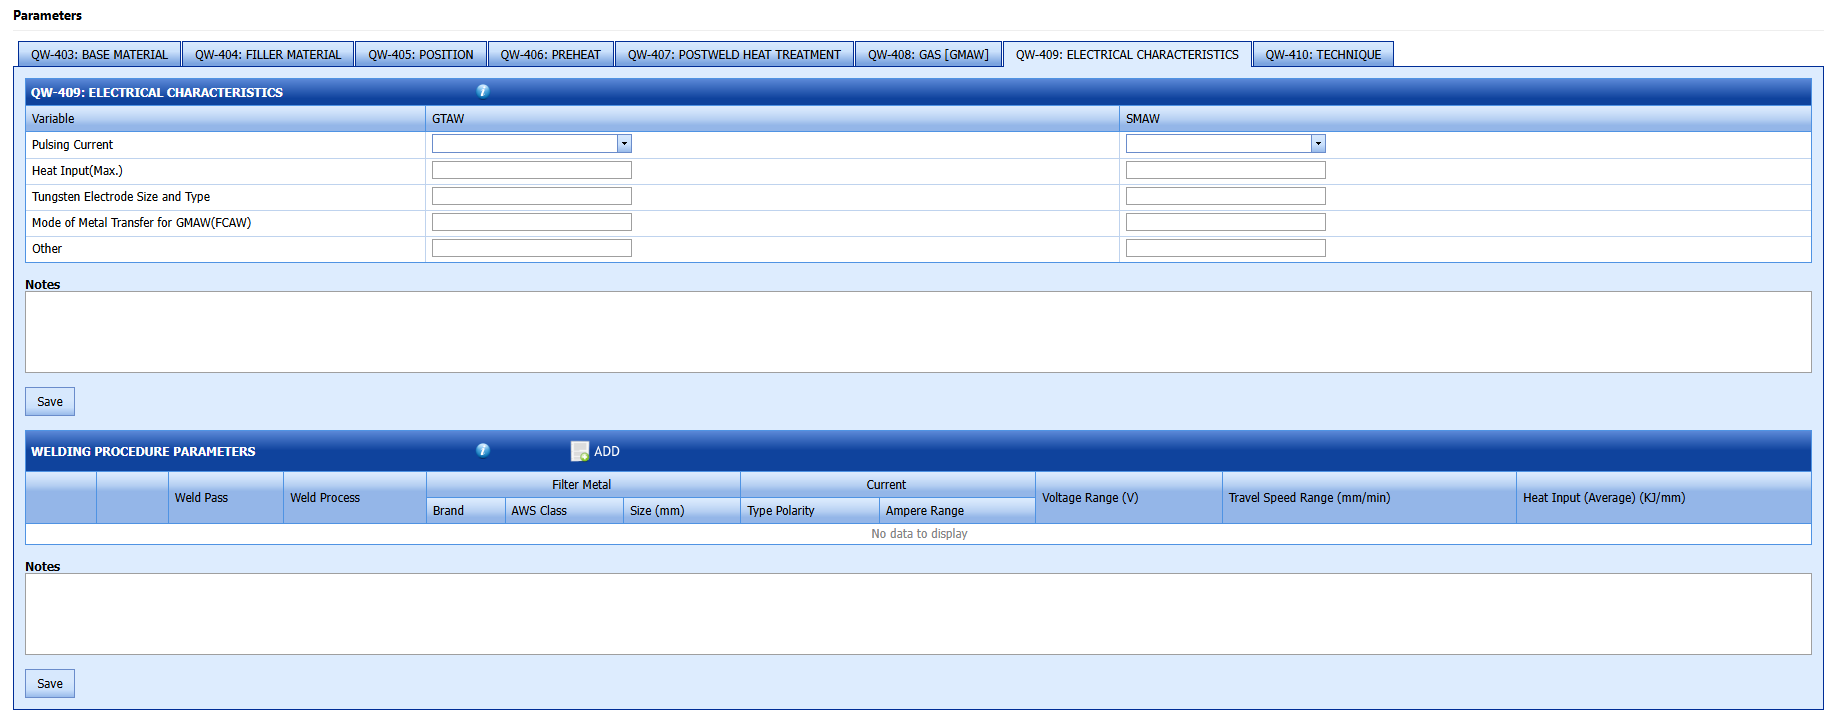
20. In the ELECTRICAL CHARACTERISTICS window, enter the electrical characteristics.
21. Click Save.
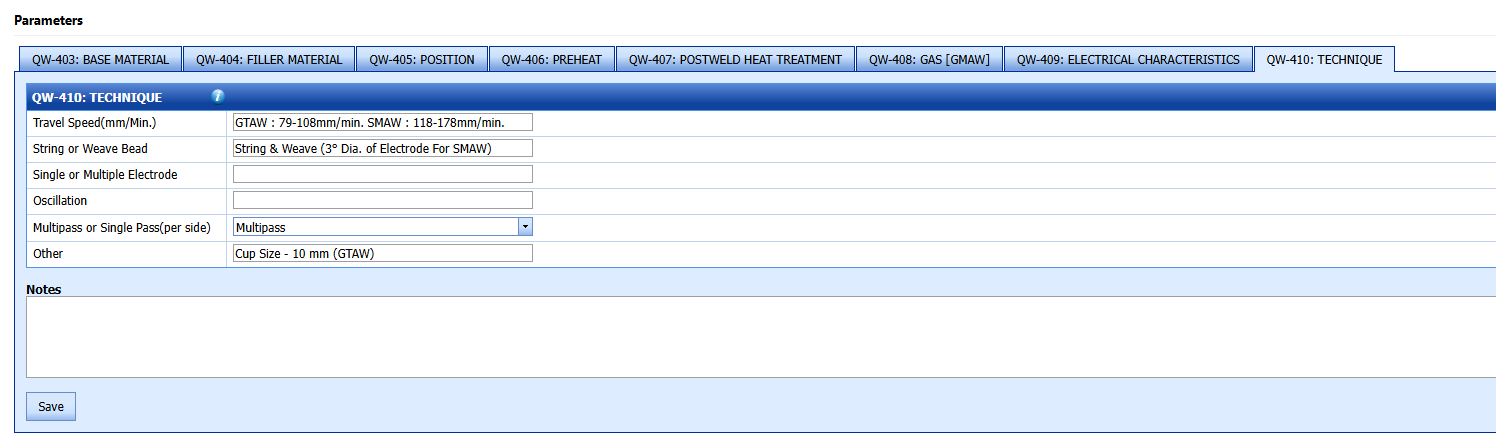
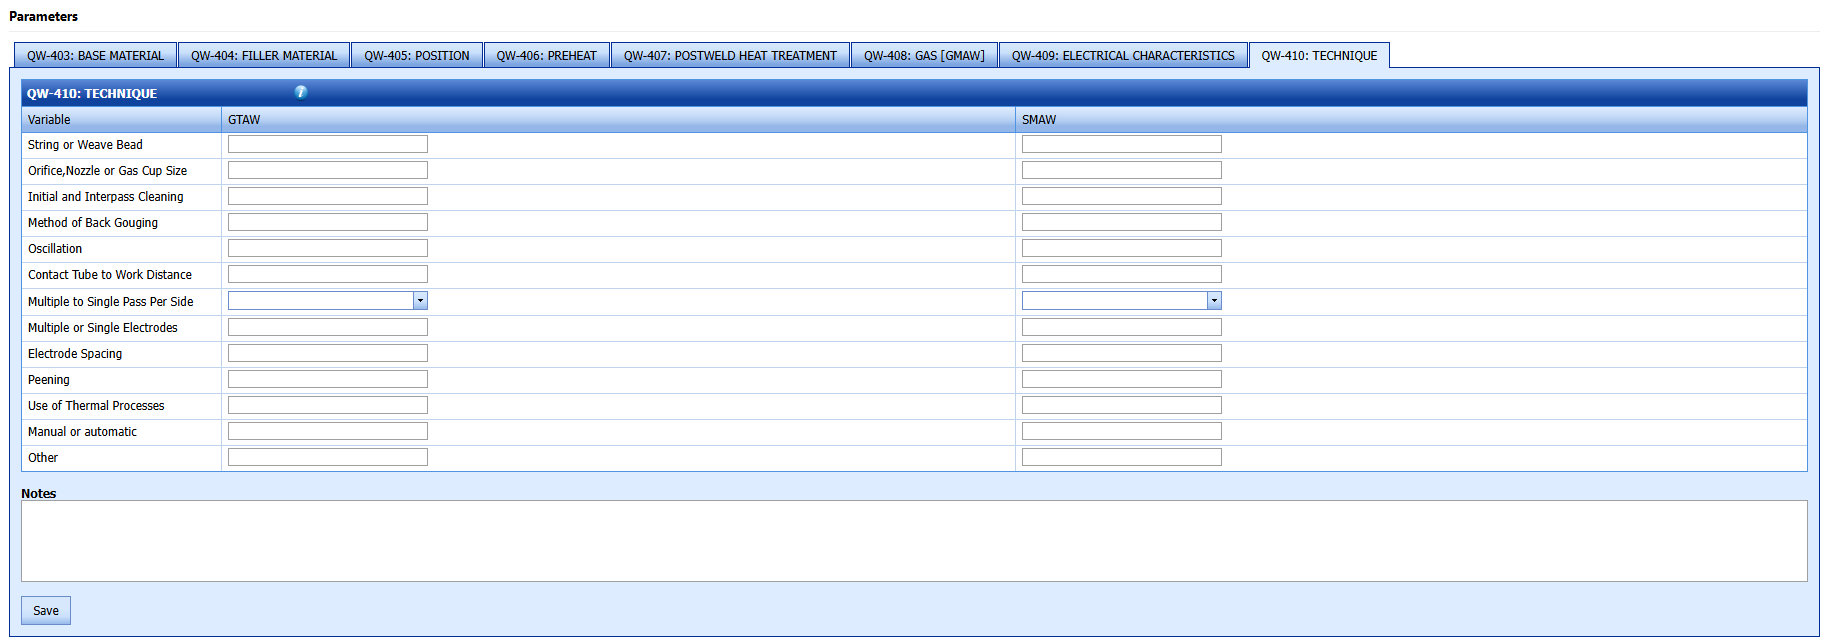
22. In the TECHNIQUE box, enter the technique details.
23. Click Save.
24. In the WELDING PROCEDURE PARAMETERS window, click  (ADD button).
The window opens a new box to add the WPQ parameters.

25. Enter the weld parameters details and click Update.
26. Click Save.
27. In the TENSILE TEST window, click  (ADD button).
The window opens a new box to add the tensile test details.


28. Enter the tensile test details and click Update.
29. Click Save.
30. In the GUIDED BEND TEST window, click  (ADD button).
The window opens a new box to add the guided bend test details.
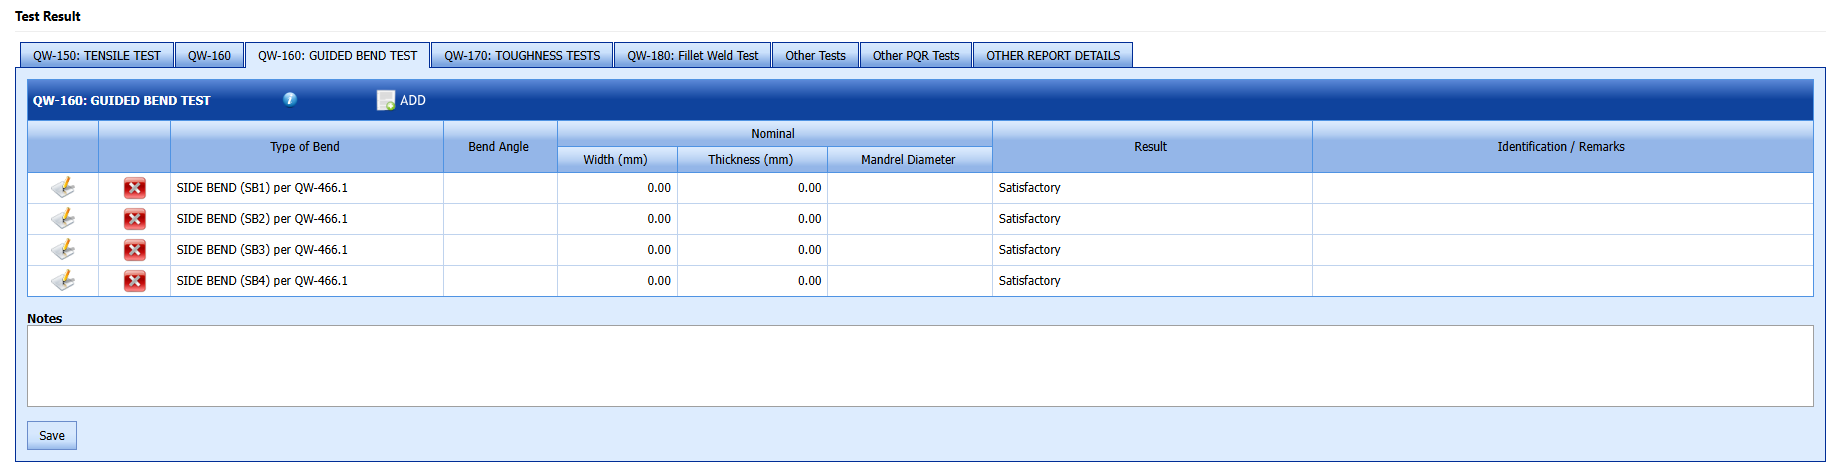

31. Enter the guided bend test details and click Update.
32. Click Save.
33. In the TOUGHNESS TESTS window, click  (ADD button).
The window opens a new box to add the toughness test details.
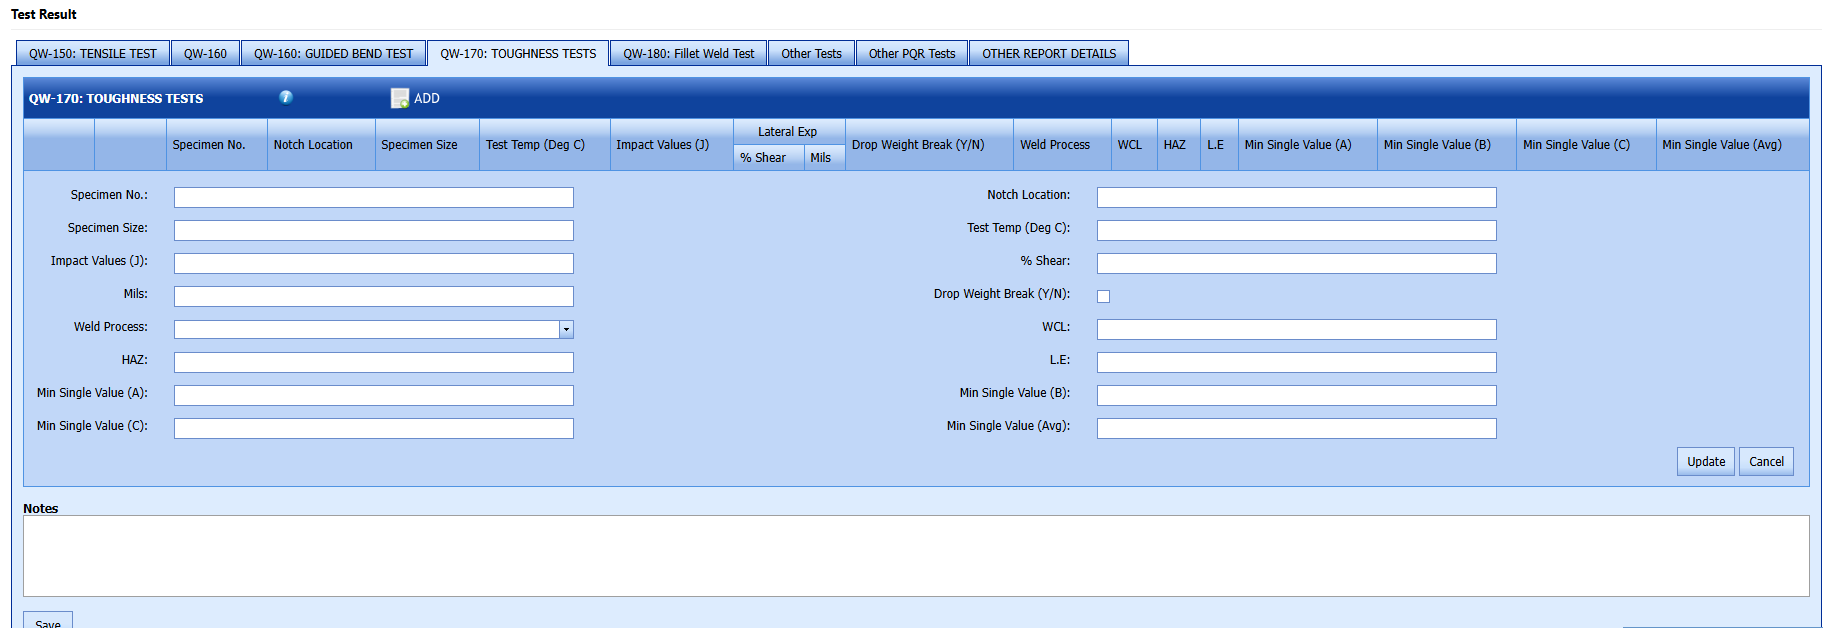
34. Enter the toughness test details and click Update.
35. Click Save.
36. In the Fillet Weld Test window, enter the details of fillet weld test.
37. Click Save.
39. In Other Tests window, enter the details of any other test you performed.
40. In the Report Details window, enter the report details.
41. Click Save All.
The PQR parameters are successfully added.
Edit a PQR
If you want to edit any existing PQR in the PQR page, do the following,
1. Click (Edit icon) in the Edit column for the respective PQR. See Fig 6.1.
The page shows the details of added PQR.
2. Click on any box where you want to edit the details, and then edit the details in the respective box.
3. Click Save.
Delete a PQR
If you want to delete any specific PQR from the list of added PQRs, you can use (Delete icon) provided in the Delete field of the PQR page. To know how to delete, see the topic, “Delete Any Client”.
Print a PQR Report
If you want to print a PQR report, click (Print icon) provided in the Print PQR column.
Attach a File into a PQR
If you want to attach any file with any PQR listed in the PQR page,
1. Click provided in the Attachment column for the respective PQR in the PQR list.
The File Upload (PQR) page opens.
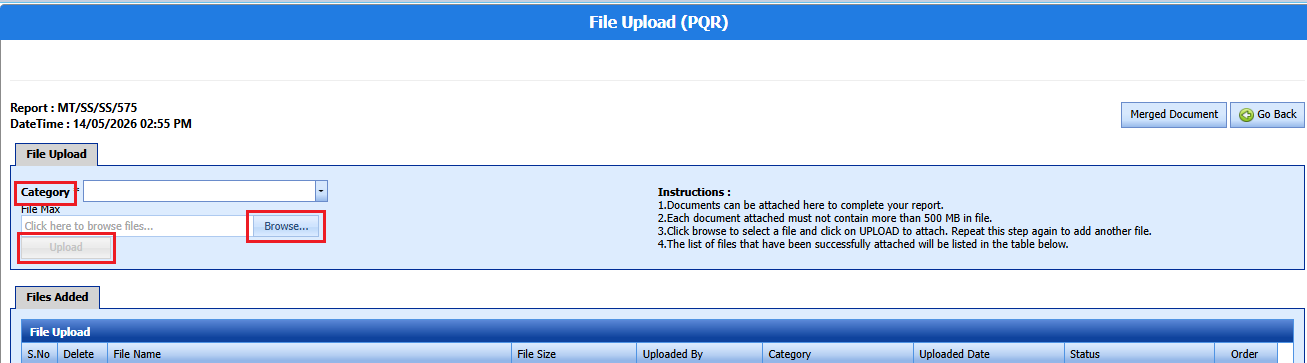
Note: Before uploading any file, read the instructions given in the File Upload (PQR) page.
2.Enter the category of the attachment.
3. Click (Browse button) to select a file to be uploaded.
4. Select any file which you want to upload, from your computer.
5 Click (Upload button) to attach the file.
The uploaded file will be displayed in the File Upload table.
Export PQRs List
You can export a list of PQRs added in the PQR page in the pdf and excel formats by using ![]() (PDF button) and
(PDF button) and
![]() (Excel button). To know how to export, see the topic, “Export Clients List”.
(Excel button). To know how to export, see the topic, “Export Clients List”.
Filter a PQR
If you want to filter any specific PQR in the PQR page, you can use  (FILTER button) provided in the PQR page.
Import Multiple PQRs
If you want to import multiple PQRs together, do the following,
1. Click  (TEMPLATE button) on the PQR See Fig 6.1.
A template will be downloaded as an excel worksheet to enter the details of PQR.
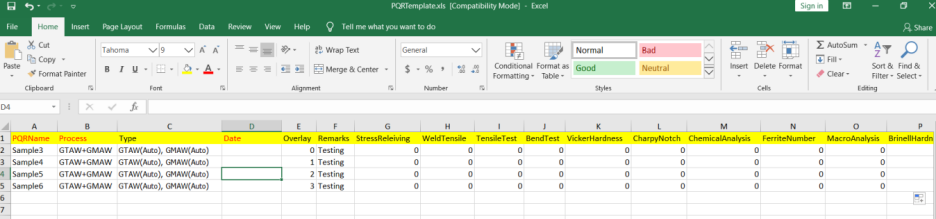
2. Enter the relevant details in the required columns on the excel worksheet.
3. Once you have added the PQR details in the excel worksheet, save the excel worksheet on your computer.
4. Click  (IMPORT button). See Fig 6.1.
A new box opens for importing the excel worksheet saved on your computer.

5. Click  (Browse button) to select the excel worksheet to be uploaded.
6. Select the excel worksheet you want to upload from your computer.
7. Click  (Upload button) to export the PQR details that are included in the excel worksheet.
The details of the PQR in the worksheet will be displayed in the PQR page.
PQR Clone
You can clone a PQR by clicking clone buttonin clone column of the PQR list screen.
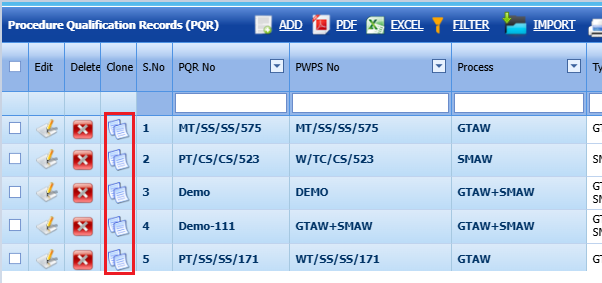
2.Do the changes if required
3 Welder Procedure Specification (WPS)
A Welding Procedure Specification (WPS) provides direction to welders and welding operators for producing sound and quality welds in accordance with code requirements. Each welder is certified through a qualification test, documented in a Welder Performance Qualification (WPQ or WQTR), which demonstrates that the welder has the required skill and ability to deposit weld metal following the specified WPS.
A WPS must be supported by a Procedure Qualification Record (PQR), which proves that the procedure can produce welds with the necessary mechanical properties. The WPQ/WQTR, on the other hand, validates the welder’s ability to follow the WPS.
The WPS in the Weld & Weld Details menu used to add the details of WPS. To navigate to WPS,
1. Click WPS in the Welding menu.
The WPS page opens.
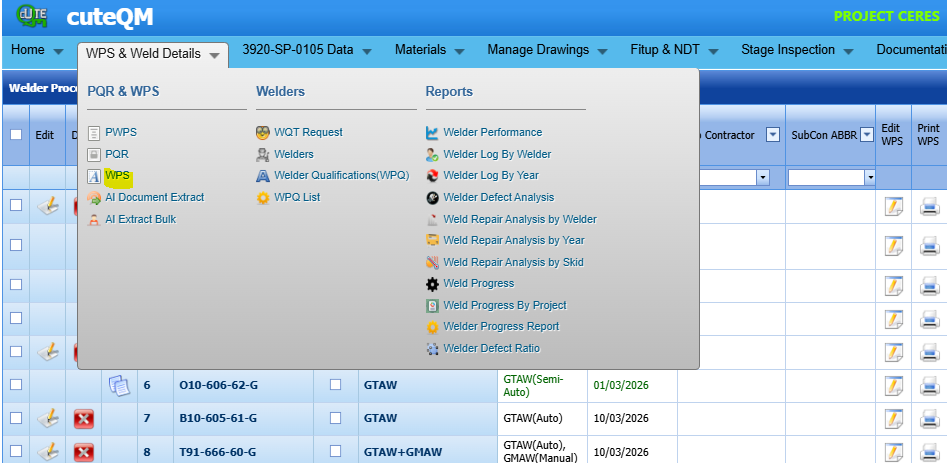
Figure 1.2: WPS page
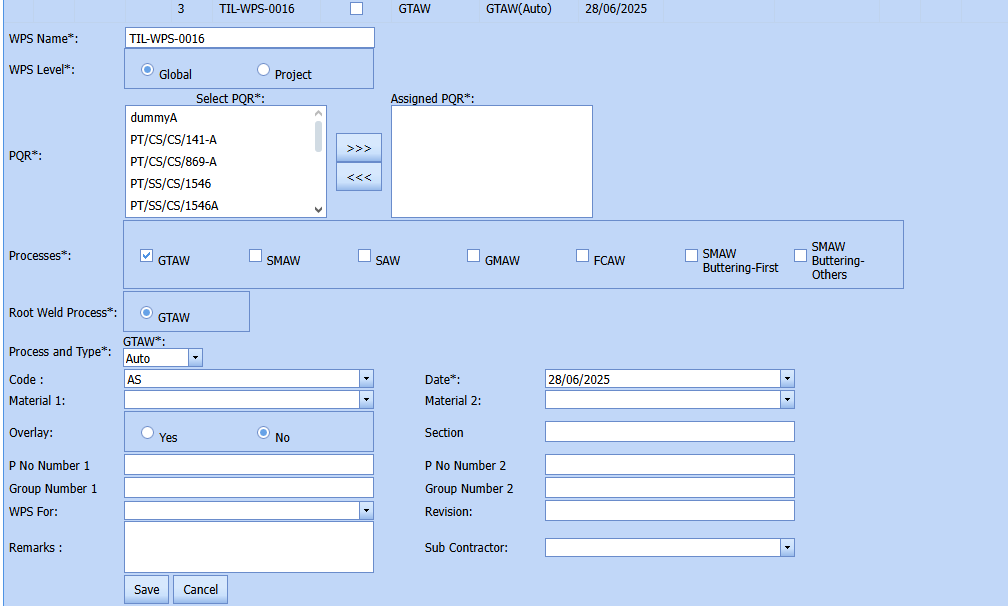
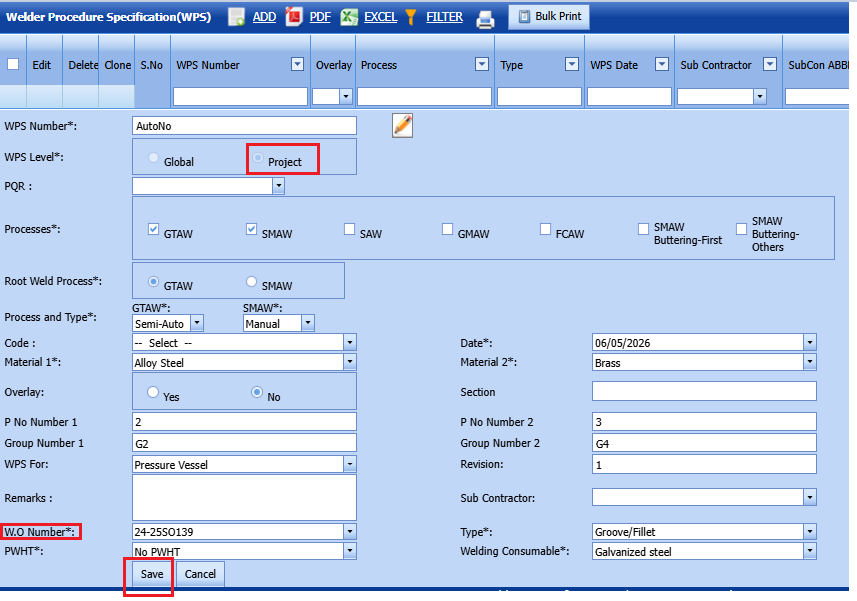
Add a WPS
If you want to add a WPS, do the following steps,
1. Click  (ADD button) in the WPS See Fig 1.2.
The page shows a new box to add the details of a WPS.
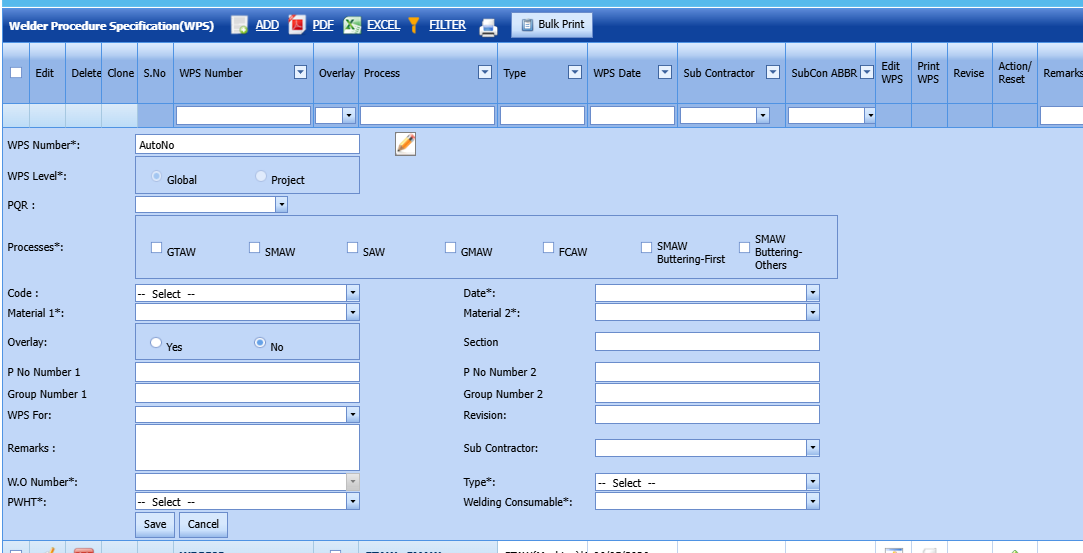
 Note: The fields notified with the symbol (*) are mandatory. You must enter the relevant details in that fields before saving.
2. In the WPS Number box, enter the name of a WPS otherwise system will auto generate wps number.
3. In the WPS Level box, select the level of WPS whether Global or Project.
4. In the PQR box, select the PQR number from a drop-down list.
5. In the Processes field, select the welding process that you want to do.
Once you have selected the weld process, the page shows the Process and Type box and Root Weld Process box for the selected welding process.

a. In the Root Weld Process box, select the root weld process type.
b. In the Process and Type box, select the type of weld process from a drop-down list.
6. In the Material 1and Material 2 boxes, select the material 1 and 2 from a drop-down list.
7. In the Overlay box, if you want to conduct the weld overlay process select Yes else select No.
8. In the Date box, select the date of adding WPS.
9. In the code box, select the appropriate code from dropdown list
10.Enter P.No 1&2
11.Enter Group Number 1&2
12.In the wps for box,select the module
13. In the Remarks box, enter your remarks if any.
14. In the subcontractor box, select the subcontractor from a drop-down list.
15.In the PWHT box, select appropriate value
16.In the Revision box,enter the revision number
17.In the Type box,select the type of the wps
18.In the welding consumable box, select the appropriate consumable from dropdown list
19. Click Save.
The WPS is successfully added and will be listed in the WPS page. Once you have added the WPS, you can add the WPS parameters.
Add WPS Parameters
To add parameters for the added WPS,
1. Click  (Edit icon) in the Edit WPS See Fig 1.2.
The page redirects you to another WPS page to add the WPS parameters.
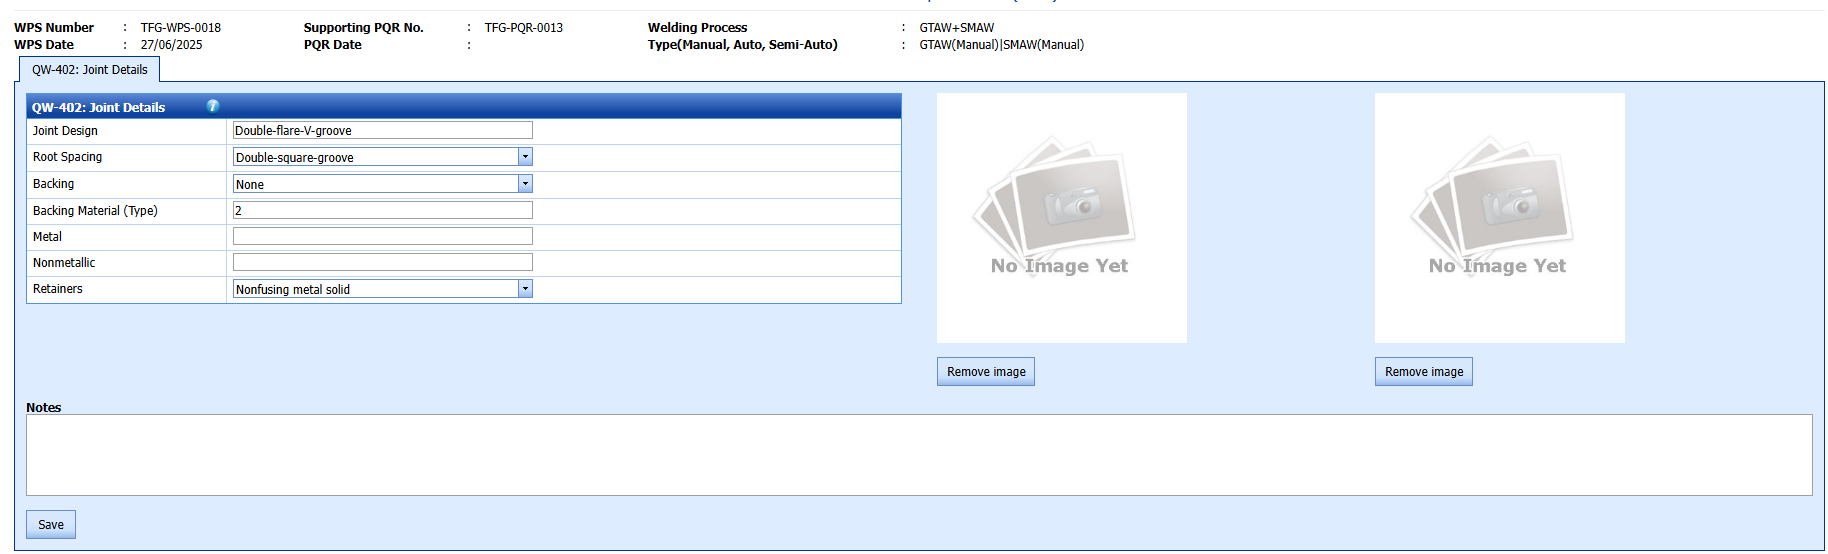

2. If you want add any image, click Browse and add the image.
3. In the Joint Details window, enter the relevant joint details the respective boxes.
4. Click Save.
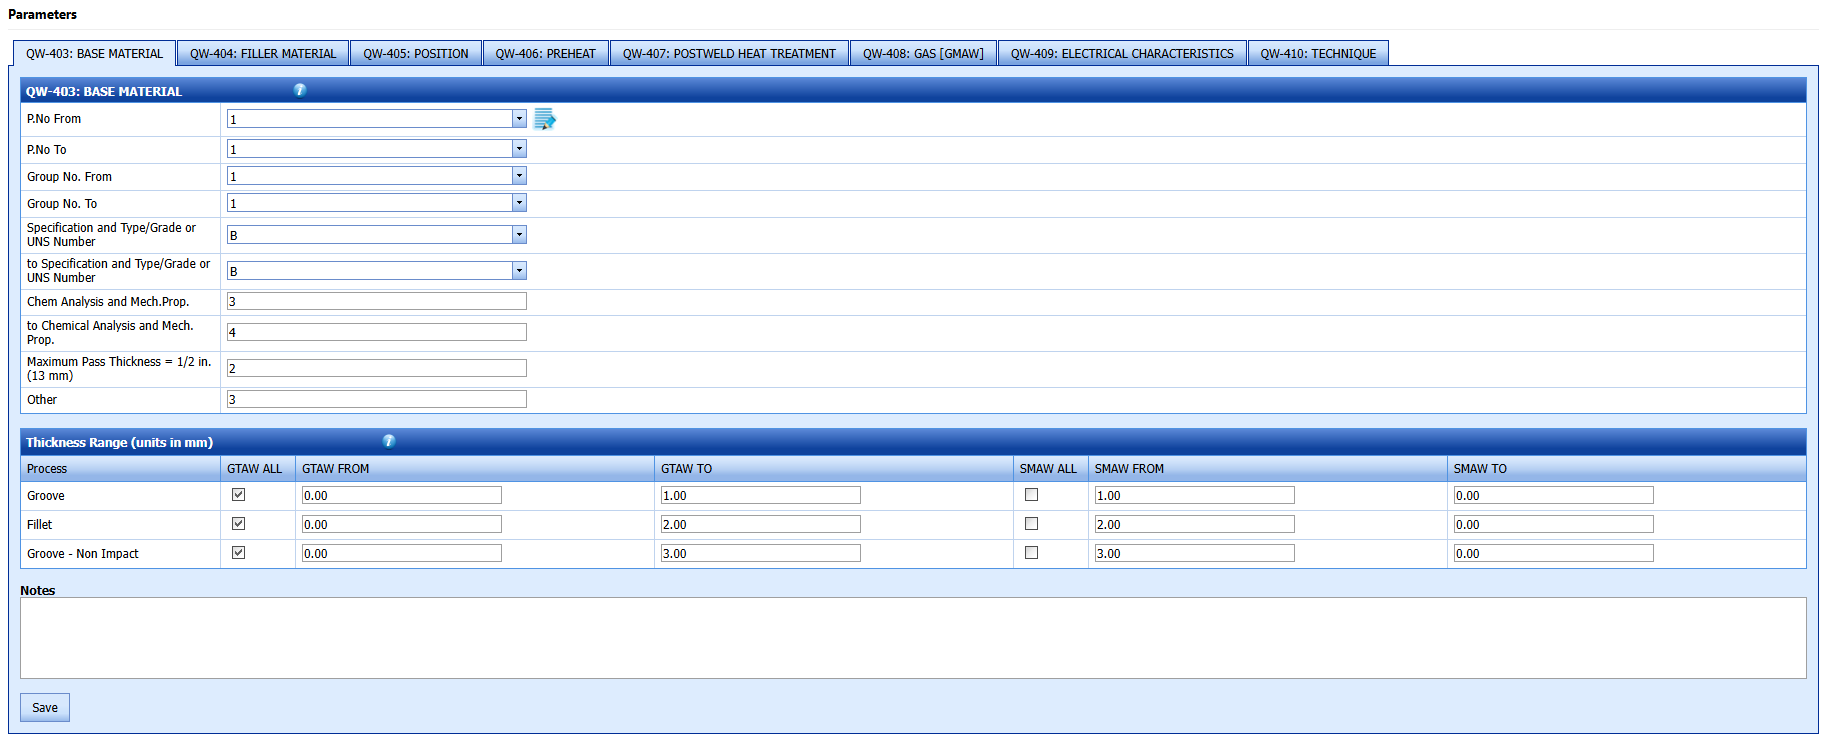
5. In the Base Material window, enter the details of material 1 and material 2.
6. In the Thickness Range box, enter the thickness range details.
7. In the Notes box, enter your notes.
8. Click Save.
9. In the Filler Material window, enter the details of filler material.
10. Click Save.
11. In the Position window, enter the position detail.
12. In the Notes box, enter your notes if any.
13. Click Save.
14. In the PREHEAT window, enter the preheat details and click Save.
15 .In the POSTWELD HEAT TREATMENT window, enter the post weld heat treatment details.
16. Click Save.
17. In the GAS (GMAW)window, enter the details of GMAW process.
18. In the GAS (GTAW)window, enter the details of GTAW process.
19. In the GAS (FCAW)window, enter the details of FCAW process.
20. In the ELECTRICAL CHARACTERISTICS window, enter the electrical characteristics.
21. Click Save.
22. In the TECHNIQUE box, enter the technique details.
23. Click Save.
24. In the WELDING PROCEDURE PARAMETERS window, click  (ADD button).
The window opens a new box to add the WPQ parameters.

25. Enter the weld parameters details and click Update.
26. In the Notes box, enter your notes if any.
27. Click Save All.
The WPS parameters are successfully added.
Edit a WPS
If you want to edit any existing WPS in the WPS page, do the following,
1. Click (Edit icon) in the Edit column for the respective WPS. See Fig 6.2.
The page shows the details of added WPS.
2. Click on any box where you want to edit the details, and then edit the details in the respective box.
3. Click Save.
Delete a WPS
If you want to delete any specific WPS from the list of added WPSs, you can use  (Delete icon) provided in the Delete field of the WPS page. To know how to delete, see the topic, “Delete Any Client”.
View a WPS Report
If you want to view a WPS report, click (Print icon) provided in the Print WPS column.
Attach a File into a WPS
If you want to attach any file with any WPS listed in the WPS page,
1. Click provided in the Attachment column for the respective WPS
The File Upload (WPS) page opens.
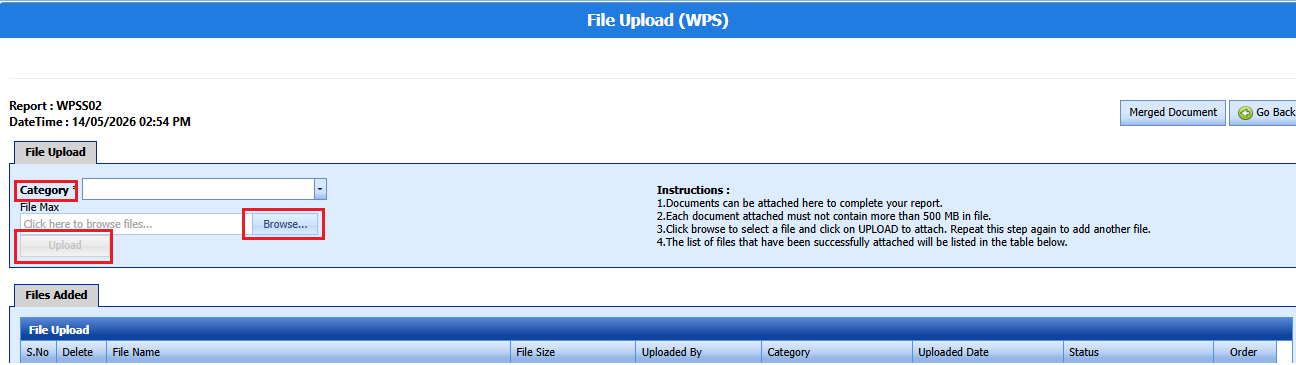
Note: Before uploading any file, read the instructions given in the File Upload (WPS) page.
2.Enter the category of the attachment.
3. Click (Browse button) to select a file to be uploaded.
4. Select any file which you want to upload, from your computer.
5. Click (Upload button) to attach the file.
The uploaded file will be displayed in the screen.
Export WPS List
You can export a list of WPSs added in the WPS page in the pdf and excel formats by using ![]() (PDF button) and
(PDF button) and ![]() (Excel button).
(Excel button).
Filter a WPS
If you want to filter any specific WPS in the WPS page, you can use  (FILTER button) provided in the WPS page.
WPS Clone
You can clone a wps by clicking clone buttonin clone column of the wps list screen.

1.Project wps can be cloned
3.Do the changes if required
4.Select the appropriate work order no
WPS Workflow
Once pwps created, it will goes to the three level approval workflow with respect to the clients.
1.After all the parameters entered, click send for approvalbutton in Action column.
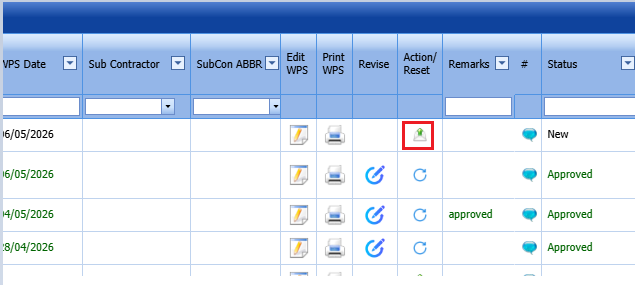
2.Once WPS send for approval, we cant edit/update/delete/attach the pwps details.
3.Reveiwer and Approver will do their approval in their dashboard screen.
4.Once the approver approves the WPS, if any modification or revision is required, click the Reset Workflow button, make the necessary changes, and then send it again for approval.
Note : The Approved wps only can be used in the welder qualification.
Import Multiple WPSs
If you want to import multiple WPSs together, do the following,
1. Click  (TEMPLATE button) on the WPS See Fig 6.2.
A template will be downloaded as an excel worksheet to enter the details of WPS.
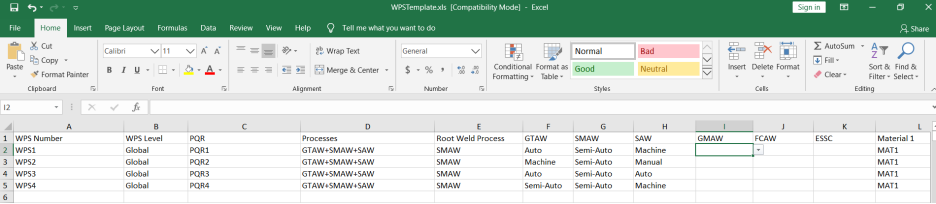
2. Enter the relevant details in the required columns on the excel worksheet.
3. Once you have added the WPS details in the excel worksheet, save the excel worksheet on your computer.
4. Click  (IMPORT button). See Fig 6.2.
A new box opens for importing the excel worksheet saved on your computer.

5. Click  (Browse button) to select the excel worksheet to be uploaded.
6. Select the excel worksheet you want to upload from your computer.
7. Click  (Upload button) to export the WPS details that are included in the excel worksheet.
The details of the WPS in the worksheet will be displayed in the WPS page.
4 AI Dodument Extract
This AI dodumnet extract helps us to capture data from pdf files of PQR/WPS and stored this in the cuteqm.
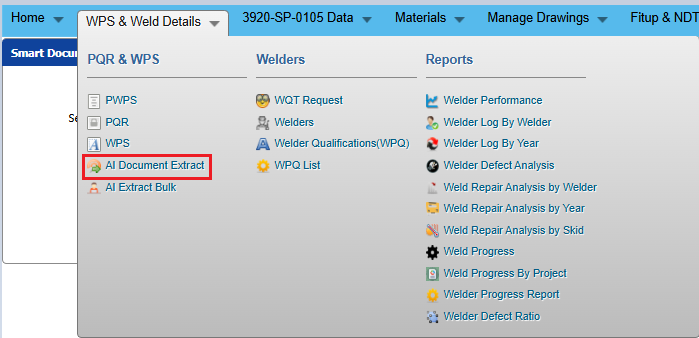
1.Click AI Document Extract menu.It redirected to new page where pdf file to be uploaded.
2.Select the type - PQR/WPS
3.Click Browse button and upload the pdf file of PQR/WPS from the local
4.Click Extract button.
5.Wait for few seconds.The pdf file will be extracted successfully.
6.Go to the PQR/WPS screen to see the extracted PQR/WPS.

5.WQT Request
It is a request raised to conduct a welding qualification test for a welder to verify whether the welder is capable of performing welding as per required codes/standards.
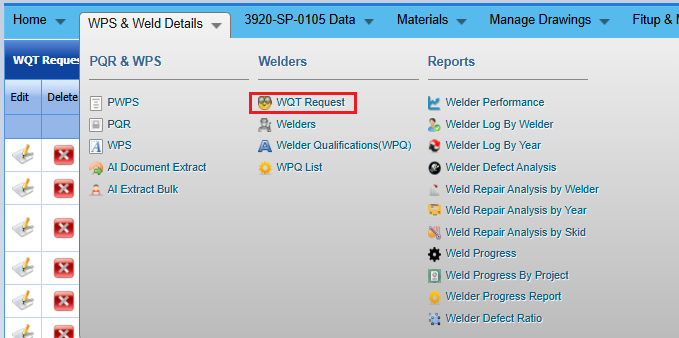
Add a WQT Request
1.Click Add icon at the top of the WQT list screen.
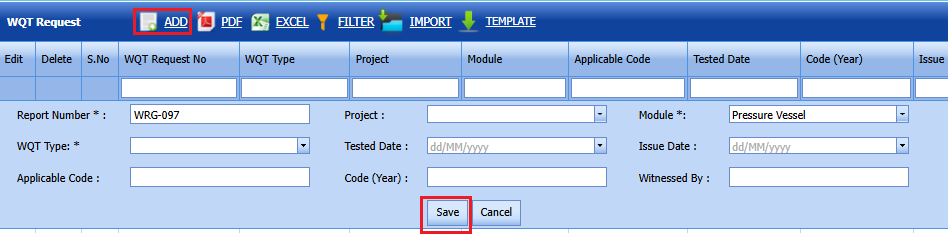
2.In the Project field,select the project number from dropdown list
3.Select the Module from dropdown list
4.WQT Type- Select fromthe dropdown list
5.Tested date- Select the date of test
6.Issues date-Select the issue date
7.Applicable code-Enter applicable code for the request
8.Code-Enter the code/year
9.Witnessed by-Enter the witness name
WQT request created successfully.
Edit WQT Request
If you want to edit any existing WQT Request , do the following,
1. Click (Edit icon) in the Edit column for the respective WQT Request.
The page shows the details of addedWQT Requests.
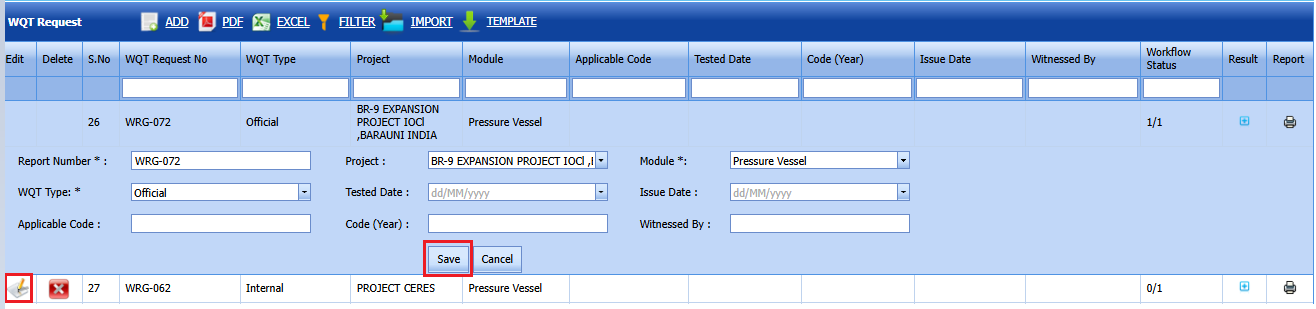
2. Click on any box where you want to edit the details, and then edit the details in the respective box.
3. Click Save.
Delete a WQT Request
If you want to delete any specific WQT from the list of added WQTs, you can use  (Delete icon) provided in the Delete field of the WQT Request page.
Attach a File into a WQT
If you want to attach any file with any WPQ listed in the WQT Request page, you can use (Attach icon) provided in the Attachment column for the respective WQT .
Export WQT List
You can export a list of WQTs added in the WQT Request page in the pdf and excel formats by using ![]() (PDF button) and
(PDF button) and ![]() (Excel button).
(Excel button).
Filter a WQT
If you want to filter any specific WQT in the WQT Request page, you can use  (FILTER button) provided in the screen.
Import Multiple WQTs
If you want to import multipleWQT's together, do the following,
1. Click  (TEMPLATE button) on the WQTrequest screen.
A template will be downloaded as an excel worksheet to enter the details of WQT .

2. Enter the relevant details in the required columns on the excel worksheet.
3. Once you have added the WQT details in the excel worksheet, save the excel worksheet on your computer.
4.Click  (IMPORT button).
A new box opens for importing the excel worksheet saved on your computer.

5. Click  (Browse button) to select the excel worksheet to be uploaded.
6. Select the excel worksheet you want to upload from your computer.
7. Click  (Upload button) to export the WQT details that are included in the excel worksheet.
The details of theWQT in the worksheet will be displayed in the WQT Request page.
Add WQT Details
Once WQT Request created, we can add WQT details against the request.
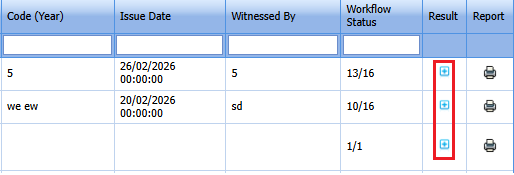
1.Click the icon in the result column to view/add the WQT details.This will redirected to new screen.
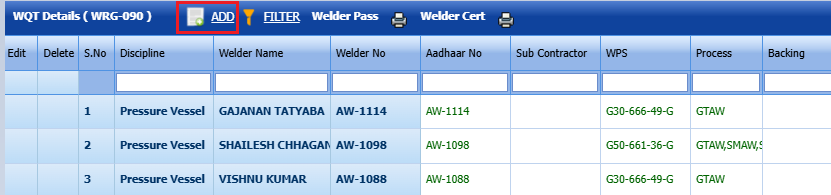
2.Click the Add icon to qualify welder details.
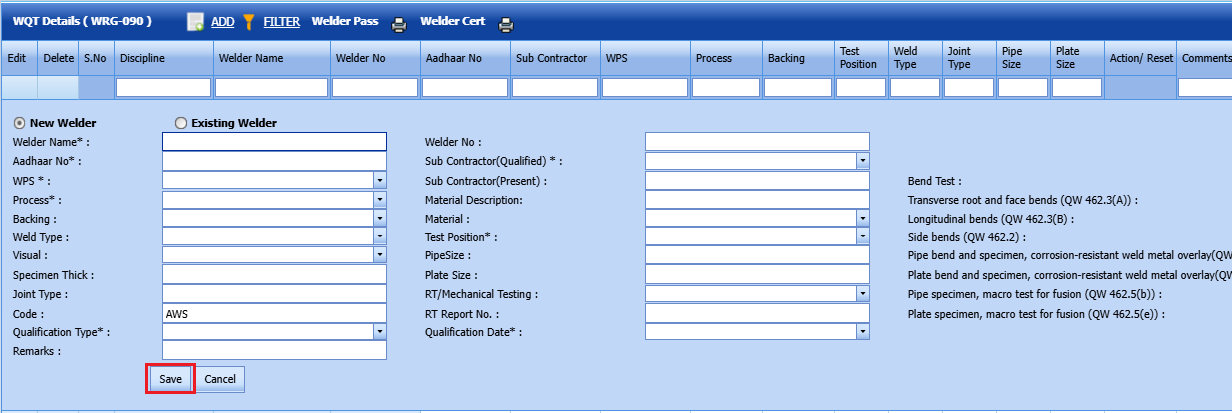
3.Select New welder or Existing welder
If New welder selected
4.Welder name-Enter the name of the welder
5.Aadhaar No-Enter aadhaar number of the welder
6.Subcontractor(Qualified)-Select the subcontractor from the dropdown list
7.WPS-Select the wps from the dropdown list
8.Process-Select the process which needs to qualify for the welder
9.Material description-Enter material description in the text box
10.Backing-Select Yes/No
11.Material-Select the material from the dropdown list
12.Weld type-Select the weld type
13.Test position-Select the position
14.Visual-Select the visual result
15.Pipe size-Enter the pipe size
16.Specimen thick-Enter the thickness
17.Plate size -Enter the size of the plate
18.Joint type -Enter joint type
19.RT/Mechanical testing -Select the result
20.Code-Enter the code
21.RT report number-Enter the RT report numer
22.Qulaification type-Select the type in the dropdown list
23.Qualification date-Select the qulaified date
24.Remarks-Enter remarks(if any)
WQT Details saved successfully.
Edit WQT Details
1.Click edit icon on the WQT details screen
2.Update the fields which needs to modify
WQT Details updated successfully.
Update welder certificate details
1.Click certificate icon on the welder certificate column of the list screen.
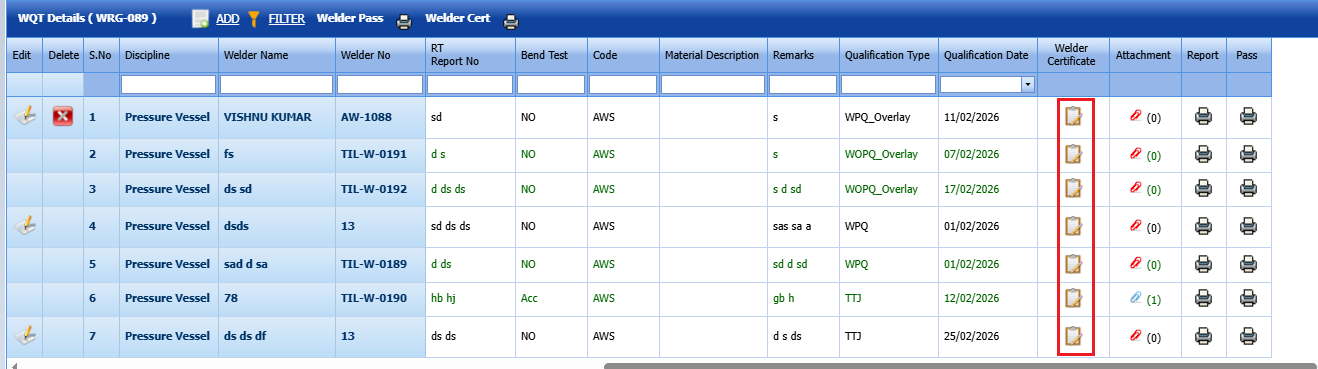
2.Fill the parameters in the welder certificate popup
Welder certificates updated successfully.
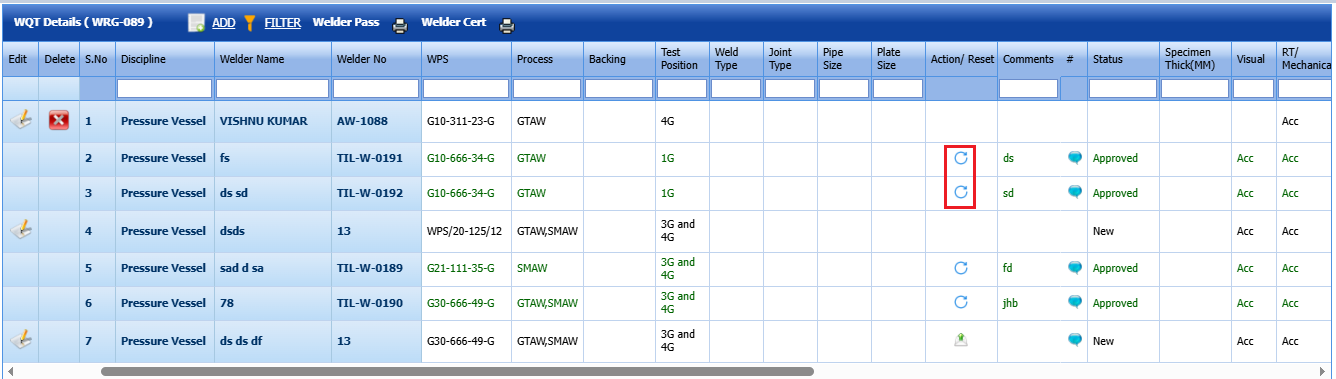
WQT Workflow
1.Once the weld result and RT results are accepted and welder certificates filled,then the workflow button will enable.
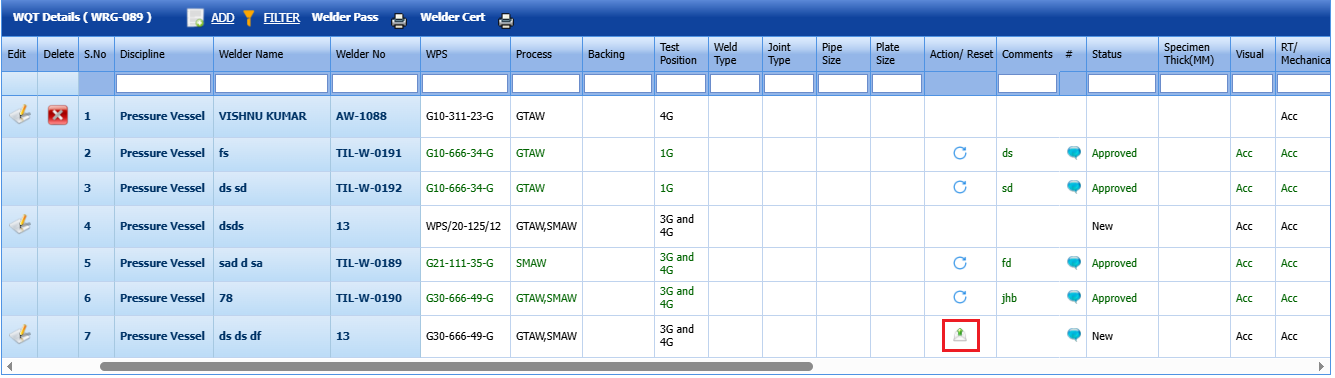
2.Click send for approval button.Once workflow button triggered,then edit/delete icons will be disappeared in the screen.
3.Reviewer and Approver will complete the workflow in their dashboard.
4.Once workflow approved, this details will be automatically saved in WPQ welder qualification screen.
5.If any modification or revision is required, click the Reset Workflow button, make the necessary changes, and then send it again for approval.
6 Welders
Welder is a person whose job is to weld materials together. This functionality has provided to add new welders who has going to work in the Pressure Vessel, and to maintain existing users.
The Welders tab in the Welding menu helps you to add the welders. To navigate to Welders,
1. Click Welders in the Welding The Welders page opens.

Figure 1.3: Welders page
Add a Welder
If you want to add a new welder, do the following steps,
1. Click  (ADD button) in the Welders See Fig 1.3.
The page shows a new box to add the details of a welder.

 Note: The fields notified with the symbol (*) are mandatory. You must enter the relevant details in that fields before saving.
2. In the Name box, enter the name of a welder.
3. In the Employee ID/Pass ID box, enter the employee id.
4. In the NRIC/Passport box, enter the NRIC/Passport number.
5. In the Nationality box, select the nationality of the welder.
6. In the Welder No/ID box, enter the welder ID number.
7. In the Welder Group box, select the welder group from a drop-down list.
8. In the Qualification Company Name box, enter the qualification company name.
9. In the Photo box, browse and attach the photo of the welder.
10. Click Save.
The welder is successfully added and will be listed in the Welders page. Once you have added the welder, you can add the certificates of the welder.
Add Certificates of Welder
To add certificates of welder,
1. Click  (Expand icon) of the respective welder. See Fig 1.3.
The Certificates window opens to add the certificates.

2. Click  (ADD button).
The window shows a box to add the certificate.

3. In the About Certificate box, enter the name of the certificate.
4. In the Certificate box, browse and attach the certificate of the welder.
5. Click Update.
The welder’s certificate is successfully added.
 Note: If you want to inactivate any welder, select the checkbox provided in the InActive column for the respective welder.
Edit a Welder
If you want to edit any existing welder in the Welders page, do the following,
1. Click  (Edit icon) in the Edit column for the respective welder. See Fig 6.3.
The page shows the details of added welder.

2. Click on any box where you want to edit the details, and then edit the details in the respective box.
3. Click Save.
Delete a Welder
If you want to delete any specific welder from the list of added welders, you can use  (Delete icon) provided in the Delete field of the Welders page.
View a Welder Log
If you want to view a Welder log, click (Print icon) provided in the Welder Log column.
Export Welders List
You can export a list of welders added in the Welders page in the pdf and excel formats by using ![]() (PDF button) and
(PDF button) and
![]() (Excel button).
(Excel button).
Filter a Welder
If you want to filter any specific welder in the Welders page, you can use  (FILTER button) provided in the Welders page. See Fig 1.3.
Import Multiple Welders
If you want to import multiple welders together, do the following,
1. Click  (TEMPLATE button) on the Welders See Fig 1.3.
A template will be downloaded as an excel worksheet to enter the details of welders.
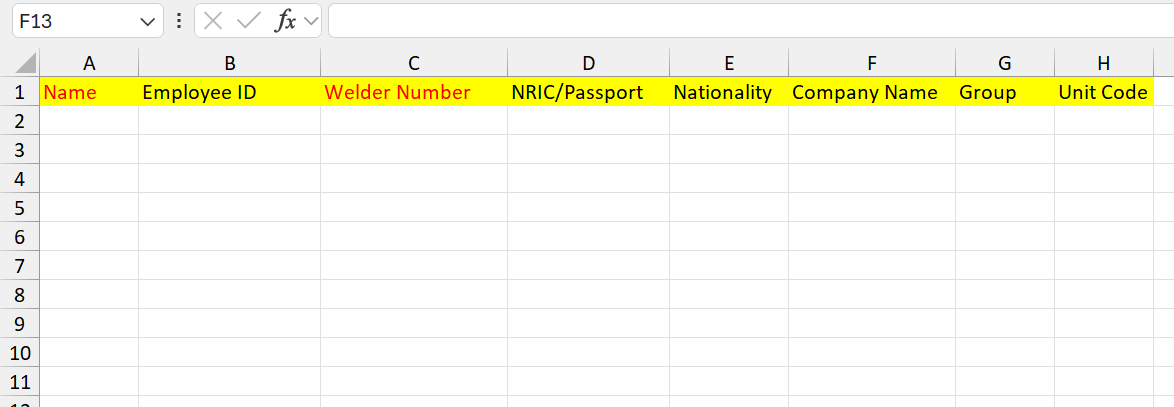
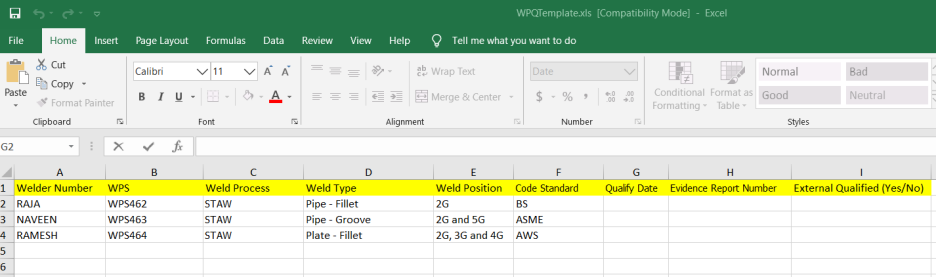
2. Enter the relevant details in the required columns on the excel worksheet. Red color highlighted Name and Welder Number are mandatory.
3. Once you have added the welder details in the excel worksheet, save the excel worksheet on your computer.
4. Click  (IMPORT button). See Fig 6.3.
A new box opens for importing the excel worksheet saved on your computer.
5. Click  (Browse button) to select the excel worksheet to be uploaded.
6. Select the excel worksheet you want to upload from your computer.
7. Click  (Upload button) to export the welder details that are included in the excel worksheet.
The details of the welder in the worksheet will be displayed in the Welders page.
7 Welder Qualification (WPQ)
A Welder Qualification Test (WQT) is the process of verifying and certifying a welder’s ability to produce welds that meet prescribed quality and code requirements.
The WQT tab in the Welding menu used to add the WQT details of the welder. To navigate to the WQT,
1. Click WQT in the Welding menu.
The Welder Qualification page opens.

Figure 1.4: Welder Qualification page
|
The welder qualification data in Yellow color shows that the welder qualification data are about to expire within 15 days. So, you must requalify the welder. The welder qualification data in Red color shows that the welder qualification data has expired. So, you must requalify the welder. To know how to requalify the welder, see the topic, “Requalify the Added WPQ of Welder”. |
Add a WPQ
If you want to add working qualifications test details of for any added welder, do the following steps,
1. Click  (ADD button) in the Welders See Fig 1.4.
The page shows a new box to add the qualification details of a welder.
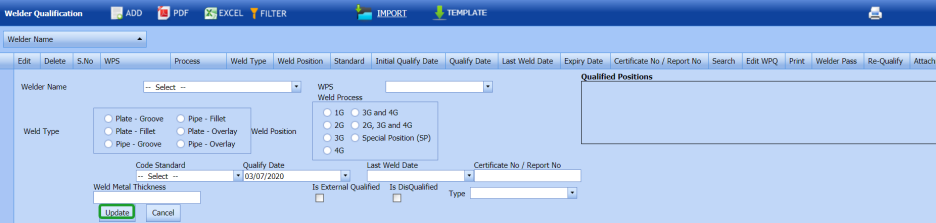
2. In the Welder Name box, select the welder name from a drop-down list.
3. In the WPS Weld Process box, select the WPS weld process from a drop-down list.
4. In the Qualified Positions box, enter the detail of qualified positions.
5. In the Weld Type box, select a weld type from the given weld types.
6. In the Weld Position box, select a weld position from the given weld positions.
7. In the Code Standard box, select the code standard from a drop-down list.
8. In the Qualify Date box, select the qualified date.
9. In the Last Weld Date box, select the last weld date.
10. In the Certificate No/Report Number box, enter the certificate/ report number.
11. If the welder is external qualified, select the checkbox of the External Qualified
12. If the welder is disqualified, select the checkbox of the Disqualified
13. Click Update.
The qualification of the welder is successfully updated. Once you have added welder qualification, you can add the WPQ search parameters and WPQ details of the welder.
Add WPQ Parameters
To add the WPQ search parameters,
1. Click (Edit icon) in the Search See Fig 1.4.
The WPQ Search Parameters window opens.

2. In the Backing column, enter the backing detail whether true or false.
3. In the No column, enter the pipe number.
4. In the No column, enter the fillet number.
5. In the Weld Metal Thk column, enter the groove and fillet thickness.
6. In the Position column, enter the position detail of pipe and fillet.
7. Click Save.
The WPQ search parameters are successfully added.
Add WPQ Details
To add WPQ details,
1. Click (Edit icon) in the Edit WPQ column of the respective welder. See Fig 1.4.
The WPQ page opens.
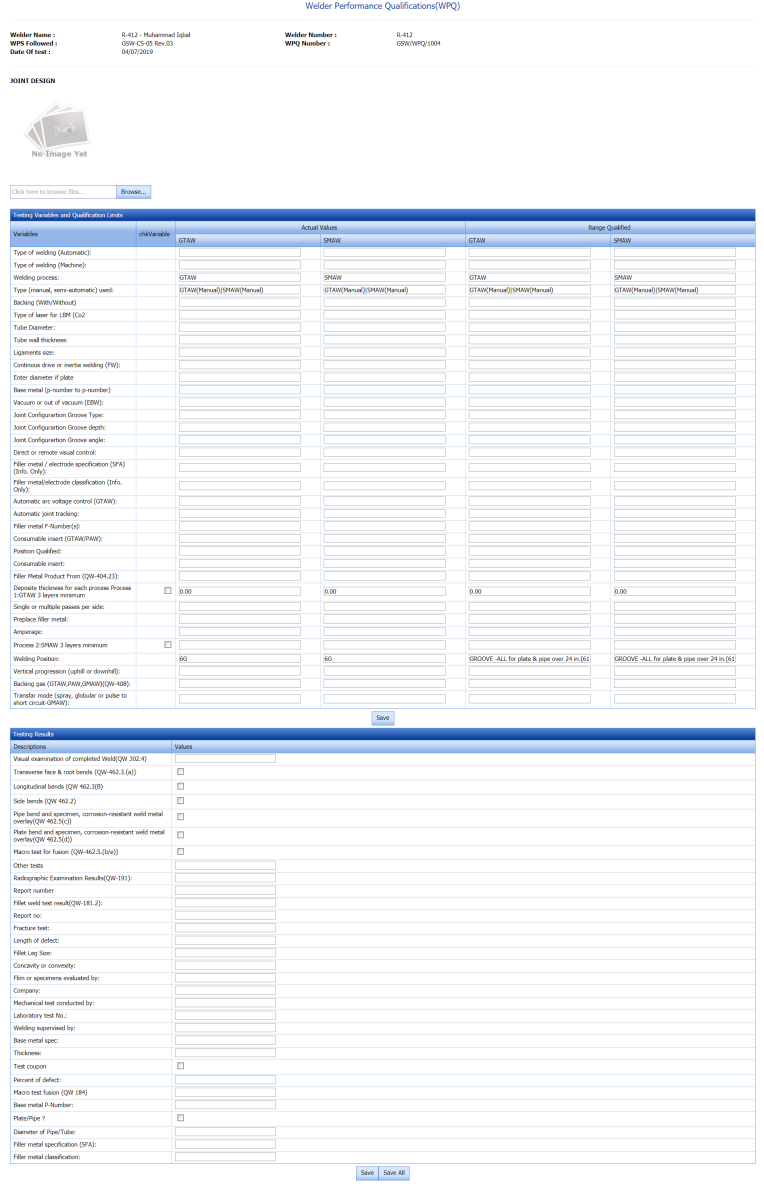
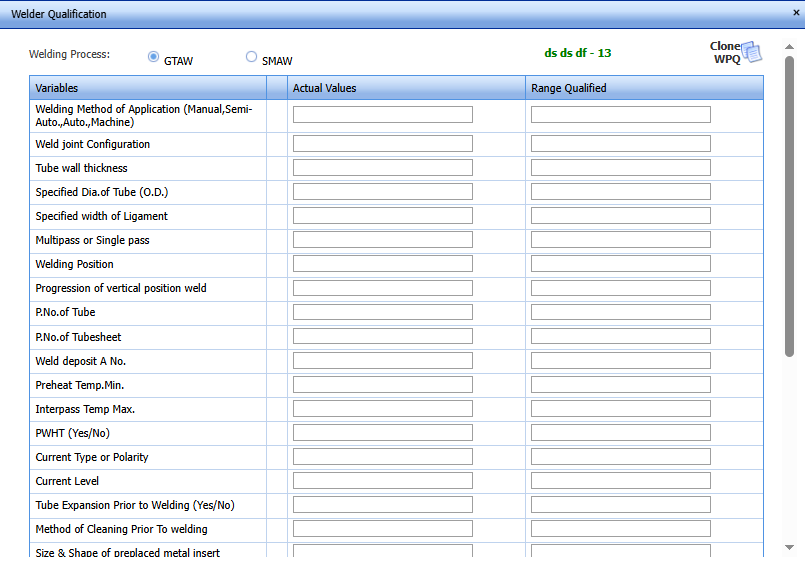
2. In the Testing Variables and Qualification Limits window, enter the testing variables and qualification limits values in the respective boxes.
 Note: The Testing Variables and Qualification Limits window has Actual Values and Range Qualified columns. The Actual Values column shows the values, which you have entered. The Range Qualified column shows the values, which are calculated based on the pre-defined criteria.
3. In the Testing Results field, enter the testing results details.
4. Click Save All.
The WPQ details are successfully added.
Requalify the Added WPQ of Welder
If the added welder qualification details have expired, you can re-qualify the welder by using this Re-Qualify option.
1. Click  (Add icon) of the respective welder.
The window shows the welding history of the respective welder if there are any welds done by welder.
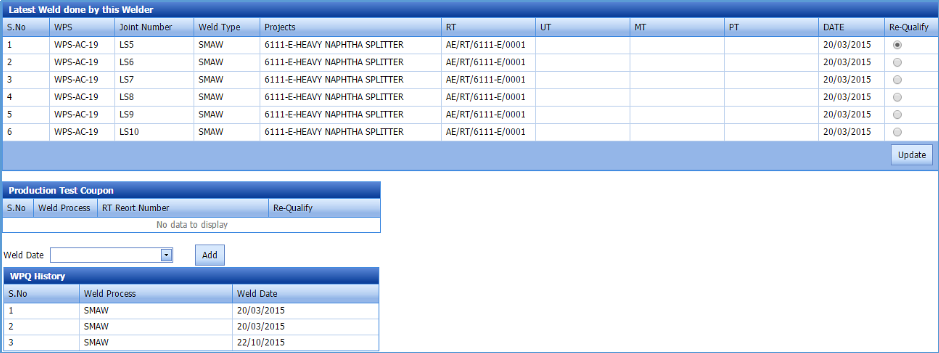
2. To requalify the welder’s certificate using latest weld done by this welder,
b. Select the welds you want to requalify.
c. Click Update.
The system requalifies the welder and updates the date and changes the requalified welder’s row from Red color to White color.
3. To requalify the welderusing production test coupen.
4. To requalify the welder’s certificate manually enter the weld date and click Add.
a. In the Weld Date box, select the weld date.
b. Click (Add button).
Now, the welder will be requalified, and the system automatically changes the requalified welder`s row from Red color to White color.
Auto requalification
We shall configure the auto requalification using welds performed and this will be sent in an email prior to automatically requalifying the welder.
Edit a WPQ
If you want to edit any existing welder qualification in the Welder Qualification page, do the following,
1. Click (Edit icon) in the Edit column for the respective welder qualification. See Fig 6.4.
The page shows the details of added welder qualification.

2. Click on any box where you want to edit the details, and then edit the details in the respective box.
3. Click Save.
Delete a WPQ
If you want to delete any specific WPQ from the list of added WPQs, you can use (Delete icon) provided in the Delete field of the Welder Qualification page. To know how to delete, see the topic, “Delete Any Client”.
View a Welder Pass
If you want to view a welder pass, click  (Print icon) provided in the Welder Pass column.
View a WPQ Report
If you want to view a WPQ report, click (Print icon) provided in the Print column.
Attach a File into a WPQ
If you want to attach any file with any WPQ listed in the Welder Qualification page, you can use (Attach icon) provided in the Attachment column for the respective WPQ in the Welder Qualification page.
6.4.10 Export WPQ List
You can export a list of WPQs added in the Welder Qualification page in the pdf and excel formats by using ![]() (PDF button) and
(PDF button) and ![]() (Excel button). T
(Excel button). T
6.4.11 Filter a WPQ
If you want to filter any specific WPQ in the Welder Qualification page, you can use (FILTER button) provided in the Welder Qualification page. See Fig 1.4.
6.4.12 Import Multiple WPQs
If you want to import multiple welder qualifications together, do the following,
1. Click (TEMPLATE button) on the Welders See Fig 1.4.
A template will be downloaded as an excel worksheet to enter the details of welders qualifications.
2. Enter the relevant details in the required columns on the excel worksheet.
3. Once you have added the WPQ details in the excel worksheet, save the excel worksheet on your computer.
4.Click (IMPORT button). See Fig 1.4.
A new box opens for importing the excel worksheet saved on your computer.
5. Click (Browse button) to select the excel worksheet to be uploaded.
6. Select the excel worksheet you want to upload from your computer.
7. Click (Upload button) to export the welder details that are included in the excel worksheet.
The details of the welder qualification in the worksheet will be displayed in the Welder Qualification page.
View a Welder Registration and Tracking Record
If you want to view a welder registration and tracking record, click  (Print icon) provided in the upper side of the Welder Qualification page.
8 WPS in Projects
The WPS in Project tab in the Welding menu helps you to add a WPS report and assign the WPS to a project.
1. Click WPS in Project tab in the Welding menu.
The WPS by projects page opens with two fields such as WPS Summary and Assign WPS to Project.
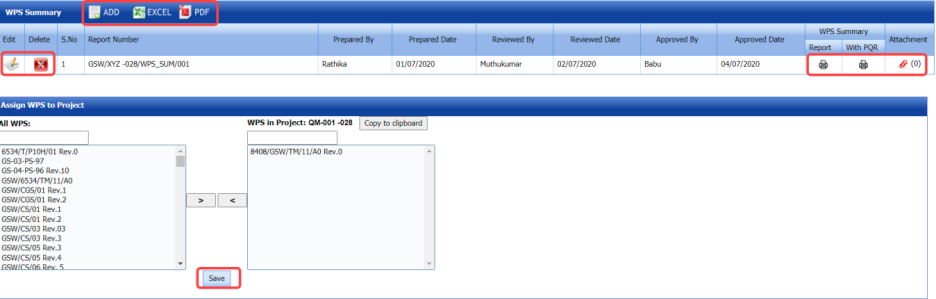
Figure 6.5: WPS in projects page
8.1 Add a WPS Report
If you want to add a new WPS report, do the following,
1. Click  (ADD button) in the WPS Summary See Fig 6.5.
A new box opens to add a WPS report.

 Tip: A report number for a new WPS report will be updated automatically in the Report Number box. If you want to change the report number, you can change.
2. In the Prepared By box, enter the name of a person who has prepared the WPS report.
3. In the Reviewed By box, enter the name of a person who has reviewed the WPS report.
4. In the Approved By box, enter the name of a person who has approved the WPS report.
5. In the Prepared Date box, choose the prepared date of the WPS report.
6 .In the Reviewed Date box, choose the reviewed date of the WPS report.
7. In the Approved Date box, choose the approved date of the WPS report.
8. Click Save.
The WPS report is successfully added.
8.2 View a WPS Summary Report
If you want to view a WPS summary report, click  (Print icon) provided in the WPS Summary Report column.
8.3 View a WPS Summary Report with PQR
If you want to view a WPS summary report with PQR, click (Print icon) provided in the WPS Summary with PQR column.
8.4 Attach a File into a WPS Summary Report
If you want to attach any file with any WPS summary report listed in the WPS Summary window, you can use  (Attach icon) provided in the Attachment column for the respective WPS summary report. To know how to attach, see the topic, “Attach a file into a PQR”.
8.5 Export WPS Summary Reports List
You can export a list of WPS summary reports added in the WPS Summary window in the pdf and excel formats by using
![]() (PDF button) and
(PDF button) and ![]() (Excel button). To know how to export, see the topic, “Export Clients List”.
(Excel button). To know how to export, see the topic, “Export Clients List”.
8.6 Assign WPS to Any Project
The Assign WPS to Project field in the WPS in projects page allows you to assign the WPS to the project. If you want to assign any WPS to the project, do the following,
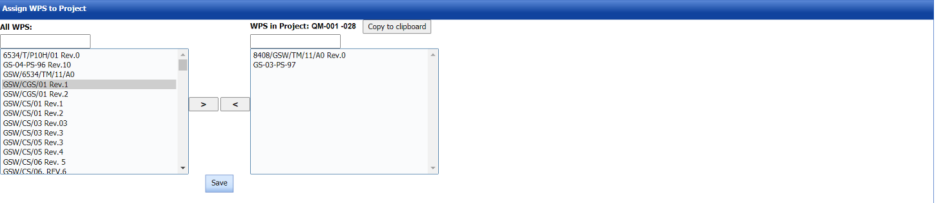
In the Assign WPS to Project field, the All WPS box displays a list of available WPS. The WPS in Project box displays a list of WPS that has been already assigned for the project.
1. If you want to assign any WPS for the project, select the respective WPS in the ALL WPS box, and then click 
(Assign welder button).
2. Click Save.
3. If you want to reject any WPS that has been assigned for the project, select the respective WPS in the WPS in Project box, and then click  (Reject welder button).
9 Welders in Projects
The Welders in Projects tab in the Welding menu helps you to assign welders for a project. You can add a welder report by using this tab. This tab also helps you to view a welder list.
1. Click Welders in Projects tab in Welding
The welders in projects page opens with four fields such as Welder Report, Assign Welder to Project, and Welder List.
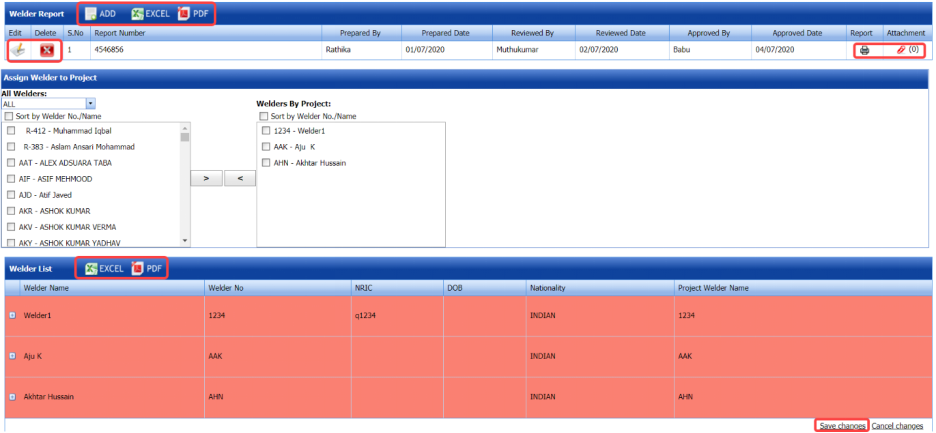
Figure 6.6: Welders in project page
9.1 Add a Welder Report
If you want to add a welder report, do the following steps,
1. Click  (ADD button) in the Welder Report See Fig 6.6.
A new box opens to add a welder report.

 Tip: A report number for a new welder report will be updated automatically in the Report Number box.
2. In the Prepared By box, enter the name of welder who has prepared the welder report.
3. In the Received By box, enter the name of welder who has received the welder report.
4. In the Approved By box, enter the name of welder who has approved the welder report.
5. In the Prepared Date box, choose the prepared date of the welder report.
6. In the Received Date box, choose the received date of the welder report.
7. In the Approved Date box, choose the approved date of the welder report.
8. Click Save.
The welder report is successfully added.
9.2 View a Welder Report
If you want to view a welder report, click  (Print icon) provided in the Report column.
9.3 Attach a File into a Welder Report
If you want to attach any file with any welder report listed in the Welder Report window, you can use  (Attach icon) provided in the Attachment column for the respective welder report. To know how to attach, see the topic, “Attach a file into a PQR”.
9.4 Export Welder Reports List
You can export a list of welder reports added in the Welder Report window in the pdf and excel formats by using ![]()
(PDF button) and ![]() (Excel button). To know how to export, see the topic, “Export Clients List”.
(Excel button). To know how to export, see the topic, “Export Clients List”.
9.5 Assign Welder to Project
The Assign Welder to Project field in the welders in projects page allows you to assign any welder to the particular project. If you want to assign any welder to the project, do the following,
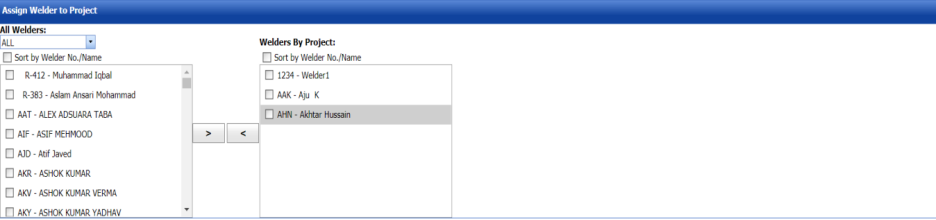
1. In the All Welders box, if you want to view all the welders, click ALL otherwise select the respective company’s welder group from a drop-down list to view their welders list.
Once you have selected the company’s welder group, the left-side box shows a list of welders. The right-side box shows a list of welders who has been already assigned for the project.
2. If you want to assign any welder for the project, select the respective welder in the left-side box, and then click 
(Assign welder button).
The selected welder will be assigned to the project.
3. If you want to reject any welder who has been assigned for the project, select the respective welder in the right-side box, and then click  (Reject welder button).
9.6 Welder List
The Welder List field in the welders in projects page shows the welder details such as welder name, welder number, NRIC, date of birth, and nationality. This field also helps you to assign the WPQs of welders to the project, and remove any WPQs from the project.

If you click (Expand icon) of the respective welder, the All WPQ box shows the details of all WPQs of the welder, and the Assigned to Project box shows any WPQ that has been assigned to a project.
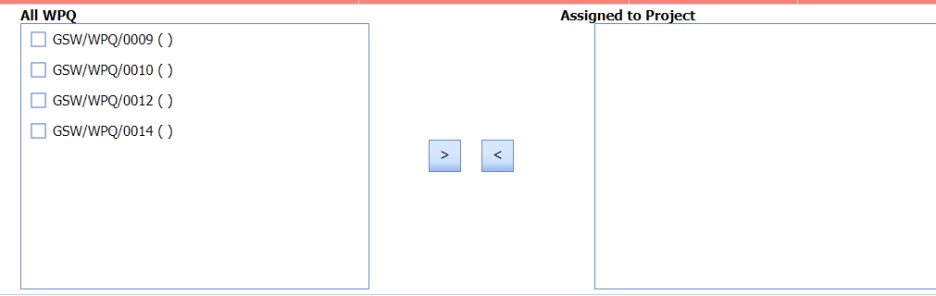
1. If you want to assign any WPQ for the project, select the respective WPQ in the All WPQ box, and then click  (Assign WPQ button).
The selected welder will be assigned to the project.
2. If you want to reject any WPQ that has been assigned for the project, select the respective WPQ in the Assigned to Project box, and then click  (Reject WPQ button).
10 Weld Map
Weld mapping is the process of assigning information to a weld joint to enable easy identification of its design (WPS), production (welders, their qualifications, date welded), quality (visual inspection, NDT) and traceability (heat numbers of materials joined & welding consumables).
The Weld Map tab in the Tag Data menu used to add a weld map.
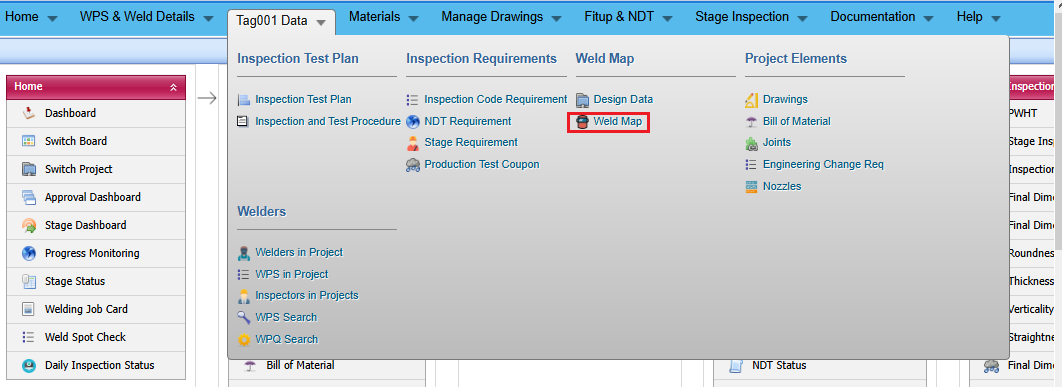
1. Click Weld Map menu
The Weld Map page opens.
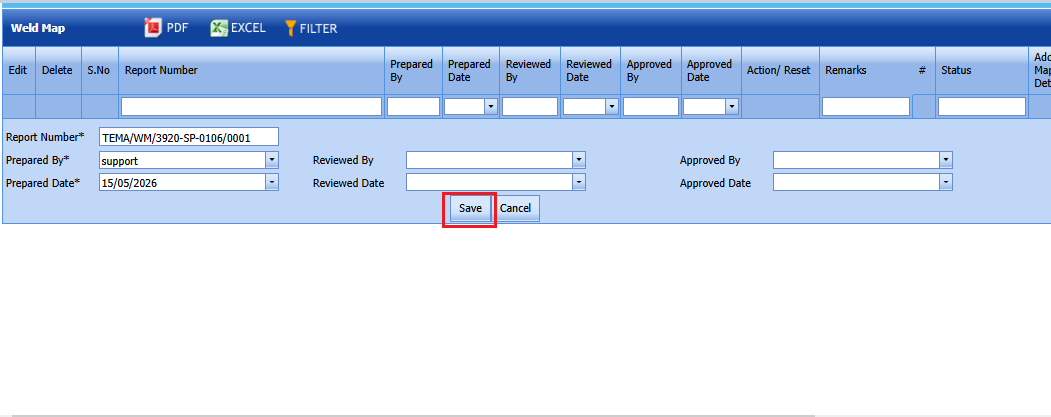
Figure 6.7: Weld Map page
10.1 Add a Weld Map
If you want to add a weld map, do the following steps,
1. Click weldmap menu See Fig 6.7.
2.An Add page will opens .
The page shows a new box to add the details of the weld map.

 Tip: A report number for a new weld map will be updated automatically in the Report Number box.
3. In the Prepared By box, enter the name of welder who has prepared the weld map.
4. In the Reviewed By box, enter the name of welder who has received the weld map.
5. In the Approved By box, enter the name of welder who has approved the weld map.
6. In the Prepared Date box, choose the prepared date of the weld map.
7. In the Reviewed Date box, choose the reviewed date of the weld map.
8. In the Approved Date box, choose the approved date of the weld map.
9. Click Save.
The weld map is successfully added.
10.2 Edit a Weld Map
If you want to edit any existing weld map in the Weld Map page, do the following,
1. Click (Edit icon) in the Edit column for the respective weld map. See Fig 6.7.
The page shows the details of added weld map.

2. Click on any box where you want to edit the details, and then edit the details in the respective box.
3. Click Save.
10.3 Attach a File into a Weld Map
If you want to attach a file with any weld map listed in the Weld Map page, you can use (Attach icon) provided in the Attachment column for the respective weld map. To know how to attach, see the topic, “Attach a file into a PWPS”.
10.4 Export Weld Maps List
You can export a list of weld maps added in the Weld Map page in the pdf and excel formats by using ![]() (PDF button) and
(PDF button) and
![]() (Excel button).
(Excel button).
10.5 Filter Any Weld Map
If you want to filter any weld map in the Weld Map page, you can use  (FILTER button) provided in the Weld Map page. See Fig 9.7. To know how to filter, see the topic, “Filter Any User Account”.
10.6.Print a Weld Map
If you want to print a weldmap then click print icon on the weldmap screen.
Weldmap print gives a clear details of the weld plan and Test plan.
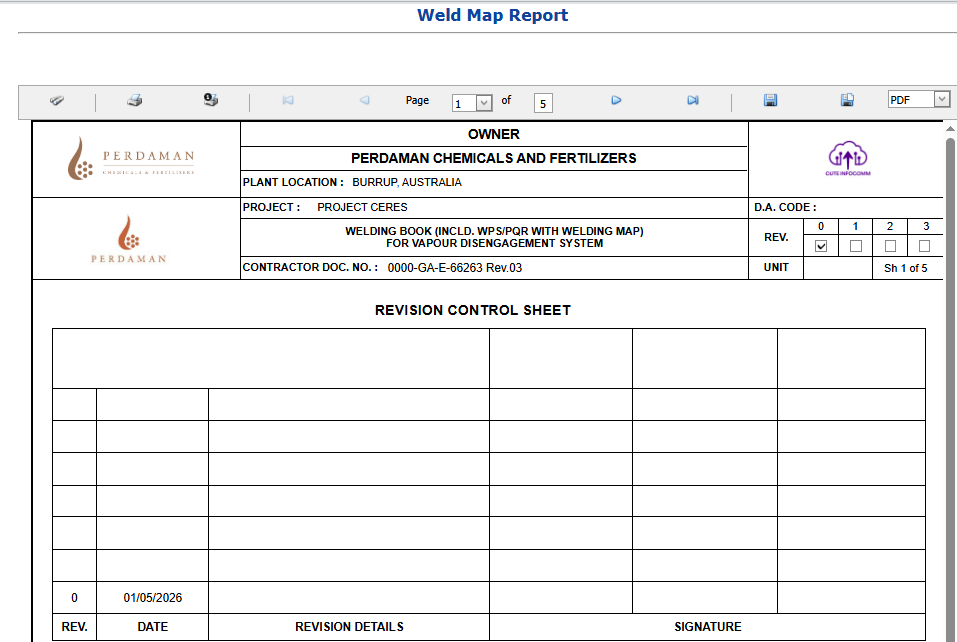
10.7 Weld Book,Weld Plan,Test Plan
Weld and Test Plan is a document detailing a systematic approach to forming a weld joint by welding two or more workpieces (metal or plastic) according to a particular geometry. A welding joint is a point or edge where two or more pieces of metal or plastic are joined together.

If you want to print weld book,weld plan and test plan, click the correcponding print button at the top as shown above.
10.8 Revise weldmap
To revise a weldmap, click Revise button placed in the revise column of the weldmap.(If workflow enabled,revise button will enable only after the workflow approval)

No Comments