
HVAC
PROJECT DATA
1. Item Master
The HVAC Switchboard menu in the cuteQM app helps you to add the Item master. Once you click the project data menu, the following tabs open Item Master
1.Click Project Data in the menu,
The Item Master page opens.
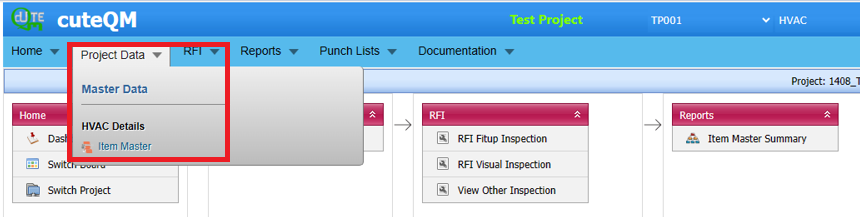
Fig 1. Item Master in HVAC Switch Board Page
1.0 Item Master
1.Click Project Data in the HVAC menu,
The Item Master opens.
Fig 1.0 Item Master Page
1.1.1 Add an Item Master
You can add the details of Item master to be used in the HVAC project by using the Items Master tab in the Project data menu. If you want to navigate to Item master,
1.Click Item Master in the Project data menu,
The Item Master page opens.
Fig 1.1.1 Add an Item Master page.
If you want to add an Item, do the following steps,
1. Click ![]() (ADD button) in the Item Master page. See Fig 1.1.1
(ADD button) in the Item Master page. See Fig 1.1.1
A new window opens to add a new Item Master.

-
 Note: The fields notified with a symbol (*) are mandatory. You must enter the relevant details in that fields before saving.
 - In the Item box, enter item number.
- Click Save.
The Item Master is successfully added and listed in the HVAC page.
1.1.2 Edit an Item
If you want to edit any existing Item master in the Item master page,

Fig 1.1.2 Edit an Item Master

- Click
 (Edit icon) of the respective Item. Fig See 1.1.2
The Item page shows the details of the selected Item.
1. Edit the details where you want.
Click Save.
Item updated successfully.
1.1.3 Delete an Item Master
-
If you want to delete any existing block in the Item page, you can use
 (Delete icon) provided in the Item page. By click confirm delete
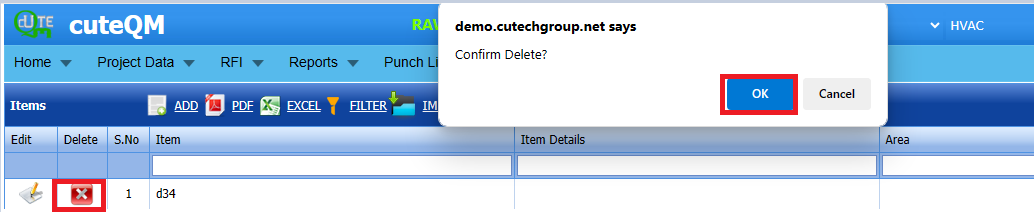
-
Click
 (Delete icon) for the corresponding area.
You receive a notification message “Confirm Delete?”.
Click OK.
-

The Item is deleted successfully.
1.1.4 Export an Item Master
You can export a list of Item added in the Item Master page in both the pdf and excel formats by using![]() (PDF button) and
(PDF button) and ![]() (Excel button). Fig See 1.1.4 page.
(Excel button). Fig See 1.1.4 page.
1.1.5 Filter an Item Master
If you want to filter any specific Item in the Item Master page, you can use ![]() (FILTER button) located on the Item page.
(FILTER button) located on the Item page.

1.1.6 Import Multiple Systems
If you want to import multiple Items together, do the following,
- Click
 (TEMPLATE button). See Fig 1.1.6
An excel worksheet will be downloaded with a predefined template to enter the details of Items.

- Enter the required Item details in the respective columns of the excel worksheet.
- Once you have added the system details in the excel worksheet, save the excel worksheet on your computer.
-
Click
 (IMPORT button). See Fig 1.1.6
A new window opens for importing the excel worksheet saved on your computer.

-
Click
 (Browse button) to select the excel worksheet to be uploaded.
 -
Select the excel worksheet you want to upload from your computer.
-
Click
  (Upload button) to export the systems that are included in the excel worksheet.
 (Upload button) to export the systems that are included in the excel worksheet.

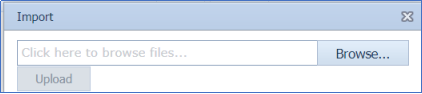
The details of the Item in the worksheet will be displayed in the Item page.
2.0 RFI

Fig 2.0 RFI page
2.1.0 RFI Fit up Inspection.
Click  (ADD button) in the RFI Fit up Inspection page.(cuteQM_Production role user only can add RFI request)
A new page opens to add an RFI Fit up List request. 

Fig 2.1.0 RFI Fit up Inspection Page
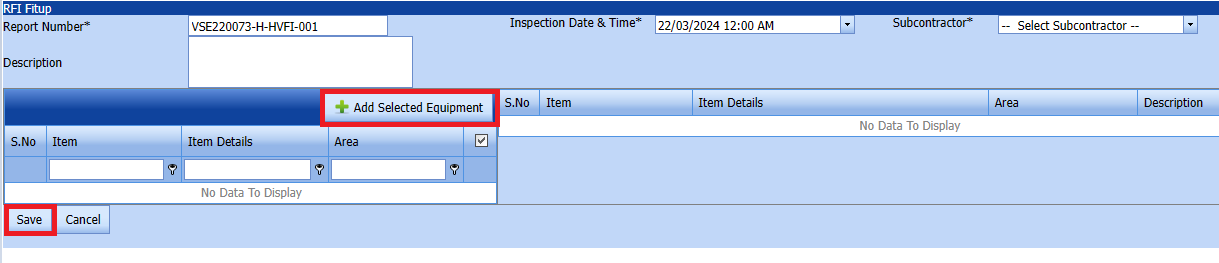
2.1.1 Add a RFI Fit up Inspection.
1.Click (ADD button) in the RFI Fit up Inspection List page.
A new page opens to add an RFI Fit up Inspection List request. 

- Click
 (ADD button) in the RFI Fit up Inspection List page.
A new page opens to add an RFI Fit up Inspection List request. 

-
In the Inspection Date and Time box, select the inspection date and time.
- In the Subcontractor box, select a subcontractor from a drop-down list.
- In the Description box, enter the description for the added RFI Fit up request.
Before saving the added RFI Fit up list, you must add items for the RFI Fit up request list request.
 Note: You can add multiple items for one request.
Click
 (Add Selected item) of the respective Item you want to add.


The added item will be moved and listed in the right side of the page.
-
 Tip: If you want to remove any added item, click
  (Remove icon) of the respective item.
 - In the Description box, enter the description for the added RFI Fit up request.
- Click Save.


The RFI Fit up list request is successfully added.
2.1.2 Edit a RFI Fit up
If you want to edit any existing RFI Fit up request in the RFI Fit up page, do the following,
Click (Edit icon) in the Edit column for the respective RFI Fit up. See Fig 2.1.2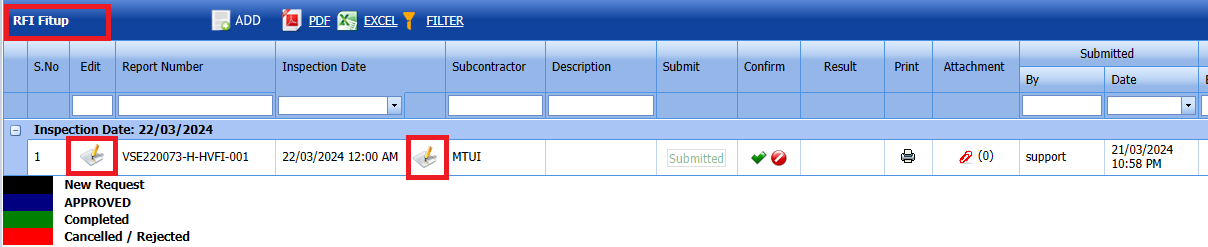
The RFI Fit up page opens with the details of the selected RFI Fit up list.
 Fig 2.1.2 Edit a RFI Fit up Page
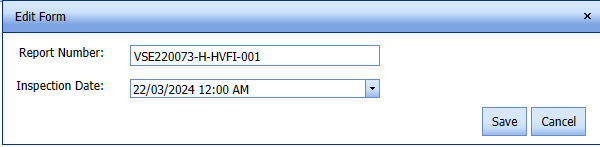
- Add/edit any item.
Click Save.Fitup inspection updated successfully.
2.1.3 Submit a RFI Fit up.
Once you have added the RFI Fit up request, the Submission column in the RFI Fit up page is appeared with (Submit and Reject icons). See Fig 2.1.5
 Fig 2.1.3 Submit & Approve a RFI Fit up Page
-
If you want to submit the RFI Fit up list, click
 (Submit icon) in the Submit column. Otherwise click
  (Reject icon) to reject the request.
Once you have submitted the RFI Fit up list request, in the Confirm Status column in the RFI Fit up List page is appeared with
 (Confirm and Reject icons).


The submitted request will be moved to for inspection.
2.1.4 Approve RFI Fit up
cuteQM_Licensee_QA user only can approve the RFI request.
- If you want to approve the RFI Fit up request, click
 (confirm icon) in the Confirm Status Otherwise click
  (Reject icon) to reject the request.
2. Once RFI Fit up list icon will be enabled to put result.

3. Click icon  result popup will open.

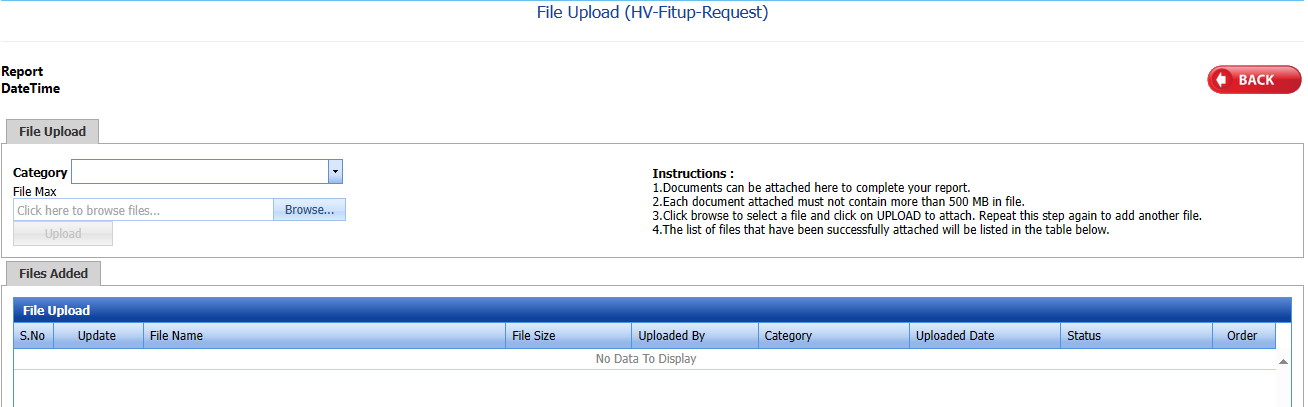
Fig 2.1.4 Approve RFI Fit up Result Page
- Click Save
- RFI result is updated successfully.
- If RFI Accepts with comments given as result then punch list will be created, and this will be shown in view punch list screen.
- If need to upload documents against item part, then click attachment icon at the result popup and upload documents.


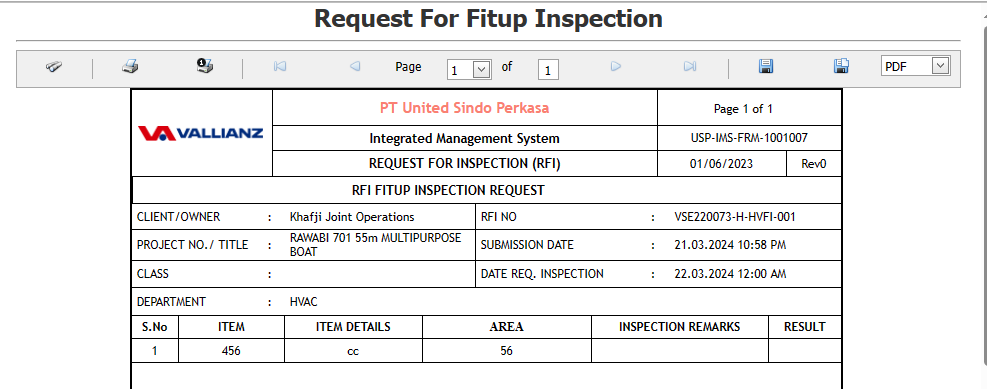
2.1.5 Print RFI Fit up
If you want to print an RFI Fit up, click  (print icon) provided in the Report column of the RFI Fit up List.
In the print, user can see the signature of both the production user and QC . Requestor signature mapped with Production and Inspector signature mapped with QC
Click here to find the steps to upload Digital signature

Fig 2.1.5 Print a RFI fit up Inspection Page.
2.1.6 Attach a File into a RFI Fit up
If you want to attach a file with any existing RFI Fit up listed in the RFI Fit up page, you can attach the file by using  (Attach icon) in the Attachment column.

A new window opens for file upload.
In the category box, select the category from drop-down list.
Select Browse and upload the documents. 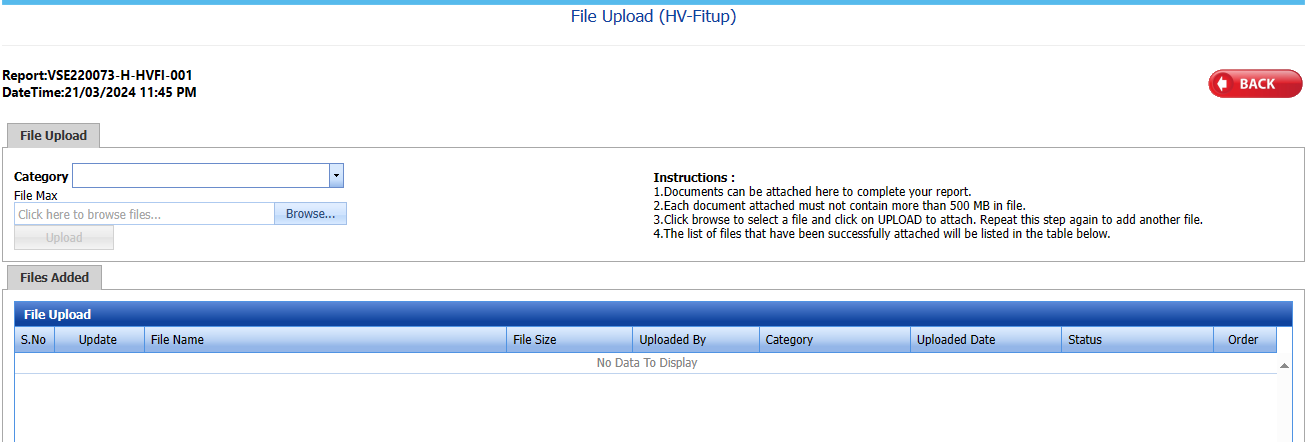
2.1.7 Export a RFI Fit up
You can export a list of RFI added in the RFI Fit up page in both the pdf and excel formats by using  (PDF button) and
  (Excel button).
Fig 2.1.7 Export a RFI Fit up Page.
2.1.8 Filter a RFI Fit up
If you want to filter any specific RFI in the RFI Fit up page
 , Fig 2.1.8 Filter a RFI Fit up Page
- you can use the filter box provided in the upper side of the RFI Fit up to filter the any specific RFI Fit up and request, select the Report Number, Inspection Date, Subcontractor and Date in the boxes and click.
- you can use
 (FILTER button) located on the RFI Fit up.
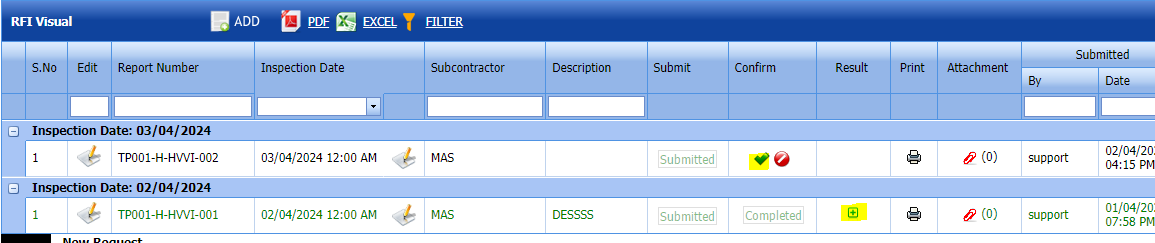
2.2.0 RFI Visual Inspection
Click RFI Visual Inspection in the RFI menu.
The RFI Visual Inspection page opens. 
Fig 2.2.0 RFI Visual Inspection Page
2.2.1 Add a RFI Visual Inspection
If you want to add an RFI Visual Inspection request, do the following,
Fig 2.2.1 Add a RFI Visual Inspection Page
- Click (ADD button) in the RFI Visual page.
A new page opens to add an RFI Visual request.


- In the Subcontractor box, select the name of a sub-contractor from a drop-down list.
- In the Inspection Date & Time box, select the date of inspection
-
In the Description box, enter the description for the inspection.
-
Click the check box of the respective frames.
-
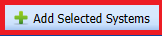
Click
 (Add Selected Equipment button).
 - In the WPS Number box, select from the drop- down list.
-
Click 
 Welder details to add Welder details.
A new page opens to add Welder-Weld Layer Weld Process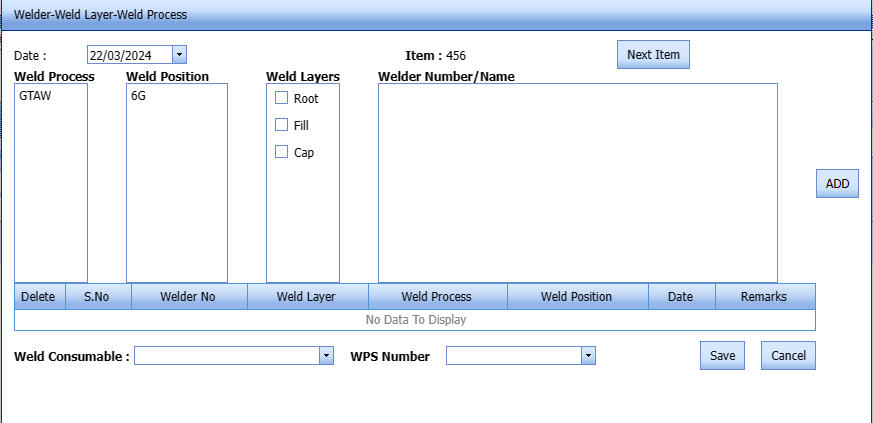
In the WPS Number box, select the WPS Number from the given drop-down list.
In the Welder Layers box select the welder layers.
In the Weld Consumable box, select the weld consumable from the given drop-down list.
Click Save.


2.2.2 Edit a RFI Visual
If you want to edit any existing RFI Fit up request in the RFI visual page, do the following,
Click (Edit icon) in the Edit column for the respective RFI visual. See Fig 2.2.2

The RFI visual page opens with the details of the selected RFI visual list.
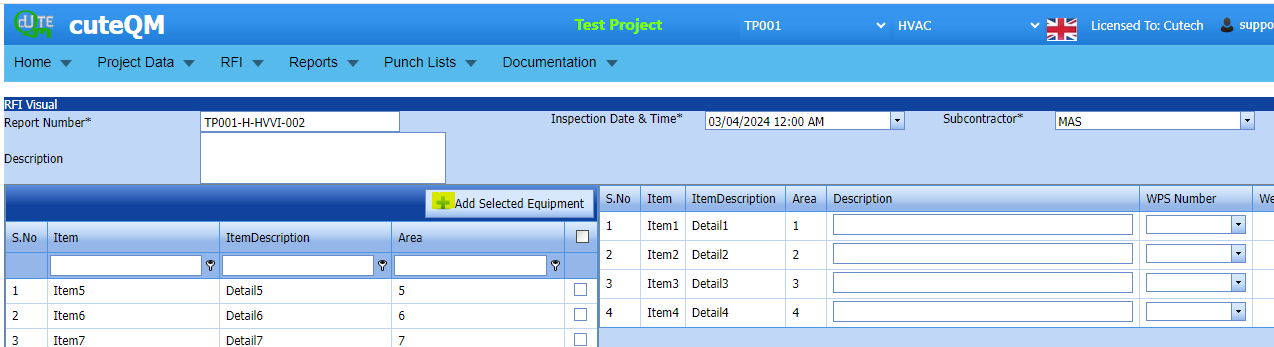
Fig 2.2.2 Edit a RFI Fit up Page
- Add/edit any item.
Click Save.visual inspection updated successfully.
2.2.3 Submit a RFI Visual.
Once you have added the RFI visual request, the Submission column in the RFI Visual page is appeared with(Submit and Reject icons). See Fig 2.2.3

Fig 2.2.3 Submit & Approve a RFI visual Page
-
If you want to submit the RFI Visual list, click
(Submit icon) in the Submit column. Otherwise click (Reject icon) to reject the request.Once you have submitted the RFI Visual list request, in the Confirm Status column in the RFIVisual List page is appeared with
(Confirm and Reject icons).
The submitted request will be moved to for inspection.
2.2.4 Approve RFI Visual
cuteQM_Licensee_QA user only can approve the RFI request.
- If you want to approve the RFI Visual request, click (confirm icon) in the Confirm Status Otherwise click (Reject icon) to reject the request.
2. Once RFI Visual list icon will be enabled to put result.
3. Click icon  result popup will open.
Fig 2.2.4 Approve RFI Visual Result Page
- Click Save
- RFI result is updated successfully.
- If Accepts with comments given as result then punch list will be created, and this will be shown in view punch list screen.
- If need to upload documents against item part, then click attachment icon at the result popup and upload documents.

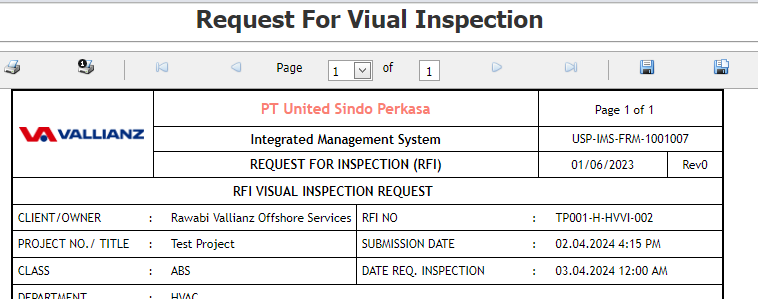
2.2.5 Print RFI Visual
If you want to print an RFI Visual, click (print icon) provided in the Report column of the RFI Visual List.
In the print, user can see the signature of both the production user and QC . Requestor signature mapped with Production and Inspector signature mapped with QC
Click here to find the steps to upload Digital signature
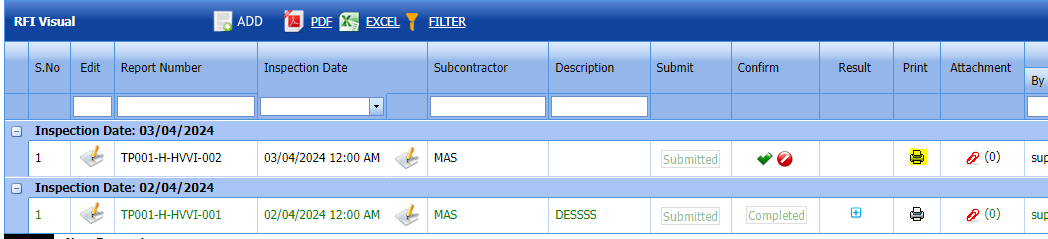
Fig 2.2.5 Print a RFI Visual Inspection Page.
2.2.6 Attach a File into a RFI Visual
If you want to attach a file with any existing RFI Visual listed in the RFI Fit up page, you can attach the file by using (Attach icon) in the Attachment column.
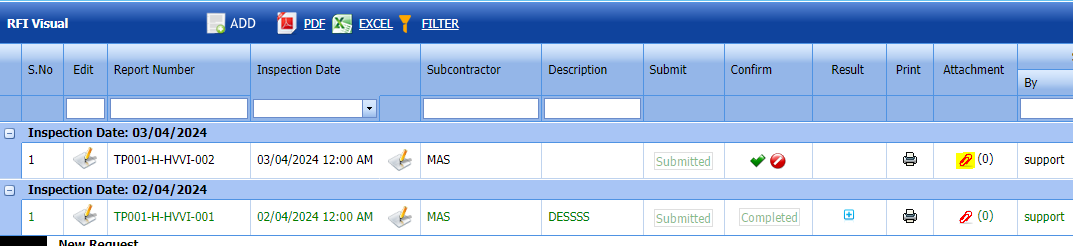
A new window opens for file upload.
In the category box, select the category from drop-down list.
Select Browse and upload the documents. 
Fig 2.2.6 Add a RFI Visual Page
2.2.7 Export a RFI Visual
You can export a list of RFI Visual list visual list requests added in the RFI Fit Visual page in both the pdf and excel formats by using (PDF button) and (Excel button). Fig 2.2.7 Export a RFI Visual Page.
2.2.8 Filter a RFI Visual
If you want to filter any RFI Visual request from the list of RFI requests in the RFI Visual page, you can use  (FILTER button).
Fig 2.2.8 Filter a RFI Visual Page
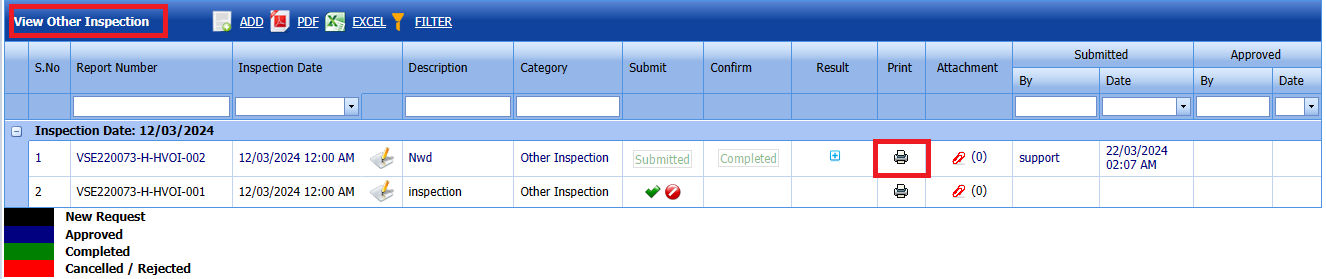
2.3.0 View Other Inspection
Click View Other Inspection in the RFI menu.
The View Other Inspection page opens. 

Fig 2.3.0 View Other Inspection Page
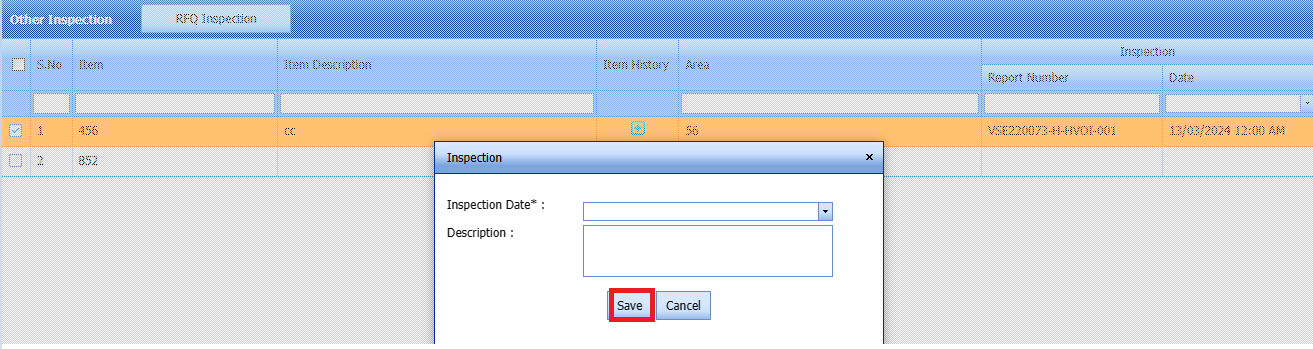
2.3.1 Add a Other Inspection
If you want to add other inspection, do the following steps,
1. Click  (ADD button) in the view other inspection page. See Fig 2.3.0
A new window opens to add a new Other Inspection. 
Fig 2.3.1 Add a Other Inspection Page.
2.Select the items to be added for RFI request.
3.Click RFQ inspection button as shown below

Once you click RFQ Inspection a new window opens.
Click Save.
2.3.2 Submit a View Other Inspection
Once you have added the view other inspection, the result column in the view other inspection page is appeared with(Submit and Reject icons). See Fig 2.2.3  Fig 2.3.3 Submit a Other Inspection request
-
If you want to submit the view other inspection request, click
(Submit icon) in the Submit column. Otherwise click (Reject icon) to reject the request.
The submitted request will be moved to for inspection.
2.3.3 Approve View other Inspection.
cuteQM_Lisencee QA role user only can approve the RFI request.
- If you want to approve the view other inspection request, click (confirm icon) in the Confirm Status Otherwise click (Reject icon) to reject the request.
2. Once RFI request approved icon will be enabled to put result.

3. Click icon  result popup will open.

Fig 2.3.3 Approve View Other Inspection Page
- Click Save
- RFI result is updated successfully.
- If accept with comments given then punch list will be created, and this will be shown in view punch list screen.
- If need to upload documents against system No, then click attachment icon at the result popup and upload documents.


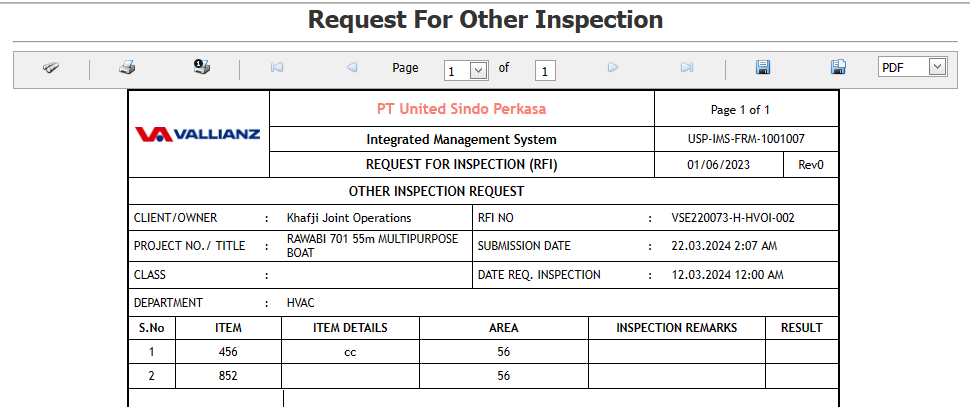
2.3.4 Print a View other Inspection.
If you want to Print and view other inspection, click (print icon) provided in the Report column of the View Other inspection page.
In the print, user can see the signature of both the production user and QC . Requestor signature mapped with Production and Inspector signature mapped with QC
Click here to find the steps to upload Digital signature
See Fig 2.3.5 Print a View Other Inspection page.
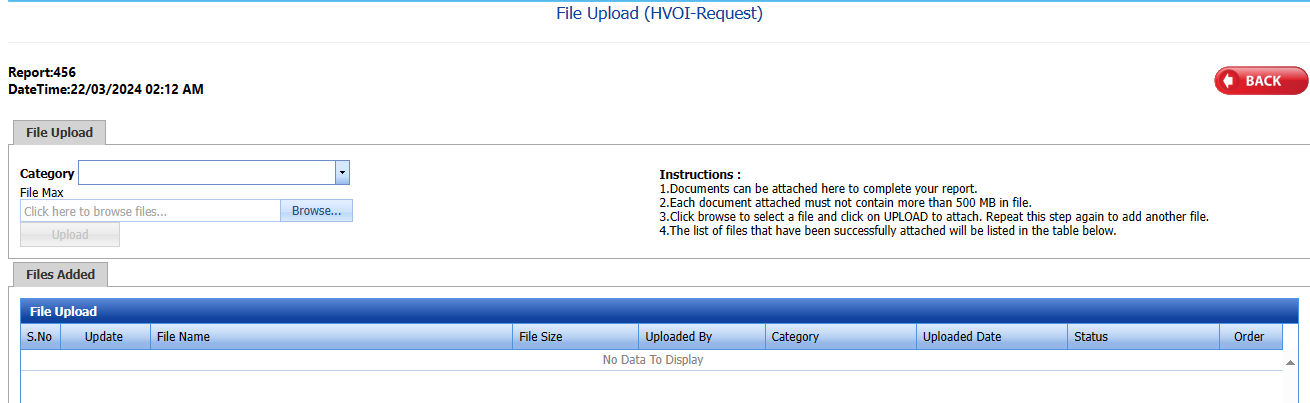
2.3.5 Attach a File into View other Inspection
If you want to attach a file with any existing View other inspection in the view other inspection page, you can attach the file by using (Attach icon) in the Attachment column.

A new window opens for file upload.
In the category box, select the category from drop-down list.
Select Browse and upload the documents. 
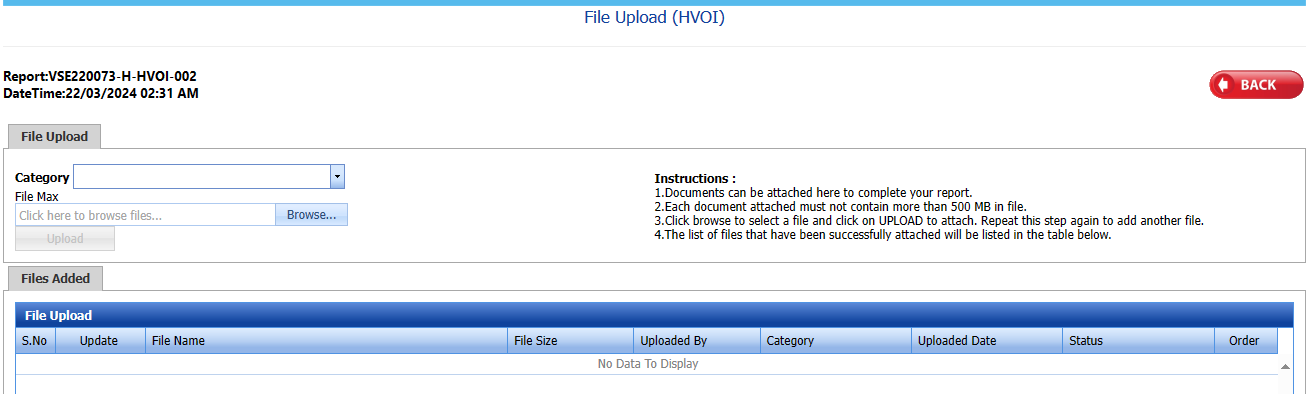 Fig 2.3.5 Attach a View other Inspection Page
2.3.6 Export an Other Inspection
You can export a list of view other inspection requests added in the View Other Inspection page in both the pdf and excel formats by using (PDF button) and (Excel button).

Fig 2.3.6 Export a View Other Inspection Page
2.3.7 Filter a Other Inspection
If you want to filter any view other inspection request from the list of RFI requests in the View other inspection page, you can use (FILTER button).

Fig 2.3.7 Filter a View other Inspection Page.
2.4.0 Reports
Click HVAC in the report's menu.
The report opens. 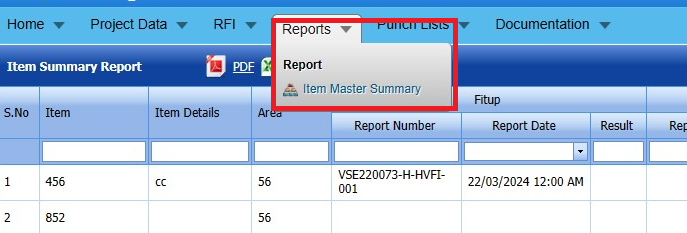
Fig 2.4.0 Reports in HVAC
2.4.1 Item Master Summary
Click Reports in the report's menu.Here we can see the summary of all the items.
The Item master Summary opens.  Fig 2.4.1 Item Master Summary Page
2.4.2 To View Item History
Click (add button) an Item History to view Fit up Summary/ Visual summary/Other Inspection summary.

Click icon  result popup will open .
2.4.3 Export an Item Summary Report
You can export a list of item summary report added in the Item Summary report in both the pdf and excel formats by using (PDF button) and (Excel button).

Fig 2.4.3 Export an Item Summary Report
2.4.5 Filter an Item Summary Report
If you want to filter any specific Item Summary report in the Item Summary report page,
you can use  (FILTER button) located on the Item Summary Item 
Fig 2.4.5 Filter an Item Summary Report Page.
No Comments