
Documentation
9.0 Documentation
The Documentation menu used to combine the number of files, which are attached to every menu of this cuteQM app. The combined files will be shown as a pdf file. This menu also used to attach a new file to a module that is not provided with an attachment option to attach any file.
9.1 Document Upload
The Document Upload tab in the Documentation menu used to upload documents for various process.
- Click Document Upload in the Documentation menu.
The Upload Documents page opens.
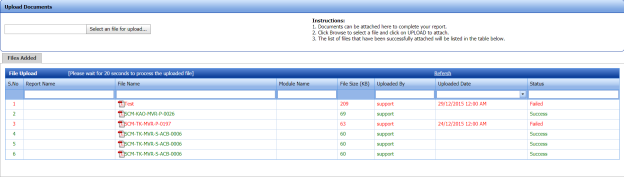
Figure 9.1: Upload Documents page
-
Select a file which you want to upload by click Select a file for upload.
The selected file will be added in the File Upload window.

9.2 Manufacture Data Report (MDR) Settings
The MDR Settings tab in the Documentation menu helps you to do page setup for the pdf file which will be shown after combining the attached files.
- Click the MDR Settings tab.
The MDR Settings page opens.
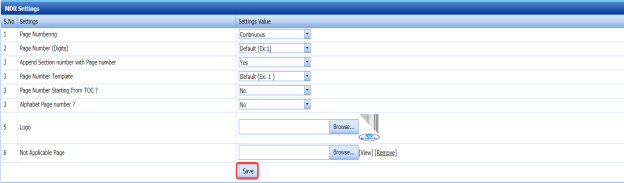
Figure 9.2: MDR Settings page
-
In the Page Numbering box, select the page numbering option that is whether Section wise or Continuous.
-
In the Page Number (Digits) box, select the page number displaying format from a drop-down list.
- If you want to append the section number with the page number, click Yes, otherwise click No in the Append Section number with Page number box.
-
In the Page Number Template box, select the page number template from a drop-down list.
- If you want to add the starting page numbers from TOC, click Yes, otherwise click No in the Page Number Starting From TOC ?
-
If you want to add alphabet page numbers, click Yes, otherwise click No in the Alphabet Page number? box.
-
In the Logo box, attach your logo by using
 (Browse button).
 -
Click Save.


9.3 Document Category
The Document Category tab in the Documentation menu used to attach a file to any module that is not provided with an attachment option to attach any file. Before attaching a file for any module, you must add the relevant category name of the module.
9.3.1 Add a Document Category
- Click the Document Category tab.
The Document Category page opens.

Figure 9.3: Document Category page
- Click
 (ADD button) in the Document Category page.
A new window opens to add a document category.
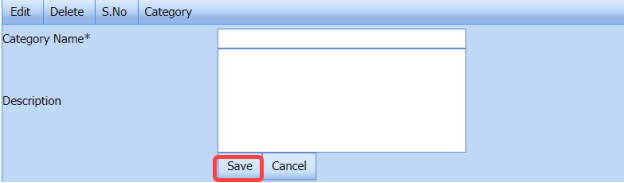
- In the Category Name box, enter the relevant category name for the module for which you want to attach a file.
-
In the Description box, enter the description for the added category.
- Click Save.
(OR)
- If you want to import any document category from another vessel, Click Import from Another Vessel.
The Import from Another Vessel window opens.

-
-
-
In the Equipment box, select an equipment from a drop-down list.
-
Click Save.
-
-
-


The added category name will be listed in the Document Category page. Once you have added the document category, you can attach any file to the added category.
9.3.2 Attach a File into an Added Document Category
If you want to attach any file with the added category listed in the Document Category page, follow the procedures given in the topic “Attach a file into a client master drawing” in the Client Master Drawing section.
9.3.3 Edit Any Document Category
If you want to edit any existing category in the Document Category page, click  (Edit icon) for the respective category, and then edit the details in the respective box.
9.3.4 Delete Any Document Category
If you want to delete any specific added category from the list, you can use  (Delete icon) provided in the Delete column of the Document Category page, See Fig 9.3.
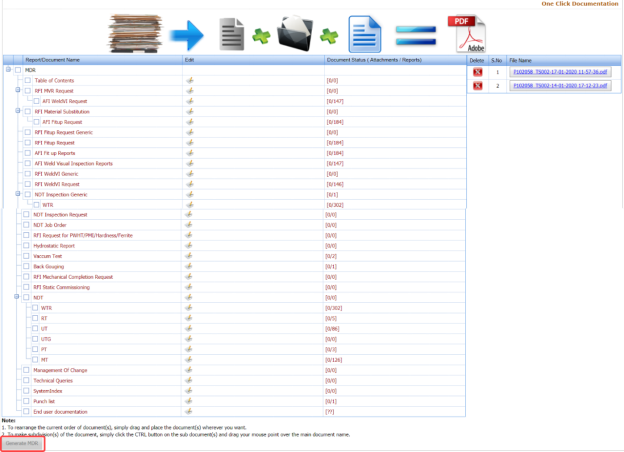
9.4 One Click Documentation
The One Click Documentation tab used to combine the attached file of the various module.
- Click the One Click Documentation tab.
The One Click Documentation page opens.
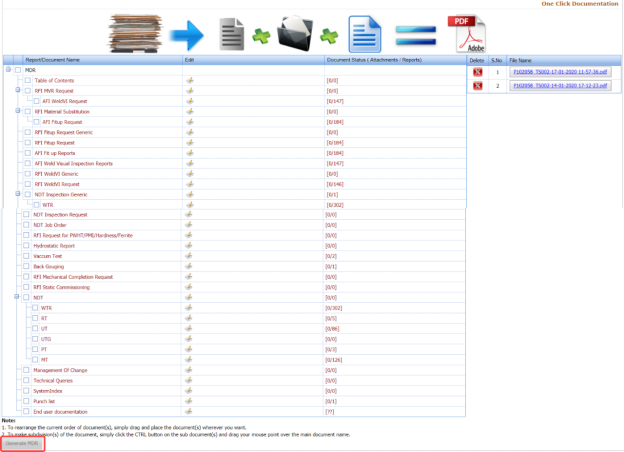
Figure 9.4: One Click Documentation page
The One Click Documentation page shows a list of reports name of each module including the attachment file counts. This page also shows the list of document categories including their attachments, which are added using the Document Category tab. Note: If you want to edit any existing category in the Document Category page, click
  (Edit icon) for the respective category, and then edit the details in the respective box.
 -
Click the check box of the respective reports which you want to combine.
-
Click Generate MDR.
The system combines the selected files and shows as the pdf file in the left side of the One Click Documentation page, See Fig 9.4.
 Tip: You can view the pdf file by clicking the respective pdf file. The file will be opened including the data in the combined files.


No Comments