
Production – RFI
8.0 Production – RFI
The Production – RFI menu in the app used to add the requests for adding various request related with the production of Pressure Vessel.
|
Users assigned with Production role only can view and access the Production - RFI menu and their functionalities. |
8.1 Fit up – Request
Fit up is joining of various joints. This has two stages of process: fitting the joints and inspecting the fitted joints.
Once Fit up has completed, before welding the Fit up Inspection is carried out in accordance with the Inspection Test Plan (ITP) by a person who has assigned with Inspection role.
To record the fit up inspection details,
The Fit up Inspection page opens and shows all the joints which are added in the Joint Master.
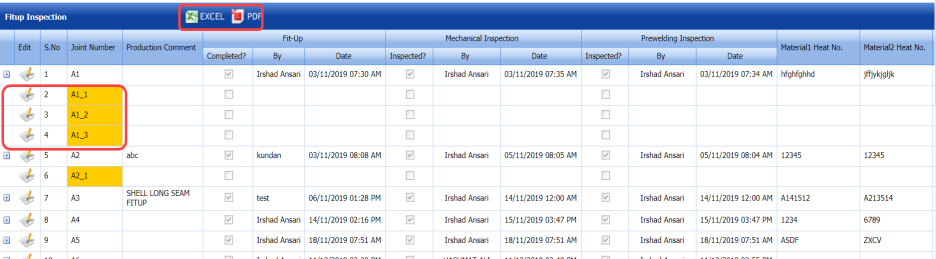
Figure 8.1: Fit up Inspection page
|
The joints in Yellow color shows that the Before Fit up/PT/MT/EP are not completed for the respective joints. Note that the
The joints in Red color shows that the Fit up is rejected for the respective joints. |

8.1.1 Add an NDT Inspection request Before Fit up for the Added Joint
For the added joint, if you have selected any NDT type to be performed before fit up, you must add the NDT request for the added joint to perform the NDT inspection before Fit up. Do the following steps to add the NDT request,
The NDT Request page opens.

Figure 8.1.1: NDT Request page
To know how to add NDT request, see the topic, “NDT Request – RFI”.
8.1.2 Update NDT Inspection Results for the Added Request
To update the the NDT inspection result for the selected joint, do the following steps,
For example, if you have added the MT request, navigate to the MT inspection result adding page.
The MT Report page opens.

Figure 8.1.2: MT Report page
To know how to add MT inspection result, see the topic, “MT Report”
 Note: If you want to update the inspection result for any other added NDT type, you must navigate to the corresponding report page in the NDT menu and follow the same procedure given in the respective pages.
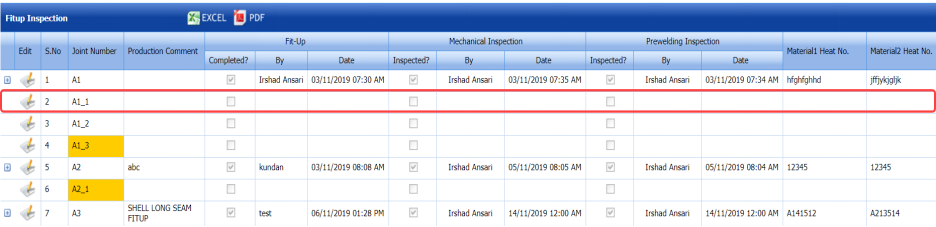
Once you have updated the NDT results, the (Edit icon) for the respective joint in the Fit up Inspection page will be enabled to add the fit up details. See the Fig 8.1.
8.1.3 Add Fit up Completion Details
To add the fit up completion details, do the following steps,

2. Click (Edit icon) for the respective joint.
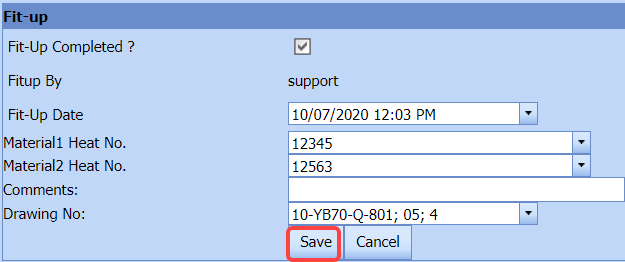
The page shows the Fit up window to add the fit up details.
|
Users assigned with Production role only can view the Fit up window. |
3. If the fit up is completed, select the checkbox of the Fit-Up Completed option.
4. In the Fit up Date box, select the fit up inspection completed date.
5. In the Material 1 Heat No box, select the heat number of the first material.
6. In the Material 2 Heat No box, select the heat number of the second material.
7. In the Comments box, enter your comments if any.
8. In the Drawing No box, select the drawing number from a drop-down list.
9. Click Save.
The fit up completion details are saved successfully. Once the fit up is completed, the fit up will be moved for inspection.
8.1.4 Add Fit up Inspection Details
Fit up inspection will be carried out by the person who has assigned with the inspection role after completing the Fit up process. To add the fit up inspection details,
|
Users assigned with cuteQM_QAQC role only can view and access the Inspection – Quality menu and their functionalities. |
The Fit up Inspection page opens to add the Mechanical and Pre-welding inspection details.
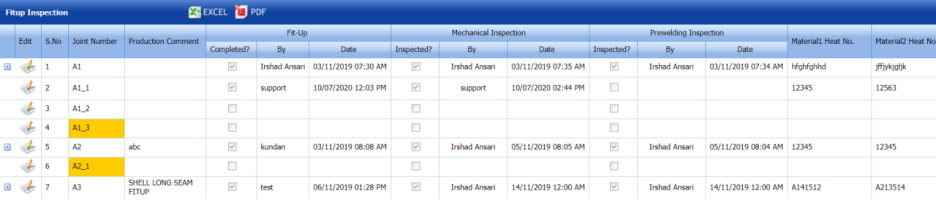
Figure 8.1.4: Fit up Inspection page
To know how to add the fit up inspection details, see the topic, “Fit up Report”.
8.2 Weld Visual - Request
The fitted joints will be moved for weld visual inspection after completing the Fit up inspection. The Weld Visual – Request in the Production – RFI menu used add the weld visual inspection request to perform the weld visual inspection.
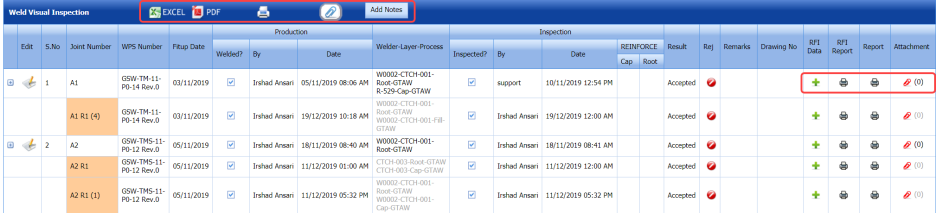
The Weld Visual Inspection page opens.

Figure 8.2: Weld Visual Inspection page
The page shows all the fit up inspection completed joints.
|
The joints in Red color shows that the respective joints are rejected in NDT (RT/UT/PT/MT).
For example, if J1 joint is rejected in RT then the joint will be created as J1R1 in the Weld visual page. If the same joint is rejected again in RT then the joint will be created as J1R2. Even after two times if the joint is rejected again in RT then the cut-out joint RW1 created as a new joint in the Fit up page.
Note that the created J1R1 and J1R2 joints will be shown in Orange color. |
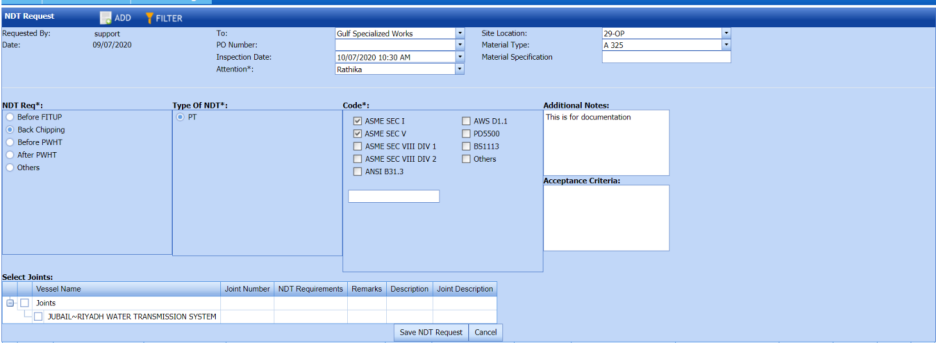
8.2.1 Add an NDT Inspection request for the Joint in Weld Visual
For the added joint, if you have selected any NDT type to be performed in Back Chipping, you must add the NDT request for the added joint to perform the NDT inspection before adding the weld visual inspection request. Do the following steps to add the NDT request,
The NDT Request page opens.

Figure 8.2.1: NDT Request page
To know how to add NDT request, see the topic, “NDT Request – RFI”.
8.2.2 Update NDT Inspection Results for the Added Request
To update the the NDT inspection result for the selected joint, do the following steps,
For example, if you have added the MT request, navigate to the MT inspection result adding page.
The MT Report page opens.
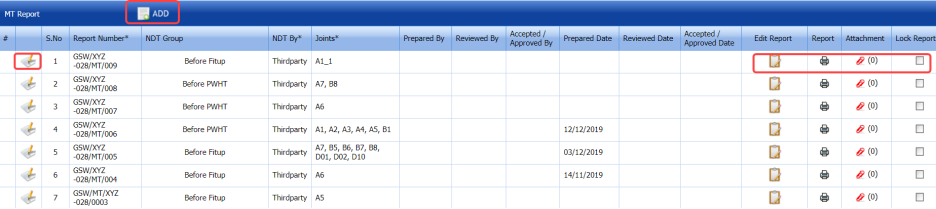
Figure 8.2.2: MT Report page
To know how to add MT inspection result, see the topic, “MT Report”.
 Note: If you want to update the inspection result for any other added NDT type, you must navigate to the corresponding report page in the NDT menu and follow the same procedure given in the respective pages.
Once you have updated the NDT results, the  (Edit icon) for the respective joint in the Weld Visual Inspection page will be enabled to add the weld visual production details. See the Fig 8.2.

8.2.3 Add Weld Visual Production Details
To add the weld visual production details, do the following steps,
2. Click (Edit icon) for the respective joint.
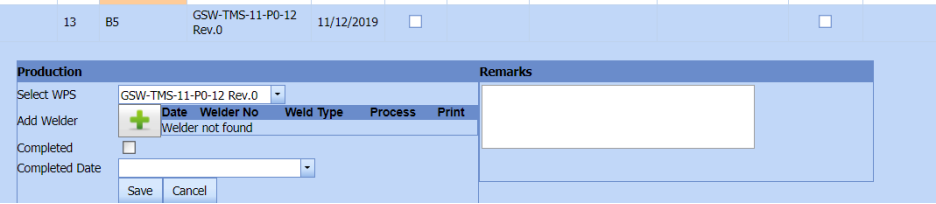
The page shows the Production window to add the welding details.
|
Users assigned with Production role only can view the Production window. |
3. In the Select WPS box, select the WPS from a drop-down list.
4. In the Add Welder box, click (Add icon) and add welder details.
5. If the welding is completed, select the checkbox of the Completed option.
6. In the Completed Date box, select the completed date.
7. In the Remarks box, enter your remarks if any.
8. Click Save.
The weld visual production details are saved successfully. Once the welding is completed, the welded joint will be moved for weld visual inspection.
8.2.4 Add Weld Visual Inspection Details
Weld Visual inspection will be carried out by the person who has assigned with the inspection role after completing the welding process. To add the weld visual inspection details,
|
Users assigned with cuteQM_QAQC role only can view and access the Inspection – Quality menu and their functionalities. |
The Weld Visual Inspection page opens to add the inspection details.

Figure 8.2.4: Fit up Inspection page
To know how to add the weld visual inspection details, see the topic, “Weld Visual Report”.
8.3 NDT Request – RFI
The NDT Request – RFI tab in the Production – RFI menu used to add NDT request based on the NDT requirement and type. To add NDT request,
1. Click NDT Request – RFI tab in the Production – RFI
The NDT Request page opens.
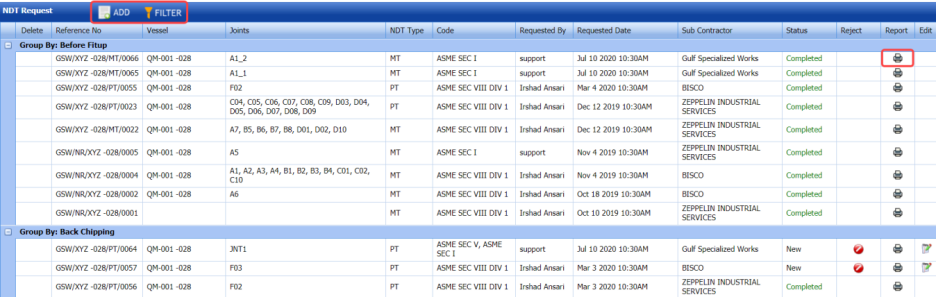
Figure 8.3: NDT Request page
8.3.1 Add an NDT Request
If you want to add an NDT request, do the following steps,
1. Click  (ADD button) in the NDT Request
The page redirects you into a new page to add the details of NDT type selected for the respective joint.
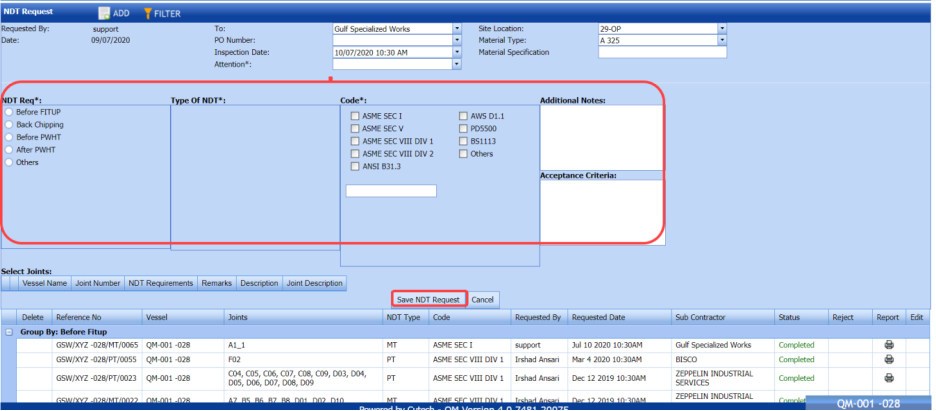
2. In the Requested By and Date boxes, the details are updated automatically.
3. In the To box, select a subcontractor from a drop-down list.
4. In the Site Location box, select a site location from a drop-down list.
5. In the PO Number box, select a PO number from a drop-down list.
6. In the Material Type box, select the material type from a drop-down list.
7. In the Inspection Date box, select the inspection date.
8. In the Material Specification box, enter the material specification.
9. In the Attention box, select a person to whom you want to create attention.
10. In the NDT Req field, select any NDT requirement.
The Type of NDT field shows the NDT type which you have selected in the NDT Inspection Requirement page, see the topic, “NDT Requirements”.
For example, if you have selected Before Fit up, The Type of NDT field shows the NDT type selected for the Before Fit up.
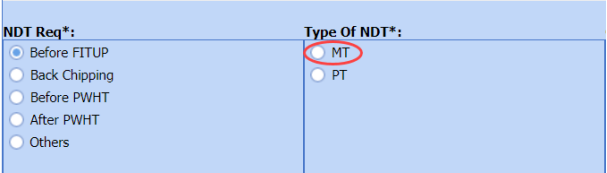
11.Select the NDT type in Type of NDT
For example, if you have selected MT, the page shows a list of joints related with the MT in the Selected Joints window.
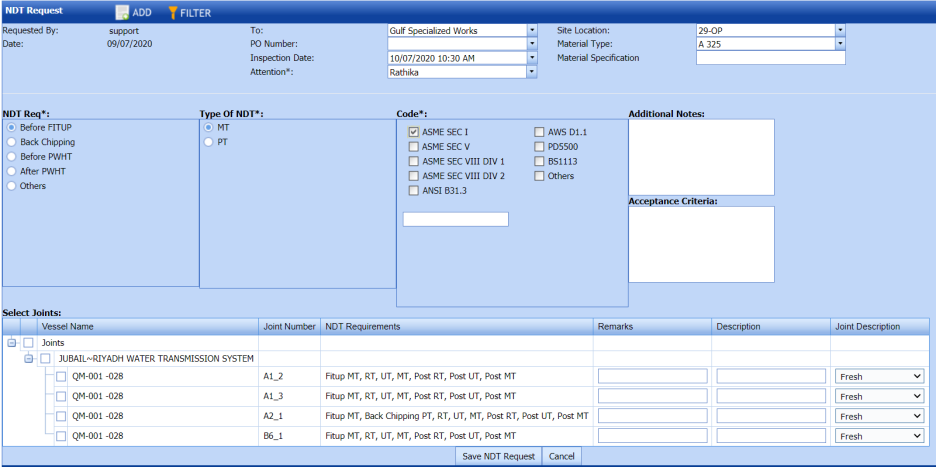
12. In the Code field, select a code.
13. In the Additional Notes box, enter your additional notes if any.
14. In the Acceptance Criteria box, enter the acceptance criteria detail.
15. In the Selected Joints window, select the checkbox of the joint for which you want to perform the MT inspection.
 Note: you can select the multiple joints together to perform the MT inspection.
16. In the Remarks column, enter your remarks if any.
17. In the Description column, enter the description for the selected joint.
18. In the Joint Description column, select the joint description from a drop-down list.
19. Click Save NDT Request.
The MT request for the respective joint is added and listed in the NDT Request page. Now navigate to the MT Report page and update the MT inspection result for the respective joint.
Note: If you want to add NDT request for any other NDT requirement, follow the above steps.
8.3.2 Edit Any NDT Request
|
Note that If the inspection results for any added NDT request has been updated, you cannot edit the respective NDT request. |
If you want to edit any existing NDT request in the NDT Request - RFI page, do the following,
1. Click (Edit icon) in the Edit column for the respective NDT request. See Fig 8.3.
The page shows the details of added NDT request.
2. Click on any box where you want to edit the details, and then edit the details in the respective box.
3. Click Save NDT Request.
8.3.3 Reject an NDT Request
|
If the inspection results for any added NDT request has been updated, you cannot reject the respective NDT request. |
If you want to reject any added NDT request, click (Reject icon) of the respective NDT request.
8.3.4 Filter an NDT Request
If you want to filter any NDT request in the NDT Request - RFI page, you can use  (FILTER button) provided in the NDT Request - RFI page. See Fig 8.3. To know how to filter, see the topic, “Filter Any User Account”.
8.4 Final Dimensional – RFI
The Final Dimensional – RFI tab in the Production – RFI menu used to add the final dimensional inspection request. To add the final dimensional inspection request,
1. Click Final Dimensional – RFI in the Production – RFI
The Final Dimensional Report page opens.
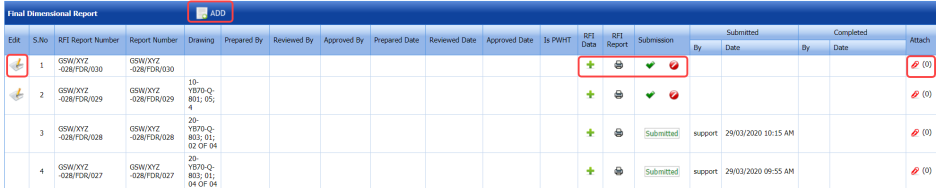
Figure 8.4: Final Dimensional Report page
8.4.1 Add a Final Dimensional Request
If you want to add a final dimensional request, do the following steps,
1. Click (ADD button) in the Final Dimensional Report
The page shows a new window to add the details of the final dimensional request.

 Tip: A report number and an RFI number for a new final dimensional report will be updated automatically in the Report Number and the RFI Report Number boxes, respectively.
2. In the Drawing box, select a drawing from a drop-down list.
3. In the Prepared By box, enter the name of a person who has prepared the final dimensional request.
4. In the Reviewed By box, enter the name of a person who has reviewed the final dimensional request.
5. In the Approved By box, enter the name of a person who has approved the final dimensional request.
6. In the Prepared Date box, choose the prepared date of the final dimensional request.
7. In the Reviewed Date box, choose the reviewed date of the final dimensional request.
8. In the Approved Date box, choose the approved date of the final dimensional request.
9. In the Is PWHT box, select Before PWHT or After PWHT based on the requirement.
10. Click Save.
The final dimensional request is added and listed in the Final Dimensional Report page.
8.4.2 Submit a Final Dimensional Request
Once you have added the final dimensional inspection request, the Submission column in the Final Dimensional Report page is appeared with (Submit and Reject icons). See Fig 8.4.
1. If you want to submit the final dimensional inspection request, click (Submit icon) in the Submission Otherwise click
 (Reject icon) to reject the request.
The submitted request will be moved to for the final dimensional inspection. The request submitted status will be updated in the Submitted column. Once the final dimensional inspection results are updated, the completed status will be updated in the Completed column.
8.4.3 Edit a Final Dimensional Request
|
Note that if the final dimensional request has been submitted, you cannot edit the respective request. |
If you want to edit any existing final dimensional request in the Final Dimensional Report page, do the following steps,
1. Click (Edit icon) in the Edit column for the respective final dimensional request. See Fig 8.4.
The page shows the details of added final dimensional request.

2. Click on any box where you want to edit the details, and then edit the details in the respective box.
3. Click Save.
8.4.4 Add RFI Data for a Final Dimensional Request
If you want to add the details of RFI data for the added final dimensional request, do the following steps,
1. Click (Add icon) in the RFI Data column of the Final Dimensional Report See Fig 8.4.
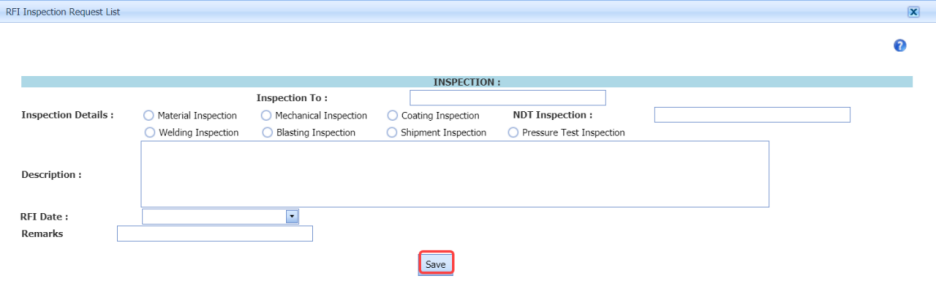
The RFI Inspection Request List window opens.

2. In the Inspection To box, enter the detail to where the inspection should end.
3. In the Inspection Details option, select what type of inspection to be performed based on your requirement.
4. In the NDT Inspection box, enter the NDT inspection detail.
5. In the Description box, enter the description for the inspection request.
6. In the RFI Date box, choose the RFI date.
7. In the Remarks box, enter your remarks if any.
8. Click Save.
8.4.5 View RFI Report for a Final Dimensional Request
If you want to view the RFI report for the final dimensional request, click (Print icon) provided in the RFI Report column.
8.4.6 Attach a File into a Final Dimensional Request
If you want to attach a file with any final dimensional request listed in the Final Dimensional Report page, you can use 
(Attach icon) provided in the Attachment column for the respective final dimensional request. To know how to attach, see the
topic, “Attach a file into a PQR”.
8.5 Nozzle Marking – RFI
In Pressure Vessels, nozzles are attached for various purposes. These nozzles are attached with to the Pressure Vessel by marking a nozzle cut out on the Pressure Vessel. Geometrical parameters of nozzle are considered while marking a cut out on shell. The nozzle marking inspection is to be performed to check the nozzle marking cut out.
This Nozzle Marking – RFI tab in the Production – RFI menu used to add the nozzle marking inspection request.
1. Click Nozzle Marking – RFI in the Production – RFI
The Nozzle Marking Inspection page opens.

Figure 8.5: Nozzle Marking Inspection page
8.5.1 Add a Nozzle Marking Inspection Request
If you want to add a nozzle marking inspection request, do the following steps,
1. Click  (ADD button) in the Nozzle Marking Inspection
The page shows a new window to add the details of the nozzle marking inspection request.

 Tip: A report number and an RFI number for a new nozzle marking inspection request will be updated automatically in the Report Number and the RFI Report Number boxes, respectively.
2. In the Drawing box, select a drawing from a drop-down list.
3. In the Prepared By box, enter the name of a person who has prepared the nozzle marking inspection request.
4. In the Reviewed By box, enter the name of a person who has reviewed the nozzle marking inspection request.
5. In the Approved By box, enter the name of a person who has approved the nozzle marking inspection request.
6. In the Prepared Date box, choose the prepared date of the nozzle marking inspection request.
7. In the Reviewed Date box, choose the reviewed date of the nozzle marking inspection request.
8. In the Approved Date box, choose the approved date of the nozzle marking inspection request.
9. Click Save.
The nozzle marking inspection request is added and listed in the Nozzle Marking Inspection page.
8.5.2 Submit a Nozzle Marking Inspection Request
Once you have added the nozzle marking inspection request, the Submission column in the Nozzle Marking Inspection page is appeared with  (Submit and Reject icons). See Fig 8.5.
1. If you want to submit the nozzle marking inspection request, click  (Submit icon) in the Submission Otherwise click
 (Reject icon) to reject the request.
The submitted request will be moved to for the nozzle marking inspection. The request submitted status will be updated in the Submitted column. Once the nozzle marking inspection results are updated, the completed status will be updated in the Completed column.
8.5.3 Edit a Nozzle Marking Inspection Request
|
Note that if the nozzle marking inspection request has been submitted, you cannot edit the respective request. |
If you want to edit any existing nozzle marking inspection request in the Nozzle Marking Inspection page, do the following steps,
1. Click (Edit icon) in the Edit column for the respective nozzle marking inspection See Fig 8.5.
The page shows the details of added nozzle marking inspection request.

2. Click on any box where you want to edit the details, and then edit the details in the respective box.
3. Click Save.
8.5.4 Add RFI Data for a Nozzle Marking Inspection Request
If you want to add the details of RFI data for the added nozzle marking inspection request, do the following steps,
1. Click (Add icon) in the RFI Data column of the Nozzle Marking Inspection See Fig 8.5.
The RFI Inspection Request List window opens.

2. In the Inspection To box, enter the detail to where the inspection should end.
3. In the Inspection Details option, select what type of inspection to be performed based on your requirement.
4. In the NDT Inspection box, enter the NDT inspection detail.
5. In the Description box, enter the description for the inspection request.
6. In the RFI Date box, choose the RFI date.
7. In the Remarks box, enter your remarks if any.
8. Click Save.
8.5.5 View RFI Report for a Nozzle Marking Inspection Request
If you want to view the RFI report for the nozzle marking inspection request, click (Print icon) provided in the RFI Report column.
8.5.6 Attach a File into a Nozzle Marking Inspection Request
If you want to attach a file with any nozzle marking inspection request listed in the Nozzle Marking Inspection page, you can use
 (Attach icon) provided in the Attachment column for the respective nozzle marking inspection request. To know how to attach, see the topic, “Attach a file into a PQR”.
8.6 Alignment Reading – RFI
The Alignment Reading – RFI tab in the Production – RFI menu used to add the alignment reading inspection request. To add the alignment reading inspection request,
1. Click Alignment Reading – RFI in the Production – RFI
The Alignment Reading Report page opens.
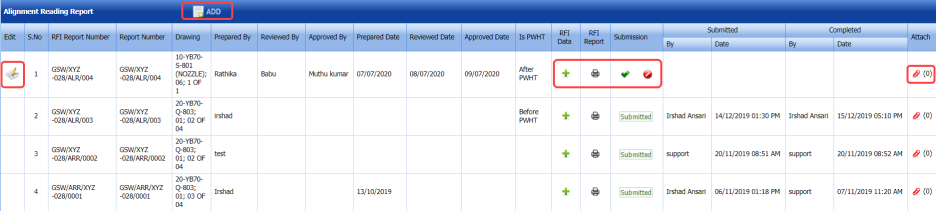
Figure 8.6: Alignment Reading Report page
8.6.1 Add an Alignment Reading Inspection Request
If you want to add an alignment reading inspection request, do the following steps,
1. Click  (ADD button) in the Alignment Reading Report
The page shows a new window to add the details of the alignment reading request.

Tip: A report number and an RFI number for a new alignment reading report will be updated automatically in the Report Number and the RFI Report Number boxes, respectively.
2. In the Drawing box, select a drawing from a drop-down list.
3. In the Prepared By box, enter the name of a person who has prepared the alignment reading request.
4. In the Reviewed By box, enter the name of a person who has reviewed the alignment reading request.
5. In the Approved By box, enter the name of a person who has approved the alignment reading request.
6. In the Prepared Date box, choose the prepared date of the alignment reading request.
7. In the Reviewed Date box, choose the reviewed date of the alignment reading request.
8. In the Approved Date box, choose the approved date of the alignment reading request.
9. In the Is PWHT box, select Before PWHT or After PWHT based on the requirement.
10. Click Save.
The alignment reading request is added and listed in the Alignment Reading Report page.
8.6.2 Submit an Alignment Reading Inspection Request
Once you have added the alignment reading inspection request, the Submission column in the Alignment Reading Report page is appeared with  (Submit and Reject icons). See Fig 8.6.
1. If you want to submit the alignment reading inspection request, click (Submit icon) in the Submission Otherwise click
 (Reject icon) to reject the request.
The submitted request will be moved to for the alignment reading inspection. The request submitted status will be updated in the Submitted column. Once the alignment reading inspection results are updated, the completed status will be updated in the Completed column.
8.6.3 Edit a Alignment Reading Inspection Request
|
Note that if the alignment reading request has been submitted, you cannot edit the respective request. |
If you want to edit any existing alignment reading request in the Alignment Reading Report page, do the following steps,
1. Click (Edit icon) in the Edit column for the respective alignment reading request. See Fig 8.6.
The page shows the details of added alignment reading request.

2. Click on any box where you want to edit the details, and then edit the details in the respective box.
3. Click Save.
8.6.4 Add RFI Data for an Alignment Reading Inspection Request
If you want to add the details of RFI data for the added alignment reading request, do the following steps,
1. Click (Add icon) in the RFI Data column of the Alignment Reading Report See Fig 8.6.
The RFI Inspection Request List window opens.

2. In the Inspection To box, enter the detail to where the inspection should end.
3. In the Inspection Details option, select what type of inspection to be performed based on your requirement.
4. In the NDT Inspection box, enter the NDT inspection detail.
5. In the Description box, enter the description for the inspection request.
6. In the RFI Date box, choose the RFI date.
7. In the Remarks box, enter your remarks if any.
8. Click Save.
8.6.5 View RFI Report for an Alignment Reading Inspection Request
If you want to view the RFI report for the alignment reading request, click  (Print icon) provided in the RFI Report column.
8.6.6 Attach a File into an Alignment Reading Inspection Request
If you want to attach a file with any alignment reading request listed in the Alignment Reading Report page, you can use  (Attach icon) provided in the Attachment column for the respective alignment reading request. To know how to attach, see the topic, “Attach a file into a PQR”.
8.7 Ovality Reading
The Ovality Reading – RFI tab in the Production – RFI menu used to add the ovality reading inspection request. To add the ovality reading inspection request,
1. Click Ovality Reading – RFI in the Production – RFI
The Ovality Reading Report page opens.

Figure 8.7: Ovality Reading Report page
8.7.1 Add an Ovality Reading Inspection Request
If you want to add an ovality reading inspection request, do the following steps,
1. Click  (ADD button) in the Ovality Reading Report
The page shows a new window to add the details of the ovality reading request.

Tip: A report number and an RFI number for a new ovality reading report will be updated automatically in the Report Number and the RFI Report Number boxes, respectively.
2. In the Drawing box, select a drawing from a drop-down list.
3. In the Prepared By box, enter the name of a person who has prepared the ovality reading request.
4. In the Reviewed By box, enter the name of a person who has reviewed the ovality reading request.
5. In the Approved By box, enter the name of a person who has approved the ovality reading request.
6. In the Prepared Date box, choose the prepared date of the ovality reading request.
7. In the Reviewed Date box, choose the reviewed date of the ovality reading request.
8. In the Approved Date box, choose the approved date of the ovality reading request.
9. In the Is PWHT box, select Before PWHT or After PWHT based on the requirement.
10. Click Save.
The ovality reading request is added and listed in the Ovality Reading Report page.
8.7.2 Submit an Ovality Reading Inspection Request
Once you have added the ovality reading inspection request, the Submission column in the Ovality Reading Report page is appeared with  (Submit and Reject icons). See Fig 8.7.
1. If you want to submit the ovality reading inspection request, click (Submit icon) in the Submission Otherwise click
 (Reject icon) to reject the request.
The submitted request will be moved to for the ovality reading inspection. The request submitted status will be updated in the Submitted column. Once the ovality reading inspection results are updated, the completed status will be updated in the Completed column.
8.7.3 Edit an Ovality Reading Inspection Request
|
Note that if the ovality reading request has been submitted, you cannot edit the respective request. |
If you want to edit any existing ovality reading request in the Ovality Reading Report page, do the following steps,
1. Click (Edit icon) in the Edit column for the respective ovality reading request. See Fig 8.7.
The page shows the details of added ovality reading request.

2. Click on any box where you want to edit the details, and then edit the details in the respective box.
3. Click Save.
8.7.4 Add RFI Data for an Ovality Reading Inspection Request
If you want to add the details of RFI data for the added ovality reading request, do the following steps,
1. Click (Add icon) in the RFI Data column of the Ovality Reading Report See Fig 8.7.
The RFI Inspection Request List window opens.

2. In the Inspection To box, enter the detail to where the inspection should end.
3. In the Inspection Details option, select what type of inspection to be performed based on your requirement.
4. In the NDT Inspection box, enter the NDT inspection detail.
5. In the Description box, enter the description for the inspection request.
6. In the RFI Date box, choose the RFI date.
7. In the Remarks box, enter your remarks if any.
8. Click Save.
8.7.5 View RFI Report for an Ovality Reading Inspection Request
If you want to view the RFI report for the ovality reading request, click (Print icon) provided in the RFI Report column.
8.7.6 Attach a File into an Ovality Reading Inspection Request
If you want to attach a file with any ovality reading request listed in the Ovality Reading Report page, you can use (Attach icon) provided in the Attachment column for the respective ovality reading request. To know how to attach, see the topic, “Attach a file into a PQR”.
8.8 Thickness – RFI
The Thickness – RFI tab in the Production – RFI menu used to add the thickness reading inspection request. To add the thickness inspection request,
1. Click Thickness – RFI in the Production – RFI The Thickness Report page opens.
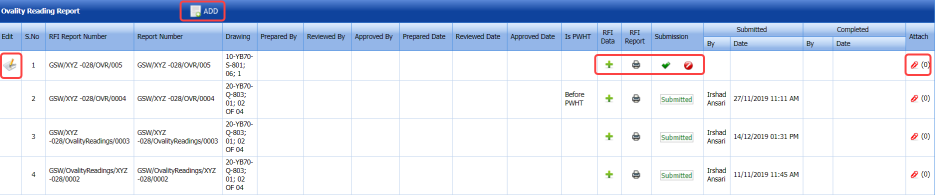
Figure 8.8: Thickness Report page
8.8.1 Add a Thickness Inspection Request
If you want to add a thickness inspection request, do the following steps,
1. Click  (ADD button) in the Thickness Report
The page shows a new window to add the details of the thickness request.

 Tip: A report number and an RFI number for a new thickness report will be updated automatically in the Report Number and the RFI Report Number boxes, respectively.
2. In the Drawing box, select a drawing from a drop-down list.
3. In the Prepared By box, enter the name of a person who has prepared the thickness request.
4. In the Reviewed By box, enter the name of a person who has reviewed the thickness request.
5. In the Approved By box, enter the name of a person who has approved the thickness request.
6. In the Prepared Date box, choose the prepared date of the thickness request.
7. In the Reviewed Date box, choose the reviewed date of the thickness request.
8. In the Approved Date box, choose the approved date of the thickness request.
9. In the Is PWHT box, select Before PWHT or After PWHT based on the requirement.
10. Click Save.
The thickness request is added and listed in the Thickness Report page.
8.8.2 Submit a Thickness Inspection Request
Once you have added the thickness inspection request, the Submission column in the Thickness Report page is appeared with
 (Submit and Reject icons). See Fig 8.8.
1. If you want to submit the thickness inspection request, click (Submit icon) in the Submission Otherwise click
(Reject icon) to reject the request.
The submitted request will be moved to for the thickness inspection. The request submitted status will be updated in the Submitted column. Once the thickness inspection results are updated, the completed status will be updated in the Completed column.
8.8.3 Edit a Thickness Inspection Request
|
Note that if the thickness request has been submitted, you cannot edit the respective request. |
If you want to edit any existing thickness request in the Thickness Report page, do the following steps,
1. Click (Edit icon) in the Edit column for the respective thickness request. See Fig 8.8.
The page shows the details of added thickness request.

2. Click on any box where you want to edit the details, and then edit the details in the respective box.
3. Click Save.
8.8.4 Add RFI Data for a Thickness Inspection Request
If you want to add the details of RFI data for the added thickness request, do the following steps,
1. Click (Add icon) in the RFI Data column of the Thickness Report See Fig 8.8.
The RFI Inspection Request List window opens.

2. In the Inspection To box, enter the detail to where the inspection should end.
3. In the Inspection Details option, select what type of inspection to be performed based on your requirement.
4. In the NDT Inspection box, enter the NDT inspection detail.
5. In the Description box, enter the description for the inspection request.
6. In the RFI Date box, choose the RFI date.
7. In the Remarks box, enter your remarks if any.
8. Click Save.
8.8.5 View RFI Report for a Thickness Inspection Request
If you want to view the RFI report for the thickness request, click (Print icon) provided in the RFI Report column.
8.8.6 Attach a File into a Thickness Inspection Request
If you want to attach a file with any thickness request listed in the Thickness Report page, you can use  (Attach icon) provided in the Attachment column for the respective thickness request. To know how to attach, see the topic, “Attach a file into a PQR”.
8.9 Vapour Phase Corrosion Inhibitor (VPCI) – RFI
VPCI also known as Volatile Corrosion Inhibitors (VCI) used for protecting the Pressure Vessel from rust and corrosion to ensure the integrity of a metal surface of the Pressure Vessel.
The VPCI – RFI tab in the Production – RFI menu used to add the VPCI inspection request. To add the VPCI inspection request,
1. Click VPCI – RFI in the Production – RFI
The VPCI Report page opens.

Figure 8.9: VPCI Report page
8.9.1 Add a VPCI Inspection Request
If you want to add a VPCI inspection request, do the following steps,
1. Click (ADD button) in the VPCI Report
The page shows a new window to add the details of the VPCI request.

Tip: A report number and an RFI number for a new VPCI report will be updated automatically in the Report Number and the RFI Report Number boxes, respectively.
2. In the Drawing box, select a drawing from a drop-down list.
3. In the Prepared By box, enter the name of a person who has prepared the VPCI request.
4. In the Reviewed By box, enter the name of a person who has reviewed the VPCI request.
5. In the Approved By box, enter the name of a person who has approved the VPCI request.
6. In the Prepared Date box, choose the prepared date of the VPCI request.
7. In the Reviewed Date box, choose the reviewed date of the VPCI request.
8. In the Approved Date box, choose the approved date of the VPCI request.
9. Click Save.
The VPCI request is added and listed in the VPCI Report page.
8.9.2 Submit a VPCI Inspection Request
Once you have added the VPCI inspection request, the Submission column in the VPCI Report page is appeared with (Submit and Reject icons). See Fig 8.9.
If you want to submit the VPCI inspection request, click  (Submit icon) in the Submission column. Otherwise click
(Reject icon) to reject the request.
The submitted request will be moved to for the VPCI inspection. The request submitted status will be updated in the Submitted column. Once the VPCI inspection results are updated, the completed status will be updated in the Completed column.
8.9.3 Edit a VPCI Inspection Request
|
Note that if the VPCI request has been submitted, you cannot edit the respective request. |
If you want to edit any existing VPCI request in the VPCI Report page, do the following steps,
1. Click (Edit icon) in the Edit column for the respective VPCI request. See Fig 8.9.
The page shows the details of added VPCI request.

2. Click on any box where you want to edit the details, and then edit the details in the respective box.
3. Click Save.
8.9.4 Add RFI Data for a VPCI Inspection Request
If you want to add the details of RFI data for the added VPCI request, do the following steps,
1. Click (Add icon) in the RFI Data column of the VPCI Report See Fig 8.9.
The RFI Inspection Request List window opens.

2. In the Inspection To box, enter the detail to where the inspection should end.
3. In the Inspection Details option, select what type of inspection to be performed based on your requirement.
4. In the NDT Inspection box, enter the NDT inspection detail.
5. In the Description box, enter the description for the inspection request.
6. In the RFI Date box, choose the RFI date.
7. In the Remarks box, enter your remarks if any.
8. Click Save.
8.9.5 View RFI Report for a VPCI Inspection Request
If you want to view the RFI report for the VPCI request, click (Print icon) provided in the RFI Report column.
8.9.6 Attach a File into a VPCI Inspection Request
If you want to attach a file with any VPCI request listed in the VPCI Report page, you can use (Attach icon) provided in the Attachment column for the respective VPCI request. To know how to attach, see the topic, “Attach a file into a PQR”.
8.10 Leak Test – RFI
In Pressure Vessel, Leak Test is performed to identify any leakage.
The Leak Test – RFI tab in the Production – RFI menu used to add the leak test request. To add the leak test request,
1. Click Leak Test – RFI in the Production – RFI The Leak Test Report page opens.

Figure 8.10: Leak Test Report page
8.10.1 Add a Leak Test Request
If you want to add a leak test request, do the following steps,
1. Click  (ADD button) in the Leak Test Report
The page shows a new window to add the details of the leak test request.

 Tip: A report number and an RFI number for a new leak test report will be updated automatically in the Report Number and the RFI Report Number boxes, respectively.
2. In the Drawing box, select a drawing from a drop-down list.
3. In the Prepared By box, enter the name of a person who has prepared the leak test request.
4. In the Reviewed By box, enter the name of a person who has reviewed the leak test request.
5. In the Approved By box, enter the name of a person who has approved the leak test request.
6. In the Prepared Date box, choose the prepared date of the leak test request.
7. In the Reviewed Date box, choose the reviewed date of the leak test request.
8. In the Approved Date box, choose the approved date of the leak test request.
9. Click Save.
The leak test request is added and listed in the Leak Test Report page.
8.10.2 Submit a Leak Test Request
Once you have added the leak test request, the Submission column in the Leak Test Report page is appeared with
(Submit and Reject icons). See Fig 8.10.
1. If you want to submit the leak test inspection request, click (Submit icon) in the Submission Otherwise click
 (Reject icon) to reject the request.
The submitted request will be moved to for the leak test. The request submitted status will be updated in the Submitted column. Once the leak test results are updated, the completed status will be updated in the Completed column.
8.10.3 Edit a Leak Test Request
|
Note that if the leak test request has been submitted, you cannot edit the respective request. |
If you want to edit any existing leak test request in the Leak Test Report page, do the following steps,
1. Click (Edit icon) in the Edit column for the respective leak test request. See Fig 8.10.
The page shows the details of added leak test request.

2. Click on any box where you want to edit the details, and then edit the details in the respective box.
3. Click Save.
8.10.4 Add RFI Data for a Leak Test Request
If you want to add the details of RFI data for the added leak test request, do the following steps,
1. Click (Add icon) in the RFI Data column of the Leak Test Report See Fig 8.10.
The RFI Inspection Request List window opens.

2. In the Inspection To box, enter the detail to where the inspection should end.
3. In the Inspection Details option, select what type of inspection to be performed based on your requirement.
4. In the NDT Inspection box, enter the NDT inspection detail.
5. In the Description box, enter the description for the inspection request.
6. In the RFI Date box, choose the RFI date.
7. In the Remarks box, enter your remarks if any.
8. Click Save.
8.10.5 View RFI Report for Leak Test Request
If you want to view the RFI report for the leak test request, click  (Print icon) provided in the RFI Report column.
8.10.6 Attach a File into a Leak Test Request
If you want to attach a file with any leak test request listed in the Leak Test Report page, you can use (Attach icon) provided in the Attachment column for the respective leak test request. To know how to attach, see the topic, “Attach a file into a PQR”.
8.11 Hydrostatic Test – RFI
Hydrostatic Test is a way in which pressure vessels can be tested for strength and leaks. The test involves filling the vessel with a liquid, usually water, which may be dyed to aid in visual leak detection, and pressurization of the vessel to the specified test pressure.
The Hydrostatic Test – RFI tab in the Production – RFI menu used to add the hydrostatic pressure test request. To add the hydrostatic pressure test request,
1. Click Hydrostatic Test – RFI in the Production – RFI
The Hydrostatic Pressure Test Report page opens.

Figure 8.11: Hydrostatic Pressure Test Report page
8.11.1 Add a Hydrostatic Pressure Test Request
If you want to add a hydrostatic pressure test request, do the following steps,
The page shows a new window to add the details of the hydrostatic pressure test request.

 Tip: A report number and an RFI number for a new hydrostatic pressure test report will be updated automatically in the Report Number and the RFI Report Number boxes, respectively.
2. In the Drawing box, select a drawing from a drop-down list.
3. In the Prepared By box, enter the name of a person who has prepared the hydrostatic pressure test request.
4. In the Reviewed By box, enter the name of a person who has reviewed the hydrostatic pressure test request.
5. In the Approved By box, enter the name of a person who has approved the hydrostatic pressure test request.
6. In the Prepared Date box, choose the prepared date of the hydrostatic pressure test request.
7. In the Reviewed Date box, choose the reviewed date of the hydrostatic pressure test request.
8. In the Approved Date box, choose the approved date of the hydrostatic pressure test request.
9. Click Save.
The hydrostatic pressure test request is added and listed in the Hydrostatic Pressure Test Report page.
8.11.2 Submit a Hydrostatic Pressure Test Request
Once you have added the hydrostatic pressure test request, the Submission column in the Hydrostatic Pressure Test Report page is appeared with (Submit and Reject icons). See Fig 8.11.
1. If you want to submit the hydrostatic pressure test inspection request, click (Submit icon) in the Submission Otherwise click
  (Reject icon) to reject the request.
The submitted request will be moved to for the hydrostatic pressure test. The request submitted status will be updated in the Submitted column. Once the hydrostatic pressure test results are updated, the completed status will be updated in the Completed column.
8.11.3 Edit a Hydrostatic Pressure Test Request
|
Note that if the hydrostatic pressure test request has been submitted, you cannot edit the respective request. |
If you want to edit any existing hydrostatic pressure test request in the Hydrostatic Pressure Test Report page, do the following steps,
1. Click (Edit icon) in the Edit column for the respective hydrostatic pressure test request. See Fig 8.11.
The page shows the details of added hydrostatic pressure test request.

2. Click on any box where you want to edit the details, and then edit the details in the respective box.
3. Click Save.
8.11.4 Add RFI Data for a Hydrostatic Pressure Test Request
If you want to add the details of RFI data for the added hydrostatic pressure test request, do the following steps,
1. Click (Add icon) in the RFI Data column of the Hydrostatic Pressure Test Report See Fig 8.11.
The RFI Inspection Request List window opens.

2. In the Inspection To box, enter the detail to where the inspection should end.
3. In the Inspection Details option, select what type of inspection to be performed based on your requirement.
4. In the NDT Inspection box, enter the NDT inspection detail.
5. In the Description box, enter the description for the inspection request.
6. In the RFI Date box, choose the RFI date.
7. In the Remarks box, enter your remarks if any.
8. Click Save.
8.11.5 View RFI Report for Hydrostatic Pressure Test Request
If you want to view the RFI report for the hydrostatic pressure test request, click  (Print icon) provided in the RFI Report column.
8.11.6 Attach a File into a Hydrostatic Pressure Test Request
If you want to attach a file with any hydrostatic pressure test request listed in the Hydrostatic Pressure Test Report page, you can use  (Attach icon) provided in the Attachment column for the respective hydrostatic pressure test request. To know how to attach, see the topic, “Attach a file into a PQR”.
8.12 Shell Side Hydrostatic – RFI
After manufacturing completion of the Pressure Vessel, the heat exchange shell side will be subjected to the hydrostatic testing.
The Shell Side Hydrostatic– RFI tab in the Production – RFI menu used to add the shell side hydrostatic pressure test request. To add the shell side hydrostatic pressure test request,
1. Click Shell Side Hydrostatic Test – RFI in the Production – RFI
The Shell Hydrostatic Pressure Test Report page opens.

Figure 8.12: Shell Hydrostatic Pressure Test Report page
8.12.1 Add a Shell Side Hydrostatic Pressure Test Request
If you want to add a shell side hydrostatic pressure test request, do the following steps,
1. Click  (ADD button) in the Shell Hydrostatic Pressure Test Report
The page shows a new window to add the details of the shell side hydrostatic pressure test request.

Tip: A report number and an RFI number for a new shell side hydrostatic pressure test report will be updated automatically in the Report Number and the RFI Report Number boxes, respectively.
2. In the Drawing box, select a drawing from a drop-down list.
3. In the Prepared By box, enter the name of a person who has prepared the shell side hydrostatic pressure test request.
4. In the Reviewed By box, enter the name of a person who has reviewed the shell side hydrostatic pressure test request.
5. In the Approved By box, enter the name of a person who has approved the shell side hydrostatic pressure test request.
6. In the Prepared Date box, choose the prepared date of the shell side hydrostatic pressure test request.
7. In the Reviewed Date box, choose the reviewed date of the shell side hydrostatic pressure test request.
8. In the Approved Date box, choose the approved date of the shell side hydrostatic pressure test request.
9. Click Save.
The shell side hydrostatic pressure test request is added and listed in the Shell Hydrostatic Pressure Test Report page.
8.12.2 Submit a Shell Side Hydrostatic Pressure Test Request
Once you have added the shell side hydrostatic pressure test request, the Submission column in the Shell Hydrostatic Pressure Test Report page is appeared with (Submit and Reject icons). See Fig 8.12.
1. If you want to submit the shell side hydrostatic pressure test inspection request, click (Submit icon) in the Submission Otherwise click
 (Reject icon) to reject the request.
The submitted request will be moved to for the shell side hydrostatic pressure test. The request submitted status will be updated in the Submitted column. Once the shell side hydrostatic pressure test results are updated, the completed status will be updated in the Completed column.
8.12.3 Edit a Shell Side Hydrostatic Pressure Test Request
|
Note that if the shell side hydrostatic pressure test request has been submitted, you cannot edit the respective request. |
If you want to edit any existing shell side hydrostatic pressure test request in the Shell Hydrostatic Pressure Test Report page, do the following steps,
1. Click (Edit icon) in the Edit column for the respective shell side hydrostatic pressure test request. See Fig 8.12.
The page shows the details of added shell side hydrostatic pressure test request.

2. Click on any box where you want to edit the details, and then edit the details in the respective box.
3. Click Save.
8.12.4 Add RFI Data for a Shell Side Hydrostatic Pressure Test Request
If you want to add the details of RFI data for the added shell side hydrostatic pressure test request, do the following steps,
1. Click (Add icon) in the RFI Data column of the Hydrostatic Pressure Test Report See Fig 8.12.
The RFI Inspection Request List window opens.

2. In the Inspection To box, enter the detail to where the inspection should end.
3. In the Inspection Details option, select what type of inspection to be performed based on your requirement.
4. In the NDT Inspection box, enter the NDT inspection detail.
5. In the Description box, enter the description for the inspection request.
6. In the RFI Date box, choose the RFI date.
7. In the Remarks box, enter your remarks if any.
8. Click Save.
8.12.5 View RFI Report for a Shell Side Hydrostatic Pressure Test Request
If you want to view the RFI report for the shell side hydrostatic pressure test request, click (Print icon) provided in the RFI Report column.
8.12.6 Attach a File into a Shell Side Hydrostatic Pressure Test Request
If you want to attach a file with any shell side hydrostatic pressure test request listed in the Shell Hydrostatic Pressure Test Report page, you can use (Attach icon) provided in the Attachment column for the respective shell side hydrostatic pressure test request. To know how to attach, see the topic, “Attach a file into a PQR”.
8.13 Pneumatic Pressure – RFI
In Pressure Vessel, Pneumatic test is a type of pressure test for checking system integrity under the pressurized condition. A pneumatic test uses air, nitrogen, or any non-flammable and non-toxic gas.
The Pneumatic Pressure – RFI tab in the Production – RFI menu used to add the pneumatic pressure test request. To add the pneumatic pressure test request,
1. Click Pneumatic Pressure – RFI in the Production – RFI
The Pneumatic Pressure Test Report page opens.

Figure 8.13: Pneumatic Pressure Test Report page
8.13.1 Add a Pneumatic Pressure Test Request
If you want to add a pneumatic pressure test request, do the following steps,
1. Click (ADD button) in the Pneumatic Pressure Test Report
The page shows a new window to add the details of the pneumatic pressure test request.

Tip: A report number and an RFI number for a new pneumatic pressure test report will be updated automatically in the Report Number and the RFI Report Number boxes, respectively.
2. In the Drawing box, select a drawing from a drop-down list.
3. In the Prepared By box, enter the name of a person who has prepared the pneumatic pressure test request.
4. In the Reviewed By box, enter the name of a person who has reviewed the pneumatic pressure test request.
5. In the Approved By box, enter the name of a person who has approved the pneumatic pressure test request.
6. In the Prepared Date box, choose the prepared date of the pneumatic pressure test request.
7. In the Reviewed Date box, choose the reviewed date of the pneumatic pressure test request.
8. In the Approved Date box, choose the approved date of the pneumatic pressure test request.
9. In the Is PWHT box, select Before PWHT or After PWHT based on the requirement.
10. Click Save.
The pneumatic pressure test request is added and listed in the Pneumatic Pressure Test Report page.
8.13.2 Submit a Pneumatic Pressure Test Request
Once you have added the pneumatic pressure test request, the Submission column in the Pneumatic Pressure Test Report page is appeared with  (Submit and Reject icons). See Fig 8.13.
1. If you want to submit the pneumatic pressure test request, click (Submit icon) in the Submission Otherwise click (Reject icon) to reject the request.
The submitted request will be moved to for the pneumatic pressure test. The request submitted status will be updated in the Submitted column. Once the pneumatic pressure test results are updated, the completed status will be updated in the Completed column.
8.13.3 Edit a Pneumatic Pressure Test Request
|
Note that if the pneumatic pressure test request has been submitted, you cannot edit the respective request. |
If you want to edit any existing pneumatic pressure test request in the Pneumatic Pressure Test Report page, do the following steps,
1. Click (Edit icon) in the Edit column for the respective pneumatic pressure test See Fig 11.13.
The page shows the details of added pneumatic pressure test request.

2. Click on any box where you want to edit the details, and then edit the details in the respective box.
3. Click Save.
8.13.4 Add RFI Data for a Pneumatic Pressure Test Request
If you want to add the details of RFI data for the added pneumatic pressure test request, do the following steps,
1. Click (Add icon) in the RFI Data column of the Pneumatic Pressure Test Report See Fig 8.13.
The RFI Inspection Request List window opens.

2. In the Inspection To box, enter the detail to where the inspection should end.
3. In the Inspection Details option, select what type of inspection to be performed based on your requirement.
4. In the NDT Inspection box, enter the NDT inspection detail.
5. In the Description box, enter the description for the inspection request.
6. In the RFI Date box, choose the RFI date.
7. In the Remarks box, enter your remarks if any.
8. Click Save.
8.13.5 View RFI Report for a Pneumatic Pressure Test Request
If you want to view the RFI report for the pneumatic pressure test request, click (Print icon) provided in the RFI Report column.
8.13.6 Attach a File into a Pneumatic Pressure Test Request
If you want to attach a file with any pneumatic pressure test request listed in the Pneumatic Pressure Test Report page, you can use (Attach icon) provided in the Attachment column for the respective pneumatic pressure test request. To know how to attach, see the topic, “Attach a file into a PQR”.
8.14 Flange Face Inspection – RFI
The Flange Face Inspection – RFI tab in the Production – RFI menu used to add the flange face inspection request. To add the flange face inspection request,
1. Click Flange Face Inspection – RFI in the Production – RFI
The Flange Face Inspection Report page opens.
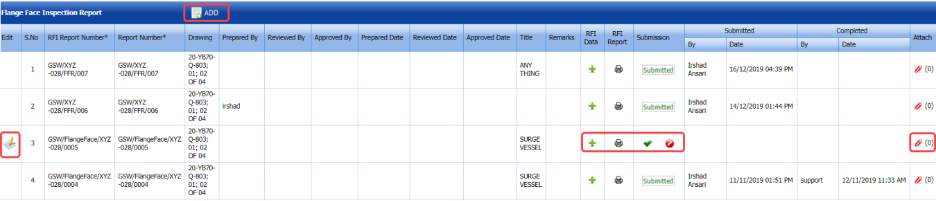
Figure 8.14: Flange Face Inspection Report page
8.14.1 Add a Flange Face Inspection Request
If you want to add a flange face inspection request, do the following steps,
1. Click  (ADD button) in the Flange Face Inspection Report
The page shows a new window to add the details of the flange face inspection request.

Tip: A report number and an RFI number for a new flange face inspection report will be updated automatically in the Report Number and the RFI Report Number boxes, respectively.
2. In the Drawing box, select a drawing from a drop-down list.
3. In the Prepared By box, enter the name of a person who has prepared the flange face inspection request.
4. In the Reviewed By box, enter the name of a person who has reviewed the flange face inspection request.
5. In the Approved By box, enter the name of a person who has approved the flange face inspection request.
6. In the Prepared Date box, choose the prepared date of the flange face inspection request.
7. In the Reviewed Date box, choose the reviewed date of the flange face inspection request.
8. In the Approved Date box, choose the approved date of the flange face inspection request.
9. In the Title box, enter the title for the request.
10. In the Remarks box, enter your remarks if any.
11. Click Save.
The flange face inspection request is added and listed in the Flange Face Inspection Report page.
8.14.2 Submit a Flange Face Inspection Request
Once you have added the flange face inspection request, the Submission column in the Flange Face Inspection Report page is appeared with (Submit and Reject icons). See Fig 8.14.
1. If you want to submit the flange face inspection request, click (Submit icon) in the Submission Otherwise click (Reject icon) to reject the request.
The submitted request will be moved to for the flange face inspection. The request submitted status will be updated in the Submitted column. Once the flange face inspection results are updated, the completed status will be updated in the Completed column.
8.14.3 Edit a Flange Face Inspection Request
|
Note that if the flange face inspection request has been submitted, you cannot edit the respective request. |
If you want to edit any existing flange face inspection request in the Flange Face Inspection Report page, do the following steps,
1. Click (Edit icon) in the Edit column for the respective flange face inspection See Fig 11.14.
The page shows the details of added flange face inspection request.

2. Click on any box where you want to edit the details, and then edit the details in the respective box.
3. Click Save.
8.14.4 Add RFI Data for a Flange Face Inspection Request
If you want to add the details of RFI data for the added flange face inspection request, do the following steps,
1. Click (Add icon) in the RFI Data column of the Flange Face Inspection Report See Fig 11.14.
The RFI Inspection Request List window opens.

2. In the Inspection To box, enter the detail to where the inspection should end.
3. In the Inspection Details option, select what type of inspection to be performed based on your requirement.
4. In the NDT Inspection box, enter the NDT inspection detail.
5. In the Description box, enter the description for the inspection request.
6. In the RFI Date box, choose the RFI date.
7. In the Remarks box, enter your remarks if any.
8. Click Save.
8.14.5 View RFI Report for a Flange Face Inspection Request
If you want to view the RFI report for the flange face inspection request, click (Print icon) provided in the RFI Report column.
8.14.6 Attach a File into a Flange Face Inspection Request
If you want to attach a file with any flange face inspection request listed in the Flange Face Inspection Report page, you can use (Attach icon) provided in the Attachment column for the respective flange face inspection request. To know how to attach, see the topic, “Attach a file into a PQR”.
8.15 Drining and Dring – RFI
The Drining and Dring – RFI tab in the Production – RFI menu used to add the drining and dring inspection request. To add the drining and dring inspection request,
1. Click Drining and Dring – RFI in the Production – RFI
The Drining and Dring Report page opens.
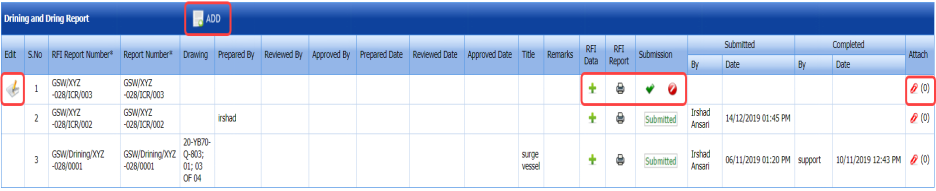
Figure 8.15: Drining and Dring Report page
8.15.1 Add a Drining and Dring Inspection Request
If you want to add a drining and dring inspection request, do the following steps,
1. Click (ADD button) in the Drining and Dring Report
The page shows a new window to add the details of the drining and dring inspection request.

Tip: A report number and an RFI number for a new drining and dring inspection report will be updated automatically in the Report Number and the RFI Report Number boxes, respectively.
2. In the Drawing box, select a drawing from a drop-down list.
3. In the Prepared By box, enter the name of a person who has prepared the drining and dring inspection request.
4. In the Reviewed By box, enter the name of a person who has reviewed the drining and dring inspection request.
5. In the Approved By box, enter the name of a person who has approved the drining and dring inspection request.
6. In the Prepared Date box, choose the prepared date of the drining and dring inspection request.
7. In the Reviewed Date box, choose the reviewed date of the drining and dring inspection request.
8. In the Approved Date box, choose the approved date of the drining and dring inspection request.
9. In the Title box, enter the title for the request.
10. In the Remarks box, enter your remarks if any.
11. Click Save.
The drining and dring inspection request is added and listed in the Drining and Dring Report page.
8.15.2 Submit a Drining and Dring Inspection Request
Once you have added the drining and dring inspection request, the Submission column in the Drining and Dring Report page is appeared with (Submit and Reject icons). See Fig 8.15.
1. If you want to submit the drining and dring inspection request, click (Submit icon) in the Submission Otherwise click (Reject icon) to reject the request.
The submitted request will be moved to for the drining and dring inspection. The request submitted status will be updated in the Submitted column. Once the drining and dring inspection results are updated, the completed status will be updated in the Completed column.
8.15.3 Edit a Drining and Dring Inspection Request
|
Note that if the drining and dring inspection request has been submitted, you cannot edit the respective request. |
If you want to edit any existing drining and dring inspection request in the Drining and Dring Report page, do the following steps,
1. Click ![]() (Edit icon) in the Edit column for the respective drining and dring inspection See Fig 8.15.
(Edit icon) in the Edit column for the respective drining and dring inspection See Fig 8.15.
The page shows the details of added drining and dring inspection request.

2. Click on any box where you want to edit the details, and then edit the details in the respective box.
3. Click Save.
8.15.4 Add RFI Data for a Drining and Dring Inspection Request
If you want to add the details of RFI data for the added drining and dring inspection request, do the following steps,
1. Click (Add icon) in the RFI Data column of the Drining and Dring Report See Fig 8.15.
The RFI Inspection Request List window opens.
2. In the Inspection To box, enter the detail to where the inspection should end.
3. In the Inspection Details option, select what type of inspection to be performed based on your requirement.
4. In the NDT Inspection box, enter the NDT inspection detail.
5. In the Description box, enter the description for the inspection request.
6. In the RFI Date box, choose the RFI date.
7. In the Remarks box, enter your remarks if any.
8. Click Save.
8.15.5 View RFI Report for a Drining and Dring Inspection Request
If you want to view the RFI report for the drining and dring inspection request, click (Print icon) provided in the RFI Report column.
8.15.6 Attach a File into a Drining and Dring Inspection Request
If you want to attach a file with any drining and dring inspection request listed in the Drining and Dring Report page, you can use (Attach icon) provided in the Attachment column for the respective drining and dring inspection request. To know how to attach, see the topic, “Attach a file into a PQR”.
8.16 Shipment Report – RFI
The Shipment Report – RFI tab in the Production – RFI menu used to add the shipment inspection request. To add the shipment inspection request,
1. Click Shipment Report – RFI in the Production – RFI
The Shipment Report page opens.

Figure 8.16: Shipment Report page
8.16.1 Add a Shipment Inspection Request
If you want to add a shipment inspection request, do the following steps,
1. Click (ADD button) in the Shipment Report
The page shows a new window to add the details of the shipment inspection request.

Tip: A report number and an RFI number for a new shipment inspection report will be updated automatically in the Report Number and the RFI Report Number boxes, respectively.
2. In the Drawing box, select a drawing from a drop-down list.
3. In the Prepared By box, enter the name of a person who has prepared the shipment inspection request.
4. In the Reviewed By box, enter the name of a person who has reviewed the shipment inspection request.
5. In the Approved By box, enter the name of a person who has approved the shipment inspection request.
6. In the Prepared Date box, choose the prepared date of the shipment inspection request.
7. In the Reviewed Date box, choose the reviewed date of the shipment inspection request.
8. In the Approved Date box, choose the approved date of the shipment inspection request.
9. In the Title box, enter the title detail.
10. In the Remarks box, enter your remarks if any.
11. Click Save.
The shipment inspection request is added and listed in the Shipment Inspection Report page.
8.16.2 Submit a Shipment Inspection Request
Once you have added the shipment inspection request, the Submission column in the Shipment Inspection Report page is appeared with (Submit and Reject icons). See Fig 8.16.
1. If you want to submit the shipment inspection request, click (Submit icon) in the Submission Otherwise click (Reject icon) to reject the request.
The submitted request will be moved to for the shipment inspection. The request submitted status will be updated in the Submitted column. Once the shipment inspection results are updated, the completed status will be updated in the Completed column.
8.16.3 Edit a Shipment Inspection Request
|
Note that if the shipment inspection request has been submitted, you cannot edit the respective request. |
If you want to edit any existing shipment inspection request in the Shipment Inspection Report page, do the following steps,
1. Click (Edit icon) in the Edit column for the respective shipment inspection See Fig 8.16.
The page shows the details of added shipment inspection request.

2. Click on any box where you want to edit the details, and then edit the details in the respective box.
3. Click Save.
8.16.4 Add RFI Data for a Shipment Inspection Request
If you want to add the details of RFI data for the added shipment inspection request, do the following steps,
1. Click (Add icon) in the RFI Data column of the Shipment Inspection Report See Fig 8.16.
The RFI Inspection Request List window opens.

2. In the Inspection To box, enter the detail to where the inspection should end.
3. In the Inspection Details option, select what type of inspection to be performed based on your requirement.
4. In the NDT Inspection box, enter the NDT inspection detail.
5. In the Description box, enter the description for the inspection request.
6. In the RFI Date box, choose the RFI date.
7. In the Remarks box, enter your remarks if any.
8. Click Save.
8.16.5 View RFI Report for a Shipment Inspection Request
If you want to view the RFI report for the shipment inspection request, click (Print icon) provided in the RFI Report column.
8.16.6 Attach a File into a Shipment Inspection Request
If you want to attach a file with any shipment inspection request listed in the Shipment Inspection Report page, you can use (Attach icon) provided in the Attachment column for the respective shipment inspection request. To know how to attach, see the topic, “Attach a file into a PQR”.
8.17 Name Plate – RFI
The Name Plate Report – RFI tab in the Production – RFI menu used to add the name plate inspection request. To add the name plate inspection request,
1. Click Name plate Report – RFI in the Production – RFI
The Name plate Report page opens.
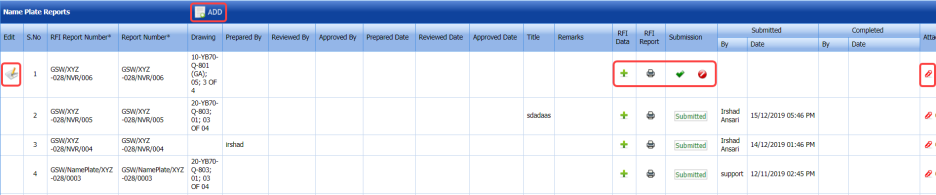
Figure 8.17: Name Plate Report page
8.17.1 Add a Name Plate Inspection Request
If you want to add a name plate inspection request, do the following steps,
1. Click (ADD button) in the Name plate Report
The page shows a new window to add the details of the name plate inspection request.

Tip: A report number and an RFI number for a new name plate inspection report will be updated automatically in the Report Number and the RFI Report Number boxes, respectively.
2. In the Drawing box, select a drawing from a drop-down list.
3. In the Prepared By box, enter the name of a person who has prepared the name plate inspection request.
4. In the Reviewed By box, enter the name of a person who has reviewed the name plate inspection request.
5. In the Approved By box, enter the name of a person who has approved the name plate inspection request.
6. In the Prepared Date box, choose the prepared date of the name plate inspection request.
7. In the Reviewed Date box, choose the reviewed date of the name plate inspection request.
8. In the Approved Date box, choose the approved date of the name plate inspection request.
9. In the Title box, enter the title detail.
10. In the Remarks box, enter your remarks if any.
11. Click Save.
The name plate inspection request is added and listed in the Name Plate Report page.
8.17.2 Submit a Name Plate Inspection Request
Once you have added the name plate inspection request, the Submission column in the Name Plate Report page is appeared with (Submit and Reject icons). See Fig 8.17.
1. If you want to submit the name plate inspection request, click (Submit icon) in the Submission Otherwise click (Reject icon) to reject the request.
The submitted request will be moved to for the name plate inspection. The request submitted status will be updated in the Submitted column. Once the name plate inspection results are updated, the completed status will be updated in the Completed column.
8.17.3 Edit a Name Plate Inspection Request
|
Note that if the name plate inspection request has been submitted, you cannot edit the respective request. |
If you want to edit any existing name plate inspection request in the Name plate Report page, do the following steps,
1. Click (Edit icon) in the Edit column for the respective name plate inspection See Fig 8.17.
The page shows the details of added name plate inspection request.

2. Click on any box where you want to edit the details, and then edit the details in the respective box.
3. Click Save.
8.17.4 Add RFI Data for a Name Plate Inspection Request
If you want to add the details of RFI data for the added name plate inspection request, do the following steps,
1. Click (Add icon) in the RFI Data column of the Name Plate Report See Fig 8.17.
The RFI Inspection Request List window opens.

2. In the Inspection To box, enter the detail to where the inspection should end.
3. In the Inspection Details option, select what type of inspection to be performed based on your requirement.
4. In the NDT Inspection box, enter the NDT inspection detail.
5. In the Description box, enter the description for the inspection request.
6. In the RFI Date box, choose the RFI date.
7. In the Remarks box, enter your remarks if any.
8. Click Save.
8.17.5 View RFI Report for a Name Plate Inspection Request
If you want to view the RFI report for the name plate inspection request, click (Print icon) provided in the RFI Report column.
8.17.6 Attach a File into a Name Plate Inspection Request
If you want to attach a file with any name plate inspection request listed in the Name Plate Report page, you can use (Attach icon) provided in the Attachment column for the respective name plate inspection request. To know how to attach, see the topic, “Attach a file into a PQR”.
8.18 Stamp Verification/Others – RFI
The Stamp Verification/Others– RFI tab in the Production – RFI menu used to add the stamp verification inspection request. To add the stamp verification inspection request,
1. Click Stamp Verification/Others – RFI in the Production – RFI
The Stamp Verification Report page opens.

Figure 8.18: Stamp Verification Report page
8.18.1 Add a Stamp Verification Inspection Request
If you want to add a stamp verification inspection request, do the following steps,
1. Click (ADD button) in the Stamp Verification Report
The page shows a new window to add the details of the stamp verification inspection request.

Tip: A report number and an RFI number for a new stamp verification inspection report will be updated automatically in the Report Number and the RFI Report Number boxes, respectively.
2. In the Drawing box, select a drawing from a drop-down list.
3. In the Prepared By box, enter the name of a person who has prepared the stamp verification inspection request.
4. In the Reviewed By box, enter the name of a person who has reviewed the stamp verification inspection request.
5. In the Approved By box, enter the name of a person who has approved the stamp verification inspection request.
6. In the Prepared Date box, choose the prepared date of the stamp verification inspection request.
7. In the Reviewed Date box, choose the reviewed date of the stamp verification inspection request.
8. In the Approved Date box, choose the approved date of the stamp verification inspection request.
9. In the Title box, enter the title detail.
10.In the Remarks box, enter your remarks if any.
11. Click Save.
The stamp verification inspection request is added and listed in the Stamp Verification Report page.
8.18.2 Submit a Stamp Verification Inspection Request
Once you have added the stamp verification inspection request, the Submission column in the Stamp Verification Report page is appeared with (Submit and Reject icons). See Fig 8.18.
1. If you want to submit the stamp verification inspection request, click (Submit icon) in the Submission Otherwise click (Reject icon) to reject the request.
The submitted request will be moved to for the stamp verification inspection. The request submitted status will be updated in the Submitted column. Once the stamp verification inspection results are updated, the completed status will be updated in the Completed column.
8.18.3 Edit a Stamp Verification Inspection Request
|
Note that if the stamp verification inspection request has been submitted, you cannot edit the respective request. |
If you want to edit any existing stamp verification inspection request in the Stamp Verification Report page, do the following steps,
1. Click (Edit icon) in the Edit column for the respective stamp verification inspection See Fig 8.18.
The page shows the details of added stamp verification inspection request.

2. Click on any box where you want to edit the details, and then edit the details in the respective box.
3. Click Save.
8.18.4 Add RFI Data for a Stamp verification Inspection Request
If you want to add the details of RFI data for the added stamp verification inspection request, do the following steps,
1. Click (Add icon) in the RFI Data column of the Stamp verification Report See Fig 8.18.
The RFI Inspection Request List window opens.

2. In the Inspection To box, enter the detail to where the inspection should end.
3. In the Inspection Details option, select what type of inspection to be performed based on your requirement.
4. In the NDT Inspection box, enter the NDT inspection detail.
5. In the Description box, enter the description for the inspection request.
6. In the RFI Date box, choose the RFI date.
7. In the Remarks box, enter your remarks if any.
8. Click Save.
8.18.5 View RFI Report for a Stamp Verification Inspection Request
If you want to view the RFI report for the stamp verification inspection request, click (Print icon) provided in the RFI Report column.
8.18.6 Attach a File into a Stamp Verification Inspection Request
If you want to attach a file with any stamp verification inspection request listed in the Stamp Verification Report page, you can use (Attach icon) provided in the Attachment column for the respective stamp verification inspection request. To know how to attach, see the topic, “Attach a file into a PQR”.
8.19 Dishend Dimension – RFI
The Dishend Dimension – RFI tab in the Production – RFI menu used to add the dishend dimension inspection request. To add the dishend dimension inspection request,
1. Click Dishend Dimension – RFI in the Production – RFI
The Dishend Dimension Report page opens.

Figure 8.19: Dishend Dimension Report page
8.19.1 Add a Dishend Dimension Inspection Request
If you want to add a dishend dimension inspection request, do the following steps,
1. Click (ADD button) in the Dishend dimension Report
The page shows a new window to add the details of the dishend dimension inspection request.

Tip: A report number and an RFI number for a new dishend dimension inspection report will be updated automatically in the Report Number and the RFI Report Number boxes, respectively.
2. In the Drawing box, select a drawing from a drop-down list.
3. In the Prepared By box, enter the name of a person who has prepared the dishend dimension inspection request.
4. In the Reviewed By box, enter the name of a person who has reviewed the dishend dimension inspection request.
5. In the Approved By box, enter the name of a person who has approved the dishend dimension inspection request.
6. In the Prepared Date box, choose the prepared date of the dishend dimension inspection request.
7. In the Reviewed Date box, choose the reviewed date of the dishend dimension inspection request.
8. In the Approved Date box, choose the approved date of the dishend dimension inspection request.
9. Click Save.
The dishend dimension inspection request is added and listed in the Dishend Dimension Report page.
8.19.2 Submit a Dishend Dimension Inspection Request
Once you have added the dishend dimension inspection request, the Submission column in the Dishend dimension Report page is appeared with (Submit and Reject icons). See Fig 8.19.
1. If you want to submit the dishend dimension inspection request, click (Submit icon) in the Submission Otherwise click (Reject icon) to reject the request.
The submitted request will be moved to for the dishend dimension inspection. The request submitted status will be updated in the Submitted column. Once the dishend dimension inspection results are updated, the completed status will be updated in the Completed column.
8.19.3 Edit a Dishend Dimension Inspection Request
|
Note that if the dishend dimension inspection request has been submitted, you cannot edit the respective request. |
If you want to edit any existing dishend dimension inspection request in the Dishend Dimension Report page, do the following steps,
1. Click (Edit icon) in the Edit column for the respective dishend dimension inspection See Fig 8.19.
The page shows the details of added dishend dimension inspection request.

2. Click on any box where you want to edit the details, and then edit the details in the respective box.
3. Click Save.
8.19.4 Add RFI Data for a Dishend Dimension Inspection Request
If you want to add the details of RFI data for the added dishend dimension inspection request, do the following steps,
1. Click (Add icon) in the RFI Data column of the Dishend dimension Report See Fig 8.19.
The RFI Inspection Request List window opens.

2. In the Inspection To box, enter the detail to where the inspection should end.
3. In the Inspection Details option, select what type of inspection to be performed based on your requirement.
4. In the NDT Inspection box, enter the NDT inspection detail.
5. In the Description box, enter the description for the inspection request.
6. In the RFI Date box, choose the RFI date.
7. In the Remarks box, enter your remarks if any.
8. Click Save.
8.19.5 View RFI Report for a Dishend Dimension Inspection Request
If you want to view the RFI report for the dishend dimension inspection request, click (Print icon) provided in the RFI Report column.
8.19.6 Attach a File into a Dishend Dimension Inspection Request
If you want to attach a file with any dishend dimension inspection request listed in the Dishend Dimension Report page, you can use (Attach icon) provided in the Attachment column for the respective dishend dimension inspection request. To know how to attach, see the topic, “Attach a file into a PQR”.
8.20 Dishend Thickness – RFI
The Dishend Thickness – RFI tab in the Production – RFI menu used to add the dishend thickness inspection request. To add the dishend thickness inspection request,
1. Click Dishend Thickness – RFI in the Production – RFI
The Dishend Thickness Report page opens.
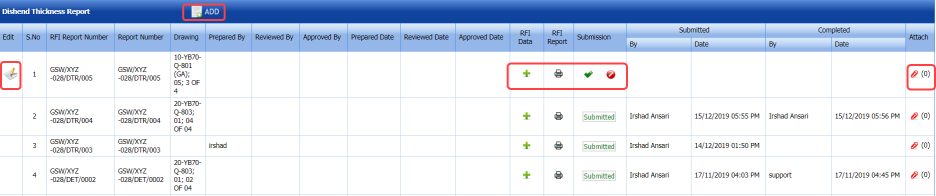
Figure 8.20: Dishend Thickness Report page
8.20.1 Add a Dishend Thickness Inspection Request
If you want to add a dishend thickness inspection request, do the following steps,
1. Click (ADD button) in the Dishend Thickness Report
The page shows a new window to add the details of the dishend thickness inspection request.

Tip: A report number and an RFI number for a new dishend thickness inspection report will be updated automatically in the Report Number and the RFI Report Number boxes, respectively.
2. In the Drawing box, select a drawing from a drop-down list.
3. In the Prepared By box, enter the name of a person who has prepared the dishend thickness inspection request.
4. In the Reviewed By box, enter the name of a person who has reviewed the dishend thickness inspection request.
5. In the Approved By box, enter the name of a person who has approved the dishend thickness inspection request.
6. In the Prepared Date box, choose the prepared date of the dishend thickness inspection request.
7. In the Reviewed Date box, choose the reviewed date of the dishend thickness inspection request.
8. In the Approved Date box, choose the approved date of the dishend thickness inspection request.
9. Click Save.
The dishend thickness inspection request is added and listed in the Dishend Thickness Report page.
8.20.2 Submit a Dishend Thickness Inspection Request
Once you have added the dishend thickness inspection request, the Submission column in the Dishend thickness Report page is appeared with (Submit and Reject icons). See Fig 8.20.
1. If you want to submit the dishend thickness inspection request, click (Submit icon) in the Submission Otherwise click (Reject icon) to reject the request.
The submitted request will be moved to for the dishend thickness inspection. The request submitted status will be updated in the Submitted column. Once the dishend thickness inspection results are updated, the completed status will be updated in the Completed column.
8.20.3 Edit a Dishend Thickness Inspection Request
|
Note that if the dishend thickness inspection request has been submitted, you cannot edit the respective request. |
If you want to edit any existing dishend thickness inspection request in the Dishend Thickness Report page, do the following steps,
1. Click (Edit icon) in the Edit column for the respective dishend thickness inspection See Fig 8.20.
The page shows the details of added dishend thickness inspection request.

2. Click on any box where you want to edit the details, and then edit the details in the respective box.
3. Click Save.
8.20.4 Add RFI Data for a Dishend Thickness Inspection Request
If you want to add the details of RFI data for the added dishend thickness inspection request, do the following steps,
1. Click (Add icon) in the RFI Data column of the Dishend Thickness Report See Fig 8.20.
The RFI Inspection Request List window opens.

2. In the Inspection To box, enter the detail to where the inspection should end.
3. In the Inspection Details option, select what type of inspection to be performed based on your requirement.
4. In the NDT Inspection box, enter the NDT inspection detail.
5. In the Description box, enter the description for the inspection request.
6. In the RFI Date box, choose the RFI date.
7. In the Remarks box, enter your remarks if any.
8. Click Save.
8.20.5 View RFI Report for a Dishend Thickness Inspection Request
If you want to view the RFI report for the dishend thickness inspection request, click (Print icon) provided in the RFI Report column.
8.20.6 Attach a File into a Dishend Thickness Inspection Request
If you want to attach a file with any dishend thickness inspection request listed in the Dishend Thickness Report page, you can use (Attach icon) provided in the Attachment column for the respective dishend thickness inspection request. To know how to attach, see the topic, “Attach a file into a PQR”.
8.21 Blasting and Painting – RFI
The Blasting and Painting – RFI tab in the Production – RFI menu used to add the blasting and painting inspection request. To add the blasting and painting inspection request,
1. Click Blasting and Painting – RFIin the Production – RFI
The Blasting and Painting Report page opens.

Figure 8.21: Blasting and Painting Report page
8.21.1 Add a Blasting and Painting Inspection Request
If you want to add a blasting and painting inspection request, do the following steps,
1. Click  (ADD button) in the Blasting and Painting Report
The page shows a new window to add the details of the blasting and painting inspection request.

Tip: A report number and an RFI number for a new blasting and painting inspection report will be updated automatically in the Report Number and the RFI Number boxes, respectively.
2. In the Inspection Date box, select the inspection date.
3. In the Time box, select the inspection time.
4. In the Prepared By box, enter the name of a person who has prepared the blasting and painting inspection request.
5. In the Approved By box, enter the name of a person who has approved the blasting and painting inspection request.
6. In the Prepared Date box, choose the prepared date of the blasting and painting inspection request.
7. In the Approved Date box, choose the approved date of the blasting and painting inspection request.
8. Click Save.
The blasting and painting inspection request is added and listed in the Blasting and Painting Report page.
8.21.2 Edit MRR for a Blasting and Painting Inspection Request
If you want to edit the MRR details of any existing blasting and painting inspection request in the Blasting and Painting Report page, do the following steps,
1. Click (Edit icon)in the Edit column for the respective blasting and painting inspection See Fig 8.21.
The page shows a new window to add the MRR details of added blasting and painting inspection request.
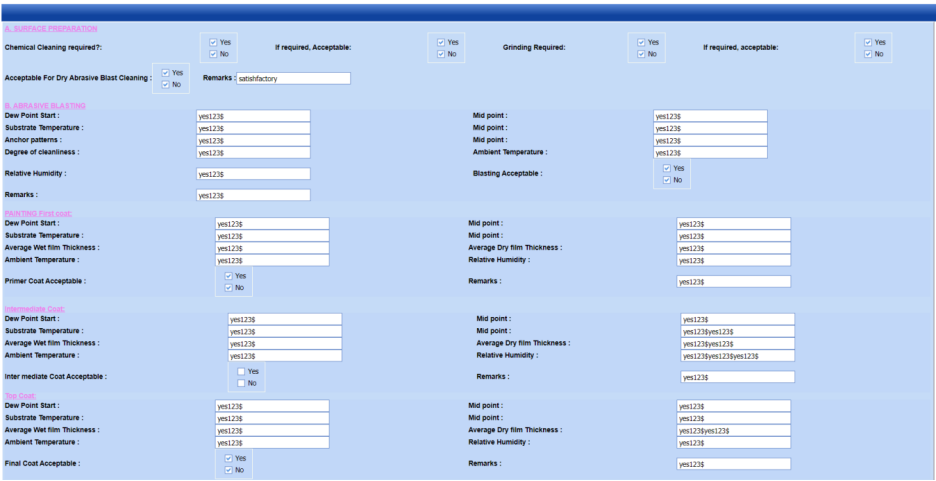
2. In the SURFACE PREPARATION field, enter the surface preparation details.
3. In the ABRASIVE BLASTING field, enter the abrasive preparation details.
4. In the Painting First Coat field, enter the details of first coat painting.
5. In the Intermediate Coat field, enter the details of intermediate coat.
6. In the Top Coat field, enter the details of top coat.
8.21.3 Submit a Blasting and Painting Inspection Request
Once you have added the blasting and painting inspection request, the Submission column in the Blasting and Painting Report page is appeared with (Submit and Reject icons). See Fig 8.21.
1. If you want to submit the blasting and painting inspection request, click (Submit icon) in the Submission Otherwise click (Reject icon) to reject the request.
The submitted request will be moved to for the blasting and painting inspection. The request submitted status will be updated in the Submitted column. Once the blasting and painting inspection results are updated, the completed status will be updated in the Completed column.
8.21.4 Add RFI Data for a Blasting and Painting Inspection Request
If you want to add the details of RFI data for the added blasting and painting inspection request, do the following steps,
1. Click (Add icon) in the RFI Data column of the Blasting and Painting Report See Fig 8.21.
The RFI Inspection Request List window opens.

2. In the Inspection To box, enter the detail to where the inspection should end.
3. In the Inspection Details option, select what type of inspection to be performed based on your requirement.
4. In the NDT Inspection box, enter the NDT inspection detail.
5. In the Description box, enter the description for the inspection request.
6. In the RFI Date box, choose the RFI date.
7. In the Remarks box, enter your remarks if any.
8. Click Save.
8.21.5 View RFI Report for a Blasting and Painting Inspection Request
If you want to view the RFI report for the blasting and painting inspection request, click (Print icon) provided in the RFI Report column.
8.21.6 View a Blasting and Painting Report for a Blasting and Painting Inspection Request
If you want to view the blasting and painting report, click (Print icon) provided in the Report column.
8.21.7 Attach a File into a Blasting and Painting Inspection Request
If you want to attach a file with any blasting and painting inspection request listed in the Blasting and Painting Report page, you can use (Attach icon) provided in the Attachment column for the respective blasting and painting inspection request. To know how to attach, see the topic, “Attach a file into a PQR”.
8.22 Miscellaneous – RFI
The Miscellaneous – RFI tab in the Production – RFI menu used to add the vessel NDT inspection request. To add the vessel NDT inspection request,
1. Click Miscellaneous – RFI in the Production – RFI
The Vessel NDT Report page opens.
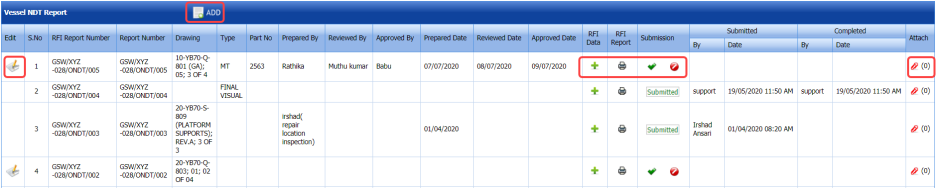
Figure 8.22: Vessel NDT Report page
8.22.1 Add a Vessel NDT Inspection Request
If you want to add a vessel NDT inspection request, do the following steps,
1. Click  (ADD button) in the Vessel NDT Report
The page shows a new window to add the details of the vessel NDT inspection request.

Tip: A report number and an RFI number for a new vessel NDT inspection report will be updated automatically in the Report Number and the RFI Report Number boxes, respectively.
2. In the Drawing box, select a drawing from a drop-down list.
3. In the Type box, select the NDT type.
4. In the Part No box, enter the part number.
5. In the Prepared By box, enter the name of a person who has prepared the vessel NDT inspection request.
6. In the Reviewed By box, enter the name of a person who has reviewed the vessel NDT inspection request.
7. In the Approved By box, enter the name of a person who has approved the vessel NDT inspection request.
8. In the Prepared Date box, choose the prepared date of the vessel NDT inspection request.
9. In the Reviewed Date box, choose the reviewed date of the vessel NDT inspection request.
10. In the Approved Date box, choose the approved date of the vessel NDT inspection request.
11. Click Save.
The vessel NDT inspection request is added and listed in the Vessel NDT Report page.
8.22.2 Submit a Vessel NDT Inspection Request
Once you have added the vessel NDT inspection request, the Submission column in the Vessel NDT Report page is appeared with (Submit and Reject icons). See Fig 8.22.
1. If you want to submit the vessel NDT inspection request, click (Submit icon) in the Submission Otherwise click (Reject icon) to reject the request.
The submitted request will be moved to for the vessel NDT inspection. The request submitted status will be updated in the Submitted column. Once the vessel NDT inspection results are updated, the completed status will be updated in the Completed column.
8.22.3 Edit a Vessel NDT Inspection Request
|
Note that if the vessel NDT inspection request has been submitted, you cannot edit the respective request. |
If you want to edit any existing vessel NDT inspection request in the Vessel NDT Report page, do the following steps,
1. Click  (Edit icon) in the Edit column for the respective vessel NDT inspection See Fig 8.22.
The page shows the details of added vessel NDT inspection request.

2. Click on any box where you want to edit the details, and then edit the details in the respective box.
3. Click Save.
8.22.4 Add RFI Data for a Vessel NDT Inspection Request
If you want to add the details of RFI data for the added vessel NDT inspection request, do the following steps,
1. Click (Add icon) in the RFI Data column of the Vessel NDT Report See Fig 8.22.
The RFI Inspection Request List window opens.

2. In the Inspection To box, enter the detail to where the inspection should end.
3. In the Inspection Details option, select what type of inspection to be performed based on your requirement.
4. In the NDT Inspection box, enter the NDT inspection detail.
5. In the Description box, enter the description for the inspection request.
6. In the RFI Date box, choose the RFI date.
7. In the Remarks box, enter your remarks if any.
8. Click Save.
8.22.5 View RFI Report for a Vessel NDT Inspection Request
If you want to view the RFI report for the vessel NDT inspection request, click (Print icon) provided in the RFI Report column.
8.22.6 Attach a File into a Vessel NDT Inspection Request
If you want to attach a file with any vessel NDT inspection request listed in the Vessel NDT Report page, you can use (Attach icon) provided in the Attachment column for the respective vessel NDT inspection request. To know how to attach, see the topic, “Attach a file into a PQR”.
8.23 Post Weld Heat Treatment (PWHT) – RFI
The PWHT Report – RFI tab in the Production – RFI menu used to add the PWHT inspection request. To add the PWHT inspection request,
1. Click PWHT Report – RFI in the Production – RFI
The PWHT Report page opens.

Figure 8.23: PWHT Report page
8.23.1 Add a PWHT Inspection Request
If you want to add a PWHT inspection request, do the following steps,
1. Click  (ADD button) in the PWHT Report
The page shows a new window to add the details of the PWHT inspection request.

Tip: A report number and an RFI number for a new PWHT inspection report will be updated automatically in the Report Number and the RFI Report Number boxes, respectively.
2. In the Drawing box, select a drawing from a drop-down list.
3. In the Prepared By box, enter the name of a person who has prepared the PWHT inspection request.
4. In the Reviewed By box, enter the name of a person who has reviewed the PWHT inspection request.
5. In the Approved By box, enter the name of a person who has approved the PWHT inspection request.
6. In the Prepared Date box, choose the prepared date of the PWHT inspection request.
7. In the Reviewed Date box, choose the reviewed date of the PWHT inspection request.
8. In the Approved Date box, choose the approved date of the PWHT inspection request.
9. In the Title box, enter the title detail.
10. In the Remarks box, enter your remarks if any.
11. Click Save.
The PWHT inspection request is added and listed in the PWHT Inspection Report page.
8.23.2 Submit a PWHT Inspection Request
Once you have added the PWHT inspection request, the Submission column in the PWHT Inspection Report page is appeared with (Submit and Reject icons). See Fig 8.23.
1. If you want to submit the PWHT inspection request, click (Submit icon) in the Submission Otherwise click (Reject icon) to reject the request.
The submitted request will be moved to for the PWHT inspection. The request submitted status will be updated in the Submitted column. Once the PWHT inspection results are updated, the completed status will be updated in the Completed column.
8.23.3 Edit a PWHT Inspection Request
|
Note that if the PWHT inspection request has been submitted, you cannot edit the respective request. |
If you want to edit any existing PWHT inspection request in the PWHT Inspection Report page, do the following steps,
1. Click (Edit icon) in the Edit column for the respective PWHT inspection See Fig 8.23.
The page shows the details of added PWHT inspection request.

2. Click on any box where you want to edit the details, and then edit the details in the respective box.
3. Click Save.
8.23.4 Add RFI Data for a PWHT Inspection Request
If you want to add the details of RFI data for the added PWHT inspection request, do the following steps,
1. Click (Add icon) in the RFI Data column of the PWHT Inspection Report See Fig 8.23.
The RFI Inspection Request List window opens.

2. In the Inspection To box, enter the detail to where the inspection should end.
3. In the Inspection Details option, select what type of inspection to be performed based on your requirement.
4. In the NDT Inspection box, enter the NDT inspection detail.
5. In the Description box, enter the description for the inspection request.
6. In the RFI Date box, choose the RFI date.
7. In the Remarks box, enter your remarks if any.
8. Click Save.
8.23.5 View RFI Report for a PWHT Inspection Request
If you want to view the RFI report for the PWHT inspection request, click (Print icon) provided in the RFI Report column.
8.23.6 Attach a File into a PWHT Inspection Request
If you want to attach a file with any PWHT inspection request listed in the PWHT Inspection Report page, you can use (Attach icon) provided in the Attachment column for the respective PWHT inspection request. To know how to attach, see the topic, “Attach a file into a PQR”.
8.24 Pre-welding Inspection - RFI
The Pre-welding – RFI tab in the Production – RFI menu used to add the pre-welding inspection request. To add the pre-welding inspection request,
1. Click Pre-welding – RFI in the Production – RFI
The Pre-welding Inspection Report page opens.

Figure 8.24: Pre-welding Inspection Report page
8.24.1 Add a Pre-welding Inspection Request
If you want to add a pre-welding inspection request, do the following steps,
1. Click  (ADD button) in the Pre-welding Inspection Report
The page shows a new window to add the details of the pre-welding inspection request.

Tip: A report number and an RFI number for a new pre-welding inspection report will be updated automatically in the Report Number and the RFI Report Number boxes, respectively.
2. In the Drawing box, select a drawing from a drop-down list.
3. In the Type box, select the NDT type.
4. In the Part No box, enter the part number.
5. In the Prepared By box, enter the name of a person who has prepared the pre-welding inspection request.
6. In the Reviewed By box, enter the name of a person who has reviewed the pre-welding inspection request.
7. In the Approved By box, enter the name of a person who has approved the pre-welding inspection request.
8. In the Prepared Date box, choose the prepared date of the pre-welding inspection request.
9. In the Reviewed Date box, choose the reviewed date of the pre-welding inspection request.
10. In the Approved Date box, choose the approved date of the pre-welding inspection request.
11. Click Save.
The pre-welding inspection request is added and listed in the Pre-welding Inspection Report page.
8.24.2 Submit a Pre-welding Inspection Request
Once you have added the pre-welding inspection request, the Submission column in the Pre-welding Inspection Report page is appeared with (Submit and Reject icons). See Fig 8.24.
1. If you want to submit the pre-welding inspection request, click (Submit icon) in the Submission Otherwise click (Reject icon) to reject the request.
The submitted request will be moved to for the pre-welding inspection. The request submitted status will be updated in the Submitted column. Once the pre-welding inspection results are updated, the completed status will be updated in the Completed column.
8.24.3 Edit a Pre-welding Inspection Request
|
Note that if the pre-welding inspection request has been submitted, you cannot edit the respective request. |
If you want to edit any existing pre-welding inspection request in the Pre-welding Inspection Report page, do the following steps,
1. Click  (Edit icon) in the Edit column for the respective pre-welding inspection See Fig 8.24.
The page shows the details of added pre-welding inspection request.

2. Click on any box where you want to edit the details, and then edit the details in the respective box.
3. Click Save.
8.24.4 Add RFI Data for a Pre-welding Inspection Request
If you want to add the details of RFI data for the added pre-welding inspection request, do the following steps,
1. Click (Add icon) in the RFI Data column of the Pre-welding Inspection Report See Fig 8.24.
The RFI Inspection Request List window opens.

2. In the Inspection To box, enter the detail to where the inspection should end.
3. In the Inspection Details option, select what type of inspection to be performed based on your requirement.
4. In the NDT Inspection box, enter the NDT inspection detail.
5. In the Description box, enter the description for the inspection request.
6. In the RFI Date box, choose the RFI date.
7. In the Remarks box, enter your remarks if any.
8. Click Save.
8.24.5 View RFI Report for a Pre-welding Inspection Request
If you want to view the RFI report for the pre-welding inspection request, click (Print icon) provided in the RFI Report column.
8.24.6 Attach a File into a Pre-welding Inspection Request
If you want to attach a file with any pre-welding inspection request listed in the Pre-welding Inspection Report page, you can use (Attach icon) provided in the Attachment column for the respective pre-welding inspection request. To know how to attach, see the topic, “Attach a file into a PQR”.
No Comments