
Materials
2.0 Materials
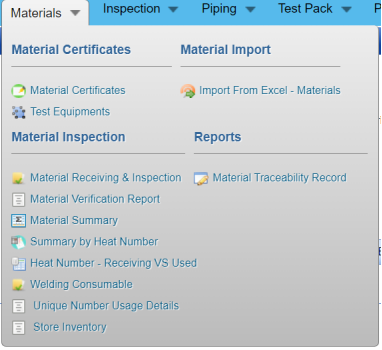
2.1 Material Receiving and Inspection (Heat Numbers)
Material Receiving Inspection validates quality of purchased raw materials based on set acceptance criteria before the materials are used for the piping project.
The Material Receiving and Inspection tab in the Materials menu helps you to add an incoming material inspection report (MIR). Incoming MIR includes material name, material size, material specification, heat numbers, and material type.
If you want to add an incoming MIR, do the following,
1. Click the Material Receiving and Inspectiontab in the Materials
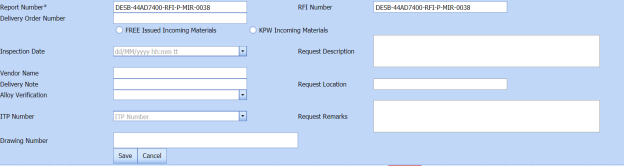
The Incoming Material Inspection Report page opens.

Figure 2.1: Incoming Material Inspection Report page
2.1.1 Add an Incoming MIR
If you want to add an incoming MIR,
1. Click  (ADD button) in the Incoming Material Inspection Report See Fig 2.1.
A new window opens to add an incoming MIR.
 Note: The fields notified with a symbol (*) are mandatory. You must enter the relevant details in that fields before saving.
 Tip: A report number and a Request for Inspection (RFI) number for a new MIR will be updated automatically in the Report Number and the RFI Number boxes, respectively.
2. In the Delivery Order Number box, enter the material’s delivery order number.
3. If materials are purchased from outside, select the KPW Incoming Materials option, and then enter the relevant details in the respective boxes. KPW incoming materials will be added to StoreInventory after MIR submission.

a. In the O. Nobox, enter the purchase order number.
b. In the Datedbox, choose the date of the purchase order.
c. In the Received Onbox, select the received date of materials.
4. If the materials are received from a client, select the FREE Issued Materialsoption, and then enter the relevant details in the respective boxes. Free issued Materials will be added to Store Inventory after MIR submission
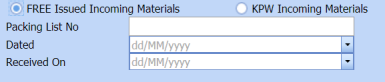
a. In the Packing List Nobox, enter the packing list number.
b. In the Datedbox, choose the date of packing.
c. In the Received Onbox, choose the received date of materials.
5. In the Inspection Datebox, choose the date of inspection.
6. In the Vendor Name box, enter the vendor name.
7. In the Request Descriptionbox, enter the request description.
8. In the ITP Numberbox, select an ITP number.
9. In the Delivery Note box, enter the delivery note.
10. In the Location box, enter the location name.
11. In the Sub Contractorbox, select the subcontractor name from a drop-down list.
12 . Click Save.
The incoming MIR is successfully added. Once you have added the MIR, you must add the material details for the added MIR.
2.1.2 Add Materials for an MIR
If you want to add the details of materials for the added incoming MIR, do the following steps,
1. Click  (Edit icon) in the Edit MIR column of the Incoming Material Inspection Report See Fig 2.1.
The Add/Edit - Materials window opens.

Figure 2.1.2: Add/Edit – Materials window
2. Click  (ADD button) in the Add/Edit - Materials
A new window opens to add the material details.

 Note: The fields notified with a symbol (*) are mandatory. You must enter the relevant details in that fields before saving.
3. In the Material Descriptionbox, enter the material description.
4. In the MaterialSize box, select the size of the material.
5. In the Material Specification box, enter the material specification.
6. In the Material Typebox, enter the type of the material.
7. In the Quantity Requiredbox, enter the required quantity of the material.
8. In the Item Nobox, enter the item number. This will be added as Item code in the store inventory
9. In the Weightbox, enter the weight of the material.
10. In the Componentbox, select a component.
11. Click Update.
Once you have added the material details, you must add the heat numbers for the added materials.
2.1.3 Add Heat Numbers
1. Click  (Add icon) of the respective material in the Add/Edit - Materials See Fig 2.1.2.
The Heat Numbers window opens.

2. Click  (ADD button) in the Heat Numbers
A new window opens to add a heat number.

3. In the Heat Number/Certificatesbox, select the heat number from a drop-down list. This heat number can be used in Fit up after Material Issuance.
4. In the Plate Number/Coil Number/ Tag Numberbox, enter the plate number or coil number or tag number of the material.
5. In the Delivery Quantity (Total)box, enter the total delivery quantity of the material including UOM. This quantity can be added in store inventory after MIR submission and it cannot change after added in store inventory.
6. In the Delivery Quantity (Partial)box, enter the partial delivery quantity of the material including UOM.
7. In the Dimensions option, select Acceptedor Rejected based on the inspection detail.
8. In the Visual option, select Acceptedor Rejected based on the inspection detail.
9. In the Mill Test Certificates (MTC) option, select Acceptedor Rejected based on the inspection detail.
10. In the Remarks box, enter your remarks if any.
11. If the heat treatment is required for the material, select YESin the Heat Treatment Otherwise select NO.
12. In the NDE is required for the material, select YESin the NDE Otherwise select NO.
13. Click Update.
 Note: If you want to manage the review material TC, click
  (Add icon). The Review Material TC window opens to add the material checklist detail.
1.1.4 Add MIR Details
If you want to add the optional details of MIR,
1. Click  (Add icon) in the Add See Fig 2.1.
The MIR Details window opens.
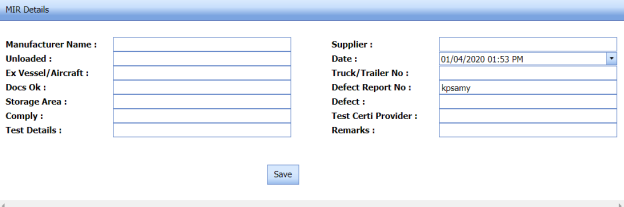
2. In the ManufacturerName box, enter the manufacturer name.
3. In the Supplierbox, enter the supplier name.
4. In the Unloadedbox, enter the unloaded detail.
5. In the Datebox, select the date of MIR.
6. In the Truck/Trailer Nobox, enter the truck/trailer number.
7. In the Defect Report Nobox, enter the defect report number.
8. In the Storage Areabox, enter the storage area name.
9. In the Defectbox, enter the defect detail.
10. In the Remarksbox, enter your remarks if any.
11. Click Save.
2.2 Store Inventory
The Store Inventory tab in the Materials menu used to add an item code including quantity in the store inventory. To add item code in the store inventory,
1. Click Store Inventoryin the Materials
The Store Inventory page opens.

Figure 2.2: Store Inventory page
2.2.1 Add a Store Inventory
If you want to add a Store Inventory,
1. Select Inventory type KPW/FIM/Offcut.
2. Click  (ADD button) in the Store Inventory See Fig 2.2.
The page opens a new window to add the details of Store Inventory.

 Note: The field notified with a symbol (*) is mandatory. You must enter the relevant details in that fields before saving.
In the Item Code box, enter an item code.
- In the Descriptionbox, enter the description of an item code.
- Click Save.
An item code including the quantity is successfully added and listed in the Store Inventory page.
2.2.2 Edit a Store Inventory
If you want to edit any existing item code quantity in the Store Inventory page, do the following,
1. Click  (Edit icon) in the Edit column for the respective Store Inventory. See Fig 2.4.
The page shows the details of the selected item code.
2. Click stock quantity box, and then edit the quantity.
3. Click Save.
2.2.3 Export Store Inventory List
You can export a list of Item codes added in the Store Inventory page in both the pdf and excel formats.
1. If you want to export the store inventory list in the pdf format, click  (PDF button).
The Store Inventory list will be downloaded as a pdf file.
2. If you want to export the store inventory list in the excel format, click  (Excel button).
The Store Inventory list will be downloaded as an excel file.
2.2.4 Filter a Store Inventory
If you want to filter any Store Inventory from the list of Item codes in the Store Inventory page, do the following,
1. Click  (FILTER button) located on the Store Inventory See Fig 2.2.
Once you clicked the Filter button, the filter box opens in each column of the Store Inventory page.

- Enter relevant detail in the respective column’s filter box to filter a Store Inventory you want.
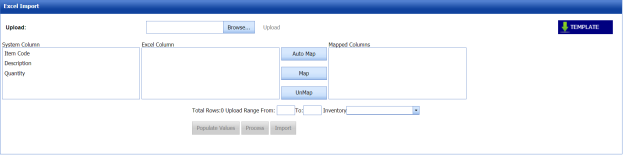
2.2.5 Import Store Inventory
If you want to import multiple Item codes in store inventory together, do the following,
1. Click  (IMPORT button). See Fig 2.2.
The Excel Import page opens.
2. Click  (TEMPLATE button).
An excel worksheet will be downloaded with a predefined template to enter the details of store inventory.
3. Enter the required store inventory details in the respective columns of the excel worksheet.
4. Once you have added the store inventory details in the excel worksheet, save the excel worksheet on your computer.
5. Click  (Browse button) to select the excel worksheet to be uploaded.
6. Select the excel worksheet you want to upload from your computer.
7. Click  (Upload button) to export the BOM details that are included in the excel worksheet.
The columns added in the excel worksheet will be listed in the Excel Column field.
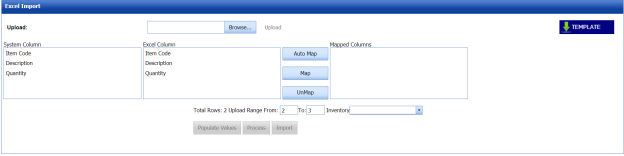
 Note: Make sure that the Excel Column field must have all the columns as in the System Column field.
8. To map the columns in the System Columnand Excel Column fields, do one of the following,
a. If you want to map the columns automatically, click  (AutoMap button).
The columns will be mapped automatically and displayed in the Mapped Columns field.
b. If you want to map each column manually, select the respective columns in both the System Columnand Excel Column fields and then click  (Map button).The selected columns will be mapped and displayed in the Mapped Columns field.
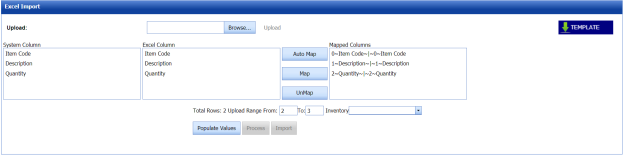
9. To un-map the columns in the Mapped Columnsfield, select the respective column and then click  (UnMap button).
 Note: In the Total Rows field, the range for uploading the data from the excel worksheet will be updated automatically.
10. Select Inventory type KPW/FIM
11. Click  (Populate Values button).
The data are populated.
12. Click  (Process button).
The system processes all the uploaded data and shows if any error with the uploaded data. You can download the error details in the excel worksheet by clicking  (Export to Excel button).
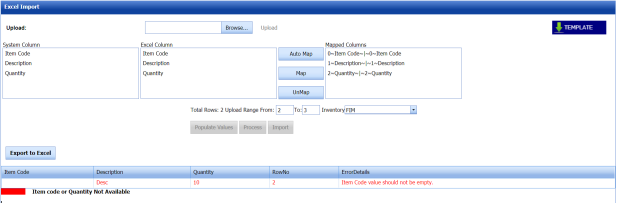
13. Once you have rectified the identified error in the excel worksheet, follow the above procedures to upload the worksheet.
- Click
 (Import button) to import the uploaded data.

The data will be successfully imported.
No Comments