
Document Progress
1.0 Document Progress
The document progress menu in the cuteQM app helps you to add collection of drawings or the documents which can be approved in multiple levels. Once you click the Document Progress menu, the following tabs open,
1.1 Drawing Type
Drawing type can be added through ADD or import of Drawing Type command.
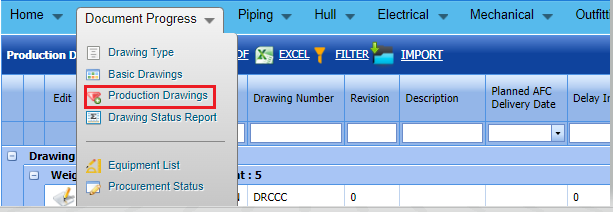
1. Click Drawing Type in the Document Progress menu.
The Drawing Type page opens.

Figure 1.1: Drawing Type page
1.1.1 Add a Drawing Type
If you want to Add Drawing type, do the following steps
- Click
 (ADD button) in the Drawing type page. See Fig 1.1.1 A new window opens to add a new Drawing type.
Figure 1.1.1 Drawing Type page
 Note: The field notified with a symbol (*) is mandatory. You must enter the relevant details in that fields before saving.
 - In the Category box, you must select the drawing category.
- In the Drawing Type box, enter the drawing type.
- Click Save. The Drawing type is successfully added.


1.1.2 Edit a Drawing Type
If you want to edit any existing Drawing type in the Drawing Type page, do the following, steps
- Click
 (Edit icon) in the Edit column for the respective drawing type. See Fig 1.1.2 A new window opens to edit the saved one.
Figure 1.1:2 Edit Page

- Click any box where you want to edit the details, and then update the details in the respective box.
- Click Save. Selected Drawing type updated successfully.


1.1.3 Delete a Drawing Type
If you want to delete any specific drawing from the list of drawing, you can use (Delete icon) provided in the Delete column of the Drawing Type page. See Fig below

-
Click
 (Delete icon) for the corresponding Drawing type.
You receive a confirmation message “Confirm delete?”.
- Click OK . Selected Drawing type deleted successfully.

1.1.4 Export Drawing Type
You can export a list of Drawing type added in the Drawing type page in both the pdf and excel formats.
-
If you want to export the Drawing type list in the pdf format, click
 (PDF button).
 The Drawing type list will be downloaded as a pdf file.
-
If you want to export the Drawing type list in the excel format, click
 (Excel button).
 The Drawing type will be downloaded as an excel file.


1.1.5 Filter a Drawing Type
If you want to filter any category and drawing Type from the list of Drawing Type in the page, do the following,
1. Click  (FILTER button) located on the Drawing Type. See Fig below
Once you clicked the Filter button, the filter box opens for the Category, and Drawing Type columns.  2. Enter relevant detail in the respective column’s filter box to filter any Category or Drawing type.
1.1.6 Import Multiple Drawing Types
If you want to import multiple Drawing Types together, do the following steps,
- Click
 (TEMPLATE button).
 - An excel worksheet will be downloaded with a predefined template to enter the details of Drawing types.

- Enter the required Drawing type and category details in the respective columns of the excel worksheet.
- Once you have added the details in the excel worksheet, save the excel worksheet on your computer.
- Click
 (IMPORT button).
 - A new window opens for importing the excel worksheet saved on your computer.
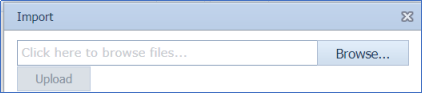
- Click
 (Browse button) to select the excel worksheet to be uploaded.
 - Click
 (Upload button) to export the drawing type that are included in the excel worksheet.


Imported successfully. The details of the Drawing Type in the worksheet will be displayed in the Drawing Type page.
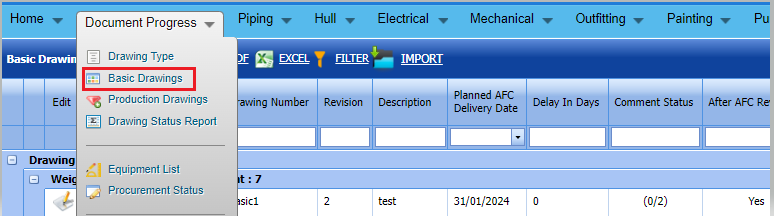
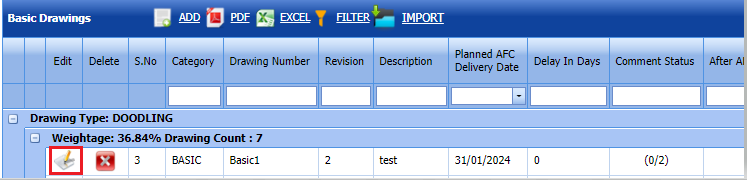
1.2 Basic Drawings
DPM_Basic role users can add Basic drawings and can create revisions.
1.2.1 Add a Basic Drawing
If you want to add a Basic Drawing, do the following steps,
Click  (ADD button) in the Add Basic Drawings. See Fig 1.2.1
 Figure 1.2. 1 Add Basic drawing page
 Note: The fields notified with a symbol (*) are mandatory. You must enter the relevant details in that fields before saving.
- DPM_Basic role user only can add Basic drawings
-
In the Basic Drawings box, enter the Drawing Type number.
-
In the Revision box, enter the revision number.
-
In the Drawing Number box, enter the drawing number of the basic drawing.
-
In the Planned AFC/Delivery Date box, select the delivery date from drop-down list.
-
In the Description box, enter your description if any.
- Click Save.
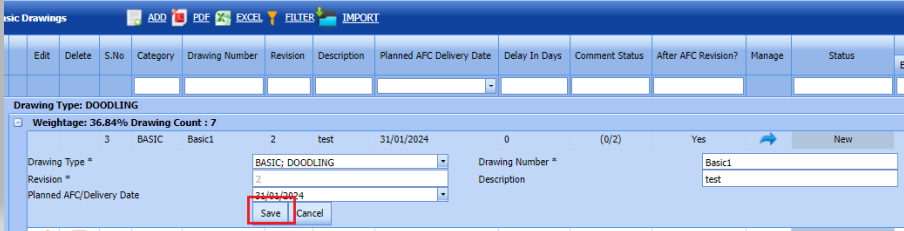
1.2.2.Edit a Basic Drawing
If you want to edit any existing Basic drawing in the Basic drawing list page, do the following steps
- Click (Edit icon) in the Edit column for the respective drawing. See Fig 1.2.2 A new window opens to edit the saved one.
Figure 1.2:2 Edit Page

- Click any box where you want to edit the details, and then update the details in the respective box.
- Click Save. Selected Basic drawing updated successfully.
1.2.3.Delete a Basic Drawing
If you want to delete any specific Basic drawing from the list of drawings, you can use (Delete icon) provided in the Delete column of the Basic Drawing page. See Fig below

-
Click
(Delete icon) for the corresponding Basic Drawing .You receive a confirmation message “Confirm delete?”.
- Click OK . Selected Basic Drawing deleted successfully.
1.2.4.Export Basic Drawing
You can export a list of Basic Drawings added in the Basic drawing page in both the pdf and excel formats.
-
If you want to export the Basic Drawings list in the pdf format, click
(PDF button). The Basic Drawings list will be downloaded as a pdf file.
-
If you want to export the Basic Drawings list in the excel format, click
(Excel button). The Basic Drawings will be downloaded as an excel file.

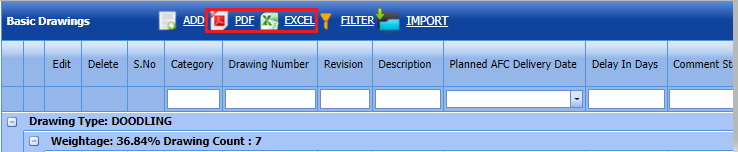
1.2.5 Filter a Basic Drawing
If you want to filter any Basic Drawings from the list of Basic Drawing , do the following steps,
Click (FILTER button) located on the Basic Drawing page. See Fig below
Once you clicked the Filter button, the filter box opens for the Drawing Type, Drawing Number,Description and Revision columns. 
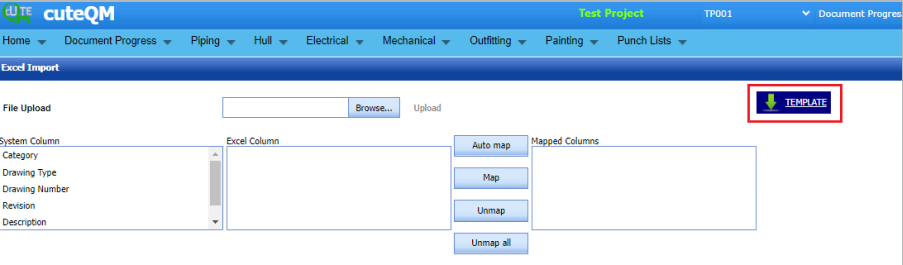
1.2.6 Import multiple Basic Drawings
If you want to Import multiple Basic drawings together, do the following steps,
- Click (IMPORT button) in the Basic drawing screen. Refer above fig
- It will redirected to import page
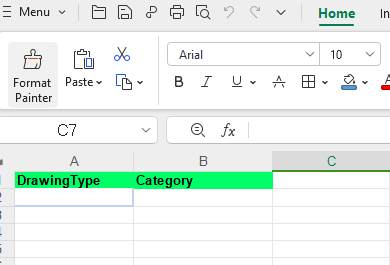
- Click (TEMPLATE button) . An excel worksheet will be downloaded with a predefined template to enter the details of Basic Drawing details.

- Enter the required Drawing type and category details in the respective columns of the excel worksheet.
- Once you have added the details in the excel worksheet, save the excel worksheet on your computer.

- After saved the excel, browse and upload the excel,
- Click populate values ,process and Import buttons. Refer below fig
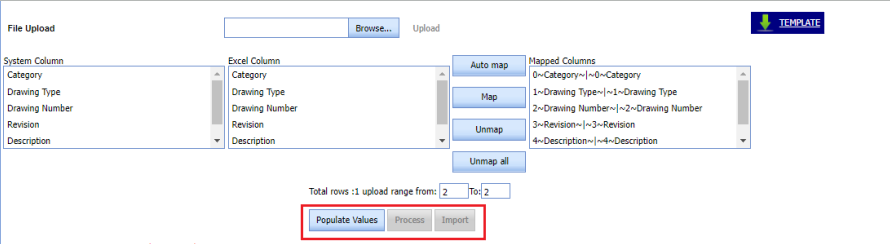
- Imported successfully, imported data will be shown in Basic drawings list screen


1.3.Basic Drawings Workflow Approval
Multiple workflow levels are there to approve Basic drawings. DPM_Basic role users only can initiate the workflow by creating basic drawings. See Fig 1.2.6
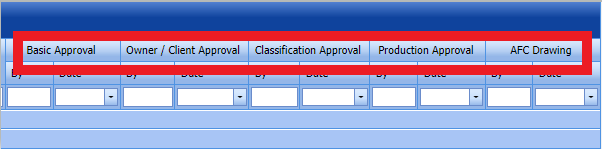 Fig 1.2.6 Workflow approvals of Basic drawings
1.3.1.Basic Approval
- DPM_Basic role users can do Basic approval
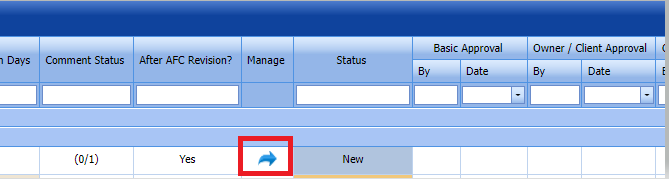
- Login as DPM_Basic role user and click Manage button placed against the basic drawing. It will redirected to details screen of the basic drawing. Refer below fig

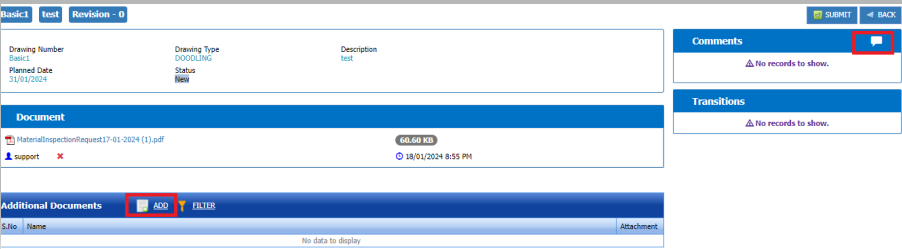
- Upload the Basic drawing which is going to approve. Refer below Fig.

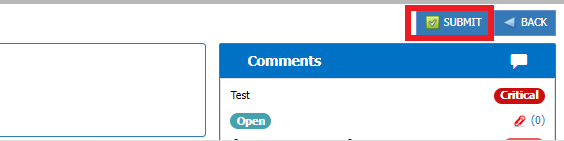
- User can add comments and additional documents in this details screen. Refer below fig.

- User can submit the added basic drawing by click the submit button placed at the top right.After Refer below fig.
- After submission, status of the basic drawing will be changed to Waiting for Owner Approval/Classification Approval.Then we can do Parallel approval for Owner/client approval or Classification approval .
- Email notification will be sent to Owner and classification users


1.3.2.Owner/Client Approval
- DPM_Owner role users can do Owner/Client approval.
- Login as DPM_Owner user and click
 manage button to view the drawing details
 - Now user can see Owner/client approve and Return buttons at the top. Refer below fig

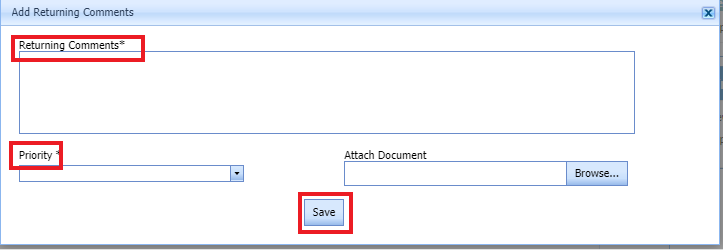
- If Return
 clicked it will redirected to popup window to enter return comments, priority and attachments.Refer below fig.
- After entering mandatory fields click save button. Refer above fig. Then New revision will be created for that drawing.
- Status will be changed to New and email notification will be sent to Creator user to submit the drawing.
- If Owner/Client approve
 clicked, then status will be changed to Waiting for Classification Approval.
 - Email notification will be sent to DPM_Classification role users to approve the drawing


1.3.3.Classification Approval
- DPM_Classification role users can do classification approval.
- Login as DPM_Classification role user and click manage button to view the drawing details .
- Now user can see Classification approve and Return buttons at the top.Refer below fig.

- If Return clicked it will redirected to popup window to enter return comments, priority and attachments. Refer below fig.
- After entering mandatory fields click save button. Refer above fig. Then New revision will be created for that drawing.
- Status will be changed to New and email notification will be sent to Creator user to submit the drawing.
- If Classification approve
 clicked , then status will be changed to Waiting for Production Approval.
 - Email notification will be sent to DPM_Production role users to approve the drawing.

1.3.4.Production Approval
- DPM_Production role user can do Production approval.
- Login as DPM_Production role user and click manage button to view the drawing details.
- Now user can see Production approve and Return buttons at the top. Refer below fig.

- If Return clicked it will redirected to popup window to enter return comments, priority and attachments. Refer below fig.
- After entering mandatory fields click save button. Refer above fig. Then New revision will be created for that drawing.
- Status will be changed to New and email notification will be sent to Creator user to submit the drawing.
- If Production Approve
 clicked , then status will be changed to Waiting for AFC .
 - Email notification will be sent to DPM_AFC role users to approve the drawing.

1.3.5.AFC Approval
- DPM_AFC user can approve drawing at any stage of the workflow .
- Login as DPM_AFC role user and click manage button to view the drawing details.
- Now user can see AFC and Return buttons at the top. Refer below fig

- If Return clicked it will redirected to popup window to enter return comments, priority and attachments. Refer below fig.
- After entering mandatory fields click save button. Refer above fig. Then New revision will be created for that drawing.
- Status will be changed to New and email notification will be sent to Creator user to submit the drawing.
- If AFC
 clicked , then status will be changed to Approved .
 - Email notification will be sent to creator user.

1.3.6.Revision
- DPM_Basic role user only can Revise the Basic drawing.
- Once Basic drawing approved, Revision button button will be enabled for DPM_Basic role users.
- Login as DPM_Basic role user and click manage button to view the drawing details.
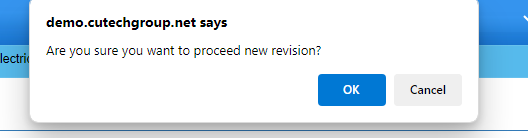
- Click Revision button at the top. Refer below fig.

- A confirmation msg will be prompted.Click Ok .Refer below fig

- New Revision of the drawing will be created. Status changed to New.
- Repeat the steps 1.3 to approve the revised drawing.

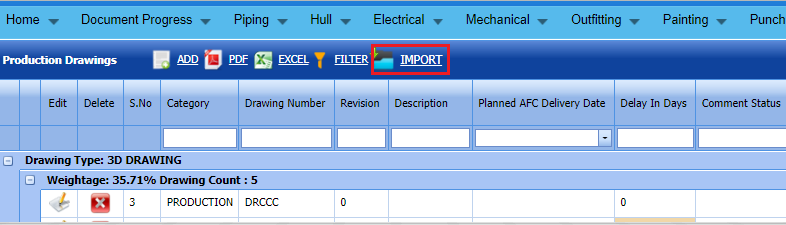
1.4 Production Drawings
DPM_Receiver role users can add Basic drawings and can create revisions.
1.4.1 Add a Production Drawing
If you want to add a Production Drawing, do the following steps.
Click (ADD button) in the Add Production Drawings. See Fig 1.4.1
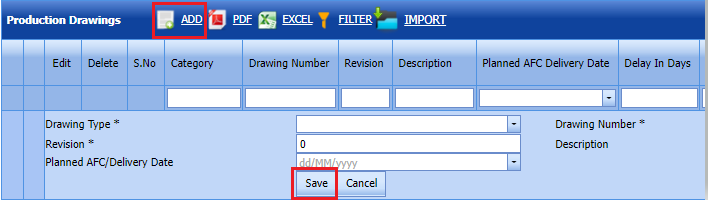
Figure 1.4. 1 Add Production drawing page
Note: The fields notified with a symbol (*) are mandatory. You must enter the relevant details in that fields before saving.
- DPM_Receiver role user only can add Basic drawings
-
In the Production Drawings box, enter the Drawing Type number.
-
In the Revision box, enter the revision number.
-
In the Drawing Number box, enter the drawing number of the basic drawing.
-
In the Planned AFC/Delivery Date box, select the delivery date from drop-down list.
-
In the Description box, enter your description if any.
- Click Save.
1.4.2.Edit a Production Drawing
If you want to edit any existing Basic drawing in the Production drawing list page, do the following steps
- Click (Edit icon) in the Edit column for the respective drawing. See Fig 1.4.2 A new window opens to edit the saved one.
Figure 1.4:2 Edit Page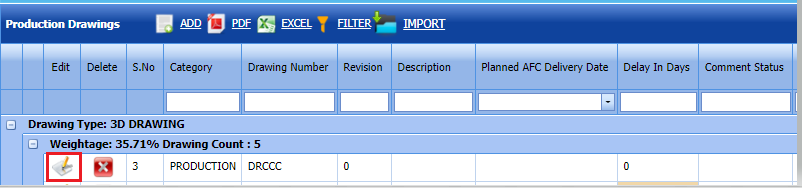
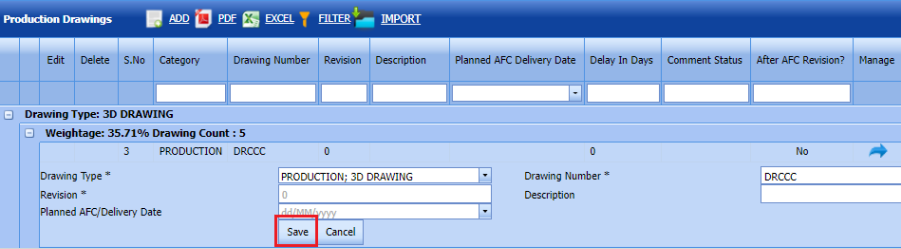
- Click any box where you want to edit the details, and then update the details in the respective box.
- Click Save. Selected Production drawing updated successfully.


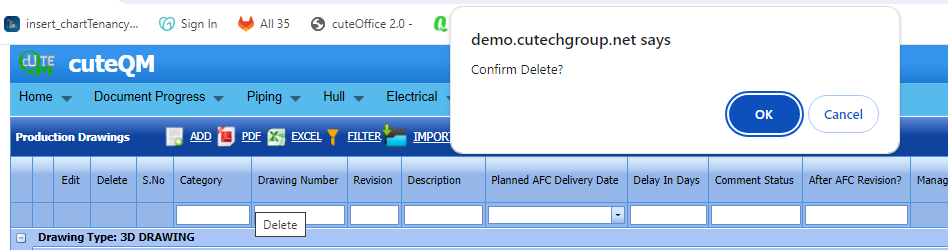
1.4.3.Delete a Production Drawing
If you want to delete any specific Production drawing from the list of drawings, you can use (Delete icon) provided in the Delete column of the Production Drawing page. See Fig below
-
Click
(Delete icon) for the corresponding Basic Drawing .You receive a confirmation message “Confirm delete?”.
- Click OK . Selected Production Drawing deleted successfully.
1.4.4.Export Production Drawing
You can export a list of Production Drawings added in the Production drawing page in both the pdf and excel formats.
-
If you want to export the Production Drawings list in the pdf format, click
(PDF button). The Production Drawings list will be downloaded as a pdf file.
-
If you want to export the Production Drawings list in the excel format, click
(Excel button). The Production Drawings will be downloaded as an excel file.
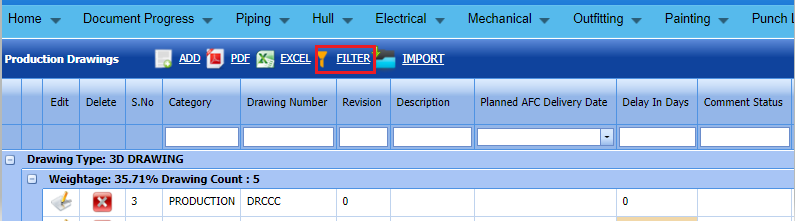
1.4.5 Filter a Production Drawing
If you want to filter any Basic Drawings from the list of Production Drawing , do the following steps,
Click (FILTER button) located on the Production Drawing page. See Fig below
Once you clicked the Filter button, the filter box opens for the Drawing Type, Drawing Number,Description and Revision columns.
1.4.6 Import multiple Production Drawings
If you want to Import multiple Production drawings together, do the following steps,
- Click (IMPORT button) in the Production drawing screen. Refer above fig.
- It will redirected to import page.
- Click (TEMPLATE button) . An excel worksheet will be downloaded with a predefined template to enter the details of Production Drawing details.
- Enter the required Drawing type and category details in the respective columns of the excel worksheet.
- Once you have added the details in the excel worksheet, save the excel worksheet on your computer.
- After saved the excel, click browse and upload the excel.
- Click populate values ,process and Import buttons. Refer below fig.
- Imported successfully, imported data will be shown in Production drawings list screen.
1.5.Production Drawings Workflow Approval
Multiple workflow levels are there to approve Production drawings. DPM_Receiver role users only can initiate the workflow by creating Production drawings. See Fig 1.5.
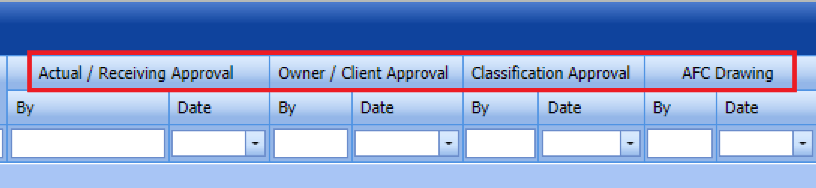
Fig 1.5.Workflow approvals of Basic drawings
1.5.1.Actual/Receiving Approval
- DPM_Receiver role users can do Basic approval
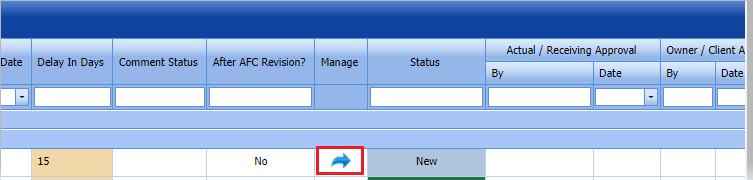
- Login as DPM_Receiver role user and click Manage button placed against the Production drawing. It will redirected to details screen of the Production drawing. Refer below fig
- Upload the Production drawing which is going to approve. Refer below Fig.
- User can add comments and additional documents in this details screen. Refer below fig.
- User can submit the added Production drawing by click the submit button placed at the top right.After Refer below fig.
- After submission, status of the Production drawing will be changed to Waiting for Owner Approval/Classification Approval.Then we can do Parallel approval for Owner/client approval or Classification approval .
- Email notification will be sent to Owner and classification users

1.5.2.Owner/Client Approval
- DPM_Owner role users can do Owner/Client approval.
- Login as DPM_Owner user and click manage button to view the drawing details
- Now user can see Owner/client approve and Return buttons at the top. Refer below fig
- If Return clicked it will redirected to popup window to enter return comments, priority and attachments.Refer below fig.
- After entering mandatory fields click save button. Refer above fig. Then New revision will be created for that drawing.
- Status will be changed to New and email notification will be sent to Creator users to submit the drawing.
- If Owner/Client approve clicked, then status will be changed to Waiting for Classification Approval.
- Email notification will be sent to DPM_Classification role users to approve the drawing
1.5.3.Classification Approval
- DPM_Classification role users can do classification approval.
- Login as DPM_Classification role user and click manage button to view the drawing details .
- Now user can see Classification approve and Return buttons at the top.Refer below fig.
- If Return clicked it will redirected to popup window to enter return comments, priority and attachments. Refer below fig.
- After entering mandatory fields click save button. Refer above fig. Then New revision will be created for that drawing.
- Status will be changed to New and email notification will be sent to creator users to submit the drawing.
- If Classification approve clicked , then status will be changed to Waiting for AFC.
- Email notification will be sent to DPM_AFC role users to approve the drawing.
1.5.4.AFC Approval
- DPM_AFC user can approve drawing at any stage of the workflow .
- Login as DPM_AFC role user and click manage button to view the drawing details.
- Now user can see AFC and Return buttons at the top. Refer below fig
- If Return clicked it will redirected to popup window to enter return comments, priority and attachments. Refer below fig.
- After entering mandatory fields click save button. Refer above fig. Then New revision will be created for that drawing.
- Status will be changed to New and email notification will be sent to creator user to submit the drawing.
- If AFC clicked , then status will be changed to Approved .
- Email notification will be sent to creator user.
1.5.5.Revision
- DPM_Receiver role user only can Revise the Productionc drawing.
- Once Production drawing approved, Revision button button will be enabled for DPM_Receiver role users.
- Login as DPM_Basic role user and click manage button to view the drawing details.
- Click Revision button at the top. Refer below fig.
- A confirmation msg will be prompted.Click Ok .Refer below fig
- New Revision of the drawing will be created. Status changed to New.
- Repeat the steps 1.5 to approve the revised drawing.
1.6 Drawing Status Report
Drawing status report shown the comments to be closed for both Basic and Production drawings. Refer below fig
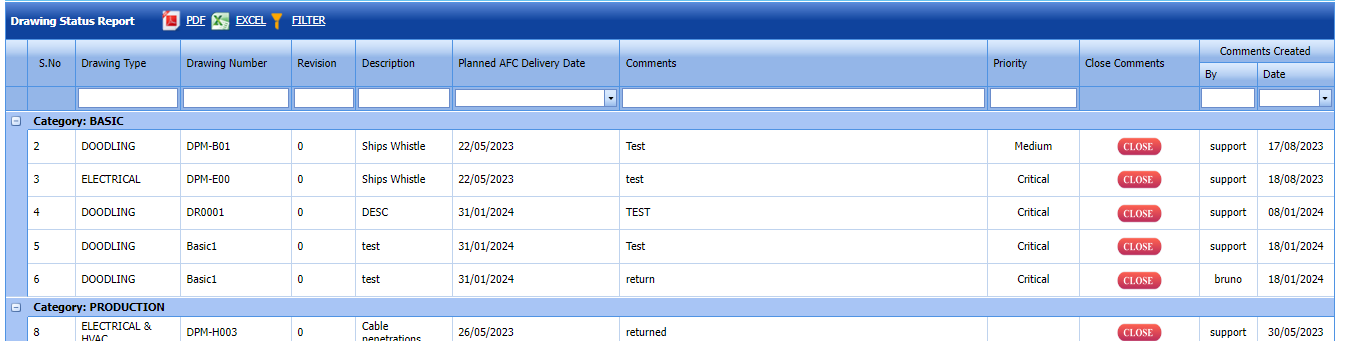
1.6.1.Export PDF & Excel
- If you want to export the Drawing status report list in the pdf format, click
 (PDF button).Drawing status report list will be downloaded as pdf format.
 - If you want to export the Drawing status report in the excel format, click (Excel button). Drawing status report list will be downloaded in excel format.

1.6.2 Filter
If you want to filter any Drawings status from the list of Drawings , do the following,
Click (FILTER button) located on the Drawing status report page. See below fig
Once you clicked the Filter button, the filter box opens for the Drawing Type, Drawing Number, and Revision ,Description ,priority & comments columns.

1.6.3 Close Comments
1.If you want to close the comments for any of the drawings, click close  button .Refer below fig

2.Once Close button clicked, confirmation msg will be prompted and click ok. Refer below fig
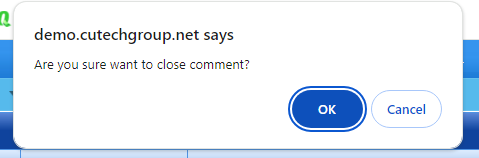
3.Comment closed successfully. It will updated against drawing in Basic drawing and Production drawing screens
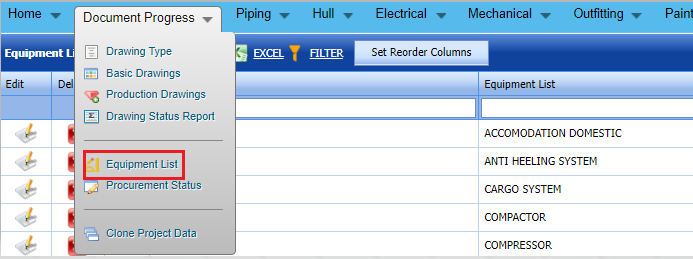
1.7 Equipment List
Equipment list screen shown the added equipments.
1.7.1 Add a Equipment
If you want to add a Equipment, do the following,
Click  (ADD button) in the Equipment list page. See Fig below
The new window open to Add Equipment

-
Note: The field notified with a symbol (*) is mandatory. You must enter the relevant details in that fields before saving.
- In the Equipment list box, you must enter equipment name
-
In the ABBR box, enter the ABBR of the equipment
- In the Remarks text box, enter remarks
-
Click Save.
The Equipment list successfully added.
1.7.2.Edit a Equipment
If you want to edit any existing Equipments in the Equipment list page, do the following steps
- Click (Edit icon) in the Edit column for the respective Equipment. See Fig 1.7.2 A new window opens to edit the saved one.
Figure 1.7.2 Edit Page

- Click any box where you want to edit the details, and then update the details in the respective box.
- Click Save. Selected Equipment updated successfully.


1.7.3.Delete a Equipment
If you want to delete any specific Equipment from the list of equipments , you can use (Delete icon) provided in the Delete column of the Equipment list page. See Fig below
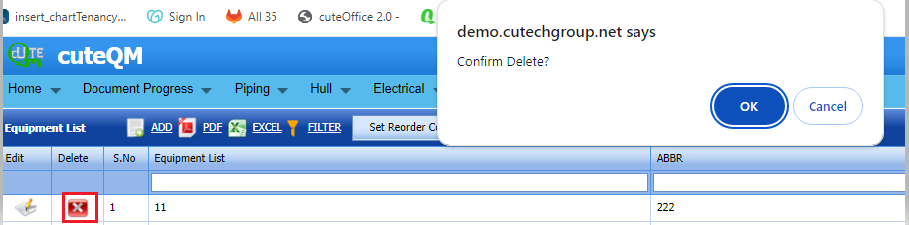
-
Click
(Delete icon) for the corresponding Equipment. .You receive a confirmation message “Confirm delete?”.
- Click OK . Selected Equipment deleted successfully.
1.7.4 Export Equipment list
- If you want to export the Equipment list in the pdf format, click (PDF button).Equipment list will be downloaded as pdf format.
- If you want to export the Equipment list in the excel format, click (Excel button). Equipment list will be downloaded in excel format.

1.7.5 Filter a Equipment
If you want to filter any Equipment from the list of equipments , do the following,
Click (FILTER button) located on the Equipment list page. See below fig
Once you clicked the Filter button, the filter box opens for the Equipment, ABBR & Remarks columns.

1.7.6 Set Reorder Columns
To Rearrange the order of the columns this button is used

Drag and change the order of the column name.Then click Set Reorder Columns ![]() button.Then the new column order will be saved.
button.Then the new column order will be saved.
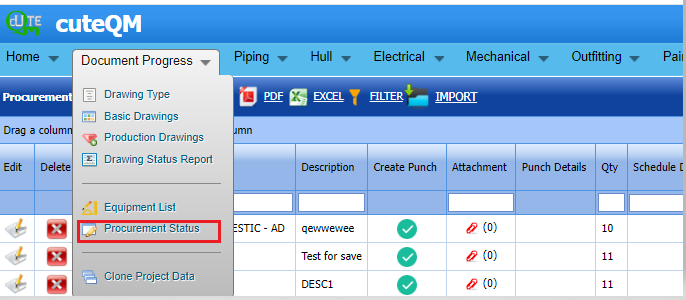
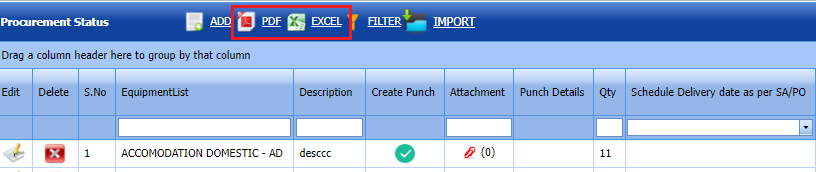
1.6 Procurement Status
Here we can create procurements and can create punchlists against the procurement status
1.6.1 Add a Procurement
If you want to add a Procurement status, do the following,
Click (ADD button) in the Procurement status page. See Fig below
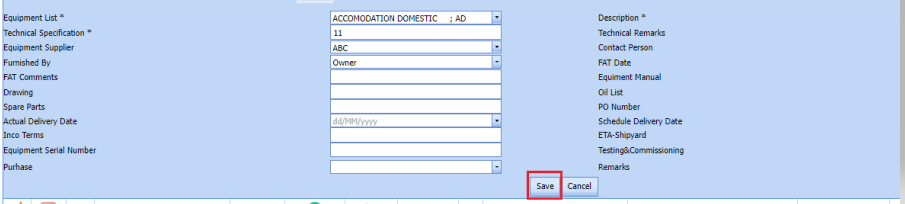
The new window open to Add Procurement status
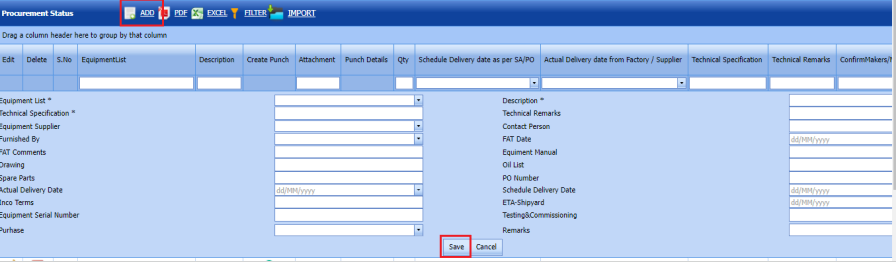
-
Note: The field notified with a symbol (*) is mandatory. You must enter the relevant details in that fields before saving.
- Fill all the fields
- Click Save.
-
The Procurement status successfully added.
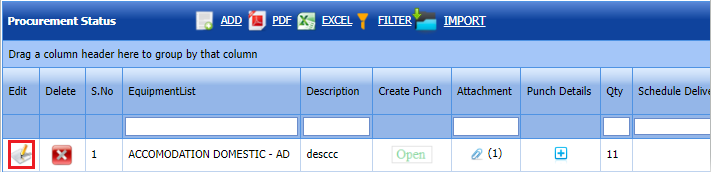
1.6.2.Edit a Procurement
If you want to edit any existing Procurement in the Procurement status list page, do the following steps
- Click (Edit icon) in the Edit column for the respective Procurement. See Fig 1.6.2 A new window opens to edit the saved one.
Figure 1.6:2 Edit Page
- Click any box where you want to edit the details, and then update the details in the respective box.
- Click Save. Selected Procurement updated successfully.

1.6.3.Delete a Procurement
If you want to delete any specific Procurement from the list of drawings, you can use (Delete icon) provided in the Delete column of the Procurement status page. See Fig below.
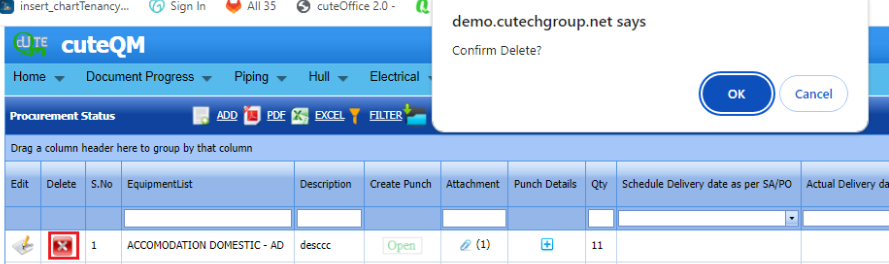
-
Click
(Delete icon) for the corresponding Procurement .You receive a confirmation message “Confirm delete?”.
- Click OK . Selected Procurement deleted successfully.
1.6.4 Export Procurement
- If you want to export the Procurement status in the pdf format, click (PDF button).Procurement status list will be downloaded as pdf format.
- If you want to export the Procurement status in the excel format, click (Excel button). Procurement status list will be downloaded in excel format.
1.6.5 Filter a Procurement
If you want to filter any Procurement status from the list of Procurement status , do the following,
Click (FILTER button) located on the Procurement status list page. See below fig
Once you clicked the Filter button, the filter box opens for all the columns.

1.6.6 Import multiple Procurements
If you want to Import multiple Procurement status together, do the following steps,
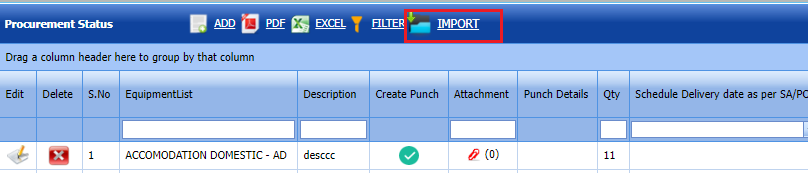
- Click (IMPORT button) in the Basic drawing screen. Refer above fig.
- It will redirected to import page.
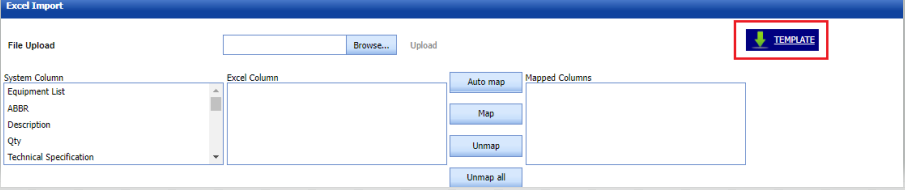
- Click (TEMPLATE button) . An excel worksheet will be downloaded with a predefined template to enter the details of Procurement details.

- Enter the required details in the respective columns of the excel worksheet.
- Once you have added the details in the excel worksheet, save the excel worksheet on your computer.

- After saved the excel, browse and upload the excel.
- Click populate values, process and Import buttons. Refer below fig
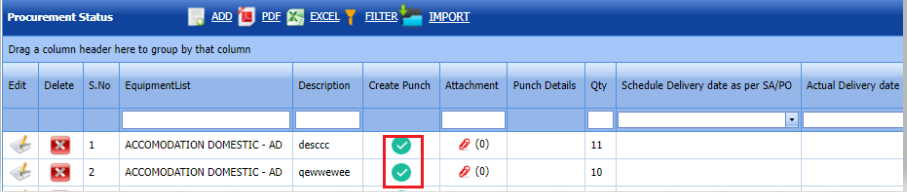
- After Imported successfully, imported data will be shown in Procurement status list screen

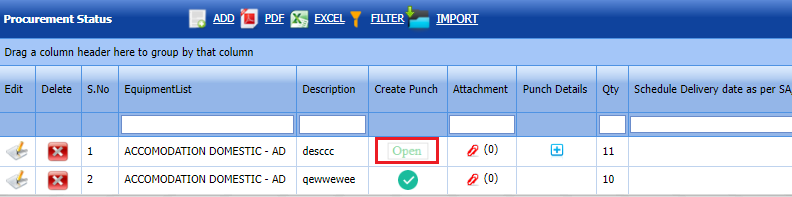
1.6.7 Create Punch
- Punchlist can be created by clicking create punch button in Procurement status list screen. Refer below fig.
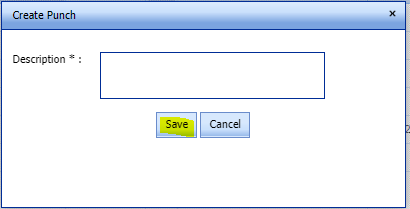
- Click Create punch
 button .Popup will be shown .Refer below fig.
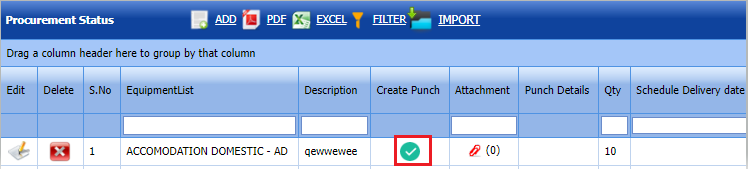
- Enter Description and click save.
- Status of the punch list changed to open.
- Go to View punch list screen and close the punch list (Refer 2.2)
- Create punch list button again enabled in Procurement list screen once punch closed in view punch list screen .


1.6.8 Punch Details
1.Click punch details button in the Procurement status list screen. Refer below fig.

2.Punch status history details will be shown

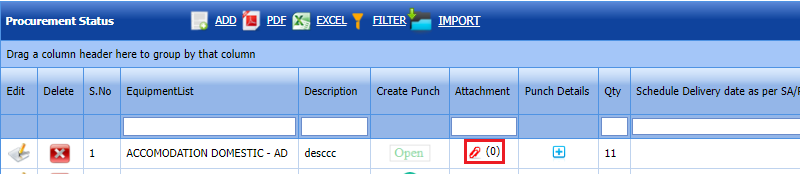
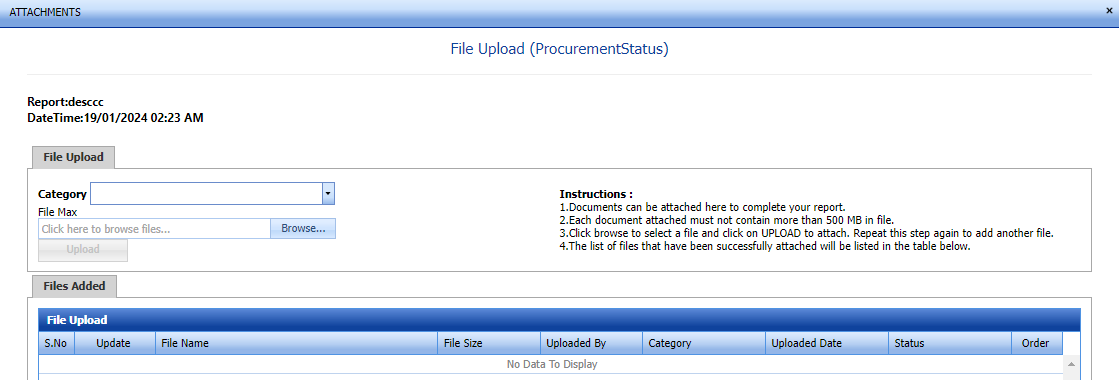
1.6.9 Attachments
User can upload multiple documents through attachment screen
- Click Attachment button in the Procurement status list screen. Refer below fig.

- It will redirected to new attachment screen. Refer below fig.

- Here user can select category of the document and browse & upload the document.
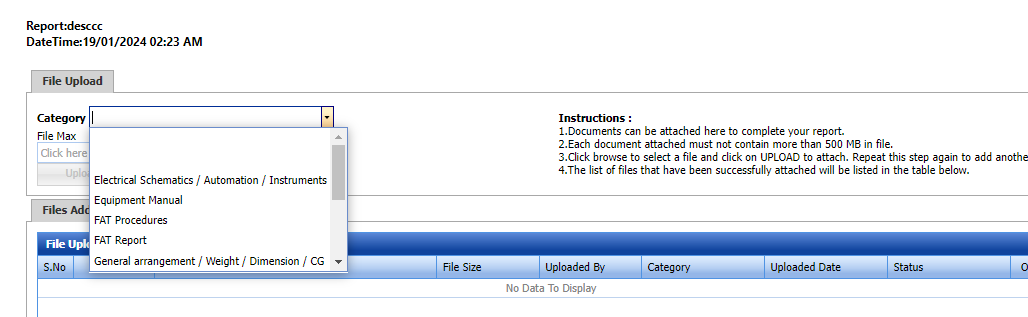
- Document uploaded successfully.
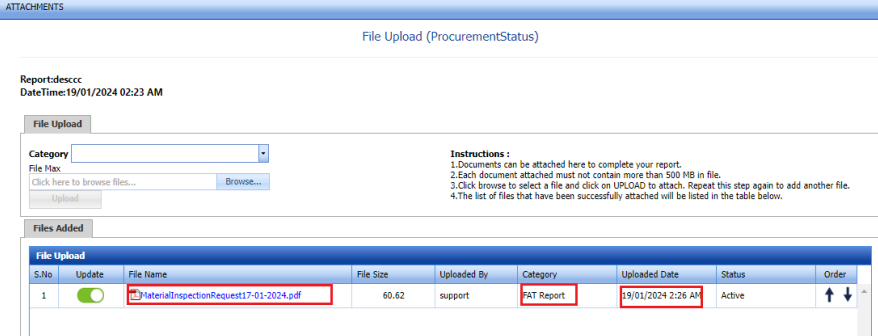
- Once document uploaded date & document name will be updated for corresponding category in the Procurement status list screen


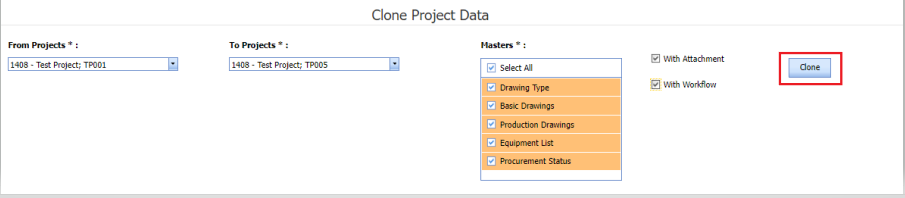
1.7 Clone Project Data
This page is used to copy the project data from one skid project to another skid project with attachments and workflow details
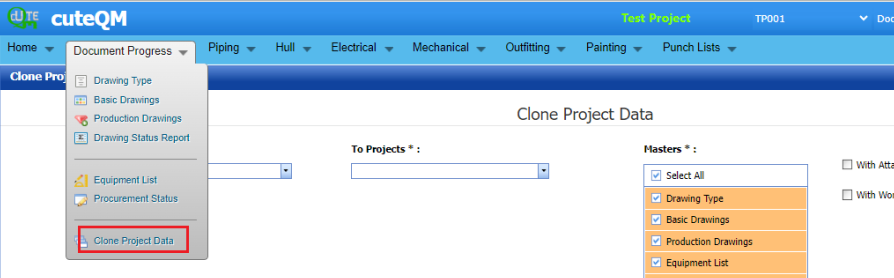
- Select From project and To project from dropdown list
- Select the master screens which are going to clone
- Select attachments and workflow check boxes if this also need to copy
- Click clone .

- Project data cloned successfully.
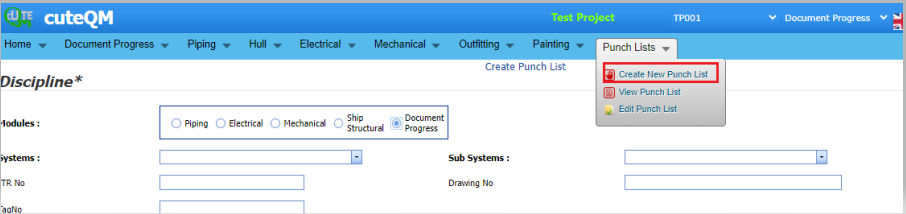
2.0 Punch Lists
A punch list is a list of items or tasks that need to be done before a Document progress project is completed. The Punch Lists menu in the home page of the cuteQM app helps to create and view the punch lists in Document progress project.
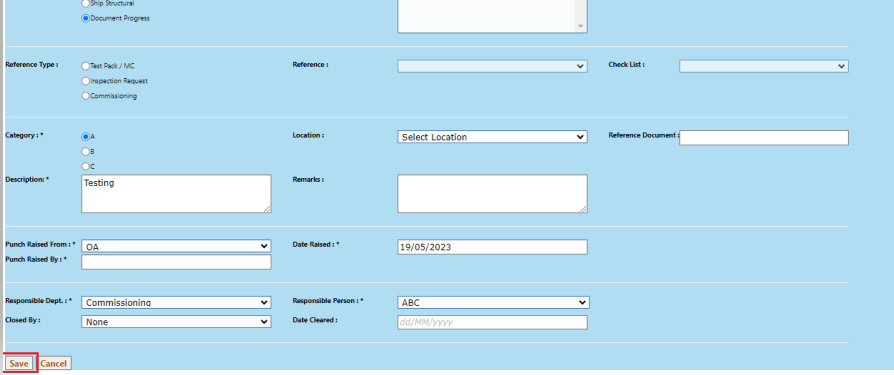
2.1 Create a New Punch List
If you want to create a punch list, do the following steps,
- Click Create punch list from punch list menu.

- It will redirected to punch list create page.
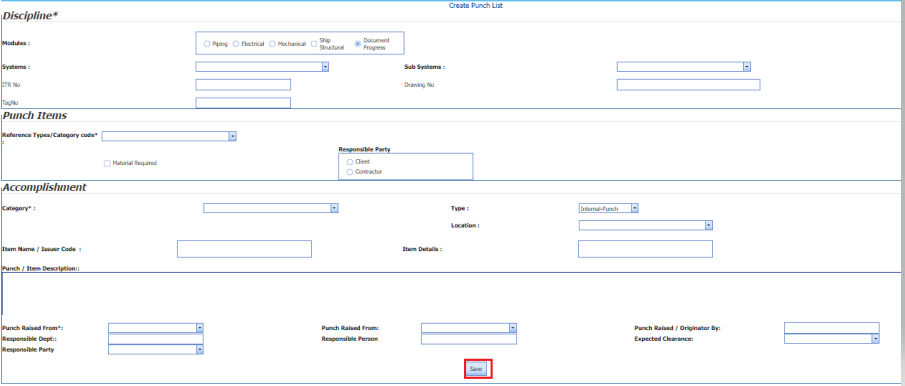
- Fill all the fields in the create page.

-
In the Modules box, select a module from the given modules.
-
In the Systems box, select a system from a drop-down list.
-
In the Sub-Systems box, select a sub-system from a drop-down list.
-
In the ITR No box, enter the ITR number.
-
In the Drawing No box, enter the drawing number.
-
In the Test Pack box, select a test pack from a drop-down list.
-
In the Tag No box, enter the tag number.
-
In the Reference Types box, select the reference type from the given options.
-
In the Select Project box, select a project from a drop-down list.
-
In the Category box, select any category from the given categories such as A, B, C & D.
-
In the Type box, select the type of punch such as whether internal or external.
- In the Item details box, enter the item details.
-
In the Location box, select a location from a drop-down list.
-
In the Item name/ Issuer code box, enter the description for the punch list.
- In the Punch Raised From box, select the detail such as from where the punch has been raised.
-
In the Date Raised box, select the date when the punch has been raised.
-
In the Punch Raised By box, enter the name of a person who has raised the punch.
- In the Responsible party box, select the responsible party for the punch.
-
In the Responsible Dept box, enter the department name, which is responsible for the punch.
-
In the Responsible Person box, enter the name of a person who is responsible for the punch.
-
In the Expected Clearance box, select the expected date of clearing the punch list.
-
Click Save.The punch list is successfully added.
2.2 View Punch Lists
The View Punch Lists tab helps you to view the punch list, which is added by using the Create New Punch List tab.
- Click View Punch Lists in the Punch Lists menu.
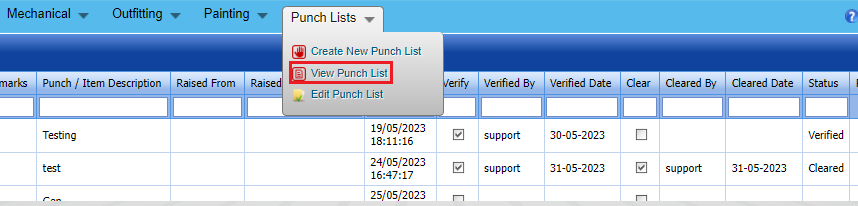
-
The Punch List page opens with added punch lists.

 Note: If you want to verify the added punch list item, click the checkbox provided in the Verify column.
 If you want to clear the added punch list item, click the checkbox provided in the Clear column.


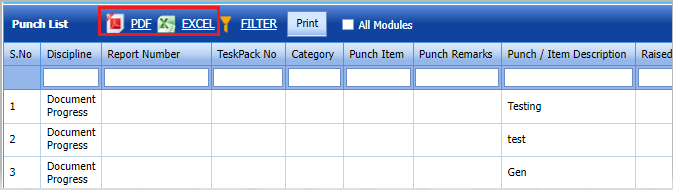
2.2.1 Export Punch lists
You can export added punch lists in the Punch lists page in both the pdf and excel formats.
-
If you want to export the punch lists in the pdf format, click
(PDF button). The punch lists will be downloaded as a pdf file.
-
If you want to export the punch lists in the excel format, click
(Excel button). The punch lists will be downloaded as an excel file.
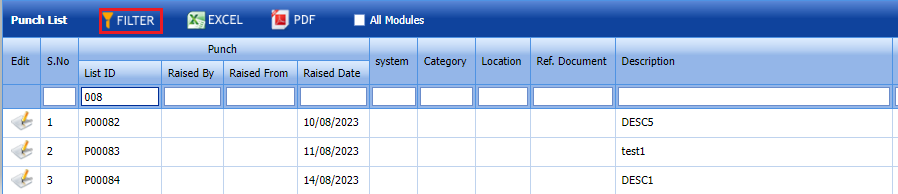
2.2.2 Filter a Punch list
If you want to filter any Punch list from the punch lists page, do the following,
1. Click (FILTER button) located on the punch lists screen. See Fig below
Once you clicked the Filter button, the filter box opens for all the columns.
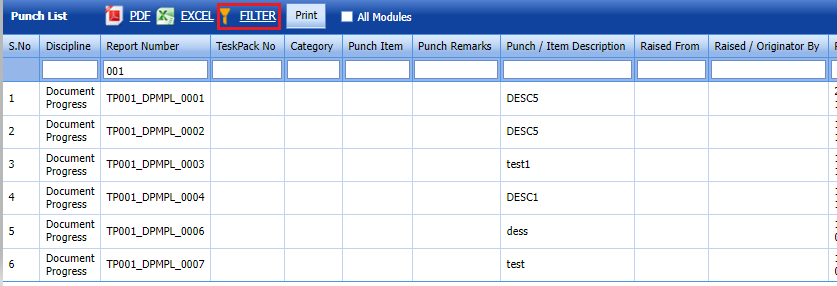
2. Enter relevant detail in the respective column’s filter box to filter any punch lists.
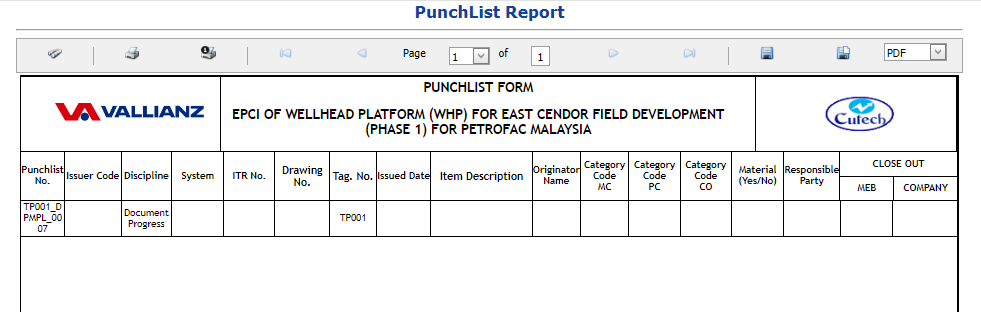
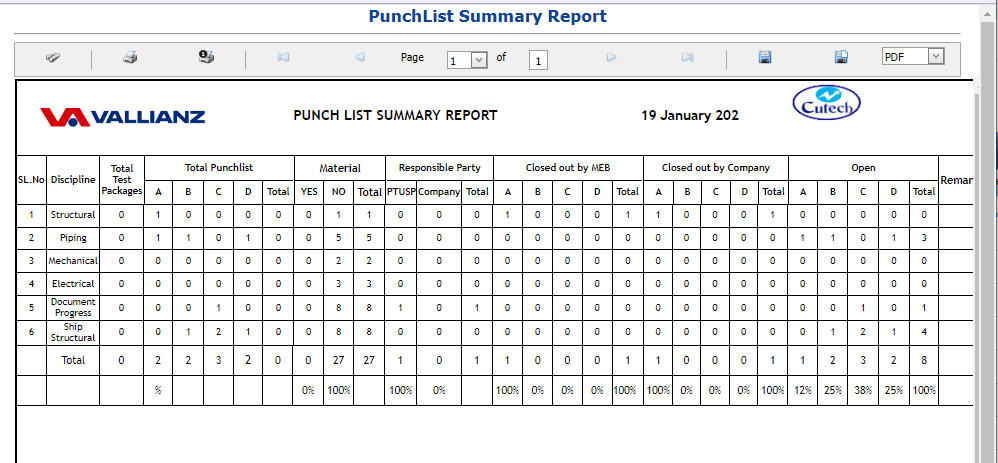
2.2.3 View a Punch List Report
-
If you want to view a punch list report, click
 (Print button) provided in the Punch List page. See fig below.
- It will redirected to new report page. And here report for the punch list shown. See fig below


2.2.4 Attach a File into a Punch List
-
If you want to attach any file with any punch list listed in the Punch List page, you can attach the file by using
 (Attach icon) in the Attachment column.
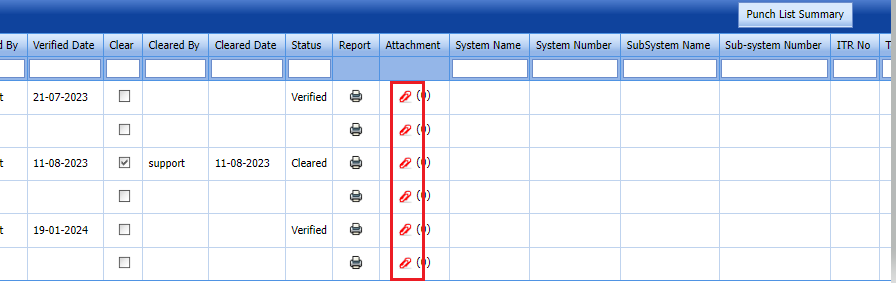
- It will redirected to new attachment page to attach files.

 Note: Before uploading any file, read the instructions given in the File Upload (Punchlist) page.
 - Click category dropdown and enter category
-
Click
 (Browse button).
 - Select a file which you want to upload from your computer.
-
Click
 (Upload button) to attach the file.


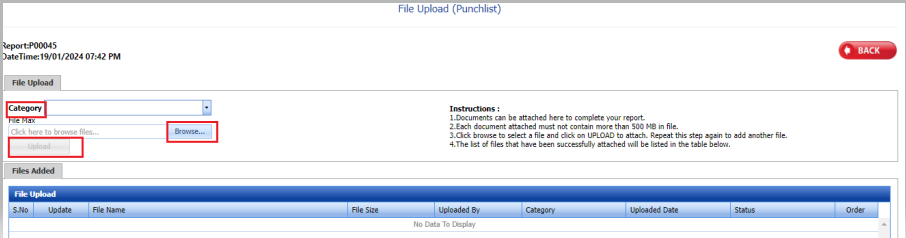


The uploaded file will be displayed in the File Upload table.

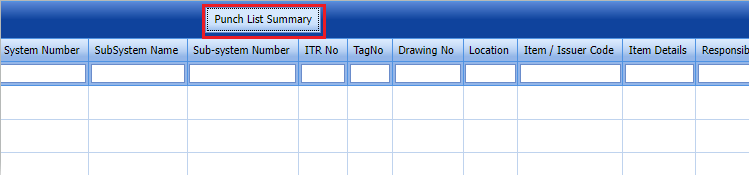
2.2.5.View Punch list summary
- If you want to view a punch list summary, click
 (Punch List Summary button) provided in the upper side of the Punch List page. See below fig
- It will redirected to new report page and displayed the punch list report

2.3 Edit a Punch List
If you want to edit a existing punch list, click Edit punch list in punch lists menu
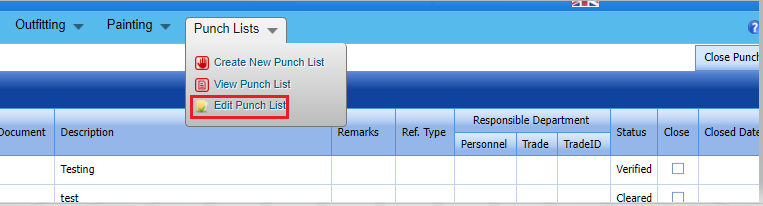
Click  (edit icon) in the Edit column for the respective punch list.. Edit the details in the respective box you want.
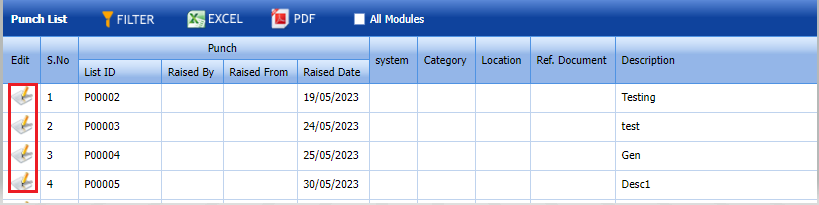
Update the details you want to change. Then click save
Punch list updated successfully.
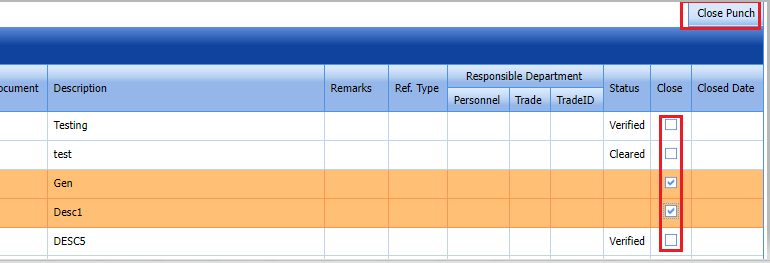
2.3.1 Close a punch list
- If you want to close the added punch list item, click the checkbox provided in the Close column.
- Click the
 close punch button at the top right.
- Punch list closed successfully.

2.3.2 Filter a Punch list
If you want to filter any Punch list from the punch lists page, do the following,
1. Click (FILTER button) located on the punch lists screen. See Fig below
Once you clicked the Filter button, the filter box opens for all the columns.
2. Enter relevant detail in the respective column’s filter box to filter any punch lists.
2.3.3 Export Punch lists
You can export added punch lists in the Punch lists page in both the pdf and excel formats.
-
If you want to export the punch lists in the pdf format, click
(PDF button). The punch lists will be downloaded as a pdf file.
-
If you want to export the punch lists in the excel format, click
(Excel button). The punch lists will be downloaded as an excel file.

No Comments