
Manage Users
User Management helps you to add new users for Pressure Vessel module, and manage multiple number of users and their roles. You can assign the projects for the added users.
|
Users assigned with Admin role only can access the Manage User menu and their functionalities. |
1.0 Users List
The Assign User Roles tab in the Manage User menu used to add and manage the user account details and assign roles for the users. If you want to add a user account, do the following steps,
1. Click Manage User menu and the Users page opens.
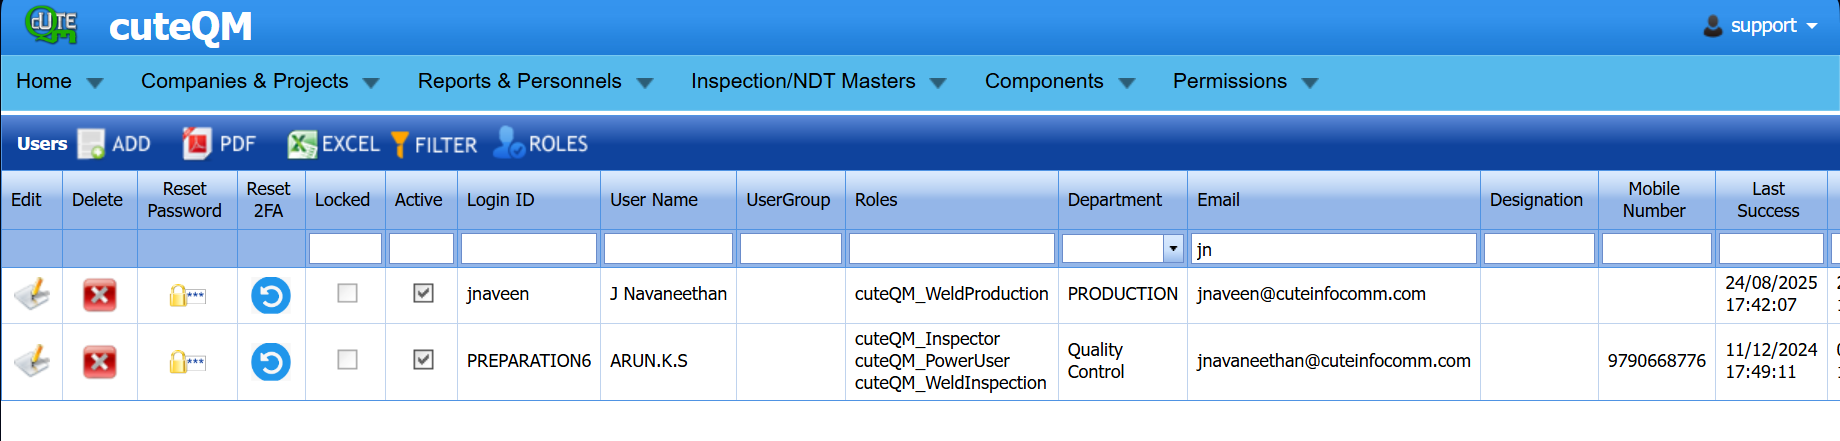
Figure 1.1: Users page
Add a User Account
If you want to add a new user account,
1. Click  (ADD button) in the Users
The page shows a new box to add the account details of the user.

2. In the Login Details window,
a. In the Login ID box, enter the login id for the user account.
b. In the Email box, enter the email of the user.
3. In the User Name box, enter the user name for the user account.
4. In the Designation box, enter the designation of the user.
5. In the Comments box, enter your comments if any.
6. In the Mobile Number box, enter the mobile number of the user.
7. In the Office Contact Number box, enter the office contact number of the user.
8. In the Expiry Date box, select the expiry date of the user account.
9. In the Roles box, select the checkbox of the roles which you want to assign for the user.
To know about the roles with their access details, see the topic, “User Access Overview in Pressure Vessel Module”.
 Note: Once you have assigned the roles for the user, the user can get access to the respective functionalities based on the assigned roles.
10 Click Save.
The user account is successfully added and listed in the Users page. An email containing the user name and password to login the cuteQM app will be sent to the given email id of the user.
Note: The password received through the email can be used only once. So, the user must change their password while login into the app for the first time.
Reset Password for any User Account
Once you have added a user account including the login id for any user, you can set password for the respective login id. To set password,
1. Click  (Password icon) in the Reset Password column for the respective user. See Fig 4.1.
The Reset Password window opens with the login id name.
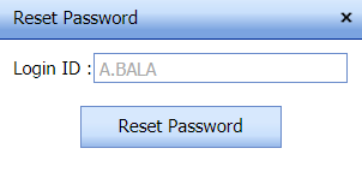
2. Click Reset Password.
The password will be reset and sent to the respective email id of the user.
Lock a User Account
The user account can get locked by the user management team or it can also get locked automatically when there are too many incorrect password attempts. (default is 10 times incorrect attempts).
If you want to lock any existing user account,
1. Enable the checkbox in the Locked column for the respective user account. See Fig 4.1.
The selected user account will be locked.
Note: You can also unlock the respective user account by disabling the checkbox of the user account.
Similarly, the same check box can be used to unlock an account.
Deactivate a User Account
If you want to deactivate any user account,
1. Disable the checkbox in the Active column for the respective user account. See Fig 1.1.
The selected user account will be deactivated.
Note: You can also activate the respective user account by enabling the checkbox of the user account.
Edit a User Account
If you want to edit any existing user account in the Users page, do the following,
1. Click (Edit icon) in the Edit column for the respective user account.
The Users page shows the details of added user account.

2. Click on any box where you want to edit the details, and then edit the details in the respective box.
3. Click Save.
Delete a User Account
If you want to delete any specific user account from the list of added user accounts, you can use  (Delete icon) provided in the Delete field of the Users page.
Export User Accounts List
You can export a list of user accounts added in the Users page in the pdf and excel formats by using  (PDF button) and
 (Excel button).
Filter a User Account
If you want to filter any specific user account in the Users page, do the following,
1. Click  (FILTER button) located on the Users See Fig 4.1.
Once you clicked the Filter button, the filter box opens in each column of the Users page.

2. Enter relevant detail in the respective column’s filter box to filter any user account.
2.0 Roles Management
If you want to add a new role,
1. Click  (ROLES Button) in the Users
The Roles window opens.
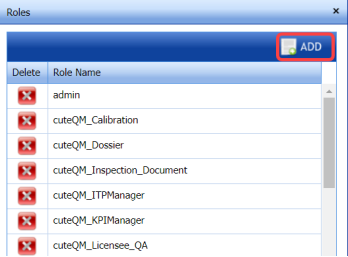
2. Click 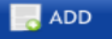 (ADD button) in the Roles

3. In the Role Name box, enter the role name.
4. Click Save.
The role is added and listed in the Roles window.
Roles and Access definition
This is common roles defined in the cuteQM. But it can be customized by clients needs.
| Admin | The Admin role has full access to the system. Do not assign this to any one who really does not require. | Full Access to the system. |
| cuteQM_Document | The Document Controller role manages access to inspection-related documentation across various modules. It includes viewing and managing key records for traceability and audit purposes | Access to Below Inspection Menus: 1.WPS and Weld Details 2. Project Data ( like Joint, Drawing etc.) 3.Materials management 4.Fit-up & NDT records 5.Stage-wise inspection 6. Documentation |
| cuteQM_PowerUser | This role is designed for power users responsible for setting up new projects and managing critical administrative tasks across the cuteQM. | Access to Below Inspection Menus: 1. Project and Company creation 2. Manage User |
| cuteQM_WeldProduction | This role user only able to fitup/weld production activity | This role user only able to fitup/weld production activity |
| cuteQM_WeldInspection | This role user only able to fitup/weld Inspection activity | This role user only able to fitup/weld Inspection activity |
3.0 Assign Projects
The Assign Projects tab in the Manage User menu used to assign the projects for users. Once you have assigned the projects for any user, the user can get access to the assigned project. To navigate to the project assigning page,
1. Click Assign Projects in the Manage User
The Assign Projects/Users page opens with the Assign by User and Assign for Project options.
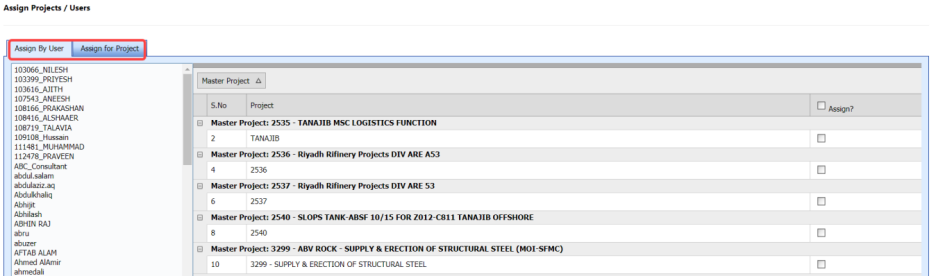
Figure 3.1: Assign Projects/Users page
Assign Projects for Users
If you want to assign projects for any user, do the following steps,
1. Click Assign by User in the Assign Projects/Users
The page shows a list of users in the left side and a list of projects in the right side.
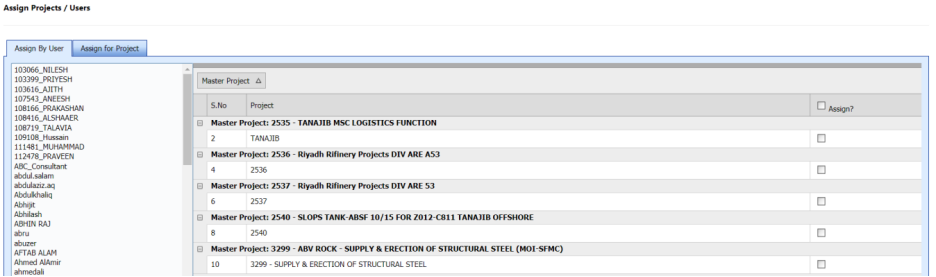
2. Select a user for whom you want to assign the projects.
3. Select the checkbox of the respective projects you want to assign.
4. Click Save.
The selected projects will be assigned for the user.
Assign Multiple Users for Any Project
If you want to assign multiple users for any specific project, do the following steps,
1. Click Assign for Project in the Assign Projects/Users
The page shows a list of projects in the left side and a list of users in the right side.
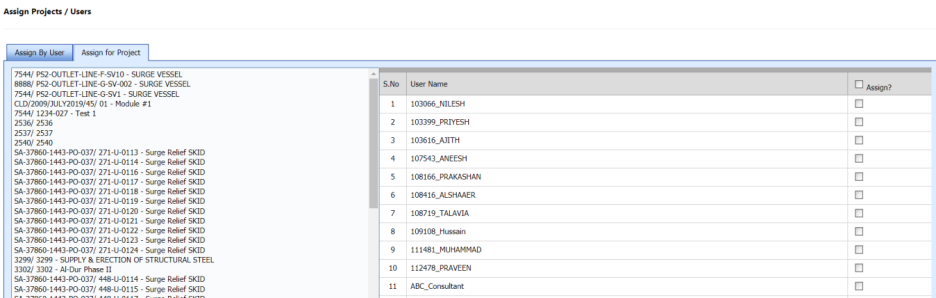
2. Select a project for which you want to assign the users.
3. Select the checkbox of the respective users you want to assign.
4. Click Save.
The selected users will be assigned for the project.
4.0 Assign Email Alerts
Assign Email Alerts is the process of assigning an email for a specific project to send any alert related with the project. The Assign Email Alerts tab in the Manage User menu used to add an email for a specific project to send any alert related with the project. To navigate to the email adding page,
1. Click Assign Email Alerts in the Manage User
The Manage Alert Configuration page opens.

2. In the Select Alert Module box, select a module from a drop-down list.
3. In the Email Address box, enter the email address.
4. In the Project box, select a project from a drop-down list.
5. Click Save.
The email id is added and assigned for the selected module and project.
5.0 Assign Widgets
The Assign Widgets tab in the Manage User menu used to assign the widgets to users. Once you have assigned the widgets to any user, the user can access the assigned widget. To navigate to the widget assigning page,
1. Click Assign Widgets in the Manage User
The Assign Widgets to User page opens.
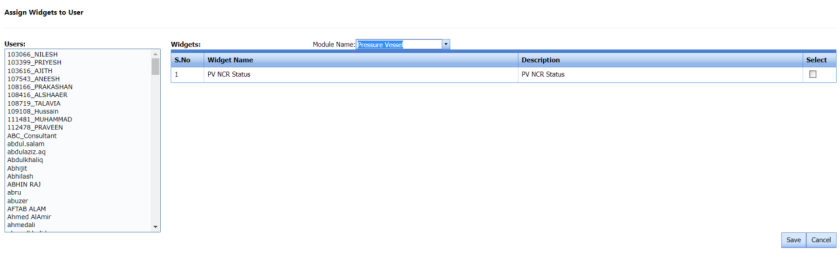
2. In the Module Name box, select the respective module name.
The page shows a list of users in the left side and a list of widgets in the right side corresponding to the selected module.
3. Select a user for whom you want to assign the widgets.
4. Select the checkbox of the respective widgets you want to assign.
5. Click Save.
The selected widgets will be assigned to the user.
No Comments