
Materials
Materials
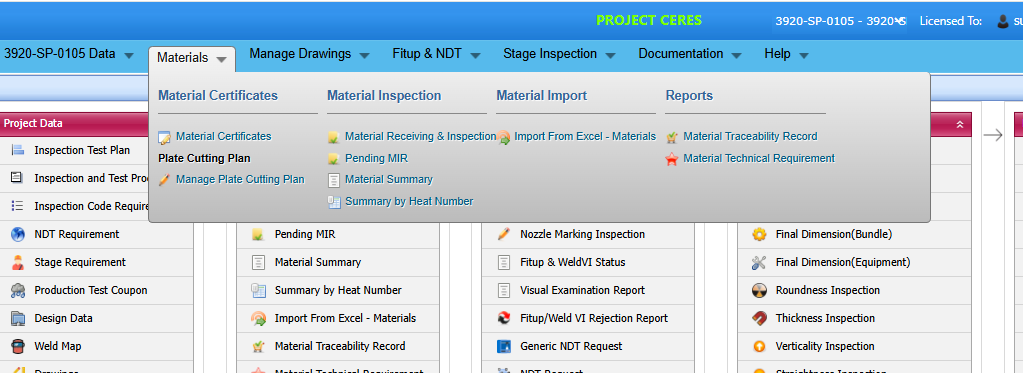
- The Material Certificates option helps you to add certificates details of the materials to be in the piping project.
- The Material Import option helps you to add the bulk materials.
- The Material Inspection option helps you to add material receiving and inspection report, and material summary by heat number.
-
The Reports option used to add material traceability record.
1.Material Certificates
Material certificate (Mill certificate) is a certificate document used to certify that the product is produced by manufacturing standards of the mill. The material certificate contains the following information: component name, manufacturer name, certification ID, component dimension and heat numbers. Once you have received the materials from the manufacturer, you must enter the details of material certificates.
The Mill Certificates tab used to add the received material certificate details. If you want to add material certificate details, do the following,
- Click Material Certificates in the Materials menu.
The Mill Certificates page opens.
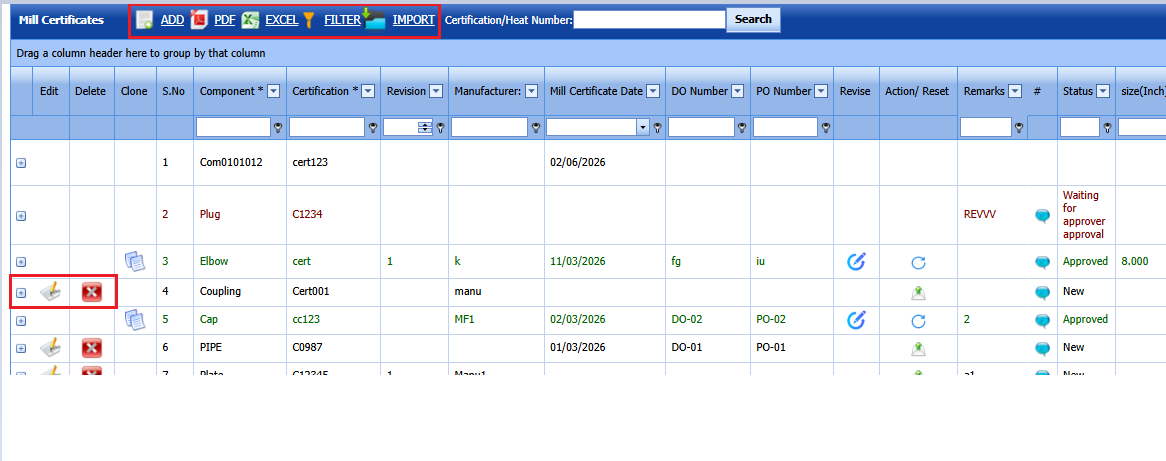
Figure 1.1: Mill Certificates page
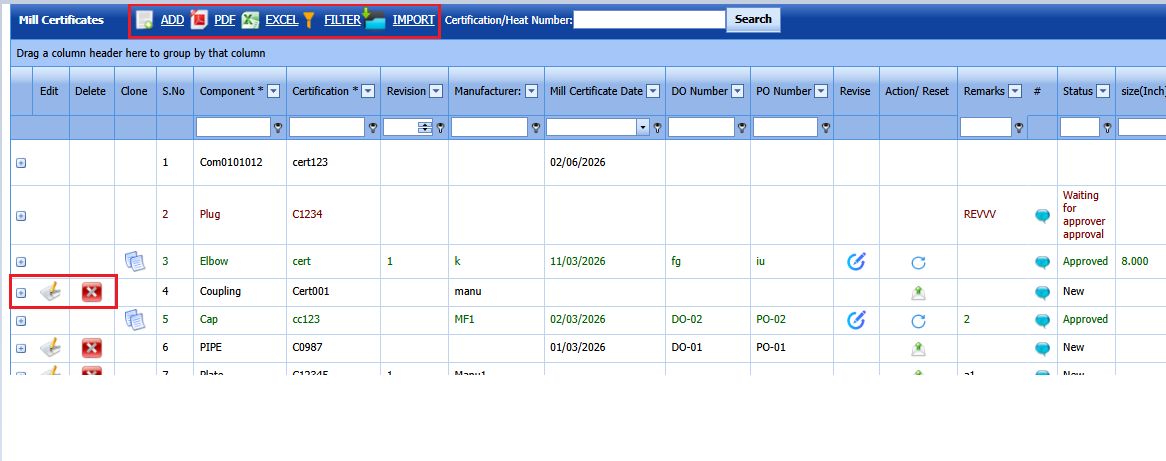
1.1. Add a Material Certificate
If you want to add a material certificate, do the following,
-
Click
 (ADD button) in the Mill Certificates See Fig 4.1.
A new window opens to add a material certificate.
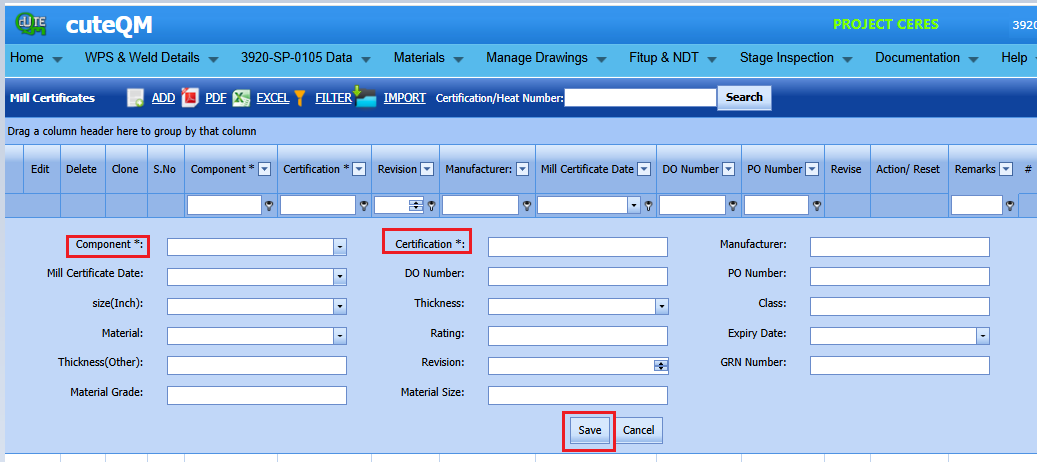
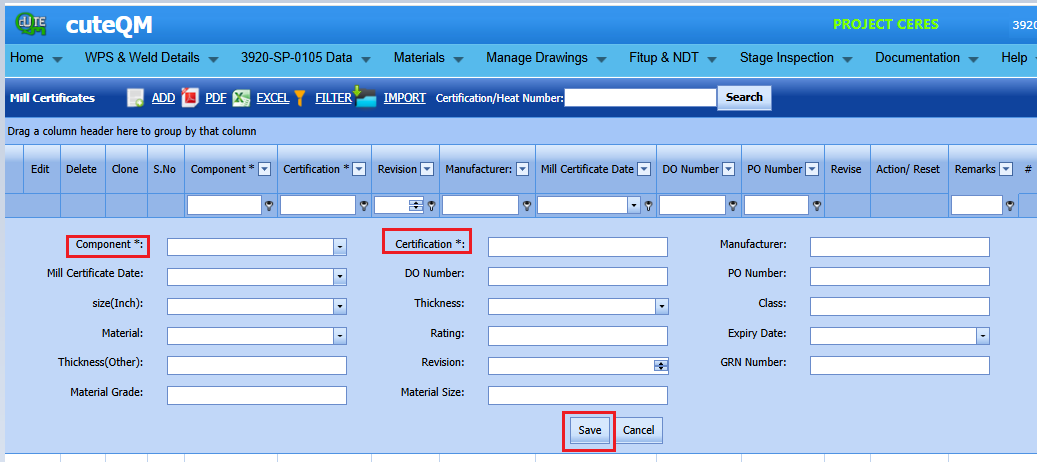
 Note: The field notified with a symbol (*) is mandatory. You must enter the relevant details in that fields before saving.
 - In the Component box, select the received component from a drop-down list.
- In the Certification box, enter the certification number of the component.
- In the Manufacturer box, enter the name of the manufacturer.
- In the Mill Certificate Date box, choose the mill certificate date.
- In the Delivery Order (DO) Number box, enter the delivery order number of the component.
-
In the Purchase Order (PO) Number box, enter the purchase order number of the component.
- In the Size box, select the size of the received component.
- In the Thickness box, select the thickness of the received component.
- In the Class box, enter the class of the received component.
- In the Material box, select the type of material where the component is made from.
- In the Rating box, enter the rating of the component.
- In the Expiry Date box, choose the expiry date of the component.
- In the Thickness(other) box, enter the thickness if other than pipe
- In the Revision box,enter revision number
- In the GRN box, enter GRN number
- In the Material Grade box,enter the grade of the material
- In the Material size box,enter size of the material
-
Click Save.


The material certificate is successfully added. Once you have added the mill certificate, you must add heat numbers for the added component.
1.2 Add Heat Numbers of Material
If you want to add heat numbers, do the following steps,
-
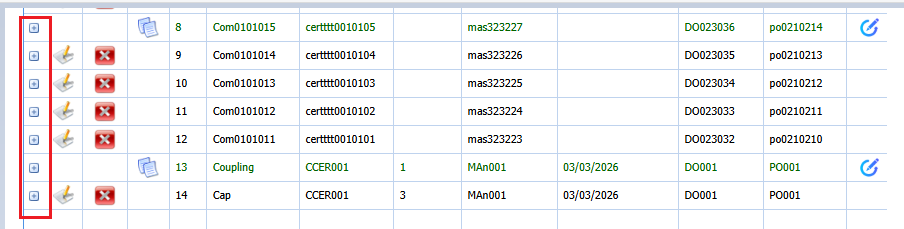
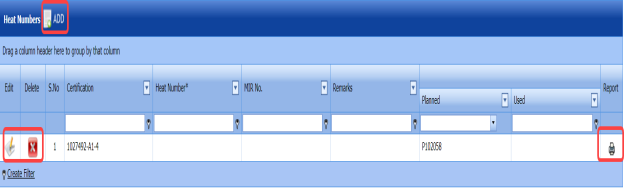
Click
 (Add icon) of the respective mill certificate.
The Heat Numbers box opens.
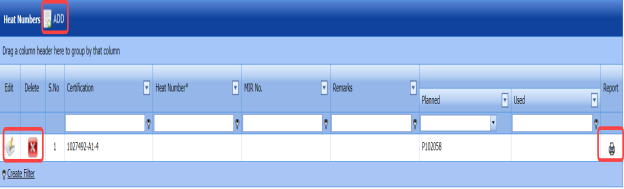
Figure: Heat Numbers page
-
Click
 (ADD button) in the Heat Numbers box.
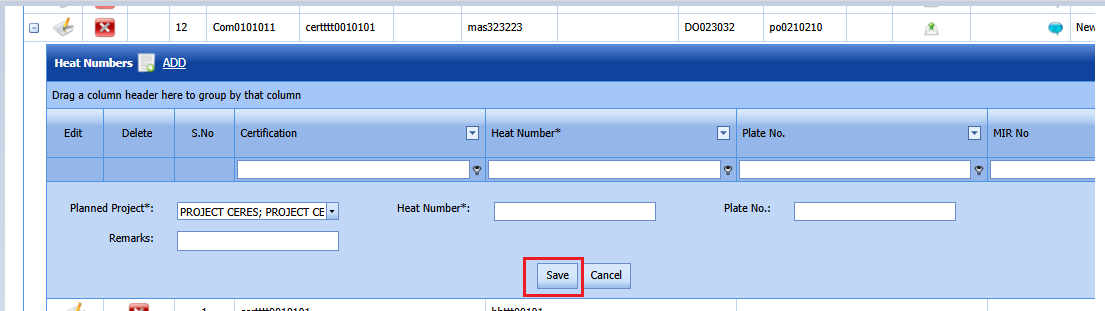
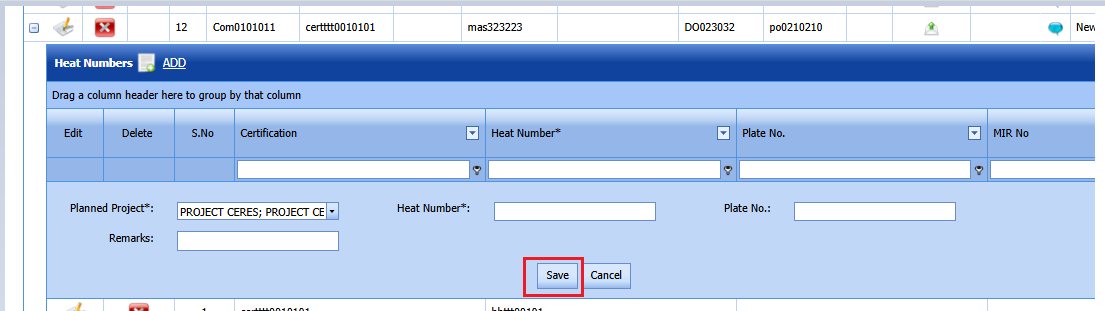
A new window opens to add the heat number.
-
In the planned Project box, select a project you want from a drop-down list.
- In the Heat Number box, enter the heat number.
- In the Plate number box,enter the plate numer
- In the Remarks box, enter your remarks if any.
- Click Save.
The heat number is successfully added for the specific component.
 Note: You can edit and delete the added heat numbers by using the respective
  (Edit icon) and
  (Delete icon).




1.3 Edit a Mill Certificate
If you want to edit any existing mill certificate in the Mill Certificates page, do the following,
-
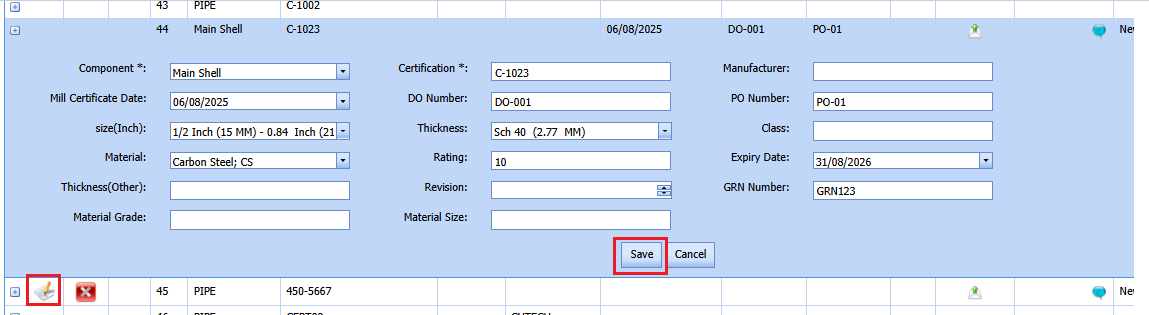
Click
 (Edit icon) in the Edit column for the respective mill certificate. See Fig 4.1.
A new window opens including the added mill certificate details.
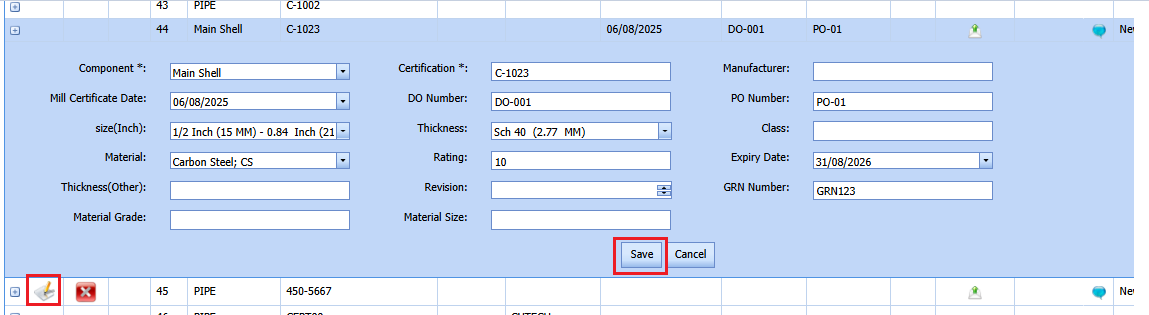
- Click any box where you want to edit the details, and then edit the details in the respective box.
-
Click Save.

1.4 Delete a Mill Certificate
If you want to delete any existing mill certificate in the Mill Certificates page, you can use (Delete icon) provided in the Mill Certificates page.
4.1.5 Export Mill Certificates List
You can export a list of mill certificates added in the Mill Certificates page in both the pdf and excel formats by using  (PDF button) and
  (Excel button).
4.1.6 Filter a Mill Certificate
If you want to filter any specific mill certificate in the Mill Certificates page,
-
you can use the filter box
provided in the upper side of the Mill Certificates To filter the mill certificate, enter the certification or heat number in the box and click Search.
-
you can also use
 (FILTER button) located on the Mill Certificates To know how to filter using the Filter button, see the topic, “Filter P&ID”.


4.1.7 Import Multiple Mill Certificates
If you want to import multiple mill certificates together, do the following,
-
Click
 (TEMPLATE button) on the Mill Certificates See Fig 4.1
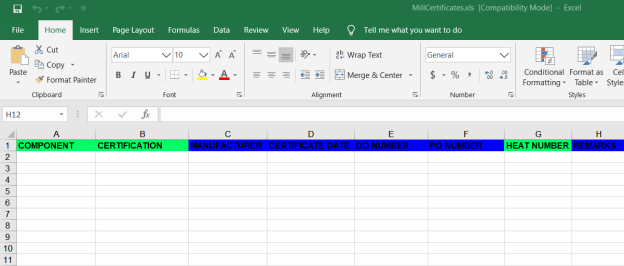
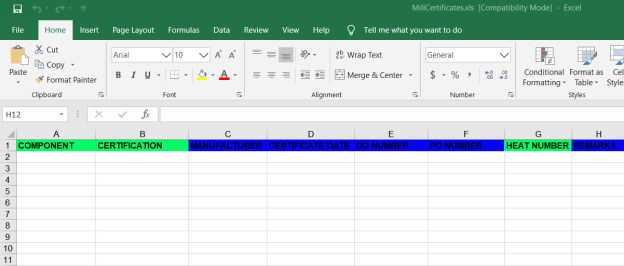
A template will be downloaded as an excel worksheet with a pre-defined template to enter the details of multiple mill certificates.
-
Enter the relevant details in the required columns on the excel worksheet.
-
Once you have added the mill certificates details in the excel worksheet, save the excel worksheet on your computer.
-
Click
 (IMPORT button). See Fig 4.1.
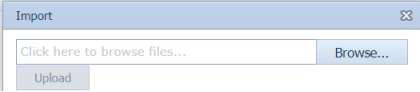
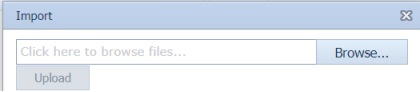
A new window opens for importing the excel worksheet saved on your computer.
-
Click
 (Browse button) to select the excel worksheet to be uploaded.
 - Select the excel worksheet you want to upload from your computer.
-
Click
 (Upload button) to export the mill certificates that are included in the excel worksheet.
The details of the mill certificates in the worksheet will be displayed in the Mill Certificates page.




4.1.8 Attach a File into a Mill Certificate
If you want to attach any file with a mill certificate listed in the Mill Certificates page, you can attach the file by using  (Attach icon) in the Attachment column. To know how to attach, follow the procedures given in the topic “Attach a file into P&ID”.
4.2.Material Receiving and Inspection
Material Receiving Inspection validates quality of purchased raw materials based on set acceptance criteria before the materials are used for the piping project.
The Material Receiving and Inspection tab in the Materials menu helps you to add an incoming material inspection report (MIR). Incoming MIR includes material name, material size, material specification, heat numbers, and material type.
If you want to add an incoming MIR, do the following,
- Click the Material Receiving and Inspection tab in the Materials
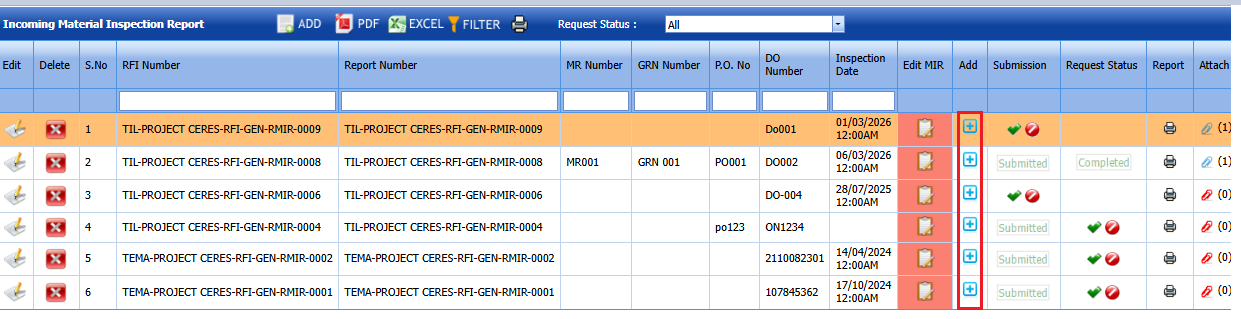
The Incoming Material Inspection Report page opens.

Figure 4.2: Incoming Material Inspection Report page

4.2.1 Add an Incoming MIR
If you want to add an incoming MIR,
-
Click
 (ADD button) in the Incoming Material Inspection Report page. See Fig 4.2.
A new window opens to add an incoming MIR.
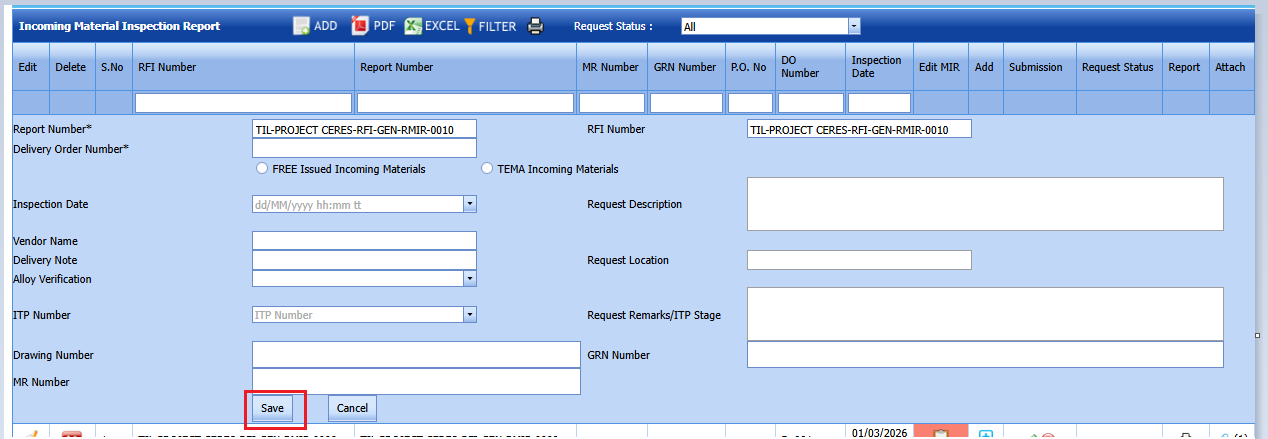
 Note: The fields notified with a symbol (*) are mandatory. You must enter the relevant details in that fields before saving.
 Tip: A report number and a Request for Inspection (RFI) number for a new MIR will be updated automatically in the Report Number and the RFI Number boxes, respectively.
 - In the Delivery Order Number box, enter the material’s delivery order number.
- If the materials are received from a client, select the Free issued incoming option, and then enter the relevant details in the respective boxes.
-
-
In the Packing List No box, enter the packing list number.
- In the Dated box, choose the date of packing.
- In the Received On box, choose the received date of materials.
-
-
- If the materials are purchased from outside, enter the relevant details in the respective boxes.
-
- In the P.O. No box, enter the purchase order number.
- In the Dated box, choose the date of the purchase order.
- In the Received On box, select the received date of materials.
-
- In the Inspection Date box, choose the date of inspection.
- In the Vendor Name box, enter the vendor name.
- In the Request Description box, enter the request description.
- In the Request Location box, enter the request location.
- In the ITP Number box, select an ITP number.
- In the Delivery Note box, enter the delivery note.
- In the Location box, enter the location name.
- In the Request Remarks box, select the subcontractor name from a drop-down list.
- In the GRN box,enter GRN number
- Click Save.
The incoming MIR is successfully added. Once you have added the MIR, you must add the material details for the added MIR.



4.2.2 Add Materials for an Incoming MIR
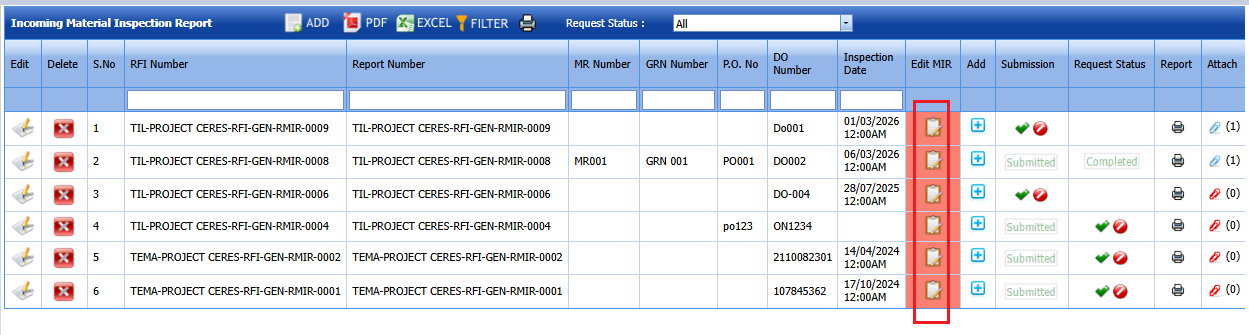
If you want to add the details of materials for the added incoming MIR, do the following steps,
-
Click
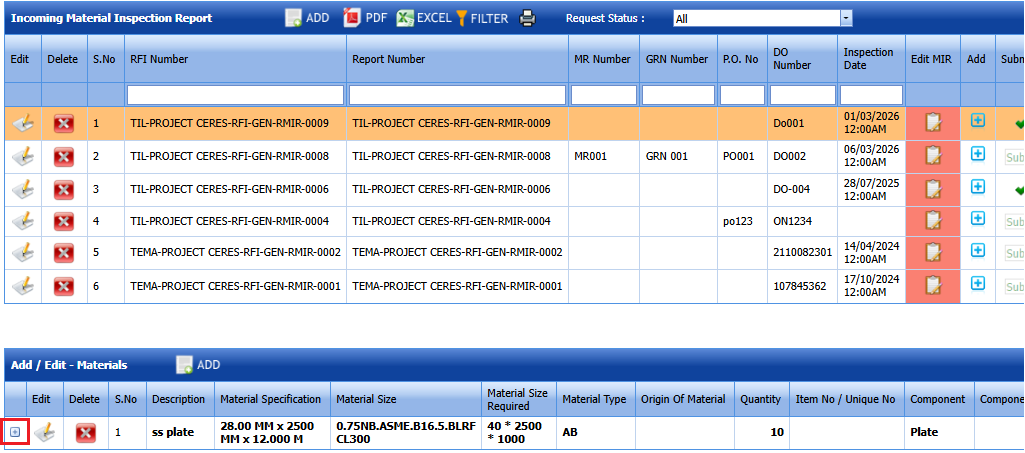
 (Edit icon) in the Edit MIR column of the Incoming Material Inspection Report See Fig 4.3.
The Add/Edit - Materials window opens.

Figure 4.2.1: Add/Edit – Materials window
-
Click
 (ADD button) in the Add/Edit - Materials window,
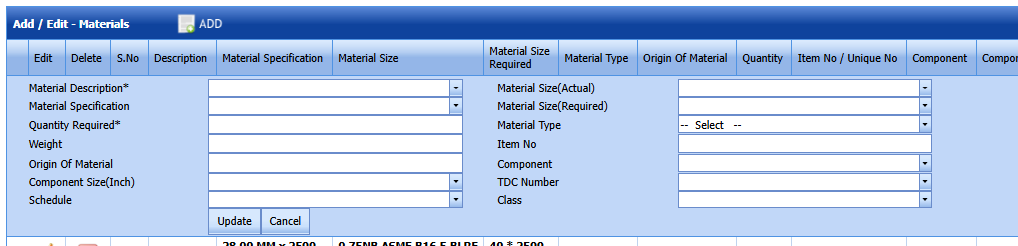
A new window opens to add the material details.
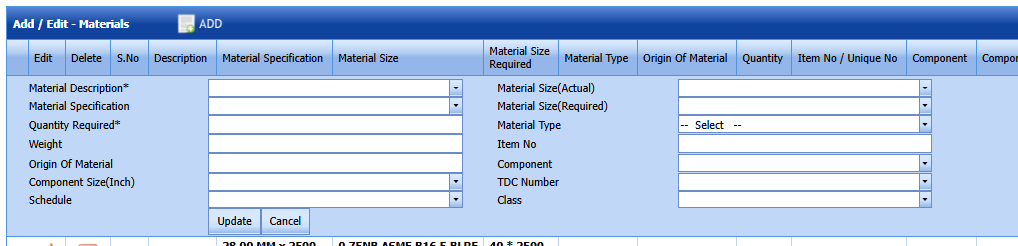
 Note: The fields notified with a symbol (*) are mandatory. You must enter the relevant details in that fields before saving.
 - In the Material Description box, enter the material description.
- In the Material Size(Actual& Required) box, select the size of the material.
- In the Material Specification box, enter the material specification.
- In the Material Type box, enter the type of the material.
- In the Quantity Required box, enter the required quantity of the material.
- In the Item No box, enter the item number.
- In the Weight box, enter the weight of the material.
- In the Component box, select a component.
- In the Component size box, select a component size.
- In the Origin of material box,enter origin of material
- In the TDC number box, enter cTDC number.
- In the Schedule box, select a schedule.
- In the Class box, enter class.
-
Click Update.
Material details added successfully.
Once you have added the material details, you must add the heat numbers for the added materials.




4.2.3 Add Heat Numbers
-
Click
 (Add icon) of the respective material in the Add/Edit - Materials window. See Fig 4.2.1.
The Heat Numbers window opens.

-
Click
 (ADD button) in the Heat Numbers window.
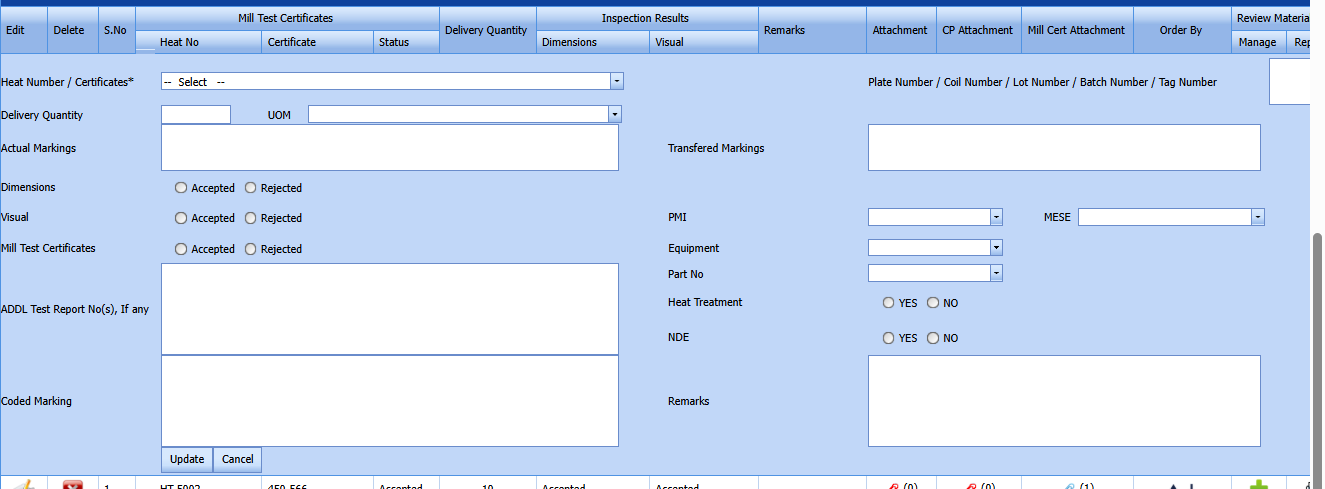
A new window opens to add a heat number.
-
In the Heat Number/Certificates box, select the heat number from a drop-down list.
-
In the Plate Number/Coil Number/ Tag Number box, enter the plate number or coil number or tag number of the material.
- In the Delivery Quantity box, enter the total delivery quantity of the material including UOM.
- In the Actual Marking box, enter the Actual marking.
- In the Dimensions option, select Accepted or Rejected based on the inspection detail.
- In the Visual option, select Accepted or Rejected based on the inspection detail.
- In the Mill Test Certificates option, select Accepted or Rejected based on the inspection detail.
- In the Remarks box, enter your remarks if any.
- If the heat treatment is required for the material, select YES in the Heat Treatment Otherwise select NO.
- In the NDE is required for the material, select YES in the NDE Otherwise select NO.
-
Click Update.
 Note: If you want to manage the review material TC, click
  (Add icon). The Review Material TC window opens to add the material checklist detail.





4.2.4 Add MIR Result
If you want to add the Result of MIR,
-
Click
 (Add icon) in the Add See Fig 4.2.
The MIR Details window opens.
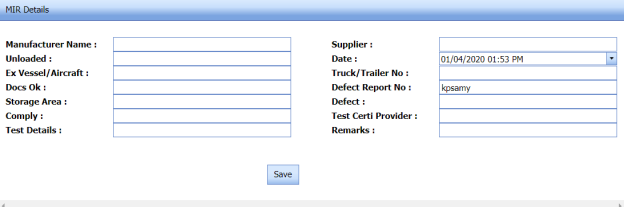
- In the Manufacturer Name box, enter the manufacturer name.
- In the Supplier box, enter the supplier name.
- In the Unloaded box, enter the unloaded detail.
- In the Date box, select the date of MIR.
- In the Truck/Trailer No box, enter the truck/trailer number.
- In the Defect Report No box, enter the defect report number.
- In the Storage Area box, enter the storage area name.
- In the Defect box, enter the defect detail.
- In the Remarks box, enter your remarks if any.
-
Click Save.

4.2.5 Print an Incoming MIR Report
If you want to print an incoming MIR report, click (print icon) provided in the Report column of the Incoming Material Inspection Report page. See Fig 4.2.
4.2.6 Print a Report with MTC
If you want to print an incoming MIR report including MTC, click  (print icon) provided in the Report with MTC column of the Incoming Material Inspection Report page. See Fig 4.2.
4.2.7 Print a Report Raw Material Offer List
If you want to print a report raw material offer list, click  (print icon) provided in the Report Raw Material Offer List column of the Incoming Material Inspection Report page. See Fig 4.2.
4.2.8 Print a MIR Summary Report
If you want to print a MIR summary report, click  (print icon) provided in the upper side of the Incoming Material Inspection Report page. See Fig 4.2.
4.2.9 Attach a File into an Added Incoming MIR
If you want to attach any file with any incoming MIR listed in the Incoming Material Inspection Report page. To know how to attach, follow the procedures given in the topic “Attach a file into P&ID”.
4.2.10 Edit an Incoming MIR
If you want to edit any existing incoming MIR in the Incoming Material Inspection Report page, do the following,
-
Click
 (Edit icon)in the Edit column for the respective MIR. See Fig 4.2.
A new window opens to edit the added incoming MIR.
-
Click any box where you want to edit the details, and then edit the details in the respective box.
- Click Save.

4.2.11 Delete an Incoming MIR
If you want to delete any specific incoming MIR from the list of MIRs, you can use  (Delete icon) provided in the Delete column of the Incoming Material Inspection Report page. To know how to delete, see the topic, “Delete P&ID”.
4.2.12 Filter an incoming MIR
If you want to filter any incoming MIR from the list of MIRs in the Incoming Material Inspection Report page,
-
you can use the request status wise filter box

provided in the upper side of the Incoming Material Inspection Report page.
-
you can also use
 (FILTER button) located on the Incoming Material Inspection Report To know how to filter using the Filter button, see the topic, “Filter P&ID”.


4.2.13 Export incoming MIR list
You can export a list of MIR added in the Incoming Material Inspection Report page in the pdf and excel formats by using  (PDF button) and
  (Excel button).
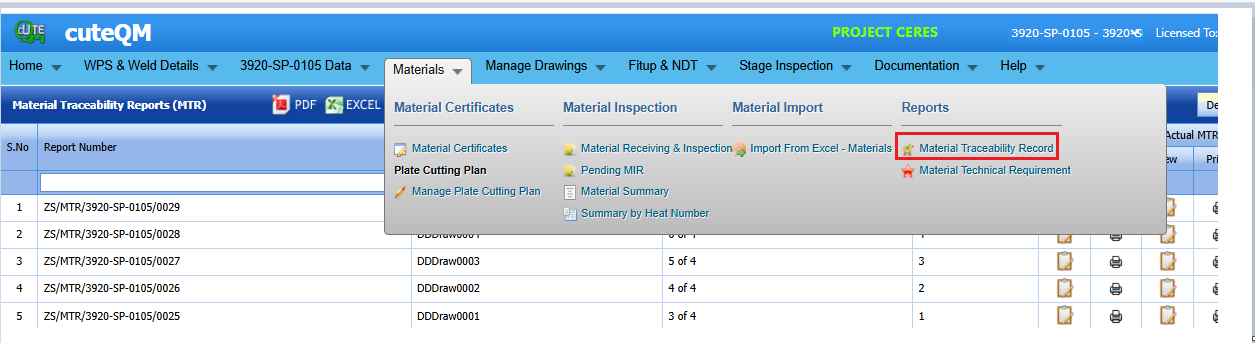
4.3 Material Traceability Record (MTR)
To add material tracebility,click material tracebileity menu under Materials.
4.3.1.Add a Material Tracebility
To add a tracebility ,do the following steps
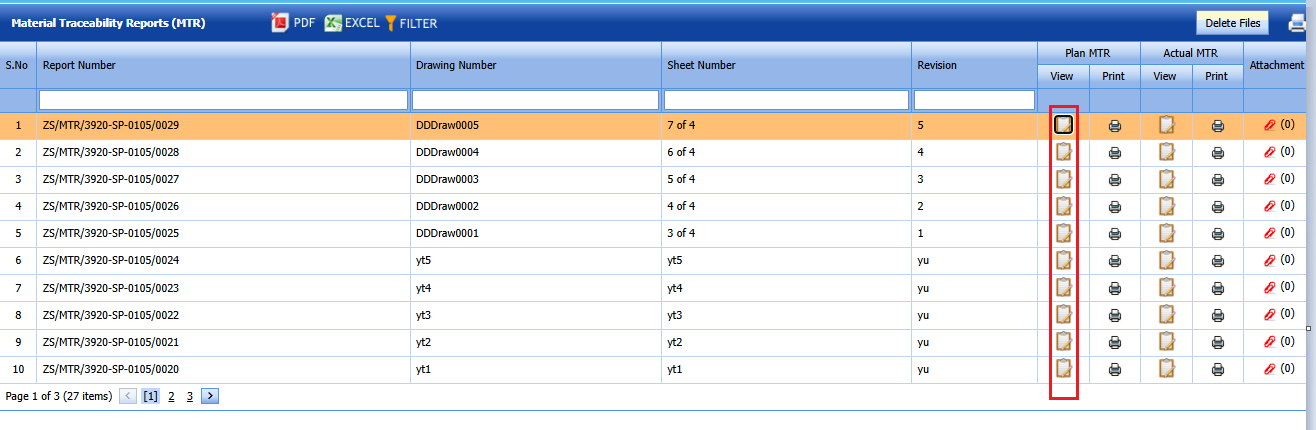
1.Click view icon for the particular drawing.
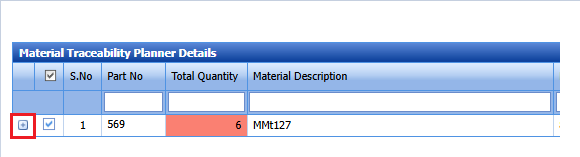
2.Part number details of the corresonding drawing will be loaded below
3.Click icon to map heat number
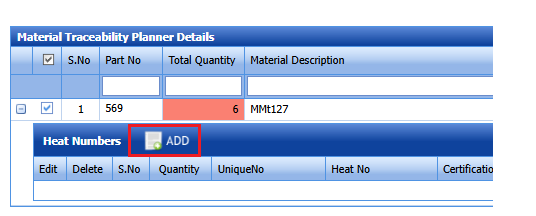
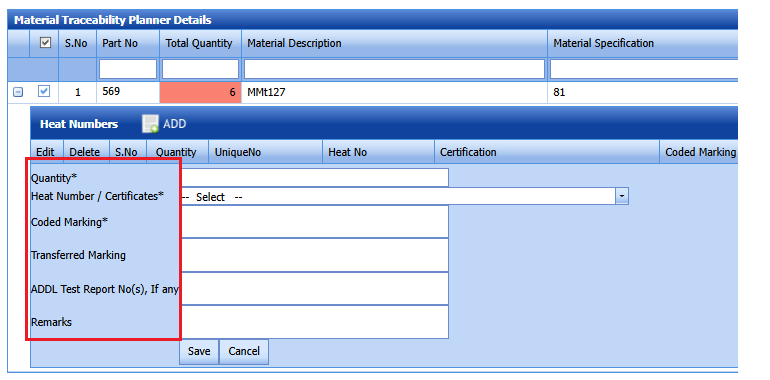
5.Enter the quantity in quantity box
6.Select the Heat number from dropdown list
7.Enter coded marking
7.Enter Transfered marking if any
8.Enter ADDL test report no if any
9.Enter remarks
Click Save .Tracebility added successfully.
4.3.2.Edit a Tracebility record
If you want to edit any existing tracebility record, do the following,
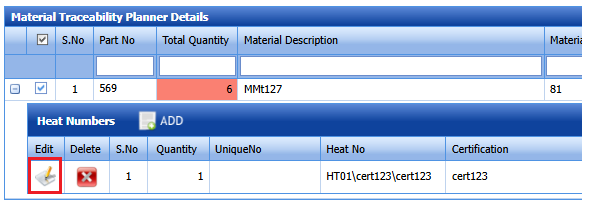
-
Click
 (Edit icon)in the Edit column for the respectivepart number.
 - Click any box where you want to edit the details, and then edit the details in the respective box.
- Click Save.

Tracebilty details updated successfully.
4.3.3 Print a Material Tracebility Report
If you want to print a material tracebility report, click  (print icon) in the Report column of the MTR page.
4.3.4 Attach a File into a Material Tracebility
If you want to attach any file with an existing MTR listed in the MTRpage, you can attach the file by using  (Attach icon) in the Attachment column..
4.3.5 Export MTR List
You can export a list of MTR added in the Material tracebility page in both the pdf and excel formats by using (PDF button) and (Excel button).
No Comments