
Projects and Equipments
Master Data
Master data is typically shared by multiple users and groups across a project. Master data includes data about Clients, End users, Third party, Projects, Sub-contractors, and Locations.
|
|
1.0 Clients
In the Pressure Vessel module, clients are created so that when creating project they can be selected as Client. The Clients tab in the Master Data menu helps you to add the details of clients. If you want to add any new client,
Click Clients in the Master Data menu.
The Clients page opens.
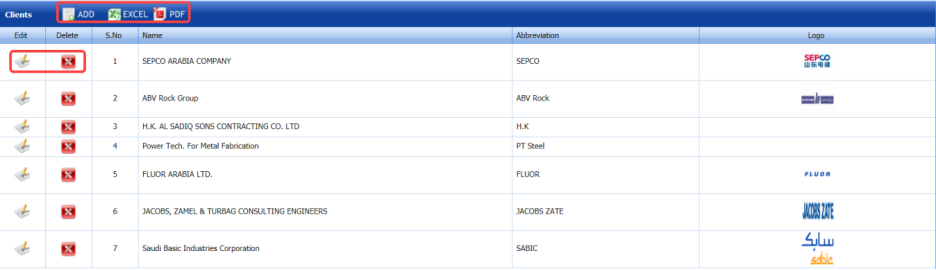
Figure 1.1: Clients page
Add a Client
If you want to add a client, do the following steps,
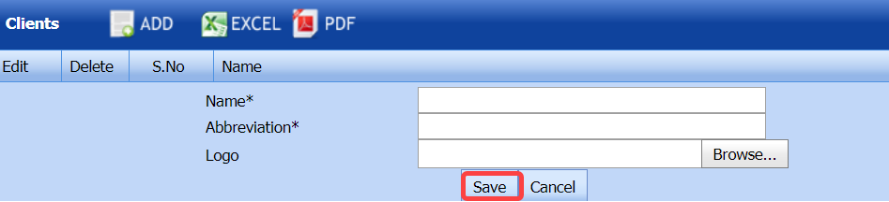
1. Click  (ADD button) in the Clients page. See Fig 1.1.
The page shows a new box to add the details of a client.
 Note: The fields notified with the symbol (*) are mandatory. You must enter the relevant details in that fields before saving.
2. In the Name box, enter the name of a client.
3. In the Abbreviation box, enter the abbreviation for the added client.
4. If you want to add a logo, click  (Browse button) provided with the Logo box, and then add the logo of the client.
5. Click Save.
The client is successfully added.
Edit a Client
If you want to edit any existing client in the Clients page, do the following,
1. Click (Edit icon) in the Edit column for the respective client. See Fig 3.1.
The page shows the details of added client.

2. Click on any box where you want to edit the details, and then edit the details in the respective box.
3. Click Save.
Delete a Client
If you want to delete any specific client from the list of clients, you can use  (Delete icon) provided in the Delete column of the Clients page, See Fig 3.1.
- Click
 (Delete icon) for the corresponding client.
You receive a notification message “Do you want to delete this row?”.
- Click OK.
The selected client will be deleted.
Export Clients List
You can export a list of clients in the pdf and excel formats.
1. If you want to export the clients list in the pdf format, click  (PDF button). See Fig 3.1.
The clients list will be downloaded in the pdf format.
2. If you want to export the clients list in the excel format, click  (Excel button).
The clients list will be downloaded in the excel format.
2.0 End Users
End User is an entity who will be using the Pressure Vessel being fabricated. Sometimes, the end user can be same as client for you. The End Users tab in the Master Data menu helps you to add the details of end users. If you want to add any end user, do the following steps,
- Click End Users in the Master Data menu.
The End Users page opens.
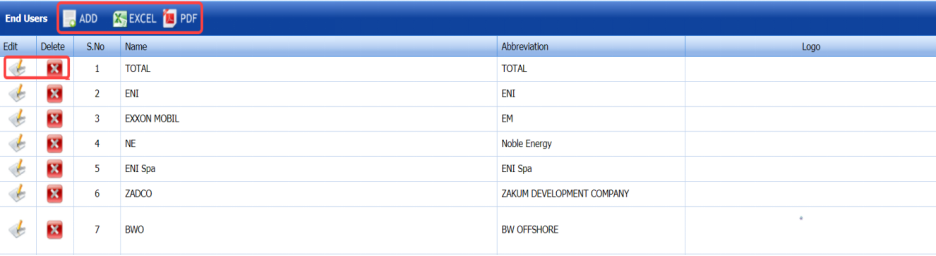
Figure 2.1: End Users page
Add an End User
If you want to add an end user,
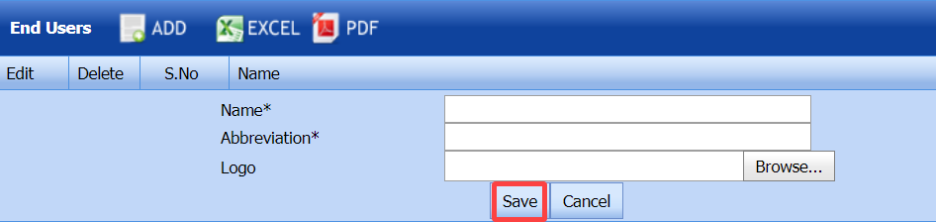
1. Click  (ADD button) in the End Users page. See Fig 2.1.
The page shows a new box opens to add the details of an end user.
 Note: The fields notified with the symbol (*) are mandatory. You must enter the relevant details in that fields before saving.
2. In the Name box, enter the name of an end user.
3. In the Abbreviation box, enter the abbreviation for the added end user.
4. If you want to add a logo, click  (Browse button) provided with the Logo box, and add the logo of the end user.
5. Click Save.
The end user is successfully added.
Edit an End User
If you want to edit any existing end user in the End Users page, do the following,
1. Click  (Edit icon) in the Edit column for the respective end user. See Fig 6.2.
The page shows the details of the selected end user.

2. Click on any box where you want to edit the details, and then edit the details in the respective box.
3. Click Save.
Delete an End User
If you want to delete any specific end user from the list of end users, you can use  (Delete icon) provided in the Delete field of the End Users page.
Export End Users List
You can export a list of end users added in the End Users page in the pdf and excel formats by using  (PDF button) and
 (Excel button).
3.0 Third Party
A Third Party Inspector is an independent inspector, usually from a certification body or inspection agency, who verifies that fabrication, testing, and documentation meet the client’s requirements, international codes, and sometimes statutory regulations. The Third Parties tab in the Master Data menu helps you to add the details of third parties. If you want to add a third party,
1. Click Third Parties in the Master Data menu.
The Third Parties page opens.

Figure 3.1: Third Parties page
Add a Third Party
If you want to add a third party, do the following steps,
1. Click (ADD button) in the Third Parties page. See Fig 3.1.
The page shows a new box to add the details of a third party.

 Note: The fields notified with the symbol (*) are mandatory. You must enter the relevant details in that fields before saving.
2. In the Name box, enter the name of a third party.
3. In the Abbreviation box, enter the abbreviation for the added third party.
4. If you want to add a logo, click  (Browse button) provided with the Logo box, and then add the logo of the third party.
5. Click Save.
The third party is successfully added.
Edit a Third Party
If you want to edit any existing third party in the Third Parties page, do the following,
1. Click  (Edit icon) in the Edit column for the respective third party.
The Third Parties page shows the details of added third party.

2. Click on any box where you want to edit the details, and then edit the details in the respective box.
3. Click Save.
Delete a Third Party
If you want to delete any specific third party from the list of third parties, you can use  (Delete icon) provided in the Delete field of the Third Parties page.
Export Third Parties List
You can export a list of third parties added in the Third Parties page in the pdf and excel formats by using  (PDF button) and
  (Excel button).
4.0 Authorised Inspectors (AI)
An Authorised Inspector is specifically an inspector certified and authorised under a regulatory code, most notably ASME Section VIII (for pressure vessels). They represent the jurisdiction or regulatory authority to ensure compliance with code rules..

Add an Authorized Inspector
If you want to add an authorized inspector, do the following steps,
1. Click  (ADD button) in the Authorized Inspectors See Fig 4.1.
The page shows a new box to add the details of an authorized inspector.
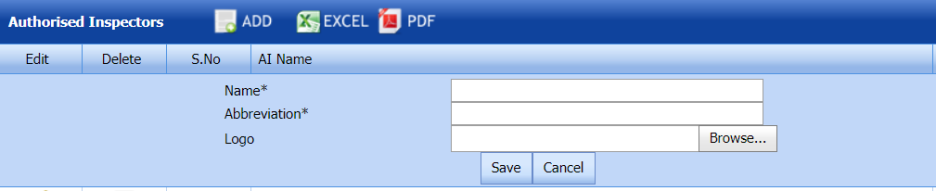
 Note: The fields notified with the symbol (*) are mandatory. You must enter the relevant details in that fields before saving.
2. In the Name box, enter the name of an authorized inspector.
3. In the Abbreviation box, enter the abbreviation for the added authorized inspector.
4. If you want to add a logo, click  (Browse button) provided with the Logo box, and then add the logo of the authorized inspector.
5. Click Save.
Edit an Authorized Inspector
If you want to edit any existing authorized inspector in the Authorized Inspectors page, do the following,
1. Click  (Edit icon) in the Edit column for the respective authorized inspector.
The page shows the details of added authorized inspector.

2. Click on any box where you want to edit the details, and then edit the details in the respective box.
3. Click Save.
Delete an Authorized Inspector
If you want to delete any specific authorized inspector from the list of authorized inspectors, you can use  (Delete icon) provided in the Delete field of the Authorized Inspectors page.
Export Authorized Inspectors List
You can export a list of authorized inspectors added in the Authorized Inspectors page in the pdf and excel formats by using
 (PDF button) and
  (Excel button).
5.0 Subcontractors
Subcontractor is an entity which has taken a portion of contract from a principal contractor such as your firm or from another subcontractor for Pressure Vessel module.
1. Click Subcontractors in the Companies and Projects
The Subcontractors page opens.

Figure 5.1: Subcontractors page
Add a Subcontractor
If you want to add a subcontractor, do the following steps,
1. Click  (ADD button) in the Subcontractors See Fig 3.5.
The page shows a new box to add the details of a subcontractor.

 Note: The fields notified with the symbol (*) are mandatory. You must enter the relevant details in that fields before saving.
2. In the Name box, enter the name of a subcontractor.
3. In the Abbreviation box, enter the abbreviation for the added subcontractor.
4. If you want to add a logo, click  (Browse button) provided with the Logo box, and then add the logo of the subcontractor.
5. Click Save.
The subcontractor is successfully added.
Edit a Subcontractor
If you want to edit any existing subcontractor in the Subcontractors page, do the following,
1. Click  (Edit icon) in the Edit column for the respective subcontractor.
The Subcontractors page shows the details of added subcontractor.

2. Click on any box where you want to edit the details, and then edit the details in the respective box.
3. Click Save.
Delete a Subcontractor
If you want to delete any specific subcontractor from the list of subcontractors, you can use  (Delete icon) provided in the Delete field of the Subcontractors page.
Export Subcontractors List
You can export a list of subcontractors added in the Subcontractors page in the pdf and excel formats by using ![]() (PDF button) and
(PDF button) and ![]() (Excel button).
(Excel button).
6.0 NDT Inspectors
NDT (Non-Destructive Testing) Inspectors provide NDT inspection services to the clients who involved in fabrication, construction and maintenance of the Pressure Vessel.
The NDT Inspectors tab in the Master Data menu used to add an NDT inspector. If you want to add an NDT inspector, do the following steps,
1. Click NDT Inspectors in the Master Data
The NDT Inspectors page opens.

Figure 6.1: NDT Inspectors page
Add an NDT Inspector
If you want to add an NDT inspector, do the following steps,
1. Click  (ADD button) in the NDT Inspectors See Fig 6.1.
The page shows a new box to add the details of an NDT inspector.

 Note: The fields notified with the symbol (*) are mandatory. You must enter the relevant details in that fields before saving.
2. In the Name box, enter the name of the NDT inspector.
3. In the No box, enter the employee number of the NDT inspector.
4. If you want to add a photo of the NDT inspector, click (Browse button) provided with the Photo box, and then add the photo of the NDT inspector.
5. If the NDT inspector is working currently, select the checkbox of the Is Active
6. Click Save.
The NDT inspector is successfully added.
Add NDT Certificates of NDT Inspector
If you want to add NDT certificate details of any NDT inspector,
1. Click  (Add icon) of the respective NDT inspector.
The Certificates window opens.

2. Click Add Certificate.
The window shows a new box to add the details of certificate.

3. In the Body box, enter the body of the NDT qualification.
4. In the Level box, select the level of NDT qualification.
5. In the Method box, select the method of NDT qualification.
6. In the Certificate Number box, enter the certificate number.
7. In the Certificate Start Date box, select the staring date of certificate.
8. In the Certificate Expiry Date box, select the expiry date of certificate.
9. In the Technical Start Date box, select the technical staring date.
10. In the Technical Expire Date box, select the technical expiry date.
11. Click Update.
The certificates details will be updated.
Edit an NDT Inspector
If you want to edit any existing NDT inspector in the NDT Inspectors page, do the following,
1. Click (Edit icon) in the Edit column for the respective NDT inspector.
The NDT Inspectors page shows the details of added NDT inspector.

2. Click on any box where you want to edit the details, and then edit the details in the respective box.
3. Click Save.
Attach a File into an NDT Inspector
If you want to attach a file with any NDT inspector listed in the NDT Inspectors page,
1. Click  (Attach icon) provided in the Attachment column for the respective NDT inspector in the NDT Inspectors
The File Upload (NDT Inspector) page opens.
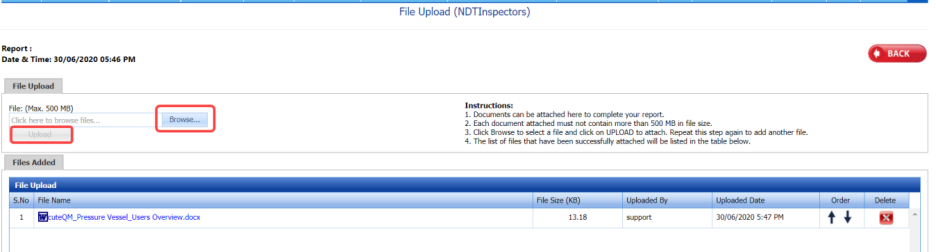
 Note: Before uploading any file, read the instructions given in the File Upload (NDT Inspector) page.
2. Click  (Browse button) to select a file to be uploaded.
3. Select any file which you want to upload, from your computer.
4. Click  (Upload button) to attach the file.
The uploaded file will be displayed in the File Upload table.
Delete an NDT Inspector
If you want to delete any specific NDT inspector from the list of added NDT inspectors, you can use  (Delete icon) provided in the Delete field of the NDT Inspectors page.
Export NDT Inspectors List
You can export a list of NDT inspectors added in the NDT Inspectors page in the pdf and excel formats by using ![]() (PDF button) and
(PDF button) and ![]() (Excel button).
(Excel button).
7.0 Projects
When a new project is awarded to the company, it needs to be created in the system so that all parties can use it to manage the data and documents.
The Projects tab in the Master Data menu used to add a new project.
|
You can add a new project if you have been assigned with Power User roles only. |
1. Click Projects in the Master Data
The Projects page opens.

Figure 7.1: Projects page
Add a New Project
If you want to add a new project, do the following
1. Click  (ADD button) in the Projects page. See Fig 3.6.
The page shows a new box to add the details of a new project.
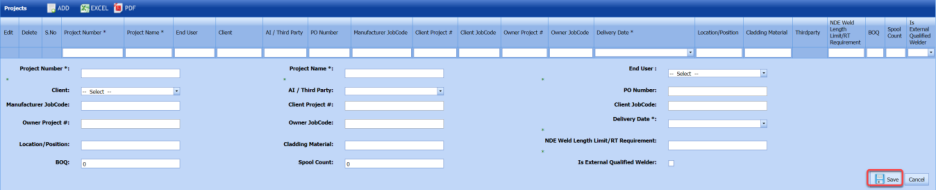
 Note: The fields notified with a symbol (*) are mandatory. You must enter the relevant details in that fields before saving.
2. In the Project Number box, enter the project number.
3. In the Project Name box, enter a project name.
4. In the End User box, select an end user from a drop-down list.
5. In the Client box, select a client from a drop-down list.
6. In the AI/ Third Party box, select an AI or a third party from a drop-down list.
 Note: If you want to add multiple third parties, add third parties by clicking
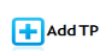 (Add TP button) in the Third party column of the Projects page. This can be done after creating the project.
7. In the Purchase Order (PO) Number box, enter the purchase order number.
8. In the Manufacturer Job Code box, enter the manufacturer job code number.
9. In the Client Project box, enter the client project code.
10 In the Client Job Code box, enter the client job code.
11. In the Owner Project box, enter the owner project code.
12. In the Owner Job Code box, enter the owner job code.
13. In the Delivery Date box, choose the delivery date.
14. In the Location/Position box, enter the location/position detail.
15. In the Cladding Material box, enter the cladding material detail.
16. In the Non-Destructive Examination (NDE) Weld Length Limit/RT Requirement box, enter the length limit of NDE welding or the RT requirements.
17. If you need an external qualified welder, click the check box provided with the External Qualified Welder
18. In the Bill of Quantities (BOQ) box, enter the BOQ detail.
19. In the Spool Count box, enter the spool count.
20. Click Save.
A new project is added successfully.
Edit a Project
If you want to edit any existing project details from the list of projects in the Projects page, do the following,
1. Click  (Edit icon) in the Edit column for the respective project. See Fig 3.6.
The page shows the added details of the selected project.

2. Click any box where you want to edit the details, and then edit the details in the respective box in the Projects
3. Click Save.
Delete a Project
If you want to delete any specific project from the list of projects, you can use  (Delete icon) provided in the Delete field of the Projects page.
Export Projects List
You can export a list of projects added in the Projects page in the pdf and excel formats by using ![]() (PDF button) and
(PDF button) and
![]() (Excel button).
(Excel button).
8.0 Equipments
Each project will have one or more equipments. Each equipment will be used to track and manage the details and documentation.
The Equipments tab in the Master Data menu used to add a new equipment under a project.
|
You can add a new equipment if you have been assigned with Admin and Power User roles only. |
1. Click Equipments in the Master Data
The Equipments page opens.
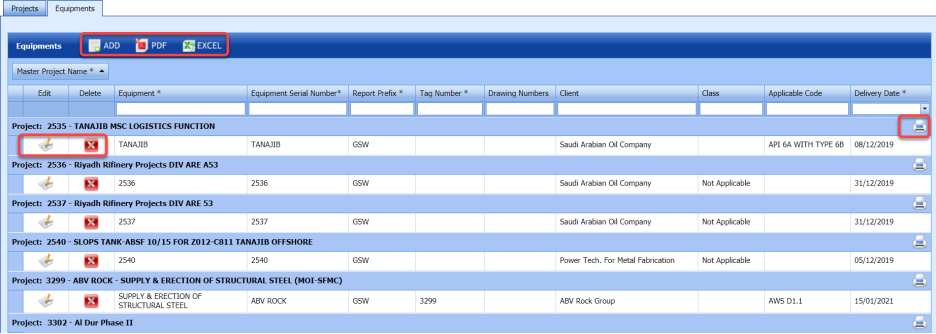
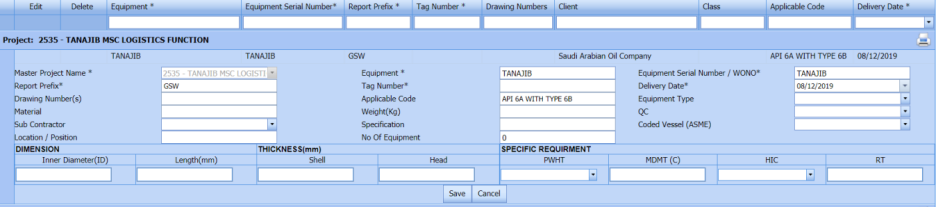
Figure 8.1: Equipments page
Add a New Equipment
If you want to add a new equipment, do the following steps,
The Equipments page shows a new box to add the details of a new equipment.
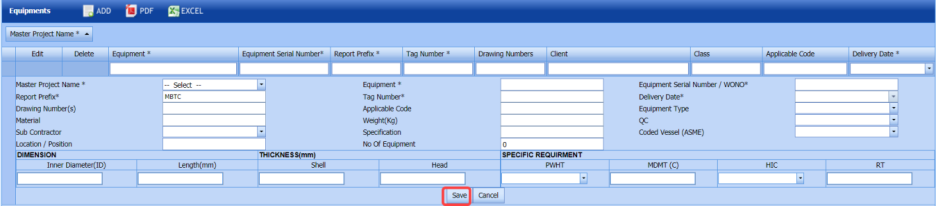
 Note: The fields notified with a symbol (*) are mandatory. You must enter the relevant details in that fields before saving.
2. In the Master Project Name box, enter the master project name from a drop-down list.
3. In the Equipment box, enter the equipment name.
4. In the Equipment Serial Number box, enter the equipment serial number.
5. In the Report Prefix box, the report prefix will be entered automatically. If you want change, you can edit the report prefix.
6. In the Tag Number box, enter the tag number.
7. In the Delivery Date box, choose the delivery date.
8. In the Drawing Number box, enter the drawing number.
9. In the Applicable Code box, enter the applicable code.
10. In the Equipment Type box, select the equipment type.
11. In the Material box, enter the material name.
12. In the Weight (Kg)box, enter the weight of the equipment.
13. In the QC box, select the QC type.
14. In the Sub Contractor box, select the sub-contractor from a drop-down list.
15. In the Specification box, enter the specification detail.
16. In the Coded Vessel box, select the coded vessel from a drop-down list.
17. In the Location/Position box, enter the location/position name.
18. In the of Equipment box, enter the number of equipment.
19. In the DIMENSION field, enter the inner diameter and length value.
20. In the THICKNESS field, enter the thickness of the shell and head.
21. In the SPECIFIC REQUIREMENT field, enter the PWHT, MDMT, HIC, and RT requirement detail.
22. Click Save.
A new equipment is added successfully.
Edit an Equipment
If you want to edit any existing equipment details from the list of equipments in the Equipments page, do the following,
1. Click  (Edit icon) in the Edit column for the respective equipment. See Fig 3.7.
The page shows the added details of the equipment.
2. Click any box where you want to edit the details, and then edit the details in the respective box in the Equipments
3. Click Save.
Delete an Equipment
If you want to delete any specific equipment from the list of equipments, you can use  (Delete icon) provided in the Delete field of the Equipments page.
Export Equipments List
You can export a list of equipments added in the Equipments page in the pdf and excel formats by using ![]()
(PDF button) and ![]() (Excel button).
(Excel button).
Print Equipments List
If you want to print equipments list, click  (Print icon) of the respective equipment in the Equipments page. The equipment list report will be opened.
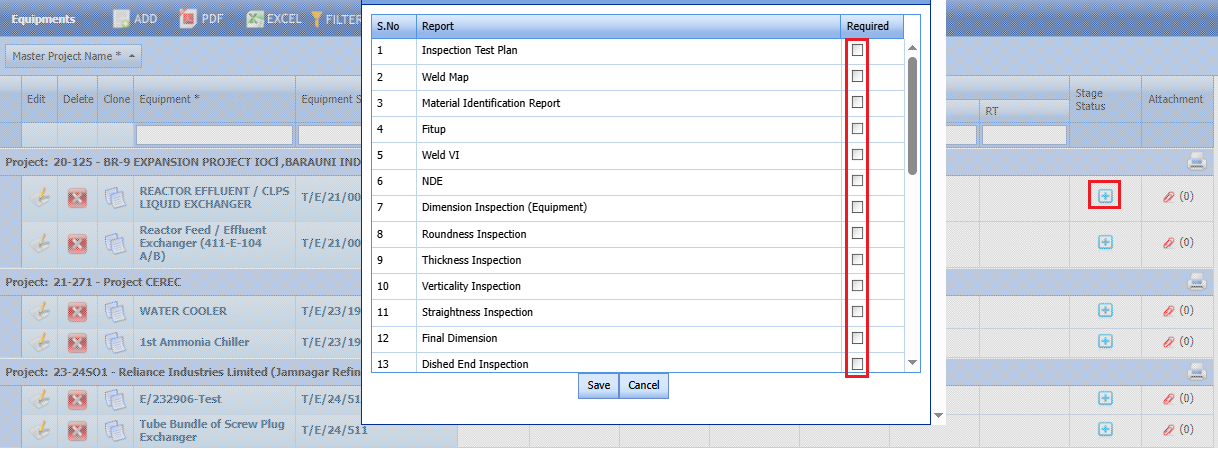
Stage status
Here we can customize,which are the stages required for the equipment .Click the icon to set the stages required.Select the required stages and click save icon .Stage status of the equipment saved successfully.
9.0 Location
Each company may have multiple locations or bays to fabricate equipments. Carbon steel and Stainless steel material are strictly managed in different locations.
The Location tab in the Master Data menu helps you to add the details of location. If you want to add any location,
1. Click Location in the Master Data
The Locations page opens.

Figure 9.1: Locations page
Add a Location
If you want to add a location, do the following steps,
1. Click  (ADD button) in the Locations See Fig 9.1.
The page shows a new box to add the details of a location.

 Note: The fields notified with the symbol (*) are mandatory. You must enter the relevant details in that fields before saving.
2. In the Location box, enter the location name.
3. In the Priority box, set the priority of the location.
4. Click Save.
The location is successfully added.
Edit a Location
If you want to edit any existing location in the Locations page, do the following,
1. Click (Edit icon) in the Edit column for the respective location. See Fig 6.8.
The page shows the details of added location.

2. Click on any box where you want to edit the details, and then edit the details in the respective box.
3. Click Save.
Delete a Location
If you want to delete any specific location from the list of added locations, you can use  (Delete icon) provided in the Delete field of the Locations page.
Export Locations List
You can export a list of locations added in the Locations page in the pdf and excel formats by using ![]() (PDF button) and
(PDF button) and![]() (Excel button).
(Excel button).
No Comments