
Employee Data
The HRM module in the cuteOffice application helps HR admins in streamlining the entire functions within an organization like managing the employee related information and company related information. Functionality present in the HRM module helps you to add employee’s basic data, employee’s and company’s master data, and company’s property details.
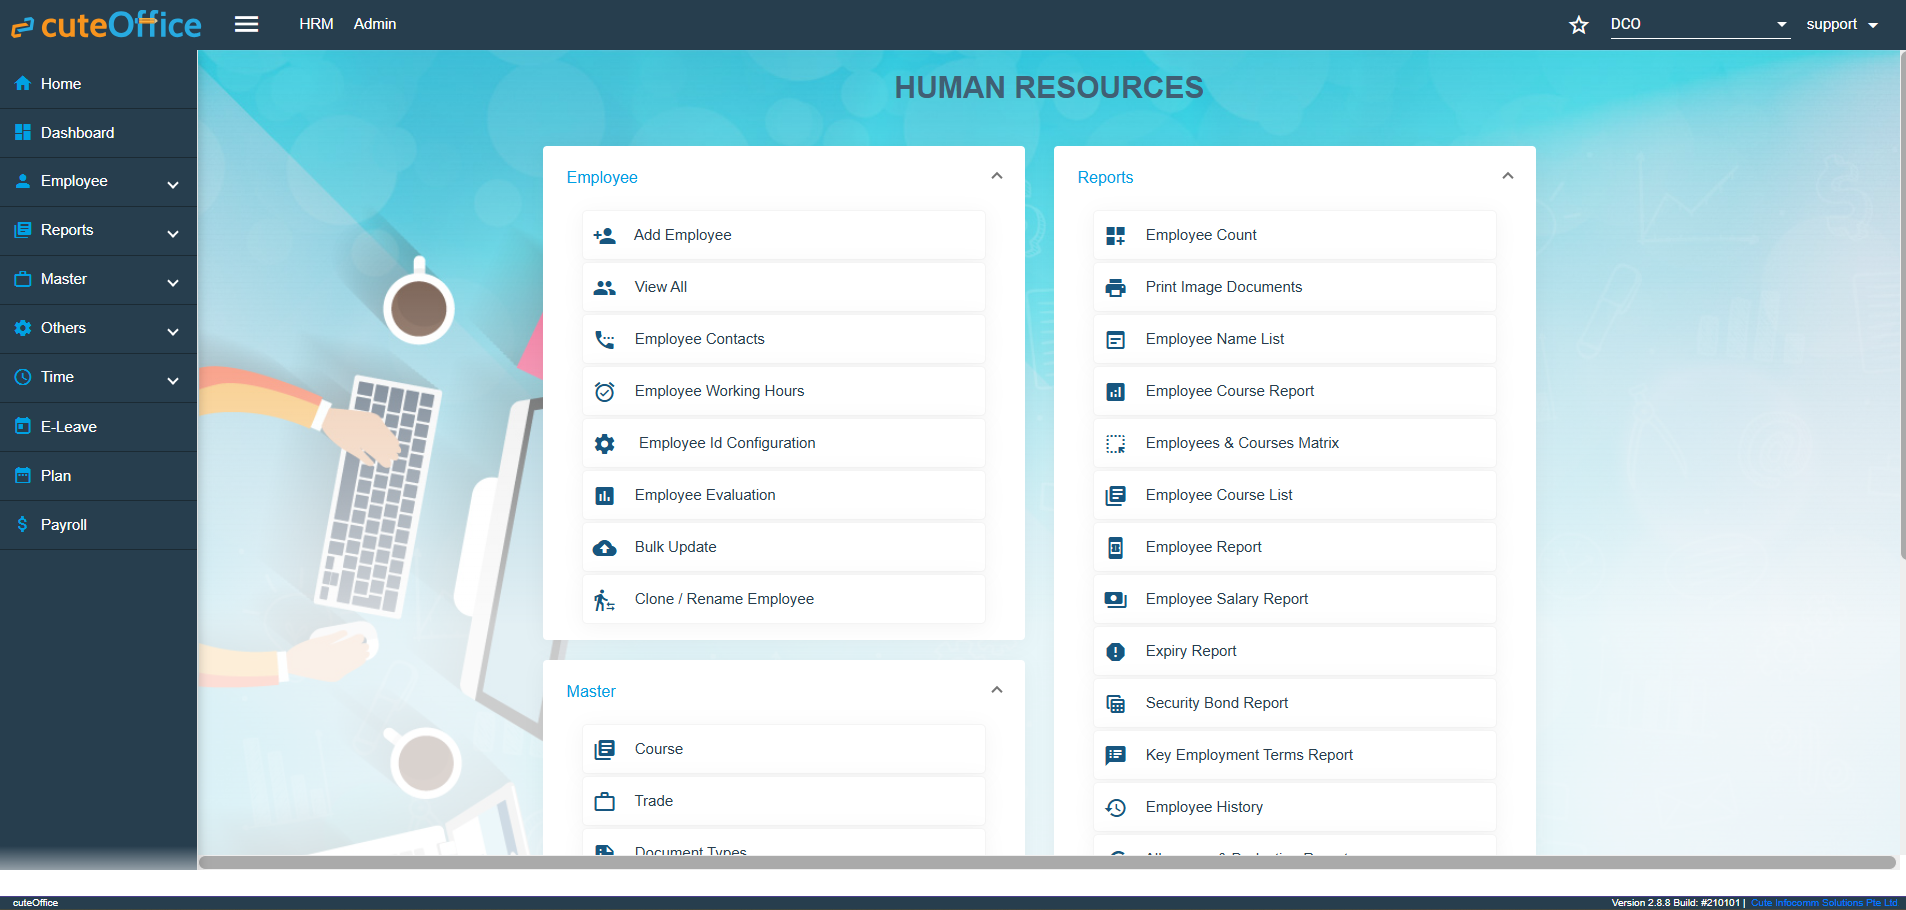
Humane Resource Menu Page
The HUMAN RESOURCES page consists the following sub menus:
- Employee - Allows HR admin to add employee’s basic details such as Name, DOB, Employee Type, Nationality and so on.
- Reports – Helps HR admin to view the various reports corresponding to the employee’s data.
- Master - Allows HR admin to add master data details of employee and company.
- Others - Allows HR admin to add the details of vehicles belongs to company, insurance details of employees, and salary addition and deduction details.
Employee
- Employee ID config
- Add Employee
- View All
- View Employee Contacts
- Employee Working Hours
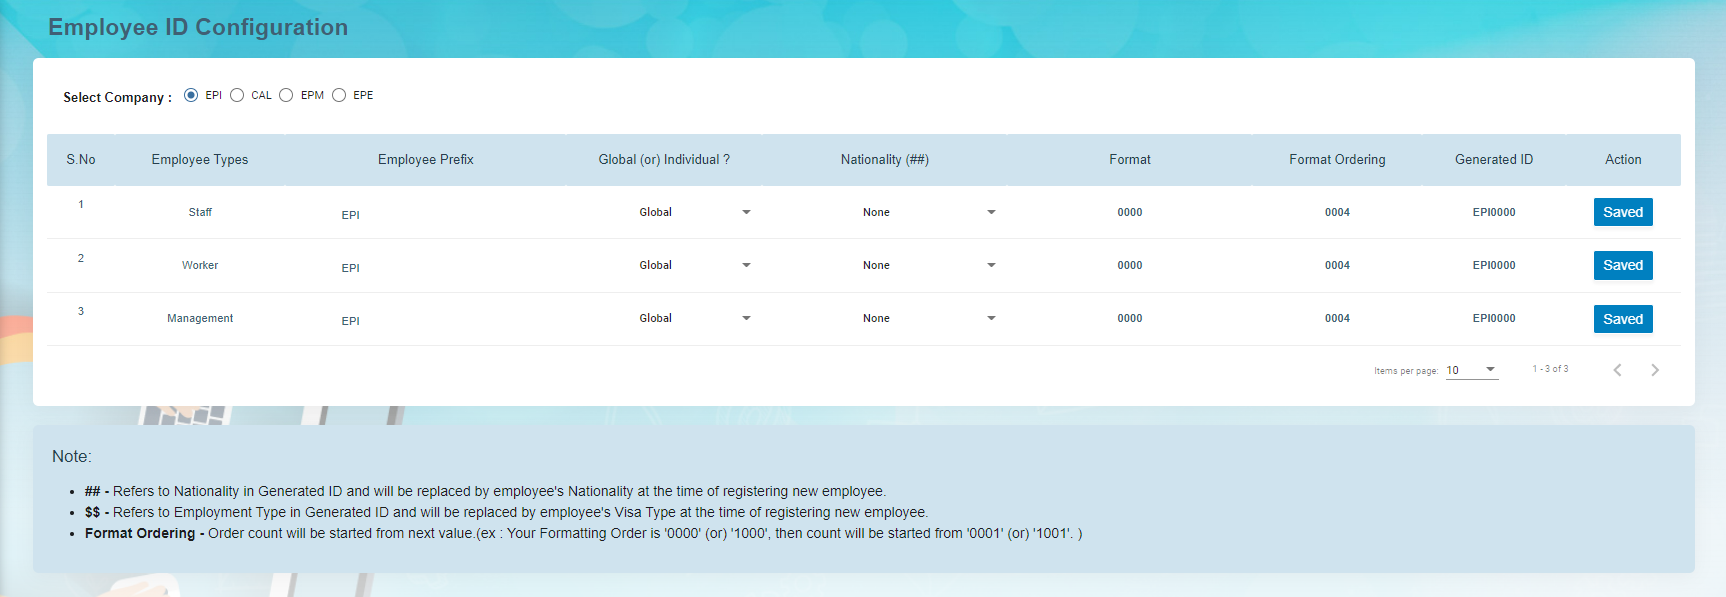
Employee ID Configuration
When creating the new employees in the system, the employee ID is automatically generated. How the employee number to be generated is configurable by the administrator.
- Click and select the company in the Employee ID Configuration page, it shows the current settings for the ID generator.

- The following are the currently supported variables that can be used for the ID generator.
-
- Employee Type – Based on the Over-all Type configured for the company
- Employee Prefix – Defaulted to company abbreviation and can be changed.
- Global/Individual – Employee Number is globally increased by Employee Type or Individually managed by employee type
-
- Global means the number will be global for the company irrespective of the employee type.
- Individual means, the employee ID running number will be maintained individually for each employee type.
-
- Nationality None / Before Employee ID / After Employee ID – If the nationality to be as part of the employee number where it should be appearing. Choose None if the employee ID does not have the country code.
- Set the number with which the employee ID should be incremented next when a new employee is created. The current number shown is already used for the previous employee created in the system.
Note: For new company, complete the initial employee id configuration before importing or adding the employees records.
Add Employee Data
The View All tab in the Employee submenu helps you to add the details of a new employee and view the added employee details including their profile percentage. The profile percentage of the employee lets you easily identify the incomplete details of employee.
To add a new employee, do the following steps,
- Click the View All tab in the Employee . The View All Employee page opens.

- Click (Add button) in the View All Employee. The Add Employee window opens.
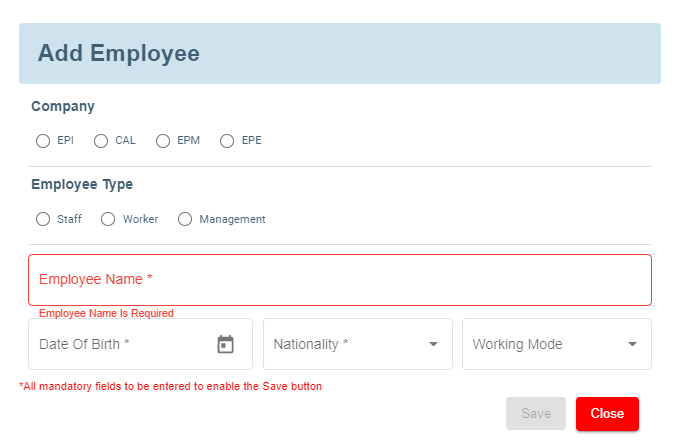
Note: The fields notified with a symbol (*) are mandatory. You must enter the relevant details in that fields before saving.
- In the Company field, select a company from the given list of companies.
- In the Employee Type field, select the employee type.
- In the Employee Name box, enter the employee name.
- In the Date of Birth box, enter the birth date of the employee.
- In the Nationality box, select the nationality of the employee.
- Click Save. The employee is created and a new employee ID is assigned to the employee. The Photo ID Document Management page opens.


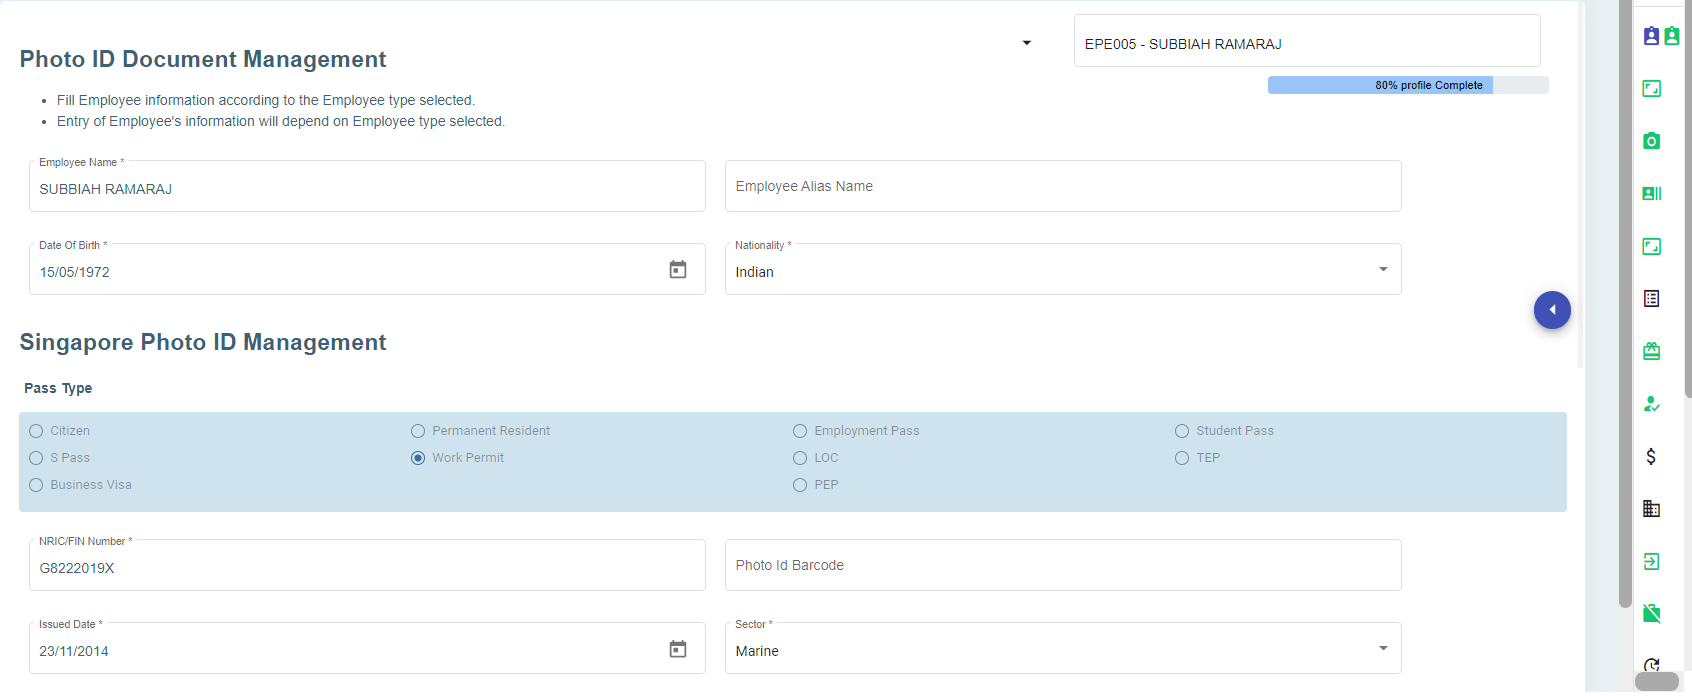
Add Photo ID Information of Employee
In the Photo ID Document Management page, you can enter the employee’s information according to the photo ID given by the employee.
Note: Before adding the employee’s photo ID information, make sure that the company you have selected using the Company field is in Singapore or other country.
If the selected company is in Singapore, the Photo ID Document Management page contains the Singapore Photo ID Management field. See below figure.
If the selected company is in other country, the Photo ID Document Management page contains the Other Photo ID Management field. See below figure. (Note: In Company Settings, change the default value "N/A" to the company’s country name (other than Singapore)).
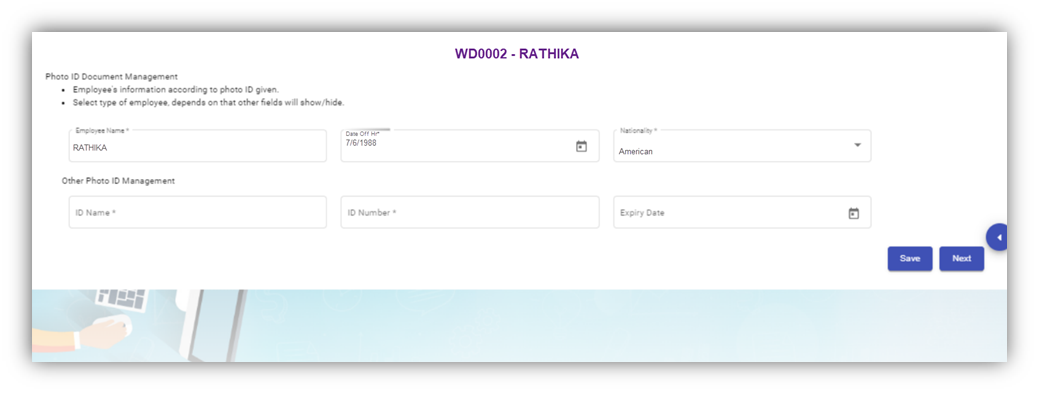
Photo ID Management (Non-Singapore)
Singapore Photo ID Management
Do one of the following steps to enter the relevant details in the Singapore Photo ID Management field based on the selection of type of employee in the Employee Type box.
- If the employee is citizen of Singapore, select the Citizen option in the Employee Type. The Singapore Photo ID Management field shows the following boxes based on the selected Citizen option. Fill the relevant information in the following boxes,

-
- In the NRIC/FIN Number box, enter the NRIC/FIN number.
- In the Photo Id Barcode, enter the barcode scanned result.
- In the Issued Date box, select the issued date of citizenship.
- In the Sector box, select the sector from a drop-down list.
- Click Save. The employee’s photo ID information will be added successfully in the system.
- If the employee is permanent resident of Singapore, select the Permanent Resident option in the Employee Type. The Singapore Photo ID Management field shows the following boxes based on the selected Permanent Resident option. Fill the relevant information in the following boxes,
- In the NRIC/FIN Number box, enter the NRIC/FIN number.
- In the Photo Id Barcode, enter the barcode scanned result.
- In the Issued Date box, select the issued date of permanent resident.
- In the Sector box, select the sector from a drop-down list.
- Click Save. The employee’s photo ID information will be added successfully in the system.
- If the employee is an employment pass holder, select the Employment Pass option in the Employee Type. The Singapore Photo ID Management field shows the following boxes based on the selected Employment Pass option. Fill the relevant information in the following boxes,
- In the NRIC/FIN Number box, enter the NRIC/FIN number.
- In the Photo Id Barcode, enter the barcode scanned result.
- In the Issued Date box, select the issued date of employment pass.
- In the Sector box, select the sector from a drop-down list.
- In the Date of Application box, select the applied date of employment pass.
- In the ID Expiry Date box, select the expiry date of the employment pass ID.
- Click Save. The employee’s photo ID information will be added successfully in the system.
- If the employee is a S pass holder, select the S Pass option in the Employee Type. The Singapore Photo ID Management field shows the following boxes based on the selected S Pass option. Fill the relevant information in the following boxes,
- In the NRIC/FIN Number box, enter the NRIC/FIN number.
- In the Photo Id Barcode, enter the barcode scanned result.
- In the Issued Date box, select the issued date of S pass.
- In the Sector box, select the sector from a drop-down list.
- In the Date of Application box, select the applied date of S pass.
- In the ID Expiry Date box, select the expiry date of the S pass ID.
- In the Levy Type box, select the levy type from a drop-down list.
- In the Levy Amount Type box, select the levy amount type from a drop-down list.
- In the Levy Amount box, enter the levy amount.
- Click Save. The employee’s photo ID information will be added successfully in the system.
- If the employee is a student pass holder, select the Student Pass option in the Employee Type. The Singapore Photo ID Management field shows the following boxes based on the selected Student Pass option. Fill the relevant information in the following boxes,
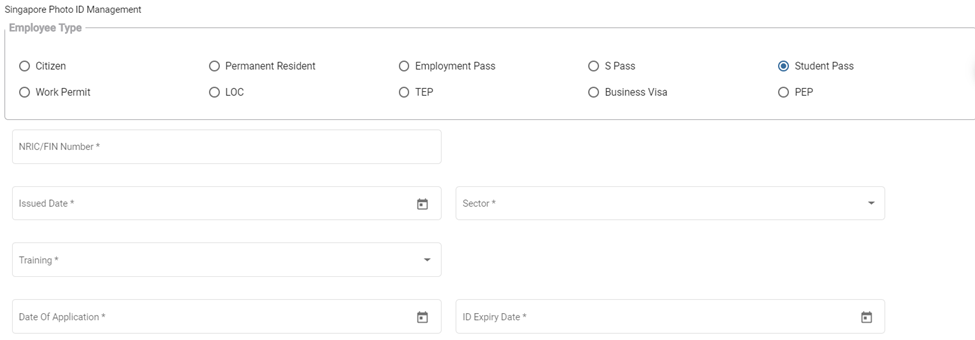
- In the NRIC/FIN Number box, enter the NRIC/FIN number.
- In the Photo Id Barcode, enter the barcode scanned result.
- In the Issued Date box, select the issued date of student pass.
- In the Sector box, select the sector from a drop-down list.
- In the Training box, select the training type from a drop-down list.
- In the Date of Application box, select the applied date of student pass.
- In the ID Expiry Date box, select the expiry date of the student pass ID.
- Click Save. The employee’s photo ID information will be added successfully in the system.
- If the employee is a work permit holder, select the Work Permit option in the Employee Type. The Singapore Photo ID Management field shows the following boxes based on the selected Work Permit option. Fill the relevant information in the following boxes,
- In the NRIC/FIN Number box, enter the NRIC/FIN number.
- In the Photo Id Barcode, enter the barcode scanned result.
- In the Issued Date box, select the issued date of work permit.
- In the Sector box, select the sector from a drop-down list.
- In the Date of Application box, select the applied date of work permit.
- In the ID Expiry Date box, select the expiry date of the work permit ID.
- In the Levy Type box, select the levy type from a drop-down list.
- In the Levy Amount Type box, select the levy amount type from a drop-down list.
- In the Levy Amount box, enter the levy amount.
- In the Security Bond Expiry box, select the expiry date of security bond.
- In the Security Bond Guarantee Number box, enter the guarantee number of security bond.
- In the Sum Insured box, enter the insured amount.
- In the Insurer box, enter the name of insurer.
- In the Number of Years box, enter insurance coverage years.
- In the Duration box, enter the duration of the insurance.
- In the Start Date and End Date boxes, select the start and end date of the insurance.
- If the indemnity is received, select the checkbox of the Is Indemnity Received option.
- If the indemnity is postre, select the checkbox of the Is Indemnity Postre option.
- If the discharge status is available, select the checkbox of the Discharge status option.
- Click Save. The employee’s photo ID information will be added successfully in the system.
- If the employee is a LOC holder, select the LOC option in the Employee Type. The Singapore Photo ID Management field shows the following boxes based on the selected LOC option. Fill the relevant information in the following boxes,
- In the NRIC/FIN Number box, enter the NRIC/FIN number.
- In the Photo Id Barcode, enter the barcode scanned result.
- In the Issued Date box, select the issued date of LOC.
- In the Sector box, select the sector from a drop-down list.
- In the Date of Application box, select the applied date of LOC.
- In the ID Expiry Date box, select the expiry date of the LOC ID.
- Click Save. The employee’s photo ID information will be added successfully in the system.
- If the employee is a TEP holder, select the TEP option in the Employee Type. The Singapore Photo ID Management field shows the following boxes based on the selected TEP option. Fill the relevant information in the following boxes,
- In the NRIC/FIN Number box, enter the NRIC/FIN number.
- In the Photo Id Barcode, enter the barcode scanned result.
- In the Issued Date box, select the issued date of TEP.
- In the Sector box, select the sector from a drop-down list.
- In the Training box, select the training type from a drop-down list.
- In the Date of Application box, select the applied date of TEP.
- In the ID Expiry Date box, select the expiry date of the TEP ID.
- Click Save. The employee’s photo ID information will be added successfully in the system.
- If the employee is a business visa holder, select the Business Visa option in the Employee Type. The Singapore Photo ID Management field shows the following boxes based on the selected Business Visa option. Fill the relevant information in the following boxes,
- In the Issued Date box, select the issued date of business visa.
- In the Sector box, select the sector from a drop-down list.
- In the Type of Visa box, enter the visa type.
- In the Sponsorship Particulars box, enter the sponsorship details.
- In the Training box, select the training type from a drop-down list.
- In the Date of Application box, select the applied date of business visa.
- In the Expiry Date box, select the expiry date of the business visa.
- In the Purpose box, enter the purpose of getting business visa.
- In the Remarks box, enter your remarks if any.
- Click Save. The employee’s photo ID information will be added successfully in the system.
- If the employee is a PEP holder, select the PEP option in the Employee Type. The Singapore Photo ID Management field shows the following boxes based on the selected PEP option. Fill the relevant information in the following boxes,
- In the NRIC/FIN Number box, enter the NRIC/FIN number.
- In the Photo Id Barcode, enter the barcode scanned result.
- In the Issued Date box, select the issued date of PEP.
- In the Sector box, select the sector from a drop-down list.
- In the Date of Application box, select the applied date of PEP.
- In the ID Expiry Date box, select the expiry date of the PEP ID.
- Click Save. The employee’s photo ID information will be added successfully in the system.
Other Photo ID Management (Non-Singapore)
To add employee’s photo ID information in the Other Photo ID Management field
Enter the relevant details in the Other Photo ID Management field based on the selection of type of employee in the Employee Type box.
-
- In the ID Name box, enter the name of the employee ID.
- In the ID Number box, enter the number of the employee ID.
- In the Expiry Date box, select the expiry date of the employee ID.
- Click Save. The employee’s photo ID information related with the company located in other country is successfully added.
- Click Next. The photo ID Image Management page opens.
Add Photo ID Image of Employee
In the Photo ID Image Management page, you can upload the image of the photo ID which is the national identification card given to the employee. You can upload both the front and back side images of the photo ID, and the Singapore SGWorkPass images.
Note: The photo ID image you want to upload should be in PNG or JPEG format. The image size should not be more than 1 MB.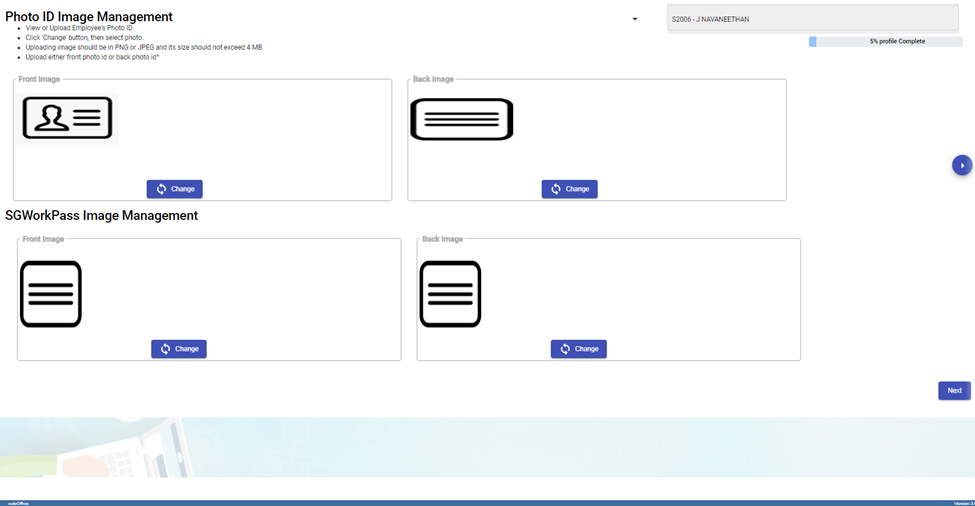

There is an option provided to trim the image as required. Click Save. The selected front image of the photo ID will be displayed in the Front Image field.
- Click Next. The Photo Management page opens.
Add Photo of Employee
In the Photo Management page, you can upload an image of the employee.
Note: The image you want to upload should be in PNG or JPEG format. The image size should not be more than 1 MB.
- Click Next. The Passport Information page opens.
Add Passport Information of Employee
In the Passport Information page, you can add information of the employee’s passport.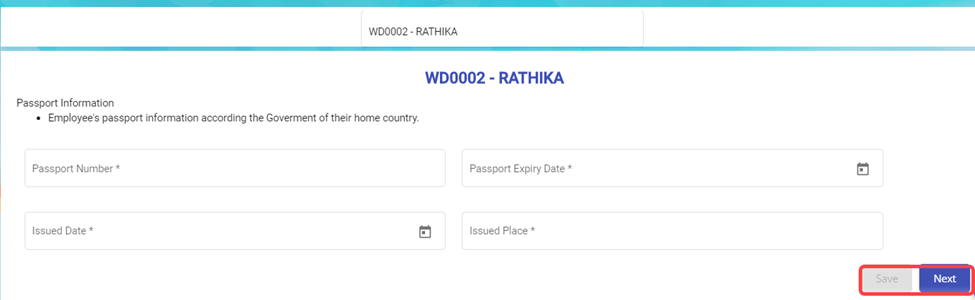
- In the Passport Number box, enter the number of the employee’s passport.
- In the Passport Expiry Date box, enter the expiry date of the passport.
- In the Issued Date box, select the passport issued date.
- In the Issued Place box, enter the passport issued place.
- Click Save. The added passport information is successfully saved.
- Click Next. The Passport Image Management page opens.
Add Image of Employee’s Passport
In the Passport Image Management page, you can add an image of the employee’s passport. You can upload both the front and back side images of the passport.
Note: The passport image you want to upload should be in PNG or JPEG format. The image size should not be more than 200 KB.
- Click Next. The Passport Collection and Issuance page opens.
Add Collection and Issuance Details of Employee’s Passport
In the Passport Collection and Issuance page, you can add the collection and issuance details of the employee passport. If you have added the collection and issuance details like collection date and issuance date, you can track the employee’s passport issuance and return history.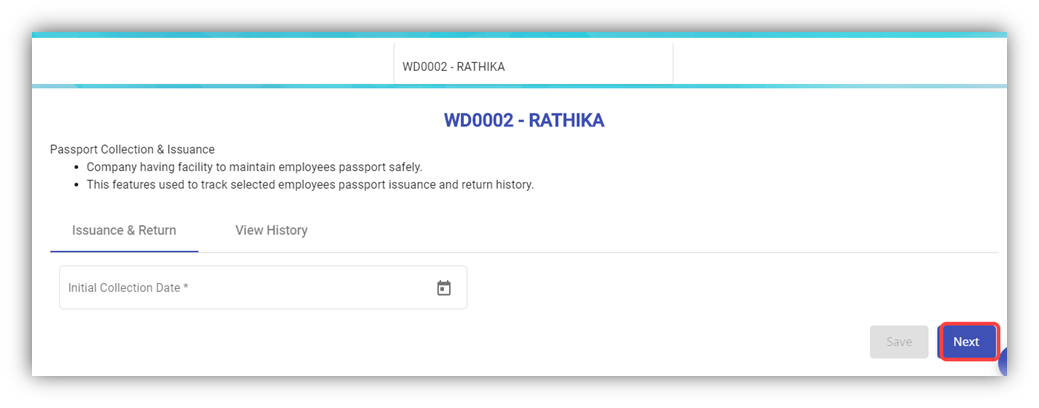
- In the Initial Collection Date box, select the date when the passport has collected from the employee.
- Click Next. The Employee Passport Issuance Details field opens.
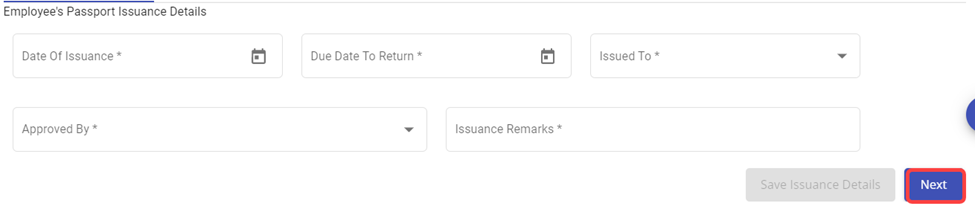
- In the Date of Issuance box, select the date when the passport to be issued to the employee.
- In the Due Date to Return box, select the due date to return the passport.
- In the Issued To box, select the name of a person to whom the passport should be issued.
- In the Approved By box, select the name of a person who should approve the issuance of passport.
- In the Issuance Remarks box, enter your remarks if any.
- Once issued, it can be returned back for safe keeping again.
- Click Next. The Official Information page opens.
Add Official Information of Employee
In the Official Information page, you can add the official information of the employee.
- In the Official Information field,
- In the Working Mode box, select the working mode of the employee from a drop-down list.
- In the Department box, select a department which the employee belongs to.
- In the Designation box, select the designation of the employee.
- In the Date of Join box, select the date of joining of the employee.
- In the Supervisor box, select the supervisor of the employee from a drop-down list.
- In the First DOJ box, select the first date of joining.
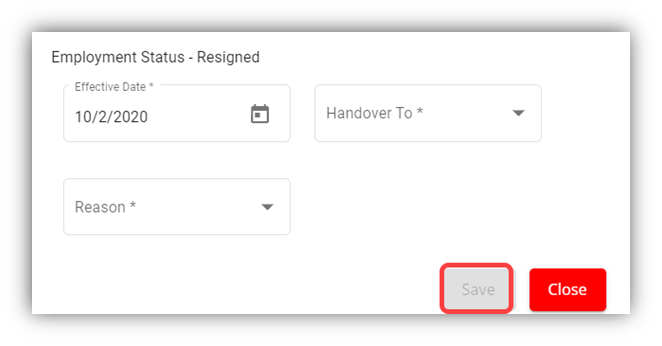
- In the Employment Status box:
- Resigned Staff. If the employee has resigned, select the Resigned option in the Employment Status. A new pop-up window opens to enter the resignation details while saving the added official information. In the Effective Date box, enter the date of relieving; In the Handover To box, select an employee to handover the resigned employee work; In the Reason box, select the reason of relieving. Click Save.
-
-
- Waiting for Clearance
- Deleted
- Terminated
-
Note: If you have selected Resigned, Deleted, and Terminated options in the Employment Status of the employee, you cannot add more details about employee and edit the added details of the employee.
-
- In the Employment Type box, select the type of employment whether Permanent or Term Contract.
- Note: If you have selected Term Contract, enter the duration of employment in the Duration of Employment box.
- In the Probation Days box, enter the probation period detail.
- In the ARE Trade box, select the trade of the employee from a drop-down list.
- Note: The ARE Trade may change according to the company.
- In the Contract Expiry box, select the contract expiry date.
- if you want to exclude the employee from cuteTime, select the checkbox of the Exclude from cuteTime?
- In the MOM Trade box, select the MOM trade from a drop-down list.
- In the Official Email Id box, enter the official email id of the employee.
- In the Attendance Id box, enter the attendance id of the employee.
- In the Public Holiday Group box, select the country you want to follow the holidays of the same.
- In the Is NS eligible? Box, select Yes if the employee is eligible to serve NS otherwise select
- In the Grade box, enter the grade number of the employee.
- In the Batch box, enter the batch number of the employee.
- In the Supplier Company box, select the supplier company from a drop-down list.
- In the Before Probation box, enter the notice period days for termination of employee before completing the probation period.
- In the After-Probation box, enter the notice period days for termination of employee after completing the probation period.
- If the employee is working under the employment act, select the checkbox of the Is Under Employment Act
- In the PPE and Size field,
- In the PPE Size box, select the required size of PPE.
- In the Shoe Size box, select the shoe size of the employee.
- In the PPE and Shoe Remarks box, enter your remarks if any.
- In the Bank Information field, enter the bank account information of employee.
- In the Bank Name box, enter the bank name.
- In the Bank Account Number box, enter the bank account number.
- In the Bank Account Type box, enter the type of bank account.
- If you want to attach any file to add extra information about the employee, click Choose File and select the respective file.
- Click Save.
- Click Next. The Experience and Qualification page opens with the Experience and Educational Qualification options.
Add Experience and Qualification Details of Employee
In the Experience and Qualification page, you can add working experience and educational qualification details of the employee.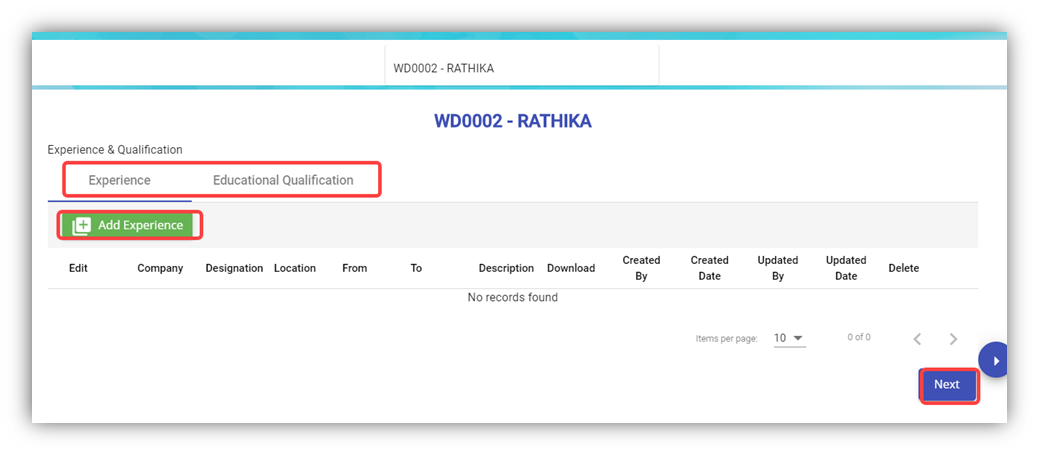
- To add work experience details of the employee, click (Add Experience button). The Add Experience window opens.

- In the Company box, enter the company name.
- In the Designation box, enter the designation of the employee.
- In the From and To boxes, select the working period of the employee.
- In the Location box, enter the location of the company.
- In the Description box, enter the description about the job nature.
- If you want to attach any file to add extra information about the work experience, click Choose File and select the respective file.
- Click Save. The work experience details of the employee are successfully added and listed in the Experience and Qualification page.
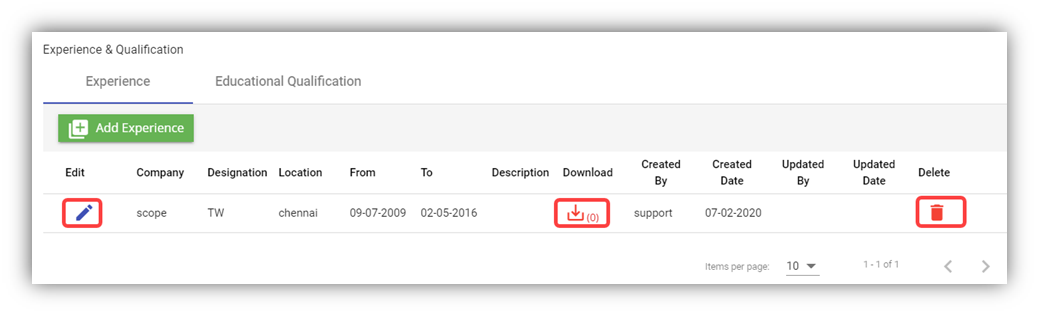 Note: If you want to edit the added work experience details, click
 ![]() (Edit icon). If you want to download the added work experience details, click
(Edit icon). If you want to download the added work experience details, click ![]() (Download icon). If you want to delete the added work experience details, click
(Download icon). If you want to delete the added work experience details, click ![]() (Delete icon).
(Delete icon).
- To add the educational qualification of the employee, click the Educational Qualification option in the upper of the Experience and Qualification
-
- Click (Add Qualification button). The Add Qualification Window opens.
- In the Qualification box, enter the educational qualification of the employee.
- In the Specialization box, enter the specialization in education.
- In the University box, enter the name of the university.
- In the Country box, enter the country name.
- In the Year of Graduation box, select the year when the employee gets graduated.
- In the Description box, enter the description about the employee’s education.
- If you want to attach any file to add extra information about the educational qualification, click Choose File and select the respective file.
- Click Save. The educational qualification details of the employee are successfully added and listed in the Experience and Qualification page
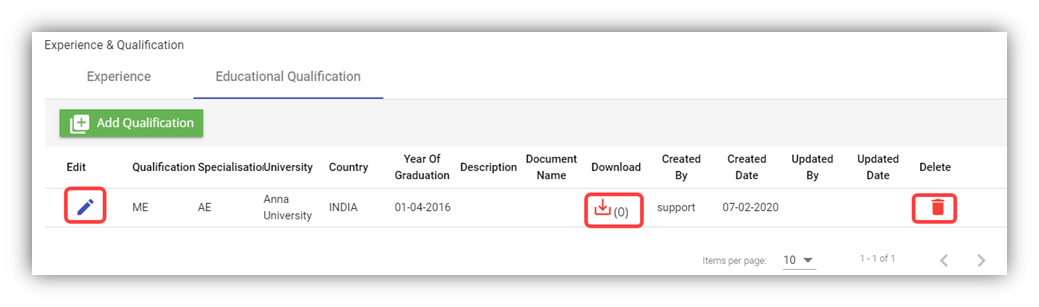 Note: If you want to edit the added educational qualification details, click
  (Edit icon). If you want to download the added educational qualification details, click
  (Download icon). If you want to delete the added educational qualification details, click
  (Delete icon).
 - Click Next. The Pay Eligibility page opens including the Salary Details and View History options.
Add Pay Eligibility Details of Employee
In the Pay Eligibility page, you can add the salary details of the employee.
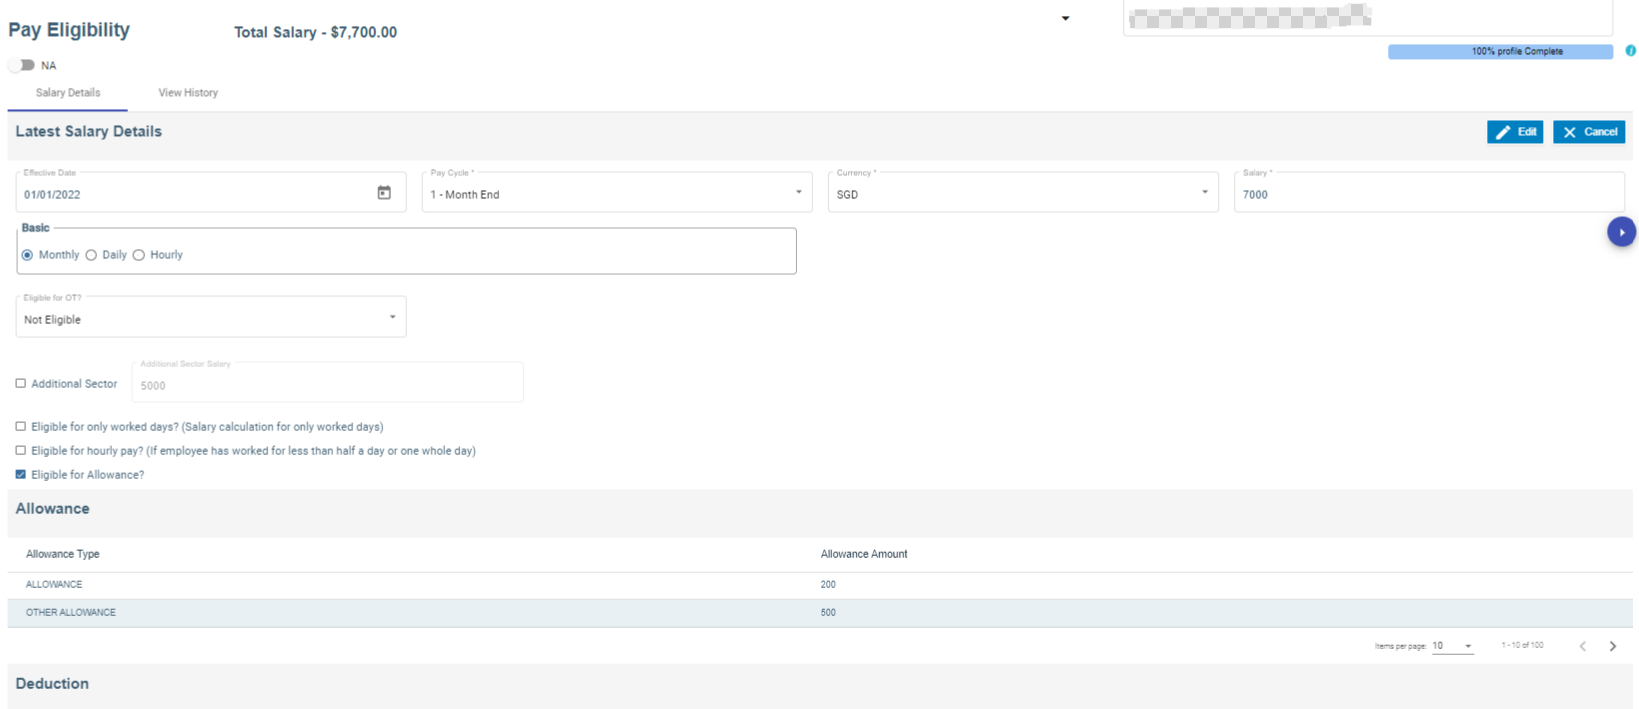
- In the Effective Date box, select the effective date for calculating salary for the employee.
- In the Pay Cycle box, select the pay cycle type.
- In the Currency box, select the currency from a drop-down list.
- In the Salary box, enter the salary amount.
- In the Basic box, select the basic pay method that is whether Monthly, Daily or Hourly
- If the employee is eligible to get pay only for worked days, select the checkbox of the Eligible for only worked days?
- If the employee is eligible to get hourly pay, select the checkbox of the Eligible for hourly pay?
- In the Eligible for OT? Box, select the OT option from a drop-down list.
- If the employee is eligible to get allowance, select the checkbox of the Eligible for Allowance?
- If an employee holding either PR or citizenship pass type and have additional salary, enable additional sector box with salary amount. (We have to configure Additional CPF account in the payroll information page).
- In the Remarks box, enter your remarks if any.
- If you want to attach any file to add extra information about the salary details, click Choose File and select the respective file.
- Click Save. The salary details are added successfully.
- Click Next. The Payroll information page opens.
Add Payroll Salary Configuration details of an employee
Salary Configuration page is meant to add pay mode, advance salary, withhold tax in percentage or fixed amount etc.,
- Under Payment & Rates, choose Pay mode from the drop-down list
- Add Advance Salary amount, if required. (To pay a portion of basic salary as an advance)
- Under With-Hold Tax, either add percentage or fixed amount.
- Enable check box to enter capping amount for tax.
- Under Others, employee groups, finance groups and working as available to configure.
- Enable check box for late minimum deduction, PH payable hrs and allow to compute salary from other Modules (ex : Scaffold module) along with that add addition allowance if necessary.
- Save button enabled automatically after all the mandatory fields are entered.
Settings to add Pay Mode, Employee Groups and Finance Groups
Pay Mode
- Click Admin
- Click options
- In the name field, choose mode of payment
- Click add button to add pay mode
- Click Save to save the record.
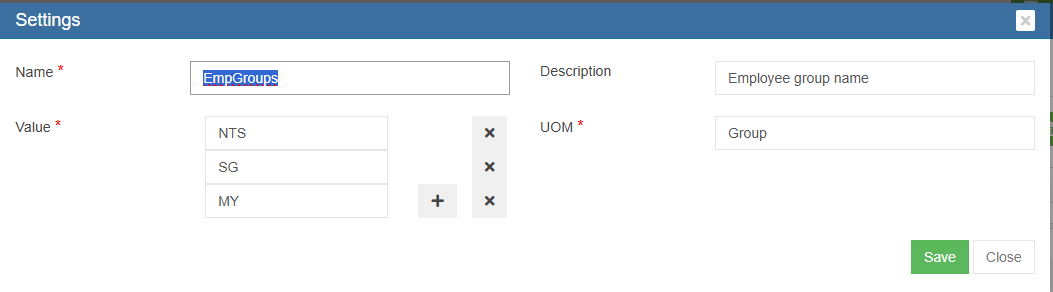
Employee Groups
- Click Admin
- Click Company menu
- Edit Company and click Settings tab
- Click add to add "EmpGroups" in the name field
- Enter Employee groups value
- Click "+" icon to add multiple Employee groups
- Click Save to save the data.

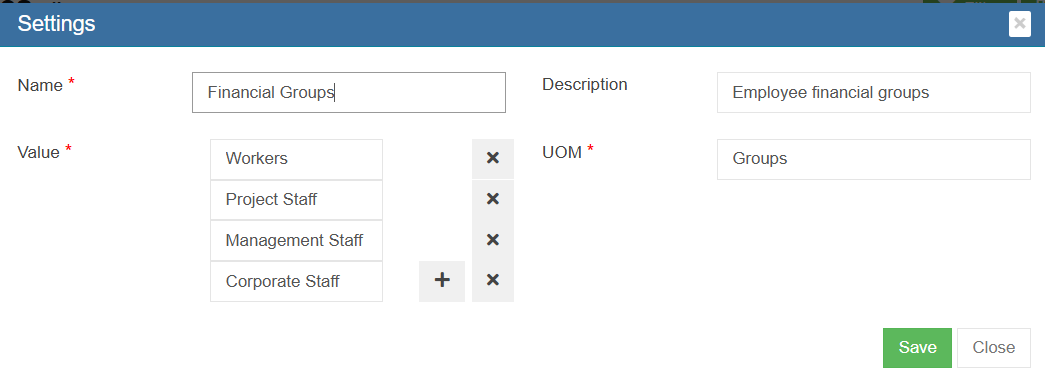
Finance Groups
- Click Admin
- Click Company menu
- Edit Company and click Settings tab
- Click add to add "Financial Groups" in the name field
- Enter Finance groups value
- Click "+" icon to add multiple Finance groups
- Click Save to save the data.

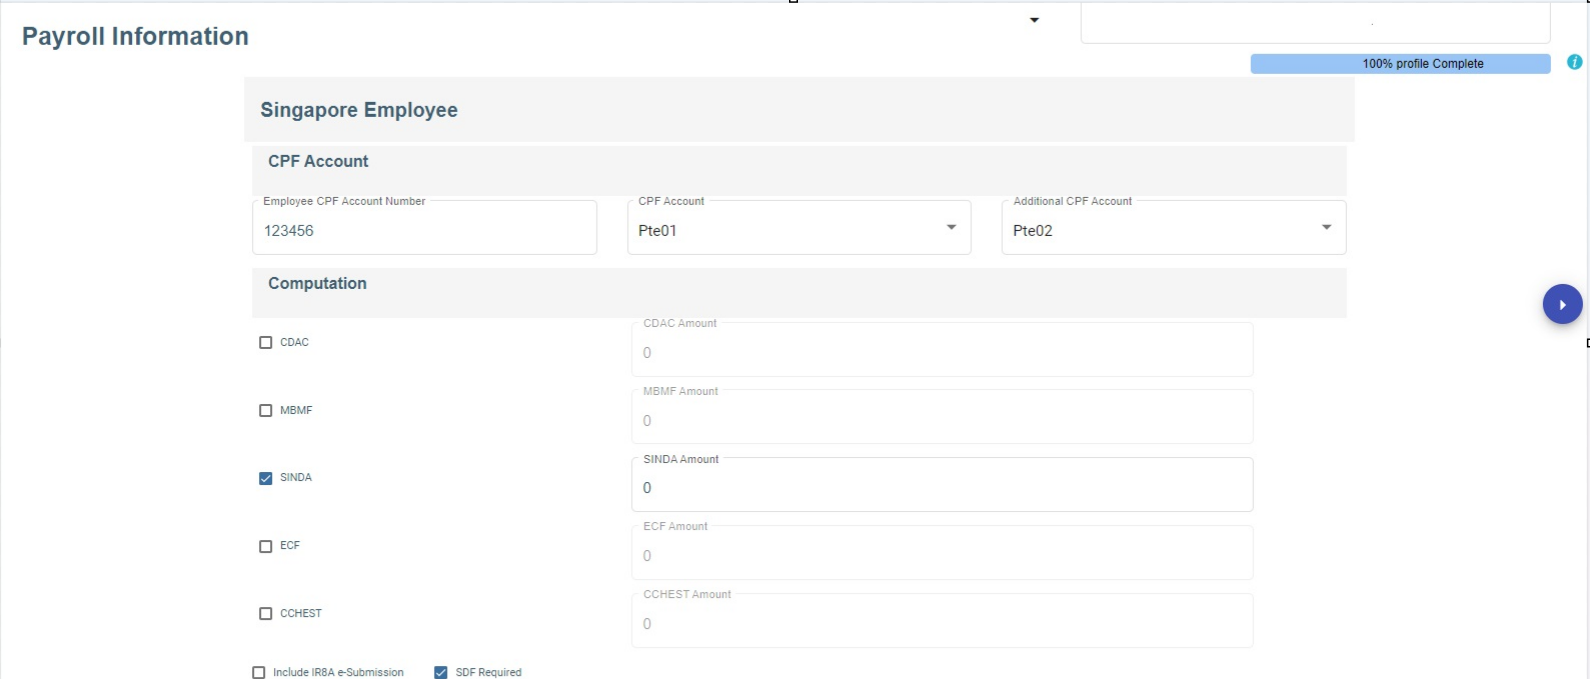
Add Payroll information details of an employee
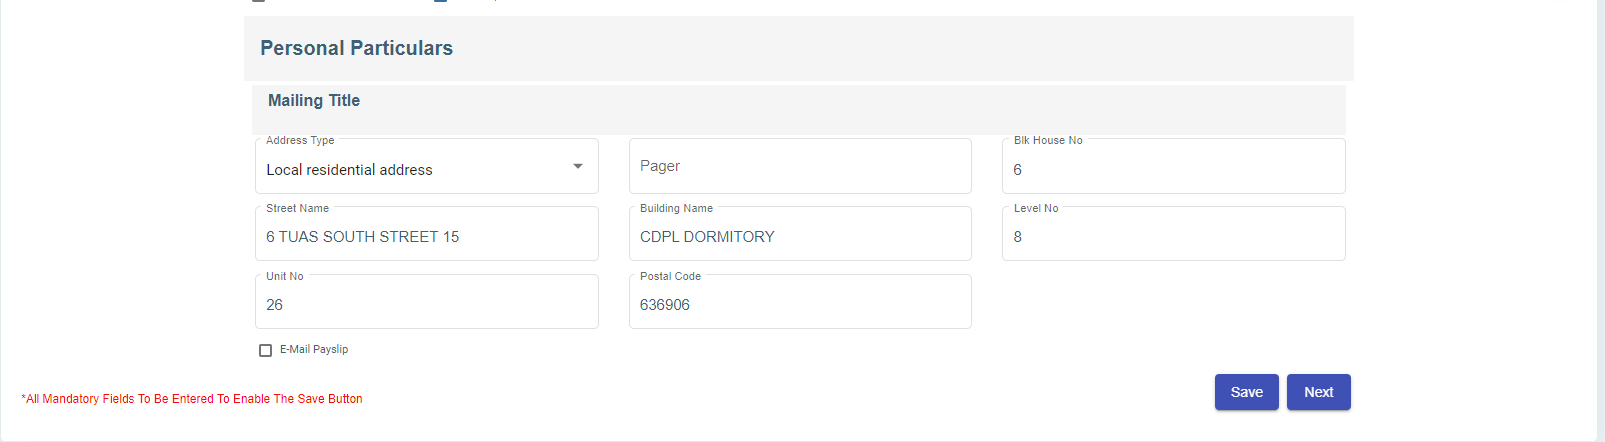
In the payroll information page, you can add the Singapore Employee CPF account information, Donation such as SINDA, CDAC, etc., and Personal Particulars.
- In the employee CPF account number, enter the account number.
- In CPF account, select CPF account from the drop-down list.
- In the Additional CPF account, choose the additional CPF account from the drop down list
- In computation, choose the donation and enter the amount or it has auto deduction of the amount.
- If required, enable IRAS e-submission and SDF,
- In the personal particular, enter the address details.
- Enable email payslip to send the payslip via email.
- Click Save. The payroll information details are added successfully.
- Click Next. The Leave details of employee page opens.
Add Leave Details of Employee
In the Employee Leave Details page, you can add the annual leave entitlement details of the employee.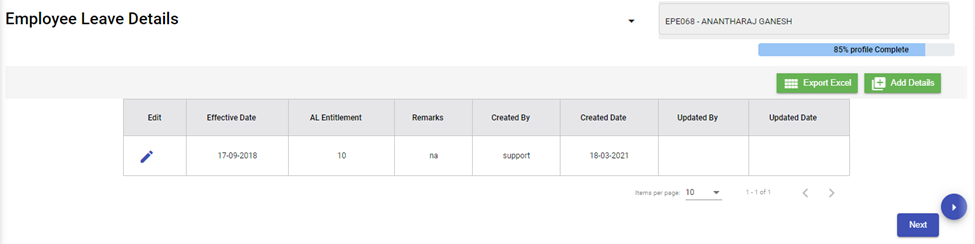
- Click (Add button) in the Employee Leave Details. The Leave Details window opens.
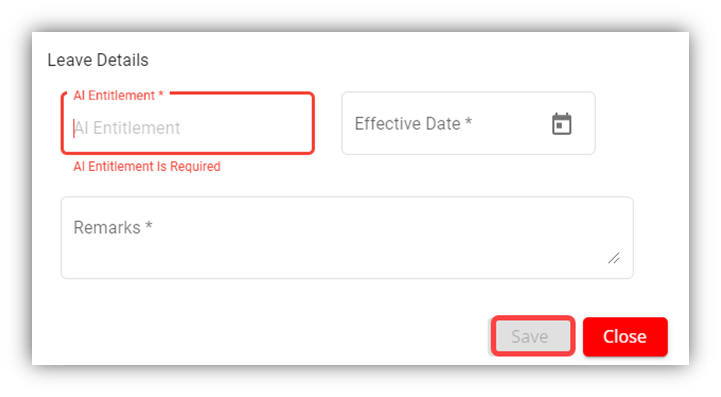
- In the AL Entitlement box, enter the number of annual leave.
- In the Effective Date box, select the effective date of the annual leave.
- In the Remarks box, enter your remarks if any.
- Click Save.
- Click Next. The Key Employment Report page opens.
Add Key Employment Report for Employee
In the Key Employment Report page, you can add key employment details such as sick leave and paid medical examination details of the employee.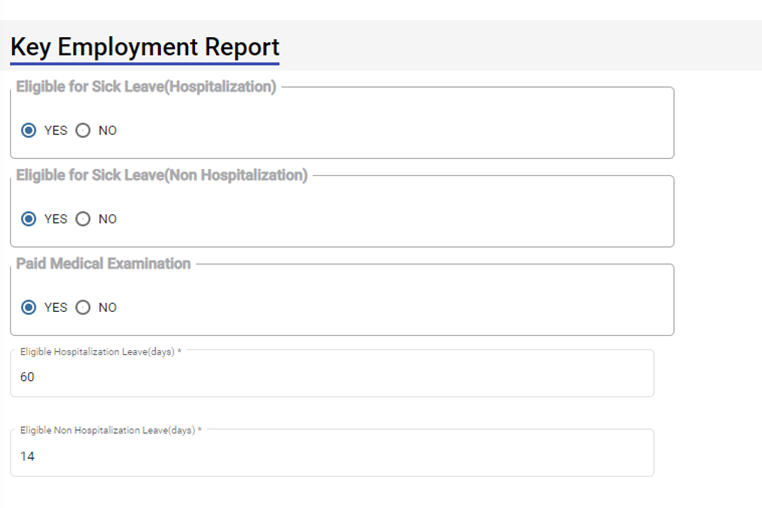
- If the employee is eligible to take sick leave even in case of non-hospitalization, select YES in the Eligible for Sick Leave (Non-Hospitalization) option otherwise select NO.
- If the employee is eligible to avail the paid medical examination, select YES in the Paid Medical Examination option otherwise select NO.
- In the Eligible Hospitalization Leave (days) box, enter the number of eligible hospitalization leaves.
- In the Eligible Non-Hospitalization Leave (days) box, enter the number of eligible non-hospitalization leaves.
- In the Exclude Time and Leave box, select the option based on the employee’s leave and permission status.
- Click Save.
- Click Next. The Employee Minimum Working Hours page opens.
Add Minimum Working Hours of Employee
In the Employee Minimum Working Hours page, you can add the minimum working hours details of the employee.
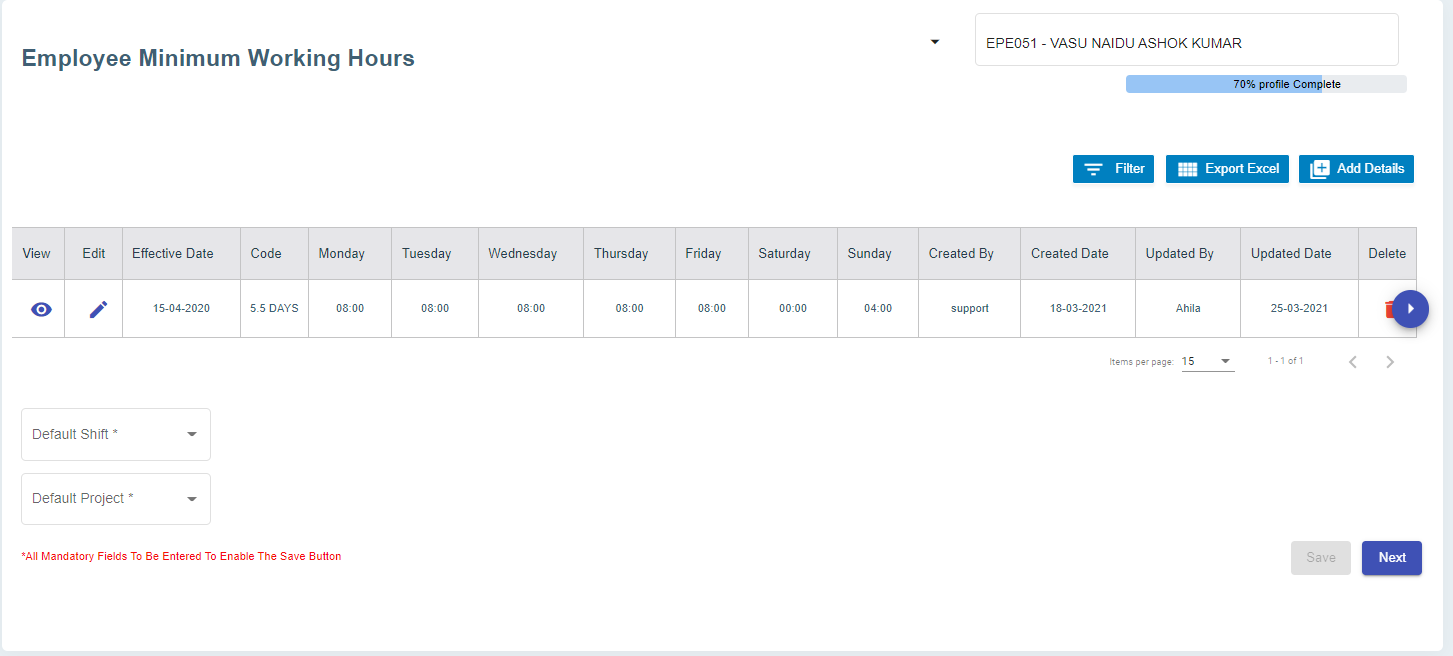
- Click (Add Details button). The Minimum Working Hours window opens.
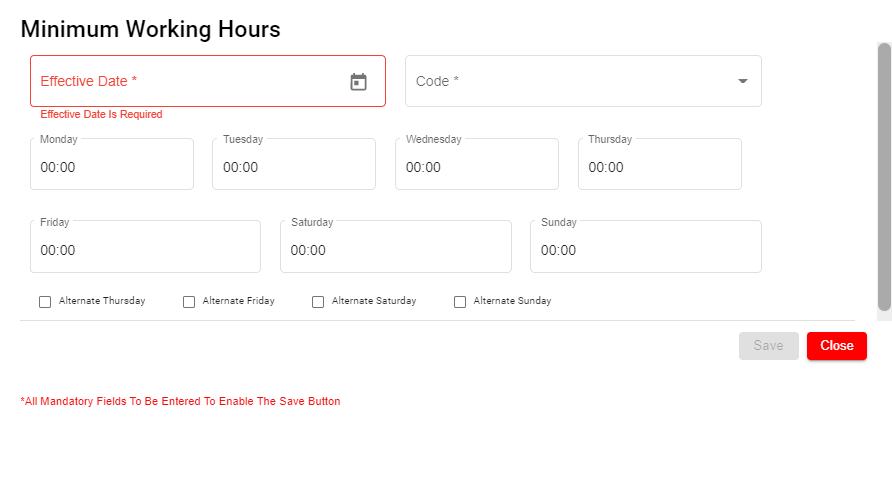
- In the Effective Date box, select the effective date to follow the minimum working hours by the employee.
- In the Code box, select relevant working day code.
- In the Monday to Sunday boxes, for each day, select the minimum hours to be worked by the employee.
- If the setting Off day is enabled, it helps to calculate the rest day in OT1.


Add Contracts and Other Document of Employee
In the Contracts and Other Document page, you can add the contract document or other document of the employee.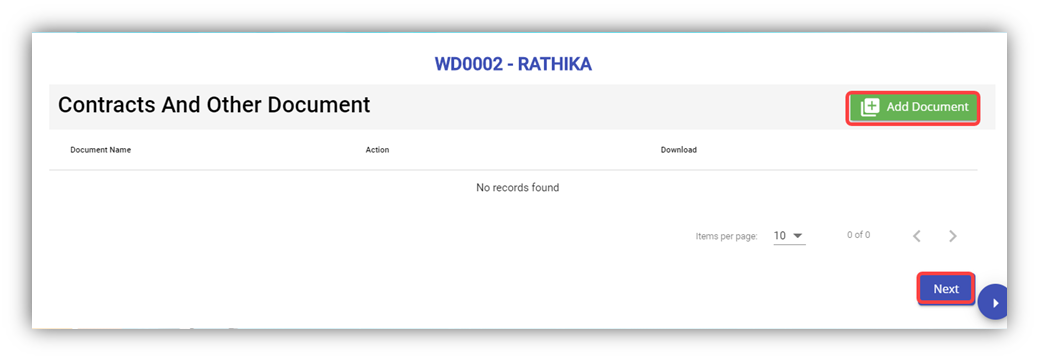
- Click (Add Document button) in the Contracts and Other Document. The Contracts and Other Document window opens.

- In the Document Type box, select the document type from a drop-down list.
- In the Document Name box, enter the document name.
- Click the Choose File option to select the document you want to add.
- Click Save. The selected document is successfully uploaded and listed in the Contracts and Other Document page.

Note: If you want to download the added document details, click
 (Download icon).
If you want to delete the added document details, click
 (Delete icon).
 - Click Next. The Courses, Certificates, and Other Documents page opens.
Add Courses, Certificates, and Other Documents of Employee
In the Courses, Certificates, and Other Documents page, you can add the details of courses, certificates, and other documents of the employee. The Courses, Certificates, and Other Documents page shows the Courses and Certificates and Other Documents options.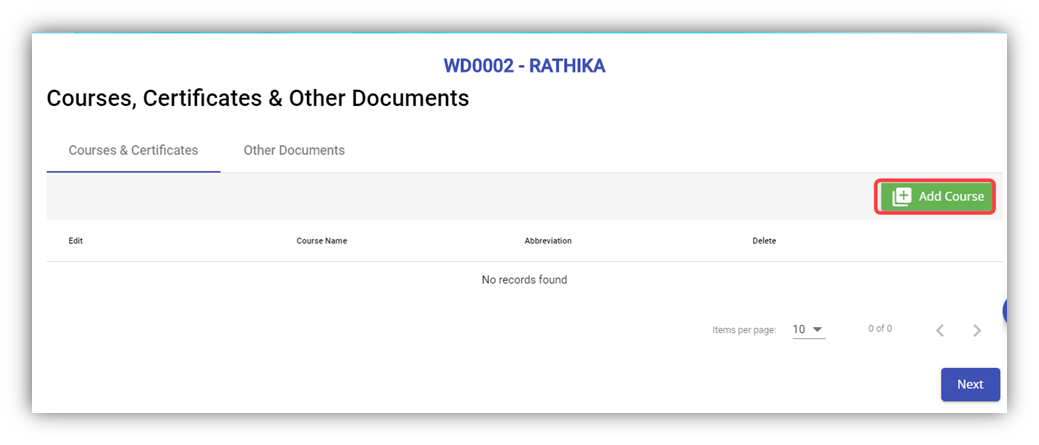
- To add courses and certificates details of the employee, click (Add Course button).
- In the Select Course/Certificate box, select the course/certificate from a drop-down list.
- In the Certificate Number box, enter the course/certificate number.
- In the Expiry Date box, select the expiry date of the added course/certificate.
- In the Date Attended box, select the attended date of the course.
- If you want to view the employee’s course certificate in the landscape format, select the checkbox of the Landscape
- In the Remarks box, enter your remarks if any.
- Click
- Navigate to the Other Documents option to add documents other than courses and certificates, and then click (Add Documents button). The Add Document window opens.
- In the Document Name box, enter the name of the document.
- If you want to attach the document, click Choose File, and select the respective document.
- Click Save. The selected document is successfully uploaded and listed in the Courses, Certificates, and Other Documents page.
Note: If you want to download the added document details, click
(Download icon).If you want to delete the added document details, click
(Delete icon). - Click Next. The Personal Particulars page opens.
Add Personal Particulars of Employee
In the Personal Particulars page, you can add the personal details of the employee.
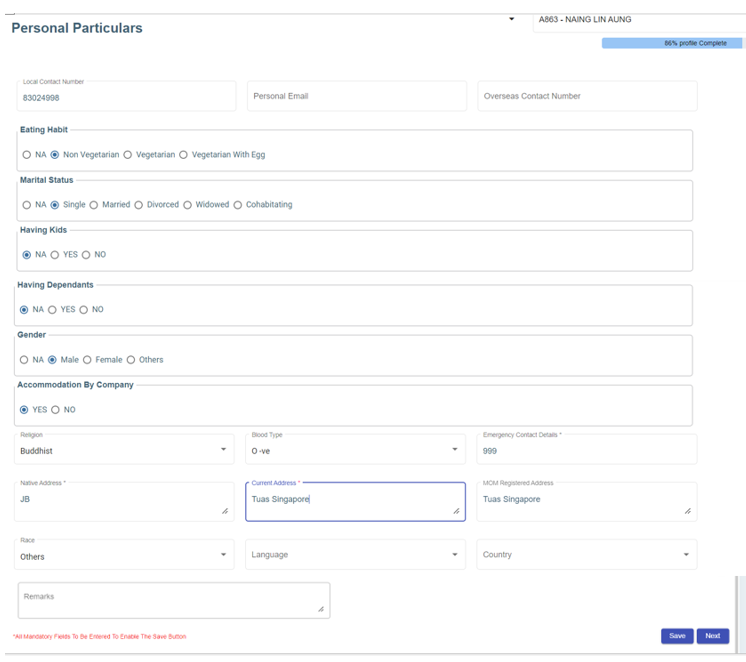
- In the Local Contact Number box, enter the local contact number of employee.
- In the Personal Email box, enter the personal email of the employee.
- In the Overseas Contact Number box, enter the overseas contact number of the employee.
- In the Eating Habit box, select the eating habit of the employee.
- In the Marital Status box, select the marital status of the employee.
- In the Having Kids box, select YES if the employee is having kids otherwise select NO.
- In the Having Dependants box, select YES if the employee is having any dependants otherwise select NO.
- In the Gender box, select the gender of the employee.
- In the Accommodation By Company box, select Yes if the company provides accommodation to the employee.
- In the Religion box, select the religion of the employee from a drop-down list.
- In the Blood Type box, select the blood group of the employee.
- In the Emergency Contact Details box, enter the emergency contact details of the employee.
- In the Native Address box, enter the native address of the employee.
- In the Current Address box, enter the present address of the employee.
- In the MOM Registered Address box, enter the address that is registered on MOM.
- In the Remarks box, enter your remarks if any.
- Click Save. The employee’s personal details are successfully added.
- Click Next. If you have selected YES in the Having Kids box, the Kids Details page opens or If you have selected YES in the Having Dependants box, the Dependant Details page opens. Otherwise, the Visa Details page opens.
Add Kids Details of Employee
In the Kids Details page, you can add the details employee’s kids. You can add multiple kids details by repeating the following procedure.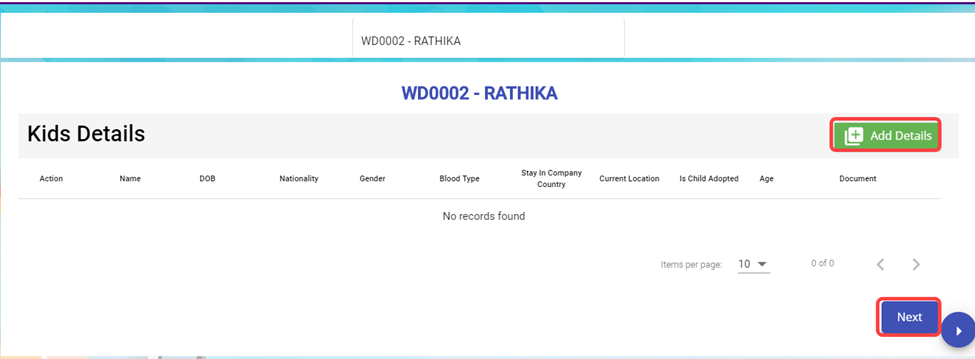
- Click (Add Details button). The Kids Details window opens.
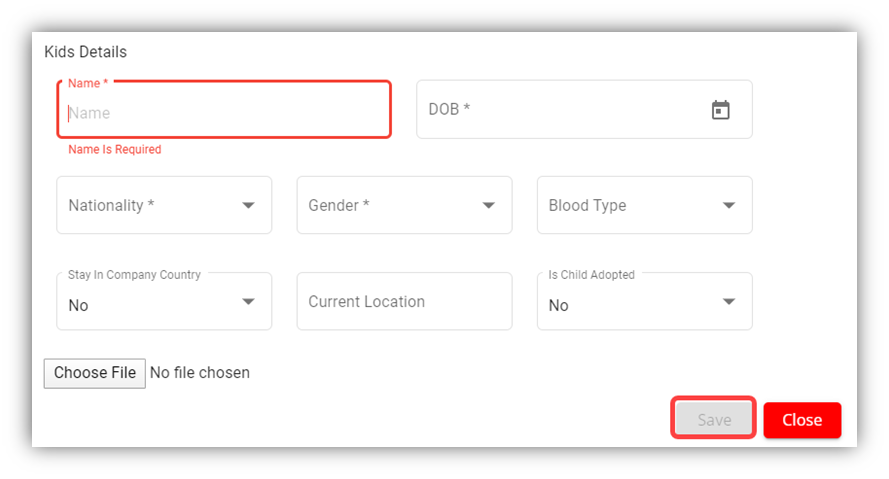
- In the Name box, enter the name of a kid.
- In the DOB box, select the birth date of the kid.
- In the Nationality box, select the nationality of the kid.
- In the Gender box, select the gender of the kid.
- In the Blood Type box, select the blood group of the kid.
- In the Stay in Company Country box, If the kid is residing at the country where the company located, select Yes otherwise select No.
- In the Current Location box, enter the current location of the kid.
- In the Is Child Adopted box, if the kid is an adopted one, select Yes otherwise select No.
- If you want to attach any document to add extra information about the kid, click Choose File, and select and attach the respective document.
- Click Save. The kid’s details are successfully added.
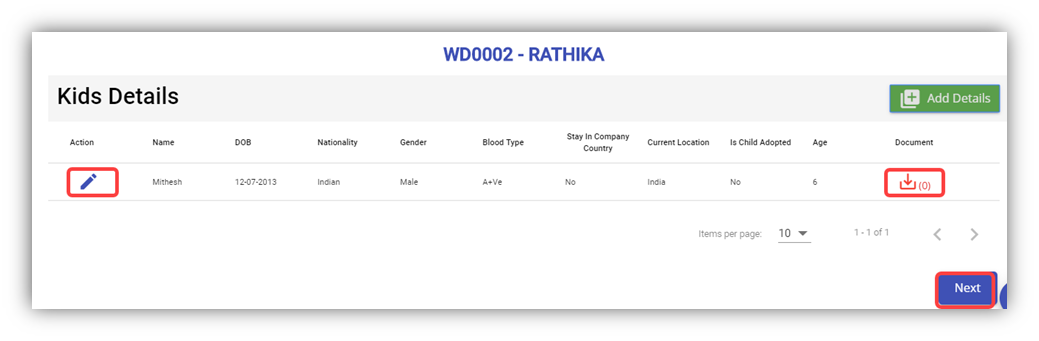 Note: If you want to edit the added kid’s details, click
  (Edit icon). If you want to download the added kid’s details, click
  (Download icon).
- Click Next.
Add Dependant Details of Employee
In the Dependant Details page, you can add the details of the dependants of the employee. 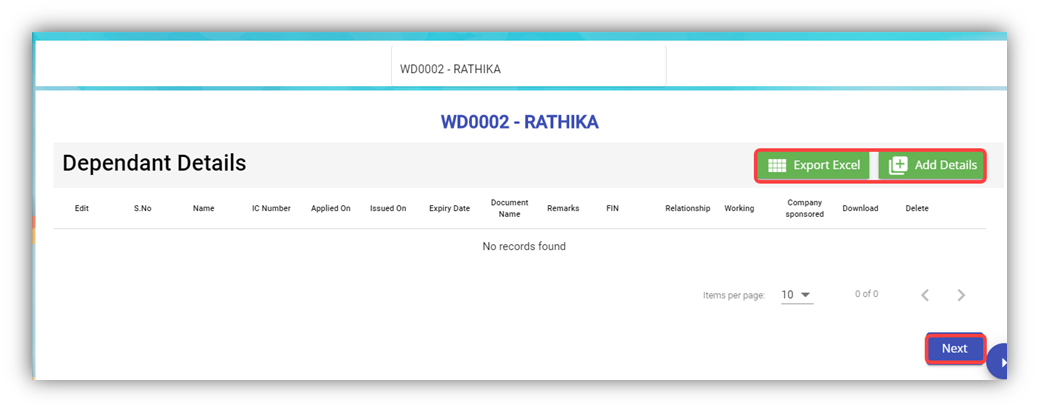
- Click (Add Details button). The Dependent Details window opens.
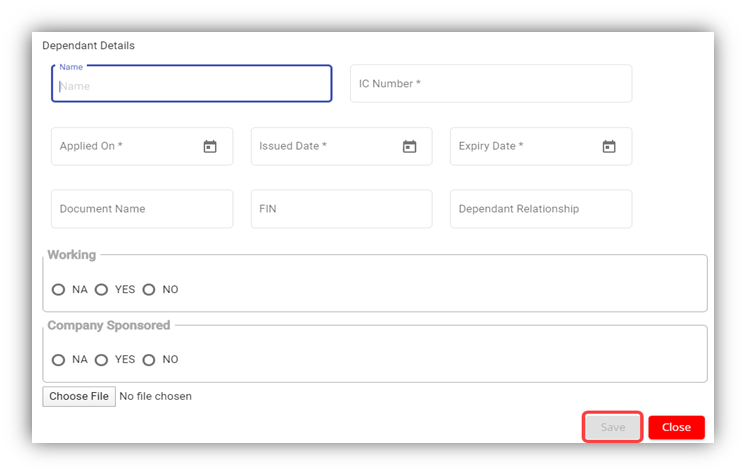
- In the Name box, enter the name of the dependant.
- In the IC Number box, enter the IC number of the dependant.
- In the Applied-On box, select the applied date for the dependant pass.
- In the Issued Date box, select the issued date of the dependant pass.
- In the Expiry Date box, select the expiry date of the independent pass.
- In the Document Name box, enter the name of the document.
- In the FIN box, enter the FIN number.
- In the Dependant Relationship box, enter the relationship of dependant with the employee.
- In the Working box, if the dependant is working select YES otherwise select NO.
- In the Company Sponsored box, if the dependant pass has sponsored by the company means select YES otherwise select NO. If the dependant pass is not applicable, select NA.
- If you want to attach any document to add extra information about the dependant, click Choose File, and select the respective document.
- Click Save. The dependant’s details are successfully added.
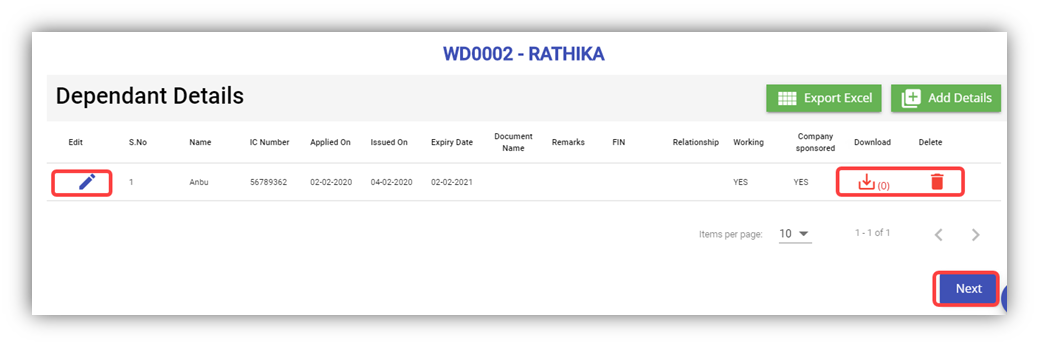 Note: If you want to edit the added dependant’s details, click
  (Edit icon). If you want to download the added dependant’s details, click
  (Download icon). If you want to delete the added dependant’s details, click
  (Delete icon). If you want to download the added dependant’s details as an excel file, click
  (Export Excel button). The dependant details are downloaded as an excel file.
- Click Next. The Visa Details page opens.
Add Visa Details of Employee
In the Visa Details page, you can add the visa details of the employee.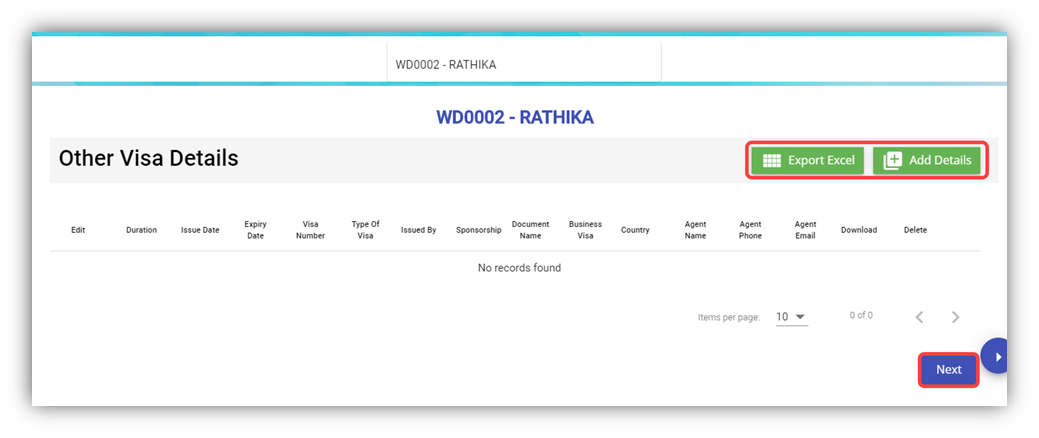
- Click (Add Details button). The Other Visa Details window opens.
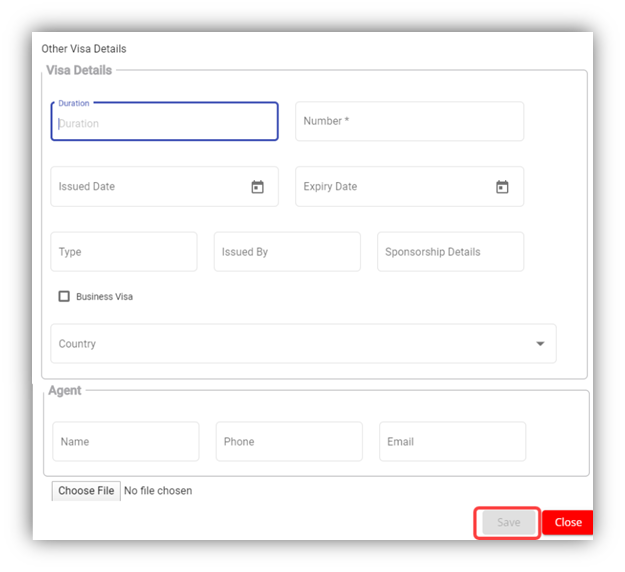
- In the Duration box, enter the duration of visa.
- In the Number box, enter the visa number.
- In the Issued Date box, select the issued date of visa.
- In the Expiry Date box, select the expiry date of visa.
- In the Type box, enter the type of visa.
- In the Issued By box, enter the detail of visa issued authority.
- In the Sponsorship Details box, enter the detail of sponsorship.
- If the visa is business type of visa, select the checkbox of the Business Visa
- In the Country box, select the country from a drop-down list.
- In the Agent box, enter the name, phone number, and email of the agent.
- If you want to attach any document to add extra information about the visa, click Choose File, and select the respective document.
- Click Save. The visa details are added successfully.
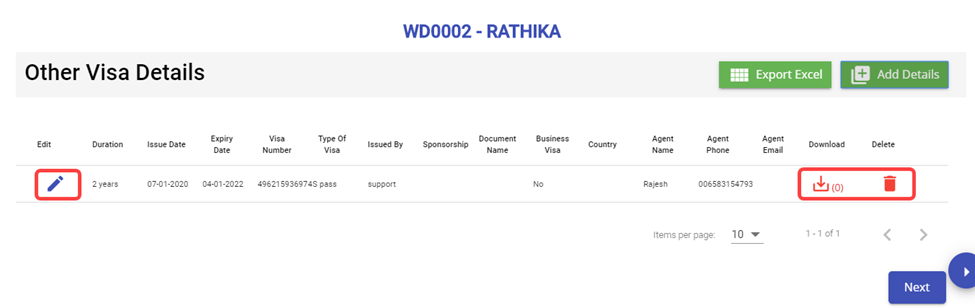
Note: If you want to edit the added visa details, click ![]() (Edit icon). If you want to download the added visa details, click
(Edit icon). If you want to download the added visa details, click ![]() (Download icon). If you want to delete the added visa details, click
(Download icon). If you want to delete the added visa details, click ![]() (Delete icon). If you want to download the added visa details as an excel file, click
(Delete icon). If you want to download the added visa details as an excel file, click ![]() (Export Excel button). The visa details are downloaded as an excel file.
(Export Excel button). The visa details are downloaded as an excel file.
- Click Next. The employee details are successfully added and listed in the View All Employee page.
View Employee Data
View All Employees
Once you have added the employee details, the added employee data will be available in the View All Employee page. You can view the added employee details in the View All Employee page.
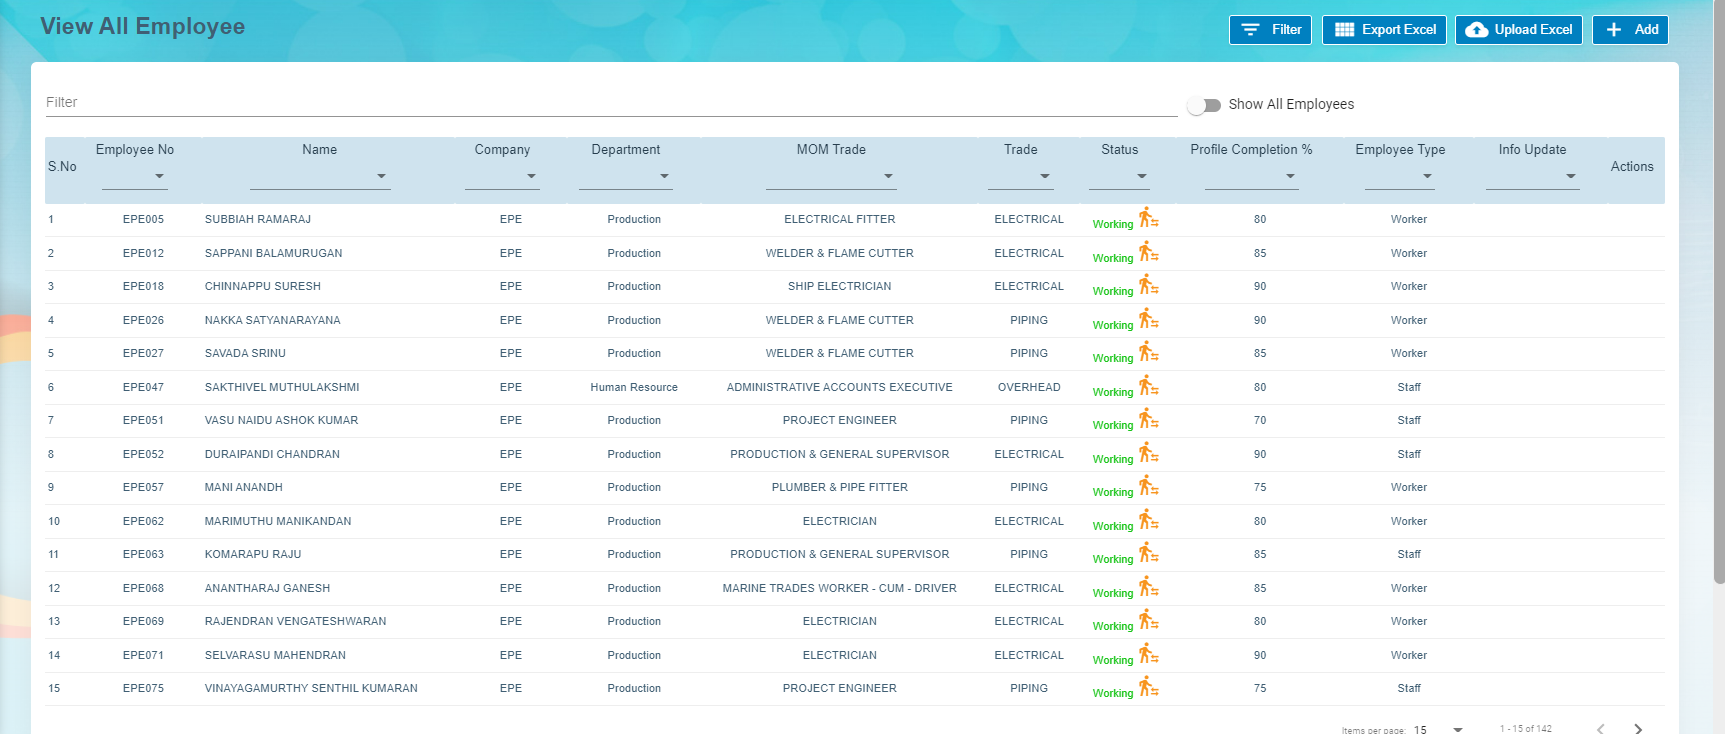
Note: To view and edit the added employee details, click the respective employee in the list.
Transfer Employee
Transfer Staff. In employee-view all page, there is an option to transfer employee to another company.
- Click
 (transfer icon), a new pop-up window opens to enter the transfer details,

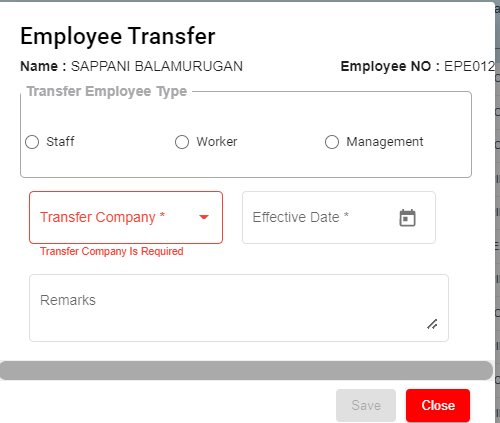
-
- In the Transferred Employee Type box, select the type of transferred employee.
- In the Transfer Company box, select the company where the employee is going to be transferred.
- In the Effective Date box, select the effective date of the transfer.
- In the Remarks box, enter your remarks if any.
- Click Save.
Note: When Transferred the employee, all the data also will be transferred from old employee ID to new employee ID.
Export Employees Data
The application has a feature to download the added employee details as an excel file. You can click ![]() (Export Excel button). The employee details in the View All Employee page will be downloaded as an excel file.
(Export Excel button). The employee details in the View All Employee page will be downloaded as an excel file.
View Employee Contacts
The View Employee Contacts tab in the Employee submenu helps you to view the employee contact details. To view the employee contact details, click the View Employee Contacts tab in the Employee. The View Employee Contacts page shows the contact details of the added employees.
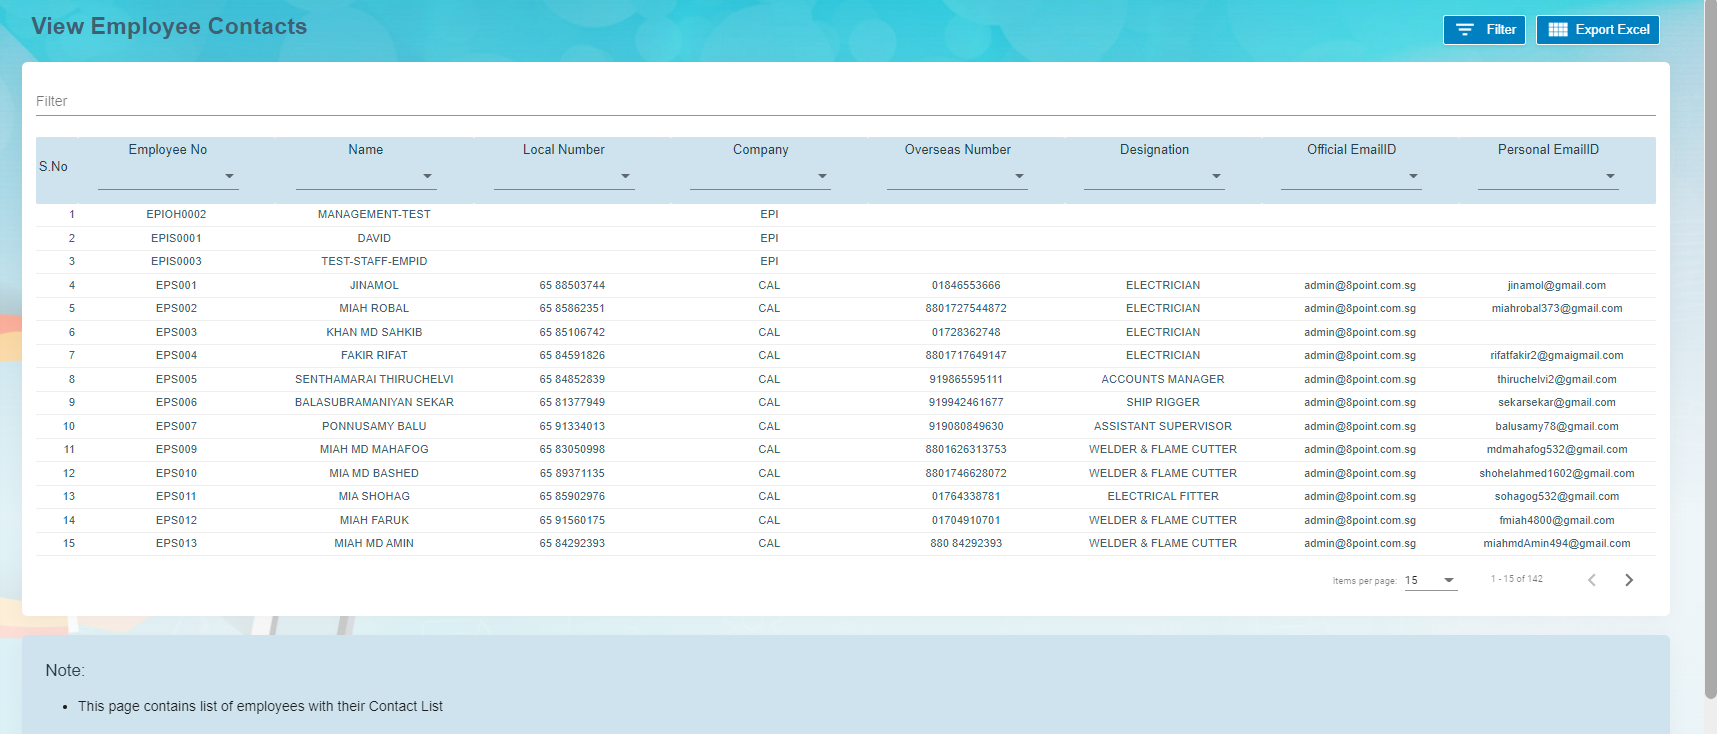
- Export Employee Contacts
The application has a feature to download the employee contacts details as an excel file. You can click (Export Excel button). The contact details in the View Employee Contacts page will be downloaded as an excel file.
 - Filter Employee Contact
If you want to view the contact details of any specific employee, click (Filter button) provided in the upper side of the View Employee Contacts page.
The Filter option will be enabled in the View Employee Contacts page to filter the specific contact detail.
View Employee Minimum Working Hours
The Employee Working Hours tab in the Employee submenu helps you to view the employee’s minimum working hours. To view the employee’s minimum working hours, click the Employee Working Hours tab in the Employee. The Employee Minimum Working Hours page shows the minimum working hours details of the added employees.
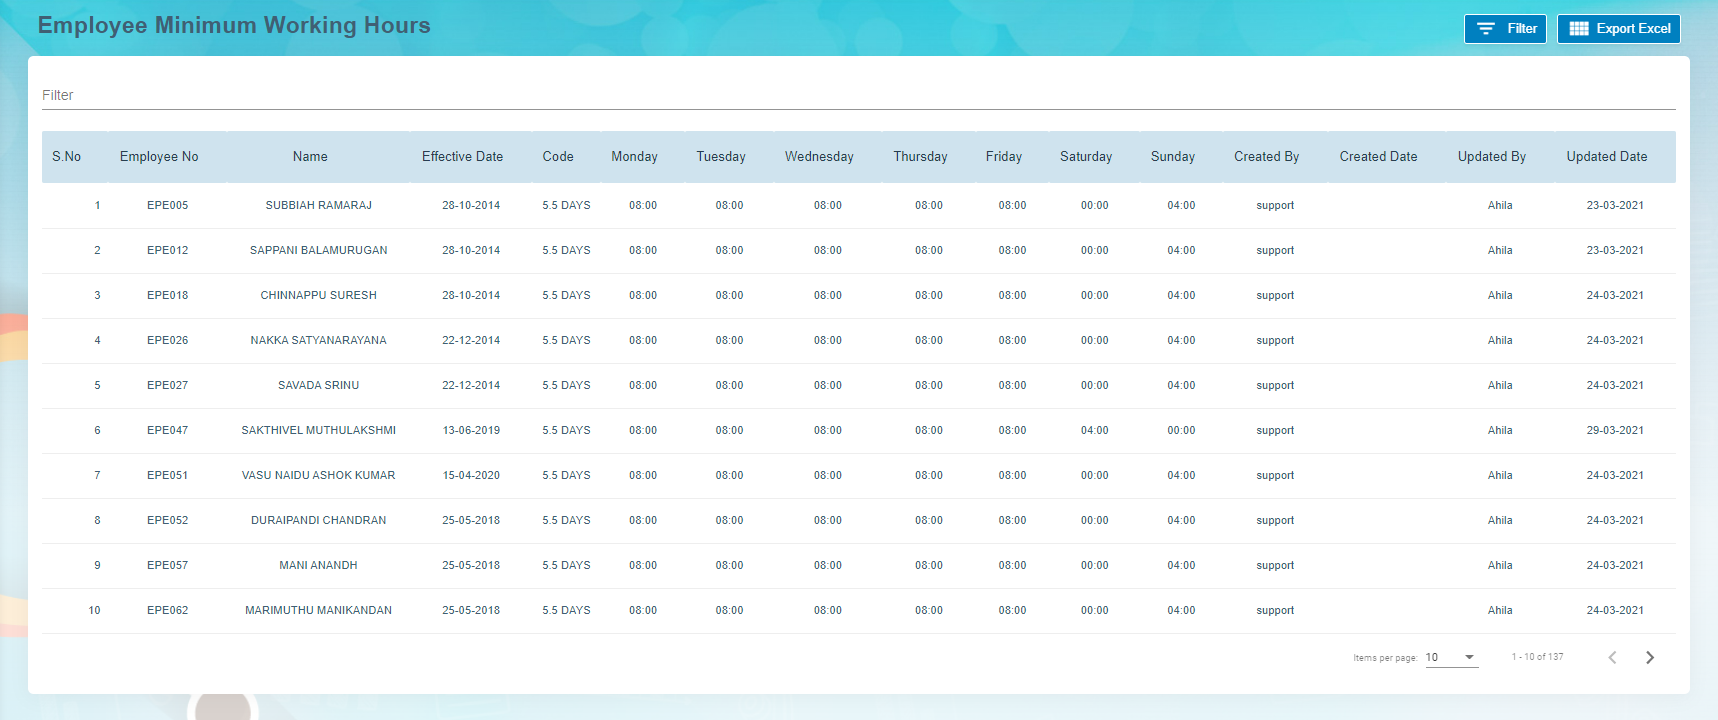
- Export Employee Minimum Working Hour Details
The application has a feature to download the employee’s minimum working hour details as an excel file. You can click
 (Export Excel button) to download the minimum working hour details. The minimum working hour details in the Employee Minimum Working Hours page will be downloaded as an excel file.
 - Filter Minimum Working Hour Details of Any Employee
If you want to view the minimum working hour details of any specific employee among multiple employees listed in the Employee Minimum Working Hours page, click
 (Filter button) provided in the upper side of the Employee Minimum Working Hours page. The Filter option will be enabled in the Employee Minimum Working Hours page to filter the specific minimum working hour detail.
Pay Revision
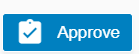
In Pay Revision, authorized user can revise employee's pay in this section. Click Pay Revision in the Reports menu, employees' pay revisions records with status will show in list as below,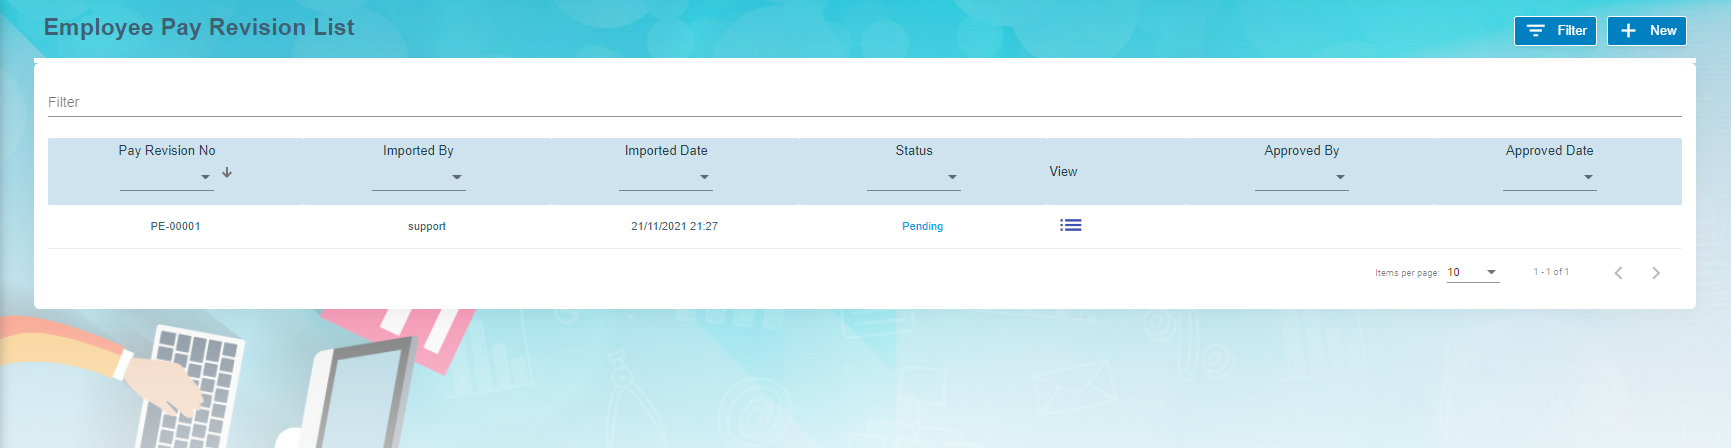
To add a new pay revision,
- Click
 add new button in the up right corner of the employee pay revision list page,
 - Click Filter and select employees that need to revise pay,

- Then click Download the template for the above selected employee we are going to do pay revision. The pay revision excel template will be downloaded.
- Fill up all the column in downloaded excel and Save the file. Note: user must enter new effective date.
- Then click Import button to import above excel file. Pay revision is uploaded against the employee.
- Click Back
 button in View all Employee.
 - In Employee Pay Revision List window , click View icon
 to view the changes against the employee.

- New window open with Pay Revision No.
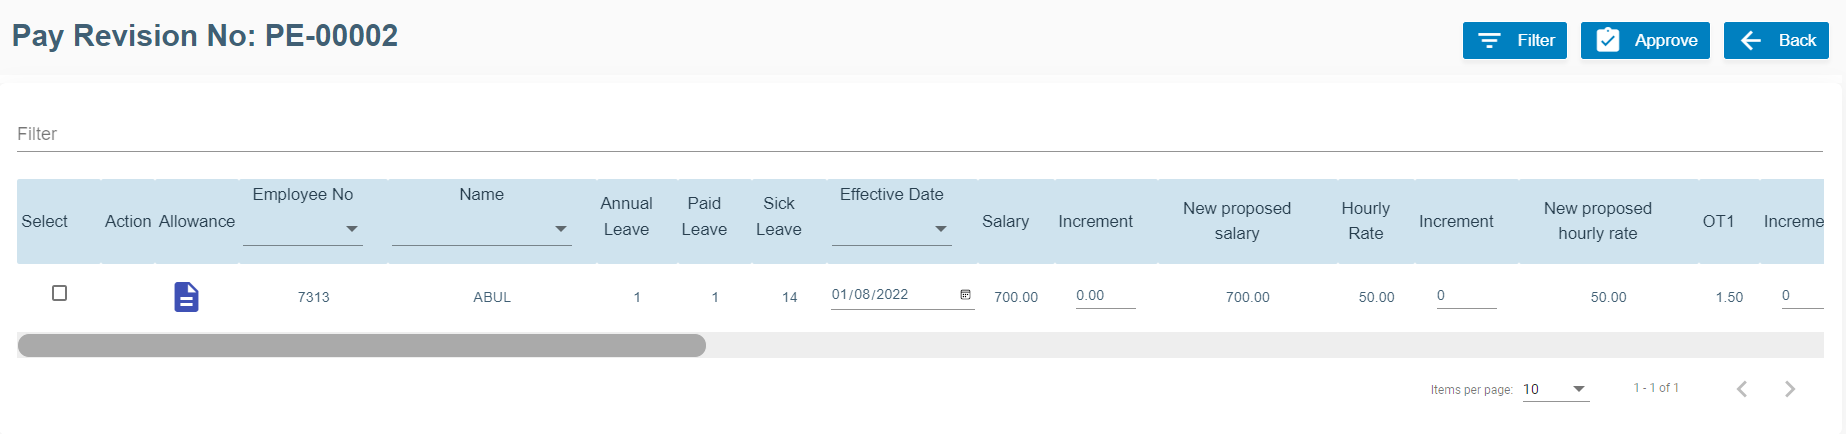
-
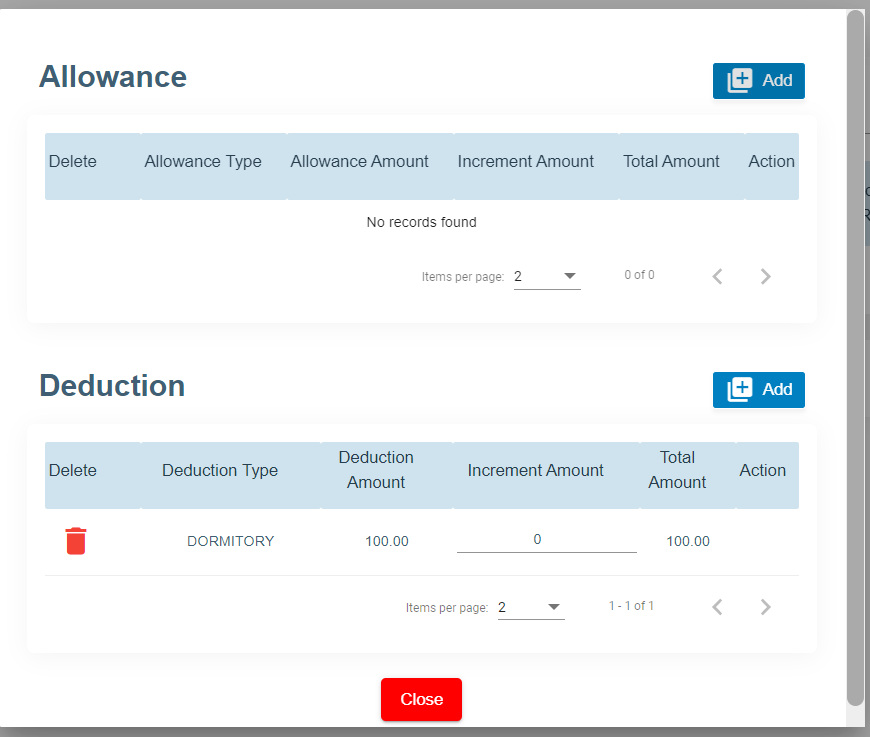
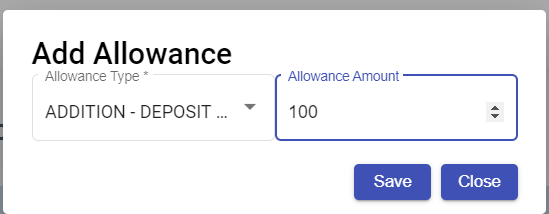
Click Action Allowance
 to add new allowance and deduction items and amounts.
- Click Save for each items added for allowance and deduction.
- Delete option
 available to delete the previously added allowance and deduction.
 - Click Close button at the end.
-
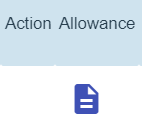
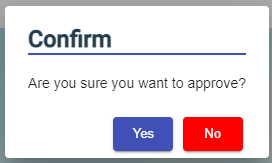
Now click Approve
 button at the top right corner to approve it.
 - The confirmation window will open as below when user clicks Approve, click Yes to confirm approval of pay revision.

- Eventually, the pay revision will be effective from the new date mentioned.


Employee Evaluation
Employee evaluation page manages evaluation for all employees. Click Evaluation tab in Employee menu, the employee evaluation list page shows as below
Add A New Evaluation
To add a new evaluation,
- Click
 Add button. Add New Employee Evaluation window opens,
- Select Employee No from the drop down list, select the Period of Evaluation from the drop down list. The period of evaluation corresponds to the employee's trade.
- Click Save. The add evaluation page will be redirect to evaluation list page. A new evaluation request will be created for selected employee.
- Click the key of the new evaluation request, the evaluation detail page will open,
- In evaluation form, employee and manager can enter the rating details
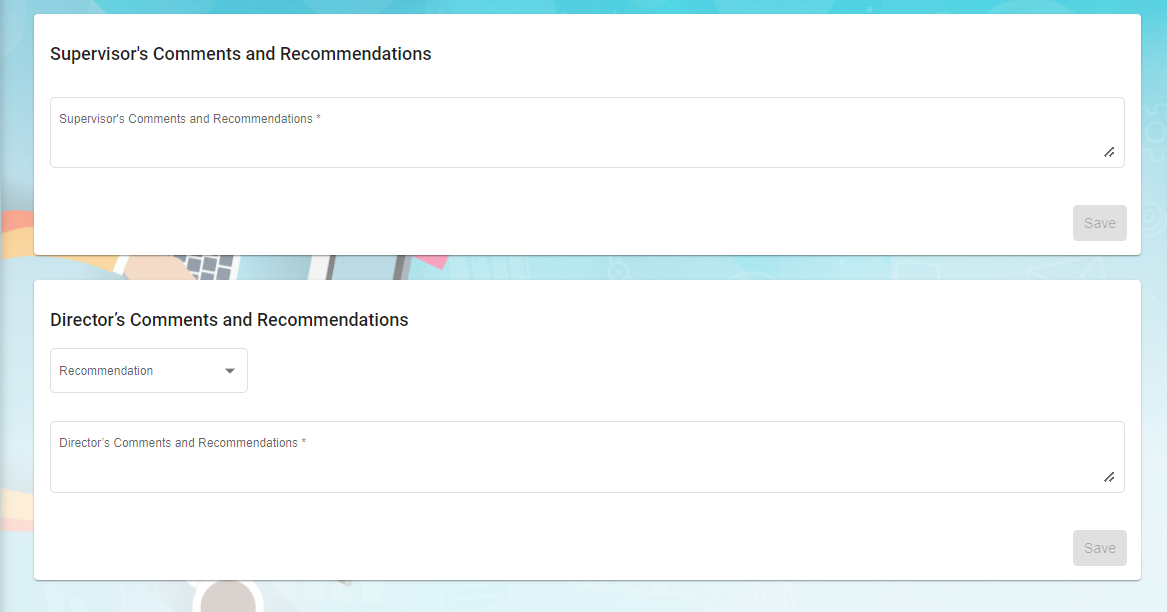
- In supervisor's comments and recommendations, enter comment if any
- In director's comments and recommendations, enter comment if any


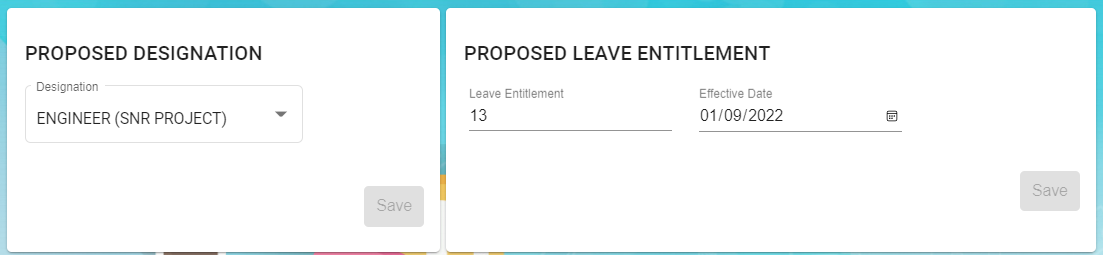
5. Users can also update below employee's details based on evaluation: Leave details, Proposed Designation, Proposed Leave Entitlement, Latest Salary Details and Learning & Development. Note: these are optional to update.

Add Evaluations in Bulk
To add evaluations in bulk,
- Click
 add in bulk button, below window opens,
- Select employees by ticking the box in front of the employee names. Note: please check the color code in the top right corner of the page for those employees that are not in selection list.
- Click Save. The add evaluation page will be redirect to evaluation list page. New evaluation requests will be created for selected employees.
- Click the key of each new evaluation request added, and fill up the the evaluation details in the evaluation request detail page. (Note: follow the same steps of adding details in single evaluation request)

Evaluation Request Approval -pending for update
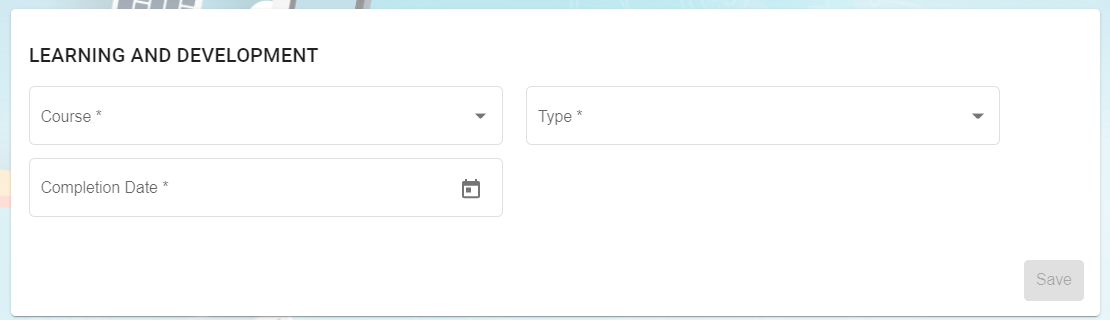
Learning and Development
Learning and development manage employees' learning and development plans. Click Learning & Development tab in Employee menu, below page opens,
Add New Course Plan
To add a new course plan,
- Click
 Add Course Plan icon in Learning and Development request list page, a new window opens,
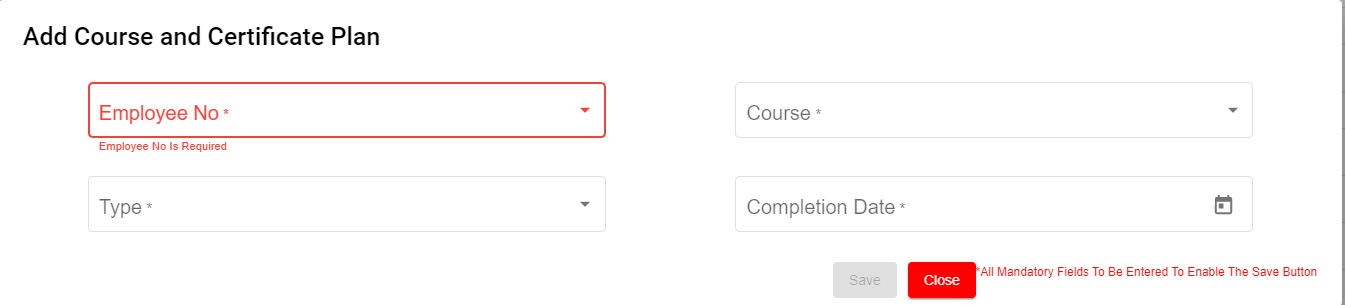
- Fill up details in add course and certificate plan page:
- In Employee No. box, select Employee No from the drop down list.
- In Course box, Choose one course or multiple courses from course list.
- In Type box, select Mandatory or Non-Mandatory based on the course requirement.
- In Completion Date box, select expected completion date of the course in the calendar selection.
- Click Save. A new learning and development request is created, and the page will be directed to learning and development list page,
- Click the request Key to view employee course details.
- Click edit button in the Course Details section as shown in above screenshot. A Course detail page open as below,
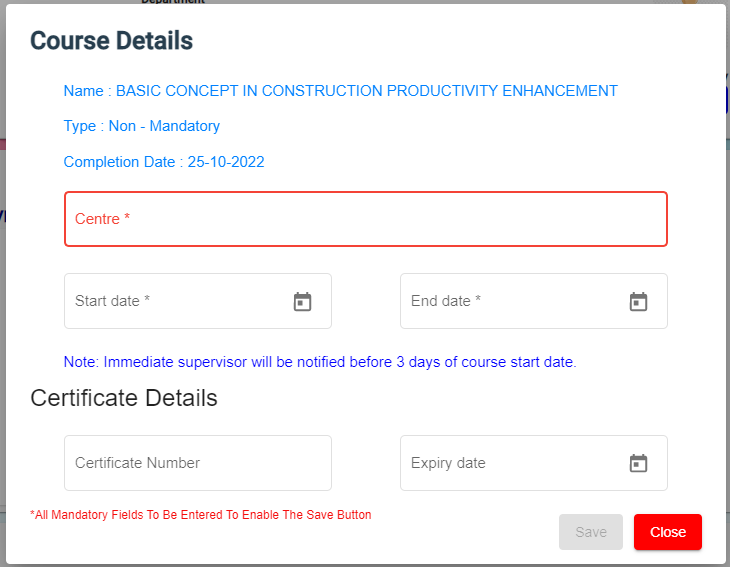
- Enter course conduction centre name, start date and end date of course. And click Save. Once request is approved, Immediate Supervisor will be notified before 3 days of course start date.
-
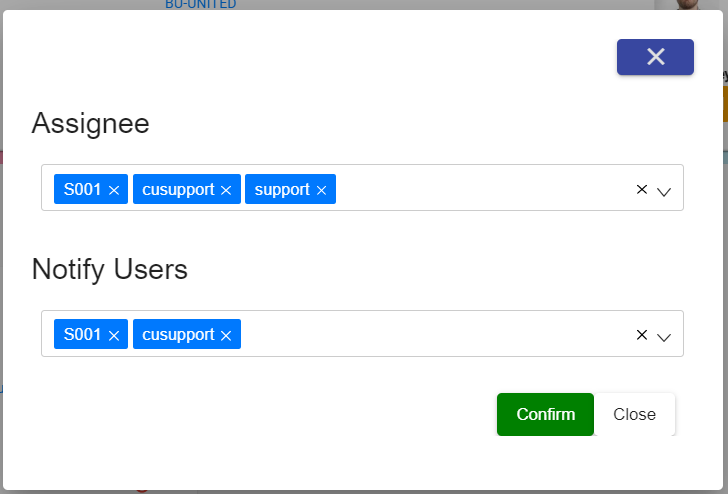
Click
 Submit button at the top right corner. The notification confirm window opens to enter Assignee and Notify users.
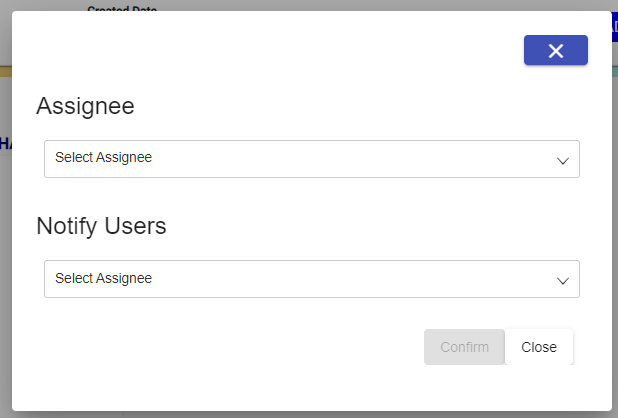
-
Click Confirm
 to confirm submission of learning and development request.
 - After course got completed by the employee, Supervisor/Worker will enter certificate number and expiry date.
-
To be updated
12. After course got completed by the employee, Supervisor/Worker will enter certificate number and expiry date.


9.
12.
13. Click Save and Close
14. Click attachment to attach the course certificate
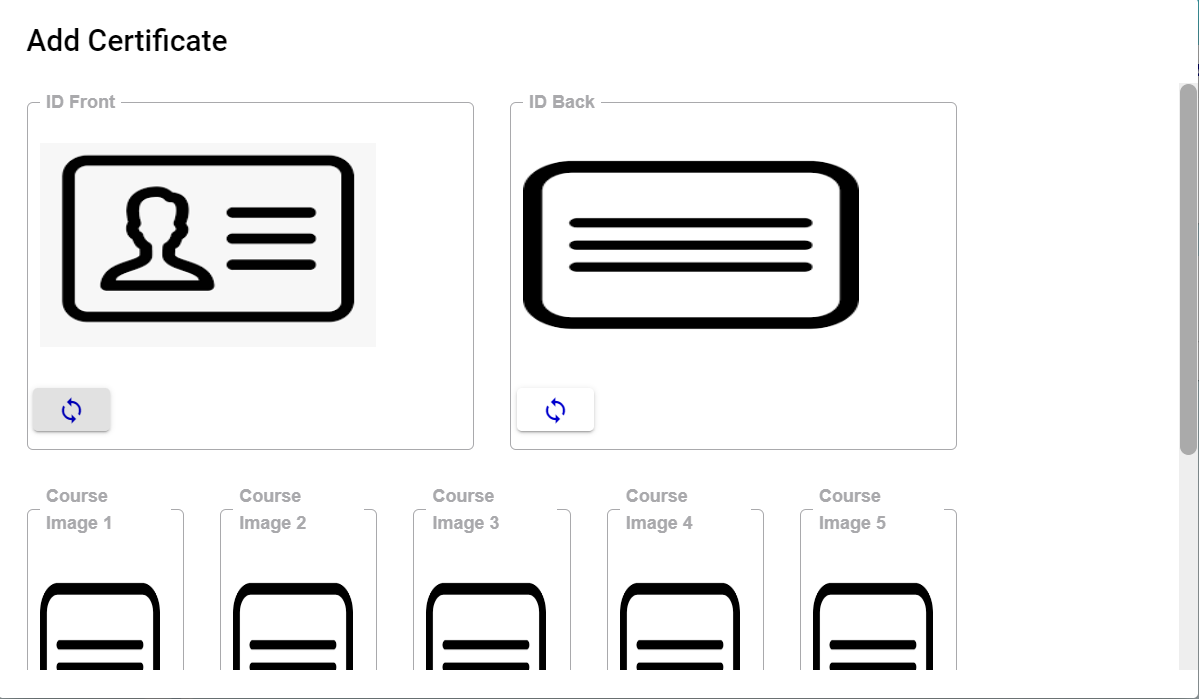
14. Click Close
15. If applicable enter Training Bond Details of the employee in the Bond Details. Bond details have a link to Offboard checklist. For instance, If the employee resigned before the Training bond, Offboard will throw alert message for refusal of the resignation.
16. Click Sent for HR on the top right corner of the page
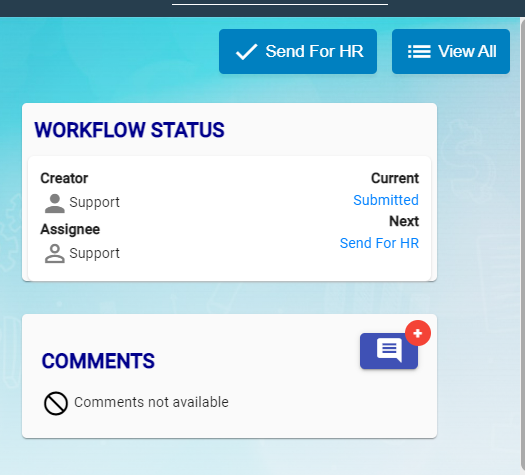
17. Next Window opens to enter Assignee and Notify user
18.Click Confirm button
19. HR will check and he will either Approve or Return
20.Click approve icon to approve.
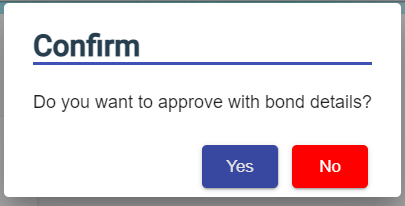
21. Confirmation Box open to approve with bond details or not.
22. Click Yes or No
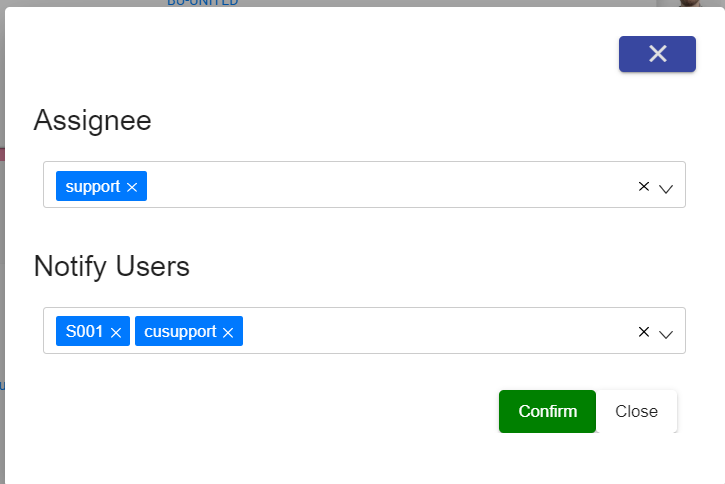
23. Enter Assignee and Notify User and Confirm.
24. LAD status Approved against the employee.
Onboard/Offboard
The Onboard / Offboard Checklist module is used to manage employee onboarding and offboarding activities through a structured checklist process. It ensures that all required tasks are completed, tracked, and documented for every employee joining or leaving the organization.
Onboard/Offboard Checklist
All the employees are listed to perform either onboarding or offboarding checklist process.
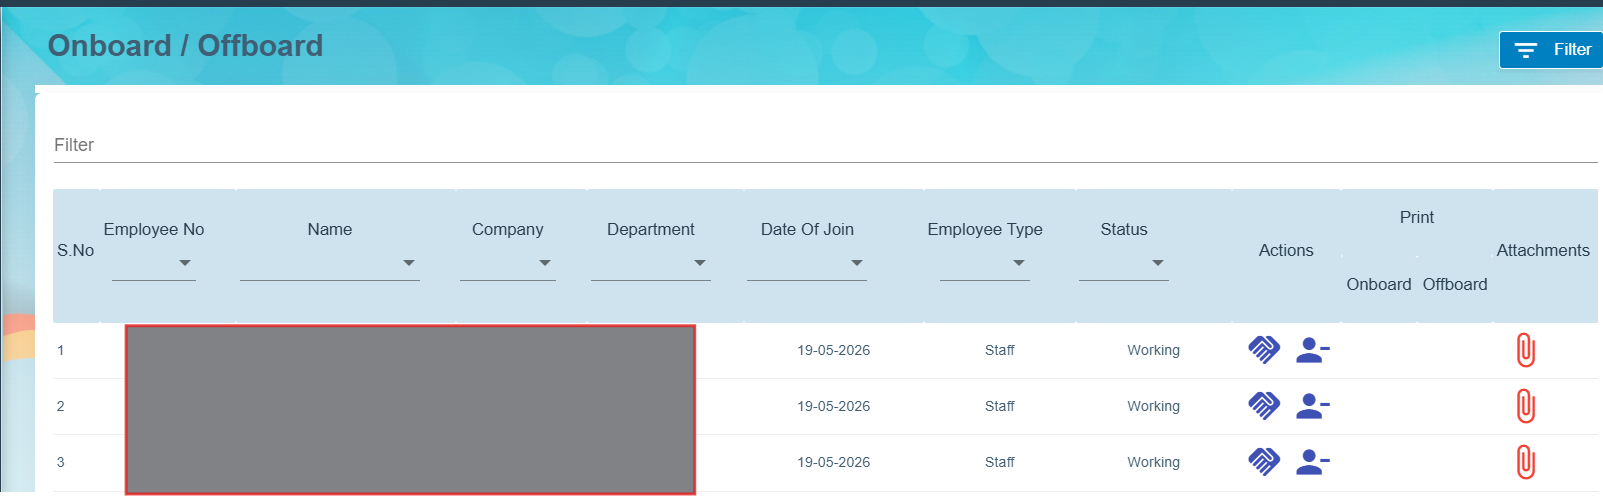
- Action column contains two icons to perform Onboard
 or Offboard
- Click Onboard and perform the Pre-Onboarding checklist
- Click Save to store checklist updates
- Print Column contains Print icon
 to take print out
 - Click Offboard and perform offboard checklist.
- Click Save to store checklist updates
- Based on checklist completion, the color code of the Onboard/Offboard displayed.


Settings
HRM Alert mail - Disable menus settings
Revoke birthday menu
- Go to global settings and choose disableBirthdayInHRMAlertEmail
- Set the value to true to hide the birthday portion in HRM_Alert_Mail
Revoke course menu
- Go to global settings and choose courseEmailAlertResponsibleBy
- Set the value to true to hide the course portion in HRM_Alert_Mail
No Comments