
Admin
- Users-system admin user can create user account, assign role, and link user account to admin company.
- Roles-system admin user can create roles, and define access right of each role based on organization structure/operation management.
- Permissions-permissions are managed by cuteOffice team, permissions are linked to different modules in the system.
- Permission Matrix-System admin user can check and export user-permission matrix by department in this tab.
- Role Matrix-System admin user can check and export user-role matrix in this tab.
- Options-option data manages all predefined value of categorical variable such as employee type, working mode etc.
- Company-System admin user need to add companies details.
- Public Holiday-System admin user can add public holiday dates.
- Notification Logs-System admin user can view all notifications processed by system (email, SMS, App)
- Audit Log-System admin user can audit all activities in system.
Users
In Admin user tab, system admin user shall create user accounts for people who need access to cuteOffice system. When create user account, system admin role user shall assign correct roles and proper access to company and department. Click Users tab, the users page opens as below,

Create User Account
To create user account, click ![]() (add icon) in the top right corner of the users page, the add new user window opens,
(add icon) in the top right corner of the users page, the add new user window opens,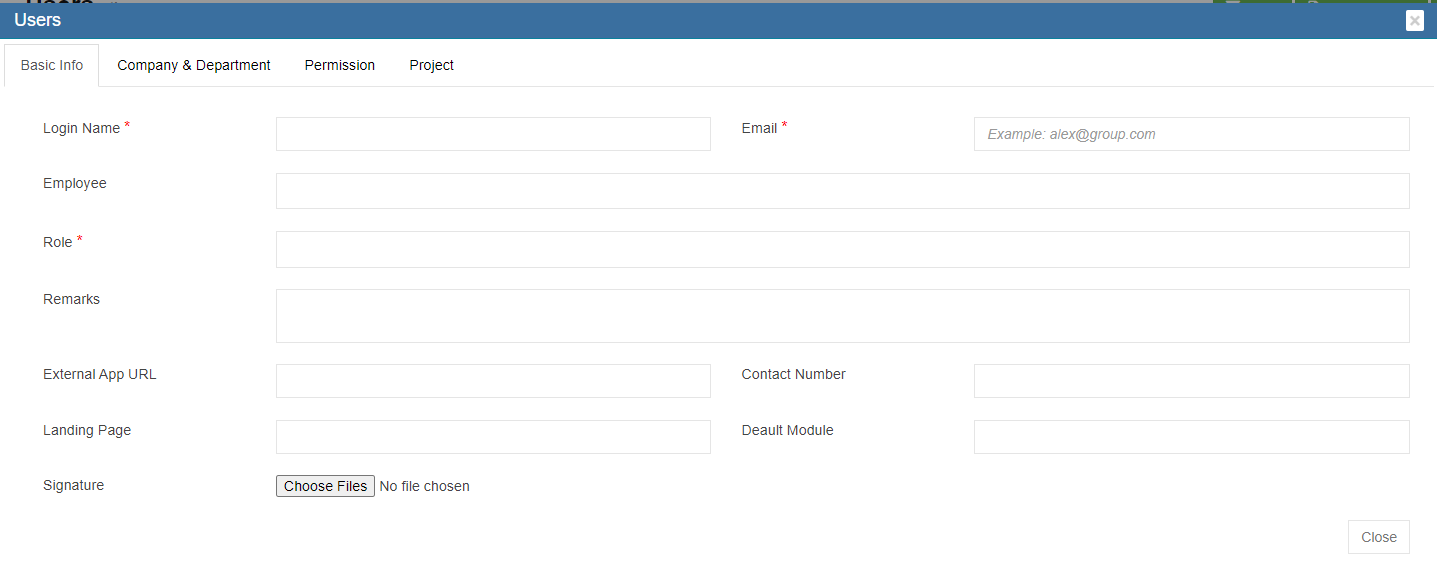
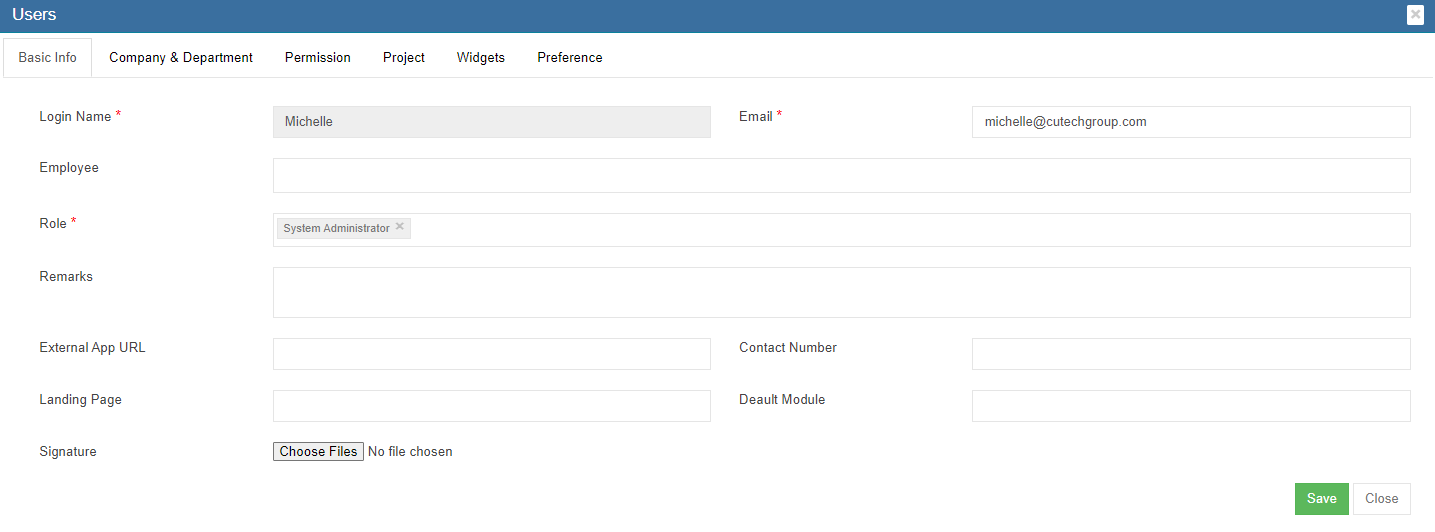
Basic Info Tab
- In Login Name box, enter the user account login name.
- In Email box, enter user email address. All system emails/notifications to the new user will be sent to this email address, e.g. password info.
- In Employee box, click the box and select employee name/ID of the user account so that new user login name is linked to his/her name/employee ID.
- In Role box, click and select role(s) for the user account based on user's activities in system. E.g. if create user account for purchasing, system admin shall select "purchaser" role.
- In Remarks, enter remarks if any.
- In Contact Number box, enter contact number of the new user.
- External App URL box, Landing Page box, Default Module box can be configured to customize user login landing page.
- If user wants to add digital signature to the system, click
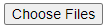 and upload digital signature.
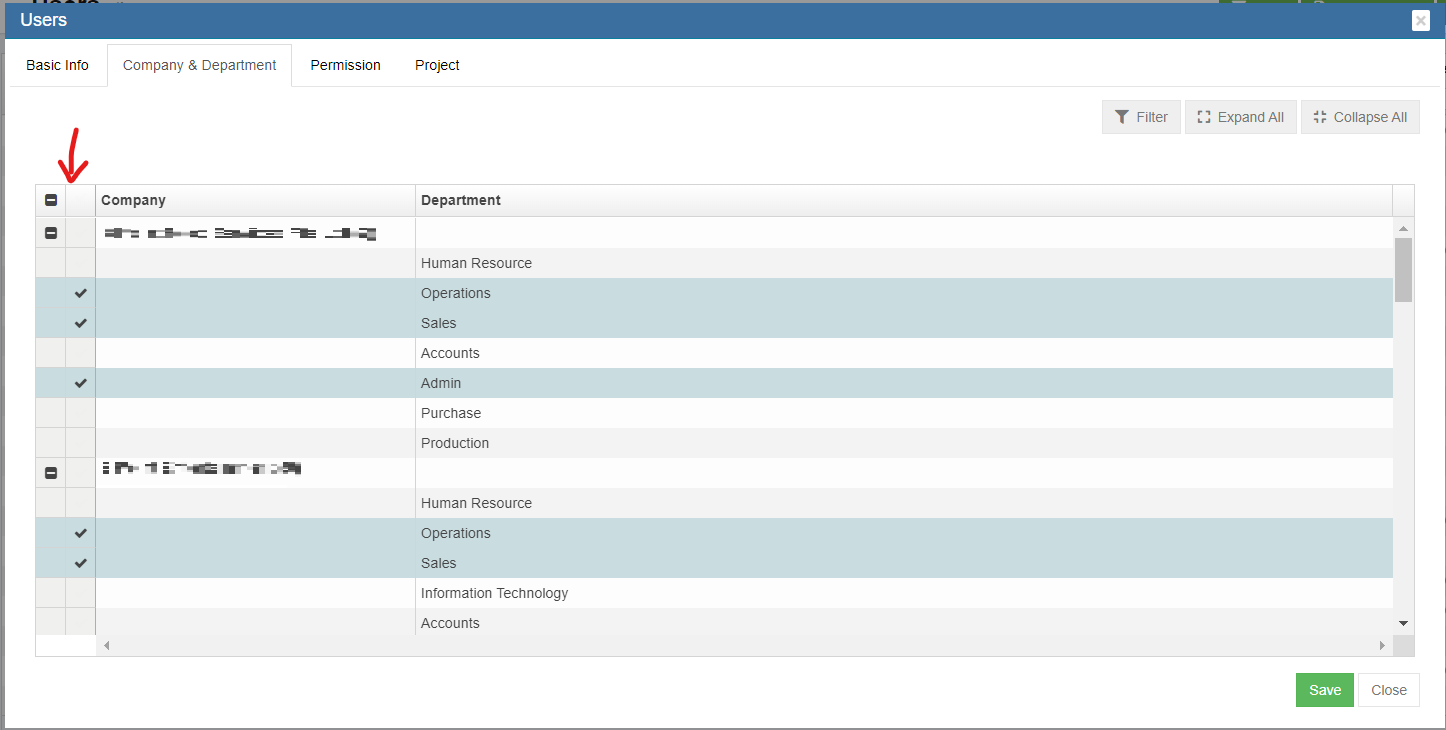
Company &Department Tab
- Click Company &Department Tab to assign company and department access to new user.

- Click
 to expand company departments.
 - In the second empty column, click to tick company and department access.

- Click Save to save company and department access.


Permission Tab
When select roles for new user account in basic info tab, the permissions associated with the roles being selected will be automatically given in the permission. If additional permission is required, system admin user can assign read/write permission. To assign additional permission, system admin user should check with Cutech support team for the permission name, and do the following steps,
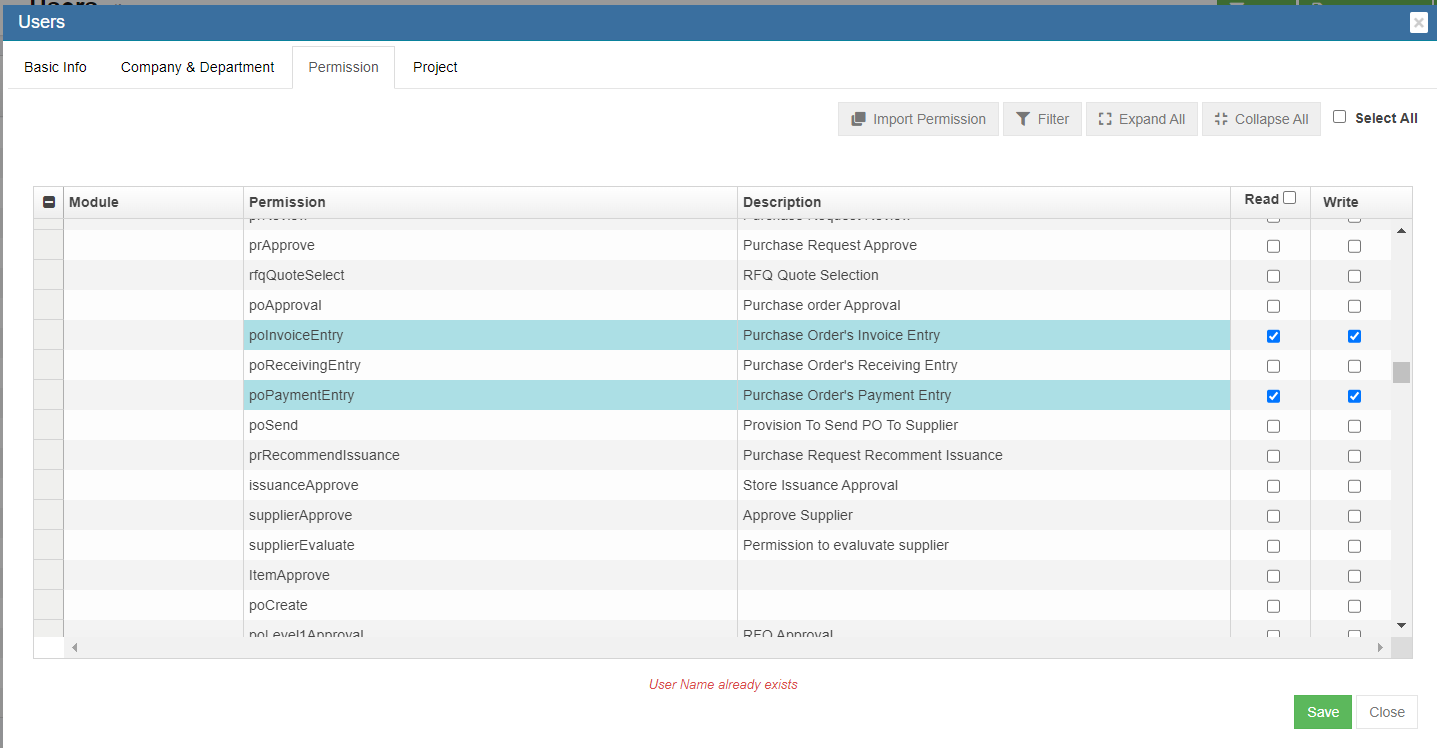
- System admin user can use filter to search and find the permission name.
- In the Read/Write column, click to tick permission. Read means user can only view the data in the corresponding module/function; write means user can enter/edit data.
- Click Save to save permission access.
Project Tab

Edit User Account
System admin user can edit all user account detail except user login name.

- Click the
 (edit icon) of the user account name to be edited, the user detail window will open,

- Edit details as needed.
- Click Save to save edits.
Lock/Unlock User Account
To temporarily revoke user account access to system, system admin user can lock a particular user account. Or if an user account is locked due to e.g. multiple attempts of wrong passwords, system admin can unlock user account. In users page, if the lock icon in lock status is red, it means user account is locked; if the lock icon is blue, it means user account is normal.

To lock/unlock user account,
- Click the lock icon, system will prompt a confirmation notification for lock/unlock.

- Click Yes to confirm lock/unlock an user account.

Reset Password
System admin user can reset password for user account when required. To reset password,
- click the reset icon in the Reset Password column.

- System will prompt a confirmation notification as below
 ,
,
-
Click Yes to confirm reset password. System will send a new password to the user account's email address.


Delete User Account
System admin user can delete user account when required. Click  delete icon in the delete column, system will prompt confirmation notification. Click Yes to confirm deletion of an user account.

Export User Accounts List
System admin user can also export user account list to PDF or CSV format by using the![]() (export icons) on the top right corner in the page.
(export icons) on the top right corner in the page.
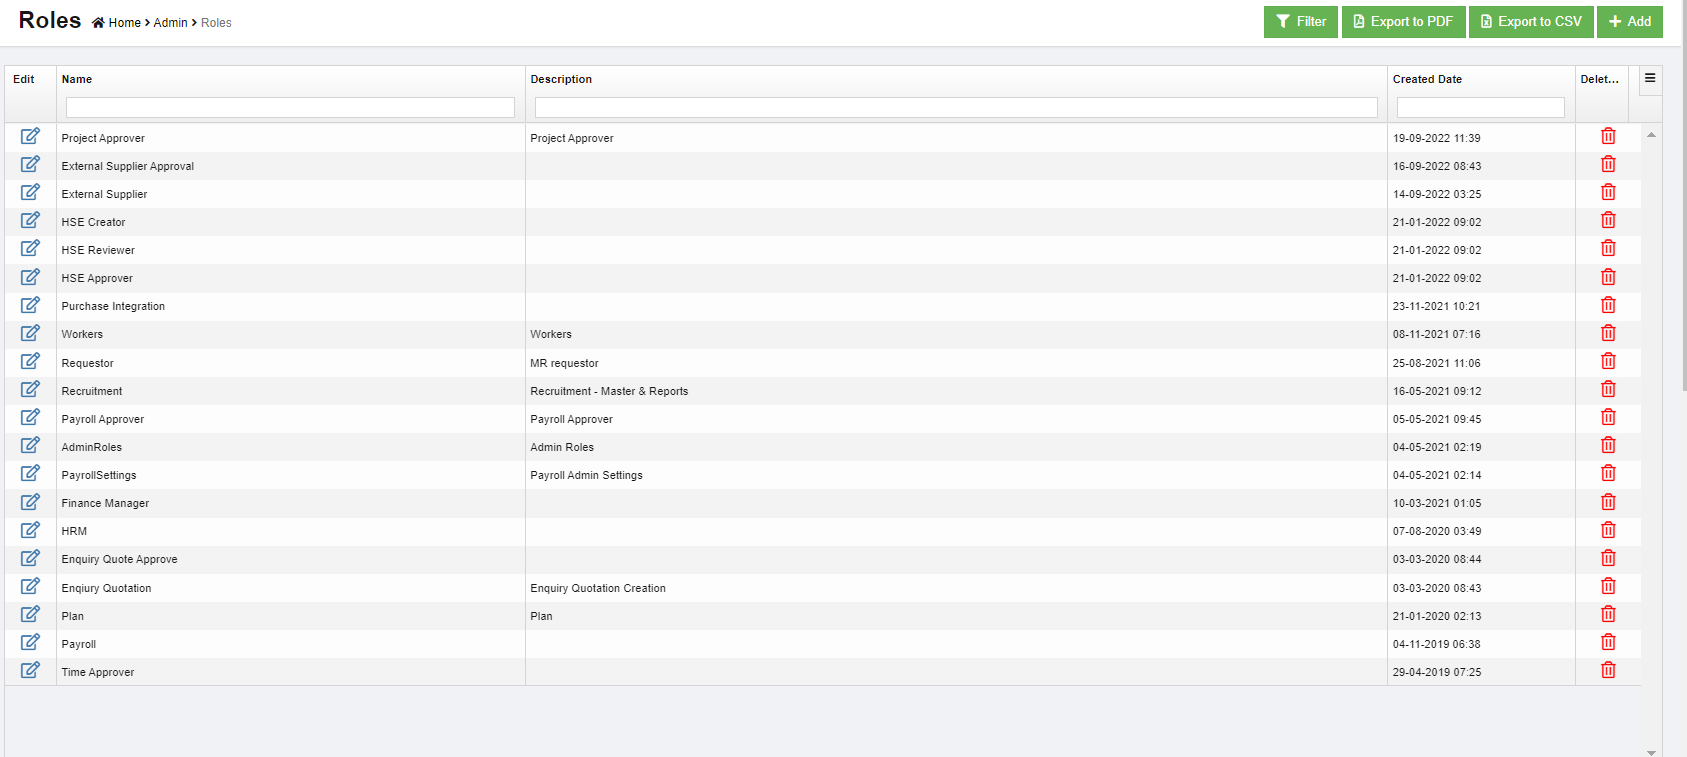
Roles
Roles are defined by a set of permissions to different functionalities in cuteOffice system. Based on company operation needs or organization structure, system admin user can create roles, and define read/write access of required permissions. Click Roles tab, all existing roles created in system will be displayed as below.
Add a New Role
To add a new role,
- Click
 (add icon), the adding new role window open as below,
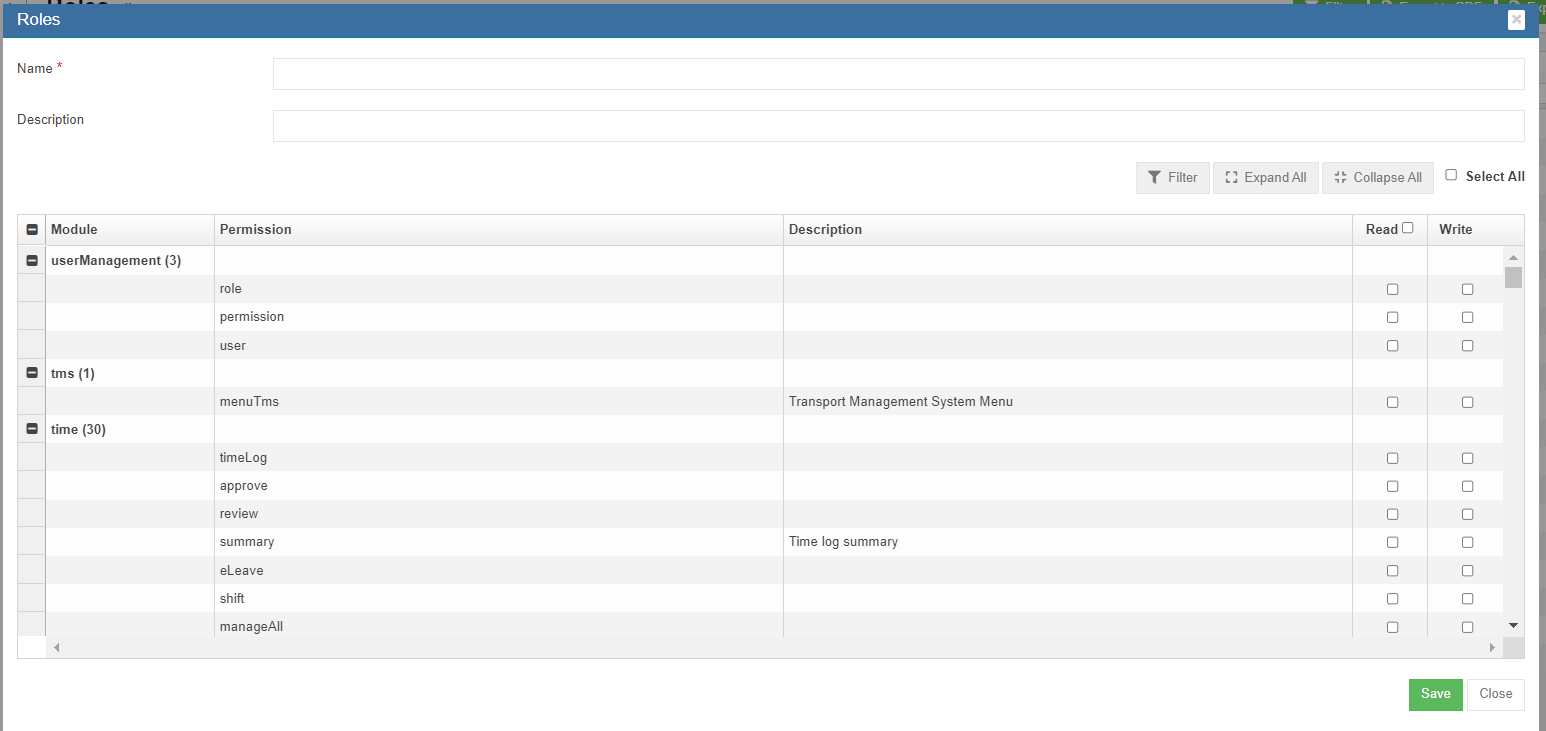
-
In Name box, enter the new role name.
- In Description box, enter description of the new role.
- Based on the function of the new role, search for relevant module and permissions.
- In the Read/Write columns, click to tick read/write permissions.
- Click Save to save the new role

Edit Role
System admin user can edit the permissions access of the role.

- Click the(edit icon) of role to be edited, the role detail page will open,
- Edit details as needed.
- Click Save to save edits.
Delete Role
System admin user can delete role when required. Click delete icon in the delete column, system will prompt confirmation notification. Click Yes to confirm deletion of a role.
Export Roles List
System admin user can also export roles list to PDF or CSV format by using the![]() (export icons) on the top right corner in the page.
(export icons) on the top right corner in the page.
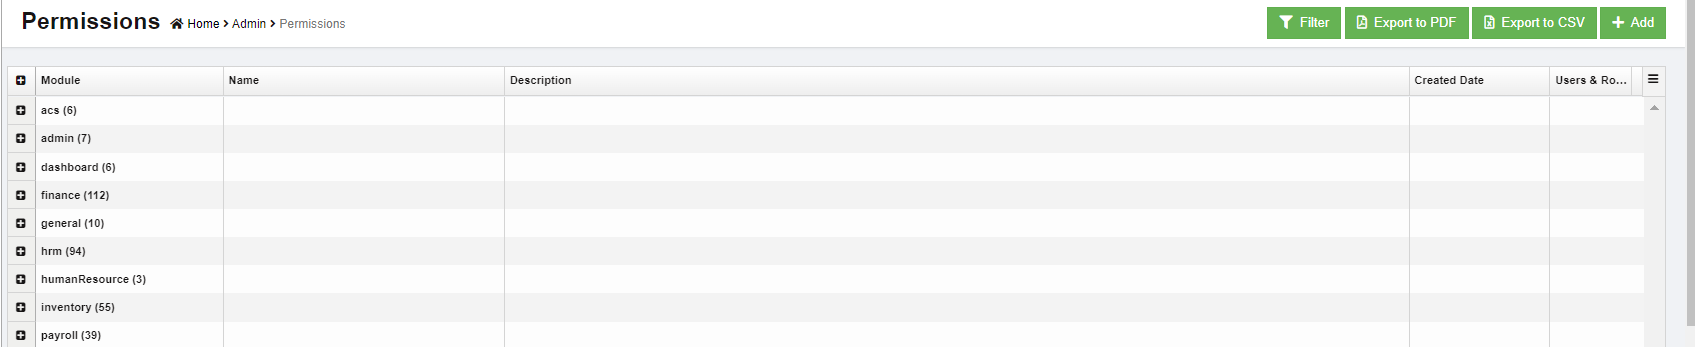
Permissions
Permissions are grouped by modules in the system. Click permissions tab, the permission list page opens as below screenshot. The permission name and function are development and managed by Cutech team.
View Permissions
To view permissions, system admin user can click![]() (filter icon), the filters will show as below yellow highlight area. User can use filters to search and view a particular permission.
(filter icon), the filters will show as below yellow highlight area. User can use filters to search and view a particular permission.

Add Permission
To add a new permission,
- Click (add icon), the adding new permission window open as below,
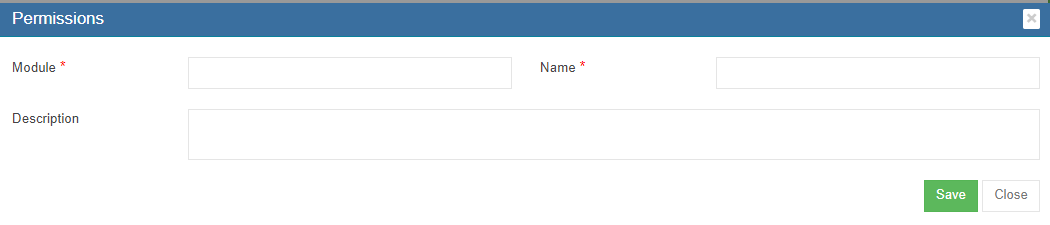
- In Module box, enter module name.
- In Name box, enter permission name.
- In Description box, enter description of the permission and the functionality of it.
- Click Save to save permission.

Export Permissions List
System admin user can also export permissions list to PDF or CSV format by using the![]() (export icons) on the top right corner in the page.
(export icons) on the top right corner in the page.
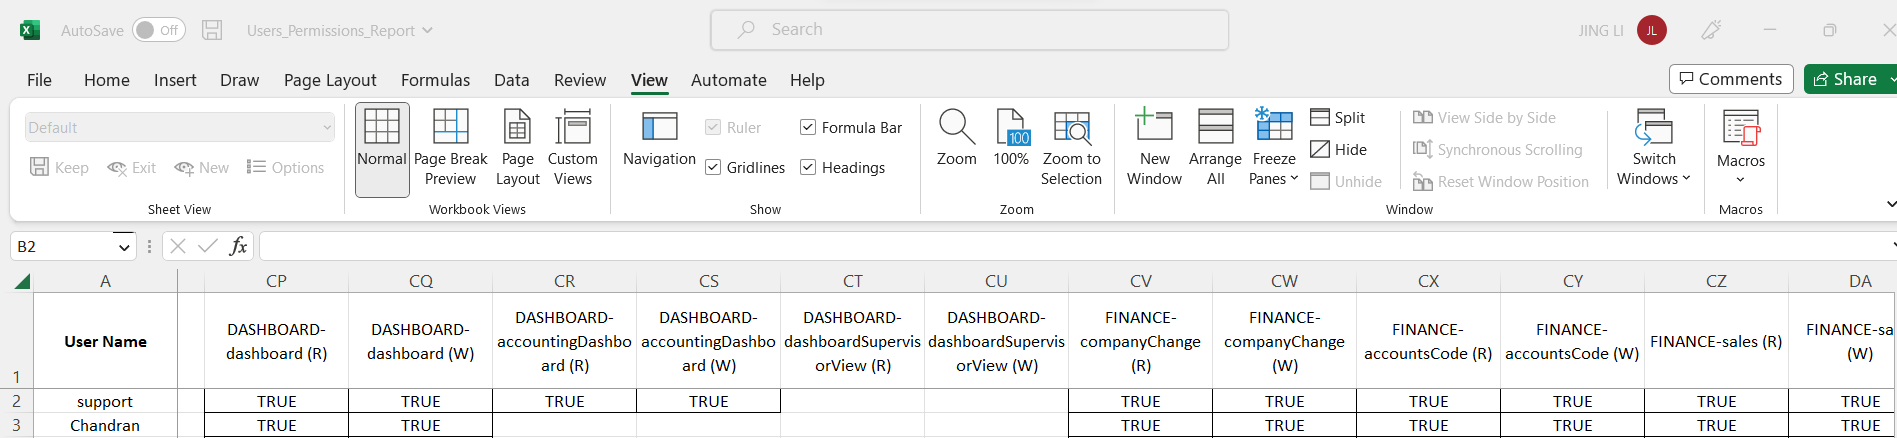
Permission Matrix
System admin user can export user-permission matrix to check all users' permissions granted to the cuteOffice system.
- Click Permission Matrix tab, below page opens.

- In the company and department filters, select company and department.
- Click
 to export to CSV format.


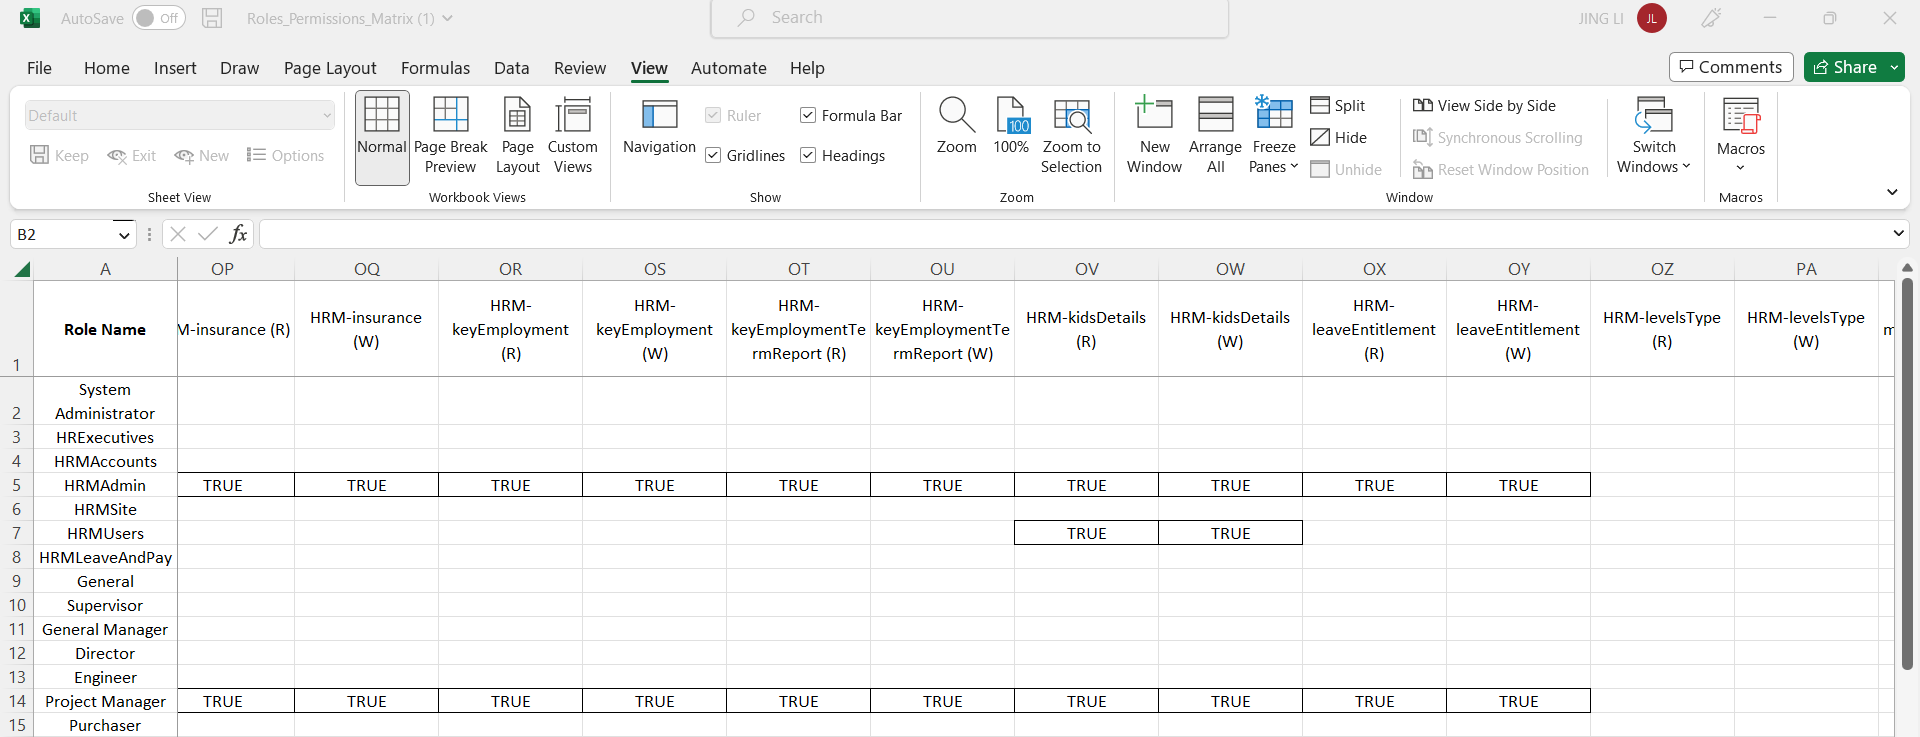
Role Matrix
System admin user can check and export user-role matrix in this tab.
- Click Role Matrix tab, below page opens.

- Click to export to CSV format.


Option
Option data manages all predefined value of categorical variable such as employee type, working mode, public holiday groups etc. Click Option tab, the option page opens as below,
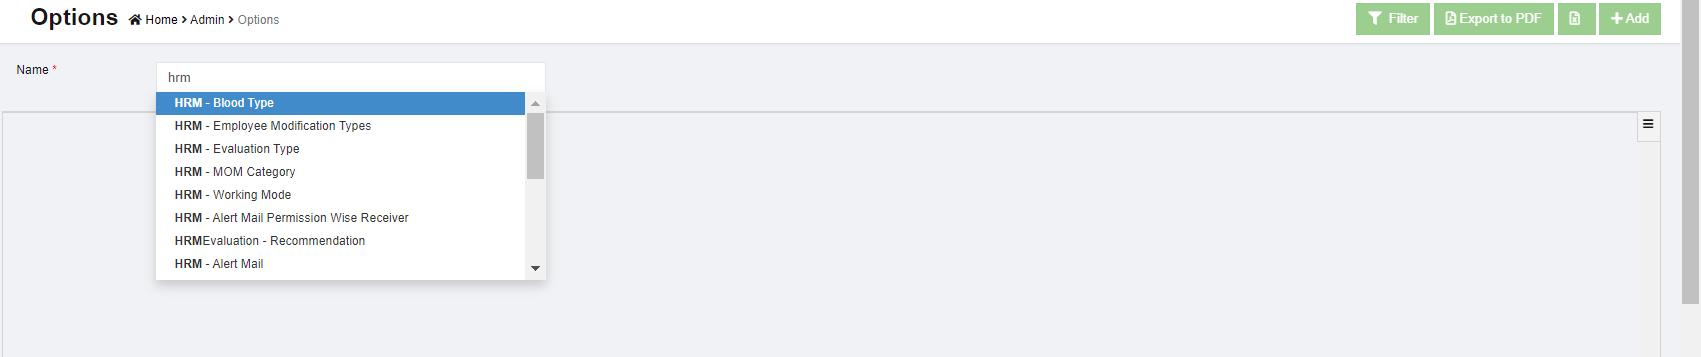
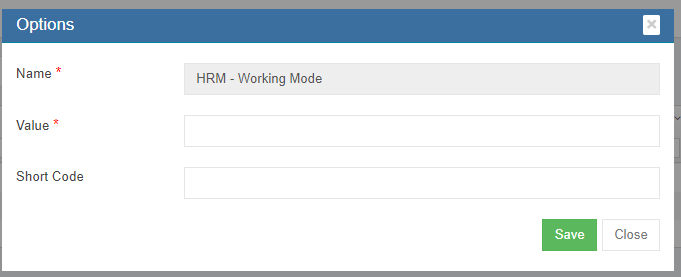
- To view option value, in Name box, click to select option name, the select option details will show as below. E.g. select working mode,

- To add more value to option, click (add icon) on the top right corner, the add option value window opens as below,

- In Value box, enter new option value, e.g if we need to add "Contract" as a new working mode, we can enter "Contract" in the Value box.
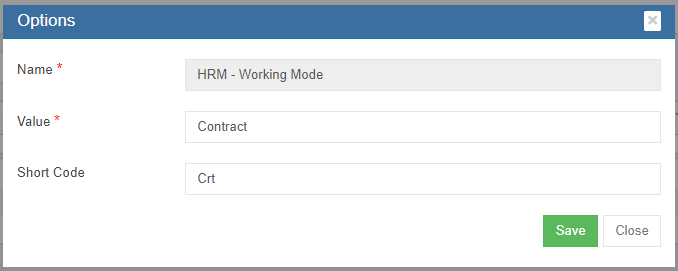
- In Short Code box, enter short code of the new option value if any.
- Click Save. The new option value will be added and saved in option details, and will be synchronized to relevant modules in the system automatically.


Company
System admin user can add details of the company and its affiliated companies. Click company tab, the list of admin companies will be displayed as below in company list page,

Add Admin Company
To add a new admin company, click ![]() (add icon) in the top right corner of the admin company page, the add new company window opens,
(add icon) in the top right corner of the admin company page, the add new company window opens,
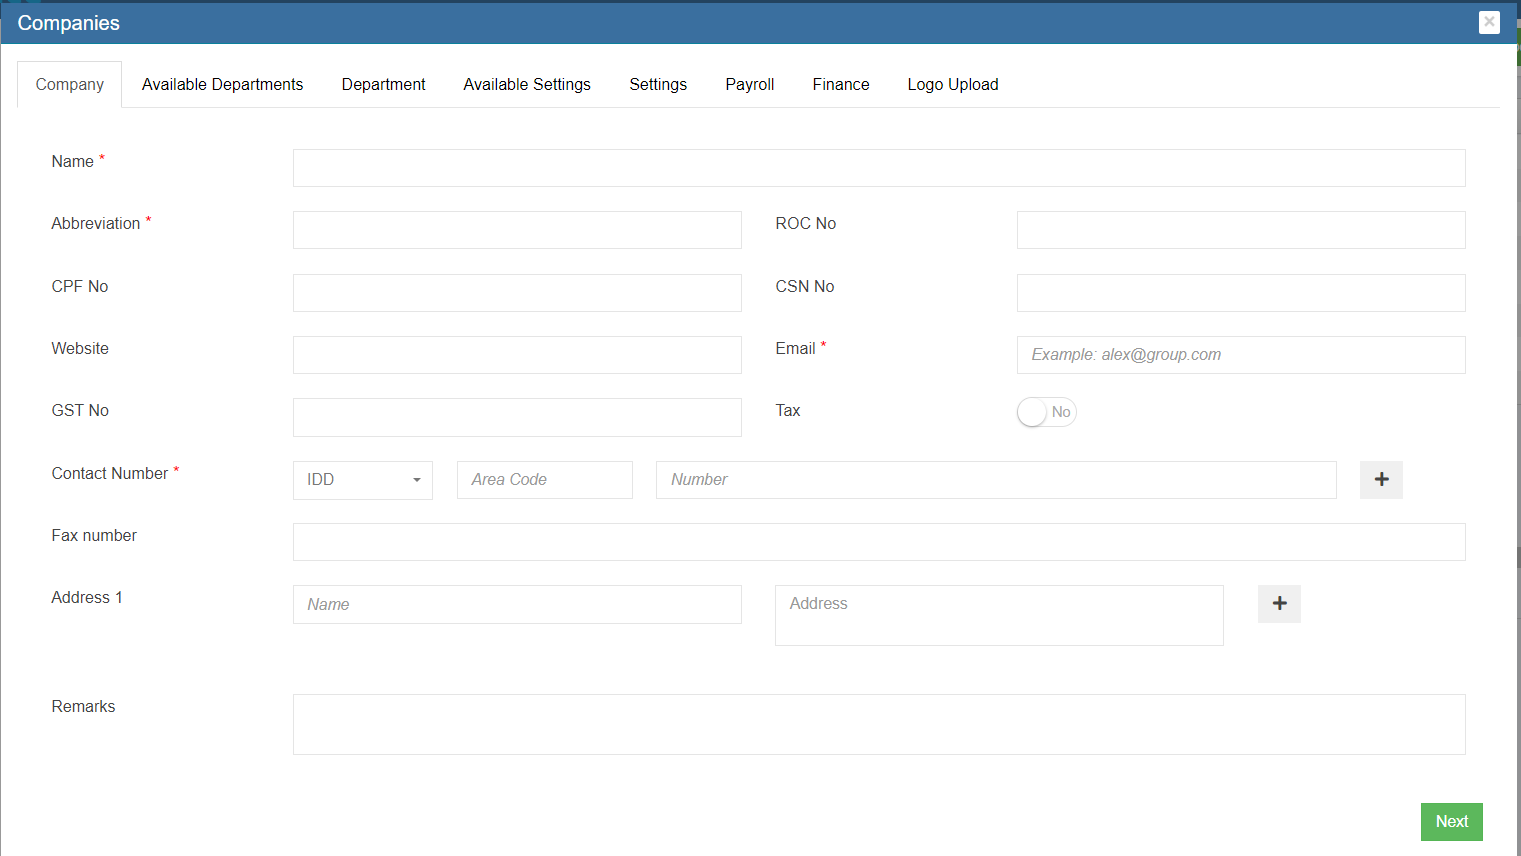
Company Tab
- In Name box, enter company name.
- In Abbreviation box, enter company name abbreviation.
- In ROC No box, enter the company registration number.
- In CPF No box, enter company CPF payment code.
- In CSN No box, enter CSN number. CPF Submission Number (CSN) is a unique identifier used by employers to transact with CPF Board.
- In Website box, enter company website link.
- In Email box, enter company email address.
- In Contact Number box, select correct IDD and enter company contact number. If system admin user wants to add multiple contact number, click
 (add icon) in the end of contact number line. A new line of contact number will be shown as below. Click
  (delete icon) to remove contact details.

- In Fax Number, enter company fax number.
- In Address 1 box, enter company address name and address details. Address name e.g., main office, warehouse. If system admin user wants to add multiple addresses, click (add icon) in the end of address line. A new line of address will be shown as below. Click (delete icon) to remove address.

- In Remarks box, enter remarks if any.
- Click Next to save company details and open department tab.


Department Tab
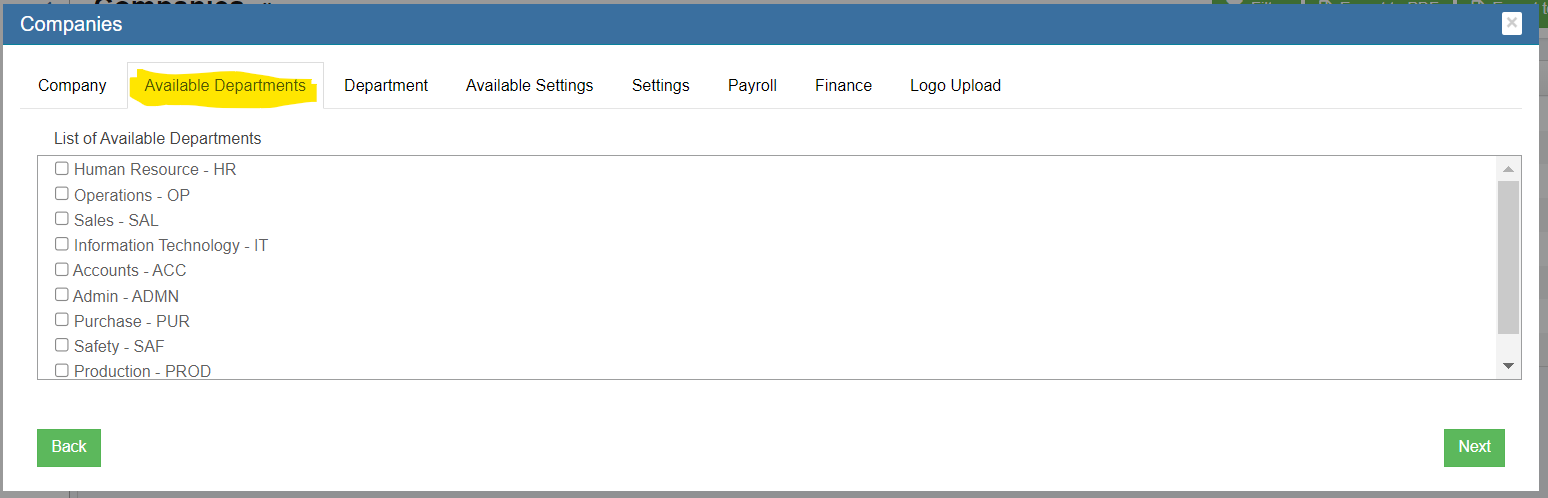
System admin user can set up departments of the company by selecting from available departments in the system, or creating new departments if can not find in available departments list.
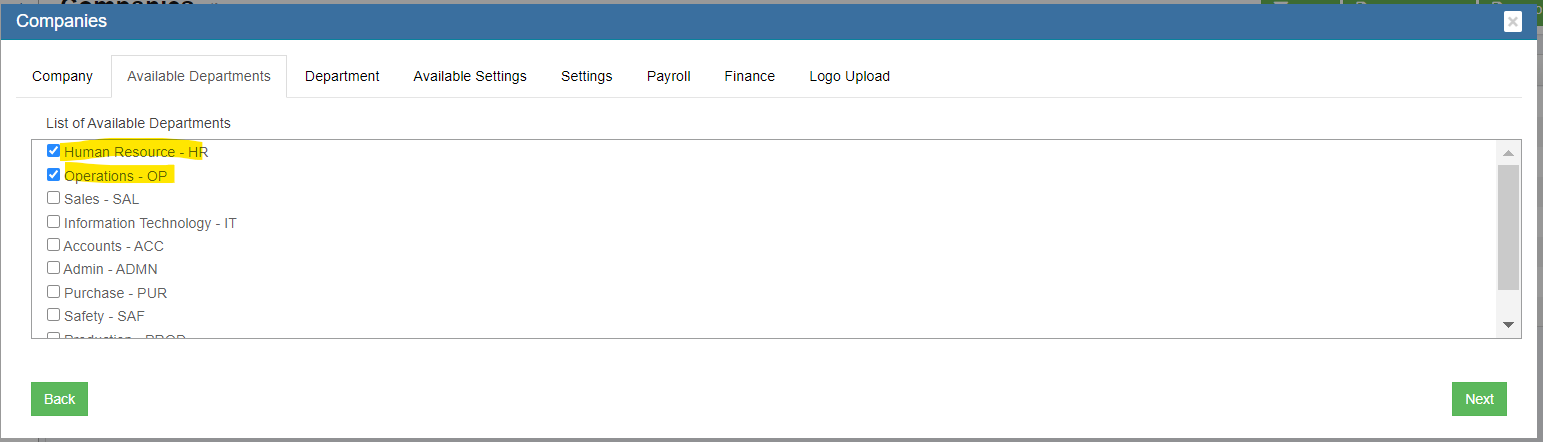
- Click the Available Departments tab, the available departments list will open as below,

- Click the tick boxes in front of the departments to add departments to the admin company.

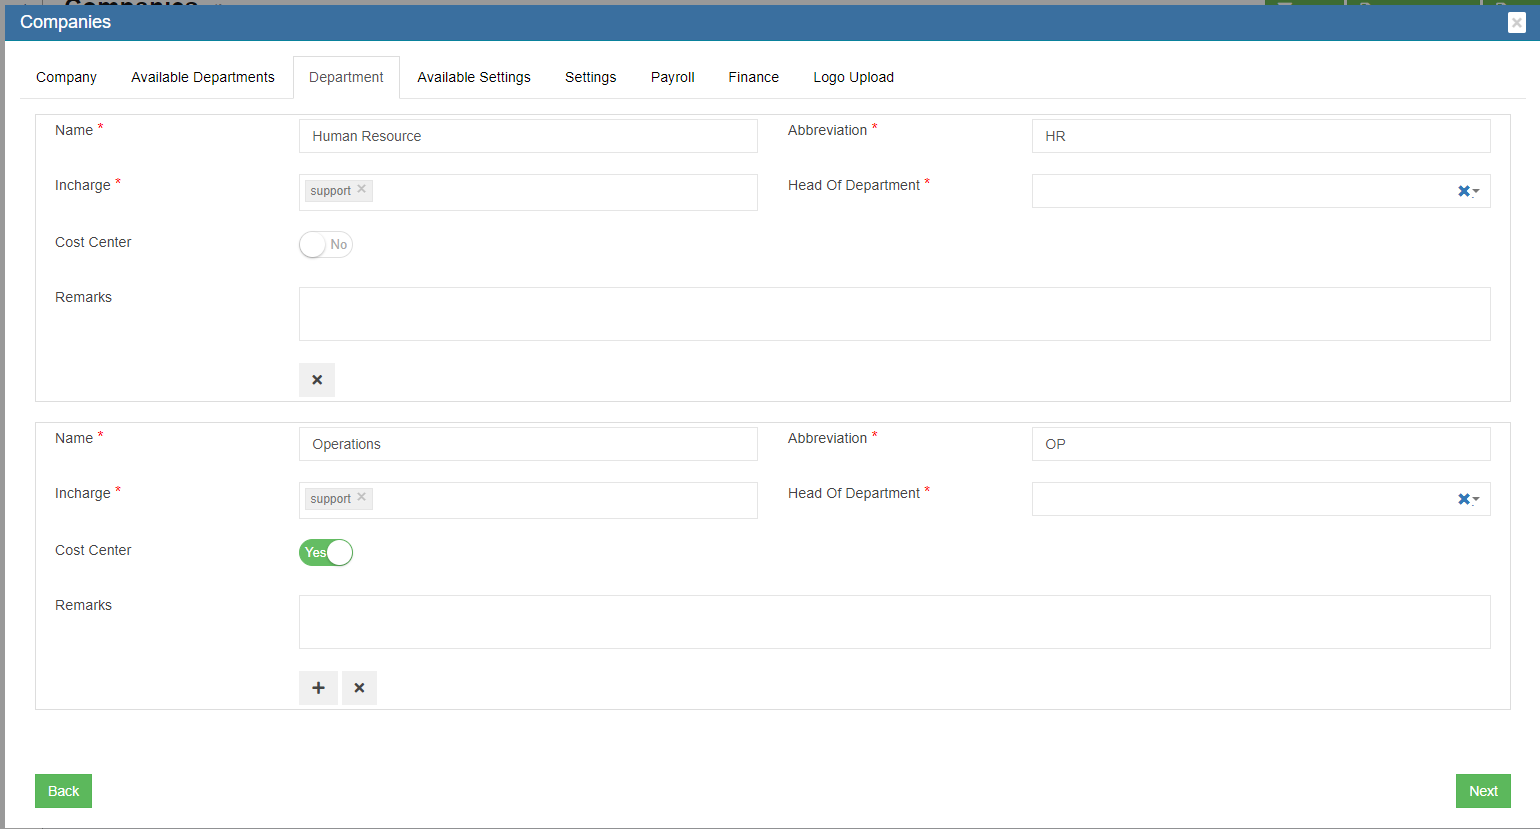
- Click Next to enter Department tab, the selected departments from available departments in previous step will be displayed in Department tab

- click (add icon) in the end of departments, a new department creation table will open as below,

- In Name box, enter department name.
- In Abbreviation box, enter department abbreviation.
- In Incharge box, click to select user in charge of the department.
- In Head of Department box, click to select user who is the head of department.
- Cost Center flag, if the department needs to be available for for sale inquiry module. E.g. we shall set sales department as cost center.
- In Remarks box, enter remark of the department if any.
- Click Next to save department details and open settings tab.

Settings Tab
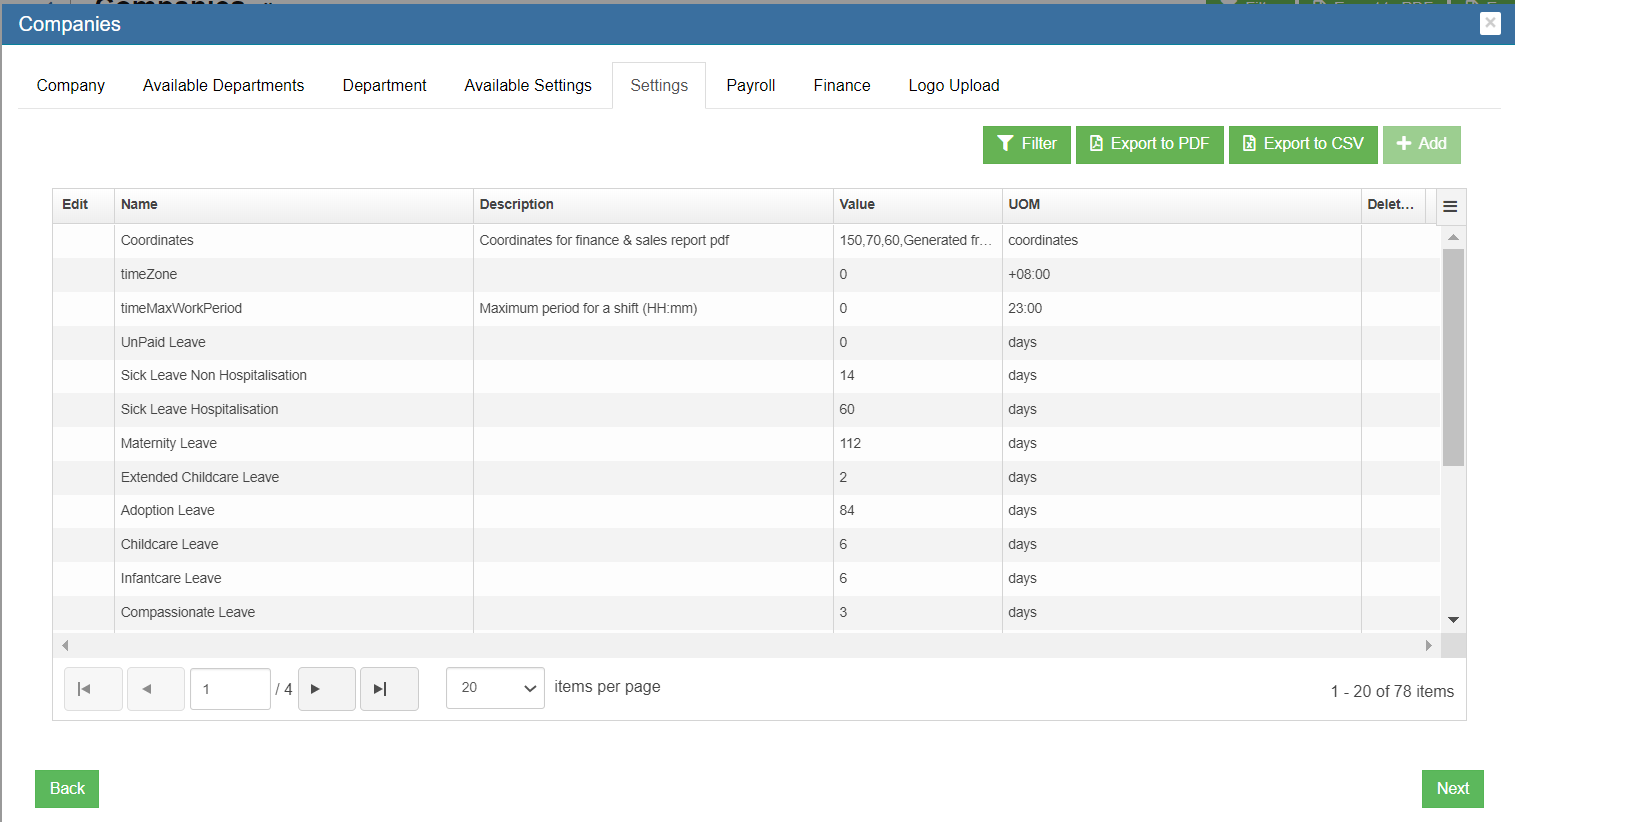
In settings tab, system admin user can set up details such as timezone, leave policy, country, system numbering for different modules etc. In the initial implementation of cuteOffice system, cutech team will do the settings. When adding new admin company, system admin user can copy from existing company settings by select company in available setting Click Next to open Payroll tab.
Payroll Tab
In the payroll tab, system admin user can set bank giro code, and tax declaration details.
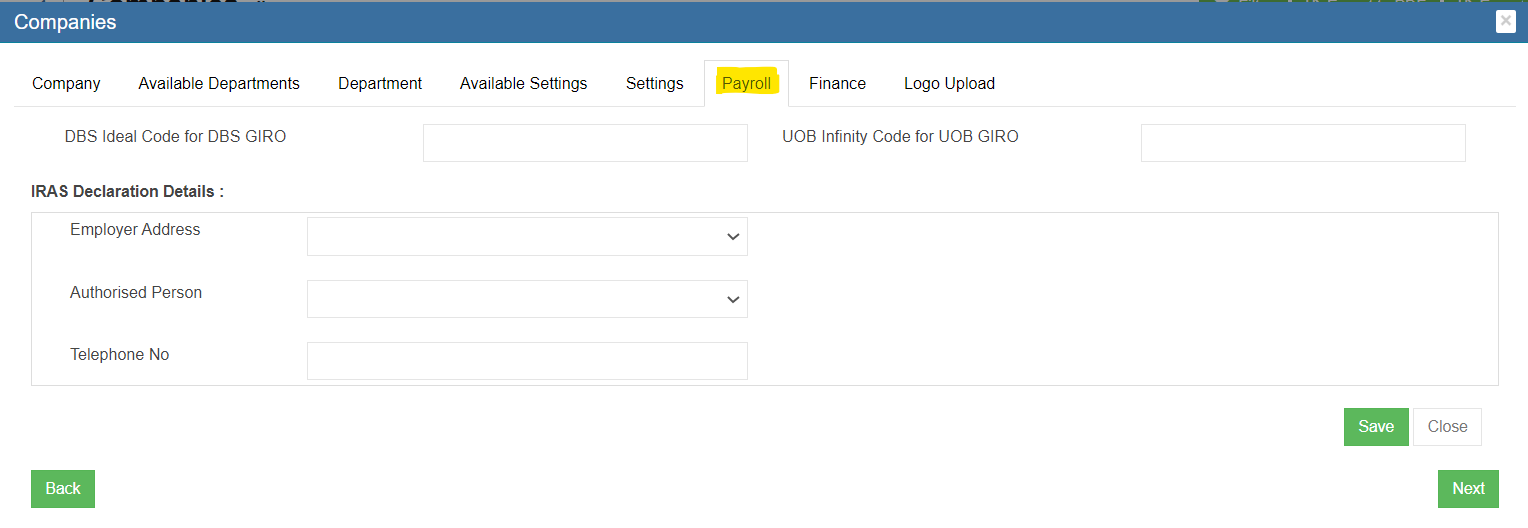
- In bank giro code line, if company bank is with DBS, enter DBS Ideal Code for DBS GIRO; if company bank is with UOB, enter UOB Infinity Code fir UOB GIRO;
- In IRAS Declaration Details,
- In Employer Address, select address from list of company addresses.
- In Authorized Person, select from authorized person.
- In Telephone No, enter telephone number.
- Click Save to save details.
- Click Next to enter Finance Tab.
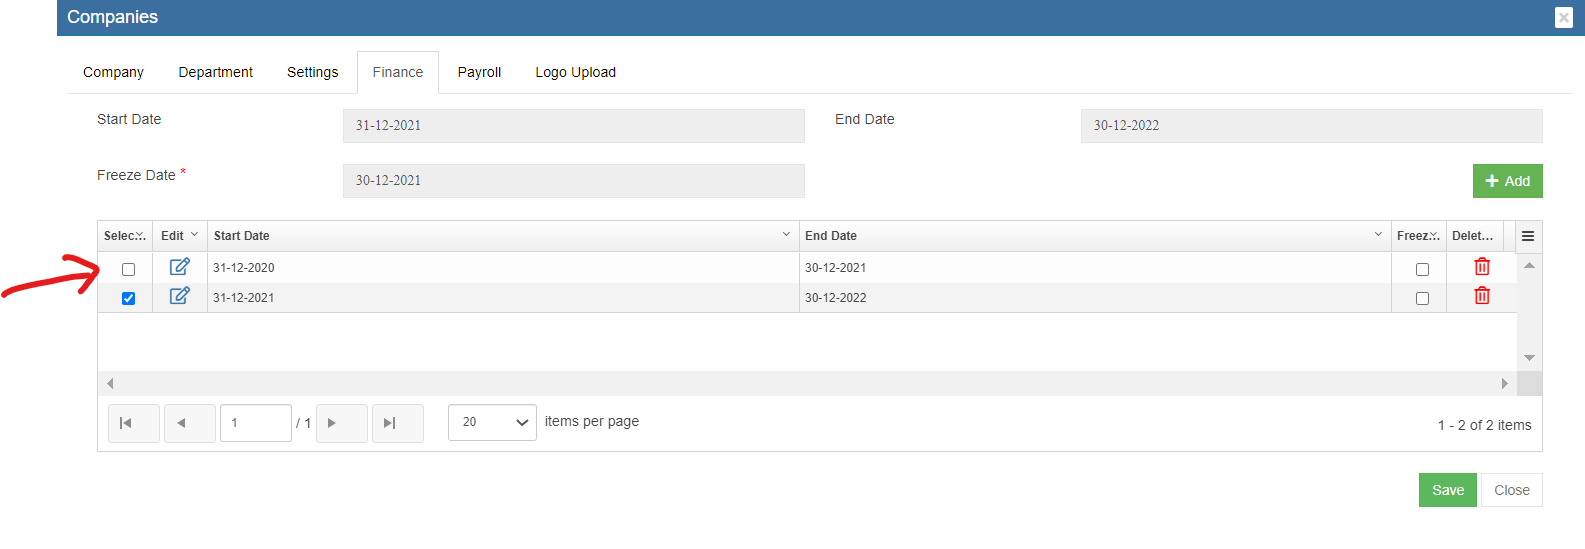
Finance Tab
In finance tab, system admin user should set financial year start date, end date, and freeze date to use finance module. The financial year need to be created by the system admin/financial person in charge every year before entering the voucher for the financial year.
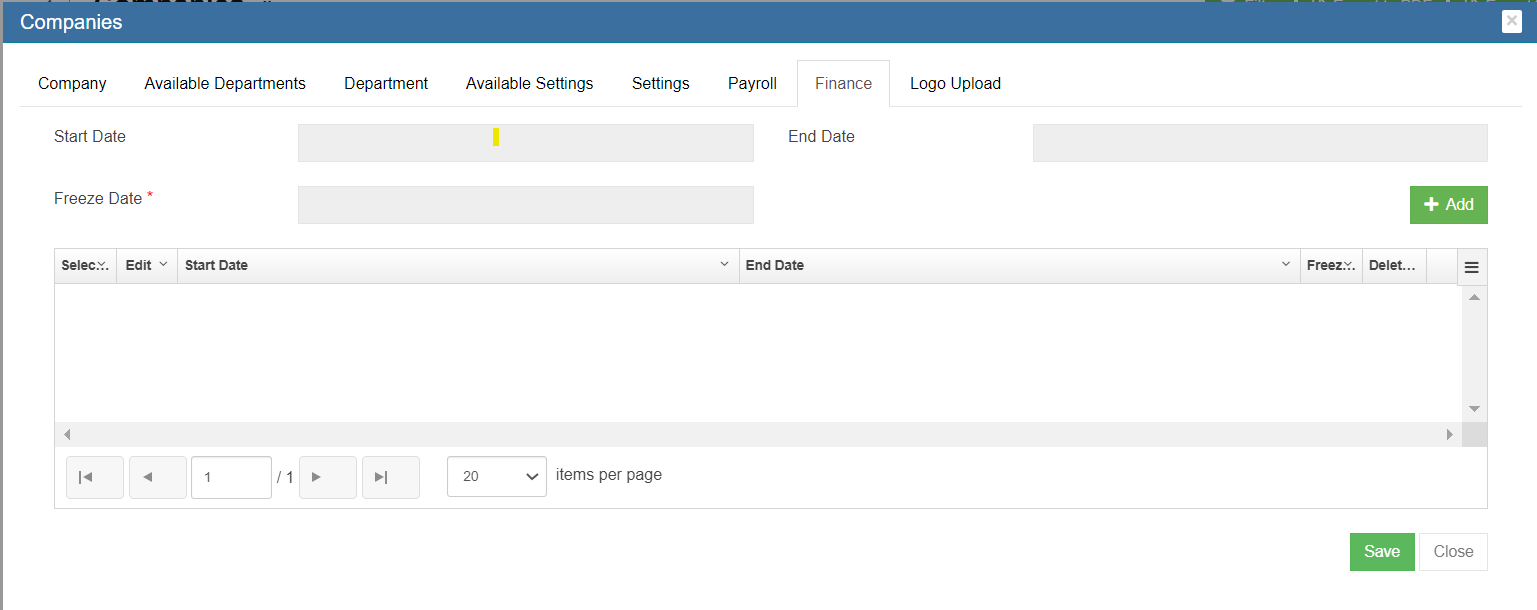
- Before a new financial year starts, click
 (add icon) to add new financial year date information, the add new financial year window opens as below,
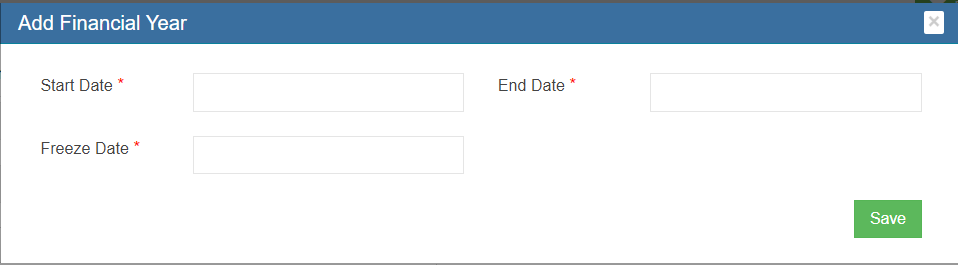
- In Start Date box, click to select financial year start date from calendar.
- In End Date box, click to select financial year end date from calendar.
- In Freeze Date box, click to select freeze date from calendar, note that freeze date must be earlier than start date.
- Click Save to save dates. The new financial year dates will be saved in the financial year list table.


Logo Upload Tab
System admin user can upload company logo in this tab, so that the logo will appear in company profile and other printing formats such as quotations etc.
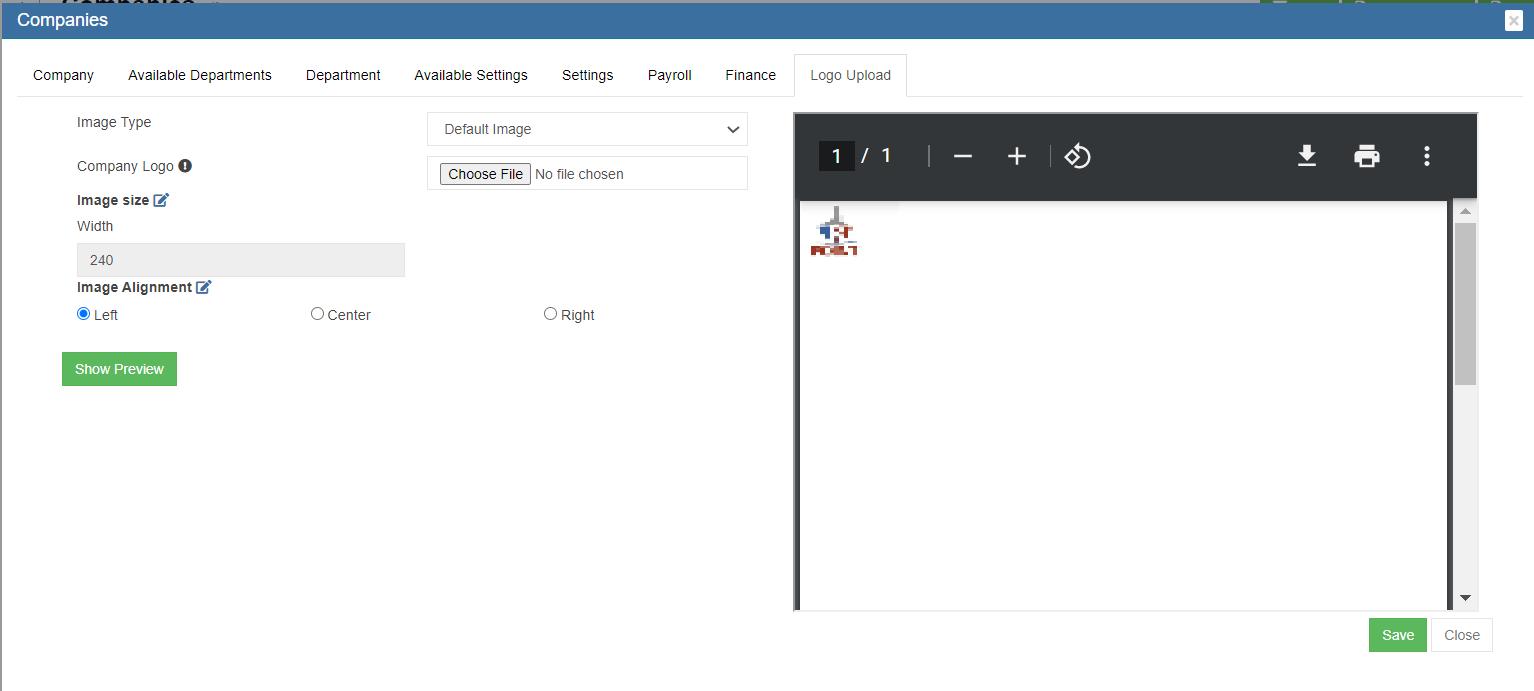
- In Image Type box, select from list of image type from Default Image, Image with Letter Pad, Letter Pad.
- In Company Logo, click
 to choose logo file to upload. The logo image will be displayed in the right side of the page for view.
 - In Width box, enter the width value for the desired look & feel.
- In Image Alignment, select the alignment.
- Click Show Preview, to view uploaded logo.
- Click Save to save all details of company.
Edit Company
System admin user can edit amin companies' details. Click the (edit icon) in front of the company name. The company details will open. Edit the details and click Save to save updates.
Delete Company
System admin user can delete company when required. Click delete icon in the delete column, system will prompt confirmation notification. Click Yes to confirm deletion of a company.
Export Company List
System admin user can also export company list to PDF or CSV format by using the![]() (export icons) on the top right corner in the page.
(export icons) on the top right corner in the page.
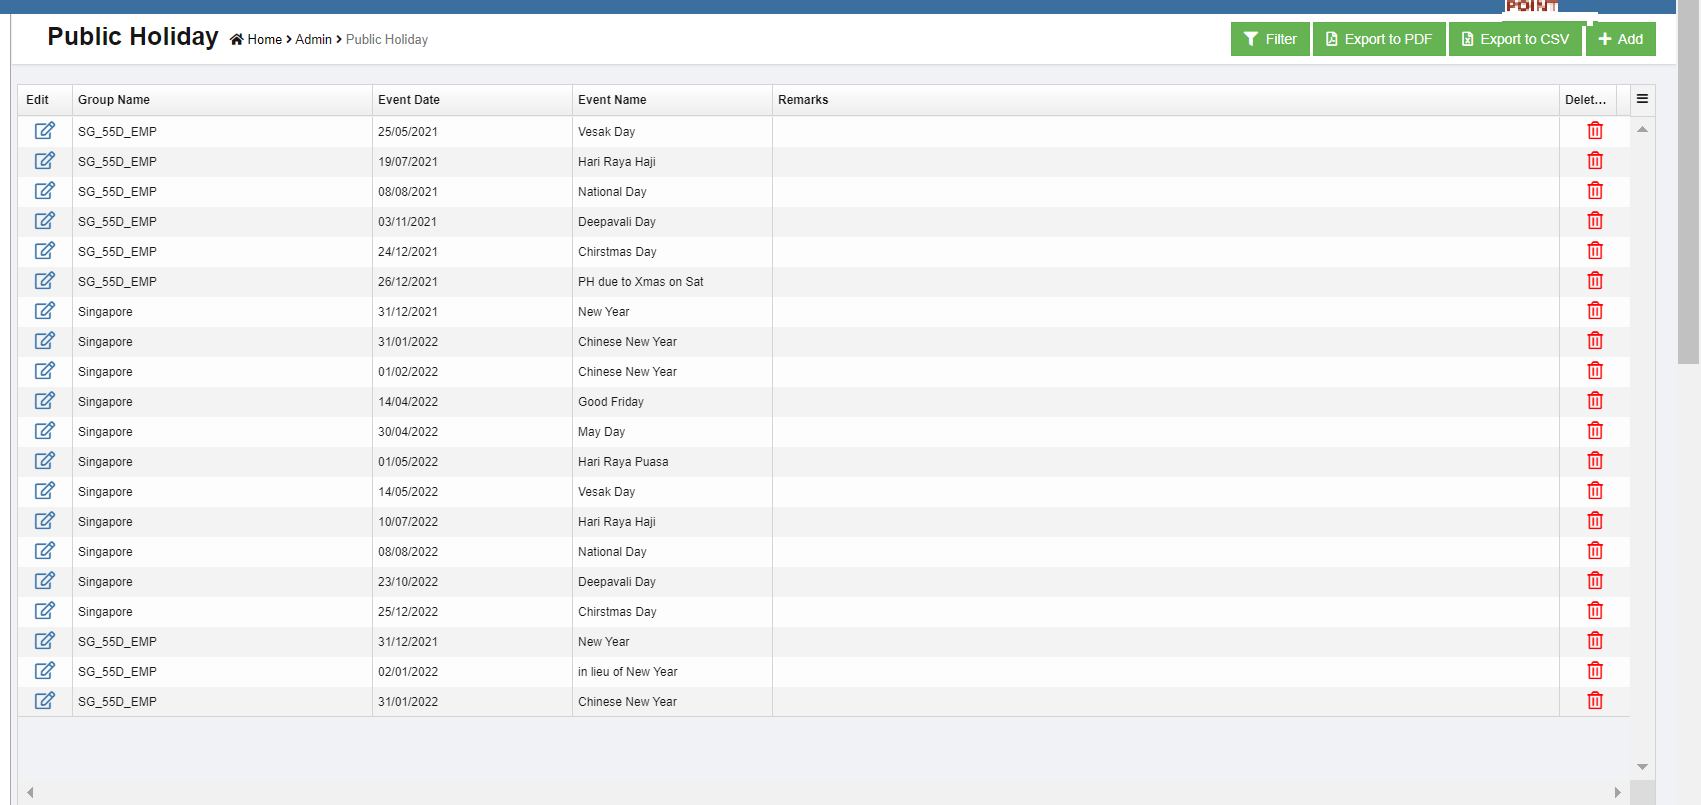
Public Holiday
System admin user can set up public holiday dates in Public Holiday menu. System admin user shall update public holiday dates before new calendrer year starts.
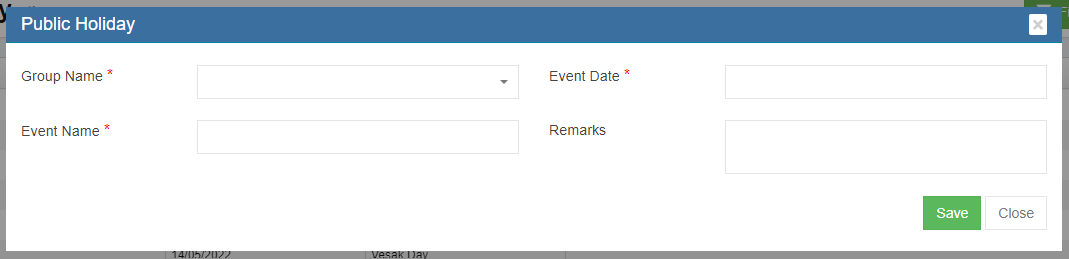
Add Public Holiday
To add a new public holiday,
- click (add icon) in the top right corner of the public holiday list page, the new Public Holiday window opens as below,

- In Group Name, select public holiday group from dropdown list (Note, system admin user can add new group name in Option menu),
- In Event Date box, click and select date from calendar.
- In Event Name box, enter the public holiday name,
- In Remarks, enter remarks if any.
- Click Save to save public holiday.
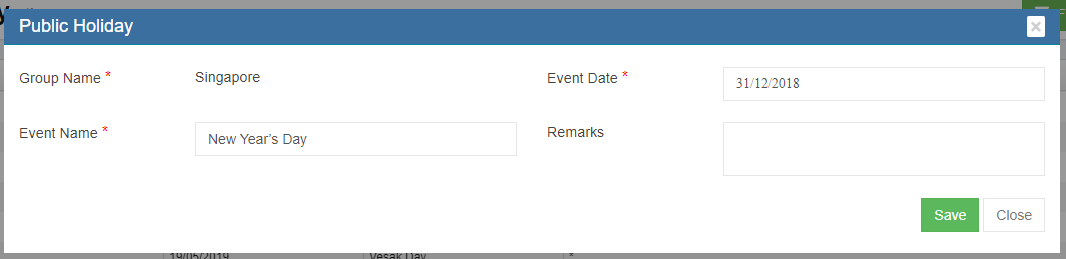
Edit Public Holiday
System admin user can edit public holiday' details except holiday group name. Click the(edit icon) in front of the public holiday name. The public holiday details will open. Edit the details and click Save to save updates.
Delete Public Holiday
System admin user can delete public holiday when required. Click delete icon in the delete column, system will prompt confirmation notification. Click Yes to confirm deletion of a public holiday.
Export Public Holiday List
System admin user can also export public holiday list to PDF or CSV format by using the![]() (export icons) on the top right corner in the page.
(export icons) on the top right corner in the page.
Notification Logs
Notification logs manages all notification messages (emails, SMS, App) that are processed by cuteOffice system. Click Notification Logs tab, it opens as below,
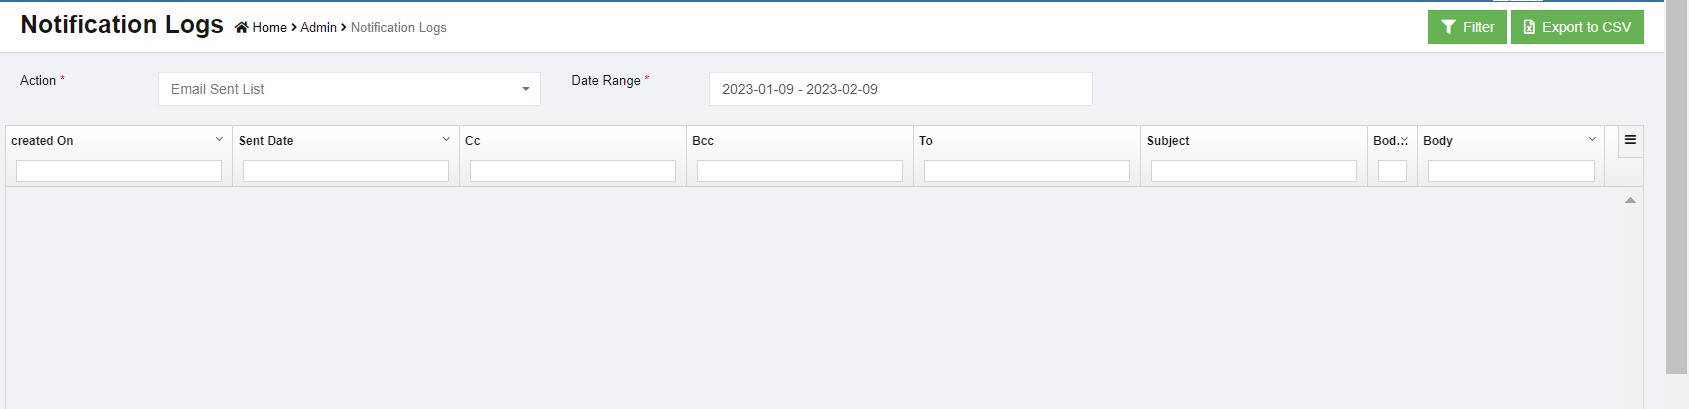
View Notification Logs
System admin user can view notification logs using search option or filter.
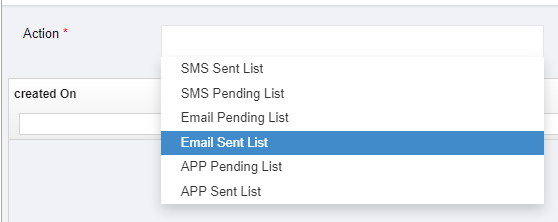
- In Action box, select action item from dropdown list,
- In Date Range box, select date range to view all notification logs in selected period.
- Or user can click
 (filter icon) in the top right corner and enter key words in the column filter to search for a particular message.

Export Notification Logs List
System admin user can also export notifications list to CSV format by using the ![]() (export icons) on the top right corner in the page.
(export icons) on the top right corner in the page.
Audit Logs
Audit logging is the process of documenting activity within the cuteOffice systems used across your organization. Audit logs record the occurrence of an event, the time at which it occurred, the responsible user or service, and the impacted entity in each module by page. Click Audit log, it opens as below,
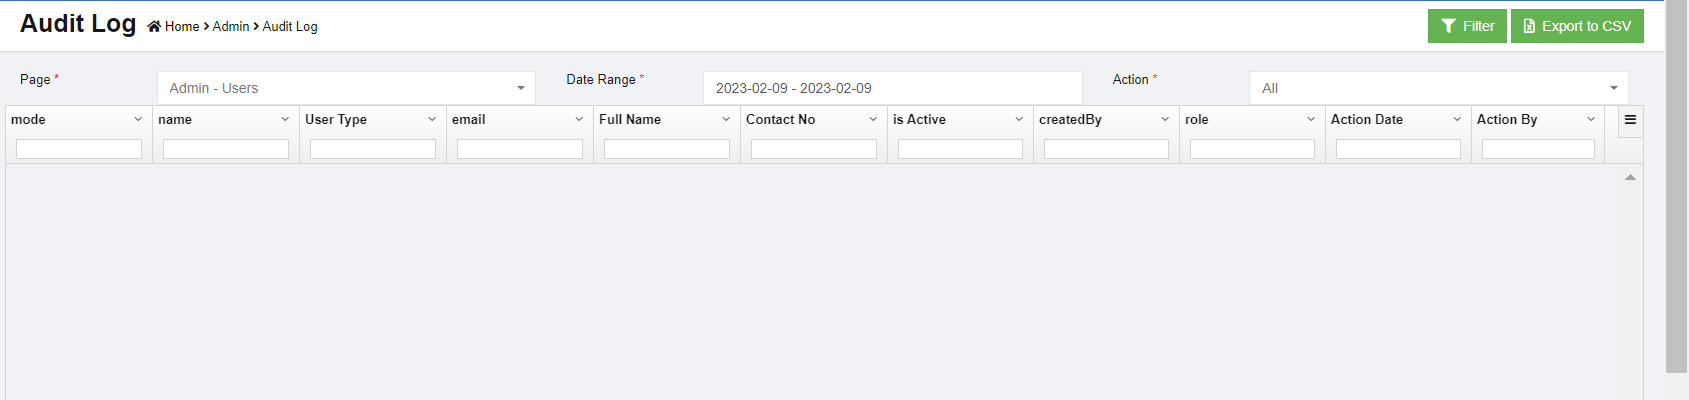
View Audit Logs
System admin user can view audit logs using search option or filter.
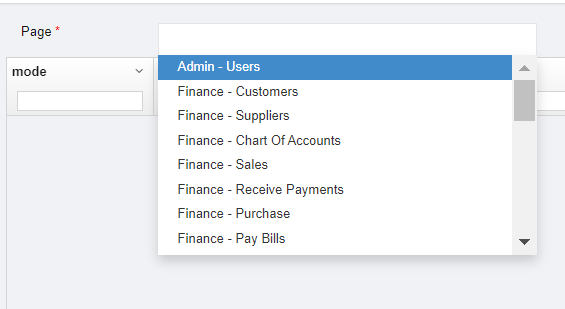
- In Page box, select the page of which system admin user wants to audit,

- In Date Range box, select date range.
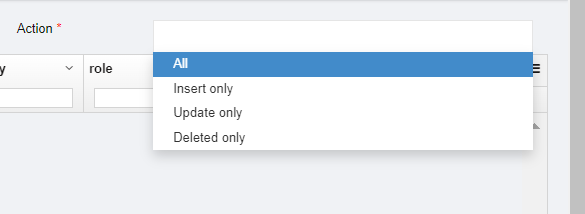
- In Action box, select action item from dropdown list,
- All audit logs will display during selected period.
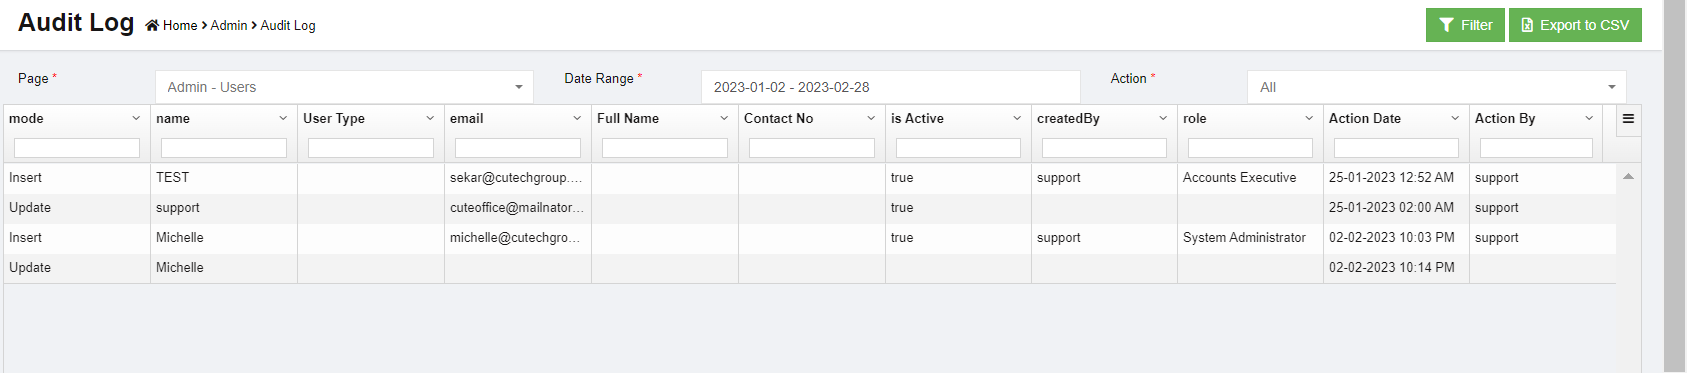
- Or user can click (filter icon) in the top right corner, and enter key words in the column filter to search for a particular action audit logs.


Export Audit Logs List
System admin user can also export audit logs list to CSV format by using the ![]() (export icons) on the top right corner in the page.
(export icons) on the top right corner in the page.
No Comments