
Project Master
User can manage project data in project master page. Click Operation tab in system main menu, then click Project to open prject master page as below,

Add New Project
To add a new project, click ![]() (add icon) in the top right corner of the project master page, the add new project window opens,
(add icon) in the top right corner of the project master page, the add new project window opens,
Project Info Tab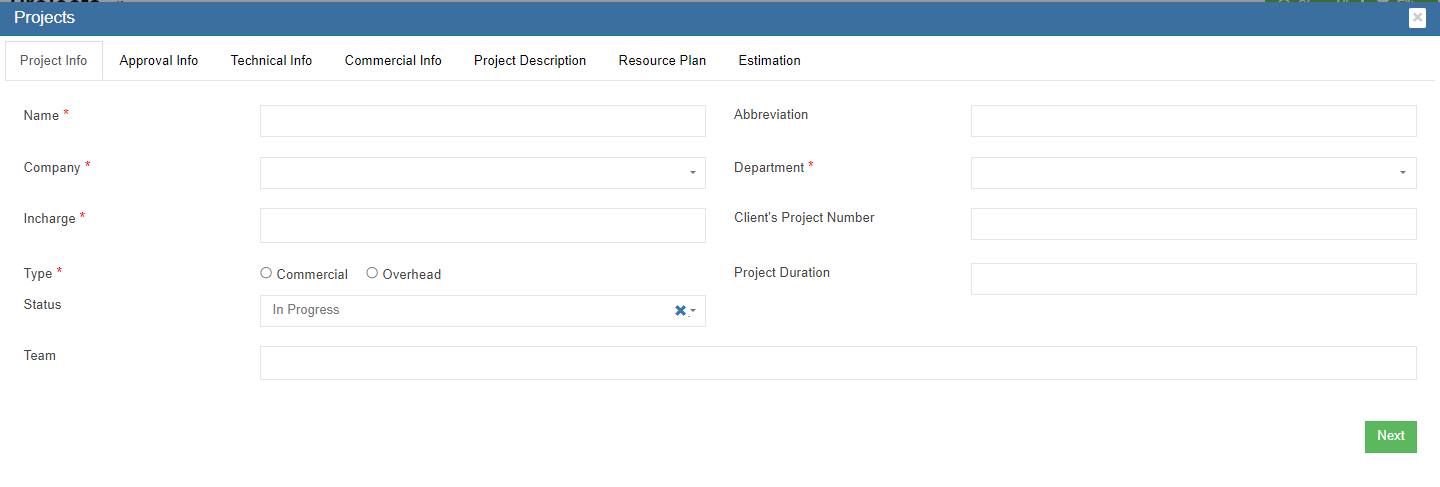
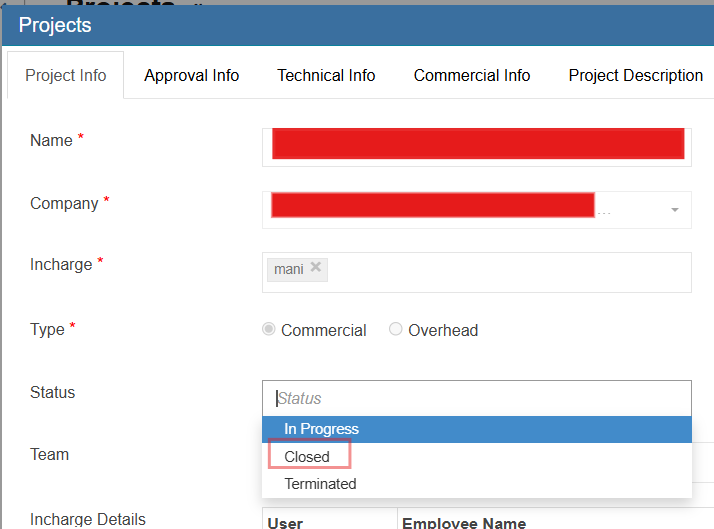
- In Name box, enter project name.
- In Abbreviation box, enter project name abbreviation.
- In Company box, select company name.
- In Department box, select department name.
- In Incharge box, select person in charge.
- In Client's Project Number box, enter client side project number if available.
- In Type box, click commercial or overhead to indicate project type.
- In Project Duration box, click to select project start and end date from calendar.
- In Status box, click to select status as In Progress/Closed/Terminated.
- In Team box, enter team information.
- Click Next to save project info and open Approval Info tab.
Approval Info Tab
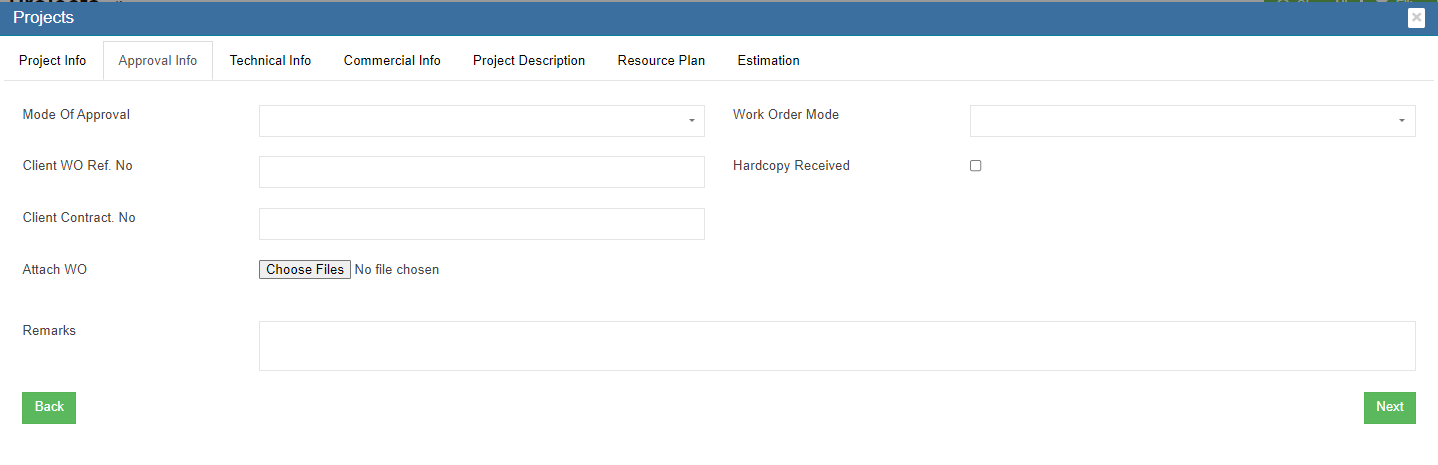
- In Mode of Approval box, click to select approval mode as Email/Hardcopy/Phone.
- In Work Order Mode box, click to select work order mode as single or multiple.
- In Client WO Ref No box, enter client work order reference number.
- In Hardcopy Received box, tick to indicate received approval hardcopy document.
- Client Contract No box, enter client contract number.
- In Attach WO area, click
 to choose file to upload.
 - In Remarks box, enter remarks if any.
- Click Next to save approval info and open Technical Info tab.
Technical Info Tab
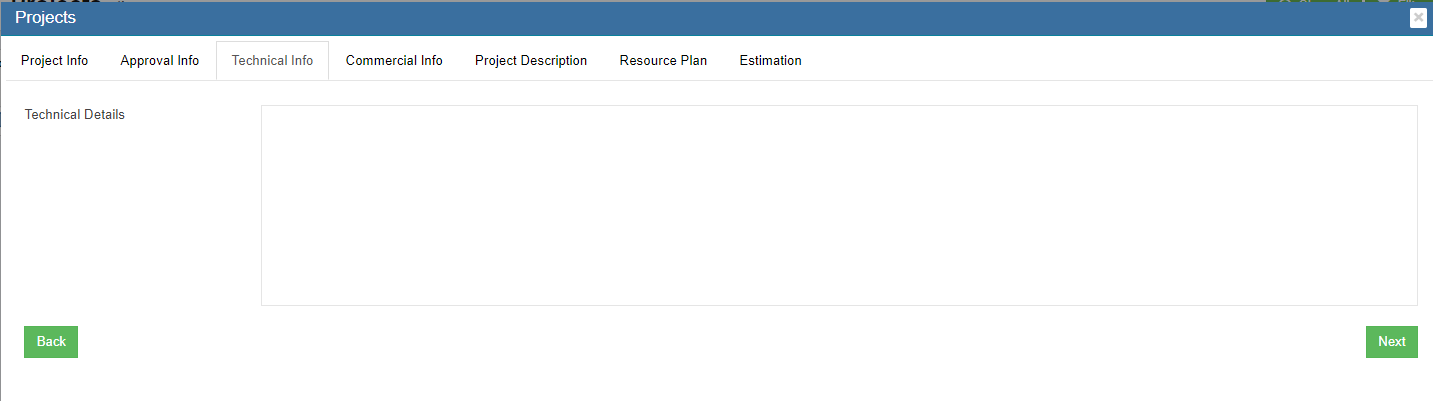
- In Technical Details box, enter project technical detail.
- Click Next to save technical info and open Commercial Info tab.
Commercial Info Tab
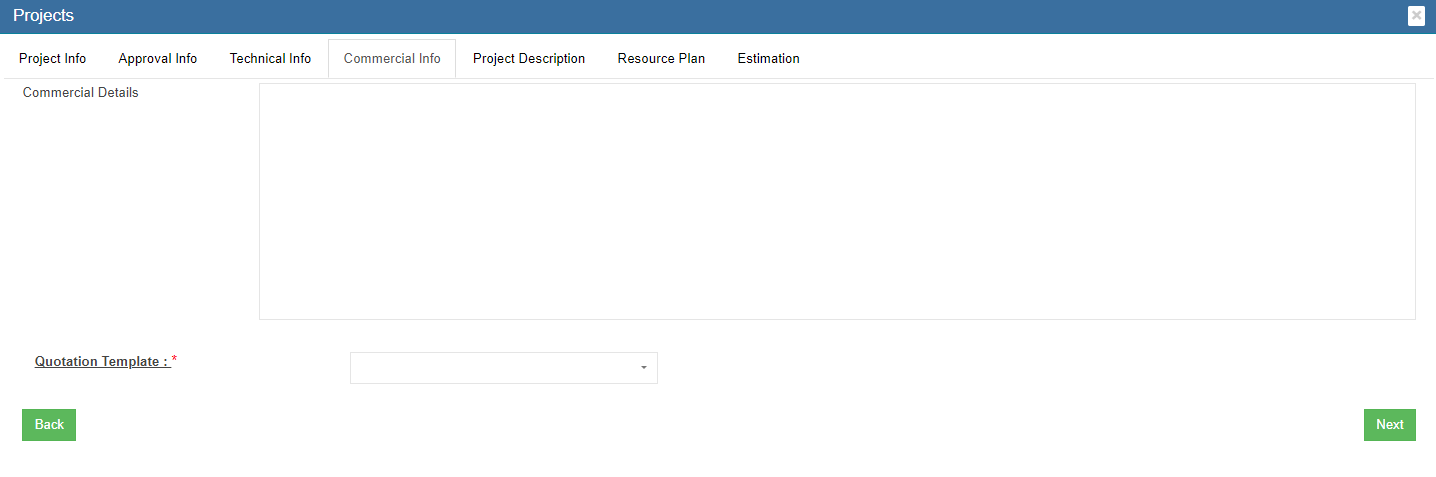
- In Commercial Details box, enter project commercial detail.
- Click Next to save commercial info and open Project Description tab.
Project Description Tab
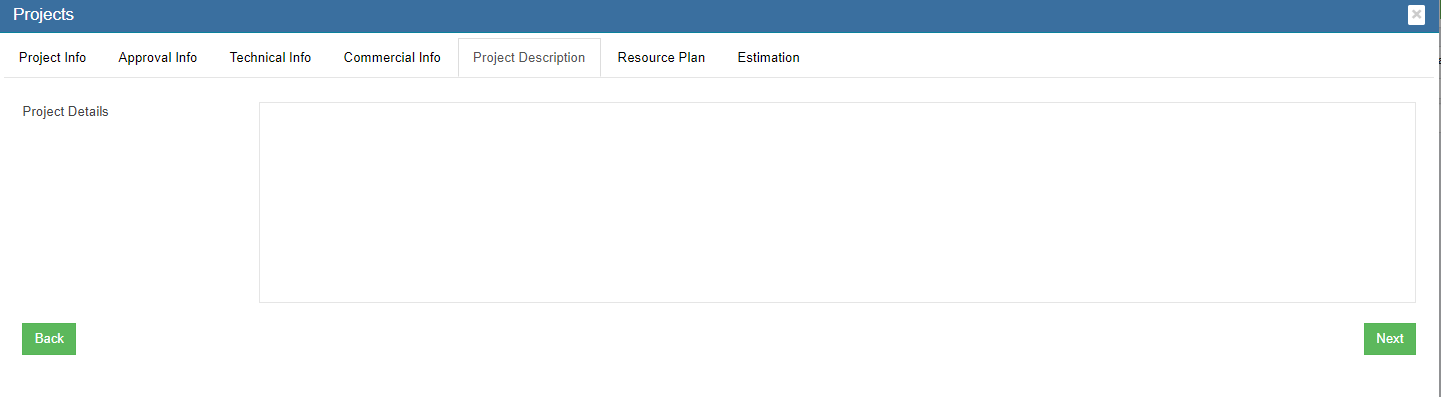
- In Project Description box, enter project description.
- Click Next to save project description and open Resource Plan tab.
Resource Plan Tab

- In Minimum Manday box, enter minimum man days.
- Click Next to save resource plan and open Estimation tab.
Estimation Tab
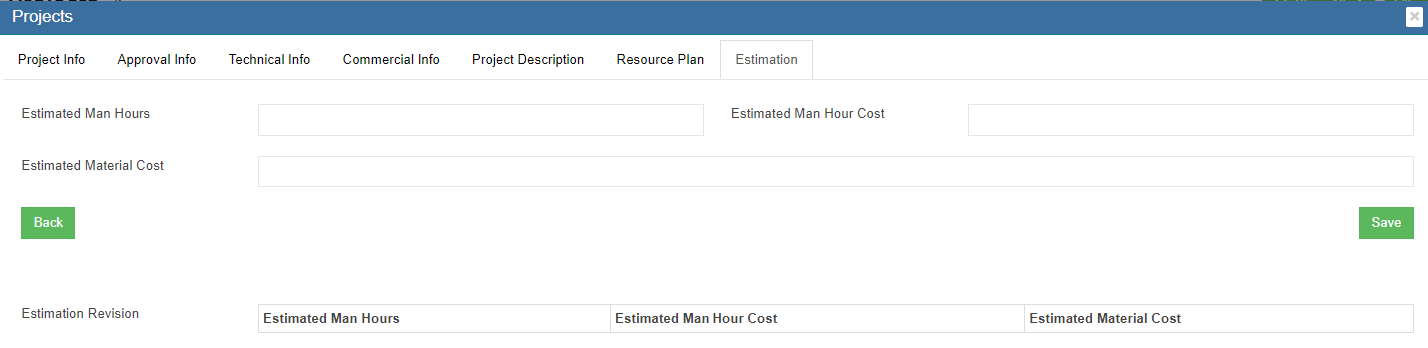
- In Estimated Man Hours box, enter estimated man hours.
- In Estimated Man Hour Cost box, enter estimated cost.
- In Estimated Material Cost box, enter estimated material cost.
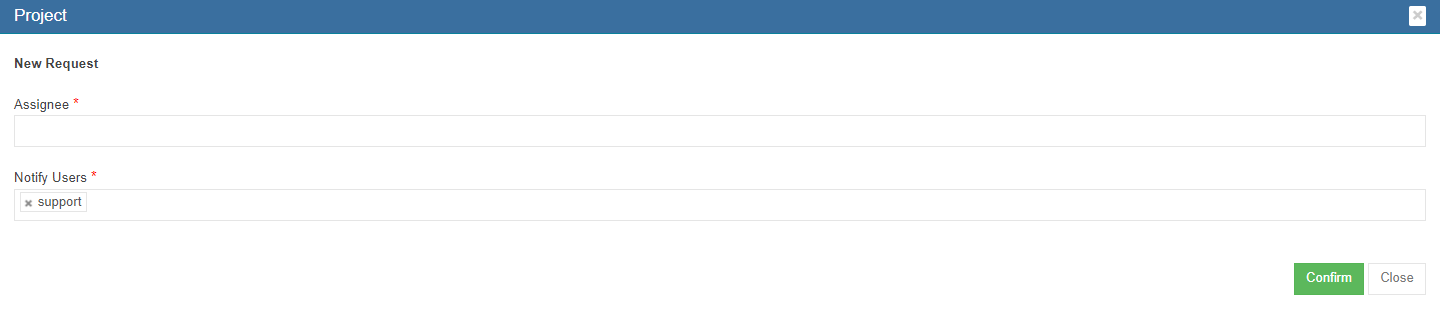
- Click Save to save all data entered in project tabs, a project creation notification window opens as below,

- Click Confirm to create project.
Project Status
Once project is completed, the status can be changed from "In Progress" to "Closed" . Edit functionality will not be available for the project to edit further.
Special permission "projectSplEditforNonActive" available to edit "Closed" status project.
Edit Project

Click the (edit icon) in front of the project name. The project details window will open. Edit the details and click Save to save updates.
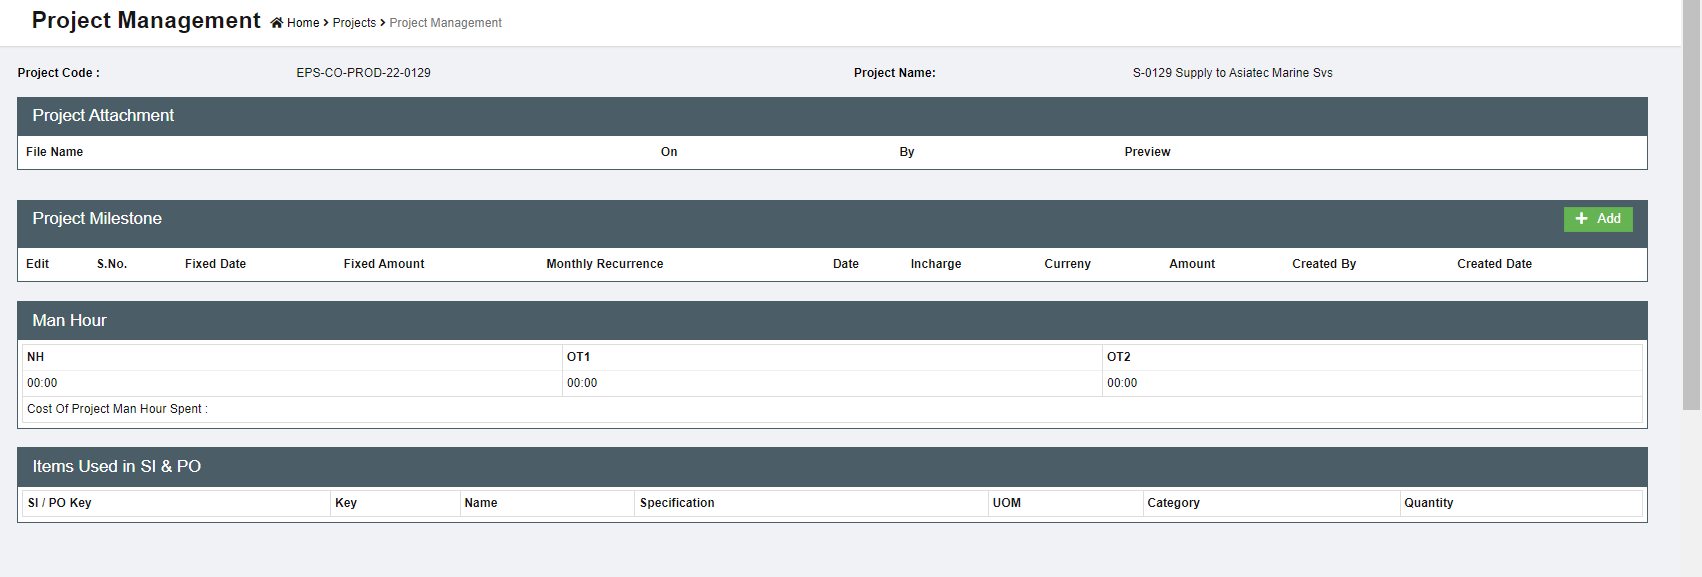
Project Management

- Click
 icon, the project management page opens as below,

- User can view all relevant project information and also add project milestones.
Project Site
Project site is used to define single or multiple site locations for a project. Each site will have geolocation (latitude & longitude) and shift name.
To establish geofence, allowing employees to perform Geopunch within the defined or default radius after accurate latitude and longitude coordinates enabled or radius can be drawn directly on the map.
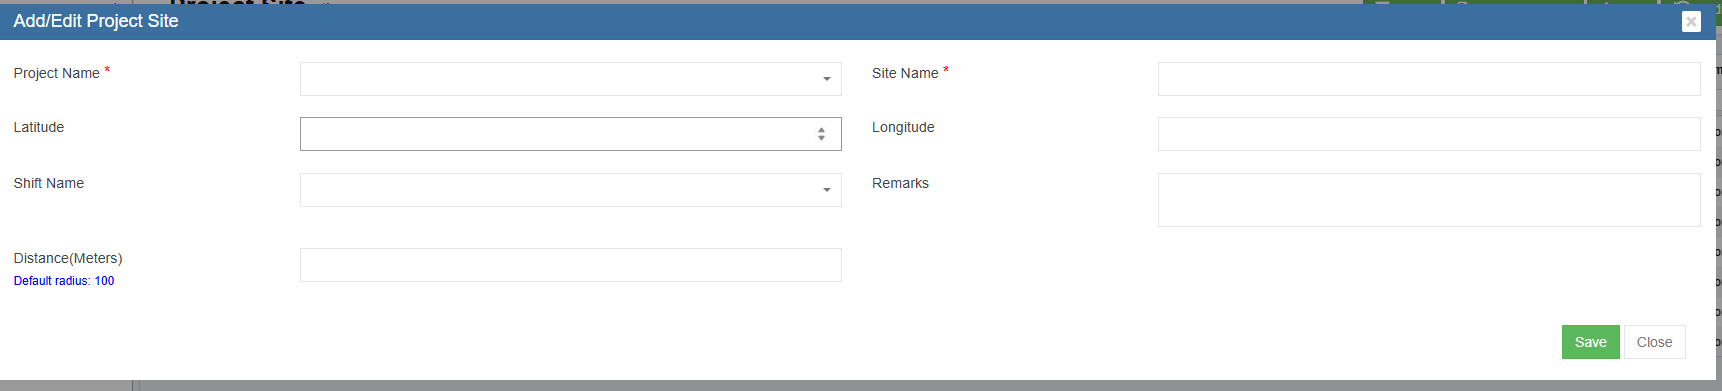
- Click Project Name and choose the project. *
- Enter Site name *
- Enter Latitude and Longitude of the location
- Enter Shift name
- Change the distance (default radius), if required.
- Save the record.
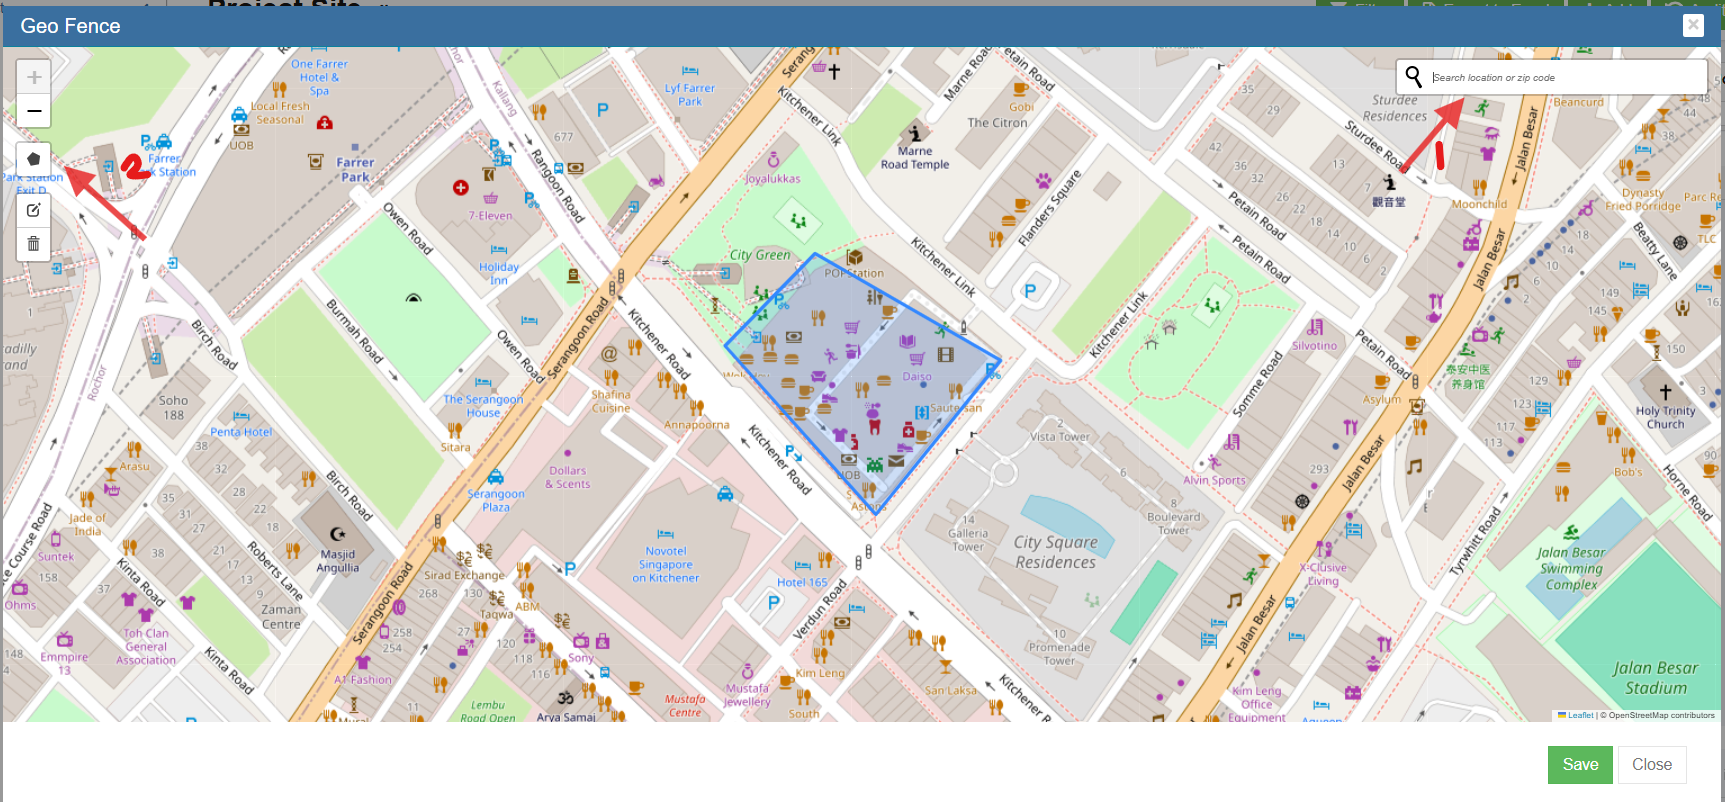
- Go to main page and click Geo icon.

- Click search and enter the pin code.
- Click Polygon to draw radius to define the boundary to perform geopunch. (Enable the geofence under global settings to true. Within the boundary, user can perform clock in & clock out. Beyond that, it is not possible )

Settings


* Mandatory fields
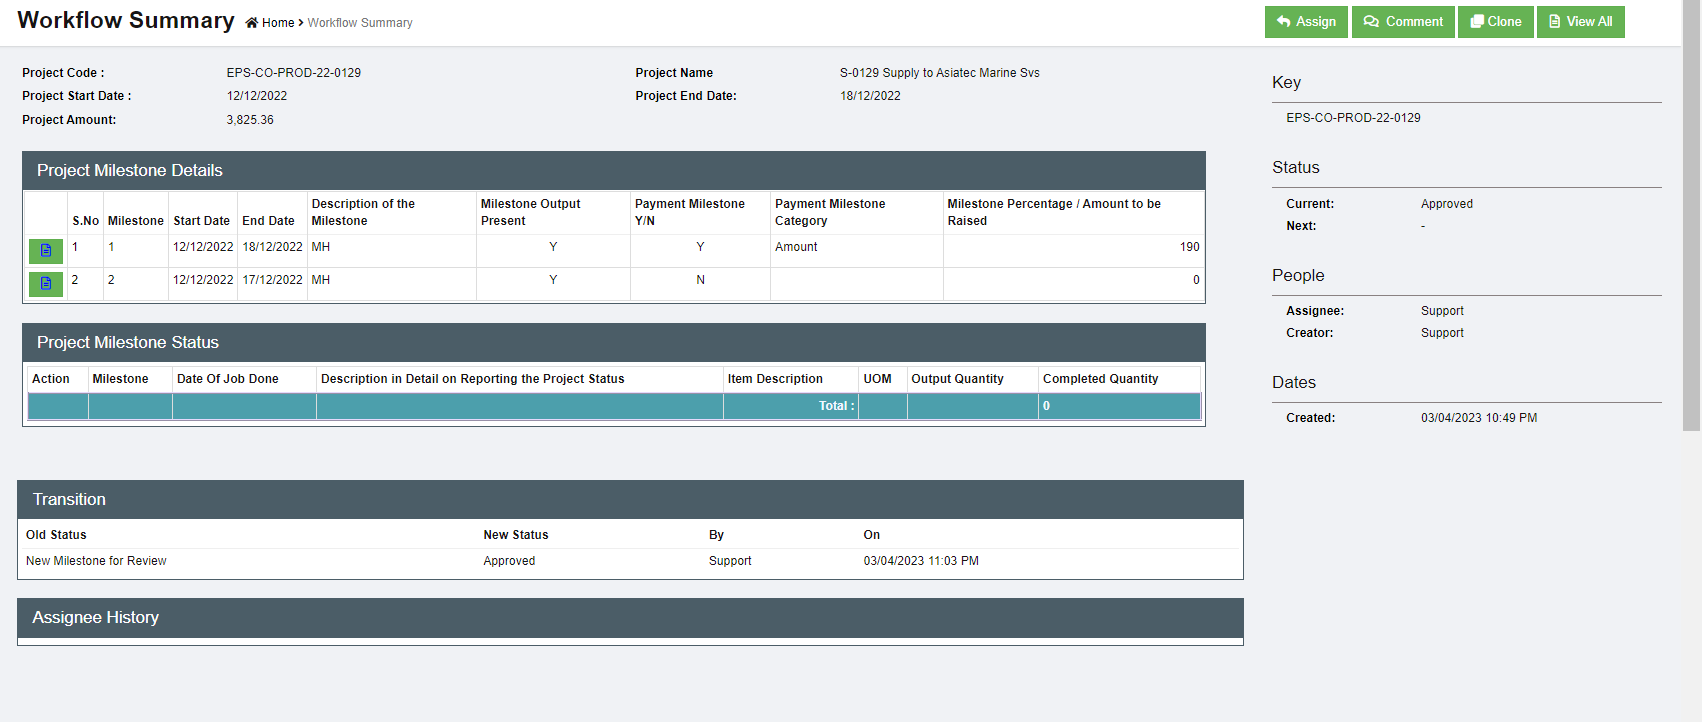
Project Milestone
The Project Milestone is to brief the various important milestones of the project. Entry of the Milestones for a Project is mandatory and the following validation needs to be implemented.
- The Start date of the Milestone (for Sno 1) should be the start date of the Project and the
last Milestone End Date should the Project End Date created - Milestone to be identified whether they are Payment Milestone Yes/No
- If the Payment Milestone is Yes, Milestone Amount is mandatory
- Total Milestone Amount should be equal to the Project Amount
- Linking Project Quotations to Milestone Yes/No
- In the Quotation field for the Milestone creation, validate the Quotation selected to be the same company. Also provide a dropdown of Quotation for this project. If no quotation is not there for this project in Enquiry, then display all the quotation for the company
- If there is only one quotation display instead of selection
- Once the Milestone Status is complete, 100%, Edit to be not provided for the Milestone. For milestones which has quantifiable output(for eg: 100m insulation of pipes) must have a field to enter the final output of the respective milestone. There can be multiple records as output. To capture Item Name, description. UOM and Quantity if output is selected
• . Change the below UI accordingly

- Click
 icon,
icon,

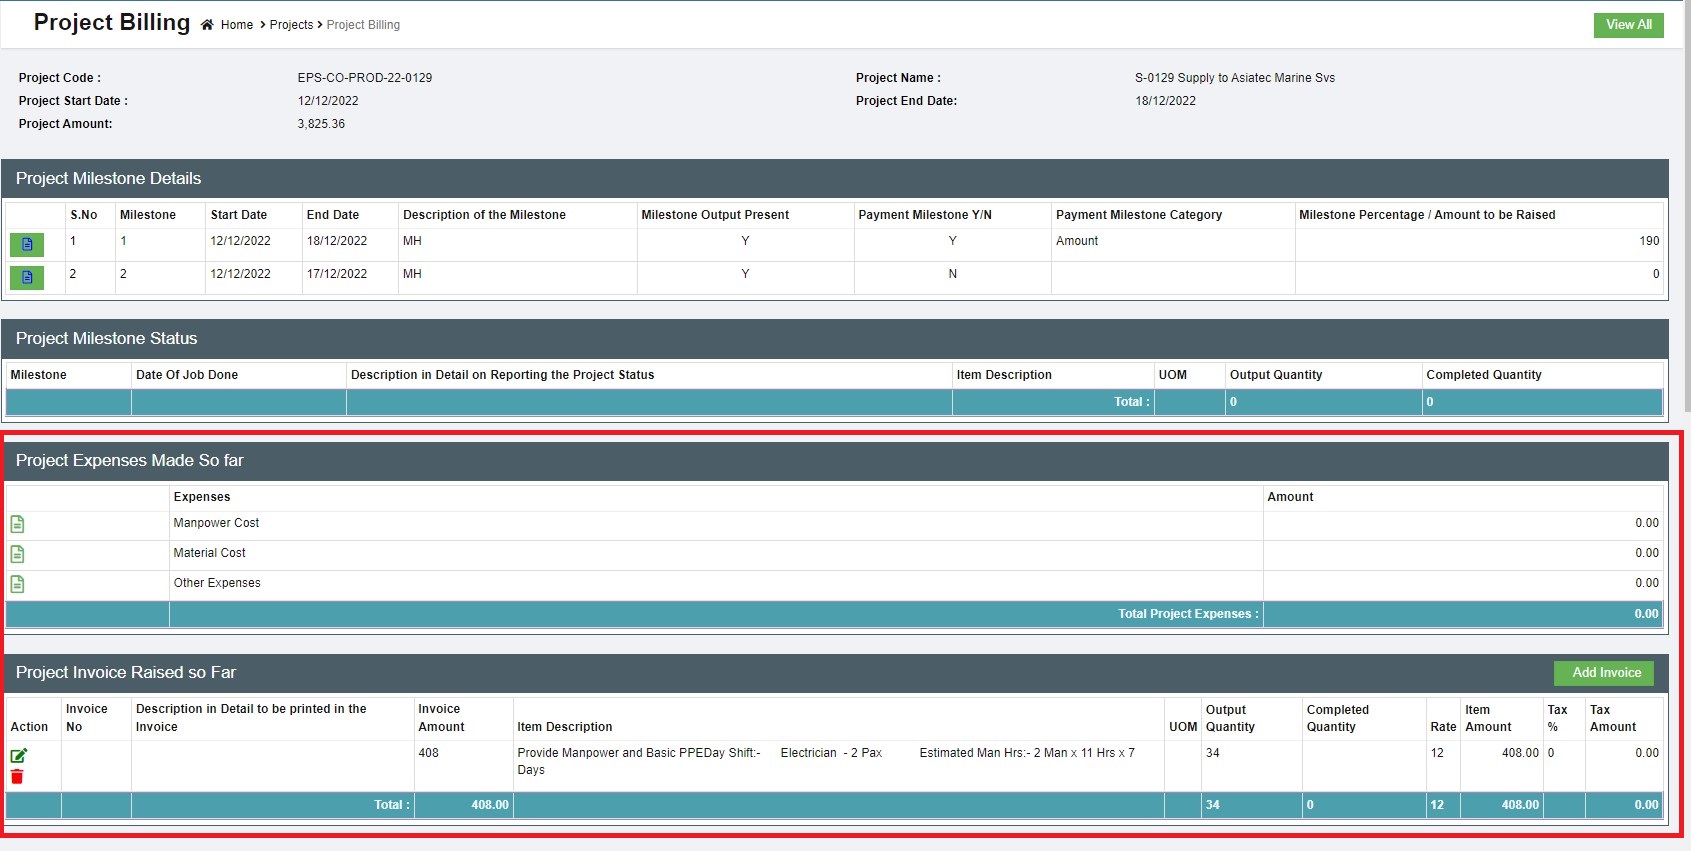
Project Billing

- Click
 icon, the project billing page opens as below,

- User can manage project expenses and project invoices in this page.
- To a
Project Attachment

- Click
 icon, the project attachment page opens,
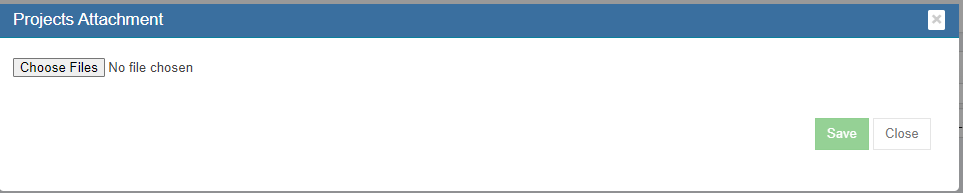
- Click Choose Files to open file upload window.
- Click Save to confirm uploading selected file as project attachment.

Project Renewal

- Click
 icon, the project renewal page opens,
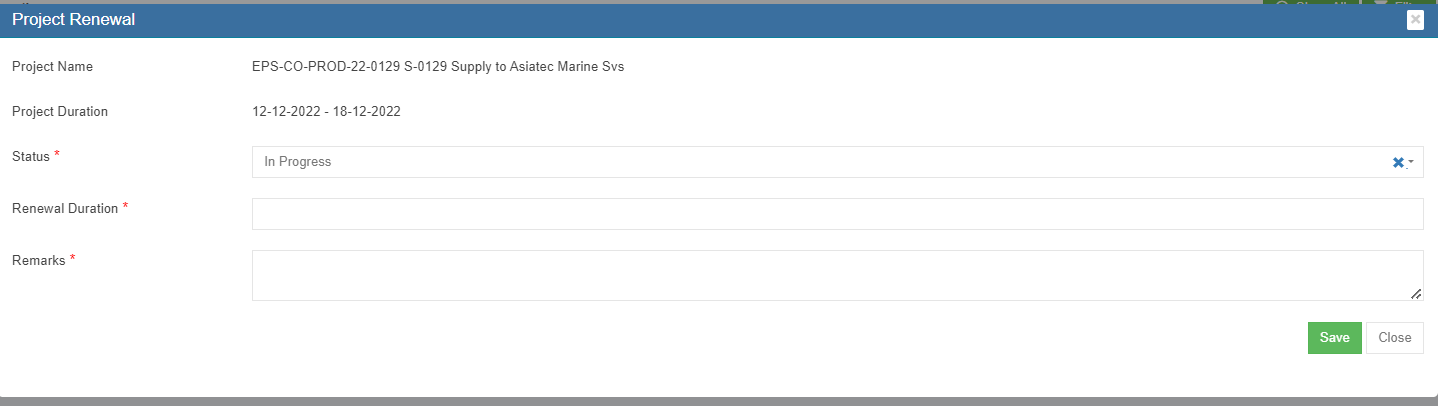
- Enter project renewal status, renewal duration, remarks etc..
- Click Save to save renewal updates.


Delete Project
Click  delete icon in the delete column, system will prompt confirmation notification. Click Yes to confirm deletion of a project.
Settings
OT Not Applicable for Project
In the project, when "OT Not Applicable for Project" setting is enabled with normal hrs, the system will display only normal hours in the time log without OT1 & OT2 hrs.
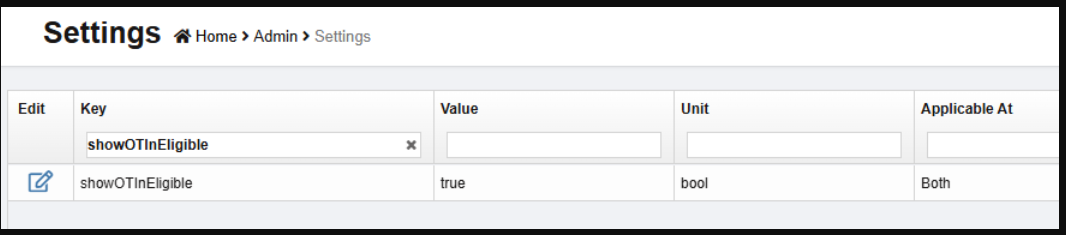
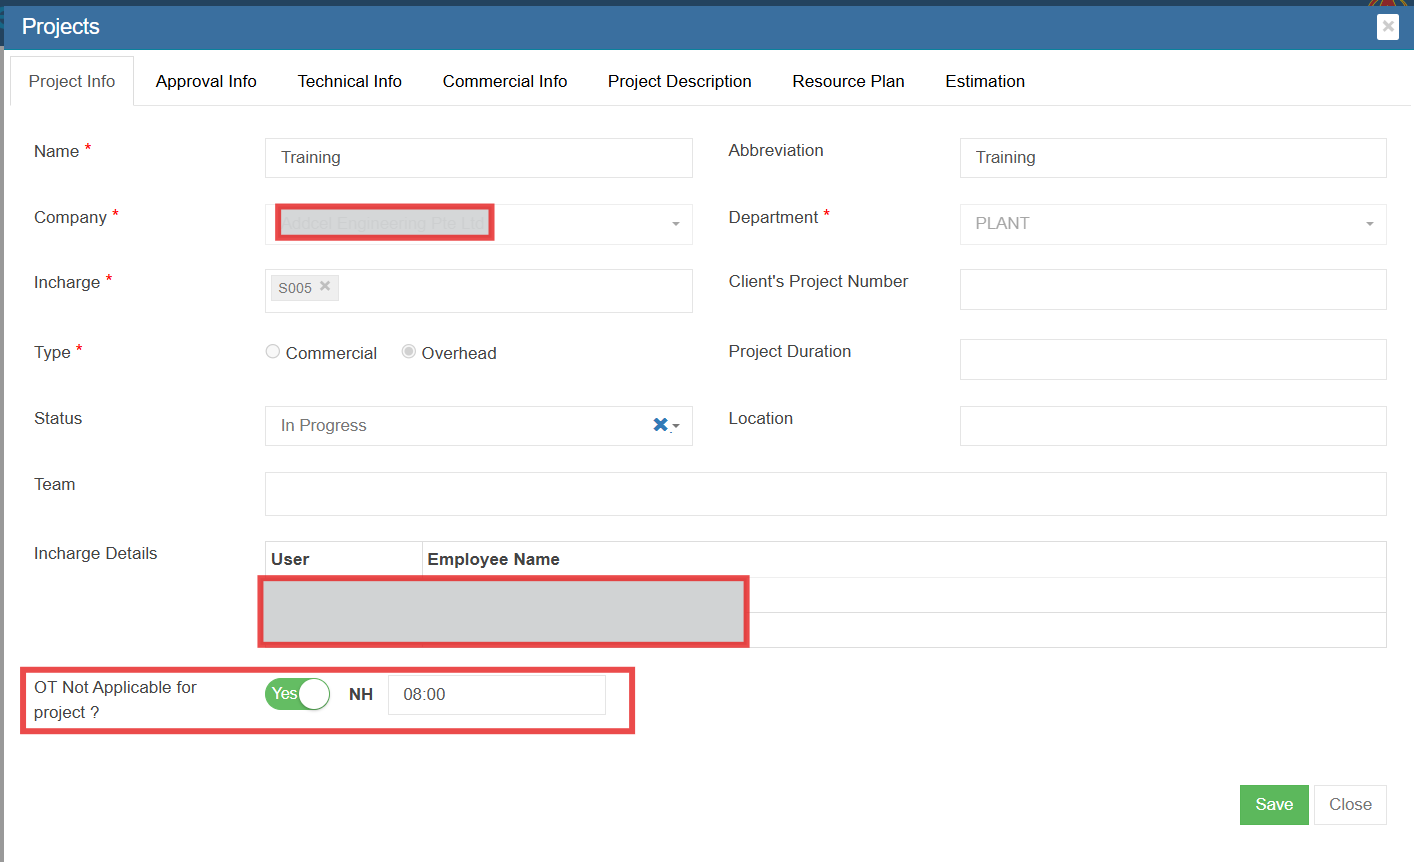
Note : If NH is 00:00, the system will use the actual NH calculation; otherwise, it will update the configured value.

Other View Options

-
Click
 icon to show active projects.
 -
Click
 icon to show column filters.
 - Click
 icon to export project list to excel file.
No Comments