
Leave Management
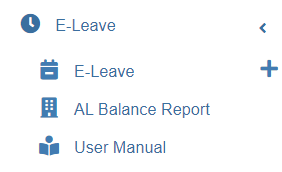
E-leave Module
The E-Leave module in the cuteOffice is a simple portal for employees to self-manage their leave efficiently and E-leave module provides insights for human resource department to monitor the leave, manage human resource planning and it is integrated with payroll calculations. Additionally, the time keepers can also apply for leave on behalf of their employees.
In cuteOffice, apply or cancel leave can be done using the cuteOffice Website or cuteOffice2a Mobile App.
Types of Leave
Depends on the employee, the list of leaves may be varied. Below are the leave types:
- Annual Leave
- Sick Leave (Non-Hospitalization)
- Sick Leave (Hospitalization)
- Maternity Leave
- Paternity Leave
- Childcare Leave
- Extended Childcare Leave
- Infant Care Leave
- Compassionate Leave
- National Service Leave
- Shared Parental Leave
- Unpaid Leave
- Birthday Leave
- Public Holiday Off-in-Lieu
- Normal Off-in-Lieu
- Overtime Off-in-Lieu
The leave types will be available based on the employees HRM profile (in HRM leave particulars, personal particulars, kids details page etc.). E.g. if the employee is Male, they will not be entitled for Maternity Leave. Similarly the childcare leave will be available only if the employee has kids that fulfill Childcare leave eligibility and entitlement requirements: https://www.mom.gov.sg/employment-practices/leave/childcare-leave/eligibility-and-entitlement, etc..
https://www.mom.gov.sg/employment-practices/leave/paternity-leave
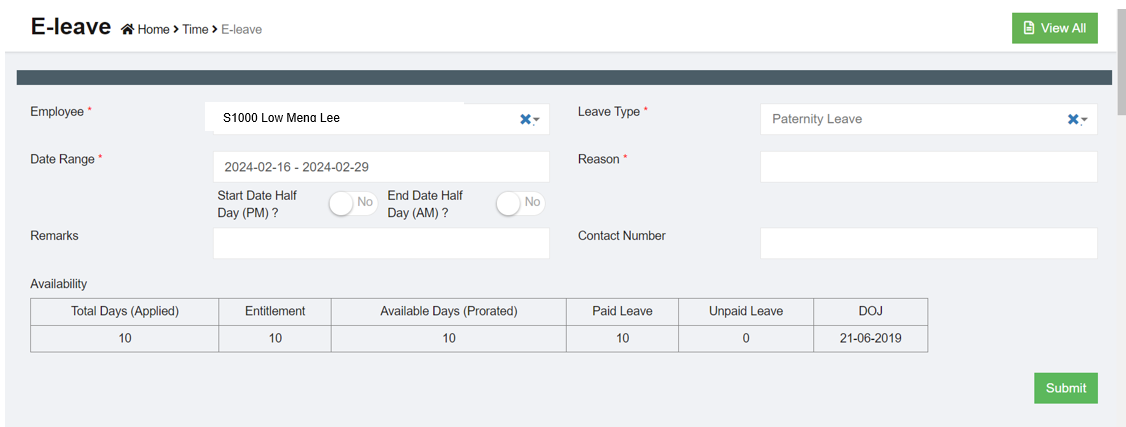
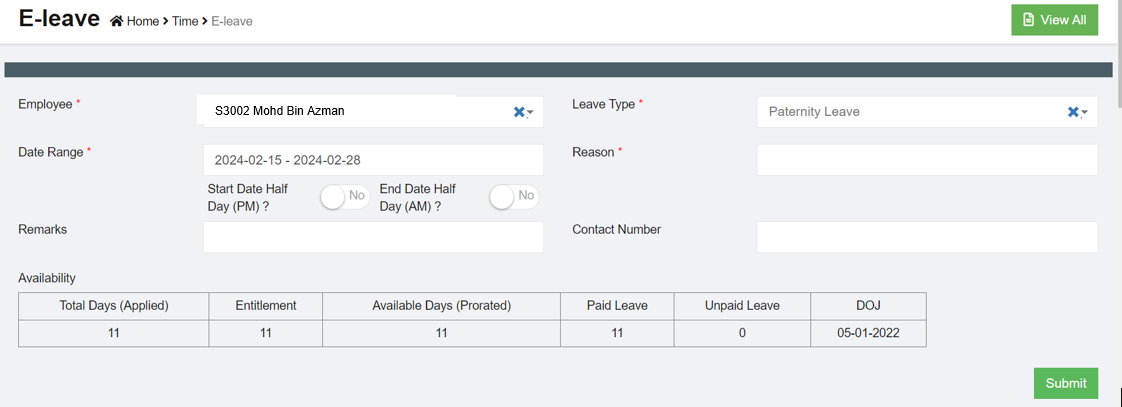
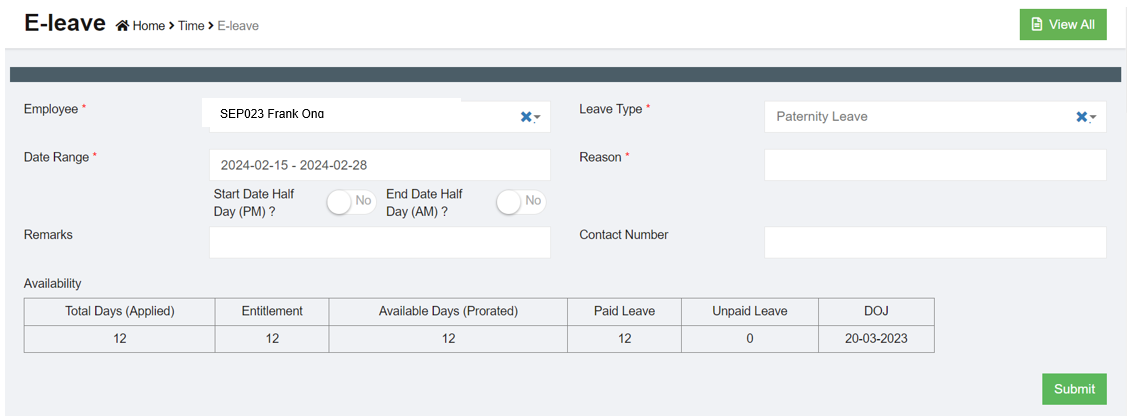
Employee who is eligible to 2 weeks paternity leave (company settings on paternity leave will be setup as 10 days), below demonstrated based on the employee’s HRM profile setup.
Employee on 5day work week.
Employee on 5.5day work week
Employee on 6day work week
Leave Calculation Period
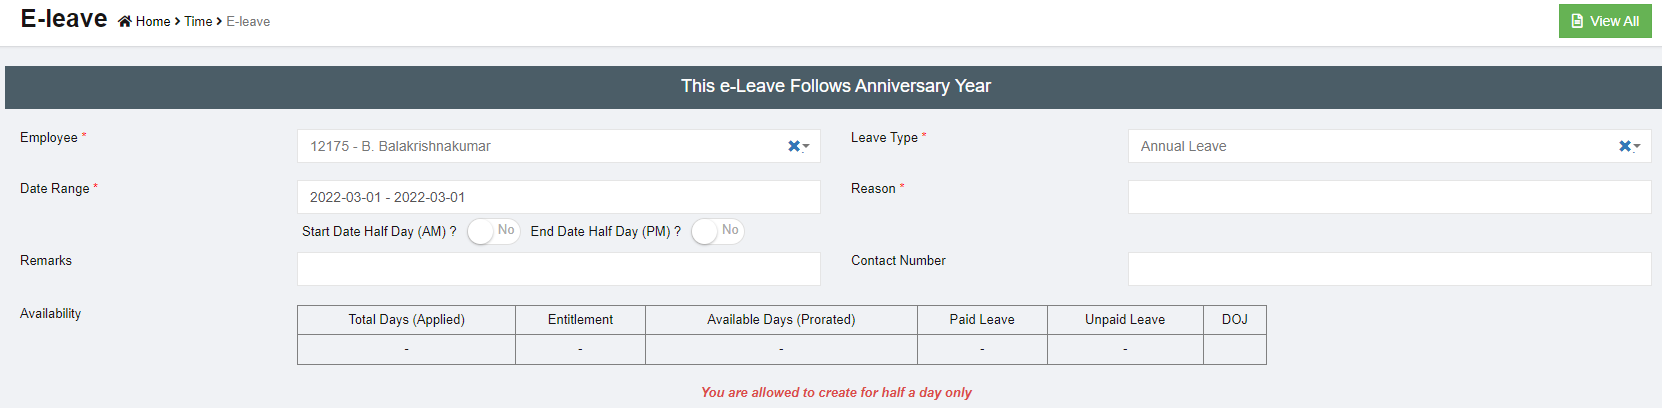
By Calendar Year: Some organizations calculate leaves following the calendar year which means all leaves will be computed from Jan to Dec for each year. The leave application form show as below:

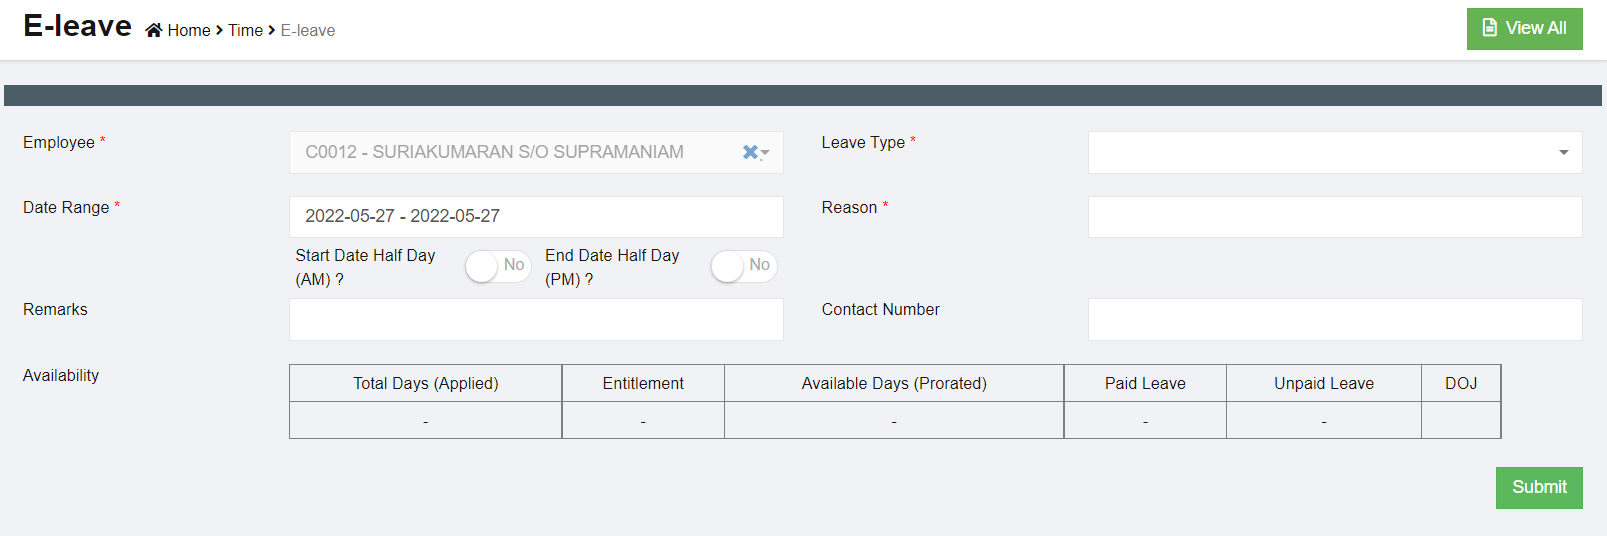
By Anniversary Year: Some organizations calculate leaves follow the anniversary year which means all leaves will be computed based on the date of join of each staff. The leave application form show as below:

Apply Leave
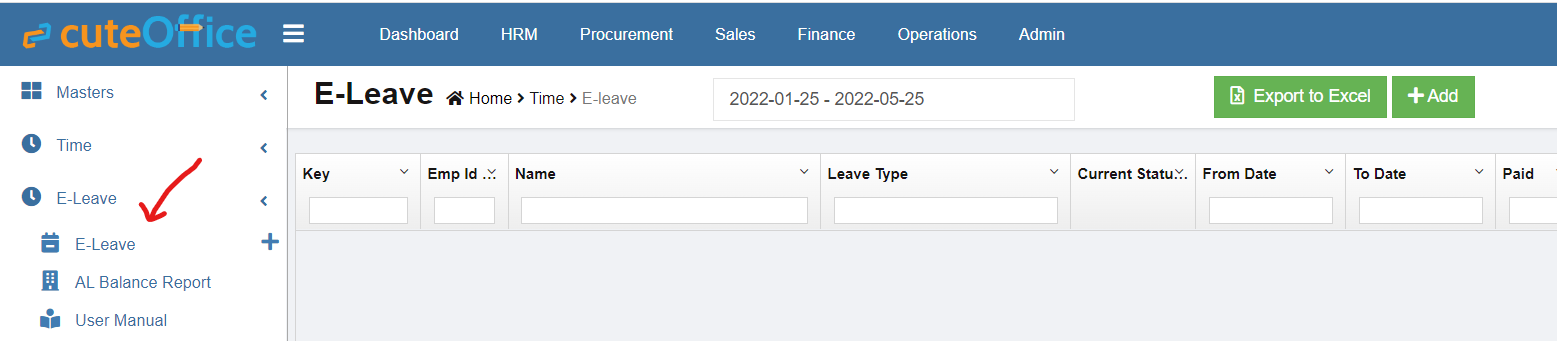
To apply leave,
- Click
 (Add button) in the E-Leave. A new page opens to add the leave.

- In the Employee box: if it's a general staff apply for his/her own leave, staff name will appear; if it's HR who can apply leave on behalf of other staff, the staff list will be available to choose based on permission and access.
- In the Leave Type box, select the leave type.
Note: If you are applying for unpaid leaves including the Public Holiday (PH) which is coming between the unpaid leaves, then the applied leave including that PH will be shown as unpaid in Timelog. If you split and apply the leaves as before PH and after PH, then the PH will not be shown as unpaid.
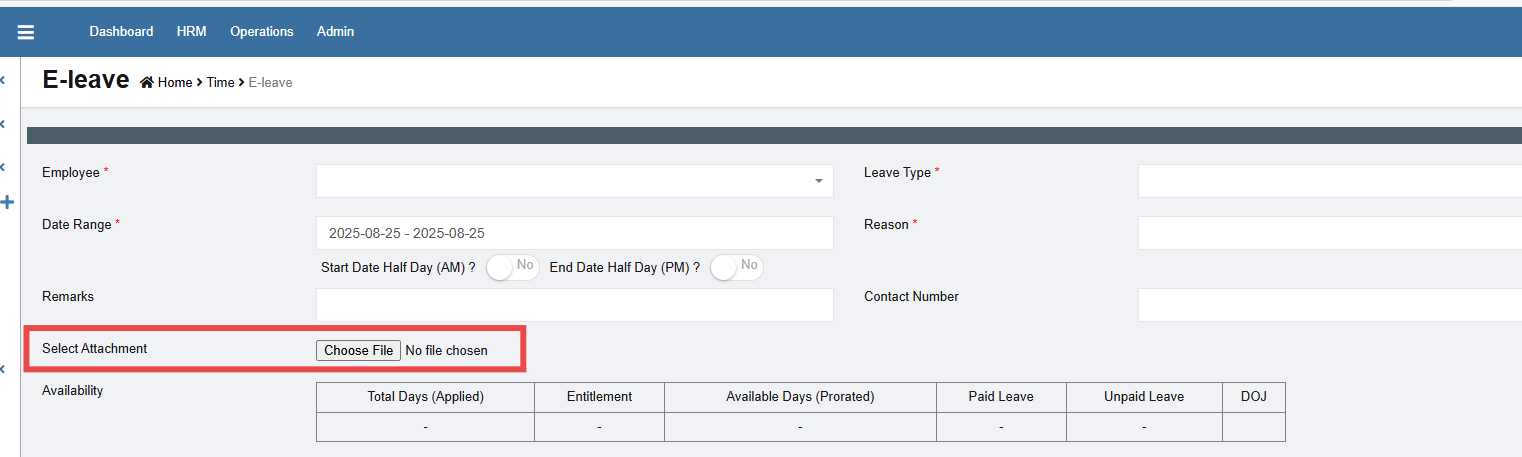
- In the Date Range box, select the leave from and to date range. Once you have selected the leave type and date range, the Availability field opens and shows the details of the leave entitlement and prorated available leave days, and whether the selected leave dates are paid or not.
Half Day Leave
If the user wants to apply for half day leave, click to enable the "Start Date Half Day (PM)" and End Date Half Day (AM) flags.

for example, in above screenshot, first option Start Date Half Day (PM) is enabled as Yes, it means that employee will start to take leave from afternoon on 2022-03-07.
Error Message: You are allowed to create half a day only
When a staff clock-in for a day in the morning and tried to apply for leave, the system will not allow to apply for full day leave. If we need to apply for full day leave, please delete the time log entry in the attendance system and then proceed to apply for leave.
- In the Reason box, enter the reason for the leave.
- In the Remarks box, enter your remarks optionally .
- In the Contact Number box, Enter contact number optionally if different from standard contact number (e.g. travelling overseas and getting a new number)
- Click Submit. The leave application will be added as new leave with a unique tracking number, and a notification for approval will be sent to supervisor.


Edit Leave Application before Approval
Employees can edit or cancel their leave application before approved by the authorized person. Authorized person who has been assigned with special permissions can edit the leave application before and/or after approval.
- Edit Leave Application
- Click
 (Edit button) in the Leave Details. The E-Leave window opens with the applied leave details.
- Edit the leave data where you want change.
- Click Save. The changed leave details will be updated in the Leave Details page.
- Cancel Leave Application
Employees can click the cancel button on the leave application detail page to cancel leave before it is approved by supervisors.

Leave Approval Process
E-leave module is integrated with timesheet and payroll modules, thus every leave application in the system must be processed (approve/reject/cancel) based on the company approval workflow setup to generate correct payroll. For Special Edit which allows user with assigned permission to edit leave after approval, time approver need to re-approve the timesheet again a special edit was done on any of the leave in approved timesheet.
Approve E-Leave
To approve the applied leave,
- Click
 (Approve button) in the Leave Details. The E-Leave approve box opens.
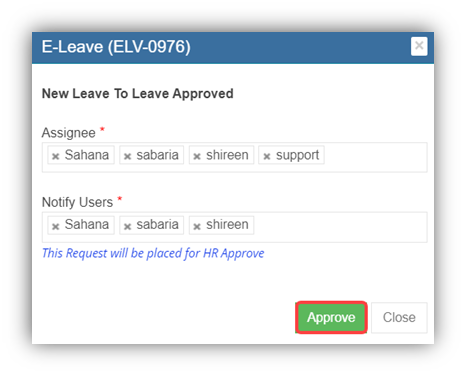
- Click Approve to approve the E-leave. The status of the leave will be changed to “Leave Approved”.
Reject E-Leave
To reject the applied leave,
- Click
 (Reject button) in the Leave Details. The E-Leave reject box opens.
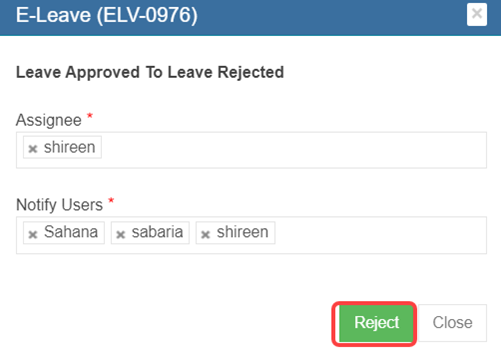
- Click Reject to approve the E-leave. The status of the leave will be changed to “Cancelled”.
Special Edit
The Special Edit option can be used to add the payment details of the applied leave. To add the payment details,
- Click
 (Special Edit button) in the Leave Details. A new window opens and shows the list of applied leaves.
Note: Before adding the paid status details, read the important note given in the box. If timesheet with leave application had been approved, then a special edit was done on any of the leave approved in timesheet, time approver need to re-approve the timesheet again.
- If the applied leave comes under the paid leave means, enable Yes in the Is Paid
- If the applied leave comes under the unpaid leave means, enable No in the Is Paid.
- Click Update.
Leave Configuration By HR
In HRM system, HR need to set annual leave eligibility for each employee. For rest of the leave types, system will configure accordingly to follow the Ministry of Manpower (MOM) rules.
Set annual leave eligibility in HRM leave eligibility page
In the Employee Leave Details page, you can add the annual leave entitlement details of the employee.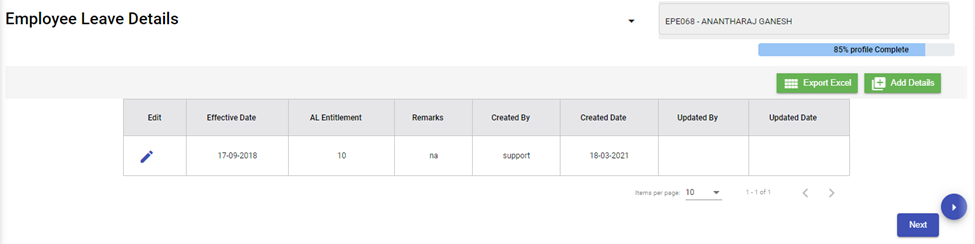
- Click (Add button) in the Employee Leave Details. The Leave Details window opens.
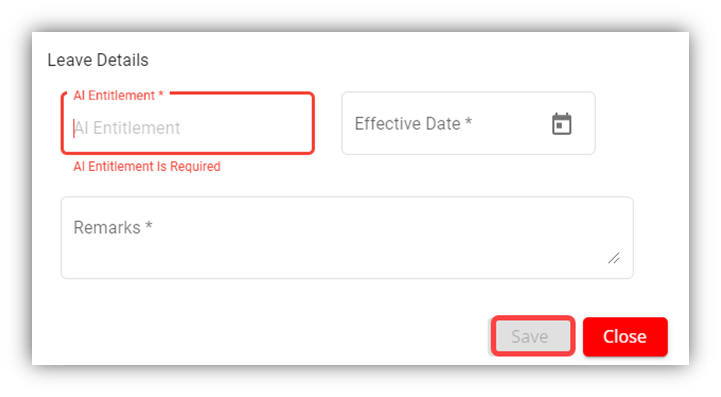
- In the AL Entitlement box, enter the number of annual leave.
- In the Effective Date box, select the effective date of the annual leave.
- In the Remarks box, enter your remarks if any.
- Click Save.
- Click Next. The Key Employment Report page opens.
Annual Leave Configuration
The Annual Leave Configuration tab in the HRM Master menu used to configure the carry forward leaves of the employee from previous year.
- Enable Global settings "checkAVLconfig" as true.

- Enable permission for the user to add available balance leave for the employees.
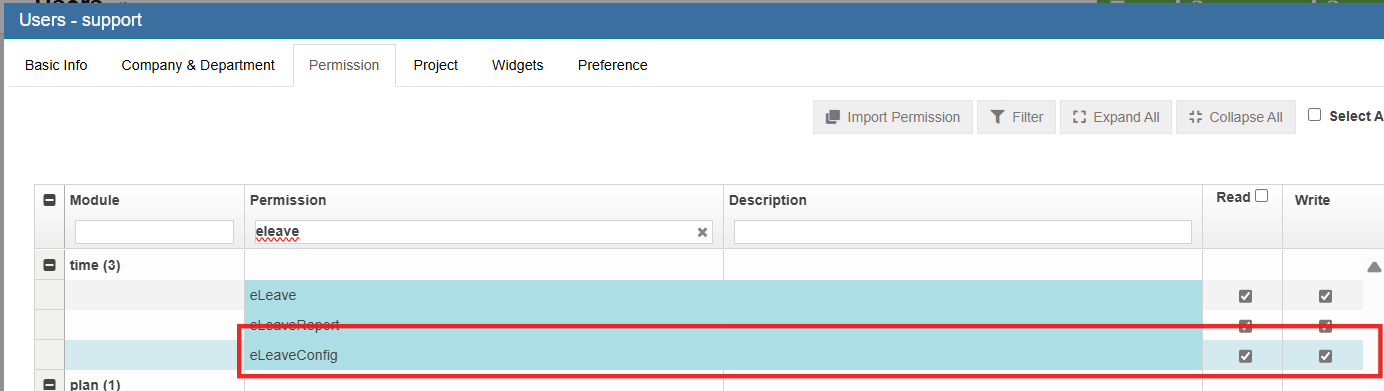

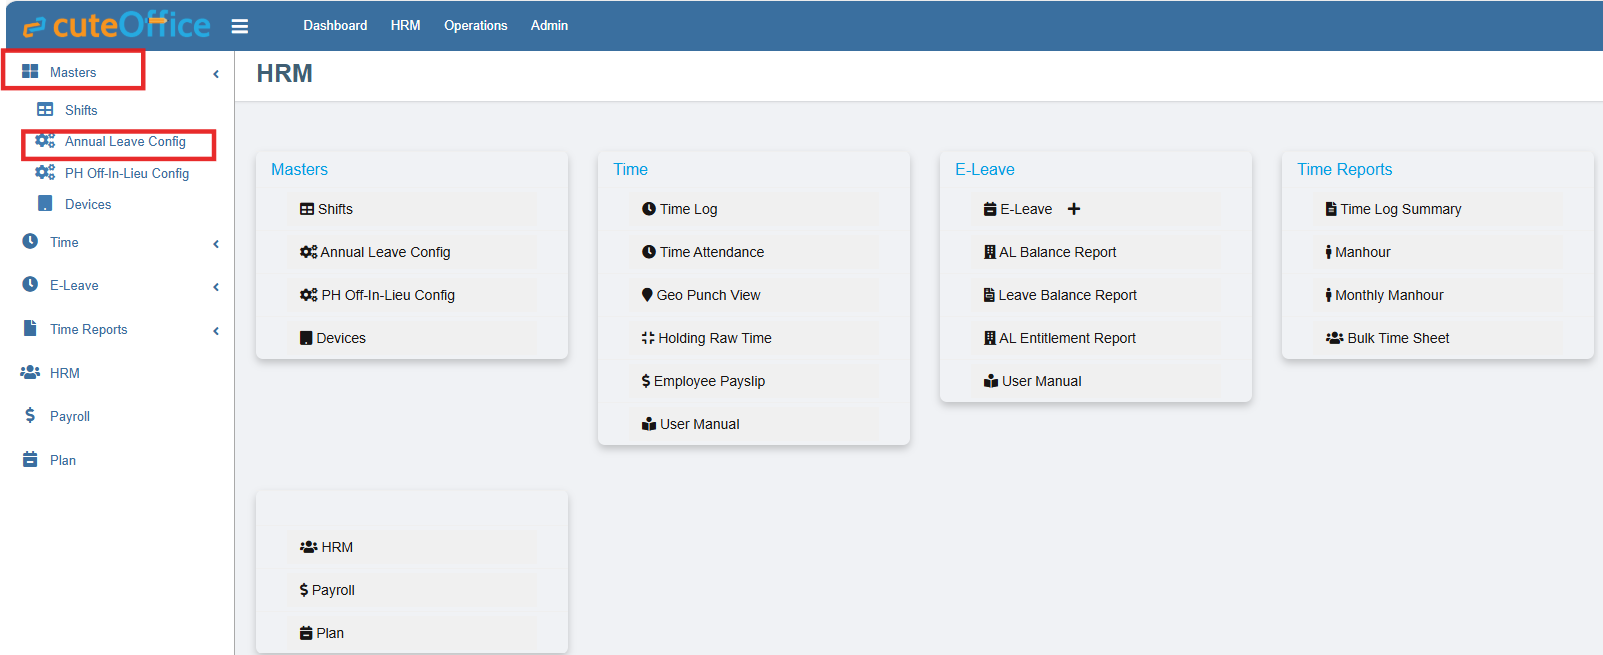
Click Annual Leave Configuration. The Annual Leave Configuration page opens.
Audit – The ![]() (Eye icon) provided in the Audit column used to track edits done in the annual leave configuration of the particular employee.
(Eye icon) provided in the Audit column used to track edits done in the annual leave configuration of the particular employee.
- Add the Carry Forward Leave Details
- Click (Add button) provided in the upper right-corner of the Annual Leave Configuration. The Edit Leave Configuration window opens.
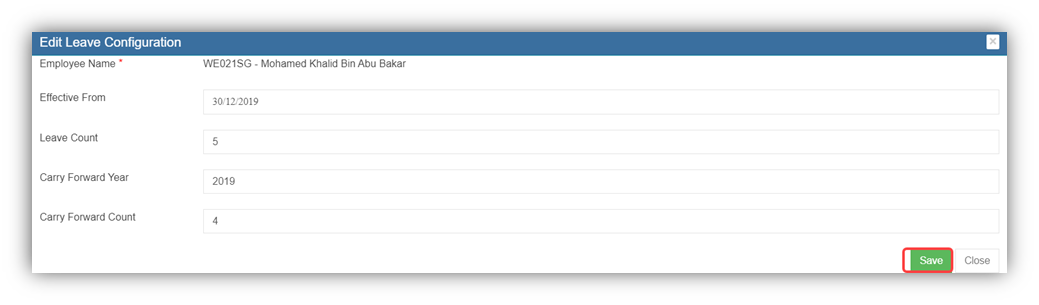
- In the Employee Name box, select an employee from a drop-down list.
- In the Effective From box, select an effective date.
- In the Leave Count box, enter the leave count.
- In the Carry Forward Year box, select the carry forward year from the list of years.
- In the Carry Forward Count box, enter the carry forward count days from the previous year.
- Click Save. The carry forward count will be added and listed in the Annual Leave Configuration page.
- Edit the Carry Forward Leave Details
If you want to edit any added carry forward leave count details in the Annual Leave Configuration page, do the following,
- Click
 (Edit icon) in the Edit column for the respective project. The Edit Leave Configuration window opens to edit the added details.
- Click any box where you want to edit the details, and then edit the details in the respective box in the window.
- Click Save.
- Delete the Carry Forward Leave Details
If you want to delete any added carry forward leave details, you can use (Delete icon) provided in the Delete column of the Annual Leave Configuration page.
- Click
 (Delete icon) for the corresponding carry forward leave details. You receive a notification message “Are you sure to delete a record?”.
- Click Yes to confirm deletion.
- Filter Any Carry Forward Leave Details
If you want to filter the carry forward leave details of any specific employee, do the following steps,
- Click (Filter button) located on the Annual Leave Configuration. Once you clicked the Filter button, the filter box opens for the various columns in the page.
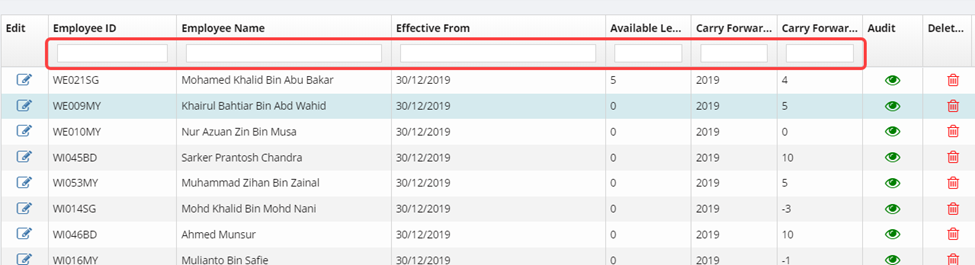
- Enter relevant detail in the respective column’s filter box to filter any particular employee’s details.
- Export the Carry Forward Leave Details
You can export the added carry forward leave details in the Annual Leave Configuration page in both the pdf and excel formats.
- If you want to export the added carry forward leave details in the pdf format, click
 (Export to PDF button).
The added carry forward leave details will be downloaded as a pdf file.
- If you want to export the added carry forward leave details in the excel format, click
 (Export to CSV button).
The added carry forward leave details will be downloaded as an excel file.
Note: Use import https://xxxxxx.cuteoffice.net/#/alMigration for Annual Leave configuration
Public Holiday Off-in-Lieu Configuration
If a public holiday falls on a non-working day, you are entitled to another day off by configuring off-in-lieu in HRM Master menu and for each employee under official information page.
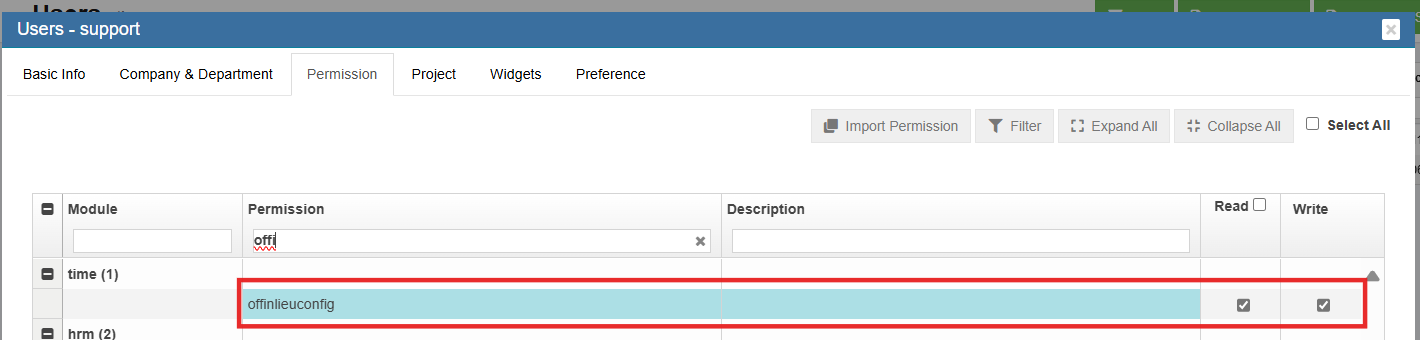
- Enable showOffInLieuPH permission under Global setting. "showOffInLieuPH"

- Enable OffinLieu Permission in role for the users

- Click HRM and Master menu.
- Click PH Off-in-lieu Configuration
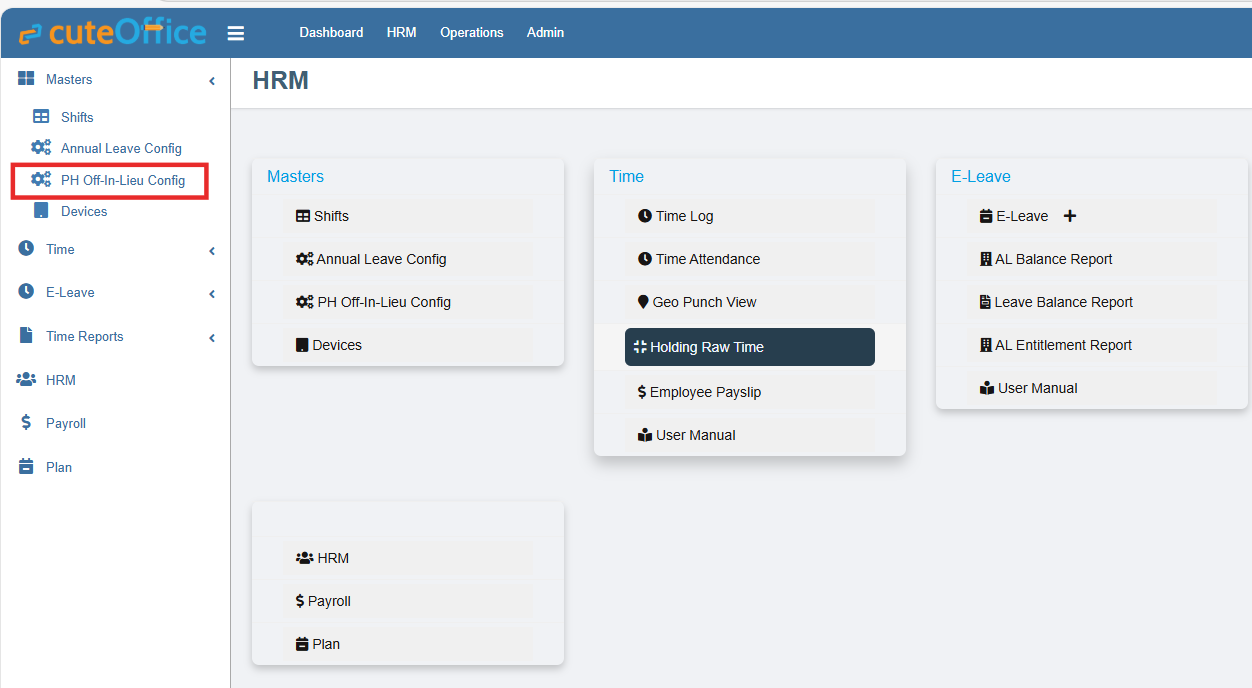

- Click Add
- Enter Off-in-Lieu date and Expiry date
- Click HRM and View all employees menu
- Click Employee and go to official information page
- Enable Off-in-lieu check box

- User/employees can apply off-in-lieu leave under Eleave Module.


Normal Off-in-Lieu Configuration
If an employee worked on Rest Day, the employee is eligible for Off-in-Lieu leave. By default, it is an unpaid leave. Using "Special Edit", HR user can change to paid leave.
- Set "showOffinlieu" flag to true

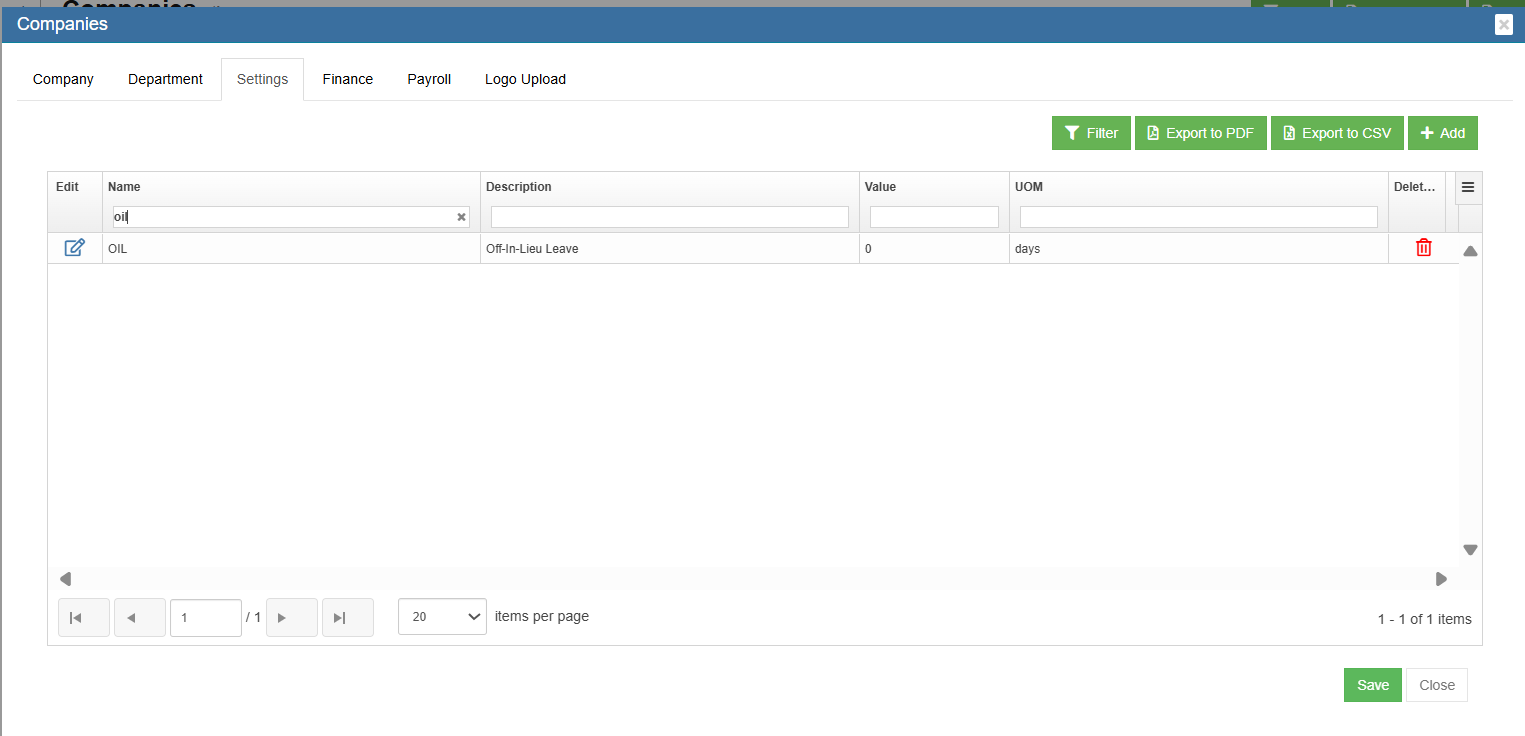
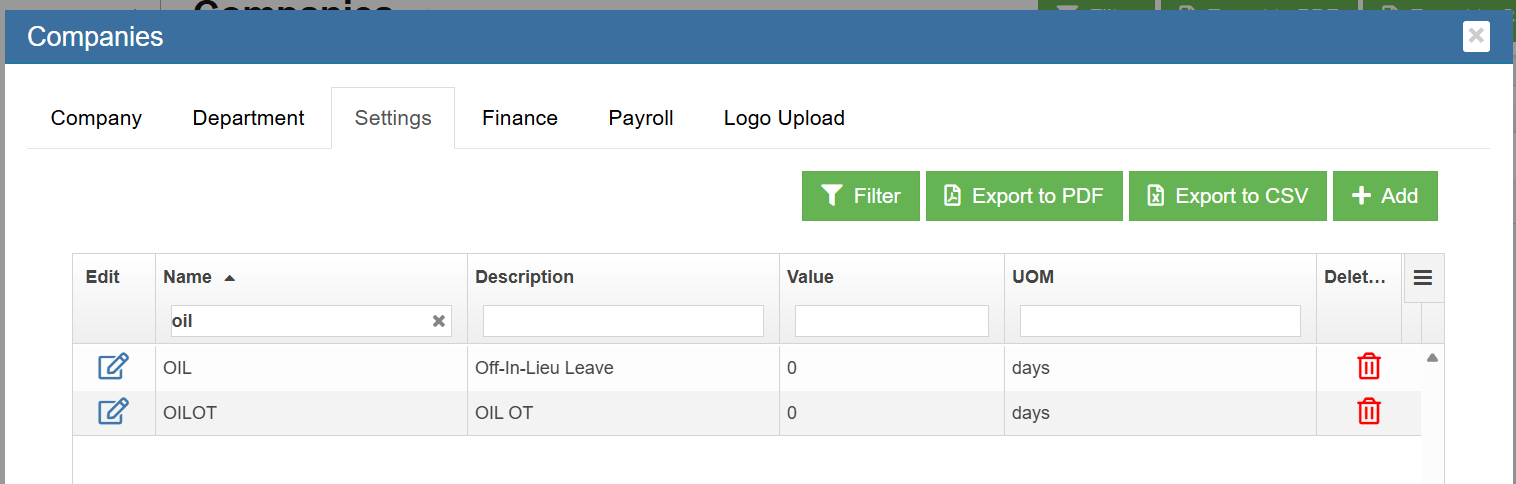
- Add Off-in-Lieu settings under company

- Save the settings with zero value.
- Apply Off-in-lieu leave under e-leave module for an employee
- By default, it is considered as unpaid leave.
- Click Submit.
- HR user can change to paid leave using special edit.


Overtime (OT) Off-in-Lieu Configuration
- Enable global settings
- tlShowOILForOT2 - Show OIL option in timelog (action button)

- tlMinHrsOILFullForOT2 - Min OT hours for 1 day OIL

- showOffinlieuOT - New leave type

- Add "OILOT" with entitlement under company settings.
- tlShowOILForOT2 - Show OIL option in timelog (action button)
- Select the Rest Day/Public Holiday
• If an employee has worked 8 hours (current configuration 8 hours) or more, the tick button will be enabled under the “Action” column. - Initiate OIL Request
• Click the tick button for OT entries that meet the eligibility criteria of 8 hours or more.
• A popup window will open. - Select Off-in-Lieu Option
• In the popup window, choose the “Off-in-Lieu” option.
• The system will automatically fetch the eligible days and proceed to create the OIL days. (Refer to Image 2) - Verify the Created Record
• Once the record is created:
(a) The OT2 and Total columns values will be empty.
(b) The Remarks column will display “Rest Day – OIL”. (Refer to Image 3) Image 1
Image 2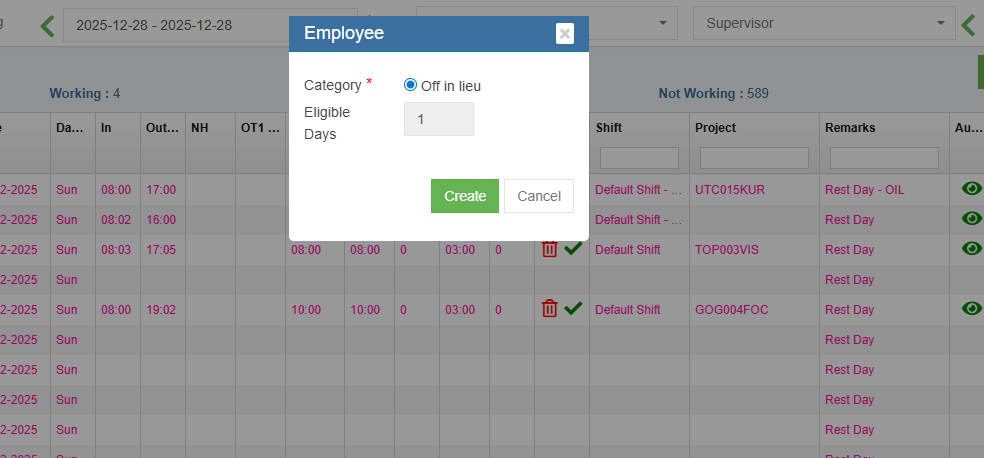
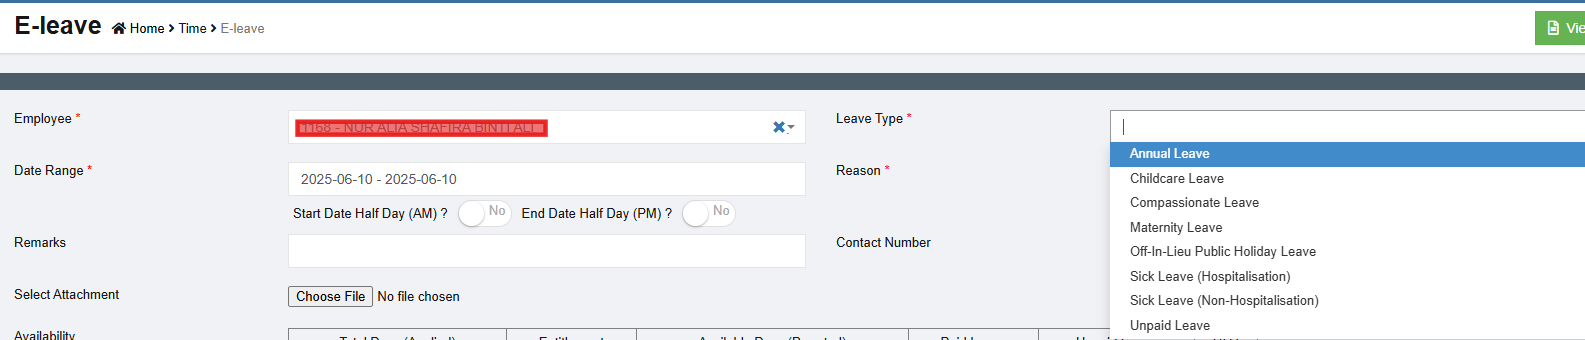
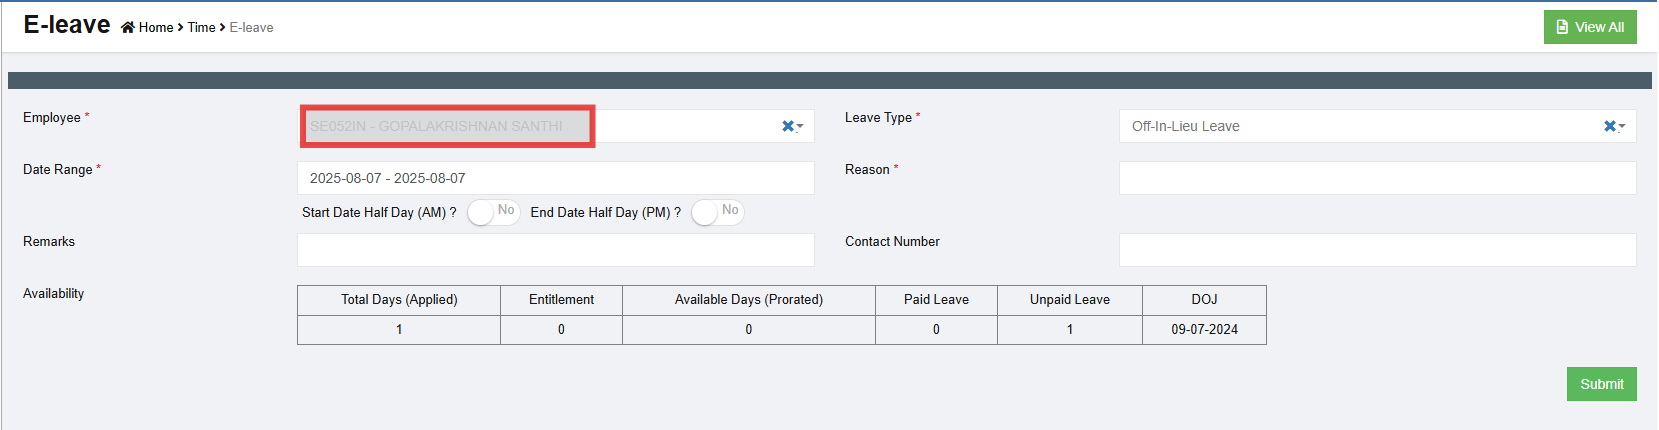
- Applying Off-in-Lieu (OIL) Leave
• Navigate to the eLeave Apply screen to apply for leave.
• Choose the leave type “Off-in-Lieu (OT)”.
• While apply, you can verify that the employee has been granted paid OIL leave. (Refer to Image 4)
- Viewing OT Date in Leave Summary
• On the Leave Summary page, you can view the actual time log OT date for the employee. - Viewing Off-in-Lieu (OIL) Records and Balances
• Navigate to E-Leave → Off-in-Lieu (OT) Menu to view:
o OIL records for all employees
o Leave balance details (Refer to Image 6)
Note – Time-Log Amendments
• When attempting to recalculate, edit, or delete time log entries, the system will validate the record.
o If leave has already been applied, no changes can be made. (Refer to Image 7)
• To amend OT data in the time log, the applied OIL leave must first be cancelled or rejected. -
New OIL report menu permissions
time -> oilOT
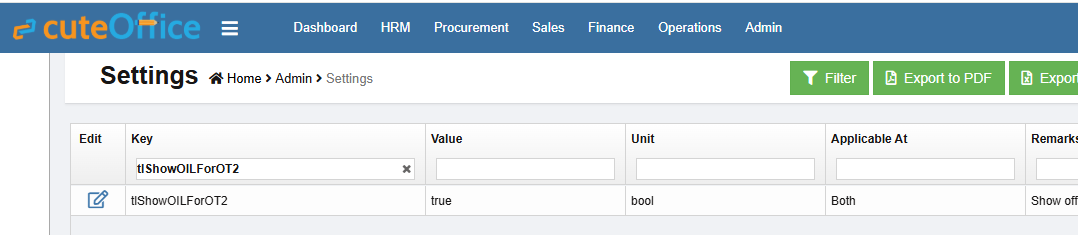


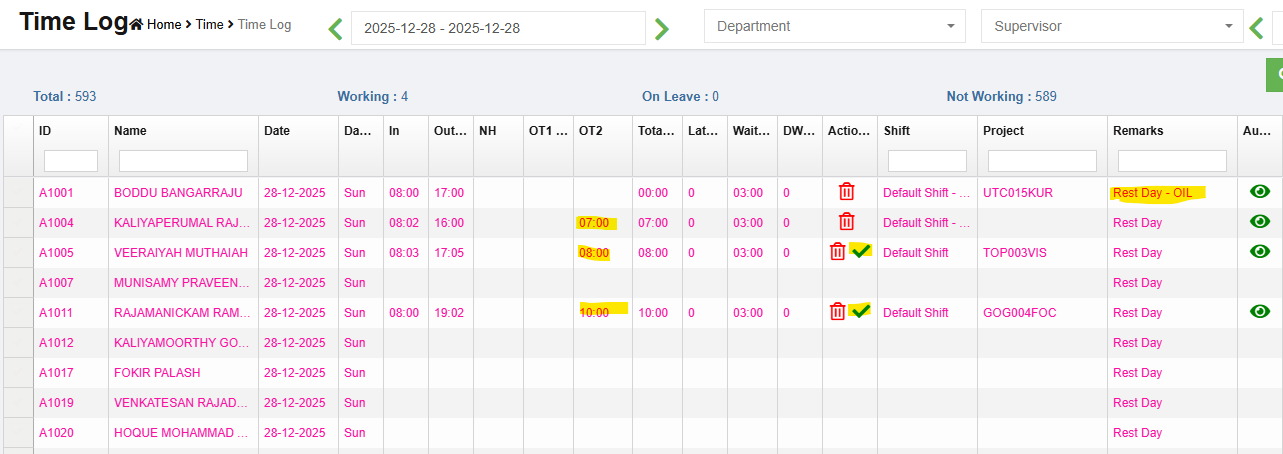 Image 1
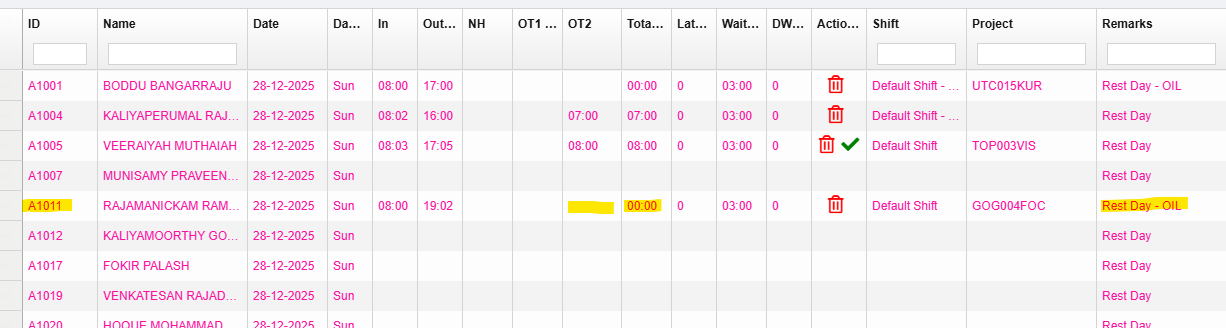 Image 3
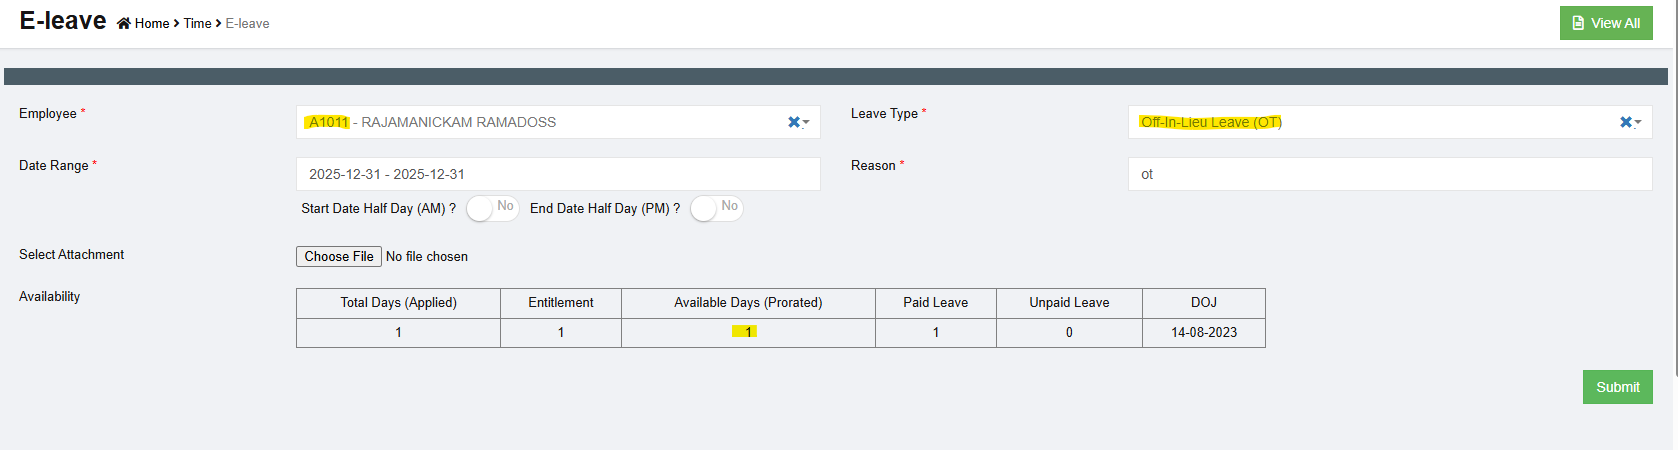
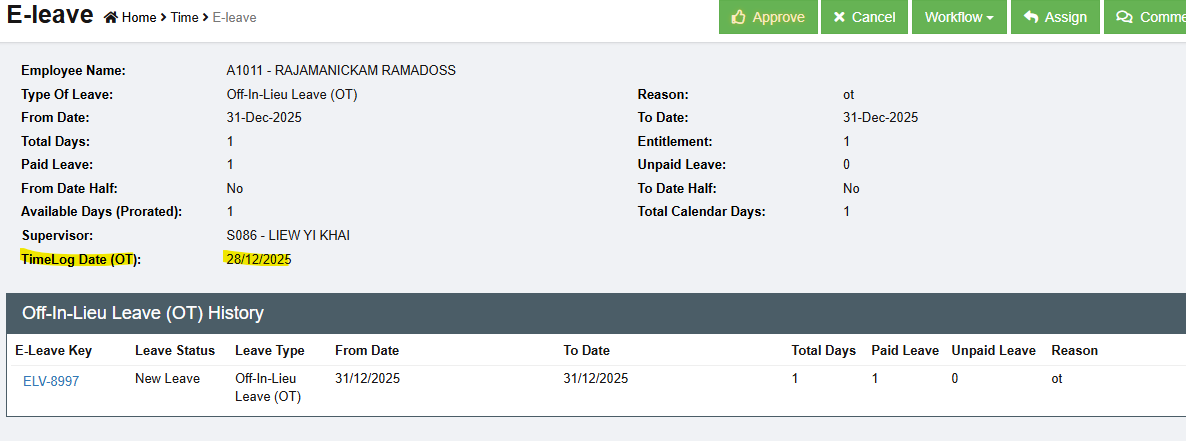 Image 5
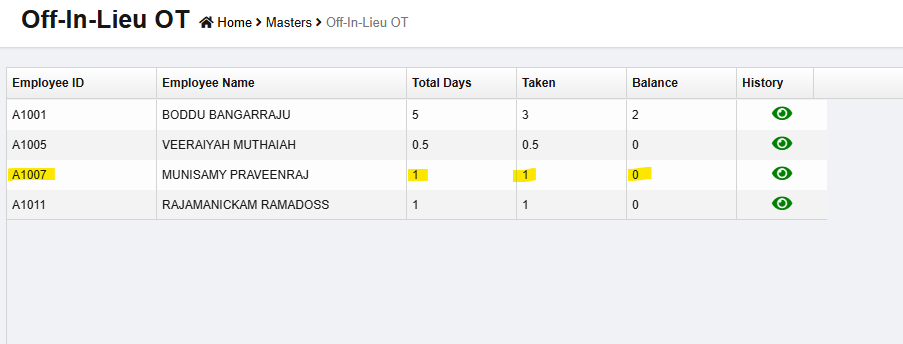
 Image 6
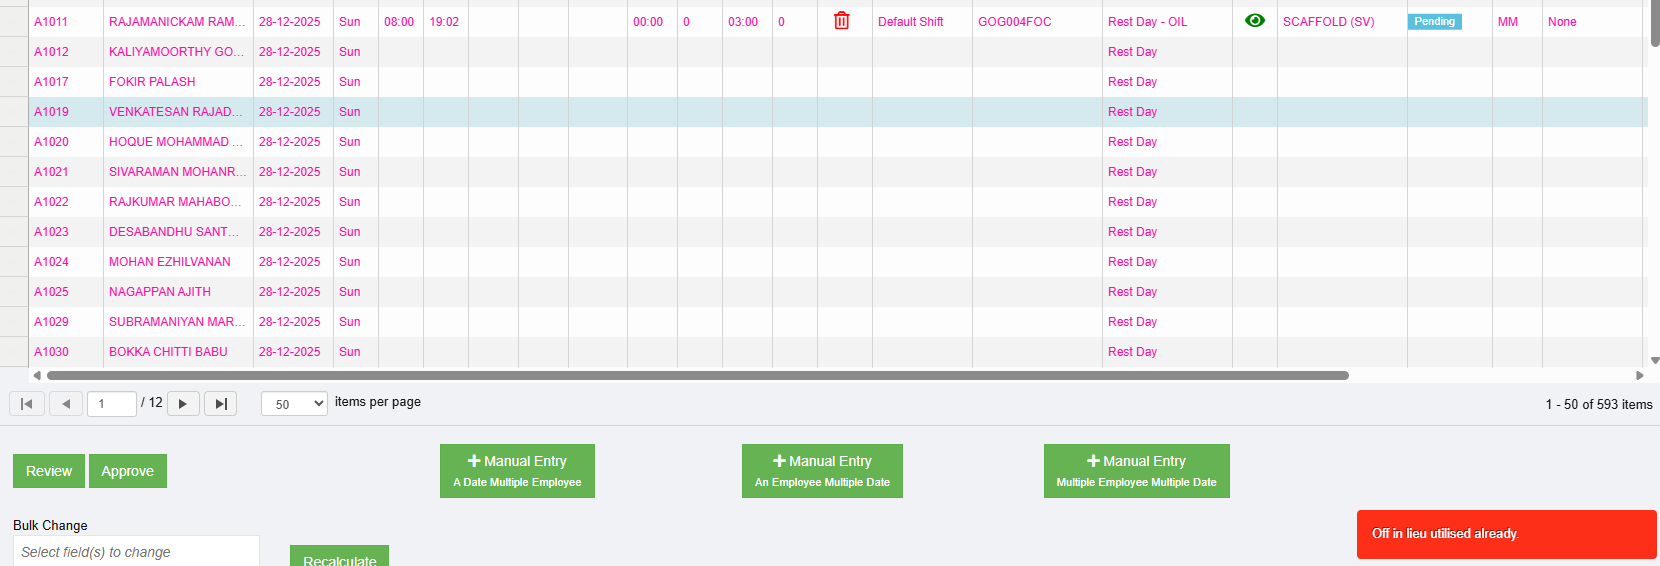 Image 7
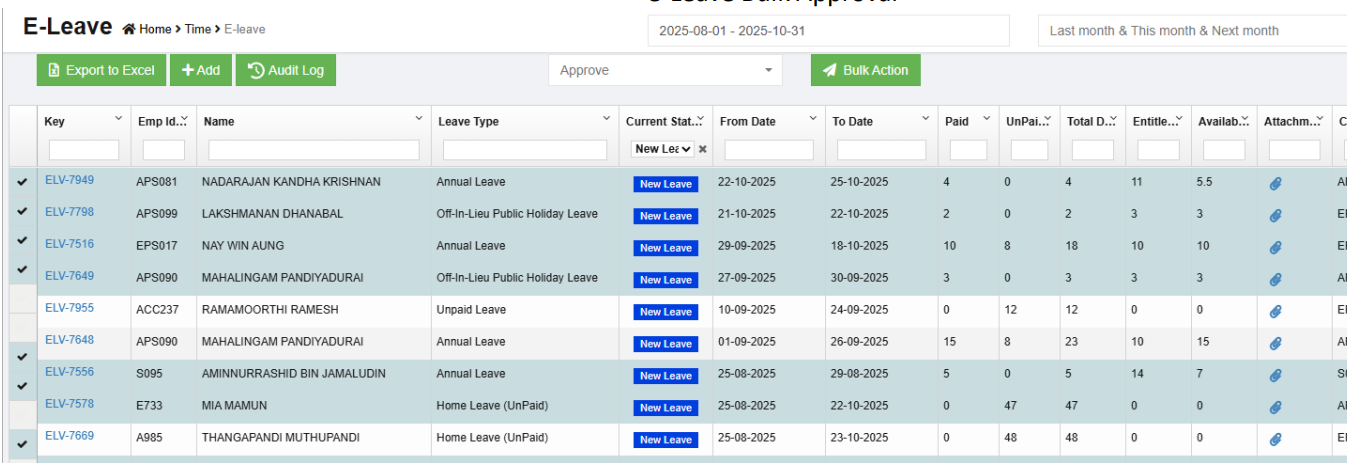
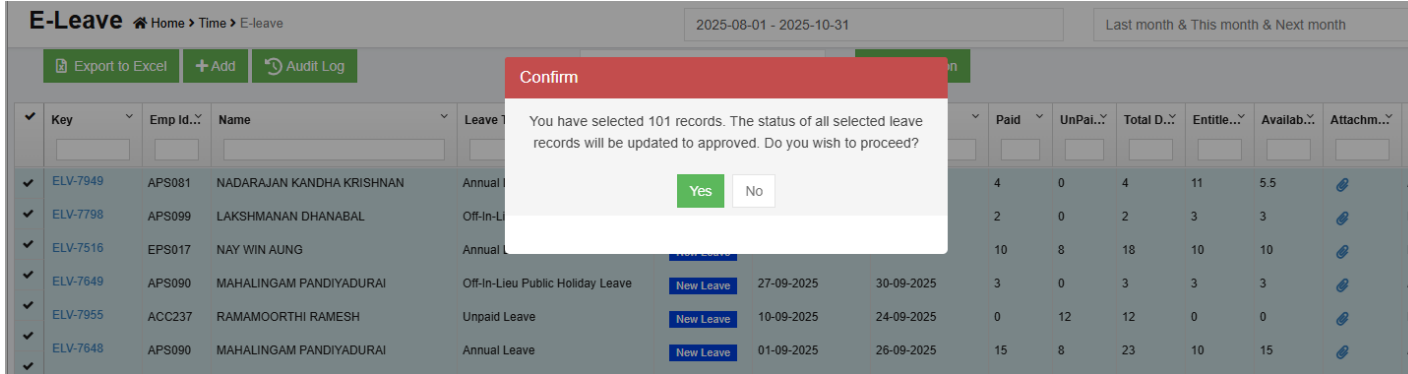
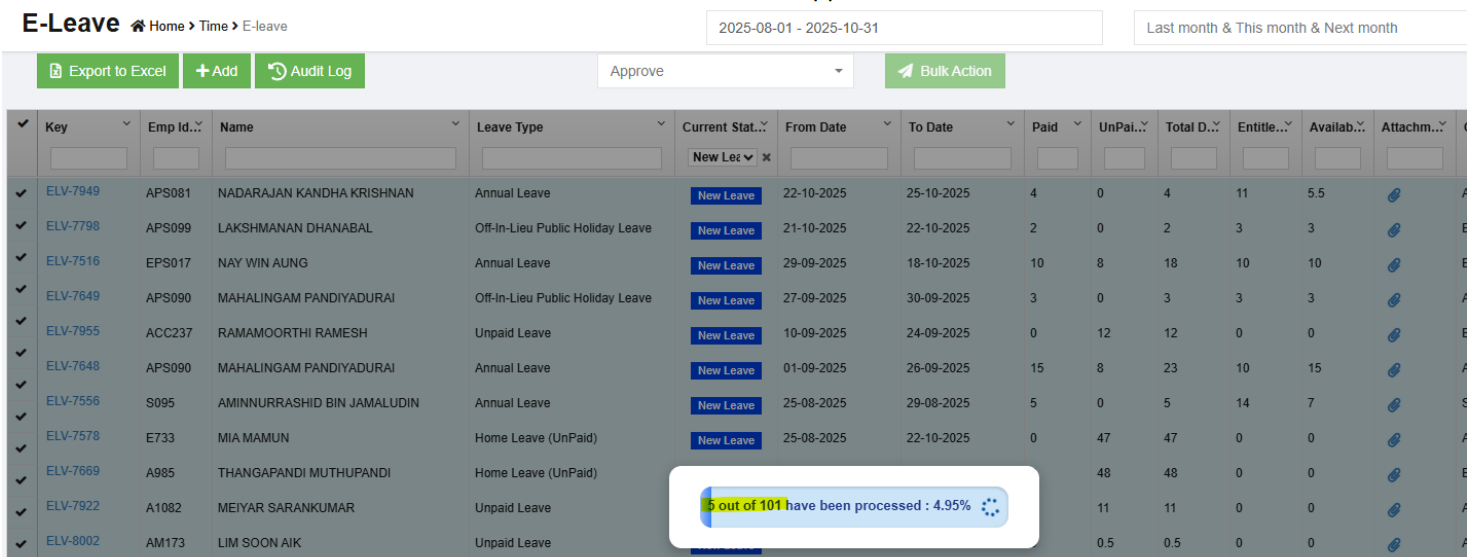
Bulk Leave Approval
System allows user to use bulk leave approval at E-Leave viewall page once user has the bulkApprove permission. MC attachments and information on employee's remaining entitlement for sick leave, hospitalisation leave, AL, off-in-lieu, childcare leave now available to users at a glance without having to click into each specific leave type. MC attachments are available for viewing instead of downloading at the E-Leave viewall page.
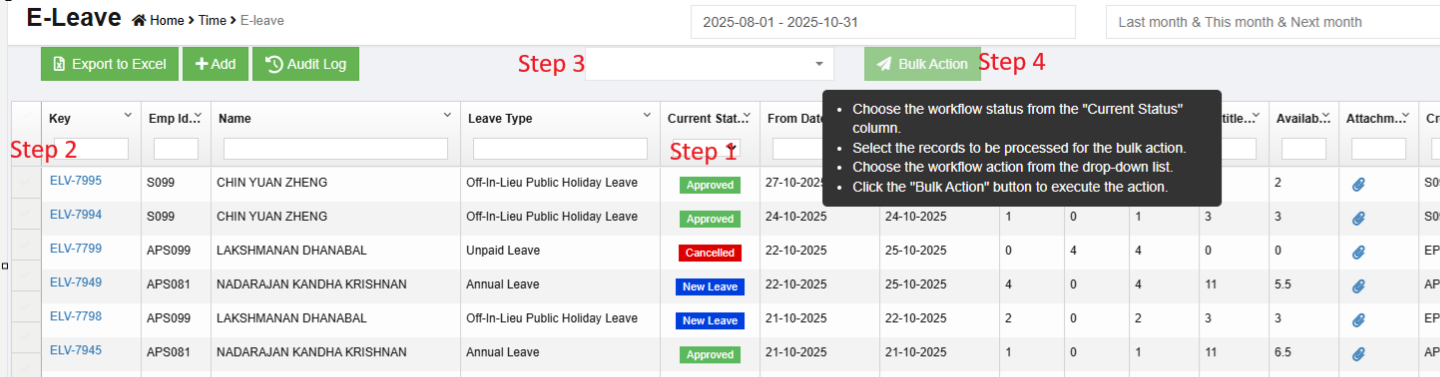
NOTE: If you use the cursor to mouse over this ![]() button, system will display the steps on the screen to user on how to use the bulk leave approval.
button, system will display the steps on the screen to user on how to use the bulk leave approval.

STEPS:
1. Choose the workflow status from the "Current Status" column.
2. Select the records to be processed for the bulk action.
3. Choose the workflow action from the drop-down list.
4. Click the "Bulk Action" button to execute the action.
To view attachment of leave records, click on this ![]() icon and system will display the attachment history window for user to preview the attachment.
icon and system will display the attachment history window for user to preview the attachment.


Leave Reports
The below are the reports available in cuteOffice
E-Leave Report
E-Leave report can be accessed from the E-Leave menu only by the authorized users.

- In date filter (see above screenshot the yellow highlighted field), select a date range to view all leaves taken within the period selected.
- Select data in other filters such as leave type, current application status etc. if required.
- The leave applications that fulfill above step 1&2 filters will show in E-leave page.
- Click
 (Export to Excel icon) to export to excel report.
AL Balance Report
AL Balance report can be accessed from the E-Leave menu only by the authorized users
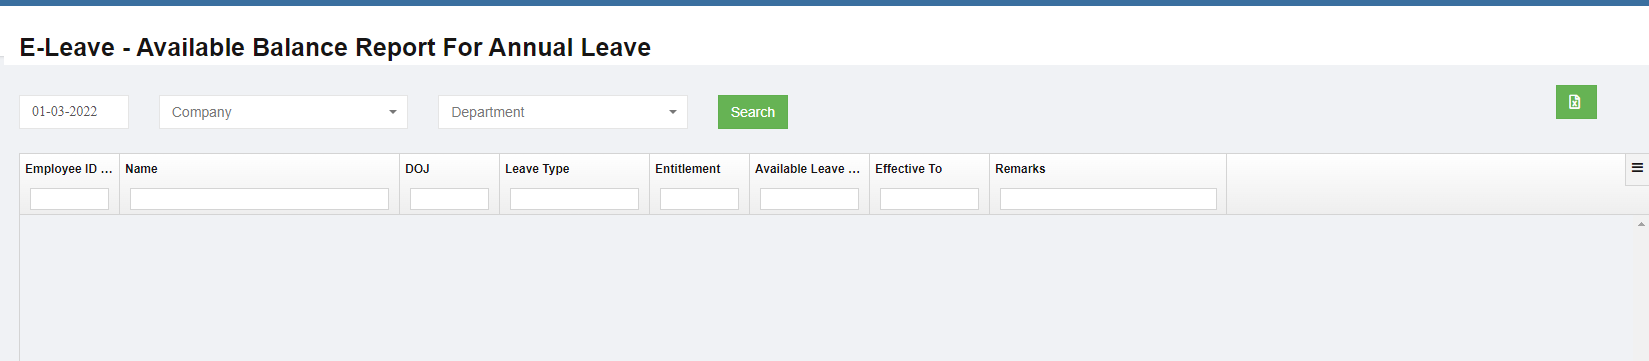
- In the date field, select the as of date to view leave balance.
- In company and department apply filter if any.
- Click search,
The report shows the following details,
- Employee Id and name
- Date of Joining
- Type of Leave
- Leave entitlement
- No of available leaves including the annual leave effective to details
- Remarks
- Click
 (Export to Excel icon),the report can be exported to Excel.
Settings
Pro-rated Annual Leave Adjustment rules
Pro-rated annual leave allocation can calculate either at the end of month or the start of a new month.
By default, system will calculate prorated leave balance based on start of new month.
To calculate prorated annual leave based on completed months, enable global settings "alLeaveCompletedMonthsOnly" by setting it to true.
Leave Attachment
Enable the flag " leaveShowAttachment" under global settings to attach file while applying leave.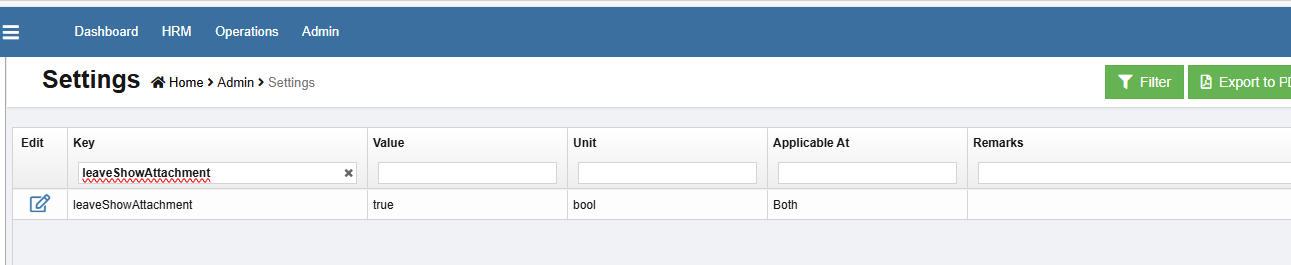
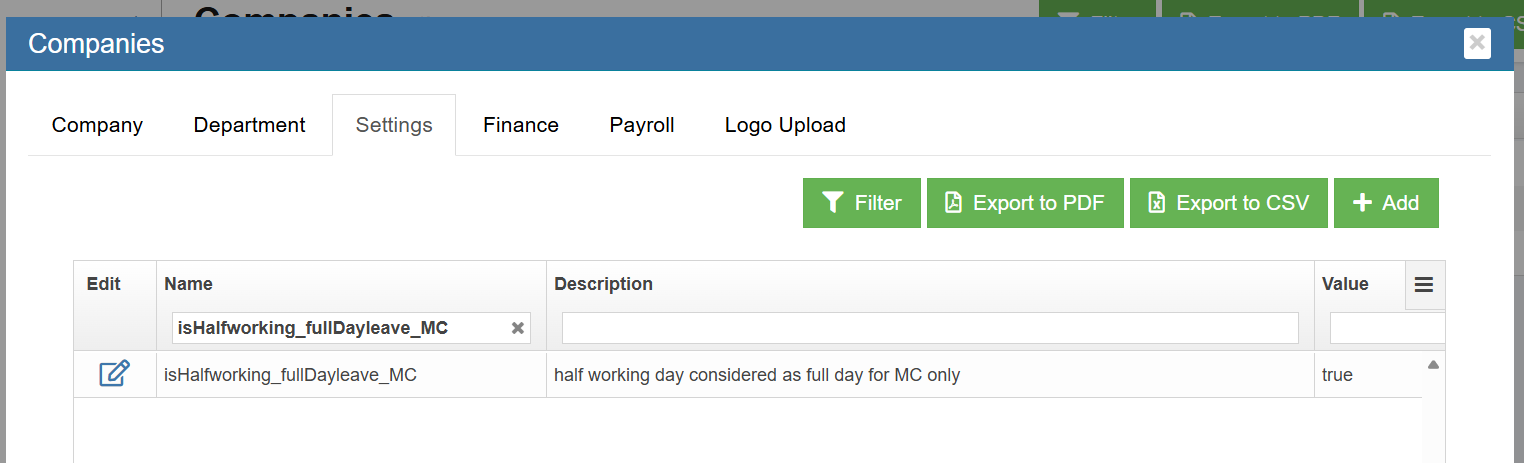
Half working day Sick Leave (MC) consider as Full day Sick Leave
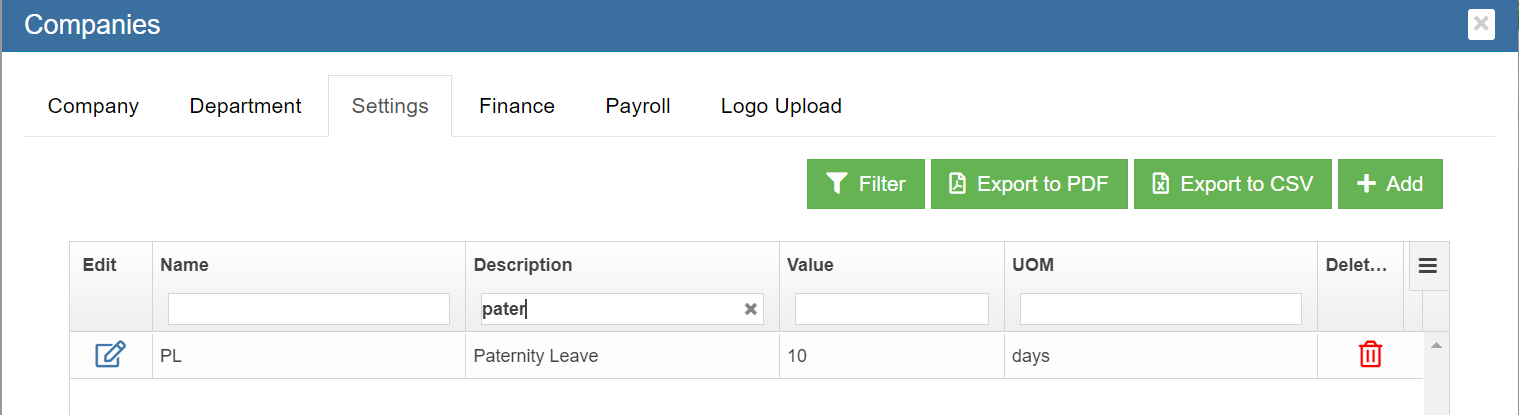
- Click Company
- Click Settings
- Add "isHalfworking_fullDayleave_MC" and make the Value "true"
- Save the record
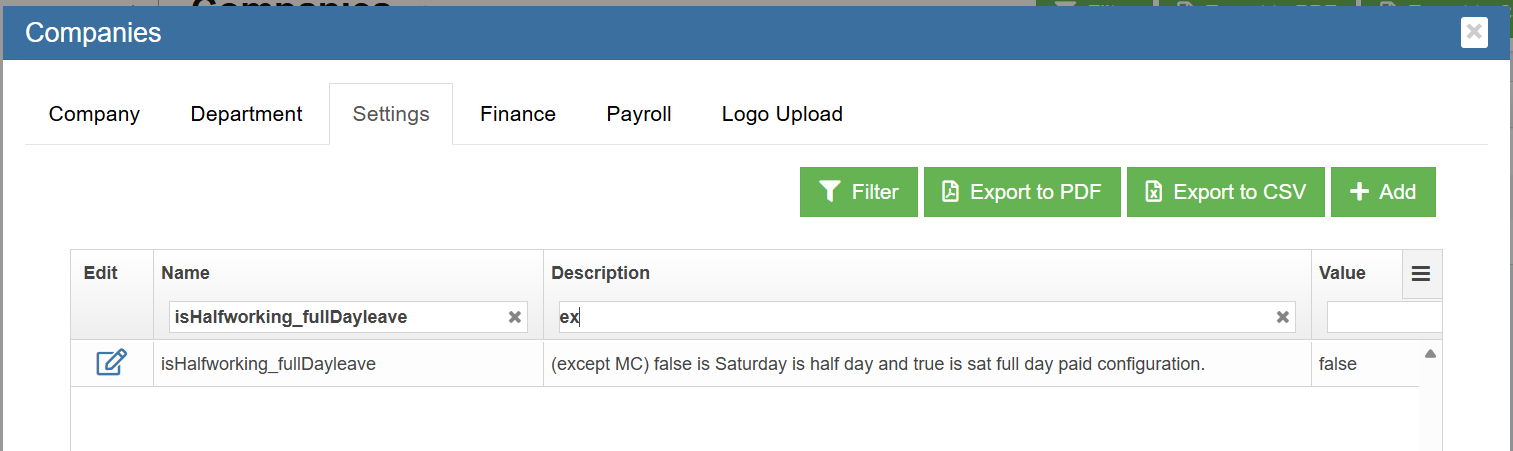
Half working day Annual Leave or Other Leave type consider as Full day Leave
- Click Company
- Click Settings
- Add "isHalfworking_fullDayleave" and make the Value "true"
Save the record.
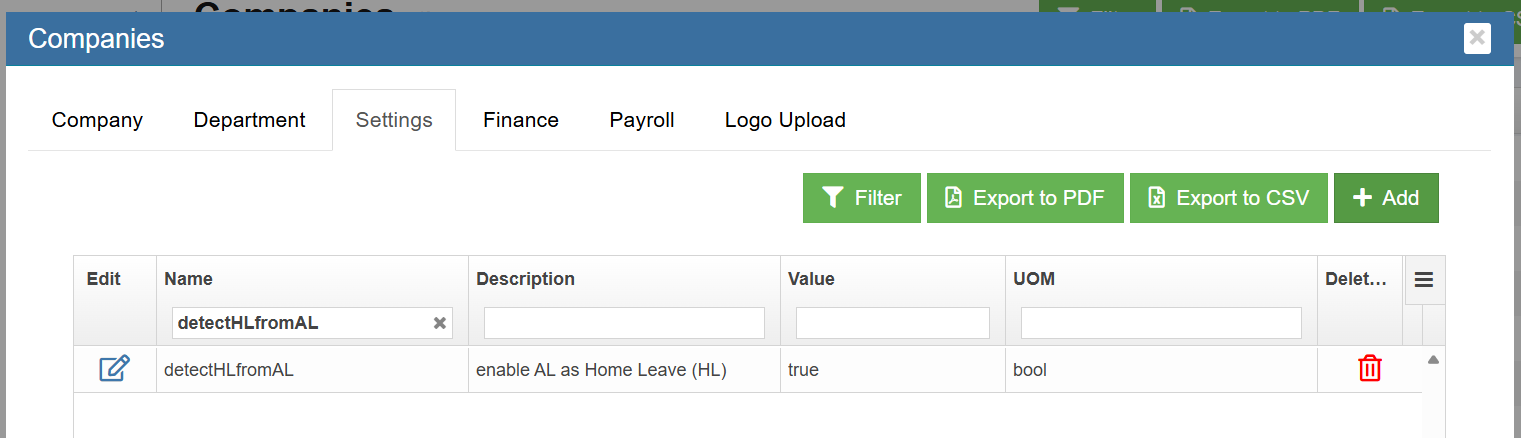
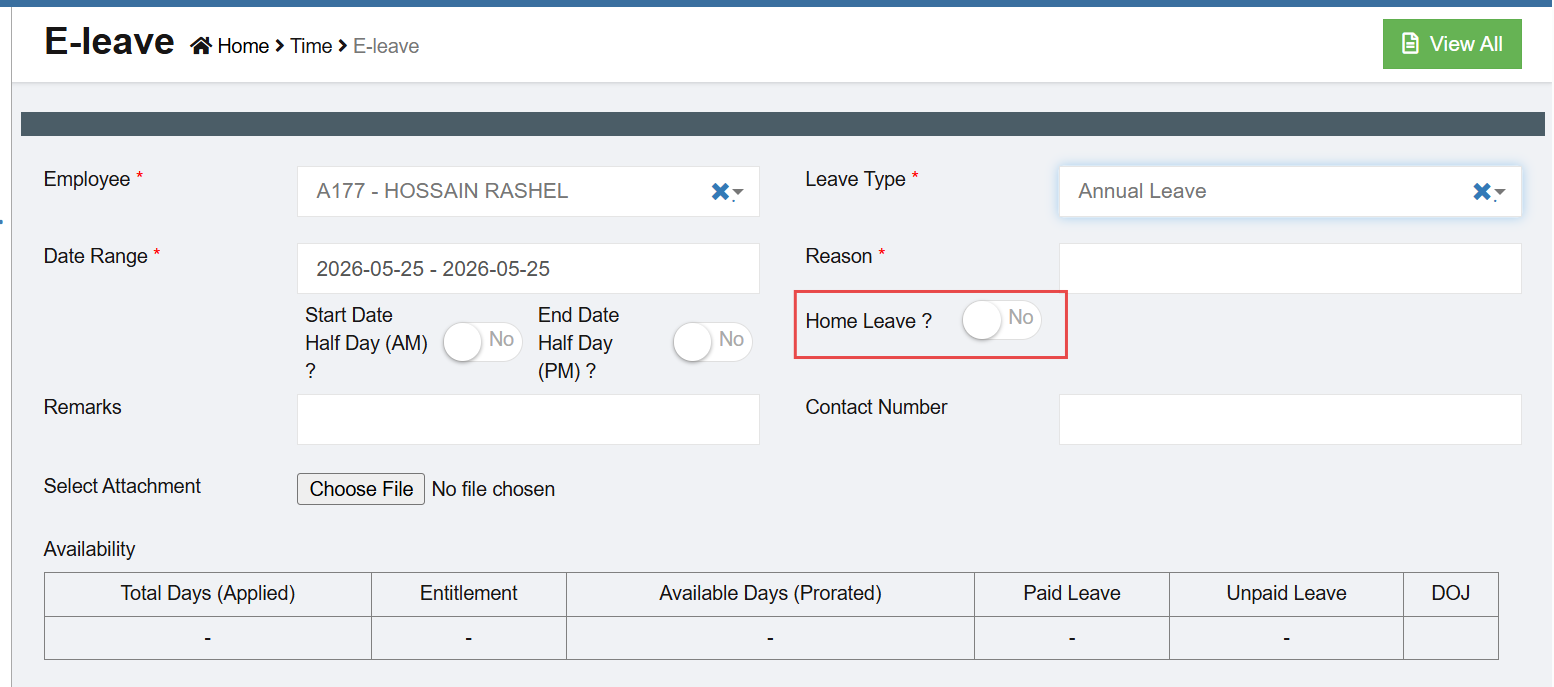
Annual Leave as Home Leave
- To mark Annual leave and Unpaid leave as Home leave, add "detectHLfromAL" under company settings to enable flag in Annual leave/Unpaid leave as home leave.


No Comments