
Payroll
Payroll Overview
The Payroll module in the cuteOffice app involves everything having to do with the process of paying employees and filing employment taxes. It supports all necessary payroll features such as pay slips, Tax filing, CPF submissions, Giro bank files, and payroll reports such as payroll journals, summary reports, etc..
The solution is able to generate compatible files to submit to CPF board, IRAS and all the banks in Singapore for employee’s salary transfer (including online bank GIRO).
Functionality present in the Payroll module including:
- Payroll Master
- Paycycle
- Paycode
- Working Day
- Bank List
- Payroll Operation
- Generate and Approve Payroll
- View and Print Payslip via Portal or Mobile App
- Email Password Protected Payslip to Employees
- Generate CPF File Including Details like CPF, CDAC, SINDA etc.
- Generate Online Bank GIRO file to all the banks in Singapore
- AIS File Generation: IR8A/ IR21/ IR8S/ Appendix A forms etc.
- Inclusion of Foreign Worker Levy/ SDL etc.
- Reports
- Pay Slip
- Payroll Journal Report
- Payroll Register Report
- Payroll Summary Report
- Cheque Register Report
- Donation Report
- Liabilities Report
- Yearly Payroll Report
- Generate CPF Submission File
- Generate GIRO Bank File
- AIS reports
Payroll Master
Pay Cycle
Pay Cycle determines the Period that employees are paid in. It determines how often payroll is run and the specific date that employees are paid on. These pay cycles are payment frequencies (monthly, semimonthly, weekly, or biweekly) defined by start and end dates in the system calendar.
For example, if a pay cycle is monthly, employees may get paid with different scenarios depending upon the company policy:
1st to end of the month, Paid on 7th of the following month
26th of previous month to 25th of current month, Paid on 1st of the following month.
1st to end of the month but cutoff for payroll computation is 24th of current month and Paid on 1st of the following month..
1st to end of the month, Paid on 1st of the month with partial amount and 7th of the month with rest of the amount.
Click Pay Cycle in Masters, the Pay Cycle page opens.

Add a Pay Cycle
If you want to add a pay cycle,
- Click
 (Add New button) in the Pay Cycle. The Pay Cycle window opens.
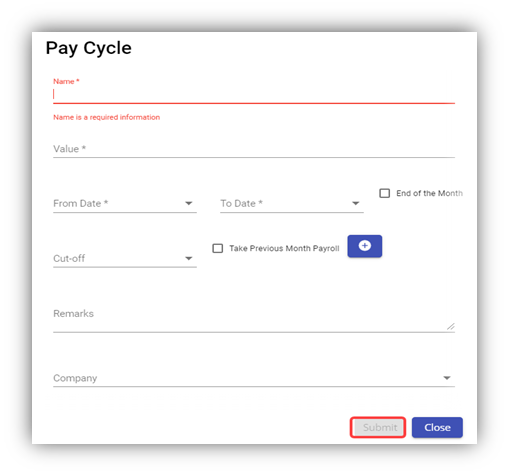
Note: The fields notified with a symbol (*) are mandatory. You must enter the relevant details in those fields before saving.
- In the Name box, enter the name of a pay cycle you want to add.
- In the Value box, enter the value of the pay cycle.
- In the From Date and To Date boxes, select the from and to dates of the pay period.
Note: if you want to add an end of the month as To Date automatically, select the checkbox of the End of the Month option.
- In the Cut-off box, select the total number of cut-off days.
Note: If you want to take previous month payroll, select the checkbox of the Take Previous Month Payroll option.
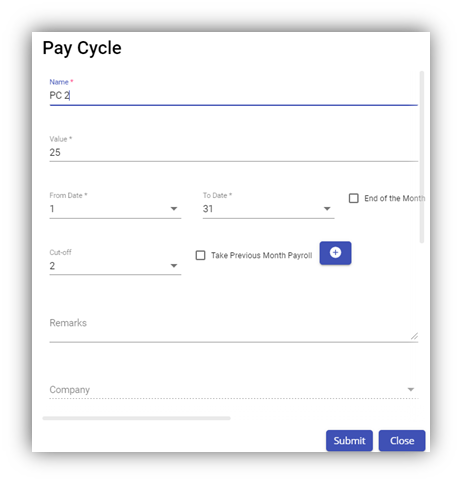
For example, the employer wants to calculate the monthly salary based on the cut-off date format that is from 1st to 24th with the approved Time Sheet and for the remaining days with Full Pay. If any leave has taken in the days which are paid fully, the deduction will be done in the next month pay. To add the pay cycle for the cut-off date format,
-
- In the From Date and To Date boxes, select the from date as 1 and to date as 24.
- In the Cut-off box, select the cut-off date as 24.
- Select the checkbox of the Take Previous Month Payroll
- In the Remarks box, enter your remarks if any.
- In the Company box, select a company from a list of companies.
Note: If you want to select all the companies in the list, select the checkbox of the ALL.
- Click Submit. The pay cycle is added and listed in the Pay Cycle page.
Edit a Pay Cycle
You can edit the details of the added pay cycle by using edit option provided in the Edit column of the Pay Cycle page. To edit the added pay cycle details,
- Click
 (Edit icon) of the respective pay cycle you have added. The Pay Cycle window opens with the added pay cycle details.
- Edit the pay cycle details where you want.
- Click Save.
Delete a Pay Cycle
You can delete the added pay cycle by using![]() (Delete icon) provided in the Delete column of the Pay Cycle page.
(Delete icon) provided in the Delete column of the Pay Cycle page.
Filter a Pay Cycle
If you want to filter any pay cycle in the Pay Cycle page, you can use ![]() (FILTER button) located on the Pay Cycle page.
(FILTER button) located on the Pay Cycle page.
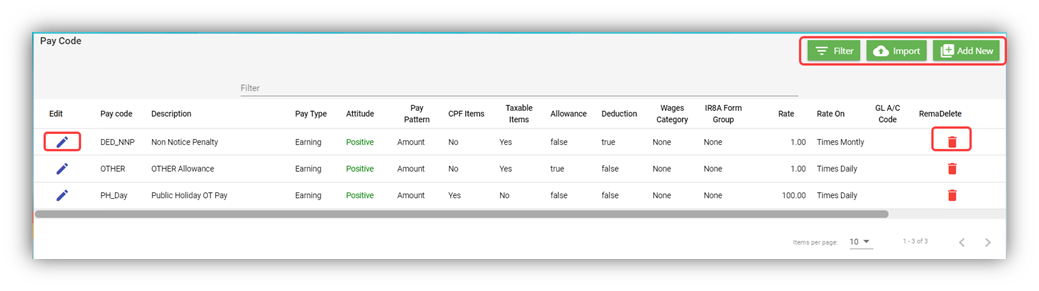
Pay Code
Pay Codes are labels used to identify and park the various parts of the salary into appropriate group for financial records. Some of the standard pay codes has been already created in the application by default and you can use the pay codes as it is.
You can also create new pay codes by using this Pay Code feature. The added pay code will be used in the further payroll process.
The Pay Code tab in the Masters submenu helps you to add a pay code. Click Pay Code in the Masters. The Pay Code page opens.
Add a Pay Code
To add a pay code,
- Click
 (Add New button) in the Pay Code. The Pay Code window opens.
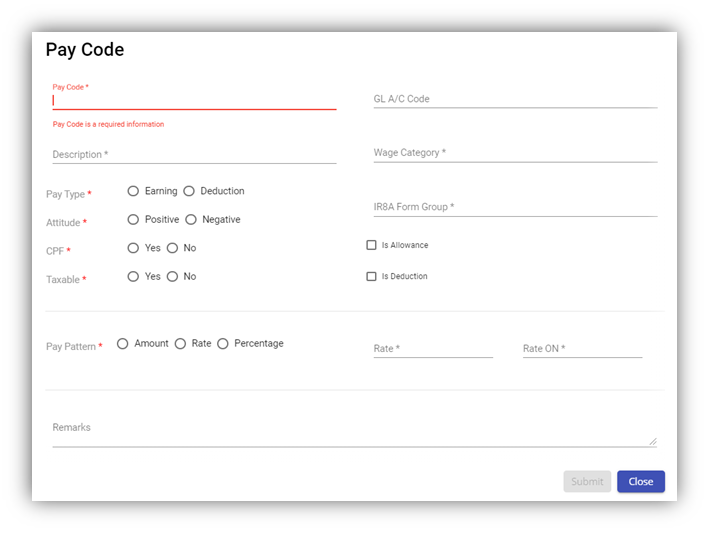
Note: The fields notified with a symbol (*) are mandatory. You must enter the relevant details in that fields before saving.
- In the Pay Code box, enter the pay code.
- In the Description box, enter the description for the added pay code.
- In the General Ledger Account (GL A/C) Code box, enter the general ledger account code.
- In the Pay Type and Attitude fields, select the appropriate options you want from the given options based on the suitable conditions given below:
- If you select the Pay Type as Earning and the Attitude as Positive, the amount that will be earned by the employee from
- Salary
- Paid Leave
- Advance Against Salary
- Over Time
- Allowances
- Bonus and so on.
- If you select the Pay Type as Earning and the Attitude as Negative, the amount that will be deducted from the employee’s earning is for
- Unpaid Leave
- Advance Salary Deduction
- Absent deduction and so on.
- If you select the Pay Type as Deduction and the Attitude as Positive, the amount that will be deducted from the employee’s earning is for
- Donations such as SINDA, CDAC, MBMF, ECF and so on
- Withhold Tax
- Any other deductions like fines.
6. In the Central Provident Fund (CPF) field, if the employee is eligible for CPF this will attract the CPF, click Yes else click No.
7. In the Taxable field, if the employee is eligible for tax deduction, click Yes else click No.
8. In the Wage Category box, select the appropriate wage category you want from the given categories.
9. In the Pay Pattern field, select the appropriate pay pattern you want from the given options.
10. In the IR8A Form Group box, select the appropriate group you want from the given options.
11. If the added pay code is for allowance, select the checkbox of the Is Allowance
12. If the added pay code is for deduction, select the checkbox of the Is Deduction
13. In the Remarks box, enter your remarks if any.
14. Click Submit. The pay code is added and listed in the Pay Code page.
Edit a Pay Code
You can edit the details of the added pay code by using edit option provided in the Edit column of the Pay Code page. To edit the added pay code details,
- Click
 (Edit icon) of the respective pay code you have added. The Pay Code window opens with the added pay code details.
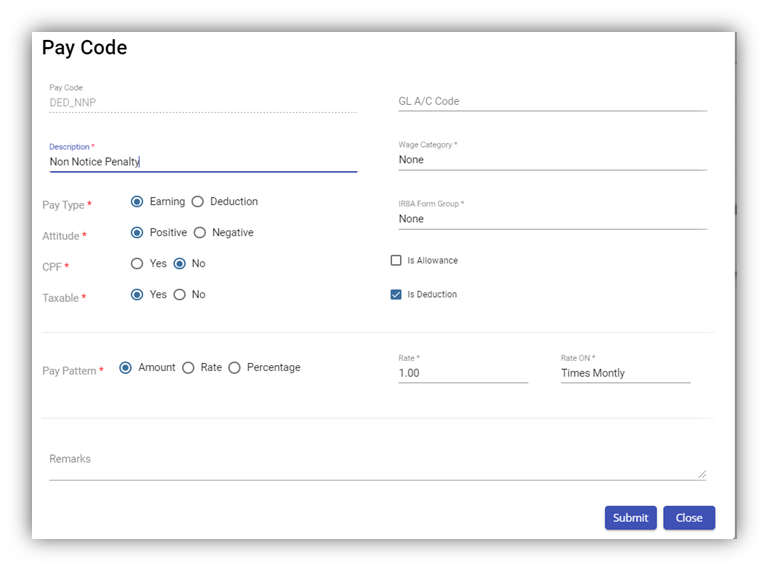
- Edit the pay code details where you want.
- Click Save.
Delete a Pay Code
You can delete the pay code by using![]() (Delete icon) provided in the Delete column of the Pay Code page.
(Delete icon) provided in the Delete column of the Pay Code page.
Filter a Pay Code
If you want to filter any pay code in the Pay Code page, you can use  (FILTER button) located on the Pay Code page.
Import Multiple Pay Codes
You can import multiple pay codes together by using import option provided in the Pay Code page. Before doing import,
- Create a template in an excel worksheet as in the Pay Code
- Add the details of pay code in the excel worksheet and save the excel worksheet in your computer.
- Click
 (Import button). A new window opens to upload the excel worksheet.
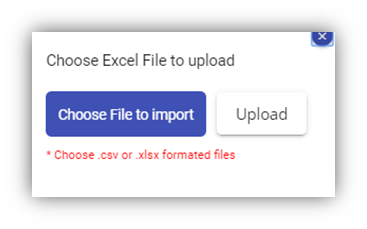
- Click Choose File to import.
- Select the excel worksheet which you want to upload.
- Click Upload. The pay code data are imported in the Pay code page successfully.
Settings
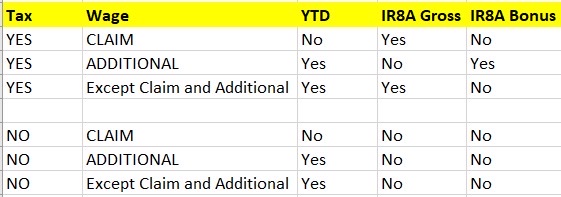
Pay code configuration for Claim/Reimbursement
The claim/reimbursement shouldn't be included in YTD gross salary and IR8A tax submission, configure "Claim" under wage category and Taxable "no".
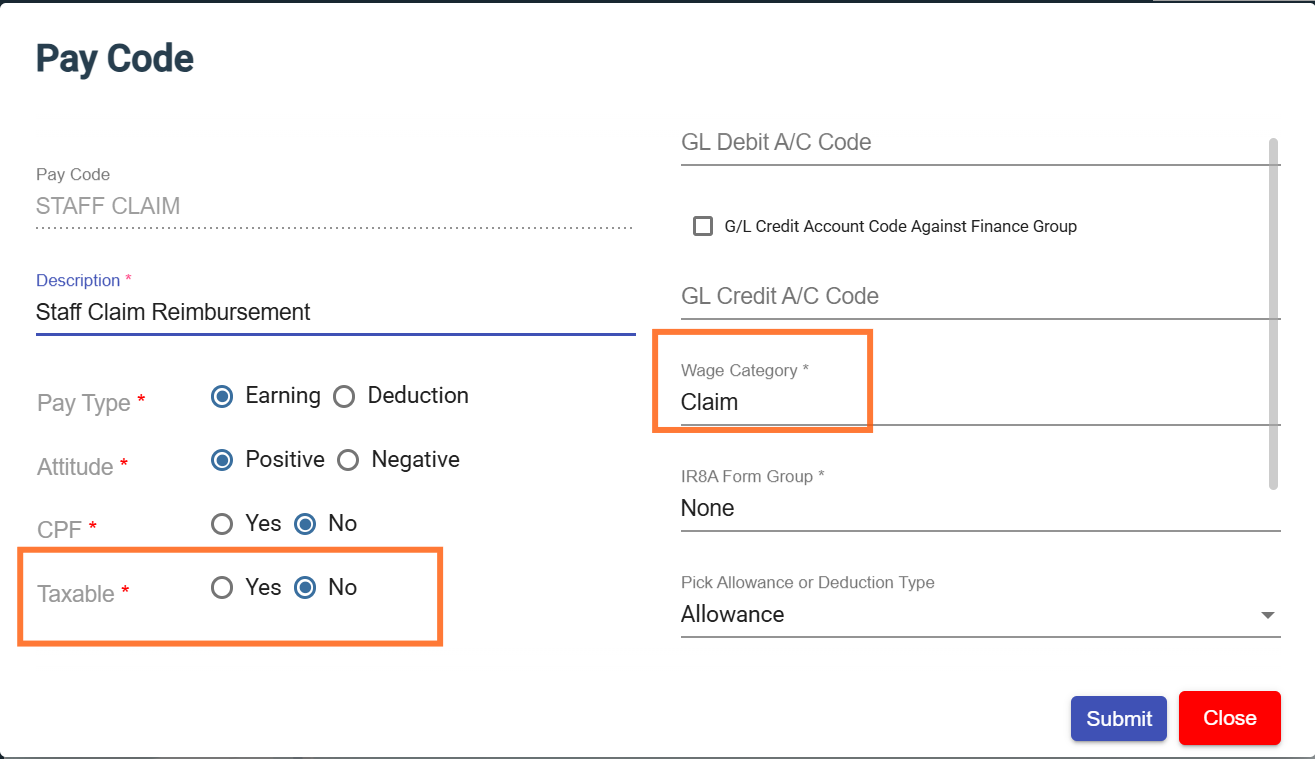
If any allowance falls under non-taxable (not to consider in IR8A), configure Taxable "no".
Working Day
Working days can vary for different types of staff based on how many days they need to work in a week as per their contract. Here you can configure the working days and assign them to employees to compute the salary details.
The Working Day tab in the Masters submenu used to add the working day table code including the working days in each month of the particular year. The added working day table code will be used in the further payroll process. Click Working Day in the Masters. The Working Day page opens.
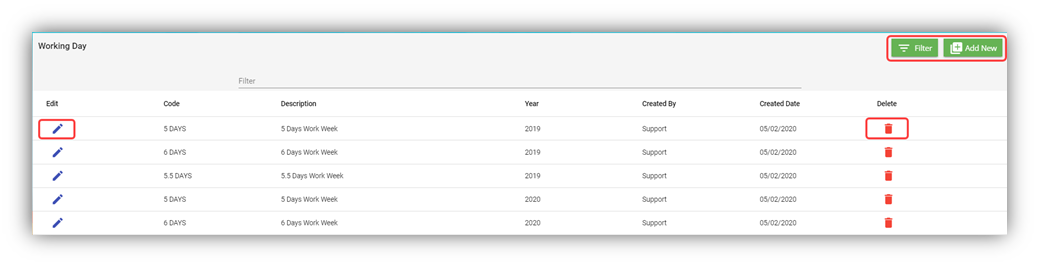
Add a Working Day Table Code
If you want to add the working day table code,
- Click
 (Add New button) in the Working Day. The Working Day Information window opens.
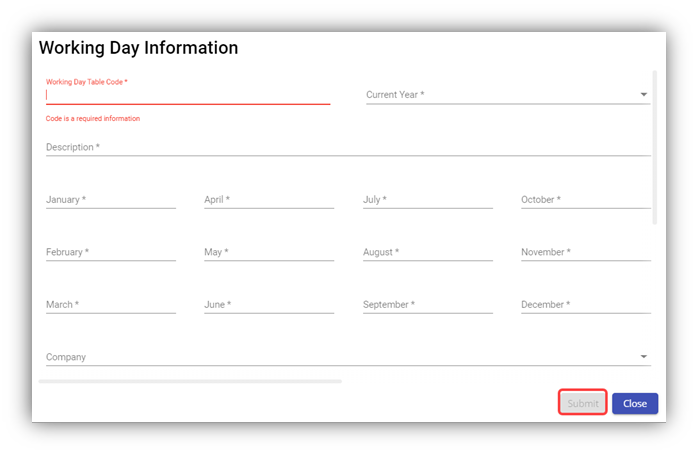
Note: The fields notified with a symbol (*) are mandatory. You must enter the relevant details in that fields before saving.
- In the Working Day Table Code box, enter the code for the working days you want to create.
- In the Current Year box, select the year for which you want to add the working day code.
- In the Description box, enter the description for the added working day code.
- From January to December boxes, enter the number of working days for each month.
- In the Company box, select a company from a drop-down list.
Note: If you want to select all the companies in the list, select the checkbox of the ALL.
- Click Submit. The working day table code is added and listed in the Working Day page.
Edit the Working Day Table Code
You can edit the details of the added working day table code by using edit option provided in the Edit column of the Working Day page. To edit the added working day table code details,
- Click
 (Edit icon) of the respective working day table code you have added. The Working Day Information window shows the added working day table code details.
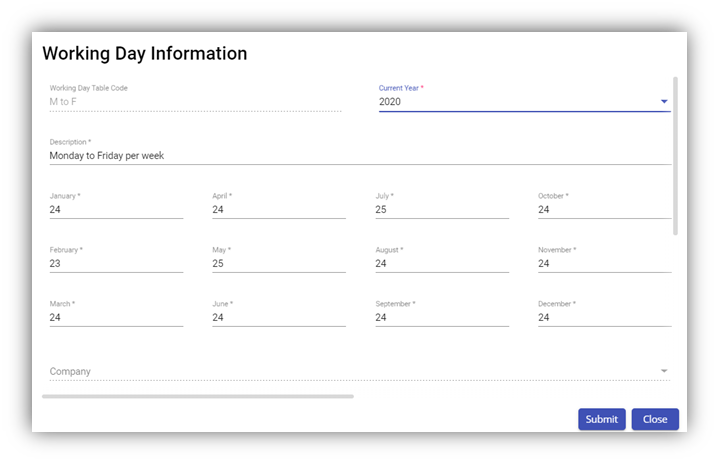
- Edit the working day table code details where you want.
- Click Save.
Delete a Working Day Table Code
You can delete the working day table code by using![]() (Delete icon) provided in the Delete column of the Working Day page.
(Delete icon) provided in the Delete column of the Working Day page.
Filter a Working Day Table Code
If you want to filter any specific working day table code in the Working Day page, you can use ![]() (FILTER button) located on the Working Day page.
(FILTER button) located on the Working Day page.
Employer Banks List
The Banks List tab in the Masters submenu helps you to add all the bank account details of the company that are used to pay salary to staff. Click Banks List in the Masters, the Banks List page opens.
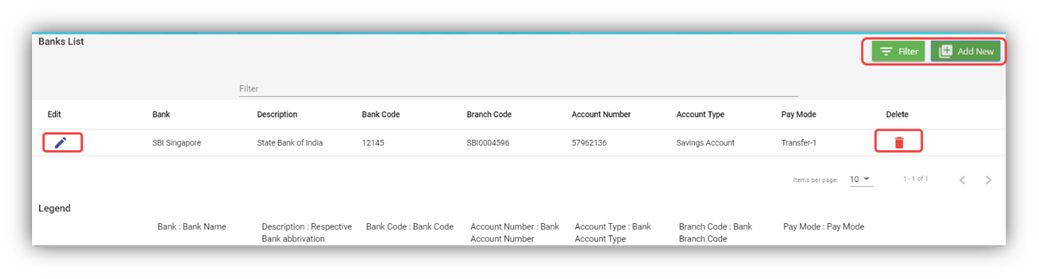
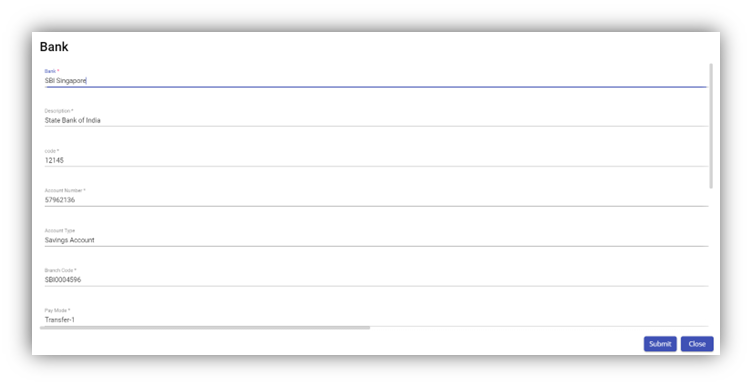
Add a Bank Account
To add a new bank account,
- Click
 (Add New button) in the Banks List, the Bank window opens.
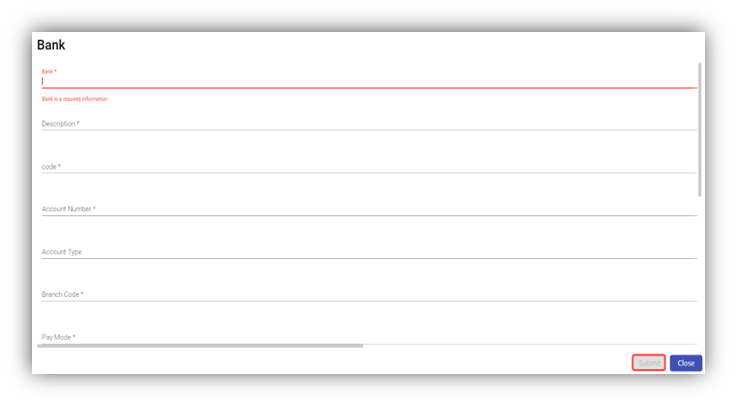
Note: The fields notified with a symbol (*) are mandatory. You must enter the relevant details in that fields before saving.
- In the Bank box, enter the bank name.
- In the Description box, enter the description for the added bank.
- In the Code box, enter the bank code.
- In the Account Number box, enter the bank account number.
- In the Account Type box, enter the type of bank account.
- In the Branch Code box, enter the branch code of the bank.
- In the Pay Mode box, select the payment mode.
- Click Submit. The bank account details are added and listed in the Banks List page.
Edit the Bank Account Details
You can edit the details of the added bank account by using edit option provided in the Edit column of the Banks List page. To edit the added bank account details,
- Click
 (Edit icon) of the respective bank account you have added. The Bank window shows the added bank account details.
- Edit the bank account details where you want.
- Click Save.
Delete a Bank Account
You can delete any added bank account by using ![]() (Delete icon) provided in the Delete column of the Bank List page.
(Delete icon) provided in the Delete column of the Bank List page.
Filter a Bank Account
If you want to filter any bank account in the Bank List page, you can use ![]() (FILTER button) located on the Bank List page.
(FILTER button) located on the Bank List page.
CPF List
CPF list shows CPF contribution rate by different age group/categories etc.
Payroll Prerequisites
The Payroll module in the cuteOffice app is fully integrated with other modules such as HRM, E- Leave, and Time. The below diagram explains how the Payroll module is in integrated with other modules. The employee’s information added in the HRM, Time and E-leave modules will be automatically synchronized with the Payroll module.
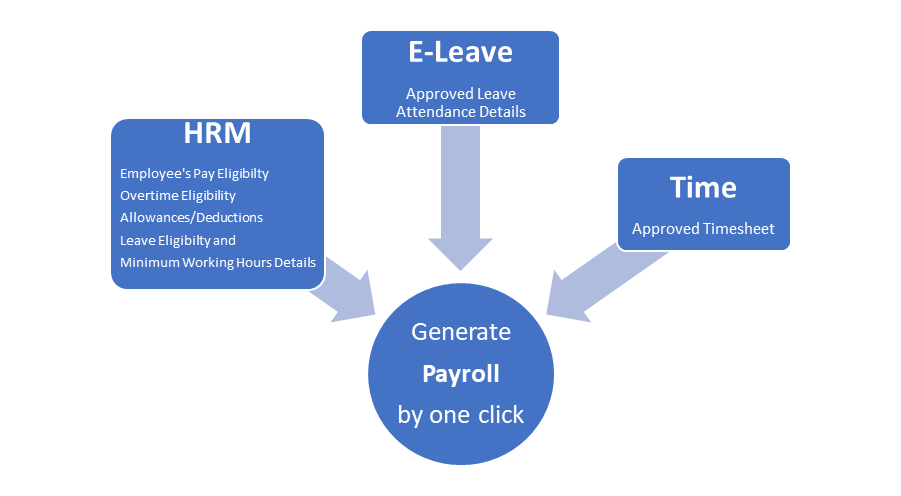
The payroll can be processed only for those staff who are registered in the HRM module. Along with the employee registration, the below information is also mandatory for payroll processing:
- The employee’s pay eligibility details
- Salary information
- Leave entitlements
- Minimum working hour configuration
- Pay cycle processing details
Payroll Admin Settings
The Settings tab in the Admin submenu is a pre-defined setup that will be used in generating the payroll. Once you have added the list of pay codes in the Masters submenu, the added pay codes will be listed here to select one of which against the pay items.
If you set the respective pay code for the following terms, the same pay code will be reflected in future payroll processing.
- Click Settings in the Admin, the Settings page opens.
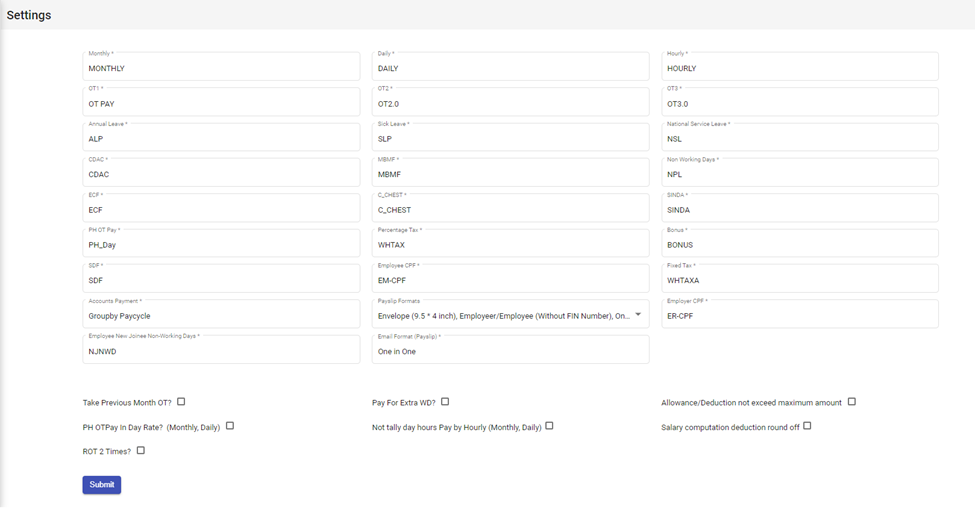
- In the Monthly box, select a pay code from the list of pay codes for monthly payment.
- In the Daily box, select a pay code from the list of pay codes for daily payment.
- In the Hourly box, select a pay code from the list of pay codes for hourly payment.
- In the OT1 box, select a pay code from the list of pay codes for OT1.
- In the OT2 box, select a pay code from the list of pay codes for OT2.
- In the OT3 box, select a pay code from the list of pay codes for OT3.
- In the Annual Leave box, select a pay code from the list of pay codes for annual leave.
- In the Sick Leave box, select a pay code from the list of pay codes for sick leave.
- In the Non-Working Days box, select a pay code from the list of pay codes for non-working days.
- In the CDAC box, select a pay code from the list of pay codes for CDAC.
- In the MBMF box, select a pay code from the list of pay codes for MBMF.
- In the SINDA box, select a pay code from the list of pay codes for SINDA.
- In the ECF box, select a pay code from the list of pay codes for ECF.
- In the C_CHEST box, select a pay code from the list of pay codes for C_CHEST.
- In the Bonus box, select a pay code from the list of pay codes for bonus.
- In the PH_OT DAY box, select a pay code from the list of pay codes for PH_OT day.
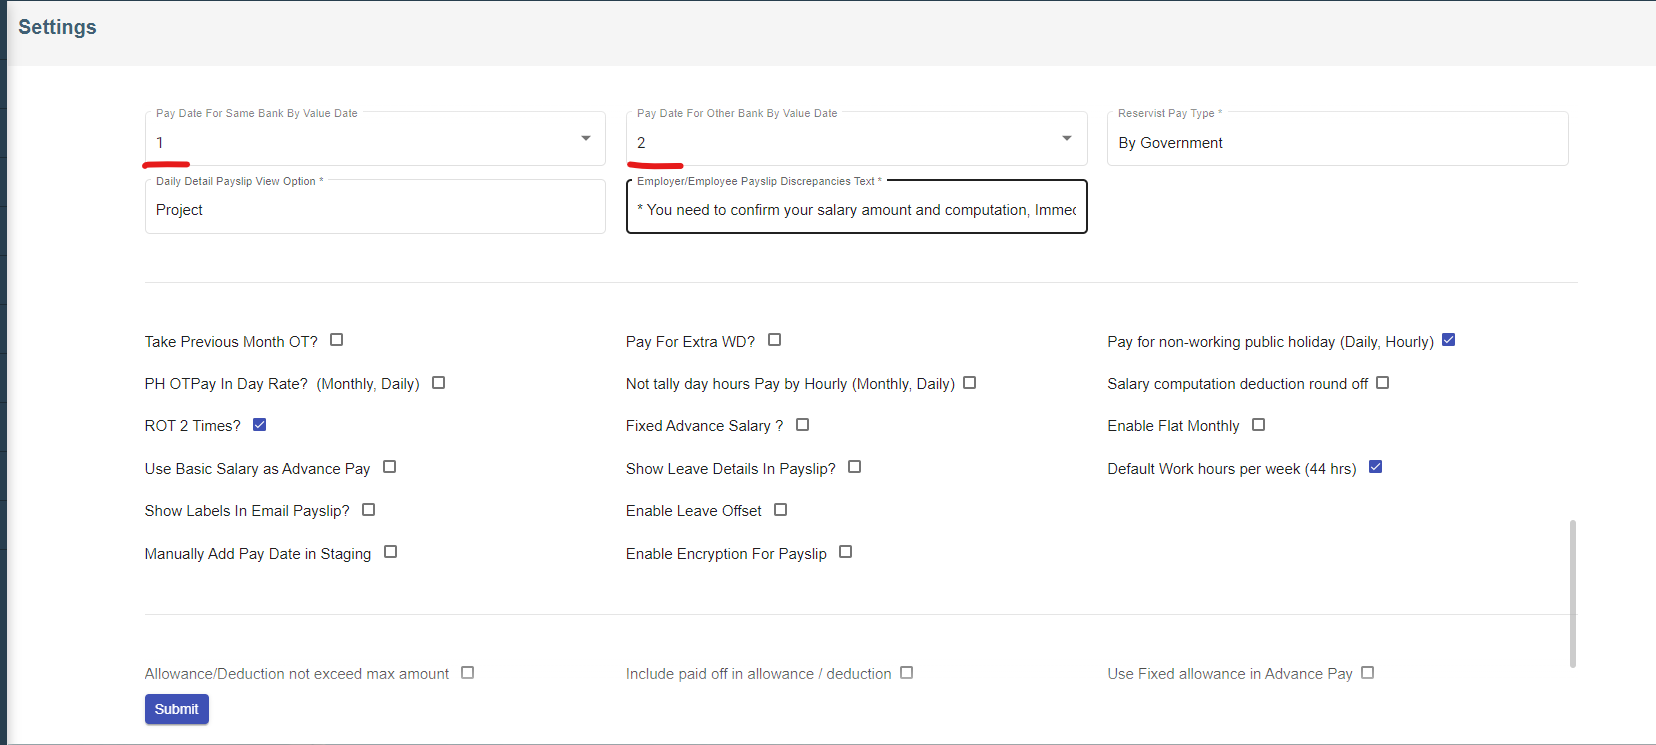
- If you want to take previous month OT, click the checkbox of the Take Previous Month OT
- If you want to set the PH OT pay based on the day rate, click the checkbox of the Is PH _OT Pay in Day Rate (Monthly, Daily)
- If you want to pay for extra working days, select the checkbox of the Pay for Extra WD
- Rest day OT (ROT) is paid at 2 times rate by default; however, it can be paid at 1.5 times rate. This can be configured by clicking the ROT 2 times check box.
- Click Submit. The payroll admin settings will be saved and updated in system.
General Payroll Process
Time module in the cuteOffice application automatically synchronizes the Timesheet of all the employees with the Payroll module. E-Leave module in the cuteOffice application automatically synchronizes the attendance and leave details of all the employees with the Payroll module. HRM module synchronizes the pay eligibilities of the employees with the Payroll module.
As mentioned in payroll prerequisites. HRM salary details, and timesheet and E-leaves must be approved to enable payroll processing.
Generate Payroll
You can generate the payroll for the employees by just one click using the Generate Payroll option. The Generate Payroll tab in the Operation submenu used to generate the payroll for the employees. To generate the payroll,
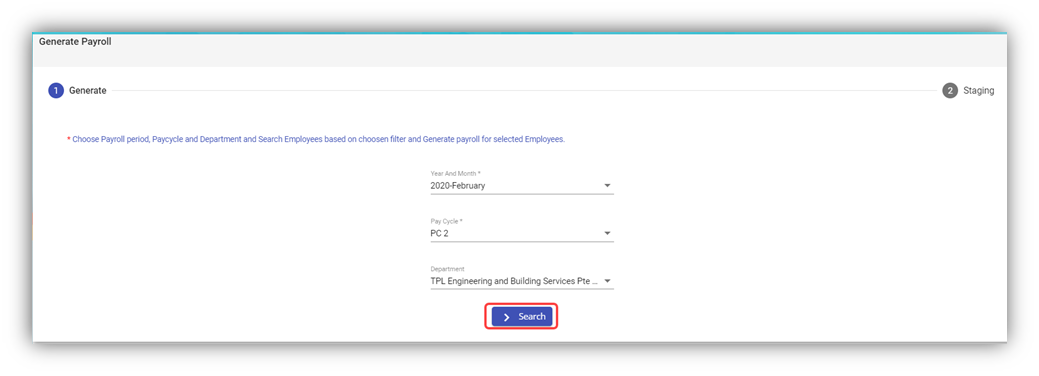
- Click Generate Payroll in the Operation. The Generate Payroll page opens.
-
Choose Payroll period, Department, and Pay Cycle to Generate a Payroll
If you want to generate a payroll, you must choose the payroll period, department, and pay cycle. Default selection is set to previous month and all departments and all pay cycles.
In the Year and Month box, select the respective month and year for which you want to generate the payroll.
In the Pay Cycle box, select a pay cycle from a drop-down list.
In the Department box, select a department from a drop-down list.
Note: If you want to select all the departments in the list, select the checkbox of the ALL option.
-
Click Search. The Generate Payroll page shows the list of processed and unprocessed employees detail based on the selected data.

Note: The page shows both the processed and unprocessed employee details separately, and shows the reason of not processing employee details in the Remarks column. For example, If the timesheet is modified and not yet approved means, it shows that Timesheet not approved.
Error: If the employee’s detail is not appeared, the following could be the reason,
A. You may have started the payroll processing before approving the attendance and Timesheet for the respective period.
B. The payroll may have been processed already.
C. In HRM official info page, some staff can be excluded from Time attendance. - Generate Payroll. Once the page shows the list of processed and unprocessed employees’ detail, you can generate the payroll by selecting the respective employee details. To generate the payroll,
-
- Click the checkbox of the respective employees.
- Click
 (Generate Payroll button).
The Confirm dialog box opens with a message “Are you sure want to proceed with Auto Pay processing for selected Employees?”.
-
- If you want to proceed with auto pay processing, click Yes. The payroll is generated and moved to the payroll staging area.
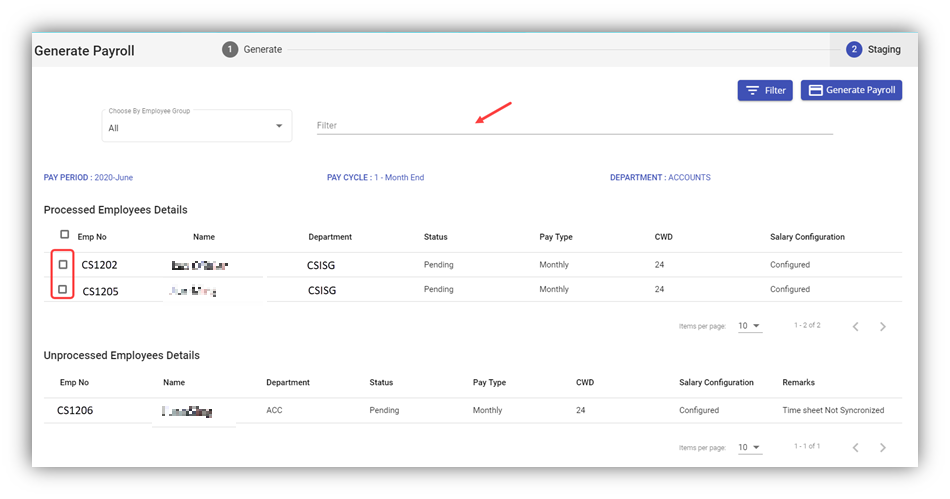
Note: If you want to generate specific employees' payroll, you can use filter option to filter any specific employee detail in the Generate Payroll page. Click ![]() (FILTER button) located on the Generate Payroll page.
(FILTER button) located on the Generate Payroll page.
Payroll in Staging
The Payroll in Staging is where you can view and validate the payroll details of the employees after payroll generation. The payroll in staging shows the auto processed payroll detail for selected employees. It can be further amended or adjusted before approval. The common payroll adjustments could be additional allowances, bonus and deductions, etc..
After viewing and adjusting the payroll, user with permission can approve the payroll for final payment to employees in Payroll in Staging tab. Click Payroll in Staging in the Operation, the Payroll in Staging page opens with a list of generated payrolls.
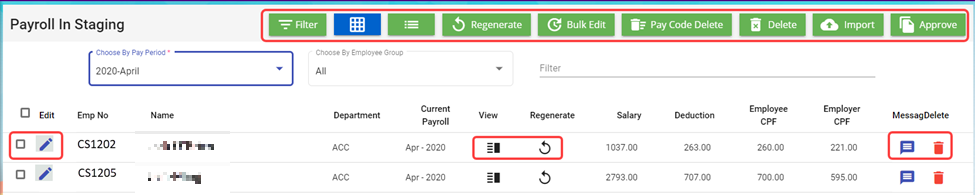
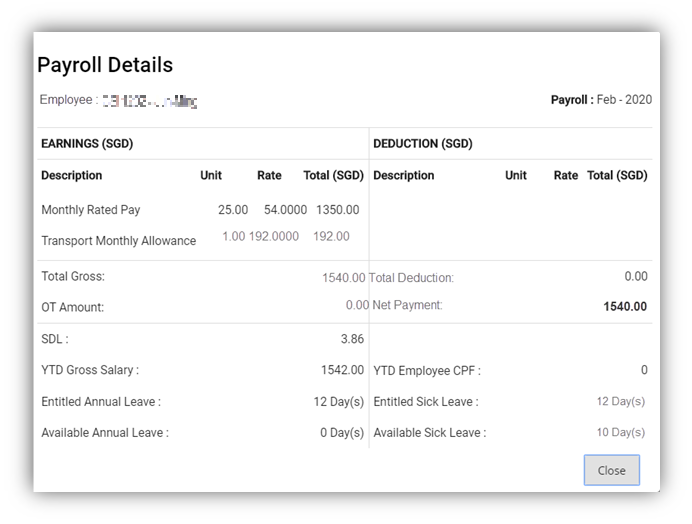
View the Payroll Details of an Employee
If you want to view the generated payroll details of any employee, you can use view option provided in the View column of the Payroll in Staging page. Click![]() (View icon) of the respective employee, the Payroll Details window opens and shows the payroll details of the selected employee.
(View icon) of the respective employee, the Payroll Details window opens and shows the payroll details of the selected employee.
Regenerate a Payroll
You can use Regenerate option provided in the Payroll in Staging page to regenerate the payroll. If you made any changes in an employee's Timesheet/Employee Salary in HRM/Pay code after the employee payroll is generated, you must use Regenerate option to regenerate the payroll so the latest updates from Time, E-leave and HRM module will be reflected in the payroll.
To regenerate the payroll, click (Regenerate icon) in the Regenerate column for the respective payroll you want to regenerate. The selected payroll will be regenerated.
Note: If you edit any pay details in payroll staging manually, it will be lost while generating the payroll.
Regenerate multiple employees' payroll: If you want to regenerate multiple payrolls together, select the checkbox of the respective payrolls and click ![]() (Regenerate button).
(Regenerate button).
Edit the Payment Details of an Employee
If you want to edit and update the payment details of any employee, you can use edit option provided in the Edit column of the Payroll in Staging page. To edit payroll details in staging,
- Click
 (Edit icon) of the respective employee. The Edit Payroll Details window opens.

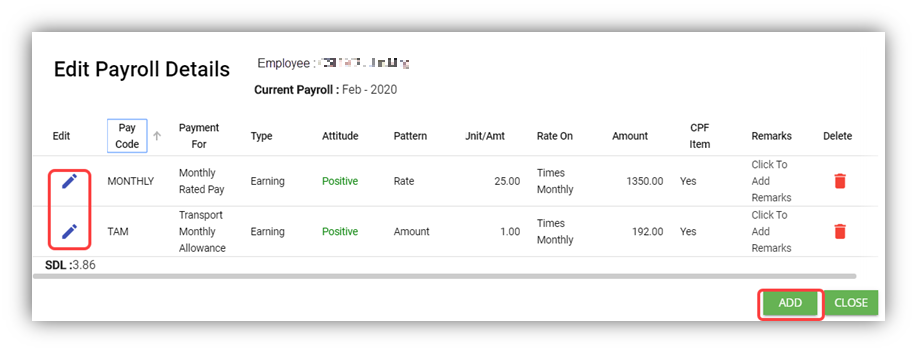
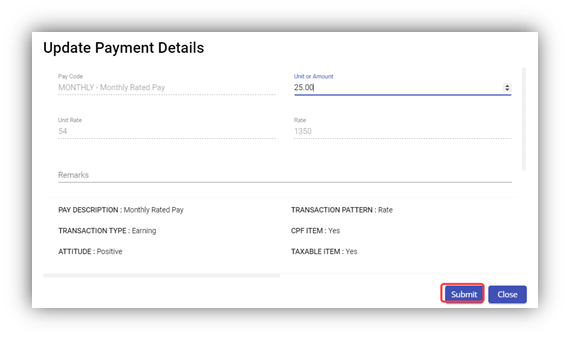
- If you want to edit and update the payment details of any employee, click (Edit icon) of the respective employee. The Update Payment Details window opens. Edit the payment details where you need, click Submit, the payment details will be updated.
- If you want to add the new payment details for any employee, click
 (ADD button) in the Edit Payroll Details. The Update Payment Details window opens to add the payment details. Enter the relevant details in the respective fields. Click Submit.
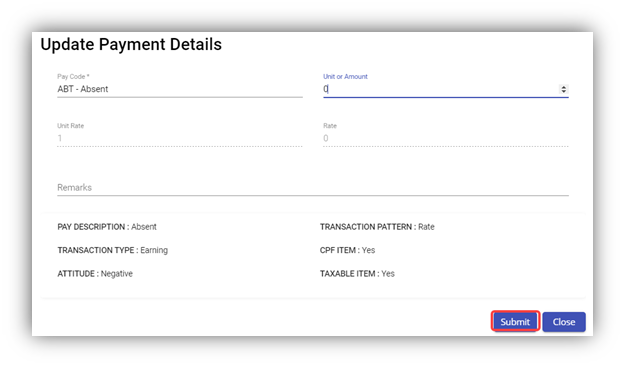
Bulk Edit the Payment Details of Multiple Employees
If you want to update the payment details of multiple employees together, you can use the Bulk Edit option provided in the Payroll in Staging page.
- Select the checkbox of the employees for whom you want to update the payment details together.
- Click
 (Bulk Edit button). The Payment Details Bulk Update window opens.
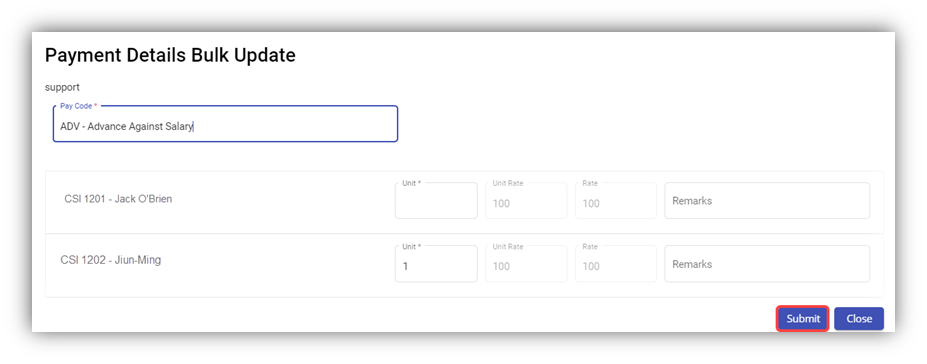
- Enter the relevant details for the respective employees.
- Click Submit.
Bulk Delete Employee Allowance/Deduction
Employee’s Allowance/Deduction details are usually configured in the Pay Eligibility in HRM. The same details will be reflected into the Payroll through Pay Code while generating payroll for an employee.
If you want to cancel the Allowance/Deduction for any employee for a particular period, you can use ![]() (Pay Code Delete button).
(Pay Code Delete button).
For example, if you want to cancel the Utility Deduction and the Accommodation allowance of an employee for the current payroll month, you can use the Pay Code Delete option.
- Click
 (Pay Code Delete button) in the Payroll in Staging. The Pay Code Bulk Delete window opens.
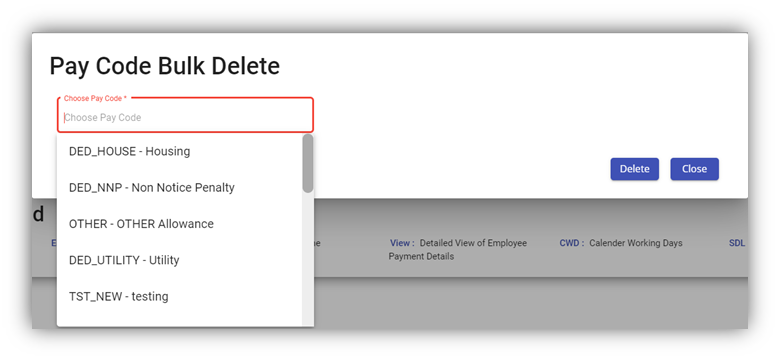
- In the Choose Pay Code box, select the pay code you want to delete. Once you have selected the pay code, the list of employees who are eligible for the selected pay code opens.

- Select the checkbox of the employees for whom you want to delete the pay code.
- Click
 (Delete button). The pay code for the selected employee will be deleted for the pay roll month.
Approve the Payroll of an Employee
If you want to approve the payroll of any employee,
- Select the employees by clicking the checkbox of the respective employee.
- Click
 (Approve button). The selected employee’s payroll will be approved for the payment.
Filter the Payroll Details of an Employee
If you want to filter the payroll details of any specific employee in the Payroll in Staging page, you can use ![]() (FILTER button) located on the Payroll in Staging page.
(FILTER button) located on the Payroll in Staging page.
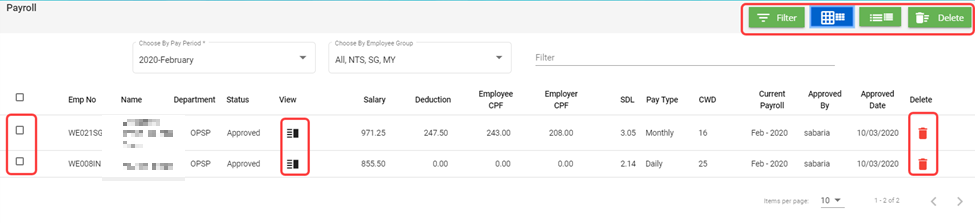
Delete the Payroll Details of an Employee
You can delete the payroll details of any employee by using ![]() (Delete icon) provided in the Delete column of the Payroll in Staging page and (Delete button) in the Payroll in Staging page.
(Delete icon) provided in the Delete column of the Payroll in Staging page and (Delete button) in the Payroll in Staging page.
Payroll History
The Payroll History tab in the Operation submenu helps you to view the history of the approved payroll list of employees. Click Payroll History in the Operation, the Payroll page opens.
View the Payroll History of an Employee
If you want to view the approved payroll details of any employee, you can use view option provided in the View column of the Payroll page. Click![]() (View icon) of the respective employee, the Payroll Details window opens and shows the payroll details of the selected employee.
(View icon) of the respective employee, the Payroll Details window opens and shows the payroll details of the selected employee.
Filter the Payroll History of an Employee
If you want to filter the payroll details of any specific employee in the Payroll page, you can use ![]() (FILTER button) located on the Payroll page.
(FILTER button) located on the Payroll page.
Delete the Payroll Details of an Employee
You can delete the payroll details of any employee by using ![]() (Delete icon) provided in the Delete column of the Payroll page and
(Delete icon) provided in the Delete column of the Payroll page and ![]() (Delete button) in the Payroll page.
(Delete button) in the Payroll page.
Note: Users need have the right permission to Delete approved payroll in Payroll History. Once an employee's approved payroll is delete, it will go back to the previous stage: payroll staging. User can search and find the payroll details in staging.
Annual Leave Encashment in Payroll for Resigned Staff
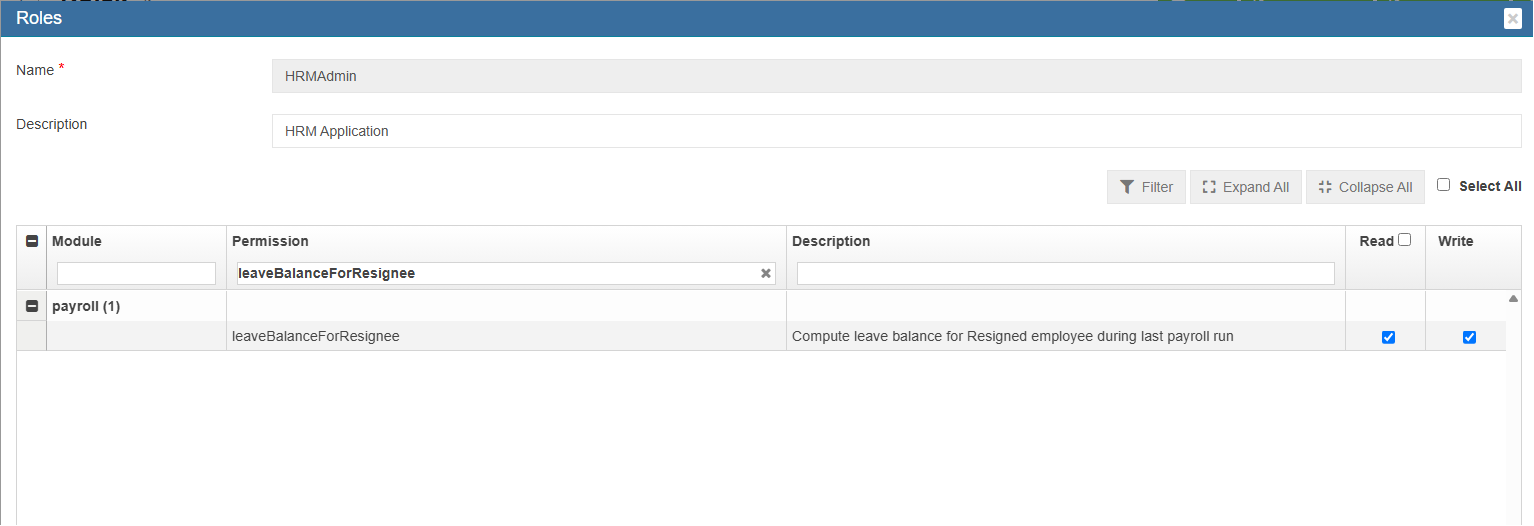
System automatically processes the balance annual leave encashment for the resigned employee in the last payroll run. User needs to have the below permission to configure paycode under payroll settings.
- Enable leaveBalanceForResignee permission for the staff who process the payroll
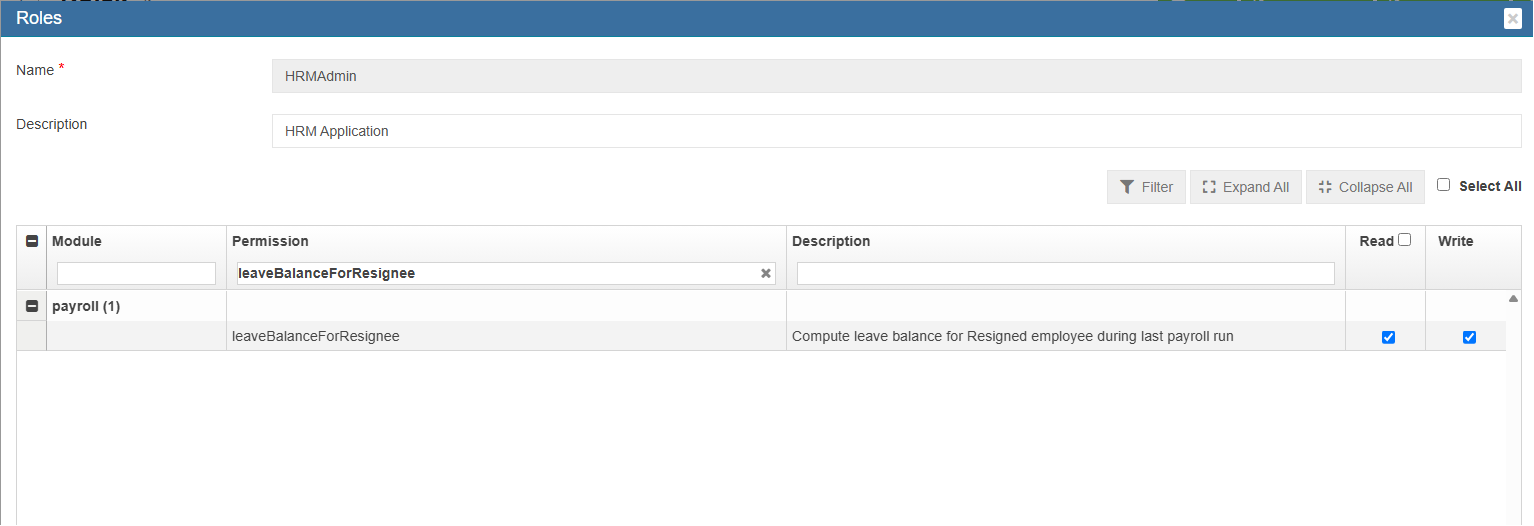
- Click Paycode and add BAL_LEAVE
- Click Payroll
- Click Admin and Settings.
- Configure Paycode "BAL_LEAVE" in the Balance Leave for Resignee

- Generate Payroll. The balance leave will be automatically calculated in the payroll as per MOM calculation.
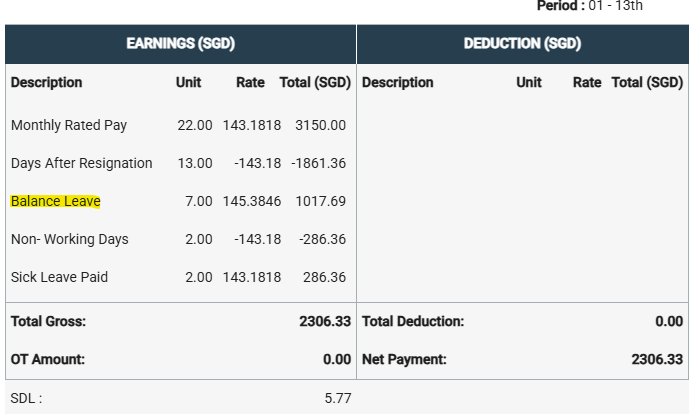


Leave balance = 7 days
Monthly salary = S$3150
Working days per week = 5 days
Annual salary = S$3150 X 12 months = S$37,800
Total workdays in a week = 5 days X 52 weeks in year = 260 days
Daily rate = S$ 37,800/260 days= S$145.3846
Total annual leave encashment = 7 days X S$145.3846= S$1017.69
Payslip release
Two ways of releasing payslip to the employees after payroll details available in the payroll history.
- Cuteoffice application 2A
- Email Payslip (Personal Email id)
cuteOffice application 2A
The following steps need to follow before viewing the payslip in the cuteOffice application.
- Create user id under user management (Admin-> User)
- Under Payroll history, select an employee and click "Release Payslip"
- Login into cuteOffice application
- Click and view the payslip.
Email Payslip
The following steps need to follow before viewing the payslip in the personal email id.
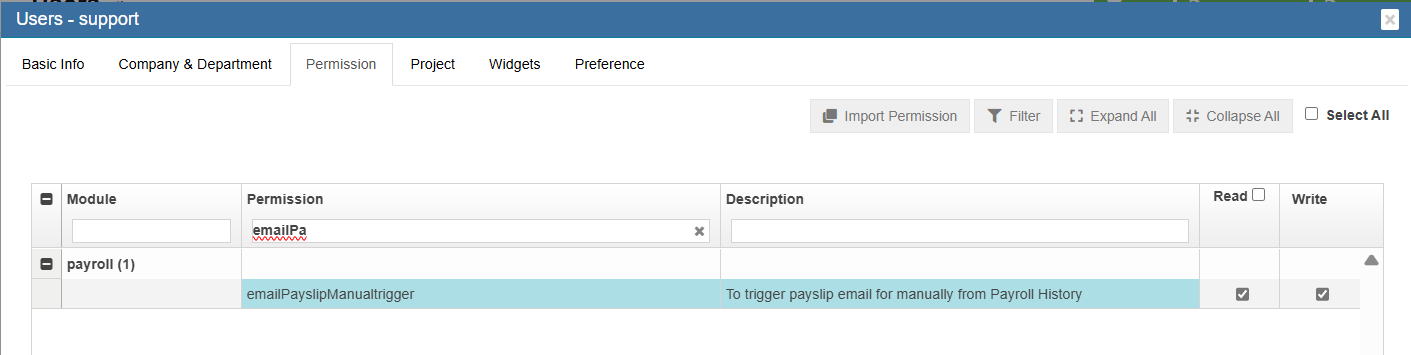
- Enable permission against user or through roles to trigger email payslip from Payroll History
- Go to HRM
- Click View all employees
- Select an employee
- Click Payroll information page from the right-side menu
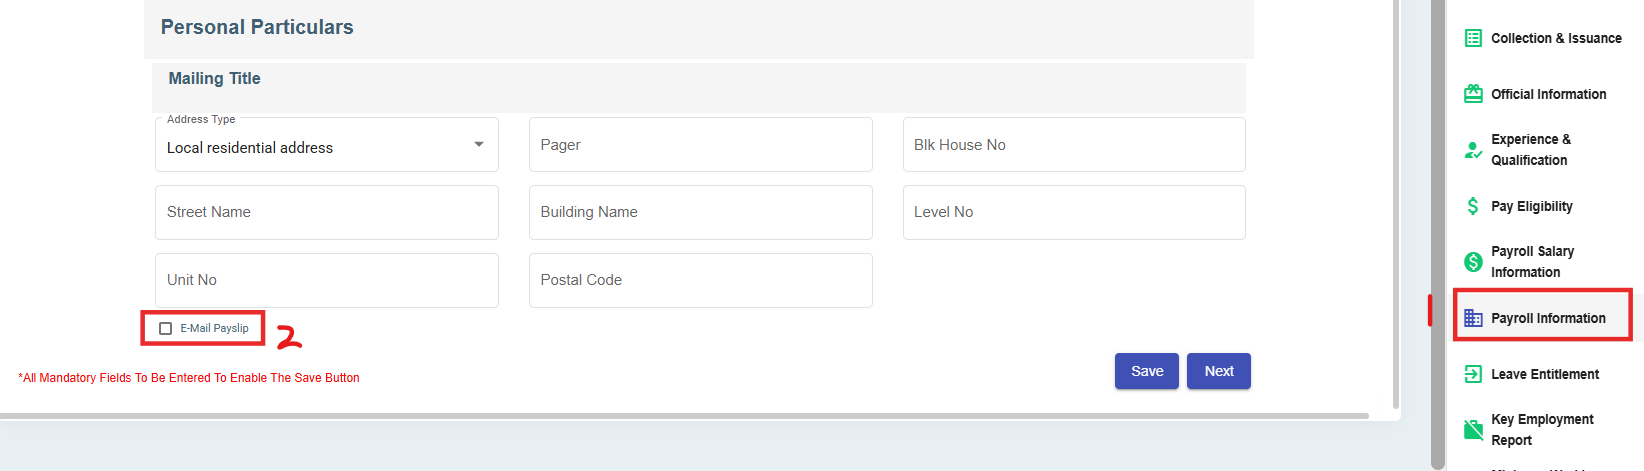
- Enable Email Payslip check box.
- Click Personal Particular
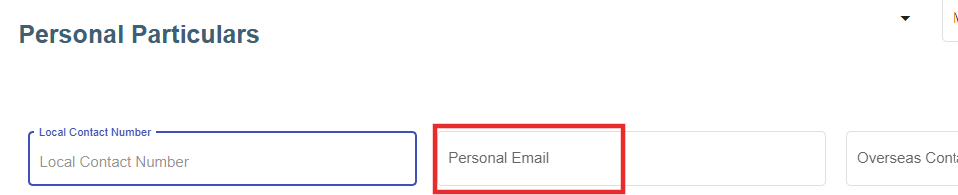
- Enter email id in the personal email field
- Go to Payroll
- Click Payroll History under Operation menu
- Choose employees to release payslip through email
- Click "Release Payslip"
- Click "Email Payslip" to release payslip to the personal email id.


Progressive Wage Model (PWM)
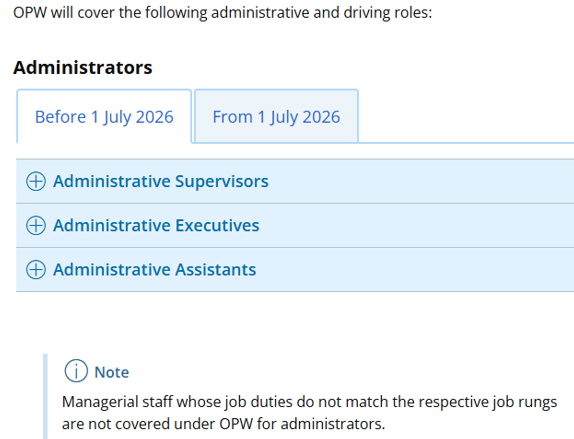
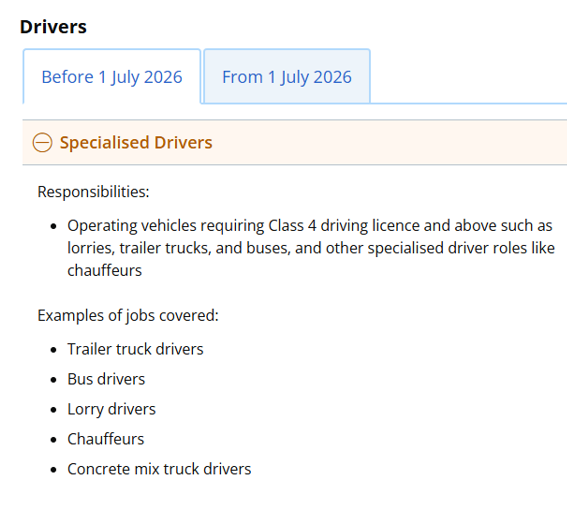
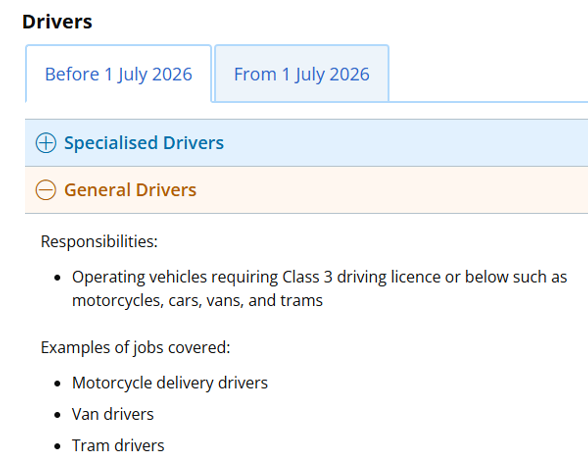
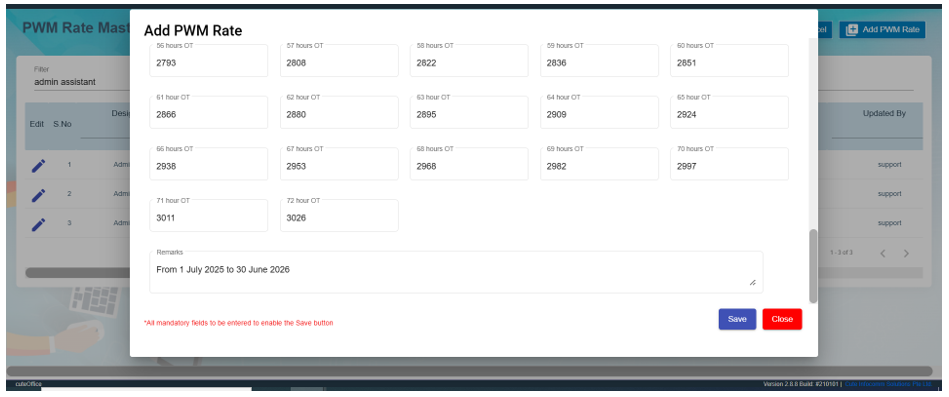
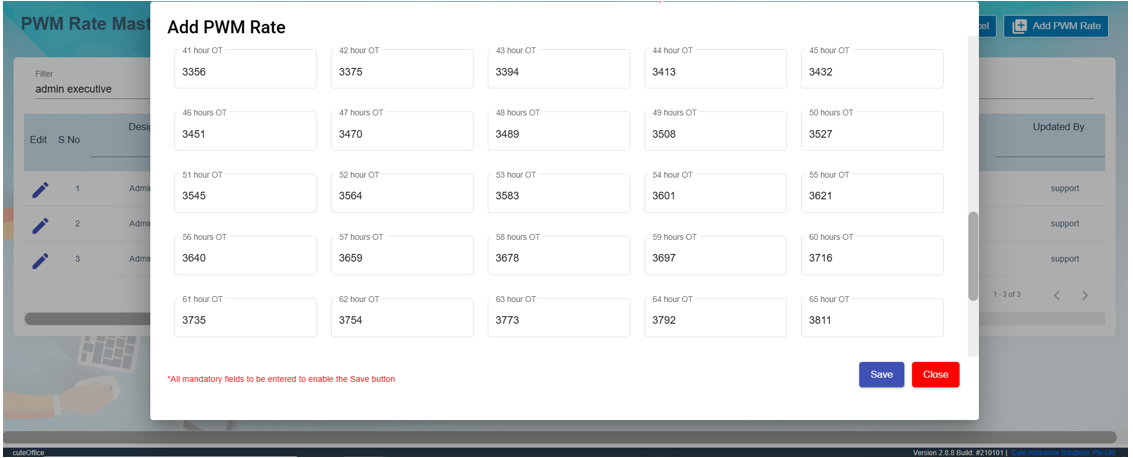
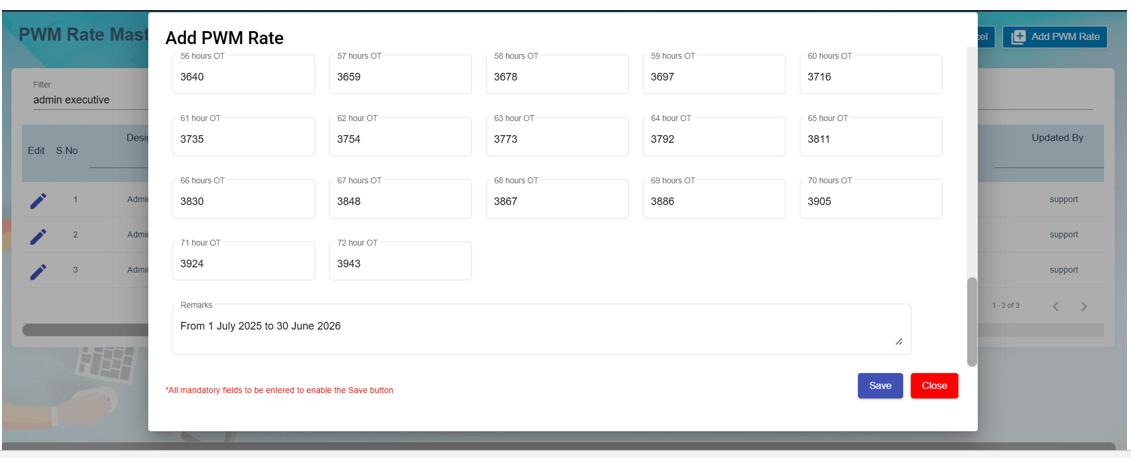
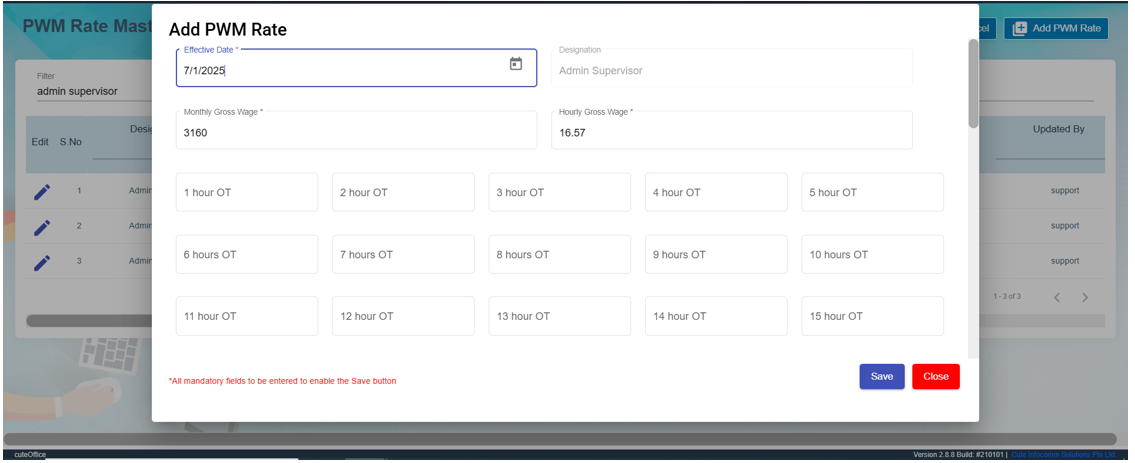
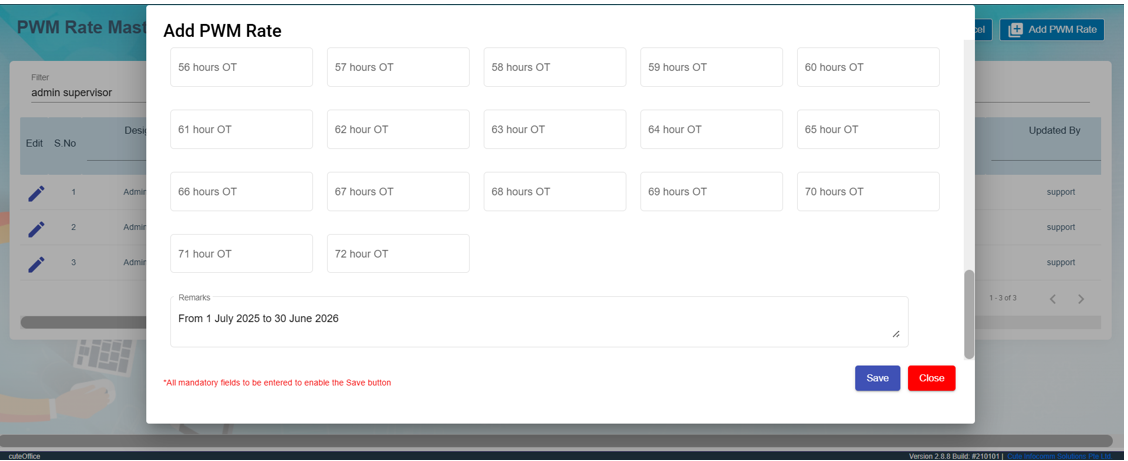
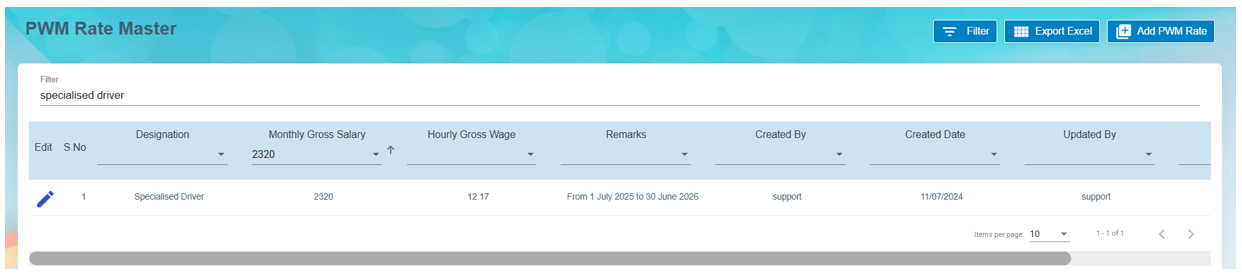
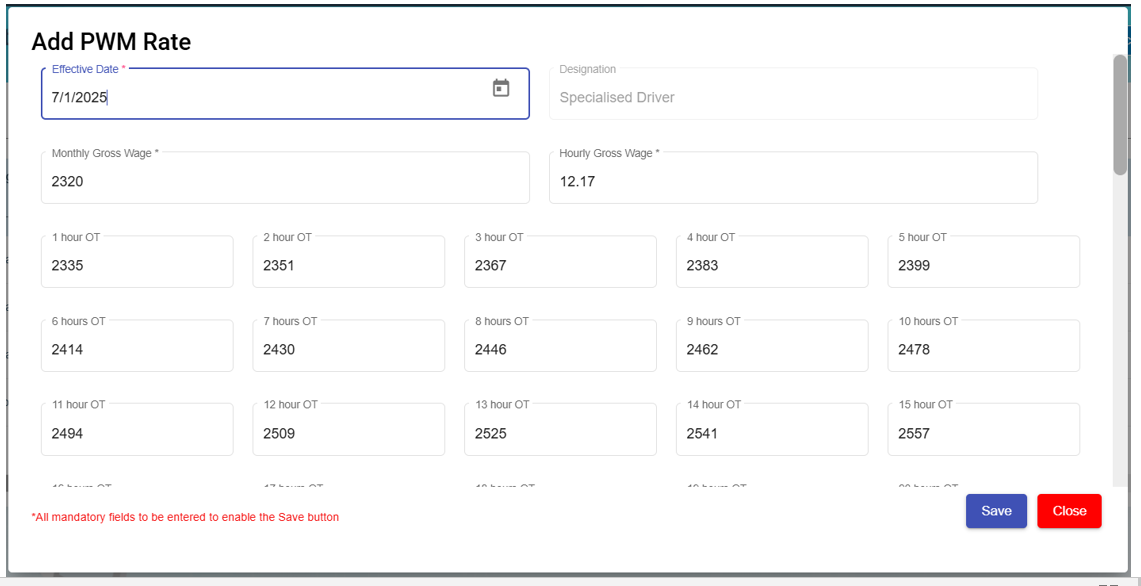
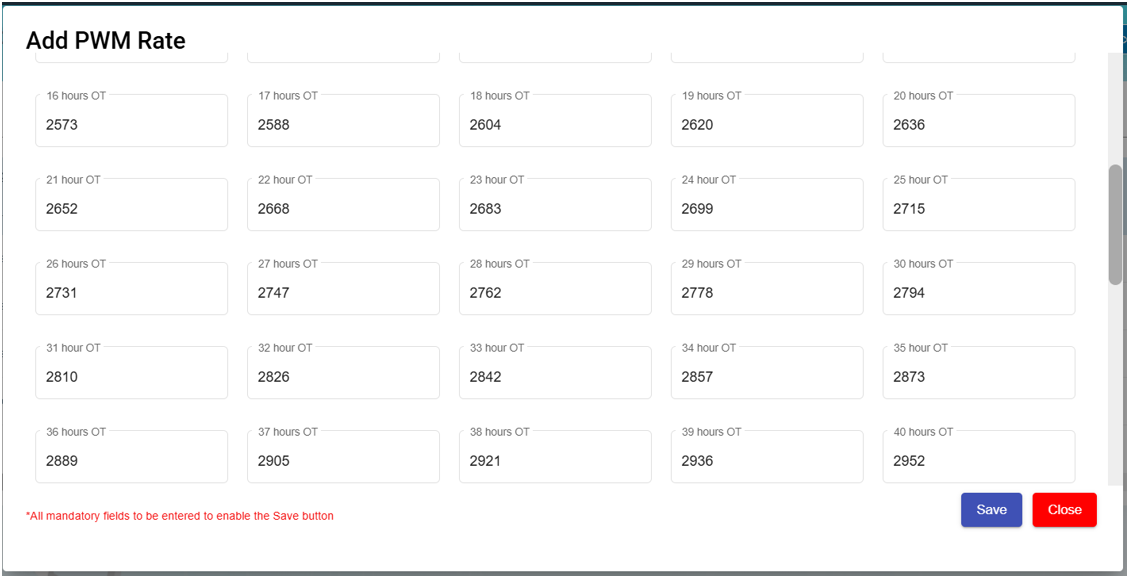
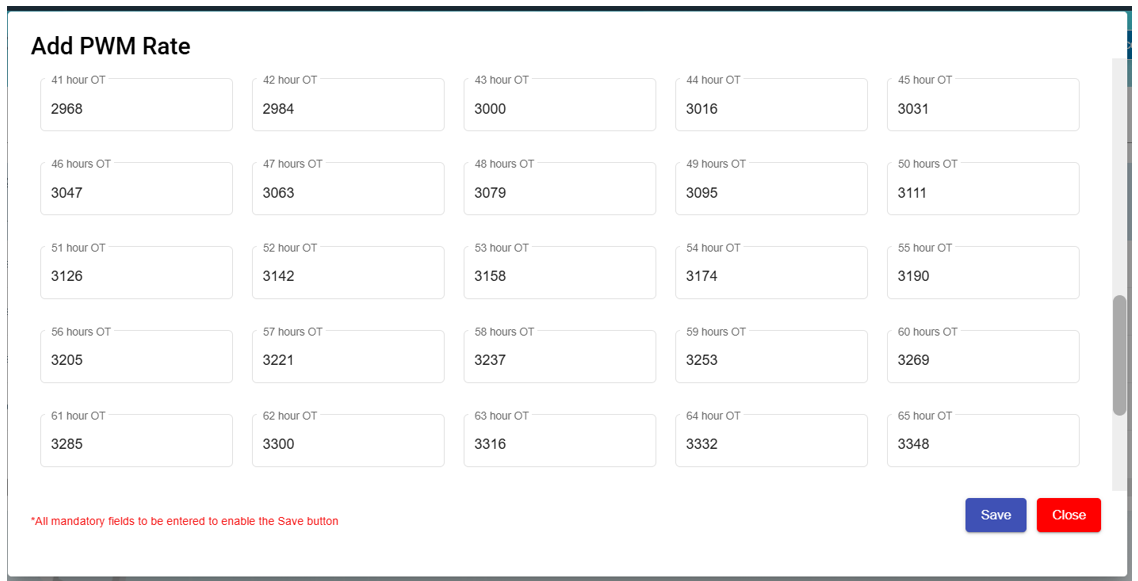
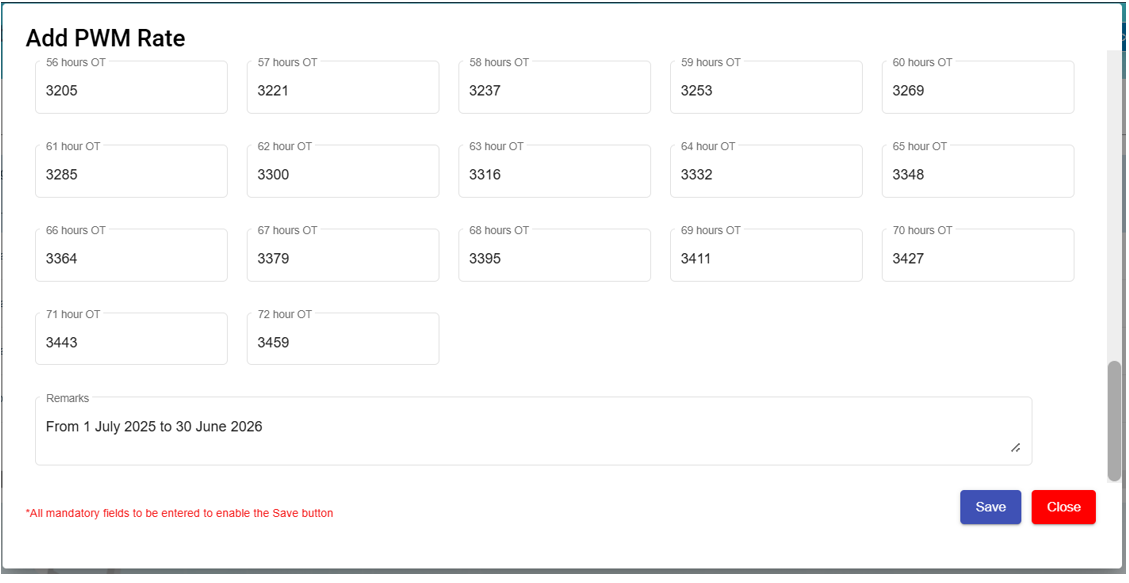
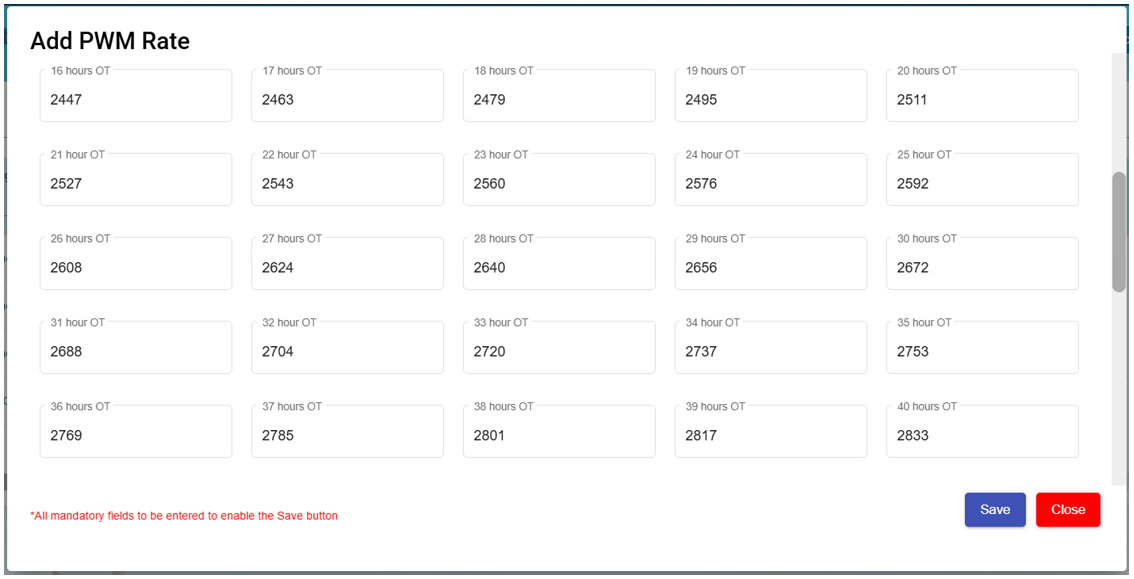
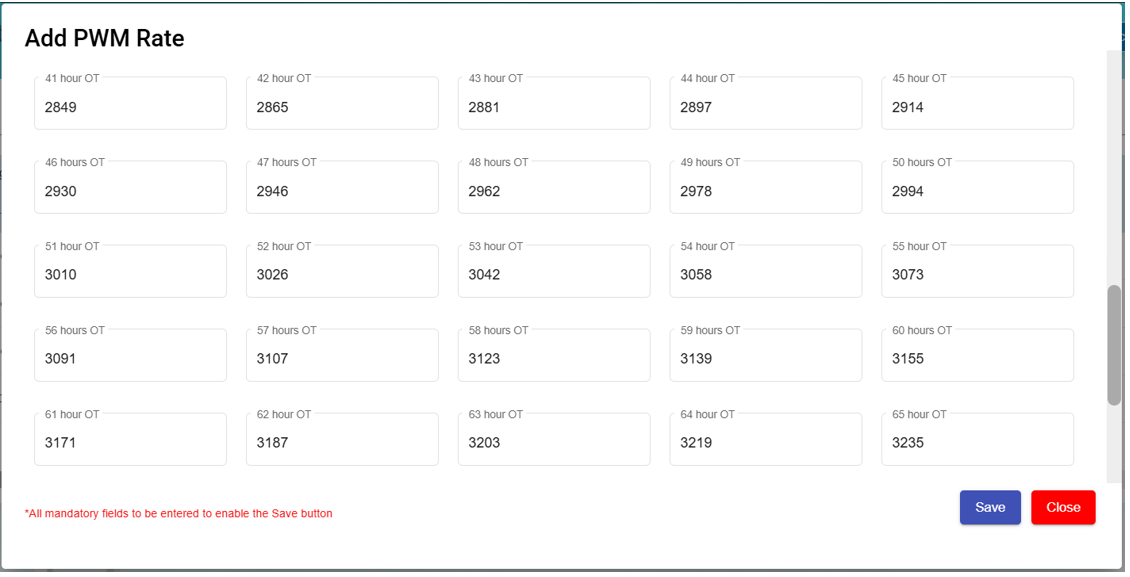
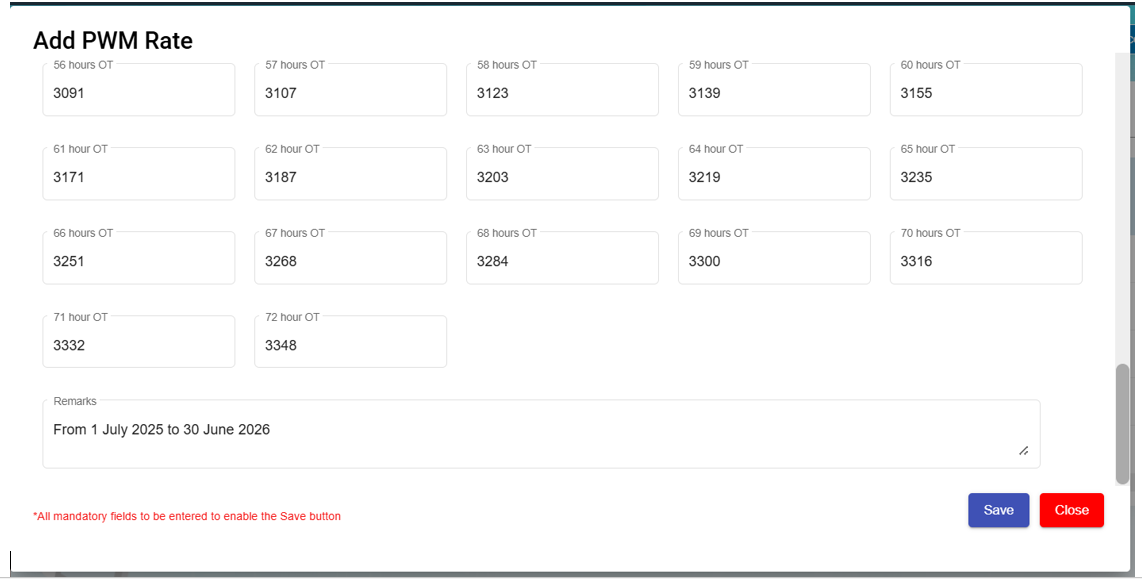
Progressive Wage Model (PWM) is set at each job level and this is to enable rank-and-file local workers to climb the wage ladder and provides for a minimum wage, improving overall productivity and in turn creating increased sustainable economic growth. PWM jobs are roles in cleaning, security, landscape, lift and escalator, retail, F&B services and waste management that have structured wages based on skills and productivity as per Ministry of Manpower (MOM). This PWM on Occupational Progressive Wages (OPW) Job Level Administrative Assistant, Administrative Executive, Administrative Supervisor, General Driver and Specialised Driver will contain OT hours up to 72 hours as stipulated by MOM.
PWM covers Singapore citizens and Singapore permanent residents working full-time or part-time under a contract of service employed by the company who has registered and qualified for the Progressive Wage (PW) Mark.
Below extract from MOM site on the administrative and driving roles being covered.
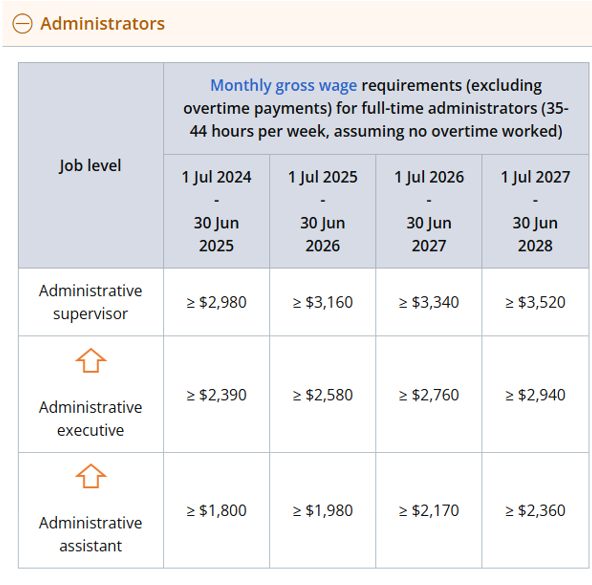
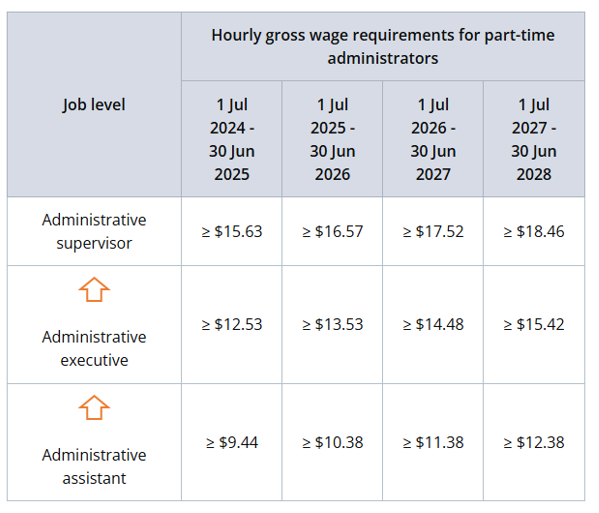
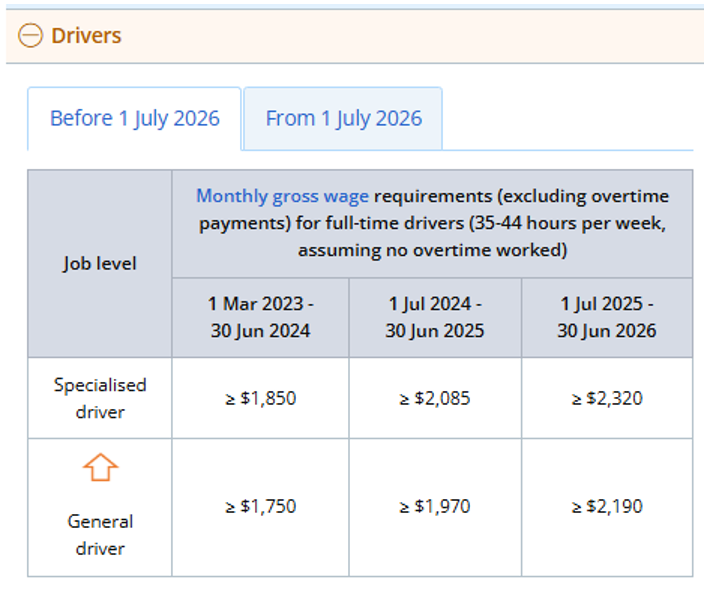
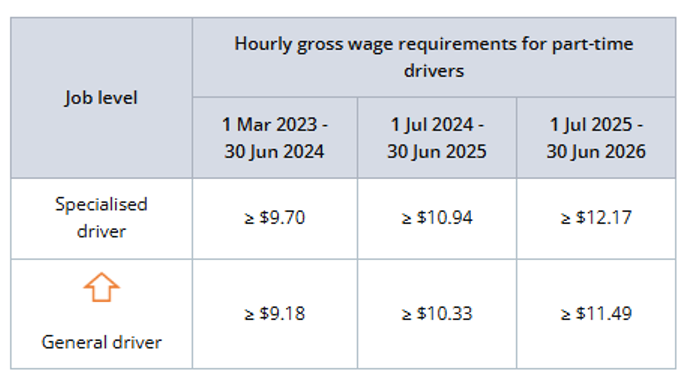
PWM setup:
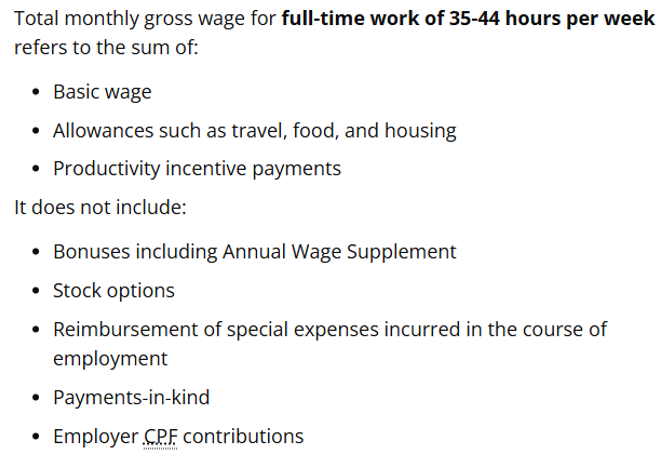
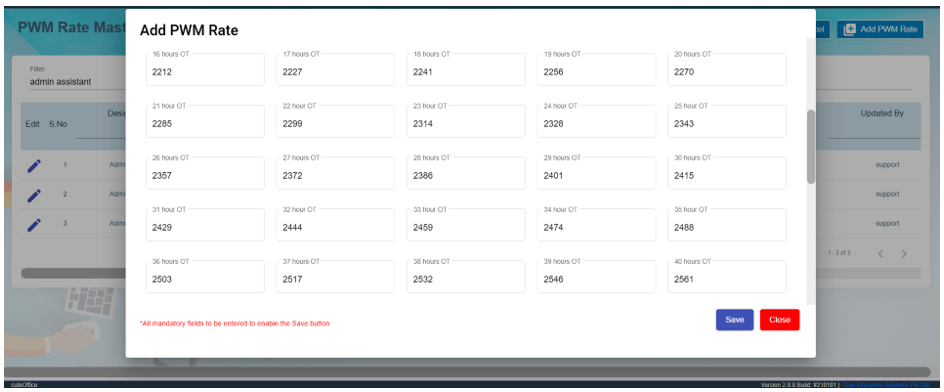
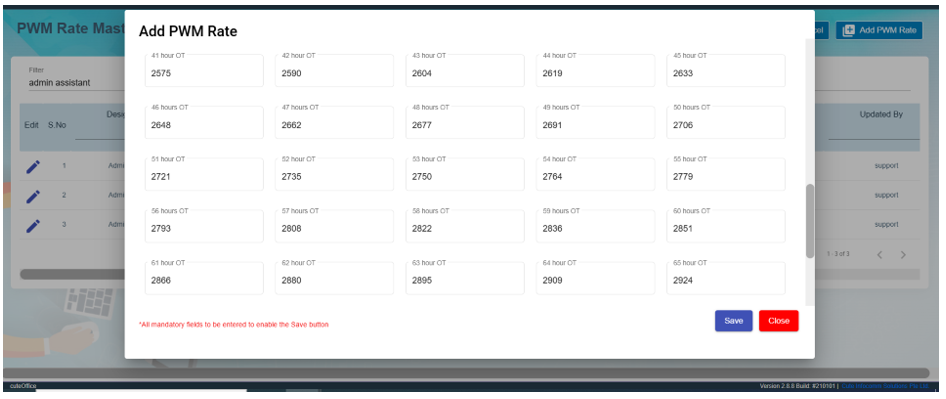
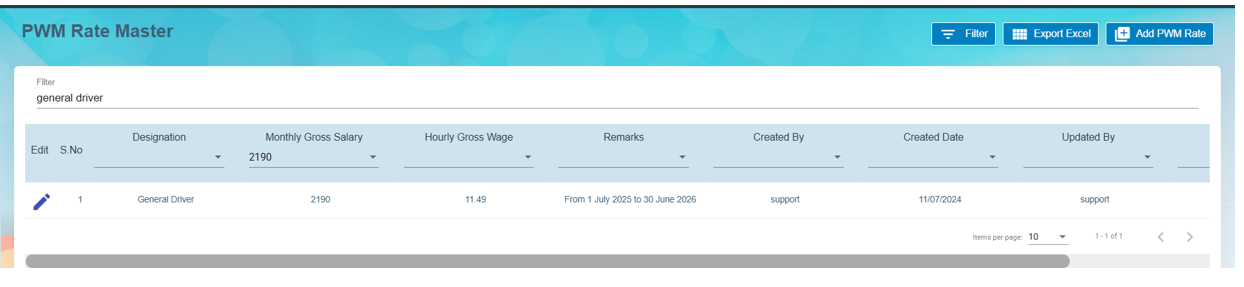
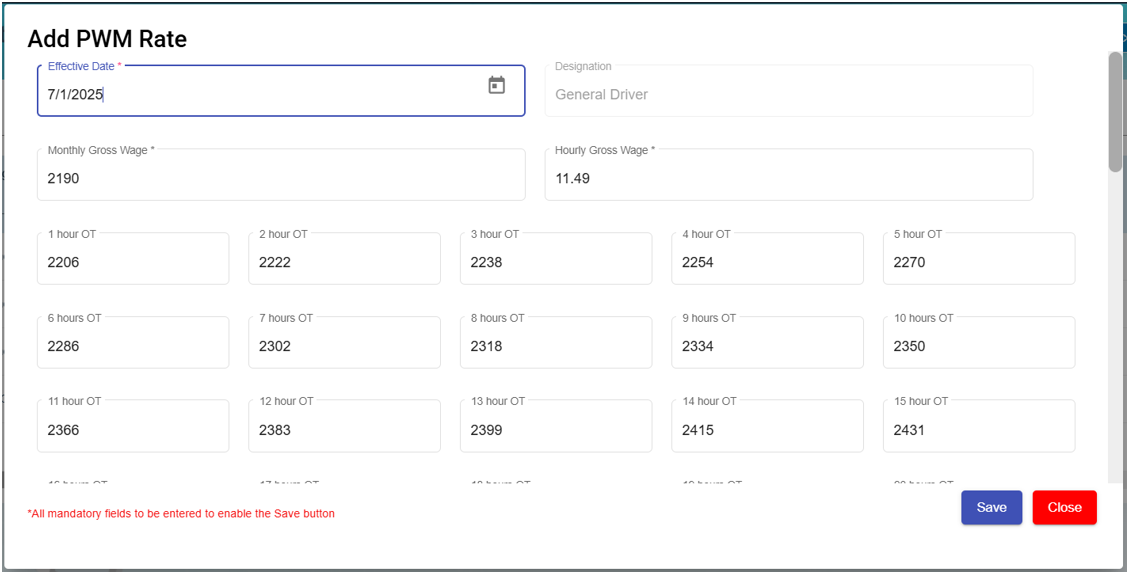
1) PWM Rate Master on administrators and drivers
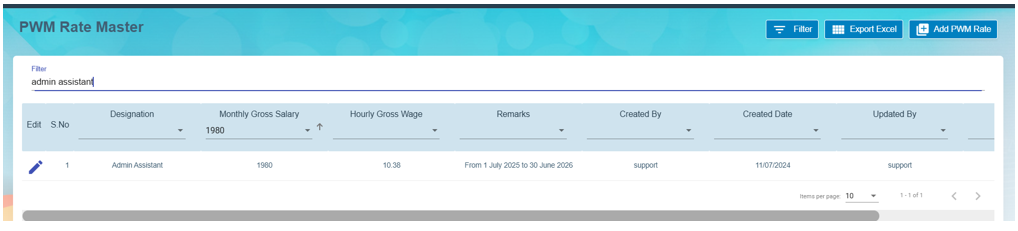
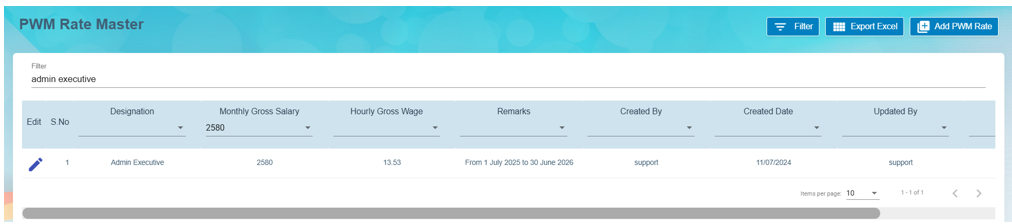
Detailed salary based on the no. of OT hours worked
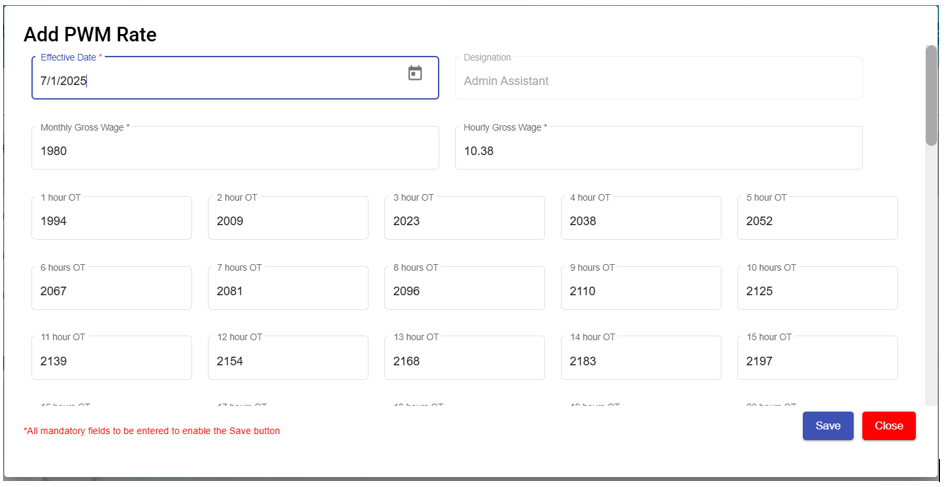
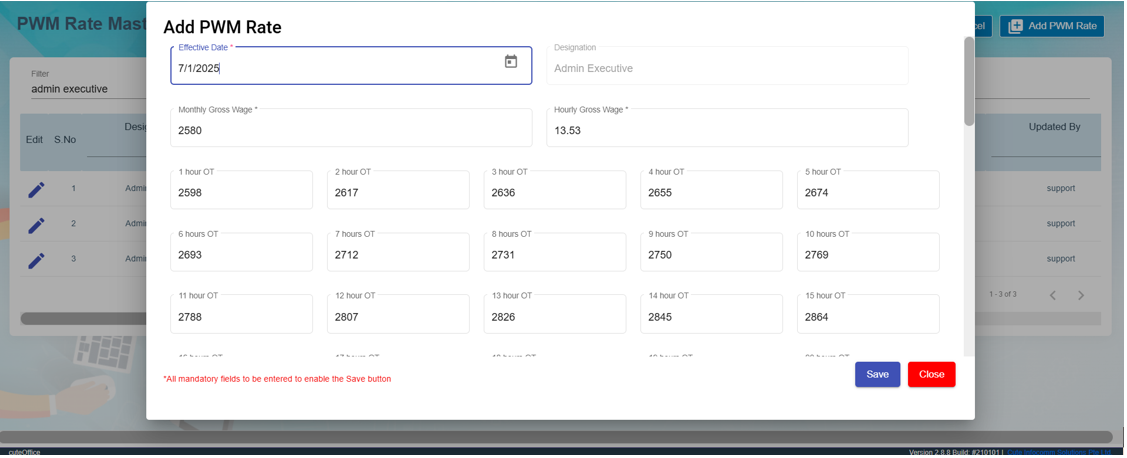

Administrative Supervisors are not subject to additional PWM gross wage requirements for overtime hours, as most of such employees will exceed the $2,600 wage threshold and will not be covered by Part 4 of the Employment Act.
2) HRM Trade Master
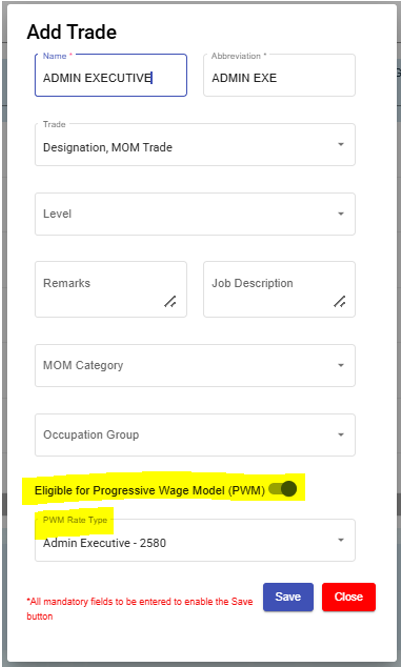
Eligible for Progressive Wage Model (PWM) set to true and need to select the PWM Rate Type to link to the PWM Rate Master.
PWM calculation

Employee is setup with MOM trade as Admin Executive in his HRM Official Information page and this MOM trade is linked to the HRM Trade Master setup.
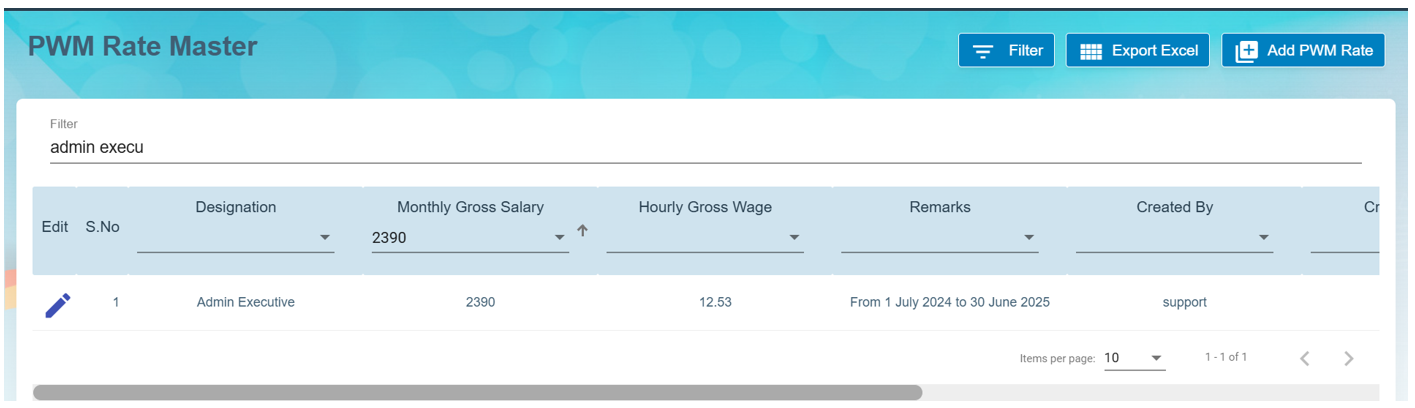
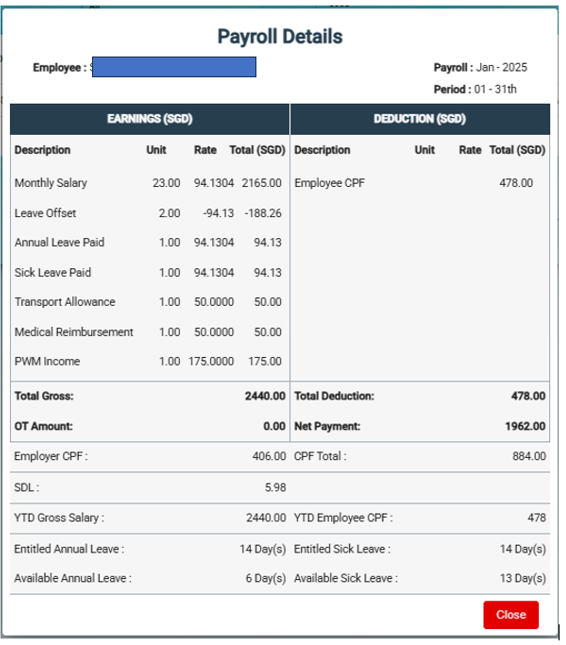
Based on the employee's MOM trade and PWM Rate Master setup for Admin Executive and due to no OT by this employee for the payroll month, PWM Income is calculated as PWM Minimum Salary minus the employee's monthly salary for the payroll month and minus transport allowance.
PWM Income = 2390 – 2165 – 50 = 175
Special Payroll Processes
- Generate Two CPF Payments with Two Pay Slip for an Employee
- CPF contribution for National Service Leave
- Add payment date in Payroll Staging Manually
- Salary Advance
Generate Two CPF Payments with Two Pay Slip for an Employee
If you want to generate two CPF payments for an employee, do the following steps,
- In the Employee List page in payroll module select an employee for whom you want to generate two CPF accounts. The Employee Details page opens and shows the selected employee data.
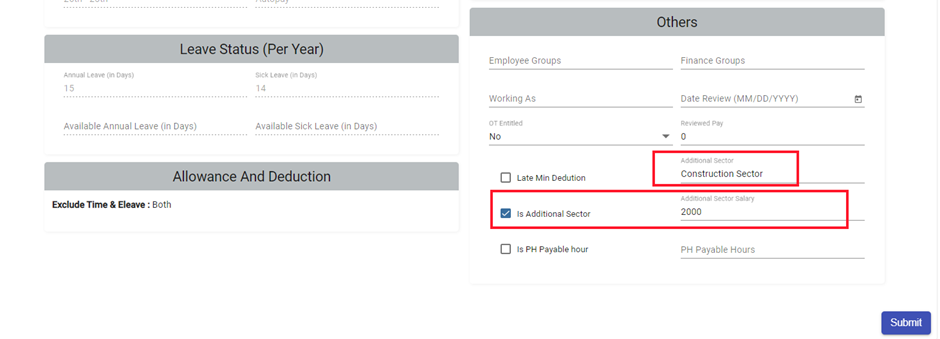
- Select the checkbox of the Is Additional Sector
- In the Additional Sector box, enter the name of the additional sector.
- In the Additional Sector Salary box, enter the salary of the added additional sector.
- Click Submit.
- Navigate to the CPF Account field.
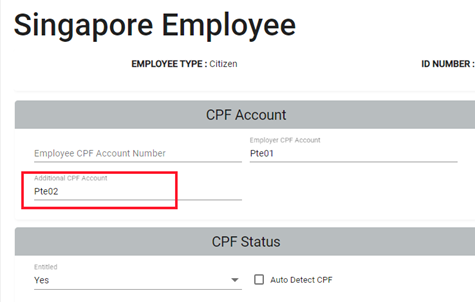
- In the Additional CPF Account box, select the additional CPF account name.
- Navigate to the Generate Payroll page.

- Select the employee for whom you have added the additional sector and generate Payroll.
- Navigate to Payroll in Staging page and select the particular employee. You will see two records such as one is configured salary and another one is additional sector salary.

Note: After approving both the records, you can generate and view two pay slips for the same employee. While generating the CPF File Submission, these two records will be placed in different CPF accounts, which are configured for the employee.
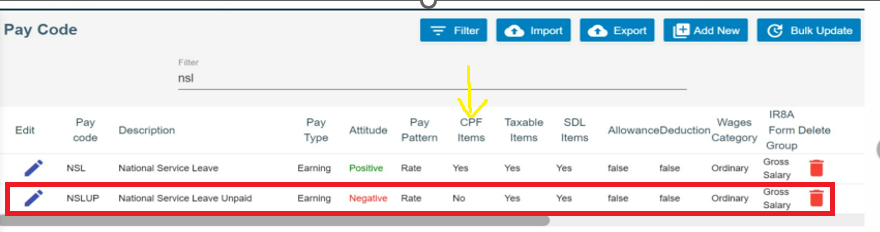
CPF contribution for National Service Leave
The purpose of this document is to narrate the CPF contribution of an employer to the employee for both paid and unpaid National Service Leave. cuteOffice Application facilitates user to configure CPF parameter in National service leave pay code for both paid and unpaid components.
Scenario 1: Employer should continue to pay CPF contributions on the total wages payable to employee for NS paid, even though employee is away from work for NS training.
- Navigate to: Payroll Master -> pay code, define NSL pay code (National Service Leave) with CPF as “Yes”.
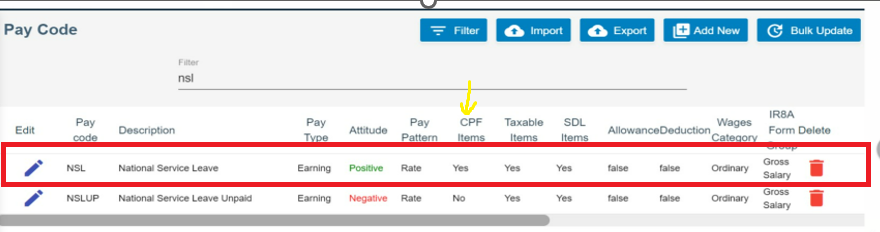
- Navigate to: Admin-> Company-> Settings -> National service leave -> Edit, the value can be configured based on the client requirement.

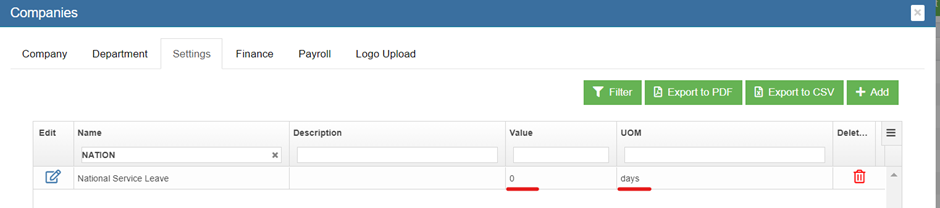
Scenario 2: Employer should continue to pay CPF contributions on the total wages payable to employee for NS unpaid for the employee away from work for NS training.
- Navigate to: Payroll Master -> pay code, define NSLUP pay code (National Service Leave Unpaid) with CPF as “No”.

- Navigate to: Admin-> Company-> Settings -> National service leave -> Edit, the value should be set as ”0” (Zero).
Example CPF details for an Employee with both paid and unpaid NS
An employee (emp 1001) draws a salary of $ 5000 per month and has 5 days NS for the current month, the above screen shots details are to be configured to facilitate CPF contribution while processing the payroll in the cuteOffice at the end of the month.
Calculate CPF contributions payable on Additional Wages
1. Enter wages for the year
- Ordinary Wage (OW)
- Additional Wage (AW)
2. CPF contribution rules
- CPF contribution on OW are subject to a monthly ceiling.
- From 1st Jan 2026, OW ceiling is $8000 per month.
- If an employee's total annual wages exceed $ 1,02,000, the AW ceiling will apply.
Example Calculation
Scenario: An employee earns a monthly salary of $ 6850 and received a bonus $ 25000 in April.
Step-by-step calculation:
- Annual OW = $ 6850 * 12 = $ 82,200.
- Bonus of $ 25000 is treated as AW under CPF
- Total wages = $ 82200+ $ 25000 =$ 107000
AW Ceiling Calculation:
- AW Ceiling = $102000-$82200=$19800
- CPF is only payable on $19800 of the bonus (not the full $25000)
CPF Contribution Computation (<=55 years old)
- Total CPF rate: 37% (Employee 20% & Employer 17%)
- CPF on monthly OW: 37%* 6850 = $ 2535
- CPF on AW: 37% * 19800 =$ 7326
Total CPF Contribution Payable
- OW CPF: $2535
- AW CPF:$7326
- Total CPF payable : $9861
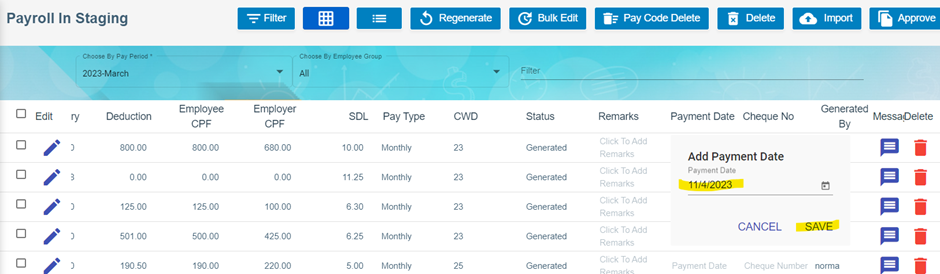
Add payment date in Payroll Staging Manually
- Navigate to Payroll module, navigate to Admin -> Settings, click to enable "Manually add pay date in Staging" option, then click Submit to confirm above option setting.
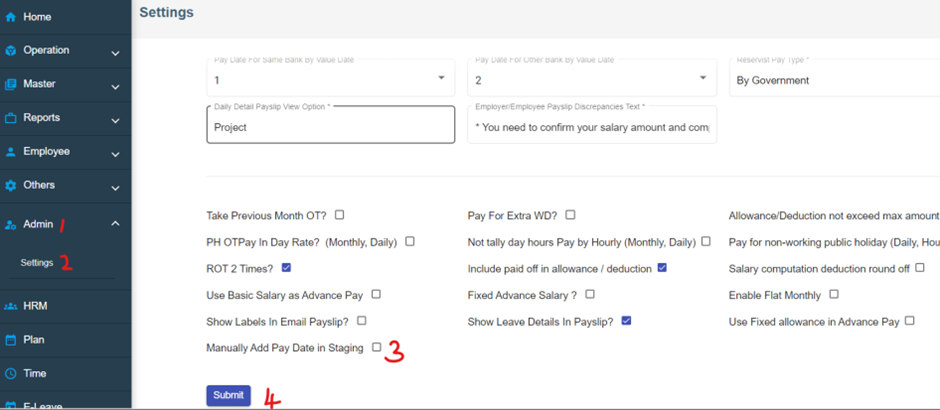
- To add pay-date for an employee, navigate to Payroll -> Operations -> Payroll Staging. Navigate to Payment Date column in payroll staging page. With settings in above step, the add pay date manually will be enabled for all employees. (Note: By default manual add pay date is available only for employee who is resigned and pay mode is “cheque”)

- Click on the relevant cell in Payment Date column, a pop-up window will show as below, user can select payment date from calendar and click SAVE to save dates.
Validation of Payment Date on the Payslip
Condition applied to setup the payment date in the payslip:
- If the Payment date is available in the Payroll in Staging, payslip contains that as a payment date.
- If the payment date is not available and GIRO BANK file generated, the payment date in the payslip will be based on the value date mentioned in the GIRO Bank File.
- if there is no payment date as well as GIRO bank generation, eventually payroll approved date will be considered as a payment date.
Conditions applied to check the GIRO value date with value date in the Payroll Settings
- Created date and Value date can be same or different while generating Giro bank file.
- The value date has been considered based on the settings in the payroll for the same bank and other banks between employer and employees.
- Value date set as either zero or one to process the payment to the employees for the same bank on the same day or next working day.
- Value date should be equal to or more than 2 days to process payment for the other banks in the next 2 working days or more.
- Based on the working days, the system will calculate actual value date and display as payment date in the Payslip.
Salary Advance
To generate advance salary,
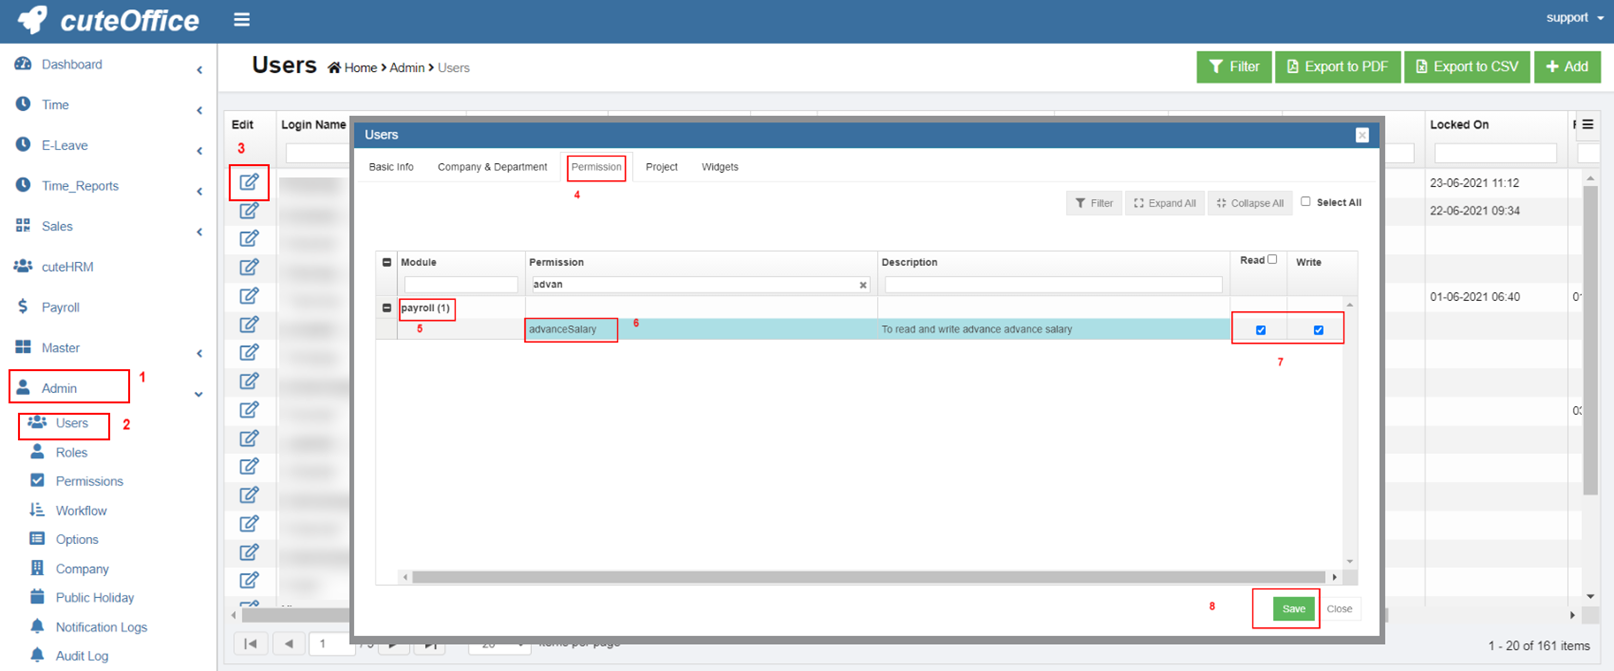
- Navigate to system Admin -> Users->Permissions, in payroll module, search and enable both write and read permission "advanceSalary" for the user who needs to process advance salary. This step will enable user's permission to view advance salary in Payroll.
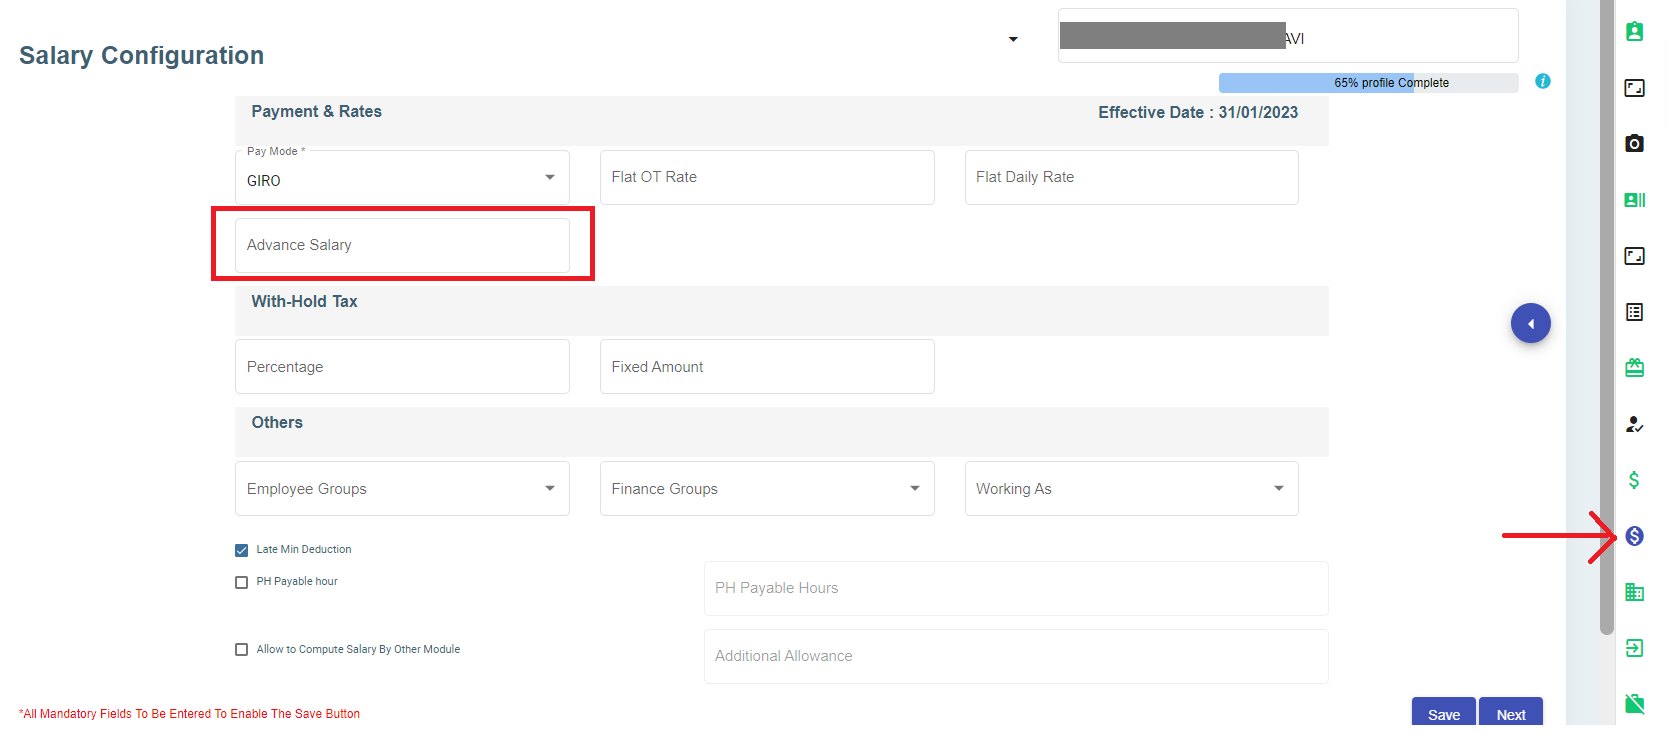
- Navigate to HRM module, search for an employee to pay a portion of basic salary as an advance, and navigate to the employee's HRM salary configuration page, in Advance Salary field, enter the amount of advance salary, click Save.

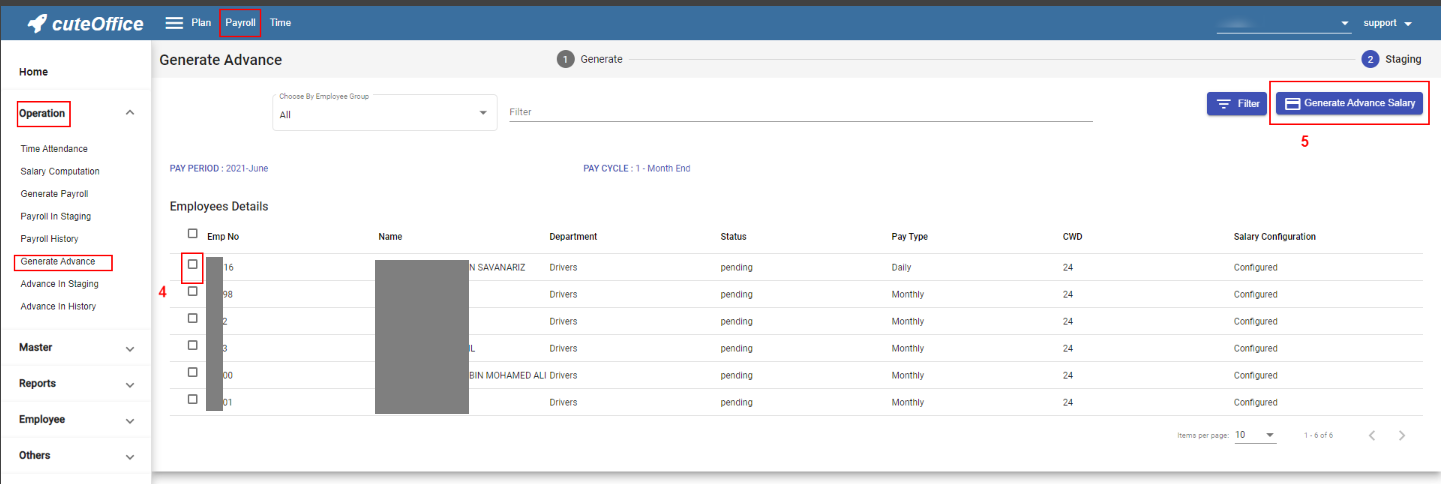
- Navigate to Payroll module, go to operation -> Generate Advance to open generate advance page as below,
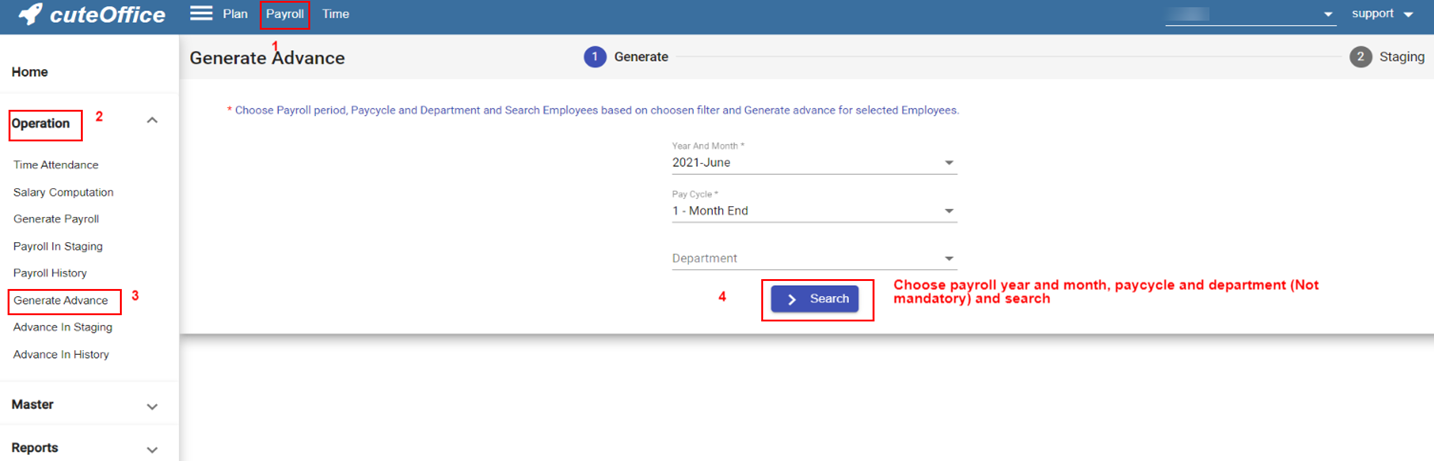
- Choose relevant search criteria such as payroll year and month, paycycle or department, then click search. A list of employees who have configured advance salary in HRM and meet search criteria will display,
-
User can either tick to select all employee or specific employees and click Generate Advance Salary button at the top right corner in the generate advance page.
-
Generated advance salary data will be moved to Advance In staging section. Where user can regenerate/delete/ approve for advance salary in staging in bulk or individually. User can also use the
 edit option to edit existing detail pay data.
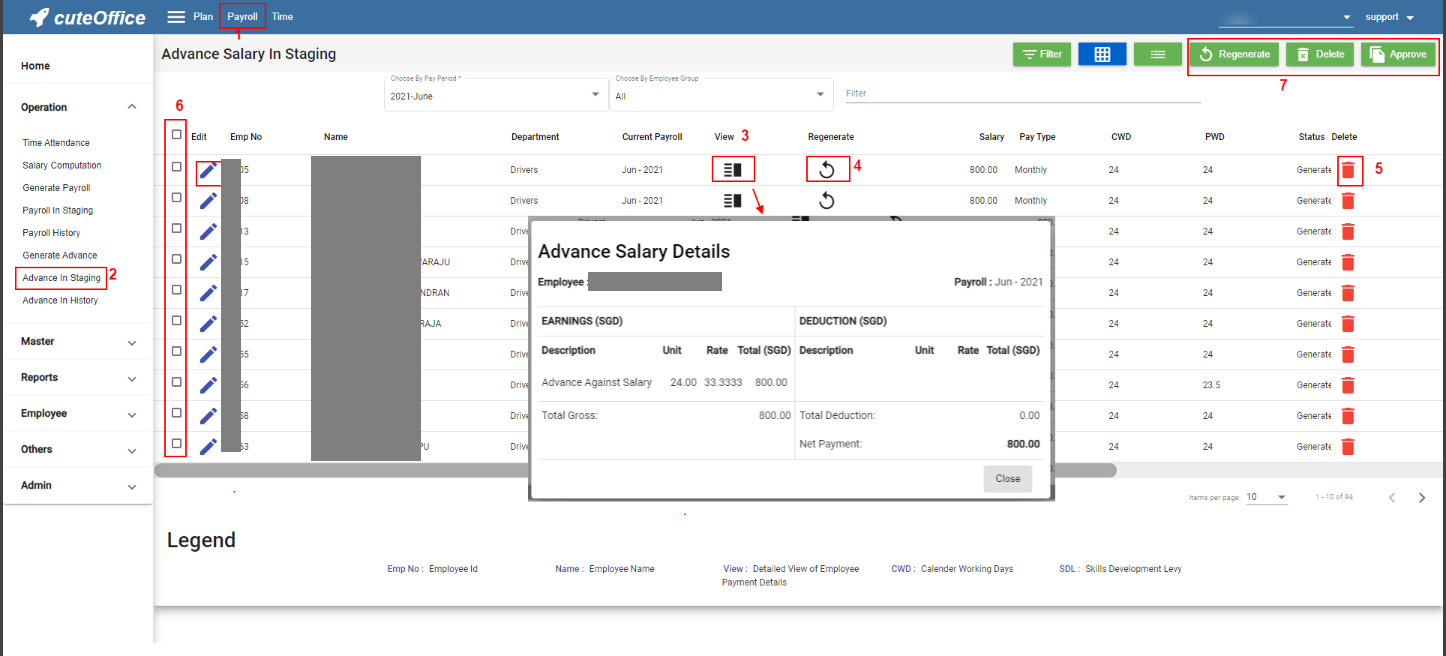


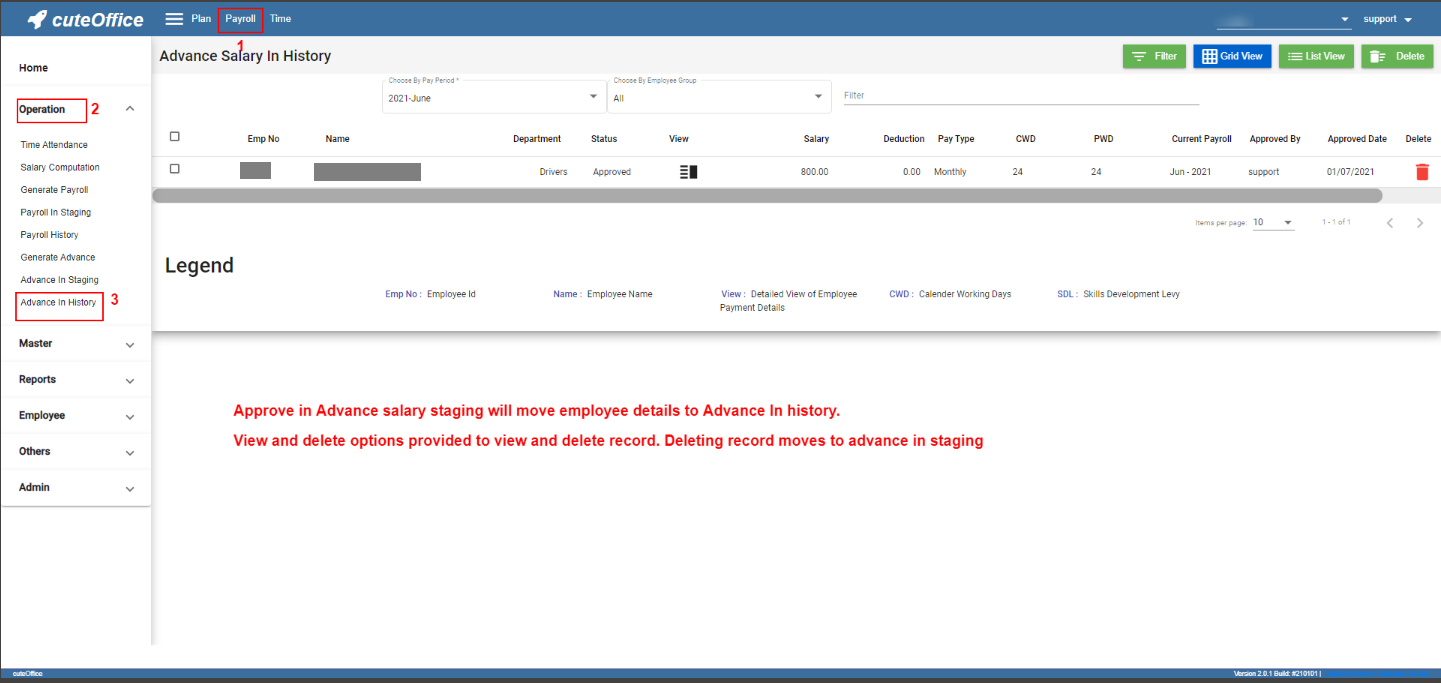
Once advance salary in staging is approved, advance salary data will move to Advance in History section,
Customized Advance Salary based on client requirement as follows
- Based on number of days worked, the basic salary will be calculated and pay as an advance salary.
- Another method, the generate advance salary without entering the value in HRM Payroll Salary information page. The advance of $1 will be available for the generated employees. Edit the advance salary in the Advance payroll staging and enter the value in it or else $1 will be added to the employees' salary.
Reports
- Pay Slip
- Payroll Journal Report
- Payroll Register Report
- Payroll Summary Report
- Cheque Register Report
- Donation Report
- Liabilities Report
- Yearly Payroll Report
- Generate CPF Submission File
- Generate GIRO Bank File
- AIS submission
Pay Slip
The Pay Slip tab in the Reports submenu used to generate and view the pay slip of employee.
To generate the pay slip,
- Click Pay Slip in the Reports. The Pay Slip page opens.
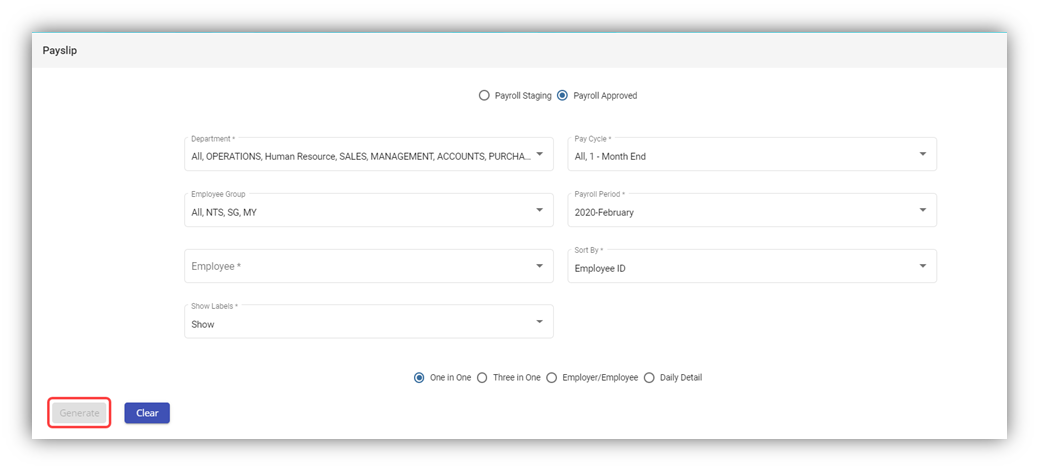
Note: You can generate the pay slip of any employee in both the Payroll in Staging and Payroll history (Approved) stages.
- On top of pay slip window, select any one of Payroll in Staging or Payroll Approved.
- In the Department box, select a department from a drop-down list.
Note: If you want to select all the departments in the list, select the checkbox of the ALL.
- In the Pay Cycle box, select a pay cycle from a drop-down list.
Note: If you want to select all the pay cycles in the list, select the checkbox of the ALL.
- In the Employee Group box, select an employee group from a drop-down list.
Note: If you want to select all the employee groups in the list, select the checkbox of the ALL.
- In the Payroll Period box, select a payroll period from a drop-down list.
Note: If you want to select all the payroll periods in the list, select the checkbox of the ALL.
- In the Employee box, select an employee from a drop-down list.
Note: If you want to select all the employees in the list, select the checkbox of the ALL.
- If you want to generate the pay slip based on the Employee ID or Employee Name, select the respective option in the Sort By box.
- If you want to show the labels, select Show otherwise select Hide from the Show Labels box.
Note: You can generate the pay slip in four type of formats.
- Select the respective format in which you want to generate the pay slip, e.g. one in one, three in one
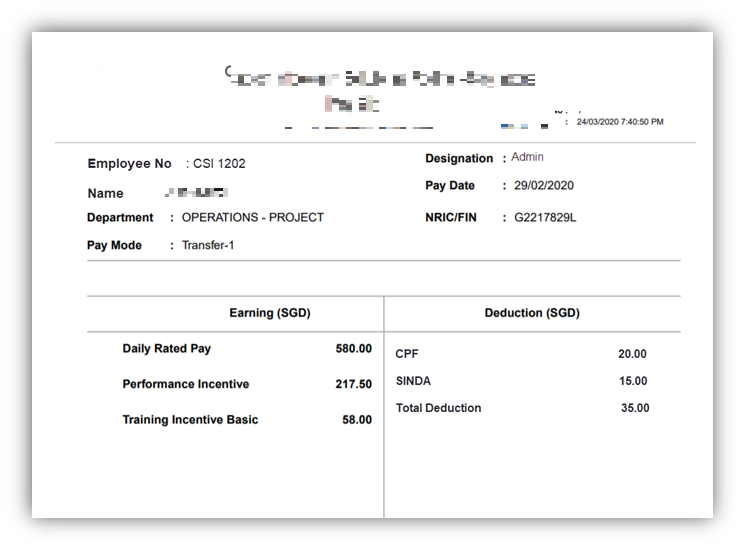
- Click Generate. The pay slip will be generated and downloaded as a PDF file in the selected format, see below as an example.
Note: If you are using the Epson Printer to print the generated pay slip, you need do set the printer settings. To know how to do setup, refer the document, “Epson Printer Setup to Print a Pay Slip”.
Payroll Journal Report
The Payroll Journal tab in the Reports submenu used to generate and view the payroll journal report of the employee. The payroll journal summary report used to check the payroll process of the employee.
To generate and view the payroll journal summary report,
- Click Payroll Journal in the Reports, the Payroll Journal page opens.
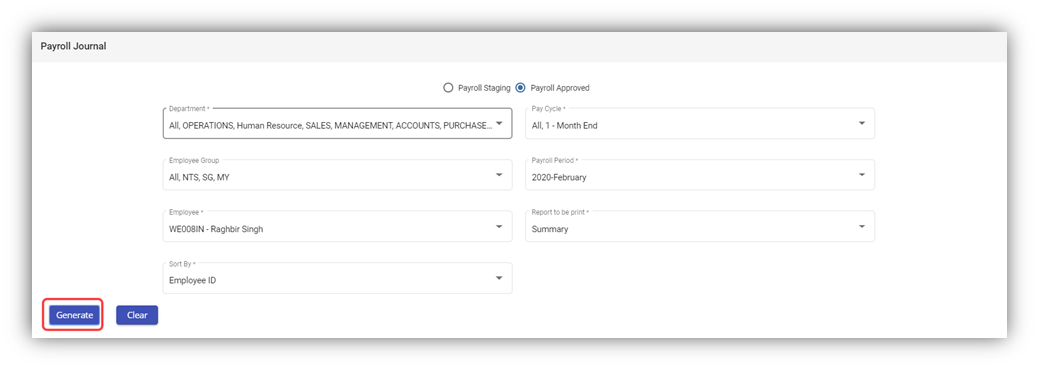
Note: You can generate the payroll journal for any employee in both the Payroll in Staging and Payroll Approved stages.
- Select any one of Payroll in Staging or Payroll Approved.
- In the Department box, select a department from a drop-down list.
Note: If you want to select all the departments in the list, select the checkbox of the ALL.
- In the Pay Cycle box, select a pay cycle from a drop-down list.
Note: If you want to select all the pay cycles in the list, select the checkbox of the ALL.
- In the Employee Group box, select an employee group from a drop-down list.
Note: If you want to select all the employee groups in the list, select the checkbox of the ALL.
- In the Payroll Period box, select a payroll period from a drop-down list.
Note: If you want to select all the payroll periods in the list, select the checkbox of the ALL.
- In the Employee box, select an employee from a drop-down list.
Note: If you want to select all the employees in the list, select the checkbox of the ALL.
- In the Report to be print box, if you want to generate the payroll journal as a summary report, select Summary or if you want to generate the payroll journal as a detail report, select Detail.
- If you want to generate the payroll journal summary report based on the Employee ID or Employee Name, select the respective option in the Sort By
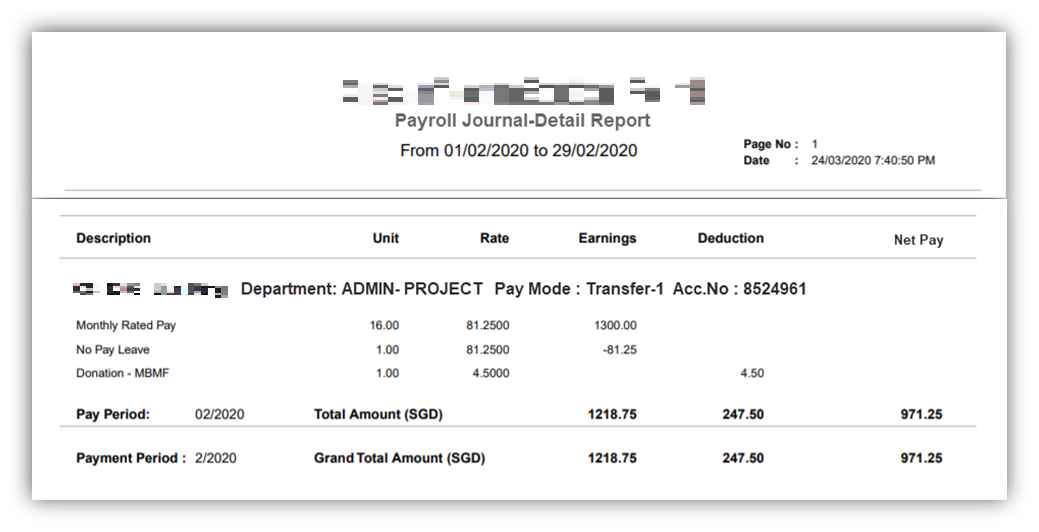
- Click Generate. The payroll journal report will be generated and downloaded as a PDF file. See below as an example.

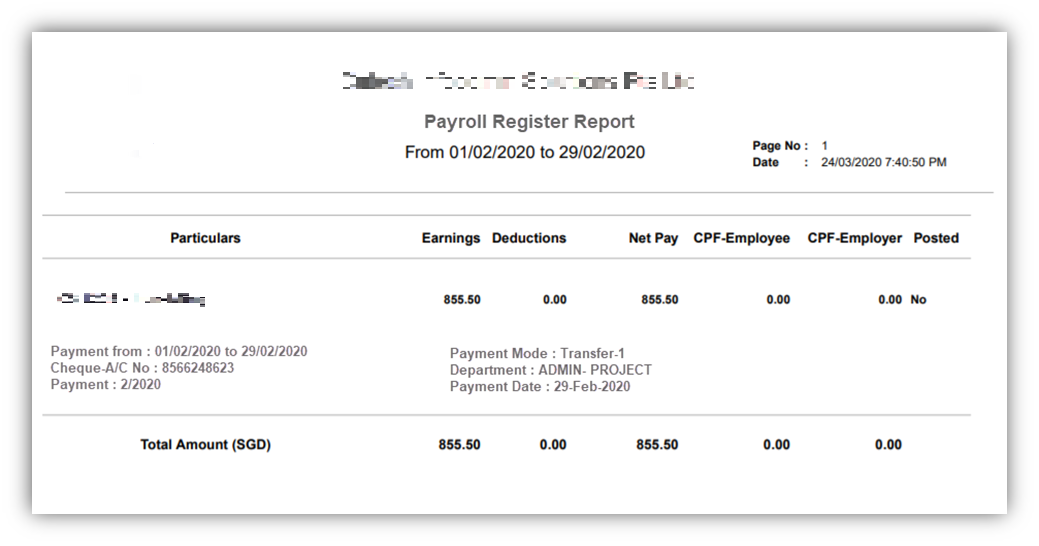
Payroll Register Report
The Payroll Register tab in the Reports submenu used to generate and view the payroll register report of the employee. The payroll register report shows the CPF detail of the local employee.
To generate and view the payroll register report,
- Click Payroll Register in the Reports, the Payroll Register page opens.

Note: You can generate the payroll register for any employee in both the Payroll in Staging and Payroll Approved stages.
- Select any one of Payroll in Staging or Payroll Approved.
- In the Department box, select a department from a drop-down list.
Note: If you want to select all the departments in the list, select the checkbox of the ALL.
- In the Pay Cycle box, select a pay cycle from a drop-down list.
Note: If you want to select all the pay cycles in the list, select the checkbox of the ALL.
- In the Employee Group box, select an employee group from a drop-down list.
Note: If you want to select all the employee groups in the list, select the checkbox of the ALL.
- In the Payroll Period box, select a payroll period from a drop-down list.
Note: If you want to select all the payroll periods in the list, select the checkbox of the ALL.
- In the Employee box, select an employee from a drop-down list.
Note: If you want to select all the employees in the list, select the checkbox of the ALL.
- If you want to generate the payroll journal summary report based on the Employee ID or Employee Name, select the respective option in the Sort By box.
- Click Generate. The payroll register report will be generated and downloaded as a PDF file. See below as an example.

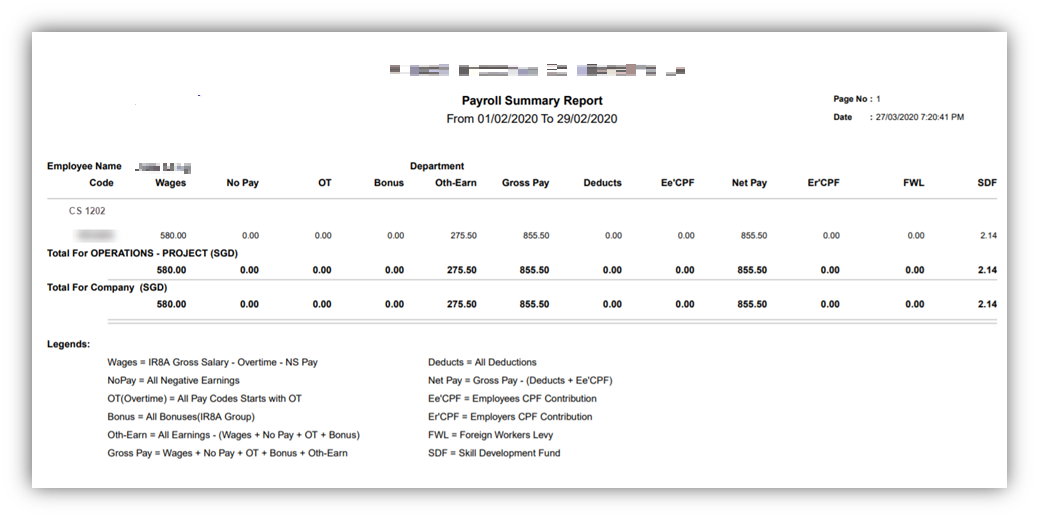
Payroll Summary Report
The Payroll Summary tab in the Reports submenu used to generate and view the payroll summary report of the employee. The payroll summary report shows the CPF detail of the local employee.
To generate and view the payroll summary report,
- Click Payroll Summary in the Reports, the Payroll Summary page opens.
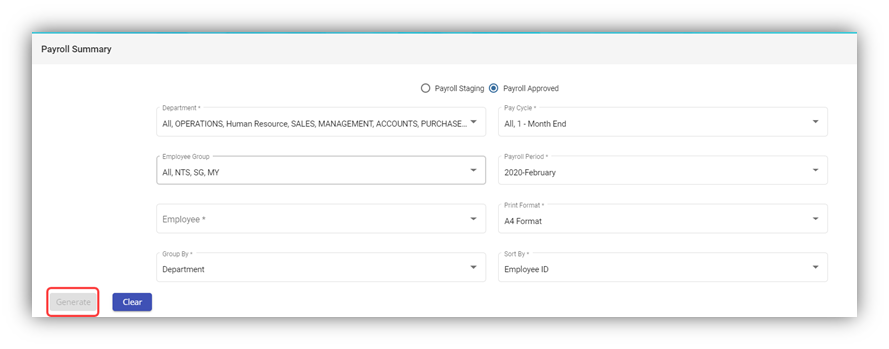 Note: You can generate the payroll summary for any employee in both the Payroll in Staging and Payroll Approved stages.
- Select any one of Payroll in Staging or Payroll Approved.
- In the Department box, select a department from a drop-down list.
Note: If you want to select all the departments in the list, select the checkbox of the ALL.
- In the Pay Cycle box, select a pay cycle from a drop-down list.
Note: If you want to select all the pay cycles in the list, select the checkbox of the ALL.
- In the Employee Group box, select an employee group from a drop-down list.
Note: If you want to select all the employee groups in the list, select the checkbox of the ALL.
- In the Payroll Period box, select a payroll period from a drop-down list.
Note: If you want to select all the payroll periods in the list, select the checkbox of the ALL.
- In the Employee box, select an employee from a drop-down list.
Note: If you want to select all the employees in the list, select the checkbox of the ALL.
- In the Print Format box, select the print format from the given list.
- In the Group by box, select the grouping mode of employees from the options such as Department, Employee Group, and Pay Mode.
Note: The grouping mode options such as Pay Mode and Employee Group are reflected from the Employee submenu.
- If you want to generate the payroll journal summary report based on the Employee ID or Employee Name, select the respective option in the Sort By box.
- Click Generate. The payroll summary report will be generated and downloaded as a PDF file. See below as an example.

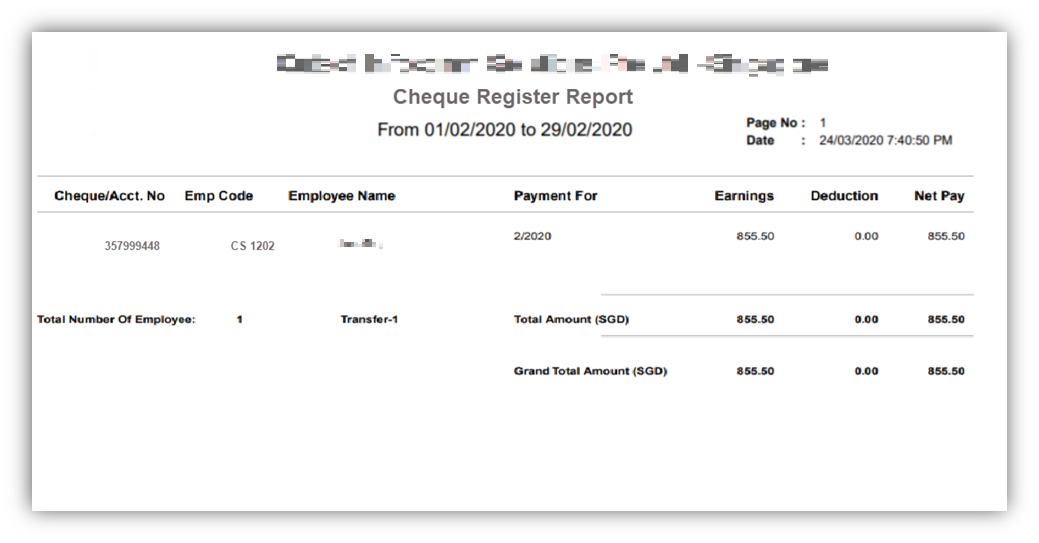
Cheque Register Report
The Cheque Register tab in the Reports submenu used to generate and view the cheque register report of the employee. The cheque register report shows the issued cheque detail of the employee.
To generate and view the cheque register report,
- Click Cheque Register in the Reports, the Cheque Register page opens.
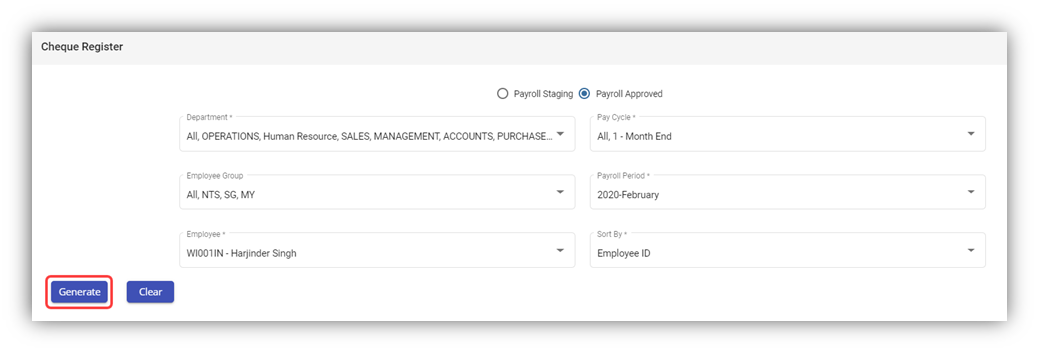 Note: You can generate the cheque register report for any employee in both the Payroll in Staging and Payroll Approved stages.
- Select any one from Payroll in Staging or Payroll Approved.
- In the Department box, select a department from a drop-down list.
Note: If you want to select all the departments in the list, select the checkbox of the ALL.
- In the Pay Cycle box, select a pay cycle from a drop-down list.
Note: If you want to select all the pay cycles in the list, select the checkbox of the ALL.
- In the Employee Group box, select an employee group from a drop-down list.
Note: If you want to select all the employee groups in the list, select the checkbox of the ALL.
- In the Payroll Period box, select a payroll period from a drop-down list.
Note: If you want to select all the payroll periods in the list, select the checkbox of the ALL.
- In the Employee box, select an employee from a drop-down list.
Note: If you want to select all the employees in the list, select the checkbox of the ALL.
- If you want to generate the payroll journal summary report based on the Employee ID or Employee Name, select the respective option in the Sort By box.
- Click Generate. The cheque register report will be generated and downloaded as a PDF file. See below as an example.
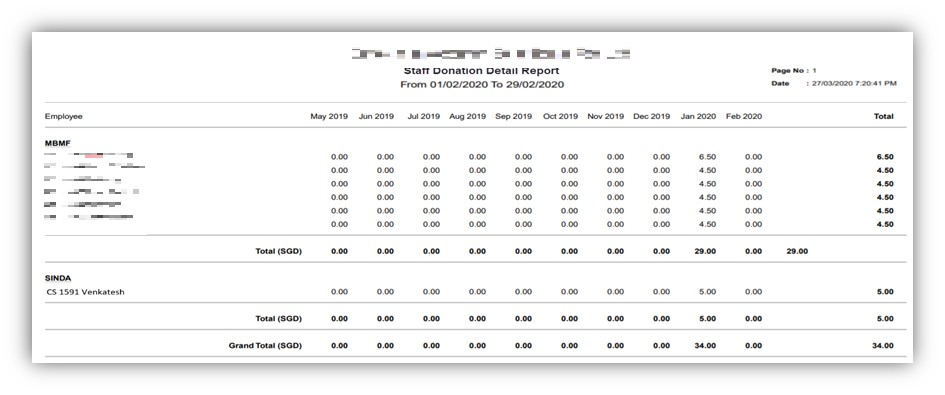
Donation Report
The Donation Report tab in the Reports submenu used to generate and view the donation report of the employee. The donation report shows the amount deducted for donation given by the employee.
To generate and view the donation report,
- Click Donation Report in the Reports, the Donation Report page opens.
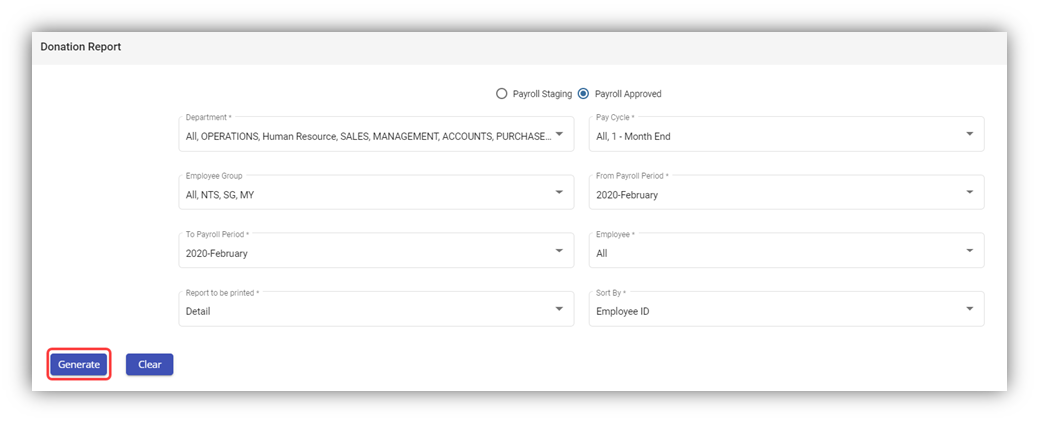 Note: You can generate the donation report for any employee in both the Payroll in Staging and Payroll Approved stages.
- Select any one from Payroll in Staging or Payroll Approved.
- In the Department box, select a department from a drop-down list.
Note: If you want to select all the departments in the list, select the checkbox of the ALL.
- In the Pay Cycle box, select a pay cycle from a drop-down list.
Note: If you want to select all the pay cycles in the list, select the checkbox of the ALL.
- In the Employee Group box, select an employee group from a drop-down list.
Note: If you want to select all the employee groups in the list, select the checkbox of the ALL.
- In the From Payroll Period and To Payroll Period boxes, select the from and to payroll periods.
- In the Employee box, select an employee from a drop-down list.
Note: If you want to select all the employees in the list, select the checkbox of the ALL.
- In the Report to be print box, if you want to generate the donation report as a summary report, select Summary or if you want to generate the donation report as a detail report, select Detail.
- If you want to generate the payroll journal summary report based on the Employee ID or Employee Name, select the respective option in the Sort By box.
- Click Generate. The donation report will be generated and downloaded as a PDF file. See below as an example.

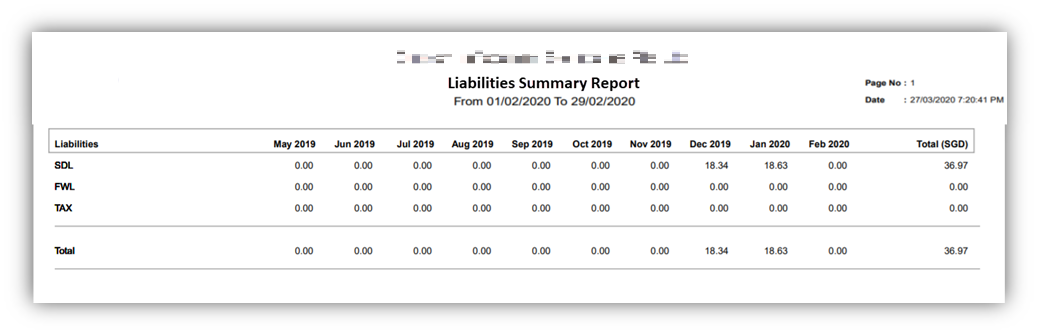
Liabilities Report
The Liabilities tab in the Reports submenu used to generate and view the liabilities report of the employee. The liabilities report shows the details Skill Development Levy (SDL) paid by the company for the particular employee. To generate and view the liabilities report,
- Click Liabilities in the Reports, the Liabilities page opens.
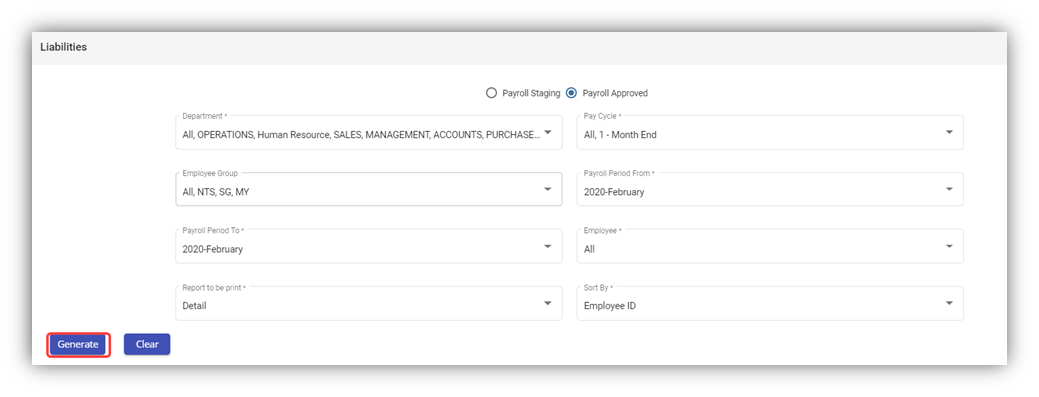 Note: You can generate the liabilities report for any employee in both the Payroll in Staging and Payroll Approved stages.
- Select any one from Payroll in Staging or Payroll Approved.
- In the Department box, select a department from a drop-down list.
Note: If you want to select all the departments in the list, select the checkbox of the ALL.
- In the Pay Cycle box, select a pay cycle from a drop-down list.
Note: If you want to select all the pay cycles in the list, select the checkbox of the ALL.
- In the Employee Group box, select an employee group from a drop-down list.
Note: If you want to select all the employee groups in the list, select the checkbox of the ALL.
- In the Payroll Period From and Payroll Period To boxes, select the from and to payroll periods.
- In the Employee box, select an employee from a drop-down list.
Note: If you want to select all the employees in the list, select the checkbox of the ALL.
- In the Report to be print box, if you want to generate the donation report as a summary report, select Summary or if you want to generate the donation report as a detail report, select Detail.
- If you want to generate the payroll journal summary report based on the Employee ID or Employee Name, select the respective option in the Sort By box.
- Click Generate. The liabilities report will be generated and downloaded as a PDF file. See below as an example.
Yearly Payroll Report
The Yearly Payroll Report tab in the Reports submenu used to generate and view the yearly payroll report of the employee. The yearly payroll report shows the details of the yearly payroll paid by the company for the particular employee.
To generate and view the yearly payroll report,
- Click Yearly Payroll Report in the Reports, the Yearly Payroll Report page opens.
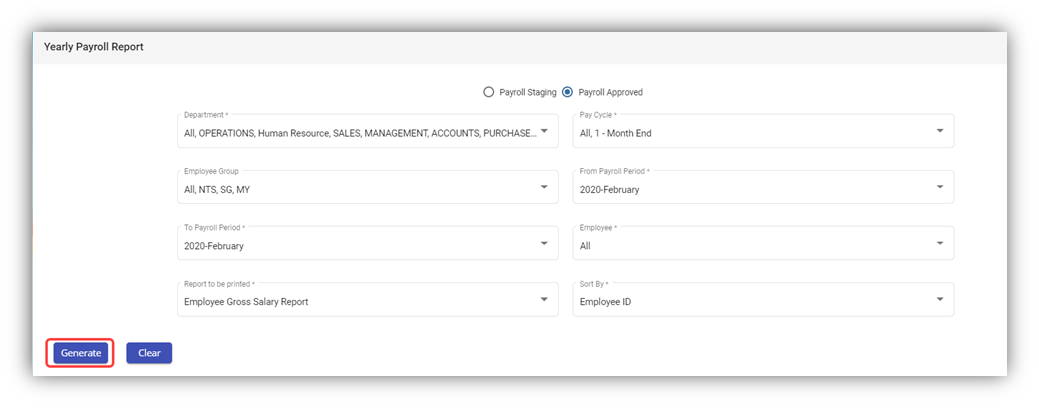 Note: You can generate the yearly payroll report for any employee in both the Payroll in Staging and Payroll Approved stages.
- Select any one from Payroll in Staging or Payroll Approved.
- In the Department box, select a department from a drop-down list.
Note: If you want to select all the departments in the list, select the checkbox of the ALL.
- In the Pay Cycle box, select a pay cycle from a drop-down list.
Note: If you want to select all the pay cycles in the list, select the checkbox of the ALL.
- In the Employee Group box, select an employee group from a drop-down list.
Note: If you want to select all the employee groups in the list, select the checkbox of the ALL.
- In the From Payroll Period and To Payroll Period boxes, select the from and to payroll periods.
- In the Employee box, select an employee from a drop-down list.
Note: If you want to select all the employees in the list, select the checkbox of the ALL.
- In the Report to be print box, if you want to generate the donation report as a summary report, select Summary or if you want to generate the donation report as a detail report, select Detail.
- If you want to generate the payroll journal summary report based on the Employee ID or Employee Name, select the respective option in the Sort By box.
- Click Generate. The yearly payroll report will be generated and downloaded as a PDF file. See below as an example.

Generate CPF Submission File
The Generate CPF Submission File tab in the Reports submenu used to generate and view the CPF submission file of the employee. The CPF submission file shows the details of the CPF submission file for the particular employee.
To generate and view the CPF submission file,
- Click Generate CPF Submission File in the Reports, the Generate CPF Submission File page opens.
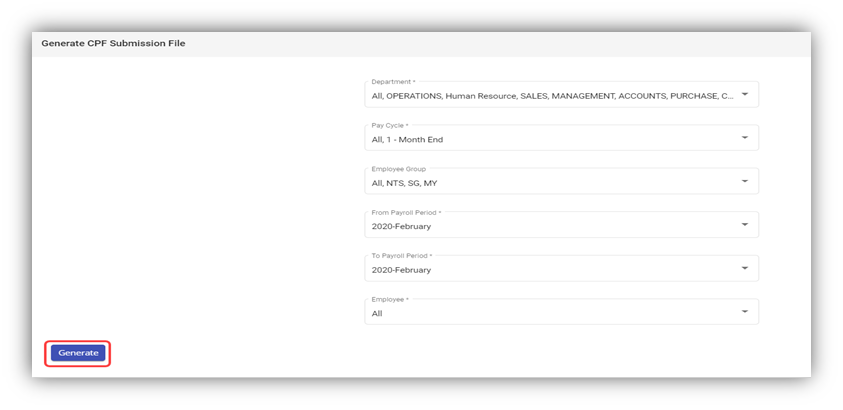
- In the Department box, select a department from a drop-down list.
Note: If you want to select all the departments in the list, select the checkbox of the ALL.
- In the Pay Cycle box, select a pay cycle from a drop-down list.
Note: If you want to select all the pay cycles in the list, select the checkbox of the ALL.
- In the Employee Group box, select an employee group from a drop-down list.
Note: If you want to select all the employee groups in the list, select the checkbox of the ALL.
- In the From Payroll Period and To Payroll Period boxes, select the from and to payroll periods.
- In the Employee box, select an employee from a drop-down list.
Note: If you want to select all the employees in the list, select the checkbox of the ALL.
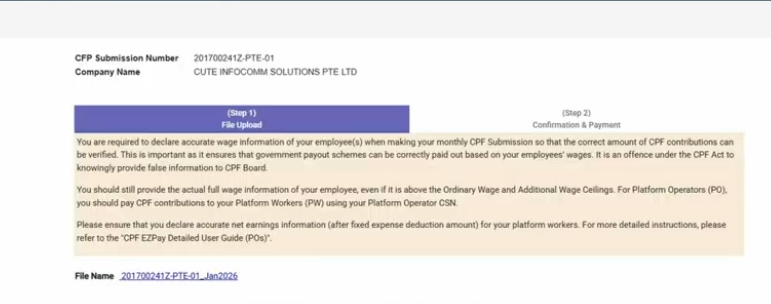
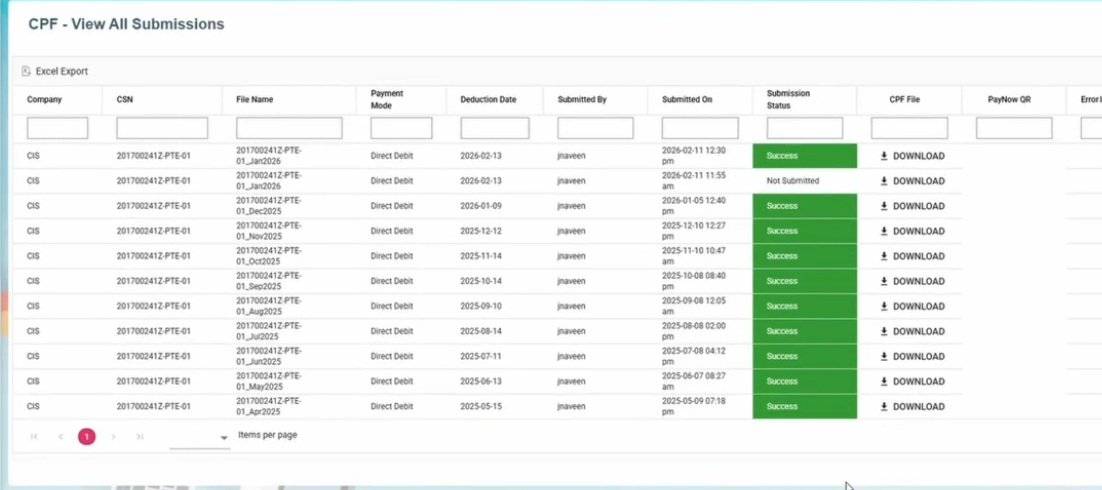
- Click Generate. The CPF submission file will be generated and downloaded as a .txt file. User can use it to upload to CPF portal.
Instead of going to the cpf portal, you can submit the data directly from cuteOffice.
https://www.youtube.com/watch?v=HSdC2jrwPU4 Use the video to see how easily we can submit to CPF Board directly.
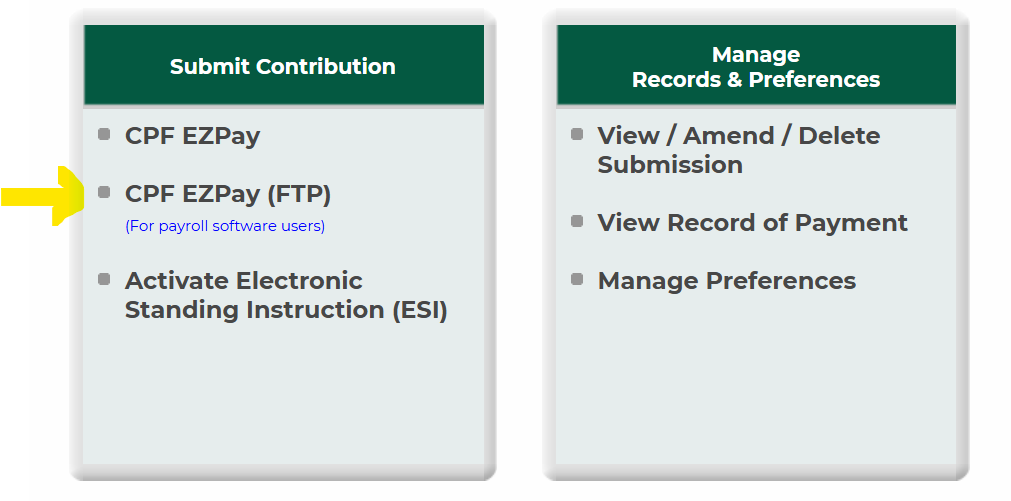
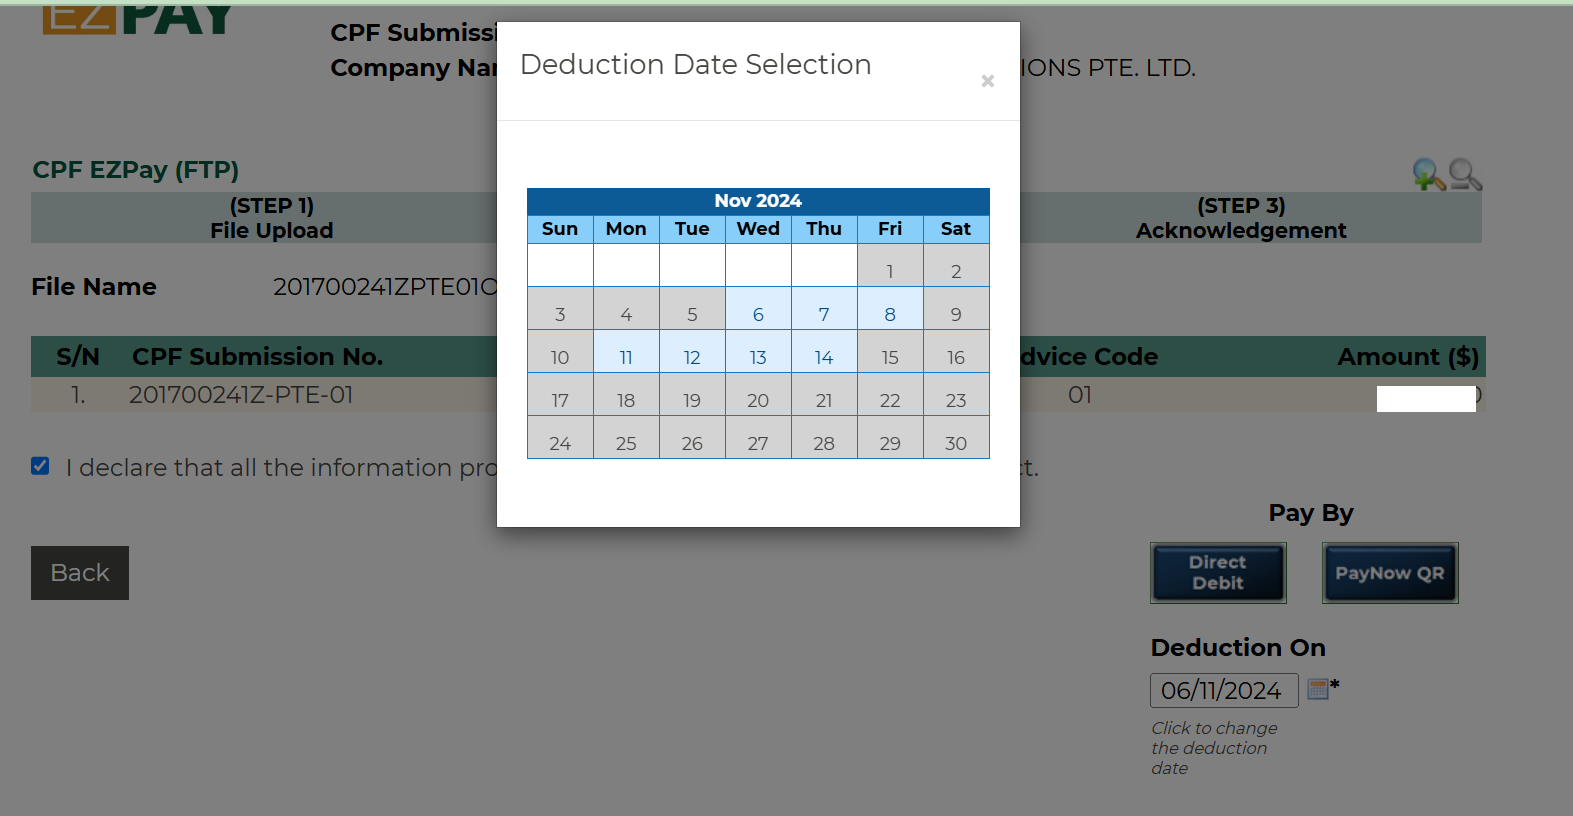
Upon generating the file, click on Submit CPF buttton.
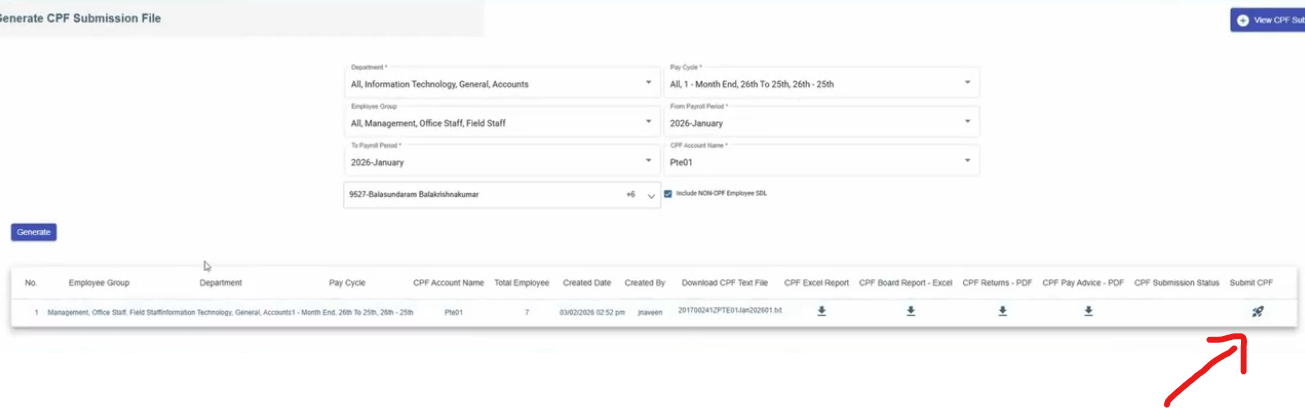
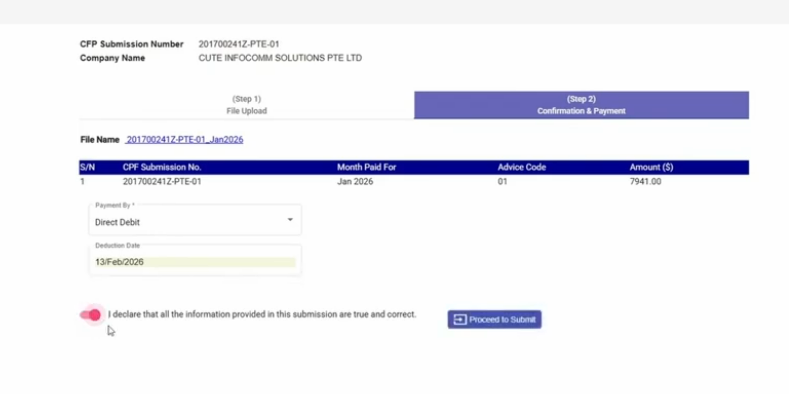
Select the second tab.
Select Direct Debit and choose Date of payment. Click acceptance for declaration and click proceed to submit.
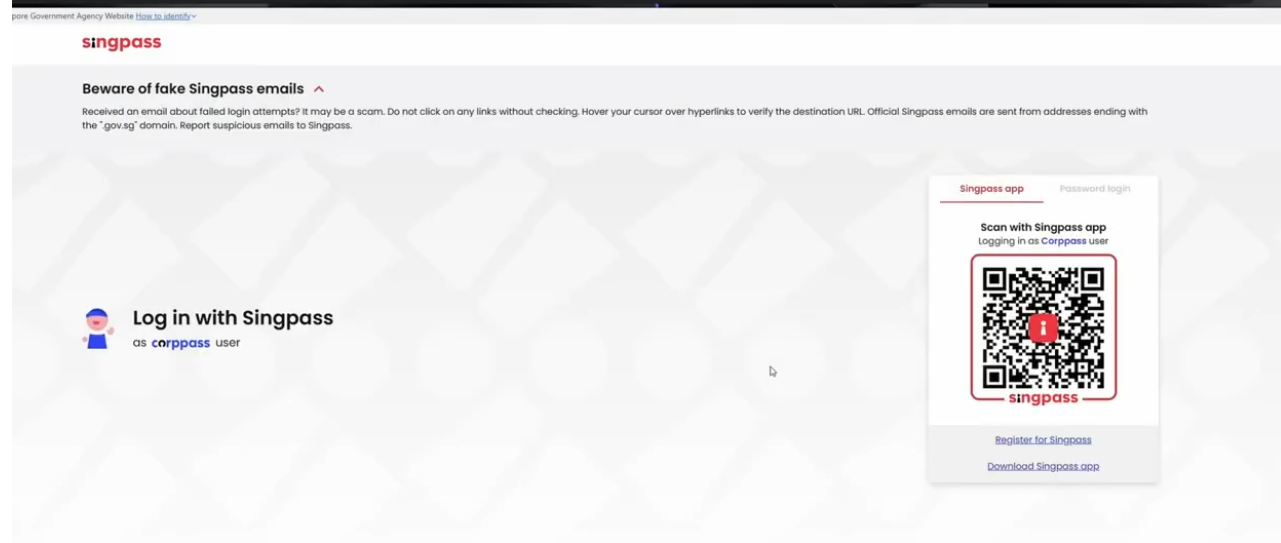
Login with Singpass.
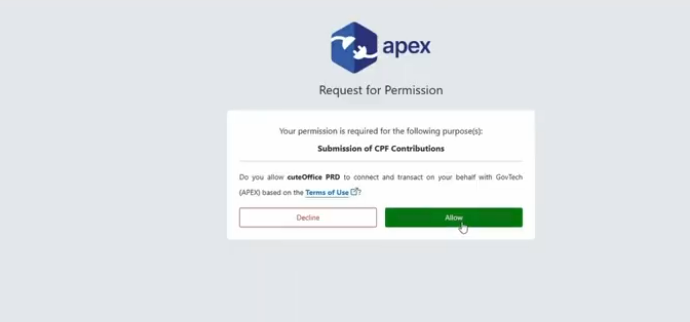
Allow to submit from cuteOffice for your behalf.
Status will be displayed, Click Ok.
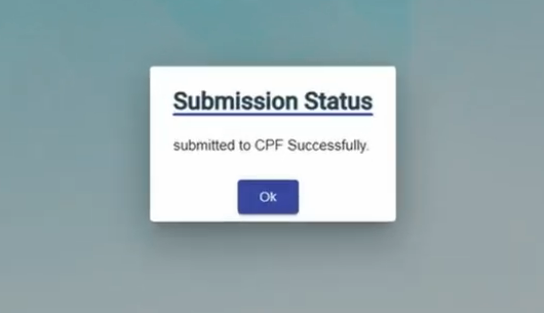
The submission status is shown for reference. You will receive the email confirmation from CPF board.
Alternatively, if you want to submit in the CPF portal, below option can be chosen.
In the next screen, select the date of deduction and select method of payment and proceed.
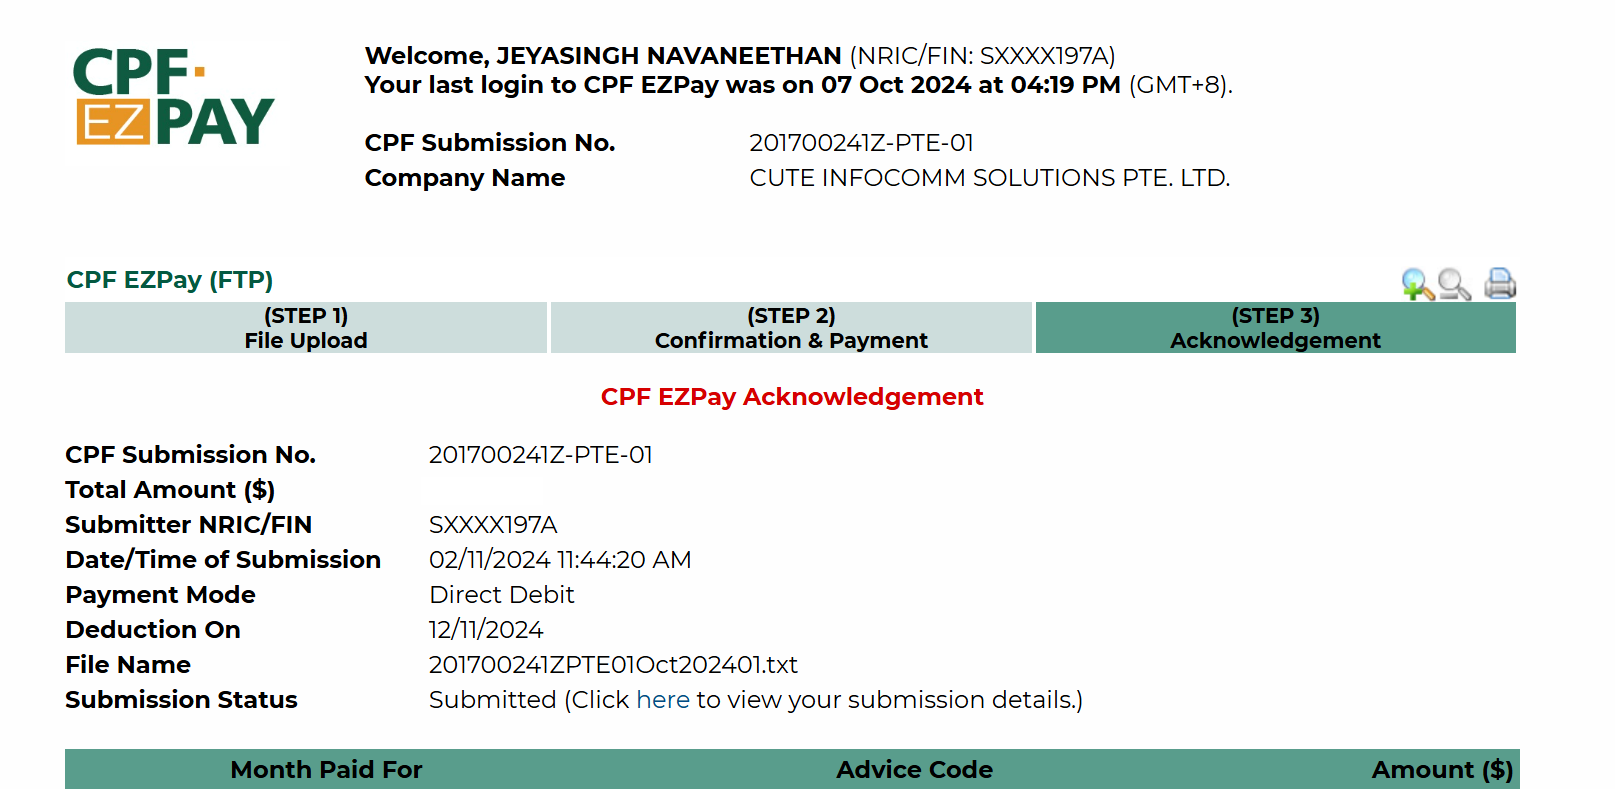
Download and keep the acknowledge slip if required.
cuteOffice has "One Stop Payroll" to submit OED , CPF and AIS submission.
The permission for AIS submission is "payroll - > aisSubmission"
Generate General Interbank Recurring Order (GIRO) Bank File
The Generate GIRO Bank File tab in the Reports submenu used to generate and view the GIRO bank file of the employee. The GIRO is used to make monthly payment to the billing organization (BO) from your account directly. The GIRO bank file shows the details of the GIRO.
Check the youTube video link for same details
To generate and view the GIRO bank file,
- Click Generate GIRO Bank File in the Reports, the Generate GIRO Bank File page opens.
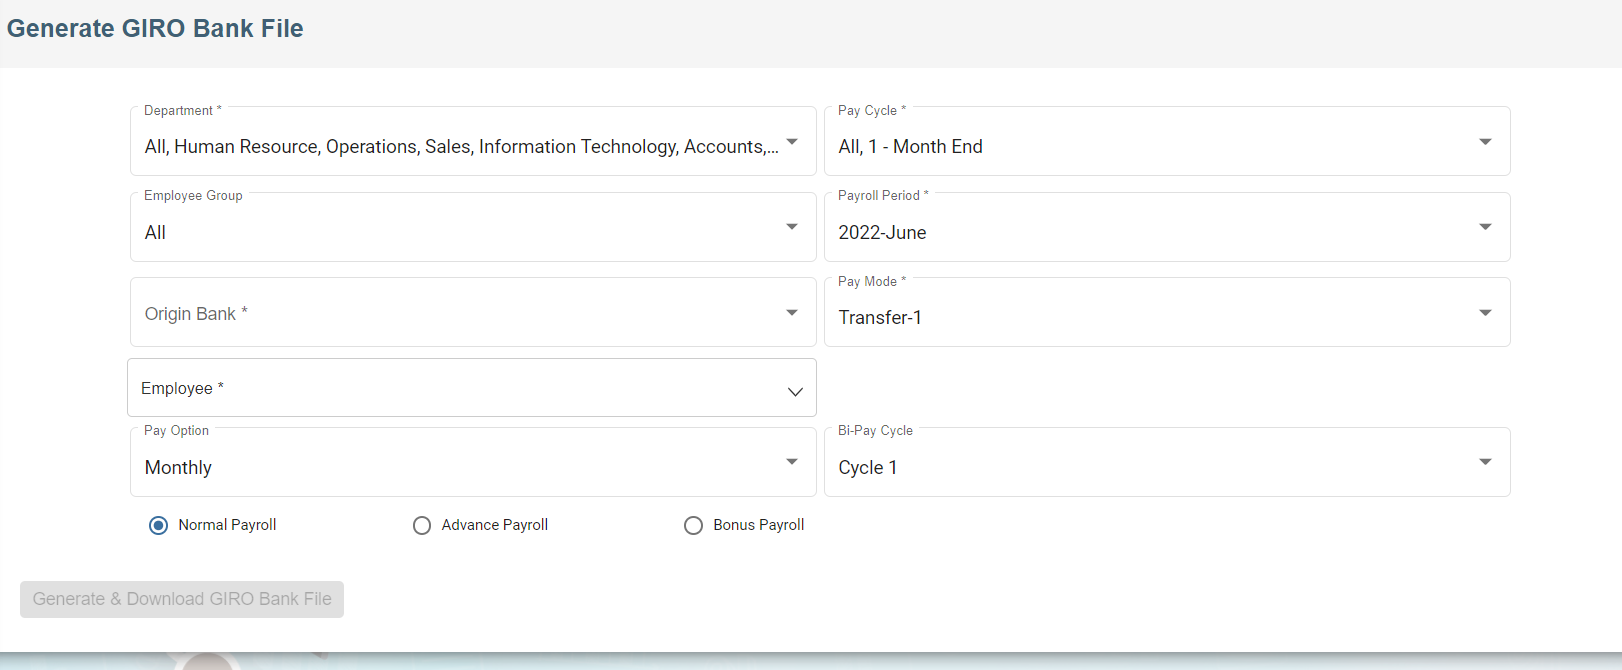
- In the Department box, select a department from a drop-down list.
Note: If you want to select all the departments in the list, select the checkbox of the ALL.
- In the Pay Cycle box, select a pay cycle from a drop-down list.
Note: If you want to select all the pay cycles in the list, select the checkbox of the ALL.
- In the Employee Group box, select an employee group from a drop-down list.
Note: If you want to select all the employee groups in the list, select the checkbox of the ALL.
- In the Payroll Period box, select the payroll period.
- In the Origin Bank box, select the origin bank from the drop-down list.
- In the Employee box, select an employee from a drop-down list.
Note: If you want to select all the employees in the list, select the checkbox of the ALL.
- Click Generate. The generate GIRO bank file will be generated and downloaded as a .txt file. User can upload to bank portal.
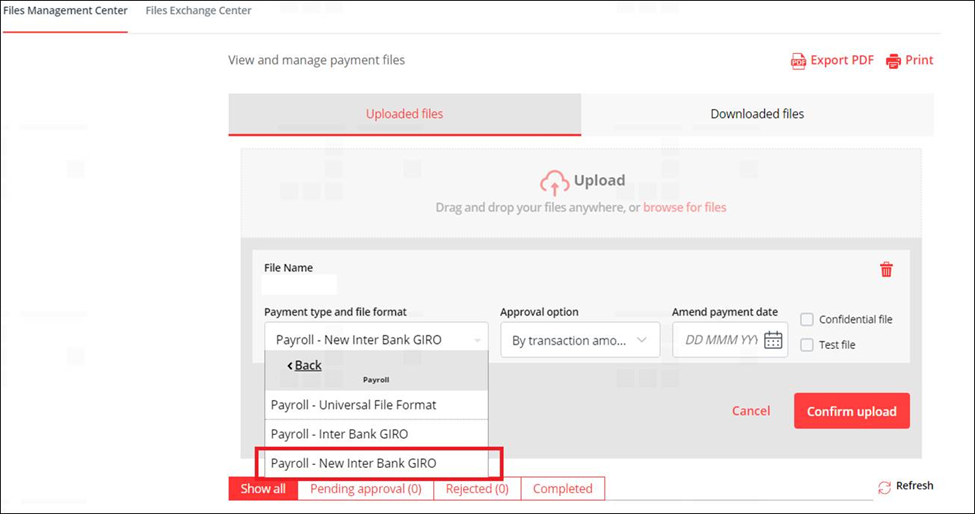
Note: For DBS bank, when uploading GIRO bank file, kindly ensure you have selected the correct format in IDEAL as “New Interbank Giro Format” in DBS file upload portal.
-
-
-
-
- Upload the GIRO bank file
- Choose Payment Type as Payroll
- Select Payroll - New Inter Bank GIRO
- Approval Option
- Amend Payment date
- Choose either confidential file or Test File
- Click confirm upload
-
-
-
Giro Bank file submission in OCBC Portal
Generate GIRO Bank file
- Click GIRO Bank in the Reports, the Generate GIRO Bank File page opens.
- In the clearing method field, choose either FAST or GIRO method.
- If you choose FAST, the value date change to the date of generating GIRO bank file.
- Click Generate & Download GIRO Bank File. The GIRO bank file generated and downloaded as a .txt file. User can upload to OCBC portal.

File Submission in OCBC Portal
- Click Transaction on the header
- Select Upload file
- Click file format
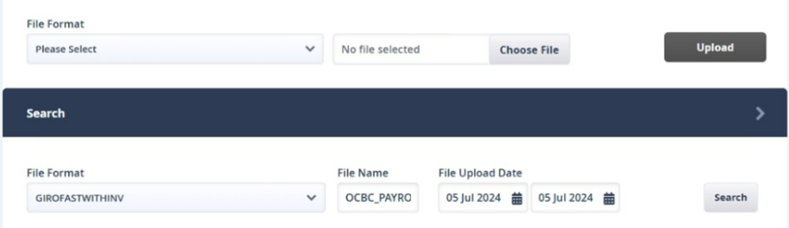
- Select file format as GIROFASTWITHINV

- Click upload and check the file upload status for uploaded successfully.
Note: If the upload file failed, check the error message and rectify it.
Giro Bank file submission in UOB Portal
File Submission in UOB Portal
- Click “Pay & Transfer”
- Select Upload bulk file
- Proceed to click on “Upload New Bulk Files”
- Click “file type”
- Select “Fast/GIRO Payroll (Employee)” as the file type
- Upload GIRO bank text file generated via payroll's GIRO Bank
- Click submit and check the file upload status for uploaded successfully.
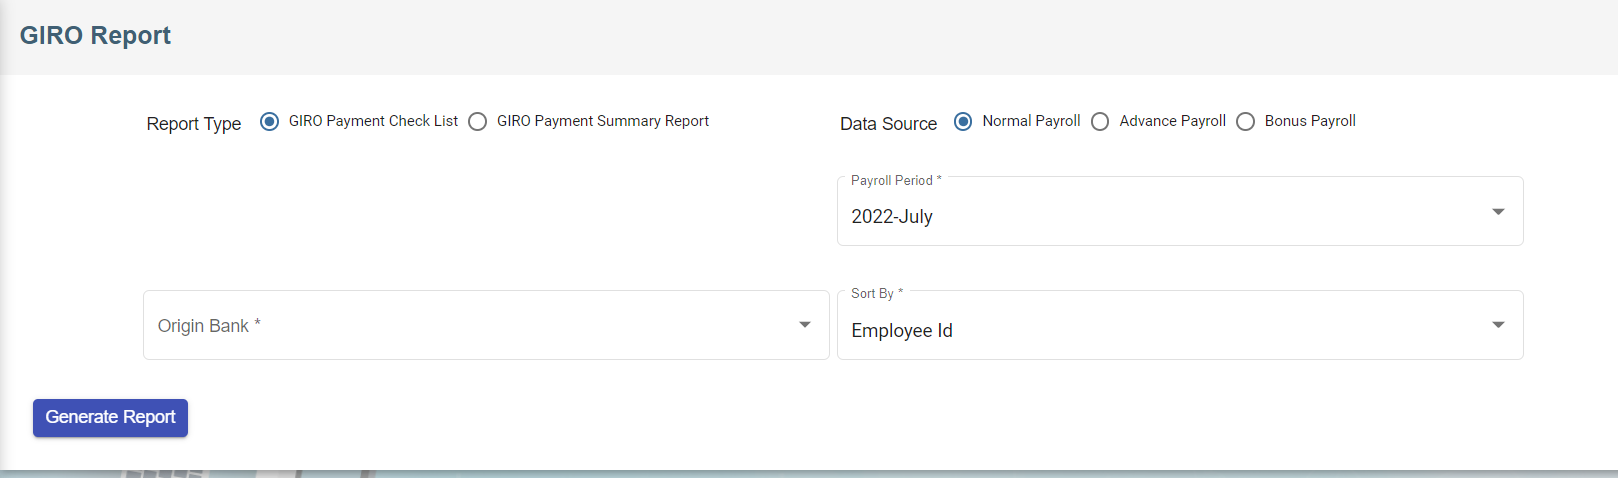
Generate GIRO Report
CuteOffice payroll allows user to view two GIRO reports before posting GIRO file to the bank: GIRO payment checklist, and GIRO payment summary report.
To generate above reports,
- Click GIRO Report in the Reports, the GIRO report page opens,

- Select report type
- Select data source
- Select origin bank
- Select payroll period
- Select sort by method
- Click
 (Generate Report Icon), the selected report type will be downloaded.
AIS Submission
The cuteOffice payroll system allows the generation of IR8A file and allow employers to submit the data to IRAS.
Before submitting to IRAS, please make sure your company is registered for Auto inclusion scheme, otherwise the submission cant be done. (https://www.iras.gov.sg/taxes/individual-income-tax/employers/auto-inclusion-scheme-(ais)-for-employment-income/join-the-auto-inclusion-scheme-(ais)-for-employment-income)
https://www.youtube.com/watch?v=iTrSy1L8INI Follow the video for a quick guide on the submission.
Enable the permission "payroll - > aisSubmission" against the role to view the menu.
To generate IR8A
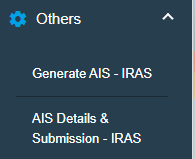
- Click Generate AIS - IRAS in the Others, the Generate AIS Submissions File page opens.
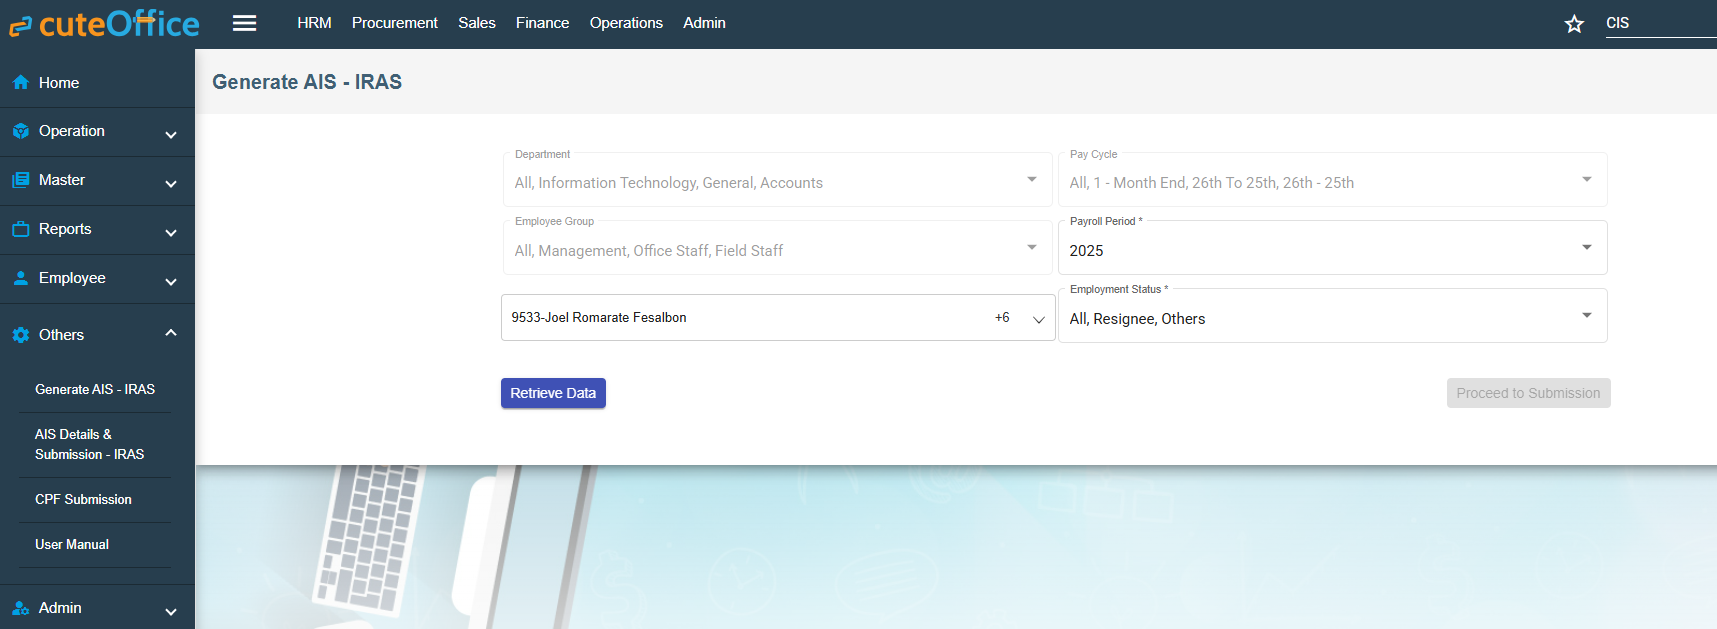
- All the Department and Pay Cycle will be selected.
- In the Employee box, select all employees from a drop-down list. The list is populated based on the last dropdown of employment status.
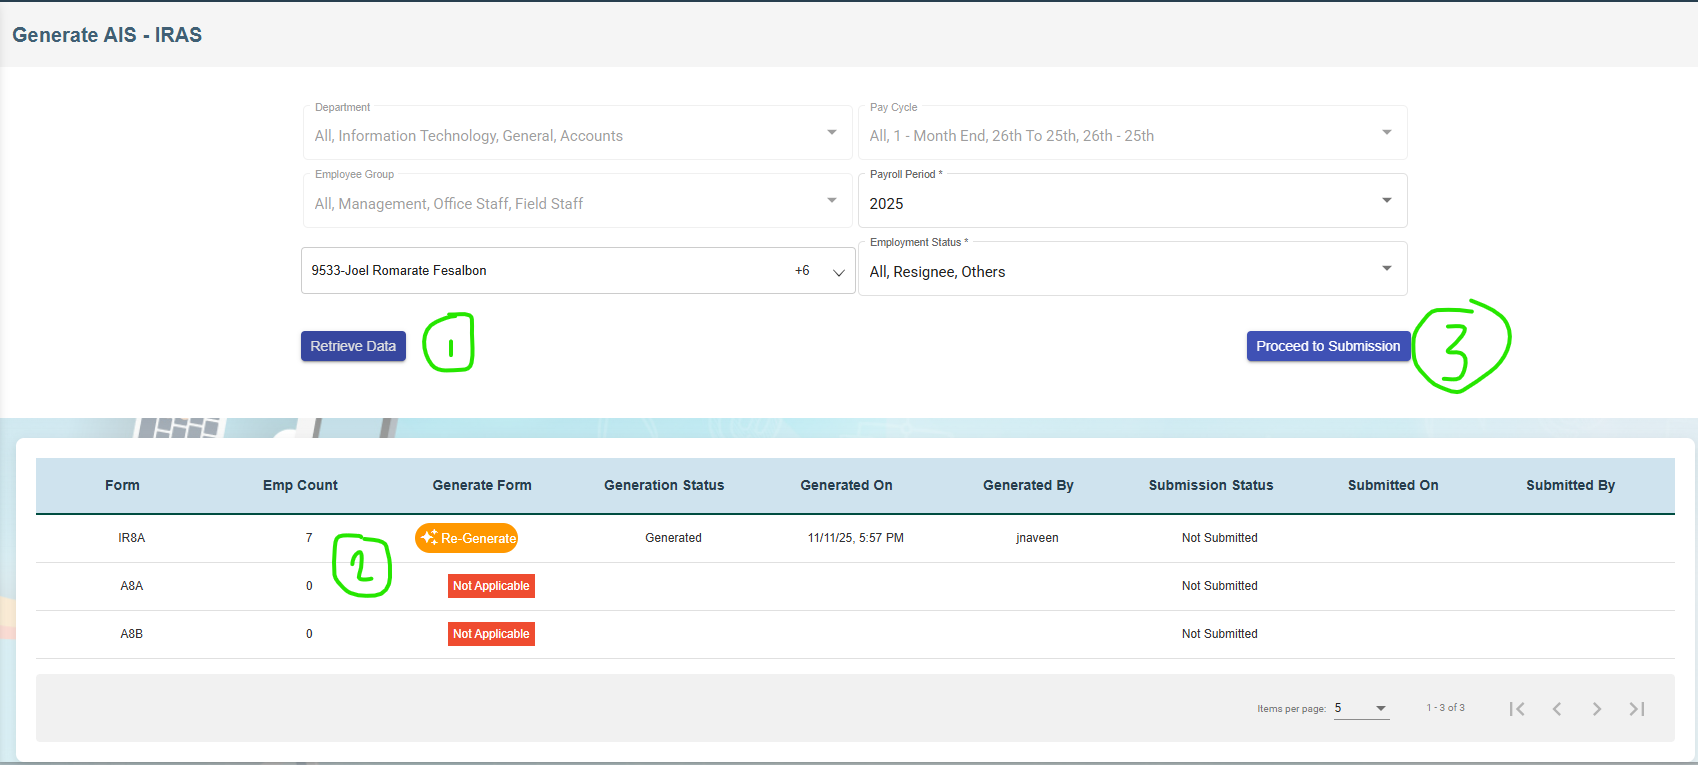
- Click Retrieve Data. The below table will be shown.

- In the Form Type IA8A click Generate. If already generated earlier, click Regenerate.
- Click Generate. The success message will appear.
- Click Proceed to Submission button.

- Click
 (Print icon) to generate the IR8A form for each employee to download if required.
 - Before approving, the data can be edited if required.
- Select all employees and click Approve submission button.

- Once approved the summary will be shown and ready for submission.
-

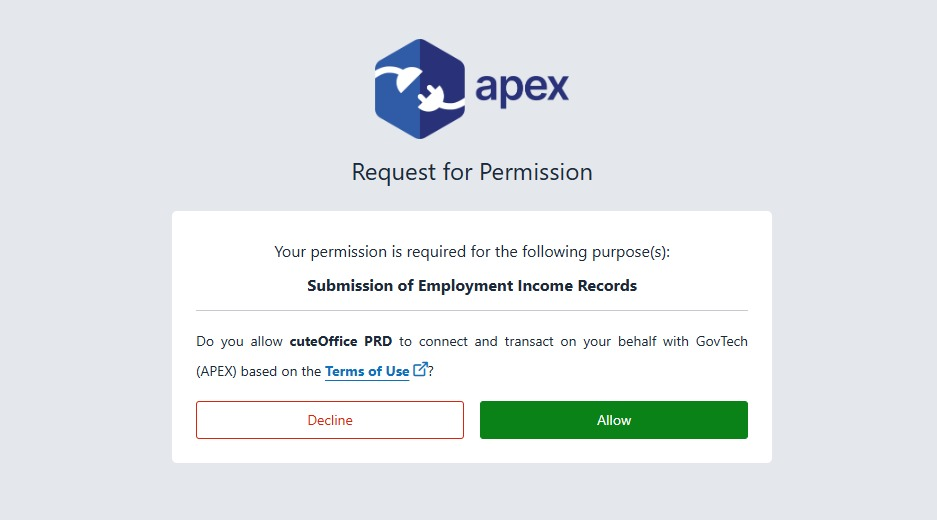
- Click Proceed to IRAS - AIS Submission and authenticate using CorpPass.
-

- Click Allow to confirm to submit the data to IRAS.
- The data successfully submitted message will appear.
- The submitted data can always be checked and verified.


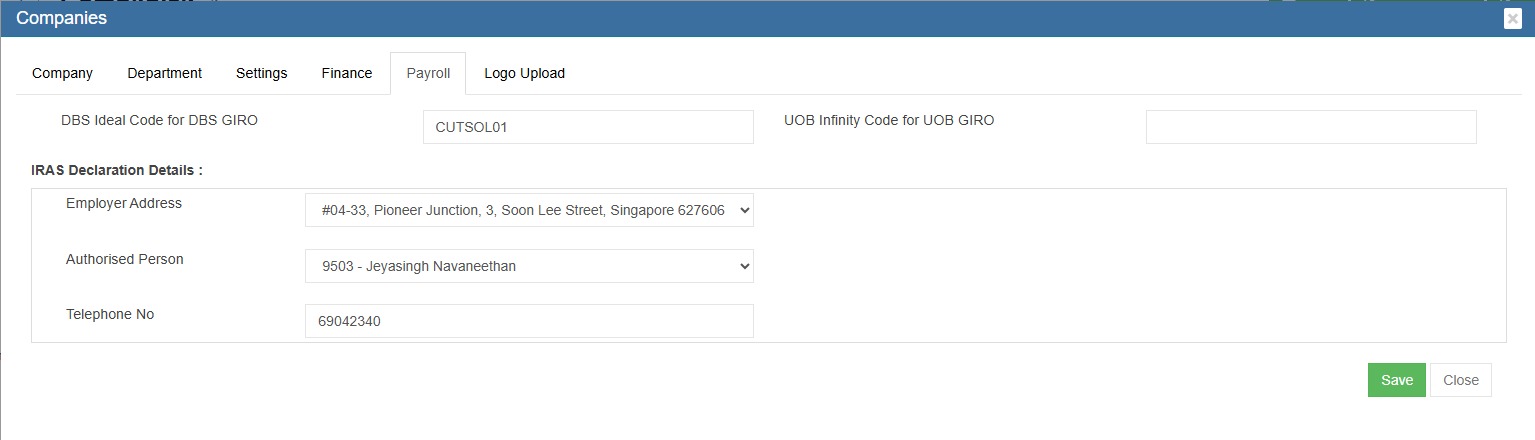
Note: If there is a prompt asking to enter Authorised person, ask the administrator to enter the authorised person details in Company->Payroll tab.
Note : To import IRAS (manually maintained), enable global settings "enableIRASImport".
Any revision and amendment submission, the below document contains the steps to follow.
quick-guide-on-making-ais-amendments-at-mytax-portal-(online-application).pdf
No Comments