
Purchase Order (PO)
After the RFQ is completed and approved, system will create PO (Status is Pending PO) and generate unique tracking key automictically. And the next step is preparing the Purchase Order (PO). In Purchase Order section, the purchase officer will prepare the final purchase order and send it to the suppliers.
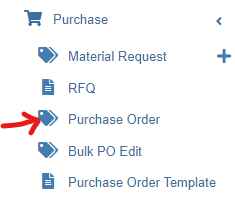
Click Procurement - > Purchase Order to open PO lists.
Create PO
The Purchase Orders can be reached by clicking the PO key from the PO list.

Or the PO can be accessed directly from the RFQ details screen Purchase Order table,
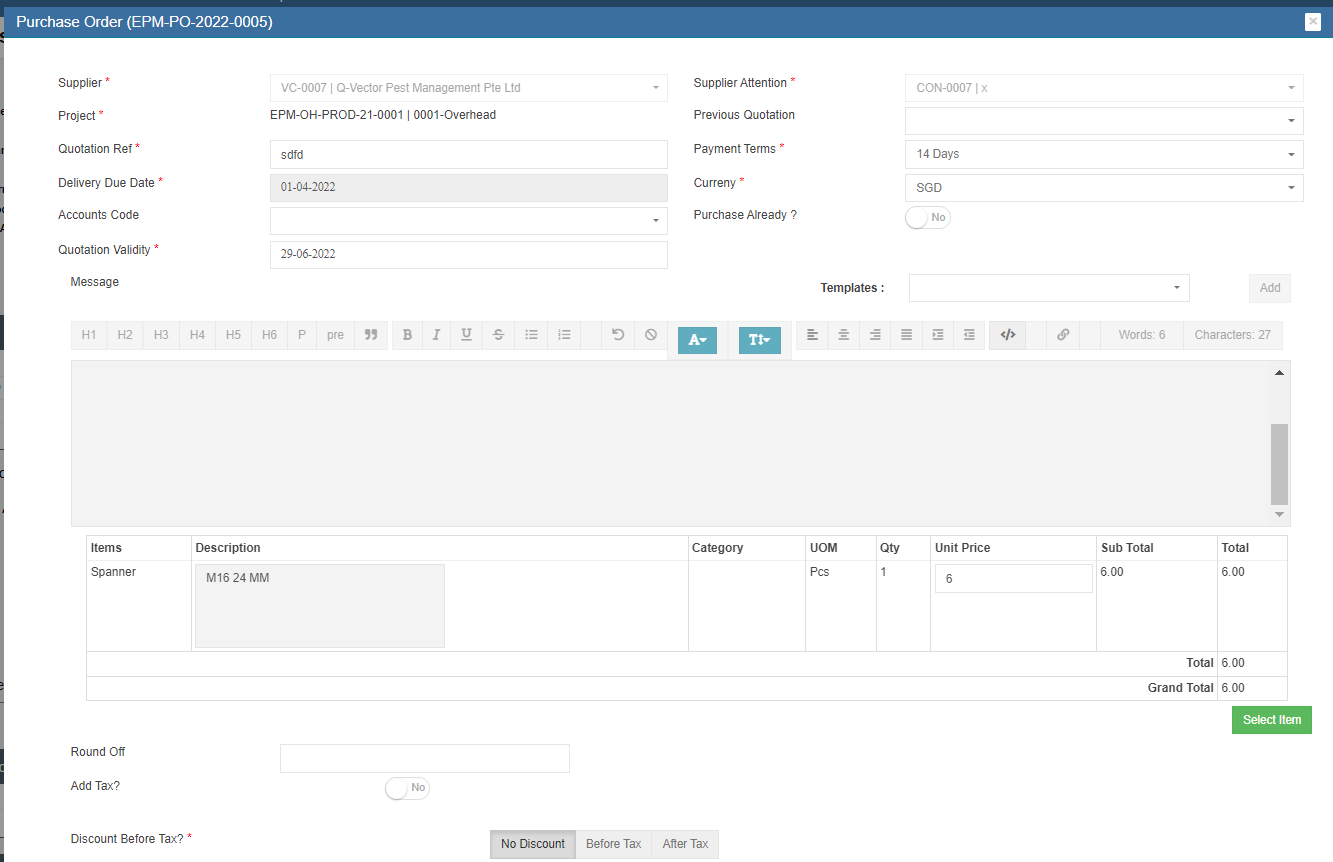
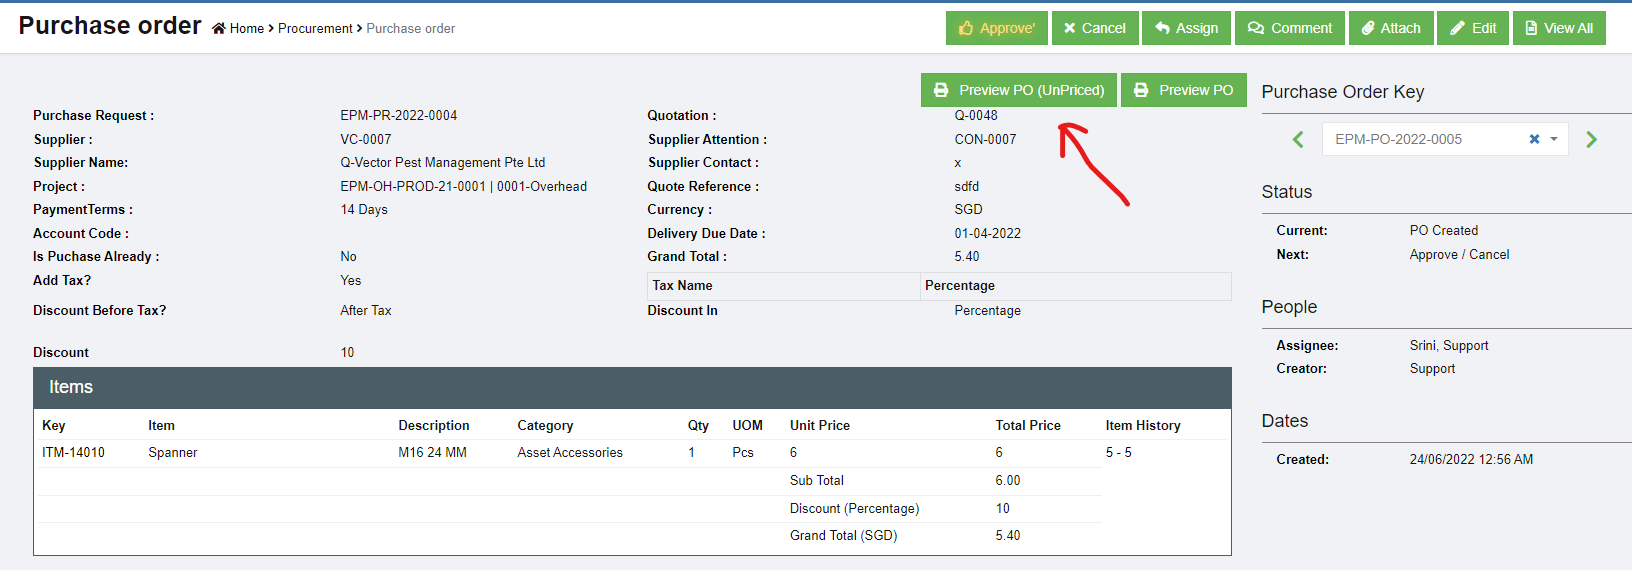
- Click the PO key of the selected PO, the PO screen opens as below and the status of the PO is “Pending PO”

- There are many options available in PO page for the purchasing officer

- Click
 edit icon, the PO detail page opens and purchase staff shall update the necessary additional information.
-
The payment terms and currency are all automatically filled from supplier master if it is available and
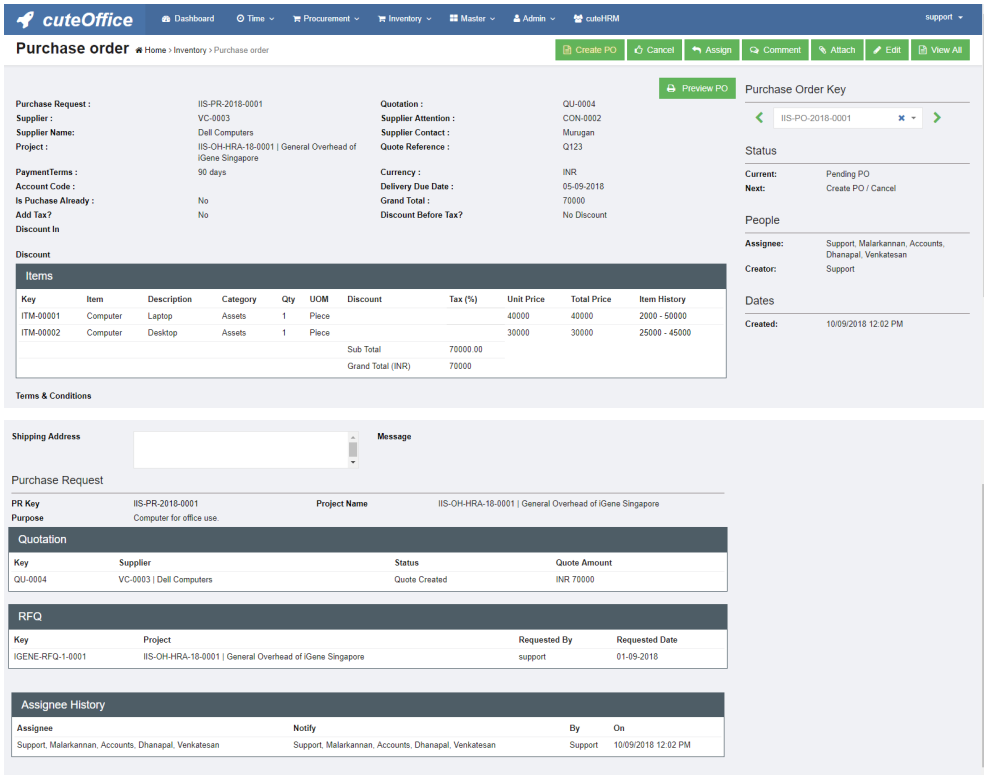
configured earlier. The item with its approved price is shown here. If any changes in price, purchasing officer shall edit the price. - Click Add Discount / Add Tax check boxes above to show more options. These options enables
additional columns and tax and discount can be applied.- The discount can be entered in value such as 1500 in full number or in percentage such as 5%.
- The Tax can be entered against individual item as in many countries, there are different tax for different
items. Use this Tax text box if different values of taxes are required. Tax information are all captured in the RFQ stage itself and can’t be changed during PO
creation
-
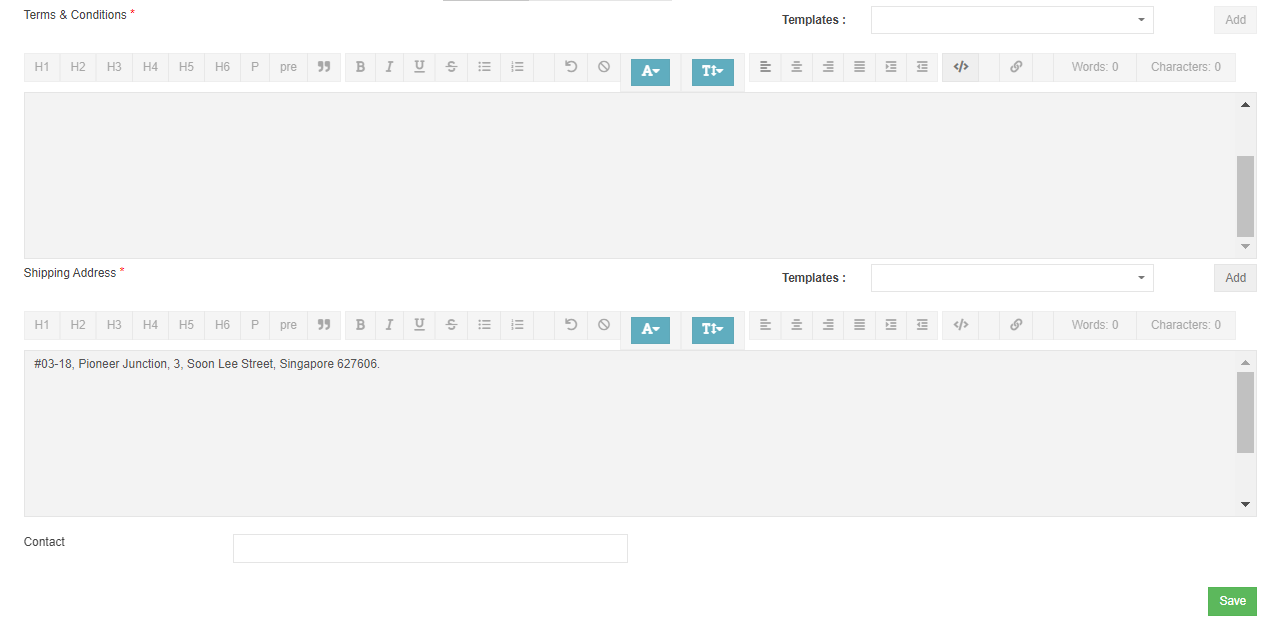
Terms and Conditions. Select the Terms and Condition from the templates available.

-
Shipping Address and contact. Select the shipping address. The list of addresses are configured in the
company master.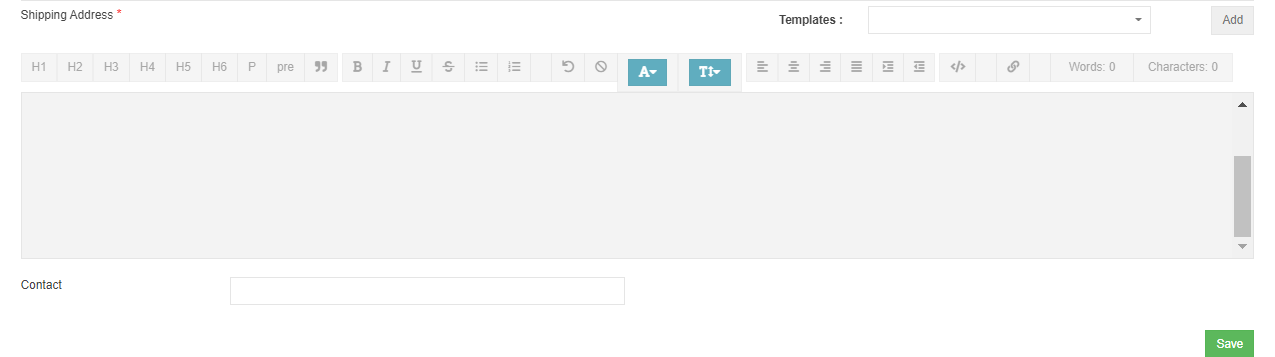
- Click
 save button to save edits. Edit window will be closed and return to the PO detail page.
 -
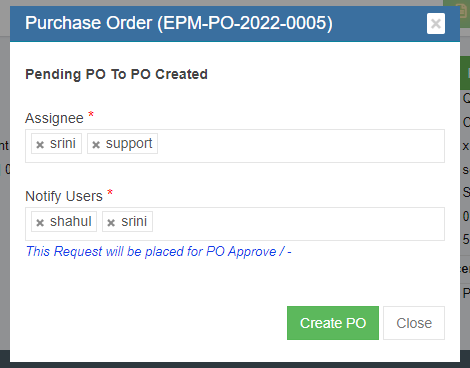
Click
 create PO button to create the PO. Below PO creation notification window opens, check and confirm then click create PO. Notifications will be send to selected users and PO is created and ready for approval.
- PO is created and ready for approval. User can preview PO before approval.


Approve PO
Only authorized users can approve PO. If user is granted with the permission to approve, user can click button to approve PO. After PO is approved, Preview PO will change to Print PO means that the PO is finalized and approved, user can print and send to suppliers.

Send PO
After PO is approved. Purchaser need to send it to that PO supplier. And the Send PO icon will blink for action.
Click 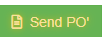 , below window opens, and there are two ways to send PO.
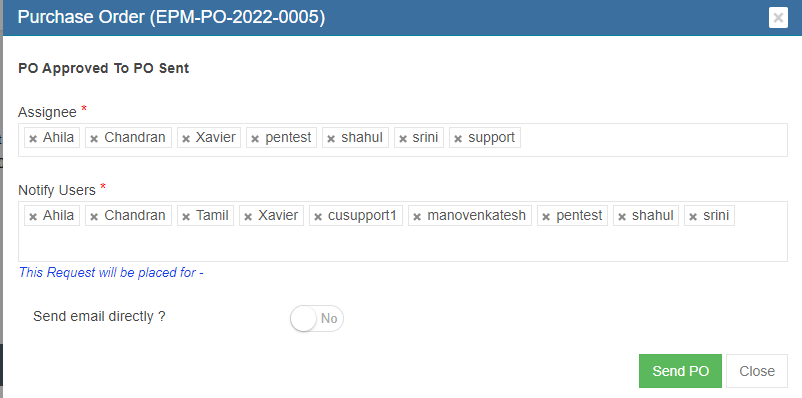
- Send email directly from cuteOffice system: click to enable "Send email directly?" to Yes, and below emailing window opens. User shall fill up all required information and click Send PO at the end.
- Print PO and email as attachment to suppliers: enable the "Send email directly?" to NO, then click send PO to update status. The send PO window will close and redirected to PO detail page, user can click Print PO and download as pdf, and email to suppliers.


Amend PO
If there are any changes agreed by both company and suppliers after PO is sent to suppliers (e.g. supplier side price increase, company side add more quantities etc. ), user can use the Amend PO option to amend. After PO is amended, authorized user need to approve the amended PO.

PO Acknowledgement
After PO is sent to supplier and supplier has acknowledged it, purchaser need to upload the signed acknowledgement along with date and other details.
- To upload PO acknowledgement, click Add button in ‘Acknowledgement PO’ section under PO detail view page.

- The acknowledgement window opens, user shall fill up details and choose acknowledgement file to upload.

- Click Save to complete PO acknowledgement, the details will be saved in the acknowledgement PO section.


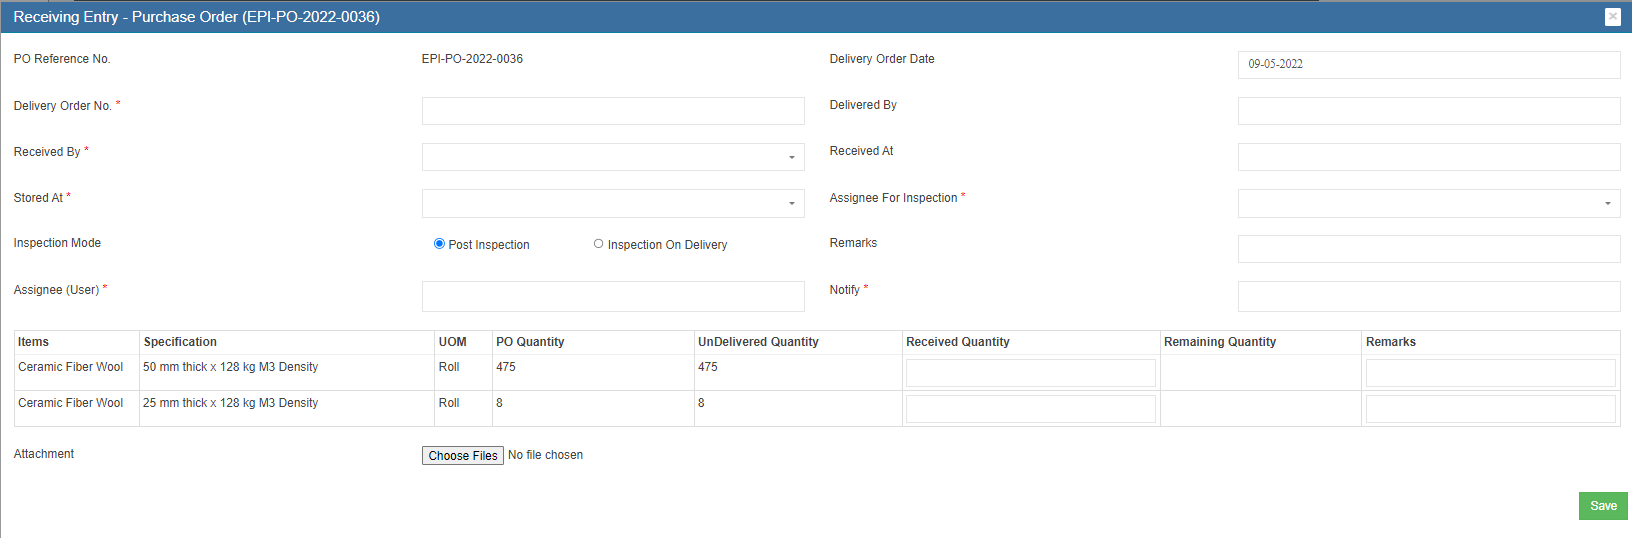
Receiving Entry
Store keeper role users need to fill up delivery order details and attach delivery order copy to system once items received from suppliers. System allows for multiple receive entry against each PO. The Receiving Entry section is in the PO detail view page, see below,

- To register receive entry, click Add button in Receiving Entry section, below receive entry window opens,

- Store keepers shall fill up all details and the correct quantities received, then click Save to save details entered.


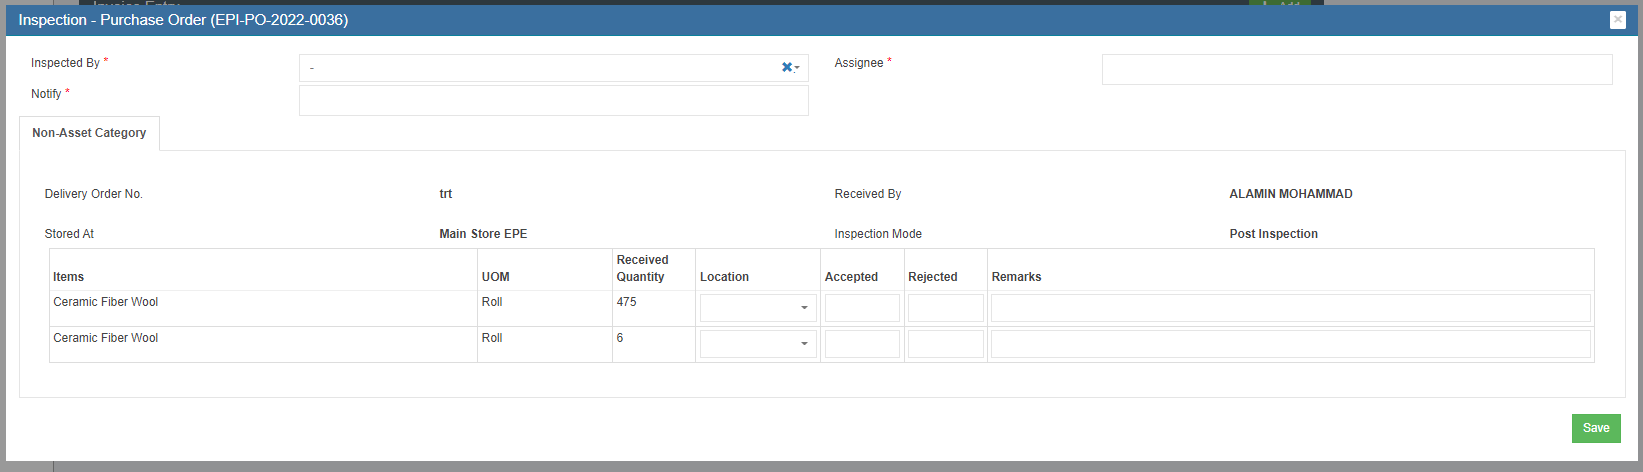
Inspection
Every receiving entry need to inspected to ensure quality purchasing. Inspection is usually done by PR creator or Project Manager. The Inspect button is located in the receiving entry section, see below,

- To inspect, click the Inspect button, below inspection window opens,

- User need to enter the accepted quantity and click Save. After click the save button then system will increase/add the quantity into store’s stock. And the inspection section will be updated with inspection details,


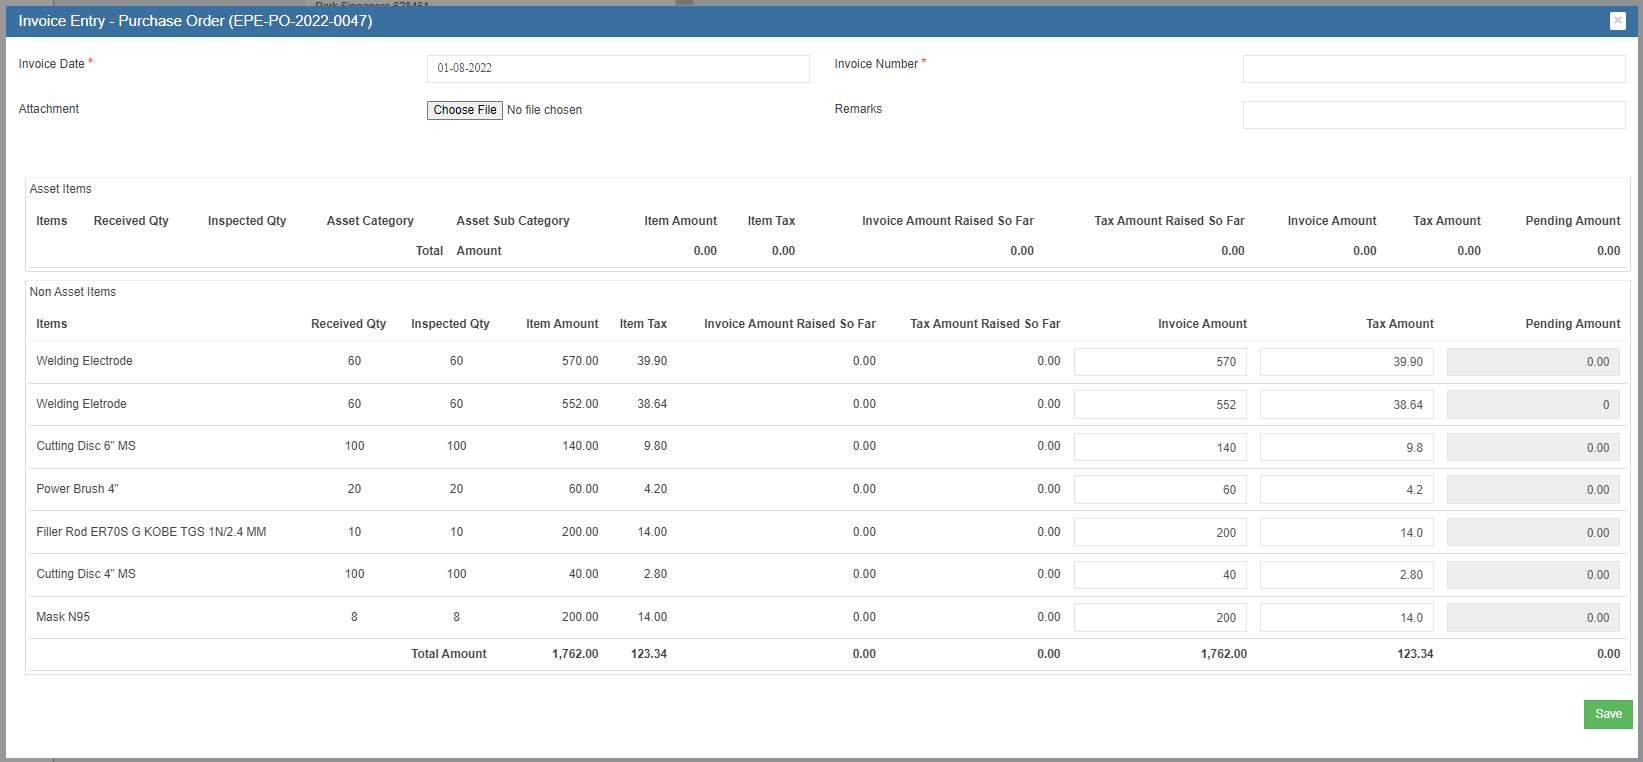
Invoice Entry
Account Executive role user shall do the Invoice Entry which means enter supplier’s invoice into the system. Attachment is compulsory for invoice entry. System allow multiple invoice entries for each PO. The Invoice Entry is located in PO detail view page, see below,

- To do invoice entry, click the Add button, the invoice entry window opens,

- check and fill up the invoice amount and other details, attach invoice copy and click Save. The details of invoice entered will be save and updated in invoice entry section,


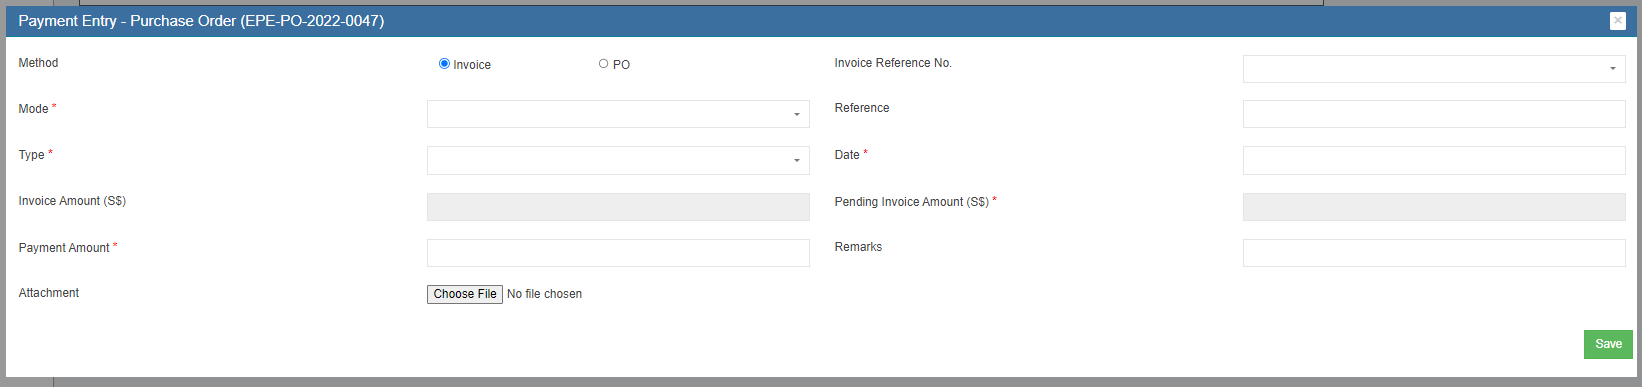
Payment Entry
Account Executive role users shall do payment entry once invoice is cleared. Payment entry can be done against entire PO or against multiple invoices for this PO. The Payment entry is located in the PO detail view page, see below,

- To entry payment record, click Add button in payment section, below payment window opens,

- User can do either payment against Invoice, or against PO,
- Payment against Invoice: click and choose Invoice as entry method, and enter details in invoice payment window
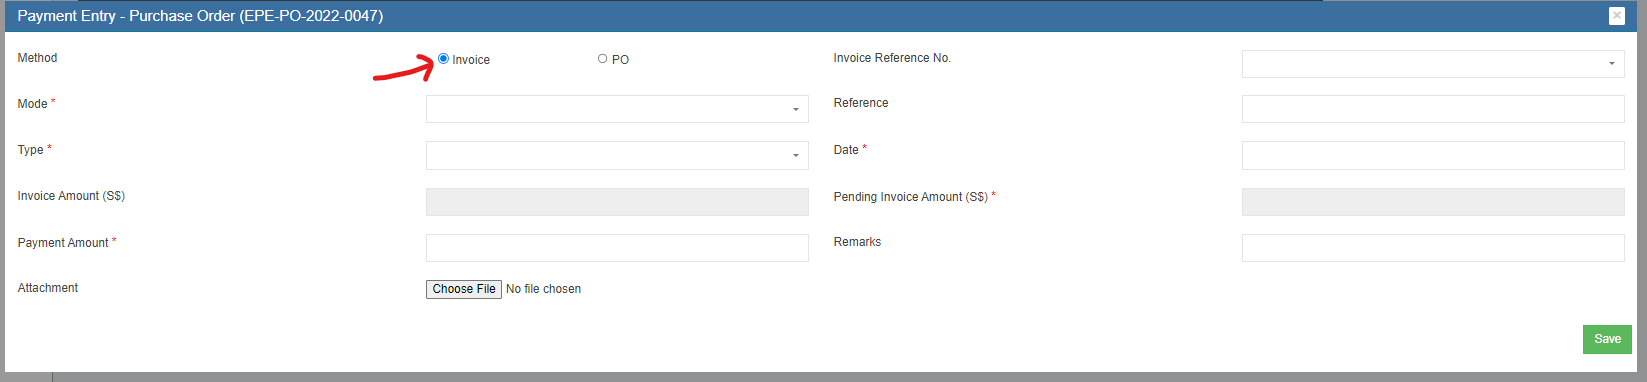
- Payment against PO, click and choose PO as entry method, and enter detail in PO payment window

- Payment against Invoice: click and choose Invoice as entry method, and enter details in invoice payment window
- Click Save. The payment details entered will be saved.


Note: Once PO Acknowledgement, Receiving entry, inspection, invoice, payment entry are completed in the system, the Po
status will automatically change to ‘PO Completed’
Purchase module Integration to Financial Accounting module
As part of Integration, invoices created in Purchase module against the Purchase Order raised and linked to the Financial Module Staging location. Subsequently, customer need to approve the vouchers in the Staging location which will then reflect in the accounting entries as per the below configuration created.
Please follow the below steps to post entries from the Purchase Module to Financial Module Staging location.
Step1: To enable Purchase Module Integration to Accounts for a Company
In Cute Office, Admin -> Company -> Select Edit.
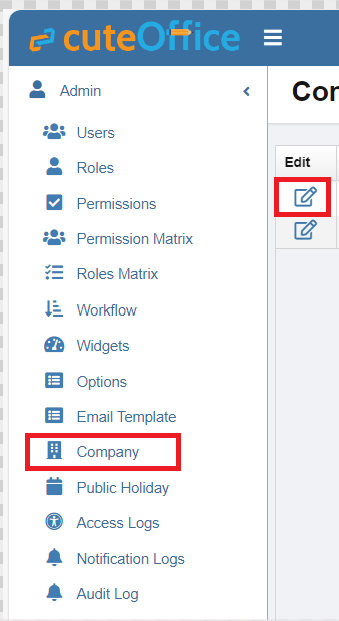
Settings ->
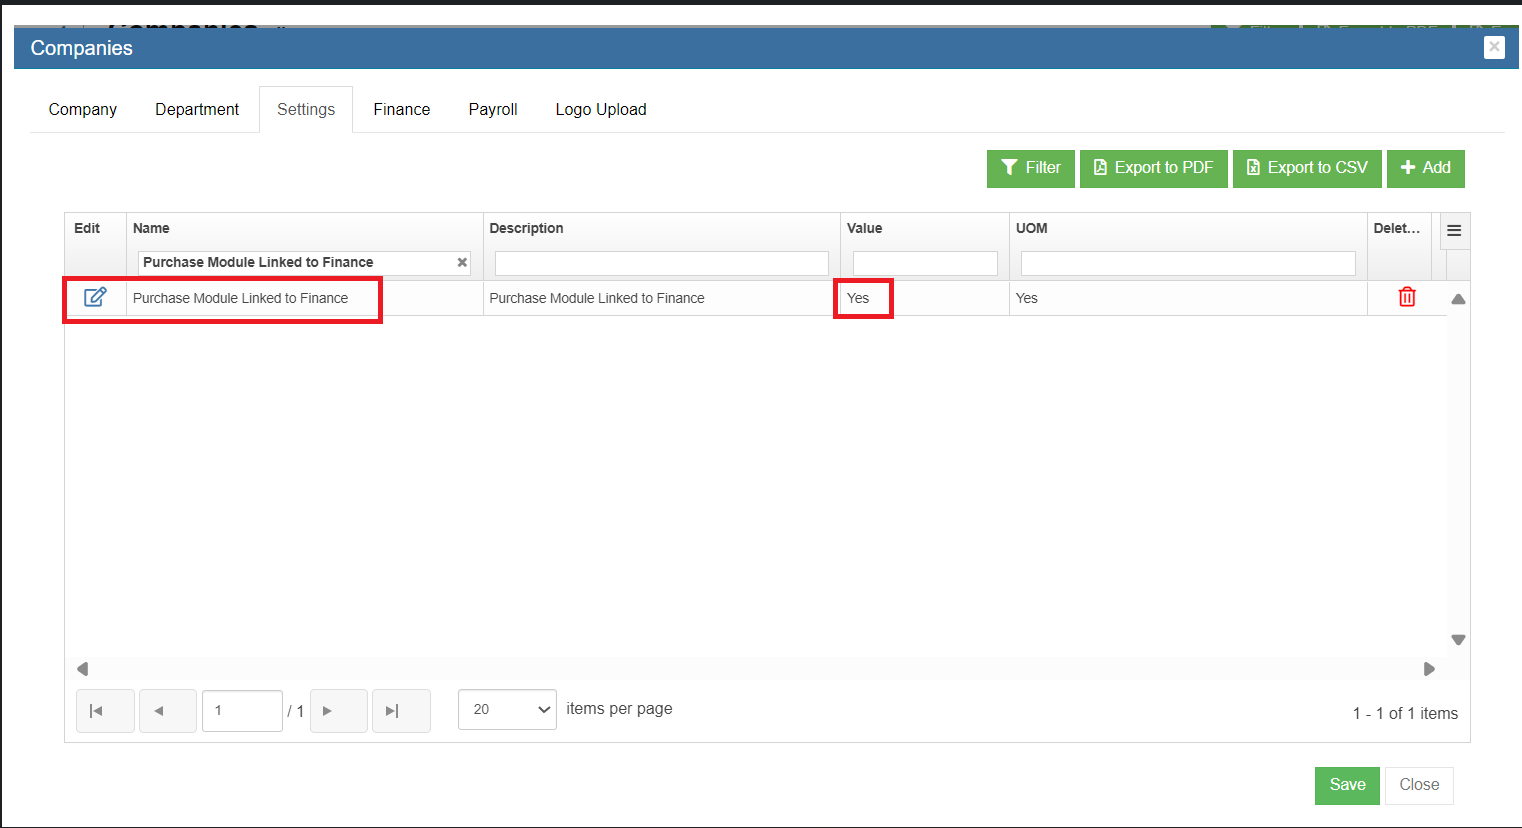
Step 1: Configuration Name - Purchase Module Linked To Finance
-> Select Edit -> Make Value as Yes. By default this value will be No
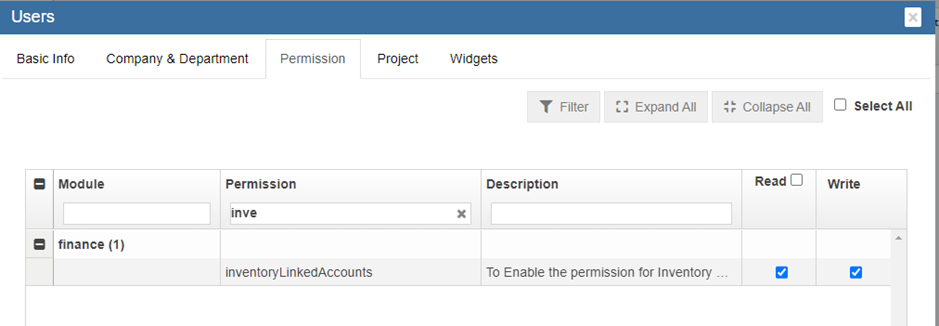
Step 2: Enable Permission to the User to Configure GL Accounts Codes to be linked to Accounting Module
Permission Name - InventoryLinkAccount
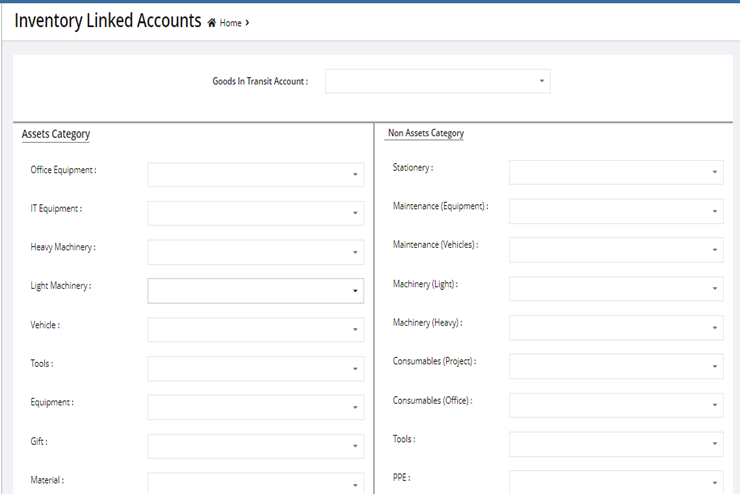
Step 3: Linking GL Account Code to Items (will be available only if Permission is provided through Step 2 is enabled)
-> Go To Finance -> Link Account Setup -> Inventory Linked Menu option
-> Setup All Asset Category and Non-Asset Category and Goods In Transit Account for GL Insert
Step 4: Posting Purchase Orders to Financial Accounting Module
Go to Procurement-> Purchase Order-> View any PO.
Post To Accounts Tab Will be Available In Invoice Entry Table
Click Post To Account to post the invoice to Accounting Module

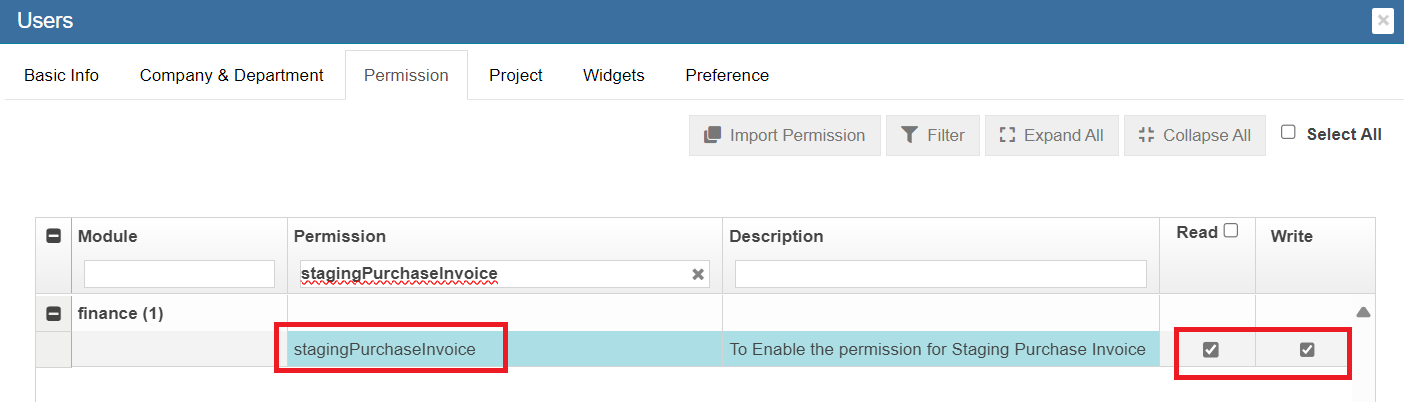
Step 5: Enable Permission to View / Post Vouchers in Staging Location
Go To-> Admin -> Users -> Permissions Tab
Step 6: To Approve the Vouchers to Accounting Module
Go To -> Finance - > Module Integration Staging
- Staging Purchase Invoice
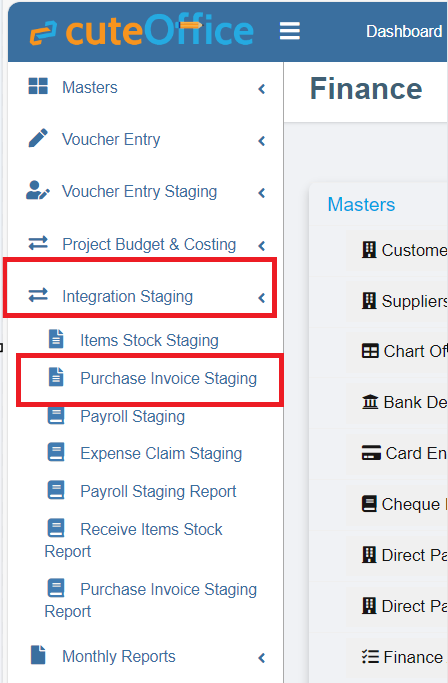
- To View and Approve the Posted Invoices In Staging Area.
No Comments