
Integration Staging
This document briefs the steps that needs to be done for implementing the purchase module and payroll module integration to financial accounting module.
Purchase Module Integration
From Purchase module, customers can opt for integrating below data
- Stock value of items purchased to Accounting module (at Purchase Cost)
- Invoices created in purchase module against the Purchase Order raised
As part of Integration, the vouchers will be generated for the above 2 scenarios (as selected by the customer) and linked to the Financial Module Staging location. Subsequently, customer need to approve the vouchers in the Staging location which will then reflect in the Accounting entries as per the configuration created.
Please follow the below steps to post entries from the Purchase Module to Financial Module Staging location.
Step 1: To enable Purchase Module Integration to Accounts at Company Level
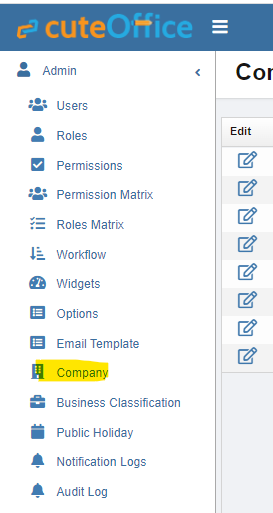
- In Cute Office, navigate to Admin module, click Company menu and click
 edit icon in selected company.
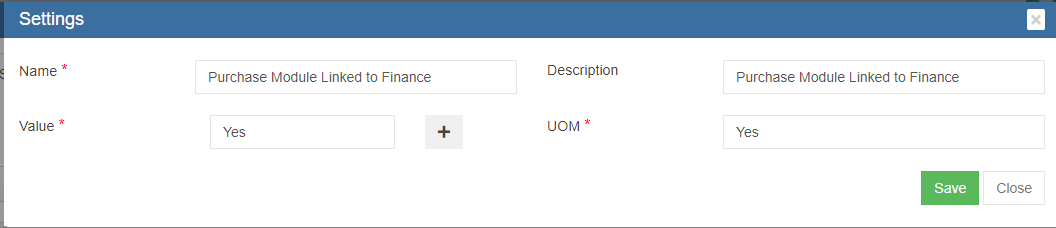
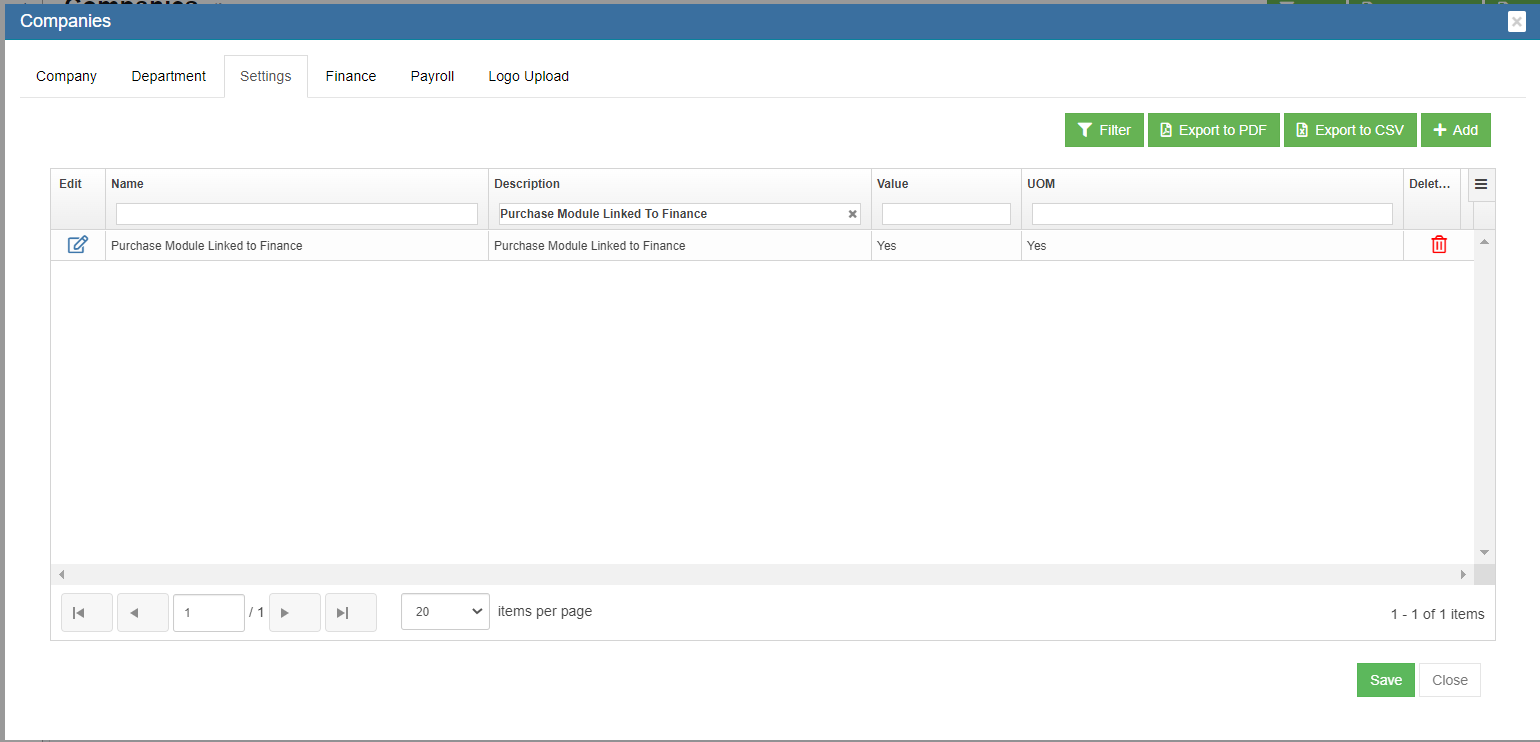
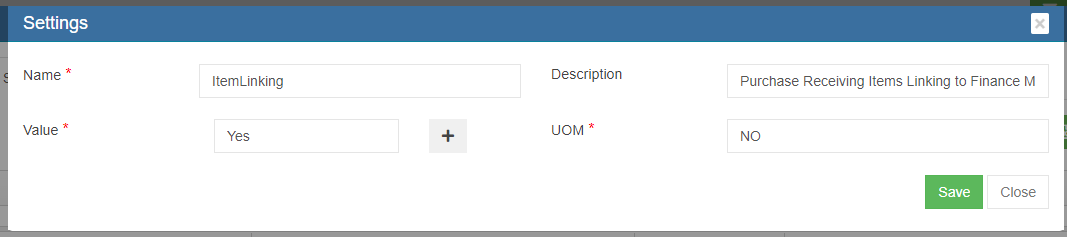
- Navigate to Setting page, search for setting configuration name Purchase Module Linked To Finance, this setting is to define whether the user wants to Link Purchase module to Finance module.

- Click edit icon, change setting Value as Yes (Note: by default the value is No), and click Save to save setting.
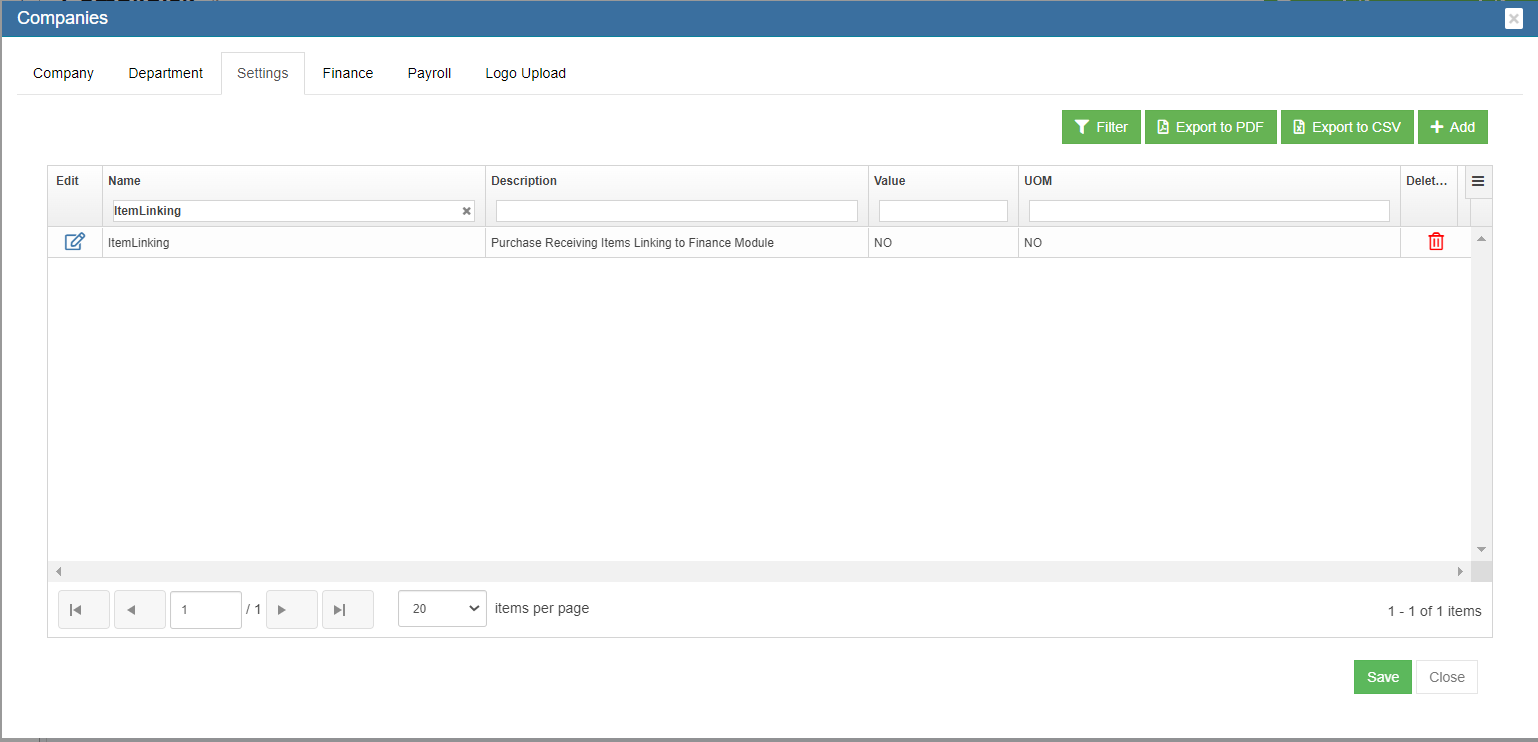
- And if user wants to integrate purchase module through item stock, then navigate to Setting page, search for setting configuration name ItemLinking, and change setting Value as Yes, the Post to Accounts option will be available after item inspected and the stock value can be posted to Finance module in the Receiving Entry table of the Purchase Order; If user do not want to integrate through item stock, set value as No, user can integrated purchase module to finance module via invoices created in Purchase Orders.


Step 2: Enable Permission to Configure GL Accounts Codes to be linked to Accounting Module at User Level
Note: It is highly recommended to define permission in user role and then assign user roles to a specific user account, so that users who perform same duty in cuteOffice will have same permissions. Roles are defined by a set of permissions to different functionalities in cuteOffice system. Based on company operation needs or organization structure, system admin user can create finance roles, such as finance manager etc., and give required permission to these roles and assign role to user.
To define permission in user role,
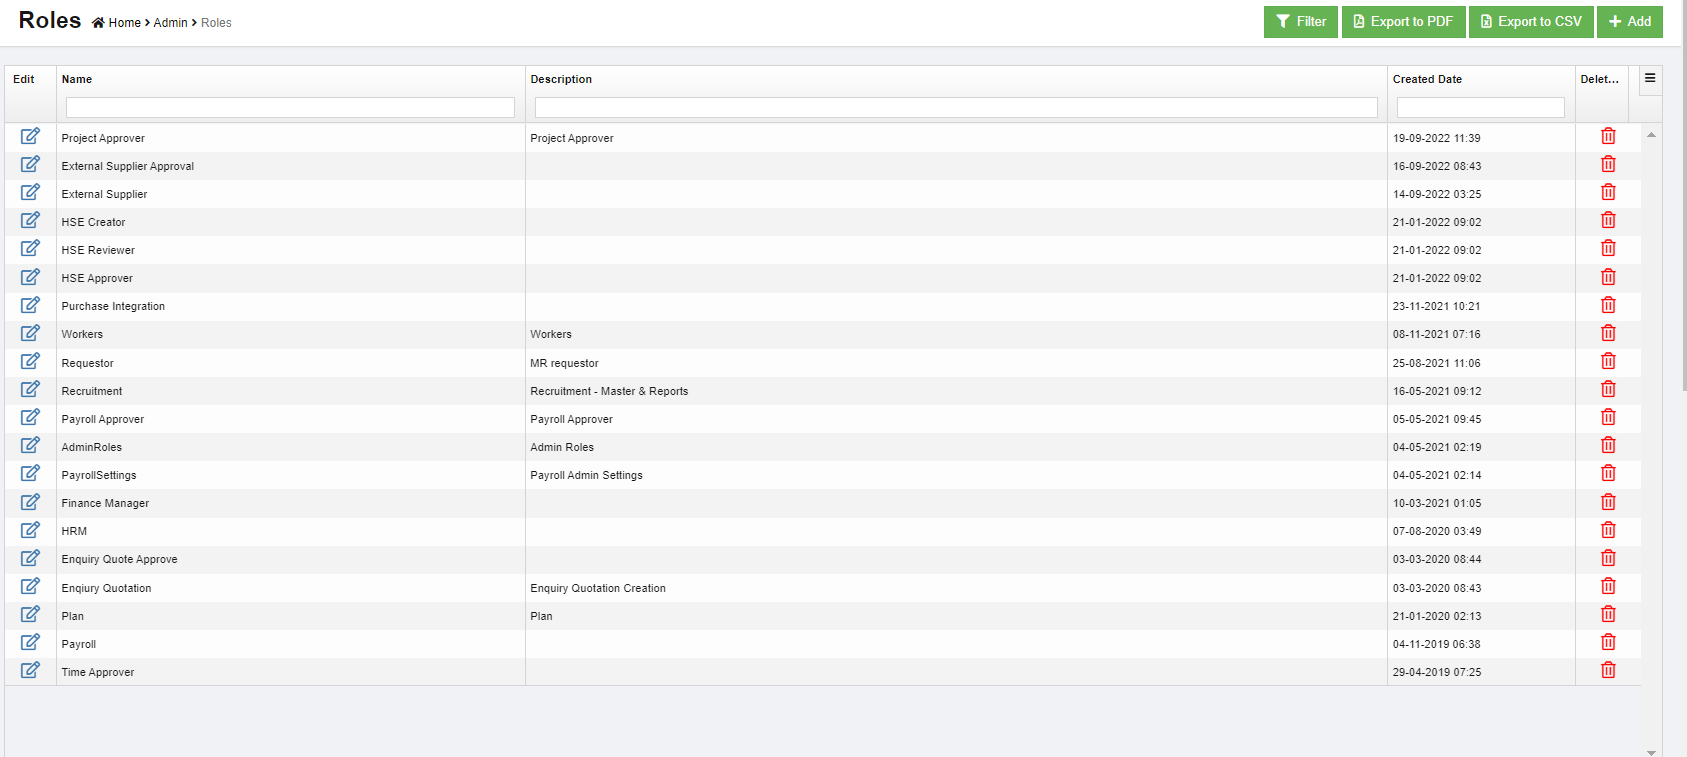
- Click Roles tab, all existing roles created in system will be displayed as below.
- Click
 (add icon), the adding new role window open as below,
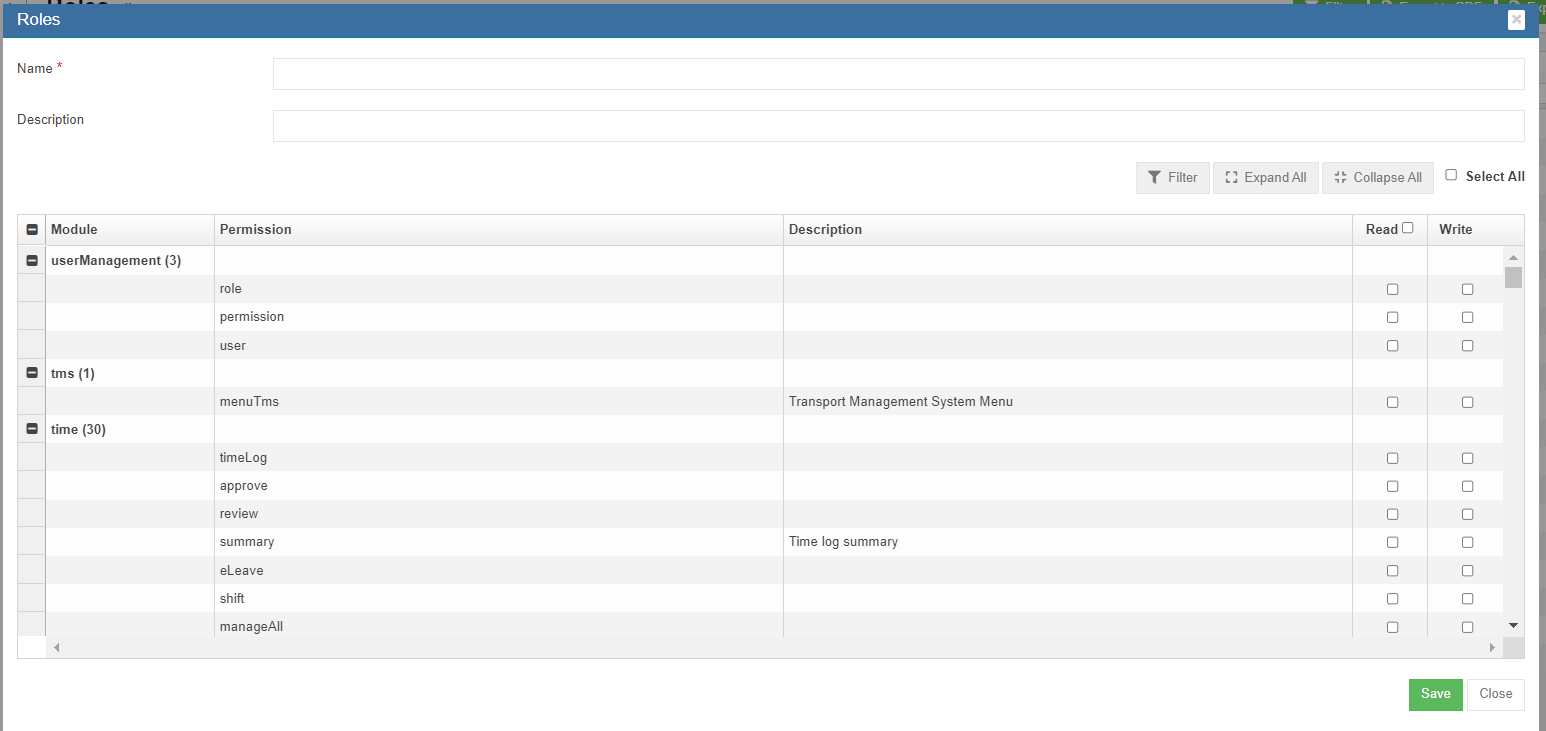
- In Name box, enter the new role name, such as "Finance Manager"
- In Description box, enter description of the new role.
- Based on the function of the new role, search for relevant module and permissions.
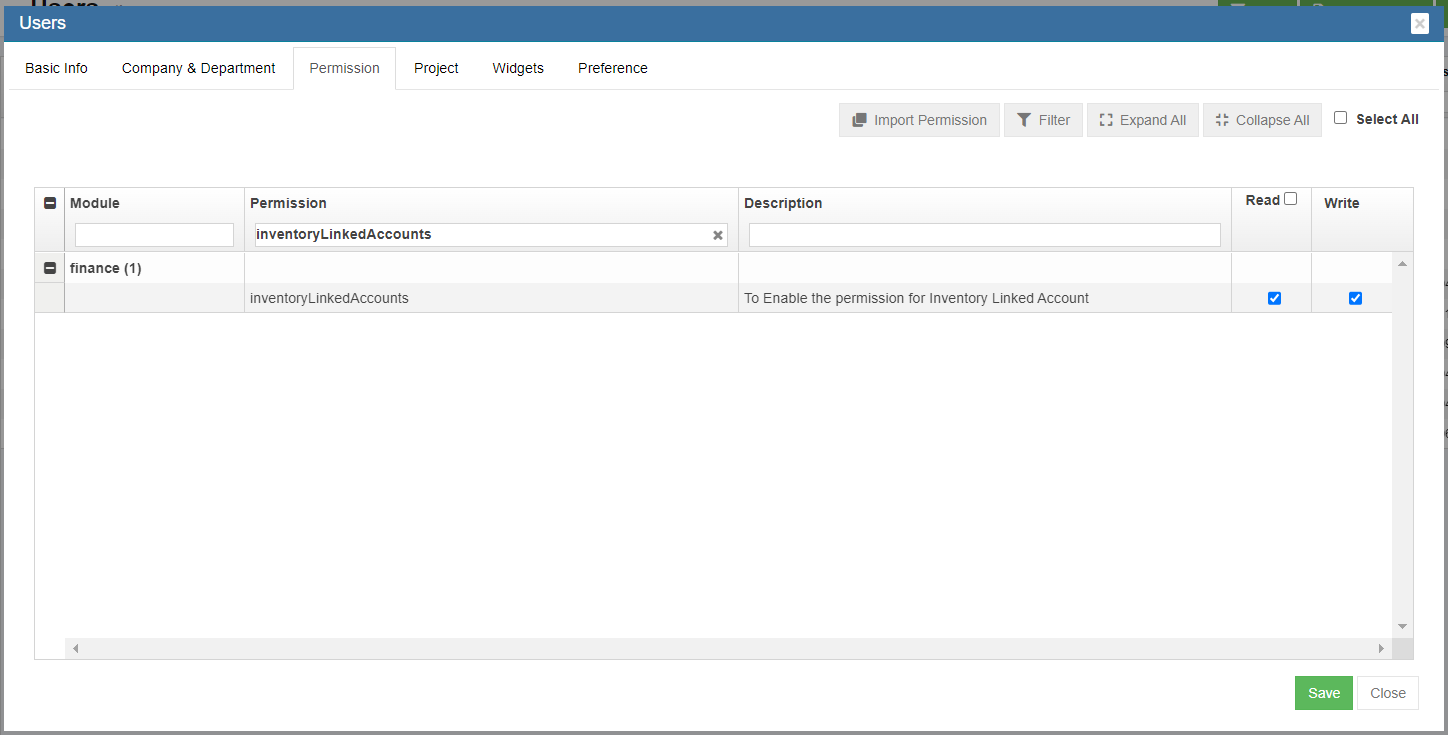
- Search and enable below Read & Write permission (click filter and filter "inventoryLinkedAccounts").
- Click Save to save the new role.
- To assign role to user, click Users menu and click edit icon in selected user.
- Navigate to user's Basic Info tab, in Role box, search and select "Finance Manager" role.
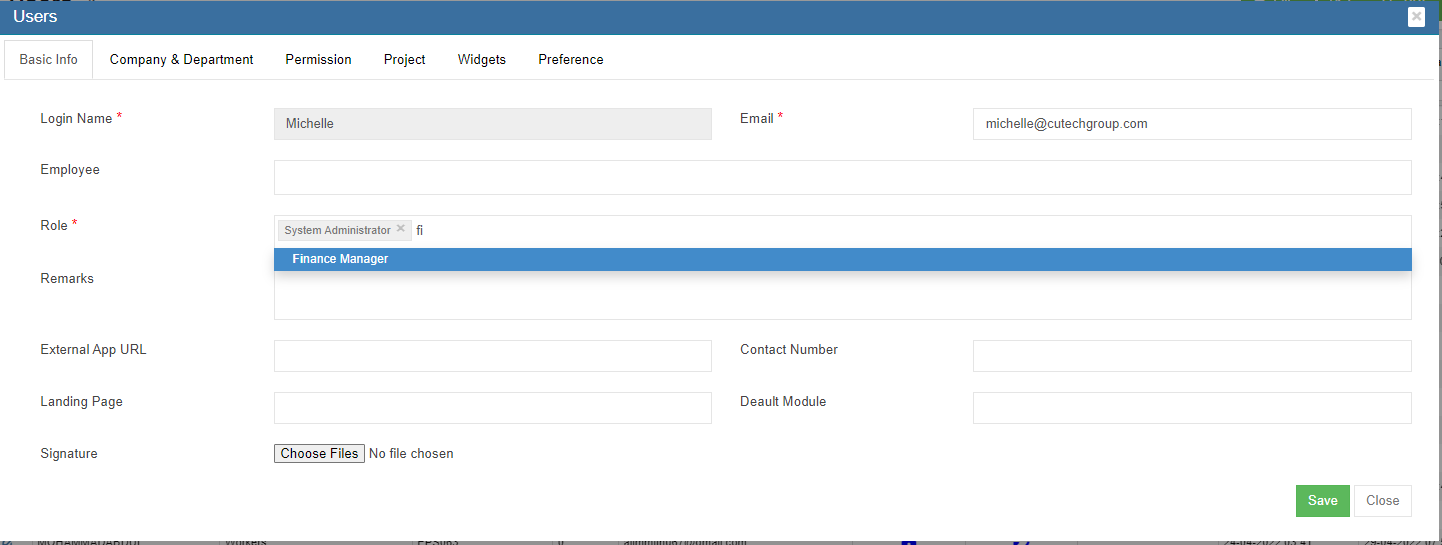
- Click Save. The new permission assigned to role "Finance Manager" will be granted to user.


To enable permission to a specific user
- In Cute Office, navigate to Admin module, click Users menu and click edit icon in selected user.
- Navigate to Permissions tab. To be enable to configure GL accounts codes to be linked to Accounting module, in user's permission page, enable below Read & Write permission (click filter and filter "inventoryLinkedAccounts").

- Click Save to save user's permission configuration.
Step 3: Linking GL Account Code to Items
Note: The Link Account Setup Menu will be available only if Permission is granted through Step 2.
- Navigate to Finance module, click Link Account Setup menu,
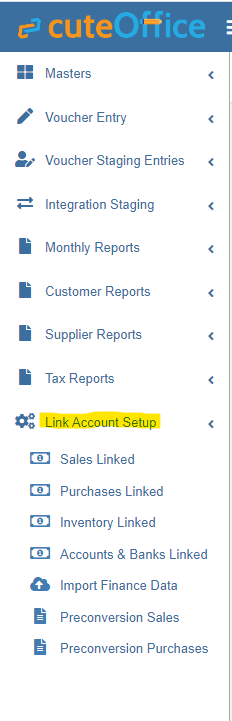
- Click Inventory Linked submenu, the inventory link account page opens as below,
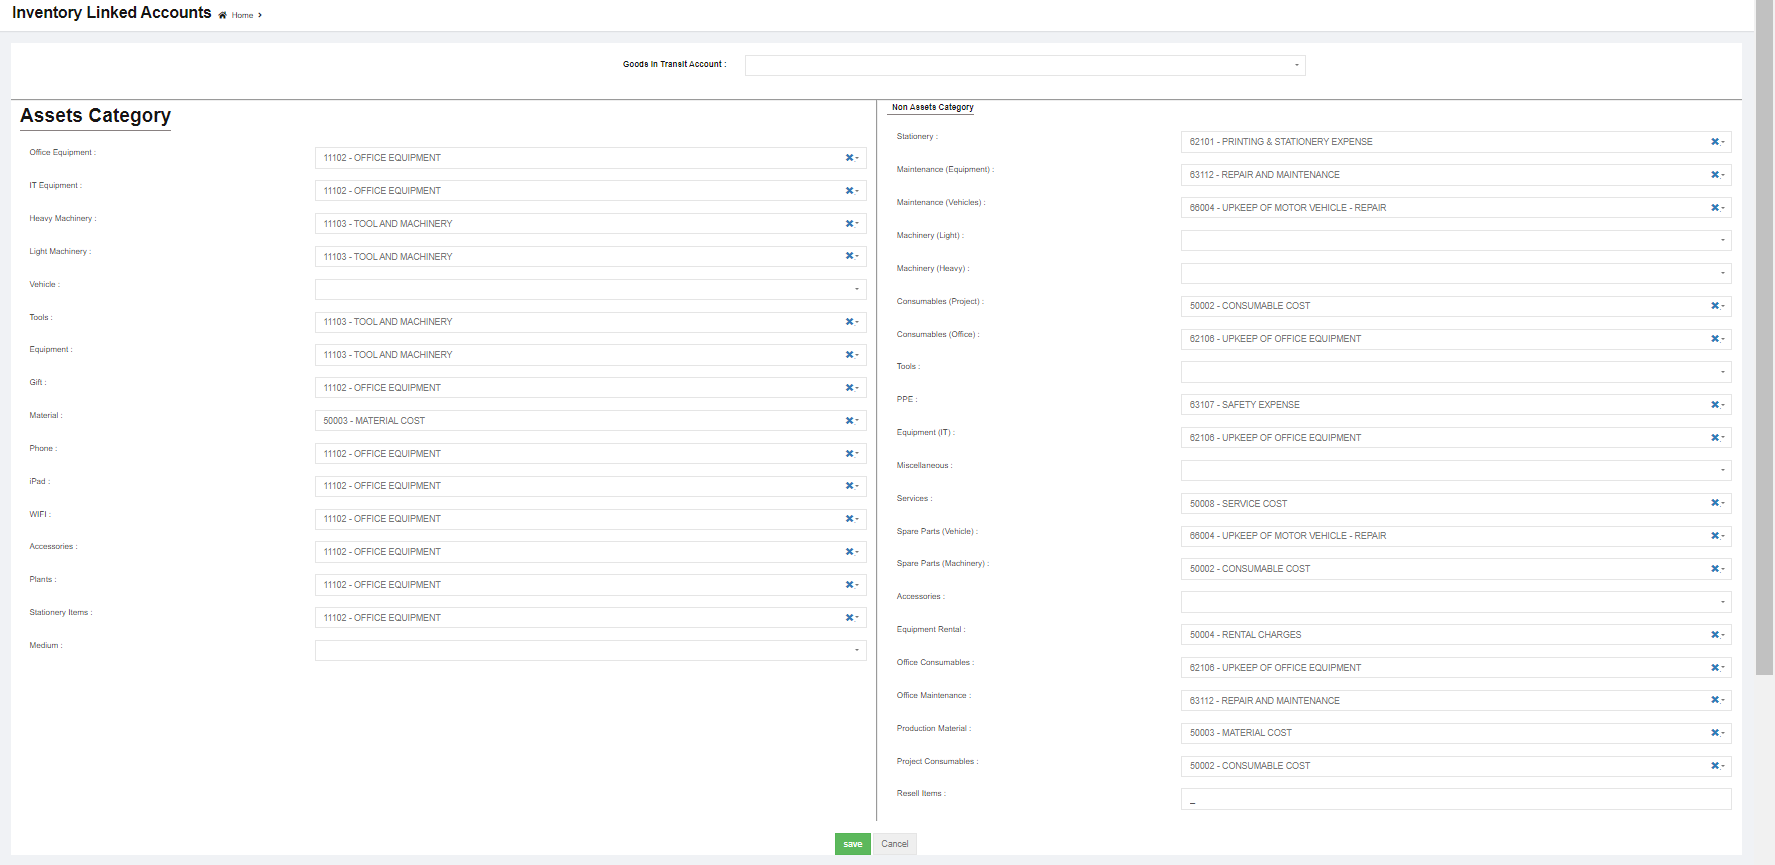
- In each of the category box, click and select to link accounts for Asset Category and Non-Asset Category and Goods In Transit Account.
- Click Save to save updates.


Step 4: Posting Purchase Orders to Financial Accounting Module
Note: Posting PO to finance function will be available only if setting configurations in Step 1 setting configuration name Purchase Module Linked To Finance is enabled as Yes at the company level.
To post PO to accounts,
- Navigate to Procurement module, click Purchase Order menu.
- Click the PO key to open PO details,
- Post To Accounts tab will be available in both Receiving Entry (if ItemLinking setting is configured as Yes at company level) & Invoice Entry Table.
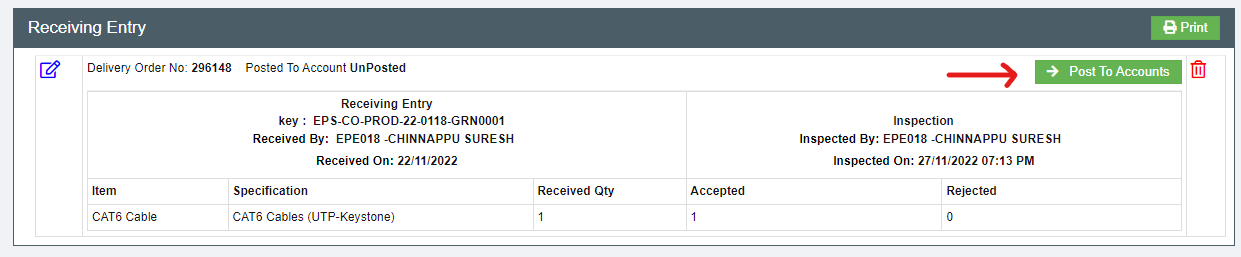
- If user chooses to Post to Accounts via item stock value, after item inspected in PO, the
 option will show in Receiving Entry table as below,
- If user chooses to Post to Accounts via invoices, after invoice details are entered in Invoice Entry, the option will show in Invoice Entry table as below,

- If user chooses to Post to Accounts via item stock value, after item inspected in PO, the
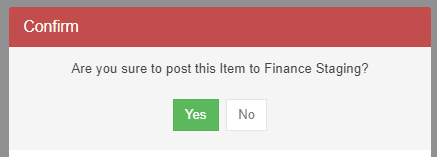
- Click , a confirmation notification will prompt,

- Click Yes to confirm posting PO to finance staging.

Step 5: Enable Permission to View / Post Vouchers in Staging Location
- In Cute Office, navigate to Admin module, click Users menu and click edit icon in selected user.
- Navigate to Permissions tab. To view staging menu in Finance, in user's permission page, enable below Read & Write permissions (click filter and filter "stagingPurchaseInvoice" and "stagingPurchaseItemReceiving").
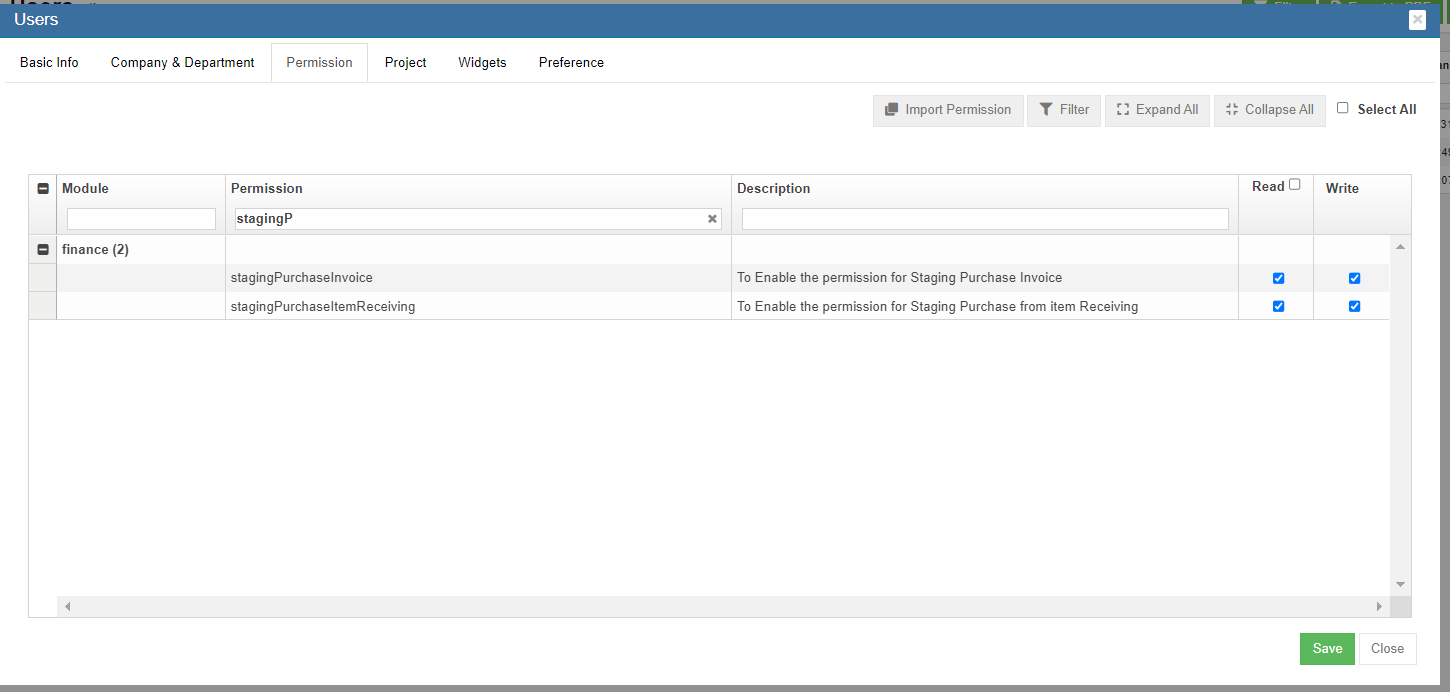
- Click Save to save permissions.

Step 6: To Approve the Purchase Integration Staging in Finance Module
- Navigate to Integration Staging menu,
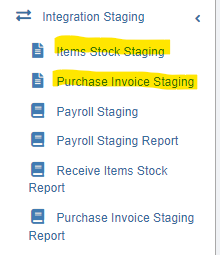
- To view and approve posted Receiving Item stock value or Invoices from Purchase module,
- If user posted via item stock value in Receiving Entry table in PO, click Items Stock Staging tab, select relevant vouchers and click
 to approve,

- If user posted via invoices, click Purchase Invoice Staging tab, select relevant vouchers and click to approve,

- If user posted via item stock value in Receiving Entry table in PO, click Items Stock Staging tab, select relevant vouchers and click


Payroll Module Integration
Follow the below steps to post entries from Payroll to Finance module Integration Staging.
Step 1: Configure Payroll Admin Settings
- Go to Payroll module, navigate to Admin menu, click Settings to open settings page as below,
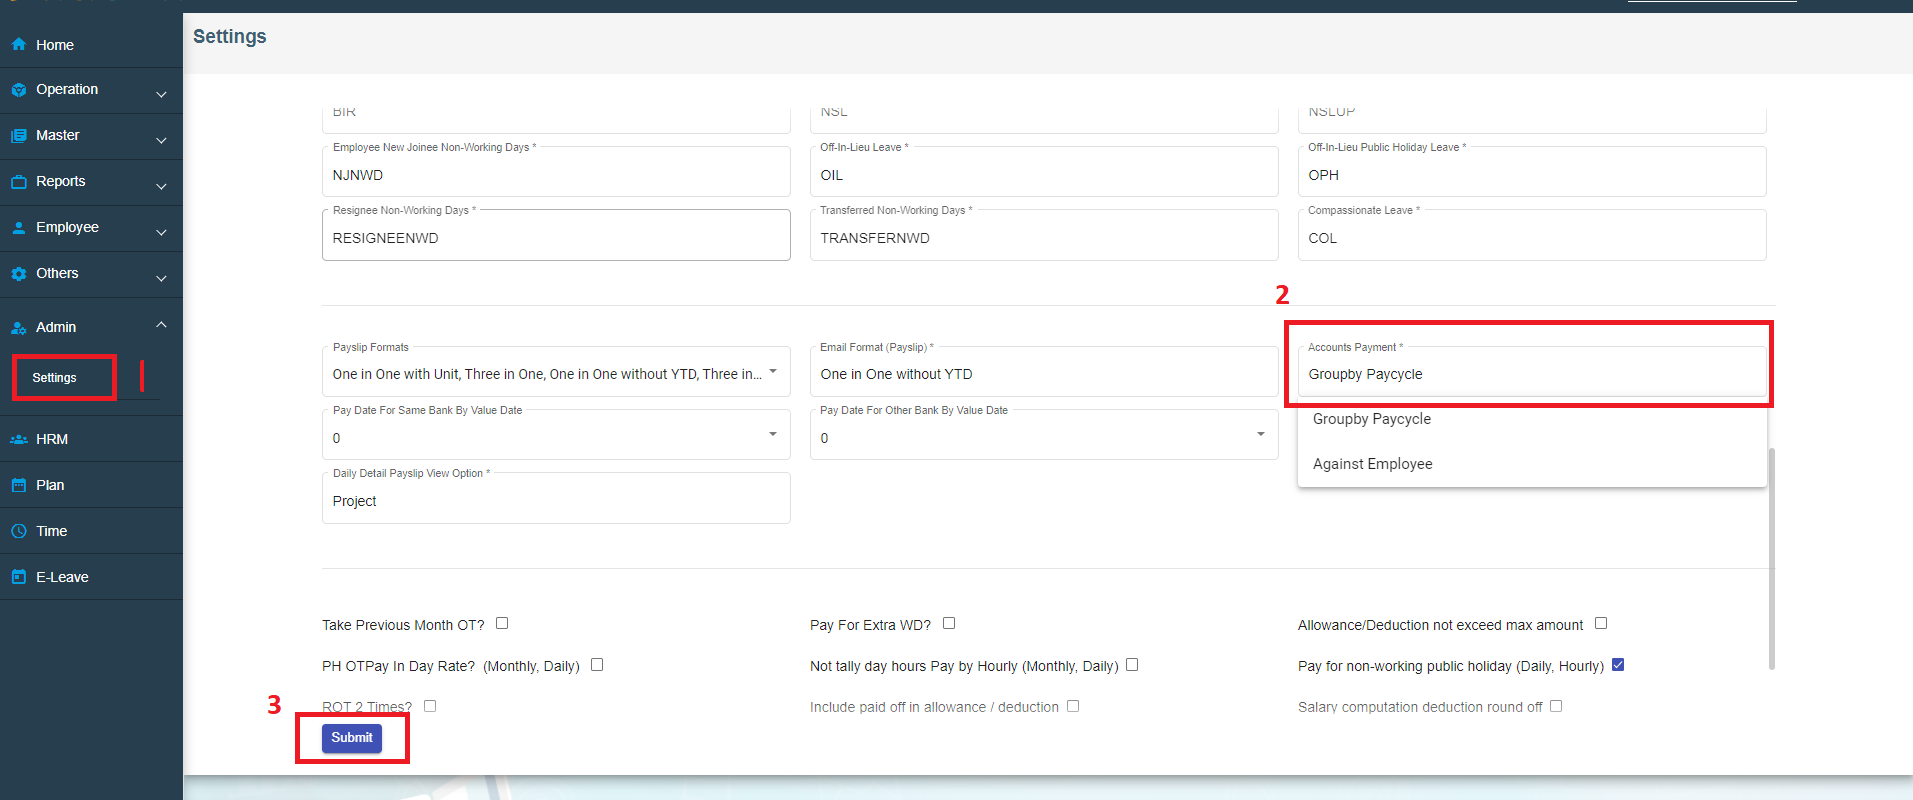
- Scroll down the page to find Account Payment box, and select "Groupby Paycycle" as account payment setting.
- Click Submit to save payroll setting configuration.

Step 2: Configure Admin Company Settings at Company Level
- In Cute Office, navigate to Admin module, click Company menu and click edit icon in selected company.
- Navigate to Setting page, search for setting configuration name Financial Groups,
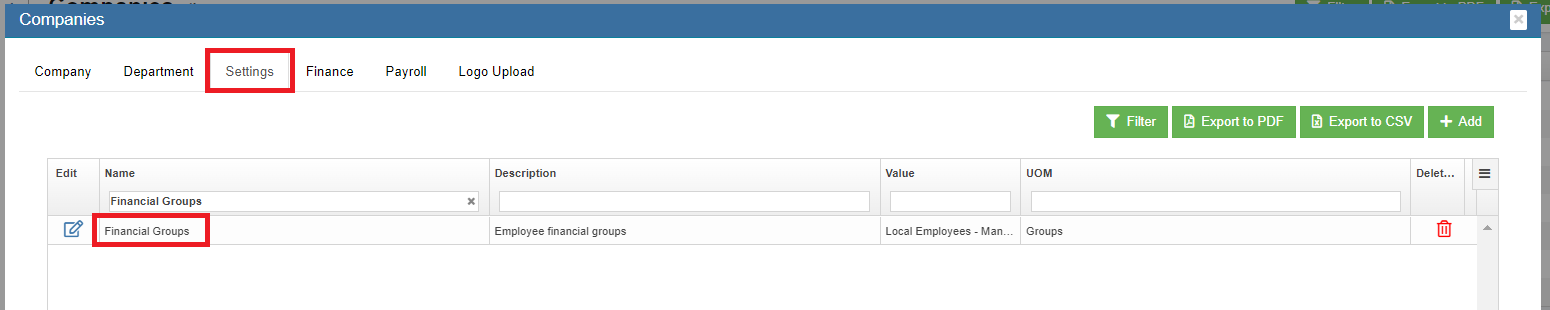
- Click icon of Financial Groups setting name,
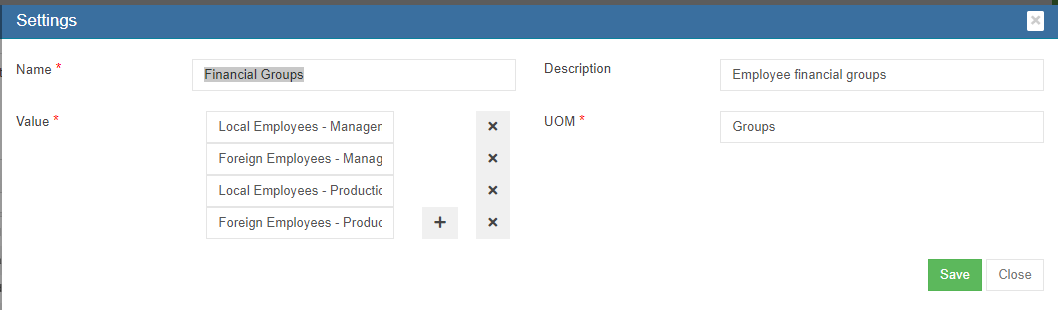
- Check and edit Value box if needed.
- Click Save to save company settings.


Step 3: Enable Permission to View Project Costing and Post Payroll to Accounts at User Level
Note: It is highly recommended to define permission in user role and then assign user roles to a specific user account, so that users who perform same duty in cuteOffice will have same permissions. Roles are defined by a set of permissions to different functionalities in cuteOffice system. Based on company operation needs or organization structure, system admin user can create finance roles, such as finance manager etc., and give required permission to these roles and assign role to user.
To define permission in user role,
- Click Roles tab, all existing roles created in system will be displayed as below.
- Click (add icon), the adding new role window open as below,
- In Name box, enter the new role name, such as "Finance Manager"
- In Description box, enter description of the new role.
- Based on the function of the new role, search for relevant module and permissions.
- Search and enable below Read & Write permissions (click filter and filter permission names "projectCosting","payrollJournal", "payrollJournalReport").
- projectCosting - To Enable Project Payroll Costing menu in Payroll
- payrollJournal - To Enable Staging Journal Resgister in Finance
- payrollJournalReport - To Enable Payroll Journal Report in Finance
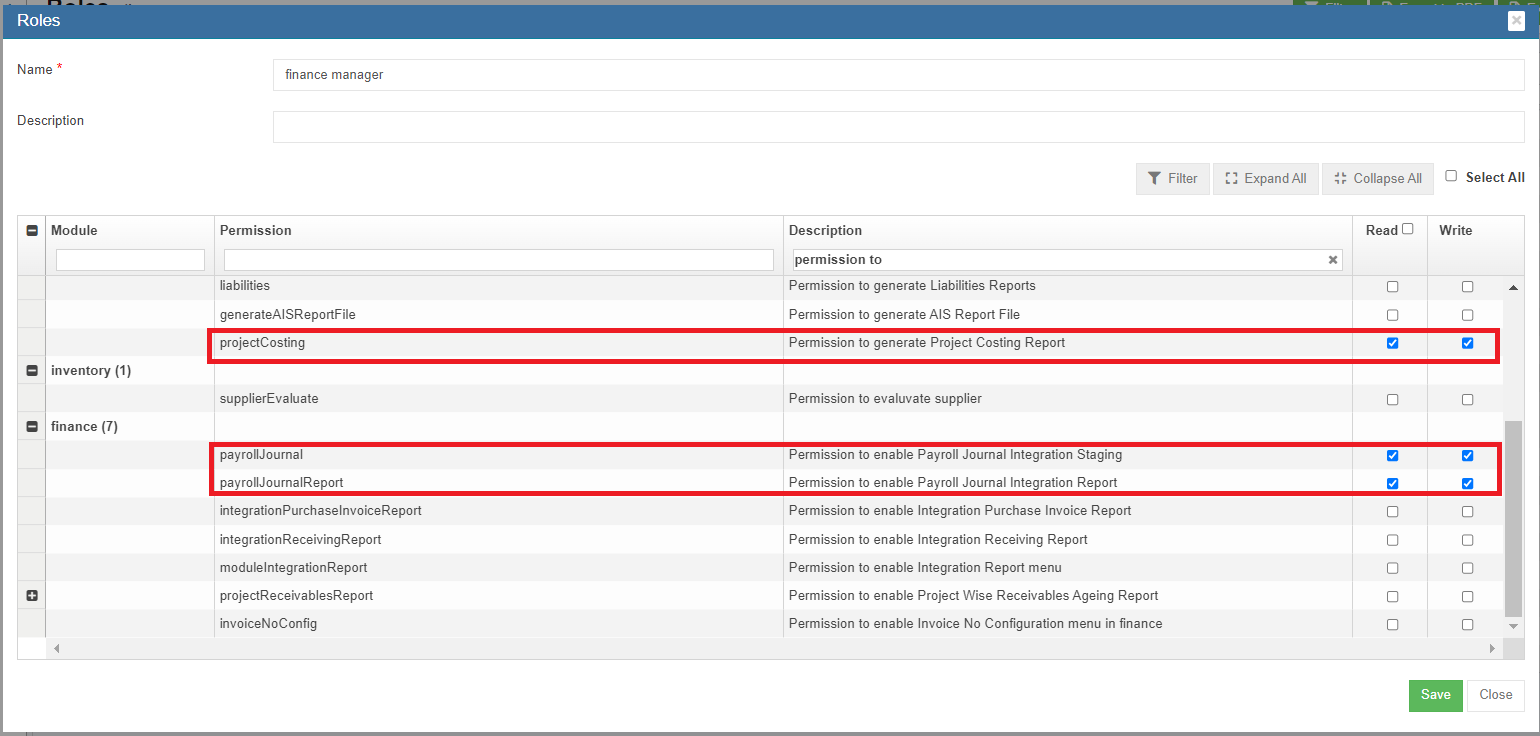
- Click Save to save the new role.
- To assign role to user, click Users menu and click edit icon in selected user.
- Navigate to user's Basic Info tab, in Role box, search and select "Finance Manager" role.
- Click Save. The new permission assigned to role "Finance Manager" will be granted to user.

To enable permission to a specific user
- In Cute Office, navigate to Admin module, click Users menu and click edit icon in selected user.
- Navigate to Permissions tab. To be enable to configure GL accounts codes to be linked to Accounting module, in user's permission page, enable below Read & Write
- permissions (click filter and filter permission names "projectCosting","payrollJournal", "payrollJournalReport")
- Click Save to save user's permission configuration.
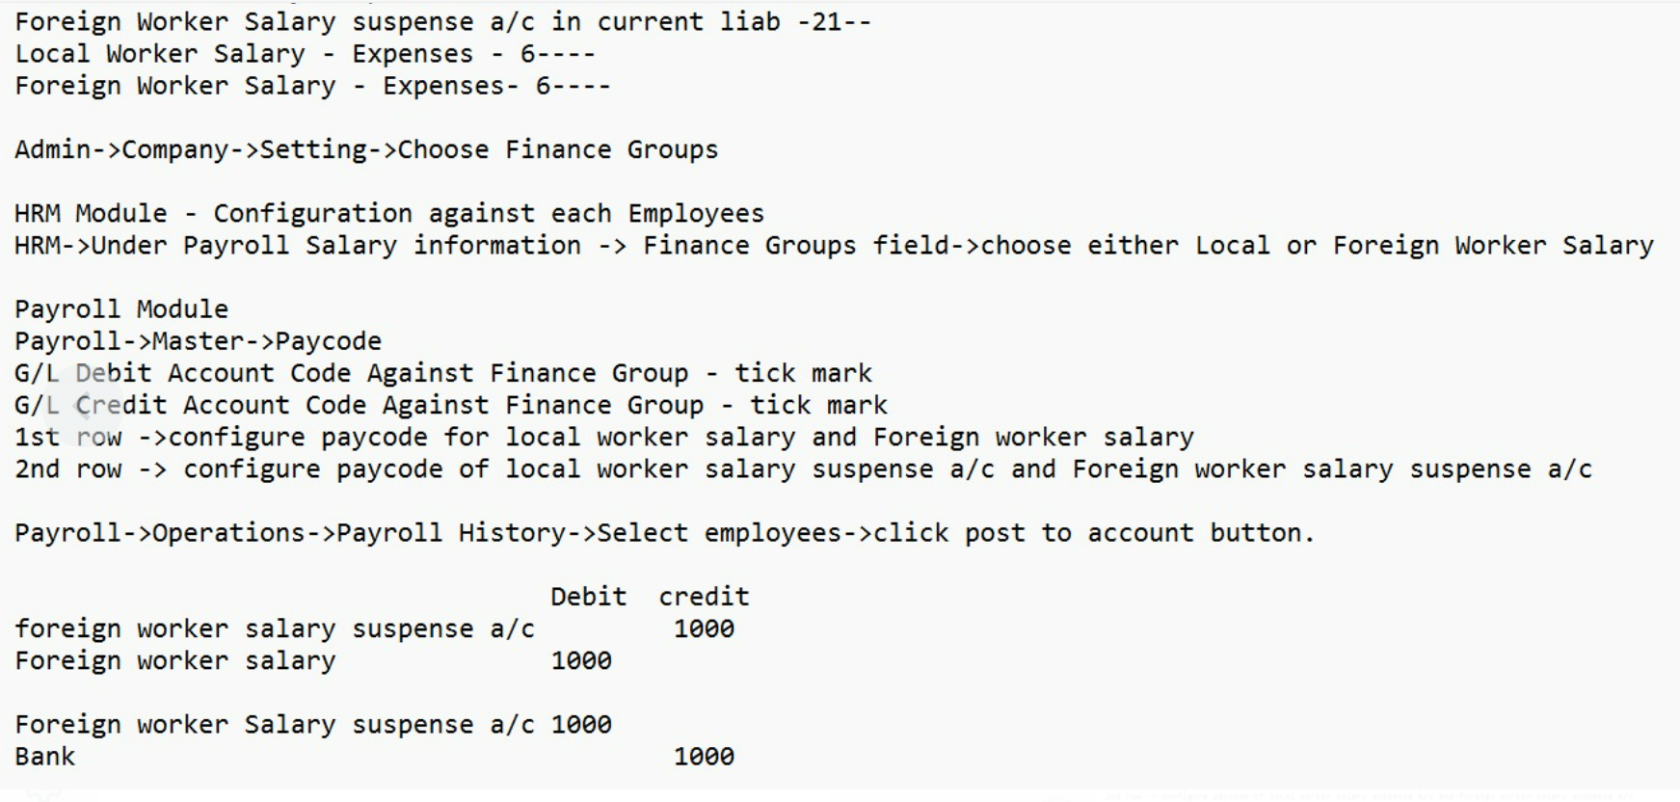
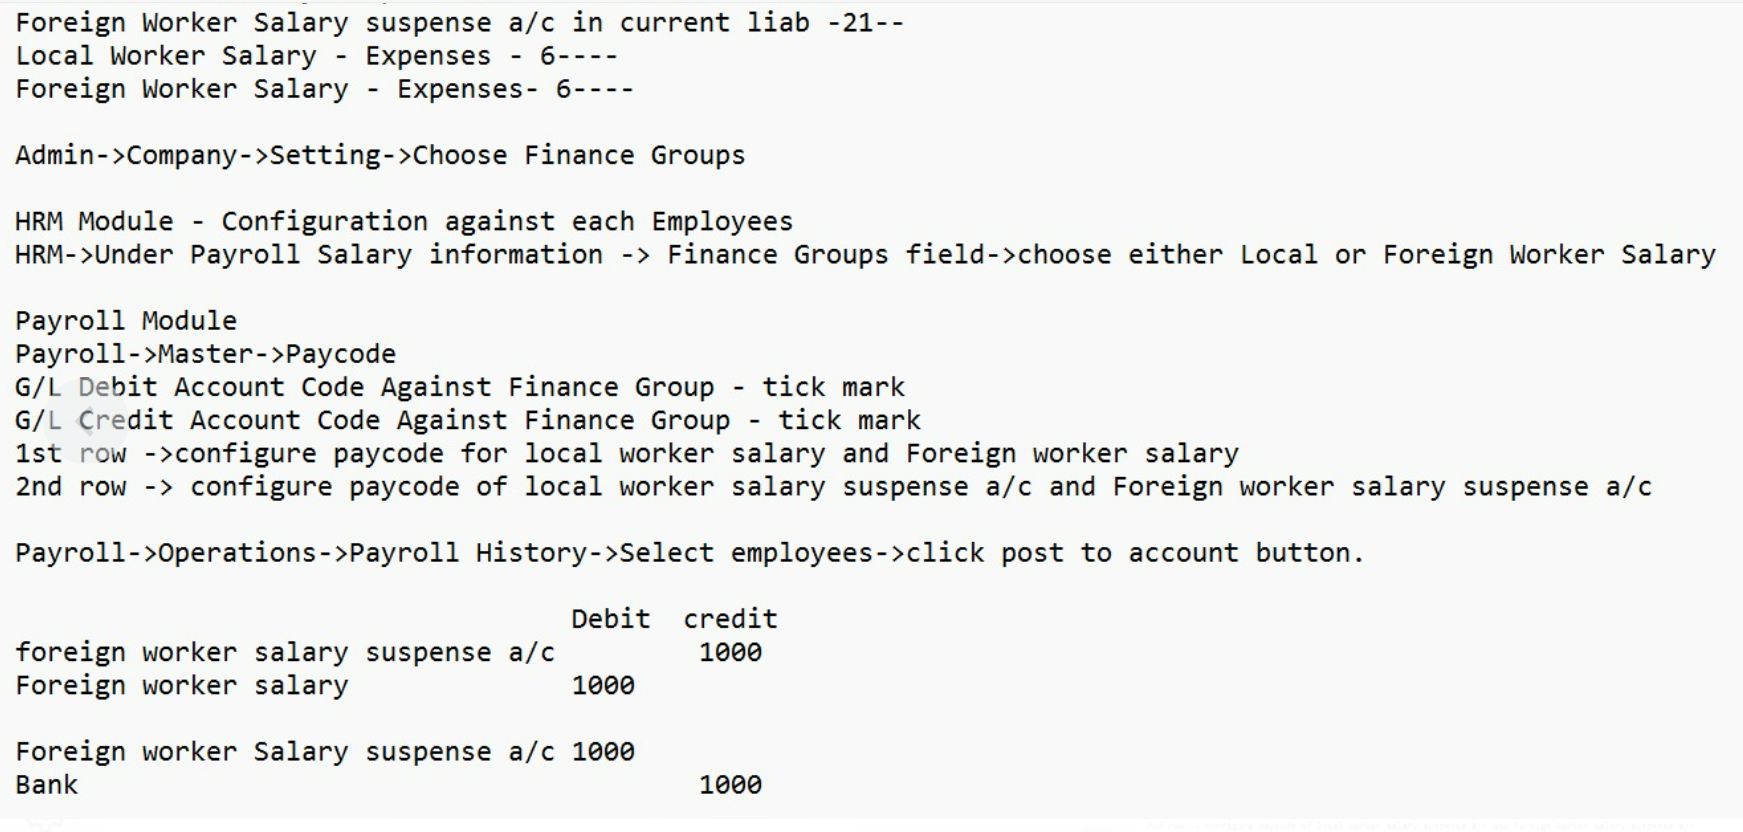
Step 4: Configure Employee's Finance Group in HRM Employee's Salary Configuration
- Go to HRM module, navigate to Employee menu, click view all to open employee list.
- Search for an specific employee and click to open the HRM details, and navigate to Payroll Salary Information page as below. In Others section, Finance Groups box, click to choose Finance Group for the specific employee.
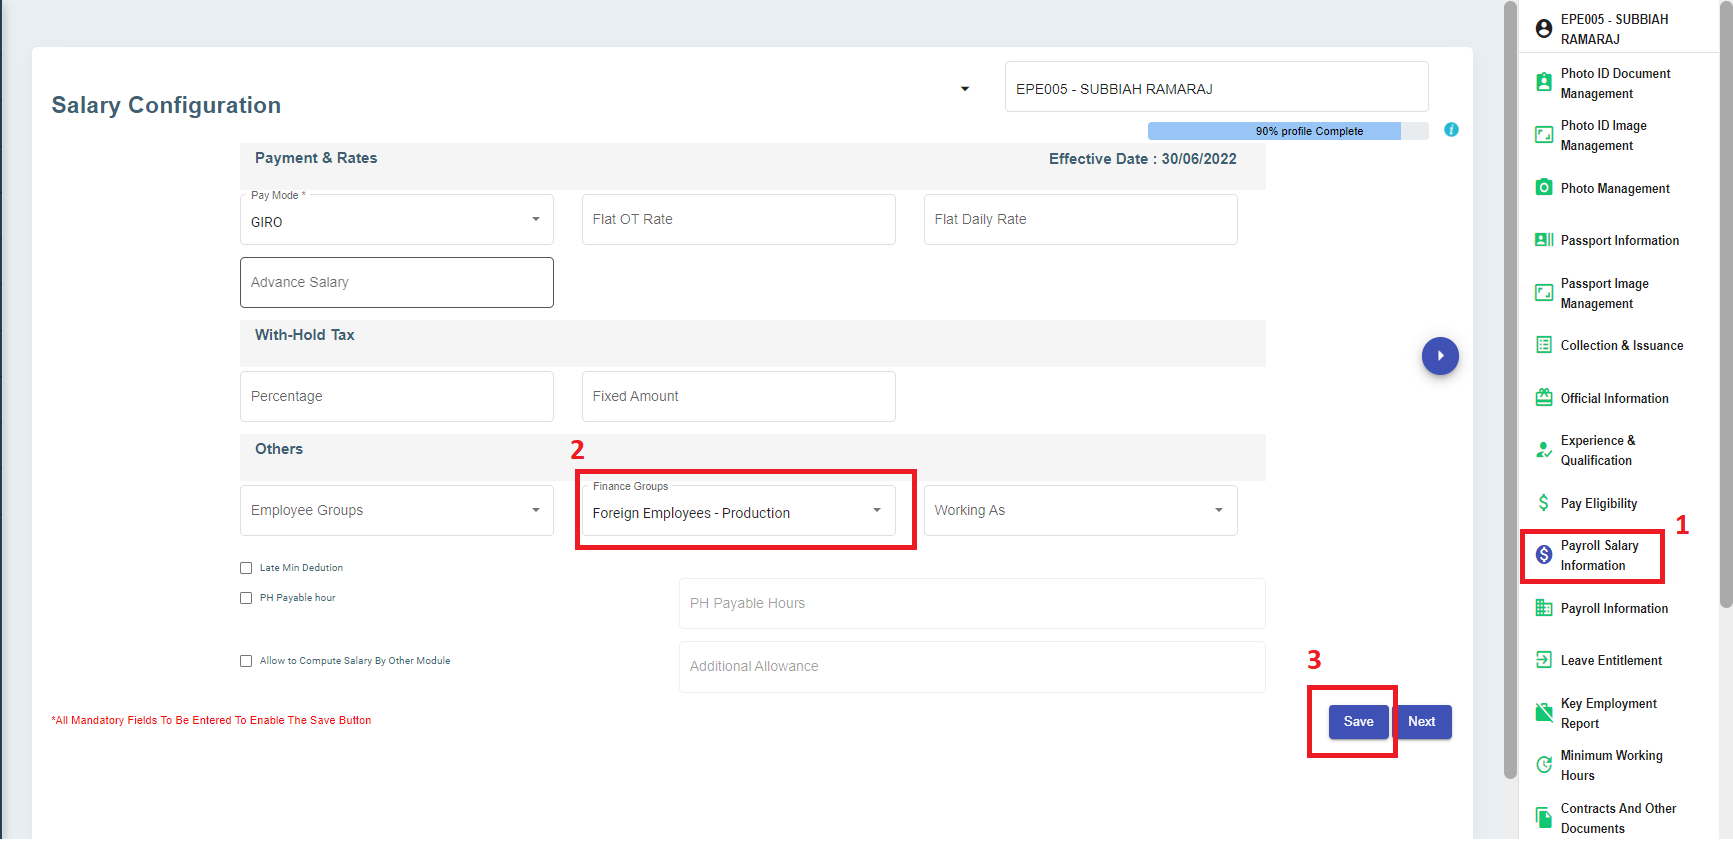
- Click Save to save employee's finance group information.

Step 5: Map G/L Debit or Credit Account to Pay Code Payroll Master
- Go to HRM-Payroll module, navigate to Master menu, click to open pay code master list.

- Select a pay code, and click edit icon,
To map Single Debit Account Code Against Finance Group or Single Credit Account Code or Against Finance Group
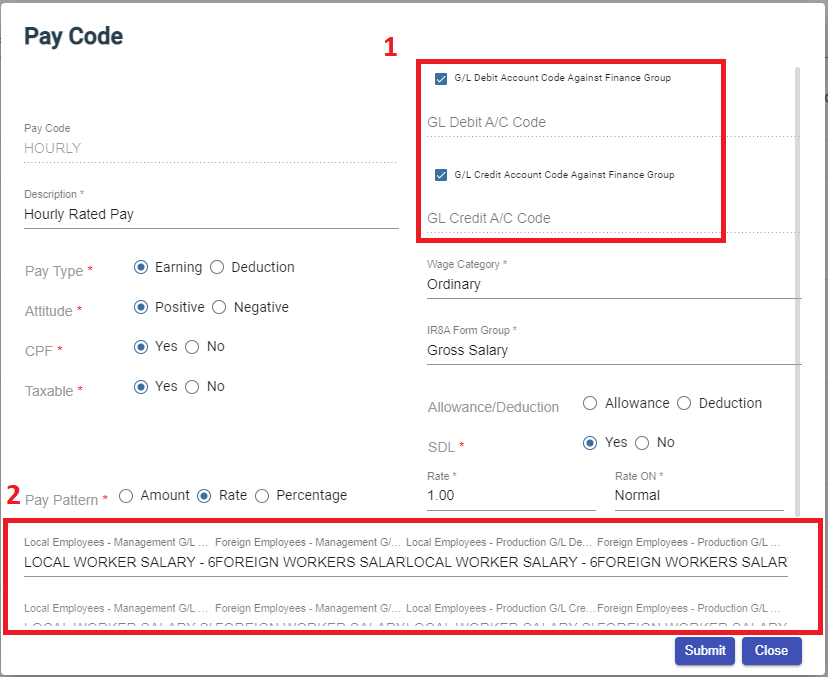
- Tick relevant box in area 1 in above screenshot.
- If
 or
or  is/are ticked, the employee finance group details will be shown in area 2, and user need to select G/L debit or credit account code in each of the employee finance group in area 2.
 - Click Submit to save account mapping information.
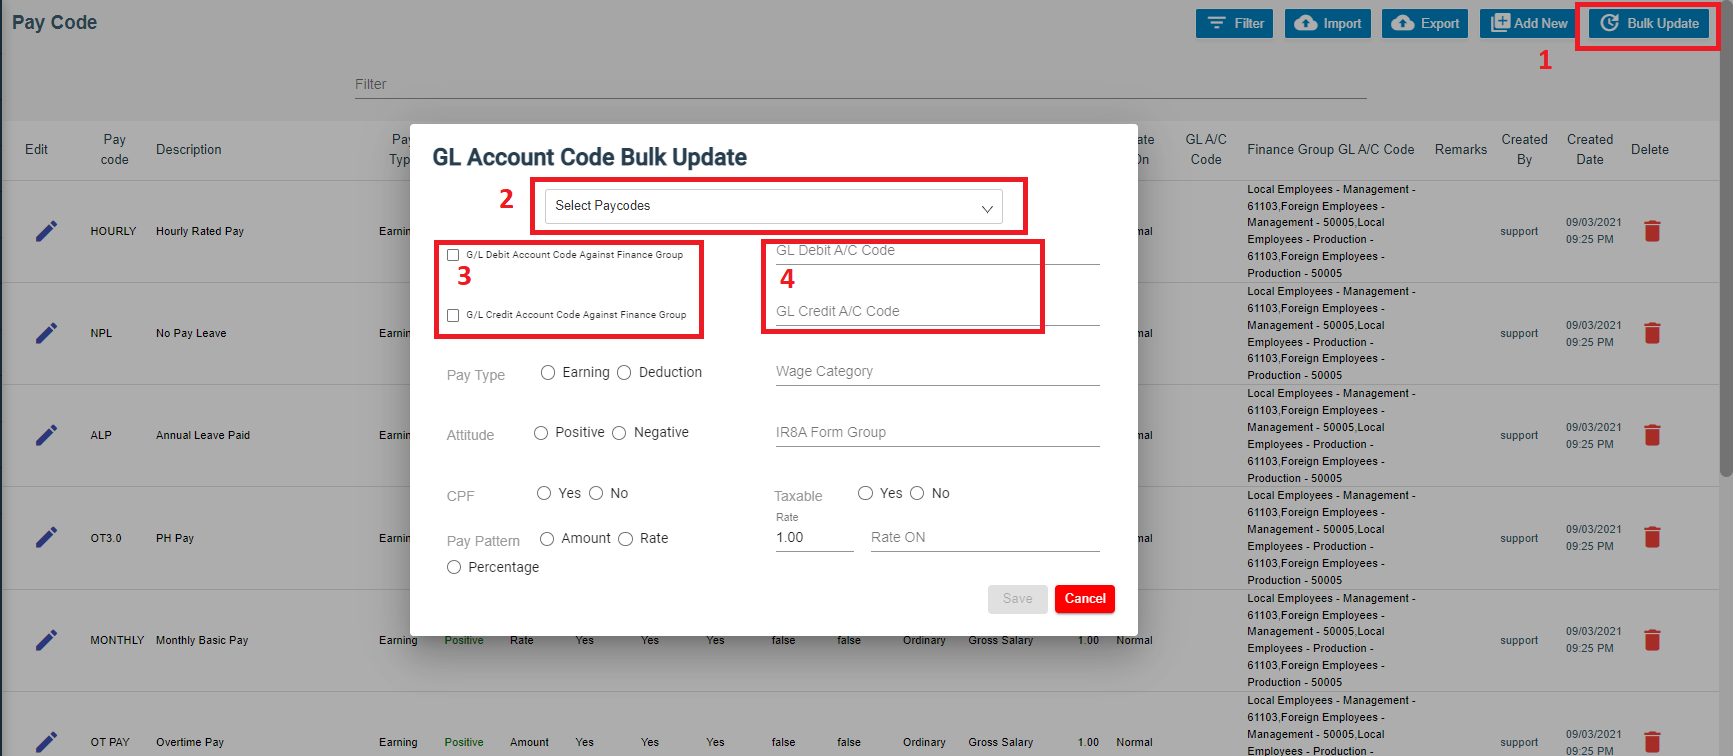
- To map account code in one stretch, use the bulk update option of G/L Account Code for multiple pay codes, click
 , the GL Account Code Bulk Update window opens as below,

- Select a pay code in area 2 in above screenshot,
- If user wants to map G/L account code against finance group, tick relevant box in area 3, and select G/L account code to map to each finance group as shown in below yellow highlight area,

- Or if user want to map G/L account code, select relevant G/L account code in area 4.
- Fill up rest of the details and click Save to save mapping details.


Step 6: To Generate & Print Project Payroll Costing
- Go to HRM-payroll module, navigate to Reports menu, click Project Payroll Costing submenu,
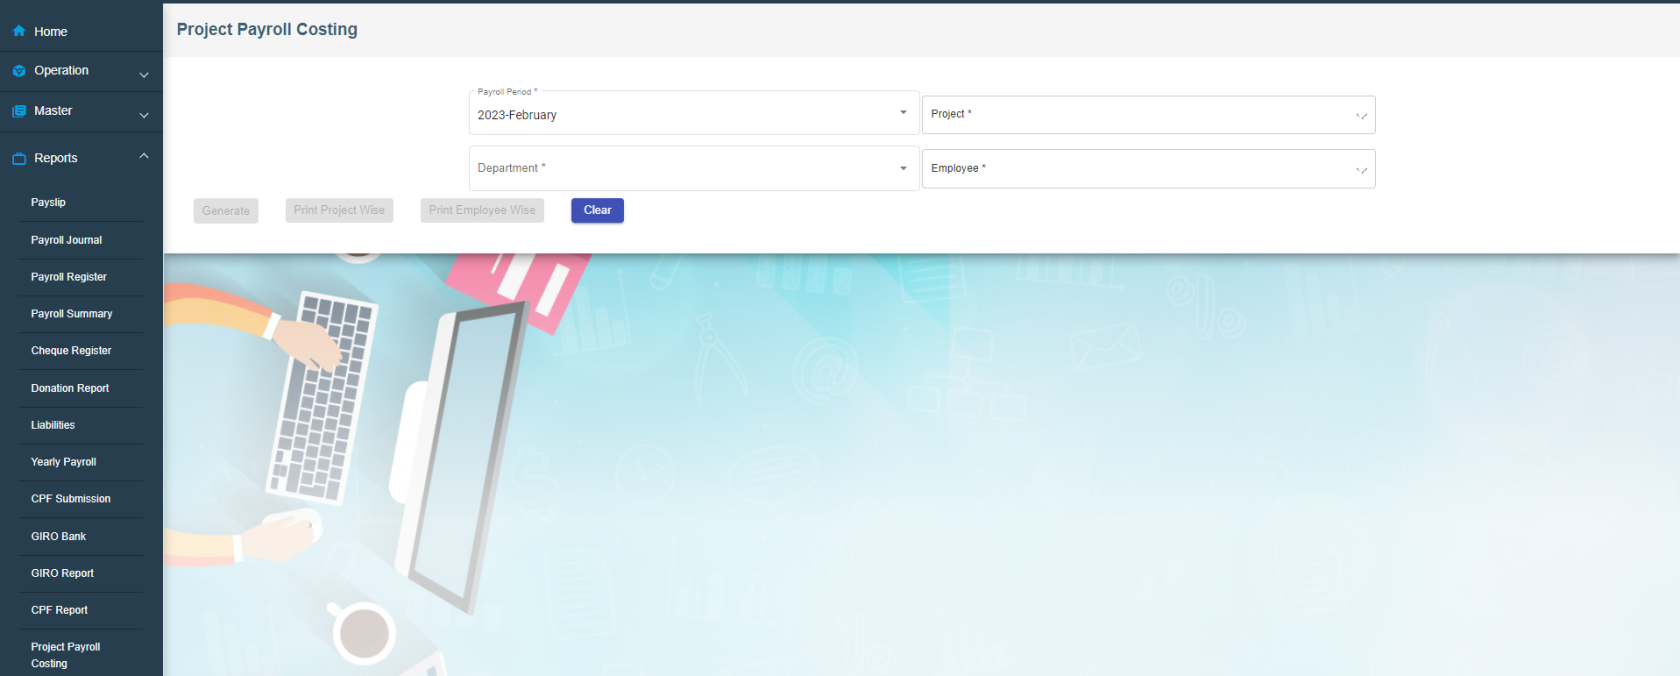
- Select relevant information in Payroll Period/Project/Department/Employees fields,

- Click
 to generate project payroll costing report; Click
 or
or to download reports.


Step 7: Post Payroll to Accounts
Once above four steps are configured, user will be able to integrate payroll to finance module (Post payroll to finance staging).
- Go to Payroll module, navigate to Operation menu, click to open Payroll history (Note: only approved payroll details will be shown in Payroll History page).
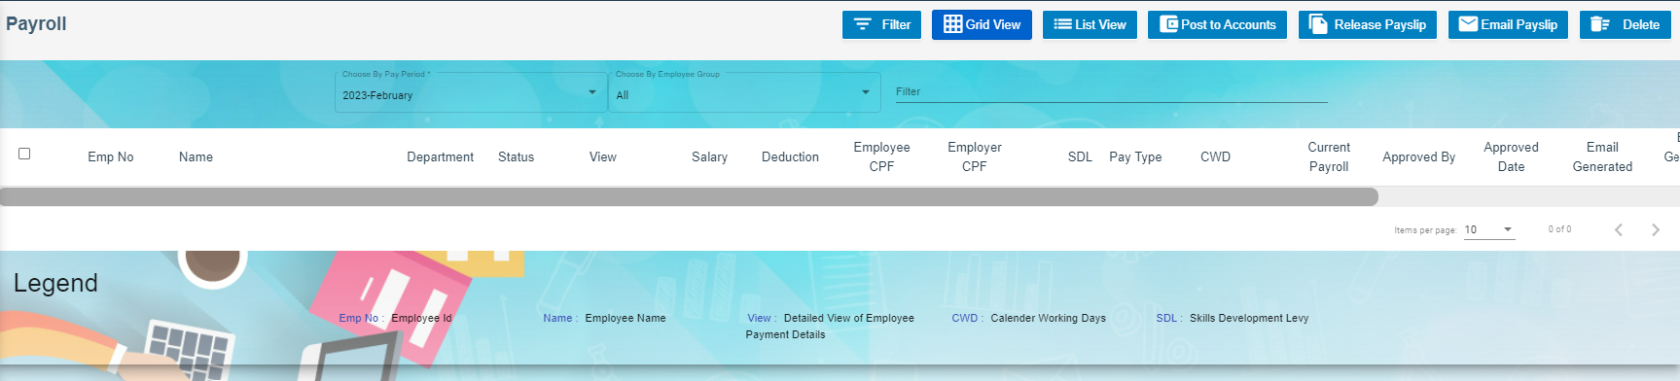
- In Choose Pay Period box, select pay period to post in accounts, all approved employees' payroll for selected pay period will be displayed,

- Tick the box in front of employees' name to select employee(s) to post to accounts,

- Click
 Post to Accounts Button at the top right corner of the payroll history page, a confirmation notification window will prompt up as below,

- Click Yes to confirm posting to accounts. Note: once employees' payroll are posted to accounts, the payroll history records will be disabled from further action such as deletion.


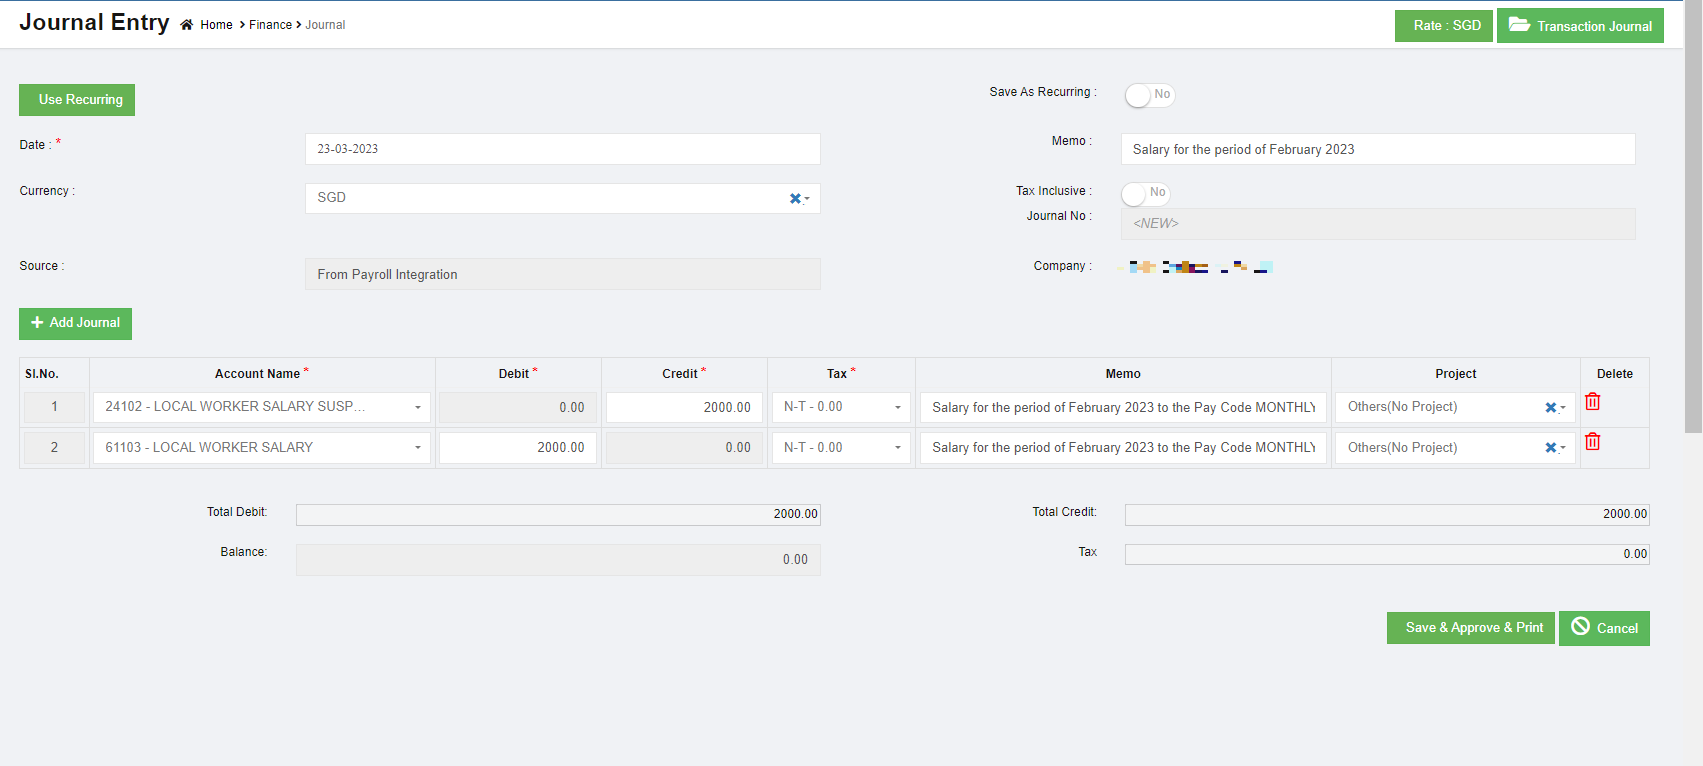
Step 8: To View/Approve Staging Payroll Journal in Finance Integration Staging
- Navigate to Finance module, go to Integration Staging menu, click Payroll Staging to open the staging payroll journal page as below,
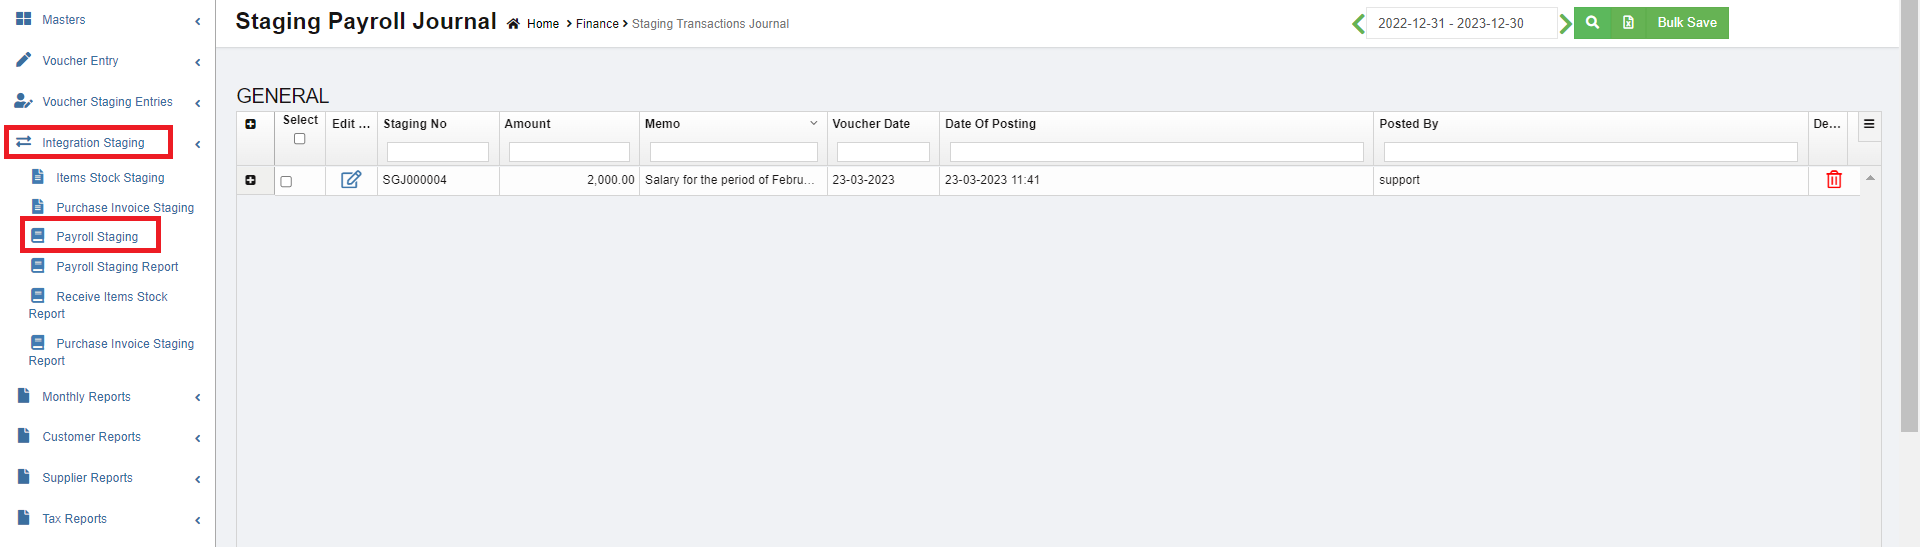
- In the date field, select period then click search icon to show staging voucher.
- To view staging payroll journal details, click
 icon to expand payroll payment details,

- To edit staging payroll journal, click edit icon, the payroll staging journal will open as below, edit fields where needed, then click
 to save & approve staging payroll journal.

Configuration and Journal details :


No Comments