
Scaffolding
Scaffolding is a temporary structure that helps workers manage materials during construction or maintenance work. The workers perform erection and dismantle with the use of tags differentiate by colors to indicate the status of the scaffolding.
Master
There are two types of master data in Scaffolding module:
Item Master-The list of items data that will be used in Scaffold module. They are managed centrally so that duplicate items are not entered into the system.
Site Master-The list of sites data that will be used in Scaffold module. They are managed centrally to use Client site code for various project.
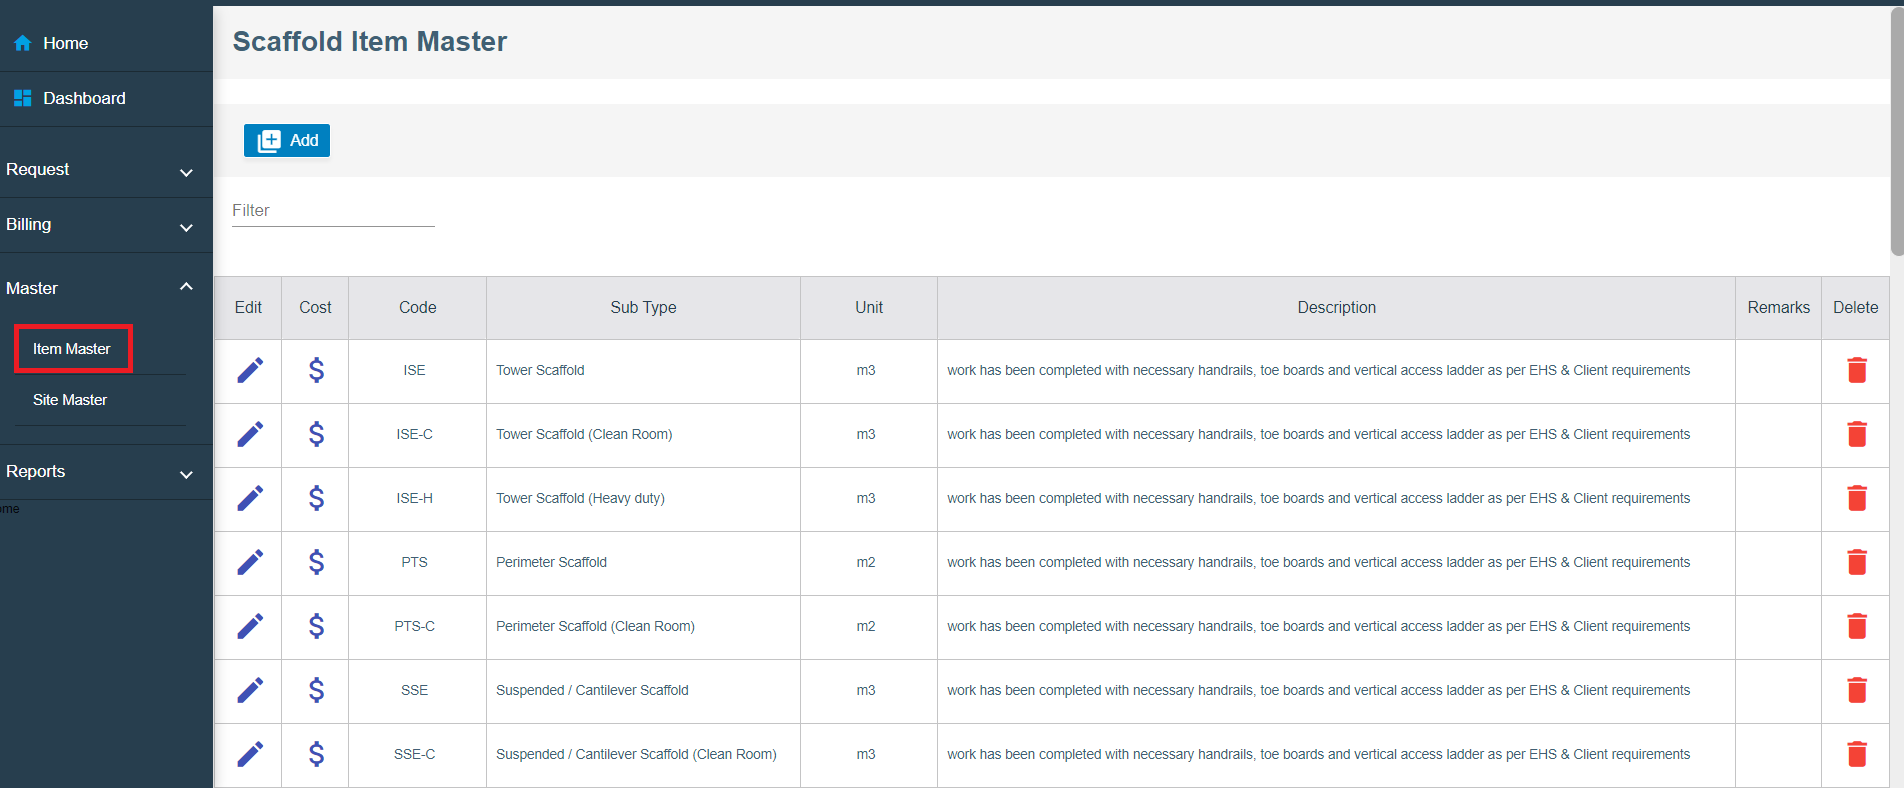
Item Master
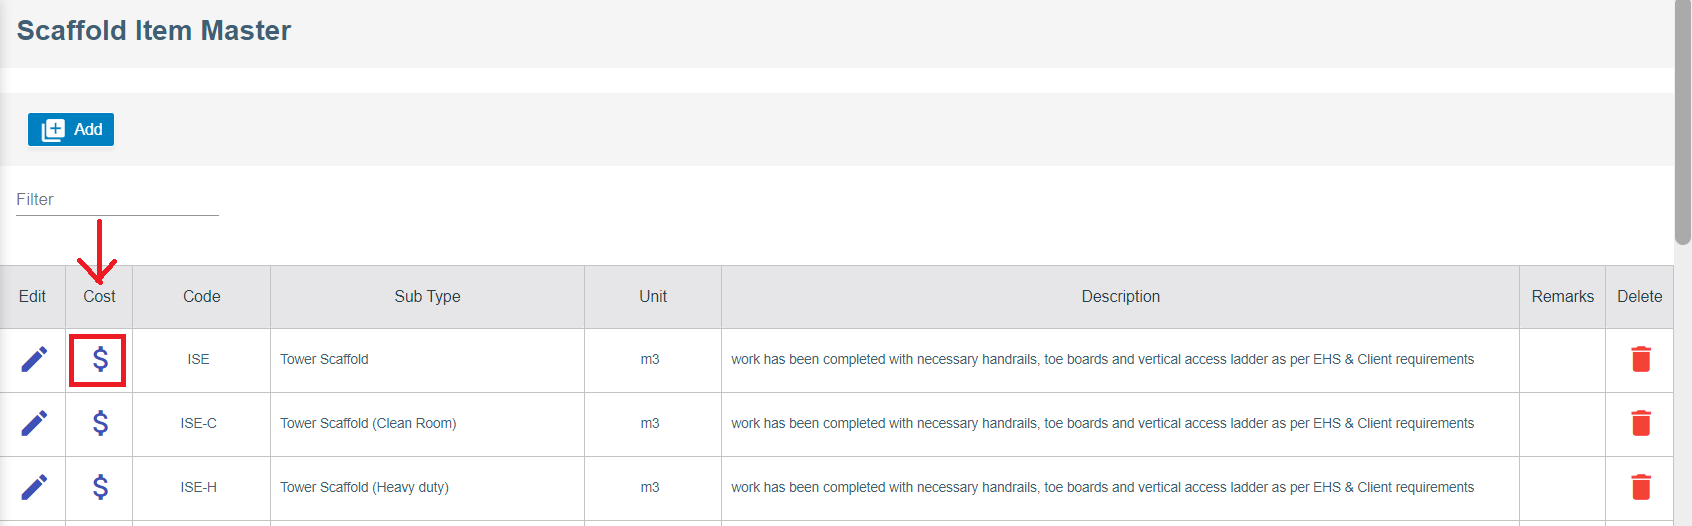
To view items master, click Item Master submenu in the Master, the item master list page opens as below,
Add New Item
To create a new item in item master,
- Click
 button on the top left corner in the Scaffold item Master list view page, the add item page opens as below,
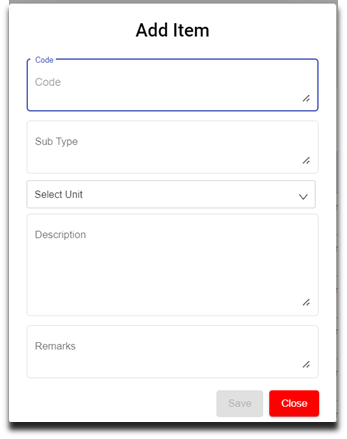
- Enter details in the below fields,
- Code (Mandatory)
- Sub Type (Mandatory)
- Select unit - UOM (mandatory)
- Description (Optional)
- Remarks (Optional)
- Click
 to save the item in the item Master. The new added item will be saved to item master list page.
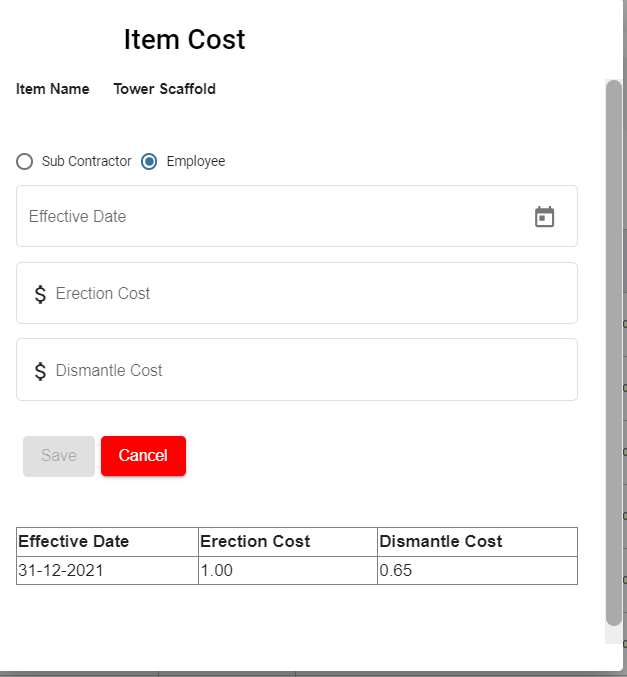
 - Once new item is added to master, user shall add cost details of the item. Navigate to the item name in the item master page, and Click
 cost icon.

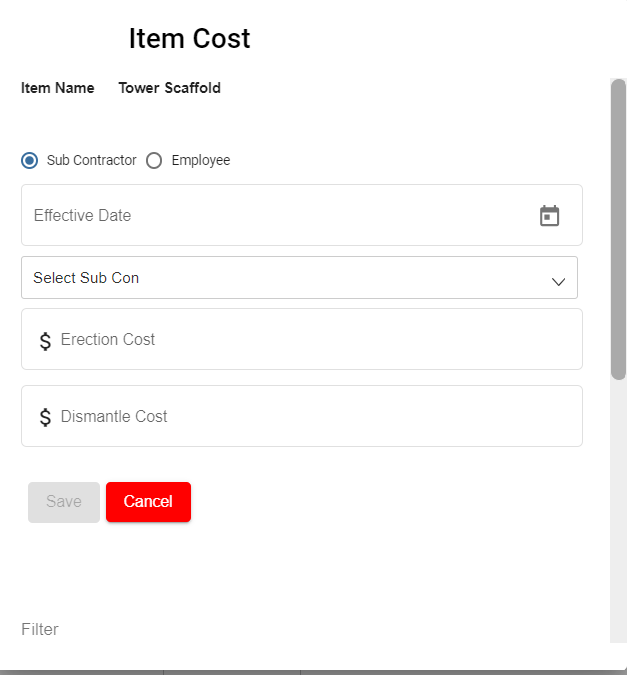
- The item cost page opens as below and enter the following details,
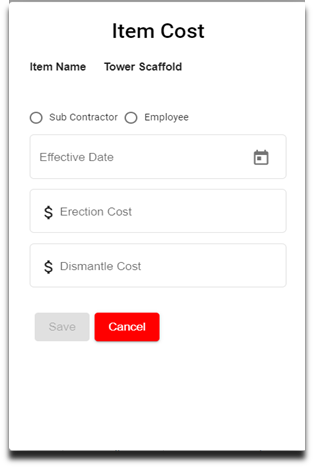
- Click to select Sub Contractor to add item cost for work assigned to sub contractor workers, enter details in below fields,
-
Choose Effective Date
-
Select Sub Contractor
-
Enter Erection Cost
-
Enter Dismantle Cost
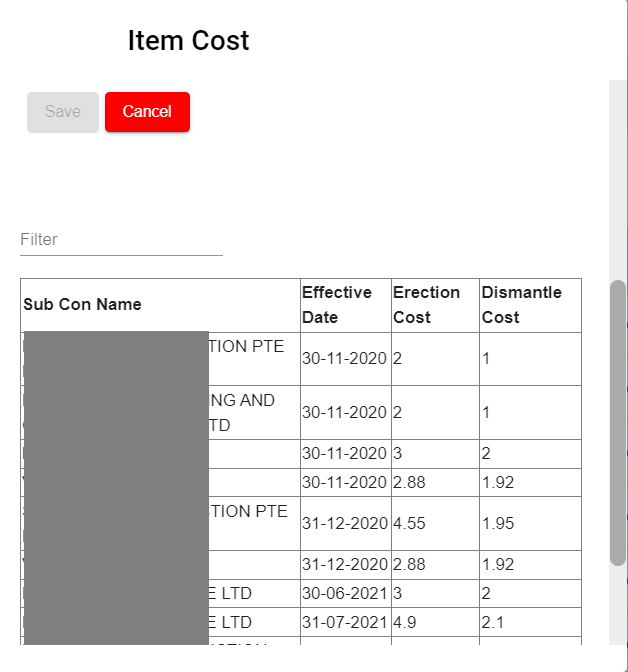
-
Click Save. Item cost will be saved, and user can scroll down and view in the cost page.

-
- Click to select Employee to add item cost for work assigned to employees, enter details in below fields
- Choose Effective Date
- Enter Erection Cost
- Enter Dismantle Cost
- Click Save. Item cost will be saved, and user can scroll down and view in the cost page.


Edit Item
To edit item,
- Click
 edit icon on the main page to update Item fields.
-
Update the respective fields.
-
Click Save button to save edit.
Delete Item
To delete Item record from the Item Master,
- Click
 delete icon in the delete column in item master list page.
 - A confirmation window opens, click Yes and the Item record will be deleted.


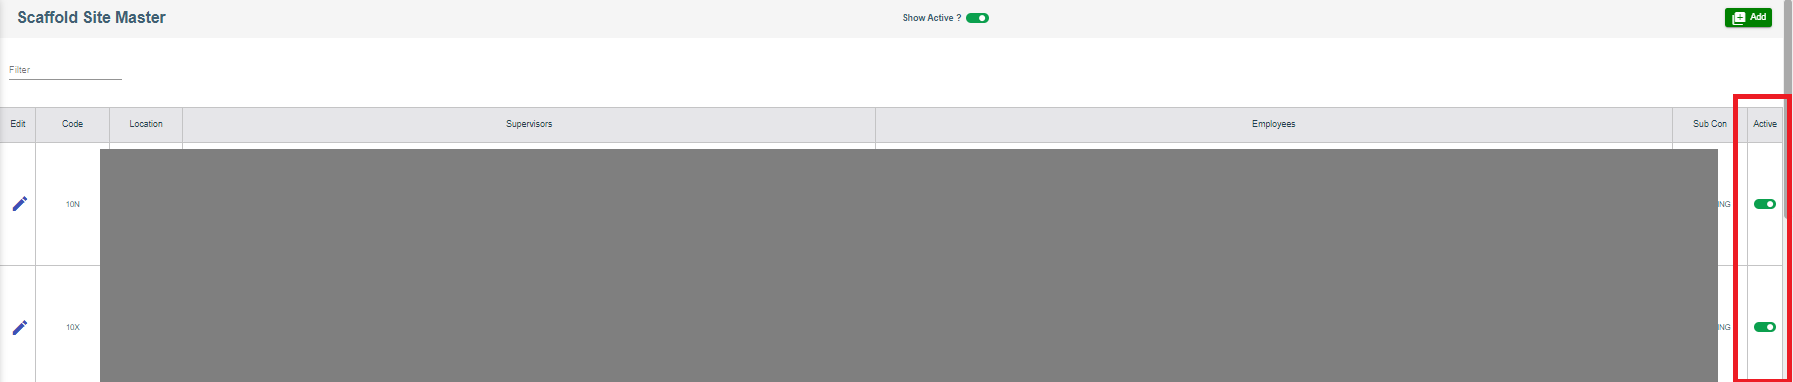
Site Master
To view Site master, click Site Master submenu in the Master, the Site master list page opens as below,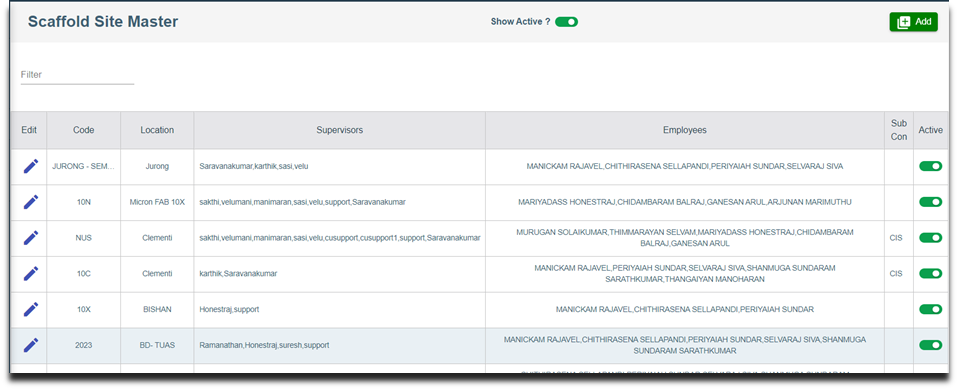
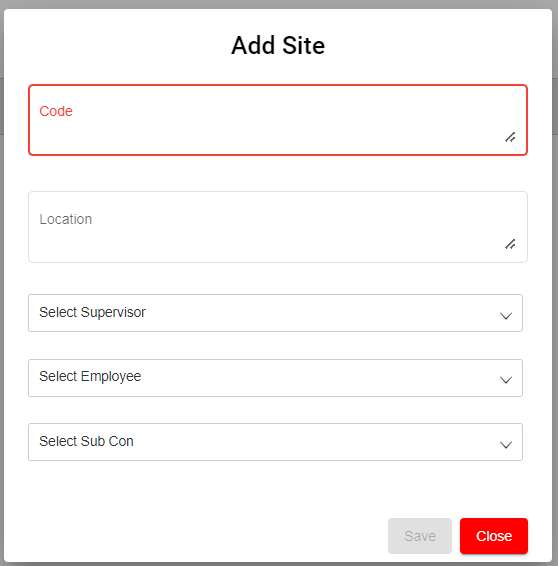
Add New Site
To create a new Site in Site Master,
- Click
 button on the top right corner in the Scaffold Site Master view page, the add Site page opens as below,

- Enter details in below fields,
- Code (Mandatory)
- Location (Mandatory)
- Select Supervisor (Optional)
- Select Employee (Optional)
- Select Sub Con (Optional)
- Click Save to save the Site details in the Site Master. Important notes: 1) Only selected supervisor and selected employees can view and access projects associated with this Site Code.
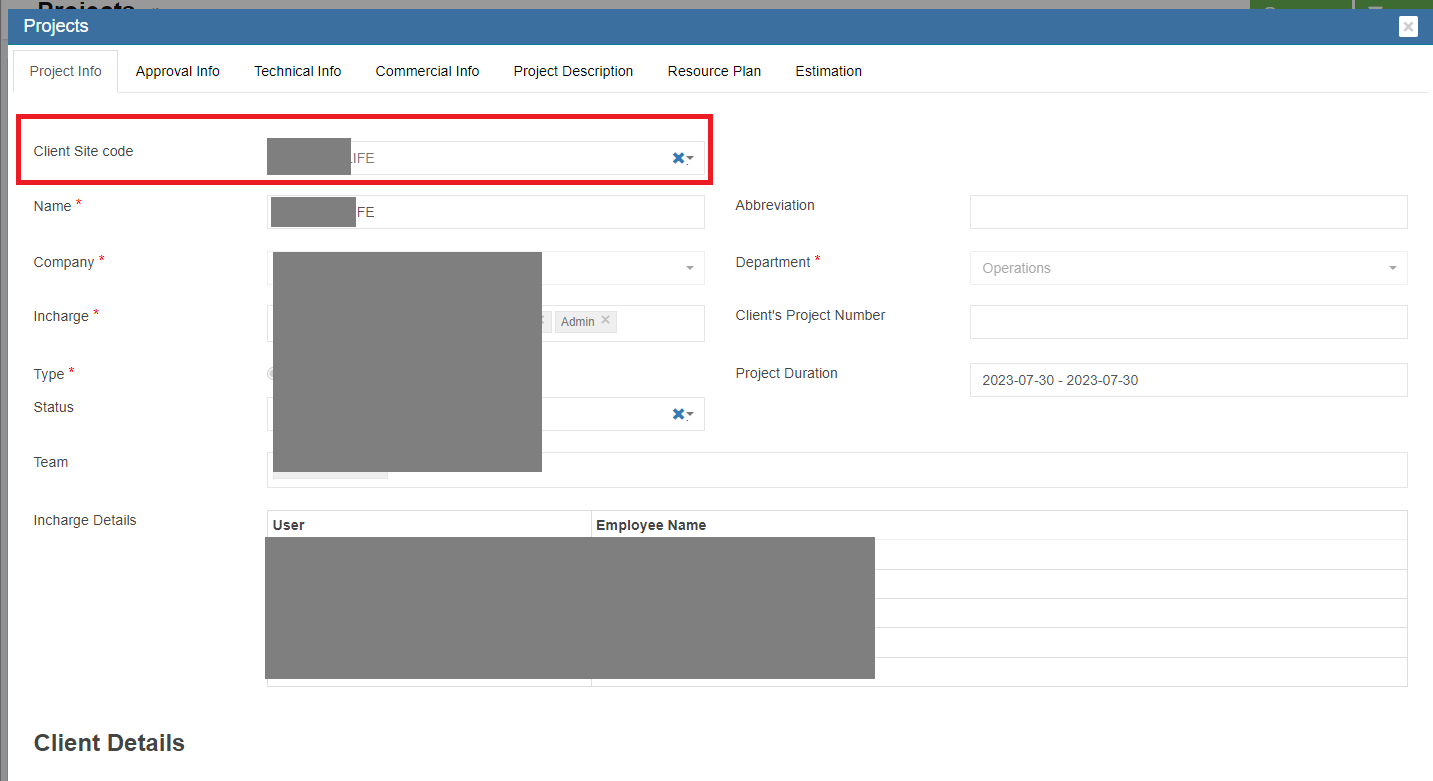
- Only project configured with Client Site code will be available in the scaffold module to create request. To configure client site code in projects,
- First, in Admin Settings, check and make sure showSiteCodeConfig setting value is True, so that in project master, client site code field will be enabled.

- Second, navigate to the project in Projects Master in Operation, in the Client Site Code field, click to select

- First, in Admin Settings, check and make sure showSiteCodeConfig setting value is True, so that in project master, client site code field will be enabled.
- Note: Site can be active or inactive, in the Active Column in site master list page, user can click to set to active
 or inactive
  .
.


Edit Site
To edit site,
- Clickedit icon on the main page to update site fields.
-
Update the respective fields.
-
Click Save button to save edit.
Delete Site
To delete Site record from the Site Master,
- Click delete icon in the delete column in site master list page.
- A confirmation window opens, click Yes and the Item record will be deleted.
Request
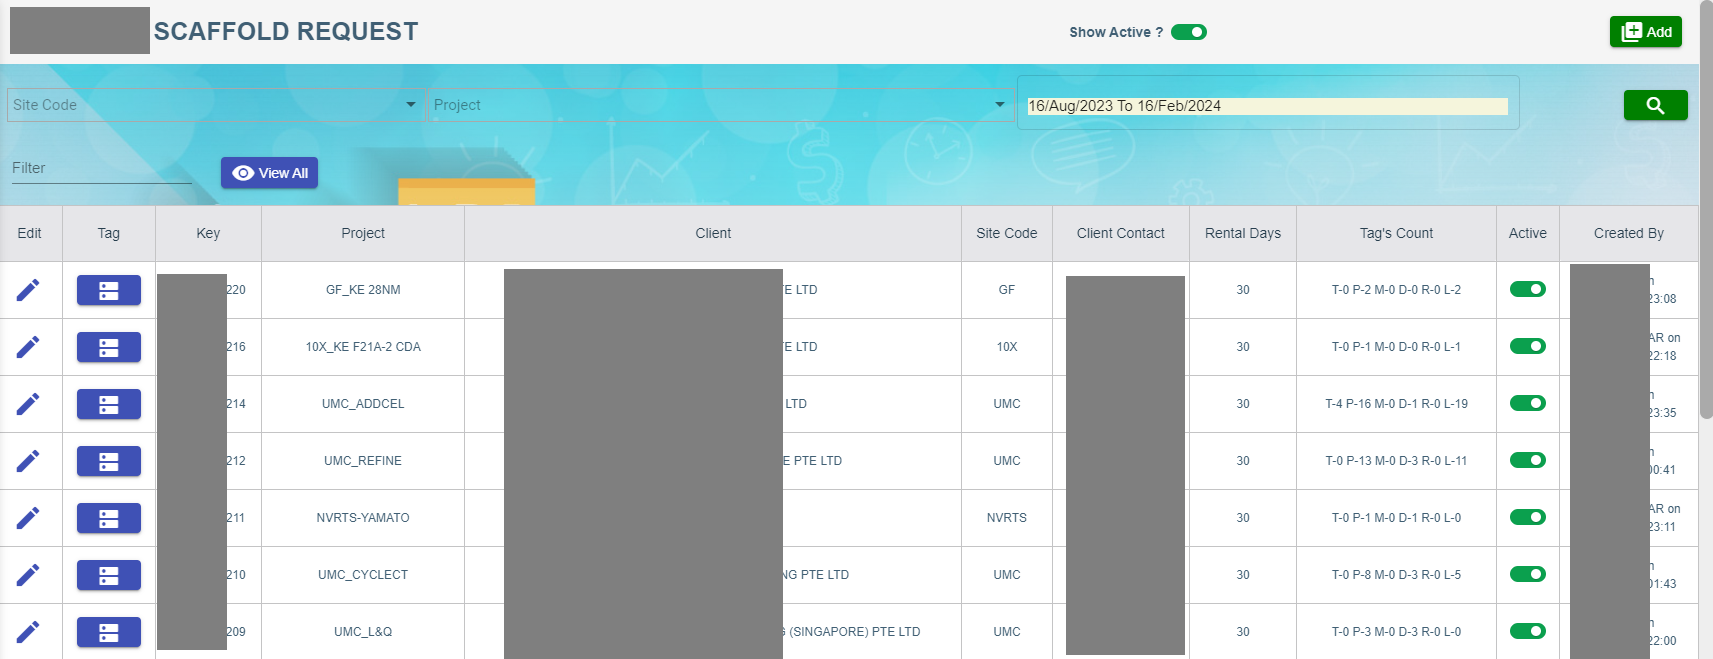
Scaffold Request
A Scaffold Request shall be raised against Site code and Project to start the scaffolding procedure. The user can add the Scaffold request to create Temporary tag, Permanent tag and Internal size for scaffolding Erection, Dismantle, Modification and Rental days. They perform checklists like Construction Checklist, Monthly Checklist and Weekly Checklist to abide by safety rules and regulations. To view Scaffold Request, click Scaffold Request submenu in the Request, the Scaffold Request page opens as below,
Add New Scaffold Request
To create a new Scaffold Request,
- Click
 button on the top right corner in the scaffold request page, the add Scaffold Request window opens as below,
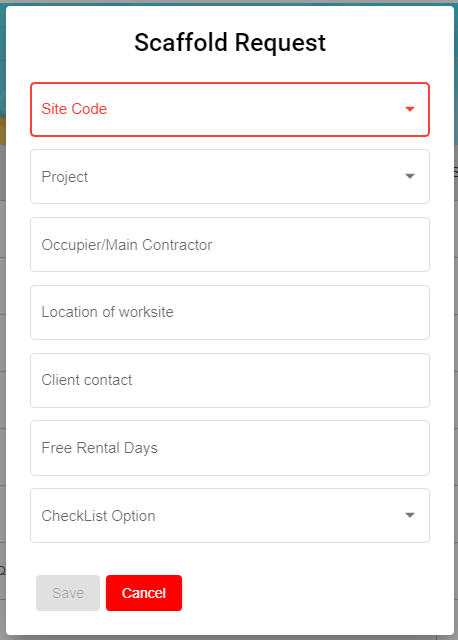
- Enter details in below fields,
- In Site Code field, click to choose site code.
- In Project field, click to select project.
- In Occupier/Main Contractor field, enter Main Contractor name.
- In Location of Worksite field, enter worksite location.
- In Client Contact field, enter client contact number.
- In Free Rental Days field, enter number of free rental days.
- In Checklist field, click to select checklist option.
- Click Save to save the Request in the Scaffold Request page. And a unique Scaffold request Key will be generated against the new added Scaffold Request.

Temporary Tag Creation
Based on the client request, admin user will create a few temporary tags against a new scaffold request.
To Create Temporary Tag,
- Click
 (Tag icon) to create temporary tags for the new Scaffold request , the Scaffold Request page opens as below,
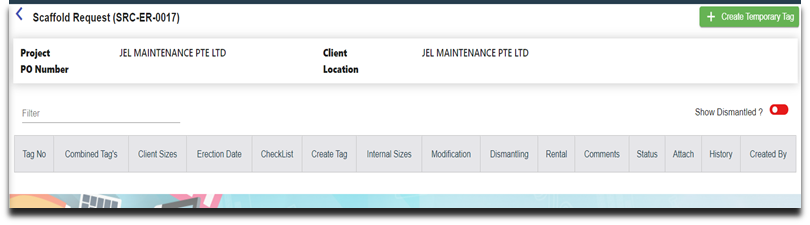
- Click
 (Create Temporary tag icon) , the below page opens,
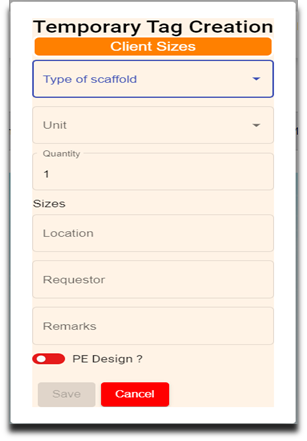
- Enter details in below fields,
- Type of Scaffold
- Unit
- Quantity
- Sizes
- Location
- Requestor
- Remarks
- PE Design (click to enable if applicable)
- Click Save to save the Temporary tag. Once saved successfully, on the scaffold main page, the Tag’s Count Column “T” changes from 0 to 1 and L changes from 0 to 1.
Note: T – Temporary
P – Permanent
M – Modify
D – Dismantle
R – Rental
L – Total Line numbers
Combined Tag Creation
If Client request to create combined tag creation against the temporary tag, user can create combined tag.
To Create Combined Tag Creation
- Click
 (Combined Tag icon) in the combined Tag’s column, the Combined Tag Creation page opens as below,
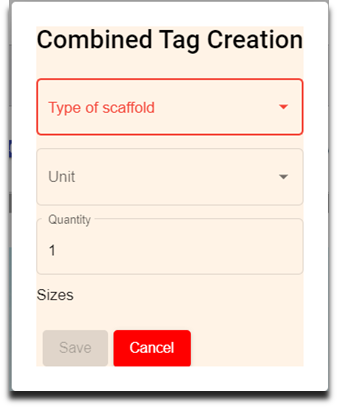
- Enter details in below fields,
- Type of Scaffold
- Unit
- Quantity
- Sizes
- Click Save to save the Combined tag. Note: Client Size column in the scaffold request consists of size details of the Scaffold Type.
Checklist
Checklist will be performed after Temporary Tag Creation.
Perform Construction Checklist
To perform construction checklist,
- Click
 (Checklist icon) in the scaffold request, the Scaffold Request Checklist page opens to perform Construction Checklist.
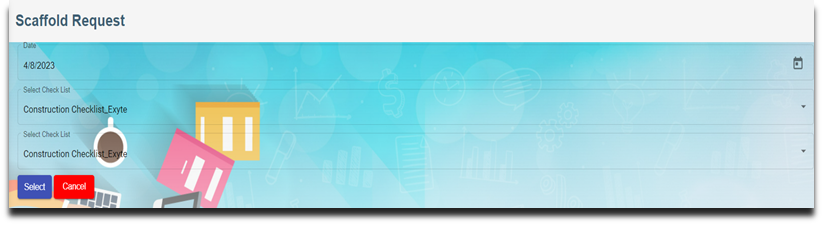
- Choose Date and Construction Checklist. Note: Date can be modified based on the checklist activity performed date.
- Click
 Select icon.
 - Enter Height of Erection,

- Click Next, the Construction Checklist opens to perform the checklist.
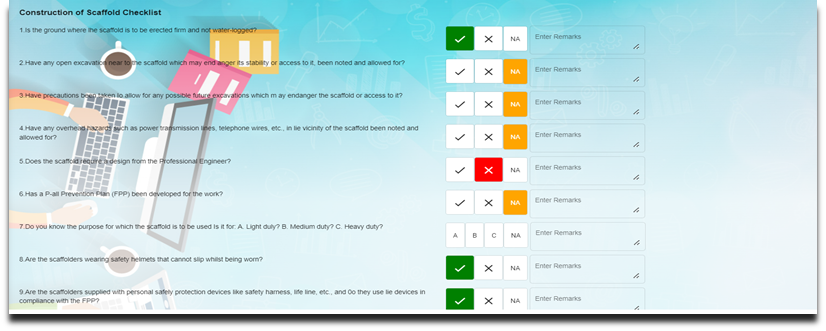
- Click to choose from any of the three

 or NA for all the line items in the checklist and enter remarks if required.
 - Click Next , the below page opens with e-Signature,
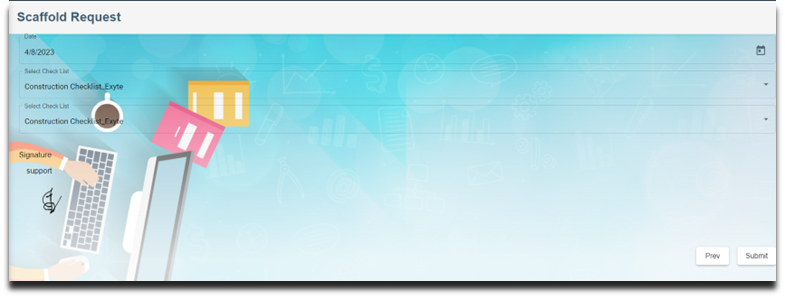
- Enter signature, and click Submit. Note: Once construction checklist is completed, the Checklist icon color will change from blue to green.
- Click
 Print icon in the checklist to print the checklist performed, the Checklist screen opens. Click Print.
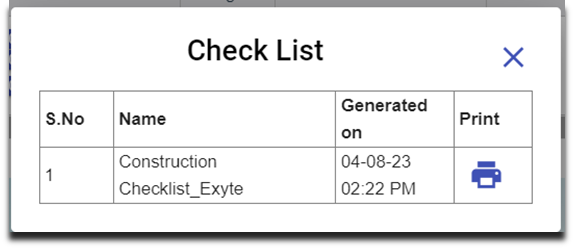

Perform Weekly Checklist
Every week, the employee performs Weekly checklist to cross check the scaffold tag no(s) maintained properly in the site.
- Click
 (Checklist icon) and perform weekly checklist.
 - Choose Date and Weekly Checklist to perform.
- Click
 (Select icon).
 - Enter Location Work Site.
- Click Next, the Weekly Checklist opens to perform the checklist.
- Click Next , the below page opens with e-Signature
- Enter signature, and Click Submit.
 Number changes from 0 to 1 indicates a weekly checklist performed for the scaffold tag numbers in the line item 1(L-1).
  The orange colour of the Checklist indicates the lapse of the weekly checklist.
- Summary of the Checklist available in the Print icon.
Create Permanent Tag
In the Create Tag page,  icon is used to create permanent tag size against the temporary tag size. The salary will be computed for the workers based on the permanent tag size.
To Create Tag,
- Click
 (create tag icon), the below Permanent Tag Creation window opens,
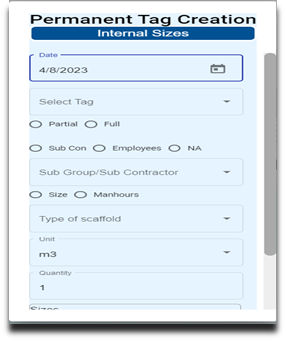
- Enter details in the following fields,
- Date
- Select Tag (Drop-down list of Temporary Tag(s))
- Choose Partial or Full
- Choose Sub Con, Employees or NA (Choose from drop-down list)
- Size/Manhours
- Type of Scaffold (open to choose anything from the drop-down list)
- Click Save to save the internal size.
Modifying Tag
Tag can be modified based on additional size request or to modify the request itself by using Tag Modification Request.
To Create Tag Modification Request,
- Click
 (Tag Modification icon), the below Tag Modification Request window opens,
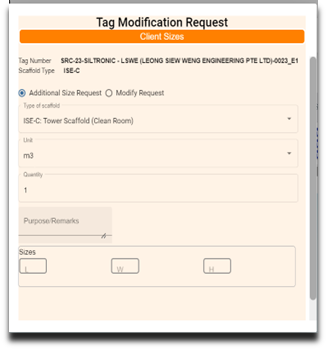
- Enter the following details
Option 1:
-
- Choose Addition size Request
- Type of Scaffold (open to choose anything from the drop-down list)
- Purpose/Remarks
- Sizes
Option:2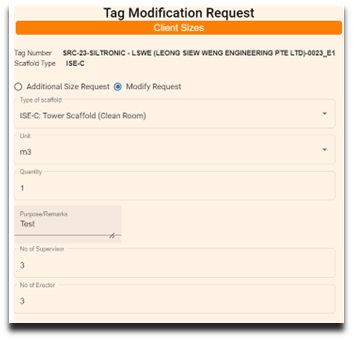
-
- Choose Modify Request
- Type of Scaffold (open to choose anything from the drop-down list)
- Purpose/Remarks
- No of Supervisors
- No of Erectors
- Click from Date & time
- Click To Date & time
- Click

-
- Click Save to save the Modification Tag.
- Modification tag available in the Tag No column.
- Create tag
 appears to create internal size for the worker. If internal size is not required for the modification tag, choose NA inside the Permanent Tag creation
.![]()
Rental Request
Users shall raise Rental Request after the free rental days get over.
To Create Rental Request,
- Click
 (Rental Request icon), the below Rental Request window opens.
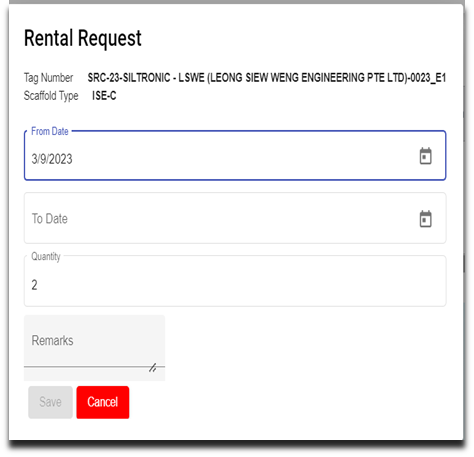
- Choose From date and To date.
- Enter remarks in the Remarks field if any.
- Click Save to save the Rental Request.
- Rental Request available in the Tag No column in freeze status. As it is redirected to the pending billing tag.
- The tag no in blue colour can modify at any stage. If it changes to white colour, it cannot be modified (freeze for billing)
Dismantling Request
The user raises dismantling Request for internal sizes when the process beings to scaffold dismantling.
To Create Dismantling Request,
- Click
 (Dismantling Request icon), the below Dismantling Request window opens.
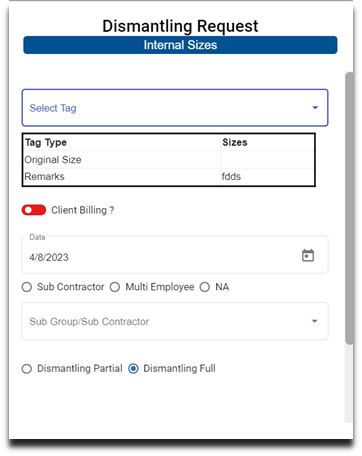
- Enter details in the following fields,
- Select Tag
- Client Billing? (
 ”Yes” /
  “No”)
“No”) - Date
- Choose Sub Contractor/ Employee/ NA
- Choose Dismantling Partial/Full
- Choose Rental Chargeable? “Yes” or “No”
- Click Save to save the Dismantling Request.
Comment
The user can add comments against the Tag Number for the Scaffold request.
To add Comment,
- Click
 (Comment icon), the below Comment Update window opens,
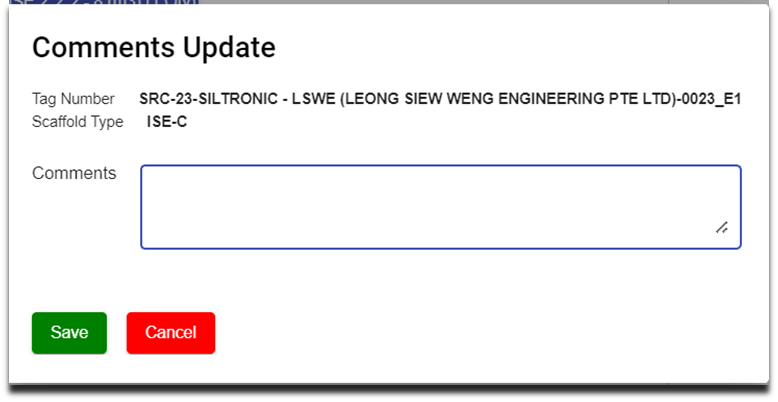
- Enter comments.
- Click Save to save the comments.
Status
The user can change the status of the Tag number either active or inactive.
To inactive Status,
- Slide the toggle button from
 Green to
  Red.
Red.
Attachment
The supporting documents can be attached against the Tag Number using attachment available under attach column.
To Attach supporting documents,
- Click
 (attach icon), the below screen open to choose file to attach against the Tag Number.
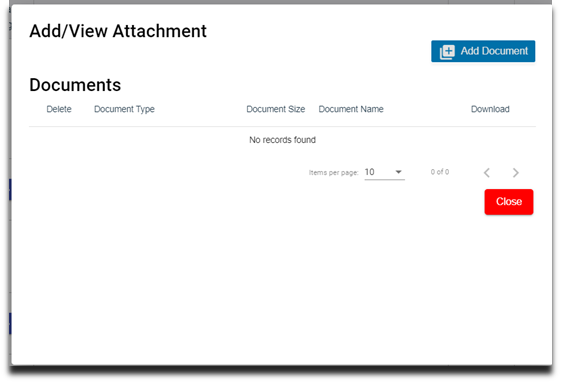
- Click
 Add Document and Choose file to upload the document.
 - Click Upload. The attached document is available under Documents.
- Click Close.
History
History gives details about the Client size, Internal size and Created by against Tag Number. Click History and view Client size and Internal size details of the Tag Number.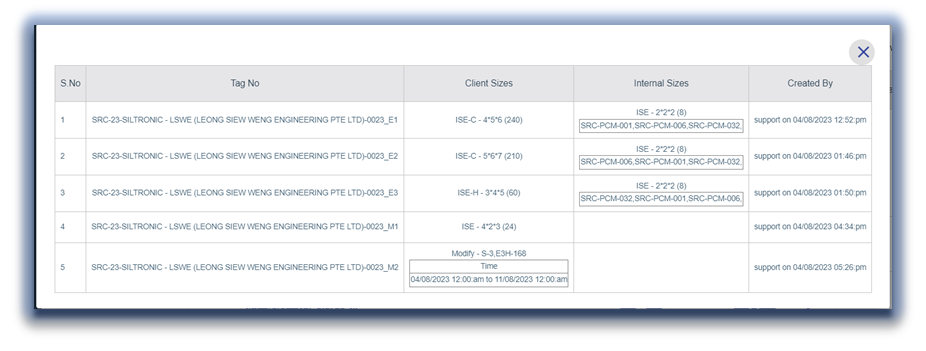
No Comments