
Material Request
Material Request (MR) is the starting point of purchasing. Users shall add material requests when any materials are required by projects (in cuteOffice, materials refers to items-item is part of master data in procurement as prerequisite).
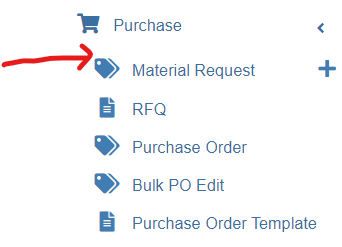
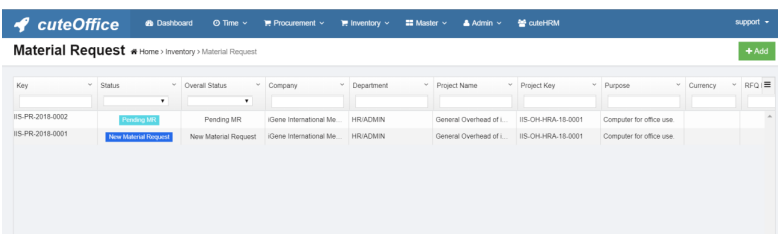
Click Material Request submenu in Purchase tab, you can view all material requests,
Add Material Request (MR)
To create a new material request (MR),
1. Click ![]() (Add button) from the menu or click
(Add button) from the menu or click ![]() Add button in the material requests list
Add button in the material requests list
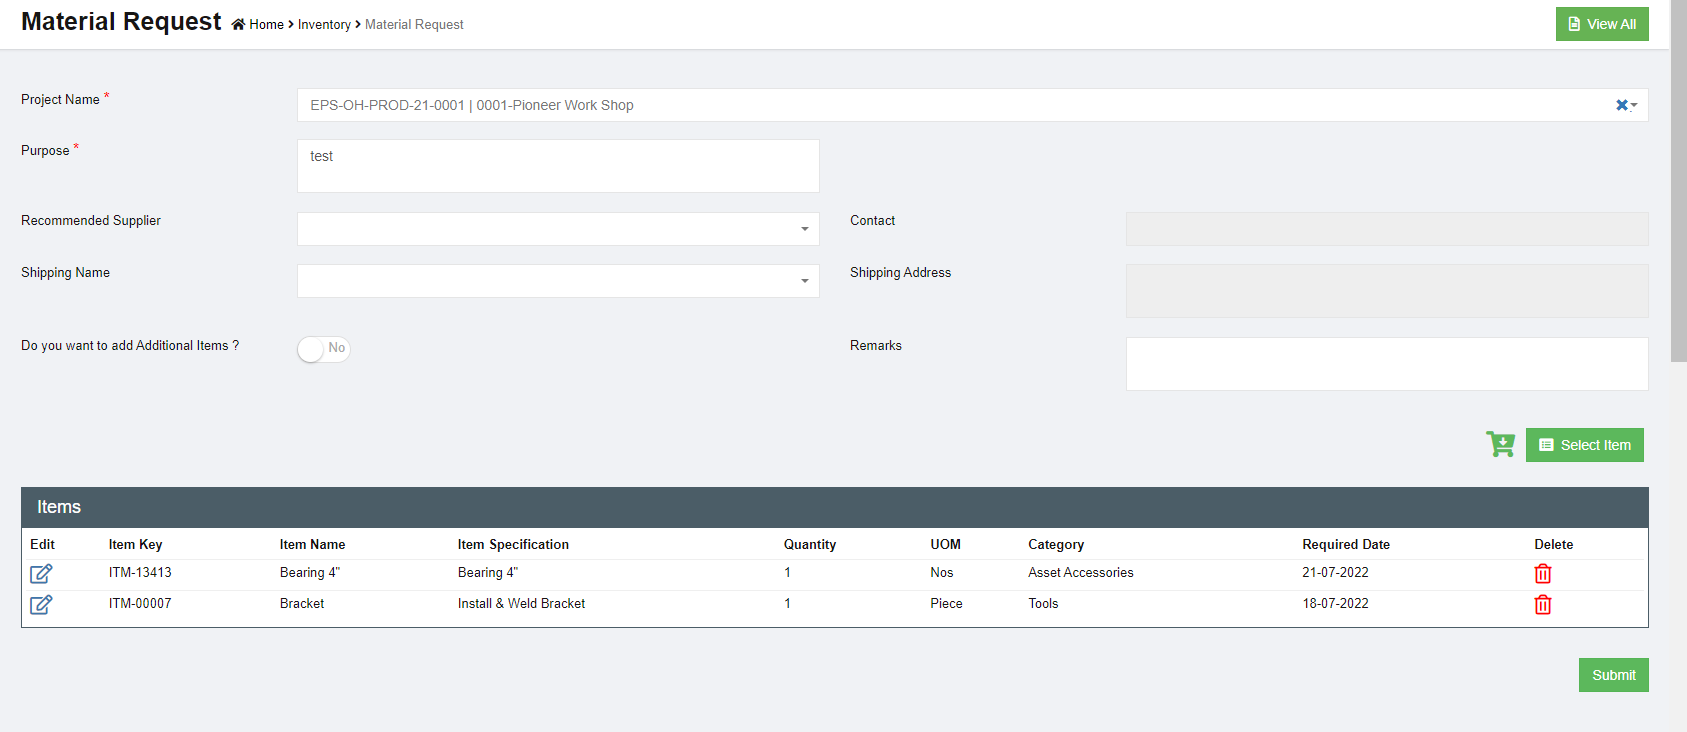
window. The below material request window opens,

2. In Project Name field, select a project for which for this material request is for.
3. In Purpose field, enter the purpose of the material request.
4. In Recommend Supplier field, Select the supplier from the list if known. Please note only approved suppliers will be listed here. If the supplier is not known leave it empty and the purchase officer will decide which supplier to purchase the item.
5. To add items in material request, you can use below either a or b option:
- a. Click
 (Select Item button) to add items to the request. The below dialog opens,
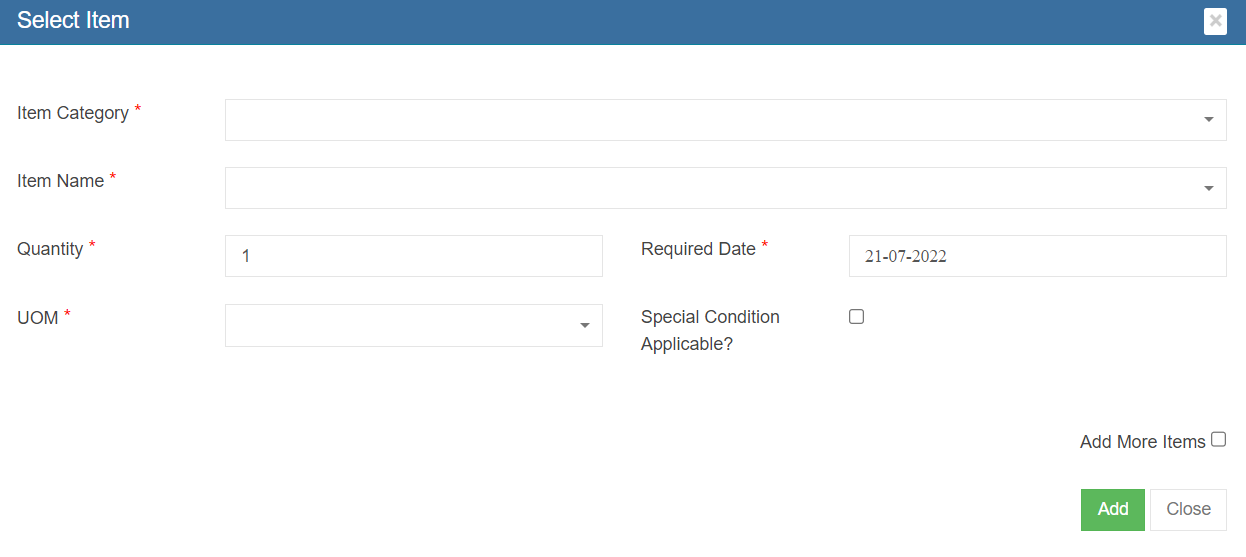

Users need to fill up all mandatory fields, such as Item Category, Item Name, Quantity, Required Date, unit of measurement (UOM). If any special conditions to be specified, select and enter the details. If only one item is required in the material request, user can click ![]() , the item will be added to the material request. If more items to be added and to keep the above select window open, user shall select “Add more items” check box before clicking
, the item will be added to the material request. If more items to be added and to keep the above select window open, user shall select “Add more items” check box before clicking ![]() .More items can be added for the same request.
.More items can be added for the same request.
- b. Or click
 (Shopping Cart icon), the below card view item list window opens,
user need to select Required Date, and user "Search" field to search for requested items, and in the item card, user can enter quantity and select UOM.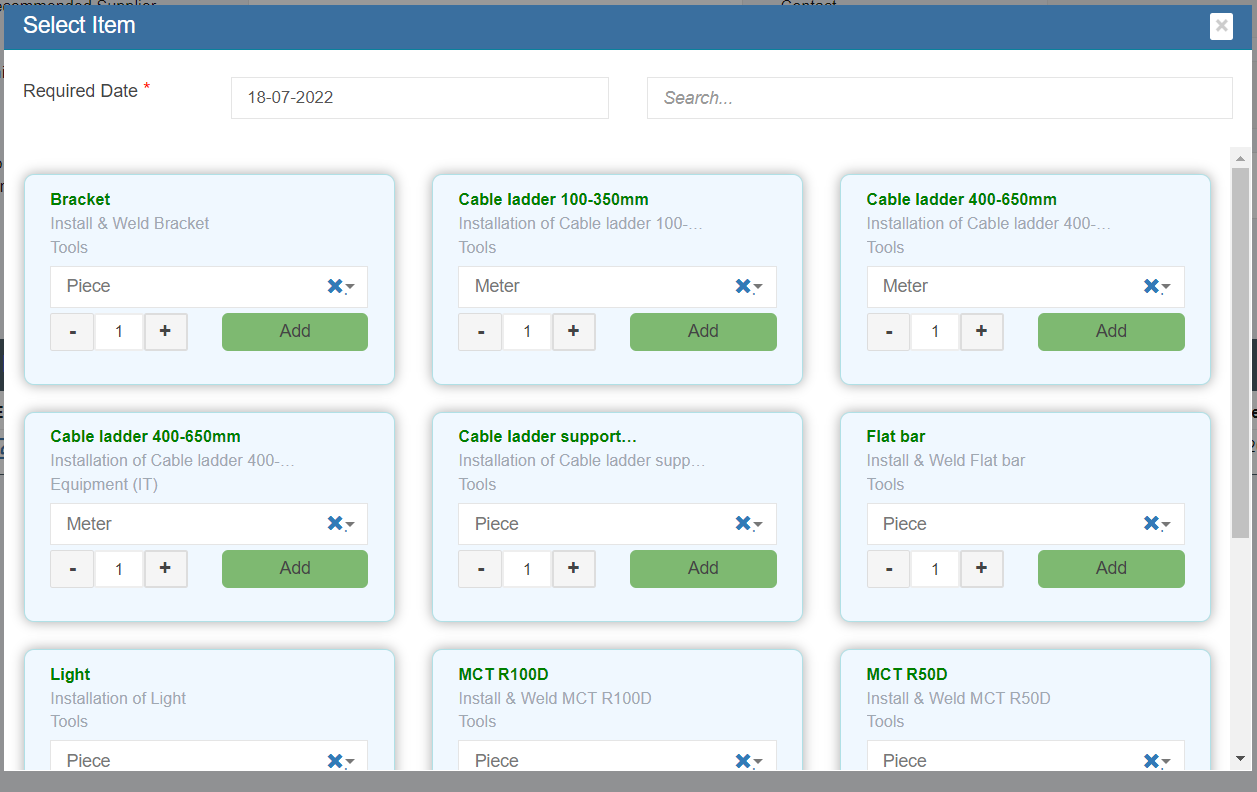

6. After all required items are added to the material request, user can submit the request by clicking ![]() (Submit icon) in material request page.
(Submit icon) in material request page.
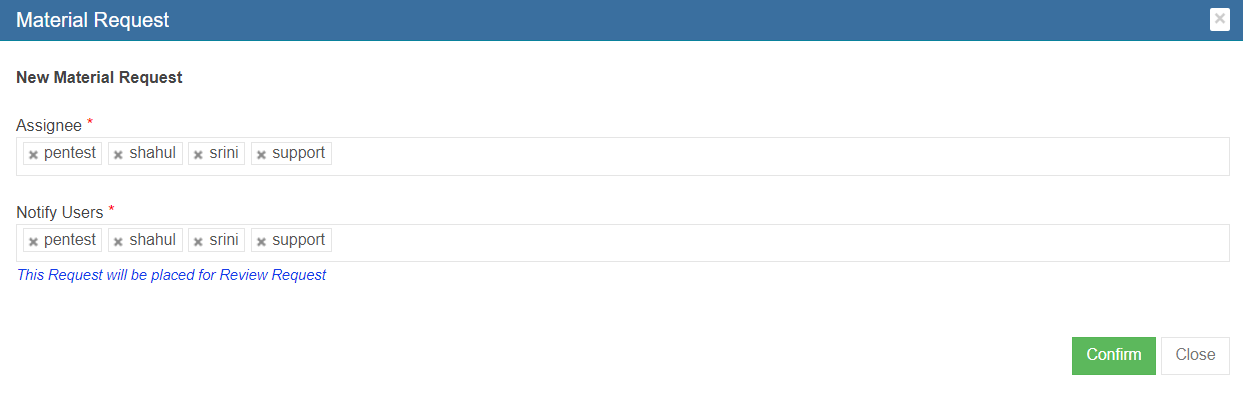
7. Once a new material request is submitted, the notification email will be trigger to selected users. You need to confirm right users are selected in below notification window and click Confirm. The material request submission is completed and page will redirect to the material request list page. And an unique key will be assigned to the material request and the status will change to "New Material Request". Note: The next step for a new material request is waiting for approval for issuance from store or purchase from the authorized suppliers.
Add additional items that are not registered in item master
If the requested item is not found in the item list in material request (means that the item is not registered in item master database), user can use this add additional item option.

- Click and enable the above option and the below additional items option appears:
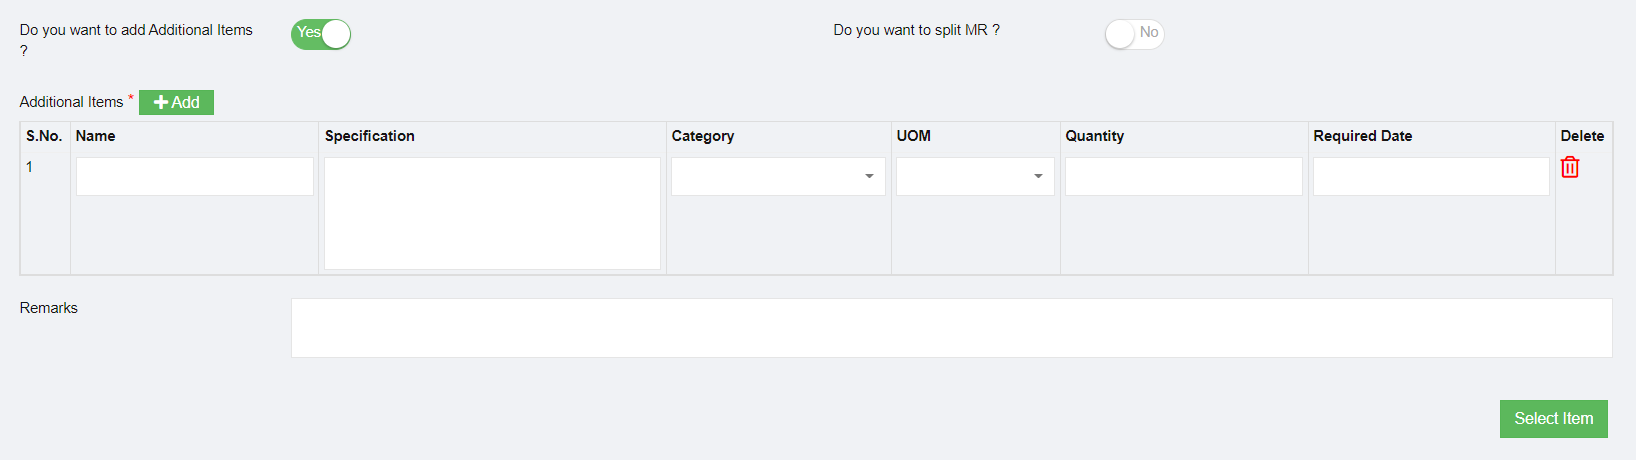
- Enter item name and specification and other details as required.
- Add more items by clicking the
 (Add button)
 - If you want to create two different MR for approved items (items from list) and new items (additional items added in material request) , please enable option to Yes in the "Do you want to split MR?" option.
- When submitted, the below message is shown and user need to confirm splitting MR by clicking Yes.
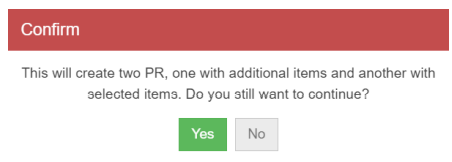
- The below notification screen appears and click Confirm.
- Please note that there are two separate requests are created and one has a status of “New
Material Request” and the other is “Pending MR”. Note: The next step for a Pending MR is waiting for the purchase team to correct or map the additional items added using "Do you want to add additional item" option, as the additional info entered by user may or may not match the company item standard so review and approved is needed by purchase team.

Pending MR-Actions to Take
As mentioned above, for material requests that include additional items not from item master, the status will be Pending MR. For MR with Pending MR status, purchase team need to take below action to correct or map the additional items:

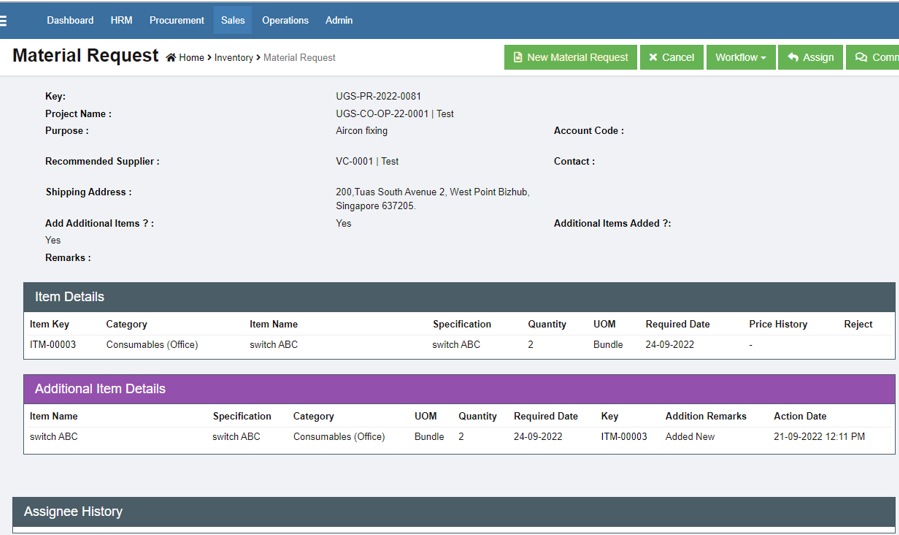
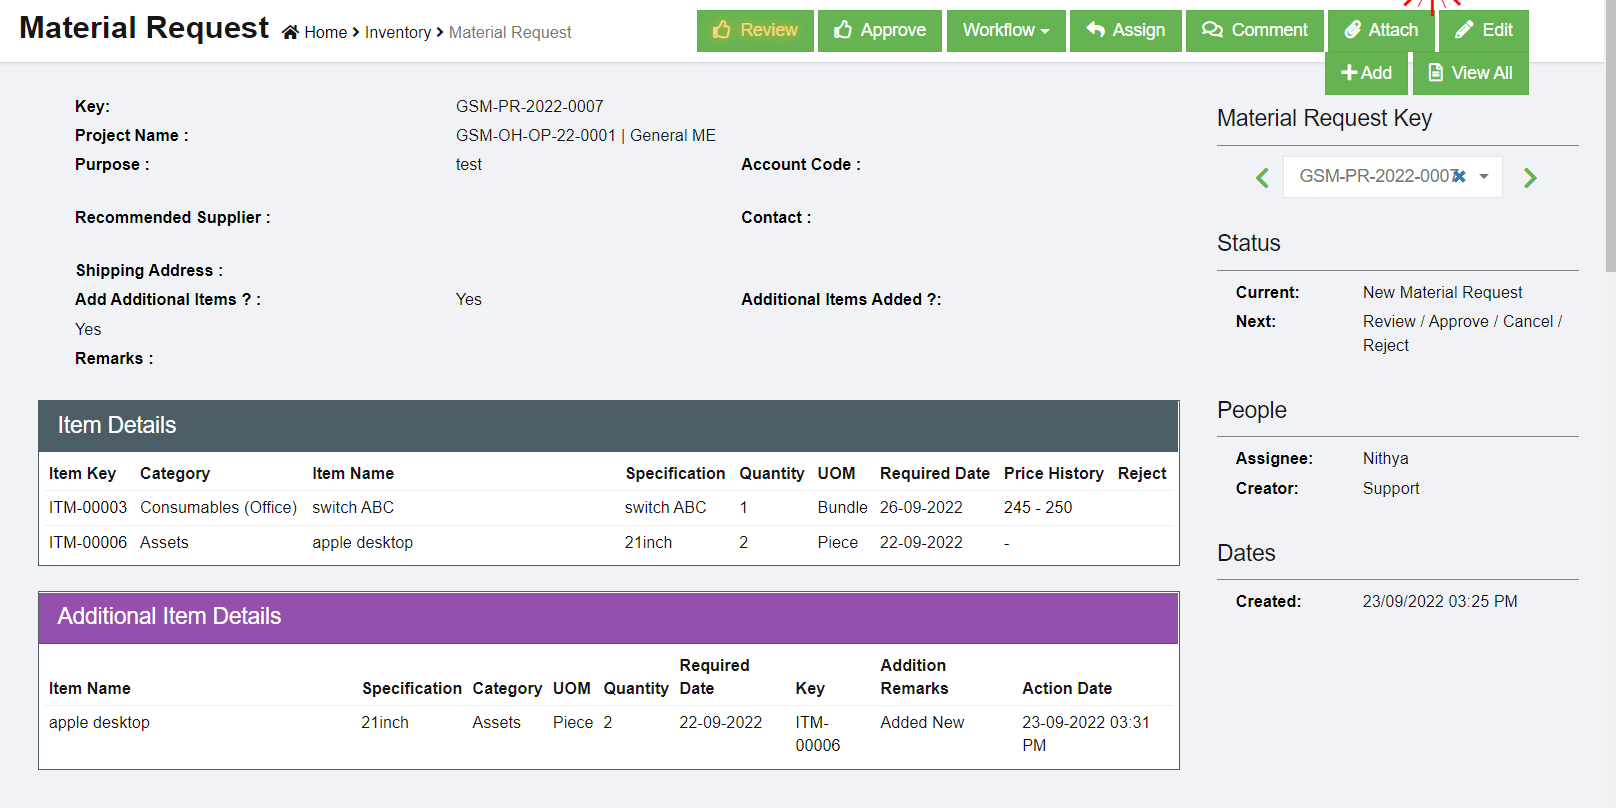
1. Click the material key of the Pending MR status. The material request detail page will open and Additional Item Details table is shown in purple color.
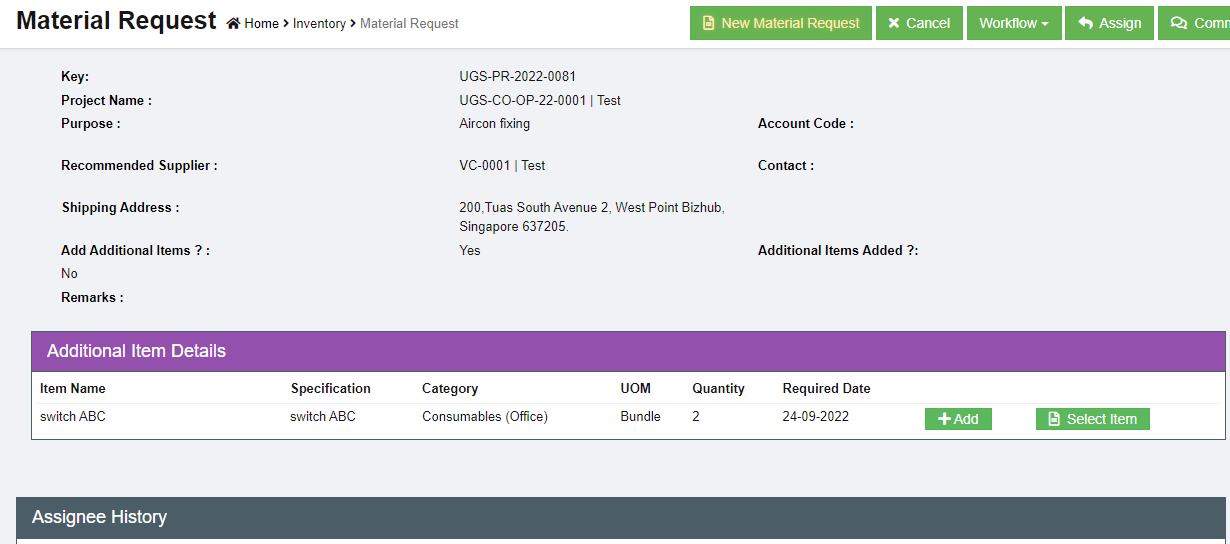
2. There are two options for each item: ![]() (Add as New Item) or
(Add as New Item) or ![]() (Select to match from exiting item).
(Select to match from exiting item).
Option 1 Add as New Item
If we know that additional item requested is not existing in the item master database and we will need to use this add option to create a new item in the database.
- Clicking
 Add icon, system will launch the add item dialog as below:
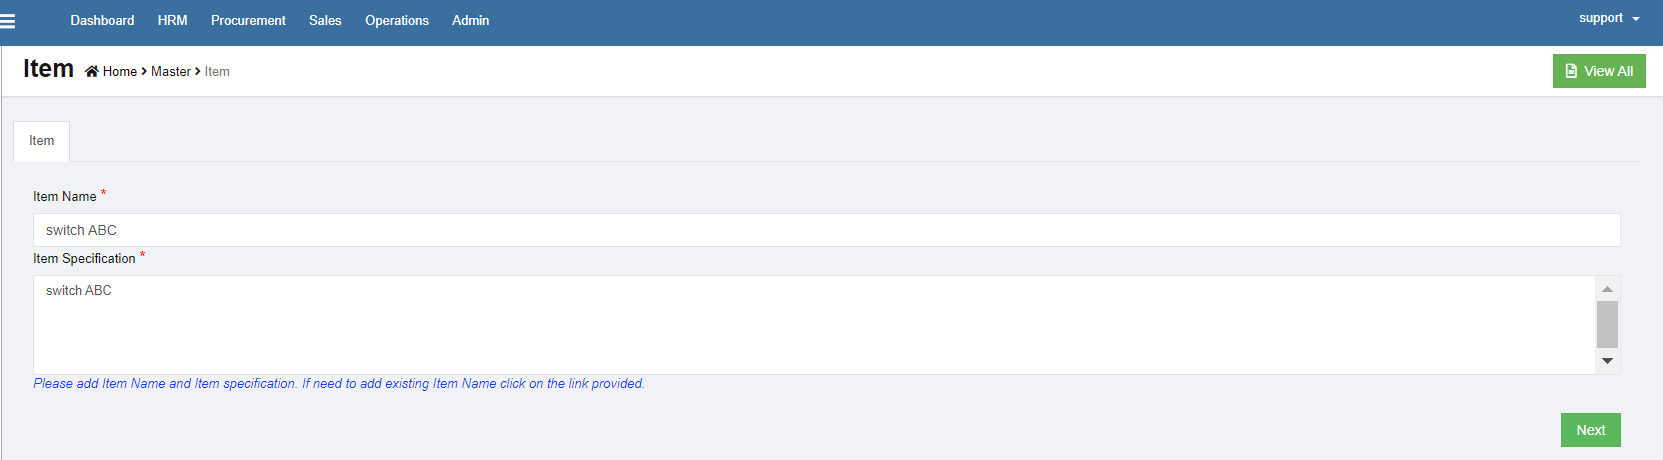
- Click Next. The add item details window opens, see below:

- Check and enter the correct item details, then click Submit. A new item is created and saved in item master database.

Option 2 Select Item (Existing)
For items that can be mapped or categorized under existing item from item master, we can use this select item option to map this item to existing item category.
 (Select Item icon), the below window opens,
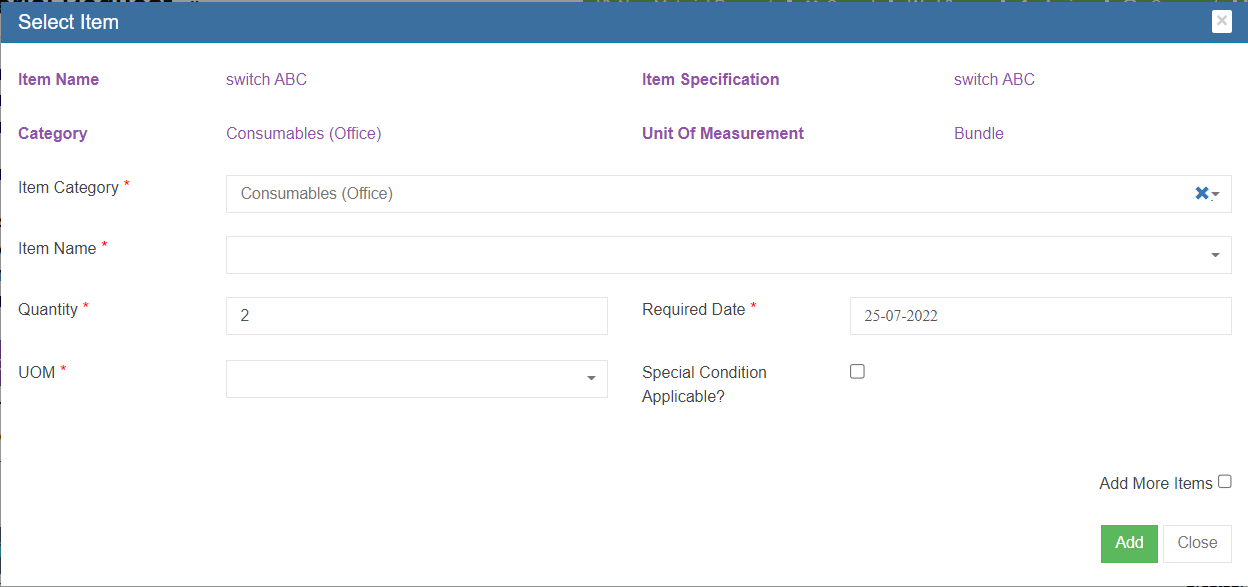
- Select the correct Item category and item name from the list and select UOM.
- Click Add to map the item. With this both items are now mapped with appropriate items master and it is now ready for approval.
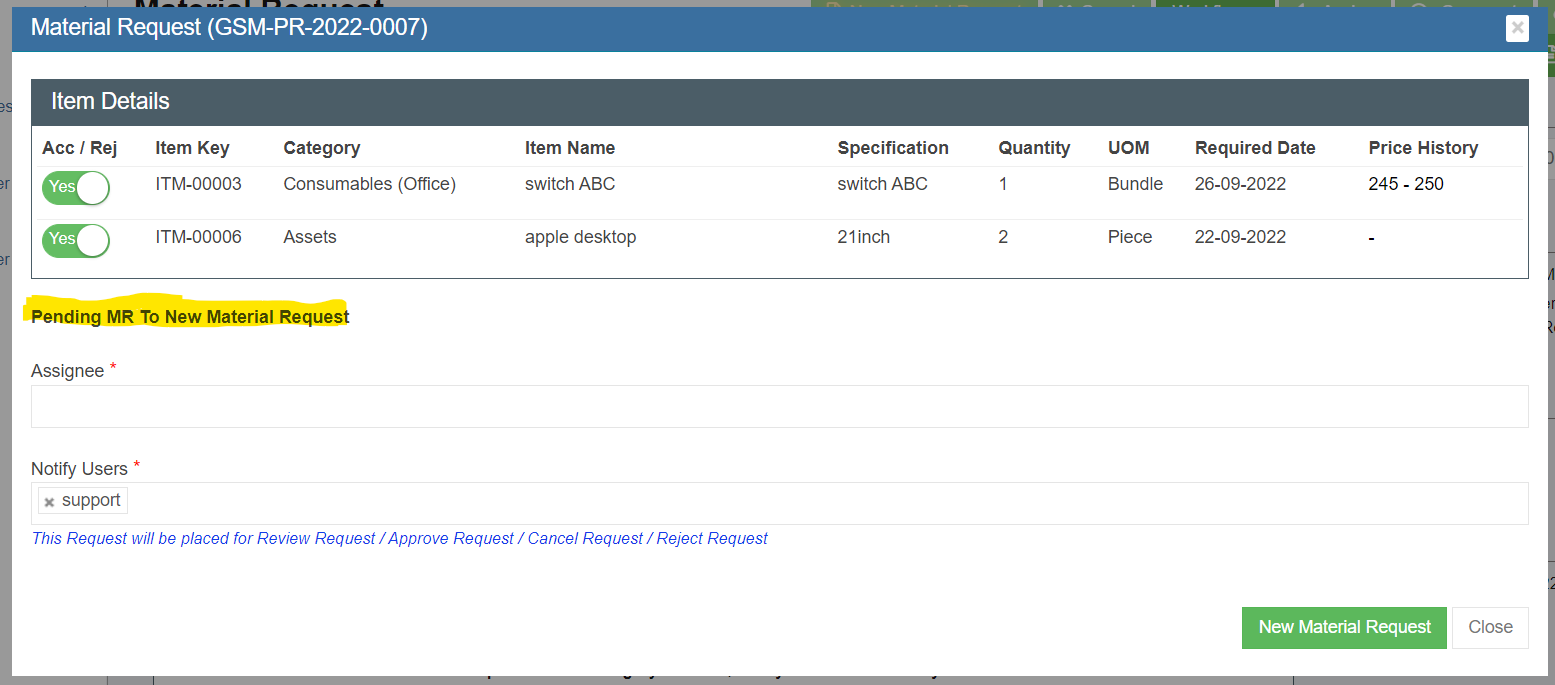
3. Click New Material Request , a notification window will open as below showing "Pending MR to New Material Request".
4. Click New Material Request button in above screen, the status of the pending MR will be changed to New Material Request, and redirected to material request page that allows for next action-review or approve (review is optional, depends on company policy).
5. Click Review or Approve button, a notification window opens, user need to select Assignees to review or approve the requested reviewed MR.
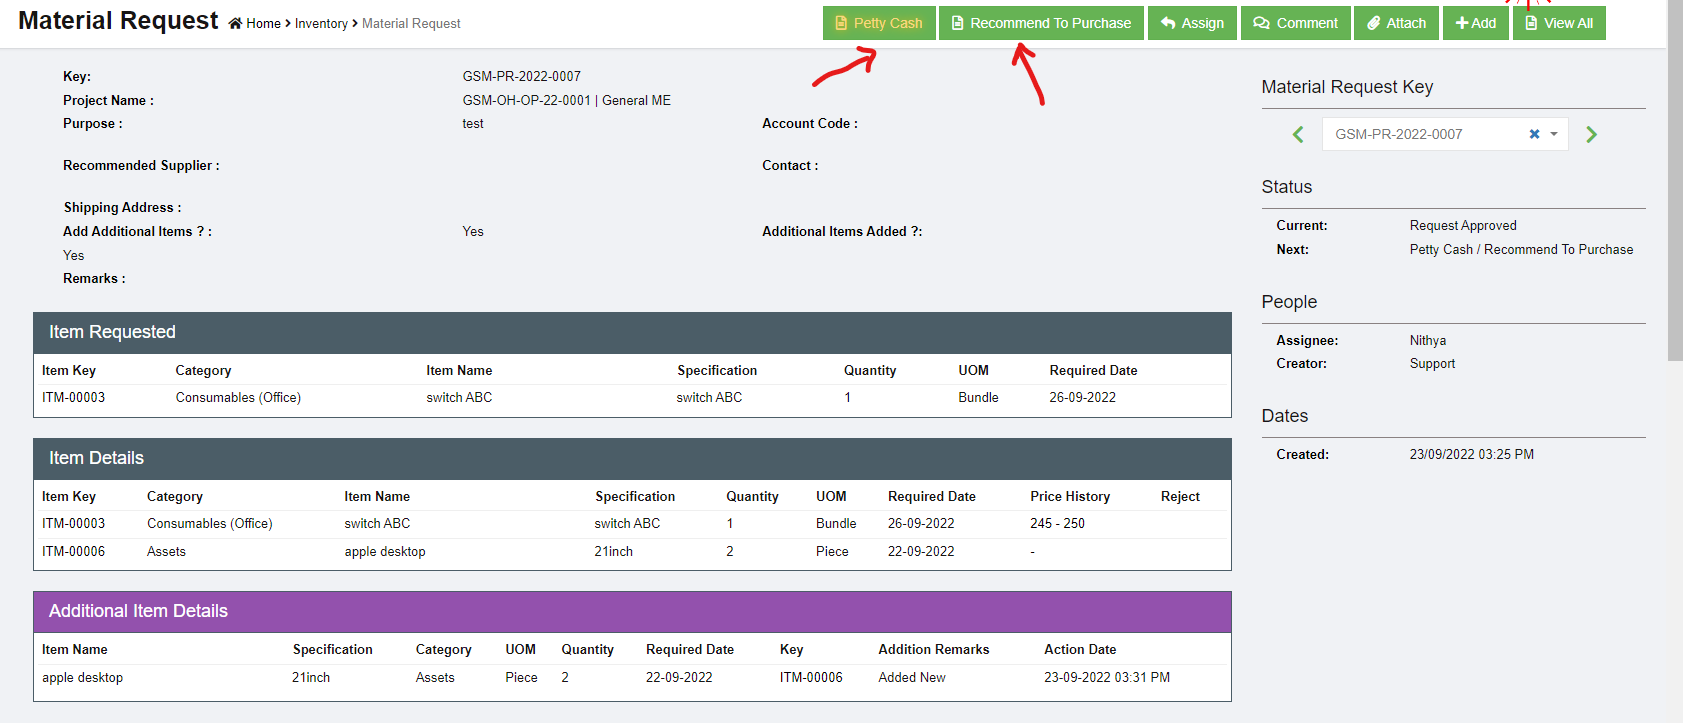
6. Once the new material request is approved. The next step will be Petty Cash/Recommended to Purchase.
Edit MR
For new material request, before it is reviewed/approved, user can edit the material request, e.g. adding more items.
- Click the material request key to open the material request detail page, see below.
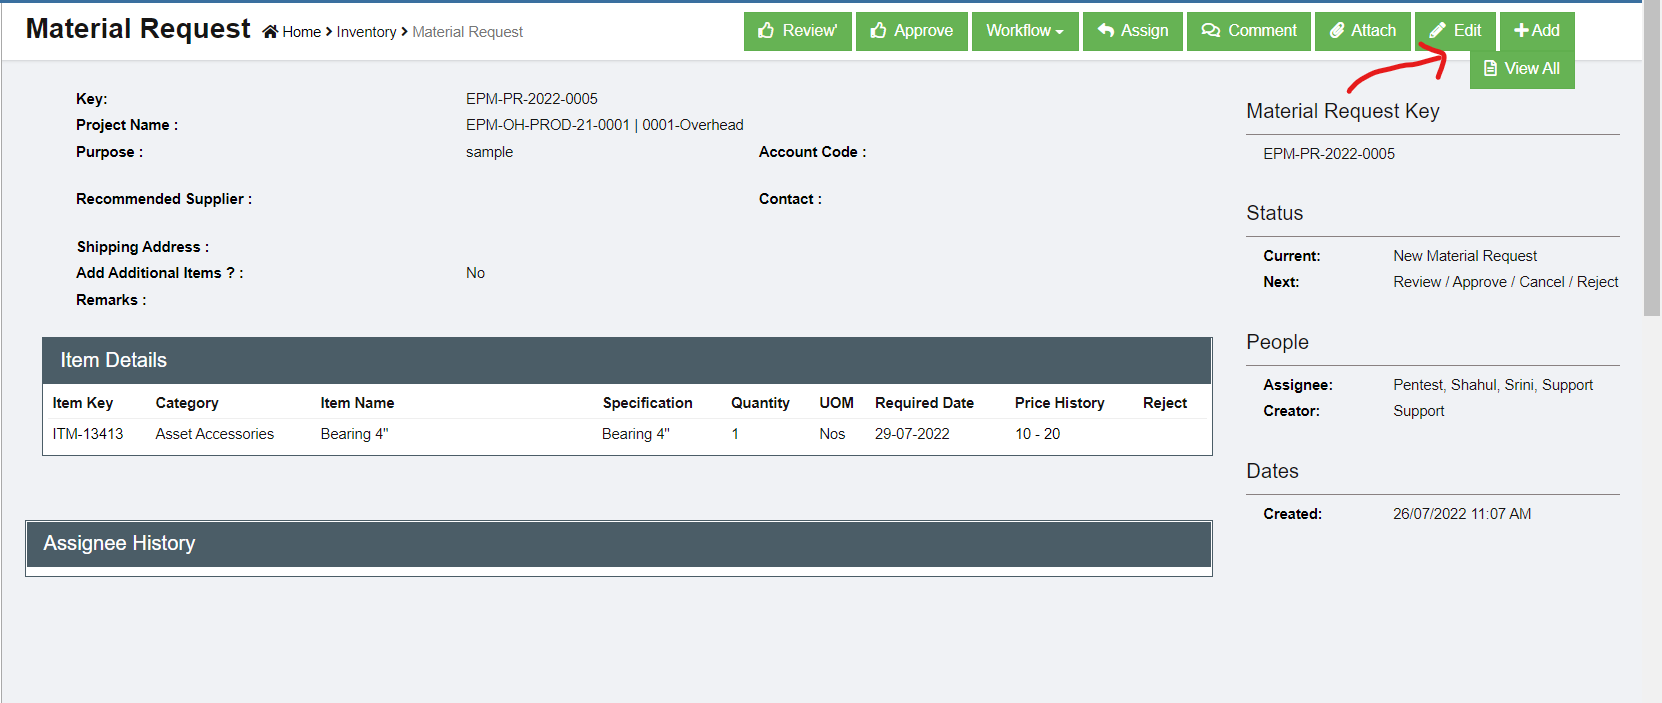
- Click edit icon
 , the material request edit window opens,
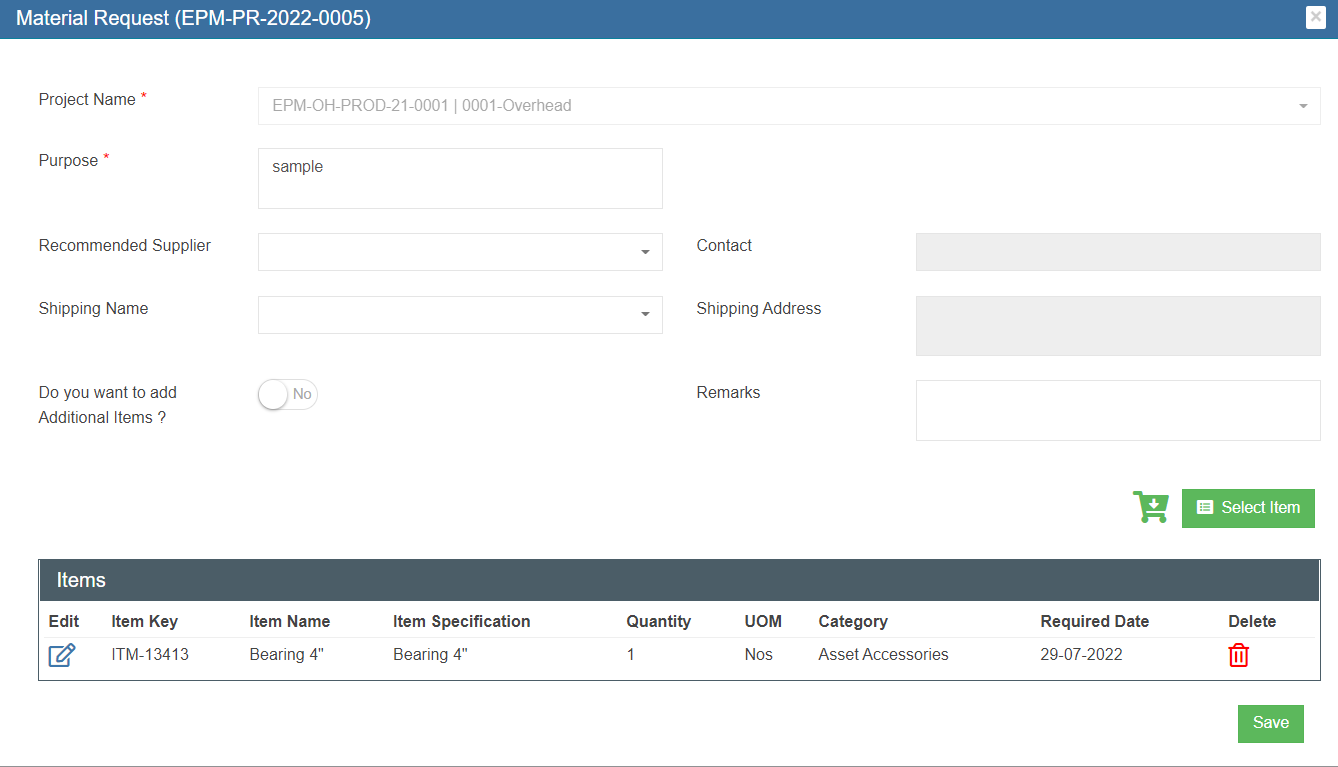
- Edit the material request where needs, then click
 (save icon) to save edits.


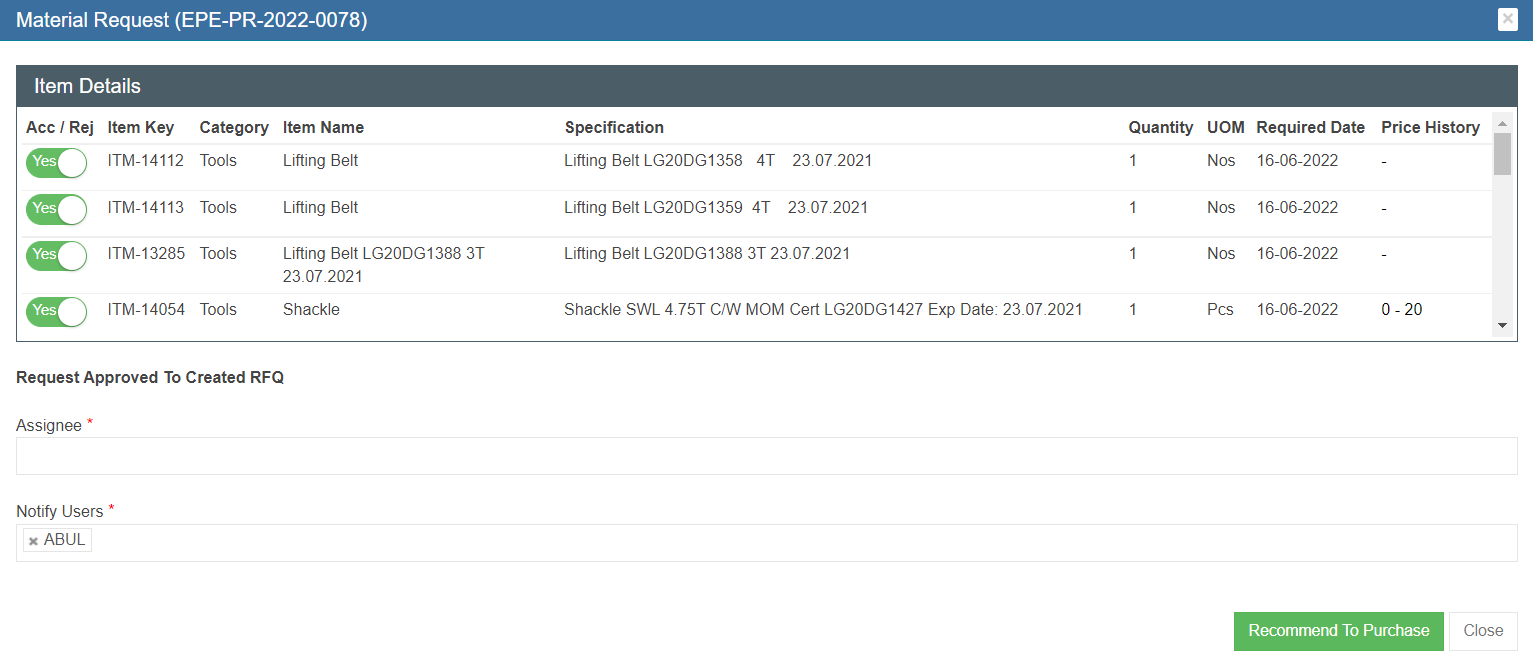
Review/ Approve MR
Each MR needs to be approved and optionally reviewed. Only authorized personnel will have access to review/approve the MR.
If the logged in user has the authority to approve, the Approve option is available in the MR detail page, see below.
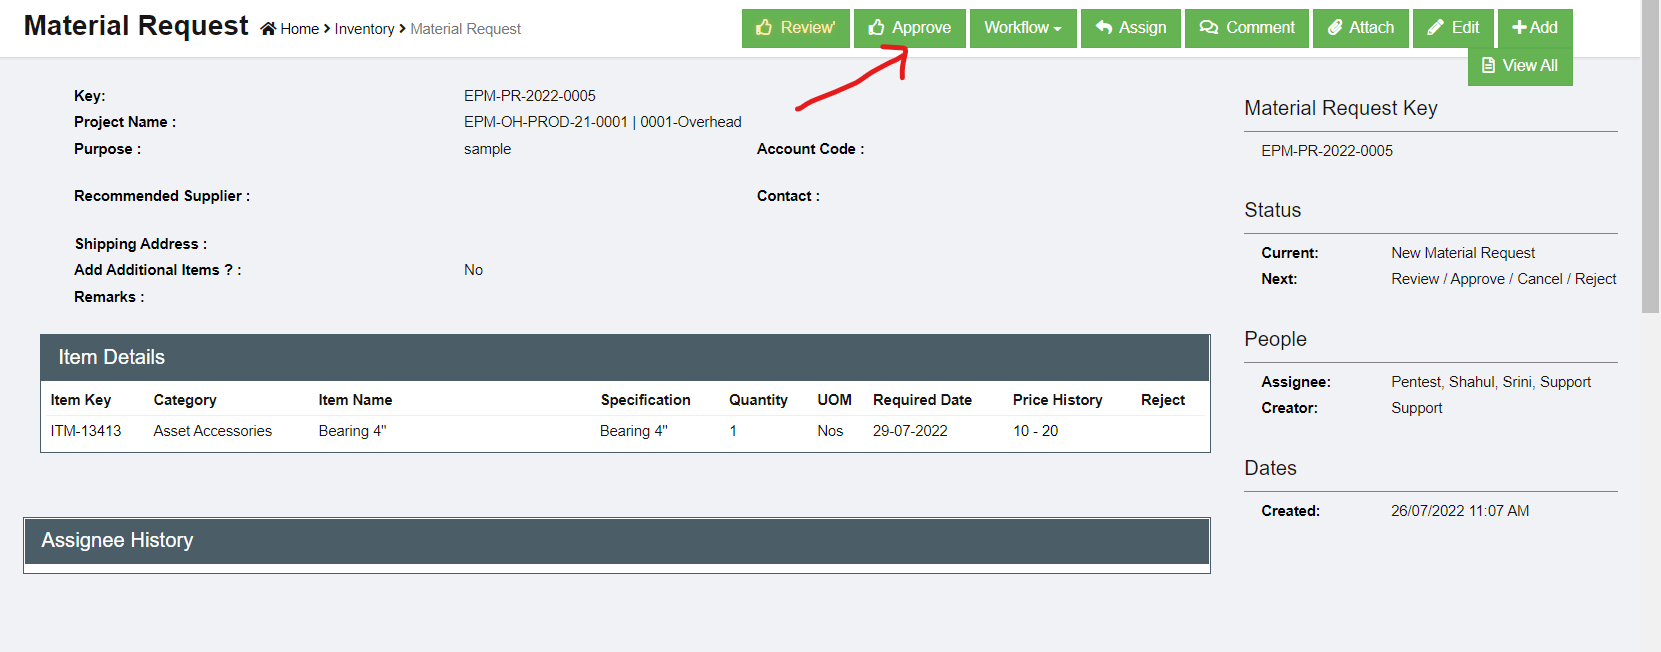
To review/approve,
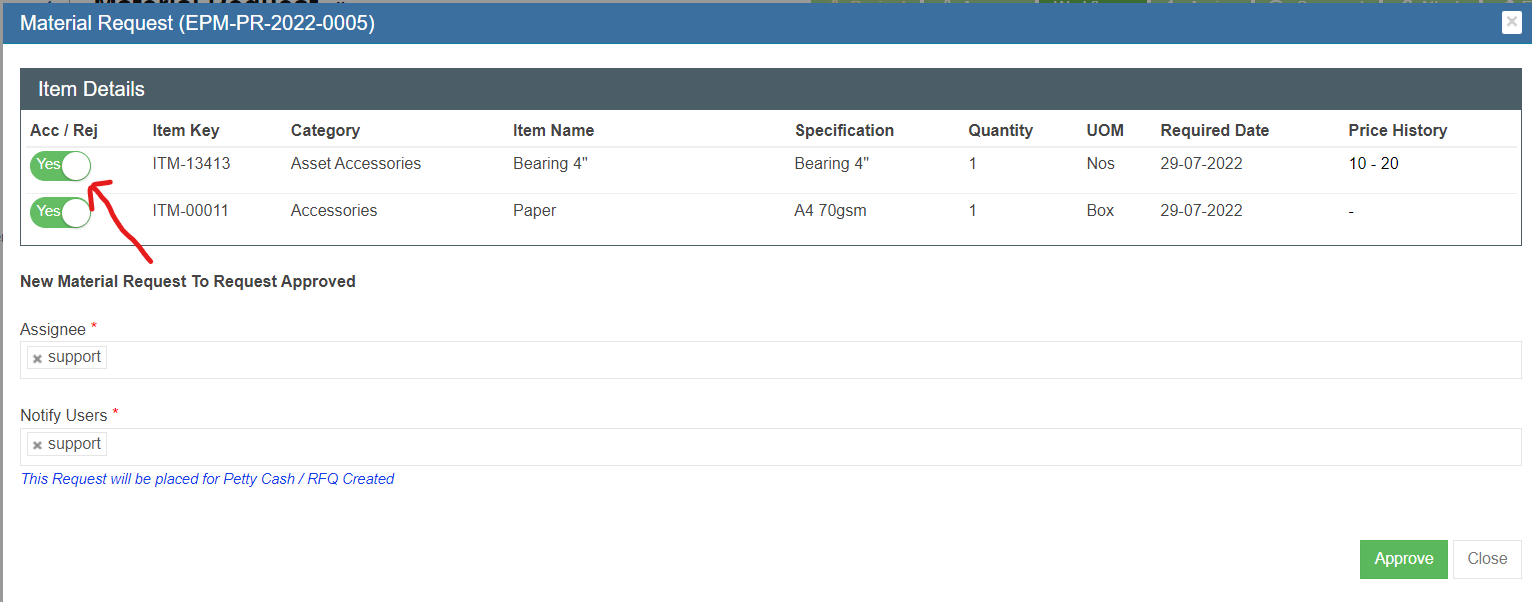
- Click the
 (Approve icon), the approve window opens,

- In the item detail table, the first column Acc/Rej default to Yes , means item approved. If user want to reject item, click flag to change to Reject. Once all items reviewed/approved. Click
 to approve.
- The status of the MR changes to Request Approved and ready for next action.

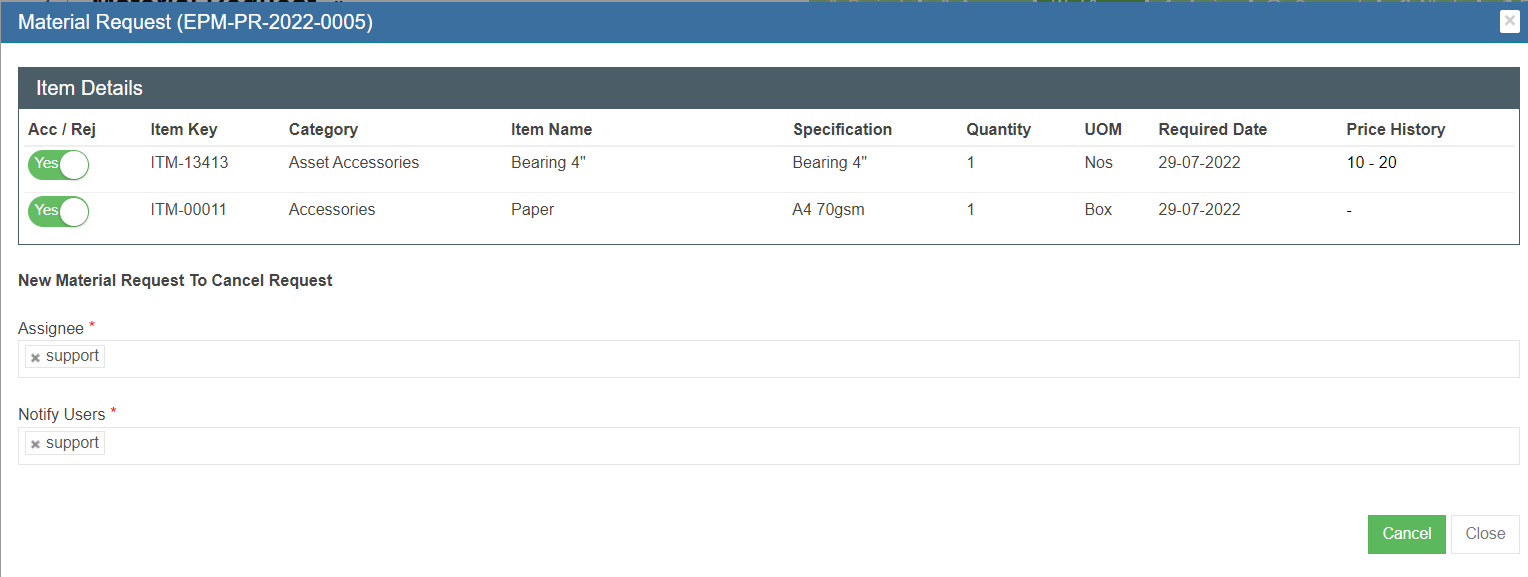
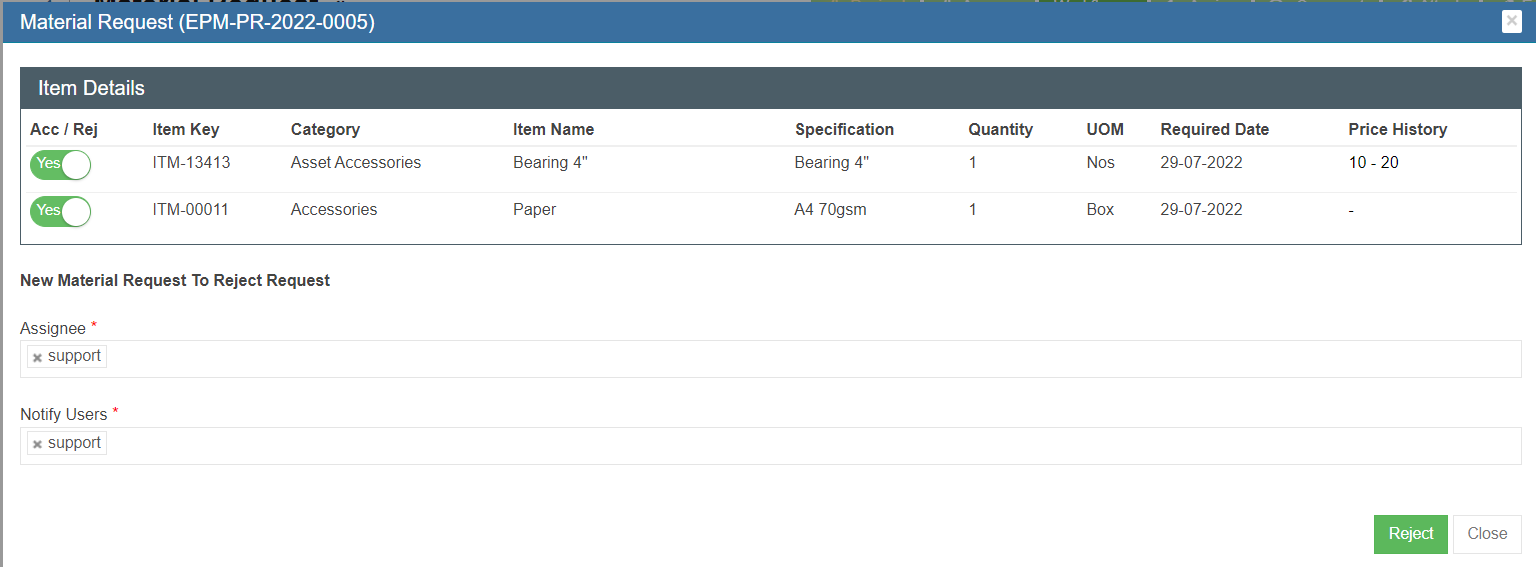
Cancel Request / Reject Request
The request can be cancelled by the same user who requested it. The request can be rejected by the approval if the MR is not acceptable or required.
- Click "Workflow", the Cancel, Reject option will show.
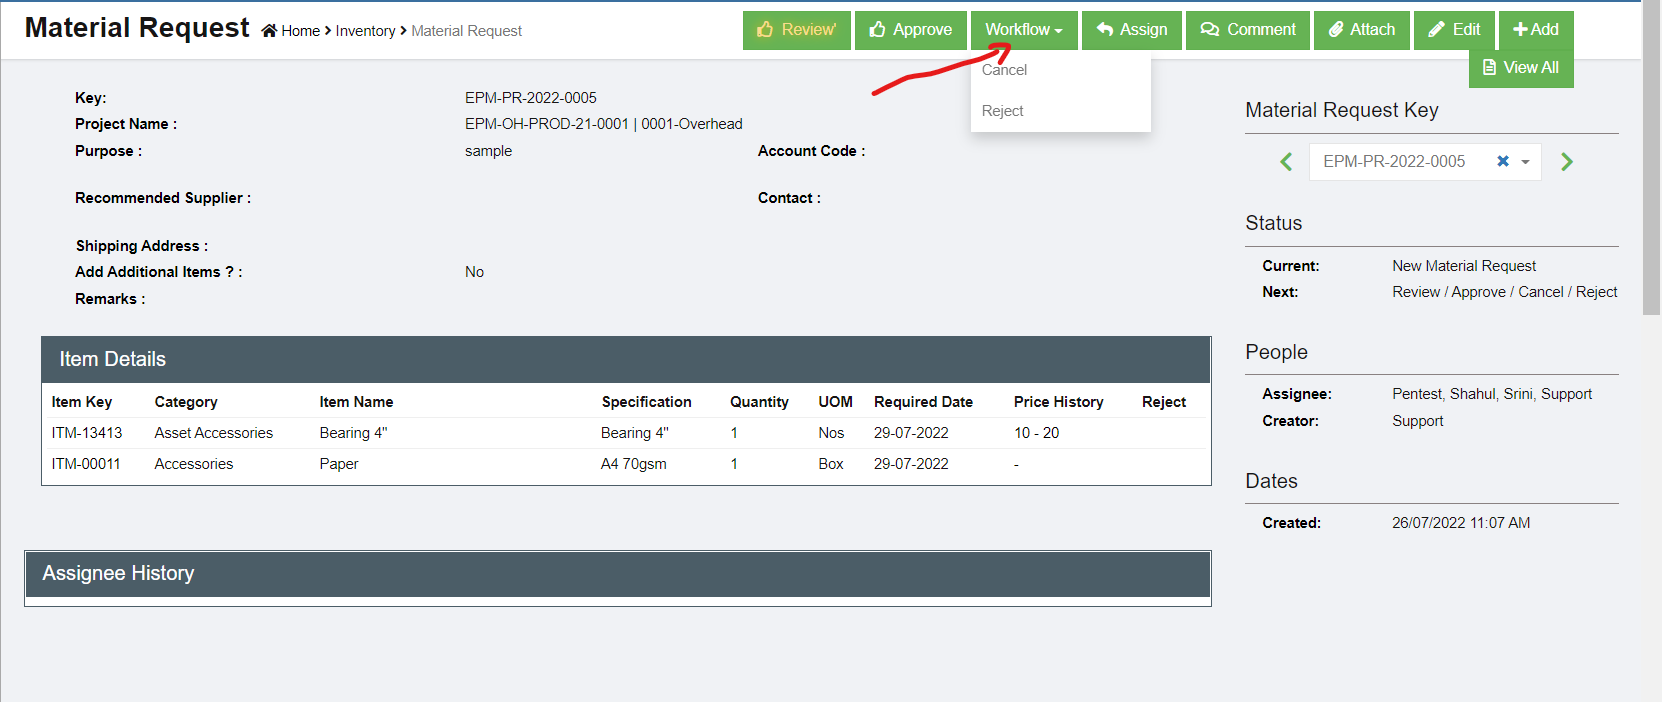
- To cancel MR, click Cancel from the option menu, below window opens, click
 to confirm cancellation of the MR.
- To reject MR, click Reject from the option menu, below window opens, click
 to reject theMR.


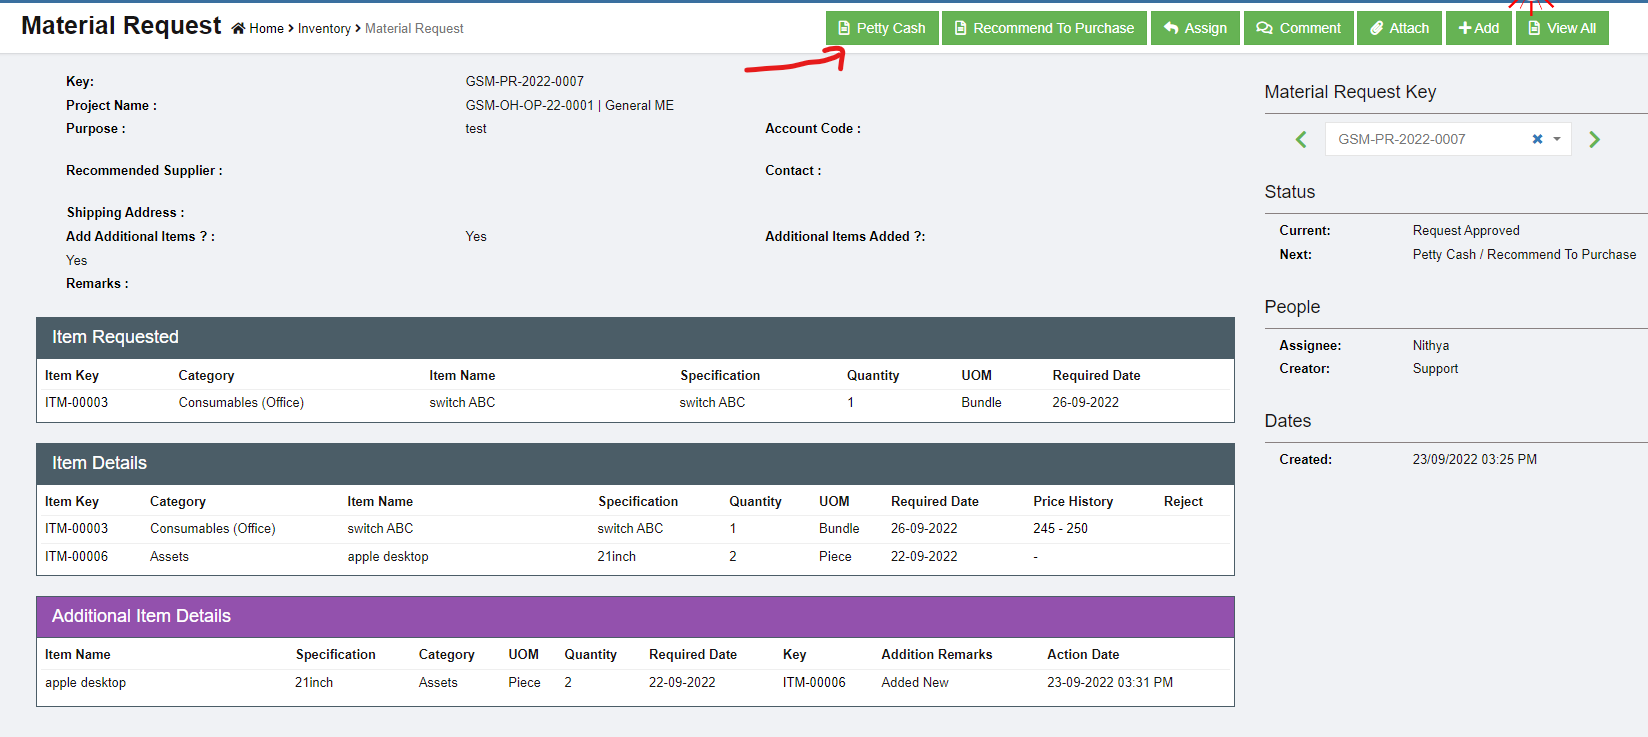
Next Steps for Approved MR
Once a MR is approved by authorized personnel, it should be further processed. There are three options:
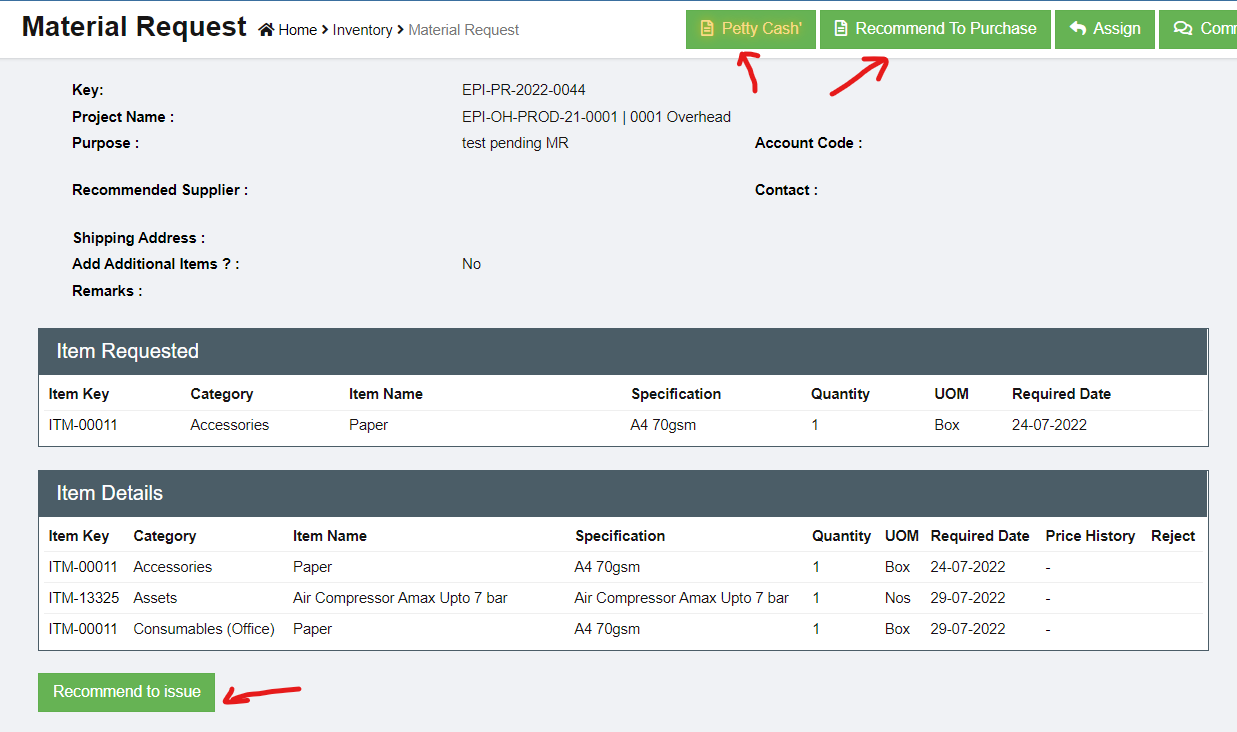
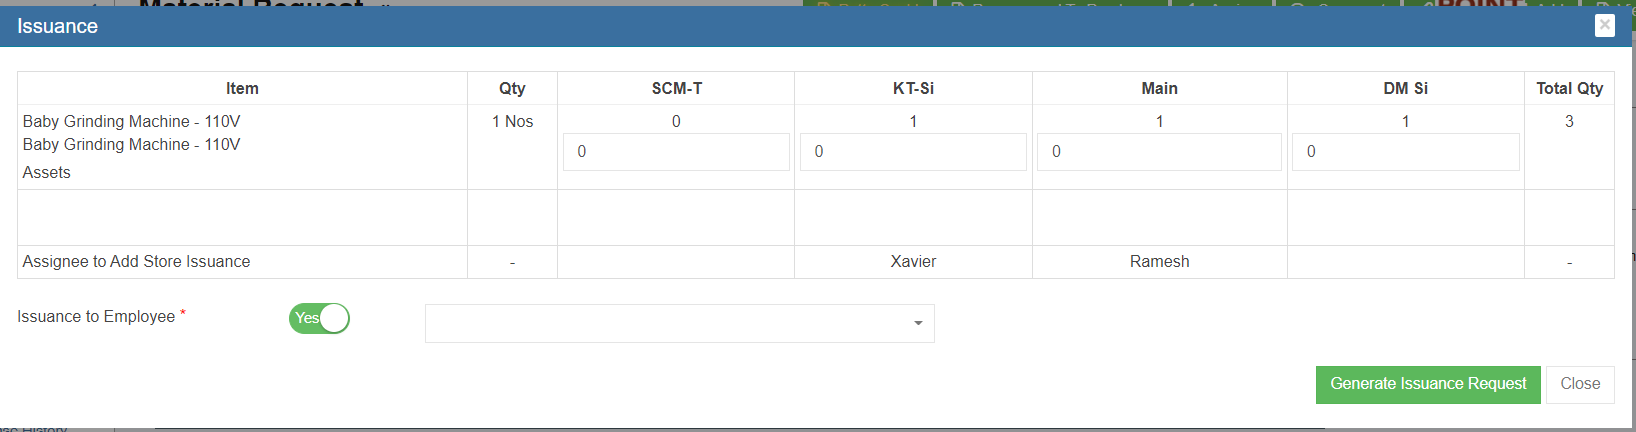
- Recommend to issuance. If there are existing stock available, authorized person can choose to recommend to issuance instead of new purchasing. See "Issuance" in Stock Management user manual.

- Petty Cash. If the requested item are small amount, user can use petty cash option to register.
- or Recommend to Purchase.


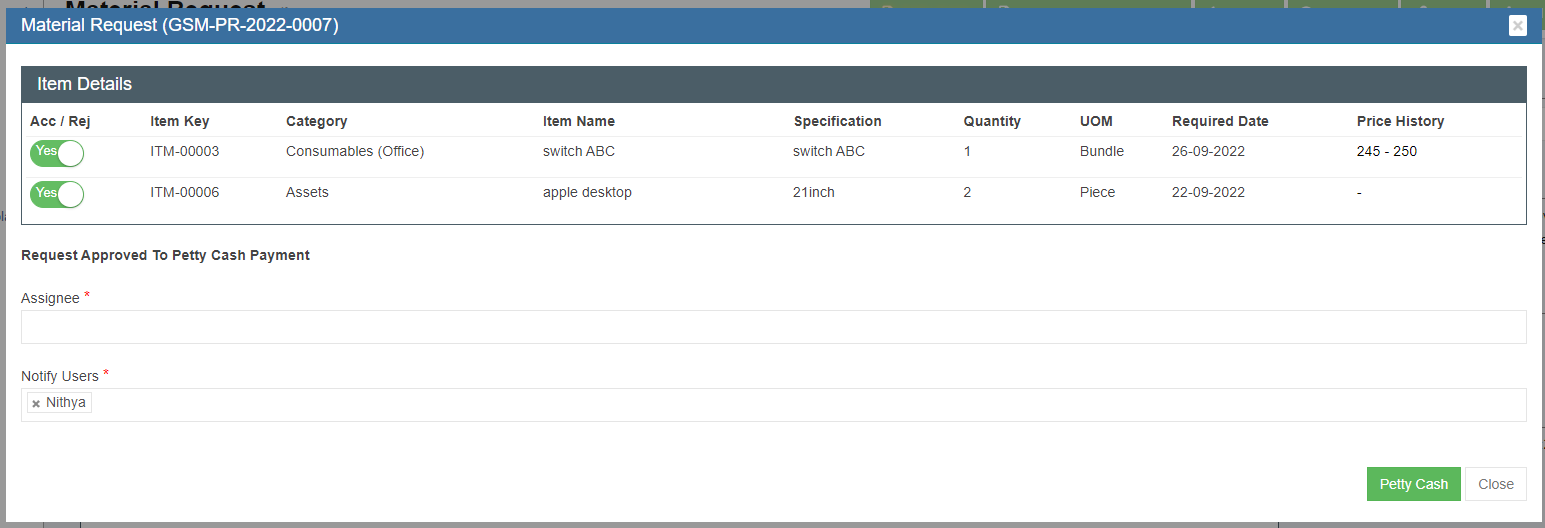
Petty Cash
A petty cash fund is a small amount of company cash, often kept on hand (e.g., in a locked drawer or box), to pay for minor or incidental expenses, such as office supplies or employee reimbursements. Sometimes the material requested item can be recommend to use petty cash to purchase instead of going thru purchase workflow.
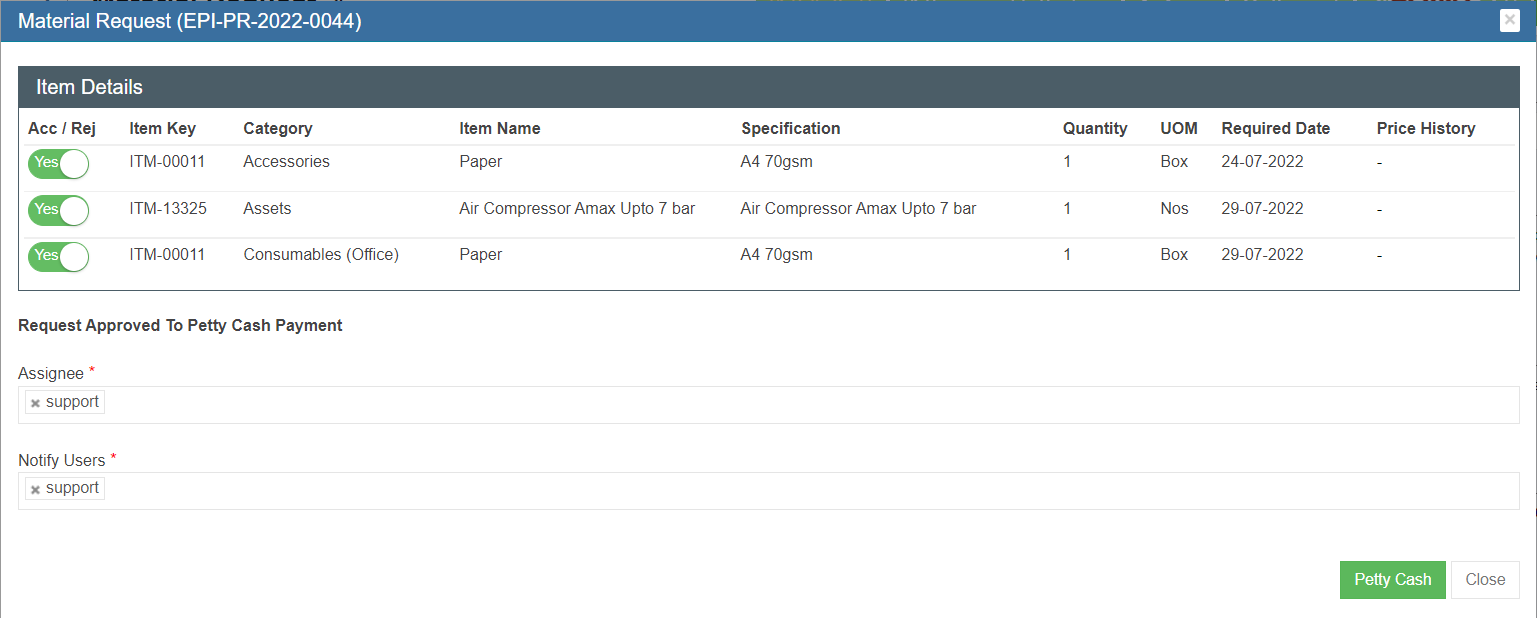
- Click the Petty Cash button in the material request detail page,
- A new notification window opens to confirm petty cash. Click Petty Cash button to confirm.
- A receiving entry will appear once confirmed petty cash option. User can enter the petty cash purchase details in the receiving entry section.

- Click Add button to enter Receiving entry- Material Request for petty cash payment

- Enter all required details in above receive entry page, and in Attachment, use Choose Files to upload invoice receipt.


No Comments