
Masters & Setup Company in Finance Module
cuteOffice finance module helps accounts team to manage all activities related to the corporate finance effectively.
The key functionalities of the finance module are:
- Masters
- Voucher Entry
- Voucher Staging Entries
- Integration Staging
- Monthly Reports
- Customer Reports
- Supplier Reports
- Tax Reports
- Link Account Setup
Finance module greatly helps to manage financial data. The subsequent reports can be generated automatically without any manual intervention.
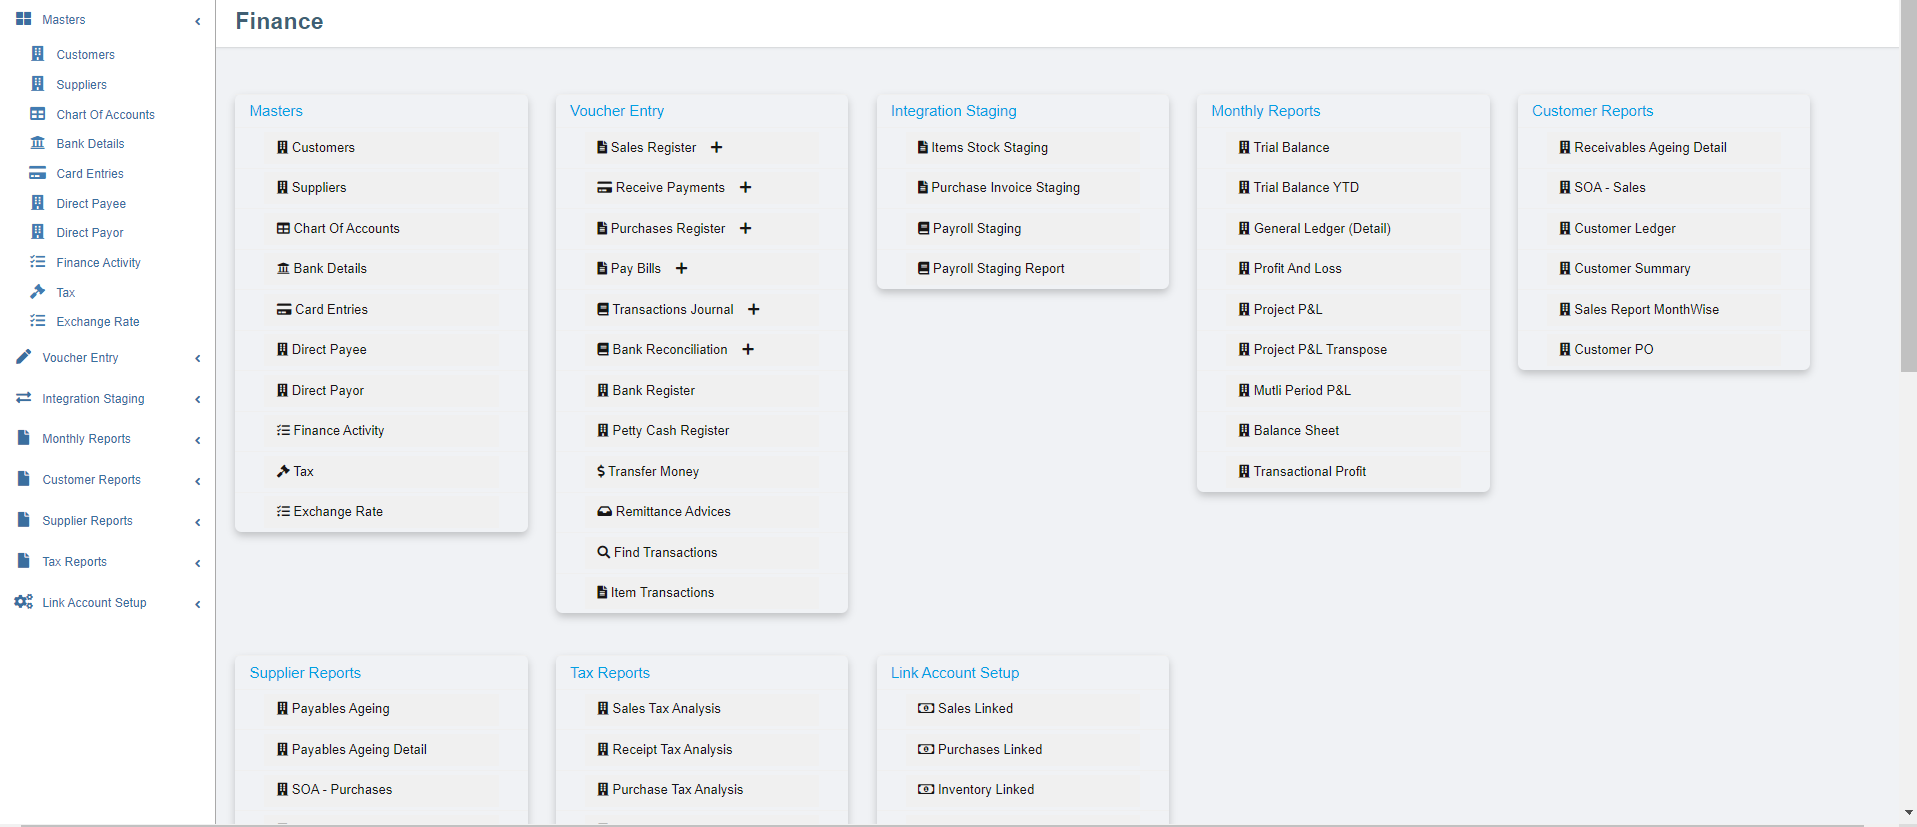
Click Finance tab in cuteOffice system, below is the screenshot of finance module home page.
Finance Module Prerequisites
The following set of information is required for the implementation of the Finance Module. The information could be provided in the form of Excel for upload to the system.
Setup a financial year
Before start using the finance module, the company needs to be configured for a financial year so that the users can start to use the system. The administrator of cuteOffice can configure the financial year details of the company in Admin menu-Company submenu.

- Click Company in the Admin menu, the admin companies (holding companies or any affiliate companies registered in system will show,

- Select the company and click
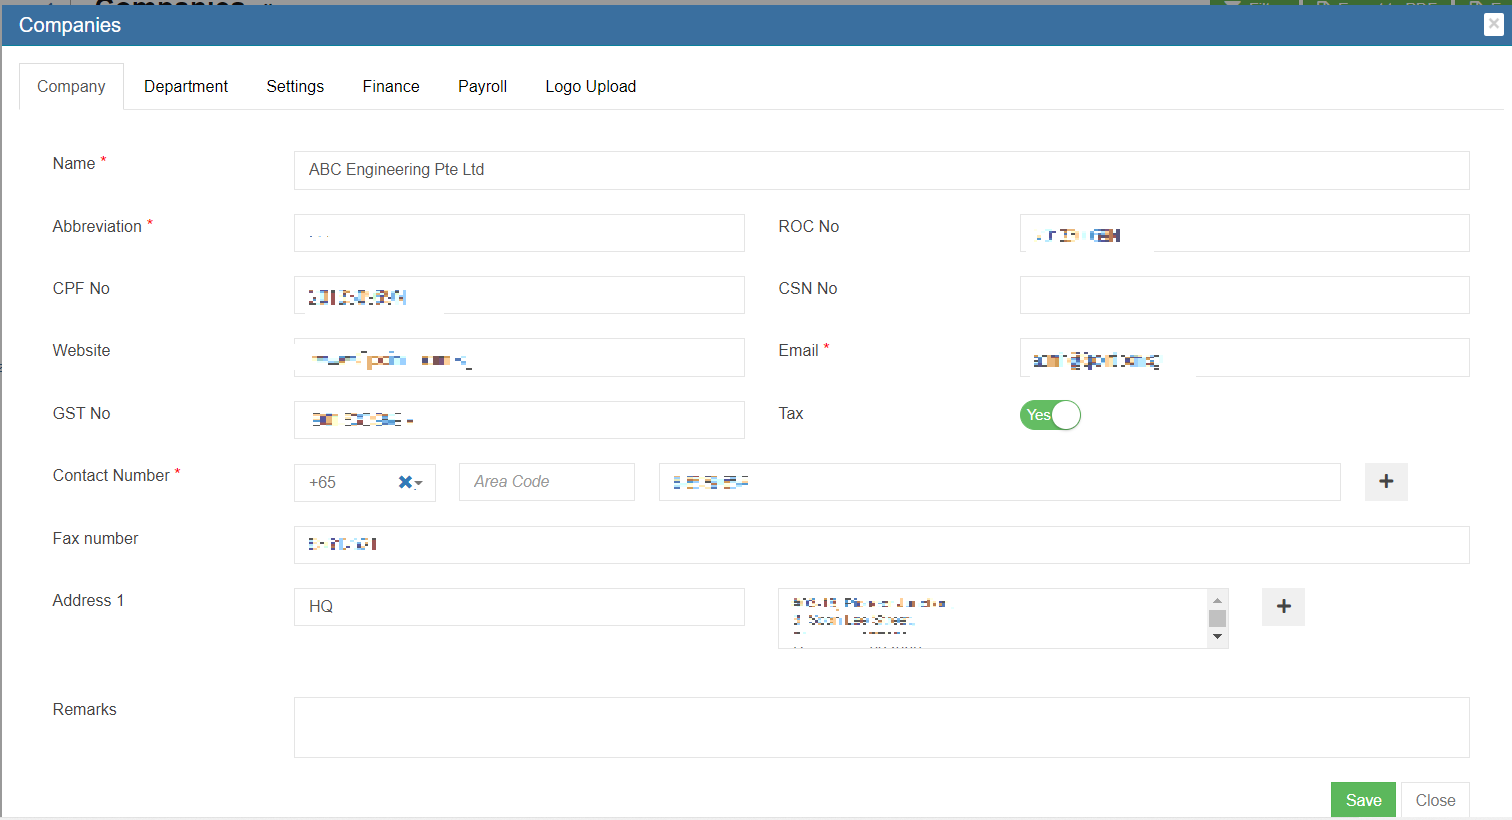
 edit button to open the company detail page as below,

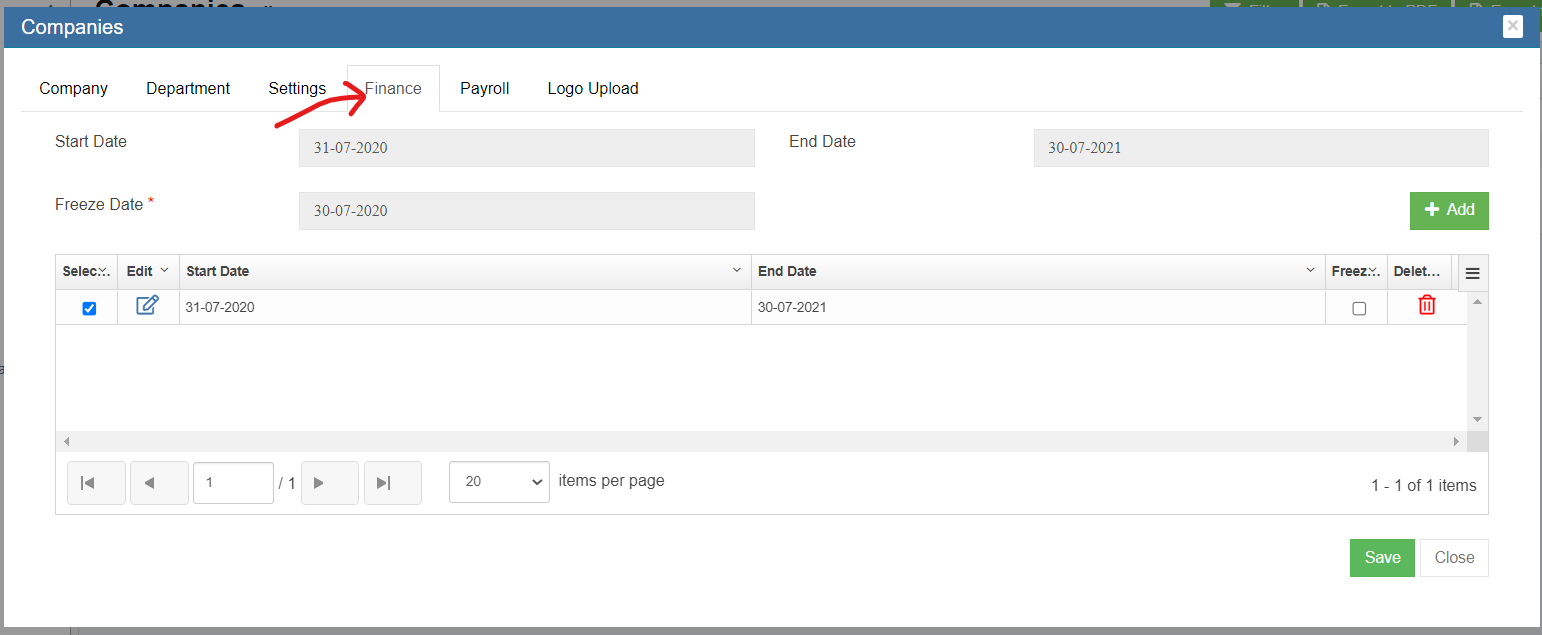
- Navigate to the Finance tab. Note: When there is no financial year setup currently, the list shows no record.
- To add a new financial year, Click
 to create a new financial year. The Add Financial Year window opens,

- Enter the start date, end date and freeze date of the financial year. Note: With this Freeze date setup, end users will not be able to do any transaction before this specified date.
- Click Save. The financial year data will be saved.


Letterhead Upload
To view letter head in the sales invoice report, the below setting has to configured.
- Go to Admin and Click Company
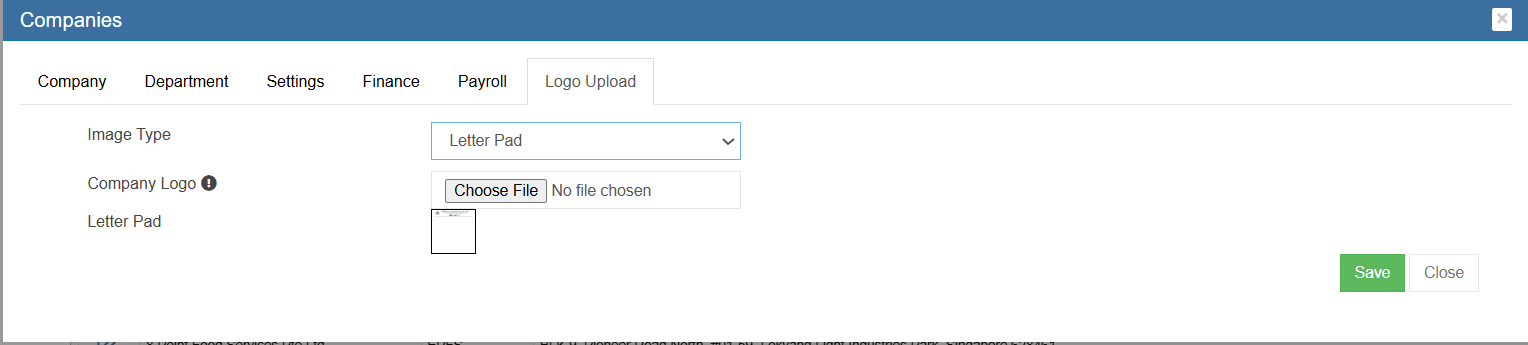
- Click Logo Upload. Choose Letter Pad in the image type.
- Click choose file and upload the company letter head.
- Go to company settings and click add
- Enter the name as " financeSalesInvoiceReportFormat".

- Enter the value as "SALESINVOICEFORMAT3"
- Click save to save the settings
- Click add and enter name as " financeSalesInvoiceReportStartPosition"
- Enter value starting from 20 to adjust the Invoice header in the report
- Click save to save the position of the "Invoice"


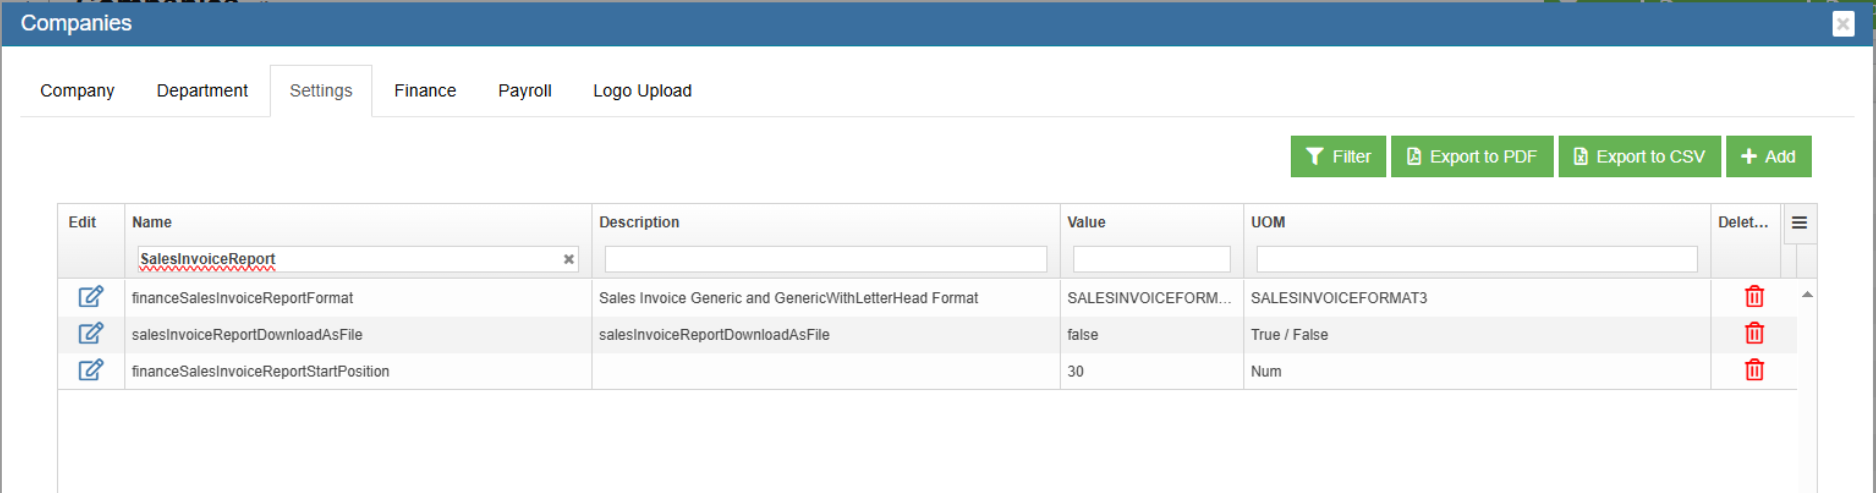

Chart of Accounts
This file will represent the Chart of Accounts that would be used in the Finance Module. The file would also contain the Opening Balance that needs to be considered for the individual Account lines.
Fields Required
Account Name : Name of the Account
Account Number : Account Number in Numeric
Opening Balance : Account Opening Balance
Account Type : Asset / Liability / Equity / Income / Expense / Other Income / Other Expense / Cost Of Sales
Account Sub Type : Fixed Asset / Current Asset / Current Liability / Income / Expense / Other Income / Other Expense
/ Cost Of Sales
Level : 1 - ASSET ,2 – Fixed Asset , 3 – Cash At Bank , 4 – Cheque Account
Type : Header / Detail (Ex: ASSET ->Fixed Asset – Header, Cheque Account - Detail)
Parent Account : Asset -> Fixed Asset - > Cash At Bank -> Cheque Account (Child Account))
Customer Master
The file is to represent the list of Customers. The Customer Number will be generated by the Finance module
Fields Required
Customer Name : Name of the Customer
Country : Country where the customer belongs to Ex: Singapore / Australia / Malaysia etc..
Customer Type : Agent / Client / Sub Contractor etc..
Industry Type : IT / Automobile / Construction etc..
Sub Industry Type : Software / Medical / Cement Companies etc..
Currency : SGD / USD / AUD etc..
GST Number : Customer Registration Number
Payment Mode : Cheque / TT / Cash
Fax : Country Code – Area Code – Telephone Number
Website : Website URL of the customer
eMail : Customer eMail
Contact No : Country Code – Area Code – Telephone Number
Address : Customer Address
Customer Receivables
This file would contain the Opening Balances of all Customer Invoices. As a control measure the sum of all the outstanding invoices should match with the Debtors Opening Balance provided as part of Chart of Accounts. If the Customer Balances are maintained at a multi-currency level, then the outstanding invoices should be the multi-currency level with the Balances tallying.
Fields Required
Invoice Number : Invoice Transaction ID
Invoice Date : Invoice Transaction Date
Customer Name : Name of the Customer (as provided in the Customer Master)
Currency : SGD / USD / AUD etc..
Tax Code : TX – 7, SR – 7, NT – 0 etc
Invoice Amount : Gross Total of the Invoice
Terms : 7 Days / 30 Days / COD etc
Memo : Invoice Description
Supplier Master
The file is to represent the list of Suppliers. The Supplier Number will be generated by the Finance module.
Fields Required
Supplier Name : Name of the Supplier
Country : Country where the Supplier belongs to Ex: Singapore / Australia / Malaysia etc..
Supplier Type : Agent / Client / Sub Contractor etc..
Industry Type : IT / Automobile / Construction etc..
Sub Industry Type : Software / Medical / Cement Companies etc..
Currency : SGD / USD / AUD etc..
GST Number : Supplier Registration Number
Payment Mode : Cheque / TT / Cash
Fax : Country Code – Area Code – Telephone Number
Website : Website URL of the customer
eMail : Supplier eMail
Contact No : Country Code – Area Code – Telephone Number
Address : Supplier Address
Supplier Payables
This file would contain the Opening Balances of all Supplier Purchase Invoices. As a control measure the sum of all the outstanding purchase invoices should match with the Creditors Opening Balance provided as part of Chart of Accounts. If the Supplier Balances are maintained at a multi-currency level, then the outstanding invoices should be the multi-currency level with the Balances tallying.
Fields Required
Invoice Number : Invoice Transaction ID
Invoice Date : Invoice Transaction Date
Supplier Name : Name of the Supplier (as provided in the Supplier Master)
Currency : SGD / USD / AUD etc..
Tax Code : TX – 7, SR – 7, NT – 0 etc
Invoice Amount : Gross Total of the Invoice
Terms : 7 Days / 30 Days / COD etc
Memo : Invoice Description
Tax Codes
This file is required to store the Tax Codes in the System.
Fields Required
Tax Code : TX – 7, SR – 7, NT – 0 etc.
Tax Type : Goods & Service Tax
Tax Description : Description of the Tax, Standard Rate etc..
Percentage : 7 %
Terms : 7 Days / 30 Days / COD etc
Form Type : Sales / Purchase
Exchange Rate (For Foreign Currency Transactions)
This file is required to store the Exchange Rate difference between the foreign currency & Base Currency in the System.
Fields Required
Base Currency : SGD
Foreign Currency : Foreign Currency Code
Rate : Exchange Rate
Sales Linked Accounts
The following configuration parameters needs to be provided to setup the Finance module which are required for Sales related transactions. Client needs to provide the Account Number (from the Chart of Accounts provided) which would be configured in the application.
Asset Account for Tracking Receivable : Debtors Account
Bank Account for Customer Receipts : Primary Bank Account
Accounts for Goods & Service Tax : GST Receiving Account
Income Account for Freight : Freight Account
Contra Account : Contra Adjustment Sales Account
Customer Pre-payments : Pre-payment Customer Account
Income Account for Late Charges : Late Charges Collection Account
Foreign Currency Customer Account : Foreign Currency Customer Debtor Account. Ex for USD Currency Customer Account, use Trade Debtors – USD Account
Foreign Currency Exchange Difference : Foreign Currency Exchange Difference Account Customer Debtor Ex for USD Exchange difference, use Trade Debtors Foreign Exchange – USD Account
Purchase Linked Accounts
The following configuration parameters needs to be provided to setup the Finance module which are required for Purchase related transactions. Client needs to provide the Account Number (from the Chart of Accounts provided) which would be configured in the application.
Liability Account for Tracking Payable : Creditors Account
Bank Account for Paying Bills : Primary Bank Account
Accounts for Goods & Service Tax : GST Paying Account
Contra Account : Contra Adjustment Purchase Account
Expense Account for Late Charges : Late Charges Payment Account
Foreign Currency Supplier Account : Foreign Currency Supplier Creditor Account. Ex for USD Currency Customer Account, use Trade Creditors – USD Account
Foreign Currency Exchange Difference : Foreign Currency Exchange Difference Account Supplier Creditor Ex for USD Exchange difference, use Trade Creditors Foreign Exchange – USD Account
Accounts & Banking Linked Accounts
The following configuration parameters needs to be provided to setup the Finance module
Equity Account for Current Earnings : Current Year Earning Account
Equity Account for Retained Earnings : Retained Earnings Account
Equity Account for Historical Balancing : Historical Balancing Account
Account for Currency Gain / Loss : Foreign Currency Gain / Loss Account
Master Data
Master Data in Finance module includes below data sets. Below are steps to add prerequisite data for finance module to run smoothly.
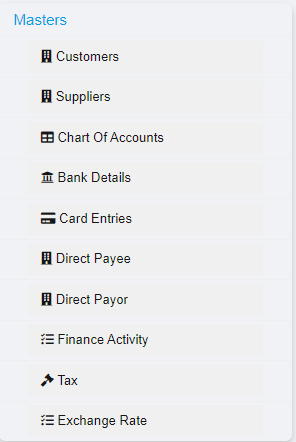
Chart of Accounts
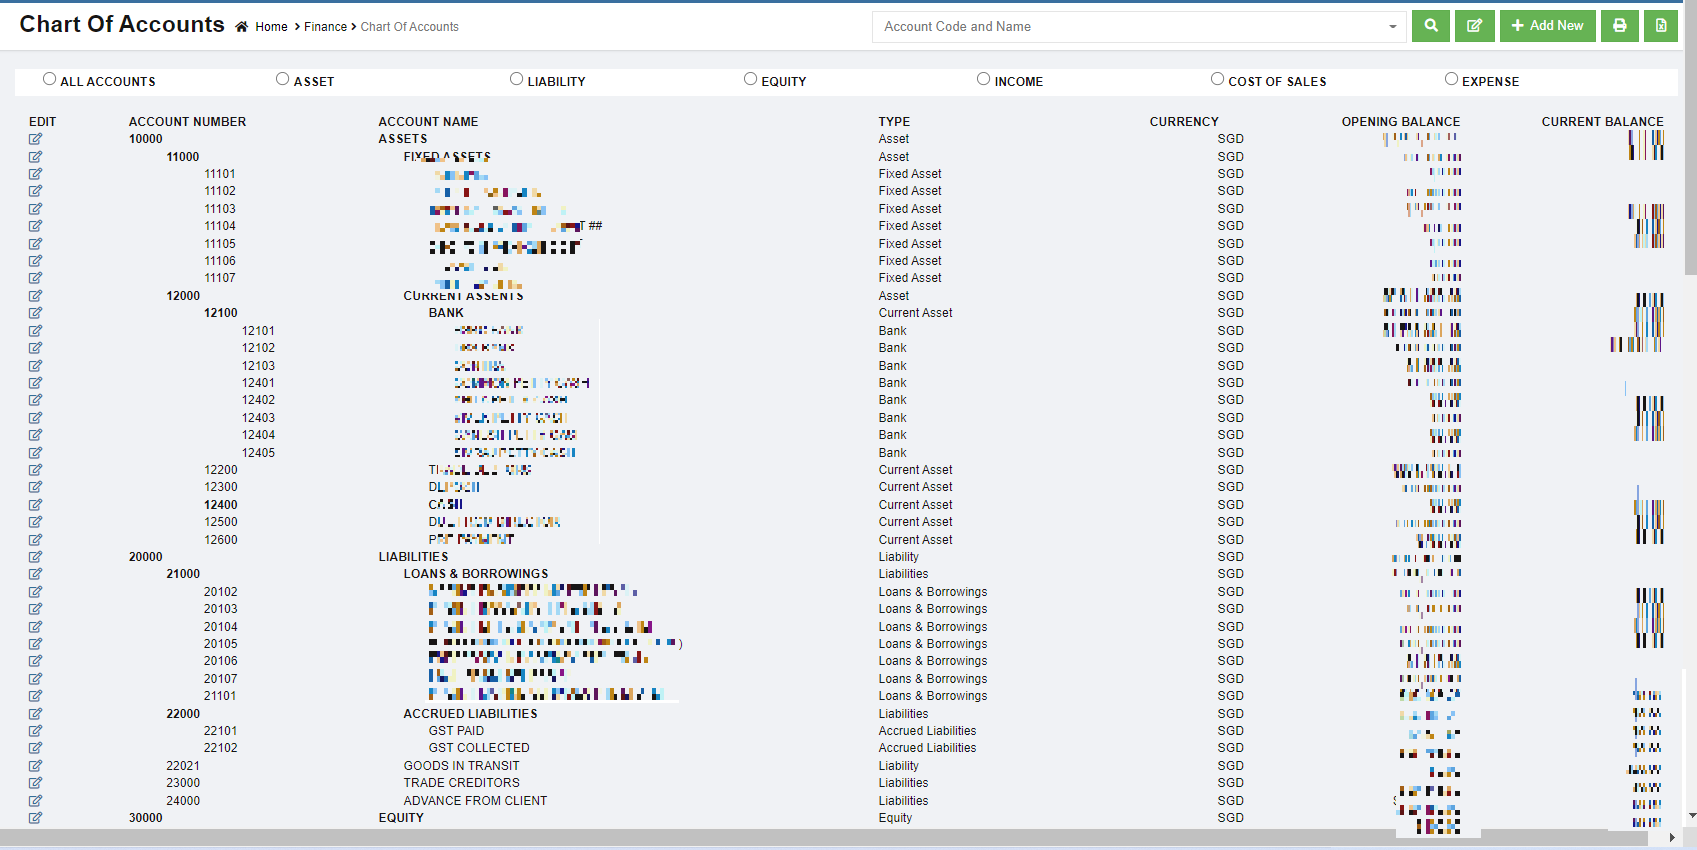
The Chart of Accounts menu in the Finance is used to manage the chart of accounts.
A chart of accounts (COA) is a financial, organizational tool that provides an index of every account in an accounting system. This provides an insight into all the financial transactions of the company. Here, an account is a unique record for each type of asset, liability, equity, revenue and expense.
The chart of accounts is classified into eight major categories and stored in the company’s ledger. Each account in the chart of accounts is typically assigned a name and a unique number by which it can be identified.
|
Accounts Code |
Classification |
Accounts Type |
Remarks |
|
10000 |
Asset |
Account Receivables Bank Assets (Current, Fixed, Others) |
Cash, Accounts, Receivable, Land, Equipment |
|
20000 |
Liability |
Accounts Payable Credit Card Liability (Current, Long Term, Others) |
Loans payable, Account payable |
|
30000 |
Equity |
Equity |
Paid up capital |
|
40000 |
Income |
Income |
Revenue from sales |
|
50000 |
Cost of Sales |
Cost of Sales |
Purchases |
|
60000 |
Expense |
Expense |
Other expenses of business |
|
80000 |
Other Income |
Other Income |
Non-operating revenues and gains |
|
90000 |
Other Expense |
Other Expense |
Non-operating expenses and losses |
The chart of accounts lists the accounts that are available for recording transactions. In keeping with the double-entry system of accounting, a minimum of two accounts is needed for every transaction- at least one account is debited and at least one account is credited.
Some general rules about debiting and crediting the accounts are:
Asset accounts normally have debit balances
- To increase an asset account, debit the account
- To decrease an asset account, credit the account
Liability accounts normally have credit balances
- To increase a liability account, credit the account
- To decrease a liability account, debit the account
View Chart of Accounts
Add a New Account Code
You can add the accounts only in the starting of the financial year. In the middle of the financial year, you cannot add or change any account.
To add a new account code,
- Click
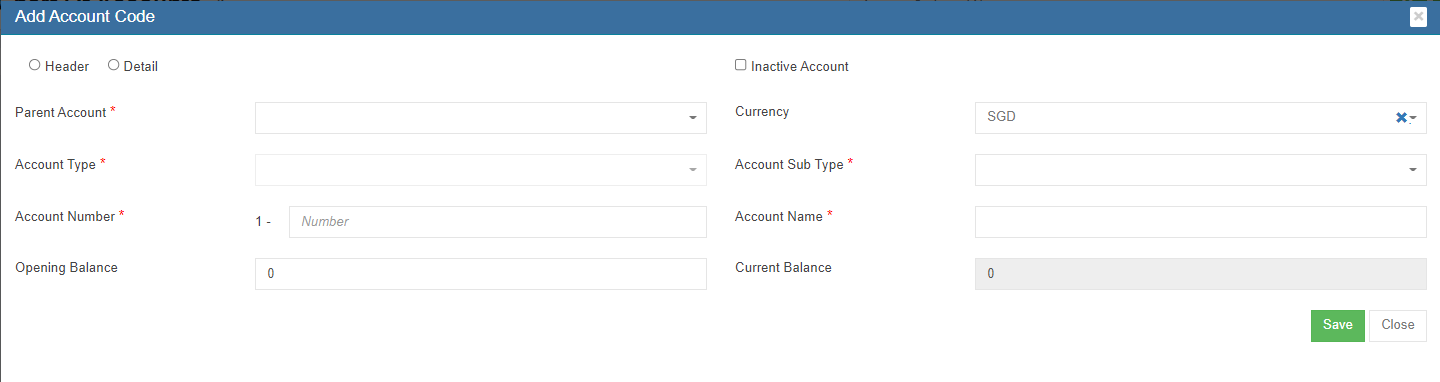
 (Add New button) in the upper right-corner of the Chart of Accounts list page, the Add Account Code window opens,

- Select the type of account code whether it's Header or Detail.
Header - Header is used only for grouping. Transactions cannot be posted under this code.
Detail – All transactions can be posted under the detail account code.
- If the account to be created is inactive account, enable the Inactive Account
- In the Parent Account box, select parent account name.
- In the Account Type box, the account type will automatically populated when parent account is selected.
- In the Currency box, select the currency.
- In the Account Sub Type box, select the account sub type.
- In the Account Number box, enter the account number.
- In the Account Name box, enter the name of the account.
- In the Opening Balance box, enter the opening balance of the account.
- In the Current Balance box, for new account it will default showing 0.
- Click Save. The new account code will be created and listed in the Chart of Accounts page.

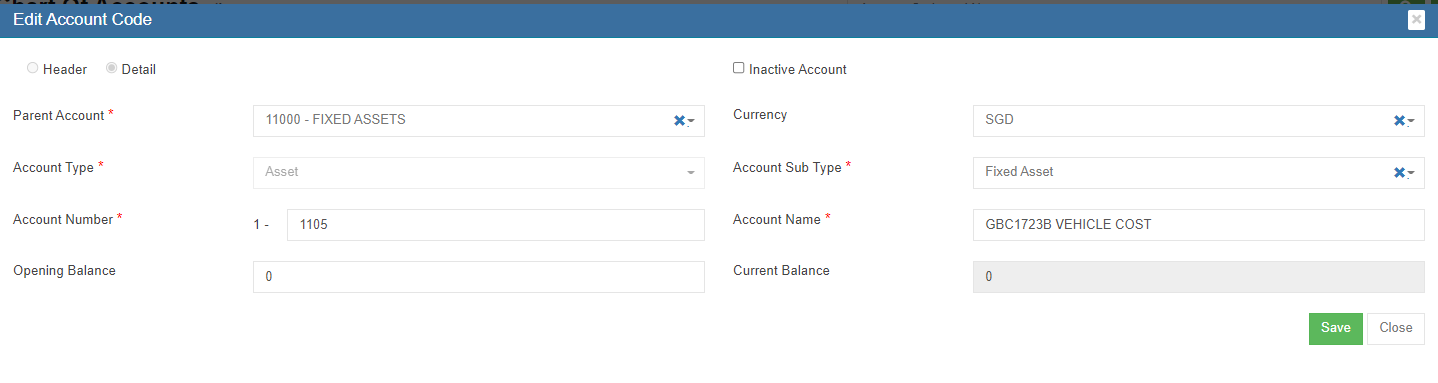
Edit Account Code
If you want to edit any added account code in the Chart of Accounts page, do the following page,
- Click
 (Edit icon) of the Account Code and Name which you want to edit, the edit account code page opens,

- Click any box where you want to edit the account details, and then edit the details in the respective box in the Edit Account Code
- Click Save to save edits.
Export Chart of Accounts
User can use the print or export
 option to print or export the chart of accounts.
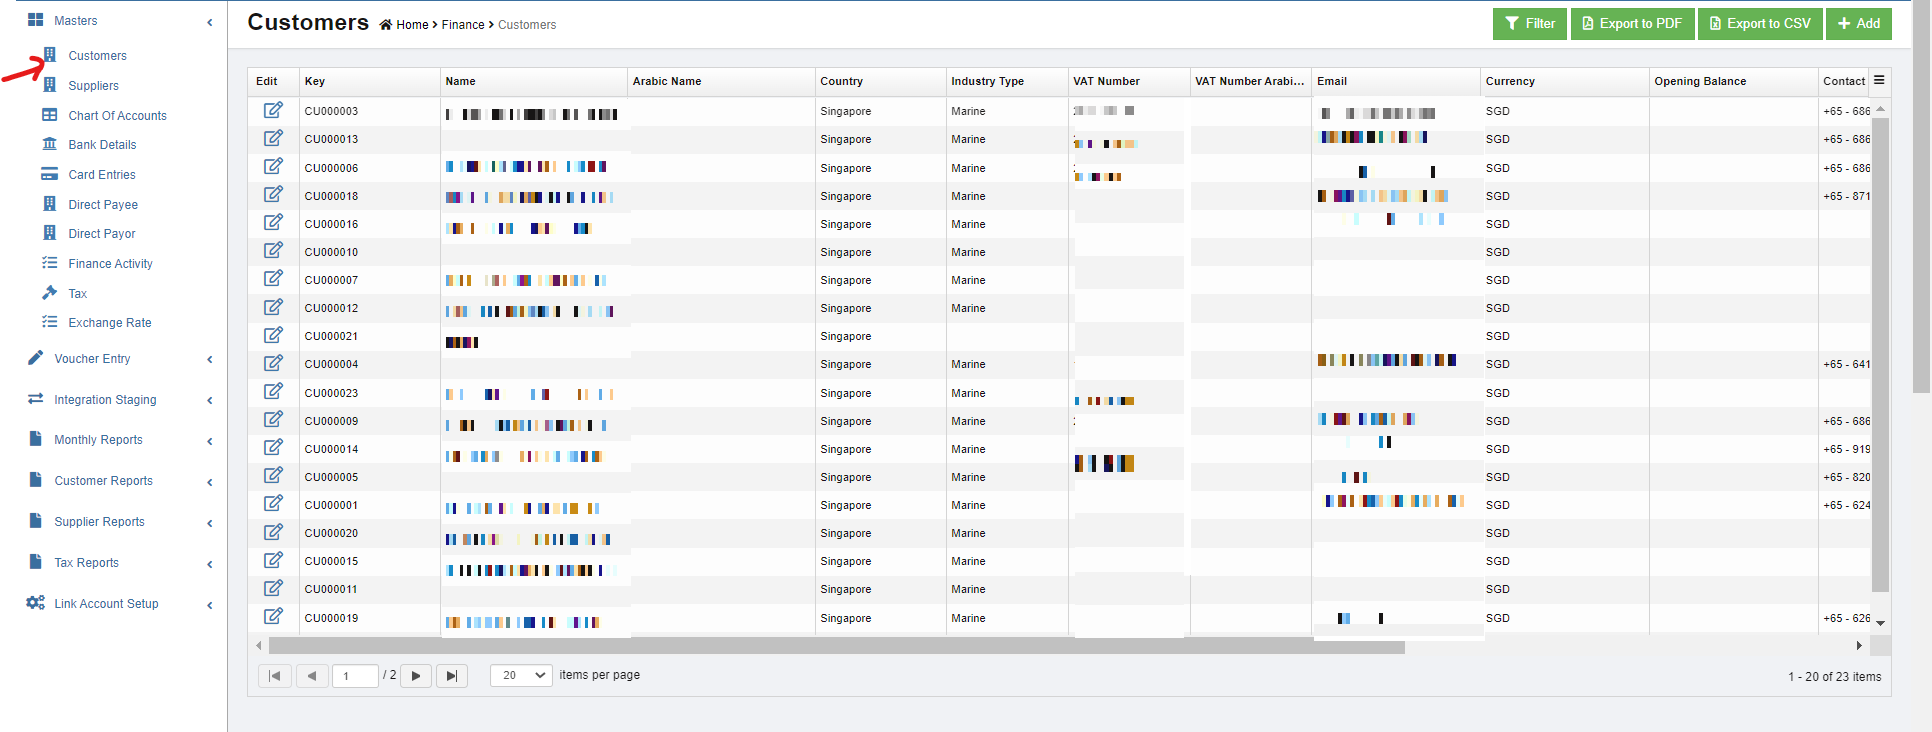
Customers
Customers master manages all customer's company details so that sales activities and transactions can be recorded and entered in finance module.
To view all customers, click Customers submenu in Master menu,
Add A New Customer
To add a new customer,
- click
 (add button) in the upper right corner of customer list page, the customer detail page open,
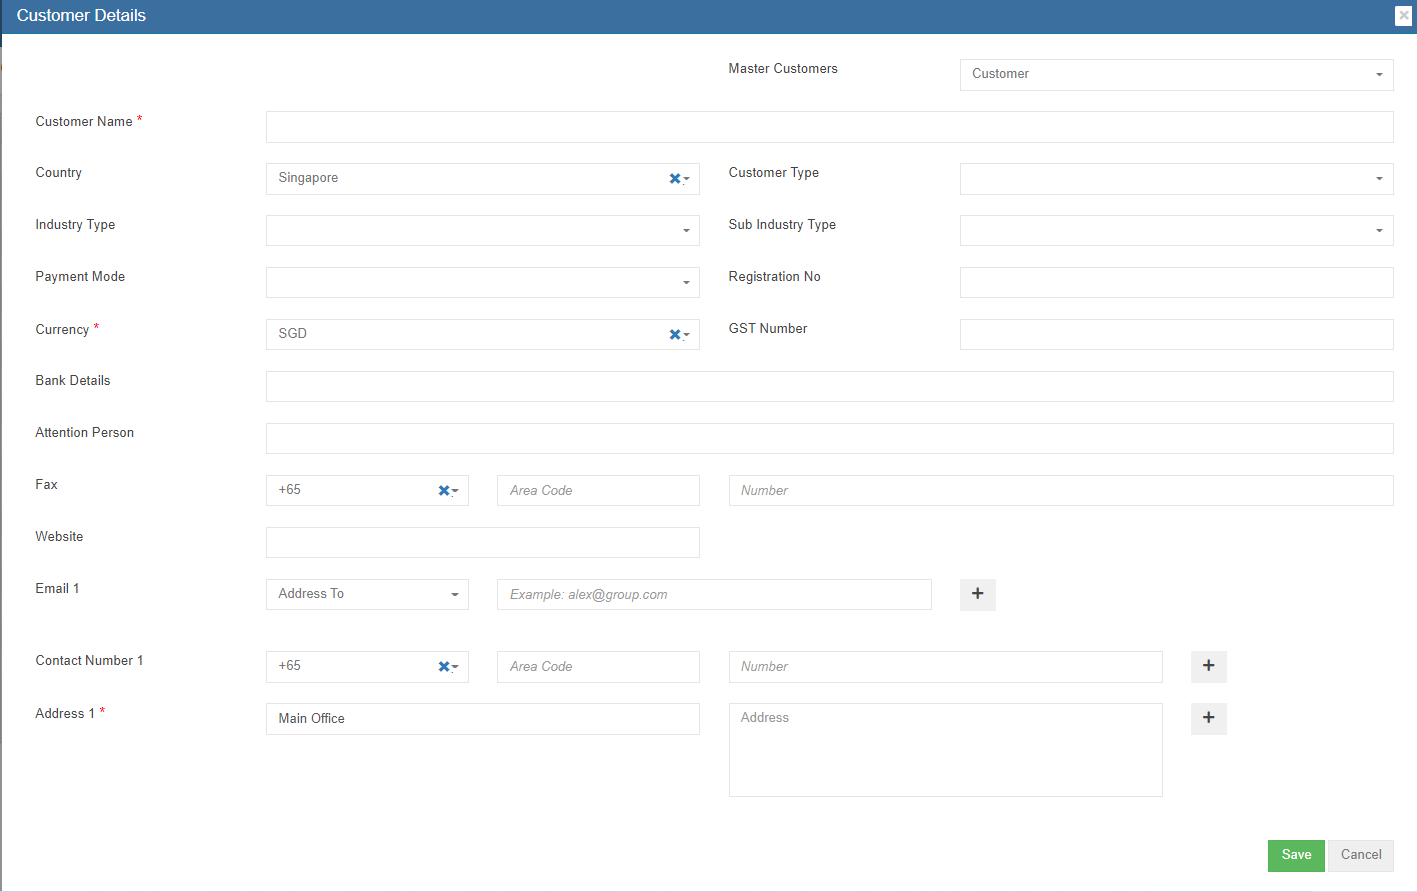
- Enter customer details in above page.
- Click Save. The new customer master data is created and saved in system.

Edit Customer
To edit customer data,
- Click
 (edit button) in the edit column of the customer that user wants to edit, the customer detail page opens,
 - Edit the fields where needed.
- Click Save to save edits.

Delete Customer
If a customer is not yet in any transaction in system, user can use delete option to delete customer data,
- click the
 (delete button) in the delete column of the customer that user wants to delete, a confirmation window opens,
- Click Yes to confirm deletion. Note: if a customer is already in use/transaction, below error message will pop up in the bottom right corner and system will not allow deletion.


Export Customer
User can use the export option to export customer data. Select and click the format that user want to download.
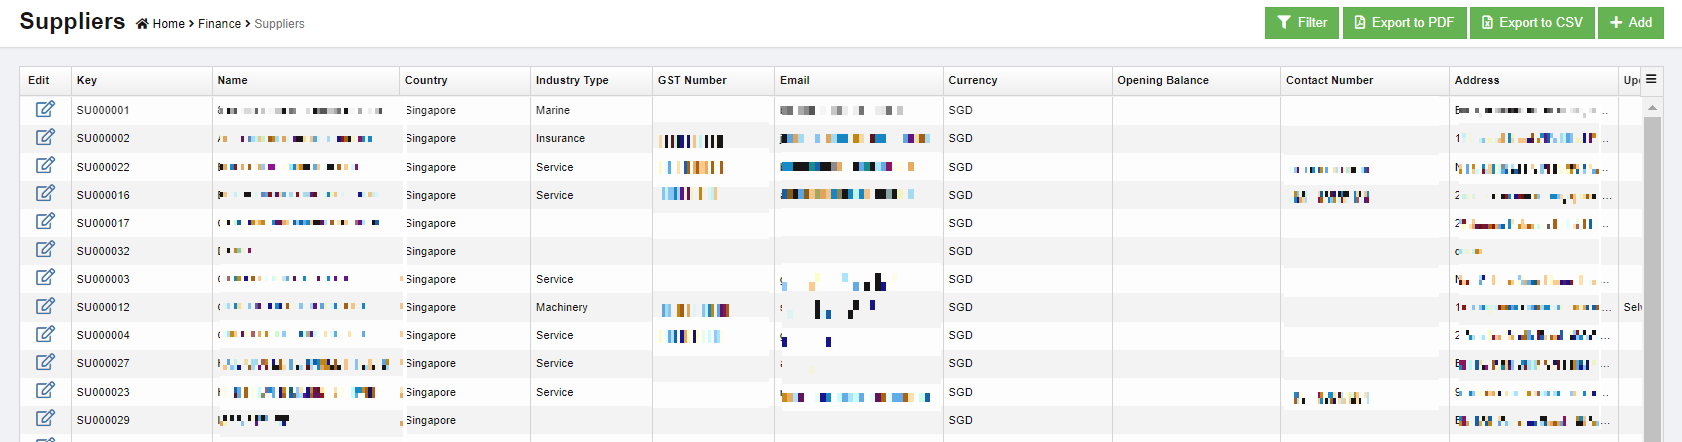
Suppliers
Suppliers master manages all suppliers' company details so that purchase activities and transactions can be recorded and entered in finance module.
To view all suppliers, click Suppliers submenu in Master menu,
Add A New Supplier
To add a new supplier,
- Click add button in the upper right corner of the suppliers list page, the supplier detail page opens,
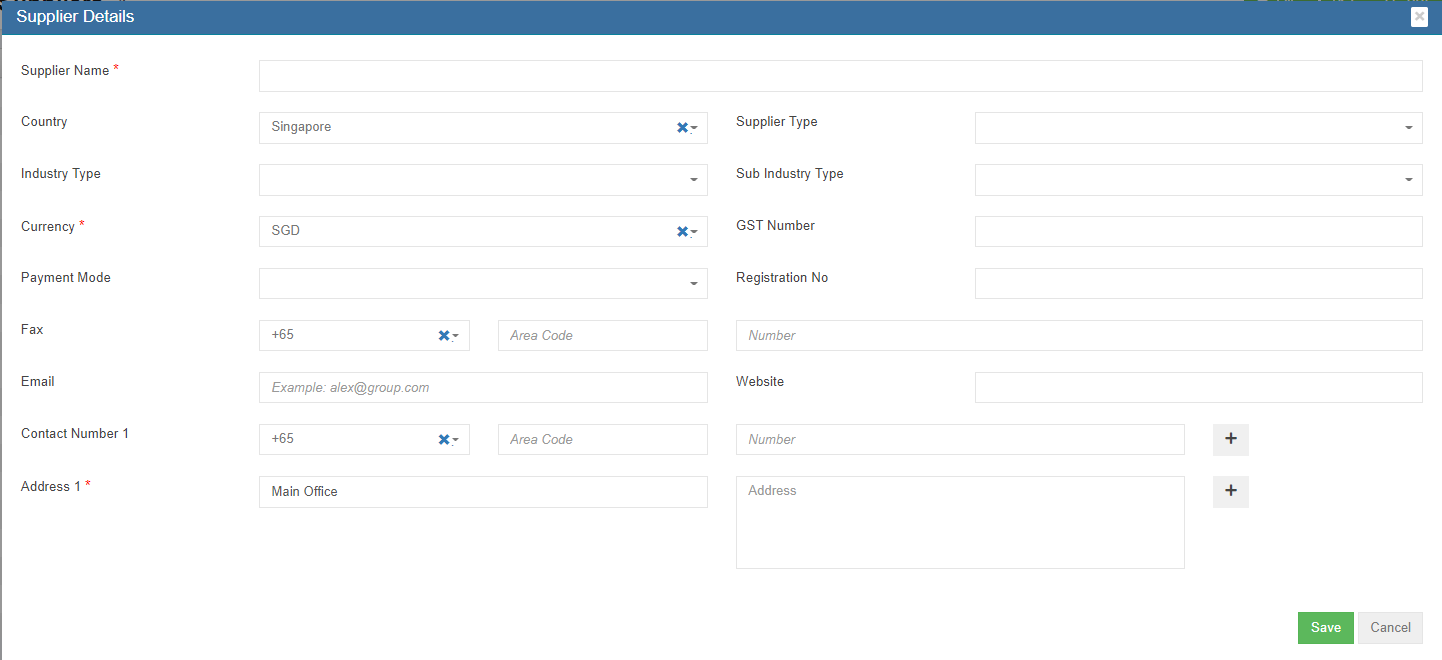
- Enter all details of the new supplier.
- Click Save. The new supplier master data is created and saved in system.

Edit Supplier
To edit supplier data,
- Click(edit button) in the edit column of the supplier that user wants to edit, the supplier detail page opens,
- Edit the fields where needed.
- Click Save to save edits.
Delete Supplier
If a supplier is not yet in any transaction in system, user can use delete option to delete supplier data,
- click the (delete button) in the delete column of the supplier that user wants to delete, a confirmation window opens,
- Click Yes to confirm deletion. Note: if a supplier is already in use/transaction, below error message will pop up in the bottom right corner and system will not allow deletion.


Export Supplier
User can use the export option to export supplier data. Select and click the format that user want to download.
Bank details
The Bank Details tab in the Finance menu used to manage all the bank account details of the company. The Bank Details data will be automatically synchronized is integrated with the Sales Register and Purchase Register pages.
To view all bank details, click Bank Detail in the Master menu, the bank details list open,

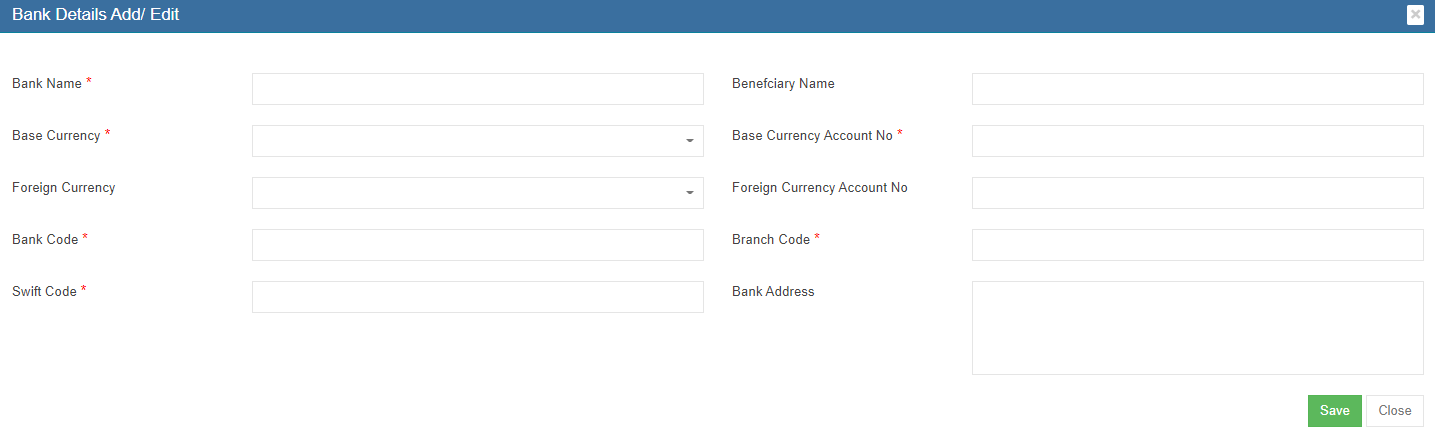
Add A New Bank
To add a new bank,
- Click
 (Add button) in the upper right-corner of the bank detail list page. The Bank Details Add/Edit window opens.

- Enter the bank details in the relevant fields.
- Click Save. The bank account is added and saved in the Bank Details list page.
Edit Bank Account Details
To edit any added bank account details in the Bank Details page,
- Click
 (Edit icon) in the Edit column for the respective bank account. The Bank Details Add/Edit window opens.

- Click and edit any fields where user wants to edit the details
- Click Save to save edits.
Delete A Bank Account Details
If a bank account is not yet in use, user can delete if needed. To delete,
- click the (delete button) in the delete column of the bank account that user wants to delete, a confirmation window opens,
- Click Yes to confirm deletion. Note: if a bank account is already in use/transaction, below error message will pop up in the bottom right corner and system will not allow deletion.
Card Entries
Card entries helps to manage company bank cards details. Click Card Entries in the Master menu, all the bank cards saved in system will show as below,
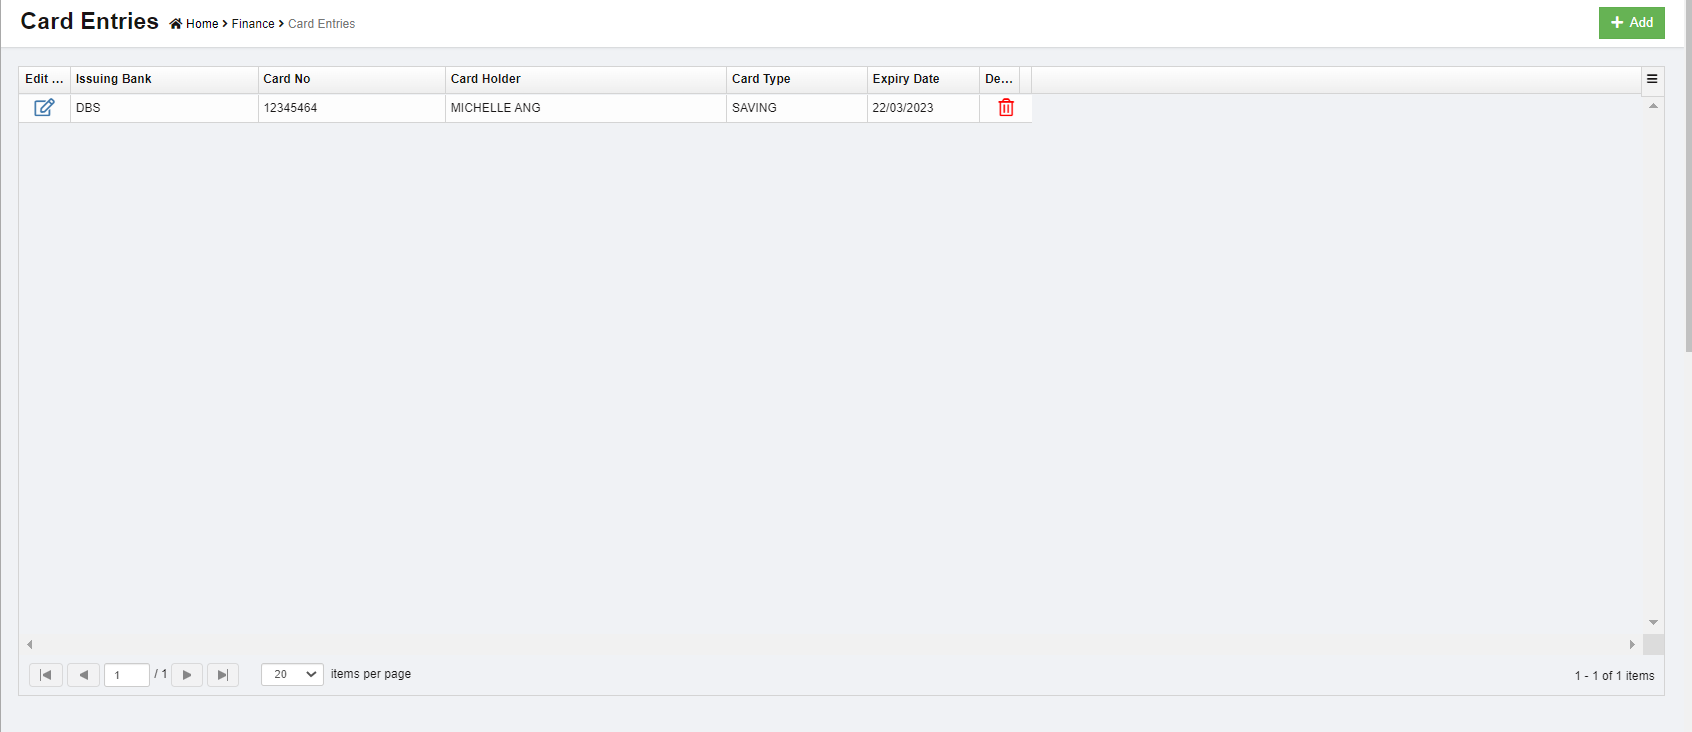
Add A New Card
To add a new card,
- Click (Add button) in the upper right-corner of the card detail list page. The Card Entry window opens,

- Enter the card details.
- Click Save to save card entry. Card details will be saved and shown in the card entry list page.

Edit Card Details
To edit any added card details in the Card Entries page,
- Click (Edit icon) in the Edit column for the respective card detail. The Card Enrty window opens.
- Click and edit any fields where user wants to edit the details
- Click Save to save edits.
Delete A Card
If a card is not yet in transaction record in system, user can delete if needed. To delete a card detail,
- click the (delete button) in the delete column of the card number that user wants to delete, a confirmation window opens,
- Click Yes to confirm deletion.
Direct Payee
Each and every direct payee’s detail needs to be added before any of the transactions such as purchase details can be entered. Before adding a direct payee, the respective users must be assigned with the Payee permission. To assign permission,
Add A Direct Payee
To add a direct payee,
- Navigate to Master, click Direct Payee. The Direct Payee page opens as below,

- Click
 (Add button) in the top right corner. The Direct Payee window opens,

- Enter the direct payee details.
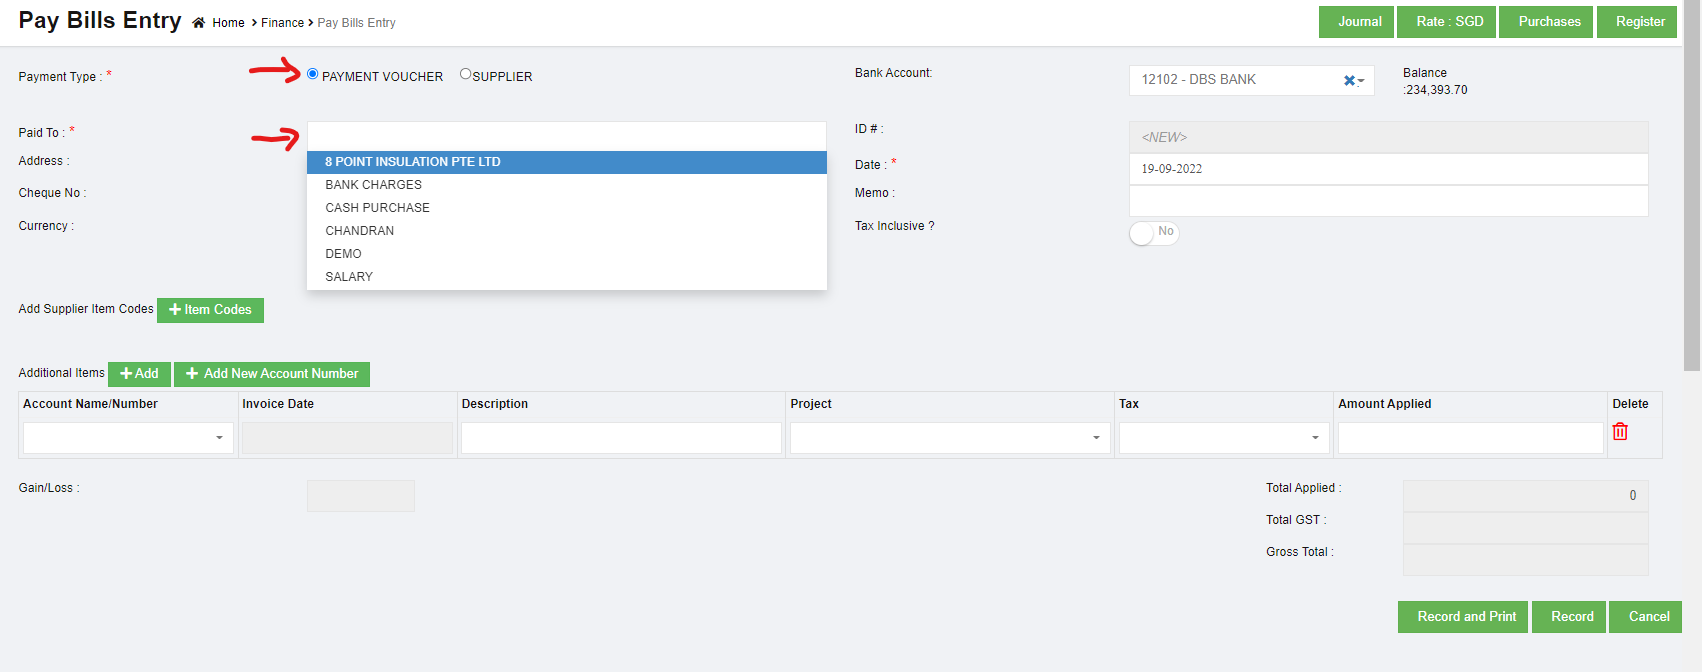
- Click Save. The direct payee will be added in the Direct Payee page. The added payee will be listed in the Pay Bills Entry page by selecting the PAYMENT VOUCHER option while adding the pay bill details.


Edit Direct Payee
To edit direct payee details,
- Click (Edit icon) in the Edit column for the respective direct payee. The direct payee details window opens.
- Click and edit any fields where user wants to edit the details
- Click Save to save edits.
Delete A Direct Payee
If a direct payee is not yet in transaction record in system, user can delete if needed. To delete a card detail,
- click the (delete button) in the delete column of the direct payee that user wants to delete, a confirmation window opens,
- Click Yes to confirm deletion.
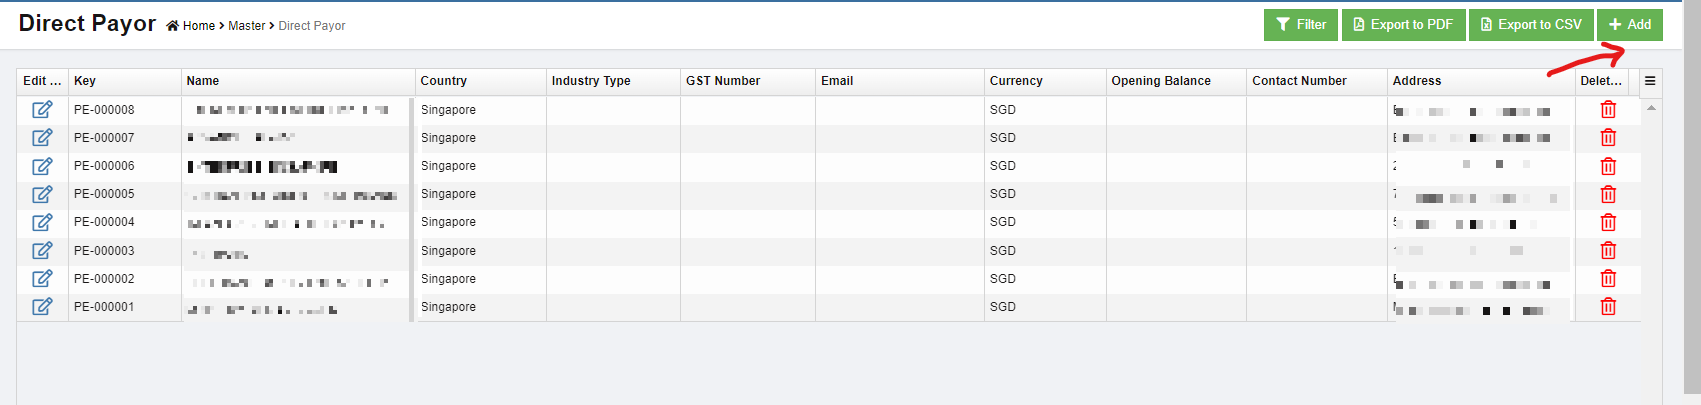
Direct Payor
Each and every direct payor’s detail needs to be added before any of the transactions such as sales can be entered. Before adding a direct payor, the respective users must be assigned with the Payor permission. To assign permission,
Add A Direct Payor
To add a direct payor,
- Navigate to Master, click Direct Payor. The Direct Payor page opens.

- Click (Add button) in the top right corner. The Direct Payor window opens.

- Enter the direct payor details.
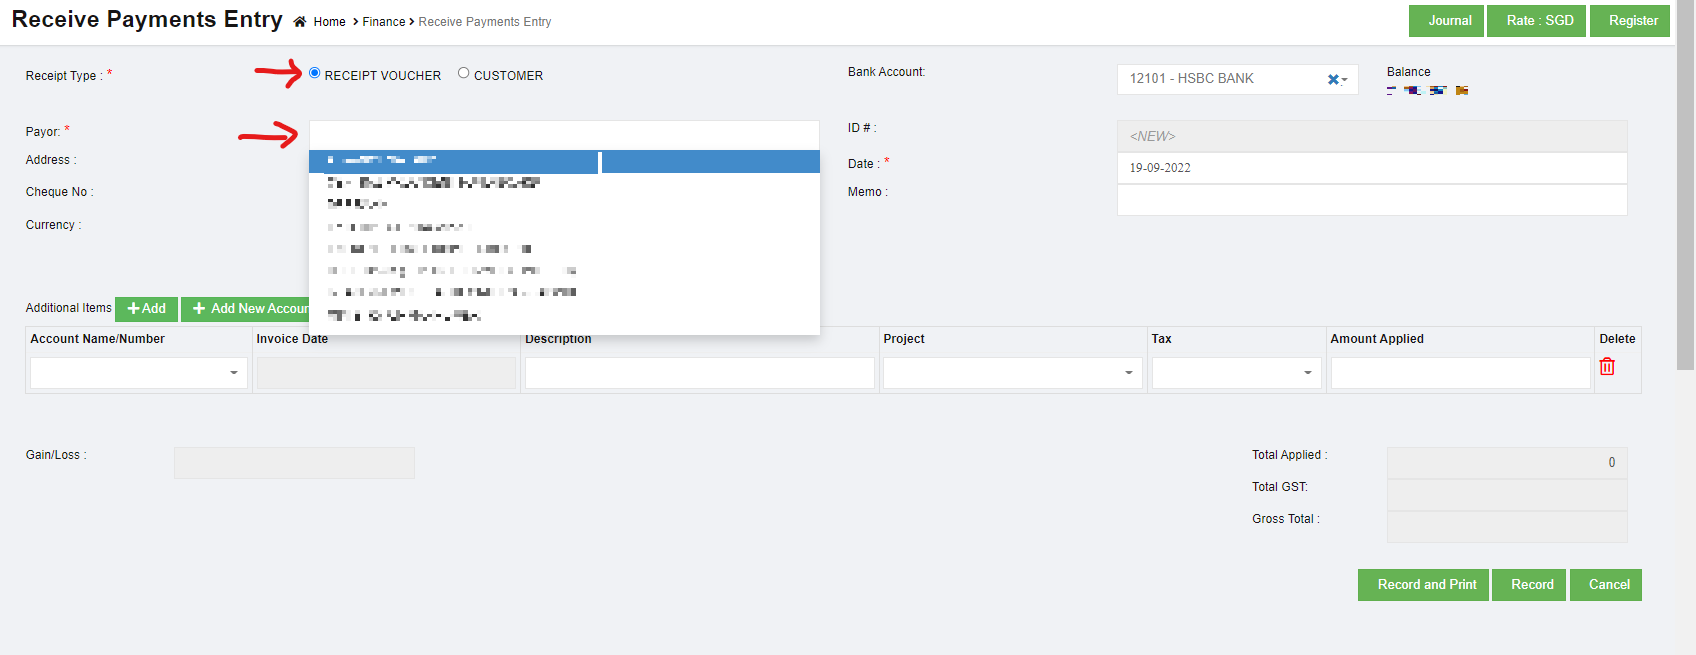
- Click Save. The direct payor will be added in the Direct Payor page. The added payer will be listed in the Receive Payment Entry page by selecting the RECEIPT VOUCHER option while adding the payment details.


Edit Direct Payor
To edit direct payor details,
- Click (Edit icon) in the Edit column for the respective direct payee. The direct payor details window opens.
- Click and edit any fields where user wants to edit the details
- Click Save to save edits.
Delete A Direct Payor
If a direct payor is not yet in transaction record in system, user can delete if needed. To delete a card detail,
- click the (delete button) in the delete column of the direct payor that user wants to delete, a confirmation window opens,
- Click Yes to confirm deletion.
Tax
Tax type, and percentage are managed in Tax master. Click Tax in Master menu, below list of tax master opens,

Add Tax Type
To add a new tax type master,
- Click
 add button in the top right corner in the tax master list page, the new tax detail page opens,
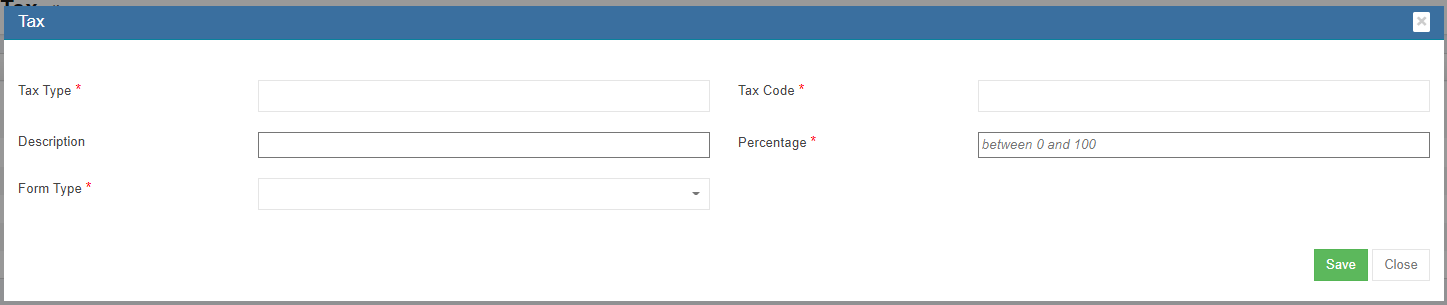
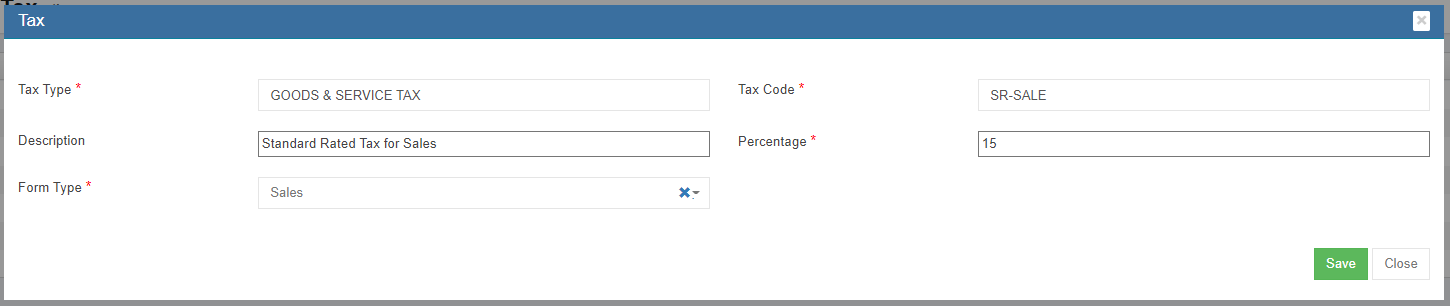
- Fill up the details of the tax master:
- In Tax Type box, enter tax type.
- In Tax Code box, enter the code.
- In Description box, enter description of the tax type.
- In Percentage box, enter the percentage between 0-100.
- In Form Type box, select the form type.
- Click Save. A new tax type is created and saved in the tax master.

Edit Tax Type
To edit a tax type master,
- Click
 edit button in front of the tax type that needs to be edited. The tax type details window opens,

- Edit the details where suits.
- Click Save to save edits.

Delete Tax Type
To delete a tax type master,
- Click
 delete button in the delete column in the relevant tax type. A confirmation window will open as below,

- Click Yes to confirm deletion. The tax type will be deleted.


Invoice Number Configure
User can configure the invoice format and invoice number in Master-Invoice Number Config.
To configure invoice number,
- Click Invoice Number Config in the finance master menu, below configure page opens,
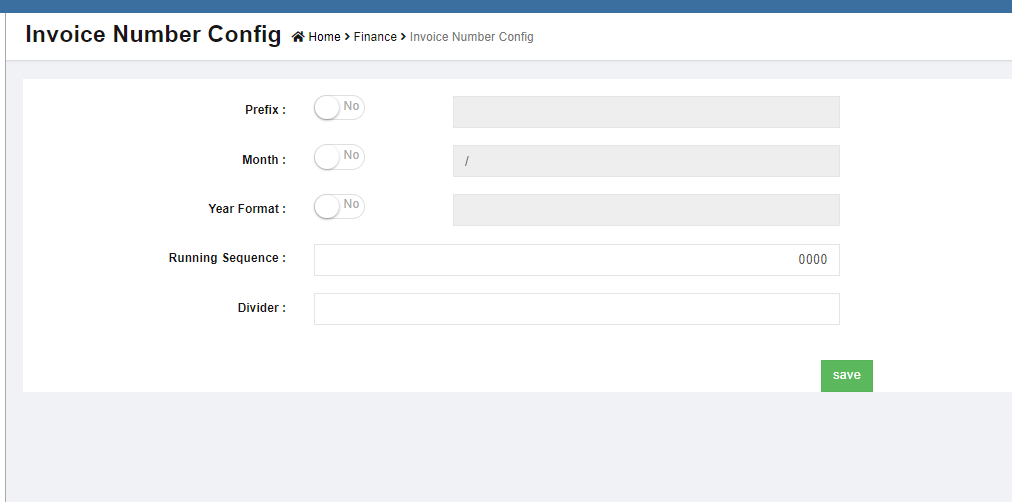
- Enter the details to configure:
- In Prefix box, if there is no prefix required, disable the flag to No; if there is prefix, enable the flag to Yes, then enter the prefix in the text field.

- In Month box, if there is no month info required, disable the flag to No; if there is, enable the flag to Yes, then enter the month format in the text field.

- In Year box, if there is year info required, disable the flag to No; if there is, enable the flag to Yes, then enter the year format in the text field.

- In Running Sequence, enter the first running number

- In Divider box, enter the divider if any

- In Prefix box, if there is no prefix required, disable the flag to No; if there is prefix, enable the flag to Yes, then enter the prefix in the text field.
- Click Save to save configuration details.


Exchange Rate
The exchange rate used in finance module are managed in exchange rate master. Click Exchange Rate in master menu, below exchange rate list opens,

Note: Exchange rate fluctuate due to various factors, cuteOffice exchange rate master accommodate such changes in exchange rate. If an exchange rate is created for the first time in the system, the "to date" field will be open so it’s definite the "to date" is as of now; when a new rate is added or edited on existing exchange rate, the adding or editing date will become the "to date" of the previous rate, as such, exchange rate can be within a period which is defined as from date & to date. Whenever finance vouchers are entered for foreign exchange the rate is picked based on the voucher date
Add Exchange Rate
To add new exchange rate,
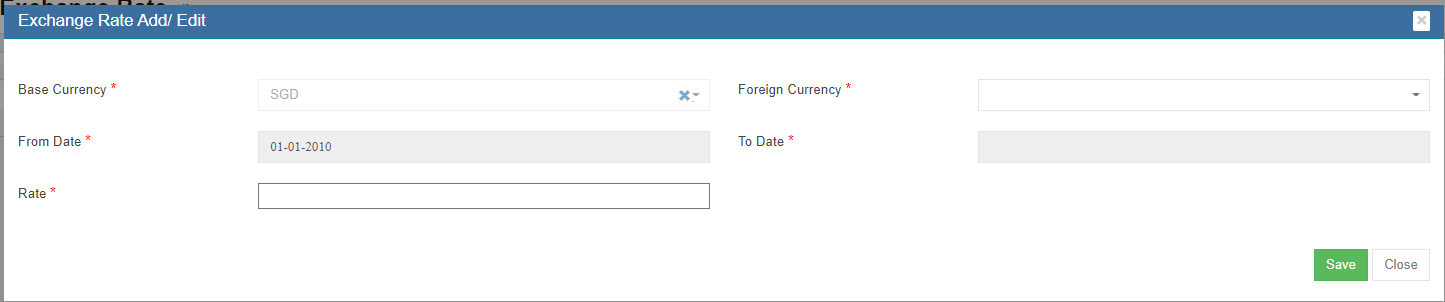
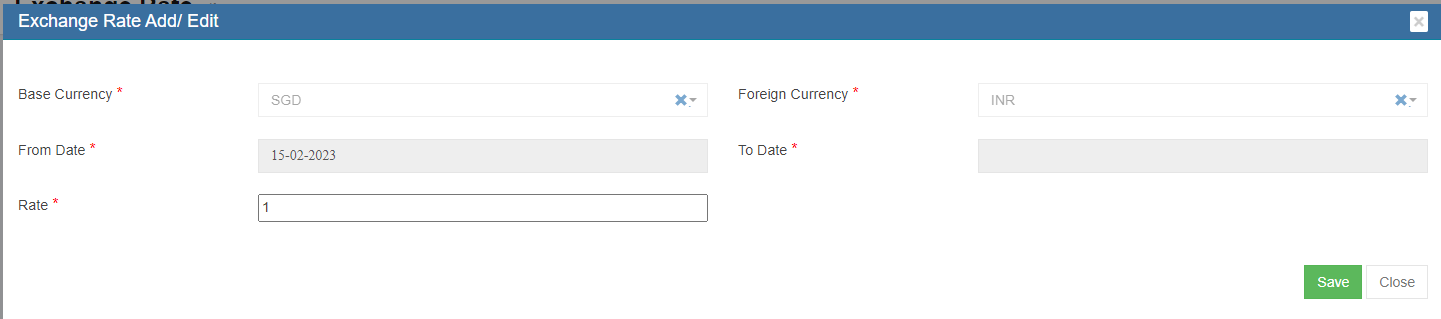
- Click add button in the top right corner in exchange rate list page, the exchange rate add/edit window opens as below,

- Enter the details of exchange rate:
- Base Currency box is default as SGD, this can be configured as other currency upon request.
- In Foreign currency box, select the foreign currency from dropdown list.
- In From Date box, the date will automatically take the end date of current active rate.
- In To Date box, if it's the first time to configure an exchange rate, this field will be open, no need to fill up.
- In Rate box, enter the exchange rate.
- Click Save. A new exchange rate will be added.
Edit Exchange Rate
To edit exchange rate,
- Clickedit button in front of the exchange rate, the exchange rate detail window opens,

- In Rate box, enter the new exchange rate.
- Click Save, a new exchange rate will be saved based on the current date and time.
No Comments