
Menu-Playback, Zone, Options, Vehicle Groups, Group Visibility, Email, Expenses, Reminders, Others
Playback
Playback option helps checking tracked vehicle's history data. One year data will be kept in the server for playback purposes. It will show data such as “Time, Vehicle Speed, Engine Status, Vehicle Latitude, Vehicle Longitude, Heading, Engine Idle Status, In Prohibited Zone, In Working Zone, and Outside Allowed Zone”. 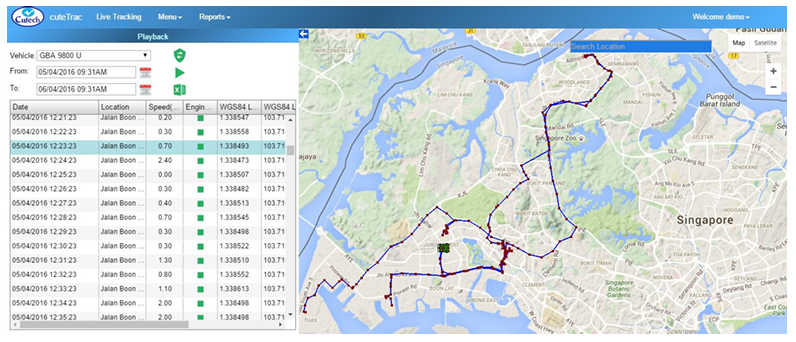 To playback the historic vehicle data,
1. Navigate to the Menu tab provided in the top left side of the screen, and click on it. List of menu items appear.
2. Click Playback in menu items. Playback page appears.
3. Select a Vehicle you want to search from the drop-down list box.
4. Select the dates you want to search for the vehicle data in From and To. A maximum of 24 hours data can be replayed at any one time.
5. Click ![]() “Load Playback Data” button . The selected vehicle data appears.
“Load Playback Data” button . The selected vehicle data appears.
6. Use the down arrow to see and playback in a faster fashion. Note: Once you have clicked ![]() button , the start playback button
button , the start playback button ![]() and excel import
and excel import ![]() options will appear.
options will appear.
- Start Playback
 - To view the vehicle movement for the dates you have selected, click this automatic playback button. So that the vehicle movement will appear in the map automatically. You can also use the use the keyboard`s up and down arrow icons to find the vehicle movements in for.
 - Export to Excel
 - To export the vehicle data in excel form, click the excel import button.
Kindly refer the below YouTube video for reference
https://www.youtube.com/watch?v=4Nb4ITbaGiQ
Zone (Geofence)
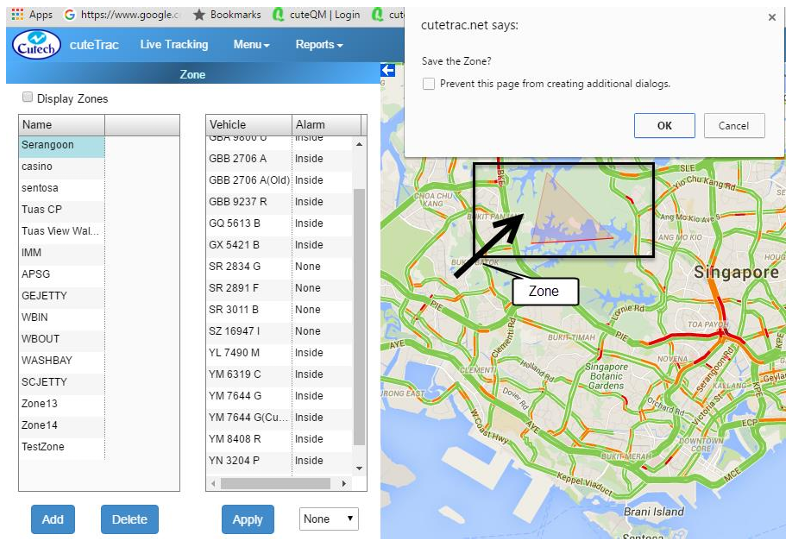
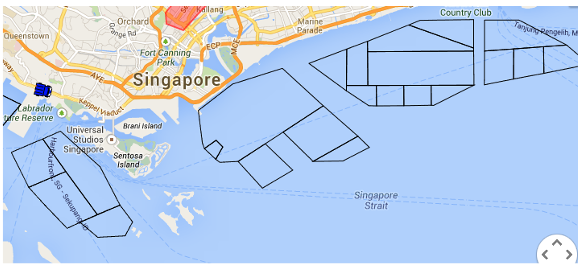
In cuteTrac, three difference type of zones can be created to assign to the vehicle, such as Inside (Prohibited Zone Alert), Outside (Leaving Allowed Zone Alert) and Working Zone. So that a corresponding person will get a vehicle alert message as per vehicle`s movement.
To create a new zone,
- Navigate to the Menu tab provided in the top left side of the screen, and click on it. List of menu items will appear.
- Click Zone in menu items. Zone page appears.
- Plan the Zone you want to create from the map.
- Click Add button provided in left side of the screen at the bottom of the “Live Tracking” window.
- Navigate to the map and click on the first point you want to create, using your mouse.
- Move to the next point and click on it. Repeat the same action until you close the zone you want to create.
- Once you have created the zone you want, you have to close it by either of the following two ways,
- If you work in Google Chrome, right click the mouse, so the system will show the following alert message of, “Save the Zone?” Click OK. The Zone will close.
- If you work in Internet Explorer, move you mouse outside the zone you have created. Double-click it using the mouse. The Zone will close.

- The newly created zone name displays in the “Live Tracking” window at the left side of the screen.
- To rename the zone, click on the zone and it turns into editable. Rename the zone as you want.
- So, once you have created the zone you can apply it for the vehicles listed in the right side of the “Live Tracking” window.
- Select the area you want to set whether Inside (Prohibited Zone Alert) or Outside (Leaving Allowed Zone Alert) or None from drop-down list at the bottom of the “Live Tracking” window, so that the alert condition will set.
- Click Apply. If you have set alert for “Inside”, alert message will come when the selected vehicle enters into the prohibited zone. When you have set alert for “Outside”, alert message will come when the selected vehicle moves outside of the zone. If you select as “None”, it will remove existing relationship between zones and vehicles.
- Working zone checkbox is made available only for certain users with a specific need of requiring to configure regular drop off points island wide such as NTUC outlets etc. This option will keep track of the regular visits and helps to be
generate the reports.
Delete Zone
You can also delete the existing zone, when you want. To delete the existing zone,
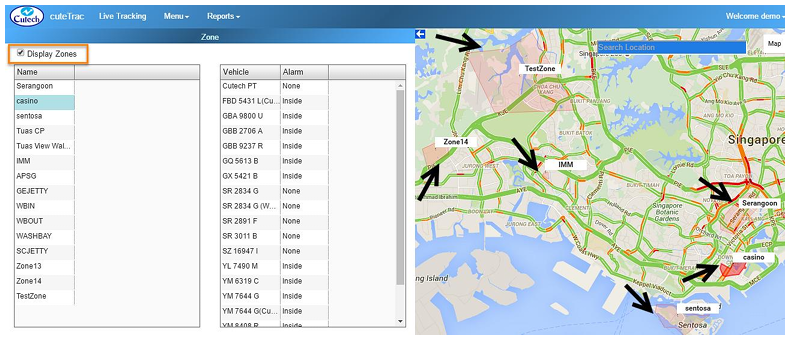
Display Zones
cuteTrac allows you to view all the created zones at a sometime, so you have to go “Display Zones” given in the top left corner of the screen, and mark the check box.
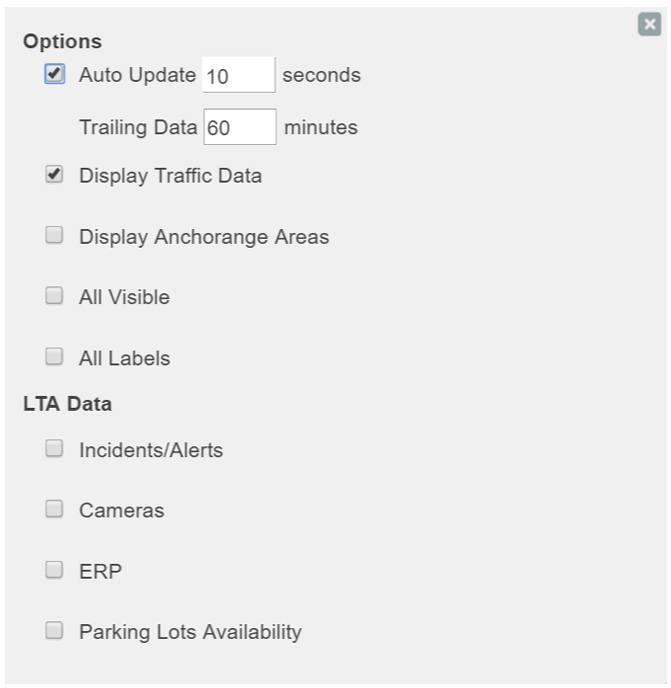
Options
Options allows users to set activity data of live tracking. To update the options level,
- Navigate to the Menu tab provided in the top left side of the screen, and click on it. List of menu items will appear.
- Click Options in menu items. Options List appears.
- Set the page for your requirement.
- Auto Update: Allows you to set time period for automatic updating of live data that fetch from cuteTrac Server and show it on the map. Default time period is 10 seconds.
- Trailing Data: Allows you to set time period for getting trail data from the map. Default time is 30 minutes. It can be set up to maximum of 99 minutes.
- Display Anchorage Zones: This will show the anchorage zones of Singapore that is available only for Boats.

- All Visible: This option used to turn on visible flag for all the vehicle and shows at the map to follow it closely.
- All Labels: This option used to keep the vehicle`s name displayed in the map.
- LTA Data: The LTA data such as current incident/accidents, cameras, ERP Locations and Parking lot availability.

Vehicle Groups
Vehicle Group helps to manage vehicles in groups for easier viewing at the live tracking window. To create a new vehicle group,
Rename Vehicle Group
User can rename a vehicle group name. To rename the group, 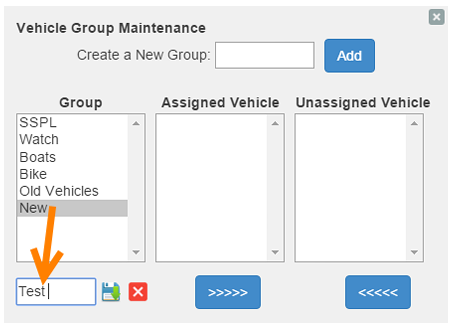
- Select the vehicle group you want to rename.
- Type a new name of vehicle group in a text box given under the “Group” column.
- Click the
 “Save” button.
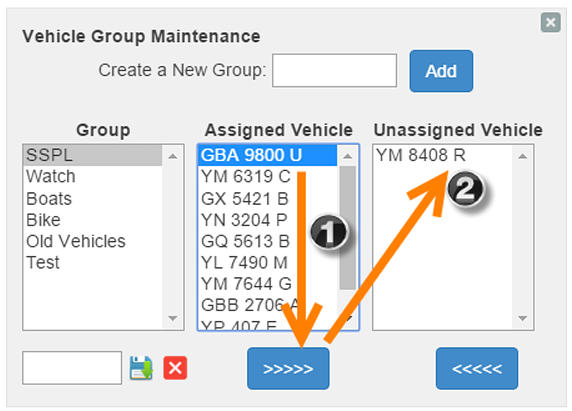
Assign Vehicle
Once the vehicle group is created, you can assign the vehicle under corresponding vehicle groups. To assign the vehicle,
- Select the group name under “Group” and vehicle under “Unassigned Vehicle”,
- Click
 button, so the selected vehicle will come under Assigned Vehicle corresponding to the group you have selected.
 - Click the “Save” button to save the changes.

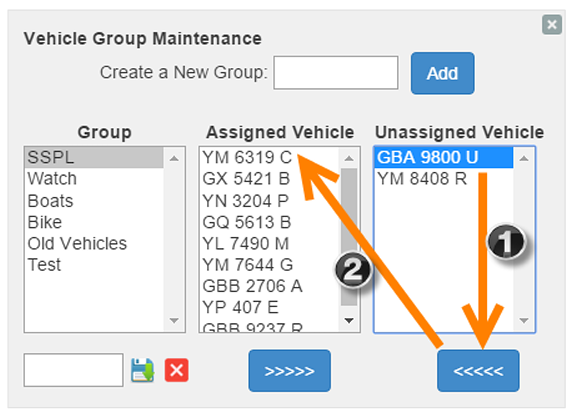
Remove Vehicle from Group
User can remove vehicle from vehicle group, to remove vehicle from a group,
- Select the group name under “Group” and vehicle under “Assigned Vehicle”,
- Click
 button, so the vehicle will come under Unassigned Vehicle corresponding to the group you have selected.
 - Click the “Save” button to save the changes.
Delete Vehicle Group
To delete a particular vehicle group,
- Select the vehicle group or the vehicle comes under a vehicle group, you want to delete.
- Click
 delete button.
 - System will display a new message of, “Confirm you want to delete!”.
- Click OK to confirm deletion.

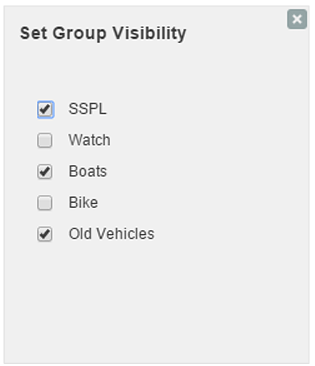
Group Visibility
Group Visibility means setting visibility of vehicle groups in live tracking of the system. To set vehicle groups visibility,
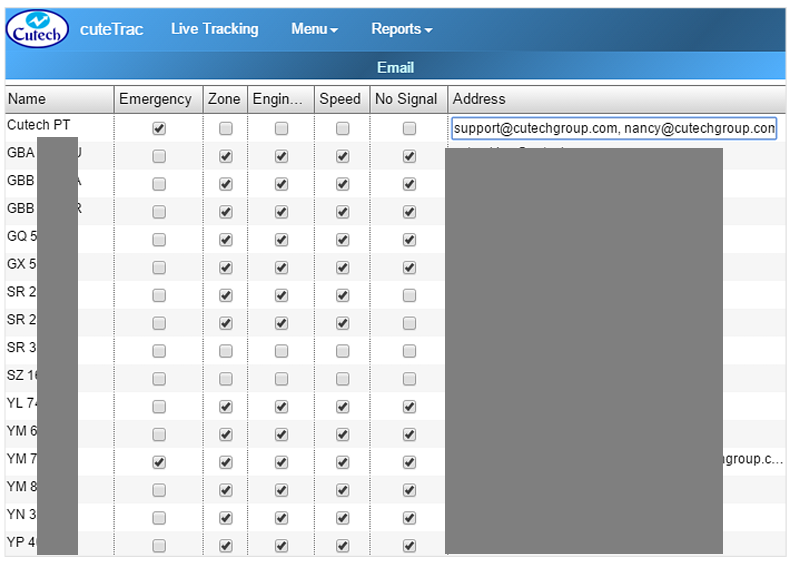
cuteTrac ensures sending alert messages to a corresponding person in following five scenarios by setting access privileges ,
- Emergency Alert
- Zone Violation
- Engine Idle State
- Over Speed
- No Signal
Emergency Alert - In each vehicle, there is one emergency alert button used by vehicle drivers when they are in emergency. The vehicle driver have to simply press the emergency alert button, so that a corresponding person will receive email alert.
Zone Violation - In cuteTrac each vehicle should travel in a specific zone that has applied to the vehicle. So there are three types of alerts applicable in the zone, when the vehicle enters into a prohibited area, when the vehicle leaving from the zone, and when the vehicle in a working zone.
Engine Idle State - Alert message should send to a corresponding person, when the vehicle`s engine idle for a long time (more than 10 minutes).
Over Speed - cuteTrac has the set speed limit for each vehicle and the alert message has to be sent when the vehicle crossed the limit.
No Signal - Alert message should send to a corresponding person, when signal has not received from the vehicle.
Set Email Access Privileges
To set access privileges,
Others
Others option tab consists of adding additional details of, “Bookmark, Fuel Details, Nearby Vehicles, and Stoppage Duration”.
Bookmark
In cuteTrac, you can add “Bookmark” in the map wherever you want. To add the Bookmark,

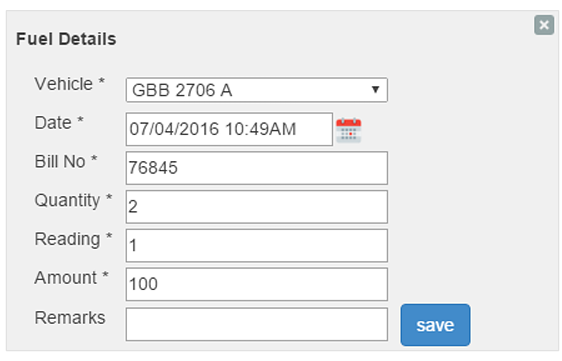
Fuel Details
In cuteTrac, each vehicle should updated with fuel details.
Add Fuel Details
To add for fuel details,
View Fuel Details
To view the added fuel details,
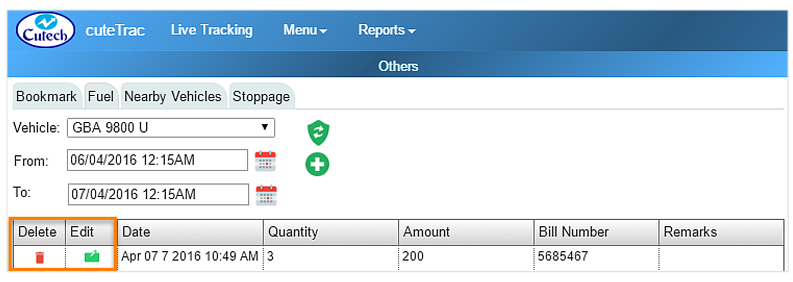
- Select the Vehicle and From and To dates.
- Click this
 “Load Fuel Details” button .
 - You can also edit and delete the existing fuel details using “Edit and Delete” options shown in the above figure.
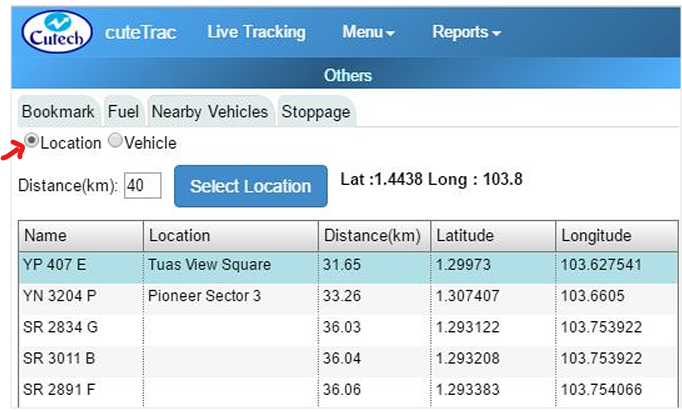
Nearby Vehicles
In cuteTrack, you can search for vehicles travel nearby you. You can search it by two options, one is “Location” and the other is “Vehicle”.
To search the nearby vehicle by location,
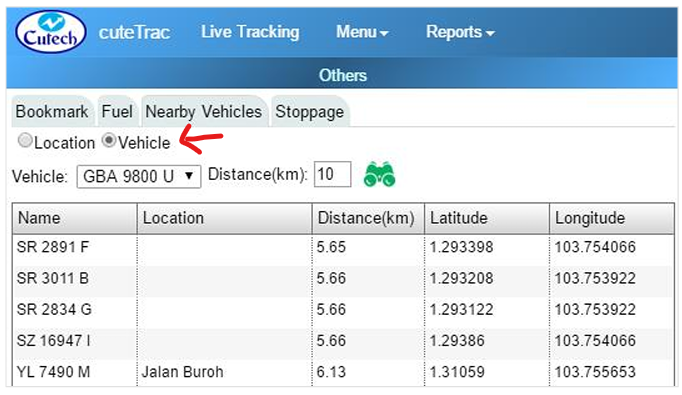
To search the nearby vehicle by vehicle name,
- Navigate to the Menu tab provided in the top left side of the screen, and click on it. List of menu items will appear.
- Click Others in menu items. Others window appears.
- Click Nearby Vehicles.
- Choose Vehicle.
- Select the name of Vehicle you want to search from the drop-down list.
- Enter the Distance in kilometer.
- Click this
 “Find” button.
Stoppage
Stoppage allows you to check how many times the vehicle has stopped for a day at specific time. To check for stoppage of the vehicle,
- Navigate to the Menu tab provided in the top left side of the screen, and click on it. List of menu items will appear.
- Click Stoppage in menu items. Stoppage window appears.
- Select the Vehicle from the drop-down list.
- Mention the Duration of stoppage.
- Select the From and To dates and time you want to check for stoppage of the vehicle.
- Click this “Submit” button.
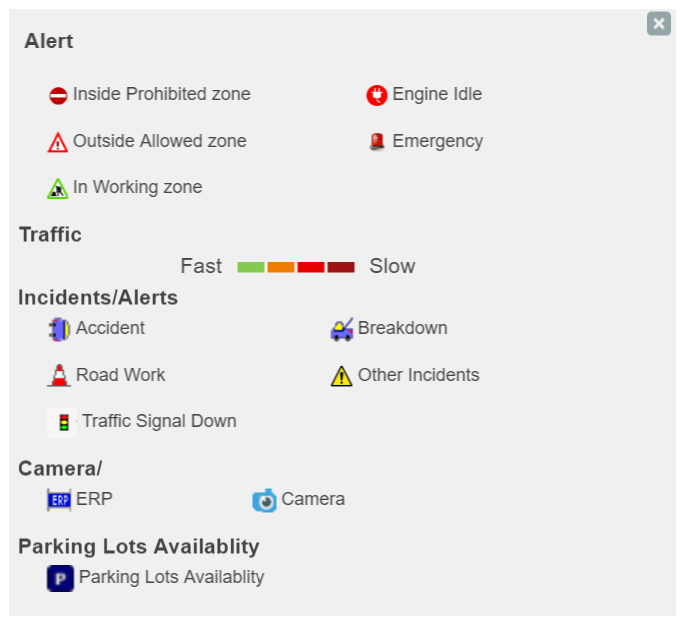
Legend
Legend shows the icon and their meanings of, Inside Prohibited Zone, Outside Allowed Zone, In Working Zone, Engine Idle and Emergency. Also it shows the traffic level, where green indicates less traffic and brown indicates more traffic.
No Comments