# REPAIR VESSEL PROJECT
### **3.0 REPAIR VESSEL PROJECT**
The dashboard of the repair vessel project contains various tabs See Fig 2.4. The following sections explain you about the functionalities of each tab associated with the vessel project,
[](http://wiki.cuteinfocomm.com/uploads/images/gallery/2022-05/image-1651656015404.png) Note: The following tabs in the dashboard of the repair vessel project have same functionalities of vessel project, so these tabs had already explained in the vessel project chapter. If you want to know more about each tab, click the respective tab.
1. [**SET DEFAULT PROJECT**](http://wiki.cuteinfocomm.com/link/47#bkmrk-2.1-set-default-proj)
2. [**TAKE OFFLINE DATA**](http://wiki.cuteinfocomm.com/link/47#bkmrk-2.2-take-offline-dat)
3. [**MILL CERTIFICATES**](http://wiki.cuteinfocomm.com/link/47#bkmrk-2.3-mill-certificate)
4. [**TEST EQUIPMENT**](http://wiki.cuteinfocomm.com/link/47#bkmrk-2.4-test-equipment)
5. [**MIR**](http://wiki.cuteinfocomm.com/link/47#bkmrk-2.5-mir%C2%A0)
6. [**MATERIAL SUBSTITUTION**](http://wiki.cuteinfocomm.com/link/47#bkmrk-3.6-material-substit)
7. [**LOAD TEST**](http://wiki.cuteinfocomm.com/link/47#bkmrk-3.11-load-test%C2%A0)
8. [**DIMENSION**](http://wiki.cuteinfocomm.com/link/47#bkmrk-3.12-dimension%C2%A0)
9. [**RFI HYDRO PRESSURE**](http://wiki.cuteinfocomm.com/link/47#bkmrk-3.9-rfi-hydro-pressu)
### **3.1 RFI FITUP GENERIC**
The **RFI FITUP GENERIC** tab helps you to check and approve the RFI fitup generic request raised in the web application, by adding and updating your inspection details. This RFI Fitup Generic feature automatically updates and synchronizes your inspection details with the RFI fitup generic report that is uploaded in the web application.
[](http://wiki.cuteinfocomm.com/uploads/images/gallery/2022-05/image-1651656066359.png)
[](http://wiki.cuteinfocomm.com/uploads/images/gallery/2022-05/image-1651656076141.png) **Note**: When you click the **RFI FITUP GENERIC** tab in the dashboard, the **RFI Fitup Generic** page displays a list of reports corresponding to today and previous day. However, if you want to view the reports for other dates, you must navigate to the **TAKE OFFLINE DATA** option. (See " [**TAKE OFFLINE DATA**](http://wiki.cuteinfocomm.com/link/47#bkmrk-2.2-take-offline-dat)" for more details.)
1\. Tap **RFI FITUP GENERIC**.See Fig 2.4.
The **RFI Fitup Generic** page opens with a list of reports for the selected date.
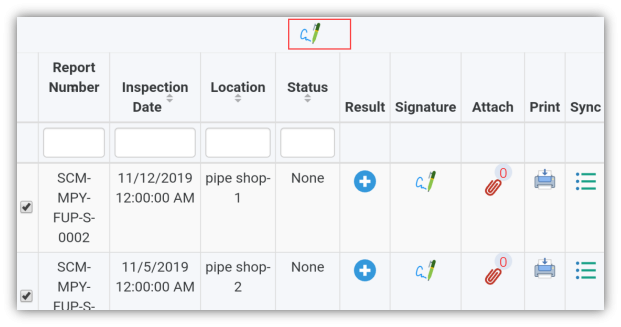
[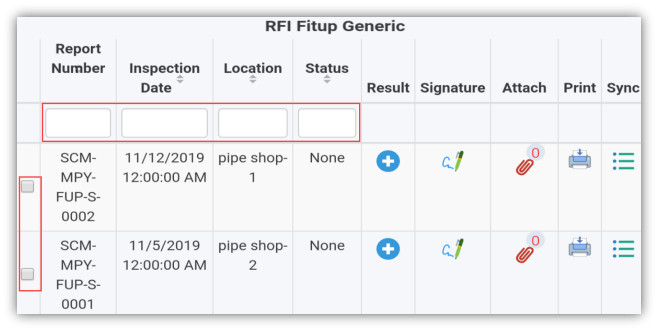](http://wiki.cuteinfocomm.com/uploads/images/gallery/2022-05/image-1651656103362.png)
**Figure 4.1 RFI Fitup Generic page**
[](http://wiki.cuteinfocomm.com/uploads/images/gallery/2022-05/image-1651656123965.png) **Tip**: 1. You can configure displaying of the number of reports per page by selecting **10**, **25**, **50** or **100**, accordingly.
2. If you want to filter one report among the list of reports, you must enter the report number, inspection date, location or status details in the respective boxes given in the **RFI Fitup Generic**page.
The **RFI Fitup Generic** page contains multiple fields such as **Report Number, Inspection Date, Location, Status, Result**, **Signature**, **Attach, Print, and Sync.**
- **Status –** shows the status of comment added in the **Result**
**None**- notifies that there are no comments in the **Result** page.
**Open**- notifies that there is a comment added in the **Open comment** box.
**Close** - notifies that there is a comment added in the **Close comment** box.
(See the topic “[The **MIR** page contains the following fields](http://wiki.cuteinfocomm.com/link/47#bkmrk-the-mir%C2%A0page-opens-w)“ for more details about other fields in the **RFI Fitup Generic** page.)
[](http://wiki.cuteinfocomm.com/uploads/images/gallery/2022-05/image-1651656196850.png) **Note**: Each report has a corresponding check box, which is located on the left pane of the **RFI Fitup Generic** page. If you want to do sign together for more than one report, you must enable the respective check boxes.
1. You must enable the respective check box of the reports.
If you have enabled more than one check box, [](http://wiki.cuteinfocomm.com/uploads/images/gallery/2022-05/image-1651656221911.png) (**Signature** icon) will appear in the top of the page.
[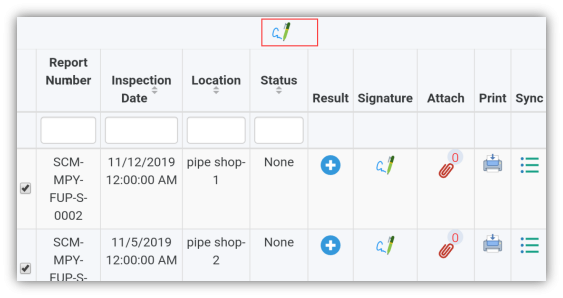](http://wiki.cuteinfocomm.com/uploads/images/gallery/2022-05/image-1651656275559.png)
2\. Tap [](http://wiki.cuteinfocomm.com/uploads/images/gallery/2022-05/image-1651656288199.png) (**Signature** icon). The signature page opens.
3\. Tap your assigned role, enter your name, and do sign.
**To add your RFI fitup generic inspection result
1. Once you find out the report where you need to add your inspection details, tap [](http://wiki.cuteinfocomm.com/uploads/images/gallery/2022-05/image-1651656305716.png) (**Result** icon) to add your inspection results, See Fig 4.1.
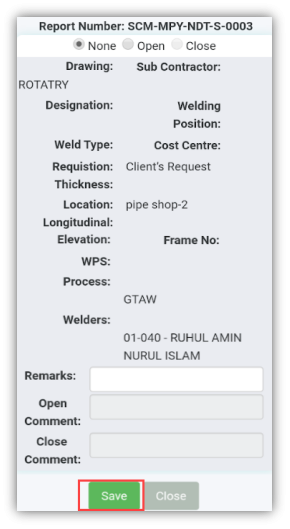
[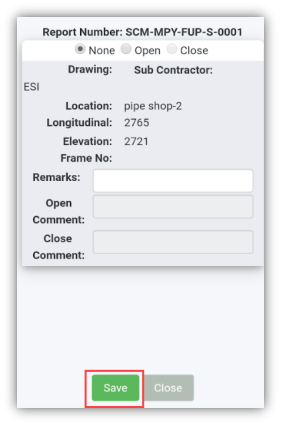](http://wiki.cuteinfocomm.com/uploads/images/gallery/2022-05/image-1651656334604.png)
The **Result** page opens with a list of reports including the material details. Each report shows material specifications such as drawing number, sub-contractor name, location, longitudinal and elevation details, and frame number.
2. In the **Remarks**box, type your remarks if any.
3. If you do not want to give any comments, enable **None**.
4. If you want to give an open comment, enable the **Open** option and enter your comment in the **Open Comment**
5. If you want to give a close comment, enable the **Close** option and enter your comment in the **Close Comment**
6. Tap **Save**.
**To add your signature**
Once you have saved your inspection results, the **Result** page automatically redirects you into the **Signature** page. Otherwise, tap
[ ](http://wiki.cuteinfocomm.com/uploads/images/gallery/2022-05/image-1651656353098.png) (**Signature** icon), See Fig 4.1.
To know how to add your signature, see the topic “[**To add your signature**](http://wiki.cuteinfocomm.com/link/47#bkmrk-to-add-your-signatur)“**.**
### **3.2 RFI WELDVI GENERIC**
The **RFI WELDVI GENERIC** tab allows you to check and approve the RFI weldVI generic request raised in the web application, by adding and updating your inspection details. This RFI WeldVI Generic feature automatically updates and synchronizes your inspection details with the RFI WeldVI generic report that is uploaded in the web application.
[](http://wiki.cuteinfocomm.com/uploads/images/gallery/2022-05/image-1651656376460.png)
[](http://wiki.cuteinfocomm.com/uploads/images/gallery/2022-05/image-1651656403781.png) **Note**: When you click the **RFI WELDVI GENERIC** tab in the dashboard, the **RFI WeldVI Generic** page displays a list of reports corresponding to today and previous day. However, if you want to view the reports for other dates, you must navigate to the **TAKE OFFLINE DATA** option. (See " [**TAKE OFFLINE DATA**](http://wiki.cuteinfocomm.com/link/47#bkmrk-2.2-take-offline-dat)" for more details.)
1\. Tap **RFI WELDVI GENERIC**.See Fig 2.4.
The **RFI WeldVI Generic** page opens with a list of reports for the selected date.
[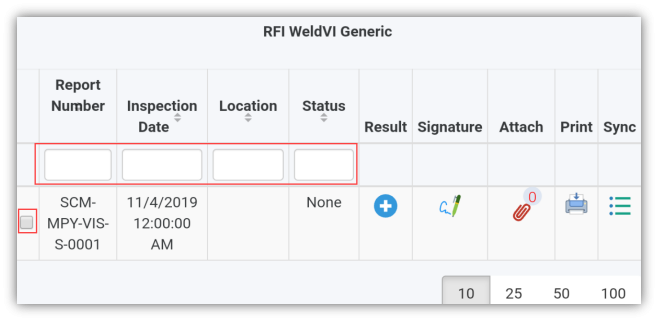](http://wiki.cuteinfocomm.com/uploads/images/gallery/2022-05/image-1651656430333.png)
**Figure 4.2 RFI WeldVI Generic page**
[](http://wiki.cuteinfocomm.com/uploads/images/gallery/2022-05/image-1651656454986.png) **Tip**: I. You can configure displaying of the number of reports per page by selecting **10**, **25**, **50** or **100**, accordingly.
1. If you want to filter one report among the list of reports, you must enter the report number, inspection date, location or status details in the respective boxes given in the **RFI WeldVI Generic**page.
The **RFI WeldVI Generic** page contains multiple fields such as **Report Number, Inspection Date, Location, Status, Result**, **Signature**, **Attach, Print, and Sync.**
- **Status –** shows the status of comment added in the **Result**
**None**- notifies that there are no comments in the **Result** page.
**Open**- notifies that there is a comment added in the **Open comment** box.
**Close** - notifies that there is a comment added in the **Close comment** box.
(See the topic “[The **MIR** page contains the following fields](http://wiki.cuteinfocomm.com/link/47#bkmrk-the-mir%C2%A0page-opens-w)“ for more details about other fields in the **RFI WeldVI Generic** page.)
[](http://wiki.cuteinfocomm.com/uploads/images/gallery/2022-05/image-1651656500314.png) **Note**: Each report has a corresponding check box, which is located on the left pane of the **RFI WeldVI Generic** page. If you want to do sign together for more than one report, you must enable the respective check boxes.
1. You must enable the respective check box of the reports.
If you have enabled more than one check box, [](http://wiki.cuteinfocomm.com/uploads/images/gallery/2022-05/image-1651656520152.png) (**Signature** icon) will appear in the top of the page.
[](http://wiki.cuteinfocomm.com/uploads/images/gallery/2022-05/image-1651656542560.png)
2. Tap [](http://wiki.cuteinfocomm.com/uploads/images/gallery/2022-05/image-1651656596063.png) (**Signature** icon). The signature page opens.
3. Tap your assigned role, enter your name, and do sign.
**To add your RFI WeldVI generic inspection result
1. Once you find out the report where you need to add your inspection details, tap [](http://wiki.cuteinfocomm.com/uploads/images/gallery/2022-05/image-1651656681761.png) (**Result** icon) to add your inspection results, See Fig 4.2.
[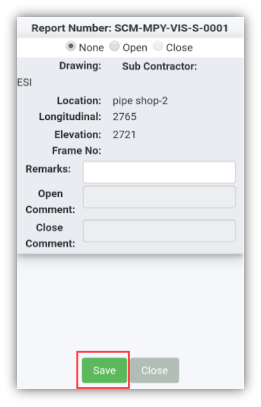](http://wiki.cuteinfocomm.com/uploads/images/gallery/2022-05/image-1651656694527.png)
The **Result** page opens with a list of reports including the material details. Each report shows material specifications such as drawing number, sub-contractor name, location, longitudinal and elevation details, and frame number.
2. In the **Remarks**box, type your remarks if any.
3. If you do not want to give any comments, enable **None**.
4. If you want to give an open comment, enable the **Open** option and enter your comment in the **Open Comment**
5. If you want to give a close comment, enable the **Close** option and enter your comment in the **Close Comment**
6. Tap **Save**.
**To add your signature**
Once you have saved your inspection results, the **Result** page automatically redirects you into the **Signature** page. Otherwise,
[](http://wiki.cuteinfocomm.com/uploads/images/gallery/2022-05/image-1651656719130.png) tap (**Signature** icon), See Fig 4.2.
To know how to add your signature, see the topic “[**To add your signature**](http://wiki.cuteinfocomm.com/link/47#bkmrk-to-add-your-signatur)“**.**
### **3.3 BACK GOUGING**
The **BACK GOUGING** tab helps you to check and update the back-gouging request, which is uploaded in the web application, by adding your inspection details. This back-gouging feature automatically updates and synchronizes your inspection details with the back-gouging report in the web application.
[](http://wiki.cuteinfocomm.com/uploads/images/gallery/2022-05/image-1651656757940.png)
[](http://wiki.cuteinfocomm.com/uploads/images/gallery/2022-05/image-1651656769629.png) **Note**: When you click the **BACK GOUGING** tab in the dashboard, the **Back Gouging page displays a list of reports corresponding to today and previous day. However, if you want to view the reports for other dates, you must navigate to the **TAKE OFFLINE DATA** option. (See " [**TAKE OFFLINE DATA**](http://wiki.cuteinfocomm.com/link/47#bkmrk-2.2-take-offline-dat)" for more details.)
1\. Tap **BACK GOUGING**.See Fig 2.4.
The **Back Gouging** page opens with a list of reports for the selected date.
[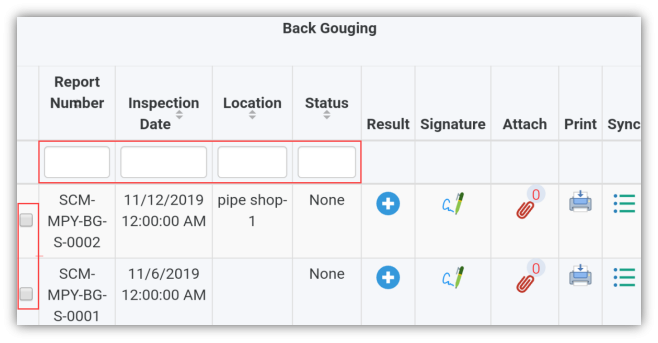](http://wiki.cuteinfocomm.com/uploads/images/gallery/2022-05/image-1651656797276.png)
**Figure 4.3 Back Gouging page**
[](http://wiki.cuteinfocomm.com/uploads/images/gallery/2022-05/image-1651656822908.png) **Tip**: I. You can configure displaying of the number of reports per page by selecting **10**, **25**, **50** or **100**, accordingly.
1. If you want to filter one report among the list of reports, you must enter the report number, inspection date, location or status details in the respective boxes given in the **Back Gouging**page.
The **Back Gouging** page contains multiple fields such as **Report Number, Inspection Date, Location, Status, Result**, **Signature**, **Attach, Print, and Sync.**
- **Status –** shows the status of comment added in the **Result**
**None**- notifies that there are no comments in the **Result** page.
**Open**- notifies that there is a comment added in the **Open comment** box.
**Close** - notifies that there is a comment added in the **Close comment** box.
(See the topic “[The **MIR** page contains the following fields](http://wiki.cuteinfocomm.com/link/47#bkmrk-the-mir%C2%A0page-opens-w)“ for more details about other fields in the **Back Gouging** page).
[](http://wiki.cuteinfocomm.com/uploads/images/gallery/2022-05/image-1651656870926.png) **Note**: Each report has a corresponding check box, which is located on the left pane of the **Back Gouging** page. If you want to do sign together for more than one report, you must enable the respective check boxes.
1. You must enable the respective check box of the reports.
If you have enabled more than one check box, [](http://wiki.cuteinfocomm.com/uploads/images/gallery/2022-05/image-1651656894886.png) (**Signature** icon) will appear in the top of the page.
[](http://wiki.cuteinfocomm.com/uploads/images/gallery/2022-05/image-1651656923670.png)
2\. Tap [](http://wiki.cuteinfocomm.com/uploads/images/gallery/2022-05/image-1651656950656.png) (**Signature** icon). The signature page opens.
3\. Tap your assigned role, enter your name, and do sign.
**To add your back gouging inspection result
1. Once you find out the report where you need to add your inspection details, tap [](http://wiki.cuteinfocomm.com/uploads/images/gallery/2022-05/image-1651656971770.png) (**Result** icon) to add your inspection results, See Fig 4.3.
[](http://wiki.cuteinfocomm.com/uploads/images/gallery/2022-05/image-1651656999972.png)
The **Result** page opens with a list of reports including the material details. Each report shows material specifications such as drawing number, sub-contractor name, location, longitudinal and elevation details, and frame number.
2. In the **Remarks**box, type your remarks if any.
3. If you do not want to give any comments, enable **None**.
4. If you want to give an open comment, enable the **Open** option and enter your comment in the **Open Comment**
5. If you want to give a close comment, enable the **Close** option and enter your comment in the **Close Comment**
6. Tap **Save**.
**To add your signature**
Once you have saved your inspection results, the **Result** page automatically redirects you into the **Signature** page. Otherwise, tap
[](http://wiki.cuteinfocomm.com/uploads/images/gallery/2022-05/image-1651657027169.png) (**Signature** icon), See Fig 4.3.
To know how to add your signature, see the topic “[**To add your signature**](http://wiki.cuteinfocomm.com/link/47#bkmrk-to-add-your-signatur)“**.**
### **3.4 VACUUM TEST**
The **VACUUM TEST** tab helps you to check and update the vacuum test request, which is uploaded in the web application, by adding your inspection details. This vacuum test feature automatically updates and synchronizes your inspection details with the vacuum test report in the web application.
[](http://wiki.cuteinfocomm.com/uploads/images/gallery/2022-05/image-1651657062500.png)
[](http://wiki.cuteinfocomm.com/uploads/images/gallery/2022-05/image-1651657070889.png) **Note**: When you click the **VACUUM** **TEST** tab in the dashboard, the **Vacuum Test page displays a list of reports corresponding to today and previous day. However, if you want to view the reports for other dates, you must navigate to the **TAKE OFFLINE DATA** option. (See " [**TAKE OFFLINE DATA**](http://wiki.cuteinfocomm.com/link/47#bkmrk-2.2-take-offline-dat)" for more details.)
1. Tap **VACUUM TEST**.See Fig 2.4.
The **Vacuum Test** page opens with a list of reports for the selected date.
[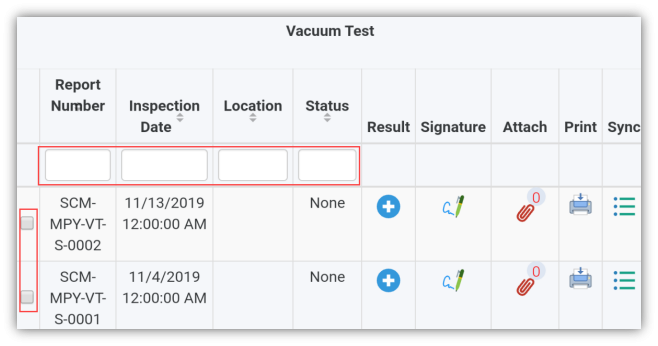](http://wiki.cuteinfocomm.com/uploads/images/gallery/2022-05/image-1651657095570.png)
**Figure 4.4 Vacuum Test page**
[](http://wiki.cuteinfocomm.com/uploads/images/gallery/2022-05/image-1651657124002.png) **Tip**:1. You can configure displaying of the number of reports per page by selecting **10**, **25**, **50** or **100**, accordingly.
2. If you want to filter one report among the list of reports, you must enter the report number, inspection date, location or status details in the respective boxes given in the **Vacuum Test**page.
The **Vacuum Test** page contains multiple fields such as **Report Number, Inspection Date, Location, Status, Result**, **Signature**, **Attach, Print, and Sync.**
- **Status –** shows the status of comment added in the **Result**
**None**- notifies that there are no comments in the **Result** page.
**Open**- notifies that there is a comment added in the **Open comment** box.
**Close** - notifies that there is a comment added in the **Close comment** box.
(See the topic “[The **MIR** page contains the following fields](http://wiki.cuteinfocomm.com/link/47#bkmrk-the-mir%C2%A0page-opens-w)“ for more details about other fields in the **Vacuum Test** page).
[](http://wiki.cuteinfocomm.com/uploads/images/gallery/2022-05/image-1651657187253.png) **Note**: Each report has a corresponding check box, which is located on the left pane of the **Vacuum Test** page. If you want to do sign together for more than one report, you must enable the respective check boxes.
1\. You must enable the respective check box of the reports.
If you have enabled more than one check box, [](http://wiki.cuteinfocomm.com/uploads/images/gallery/2022-05/image-1651657223825.png) (**Signature** icon) will appear in the top of the page.
[](http://wiki.cuteinfocomm.com/uploads/images/gallery/2022-05/image-1651657249792.png)
2\. Tap [](http://wiki.cuteinfocomm.com/uploads/images/gallery/2022-05/image-1651657272840.png) (**Signature** icon). The signature page opens.
3\. Tap your assigned role, enter your name, and do sign.
**To add your vacuum test inspection result
1. Once you find out the report where you need to add your inspection details, tap [](http://wiki.cuteinfocomm.com/uploads/images/gallery/2022-05/image-1651657294257.png) (**Result** icon) to add your inspection results, See Fig 4.3.
[](http://wiki.cuteinfocomm.com/uploads/images/gallery/2022-05/image-1651657322230.png)
The **Result** page opens with a list of reports including the material details. Each report shows material specifications such as drawing number, sub-contractor name, location, longitudinal and elevation details, and frame number.
2. In the **Remarks**box, type your remarks if any.
3. If you do not want to give any comments, enable **None**.
4. If you want to give an open comment, enable the **Open** option and enter your comment in the **Open Comment**
5. If you want to give a close comment, enable the **Close** option and enter your comment in the **Close Comment**
6. Tap **Save**.
**To add your signature**
Once you have saved your inspection results, the **Result** page automatically redirects you into the **Signature** page. Otherwise, tap
[](http://wiki.cuteinfocomm.com/uploads/images/gallery/2022-05/image-1651657341632.png) (**Signature** icon), See Fig 4.4.
To know how to add your signature, see the topic “[**To add your signature**](http://wiki.cuteinfocomm.com/link/47#bkmrk-to-add-your-signatur)“**.**
### **3.5 NDT INSPECTION GENERIC**
The **NDT INSPECTION GENERIC** tab allows you to check and update the NDT inspection generic request raised in the web application, by adding and updating your inspection details. This feature automatically updates and synchronizes your inspection details with the NDT inspection generic report uploaded in the web application.
[](http://wiki.cuteinfocomm.com/uploads/images/gallery/2022-05/image-1651657390178.png)
There are four main types of NDT Inspection Generic: **RT**, **UT**, **PT**, and **MT**.
[](http://wiki.cuteinfocomm.com/uploads/images/gallery/2022-05/image-1651657402041.png) **Note**: When you click the **NDT INSPECTION GENERIC** tab in the dashboard, the **NDT Inspection Generic** page displays a list of reports corresponding to today and previous day. However, if you want to view the reports for other dates, you must navigate to the **TAKE OFFLINE DATA** option. (See " [**TAKE OFFLINE DATA**](http://wiki.cuteinfocomm.com/link/47#bkmrk-2.2-take-offline-dat)" for more details.)
1\. Tap **NDT INSPECTION GENERIC**.See Fig 2.4.
The **NDT Inspection Generic** page opens with a list of reports for the corresponding types such as **RT**, **UT**, **PT**, and **MT**. You must select the respective type to view the relevant reports.
[](http://wiki.cuteinfocomm.com/uploads/images/gallery/2022-05/image-1651657444637.png)
**Figure 4.5 NDT Inspection Generic page**
[](http://wiki.cuteinfocomm.com/uploads/images/gallery/2022-05/image-1651657465838.png) **Tip**: 1. You can configure displaying of the number of reports per page by selecting **10**, **25**, **50** or **100**, accordingly.
2. If you want to filter one report among the list of reports, you must enter the report number, inspection date, location or status details in the respective boxes given in the **NDT Inspection Generic**page.
The **NDT Inspection Generic** page contains multiple fields such as **Report Number, Inspection Date, Location, Status, Result**, **Signature**, **Attach, Print, and Sync.**
- **Status –** shows the status of comment added in the **Result**
**None**- notifies that there are no comments in the **Result** page.
**Open**- notifies that there is a comment added in the **Open comment** box.
**Close** - notifies that there is a comment added in the **Close comment** box.
(See the topic “[The **MIR** page contains the following fields](http://wiki.cuteinfocomm.com/link/47#bkmrk-the-mir%C2%A0page-opens-w)“ for more details about other fields in the **NDT Inspection Generic** page).
[](http://wiki.cuteinfocomm.com/uploads/images/gallery/2022-05/image-1651657548742.png) **Note**: Each report has a corresponding check box, which is located on the left pane of the **NDT Inspection Generic** page. If you want to do sign together for more than one report, you must enable the respective check boxes.
1. You must enable the respective check box of the reports.
If you have enabled more than one check box, [ ](http://wiki.cuteinfocomm.com/uploads/images/gallery/2022-05/image-1651657568069.png)(**Signature** icon) will appear in the top of the page.
[](http://wiki.cuteinfocomm.com/uploads/images/gallery/2022-05/image-1651657601959.png)
[2. Tap ](http://wiki.cuteinfocomm.com/uploads/images/gallery/2022-05/image-1651657628502.png) (**Signature** icon). The signature page opens.
3\. Tap your assigned role, enter your name, and do sign.
**To add your NDT RT, UT, PT, and MT inspection results**
1\. Tap **RT, UT, PT** or**MT**. A list of reports is appeared for the selected type.
2\. Once you find out the report where you need to add your inspection details, tap [](http://wiki.cuteinfocomm.com/uploads/images/gallery/2022-05/image-1651657694614.png) (**Result** icon) to add your inspection results, See Fig 4.5.
The **Result** page opens with a list of material details.
[](http://wiki.cuteinfocomm.com/uploads/images/gallery/2022-05/image-1651657736403.png)
Each report shows material specifications such as drawing number, sub-contractor name, designation, welding position, weld type, cost centre, requisition name, thickness, location, longitudinal and elevation details, WPS, process, and welder names.
3\. In the **Remarks**box, type your remarks if any.
4\. If you do not want to give any comments, enable **None**.
5\. If you want to give an open comment, enable the **Open** option and enter your comment in the **Open Comment**
6\. If you want to give a close comment, enable the **Close** option and enter your comment in the **Close Comment**
7\. Tap **Save**.
**To add your signature**
Once you have saved your inspection results, the **Result** page automatically redirects you into the **Signature** page. Otherwise, tap
[](http://wiki.cuteinfocomm.com/uploads/images/gallery/2022-05/image-1651657812427.png) (**Signature** icon), See Fig 4.5.
To know how to add your signature, see the topic “[**To add your signature**](http://wiki.cuteinfocomm.com/link/47#bkmrk-to-add-your-signatur)“**.**
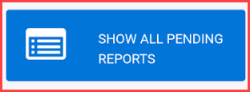
### **3.6 SHOW ALL PENDING REPORTS**
The **SHOW ALL PENDING REPORTS** tab helps you to view all pending reports for the inspections those are not completed yet. By using this feature, you can check whether the QA, Sub contractor, Client, and Owner have submitted their inspection report.
[](http://wiki.cuteinfocomm.com/uploads/images/gallery/2022-05/image-1651657859522.png)
This feature automatically updates the detail of all pending reports from the web application. You can view the pending reports in an offline mode also.
Do the following steps to view the pending reports,
1\. Tap **SHOW ALL PENDING REPORTS**. See Fig 2.4. The **Pending Reports** page opens.
[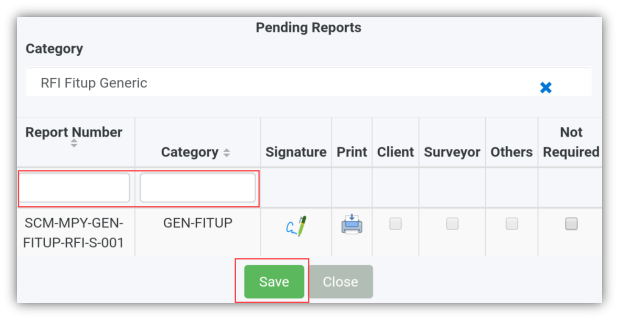](http://wiki.cuteinfocomm.com/uploads/images/gallery/2022-05/image-1651657888164.png)
**Figure 4.6 Pending Reports page**
[](http://wiki.cuteinfocomm.com/uploads/images/gallery/2022-05/image-1651657906744.png) **Tip**: 1. You can configure displaying of the number of reports per page by selecting **10**, **25**, **50** or **100**, accordingly.
2. If you want to filter one report among all reports, you must enter the report number or category details in the respective boxes given in the **Pending Reports**page.
The **Pending Reports** page contains the following fields:
- **Report Number** - shows the report number of the pending reports.
- **Category** - shows the category of the pending reports.
- **QA, Subcon, Client, and Owner**- each field appears with a check box to show whether the inspection has completed by the QA, Subcontractor, Client, and Owner, respectively.
[](http://wiki.cuteinfocomm.com/uploads/images/gallery/2022-05/image-1651657942976.png) **Note**: If the check box of any field is enabled with the tick mark, it means that the respective person has completed the inspection.
- **Not required** - appears with a check box that helps you to decide about further inspection process. You can enable the check box if you have decided that no need of any further inspection process to be done by the QA, Subcontractor, Client or Owner.
2. Tap the **Category** box, and select the category from a drop-down list.
The **Pending Reports** page shows a list of pending reports corresponding to the selected category. You can check the status of the report.
3. If want to end up the inspection process, enable the check box in the **Not required**
4. Tap **Save**.