# Non-Conformance Report (NCR)
### **8.0 Non-Conformance Report (NCR)**
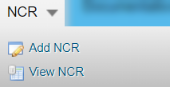
NCR used to document the details of a non-conformance identified in a quality audit or other process review. The **NCR** menu helps to add an NCR in the Structural project. Once you click the **NCR** menu, the following tabs open,
[](http://wiki.cuteinfocomm.com/uploads/images/gallery/2022-05/image-1652070434784.png)
### **8.1 Add NCR**
The **Add NCR** tab in the **NCR** menu used to add an NCR. Do the following steps to add an NCR,
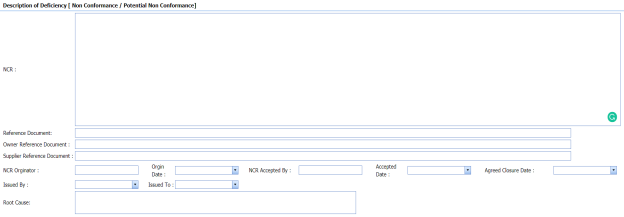
1. Click the **Add NCR** tab. The **NCR** page opens.
[](http://wiki.cuteinfocomm.com/uploads/images/gallery/2022-05/image-1652070485758.png)
[](http://wiki.cuteinfocomm.com/uploads/images/gallery/2022-05/image-1652070492845.png)
[](http://wiki.cuteinfocomm.com/uploads/images/gallery/2022-05/image-1652070505269.png)
[](http://wiki.cuteinfocomm.com/uploads/images/gallery/2022-05/image-1652070513900.png)
[](http://wiki.cuteinfocomm.com/uploads/images/gallery/2022-05/image-1652070525879.png)
**Figure 8.1: NCR page**
[](http://wiki.cuteinfocomm.com/uploads/images/gallery/2022-05/image-1652070550378.png) **Tip**: A report number for a new NCR will be updated automatically in the **Report Number** box.
2. In the **Type** box, select the type of non-conformance from a drop-down list.
3. In the **Classification** box, select whether minor classification or major classification from a drop-down list.
4. In the **Source/ Item** box, select the source of NCR from a drop-down list.
5. To add controlling/ reference documents,
[](http://wiki.cuteinfocomm.com/uploads/images/gallery/2022-05/image-1652070579007.png)
1. 1. 1. Click [ ](http://wiki.cuteinfocomm.com/uploads/images/gallery/2022-05/image-1652070606962.png) (**ADD** button) in the **Controlling/ Reference documents** box.
A new window opens in the **Doc No** column.
2. Enter the document number in the new window of the **Doc No** column.
3. Enter the description for the document in a box of the **Description of document** column.
4. Enter the section reference number in a box of the **Section ref No** column.
5. Click **Save**.
6. In the ****NCR**** box, enter the description for the identified deficiency of the selected non-conformance type.
7. In the **Reference Document** box, enter the reference document detail.
8. In the **Owner Reference Document** box, enter the owner reference document detail.
9. In the **Supplier Reference Document** box, enter the supplier reference document detail.
10. In the **NCR originator** box, enter the originator of NCR.
11. In the **Origin** **Date** box, select the origin date of NCR.
12. In the **NCR Accepted By** box, enter the name of a person who has accepted the NCR.
13. In the **NCR Accepted Date** box, select the NCR accepted date.
14. In the **Agreed Closure Date** box, select the agreed closure date.
15. In the **Issued By** box, select the company who has issued the NCR.
16. In the **Issued To** box, select the company for which the NCR has issued.
17. In the **Root Cause** box, enter the root cause detail.
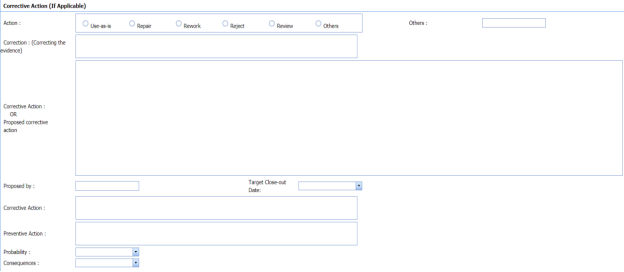
18. If you want to add the corrective action detail, do the following,
1. 1. 1. In the **Action** box, select any corrective action from the given options.
2. In the **Corrective Action** box, enter the corrective action detail.
3. In the **Proposed by** box, enter the name of a person who has proposed the corrective action.
4. In the **Target Close-out Date** box, select the target close out date.
5. In the **Preventive Action** box, enter the preventive actions.
6. In the **Probability** box, select the probability percentage of non-conformance.
7. In the **consequences** box, select the consequences level you have faced.
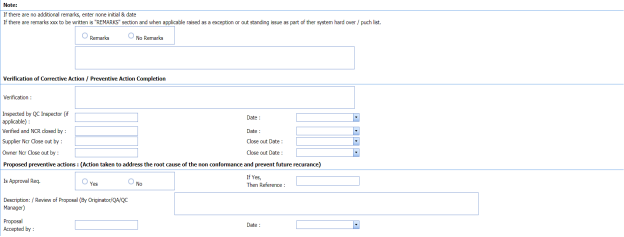
19. If you want to add any remarks, click ****Remarks**** option and enter your remarks, otherwise click ****No Remarks**** option.
20. In the ****Verification**** box, enter the verification detail on completion of corrective action/ preventive action.
21. In the **Inspected by QC Inspector**, and **Date** boxes, enter the name of the QC inspector who has inspected the NCR, and date, respectively.
22. In the **Verified and NCR closed by**, and **Date** boxes, enter the name of a person who has verified and closed the NCR, and date, respectively.
23. In the ****Supplier NCR Close out by****, and ****Close Out Date**** boxes, enter the name of a person who has closed the supplier NCR, and close out date, respectively.
24. In the ****Owner NCR Close out by****, and ****Close Out Date**** boxes, enter the name of a person who has closed the owner NCR, and close out date, respectively.
25. In the ****Approval Req**** box, if you need approval, click ****Yes,**** otherwise click **NO.**
26. If you have selected ****Yes****, you must enter the reference detail in the ****If Yes, Then Reference****
27. In the **Description** box, enter the description of proposal.
28. In the **Proposal Accepted by**, and **Date** boxes, enter the name of a person who has accepted the proposal, and date, respectively.
29. In the NCR Close Notes box, enter the NCR close notes.
30. In the ****Disposition Completed by,**** and ****Date**** boxes, enter the name of a person who has completed the disposition, and date, respectively.
31. Click **Save**.
The NCR is successfully added.
### **8.2 View NCR**
The **View NCR** tab helps you to add, view, and edit the NCR, which is added by using the **Add NCR** tab.
1. Click the **View NCR** tab in the **NCR** menu. The **View NCR** page opens with added NCR.
[](http://wiki.cuteinfocomm.com/uploads/images/gallery/2022-05/image-1652070974200.png)
**Figure 8.2: View NCR page**
#### **8.2.1 Add an NCR**
If you want to add an NCR, do the following,
1. Click [](http://wiki.cuteinfocomm.com/uploads/images/gallery/2022-05/image-1652071020947.png) (**ADD** button) in the **View NCR** page. The **View NCR** page redirects you into the **NCR** page. Follow the same procedure in the topic, “[**Add NCR**](http://wiki.cuteinfocomm.com/link/72#bkmrk-8.1-add-ncr)” to add an NCR.
#### **8.2.2 Print an NCR**
If you want to print an NCR, click [](http://wiki.cuteinfocomm.com/uploads/images/gallery/2022-05/image-1652071063247.png) (**Print** button) provided in the upper side of the **View NCR** page. See Fig 8.2.
#### **8.2.3 Attach a File into an NCR**
If you want to attach any file with any NCR listed in the **View NCR** page, follow the procedures given in the topic “[**Attach a file into a client master drawing**](http://wiki.cuteinfocomm.com/books/cuteqm/page/project-data-qXJ/#bkmrk-3.2.2%C2%A0attach-a-file-)” in the **Client Master Drawing** section.
#### **8.2.4 Update Any NCR**
If you want to update any existing NCR in the **View** **NCR** page, click [](http://wiki.cuteinfocomm.com/uploads/images/gallery/2022-05/image-1652071121785.png) (Update icon) in the **Update** column for the respective NCR. See Fig 8.2. Edit the details in the respective box you want.
#### **8.2.5 Export NCR**
You can export the NCR added in the **View NCR** page in the pdf and excel formats. To know how to export, see the topic, “[**Export Areas list**](http://wiki.cuteinfocomm.com/books/cuteqm/page/project-data-qXJ/#bkmrk-3.1.4%C2%A0export-areas-l)” in the **Area** option.
#### **8.2.6 Delete NCR**
If you want to delete any NCR in the **View NCR** page, click[](http://wiki.cuteinfocomm.com/uploads/images/gallery/2022-05/image-1652071182518.png) (Delete icon) provided in the **Delete** column of the **View NCR** page, See Fig 8.2.