# Mechanical
This section covers the inspections and data management related to mechanical module.
### **1. Project Data**
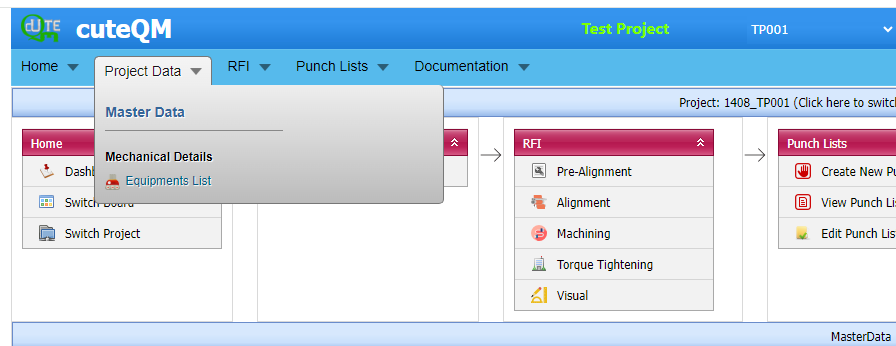
Select Mechanicalmodule at the top
[](https://wiki.cuteinfocomm.com/uploads/images/gallery/2024-08/image-1724246382152.png)
The **Project Data** menu in the ***cuteQM*** app helps you to add the master data. Once you click the **Project Data** menu, Equipment list master screen to be shown as below
[](https://wiki.cuteinfocomm.com/uploads/images/gallery/2024-04/image-1712038655464.png)
#### **1.1 Equipment List**
You can add the details of equipment to be used in the Mechanical project by using the Equipment List tab in the Project Data menu. If you
want to navigate to Systems,
[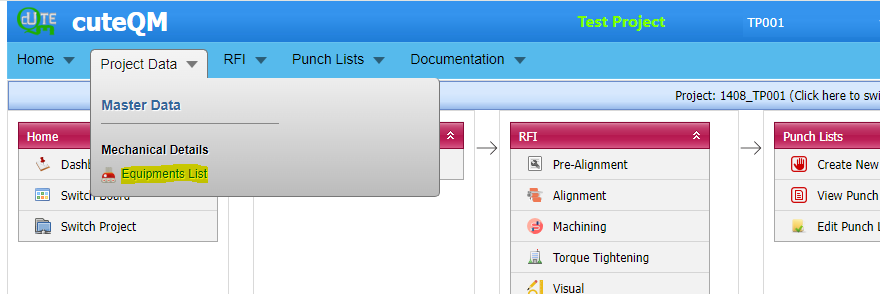](https://wiki.cuteinfocomm.com/uploads/images/gallery/2024-04/image-1712039522245.png)
Fig 1.3 Equipment List
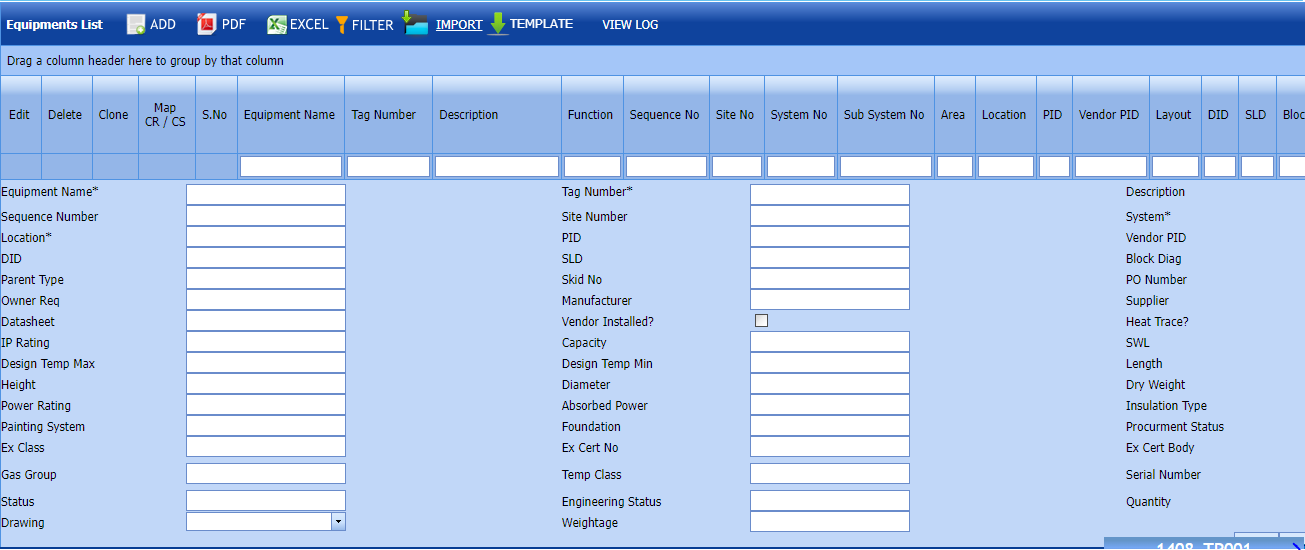
##### **1.1.1 Equipment List**
The Equipements tab in the Project Data menu used to add the details of equipment to be used in the Mechanical project. To add equipment,
1.Click Equipment List in the **Project Data** menu,
The **Equipment List** page opens.
[](https://wiki.cuteinfocomm.com/uploads/images/gallery/2024-02/image-1707095925872.png)
Fig1.3.1 Equipment List Page
##### **1.1.2 Add an Equipment**
If you want to add an equipment list, do the following steps,
1\. Click [](https://wiki.cuteinfocomm.com/uploads/images/gallery/2022-04/image-1651162410824.png) (**ADD** button) in the **Equipements List** See Fig 1.3.2
A new window opens to add an equipment List.
[](https://wiki.cuteinfocomm.com/uploads/images/gallery/2024-02/image-1707096200302.png) Fig 1.3.2 Add an Equipment List
1. [](https://wiki.cuteinfocomm.com/uploads/images/gallery/2022-04/image-1651162503766.png)**Note**: The field notified with a symbol (\*) is mandatory. You must enter the relevant details in that fields before saving.
2. In the Equipment Name box, enter the name of the equipment list.
3. In the Tag Number box, enter the Tag Number of the equipment list.
4. In the Location box, enter the location of the equipment
Click **Save**.
The equipment list is successfully saved.
##### **1.1.3 Edit an Equipment List**
If you want to edit any existing an equipment in the **Equipment List** page,
[](https://wiki.cuteinfocomm.com/uploads/images/gallery/2024-02/image-1707096595389.png) Fig 1.1.3 Edit an Equipment List
1\. Click [](https://wiki.cuteinfocomm.com/uploads/images/gallery/2022-04/image-1651163343682.png) (Edit icon) of the respective test equipment. See Fig 1.1.3
[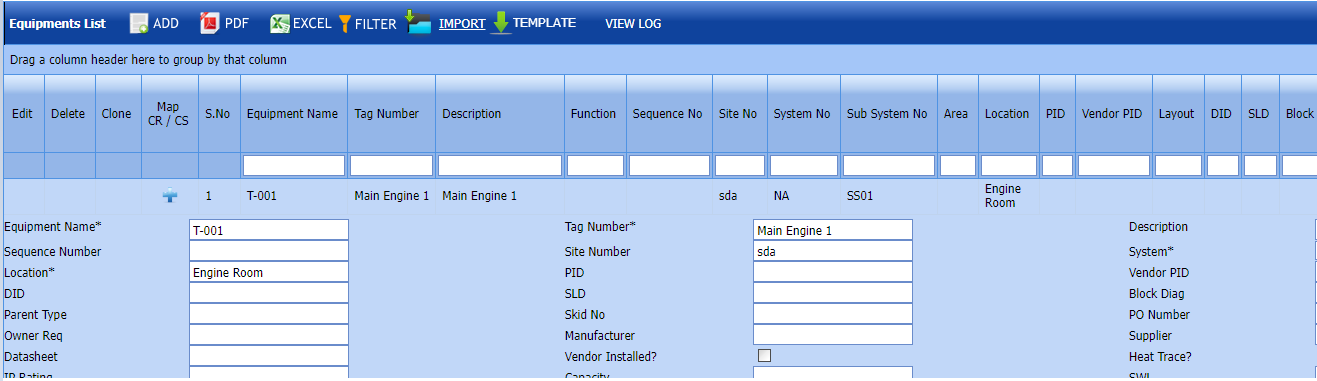](https://wiki.cuteinfocomm.com/uploads/images/gallery/2024-02/image-1707096649473.png)2. Edit the details where you want.
3\. Click **Save**.
The equipment list is successfully updated.
**1.1.4 Delete an Equipment List**
#####
If you want to delete any existing an equipment list in the Equipment list page, you can use [](https://wiki.cuteinfocomm.com/uploads/images/gallery/2022-04/image-1651163416136.png) (Delete icon) provided in the Equipment List page.
[](https://wiki.cuteinfocomm.com/uploads/images/gallery/2024-02/image-1707096735569.png)
1. Click [](https://wiki.cuteinfocomm.com/uploads/images/gallery/2022-05/image-1651603839749.png) (Delete icon) for the corresponding Equipment.
You receive a confirmation message “**Confirm** **delete?**”.
2. Click **OK .** Equipment List deleted successfully.
##### **1.1.5 Clone an Equipment List**
1\. Click[](https://wiki.cuteinfocomm.com/uploads/images/gallery/2022-04/image-1651131989751.png)(Clone icon) of the respective Clone.
[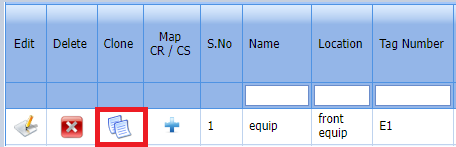](https://wiki.cuteinfocomm.com/uploads/images/gallery/2024-01/image-1706613398621.png)
Fig 1.3.5 Clone an Equipment List
2\. If you want to change any details, you can change in the respective boxes. [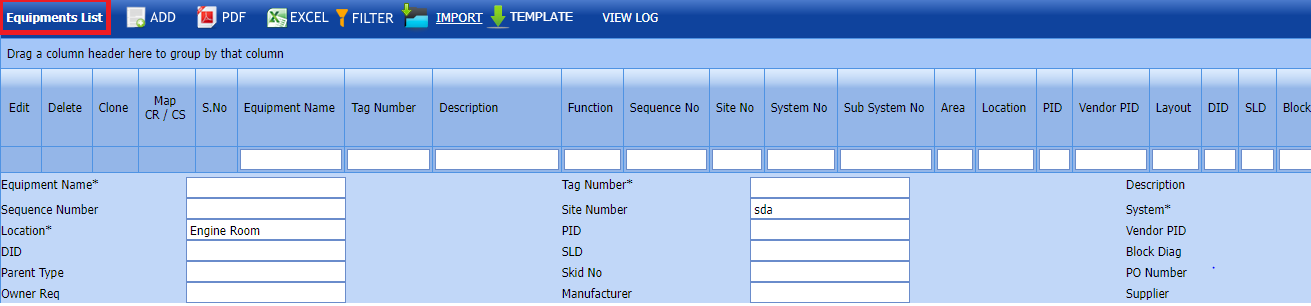](https://wiki.cuteinfocomm.com/uploads/images/gallery/2024-02/image-1707096909158.png)
3\. Click **Save**
The new clone is successfully added and listed in the Equipment list page.
##### **1.1.6 Add a Map CR/CS**
If you want to add a new Map, do the following steps,[](https://wiki.cuteinfocomm.com/uploads/images/gallery/2024-02/image-1707097012737.png)
[](https://wiki.cuteinfocomm.com/uploads/images/gallery/2022-05/image-1651659141800.png)Note: If you want to map cover page for any added equipment click the respective [](https://wiki.cuteinfocomm.com/uploads/images/gallery/2022-05/image-1651659166560.png)(Add icon) provided in the Map Cover Page column and add the cover pages.
If you want to map Check Record/Check Sheet (CR/CS Name) Type or CR/CS Count for any added equipment List, [](https://wiki.cuteinfocomm.com/uploads/images/gallery/2022-05/image-1651659166560.png)(click the respective (Add icon) provided in the Map CR/CS column and add the cover pages.
[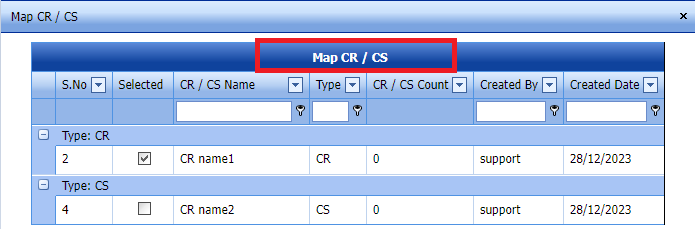](https://wiki.cuteinfocomm.com/uploads/images/gallery/2024-02/image-1707097200852.png)
Fig 1.3.6 Add Map CR/CS page.
##### **1.1.7 Export an Equipment List**
You can export a list of test equipment list added in the **Equipment List** page in both the pdf and excel formats by using [](https://wiki.cuteinfocomm.com/uploads/images/gallery/2022-04/image-1651163465862.png) (**PDF** button) and [](https://wiki.cuteinfocomm.com/uploads/images/gallery/2022-04/image-1651163476334.png) (**Excel** button).
[](https://wiki.cuteinfocomm.com/uploads/images/gallery/2024-02/image-1707097387680.png)
Fig 1.3.7 Export an Equipment List
##### **1.1.8 Filter an Equipment List**
You can also use [](https://wiki.cuteinfocomm.com/uploads/images/gallery/2022-04/image-1651163568393.png) (FILTER button) located on the Equipment list.
[](https://wiki.cuteinfocomm.com/uploads/images/gallery/2024-02/image-1707097475502.png)
Fig 1.3.8 Filter an Equipment List
##### **1.1.9 Import Multiple Equipment List**
If you want to import multiple equipment list together, do the following,
1. Click [](https://wiki.cuteinfocomm.com/uploads/images/gallery/2022-04/image-1651163686212.png) (**TEMPLATE** button). See Fig1.3.9
[](https://wiki.cuteinfocomm.com/uploads/images/gallery/2024-02/image-1707097622967.png)
2. An excel worksheet will be downloaded with a predefined template to enter the details of equipment list.
1. Enter the required equipment details in the respective columns of the excel worksheet.
2. Once you have added the equipment details in the excel worksheet, save the excel worksheet on your computer.
3. Click [](https://wiki.cuteinfocomm.com/uploads/images/gallery/2022-04/image-1651163752394.png) (**IMPORT** button). See Fig 1.3.9
A new window opens for importing the excel worksheet saved on your computer.
[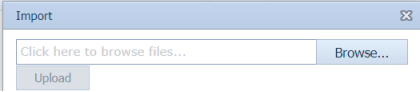](https://wiki.cuteinfocomm.com/uploads/images/gallery/2022-04/image-1651163782872.png)
4. Click [](https://wiki.cuteinfocomm.com/uploads/images/gallery/2022-04/image-1651163789045.png) (**Browse** button) to select the excel worksheet to be uploaded.
5. Select the excel worksheet you want to upload from your computer.
Click [](https://wiki.cuteinfocomm.com/uploads/images/gallery/2022-04/image-1651163813900.png) (**Upload** button) to export the equipment list details that are included in the excel worksheet.Equipment lists imported successfully.
The details of the equipment list in the worksheet will be displayed in the **Equipment List** page.
#####
**1.1.10 View Log**
1. You can also use [](https://wiki.cuteinfocomm.com/uploads/images/gallery/2024-02/image-1707098008638.png) (View Log button) located on the Equipment list.Here last imported details to be shown.
1. Click [ ](https://wiki.cuteinfocomm.com/uploads/images/gallery/2024-02/image-1707098008638.png) (View Log button). See Fig1.3.10
[](https://wiki.cuteinfocomm.com/uploads/images/gallery/2024-02/image-1707097913871.png)
### **2.0 RFI**
The **RFI** menu in the home page of the ***cuteQM*** app used add a RFI pre- alignment, Alignment Machining, Torque Tightening and Visual.
[](https://wiki.cuteinfocomm.com/uploads/images/gallery/2024-02/image-1707100455561.png)
#### **2.1 Pre- Alignment**
Click[ ](https://wiki.cuteinfocomm.com/uploads/images/gallery/2024-02/image-1707100831153.png)Pre-Alignment List in the RFI menu.
The Pre-Alignment page opens. 
[](https://wiki.cuteinfocomm.com/uploads/images/gallery/2024-02/image-1707236021718.png)
Fig 2.1 Pre- Alignment
##### **2.1.1 Add a Pre-Alignment RFI**
1.cuteQM\_Production role user only can add RFI request.
2.If you want to add an RFI Pre- Alignment, do the following steps,
[](https://wiki.cuteinfocomm.com/uploads/images/gallery/2024-02/image-1707236701497.png)
[](https://wiki.cuteinfocomm.com/uploads/images/gallery/2024-02/image-1707101034695.png)
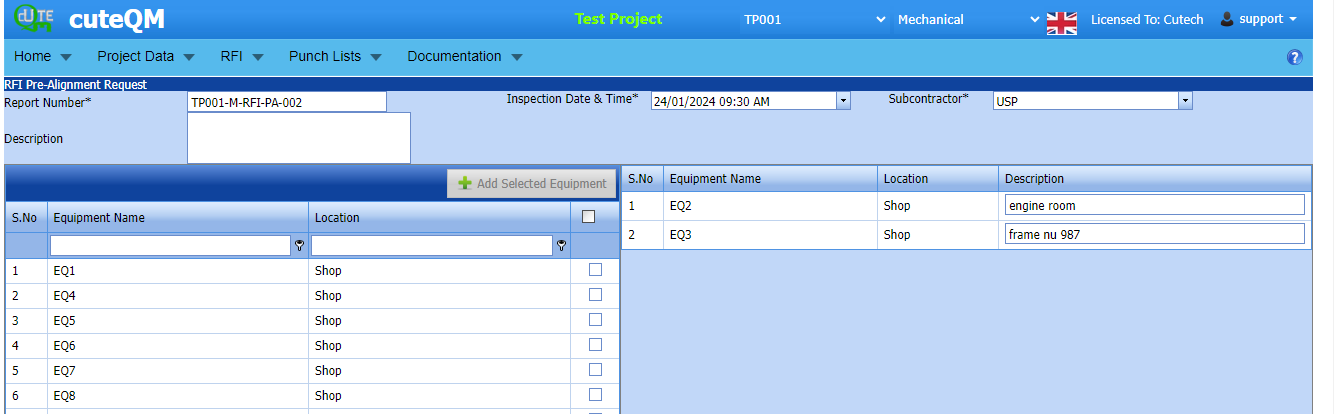
1. Click Add icon in RFI Pre Alignment Request.
2. In the **Inspection Date and Time** box, select the inspection date and time.
3. In the **Subcontractor** box, select a subcontractor from a drop-down list.
[](https://wiki.cuteinfocomm.com/uploads/images/gallery/2022-04/image-1651201027630.png)**Note**: You can add multiple cables for one request.
Click[](https://wiki.cuteinfocomm.com/uploads/images/gallery/2022-04/image-1651201285984.png) (Add Selected Cables) of the respective equipment you want to add.
The added cables will be moved and listed in the right side of the page. 
[](https://wiki.cuteinfocomm.com/uploads/images/gallery/2024-02/image-1707237298355.png)
The added equipment will be moved and listed in the right side of the page
1. [](https://wiki.cuteinfocomm.com/uploads/images/gallery/2022-04/image-1651201433945.png) **Tip**: If you want to remove any added joint, click [](https://wiki.cuteinfocomm.com/uploads/images/gallery/2022-04/image-1651201449656.png)(**Remove** icon) of the respective equipment.
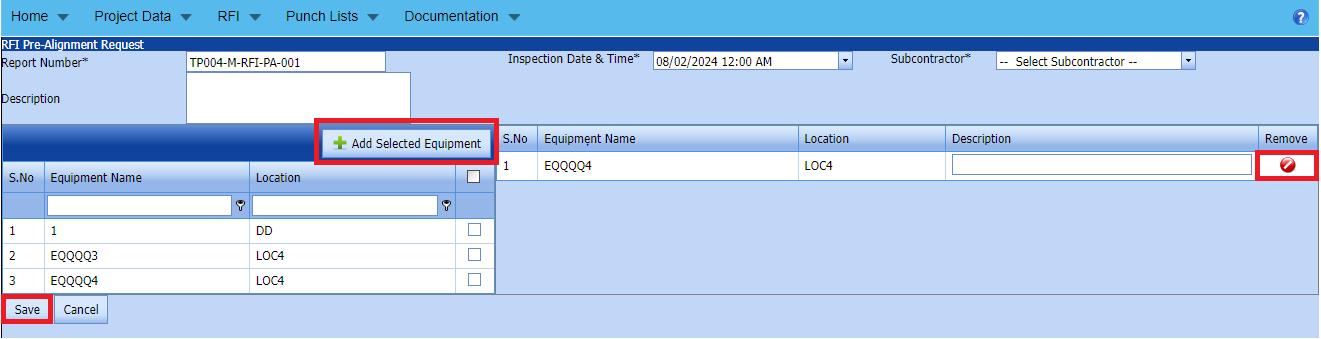
2. In the **Description** box, enter the description for the added RFI Pre- Alignment request.
3. Click **Save**.
4. RFI Pre-Alignment Request created successfully.
##### **2.1.2.Edit a Pre-Alignment RFI**
If you want to edit any existing Pre-Alignment RFI request in the **list** page, do the following,
Click (Edit icon) in the **Edit** column for the respectivePre-Alignment Request. See Fig 2.1.2
[](https://wiki.cuteinfocomm.com/uploads/images/gallery/2024-04/image-1712040226606.png)
The **Pre-Alignment Request page** opens with the details of the selected equipment list.
[](https://wiki.cuteinfocomm.com/uploads/images/gallery/2024-04/image-1712040143342.png)
Fig 2.1.2 Edit a Pre-Alignment Request Page
1. Add/remove any equipments
2. Click **Save**.Pre-Alignmnet RFI request updated successfully.
#####
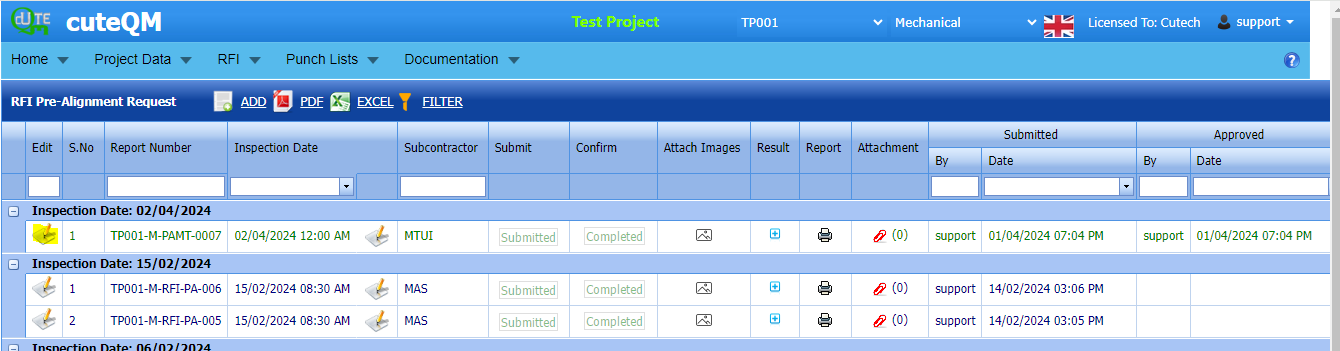
##### **2.1.3 Submit RFI Pre- alignment Request.**
Once you have added the RFI fit up request, the **Submission** column in the **RFI Fit up visual Lists** page is appeared with[](https://wiki.cuteinfocomm.com/uploads/images/gallery/2022-04/image-1651201968441.png)(Submit and Reject icons). See Fig 2.1.3[](https://wiki.cuteinfocomm.com/uploads/images/gallery/2024-03/image-1709450588835.png)
Fig 2.1.3 Submit RFI Pre-Alignment Request
1. If you want to submit the RFI pre-alignment request, click [](https://wiki.cuteinfocomm.com/uploads/images/gallery/2022-04/image-1651201981884.png)(Submit icon) in the **Submit** column. Otherwise click [](https://wiki.cuteinfocomm.com/uploads/images/gallery/2022-04/image-1651201995224.png)(Reject icon) to reject the request.
Once you have submitted the RFI Pre-Alignment request, in the **Confirm** **Status** column in the **RFI pre- alignment request List** page is appeared with[](https://wiki.cuteinfocomm.com/uploads/images/gallery/2022-04/image-1651202048663.png)(Confirm and Reject icons).
The approved request will be moved to for inspection.
##### **2.1.4 Approve RFI pre- alignment request**
**cuteQM\_Licensee\_QA user only can approve the RFI request.**
1. If you want to approve the **RFI pre- alignment request** , click[](https://wiki.cuteinfocomm.com/uploads/images/gallery/2022-04/image-1651203762346.png) (confirm icon) in the **Confirm Status** Otherwise click [](https://wiki.cuteinfocomm.com/uploads/images/gallery/2022-04/image-1651203792080.png) (Reject icon) to reject the request.
2. Once RFI pre- alignment request approved [](https://wiki.cuteinfocomm.com/uploads/images/gallery/2024-01/image-1706614735279.png) icon will be enabled to put result. [](https://wiki.cuteinfocomm.com/uploads/images/gallery/2024-03/image-1709450892622.png)
3. Click icon [](https://wiki.cuteinfocomm.com/uploads/images/gallery/2024-01/image-1706632325743.png) result popup will open. [](https://wiki.cuteinfocomm.com/uploads/images/gallery/2024-03/image-1709450945110.png)
Fig 2.1.4 Approve RFI Pre-alignment request.
2. Click **Save**
3. RFI result is updated successfully.
4. If Accept with comments given then punch list will be created, and this will be shown in view punch list screen.
5. If need to upload documents against equipment, then click attachment icon at the result popup and upload document.
##### **2.1.5 Attach a images into a RFI pre- alignment request**
If you want to attach a image with any existing RFI pre-alignment listed in the **RFI pre-alignment request** page, you can attach the file by using[](https://wiki.cuteinfocomm.com/uploads/images/gallery/2024-03/image-1709451389767.png) (Attach icon) in the **Attach images** column.[](https://wiki.cuteinfocomm.com/uploads/images/gallery/2024-03/image-1709451460002.png)
New popup window will open. once you click Add icon  You can Attach images [](https://wiki.cuteinfocomm.com/uploads/images/gallery/2024-03/image-1709451659807.png)
##### **2.1.6 Print RFI Pre alignment request**
If you want to Print an RFI pre alignment report, click [](https://wiki.cuteinfocomm.com/uploads/images/gallery/2022-05/image-1651808508303.png) (print icon) provided in the **Report** column of the RFI pre alignment page.
**Signature of the production user and QC user will be shown in the report. Requestor signature mapped with Production user and Inspector signature mapped with QC .**
**[Click here to find the steps to upload Digital signature](https://wiki.cuteinfocomm.com/books/cuteqm/page/user-management-qg8#bkmrk-1.3%C2%A0%C2%A0%C2%A0%C2%A0%C2%A0%C2%A0%C2%A0%C2%A0%C2%A0%C2%A0-log-ou "Steps to upload Digital signature")**
[](https://wiki.cuteinfocomm.com/uploads/images/gallery/2024-03/image-1709452531053.png)
Fig 2.1.7 View a RFI pre alignment request. [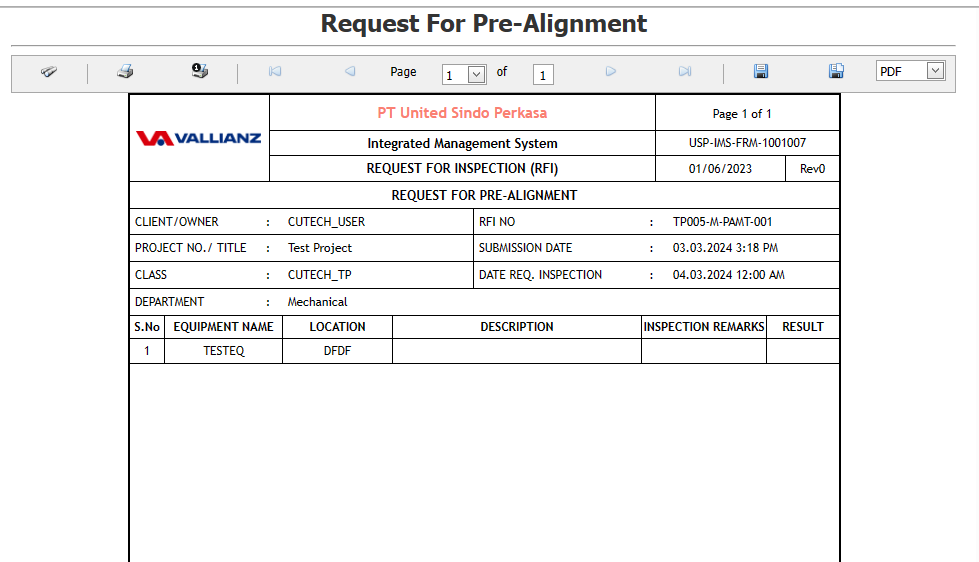](https://wiki.cuteinfocomm.com/uploads/images/gallery/2024-03/image-1709452584880.png)
[](https://wiki.cuteinfocomm.com/uploads/images/gallery/2024-08/image-1724246288155.png)
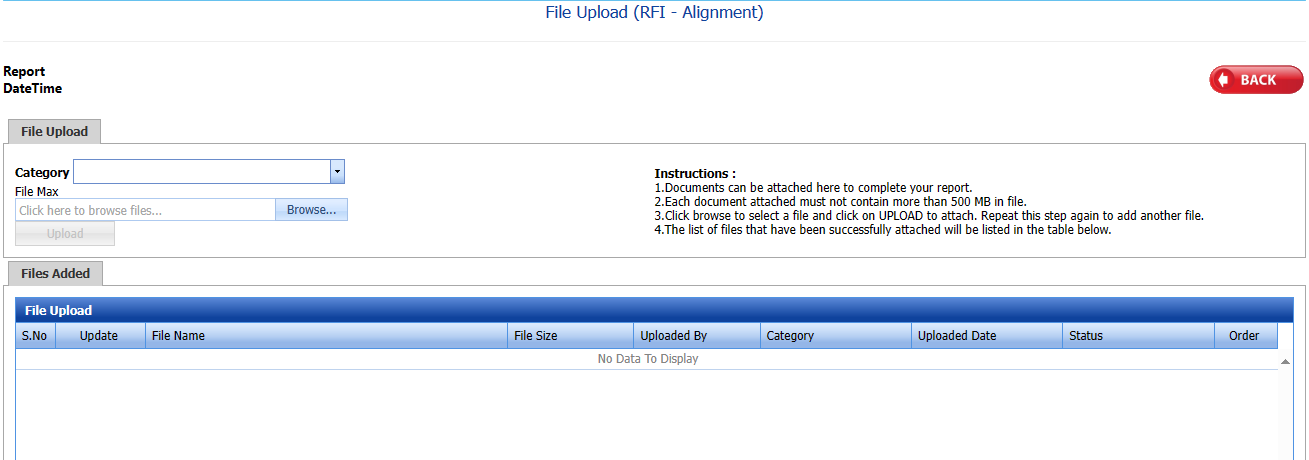
##### **2.1.7 Attach a File into a RFI pre alignment request**
If you want to attach a file with any existing RFI fit up visual list listed in the **RFI pre alignment request** page, you can attach the file by using [](https://wiki.cuteinfocomm.com/uploads/images/gallery/2022-04/image-1651202499153.png) (Attach icon) in the **Attachment** column.[](https://wiki.cuteinfocomm.com/uploads/images/gallery/2024-01/image-1706697070366.png)
New window will open . you can upload document's [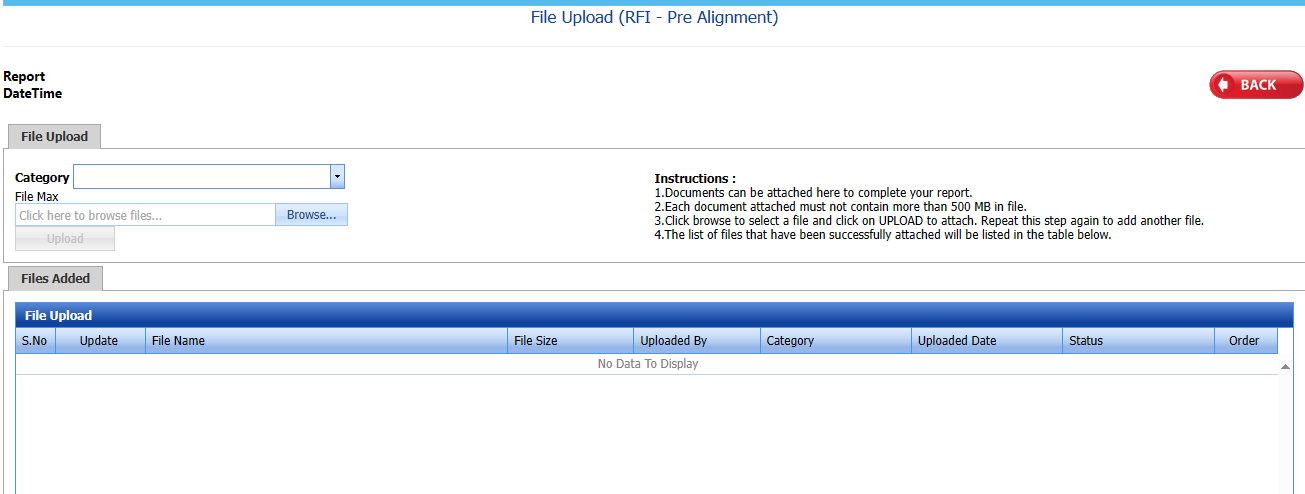](https://wiki.cuteinfocomm.com/uploads/images/gallery/2024-03/image-1709452779874.png)
##### **2.1.8 Export a RFI Pre-Alignment**
You can export a list of RFI pre-alignment list requests added in the **RFI Pre-Alignment List** page in both the pdf and excel formats by using [](https://wiki.cuteinfocomm.com/uploads/images/gallery/2022-04/image-1651202537414.png) (**PDF** button) and [](https://wiki.cuteinfocomm.com/uploads/images/gallery/2022-04/image-1651202548613.png) (**Excel** button).[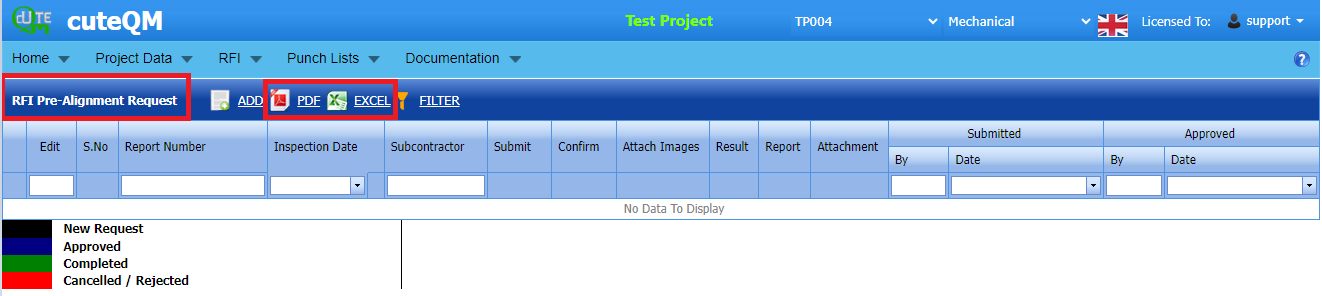](https://wiki.cuteinfocomm.com/uploads/images/gallery/2024-02/image-1707237896365.png) Fig 2.1.2 Export a RFI Pre-Alignment List Page
##### **2.1.9 Filter a RFI Pre-Alignment**
If you want to filter any specific RFI Pre-Alignment in the **RFI Pre- Alignment List** page, [](https://wiki.cuteinfocomm.com/uploads/images/gallery/2024-02/image-1707238111313.png)
- you can use the filter box provided in the upper side of the **RFI Pre- Alignment To** filter the any specific RFI Pre-Alignment and request, select the Report Number, Inspection Date, Subcontractor and **Date** in the boxes and click.
- you can use [](https://wiki.cuteinfocomm.com/uploads/images/gallery/2022-04/image-1651202662798.png) (**FILTER** button) located on the **RFI Pre-Alignment List.**
#### **2.2 RFI Alignment**
1\. Click **RFI Alignment** in the **RFI** menu.
The **RFI Alignment** page opens. [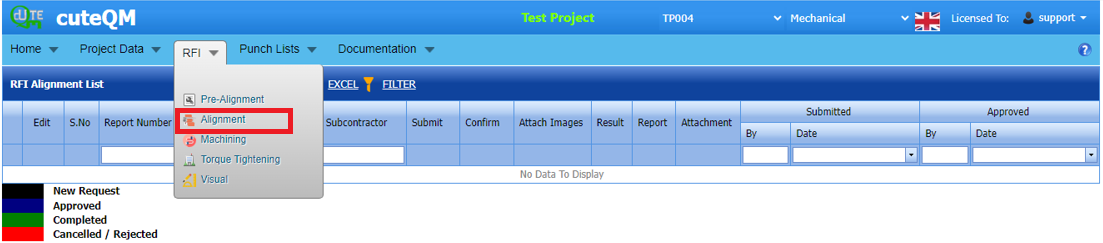](https://wiki.cuteinfocomm.com/uploads/images/gallery/2024-02/image-1707238694576.png)
Fig 2.2 RFI Alignment Page
##### **2.2.1 RFI Alignment List**
Click [](https://wiki.cuteinfocomm.com/uploads/images/gallery/2022-05/image-1651427486684.png) (**ADD** button) in the **RFI Alignment List** page.
A new page opens to add an RFI Alignment List request. 
[](https://wiki.cuteinfocomm.com/uploads/images/gallery/2024-02/image-1707238920836.png)
Fig 2.2.1 Alignment List Page
##### **2.2.2 Add RFI Alignment**
1.Click [](https://wiki.cuteinfocomm.com/uploads/images/gallery/2022-05/image-1651427486684.png) (**ADD** button) in the **RFI Alignment List** page.cuteQM\_Production role user only can add RFI request.
A new page opens to add an RFI Alignment List request. 
[](https://wiki.cuteinfocomm.com/uploads/images/gallery/2024-02/image-1707239390919.png)
1. Click [](https://wiki.cuteinfocomm.com/uploads/images/gallery/2022-05/image-1651427486684.png) (**ADD** button) in the **RFI Alignment List** page. A new page opens to add an RFI Alignment request. 
[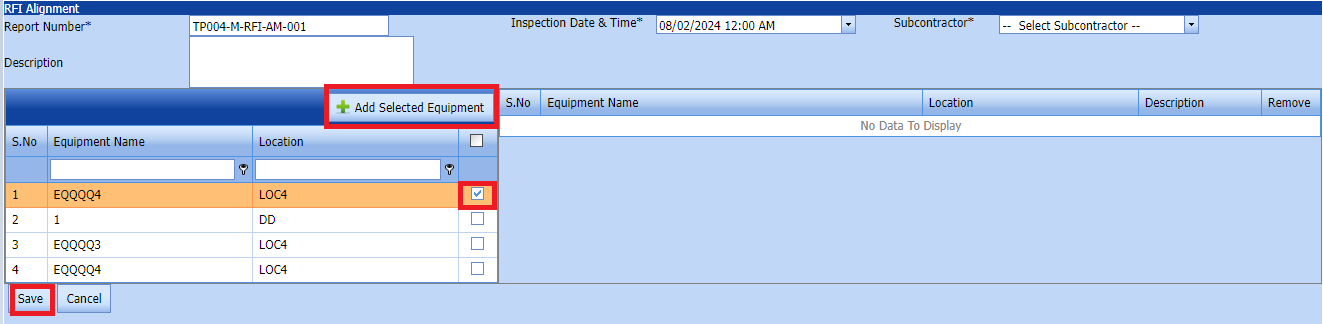](https://wiki.cuteinfocomm.com/uploads/images/gallery/2024-02/image-1707239556092.png)
1. In the **Inspection Date and Time** box, select the inspection date and time.
2. In the **Subcontractor** box, select a subcontractor from a drop-down list.
3. In the **Description** box, enter the description for the added RFI Alignment request.
Before saving the added RFI Alignment list, you must add equipment for the RFI Aligment list request.
[](https://wiki.cuteinfocomm.com/uploads/images/gallery/2022-04/image-1651201027630.png)**Note**: You can add multiple Equipment for one request.
[](https://wiki.cuteinfocomm.com/uploads/images/gallery/2024-02/image-1707239987211.png)
Click[](https://wiki.cuteinfocomm.com/uploads/images/gallery/2022-04/image-1651201285984.png) (Add Selected System) of the respective system you want to add.
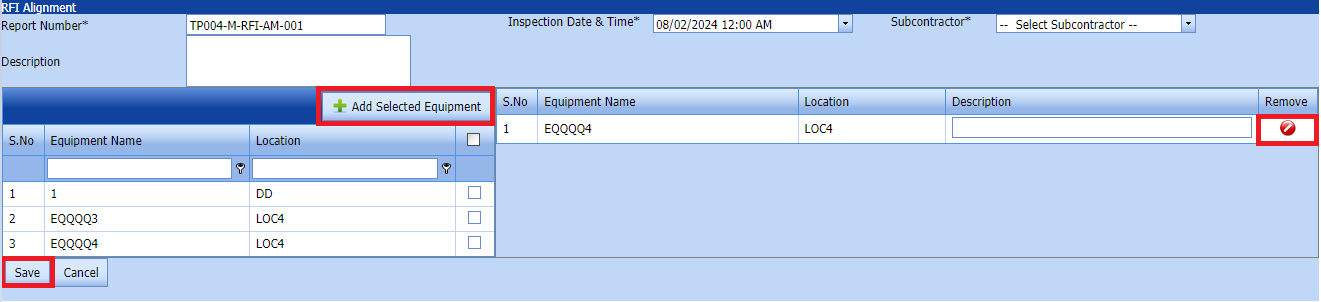
The added system will be moved and listed in the right side of the page.
1. [](https://wiki.cuteinfocomm.com/uploads/images/gallery/2022-04/image-1651201433945.png) **Tip**: If you want to remove any added system, click [](https://wiki.cuteinfocomm.com/uploads/images/gallery/2022-04/image-1651201449656.png)(**Remove** icon) of the respective joint.
2. In the **Description** box, enter the description for the added RFI Alignment request.
3. Click **Save**.
The RFI Alignment list request is successfully added.
##### **2.2.3.Edit a Alignment RFI**
If you want to edit any existing Alignment RFI request in the **list** page, do the following,
Click (Edit icon) in the **Edit** column for the respectiveAlignment Request. See Fig 2.2.3
[](https://wiki.cuteinfocomm.com/uploads/images/gallery/2024-04/image-1712041107412.png)
The **Alignment Request page** opens with the details of the selected equipment list.
[](https://wiki.cuteinfocomm.com/uploads/images/gallery/2024-04/image-1712040143342.png)
Fig 2.2.3 Edit a Alignment RFI Request Page
1. Add/remove any equipments
2. Click **Save**.Alignment RFI request updated successfully.
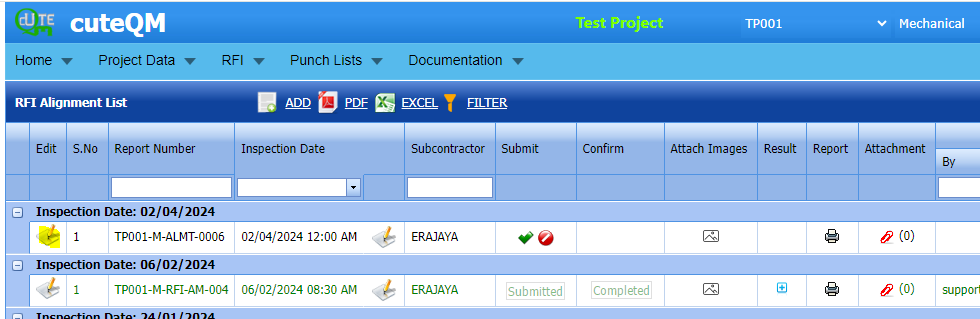
##### **2.2.4 Submit RFI Alignment request**
Once you have added the RFI pre-alignment request, the **Submission** column in the **RFI alignment re** page is appeared with[](https://wiki.cuteinfocomm.com/uploads/images/gallery/2022-04/image-1651201968441.png)(Submit and Reject icons). See Fig 2.2.5
[](https://wiki.cuteinfocomm.com/uploads/images/gallery/2024-03/image-1709454122275.png)
Fig 2.1.4 Submit RFI Alignment Request
1. If you want to submit the RFI alignment request, click [](https://wiki.cuteinfocomm.com/uploads/images/gallery/2022-04/image-1651201981884.png)(Submit icon) in the **Submit** column. Otherwise click [](https://wiki.cuteinfocomm.com/uploads/images/gallery/2022-04/image-1651201995224.png)(Reject icon) to reject the request.
Once you have submitted the RFI Alignment request, in the **Confirm** **Status** column in the **RFI Alignment request List** page is appeared with[](https://wiki.cuteinfocomm.com/uploads/images/gallery/2022-04/image-1651202048663.png)(Confirm and Reject icons).
The submitted request will be moved to for inspection.
##### **2.2.6 Approve RFI Alignment request**
**cuteQM\_Licensee\_QA user only can approve the RFI request.**
1. If you want to approve the **RFI pre- alignment request** , click[](https://wiki.cuteinfocomm.com/uploads/images/gallery/2022-04/image-1651203762346.png) (confirm icon) in the **Confirm Status** Otherwise click [](https://wiki.cuteinfocomm.com/uploads/images/gallery/2022-04/image-1651203792080.png) (Reject icon) to reject the request.
2. Once RFI pre- alignment request approved [](https://wiki.cuteinfocomm.com/uploads/images/gallery/2024-01/image-1706614735279.png) icon will be enabled to put result. [](https://wiki.cuteinfocomm.com/uploads/images/gallery/2024-03/image-1709450892622.png)
3. Click icon [](https://wiki.cuteinfocomm.com/uploads/images/gallery/2024-01/image-1706632325743.png) result popup will open. [](https://wiki.cuteinfocomm.com/uploads/images/gallery/2024-03/image-1709450945110.png)
Fig 2.2.6 Approve RFI Pre-alignment request.
2. Click **Save**
3. RFI result is updated successfully.
4. If Accepted with comments given as result,then punch list will be created, and this will be shown in view punch list screen.
5. If need to upload documents against equipment, then click attachment icon at the result popup and upload document.
##### **2.2.7 Attach a images into a RFI alignment request**
If you want to attach an image with any existing RFI alignment listed in the **RFI alignment request** page, you can attach the file by using[](https://wiki.cuteinfocomm.com/uploads/images/gallery/2024-03/image-1709451389767.png) (Attach icon) in the **Attach images** column.
[](https://wiki.cuteinfocomm.com/uploads/images/gallery/2024-03/image-1709454229606.png)
New popup window will open. once you click Add icon  You can Attach images [](https://wiki.cuteinfocomm.com/uploads/images/gallery/2024-03/image-1709451659807.png)
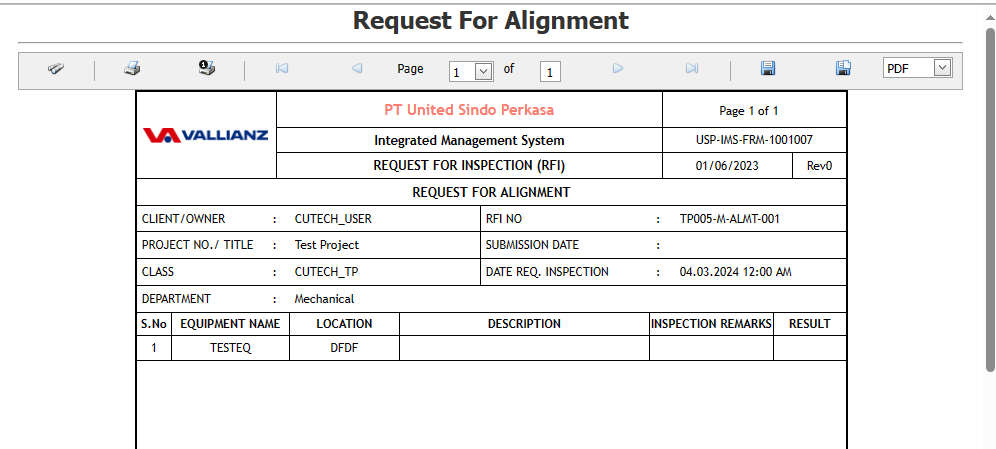
##### **2.2.8 Print RFI Alignment request**
If you want to Print an RFI alignment report, click [](https://wiki.cuteinfocomm.com/uploads/images/gallery/2022-05/image-1651808508303.png) (print icon) provided in the **Report** column of the RFI alignment page.
**Signature of the production user and QC user will be shown in the report. Requestor signature mapped with Production user and Inspector signature mapped with QC .**
**[Click here to find the steps to upload Digital signature](https://wiki.cuteinfocomm.com/books/cuteqm/page/user-management-qg8#bkmrk-1.3%C2%A0%C2%A0%C2%A0%C2%A0%C2%A0%C2%A0%C2%A0%C2%A0%C2%A0%C2%A0-log-ou "Steps to upload Digital signature")**
[](https://wiki.cuteinfocomm.com/uploads/images/gallery/2024-03/image-1709454572929.png)
Fig 2.1.7 View a RFI Alignment request.
[](https://wiki.cuteinfocomm.com/uploads/images/gallery/2024-03/image-1709454624393.png)
[](https://wiki.cuteinfocomm.com/uploads/images/gallery/2024-08/image-1724246270796.png)
##### **2.2.9 Attach a File into a RFI Alignment request**
If you want to attach a file with any existing RFI fit up visual list listed in the **RFI pre alignment request** page, you can attach the file by using [](https://wiki.cuteinfocomm.com/uploads/images/gallery/2022-04/image-1651202499153.png) (Attach icon) in the **Attachment** column.
[](https://wiki.cuteinfocomm.com/uploads/images/gallery/2024-03/image-1709454690235.png)
New window will open . you can upload document's
[](https://wiki.cuteinfocomm.com/uploads/images/gallery/2024-03/image-1709454711621.png)
##### **2.2.10 Export a RFI Alignment**
You can export a list of RFI Alignment added in the **RFI Alignment List** page in both the pdf and excel formats by using [](https://wiki.cuteinfocomm.com/uploads/images/gallery/2022-04/image-1651202537414.png) (**PDF** button) and [](https://wiki.cuteinfocomm.com/uploads/images/gallery/2022-04/image-1651202548613.png) (**Excel** button). [](https://wiki.cuteinfocomm.com/uploads/images/gallery/2024-02/image-1707240200995.png) Fig 2.2.3 Export a RFI Pre-Alignment List Page
##### **2.2.11 Filter a RFI Alignment List**
If you want to filter any specific RFI Alignment in the **RFI Alignment List** page, [](https://wiki.cuteinfocomm.com/uploads/images/gallery/2024-02/image-1707238111313.png)
Fig 2.2.11 Filter a RFI Alignment List Page
- you can use the filter box provided in the upper side of the **RFI Alignment To** filter the any specific RFI Alignment and request, select the Report Number, Inspection Date, Subcontractor and **Date** in the boxes and click.
- you can use [](https://wiki.cuteinfocomm.com/uploads/images/gallery/2022-04/image-1651202662798.png) (**FILTER** button) located on the **RFI Alignment List.**
#### **2.3 Machining**
1\. Click **RFI Machining** in the **RFI** menu.
The **RFI Machining** page opens. [](https://wiki.cuteinfocomm.com/uploads/images/gallery/2024-02/image-1707240706489.png) Fig 2.3 RFI Machining List Page
##### **2.3.1 RFI Machining List**
Click [](https://wiki.cuteinfocomm.com/uploads/images/gallery/2022-05/image-1651427486684.png) (**ADD** button) in the **RFI Machining List** page.(cuteQM\_Production role user only can add RFI request)
A new page opens to add an **RFI Machining List** request. 
[](https://wiki.cuteinfocomm.com/uploads/images/gallery/2024-02/image-1707240900644.png)
Fig 2.3.1 RFI Machining List Page
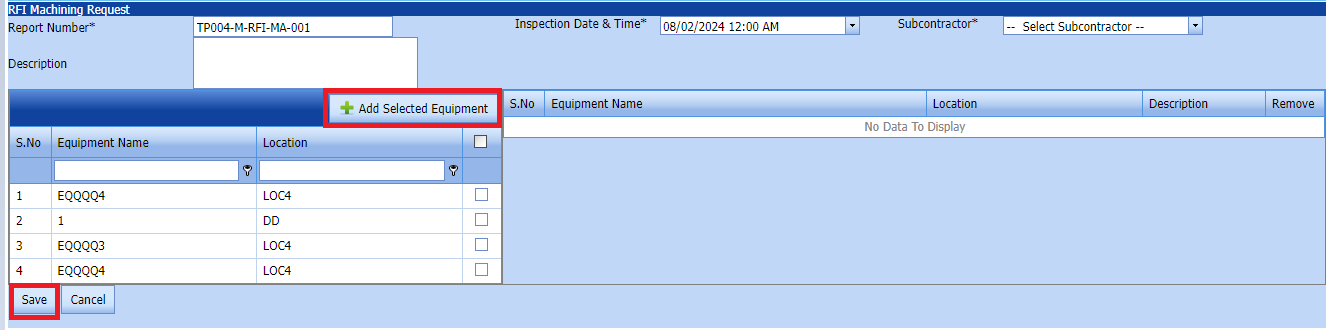
##### **2.3.2 Add a RFI Machining**
1.Click [](https://wiki.cuteinfocomm.com/uploads/images/gallery/2022-05/image-1651427486684.png) (**ADD** button) in the **RFI Machining List** page.
A new page opens to add an **RFI Machining List** request. 
[](https://wiki.cuteinfocomm.com/uploads/images/gallery/2024-02/image-1707241066886.png)
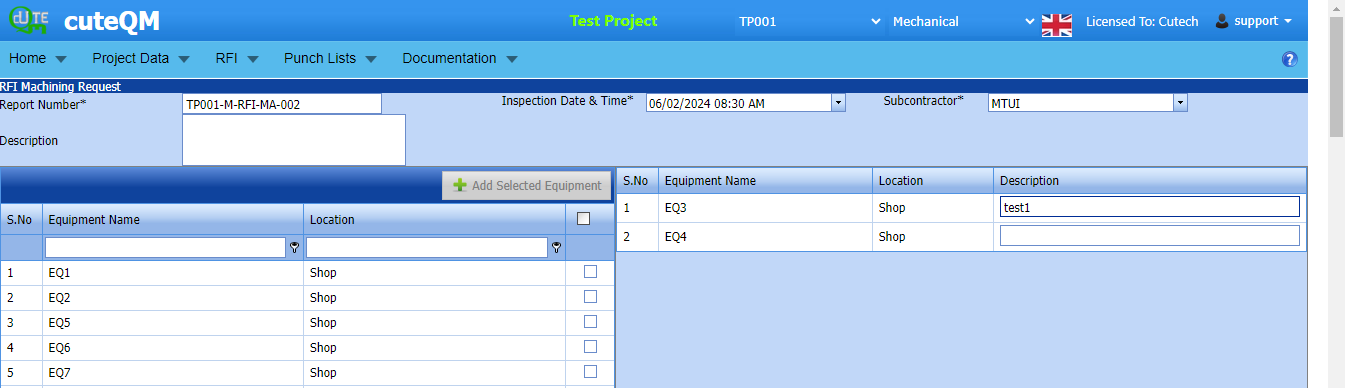
1. Click [](https://wiki.cuteinfocomm.com/uploads/images/gallery/2022-05/image-1651427486684.png) (**ADD** button) in the **RFI Machining List** page. A new page opens to add an RFI Machining List request. 
[](https://wiki.cuteinfocomm.com/uploads/images/gallery/2024-02/image-1707241267865.png)
1. In the **Inspection Date and Time** box, select the inspection date and time.
2. In the **Subcontractor** box, select a subcontractor from a drop-down list.
3. In the **Description** box, enter the description for the added RFI Alignment request.
Before saving the added RFI machining list, you must add equipment for the RFI machining request list request.
[](https://wiki.cuteinfocomm.com/uploads/images/gallery/2022-04/image-1651201027630.png)**Note**: You can add multiple Equipment for one request.
[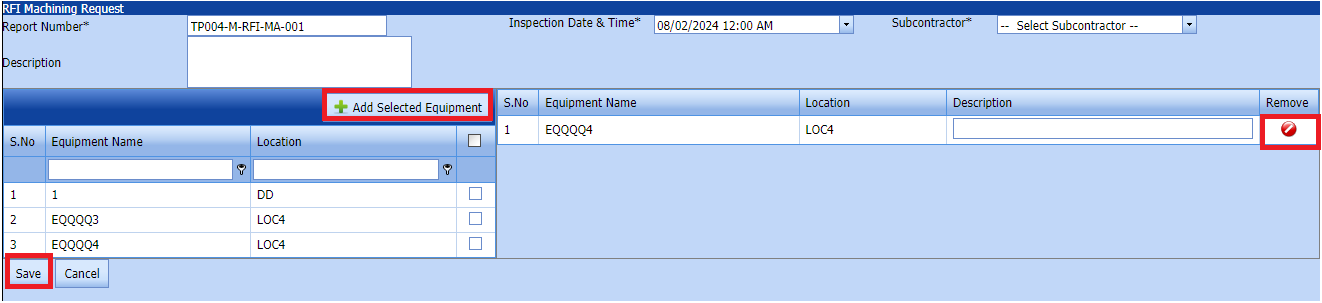](https://wiki.cuteinfocomm.com/uploads/images/gallery/2024-02/image-1707241383014.png)
Click[](https://wiki.cuteinfocomm.com/uploads/images/gallery/2022-04/image-1651201285984.png) (Add Selected System) of the respective system you want to add.
The added system will be moved and listed in the right side of the page.
1. [](https://wiki.cuteinfocomm.com/uploads/images/gallery/2022-04/image-1651201433945.png) **Tip**: If you want to remove any added system, click [](https://wiki.cuteinfocomm.com/uploads/images/gallery/2022-04/image-1651201449656.png)(**Remove** icon) of the respective joint.
2. In the **Description** box, enter the description for the added RFI Machining request.
3. Click **Save**.
The RFI Machining list request is successfully added.
##### **2.3.3.Edit a Machining RFI**
If you want to edit any existing Machining RFI request in the **list** page, do the following,
Click (Edit icon) in the **Edit** column for the respective Machining RFI Request. See Fig 2.3.3
[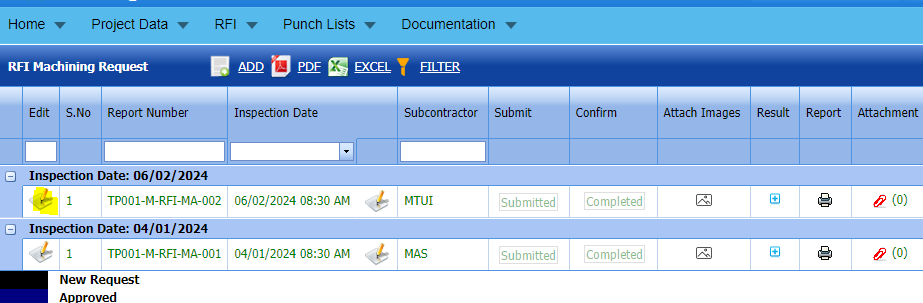](https://wiki.cuteinfocomm.com/uploads/images/gallery/2024-04/image-1712042264043.png)
The **Machining RFI Request page** opens with the details of the selected equipment list.
[](https://wiki.cuteinfocomm.com/uploads/images/gallery/2024-04/image-1712042320396.png)
Fig 2.3.3 Edit a Machining RFI Request Page
1. Add/remove any equipments
2. Click **Save**.Machining RFI request updated successfully.
#####
##### **2.3.4 Submit RFI Machining request.**
Once you have added the RFI machining request, the **Submission** column in the **RFI Machining request** page is appeared with[](https://wiki.cuteinfocomm.com/uploads/images/gallery/2022-04/image-1651201968441.png)(Submit and Reject icons). See Fig 2.3.5
[](https://wiki.cuteinfocomm.com/uploads/images/gallery/2024-03/image-1709454949071.png)
Fig 2.3.4 Submit RFI Machining Request
1. If you want to submit the RFI alignment request, click [](https://wiki.cuteinfocomm.com/uploads/images/gallery/2022-04/image-1651201981884.png)(Submit icon) in the **Submit** column. Otherwise click [](https://wiki.cuteinfocomm.com/uploads/images/gallery/2022-04/image-1651201995224.png)(Reject icon) to reject the request.
Once you have submitted the RFI Alignment request, in the **Confirm** **Status** column in the **RFI Alignment request List** page is appeared with[](https://wiki.cuteinfocomm.com/uploads/images/gallery/2022-04/image-1651202048663.png)(Confirm and Reject icons).
The submitted request will be moved to for inspection.
##### **2.3.5 Approve RFI Machining request**
**cuteQM\_Licensee\_QA user only can approve the RFI request.**
1. If you want to approve the **RFI Machining request** , click[](https://wiki.cuteinfocomm.com/uploads/images/gallery/2022-04/image-1651203762346.png) (confirm icon) in the **Confirm Status** Otherwise click [](https://wiki.cuteinfocomm.com/uploads/images/gallery/2022-04/image-1651203792080.png) (Reject icon) to reject the request.
2. Once RFI Machining request approved [](https://wiki.cuteinfocomm.com/uploads/images/gallery/2024-01/image-1706614735279.png) icon will be enabled to put result. [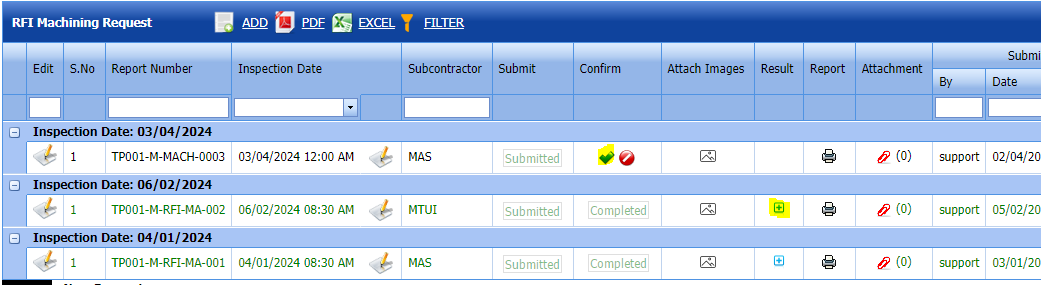](https://wiki.cuteinfocomm.com/uploads/images/gallery/2024-04/image-1712042746203.png)
3. Click icon [](https://wiki.cuteinfocomm.com/uploads/images/gallery/2024-01/image-1706632325743.png) result popup will open. [](https://wiki.cuteinfocomm.com/uploads/images/gallery/2024-03/image-1709450945110.png)
Fig 2.3.5 Approve RFI Machining request.
2. Click **Save**
3. RFI result is updated successfully.
4. If Accepted with comments given as result,then punch list will be created, and this will be shown in view punch list screen.
5. If need to upload documents against equipment, then click attachment icon at the result popup and upload document.
##### **2.3.6 Attach a images into a RFI machining request.**
If you want to attach an image with any existing RFI machining listed in the **RFI machining request** page, you can attach the file by using[](https://wiki.cuteinfocomm.com/uploads/images/gallery/2024-03/image-1709451389767.png) (Attach icon) in the **Attach images** column.
[](https://wiki.cuteinfocomm.com/uploads/images/gallery/2024-03/image-1709455007648.png)
New popup window will open. once you click Add icon  You can Attach images [](https://wiki.cuteinfocomm.com/uploads/images/gallery/2024-03/image-1709451659807.png)
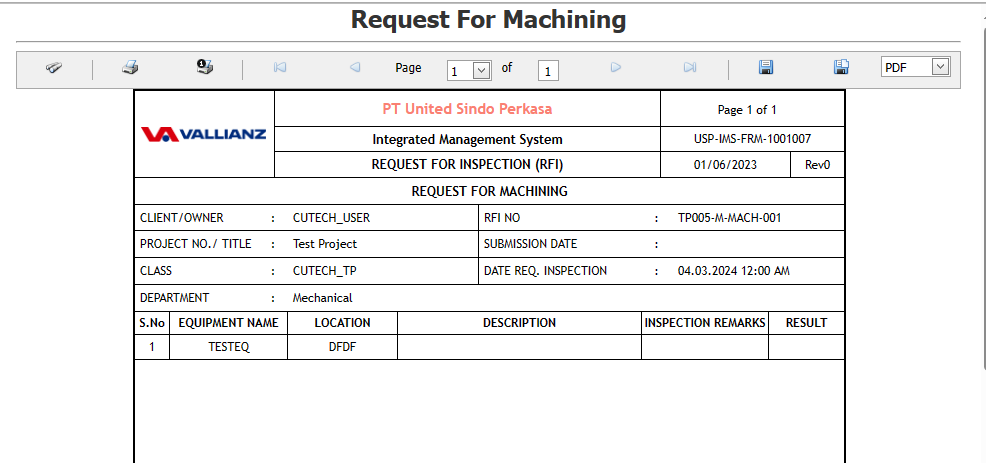
##### **2.3.7 Print RFI Machining request**
If you want to view an RFI machining report, click [](https://wiki.cuteinfocomm.com/uploads/images/gallery/2022-05/image-1651808508303.png) (print icon) provided in the **Report** column of the RFI Machining page.
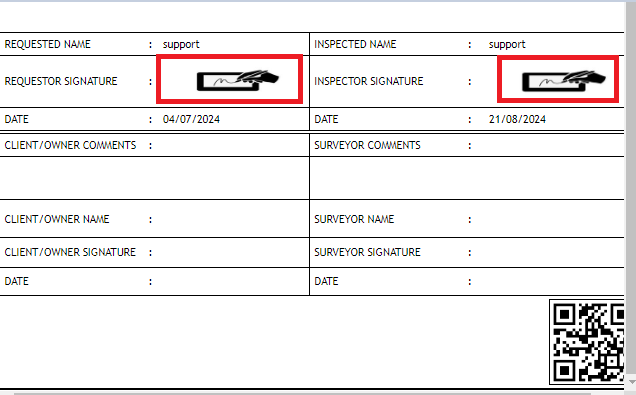
**Signature of the production user and QC user will be shown in the report. Requestor signature mapped with Production user and Inspector signature mapped with QC .**
**[Click here to find the steps to upload Digital signature](https://wiki.cuteinfocomm.com/books/cuteqm/page/user-management-qg8#bkmrk-1.3%C2%A0%C2%A0%C2%A0%C2%A0%C2%A0%C2%A0%C2%A0%C2%A0%C2%A0%C2%A0-log-ou "Steps to upload Digital signature")**
[](https://wiki.cuteinfocomm.com/uploads/images/gallery/2024-03/image-1709455054389.png)
Fig 2.3.7 View a RFI machining request.
[](https://wiki.cuteinfocomm.com/uploads/images/gallery/2024-03/image-1709455112518.png)
[](https://wiki.cuteinfocomm.com/uploads/images/gallery/2024-08/image-1724246252789.png)
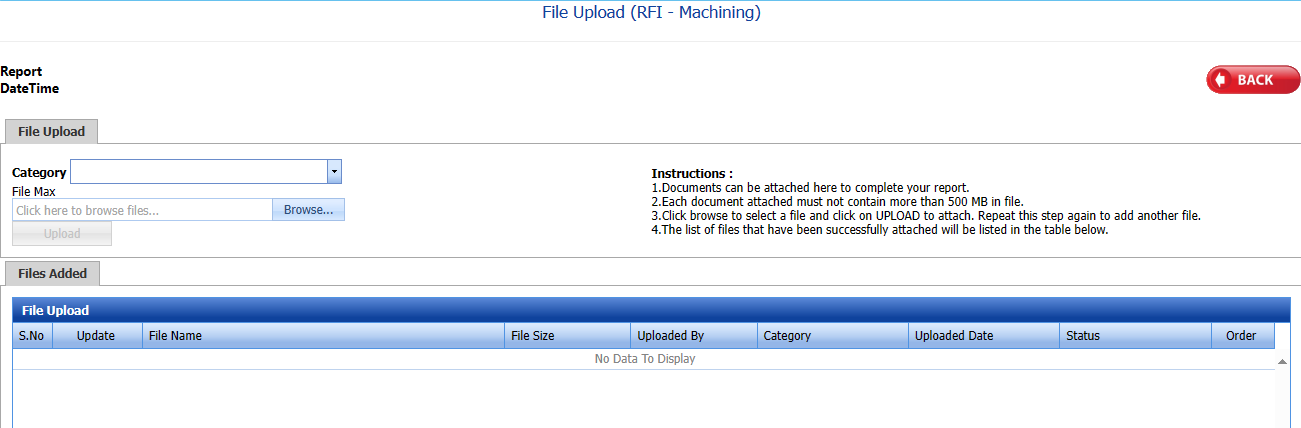
##### **2.3.8 Attach a File into a RFI Machining request**
If you want to attach a file with any existing RFI listed in the **RFI machining request** page, you can attach the file by using [](https://wiki.cuteinfocomm.com/uploads/images/gallery/2022-04/image-1651202499153.png) (Attach icon) in the **Attachment** column.
[](https://wiki.cuteinfocomm.com/uploads/images/gallery/2024-03/image-1709455327682.png)
New window will open. you can upload document's.
[](https://wiki.cuteinfocomm.com/uploads/images/gallery/2024-03/image-1709455356812.png)
##### **2.3.9 Export a RFI Machining List**
You can export a list of RFI Machining added in the **RFI Machining List** page in both the pdf and excel formats by using [](https://wiki.cuteinfocomm.com/uploads/images/gallery/2022-04/image-1651202537414.png) (**PDF** button) and [](https://wiki.cuteinfocomm.com/uploads/images/gallery/2022-04/image-1651202548613.png) (**Excel** button).[](https://wiki.cuteinfocomm.com/uploads/images/gallery/2024-02/image-1707241526647.png) Fig 2.3.9 Export a RFI Machining List Page
##### **2.3.10 Filter a RFI Machining List**
If you want to filter any specific RFI Machining in the **RFI Machining List** page, [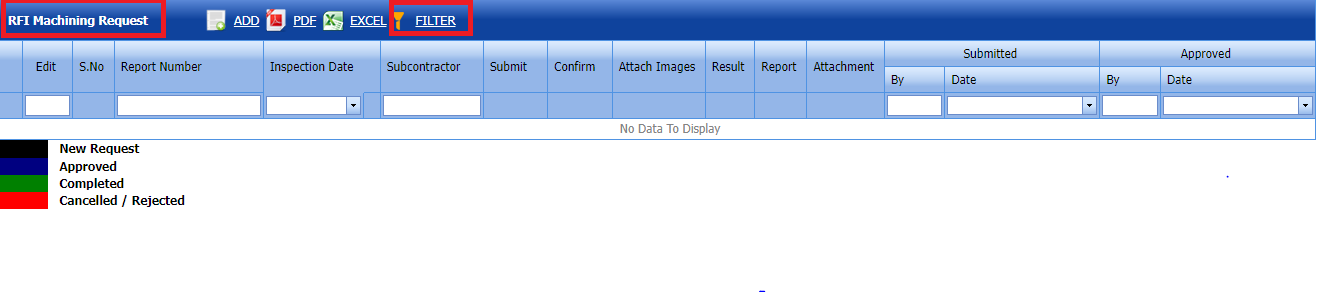](https://wiki.cuteinfocomm.com/uploads/images/gallery/2024-02/image-1707241621140.png) Fig 2.3.10 Filter a RFI Machining List Page
- you can use the filter box provided in the upper side of the **RFI Machining List** to filter the any specific RFI Alignment and request, select the Report Number, Inspection Date, Subcontractor and **Date** in the boxes and click.
you can use [](https://wiki.cuteinfocomm.com/uploads/images/gallery/2022-04/image-1651202662798.png) (**FILTER** button) located on the **RFI Machining List.**
#### **2.4 RFI Torque Tightening**
1\. Click **RFI Torque Tightening** in the **RFI** menu.
The **RFI Torque Tightening** page opens. 
[](https://wiki.cuteinfocomm.com/uploads/images/gallery/2024-02/image-1707242097927.png)
Fig 2.4 RFI Torque Tightening request Page
##### **2.4.1 RFI Torque Tightening Request**
Click [](https://wiki.cuteinfocomm.com/uploads/images/gallery/2022-05/image-1651427486684.png) (**ADD** button) in the **RFI Torque Tightening request** page.
A new page opens to add an **RFI Torque Tightening request**. 
[](https://wiki.cuteinfocomm.com/uploads/images/gallery/2024-02/image-1707242182170.png)
Fig 2.4.1 RFI Torque tightening request Page
##### **2.4.2 Add a Torque Tightening Request**
1.Click [](https://wiki.cuteinfocomm.com/uploads/images/gallery/2022-05/image-1651427486684.png) (**ADD** button) in the **RFI Torque Tightening request** page.
A new page opens to add an **RFI Torque Tightening** request. 
[](https://wiki.cuteinfocomm.com/uploads/images/gallery/2024-02/image-1707242357698.png)
1. Click [](https://wiki.cuteinfocomm.com/uploads/images/gallery/2022-05/image-1651427486684.png) (**ADD** button) in the **RFI Torque Tightening request page. A new page opens to add an RFI Torque Tightening request. 
[](https://wiki.cuteinfocomm.com/uploads/images/gallery/2024-02/image-1707242498326.png)
1. In the **Inspection Date and Time** box, select the inspection date and time.
2. In the **Subcontractor** box, select a subcontractor from a drop-down list.
3. In the **Description** box, enter the description for the added RFI Alignment request.
Before saving the added RFI Torque Tightening request , you must add equipment for the Torque Tightening request list request.
[](https://wiki.cuteinfocomm.com/uploads/images/gallery/2022-04/image-1651201027630.png)**Note**: You can add multiple Equipment for one request.
[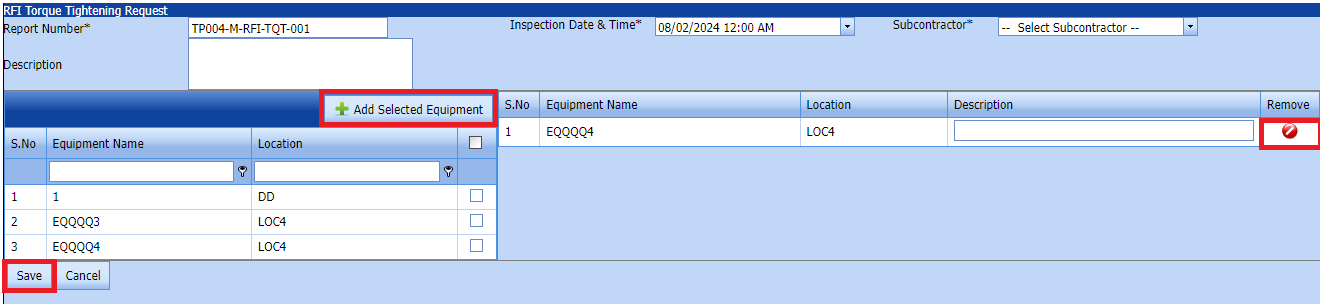](https://wiki.cuteinfocomm.com/uploads/images/gallery/2024-02/image-1707242588333.png)
Click[](https://wiki.cuteinfocomm.com/uploads/images/gallery/2022-04/image-1651201285984.png) (Add Selected System) of the respective system you want to add.
The added system will be moved and listed in the right side of the page.
1. [](https://wiki.cuteinfocomm.com/uploads/images/gallery/2022-04/image-1651201433945.png) **Tip**: If you want to remove any added system, click [](https://wiki.cuteinfocomm.com/uploads/images/gallery/2022-04/image-1651201449656.png)(**Remove** icon) of the respective joint.
2. In the **Description** box, enter the description for the added RFI Torque Tightening request.
3. Click **Save**.
The RFI Torque Tightening request is successfully added.
##### **2.4.3.Edit a Torque Tightening RFI**
If you want to edit any existing Torque Tightening RFI request in the **list** page, do the following,
Click (Edit icon) in the **Edit** column for the respective Torque Tightening RFI Request. See Fig 2.4.3
[](https://wiki.cuteinfocomm.com/uploads/images/gallery/2024-04/image-1712042264043.png)
The **Torque Tightening RFI Request page** opens with the details of the selected equipment list.
[](https://wiki.cuteinfocomm.com/uploads/images/gallery/2024-04/image-1712042320396.png)
Fig 2.4.3 Edit a Torque Tightening RFI Request Page
1. Add/remove any equipments
2. Click **Save**.Torque Tightening RFI request updated successfully.
#####
##### **2.4.4 Submit RFI Torque Tightening request.**
Once you have added the RFI machining request, the **Submit** column in the **RFI Torque tightening request** page is appeared with[](https://wiki.cuteinfocomm.com/uploads/images/gallery/2022-04/image-1651201968441.png)(Submit and Reject icons).
[](https://wiki.cuteinfocomm.com/uploads/images/gallery/2024-03/image-1709455522274.png)
Fig 2.4.4 Submit RFI torque tightening Request
1. If you want to submit the RFI torque tightening request, click [](https://wiki.cuteinfocomm.com/uploads/images/gallery/2022-04/image-1651201981884.png)(Submit icon) in the **Submit** column. Otherwise click [](https://wiki.cuteinfocomm.com/uploads/images/gallery/2022-04/image-1651201995224.png)(Reject icon) to reject the request.
Once you have submitted the RFI Alignment request, in the **Confirm** **Status** column in the **RFI Torque Tightening request List** page is appeared with[](https://wiki.cuteinfocomm.com/uploads/images/gallery/2022-04/image-1651202048663.png)(Confirm and Reject icons).
The approved request will be moved to for inspection.
##### **2.4.5 Approve RFI Torque Tightening request**
**cuteQM\_Licensee\_QA user only can approve the RFI request.**
1. If you want to approve the **RFI Torque Tightening request** , click[](https://wiki.cuteinfocomm.com/uploads/images/gallery/2022-04/image-1651203762346.png) (confirm icon) in the **Confirm Status** Otherwise click [](https://wiki.cuteinfocomm.com/uploads/images/gallery/2022-04/image-1651203792080.png) (Reject icon) to reject the request.
2. Once RFI Torque Tightening request approved [](https://wiki.cuteinfocomm.com/uploads/images/gallery/2024-01/image-1706614735279.png) icon will be enabled to put result. [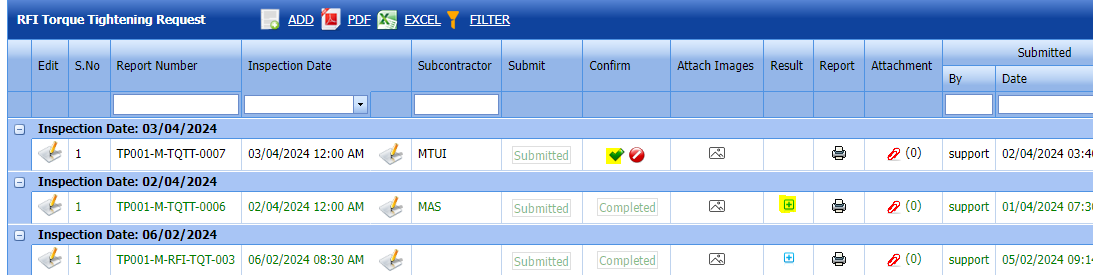](https://wiki.cuteinfocomm.com/uploads/images/gallery/2024-04/image-1712043670601.png)
3. Click icon [](https://wiki.cuteinfocomm.com/uploads/images/gallery/2024-01/image-1706632325743.png) result popup will open. [](https://wiki.cuteinfocomm.com/uploads/images/gallery/2024-03/image-1709450945110.png)
Fig 2.3.5 Approve RFI Torque Tightening request.
2. Click **Save**
3. RFI result is updated successfully.
4. If Accepted with comments given as result,then punch list will be created, and this will be shown in view punch list screen.
5. If need to upload documents against equipment, then click attachment icon at the result popup and upload document.
##### **2.4.6 Attach a images into a RFI Torque tightening request.**
If you want to attach an image with any existing RFI Torque tightening listed in the **RFI torque tightening request** page, you can attach the file by using[](https://wiki.cuteinfocomm.com/uploads/images/gallery/2024-03/image-1709451389767.png) (Attach icon) in the **Attach images** column.
[](https://wiki.cuteinfocomm.com/uploads/images/gallery/2024-03/image-1709455758797.png)
New popup window will open. once you click Add icon  You can Attach images [](https://wiki.cuteinfocomm.com/uploads/images/gallery/2024-03/image-1709451659807.png)
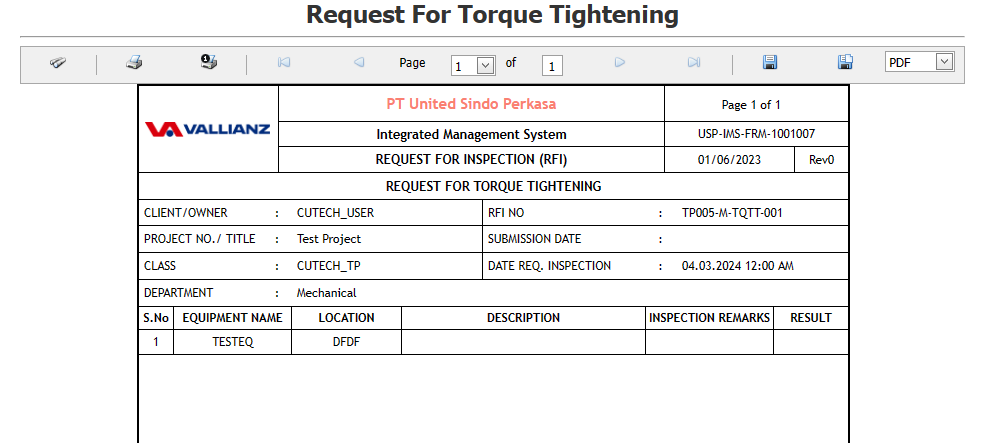
##### **2.4.7 Print RFI Torque tightening request**
If you want to view an RFI torque tightening report, click [](https://wiki.cuteinfocomm.com/uploads/images/gallery/2022-05/image-1651808508303.png) (print icon) provided in the **Report** column of the RFI Torque tightening page.
**Signature of the production user and QC user will be shown in the report. Requestor signature mapped with Production user and Inspector signature mapped with QC .**
**[Click here to find the steps to upload Digital signature](https://wiki.cuteinfocomm.com/books/cuteqm/page/user-management-qg8#bkmrk-1.3%C2%A0%C2%A0%C2%A0%C2%A0%C2%A0%C2%A0%C2%A0%C2%A0%C2%A0%C2%A0-log-ou "Steps to upload Digital signature")**
[](https://wiki.cuteinfocomm.com/uploads/images/gallery/2024-03/image-1709455852926.png)
Fig 2.4.7 View a RFI Torque tightening request.
[](https://wiki.cuteinfocomm.com/uploads/images/gallery/2024-03/image-1709456038820.png)
[](https://wiki.cuteinfocomm.com/uploads/images/gallery/2024-08/image-1724246233919.png)
##### **2.4.8 Attach a File into a RFI torque tightening request.**
If you want to attach a file with any existing RFI listed in the **RFI torque tightening request** page, you can attach the file by using [](https://wiki.cuteinfocomm.com/uploads/images/gallery/2022-04/image-1651202499153.png) (Attach icon) in the **Attachment** column.
[](https://wiki.cuteinfocomm.com/uploads/images/gallery/2024-03/image-1709456083548.png)
New window will open. you can upload document's.
[](https://wiki.cuteinfocomm.com/uploads/images/gallery/2024-03/image-1709455356812.png)
##### **2.4.9 Export a RFI Torque Tightening Request**
You can export a list of RFI Machining added in the **RFI Torque Tightening request** page in both the pdf and excel formats by using [](https://wiki.cuteinfocomm.com/uploads/images/gallery/2022-04/image-1651202537414.png) (**PDF** button) and [](https://wiki.cuteinfocomm.com/uploads/images/gallery/2022-04/image-1651202548613.png) (**Excel** button).[](https://wiki.cuteinfocomm.com/uploads/images/gallery/2024-02/image-1707242815826.png)
Fig 2.4.3 Export a RFI Torque tightening request Page
##### **2.4.10 Filter a RFI Torque tightening List**
If you want to filter any specific RFI Machining in the **RFI Machining List** page,
[](https://wiki.cuteinfocomm.com/uploads/images/gallery/2024-02/image-1707242946892.png)
Fig 2.4.10 Filter RFI Torque tightening request Page
- you can use the filter box provided in the upper side of the **RFI Torque Tightening Request** to filter the any specific RFI Alignment and request, select the Report Number, Inspection Date, Subcontractor and **Date** in the boxes and click.
- you can use [](https://wiki.cuteinfocomm.com/uploads/images/gallery/2022-04/image-1651202662798.png) (**FILTER** button) located on the **RFI Torque tightening request.**
#### **2.5 Visual**
Click **RFI Visual** in the **RFI** menu.
The **RFI Visual** page opens. [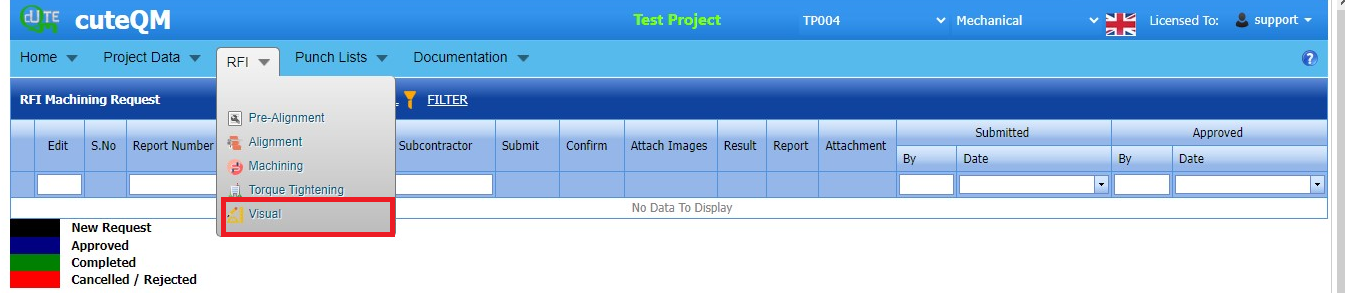](https://wiki.cuteinfocomm.com/uploads/images/gallery/2024-02/image-1707243531273.png)
Fig 2.5 RFI Visual request Page
##### **2.5.1 RFI Visual**
Click [](https://wiki.cuteinfocomm.com/uploads/images/gallery/2022-05/image-1651427486684.png) (**ADD** button) in the RFI Visual **request** page.
A new page opens to add an **RFI visual request**. 
[](https://wiki.cuteinfocomm.com/uploads/images/gallery/2024-02/image-1707243714839.png)
Fig 2.5.1 RFI Visual Page
##### **2.5.2 Add a Visual**
1.Click [](https://wiki.cuteinfocomm.com/uploads/images/gallery/2022-05/image-1651427486684.png) (**ADD** button) in the **RFI Visual** page.
A new page opens to add an **RFI Visual** request. 
[](https://wiki.cuteinfocomm.com/uploads/images/gallery/2024-02/image-1707243851719.png)
1. Click [](https://wiki.cuteinfocomm.com/uploads/images/gallery/2022-05/image-1651427486684.png) (**ADD** button) in the **RFI Visual page. A new page opens to add an RFI Visual. 
[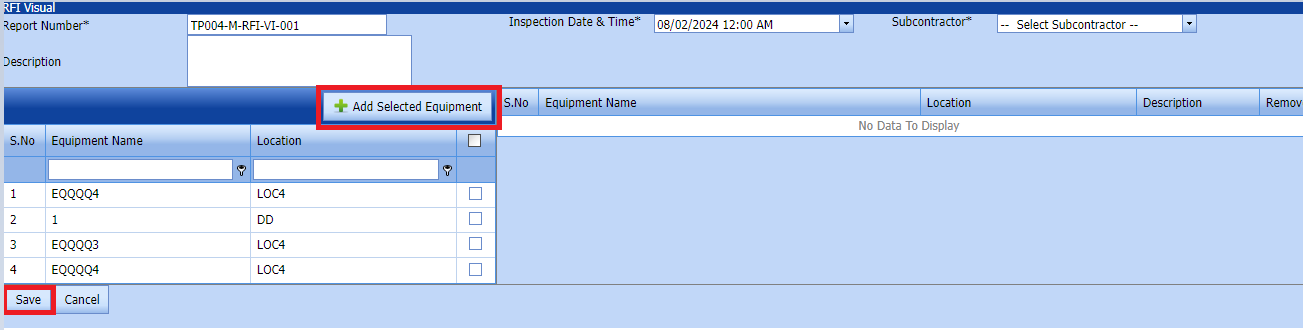](https://wiki.cuteinfocomm.com/uploads/images/gallery/2024-02/image-1707243924371.png)
1. In the **Inspection Date and Time** box, select the inspection date and time.
2. In the **Subcontractor** box, select a subcontractor from a drop-down list.
3. In the **Description** box, enter the description for the added RFI visual request.
Before saving the added RFI visual request , you must add equipment for the RFI Visual list request.
[](https://wiki.cuteinfocomm.com/uploads/images/gallery/2022-04/image-1651201027630.png)**Note**: You can add multiple Equipment for one request.
[](https://wiki.cuteinfocomm.com/uploads/images/gallery/2024-02/image-1707244063714.png)
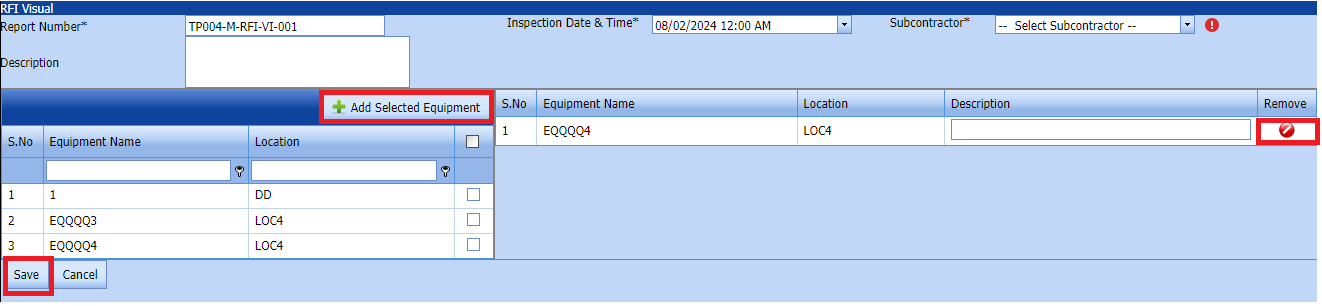
Click[](https://wiki.cuteinfocomm.com/uploads/images/gallery/2022-04/image-1651201285984.png) (Add Selected System) of the respective system you want to add.
The added equipment will be moved and listed in the right side of the page.
1. [](https://wiki.cuteinfocomm.com/uploads/images/gallery/2022-04/image-1651201433945.png) **Tip**: If you want to remove any added system, click [](https://wiki.cuteinfocomm.com/uploads/images/gallery/2022-04/image-1651201449656.png)(**Remove** icon) of the respective joint.
2. In the **Description** box, enter the description for the add RFI Visual.
3. Click **Save**.
The RFI Visual is successfully added.
##### **2.5.3.Edit a Visual RFI**
If you want to edit any existing Visual RFI request in the **list** page, do the following,
Click (Edit icon) in the **Edit** column for the respective Visual RFI Request. See Fig 2.4.3
[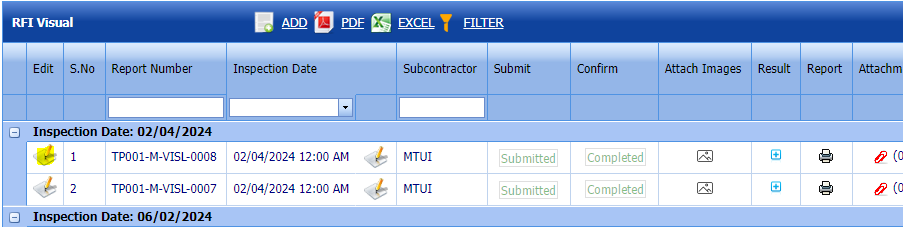](https://wiki.cuteinfocomm.com/uploads/images/gallery/2024-04/image-1712043970902.png)
The **Visual RFI Request page** opens with the details of the selected equipment list.
[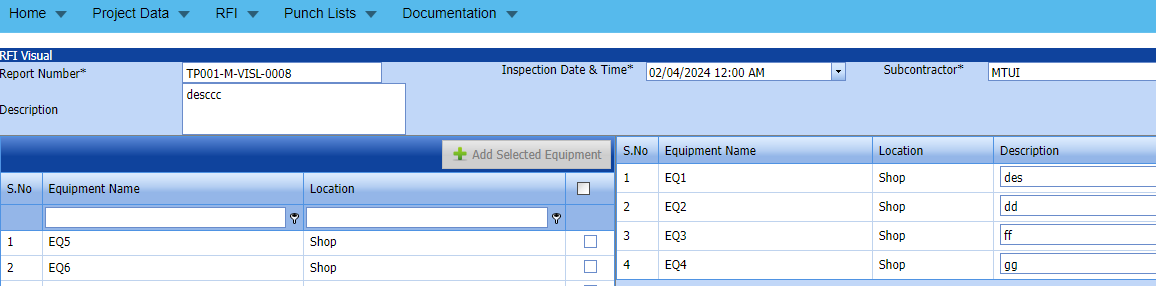](https://wiki.cuteinfocomm.com/uploads/images/gallery/2024-04/image-1712043995182.png)
Fig 2.4.3 Edit a Visual RFI Request Page
1. Add/remove any equipments
2. Click **Save**.Visual RFI request updated successfully.
#####
2.5.3 Submit RFI Visual request.**
Once you have added the RFI Visual request, the **Submit** column in the **RFI Visual request** page is appeared with[](https://wiki.cuteinfocomm.com/uploads/images/gallery/2022-04/image-1651201968441.png)(Submit and Reject icons).
[](https://wiki.cuteinfocomm.com/uploads/images/gallery/2024-03/image-1709456511252.png)
Fig 2.5.3 Submit RFI Visual Request
1. If you want to submit the RFI Visual request, click [](https://wiki.cuteinfocomm.com/uploads/images/gallery/2022-04/image-1651201981884.png)(Submit icon) in the **Submit** column. Otherwise click [](https://wiki.cuteinfocomm.com/uploads/images/gallery/2022-04/image-1651201995224.png)(Reject icon) to reject the request.
Once you have submitted the RFI Visual request, in the **Confirm** **Status** column in the **RFI Visual request List** page is appeared with[](https://wiki.cuteinfocomm.com/uploads/images/gallery/2022-04/image-1651202048663.png)(Confirm and Reject icons).
The submitted request will be moved to inspection.
##### **2.5.4 Approve RFI Visual request**
**cuteQM\_Licensee\_QA user only can approve the RFI request.**
1. If you want to approve the **RFI Torque Tightening request** , click[](https://wiki.cuteinfocomm.com/uploads/images/gallery/2022-04/image-1651203762346.png) (confirm icon) in the **Confirm Status** Otherwise click [](https://wiki.cuteinfocomm.com/uploads/images/gallery/2022-04/image-1651203792080.png) (Reject icon) to reject the request.
2. Once RFI Visual request approved [](https://wiki.cuteinfocomm.com/uploads/images/gallery/2024-01/image-1706614735279.png) icon will be enabled to put result. [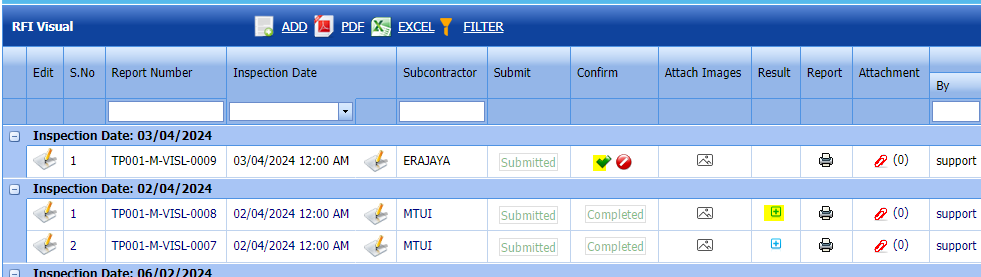](https://wiki.cuteinfocomm.com/uploads/images/gallery/2024-04/image-1712044094631.png)
3. Click icon [](https://wiki.cuteinfocomm.com/uploads/images/gallery/2024-01/image-1706632325743.png) result popup will open. [](https://wiki.cuteinfocomm.com/uploads/images/gallery/2024-03/image-1709450945110.png)
Fig 2.5.4 Approve RFI Visual request.
2. Click **Save**
3. RFI result is updated successfully.
4. If Accepted with comments given as result,then punch list will be created, and this will be shown in view punch list screen.
5. If need to upload documents against equipment, then click attachment icon at the result popup and upload document.
##### **2.5.5 Attach a images into a RFI Visual request.**
If you want to attach an image with any existing RFI Visual listed in the **RFI Visual request** page, you can attach the file by using[](https://wiki.cuteinfocomm.com/uploads/images/gallery/2024-03/image-1709451389767.png) (Attach icon) in the **Attach images** column.[](https://wiki.cuteinfocomm.com/uploads/images/gallery/2024-03/image-1709456565405.png)
New popup window will open. once you click Add icon  You can Attach images [](https://wiki.cuteinfocomm.com/uploads/images/gallery/2024-03/image-1709451659807.png)
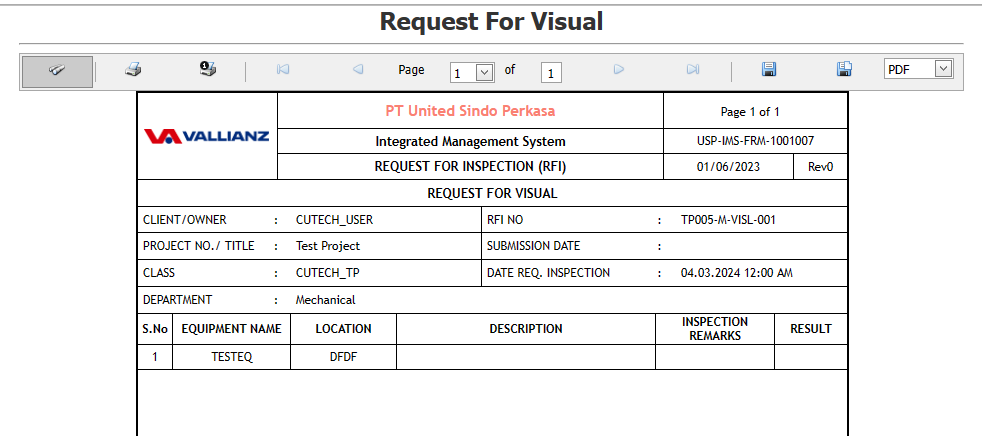
##### **2.5.6 Print a RFI Visual request**
If you want to view an RFI Visual report, click [](https://wiki.cuteinfocomm.com/uploads/images/gallery/2022-05/image-1651808508303.png) (print icon) provided in the **Report** column of the RFI Visual page.
**Signature of the production user and QC user will be shown in the report. Requestor signature mapped with Production user and Inspector signature mapped with QC .**
**[Click here to find the steps to upload Digital signature](https://wiki.cuteinfocomm.com/books/cuteqm/page/user-management-qg8#bkmrk-1.3%C2%A0%C2%A0%C2%A0%C2%A0%C2%A0%C2%A0%C2%A0%C2%A0%C2%A0%C2%A0-log-ou "Steps to upload Digital signature")**
[](https://wiki.cuteinfocomm.com/uploads/images/gallery/2024-03/image-1709456791451.png)
Fig 2.5.7 Print a RFI Visual request.
[](https://wiki.cuteinfocomm.com/uploads/images/gallery/2024-03/image-1709456830213.png)
[](https://wiki.cuteinfocomm.com/uploads/images/gallery/2024-08/image-1724246208568.png)
##### **2.5.7 Attach a File into a RFI Visual request.**
If you want to attach a file with any existing RFI listed in the **RFI Visual request** page, you can attach the file by using [](https://wiki.cuteinfocomm.com/uploads/images/gallery/2022-04/image-1651202499153.png) (Attach icon) in the **Attachment** column.
[](https://wiki.cuteinfocomm.com/uploads/images/gallery/2024-03/image-1709456083548.png)
New window will open. you can upload document's. [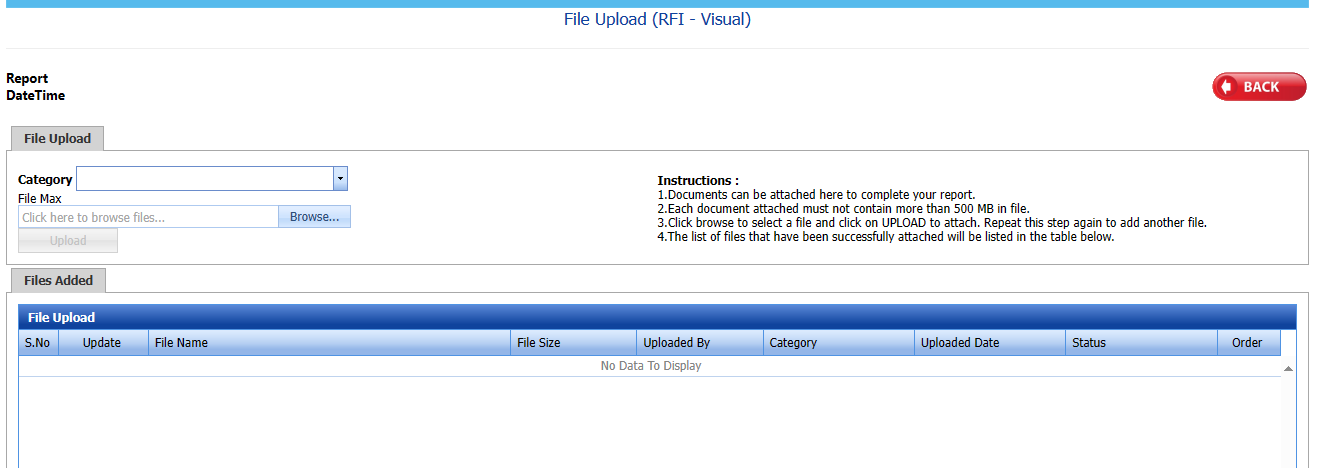](https://wiki.cuteinfocomm.com/uploads/images/gallery/2024-03/image-1709456915706.png)
##### **2.5.8 Export a RFI Visual**
You can export a list of RFI visual added in the **RFI Visual** page in both the pdf and excel formats by using [](https://wiki.cuteinfocomm.com/uploads/images/gallery/2022-04/image-1651202537414.png) (**PDF** button) and [](https://wiki.cuteinfocomm.com/uploads/images/gallery/2022-04/image-1651202548613.png) (**Excel** button).[](https://wiki.cuteinfocomm.com/uploads/images/gallery/2024-02/image-1707244665426.png)
Fig 2.5.8 Export a RFI Visual Page
##### **2.5.9 Filter a RFI Visual**
If you want to filter any specific RFI Machining in the **RFI Visual List** page,[](https://wiki.cuteinfocomm.com/uploads/images/gallery/2024-02/image-1707244828745.png) Fig 2.5.9 Filter RFI Visual Page
- you can use the filter box provided in the upper side of the **RFI Visual** to filter the any specific RFI visual and request, select the Report Number, Inspection Date, Subcontractor and **Date** in the boxes and click.
- you can use [](https://wiki.cuteinfocomm.com/uploads/images/gallery/2022-04/image-1651202662798.png) (**FILTER** button) located on the **RFI Visual**