# Materials
### **4.0 Materials**
The **Materials** menu in the home page of the ***cuteQM*** app used to add the material details such as material certificates, material inspection details, material import details, and material summary and traceability record.
The **Materials** menu appears with four options such as **Material Certificates, Material Import, Material Inspection,** and **Reports**. The **Material Certificates** option helps you to add material certificates details for the structural project.
The **Material Import** option helps you to bulk add the materials. The **Material Inspection** option helps you to add material receiving report, material inspection, and material verification report.
The **Reports** option used to add material traceability record and material summary by using heat number.
### **4.1 Material Certificates**
Mill Certificate is a certificate document of the steel industry, which is used to certify the product is produced by manufacturing standards of the mill. Once you have received the materials from the manufacturer, you must enter the details of materials.
The **Material Certificates (Mill Certificates)** tab used to add the received material details including mill certification ID and mill certification number. If you want to add material certificates, do the following,
1. Click **Material Certificates** in the **Materials** menu. The **Mill Certificates** page opens.
[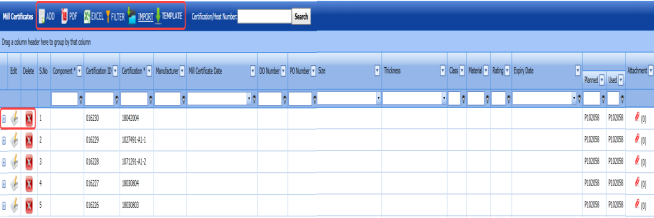](http://wiki.cuteinfocomm.com/uploads/images/gallery/2022-05/image-1651771516977.png)
**Figure 4.1: Mill Certificates page**
#### **4.1.1 Add a Material Certificate**
If you want to add a material certificate, do the following,
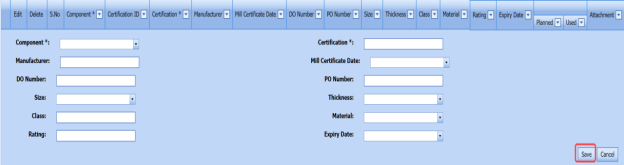
1. Click [](http://wiki.cuteinfocomm.com/uploads/images/gallery/2022-05/image-1651771611128.png) (**ADD** button) in the **Mill Certificates** page. See Fig 4.1. A new window opens to add a material certificate.
[](http://wiki.cuteinfocomm.com/uploads/images/gallery/2022-05/image-1651771631111.png)
[](http://wiki.cuteinfocomm.com/uploads/images/gallery/2022-05/image-1651771647910.png)**Note**: The field notified with a symbol (\*) is mandatory. You must enter the relevant details in that fields before saving.
2. In the **Component** box, select a component from a drop-down list.
3. In the **Certification** box, enter the certification number of the material.
4. In the **Manufacturer** box, enter the name of the manufacturer.
5. In the **Mill Certificate Date** box, choose the mill certificate date.
6. In the **Delivery Order (DO) Number** box, enter the delivery order number of the component.
7. In the **Purchase Order (PO)** **Number** box, enter the purchase order number of the component.
8. In the **Size** box, select the size of the received component.
9. In the **Thickness** box, select the thickness of the received component.
10. In the **Class** box, enter the class of the received component.
11. In the **Material** box, select the type of material the component is made from.
12. In the **Rating** box, enter the rating of the component.
13. In the **Expiry Date** box, choose the expiry date of the component.
14. Click **Save**.
The material certificate is successfully added. Once you have added the mill certificate, you must add heat numbers for the added component.
#### **4.1.2 Add Heat Numbers**
If you want to add heat numbers, do the following steps,
1. Click [](http://wiki.cuteinfocomm.com/uploads/images/gallery/2022-05/image-1651772075895.png) (Add icon) of the respective mill certificate.
The **Heat Numbers** box opens.
[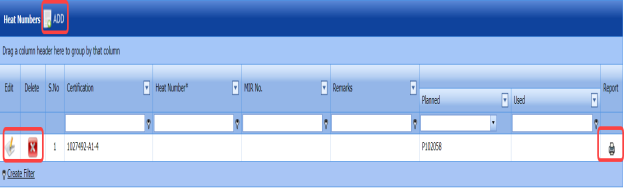](http://wiki.cuteinfocomm.com/uploads/images/gallery/2022-05/image-1651772092801.png)
**Figure 4.1.1: Heat Numbers page**
2. Click [](http://wiki.cuteinfocomm.com/uploads/images/gallery/2022-05/image-1651772349201.png) (****ADD**** button) in the ****Heat Numbers**** box. A new window opens to add the heat number.
[](http://wiki.cuteinfocomm.com/uploads/images/gallery/2022-05/image-1651772393572.png)
3. In the **planned Project** box, select a project you want from a drop-down list.
4. In the **Heat Number** box, enter the heat number.
5. In the **Remarks** box, enter your remarks if any.
6. Click **Save**.
#### **4.1.3 Edit Any Heat Number**
If you want to edit any existing heat numbers,
1. Click [ ](http://wiki.cuteinfocomm.com/uploads/images/gallery/2022-05/image-1651772557789.png)(Edit icon) in the **Edit** column for the respective heat number.
2. Click any box where you want to edit the details, and then edit the details in the respective box.
3. Click **Save**.
#### **4.1.4 Delete Any Heat Number**
If you want to delete any heat number, you can use [](http://wiki.cuteinfocomm.com/uploads/images/gallery/2022-05/image-1651772612576.png) (Delete icon) provided in the **Delete** column of the **Heat Numbers** page, See Fig 4.1.1.
1. Click [](http://wiki.cuteinfocomm.com/uploads/images/gallery/2022-05/image-1651772645737.png) (Delete icon) for the corresponding heat number. You receive a notification message “**Confirm delete?**”.
2. Click **OK**.
#### **4.1.5 Print a Material Consumption Report**
If you want to print a material consumption report, click [](http://wiki.cuteinfocomm.com/uploads/images/gallery/2022-05/image-1651772717663.png)(print icon) provided in the **Report** column. See Fig 4.1.1.
#### **4.1.6 Attach a File into a Mill Certificate**
If you want to attach any file with the mill certificates listed in the **Mill Certificates** page, follow the procedures given in the topic “[**Attach a file into a client master drawing**](http://wiki.cuteinfocomm.com/books/cuteqm/page/project-data-qXJ/#bkmrk-3.2.2%C2%A0attach-a-file-)” in the **Client Master Drawing** section.
#### **4.1.7 Edit Any Mill Certificates**
If you want to edit any existing mill certificate in the **Mill Certificates** page, do the following,
1. Click [](http://wiki.cuteinfocomm.com/uploads/images/gallery/2022-05/image-1651772903048.png)(Edit icon) in the **Edit** column for the respective mill certificate. See Fig 4.1. A new window opens to edit the mill certificate.
2. Click any box where you want to edit the details, and then edit the details in the respective box.
3. Click **Save**.
#### **4.1.8 Delete Any Mill Certificate**
If you want to delete any specific mill certificate from the list of mill certificates, you can use [](http://wiki.cuteinfocomm.com/uploads/images/gallery/2022-05/image-1651772978730.png) (Delete icon) provided in the **Delete** column of the **Mill Certificates** page. To know how to delete, see the topic, “**Delete Any Area**”.
#### **4.1.9 Export Mill Certificates List**
You can export a list of mill certificates added in the **Mill Certificates** page in the pdf and excel formats. To know how to export, see the topic, “[**Export Areas list**](http://wiki.cuteinfocomm.com/books/cuteqm/page/project-data-qXJ/#bkmrk-3.1.4%C2%A0export-areas-l)” in the **Area** option.
#### **4.1.10 Filter Any Mill Certificate**
If you want to filter any mill certificate from the list of mill certificates in the **Mill Certificates** page, you can use the [](http://wiki.cuteinfocomm.com/uploads/images/gallery/2022-05/image-1651773528678.png)(**FILTER** button). To know how to filter, see the topic, ”**Filter Any Area**”.
#### **4.1.11 Import Multiple Mill Certificates**
If you want to import multiple mill certificates together, do the following,
1. Click (**TEMPLATE** button) on the **Mill Certificates** page. See Fig 4.1. A template will be downloaded as an excel worksheet to enter the details of multiple mill certificates.
[](http://wiki.cuteinfocomm.com/uploads/images/gallery/2022-05/image-1651773684895.png)
2. Enter the relevant details in the required columns on the excel worksheet.
3. Once you have added the mill certificates details in the excel worksheet, save the excel worksheet on your computer.
4. Click [](http://wiki.cuteinfocomm.com/uploads/images/gallery/2022-05/image-1651773727999.png) (**IMPORT** button). See Fig 4.1.
A new window opens for importing the excel worksheet saved on your computer.
[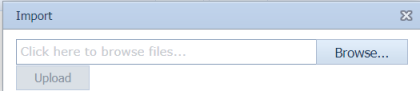](http://wiki.cuteinfocomm.com/uploads/images/gallery/2022-05/image-1651773747649.png)
5. Click [](http://wiki.cuteinfocomm.com/uploads/images/gallery/2022-05/image-1651773772350.png) (**Browse** button) to select the excel worksheet to be uploaded.
6. Select the excel worksheet you want to upload from your computer.
7. Click [](http://wiki.cuteinfocomm.com/uploads/images/gallery/2022-05/image-1651773919523.png) (**Upload** button) to export the mill certificates that are included in the excel worksheet.
The details of the mill certificates in the worksheet will be displayed in the **Mill Certificates**
### **4.2 Material Take Off**
Material Take Off ((MTO) report refers to a list of a materials including quantities and grades that are required in the structural project.
The **Material Take Off** tab helps you to add an MTO report. If you want to add an MTO report, do the following,
1. Click the **Material Take Off** tab in the **Materials** menu. The **MTO Report** page opens.
[](http://wiki.cuteinfocomm.com/uploads/images/gallery/2022-05/image-1651774231233.png)
**Figure 4.2: MTO Report page**
#### **4.2.1 Add an MTO Report**
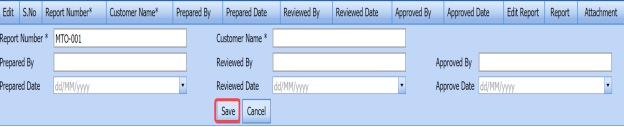
1. Click [](http://wiki.cuteinfocomm.com/uploads/images/gallery/2022-05/image-1651774833807.png) (**ADD** button) in the **MTO Report** page. See Fig 4.2. A new window opens to add an MTO report.
[](http://wiki.cuteinfocomm.com/uploads/images/gallery/2022-05/image-1651774856090.png)
[](http://wiki.cuteinfocomm.com/uploads/images/gallery/2022-05/image-1651774872306.png) **Note**: The fields notified with a symbol (\*) are mandatory. You must enter the relevant details in that fields before saving.
[](http://wiki.cuteinfocomm.com/uploads/images/gallery/2022-05/image-1651774896045.png)**Tip**: A report number for a new MTO report will be updated automatically in the **Report Number** box.
2. In the **Customer Name** box, select the name of a customer.
3. In the **Prepared By** box, enter the name of a person who has prepared the MTO report.
4. In the **Reviewed By** box, enter the name of a person who has reviewed the MTO report.
5. In the **Approved By** box, enter the name of a person who has approved the MTO report.
6. In the **Prepared Date** box, choose the prepared date of the MTO report.
7. In the **Reviewed Date** box, choose the reviewed date of the MTO report.
8. In the **Approved Date** box, choose the approved date of the MTO report.
9. Click **Save**.
The MTO report is successfully added. Once you have added the MTO report, you must add the material details for the added report.
#### **4.2.2 Add Material Details**
1. Click [](http://wiki.cuteinfocomm.com/uploads/images/gallery/2022-05/image-1651774992665.png)(Edit icon) in the **Edit Report** column of the **MTO Report** See Fig 4.2. The **Report Parameters** box opens.
[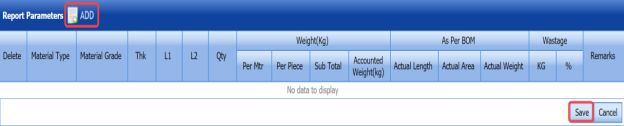](http://wiki.cuteinfocomm.com/uploads/images/gallery/2022-05/image-1651775008334.png)
2. Click [](http://wiki.cuteinfocomm.com/uploads/images/gallery/2022-05/image-1651775024992.png) (**ADD** button) in the **Report Parameters** box.
A new window opens in the **Material Type** column.
3. Enter the material name in the **Material Type** column.
4. Enter the grade of the material in the **Material Grade** column.
5. Enter the relevant details in the respective columns of the **Report Parameters** box.
6. Click **Save**.
[](http://wiki.cuteinfocomm.com/uploads/images/gallery/2022-05/image-1651775066443.png) **Tip**: If you want to delete the added material details, click [](http://wiki.cuteinfocomm.com/uploads/images/gallery/2022-05/image-1651775088982.png) (Delete icon) provided in the **Delete** column of the **Report Parameters** box.
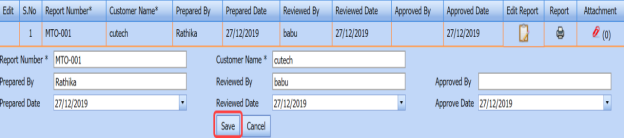
#### **4.2.3 Edit Any MTO Reports**
If you want to edit any existing MTO report in the **MTO Report** page, do the following,
1. Click [](http://wiki.cuteinfocomm.com/uploads/images/gallery/2022-05/image-1651775146278.png)(Edit icon) in the ****Edit**** column for the respective ****MTO Report**** See Fig 4.2. A new window opens to edit the MTO report.
[](http://wiki.cuteinfocomm.com/uploads/images/gallery/2022-05/image-1651775171167.png)
2. Click any box where you want to edit the details, and then edit the details in the respective box.
3. Click **Save**.
#### **4.2.4 Attach a File into an MTO Report**
If you want to attach any file with the MTO reports listed in the **MTO Report** page, follow the procedures given in the topic “[**Attach a file into a client master drawing**](http://wiki.cuteinfocomm.com/books/cuteqm/page/project-data-qXJ/#bkmrk-3.2.2%C2%A0attach-a-file-)” in the **Client Master Drawing** section.
#### **4.2.5 Print an MTO Report**
If you want to print an MTO report, click [](http://wiki.cuteinfocomm.com/uploads/images/gallery/2022-05/image-1651775665751.png) (print icon) provided in the **Report** column of the **MTO Report** page. See Fig 4.2.
#### **4.2.6 Export MTO Reports**
You can export a list of MTO reports added in the **MTO Report** page. To know how to export, see the topic, “[**Export Areas list**](http://wiki.cuteinfocomm.com/books/cuteqm/page/project-data-qXJ/#bkmrk-3.1.4%C2%A0export-areas-l)” in the **Area** option.
### **4.3 Material Receiving and Inspection (Heat Numbers)**
Material Receiving Inspection validates quality of purchased raw materials based on set acceptance criteria before the materials are used for the Structural project.
The **Material Receiving and Inspection** tab in the **Materials** menu helps you to add an incoming material inspection report (MIR). Incoming MIR includes material name, material size, material specification, heat numbers, and material type.
If you want to add an incoming MIR, do the following,
1. Click **Material Receiving and Inspection** in the **Materials** menu. The **Incoming Material Inspection Report** page opens.
[](http://wiki.cuteinfocomm.com/uploads/images/gallery/2022-05/image-1651775803783.png)
**Figure 4.3: Incoming Material Inspection Report page**
#### **4.3.1 Add an Incoming MIR**
If you want to add an incoming MIR,
1. Click [](http://wiki.cuteinfocomm.com/uploads/images/gallery/2022-05/image-1651775866163.png) (**ADD** button) in the **Incoming Material Inspection Report** See Fig 4.3. A new window opens to add an incoming MIR.
[](http://wiki.cuteinfocomm.com/uploads/images/gallery/2022-05/image-1651775876891.png)
[](http://wiki.cuteinfocomm.com/uploads/images/gallery/2022-05/image-1651775887800.png) **Note**: The fields notified with a symbol (\*) are mandatory. You must enter the relevant details in that fields before saving.
[](http://wiki.cuteinfocomm.com/uploads/images/gallery/2022-05/image-1651775901856.png)**Tip**: A report number and a Request for Inspection (RFI) number for a new MIR will be updated automatically in the **Report Number** and the **RFI Number** boxes, respectively.
2. In the **Delivery Order Number** box, enter the material’s delivery order number.
3. If the materials are received from a client, select the **MUHIBBAH Incoming Materials** option, and then enter the relevant details in the respective boxes.
[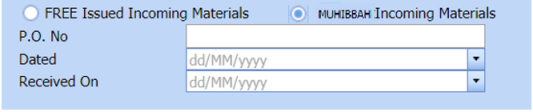](http://wiki.cuteinfocomm.com/uploads/images/gallery/2022-05/image-1651775937291.png)
1. 1. In the **P.O. No** box, enter the purchase order number.
2. In the **Dated** box, choose the date of the purchase order.
3. In the **Received On** box, select the received date of materials.
4. If the materials are purchased from outside, select the ****FREE Issued Incoming Materials**** option, and then enter the relevant details in the respective boxes. [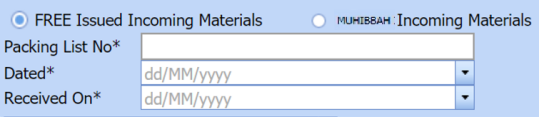](http://wiki.cuteinfocomm.com/uploads/images/gallery/2022-05/image-1651776012317.png)
1. 1. In the **Packing List No** box, enter the packing list number.
2. In the **Dated** box, choose the date of packing.
3. In the **Received On** box, choose the received date of materials.
5. In the **Inspection Date** box, choose the date of inspection.
6. In the **Vendor Name** box, enter the vendor name.
7. In the **Request Description** box, enter the request description.
8. In the **ITP Number** box, select an ITP number.
9. In the **Delivery Note** box, enter the delivery note.
10. In the **Location** box, enter the location name.
11. In the **Sub Contractor** box, select the subcontractor name from a drop-down list.
12. Click **Save**.
The incoming MIR is successfully added. Once you have added the MIR, you must add the material details for the added MIR.
#### **4.3.2 Add Materials for an Incoming MIR**
If you want to add the details of materials for the added incoming MIR, do the following steps,
1. Click [](http://wiki.cuteinfocomm.com/uploads/images/gallery/2022-05/image-1651776146029.png) (Edit icon) in the **Edit MIR** column of the **Incoming Material Inspection Report** See Fig 4.3. The **Add/Edit - Materials** window opens.
[](http://wiki.cuteinfocomm.com/uploads/images/gallery/2022-05/image-1651776160778.png)
**Figure 4.3.1: Add/Edit – Materials window**
2. Click [](http://wiki.cuteinfocomm.com/uploads/images/gallery/2022-05/image-1651776188690.png) (**ADD** button) in the **Add/Edit - Materials** window.
A new window opens to add the material details.
[](http://wiki.cuteinfocomm.com/uploads/images/gallery/2022-05/image-1651776202338.png)
[](http://wiki.cuteinfocomm.com/uploads/images/gallery/2022-05/image-1651776212521.png)**Note**: The fields notified with a symbol (\*) are mandatory. You must enter the relevant details in that fields before saving.
3. In the **Material Description** box, enter the material description.
4. In the **Material** **Size** box, select the size of the material.
5. In the **Material Specification** box, enter the material specification.
6. In the **Material Type** box, enter the type of the material.
7. In the **Quantity Required** box, enter the required quantity of the material.
8. In the **Item No** box, enter the item number.
9. In the **Weight** box, enter the weight of the material.
10. In the **Component** box, select a component.
11. Click **Update**.
Once you have added the material details, you must add the heat numbers for the added materials.
#### **4.3.3 Add Heat Numbers**
1. Click [](http://wiki.cuteinfocomm.com/uploads/images/gallery/2022-05/image-1651776294719.png) (Add icon) of the respective material in the **Add/Edit - Materials** See Fig 4.3.1. The **Heat Numbers** window opens.
[](http://wiki.cuteinfocomm.com/uploads/images/gallery/2022-05/image-1651776313050.png)
2. Click [](http://wiki.cuteinfocomm.com/uploads/images/gallery/2022-05/image-1651776552695.png) (**ADD** button) in the **Heat Numbers** window.
A new window opens to add a heat number.
[](http://wiki.cuteinfocomm.com/uploads/images/gallery/2022-05/image-1651776579466.png)
3. In the **Heat Number/Certificates** box, select the heat number from a drop-down list.
4. In the ****Plate Number/Coil Number/ Tag Number**** box, enter the plate number or coil number or tag number of the material.
5. In the **Delivery Quantity (Total)** box, enter the total delivery quantity of the material including UOM.
6. In the **Delivery Quantity (Partial)** box, enter the partial delivery quantity of the material including UOM.
7. In the **Dimensions** option, select **Accepted** or **Rejected** based on the inspection detail.
8. In the **Visual** option, select **Accepted** or **Rejected** based on the inspection detail.
9. In the **Mill Test Certificates (MTC)** option, select **Accepted** or **Rejected** based on the inspection detail.
10. In the **Remarks** box, enter your remarks if any.
11. If the heat treatment is required for the material, select ****YES**** in the ****Heat Treatment**** Otherwise select ****NO****.
12. In the NDE is required for the material, select **YES** in the **NDE** option. Otherwise select **NO**.
13. Click **Update.**
[](http://wiki.cuteinfocomm.com/uploads/images/gallery/2022-05/image-1651776667259.png) **Note**: If you want to manage the review material TC, click [](http://wiki.cuteinfocomm.com/uploads/images/gallery/2022-05/image-1651776689133.png) (Add icon). The Review Material TC window opens to add the material checklist detail.
#### **4.3.4 Add MIR Details**
If you want to add the details of MIR,
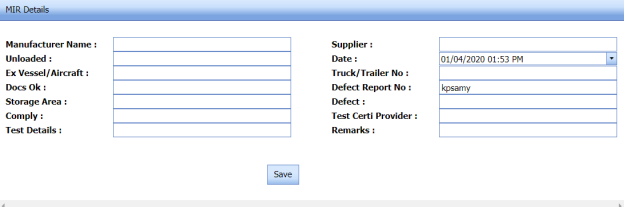
1. Click [](http://wiki.cuteinfocomm.com/uploads/images/gallery/2022-05/image-1651776763148.png) (Add icon) in the **Add** See Fig 4.3. The **MIR Details** window opens.
[](http://wiki.cuteinfocomm.com/uploads/images/gallery/2022-05/image-1651776778783.png)
2. In the **Manufacturer** Name box, enter the manufacturer name.
3. In the **Supplier** box, enter the supplier name.
4. In the **Unloaded** box, enter the unloaded detail.
5. In the **Date** box, select the date of MIR.
6. In the **Truck/Trailer No** box, enter the truck/trailer number.
7. In the **Defect Report No** box, enter the defect report number.
8. In the **Storage Area** box, enter the storage area name.
9. In the **Defect** box, enter the defect detail.
10. In the **Remarks** box, enter your remarks if any.
11. Click **Save**.
#### **4.3.5 Print an Incoming MIR Report**
If you want to print an incoming MIR report, click [](http://wiki.cuteinfocomm.com/uploads/images/gallery/2022-05/image-1651776907903.png) (print icon) provided in the **Report** column of the **Incoming Material Inspection Report** page. See Fig 4.3.
#### **4.3.6 Print a Report with MTC**
If you want to print an incoming MIR report including MTC, click[](http://wiki.cuteinfocomm.com/uploads/images/gallery/2022-05/image-1651776939228.png) (print icon) provided in the **Report** **with MTC** column of the **Incoming Material Inspection Report** page. See Fig 4.3.
#### **4.3.7 Print a Report Raw Material Offer List**
If you want to print a report raw material offer list, click [](http://wiki.cuteinfocomm.com/uploads/images/gallery/2022-05/image-1651776978589.png) (print icon) provided in the **Report** **Raw Material Offer List** column of the **Incoming Material Inspection Report** page. See Fig 4.3.
#### **4.3.8 Print a MIR Summary Report**
If you want to print a MIR summary report, click (print icon) provided in the upper side of the **Incoming Material Inspection Report** page. See Fig 4.3.
#### **4.3.9 Attach a File into an Added Incoming MIR**
If you want to attach any file with any incoming MIR listed in the **Incoming Material Inspection Report** page. To know how to attach, follow the procedures given in the topic “[**Attach a file into a client master drawing**](http://wiki.cuteinfocomm.com/books/cuteqm/page/project-data-qXJ/#bkmrk-3.2.2%C2%A0attach-a-file-)”.
#### **4.3.10 Edit Any Incoming MIR**
If you want to edit any existing incoming MIR in the **Incoming Material Inspection Report** page, do the following,
1. Click [](http://wiki.cuteinfocomm.com/uploads/images/gallery/2022-05/image-1651777154026.png)(Edit icon) in the **Edit** column for the respective MIR. See Fig 4.3. A new window opens to edit the added incoming MIR.
2. Click any box where you want to edit the details, and then edit the details in the respective box.
3. Click **Save**.
#### **4.3.11 Filter Any Incoming MIR**
If you want to filter any incoming MIR from the list of MIRs in the **Incoming Material Inspection Report** page,
- you can use the request status wise filter box [](http://wiki.cuteinfocomm.com/uploads/images/gallery/2022-05/image-1651777239636.png) provided in the upper side of the **Incoming Material Inspection Report**
- You can also use [](http://wiki.cuteinfocomm.com/uploads/images/gallery/2022-05/image-1651777252360.png) (****FILTER**** button) located on the ****Incoming Material Inspection Report** To know how to filter, see the topic, ”****Filter Any Area****”.
#### **4.3.12 Export Incoming MIR list**
You can export a list of MIR added in the **Incoming Material Inspection Report** page in the pdf and excel formats by using [](http://wiki.cuteinfocomm.com/uploads/images/gallery/2022-05/image-1651777286334.png) (**PDF** button) and [](http://wiki.cuteinfocomm.com/uploads/images/gallery/2022-05/image-1651777297552.png) (**Excel** button). To know how to export, see the topic, “[**Export Areas list**](http://wiki.cuteinfocomm.com/books/cuteqm/page/project-data-qXJ/#bkmrk-3.1.4%C2%A0export-areas-l)”.
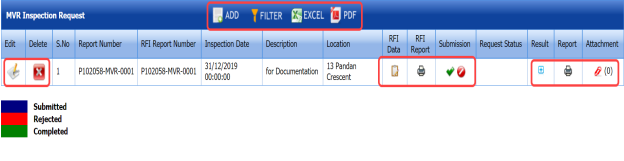
### **4.4 Material Verification Report (MVR) (Heat Numbers)**
MVR will be used while go for material inspection. The **Material Verification Report** tab in the **Materials** menu helps you to add an MVR inspection request. If you want to add an MVR inspection request, do the following steps,
1. Click **Material Verification Report** in the **Materials** menu. The **MVR Inspection Request** page opens.
[](http://wiki.cuteinfocomm.com/uploads/images/gallery/2022-05/image-1651777346632.png)
**Figure 4.4: MVR Inspection Request page**
#### **4.4.1 Add an MVR Inspection Request**
If you want to add an MVR inspection request,
1. Click [ ](http://wiki.cuteinfocomm.com/uploads/images/gallery/2022-05/image-1651777400149.png) (**ADD** button) in the **MVR Inspection Request** See Fig 4.4. A new window opens to add an MVR inspection request.
[](http://wiki.cuteinfocomm.com/uploads/images/gallery/2022-05/image-1651777425573.png)
[](http://wiki.cuteinfocomm.com/uploads/images/gallery/2022-05/image-1651777433487.png) **Note**: The fields notified with a symbol (\*) are mandatory. You must enter the relevant details in that fields before saving.
[](http://wiki.cuteinfocomm.com/uploads/images/gallery/2022-05/image-1651777449029.png)**Tip**: A report number and an RFI report number for a new MVR will be updated automatically in the **Report Number** and the **RFI Report Number** boxes, respectively.
2. In the **Inspection Date** box, choose the date of inspection.
3. In the **Description** box, enter the description for the MVR.
4. In the **Location** box, select a location from a drop-down list.
5. Click **Save**.
The MVR is successfully added. Once you have added the MVR, you must add the RFI data for the added MVR.
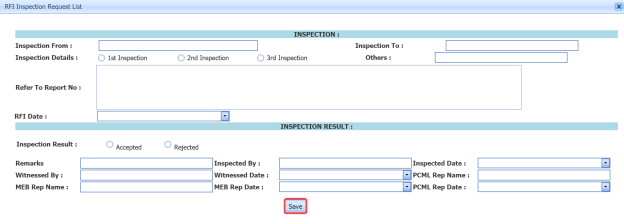
#### **4.4.2 Add RFI Data for an Added MVR Inspection Request**
If you want to add the details of RFI data for the added MVR inspection request, do the following,
1. Click [](http://wiki.cuteinfocomm.com/uploads/images/gallery/2022-05/image-1651777532538.png)(Edit icon) in the **RFI Data** column of the **MVR Inspection Request** See Fig 4.4. The **RFI Inspection Request List** window opens.
[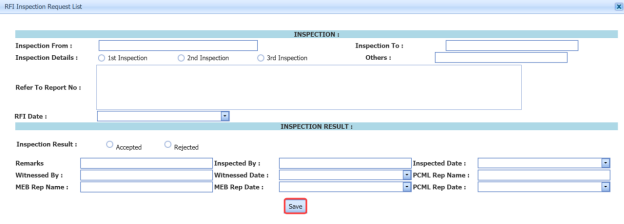](http://wiki.cuteinfocomm.com/uploads/images/gallery/2022-05/image-1651777882034.png)
2. In the ****Inspection From**** box, enter the detail from where the inspection should start.
3. In the **Inspection To** box, enter the detail to where the inspection should end.
4. In the **Inspection Details** option, select 1st Inspection, 2nd Inspection or 3rd Inspection according to the inspection details.
5. In the **Others** box, enter any other inspection related details.
6. In the **Refer to Report No** box, enter the report number for reference.
7. In the **RFI Date** box, choose the RFI date.
8. In the ****Inspection Result**** option, if the inspection result is accepted, select ****Accepted**** otherwise select ****Rejected****.
9. In the **Remarks** box, enter your remarks if any.
10. In the **Inspected by** box, enter the name of a person who has done inspection.
11. In the **Inspected Date** box, choose the date of inspection.
12. In the **Witnessed By** box, enter the name of the witnessed person.
13. In the **Witnessed Date** box, choose the date of witnessed.
14. In the **PCML Rep Name** box, enter the representative name of PCML.
15. In the **PCML Rep Date** box, choose the PCML rep date.
16. In the **MEB Rep Name** box, enter the representative name of MEB.
17. In the **MEB Rep Date box**, choose MEB rep date.
18. Click **Save**.
Once you have added the RFI data, you must add the result for the added MVR inspection request.
#### **4.4.3 View an RFI Report**
If you want to print an RFI report, click [](http://wiki.cuteinfocomm.com/uploads/images/gallery/2022-05/image-1651778186115.png) (print icon) provided in the **RFI** **Report** column of the **MVR Inspection Request** page. See Fig 4.4.
#### **4.4.4 Add Result for an Added MVR Inspection Request**
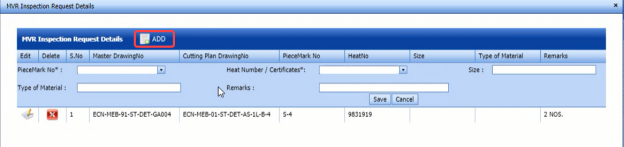
1. Click [](http://wiki.cuteinfocomm.com/uploads/images/gallery/2022-05/image-1651778219043.png) (Add icon) of the respective report number. The **MVR Inspection Request Details** window opens.
[](http://wiki.cuteinfocomm.com/uploads/images/gallery/2022-05/image-1651778237598.png)
2. Click [](http://wiki.cuteinfocomm.com/uploads/images/gallery/2022-05/image-1651778259381.png) (**ADD** button) in the **MVR Inspection Request Details** window. A new window opens to add result.
[](http://wiki.cuteinfocomm.com/uploads/images/gallery/2022-05/image-1651778267465.png)
3. In the **Piece Mark No** box, select the piece mark number from a drop-down list.
4. In the **Heat Number / Certificates** box, select the heat number from a drop-down list.
5. In the **Size** box, enter the size of the material.
6. In the **Type of Material** box, enter the type of material.
7. In the **Remarks** box, enter your remarks if any.
8. Click **Save**.
Once you have added the result for the MVR inspection request, you must submit and approve the MVR inspection request.
#### **4.4.5 Submit and Approve an MVR Inspection Report**
Once you have added the result, the **Submission** column in the **MVR Inspection Request** page is appeared with[](http://wiki.cuteinfocomm.com/uploads/images/gallery/2022-05/image-1651778360135.png) (Submit and Reject icons).
1. If you want to submit the MVR inspection request, click [](http://wiki.cuteinfocomm.com/uploads/images/gallery/2022-05/image-1651778413877.png)(Submit icon) in the **Submission** Otherwise click [](http://wiki.cuteinfocomm.com/uploads/images/gallery/2022-05/image-1651778423778.png) (Reject icon) to reject the request. Once you have submitted the MVR inspection request, the **Request Status** column in the **MVR Inspection Request** page is appeared with (Accept and Reject icons).
2. If you want to approve the MVR inspection request, click [](http://wiki.cuteinfocomm.com/uploads/images/gallery/2022-05/image-1651778460336.png) (Submit icon) in the ****Request Status**** Otherwise click [](http://wiki.cuteinfocomm.com/uploads/images/gallery/2022-05/image-1651778472369.png) (Reject icon) to reject the request.
#### **4.4.6 Print an MVR Inspection Report**
If you want to print an MVR inspection report, click [](http://wiki.cuteinfocomm.com/uploads/images/gallery/2022-05/image-1651778518861.png) (print icon) in the **Report** column of the **MVR Inspection Request** page. See Fig 4.4.
#### **4.4.7 Attach a File into an MVR Inspection Request**
If you want to attach any file with an existing MVR inspection request listed in the **MVR Inspection Request** page, you can attach the file by using [](http://wiki.cuteinfocomm.com/uploads/images/gallery/2022-05/image-1651778577305.png) (Attach icon) in the **Attachment** column. To know how to attach, follow the procedures given in the topic “[**Attach a file into a client master drawing**](http://wiki.cuteinfocomm.com/books/cuteqm/page/project-data-qXJ/#bkmrk-3.2.2%C2%A0attach-a-file-)”.
#### **4.4.8 Edit Any MVR Inspection Request**
If you want to edit any existing MVR inspection request in the **MVR Inspection Request** page, do the following,
1. Click [](http://wiki.cuteinfocomm.com/uploads/images/gallery/2022-05/image-1651778630941.png) (Edit icon) in the **Edit** column for the respective MVR inspection request. See Fig 4.4. A new window opens to edit the MVR inspection request.
2. Click any box where you want to edit the details, and then edit the details in the respective box.
3. Click **Save**.
#### **4.4.9 Filter Any MVR Inspection Request**
If you want to filter any MVR request from the list of requests in the **MVR Inspection Request** page, you can use [](http://wiki.cuteinfocomm.com/uploads/images/gallery/2022-05/image-1651778749912.png)(**FILTER** button). To know how to filter, see the topic, ”**Filter Any Area**”.
#### **4.4.10 Export MVR Inspection Request List**
You can export a list of MVR inspection requests added in the **MVR Inspection Request** page in the pdf and excel formats by using [](http://wiki.cuteinfocomm.com/uploads/images/gallery/2022-05/image-1651778797039.png) (**PDF** button) and [](http://wiki.cuteinfocomm.com/uploads/images/gallery/2022-05/image-1651778807609.png) (**Excel** button). To know how to export, see the topic, “[**Export Areas list**](http://wiki.cuteinfocomm.com/books/cuteqm/page/project-data-qXJ/#bkmrk-3.1.4%C2%A0export-areas-l)”.
### **4.5 Welding Consumable Register List**
Welding Consumables are products used to create strong joints between two or more parts while welding. Welding Consumable are segmented based on welding technique, welding consumable type, end-use industry, and region.
The **Welding Consumable Register List tab** in the **Materials** menu used to add a weld consumable list. If you want to add a welding consumable list, do the following,
1. Click the **Welding Consumable Register List** tab in the **Materials** menu. The **Welding Consumable Register List** page opens.
[](http://wiki.cuteinfocomm.com/uploads/images/gallery/2022-05/image-1651778866330.png)
**Figure 4.5: Welding Consumable Register List page**
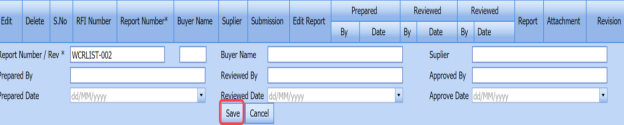
#### **4.5.1 Add a Welding Consumable List**
If you want to add a welding consumable list, do the following,
1. Click [](http://wiki.cuteinfocomm.com/uploads/images/gallery/2022-05/image-1651778915268.png) (**ADD** button) in the **Welding Consumable Register List** See Fig 4.5. A new window opens to add a welding consumable list.
[](http://wiki.cuteinfocomm.com/uploads/images/gallery/2022-05/image-1651778929256.png)
[](http://wiki.cuteinfocomm.com/uploads/images/gallery/2022-05/image-1651778940121.png)**Note**: The field notified with a symbol (\*) is mandatory. You must enter the relevant details in that field before saving.
[](http://wiki.cuteinfocomm.com/uploads/images/gallery/2022-05/image-1651778955652.png) **Tip**: A report number for a new welding consumable list will be updated automatically in the **Report Number** **/ Rev** box.
2. In the **Buyer Name** box, enter the name of a buyer.
3. In the **Supplier** box, enter the name of a supplier of welding consumables.
4. In the ****Prepared By**** box, enter the name of a person who has prepared the welding consumable list.
5. In the ****Reviewed By**** box, enter the name of a person who has reviewed the welding consumable list.
6. In the ****Approved By**** box, enter the name of a person who has approved the welding consumable list.
7. In the ****Prepared Date**** box, choose the prepared date of the welding consumable list.
8. In the **Reviewed Date** box, choose the reviewed date of the welding consumable list.
9. In the ****Approved Date**** box, choose the approved date of the welding consumable list.
10. Click **Save**.
The welding consumable register list is successfully added. Once you have added the register list, you must add the consumable details for the added register list.
[](http://wiki.cuteinfocomm.com/uploads/images/gallery/2022-05/image-1651779051382.png)**Tip**: If you want to add a copy of added welding consumable register list, click **Revision** in the **Revision** column of the **Welding Consumable Register List** page.
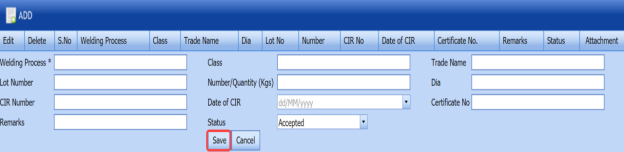
#### **4.5.2 Add Welding Consumable Details for Added Consumable List**
If you want to add the details of welding consumables for the added list, do the following,
1. Click [](http://wiki.cuteinfocomm.com/uploads/images/gallery/2022-05/image-1651779097119.png)(Edit icon) in the **Edit Report** column of the **Welding Consumable Register List** See Fig 4.5. A new window opens to add the welding consumable details.
[](http://wiki.cuteinfocomm.com/uploads/images/gallery/2022-05/image-1651779113070.png)
2. In the **Welding Process** box, enter the type of welding process.
3. In the **Class** box, enter the class of welding consumable.
4. In the **Trade Name** box, enter the trade name of welding consumable.
5. In the **Lot Number** box, enter the lot number of the welding consumable.
6. In the **Number / Quantity (Kgs)** box, enter the number or quantity of the welding consumable.
7. In the **Dia** box, enter the diameter of the welding consumable.
8. In the **CIR Number** box, enter the CIR number of the welding consumable.
9. In the **Date of CIR** box, select the date of CIR.
10. In the **Certificate No** box, enter the certificate number.
11. In the **Remarks** box, enter your remarks if any
12. In the **Status** box, select **Accepted**, **Rejected** or **Hold** from a drop-down list.
13. Click **Save**.
Once you have added the welding consumable details, you must add the result for the added consumable list.
#### **4.5.3 Submit a Welding Consumable List**
Once you have added the welding consumable details, the **Submission** column in the **Welding Consumable Register List** page is appeared with[](http://wiki.cuteinfocomm.com/uploads/images/gallery/2022-05/image-1651779641885.png) (Submit and Reject icons).
1. If you want to submit the welding consumable list, click [](http://wiki.cuteinfocomm.com/uploads/images/gallery/2022-05/image-1651779662146.png)(Submit icon) in the **Submission** Otherwise click [](http://wiki.cuteinfocomm.com/uploads/images/gallery/2022-05/image-1651779673971.png)(Reject icon) to reject the request.
#### **4.5.4 Print a Welding Consumable Report**
If you want to print a welding consumable report, click (print icon) in the **Report** column of the **Welding Consumable Register List** page. See Fig 4.5.
#### **4.5.5 Attach a File into a Welding Consumable Register List**
If you want to attach any file with any welding consumable register list in the **Welding Consumable Register List** page, follow the procedures given in the topic “[**Attach a file into a client master drawing**](http://wiki.cuteinfocomm.com/books/cuteqm/page/project-data-qXJ/#bkmrk-3.2.2%C2%A0attach-a-file-)” in the **Client Master Drawing** section.
#### **4.5.6 Edit Any Welding Consumable Register List**
If you want to edit any existing welding consumable register list in the **Welding Consumable Register List** page, do the following,
1. Click [](http://wiki.cuteinfocomm.com/uploads/images/gallery/2022-05/image-1651779906526.png)(Edit icon) in the **Edit** column for the respective welding consumable register list. See Fig 4.5. A new window opens to edit the welding consumable register list.
2. Click any box where you want to edit the details, and then edit the details in the respective box.
3. Click **Save**.
#### **4.5.7 Export Welding Consumable Register List**
You can export a list of welding consumable register list added in the **Welding consumable Register List** page in the pdf and excel formats. To know how to export, see the topic, “[**Export Areas list**](http://wiki.cuteinfocomm.com/books/cuteqm/page/project-data-qXJ/#bkmrk-3.1.4%C2%A0export-areas-l)” in the **Area** option.
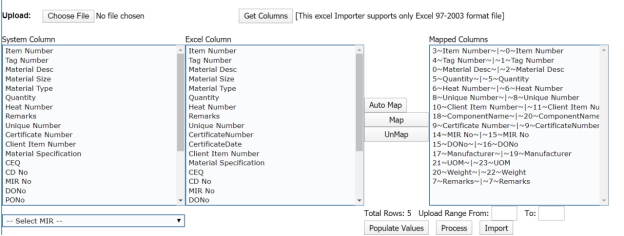
### **4.6 Import Materials**
The **Import from Excel - Materials** tab helps you to upload various data related to materials for different fields included in the **Materials** menu instead of uploading data for each field individually.
If you want to import data for different fields, do the following,
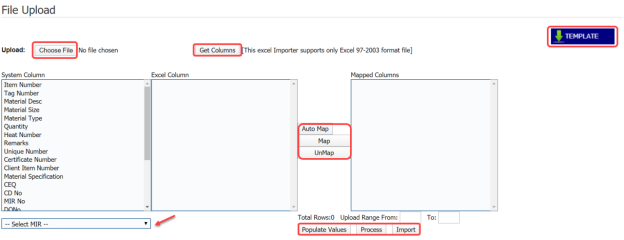
1. Click the **Import from Excel – Materials** tab in the **Materials** menu. The **File Upload** page opens.
[](http://wiki.cuteinfocomm.com/uploads/images/gallery/2022-05/image-1651780410958.png)
2. Download a template by using the (**TEMPLATE** button) to enter the details of data.
An excel worksheet will be downloaded.
[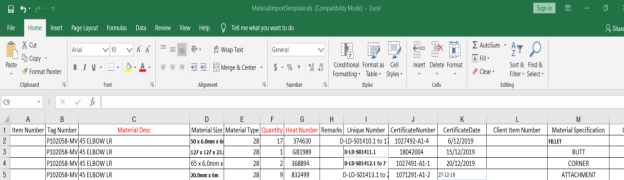](http://wiki.cuteinfocomm.com/uploads/images/gallery/2022-05/image-1651780439095.png)
3. Enter the relevant details in the respective column of the excel worksheet based on the columns listed in the **System Column** field.
4. Click [](http://wiki.cuteinfocomm.com/uploads/images/gallery/2022-05/image-1651780473482.png) (**Choose File** button).
Once the file has been uploaded successfully, you receive a message, “**Successfully uploaded**”
5. Click[](http://wiki.cuteinfocomm.com/uploads/images/gallery/2022-05/image-1651780514532.png) (**Get Columns** button).
The columns added in the excel worksheet will be listed in the **Excel Column** field. The system automatically maps the **Required Columns to Import** field and the **Excel Column** field and displays in the **Mapped Columns** field.
[](http://wiki.cuteinfocomm.com/uploads/images/gallery/2022-05/image-1651780536388.png)
6. If you want to map any columns or to unmap any mapped columns, select the respective columns and then click (****Map**** button) and (****UnMap**** button) accordingly.
7. Once you have completed the mapping and unmapping of columns, in the **Upload Range From** and **To** fields, enter the range of rows you want to upload from the excel worksheet.
[](http://wiki.cuteinfocomm.com/uploads/images/gallery/2022-05/image-1651780570418.png) **Note**: In the **Total Rows** field, the system indicates the total number of rows filled in the excel worksheet.
[](http://wiki.cuteinfocomm.com/uploads/images/gallery/2022-05/image-1651780585522.png)**Tip**: You must enter the upload starting range as two in the **Upload Range From** field because a first row in the excel worksheet is having heading of the columns.
8. Click [](http://wiki.cuteinfocomm.com/uploads/images/gallery/2022-05/image-1651780614878.png) (**Populate Value** button).
9. Click [ ](http://wiki.cuteinfocomm.com/uploads/images/gallery/2022-05/image-1651780623792.png)(**Process** button).
Once you have clicked the Process button, the system processes the columns and displays in the **Excel Import** page.
[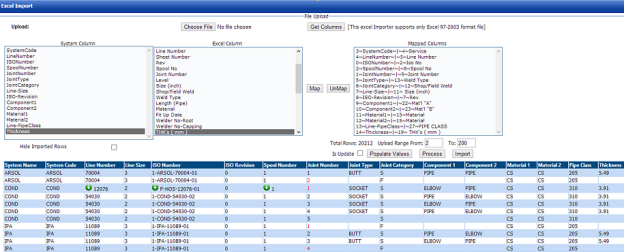](http://wiki.cuteinfocomm.com/uploads/images/gallery/2022-05/image-1651780643624.png)
10. Click [ ](http://wiki.cuteinfocomm.com/uploads/images/gallery/2022-05/image-1651780660434.png) (**Import** button) to import the data added in the excel worksheet.
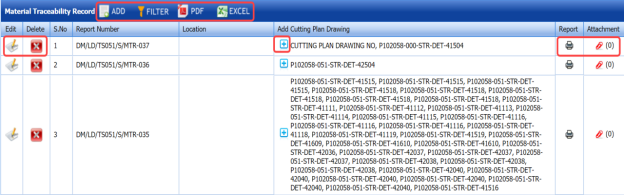
### **4.7 Material Traceability Record**
The **Material Traceability Record** tab in the **Materials** menu used to track a material traceability record (MTR). If you want to add an MTR, do the following,
1. Click the **Material Traceability Record** tab in the **Materials** menu. The **Material Traceability Record** page opens.
[](http://wiki.cuteinfocomm.com/uploads/images/gallery/2022-05/image-1651780728698.png)
**4.7: Material Traceability Record page**
2. Click [](http://wiki.cuteinfocomm.com/uploads/images/gallery/2022-05/image-1651780761687.png) (**ADD** button) in the **Material Traceability Record** page. See Fig 4.7.
A new window opens to add an MTR.
[](http://wiki.cuteinfocomm.com/uploads/images/gallery/2022-05/image-1651780780745.png)
[](http://wiki.cuteinfocomm.com/uploads/images/gallery/2022-05/image-1651780791350.png) **Tip**: A report number for a new MTR will be updated automatically in the **Report Number** box.
3. In the **Location** box, enter the location detail.
The MTR is added. Once you have added the MTR, you must add the cutting plan drawing details for the added MTR.
#### **4.7.1 Add a Cutting Plan Drawing for an MTR**
If you want to add a cutting plan drawing for the added MTR, do the following,
[](http://wiki.cuteinfocomm.com/uploads/images/gallery/2022-05/image-1651780844611.png)
1. Click [](http://wiki.cuteinfocomm.com/uploads/images/gallery/2022-05/image-1651780865668.png) (Add icon) provided in the **Add Cutting Plan Drawing** column of the **Material Traceability Record** page. The **Cutting Plan Drawing Details** box opens.
[](http://wiki.cuteinfocomm.com/uploads/images/gallery/2022-05/image-1651780879765.png)
2. Click [](http://wiki.cuteinfocomm.com/uploads/images/gallery/2022-05/image-1651780894445.png) (**ADD** button) in the **Cutting Plan Drawing Details** box. A new window opens to add a master drawing number and a cutting plan drawing number.
[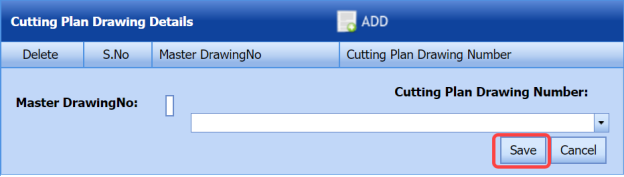](http://wiki.cuteinfocomm.com/uploads/images/gallery/2022-05/image-1651780908796.png)
3. In the **Cutting Plan Drawing Number** box, select the mater drawing and cutting plan drawing numbers from a drop-down list.
4. Click **Save**.
#### **4.7.2 Print an MTR report**
If you want to print an MTR report, click [](http://wiki.cuteinfocomm.com/uploads/images/gallery/2022-05/image-1652072191912.png) (print icon) in the **Report** column of the **Material Traceability Record** page. See Fig 4.7.
#### **4.7.3 Attach a File into an MTR**
If you want to attach any file with any MTR list in the **Material Traceability Record** page, follow the procedures given in the topic “[**Attach a file into a client master drawing**](http://wiki.cuteinfocomm.com/books/cuteqm/page/project-data-qXJ/#bkmrk-3.2.2%C2%A0attach-a-file-)” in the **Client Master Drawing** section.
#### **4.7.4 Edit Any MTR**
If you want to edit any existing MTR in the **Material Traceability Record** page, do the following,
1. Click [](http://wiki.cuteinfocomm.com/uploads/images/gallery/2022-05/image-1652072247567.png)(Edit icon) in the **Edit** column for the respective MTR. See Fig 4.7. A new window opens to edit the MTR.
2. Click any box where you want to edit the details, and then edit the details in the respective box.
3. Click **Save**.
#### **4.7.5 Export MTR List**
You can export a list of MTRs added in the **Material Traceability Record** page in the pdf and excel formats. To know how to export, see the topic, “[**Export Areas list**](http://wiki.cuteinfocomm.com/books/cuteqm/page/project-data-qXJ/#bkmrk-3.1.4%C2%A0export-areas-l)” in the **Area** option.
#### **4.7.6 Filter Any MTR**
If you want to filter any MTR from the list of MTRs in the **Material Traceability Record** page, you can use the [](http://wiki.cuteinfocomm.com/uploads/images/gallery/2022-05/image-1652072324053.png) (**FILTER** button). To know how to filter, see the topic, ”**Filter Any Area**”.
### **4.8 Material Summary**
The **Material Summary** tab in the **Materials** menu used to track the material summary details. If you want to trach the summary details of the material, do the following,
1. Click the **Material Summary** tab in the **Materials** menu. The **Material Summary Details** page opens.
[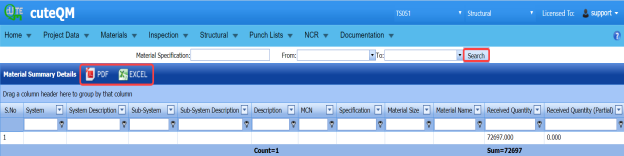](http://wiki.cuteinfocomm.com/uploads/images/gallery/2022-05/image-1652072371650.png)
**Figure 7.8: Material Summary Details page**
2. In the **Material Specification** box, enter the material specification.
3. In the **From** and **To** boxes, choose the respective from and to dates to get the material summary details.
4. Click **Search**.
The summary details of the added material specification will be displayed for the selected period.
#### **4.8.1 Export Material Summary Details**
You can export a list of MTRs added in the **Material Summary Details** page in the pdf and excel formats. To know how to export, see the topic, “[**Export Areas list**](http://wiki.cuteinfocomm.com/books/cuteqm/page/project-data-qXJ/#bkmrk-3.1.4%C2%A0export-areas-l)” in the **Area** option.
### **4.9 Material Summary by Heat Number**
The **Summary by Heat Number** tab in the **Materials** menu used to track the material summary details by using the respective heat numbers. If you want to track the summary details of the material, do the following,
1. Click the **Summary by Heat Number** tab in the **Materials** menu. The **Material Summary Details (By Heat Number)** page opens.
[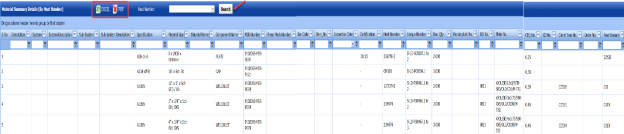](http://wiki.cuteinfocomm.com/uploads/images/gallery/2022-05/image-1652072488866.png)
**Fig 4.9:** **Material Summary Details (By Heat Number)** **page**
2. In the **Heat Number** box, select the heat number from a drop-down list.
3. Click ****Search****.
The material summary details corresponding to the selected heat number will be displayed.
#### **4.9.1 Export Material Summary Details (By Heat Number)**
You can export the material summary details in the **Material Summary Details (By Heat Number)** page in the pdf and excel formats. To know how to export, see the topic, “[**Export Areas list**](http://wiki.cuteinfocomm.com/books/cuteqm/page/project-data-qXJ/#bkmrk-3.1.4%C2%A0export-areas-l)” in the **Area** option.
### **4.10 Material Traceability Summary Report**
If you want to view the material traceability summary report, navigate to the **Material Traceability Summary Report** tab in the **Materials** menu.
1. Click **Material Traceability Summary Report** in the **Materials** menu. The **Material Traceability Summary Report** page opens.
[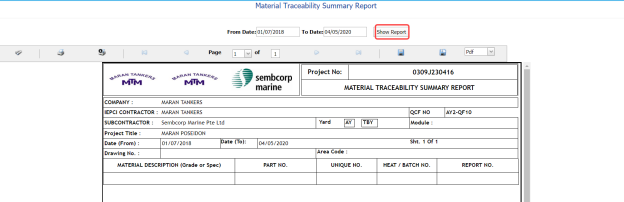](http://wiki.cuteinfocomm.com/uploads/images/gallery/2022-05/image-1652072581908.png)
**Figure 4.10: Material Traceability Summary Report page**
2. In the **From Date** and **To Date** boxes, select the from and to dates.
3. Click **Show Report**.
The summary report for the selected date will be opened.
#### **4.10.1 Print Material Traceability Summary Report**
If you want to print a material traceability summary report, use [](http://wiki.cuteinfocomm.com/uploads/images/gallery/2022-05/image-1652072669995.png)and [](http://wiki.cuteinfocomm.com/uploads/images/gallery/2022-05/image-1652072687767.png) (print icons) provided in the **Material Traceability Summary Report** page.
1. If you want to print the current page of the summary report, click [](http://wiki.cuteinfocomm.com/uploads/images/gallery/2022-05/image-1652072744876.png) (print icon including the page number).
2. If you want to print all the pages of the summary report, click [](http://wiki.cuteinfocomm.com/uploads/images/gallery/2022-05/image-1652072736839.png)(print icon).
#### **4.10.2 Export Material Traceability Summary Report**
You can export the material traceability summary report in various formats by using the option [](http://wiki.cuteinfocomm.com/uploads/images/gallery/2022-05/image-1652072808282.png) provided in the upper right corner of the **Material Traceability Summary Report** page.
### **4.11 RFI Material Substitution**
An RFI could be issued requesting for material substitutions if certain material is not available or cost exorbitantly high. Various subcontractors could be provided with these requests to find who has the best quality materials for the project.
You can add an RFI for material substitution by using the **RFI Material Substitution** tab in the **Materials** menu.
#### **4.11.1 Add an RFI Material Substitution**
If you want to add an RFI material substitution, do the following steps,
1. Click **RFI Material Substitution** in the **Materials** menu. The **RFI Material Substitution** page opens.
[](http://wiki.cuteinfocomm.com/uploads/images/gallery/2022-05/image-1652072889246.png)
**Figure 4.11: RFI Material Substitution page**
2. In the ****Requested By**** box, enter the name of a person who has requested the material substitution.
3. In the **Sub Contractor** box, select a sub-contractor from a drop-down list.
4. In the **Inspection Date & Time** box, select the inspection date and time.
5. In the **Location** box, enter the location name.
6. In the **Center** box, enter the center name.
7. In the **Details of Work** box, enter the work details.
8. In the **Comments** box, enter your comments if any.
Before saving the added material substitution request, you must add the material substitution detail.
9. Click [](http://wiki.cuteinfocomm.com/uploads/images/gallery/2022-05/image-1652072954448.png) (**ADD** button) in the **Material Substitution Detail** window.
10. In the **Type** box, select the type of material substitution.
11. In the **Material** box, enter the name of the material.
12. In the **DWG. Ref** box, enter the drawing reference number.
13. In the **Original Size** box, enter the original size of the material.
14. In the **Original Grade** box, enter the original grade of the material.
15. In the **Item** box, select an item.
16. In the **QTY** box, enter the quantity of the material.
17. Click **Save.**
The material substitution details will be added and listed in the **Material Substitution Detail** window.
[](http://wiki.cuteinfocomm.com/uploads/images/gallery/2022-05/image-1652073010811.png)
If you want to add the proposed material substitution detail,
18. Click [](http://wiki.cuteinfocomm.com/uploads/images/gallery/2022-05/image-1652073057659.png)(Add icon) in the **Material Substitution Detail** window.
[](http://wiki.cuteinfocomm.com/uploads/images/gallery/2022-05/image-1652073068840.png)
19. Click [](http://wiki.cuteinfocomm.com/uploads/images/gallery/2022-05/image-1652073080388.png) (**ADD** button).
[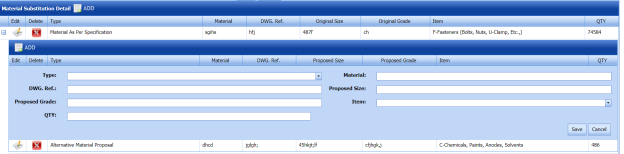](http://wiki.cuteinfocomm.com/uploads/images/gallery/2022-05/image-1652073090757.png)
20. Enter the details of proposed material substitution.
21. Click **Save**.
The request for material substitution will be added and listed in the **View RFI Material Substitution** page.
### **4.12 View RFI Material Substitution**
The **View RFI Material Substitution** tab helps you to view and edit the material substitution request, which is added by using the **RFI Material Substitution** tab. This tab also allows you to add a new material substitution request.
1. Click **View RFI Material Substitution** in the **Materials** menu. The **View RFI Material Substitution** page opens with a list of added material substitution requests.
[](http://wiki.cuteinfocomm.com/uploads/images/gallery/2022-05/image-1652073226948.png)
**Figure 4.12: View RFI Material Substitution page**
#### **4.12.1 Add an RFI Material Substitution**
If you want to add a material substitution request, do the following steps,
1. Click [](http://wiki.cuteinfocomm.com/uploads/images/gallery/2022-05/image-1652073318037.png) (**ADD** button) in the **View RFI Material Substitution page. The system redirects you to a new page to add a new material substitution request. To know how to add a material substitution request, See the topic, “[**Add an RFI Material Substitution**](http://wiki.cuteinfocomm.com/link/68#bkmrk-4.11.1%C2%A0add-an-rfi-ma)”.
Once you have added the material substitution request, you must submit the added request to perform material substitution inspection.
#### **4.12.2 Edit Any Material Substitution Inspection Request**
If you want to edit any existing material substitution inspection request in the **View RFI Material Substitution page, do the following,
1. Click [](http://wiki.cuteinfocomm.com/uploads/images/gallery/2022-05/image-1652073460752.png)(Edit icon) in the **Edit** column for the respective material substitution inspection request. See Fig 4.12. The **RFI Material Substitution** page opens with the details of the selected material substitution inspection request.
2. Click any box where you want to edit the details, and then edit the details in the respective box.
3. Click **Save**.
#### **4.12.3 Submit and Approve an RFI Material Substitution**
Once you have added the material substitution inspection request, the **Submission** column in the **View RFI Material Substitution** page is appeared with [](http://wiki.cuteinfocomm.com/uploads/images/gallery/2022-05/image-1652073551320.png) (Submit and Reject icons).
1. If you want to submit the material substitution inspection request, click [](http://wiki.cuteinfocomm.com/uploads/images/gallery/2022-05/image-1652073570922.png) (Submit icon) in the **Submission** column. Otherwise click [](http://wiki.cuteinfocomm.com/uploads/images/gallery/2022-05/image-1652073581301.png) (Reject icon) to reject the request. Once you have submitted the material substitution inspection request, the **Request Status** column in the **View RFI Material Substitution** page is appeared with (Approve and Reject icons).
2. If you want to approve the material substitution inspection request, click [](http://wiki.cuteinfocomm.com/uploads/images/gallery/2022-05/image-1652073633943.png) (Approve icon) in the ****Request Status**** Otherwise click [](http://wiki.cuteinfocomm.com/uploads/images/gallery/2022-05/image-1652073642921.png) (Reject icon) to reject the request. The material substitution inspection request will be moved for material substitution inspection.
#### **4.12.4 Add Results of Material Substitution Inspection**
After completing the material inspection for the added request, you can add the inspection result details. To add results, do the following steps,
1. Click [](http://wiki.cuteinfocomm.com/uploads/images/gallery/2022-05/image-1652073697054.png) (Add icon) in the **Results** column of the respective request. The Result window opens with the details of proposed and original materials.
[](http://wiki.cuteinfocomm.com/uploads/images/gallery/2022-05/image-1652073708634.png)
2. In the ****Result**** column, select the result of each material from the given result options in the drop-down list.
3. In the **Remarks** column, enter your remarks if any.
4. Click **Approve All &** **Save**.
#### **4.12.5 View a Material Substitution Report**
If you want to view a material substitution report, click [](http://wiki.cuteinfocomm.com/uploads/images/gallery/2022-05/image-1652073762390.png)(print icon) provided in the **Print** column of the **View RFI Material Substitution** page. See Fig 4.12.
#### **4.12.6 Attach a File into an RFI Material Substitution**
If you want to attach a file with any existing material substitution inspection request listed in the **View RFI Material Substitution** page, you can attach the file by using [](http://wiki.cuteinfocomm.com/uploads/images/gallery/2022-05/image-1652073793674.png)(Attach icon) in the **Attachment** column. To know how to attach, follow the procedures given in the topic “[**Attach a file into a client master drawing**](http://wiki.cuteinfocomm.com/books/cuteqm/page/project-data-qXJ/#bkmrk-3.2.2%C2%A0attach-a-file-)”.
#### **4.12.7 View Signature Details of Inspectors**
You can view the sign details of the inspectors such as QA, Sub contractor, Client, and Owner, once they completed the material substitution inspection and submitted the inspection result details including their signature. To view the signature details, click [](http://wiki.cuteinfocomm.com/uploads/images/gallery/2022-05/image-1652073826989.png)(Sign icon) in the **Sign Details** column in the **View RFI Material Substitution** page.
#### **4.12.8 Export an RFI Material Substitution List**
You can export a list of material substitution requests added in the **View RFI Material Substitution** page in both the pdf and excel formats by using [](http://wiki.cuteinfocomm.com/uploads/images/gallery/2022-05/image-1652073856152.png) (**PDF** button) and [](http://wiki.cuteinfocomm.com/uploads/images/gallery/2022-05/image-1652073863875.png) (**Excel** button). To know how to export, see the topic, “[**Export Areas list**](http://wiki.cuteinfocomm.com/books/cuteqm/page/project-data-qXJ/#bkmrk-3.1.4%C2%A0export-areas-l)”.
#### **4.12.9 Filter Any RFI Material Substitution**
If you want to filter any specific material substitution inspection request in the **View RFI Material Substitution** page, you can use [](http://wiki.cuteinfocomm.com/uploads/images/gallery/2022-05/image-1652073892128.png) (**FILTER** button) located on the **View RFI Material Substitution** page. To know how to filter, see the topic, ”**Filter Any Area**”.
### **4.13 Material Receiving and Inspection (Unique Numbers)**
Material Receiving Inspection validates quality of purchased raw materials based on set acceptance criteria before the materials are used for the structural project.
The **Material Receiving and Inspection** tab in the **Materials** menu helps you to add an incoming material inspection report (MIR). Incoming MIR includes material name, material size, material specification, and material type.
If you want to add an incoming MIR, do the following,
1. Click the **Material Receiving and Inspection** tab in the **Materials** menu. The **Incoming Material Inspection Report** page opens.
[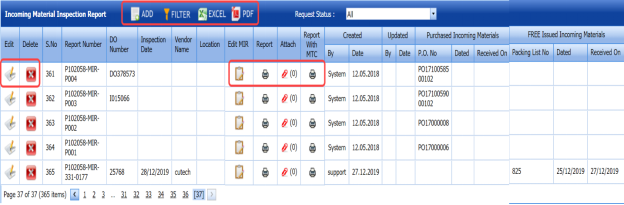](http://wiki.cuteinfocomm.com/uploads/images/gallery/2022-05/image-1652073958183.png)
**Figure 4.13: Incoming Material Inspection Report page**
#### **4.13.1 Add an Incoming MIR**
If you want to add an incoming MIR,
1. Click [](http://wiki.cuteinfocomm.com/uploads/images/gallery/2022-05/image-1652074028338.png) (**ADD** button) in the **Incoming Material Inspection Report** page. See Fig 4.13. A new window opens to add an incoming MIR.
[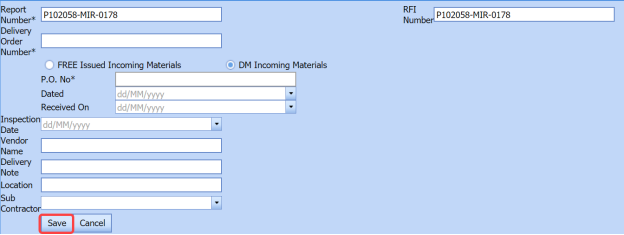](http://wiki.cuteinfocomm.com/uploads/images/gallery/2022-05/image-1652074046198.png)
[](http://wiki.cuteinfocomm.com/uploads/images/gallery/2022-05/image-1652074055620.png)**Note**: The fields notified with a symbol (\*) are mandatory. You must enter the relevant details in that fields before saving.
[](http://wiki.cuteinfocomm.com/uploads/images/gallery/2022-05/image-1652074068771.png)**Tip**: A report number and an Request for Inspection (RFI) number for a new MIR will be updated automatically in the **Report Number** and the **RFI Number** boxes, respectively.
2. In the **Delivery Order Number** box, enter the material’s delivery order number.
3. If the materials are received from a client, select the ****DM Incoming Materials**** option, and then enter the relevant details in the respective boxes. [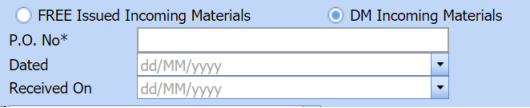](http://wiki.cuteinfocomm.com/uploads/images/gallery/2022-05/image-1652074097714.png)
1. 1. 1. In the **P.O. No** box, enter the purchase order number.
2. In the **Dated** box, choose the date of the purchase order.
3. In the **Received On** box, select the received date of materials.
4. If the materials are purchased from outside, select the **FREE Issued Incoming Materials** option, and then enter the relevant details in the respective boxes.
[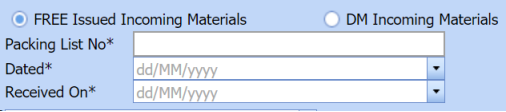](http://wiki.cuteinfocomm.com/uploads/images/gallery/2022-05/image-1652074132955.png)
1. 1. 1. In the **Packing List No** box, enter the packing list number.
2. In the **Dated** box, choose the date of packing.
3. In the **Received On** box, choose the received date of materials.
5. In the **Inspection Date** box, choose the date of inspection.
6. In the **Vendor Name** box, enter the vendor name.
7. In the **Delivery Note** box, enter the delivery note.
8. In the **Location** box, enter the location name.
9. In the ****Sub Contractor**** box, select the subcontractor name from a drop-down list.
10. Click **Save**.
The incoming MIR is successfully added. Once you have added the MIR, you must add the material details for the added MIR.
#### **4.13.2 Add Materials for an Incoming MIR**
If you want to add the details of materials for the added incoming MIR, do the following,
1. Click [](http://wiki.cuteinfocomm.com/uploads/images/gallery/2022-05/image-1652074213914.png)(Edit icon) in the **Edit MIR** column of the **Incoming Material Inspection Report** See Fig 4.13. The **Add/Edit - Materials** window opens.
[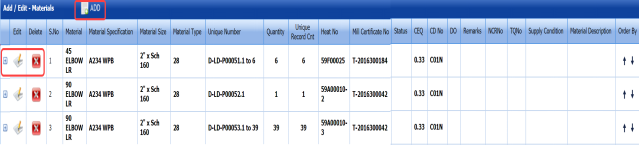](http://wiki.cuteinfocomm.com/uploads/images/gallery/2022-05/image-1652074228247.png)
**Figure 4.13.1: Add/Edit – Materials window**
2. Click [](http://wiki.cuteinfocomm.com/uploads/images/gallery/2022-05/image-1652074256935.png) (**ADD** button) in the **Add/Edit - Materials** window.
A new window opens to add the material details.
[](http://wiki.cuteinfocomm.com/uploads/images/gallery/2022-05/image-1652074267520.png)
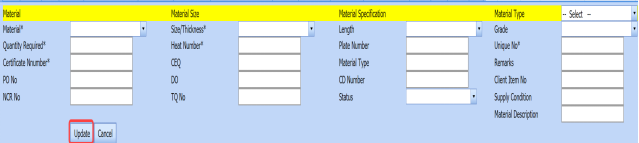
[](http://wiki.cuteinfocomm.com/uploads/images/gallery/2022-05/image-1652074275783.png) **Note**: The fields notified with a symbol (\*) are mandatory. You must enter the relevant details in that fields before saving.
3. In the **Material** box, select the name of the material from a drop-down list.
4. In the **Quantity Required** box, enter the required quantity of the material.
5. In the **Certificate Number** box, enter the certificate number.
6. In the **PO No** box, enter the purchase order number.
7. In the **Non-Conformance Report (NCR) No** box, enter the NCR number.
8. In the **Size/Thickness** box, select the size/thickness of the received material from a drop-down list.
9. In the **Heat Number** box, enter the heat number of the material.
10. In the **CEQ** box, enter the CEQ number.
11. In the **DO** box, enter the deliver order number.
12. In the **TQ No** box, enter the TQ number.
13. In the **Length** box, select the length of the material from a drop-down list.
14. In the **Plate Number** box, enter the plate number of the material.
15. In the **Material Type** box, enter the type of the material.
16. In the **CD Number** box, enter the CD number.
17. In the **Status** box, select the status of the received material.
18. In the **Material Type** box, select the type of material from a drop-down list.
19. In the **Grade** box, select the grade of the material.
20. In the **Unique No** box, enter the unique number of the material.
21. In the **Remarks** box, enter your remarks if any.
22. In the **Client Item No** box, enter the client item number.
23. In the **Supply Condition** box, enter the supply condition details of the material.
24. In the **Material Description** box, enter the material description.
25. Click ****Update****.
Once you have added the material details, you must add the heat numbers for the added materials.
#### **4.13.3 Add Heat Numbers**
1. Click [](http://wiki.cuteinfocomm.com/uploads/images/gallery/2022-05/image-1652074423045.png)(Add icon) of the respective material in the **Add/Edit - Materials** window. See Fig 4.13.1. The **Heat Numbers** window opens.
[](http://wiki.cuteinfocomm.com/uploads/images/gallery/2022-05/image-1652074440463.png)
2. Click [](http://wiki.cuteinfocomm.com/uploads/images/gallery/2022-05/image-1652074457514.png) (**ADD** button) in the **Heat Numbers** window. A new window opens to add a heat number.
[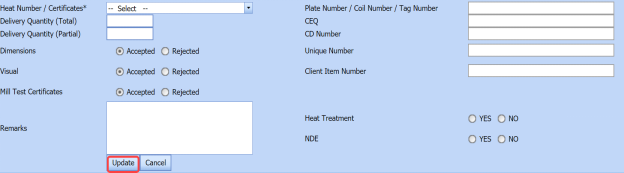](http://wiki.cuteinfocomm.com/uploads/images/gallery/2022-05/image-1652074470694.png)
3. In the **Heat Number/Certificates** box, select the heat number from a drop-down list.
4. In the **Plate Number/Coil Number/ Tag Number** box, enter the plate number or coil number or tag number of the material.
5. In the **Delivery Quantity (Total)** box, enter the total delivery quantity of the material.
6. In the **Delivery Quantity (Partial)** box, enter the partial delivery quantity of the material.
7. In the **CEQ** box, enter the CEQ number.
8. In the **CD Number** box, enter the CD number.
9. In the **Unique Number** box, enter the unique number of the material.
10. In the **Client Item Number** box, enter the client item number.
11. In the ****Dimensions**** option, select ****Accepted**** or ****Rejected**** based on the inspection detail.
12. In the **Visual** option, select **Accepted** or **Rejected** based on the inspection detail.
13. In the ****Mill Test Certificates (MTC)**** option, select ****Accepted**** or ****Rejected**** based on the inspection detail.
14. In the **Remarks** option, enter your remarks if any.
15. If the heat treatment is required for the material, select ****YES**** in the ****Heat Treatment**** Otherwise select ****NO****.
16. In the NDE is required for the material, select **YES** in the **NDE** option. Otherwise select **NO**.
17. Click **Update.**
Once you have added the heat numbers, you must add unique numbers for the material.
#### **4.13.4 Add Unique Numbers**
1. Click [](http://wiki.cuteinfocomm.com/uploads/images/gallery/2022-05/image-1652074614590.png)(Add icon) of the respective heat number in the [**Heat Numbers** box](http://wiki.cuteinfocomm.com/link/68#bkmrk-4.13.3%C2%A0add-heat-numb). The **Unique Numbers** box opens.
[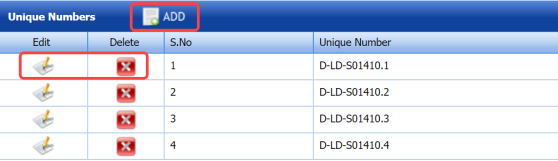](http://wiki.cuteinfocomm.com/uploads/images/gallery/2022-05/image-1652074623858.png)
2. Click [](http://wiki.cuteinfocomm.com/uploads/images/gallery/2022-05/image-1652074642125.png) (**ADD** button) in the **Unique Numbers** window. A new window opens to add a unique number.
[](http://wiki.cuteinfocomm.com/uploads/images/gallery/2022-05/image-1652074652843.png)
3. In the **Unique Number** box, enter a unique number for the respective heat number.
4. In the **Original Number** box, enter the original number of the material.
5. In the **Size** box, enter the size of the material.
6. Click **Update**.
#### **4.13.5 Print an Incoming MIR**
If you want to print an incoming MIR report, click [](http://wiki.cuteinfocomm.com/uploads/images/gallery/2022-05/image-1652074708958.png)(print icon) provided in the **Report** column of the **Incoming Material Inspection Report** page. See Fig 4.13.
#### **4.13.6 Print a Report with MTC**
If you want to print an incoming MIR report including MTC, click [](http://wiki.cuteinfocomm.com/uploads/images/gallery/2022-05/image-1652074743113.png) (print icon) provided in the **Report** **with MTC** column of the **Incoming Material Inspection Report** page. See Fig 4.13.
#### **4.13.7 Attach a File into an Added Incoming MIR**
If you want to attach any file with any incoming MIR listed in the **Incoming Material Inspection Report** page, follow the procedures given in the topic “[**Attach a file into a client master drawing**](http://wiki.cuteinfocomm.com/books/cuteqm/page/project-data-qXJ/#bkmrk-3.2.2%C2%A0attach-a-file-)” in the **Client Master Drawing** section.
#### **4.13.7.1 Edit Any Incoming MIR**
If you want to edit any existing incoming MIR in the **Incoming Material Inspection Report** page, do the following,
1. Click [](http://wiki.cuteinfocomm.com/uploads/images/gallery/2022-05/image-1652074812500.png)(Edit icon) in the **Edit** column for the respective MIR. See Fig 4.13. A new window opens to edit the added incoming MIR.
2. Click any box where you want to edit the details, and then edit the details in the respective box.
3. Click **Save**.
#### **4.13.8 Filter Any Incoming MIR**
If you want to filter any incoming MIR from the list of MIRs in the **Incoming Material Inspection Report** page,
- you can use the [](http://wiki.cuteinfocomm.com/uploads/images/gallery/2022-05/image-1652074876548.png) (**FILTER** button). To know how to filter, see the topic, ”**Filter Any Area**”.
- If you want to filter any MIR based on the approval status of the MIR, click the **Request Status** box provided in the **Incoming Material Inspection Report** page and then select the appropriate option from a drop-down list.
[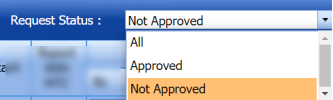](http://wiki.cuteinfocomm.com/uploads/images/gallery/2022-05/image-1652074894049.png)
- If you click the **All** option, the system shows a list of all MIRs.
- If you click the **Approved** option, the system shows a list of approved MIRs.
- If you click **Not Approved** option, the system shows a list of not approved MIRs.
#### **4.13.9 Export Incoming MIR List**
You can export a list of MIR added in the **Incoming Material Inspection Report** page in the pdf and excel formats. To know how to export, see the topic, “[**Export Areas list**](http://wiki.cuteinfocomm.com/books/cuteqm/page/project-data-qXJ/#bkmrk-3.1.4%C2%A0export-areas-l)” in the **Area** option.
### **4.14 Material Verification Report (MVR) (Unique Numbers)**
MVR will be used while go for material inspection. The **Material Verification Report** tab in the **Materials** menu helps you to add an MVR inspection request. If you want to add an MVR inspection request, do the following,
1. Click **Material Verification Report** in the **Materials** menu. The **MVR Inspection Request** page opens.
[](http://wiki.cuteinfocomm.com/uploads/images/gallery/2022-05/image-1652075030937.png)
**Figure 4.14: MVR Inspection Request page**
#### **4.14.1 Add an MVR Inspection Request**
If you want to add an MVR inspection request,
1. Click [](http://wiki.cuteinfocomm.com/uploads/images/gallery/2022-05/image-1652075082788.png) (**ADD** button) in the **MVR Inspection Request** See Fig 4.14. A new window opens to add an MVR inspection request.
[](http://wiki.cuteinfocomm.com/uploads/images/gallery/2022-05/image-1652075102430.png)
[](http://wiki.cuteinfocomm.com/uploads/images/gallery/2022-05/image-1652075110359.png) **Note**: The fields notified with a symbol (\*) are mandatory. You must enter the relevant details in that fields before saving.
[](http://wiki.cuteinfocomm.com/uploads/images/gallery/2022-05/image-1652075125054.png)**Tip**: A report number and an RFI report number for a new MVR will be updated automatically in the **Report Number** and the **RFI Report Number** boxes, respectively.
2. In the **Inspection Date** box, choose the date of inspection.
3. In the **Description** box, enter the description for the MVR.
4. In the **Location** box, select a location from a drop-down list.
5. Click ****Save****. The MVR is successfully added. Once you have added the MVR, you must add the RFI data for the added MVR.
#### **4.14.2 Add RFI Data for an Added MVR Inspection Request**
If you want to add the details of RFI data for the added MVR inspection request, do the following,
1. Click [](http://wiki.cuteinfocomm.com/uploads/images/gallery/2022-05/image-1652075211547.png)(Edit icon) in the **RFI Data** column of the **MVR Inspection Request** page. See Fig 4.14. The **RFI Inspection Request List** window opens.
[](http://wiki.cuteinfocomm.com/uploads/images/gallery/2022-05/image-1652075245839.png)
2. In the **Inspection From** box, enter the detail from where the inspection should start.
3. In the **Inspection To** box, enter the detail to where the inspection should end.
4. In the ****Inspection Details**** option, select 1stInspection, 2nd Inspection or 3rd Inspection according to the inspection details.
5. In the **Others** box, enter any other inspection related details.
6. In the **Refer to Report No** box, enter the report number for reference.
7. In the **RFI Date** box, choose the RFI date.
8. In the ****Inspection Result**** option, if the inspection result is accepted, select ****Accepted**** otherwise select ****Rejected****.
9. In the **Remarks** box, enter your remarks if any.
10. In the **Inspected by** box, enter the name of a person who has done inspection.
11. In the **Inspected Date** box, choose the date of inspection.
12. In the **Witnessed By** box, enter the name of the witnessed person.
13. In the **Witnessed Date** box, choose the date of witnessed.
14. In the **PCML Rep Name** box, enter the representative name of PCML.
15. In the **PCML Rep Date** box, choose the PCML rep date.
16. In the **MEB Rep Name** box, enter the representative name of MEB.
17. In the **MEB Rep Date box**, choose MEB rep date.
18. Click ****Save****.
Once you have added the RFI data, you must add the result for the added MVR inspection request.
#### **4.14.3 Print an RFI Report**
If you want to print an RFI report, click [](http://wiki.cuteinfocomm.com/uploads/images/gallery/2022-05/image-1652075364404.png)(print icon) provided in the **RFI** **Report** column of the **MVR Inspection Request** page. See Fig 4.14.
#### **4.14.4 Add Result for an Added MVR Inspection Request**
1. Click [](http://wiki.cuteinfocomm.com/uploads/images/gallery/2022-05/image-1652075396963.png) (Add icon) of the respective report number. The **MVR Inspection Request Details** window opens.
[](http://wiki.cuteinfocomm.com/uploads/images/gallery/2022-05/image-1652075408052.png)
2. Click [](http://wiki.cuteinfocomm.com/uploads/images/gallery/2022-05/image-1652075426138.png) (**ADD** button) in the **MVR Inspection Request Details** window.
A new window opens to add result.
[](http://wiki.cuteinfocomm.com/uploads/images/gallery/2022-05/image-1652075436519.png)
3. In the **Piece Mark No** box, select the piece mark number from a drop-down list.
4. In the **Heat Number / Certificates** box, select the heat number from a drop-down list.
5. In the **Size** box, enter the size of the material.
6. In the **Type of Material** box, enter the type of material.
7. In the **Remarks** box, enter your remarks if any.
8. Click **Save**.
Once you have added the result for the MVR inspection request, you must submit and approve the MVR inspection request.
#### **4.14.5 Submit and Approve an MVR Inspection Report**
Once you have added the result, the **Submission** column in the **MVR Inspection Request** page is appeared with [](http://wiki.cuteinfocomm.com/uploads/images/gallery/2022-05/image-1652075522012.png)(Submit and Reject icons).
1. If you want to submit the MVR inspection request, click [](http://wiki.cuteinfocomm.com/uploads/images/gallery/2022-05/image-1652075538064.png)(Submit icon) in the **Submission** column. Otherwise click [](http://wiki.cuteinfocomm.com/uploads/images/gallery/2022-05/image-1652075546818.png) (Reject icon) to reject the request. Once you have submitted the MVR inspection request, the **Request Status** column in the **MVR Inspection Request** page is appeared with[](http://wiki.cuteinfocomm.com/uploads/images/gallery/2022-05/image-1652075590310.png)(Accept and Reject icons).
2. If you want to approve the MVR inspection request, click [ ](http://wiki.cuteinfocomm.com/uploads/images/gallery/2022-05/image-1652075613526.png)(Submit icon) in the **Request Status** column. Otherwise click [](http://wiki.cuteinfocomm.com/uploads/images/gallery/2022-05/image-1652075628529.png) (Reject icon) to reject the request.
#### **4.14.6 Print an MVR Inspection Report**
1. If you want to print an MVR inspection report, click [](http://wiki.cuteinfocomm.com/uploads/images/gallery/2022-05/image-1652075667539.png)(print icon) in the **Report** column of the **MVR Inspection Request** See Fig 4.14.
#### **4.14.7 Attach a File into an MVR Inspection Request**
If you want to attach any file with any MVR inspection request listed in the **MVR Inspection Request** page, follow the procedures given in the topic “[**Attach a file into a client master drawing**](http://wiki.cuteinfocomm.com/books/cuteqm/page/project-data-qXJ/#bkmrk-3.2.2%C2%A0attach-a-file-)” in the **Client Master Drawing** section.
#### **4.14.8 Edit Any MVR Inspection Request**
If you want to edit any existing MVR inspection request in the **MVR Inspection Request** page, do the following,
1. Click [](http://wiki.cuteinfocomm.com/uploads/images/gallery/2022-05/image-1652075742403.png)(Edit icon) in the **Edit** column for the respective MVR inspection request. See Fig 4.14. A new window opens to edit the MVR inspection request.
2. Click any box where you want to edit the details, and then edit the details in the respective box.
3. Click **Save**.
#### **4.14.9 Filter Any MVR Inspection Request**
If you want to filter any MVR request from the list of requests in the **MVR Inspection Request** page, you can use the [](http://wiki.cuteinfocomm.com/uploads/images/gallery/2022-05/image-1652075795575.png) (**FILTER** button). To know how to filter, see the topic, ”**Filter Any Area**”.
#### **4.14.10 Export MVR Inspection Request List**
You can export a list of MVR inspection requests added in the **MVR Inspection Request** page in the pdf and excel formats. To know how to export, see the topic, “[**Export Areas list**](http://wiki.cuteinfocomm.com/books/cuteqm/page/project-data-qXJ/#bkmrk-3.1.4%C2%A0export-areas-l)” in the **Area** option.