# Calibration
Calibration is the act of ensuring that a testing instrument used in measurement will produce accurate results. Calibration is comparison between a standard measurement and the measurement using the test instrument.
#### **Testing Instruments**
Each testing instrument used in the Pressure Vessel module have calibration, which needs to be registered with following data as Calibration Report Number, Last Calibration Date, Calibration By, and Calibration Due Date.
To add a testing instrument, do the following steps,
1\. Click **Testing Instruments** in the **Calibration**
The **Testing Instruments** page opens.
[](http://wiki.cuteinfocomm.com/uploads/images/gallery/2022-04/image-1651049013109.png)
**Figure 1.1: Testing Instruments page**
#### **Add a Testing Instrument**
If you want to add a testing instrument, do the following steps,
1\. Click [ ](http://wiki.cuteinfocomm.com/uploads/images/gallery/2022-04/image-1651049069577.png)(**ADD** button) in the **Testing Instruments** See Fig 1.1.
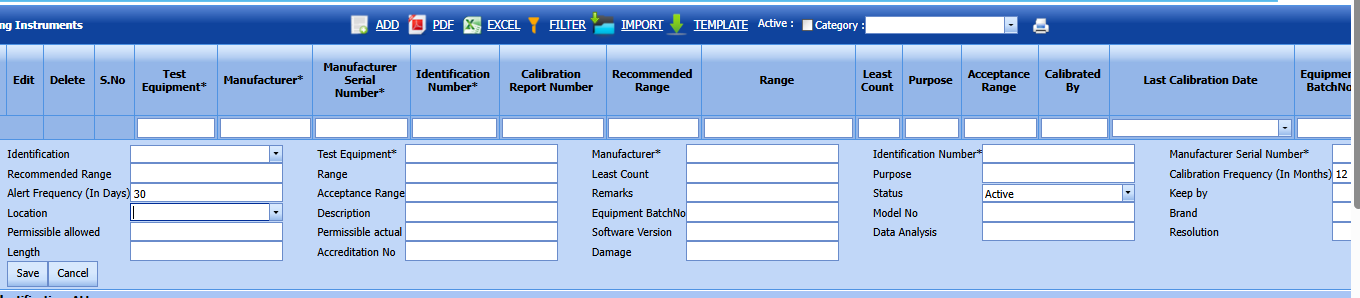
The page shows a new box to add the details of a testing instrument.
[](https://wiki.cuteinfocomm.com/uploads/images/gallery/2026-05/image-1779958921899.png)
[](http://wiki.cuteinfocomm.com/uploads/images/gallery/2022-04/image-1651049107445.png)**Note**: The fields notified with the symbol (\*) are mandatory. You must enter the relevant details in that fields before saving.
2\. In the **Category** box, select the category name from a drop-down list.
3\. In the **Test Equipment** box, enter the test equipment name.
4\. In the **Manufacturer** box, enter the manufacturer name of the test equipment.
5\. In the **Asset Tag Number** box, enter the asset tag number of the test equipment.
6\. In the **Serial Number** box, enter the serial number of the test equipment.
7\. In the **Recommended Range** box, enter the recommended range of the test equipment.
8\. In the **Purpose/Model** box, enter the model of the test equipment.
9\. In the **Calibration Frequency (In Months)**box, enter the calibration frequency of the test equipment.
10\. In the **Alert Frequency (In Days)**box, enter the alert frequency of the test equipment.
11\. In the **Acceptance Criteria** box, enter the acceptance criteria detail.
12.Select **location** from the location dropdown
13\. In the **Remarks** box, enter your remarks if any.
14\. In the **Status/Condition** box, select the status/condition of the test equipment.
15.Enter **range**
16.Enter all the other fields
Click **Save**.
The testing equipment is successfully added.
#### **Add Calibration Data for a Testing Instrument**
Once you have added the testing instrument, you can add the calibration data for the added testing instrument.
1\. Click [](http://wiki.cuteinfocomm.com/uploads/images/gallery/2022-04/image-1651049255472.png)(Add icon) for the respective testing instrument. See Fig 1.1.
The **Calibration** window opens.
[](http://wiki.cuteinfocomm.com/uploads/images/gallery/2022-04/image-1651049273087.png)
2\. Click [ ](http://wiki.cuteinfocomm.com/uploads/images/gallery/2022-04/image-1651049291182.png)(**ADD** button) in the **Calibration** window.
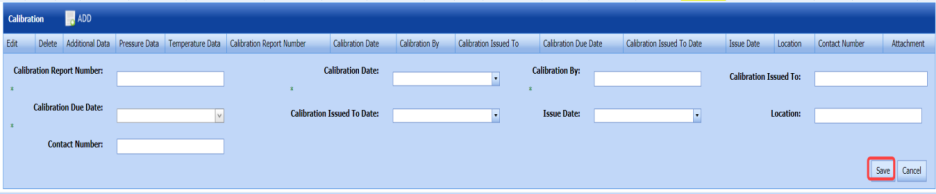
The window shows a new box to add the calibration data.
[](http://wiki.cuteinfocomm.com/uploads/images/gallery/2022-04/image-1651049336785.png)
3\. In the **Calibration Report Number** box, enter the calibration report number.
4\. In the **Calibration Date** box, select the calibration date.
5\. In the **Calibration By** box, enter the name of a person who has done the calibration.
6\. In the **Calibration Issued To** box, enter the name of a person to whom the calibration details to be issued.
7\. In the **Calibration Due Date** box, select the calibration due date.
8\. In the **Calibration Issued Date** box, select the calibration issued date.
9\. In the **Location** box, enter the name of the location where the calibration has done.
10\. In the **Contact Number** box, enter the contact number of the person who has done the calibration.
11\. Click **Save**.
The calibration data is added successfully.
#### **Edit a Testing Instrument**
If you want to edit any existing testing instrument in the **Testing Instruments** page,
1\. Click (Edit icon) of the respective testing instrument. See Fig 1.1.
The **Testing Instruments** page shows the details of the selected test instrument.
[](http://wiki.cuteinfocomm.com/uploads/images/gallery/2022-04/image-1651049475386.png)
2\. Edit the details where you want.
3\. Click **Save**.
#### **Delete a Testing Instrument**
If you want to delete any specific testing instrument from the list of added testing instrument, you can use [ ](http://wiki.cuteinfocomm.com/uploads/images/gallery/2022-04/image-1651049520675.png) (Delete icon) provided in the **Delete** field of the **Testing Instruments** page. To know how to delete, see the topic, “[**Delete Any Client**](http://wiki.cuteinfocomm.com/books/cuteqm/page/master-data#bkmrk-3.1.3-delete-a-clien)”.
#### **Export Testing Instruments List**
You can export a list of testing instruments added in the **Testing Instruments** page in the pdf and excel formats by using [](http://wiki.cuteinfocomm.com/uploads/images/gallery/2022-04/image-1651049560295.png) (**PDF** button) and [](http://wiki.cuteinfocomm.com/uploads/images/gallery/2022-04/image-1651049572144.png)(**Excel** button). To know how to export, see the topic, “[**Export Clients List**](http://wiki.cuteinfocomm.com/books/cuteqm/page/master-data#bkmrk-3.1.4-export-clients)”.
#### **View an Equipment Master List**
If you want to view an equipment master list, click [ ](http://wiki.cuteinfocomm.com/uploads/images/gallery/2022-04/image-1651049604971.png) (Print icon) provided in the upper side of the **Testing Instruments** page.
#### **Filter a Testing Instrument**
If you want to filter any specific testing instrument in the **Testing Instruments** page,
- you can use the category wise filter box [](http://wiki.cuteinfocomm.com/uploads/images/gallery/2022-04/image-1651049654447.png) provided in the upper side of the **Testing Instruments** To filter the testing equipment, select the category from the drop-down list
- You can also use [](http://wiki.cuteinfocomm.com/uploads/images/gallery/2022-04/image-1651049779588.png) (****FILTER**** button) located on the ****Testing Instruments** To know how to filter using the ****Filter**** button, see the topic, “[**Filter Any User Account**](http://wiki.cuteinfocomm.com/books/cuteqm/page/manage-user#bkmrk-4.1.9-filter-a-user-)”.
#### **Import Multiple Testing Instruments**
If you want to import multiple testing instruments together, do the following,
1\. Click [ ](http://wiki.cuteinfocomm.com/uploads/images/gallery/2022-04/image-1651049917738.png)(**TEMPLATE** button). See Fig 1.1.
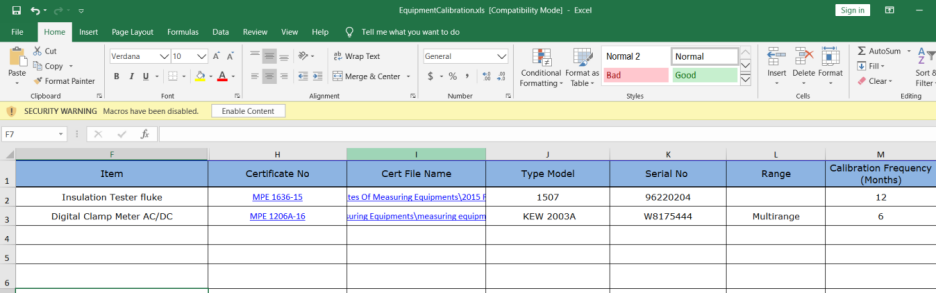
An excel worksheet will be downloaded with a predefined template to enter the details of test instruments.
[](http://wiki.cuteinfocomm.com/uploads/images/gallery/2022-04/image-1651049940642.png)
2\. Enter the required test instrument details in the respective columns of the excel worksheet.
3\. Once you have added the testing instrument details in the excel worksheet, save the excel worksheet on your computer.
4\. Click [ ](http://wiki.cuteinfocomm.com/uploads/images/gallery/2022-04/image-1651049977748.png)(**IMPORT** button). See Fig 1.1.
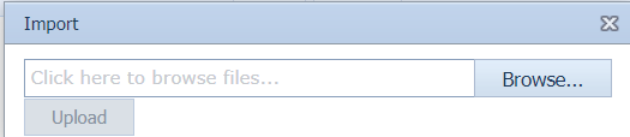
A new box opens for importing the excel worksheet saved on your computer.
[](http://wiki.cuteinfocomm.com/uploads/images/gallery/2022-04/image-1651049994692.png)
5\. Click [ ](http://wiki.cuteinfocomm.com/uploads/images/gallery/2022-04/image-1651050013701.png)(**Browse** button) to select the excel worksheet to be uploaded.
6\. Select the excel worksheet you want to upload from your computer.
7\. Click [ ](http://wiki.cuteinfocomm.com/uploads/images/gallery/2022-04/image-1651050047167.png)(**Upload** button) to export the testing instrument details that are included in the excel worksheet.
The details of the testing instruments in the worksheet will be displayed in the **Testing Instruments** page.
#### **View a Calibration History Card**
To view a calibration history card, click [](http://wiki.cuteinfocomm.com/uploads/images/gallery/2022-04/image-1651050092895.png)(Print icon) of the respective testing instrument, which is provided in the **Report** column of the **Testing Instruments** page.