# Mobile App - Ship Structural
# 1.User Management
### **1.1 Downloading *cuteQM* app**
To use the ***cuteQM*** app you must first download it from the **Play Store**.
1. Open the **Play Store** and search for “***cuteQM***”.
2. Download and install the ***cuteQM*** app on your mobile phone.
3. After installation, open the ***cuteQM***
***You are ready to go!***
### **1.2 Log in**
**After installation, when you open the *cuteQM* app you may be asked to Login. Follow the steps to successfully log into your account.**
[ ](https://wiki.cuteinfocomm.com/uploads/images/gallery/2024-08/image-1724221885734.png)[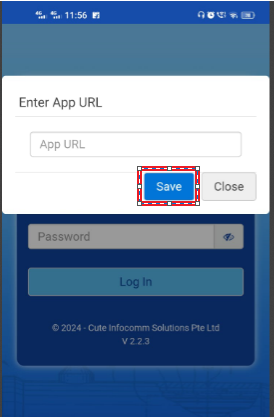](https://wiki.cuteinfocomm.com/uploads/images/gallery/2024-08/image-1724221798542.png)
1\. Before enter your user id and password, tap [ ](http://wiki.cuteinfocomm.com/uploads/images/gallery/2022-05/image-1651671754003.png)(Settings icon) and enter the app URL http://www.cuteqm.com/cuteQMPTUSPAPI.
2\. Tap **Save**.
3\. Enter your user id and password in the allocated fields.
4\. Tap **Log in** to complete the process.
The home screen of the ***cuteQM*** app is appeared.
### **1.3 Home screen of *cuteQM* app**
[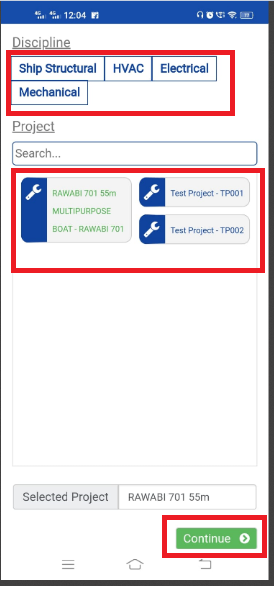 ](https://wiki.cuteinfocomm.com/uploads/images/gallery/2024-08/image-1724222407954.png)[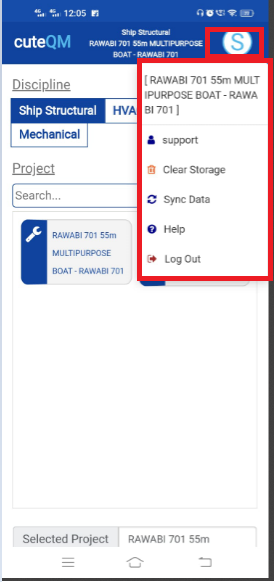](https://wiki.cuteinfocomm.com/uploads/images/gallery/2024-08/image-1724222471135.png)
1. **Module** – helps to select the module. Select ship structural module
2. **Project** – Helps to select the project. select the project.
3. Click **Save** button to go to the menu screen.
[](https://wiki.cuteinfocomm.com/uploads/images/gallery/2024-08/image-1724239800309.png)(show/hide icon) helps to show/hide the user id information that is displayed in the right panel of the home screen. if you touch this icon the information appears on, if you touch this icon again the information goes off.
- **Clear Storage** - clears all data in this app. Tap the **Clear Storage** option to delete all the data.
- **Sync Data**- synchronizes your inspection results with the respective reports in the web application. If your inspection results are not automatically synchronized with the web application, tap the **Sync Data** option for manual synchronization.
- **Log out** - To log out from the cuteQM app.
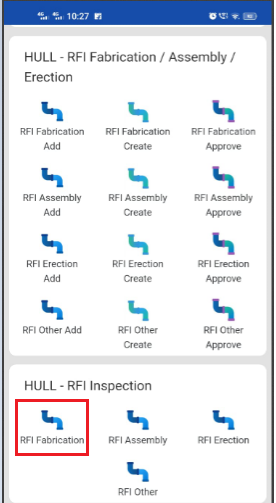
# 2.Hull RFI
### **2.1.RFI Hull Fabrication**
#### **2.1.1.RFI Fabrication Add**
[](https://wiki.cuteinfocomm.com/uploads/images/gallery/2024-08/image-1724316522383.png)[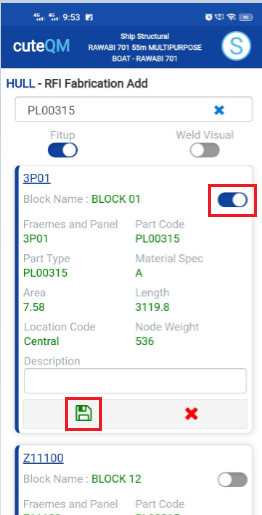](https://wiki.cuteinfocomm.com/uploads/images/gallery/2024-08/image-1724316606135.png)
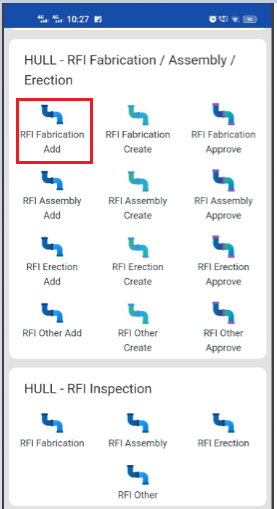
1. Click **RFI Fabrication Add** menu .This menu helps to add the hull parts for the RFI fabrication request.
2. Select partcode in the dropdown list.
3. Select the appropriate hull part
4. Enter **description**.
5. Click [S](https://wiki.cuteinfocomm.com/uploads/images/gallery/2024-08/image-1724334603626.png)**ave** icon.
**Hull Fabrication request added successfully.**
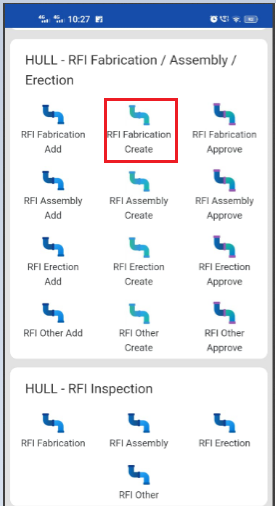
#### **2.1.2.RFI Fabrication Create**
[ ](https://wiki.cuteinfocomm.com/uploads/images/gallery/2024-08/image-1724316757332.png)[](https://wiki.cuteinfocomm.com/uploads/images/gallery/2024-08/image-1724316778238.png)
1. Click **RFI fabrication create** menu.This menu helps to create RFI requests from added hull parts.
2. Select the part no from dropdown list
3. Select the fitup toggle(Defaultly selected)
4. Select the hull part
5. Click **Create** button at the top
6. After create button clicked,a popup will open to key in **inspection date,subcontractor and description**. [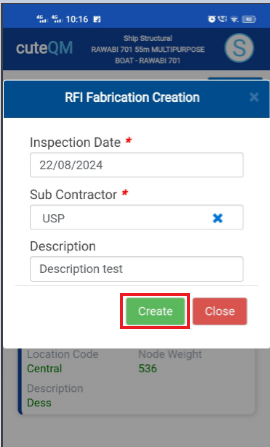](https://wiki.cuteinfocomm.com/uploads/images/gallery/2024-08/image-1724302153174.png)
7. Click **Create** button.
**RFI Fabrication request created successfully.**
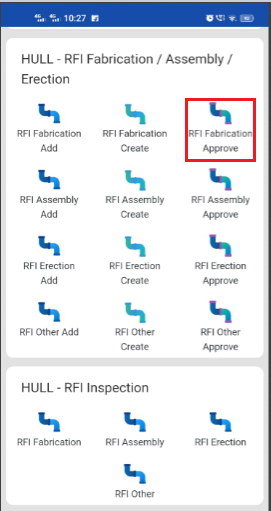
#### **2.1.3.RFI Fabrication Approve**
[ ](https://wiki.cuteinfocomm.com/uploads/images/gallery/2024-08/image-1724317252355.png)[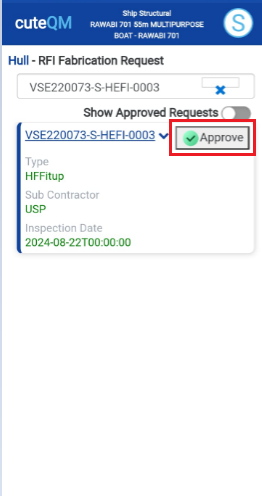](https://wiki.cuteinfocomm.com/uploads/images/gallery/2024-08/image-1724317438790.png)
1. Click **RFI Fabrication approve** menu
2. Select the RFI request no from dropdown list
3. Click **Approve** button.
**Hull Fabrication request approved successfully.**
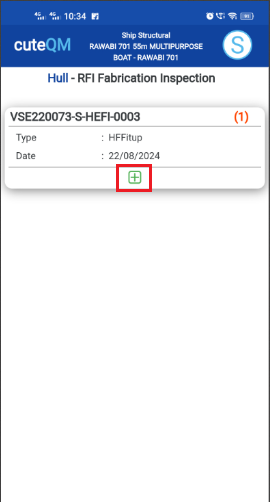
#### **2.1.4.RFI Fabrication Inspection**
1. Click **RFI Fabrication** menu in Inspection.
2. [ ](https://wiki.cuteinfocomm.com/uploads/images/gallery/2024-08/image-1724303024731.png)
1. Click [ button .It will redirected to new page](https://wiki.cuteinfocomm.com/uploads/images/gallery/2024-08/image-1724304171025.png)
[ ](https://wiki.cuteinfocomm.com/uploads/images/gallery/2024-08/image-1724317725362.png)[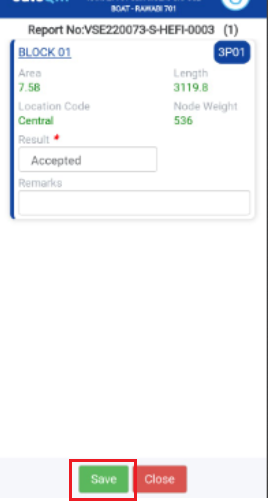](https://wiki.cuteinfocomm.com/uploads/images/gallery/2024-08/image-1724317903894.png)
1. Result will be defaultly accepted,If need to reject,you can change the dropdown as Reject
2. Enter **remarks**
3. Click **Save** button. **RFI** **Fabrication inspection approved successfully.**
### **2.2.RFI Hull Assembly**
#### **2.2.1.RFI Assembly Add**
[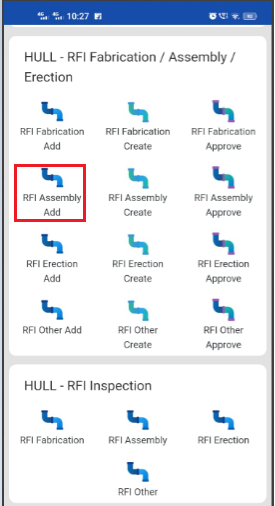](https://wiki.cuteinfocomm.com/uploads/images/gallery/2024-08/image-1724307797796.png)[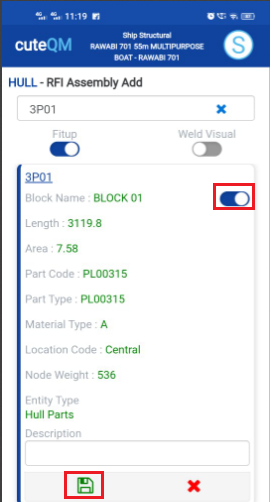](https://wiki.cuteinfocomm.com/uploads/images/gallery/2024-08/image-1724307847627.png)
1. Click **RFI Assembly Add** menu .This menu helps to add the hull parts and frames for the RFI Assembly request.
2. Select partcode in the dropdown list.
3. Select the appropriate hull part
4. Enter **description.**
5. Click [S](https://wiki.cuteinfocomm.com/uploads/images/gallery/2024-08/image-1724334603626.png)**ave** icon.
**Hull Assembly request added successfully.**
#### **2.2.2.RFI Assembly Create**
[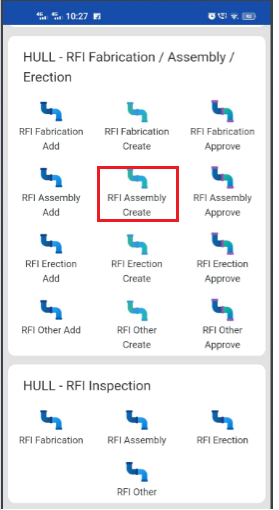](https://wiki.cuteinfocomm.com/uploads/images/gallery/2024-08/image-1724307229951.png)[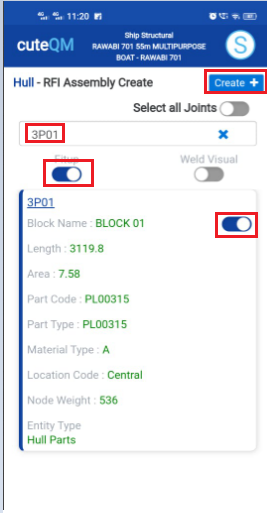](https://wiki.cuteinfocomm.com/uploads/images/gallery/2024-08/image-1724307516105.png)
1. Click **RFI Assembly create** menu.This menu helps to create RFI requests from added hull parts and frames.
2. Select the part no from dropdown list
3. Select the fitup toggle(Defaultly selected)
4. Select the hull part
5. Click **Create** button at the top
6. After create button clicked,a popup will open to key in **inspection date,subcontractor and description.**
[ 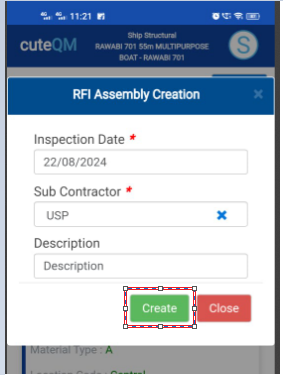 ](https://wiki.cuteinfocomm.com/uploads/images/gallery/2024-08/image-1724306449712.png)
7.Click **Create** button
**RFI Assembly request created successfully.**
#### **2.2.3.RFI Assembly Approve**
[ 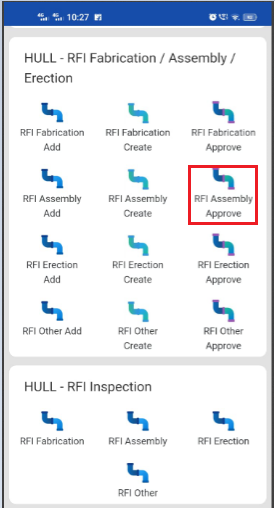 ](https://wiki.cuteinfocomm.com/uploads/images/gallery/2024-08/image-1724308053863.png)[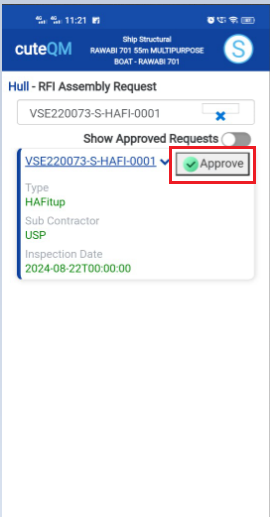](https://wiki.cuteinfocomm.com/uploads/images/gallery/2024-08/image-1724308079107.png)
1. Click **RFI Assembly approve** menu
2. Select the RFI request no from dropdown list
3. Click **Approve** button
**Hull Assembly request approved successfully.**
#### **2.2.4.RFI Assembly Inspection**
1. Click RFI Assembly menu in Inspection.[ ](https://wiki.cuteinfocomm.com/uploads/images/gallery/2024-08/image-1724303024731.png)[ ](https://wiki.cuteinfocomm.com/uploads/images/gallery/2024-08/image-1724305268684.png)
2. Click [ button .It will redirected to new page](https://wiki.cuteinfocomm.com/uploads/images/gallery/2024-08/image-1724304171025.png)
[](https://wiki.cuteinfocomm.com/uploads/images/gallery/2024-08/image-1724306785755.png) [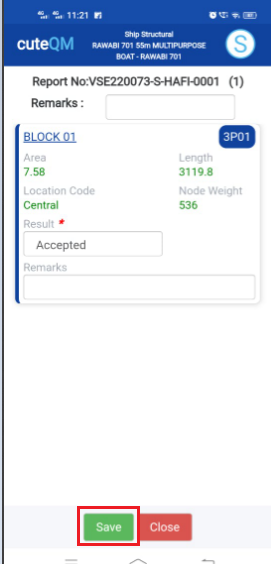](https://wiki.cuteinfocomm.com/uploads/images/gallery/2024-08/image-1724306676667.png)
[ ](https://wiki.cuteinfocomm.com/uploads/images/gallery/2024-08/image-1724304381939.png)
1. Result will be defaultly loaded as accepted,If need to reject,you can change the dropdown as Reject
2. Enter **remarks**
3. Click **Save** button. **RFI Assembly inspection approved successfully.**
### **2.3.RFI Hull Erection**
#### **2.3.1.RFI Hull Erection Add**
[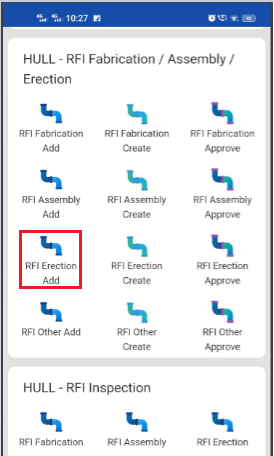](https://wiki.cuteinfocomm.com/uploads/images/gallery/2024-08/image-1724309770873.png)[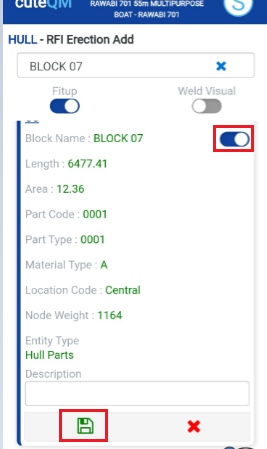](https://wiki.cuteinfocomm.com/uploads/images/gallery/2024-08/image-1724309931686.png)
1. Click **RFI Hull Erection Add** menu .This menu helps to add the hull parts and frames for the RFI Erection request.
2. Select partcode in the dropdown list.
3. Select the appropriate hull part
4. Enter **description**.
5. Click [S](https://wiki.cuteinfocomm.com/uploads/images/gallery/2024-08/image-1724334603626.png)**ave** icon.
**Hull Erection request added successfully.**
#### **2.3.2.RFI Erection Create**
[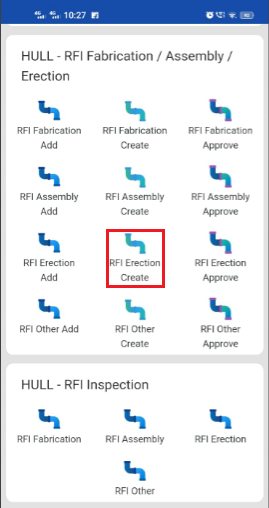](https://wiki.cuteinfocomm.com/uploads/images/gallery/2024-08/image-1724307188540.png)[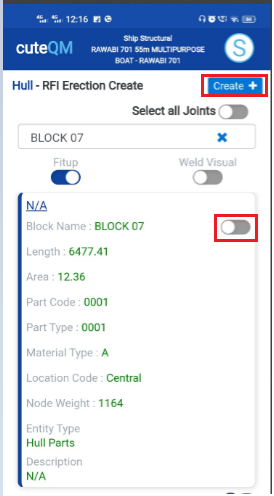](https://wiki.cuteinfocomm.com/uploads/images/gallery/2024-08/image-1724310056271.png)
1. Click **RFI Assembly create** menu.This menu helps to create RFI requests from added hull parts and frames.
2. Select the part no from dropdown list
3. Select the fitup toggle(Defaultly selected)
4. Select the hull part
5. Click **Create** button at the top
6. After create button clicked,a popup will open to key in **inspection date,subcontractor and description.**
[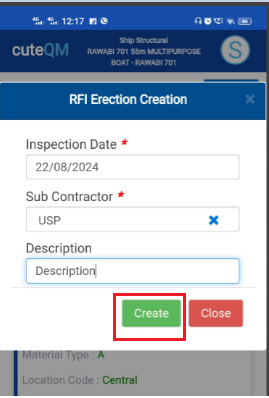](https://wiki.cuteinfocomm.com/uploads/images/gallery/2024-08/image-1724310151680.png)
7.Click **Create** button
**RFI Erection request created successfully.**
#### **2.3.3.RFI Erection Approve**
[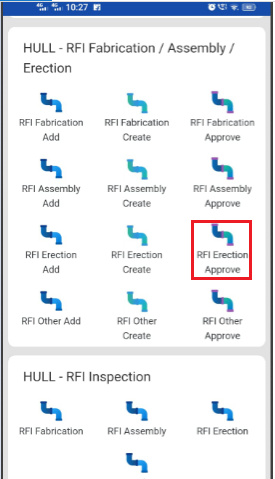](https://wiki.cuteinfocomm.com/uploads/images/gallery/2024-08/image-1724310336737.png)[](https://wiki.cuteinfocomm.com/uploads/images/gallery/2024-08/image-1724310348848.png)
1. Click **RFI Erection approve** menu
2. Select the RFI request no from dropdown list
3. Click **Approve** button
**Hull Erection request approved successfully.**
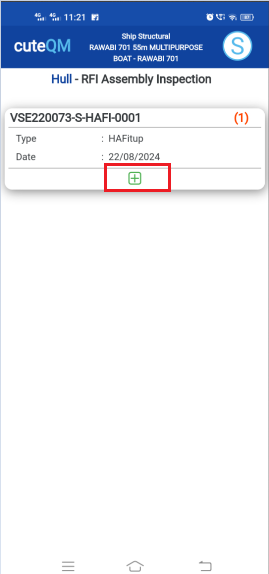
#### **2.3.4.RFI Erection Inspection**
1. Click **RFI Assembly** menu in Inspection.[ ](https://wiki.cuteinfocomm.com/uploads/images/gallery/2024-08/image-1724303024731.png)[ ](https://wiki.cuteinfocomm.com/uploads/images/gallery/2024-08/image-1724305268684.png)
[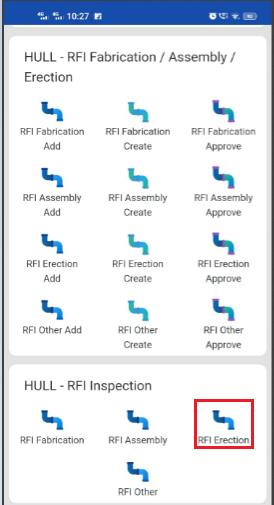](https://wiki.cuteinfocomm.com/uploads/images/gallery/2024-08/image-1724307399392.png)
2. Click [ button .It will redirected to new page](https://wiki.cuteinfocomm.com/uploads/images/gallery/2024-08/image-1724304171025.png)
[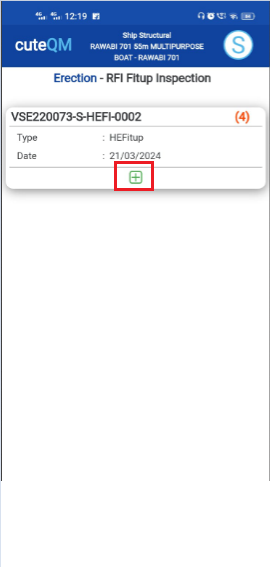](https://wiki.cuteinfocomm.com/uploads/images/gallery/2024-08/image-1724310560266.png) [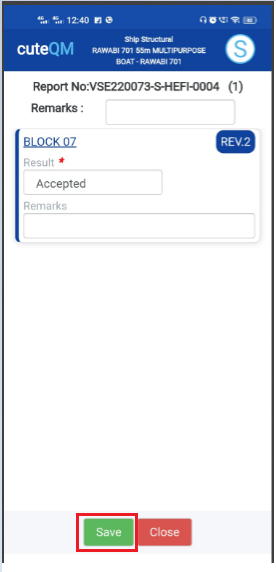](https://wiki.cuteinfocomm.com/uploads/images/gallery/2024-08/image-1724310713314.png)
1. Result will be defaultly loaded as accepted,If need to reject,you can change the dropdown as Reject
2. Enter **remarks**
3. Click **Save** button. **RFI Erection inspection approved successfully.**
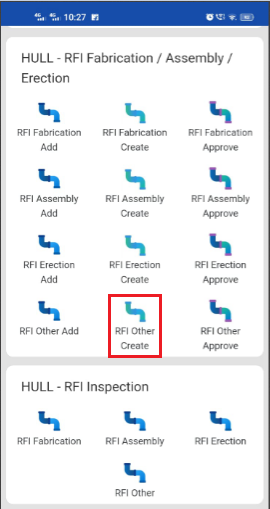
### **2.4.RFI Other Inspection**
#### **2.4.1.RFI Other inspection Add**
**[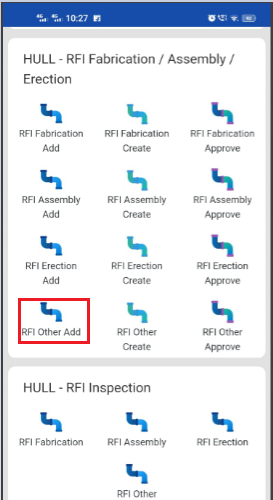 ](https://wiki.cuteinfocomm.com/uploads/images/gallery/2024-08/image-1724319170678.png)[ ](https://wiki.cuteinfocomm.com/uploads/images/gallery/2024-08/image-1724309770873.png)**[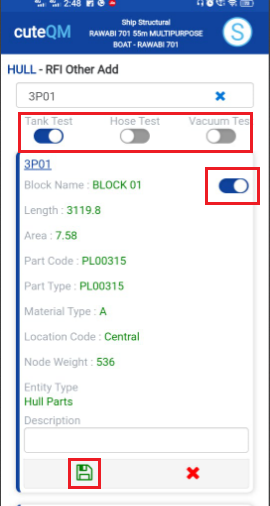](https://wiki.cuteinfocomm.com/uploads/images/gallery/2024-08/image-1724319575247.png)
1. Click **RFI other inspection Add** menu .This menu helps to add the request for Tank test,Hose test and Vaccum test.
2. Select the **test type** as required (Tank test,Hose test and Vaccum test)
3. Select partcode in the dropdown list.
4. Select the appropriate hull part
5. Enter **description**.
6. Click [S](https://wiki.cuteinfocomm.com/uploads/images/gallery/2024-08/image-1724334603626.png)**ave** icon.
**Hull other inspection request added successfully.**
#### **2.4.2.RFI Other inspection Create**
[ ](https://wiki.cuteinfocomm.com/uploads/images/gallery/2024-08/image-1724319728321.png)[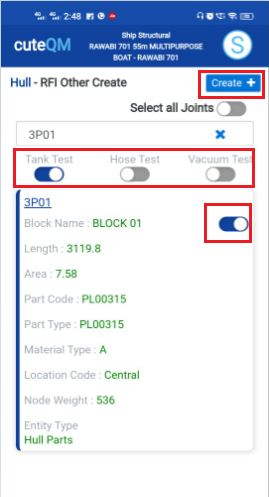](https://wiki.cuteinfocomm.com/uploads/images/gallery/2024-08/image-1724319802515.png)
1. Click **RFI Other inspection create** menu.This menu helps to create RFI requests from added hull parts .
2. Select the type of the test toggle button as required.
3. Select the required hull part toggle
4. Click **Create** button at the top
5. After create button clicked,a popup will open to key in **inspection date,subcontractor and descriptio**n.
[ 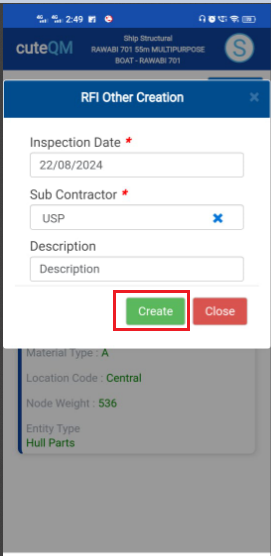](https://wiki.cuteinfocomm.com/uploads/images/gallery/2024-08/image-1724320052823.png)
7.Click **Create** button
**RFI Other inspection request created successfully.**
#### **2.4.3.RFI Other inspection Approve**
[](https://wiki.cuteinfocomm.com/uploads/images/gallery/2024-08/image-1724320169289.png)[ ](https://wiki.cuteinfocomm.com/uploads/images/gallery/2024-08/image-1724310336737.png)[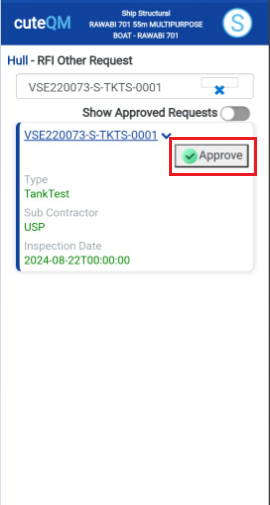](https://wiki.cuteinfocomm.com/uploads/images/gallery/2024-08/image-1724320368870.png)
1. Click **RFI Other inspection approve** menu
2. Select the RFI request no from dropdown list
3. Click **Approve** button
**Hull Other inspection request approved successfully.**
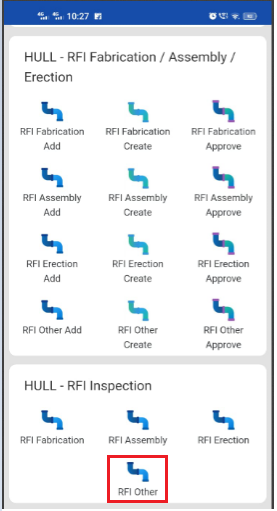
#### **2.4.4.RFI Other Inspection**
1. Click **RFI Other inspection** menu in Inspection.[ ](https://wiki.cuteinfocomm.com/uploads/images/gallery/2024-08/image-1724303024731.png)[ ](https://wiki.cuteinfocomm.com/uploads/images/gallery/2024-08/image-1724305268684.png)
[](https://wiki.cuteinfocomm.com/uploads/images/gallery/2024-08/image-1724320464395.png)
2. Click [ button .It will redirected to new page](https://wiki.cuteinfocomm.com/uploads/images/gallery/2024-08/image-1724304171025.png)
[  ](https://wiki.cuteinfocomm.com/uploads/images/gallery/2024-08/image-1724320550731.png)[](https://wiki.cuteinfocomm.com/uploads/images/gallery/2024-08/image-1724320673970.png)
1. Result will be defaultly loaded as accepted,If need to reject,you can change the dropdown as Reject
2. Enter **Description**
3. Enter **remarks**
4. Click **Save** button. **RFI Other inspection approved successfully.**
# 3.Outfitting RFI
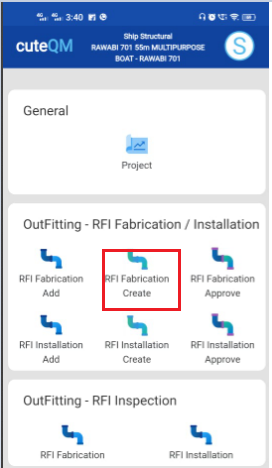
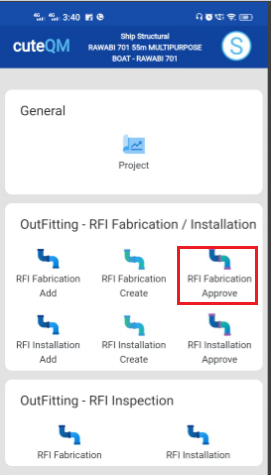
### **3.1.RFI Fabrication**
#### **3.1.1.RFI Fabrication Add**
[ 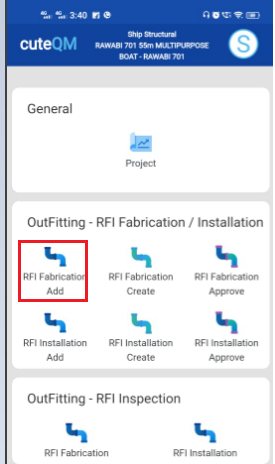 ](https://wiki.cuteinfocomm.com/uploads/images/gallery/2024-08/image-1724321887473.png)[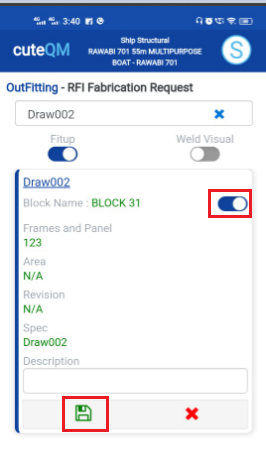](https://wiki.cuteinfocomm.com/uploads/images/gallery/2024-08/image-1724322123801.png)
[ ](https://wiki.cuteinfocomm.com/uploads/images/gallery/2024-08/image-1724321887473.png)
1. Click **RFI Fabrication Add** menu .This menu helps to add the outfitting work for the RFI fabrication request.
2. Select Drawing no in the dropdown list.
3. Select the appropriate outfitting drawing
4. Enter **description**.
5. Click [S](https://wiki.cuteinfocomm.com/uploads/images/gallery/2024-08/image-1724334603626.png)**ave** icon.
**Outfitting Fabrication request added successfully.**
#### **3.1.2.RFI Fabrication Create**
[ ](https://wiki.cuteinfocomm.com/uploads/images/gallery/2024-08/image-1724322367438.png)[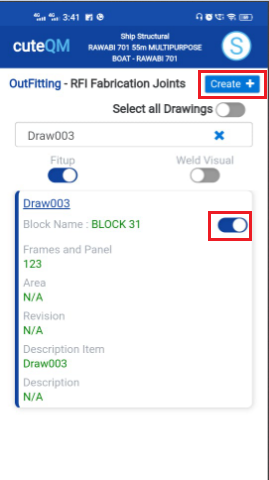](https://wiki.cuteinfocomm.com/uploads/images/gallery/2024-08/image-1724322475400.png)
1. Click **RFI fabrication create** menu.This menu helps to create RFI requests from added outfitting parts.
2. Select the drawing no from dropdown list
3. Select the fitup toggle(Defaultly selected)
4. Select the outfitting part
5. Click **Create** button at the top
6. After create button clicked,a popup will open to key in **inspection date,subcontractor and description.** [](https://wiki.cuteinfocomm.com/uploads/images/gallery/2024-08/image-1724302153174.png)
7. Click **Create** button.
**RFI Fabrication request created successfully.**
#### **3.1.3.RFI Fabrication Approve**
[ ](https://wiki.cuteinfocomm.com/uploads/images/gallery/2024-08/image-1724331709468.png)[ ](https://wiki.cuteinfocomm.com/uploads/images/gallery/2024-08/image-1724317252355.png)[](https://wiki.cuteinfocomm.com/uploads/images/gallery/2024-08/image-1724317438790.png)
1. Click **RFI Fabrication approve** menu
2. Select the RFI request no from dropdown list
3. Click **Approve** button.
**Outfitting Fabrication request approved successfully.**
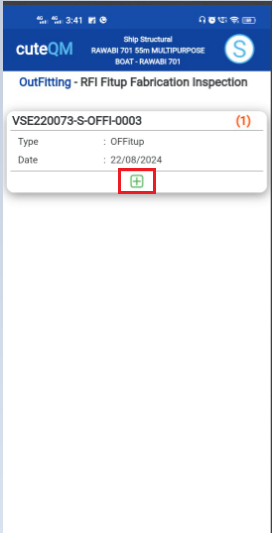
#### **3.1.4.RFI Fabrication Inspection**
1. Click **RFI Fabrication** menu in Inspection.
2. [ ](https://wiki.cuteinfocomm.com/uploads/images/gallery/2024-08/image-1724303024731.png)[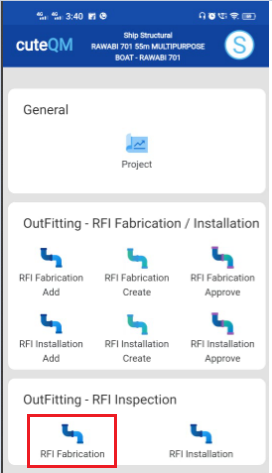](https://wiki.cuteinfocomm.com/uploads/images/gallery/2024-08/image-1724322772618.png)
1. Click [ button .It will redirected to new page](https://wiki.cuteinfocomm.com/uploads/images/gallery/2024-08/image-1724304171025.png)
[  ](https://wiki.cuteinfocomm.com/uploads/images/gallery/2024-08/image-1724322856296.png)[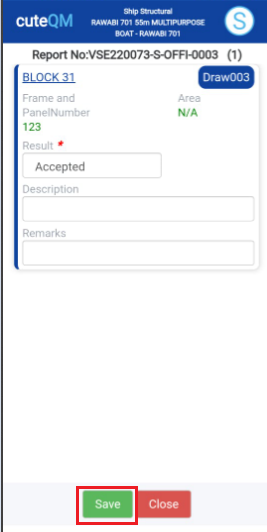](https://wiki.cuteinfocomm.com/uploads/images/gallery/2024-08/image-1724322921610.png)
[ ](https://wiki.cuteinfocomm.com/uploads/images/gallery/2024-08/image-1724317725362.png)
1. Result will be defaultly accepted,If need to reject,you can change the dropdown as Reject
2. Enter **remarks**
3. Click **Save** button. **RFI** **Fabrication inspection approved successfully.**
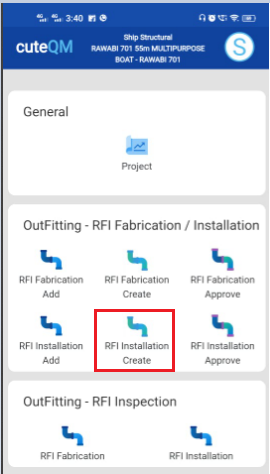
### **3.2.RFI Installation**
#### **3.2.1.RFI Installation Add**
[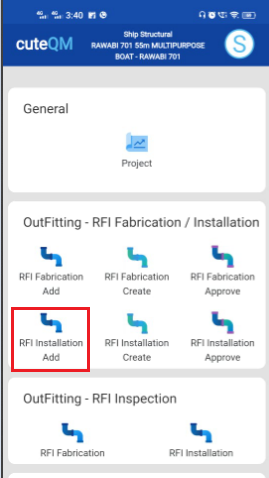 ](https://wiki.cuteinfocomm.com/uploads/images/gallery/2024-08/image-1724324164730.png)[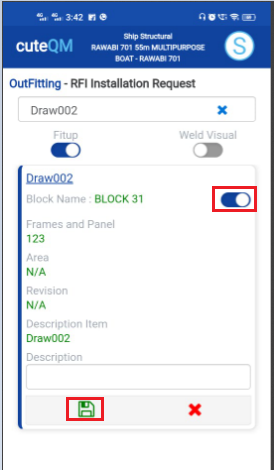](https://wiki.cuteinfocomm.com/uploads/images/gallery/2024-08/image-1724324332757.png)
1. Click **RFI Installation Add** menu .This menu helps to add the outfitting work for the RFI installation request.
2. Select Drawing no in the dropdown list.
3. Select the appropriate outfitting drawing toggle
4. Enter **description**.
5. Click [S](https://wiki.cuteinfocomm.com/uploads/images/gallery/2024-08/image-1724334603626.png)**ave** icon.
**Outfitting Installation request added successfully.**
#### **3.2.2.RFI Installation Create**
[ ](https://wiki.cuteinfocomm.com/uploads/images/gallery/2024-08/image-1724324426258.png)[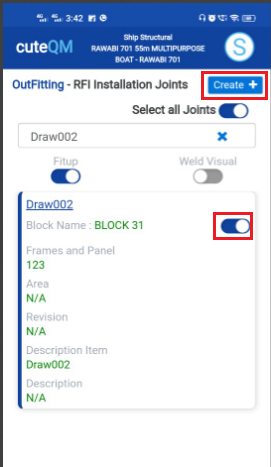](https://wiki.cuteinfocomm.com/uploads/images/gallery/2024-08/image-1724326588616.png)
1. Click **RFI Installation create** menu.This menu helps to create RFI requests from added outfitting parts.
2. Select the drawing no from dropdown list
3. Select the fitup toggle(Defaultly selected)
4. Select the outfitting part toggle button
5. Click **Create** button at the top
6. After create button clicked,a popup will open to key in **inspection date,subcontractor and descriptio**n. [](https://wiki.cuteinfocomm.com/uploads/images/gallery/2024-08/image-1724302153174.png)
7. Click **Create** button.
**RFI Installation request created successfully.**
#### **3.2.3.RFI Installation Approve**
[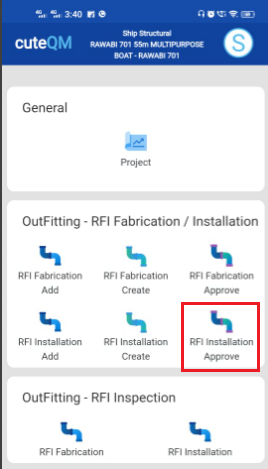 ](https://wiki.cuteinfocomm.com/uploads/images/gallery/2024-08/image-1724328495041.png)[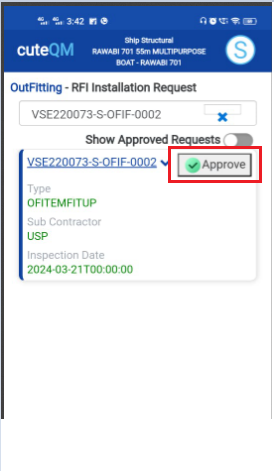](https://wiki.cuteinfocomm.com/uploads/images/gallery/2024-08/image-1724328631165.png)
1. Click **RFI Installation approve** menu
2. Select the RFI request no from dropdown list
3. Click **Approve** button.
**Outfitting Installation request approved successfully.**
#### **3.2.4.RFI Installation Inspection**
1. Click **RFI Installation** menu in Inspection.
2. [ ](https://wiki.cuteinfocomm.com/uploads/images/gallery/2024-08/image-1724303024731.png)[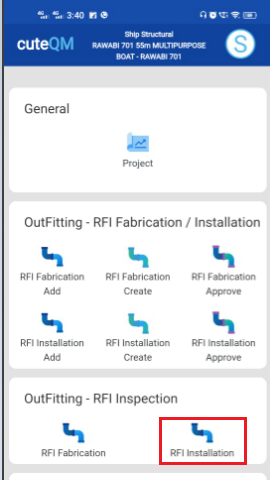](https://wiki.cuteinfocomm.com/uploads/images/gallery/2024-08/image-1724328742147.png)
1. Click [ button .It will redirected to new page](https://wiki.cuteinfocomm.com/uploads/images/gallery/2024-08/image-1724304171025.png)
[ 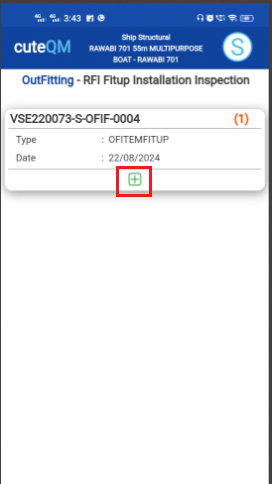 ](https://wiki.cuteinfocomm.com/uploads/images/gallery/2024-08/image-1724328793405.png)[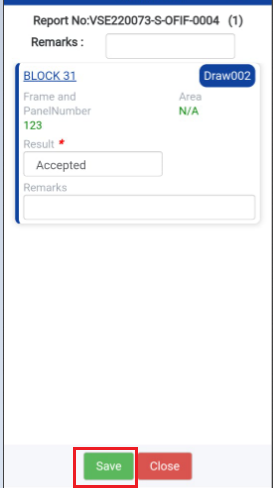](https://wiki.cuteinfocomm.com/uploads/images/gallery/2024-08/image-1724328889268.png)[ ](https://wiki.cuteinfocomm.com/uploads/images/gallery/2024-08/image-1724322856296.png)
1. Result will be defaultly accepted,If need to reject,you can change the dropdown as Reject
2. Enter **remarks**
3. Click **Save** button. **RFI** **Installation inspection approved successfully.**
# 4.Painting RFI
### **4.1. RFI Coat**
#### **4.1.1.RFI Coat Add**
[ ](https://wiki.cuteinfocomm.com/uploads/images/gallery/2024-08/image-1724330340746.png)[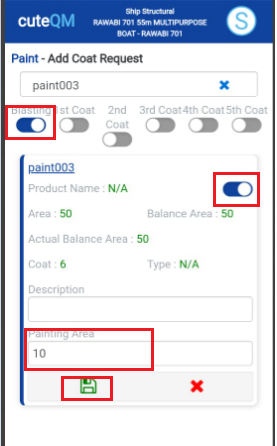](https://wiki.cuteinfocomm.com/uploads/images/gallery/2024-08/image-1724330456583.png)
1. Click **RFI Coat Add** menu .This menu helps to add the painting coat work for the RFI coat request.
2. Select Painting name in the dropdown list.
3. Select the appropriate painting type toggle button (Blasting,coat1,coat2....)
4. Enter **description**.
5. Enter **painting area**
6. Click [S](https://wiki.cuteinfocomm.com/uploads/images/gallery/2024-08/image-1724334603626.png)**ave** icon.
**Painting coat RFI request added successfully.**
#### **3.1.2.RFI Coat Create**
[ ](https://wiki.cuteinfocomm.com/uploads/images/gallery/2024-08/image-1724330745241.png)[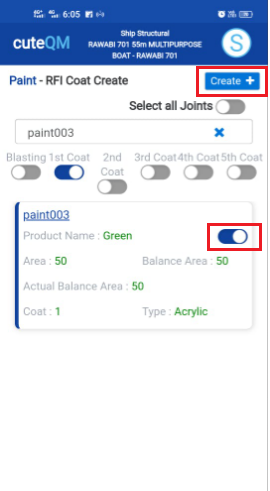](https://wiki.cuteinfocomm.com/uploads/images/gallery/2024-08/image-1724330764407.png)
1. Click **RFI Coat create** menu.This menu helps to create RFI requests from added painting names.
2. Select the painting name from dropdown list
3. Select the painting tyep toggle(Defaultly blasting selected)
4. Select the painting name
5. Click **Create** button at the top
6. After create button clicked,a popup will open to key in **inspection date,subcontractor and description.**
[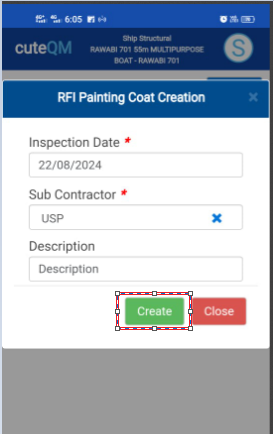](https://wiki.cuteinfocomm.com/uploads/images/gallery/2024-08/image-1724330937133.png)
7.Click **Create** button.
**RFI Coat request created successfully.**
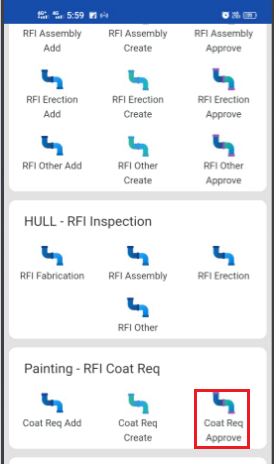
#### **3.1.3.RFI Coat Approve**
[ ](https://wiki.cuteinfocomm.com/uploads/images/gallery/2024-08/image-1724331003361.png)[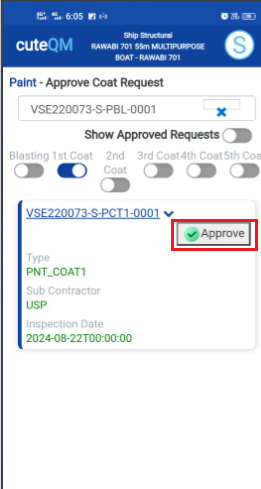](https://wiki.cuteinfocomm.com/uploads/images/gallery/2024-08/image-1724331039322.png)
1. Click **RFI Coat approve** menu
2. Select the RFI request no from dropdown list
3. Select the paint type toggle(Defaultly blasting selected)
4. Click **Approve** button.
**RFI Coat request approved successfully.**
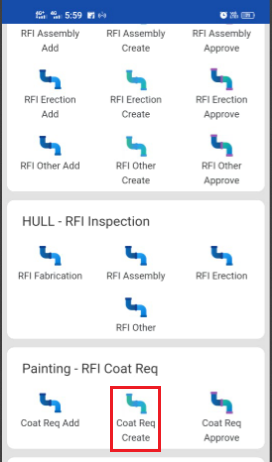
#### **3.1.4.RFI Coat Inspection**
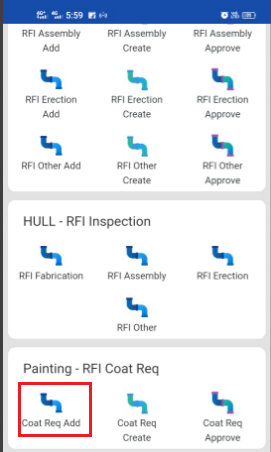
1. Click **RFI Coat** menu in Inspection.
2. [ ](https://wiki.cuteinfocomm.com/uploads/images/gallery/2024-08/image-1724303024731.png)[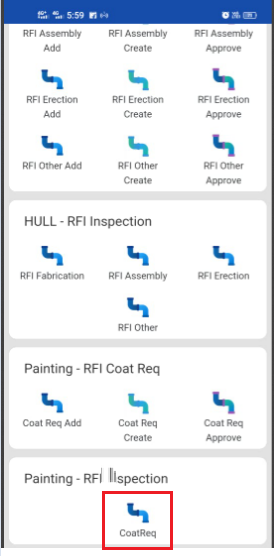](https://wiki.cuteinfocomm.com/uploads/images/gallery/2024-08/image-1724331155234.png)
1. Click [ button .It will redirected to new page](https://wiki.cuteinfocomm.com/uploads/images/gallery/2024-08/image-1724304171025.png)
[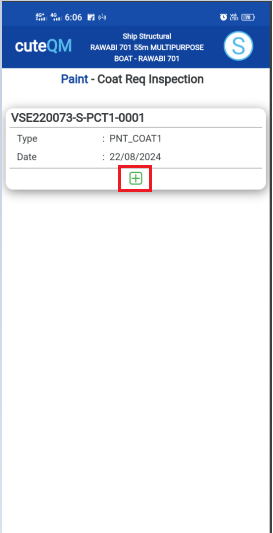vvvv](https://wiki.cuteinfocomm.com/uploads/images/gallery/2024-08/image-1724331207540.png)[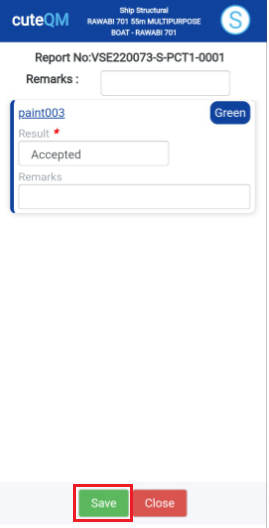](https://wiki.cuteinfocomm.com/uploads/images/gallery/2024-08/image-1724331251735.png)
1. Result will be defaultly accepted,If need to reject,you can change the dropdown as Reject
2. Enter **remarks**
3. Click **Save** button. **RFI** **Coat inspection approved successfully.**