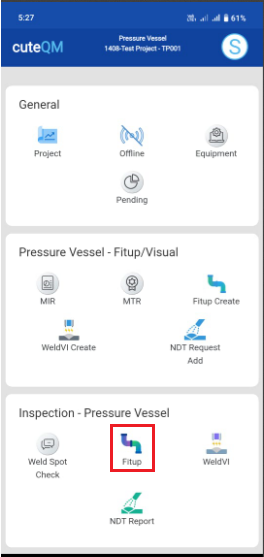
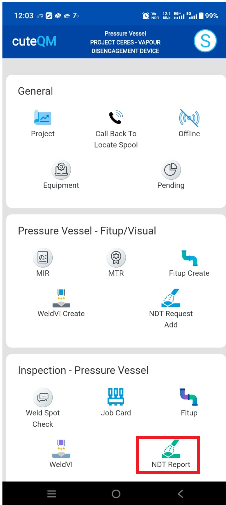
Mobile App -Pressure Vessel
- User Management
- Take Offline Data
- Fitup
- Weld Visual
- NDT Request and NDT report
- Welding Jobcard and Weld Spot Check
User Management
1.1 Downloading cuteQM app
To use the cuteQM app you must first download it from the Play Store.
- Open the Play Store and search for “cuteQM”.
- Download and install the cuteQM app on your mobile phone.
- After installation, open the cuteQM
You are ready to go!
1.2 Log in
After installation, when you open the cuteQM app you may be asked to Login. Follow the steps to successfully log into your account.
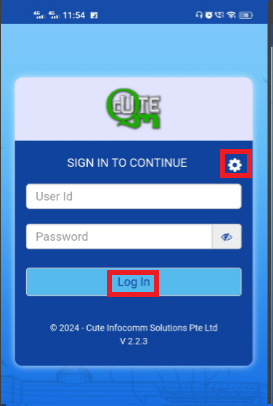
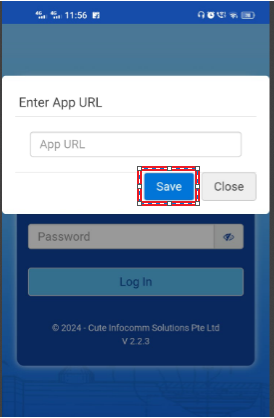
1. Before enter your user id and password, tap  (Settings icon) and enter the app URL https://apiassurex.temaindia.com .
2. Tap Save.
3. Enter your user id and password in the allocated fields.
4. Tap Log in to complete the process.
The home screen of the cuteQM app is appeared.
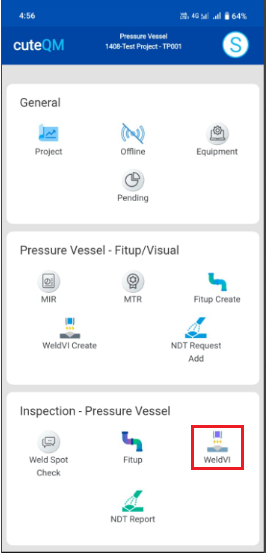
1.3 Home screen of cuteQM app
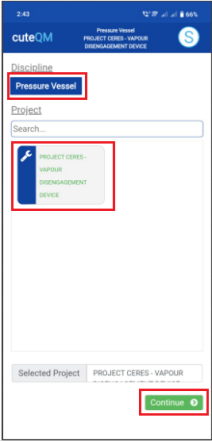
- Module – helps to select the module. Select pressure vessel module
- Project – Helps to select the project. select the project.
- Click Save button to go to the menu screen.
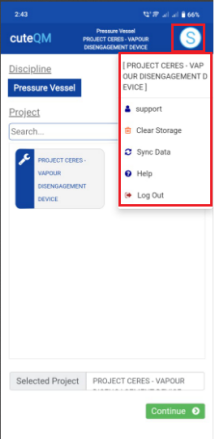
![]() (show/hide icon) helps to show/hide the user id information that is displayed in the right panel of the home screen. if you touch this icon the information appears on, if you touch this icon again the information goes off.
(show/hide icon) helps to show/hide the user id information that is displayed in the right panel of the home screen. if you touch this icon the information appears on, if you touch this icon again the information goes off.
- Clear Storage - clears all data in this app. Tap the Clear Storage option to delete all the data.
- Sync Data- synchronizes your inspection results with the respective reports in the web application. If your inspection results are not automatically synchronized with the web application, tap the Sync Data option for manual synchronization.
- Log out - To log out from the cuteQM app.
Take Offline Data
The Offline tab helps you viewing the reports for the specific inspection dates you want.
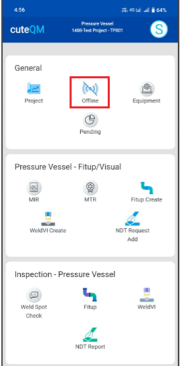
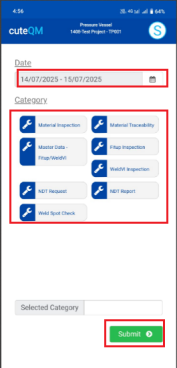
Do the following steps to take offline date
Offine data stored successfully.
Fitup
Fitup Create
The Fitup Create tab helps you to create Fitup request in mobile and sync the details to the web application.
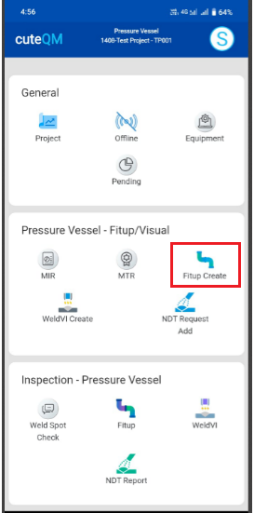
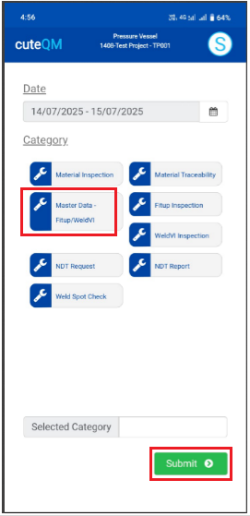

To create Fitup request,do the following
- Take offlinedata for Master Data-FITUP/WeldVI.
- Click Fitup Create menu
- Here joints listed to create the Fitup
- Select the joints
- Enable Fitup completed toggle button
- Click Save
Fitup request created successfully.
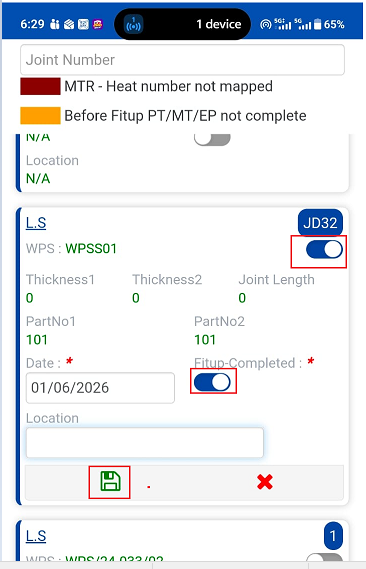
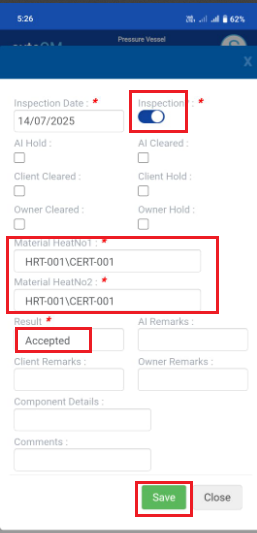
Fitup Inspection
For fitup inspection,do the following steps
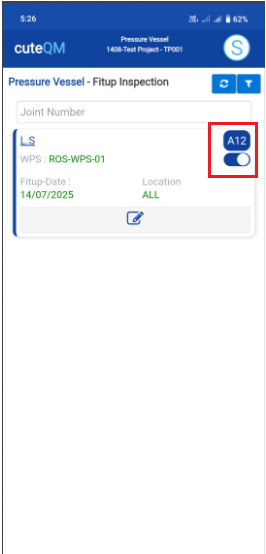
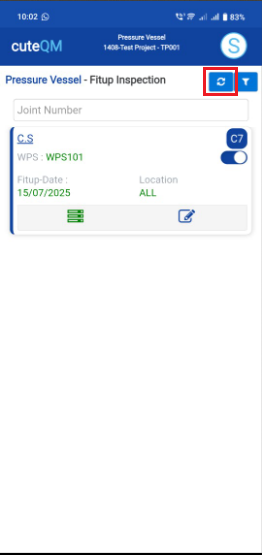
- Take offline data for Fitup Inspection.
- Click Fitup menu in inspection
- Here fitup inspection created joints listed
- Select the joint
- Enable inspection toggle button
- Select heat number 1and heat number 2 and Result
- Click Save button placed at the bottom
Fitup inspection updated successfully.
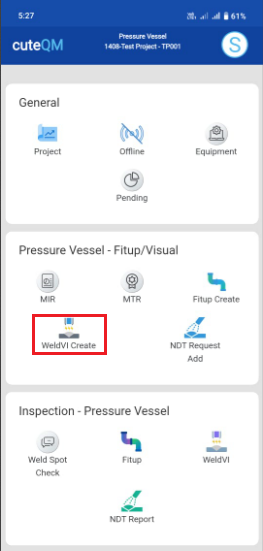
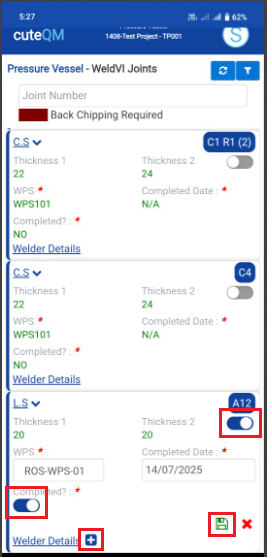
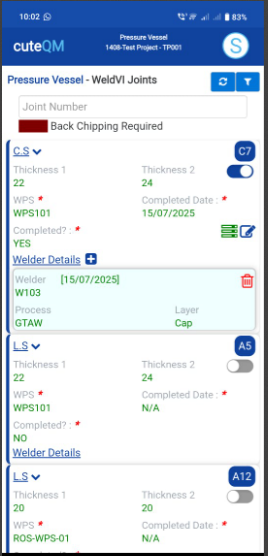
Weld Visual
WeldVI Create
The WeldVI create tab helps you to create weld visual request in mobile and sync the details to the web application.
To create Weld visual request,do the following steps
- Click weldvi createmenu
- Selectthe joint
- Enable the toggle button as Completed
- Click + iconto add welder details
- Click Savebutton
Weldvi request created successfully.
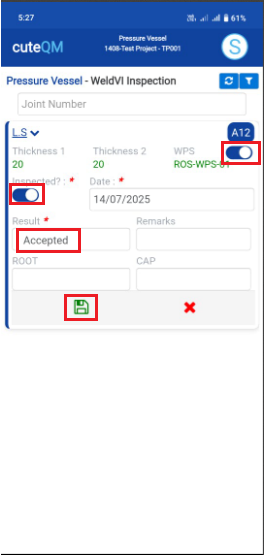
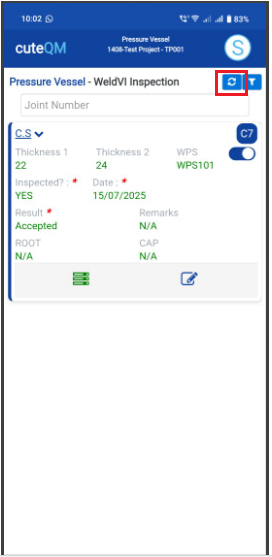
WeldVI Inspection
For weld visual inspection,do the following steps.
WeldVI inspection updated successfully.
NDT Request and NDT report
NDT Request
The NDT Request Add tab helps you to create NDT request in mobile and sync the details to the web application.

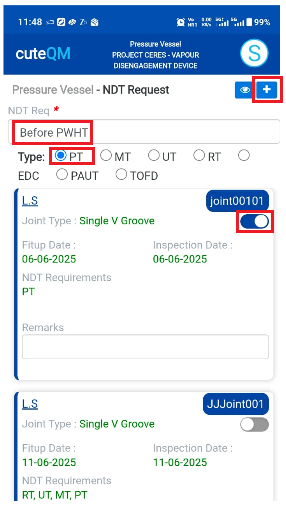
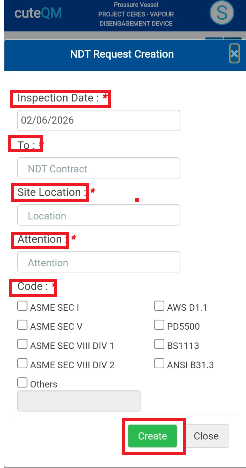
To create NDT Request request,do the following
- Take offline data for NDT Request.
- Click NDT Request Add menu
- Here joints listed to create the NDT Request
- Select the NDT request type from the dropdown(Before fitup/Before pwht,after pwht etc)
- Select the Type of the NDT (RT/UT/PT/MT etc)
- Select the joints
- Click the + icon placed at the top
- This will navigate to add popup
- Select the inspection date
- Select the NDT contractor
- Select the site location from the dropdown list
- Select attention
- Select the appropriate code for the NDT Request
- Click Create
NDT Request created successfully.
NDT Report
The NDT Report tab helps you to create NDT reports in mobile and sync the details to the web application.
- Take offline data for NDT Report.
- Click NDT Report menu
- Here joints listed to create the NDT Report based on NDT type
- Select the Type of the NDT report
- Select the joints
- Click the + icon placed at the top
- This will navigate to add popup
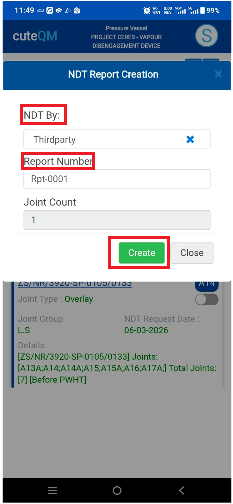
- Select the NDT By from the dropdown list
- Enter the Report number
- Click Create
NDT Report created successfully.
Welding Jobcard and Weld Spot Check
Welding Jobcard
The Welding Job Card feature in the mobile app is used to record and manage welding activities performed on specific weld joints. It allows users to capture welding details such as weld number, welder information, welding process, WPS used, welding date, consumables, and other relevant data.
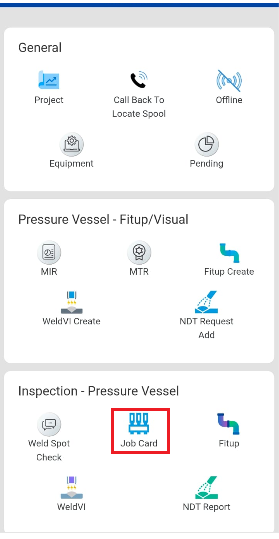
To create welding job card,do the following steps
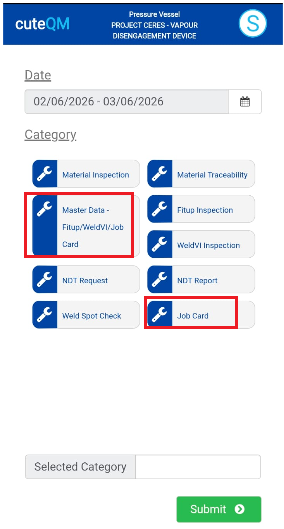
- Take offline data for Master Data-Fitup/WeldVI/Jobcard
- Take offline data for Job Card.
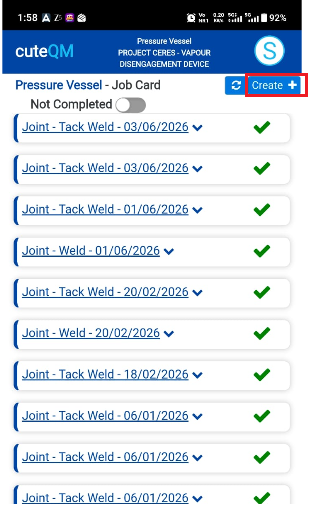
- Click Job Card menu in inspection
- Here jobcard list will be shown
- Click Create button at top
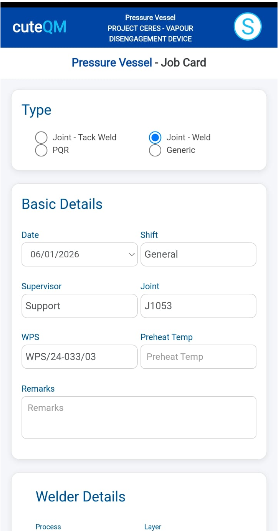
- Page will navigate to Add screen of job card
- Select the Type of the job card
- Select the date of jobcard
- Select the shift
- Select the supervisor
- Select the joint from the dropdown
- Select the wps number
- Enter pre heat temperature
- Enter remarks
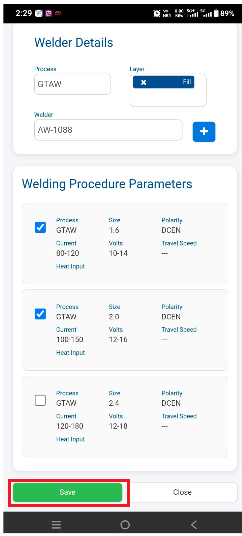
- Select the process in welder details
- Select the weld layer
- Select the welder.
- Once welder selected ,click + icon
- Select the welding procedure parameter
- Click Save.
Job Card created successfully.
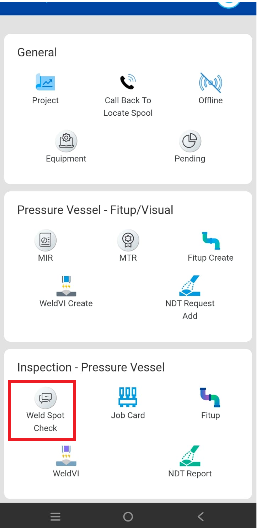
Weld spot check
The Weld Spot Check feature in the mobile app is used to perform and record inspection checks on selected jobcard's joint. Inspectors can review weld quality, verify compliance with project requirements, record observations, attach photos, and document any defects or remarks. This helps ensure welding quality and provides traceable inspection records directly from the field.
Add weld spot check
To add weld spot check for a welding job card,do the following steps
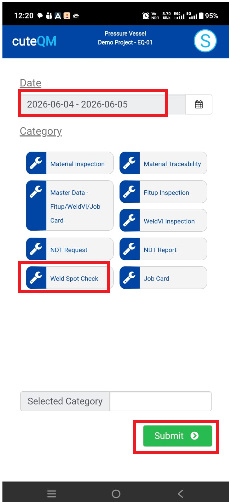
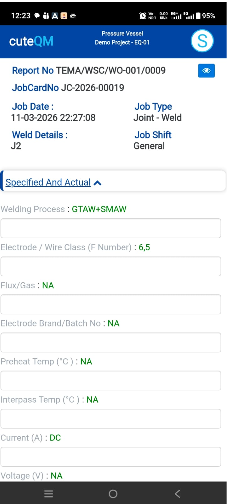
1.Take offline data for weld spot check
2.Click Weld spot check menu
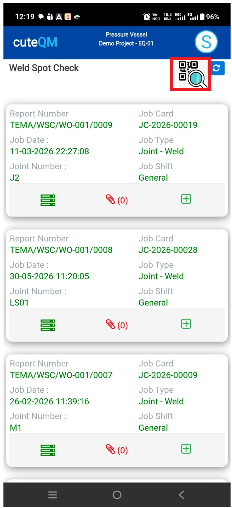
4.A QR code scan window will open.Scan the QR code of the job card.
5.A weld spot check record will automatically created.
6.Fill all the observations one by one
Weld spot check created successfully.
Update a weld spot check
To update weld spot check ,do the following steps
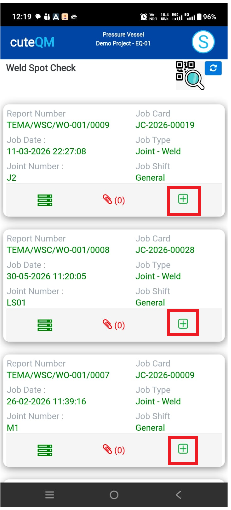
1.Take offline data for weld spot check
2.Click Weld spot check menu
3.Here all the existing spot check record will be displayed
4.Click + icon of the record to be updated
Weld spot check updated successfully.
Attach photo/files in weld spot check
To attach photo/files in the weld spot check,dothe following steps
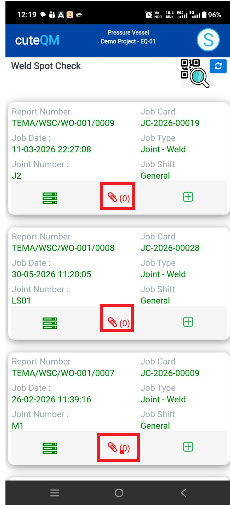
1.Take offline data for weld spot check
2.Click Weld spot check menu
3.Here all the existing spot check record will be displayed
4.Click attachmment  icon
icon
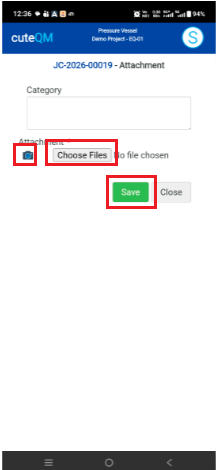
5.Enter category if required
6.Click camera icon and then phone camera will open.Capture the photo directly from the phone
7.If need to attach a file then click Choose file and select the file from phone and attach
8.Click save
Attachment saved successfully