# Mobile App - Electrical and Instrumentation
# 1.User Management
### **1.1 Downloading *cuteQM* app**
To use the ***cuteQM*** app you must first download it from the **Play Store**.
1. Open the **Play Store** and search for “***cuteQM***”.
2. Download and install the ***cuteQM*** app on your mobile phone.
3. After installation, open the ***cuteQM***
***You are ready to go!***
### **1.2 Log in**
**After installation, when you open the *cuteQM* app you may be asked to Login. Follow the steps to successfully log into your account.**
[ ](https://wiki.cuteinfocomm.com/uploads/images/gallery/2024-08/image-1724221885734.png)[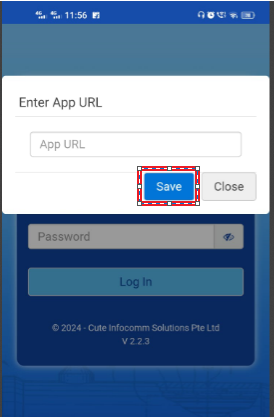](https://wiki.cuteinfocomm.com/uploads/images/gallery/2024-08/image-1724221798542.png)
1\. Before enter your user id and password, tap [ ](http://wiki.cuteinfocomm.com/uploads/images/gallery/2022-05/image-1651671754003.png)(Settings icon) and enter the app URL http://www.cuteqm.com/cuteQMPTUSPAPI.
2\. Tap **Save**.
3\. Enter your user id and password in the allocated fields.
4\. Tap **Log in** to complete the process.
The home screen of the ***cuteQM*** app is appeared.
### **1.3 Home screen of *cuteQM* app**
[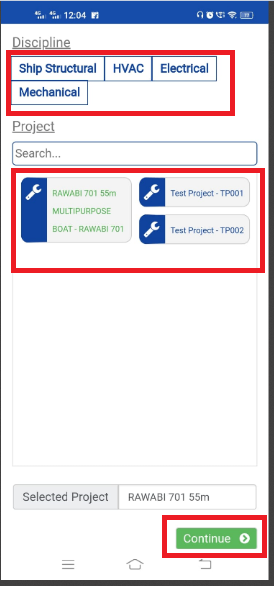 ](https://wiki.cuteinfocomm.com/uploads/images/gallery/2024-08/image-1724222407954.png)[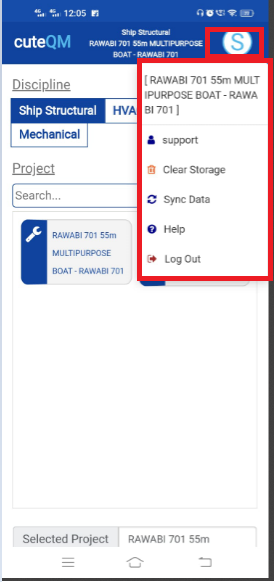](https://wiki.cuteinfocomm.com/uploads/images/gallery/2024-08/image-1724222471135.png)
1. **Module** – helps to select the module. Select **Electrical** module
2. **Project** – Helps to select the project. select the project.
3. Click **Save** button to go to the menu screen.
[](https://wiki.cuteinfocomm.com/uploads/images/gallery/2024-08/image-1724239800309.png)(show/hide icon) helps to show/hide the user id information that is displayed in the right panel of the home screen. if you touch this icon the information appears on, if you touch this icon again the information goes off.
- **Clear Storage** - clears all data in this app. Tap the **Clear Storage** option to delete all the data.
- **Sync Data**- synchronizes your inspection results with the respective reports in the web application. If your inspection results are not automatically synchronized with the web application, tap the **Sync Data** option for manual synchronization.
- **Log out** - To log out from the cuteQM app.
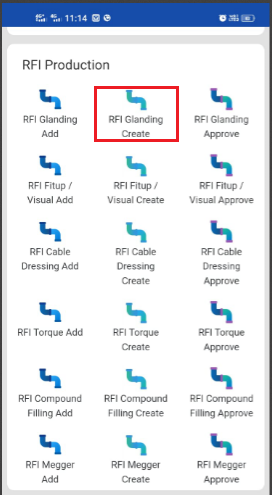
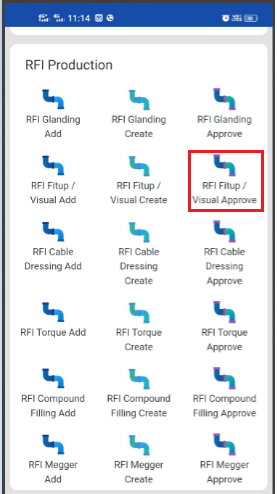
# 2. RFI
### **2.1. Glanding & Termination RFI**
#### **2.1.1.RFI Glanding Add**
[  ](https://wiki.cuteinfocomm.com/uploads/images/gallery/2024-08/image-1724379663208.png)[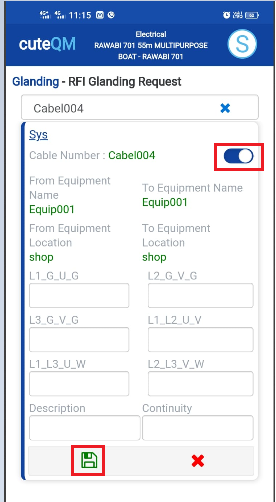](https://wiki.cuteinfocomm.com/uploads/images/gallery/2024-08/image-1724379677647.png)
[ ](https://wiki.cuteinfocomm.com/uploads/images/gallery/2024-08/image-1724334273188.png)
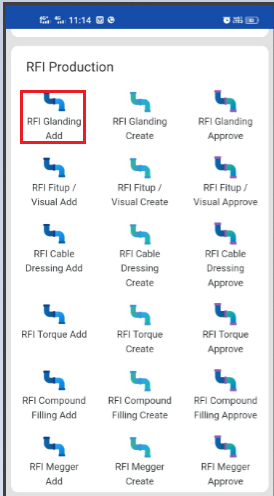
1. Click **RFI Glanding Add** menu .This menu helps to add the cables for the RFI Glanding request.
2. Select cable no in the dropdown list.
3. Toggle **ON** the appropriate cable
4. Enter L1,L2,L3..Values
5. Enter **description**.
6. Enter **Continuity**
7. Click [S](https://wiki.cuteinfocomm.com/uploads/images/gallery/2024-08/image-1724334603626.png)**ave** icon.
**Glanding request added successfully.**
#### **2.1.2.RFI Glanding Create**
[ ](https://wiki.cuteinfocomm.com/uploads/images/gallery/2024-08/image-1724379823938.png)[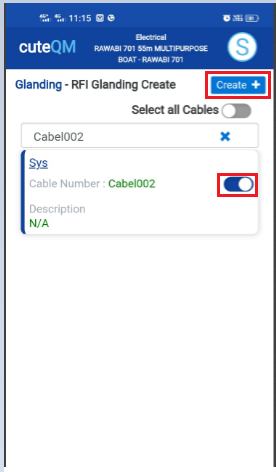](https://wiki.cuteinfocomm.com/uploads/images/gallery/2024-08/image-1724379844669.png)
1. Click **RFI Glanding create** menu.This menu helps to create RFI requests from added cables.
2. Select the cable no from dropdown list
3. Toggle **ON** the required cable
4. Click **Create** button at the top
5. After create button clicked,a popup will open to key in **inspection date,subcontractor ,description & calibration details.**
[ 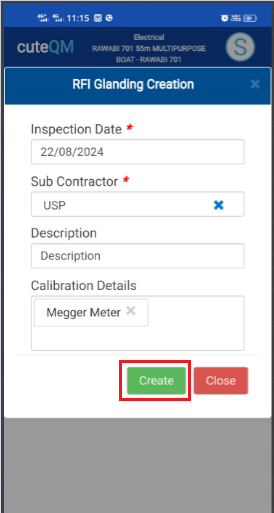](https://wiki.cuteinfocomm.com/uploads/images/gallery/2024-08/image-1724379931286.png)
6\. Click **Create** button.
**RFI Glanding request created successfully.**
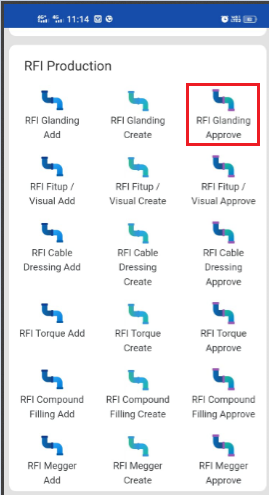
#### **2.1.3.RFI Glanding Approve**
[ ](https://wiki.cuteinfocomm.com/uploads/images/gallery/2024-08/image-1724379975132.png)[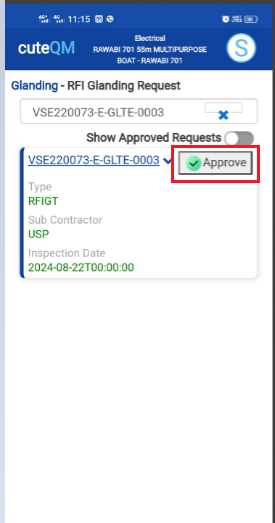](https://wiki.cuteinfocomm.com/uploads/images/gallery/2024-08/image-1724379988437.png)
1. Click **RFI Glanding approve** menu
2. Select the RFI request no from dropdown list
3. Click **Approve** button.
**Glanding request approved successfully.**
#### **2.1.4.RFI Glanding Inspection**
1.Click **RFI Glanding** menu in Inspection.
[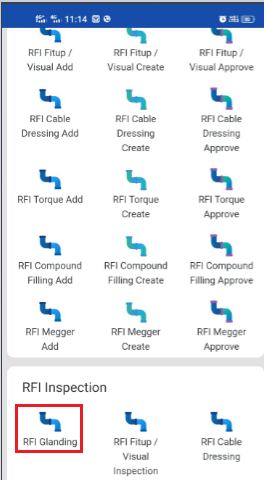](https://wiki.cuteinfocomm.com/uploads/images/gallery/2024-08/image-1724380036667.png)
2.Click [ button .It will redirected to new page](https://wiki.cuteinfocomm.com/uploads/images/gallery/2024-08/image-1724304171025.png)
[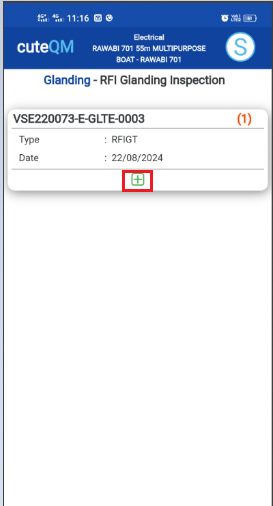 ](https://wiki.cuteinfocomm.com/uploads/images/gallery/2024-08/image-1724380355083.png)[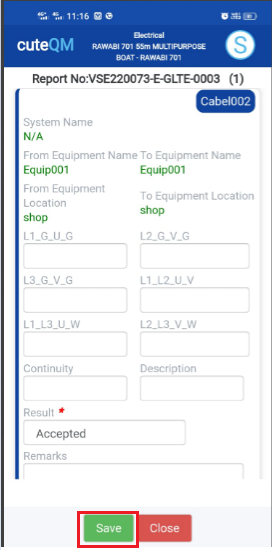](https://wiki.cuteinfocomm.com/uploads/images/gallery/2024-08/image-1724380396970.png)[ ](https://wiki.cuteinfocomm.com/uploads/images/gallery/2024-08/image-1724335418846.png)
1. Result will be defaultly accepted,If need to reject,you can change the dropdown as Reject
2. Enter **Description**
3. Enter **Remarks**
4. Click **Save** button. **RFI** **Glanding inspection approved successfully.**
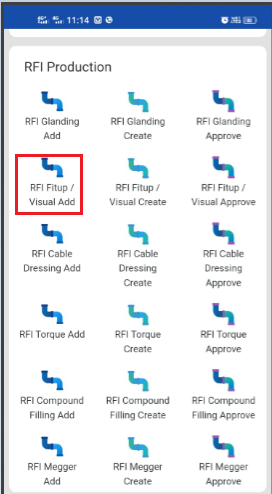
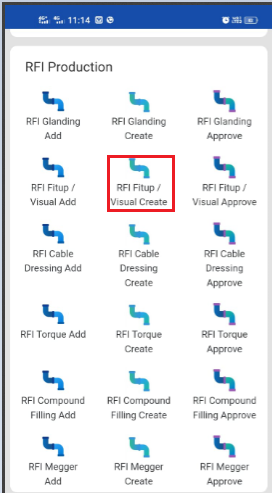
### **2.2. Fitup/Visual RFI**
#### **2.2.1.RFI Fitup/Visual Add**
[ ](https://wiki.cuteinfocomm.com/uploads/images/gallery/2024-08/image-1724380758169.png)[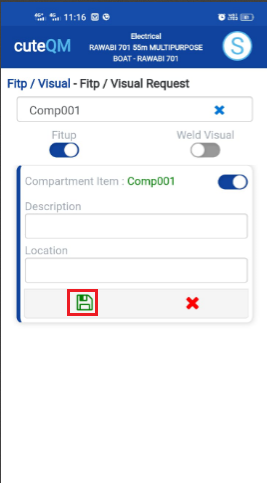](https://wiki.cuteinfocomm.com/uploads/images/gallery/2024-08/image-1724380804851.png)
1. Click **RFI Fitup/visual Add** menu .This menu helps to add the compartments for the RFI Fitup/visual request.
2. Select compartment no in the dropdown list.
3. Toggle ON Fitup or weld as required
4. Toggle **ON** the appropriate compartment
5. Enter **description**.
6. Enter **location**.
7. Click [S](https://wiki.cuteinfocomm.com/uploads/images/gallery/2024-08/image-1724334603626.png)**ave** icon.
**Fitup/visual request added successfully.**
#### **2.2.2.RFI Fitup/Visual Create**
[ ](https://wiki.cuteinfocomm.com/uploads/images/gallery/2024-08/image-1724380973668.png)[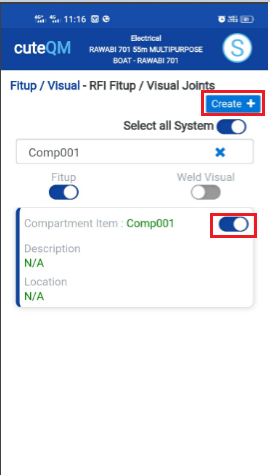](https://wiki.cuteinfocomm.com/uploads/images/gallery/2024-08/image-1724380998744.png)
1. Click **RFI Fitup/visual create** menu.This menu helps to create RFI requests from added compartments.
2. Select the compartment no from dropdown list
3. Toggle **ON** the required comprtment
4. Click **Create** button at the top
5. After create button clicked,a popup will open to key in **inspection date,subcontractor and description.**
[ 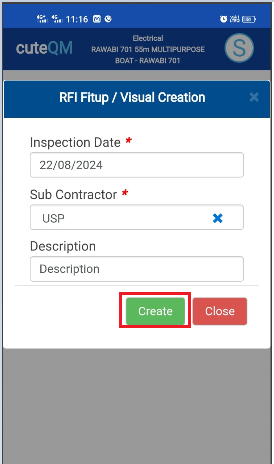](https://wiki.cuteinfocomm.com/uploads/images/gallery/2024-08/image-1724381091581.png)
6\. Click **Create** button.
**RFI Fitup/visual request created successfully.**
#### **2.2.3.RFI Fitup/Visual Approve**
[ ](https://wiki.cuteinfocomm.com/uploads/images/gallery/2024-08/image-1724381207373.png)[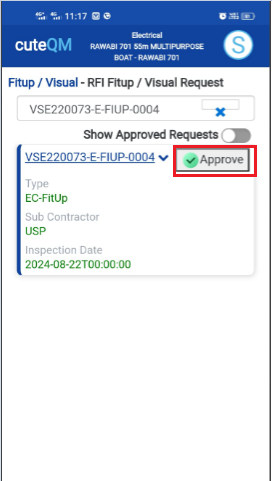](https://wiki.cuteinfocomm.com/uploads/images/gallery/2024-08/image-1724381219349.png)
1. Click **RFI Fitup/visual approve** menu
2. Select the RFI request no from dropdown list
3. Click **Approve** button.
**Fitup/visual request approved successfully.**
#### **2.2.4.RFI Fitup/Visual Inspection**
1.Click **RFI Fitup/visual** menu in Inspection.
[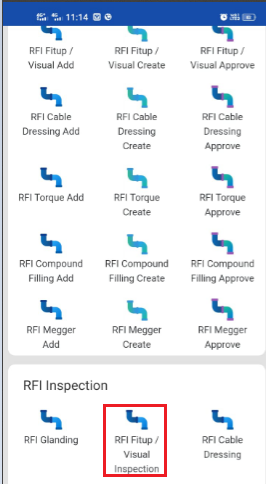](https://wiki.cuteinfocomm.com/uploads/images/gallery/2024-08/image-1724381269824.png)
2.Click [ button .It will redirected to new page](https://wiki.cuteinfocomm.com/uploads/images/gallery/2024-08/image-1724304171025.png)
[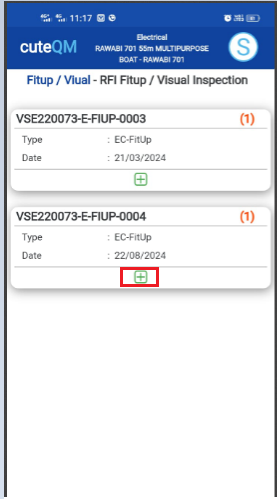 ](https://wiki.cuteinfocomm.com/uploads/images/gallery/2024-08/image-1724381319997.png)[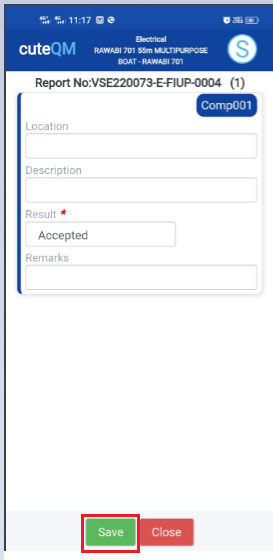](https://wiki.cuteinfocomm.com/uploads/images/gallery/2024-08/image-1724381364646.png)
1. Result will be defaultly accepted,If need to reject,you can change the dropdown as Reject
2. Enter **Description**
3. Enter **Remarks**
4. Click **Save** button. **RFI** **Fitup/visual inspection approved successfully.**
### **2.3. Cable dressing & Banding RFI**
#### **2.3.1.Cable dressing Add**
[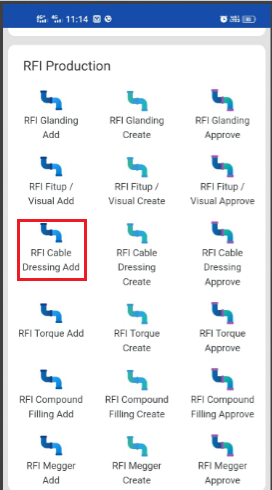 ](https://wiki.cuteinfocomm.com/uploads/images/gallery/2024-08/image-1724387281177.png)[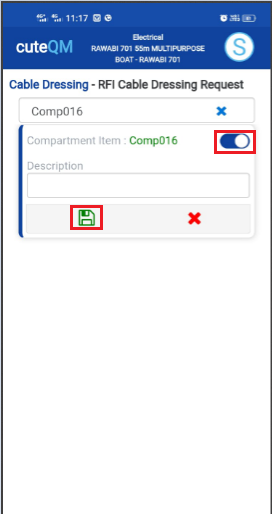](https://wiki.cuteinfocomm.com/uploads/images/gallery/2024-08/image-1724387294002.png)
1. Click **RFI** **Cable dressing Add** menu .This menu helps to add the compartments for the RFI cable dressing request.
2. Select compartment no in the dropdown list.
3. Toggle **ON** the appropriate compartment
4. Enter **description**.
5. Click [S](https://wiki.cuteinfocomm.com/uploads/images/gallery/2024-08/image-1724334603626.png)**ave** icon.
**Cable dressing & Banding request added successfully.**
#### **2.3.2.RFI Cable dressing Create**
[ ](https://wiki.cuteinfocomm.com/uploads/images/gallery/2024-08/image-1724387447832.png)[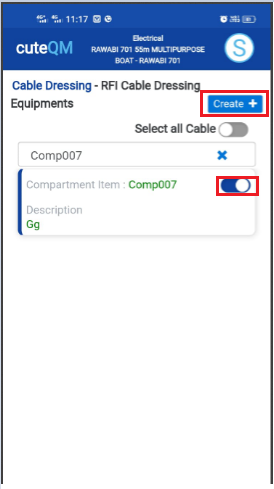](https://wiki.cuteinfocomm.com/uploads/images/gallery/2024-08/image-1724387458092.png)
1. Click RFI **Cable dressing** create menu.This menu helps to create RFI requests from added compartments.
2. Select the compartment no from dropdown list
3. Toggle **ON** the required comprtment
4. Click **Create** button at the top
5. After create button clicked,a popup will open to key in **inspection date,subcontractor and description.**
[ ](https://wiki.cuteinfocomm.com/uploads/images/gallery/2024-08/image-1724381091581.png)
6\. Click **Create** button.
**RFI Cable dressing & Banding request created successfully.**
#### **2.3.3.RFI Cable dressing Approve**
[ ](https://wiki.cuteinfocomm.com/uploads/images/gallery/2024-08/image-1724387585574.png)[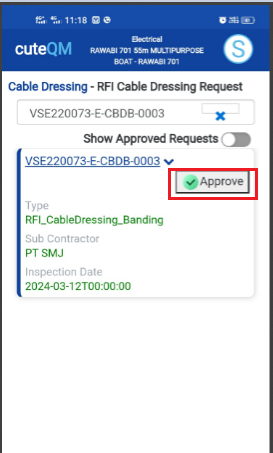](https://wiki.cuteinfocomm.com/uploads/images/gallery/2024-08/image-1724387596462.png)
1. Click **RFI Cable dressing approve** menu
2. Select the RFI request no from dropdown list
3. Click **Approve** button.
**Cable dressing & Banding request approved successfully.**
#### **2.3.4.RFI Cable dressing & Banding Inspection**
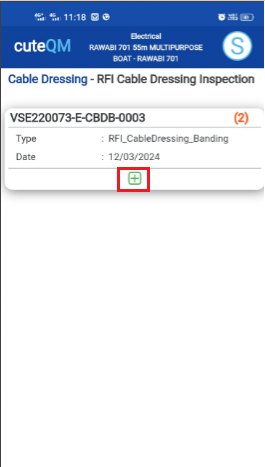
1.Click **RFI** **Cable dressing** menu in Inspection.
[](https://wiki.cuteinfocomm.com/uploads/images/gallery/2024-08/image-1724387727098.png)
2.Click [ button .It will redirected to new page](https://wiki.cuteinfocomm.com/uploads/images/gallery/2024-08/image-1724304171025.png)
[](https://wiki.cuteinfocomm.com/uploads/images/gallery/2024-08/image-1724387750459.png) [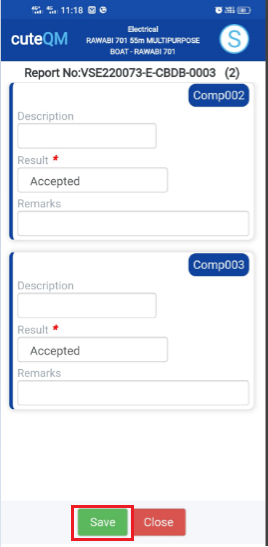](https://wiki.cuteinfocomm.com/uploads/images/gallery/2024-08/image-1724387792561.png)
1. Result will be defaultly accepted,If need to reject,you can change the dropdown as Reject
2. Enter **Description**
3. Enter **Remarks**
4. Click **Save** button. **RFI** **Cable dressing & Banding inspection approved successfully.**
### **2.4. Torque Tightening RFI**
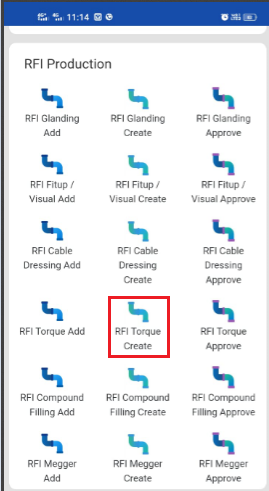
#### **2.4.1.RFI Torque Add**
[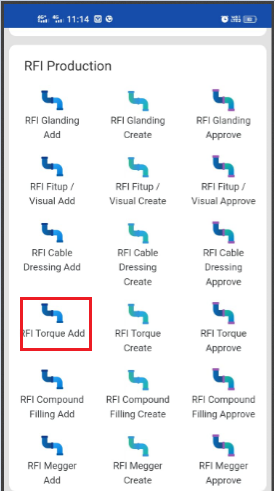 ](https://wiki.cuteinfocomm.com/uploads/images/gallery/2024-08/image-1724388730306.png)[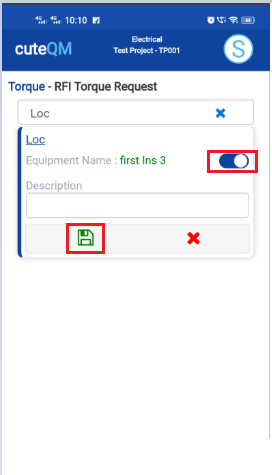](https://wiki.cuteinfocomm.com/uploads/images/gallery/2024-08/image-1724388743656.png)[ ](https://wiki.cuteinfocomm.com/uploads/images/gallery/2024-08/image-1724379663208.png)[ ](https://wiki.cuteinfocomm.com/uploads/images/gallery/2024-08/image-1724334273188.png)
1. Click **RFI Torque Add** menu .This menu helps to add the equipments for the RFI Torque request.
2. Select equipment location in the dropdown list.
3. Toggle **ON** the appropriate equipment
4. Enter **description**.
5. Click [**S**](https://wiki.cuteinfocomm.com/uploads/images/gallery/2024-08/image-1724334603626.png)**ave** icon.
**Torque RFI request added successfully.**
#### **2.4.2.RFI Torque Create**
[ ](https://wiki.cuteinfocomm.com/uploads/images/gallery/2024-08/image-1724388911125.png)[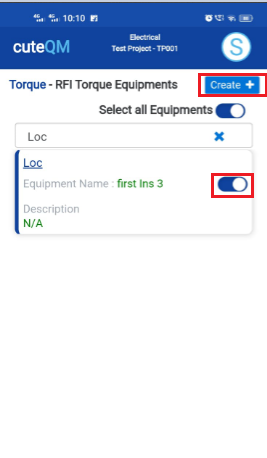](https://wiki.cuteinfocomm.com/uploads/images/gallery/2024-08/image-1724388922855.png)
1. Click **RFI Torque create** menu.This menu helps to create RFI requests from added equipments.
2. Select the equipment location from dropdown list
3. Toggle **ON** the required equipment
4. Click **Create** button at the top
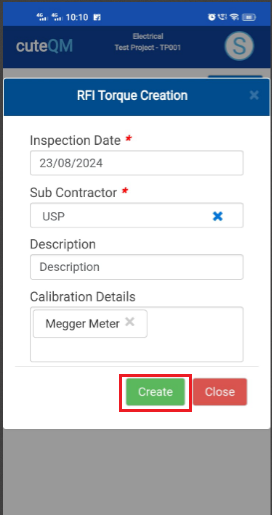
5. After create button clicked,a popup will open to key in **inspection date,subcontractor ,description & calibration details.**
[](https://wiki.cuteinfocomm.com/uploads/images/gallery/2024-08/image-1724389019172.png)
6\. Click **Create** button.
**RFI Torque request created successfully.**
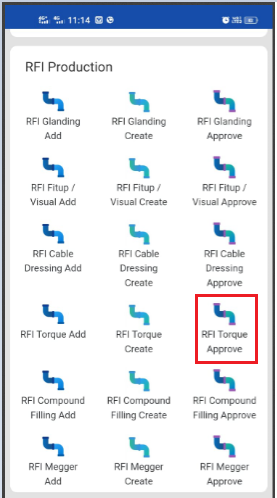
#### **2.4.3.RFI Torque Approve**
[ ](https://wiki.cuteinfocomm.com/uploads/images/gallery/2024-08/image-1724389507428.png)[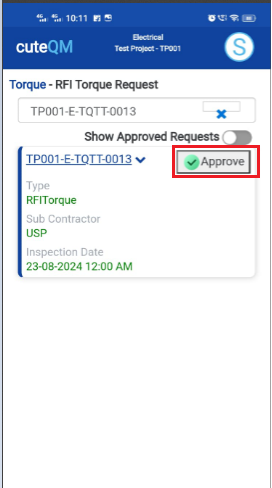](https://wiki.cuteinfocomm.com/uploads/images/gallery/2024-08/image-1724389524560.png)
1. Click **RFI Torque approve** menu
2. Select the RFI request no from dropdown list
3. Click **Approve** button.
**Torque RFI request approved successfully.**
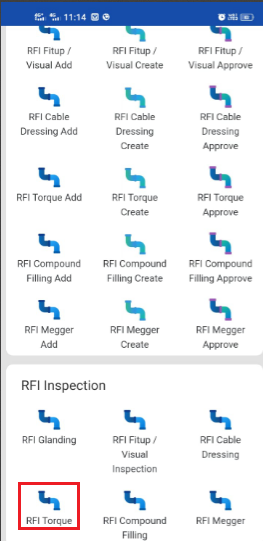
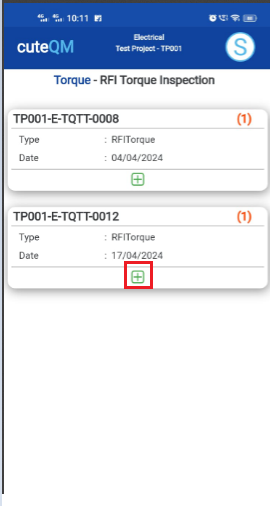
#### **2.4.4.RFI Torque Inspection**
1.Click **RFI Torque** menu in Inspection.
[](https://wiki.cuteinfocomm.com/uploads/images/gallery/2024-08/image-1724389609711.png)
2.Click [ button .It will redirected to new page](https://wiki.cuteinfocomm.com/uploads/images/gallery/2024-08/image-1724304171025.png)
[ ](https://wiki.cuteinfocomm.com/uploads/images/gallery/2024-08/image-1724389651648.png)[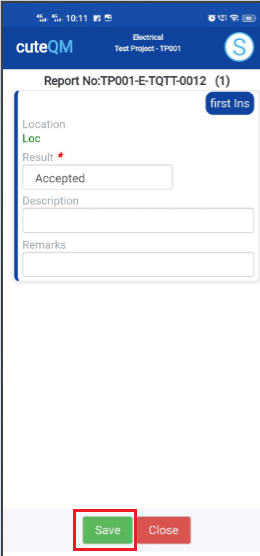](https://wiki.cuteinfocomm.com/uploads/images/gallery/2024-08/image-1724389689295.png)[ ](https://wiki.cuteinfocomm.com/uploads/images/gallery/2024-08/image-1724335418846.png)
1. Result will be defaultly accepted,If need to reject,you can change the dropdown as Reject
2. Enter **Description**
3. Enter **Remarks**
4. Click **Save** button. **RFI** **Torque inspection approved successfully.**
### **2.5. Compound filling/MCT Packing RFI**
#### **2.5.1.Compound filling Add**
[ ](https://wiki.cuteinfocomm.com/uploads/images/gallery/2024-08/image-1724390162223.png)[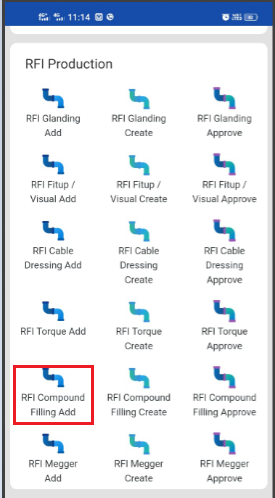 ](https://wiki.cuteinfocomm.com/uploads/images/gallery/2024-08/image-1724390181419.png)[](https://wiki.cuteinfocomm.com/uploads/images/gallery/2024-08/image-1724390248943.png)
1. Click **RFI** **Compound filling Add** menu .This menu helps to add the compartments for the RFI **Compound filling** request.
2. Select compartment no in the dropdown list.
3. Toggle **ON** the appropriate compartment
4. Enter **description**.
5. Click [S](https://wiki.cuteinfocomm.com/uploads/images/gallery/2024-08/image-1724334603626.png)**ave** icon.
**Compound filling request added successfully.**
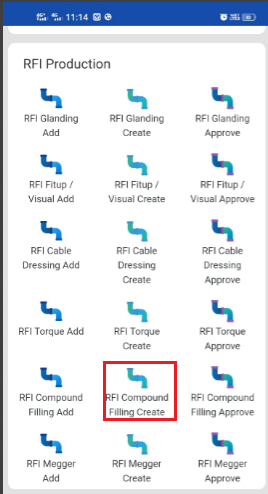
#### **2.5.2.RFI Compound filling Create**
[ ](https://wiki.cuteinfocomm.com/uploads/images/gallery/2024-08/image-1724390326343.png)[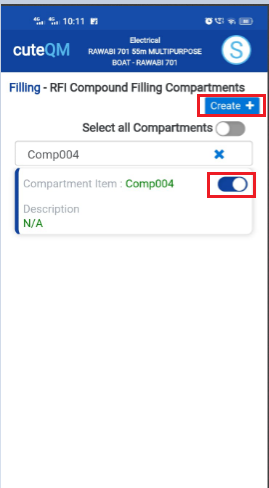](https://wiki.cuteinfocomm.com/uploads/images/gallery/2024-08/image-1724390337585.png)
1. Click **RFI** **Compound filling create** menu.This menu helps to create RFI requests from added compartments.
2. Select the compartment no from dropdown list
3. Toggle **ON** the required comprtment
4. Click **Create** button at the top
5. After create button clicked,a popup will open to key in **inspection date,subcontractor and description.**
[ 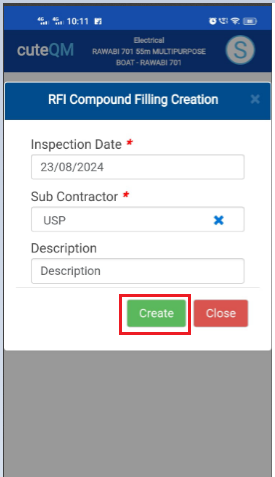](https://wiki.cuteinfocomm.com/uploads/images/gallery/2024-08/image-1724390402874.png)
6\. Click **Create** button.
**RFI Compound filling request created successfully.**
#### **2.5.3.RFI Compound filling Approve**
[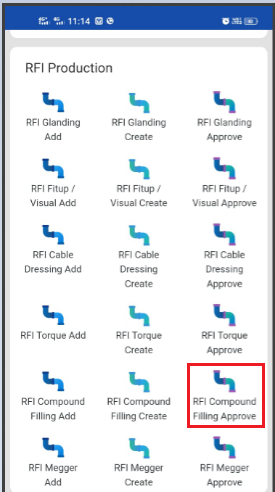 ](https://wiki.cuteinfocomm.com/uploads/images/gallery/2024-08/image-1724390493896.png)[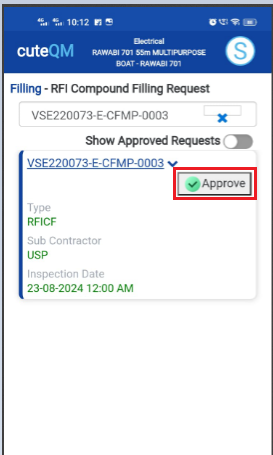](https://wiki.cuteinfocomm.com/uploads/images/gallery/2024-08/image-1724390506160.png)
1. Click ****RFI Compound filling** approve** menu
2. Select the RFI request no from dropdown list
3. Click **Approve** button.
**Compound Filling /MCT Packing RFI request approved successfully.**
#### **2.5.4.RFI Compound Filling /MCT Packing Inspection**
1.Click **RFI** **Cable dressing** menu in Inspection.
[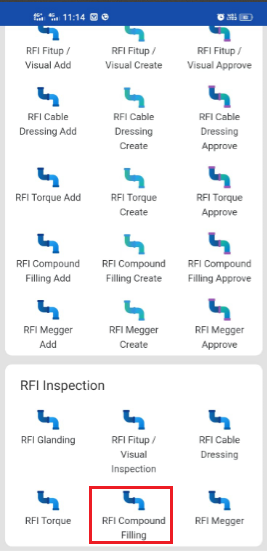](https://wiki.cuteinfocomm.com/uploads/images/gallery/2024-08/image-1724390548821.png)
2.Click [ button .It will redirected to new page](https://wiki.cuteinfocomm.com/uploads/images/gallery/2024-08/image-1724304171025.png)
[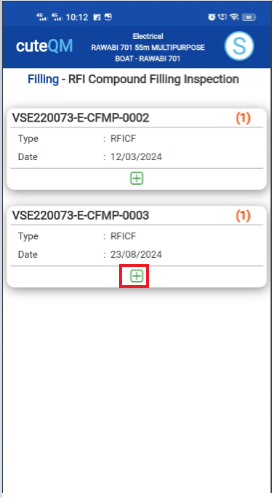 ](https://wiki.cuteinfocomm.com/uploads/images/gallery/2024-08/image-1724390589035.png)[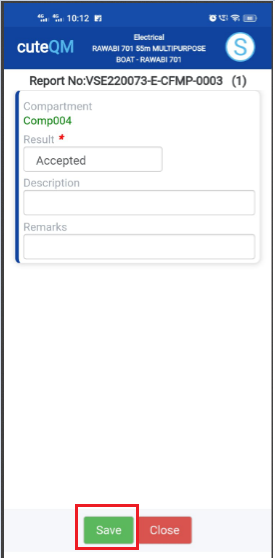](https://wiki.cuteinfocomm.com/uploads/images/gallery/2024-08/image-1724390662330.png)
1. Result will be defaultly accepted,If need to reject,you can change the dropdown as Reject
2. Enter **Description**
3. Enter **Remarks**
4. Click **Save** button. **RFI** **Compound Filling /MCT Packing inspection approved successfully.**
### **2.6. Equipment Megger Test RFI**
#### **2.6.1.RFI Megger Add**
[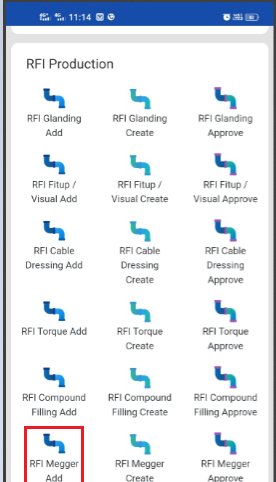 ](https://wiki.cuteinfocomm.com/uploads/images/gallery/2024-08/image-1724390977542.png)[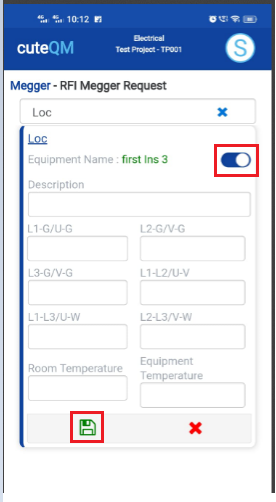](https://wiki.cuteinfocomm.com/uploads/images/gallery/2024-08/image-1724390993104.png)
1. Click **RFI Torque Add** menu .This menu helps to add the equipments for the RFI megger request.
2. Select equipment location in the dropdown list.
3. Toggle **ON** the appropriate equipment
4. Enter **description**.
5. Enter **L1,L2,L3** Values
6. Enter **room temperature**
7. Enter **Equipment temperature**
8. Click [S](https://wiki.cuteinfocomm.com/uploads/images/gallery/2024-08/image-1724334603626.png)**ave** icon.
**RFI Megger request added successfully.**
#### **2.6.2.RFI Megger Create**
[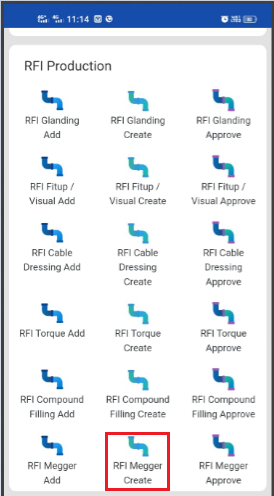 ](https://wiki.cuteinfocomm.com/uploads/images/gallery/2024-08/image-1724391204048.png)[](https://wiki.cuteinfocomm.com/uploads/images/gallery/2024-08/image-1724391227504.png)
1. Click **RFI Megger create** menu.This menu helps to create RFI requests from added equipments.
2. Select the equipment location from dropdown list
3. Toggle **ON** the required equipment
4. Click **Create** button at the top
5. After create button clicked,a popup will open to key in **inspection date,subcontractor ,description & calibration details.**
[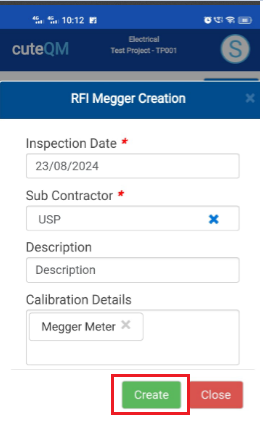](https://wiki.cuteinfocomm.com/uploads/images/gallery/2024-08/image-1724391300447.png)
6\. Click **Create** button.
**RFI Megger request created successfully.**
#### **2.6.3.RFI Megger Approve**
[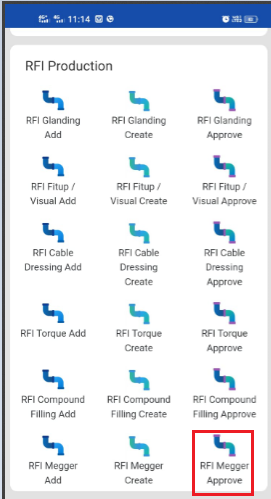 ](https://wiki.cuteinfocomm.com/uploads/images/gallery/2024-08/image-1724391358240.png)[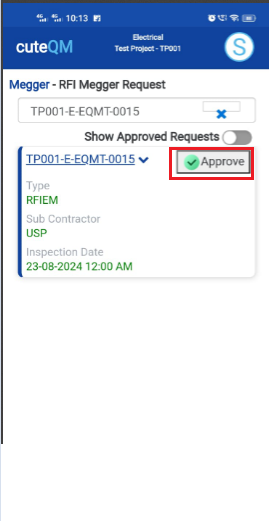](https://wiki.cuteinfocomm.com/uploads/images/gallery/2024-08/image-1724391370876.png)
1. Click **RFI Megger approve** menu
2. Select the RFI request no from dropdown list
3. Click **Approve** button.
**Equipment megger RFI request approved successfully.**
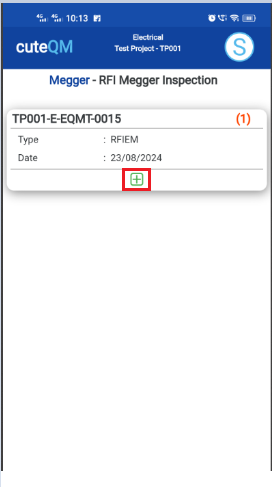
#### **2.6.4.RFI Megger Inspection**
1.Click **RFI Megger** menu in Inspection.
[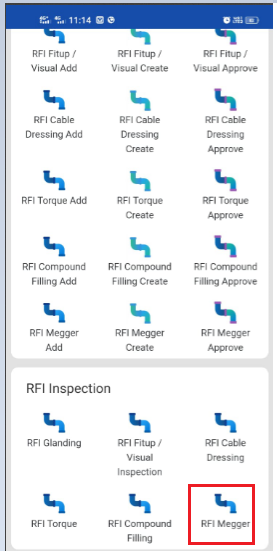](https://wiki.cuteinfocomm.com/uploads/images/gallery/2024-08/image-1724391428485.png)
2.Click [ button .It will redirected to new page](https://wiki.cuteinfocomm.com/uploads/images/gallery/2024-08/image-1724304171025.png)
[ ](https://wiki.cuteinfocomm.com/uploads/images/gallery/2024-08/image-1724391462495.png)[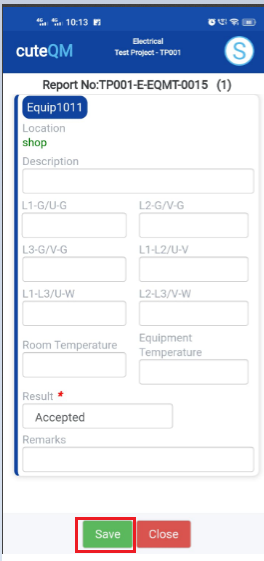](https://wiki.cuteinfocomm.com/uploads/images/gallery/2024-08/image-1724391501387.png)
1. Result will be defaultly accepted,If need to reject,you can change the dropdown as Reject
2. Enter **Description**
3. Enter **L1,L2,L3,Room temperature & Equipment temperature** values
4. Enter **Remarks**
5. Click **Save** button. **RFI** **Equipment megger test inspection approved successfully.**