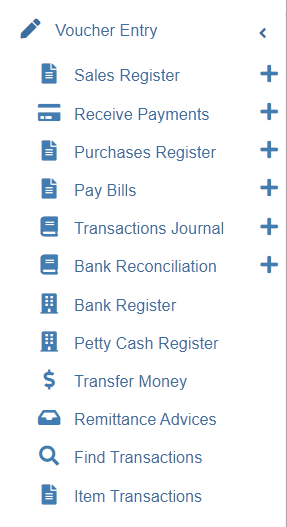
# Voucher Entry
Voucher Entry manages all finance transactions. It contains below submenu:
- Sales Register
- Receive Payments
- Purchases Register
- Pay Bills
- Transactions Journal
- Bank Register
- Petty Cash Register
- Transfer Money
- Bank Reconciliation
- Remittance Advices
- Find Transactions
- Item Transactions
[](http://wiki.cuteinfocomm.com/uploads/images/gallery/2022-10/image-1666203675765.png)
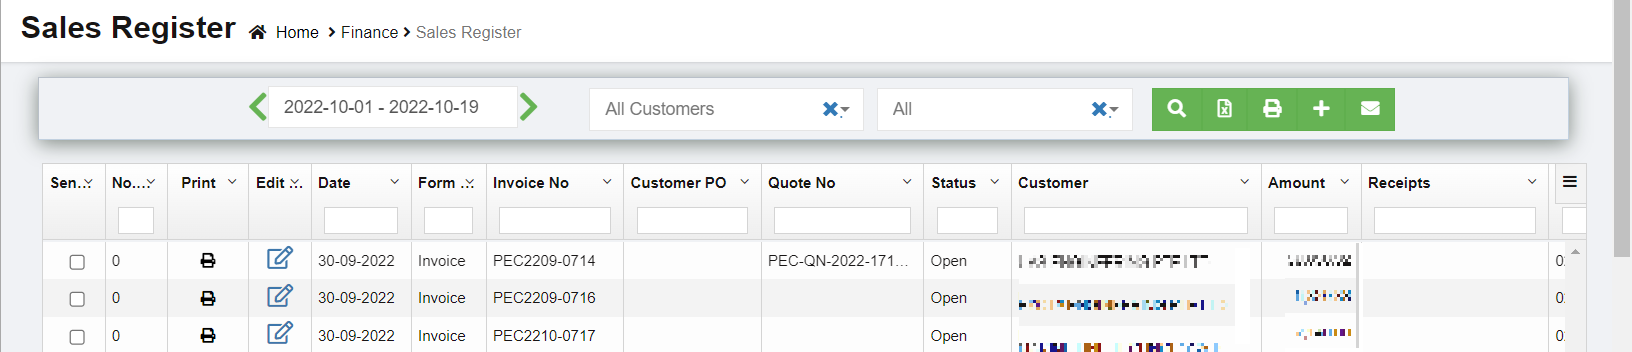
## Sales Register
Sales Register helps to record and manage the sales and income from sales. The list of transactions pertaining to each month can be viewed by selecting that month, customer, and transaction status. Click **Sales Register** in the **Voucher Entry menu,** The **Sales Register** page opens.
[](http://wiki.cuteinfocomm.com/uploads/images/gallery/2023-04/image-1682094034908.png)
### View Sales Entry
If you want to view the sales entry details of a particular customer, you can use the filters to search
[](http://wiki.cuteinfocomm.com/uploads/images/gallery/2022-10/image-1666207318498.png)
1. In the Calendar field, select the period for which you want to view the sales entry details.
2. In the Customer box, select a customer.
3. In the Status box, select the status for you want to view the sales entry details.
4. Click [](http://wiki.cuteinfocomm.com/uploads/images/gallery/2022-10/image-1666207536064.png). The sales entry detail opens for the selected customer and period.
### Enable Permission for Sales Recurring Transaction
If you want to add a new sales entry by using the transaction details of an existing invoice number, you need to enable permission for accessing the Sales recurring transaction option. To enable the permission for sales recurring transaction, search for permission name "**SalesRecurring"** in user 's permission page and enable both read and write permissions. Once you have enabled this permission, the sale recurring transaction related option will be appeared while adding a new sales entry.
[](http://wiki.cuteinfocomm.com/uploads/images/gallery/2022-10/image-1666208012032.png)
### Add a New Sales Entry
To add a sales entry,
Click[](http://wiki.cuteinfocomm.com/uploads/images/gallery/2022-10/image-1666241439740.png) (Add icon) provided in the upper right-corner of the Sales Register page, the Sales Entry page opens as below, [](http://wiki.cuteinfocomm.com/uploads/images/gallery/2022-10/image-1666241535572.png)[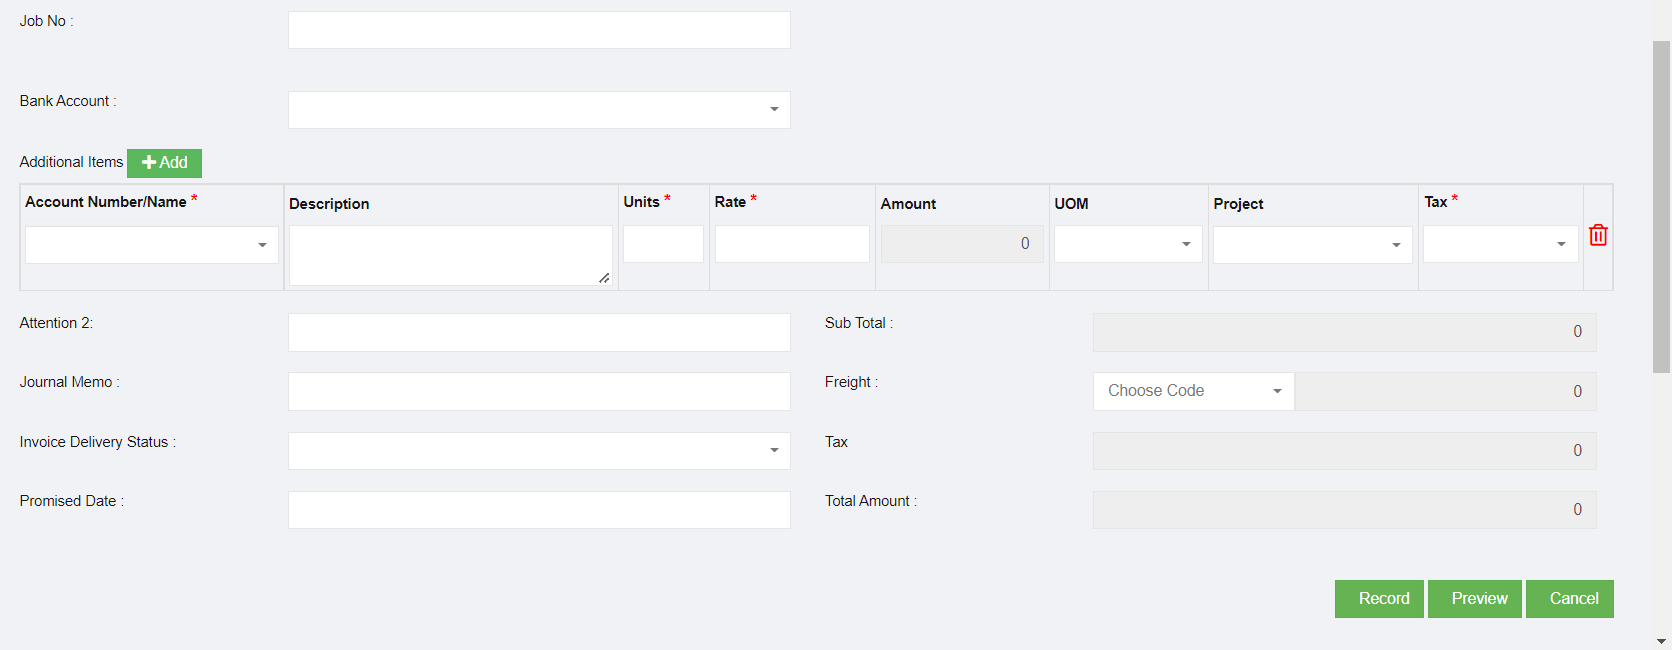](http://wiki.cuteinfocomm.com/uploads/images/gallery/2022-10/image-1666241559159.png)
**Note: useful navigation options**
- [](http://wiki.cuteinfocomm.com/uploads/images/gallery/2022-10/image-1666241702853.png)(Journal button)-You can use the Journal option to view the sales journal entry. Sales journal entry records a cash or credit sale to a customer. Sales journal entries also reflect changes to accounts such as Cost of Goods Sold, Inventory, and Sales Tax Payable accounts.
- [](http://wiki.cuteinfocomm.com/uploads/images/gallery/2022-10/image-1666241795080.png)(Payment button) – used to navigate into the Receive Payments Entry page.
- [](http://wiki.cuteinfocomm.com/uploads/images/gallery/2022-10/image-1666241838365.png)(Register button) – used to navigate into the Sales Register page.
#### Add Sales Entry using Recurring Option
If you want to add a sales entry by using the sales recurring option,
1. Click[](http://wiki.cuteinfocomm.com/uploads/images/gallery/2022-10/image-1666242173987.png) (use recurring button), all the saved recurring transactions page will open as below, [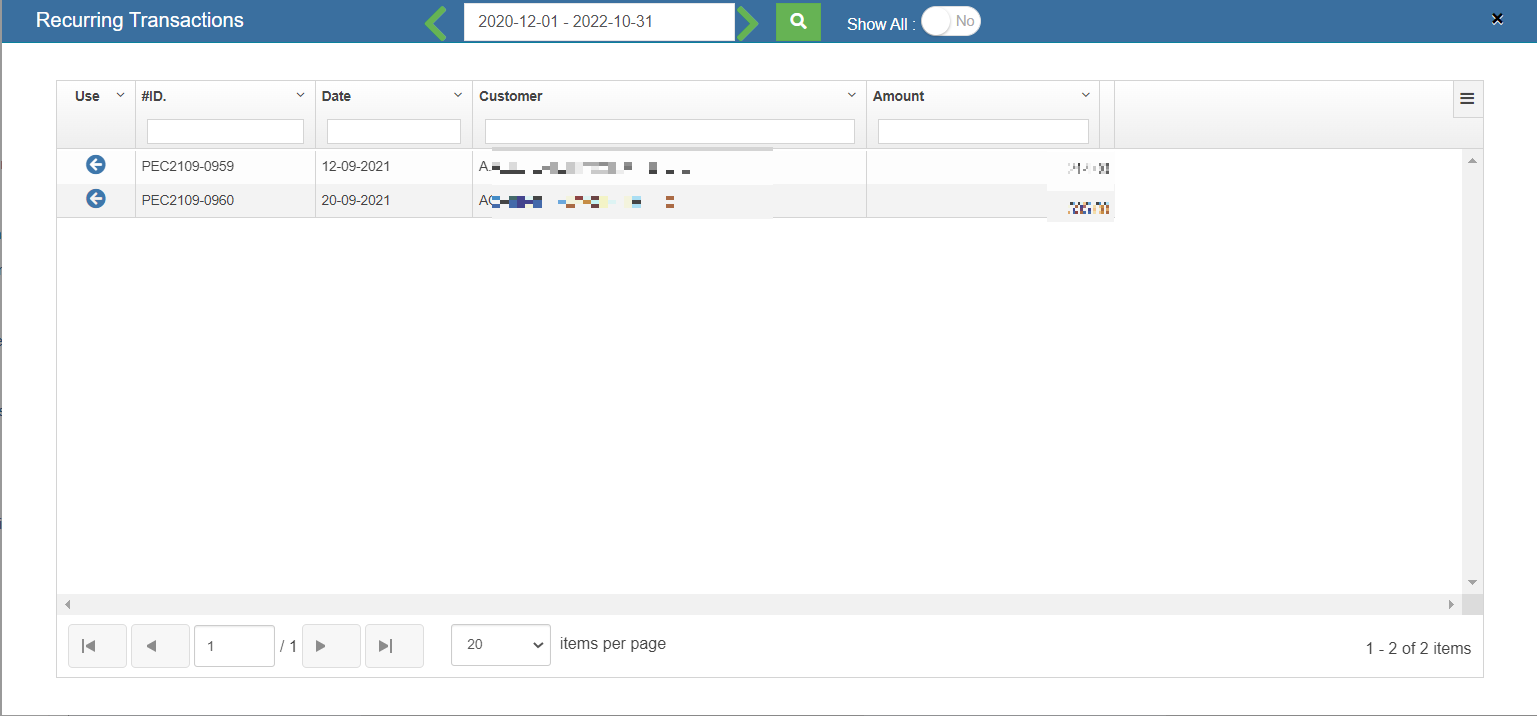](http://wiki.cuteinfocomm.com/uploads/images/gallery/2023-04/image-1682094093619.png)
2. Select an invoice number from the recurring transactions list. Click the use icon. Once the invoice number is selected, it will retrieve the respective transaction details saved successfully in cuteOffice. All the input fields will be automatically filled up according to the selection of invoice number.
**Note:** to save a sale entry as Recurring, enable the "Save As Recurring" flag to Yes when register a sales entry. Once saved as recurring entry, it will be shown in the recurring transaction page when use "Use Recurring" option to register sales entry.
[](http://wiki.cuteinfocomm.com/uploads/images/gallery/2022-10/image-1666242591995.png)
#### Add Sales Entry Manually
To add a sales entry manually,
1. In the **Sales Form Type** field, select the sales form type you want to add. [](http://wiki.cuteinfocomm.com/uploads/images/gallery/2022-10/image-1666377540813.png)
2. If the tax is inclusive for the sales entry, enable **Yes** in the in the Tax Inclusive option.
3. In the **Customer** box, select a customer from customer dropdown list. Note: If you can't find the customer in the list, and want to add as a new customer, you can click the add button near the Customer box. [](http://wiki.cuteinfocomm.com/uploads/images/gallery/2022-11/image-1667601667741.png)
4. In the **Terms** box, select the terms. Terms refers to the payment period of the customer. For example, if you select the terms as **COD**, then the customer needs to pay cash on delivery. If you select **30 Days**, then the customer needs to pay the amount within the 30 days of delivery.
5. In the **Ship to** box, select the shipping location. Note: once you have selected the shipping location, the shipping address will be automatically updated in the Address box.
6. In the **Destination Country** box, enter the destination country detail.
7. In the **Invoice** box, the invoice number will be updated automatically. Note: If you want to edit the invoice number, click [](http://wiki.cuteinfocomm.com/uploads/images/gallery/2022-11/image-1667602387078.png) (Edit button) and change the invoice number.
8. In the **Customer Purchase Order (PO)** box, enter the customer PO number.
9. In the **Date** box, select the date (click in the field and select from the calendar).
10. In the **Bank Account** box, select the bank account to receive payment from the customer.
11. In the **Account Number/Name** box, select the appropriate chart of account from the list of chart of accounts. Note: If you want to add additional account number, click (Add button) and add the account and item details by following the below steps. Once you have selected the account number and name, the Description box shows the description for the corresponding selected account.
12. In the **Period of Work** box, select the number of days spent for this work.
13. In the **Units** box, enter the number of items purchased by the customer.
14. In the **Rate** box, enter the rate of each item.
15. Once you have entered the units and rate of the item, the total amount will be calculated and displayed in the **Amount** box.
16. In the **Project** box, select for which project, the items are purchased.
17. In the **Tax** box, select a tax code from the given tax codes. The total amount for the items will be automatically updated in the Sub Total box. Tax Codes:
**Zero Rated (ZR) – 0%** **GST**– Export of goods to overseas.
**Standard Rated (SR) -7% GST**– Most local sales falls under this category.
**Exempt Supplies (EX)** - GST is not applicable – Sale of unfurnished residential property, Importation and local supply of investment precious metals.
18. In the **Sales Person** box, enter the name of the sales person.
19. In the **Invoice Delivery Status** box, select the invoice delivery status from the list.
20. In the **Promised Date** box, select the date when the item will be delivered.
21. In the **Fright** box, select the tax percentage for the freight charges.
22. The tax amount will be automatically updated in the **Tax** box.
23. Click **Record** to complete sales register.
### Add/Change Exchange Rate (Need team's input re this section)
Make sure that you cannot edit the exchange rate of the base currency Singapore Dollar (SGD).
Once you have added the sales amount details, if you want to change the USD exchange rate, do the following steps,
1. Click (**Rate** button) provided in the **Sales Entry,** The **Exchange Rate Add/Edit** window opens.
2. In the **Base Currency** box, select the base currency.
3. In the **Foreign Currency** box, select the foreign currency.
4. In the **Rate** box, enter the exchange rate.
5. Click **Save**.
The exchange rate will be changed and the total amount will be calculated according to the selected exchange rate.
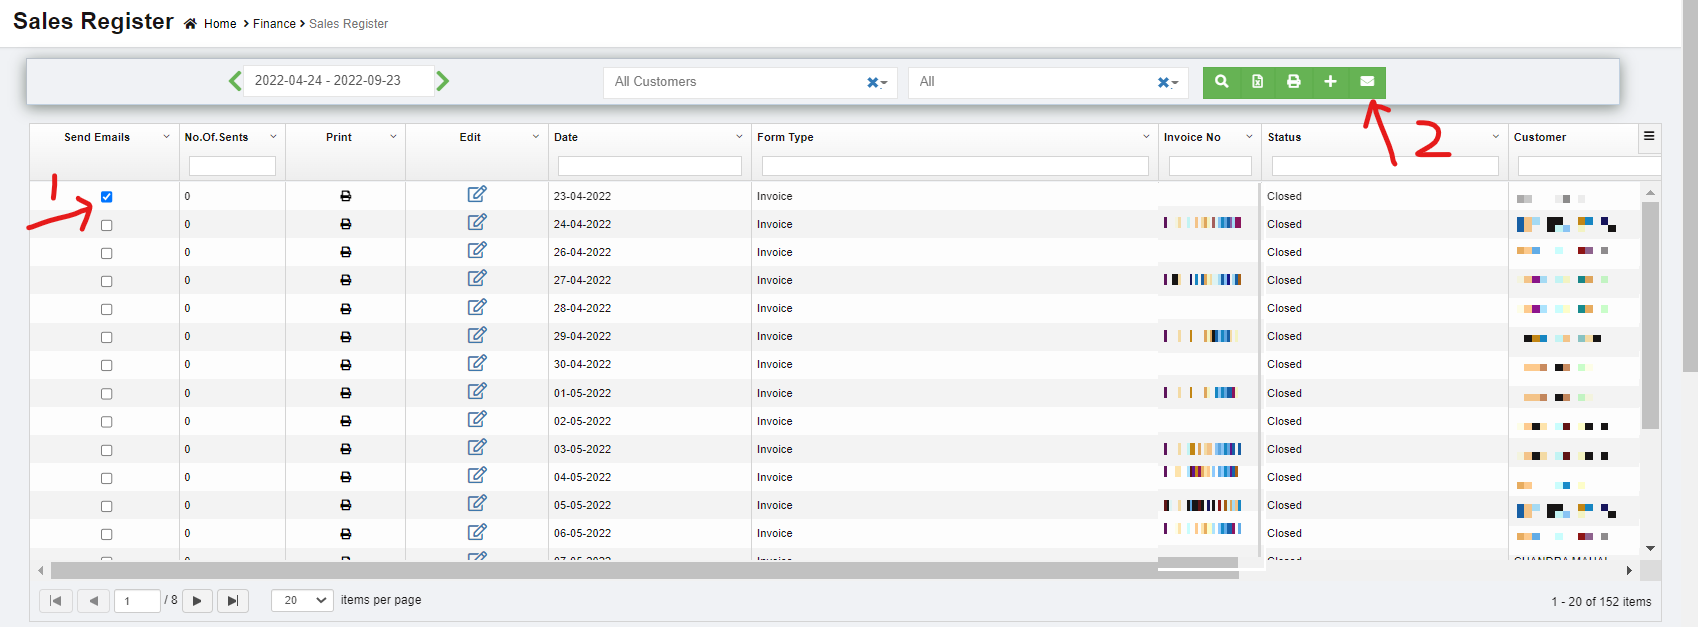
### Send Invoice to Customers through Email
If you want to send the invoices to the specific customer,
[](http://wiki.cuteinfocomm.com/uploads/images/gallery/2023-04/image-1682094159145.png)
1. Select the checkbox provided in the **Send Emails** column for the invoices which you want to send to the customer.
2. Click(E-Mail icon) provided in the **Sales Register.** The selected invoices will be sent to the respective email address.
### Add Purchase Details Against a Sales Invoice (need team's input)
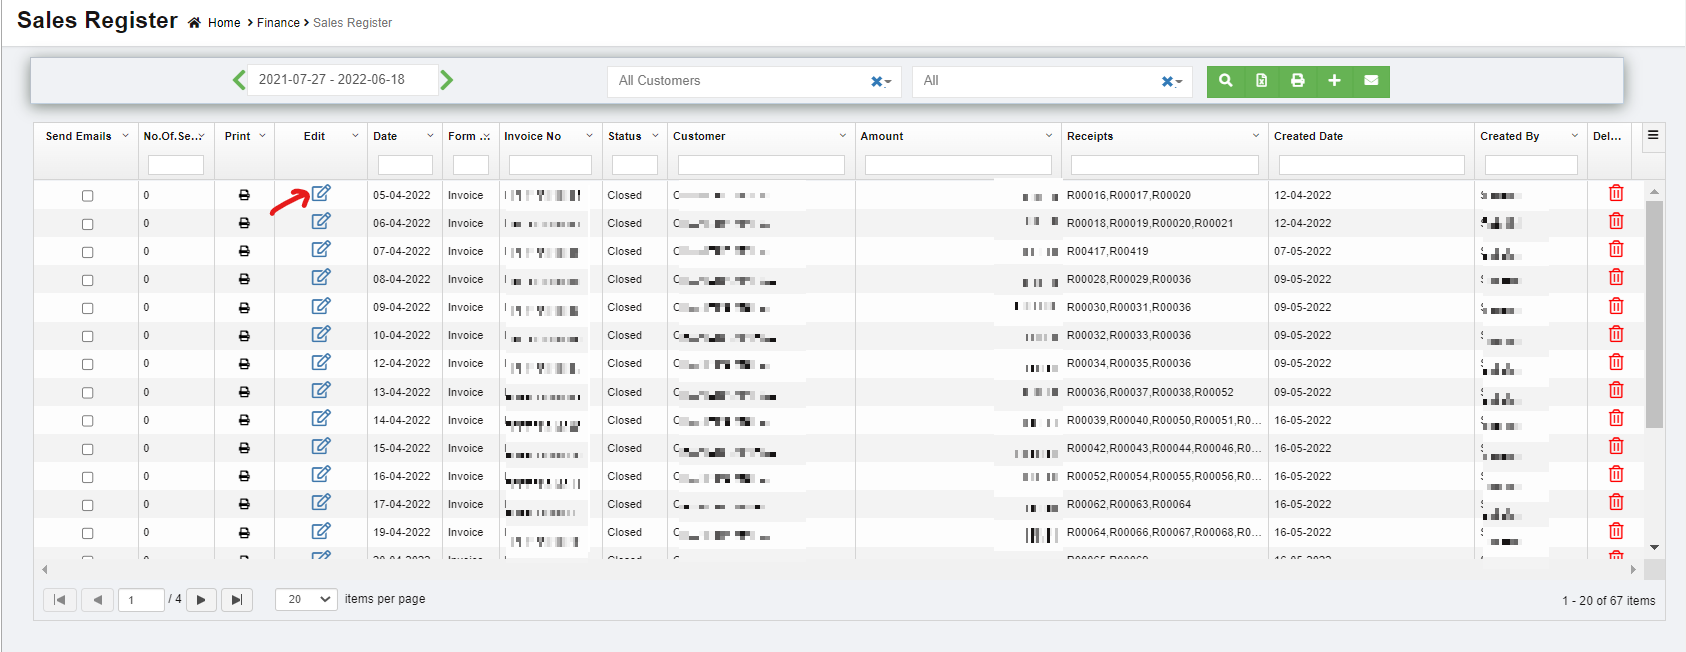
### Edit the Sales Entry Details
If you want to edit any added sales entry details in the **Sales Entry** page, navigate to sales register list view page,
[](http://wiki.cuteinfocomm.com/uploads/images/gallery/2023-04/image-1682094227092.png)
1. Click [](http://wiki.cuteinfocomm.com/uploads/images/gallery/2022-11/image-1668025713960.png)(Edit icon) in the **Edit** column for the respective sales entry. The **Sales Entry** page opens and shows the added sales details.
2. Click and edit where needed.
3. Click **Record** to save edits. The Changed sales entry details will be updated.
### Delete Any Added Sales Entry
If you want to delete any added sales entry, you can use delete option provided in the **Delete** column of the **Sales Register** page,
1. Click [](http://wiki.cuteinfocomm.com/uploads/images/gallery/2022-11/image-1668025897554.png)(Delete icon) for the corresponding sales entry. You receive a notification message “**Are you sure to delete a record**?” [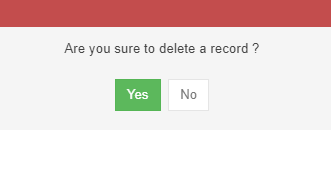](http://wiki.cuteinfocomm.com/uploads/images/gallery/2022-11/image-1668025932541.png)
2. Click **Yes**. The selected sales entry will be deleted.
### Print the Invoice Details
If you want to print the invoice details of the particular sales entry, click (Print icon) provided in the **Print** column for the corresponding sales entry.
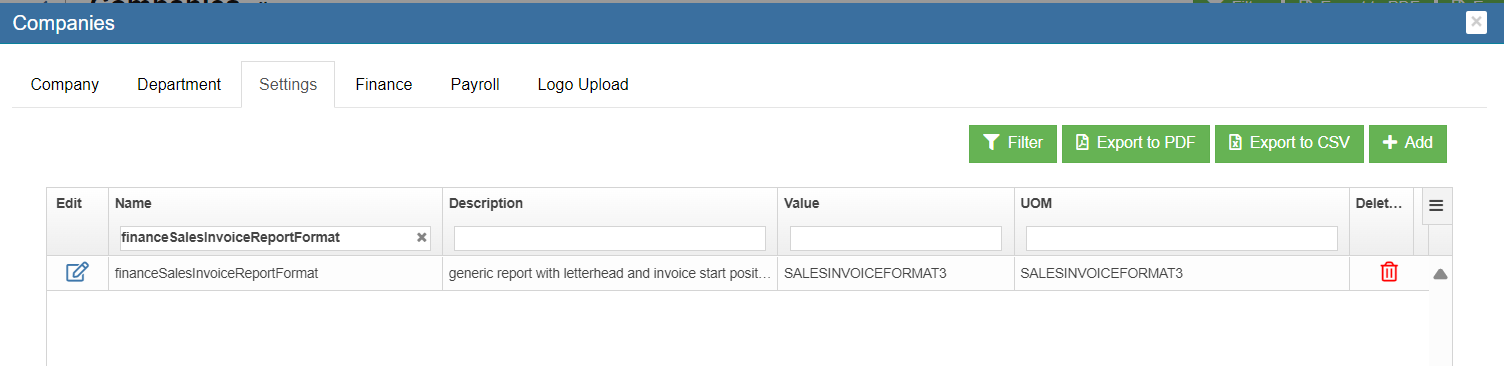
#### Settings Configuration to Print Invoice
1. Click [](http://wiki.cuteinfocomm.com/uploads/images/gallery/2022-11/image-1668025713960.png)(Edit icon) in the **Edit** column for the respective company. The **company** page opens and go to settings tabs. Use filter and enter "financeSalesInvoiceReportFormat".
2. Click edit and enter "SALESINVOICEFORMAT3" in the value.
3. Click Save to save details.
4. Go to Logo upload tab and choose "Letter Pad" in the image type.
5. Click choose file and add Company Letterhead.
6. Click Show Preview and Save the details.
[](https://wiki.cuteinfocomm.com/uploads/images/gallery/2024-04/image-1713518419864.png)
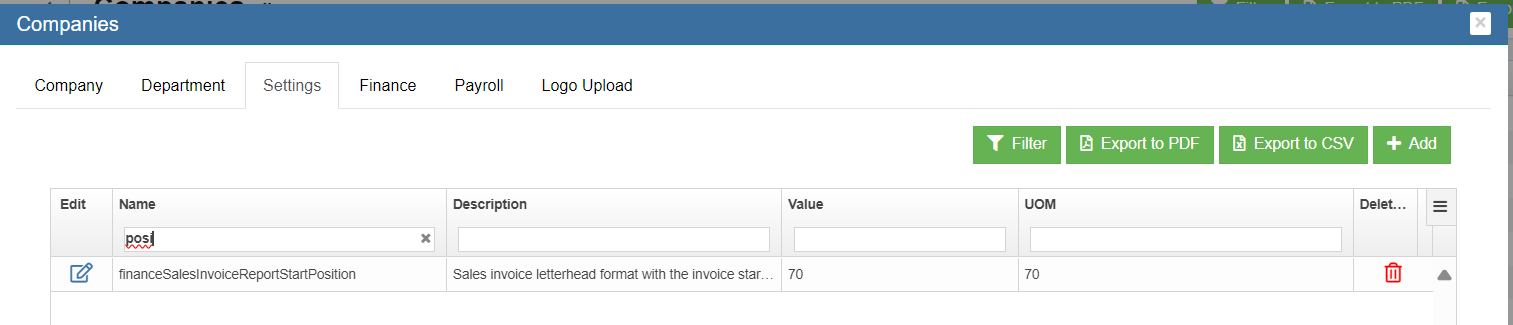
Note : Use setting "financeSalesInvoiceReportStartPosition" to adjust the space between header and "Tax Invoice" in the report
[](https://wiki.cuteinfocomm.com/uploads/images/gallery/2024-04/image-1713518918691.png)
[](https://wiki.cuteinfocomm.com/uploads/images/gallery/2024-04/image-1713519135338.png)
### Export the Sales Register
If you want to export the added sales entries in the **Sales Register** page in the excel format, you can click (Excel icon). The added sales entries will be downloaded in the excel format.
## Receive Payments
The **Receive Payments** tab in the **Finance** menu helps you to add the details of the payment received from the customer. Click **Receive Payments** in the **Finance**, the **Receive Payments Register** page opens as below,
[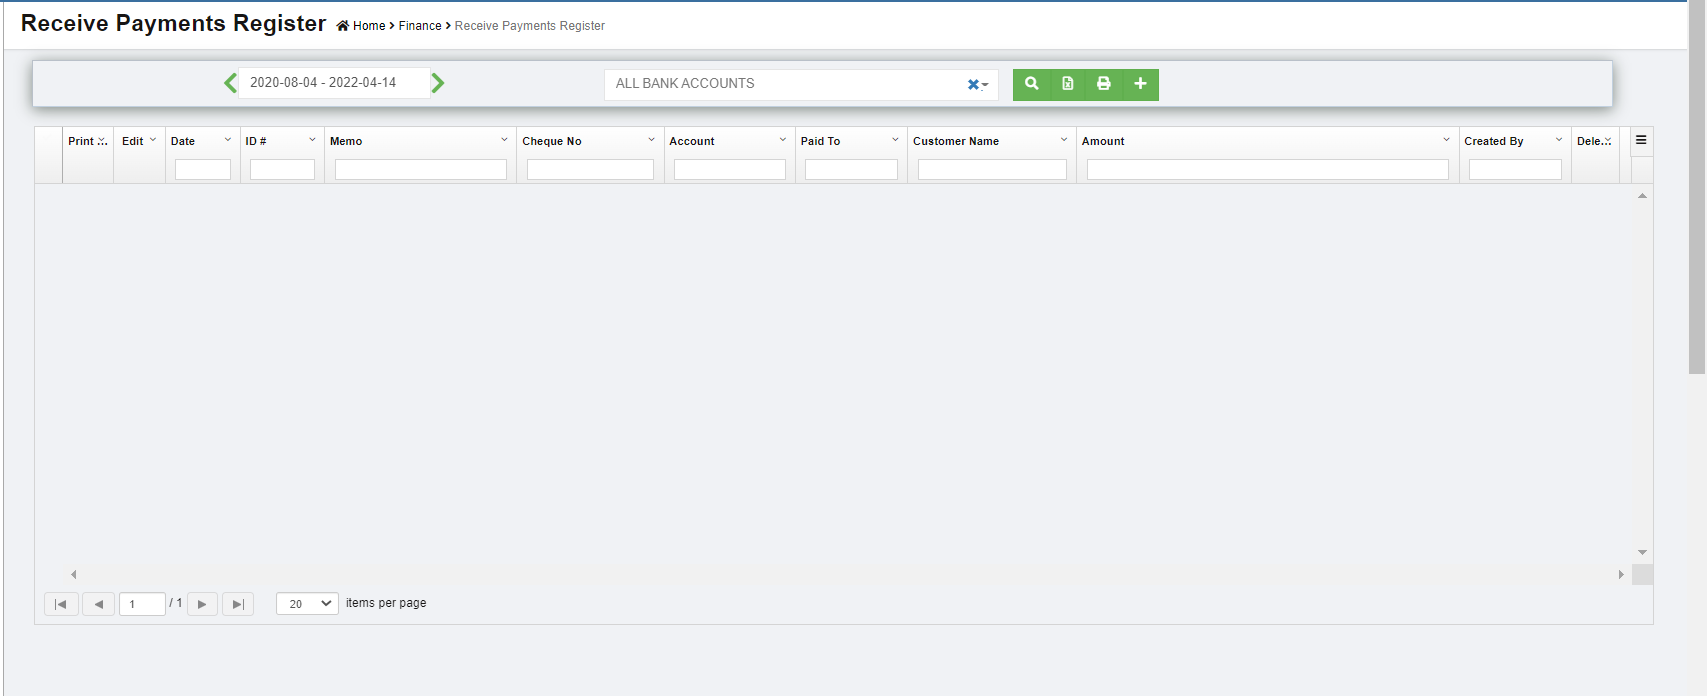](http://wiki.cuteinfocomm.com/uploads/images/gallery/2022-12/image-1669918201394.png)
### View Received Payments
If you want to view the received payment entry details of the particular bank account, you can use below filter to search,
[](http://wiki.cuteinfocomm.com/uploads/images/gallery/2022-12/image-1669918363721.png)
1. In the Calendar field, select the period for which you want to view the received payment entry details.
2. In the **Account** box, select a bank account.
3. Click [, ](http://wiki.cuteinfocomm.com/uploads/images/gallery/2022-12/image-1669918498677.png)the received payment entry detail opens for the selected bank account and period.
### Add a Received Payment Entry
To add a received payment details,
1. Click[](http://wiki.cuteinfocomm.com/uploads/images/gallery/2022-12/image-1670382846981.png)(Add icon) provided in the upper right-corner of the Receive Payments Register. The Receive Payments Entry page opens.[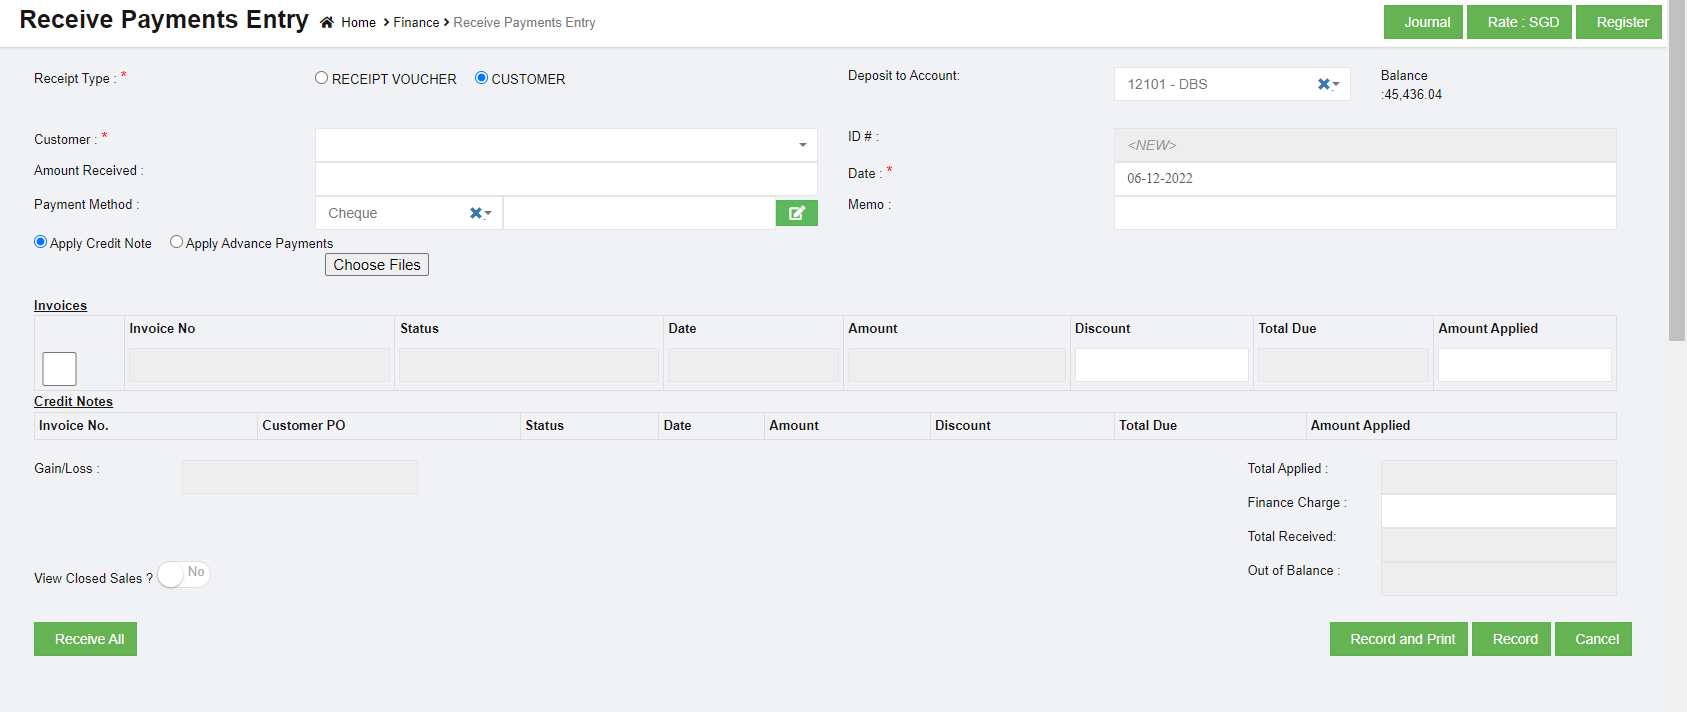](http://wiki.cuteinfocomm.com/uploads/images/gallery/2022-12/image-1670384489058.png)
2. In the **Receipt Type** field, if you want to add the details of payment received from any buyer other than the customers, select the **RECEIPT VOUCHER,** Once you select the **RECEIPT VOUCHER** option, the **Receive Payments Entry** page shows the following fields to be filled.[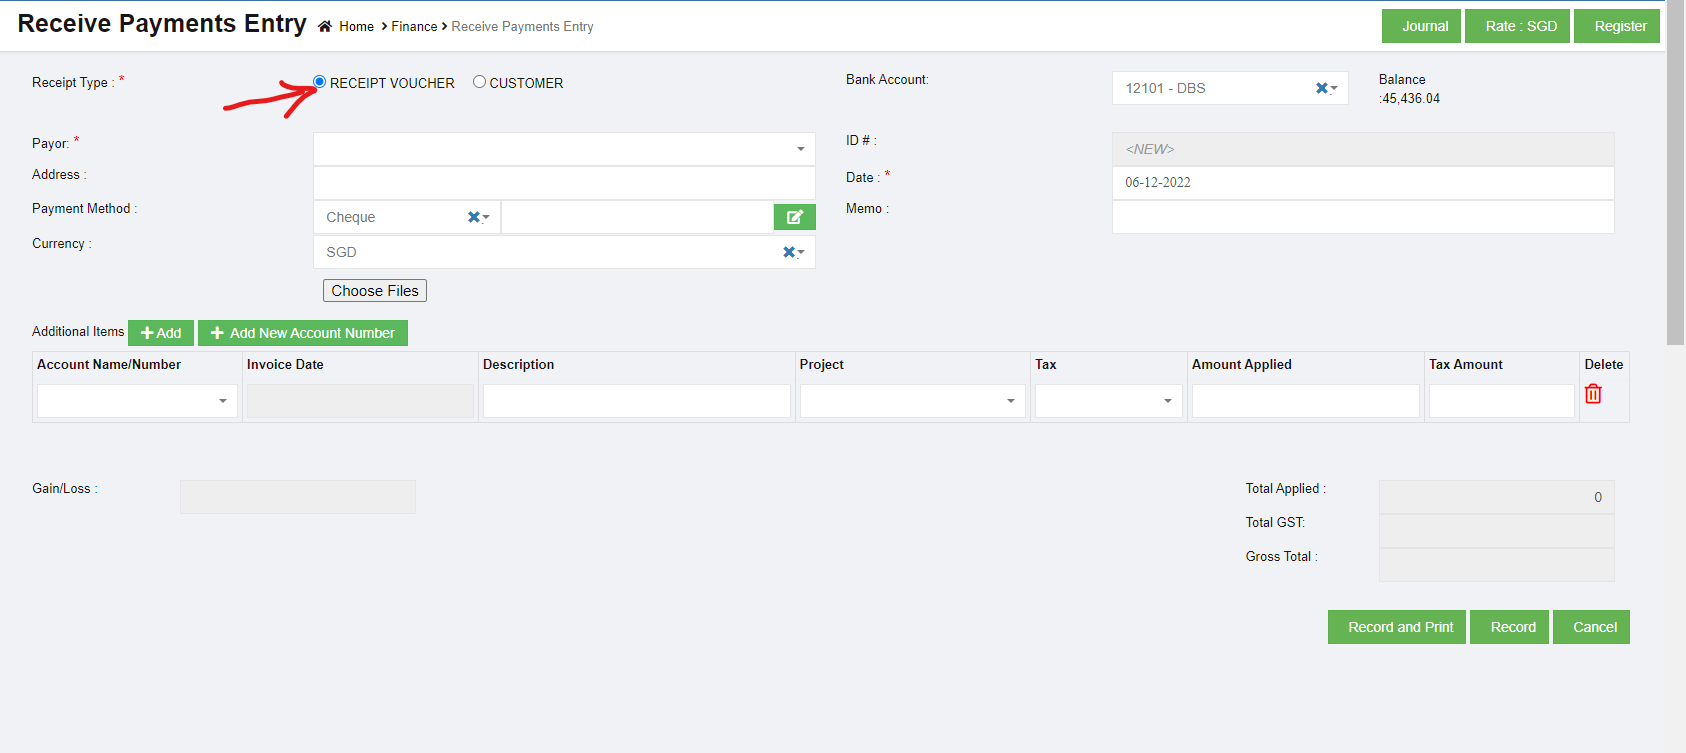](http://wiki.cuteinfocomm.com/uploads/images/gallery/2022-12/image-1670394395833.png)
- In the **Bank Account** box, select a bank account.
- In the **Payor** box, select a payor from a drop-down list.
- In the **Address** box, enter the address of the person or company who has made payment.
- In the **Date** box, select the date of payment.
- In the **Payment Method** box, select the mode of payment.
- In the **Currency** box, select the currency type.
- In the **Account Name**/**Number** box, select any one of appropriate chart of account from the list of charts of accounts.
- If you want to add additional account number, click (Add button) and add the account details.
- If you want to add a new account number, click (Add New Account Number button) and add the account details.
**Note**: Once you have selected the account number and name, the Invoice Date box shows the invoice date and the Description box shows the description for the corresponding selected account.
- In the **Tax** box, select a tax code from the given tax codes.
- In the **Amount applied** box, enter the amount. Once you have selected the tax code and entered the amount, the GST and gross total will be automatically updated. The gain/loss amount will be automatically updated in the **Gain/Loss** box.
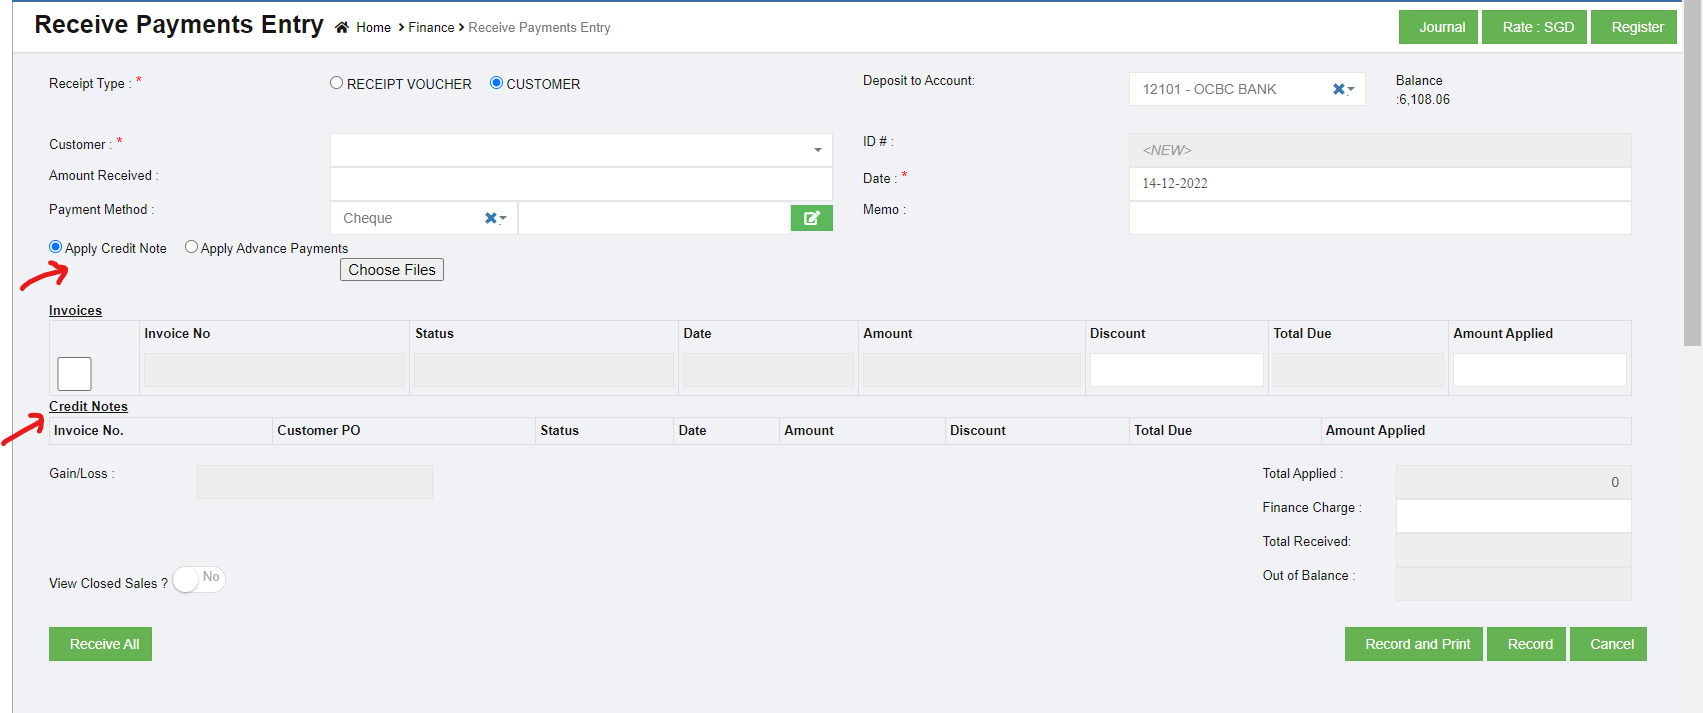
- Click **Record** to save the received payments details. The added payment details will be saved and listed in the **Receive Payments Register** page. **Note**: If you want to print the received payments details, click [ ](http://wiki.cuteinfocomm.com/uploads/images/gallery/2022-12/image-1670395538811.png)(**Record and Print** button).
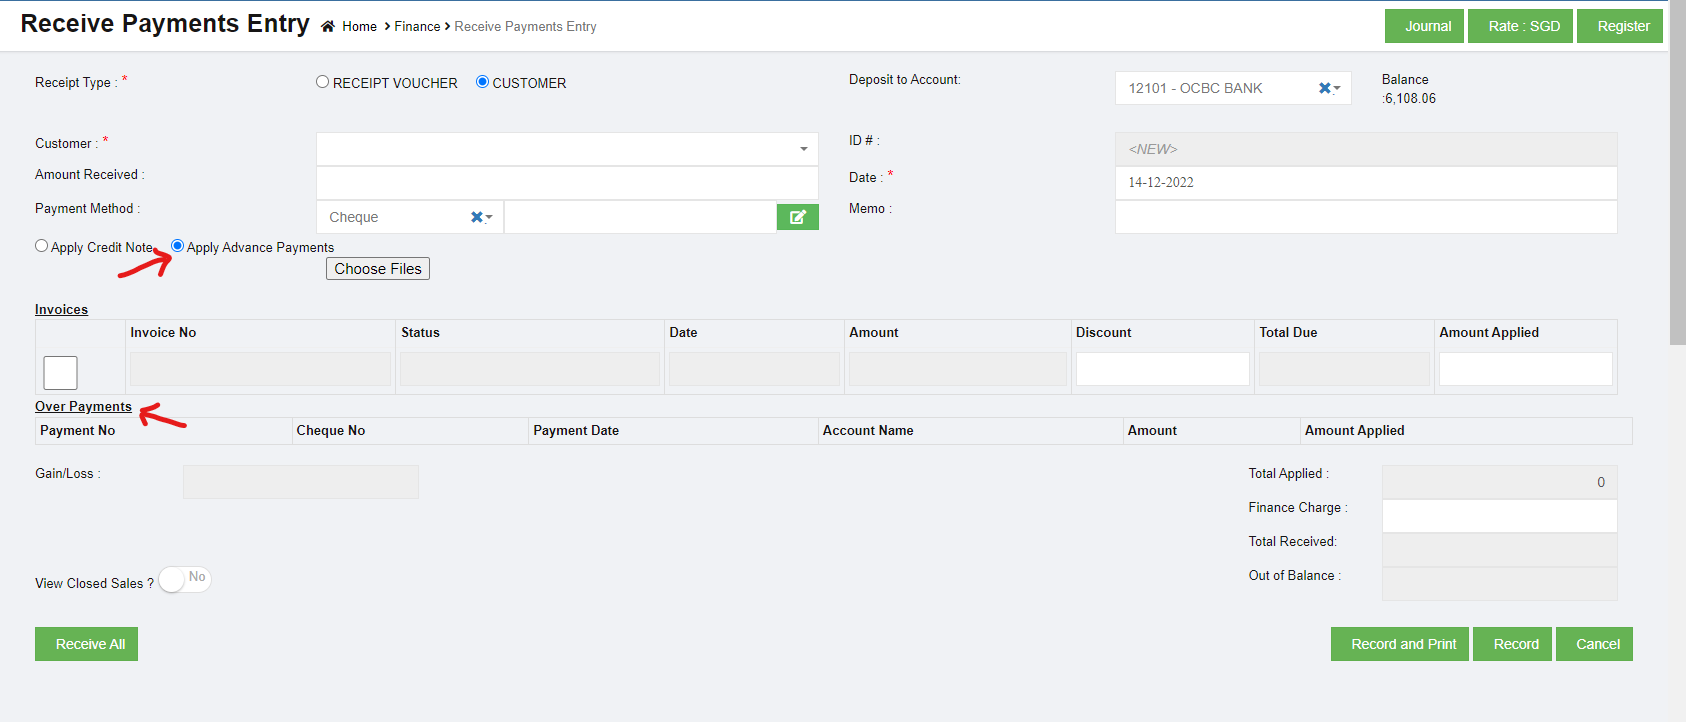
3. In the **Receipt Type** field, if you want to add the details of payment received from any customers, select the **CUSTOMER.** Once you select the **CUSTOMER** option, the **Receive Payments Entry** page shows the following fields to be filled. [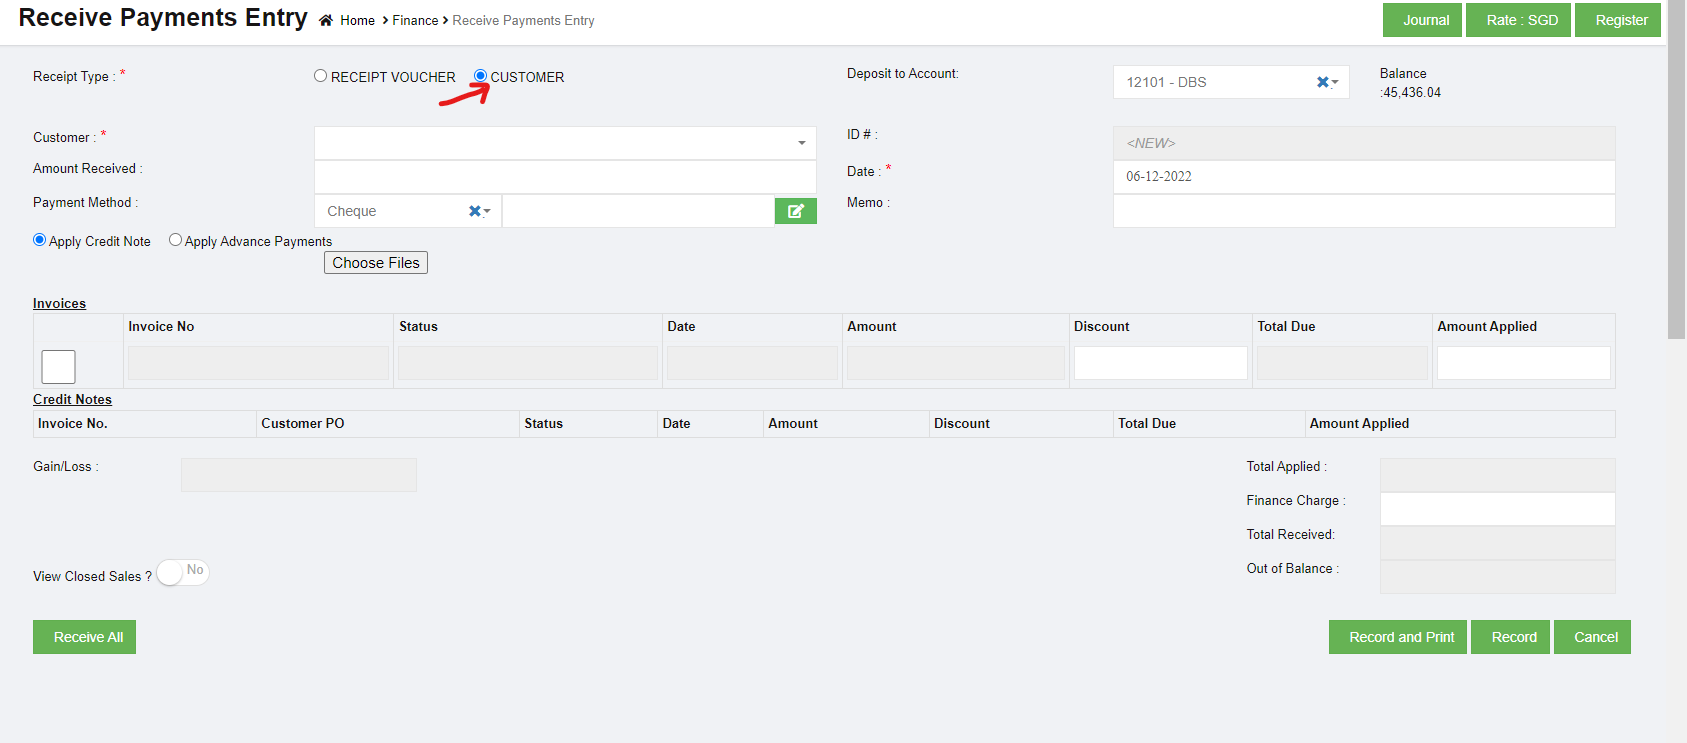](http://wiki.cuteinfocomm.com/uploads/images/gallery/2022-12/image-1670395973031.png)
- In the **Deposit to Account** box, select the amount deposit account.
- In the **Customer** box, select a customer from the list of customers. Once you have selected the customer, the list of invoices created for the respective customer open.
- In the **Amount Received** box, enter the received amount from the customer.
- In the **Date** box, select the date of payment.
- In the **Payment Method** box, select the mode of payment.
- If you want to add any credit note or credit memo, select the **Apply Credit Note.** Credit Note is a way of refunding an invoice that has already been issued or paid. It can be for part of or the whole amount of an invoice. Once select Apply Credit Note option, the Credit Note fields will be displayed as below,
[](http://wiki.cuteinfocomm.com/uploads/images/gallery/2022-12/image-1671086443155.png)
- If you want to receive the payment from any overpayments, Select the **Apply Overpayments** option.
Overpayment is a liability as it consists of money due back to the customer. Scenario 1 - Customer may pay an advance payment and park that amount for later adjusting against the invoice. Scenario 2 - Customer may pay extra amount and park that amount for later use. Once select Apply Overpayments option, the overpayment Confirm dialog box opens and shows the following notification,
[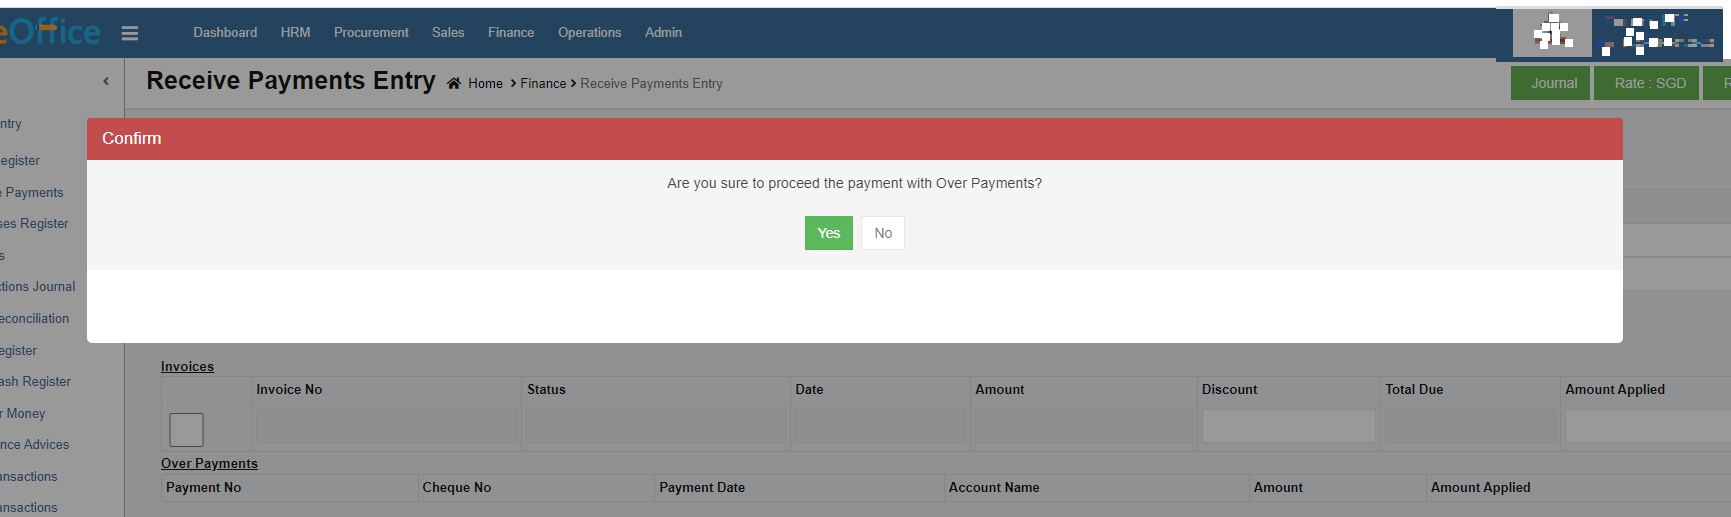](http://wiki.cuteinfocomm.com/uploads/images/gallery/2023-04/image-1682094351533.png)
Click Yes. The Over Payments fields will be displayed as below:
[](http://wiki.cuteinfocomm.com/uploads/images/gallery/2022-12/image-1671086393547.png)
The system will display the information of over payment if available. The Amount box in the Over Payments field shows the balance amount of the over payment. If you want to receive the amount from the customer’s over payment, enter the amount in the Amount Applied box in the Over Payments field. The total amount will be adjusted from the applied over payment amount.
**Note:** If you want to attach any file regarding credit note or overpayments, click  (Choose Files button) and attach the file.
- In the **Invoices** field, enter the discount amount in the Discount box.
Note: To manually enter the amount in the Invoices field, the respective users must be assigned with the **Manual Amount Filling** permission.
4. If you want to enter the amount manually,
- In the **Amount Applied** box, enter the paid amount. Once you have entered the paid amount, the total applied, finance charge, total received and out of balance will be automatically updated. The gain/loss amount will be automatically updated in the **Gain/Loss** box.
- If you want to view the closed sales details, enable **Yes** in the **View Closed Sales**
- If you want to view all the payment details, click (**Receive All** button).
- Click **Record** to save the received payments details. The added payment details will be saved and listed in the **Receive Payments Register** page. **Note**: If you want to print the received payments details, click (**Record and Print** button).
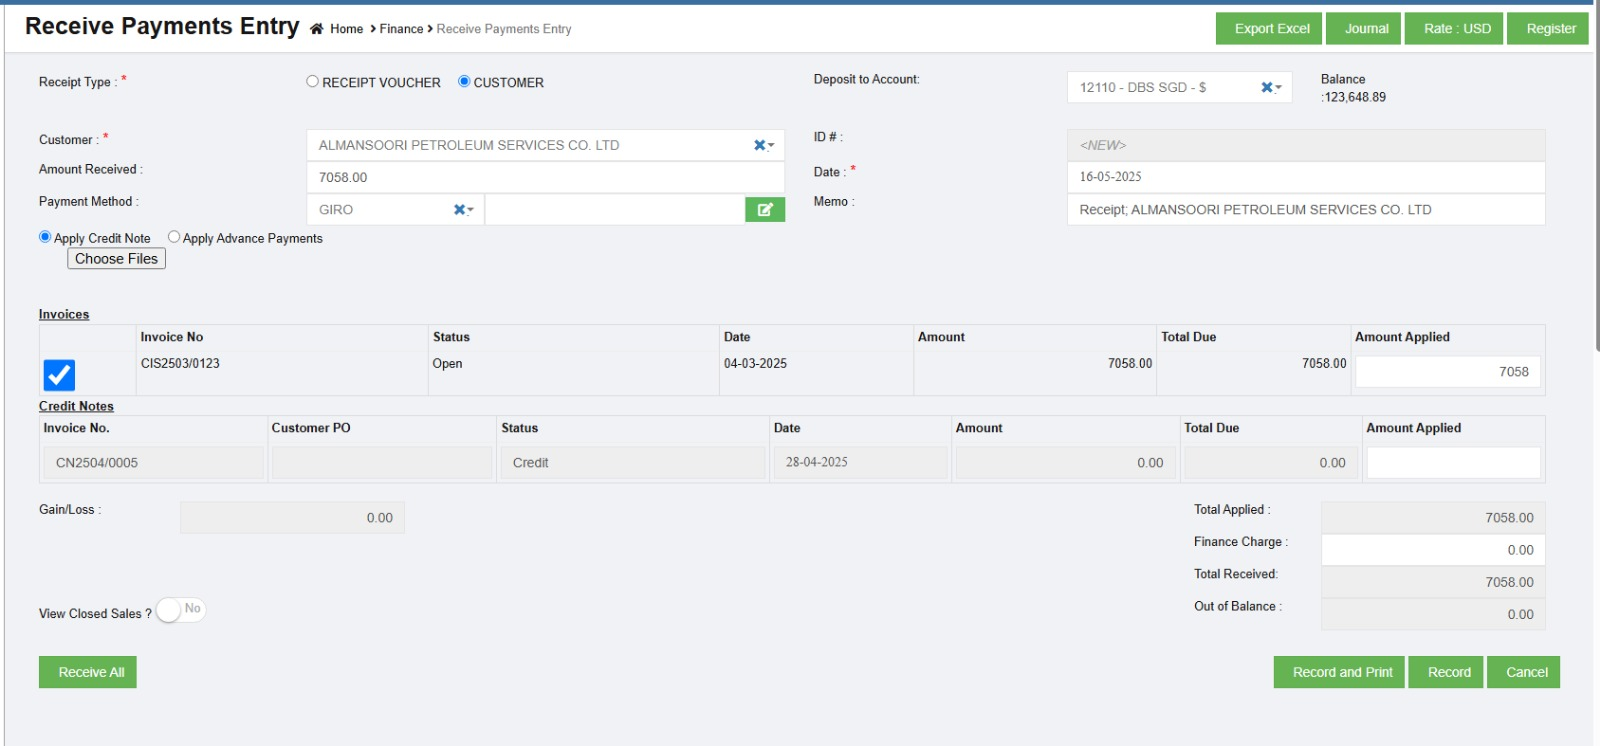
#### Receive USD customer payment in SDD account.
If a customer is invoiced in USD and received payment in SGD, then use the below method to update the receive payment in system.
Example: Customer AlMansoori was invoiced with 7058 USD. The payment received in SGD account is SGD 9076.95
[](https://wiki.cuteinfocomm.com/uploads/images/gallery/2025-05/image-1748669605108.png)
So the exchange rate calculated in 9076.95 / 7058 = 1.286051
Go to Receive payment entry screen and enter the USD amount in amount received textbox.
[](https://wiki.cuteinfocomm.com/uploads/images/gallery/2025-05/image-1748669527782.png)
Click on Rate: USD and enter the exchange rate
[](https://wiki.cuteinfocomm.com/uploads/images/gallery/2025-05/image-1748669583721.png)
Now Record the receipt.
The journal shows the actual receipt of 9076.95 in the SGD account as required.
[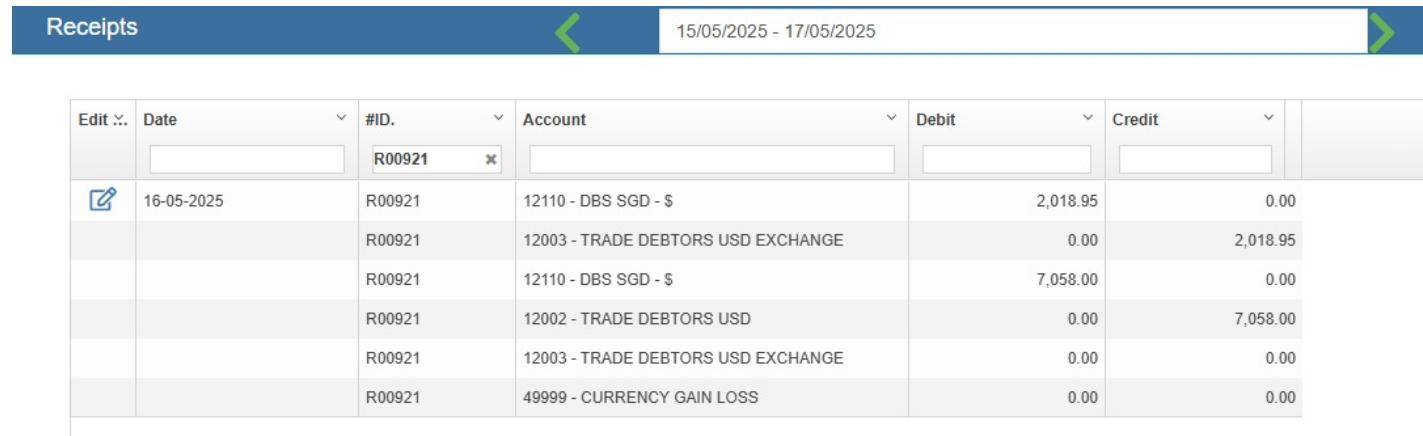](https://wiki.cuteinfocomm.com/uploads/images/gallery/2025-05/image-1748669775941.png)
### Edit the Receive Payment Entry Details
If you want to edit any added receive payment entry details in the **Receive Payments Entry** page, do the following steps,
1. Click [](http://wiki.cuteinfocomm.com/uploads/images/gallery/2022-11/image-1668025713960.png)(Edit icon) in the **Edit** column for the respective receive payment entry. The **Receive Payments Entry** page opens and shows the added received payment details.
2. Click any box where you want to edit the details, and then edit the details in the respective box in the window.
3. Click **Record**. The changed receive payment entry details will be updated.
### Delete Any Added Receive Payment Entry
If you want to delete any added receive payment entry, you can use (Delete icon) provided in the **Delete** column of the **Receive Payments Register** page,
1. Click [](http://wiki.cuteinfocomm.com/uploads/images/gallery/2022-11/image-1668025897554.png)(Delete icon) for the corresponding receive payments entry. You receive a notification message “**Are you sure to delete a record**?”.
2. Click **Yes**. The selected receive payments entry will be deleted.
### Print the Receipt Voucher
If you want to print the receipt voucher of the particular received payment entry, click  (Print icon) provided in the **Print** column for the corresponding payment entry.
### Export the Receive Payments Register
If you want to export the added received payments entry in the **Receive Payments Register** page in the excel format, you can click (Excel icon). The added receive payments entries will be downloaded in the excel format.
## Purchase Register
**Purchase Register** is a record of your company's purchases from suppliers. Each time when a purchase is made, the Purchase Invoice received from the Supplier should be recorded in the Purchase register page. Click Purchases Register in the Finance menu.
The Purchases Register page opens.
[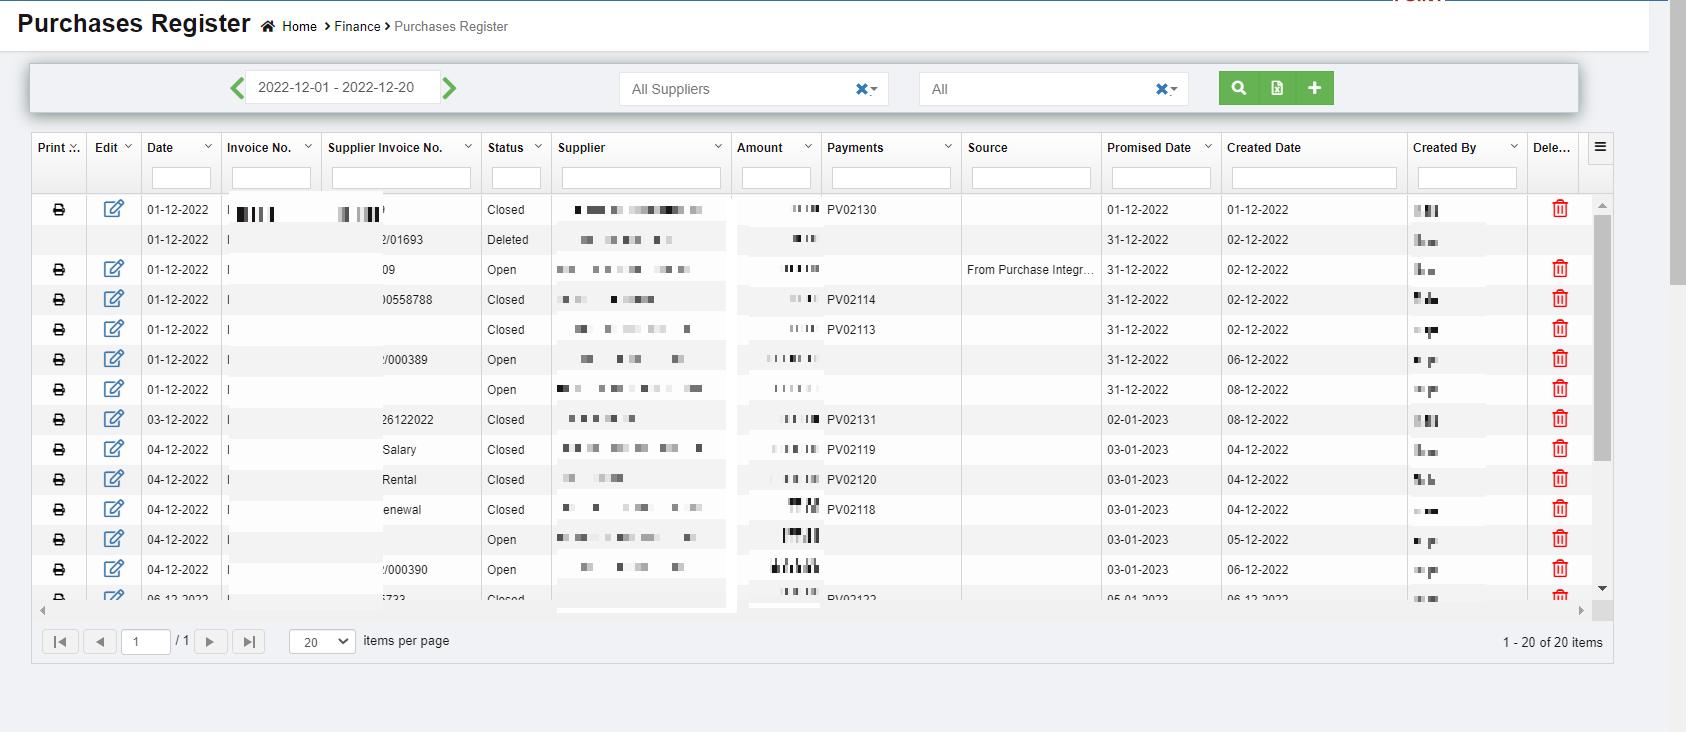](http://wiki.cuteinfocomm.com/uploads/images/gallery/2023-04/image-1682094417373.png)
### View Purchase Register
If you want to view the purchase entry details of the particular supplier,
[](http://wiki.cuteinfocomm.com/uploads/images/gallery/2023-01/image-1672815891746.png)
1. In the Calendar, select the period for which you want to view the purchase entry details.
2. In the Supplier box, select a supplier.
3. In the Status box, select the status to view the purchase entry details.
4. Click . The purchase entry detail opens for the selected supplier and period.
### Enable Permission for Purchase Recurring Transaction
If you want to add a new purchase entry by using the transaction details of an existing invoice number, you need to enable permission for accessing the Purchase recurring transaction option. To enable the permission for purchase recurring transaction, search for permission name "**Purchase Recurring"** in user 's permission page and enable both read and write permissions. Once you have enabled this permission, the purchase recurring transaction related option will be appeared while adding a new purchase entry.
### Add a Purchase Entry
If you want to add a purchase entry, click (Add icon) provided in the upper right-corner of the **Purchases Register.** The **Purchases Entry** page opens.
[](http://wiki.cuteinfocomm.com/uploads/images/gallery/2023-01/image-1672816930168.png)
**Note: useful navigation options**
- [](http://wiki.cuteinfocomm.com/uploads/images/gallery/2022-10/image-1666241702853.png)(Journal button)-You can use the Journal option to view the purchase journal entry. Purchase Credit Journal Entry is the journal entry passed by the company in the purchase journal of the date when the company purchases any goods from the supplier on the terms of credit, where the purchases account will be debited.
- (Pay Bill button) – used to navigate into the Pay Bills Entry page.
- [](http://wiki.cuteinfocomm.com/uploads/images/gallery/2022-10/image-1666241838365.png)(Register button) – used to navigate into the Purchases Entry page.
#### Add a Purchase Entry Using the Purchase Recurring Option
If you want to add a purchase entry by using the purchase recurring option,
1. 1. Click[](http://wiki.cuteinfocomm.com/uploads/images/gallery/2022-10/image-1666242173987.png) (use recurring button), all the saved recurring transactions page will open as below, [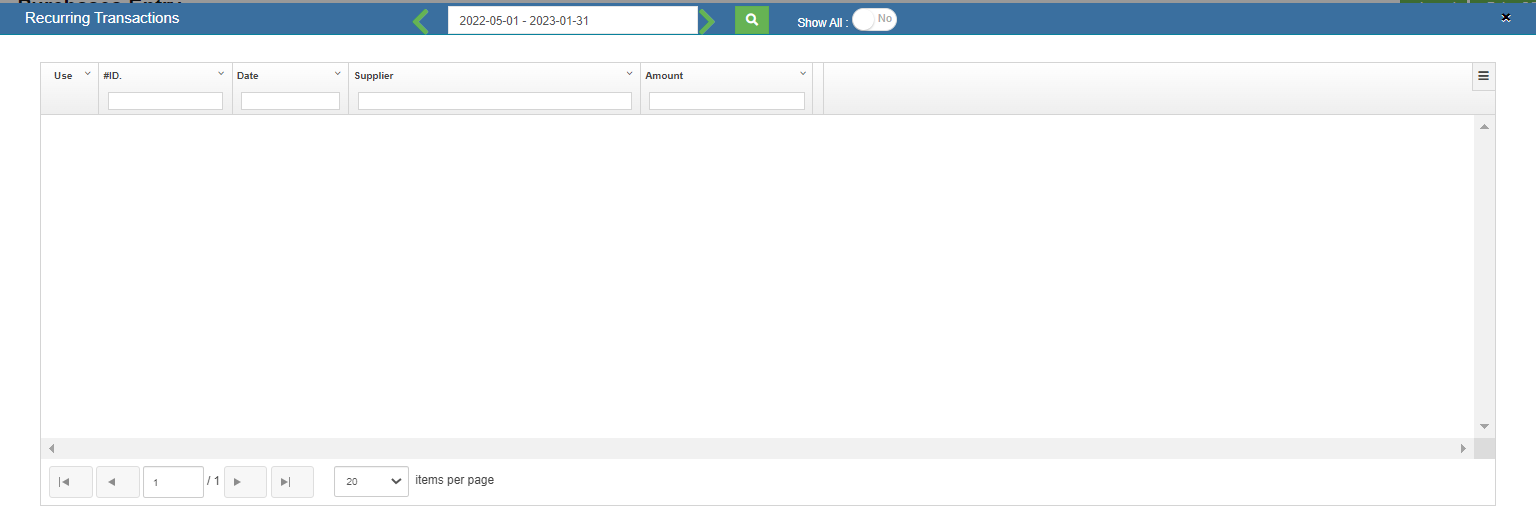](http://wiki.cuteinfocomm.com/uploads/images/gallery/2023-01/image-1672817751954.png)
2. Select an invoice number from the recurring transactions list. Click the use icon. Once the invoice number is selected, it will retrieve the respective transaction details saved successfully in cuteOffice. All the input fields will be automatically filled up according to the selection of invoice number.
**Note:** to save a purchase entry as Recurring, enable the "Save As Recurring" flag to Yes when register a purchase entry. Once saved as recurring entry, it will be shown in the recurring transaction page when use "Use Recurring" option to register purchase entry.
[](http://wiki.cuteinfocomm.com/uploads/images/gallery/2022-10/image-1666242591995.png)
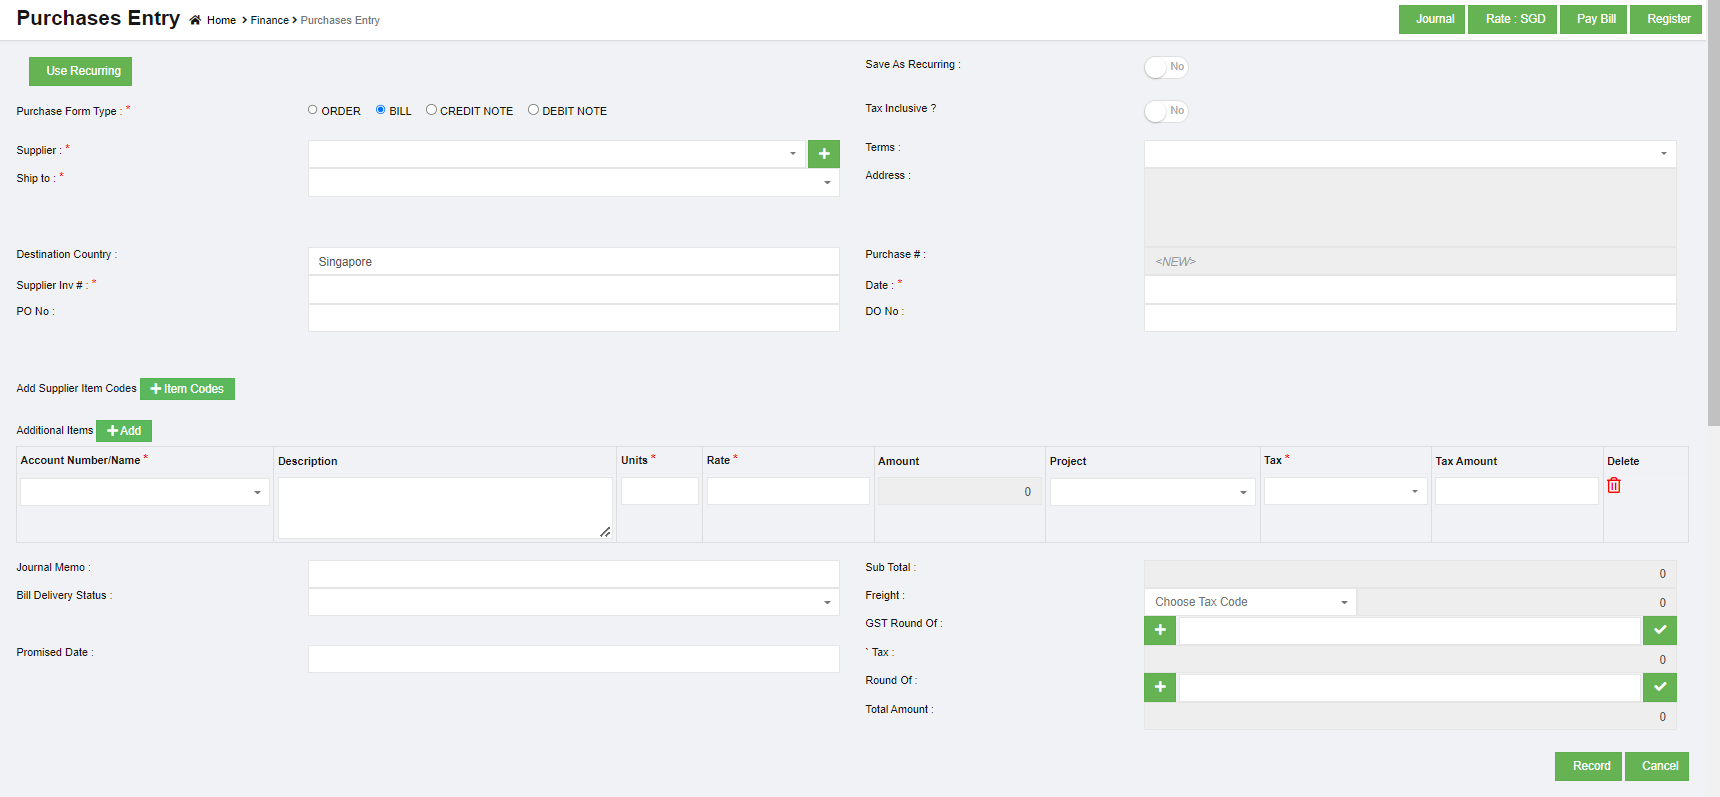
#### Add a Purchase Entry Manually
If you want to add a purchase entry manually, click [](http://wiki.cuteinfocomm.com/uploads/images/gallery/2022-12/image-1670382846981.png) add button in the purchase register page, the purchase entry page will open as below,
[](http://wiki.cuteinfocomm.com/uploads/images/gallery/2023-01/image-1673331856445.png)
1. In the **Purchase Form Type** field, select the purchase form type from the given types.
2. In the in the **Tax Inclusive** field, If the tax is inclusive for the purchase entry, enable to Yes; or else, No.
3. In the **Supplier** box, select a supplier from drop down list from suppliers' master. Note: If you want to add a new supplier, you can add a new supplier by clicking[ ](http://wiki.cuteinfocomm.com/uploads/images/gallery/2023-01/image-1673332293135.png)(Add icon) near the Supplier box.
4. In the **Terms** box, select the terms. Terms – Terms refers to the payment period. For example, if you select the terms as COD, then you need to pay cash on delivery. If you select 30 Days, then you need to pay the purchase amount within the 30 days of delivery.
5. In the **Ship to** box, select the shipping location. Note: once you have selected the shipping location, the shipping address will be automatically updated in the Address box.
6. In the **Destination Country** box, enter the destination country name.
7. In the **Supplier Inv#** box, enter the invoice number received from the supplier.
8. In the **Date** box, select the purchase date.
9. In the **Account Number/Name** box, select any one of appropriate chart of account from the list of charts of accounts.
10. Once you have selected the account number and name, the **Description** box shows the description for the corresponding selected account.
11. In the **Units** box, enter the number of items purchased by you.
12. In the **Rate** box, enter the rate of one item.
13. Once you have entered the units and rate of the item, the total amount will be calculated and displayed in the **Amount** box.
14. In the **Project** box, select for which project, the items are purchased.
15. In the **Tax** box, select a tax code from the given tax codes. The total amount for the items will be automatically updated in the **Sub Total** box.
16. In the **Bill Delivery Status** box, select the bill delivery status from the list.
17. In the **Promised Date** box, select the date when the payment will be made.
18. In the **Freight** box, select the tax percentage for the freight charges. The tax amount will be automatically updated in the Tax box.
19. In the **GST Round Of** box, user can use this option to round of GST amount. If need to round down the GST amount, click area 1 to show as "-", then enter round down amount, then click area 2 to enable round of; if need to round up the GST amount, click area 1 to show as "+", then enter round up amount, then click area 2 to enable round of. [](http://wiki.cuteinfocomm.com/uploads/images/gallery/2023-01/image-1673334081596.png)
20. In the **Round Of** box, user can use this option to round of the total amount. Refer to above point of GST round of.
21. Click **Record**. The purchase entry will be added and listed in the Purchases Register page.
### Edit the Purchase Entry Details
If you want to edit any added purchase entry details in the **Purchases Entry** page, do the following steps,
1. Click [](http://wiki.cuteinfocomm.com/uploads/images/gallery/2023-01/image-1673334575459.png)(Edit icon) in the **Edit** column for the respective purchase entry. The **Purchases Entry** page opens and shows the added purchase details.
2. Click any box where you want to edit the details, and then edit the details in the respective box in the window.
3. Click **Record**. The changed purchase entry details will be updated.
### Delete Any Added Purchase Entry
If you want to delete any added purchase entry, you can use delete option provided in the **Delete** column of the **Purchases Register** page,
1. Click[](http://wiki.cuteinfocomm.com/uploads/images/gallery/2022-11/image-1668025897554.png) (Delete icon) for the corresponding purchase entry. You receive a notification message “**Are you sure to delete a record**?”.
2. Click **Yes**. The selected purchase entry will be deleted.
### Print the Invoice Details
If you want to print the invoice details of the particular purchase entry, click  (Print icon) provided in the **Print** column for the corresponding purchase entry.
### Export the Purchase Register
If you want to export the added purchase entries in the **Purchases Register** page in the excel format, click  (Excel icon). The added purchase entries will be downloaded in the excel format.
## Pay Bills
**Pay Bills** is a statement specifying the amount of money paid to the supplier for the purchase. The **Pay Bills** tab in the **Finance** menu helps you to add the details of the amount paid to the supplier. Navigate to finance module, and click **Pay Bills** in the **Voucher Entry menu**, the **Pay Bills Register** page opens as below,
[](http://wiki.cuteinfocomm.com/uploads/images/gallery/2023-04/image-1682094494999.png)
### View Paid Bills
If you want to view the paid bill details of a particular bank account, go to the pay bills register page,
1. In the Calendar, select the period for which you want to view the paid bill details.
2. In the **Account** box, select a bank account.
3. Click [](http://wiki.cuteinfocomm.com/uploads/images/gallery/2023-01/image-1673506656851.png) search icon. The page shows the paid bill details for the selected bank account and period.
### Add a Pay Bill Entry
To add paid bill details,
1. Click [](http://wiki.cuteinfocomm.com/uploads/images/gallery/2023-01/image-1673506751553.png) (Add icon) provided in the upper right-corner of the **Pay Bill Register.** The **Pay Bills Entry** page opens.[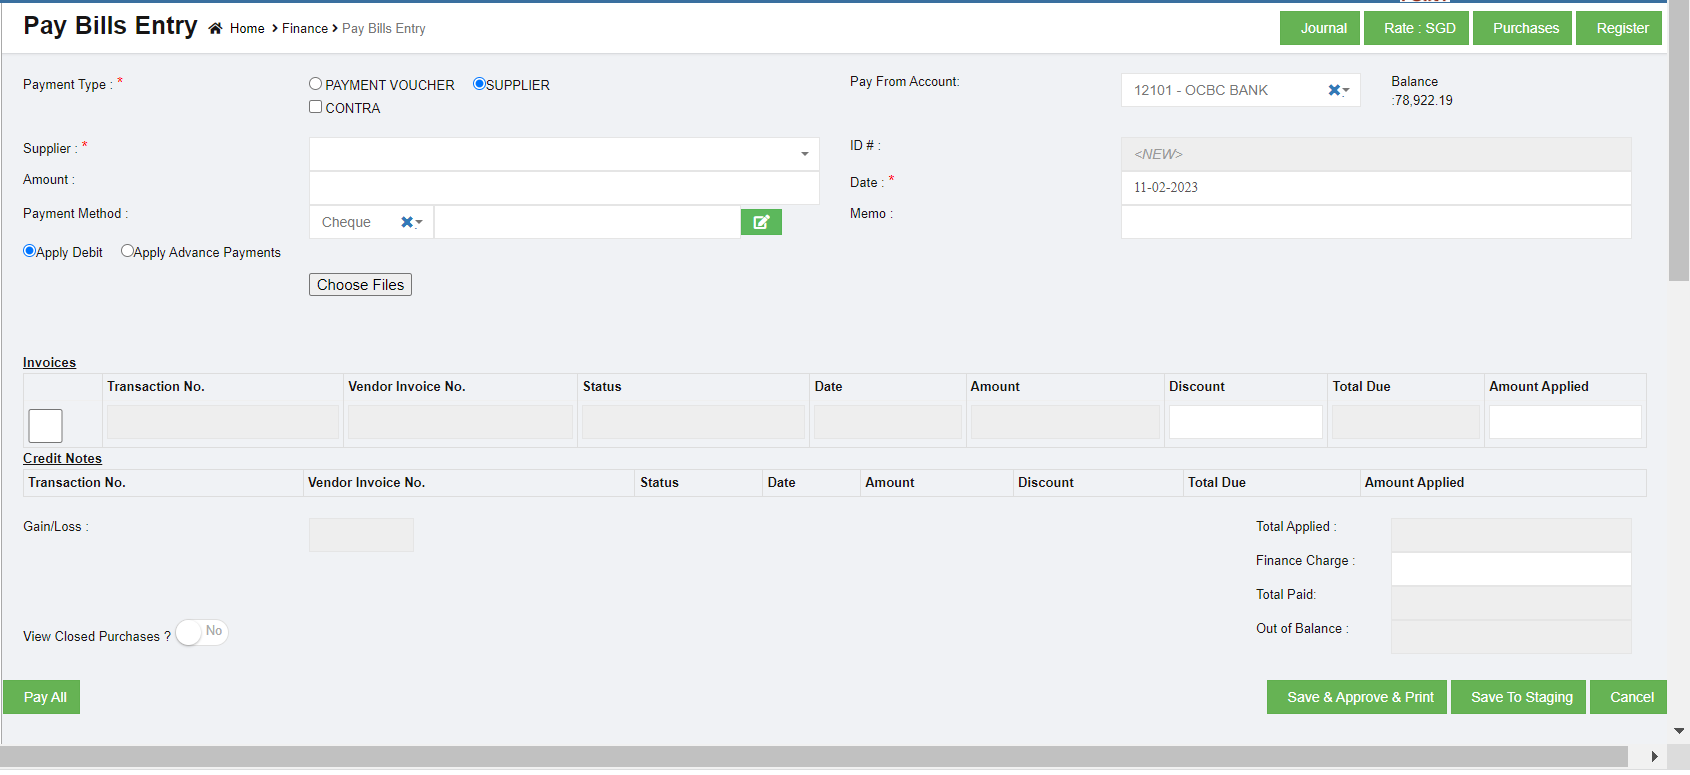](http://wiki.cuteinfocomm.com/uploads/images/gallery/2023-02/image-1676102791799.png)
**Note: useful navigation options**
- [](http://wiki.cuteinfocomm.com/uploads/images/gallery/2022-10/image-1666241702853.png)(Journal button)-You can use the Journal option to used to view the pay bills journal entry. Purchase Credit Journal Entry is the journal entry passed by the company in the purchase journal of the date when the company purchases any goods from the supplier on the terms of credit, where the purchases account will be debited.
- (Pay Bill button) – used to navigate into the Pay Bills Entry page.
- [](http://wiki.cuteinfocomm.com/uploads/images/gallery/2022-10/image-1666241838365.png)(Register button) – used to navigate into the Purchases Entry page.
2. In the **Payment Type** field, there are three types, namely Payment Voucher and Contra. Payments can be made in two scenarios: payments against an Invoice or Advance payment; Payments made without a Supplier Invoice.
- Type 1 PAYMENT VOUCHER-Payment Voucher option will be selected when the User intends to make a payment without an invoice. When this option is selected, User has to select the Supplier (which is a mandatory field) and the Supplier information will be picked from the Direct Payee Master. For such cases, User needs to create the details in the Direct Payee master, before raising the Pay Bill transaction. . Once you select the **PAYMENT VOUCHER** option in payment type, the **Pay Bills Entry** page shows the following fields need to be filled.
[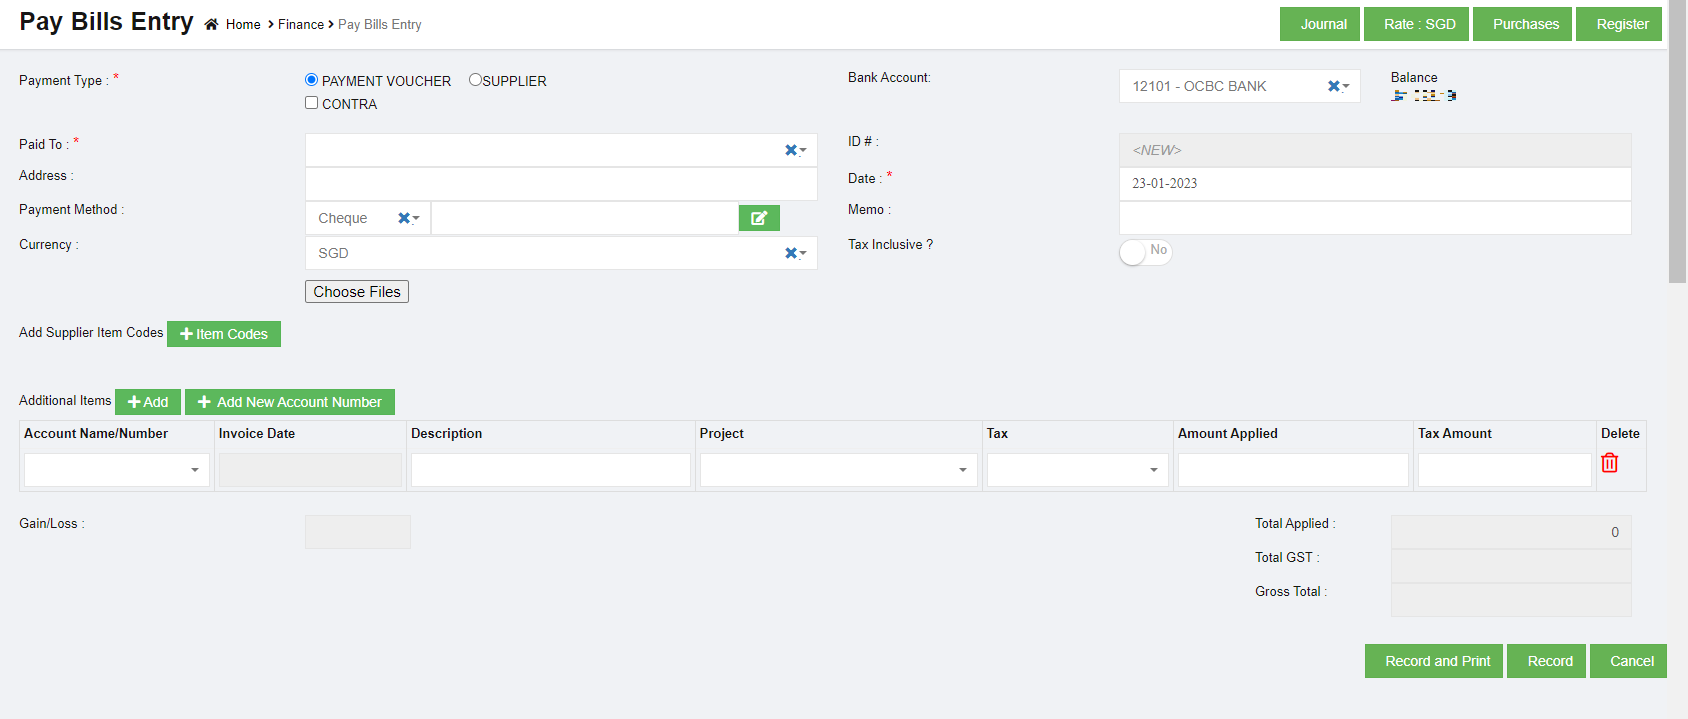](http://wiki.cuteinfocomm.com/uploads/images/gallery/2023-04/image-1682094546028.png)
- In the **Bank Account** box, select the debited bank account.
- In the **Paid To** box, enter the bank name to which the amount has been transferred.
- In the **Address** box, enter the address of the supplier who has received payment.
- In the **Date** box, select the date of payment.
- In the **Payment Method** box, select the mode of payment.
- In the **Currency** box, select the currency type.
- In the **Account Name**/**Number** box, select any one of appropriate chart of account from the list of charts of accounts. If you want to add additional account number, click (**Add** button) and add the account details. If you want to add a new account number, click (**Add** **New Account Number** button) and add the account details.
- Once you have selected the account number and name, the **Invoice Date** box shows the invoice date and the **Description** box shows the description for the corresponding selected account.
- In the **Tax** box, select a tax code from the given tax codes.
- In the **Amount applied** box, enter the amount. Once you have selected the tax code and entered the amount, the GST and gross total will be automatically updated. The gain/loss amount will be automatically updated in the Gain/Loss box.
- Click **Record** to save the paid amount details. The added payment details will be saved and listed in the **Pay Bills Register** page. **Note**: If you want to print the received payments details, click (**Record and Print** button).
- Type 2 Supplier-supplier option will be selected when the User intends to pay / settle an outstanding invoice to the Supplier. When this option is selected, User has to select the Supplier (which is a mandatory field) from the Supplier Master. User will enter the Payment amount and apply the amount against the Outstanding invoices by entering the Applied Amount field. While doing so, the Outstanding Invoice is adjusted against the Applied amount, and the Supplier Total Outstanding amount is thus calculated. If the Amount paid to the Supplier is to be treated as Advance, then user need to select the Apply Advance Payment and the amount will be treated as Advance Amount, Once you select the **SUPPLIER** option, the **Pay Bills Entry** page shows the following fields need to be filled.
[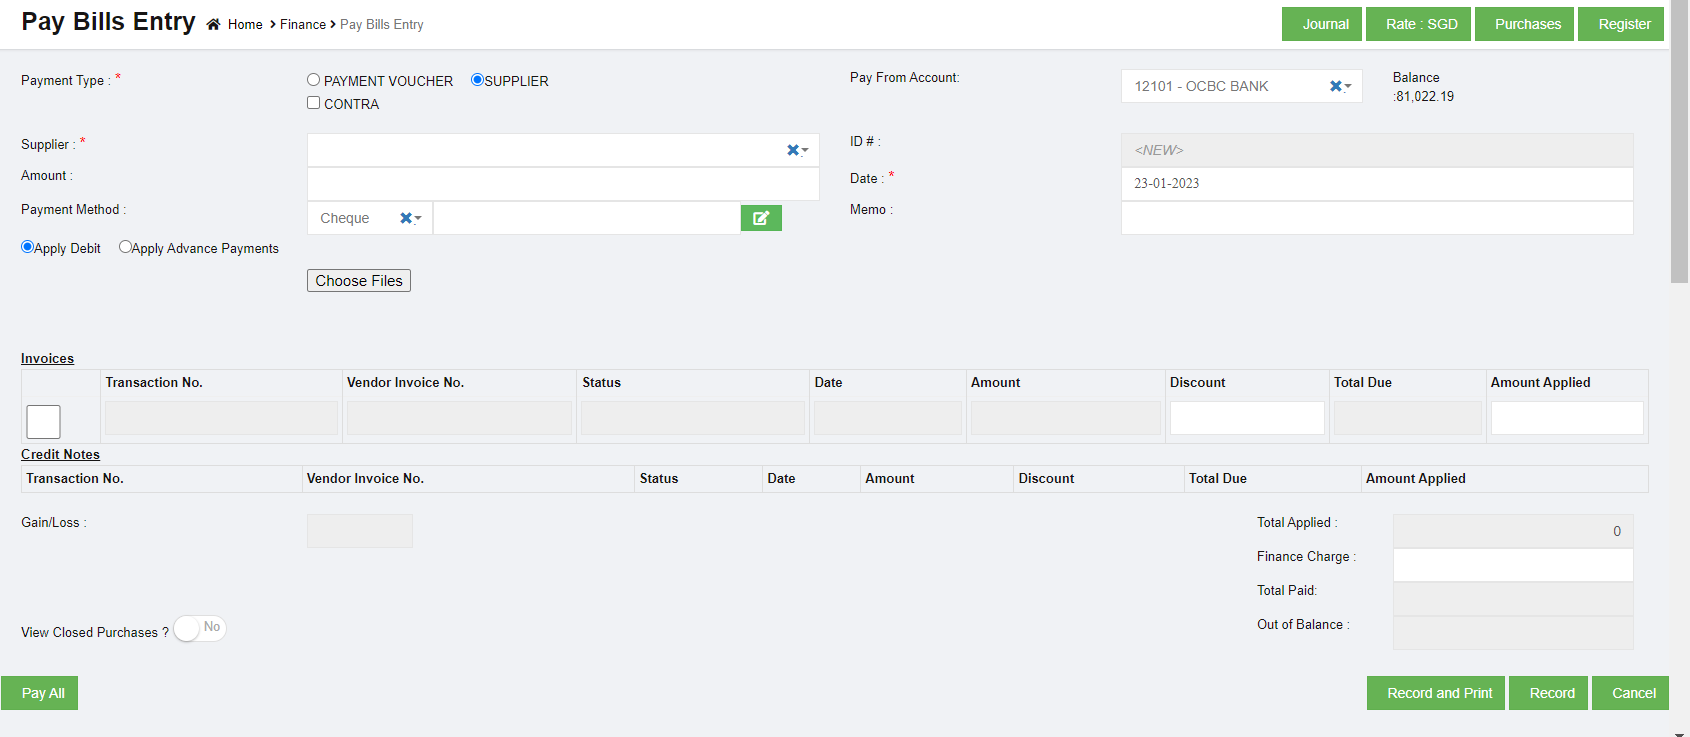](http://wiki.cuteinfocomm.com/uploads/images/gallery/2023-01/image-1674544154513.png)
- In the **Pay From Account** box, select the debited bank account.
- In the **Supplier** box, select a supplier from the list of suppliers. Once you have selected the supplier, the list of vendor invoices created for the respective supplier open.
- In the **Amount** box, enter the amount paid to the supplier.
- In the **Date** box, select the date of payment.
- In the **Payment Method** box, select the mode of payment.
a. If you want to add any credit note or credit memo, select the **Apply Debit** option.
b. If you want to pay from any over payments, select the **Apply Advance Payments** option. A confirm dialog box opens and shows the following notification. Click Yes. The Over Payments field will be displayed below the Invoices field. The system will display the information of over payment if available. The Amount box in the Over Payments field shows the balance amount of the over payment. If you want to pay the amount from your over payment, enter the amount in the Amount Applied box in the Over Payments field. The total amount will be adjusted from the applied over payment amount.
**Note:** If you want to attach any file regarding credit note or overpayments, click  (Choose Files button) and attach the file. [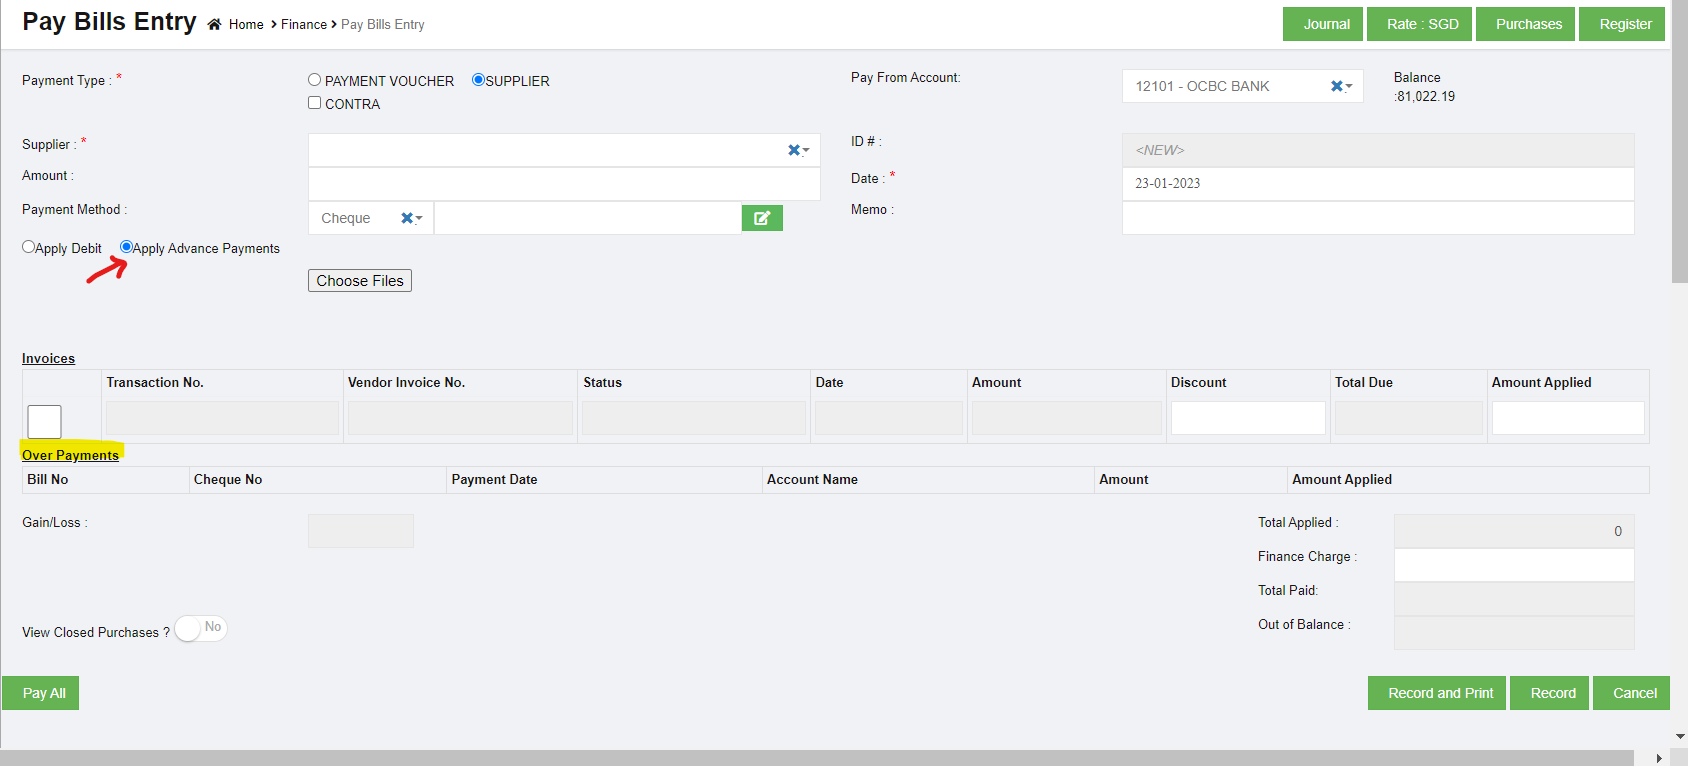](http://wiki.cuteinfocomm.com/uploads/images/gallery/2023-01/image-1674544701098.png)
- In the **Invoices** field, enter the discount amount in the **Discount** box. Note: To manually enter the amount in the Invoices field, the respective users must be assigned with the Manual Amount Filling permission.
- In the **Amount Applied** box, enter the paid amount. Once you have entered the paid amount, the total applied, finance charge, total received and out of balance will be automatically updated. The gain/loss amount will be automatically updated in the Gain/Loss box.
- If you want to view the closed purchases details, enable to **Yes** in the View Closed Purchases option. [](http://wiki.cuteinfocomm.com/uploads/images/gallery/2023-01/image-1674545072665.png)
If you want to view all the paid details, click  (Pay All button).
- Click **Record** to save the paid bill details. The added bill details will be saved and listed in the Pay Bills Register page. Note: If you want to print the paid bill details, click  (Record and Print button).
- Type 3 CONTRA-Contra Payments in Cuteoffice Application is to settle the outstanding Invoices between the same Supplier & Customer. Please refer the Contra Entry voucher documentation for this. Select Supplier, and if the supplier is same as customer, click to select Contra.
Once you select the S**upplier and Contra** option in payment type, the **Pay Bills Entry** page shows the following fields need to be filled.[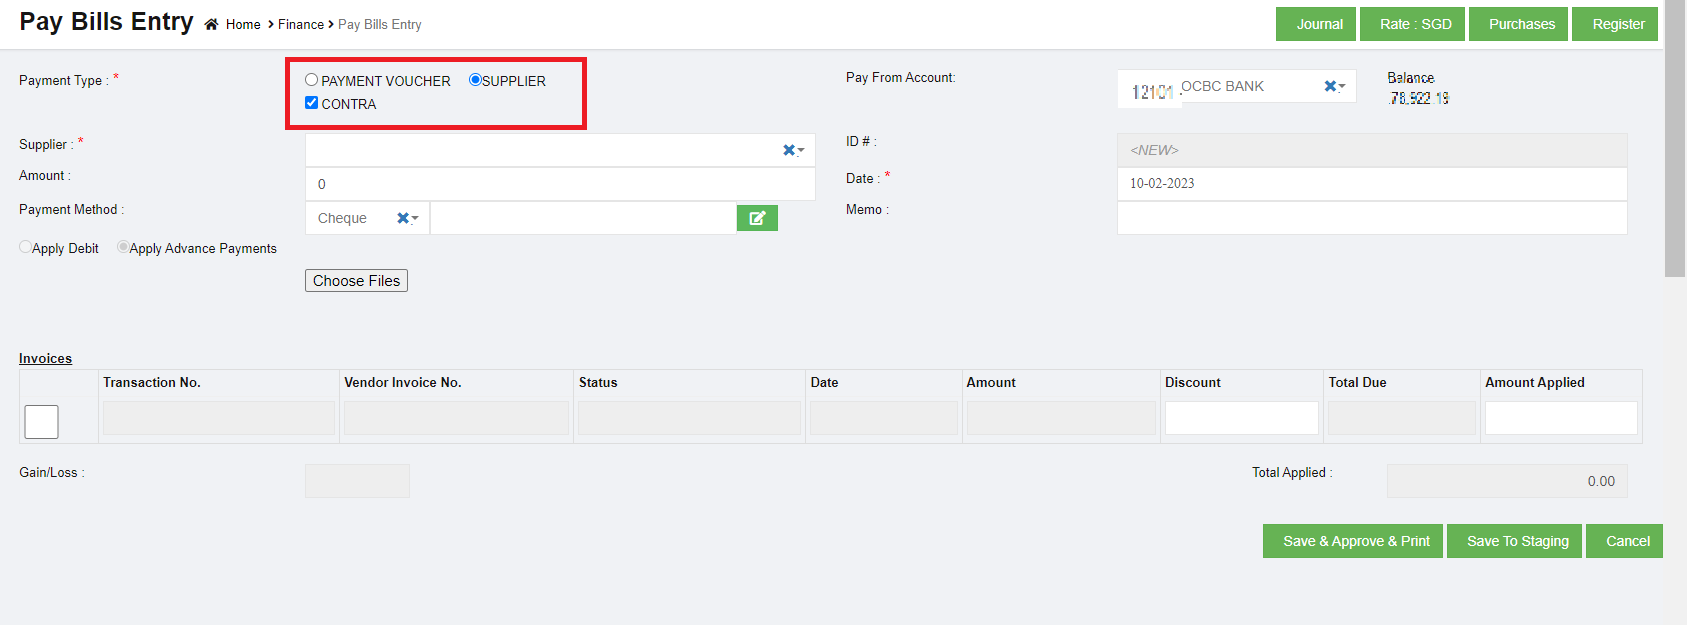](http://wiki.cuteinfocomm.com/uploads/images/gallery/2023-02/image-1676102131457.png)
- - In the **Pay From Account** box, select the debited bank account.
- In the **Supplier** box, select a supplier from the list of suppliers. Once you have selected the supplier, the list of vendor invoices created for the respective supplier open.
- In the **Amount** box, enter the amount paid to the supplier.
- In the **Date** box, select the date of payment.
- In the **Payment Method** box, select the mode of payment.
a. If you want to add any credit note or credit memo, select the Apply Debit option.
b. If you want to pay from any over payments, select the Apply Advance Payments option. A confirm dialog box opens and shows the following notification. Click Yes. The Over Payments field will be displayed below the Invoices field. The system will display the information of over payment if available. The Amount box in the Over Payments field shows the balance amount of the over payment. If you want to pay the amount from your over payment, enter the amount in the Amount Applied box in the Over Payments field. The total amount will be adjusted from the applied over payment amount.
Note: If you want to attach any file regarding credit note or overpayments, click (Choose Files button) and attach the file.
- - In the **Invoices** field, select the invoice of the transaction and enter the discount amount in the **Discount** box. Note: To manually enter the amount in the Invoices field, the respective users must be assigned with the Manual Amount Filling permission.
- In the **Amount Applied** box, enter the paid amount. Once you have entered the paid amount, the total applied, finance charge, total received and out of balance will be automatically updated. The gain/loss amount will be automatically updated in the Gain/Loss box.
- If you want to view the closed purchases details, enable to **Yes** in the View Closed Purchases option. [](http://wiki.cuteinfocomm.com/uploads/images/gallery/2023-01/image-1674545072665.png)
If you want to view all the paid details, click  (Pay All button).
- Click [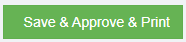](http://wiki.cuteinfocomm.com/uploads/images/gallery/2023-02/image-1676102626914.png) to approve, or click [](http://wiki.cuteinfocomm.com/uploads/images/gallery/2023-02/image-1676102709644.png)to save to staging. The added bill details will be saved and listed in the Pay Bills Register page.
### Contra Voucher Entry
Contra Function in Cuteoffice Application is to settle the outstanding Invoices between the same Supplier & Customer.
#### Contra voucher entry Scenario
Group companies can have multiple companies and Buy / Sell functions can have within these companies. In such scenarios Buy & Sell function happens raising the Purchase Invoices and Sales Invoice through the normal Purchase Register and Sales Register entry through our Cuteoffice Application. However these companies within the group do not make payments to each other, instead for such cases Contra Voucher entry in Pay Bills can be used.
#### Prerequisites
To raise a Contra Voucher the following conditions should be met
1. Supplier Name (Supplier Code) & the Customer Name (Customer code) should be the same
2. Contra Amount Entered should be Less Than Purchase Applied Amount in Pay Bill
3. After the Pay Bill data is entered and Record Button is clicked, Application Control will navigate to Customer Receipts Payment. If the client cancels the Customer Receipt Payment entry then the associated Pay Bills entry entered will be deleted by the application automatically. In other words, for Contra Entry Pay Bills and Customer Receipts should be done immediately without a break
4. In Customer Receipts Entry, Contra Amount that is displayed should be allowed to Edit
#### Contra voucher entry Examples
**Example 1 – Contra Amount = 0 ; Purchase Invoice Amount Applied = 1000**
The above example means that the Client wants to pay $1000 to a Purchase Invoice and have the Sales Invoice Pay $1000.
GL Entry for the above will be:
Pay Bills
Dr Sundry Creditors - $1000
Cr Contra Account - $1000 (Contra Account code is configured in Account Link Menu)
Customer Receipts
Dr Contra Account - $1000 (Contra Account code is configured in Account Link Menu)
Cr Sundry Debtors - $1000
**Example 2 – Contra Amount = 600 ; Purchase Invoice Amount Applied = 1000**
The above example means that the Client wants to pay $1000 to a Purchase Invoice and have the Sales Invoice Pay $600. The balance $400 will be paid from the Bank Account as mentioned in the Pay Bill entry
Pay Bills
Dr Sundry Creditors - $1000
Cr Contra Account - $1000 (Contra Account code is configured in Account Link Menu)
Cr Bank A/c - $400
Customer Receipts
Dr Contra Account - $1000 (Contra Account code is configured in Account Link Menu)
Cr Sundry Debtors - $1000
#### Steps to Operate
- In Pay Bills screen Select Contra Option and proceed the Pay Bill Transaction as usual
- Enter the Contra Amount Example 600
- Enter the Purchase Amount Applied – Example 1000
- Click Record Button
- Application will automatically load the Customer Receipt and allow to complete the transaction with Applied Amount as $1000
- If the Amount applied entered is not equal to $1000, application will display an error and proceed only if the amount entered is $1000
- GL entries will be created as mentioned above
The following bug will be fixed and a GIT issue has been raised:
1. Customer Name (Customer code) in Customer Receipts screen will not be allowed to change. This is controlled through a configuration allowing Customer Name change, will be set to False
2. Contra Amount Entered should be Less Than Purchase Applied Amount in Pay Bill
3. In Customer Receipts Entry, Contra Amount that is displayed should be allowed to Edit.
#### **Contra Voucher against Receive Payment**
**Example 3 : Contra Account in Pay bill -** $1080 **Purchase Invoice -** $1080 **Sales Invoice -** $100000 **Receive Payment (Normal) -** $98920 **Contra Receive Payment -** $1080
**To raise a Contra Voucher against Receive Payment the following steps to operate.**
1. Supplier Name (Supplier Code) & the Customer Name (Customer code) should be the same.
2. Raising Sales Invoice in Sales register (ex: $ 100000)
3. Raising Purchase Invoice in Purchase register (ex: $ 1080)
4. Normal receive payment entry in Bank with offset contra amount (ex: Amount received $ 98920)
5. Contra Pay bill entry for the amount $1080 . Choose Contra Account code in Pay from Account [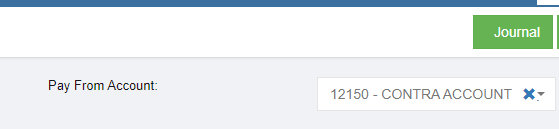](http://wiki.cuteinfocomm.com/uploads/images/gallery/2024-02/image-1709183778348.png)
6. Contra Receive payment entry to Offset Paybill . Choose Contra Account code is configured in Account Link Menu[](http://wiki.cuteinfocomm.com/uploads/images/gallery/2024-02/image-1709183778348.png)
7. The Customer Receipt Payment entry entered in Contra then the associated Pay Bills entry entered in Contra will be cancelled by the application automatically.
**Output of the Scenario**
1. Sale Invoice entry
[](http://wiki.cuteinfocomm.com/uploads/images/gallery/2024-02/image-1709182671362.png)
2. Purchase Invoice entry
[](http://wiki.cuteinfocomm.com/uploads/images/gallery/2024-02/image-1709183234521.png)
3. Contra Pay bill entry
[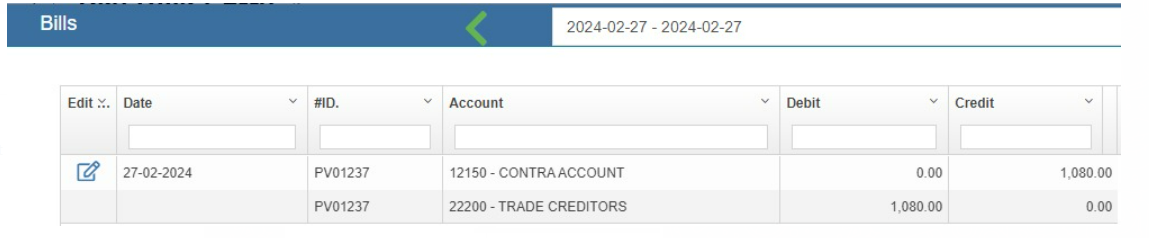](http://wiki.cuteinfocomm.com/uploads/images/gallery/2024-02/image-1709183299452.png)
4. Normal Receive Payment entry
[](http://wiki.cuteinfocomm.com/uploads/images/gallery/2024-02/image-1709183519803.png)
5. Contra Receive Payment entry
[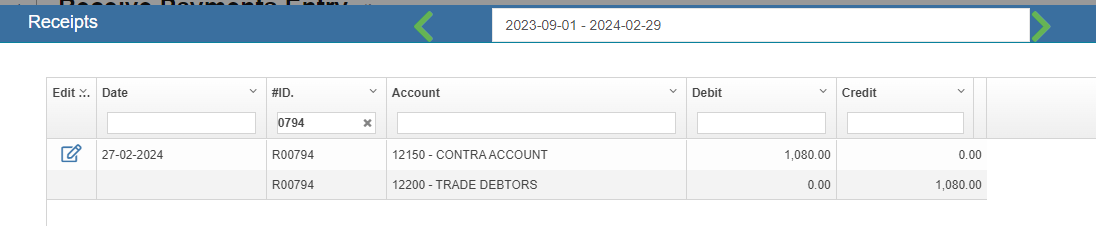](http://wiki.cuteinfocomm.com/uploads/images/gallery/2024-02/image-1709183612919.png)
- GL entries will be created as mentioned above.
### Edit the Pay Bills
If you want to edit any added purchase entry details in the **Pay Bills** page, do the following steps,
1. Click [](http://wiki.cuteinfocomm.com/uploads/images/gallery/2023-01/image-1673334575459.png)(Edit icon) in the **Edit** column for the respective pay bill. The **Pay Bill Entry** page opens and shows the added payment details.
2. Click any box where you want to edit the details, and then edit the details in the respective box in the window.
3. Click[](http://wiki.cuteinfocomm.com/uploads/images/gallery/2023-02/image-1676102626914.png). The changed pay bill entry details will be updated.
### Delete Any Added Pay Bills Entry
If you want to delete any added pay bill entry, you can use delete option provided in the **Delete** column of the **Pay Bills** page,
1. Click[](http://wiki.cuteinfocomm.com/uploads/images/gallery/2022-11/image-1668025897554.png) (Delete icon) for the corresponding pay bills entry. You receive a notification message “**Are you sure to delete a record**?”.
2. Click **Yes**. The selected pay bill entry will be deleted.
### Print the Pay Bills Details
If you want to print the invoice details of the particular pay bills entry, click  (Print icon) provided in the **Print** column for the corresponding pay bills entry.
### Export the Pay Bills
If you want to export the pay bills records in the **Pay Bills** page in the excel format, click  (Excel icon). The pay bills entry will be downloaded in the excel format.
## Transactions Journal
In Transactions Journal page, user can search for any financial transaction entered in cuteOffice finance module.
### View Transactions Journal Entry
To view transaction journal,
1. Click Transactions Journal in Finance menu, the Transaction Journal page opens as below,[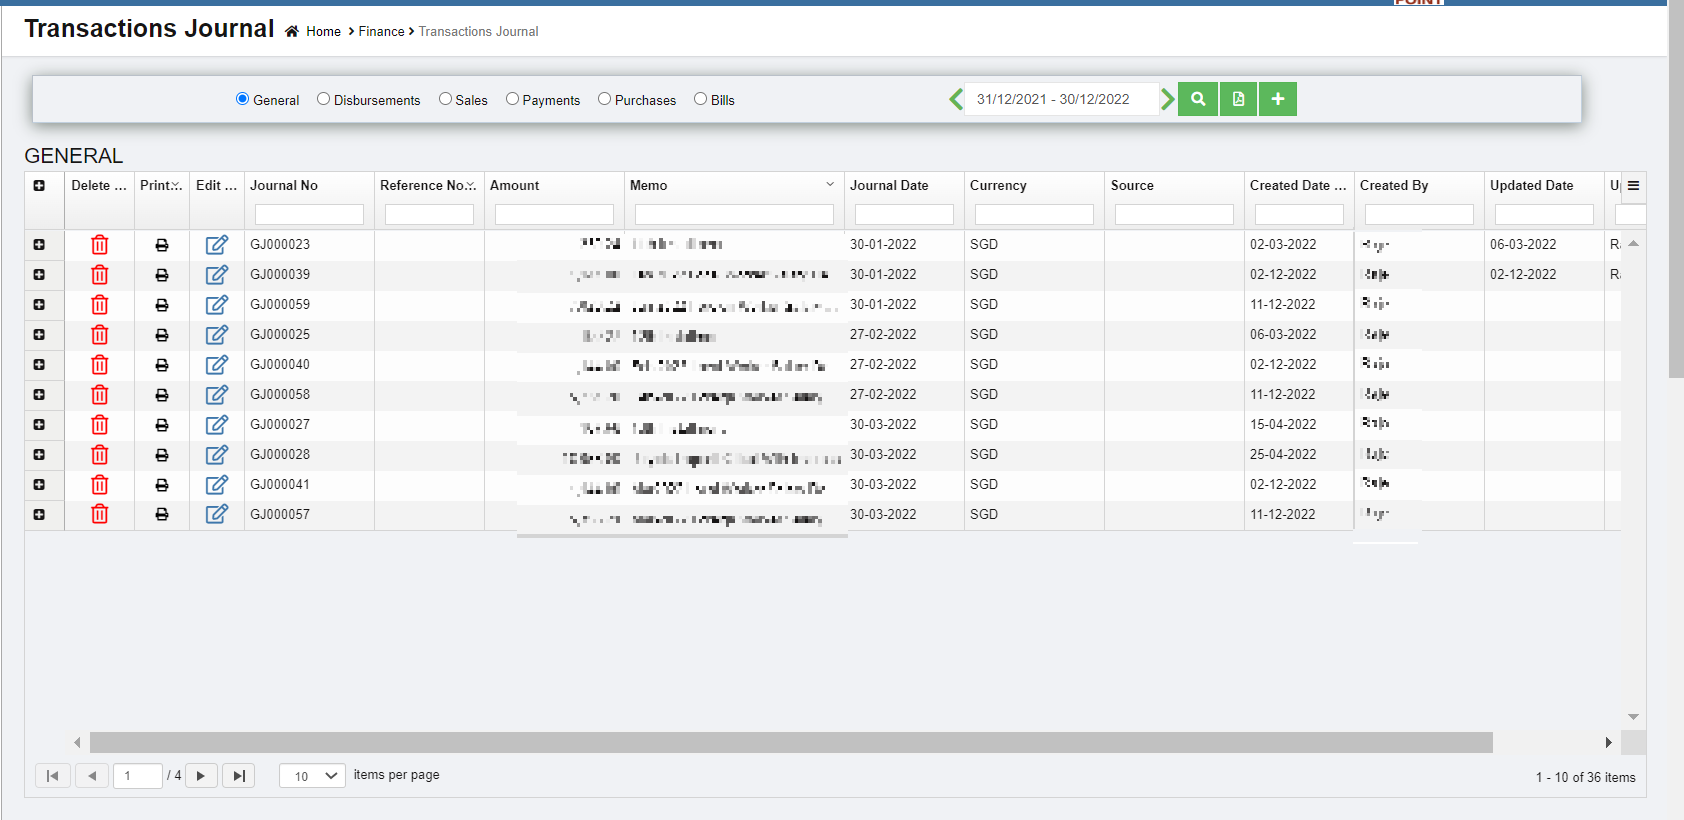](http://wiki.cuteinfocomm.com/uploads/images/gallery/2023-02/image-1676355716003.png)
2. In the Transactions Journal page, select any one transaction journal type from the given types. [](http://wiki.cuteinfocomm.com/uploads/images/gallery/2023-02/image-1676356040580.png)
3. In the Calendar, select the date range. [](http://wiki.cuteinfocomm.com/uploads/images/gallery/2023-02/image-1676356056649.png)
4. Click [](http://wiki.cuteinfocomm.com/uploads/images/gallery/2023-02/image-1676356076591.png)(Search icon). All qualified transactions journal will be shown in the page.
### Edit Transaction Journal Entry
To edit any transaction journal entry in the **Transaction Journal** page,
1. Click [](http://wiki.cuteinfocomm.com/uploads/images/gallery/2023-01/image-1673334575459.png)(Edit icon) in the **Edit** column for the respective transaction journal entry. The respective page opens and shows the journal entry details. [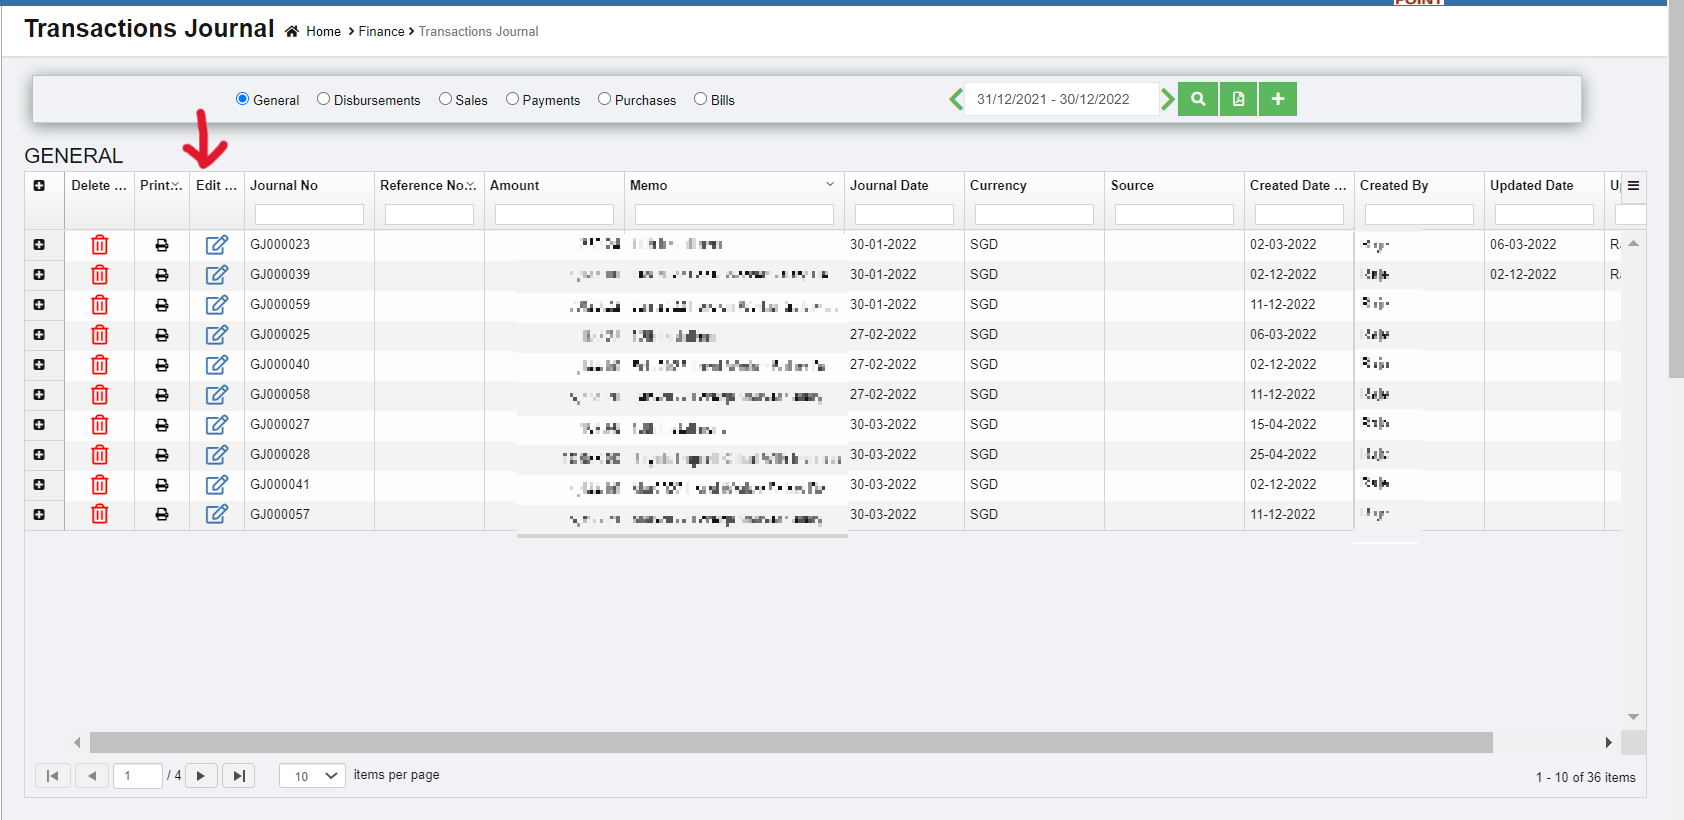](http://wiki.cuteinfocomm.com/uploads/images/gallery/2023-02/image-1676356483986.png)
2. Click any box where you want to edit the details, and then edit the details in the respective box in the window. [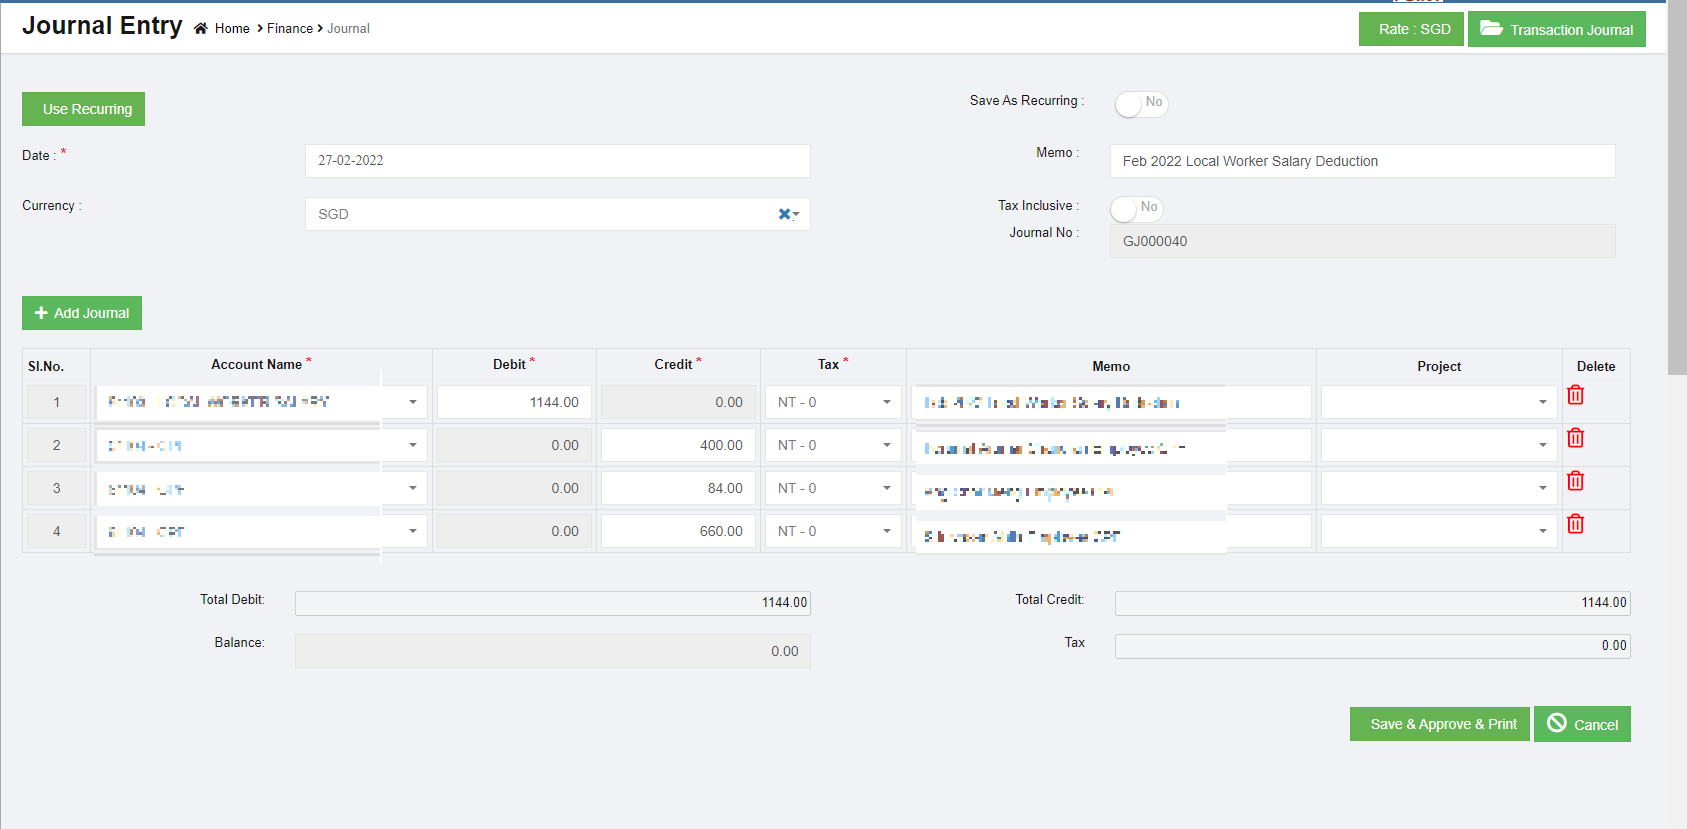](http://wiki.cuteinfocomm.com/uploads/images/gallery/2023-02/image-1676356628311.png)
3. Click[](http://wiki.cuteinfocomm.com/uploads/images/gallery/2023-02/image-1676102626914.png). The transaction journal entry details will be updated.
### Delete Any Transaction Journal Entry
If you want to delete any transaction journal entry, you can use delete option provided in the **Delete** column of the **Transactions Journal** page, click[](http://wiki.cuteinfocomm.com/uploads/images/gallery/2022-11/image-1668025897554.png) (Delete icon) for the corresponding transaction journal entry. The selected transaction journal entry will be deleted. to confirm with sekar if need to prompt confirmation notification
### Print the Transaction Journal Entry
If you want to print the particular transaction journal entry, click  (Print icon) provided in the **Print** column for the corresponding transaction journal entry.
### Export the Transaction Journal Entry
If you want to export the added transaction journal entry in the **Transactions Journal** page in the excel format, click (Excel icon). The added transaction journal entries will be downloaded in the excel format.
## Bank Register
Bank Register are reports that is generated based on the entries made through the various vouchers. The selection for these reports would be Bank as defined in the Chart of Accounts master. The **Bank Register** tab in the **Finance** menu used to view the transaction statement of the particular bank account.
### View Bank Register
To view the transaction statement,
1. Click **Bank Register** in the **Finance**, the **Bank Register** page opens. [](http://wiki.cuteinfocomm.com/uploads/images/gallery/2023-02/image-1676357375442.png)
2. In the **Account** box, select an account from the list of bank accounts.
3. In the Calendar, select the date range from the current financial year.
4. Click [](http://wiki.cuteinfocomm.com/uploads/images/gallery/2023-02/image-1676356076591.png)(search icon). The **Bank Register** page shows the transaction detail of the selected account.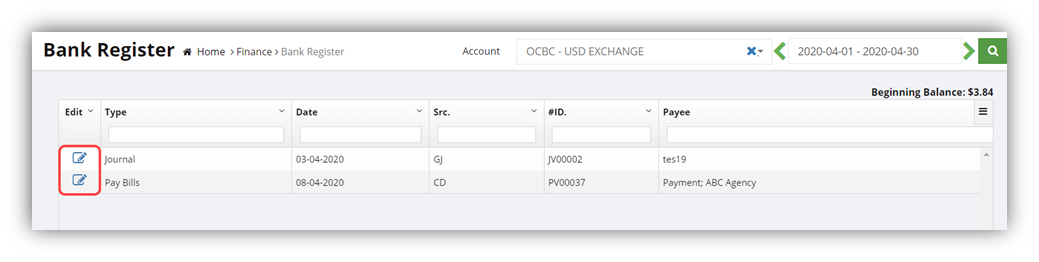
### Edit the Transaction Detail
To edit any transaction detail listed in the **Bank Register** page,
1. click [](http://wiki.cuteinfocomm.com/uploads/images/gallery/2023-01/image-1673334575459.png)(Edit icon) provided in the **Edit** column for the respective transaction. The selected transaction page opens. You can edit the transaction detail if you want.[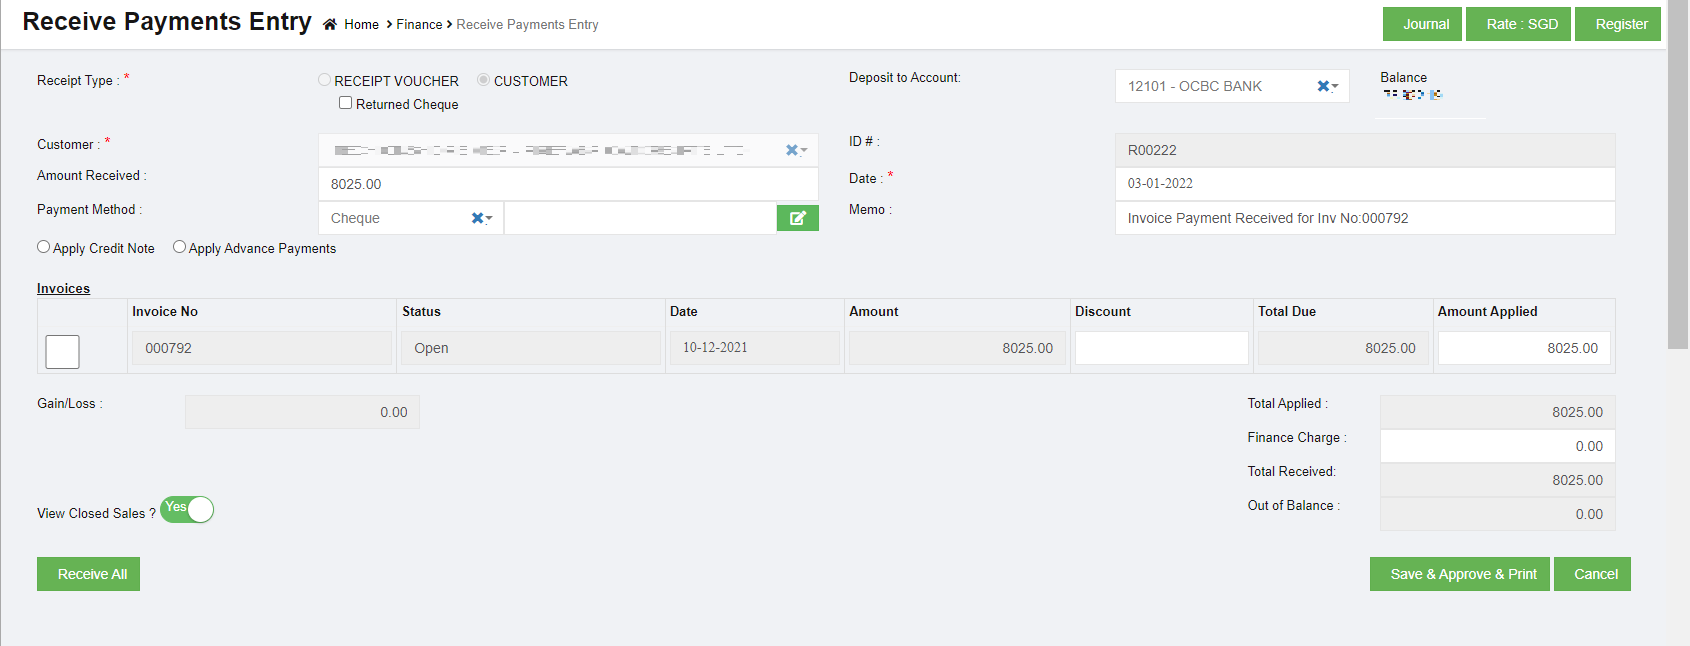](http://wiki.cuteinfocomm.com/uploads/images/gallery/2023-02/image-1676357635369.png)
2. Click[](http://wiki.cuteinfocomm.com/uploads/images/gallery/2023-02/image-1676102626914.png). The transaction details will be updated.
## Transfer Money
The **Transfer Money** tab in the **Finance** menu is used to record transfer money from one bank account to another bank account. Finance users can transfer the money with multi foreign currency banks.
To transfer money,
1. Click **Transfer Money** in the **Finance**, the **Transfer Money** page opens, [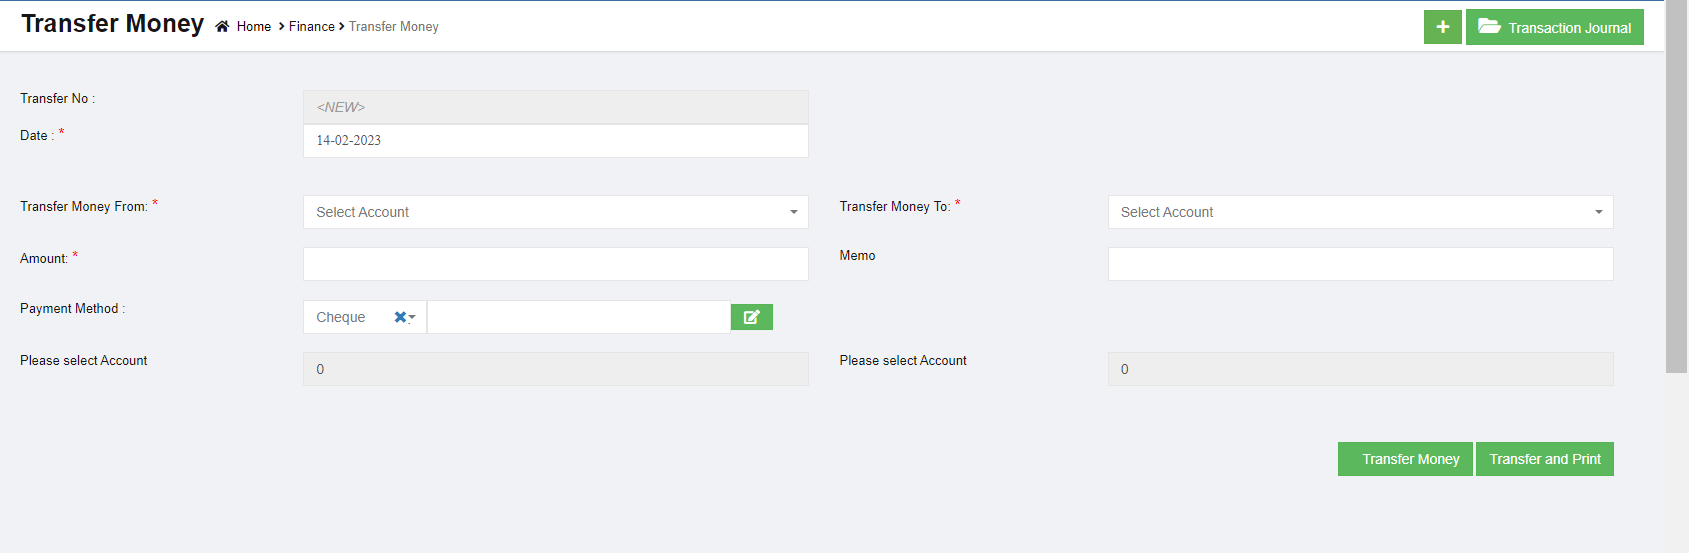](http://wiki.cuteinfocomm.com/uploads/images/gallery/2023-02/image-1676422324882.png)
2. In the **Transfer No** box, the transfer number will be updated automatically.
3. In the **Date** box, select the date of money transfer.
4. In the **Transfer Money From** box, select an account where you want to transfer money from. **Note**: Once you select the debit account, the **Transfer Money** page shows the account balance of the selected account.
5. In the **Transfer Money To** box, select an account where you want to transfer money to. **Note**: Once you select the credit account, the **Transfer Money** page shows the account balance of the selected account.
6. In the **Amount** box, enter the amount you want to transfer.
7. In the **Payment Method** box, select the payment method.
8. Click [](http://wiki.cuteinfocomm.com/uploads/images/gallery/2023-02/image-1676422501414.png)(Transfer Money icon). The entered amount will be transferred to the respective selected account. The transfer money detail will be moved and listed in the **Transaction Journal** page. **Note**: If you want to print the transferred money details, click [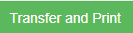](http://wiki.cuteinfocomm.com/uploads/images/gallery/2023-02/image-1676422547098.png) (Transfer and Print icon).
## Petty Cash Register
Petty cash register helps companies ensure that the funds are used appropriately and the transactions are properly documented. Having such a system in place serves as an internal control to protect the business against theft and fraud, and it supports the larger, general ledger reconciliation process. Petty Cash Register are reports that is generated based on the entries made through the various vouchers. The selection for these reports would be Cash as defined in the Chart of Accounts master. This report is to list down the transaction made from these nature of accounts with a running balance.
[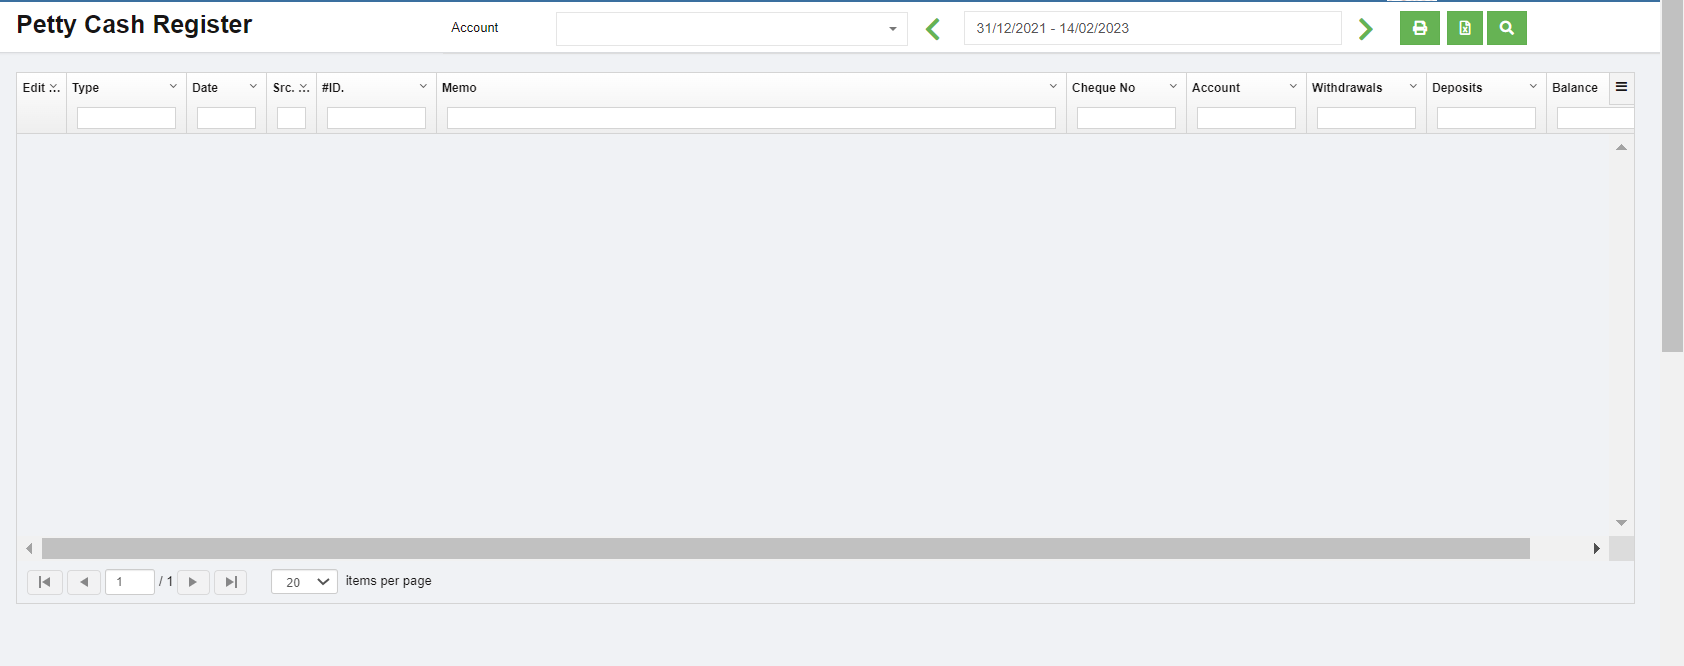](http://wiki.cuteinfocomm.com/uploads/images/gallery/2023-02/image-1676423024159.png)
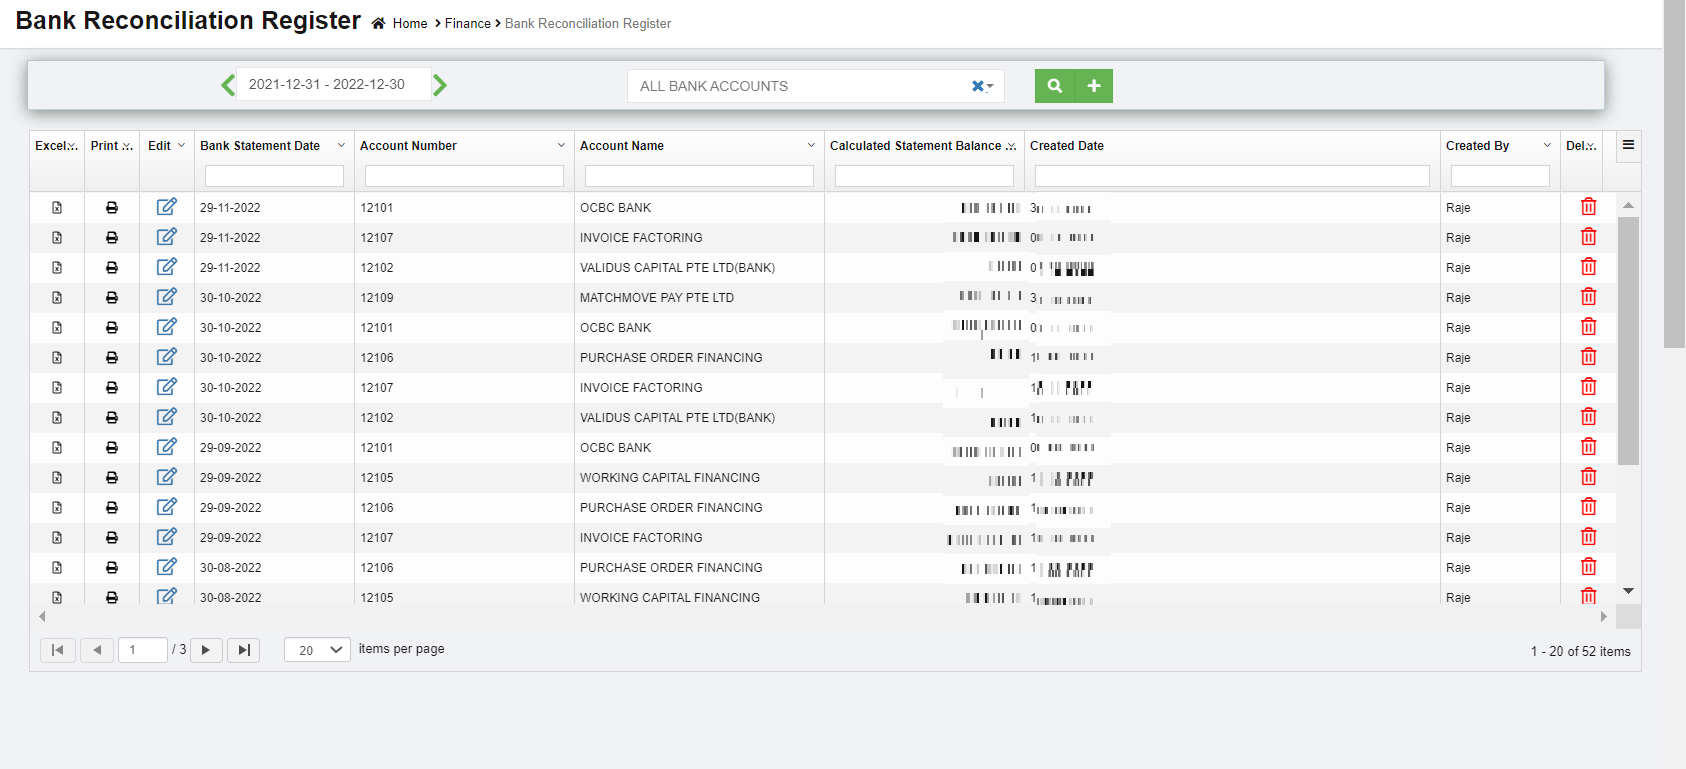
## Bank Reconciliation Register
**Bank Reconciliation** is the process of verifying the bank statement with the reconciliation report to ensure that the records such as check register, general ledger account, and balance sheet, are correct. This is done by comparing the company's recorded amounts with the amounts shown on the bank statement.
Any differences must be justified. When there are no unexplained differences, you must state that the bank statement has been reconciled. Once you have reconciled the bank statement, the reconciled bank statement will be shown in bank reconciliation report and the general ledger.
Click **Bank Reconciliation** tab in the **Finance** menu, the Bank Reconciliation Register page opens as below,
[](http://wiki.cuteinfocomm.com/uploads/images/gallery/2023-02/image-1677120015563.png)
### View A Bank Reconciliation Details
To view the bank reconciliation details of the particular bank account,
1. In the Calendar box, select the period for which you want to view the bank reconciliation details.
2. In the **Account Name** box, select an account.
3. Click [](http://wiki.cuteinfocomm.com/uploads/images/gallery/2023-02/image-1676356076591.png)(search icon). The bank reconciliation detail opens for the selected account and period.
### Reconcile Any Bank Statement
To reconcile any bank statement,
1. Click[](http://wiki.cuteinfocomm.com/uploads/images/gallery/2022-12/image-1670382846981.png) (Add icon) provided in the upper right-corner of the **Bank Reconciliation Register,** the **Bank Reconciliation** page opens. [](http://wiki.cuteinfocomm.com/uploads/images/gallery/2023-02/image-1677120341224.png)
2. In the **Account** box, select an account from the list of accounts.
3. In the **Bank Statement Balance** box, enter the balance of the selected account.
4. In the **Bank Statement Date** box, select the bank statement date.
5. Click [](http://wiki.cuteinfocomm.com/uploads/images/gallery/2023-02/image-1677120562047.png)(search icon). The list of job numbers opens including date and cheque number.
6. Select the job number.
7. Click [](http://wiki.cuteinfocomm.com/uploads/images/gallery/2023-02/image-1677120475671.png), the selected bank account is reconciled. Click [](http://wiki.cuteinfocomm.com/uploads/images/gallery/2023-02/image-1677120676563.png) to reconcile and print report. Click[](http://wiki.cuteinfocomm.com/uploads/images/gallery/2023-02/image-1677120744513.png) to save as draft.
### Edit Any Reconciled Bank Statement
To edit any reconciled bank statement in the **Bank Reconciliation Register** page,
1. Click[](http://wiki.cuteinfocomm.com/uploads/images/gallery/2023-01/image-1673334575459.png) (edit icon) in the **Edit** column for the respective reconciled bank statement. The page opens and shows the respective reconciled bank statement. [](http://wiki.cuteinfocomm.com/uploads/images/gallery/2023-02/image-1677121072516.png)
2. Click any box where you want to edit the details, and then edit the details in the respective box in the window.
3. Click **Record**. The changed reconciled bank statement details will be updated.
### Delete Any Added Reconciled Bank Statement
If you want to delete any added reconciled bank statement, you can use delete option provided in the **Delete** column of the **Bank Reconciliation Register** page,
[](http://wiki.cuteinfocomm.com/uploads/images/gallery/2023-02/image-1677121620526.png)
1. Click [](http://wiki.cuteinfocomm.com/uploads/images/gallery/2022-11/image-1668025897554.png)(Delete icon) for the corresponding reconciled bank statement. You receive a notification message. [](http://wiki.cuteinfocomm.com/uploads/images/gallery/2023-02/image-1677121652639.png)
2. Click **Yes** to confirm deletion of the selected reconciled bank statement.
### Print the Reconciled Bank Statement
If you want to print the reconciled bank statement, click  (Print icon) provided in the **Print** column in the **Bank Reconciliation Register** page.
### Export the Reconciled Bank Statement
If you want to export the added reconciled bank statement in the **Bank Reconciliation Register** page in the excel format, you can use export to excel option in the **Excel** column. Click (Excel icon) of the respective reconciled bank statement. The reconciled bank statement will be downloaded in the excel format.
## Remittance Advices
A remittance advice is an acknowledge sent by a customer to a supplier, informing the supplier that an invoice has been paid. The purpose of the remittance advice is to match a customer's payment with the invoice. The remittance advice is also sent to the supplier to inform that the payment has been received against the payment voucher. Click Remittance Advices tab in Voucher menu, the remittance page opens as below,
[](http://wiki.cuteinfocomm.com/uploads/images/gallery/2023-02/image-1677209770140.png)
### View Remittance Advices
to view the remittance advices,
1. Click Remittance Advices tab in Voucher menu to open the Remittance page
2. In the **Payment Type** box, select the payment type from **Pay Bills** or **Payment Vouchers**.
3. In the Calendar box, select the date range you want to view the remittance advices.
4. Click[](http://wiki.cuteinfocomm.com/uploads/images/gallery/2023-02/image-1676356076591.png) (search icon), the page shows the remittance advices for the selected payment type and period.
### Edit Any Remittance Advice
To edit any remittance advice in the **Remittance Advices** page,
1. Click [](http://wiki.cuteinfocomm.com/uploads/images/gallery/2023-01/image-1673334575459.png)(edit icon) in the **Edit** column for the respective remittance advice. The respective page opens and shows details of the remittance advice. [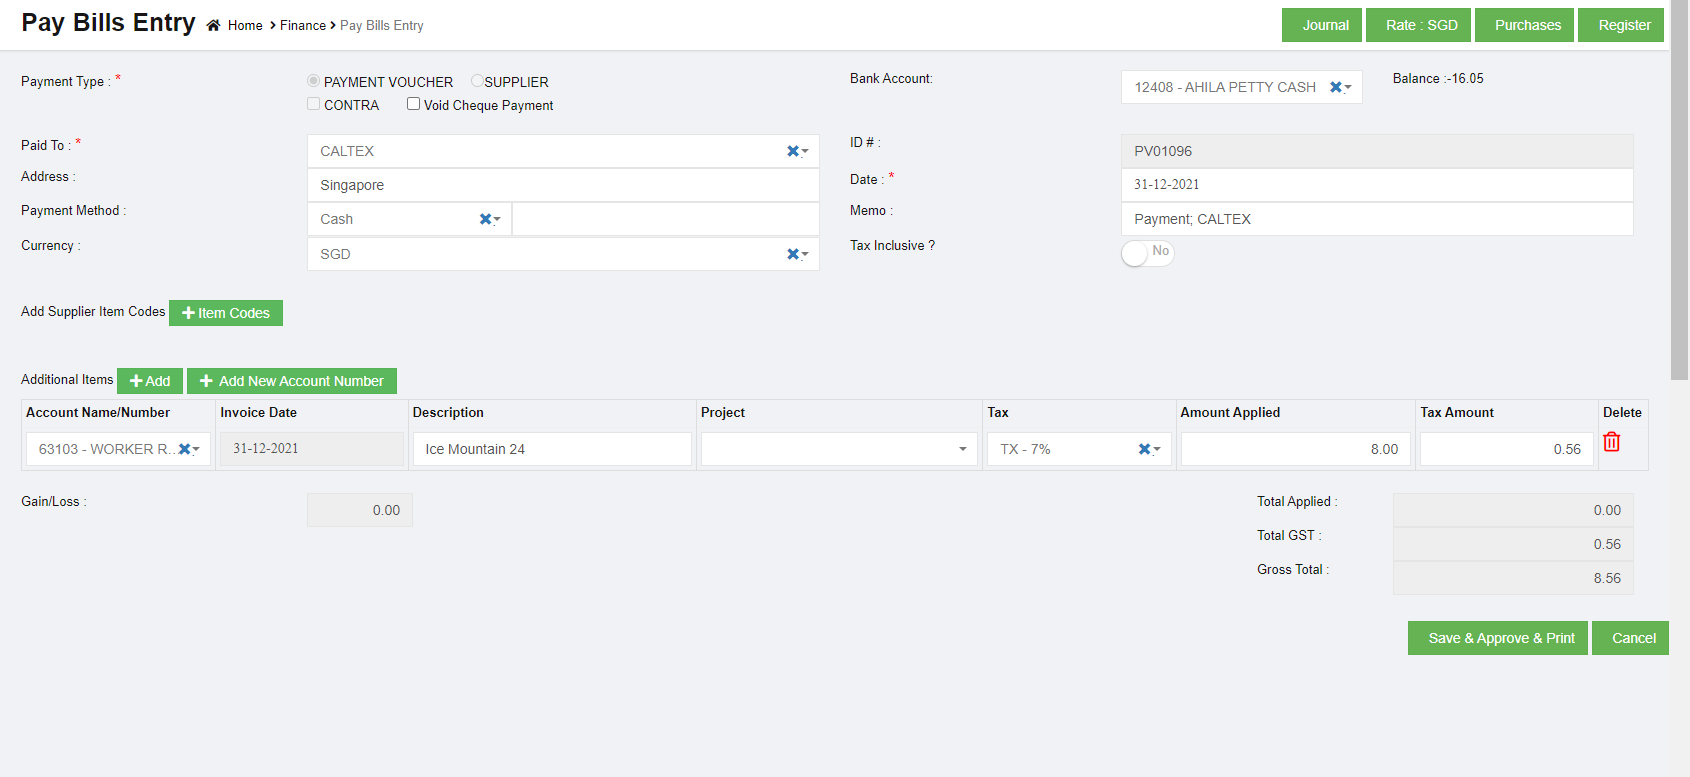](http://wiki.cuteinfocomm.com/uploads/images/gallery/2023-02/image-1677210227650.png)
2. Edit the details in the respective box as needed.
3. Click[. ](http://wiki.cuteinfocomm.com/uploads/images/gallery/2023-02/image-1677210294241.png)The changed remittance advice details will be updated.
### Print Any Remittance Advice
If you want to print the remittance advice, click  (Print icon) provided in the **Print** column in the **Remittance Advices** page.
## Find Transactions
The **Find Transactions** tab in the **Finance** menu is used to view the details of the transactions such as sales and purchase transactions of both customer and supplier. Click **Find Transactions** in the **Finance**, the **Find Transactions** page opens.[](http://wiki.cuteinfocomm.com/uploads/images/gallery/2023-02/image-1677210952474.png)
to view the transaction details of particular customer/supplier
1. In **Filter** box, click to select **Customer/Supplier.**
2. In the **Search By** box, select **Customer** or **Supplier**.
3. In the **Name** box, select the name of the customer or supplier.
4. In the Calendar, select the date range.
5. Click[](http://wiki.cuteinfocomm.com/uploads/images/gallery/2023-02/image-1676356076591.png) (search icon), the transaction details for the selected customer/supplier opens.
to view the transaction details for the particular sales invoice,
1. In Filter box, click to select **Sales Invoice.**
2. In the **Sales Invoice** box, select the sales invoice number.
3. In the **Customer** box, the customer will be updated automatically.
4. Click [](http://wiki.cuteinfocomm.com/uploads/images/gallery/2023-02/image-1676356076591.png) (search icon), the transaction details for the selected sales invoice opens.
to view the transaction details for the particular purchase invoice,
1. In **Filter** box, click to select **Bill.**
2. In the **Purchase Invoice** box, select the purchase invoice number.
3. In the **Supplier** box, the supplier will be updated automatically.
4. Click [](http://wiki.cuteinfocomm.com/uploads/images/gallery/2023-02/image-1676356076591.png) (search icon), the transaction details for the selected purchase invoice opens.
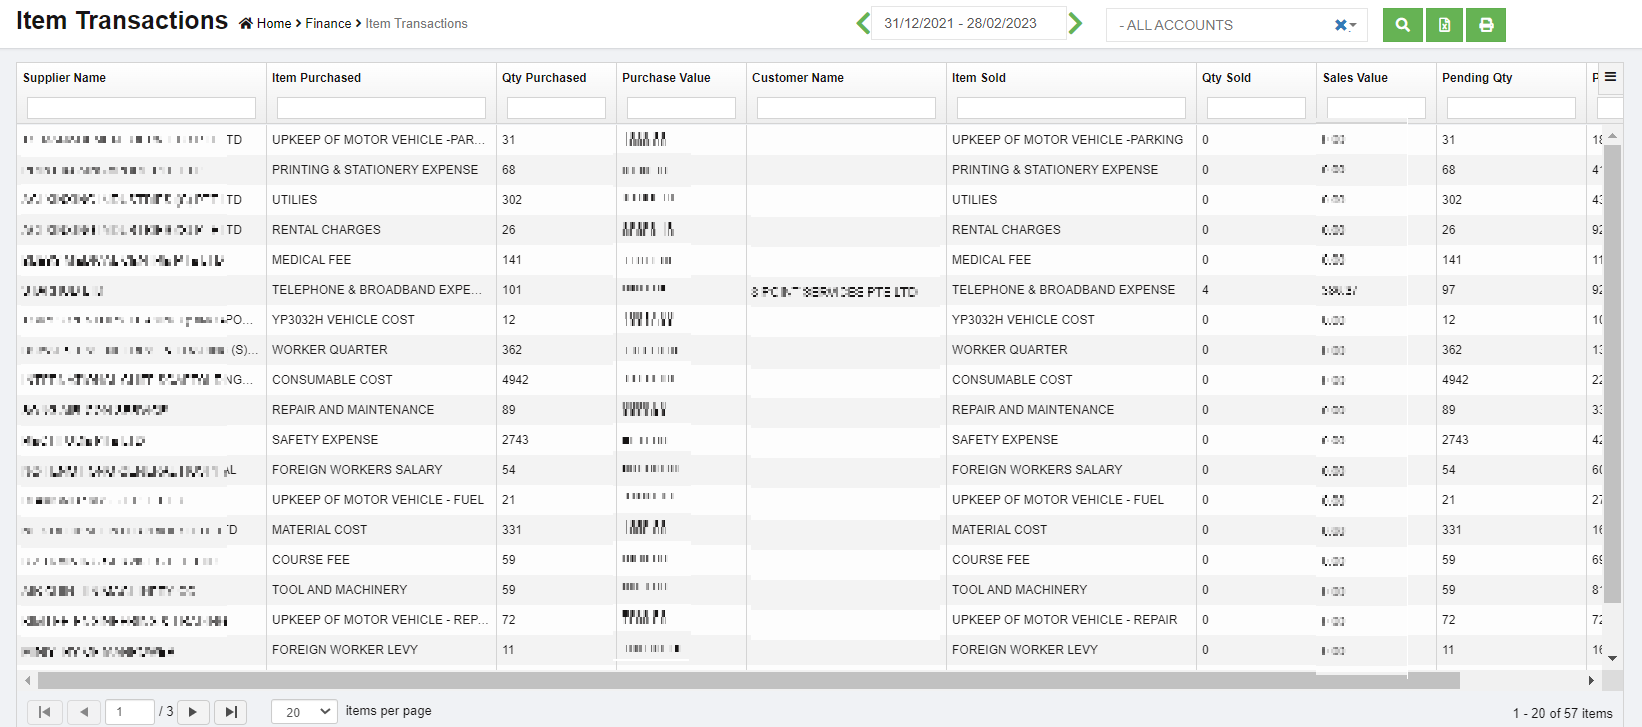
## Item Transactions
The **Item Transactions** tab in the **Finance** menu is used to view the item details of the transactions of sales and purchases of both customer and supplier. Click **Item Transactions** in the **Finance**, the **Item Transactions** page opens as below,
[](http://wiki.cuteinfocomm.com/uploads/images/gallery/2023-02/image-1677524609886.png)
User can use the column filters to search for specific item sales/purchase details,
[](http://wiki.cuteinfocomm.com/uploads/images/gallery/2023-02/image-1677619329788.png)
#### Bad Debt Write-Off transaction
**Step 1: Check your aging accounts receivable**
Review other invoices or receivables that should be considered as bad debt using the Accounts Receivable Aging Detail report.
1. Go to **Reports**
2. Find and open an **Accounts Receivable Aging Detail** report.
3. Check which outstanding accounts receivable should be written off.
**Step 2: Create a bad debts expense account**
If you haven't already, create a "bad debts" expense account.
1. Go to Master and select **Chart of accounts**
2. Click add to create a new account.
3. Choose Detail account
4. From the Parent **Account Type** ▼ dropdown, select **Expenses**.
5. From the Parent **Account Sub Type** ▼ dropdown, select **Expenses**
6. Enter **Account Number**
7. Enter Account name as **Bad debts in Account Name** field.
8. Select **Save and Close**.
**Step 3: Create a Credit Note Invoice**
1. Go to Voucher entry and Select Sales Register
2. Select **+ icon**.
3. Choose Sales form type as **Credit Note**
4. Under Customers, select **Customer name**.
5. Choose **Bad Debts from Account Number/Name.**
6. Enter the write off amount.
7. Select **Save and Close**.
**Step 4: Apply the credit note against invoice**
1. Go to Voucher entry and Select Receive Payment
2. Select **+ icon**.
3. Under Customers, select **Customer Name**
4. **Outstanding Transactions** and **Credit Note available** in the section,
5. Enter **Credit amount** against the **invoice number** under **Amount Applied.**
6. Enter Credit amount value under Amount Applied.
7. Check **Out of Balance** should be **Zero.**
8. Select **Save and Close**.
The uncollectible receivable now appears on your Profit and Loss report under the Bad Debts expense account.
#### **Bad Debt Write-Off for Journal Entry**
##### **Step 1: Check your Opening Balance in the Accounting records (COA) to write off**
1. Go to **COA**
2. Check which accounts to be written off.
3. Find the amount in accounting to write off.
##### **Step 2: Create a bad debts expense account**
If you haven't already, create a "bad debts" expense account.
1. Go to Master and select **Chart of accounts**
2. Click add to create a new account.
3. Choose Detail account
4. From the Parent **Account Type** ▼ dropdown, select **Expenses**.
5. From the Parent **Account Sub Type** ▼ dropdown, select **Expenses**
6. Enter **Account Number**
7. Enter Account name as **Bad debts in Account Name** field.
8. Select **Save and Close**.
##### **Step 3: Create a Journal to write off**
1. Go to Transaction Journal under Voucher Entry
2. Select **+ icon**.
3. 1st Line item a) Choose Outstanding Account name
b) Enter the amount on the credit side for Asset
c) Enter the amount on the debit side for Liability
4. 2nd Line item a) Choose Bad debt from the Account Name
b) Enter the write off amount on the debit side for Asset
c) Enter the write off amount on the credit side for Liability
5. Select **Save and Close**.
The uncollectible or payable amount now appears on your Bad debt Expense, and they are removed as assets/Liability from the balance sheet.
This results the total expense either increase or decrease in the Profit and Loss statement.