# Time Attendance
The **Time** module in the ***cuteOffice*** application helps manage the time attendance details of employees within an organization.
Below are key functionalities in the **Time** module:
- Capture Time Attendance from Devices
- Shift Management
- Projects List Management
- Interface with Leave System
- Generate Timesheet
- Approving Timesheet
- Calculating working time details to Generate Payroll
- Alerts and Reports
If you want to navigate to the **Time** module, click the **Time** menu in the menu bar. The submenus of **Time** will be displayed.
[](http://wiki.cuteinfocomm.com/uploads/images/gallery/2022-06/image-1654969845802.png)
The **Time** menu consists the following sub menus:
- Time Log
- Geo Punch View
- Supplier Time Log
- Planning
- Planning Dashboard
- User Manual
## Time Log
The **Time Log** submenu in the **Time** menu helps to manage the employee’s daily attendance.
The logged in user must have assigned as the **Time Keeper** role or must have permissions to the specific **Company** and **Department** in order to view the employee’s attendance details from the respective company and department.
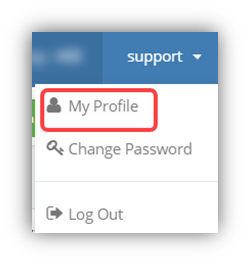
**Tip**: You can check your permission details by clicking on the user name in the upper right corner and then clicking the **My Profile** option.
The Profile shows the details of your assigned roles. Based on the assigned roles, you can access the different functionalities in the **Time Log**.
To navigate to the **Time Log** page, Click **Time Log** in the ****Time*.*****
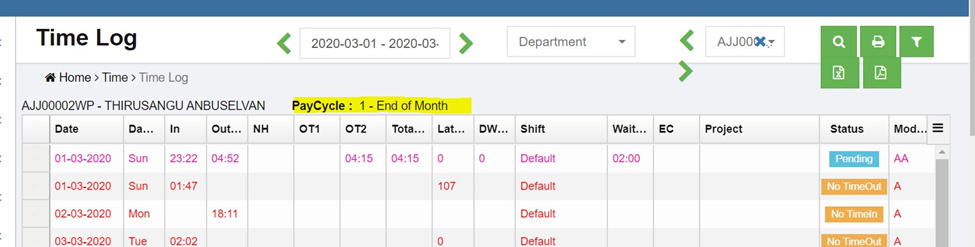
The Time Log page opens with a list of employees including the attendance details.
Time Log is integrated with the planning module, where the planning module refers to the combination of shift details in the Shift column and project details in the Project column.
***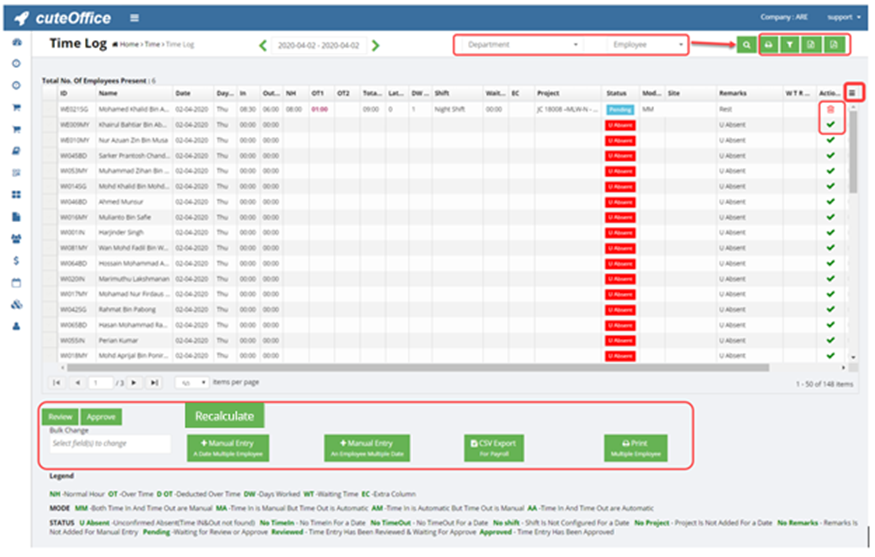***
**Note:** If you want to view all the columns, click (Column icon) in the upper right side of the **Time Log** page. A list of columns will be shown. You can select the columns which you want to display in the **Time Log** page.
The **Time Log** page shows the following fields,
- **ID** – Employee id
- **Name** – Name of the employee
- **Date** – Attendance date
- **In** – In time of the employee
- **Out** – Out time of the employee
- **Normal Hour (NH)** – Normal hour is calculated based on the in and out times and shift.
**Note**: The maximum normal hour is decided by the added Shift based on the employee’s in and out time. If the shift is not selected, then the normal hour will not be calculated. To know how to add a shift, See the topic on “[**Shifts**](#_Shifts)”.
- **Over Time 1 (OT1)** - The hours worked beyond the normal hour are considered as OT1 in normal days except public holidays and days marked as 0 working hours in shift.
**Note**: The OT also depends on other parameters in shift such as minimum hour for OT. If minimum required hour for OT is configured as 1 hour and if the employee has worked for OT about 55 minutes, then the OT computed as zero.
- **OT2** - The hours worked beyond normal hours are considered as OT2 in public holidays and days marked as 0 working hours in shift.
- **Total Hours** – The total hours are sum of normal working hours and OT.
- **Late** – If the employee’s entry time is later than the shift starting time, then the late time will be calculated and displayed in minutes.
- **Days Worked (DW)** – If the employee’s worked hours are equal to the shift hours, it will be considered as one worked day. If the employee’s worked hours are less than shift hours, it will be considered as half worked day (0.5). If the employee’s worked hours are less than four hours, it will be considered as zero (0) worked day.
- **Shift** – The **Shift** field shows the work schedule of the employee.
**Note**: If the particular shift is selected for the current day, then the same shift will be updated automatically for the upcoming days. To select or change the shift, double click on the shift cell, and select the shift from a drop-down list.
- **Waiting Time** – If the employee is temporarily idle while waiting for further work, it will be considered as waiting time.
- **Extra Computation (EC)**- EC also refers to custom computation. EC will be used for computing additional payment.
- **Project** – The **Project** field shows the project that the employee is currently working on.
**Note**: If the particular project is selected for the current day, then the same project will be updated automatically for the upcoming days. To select or change the project, double click on the project cell, and select the project from a drop-down list.
- **Status** – The **Status** field shows the employee’s time log status. Each status is explained in the lower side of the **Time Log**
- **Mode** – The **Mode** field shows the capturing mode of in and out times. Each mode is explained in the lower side of the **Time Log**
- **Site** – The **Site** field shows the name of site where the employee is working.
- **Waiting Time Rest Over Time (WTROT)**
- **Action** – The **Action** field shows the following two type of actions based on the in and out time entries.
If the employee’s in and out time entries are not captured automatically, then (Add icon) will be displayed in the **Action** field.
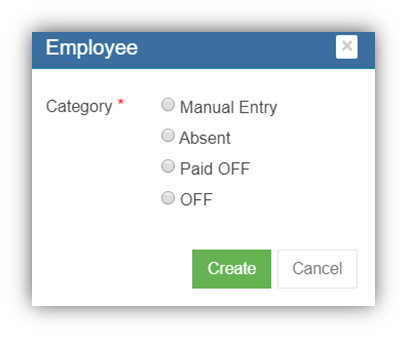
- - To manually add the attendance detail of the employee. Click (Add icon) for the respective employee. The Employee box opens.to manually add the attendance detail of the employee. Click (Add icon) for the respective employee. The Employee box opens. If you want to manually enter the attendance detail, select **Manual Entry**. The system automatically updated the in and out times based on the shift detail.
1. 1. 1. If the employee is absent, select **Absent**.
2. If the employee gets a paid off in lieu off another working day/hour, select **Paid OFF**.
3. If the employee gets unpaid off, select **OFF**.
- - If you want to delete any time entries of any employee, click (Delete icon) in the **Action** field for the respective employee. The **Confirm** dialog box opens with the notification message, “Are you sure to delete a record?”. Click **Yes**. The selected time entry record will be deleted.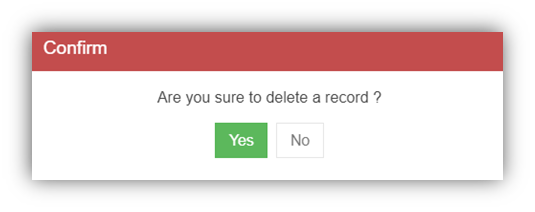
- **Waiting Time Normal Hours (WTNH) Edit –** If you want to edit WTNH, enable the checkbox provided in the **WTNH Edit**
- **Map –** shows the map details if the employee did geo punch.
- **Time In Location** & **Time Out Location –** shows geo punch address of time in and time out location if the employee did geo punch.
### View Time log
1. If you want view the attendance details for the particular day, choose the respective day in the calendar.
**Note**: The calendar has a date range selector, so that you need to select two days that is From and To days. If you want to select a single day, select From and To days as same day.
2. If you want to view the attendance details of a particular employee for several days e.g. one month, you must select the date range including the particular department and employee.

1. - Select the date range in the calendar.
- Select a department that the employee belongs to.
- Select the employee.
**Note**: Once you have selected the employee, the **Paycycle** option shows the paycycle details of the selected employee. The **Time Log** page shows the attendance details of the employee for the selected date range.
#### Filter the Time Log Details
If you want to filter the time log details for any particular company and project, do the following steps,
1. Click (Filter icon) in the **Time Log.** The **Company** and **Project** filter boxes open.

2. In the **Company** filter box, select a company from a drop-down list of companies.
3. In the **Project** filter box, select a project from a drop-down list of projects.
4. Click **Search**. The filtered time log details are displayed based on the selection of company and project.
#### Print the Timesheet
You can print and view the timesheets of the particular employee by using print option provided in the upper right-corner of the **Time Log** page. To print and view the timesheet,
1. Select the date range in the **Calendar**.
2. Select an employee in the **Employee**
3. Click (Print icon). The timesheet will be downloaded and displayed.
#### Export Timesheet
You can export the timesheet in the **Time Log** page in the pdf and excel formats.
1. If you want to export the timesheet in the pdf format, click (PDF icon). The timesheet will be downloaded in the pdf format.
2. If you want to export the timesheet in the excel format, click (Excel icon). The timesheet will be downloaded in the excel format.
#### Export a CSV File for Payroll Generation
You can export the timesheet as a CSV file for generating the payroll. To export the timesheet,
1. Click (**CSV Export** button) in the lower side of the **Time Log.** The **CSV Generation** window opens.
2. In the **Company** box, select a company from a list of companies.
3. If you want to export the timesheet for 1st to End of Month (EOM), select the **1st to EOM**
4. If you want to export the timesheet for 26th to 25th, select the **26th to 25th**
5. Select the month for which you want to export the timesheet details.
6. Click **Generate**. The timesheet details are downloaded as a CSV file.
#### Print Timesheet for Multiple Employees
If you want to print the timesheet for the multiple employees,
1. Click 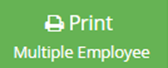(**Print** button) provided in the lower side of the **Time Log.** The **Print (Multiple Employee)** window opens.
2. In the **Company** box, select a company from a list of companies.
3. If you want to export the timesheet for 1st to End of Month (EOM), select the **1st to EOM**
4. If you want to export the timesheet for 26th to 25th, select the **26th to 25th**
5. In the **Department** box, select a department from a list of departments.
6. Select the month for which you want to export the timesheet details.
7. Click **Generate**. The timesheets are downloaded for the employees of the selected department.
### Edit Time log
#### Edit In Time, Out Time, Normal Hours, and Over Time
**Note**: In order to edit the time entry, you must be assigned for **Edit Auto Time Permission** or you must be assigned as the **Time Keeper.**
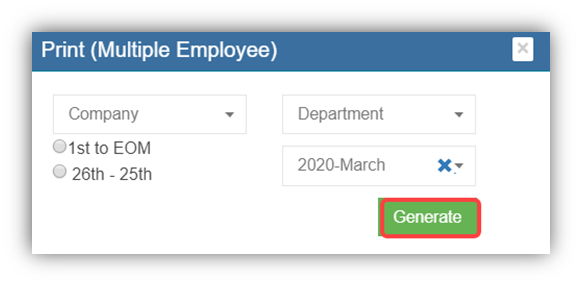
If you want to edit the in time, out time, normal hours, and over time entries, which are captured from attendance devices automatically, do the following steps,
1. Double click on the respective cell where you want to change, and edit the time entries. Once you have edited the time entries, you must enter the remarks to explain why you have edited the auto captured time entries.
2. To enter remarks, double click on the respective **Remarks.** The **Remarks** box opens with a list of reasons.
3. Select the appropriate reason in the **Remarks.** The Remarks will be updated.
#### Manually Add Attendance Details
- ##### Add attendance data for Multiple Employees on a Single Day
If multiple employees have the same time entries for any day, you can add the attendance details of all the employees together. To add the attendance details, do the following steps,
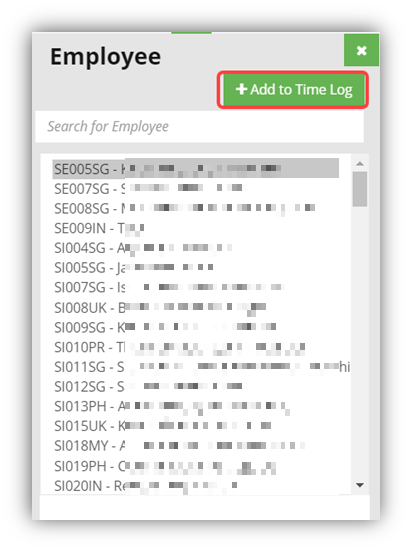
1. Click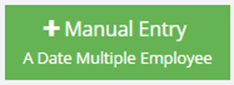 (**Manual Entry** Button) provided in the **Time Log**. The **Employee** window opens with a list of employees.
[](http://wiki.cuteinfocomm.com/uploads/images/gallery/2023-04/image-1682096217117.png)
2. Select the employees for whom you want to add the attendance details.
3. Click **Add to Time Log.** The **Employee** box opens,
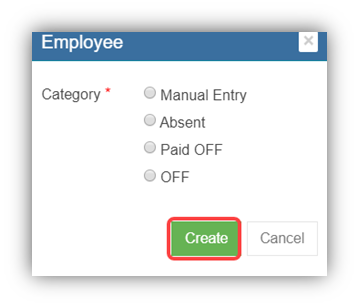
4. Select the category from the category list. The attendance details will be added for all the selected employees.
- ##### Add Attendance Details of an Employee for Multiple Days
If a single employee has the same time entries for multiple days, you can add the attendance details of all the days together. To add the attendance details, do the following steps,
1. Click (**Manual Entry** Button) provided in the **Time Log**. The **Time Log Manual Entry – an Employee Multiple Dates** window opens.
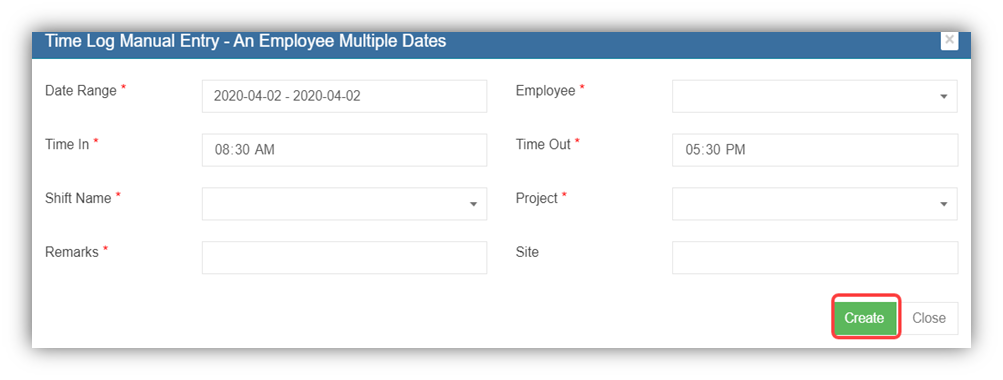
2. In the **Date Range** box, select the dates range.
3. In the **Employee** box, select an employee from the list of employees.
4. In the **Time In** box, enter the in time.
5. In the **Time Out** box, enter the out time.
6. In the **Shift Name** box, select a shift from a drop-down list.
7. In the **Project** box, select a project from a drop-down list.
8. In the **Remarks** box, enter your remarks if any.
9. In the **Site** box, enter the site name.
10. Click **Create**. The attendance details will be added for the selected employee.
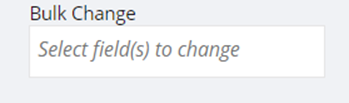
#### Bulk Change
The **Bulk Change** option in the **Time Log** page can be used to make changes in the attendance details of multiple employees in bulk. To use bulk change,
1. Select the employees for whom you want to make changes in time entries. See the below figure. 
2. Navigate to the **Bulk Change** option provided in the lower side of the **Time Log**
3. Click on the **Bulk Change.** A list of options to be edited opens.
4. Select the options which you want edit. Once you have selected the options, the selected option will be displayed in the right side.
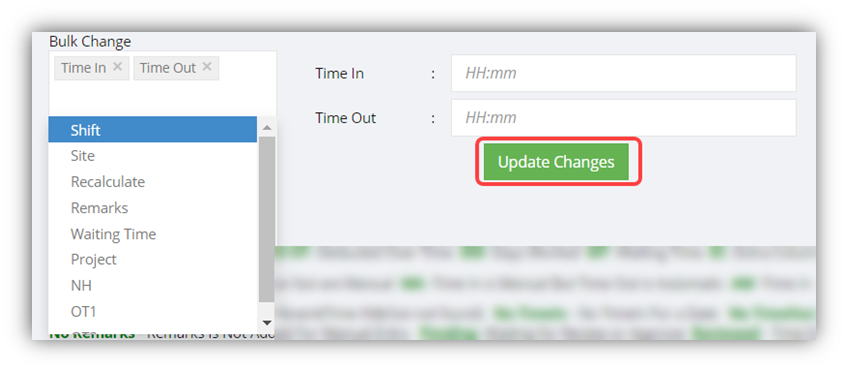
5. For example, if you have selected the **Time In** and **Time Out** options, , the time in and time out bulk update window will pop up, you need to enter the in and out times in the respective **Time In** and **Time Out** fields.
6. Click **Update Changes**. The time entries for the selected employees will be changed.
#### Bulk update of a Project under the time log for Multiple employees on a specific date
1. Click “A Date Multiple Employees” button in the time log 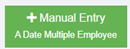. A window will open to select Project, Supplier company and Employees to update for a single date. 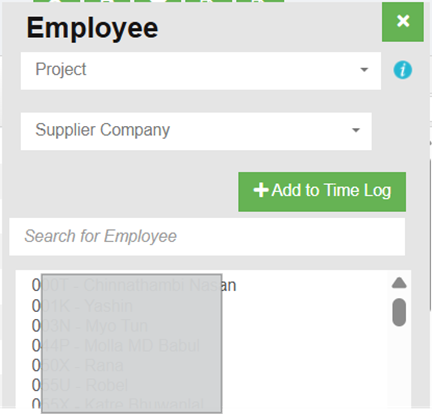
2. Choose the specific project and Supplier company from the drop-down list.
3. Based on the previous day time log, the employee names will be listed. If the PH or non-working day falls on the previous day, the time log data from the last working day will be considered for the project update. 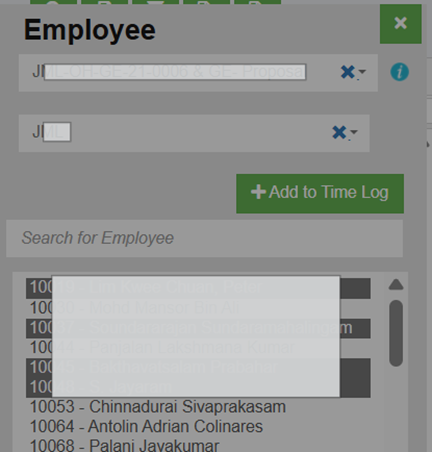
4. Hold the “Ctrl” key and select multiple employees.
5. Click “Add to Time log”
6. Another window will open to choose Manual entry category
7. Click “Create” to create records in the time log.
#### Recalculate the Timesheet
When you do changes in the timesheet of any employee, for example changes in In time, Out time, OT, and Waiting time, you need to recalculate the total work hours after made changes in the timings. To recalculate the total work hours,
1. Select the respective time logs where you have done changes in the timings.
2. Click (**Recalculate** button) provided in the **Time Log.** According to the changes you have done in the time log, the total hours will be calculated and updated in the same.
### Review and Approve Time Log
The timesheet can only be reviewed or approved by the person who has granted with assigned permissions. The "approve" permission can overwrite the "review" permission, that time sheet approver can approve the timesheet without reviewing it.
#### Review the Timesheet
Review option provided in the **Time Log** page helps the reviewer to review the in and out times of the employee. To review the timesheet,
1. Select the dates you want to review.
2. Click (**Review** button). The timesheet is reviewed successfully and the status is changed as **Reviewed** in the **Status** column of the **Time Log** page.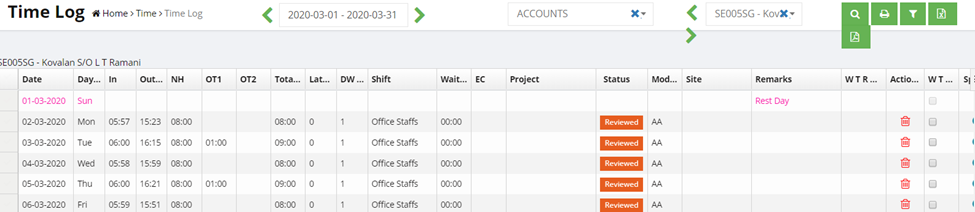
#### Approve the Timesheet
Once the timesheet is reviewed by the reviewer, then timesheet will be ready for approval. To approve the timesheet,
1. Select the date range in the calendar.
2. Select a department and an employee for whom you want to approve the timesheet. The timesheet opens for the selected employee.
3. Select the respective records which you want to approve.
4. Check whether the Time, Shift, and Project details are entered properly.
5. Click (**Approve** button). The timesheet is approved successfully and the status is changed as **Approved** in the **Status** column of the **Time Log** page.
**Tip**: Make sure that all the attendance records should show the individual status as **Pending** in the **Status** column for approving the timesheet.
- If the **Summary** field shows the status as **Ready For Approval** which means the timesheet is ready for the approval.
- If the **Summary** field shows the status as **INVALID** which means that the time attendance records are not yet ready for approval. The reason may be the records are incomplete due to missing of the Time, Shift, and Project details and so on. Timekeeper personal shall fill up attendance details accordingly. 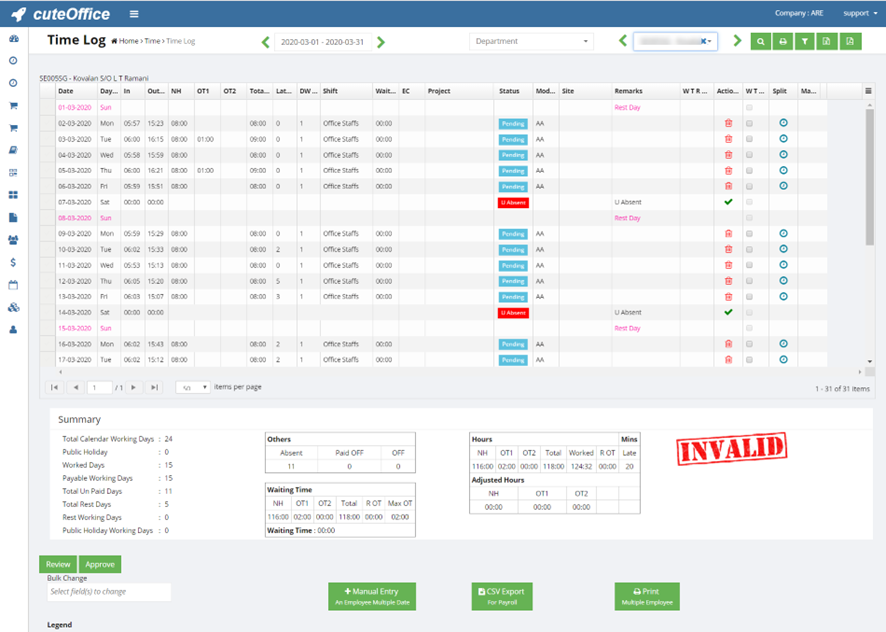
The **Summary** field shows the following summary details of the employee’s time attendance:
- Total working days in the month
- of worked days of the employee
- of holidays
- Paid and un paid leaves of the employee
- Total NH, OT, and waiting time
This summary details helps you to know how much time is spent on what project by your employees.
#### Edit the Time Log after Approval
You can edit the time log details even after approval with permission. Once the changed has done, then the record still needs to be approved again by the approver.
Note: Make sure that you have been granted with the **Change Project Approved** permission to change the project even after the approval. If you have the **Edit Approved** permission, you can modify each time log details even after the approval.
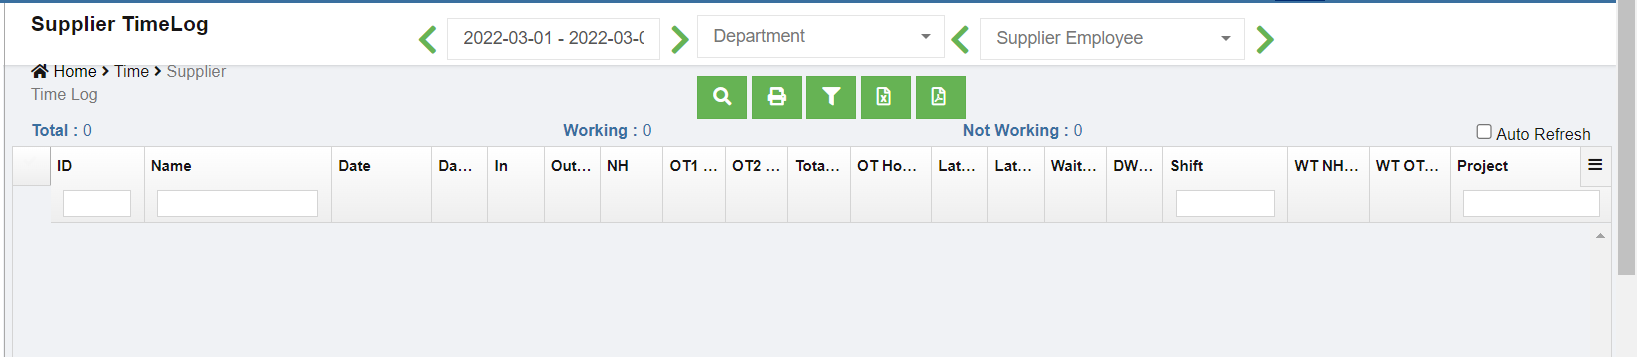
## Supplier Time Log
The **Supplier** **Time Log** submenu in the **Time** menu helps to manage the daily attendance of the external employees who are working under the contract basis. This type of employees is called as suppliers.
The logged in user must have assigned as the **Time Keeper** role or must have permissions to the specific **Company** and **Department** in order to view the supplier’s attendance details from the respective company and department.
Enable permissions such as "externalEmployee" and "supplierTimeLog" to add Supplier Workers and view attendance in the Time log.
To navigate to the **Supplier** **Time Log** page,
1. Click **Supplier** **Time Log** in the **Time*.*** The **Supplier Time Log** page opens with a list of suppliers including the attendance details.
[](http://wiki.cuteinfocomm.com/uploads/images/gallery/2022-06/image-1656195775094.png)
The **Supplier Time Log** page shows the same fields as in the **Time Log** page.
2. If you want view the attendance details for the particular day, choose the respective day in the calendar.
**Note**: The calendar has a date range selector, so that you need to select two days that is from and to days. If you want to select a single day, select start and end days as same day.
3. If you want to view the attendance details for several days e.g. one month, you must select the date range including the particular department and supplier employee. The **Time Log** page shows the attendance details of the employee for the selected date range.
- - Select the date range in the calendar.
- Select a department that the employee belongs to.
- Select the employee.
The view/filter/print/edit/review/approve procedures in **Supplier Time Log** are same as **Time Log**
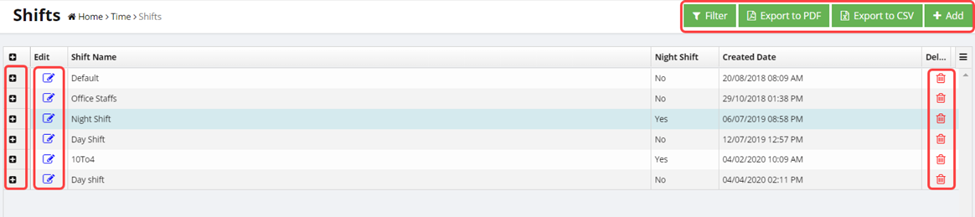
## Shifts
Shift plays a major role in calculating the timesheets for the employees. The **Shifts** tab in the **Time** menu is a master data of all the details of shifts. In each shift, daily working hours requirements and rules of computing the working hours are configured. The added shift details will be automatically integrated with the time log details.
Users can edit shift master data with the right permission assigned.
### Add a Shift
To add a new shift,
1. Click (**Add** button) provided in the upper right-corner of the **Shifts.** The **Shifts** window opens and shows the days in a week in the left side, so you can configure the shift for each day.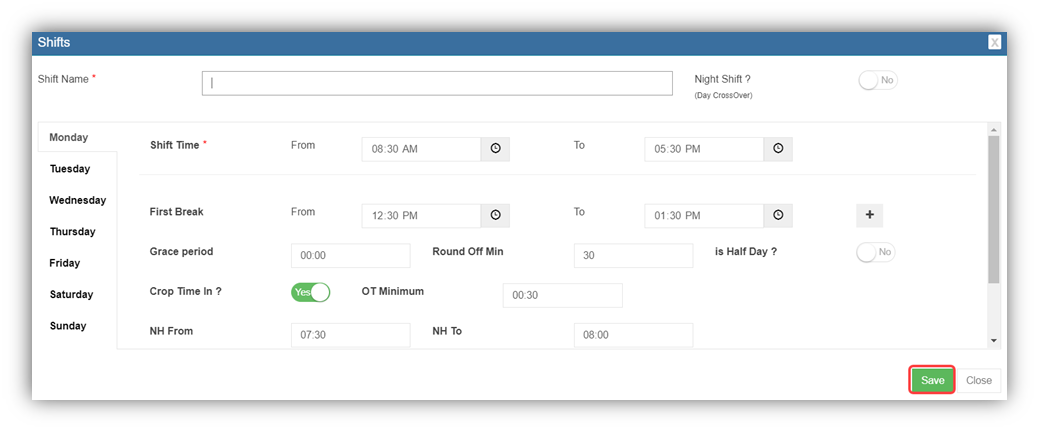
2. In the **Shift Name** box, enter the shift name.
3. If the employee is working in the night shift, enable **Yes** for the **Night Shift**
4. Click the day for which you want to add the shift details.
5. In the **Shift Time** field, set the shift starting and ending times in the **From** and **To**
6. In the **First Break** field, set the break starting and ending times in the **From** and **To**
**Note**: If you want to add another break, click  (Add icon) and add another break timing. Normal hour will be calculated by the deduction of break timings from the time between the shift start and end times.
7. In the **Grace Period** box, enter the grace period minutes.
**Grace Period -** If the employee is allowed to clock in late without affecting the normal hour calculation, enter the grace period time range. The default value is 0 minutes. For example, in above screenshot, if an employee clocks in at 8.35am for the shift starting 8.30am, they will lose 30 minutes(rounded off) if grace period is set as 0. But if grace period is 10 minutes, then the time in will be computed as 8.30 even though the staff is late for 5 minutes.
8. In the **Round Off Min** box, enter the round off minutes.
**Round Off Minute** – If the employee clocks in by late even after the grace period, then the system will extend the normal working hours based on the round off minute you set. For example, the round off minute is set as 30 minutes and the grace period is 10 minutes. If an employee clocks in at 8.41, it will be rounded off to 9.00 AM as the round off is set to 30 minutes.
9. If the employees need to work for only half-day, enable **Yes** for the **Half Day**
10. In the **Crop Time** **in** box, enable **Yes** to round off when doing the worked hours calculations.
11. In the **OT Minimum** box, enter the minimum OT time.
If the employee works beyond the normal working hours then the extra working time is considered as an over time. For example, the OT minimum is set as 30 minutes. If an employee works for extra time about 15 minutes, then the OT will be considered as 0 minutes because the minimum OT period is set as 30 minutes.
12. In the **NH From** and **NH To** boxes, enter the normal hour from and to ranges.
13. . In the **Waiting Time** box, enter the waiting of the employee.
**Waiting Time** – If the employee is temporarily idle while waiting for further work, it will be considered as waiting time.
14. In the **Deduct OT** box, enter the deduct OT time.
15. Premium OT ( 1.5 times/2 times pay ) after the configured hours based on the settings.
[](http://wiki.cuteinfocomm.com/uploads/images/gallery/2024-03/image-1709288479848.png)
16. If you want to apply the same shift for all days, click **Apply to All**.
The added shift details will be applied for all days.
17. Click **Save**. The shift is added and listed in the **Shifts** page.
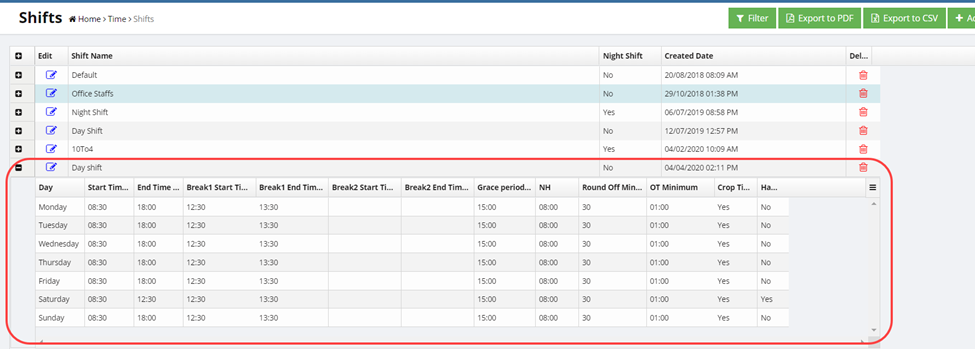
### View the Added Shift Details
If you want to view the added shift details, click (Expand icon) of the respective shift. The **Shifts** page shows the details of the selected shift.
### Edit the Shift Details
If you want to edit any added shift details in the **Shifts** page, do the following steps,
1. Click (Edit icon) in the **Edit** column for the respective shift. The **Shifts** window opens to edit the added shift details.
2. Click any box where you want to edit the shift details, and then edit the details in the respective box in the **Shifts**
3. Click **Save**.
### Delete Any Shift
If you want to delete any added shift, you can click  (Delete icon) provided in the **Delete** column of the **Shifts** page, You receive a notification message “**Are you sure to delete a record**?”. Click **Yes** to confirm deletion.
### Filter Any Shift
If you want to filter any particular shift from the list of added shifts,
1. click (**Filter** button) located on the **Shifts.** Once you clicked the **Filter** button, the filter box opens for the various columns in the page.
2. Enter relevant detail in the respective column’s filter box to filter any particular shift.
### Export the Shift Details
You can export the added shift details in the **Shifts** page in both the pdf and excel formats.
1. If you want to export shift details in the pdf format, click (**Export to** **PDF** button). The shift details will be downloaded as a pdf file.
2. If you want to export shift details in the excel format, click (**Export to CSV** button). The shift details will be downloaded as an excel file.
## Holding Raw Time
**Holding Raw Time** option in the **Time** menu used to resynchronize the unprocessed time records of the employee. Raw time refers to data received from attendance device.
### Resynchronize Raw Data
To manually resynchronize attendance data from device,
1. Click **Holding Raw Time** in the **Time.** The **Holding Raw Data** page opens. The page shows the list of employee’s time records which has not been synchronized.
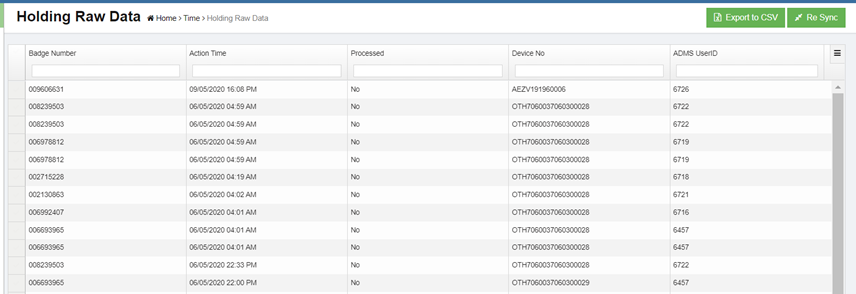
2. By searching the Attendance ID of the employee, select the time records which you want to resynchronize.
3. Then click "Re Sync" button on the top right. The selected time records will be synchronized to the Time Log.
**Note**: If one Attendance ID is selected, the time records for different dates will be synchronized. There is no need to select each date for the same Attendance ID.
### Export the Unprocessed Time Record Details
You can export the unprocessed time record details in the **Holding Raw Data** page in the excel format. Click (**Export to CSV** button). The unprocessed time record details will be downloaded as an excel file.
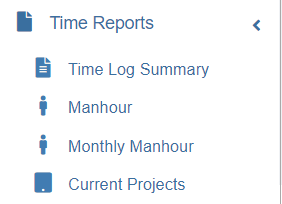
## Time Reports
The Time Reports menu used to view the reports related with the time log details of the employees. Click the **Time Reports** menu in the menu bar. The submenus of **Time** **Reports** will be displayed.
[](http://wiki.cuteinfocomm.com/uploads/images/gallery/2022-06/time-report.png)
The **Time** **Reports** menu consists the following sub menus:
- **Time Log Summary**
- **Manhour**
- **Monthly Manhour**
- **Current Projects**
### Time Log Summary
The **Time Log Summary** tab in the **Time Reports** menu shows the time log summary report of the employees belong to the particular department in a company.
#### View the Time Log Summary Report
To view the time log summary report,
1. Click **Time Log Summary** in the **Time** **Reports.** The **Time Log Summary** page opens.
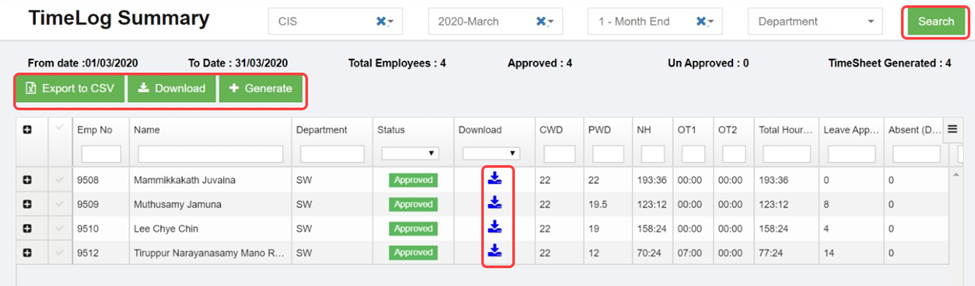
The **Time Log Summary** page contains the following fields:
- **Emp No –** Employee number
- **Name –** Employee name
- **Status –** Shows the approval status of the timesheet that is whether the timesheet is approved or not.
- **Calendar Working Days (CWD)** – The CWD field shows the total number of working days in the selected month.
- **Payable Working Days (PWD) –** The PWD field shows the total number of days worked by the employee in the selected month.
- **NH –** shows the normal working hours.
- **OT1, OT2, OT3 –** shows the over time.
- **Leave Applied (Days) –** Number of leaves applied by the employee
- **Absent (Days)** – Number of absent days
- **OFF (Days) –** Number of OFF
- **Paid Leave –** Number of paid leaves
- **Un paid Leave –** Number of unpaid leaves
- **Approved by –** Name of a person who has approved the leaves
- **Approved Date –** Date when the leaves has been approved
2. In the **Company** box, select a company.
3. In the **Year and Month** box, select a month and year for which you want to view the time log summary report.
4. In the **Pay Cycle** box, select a pay cycle.
5. In the **Department** box, select a department from the list of departments.
6. Click **Search**. The time log summary report is displayed for the employees of the selected department.
#### Export Time Log Summary Details
You can export the time log summary details in an excel format. Click (**Export to CSV** button). The time log summary details will be downloaded in the excel format.
#### Generate Bulk Timesheet
**Generate** option provided in the **Time Log Summary** page helps to manually generate the bulk timesheets. It helps to ease the bulk timesheet generating operation. To generate the timesheet,
**Note:** You can generate the bulk timesheets together only for the approved timesheets.
1. Select the employees whom you want to generate their timesheet.
2. Click (**Generate** button). The bulk timesheet will be generated and the (Download icon) will be enabled in the **Download** column.
#### Download Time Log Summary Details
1. If you want to download the time log summary details for all the employees, select the employees and click (**Download** button) provided in the upper side of the **Time Log Summary**
2. If you want to download the time log summary details for any individual employee, click the respective(Download icon) provided in the **Download**
### Man Hour Report
A man-hour is the average amount of work that one employee can do in an hour. Man-hour report are used to view how long jobs took, or how many employees are involved to do a job in a particular time.
The **Man Hour Report** tab in the **Time Reports** menu used to view the man hour report of the employees.
To view the man hour report,
1. Click **Man Hour Report** in the **Time** **Reports.** The **Man Hour Report** page opens.

2. In the **Calendar** box, select the date range for which you want to view the man-hour report.
3. In the **Project** box, select a project from the list of projects.
4. Click **Search**. The man-hour report is displayed for the selected period and project. The Report shows total man hours and list of employees including their individual manhours.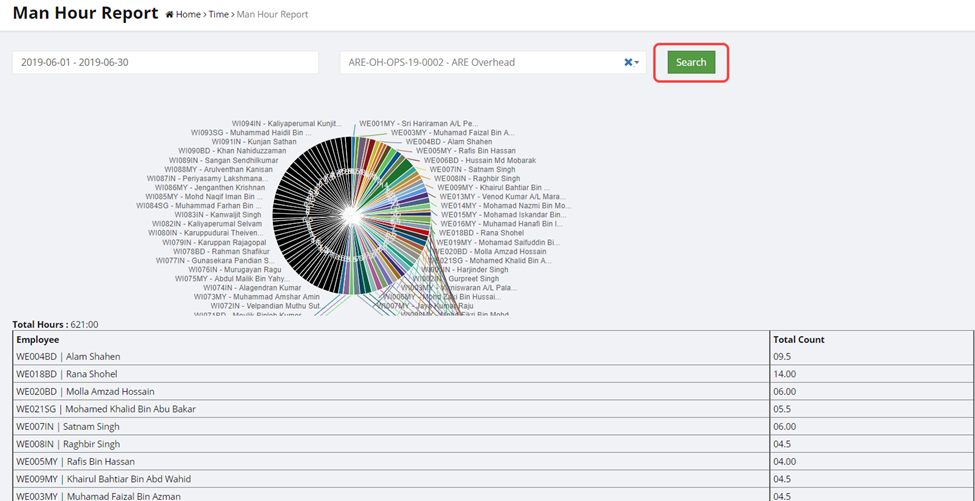
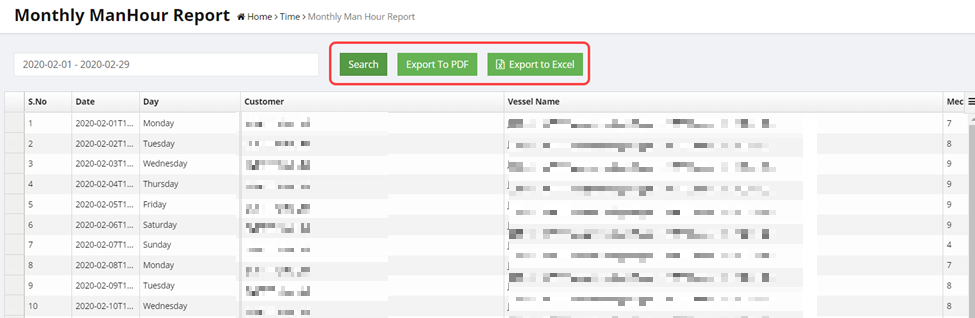
### Monthly Man Hour Report
The **Monthly** **Man Hour Report** tab in the **Time Reports** menu used to view the man hour report of the employees on a monthly basis.
#### View Monthly Man Hour Report
To view the monthly man hour report,
1. Click **Monthly Man Hour Report** in the **Time** **Reports.** The **Monthly** **Man Hour Report** page opens.
[](http://wiki.cuteinfocomm.com/uploads/images/gallery/2023-04/image-1682096276800.png)
The **Monthly Man Hour Report** page contains the following fields:
- **Customer** – shows the name of the customer
- **Vessel Name –** shows the name of vessel where the employees worked
- **Mechanics –** shows the total number of employees involved in the work
- **Total Man Hour –** shows the total man-hour
2. In the **Calendar** box, select the date range for which you want to view the monthly man-hour report.
3. Click **Search**. The monthly man-hour report is displayed for the selected period and project.
#### Export Monthly Man Hour Report
You can export the monthly man hour report in the pdf and excel formats.
1. If you want to export the monthly man hour report in the pdf format, click (**Export to** **PDF** button). The monthly man hour report will be downloaded in the pdf format.
2. If you want to export the monthly man hour report in the excel format, click (**Export to CSV** button). The monthly man hour report will be downloaded in the excel format.
### Current Projects
The **Current Projects** tab in the **Time Reports** menu used to view the details of customer’s projects currently working by the company.
#### View Current Projects
To view the current projects,
1. Click **Current Projects** in the **Time Reports.** The **Current Projects** page opens.
[](http://wiki.cuteinfocomm.com/uploads/images/gallery/2023-04/image-1682096322416.png)
The **Current Projects** page contains the following fields:
- **Main Code –** shows the company code
- **Vessel Name –** shows the name of the currently working vessel project
- **Customer Name –** shows the customer name
- **Department –** shows the department name
- **Start Date** and **End Date –** shows the starting and ending dates of project
- **Total\_MHr –** shows the total manhour
- **Status –** shows the status of the project
2. In the **Customer Name** box, select the name of a customer.
3. In the **Type** field, if you want to view the current status for commercial projects, select **Commercial**. If you want to view the current status for overhead projects, select If you want to view the current status for both commercial and overhead projects, select **Both**.
4. Click **Search**. The status of the current projects is displayed for the selected customer and type.
#### Export Current Project Details
You can export the current project details in the pdf and excel formats.
1. If you want to export the current project details in the pdf format, click (**Export to** **PDF** button). The current project details will be downloaded in the pdf format.
2. If you want to export the current project details in the excel format, click (**Export to CSV** button). The current project details will be downloaded in the excel format.
#### **Time Log Settings**
- ##### **Time log Prioritize Shift NH**
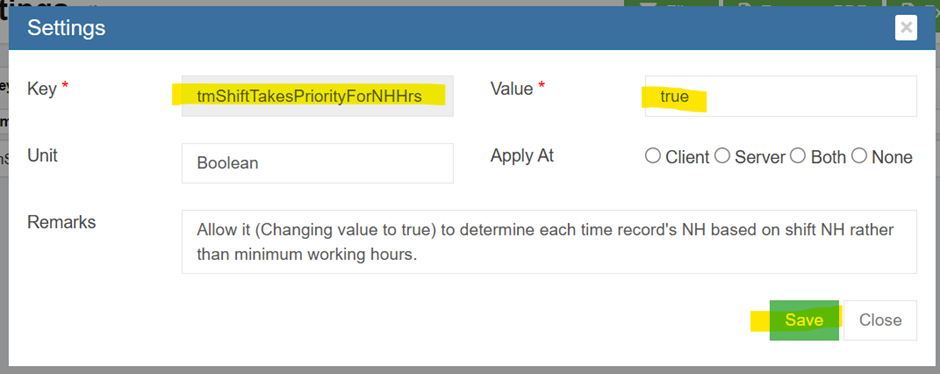
Cute Office automatically takes into account NH from both the Minimum and Shift working hours. The system will give priority to the minimum working hours if they exceed the shift's NH; if not, the shift will be given priority if the NH in the shift is the highest.
To prioritize shift even hours when minimum working hours are greater, a new setting called tmShiftTakesPriorityForNHHrs has been created. In order to make it possible, enable the below setting as "true".
**Enable Settings to prioritize shift in NH calculation.**
Change the value to "true" in the global admin settings for " tmShiftTakesPriorityForNHHrs " and save the changes to activate the feature.
##### **Maximum round off for Out punch**
Client request to have forward round off for out punch as employees punch a minute or couple of mins before shift out time, system consider it as half working day. To avoid this introduced new setting for ceiling the out entry in the time log by shift.
**Step 1:** **Settings to Enable Max Round off mins in Shift Master**
Change the value to "true" in the global admin settings for "tmShiftShowMaxRoundOffForTimeOutEntry" and save the changes to activate the feature.

**Step 2: Maximum round off mins in Shift master**
Add the maximum round off minutes to the "Max Round Off for out Entry" field under HRM -> Master -> Shifts -> Edit for time out and Save Shift.

**Ex:** If Shift Out time is 06:00 pm and Max Round Off for out entry is 30 mins as per above screen,
1. Employee actual time out is 05: 32pm -> system consider it as 06:00pm
2. Employee actual time out is 06: 00 pm -> system consider it as 06:00pm
3. Employee actual time out is 06:23pm -> system consider it as 06:30pm
It’s a **forward round off for out time** only.
- **Capture First Clock in and Last Clock out for multiple project entry** System automatically takes first clock in and last clock out to calculate total number of hours spend in a day for multiple check in and check out without considering it as a Night Shift. **Step 1:** Go to company settings and edit nightShiftNotApplicable. Change the flag to true. [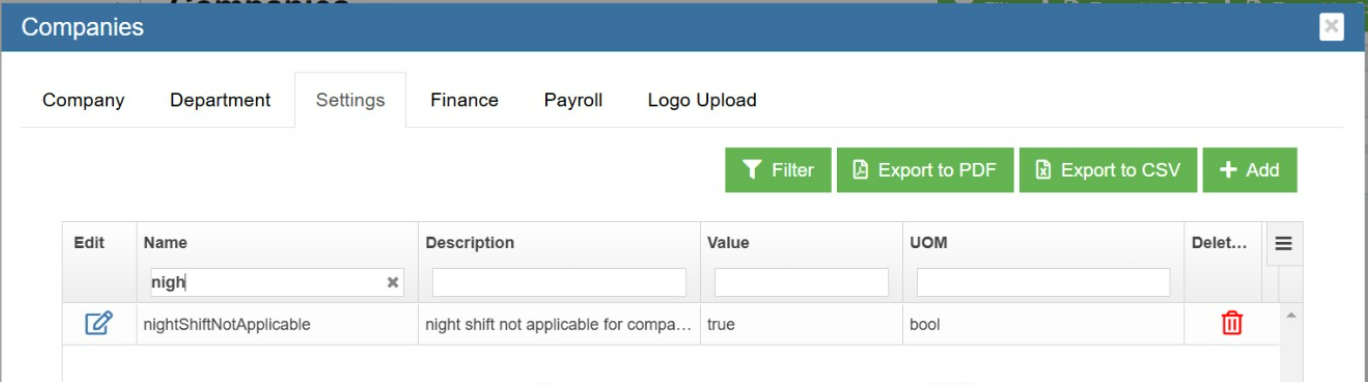](https://wiki.cuteinfocomm.com/uploads/images/gallery/2024-10/image-1730187053531.png)
**Step 2:** Filter overWrite TimeOut and change the flag to true.
[](https://wiki.cuteinfocomm.com/uploads/images/gallery/2024-10/image-1730187396959.png)
These two settings help to calculate normal hour and overtime hours based on the first clock in and last clock out in a day without considering it either night shift or next day.
Note: Multiple clocks in can happen before 12 am of the next day. Orelse system will calculate next day for last clock in after 12 am of the next day.
##### **Enable Normal Hours according to Shift time**
Normal hours calculated based on the shift time.
Ex: Shift time 9 am to 6 pm
Configure - NH from 6hrs to 8 hrs (consider as one day).
If the employee clock out after completing 6hr and come for work at 9 pm on the same day. The system will not deduct 2 hrs as NH to fulfill NH 8hrs. From 9pm onwards, it will consider as overtime.
[](https://wiki.cuteinfocomm.com/uploads/images/gallery/2024-09/image-1727086376858.png)
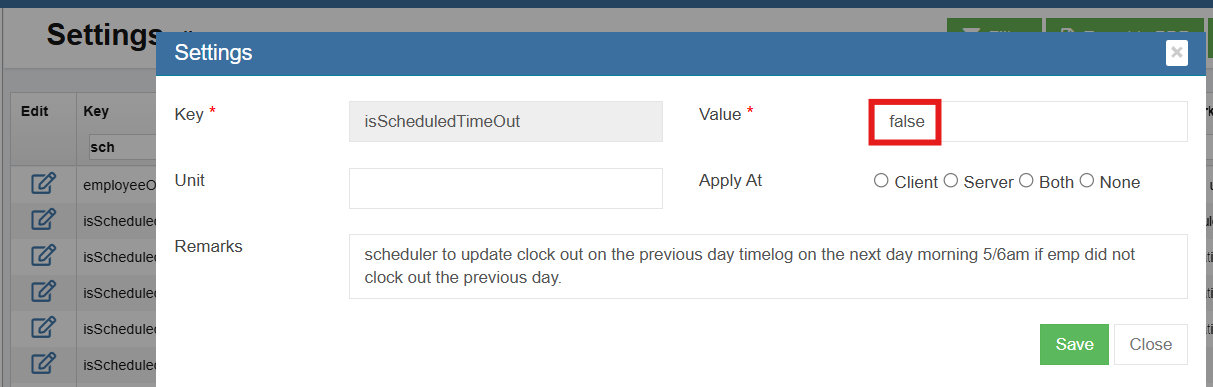
##### **Enable Auto Time out**
If an employee forgot to clock out, the scheduler runs the next day at 5-6am to update the clock out time on the previous days' time log, provided the employee did not clock out.
Enable the below global settings to "true", by default "false" will be available. In the time log, Mode shows "S".
[ ](https://wiki.cuteinfocomm.com/uploads/images/gallery/2025-03/image-1741161528814.png)[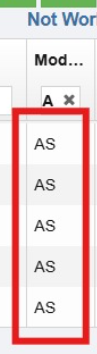](https://wiki.cuteinfocomm.com/uploads/images/gallery/2025-03/image-1741161653119.png)
##### **Premium Over Time**
If client have **extra shift** and rate various from overtime rate for both weekdays and weekends, total hours of **Premium Over Time (POT)** will be calculated automatically in the time log.
**Steps**
1. Enable POT under Global settings
[](https://wiki.cuteinfocomm.com/uploads/images/gallery/2025-03/s1.png)
2. Enable POT under Shift[](https://wiki.cuteinfocomm.com/uploads/images/gallery/2025-03/s2.png)
3. Enter the start time of Premium Overtime inside the Shift to consider as cutoff time.
4. Additional POT column will be available in the time log to calculate the total hours worked by the employee after the cutoff time given in the Premium Overtime shift and pushed to it. [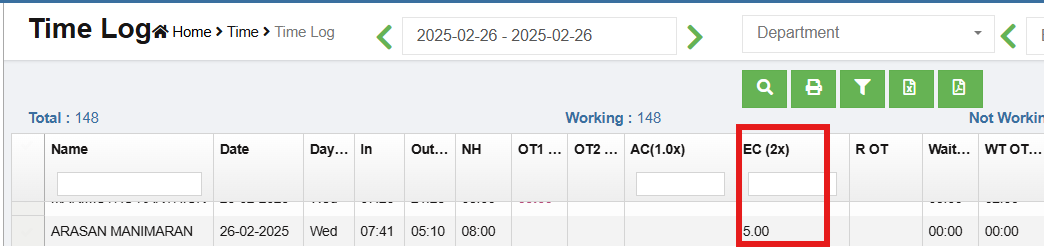](https://wiki.cuteinfocomm.com/uploads/images/gallery/2025-03/s3.png)
5. Display EC(2x) can change using the below Global settings[](https://wiki.cuteinfocomm.com/uploads/images/gallery/2025-03/s6.png)
5. The rate will be calculated accordingly by the pay code generated for POT.[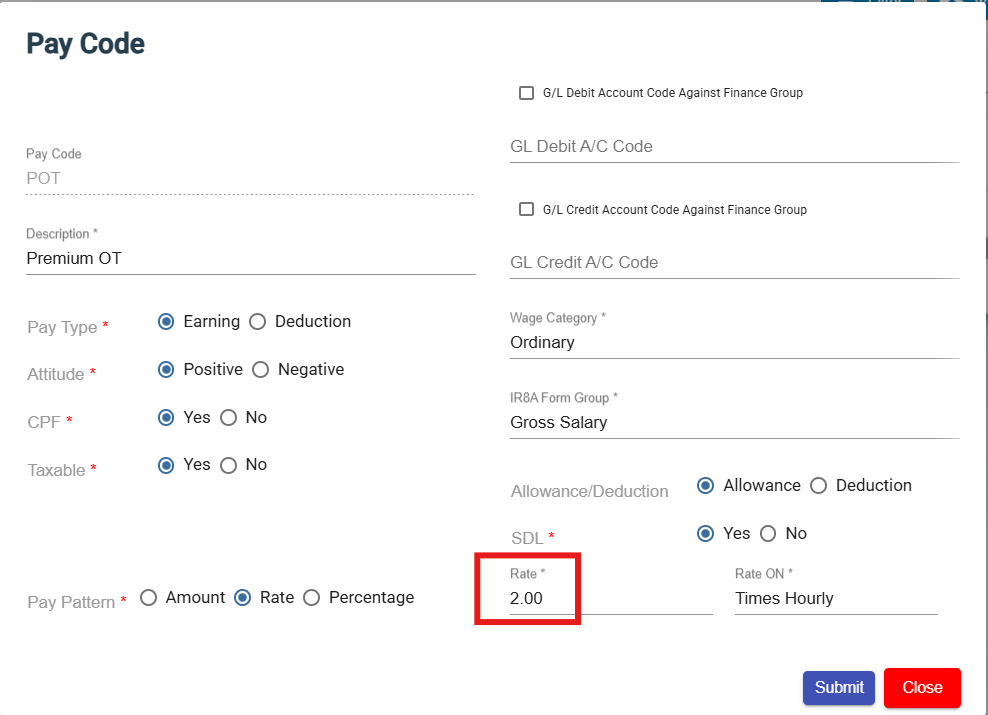](https://wiki.cuteinfocomm.com/uploads/images/gallery/2025-03/s4.png)
6. Configure POT under Timelog Extra Shift in Payroll Admin Settings. [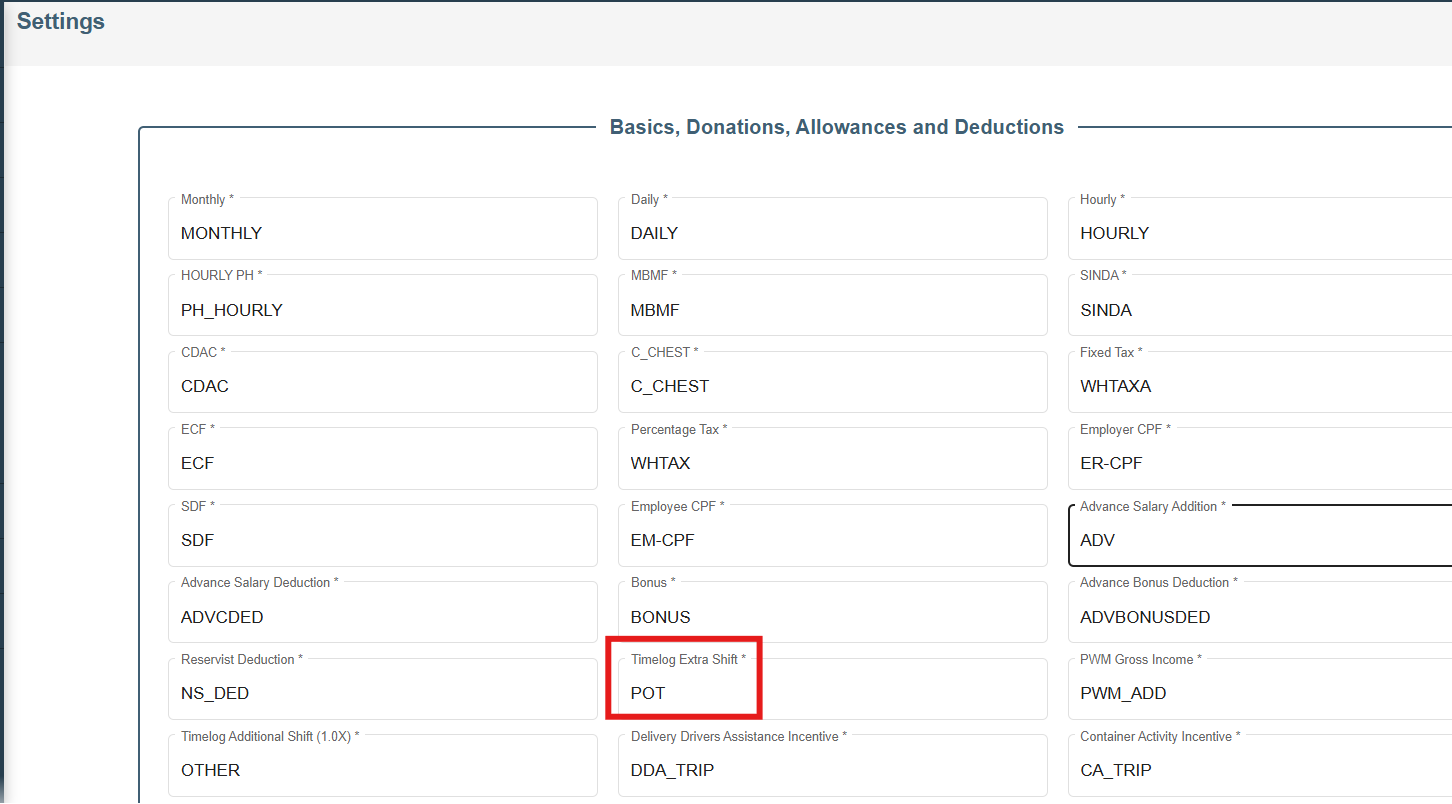](https://wiki.cuteinfocomm.com/uploads/images/gallery/2025-03/s5.png)
##### **Off Day Configuration**
If an employee works on an "**Off day" (basically rest day)** at the employer's request, the employee will be paid **1.5 times the basic pay**.
To configure "Off day" for 1.5 times basic pay:
1. Enable "enableOffDay" flag in the global settings
2. Under HRM Minimum Working Hours, click add and configure the off day. [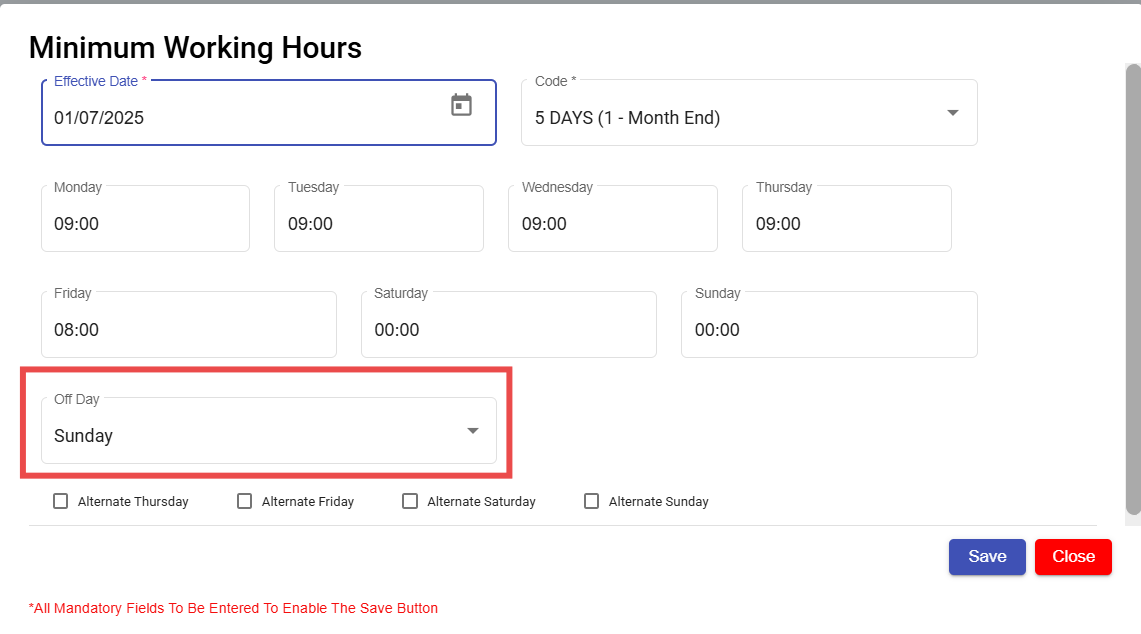](https://wiki.cuteinfocomm.com/uploads/images/gallery/2025-08/image-1755700248699.png)
3. Click **Save.**
4. Go to **Time Log** and add an entry for the off day.
5. The total hours will appear in the OT1 column to calculate 1.5 times the basic pay in the payroll. [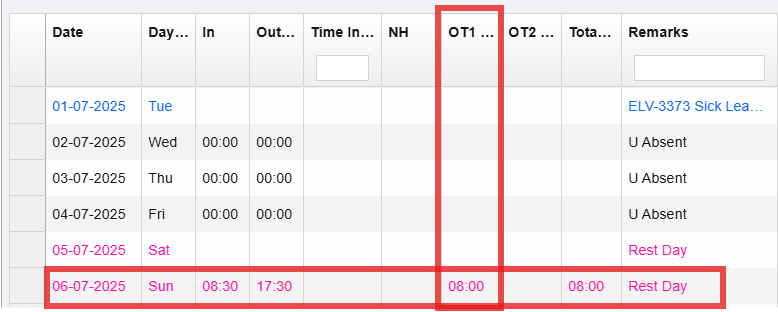](https://wiki.cuteinfocomm.com/uploads/images/gallery/2025-08/image-1755700393995.png)
##### Enable Leave & Absent Report
To view Leave & Absent Report, enable permission "time - eleaveAbsentReport". ##### Enable ISRP Time Sheet
To view ISRP Time Sheet, enable permission "Time- importTimeLog".
##### Enable A/D Type
To view header A/D type in Time log, enable permission "allowTimlogAdditionDeduction". [](https://wiki.cuteinfocomm.com/uploads/images/gallery/2026-02/image-1772103107301.png)
A/D type column is available in the time log to add addition/deduction amount directly for each employee on the respective date. [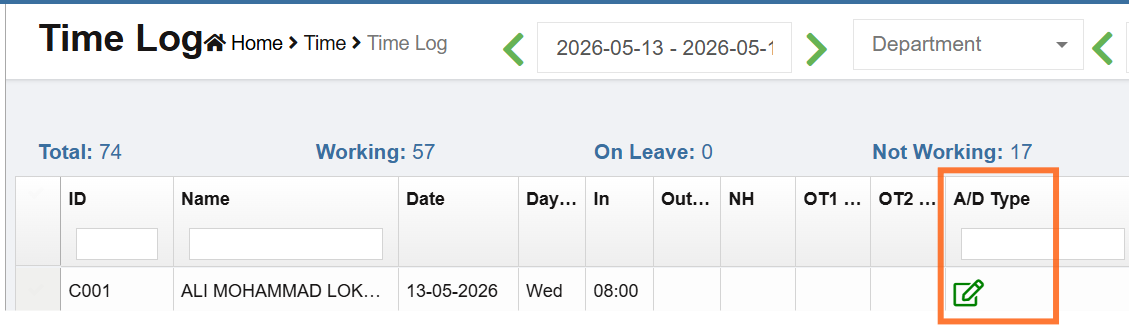](https://wiki.cuteinfocomm.com/uploads/images/gallery/2026-05/image-1778669990402.png)
Click edit and add the addition and deduction amount for the date. [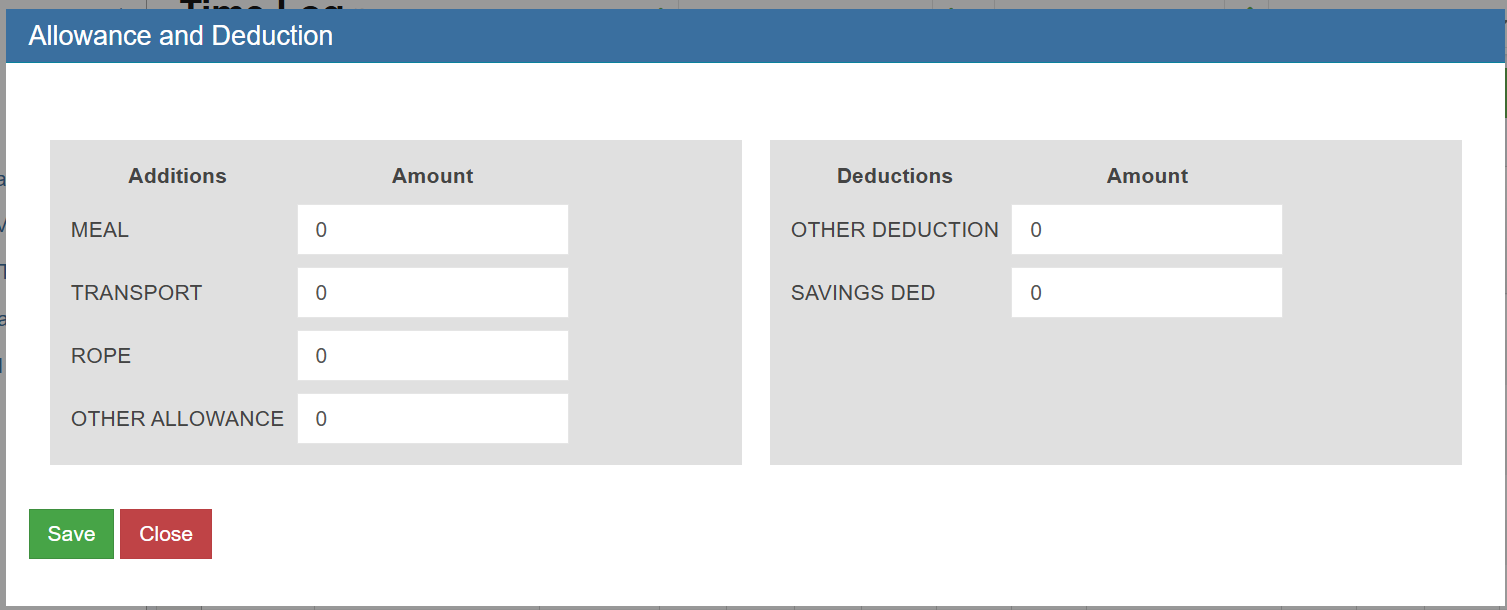](https://wiki.cuteinfocomm.com/uploads/images/gallery/2026-05/image-1778670073880.png)
The same record falls automatically under HRM->Others->Salary Addition/Deduction page. To delete the record in the time log, delete the record from salary addition/deduction page.