# Leave User Manual (External)

## E-leave Module

The **E-Leave** module in the ***cuteOffice*** is a simple portal for employees to self-manage their leave efficiently and **E-leave** module provides insights for human resource department to monitor the leave, manage human resource planning and it is integrated with payroll calculations. Additionally, the time keepers can also apply for leave on behalf of their employees.

In cuteOffice, apply or cancel leave can be done using the cuteOffice Website or cuteOffice2a Mobile App.


#### <span style="color: #169179;">**e-Leave V2** </span>

# <span style="color: #3598db;">1 Apply for Leave</span>

This section explains how to open the E-Leave module, create a new leave request and complete workflow submission.

## 1.1 Open the E-Leave Module

PURPOSE

Use this feature to open the E-Leave module from the HRM menu, either to create a new leave request or to view existing leave records.

<table id="bkmrk-steps-1%C2%A0%C2%A0%C2%A0%C2%A0%C2%A0%C2%A0%C2%A0%C2%A0%C2%A0%C2%A0-op" style="height: 400px; width: 933px;" width="747"><tbody><tr><td style="width: 390.922px;" width="340">STEPS

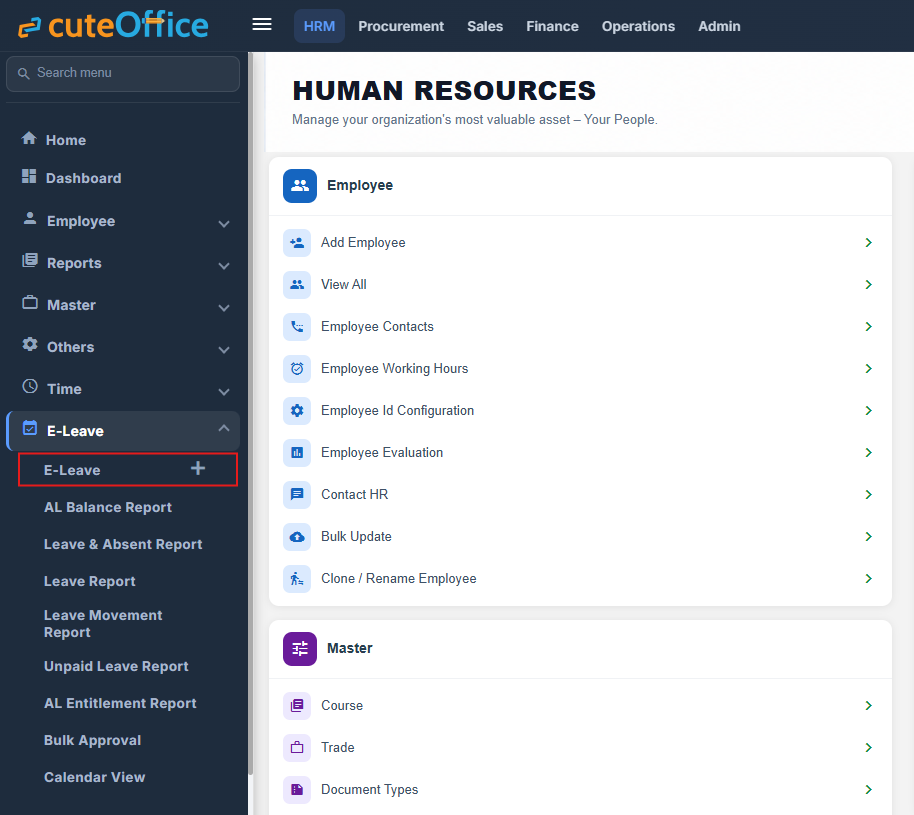
**1** Open the HRM menu.

**2** Expand the E-Leave menu.

**3** Select the “+” icon beside E-Leave to create a new leave request.

**4** Select the E-Leave menu text to view existing leave records.

</td><td style="width: 448.062px;" width="313">**Figure 1.** Open the E-Leave module from the HRM menu.  
[![1.png](https://wiki.cuteinfocomm.com/uploads/images/gallery/2026-11/scaled-1680-/1.png)](https://wiki.cuteinfocomm.com/uploads/images/gallery/2026-11/1.png)
</td></tr></tbody></table>

## 1.2 Create a New Leave Request

PURPOSE

Use this feature to complete a new leave application in the E-Leave module.

STEPS

- Select the employee from the Employee drop-down list.
- Select the required leave type.
- Choose the leave dates using the calendar. The current date is selected by default.
- If a half-day is required, enable the appropriate AM or PM half-day toggle.
- Enter the reason for the leave.
- Complete any other required fields and attach supporting documents, if required.
- Select Submit to proceed to workflow submission.

[![2.png](https://wiki.cuteinfocomm.com/uploads/images/gallery/2026-11/scaled-1680-/2.png)](https://wiki.cuteinfocomm.com/uploads/images/gallery/2026-11/2.png)

**Figure 2.** E-Leave application screen, including the leave calendar, summary and attachment area.

#### <span style="color: #3598db;">Half Day Leave</span>

If the user wants to apply for half day leave, click to enable the "Start Date Half Day (PM)" and End Date Half Day (AM) flags.

 [![half.png](https://wiki.cuteinfocomm.com/uploads/images/gallery/2026-11/scaled-1680-/half.png)](https://wiki.cuteinfocomm.com/uploads/images/gallery/2026-11/half.png)

for example, in above screenshot, first option **Start Date Half Day (PM)** is enabled as **Yes**, it means that employee will start to take leave from afternoon on 2026-11-18.

## Leave Approval Process

E-leave module is integrated with timesheet and payroll modules, thus every leave application in the system must be processed (approve/reject/cancel) based on the company approval workflow setup to generate correct payroll. For **Special Edit** which allows user with assigned permission to edit leave after approval. Time approver needs to re-approve the timesheet again a special edit was done on any of the leave in approved timesheet.

## 1.3 Complete Workflow Submission

PURPOSE

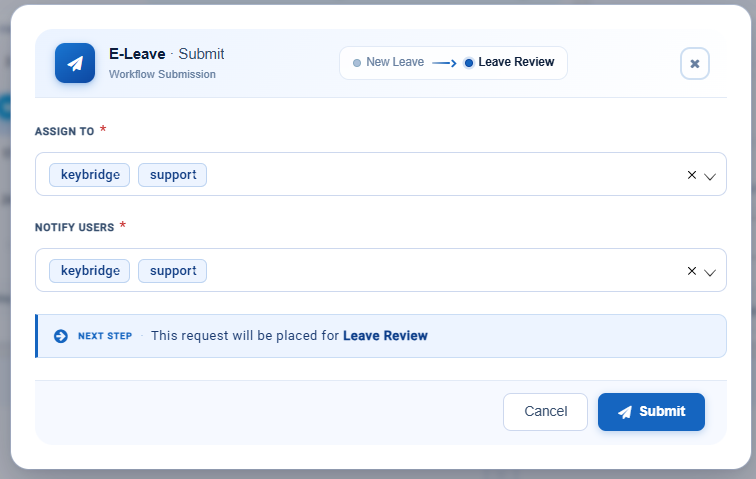
<table id="bkmrk-after-you-select-sub" style="height: 366px; width: 833px;" width="713"><tbody><tr><td style="width: 306.281px;" width="253">After you select Submit, the Workflow Submission window opens. Review the assigned users and notification recipients before submitting the request.

REVIEW THE WINDOW

• **Assign To:** review the users assigned to the next workflow step.

• **Notify Users:** review the users who should receive notifications.

• Check the **Next Step** message to confirm the workflow stage.

Select **Submit** to send the request into the displayed workflow stage.

</td><td style="width: 465.719px;" width="399">**Figure 3.** Workflow Submission window showing Assign To, Notify Users and the next workflow step.  
[![3.png](https://wiki.cuteinfocomm.com/uploads/images/gallery/2026-11/scaled-1680-/3.png)](https://wiki.cuteinfocomm.com/uploads/images/gallery/2026-11/3.png)
</td></tr></tbody></table>

# <span style="color: #3598db;">2 E-Leave Summary</span>

Open a leave record to view its summary, workflow information and related leave details.

## 2.1 Understanding the Leave Details Section

PURPOSE

The E-Leave Summary page brings the details of a leave record, its workflow information and related leave information together on one screen. The numbered areas below show where to find each part.

  
[![4.png](https://wiki.cuteinfocomm.com/uploads/images/gallery/2026-11/scaled-1680-/4.png)](https://wiki.cuteinfocomm.com/uploads/images/gallery/2026-11/4.png)

**Figure 4.** E-Leave Summary page, with the main areas numbered.

<table id="bkmrk-no.-area-what-it-sho" width="653"><thead><tr><td width="51">**No.**

</td><td width="160">**Area**

</td><td width="442">**What it shows or does**

</td></tr></thead><tbody><tr><td width="51">**1**

</td><td width="160">**Action toolbar**

</td><td width="442">Approval Timeline, Assign, Comment, Edit, Special Edit, Add and View All.

</td></tr><tr><td width="51">**2**

</td><td width="160">**Leave Details**

</td><td width="442">Employee, Supervisor, Leave Type, Reason, Entitlement, Available (Prorated), Applied Dates, Half Day, Days and Contact Number.

</td></tr><tr><td width="51">**3**

</td><td width="160">**Leave Utilisation Summary**

</td><td width="442">Leave utilisation for the selected year.

</td></tr><tr><td width="51">**4**

</td><td width="160">**Team Leave Impact**

</td><td width="442">Other employees’ leave applications on overlapping dates.

</td></tr><tr><td width="51">**5**

</td><td width="160">**Summary panel**

</td><td width="442">Key, Status (Current and Next), People (Assignee, Notify and Creator) and Dates.

</td></tr></tbody></table>

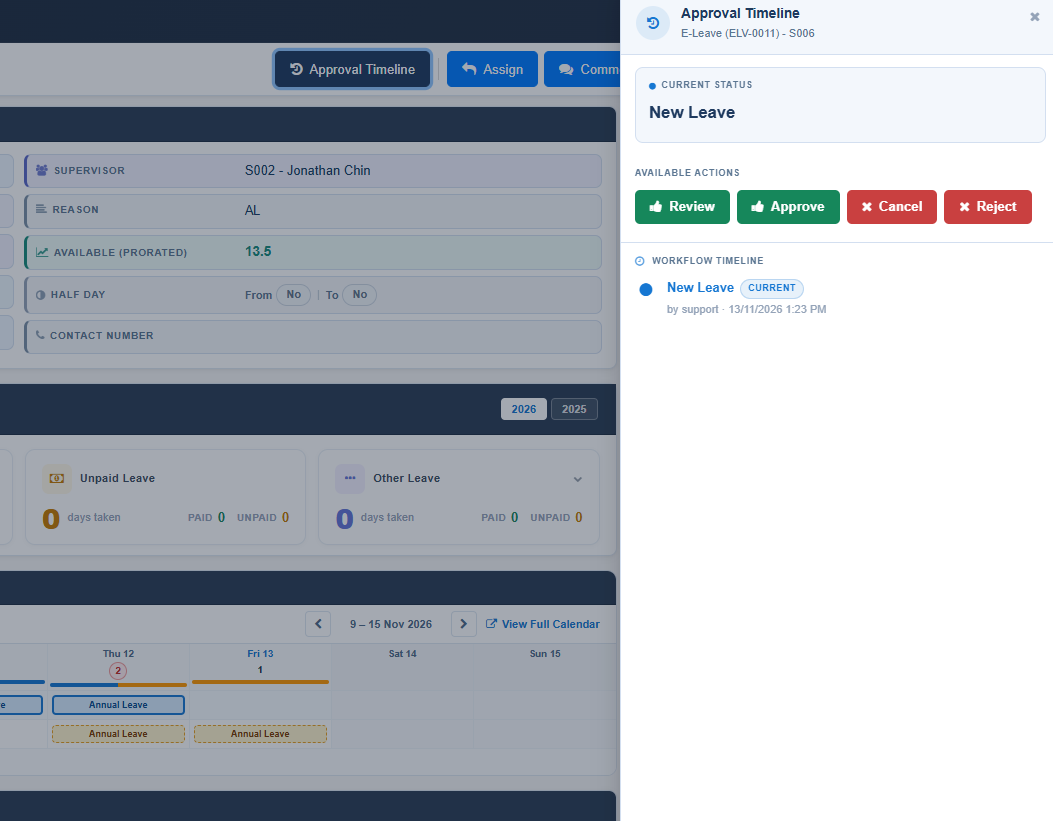
## 2.2 Workflow Approval and Approval Timeline

PURPOSE

Use the Approval Timeline to check the status of a leave record in its workflow.

<table id="bkmrk-steps-1%C2%A0%C2%A0%C2%A0%C2%A0%C2%A0%C2%A0%C2%A0%C2%A0%C2%A0%C2%A0-op-0" style="width: 874px; height: 496px;" width="653"><tbody><tr><td style="width: 273.172px;">STEPS

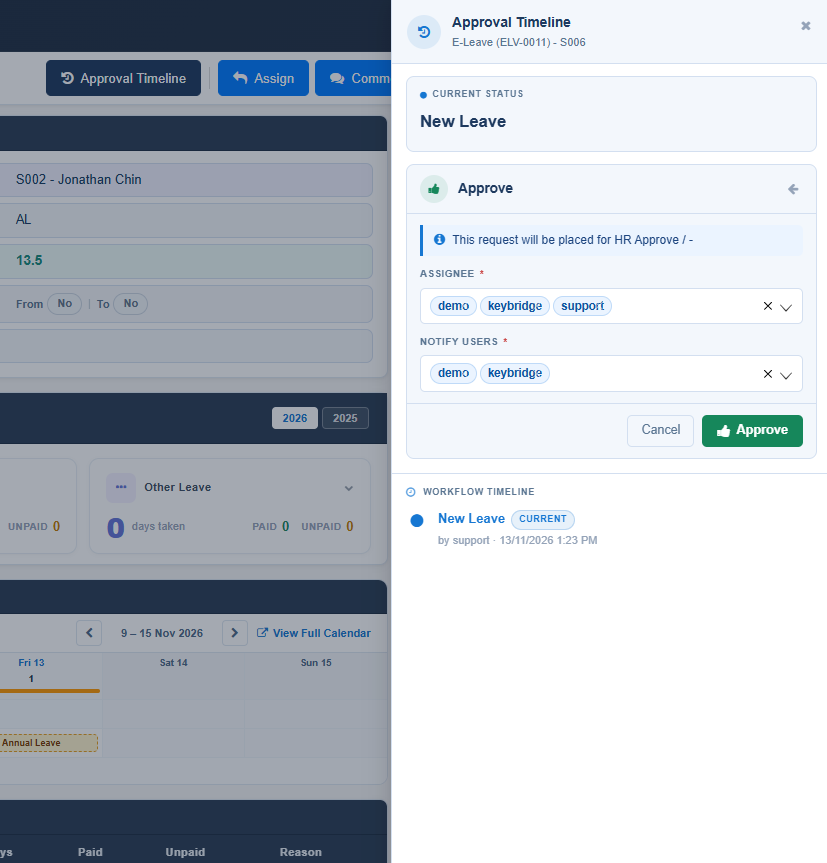
**1** Open the required leave record.

**2** Select **Approval Timeline**.

**3** The approval panel opens and displays the current workflow status, available actions and workflow timeline.

</td><td style="width: 567.797px;">**Figure 5.** Approval Timeline panel showing the current status, available workflow actions and timeline.  
[![5.png](https://wiki.cuteinfocomm.com/uploads/images/gallery/2026-11/scaled-1680-/5.png)](https://wiki.cuteinfocomm.com/uploads/images/gallery/2026-11/5.png)
</td></tr></tbody></table>

## 2.3 Available Workflow Actions

PURPOSE

<table id="bkmrk-select-the-appropria" style="height: 578px; width: 1168px;" width="833"><tbody><tr><td style="width: 358.047px;" width="287">Select the appropriate action available to you in the approval panel, such as Review, Approve, Cancel or Reject.

For actions that require workflow submission, review the assigned users and notification recipients, then select the relevant action button to proceed.

</td><td style="width: 629.938px;" width="366">[![6.png](https://wiki.cuteinfocomm.com/uploads/images/gallery/2026-11/scaled-1680-/6.png)](https://wiki.cuteinfocomm.com/uploads/images/gallery/2026-11/6.png)

**Figure 6.** Example of an approval action with assignee and notification fields.

</td></tr></tbody></table>

<table id="bkmrk-note-the-available-a" width="653"><tbody><tr><td width="653">**NOTE**

The available actions depend on the workflow stage and your permissions.

</td></tr></tbody></table>

## 2.4 Assign, Comment, Edit and Special Edit

PURPOSE

The summary page also provides actions such as Assign, Comment, Edit and Special Edit, subject to the user’s permissions and the workflow state.

  
[![7.png](https://wiki.cuteinfocomm.com/uploads/images/gallery/2026-11/scaled-1680-/7.png)](https://wiki.cuteinfocomm.com/uploads/images/gallery/2026-11/7.png)

**Figure 7.** Action toolbar: (1) Approval Timeline, (2) Assign, (3) Comment, (4) Edit and (5) Special Edit.

### Edit Leave Application before Approval

Employees can edit or cancel their leave application before approved by the authorized person. Authorized person who has been assigned with special permissions can edit the leave application before and/or after approval.

- **Edit Leave Application**

1. Click (**Edit** button) in the **Leave Details.** The **E-Leave** window opens with the applied leave details. [![edit.png](https://wiki.cuteinfocomm.com/uploads/images/gallery/2026-11/scaled-1680-/edit.png)](https://wiki.cuteinfocomm.com/uploads/images/gallery/2026-11/edit.png)
2. Edit the leave data where you want change.
3. Click **Save**. The changed leave details will be updated in the **Leave Details** page.

### Special Edit

The **Special Edit** option can be used to add the payment details of the applied leave. To add the payment details,

1. Enable "editApproved" permission.
2. Click (**Special Edit** button) in the **Leave Details.** A new window opens and shows the list of applied leaves.  
      
    [![special.png](https://wiki.cuteinfocomm.com/uploads/images/gallery/2026-11/scaled-1680-/special.png)](https://wiki.cuteinfocomm.com/uploads/images/gallery/2026-11/special.png)

## 2.5 Additional Summary Widgets

The summary page also includes the following widgets. The numbered areas show where each widget appears on the page.

[![8.png](https://wiki.cuteinfocomm.com/uploads/images/gallery/2026-11/scaled-1680-/8.png)](https://wiki.cuteinfocomm.com/uploads/images/gallery/2026-11/8.png)

**Figure 8.** E-Leave Summary with leave information, utilisation, team leave impact and history sections: (1) Leave Utilisation Summary, (2) Team Leave Impact and (3) Leave History.

### Leave Utilisation Summary

Displays the employee’s leave utilisation, including Annual Leave, Sick Leave, Unpaid Leave and Other Leave, for the selected year.

[![9.png](https://wiki.cuteinfocomm.com/uploads/images/gallery/2026-11/scaled-1680-/9.png)](https://wiki.cuteinfocomm.com/uploads/images/gallery/2026-11/9.png)

**Figure 9.** Leave Utilisation Summary widget.

### Team Leave Impact

Helps users review other employees’ leave applications on overlapping dates and understand potential manpower impact.

[![10.png](https://wiki.cuteinfocomm.com/uploads/images/gallery/2026-11/scaled-1680-/10.png)](https://wiki.cuteinfocomm.com/uploads/images/gallery/2026-11/10.png)

**Figure 10.** Team Leave Impact widget.

<table id="bkmrk-note-visibility-of-t" width="653"><tbody><tr><td width="653">**NOTE**

Visibility of Team Leave Impact depends on the applicable permissions.

</td></tr></tbody></table>

### Leave History

Displays the employee’s leave history, similar to the history available in the V1 E-Leave summary.

[![11.png](https://wiki.cuteinfocomm.com/uploads/images/gallery/2026-11/scaled-1680-/11.png)](https://wiki.cuteinfocomm.com/uploads/images/gallery/2026-11/11.png)

**Figure 11.** Leave History area of the E-Leave Summary page.

# <span style="color: #3598db;">3 E-Leave View All</span>

The E-Leave View All page displays leave records in a grid and provides filtering and column customisation options.

## 3.1 Viewing Leave Records

PURPOSE

Use the grid to view leave records. The numbered controls below are used to filter, customise and refresh the grid and to create a new request.

[![12.png](https://wiki.cuteinfocomm.com/uploads/images/gallery/2026-11/scaled-1680-/12.png)](https://wiki.cuteinfocomm.com/uploads/images/gallery/2026-11/12.png)

**Figure 12.** E-Leave View All grid showing leave records and column filters.

<table id="bkmrk-no.-area-what-it-sho-0" width="653"><thead><tr><td width="51">**No.**

</td><td width="160">**Area**

</td><td width="442">**What it shows or does**

</td></tr></thead><tbody><tr><td width="51">**1**

</td><td width="160">**Period**

</td><td width="442">Select a predefined period (see 3.4).

</td></tr><tr><td width="51">**2**

</td><td width="160">**Date-range picker**

</td><td width="442">Select a custom date range (see 3.3).

</td></tr><tr><td width="51">**3**

</td><td width="160">**Refresh**

</td><td width="442">Refresh the grid (see 3.6).

</td></tr><tr><td width="51">**4**

</td><td width="160">**Columns**

</td><td width="442">Choose which columns are displayed (see 3.5).

</td></tr><tr><td width="51">**5**

</td><td width="160">**Add**

</td><td width="442">Start a new E-Leave request (see 3.7).

</td></tr><tr><td width="51">**6**

</td><td width="160">**Filter row**

</td><td width="442">Filter records by the available columns (see 3.2).

</td></tr></tbody></table>

## 3.2 Filtering Records Using Column Filters

PURPOSE

Use the filter row below the column headings to filter records by the available columns.

[![13.png](https://wiki.cuteinfocomm.com/uploads/images/gallery/2026-11/scaled-1680-/13.png)](https://wiki.cuteinfocomm.com/uploads/images/gallery/2026-11/13.png)

**Figure 13.** Example of the grid after applying filters.

## 3.3 Selecting a Date Range

Use the date-range picker to select a custom date range.

## 3.4 Using Predefined Period Filters

Alternatively, select a predefined period from the Period drop-down list.

## 3.5 Customising Visible Columns

STEPS

- Select Columns to choose which columns are displayed in the grid.
- Enable or disable the required columns, then select Save to apply the selection.
- Where column reordering is available, drag columns into the required order.

## 3.6 Refreshing the Grid

Select Refresh to refresh the grid and clear the current filter selections, as applicable.

# <span style="color: #3598db;">4 E-Leave Reports</span>

The reports available in E-Leave V1 are also available in V2, in the same format.

## 4.1 Viewing E-Leave Reports

PURPOSE

Use the reports under the E-Leave menu to view the actual leave reports.

<table id="bkmrk-steps-1%C2%A0%C2%A0%C2%A0%C2%A0%C2%A0%C2%A0%C2%A0%C2%A0%C2%A0%C2%A0-op-1" width="653"><tbody><tr><td width="373">STEPS

**1** Open the HRM menu.

**2** Expand the E-Leave menu.

**3** Select the required report from the list under the E-Leave menu.

The reports listed in the menu are:

• AL Balance Report

• Leave &amp; Absent Report

• Leave Report

• Leave Movement Report

• Unpaid Leave Report

• AL Entitlement Report

</td><td width="279">[![14.png](https://wiki.cuteinfocomm.com/uploads/images/gallery/2026-11/scaled-1680-/14.png)](https://wiki.cuteinfocomm.com/uploads/images/gallery/2026-11/14.png)

**Figure 14.** Reports listed under the E-Leave menu.

</td></tr></tbody></table>

# <span style="color: #3598db;">5 Bulk Approval</span>

Bulk Approval lets you approve or reject multiple leave records at once.

## 5.1 Open Bulk Approval

<table id="bkmrk-steps-1%C2%A0%C2%A0%C2%A0%C2%A0%C2%A0%C2%A0%C2%A0%C2%A0%C2%A0%C2%A0-op-2" width="653"><tbody><tr><td width="393">STEPS

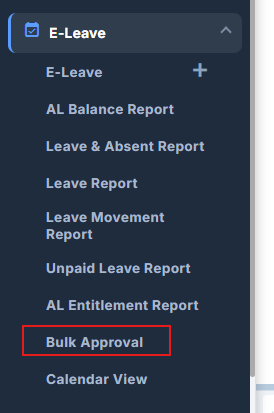
**1** Open the HRM menu and expand the E-Leave menu.

**2** Select Bulk Approval.

</td><td width="259">[![14.png](https://wiki.cuteinfocomm.com/uploads/images/gallery/2026-11/scaled-1680-/14.png)](https://wiki.cuteinfocomm.com/uploads/images/gallery/2026-11/14.png)

**Figure 15.** Bulk Approval option in the E-Leave menu.

</td></tr></tbody></table>

## 5.2 Load the Pending Records

STEPS

- On the Bulk Approval page, select the E-leave Module.
- Select the required Workflow Status.
- Select the Date Range.
- Select Search. The pending records are loaded in the grid.

## 5.3 Select Records and Choose an Action

STEPS

- Select the checkbox for each required record.
- The approval action buttons are shown based on your permissions, such as Review and Approve.
- Select one of the workflow action buttons to continue.

[![16.png](https://wiki.cuteinfocomm.com/uploads/images/gallery/2026-11/scaled-1680-/16.png)](https://wiki.cuteinfocomm.com/uploads/images/gallery/2026-11/16.png)

**Figure 17.** Records selected, with the workflow action buttons available.

## 5.4 Complete the Assignee Window

STEPS

- The Assignee window opens.
- Review the Assignee and Notify Users fields.
- Select the action button in the window to submit.

[![17.png](https://wiki.cuteinfocomm.com/uploads/images/gallery/2026-11/scaled-1680-/17.png)](https://wiki.cuteinfocomm.com/uploads/images/gallery/2026-11/17.png)

**Figure 18.** Assignee window for a bulk approval action.

## 5.5 Wait for the Progress to Complete

After you submit, a progress indicator is displayed. Wait until the progress reaches 100%.

[![18.png](https://wiki.cuteinfocomm.com/uploads/images/gallery/2026-11/scaled-1680-/18.png)](https://wiki.cuteinfocomm.com/uploads/images/gallery/2026-11/18.png)

**Figure 19.** Progress indicator shown while the selected records are processed.

# <span style="color: #3598db;">6 Notes</span>

<table id="bkmrk-please-note-%E2%80%A2%C2%A0%C2%A0%C2%A0%C2%A0-th" style="width: 950px;" width="653"><tbody><tr><td style="width: 808px;" width="653">**PLEASE NOTE**

• The actions and fields available to each user may vary depending on their permissions, workflow stage, leave type and configured settings.

• Some leave types may require additional information or supporting documents.

• If an expected action or field is not available, contact your system administrator.

</td></tr></tbody></table>

### <span style="color: #169179;"> </span>