# cuteOffice
# Introduction
cuteOffice ERP
# cuteOffice ERP
cuteOffice in core helps to manage HR, Procurement, Sales and finance. At the same time we have operations module for different verticals such as NDT, Scaffolding, Transport, Accounting Firms, Service Management, Permit to Work, HSE etc
- Comprehensive Suite: Cute Infocomm Solutions offers an all-in-one ERP solution covering HRM, procurement, sales, and finance, streamlining your entire business.
- Customization: Our ERP can be tailored to fit your unique business needs, ensuring maximum efficiency.
- User-Friendly Interface: Cute Infocomm's intuitive interface is designed for ease of use, reducing the learning curve for your team.
- Mobile Accessibility: Access your ERP on-the-go, making remote work and decision-making easier.
- Data Security: We prioritize data security, implementing the latest encryption and security protocols to protect your sensitive information.
- Scalability: Our ERP grows with your business, accommodating expansion and increasing demands.
- Real-time Analytics: Gain insights into your business operations with real-time data and analytics, enabling informed decisions.
- Seamless Integration: Easily integrate with other software and systems to enhance productivity.
- Cost Efficiency: Cut operational costs and improve resource allocation through streamlined processes.
- Compliance Management: Ensure regulatory compliance effortlessly with built-in compliance features.
- Vendor Collaboration: Collaborate seamlessly with suppliers and vendors, optimizing procurement processes.
- Customer Relationship Management: Strengthen customer relationships with a holistic view of sales and service data.
- Automation: Reduce manual tasks with automation features, saving time and reducing errors.
- Forecasting Tools: Make data-driven forecasts to optimize inventory and sales strategies.
- Employee Self-Service: Empower your staff with self-service options for HR tasks, reducing HR workload.
- Real-time Inventory Tracking: Keep tight control over your inventory levels, reducing stockouts and overstocking.
- Financial Control: Maintain a clear overview of your finances with robust financial management tools.
- User Training and Support: Receive comprehensive training and ongoing support to maximize your ERP's potential.
- Cloud or On-Premises: Choose between cloud-based or on-premises deployment options to suit your preferences.
- Industry Expertise: Benefit from Cute Infocomm's deep industry knowledge, ensuring your ERP aligns with industry best practices.
These USPs showcase the strengths of Cute Infocomm Solutions' ERP software and how it can provide significant value to businesses across various sectors.
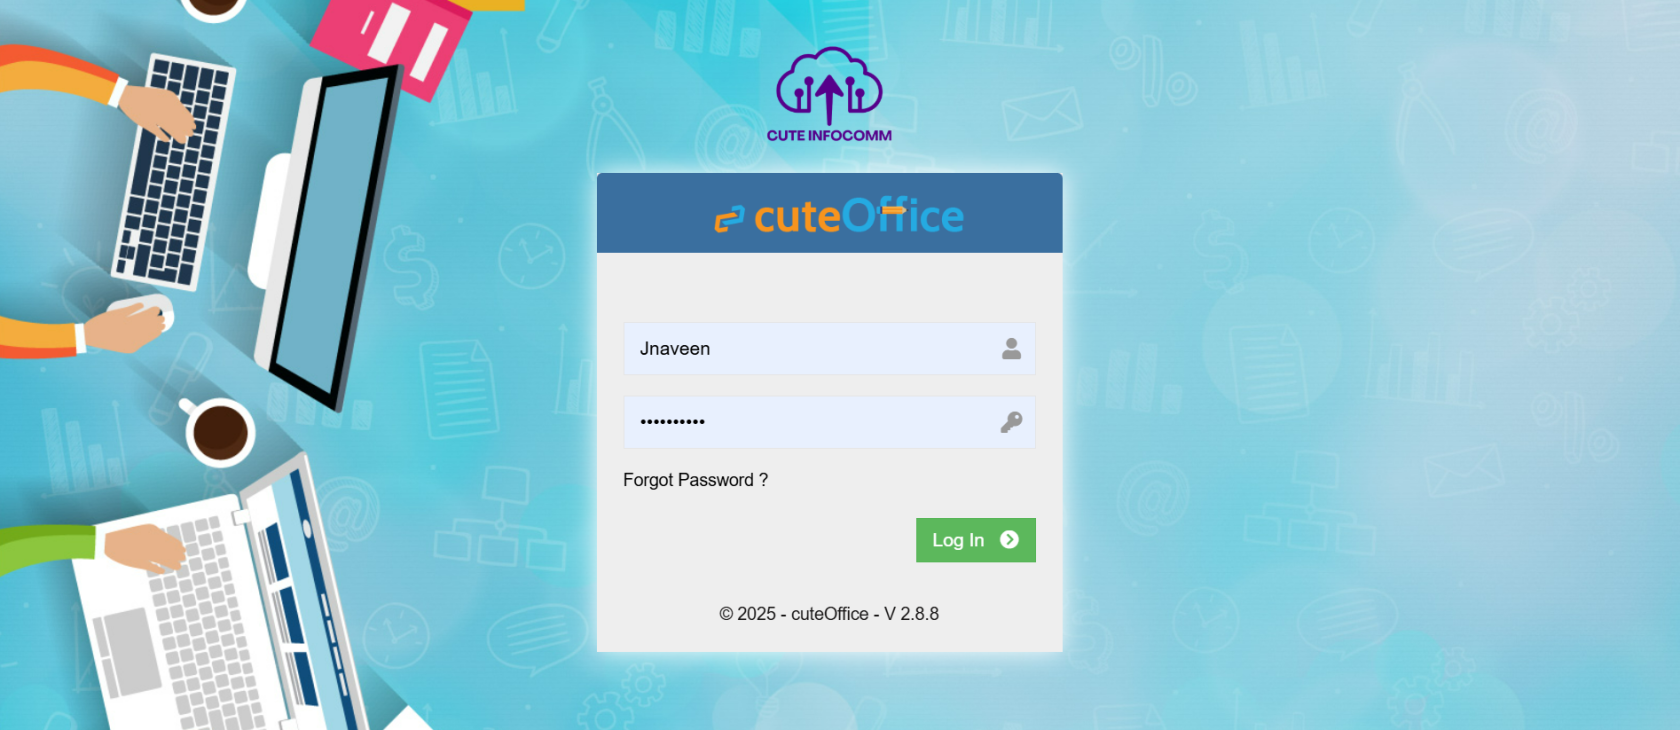
# Login
## 🧾 cuteOffice Login Page
### 📍 Website
**URL:** [https://<your company>.cuteoffice.net](https://cis.cuteoffice.net/)
- - - - - -
### 🔐 Purpose of the Login Page
The login page is the secure gateway to access your organization’s cuteOffice modules. Only authorized users with valid credentials can log in.
Make sure your company logo displays.
[](https://wiki.cuteinfocomm.com/uploads/images/gallery/2025-07/image-1751537787712.png)
- - - - - -
### 👣 Steps to Log In
1. **Open the Website:**
- Visit **[https://<your company>.cuteoffice.net](https://cis.cuteoffice.net/)** on your browser.
2. **Enter Your Credentials:**
- **Username / Email:** Enter your registered username or email ID.
- **Password:** Enter your secure password.
3. **Click ‘Login’:**
- Hit the **Login** button to proceed.
4. **Two-Factor Authentication (if enabled):**
- Follow the instructions below in 2FA section.
- - - - - -
### 🆘 Forgot Password?
- Click on the **“Forgot Password?”** link.
- Enter your email address.
- You will receive a OTP in your email which you can enter to reset your password.
- Follow the instructions to reset your password.
- - - - - -
### ✅ Login Success
- Upon successful login, you will be redirected to your **Dashboard**.
- From here, you can access modules like Payroll, Procurement, Sales, Accounting, Scaffolding, HR, Maintenance, and more based on your role and the modules the company has purchased.
- - - - - -
### ❌ Login Errors
- **Invalid Username/Password:** Double-check credentials.
- **Account Locked:** Too many failed attempts? Contact your system administrator.
- - - - - -
### 🔐 Security Notes
- Your credentials are encrypted and transmitted over HTTPS.
- Ensure you're using a secure network.
- Do not share your password with anyone.
- Always **log out** after use, especially on shared devices.
- - - - - -
### 📞 Need Help?
If you're having trouble logging in, contact your cuteOffice administrator or email us at **[cuteofficesupport@cuteinfocomm.com](mailto:Enquiry@cuteinfocomm.com)**.
- - - - - -
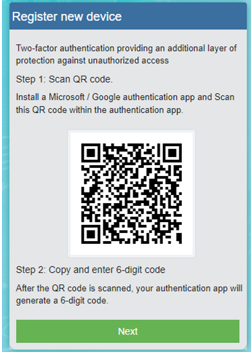
### 🔐 Two-Factor Authentication (2FA)
If your organization has enabled **Two-Factor Authentication (2FA)**, you will need to complete an additional verification step during login.
#### 🛠️ Setting Up 2FA (First-Time Only)
On your first login, the system will prompt you to enable 2FA. Follow these steps:
1. **Download an Authenticator App:**
- Install **Google Authenticator** or **Microsoft Authenticator** from the Play Store (Android) or App Store (iOS).
2. **Scan the QR Code:**
- Open the app and scan the QR code displayed on your screen.
- [](https://wiki.cuteinfocomm.com/uploads/images/gallery/2025-03/image-1742988135169.png)
3. **Enter the Generated OTP:**
- The app will generate a 6-digit code. Enter it in the provided field to complete setup.
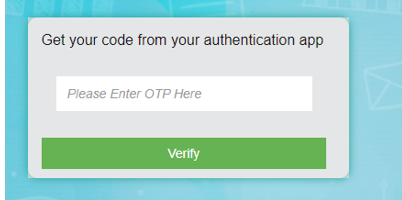
#### 🔁 Using 2FA During Login
After setup, you will be required to enter a new 6-digit OTP from the authenticator app **each time you log in**.
[](https://wiki.cuteinfocomm.com/uploads/images/gallery/2025-03/image-1742988120871.png)
This ensures that only authorized users with access to both the password and the registered mobile device can log in.
- - - - - -# Human Resource
Human Resource (HRM) management. Employee data, leave details, attendance, planning, performance appraisal, expense claim are all part of HR module.
# Employee Data
The HRM module in the ***cuteOffice*** application helps HR admins in streamlining the entire functions within an organization like managing the employee related information and company related information. Functionality present in the HRM module helps you to add employee’s basic data, employee’s and company’s master data, and company’s property details.
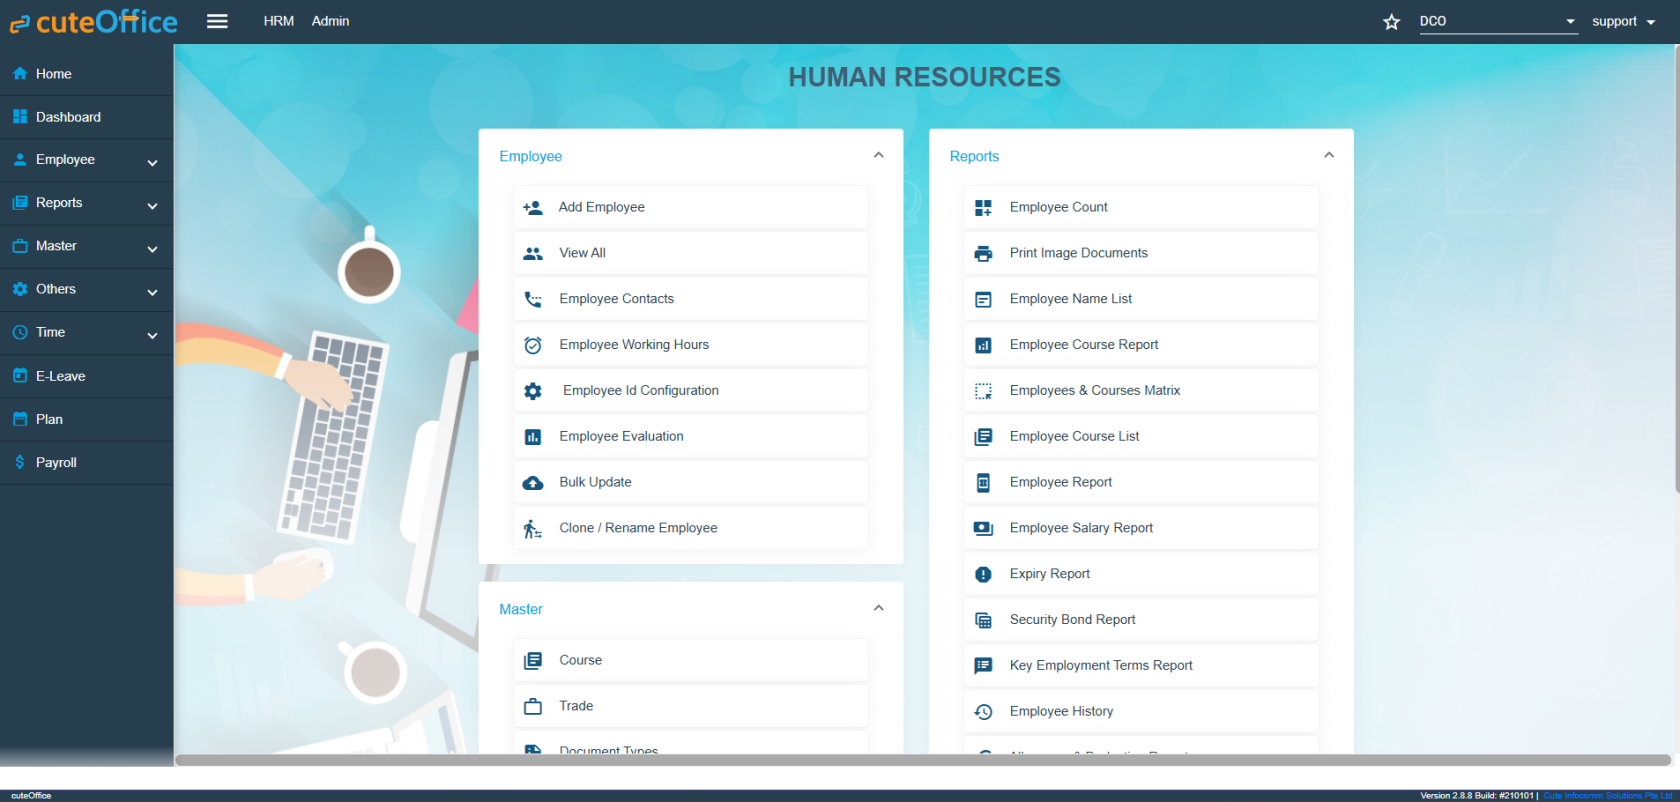
If you want to navigate to the **HRM** module, do the following,
Click the **HRM** menu in the menu bar. The **HUMAN RESOURCES** page opens.
[](https://wiki.cuteinfocomm.com/uploads/images/gallery/2026-05/image-1778224644440.png)
Humane Resource Menu Page
The **HUMAN RESOURCES** page consists the following sub menus:
- **Employee -** Allows HR admin to add employee’s basic details such as Name, DOB, Employee Type, Nationality and so on.
- **Reports –** Helps HR admin to view the various reports corresponding to the employee’s data.
- **Master** - Allows HR admin to add master data details of employee and company.
- **Others** - Allows HR admin to add the details of vehicles belongs to company, insurance details of employees, and salary addition and deduction details.
## Employee
The **Employee** submenu in the **HRM** menu helps you to add the employee details that is both personal and professional details. The **Employee** submenu contains the following tabs,
- Employee ID config
- Add Employee
- View All
- View Employee Contacts
- Employee Working Hours
### Employee ID Configuration
When creating the new employees in the system, the employee ID is automatically generated. How the employee number to be generated is configurable by the administrator.
- Click and select the company in the **Employee ID Configuration** page, it shows the current settings for the ID generator. [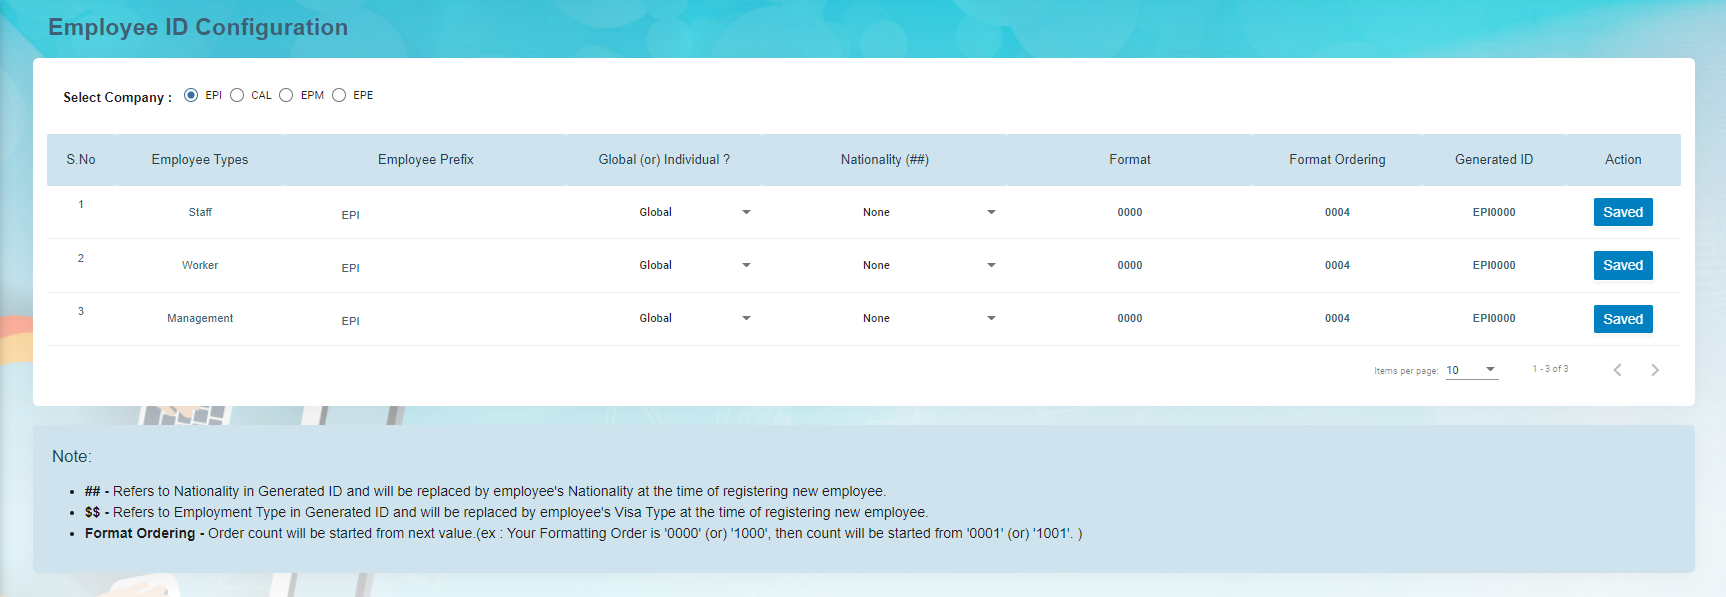](http://wiki.cuteinfocomm.com/uploads/images/gallery/2022-09/image-1662065090441.png)
- The following are the currently supported variables that can be used for the ID generator.
1. 1. Employee Type – Based on the Over-all Type configured for the company
2. Employee Prefix – Defaulted to company abbreviation and can be changed.
3. Global/Individual – Employee Number is globally increased by Employee Type or Individually managed by employee type
- - Global means the number will be global for the company irrespective of the employee type.
- Individual means, the employee ID running number will be maintained individually for each employee type.
4. Nationality None / Before Employee ID / After Employee ID – If the nationality to be as part of the employee number where it should be appearing. Choose None if the employee ID does not have the country code.
5. Set the number with which the employee ID should be incremented next when a new employee is created. The current number shown is already used for the previous employee created in the system.
**Note:** For new company, complete the initial employee id configuration before importing or adding the employees records.
### Add Employee Data
The **View All** tab in the **Employee** submenu helps you to add the details of a new employee and view the added employee details including their profile percentage. The profile percentage of the employee lets you easily identify the incomplete details of employee.
To add a new employee, do the following steps,
1. Click the **View All** tab in the **Employee** . The **View All Employee page** opens. [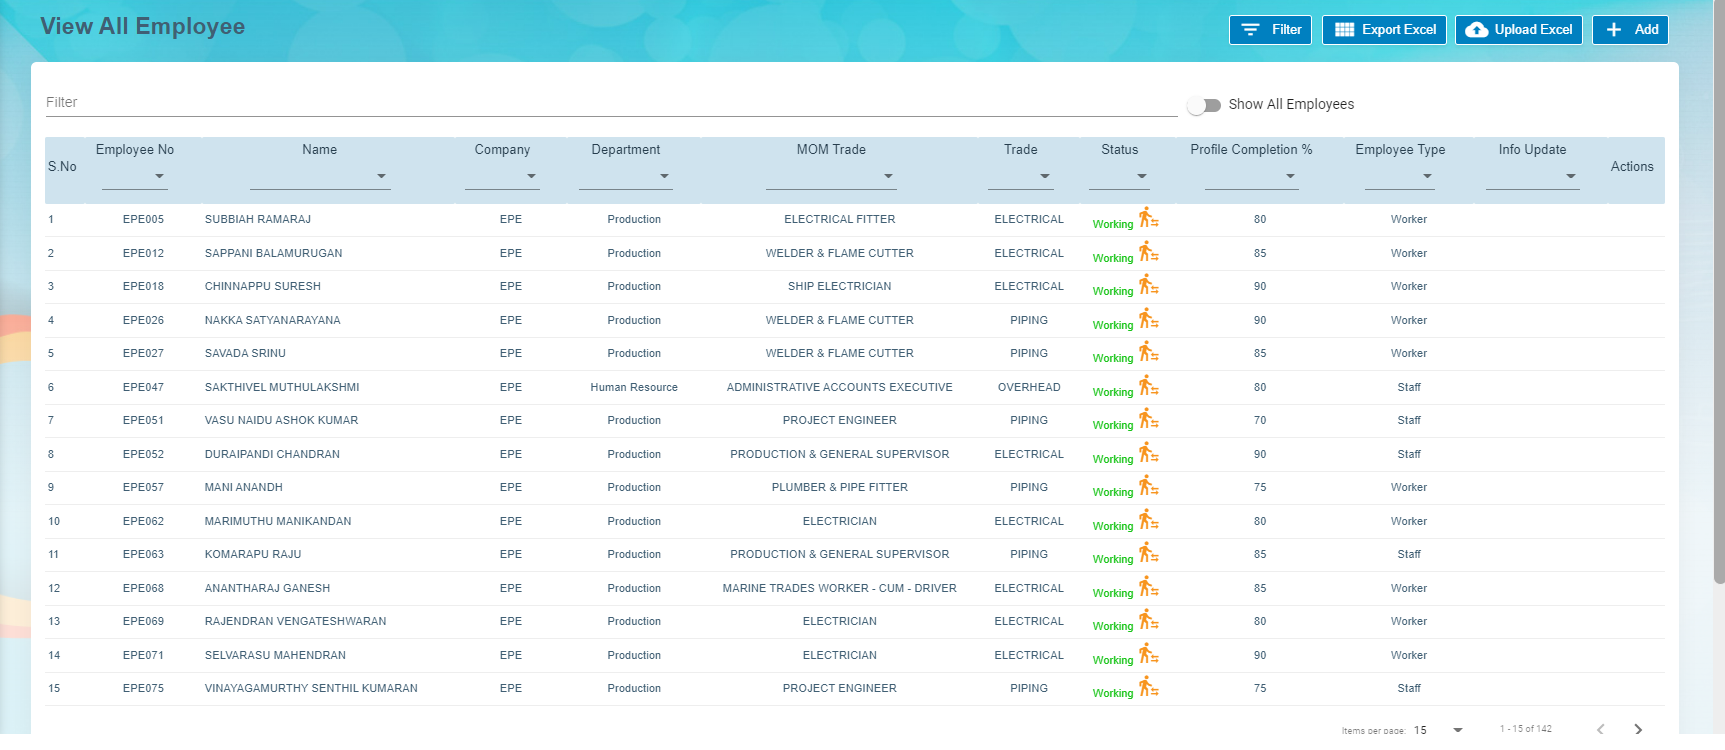](http://wiki.cuteinfocomm.com/uploads/images/gallery/2022-09/image-1662065050636.png)
2. Click (**Add** button) in the **View All Employee**. The **Add Employee** window opens. [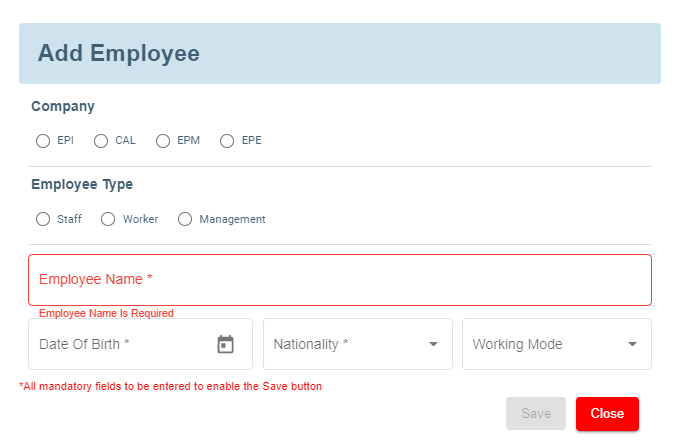](http://wiki.cuteinfocomm.com/uploads/images/gallery/2022-09/image-1662065171103.png)
**Note**: The fields notified with a symbol (\*) are mandatory. You must enter the relevant details in that fields before saving.
3. In the **Company** field, select a company from the given list of companies.
4. In the **Employee Type** field, select the employee type.
5. In the **Employee Name** box, enter the employee name.
6. In the **Date of Birth** box, enter the birth date of the employee.
7. In the **Nationality** box, select the nationality of the employee.
8. Click **Save**. The employee is created and a new employee ID is assigned to the employee. The **Photo ID Document Management** page opens.
#### Add Photo ID Information of Employee
In the **Photo ID Document Management** page, you can enter the employee’s information according to the photo ID given by the employee.
**Note**: Before adding the employee’s photo ID information, make sure that the company you have selected using the [**Company**](#company) field is in Singapore or other country.
If the selected company is in Singapore, the **Photo ID Document Management** page contains the **Singapore Photo ID Management** field. See below figure.
[](http://wiki.cuteinfocomm.com/uploads/images/gallery/2022-09/image-1662071606998.png)
If the selected company is in other country, the **Photo ID Document Management** page contains the **Other Photo ID Management** field. See below figure. (Note: In Company Settings, change the default value "N/A" to the company’s country name (other than Singapore)).
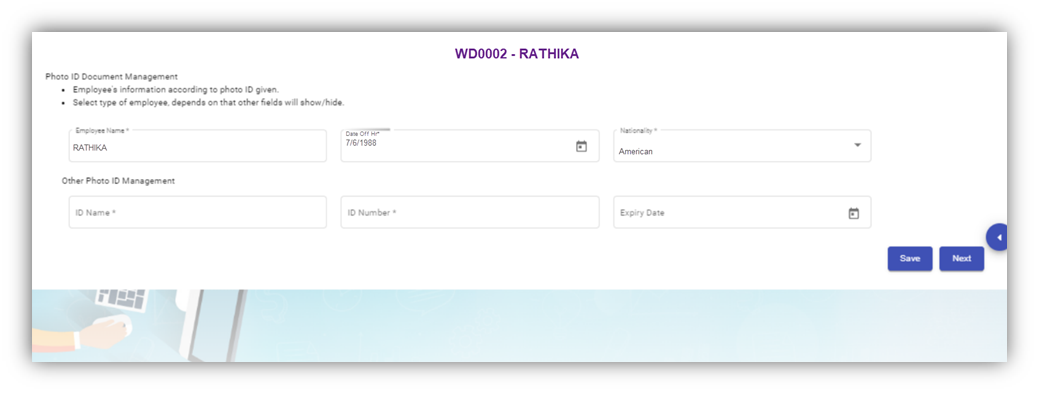
Photo ID Management (Non-Singapore)
##### **Singapore Photo ID Management**
Do one of the following steps to enter the relevant details in the **Singapore Photo ID Management** field based on the selection of type of employee in the **Employee Type** box.
- If the employee is citizen of Singapore, select the **Citizen** option in the **Employee Type.** The **Singapore Photo ID Management** field shows the following boxes based on the selected **Citizen** option. Fill the relevant information in the following boxes,[](http://wiki.cuteinfocomm.com/uploads/images/gallery/2022-09/image-1662071606998.png)
- 1. In the **NRIC/FIN Number** box, enter the NRIC/FIN number.
2. In the **Photo Id Barcode**, enter the barcode scanned result.
3. In the **Issued Date** box, select the issued date of citizenship.
4. In the **Sector** box, select the sector from a drop-down list.
5. Click **Save**. The employee’s photo ID information will be added successfully in the system.
- If the employee is permanent resident of Singapore, select the **Permanent Resident** option in the **Employee Type.** The **Singapore Photo ID Management** field shows the following boxes based on the selected **Permanent Resident** option. Fill the relevant information in the following boxes,
1. In the **NRIC/FIN Number** box, enter the NRIC/FIN number.
2. In the **Photo Id Barcode**, enter the barcode scanned result.
3. In the **Issued Date** box, select the issued date of permanent resident.
4. In the **Sector** box, select the sector from a drop-down list.
5. Click **Save**. The employee’s photo ID information will be added successfully in the system.
- If the employee is an employment pass holder, select the **Employment Pass** option in the **Employee Type.** The **Singapore Photo ID Management** field shows the following boxes based on the selected **Employment Pass** option. Fill the relevant information in the following boxes,
1. In the **NRIC/FIN Number** box, enter the NRIC/FIN number.
2. In the **Photo Id Barcode**, enter the barcode scanned result.
3. In the **Issued Date** box, select the issued date of employment pass.
4. In the **Sector** box, select the sector from a drop-down list.
5. In the **Date of Application** box, select the applied date of employment pass.
6. In the **ID Expiry Date** box, select the expiry date of the employment pass ID.
7. Click **Save**. The employee’s photo ID information will be added successfully in the system.
- If the employee is a S pass holder, select the **S Pass** option in the **Employee Type.** The **Singapore Photo ID Management** field shows the following boxes based on the selected **S Pass** option. Fill the relevant information in the following boxes,
1. In the **NRIC/FIN Number** box, enter the NRIC/FIN number.
2. In the **Photo Id Barcode**, enter the barcode scanned result.
3. In the **Issued Date** box, select the issued date of S pass.
4. In the **Sector** box, select the sector from a drop-down list.
5. In the **Date of Application** box, select the applied date of S pass.
6. In the **ID Expiry Date** box, select the expiry date of the S pass ID.
7. In the **Levy Type** box, select the levy type from a drop-down list.
8. In the **Levy Amount Type** box, select the levy amount type from a drop-down list.
9. In the **Levy Amount** box, enter the levy amount.
10. Click **Save**. The employee’s photo ID information will be added successfully in the system.
- If the employee is a student pass holder, select the **Student Pass** option in the **Employee Type.** The **Singapore Photo ID Management** field shows the following boxes based on the selected **Student Pass** option. Fill the relevant information in the following boxes,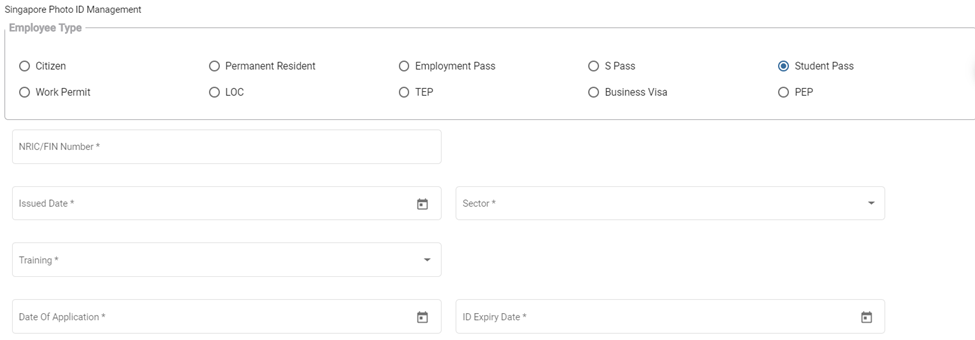
1. In the **NRIC/FIN Number** box, enter the NRIC/FIN number.
2. In the **Photo Id Barcode**, enter the barcode scanned result.
3. In the **Issued Date** box, select the issued date of student pass.
4. In the **Sector** box, select the sector from a drop-down list.
5. In the **Training** box, select the training type from a drop-down list.
6. In the **Date of Application** box, select the applied date of student pass.
7. In the **ID Expiry Date** box, select the expiry date of the student pass ID.
8. Click **Save**. The employee’s photo ID information will be added successfully in the system.
- If the employee is a work permit holder, select the **Work Permit** option in the **Employee Type.** The **Singapore Photo ID Management** field shows the following boxes based on the selected **Work Permit** option. Fill the relevant information in the following boxes,
1. In the **NRIC/FIN Number** box, enter the NRIC/FIN number.
2. In the **Photo Id Barcode**, enter the barcode scanned result.
3. In the **Issued Date** box, select the issued date of work permit.
4. In the **Sector** box, select the sector from a drop-down list.
5. In the **Date of Application** box, select the applied date of work permit.
6. In the **ID Expiry Date** box, select the expiry date of the work permit ID.
7. In the **Levy Type** box, select the levy type from a drop-down list.
8. In the **Levy Amount Type** box, select the levy amount type from a drop-down list.
9. In the **Levy Amount** box, enter the levy amount.
10. In the **Security Bond Expiry** box, select the expiry date of security bond.
11. In the **Security Bond Guarantee Number** box, enter the guarantee number of security bond.
12. In the **Sum Insured** box, enter the insured amount.
13. In the **Insurer** box, enter the name of insurer.
14. In the **Number of Years** box, enter insurance coverage years.
15. In the **Duration** box, enter the duration of the insurance.
16. In the **Start Date** and **End Date** boxes, select the start and end date of the insurance.
17. If the indemnity is received, select the checkbox of the **Is Indemnity Received** option.
18. If the indemnity is postre, select the checkbox of the **Is Indemnity Postre** option.
19. If the discharge status is available, select the checkbox of the **Discharge status** option.
20. Click **Save**. The employee’s photo ID information will be added successfully in the system.
- If the employee is a LOC holder, select the **LOC** option in the **Employee Type.** The **Singapore Photo ID Management** field shows the following boxes based on the selected **LOC** option. Fill the relevant information in the following boxes,
1. In the **NRIC/FIN Number** box, enter the NRIC/FIN number.
2. In the **Photo Id Barcode**, enter the barcode scanned result.
3. In the **Issued Date** box, select the issued date of LOC.
4. In the **Sector** box, select the sector from a drop-down list.
5. In the **Date of Application** box, select the applied date of LOC.
6. In the **ID Expiry Date** box, select the expiry date of the LOC ID.
7. Click **Save**. The employee’s photo ID information will be added successfully in the system.
- If the employee is a TEP holder, select the **TEP** option in the **Employee Type.** The **Singapore Photo ID Management** field shows the following boxes based on the selected **TEP** option. Fill the relevant information in the following boxes,
1. In the **NRIC/FIN Number** box, enter the NRIC/FIN number.
2. In the **Photo Id Barcode**, enter the barcode scanned result.
3. In the **Issued Date** box, select the issued date of TEP.
4. In the **Sector** box, select the sector from a drop-down list.
5. In the **Training** box, select the training type from a drop-down list.
6. In the **Date of Application** box, select the applied date of TEP.
7. In the **ID Expiry Date** box, select the expiry date of the TEP ID.
8. Click **Save**. The employee’s photo ID information will be added successfully in the system.
- If the employee is a business visa holder, select the **Business Visa** option in the **Employee Type.** The **Singapore Photo ID Management** field shows the following boxes based on the selected **Business Visa** option. Fill the relevant information in the following boxes,
1. In the **Issued Date** box, select the issued date of business visa.
2. In the **Sector** box, select the sector from a drop-down list.
3. In the **Type of Visa** box, enter the visa type.
4. In the **Sponsorship Particulars** box, enter the sponsorship details.
5. In the **Training** box, select the training type from a drop-down list.
6. In the **Date of Application** box, select the applied date of business visa.
7. In the **Expiry Date** box, select the expiry date of the business visa.
8. In the **Purpose** box, enter the purpose of getting business visa.
9. In the **Remarks** box, enter your remarks if any.
10. Click **Save**. The employee’s photo ID information will be added successfully in the system.
- If the employee is a PEP holder, select the **PEP** option in the **Employee Type.** The **Singapore Photo ID Management** field shows the following boxes based on the selected **PEP** option. Fill the relevant information in the following boxes,
1. In the **NRIC/FIN Number** box, enter the NRIC/FIN number.
2. In the **Photo Id Barcode**, enter the barcode scanned result.
3. In the **Issued Date** box, select the issued date of PEP.
4. In the **Sector** box, select the sector from a drop-down list.
5. In the **Date of Application** box, select the applied date of PEP.
6. In the **ID Expiry Date** box, select the expiry date of the PEP ID.
7. Click **Save**. The employee’s photo ID information will be added successfully in the system.
##### **Other Photo ID Management (Non-Singapore)**
To add employee’s photo ID information in the Other Photo ID Management field
Enter the relevant details in the Other Photo ID Management field based on the selection of type of employee in the Employee Type box.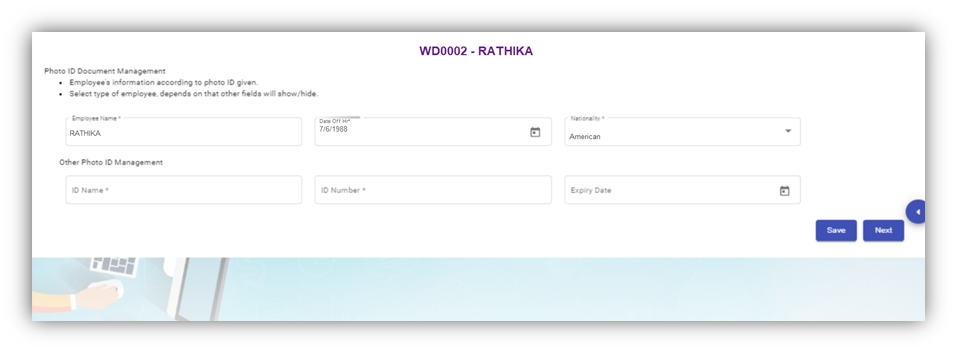
- 1. In the **ID Name** box, enter the name of the employee ID.
2. In the **ID Number** box, enter the number of the employee ID.
3. In the **Expiry Date** box, select the expiry date of the employee ID.
4. Click **Save**. The employee’s photo ID information related with the company located in other country is successfully added.
5. Click **Next**. The **photo ID Image Management** page opens.
#### Add Photo ID Image of Employee
In the **Photo ID Image Management** page, you can upload the image of the photo ID which is the national identification card given to the employee. You can upload both the front and back side images of the photo ID, and the Singapore SGWorkPass images.
**Note**: The photo ID image you want to upload should be in PNG or JPEG format. The image size should not be more than 1 MB.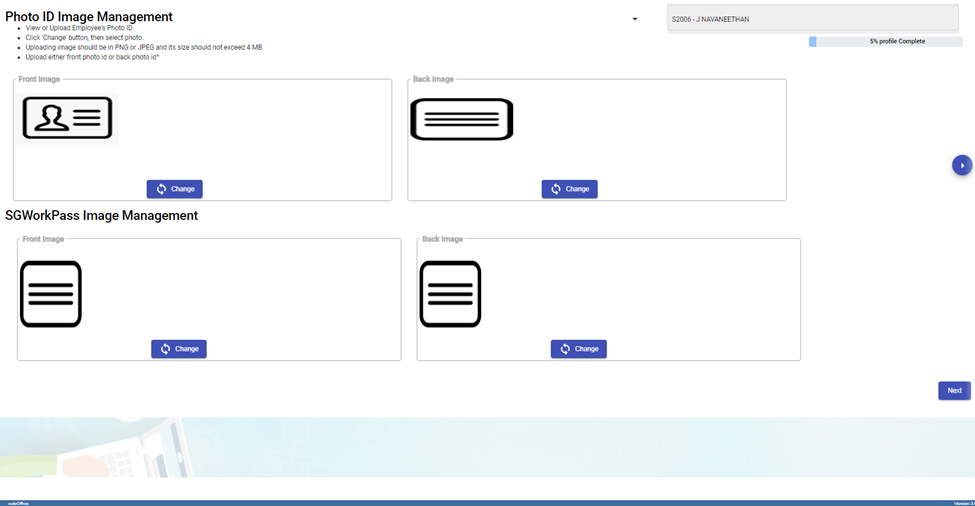
1. Click (**Change** button) in the **Front Image** field and select a front image of the phot ID or drag and drop the image.

There is an option provided to trim the image as required. Click Save. The selected front image of the photo ID will be displayed in the **Front Image** field.
2. Click (**Change** button) in the **Back-Image** field and select a back image of the phot ID and do the same operations. The selected back image of the photo ID will be displayed in the **Back-Image** field.
3. Click **Next**. The **Photo Management** page opens.
#### Add Photo of Employee
In the **Photo Management** page, you can upload an image of the employee.
**Note**: The image you want to upload should be in PNG or JPEG format. The image size should not be more than 1 MB.
1. Click (**Change** button) in the **Employee Image** field and select an image of the employee. The selected image of the employee will be displayed in the **Employee** **Image** field.
2. Click **Next**. The **Passport Information** page opens.
#### Add Passport Information of Employee
In the **Passport Information** page, you can add information of the employee’s passport.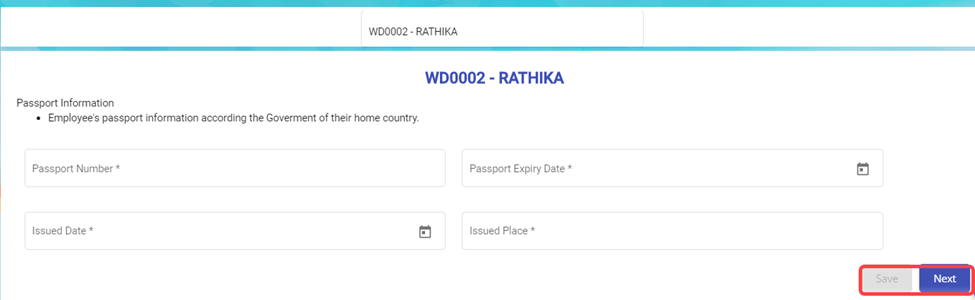
1. In the Passport Number box, enter the number of the employee’s passport.
2. In the Passport Expiry Date box, enter the expiry date of the passport.
3. In the Issued Date box, select the passport issued date.
4. In the Issued Place box, enter the passport issued place.
5. Click **Save**. The added passport information is successfully saved.
6. Click **Next**. The **Passport Image Management** page opens.
#### Add Image of Employee’s Passport
In the **Passport Image Management** page, you can add an image of the employee’s passport. You can upload both the front and back side images of the passport.
**Note**: The passport image you want to upload should be in PNG or JPEG format. The image size should not be more than 200 KB.
1. Click (**Change** button) in the **Front Image** field and select a front image of the passport. The selected front image of the passport will be displayed in the **Front Image** field.
2. Click (**Change** button) in the **Back-Image** field and select a back image of the passport. The selected back image of the passport will be displayed in the **Back-Image** field.
3. Click **Next**. The **Passport Collection and Issuance** page opens.
#### Add Collection and Issuance Details of Employee’s Passport
In the **Passport Collection and Issuance** page, you can add the collection and issuance details of the employee passport. If you have added the collection and issuance details like collection date and issuance date, you can track the employee’s passport issuance and return history.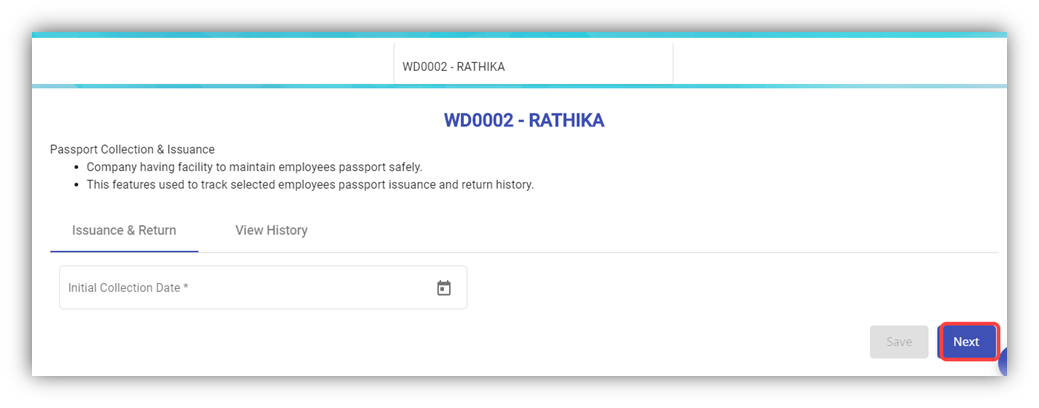
1. In the **Initial Collection Date** box, select the date when the passport has collected from the employee.
2. Click **Next**. The **Employee Passport Issuance Details** field opens.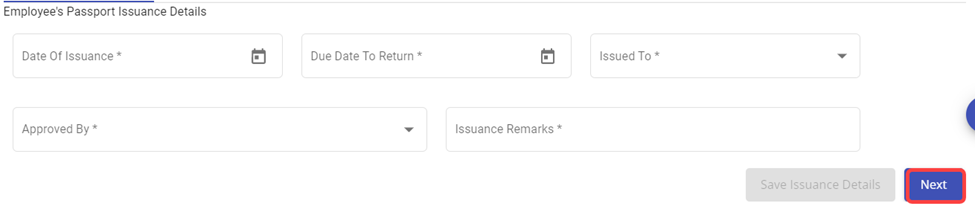
3. In the **Date of Issuance** box, select the date when the passport to be issued to the employee.
4. In the **Due Date to Return** box, select the due date to return the passport.
5. In the **Issued To** box, select the name of a person to whom the passport should be issued.
6. In the **Approved By** box, select the name of a person who should approve the issuance of passport.
7. In the **Issuance Remarks** box, enter your remarks if any.
8. Once issued, it can be returned back for safe keeping again.
9. Click **Next**. The **Official Information** page opens.
#### Add Official Information of Employee
In the **Official Information** page, you can add the official information of the employee.
1. In the **Official Information** field,
- In the **Working Mode** box, select the working mode of the employee from a drop-down list.
- In the **Department** box, select a department which the employee belongs to.
- In the **Designation** box, select the designation of the employee.
- In the **Date of Join** box, select the date of joining of the employee.
- In the **Supervisor** box, select the supervisor of the employee from a drop-down list.
- In the **First DOJ** box, select the first date of joining.
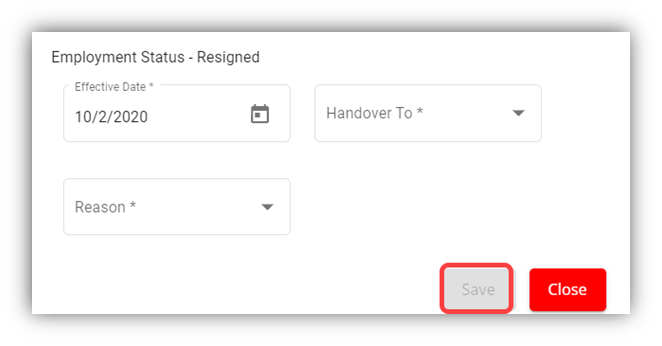
- In the **Employment Status** box:
- **Resigned Staff.** If the employee has resigned, select the **Resigned** option in the **Employment Status.** A new pop-up window opens to enter the resignation details while saving the added official information. In the Effective Date box, enter the date of relieving; In the Handover To box, select an employee to handover the resigned employee work; In the Reason box, select the reason of relieving. Click Save.
- - - Waiting for Clearance
- Deleted
- Terminated
**Note**: If you have selected **Resigned**, **Deleted**, and **Terminated** options in the **Employment Status** of the employee, you cannot add more details about employee and edit the added details of the employee.
1. -
- In the **Employment Type** box, select the type of employment whether **Permanent** or **Term Contract**.
- **Note**: If you have selected **Term Contract**, enter the duration of employment in the **Duration of Employment** box.
- In the **Probation Days** box, enter the probation period detail.
- In the **ARE Trade** box, select the trade of the employee from a drop-down list.
- **Note**: The **ARE Trade** may change according to the company.
- In the **Contract Expiry** box, select the contract expiry date.
- if you want to exclude the employee from cuteTime, select the checkbox of the **Exclude from cuteTime?**
- In the **MOM Trade** box, select the MOM trade from a drop-down list.
- In the **Official Email Id** box, enter the official email id of the employee.
- In the **Attendance Id** box, enter the attendance id of the employee.
- In the **Public Holiday Group** box, select the country you want to follow the holidays of the same.
- In the **Is NS eligible?** Box, select **Yes** if the employee is eligible to serve NS otherwise select
- In the **Grade** box, enter the grade number of the employee.
- In the **Batch** box, enter the batch number of the employee.
- In the **Supplier Company** box, select the supplier company from a drop-down list.
- In the **Before Probation** box, enter the notice period days for termination of employee before completing the probation period.
- In the **After-Probation** box, enter the notice period days for termination of employee after completing the probation period.
- If the employee is working under the employment act, select the checkbox of the **Is Under Employment Act**
2. In the **PPE and Size** field,
- In the **PPE Size** box, select the required size of PPE.
- In the **Shoe Size** box, select the shoe size of the employee.
- In the **PPE and Shoe Remarks** box, enter your remarks if any.
3. In the **Bank Information** field, enter the bank account information of employee.
- In the **Bank Name** box, enter the bank name.
- In the **Bank Account Number** box, enter the bank account number.
- In the **Bank Account Type** box, enter the type of bank account.
4. If you want to attach any file to add extra information about the employee, click **Choose File** and select the respective file.
5. Click **Save**.
6. Click **Next**. The **Experience and Qualification** page opens with the **Experience** and **Educational Qualification** options.
#### Add Experience and Qualification Details of Employee
In the **Experience and Qualification** page, you can add working experience and educational qualification details of the employee.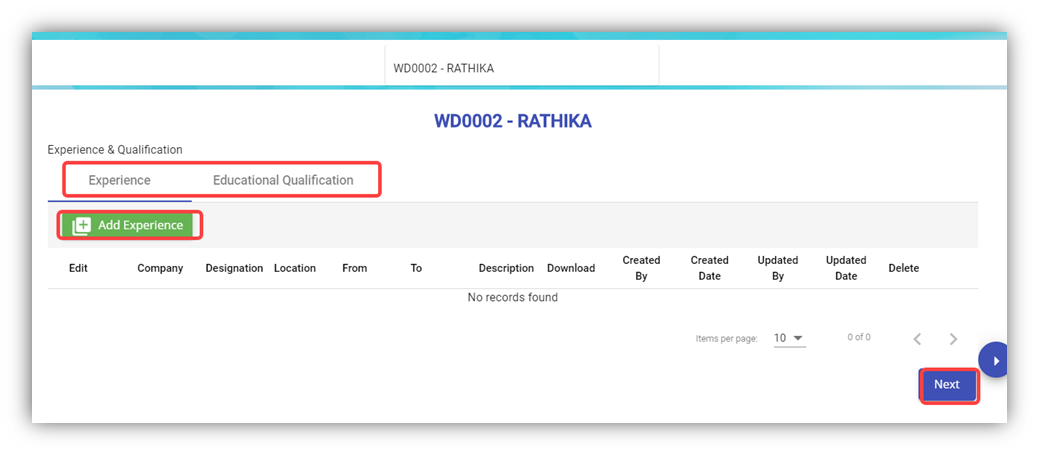
- To add work experience details of the employee, click (**Add Experience** button). The Add Experience window opens.
1. In the **Company** box, enter the company name.
2. In the **Designation** box, enter the designation of the employee.
3. In the **From** and **To** boxes, select the working period of the employee.
4. In the **Location** box, enter the location of the company.
5. In the **Description** box, enter the description about the job nature.
6. If you want to attach any file to add extra information about the work experience, click **Choose File** and select the respective file.
7. Click **Save**. The work experience details of the employee are successfully added and listed in the **Experience and Qualification** page.
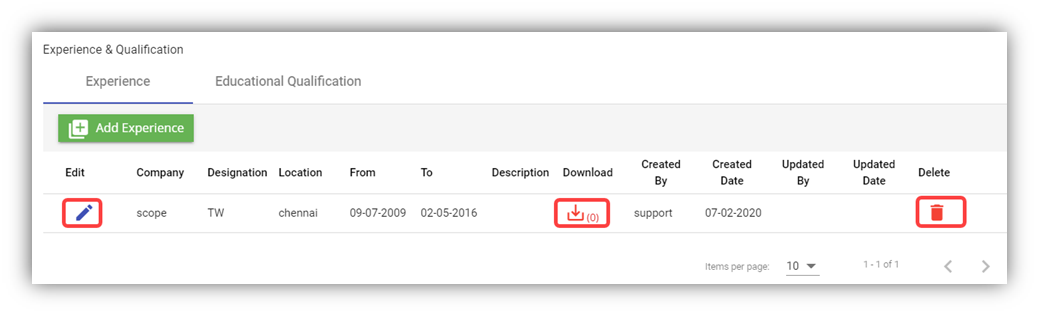**Note**: If you want to edit the added work experience details, click (Edit icon). If you want to download the added work experience details, click (Download icon). If you want to delete the added work experience details, click  (Delete icon).
- To add the educational qualification of the employee, click the **Educational Qualification** option in the upper of the **Experience and Qualification**
1. 1. Click (**Add Qualification** button). The **Add Qualification** Window opens.
2. In the **Qualification** box, enter the educational qualification of the employee.
3. In the **Specialization** box, enter the specialization in education.
4. In the **University** box, enter the name of the university.
5. In the **Country** box, enter the country name.
6. In the **Year of Graduation** box, select the year when the employee gets graduated.
7. In the **Description** box, enter the description about the employee’s education.
8. If you want to attach any file to add extra information about the educational qualification, click **Choose File** and select the respective file.
9. Click **Save**. The educational qualification details of the employee are successfully added and listed in the **Experience and Qualification** page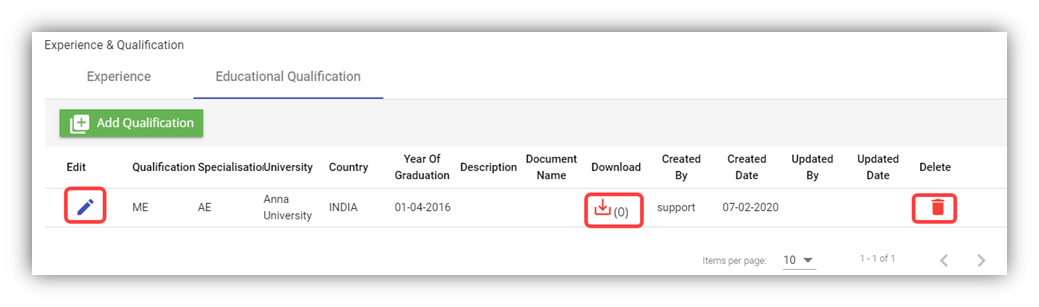**Note**: If you want to edit the added educational qualification details, click (Edit icon). If you want to download the added educational qualification details, click (Download icon). If you want to delete the added educational qualification details, click  (Delete icon).
10. Click **Next**. The **Pay Eligibility** page opens including the **Salary Details** and **View History** options.
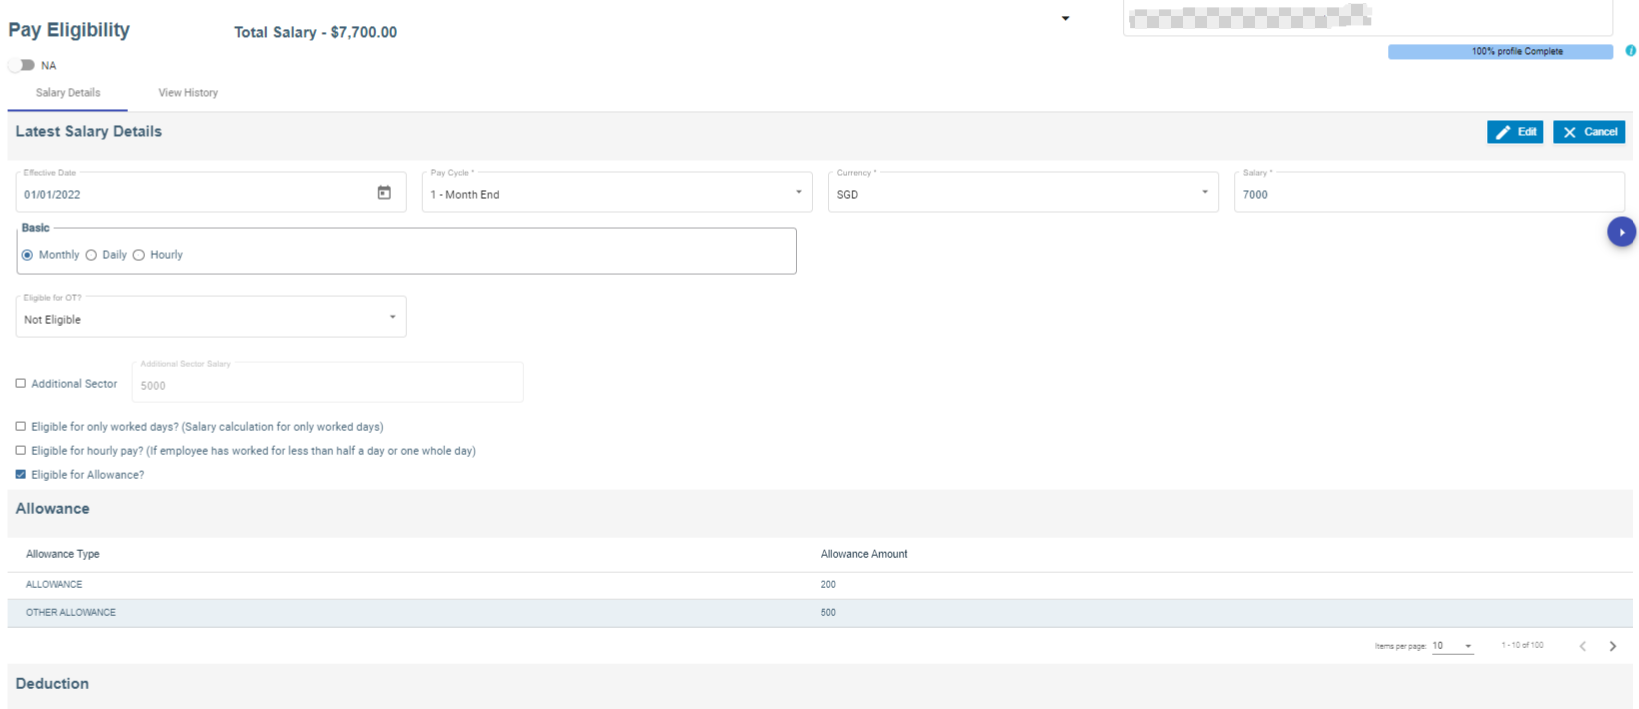
#### Add Pay Eligibility Details of Employee
In the **Pay Eligibility** page, you can add the salary details of the employee.
[](http://wiki.cuteinfocomm.com/uploads/images/gallery/2024-02/image-1708494832932.png)
1. In the **Effective Date** box, select the effective date for calculating salary for the employee.
2. In the **Pay Cycle** box, select the pay cycle type.
3. In the **Currency** box, select the currency from a drop-down list.
4. In the **Salary** box, enter the salary amount.
5. In the **Basic** box, select the basic pay method that is whether **Monthly**, **Daily** or **Hourly**
6. If the employee is eligible to get pay only for worked days, select the checkbox of the **Eligible for only worked days?**
7. If the employee is eligible to get hourly pay, select the checkbox of the **Eligible for hourly pay?**
8. In the **Eligible for OT?** Box, select the OT option from a drop-down list.
9. If the employee is eligible to get allowance, select the checkbox of the **Eligible for Allowance?**
10. If an employee holding either PR or citizenship pass type and have additional salary, enable additional sector box with salary amount. (We have to configure Additional CPF account in the payroll information page).
11. In the **Remarks** box, enter your remarks if any.
12. If you want to attach any file to add extra information about the salary details, click **Choose File** and select the respective file.
13. Click **Save**. The salary details are added successfully.
14. Click **Next**. The **Payroll information** page opens.
#### Add Payroll Salary Configuration details of an employee
Salary Configuration page is meant to add pay mode, advance salary, withhold tax in percentage or fixed amount etc.,
1. Under Payment & Rates, choose Pay mode from the drop-down list
2. Add Advance Salary amount, if required. (To pay a portion of basic salary as an advance)
3. Under With-Hold Tax, either add percentage or fixed amount.
4. Enable check box to enter capping amount for tax.
5. Under Others, employee groups, finance groups and working as available to configure.
6. Enable check box for late minimum deduction, PH payable hrs and allow to compute salary from other Modules (ex : Scaffold module) along with that add addition allowance if necessary.
7. Save button enabled automatically after all the mandatory fields are entered.
##### Settings to add Pay Mode, Employee Groups and Finance Groups
Pay Mode
1. Click Admin
2. Click options
3. In the name field, choose mode of payment
4. Click add button to add pay mode
5. Click Save to save the record.
Employee Groups
1. Click Admin
2. Click Company menu
3. Edit Company and click Settings tab
4. Click add to add "EmpGroups" in the name field
5. Enter Employee groups value
6. Click "+" icon to add multiple Employee groups
7. Click Save to save the data. [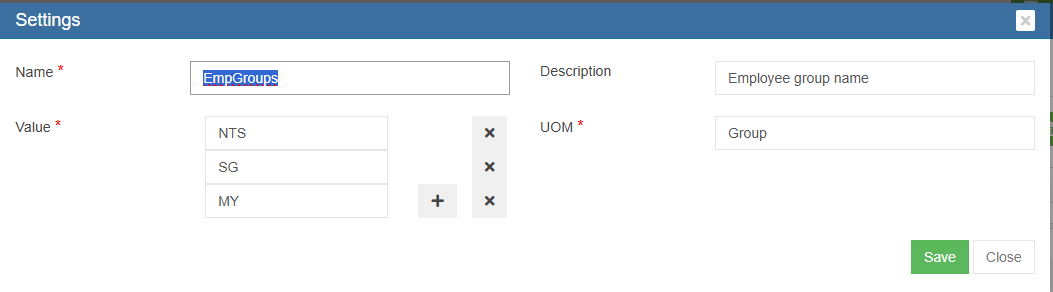](https://wiki.cuteinfocomm.com/uploads/images/gallery/2025-05/image-1746432048537.png)
Finance Groups
1. Click Admin
2. Click Company menu
3. Edit Company and click Settings tab
4. Click add to add "Financial Groups" in the name field
5. Enter Finance groups value
6. Click "+" icon to add multiple Finance groups
7. Click Save to save the data. [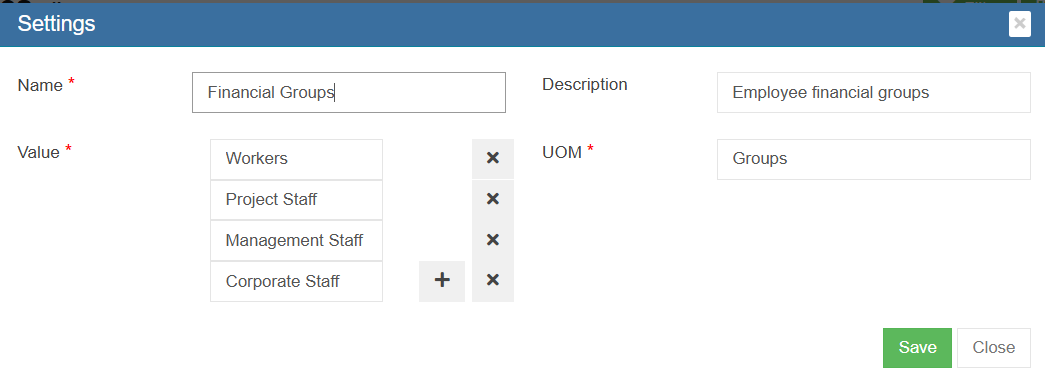](https://wiki.cuteinfocomm.com/uploads/images/gallery/2025-05/image-1746432250364.png)
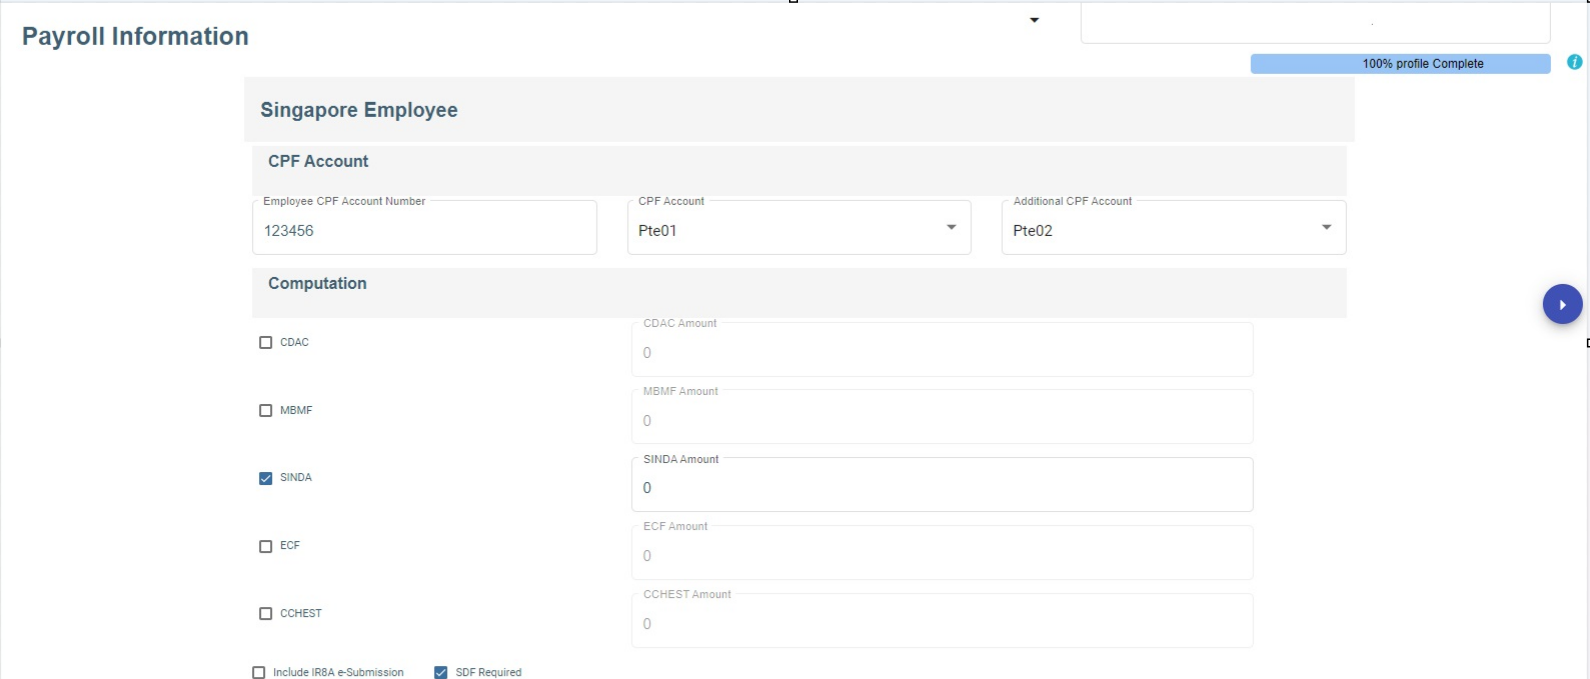
#### Add Payroll information details of an employee
In the payroll information page, you can add the Singapore Employee CPF account information, Donation such as SINDA, CDAC, etc., and Personal Particulars.
1. In the employee CPF account number, enter the account number.
2. In CPF account, select CPF account from the drop-down list.
3. In the Additional CPF account, choose the additional CPF account from the drop down list
4. In computation, choose the donation and enter the amount or it has auto deduction of the amount.
5. If required, enable IRAS e-submission and SDF,
6. In the personal particular, enter the address details.
7. Enable email payslip to send the payslip via email.
8. Click **Save.** The payroll information details are added successfully.
9. Click **Next.** The Leave details of employee page opens.
[](http://wiki.cuteinfocomm.com/uploads/images/gallery/2024-02/image-1708493624581.png)
[](http://wiki.cuteinfocomm.com/uploads/images/gallery/2024-02/image-1708493693782.png)
#### Add Leave Details of Employee
In the **Employee Leave Details** page, you can add the annual leave entitlement details of the employee.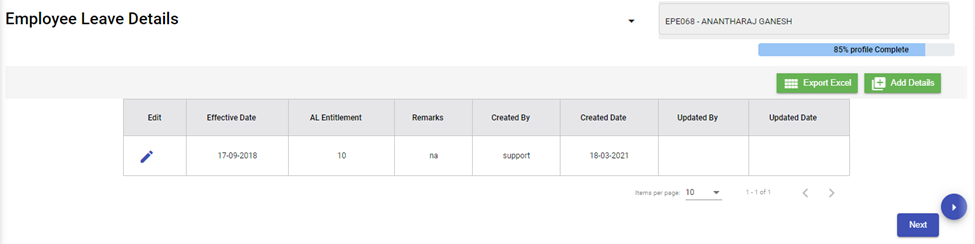
1. Click (**Add** button) in the **Employee Leave Details.** The Leave Details window opens.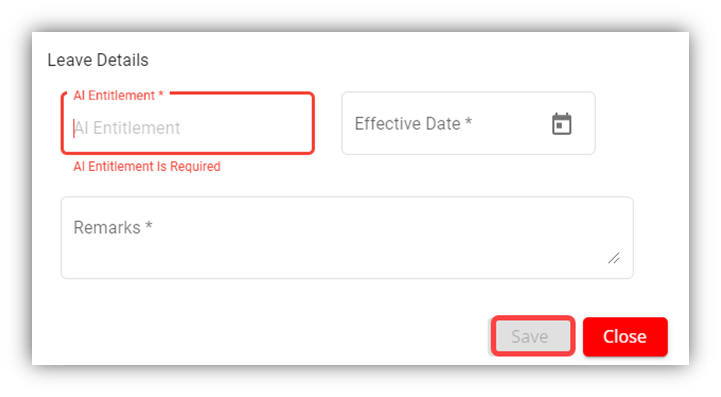
2. In the **AL Entitlement** box, enter the number of annual leave.
3. In the **Effective Date** box, select the effective date of the annual leave.
4. In the **Remarks** box, enter your remarks if any.
5. Click **Save**.
6. Click **Next**. The **Key Employment Report** page opens.
#### Add Key Employment Report for Employee
In the **Key Employment Report** page, you can add key employment details such as sick leave and paid medical examination details of the employee.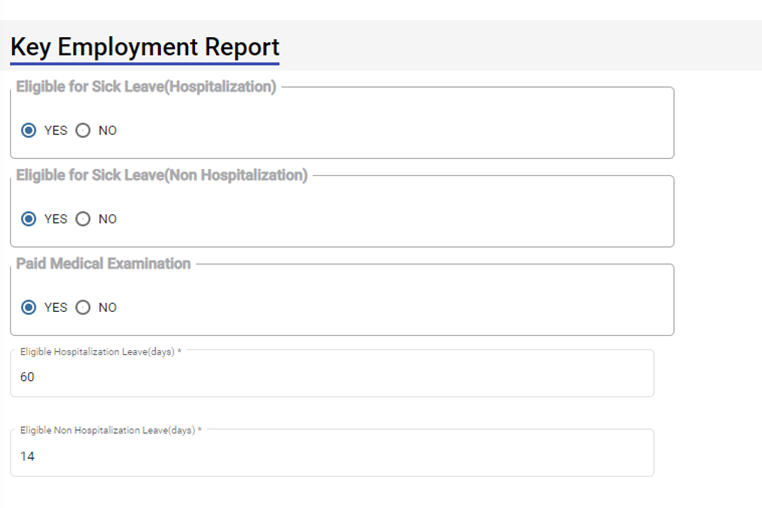
1. If the employee is eligible to take sick leave even in case of non-hospitalization, select **YES** in the **Eligible for Sick Leave (Non-Hospitalization)** option otherwise select **NO**.
2. If the employee is eligible to avail the paid medical examination, select **YES** in the **Paid Medical Examination** option otherwise select **NO**.
3. In the **Eligible Hospitalization Leave (days)** box, enter the number of eligible hospitalization leaves.
4. In the **Eligible Non-Hospitalization Leave (days)** box, enter the number of eligible non-hospitalization leaves.
5. In the **Exclude Time and Leave** box, select the option based on the employee’s leave and permission status.
6. Click **Save**.
7. Click **Next**. The **Employee Minimum Working Hours** page opens.
#### Add Minimum Working Hours of Employee
In the **Employee Minimum Working Hours** page, you can add the minimum working hours details of the employee.
[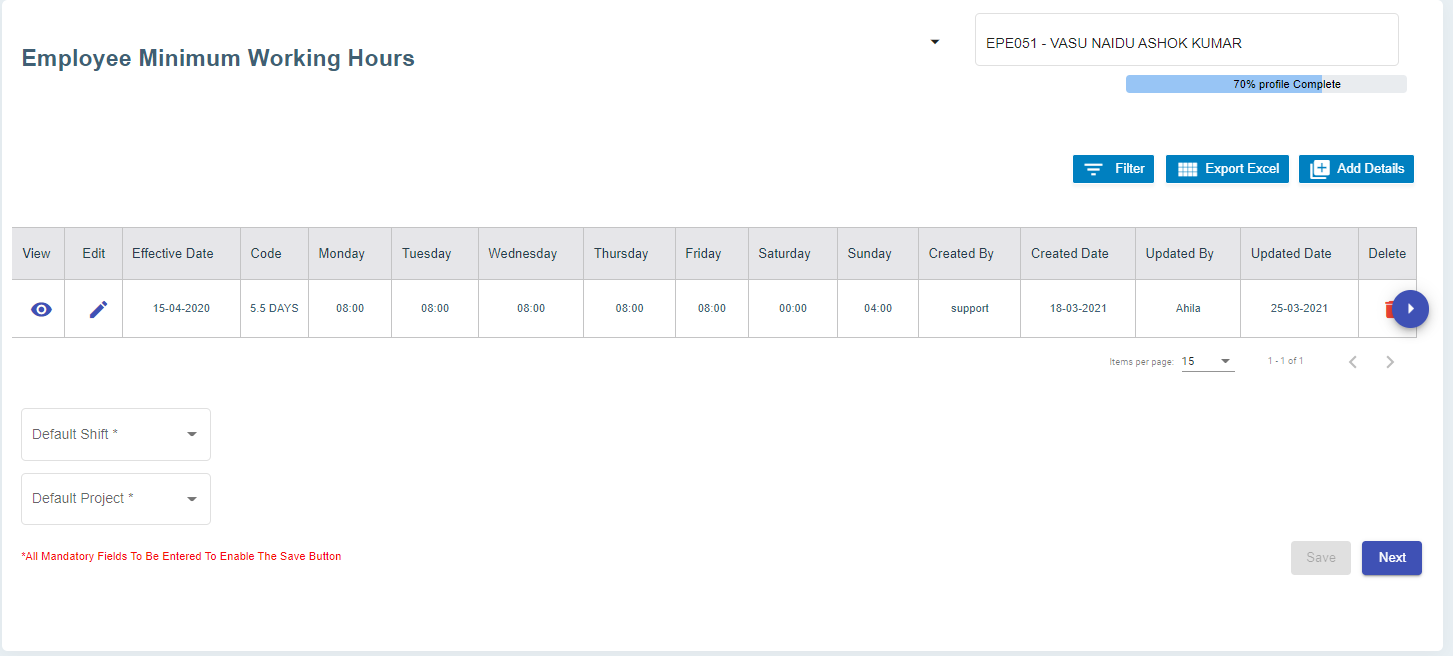](http://wiki.cuteinfocomm.com/uploads/images/gallery/2022-09/image-1662072519478.png)
1. Click (Add Details button). The **Minimum Working Hours** window opens. [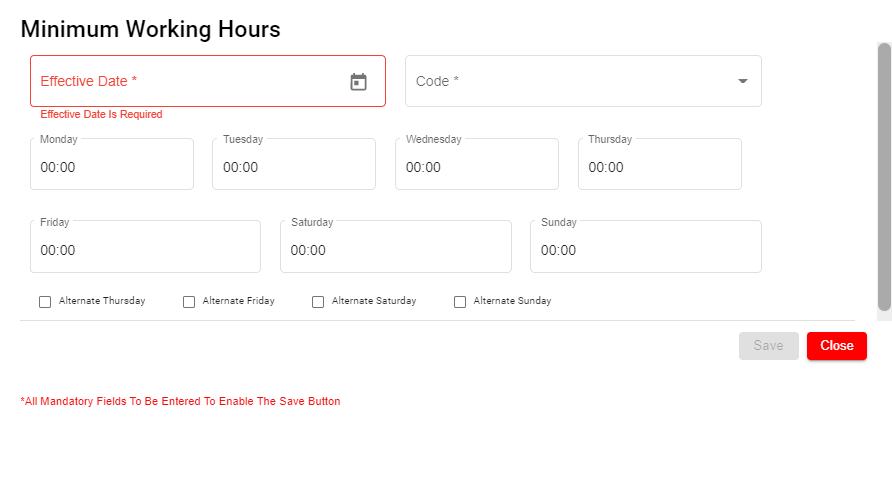](http://wiki.cuteinfocomm.com/uploads/images/gallery/2022-09/image-1662072541484.png)
2. In the **Effective Date** box, select the effective date to follow the minimum working hours by the employee.
3. In the **Code** box, select relevant working day code.
4. In the **Monday** to **Sunday** boxes, for each day, select the minimum hours to be worked by the employee.
5. If the setting **Off day** is enabled, it helps to calculate the rest day in OT1. [](http://wiki.cuteinfocomm.com/uploads/images/gallery/2024-03/image-1709278145553.png)
#### Add Contracts and Other Document of Employee
In the **Contracts and Other Document** page, you can add the contract document or other document of the employee.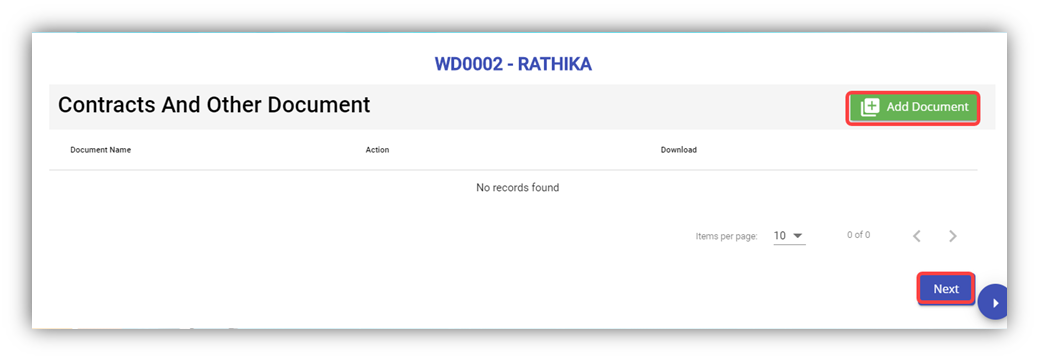
1. Click (**Add Document** button) in the **Contracts and Other Document.** The **Contracts and Other Document** window opens.
2. In the **Document Type** box, select the document type from a drop-down list.
3. In the **Document** **Name** box, enter the document name.
4. Click the **Choose File** option to select the document you want to add.
5. Click **Save.** The selected document is successfully uploaded and listed in the **Contracts and Other Document** page. **Note**: If you want to download the added document details, click[](http://wiki.cuteinfocomm.com/uploads/images/gallery/2022-05/download.png) (Download icon).
If you want to delete the added document details, click [](http://wiki.cuteinfocomm.com/uploads/images/gallery/2022-05/delete.png) (Delete icon).
6. Click **Next**. The **Courses, Certificates, and Other Documents** page opens.
#### Add Courses, Certificates, and Other Documents of Employee
In the **Courses, Certificates, and Other Documents** page, you can add the details of courses, certificates, and other documents of the employee. The **Courses, Certificates, and Other Documents** page shows the **Courses and Certificates** and **Other Documents** options.
1. To add courses and certificates details of the employee, click (**Add Course** button).
2. In the **Select Course/Certificate** box, select the course/certificate from a drop-down list.
3. In the **Certificate Number** box, enter the course/certificate number.
4. In the **Expiry Date** box, select the expiry date of the added course/certificate.
5. In the **Date Attended** box, select the attended date of the course.
6. If you want to view the employee’s course certificate in the landscape format, select the checkbox of the **Landscape**
7. In the **Remarks** box, enter your remarks if any.
8. Click
9. Navigate to the **Other Documents** option to add documents other than courses and certificates, and then click (**Add Documents** button). The **Add Document** window opens.
10. In the Document Name box, enter the name of the document.
11. If you want to attach the document, click **Choose File,** and select the respective document.
12. Click Save. The selected document is successfully uploaded and listed in the **Courses, Certificates, and Other Documents** page. **Note**: If you want to download the added document details, click[](http://wiki.cuteinfocomm.com/uploads/images/gallery/2022-05/download.png) (Download icon).
If you want to delete the added document details, click [](http://wiki.cuteinfocomm.com/uploads/images/gallery/2022-05/delete.png) (Delete icon).
13. Click **Next**. The **Personal Particulars** page opens.
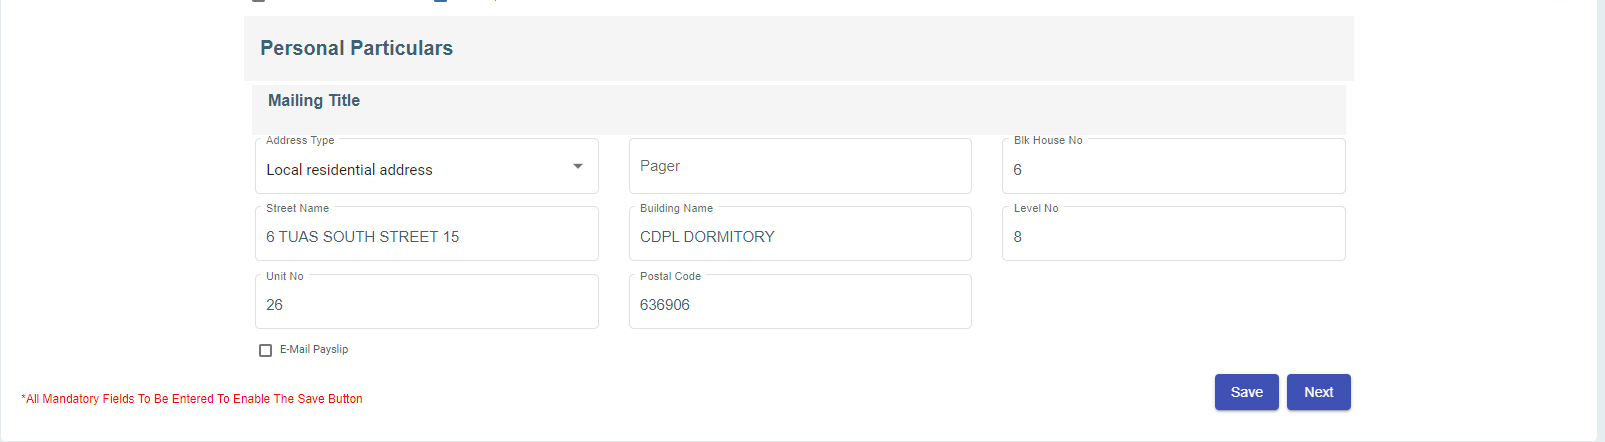
#### Add Personal Particulars of Employee
In the **Personal Particulars** page, you can add the personal details of the employee.
[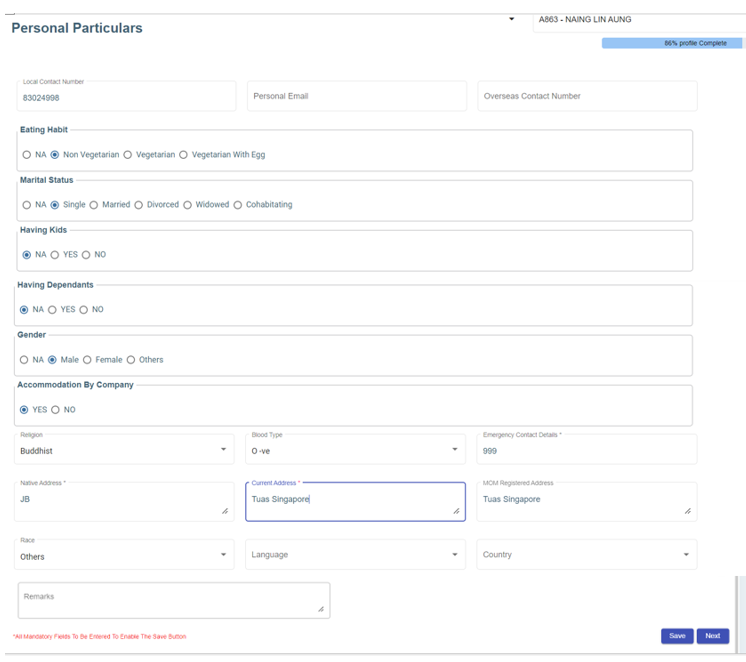](http://wiki.cuteinfocomm.com/uploads/images/gallery/2024-03/image-1709624449366.png)
1. In the **Local Contact Number** box, enter the local contact number of employee.
2. In the **Personal Email** box, enter the personal email of the employee.
3. In the **Overseas Contact Number** box, enter the overseas contact number of the employee.
4. In the **Eating Habit** box, select the eating habit of the employee.
5. In the **Marital Status** box, select the marital status of the employee.
6. In the **Having Kids** box, select **YES** if the employee is having kids otherwise select **NO**.
7. In the **Having Dependants** box, select **YES** if the employee is having any dependants otherwise select **NO**.
8. In the **Gender** box, select the gender of the employee.
9. In the **Accommodation By Company** box, select **Yes** if the company provides accommodation to the employee.
10. In the **Religion** box, select the religion of the employee from a drop-down list.
11. In the **Blood Type** box, select the blood group of the employee.
12. In the **Emergency Contact Details** box, enter the emergency contact details of the employee.
13. In the **Native Address** box, enter the native address of the employee.
14. In the **Current Address** box, enter the present address of the employee.
15. In the **MOM Registered Address** box, enter the address that is registered on MOM.
16. In the **Remarks** box, enter your remarks if any.
17. Click **Save**. The employee’s personal details are successfully added.
18. Click **Next**. If you have selected **YES** in the [**Having Kids**](#Kid) box, the **Kids Details** page opens or If you have selected **YES** in the [**Having Dependants**](#Dependent) box, the [**Dependant Details**](#_Add_Dependent_Details) page opens. Otherwise, the [**Visa Details**](#_Add_Visa_Details) page opens.
#### Add Kids Details of Employee
In the **Kids Details** page, you can add the details employee’s kids. You can add multiple kids details by repeating the following procedure.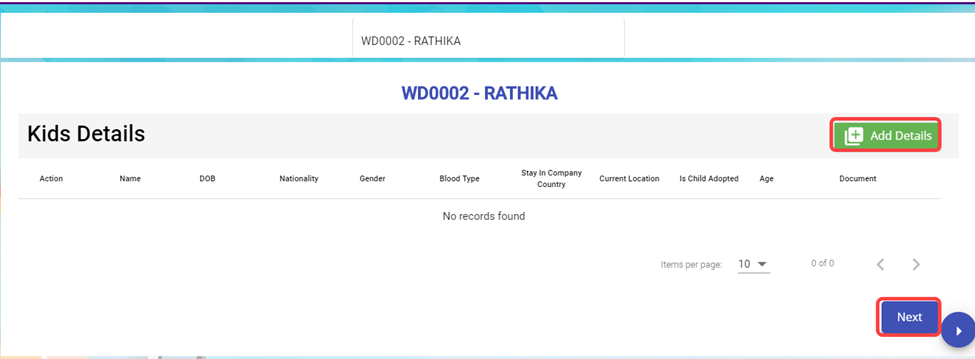
1. Click (**Add Details** button). The **Kids Details** window opens.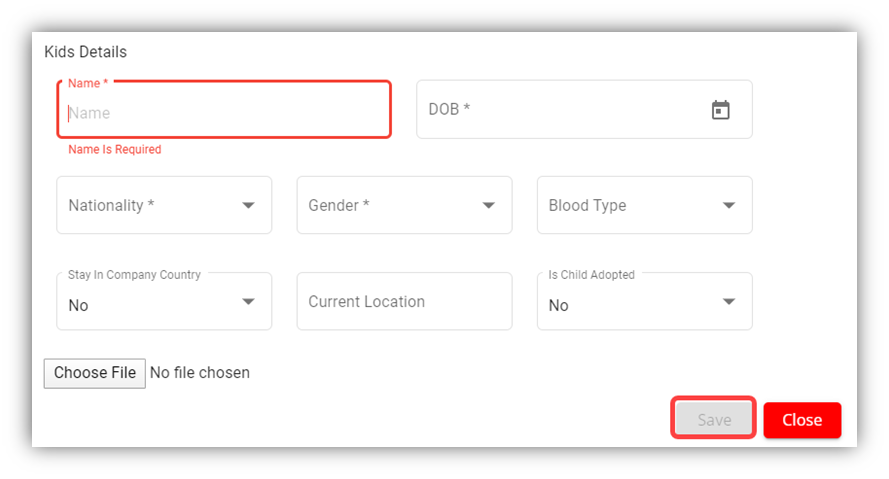
2. In the **Name** box, enter the name of a kid.
3. In the **DOB** box, select the birth date of the kid.
4. In the **Nationality** box, select the nationality of the kid.
5. In the **Gender** box, select the gender of the kid.
6. In the **Blood Type** box, select the blood group of the kid.
7. In the **Stay in Company Country** box, If the kid is residing at the country where the company located, select **Yes** otherwise select **No**.
8. In the **Current Location** box, enter the current location of the kid.
9. In the **Is Child Adopted** box, if the kid is an adopted one, select **Yes** otherwise select **No**.
10. If you want to attach any document to add extra information about the kid, click **Choose File,** and select and attach the respective document.
11. Click **Save**. The kid’s details are successfully added.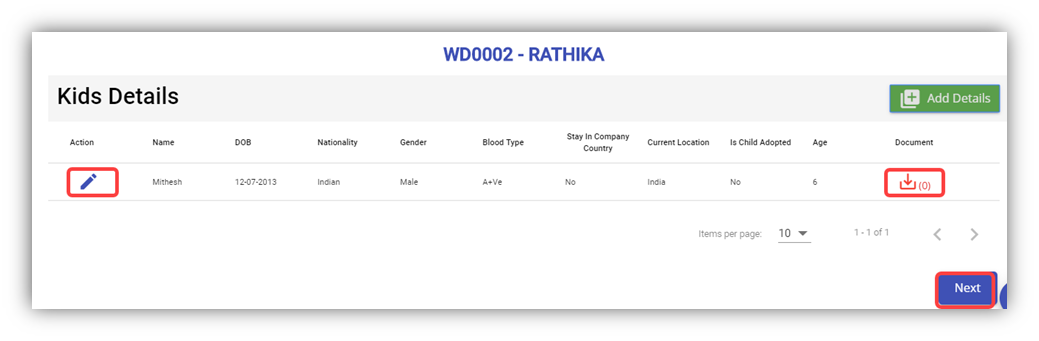**Note**: If you want to edit the added kid’s details, click  (Edit icon). If you want to download the added kid’s details, click  (Download icon).
12. Click **Next**.
#### Add Dependant Details of Employee
In the **Dependant Details** page, you can add the details of the dependants of the employee. 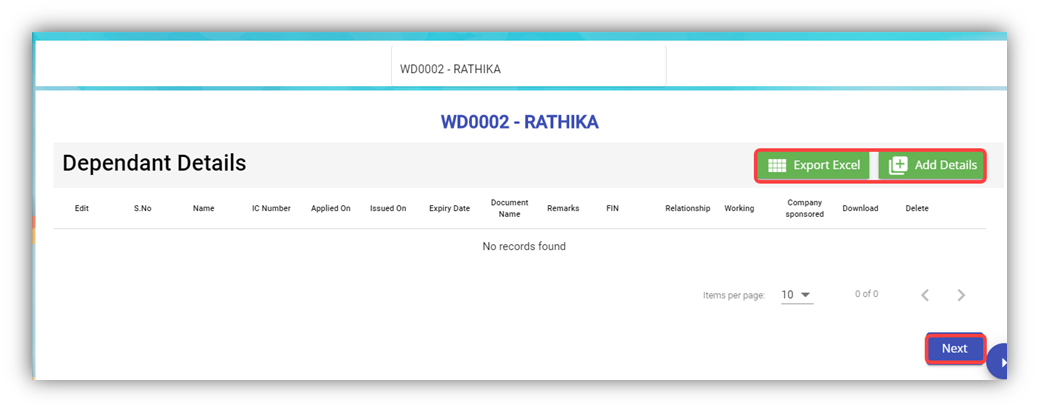
1. Click (**Add Details** button). The **Dependent Details** window opens.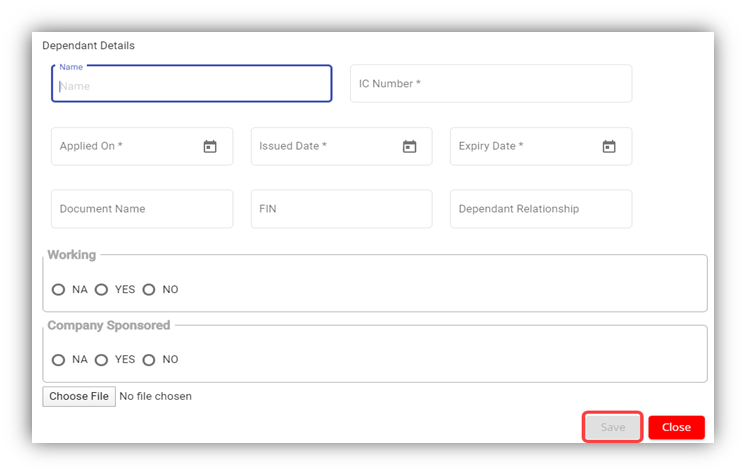
2. In the **Name** box, enter the name of the dependant.
3. In the **IC Number** box, enter the IC number of the dependant.
4. In the **Applied-On** box, select the applied date for the dependant pass.
5. In the **Issued Date** box, select the issued date of the dependant pass.
6. In the **Expiry Date** box, select the expiry date of the independent pass.
7. In the **Document Name** box, enter the name of the document.
8. In the **FIN** box, enter the FIN number.
9. In the **Dependant Relationship** box, enter the relationship of dependant with the employee.
10. In the **Working** box, if the dependant is working select **YES** otherwise select **NO**.
11. In the **Company Sponsored** box, if the dependant pass has sponsored by the company means select **YES** otherwise select **NO**. If the dependant pass is not applicable, select **NA**.
12. If you want to attach any document to add extra information about the dependant, click **Choose File,** and select the respective document.
13. Click **Save**. The dependant’s details are successfully added.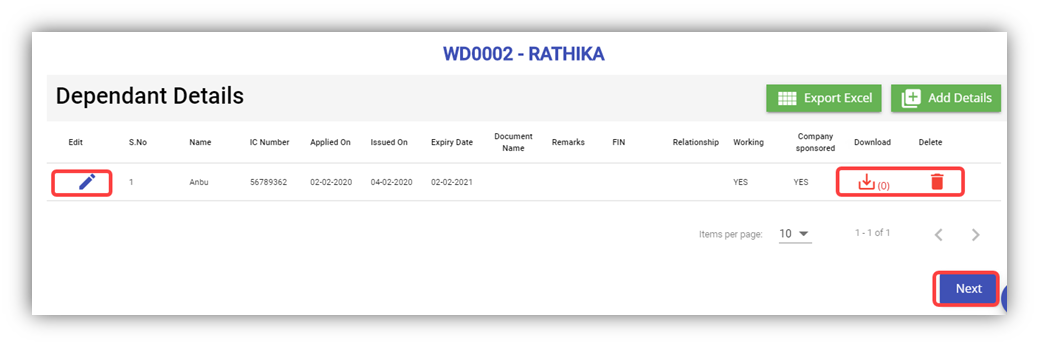**Note**: If you want to edit the added dependant’s details, click  (Edit icon). If you want to download the added dependant’s details, click (Download icon). If you want to delete the added dependant’s details, click  (Delete icon). If you want to download the added dependant’s details as an excel file, click  (Export Excel button). The dependant details are downloaded as an excel file.
14. Click **Next**. The **Visa Details** page opens.
#### Add Visa Details of Employee
In the **Visa Details** page, you can add the visa details of the employee.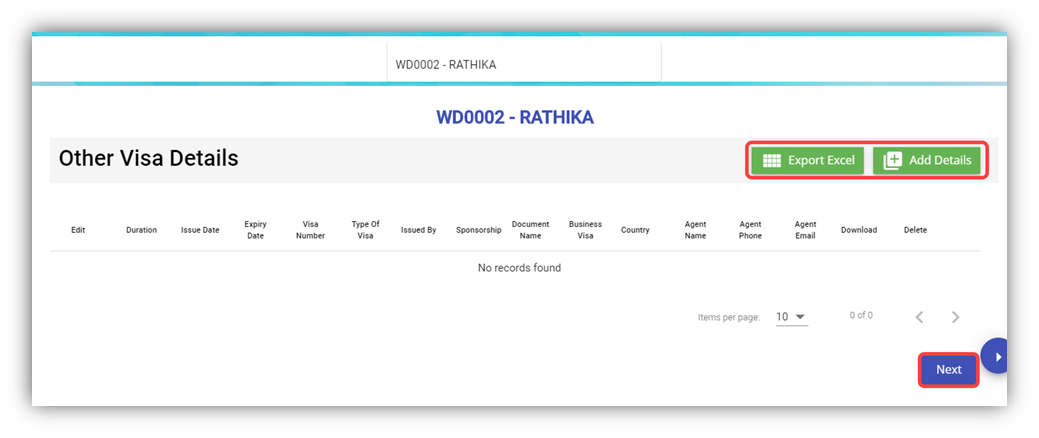
1. Click (**Add Details** button). The **Other Visa Details** window opens.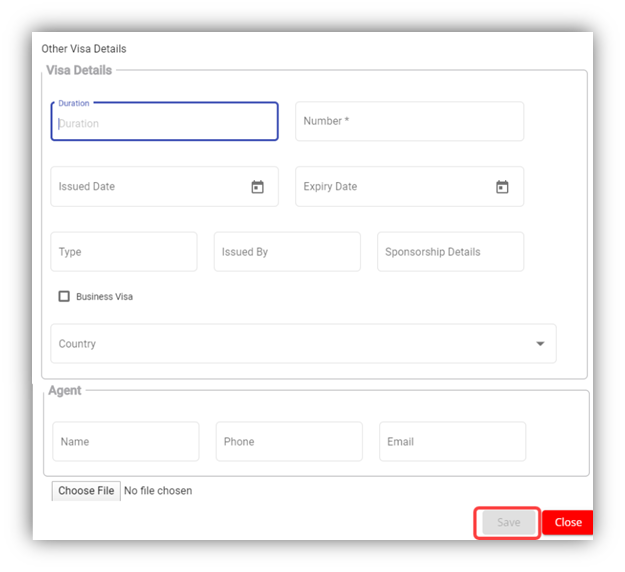
2. In the **Duration** box, enter the duration of visa.
3. In the **Number** box, enter the visa number.
4. In the **Issued Date** box, select the issued date of visa.
5. In the **Expiry Date** box, select the expiry date of visa.
6. In the **Type** box, enter the type of visa.
7. In the **Issued By** box, enter the detail of visa issued authority.
8. In the **Sponsorship Details** box, enter the detail of sponsorship.
9. If the visa is business type of visa, select the checkbox of the **Business Visa**
10. In the **Country** box, select the country from a drop-down list.
11. In the **Agent** box, enter the name, phone number, and email of the agent.
12. If you want to attach any document to add extra information about the visa, click **Choose File,** and select the respective document.
13. Click **Save**. The visa details are added successfully.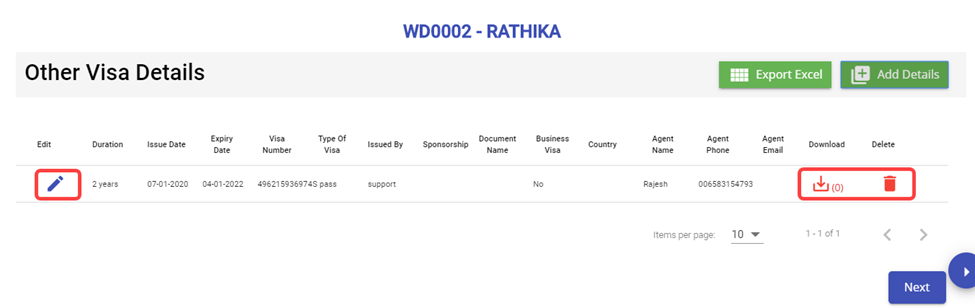
**Note**: If you want to edit the added visa details, click  (Edit icon). If you want to download the added visa details, click  (Download icon). If you want to delete the added visa details, click  (Delete icon). If you want to download the added visa details as an excel file, click  (Export Excel button). The visa details are downloaded as an excel file.
14. Click **Next**. The employee details are successfully added and listed in the **View All Employee** page.
### View Employee Data
#### View All Employees
Once you have added the employee details, the added employee data will be available in the **View All Employee** page. You can view the added employee details in the **View All Employee** page.
[](http://wiki.cuteinfocomm.com/uploads/images/gallery/2022-09/image-1662065614373.png)
**Note**: To view and edit the added employee details, click the respective employee in the list.
#### Transfer Employee
**Transfer Staff.** In employee-view all page, there is an option to transfer employee to another company.
1. Click[](http://wiki.cuteinfocomm.com/uploads/images/gallery/2022-09/image-1662065916245.png)(transfer icon), a new pop-up window opens to enter the transfer details, [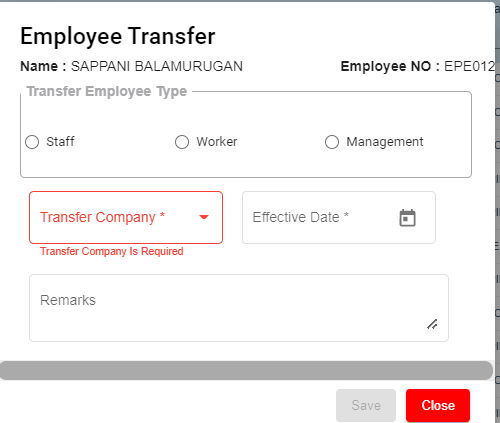](http://wiki.cuteinfocomm.com/uploads/images/gallery/2022-09/image-1662072701471.png)
- - In the **Transferred Employee Type** box, select the type of transferred employee.
- In the **Transfer Company** box, select the company where the employee is going to be transferred.
- In the **Effective Date** box, select the effective date of the transfer.
- In the **Remarks** box, enter your remarks if any.
- Click **Save**.
**Note**: When **Transferred** the employee, all the data also will be transferred from old employee ID to new employee ID.
#### Export Employees Data
The application has a feature to download the added employee details as an excel file. You can click  (**Export Excel** button). The employee details in the **View All Employee** page will be downloaded as an excel file.
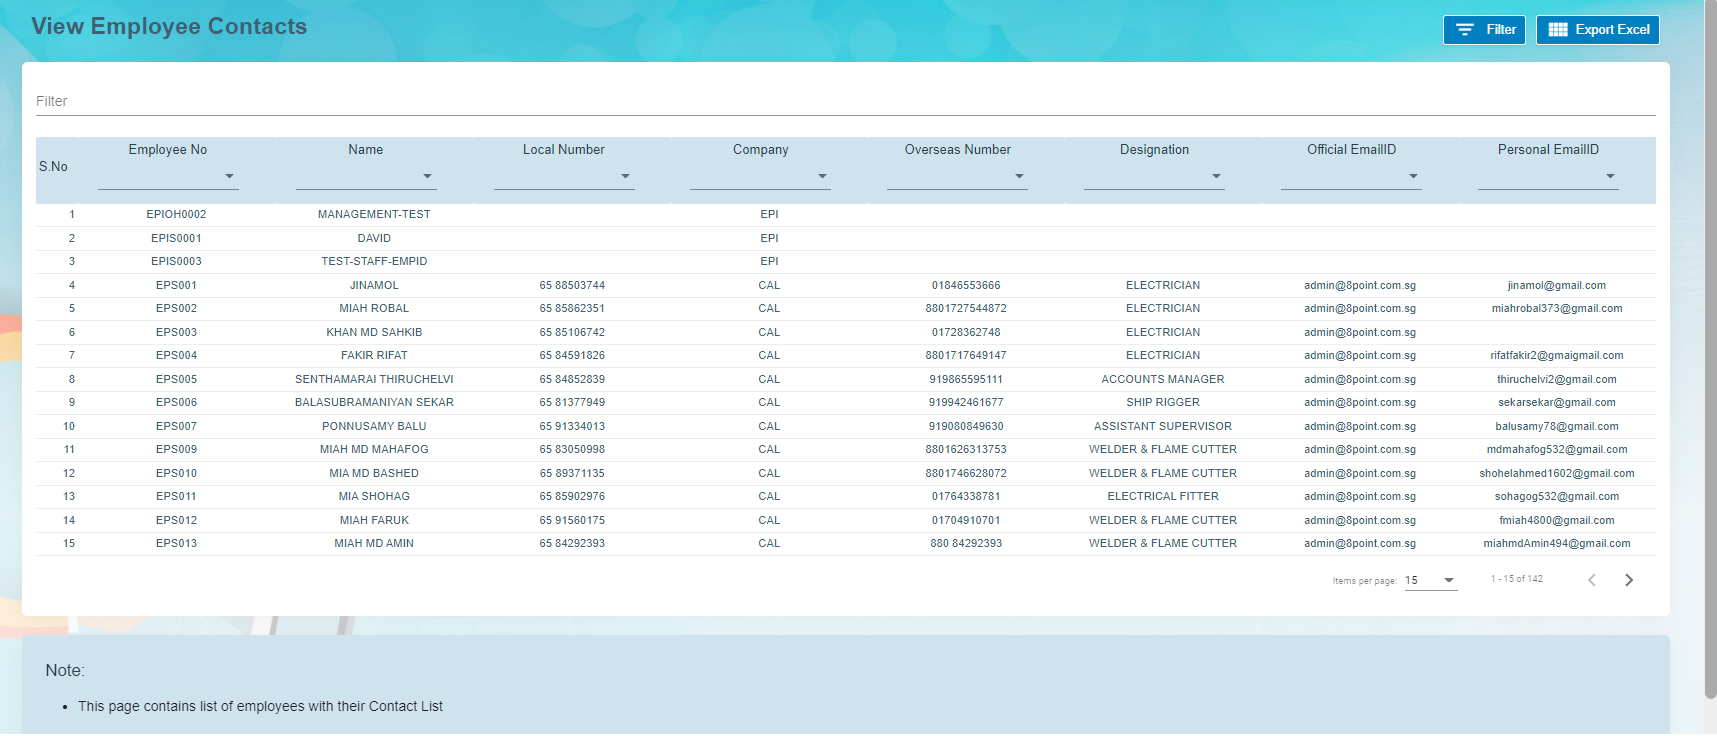
### View Employee Contacts
The **View** **Employee Contacts** tab in the **Employee** submenu helps you to view the employee contact details. To view the employee contact details, click the **View** **Employee Contacts** tab in the **Employee.** The **View** **Employee Contacts** page shows the contact details of the added employees.
[](http://wiki.cuteinfocomm.com/uploads/images/gallery/2022-09/image-1662092941716.png)
- **Export Employee Contacts**
The application has a feature to download the employee contacts details as an excel file. You can click  (Export Excel button). The contact details in the View Employee Contacts page will be downloaded as an excel file.
- **Filter Employee Contact**
If you want to view the contact details of any specific employee, click  (Filter button) provided in the upper side of the View Employee Contacts page.
The Filter option will be enabled in the View Employee Contacts page to filter the specific contact detail.
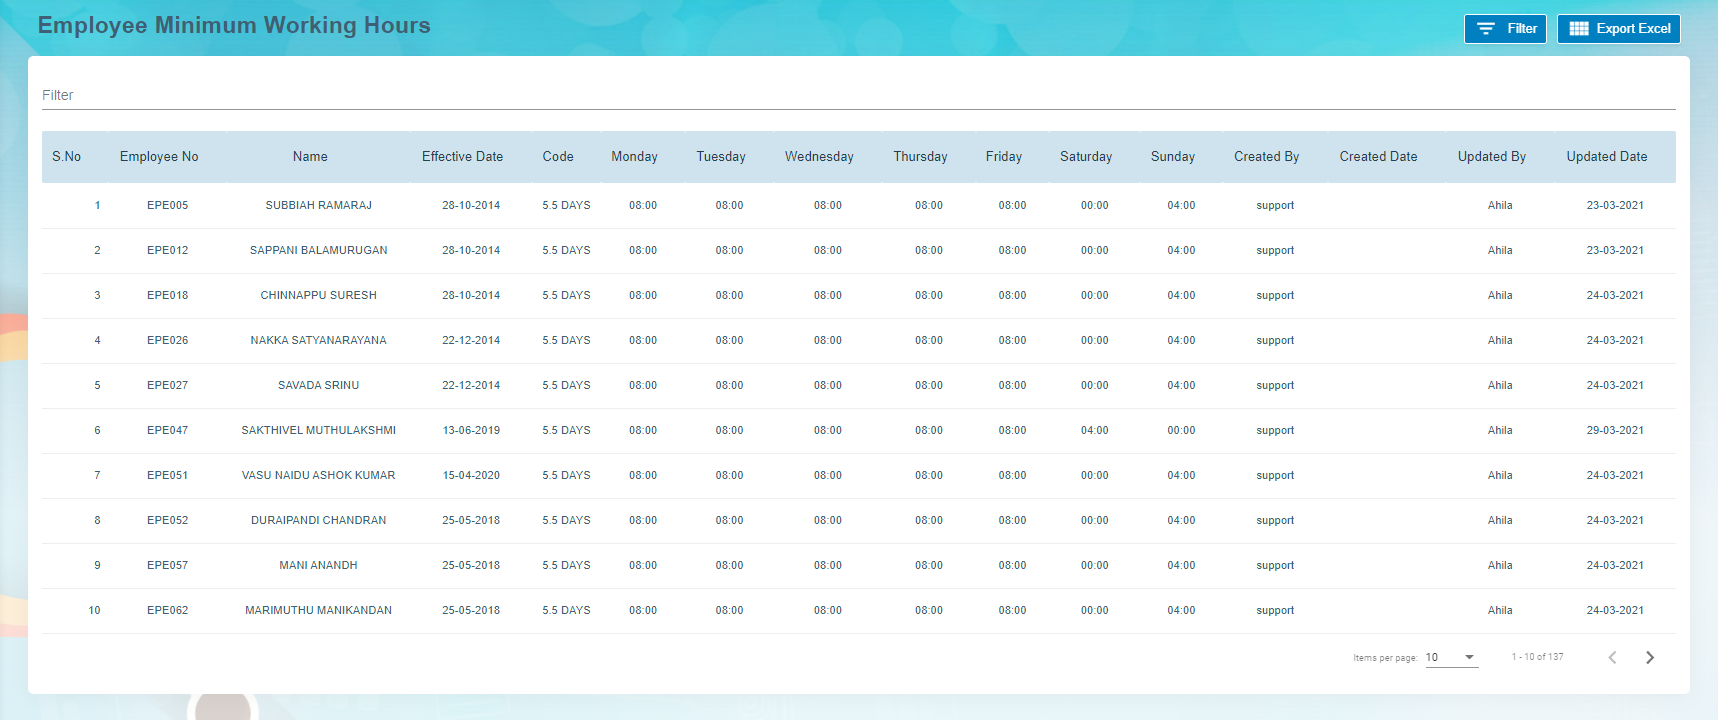
### View Employee Minimum Working Hours
The **Employee Working Hours** tab in the **Employee** submenu helps you to view the employee’s minimum working hours. To view the employee’s minimum working hours, click the **Employee Working Hours** tab in the **Employee.** The **Employee Minimum Working Hours** page shows the minimum working hours details of the added employees.
[](http://wiki.cuteinfocomm.com/uploads/images/gallery/2022-09/image-1662092919543.png)
- **Export Employee Minimum Working Hour Details**The application has a feature to download the employee’s minimum working hour details as an excel file. You can click (**Export Excel** button) to download the minimum working hour details. The minimum working hour details in the **Employee Minimum Working Hours** page will be downloaded as an excel file.
- **Filter Minimum Working Hour Details of Any Employee**If you want to view the minimum working hour details of any specific employee among multiple employees listed in the **Employee** **Minimum Working Hours** page, click[(Filter button) provided in the upper side of the Employee Minimum Working Hours page. The Filter option will be enabled in the Employee Minimum Working Hours page to filter the specific minimum working hour detail.](http://wiki.cuteinfocomm.com/uploads/images/gallery/2022-05/image-1652207986748.png)
### Pay Revision
In Pay Revision, authorized user can revise employee's pay in this section. Click **Pay Revision** in the **Reports** menu, employees' pay revisions records with status will show in list as below,[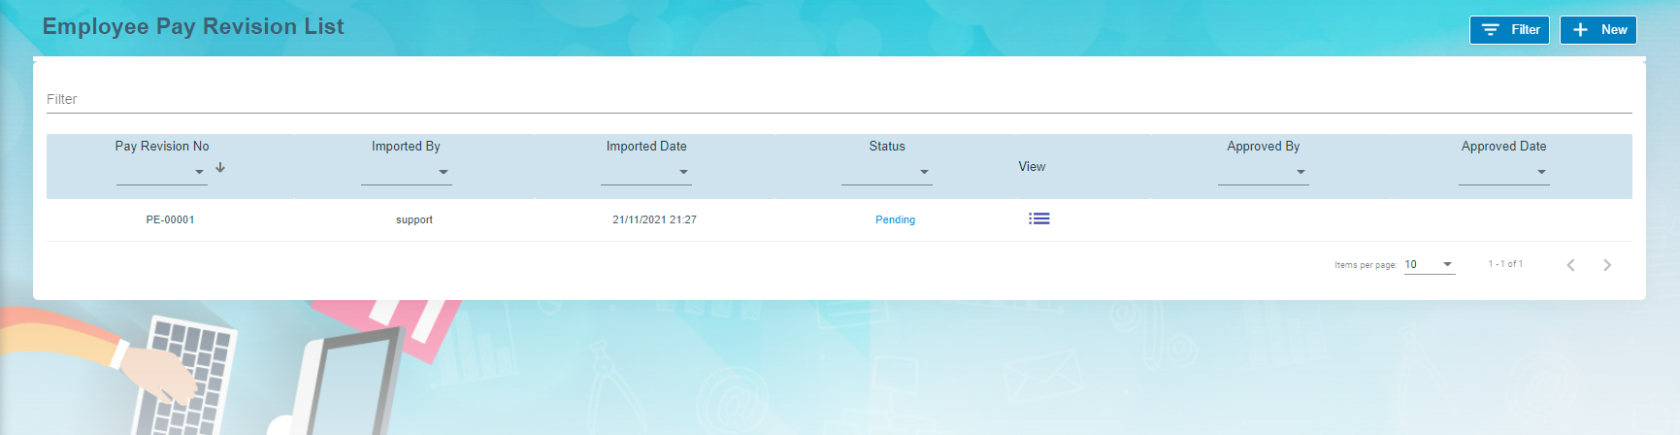](http://wiki.cuteinfocomm.com/uploads/images/gallery/2022-09/image-1662073192791.png)
To add a new pay revision,
1. Click[](http://wiki.cuteinfocomm.com/uploads/images/gallery/2022-09/image-1662073580758.png) add new button in the up right corner of the employee pay revision list page,
2. Click **Filter** and select employees that need to revise pay,[](http://wiki.cuteinfocomm.com/uploads/images/gallery/2022-09/image-1662073606376.png)
3. Then click **Download the template** for the above selected employee we are going to do pay revision. The pay revision excel template will be downloaded.
4. Fill up all the column in downloaded excel and Save the file. **Note: user must enter new effective date**.
5. Then click **Import** button to import above excel file. Pay revision is uploaded against the employee.
6. Click Back [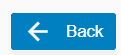](http://wiki.cuteinfocomm.com/uploads/images/gallery/2022-09/image-1664268372878.png)button in View all Employee.
7. In Employee Pay Revision List window , click View icon[ ](http://wiki.cuteinfocomm.com/uploads/images/gallery/2022-09/image-1664269246085.png) to view the changes against the employee. [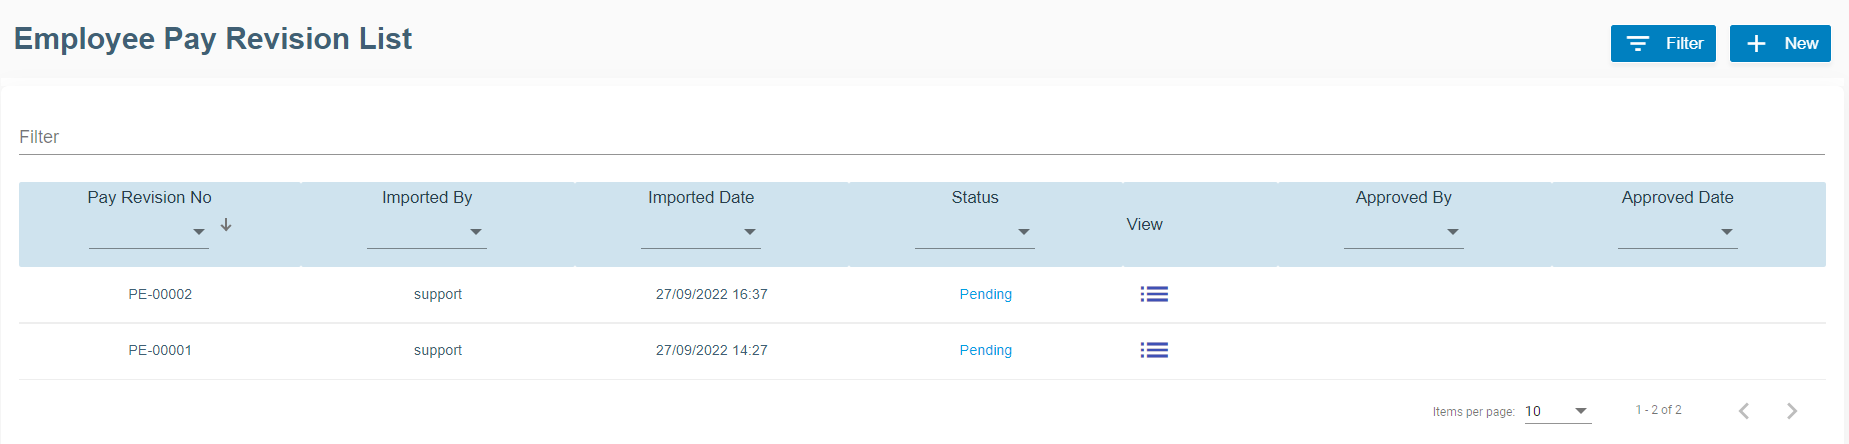](http://wiki.cuteinfocomm.com/uploads/images/gallery/2022-09/image-1664269507284.png)
8. New window open with Pay Revision No. [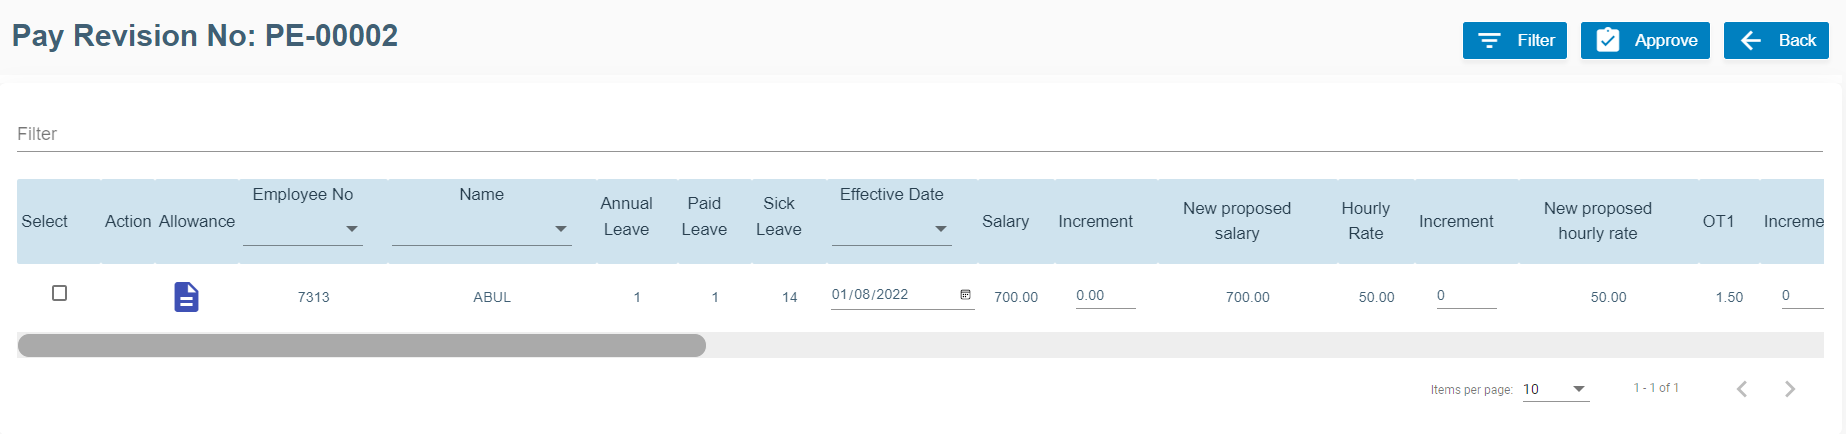](http://wiki.cuteinfocomm.com/uploads/images/gallery/2022-09/image-1664268931845.png)
[](http://wiki.cuteinfocomm.com/uploads/images/gallery/2022-09/image-1664270072295.png)
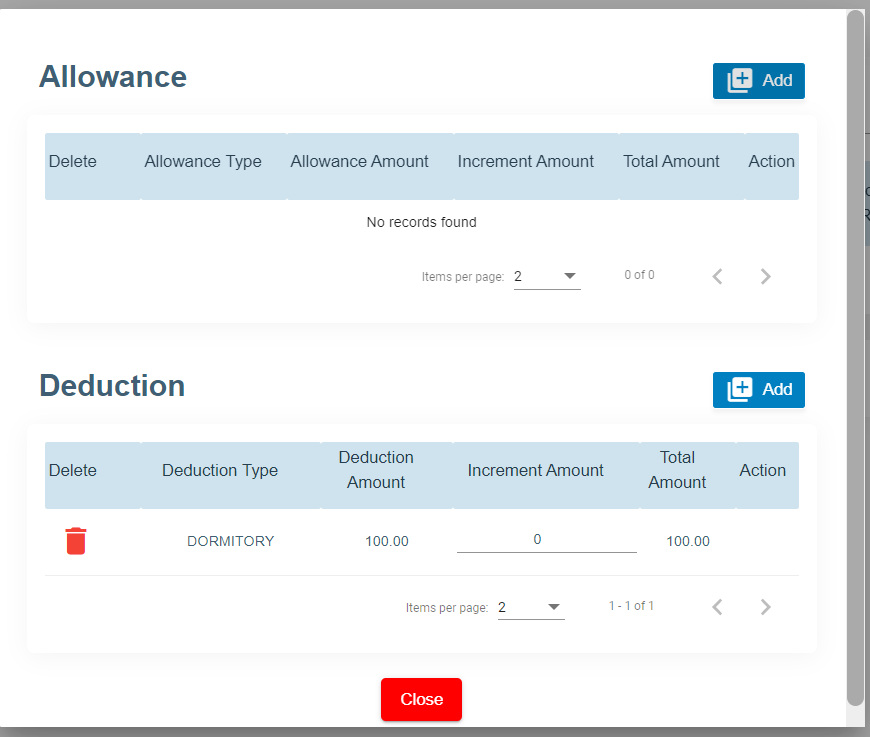
9. Click Action Allowance [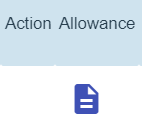 ](http://wiki.cuteinfocomm.com/uploads/images/gallery/2022-09/image-1664270149565.png)to add new allowance and deduction items and amounts.
[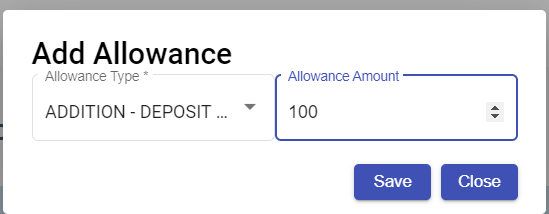](http://wiki.cuteinfocomm.com/uploads/images/gallery/2022-09/image-1664270369274.png)
10. Click Save for each items added for allowance and deduction.
11. Delete option[](http://wiki.cuteinfocomm.com/uploads/images/gallery/2022-09/image-1664270991221.png)available to delete the previously added allowance and deduction.
12. Click Close button at the end.
13. Now click **Approve[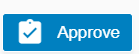](http://wiki.cuteinfocomm.com/uploads/images/gallery/2022-09/image-1664271138712.png)** button at the top right corner to approve it.
14. The confirmation window will open as below when user clicks **Approve**, click **Yes** to confirm approval of pay revision. [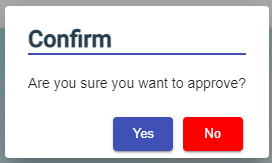](http://wiki.cuteinfocomm.com/uploads/images/gallery/2022-09/image-1663094058782.png)
15. Eventually, the pay revision will be effective from the new date mentioned.
### Employee Evaluation
Employee evaluation page manages evaluation for all employees. Click Evaluation tab in Employee menu, the employee evaluation list page shows as below
#### Add A New Evaluation
To add a new evaluation,
1. Click [](http://wiki.cuteinfocomm.com/uploads/images/gallery/2022-10/image-1664824676986.png)Add button. Add New Employee Evaluation window opens, [](http://wiki.cuteinfocomm.com/uploads/images/gallery/2022-09/image-1663580391250.png)
2. Select Employee No from the drop down list, select the Period of Evaluation from the drop down list. The period of evaluation corresponds to the employee's trade.
3. Click Save. The add evaluation page will be redirect to evaluation list page. A new evaluation request will be created for selected employee.
4. Click the key of the new evaluation request, the evaluation detail page will open, [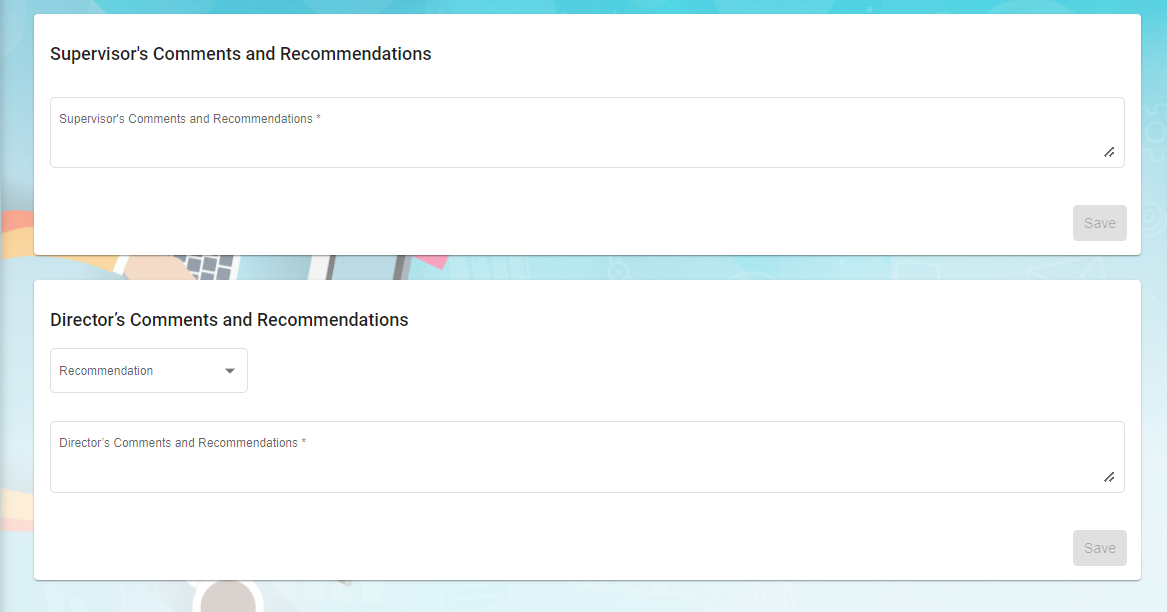](http://wiki.cuteinfocomm.com/uploads/images/gallery/2022-10/image-1664832391707.png)
- In evaluation form, employee and manager can enter the rating details
- In supervisor's comments and recommendations, enter comment if any
- In director's comments and recommendations, enter comment if any
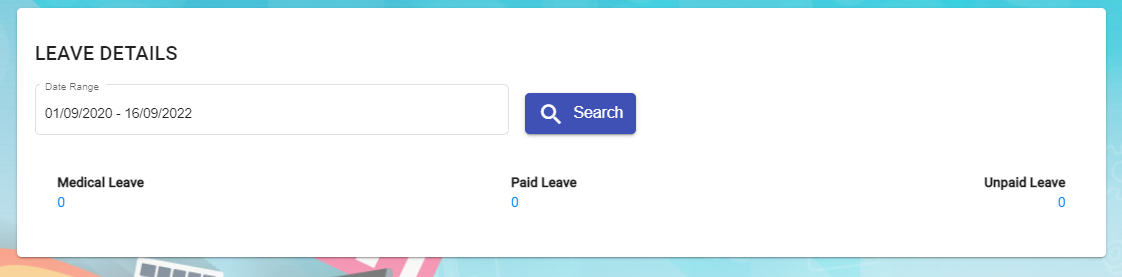
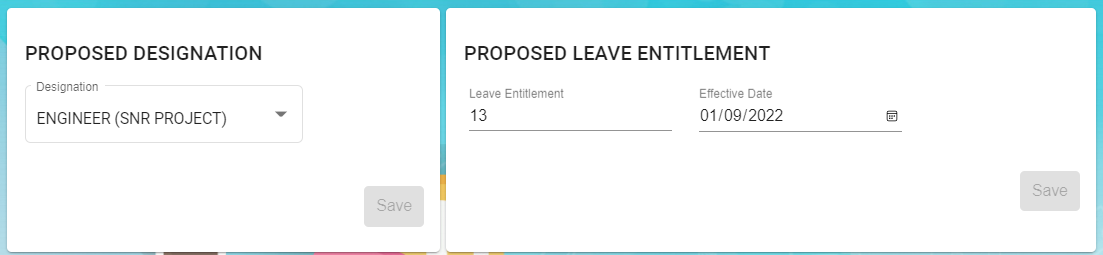
5\. Users can also update below employee's details based on evaluation: Leave details, Proposed Designation, Proposed Leave Entitlement, Latest Salary Details and Learning & Development. Note: these are optional to update.
[](http://wiki.cuteinfocomm.com/uploads/images/gallery/2022-09/image-1663322070039.png)
[](http://wiki.cuteinfocomm.com/uploads/images/gallery/2022-09/image-1663322103137.png)
[](http://wiki.cuteinfocomm.com/uploads/images/gallery/2022-09/image-1663322142772.png)
[](http://wiki.cuteinfocomm.com/uploads/images/gallery/2022-09/image-1663322177585.png)
#### Add Evaluations in Bulk
To add evaluations in bulk,
1. Click[](http://wiki.cuteinfocomm.com/uploads/images/gallery/2022-10/image-1664833503135.png)add in bulk button, below window opens,
2. Select employees by ticking the box in front of the employee names. Note: please check the color code in the top right corner of the page for those employees that are not in selection list.
3. Click Save. The add evaluation page will be redirect to evaluation list page. New evaluation requests will be created for selected employees.
4. Click the key of each new evaluation request added, and fill up the the evaluation details in the evaluation request detail page. (Note: follow the same steps of adding details in single evaluation request)
##### Evaluation Request Approval -pending for update
### Learning and Development
Learning and development manage employees' learning and development plans. Click Learning & Development tab in Employee menu, below page opens,
#### Add New Course Plan
To add a new course plan,
1. Click [](http://wiki.cuteinfocomm.com/uploads/images/gallery/2022-09/image-1664352774264.png) Add Course Plan icon in Learning and Development request list page, a new window opens, [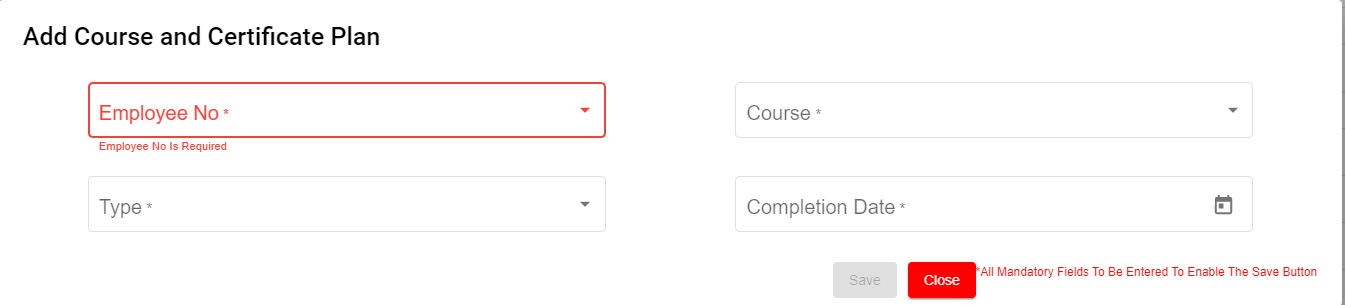](http://wiki.cuteinfocomm.com/uploads/images/gallery/2022-09/image-1664352638622.png)
2. Fill up details in add course and certificate plan page:
- In Employee No. box, select Employee No from the drop down list.
- In Course box, Choose one course or multiple courses from course list.
- In Type box, select Mandatory or Non-Mandatory based on the course requirement.
- In Completion Date box, select expected completion date of the course in the calendar selection.
3. Click Save. A new learning and development request is created, and the page will be directed to learning and development list page,
4. Click the request Key to view employee course details.
5. Click edit button in the Course Details section as shown in above screenshot. A Course detail page open as below, [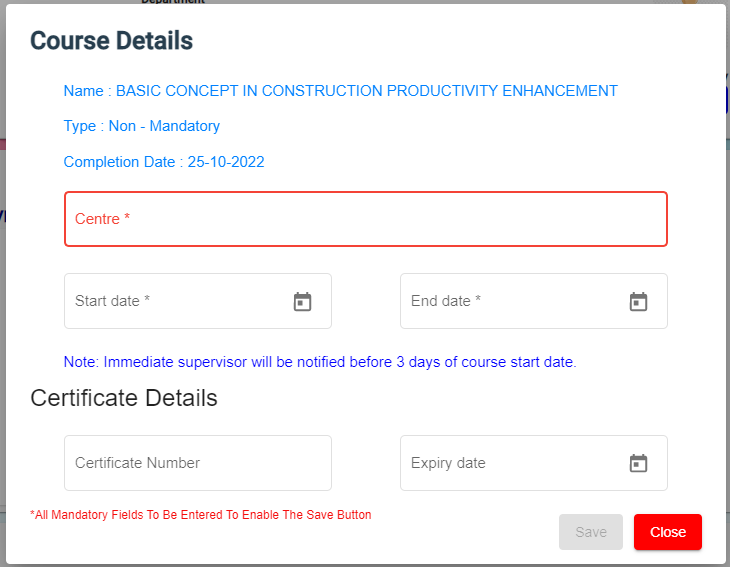](http://wiki.cuteinfocomm.com/uploads/images/gallery/2022-10/image-1664841046897.png)
6. Enter course conduction centre name, start date and end date of course. And click Save. Once request is approved, Immediate Supervisor will be notified before 3 days of course start date.
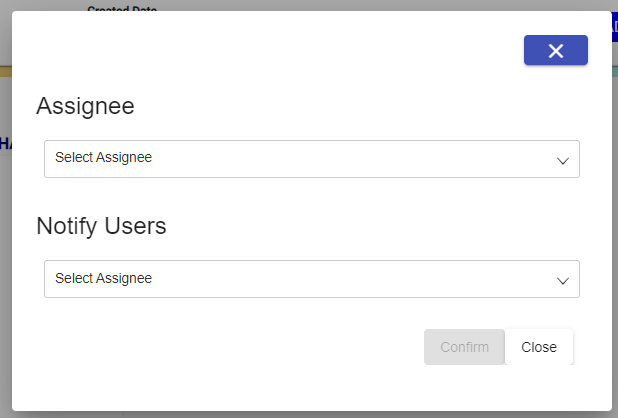
7. Click [](http://wiki.cuteinfocomm.com/uploads/images/gallery/2022-09/image-1664357163504.png) Submit button at the top right corner. The notification confirm window opens to enter Assignee and Notify users.
[](http://wiki.cuteinfocomm.com/uploads/images/gallery/2022-10/image-1664841314457.png)
8. Click Confirm[](http://wiki.cuteinfocomm.com/uploads/images/gallery/2022-09/image-1664357955969.png) to confirm submission of learning and development request.
9. After course got completed by the employee, Supervisor/Worker will enter certificate number and expiry date.
10.
11. To be updated
12\. After course got completed by the employee, Supervisor/Worker will enter certificate number and expiry date.
9\.
12\.
13\. Click Save and Close
14\. Click attachment to attach the course certificate
[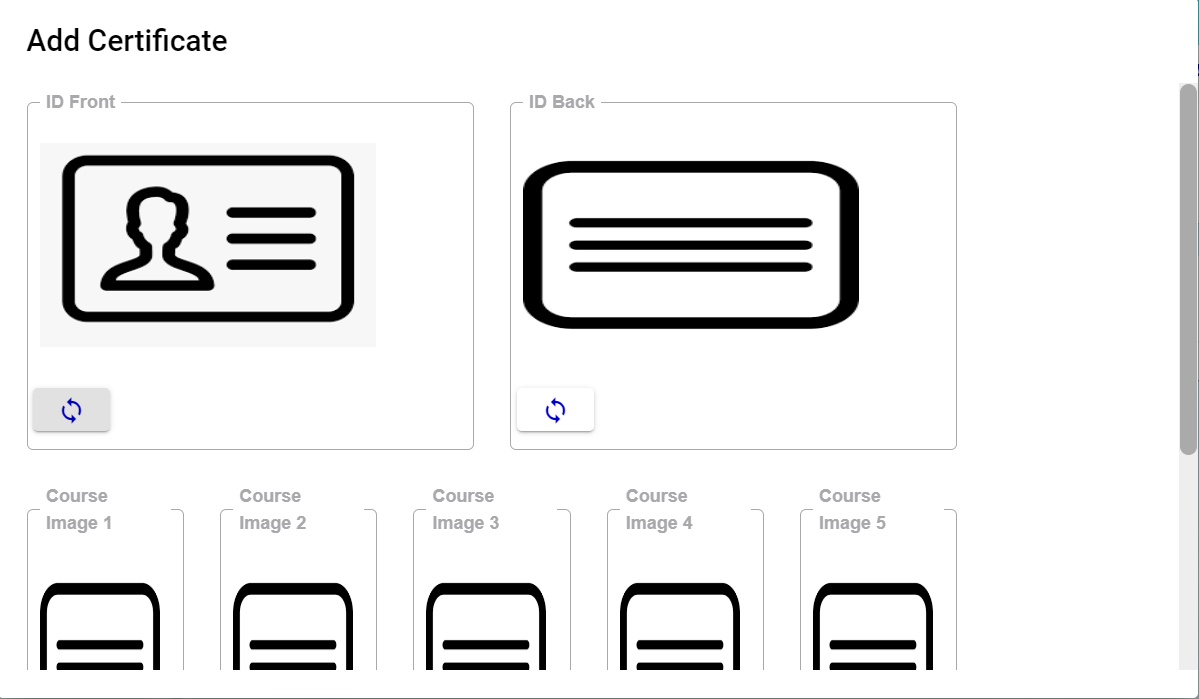](http://wiki.cuteinfocomm.com/uploads/images/gallery/2022-09/image-1664366544017.png)
14\. Click Close
15\. If applicable enter Training Bond Details of the employee in the Bond Details. Bond details have a link to Offboard checklist. For instance, If the employee resigned before the Training bond, Offboard will throw alert message for refusal of the resignation.
16\. Click Sent for HR on the top right corner of the page
[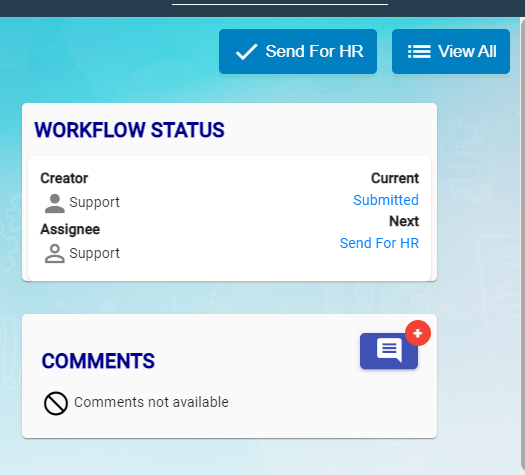](http://wiki.cuteinfocomm.com/uploads/images/gallery/2022-09/image-1664367537696.png)
17\. Next Window opens to enter Assignee and Notify user
[](http://wiki.cuteinfocomm.com/uploads/images/gallery/2022-09/image-1664367639710.png)
18.Click Confirm button
19\. HR will check and he will either Approve or Return
20.Click approve icon to approve.
[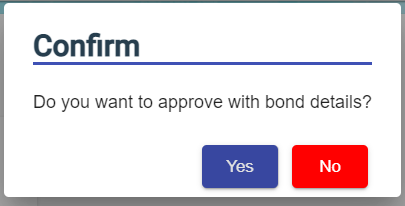](http://wiki.cuteinfocomm.com/uploads/images/gallery/2022-09/image-1664367945687.png)
21\. Confirmation Box open to approve with bond details or not.
22\. Click Yes or No
[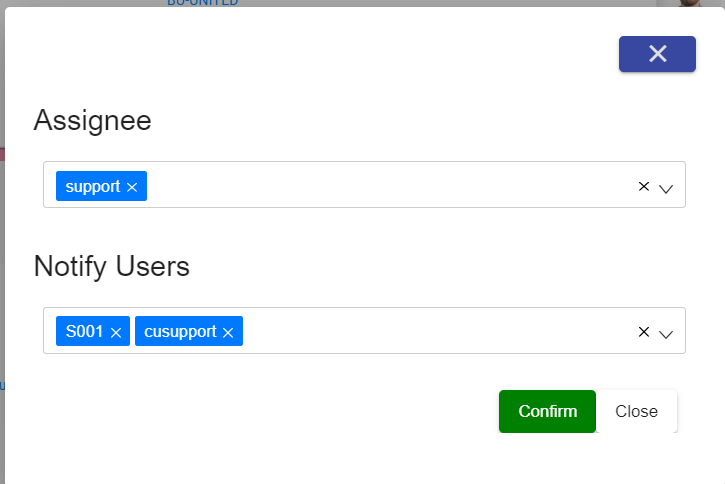](http://wiki.cuteinfocomm.com/uploads/images/gallery/2022-09/image-1664368064372.png)
23\. Enter Assignee and Notify User and Confirm.
24\. LAD status Approved against the employee.
### Onboard/Offboard
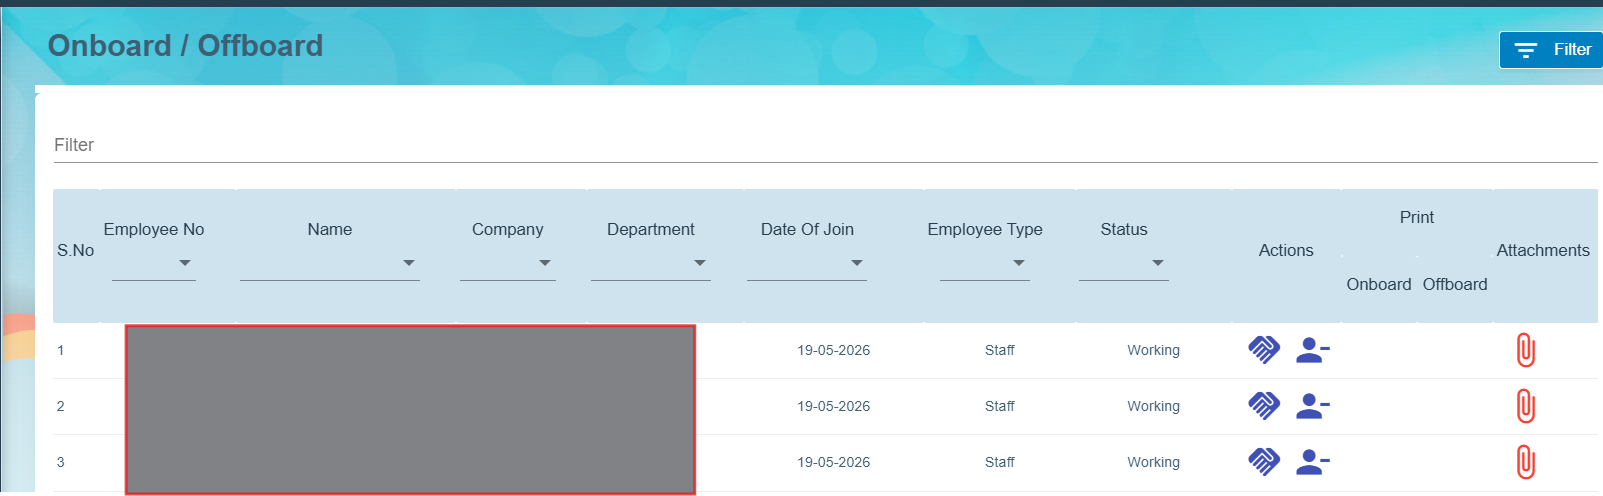
The Onboard / Offboard Checklist module is used to manage employee onboarding and offboarding activities through a structured checklist process. It ensures that all required tasks are completed, tracked, and documented for every employee joining or leaving the organization.
##### Onboard/Offboard Checklist
All the employees are listed to perform either onboarding or offboarding checklist process.
[](https://wiki.cuteinfocomm.com/uploads/images/gallery/2026-05/image-1778827926095.png)
1. Action column contains two icons to perform Onboard [](https://wiki.cuteinfocomm.com/uploads/images/gallery/2026-05/image-1778828135612.png)or Offboard [](https://wiki.cuteinfocomm.com/uploads/images/gallery/2026-05/image-1778828336198.png)
2. Click Onboard and perform the Pre-Onboarding checklist
3. Click Save to store checklist updates
4. Print Column contains Print icon [](https://wiki.cuteinfocomm.com/uploads/images/gallery/2026-05/image-1778829530156.png)to take print out
5. Click Offboard and perform offboard checklist.
6. Click Save to store checklist updates
7. Based on checklist completion, the color code of the Onboard/Offboard displayed. [](https://wiki.cuteinfocomm.com/uploads/images/gallery/2026-05/image-1778833690638.png)
#### Settings
##### HRM Alert mail - Disable menus settings
##### Revoke birthday menu
- Go to global settings and choose **disableBirthdayInHRMAlertEmail**
- Set the value to true to hide the birthday portion in **HRM\_Alert\_Mail**
##### Revoke course menu
- Go to global settings and choose **courseEmailAlertResponsibleBy**
- Set the value to true to hide the course portion in **HRM\_Alert\_Mail**
# HRM Reports
## Reports
The **Reports** submenu in the **HUMAN RESOURCES** page helps you to view the added details of employee as a report.
The **Reports** submenu contains the following tabs,
[](http://wiki.cuteinfocomm.com/uploads/images/gallery/2022-09/image-1662091255945.png)
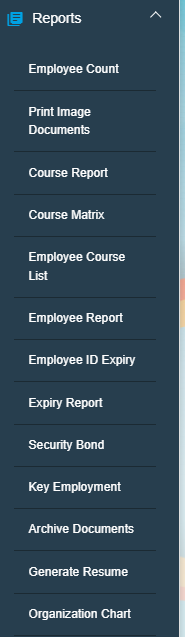
### View Employee Count
The **Employee Count** tab in the **Reports** submenu helps you to view the employee count based on the employee’s mode of working and status of working.
1. Click the **Employee Count** tab in the **Reports.** The **Employee Count** page opens. [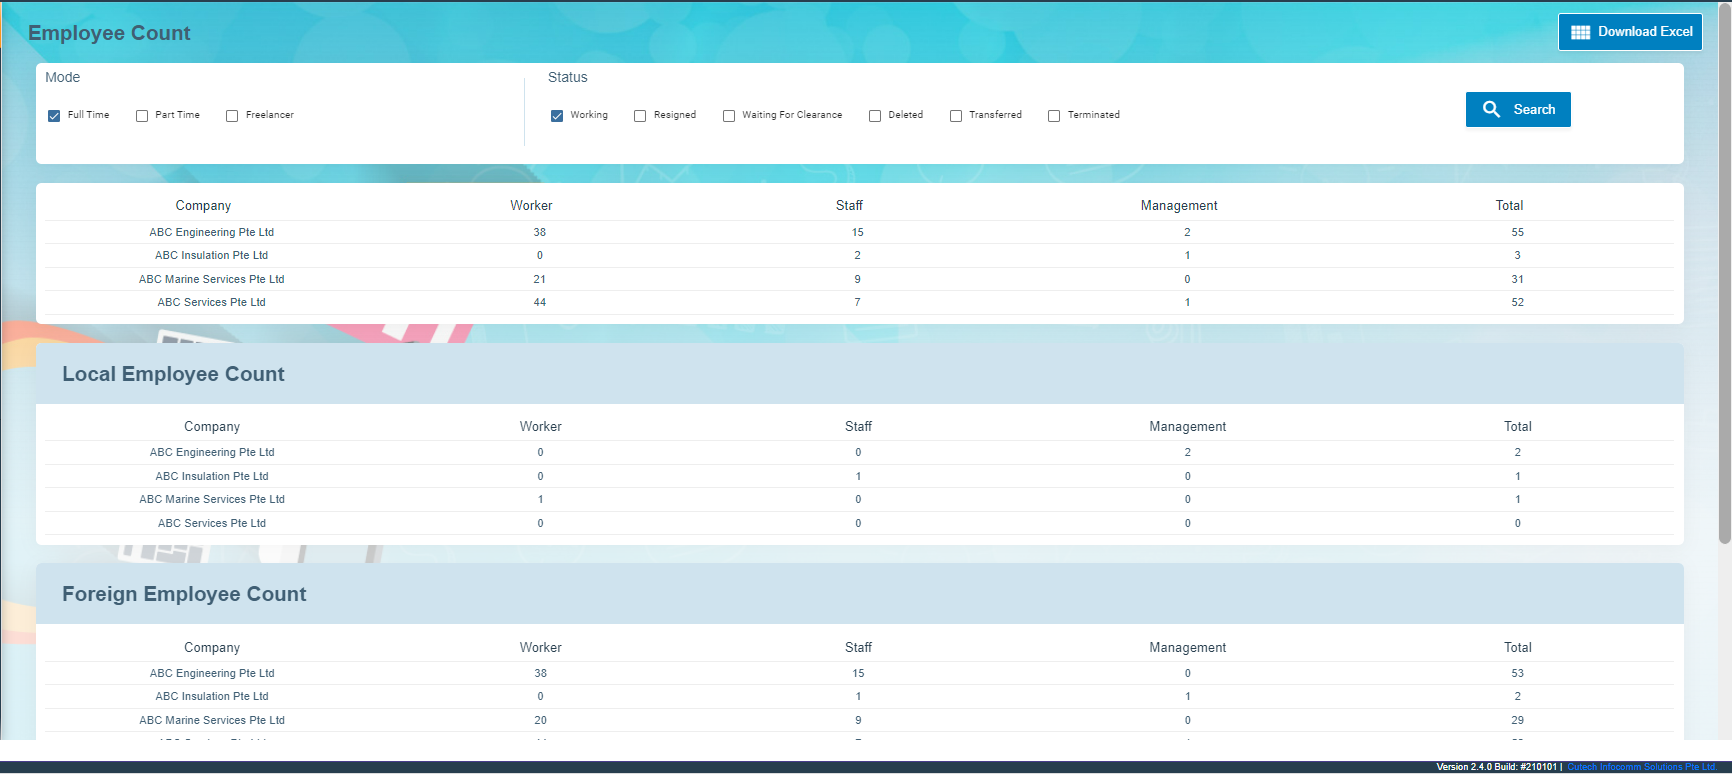](http://wiki.cuteinfocomm.com/uploads/images/gallery/2022-09/image-1662093000429.png)
2. In the **Mode** box, select the working mode of the employee whether **Full Time**, **Part-Time** or **Freelancer**.
3. In the **Status** box, select the working status of the employee whether **Working**, **Resigned**, or others from the given options.
**Note**: You can select more than one working mode and working status to view the combined employee count.
4. Click **Search**. The **Employee Count** page shows the employee count based on the selected working mode and status. [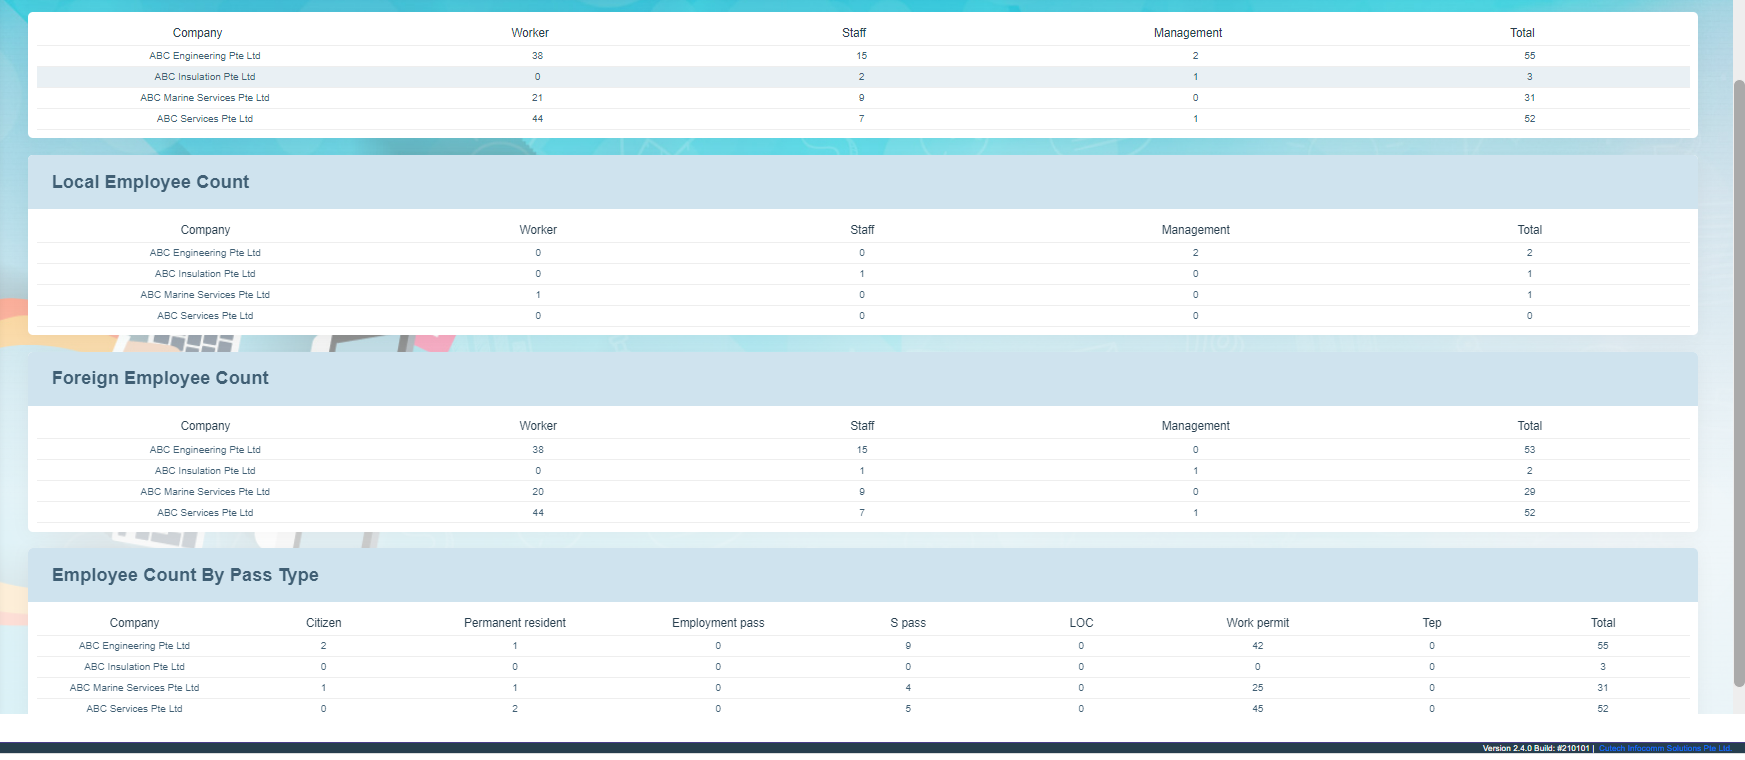](http://wiki.cuteinfocomm.com/uploads/images/gallery/2022-09/image-1662093052146.png)
### Print Image Documents
The **Print Image Documents** tab in the **Reports** submenu helps you to generate and view the employee’s photo, ID document, passport document, course ID, and certificates. To print the image documents,
1. Click the **Print Image Documents** tab in the **Reports.** The **Employee Document Download** page opens. [](http://wiki.cuteinfocomm.com/uploads/images/gallery/2022-09/image-1662090787623.png)
2. In the **Employee** **selection** box,
- If you want single employee, choose single in employee selection, then search and select an employee from employee dropdown list.
- If you want to see multiple employees, choose multiple in the employee selection and select multiple employees in the check box. Or else you can click select all employee to show all employees print image documents.
3. Select the document type to be printed. If select course/certificate, then specify the course title from the course dropdown list.
4. Click **Generate Report**.
### View Course Report
You can view the course details of any particular employee or all employees by using this **Course Report** tab. To view the employee course report,
1. Click the **Course Report** tab in the **Reports**. The **Course Report** page opens. [](http://wiki.cuteinfocomm.com/uploads/images/gallery/2022-09/image-1662093089092.png)
2. If you want to view the course details for any particular employee, in the **Employee** box, select the employee from a drop-down list. Or If you want to view the course details for all employees, select the checkbox of the **Show All Employee**
3. Click **Search**. The employee course report opens. [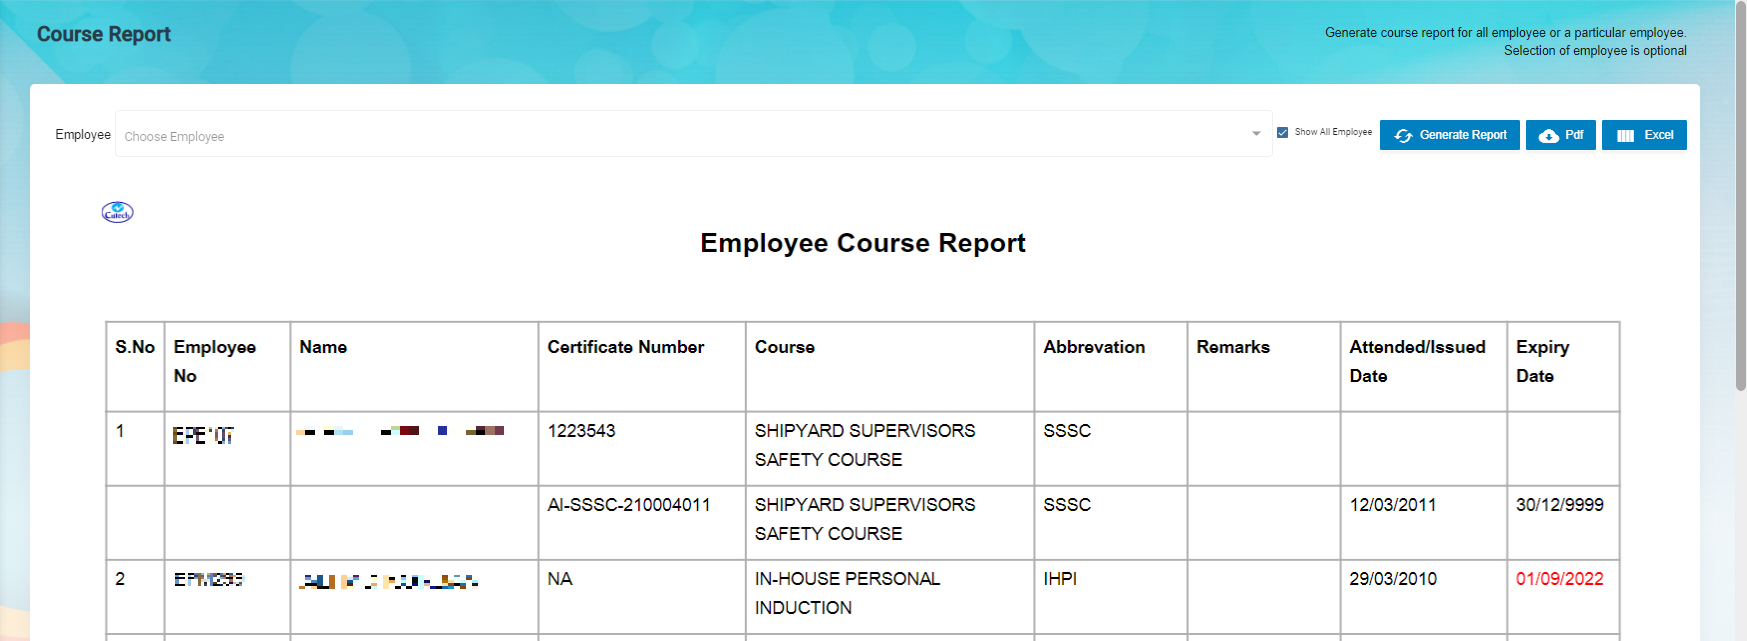](http://wiki.cuteinfocomm.com/uploads/images/gallery/2023-04/image-1682095648070.png)
**Note**: If you want to download the employee course report in pdf format, click 
(**PDF download** button). The pdf report will be downloaded.
### View Courses Matrix
The **Courses Matrix** tab in the **Reports** submenu helps you to generate and view the employee’s course attendance report. To view the course attendance report,
1. Click the **Courses Matrix** tab in the **Reports**. The **Courses Matrix** page opens. [](http://wiki.cuteinfocomm.com/uploads/images/gallery/2022-09/image-1662093188842.png)
2. In the **Select Employees** box, select the employees for whom you want to view the course attendance report.
3. In the **Select Courses** box, select the courses.
**Note**: The maximum number of selection of employees is 10. You cannot select the more than 10 employees.
4. Click **Submit**. The employee’s course matrix report opens. [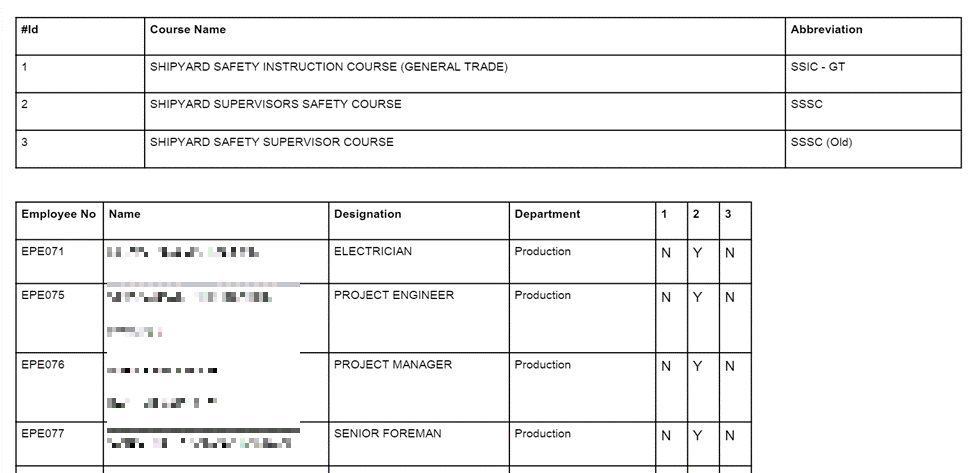](http://wiki.cuteinfocomm.com/uploads/images/gallery/2023-04/image-1682095691372.png)
**Note**: If you want to download the employee course and matrix report in pdf format, click  (**PDF download** button). The pdf report will be downloaded.
### View Employee Course List
The **Employee Course List** tab in the **Reports** submenu helps you to view the courses which are completed by the employees. To view the course list,
1. Click the **Employee Course List** tab in the **Reports.** The **Employee Course List** page opens, [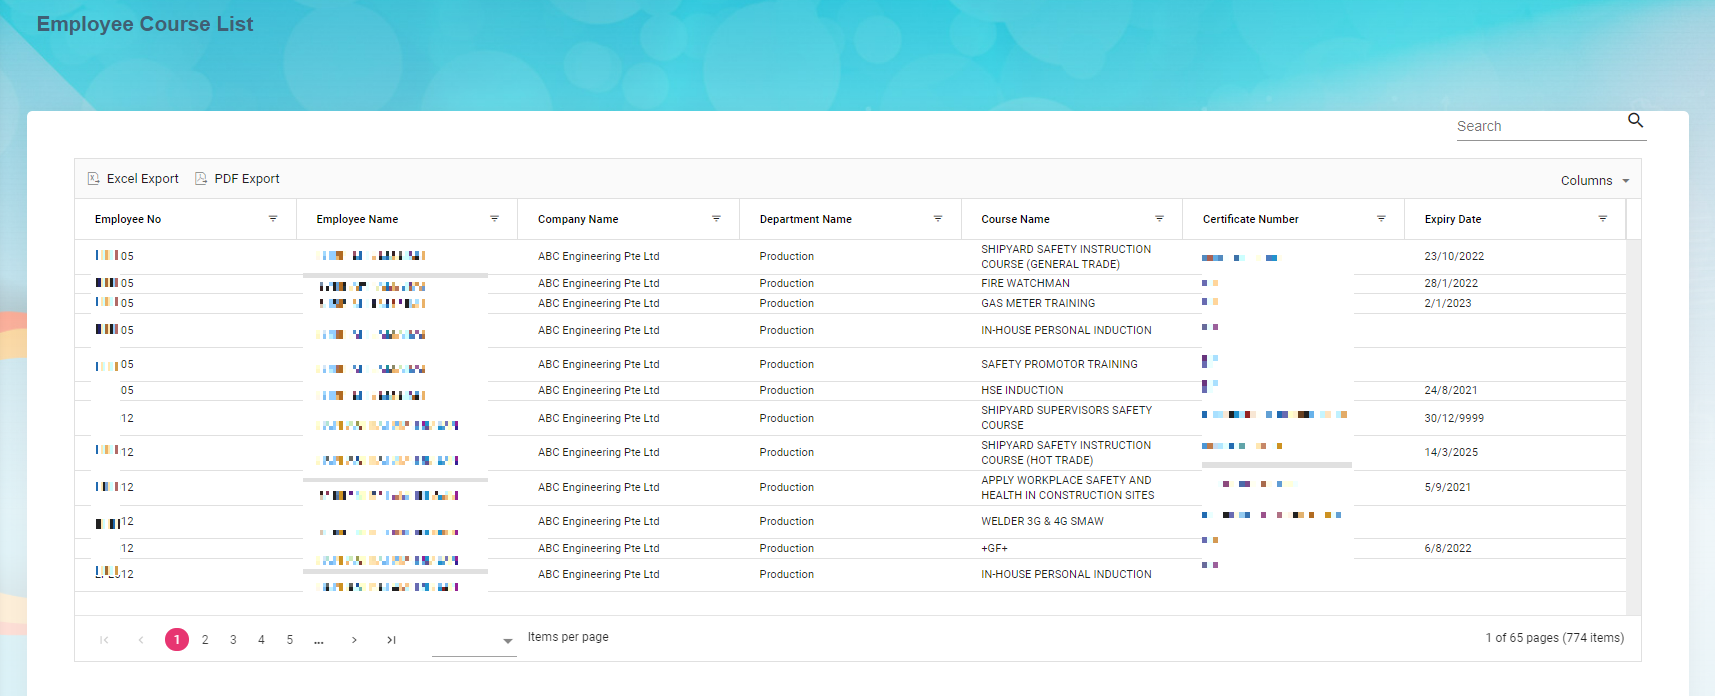](http://wiki.cuteinfocomm.com/uploads/images/gallery/2023-04/image-1682095753850.png)
**To Customize the** **Employee Course List** **page**:
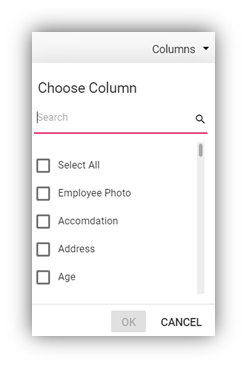
You can customize the **Employee Course List** page by using the **Columns** option. In the **Columns** option, select the columns which you want to add in the **Employee Course List.** The selected columns will be added the Employee Course List page.

2. In the **Course Name** box, select a course from the list of courses added using the [Course Master](#_Course). The page shows a list of employees who has completed the selected course.
- **Export course list**
The application has a feature to download the course list as an excel file. You can use (**Export Excel** button) to download the course list details. To download the course list details, select the desired format and click[](http://wiki.cuteinfocomm.com/uploads/images/gallery/2022-09/image-1662091449802.png)(**Export Excel** or **PDF** button). The course list in the **Employee Course List** page will be downloaded.
- **Filter Course List**
If you want to view any specific course completed details among multiple completed courses listed in the **Employee** **Course List** page, you can use the filter option provided below each column in the **Employee** **Course List** page.
### View Employee Report
You can view the list of added employees including their details such as employee number, company, and so on by using the **Employee Report** tab in the **Reports** submenu. Click the **Employee Report** tab in the **Reports**. The **Employee Report** page opens with a list of added employees including their details.
[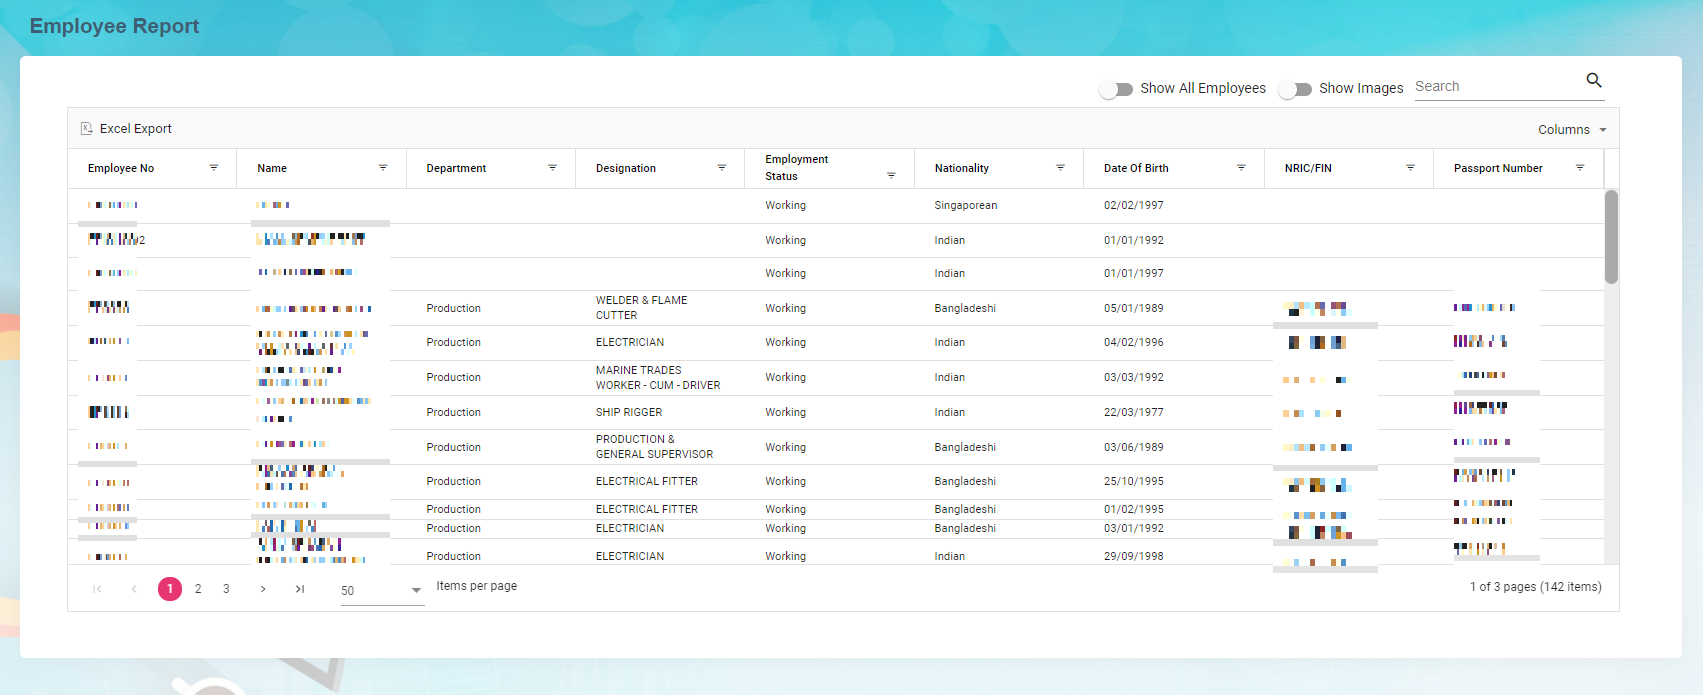](http://wiki.cuteinfocomm.com/uploads/images/gallery/2023-04/image-1682095806683.png)
**To Customize the** **Employee Report** **page**:
You can customize the **Employee Report** page by using the **Columns** option. In the **Columns** option, select the columns which you want to add in the **Employee Report.** The selected columns will be added the Employee Report page.
- **Export Employee Report**
The application has a feature to download the employee report as an excel file. You can use (**Export Excel** button) to download the employee report. To download the employee report, select the desired format and click[](http://wiki.cuteinfocomm.com/uploads/images/gallery/2022-09/image-1662091449802.png)(**Export Excel** or **PDF** button). The employee details in the **Employee Report** page will be downloaded.
- **Filter Employee Report**
If you want to view any specific employee details among multiple employees listed in the **Employee** **Report** page, you can use the filter option provided below each column in the **Employee** **Report** page.
### View Employee’s Security Bond Report
The **Security Bond Report** tab in the **Reports** menu used to generate and view the security bond (work permit) report of the employee. To view the security bond report,
1. Click the **Security Bond Report** tab in the **Reports.** The **Employee’s (Work Permit) Security Bond Report** page opens. [](http://wiki.cuteinfocomm.com/uploads/images/gallery/2022-09/image-1662091589178.png)
2. In the **Employee** box, select an employee from a drop-down list. Or if you want to view the security bond report for all the employees, click the checkbox of the **Show All Employee**
3. Click **Generate Report**. The security bond report for the selected employee opens. [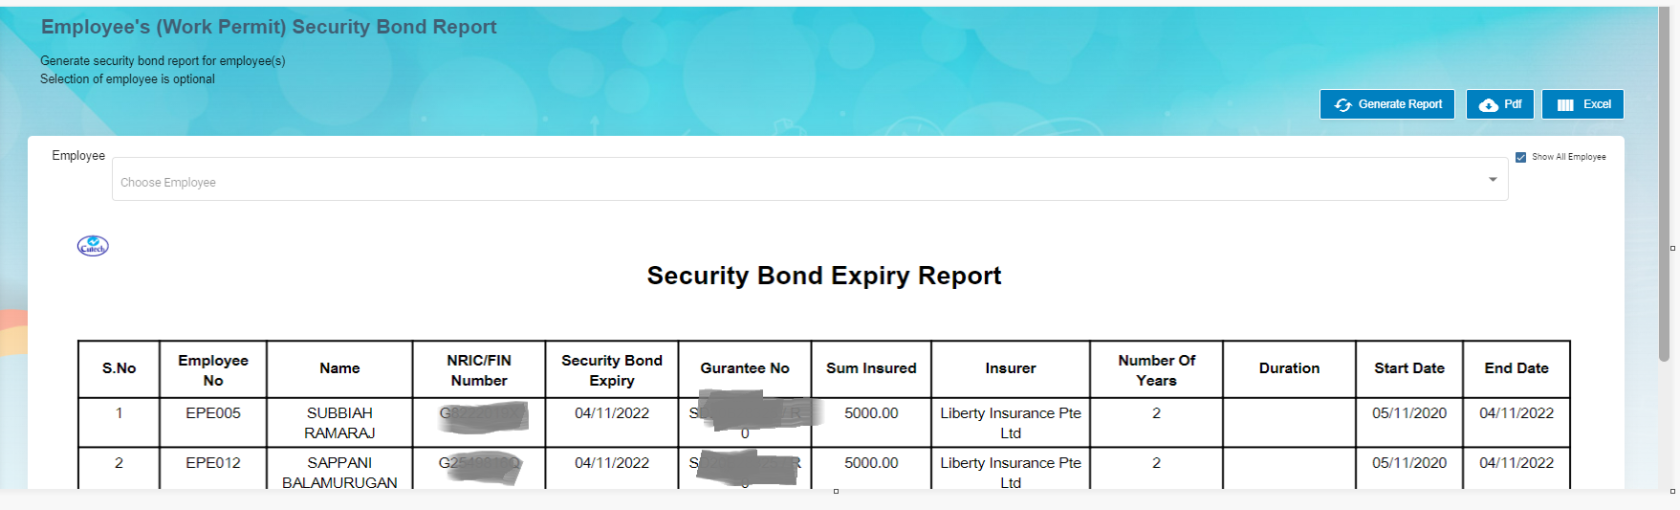](http://wiki.cuteinfocomm.com/uploads/images/gallery/2022-09/image-1662093468267.png)
**Note**: If you want to download the employee’s security bond report in pdf format, click[](http://wiki.cuteinfocomm.com/uploads/images/gallery/2022-09/image-1662093519391.png)(**PDF download** button). The pdf report will be downloaded.
### View Employee’s Key Employment Terms Report
The **Key Employment Terms Report** tab in the **Reports** menu used to view the key employment terms report of the employee. To view the key employment terms report,
1. Click the **Key Employment Terms Report** tab in the **Reports.** The **Employee’s Key Employment Terms Report** page opens. [](http://wiki.cuteinfocomm.com/uploads/images/gallery/2022-09/image-1662093552003.png)
2. In the **Employee** box, select an employee from a drop-down list.
3. Click **Generate Report**. The key employment terms report for the selected employee opens, [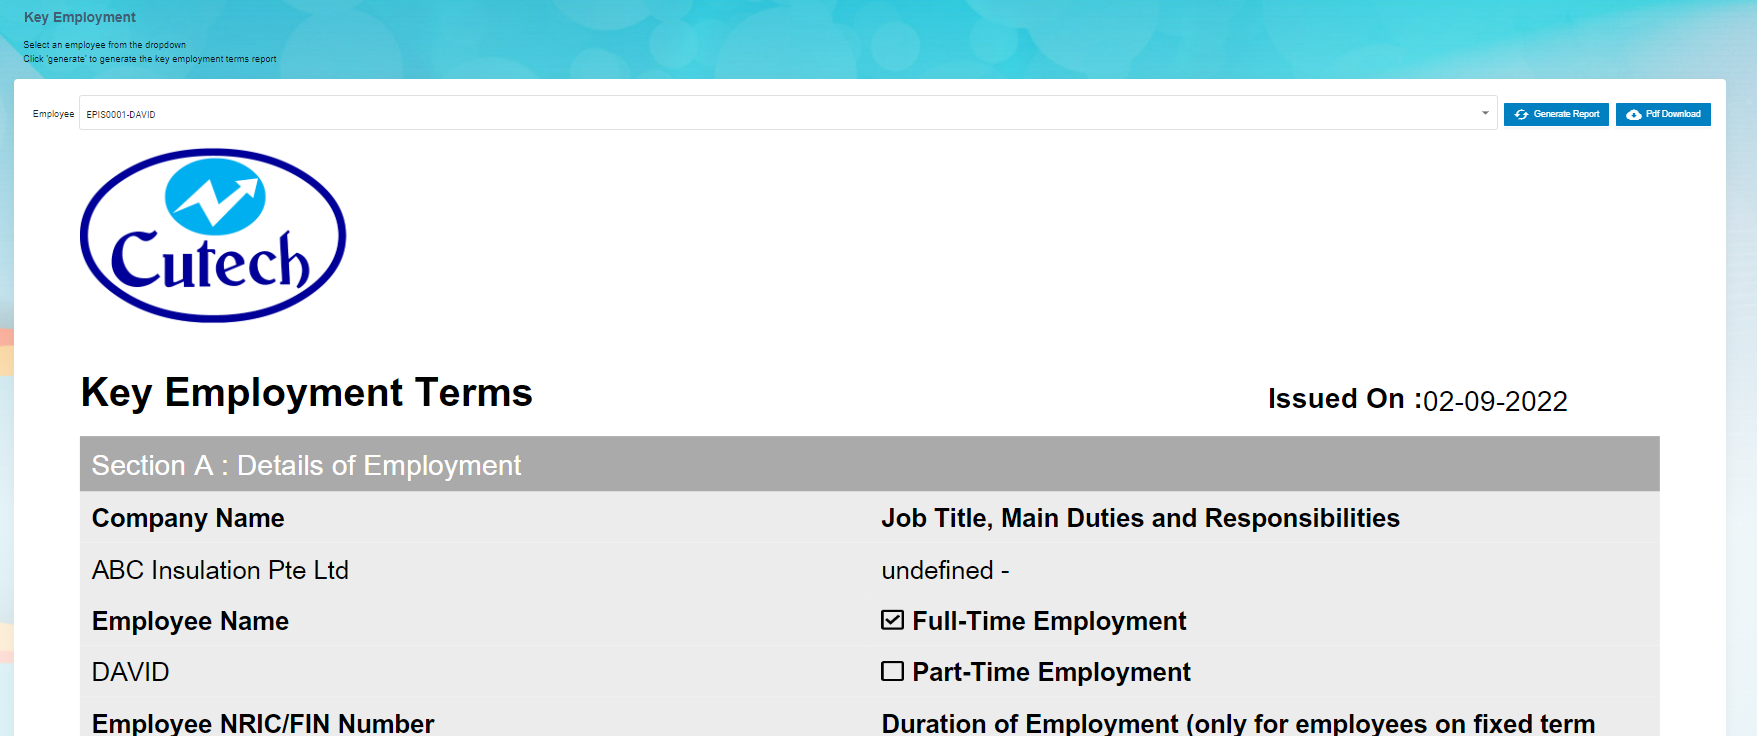](http://wiki.cuteinfocomm.com/uploads/images/gallery/2022-09/image-1662093626807.png)
**Note**: If you want to download the employee’s key employment terms report in pdf format, click [](http://wiki.cuteinfocomm.com/uploads/images/gallery/2022-09/image-1662093519391.png) (**PDF download** button). The pdf report will be downloaded.
### View Archived Documents
The **Archive Documents** in the **Reports** submenu used to view the archived documents of the employee. To view the archived documents of the employee, click the **Archive Documents** tab in the **Reports.** The **Archived Employee Documents** page opens with a list of archived documents of the employees.
[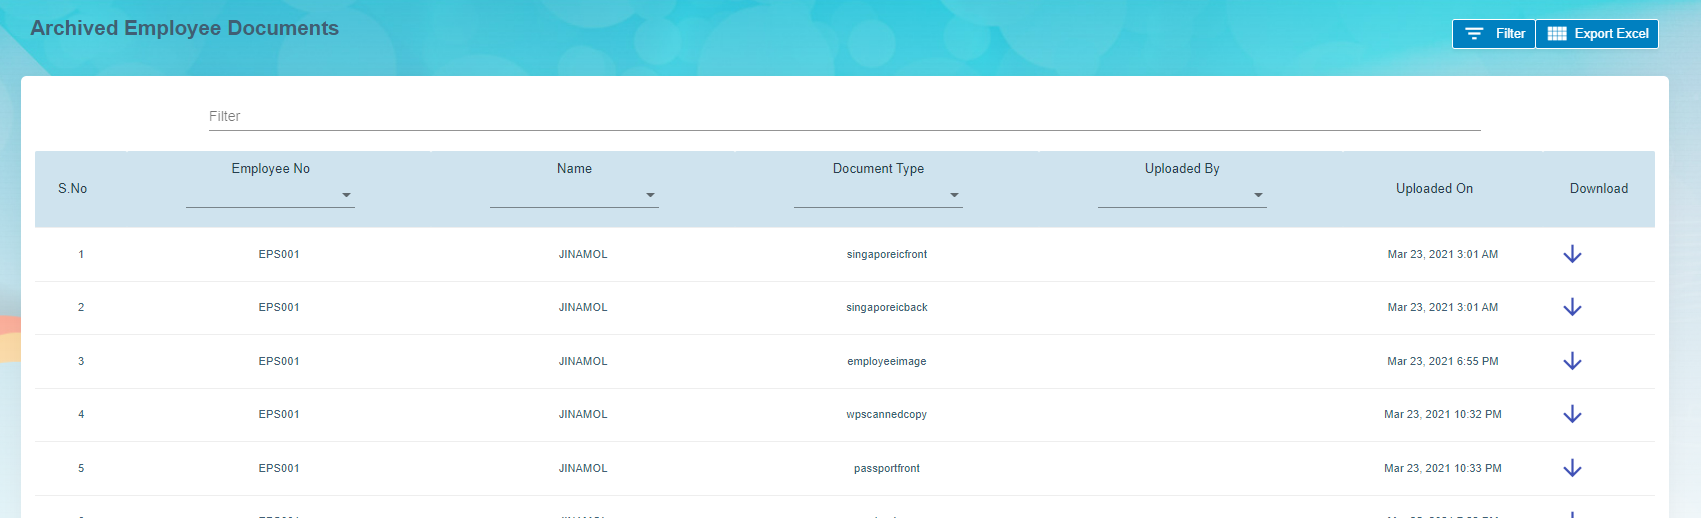](http://wiki.cuteinfocomm.com/uploads/images/gallery/2022-09/image-1662093691058.png)
- **Download an Archived Document of Employee**
If you want to download the detail of the archived document of any employee, click  (Download icon provided in the **Download** column) of the respective employee. The archived document of the selected employee will be downloaded.
- **Export Archived Employee Documents**
The application has a feature to download the archived employee documents list as an excel file. You can click[](http://wiki.cuteinfocomm.com/uploads/images/gallery/2022-09/image-1663356992223.png) (**Export Excel** button) to download the documents list. The archived document list in the **Archived** **Employee Documents** page will be downloaded as an excel file.
- **Filter Archived Document of Employee**
If you want to view the archived document of any specific employee among multiple employees listed in the **Archived** **Employee** **Documents** page, click[](http://wiki.cuteinfocomm.com/uploads/images/gallery/2022-09/image-1663357019209.png)(**Filter** button) provided in the upper side of the **Archived** **Employee** **Documents** page. The **Filter** option will be enabled in the **Archived** **Employee** **Documents** page to filter the specific archived document.
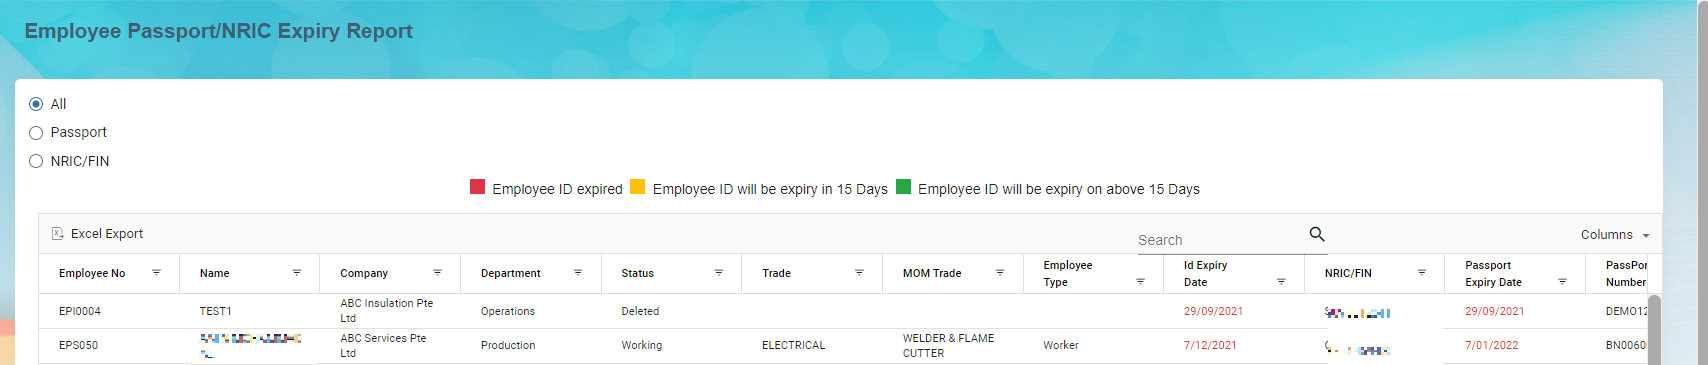
### Employee ID Expiry
This report allows user to check passport/NRIC expiry date. Click **Employee ID Expiry** in **Reports** menu, below page opens,
[](http://wiki.cuteinfocomm.com/uploads/images/gallery/2023-04/image-1682095928241.png)
To generate report, select below option to generate relevant report,
[](http://wiki.cuteinfocomm.com/uploads/images/gallery/2022-09/image-1663097946870.png)
Or you can use the search option to search for particular record,
[](http://wiki.cuteinfocomm.com/uploads/images/gallery/2022-09/image-1663098099433.png)
To export the report, you can use the export button located on the up left corner of the report page.
[](http://wiki.cuteinfocomm.com/uploads/images/gallery/2022-09/image-1663107739432.png)
### Expiry Report
Expiry report allows user to generate all kinds of expiry reports such as employee passport expiry, employee contract expiry, probation expiry report etc.. Click Expiry Report, below page opens,
[](http://wiki.cuteinfocomm.com/uploads/images/gallery/2022-09/image-1662093786271.png)
To generate expiry report,
1. In **Report Type** field, select the type from dropdown list, [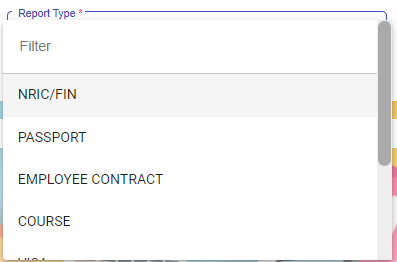](http://wiki.cuteinfocomm.com/uploads/images/gallery/2022-09/image-1663108091496.png)
2. In Expires In field, select the expiring period, [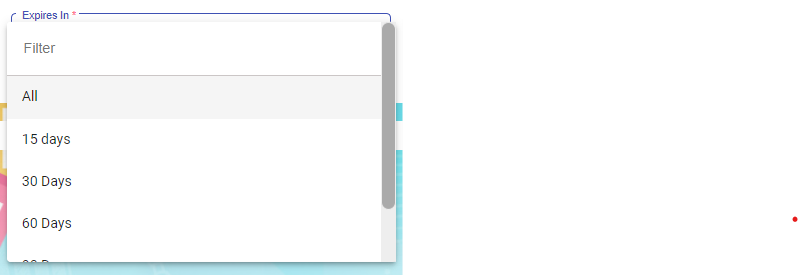](http://wiki.cuteinfocomm.com/uploads/images/gallery/2022-09/image-1663108139289.png)
3. In Company field, select the company name. [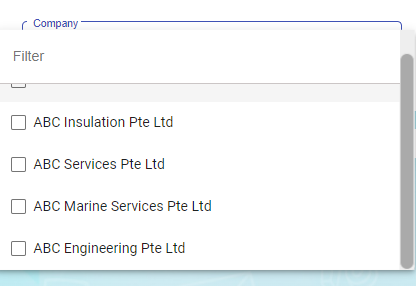](http://wiki.cuteinfocomm.com/uploads/images/gallery/2022-09/image-1663108166958.png)
4. Click[](http://wiki.cuteinfocomm.com/uploads/images/gallery/2022-09/image-1663108186010.png) button to generate report.
5. To download report, click the download icon. [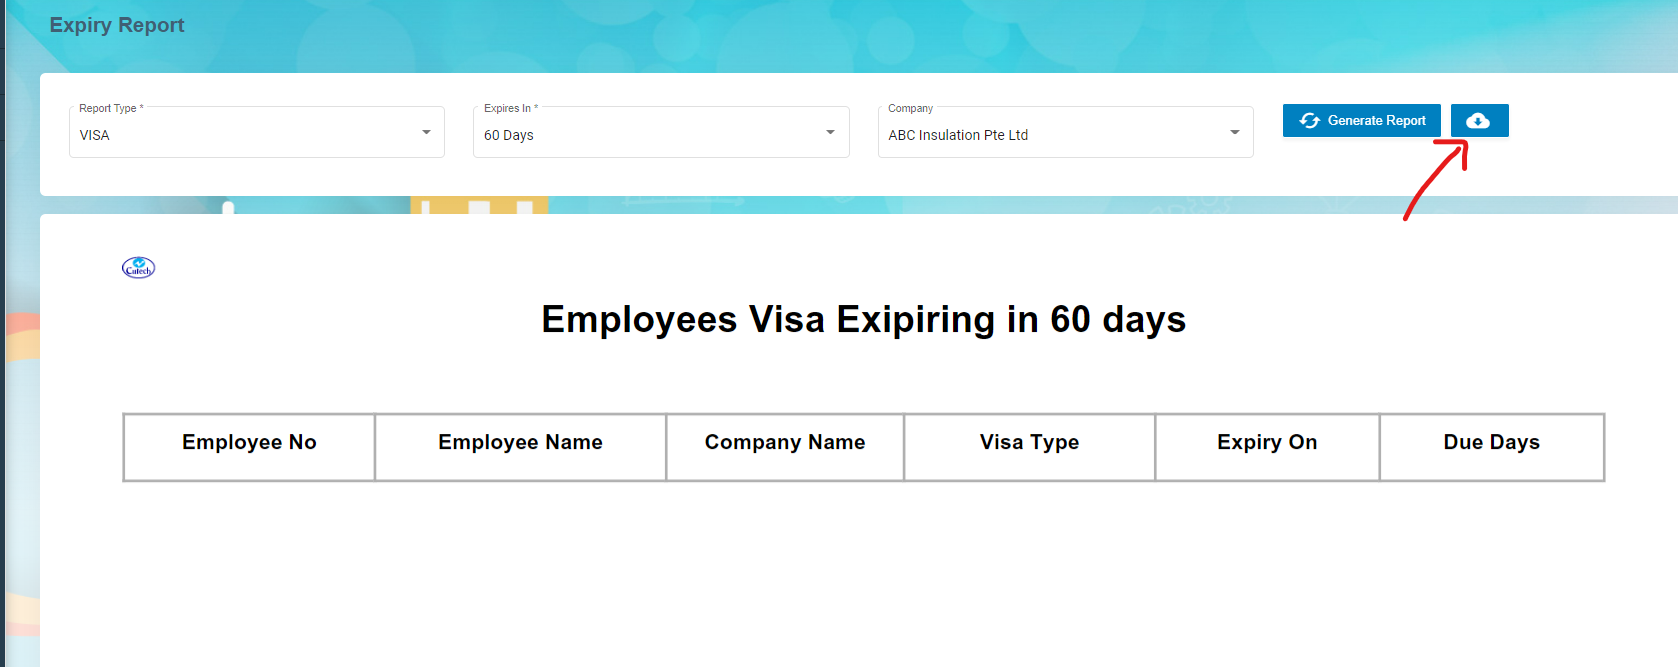](http://wiki.cuteinfocomm.com/uploads/images/gallery/2022-09/image-1663108289105.png)
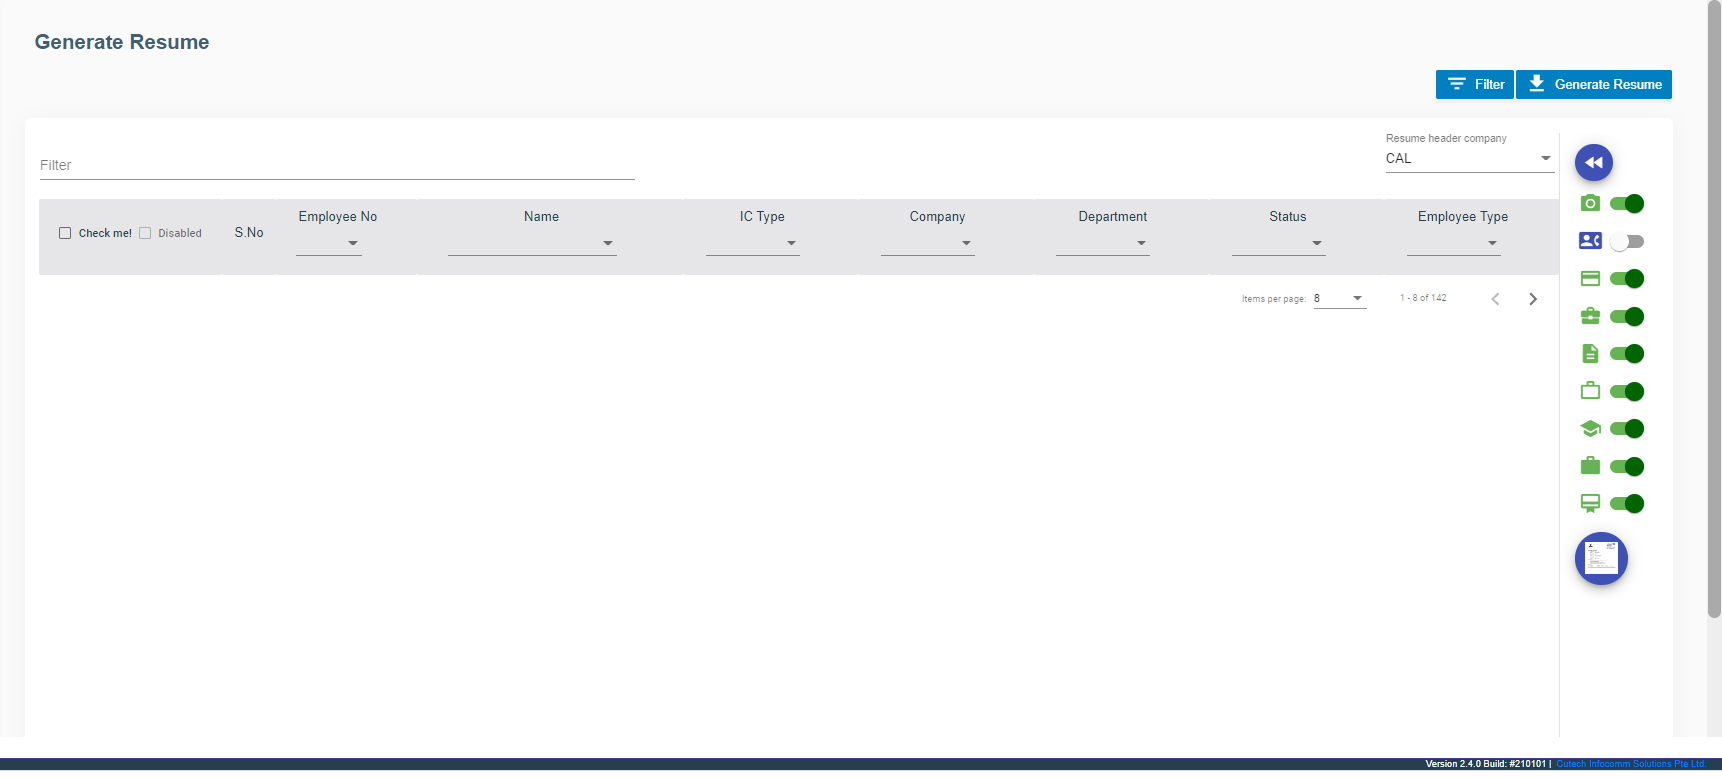
### Generate Resume
User can generate employee resume in this section. Click Generate Resume submenu,
[](http://wiki.cuteinfocomm.com/uploads/images/gallery/2022-09/image-1662093819289.png)
### Organization Chart
[](http://wiki.cuteinfocomm.com/uploads/images/gallery/2022-09/image-1662093868981.png)
.
# HRM Master Data
## Masters
The **Masters** submenu in the **HUMAN RESOURCES** page helps you to add the master data like details of employee’s skill set, job categories, and allowances, and company’s general document.
The **Masters** submenu contains the following tabs,
[](http://wiki.cuteinfocomm.com/uploads/images/gallery/2022-09/image-1663313292019.png)
- Course
- Trade
- Document Type
- Document
- Addition/Deduction
- Bank list
- Foreign Worker Levy
- Letter Template
- Onboard/Offboard Checklist
- Evaluation Factor
### Course
The **Course** tab in the **Masters** submenu helps you to add the course details. Once you have added the course, you can assign the added course for the for the respective employees while adding the employee course details. Click the Course tab in the Masters submenu. The Course Master page opens. [](http://wiki.cuteinfocomm.com/uploads/images/gallery/2022-09/image-1662112456589.png)
#### Add Course.
To add a new course,
1. Click (**Add Course** button) in the **Course Master.** The **Add Course** window opens. [](http://wiki.cuteinfocomm.com/uploads/images/gallery/2022-09/image-1662093911337.png)
**Note**: The fields notified with a symbol (\*) are mandatory. You must enter the relevant details in that fields before saving.
2. In the **Course** **Name** box, enter the name of course.
3. In the **Abbreviation** box, enter the abbreviation for the course name.
4. In the **Division Name** box, enter the division name.
5. In the **Responsible By** box, select the name of a person who is responsible for the course.
6. In the **Remarks** box, enter your remarks if any.
7. Click **Save**. The course is successfully added and listed in the **Course Master** page.
#### Edit Course
You can edit the details of the added course by using (Edit icon) provided in the **Edit** column of the **Course Master** page. Click (Edit icon) of the respective course you have added. The **Add Course** window opens with the added course details. Edit the course details where you want. Then click **Save**.
[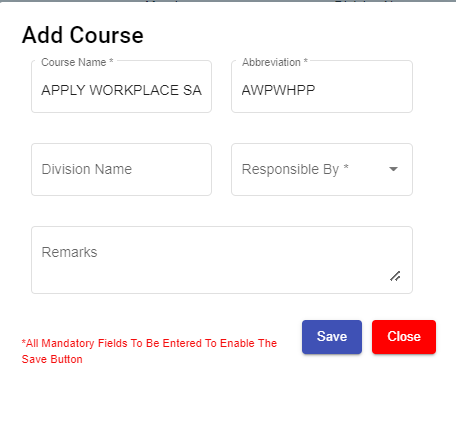](http://wiki.cuteinfocomm.com/uploads/images/gallery/2022-09/image-1662093937047.png)
#### Delete Course
You can delete the added course by using (Delete icon) provided in the **Delete** column of the **Course Master** page. Click (Delete icon) of the respective course. The **Confirm** dialogue box opens with the following notification: “**Are you sure to delete record?**”. If you want to delete the course, click **Yes** otherwise click **No**.
[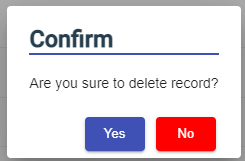](http://wiki.cuteinfocomm.com/uploads/images/gallery/2022-09/image-1662093999766.png)
#### Filter Course
If you want to view any specific course details among multiple courses listed in the **Course Master** page, you can use the filter option provided in the upper left corner of the **Course Master** page. Click (Filter button). The filter option opens. Type any one of the details of course name, abbreviation, division name, active date, responsible by, and remarks which you know. The course which you want to view is filtered now.
#### Export Course
The application has a feature to download the added course details as an excel file. You can use (**Export Excel** button) to download the added course details. Click (**Export Excel** button). The course details in the **Course Master** page will be downloaded as an excel file.
### Trade
The **Trade** tab in the **Masters** submenu helps you to add the trade (Job category of employee) details. Once you have added the trade, you can assign the added trade for the respective employees while adding the employee details. If you want to add a trade, click the **Trade** tab in the **Masters** submenu. The **Trade Master** page opens.
[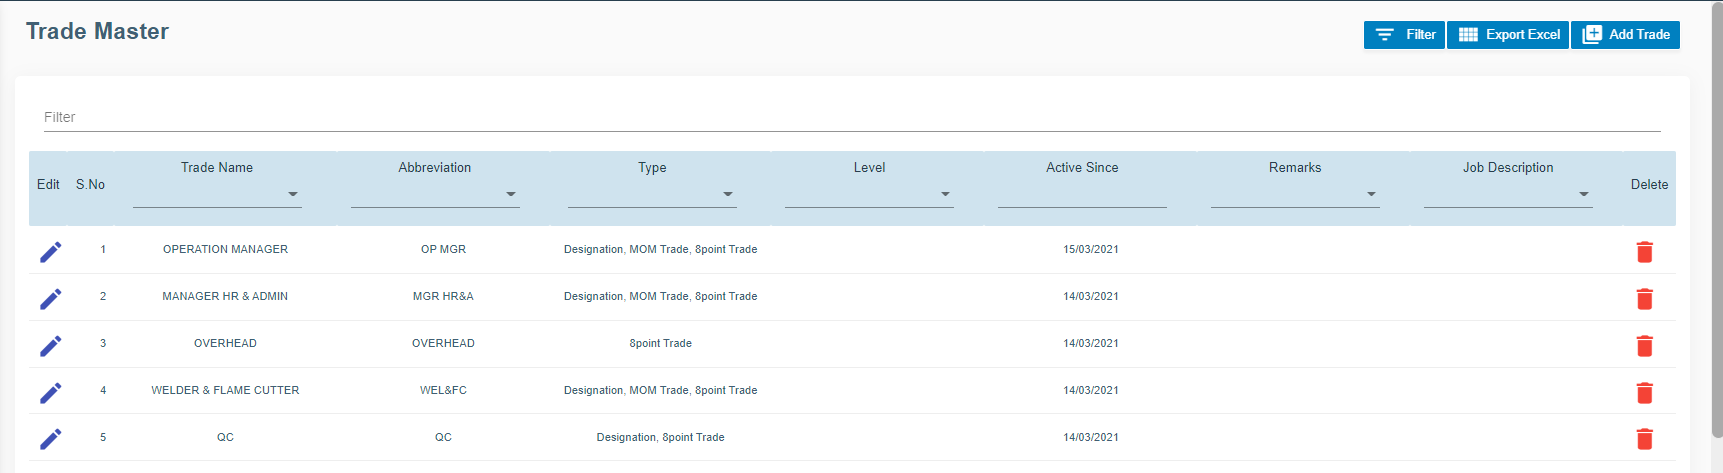](http://wiki.cuteinfocomm.com/uploads/images/gallery/2022-09/image-1662094037340.png)
#### Add Trade
To add a new trade,
1. Click (**Add Trade** button) in the **Trade Master.** The **Add Trade** window opens.
**Note**: The fields notified with a symbol (\*) are mandatory. You must enter the relevant details in that fields before saving.
2. In the **Name** box, enter the name of trade.
3. In the **Abbreviation** box, enter the abbreviation for the trade name.
4. In the **Trade** box, select the type of trade from a drop-down list.
5. In the **Remarks** box, enter your remarks if any.
6. In the **Job Description** box, enter the job description detail.
7. Click **Save**. The trade is successfully added and listed in the **Trade Master** page.
#### Edit Trade
You can edit the details of the added trade by using (Edit icon) provided in the **Edit** column of the **Trade Master** page. Click (Edit icon) of the respective trade you have added. The **Add Trade** window opens with the trade details. Edit the trade details where you want. Click **Save**.
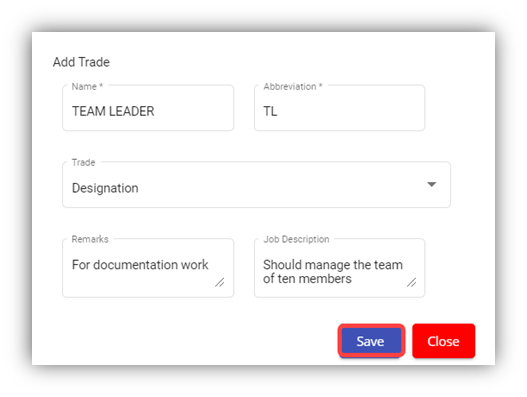
#### Delete Trade
You can click the  (Delete icon) in the **Delete** column of the **Trade Master** page. The Confirm dialogue box opens with the following notification: “Are you sure to delete record?”. If you want to delete the trade, click **Yes** otherwise click **No**.
#### Filter Trade
If you want to view any specific trade details among multiple trades listed in the **Trade Master** page, you can use the filter option provided in the upper left corner of the **Trade Master** page. Click (Filter button). The filter option opens.
#### Export Trade
The application has a feature to download the added trade details as an excel file. You can click  (**Export Excel** button) to download the added trade details. The trade details in the **Trade Master** page will be downloaded as an excel file.
### Document Types
Document types manages the types of documents to be added to system. Click Document Types in the Master menu, the document types opens,
[](http://wiki.cuteinfocomm.com/uploads/images/gallery/2022-09/image-1662596033703.png)
#### Add Document Type
To add a new document type,
1. Click[](http://wiki.cuteinfocomm.com/uploads/images/gallery/2022-09/image-1662094737267.png), the document type window opens, [](http://wiki.cuteinfocomm.com/uploads/images/gallery/2022-09/image-1662094780149.png)
2. Enter document type name and any remarks if necessary.
3. Click **Save**. A new document type will be created and saved.
#### Edit Document Type
You can edit the details of a document type by using edit option provided in the **Edit** column of the **Document Types** page. Click [](http://wiki.cuteinfocomm.com/uploads/images/gallery/2022-09/image-1662094942497.png)(Edit icon) of the respective document type. The **Add Document** window opens with the document details. Edit the document type details where you want. Click **Save**.
#### Delete Document Type
You can delete a document type by using (Delete icon) provided in the **Delete** column of the **Document Types** page. If you want to delete the document type, click **Yes** otherwise click **No**.
#### Filter Document Type
If you want to view any specific document type details among multiple document types listed in the **Document Types** page, you can use the filter option provided in the upper left corner of the **Document Types** page. Click (Filter button). The filter option opens.
#### Export Document Type
The application has a feature to download the added document type details as an excel file. You can use (**Export Excel** button) to download the added document type details. Click (**Export Excel** button). The document details in the **Document Types** page will be downloaded as an excel file.
### Document
The **Document** tab in the **Masters** submenu helps you to add the type of company’s general documents like ISO certificates, product certificates and so on. The added document type will be used while adding the document name. Click the **Document Master** tab in the **Masters.** The **Document Master** page opens.
[](http://wiki.cuteinfocomm.com/uploads/images/gallery/2022-09/image-1662596005861.png)
#### Add Document
To add any document,
1. Click (**Add Document** button) in the **Document Master.** The **Add Document** window opens.
**Note**: The fields notified with a symbol (\*) are mandatory. You must enter the relevant details in that fields before saving.
2. In the **Document Type** box, select the type of document.
3. In the **Abbreviation** box, enter the abbreviation for the document type.
4. In the **Purpose** box, enter the purpose of adding the document.
5. In the **Responsible By** box, enter the name of a person who is responsible for the document.
6. In the **Remarks** box, enter your remarks if any.
7. Click **Save**. The document type is successfully added and listed in the **Document Master** page.
#### Edit Document
You can edit the details of the added document type by using (Edit icon) provided in the **Edit** column of the **Document Master** page. Click (Edit icon) of the respective document type you have added. The **Add Document** window opens with the document details. Edit the document type details where you want. Click **Save**.
#### Delete Document
You can delete the added document by using (Delete icon) provided in the **Delete** column of the **Document Master** page. If you want to delete the document type, click **Yes** otherwise click **No**.
#### Filter Document
If you want to view any specific document type details among multiple document types listed in the **Document Master** page, you can use the filter option provided in the upper left corner of the **Document Master** page. Click (Filter button). The filter option opens.
#### Export Document
The application has a feature to download the added document type details as an excel file. You can use (**Export Excel** button) to download the added document type details. Click (**Export Excel** button). The document details in the **Document Master** page will be downloaded as an excel file.
### Allowance/Deduction Master
The **Allowance/Deduction Master** tab in the **Masters** submenu helps you to add the allowance, addition, or deduction type master data. Click the **Allowance/Deduction Master** tab in the **Masters.** The **Allowance/Deduction Type Master** page opens.
[](http://wiki.cuteinfocomm.com/uploads/images/gallery/2022-09/image-1662596114277.png)
#### Add Allowance/Addition/Deduction Master
If you want to add allowance/deduction master, do the following steps,
1. Click (**Add Allowance/Deduction Type** button) in the **Allowance/Deduction Type Master**. The **Add Allowance/Deduction Type** window opens. [](http://wiki.cuteinfocomm.com/uploads/images/gallery/2022-09/image-1662596144102.png)
**Note**: The fields notified with a symbol (\*) are mandatory. You must enter the relevant details in that fields before saving.
1. In the **Type** box, select the type of master data you want to add whether Allowance, Addition, or Deduction.
2. In the **Name** box, enter the name of the master type.
3. In the **Abbreviation** box, enter the abbreviation for the added master type.
4. In the **Company** box, select a company.
5. In the **Pay Code** box, select the pay code from a drop-down list.
6. If creating allowance master data, user must select one of the following option of pay period where applicable ,
- - - If the allowance is fixed one, select the checkbox of the **Fixed**
- If the allowance is paid only for actual working days, select the checkbox of the **Actual Days**
- If the allowance is paid for Public Holidays, select the checkbox of the **Include PH**
- If the allowance is paid when employee works in PH, select **Include PH Working Days**
- If the allowance is paid when employee works during rest days, select **Include Rest Working days**
- If the allowance is paid when employee on paid leave, select **Include Paid Leave**
- If the allowance is daily rate, select **Daily rate.**
7. Click **Save**. The added master type is successfully added and listed in the Allowance/Deduction Type Master page.
#### Edit Allowance/Addition/Deduction Master
You can edit the details of the added master type by using edit option provided in the **Edit** column of the **Allowance/Deduction Master** page. Click  (Edit icon) of the respective allowance type you have added. The **Add Allowance/Deduction** window opens with the added details. Edit the master details where you want. Click **Save**.
#### Delete Allowance/Addition/Deduction Master
You can delete the added master type by using  (Delete icon) provided in the **Delete** column of the **Allowance/Deduction Master** page. If you want to delete the Allowance/Addition/Deduction, click **Yes** otherwise click **No**.
#### Filter Allowance/Addition/Deduction Master
If you want to view any specific master type details listed in the **Allowance/Deduction Master** page, you can use the filter option provided in the upper left corner of the **Allowance/Deduction Master** page. Click (Filter button). The filter option opens.
#### Export Allowance/Addition/Deduction Master
The application has a feature to download the added master type details as an excel file. You can use (**Export Excel** button) to download the added master details. Click (**Export Excel** button). The allowance type details in the **Allowance/Deduction Master** page will be downloaded as an excel file.
### Bank List
The **Bank List** tab in the HRM **Masters** menu helps you to add all the bank details of employees that are used to receive salary payment. Click **Bank List** in the **Masters,** the **Banks List** page opens.[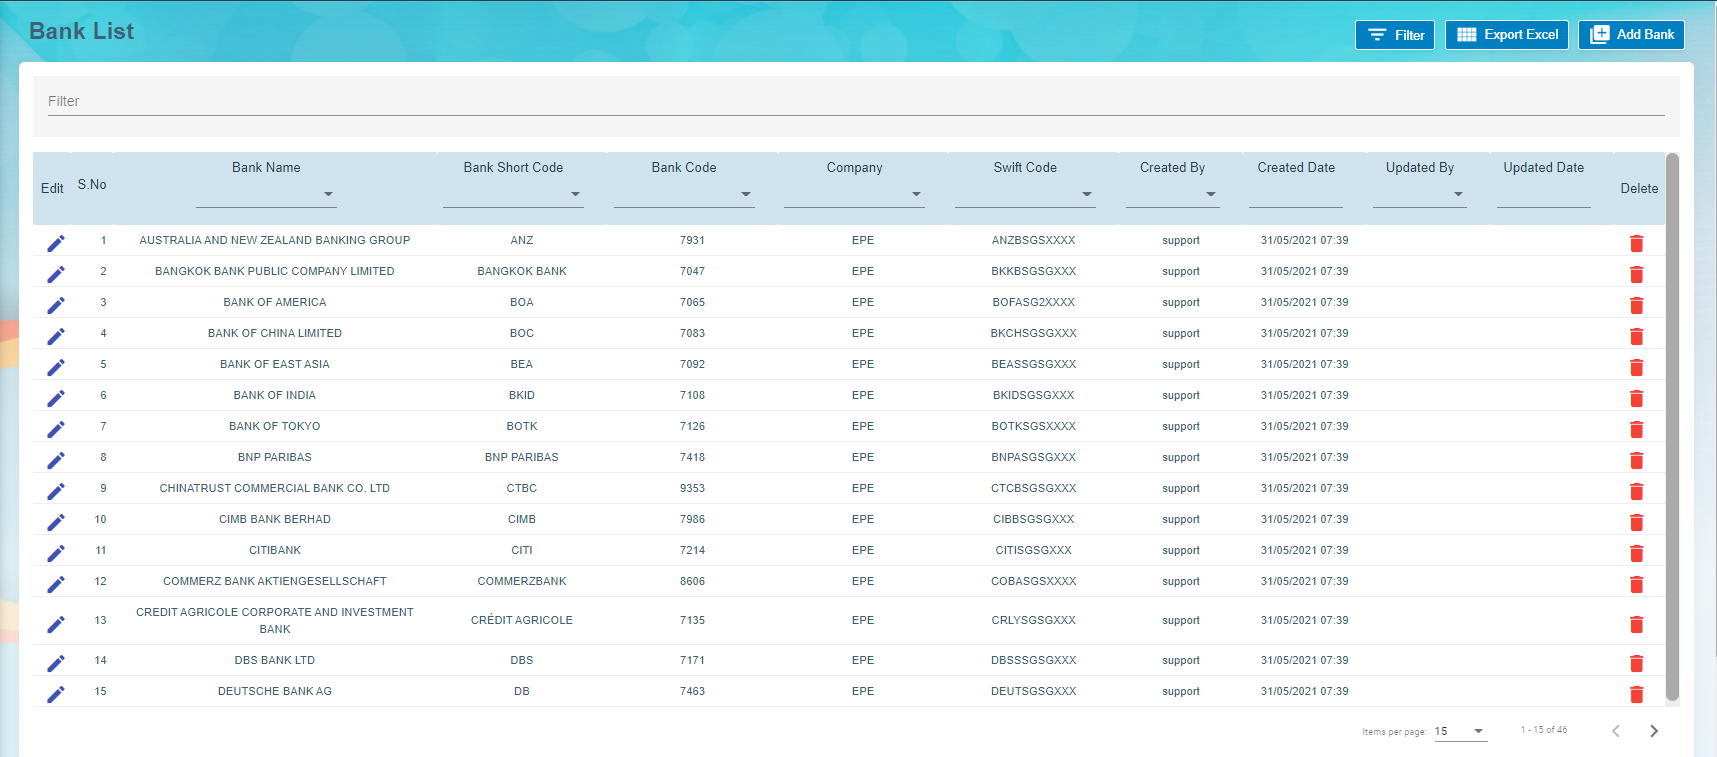](http://wiki.cuteinfocomm.com/uploads/images/gallery/2022-09/image-1663094930977.png)
#### Add a Bank Account
To add a new bank account,
1. Click[](http://wiki.cuteinfocomm.com/uploads/images/gallery/2022-09/image-1663095073003.png)(**Add New Bank** button) in the **Banks List, t**he **Bank** window opens. [](http://wiki.cuteinfocomm.com/uploads/images/gallery/2022-09/image-1663095181971.png)
- **Note**: The fields notified with a symbol (\*) are mandatory. You must enter the relevant details in that fields before saving.
2. In the **Bank Name** box, enter the bank name.
3. In the **Bank Short Code** box, enter the short code for the added bank.
4. In the **Bank Code** box, enter the bank code.
5. In the **Swift Code** box, enter the bank swift code.
6. Click **Save**. The Bank Name is successfully added and listed in the Bank List Master page.
#### Edit the Bank Account Details
You can edit the details of the added bank account by using edit option provided in the **Edit** column of the **Bank List** page. To edit the added bank account details,
1. Click (Edit icon) of the respective bank account you have added. The **Bank** window shows the added bank account details.
[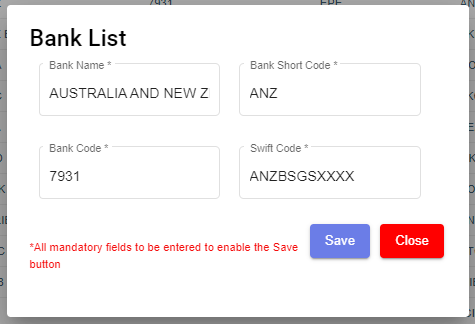](http://wiki.cuteinfocomm.com/uploads/images/gallery/2022-09/image-1663095296856.png)
2. Edit the bank account details where you want.
3. Click **Save**.
#### Delete a Bank Account
You can delete any added bank account by using (Delete icon) provided in the **Delete** column of the **Bank List** page.
#### Filter a Bank Account
If you want to filter any bank account in the **Bank List** page, you can use[ ](http://wiki.cuteinfocomm.com/uploads/images/gallery/2022-09/image-1663095417308.png)(**filter** button) on the **Bank List** page.
#### Export to Excel
If you want to export the **Bank List** page, you can use[](http://wiki.cuteinfocomm.com/uploads/images/gallery/2022-09/image-1663095384875.png) (**export** button) on the **Bank List** page.
### Foreign Worker Levy
Foreign Worker Levy is a mechanism to regulate the number of foreign workers in Singapore. The employer need not to pay CPF contributions for their foreign workers. However, they must pay a monthly levy for Work Permit and S Pass holders to government.
The **Foreign Worker Levy** tab in the **Masters** submenu used to add a foreign worker levy code. The added foreign worker levy code will be used in the further payroll process. Click **Foreign Worker Levy** in the **Masters,** the **Foreign Worker Levy** page opens.
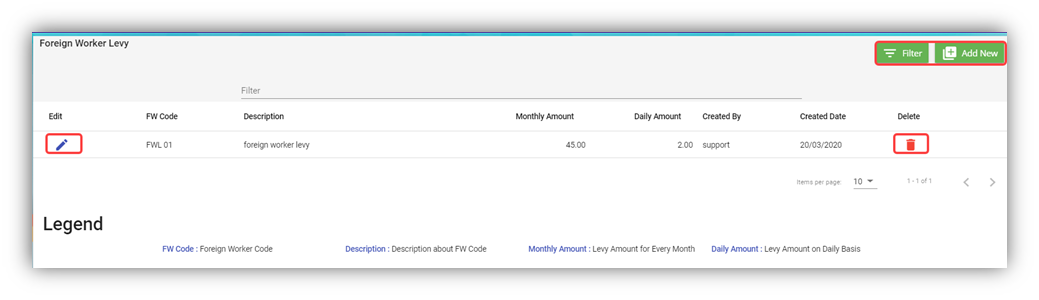
#### Add a Foreign Worker Levy Code
If you want to add a foreign worker levy code,
1. Click (**Add New** button) in the **Foreign Worker Levy.** The **Foreign Worker Levy Information** window opens.
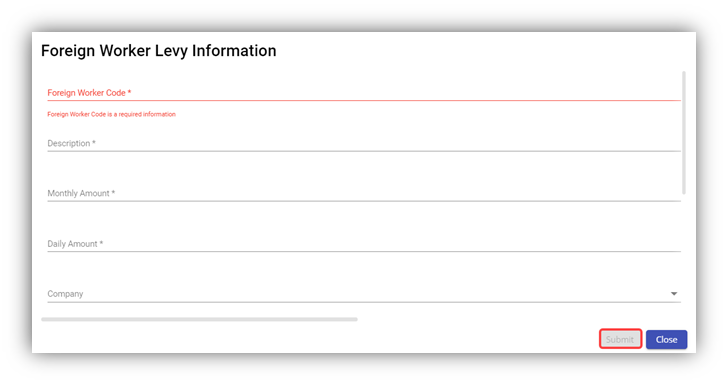
**Note**: The fields notified with a symbol (\*) are mandatory. You must enter the relevant details in that fields before saving.
2. In the **Foreign Worker Code** box, enter the code for the foreign worker levy you want to create.
3. In the **Description** box, enter the description for the added foreign worker levy code.
4. In the **Monthly Amount** box, enter the monthly amount to be paid for the foreign worker levy.
5. In the **Daily Amount** box, enter the daily amount to be paid for the foreign worker levy.
6. In the **Company** box, select a company from a drop-down list.
**Note**: If you want to select all the companies in the list, select the checkbox of the **ALL**.
7. Click **Submit**. The foreign worker levy code is added and listed in the **Foreign Worker Levy** page.
#### Edit the Foreign Worker Levy Code
You can edit the details of the added foreign worker levy code by using edit option provided in the **Edit** column of the **Foreign Worker Levy** page. To edit the added foreign worker levy code details,
1. Click (Edit icon) of the respective foreign worker levy code you have added. The **Foreign Worker Levy Information** window shows the added foreign worker levy code details.
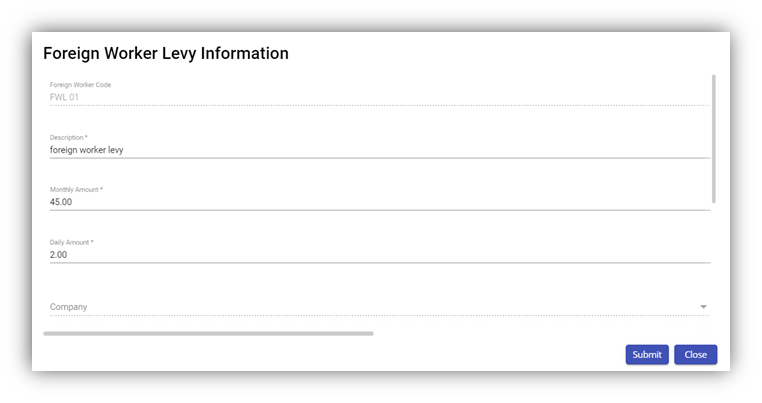
2. Edit the foreign worker levy code details where you want.
3. Click **Save**.
#### Delete a Foreign Worker Levy Code
You can delete the foreign worker levy code by using (Delete icon) provided in the **Delete** column of the **Foreign Worker Levy** page.
#### Filter Foreign Worker Levy Code
If you want to filter any foreign worker levy code in the **Foreign Worker Levy** page, you can use  (**FILTER** button) located on the **Generate Payroll** page.
### Letter Template
All HR and admin related letter templates can be configured and managed in this section. Click **Letter Template** in **Master** menu, the current templates will show as below,
[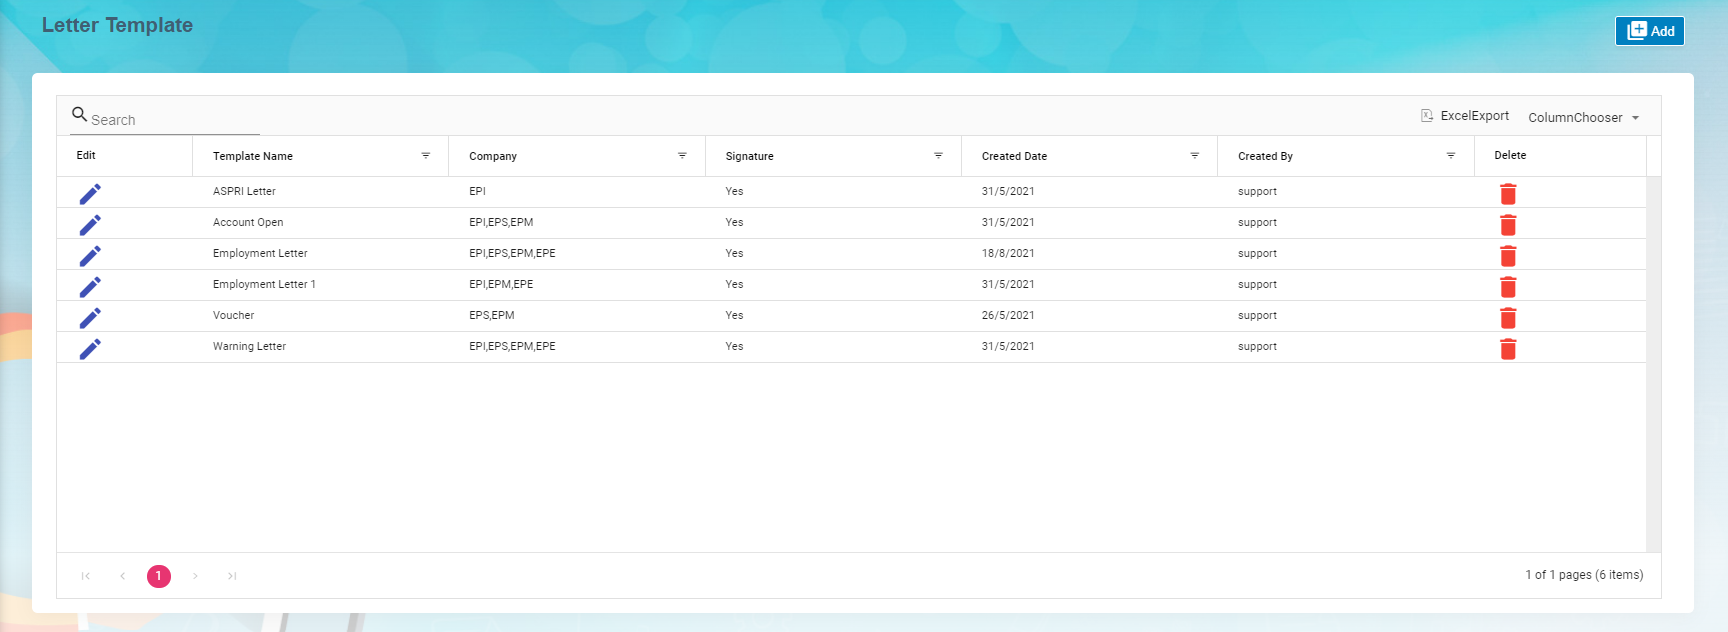](http://wiki.cuteinfocomm.com/uploads/images/gallery/2022-09/image-1662601030622.png)
#### View Letter Template
To view current letter templates,
1. Click[ ](http://wiki.cuteinfocomm.com/uploads/images/gallery/2022-09/image-1662690942077.png)edit icon of the template that user wants to view, the template will open,
2. Click Preview button or Download button in the top right corner to view or download the template as pdf file. [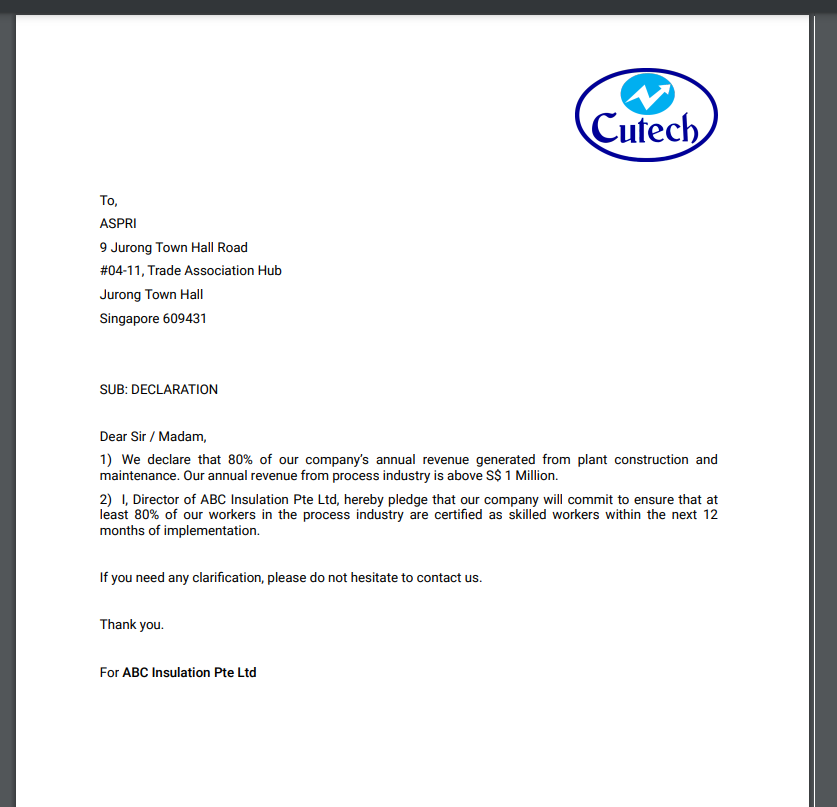](http://wiki.cuteinfocomm.com/uploads/images/gallery/2022-09/image-1662691076281.png)
#### Add A New Letter Template
To add a new letter template,
1. Click [](http://wiki.cuteinfocomm.com/uploads/images/gallery/2022-09/image-1662604025739.png) add button in the top right corner in the template list page, the template creation page opens,[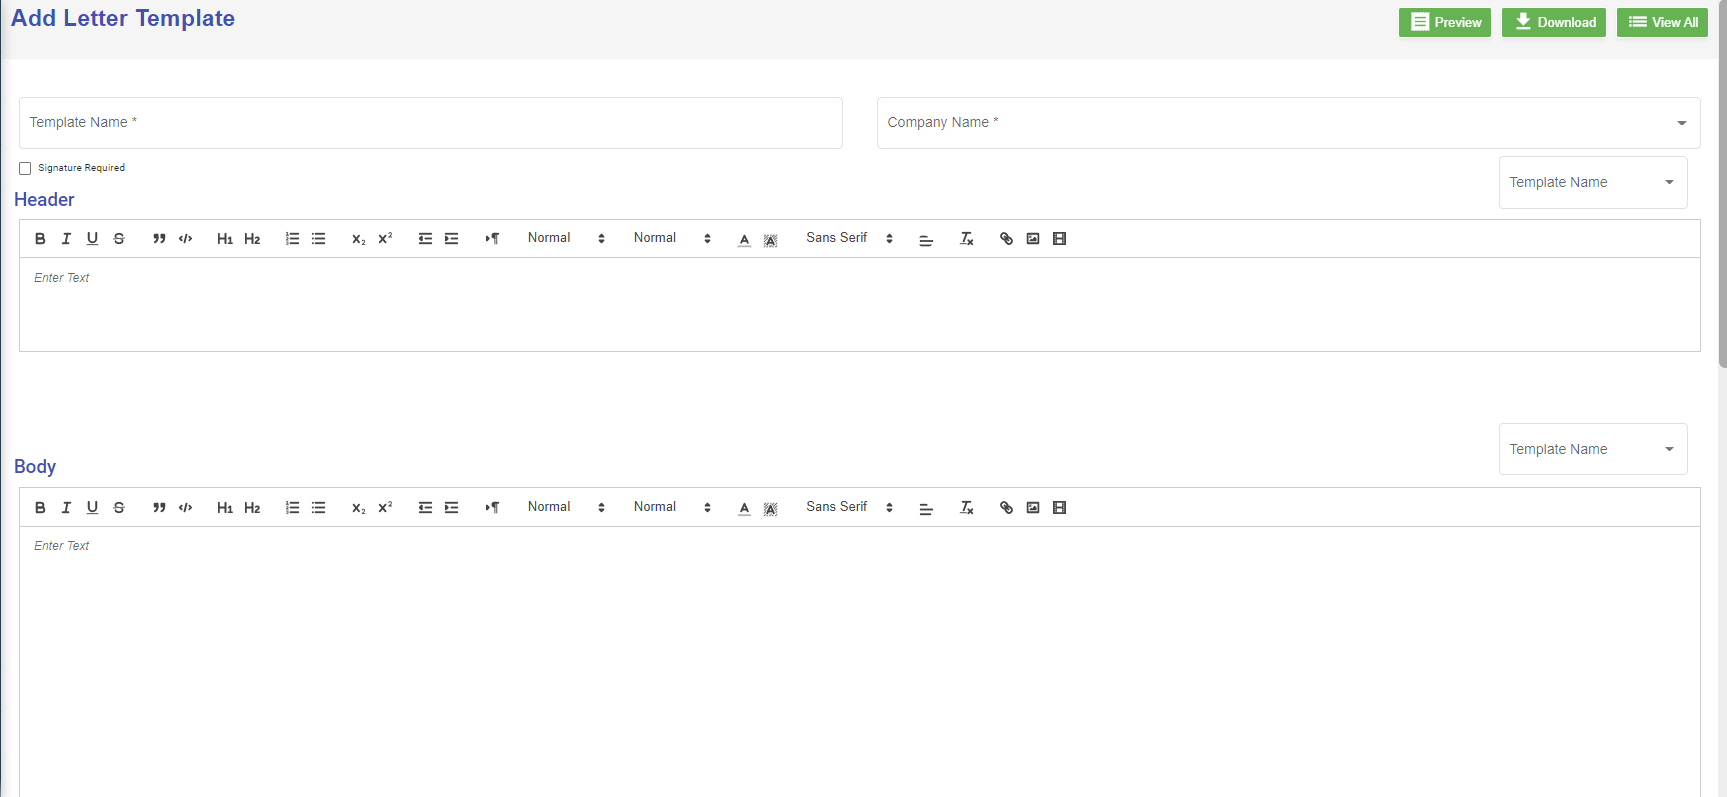](http://wiki.cuteinfocomm.com/uploads/images/gallery/2022-09/image-1662691308170.png)
2. Enter the details of the new letter template:
- In **Template Name**, enter the letter template name
- In **Company Name**, select company name from dropdown list
- If letter require signature, tick the **Signature Required** checkbox
- In **Header** section, enter the letter header content, or you can copy from existing template-select the template name, the header content of the selected template will automatically populated,
- In **Body** section, enter the body content, or you can copy from existing template-select the template name, the body content of the selected template will automatically populated,
- In **Footer** section, enter the footer content, or you can copy from existing template-select the template name, the footer content of the selected template will automatically populated,
- In **Signature** section, enter the signature format or you can copy from existing template-select the template name, the signature format of the selected template will automatically populated,
3. Click **Save** to create and save new letter template.
#### Edit Letter Template
To edit letter template,
1. Click[ ](http://wiki.cuteinfocomm.com/uploads/images/gallery/2022-09/image-1662690942077.png)edit icon of the template that user wants to view, the template will open as below, [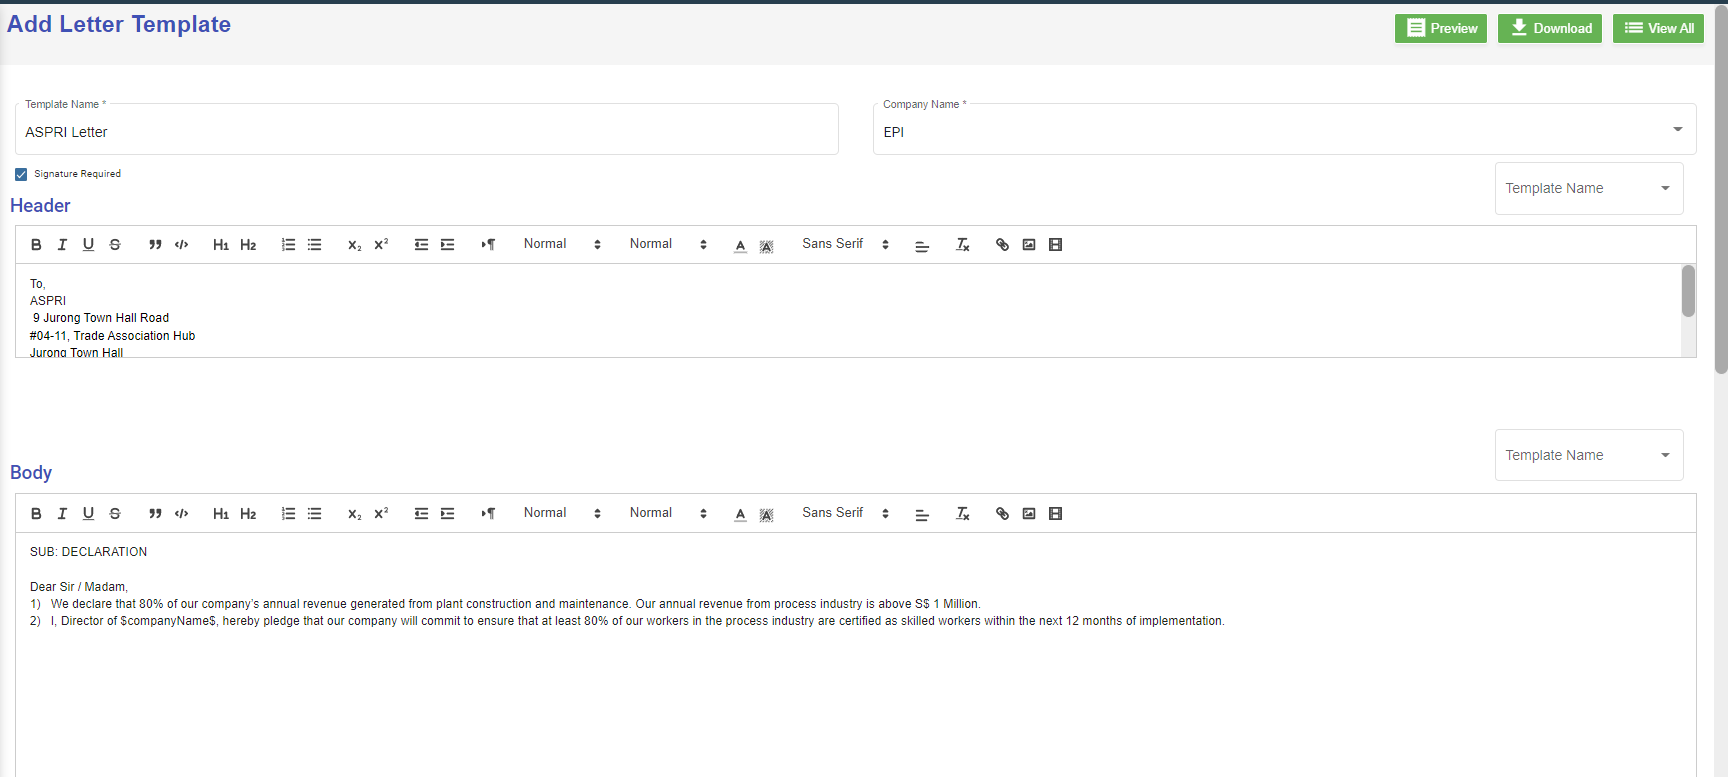](http://wiki.cuteinfocomm.com/uploads/images/gallery/2022-09/image-1662690921723.png)
2. Edit the details where needed.
3. Click **Save** to save edits.
#### Delete Letter Template
User can use the delete option to delete letter template that is no longer in use or need to remove. Click [](http://wiki.cuteinfocomm.com/uploads/images/gallery/2022-09/image-1662695579815.png) in the delete column of the template. The template will be removed.
### Onboard/Offboard Checklist
Onboard/Offboard Checklist master manages different type of checklist which contains list of task that the employee needs to perform before onboarding process/offboarding process.
#### Add Onboard Checklist
1. Click [](http://wiki.cuteinfocomm.com/uploads/images/gallery/2022-09/image-1662604025739.png) add button in the top right corner in the Onboard Checklist page, the Edit category page opens to enter questions in checklist template.[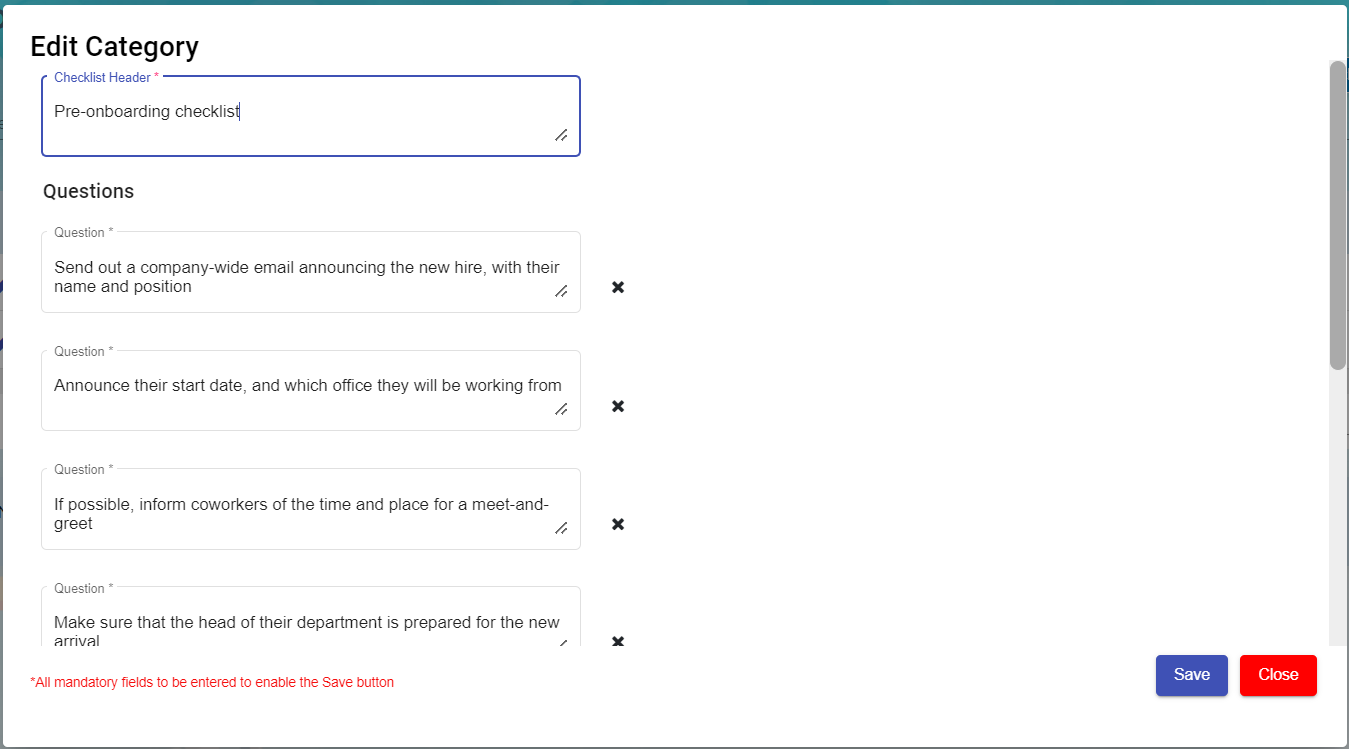](http://wiki.cuteinfocomm.com/uploads/images/gallery/2022-09/image-1663306419297.png)
2. Enter Checklist Header
3. Add or Delete the mandatory questions to be asked during Onboard processing.
4. Click save to create new Onboard checklist template.
#### Add Offboard Checklist
1. Click [](http://wiki.cuteinfocomm.com/uploads/images/gallery/2022-09/image-1662604025739.png) add button in the top right corner in the Offboard Checklist page, the Edit category page opens to enter questions in checklist template.[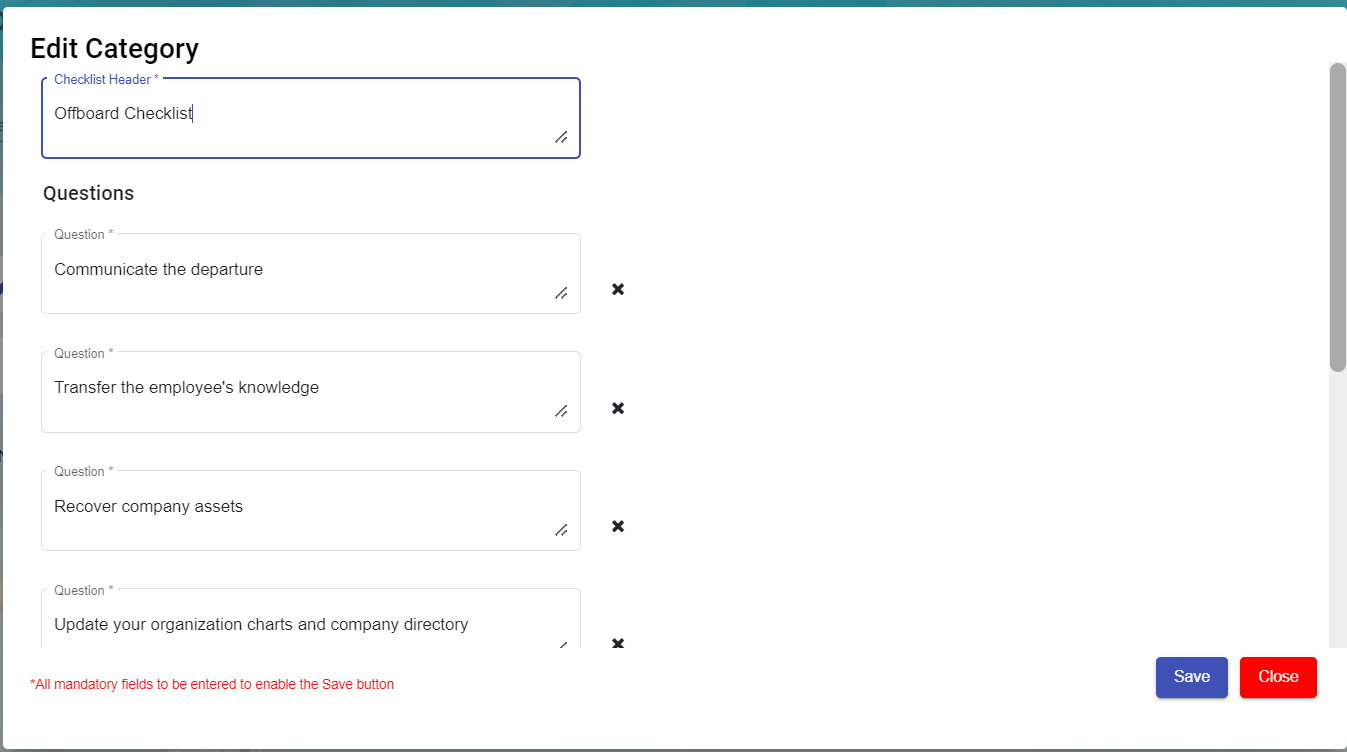](http://wiki.cuteinfocomm.com/uploads/images/gallery/2022-09/image-1663306374492.png)
2. Enter Checklist Header
3. Add or Delete the mandatory questions to be asked during Offboard processing.
4. Click save to create new Offboard checklist template.
#### Edit the Checklist
To edit the checklist, click[ ](http://wiki.cuteinfocomm.com/uploads/images/gallery/2022-09/image-1662690942077.png)edit icon of the checklist to edit the questions in the edit category page. Then click **Save** to save edits.
[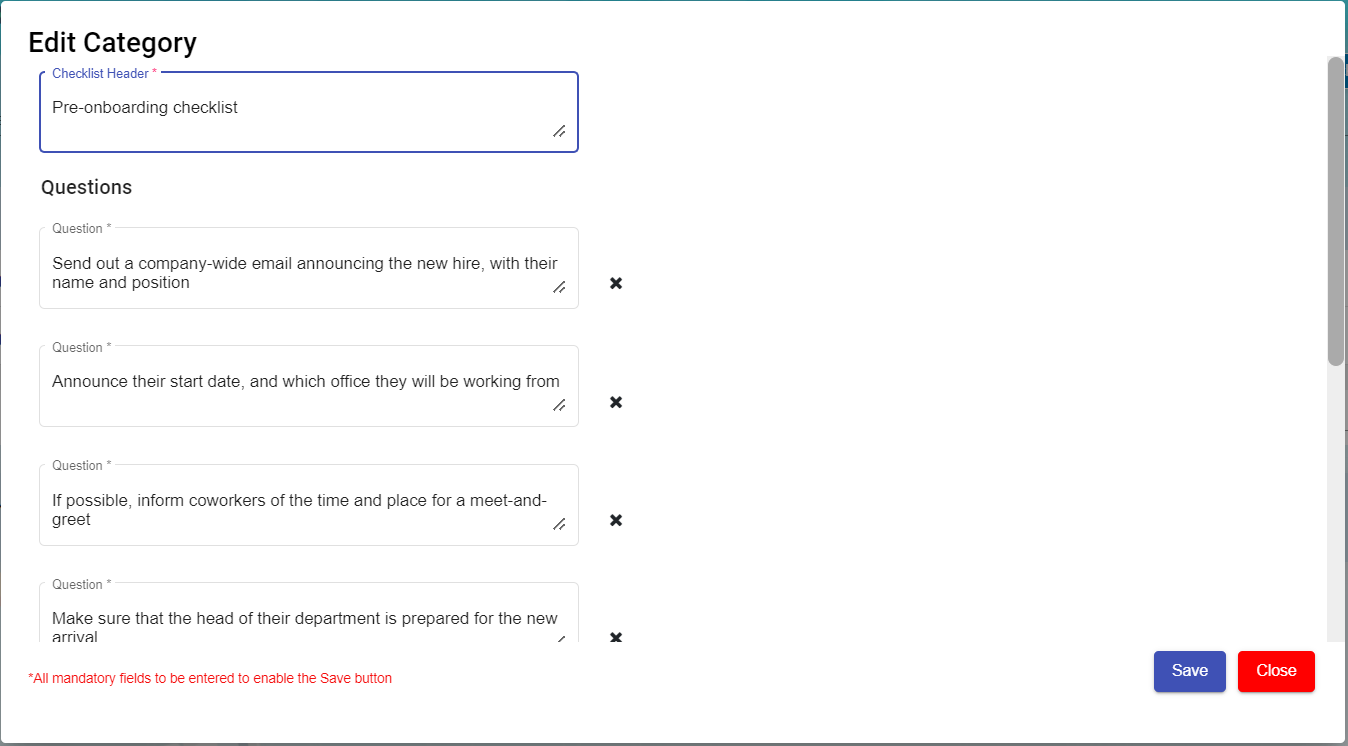](http://wiki.cuteinfocomm.com/uploads/images/gallery/2022-09/image-1663311260051.png)
#### Delete Checklist
User can use the delete option to delete the Onboard/Offboard checklist which is not in use or need to remove. Click [](http://wiki.cuteinfocomm.com/uploads/images/gallery/2022-09/image-1662695579815.png) in the delete column of the checklist. The checklist will be removed.
#### Filter a Onboard/Offboard Checklist
If you want to filter any checklist in the Onboard/Offboard Checklist page, you can use[ ](http://wiki.cuteinfocomm.com/uploads/images/gallery/2022-09/image-1663095417308.png)(**filter** button) on the page.
### Evaluation Factor
Evaluation Factor master manages all the different evaluation factors based on period, type and trade. Click Evaluation factor, the created list will open as below,
[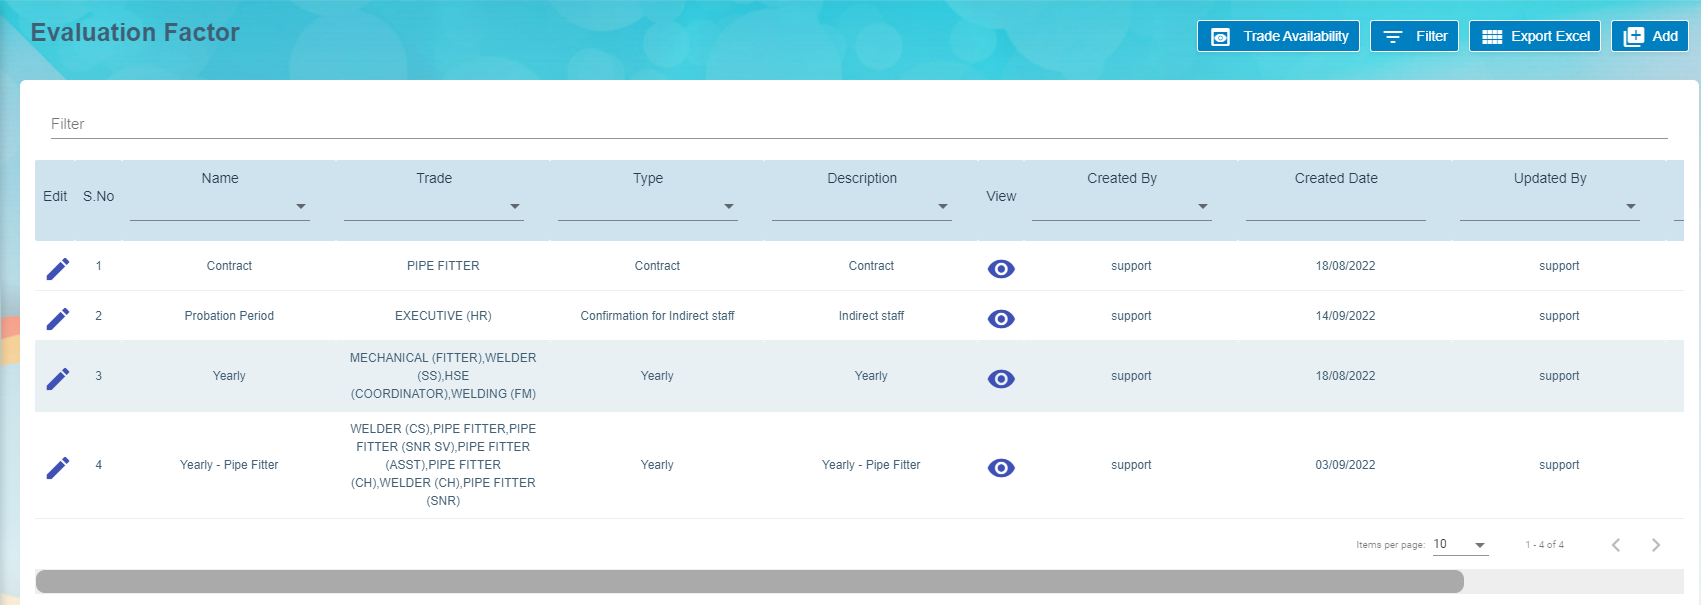](http://wiki.cuteinfocomm.com/uploads/images/gallery/2022-09/image-1663314194284.png)
#### Add A New Evaluation Factor
To add a new evaluation template,
1. Click the [](http://wiki.cuteinfocomm.com/uploads/images/gallery/2022-09/image-1662604025739.png), a new evaluation factor details window opens,
[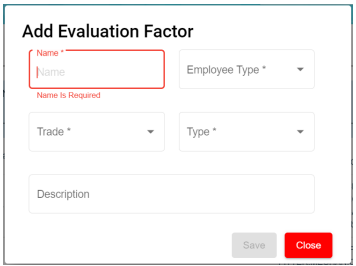](http://wiki.cuteinfocomm.com/uploads/images/gallery/2022-10/image-1666651774377.png)
2. Enter all the details of the new evaluation factor:
- At Name field, type the name of this new evaluation template.
- At Employee Type, select from the dropdown list i.e. Staff, Worker, Management
- At Trade field, select from the dropdown list of which trade is applicable for this new evaluation
template. User can also use filter to search for the trade name. User can select more than 1 trade by ticking the given checkbox beside the trade.
- At Type field, select the type for this new evaluation template. This list is setup at Admin ->
Options -> HRM - Evaluation Type.
[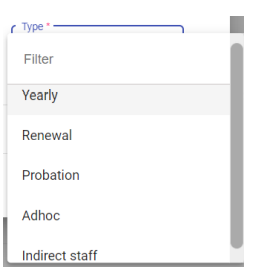](http://wiki.cuteinfocomm.com/uploads/images/gallery/2022-10/image-1666652325245.png)
1. - At Description field, type a brief description for this new evaluation template. [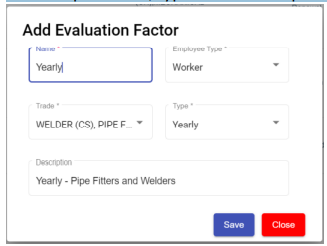](http://wiki.cuteinfocomm.com/uploads/images/gallery/2022-10/image-1666652423855.png)
2. Click **Save** button to create the new evaluation template and it will be shown as below, [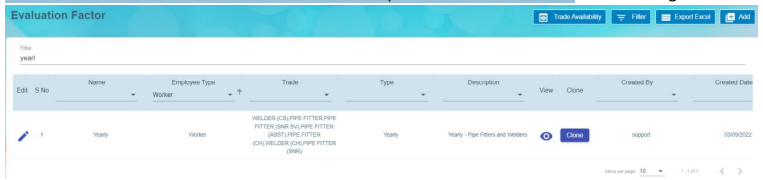](http://wiki.cuteinfocomm.com/uploads/images/gallery/2022-10/image-1666652551302.png)
3. The New Evaluation factor added on the main page. Click[](http://wiki.cuteinfocomm.com/uploads/images/gallery/2022-09/image-1663315743260.png)view icon to add details in Part I, Part II, Part III, Designation & Skill Level and Rating. **Note:** Part II and Part III are optional.
#### Add Details in New Evaluation Template
##### Part I of Evaluation Factor
Click on Part I tab, the part I detail page opens.
[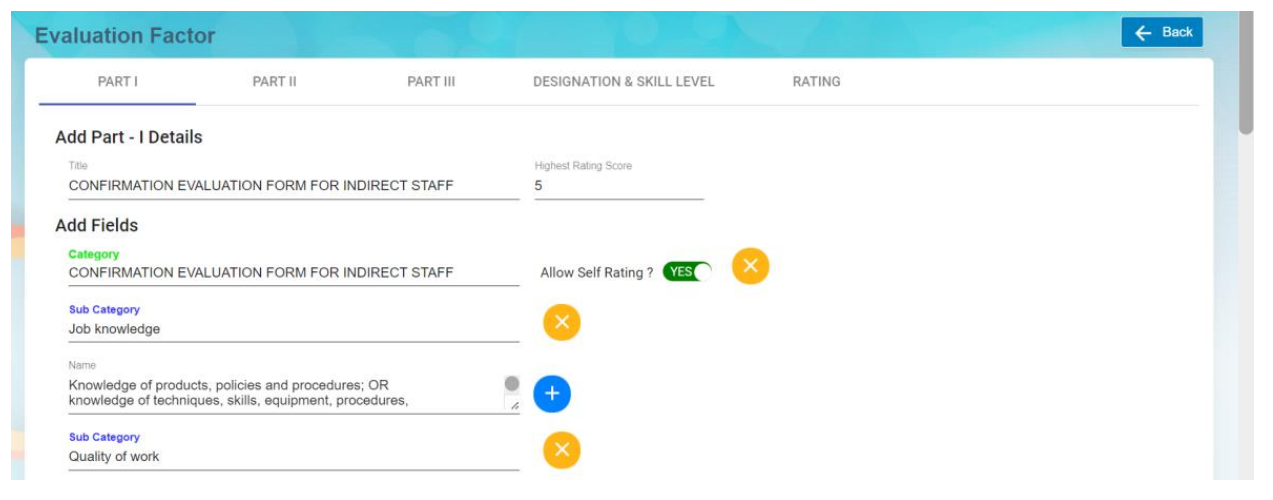](http://wiki.cuteinfocomm.com/uploads/images/gallery/2022-10/image-1666731836689.png)
1. In **Add Part I Details,** enter the Title and Highest Rating Score of this evaluation,
- **Title** – enter the title and this will display at the beginning of the evaluation form as
shown in the below screenshot highlighted in yellow of an employee evaluation form
using this evaluation factor template. [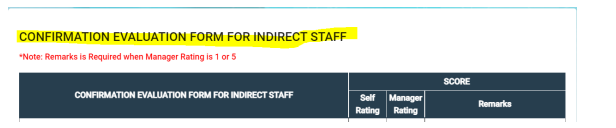](http://wiki.cuteinfocomm.com/uploads/images/gallery/2022-10/image-1666731803557.png)
- **Highest Rating Score** – enter the number score columns in the evaluation form.
2. In **Add Fields,** enter details as below:
- **Category**, it will be the column header in the evaluation table.
- **Sub Category,** it will be the sub Header of criteria setup in the evaluation form
- **Name**, it will be the detailed perspectives of each criteria under the sub category.
- **Allow Self Rating,** if set to Yes, it means employee needs to do self rating. **Note:** Users can click [](http://wiki.cuteinfocomm.com/uploads/images/gallery/2022-09/image-1663562038610.png) **add** icon to add (category, subcategory and, name). If click add icon at the Category level, system will create a new category with new sub category and new name under this new category. If click add icon at sub category level, system will create a new sub category including the name that falls under this new sub category. If click add icon at name level, then system will create a new name.
Users can click [](http://wiki.cuteinfocomm.com/uploads/images/gallery/2022-10/image-1664858181194.png) **delete** icon to remove (category, subcategory and, name). If click the delete icon at the Category level, system will delete the entire category including
the sub category and name belonging to this category. If click the delete icon at sub category level, system will delete this sub category including the name that falls under this sub category. If click the delete icon at name level, then system will delete only this name.
3. Click **Save** to save the Part I details.
##### Part II of Evaluation Factor
Click on Part II tab, it opens as below. If the "Add Part-II Details" is set to ON, system will display this Part II details as part of the
employee evaluation; If it's set to OFF, then the Part II details will be omitted from the employee evaluation form.
[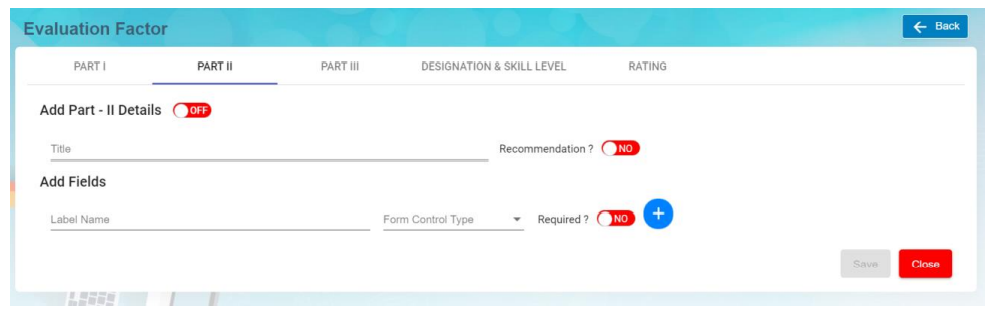](http://wiki.cuteinfocomm.com/uploads/images/gallery/2022-10/image-1666735475830.png)
1. In **Add Part – II Details** section, enter below details. Note: The flag "**OFF"** next to Part II details need to set to **ON** hence this Part II will be displayed in the employee evaluation form.
- **Title** – Input the title and this will be displayed as the header of the section in the employee
evaluation form as shown below. [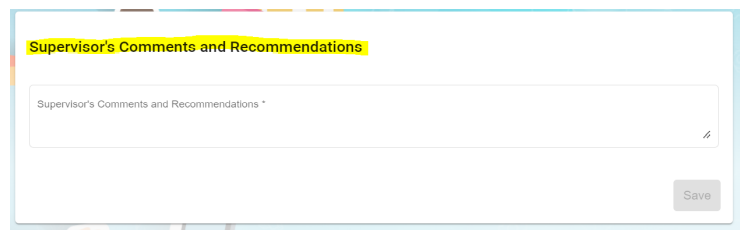](http://wiki.cuteinfocomm.com/uploads/images/gallery/2022-10/image-1666736290274.png)
- When **"Recommendation?"** icon is set to YES, system will display this Recommendation with a list of dropdown values for user to select as shown below, [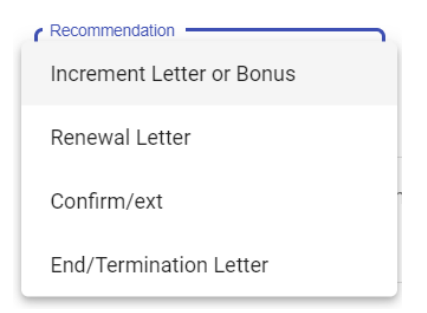](http://wiki.cuteinfocomm.com/uploads/images/gallery/2022-10/image-1666837488254.png)
2. In **Add Felids,** enter below details,
- **Label Name**-enter the label name.
- **Form control type**-choose type of control (Text/Text Area/Checkbox) for this Label Name
- **Required?**- if this icon is set to YES, it is mandatory for user to select or type some text into this form control
field.
- Click [ ](http://wiki.cuteinfocomm.com/uploads/images/gallery/2022-09/image-1663562038610.png)icon to add more label name field if needed. **Note:** Users can click [](http://wiki.cuteinfocomm.com/uploads/images/gallery/2022-09/image-1663562038610.png) **add** icon to add (category, subcategory and, name). If click add icon at the Category level, system will create a new category with new sub category and new name under this new category. If click add icon at sub category level, system will create a new sub category including the name that falls under this new sub category. If click add icon at name level, then system will create a new name.
Users can click [](http://wiki.cuteinfocomm.com/uploads/images/gallery/2022-10/image-1664858181194.png) **delete** icon to remove (category, subcategory and, name). If click the delete icon at the Category level, system will delete the entire category including
the sub category and name belonging to this category. If click the delete icon at sub category level, system will delete this sub category including the name that falls under this sub category. If click the delete icon at name level, then system will delete only this name.
3. Click **Save** to save the Part II details.
##### Part III of Evaluation Factor
Click on Part III tab, it opens as below. If the "Add Part- III Details" is set to ON, system will display this Part III details as part of the
employee evaluation; If it's set to OFF, then the Part III details will be omitted from the employee evaluation form.
[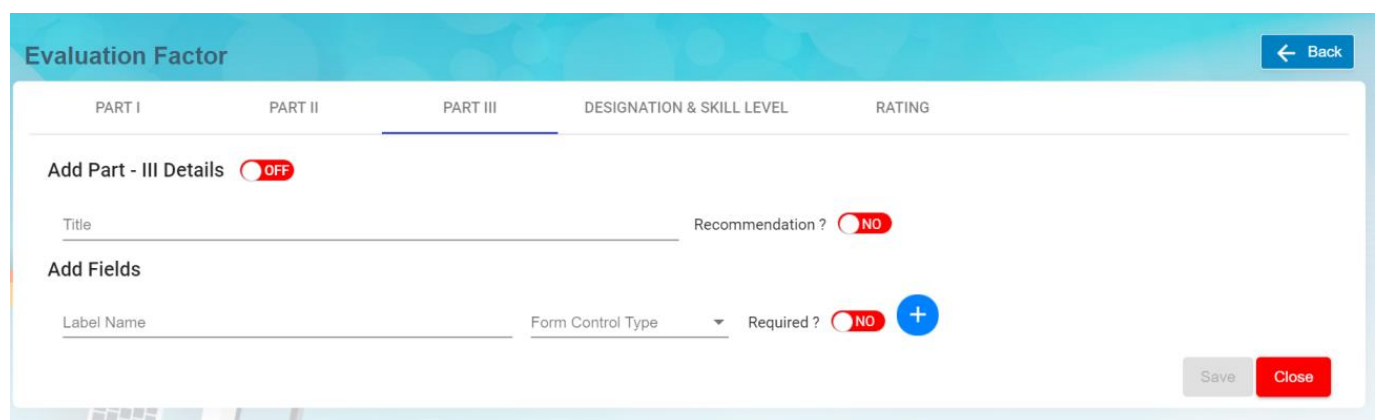](http://wiki.cuteinfocomm.com/uploads/images/gallery/2022-10/image-1666838712207.png)
1. In **Add Part- III Details** section, enter below details. Note: The flag "**OFF"** next to Part III details need to set to **ON** hence this Part III will be displayed in the employee evaluation form.
- **Title** – Input the title and this will be displayed as the header of the section in the employee evaluation form as shown below. [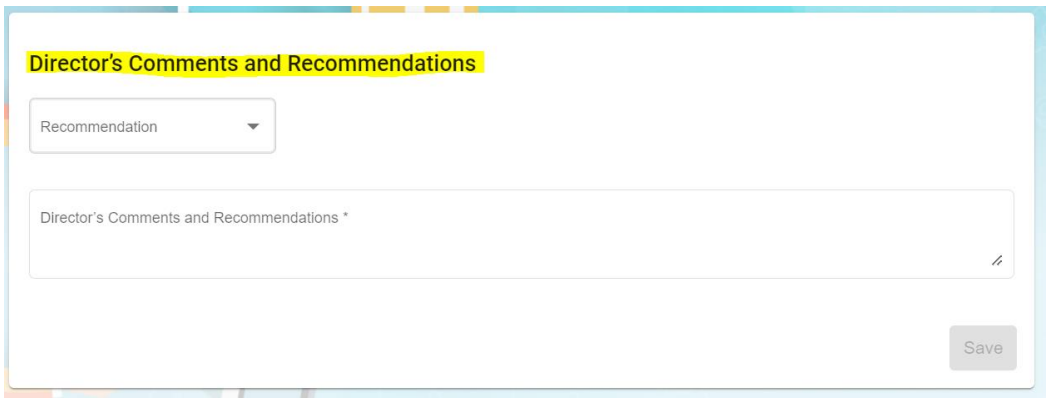](http://wiki.cuteinfocomm.com/uploads/images/gallery/2022-10/image-1666898672606.png)
- When **"Recommendation?"** icon is set to YES, system will display this Recommendation with a list of dropdown values for user to select as shown below, [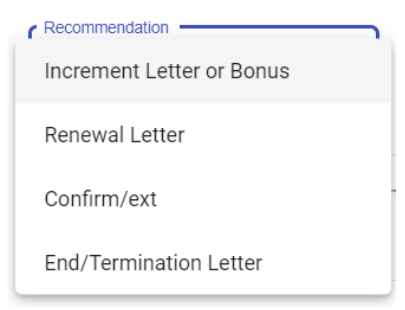](http://wiki.cuteinfocomm.com/uploads/images/gallery/2022-10/image-1666898726651.png)
2. In **Add Felids,**
- **Label Name**-enter the label name.
- **Form control type**-choose type of control (Text/Text Area/Checkbox) for this Label Name
- **Required?**- if this icon is set to YES, it is mandatory for user to select or type some text into this form control
field.
- Click [ ](http://wiki.cuteinfocomm.com/uploads/images/gallery/2022-09/image-1663562038610.png)icon to add more label name field if needed. **Note:** Users can click [](http://wiki.cuteinfocomm.com/uploads/images/gallery/2022-09/image-1663562038610.png) **add** icon to add (category, subcategory and, name). If click add icon at the Category level, system will create a new category with new sub category and new name under this new category. If click add icon at sub category level, system will create a new sub category including the name that falls under this new sub category. If click add icon at name level, then system will create a new name.
Users can click [](http://wiki.cuteinfocomm.com/uploads/images/gallery/2022-10/image-1664858181194.png) **delete** icon to remove (category, subcategory and, name). If click the delete icon at the Category level, system will delete the entire category including
the sub category and name belonging to this category. If click the delete icon at sub category level, system will delete this sub category including the name that falls under this sub category. If click the delete icon at name level, then system will delete only this name.
3. Click **Save** to save the Part III details.
##### Designation & Skill Level
The Designation & Skill Level section is to show the salary guide and job description of the selected trade(s) and this will serve as a benchmark when supervisors conduct employee evaluations. Click on DESIGNATION & SKILL LEVEL tab, it opens as below,
[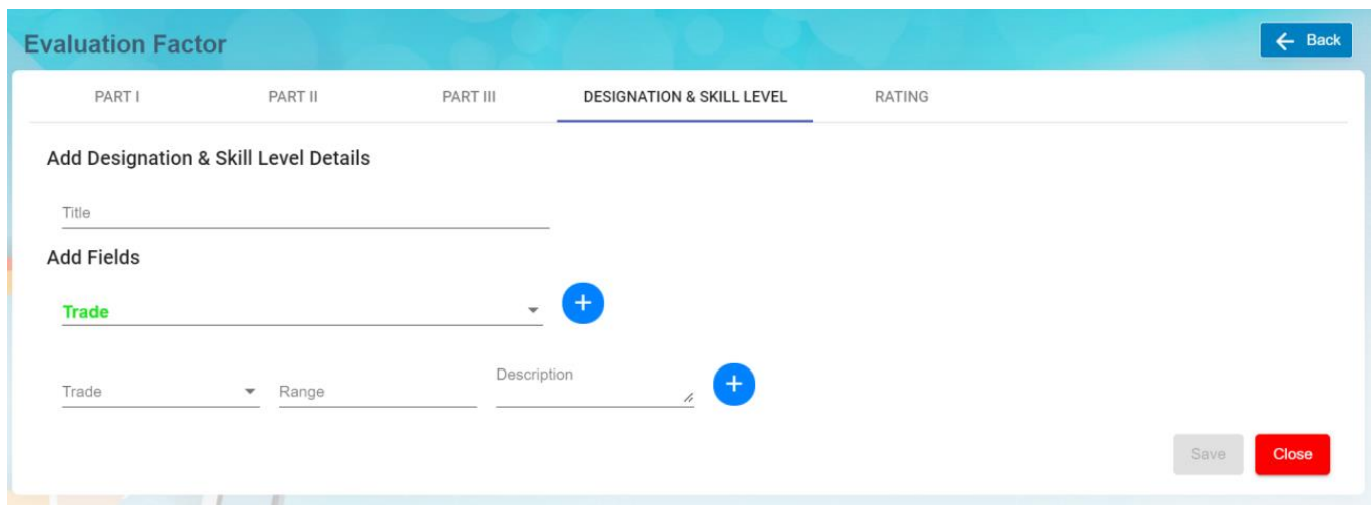](http://wiki.cuteinfocomm.com/uploads/images/gallery/2022-10/image-1666898957434.png)
1. In **Add Designation & Skill Level Details** section,
- **Title** – enter the title and this will be displayed as the header of this Designation & Skill Level
section in the employee evaluation form.
2. In **Add Fields** section, enter below details,
- ****Trade[](http://wiki.cuteinfocomm.com/uploads/images/gallery/2022-10/image-1666899946456.png)****-Click on the field to select trades in the dropdown list. Users can select multiple trades. Tick on the checkbox as shown in the below screenshot,
[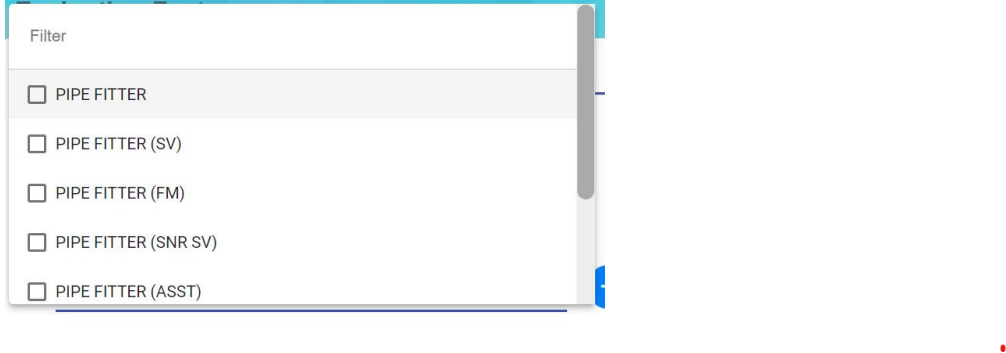](http://wiki.cuteinfocomm.com/uploads/images/gallery/2022-10/image-1666899834308.png)
- After the above trade selection, you need to select each individual trade and input the
salary range for this selected trade and job description of this selected trade. Refer to
below screenshot, [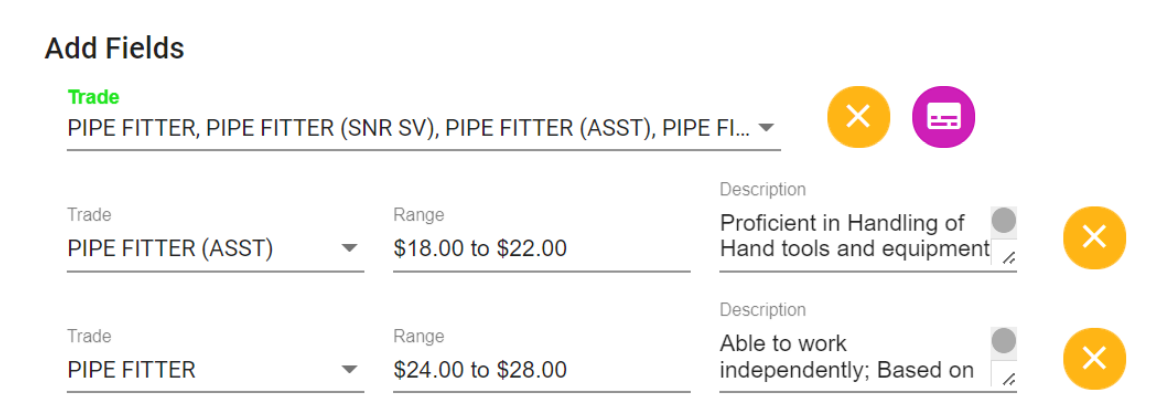](http://wiki.cuteinfocomm.com/uploads/images/gallery/2022-10/image-1666900049792.png)
**Note:** Users can click [](http://wiki.cuteinfocomm.com/uploads/images/gallery/2022-09/image-1663562038610.png) **add** icon to add more trades is required.
Users can click [](http://wiki.cuteinfocomm.com/uploads/images/gallery/2022-10/image-1664858181194.png) **delete** icon to remove trade. If click the delete icon at the **[](http://wiki.cuteinfocomm.com/uploads/images/gallery/2022-10/image-1666899946456.png)**level, system will delete whole section within this Trade field. If click the delete icon at trade after this Trade , then system will delete this selected trade.
- User can[](http://wiki.cuteinfocomm.com/uploads/images/gallery/2022-10/image-1666900364286.png)icon to clone a trade as shown in the below screenshot. Note that the dropdown list at this Clone Trade is based on the selected trades shown at the Evaluation Factor list page. This Clone Trade option is basically to duplicate the whole section of this selected**[](http://wiki.cuteinfocomm.com/uploads/images/gallery/2022-10/image-1666899946456.png)** and its sub trades (salary scale and job description). Once selected, click[ ](http://wiki.cuteinfocomm.com/uploads/images/gallery/2022-10/image-1666900541340.png)icon to save this clone trade and you will notice that system create another separate section
[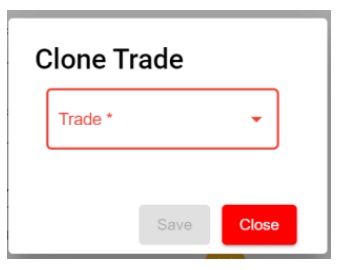](http://wiki.cuteinfocomm.com/uploads/images/gallery/2022-10/image-1666900448965.png)
3. Click **Save** to save this Part of the evaluation factor.
##### Rating
The Rating section is optional to be setup. Based on your evaluation form format, if rating is required to be shown in the evaluation form then it can be setup as per below. Click on Rating tab, Rating details window opens,
[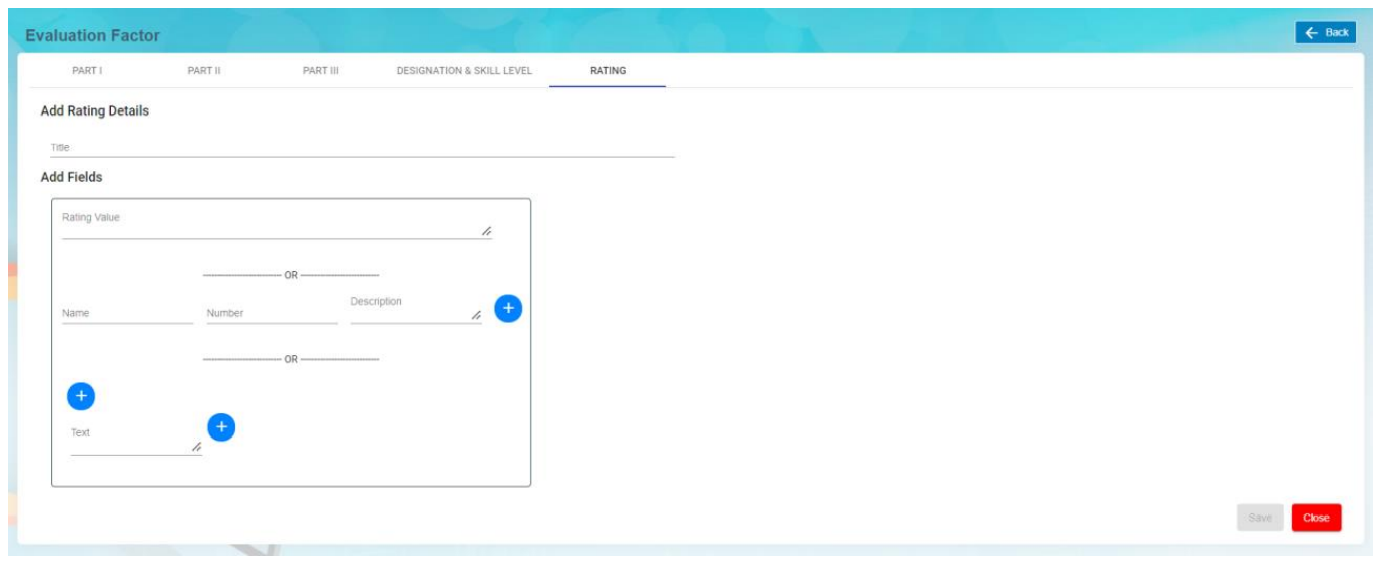](http://wiki.cuteinfocomm.com/uploads/images/gallery/2022-10/image-1666900907041.png)
1. In **Add Rating Details** section,
- **Title** – enter the title and this will be displayed as the header of this Rating section in the
employee evaluation form.
2. In **Add Fields** section, there are three options to creating the rating section to be displayed in the
employee evaluation form.
- **Option 1**: **Rating Value** – Input text to describe this rating value.[](http://wiki.cuteinfocomm.com/uploads/images/gallery/2022-10/image-1666901144339.png)
- ****Option 2****[](http://wiki.cuteinfocomm.com/uploads/images/gallery/2022-10/image-1666901229373.png)
- **Name** – enter text to describe this name.
- **Number** – enter a numeric value.
- **Description** – enter long description to describe this name.
Click on [](http://wiki.cuteinfocomm.com/uploads/images/gallery/2022-09/image-1663562038610.png)add icon to add if a different name, number and description is required
1. - ****Option 3****[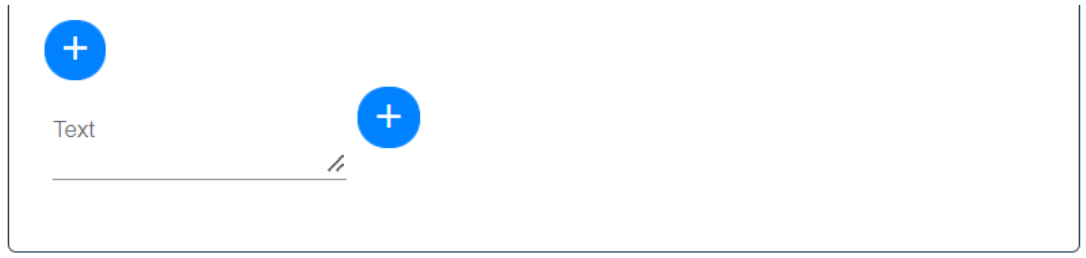](http://wiki.cuteinfocomm.com/uploads/images/gallery/2022-10/image-1666901321736.png)
- Click on [](http://wiki.cuteinfocomm.com/uploads/images/gallery/2022-09/image-1663562038610.png) icon before the Text field to add column horizontally.
Click on [](http://wiki.cuteinfocomm.com/uploads/images/gallery/2022-09/image-1663562038610.png) icon after the Text field to add column vertically.
Click on [](http://wiki.cuteinfocomm.com/uploads/images/gallery/2022-10/image-1664858181194.png) icon above the Text field will delete the column horizontally.
Click on [](http://wiki.cuteinfocomm.com/uploads/images/gallery/2022-10/image-1664858181194.png) icon beside the Text field will delete the column vertically. [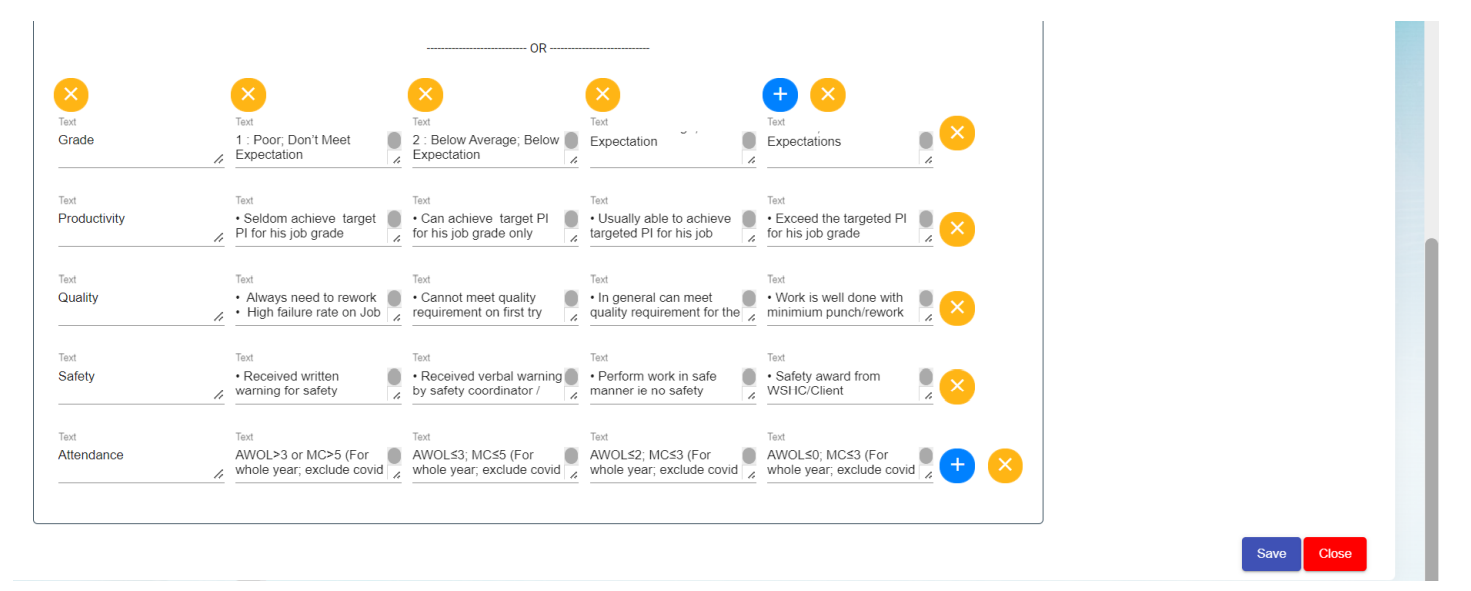](http://wiki.cuteinfocomm.com/uploads/images/gallery/2022-10/image-1666901449416.png)
2. Click **Save** to save the rating setup of the evaluation factor.
#### View Trade Availability
User can view the available trades used in evaluation by clicking on the Trade Availability icon in the Evaluation Factor page.
[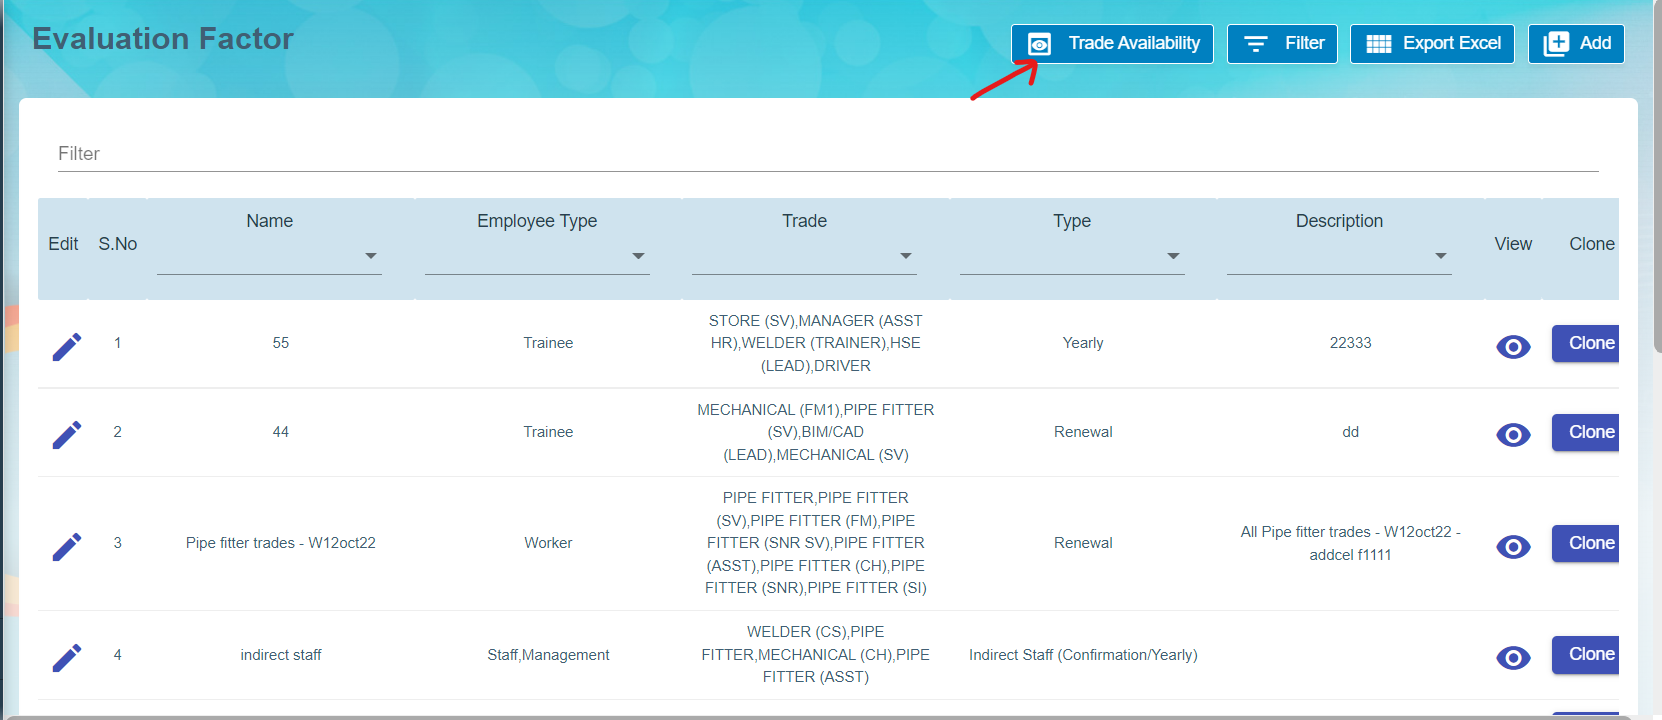](http://wiki.cuteinfocomm.com/uploads/images/gallery/2022-10/image-1666901811821.png)
Click [](http://wiki.cuteinfocomm.com/uploads/images/gallery/2022-10/image-1666901951872.png), below page opens for view,
[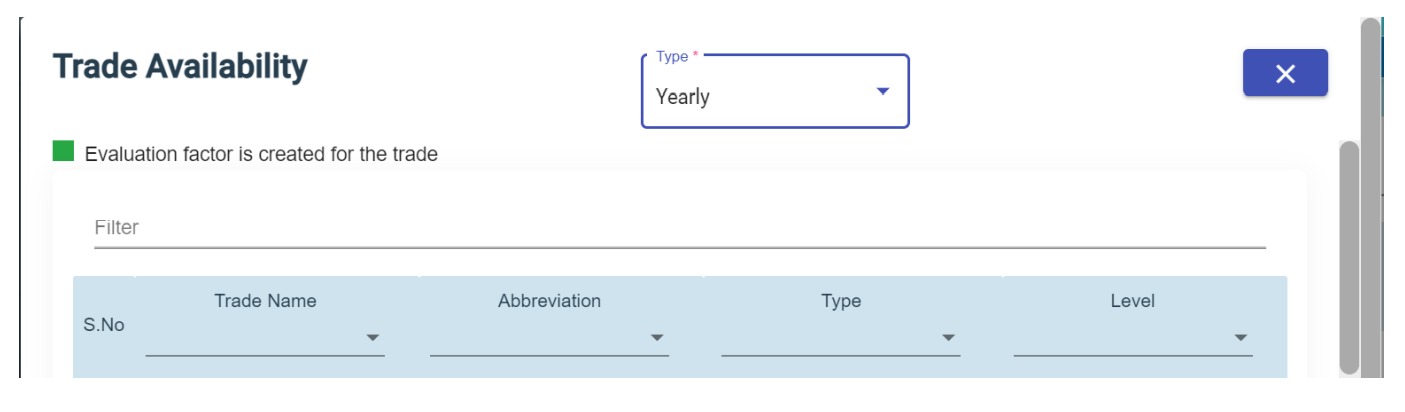](http://wiki.cuteinfocomm.com/uploads/images/gallery/2022-10/image-1666901926753.png)
#### Filter Evaluation Factor
User can click [](http://wiki.cuteinfocomm.com/uploads/images/gallery/2022-10/image-1666902066314.png) icon in the evaluation factor page to filter evaluation factor on different columns.
#### Export Evaluation Factor
User can click [](http://wiki.cuteinfocomm.com/uploads/images/gallery/2022-10/image-1666902547424.png)icon to export this list of Evaluation Factor into an excel file.
# HRM Others
The **Others** submenu in the **HUMAN RESOURCES** page helps you to manage the details of vehicles belongs to the company, insurance details of company and employees, salary addition/deduction details of employees for each month and various documents that company needs to keep track of along with MOM OED submissions too.
[](https://wiki.cuteinfocomm.com/uploads/images/gallery/2025-03/image-1741838058117.png)
The **Others** submenu contains the following tabs,
- Vehicle
- Insurance
- Addition/Deduction
- Document List
- Letter Generation
- Broadcast
- MOM OED Submissions
- User Manual
- Scheduler Subscription
### Vehicle
The **Vehicle** tab in the **Others** submenu helps you to add the details of vehicles belongs to the company including vehicle type, vehicle insurance, maintenance, and season parking pass details. Click the **Vehicle** tab in the **Others.** The **Vehicle** page opens.
[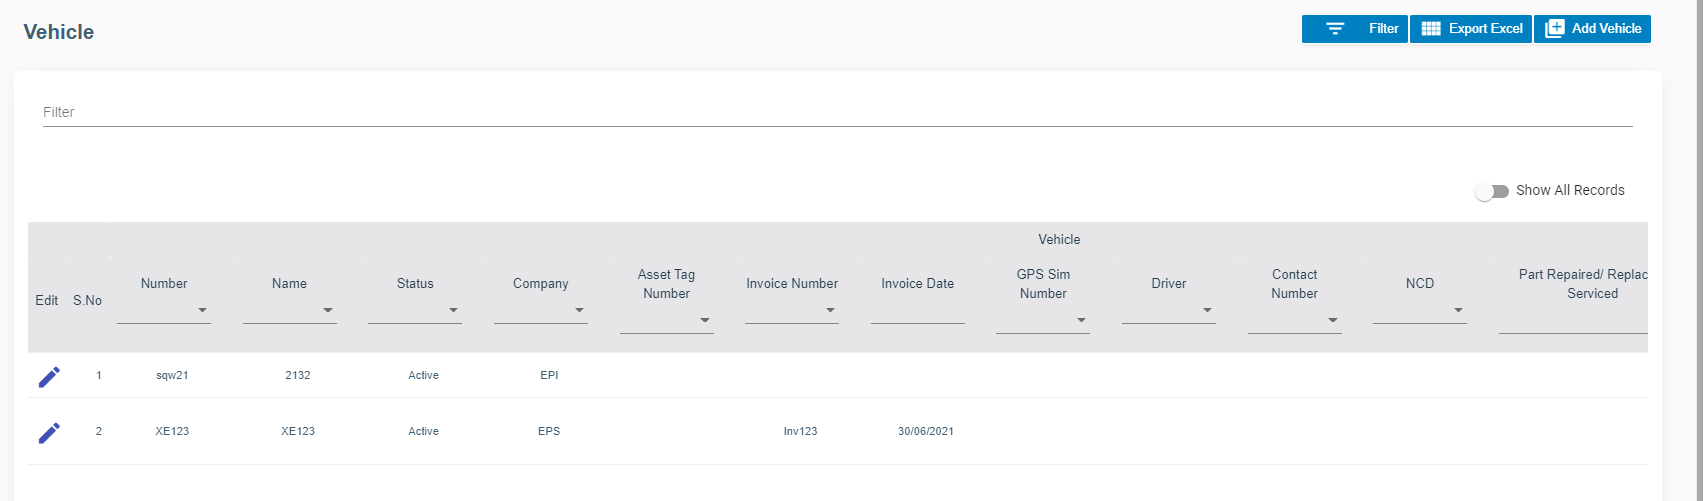](http://wiki.cuteinfocomm.com/uploads/images/gallery/2022-09/image-1662095291430.png)
#### Add Vehicle
If you want to add vehicle, do the following steps,
1. Click (**Add Vehicle** button) in the **Vehicle.** The **Vehicle Information** window opens.
2. In the **Vehicle** tab, fill up the following details, [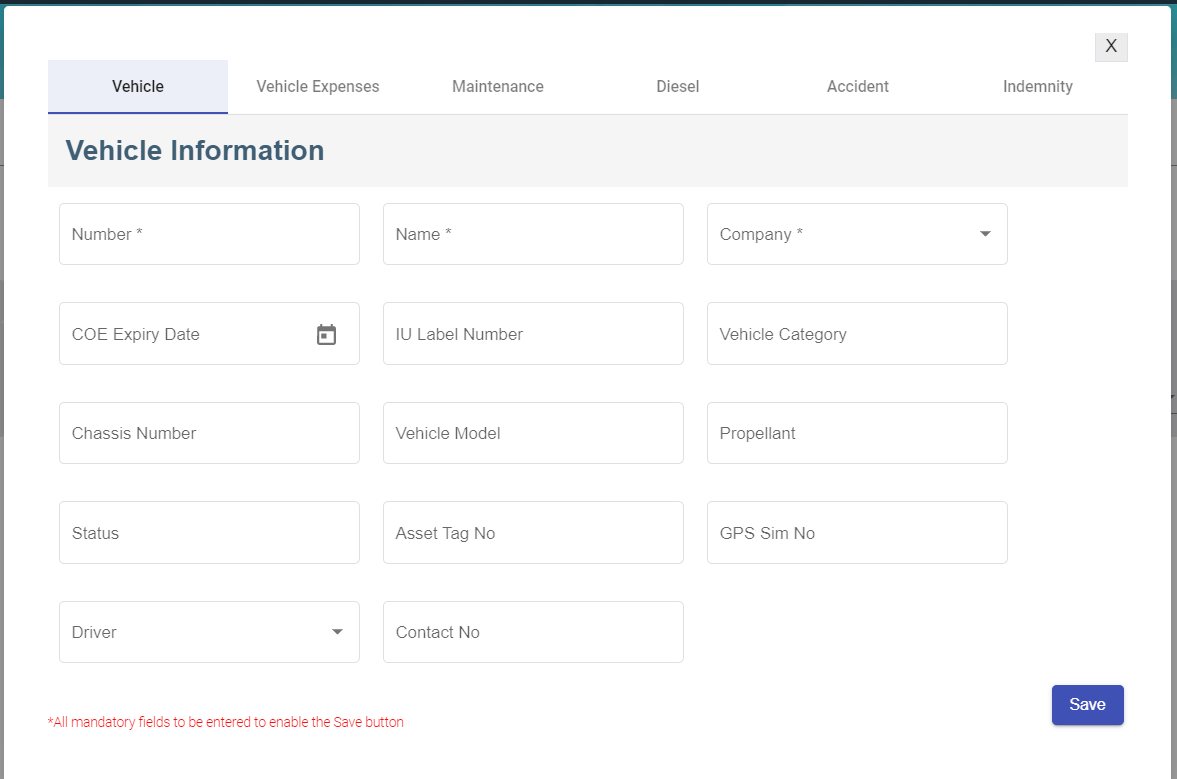](http://wiki.cuteinfocomm.com/uploads/images/gallery/2022-09/image-1663644517500.png)
- - In the **Number** box, enter the vehicle number.
- In the **Name** box, enter the name of the vehicle.
- In the **Company** box, select company name from dropdown list.
- In the **COE Expiry Date** box, enter COE expiry date.
- In the **IU label Number** box, enter the IU number.
- In the **Vehicle Category** box, enter the vehicle category.
- In the **Chassis Number** box, enter the car identification number
- In the **Vehicle Model** box, enter the vehicle model.
- In the **Propellant** box, enter the propellant information.
- In the **Status** box, enter the status of the vehicle
- In **Asset Tag No** box, enter the company asset tag number.
- In **GPS Sim No** box, enter the GPS Sim attached to the vehicle if any
- In **Driver** box, select the driver name from company employee list.
- In **Contact No** box, enter the contact number.
- Click **Save** then click **Next**, the vehicle expenses tab will open.
3. In the **Vehicle Expenses** tab, fill up the following details, [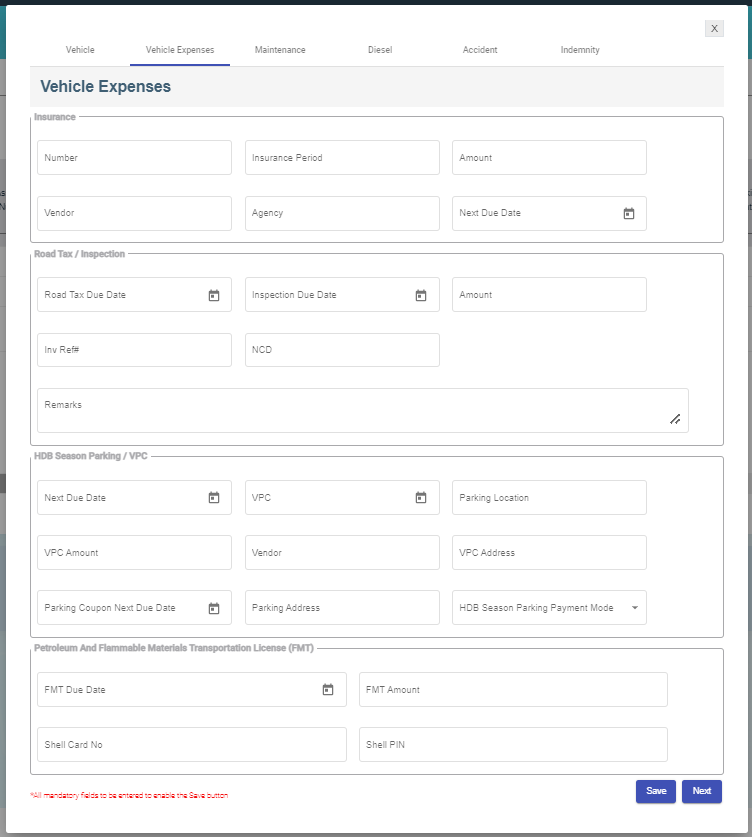](http://wiki.cuteinfocomm.com/uploads/images/gallery/2022-09/image-1663261822494.png)
- Insurance section
- In the **Number** box, enter the vehicle insurance number.
- In the **Insurance Period** box, enter the current insurance period,
- In the **Vendor** box, enter the name of the vendor.
- In the **Agency** box, enter the name of the agency.
- In the **Next Due Date** box, select the due date of the vehicle insurance.
- Road Tax/Inspection section
- In the **Road Tax Due Date** box, select the due date of the road tax.
- In the **Inspection Due Date** box, select the due date of the inspection.
- In the **Amount** box, enter the inspection amount.
- In the **Inv Ref#** box, enter invoice reference number.
- In the **NCD** box, enter no claims discount.
- HDB Season Parking/VPC section
- In the **Next Due Date** box, select the due date for HDB season parking.
- In the **Vehicle Parking Certificate (VPC)** box, select the VPC due date.
- In the **Parking Location** box, enter the parking address.
- In the **VPC Amount** box, enter the VPC amount.
- In the **Vendor** box, enter the vendor name.
- In the **VPC Address** box, enter the VPC address.
- In the **Parking Coupon Next Due Date** box, select the next due date of the parking coupon.
- In the **Parking Address** box, enter parking address.
- In the **HDB Season Parking Payment Mode** box, select the payment mode.
- Petroleum And Flammable Materials Transportation License (FMT) section
- In the **FMT Due Date** box, enter the due date of the FMT.
- In the **FMT Amount** box, enter the FMT amount.
- In the **Shell Card No** box, enter the shell card number.
- In the **Shell Pin** box, enter the shell pin number.
- Click **Save**, then click **Next**, the Vehicle Maintenance tab will open.
4. In the **Vehicle Maintenance** tab, fill up the following details, [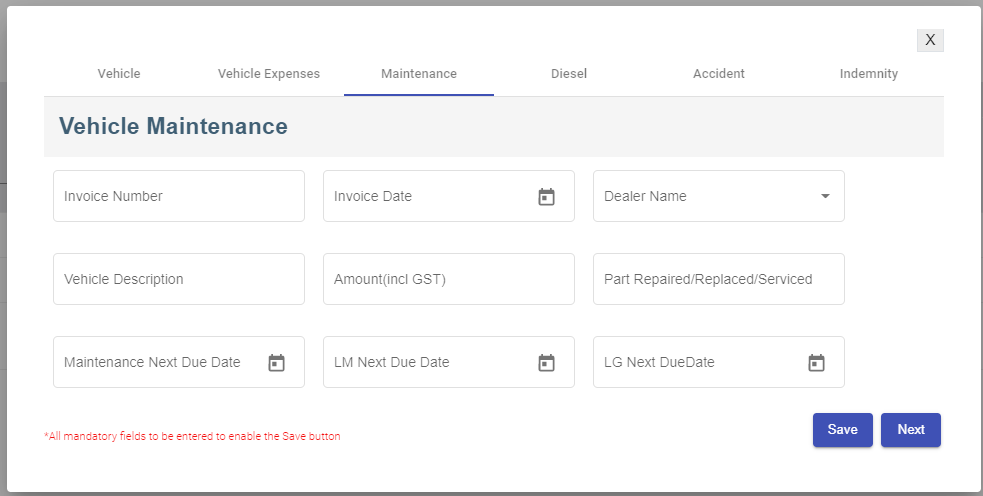](http://wiki.cuteinfocomm.com/uploads/images/gallery/2022-09/image-1663263840925.png)
- - In the **Invoice Number** box, enter the invoice number.
- In the **Invoice Date** box, select the date of the invoice.
- In the **Dealer Name** box, select the dealer name.
- In the **Vehicle Description** box, enter the maintenance description.
- In the **Amount (incl GST)** box, enter the maintenance amount.
- In the **Part Repaired/Replaced/Serviced** box, enter the part name.
- In the **Maintenance Next Due Date** box, select the next due date of maintenance.
- In the **LM Next Due Date** box, select the next due date of LM.
- In the **LG Next Due** box, select the next due date of LG.
- Click **Save**, then click **Next**, the Vehicle Diesel tab will open.
5. In the **Vehicle Diesel** tab, fill up details of each record. [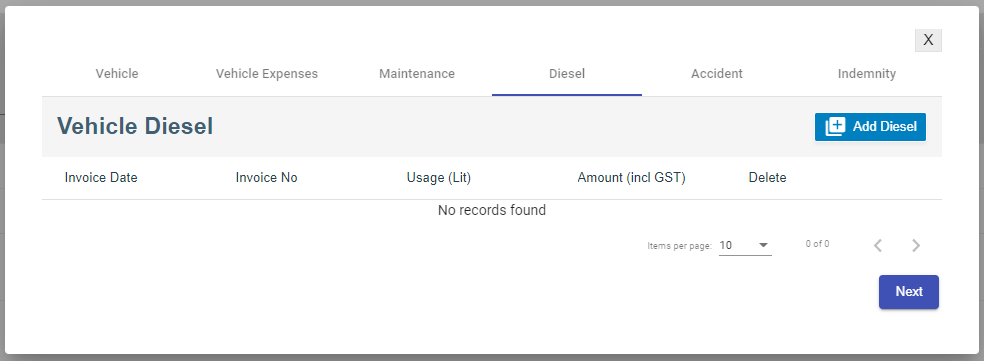](http://wiki.cuteinfocomm.com/uploads/images/gallery/2022-09/image-1663264329106.png)
- Click [](http://wiki.cuteinfocomm.com/uploads/images/gallery/2022-09/image-1663352493239.png)add diesel icon, below window opens, enter the diesel details, [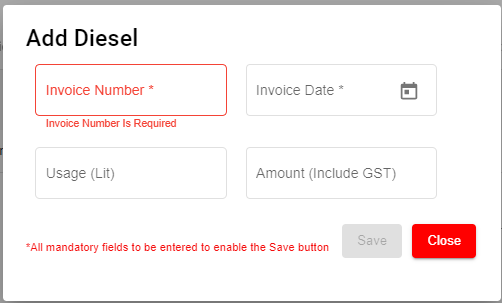](http://wiki.cuteinfocomm.com/uploads/images/gallery/2022-09/image-1663264465471.png)
- Click **Save**, then click **Next**, the Accident tab will open.
6. In the **Accident** tab, fill up the following details, [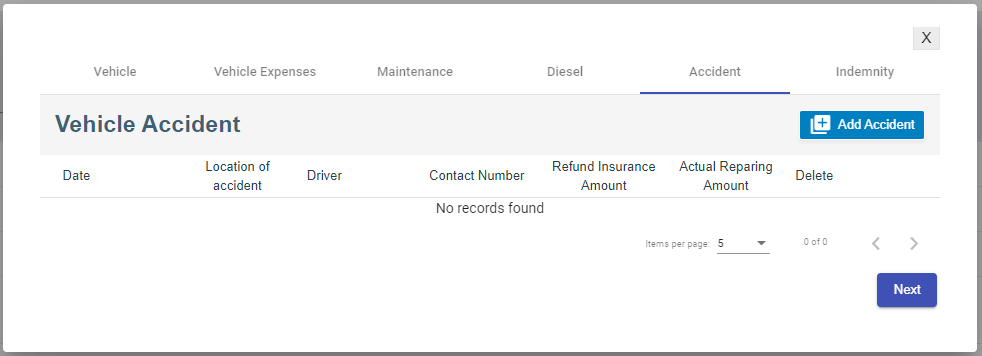](http://wiki.cuteinfocomm.com/uploads/images/gallery/2022-09/image-1663352451233.png)
- Click[](http://wiki.cuteinfocomm.com/uploads/images/gallery/2022-09/image-1663352538043.png) add accident icon, below window opens, enter the details of the accident [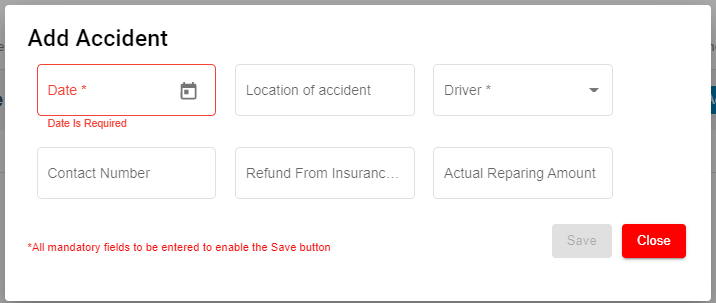](http://wiki.cuteinfocomm.com/uploads/images/gallery/2022-09/image-1663352813437.png)
- Click **Save** and then click **Next**, the Indemnity tab will open.
7. In the **Indemnity** tab, fill up the following details, [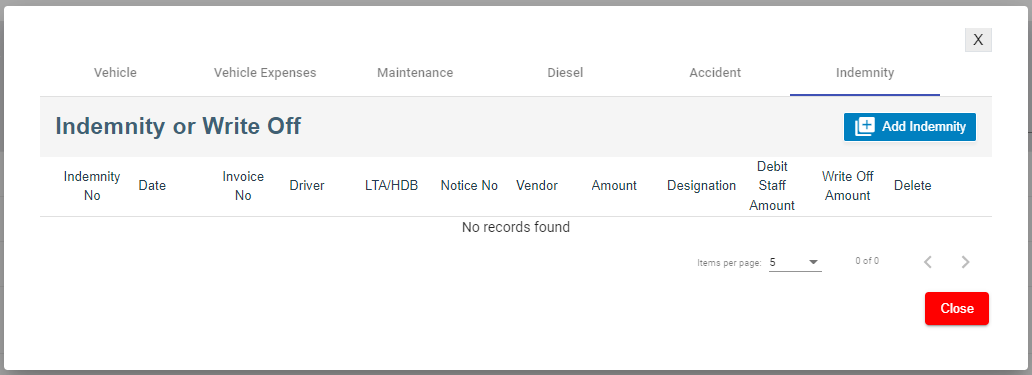](http://wiki.cuteinfocomm.com/uploads/images/gallery/2022-09/image-1663353086440.png)
- Click[](http://wiki.cuteinfocomm.com/uploads/images/gallery/2022-09/image-1663353135029.png) add indemnity icon, below window opens, enter the details of the indemnity. [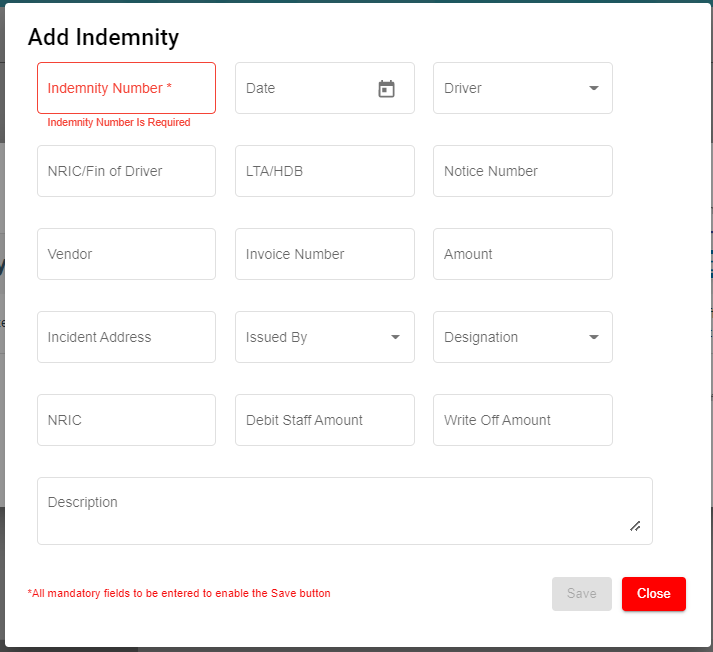](http://wiki.cuteinfocomm.com/uploads/images/gallery/2022-09/image-1663353228245.png)
- Click **Save.**
#### Edit Vehicle
You can edit the details of the added vehicle by using edit option provided in the **Edit** column of the **Vehicle** page. Click  (Edit icon) of the respective vehicle you have added. The **Add vehicle** window opens with the added vehicle details. Edit the vehicle details where you want. Click **Save**.
[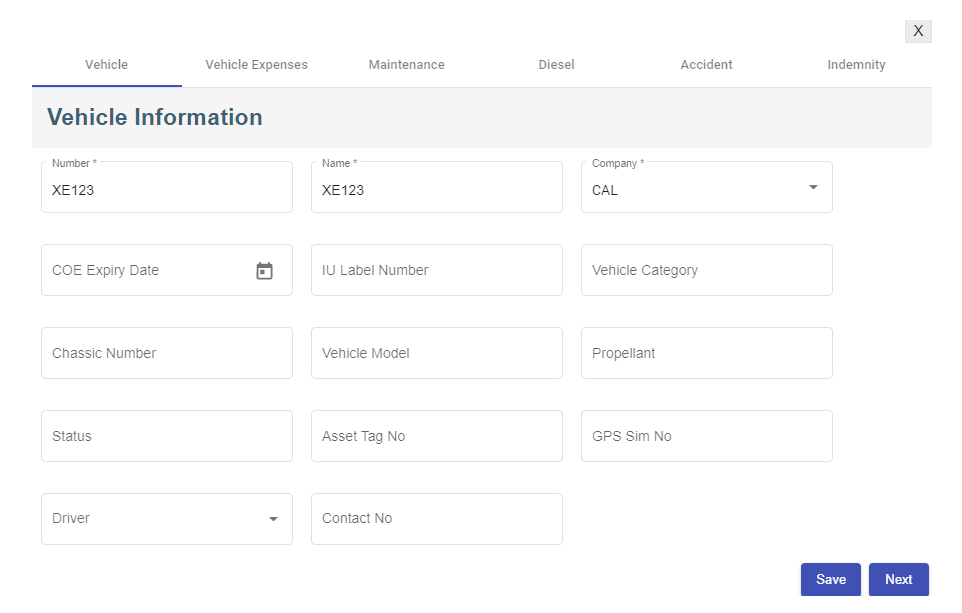](http://wiki.cuteinfocomm.com/uploads/images/gallery/2022-09/image-1662095366866.png)
#### Add/ View Attachment for Vehicle
If you want to add any new attachment for the vehicle or view any added attachment,
1. click (Attachment icon) of the respective vehicle for which you want to add or view the attachment. The **Add/ View Attachment** window opens. [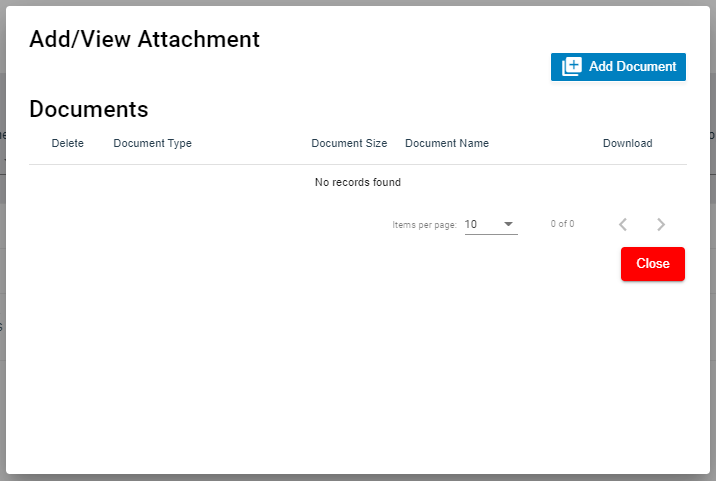](http://wiki.cuteinfocomm.com/uploads/images/gallery/2022-09/image-1663353629149.png)
2. Click [](http://wiki.cuteinfocomm.com/uploads/images/gallery/2022-09/image-1663353642362.png)(Add Document button). The file choosing and uploading option will be enabled. Click (Choose File button) and select the file which you want to upload. [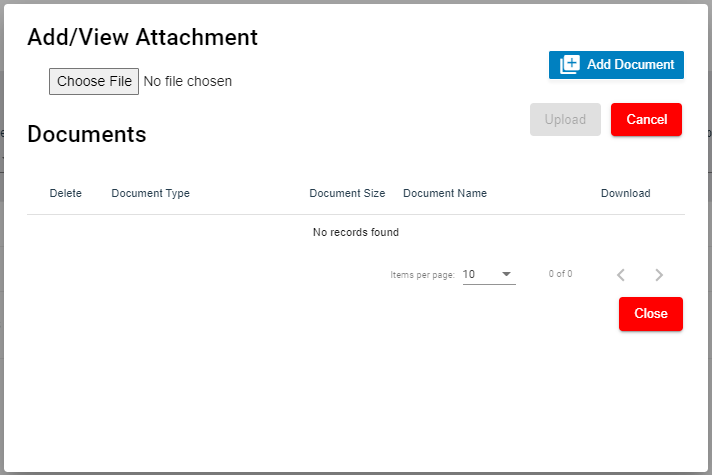](http://wiki.cuteinfocomm.com/uploads/images/gallery/2022-09/image-1663353963695.png)
3. Click **Upload.** The selected file will be uploaded and displayed in the **Add/View Attachment** window.
#### Delete Vehicle
You can delete the added vehicle by using[ ](http://wiki.cuteinfocomm.com/uploads/images/gallery/2022-09/image-1663353518509.png)(Delete icon) provided in the **Delete** column of the **Vehicle** page. If you want to delete the Vehicle Type, click **Yes** otherwise click **No**.
[](http://wiki.cuteinfocomm.com/uploads/images/gallery/2022-09/image-1663353560071.png)
#### Filter Vehicle
If you want to view any specific vehicle details among multiple vehicles listed in the **Vehicle** page, you can use the filter option provided in the upper right corner of the **Vehicle** page. Click[ ](http://wiki.cuteinfocomm.com/uploads/images/gallery/2022-09/image-1663353587313.png)(Filter button). The filter option opens.
#### Export Vehicle
The application has a feature to download the added vehicle details as an excel file. You can use (**Export Excel** button) to download the added vehicle details. Click[](http://wiki.cuteinfocomm.com/uploads/images/gallery/2022-09/image-1663354003972.png)(**Export Excel** button). The vehicle details in the **Vehicle** page will be downloaded as an excel file.
### Insurance
The **Insurance** tab in the **Others** submenu helps you to add the details of various insurance policy that is taken by the company. If you want to add an insurance, click the **Insurance** tab in the **Others.** The **Insurance** page opens.
[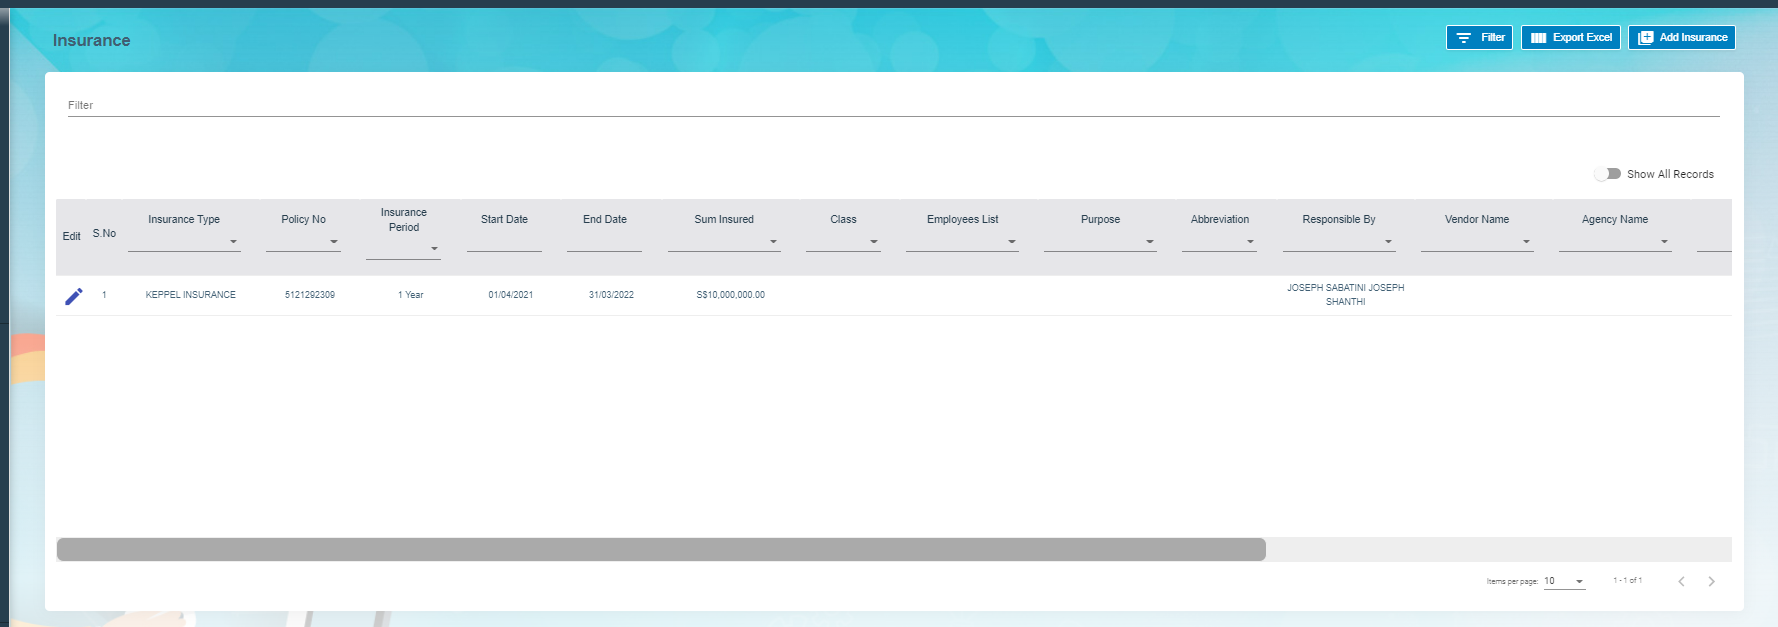](http://wiki.cuteinfocomm.com/uploads/images/gallery/2022-09/image-1663139258801.png)
#### Add Insurance
To add insurances,
1. Click[](http://wiki.cuteinfocomm.com/uploads/images/gallery/2022-09/image-1663354158316.png)(**Add Insurance** button) in the **Insurance,** the **Add New Insurance Policy Details** window opens, [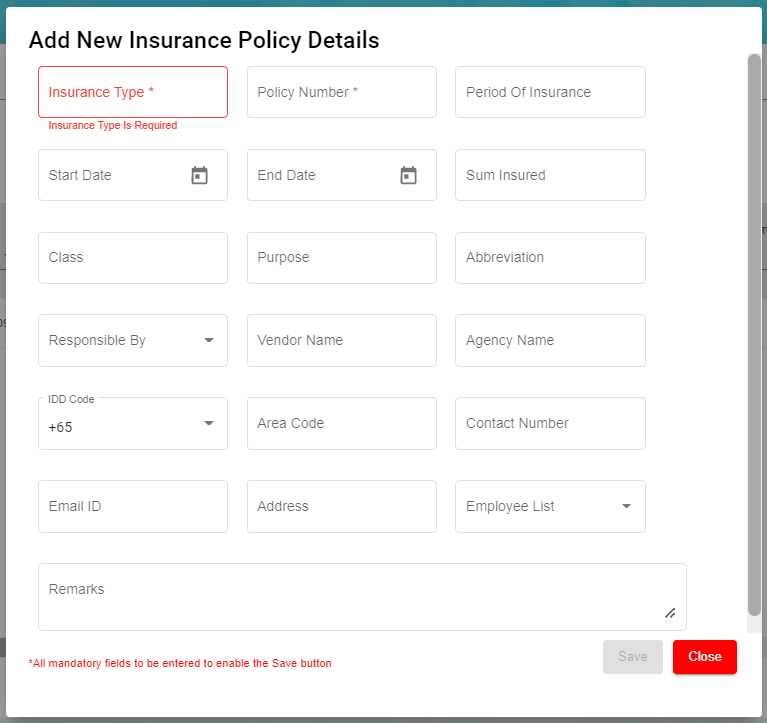](http://wiki.cuteinfocomm.com/uploads/images/gallery/2022-09/image-1663354129765.png)**Note**: The fields notified with a symbol (\*) are mandatory. You must enter the relevant details in that fields before saving.
2. - In the **Insurance Type** box, enter the type of insurance.
- In the **Policy Number** box, enter the insurance policy number.
- In the **Period of Insurance** box, enter the total insurance period.
- In the **Start Date** box, select the insurance starting period.
- In the **End Date** box, select the insurance end date.
- In the **Sum Insured** box, enter the insurance amount.
- In the **Class** box, enter the class of insurance.
- In the **Purpose** box, enter the purpose of taking insurance.
- In the **Abbreviation** box, enter the abbreviation for the class.
- In the **Responsible By** box, select the name of a person who is responsible for the insurance.
- In the **Vendor Name** box, enter the vendor name.
- In the **Agency Name** box, enter the agency name.
- In the **IDD Code** box, enter the IDD code.
- In the **Area Code** box, enter the area code.
- In the **Contact Number** box, enter the contact number.
- In the **Email ID** box, enter the email id of the employee.
- In the **Address** box, enter the address of the employee.
- In the **Employee List** box, select the employees from the given list. **Tip**: You can select all the employees if you have insured for multiple employees.
- In the **Remarks** box, enter your remarks if any.
3. Click **Save**. The insurance is successfully added and listed in the **Insurance** page.
#### Edit Insurance
You can edit the details of the added insurance by using[](http://wiki.cuteinfocomm.com/uploads/images/gallery/2022-09/image-1663354671200.png)(Edit icon) provided in the **Edit** column of the **Insurance** page. To edit the added insurance details,
1. Click (Edit icon) of the respective insurance you have added. The Insurance Policy Details window opens with the added insurance details.
2. Edit the insurance details where you want.
3. Click **Save**.
#### Add/ View Attachment for Insurance
If you want to add any new attachment for the insurance or view any added attachment, you can use[](http://wiki.cuteinfocomm.com/uploads/images/gallery/2022-09/image-1663354754354.png)(Attachment icon) provided in the **Documents** column of the **Insurance** page.
#### Delete Insurance
You can delete the added insurance by using [](http://wiki.cuteinfocomm.com/uploads/images/gallery/2022-09/image-1663353518509.png)(Delete icon) provided in the **Delete** column of the **Insurance** page.
#### Filter Insurance
If you want to view any specific insurance details among multiple insurances listed in the **Insurance** page, you can use the [](http://wiki.cuteinfocomm.com/uploads/images/gallery/2022-09/image-1663353587313.png)filter option provided in the upper right corner of the **Insurance** page.
#### Export Insurance
The application has a feature to download the added insurance details as an excel file. You can use (**Export Excel** button) to download the added insurance details. Click [](http://wiki.cuteinfocomm.com/uploads/images/gallery/2022-09/image-1663354003972.png)(**Export Excel** button), the insurance details in the **Insurance** page will be downloaded as an excel file.
### Employee Salary Addition/Deduction
**Note**: This section is linked with **Payroll**.
The **Salary Addition/Deduction** tab in the **Others** submenu helps you to add the details of any addition or deduction in the employee’s salary for each month. This data is synchronized with the employee salary and automatically processed for each month. To add the salary addition/deduction details, click the **Salary Addition/Deduction** tab in the **Others**. The **Employees Addition/Deduction History** page opens.
[](http://wiki.cuteinfocomm.com/uploads/images/gallery/2022-09/image-1663139472695.png)
#### Add Salary Addition/Deduction
If you want to add employee’s salary addition/deduction details, do the following steps,
1. Click [](http://wiki.cuteinfocomm.com/uploads/images/gallery/2022-09/image-1663354967344.png)(Add Salary Addition/Deduction button) in the Employees Addition/Deduction History, a new page for adding the details of salary addition/deduction open. [](http://wiki.cuteinfocomm.com/uploads/images/gallery/2022-09/image-1663139619963.png)
**Note**: The fields notified with a symbol (\*) are mandatory. You must enter the relevant details in that fields before saving.
2. In the **Employee selection** field:
- If you want to add the salary addition/deduction details for one employee, select the **Single**;
- If you want to add the salary addition/deduction details for more than one employee, select the **Multiple**
3. In the **Type** field:
- If you want add the salary addition details, select the **Addition**;
- If you want to deduct the salary deduction details, select the **Deduction**
4. In the **Employee** box:
- If you have selected the **Single** option in the **Employee selection** field, you can add only one employee from a drop-down list;
- If you have selected the **Multiple** option in the **Employee selection** field, you can add multiple employees by selecting the checkbox of the respective employees.
5. To select the **Addition Type**/**Deduction Type**, do one of the following steps,
**Note**: If you have selected the **Addition** option in the **Type** field, the **Addition Type** box will be enabled. If you have selected the **Deduction** option, the **Deduction Type** box will be enabled.
- In the **Addition Type** box, select the type of addition from a drop-down list.
- In the **Deduction Type** box, select the type of deduction from a drop-down list.
6. In the Currency box, select the currency type.
7. In the Amount box, enter the amount to be added or deducted.
8. To select the **Addition Date**/**Deduction Date**, do one of the following steps,
**Note**: If you have selected the **Addition** option in the **Type** field, the **Addition Date** box will be enabled. If you have selected the **Deduction** option, the **Deduction Date** box will be enabled.
- In the **Addition Date** box, select the date of addition from a drop-down list.
- In the **Deduction Date** box, select the date of deduction from a drop-down list.
9. In the **Remarks** box, enter your remarks if any.
10. Click **Next**.
11. Click **Confirm**. The salary addition/deduction details of employee are successfully added.
#### Delete Salary Addition/Deduction
You can delete the added salary addition/deduction details by using (Delete icon) provided in the **Delete** column of the **Employees Addition/Deduction History** page.
#### Filter Salary Addition/Deduction
There are two type of filter options provided in the **Employees Addition/Deduction History** page to view the detail of specific salary addition/deduction of employee.
**Filter option 1**
The **Employees Addition/Deduction History** page contains a filter option in the upper side of the page. To view the salary addition/deduction of the particular employee,
1. In the **From** and **To** boxes, select the from and to dates.
2. In the **Employee** box, select the employee you want to view the details.
3. In the **Type** box, select whether the addition or deduction.
4. In the **Type Name** box, enter the type of addition/deduction.
5. Click **Search**. The salary addition/deduction details of the employee you have selected will be filtered.
**Filter option 2**
If you want to view any specific salary addition/deduction details among multiple entries listed in the **Employees Addition/Deduction History** page, you can use this filter option[](http://wiki.cuteinfocomm.com/uploads/images/gallery/2022-09/image-1663355063095.png)provided in the upper right corner of the **Employees Addition/Deduction History** page.
#### Export Salary Addition/Deduction
The application has a feature to download the added salary addition/deduction details as an excel file. You can click [](http://wiki.cuteinfocomm.com/uploads/images/gallery/2022-09/image-1663354003972.png)(**Export Excel** button) to download the added salary addition/deduction details. The salary addition/deduction details in the **Employees Addition/Deduction History** page will be downloaded as an excel file.
### Document List
The **Document List** tab in the **Others** submenu helps you to add any documents that company needs to maintain with or without expiry date like ISO 9001:2015 certification and company’s product certification etc. To add a document, click the **Document List** tab in the **Others.** The Document List page opens.
[](http://wiki.cuteinfocomm.com/uploads/images/gallery/2022-09/image-1663139741261.png)
#### Add Document
If you want to add a document,
1. Click [](http://wiki.cuteinfocomm.com/uploads/images/gallery/2022-09/image-1663355137131.png)(Add Document) button in the Document List. The Add Document window opens. [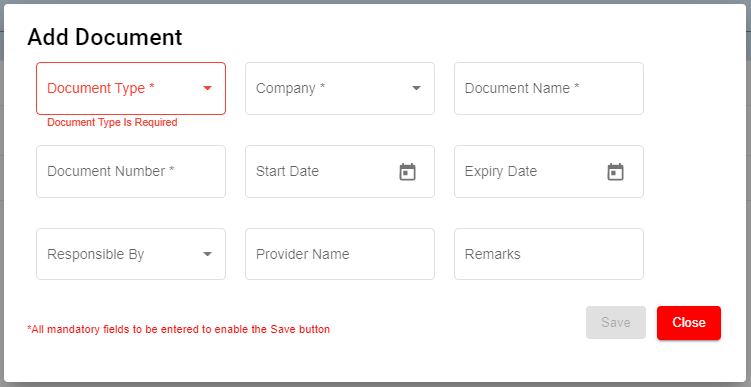](http://wiki.cuteinfocomm.com/uploads/images/gallery/2022-09/image-1663355175983.png)
- In the **Document Type** box, select the document type from a drop-down list. ( Selecting the '**Public**' document type will make the document available under the '**View Document**' page. The **"Public"** document type is added by default)
- In the **Company** box, select a company from a drop-down list.
- In the **Document Name** box, enter the name of a document you want to add.
- In the **Document Number** box, enter the document number.
- In the **Start Date** box, enter the validity starting date of the document.
- In the **Expiry Date** box, enter the validity expiry date of the document.
- In the **Responsible** By box, select the name of a person responsible for the document.
- In the **Provider Name** box, enter the document provider name.
- In the **Remarks** box, enter your remarks if any.
2. Click **Save**. The document is successfully added and listed in the **Document List** page.
#### Edit Document
You can edit the details of the added document by using (Edit icon) provided in the **Edit** column of the **Document List** page. To edit the added document details, click (Edit icon) of the respective document you have added. The **Add Document** window opens with the added details. Edit the document details where you want. Click **Save**.
[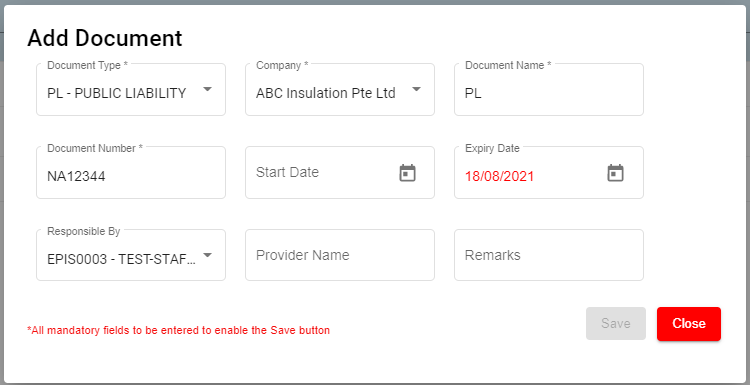](http://wiki.cuteinfocomm.com/uploads/images/gallery/2022-09/image-1663355227328.png)
#### Add/ View Attachment for Document
If you want to add any new attachment for the document or view any added attachment, you can use (Attachment icon) provided in the **Documents** column of the **Document List** page.
#### Delete Document
You can delete the added document by using (Delete icon) provided in the **Delete** column of the **Document List** page. If you want to delete the Document, click **Yes** otherwise click **No**.
#### Filter Document
If you want to view any specific document details among multiple documents listed in the **Document List** page, you can use the filter option [](http://wiki.cuteinfocomm.com/uploads/images/gallery/2022-09/image-1663355063095.png)provided in the upper right corner of the **Document List** page.
#### Export Document
The application has a feature to download the added document details as an excel file. Click [](http://wiki.cuteinfocomm.com/uploads/images/gallery/2022-09/image-1663354003972.png) (**Export Excel** button) to download the added document details. The document details in the **Document List** page will be downloaded as an excel file.
**Note**: The documents with expiry dates will be tracked for its expiry date in **HRM dashboard** and in **weekly emails** alerts.
### Letter Generation
User can generate all different letters here that are defined in letter template master. Click Letter Generation, the history record of letter generated are listed as below,
[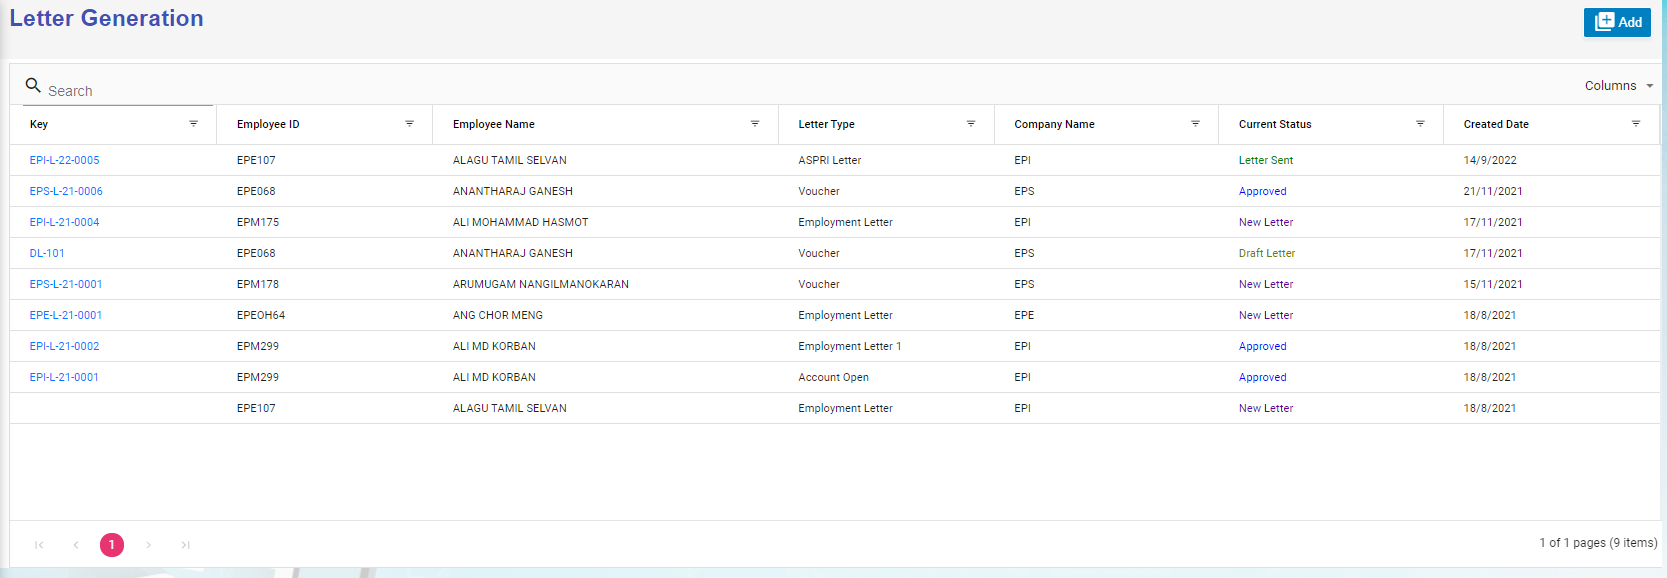](http://wiki.cuteinfocomm.com/uploads/images/gallery/2022-09/image-1663355632688.png)
#### Generate A New Letter
To generate a new letter,
1. Click[](http://wiki.cuteinfocomm.com/uploads/images/gallery/2022-09/image-1663356302980.png) add icon, below add letter page opens,[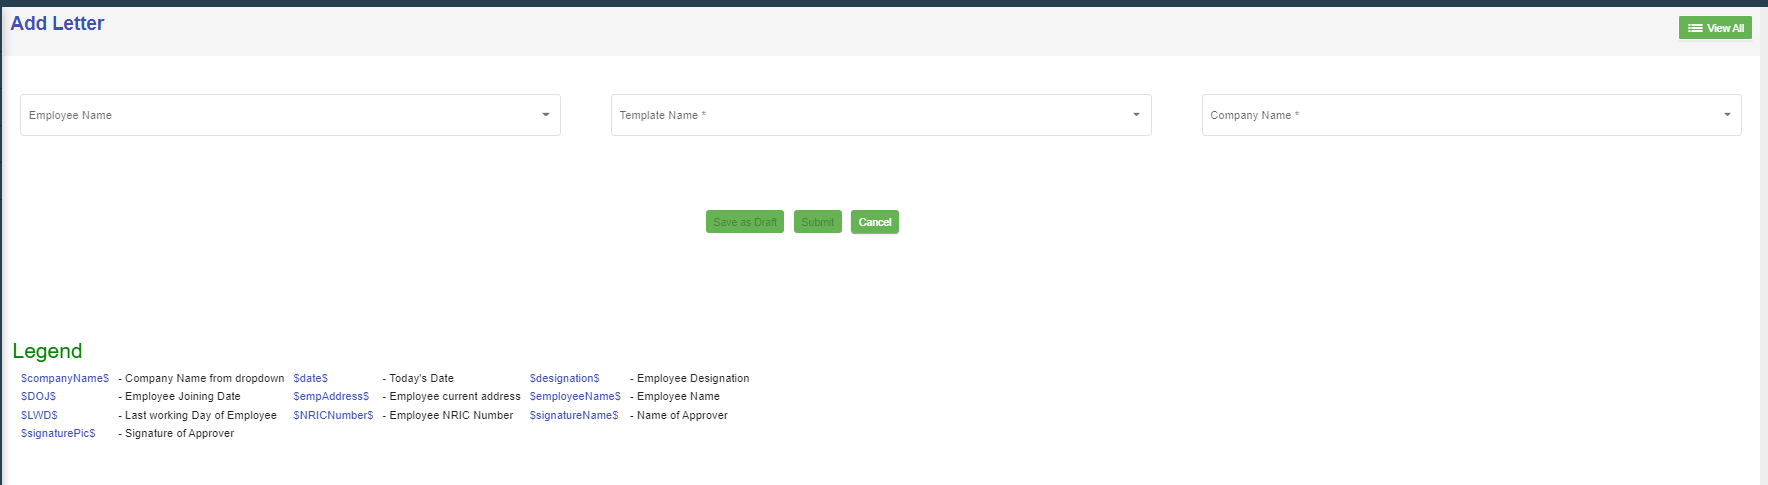](http://wiki.cuteinfocomm.com/uploads/images/gallery/2022-09/image-1663147497713.png)
2. Select employee name, letter template name, and company name, the selected letter template will opens as below,[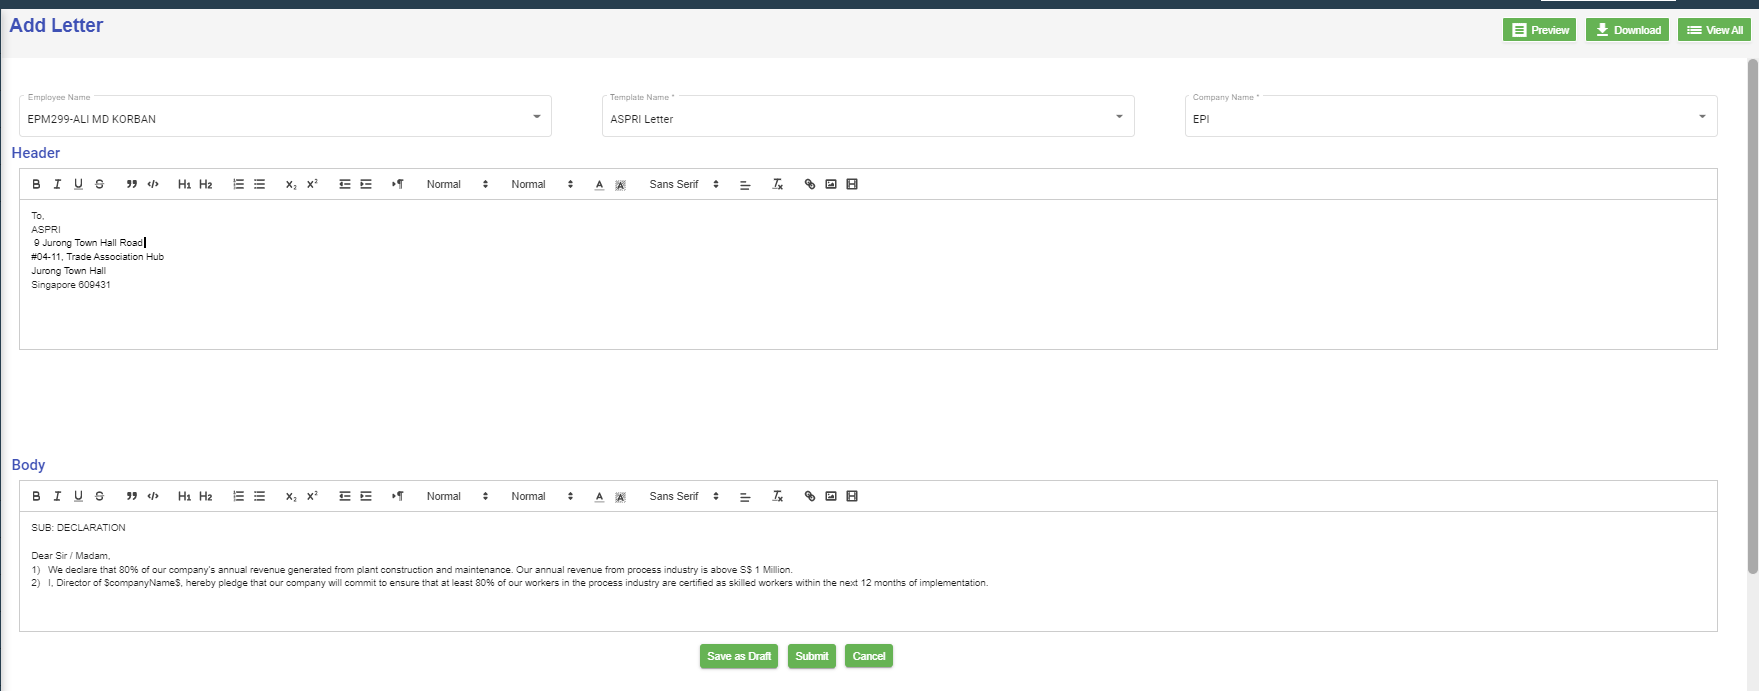](http://wiki.cuteinfocomm.com/uploads/images/gallery/2022-09/image-1663148099362.png)
3. Check and edit the content if needed,
4. Click **Submit,** below notification confirmation window opens,[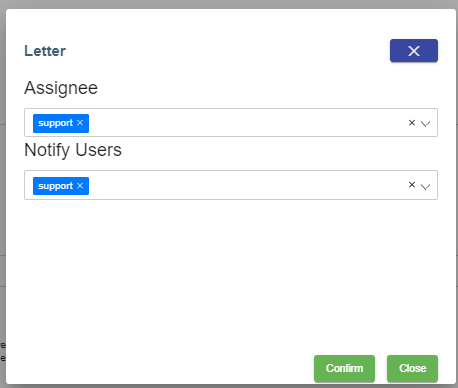](http://wiki.cuteinfocomm.com/uploads/images/gallery/2022-09/image-1663148594519.png)
5. Click **Confirm**, the letter will be generated and ready for preview and approve. Note: before approval, there will be watermark as draft.[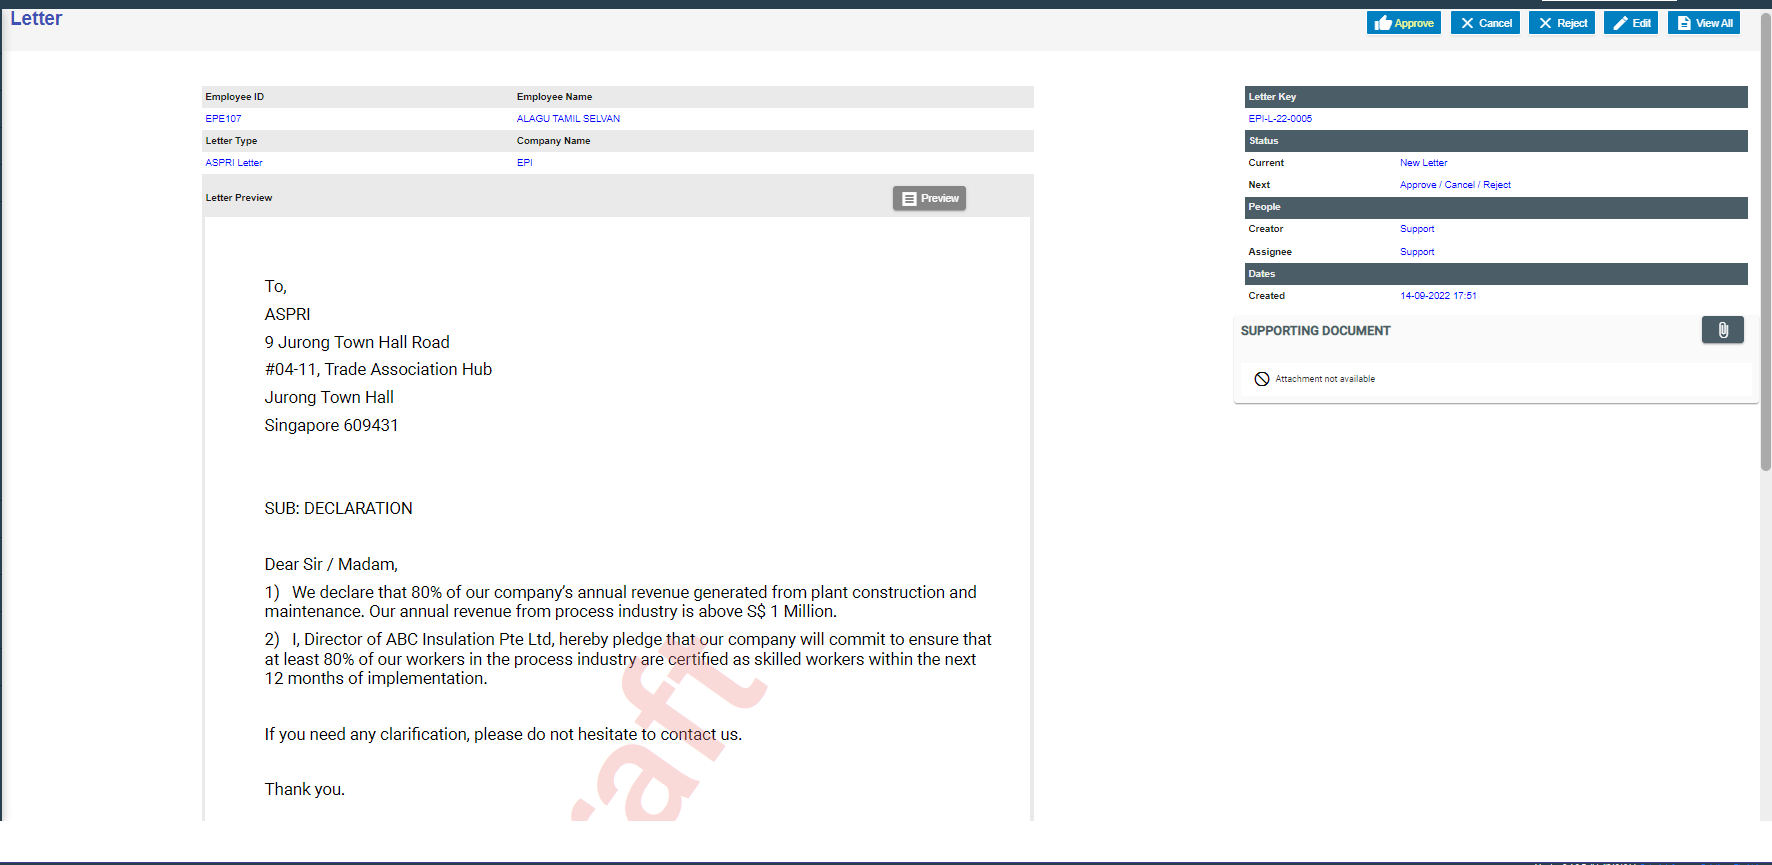](http://wiki.cuteinfocomm.com/uploads/images/gallery/2022-09/image-1663149301264.png)
6. To approve letter generation, click [](http://wiki.cuteinfocomm.com/uploads/images/gallery/2022-09/image-1663356632984.png), below notification opens,[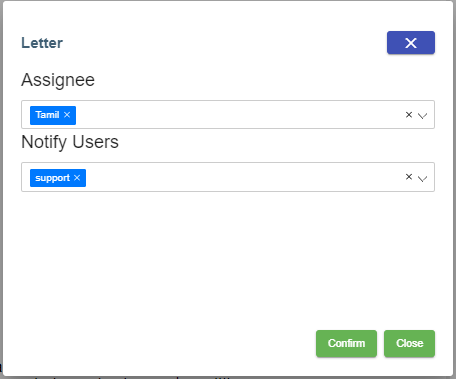](http://wiki.cuteinfocomm.com/uploads/images/gallery/2022-09/image-1663149647712.png)
Click **Confirm**, the letter is generated and approved. User can download for use.[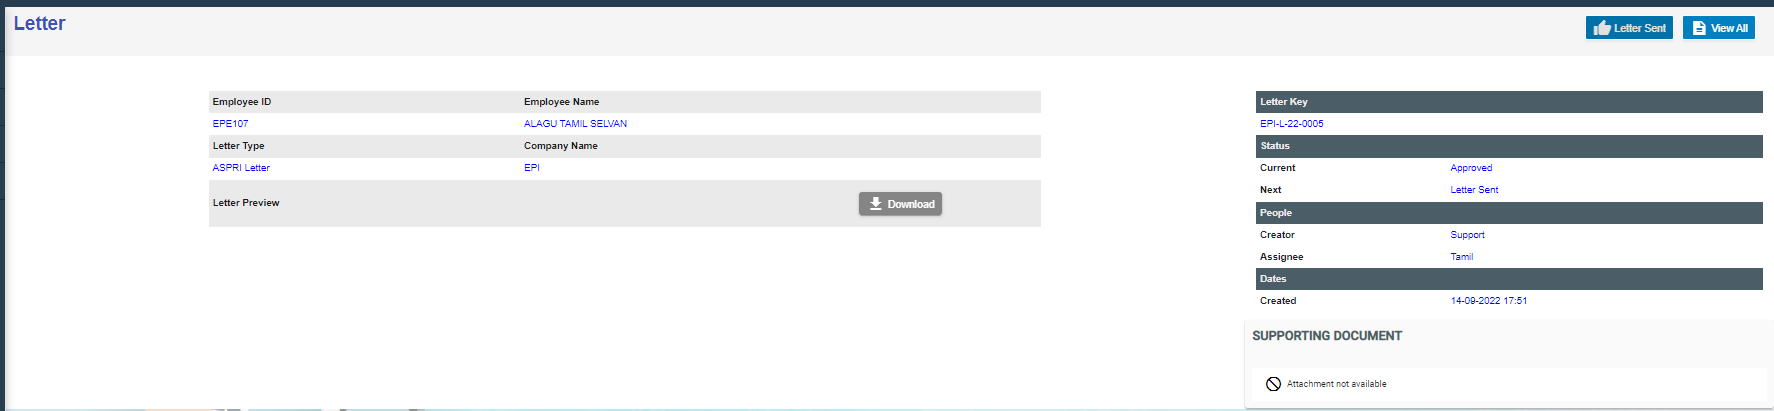](http://wiki.cuteinfocomm.com/uploads/images/gallery/2022-09/image-1663149928458.png)
### Broadcast
User can create broadcast message to a group of selected employees within the company. To view the screen, enable "menuNotification", "hrmNotificationCreator" and "hrmNotificationApprover" permission under HRM module.
[](https://wiki.cuteinfocomm.com/uploads/images/gallery/2025-03/image-1741845781877.png)
1\. Click [](https://wiki.cuteinfocomm.com/uploads/images/gallery/2025-03/image-1741845945971.png) to create new broadcast message.
[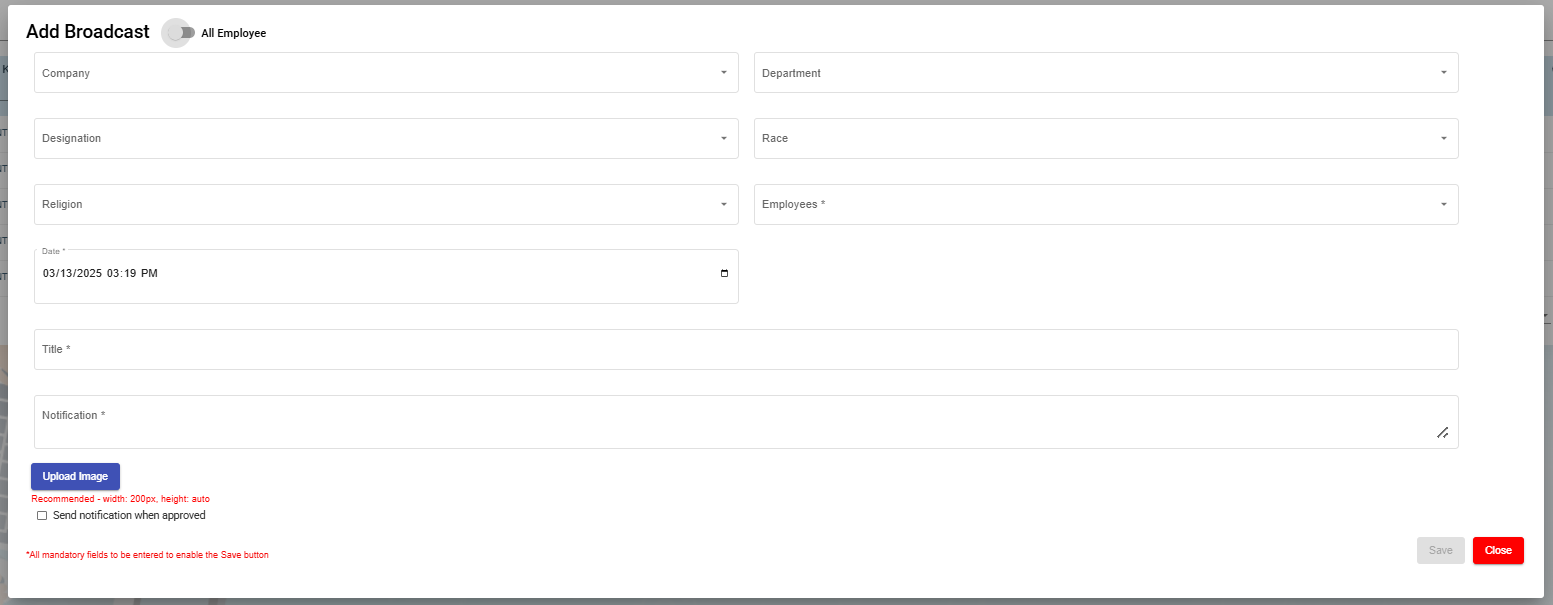](https://wiki.cuteinfocomm.com/uploads/images/gallery/2025-03/image-1741850372638.png)
- Change the toggle button [](https://wiki.cuteinfocomm.com/uploads/images/gallery/2025-03/image-1741846272692.png)to change to select All Employee.
- Select Company in the Company field.
- Select Department in the Department field.
- Select Designation in the Designation field.
- Select Race in the Race field (optional).
- Select Religion in the Religion field (optional).
- Select Employee in the Employees field and this is mandatory to select which employee(s) for this broadcast message.
- Select the date and time in the Date field using the [](https://wiki.cuteinfocomm.com/uploads/images/gallery/2025-03/image-1741850786207.png)calendar icon and this is mandatory to set the broadcast message to be delivered.
- Input the subject of this broadcast message in this mandatory Title field.
- Type the body text of this message in this mandatory Notification field.
- Click on the [](https://wiki.cuteinfocomm.com/uploads/images/gallery/2025-03/image-1741851522485.png) button if an image is required to be attached to the broadcast message. Note on the recommended file size of image file when uploading.
- Tick on the checkbox [](https://wiki.cuteinfocomm.com/uploads/images/gallery/2025-03/image-1741851688794.png) if the broadcast message notification needs to be sent to the selected employee(s) once the broadcast message is approved. Once broadcast message is approved, a notification will be sent to the selected employee(s)mobile. When the notification is clicked on a mobile device, it will open the cuteOffice 2B application's home page and the notification log will appear in the system in the Admin -> Notification Logs
Once done and the mandatory fields (marked with \*) are entered/selected, you will be able to see the Save button. Click on the Save button to record the broadcast message.
Below sample record with status = New
[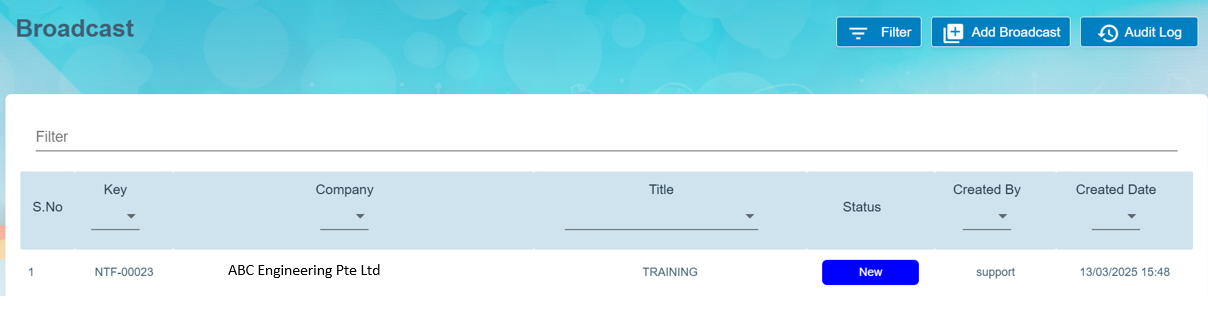](https://wiki.cuteinfocomm.com/uploads/images/gallery/2025-03/image-1741852342381.png)
2\. Click on the key of the broadcast message (as shown in above pt 1) and click on the [ ](https://wiki.cuteinfocomm.com/uploads/images/gallery/2025-03/image-1741852911263.png)button to send to the required authorised person to approve this broadcast message before sending to the selected employee(s). The status will change from [](https://wiki.cuteinfocomm.com/uploads/images/gallery/2025-03/image-1741853161818.png)to [](https://wiki.cuteinfocomm.com/uploads/images/gallery/2025-03/image-1741853088376.png)in the View All page of the Broadcast page.
[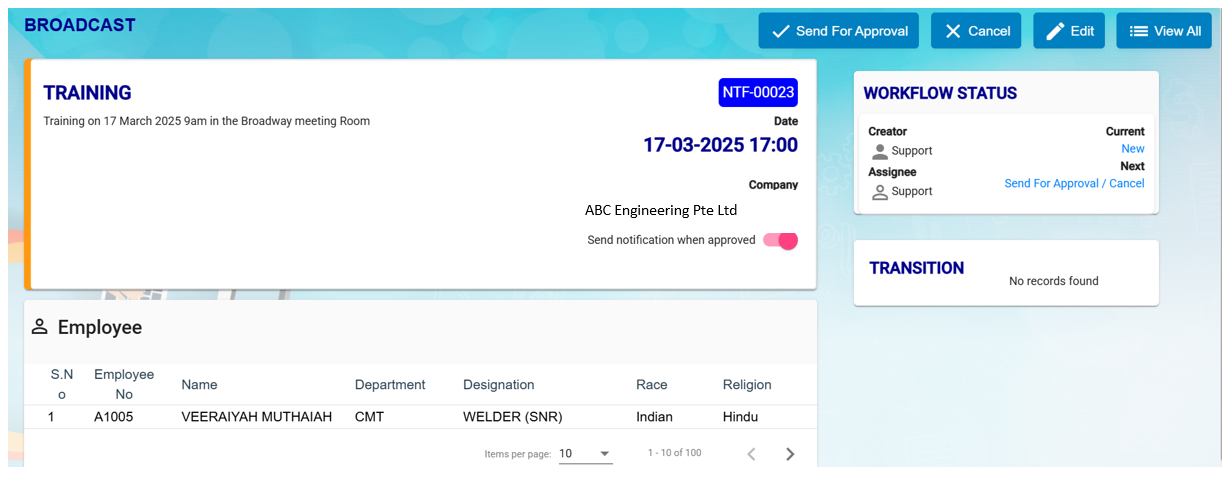](https://wiki.cuteinfocomm.com/uploads/images/gallery/2025-03/image-1741852783428.png)
[](https://wiki.cuteinfocomm.com/uploads/images/gallery/2025-03/image-1741853246902.png)
3\. To approve the broadcast message, click on [](http://wiki.cuteinfocomm.com/uploads/images/gallery/2022-09/image-1663356632984.png) button. You can click on the [](https://wiki.cuteinfocomm.com/uploads/images/gallery/2025-03/image-1741853461683.png) button any amendment and then send for approval again. Once Approved, status will show this [](https://wiki.cuteinfocomm.com/uploads/images/gallery/2025-03/image-1741853568431.png) of this broadcast message in the View All of the Broadcast page.
[](https://wiki.cuteinfocomm.com/uploads/images/gallery/2025-03/image-1741853614834.png)
#### MOM OED Submissions
The Occupational Employment Dataset (OED) is an ongoing registry where organisations in Singapore are required to provide the job and work location details of all employees. The below URL is usually used to submit the OED data.
[https://stats.mom.gov.sg/laboursurvey](https://stats.mom.gov.sg/laboursurvey)
Now with the help of cuteOffice, the data can be submitted with ease to MOM.
Enable the permission "HRM -> oedSubmissionMOM" to submit OED.
Click on MOM - OED MOM Submission menu to submit
You can also view the video on the process of submitting OED data here. [https://www.youtube.com/watch?v=pjiHbK\_gRFs](https://www.youtube.com/watch?v=pjiHbK_gRFs "Submit MOM OED data")
[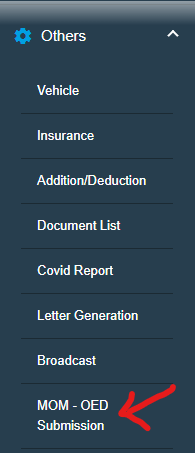](https://wiki.cuteinfocomm.com/uploads/images/gallery/2025-04/image-1743559298487.png)
[](https://wiki.cuteinfocomm.com/uploads/images/gallery/2025-04/image-1743561435519.png)
However, before submitting the data to mom from cuteOffice, we need to take few actions
There are certain mandatory data which should be sent to MOM and there are some optional data.
The mandatory data are
1. Full Name
2. Pass Type
3. NRIC/FIN
4. PW Job Title
5. Main Job Title
6. Standard Hours Work
7. Job Type
8. Date of Join
9. Date of Leaving (for resigned staff)
10. Total Working Days of Month
11. Actual Working Days of Month
Other than the above the below optional data can be sent which you can control whether to send or not.
1. Highest Education
2. Main Job Duties
3. Is Employee HR Role
4. Primary HR Role
5. Secondary HR Role
6. HR Job Level
7. Occupation Group
8. Employee Type
9. Department
10. Paid OT Hours
11. Payment Mode
12. Basic Wage
13. Gross Wage
14. Annual Leaves
15. Premise Type
16. Postal Code
17. Street Name
18. mode of Leaving
Trade Master has few important data that is required for OED submissions
[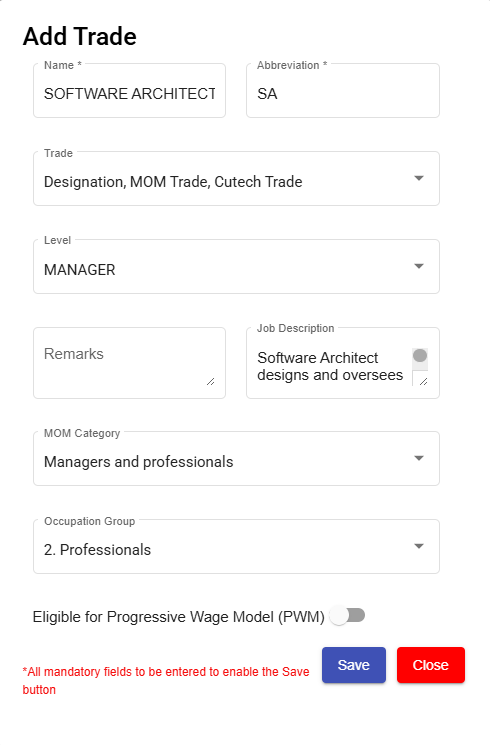](https://wiki.cuteinfocomm.com/uploads/images/gallery/2025-04/image-1743560219844.png)
**MOM Category** - For every one of your designation shall be mapped to MOM category.
Similarly Map the **Occupation group** with the trade.
**Job description** is optional data for **Main Job Duties**
**Note**: Only after approving the timesheet, you can submit the OED data as worked day is part of the data to submit.
The Highest education is sent from employee data. To update go to Educational Qualifications tab of experience
[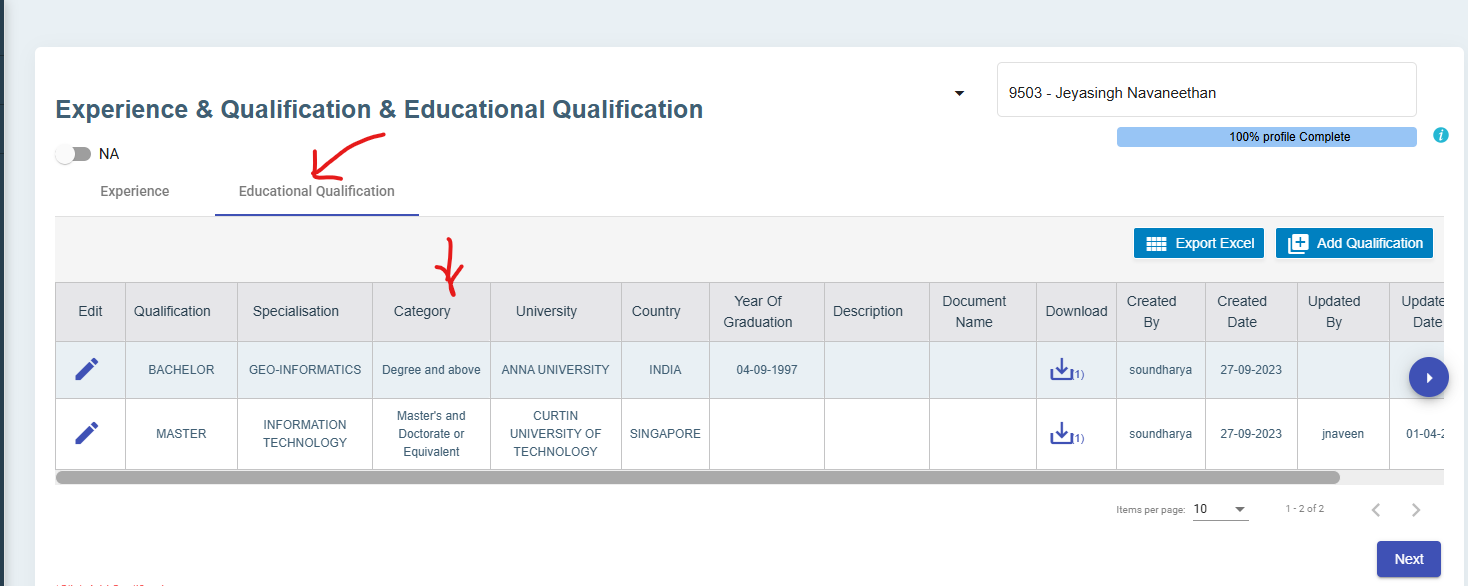](https://wiki.cuteinfocomm.com/uploads/images/gallery/2025-04/image-1743560657471.png)
Edit the highest education record and mark as highest an also make sure to select the category of education such as master , bachelor etc
[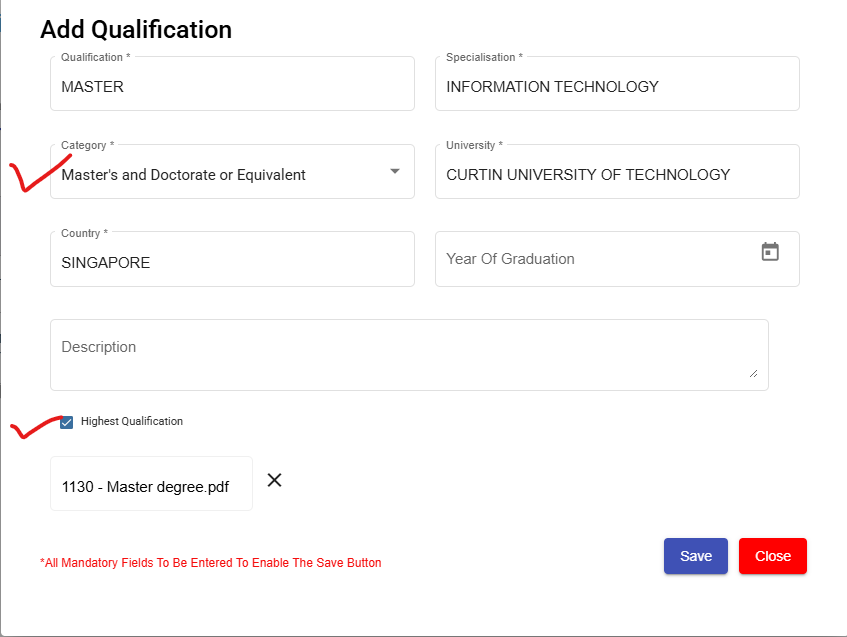](https://wiki.cuteinfocomm.com/uploads/images/gallery/2025-04/image-1743560774697.png)
In official information page, select the place of working Premise Type and also update whether the employee is in HRM role or not.
[](https://wiki.cuteinfocomm.com/uploads/images/gallery/2025-04/image-1743561027850.png)
If Employee is in HR role, select additional fields such as
1. Primary HR Role
2. Secondary HR Role and
3. HR Job Level
All are drop down data as per MOM and choose from the list.
[](https://wiki.cuteinfocomm.com/uploads/images/gallery/2025-04/image-1743561068852.png)
In -OED View All Submissions page, select New Submission to send data
[](https://wiki.cuteinfocomm.com/uploads/images/gallery/2025-04/image-1743561418603.png)
The new submissions window opens up.
[](https://wiki.cuteinfocomm.com/uploads/images/gallery/2025-04/image-1743561511749.png)
Click on Settings icon on the right to choose which fields of data that you are planning to send to MOM
[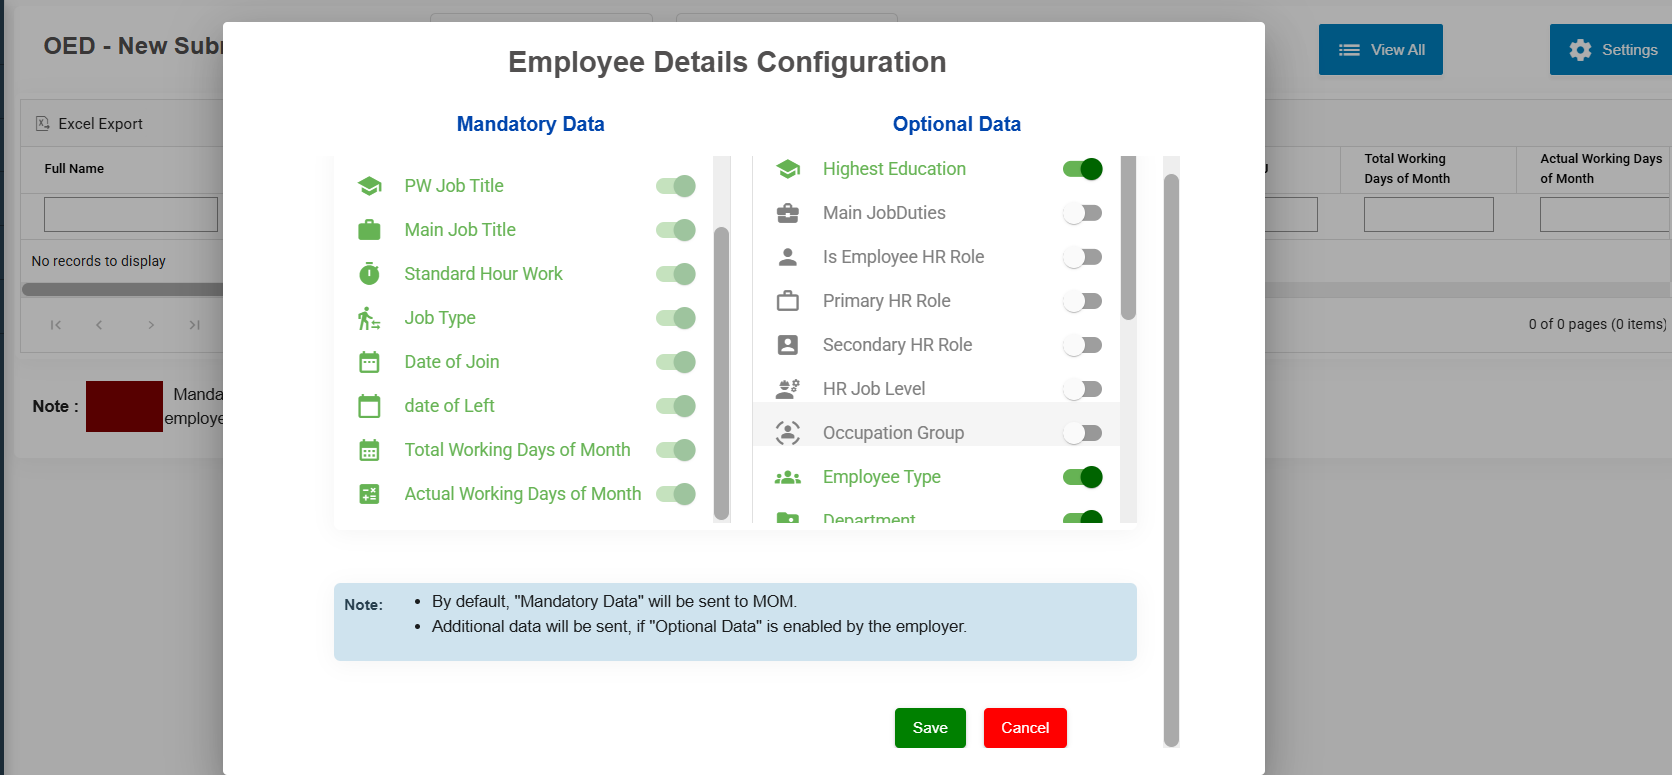](https://wiki.cuteinfocomm.com/uploads/images/gallery/2025-04/image-1743560028272.png)
Mandatory data fields cant be unselected.
Choose the company and period for which you want to submit the records. Click Search
All the employees with data that will be submitted will be showing here.
[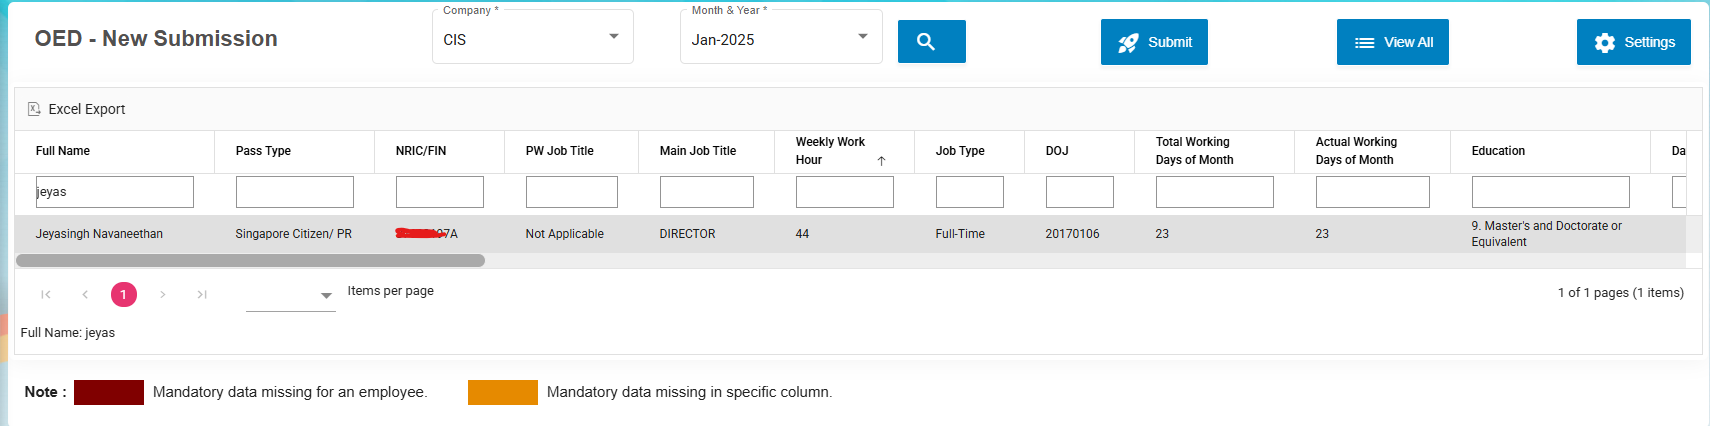](https://wiki.cuteinfocomm.com/uploads/images/gallery/2025-04/image-1743563206485.png)
If any data is not available, it will be highlighted. Do the necessary corrections in respective places.
Click the button[.](https://wiki.cuteinfocomm.com/uploads/images/gallery/2025-04/image-1743563414764.png)
The summary is shown and Click Agree & Proceed to login with SingPass and submit the OED data to MOM.
[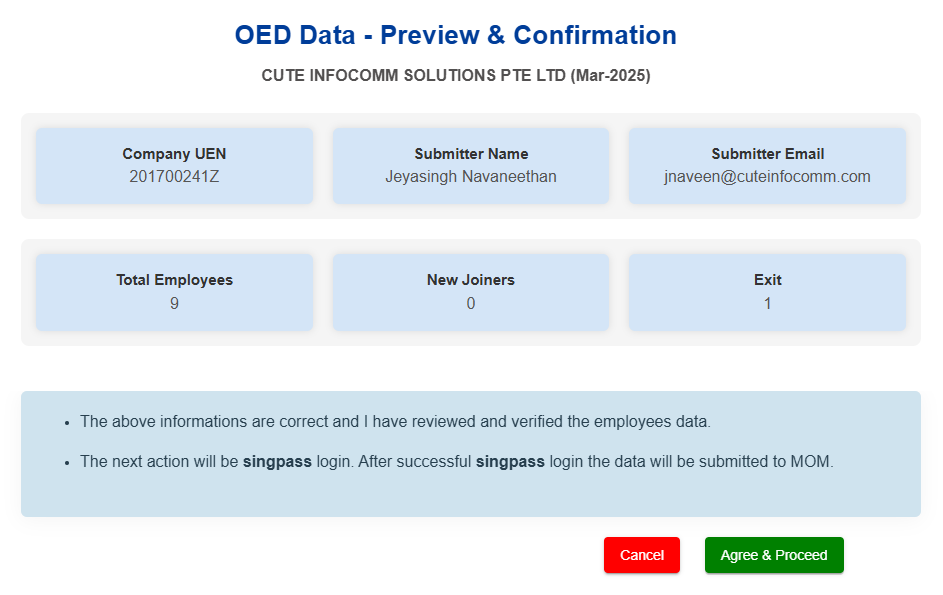](https://wiki.cuteinfocomm.com/uploads/images/gallery/2025-04/image-1743572933376.png)
Once authorised and selected the correct company name, Click Allow for cuteOffice to submit the data on your behalf.
[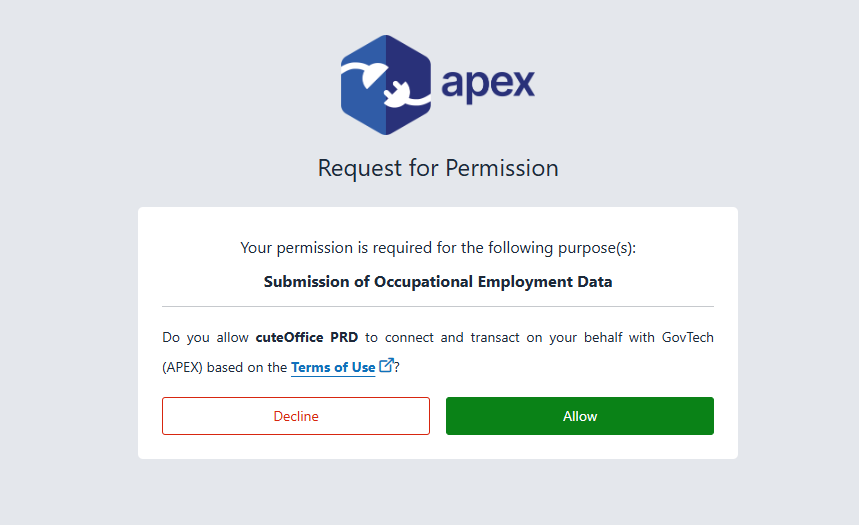](https://wiki.cuteinfocomm.com/uploads/images/gallery/2025-04/image-1743563524368.png)
The data will be submitted and it will show a confirmation message.
[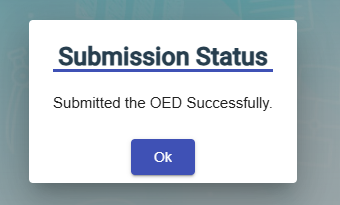](https://wiki.cuteinfocomm.com/uploads/images/gallery/2025-04/image-1743586885057.png)
The list of submitted data will be available for review along with the submission status.
[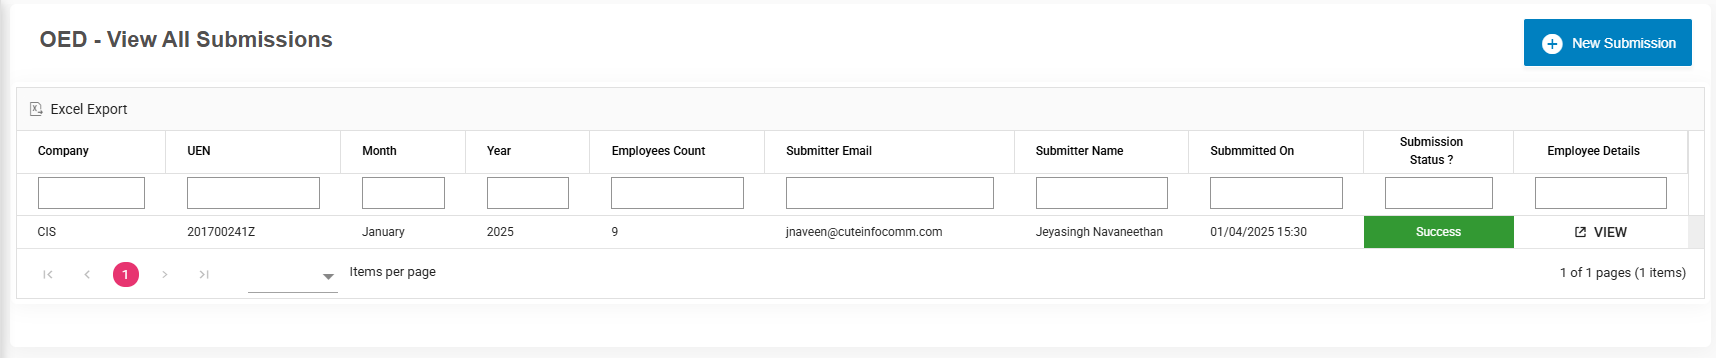](https://wiki.cuteinfocomm.com/uploads/images/gallery/2025-04/image-1743563676787.png)
#### L&D Course Calendar
1\. Enter Month to view Learning and development calendar for the employee
2\. Hover the cursor near to employee, tool tip open to show L&D Course details
[](http://wiki.cuteinfocomm.com/uploads/images/gallery/2022-09/image-1664352090534.png)
### View Document
User can view the document which was created for public view within the company. Click on the title e.g. Worker Handbook.pdf to trigger download of the document for viewing.
[](https://wiki.cuteinfocomm.com/uploads/images/gallery/2025-03/image-1741844860131.png)
#### Filter Document
If you want to view any specific document details among multiple documents listed in the **View Document** page, you can use the filter option [](http://wiki.cuteinfocomm.com/uploads/images/gallery/2022-09/image-1663355063095.png)provided in the upper right corner of the **View Document** page to search.
### Scheduler Subscription
To configure scheduler, enable "menuSchedulerSubscription" permission.
[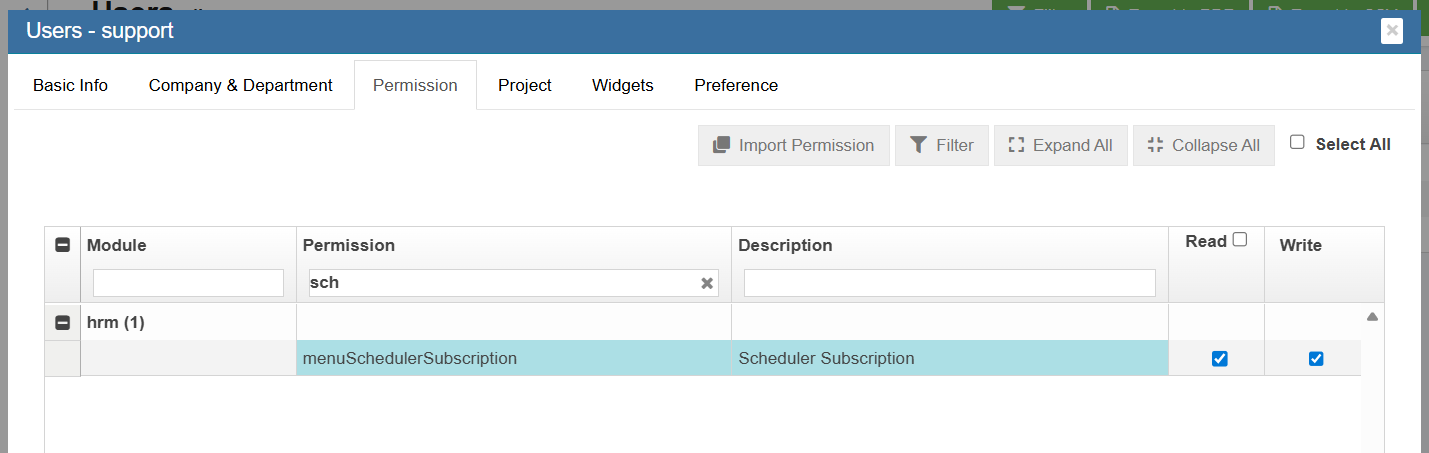](https://wiki.cuteinfocomm.com/uploads/images/gallery/2025-12/image-1766048811799.png)
User can view the menu under HRM->Others.
[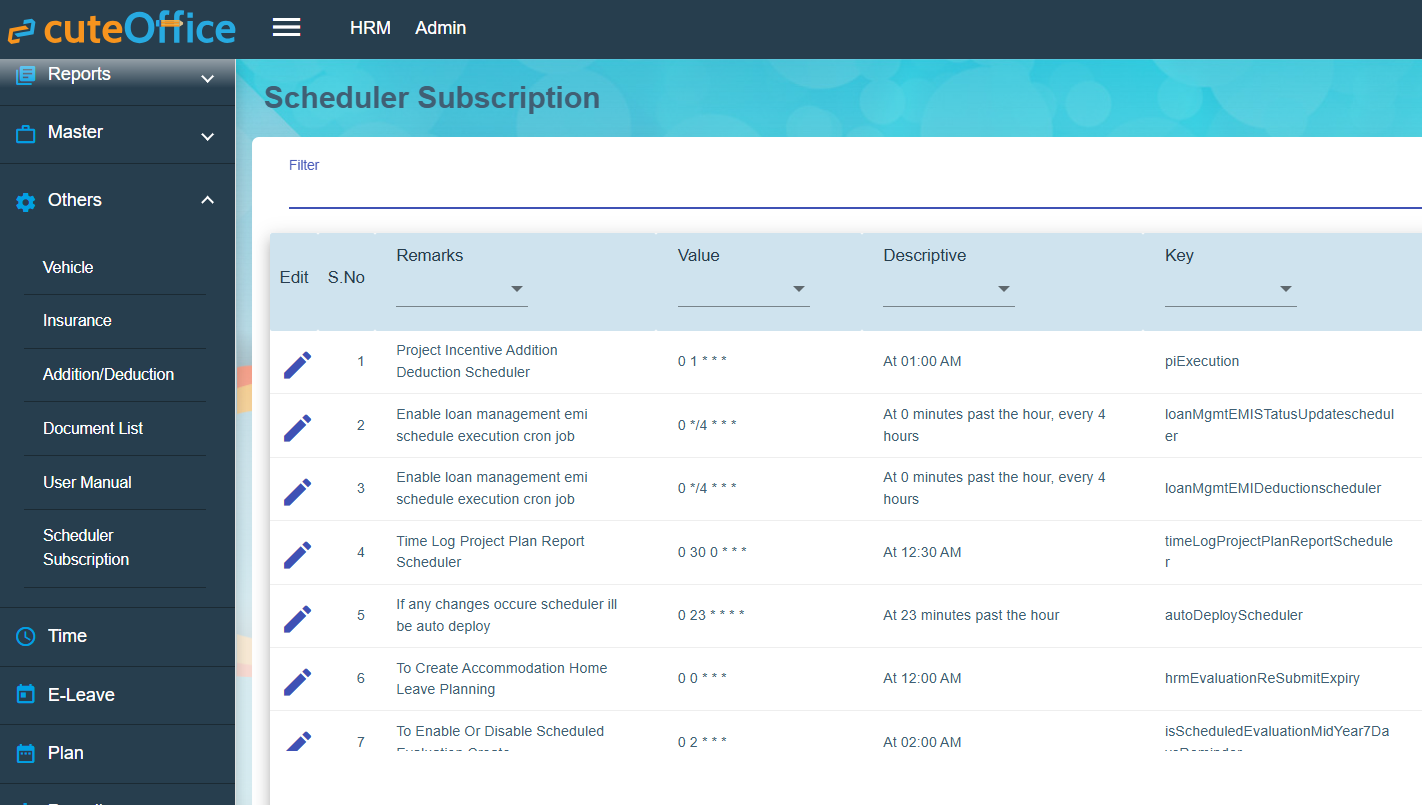](https://wiki.cuteinfocomm.com/uploads/images/gallery/2025-12/image-1766049516209.png)
Click edit and change the scheduler ( Hours, minutes and seconds) and save the record.
# HRM Accommodation
The **Accommodation** submenu in the **HUMAN RESOURCES** page helps to track and forecast the company's dormitory vacancies i.e. to help the HR team to better manage the dormitory accommodation provided to the foreign employees.
The Accommodation submenu consists of the following pages
- Accommodation
- Rooms/Beds
- Employee's Dormitory Accommodation
- Room Occupancy Report
- Room Availability Report
- Forecasting Report
- Forecasting Detailed Report
- Workers Accommodation Report
- Accommodation Expiring List
### Accommodation
The Accommodation page in the Accommodation submenu helps you to create the master data of the dormitory accommodation. Click on this page to add or update the accommodation provided by the respective dormitory operator/vendor.
[](http://wiki.cuteinfocomm.com/uploads/images/gallery/2024-03/image-1709632230460.png)
#### Add Accommodation
Click [](http://wiki.cuteinfocomm.com/uploads/images/gallery/2024-03/image-1709632392811.png)to create new dormitory vendor record.
[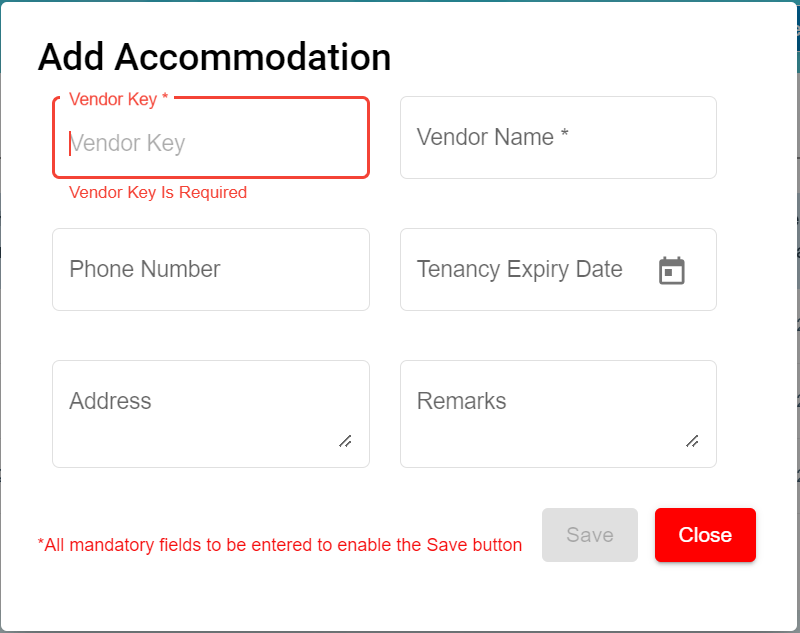](http://wiki.cuteinfocomm.com/uploads/images/gallery/2024-03/image-1709632487867.png)
To Add new accommodation of the new dormitory vendor, do the following steps
1\. In the **Vendor Key** field, enter the Vendor Key to identify this dormitory vendor record.
2\. In the **Vendor Name** field, enter the name of this dormitory vendor record.
3\. In the **Phone Number** field, enter the phone number of this dormitory vendor record.
4\. In the **Tenancy Expiry Date** field, enter this tenancy expiry date of this dormitory vendor record.
5\. In the **Address** field, enter the address of this dormitory.
6\. In the **Remarks** field, enter the remarks.
Click **Save** button to save the above details for this dormitory vendor record.
#### Edit Accommodation
You can edit the details of the added accommodation record by using the edit option provided in the Edit column of the Accommodation page. Click [](http://wiki.cuteinfocomm.com/uploads/images/gallery/2024-03/image-1709708413181.png) (Edit icon) of the respective accommodation you have added. Edit the accommodation details where you want. Click **Save**.
[](http://wiki.cuteinfocomm.com/uploads/images/gallery/2024-03/image-1709708835107.png)
#### Delete Accommodation
You can delete the added accommodation by using [](http://wiki.cuteinfocomm.com/uploads/images/gallery/2024-03/image-1709711221708.png)(Delete icon) provided in the Delete column of the Accommodation page. If you want to delete the Accommodation, click **Yes** otherwise click **No**.
You can delete the added manage rooms record by using [](http://wiki.cuteinfocomm.com/uploads/images/gallery/2024-03/image-1709711221708.png)(Delete icon) provided in the Delete column of the Manage Rooms page. If you want to delete the accommodation details record, click **Yes** otherwise click **No**.
If you want to view a specific accommodation record on rooms and beds, you can use the filter option provided in the upper right corner of the **Manage Rooms** page. Click [](http://wiki.cuteinfocomm.com/uploads/images/gallery/2024-03/image-1709711118552.png) (Filter button). The filter option opens and input the text to filter.
Export Manage Rooms
Advance Payment
We have customized to generate advance Salary based on client requirements
General configuration steps
• Navigate to system Admin -> Users->Permissions, in payroll module, search and enable both write and read permission "advanceSalary" for the user who needs to process advance salary. This step will enable user's permission to view advance salary in Payroll.
• Add Advance cut-off date in the global settings to process advance salary after the cut-off date.
Scenario 1:
• Navigate to HRM module, search for employee who needs to advance a portion of the salary, and navigate to the employee's HRM salary configuration page, in Advance Salary field, enter the amount of advance salary, click Save.
Advance Salary (Ex) : $ 800
• Total working days for the month (Eg: 24)
Per day rate = 800/24 = 33.33
Non-working days (Ex: 2 days – unpaid leave based on time log records of the month)
Total Advance = 800 - (33.3*2) = 733.33
• Navigate to Payroll module, go to operation -> Generate Advance to open generate advance page as below,
• Choose relevant search criteria such as payroll year and month, paycycle or department, then click search. A list of employees who have configured advance salary in HRM and meet search criteria will display,
• User can either tick to select all employee or specific employees and click Generate Advance Salary button at the top right corner in the generate advance page.
• Generated advance salary data will be moved to Advance In staging section. Where user can regenerate/delete/ approve for advance salary in staging in bulk or individually. User can also use the edit option to edit existing detail pay data.
Once advance salary in staging is approved, advance salary data will move to Advance in History section,
Scenario 2:
Use Basic Salary as Advance Pay
• Go to Payroll settings under Payroll-> Admin -> Settings.
Click checkbox “Use Basic Salary as Advance Pay”.
Note:
In this case, the basic salary amount under HRM Pay Eligibility page is considered as an Advance Salary. User need not to enter amount in the Advance Salary field under HRM ->Payroll Salary configuration page.
Check advance salary in HRM -> Payroll Salary information screen (Ex: 0)
Get Basic salary from Pay eligibility (Ex: 3000)
If an employee has” exclude time/leave” as “time or both” , the generated advance salary will have default $ 1 value for changing it manually.
Per day rate = 3000/24 = 125
If 2 non-working days of the month (Ex: 2 – unpaid leave), the Total Advance = 3000 - (125*2) = $ 2750
• Navigate to Payroll module, go to operation -> Generate Advance to open generate advance page.
• Select all employee or specific employees and click Generate Advance Salary button at the top right corner in the generate advance page.
• Generated advance salary data will be moved to Advance In staging section. Where user can regenerate/delete/ approve for advance salary in staging in bulk or individually.
• Once advance salary in staging is approved, advance salary data will move to Advance in History section
Scenario 3:
Fixed Advance Salary?
• Add advance salary in HRM -> Payroll Salary information screen (Ex: 800)
• No Computation for Total Advance based on absent or unpaid leave
• Total Advance = 800
## Reports
The **Reports** submenu in the **Payroll** module used to generate and view various reports related to the employee’s payroll such as pay slip, payroll journal, payroll register, and so on. The **Reports** submenu contains the following reports,
- Pay Slip
- Payroll Journal Report
- Payroll Register Report
- Payroll Summary Report
- Cheque Register Report
- Donation Report
- Liabilities Report
- Yearly Payroll Report
- Generate CPF Submission File
- Generate GIRO Bank File
- AIS submission
### Pay Slip
The **Pay Slip** tab in the **Reports** submenu used to generate and view the pay slip of employee.
To generate the pay slip,
1. Click **Pay Slip** in the **Reports.** The **Pay Slip** page opens.
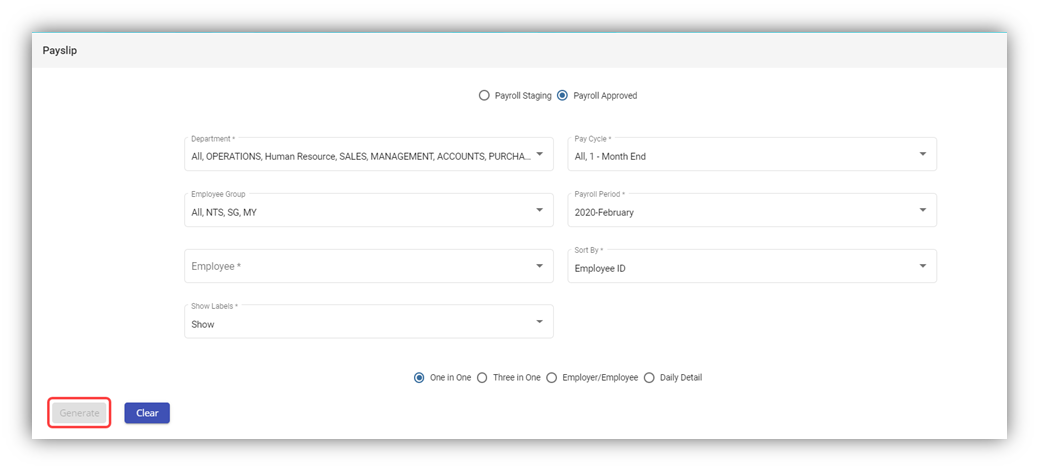
**Note:** You can generate the pay slip of any employee in both the **Payroll in Staging** and **Payroll history** (Approved) stages.
2. On top of pay slip window, select any one of **Payroll in Staging** or **Payroll Approved**.
3. In the **Department** box, select a department from a drop-down list.
**Note**: If you want to select all the departments in the list, select the checkbox of the **ALL**.
4. In the **Pay Cycle** box, select a pay cycle from a drop-down list.
**Note**: If you want to select all the pay cycles in the list, select the checkbox of the **ALL**.
5. In the **Employee Group** box, select an employee group from a drop-down list.
**Note**: If you want to select all the employee groups in the list, select the checkbox of the **ALL**.
6. In the **Payroll Period** box, select a payroll period from a drop-down list.
**Note**: If you want to select all the payroll periods in the list, select the checkbox of the **ALL**.
7. In the **Employee** box, select an employee from a drop-down list.
**Note**: If you want to select all the employees in the list, select the checkbox of the **ALL**.
8. If you want to generate the pay slip based on the **Employee ID** or **Employee Name**, select the respective option in the **Sort By** box.
9. If you want to show the labels, select **Show** otherwise select **Hide** from the **Show Labels** box.
**Note**: You can generate the pay slip in four type of formats.
10. Select the respective format in which you want to generate the pay slip, e.g. one in one, three in one
11. Click **Generate**. The pay slip will be generated and downloaded as a PDF file in the selected format, see below as an example.
[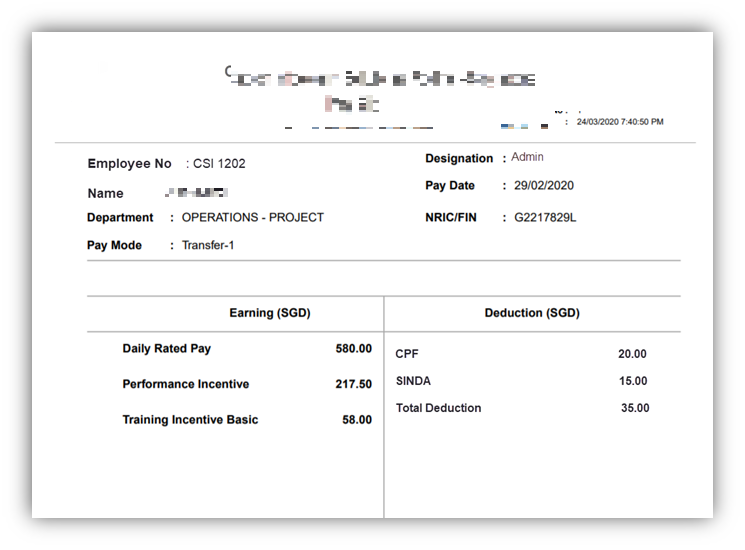](https://wiki.cuteinfocomm.com/uploads/images/gallery/2023-04/image-1682096693397.png)
**Note**: If you are using the Epson Printer to print the generated pay slip, you need do set the printer settings. To know how to do setup, refer the document, “**Epson Printer Setup to Print a Pay Slip**”.
### Payroll Journal Report
The **Payroll Journal** tab in the **Reports** submenu used to generate and view the payroll journal report of the employee. The payroll journal summary report used to check the payroll process of the employee.
To generate and view the payroll journal summary report,
1. Click **Payroll Journal** in the **Reports,** the **Payroll Journal** page opens.
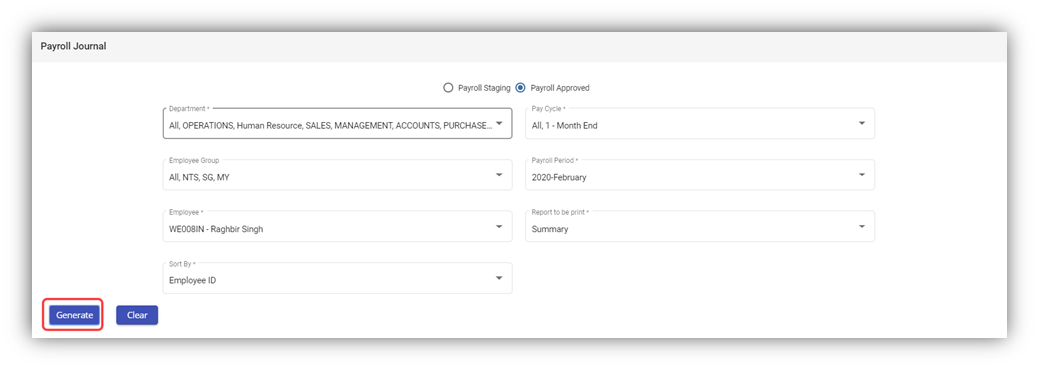
**Note:** You can generate the payroll journal for any employee in both the Payroll in Staging and Payroll Approved stages.
2. Select any one of **Payroll in Staging** or **Payroll Approved**.
3. In the **Department** box, select a department from a drop-down list.
**Note**: If you want to select all the departments in the list, select the checkbox of the **ALL**.
4. In the **Pay Cycle** box, select a pay cycle from a drop-down list.
**Note**: If you want to select all the pay cycles in the list, select the checkbox of the **ALL**.
5. In the **Employee Group** box, select an employee group from a drop-down list.
**Note**: If you want to select all the employee groups in the list, select the checkbox of the **ALL**.
6. In the **Payroll Period** box, select a payroll period from a drop-down list.
**Note**: If you want to select all the payroll periods in the list, select the checkbox of the **ALL**.
7. In the **Employee** box, select an employee from a drop-down list.
**Note**: If you want to select all the employees in the list, select the checkbox of the **ALL**.
8. In the **Report to be print** box, if you want to generate the payroll journal as a summary report, select **Summary** or if you want to generate the payroll journal as a detail report, select **Detail**.
9. If you want to generate the payroll journal summary report based on the **Employee ID** or **Employee Name**, select the respective option in the **Sort By**
10. Click **Generate**. The payroll journal report will be generated and downloaded as a PDF file. See below as an example. [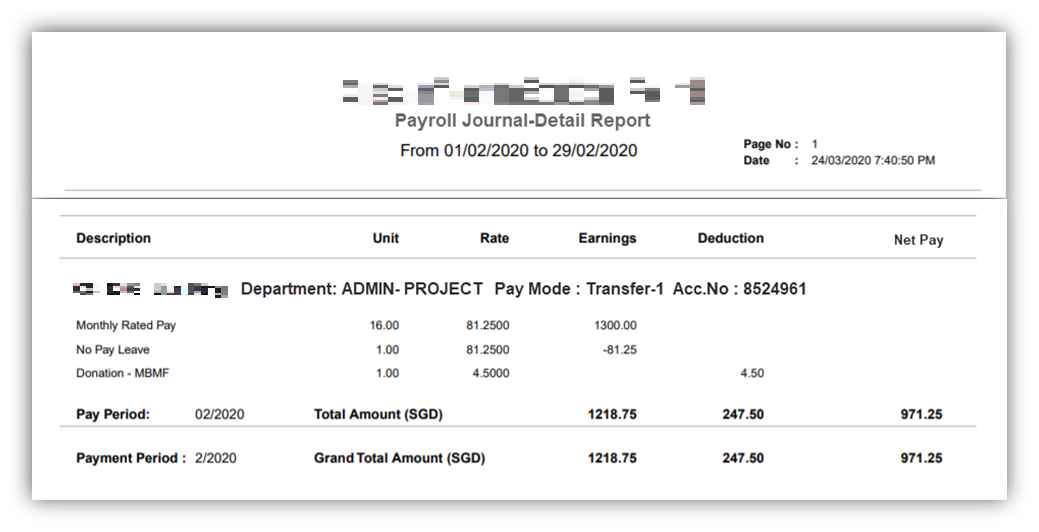](https://wiki.cuteinfocomm.com/uploads/images/gallery/2023-04/image-1682096755323.png)
### Payroll Register Report
The **Payroll Register t**ab in the **Reports** submenu used to generate and view the payroll register report of the employee. The payroll register report shows the CPF detail of the local employee.
To generate and view the payroll register report,
1. Click **Payroll Register** in the **Reports,** the **Payroll Register** page opens.

**Note:** You can generate the payroll register for any employee in both the Payroll in Staging and Payroll Approved stages.
2. Select any one of **Payroll in Staging** or **Payroll Approved**.
3. In the **Department** box, select a department from a drop-down list.
**Note**: If you want to select all the departments in the list, select the checkbox of the **ALL**.
4. In the **Pay Cycle** box, select a pay cycle from a drop-down list.
**Note**: If you want to select all the pay cycles in the list, select the checkbox of the **ALL**.
5. In the **Employee Group** box, select an employee group from a drop-down list.
**Note**: If you want to select all the employee groups in the list, select the checkbox of the **ALL**.
6. In the **Payroll Period** box, select a payroll period from a drop-down list.
**Note**: If you want to select all the payroll periods in the list, select the checkbox of the **ALL**.
7. In the **Employee** box, select an employee from a drop-down list.
**Note**: If you want to select all the employees in the list, select the checkbox of the **ALL**.
8. If you want to generate the payroll journal summary report based on the **Employee ID** or **Employee Name**, select the respective option in the **Sort By** box.
9. Click **Generate**. The payroll register report will be generated and downloaded as a PDF file. See below as an example. [](https://wiki.cuteinfocomm.com/uploads/images/gallery/2023-04/image-1682096802587.png)
### Payroll Summary Report
The **Payroll Summary t**ab in the **Reports** submenu used to generate and view the payroll summary report of the employee. The payroll summary report shows the CPF detail of the local employee.
To generate and view the payroll summary report,
1. Click **Payroll Summary** in the **Reports,** the **Payroll Summary** page opens.
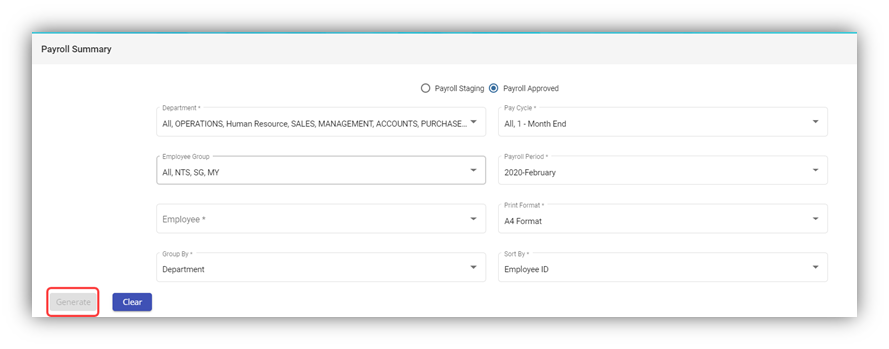**Note:** You can generate the payroll summary for any employee in both the Payroll in Staging and Payroll Approved stages.
2. Select any one of **Payroll in Staging** or **Payroll Approved**.
3. In the **Department** box, select a department from a drop-down list.
**Note**: If you want to select all the departments in the list, select the checkbox of the **ALL**.
4. In the **Pay Cycle** box, select a pay cycle from a drop-down list.
**Note**: If you want to select all the pay cycles in the list, select the checkbox of the **ALL**.
5. In the **Employee Group** box, select an employee group from a drop-down list.
**Note**: If you want to select all the employee groups in the list, select the checkbox of the **ALL**.
6. In the **Payroll Period** box, select a payroll period from a drop-down list.
**Note**: If you want to select all the payroll periods in the list, select the checkbox of the **ALL**.
7. In the **Employee** box, select an employee from a drop-down list.
**Note**: If you want to select all the employees in the list, select the checkbox of the **ALL**.
8. In the **Print Format** box, select the print format from the given list.
9. In the **Group by** box, select the grouping mode of employees from the options such as **Department**, **Employee Group**, and **Pay Mode**.
**Note**: The grouping mode options such as **Pay Mode** and **Employee Group** are reflected from the **Employee** submenu.
10. If you want to generate the payroll journal summary report based on the **Employee ID** or **Employee Name**, select the respective option in the **Sort By** box.
11. Click **Generate**. The payroll summary report will be generated and downloaded as a PDF file. See below as an example. [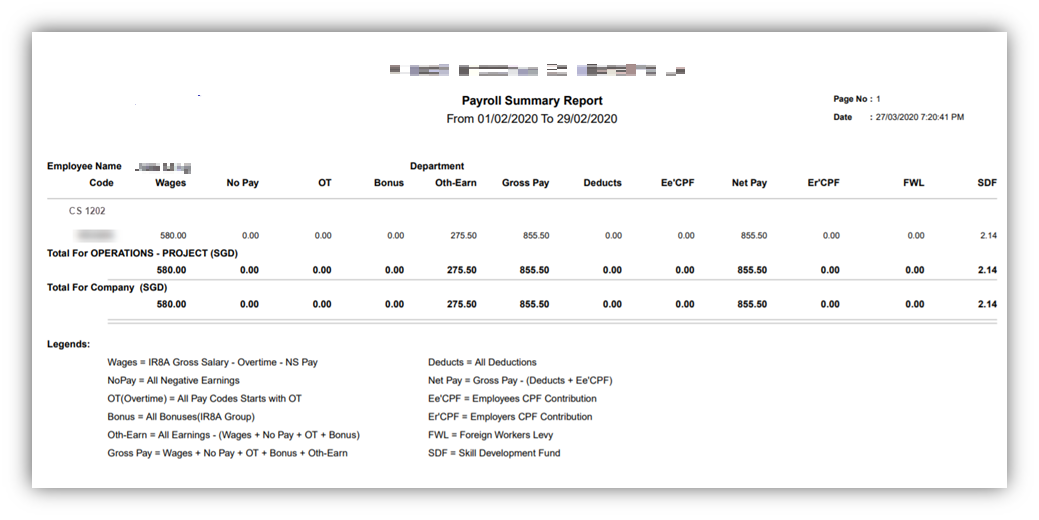](https://wiki.cuteinfocomm.com/uploads/images/gallery/2023-04/image-1682096860974.png)
### Cheque Register Report
The **Cheque Register t**ab in the **Reports** submenu used to generate and view the cheque register report of the employee. The cheque register report shows the issued cheque detail of the employee.
To generate and view the cheque register report,
1. Click **Cheque Register** in the **Reports,** the **Cheque Register** page opens.
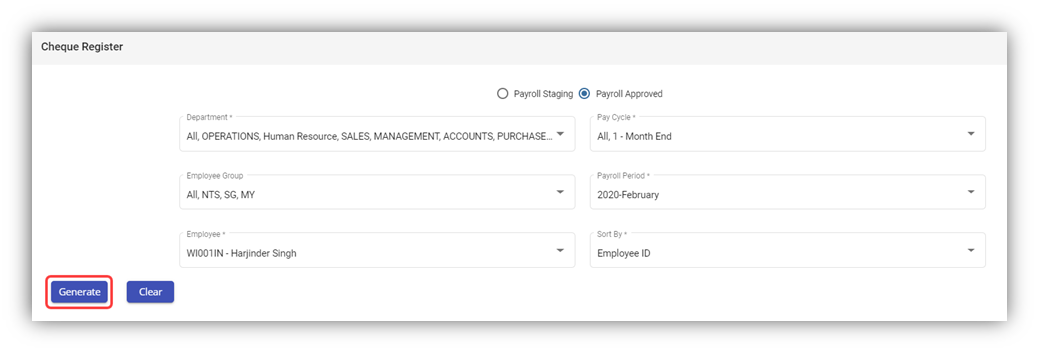**Note:** You can generate the cheque register report for any employee in both the Payroll in Staging and Payroll Approved stages.
2. Select any one from **Payroll in Staging** or **Payroll Approved**.
3. In the **Department** box, select a department from a drop-down list.
**Note**: If you want to select all the departments in the list, select the checkbox of the **ALL**.
4. In the **Pay Cycle** box, select a pay cycle from a drop-down list.
**Note**: If you want to select all the pay cycles in the list, select the checkbox of the **ALL**.
5. In the **Employee Group** box, select an employee group from a drop-down list.
**Note**: If you want to select all the employee groups in the list, select the checkbox of the **ALL**.
6. In the **Payroll Period** box, select a payroll period from a drop-down list.
**Note**: If you want to select all the payroll periods in the list, select the checkbox of the **ALL**.
7. In the **Employee** box, select an employee from a drop-down list.
**Note**: If you want to select all the employees in the list, select the checkbox of the **ALL**.
8. If you want to generate the payroll journal summary report based on the **Employee ID** or **Employee Name**, select the respective option in the **Sort By** box.
9. Click **Generate**. The cheque register report will be generated and downloaded as a PDF file. See below as an example.
[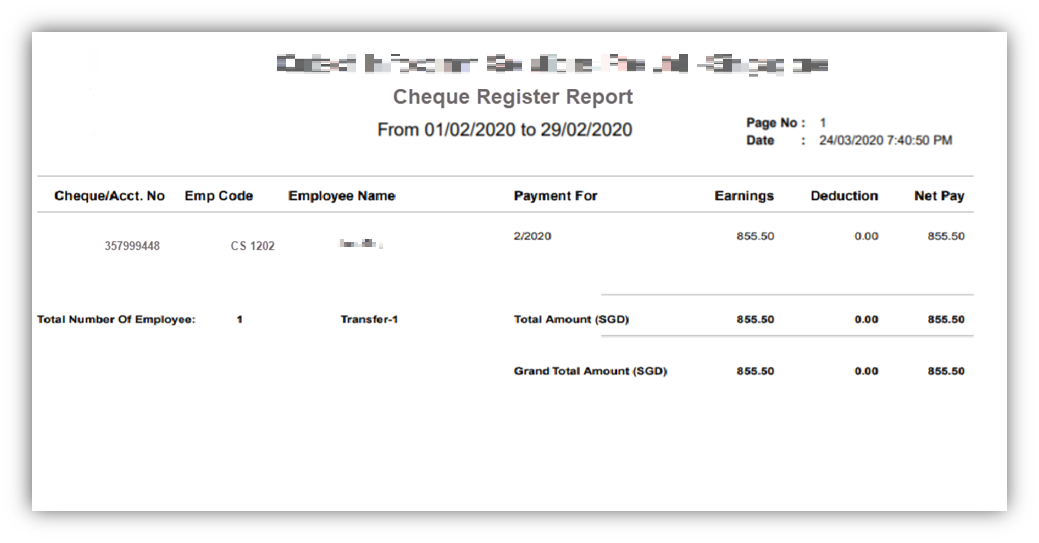](https://wiki.cuteinfocomm.com/uploads/images/gallery/2023-04/image-1682096933162.png)
### Donation Report
The **Donation Report** tab in the **Reports** submenu used to generate and view the donation report of the employee. The donation report shows the amount deducted for donation given by the employee.
To generate and view the donation report,
1. Click **Donation Report** in the **Reports,** the **Donation Report** page opens.
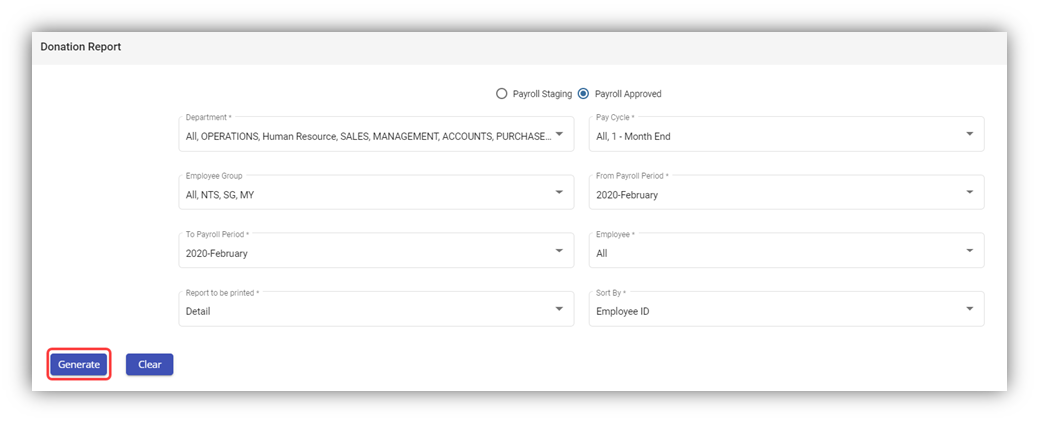**Note:** You can generate the donation report for any employee in both the Payroll in Staging and Payroll Approved stages.
2. Select any one from **Payroll in Staging** or **Payroll Approved**.
3. In the **Department** box, select a department from a drop-down list.
**Note**: If you want to select all the departments in the list, select the checkbox of the **ALL**.
4. In the **Pay Cycle** box, select a pay cycle from a drop-down list.
**Note**: If you want to select all the pay cycles in the list, select the checkbox of the **ALL**.
5. In the **Employee Group** box, select an employee group from a drop-down list.
**Note**: If you want to select all the employee groups in the list, select the checkbox of the **ALL**.
6. In the **From** **Payroll Period** and **To Payroll Period** boxes, select the from and to payroll periods.
7. In the **Employee** box, select an employee from a drop-down list.
**Note**: If you want to select all the employees in the list, select the checkbox of the **ALL**.
8. In the **Report to be print** box, if you want to generate the donation report as a summary report, select **Summary** or if you want to generate the donation report as a detail report, select **Detail**.
9. If you want to generate the payroll journal summary report based on the **Employee ID** or **Employee Name**, select the respective option in the **Sort By** box.
10. Click **Generate**. The donation report will be generated and downloaded as a PDF file. See below as an example. [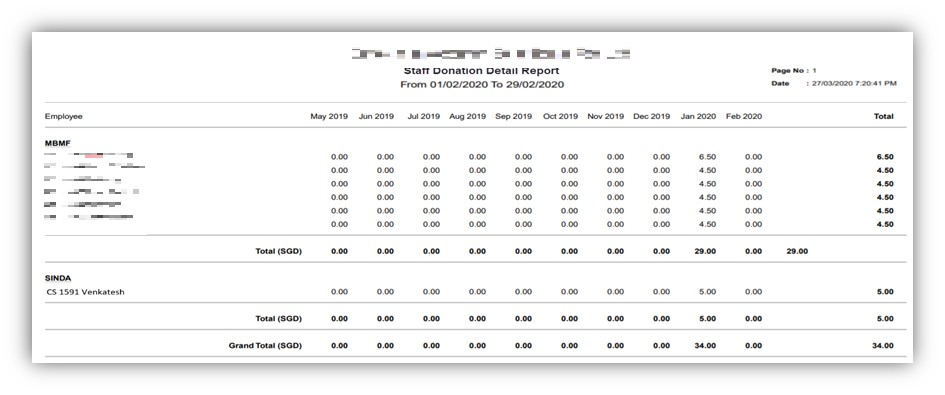](https://wiki.cuteinfocomm.com/uploads/images/gallery/2023-04/image-1682096982419.png)
### Liabilities Report
The **Liabilities** tab in the **Reports** submenu used to generate and view the liabilities report of the employee. The liabilities report shows the details Skill Development Levy (SDL) paid by the company for the particular employee. To generate and view the liabilities report,
1. Click **Liabilities** in the **Reports,** the **Liabilities** page opens.
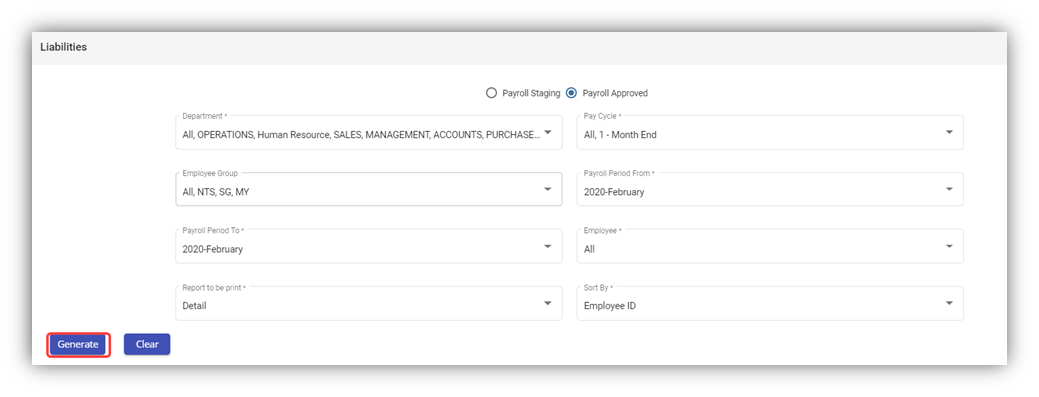**Note:** You can generate the liabilities report for any employee in both the Payroll in Staging and Payroll Approved stages.
2. Select any one from **Payroll in Staging** or **Payroll Approved**.
3. In the **Department** box, select a department from a drop-down list.
**Note**: If you want to select all the departments in the list, select the checkbox of the **ALL**.
4. In the **Pay Cycle** box, select a pay cycle from a drop-down list.
**Note**: If you want to select all the pay cycles in the list, select the checkbox of the **ALL**.
5. In the **Employee Group** box, select an employee group from a drop-down list.
**Note**: If you want to select all the employee groups in the list, select the checkbox of the **ALL**.
6. In the **Payroll Period** **From** and **Payroll Period** **To** boxes, select the from and to payroll periods.
7. In the **Employee** box, select an employee from a drop-down list.
**Note**: If you want to select all the employees in the list, select the checkbox of the **ALL**.
8. In the **Report to be print** box, if you want to generate the donation report as a summary report, select **Summary** or if you want to generate the donation report as a detail report, select **Detail**.
9. If you want to generate the payroll journal summary report based on the **Employee ID** or **Employee Name**, select the respective option in the **Sort By** box.
10. Click Generate. The liabilities report will be generated and downloaded as a PDF file. See below as an example.
[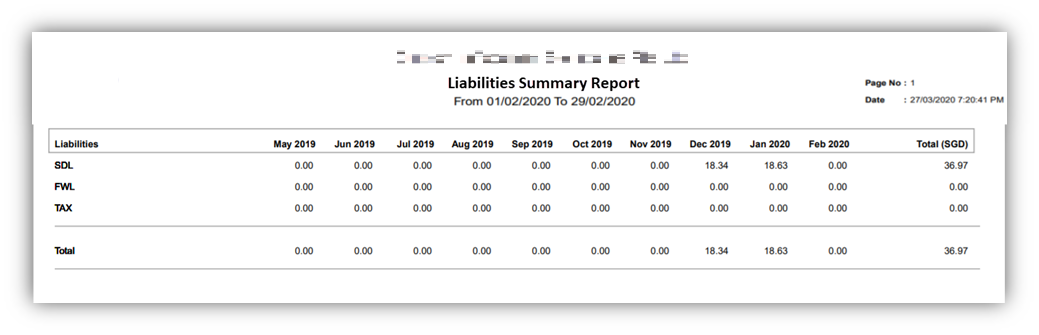](https://wiki.cuteinfocomm.com/uploads/images/gallery/2023-04/image-1682100861122.png)
### Yearly Payroll Report
The Yearly Payroll Report tab in the Reports submenu used to generate and view the yearly payroll report of the employee. The yearly payroll report shows the details of the yearly payroll paid by the company for the particular employee.
To generate and view the yearly payroll report,
1. Click **Yearly Payroll Report** in the **Reports,** the **Yearly Payroll Report** page opens.
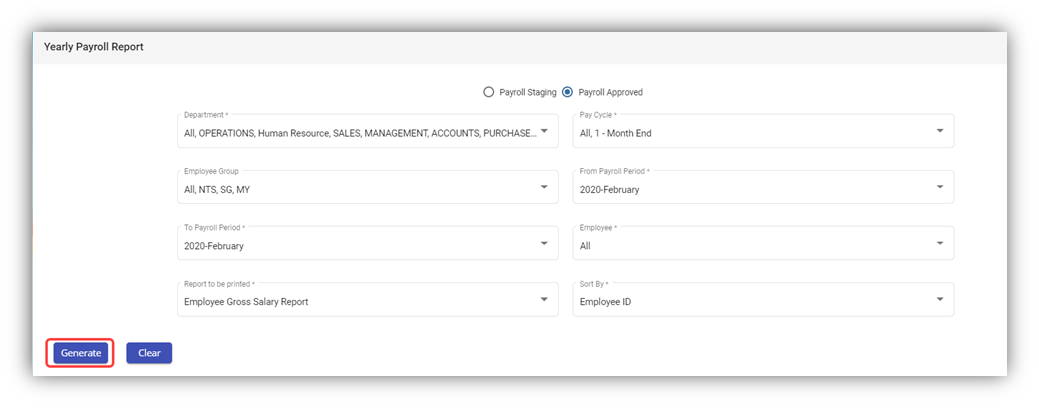**Note:** You can generate the yearly payroll report for any employee in both the Payroll in Staging and Payroll Approved stages.
2. Select any one from **Payroll in Staging** or **Payroll Approved**.
3. In the **Department** box, select a department from a drop-down list.
**Note**: If you want to select all the departments in the list, select the checkbox of the **ALL**.
4. In the **Pay Cycle** box, select a pay cycle from a drop-down list.
**Note**: If you want to select all the pay cycles in the list, select the checkbox of the **ALL**.
5. In the **Employee Group** box, select an employee group from a drop-down list.
**Note**: If you want to select all the employee groups in the list, select the checkbox of the **ALL**.
6. In the **From** **Payroll Period** and **To** **Payroll Period** boxes, select the from and to payroll periods.
7. In the **Employee** box, select an employee from a drop-down list.
**Note**: If you want to select all the employees in the list, select the checkbox of the **ALL**.
8. In the **Report to be print** box, if you want to generate the donation report as a summary report, select **Summary** or if you want to generate the donation report as a detail report, select **Detail**.
9. If you want to generate the payroll journal summary report based on the **Employee ID** or **Employee Name**, select the respective option in the **Sort By** box.
10. Click **Generate**. The yearly payroll report will be generated and downloaded as a PDF file. See below as an example.
[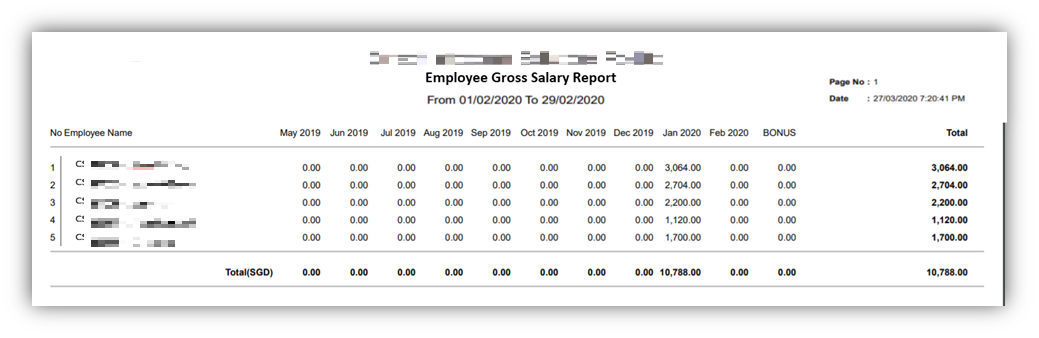](https://wiki.cuteinfocomm.com/uploads/images/gallery/2023-04/image-1682101066508.png)
### Generate CPF Submission File
The **Generate CPF Submission File** tab in the **Reports** submenu used to generate and view the CPF submission file of the employee. The CPF submission file shows the details of the CPF submission file for the particular employee.
To generate and view the CPF submission file,
1. Click **Generate CPF Submission File** in the **Reports,** the **Generate CPF Submission File** page opens.
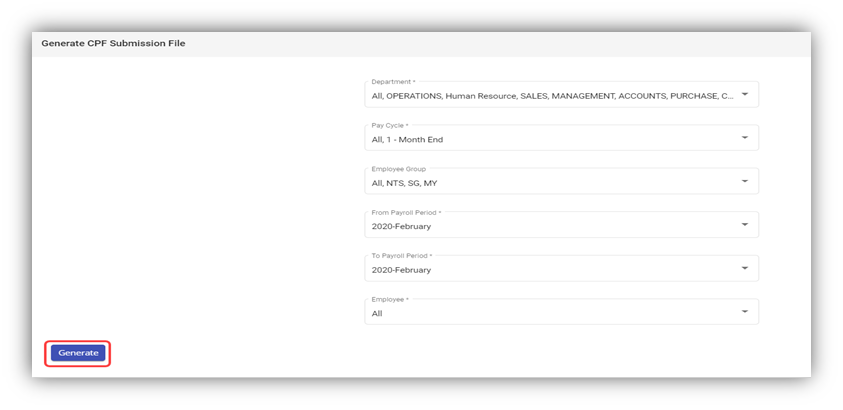
2. In the **Department** box, select a department from a drop-down list.
**Note**: If you want to select all the departments in the list, select the checkbox of the **ALL**.
3. In the **Pay Cycle** box, select a pay cycle from a drop-down list.
**Note**: If you want to select all the pay cycles in the list, select the checkbox of the **ALL**.
4. In the **Employee Group** box, select an employee group from a drop-down list.
**Note**: If you want to select all the employee groups in the list, select the checkbox of the **ALL**.
5. In the **From** **Payroll Period** and **To** **Payroll Period** boxes, select the from and to payroll periods.
6. In the **Employee** box, select an employee from a drop-down list.
**Note**: If you want to select all the employees in the list, select the checkbox of the **ALL**.
7. Click **Generate**. The CPF submission file will be generated and downloaded as a .txt file. User can use it to upload to CPF portal.
Instead of going to the cpf portal, you can submit the data directly from cuteOffice.
[https://www.youtube.com/watch?v=HSdC2jrwPU4](https://www.youtube.com/watch?v=HSdC2jrwPU4 "Submit to CPF board from cuteOffice") Use the video to see how easily we can submit to CPF Board directly.
Upon generating the file, click on Submit CPF buttton.
[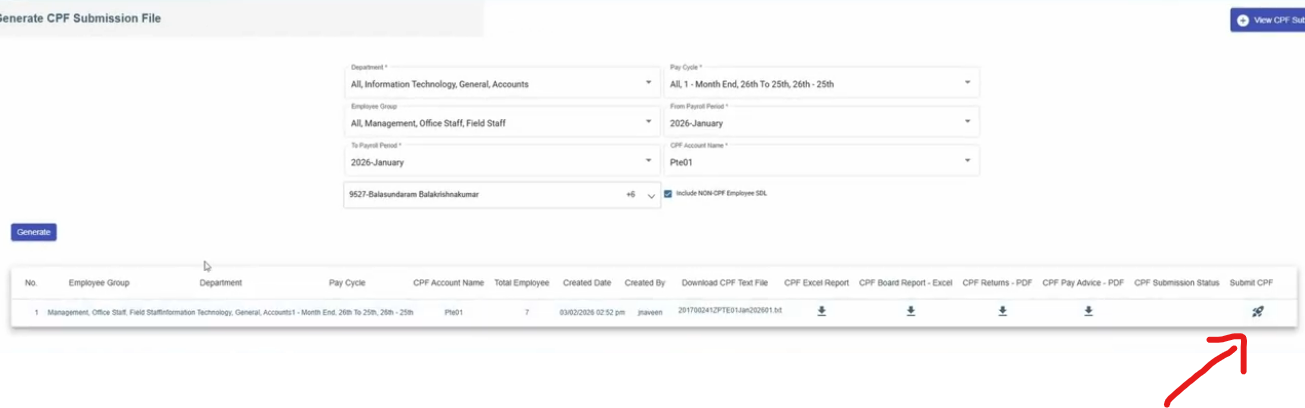](https://wiki.cuteinfocomm.com/uploads/images/gallery/2026-02/image-1772108520303.png)
Select the second tab.
[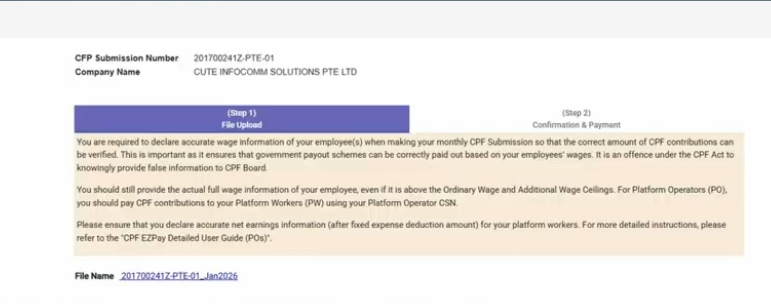](https://wiki.cuteinfocomm.com/uploads/images/gallery/2026-02/image-1772108575715.png)
Select Direct Debit and choose Date of payment. Click acceptance for declaration and click proceed to submit.
[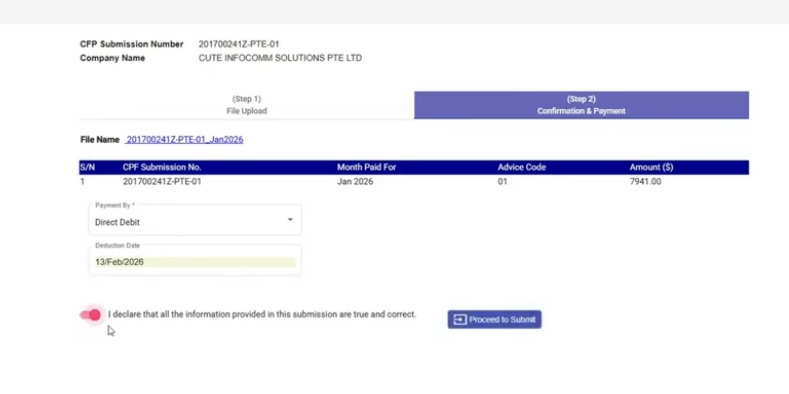](https://wiki.cuteinfocomm.com/uploads/images/gallery/2026-02/image-1772108589443.png)
Login with Singpass.
[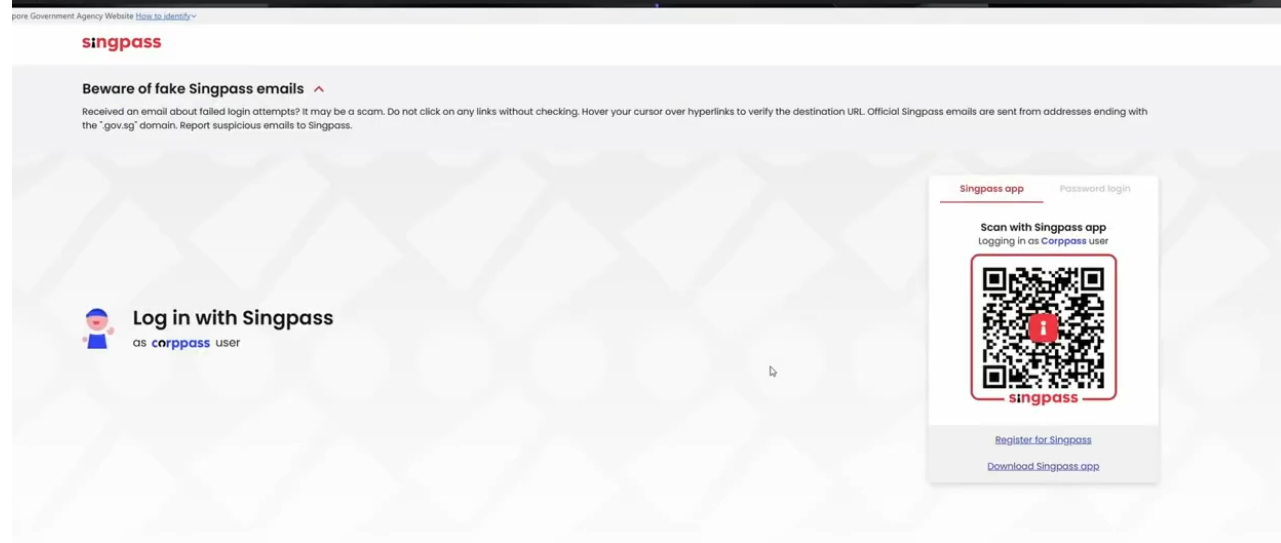](https://wiki.cuteinfocomm.com/uploads/images/gallery/2026-02/image-1772108619936.png)
Allow to submit from cuteOffice for your behalf.
[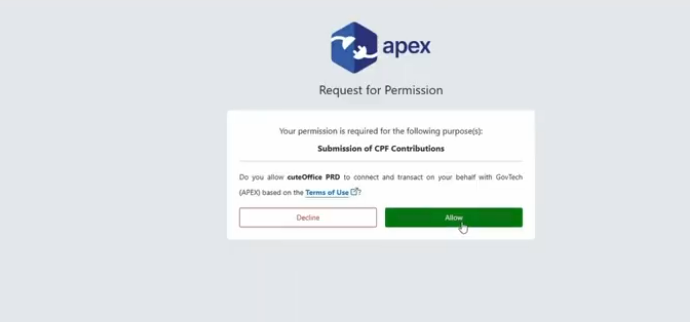](https://wiki.cuteinfocomm.com/uploads/images/gallery/2026-02/image-1772108641558.png)
Status will be displayed, Click Ok.
[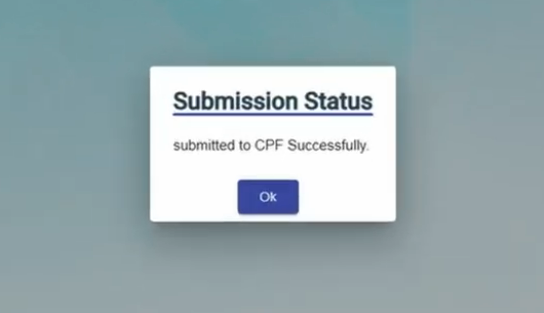](https://wiki.cuteinfocomm.com/uploads/images/gallery/2026-02/image-1772108677416.png)
The submission status is shown for reference. You will receive the email confirmation from CPF board.
[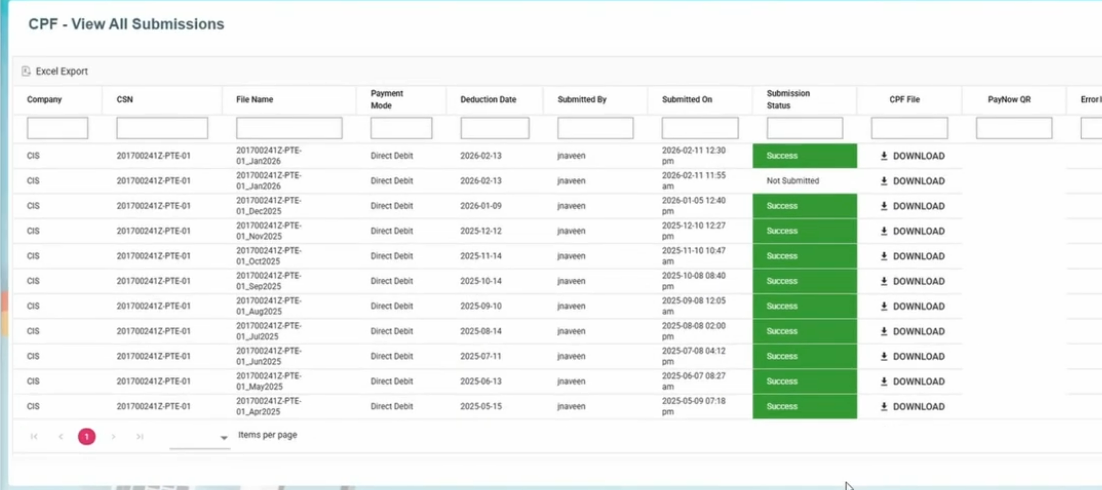](https://wiki.cuteinfocomm.com/uploads/images/gallery/2026-02/image-1772108692281.png)
Alternatively, if you want to submit in the CPF portal, below option can be chosen.
[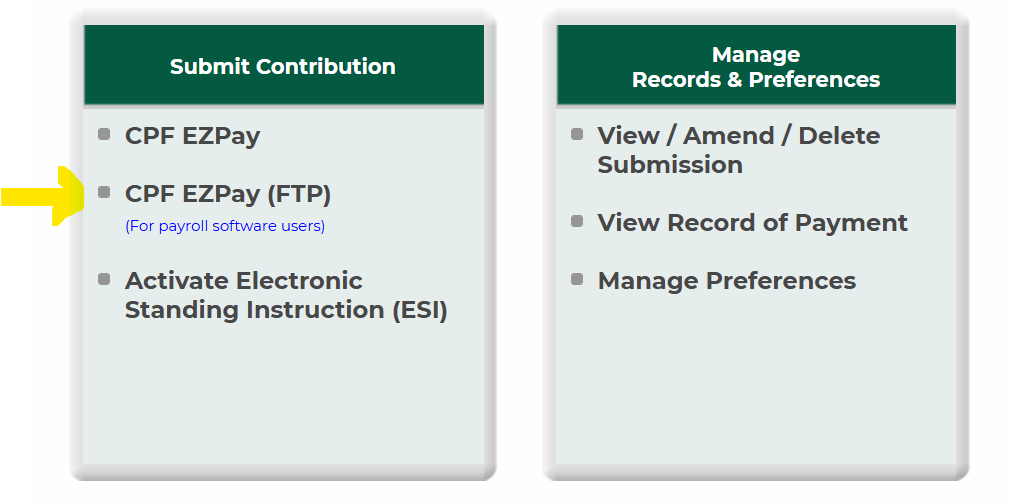](https://wiki.cuteinfocomm.com/uploads/images/gallery/2024-11/image-1730519612176.png)
[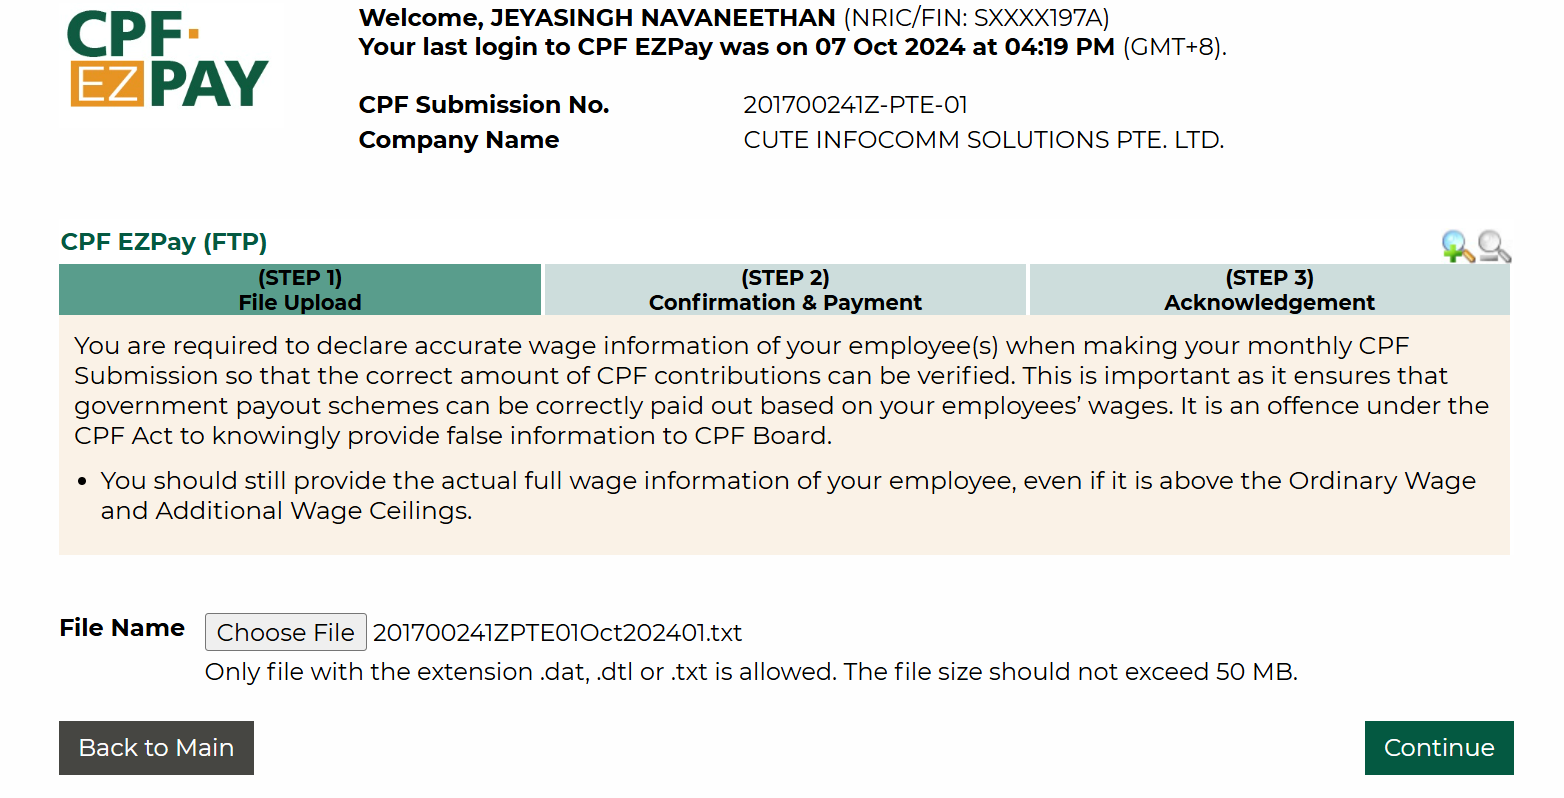](https://wiki.cuteinfocomm.com/uploads/images/gallery/2024-11/image-1730519646966.png)
In the next screen, select the date of deduction and select method of payment and proceed.
[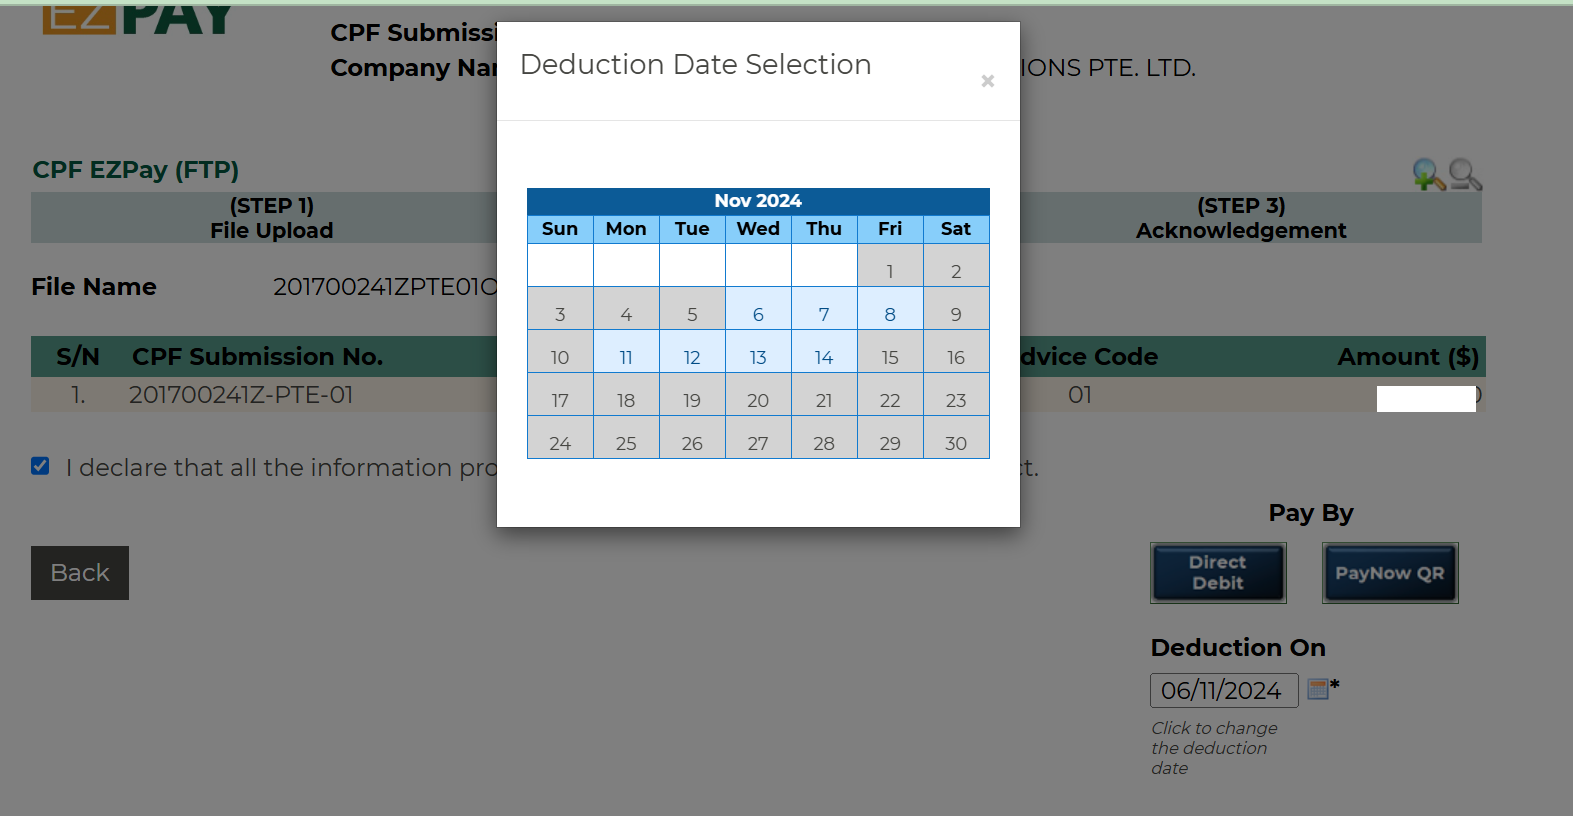](https://wiki.cuteinfocomm.com/uploads/images/gallery/2024-11/image-1730519784321.png)
[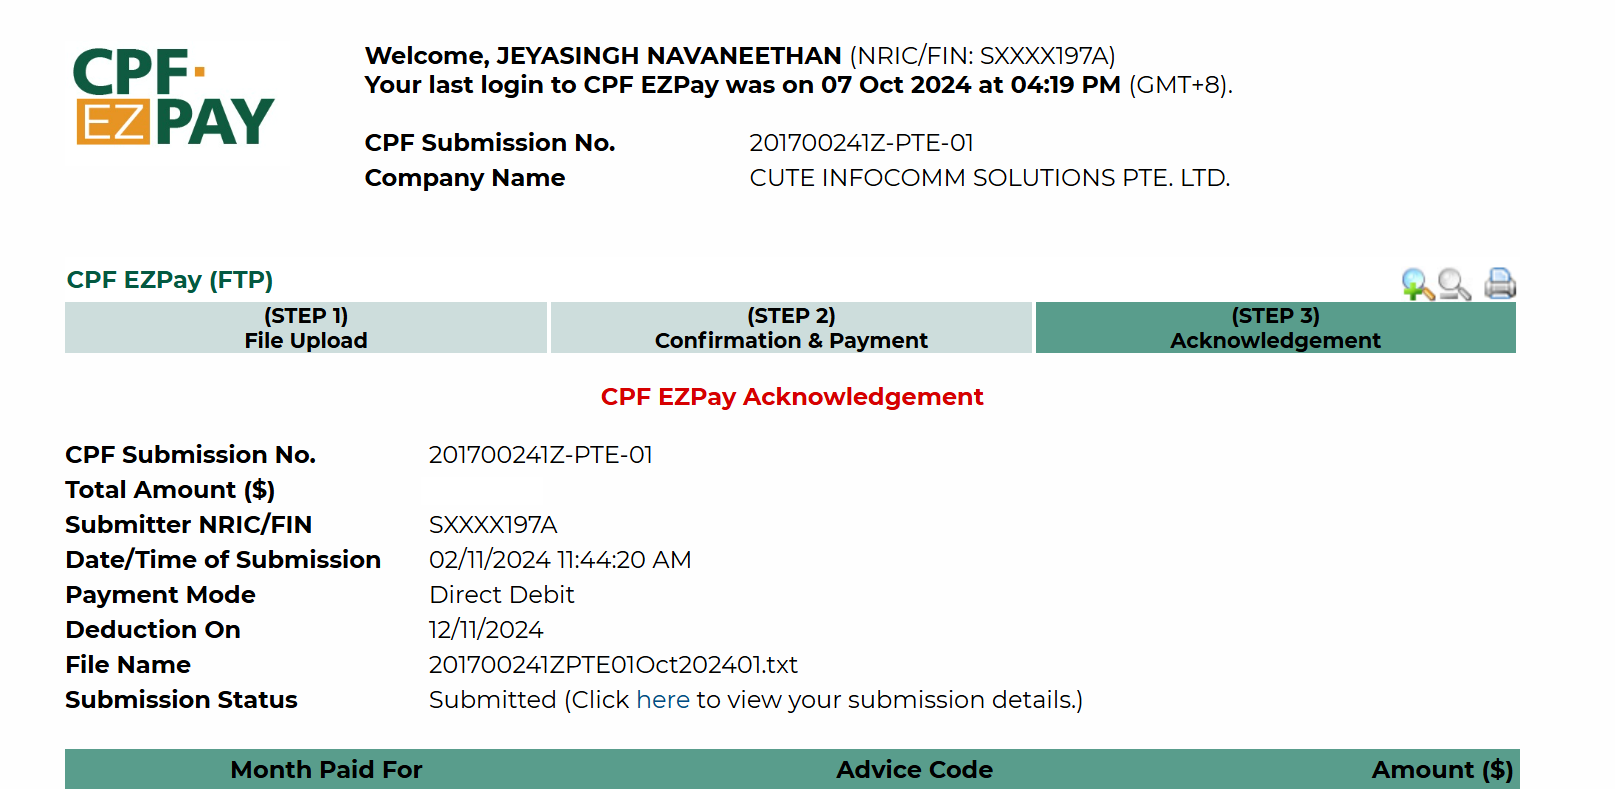](https://wiki.cuteinfocomm.com/uploads/images/gallery/2024-11/image-1730519850252.png)
Download and keep the acknowledge slip if required.
cuteOffice has "One Stop Payroll" to submit OED , CPF and AIS submission.
The permission for AIS submission is "payroll - > aisSubmission"
### Generate General Interbank Recurring Order (GIRO) Bank File
The **Generate GIRO Bank File** tab in the **Reports** submenu used to generate and view the GIRO bank file of the employee. The GIRO is used to make monthly payment to the billing organization (BO) from your account directly. The GIRO bank file shows the details of the GIRO.
Check the youTube video link for same details
[https://youtu.be/kz7YNF3nR\_M](https://youtu.be/kz7YNF3nR_M "How to upload a bank Giro file from DBS")
To generate and view the GIRO bank file,
1. Click **Generate GIRO Bank File** in the **Reports,** the **Generate GIRO Bank File** page opens.
[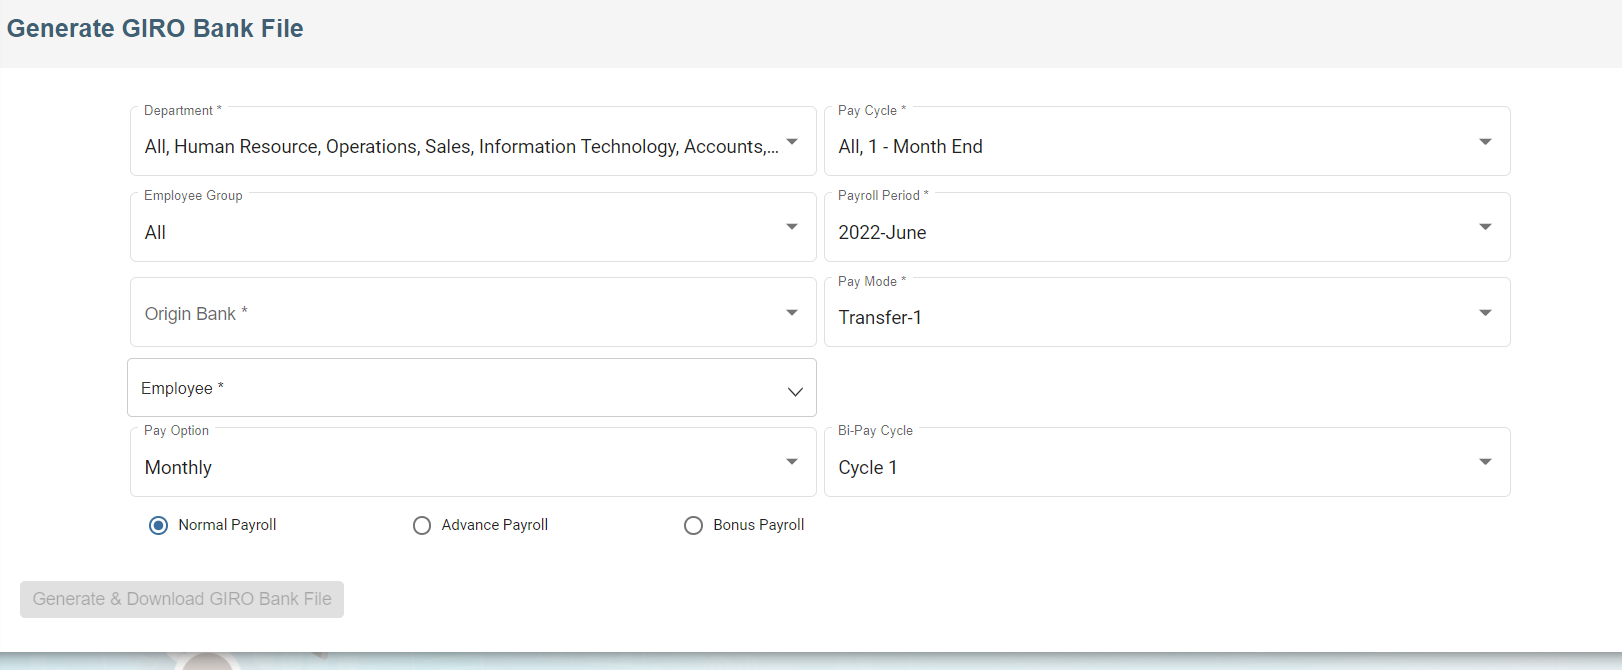](https://wiki.cuteinfocomm.com/uploads/images/gallery/2022-07/image-1657407137538.png)
2. In the **Department** box, select a department from a drop-down list.
**Note**: If you want to select all the departments in the list, select the checkbox of the **ALL**.
3. In the **Pay Cycle** box, select a pay cycle from a drop-down list.
**Note**: If you want to select all the pay cycles in the list, select the checkbox of the **ALL**.
4. In the **Employee Group** box, select an employee group from a drop-down list.
**Note**: If you want to select all the employee groups in the list, select the checkbox of the **ALL**.
5. In the **Payroll Period** box, select the payroll period.
6. In the **Origin Bank** box, select the origin bank from the drop-down list.
7. In the **Employee** box, select an employee from a drop-down list.
**Note**: If you want to select all the employees in the list, select the checkbox of the **ALL**.
8. Click **Generate**. The generate GIRO bank file will be generated and downloaded as a .txt file. User can upload to bank portal.
**Note:** For DBS bank, when uploading GIRO bank file, kindly ensure you have selected the correct format in IDEAL as “New Interbank Giro Format” in DBS file upload portal.
- - - - - Upload the GIRO bank file
- Choose Payment Type as Payroll
- Select Payroll - New Inter Bank GIRO
- Approval Option
- Amend Payment date
- Choose either confidential file or Test File
- Click confirm upload
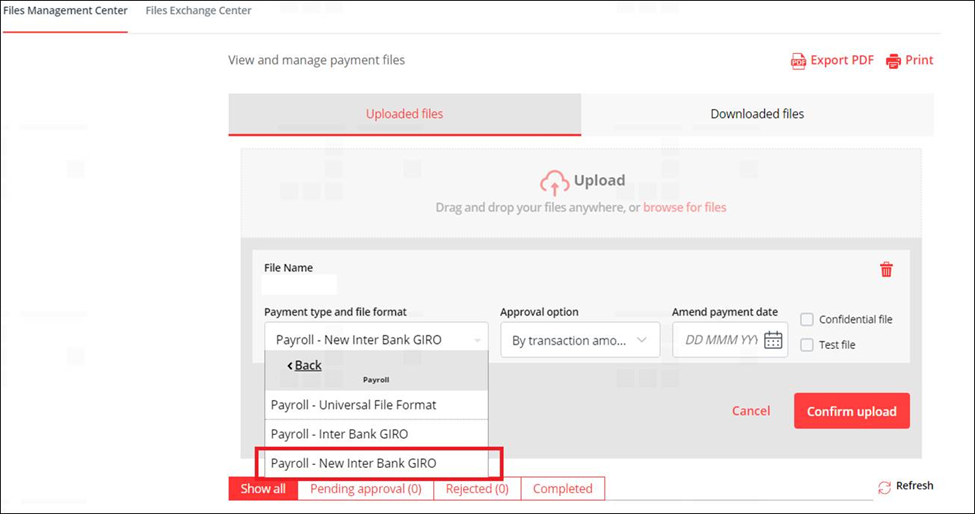
#### **Giro Bank file submission in OCBC Portal**
##### Generate GIRO Bank file
- Click **GIRO Bank** in the **Reports,** the **Generate GIRO Bank File** page opens.
- In the clearing method field, choose either FAST or GIRO method.
- If you choose FAST, the value date change to the date of generating GIRO bank file.
- Click **Generate & Download GIRO Bank File**. The GIRO bank file generated and downloaded as a .txt file. User can upload to OCBC portal.

##### File Submission in OCBC Portal
- Click Transaction on the header
- Select Upload file
- Click file format
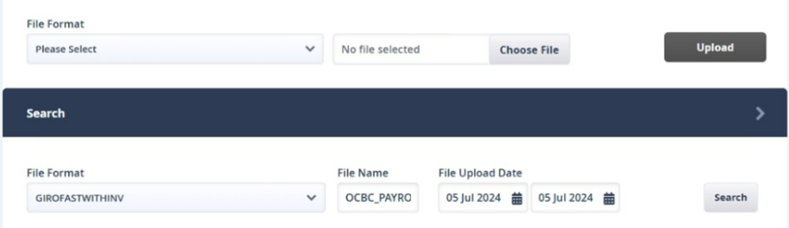
- Select file format as **GIROFASTWITHINV**
[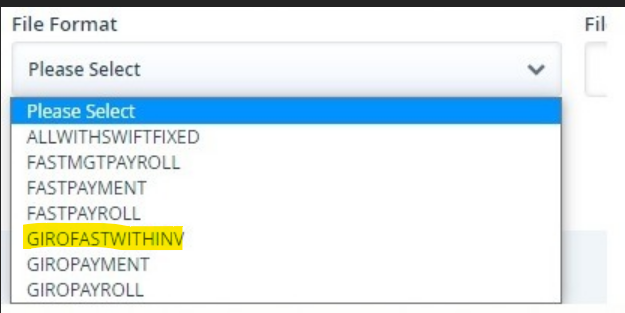](https://wiki.cuteinfocomm.com/uploads/images/gallery/2024-07/image-1720423810782.png)
- Click upload and check the file upload status for uploaded successfully.
Note: If the upload file failed, check the error message and rectify it.
#### **Giro Bank file submission in UOB Portal**
##### File Submission in UOB Portal
- Click “Pay & Transfer”
- Select Upload bulk file
- Proceed to click on “Upload New Bulk Files”
- Click “file type”
- Select “Fast/GIRO Payroll (Employee)” as the file type
- Upload GIRO bank text file generated via payroll's GIRO Bank
- Click submit and check the file upload status for uploaded successfully.
### Generate GIRO Report
CuteOffice payroll allows user to view two GIRO reports before posting GIRO file to the bank: GIRO payment checklist, and GIRO payment summary report.
To generate above reports,
1. Click **GIRO Report** in the **Reports,** the **GIRO report** page opens,[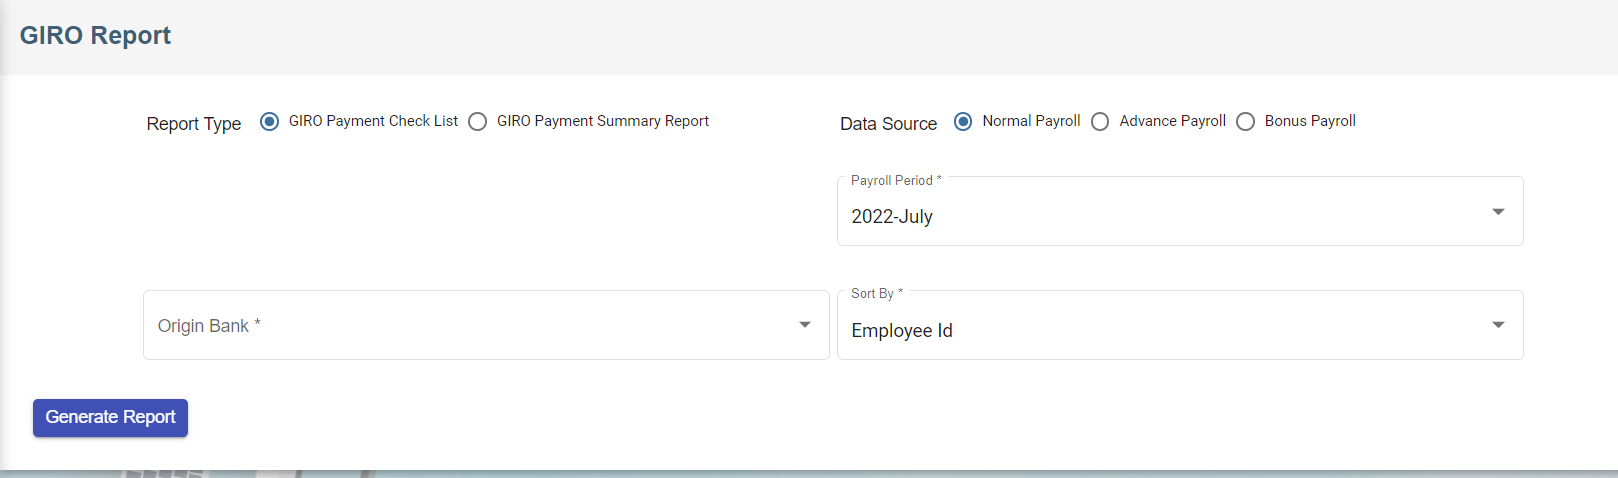](https://wiki.cuteinfocomm.com/uploads/images/gallery/2022-07/image-1657568315695.png)
2. Select report type
3. Select data source
4. Select origin bank
5. Select payroll period
6. Select sort by method
7. Click[ (](https://wiki.cuteinfocomm.com/uploads/images/gallery/2022-07/image-1657568677505.png)Generate Report Icon), the selected report type will be downloaded.
### AIS Submission
The cuteOffice payroll system allows the generation of IR8A file and allow employers to submit the data to IRAS.
Before submitting to IRAS, please make sure your company is registered for Auto inclusion scheme, otherwise the submission cant be done. ([https://www.iras.gov.sg/taxes/individual-income-tax/employers/auto-inclusion-scheme-(ais)-for-employment-income/join-the-auto-inclusion-scheme-(ais)-for-employment-income](https://www.iras.gov.sg/taxes/individual-income-tax/employers/auto-inclusion-scheme-(ais)-for-employment-income/join-the-auto-inclusion-scheme-(ais)-for-employment-income "IRAS Auto inclusion"))
[https://www.youtube.com/watch?v=iTrSy1L8INI](https://www.youtube.com/watch?v=iTrSy1L8INI "Submit to IRAS AIS from cuteOffice") Follow the video for a quick guide on the submission.
Enable the permission "payroll - > aisSubmission" against the role to view the menu.
The below menu will be available
[ ](https://wiki.cuteinfocomm.com/uploads/images/gallery/2026-01/image-1769500323228.png)
[](https://wiki.cuteinfocomm.com/uploads/images/gallery/2026-01/image-1769500347610.png)
To generate IR8A
1. Click **Generate AIS - IRAS** in the **Others,** the **Generate AIS Submissions File** page opens.
[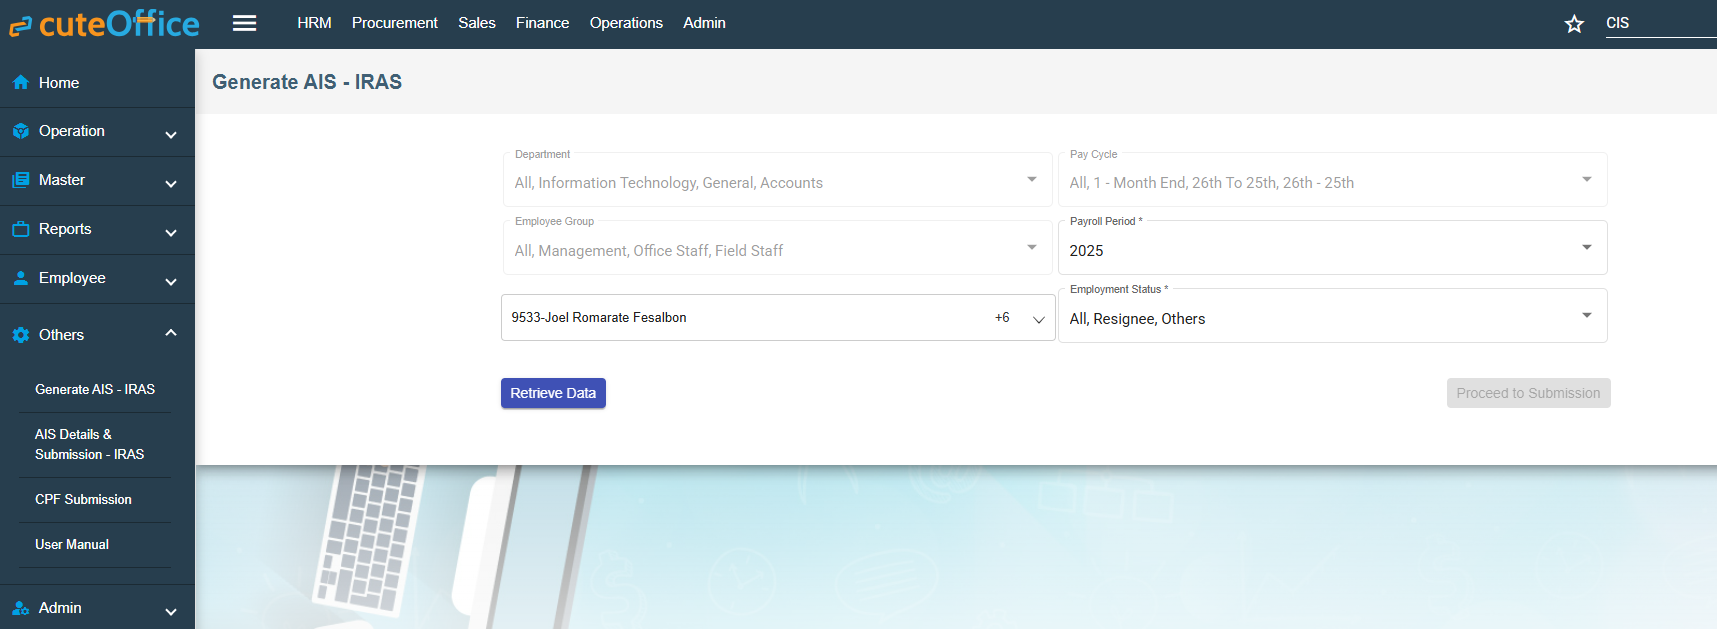](https://wiki.cuteinfocomm.com/uploads/images/gallery/2026-01/image-1769500492701.png)
2. All the **Department** and **Pay Cycle** will be selected.
3. In the **Employee** box, select all employees from a drop-down list. The list is populated based on the last dropdown of employment status.
4. Click Retrieve Data. The below table will be shown. [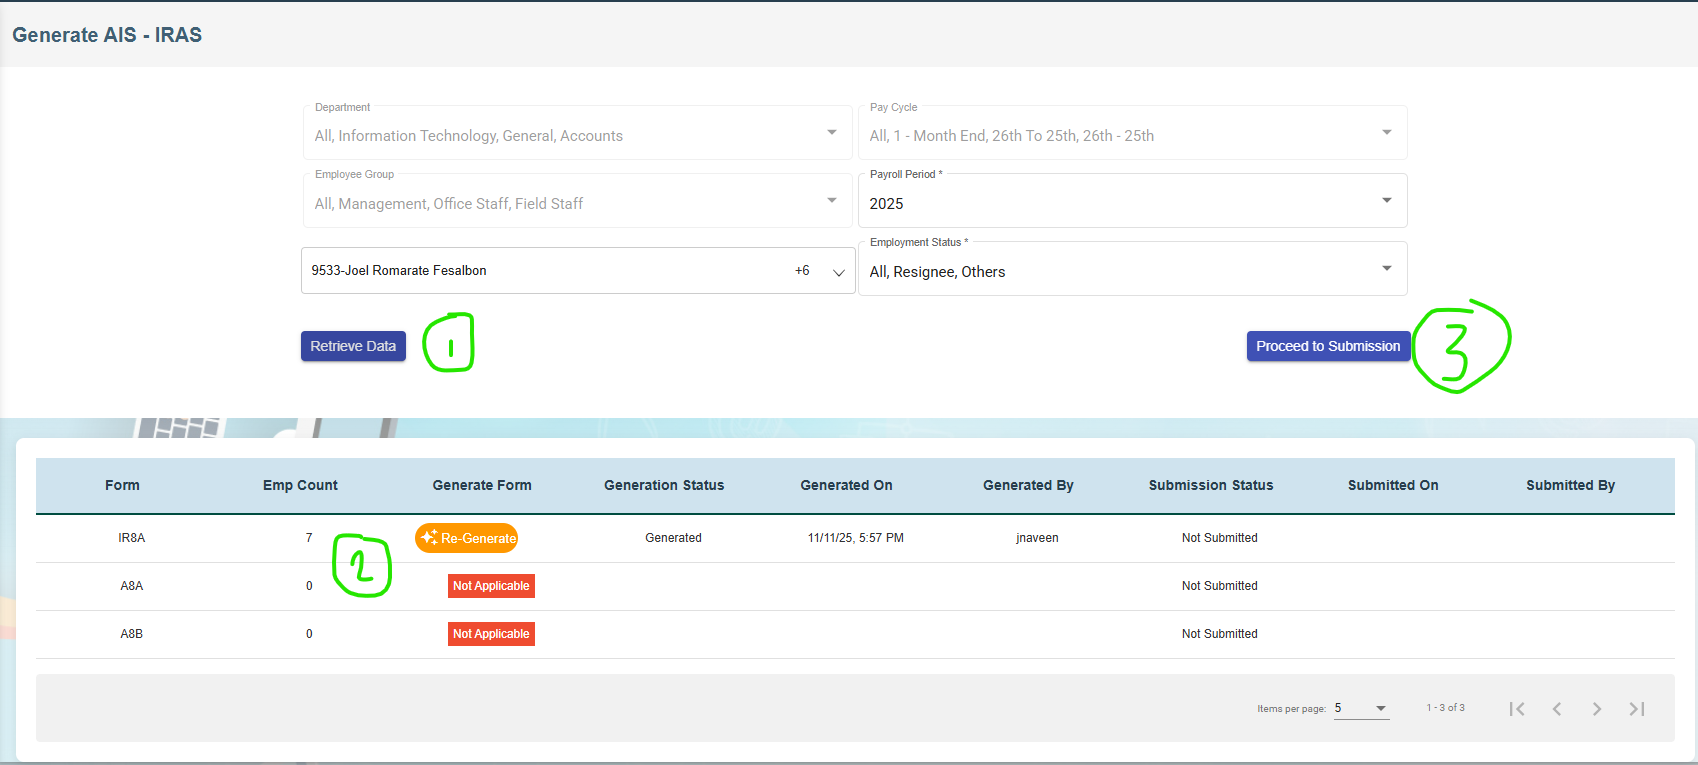](https://wiki.cuteinfocomm.com/uploads/images/gallery/2026-01/image-1769500742435.png)
5. In the **Form Type** IA8A click Generate. If already generated earlier, click Regenerate.
6. Click **Generate**. The success message will appear.
7. Click **Proceed to Submission** button.
[](https://wiki.cuteinfocomm.com/uploads/images/gallery/2026-01/image-1769500907859.png)
11. Click [ (Print ](https://wiki.cuteinfocomm.com/uploads/images/gallery/2022-07/image-1657255085239.png)icon) to generate the IR8A form for each employee to download if required.
12. Before approving, the data can be edited if required.
13. [Select all employees and click Approve submission button. ](https://wiki.cuteinfocomm.com/uploads/images/gallery/2026-01/image-1769501135579.png)
14. Once approved the summary will be shown and ready for submission.
15. [](https://wiki.cuteinfocomm.com/uploads/images/gallery/2026-01/image-1769502368420.png)
16. Click Proceed to IRAS - AIS Submission and authenticate using CorpPass.
17. [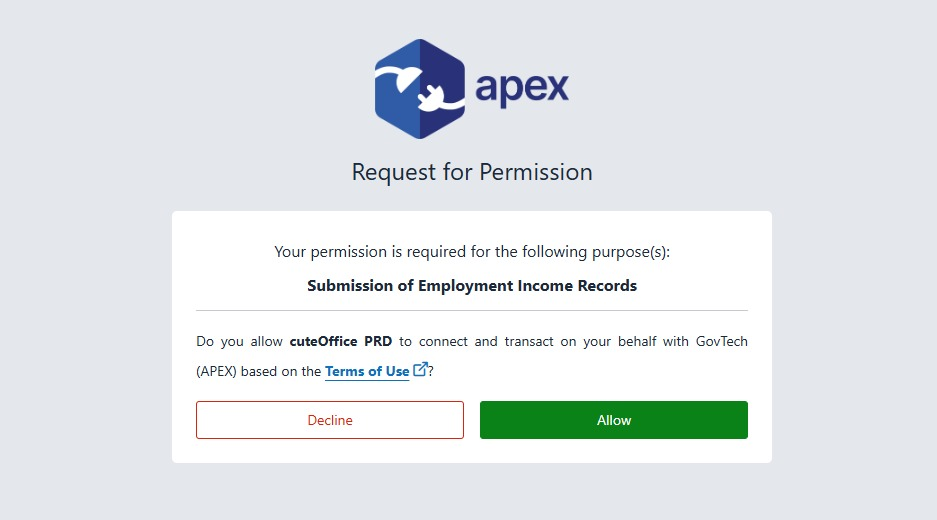](https://wiki.cuteinfocomm.com/uploads/images/gallery/2026-01/image-1769502431001.png)
18. Click Allow to confirm to submit the data to IRAS.
19. The data successfully submitted message will appear.
20. The submitted data can always be checked and verified. [](https://wiki.cuteinfocomm.com/uploads/images/gallery/2026-01/image-1769502607159.png)
Note: If there is a prompt asking to enter Authorised person, ask the administrator to enter the authorised person details in Company->Payroll tab.
[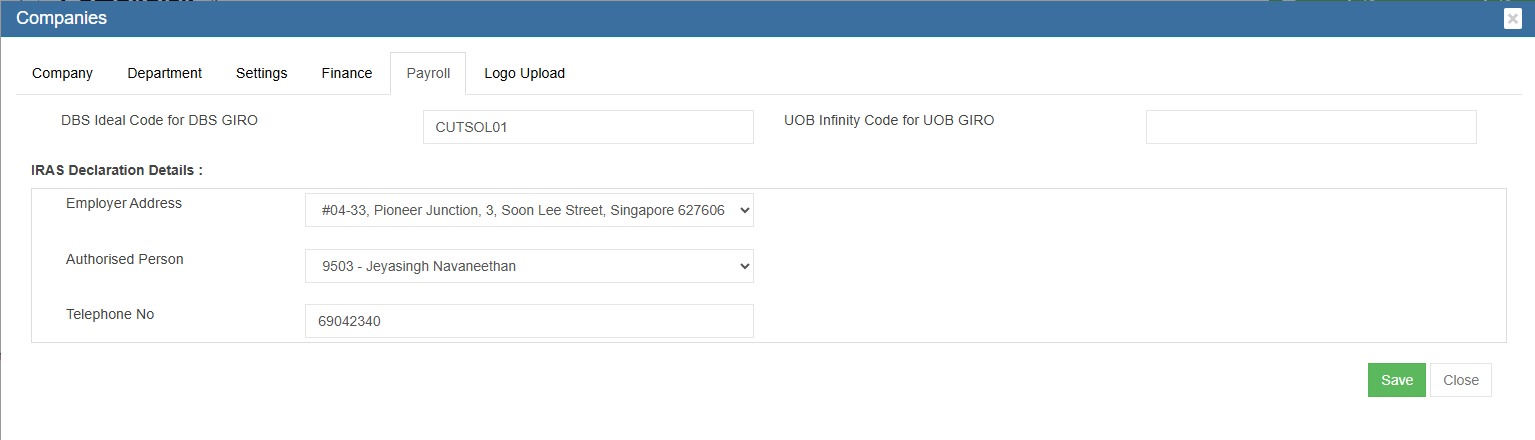](https://wiki.cuteinfocomm.com/uploads/images/gallery/2026-02/image-1770378469101.jpeg)
Note : To import IRAS (manually maintained), enable global settings "enableIRASImport".
Any revision and amendment submission, the below document contains the steps to follow.
[quick-guide-on-making-ais-amendments-at-mytax-portal-(online-application).pdf](https://www.iras.gov.sg/media/docs/default-source/uploadedfiles/pdf/quick-guide-on-making-ais-amendments-at-mytax-portal-(online-application).pdf?sfvrsn=cbdfa153_14)
# Expense Claims
Employees shall submit expense claim forms along with the necessary supporting documents. The system allows expense claims to be saved and maintained as drafts for future completion. Claim can be verified and approved by the management, and the entire workflow is fully customized by client requirement.
#### New Claim
To add new expense claim, the below steps as to be followed.
1. Click Expense menu
2. Click Expense Claim [](https://wiki.cuteinfocomm.com/uploads/images/gallery/2026-05/image-1778741715500.png)
3. Click add button on the top right corner [ ](https://wiki.cuteinfocomm.com/uploads/images/gallery/2026-05/image-1778741821794.png)[](https://wiki.cuteinfocomm.com/uploads/images/gallery/2026-05/image-1778741974664.png)
4. Choose Company, Employee name, Currency, Date, Work Order (Project), Expense Code (integrated with Finance Claim code Master), Expenses details (open text), currency, Amount, GST Option and Attachment.
5. Click Add icon beside to attachment icon to add next line item.
6. Click Save as Draft
7. Click Submit [](https://wiki.cuteinfocomm.com/uploads/images/gallery/2026-05/image-1778742781910.png)
8. Add Assignee and Notify Users for Approval.
9. Click Confirm
10. Assignee can verify and approve/return/reject/cancel the record. [](https://wiki.cuteinfocomm.com/uploads/images/gallery/2026-05/image-1778753506950.png)
11. The status change from "New Claim" to "Approved" in the view all page. [](https://wiki.cuteinfocomm.com/uploads/images/gallery/2026-05/image-1778743111278.png)
12. Click "Post to Account" to post the record in Finance "Expense Claim Staging".
13. Navigate to Finance Module
14. Click Integration Staging
15. Click Expense Claim Staging
16. Click edit and save the record. [ ](https://wiki.cuteinfocomm.com/uploads/images/gallery/2026-05/image-1778744062347.png)
[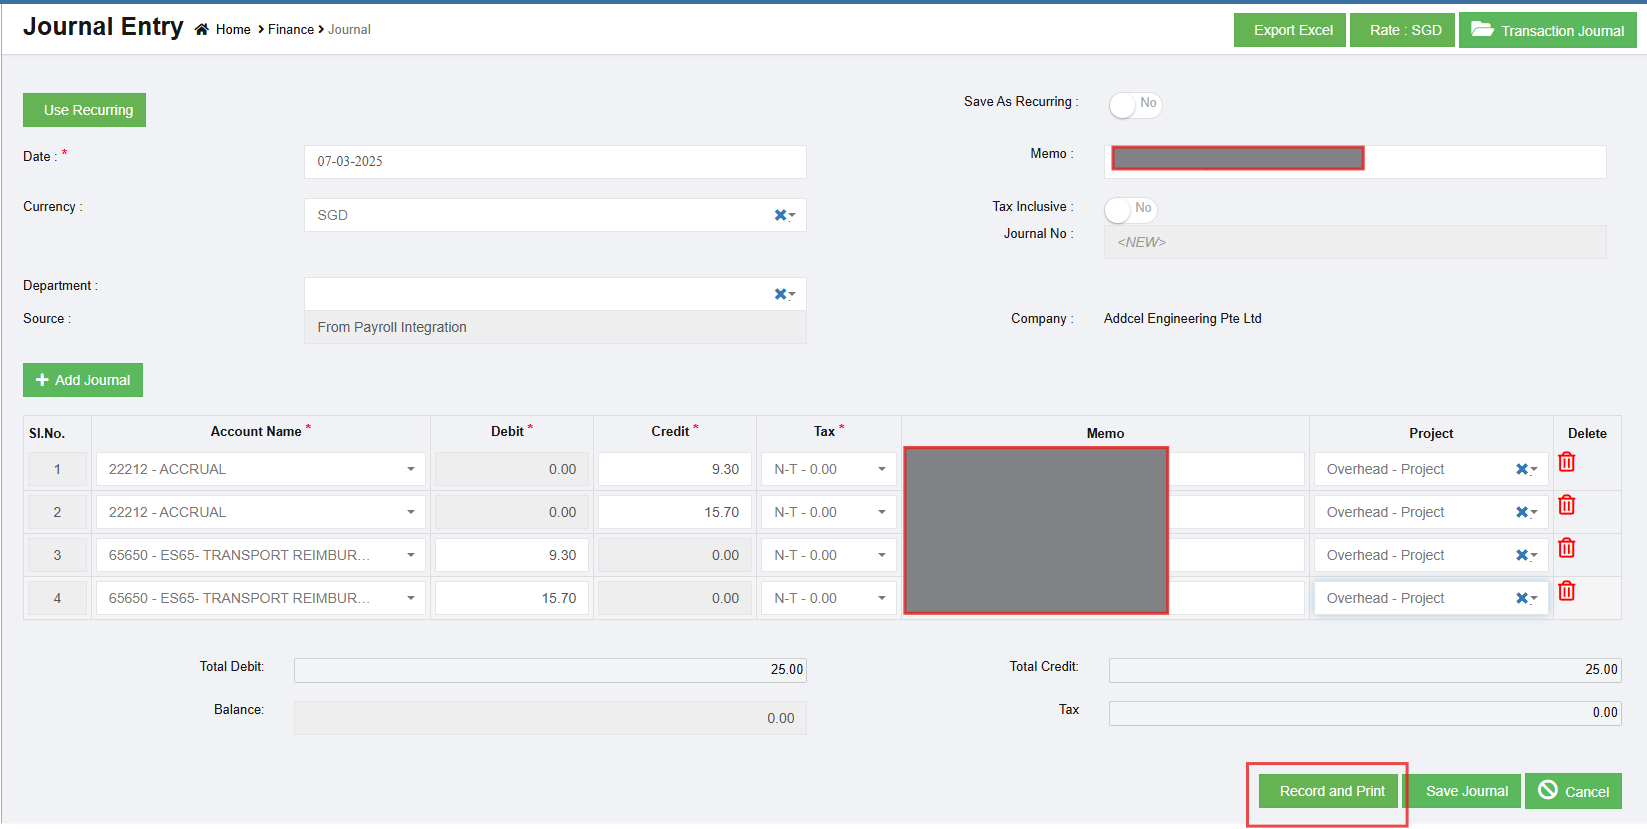](https://wiki.cuteinfocomm.com/uploads/images/gallery/2026-05/image-1778744157106.png)
# Procurement
Raise material request, send RFQ, generate PO, receive materials and manage inventory.
# New Page
# Purchase Module Overview
**CuteOffice** purchase module is designed to streamline the business process of purchasing starting from material request. When a material request(**MR**) is raised, cuteOffice system will check available stock of requested material: if there are available stock, system will recommend to issuance from store; if there is no available stock, system will recommend to purchase or petty cash option. The material request will be reviewed/approved, and requests for quotation (**RFQ**s) can be created and sent to suppliers from system. System will record and compare quotations from multiple suppliers and highlight lowest cost combination for user's reference. Purchase manager need to review and approve RFQ. Then relevant purchase order(s) (**PO**s) will be generated from system automatically, and user can email **PO** to suppliers from system or download **PO** to send to suppliers separately. User can record item receive entries and inspections against each **PO**.
The workflow of purchase module in cuteOffice is as below:
**Note: all master data must be entered/imported before the workflow starts-please refer to the Master Data section for more details.**
[](http://wiki.cuteinfocomm.com/uploads/images/gallery/2022-07/image-1657900453010.png)
[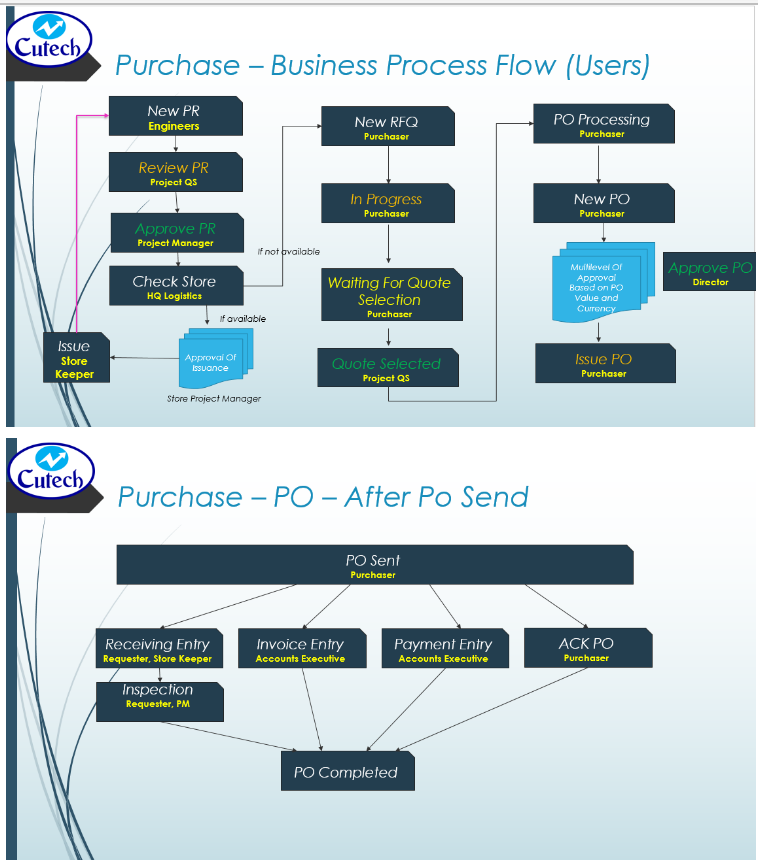](http://wiki.cuteinfocomm.com/uploads/images/gallery/2022-09/image-1663903389288.png)
# Material Request
Material Request (**MR**) is the starting point of purchasing. Users shall add material requests when any materials are required by projects (in cuteOffice, materials refers to **items**-item is part of master data in procurement as prerequisite).
Click **Material Request** submenu in **Purchase** tab, you can view all material requests,
[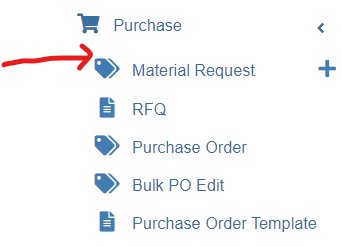](http://wiki.cuteinfocomm.com/uploads/images/gallery/2022-07/image-1658175247076.png)
### Add Material Request (MR)
To create a new material request (**MR**),
1\. Click [ ](http://wiki.cuteinfocomm.com/uploads/images/gallery/2022-07/image-1658175556486.png)(Add button) from the menu or click [](http://wiki.cuteinfocomm.com/uploads/images/gallery/2022-07/image-1658175505931.png) Add button in the material requests list
window. The below material request window opens,
[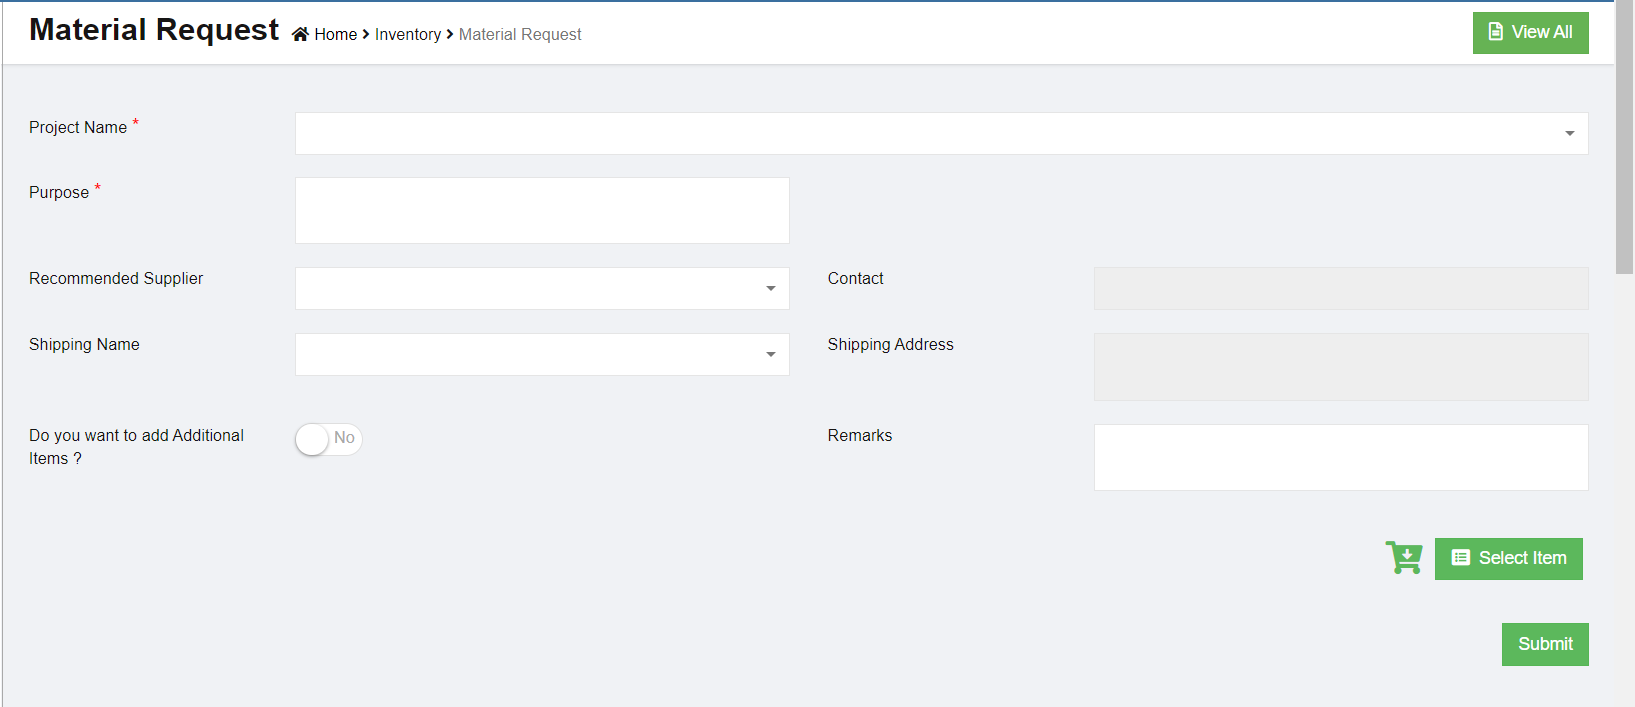](http://wiki.cuteinfocomm.com/uploads/images/gallery/2022-07/image-1658175483035.png)
2\. In **Project Name** field, select a project for which for this material request is for.
3\. In **Purpose** field, enter the purpose of the material request.
4\. In **Recommend Supplier** field, Select the supplier from the list if known. Please note only approved suppliers will be listed here. If the supplier is not known leave it empty and the purchase officer will decide which supplier to purchase the item.
5\. To add items in material request, you can use below either **a** or **b** option:
- **a**. Click [(](http://wiki.cuteinfocomm.com/uploads/images/gallery/2022-07/image-1658187649615.png)Select Item button) to add items to the request. The below dialog opens,[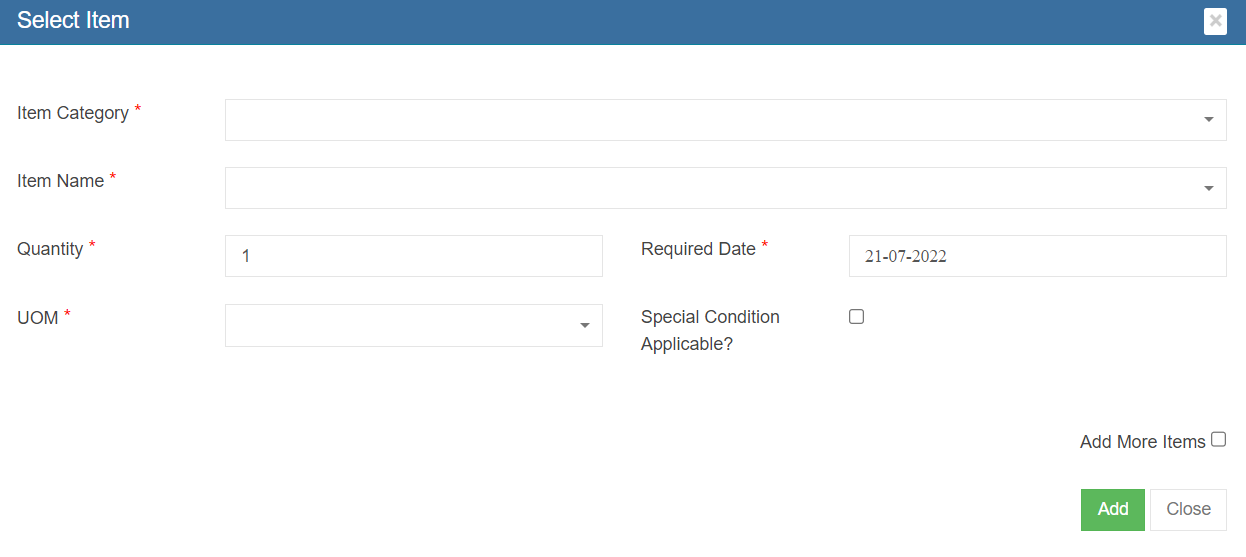](http://wiki.cuteinfocomm.com/uploads/images/gallery/2022-07/image-1658187725390.png)
Users need to fill up all mandatory fields, such as **Item Category, Item Name, Quantity, Required Date, unit of measurement (UOM).** If any special conditions to be specified, select and enter the details. If only one item is required in the material request, user can click [, the item will be added to the material request. If more items to be added and to keep the above select window open, user shall select “Add more items” check box before clicking ](http://wiki.cuteinfocomm.com/uploads/images/gallery/2022-07/image-1658188109612.png)[.More items can be added for the same request.](http://wiki.cuteinfocomm.com/uploads/images/gallery/2022-07/image-1658188109612.png)
- **b**. Or click[(Shopping Cart icon)](http://wiki.cuteinfocomm.com/uploads/images/gallery/2022-07/image-1658188365706.png), the below card view item list window opens,[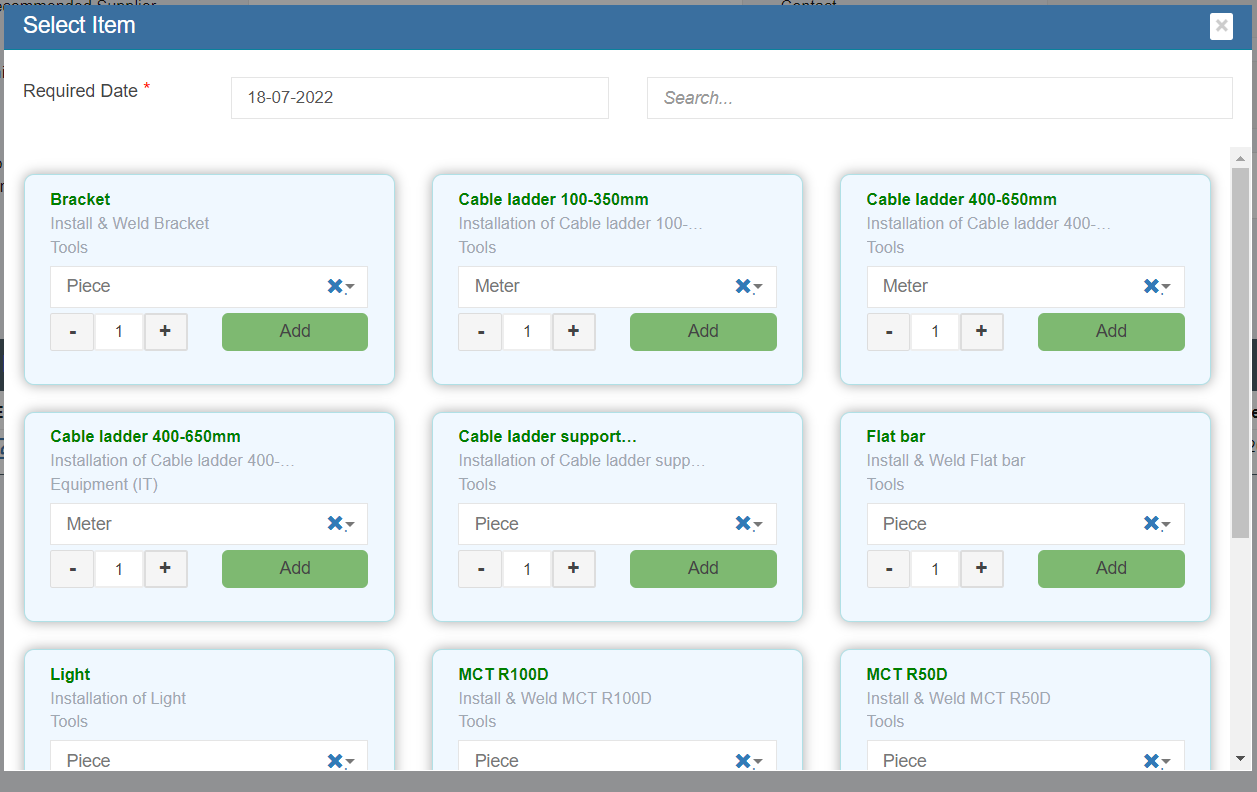](http://wiki.cuteinfocomm.com/uploads/images/gallery/2022-07/image-1658188491349.png)
user need to select Required Date, and user "Search" field to search for requested items, and in the item card, user can enter quantity and select UOM.
6\. After all required items are added to the material request, user can submit the request by clicking [(](http://wiki.cuteinfocomm.com/uploads/images/gallery/2022-07/image-1658189964589.png)Submit icon) in material request page.
[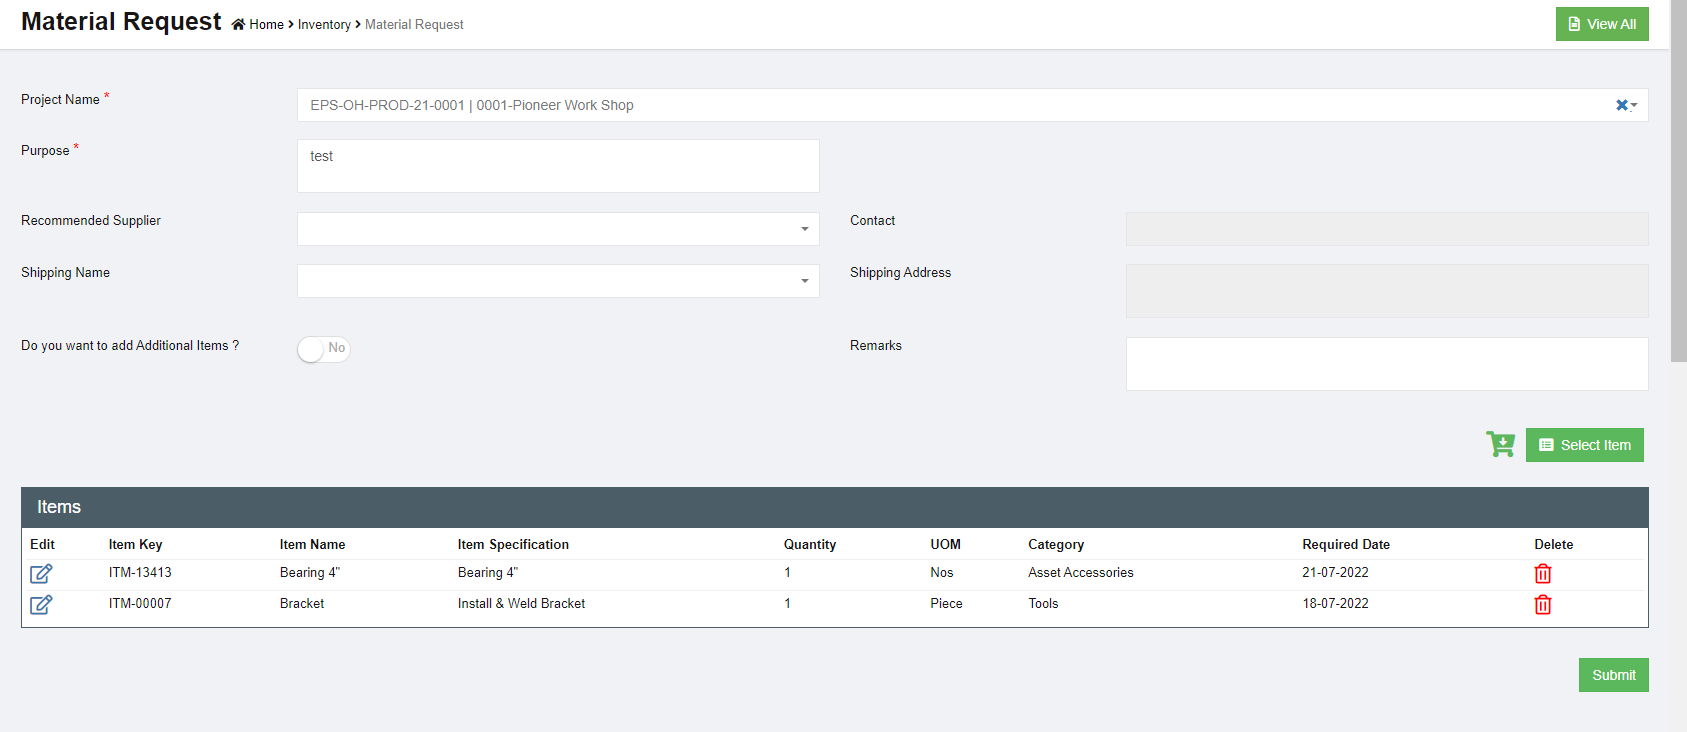](http://wiki.cuteinfocomm.com/uploads/images/gallery/2022-07/image-1658190177525.png)
7\. Once a new material request is submitted, the notification email will be trigger to selected users. You need to confirm right users are selected in below notification window and click **Confirm.** The material request submission is completed and page will redirect to the material request list page. And an unique key will be assigned to the material request and the status will change to **"New Material Request". Note:** The next step for a new material request is waiting for approval for issuance from store or purchase from the authorized suppliers.
[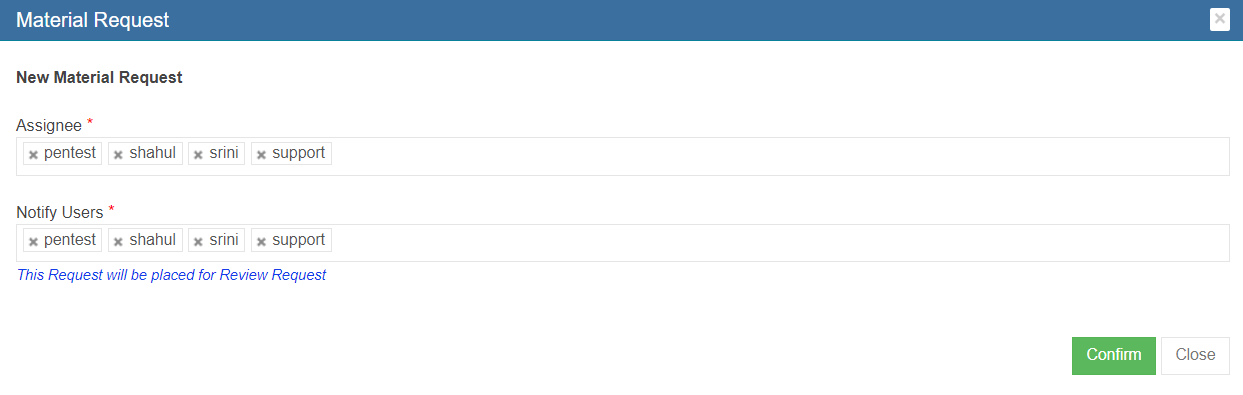](http://wiki.cuteinfocomm.com/uploads/images/gallery/2022-07/image-1658346604183.png)
#### Add additional items that are not registered in item master
If the requested item is not found in the item list in material request (means that the item is not registered in item master database), user can use this add additional item option.
[](http://wiki.cuteinfocomm.com/uploads/images/gallery/2022-07/image-1658346053143.png)
- Click and enable the above option and the below additional items option appears:
[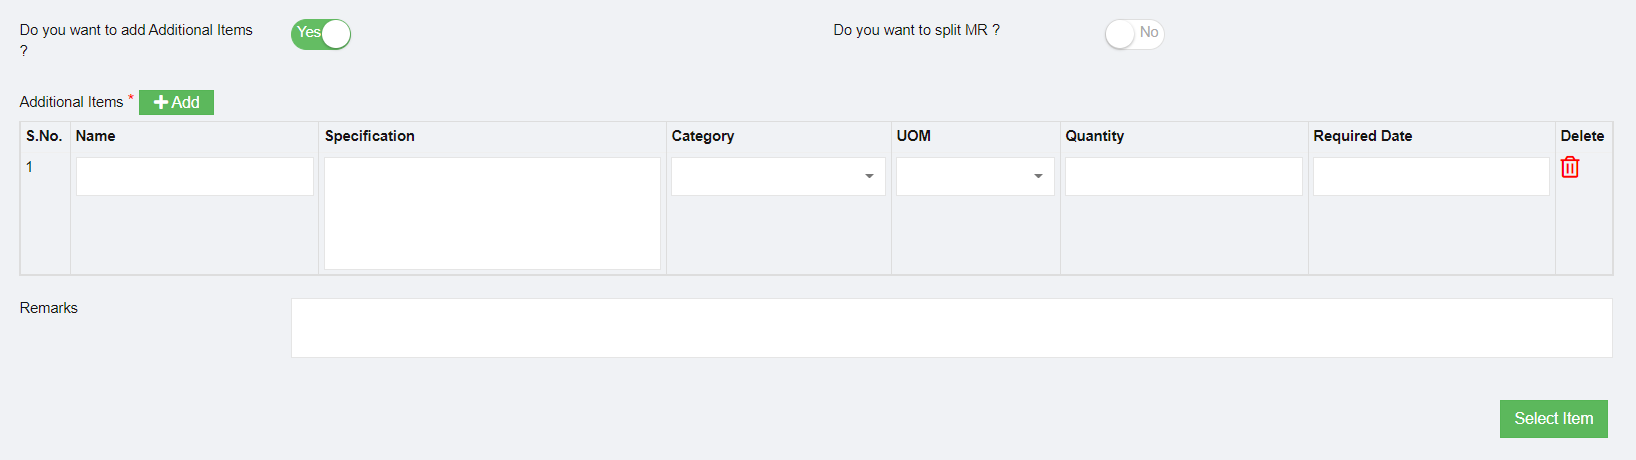](http://wiki.cuteinfocomm.com/uploads/images/gallery/2022-07/image-1658346018762.png)
- Enter item name and specification and other details as required.
- Add more items by clicking the[](http://wiki.cuteinfocomm.com/uploads/images/gallery/2022-07/image-1658345883099.png) (Add button)
- If you want to create two different MR for approved items (items from list) and new items (additional items added in material request) , please enable option to **Yes** in the "Do you want to split MR?" option.
- When submitted, the below message is shown and user need to confirm splitting MR by clicking ****Yes.****[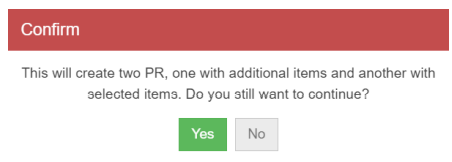](http://wiki.cuteinfocomm.com/uploads/images/gallery/2022-07/image-1658358967231.png)
- The below notification screen appears and click Confirm.
- Please note that there are two separate requests are created and one has a status of “New
Material Request” and the other is “Pending MR”. Note: The next step for a Pending MR is waiting for the purchase team to correct or map the additional items added using "Do you want to add additional item" option, as the additional info entered by user may or may not match the company item standard so review and approved is needed by purchase team. [](http://wiki.cuteinfocomm.com/uploads/images/gallery/2022-07/image-1658359073640.png)
#### Pending MR-Actions to Take
As mentioned above, for material requests that include additional items not from item master, the status will be **Pending MR.** For MR with Pending MR status, purchase team need to take below action to correct or map the additional items:
[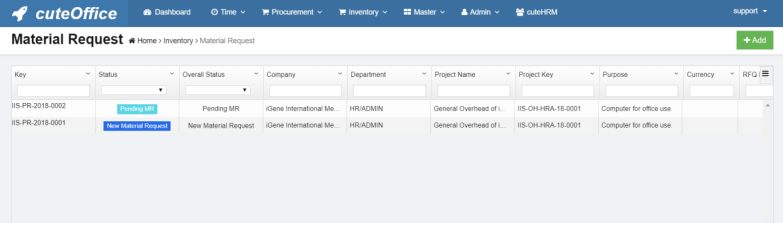](http://wiki.cuteinfocomm.com/uploads/images/gallery/2022-07/image-1658530837663.png)
1\. Click the material key of the Pending MR status. The material request detail page will open and Additional Item Details table is shown in purple color.
[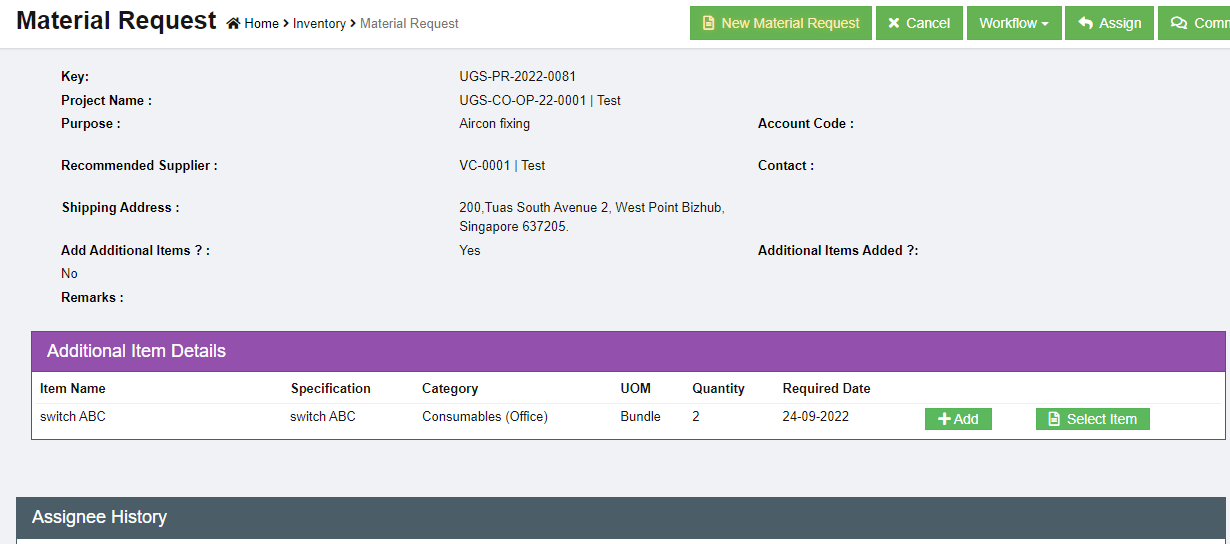](http://wiki.cuteinfocomm.com/uploads/images/gallery/2022-09/image-1663733015022.png)
2\. There are two options for each item: [(](http://wiki.cuteinfocomm.com/uploads/images/gallery/2022-07/image-1658531052566.png)Add as New Item) or [(](http://wiki.cuteinfocomm.com/uploads/images/gallery/2022-07/image-1658531085097.png)Select to match from exiting item).
**Option 1 Add as New Item**
If we know that additional item requested is not existing in the item master database and we will need to use this add option to create a new item in the database.
- Clicking **[](http://wiki.cuteinfocomm.com/uploads/images/gallery/2022-07/image-1658531052566.png)**Add icon, system will launch the add item dialog as below:
[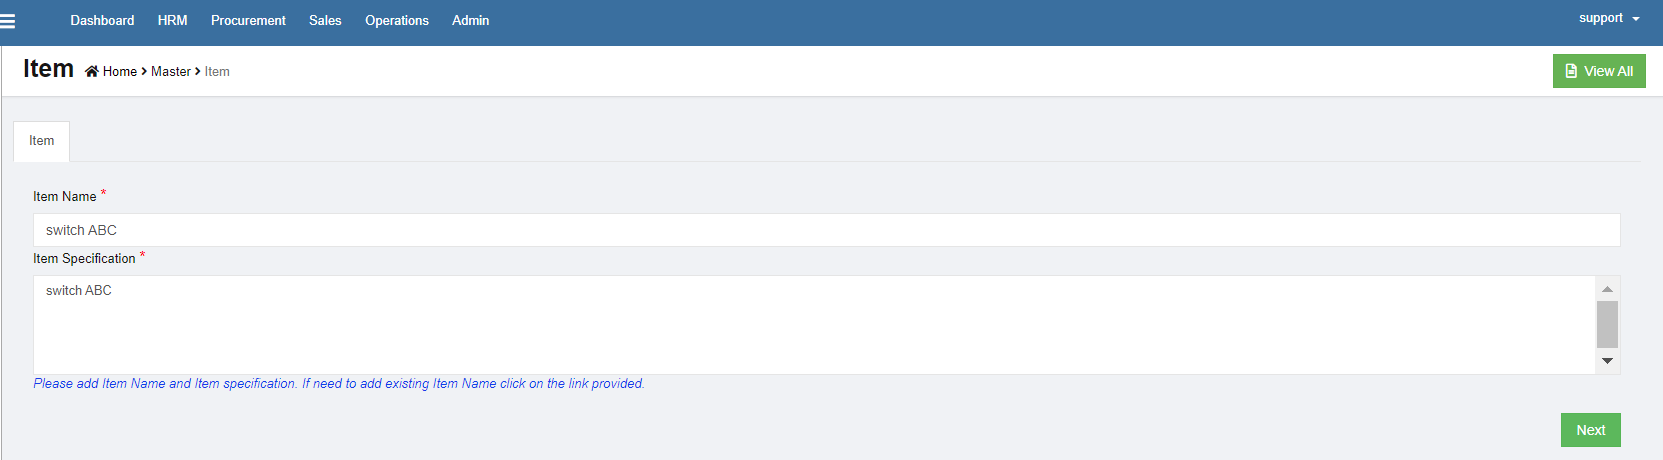](http://wiki.cuteinfocomm.com/uploads/images/gallery/2022-09/image-1663733075291.png)
- Click Next. The add item details window opens, see below:
[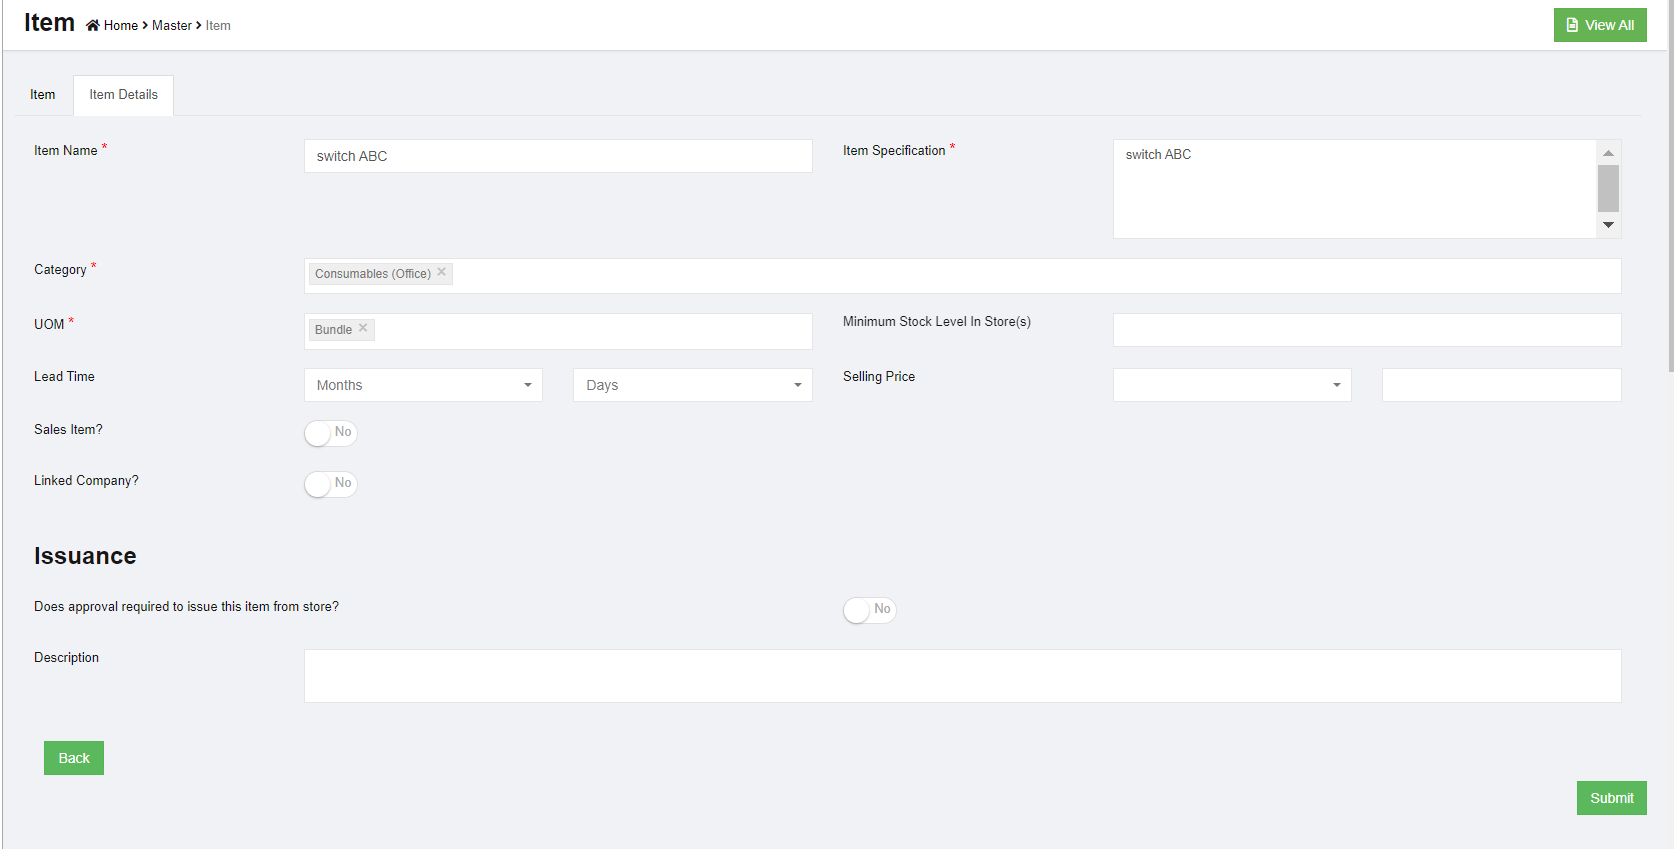](http://wiki.cuteinfocomm.com/uploads/images/gallery/2022-09/image-1663733250735.png)
- Check and enter the correct item details, then click **Submit**. A new item is created and saved in item master database. [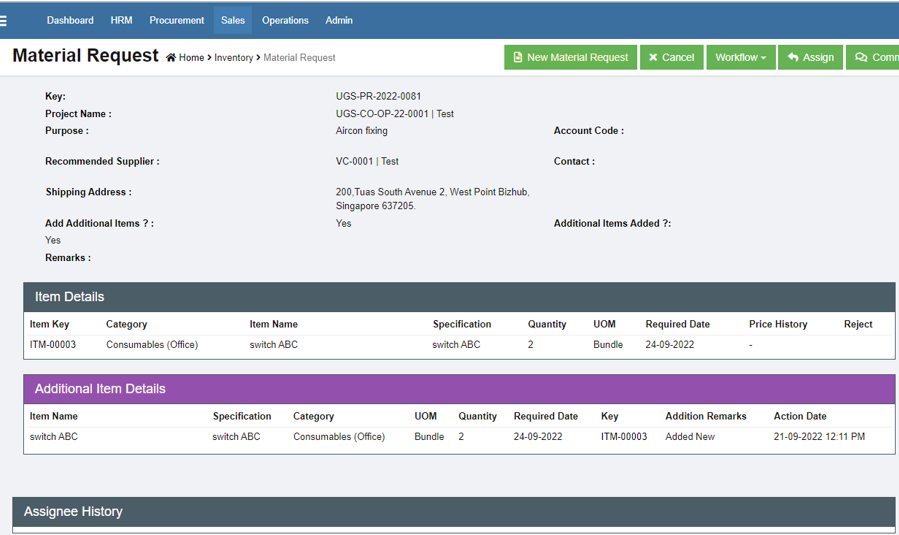](http://wiki.cuteinfocomm.com/uploads/images/gallery/2022-09/image-1663734312869.png)
**Option 2 Select Item (Existing)**
For items that can be mapped or categorized under existing item from item master, we can use this select item option to map this item to existing item category.
- Click[(Select Item icon), the below window opens,](http://wiki.cuteinfocomm.com/uploads/images/gallery/2022-07/image-1658531733054.png)
[](http://wiki.cuteinfocomm.com/uploads/images/gallery/2022-07/image-1658531848312.png)
- Select the correct Item category and item name from the list and select UOM.
- Click Add to map the item. With this both items are now mapped with appropriate items master and it is now ready for approval.
3\. Click New Material Request[](http://wiki.cuteinfocomm.com/uploads/images/gallery/2022-09/image-1663972341806.png), a notification window will open as below showing "Pending MR to New Material Request".
[](http://wiki.cuteinfocomm.com/uploads/images/gallery/2022-09/image-1663972478466.png)
4\. Click New Material Request button in above screen, the status of the pending MR will be changed to New Material Request, and redirected to material request page that allows for next action-review or approve (review is optional, depends on company policy).
[](http://wiki.cuteinfocomm.com/uploads/images/gallery/2022-09/image-1663972705677.png)
5\. Click Review or Approve button, a notification window opens, user need to select Assignees to review or approve the requested reviewed MR.
6\. Once the new material request is approved. The next step will be Petty Cash/Recommended to Purchase.
[](http://wiki.cuteinfocomm.com/uploads/images/gallery/2022-09/image-1663973265735.png)
### Edit MR
For new material request, before it is reviewed/approved, user can edit the material request, e.g. adding more items.
1. Click the material request key to open the material request detail page, see below.[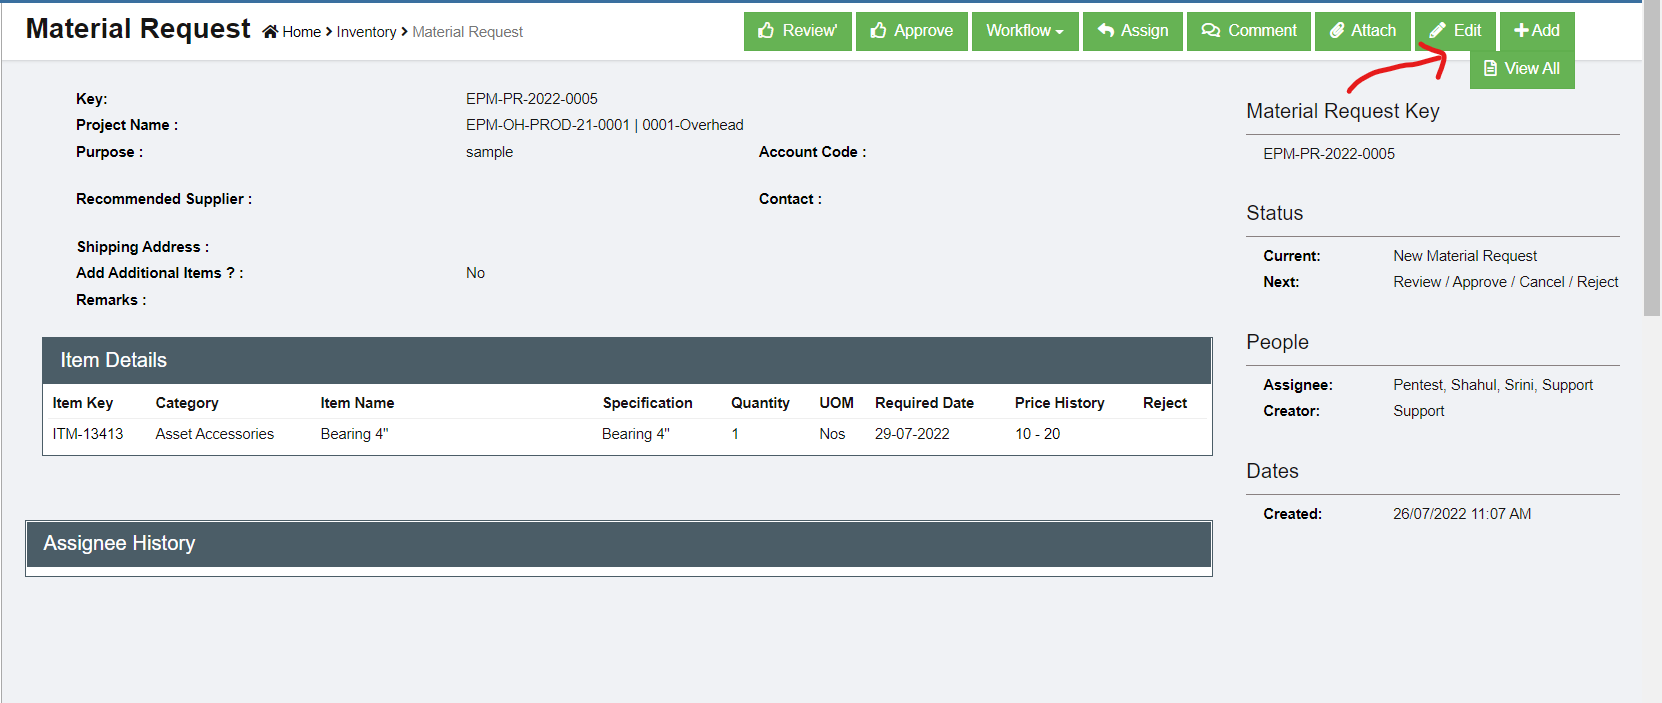](http://wiki.cuteinfocomm.com/uploads/images/gallery/2022-07/image-1658858884891.png)
2. Click edit icon[, the material request edit window opens,](http://wiki.cuteinfocomm.com/uploads/images/gallery/2022-07/image-1658859174910.png)[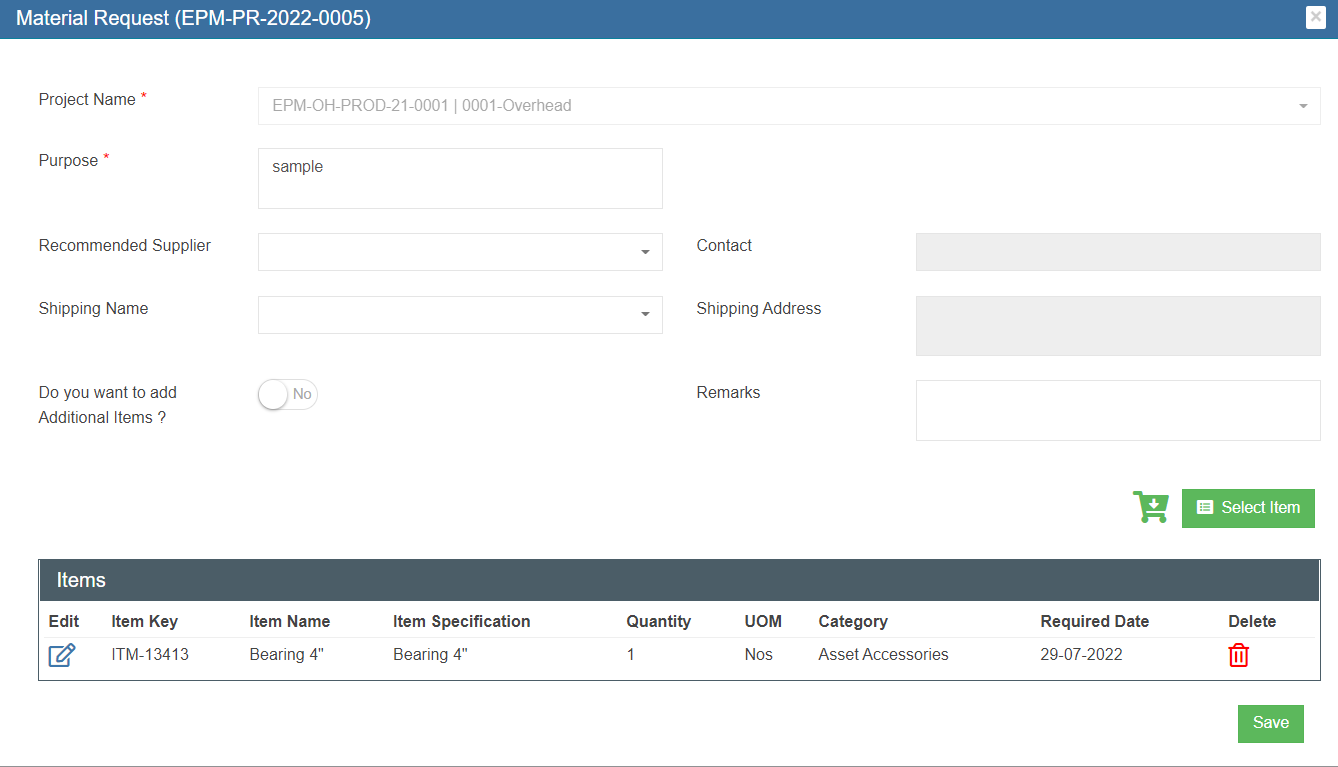](http://wiki.cuteinfocomm.com/uploads/images/gallery/2022-07/image-1658859300248.png)
3. Edit the material request where needs, then click [(save icon) to save edits.](http://wiki.cuteinfocomm.com/uploads/images/gallery/2022-07/image-1658859378476.png)
### Review/ Approve MR
Each MR needs to be approved and optionally reviewed. Only authorized personnel will have access to review/approve the MR.
If the logged in user has the authority to approve, the Approve option is available in the MR detail page, see below.
[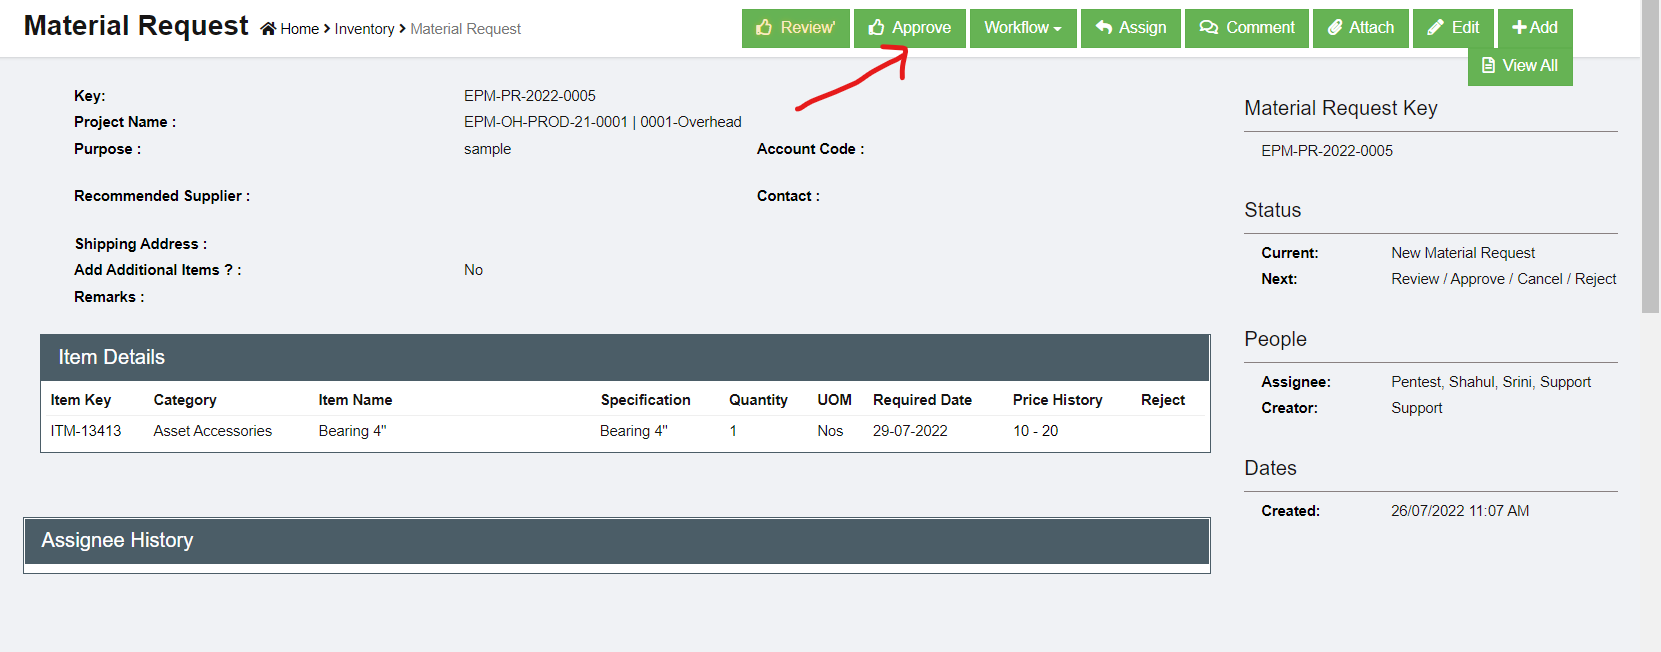](http://wiki.cuteinfocomm.com/uploads/images/gallery/2022-07/image-1658859904974.png)
To review/approve,
1. Click the[(Approve icon), the approve window opens,](http://wiki.cuteinfocomm.com/uploads/images/gallery/2022-07/image-1658859972707.png)[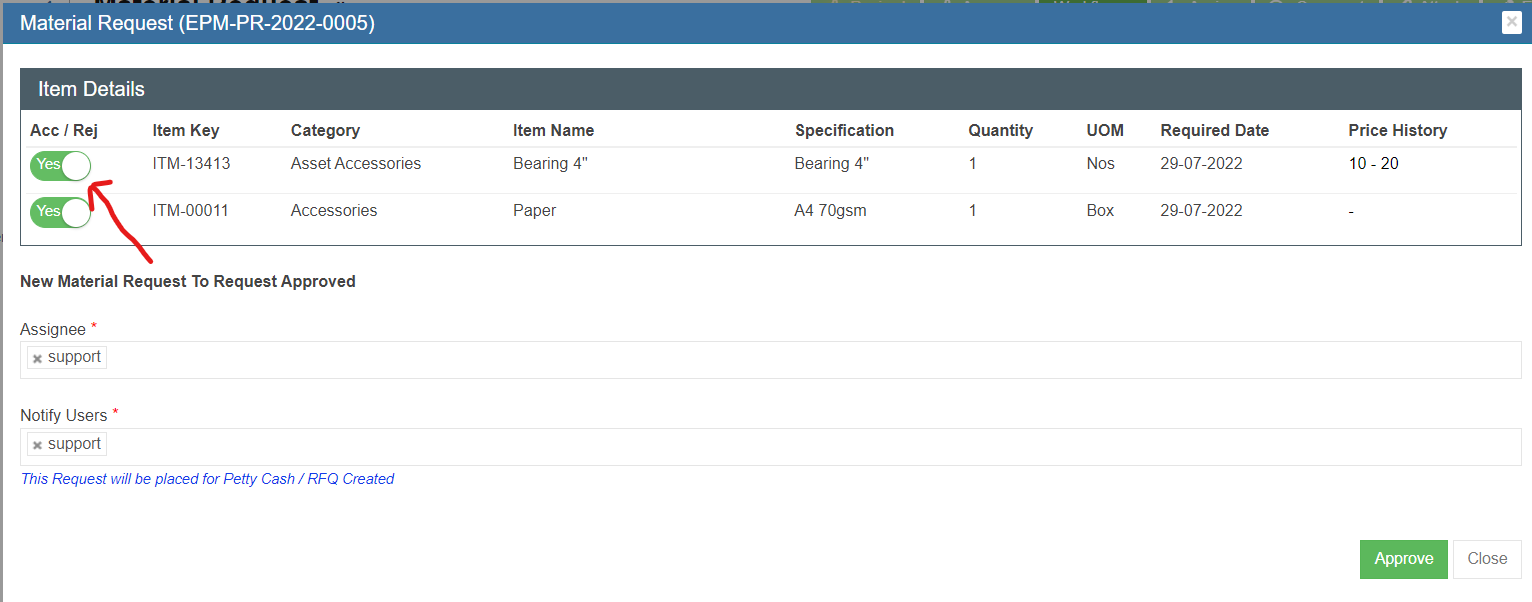](http://wiki.cuteinfocomm.com/uploads/images/gallery/2022-07/image-1658860426584.png)
2. In the item detail table, the first column Acc/Rej default to Yes , means item approved. If user want to reject item, click flag to change to Reject. Once all items reviewed/approved. Click[](http://wiki.cuteinfocomm.com/uploads/images/gallery/2022-07/image-1658860642594.png) to approve.
3. The status of the MR changes to Request Approved and ready for next action. [](http://wiki.cuteinfocomm.com/uploads/images/gallery/2022-07/image-1658860838871.png)
### Cancel Request / Reject Request
The request can be cancelled by the same user who requested it. The request can be rejected by the approval if the MR is not acceptable or required.
1. Click "Workflow", the **Cancel, Reject** option will show.
[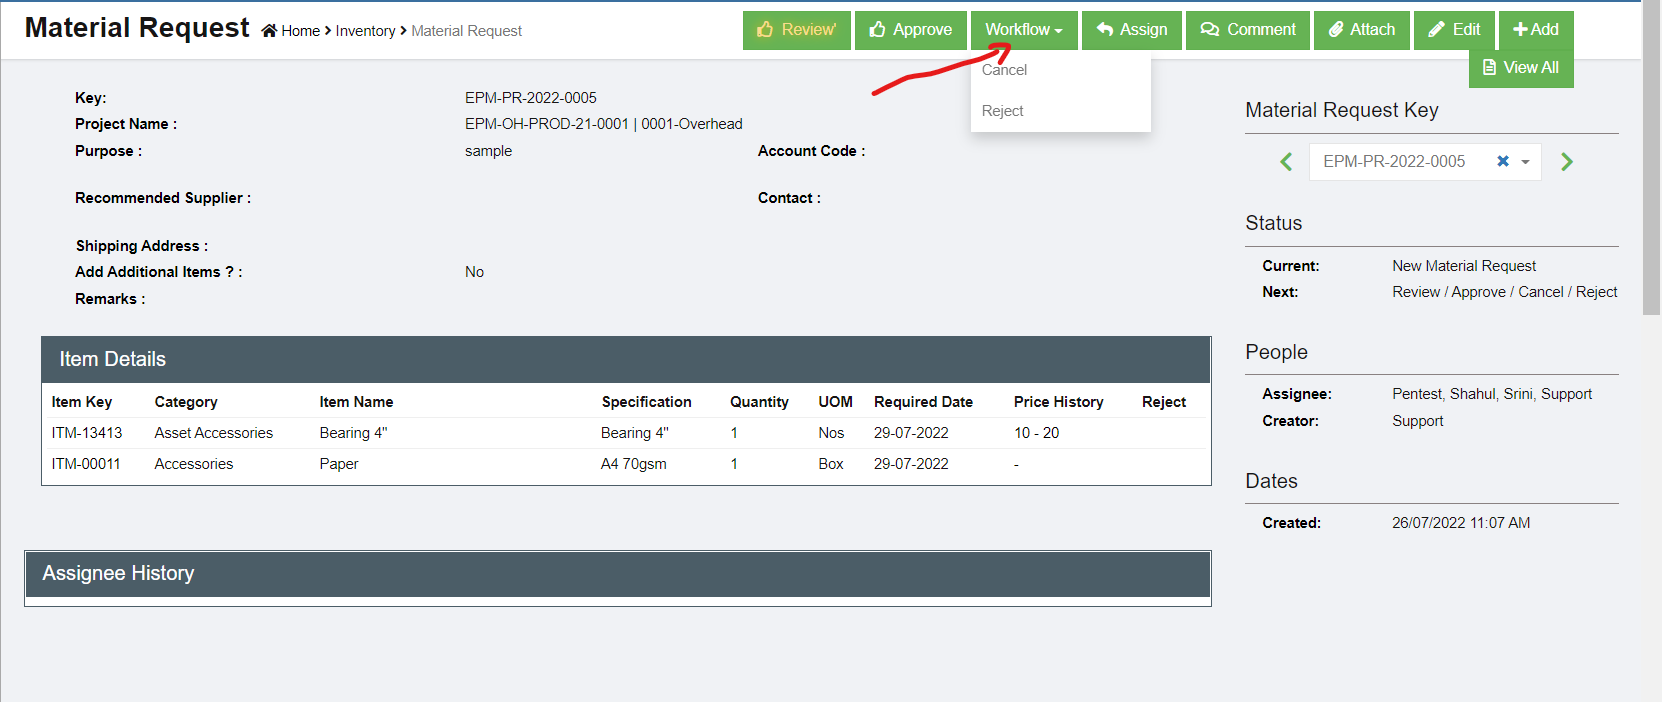](http://wiki.cuteinfocomm.com/uploads/images/gallery/2022-07/image-1658860743340.png)
2. To cancel MR, click **Cancel** from the option menu, below window opens, click[ to confirm cancellation of the MR.](http://wiki.cuteinfocomm.com/uploads/images/gallery/2022-07/image-1658879768613.png)[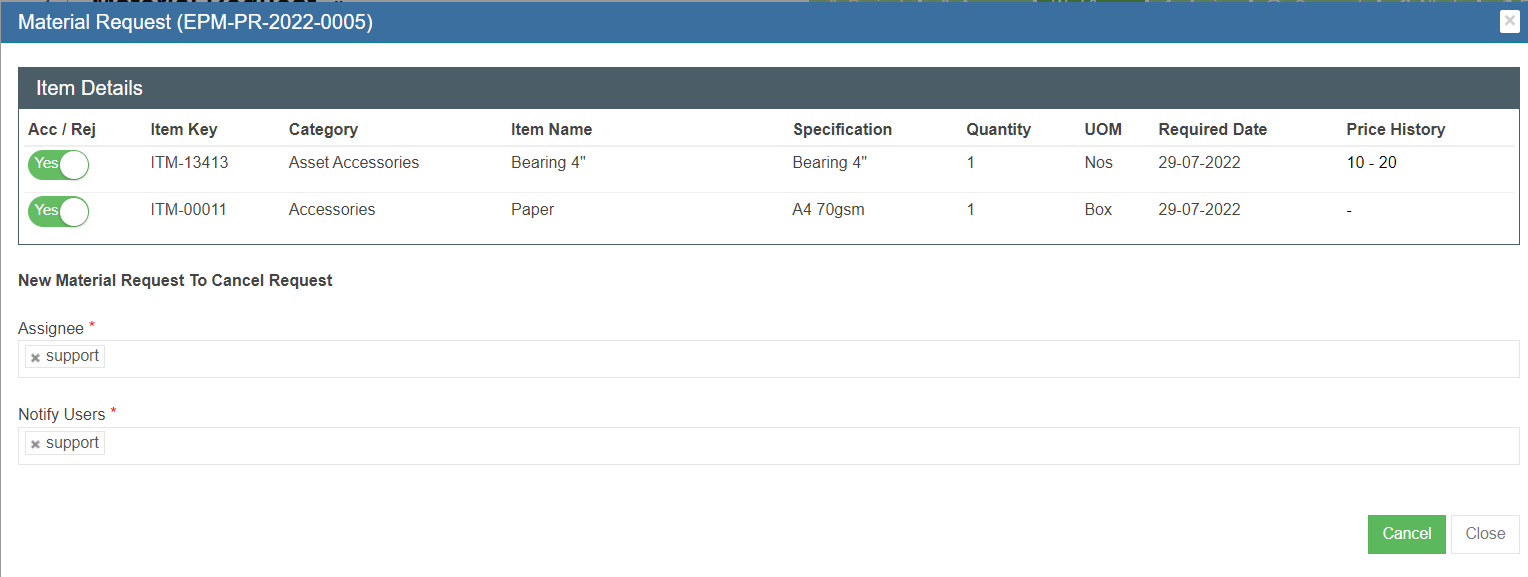](http://wiki.cuteinfocomm.com/uploads/images/gallery/2022-07/image-1658879655467.png)
3. To reject MR, click Reject from the option menu, below window opens, click [](http://wiki.cuteinfocomm.com/uploads/images/gallery/2022-07/image-1658879959068.png)to reject theMR. [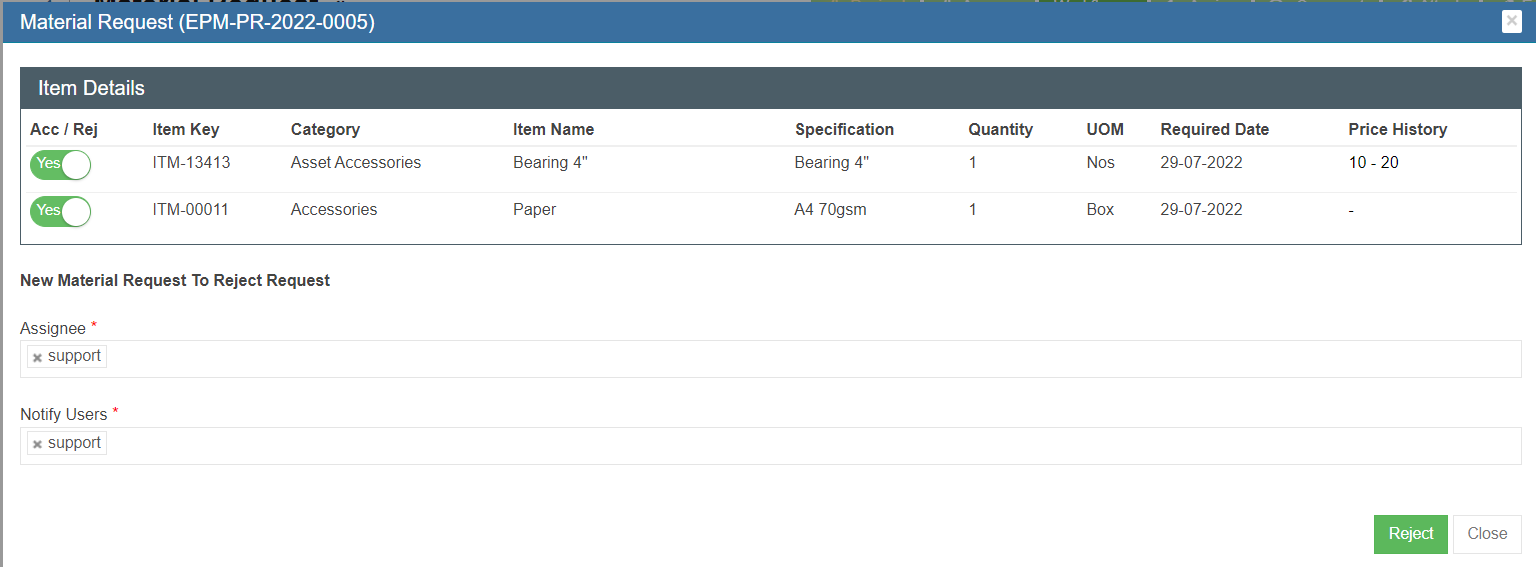](http://wiki.cuteinfocomm.com/uploads/images/gallery/2022-07/image-1658879929797.png)
### Next Steps for Approved MR
Once a MR is approved by authorized personnel, it should be further processed. There are three options:
[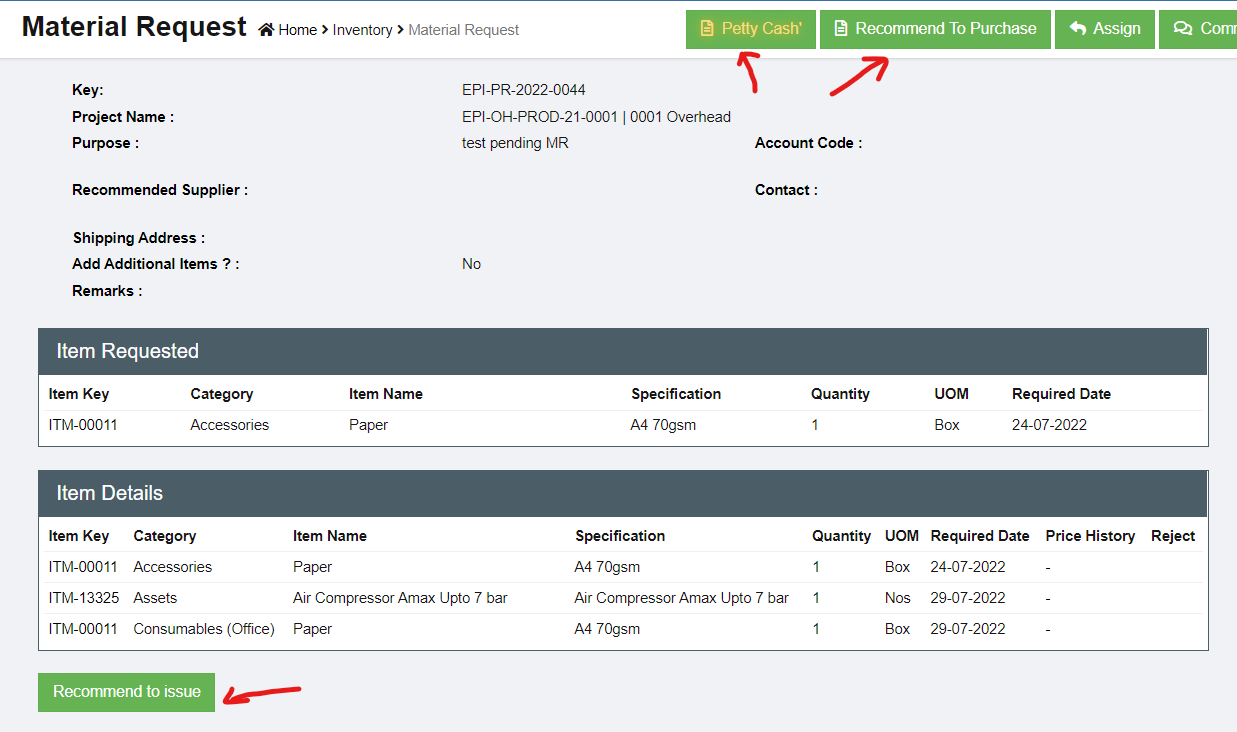](http://wiki.cuteinfocomm.com/uploads/images/gallery/2022-07/image-1658881150986.png)
- **Recommend to issuance.** If there are existing stock available, authorized person can choose to recommend to issuance instead of new purchasing. See "Issuance" in Stock Management user manual. [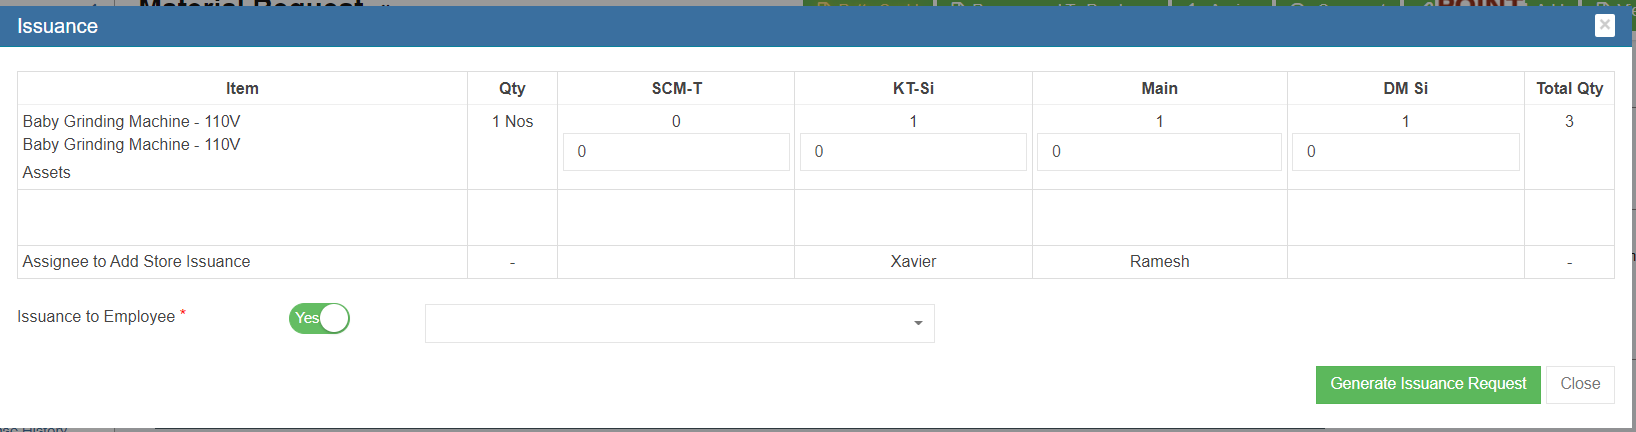](http://wiki.cuteinfocomm.com/uploads/images/gallery/2022-07/image-1659025426602.png)
- **Petty Cash.** If the requested item are small amount, user can use petty cash option to register. [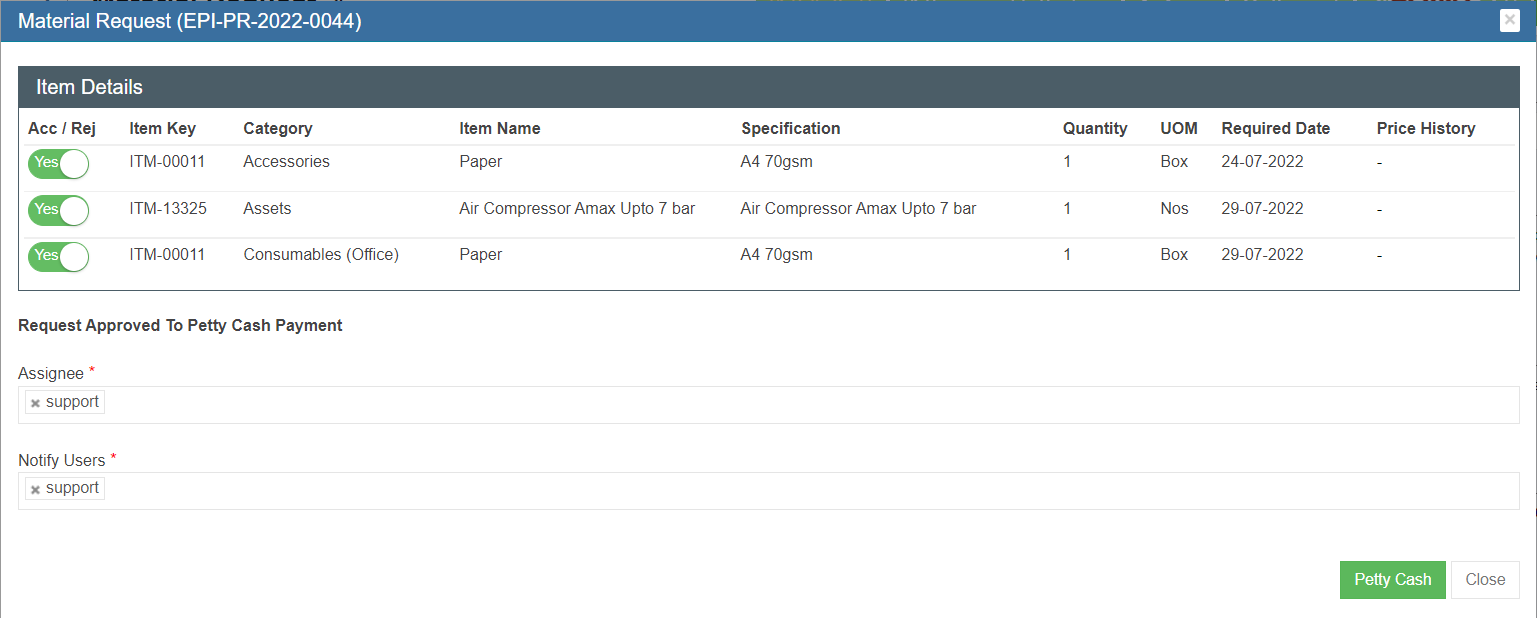](http://wiki.cuteinfocomm.com/uploads/images/gallery/2022-07/image-1658959319285.png)
- **or Recommend to Purchase.** [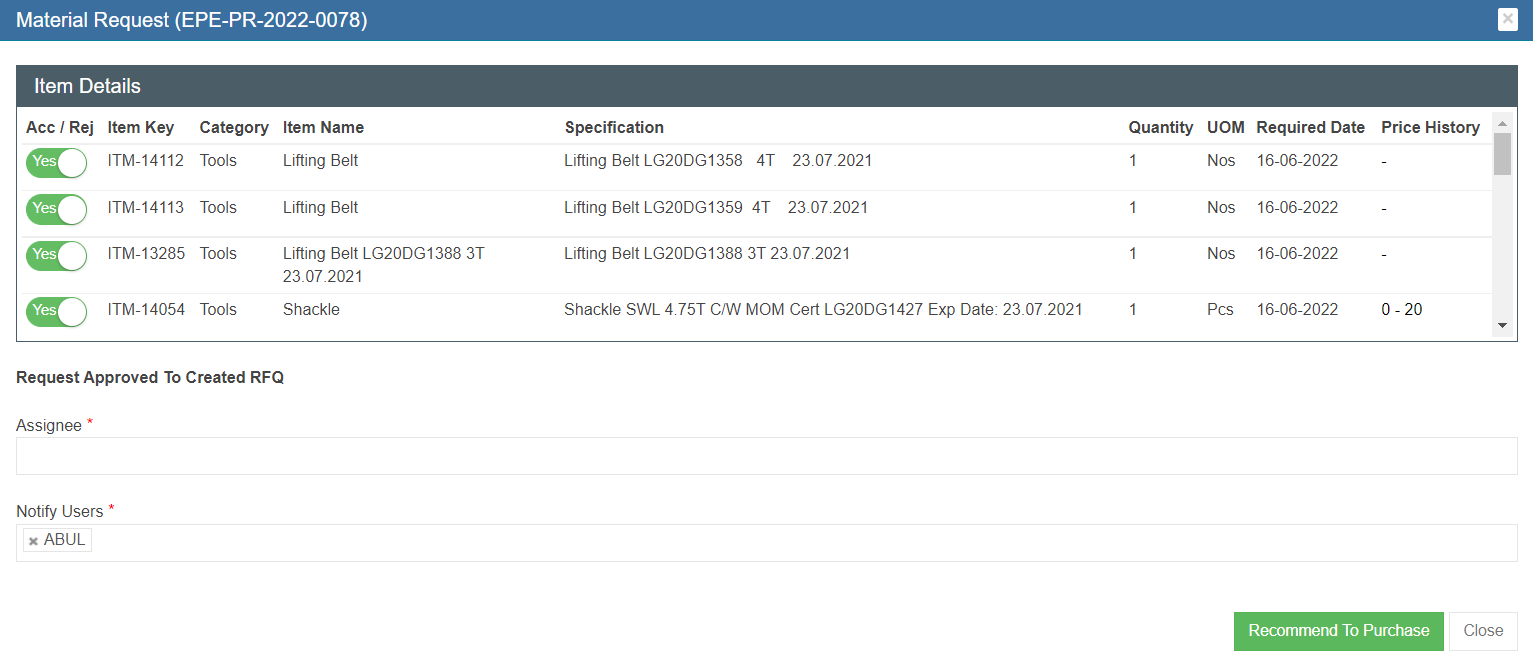](http://wiki.cuteinfocomm.com/uploads/images/gallery/2022-07/image-1659025228492.png)
#### Petty Cash
A petty cash fund is a small amount of company cash, often kept on hand (e.g., in a locked drawer or box), to pay for minor or incidental expenses, such as office supplies or employee reimbursements. Sometimes the material requested item can be recommend to use petty cash to purchase instead of going thru purchase workflow.
1. Click the Petty Cash button in the material request detail page, [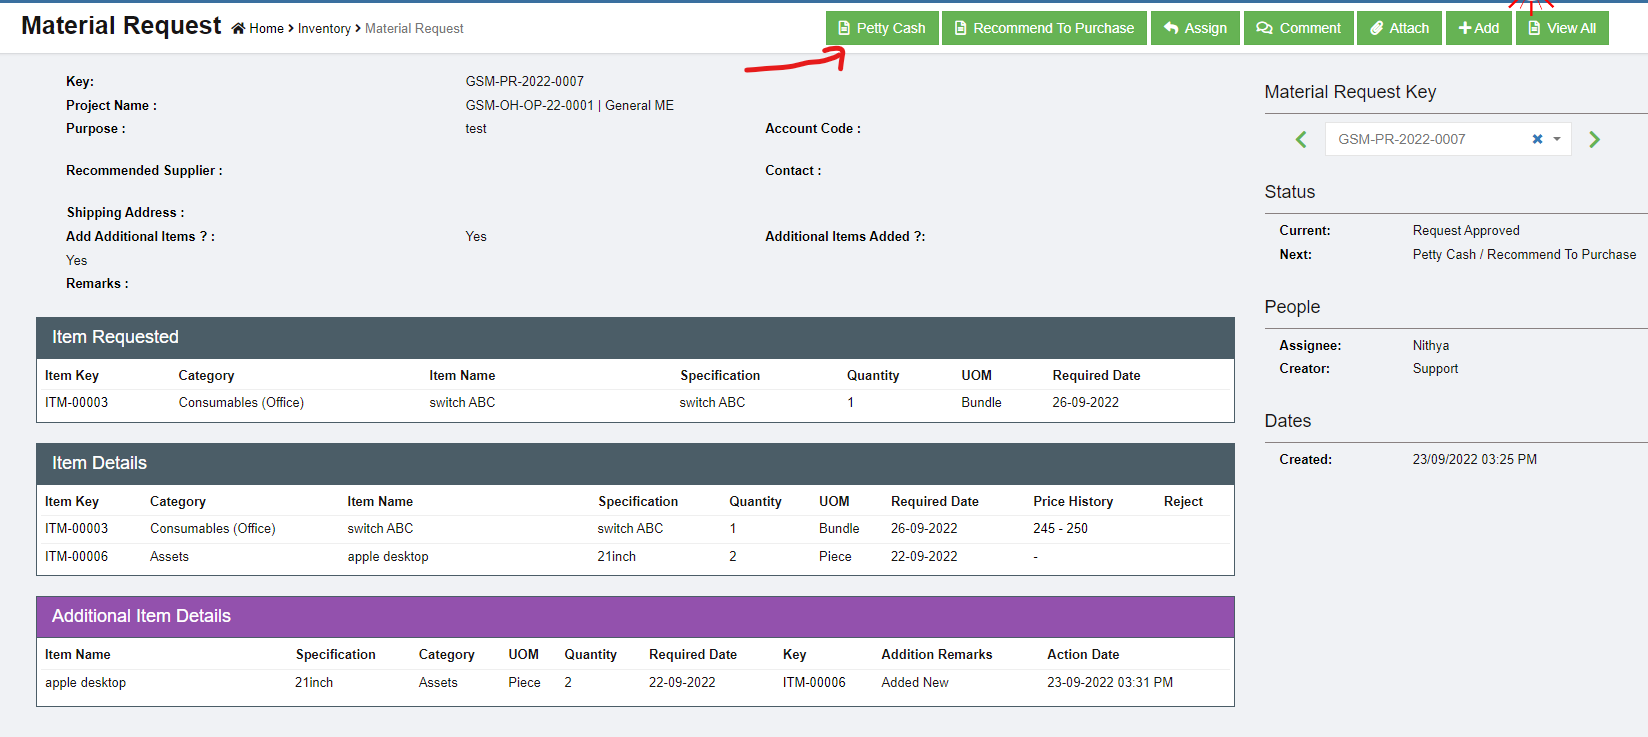](http://wiki.cuteinfocomm.com/uploads/images/gallery/2022-09/image-1663973515801.png)
2. A new notification window opens to confirm petty cash. Click Petty Cash button to confirm.[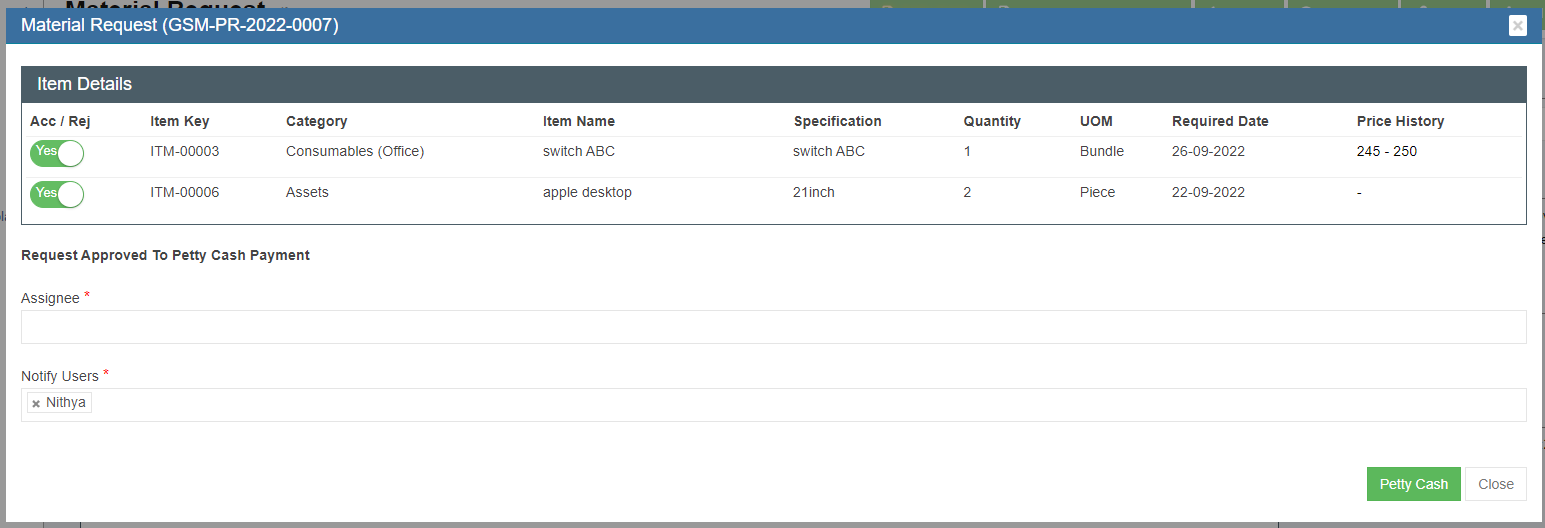](http://wiki.cuteinfocomm.com/uploads/images/gallery/2022-09/image-1663973332679.png)
3. A receiving entry will appear once confirmed petty cash option. User can enter the petty cash purchase details in the receiving entry section. [](http://wiki.cuteinfocomm.com/uploads/images/gallery/2022-09/image-1663973682219.png)
4. Click Add button to enter Receiving entry- Material Request for petty cash payment[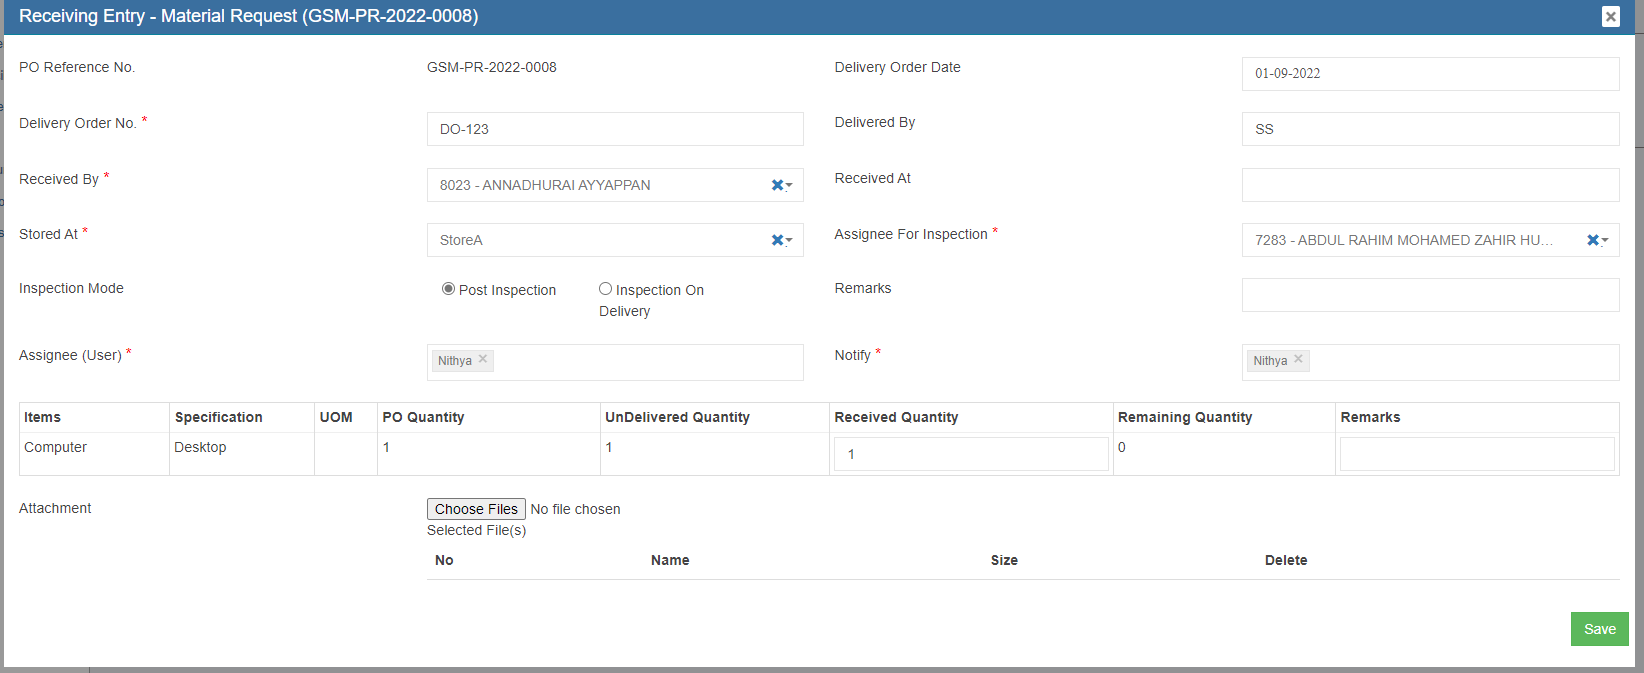](http://wiki.cuteinfocomm.com/uploads/images/gallery/2022-09/image-1664532848411.png)
5. Enter all required details in above receive entry page, and in Attachment, use Choose Files to upload invoice receipt.
# Request for Quotation (RFQ)
Once the Material Request is approved, and authorized to purchase, it should be recommended to purchase.
1. Click [](http://wiki.cuteinfocomm.com/uploads/images/gallery/2022-07/image-1659118109177.png)to proceed to next action of creating Request for Quotation (RFQ) from approved suppliers. [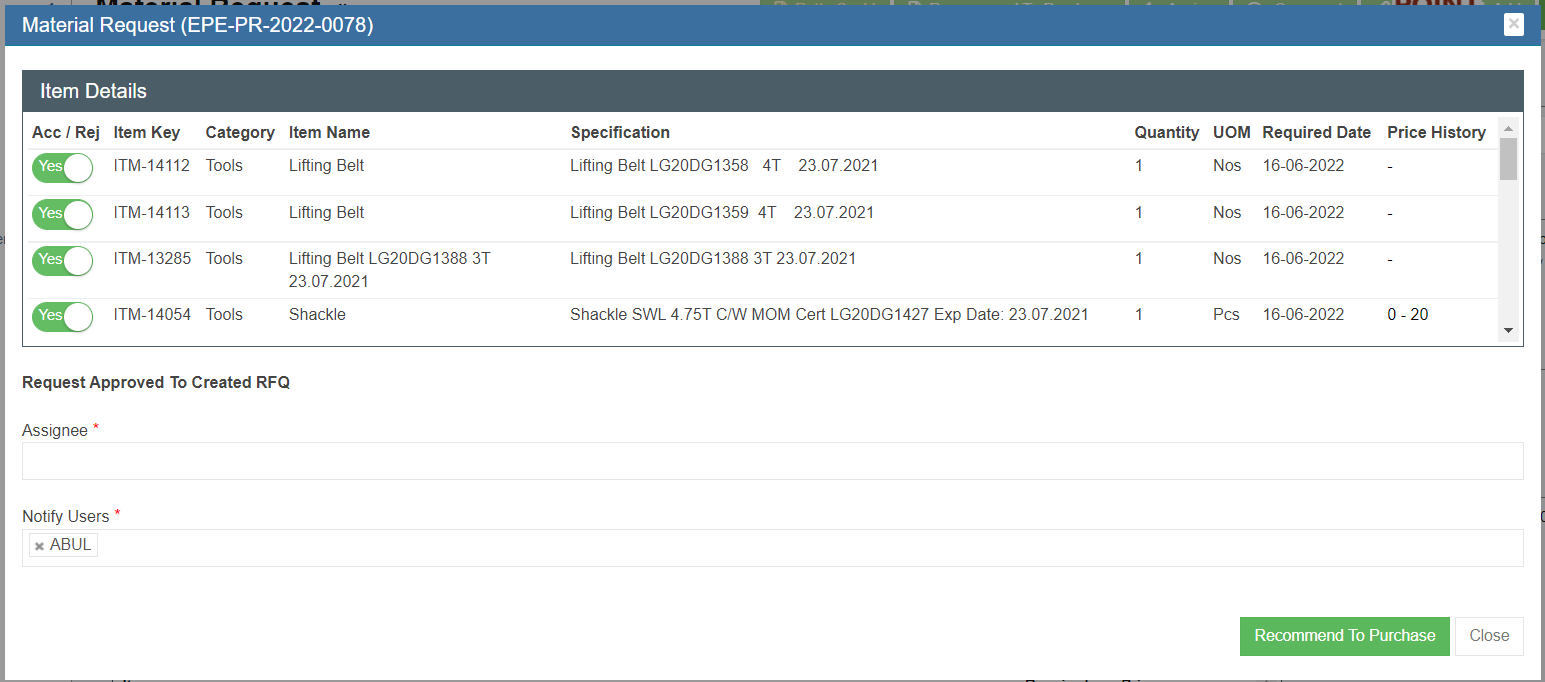](http://wiki.cuteinfocomm.com/uploads/images/gallery/2022-07/image-1659118325073.png)
2. Click to confirm Recommended To Purchase, a RFQ with unique key for tracking will be created automatically for the MR. See below RFQ table. [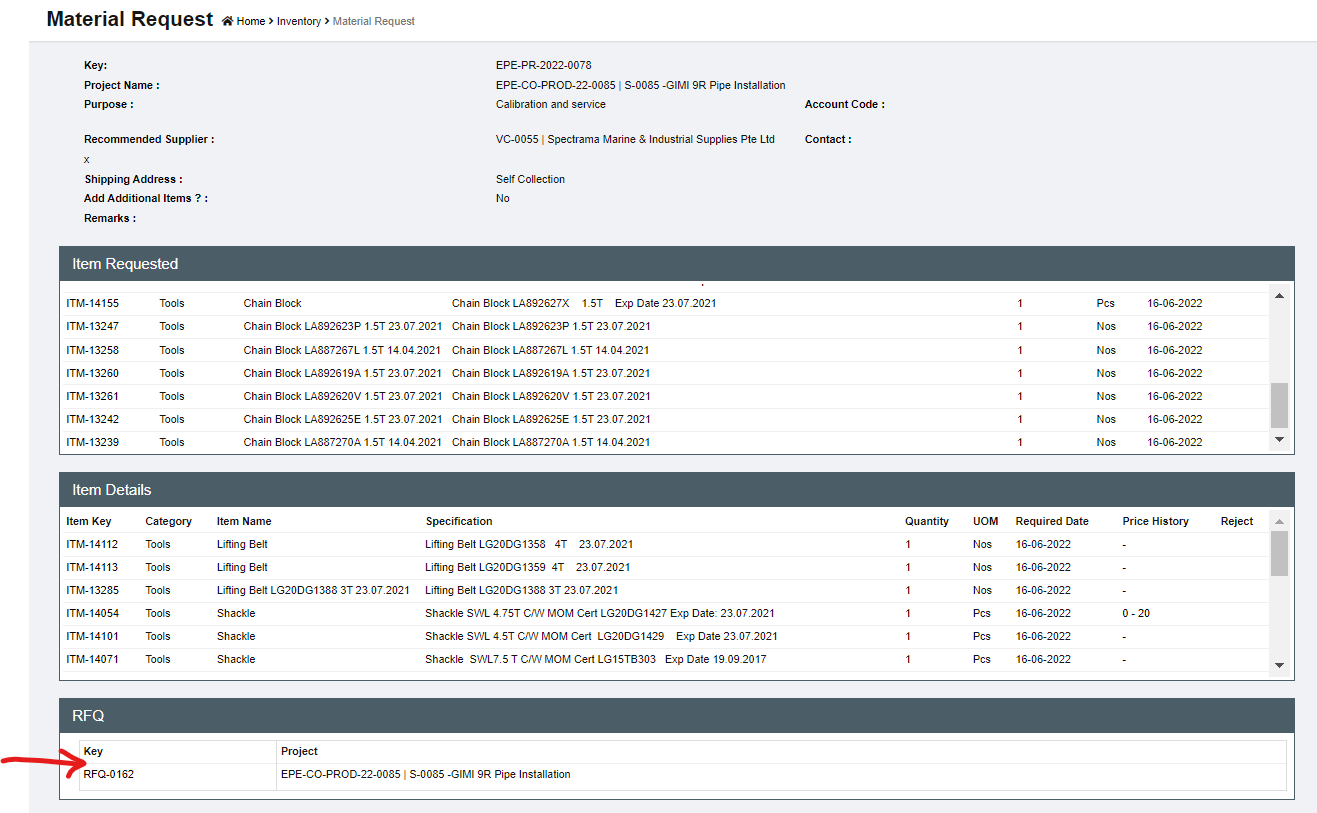](http://wiki.cuteinfocomm.com/uploads/images/gallery/2022-07/image-1659118591415.png)
3. The status of the MR is changed to “Created RFQ". [](http://wiki.cuteinfocomm.com/uploads/images/gallery/2022-07/image-1659118742205.png)
### Request for Quotation (RFQ)
Once RFQ is created, it can be accessed in the MR detail page or thru Procurement - > RFQ where all RFQs are listed. In RFQ, the purchase officer will send all the appropriate suppliers with a request for quotation. The quotation requests will be managed in this section.
[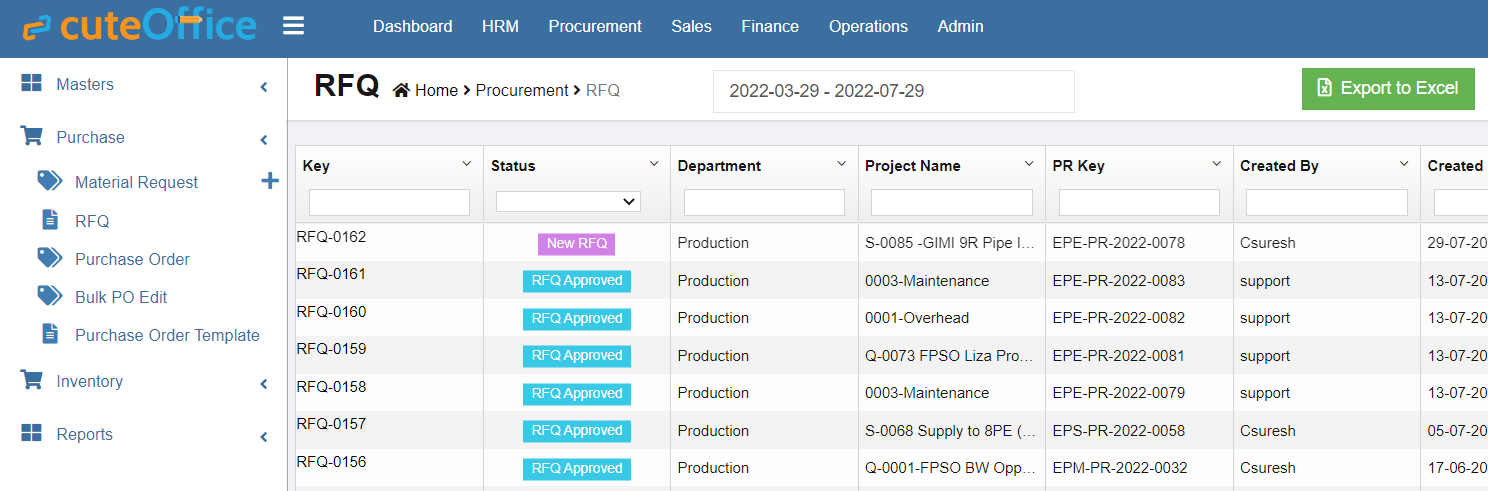](http://wiki.cuteinfocomm.com/uploads/images/gallery/2022-07/image-1659119362593.png)
1. Click the RFQ key in the RFQ list page or in the MR detail page RFQ table, the RFQ detail page opens, see below:[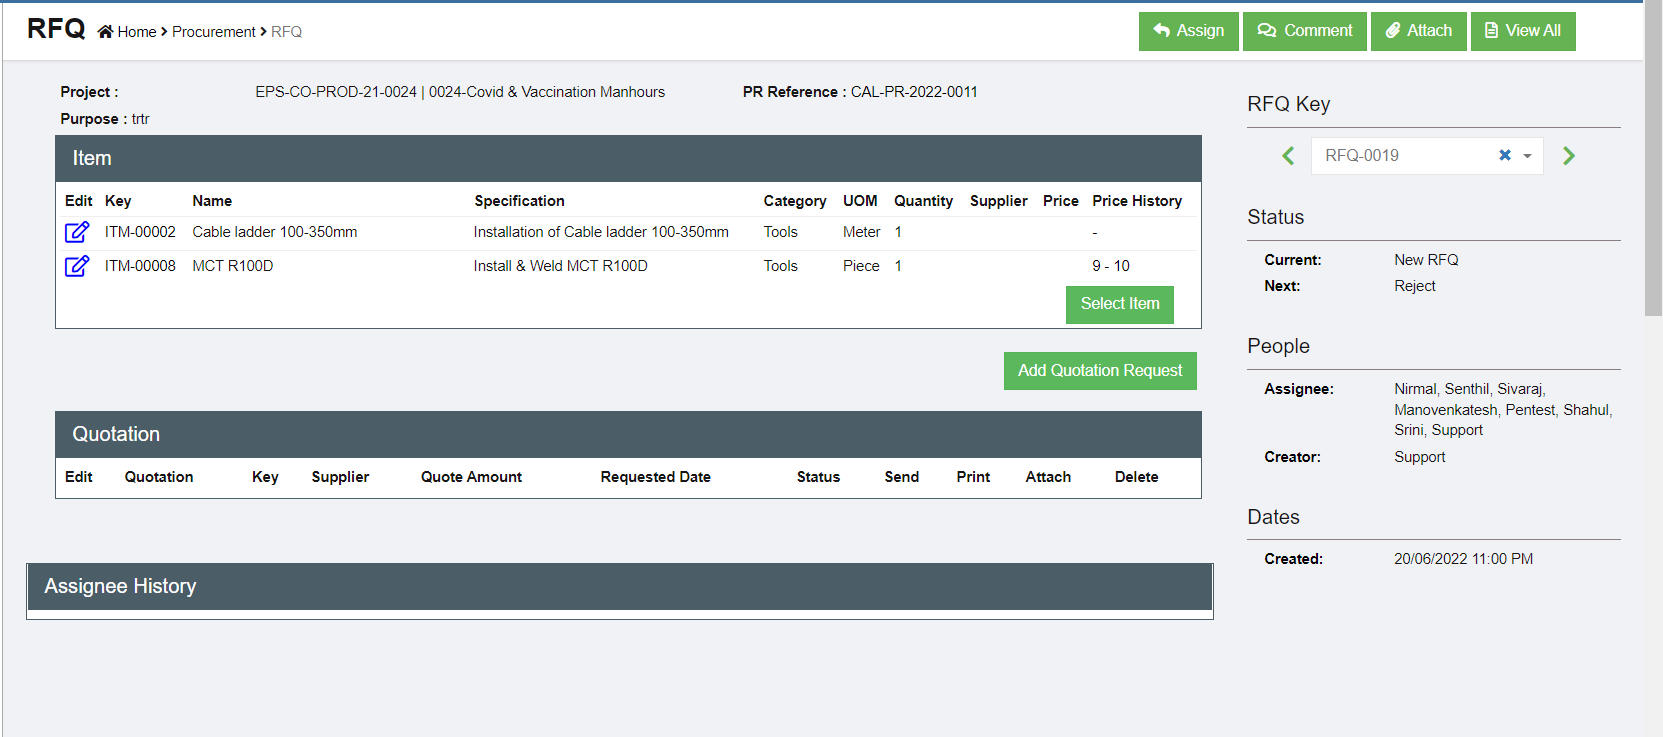](http://wiki.cuteinfocomm.com/uploads/images/gallery/2022-07/image-1659119696019.png)
2. Click[](http://wiki.cuteinfocomm.com/uploads/images/gallery/2022-07/image-1659119944809.png) (Add Quotation Request button) and the below window opens. [](http://wiki.cuteinfocomm.com/uploads/images/gallery/2022-07/image-1659120178625.png)
3. Select a supplier from the supplier dropdown list.
4. Select the items that we want to ask for quotation from the supplier. By default all the items in the
MR are selected. Company can request for quotation for different items from different suppliers.
5. Click[](http://wiki.cuteinfocomm.com/uploads/images/gallery/2022-07/image-1659120607001.png) to create the RFQ for the supplier. The below quotations for different suppliers are created.[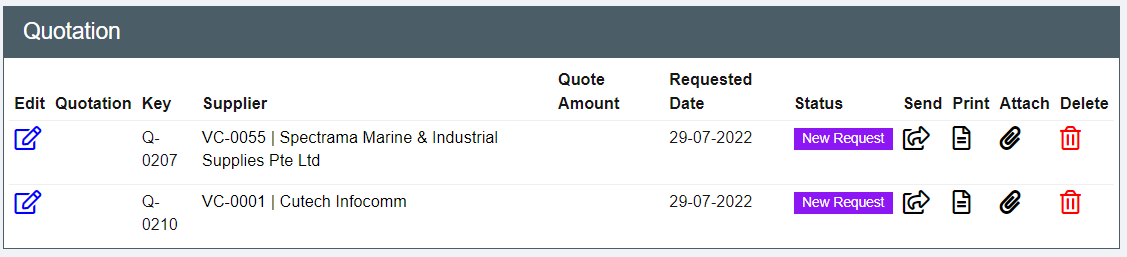](http://wiki.cuteinfocomm.com/uploads/images/gallery/2022-07/image-1659120779405.png)
6. The RFQ can be sent to suppliers by two ways:
- Click the[](http://wiki.cuteinfocomm.com/uploads/images/gallery/2022-07/image-1659121120075.png)(print button) to generate the RFQ which can be saved as PDF and sent to the supplier (make sure the Pop up is not blocked by web browser so that it can be viewed in the browser. If blocked click
on the red cross icon in the browser to allow opining the pdf RFQ) [](http://wiki.cuteinfocomm.com/uploads/images/gallery/2022-07/image-1659121588110.png)
- Click[ ](http://wiki.cuteinfocomm.com/uploads/images/gallery/2022-07/image-1659121201329.png)to email the RFQ to suppliers directly from cuteOffice system (make sure to inform Cutech team to configure sender email address). Click to enable "Send email directly?", and the email template will open. Check and fill up required information and click [](http://wiki.cuteinfocomm.com/uploads/images/gallery/2022-07/image-1659122304476.png) to send email. [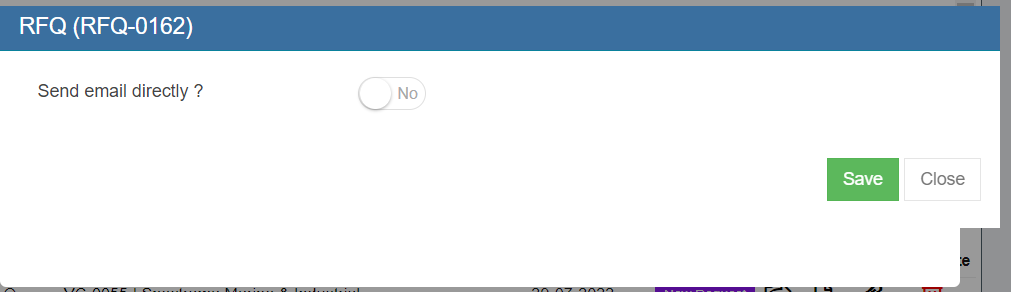](http://wiki.cuteinfocomm.com/uploads/images/gallery/2022-07/image-1659121721740.png)
[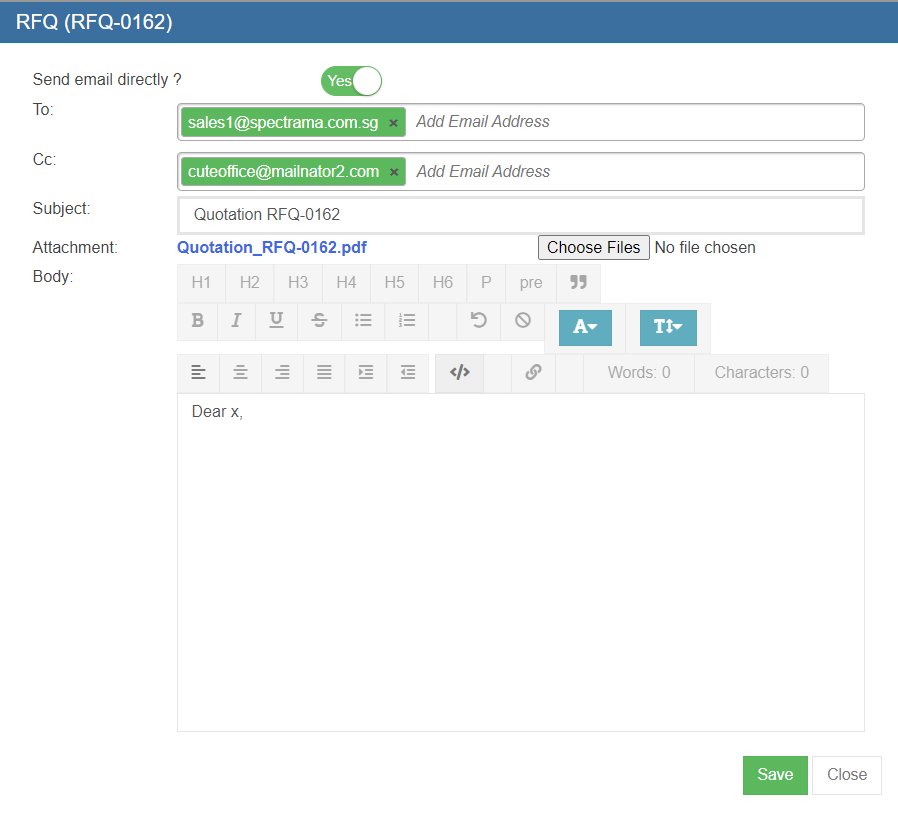](http://wiki.cuteinfocomm.com/uploads/images/gallery/2022-07/image-1659121785016.png)
7. Once sent, the status of the RFQ is changed to Sent to Supplier. Once we receive quotation details from suppliers, we can enter the details in quotation.
[](http://wiki.cuteinfocomm.com/uploads/images/gallery/2022-07/image-1659122449306.png)
8. Click [ ](http://wiki.cuteinfocomm.com/uploads/images/gallery/2022-07/image-1659122563716.png)to open quotation page to enter details received from suppliers.
[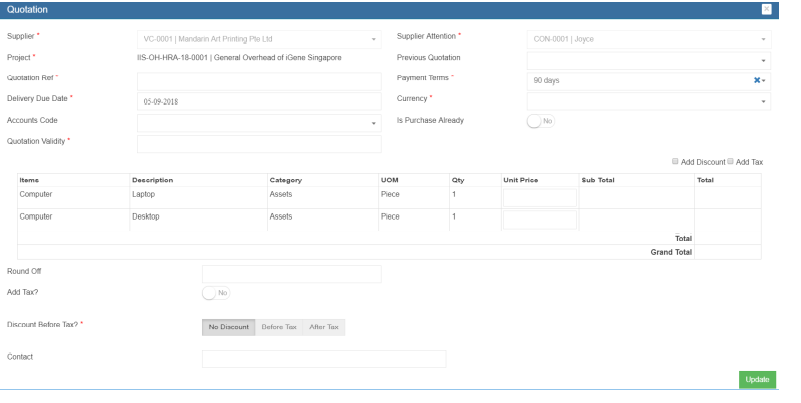](http://wiki.cuteinfocomm.com/uploads/images/gallery/2022-07/image-1659122655723.png)
9. Enter Quotation reference number, Quotation validity. The Payment terms, contact details are will appear automatically. Enter the price quoted and other details such as tax, discount etc. Click Update to save quotation details entered.
10. Once all the quotations are received and entered in the system, the purchaser will request the
Quote selection authorized personnel to select the Quote. This can be done by clicking [](http://wiki.cuteinfocomm.com/uploads/images/gallery/2022-07/image-1659122784062.png)the Request to Select Quotation button. The below dialog opens up. [](http://wiki.cuteinfocomm.com/uploads/images/gallery/2022-07/image-1659122828388.png)
11. Click Confirm. This action creates a new **RFQ Quote Selection** section in the RFQ see below.[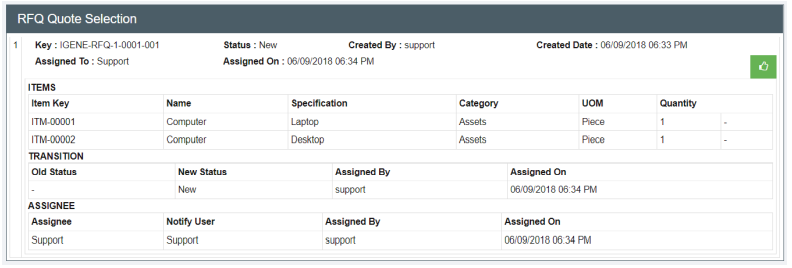](http://wiki.cuteinfocomm.com/uploads/images/gallery/2022-07/image-1659122932772.png)
12. The authorized persons who can do the selection of quotes can perform this action will see this
button. Click [ ](http://wiki.cuteinfocomm.com/uploads/images/gallery/2022-07/image-1659123048393.png)the selection button and the below window opens up. [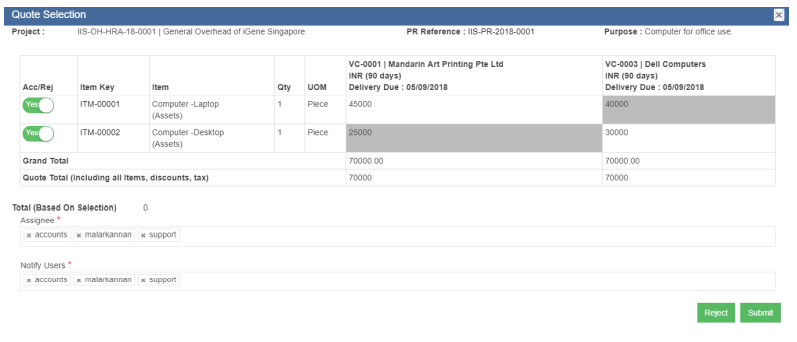](http://wiki.cuteinfocomm.com/uploads/images/gallery/2022-07/image-1659123107974.png)
13. The suppliers price along with the delivery due date are shown. The lowest price will be highlighted in
grey color. Click the supplier of choice for each item. The color will change to green
color. Click Submit to confirm the selection of vendors for purchasing. [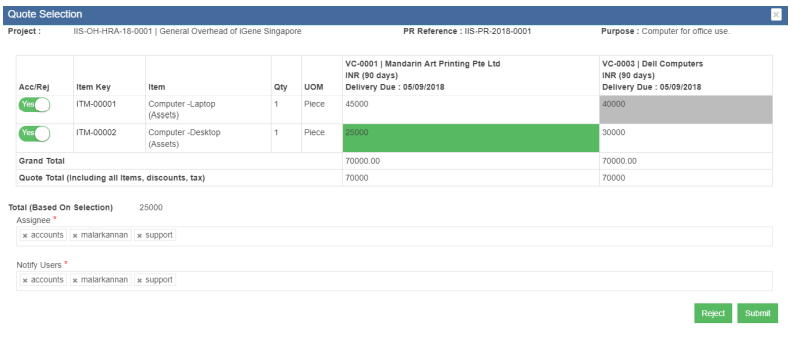](http://wiki.cuteinfocomm.com/uploads/images/gallery/2022-07/image-1659127790432.png)
[](http://wiki.cuteinfocomm.com/uploads/images/gallery/2022-10/image-1665545008903.png)
**Note: Added the above screen shot from Qa3.**
14. Click Yes when the confirmation message is prompted. This will trigger the notification to the
approver.
[](http://wiki.cuteinfocomm.com/uploads/images/gallery/2022-07/image-1659127833608.png)
15. The status of the RFQ is **Quote Selected**. Click the[](http://wiki.cuteinfocomm.com/uploads/images/gallery/2022-07/image-1659123048393.png) to approve the quote selection. [](http://wiki.cuteinfocomm.com/uploads/images/gallery/2022-07/image-1659127910894.png)
16. Once the quote selection is approved, the system gets updated as below and shown in transaction.
Also the status in the RFQ list is changed to Quote Selected. [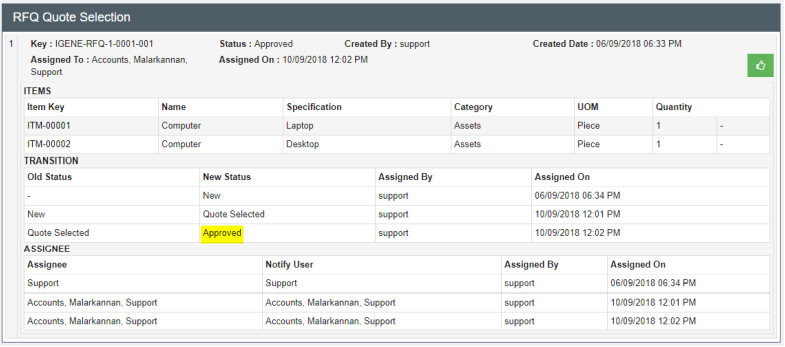](http://wiki.cuteinfocomm.com/uploads/images/gallery/2022-07/image-1659128005414.png)
[](http://wiki.cuteinfocomm.com/uploads/images/gallery/2022-07/image-1659128044890.png)
17. And a PO will be created automatically with **Pending PO status** and shown in the RFQ page as below. And it is ready for PO preparation. [](http://wiki.cuteinfocomm.com/uploads/images/gallery/2022-07/image-1659128139778.png)
# Purchase Order (PO)
After the RFQ is completed and approved, system will create PO (Status is **Pending PO**) and generate unique tracking key automictically. And the next step is preparing the Purchase Order (PO). In Purchase Order section, the purchase officer will prepare the final purchase order and send it to the suppliers.
Click Procurement - > Purchase Order to open PO lists.
[](http://wiki.cuteinfocomm.com/uploads/images/gallery/2022-07/image-1659128576710.png)
### Create PO
The Purchase Orders can be reached by clicking the PO key from the PO list.
[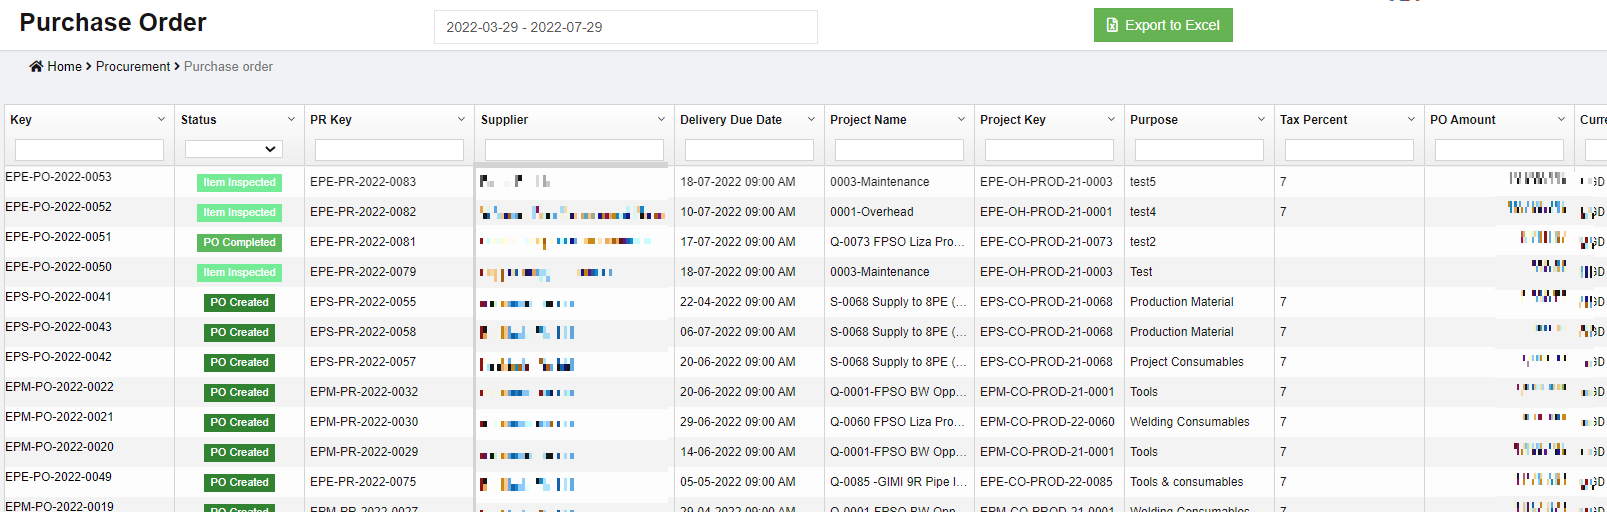](http://wiki.cuteinfocomm.com/uploads/images/gallery/2023-04/image-1682107210616.png)
Or the PO can be accessed directly from the RFQ details screen **Purchase Order** table,[](http://wiki.cuteinfocomm.com/uploads/images/gallery/2022-07/image-1659131478080.png)
1. Click the PO key of the selected PO, the PO screen opens as below and the status of the PO is “Pending PO” [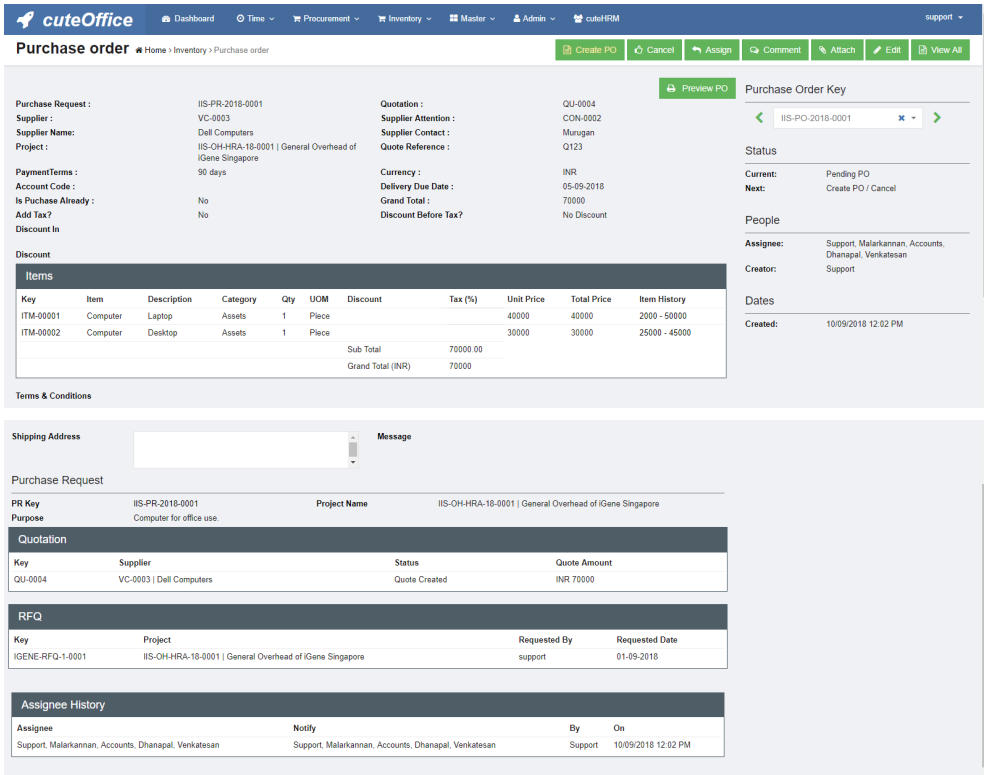](http://wiki.cuteinfocomm.com/uploads/images/gallery/2022-07/image-1659132254507.png)
2. There are many options available in PO page for the purchasing officer[](http://wiki.cuteinfocomm.com/uploads/images/gallery/2022-07/image-1659132325582.png)
3. Click [](http://wiki.cuteinfocomm.com/uploads/images/gallery/2022-07/image-1659132742449.png) edit icon, the PO detail page opens and purchase staff shall update the necessary additional information. [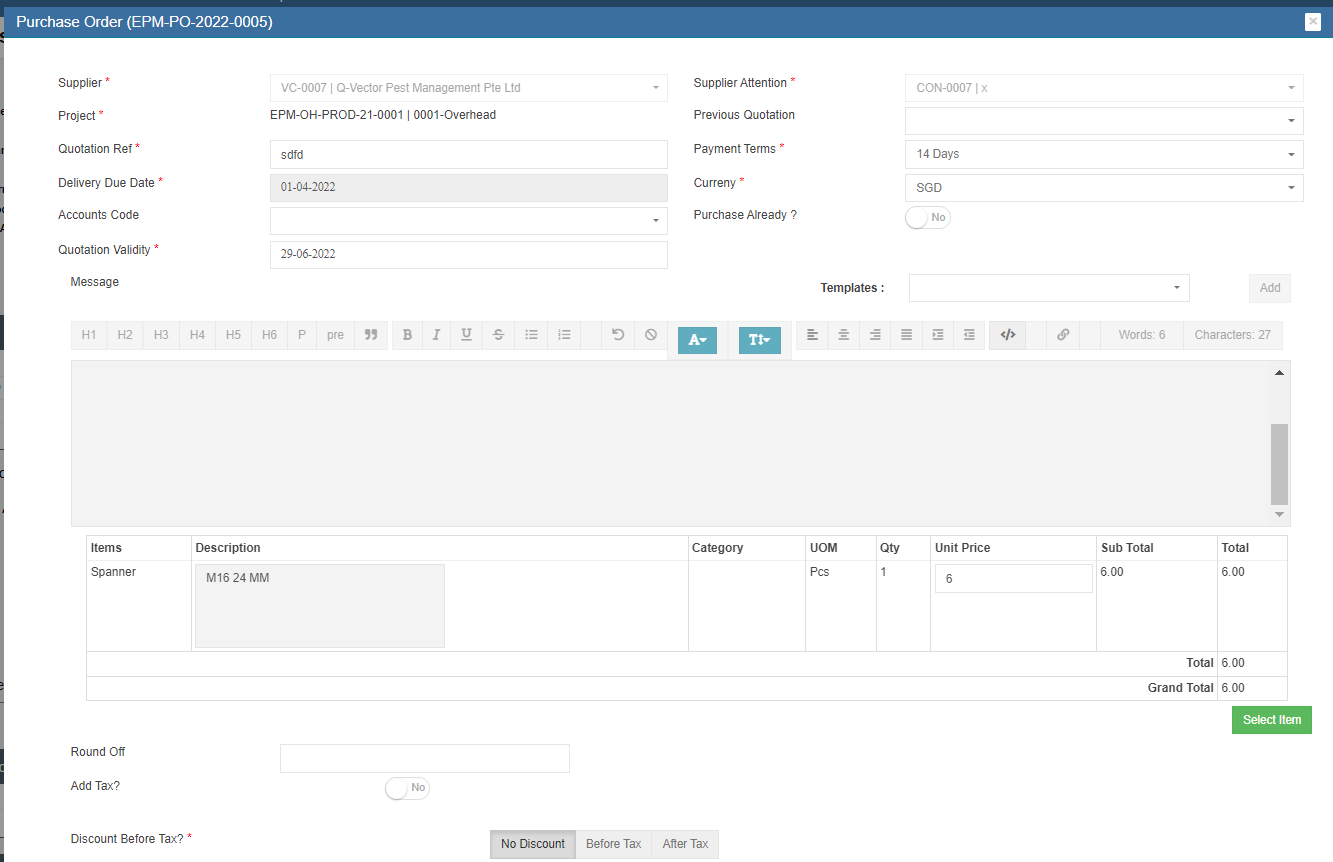](http://wiki.cuteinfocomm.com/uploads/images/gallery/2022-07/image-1659133105727.png)
[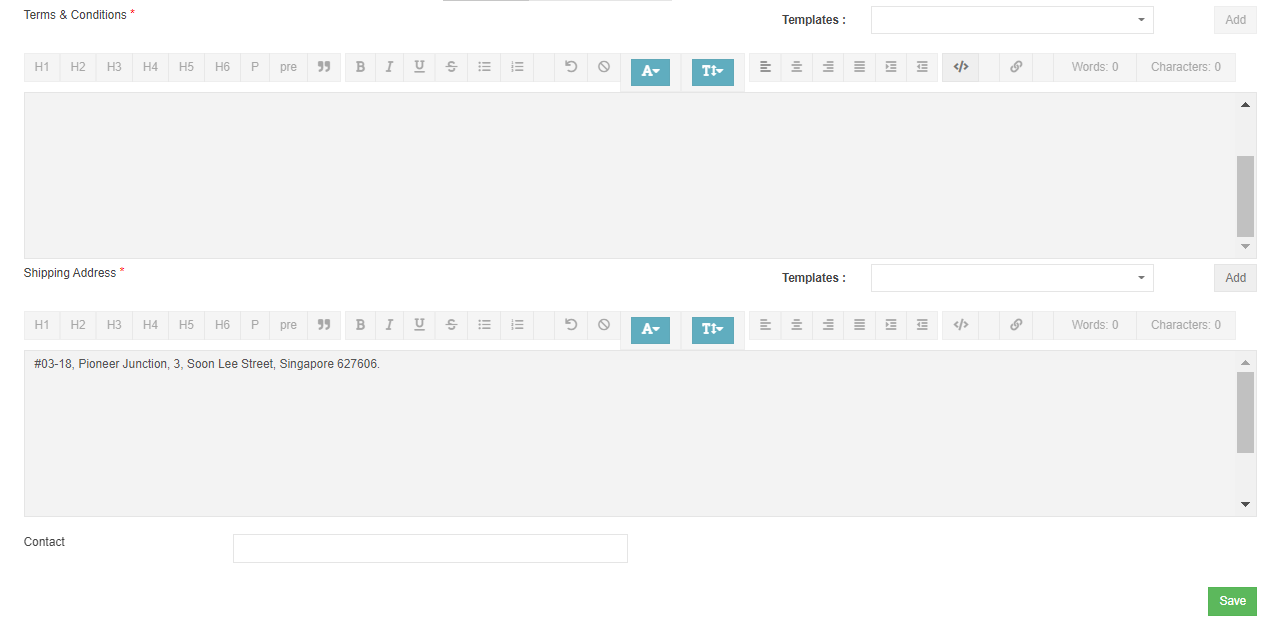](http://wiki.cuteinfocomm.com/uploads/images/gallery/2022-07/image-1659133135678.png)
4. The payment terms and currency are all automatically filled from supplier master if it is available and
configured earlier. The item with its approved price is shown here. If any changes in price, purchasing officer shall edit the price.
5. Click Add Discount / Add Tax check boxes above to show more options. These options enables
additional columns and tax and discount can be applied.
- The discount can be entered in value such as 1500 in full number or in percentage such as 5%.
- The Tax can be entered against individual item as in many countries, there are different tax for different
items. Use this Tax text box if different values of taxes are required. Tax information are all captured in the RFQ stage itself and can’t be changed during PO
creation [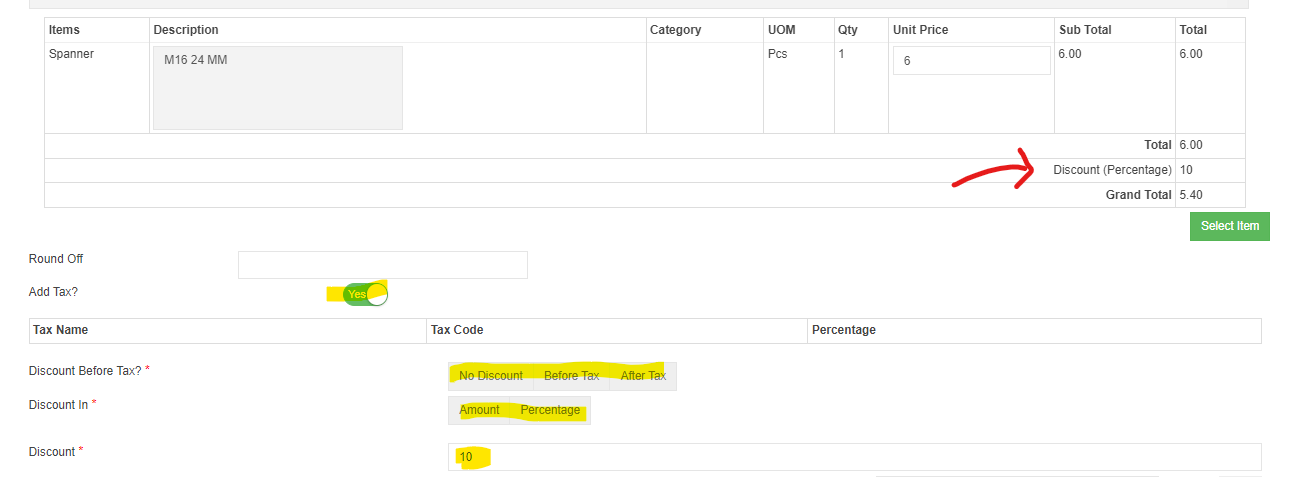](http://wiki.cuteinfocomm.com/uploads/images/gallery/2022-07/image-1659133374952.png)
6. Terms and Conditions. Select the Terms and Condition from the templates available.
[](http://wiki.cuteinfocomm.com/uploads/images/gallery/2022-07/image-1659133921719.png)
7. Shipping Address and contact. Select the shipping address. The list of addresses are configured in the
company master. [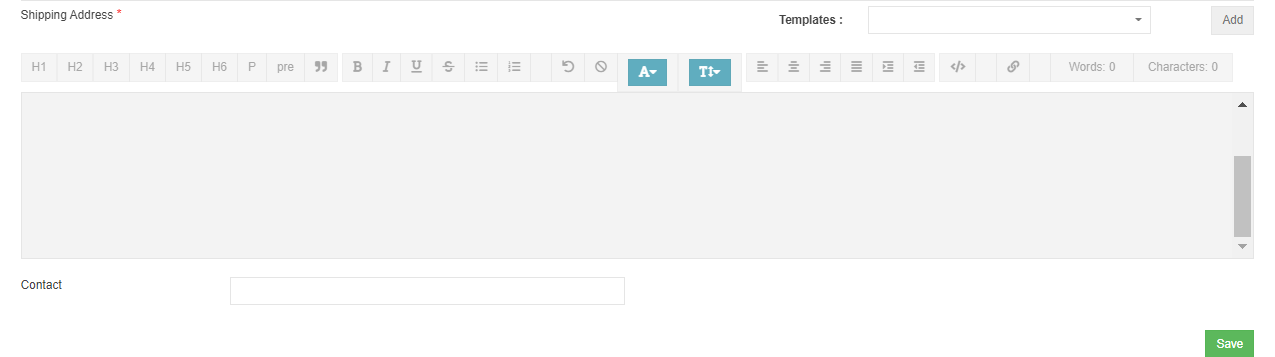](http://wiki.cuteinfocomm.com/uploads/images/gallery/2022-07/image-1659134021478.png)
8. Click [](http://wiki.cuteinfocomm.com/uploads/images/gallery/2022-07/image-1659134145661.png)save button to save edits. Edit window will be closed and return to the PO detail page.
9. Click[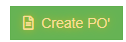](http://wiki.cuteinfocomm.com/uploads/images/gallery/2022-07/image-1659134269281.png)create PO button to create the PO. Below PO creation notification window opens, check and confirm then click create PO. Notifications will be send to selected users and PO is created and ready for approval.
[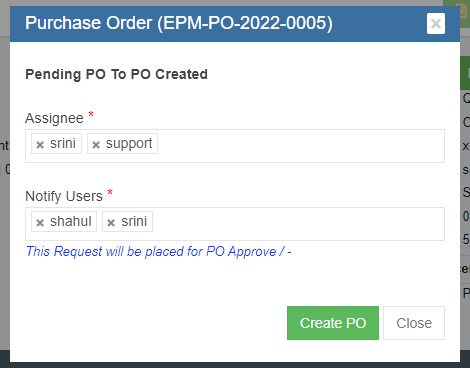](http://wiki.cuteinfocomm.com/uploads/images/gallery/2022-07/image-1659134383217.png)
10. PO is created and ready for approval. User can preview PO before approval.[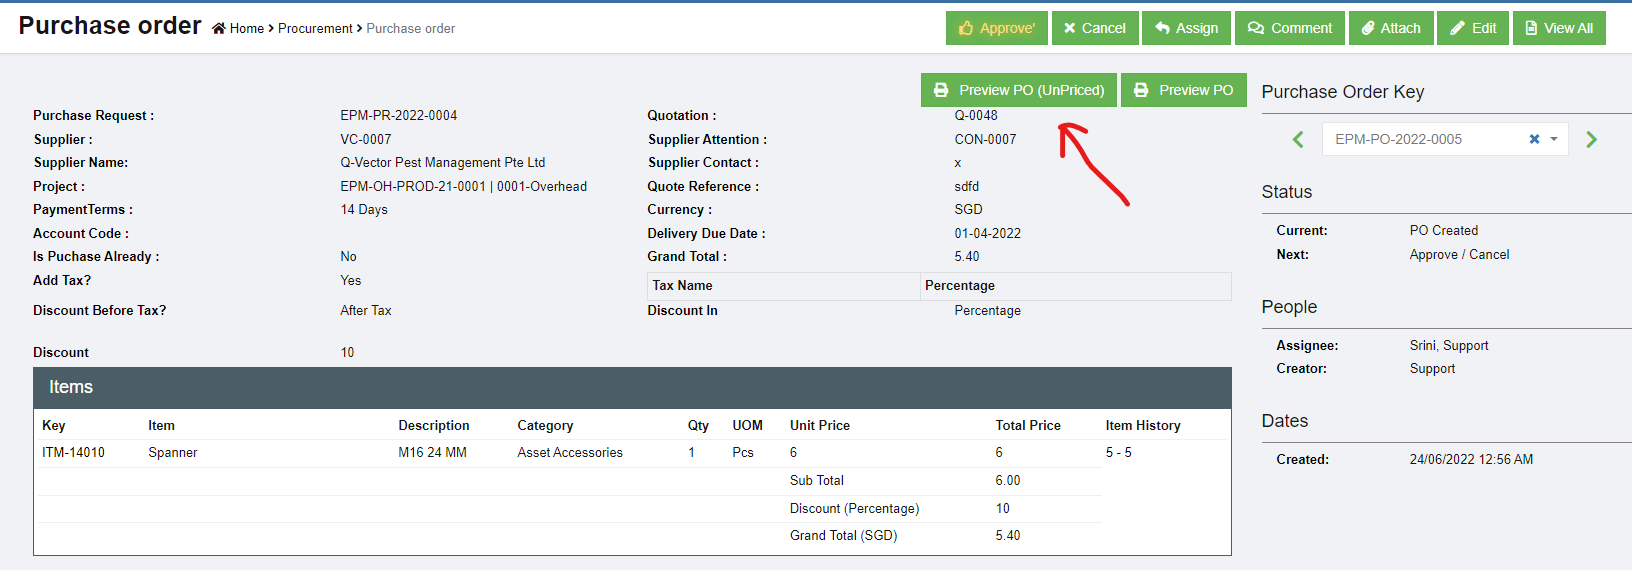](http://wiki.cuteinfocomm.com/uploads/images/gallery/2022-07/image-1659134626980.png)
### Approve PO
Only authorized users can approve PO. If user is granted with the permission to approve, user can click[](http://wiki.cuteinfocomm.com/uploads/images/gallery/2022-07/image-1659135013049.png) button to approve PO. After PO is approved, Preview PO will change to Print PO means that the PO is finalized and approved, user can print and send to suppliers.
[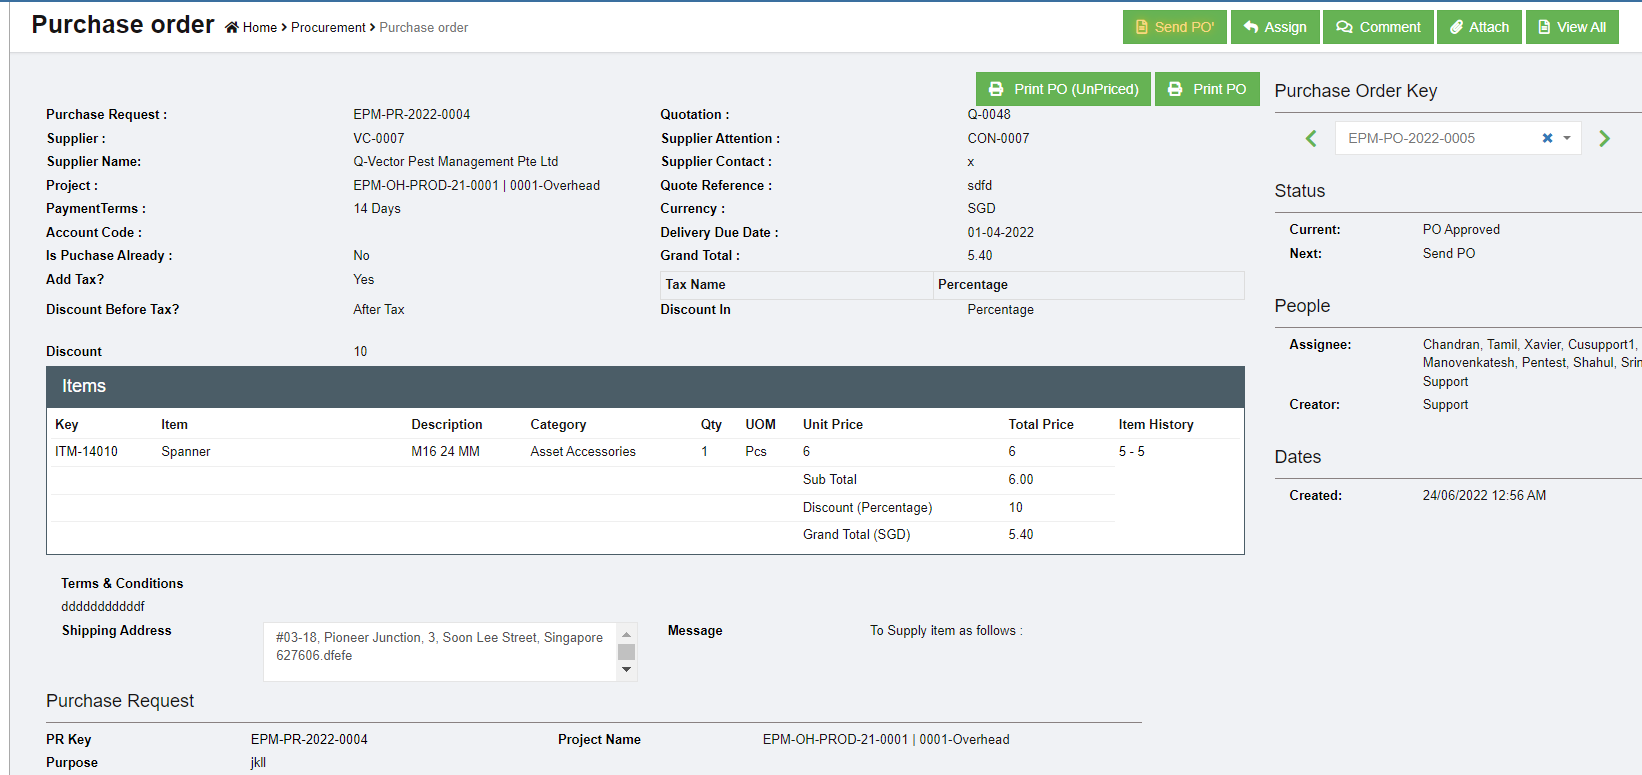](http://wiki.cuteinfocomm.com/uploads/images/gallery/2022-07/image-1659135057081.png)
### Send PO
After PO is approved. Purchaser need to send it to that PO supplier. And the Send PO icon will blink for action.
Click [](http://wiki.cuteinfocomm.com/uploads/images/gallery/2022-07/image-1659135386853.png) , below window opens, and there are two ways to send PO.
[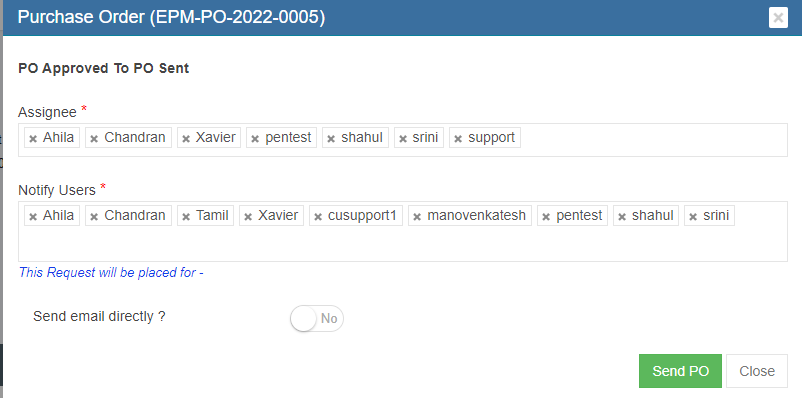](http://wiki.cuteinfocomm.com/uploads/images/gallery/2022-07/image-1659135229112.png)
1. Send email directly from cuteOffice system: click to enable "Send email directly?" to **Yes,** and below emailing window opens. User shall fill up all required information and click **Send PO** at the end. [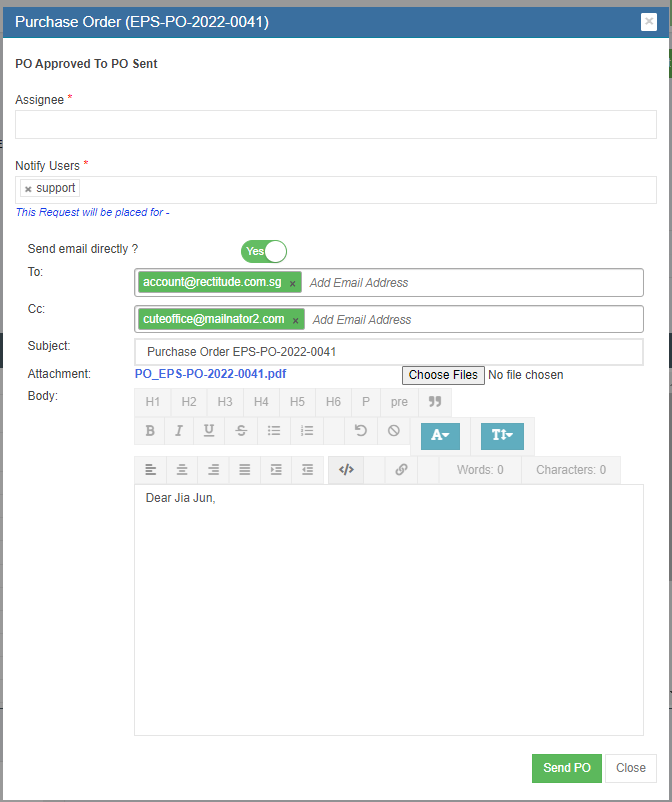](http://wiki.cuteinfocomm.com/uploads/images/gallery/2022-08/image-1659377820626.png)
2. Print PO and email as attachment to suppliers: enable the "Send email directly?" to **NO,** then click send PO to update status. The send PO window will close and redirected to PO detail page, user can click Print PO and download as pdf, and email to suppliers. [](http://wiki.cuteinfocomm.com/uploads/images/gallery/2022-08/image-1659378292491.png)
### Amend PO
If there are any changes agreed by both company and suppliers after PO is sent to suppliers (e.g. supplier side price increase, company side add more quantities etc. ), user can use the **Amend PO** option to amend. After PO is amended, authorized user need to approve the amended PO.
[](http://wiki.cuteinfocomm.com/uploads/images/gallery/2022-08/image-1659378406220.png)
### PO Acknowledgement
After PO is sent to supplier and supplier has acknowledged it, **purchaser** need to upload the signed acknowledgement along with date and other details.
1. To upload PO acknowledgement, click Add button in ‘Acknowledgement PO’ section under PO detail view page.[](http://wiki.cuteinfocomm.com/uploads/images/gallery/2022-08/image-1659378792940.png)
2. The acknowledgement window opens, user shall fill up details and choose acknowledgement file to upload.[](http://wiki.cuteinfocomm.com/uploads/images/gallery/2022-08/image-1659378842601.png)
3. Click **Save** to complete PO acknowledgement, the details will be saved in the acknowledgement PO section. [](http://wiki.cuteinfocomm.com/uploads/images/gallery/2022-08/image-1659379054846.png)
### Receiving Entry
Store keeper role users need to fill up delivery order details and attach delivery order copy to system once items received from suppliers. System allows for multiple receive entry against each PO. The Receiving Entry section is in the PO detail view page, see below,
[](http://wiki.cuteinfocomm.com/uploads/images/gallery/2022-08/image-1659379297770.png)
1. To register receive entry, click Add button in Receiving Entry section, below receive entry window opens, [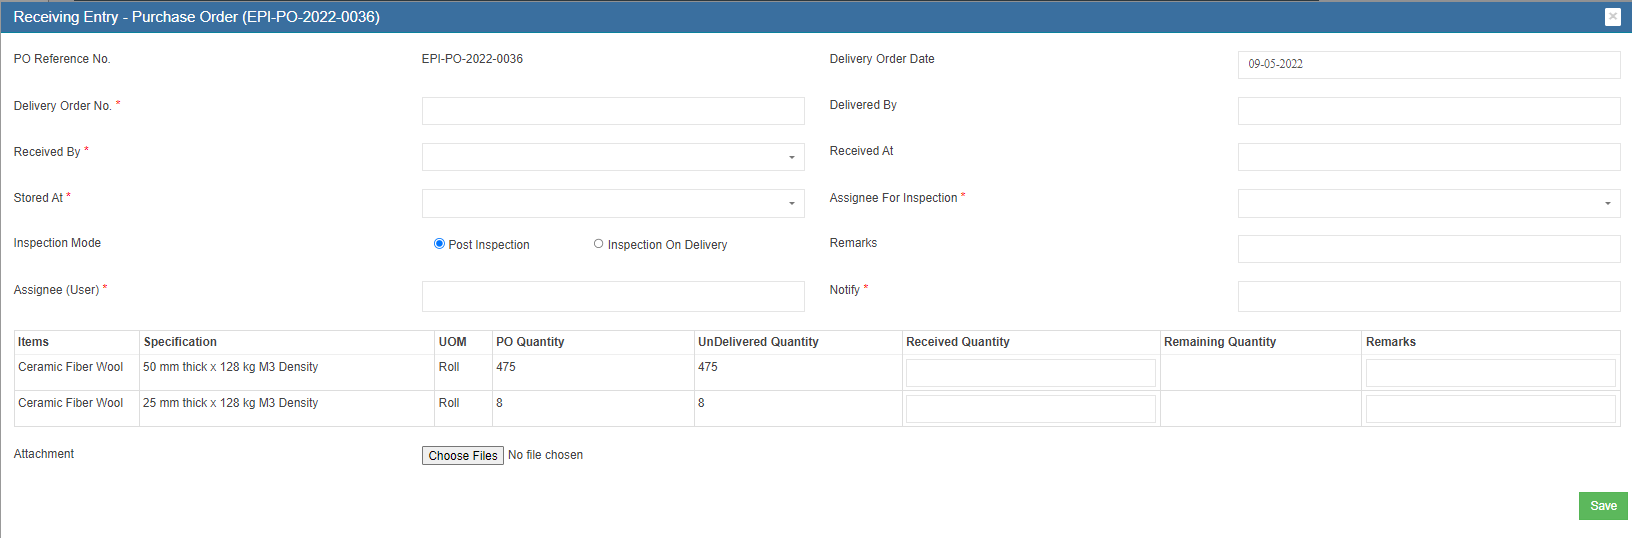](http://wiki.cuteinfocomm.com/uploads/images/gallery/2022-08/image-1659379411707.png)
2. Store keepers shall fill up all details and the correct quantities received, then click **Save** to save details entered. [](http://wiki.cuteinfocomm.com/uploads/images/gallery/2022-08/image-1659379526038.png)
### Inspection
Every receiving entry need to inspected to ensure quality purchasing. Inspection is usually done by PR creator or Project Manager. The Inspect button is located in the receiving entry section, see below,
[](http://wiki.cuteinfocomm.com/uploads/images/gallery/2022-08/image-1659379746286.png)
1. To inspect, click the Inspect button, below inspection window opens,[](http://wiki.cuteinfocomm.com/uploads/images/gallery/2022-08/image-1659379716508.png)
2. User need to enter the accepted quantity and click **Save**. After click the save button then system will increase/add the quantity into store’s stock. And the inspection section will be updated with inspection details, [](http://wiki.cuteinfocomm.com/uploads/images/gallery/2022-08/image-1659379941355.png)
### Invoice Entry
Account Executive role user shall do the Invoice Entry which means enter supplier’s invoice into the system. Attachment is compulsory for invoice entry. System allow multiple invoice entries for each PO. The Invoice Entry is located in PO detail view page, see below,
[](http://wiki.cuteinfocomm.com/uploads/images/gallery/2022-08/image-1659381313579.png)
1. To do invoice entry, click the Add button, the invoice entry window opens, [](http://wiki.cuteinfocomm.com/uploads/images/gallery/2022-08/image-1659381423811.png)
2. check and fill up the invoice amount and other details, attach invoice copy and click **Save**. The details of invoice entered will be save and updated in invoice entry section, [](http://wiki.cuteinfocomm.com/uploads/images/gallery/2022-08/image-1659381610163.png)
### Payment Entry
Account Executive role users shall do payment entry once invoice is cleared. Payment entry can be done against entire PO or against multiple invoices for this PO. The Payment entry is located in the PO detail view page, see below,
[](http://wiki.cuteinfocomm.com/uploads/images/gallery/2022-08/image-1659381743991.png)
1. To entry payment record, click Add button in payment section, below payment window opens, [](http://wiki.cuteinfocomm.com/uploads/images/gallery/2022-08/image-1659381854637.png)
2. User can do either payment against Invoice, or against PO,
- Payment against Invoice: click and choose Invoice as entry method, and enter details in invoice payment window[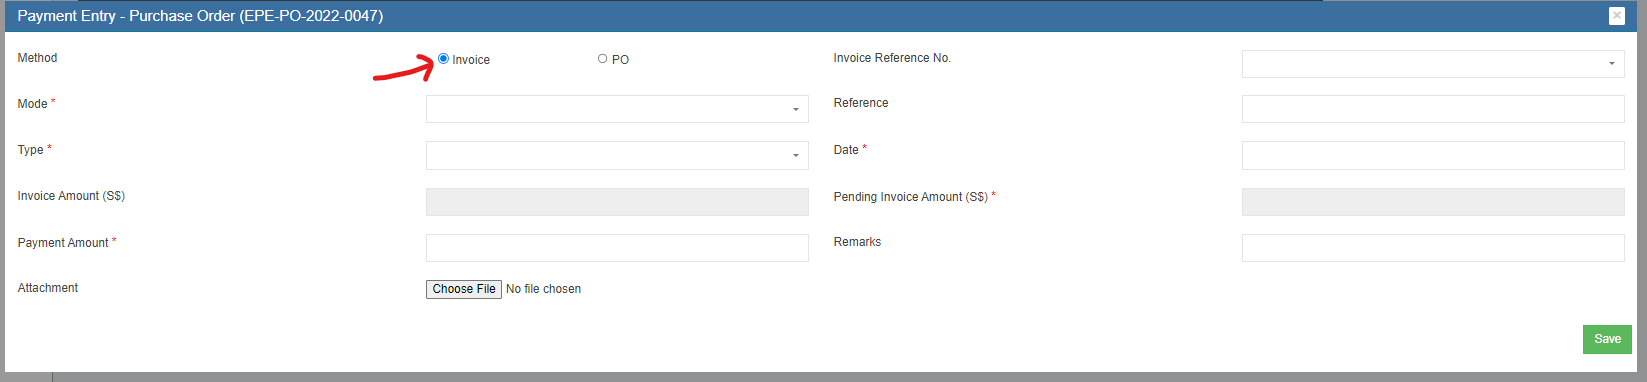](http://wiki.cuteinfocomm.com/uploads/images/gallery/2022-08/image-1659382022335.png)
- Payment against PO, click and choose PO as entry method, and enter detail in PO payment window [](http://wiki.cuteinfocomm.com/uploads/images/gallery/2022-08/image-1659382130968.png)
3. Click **Save.** The payment details entered will be saved. [](http://wiki.cuteinfocomm.com/uploads/images/gallery/2022-08/image-1659382248404.png)
**Note: Once PO Acknowledgement, Receiving entry, inspection, invoice, payment entry are completed in the system, the Po**
**status will automatically change to ‘PO Completed’**
#### **Purchase module Integration to Financial Accounting module**
As part of Integration, invoices created in Purchase module against the Purchase Order raised and linked to the Financial Module Staging location. Subsequently, customer need to approve the vouchers in the Staging location which will then reflect in the accounting entries as per the below configuration created.
Please follow the below steps to post entries from the Purchase Module to Financial Module Staging location.
**Step1: To enable Purchase Module Integration to Accounts for a Company**
**In Cute Office, Admin -> Company -> Select Edit.**
[](https://wiki.cuteinfocomm.com/uploads/images/gallery/2024-04/image-1713258686904.png)
Settings ->
**Step 1: Configuration Name - Purchase Module Linked To Finance**
-> Select Edit -> Make Value as **Yes.** *By default this value will be No*
**[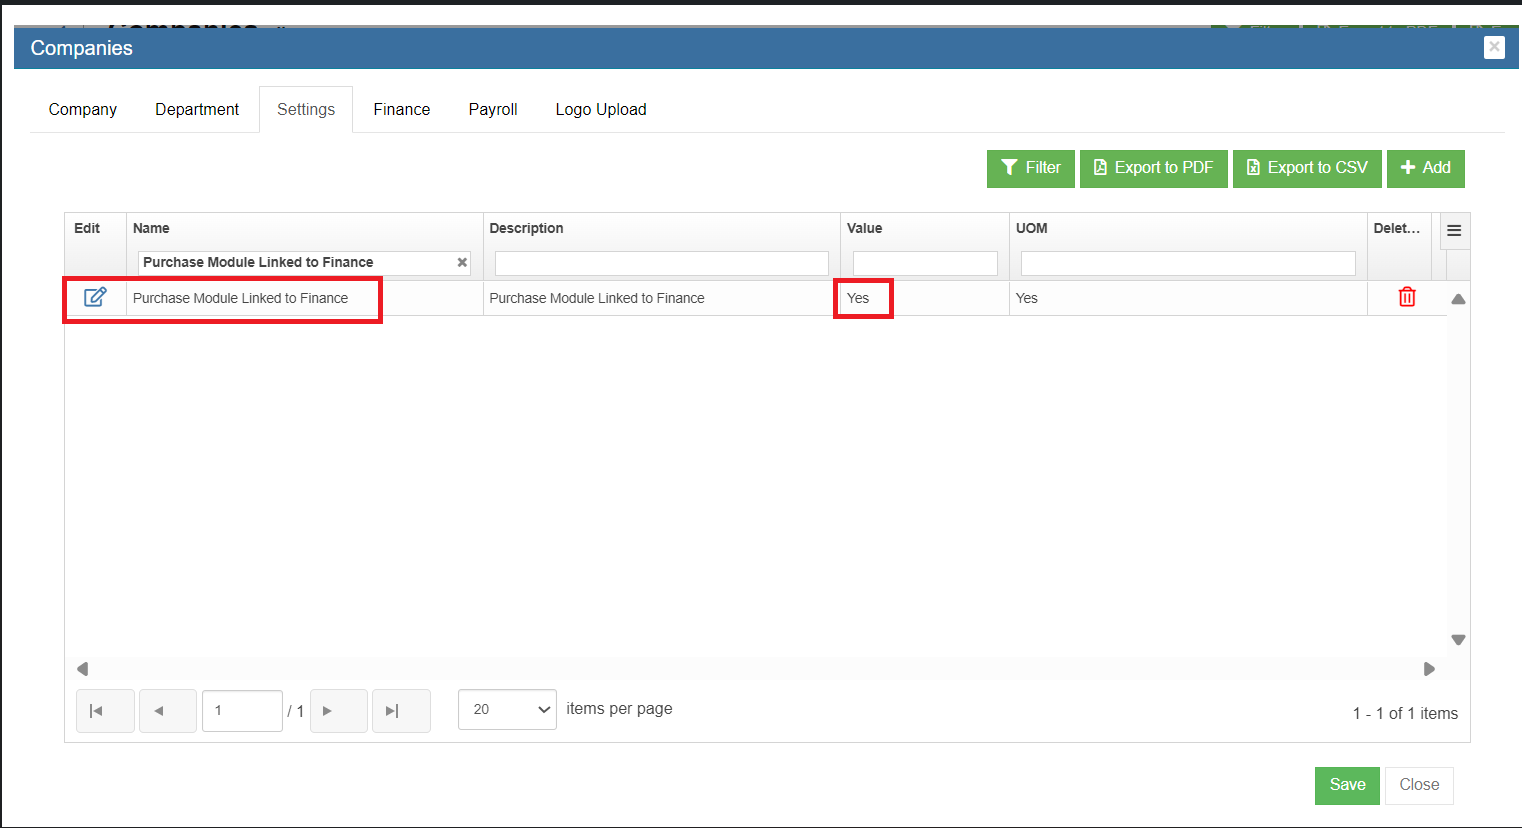](https://wiki.cuteinfocomm.com/uploads/images/gallery/2024-04/image-1713259099378.png)**
Step 2: Enable Permission to the User to Configure GL Accounts Codes to be linked to Accounting Module**
**Permission Name - InventoryLinkAccount**
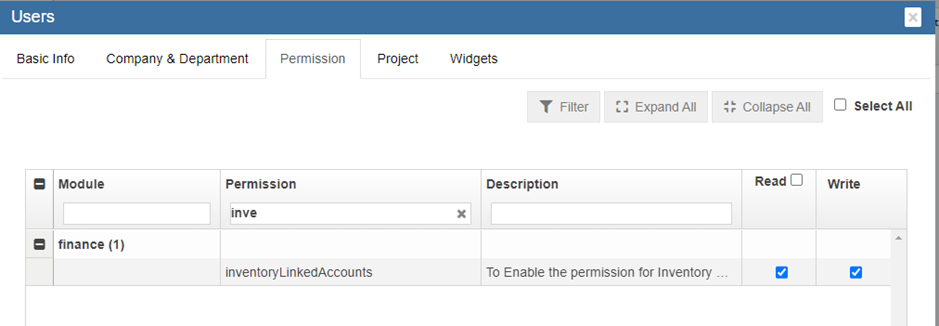
Step 3: Linking GL Account Code to Items (will be available only if Permission is provided through Step 2 is enabled)**
-> **Go To Finance -> Link Account Setup -> Inventory Linked Menu option**
-> **Setup All Asset Category and Non-Asset Category and Goods In Transit Account for GL Insert**
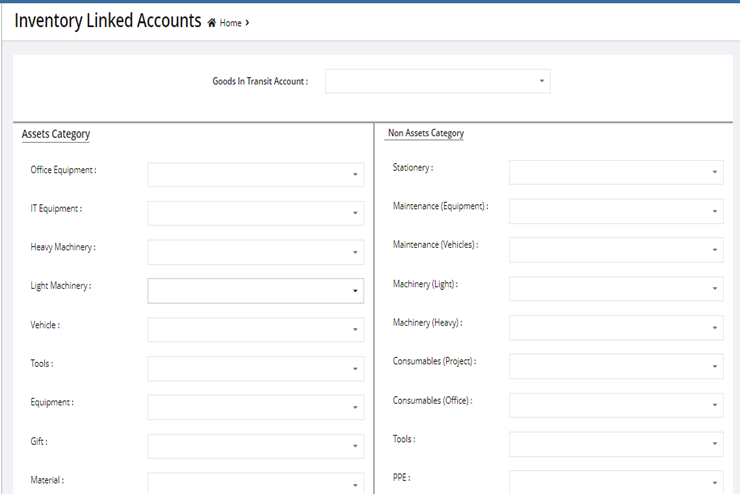
**Step 4: Posting Purchase Orders to Financial Accounting Module**
Go to Procurement-> Purchase Order-> View any PO.
**Post To Accounts** Tab Will be Available In **Invoice Entry Table**
**Click Post To Account** to post the invoice to Accounting Module
[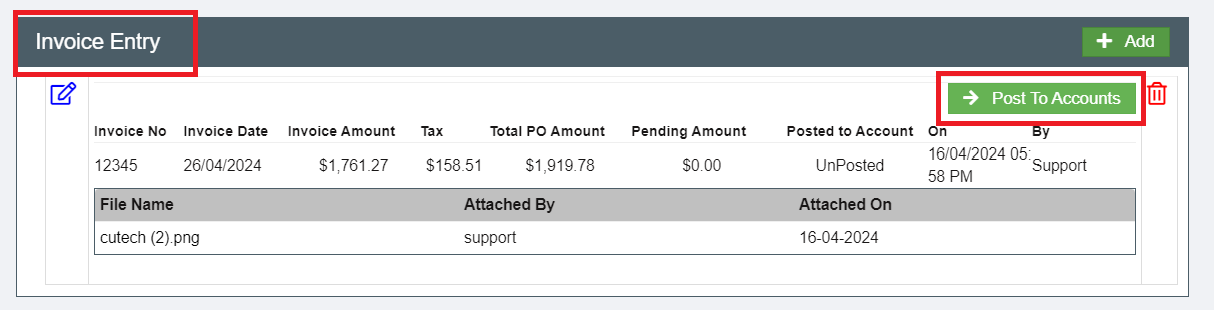](https://wiki.cuteinfocomm.com/uploads/images/gallery/2024-04/image-1713261643957.png)
**Step 5: Enable Permission to View / Post Vouchers in Staging Location**
Go To-> Admin -> Users -> Permissions Tab
- To View Staging Menu In Finance -> Enable the Permission.
[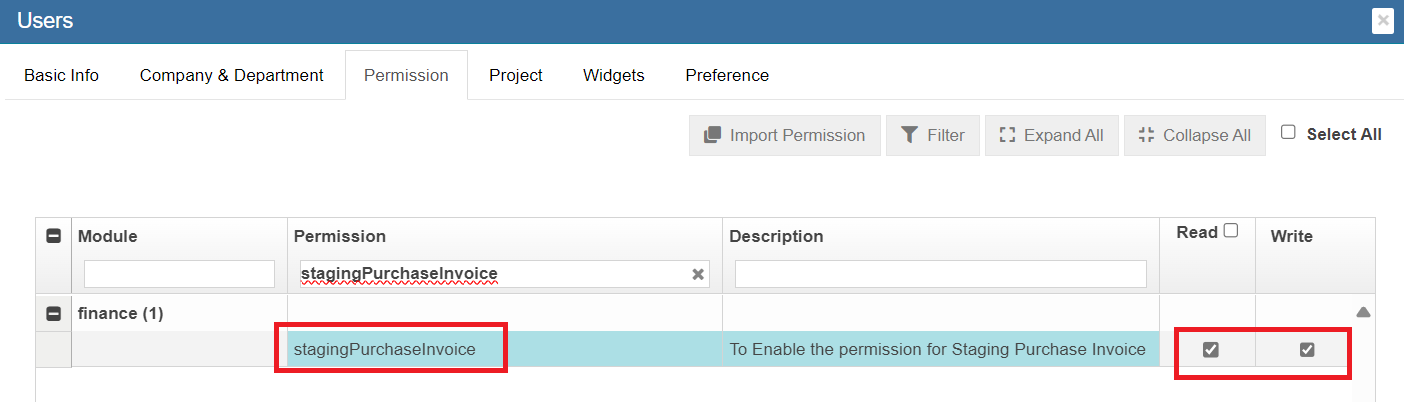](https://wiki.cuteinfocomm.com/uploads/images/gallery/2024-04/image-1713261058618.png)
**Step 6: To Approve the Vouchers to Accounting Module**
Go To -> Finance - > Module Integration Staging
1. Staging Purchase Invoice
[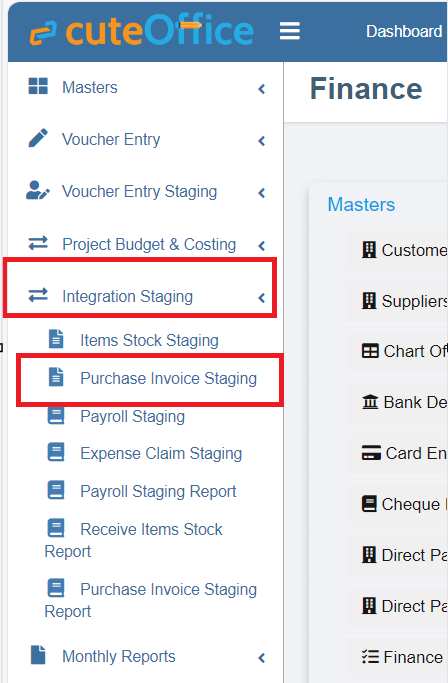](https://wiki.cuteinfocomm.com/uploads/images/gallery/2024-04/image-1713261327450.png)
- To View and Approve the Posted Invoices In Staging Area.
# Inventory
Inventory module provides systematic way to record items received from purchasing, inspect, store and stock management, asset management, write-off, issuance and returns. Inventory module includes below submenus:
[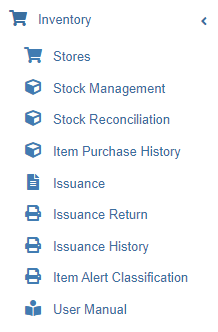 ](http://wiki.cuteinfocomm.com/uploads/images/gallery/2022-08/image-1659389119106.png)
## Stores
Store master contains the list of stores. System allows to add store with person in charge and project.
### View Stores
Click **Stores** in Inventory module menu, the list of stores added in system will show as below,
[](http://wiki.cuteinfocomm.com/uploads/images/gallery/2023-04/image-1682107336046.png)
To view individual store details, click the key of the store, the store detail page opens,
[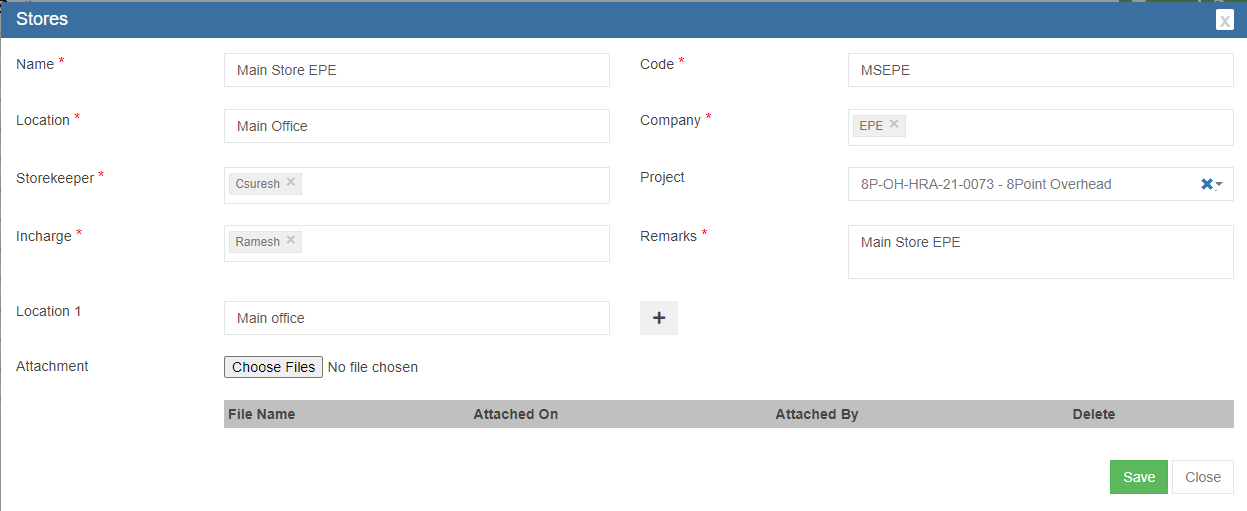](http://wiki.cuteinfocomm.com/uploads/images/gallery/2022-08/image-1659396342876.png)
### Add/Edit Store
If store’s in charge person have project manager role in user profile, then the user has permission to approve this store’s issuance requests. System allows for multiple locations for each store.
To add store,
1. click [](http://wiki.cuteinfocomm.com/uploads/images/gallery/2022-08/image-1659396560874.png) button in store list view page, below store detail page opens,[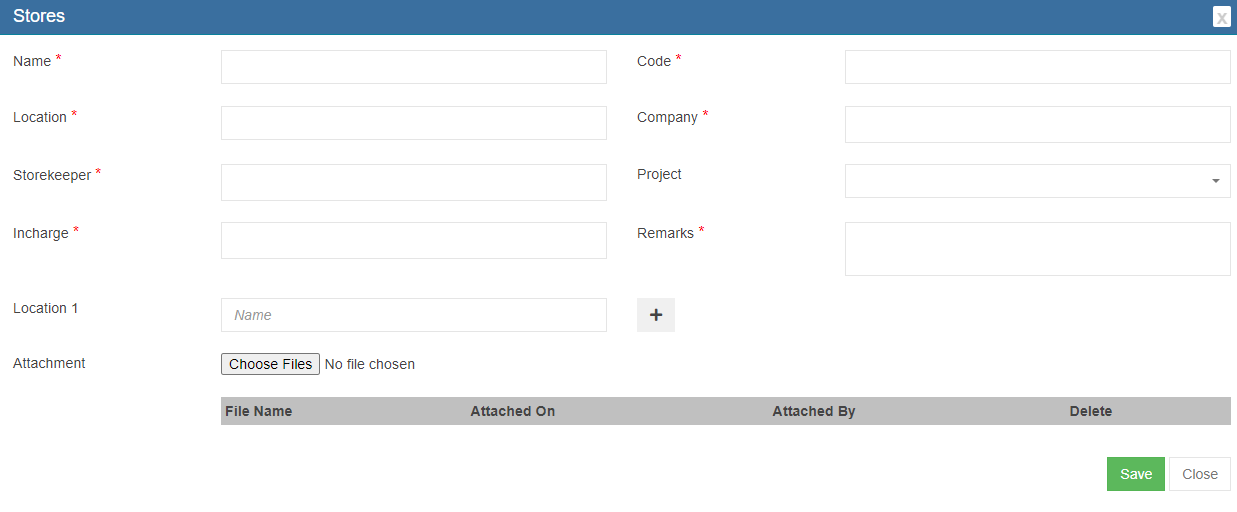](http://wiki.cuteinfocomm.com/uploads/images/gallery/2022-08/image-1659396521317.png)
2. Fill up all required details. If the store has multiple locations, click the[](http://wiki.cuteinfocomm.com/uploads/images/gallery/2022-08/image-1659396661533.png) icon after the location 1 and enter location details.
3. Click **Save**. The store is added in system.
To edit store,
1. Click[](http://wiki.cuteinfocomm.com/uploads/images/gallery/2022-08/image-1659396878886.png)in front of the store in store list view, the store detail page opens.
2. Edit with updated information, then click **Save** to save edits.
## Stock Management
**Note:** The quantity of item that categorized as ‘Asset’ and/or ‘Asset Accessories’ is always 1. The rest of item's quantity
is always greater than 1.
To view the stores' stock, click ‘Stock Management’ submenu in the Inventory menu. The stock management (Store Items) page opens as below,
[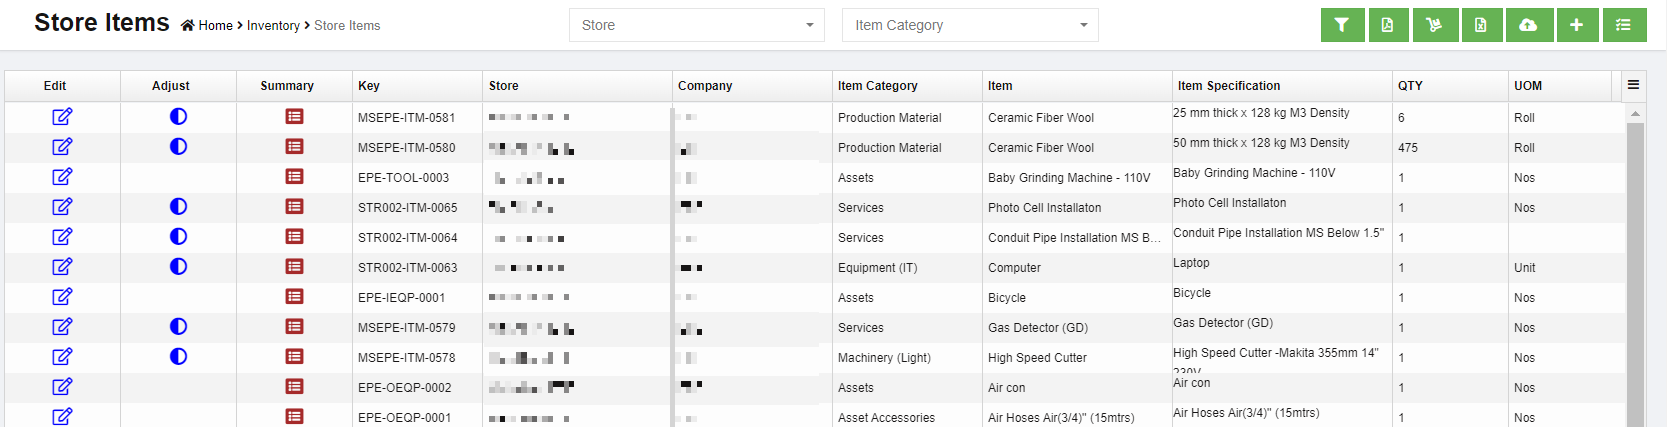](http://wiki.cuteinfocomm.com/uploads/images/gallery/2023-04/image-1682107396779.png)
#### Filter Store Item
Users can filter store item using filters as below:
[](http://wiki.cuteinfocomm.com/uploads/images/gallery/2022-08/image-1659545291770.png)
- Select store from dropdown list
- Select item category from dropdown list
- Or click the[](http://wiki.cuteinfocomm.com/uploads/images/gallery/2022-08/image-1659545356466.png) button to enable more filters [](http://wiki.cuteinfocomm.com/uploads/images/gallery/2022-08/image-1659545434168.png)
#### Store Item Summary
In item summary page, users can view the purchase history, store stock details, adjustment history, issuance and return
history of the item.
Click [](http://wiki.cuteinfocomm.com/uploads/images/gallery/2022-08/image-1659545655946.png)(Summary icon), the summary details of the item will show as below,
[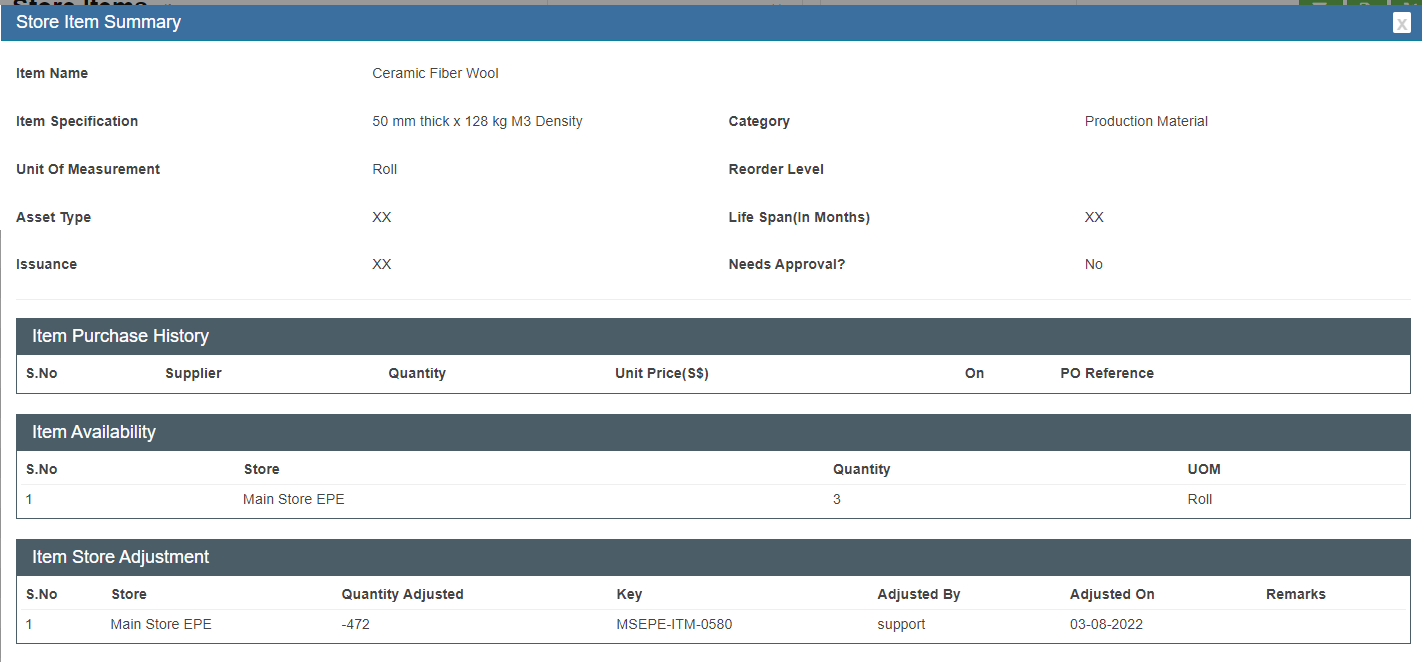](http://wiki.cuteinfocomm.com/uploads/images/gallery/2022-08/image-1659545599905.png)
#### Item Quantity Adjustment
Users can adjust the item quantity manually. System will record the history of adjustments. Store item quantity adjustment can only be done for items that are not categorized as ‘Asset’ and ‘Asset Accessories’
Click[](http://wiki.cuteinfocomm.com/uploads/images/gallery/2022-08/image-1659545983153.png) (adjustment button), the item quantity adjustment window opens. In **New Quantity** field, enter the updated quantity figure. E.g. if enter as 3, then the total quantity of the item becomes 3.
[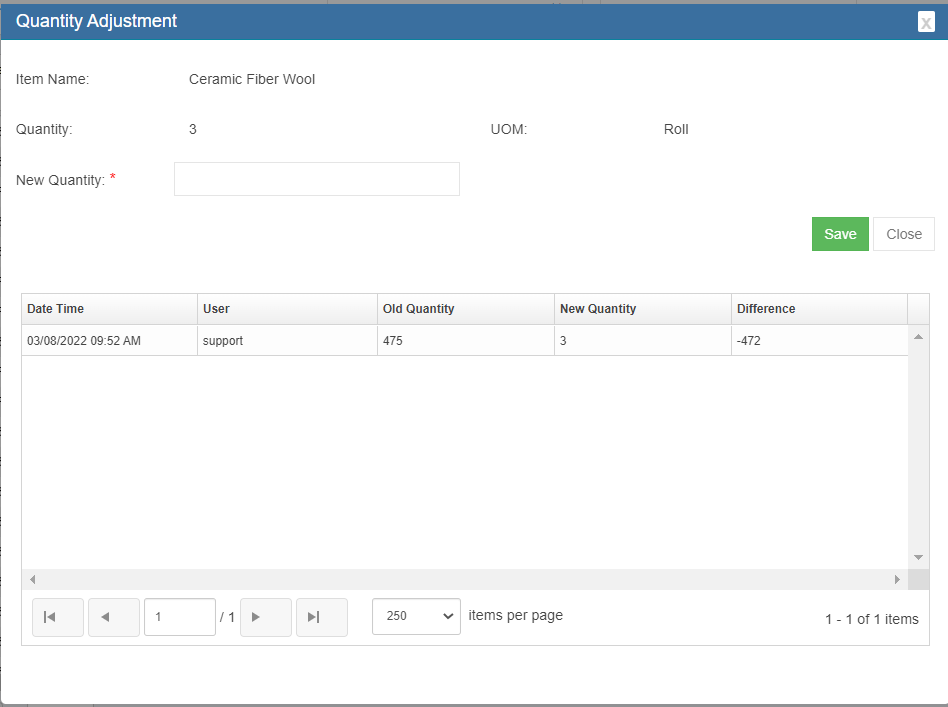](http://wiki.cuteinfocomm.com/uploads/images/gallery/2022-08/image-1659546088294.png)
#### Calibration, Maintenance, License, Warranty of Asset
The stock management also provides options to manage assets items. If there is any change in asset calibration, maintenance, license and warranty details, user can[](http://wiki.cuteinfocomm.com/uploads/images/gallery/2022-08/image-1659546566123.png)edit button of an asset item, and navigate to the relevant tabs, and fill up with updated information. Then click **Save**.
[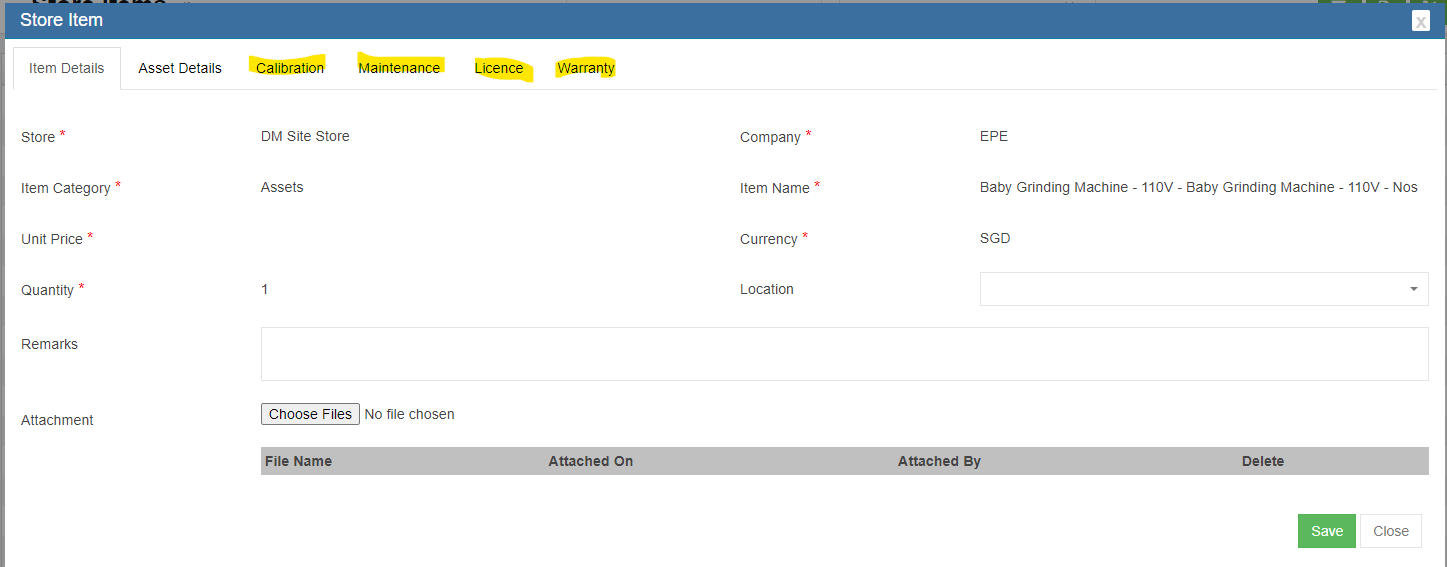](http://wiki.cuteinfocomm.com/uploads/images/gallery/2022-08/image-1659546660696.png)
### Stock Reconciliation
Stock reconciliation provides all information of the items recorded in system such as purchase history, issuance, adjustment etc.., this is to help companies reconcile inventory periodically to find any discrepancies in stock that need to be addressed.
User can filter, and/or export details to excel or PDF file.
[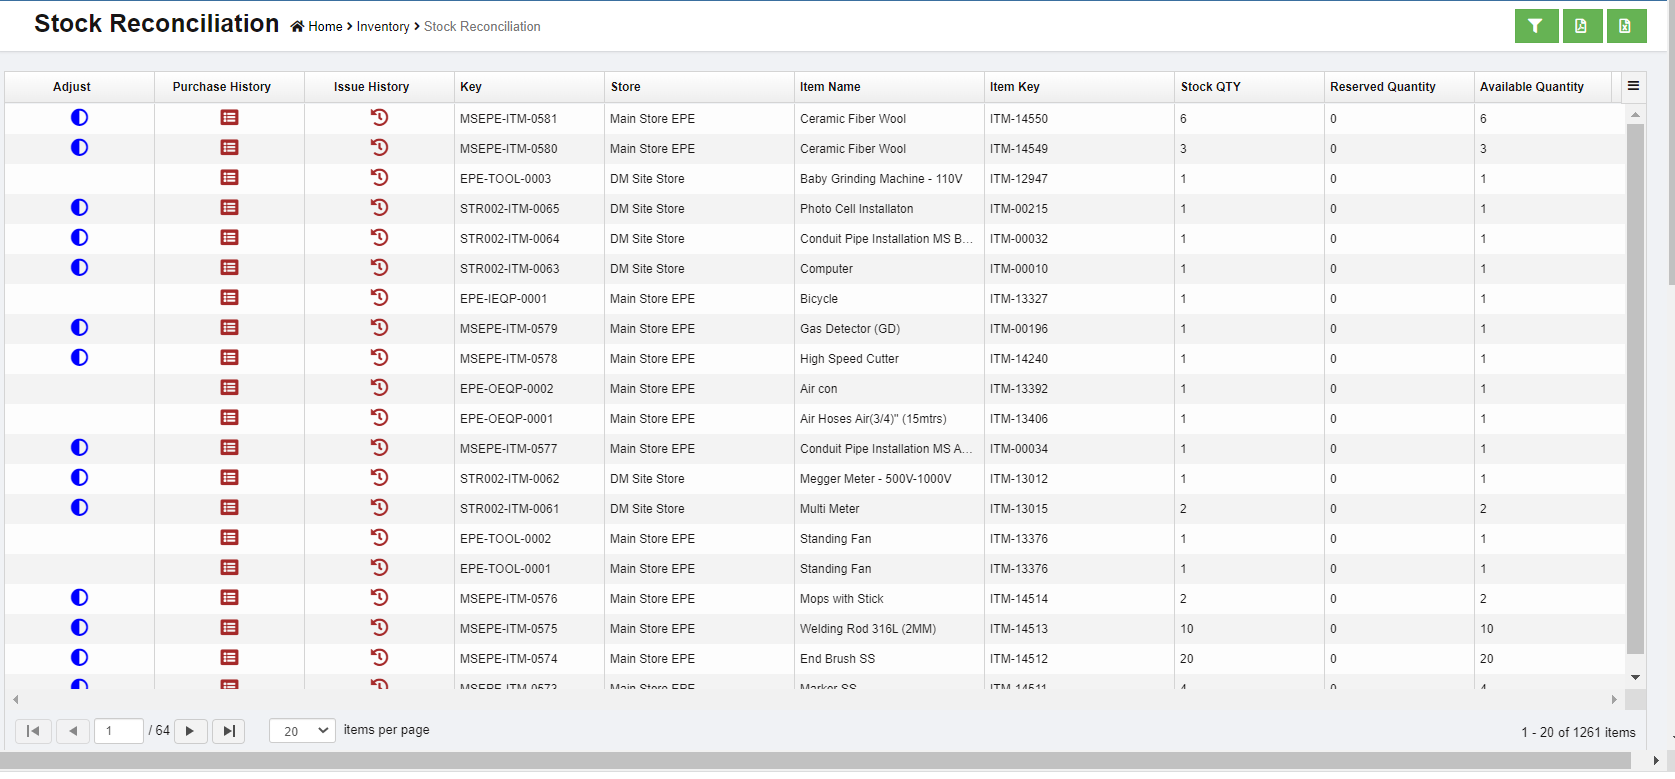](http://wiki.cuteinfocomm.com/uploads/images/gallery/2022-08/image-1659546794767.png)
### Item Purchase History
Item purchase history provides both item wise purchase history against **PO**.
[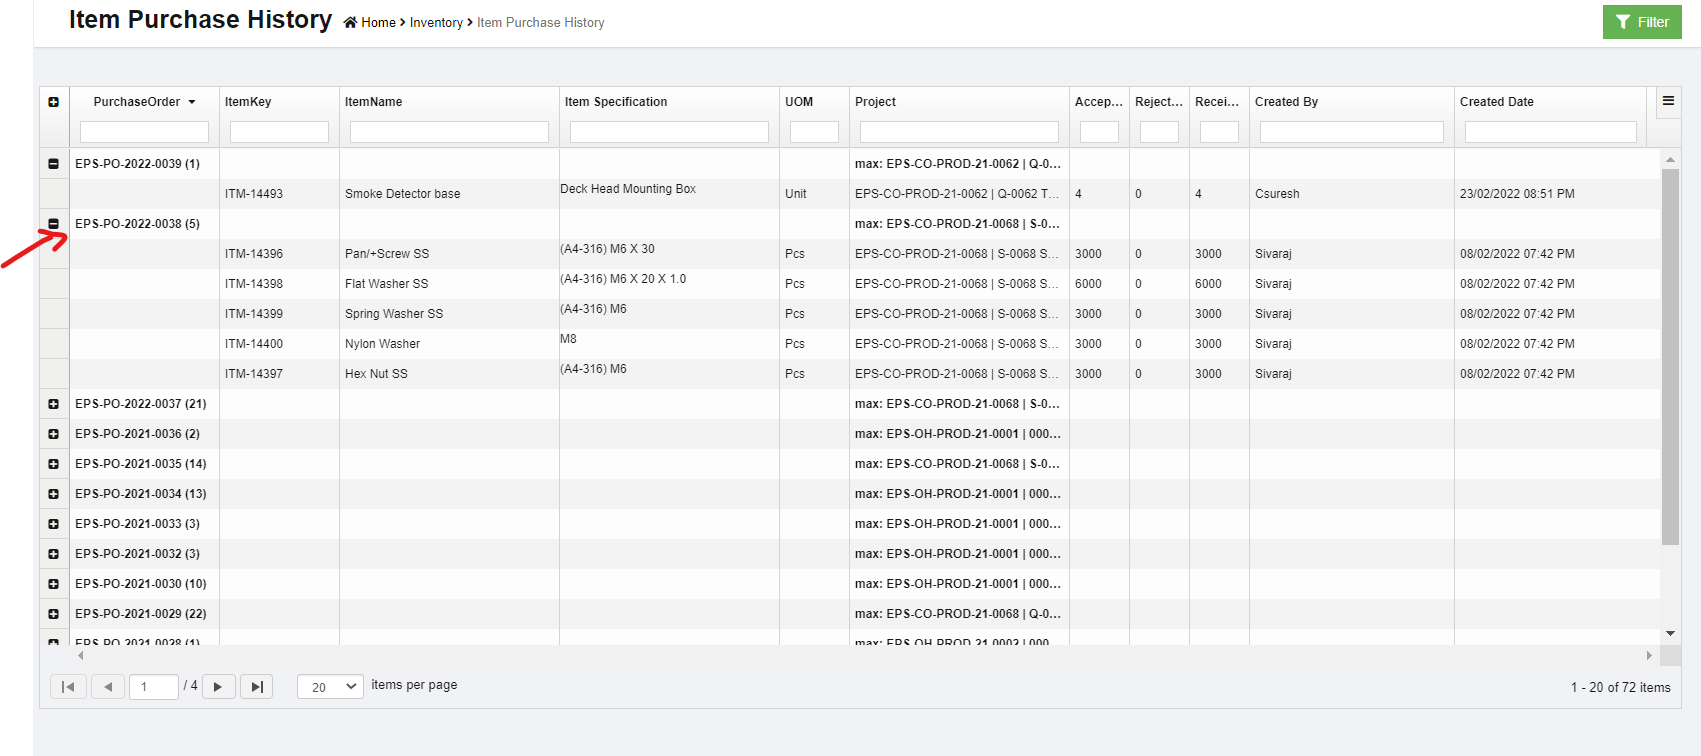](http://wiki.cuteinfocomm.com/uploads/images/gallery/2022-08/image-1659568138983.png)
### Issuance
The item inventory shall always be issued from a warehouse and recorded in system when it is required in the production activities. Or when there is available stock for the item that is requested in MR, system will provide option to **"Recommend to Issuance"**.
Click **Issuance** in Inventory menu, the store issuance page opens, it will list all history records of issuance.
[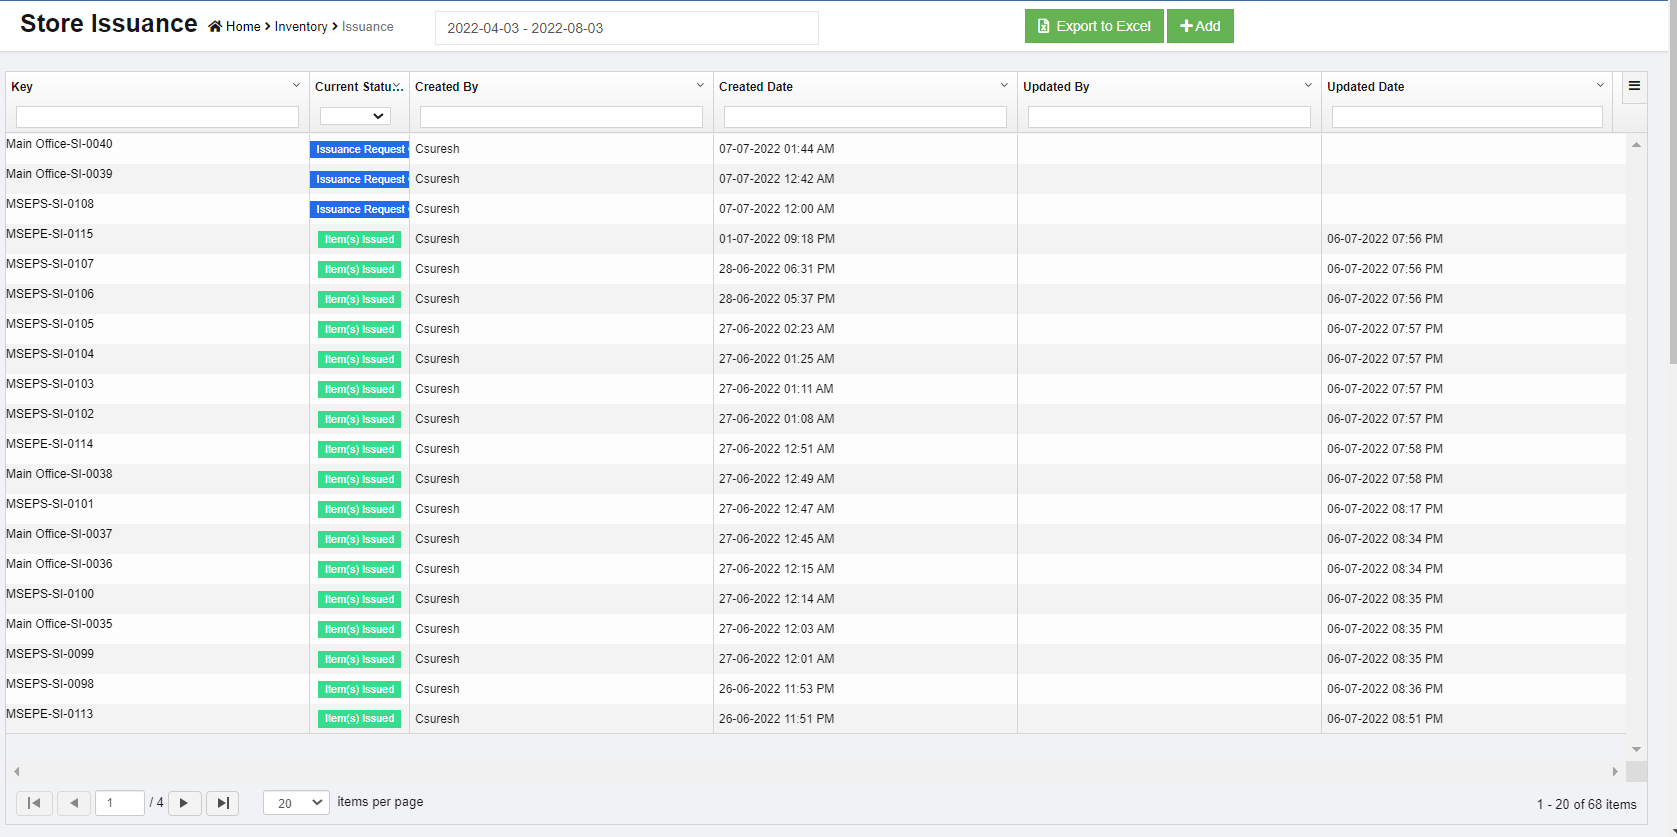](http://wiki.cuteinfocomm.com/uploads/images/gallery/2022-08/image-1659568559988.png)
#### Add Issuance Request
When any item is requested to issue from store stock, user shall add new issuance request.
1. Click [](http://wiki.cuteinfocomm.com/uploads/images/gallery/2022-08/image-1659573901031.png) in issuance list view page, below issuance window opens, [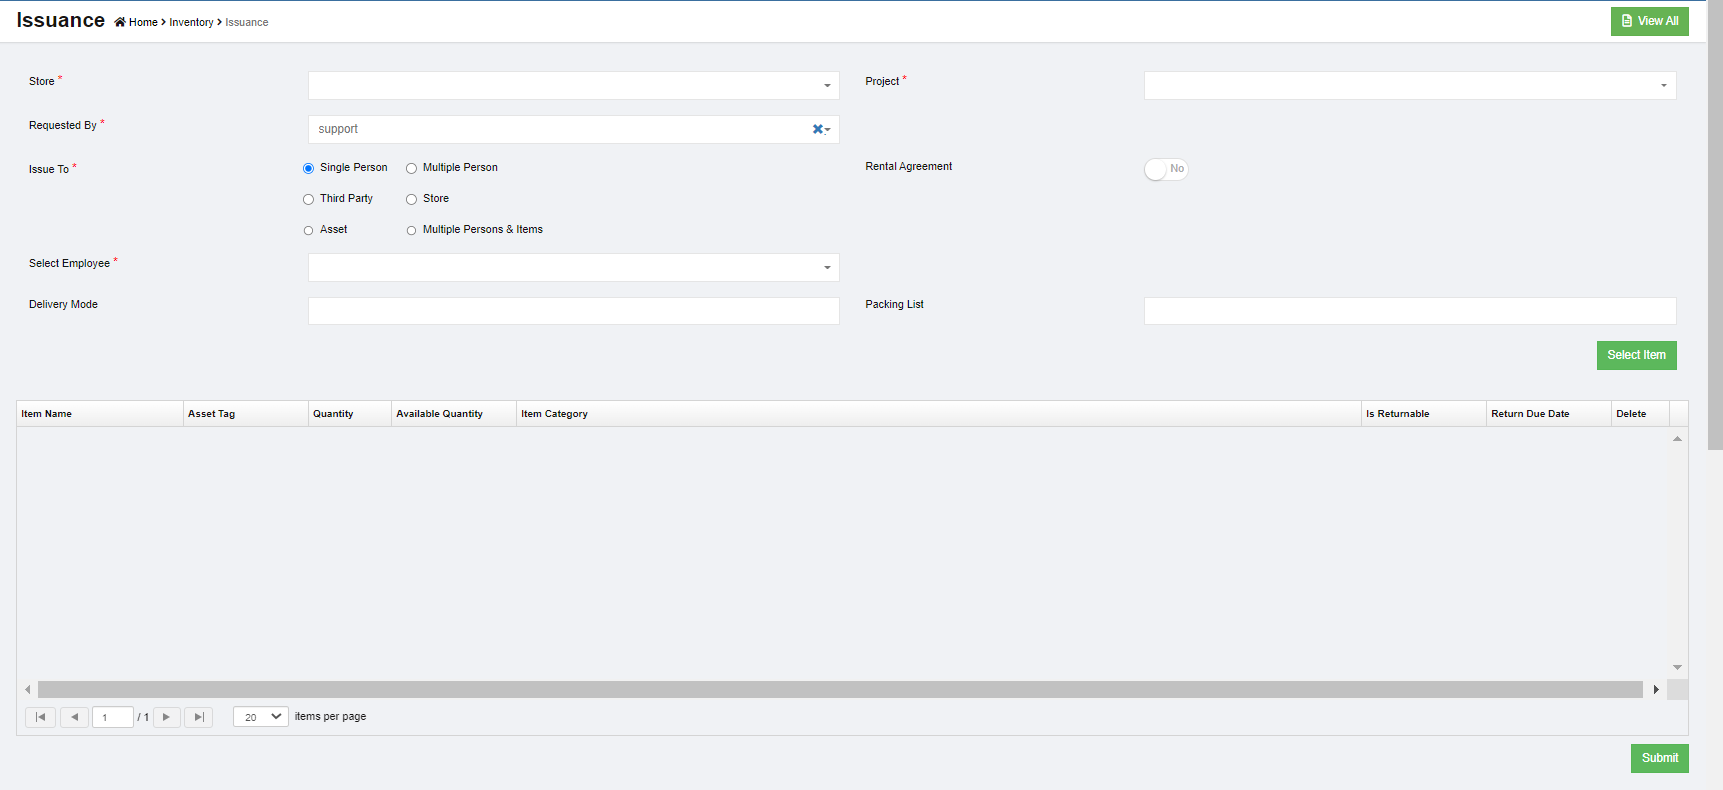](http://wiki.cuteinfocomm.com/uploads/images/gallery/2022-08/image-1659895450115.png)
2. Fill up all mandatory information in above window:
- Store-select issuance store from dropdown list
- Project-select project name to issue items
- Request By-the login username will automatically populated as request by user.
- Rental agreement-if issuance is for rental, click to enable to **yes**, then click "Rental Agreement" to enter rental and delivery order details, and **Save.**[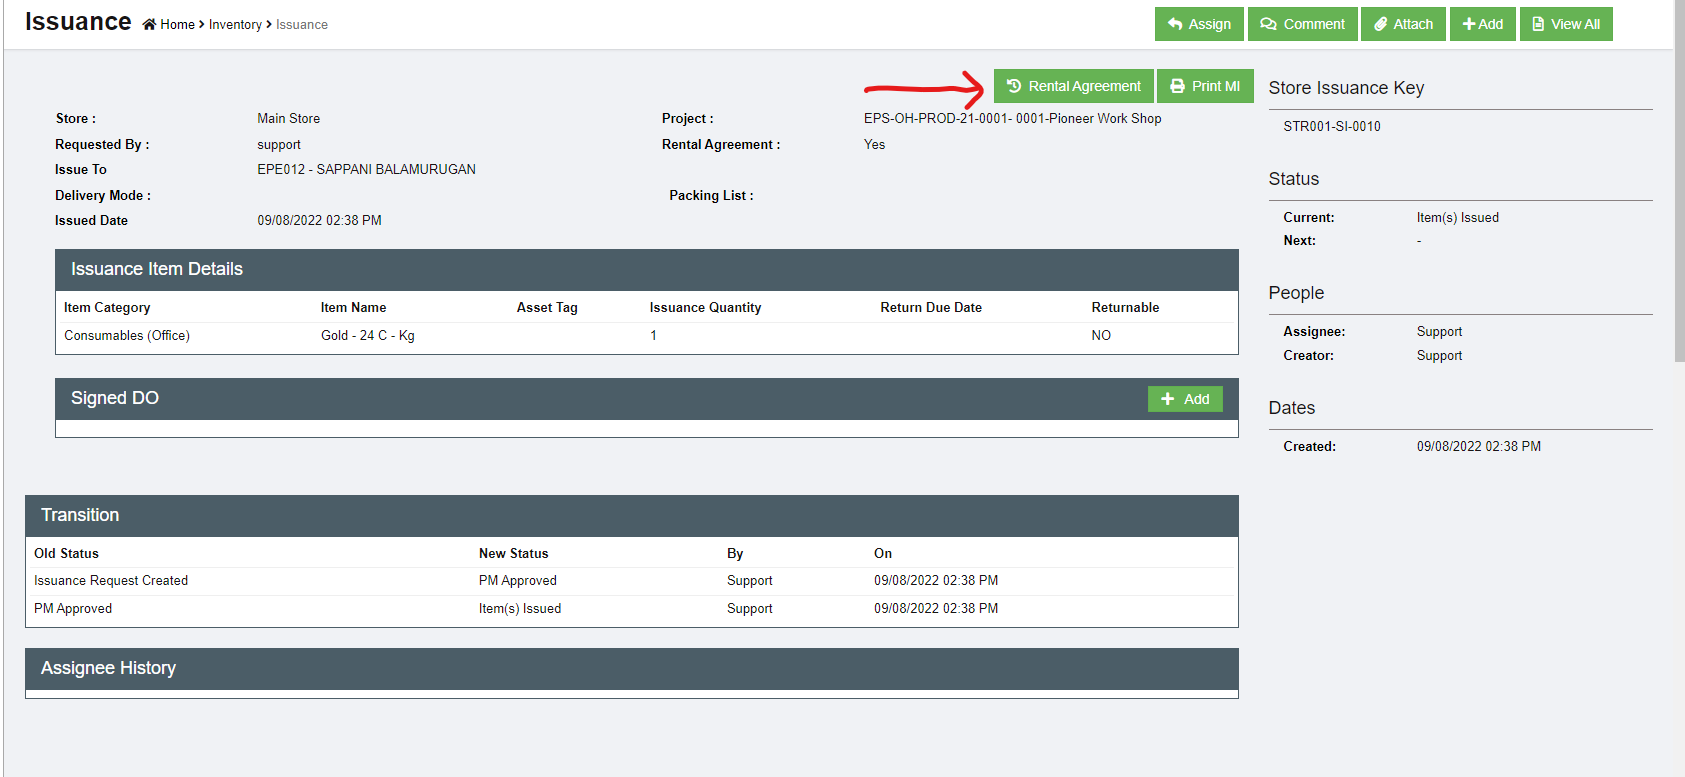](http://wiki.cuteinfocomm.com/uploads/images/gallery/2022-08/image-1660081277541.png)
[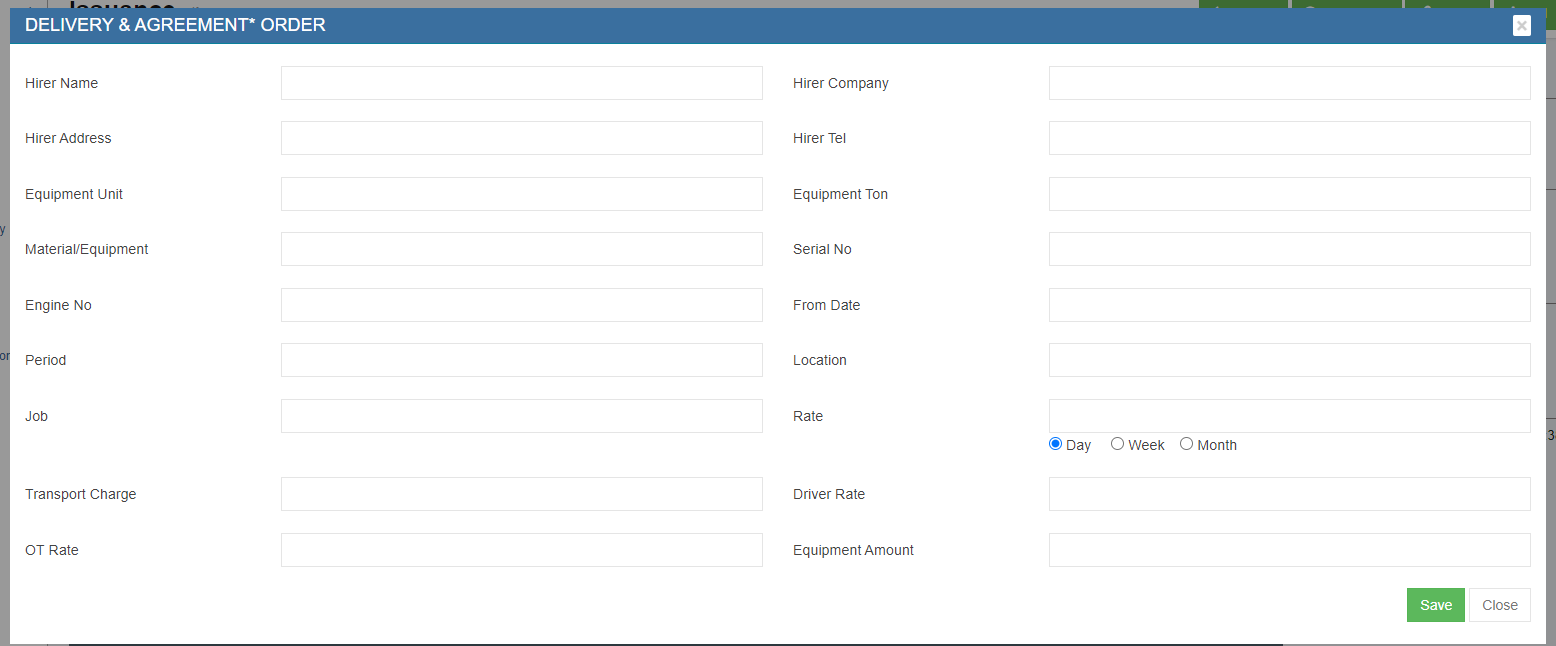](http://wiki.cuteinfocomm.com/uploads/images/gallery/2022-08/image-1660081242577.png)
- Issue To-system provides below options, each option will populate different information table for user to fill up:
- Single Person-select an employee from dropdown list [](http://wiki.cuteinfocomm.com/uploads/images/gallery/2022-08/image-1659895706347.png)
- Multiple Persons-select multiple employees from dropdown list [](http://wiki.cuteinfocomm.com/uploads/images/gallery/2022-08/image-1659895733681.png)
- Third Party-enter third party company, contact ,and other details [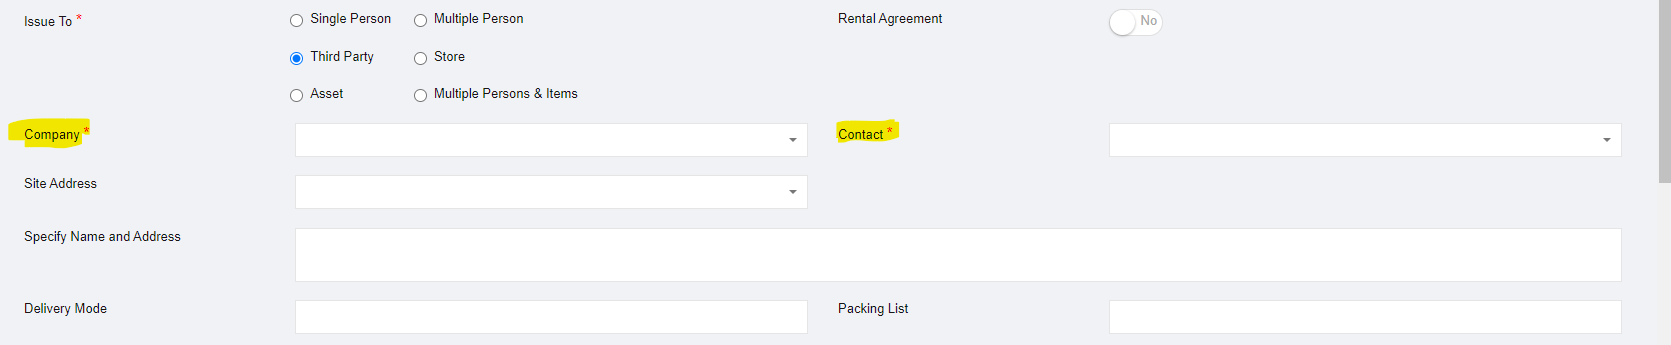](http://wiki.cuteinfocomm.com/uploads/images/gallery/2022-08/image-1659895763424.png)
- Store-select store to receive issuance [](http://wiki.cuteinfocomm.com/uploads/images/gallery/2022-08/image-1659895796636.png)
- Asset-select asset and [](http://wiki.cuteinfocomm.com/uploads/images/gallery/2022-08/image-1659895836764.png)
- Multiple persons & items [](http://wiki.cuteinfocomm.com/uploads/images/gallery/2022-08/image-1659897124914.png)
3. Then click **Select Item,** and select items in the popup window as below [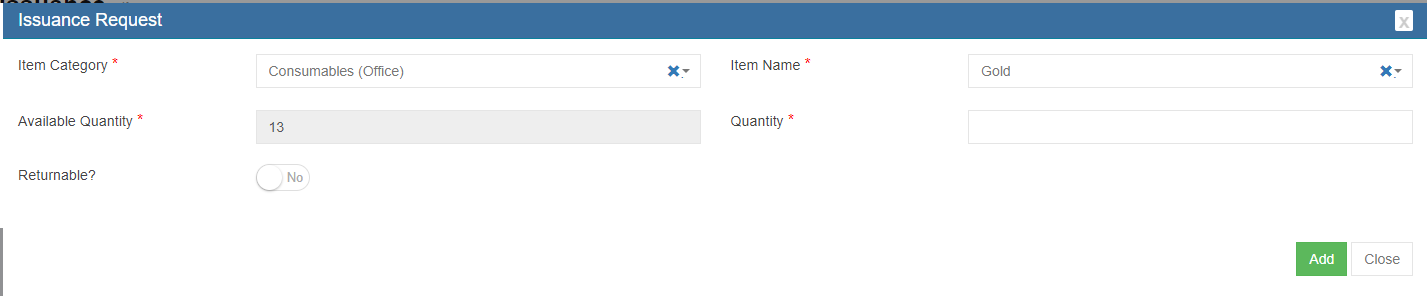](http://wiki.cuteinfocomm.com/uploads/images/gallery/2022-08/image-1659897446182.png)
4. Click **Submit** to submit issuance request, the issuance notification window opens, check and select assignee and notify users and click **Confirm**. [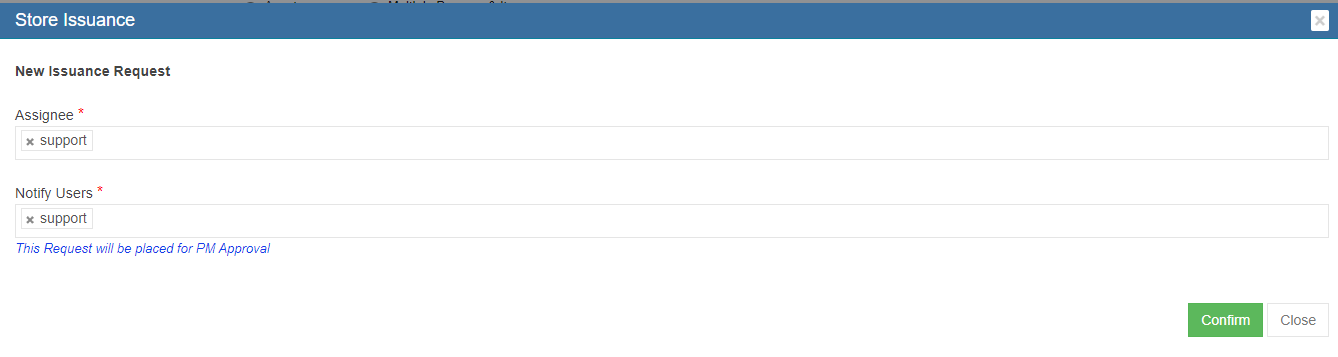](http://wiki.cuteinfocomm.com/uploads/images/gallery/2022-08/image-1659897512081.png)
5. An unique key will be generated and assigned to the issuance request, and page will be redirected to issuance request detail page as below screenshot. There are multiple action buttons in issuance detail page.[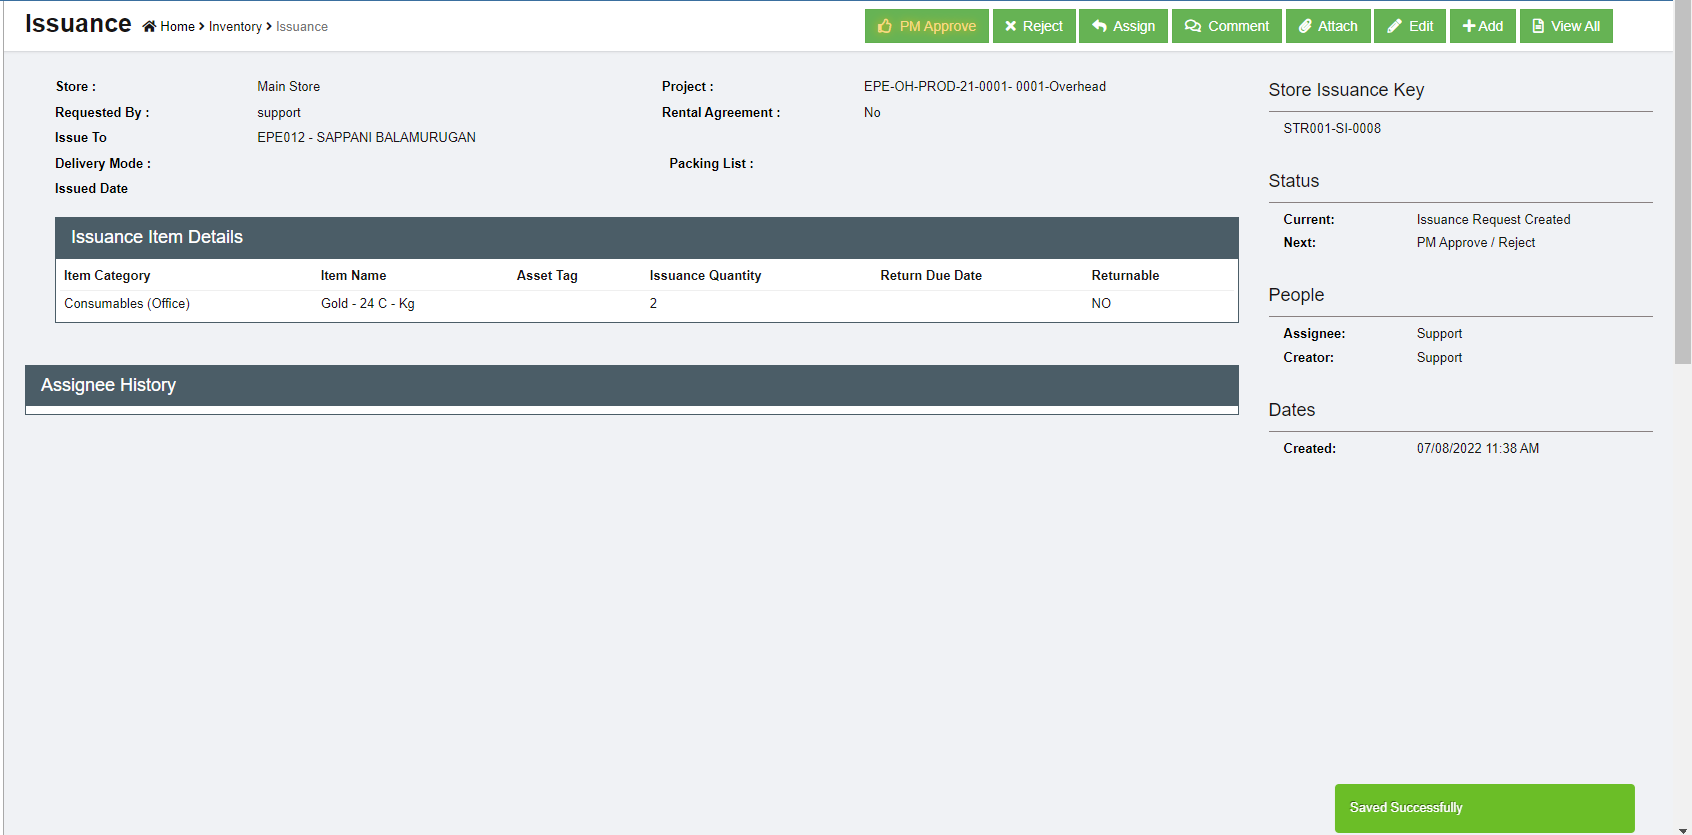](http://wiki.cuteinfocomm.com/uploads/images/gallery/2022-08/image-1659897552694.png)
#### Approve/Reject Issuance Request
Project manager shall approve the issuance request before store keeper issue items.
- To approve issuance request,
1. click[](http://wiki.cuteinfocomm.com/uploads/images/gallery/2022-08/image-1659980723498.png) in the issuance detail page, the issuance notification window pop up, [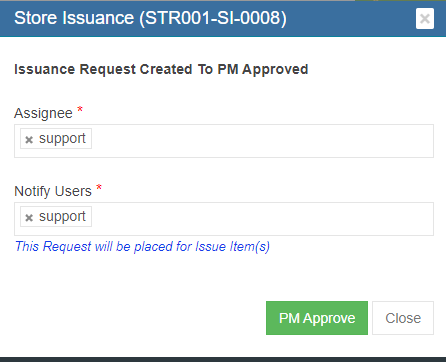](http://wiki.cuteinfocomm.com/uploads/images/gallery/2022-08/image-1659981039237.png)
2. Click PM approve in the notification window, the issuance request status will be **PM approved**, and is ready for issue. [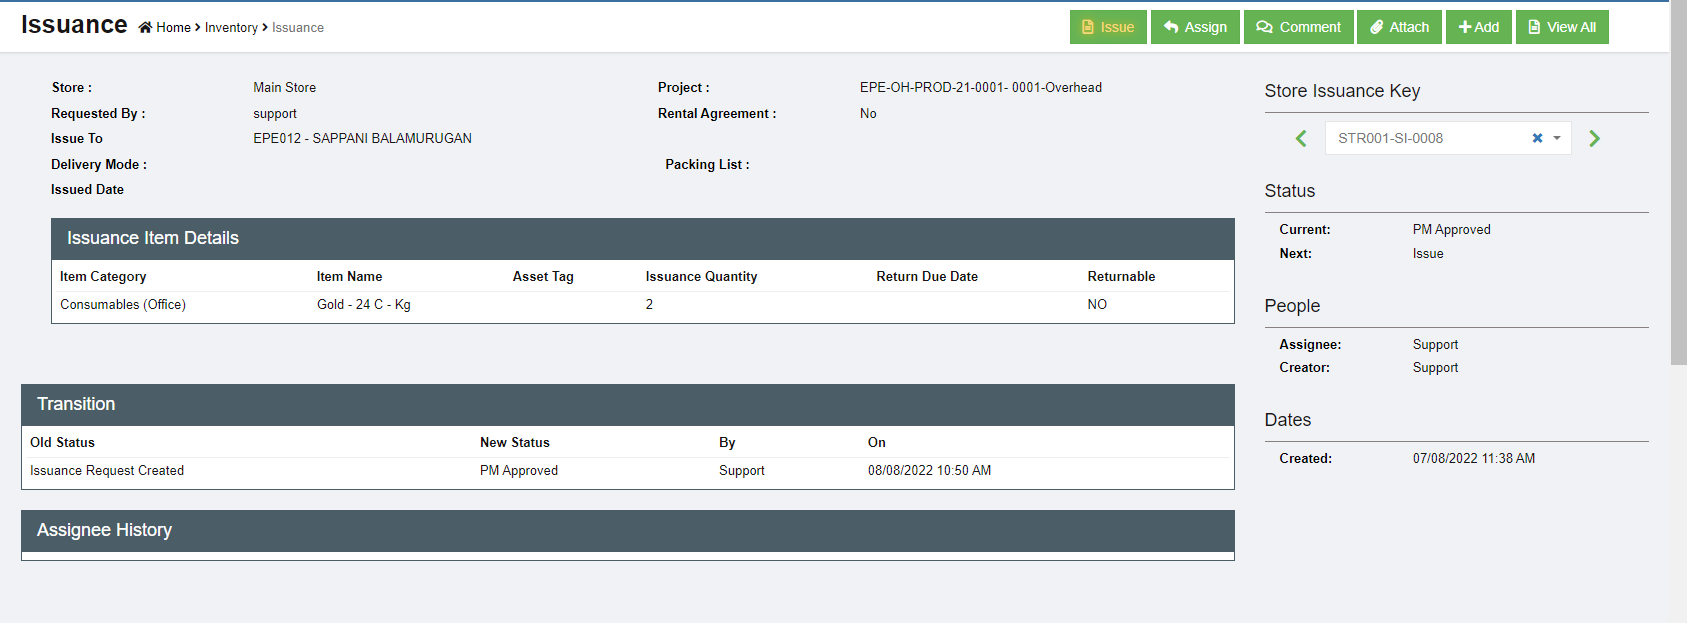](http://wiki.cuteinfocomm.com/uploads/images/gallery/2022-08/image-1659981071066.png)
- To reject issuance request,
1. Click [](http://wiki.cuteinfocomm.com/uploads/images/gallery/2022-08/image-1660074905141.png) icon in the issuance request detail page, the rejection notification window pop up, [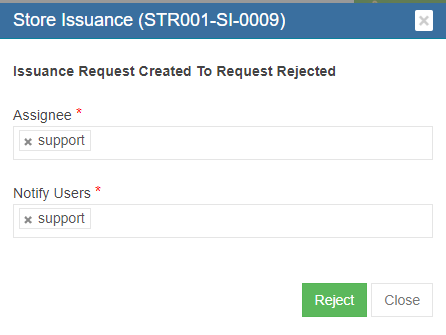](http://wiki.cuteinfocomm.com/uploads/images/gallery/2022-08/image-1660074956523.png)
2. Click **Reject** button in the notification window, the issuance request is rejected, the status will change to **Request Rejected.**
- Other Options in Issuance
- Comment-to enter comments or remarks about the request
- Attach-to upload any files/documents about the request
#### Issue Items
Store keepers can proceed to issue items to material requestor after project manager approves it.
To issue items,
1. Click the Issue button, below notification window opens, click[](http://wiki.cuteinfocomm.com/uploads/images/gallery/2022-08/image-1659991584740.png) to complete issuance in system and proceed to issue physical items from store(warehouse). The issuance request status will change to **Item(s) Issued.**
[](http://wiki.cuteinfocomm.com/uploads/images/gallery/2022-08/image-1659981120101.png)
2. A Material Issuance report will be automatically generated. User can click the Print MI button to print the Material Issuance report (MI) as pdf file.[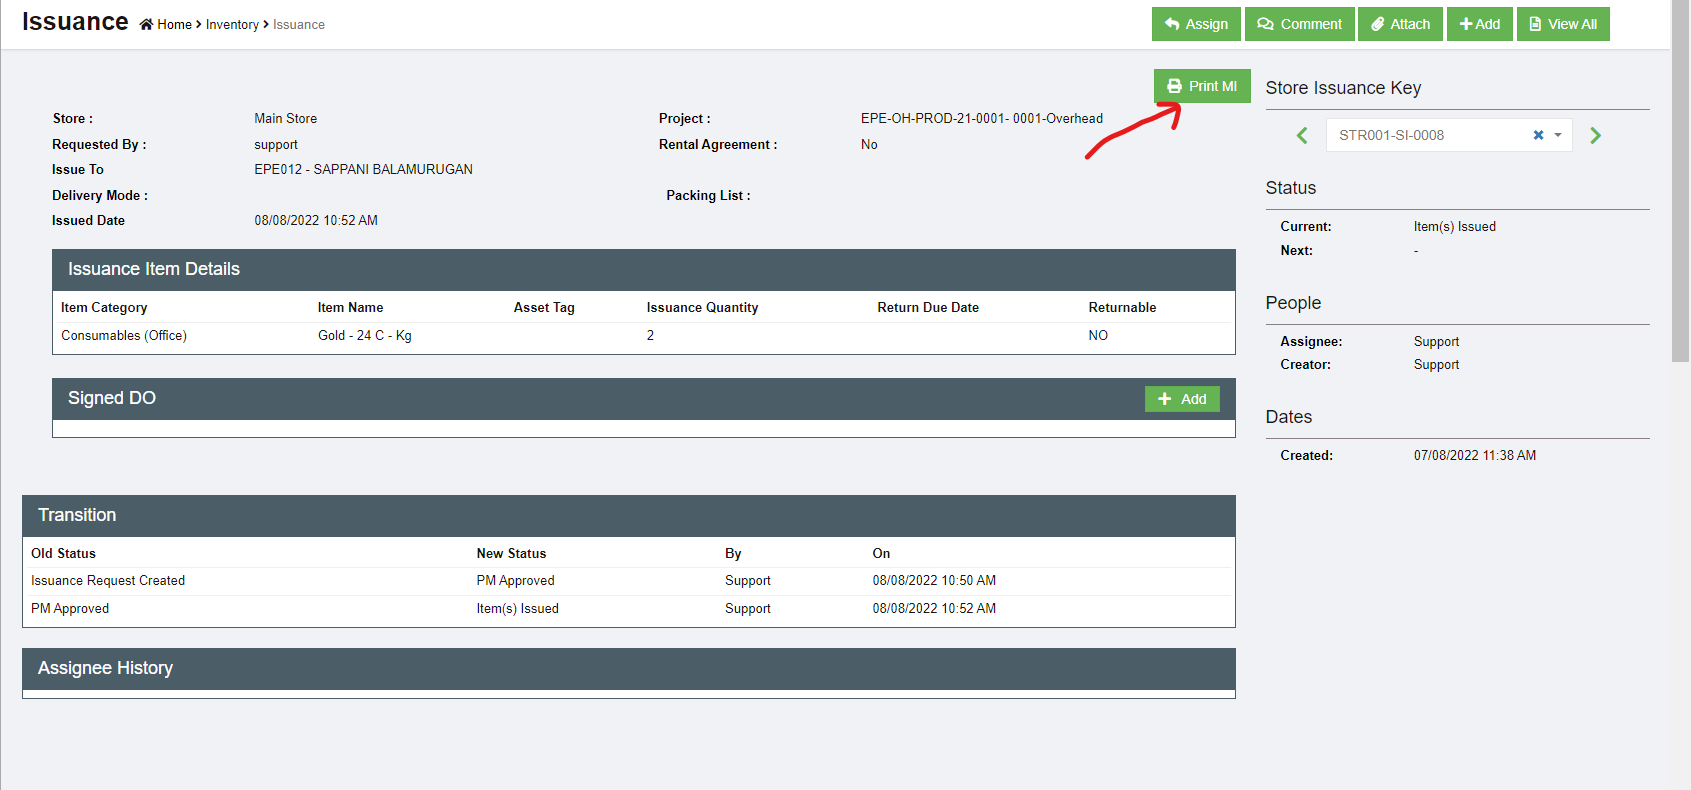](http://wiki.cuteinfocomm.com/uploads/images/gallery/2022-08/image-1659981163381.png)
3. After the physical items delivered to project, store keepers shall upload the signed delivery order (DO). Click Add button in the Signed DO section in issuance detail page. [](http://wiki.cuteinfocomm.com/uploads/images/gallery/2022-08/image-1659993409694.png)
4. Fill up DO details and upload signed DO copy, click **Save.** The issuance request status will change to **Item(s) Delivered.** This is the complete status of an issuance request.
### Issuance Return
### Issuance History
[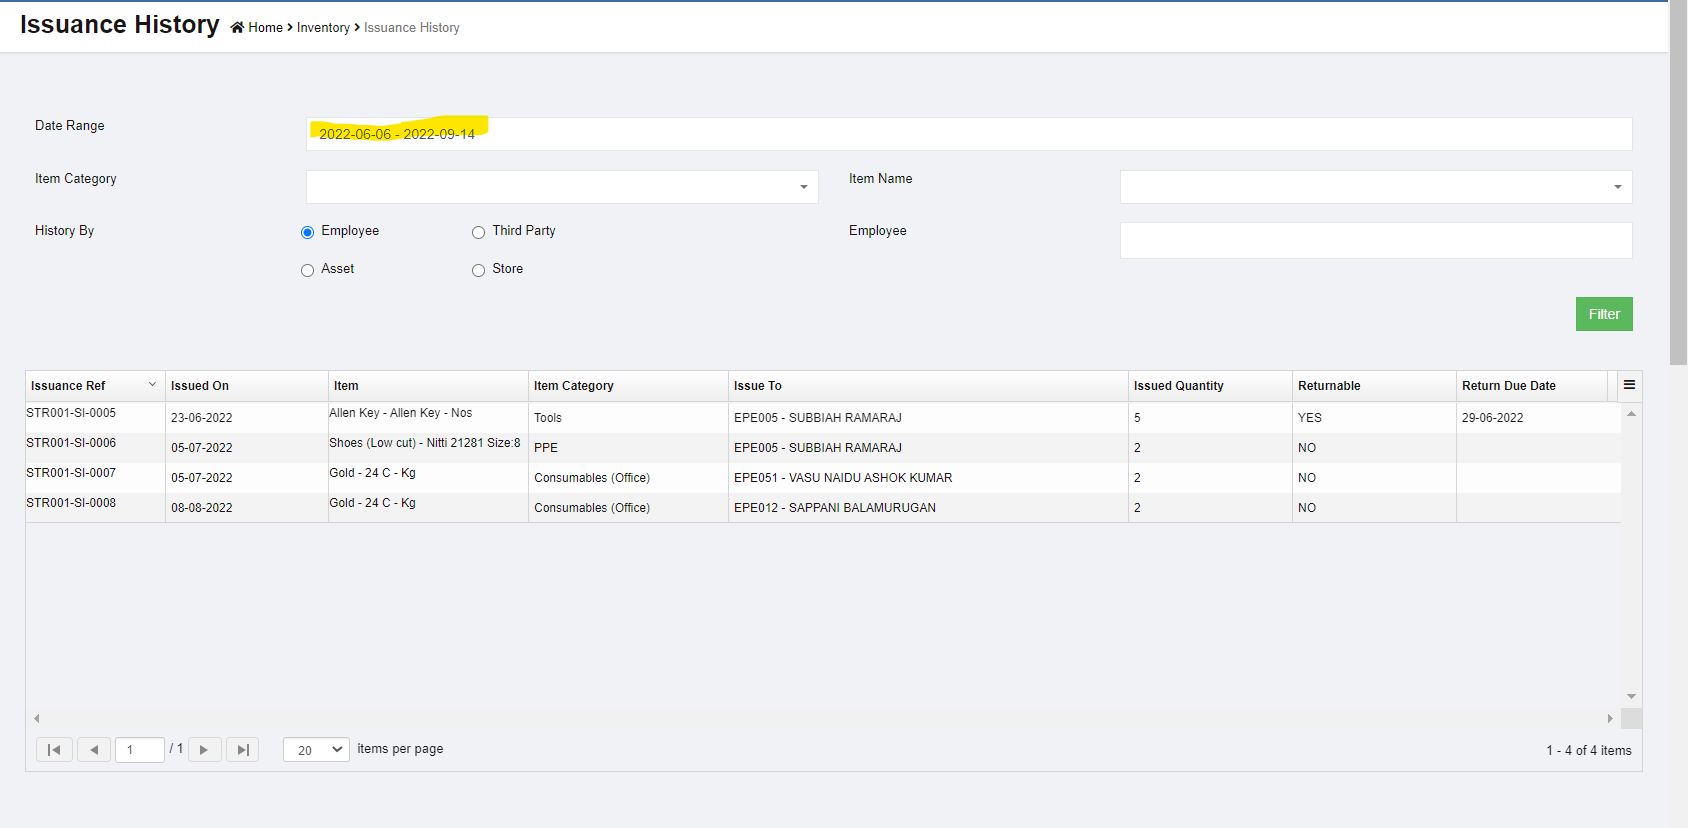](http://wiki.cuteinfocomm.com/uploads/images/gallery/2022-08/image-1660080985144.png)
# Master Data
The **Masters** menu in the procurement module helps to define and manage the master data like items detail, suppliers, company, contact, and asset category.
[](http://wiki.cuteinfocomm.com/uploads/images/gallery/2022-08/image-1660169861349.png)
## Items
The list of items that will be used in procurement module is managed in cuteOffice Items master. They are managed centrally so that duplicate items are not entered into the system.
To view items master, click **Items** submenu in the **Masters,** the item master list page opens as below,
[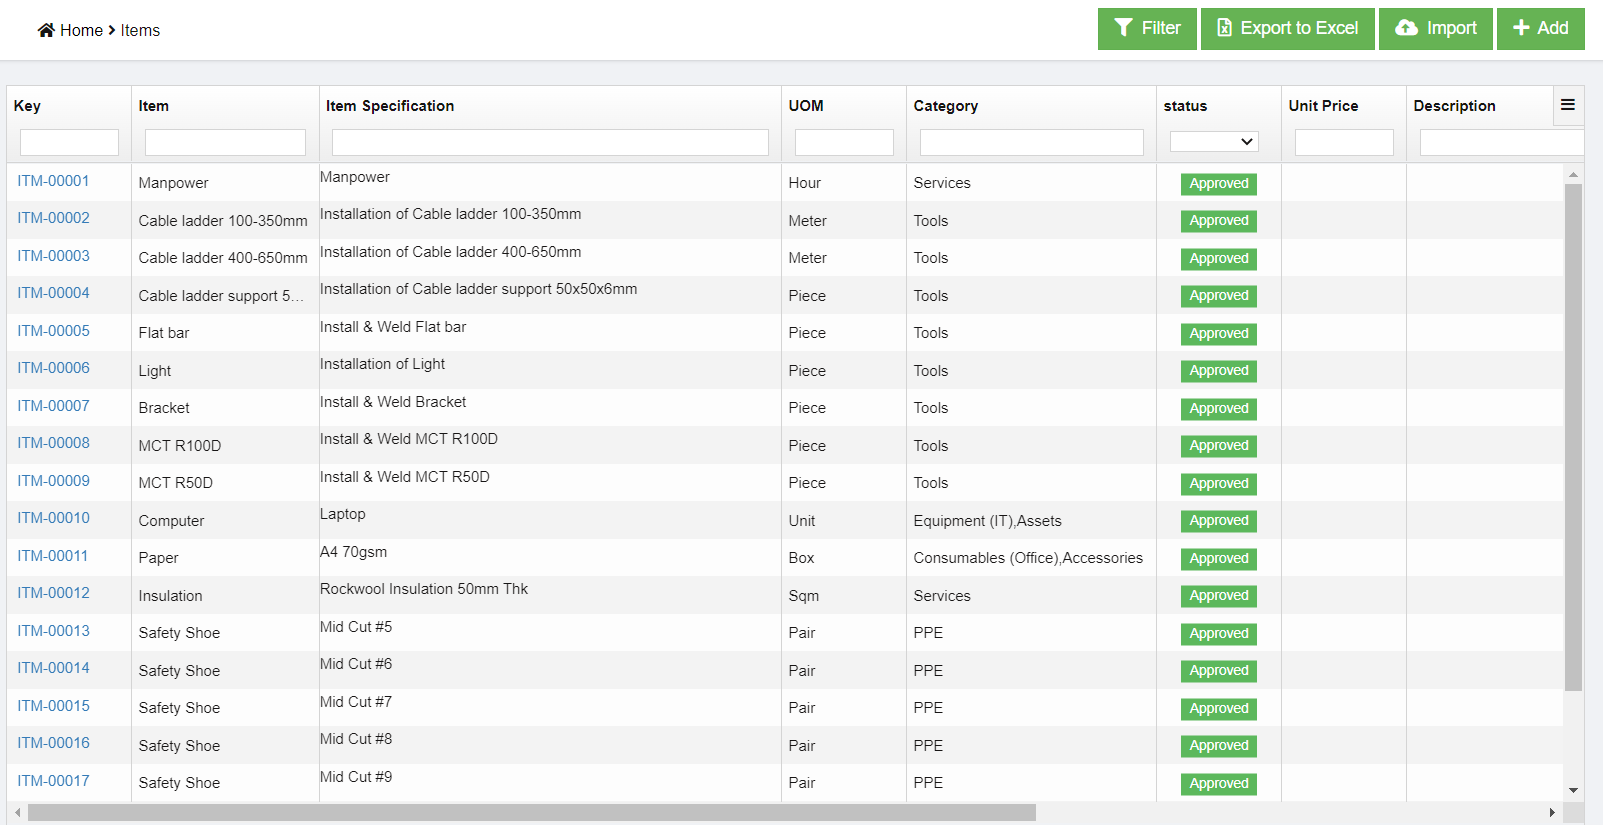](http://wiki.cuteinfocomm.com/uploads/images/gallery/2022-08/image-1660170744605.png)
### Add a New Item
To create a new item as item master,
1. click [ ](http://wiki.cuteinfocomm.com/uploads/images/gallery/2022-08/image-1660171564547.png)button in the top right corner in item list view page, the add item page opens as below, [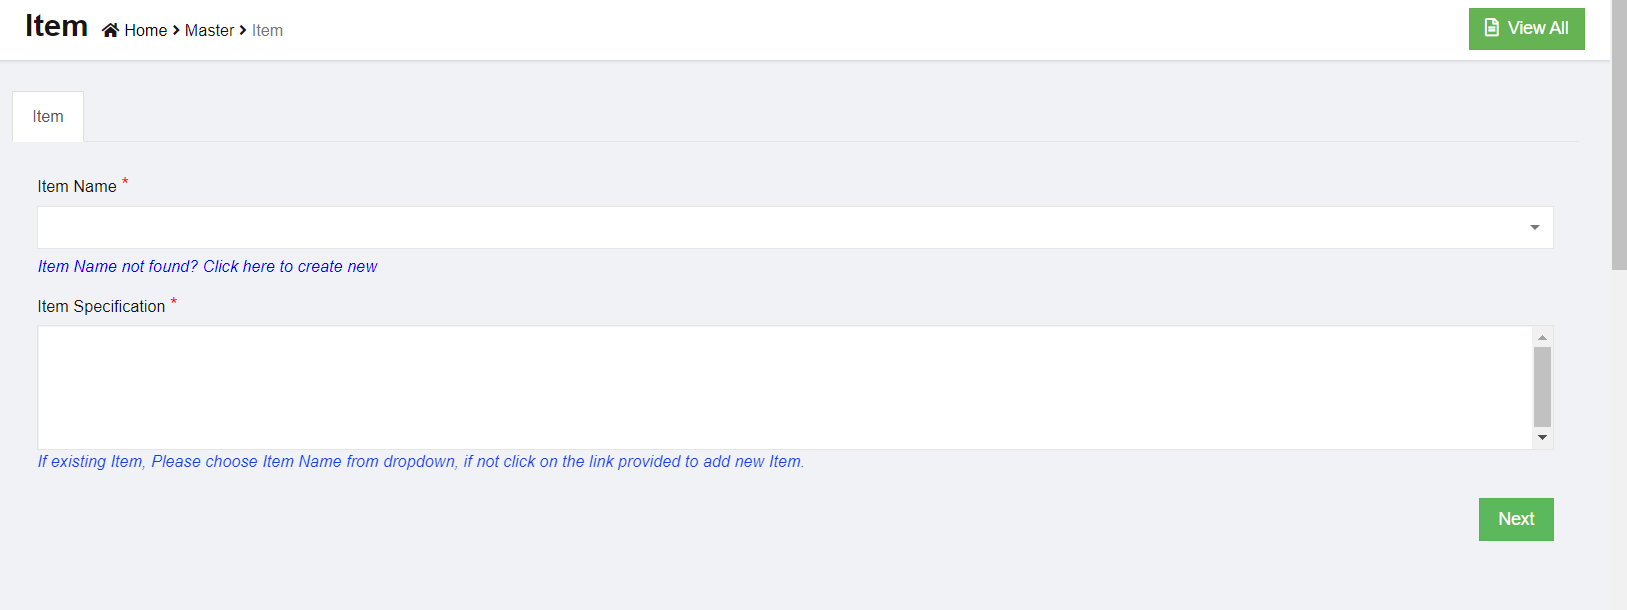](http://wiki.cuteinfocomm.com/uploads/images/gallery/2022-08/image-1660171744060.png)
2. There are two mandatory information to be filled up. For example, we want to buy a desktop computer. So we have decided classify Computer as **item name** and Desktop as **item specification**
- Item Name
- Item Specification
3. Select the Item from list. If you can’t find the item, then click “Item Name not found? Click here to create new” link below the text box, [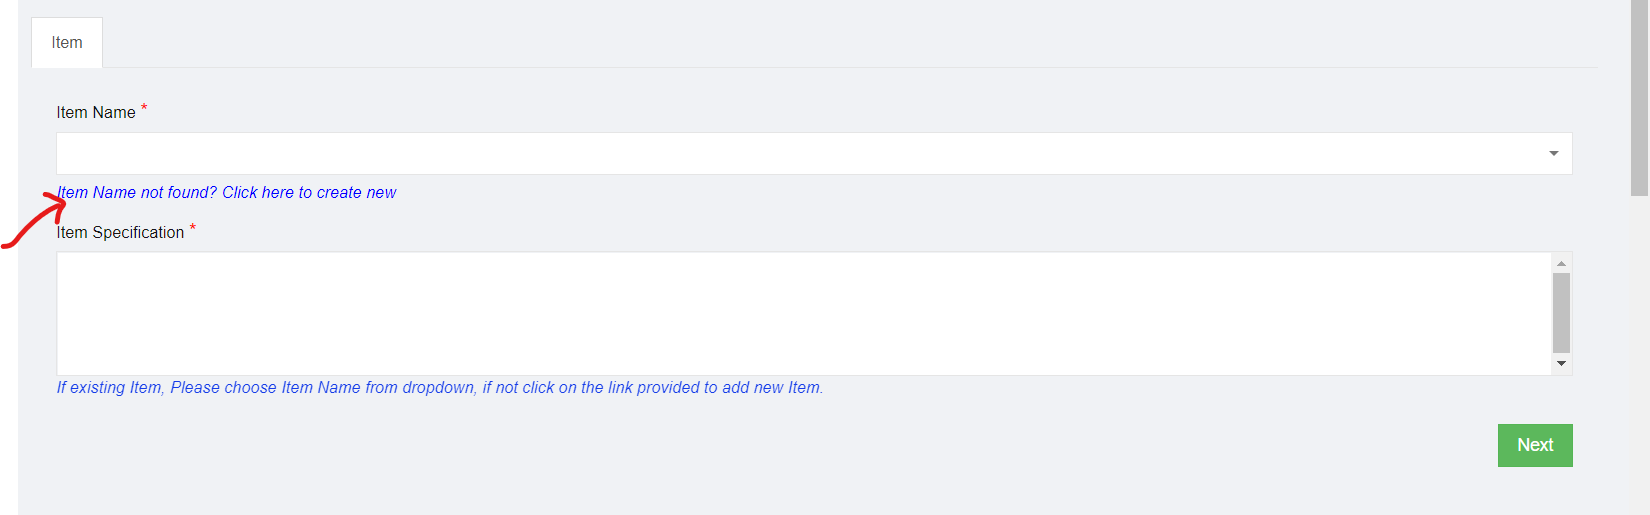](http://wiki.cuteinfocomm.com/uploads/images/gallery/2022-08/image-1660172078595.png)
4. Enter item name as computer, and the item specification as desktop.[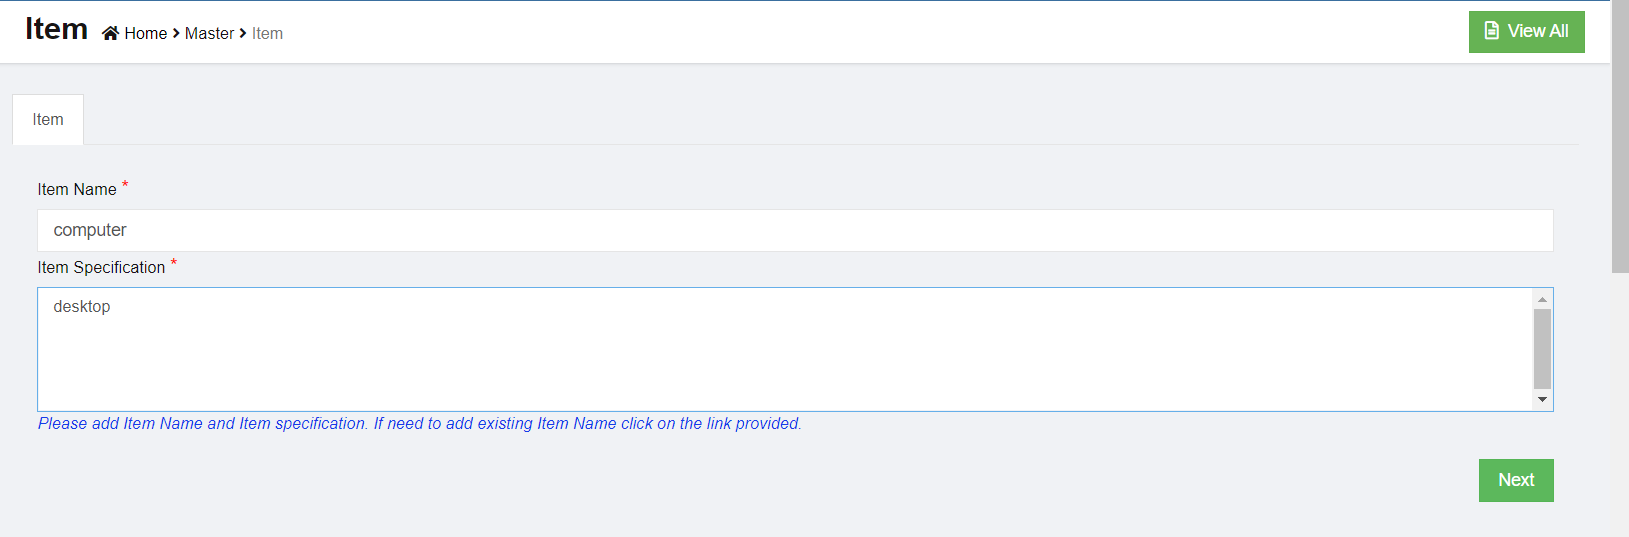](http://wiki.cuteinfocomm.com/uploads/images/gallery/2022-08/image-1660172214959.png)
5. Click Next. The below dialog appears,
[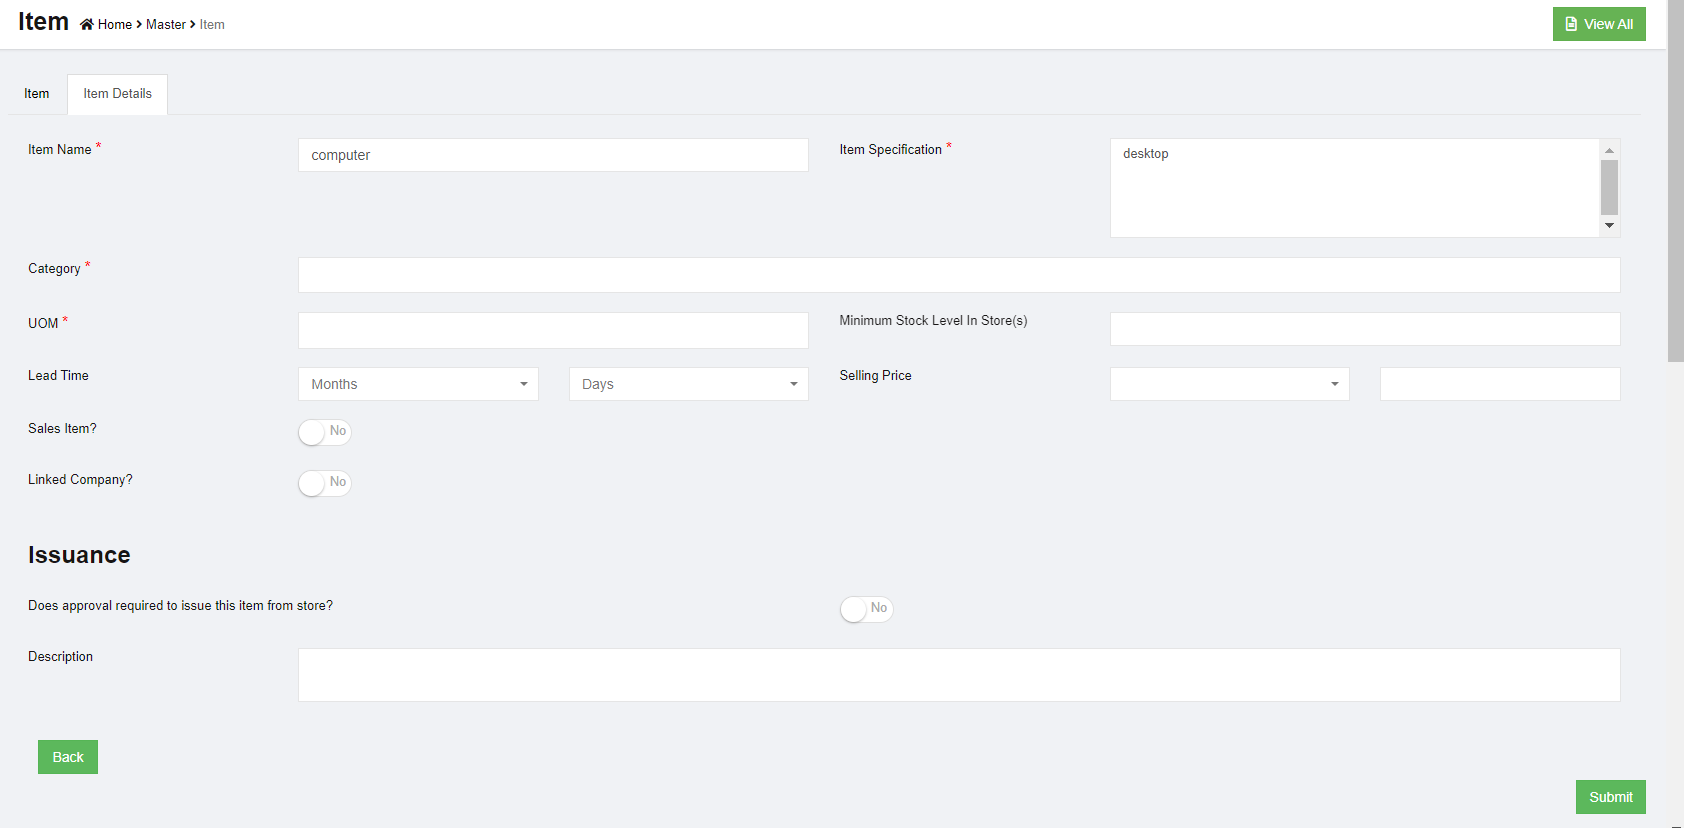](http://wiki.cuteinfocomm.com/uploads/images/gallery/2022-08/image-1660172319942.png)
- Choose a category for the item. Select Assets and Equipment (IT). Each item can be classified into more than one category. The category classification is defined by the administrator in Admin Settings.
- Select UOM. (Unit of Measurement). Choose Piece. The UOM is defined by the administrator in Admin Settings.
- Enter minimum stock level alert quantity.
- Enter lead time required to buy this item
- When issue this item, if it requires approval, click to enable flag as **Yes**, or default as **No,**
- Enter any additional description for the item.
6. Click **Submit**. Each item newly added to item master needs to be approved before it can be used in system. If item master auto approval is configured, the below dialog appears to approve immediately upon submit. [](http://wiki.cuteinfocomm.com/uploads/images/gallery/2022-08/image-1660182615861.png)
7. Click **Confirm,** item will be approved and appear in item list for system use. Page will be redirected to the below screen. [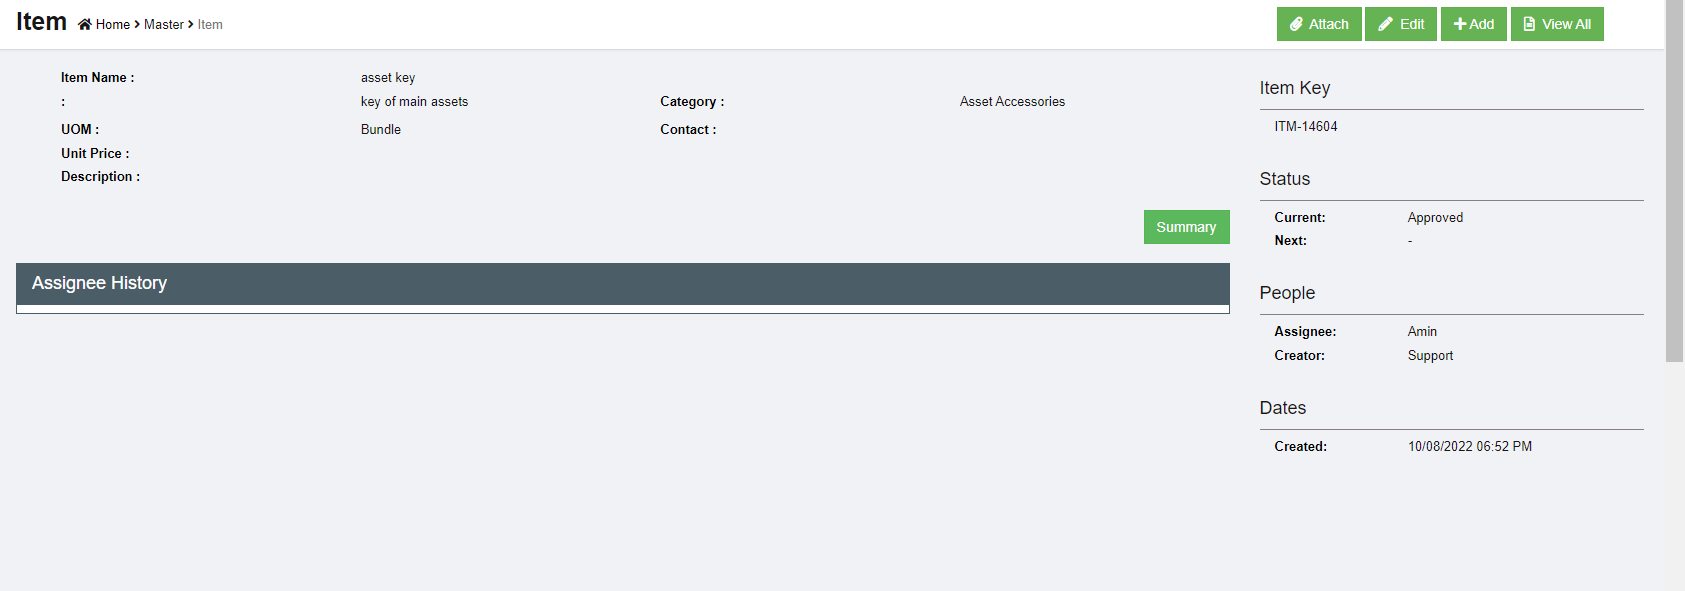](http://wiki.cuteinfocomm.com/uploads/images/gallery/2022-08/image-1660182897699.png)
### Edit Item
To edit item master, go to the item list page,
1. click the item key and open the item detail page as below, [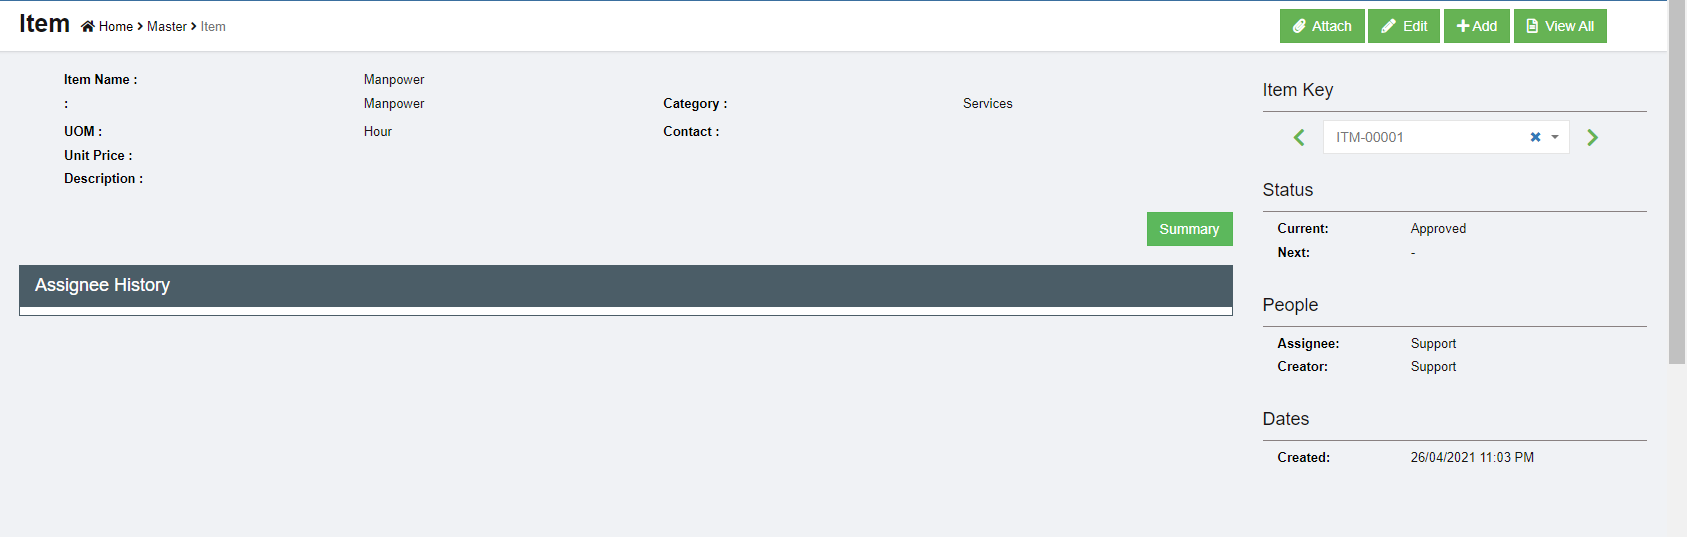](http://wiki.cuteinfocomm.com/uploads/images/gallery/2022-08/image-1660183101408.png)
2. Click[](http://wiki.cuteinfocomm.com/uploads/images/gallery/2022-08/image-1660183134928.png) Edit button, the edit window opens up, [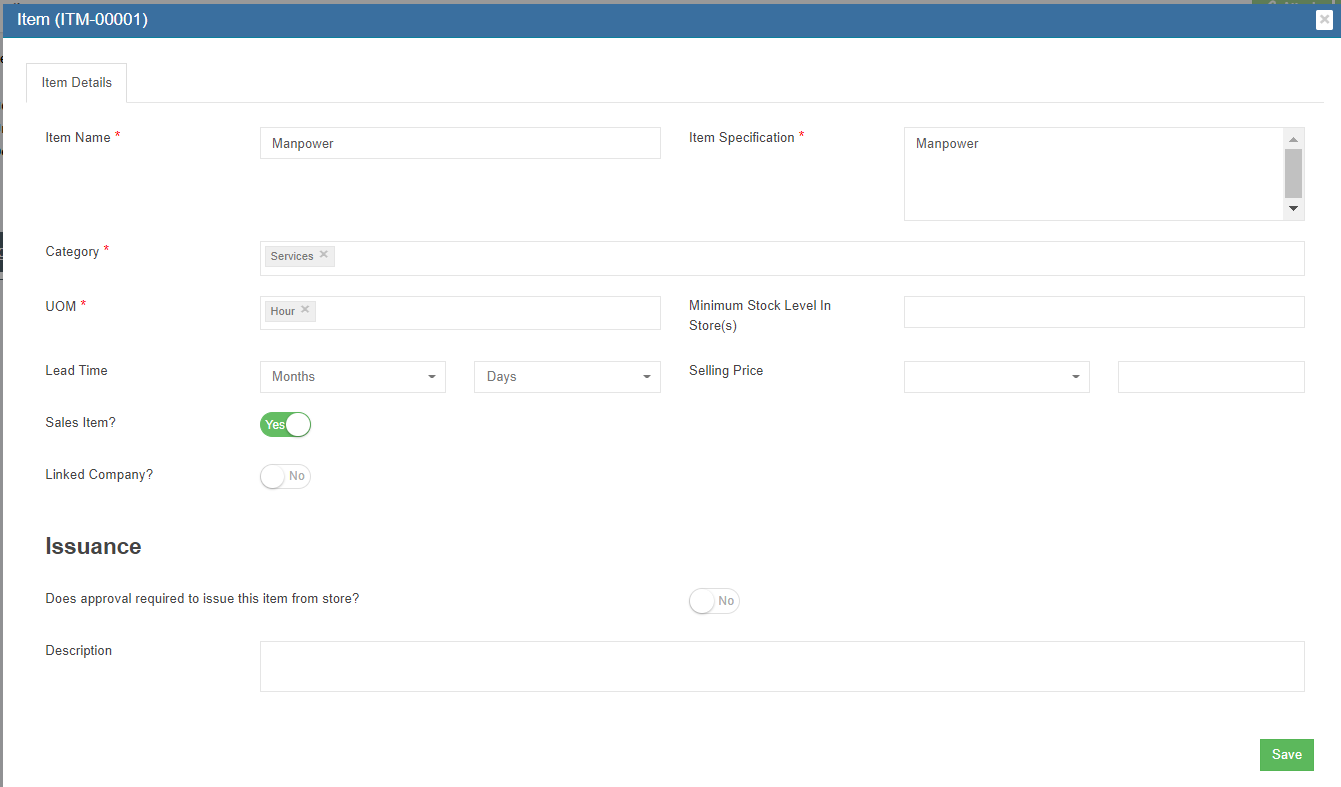](http://wiki.cuteinfocomm.com/uploads/images/gallery/2022-08/image-1660183214012.png)
3. Update details, and click **Save** to save edits.
### Attach
Any photos and additional documents can be uploaded against the item.
1. Click[](http://wiki.cuteinfocomm.com/uploads/images/gallery/2022-08/image-1660187936089.png) Attach button, the attach window opens up, [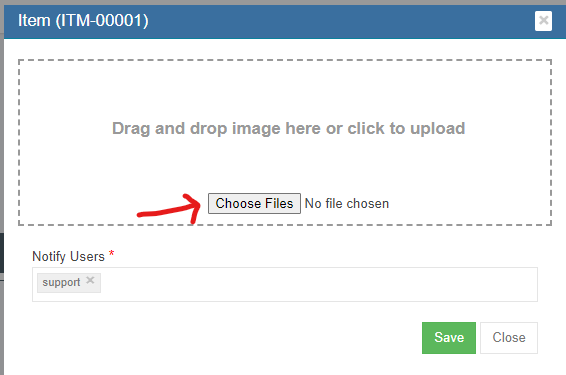](http://wiki.cuteinfocomm.com/uploads/images/gallery/2022-08/image-1660187985936.png)
2. Click **Choose Files** and browse the file to attach.
3. The added item is shown below, [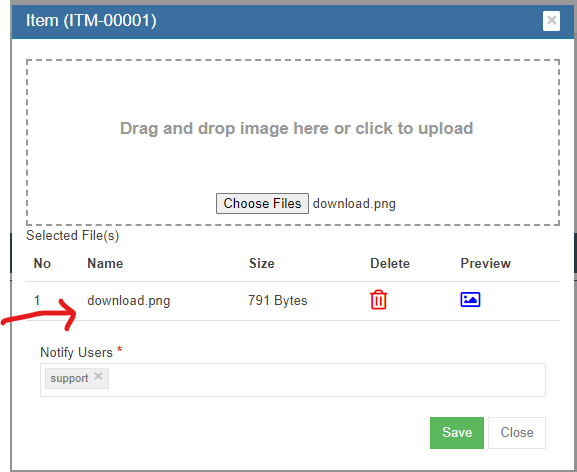](http://wiki.cuteinfocomm.com/uploads/images/gallery/2022-08/image-1660188035082.png)
4. Click[(](http://wiki.cuteinfocomm.com/uploads/images/gallery/2022-08/image-1660188056241.png)preview button) to view attached file,
5. Click **Save** to store the attachment against the item.
### Export Items
User can export all items master data use the export option. Click [](http://wiki.cuteinfocomm.com/uploads/images/gallery/2022-08/image-1661796864622.png) the items master data will be export and downloaded.
## Suppliers
Suppliers are managed centrally as master data in cuteOffice. All suppliers needs approval to be qualified as supplier, and system provides ranking and evaluation options.
To view all suppliers, click **Suppliers** submenu in the **Masters** menu,
[](http://wiki.cuteinfocomm.com/uploads/images/gallery/2022-08/image-1660338120837.png)
### Add New Supplier
All supplier companies shall be registered in company master data first, then add as suppliers master.
To add new supplier,
1. click Add button[](http://wiki.cuteinfocomm.com/uploads/images/gallery/2022-08/image-1660338813842.png) or [](http://wiki.cuteinfocomm.com/uploads/images/gallery/2022-08/image-1660338837754.png), the new supplier page will open as below, [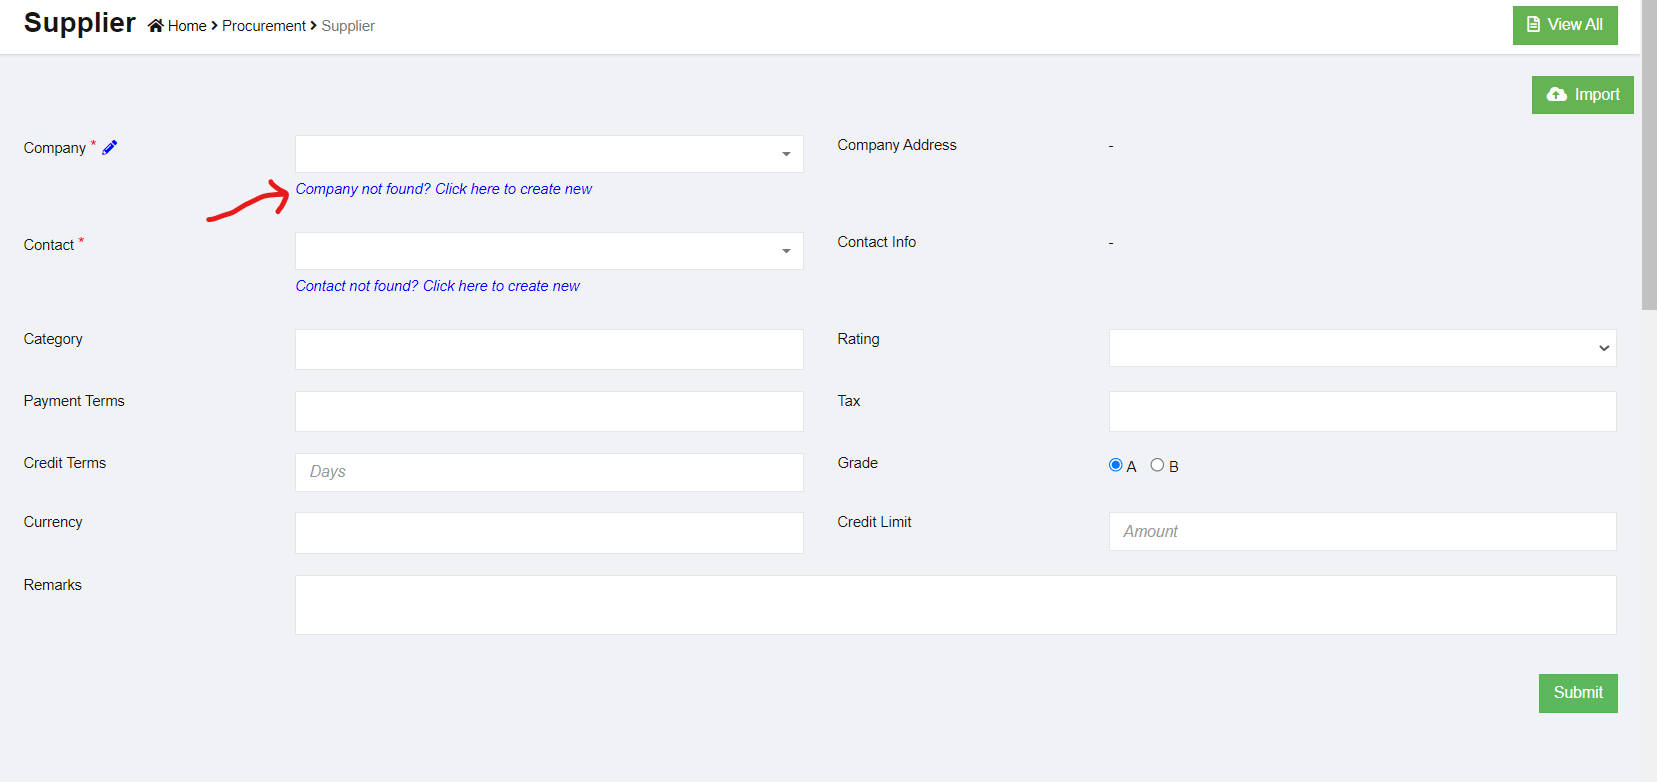](http://wiki.cuteinfocomm.com/uploads/images/gallery/2022-08/image-1660338933048.png)
2. Select a company from the dropdown list as supplier. If the company is not available, click the link-"**Company not found? Click here to create new"** below the company dropdown and create a new company. The selected company details are shown in the right side.
- Please check user manual on how to create company master data.
3. Select contact from contact master dropdown. The contact details will show. If the contact is not in the dropdown list, click the link "**Contact not found? Click here to create new**" to create new contact in master data.
- Please check user manual on how to create contact master data.
4. Select rating. The ratings value are managed in Admin Options
5. Select Payment Terms. The terms are maintained in Admin Options
6. Select Currency. The currencies are maintained in Admin Options
7. Choose Grade. If A means the supplier needs evaluation. Grade B customers does not require
evaluation. For example, if we buy Amazon, do we need to evaluate them? No. so we choose B.
However, if we need to buy a computer from a supplier they need to be checked and evaluated
before making an order.
8. Click Submit to create the supplier. The below dialog opens up. [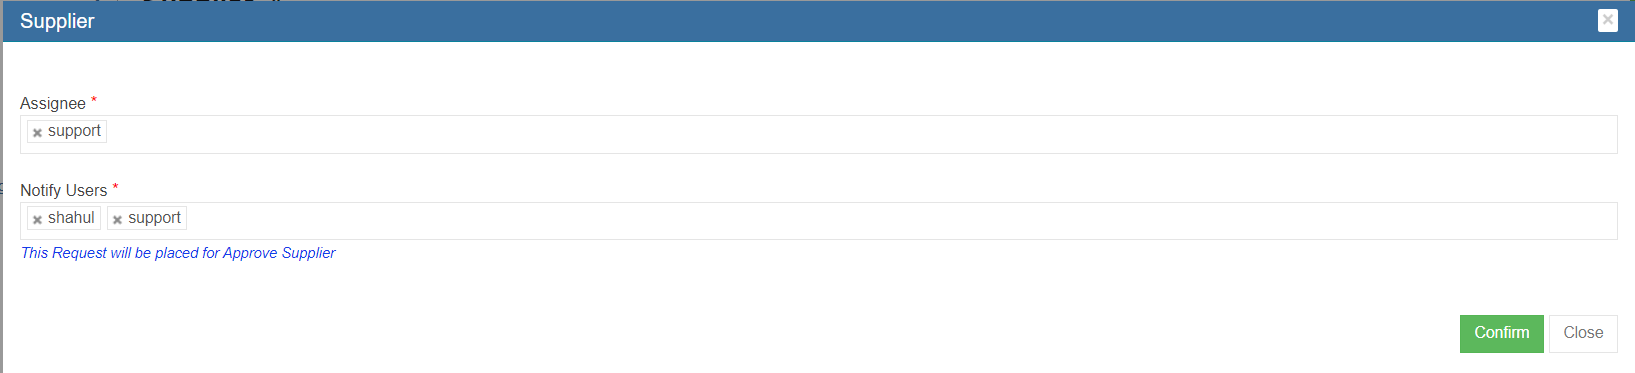](http://wiki.cuteinfocomm.com/uploads/images/gallery/2022-08/image-1660339858019.png)
9. Click Confirm, a new supplier is created and directed to below new supplier detail page, [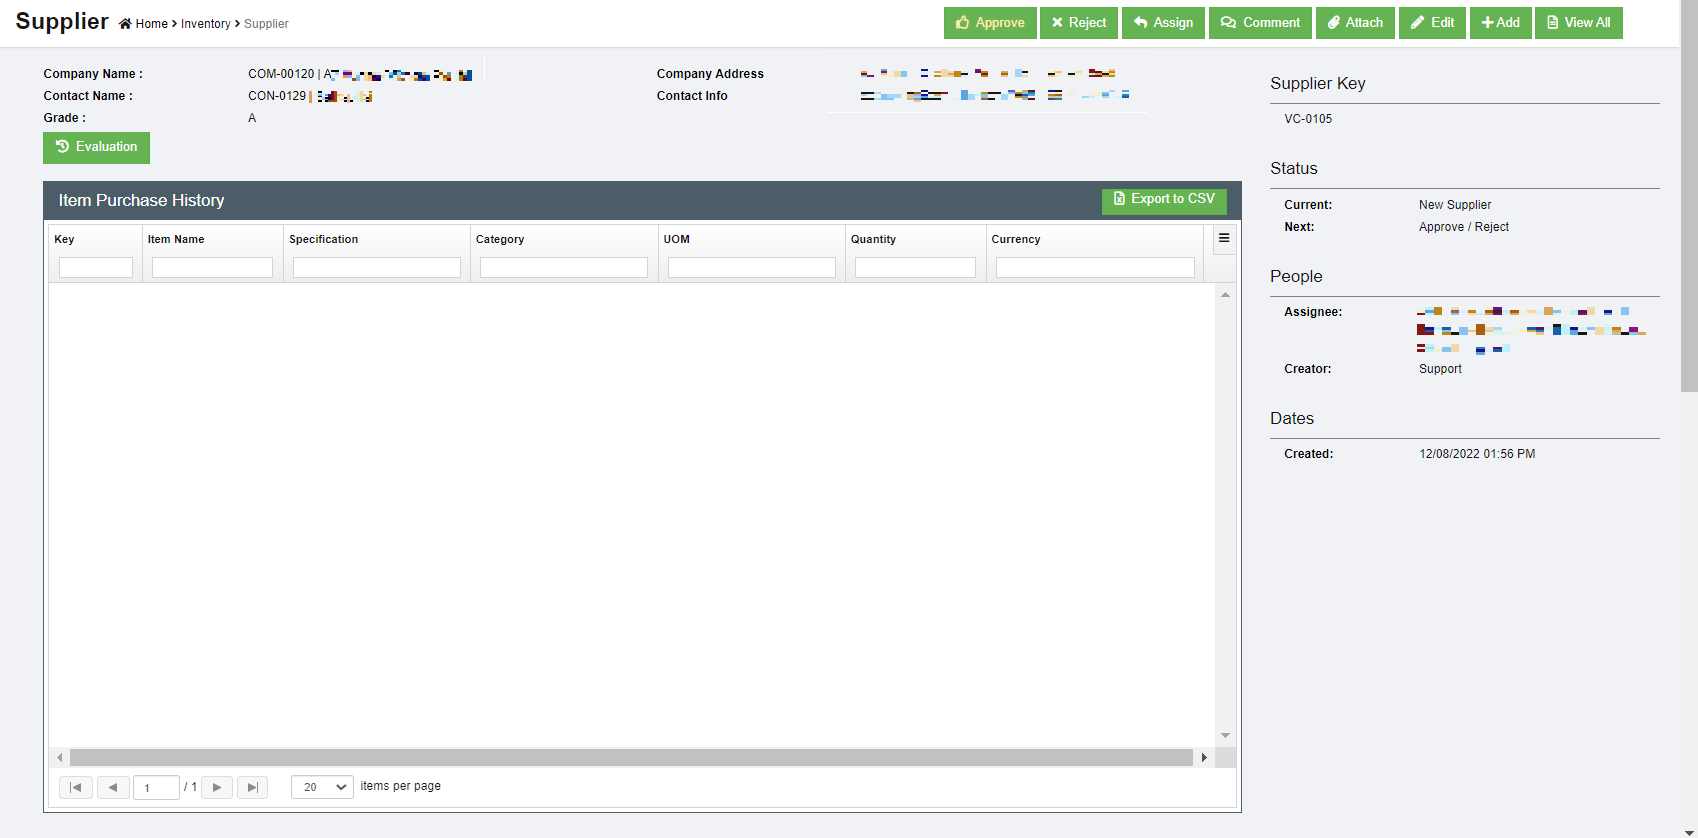](http://wiki.cuteinfocomm.com/uploads/images/gallery/2023-04/image-1682107587596.png)
10. All new suppliers created in system need to be approved unless auto approval is configured. To approve, click the **Approve** button in above supplier detail page, below dialog opens, [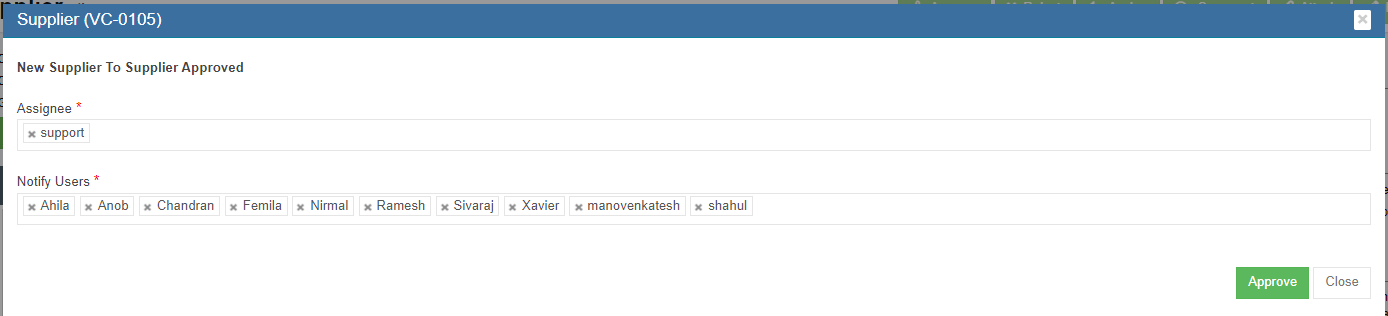](http://wiki.cuteinfocomm.com/uploads/images/gallery/2022-08/image-1660337950542.png)
11. Click **Approve.** The supplier status will change to supplier approved. [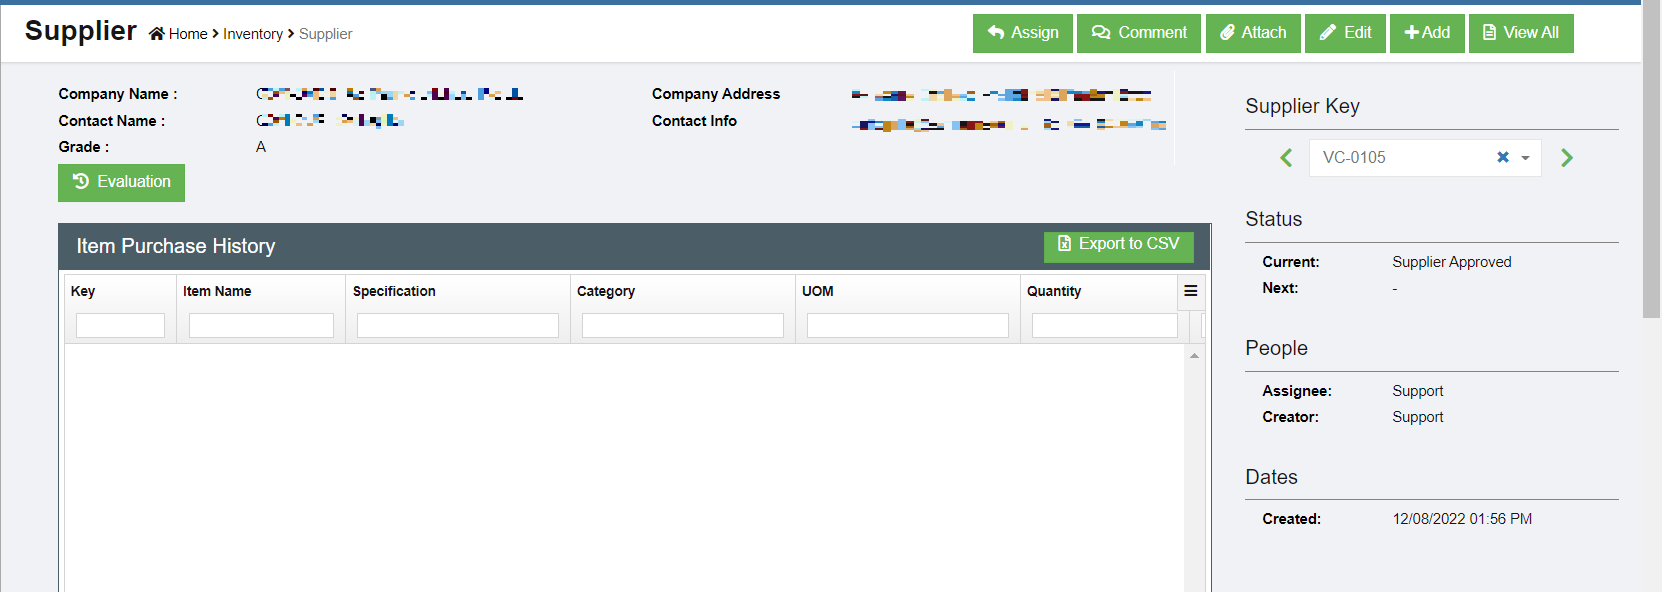](http://wiki.cuteinfocomm.com/uploads/images/gallery/2023-04/image-1682107639602.png)
[](http://wiki.cuteinfocomm.com/uploads/images/gallery/2022-08/image-1660338011056.png)
12. To evaluate supplier, click the [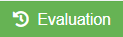 ](http://wiki.cuteinfocomm.com/uploads/images/gallery/2022-08/image-1660340184962.png)button, below evaluation window opens. Complete the evaluation and click **Save.** [](http://wiki.cuteinfocomm.com/uploads/images/gallery/2022-08/image-1660337933652.png)
### Other Options in Supplier
[](http://wiki.cuteinfocomm.com/uploads/images/gallery/2022-08/image-1660686461535.png)
There are other options available in supplier master data management.
Attach-Any related documents such as their ACRA document or any other document can be added as reference using the Attach function. Click attach button, and choose the file to upload and save.
Comment-Authorized users can make comment on the supplier for future reference by clicking the Comment button.
### Export Supplier
User can export all suppliers data use the export option. Click [](http://wiki.cuteinfocomm.com/uploads/images/gallery/2022-08/image-1661796864622.png) the supplier master data will be export and downloaded.
## Company
Company master data manages all clients company, supplier company or any third party companies. To view company master list, click **Company** in the Master menu.
[](http://wiki.cuteinfocomm.com/uploads/images/gallery/2023-04/image-1682107686155.png)
### Add New Company
To add a new company,
1. Click [](http://wiki.cuteinfocomm.com/uploads/images/gallery/2022-08/image-1660687295634.png) (Add button) and the new company window opens up, [](http://wiki.cuteinfocomm.com/uploads/images/gallery/2022-08/image-1660687616739.png)
2. Enter the company name and click **Next**. The below window opens, [](http://wiki.cuteinfocomm.com/uploads/images/gallery/2022-08/image-1660687658096.png)
3. Select the country
4. Enter the email address of the company
5. Enter contact number. Click + to add more contact numbers.
6. Enter Address. Click + to add more address for the same company.
7. Click **Next** and the below contacts information dialog opens up [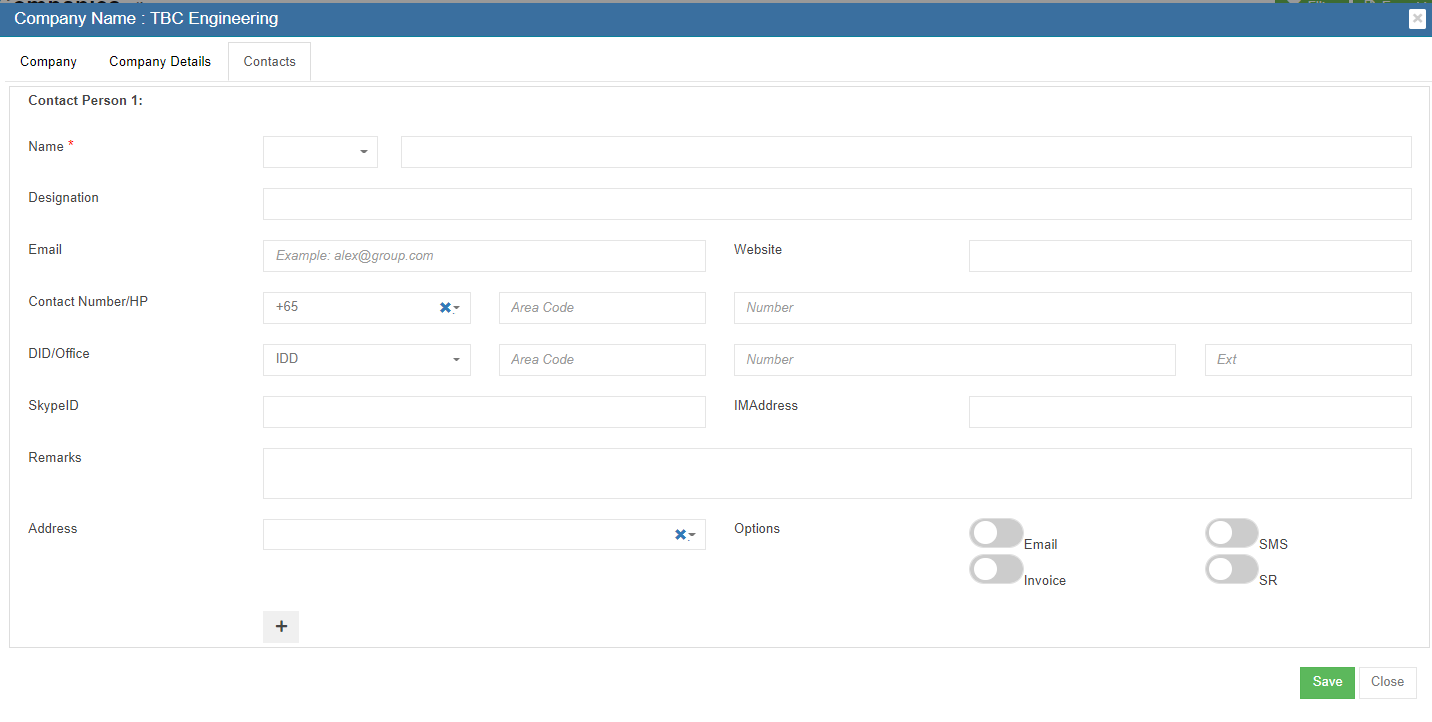](http://wiki.cuteinfocomm.com/uploads/images/gallery/2022-08/image-1660687891893.png)
8. Select person salutation and enter the name of the contact.
9. Enter designation.
10. Enter email address of the contact.
11. Enter phone number, direct phone number etc.
12. Click **Save** to create the company and the contact under the company.
### Edit Company
1. In the company list page, click[](http://wiki.cuteinfocomm.com/uploads/images/gallery/2022-08/image-1660688476953.png) the edit icon against the company, the company detail page will open, [](http://wiki.cuteinfocomm.com/uploads/images/gallery/2023-04/image-1682107732935.png)
2. Edit the company details and click **Save**.
### Delete Company
1. Click[](http://wiki.cuteinfocomm.com/uploads/images/gallery/2022-08/image-1660688625741.png)Delete icon against the company that user wants to delete, [](http://wiki.cuteinfocomm.com/uploads/images/gallery/2023-04/image-1682107787324.png)
2. A confirmation window opens as below, click **Yes** and the company will be deleted. [](http://wiki.cuteinfocomm.com/uploads/images/gallery/2022-08/image-1660688707678.png)
### Export Company
User can export all company data use the export option. Click [](http://wiki.cuteinfocomm.com/uploads/images/gallery/2022-08/image-1661796864622.png) the company master data will be export and downloaded.
## Contacts
Contacts master contains all contacts data from company master. Contacts master can be added in company master contact tab as well as contact master. To view contact master list, click **Contacts** in the Master menu,
[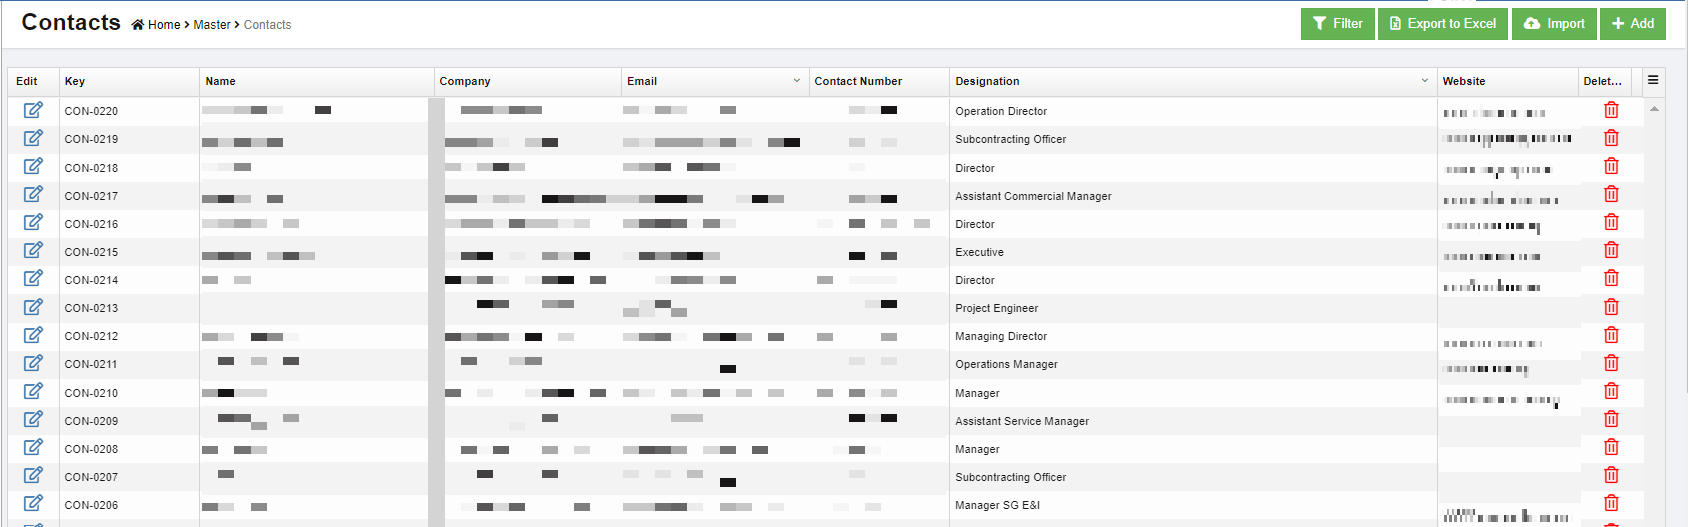](http://wiki.cuteinfocomm.com/uploads/images/gallery/2023-04/image-1682107852099.png)
### Add New Contact
To add new contact,
1. Click [(](http://wiki.cuteinfocomm.com/uploads/images/gallery/2022-08/image-1660338813842.png)Add button) and the new contact window opens up,[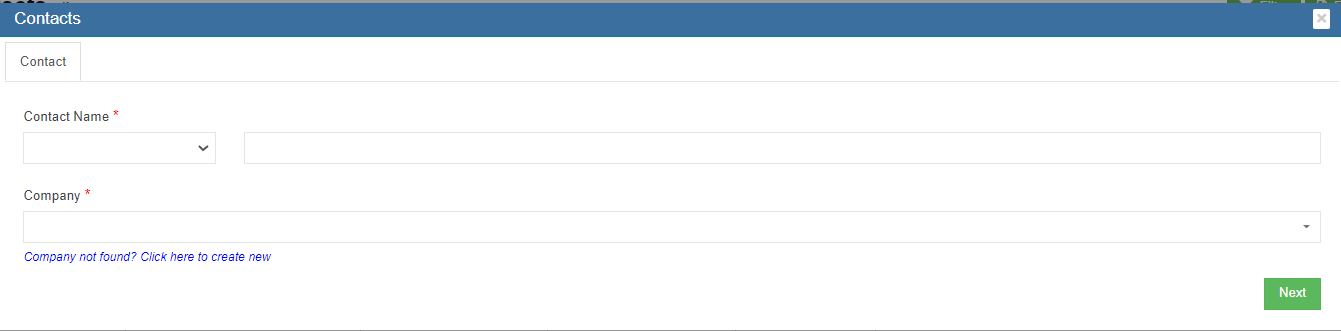](http://wiki.cuteinfocomm.com/uploads/images/gallery/2022-08/image-1660696628700.png)
2. Select the salutation and enter the contact name.
3. Click and select company name, then click **Next,** the contact detail window opens, [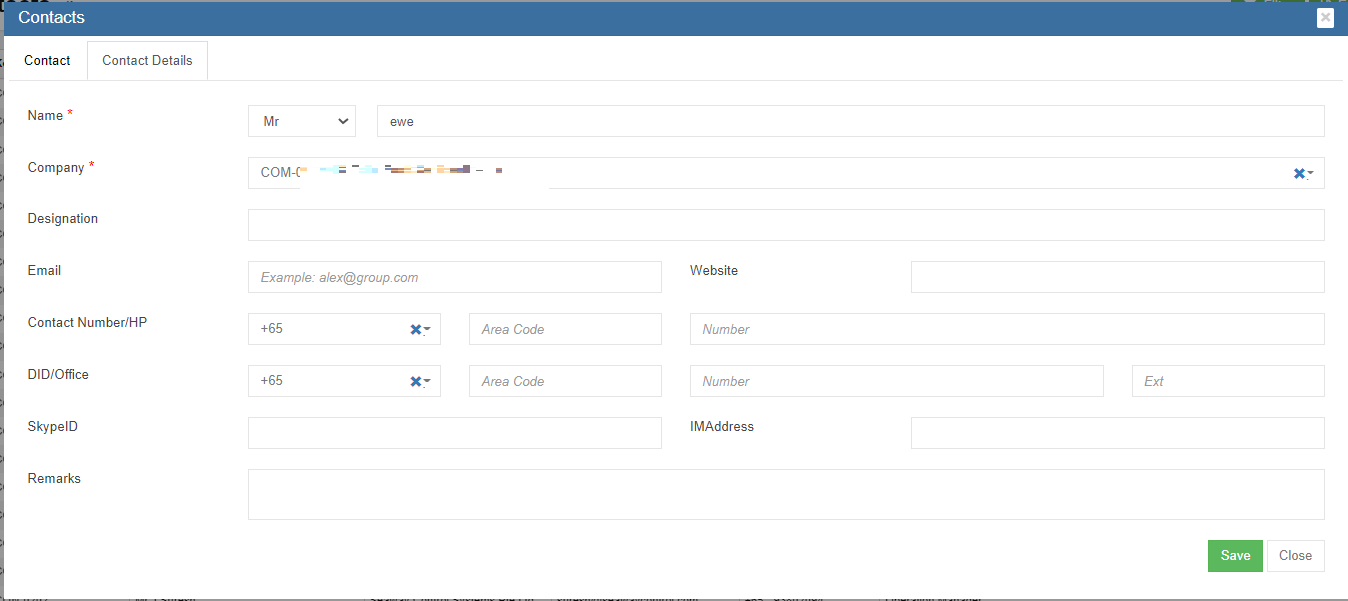](http://wiki.cuteinfocomm.com/uploads/images/gallery/2023-04/image-1682107905508.png)
- If the company already exists in company master, it will appear in the company dropdown list
- If the company not exist in company master yet, click the link "Company not found? Click here to create new" to add company in master data.
4. Select person salutation and enter the name of the person
5. Enter designation
6. Enter email address of the person
7. Enter phone, direct phone number etc.
8. Click **Save** to create the contact and it is created under the company.
Or alternatively, create contact under company master:
1. Click Company in Master menu, select the company from which the new contact come, [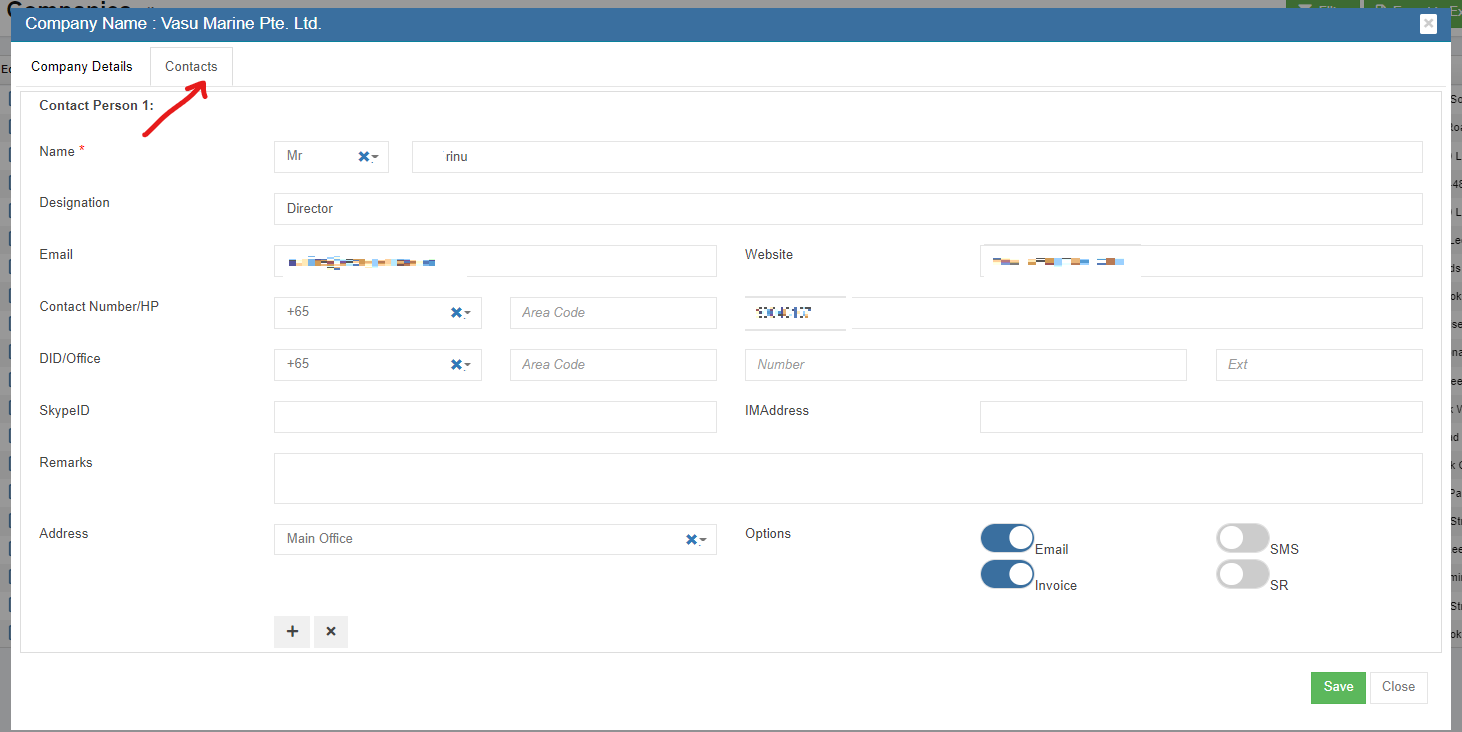](http://wiki.cuteinfocomm.com/uploads/images/gallery/2023-04/image-1682107967744.png)
2. Click the contact tab as in above screenshot, the contact detail page opens.
3. Click [](http://wiki.cuteinfocomm.com/uploads/images/gallery/2022-08/image-1660697382240.png)icon at the bottom left side to add new contact. The new contact page will open.
4. Select person salutation and enter the name of the contact.
5. Enter designation
6. Enter email address
7. Enter phone, direct phone number etc.
8. Click **Save** to create the contact under the company. The contact data will be saved in contact master as well.
### Edit Contact
1. In the contact list page, click[](http://wiki.cuteinfocomm.com/uploads/images/gallery/2022-08/image-1660688476953.png) the edit icon against the contact, the contact detail page will open.
2. Edit the contact details and click **Save**.
### Delete Contact
1. Click[](http://wiki.cuteinfocomm.com/uploads/images/gallery/2022-08/image-1660688625741.png)Delete icon against the contact that user wants to delete,
2. Click Yes to confirm deletion. [](http://wiki.cuteinfocomm.com/uploads/images/gallery/2022-08/image-1660697761656.png)
### Export Contact
User can export all contact data use the export option. Click [](http://wiki.cuteinfocomm.com/uploads/images/gallery/2022-08/image-1661796864622.png) the contact master data will be export and downloaded.
## Asset Category
To view all current asset category, click **Asset Category** in Master menu,
[](http://wiki.cuteinfocomm.com/uploads/images/gallery/2022-08/image-1660697926132.png)
### Add New Asset Category
To add new asset category,
1. click [](http://wiki.cuteinfocomm.com/uploads/images/gallery/2022-08/image-1660338813842.png)in the asset category list view page. The new asset category window opens, [](http://wiki.cuteinfocomm.com/uploads/images/gallery/2022-08/image-1660698093565.png)
2. Enter category name and abbreviation, or any remarks.
3. Click **Save**. A new asset category is added.
### Edit Asset Category
1. In the asset category list page, click[](http://wiki.cuteinfocomm.com/uploads/images/gallery/2022-08/image-1660688476953.png) the edit icon against the category, the asset category detail page will open.
2. Edit the details and click **Save**.
### Delete Contact
1. Click[](http://wiki.cuteinfocomm.com/uploads/images/gallery/2022-08/image-1660688625741.png)Delete icon against the asset category that user wants to delete,
2. Click **Yes** to confirm deletion in the confirmation window.
### Add Sub-category under Asset Category
To add sub category of an asset category, click the add icon in the Add column against each asset category.
[](http://wiki.cuteinfocomm.com/uploads/images/gallery/2022-08/image-1660698463076.png)
### Export Asset Category
User can export all asset category data use the export option. Select and click[ ](http://wiki.cuteinfocomm.com/uploads/images/gallery/2022-08/image-1661797100437.png) the asset category master data will be export and downloaded in selected format.
# Stock Reports
Manage Stocks
# Suppliers Management
Suppliers can register in the client's supplier portal and once approved they get RFQ in the system and quotes can be submitted online. Approved PO are sent through the system and invoices can be submitted online.
## Supplier Registration in cuteOffice
Suppliers' representative user shall register as user in cuteOffice system. Contact your Client for URL to register as supplier. New supplier shall follow below steps to create user account and navigate supplier portal in cuteOffice:
### Supplier Self Registration
1. In cuteOffice user login page of supplier portal, click "Register as new supplier",[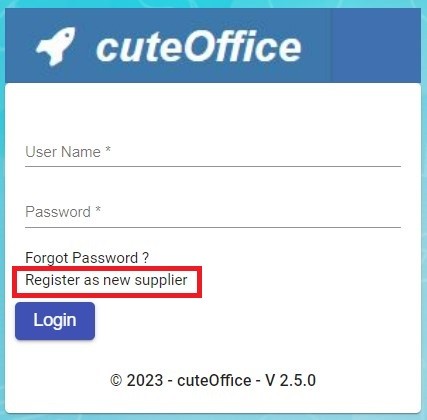](http://wiki.cuteinfocomm.com/uploads/images/gallery/2023-05/image-1685570852978.jpg)
2. The new supplier registration page opens as below, which includes three parts of information: General Company Information, Authorised Representative Information, Attachment:
- **General Company Information**[](http://wiki.cuteinfocomm.com/uploads/images/gallery/2023-05/image-1685571181753.png)
Company Details
- - - In Company Name box, enter supplier company name.
- In Supplier Type box, select supplier type as local or overseas.
- In UEN box, enter company UEN number.
- In GST/VAT Reg No. box, enter GST/VAT registration number.
- In Tax box, enter Yes or No.
- In Currency box, select currency
- In Address box, enter company address.
Communication
- - - In Email box, enter company email address.
- In Phone Number, select IDD code and enter company phone number.
- In Fax Number, select IDD code and enter company fax number.
- In Website box, enter company website URL.
Credit & Payment Terms
- - - In Payment Terms box, select payment terms,
- In Credit Term box, select credit terms.
- In Credit Limit box, enter credit limit amount.
1. - **Authorised Representative Information**[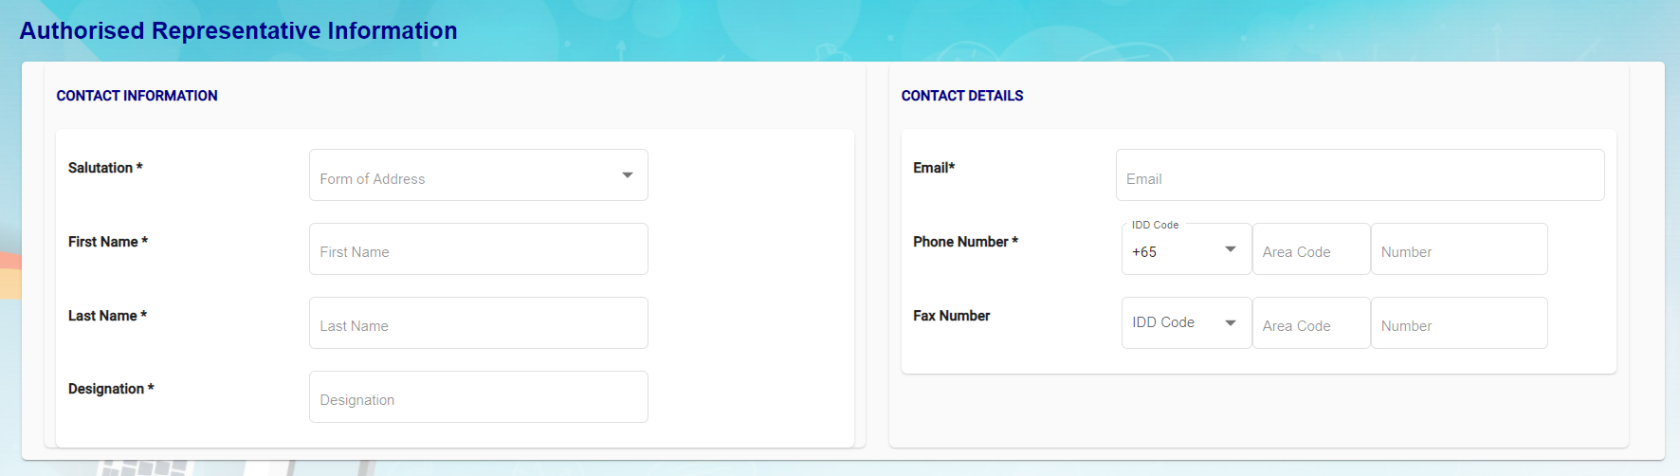](http://wiki.cuteinfocomm.com/uploads/images/gallery/2023-05/image-1685571196088.png)
- In Salutation box, select relevant salutation.
- In First Name box, enter user first name.
- In Last Name box, enter user last name,
- In Designation box, enter user designation.
- In Email box, enter user email address,
- In Phone Number, select IDD code and enter user phone number.
- In Fax Number, select IDD code and enter user fax number.
2. - **Attachment-**supplier user can upload required documents in attachment. Click "Select your file" and select files to upload:[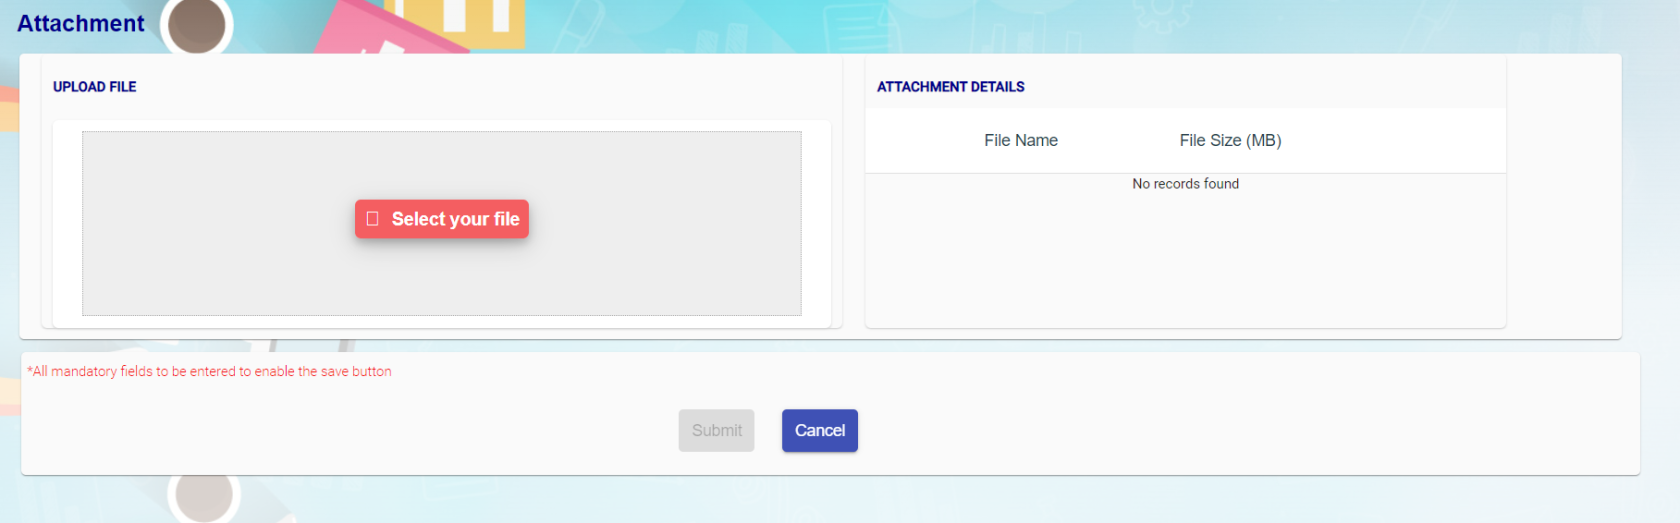](http://wiki.cuteinfocomm.com/uploads/images/gallery/2023-05/image-1685571210372.png)
3. Once all mandatory information are filled up, the submit button will be enabled. Click Submit, a registration success confirmation message will show as below. [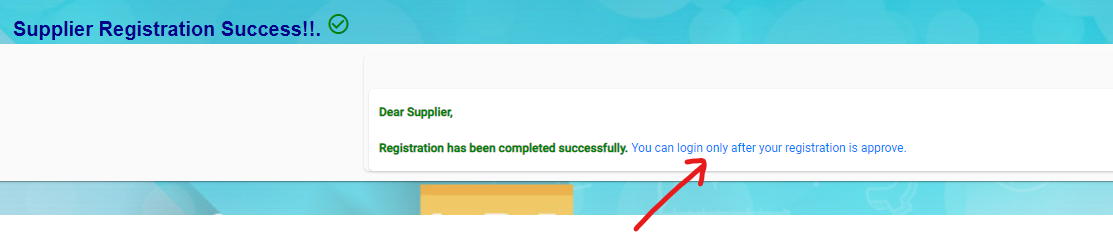](http://wiki.cuteinfocomm.com/uploads/images/gallery/2023-07/image-1690237806485.png)
### Approving New Suppliers (Client)(Not Suppliers)
Once new suppliers registered in cuteOffice, client company need to approve the new supplier to allow suppliers appearing in procurement module.
1. Navigate to cuteOffice version 2, and click Supplier from the main page.[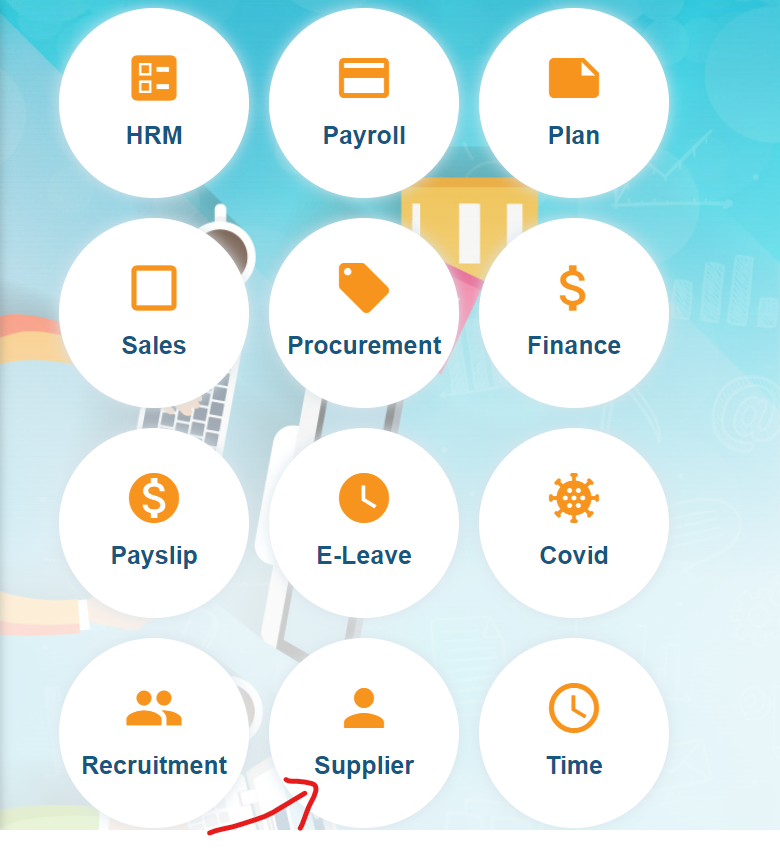](http://wiki.cuteinfocomm.com/uploads/images/gallery/2023-07/image-1690237512766.png)
2. Click [ ](http://wiki.cuteinfocomm.com/uploads/images/gallery/2023-07/image-1690237999638.png)Supplier Request, the new suppliers requests list page opens as below, all new registered suppliers will show status as "New Supplier". [](http://wiki.cuteinfocomm.com/uploads/images/gallery/2023-07/image-1690237945822.png)
3. Click the key of the new supplier name to open new supplier review page,
[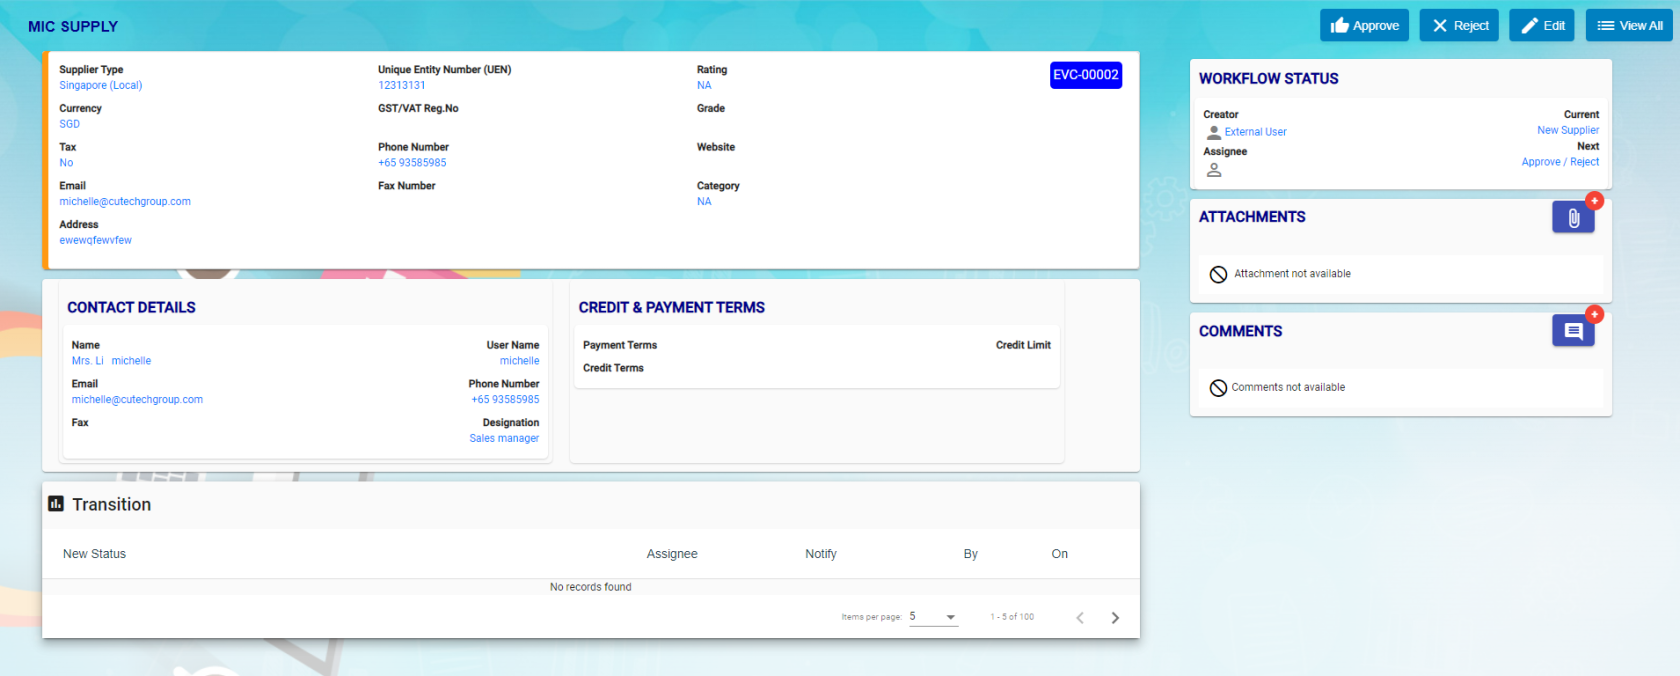](http://wiki.cuteinfocomm.com/uploads/images/gallery/2023-07/image-1690238153295.png)
4. To Approve supplier, click [ ](http://wiki.cuteinfocomm.com/uploads/images/gallery/2023-07/image-1690238240009.png), the notification window opens,
[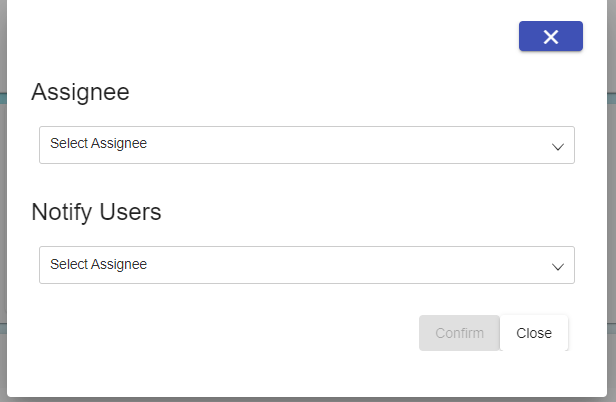](http://wiki.cuteinfocomm.com/uploads/images/gallery/2023-07/image-1690238320627.png)
5. Select respective users to receive supplier approval notifications, and click Confirm button to approve supplier. Or click Reject to reject new supplier. A notification will be sent to the respective user of the company.
6. Once company approved new suppliers, the status of the supplier request will be changed to approved automatically in the supplier portal.
## Supplier Login
In supplier portal, suppliers can view Dashboard (Quotation Request vs Quotation Approved), Quotation /PO and Invoice menu. New quotations created in procurement module will be available in the supplier portal. Quotation number is the same as in RFQ.
[](http://wiki.cuteinfocomm.com/uploads/images/gallery/2023-08/image-1692080867522.png)
**Note:** External Supplier will be available in the user list. External supplier will login to the supplier portal.

## Supplier Management
### Quotation management
1. Click Quotation/PO menu in Supplier portal.[](http://wiki.cuteinfocomm.com/uploads/images/gallery/2023-08/image-1692082023458.png)
2. Click edit icon of the new quotation where status = Waiting for quotation submission, the new quotation opens as below for supplier to fill up details.[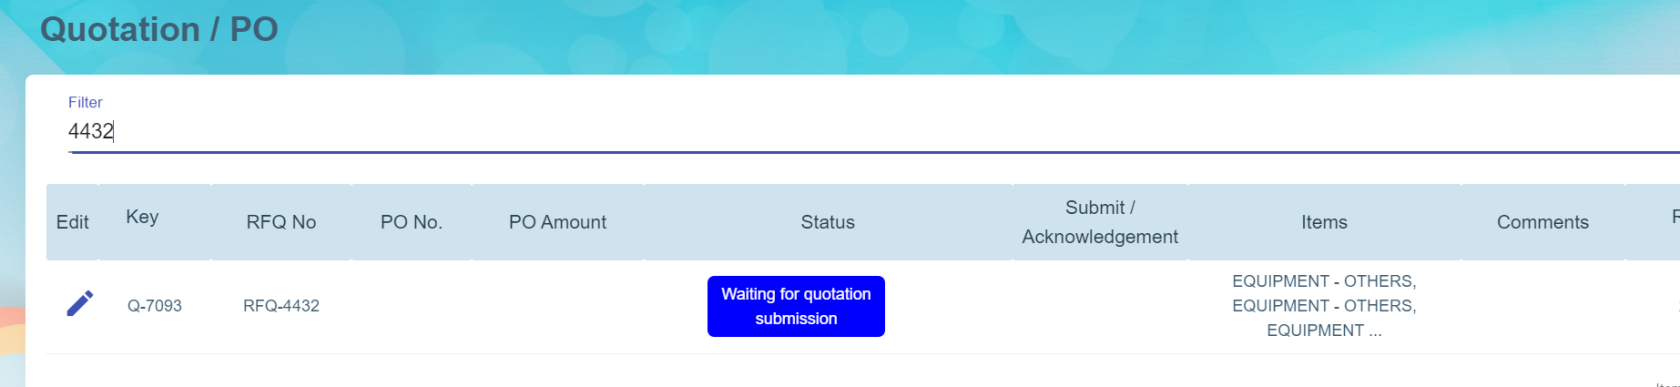](https://wiki.cuteinfocomm.com/uploads/images/gallery/2024-07/image-1721877467943.png)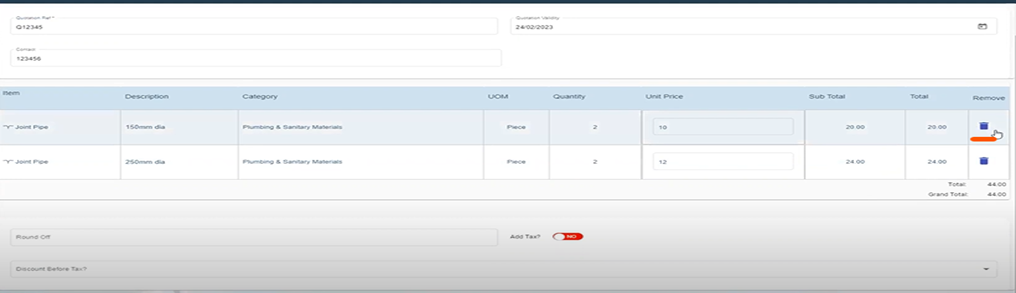
3. Enter quotation reference number, validity date, contact number and enter unit price, add TAX and Discount (optional) if required. (Item can be delete from quotation from procurement module , if it is not applicable).
4. Click save to save quotation details. **Note:** Suppliers can edit and modify the quotation until it gets submit.[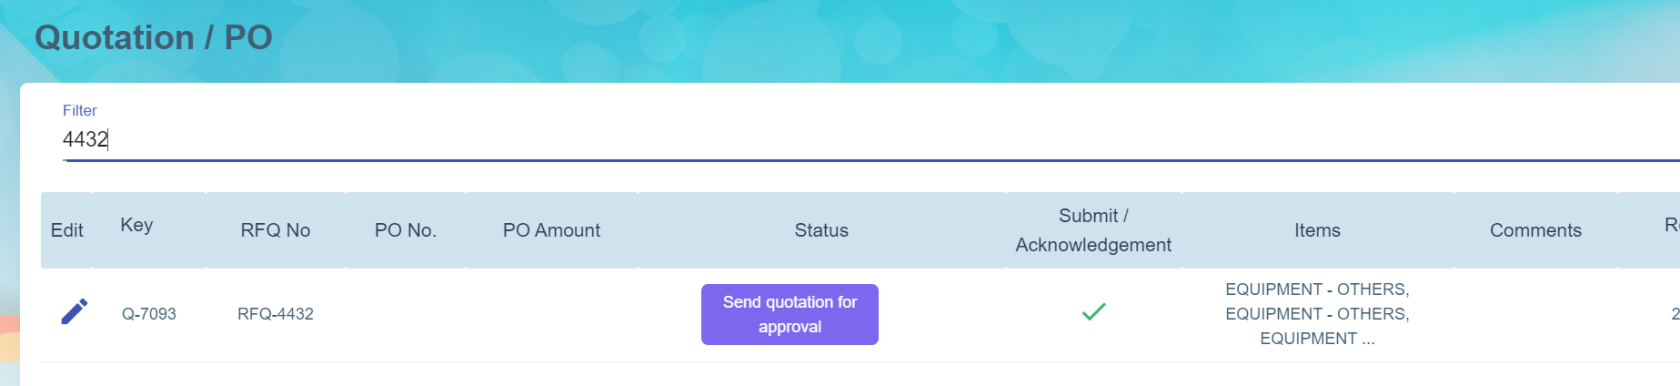](https://wiki.cuteinfocomm.com/uploads/images/gallery/2024-07/image-1721878085143.png)
5. Once suppliers confirmed the details entered are correct, click submit, the status of new quotation will be changed to Waiting for quotation approval.[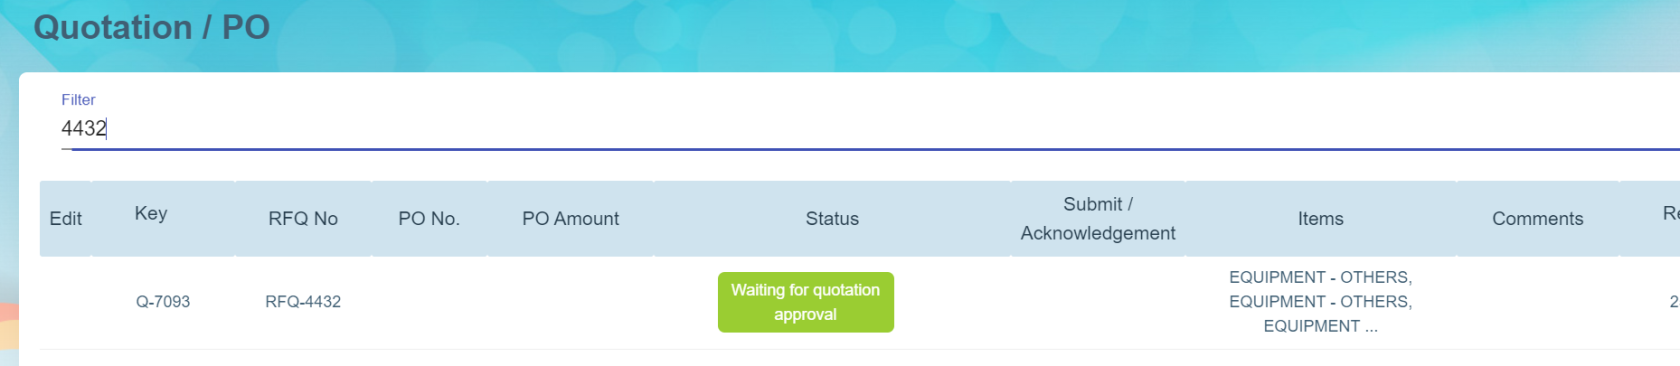](https://wiki.cuteinfocomm.com/uploads/images/gallery/2024-07/image-1721878279831.png)
6. And in procurement module RFQ list, the status of relevant quotation table in the RFQ will automatically updated as quotation created (As Procurement module and supplier module are interlinked). 
7. Then company will be able to select and confirm quotation and proceed to create PO and send PO to relevant suppliers.
### PO management
Once PO is sent to suppliers, supplier users can login to the supplier portal to manage relevant PO.
1. Click Quotation/PO menu in Supplier portal. The status of PO will be "Quotation approved" in Supplier portal with the PO number.[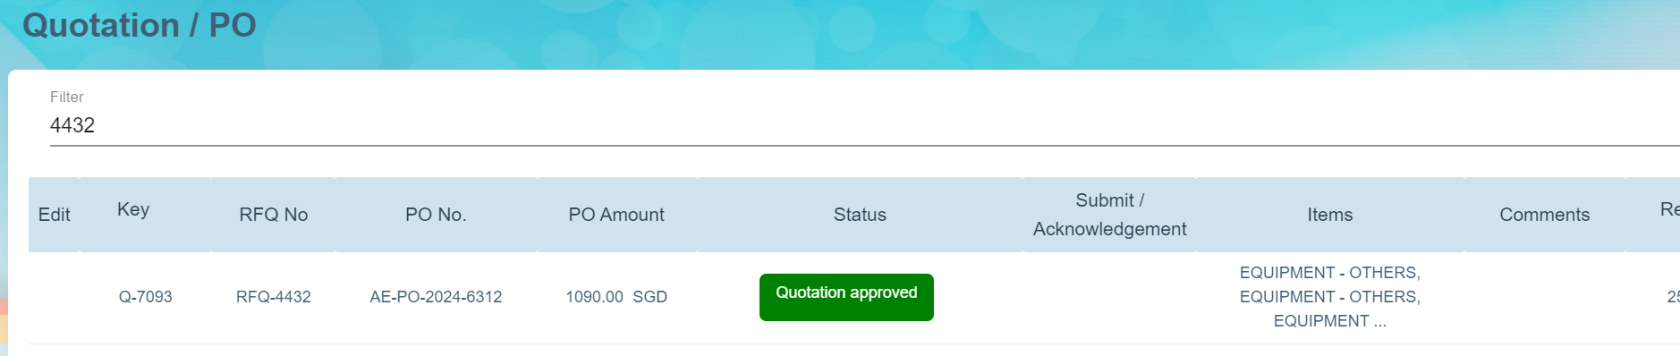](https://wiki.cuteinfocomm.com/uploads/images/gallery/2024-07/image-1721879096834.png)
2. Supplier user shall click the Quotation key to open PO detail page, 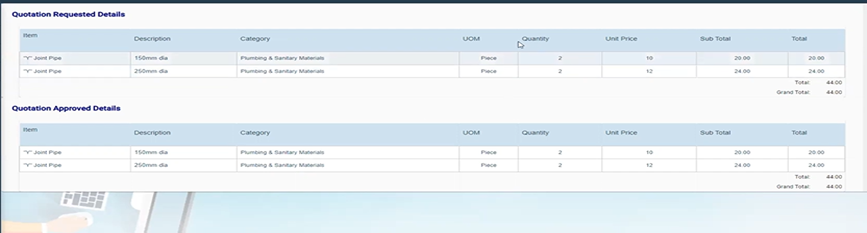
3. Suppliers can acknowledge PO (optional step). Supplier will submit invoice and delivery order.
4. After client company received items against the PO, client company will add receiving entry details.
5. Supplier will enter invoice details in supplier portal. Supplier can also enter Partial payment in the invoice amount.[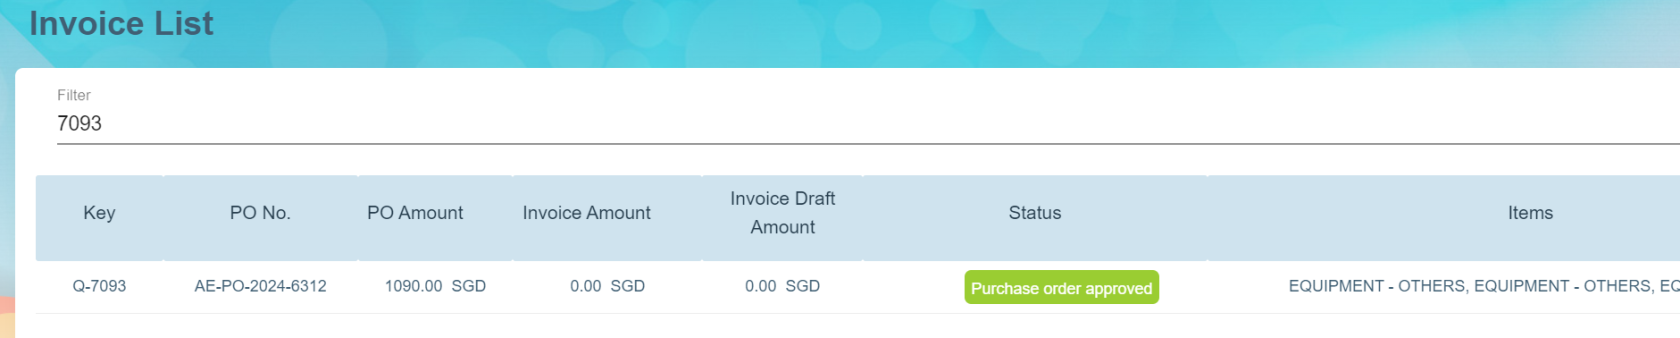](https://wiki.cuteinfocomm.com/uploads/images/gallery/2024-07/image-1721879844781.png)
6. Click on the quotation key i.e. Q-7093 in the Invoice List page and click Add Invoice button at the Invoice Page to add invoice.[](https://wiki.cuteinfocomm.com/uploads/images/gallery/2024-07/image-1721880030579.png)
7. Based on the above selected key, system will show the list of item(s) of the quotation/PO approved record in the invoice details page where user can select which item to invoice. Supplier needs to enter the Invoice Date, Invoice Number and Remarks (optional) and it is compulsory to upload the invoice as attachment to this invoice details record.

8. Below sample shows the status = New when you save the invoice and the icon "Send for Approval by Supplier" in the Action column means that this invoice is still in draft mode.
[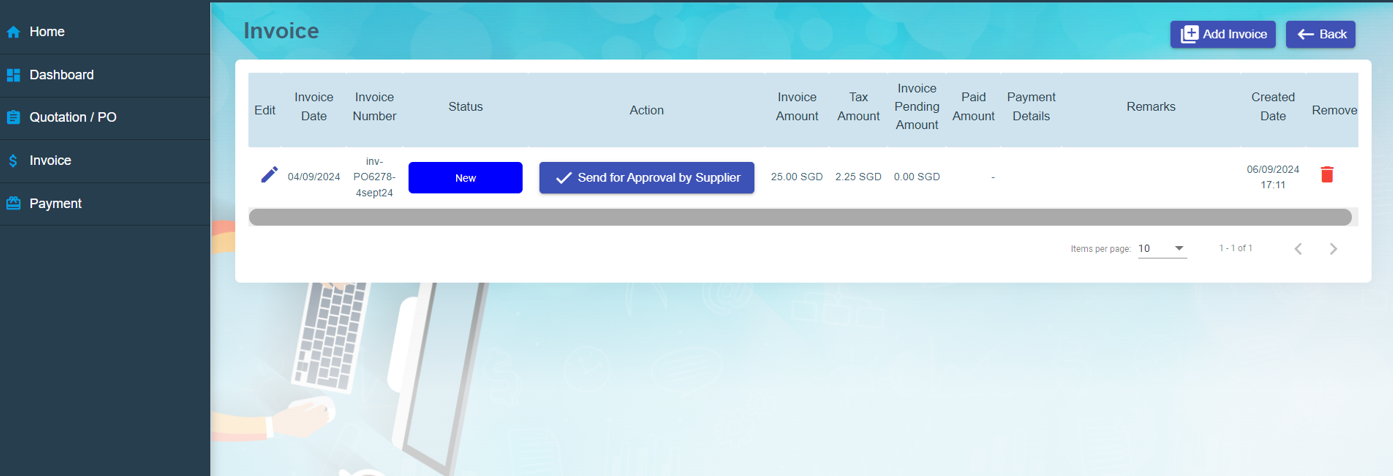](https://wiki.cuteinfocomm.com/uploads/images/gallery/2024-09/image-1726711073612.png)
Once invoice is final then you may click on the icon [](https://wiki.cuteinfocomm.com/uploads/images/gallery/2024-09/image-1726711358047.png) in the Action column to submit for the client’s approval with system prompting Yes or No to submit.
[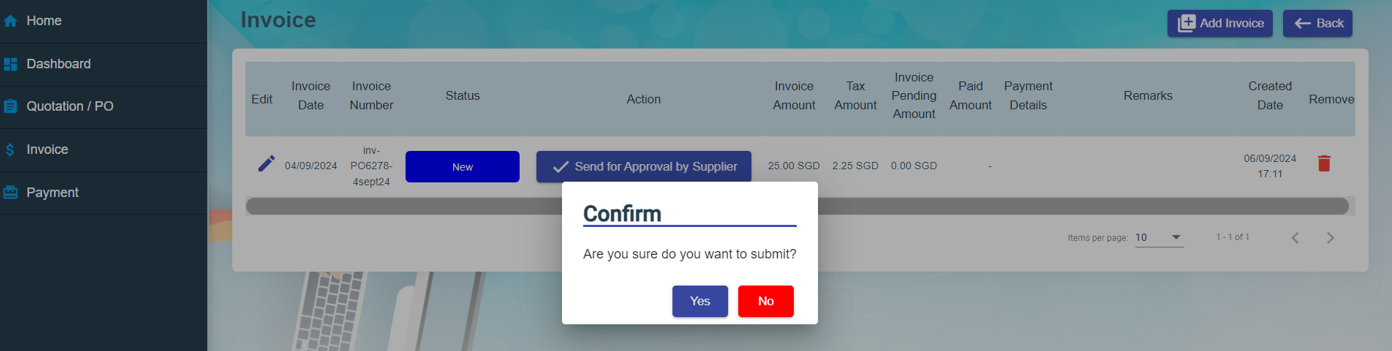](https://wiki.cuteinfocomm.com/uploads/images/gallery/2024-09/image-1726711255974.png)
Once clicked Yes to confirm to submit, the status of the invoice will be changed to Submitted and icon is changed to
"Wating for Approval by Client" in the Action column (refer below screenshot) and this will reflect in the client’s procurement module that the invoice is final and can review to proceed to approve for payment if everything is in order.
[](https://wiki.cuteinfocomm.com/uploads/images/gallery/2024-09/image-1726711405468.png)
9. The invoice data entered by suppliers in supplier portal where invoice status = Submitted, will be automatically synchronized to the invoice draft in client's procurement portal as shown in the below example.[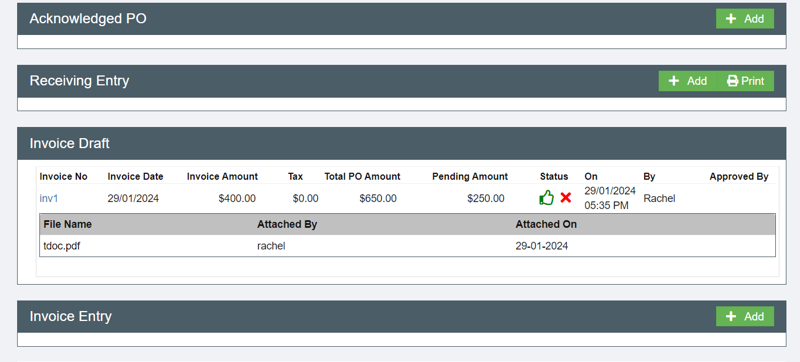](https://wiki.cuteinfocomm.com/uploads/images/gallery/2024-07/image-1721881387218.png)
10. If invoice details are all correct and approved by the client company, it will automatically load in Invoice Entry when client user clicks on the thumbs up icon at the Invoice Draft section to approve the invoice. [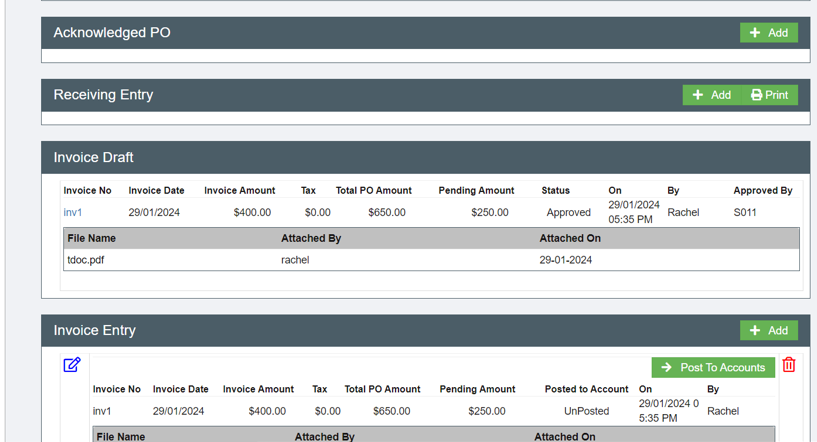](https://wiki.cuteinfocomm.com/uploads/images/gallery/2024-07/image-1721881696159.png)
Based on the client company configuration, if there is a link between the Procurement module and the Finance module, the client user can click on Post to Accounts button at the Invoice Entry to integrate this invoice to the Finance module for payment.
11. Final stage is payment entry. Payment amount and pending invoice amount are entered against either invoice reference number or purchase order key as shown in the below example. [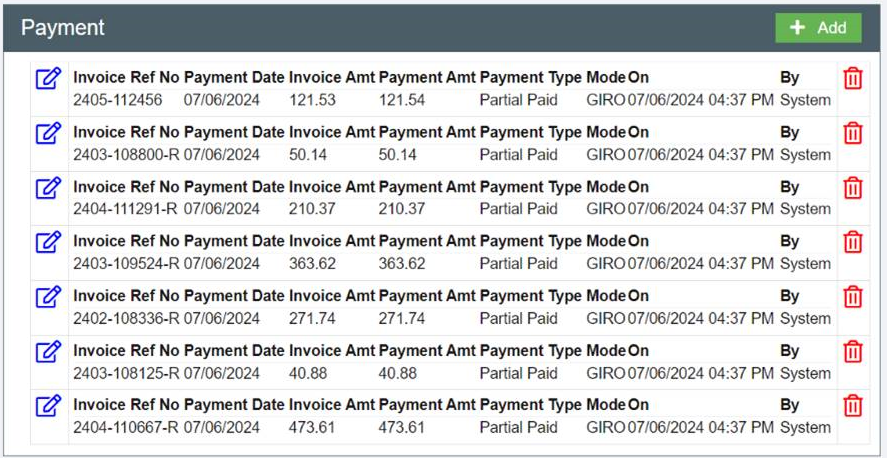](https://wiki.cuteinfocomm.com/uploads/images/gallery/2024-09/image-1726711649998.png)
12. Once invoice is approved by client and payment is generated for the invoice in the client finance module, the invoice in the supplier portal will be shown as Approved status and there will be an icon in the Payment Details column and system will show the payment details in Payment Details pop up window. [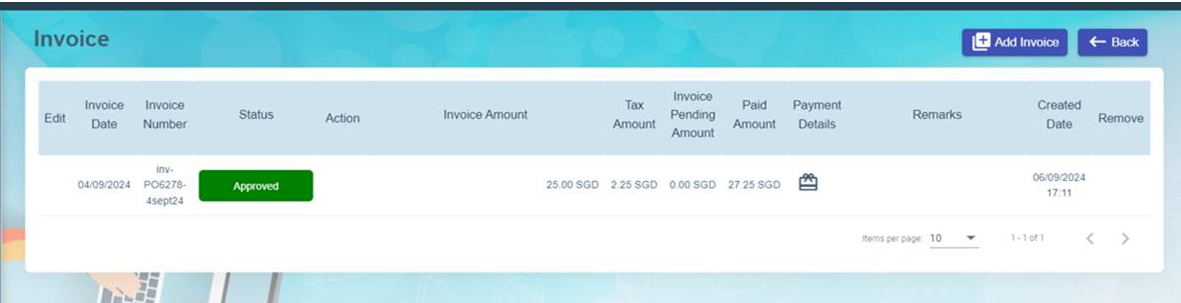](https://wiki.cuteinfocomm.com/uploads/images/gallery/2024-09/image-1726711730930.png)
[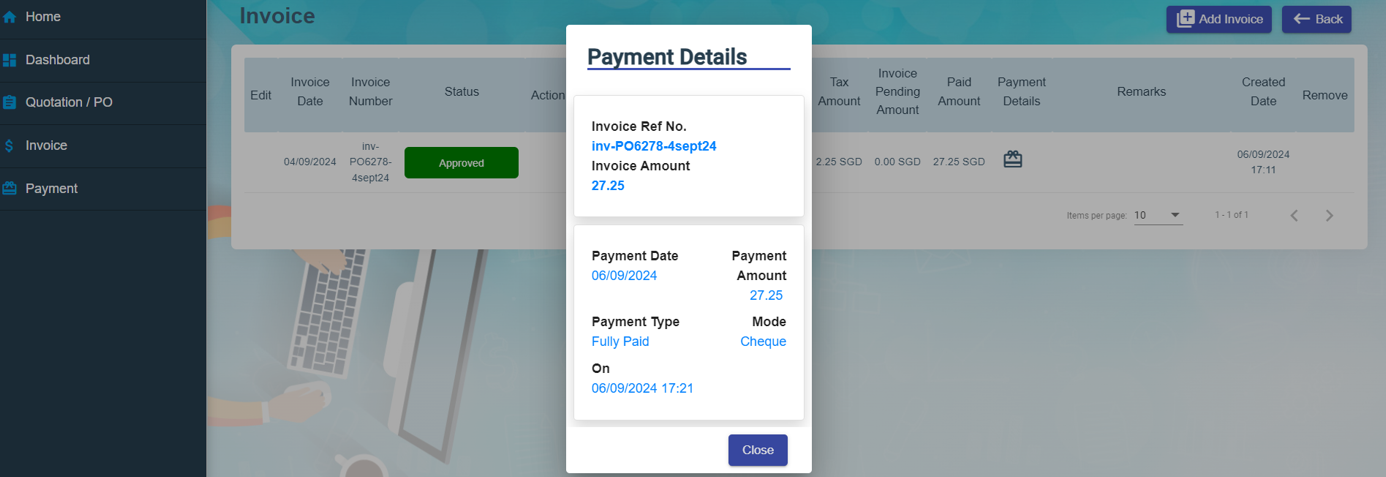](https://wiki.cuteinfocomm.com/uploads/images/gallery/2024-09/image-1726712170320.png)
To view all payments in the supplier portal, click on the left hand side menu "Payment" and system will display all payments as shown in the below screenshot. [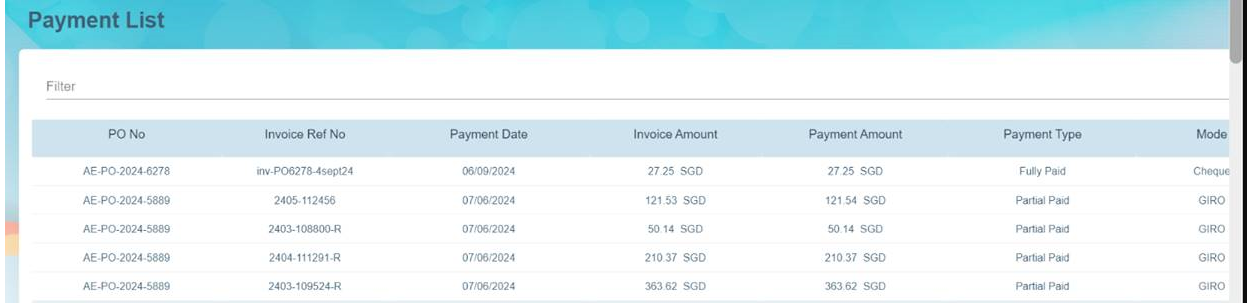](https://wiki.cuteinfocomm.com/uploads/images/gallery/2024-09/image-1726712236489.png)
# Sales and Enquiry
Register enquiry, create quotation and convert to projects
# New Page
# Masters
Masters in Sales module includes: Company, Contacts, Quotation Template, Contract Template.
Company master data and contact master data are the same data as Admin-Master.
## Quotation Template
Authorized user can manage (add ,edit or delete) quotation template in this page. Click Quotation Template in Sales-Master tab, the quotation template list page opens as below,
[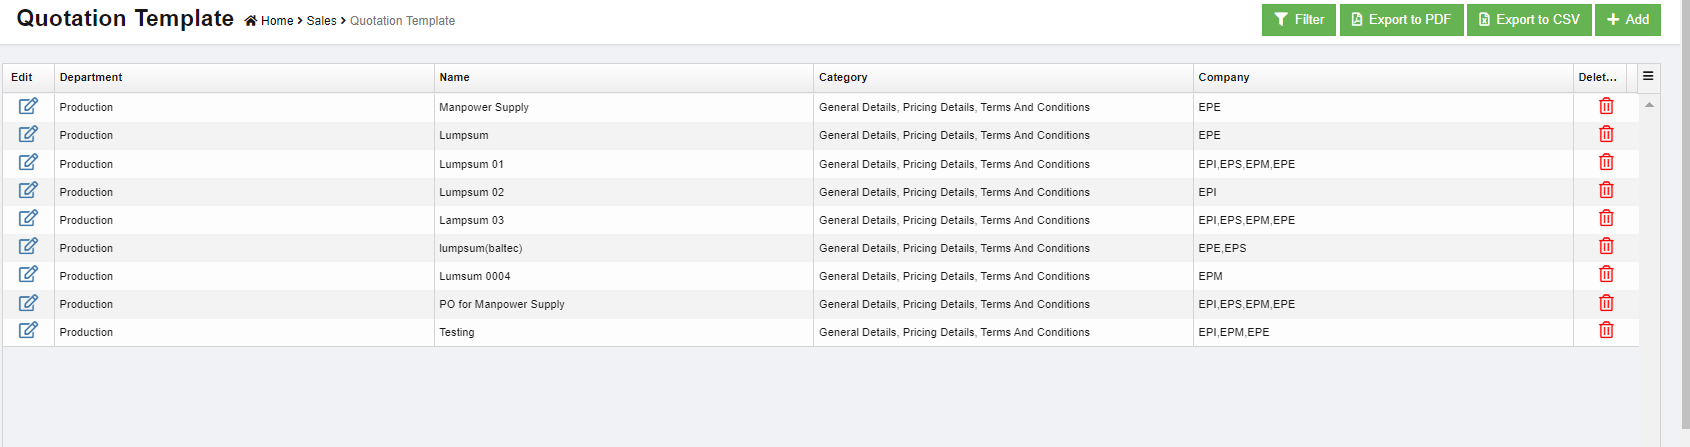](http://wiki.cuteinfocomm.com/uploads/images/gallery/2023-05/image-1684358441622.png)
### Add New Quotation Template
To add a new quotation template,
1. Click[](http://wiki.cuteinfocomm.com/uploads/images/gallery/2023-05/image-1684359119878.png) in the top right corner, the new quotation page opens, [](http://wiki.cuteinfocomm.com/uploads/images/gallery/2023-05/image-1684359663438.png)
2. In Template Name box, enter the quotation name.
3. In Category box, click to select categories to be included in the template.
4. In Department box, select department.
5. In Company box, select company name.
6. In Quotation Validity Days box, select
7. Click Save to save new template.
# Sales
Sales module in cuteOffice allows sales person to create & modify sale enquiry, and prepare sales quotation to customers against sale enquiry.
## Enquiry
Click Enquiry submenu in Sales menu, the enquiry list page opens as below, the current status column provides color codes for different status type for better visualization.
Status of enquiry legendary:
- Save Draft-when click Create Quote, after enter details in the quotation, use can choose to save as draft by clicking [](http://wiki.cuteinfocomm.com/uploads/images/gallery/2023-06/image-1688077637506.png) icon in the quotation estimation page. The quotation status will change to "Save Draft"
- Quote Created-when click Create Quote, after enter details in the quotation, if user click save, the quotation status will change to "Quote Created".
- Waiting for Approval-after quotation was sent for approval, the enquiry status will change to "Waiting for Approval"
- Approved-after approving authorities approves the quotation, the enquiry status will change to "Approved"
- Waiting for Work Order-after quotation was sent to client, the enquiry status will change to " Waiting for Work Order"
- Project Created-once client replied and approves quotation, user can enter project and the status of enquiry will change to "Project Created"
- Closed Enquiry-when click cancel option in enquiry, the status will change to "Closed Enquiry"
[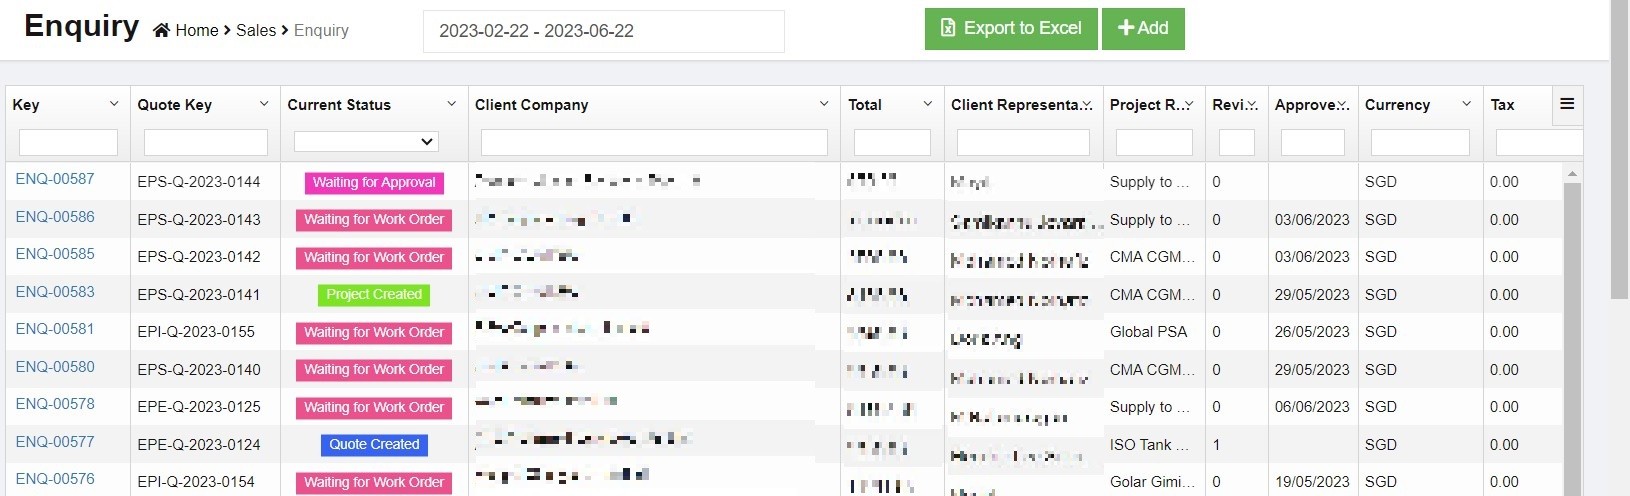](http://wiki.cuteinfocomm.com/uploads/images/gallery/2023-06/image-1687500230336.jpg)
#### Add New Sales Enquiry
To add a new sales enquiry,
1. Click [ ](http://wiki.cuteinfocomm.com/uploads/images/gallery/2023-05/image-1684965210251.png)in the up right corner of sales enquiry list page or [](http://wiki.cuteinfocomm.com/uploads/images/gallery/2023-05/image-1684965307406.png) icon in the enquiry menu, the new sales enquiry page opens as below,
[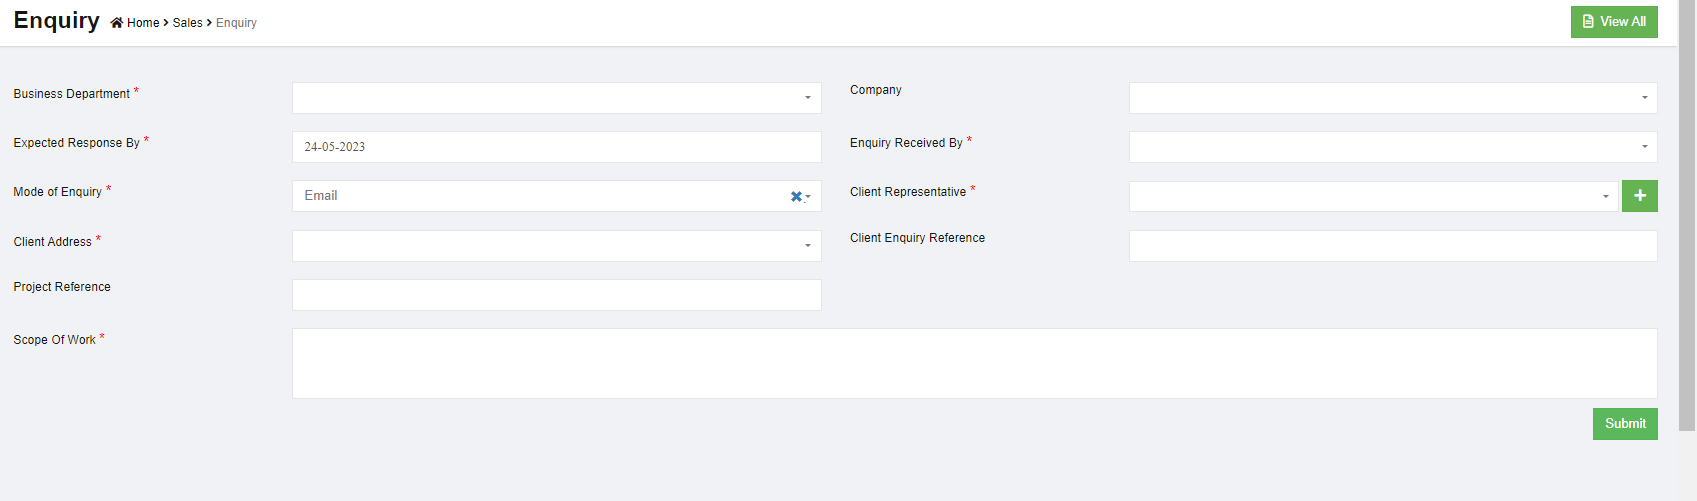](http://wiki.cuteinfocomm.com/uploads/images/gallery/2023-05/image-1684965458607.png)
2. In Business Department box, click to select relevant department name (Note: only departments marked as cost center will be show in the list of department. This can be configured in Admin-company-department setting page).
3. In Company box, click to select relevant company name.
4. In Expected Response By box, click to select a response by date from calendar.
5. In Enquiry Received By box, click to select employee ID& name.
6. In Mode of Enquiry box, click to select mode from list of email/fax, marketing, personal visit, phone. Note: the list of mode of enquiry can be customized in Admin-option.
7. In Client Representative box, select contact name if available in the drop down list, or click[](http://wiki.cuteinfocomm.com/uploads/images/gallery/2023-05/image-1684965994609.png) to add a new contact. Note: system will show all existing enquires received from the selected client representative for reference or further action such as create quotation or clone enquiry.
8. In Client Address box, once client contact is selected, the client address will populate address data from the contact details.
9. In Client Enquiry Reference box, enter enquiry reference if any.
10. In Project Reference box, enter project reference if any.
11. In Scope of Work box, enter scope of work from the enquiry.
12. Click Submit, a notification window will pop up, [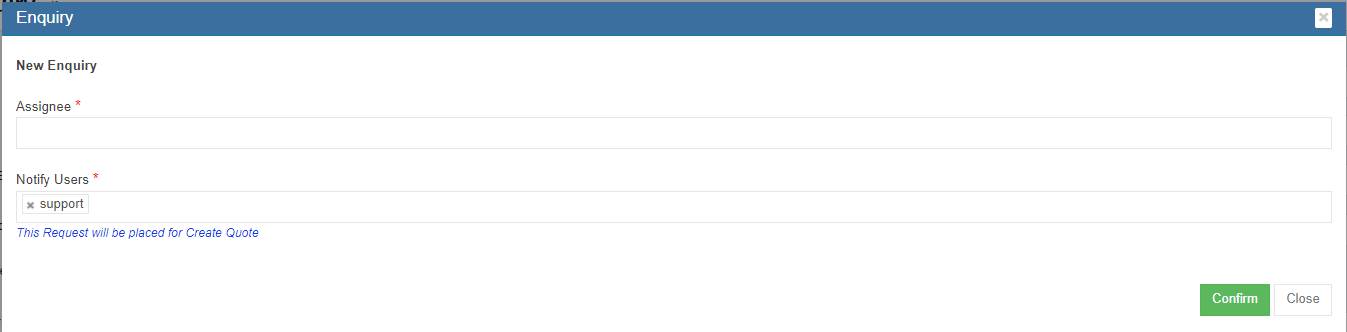](http://wiki.cuteinfocomm.com/uploads/images/gallery/2023-05/image-1684966765794.png)
13. Select Assignee and Notify Users, then click Confirm to create a new sales enquiry.
#### Create Quotation
After an enquiry is submitted, user can proceed to create quotation. Click enquiry key to open enquiry,
1. Click[  ](http://wiki.cuteinfocomm.com/uploads/images/gallery/2023-06/image-1688075787280.png)in the enquiry detail page, [](http://wiki.cuteinfocomm.com/uploads/images/gallery/2023-06/image-1688076815320.jpg)
2. The quotation estimation detail page opens as below, [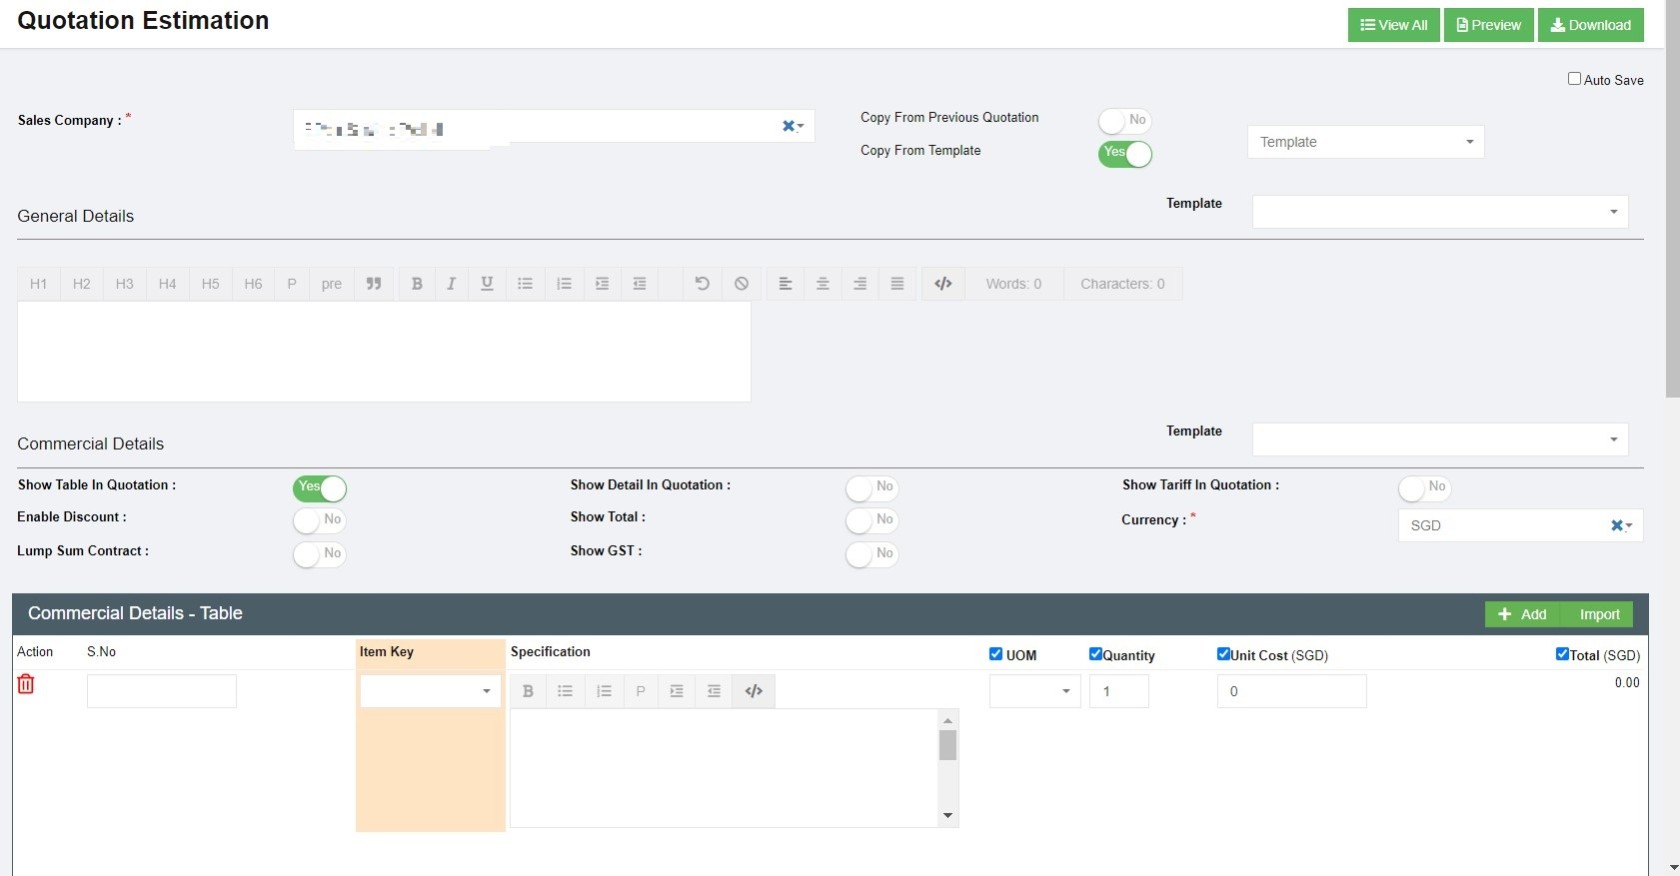](http://wiki.cuteinfocomm.com/uploads/images/gallery/2023-06/image-1688076959591.jpg)
3. In sales company section, the details will be the sales company entered in enquiry.
4. In terms of quotation templates, user can copy from previous quotation or copy from templates.
- To copy from previous quotation, enable 1 to Yes, and select the relevant previous quotation key/name, the previous quotation details will load, user can edit or update details where needed.[](http://wiki.cuteinfocomm.com/uploads/images/gallery/2023-06/image-1688077113757.png)
- To copy from template, enable the "Copy From Template" to Yes, and select template name from the template list. [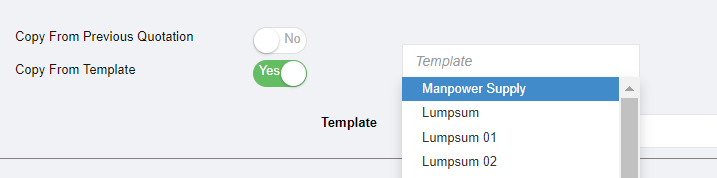](http://wiki.cuteinfocomm.com/uploads/images/gallery/2023-06/image-1688078005322.png)
5. In General Details section, the details will be automatically filled up from template if user choose to use template or copied from previous quotation. Or else, user can key in any details when needed.
6. In Commercial Details section,, [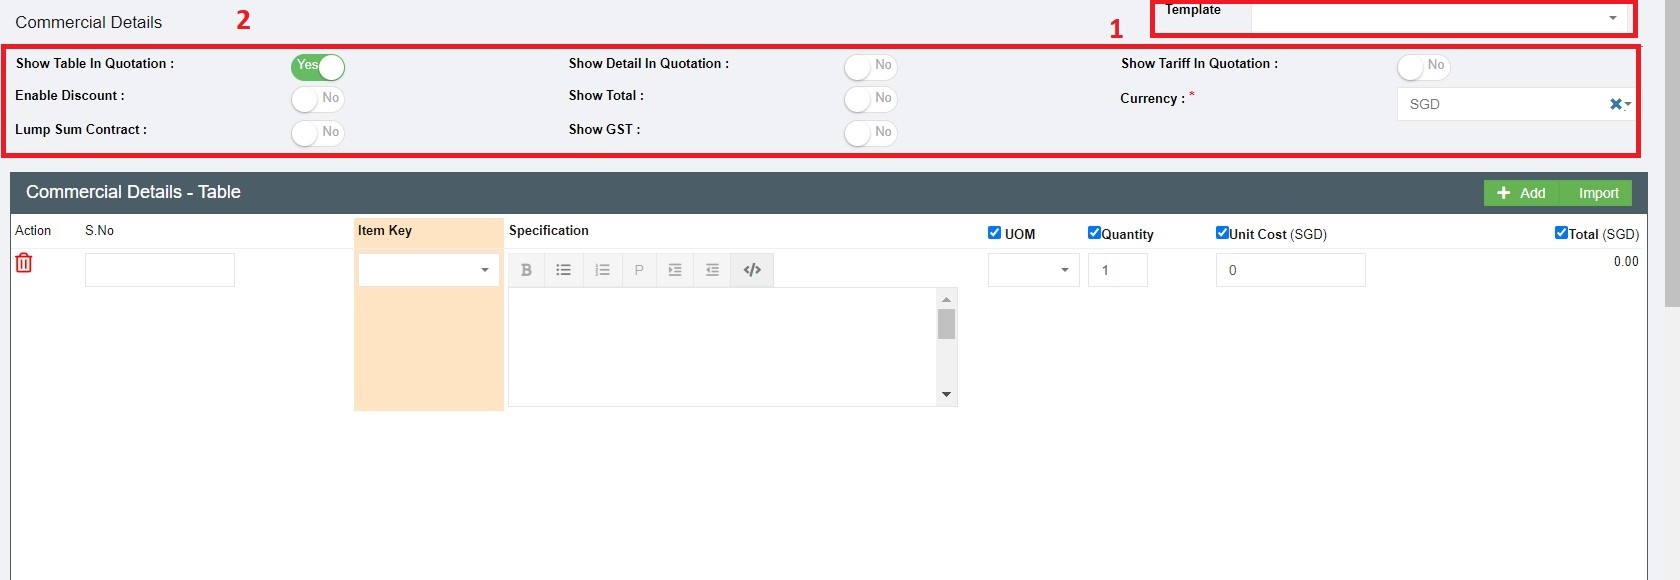](http://wiki.cuteinfocomm.com/uploads/images/gallery/2023-07/image-1689029726337.jpg)
- User can choose from commercial detail templates in area 1 that are predefined by user.
- Or customize commercial details table using the flag options in area 2 in above screenshot.
- Select items and enter other details such as quantity etc. (Once selected Item key, the specifications and UOM will load from item master list); click [](http://wiki.cuteinfocomm.com/uploads/images/gallery/2023-07/image-1689147537198.png)Add item icon in the upper right corner of Commercial Details table to add more items.
7. In Terms and Condition section, user can enter details or select template from the template field. [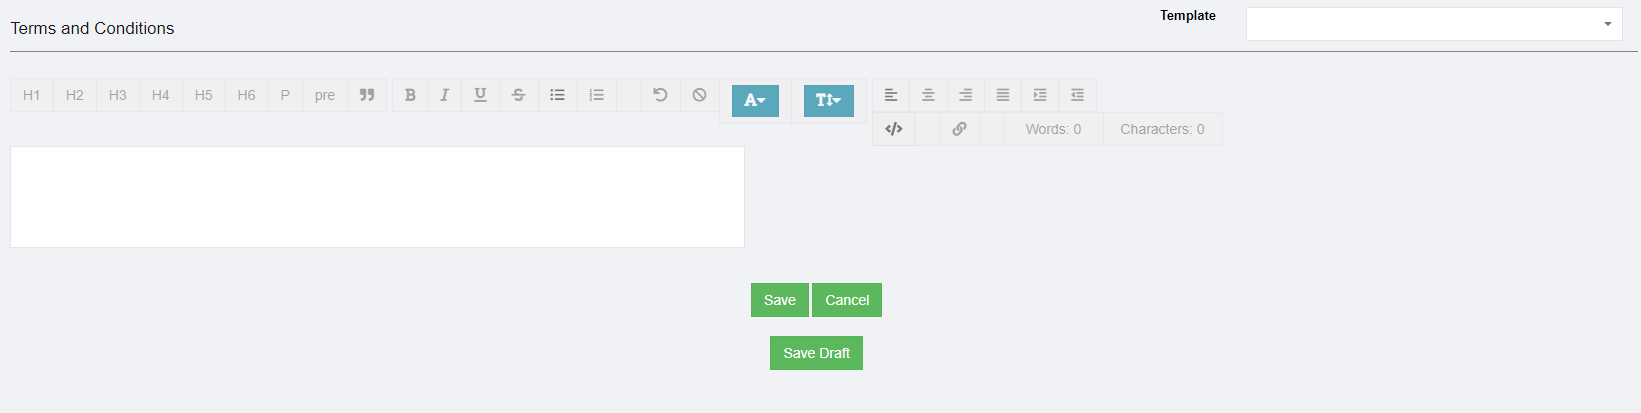](http://wiki.cuteinfocomm.com/uploads/images/gallery/2023-07/image-1689147606472.png)
8. Once quotation details are filled up, user can click Save/Cancel or Save draft as needed.
### Edit Sales Enquiry When Needed
Edit of quotation information is allowed before the enquiry is approved. Once enquiry is approved, user can not edit quotation information and can only edit client information (contact /address).
To edit enquiry,
1. Click the key of the enquiry to open detail page, [](http://wiki.cuteinfocomm.com/uploads/images/gallery/2023-07/image-1689149677772.jpg)
2. Click the edit icon in respective area to edit details. (Note: once quotation is sent for approval, the general enquiry information and quotation information is not allow to edit and edit option will be removed.),
- Click edit icon in area 1 to edit enquiry general details
- Click edit icon in area 2 & 3 to edit client information
- Click edit icon in area 4 to edit quotation information.
3. User can preview or download quotations using below options in quotation information section. [](http://wiki.cuteinfocomm.com/uploads/images/gallery/2023-07/image-1689149239850.png)
### Approve Quotation
1. once quotation details are reviewed and ready for approval, user can click the[](http://wiki.cuteinfocomm.com/uploads/images/gallery/2023-07/image-1689148134934.png) icon (the action needed icons will blink in yellow) and a notification window will open as below, [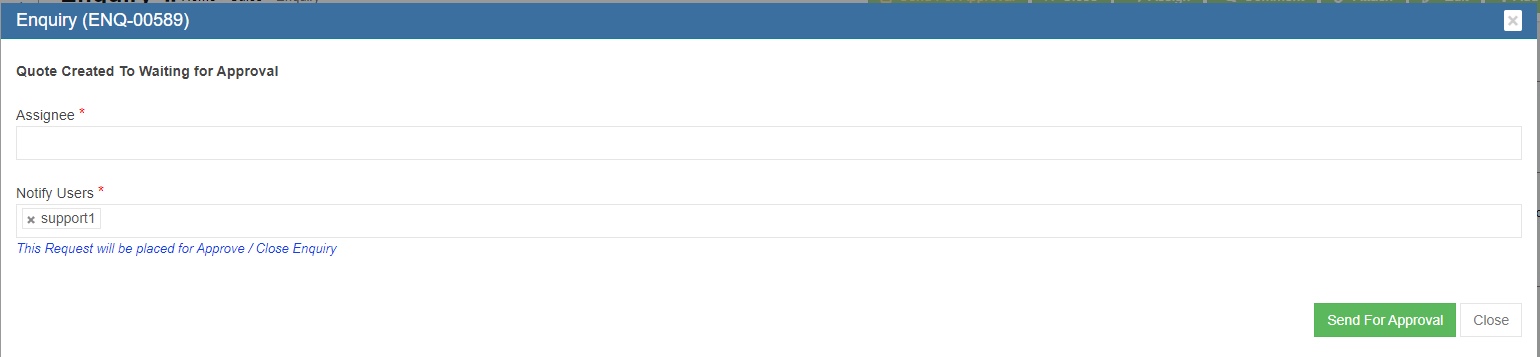](http://wiki.cuteinfocomm.com/uploads/images/gallery/2023-07/image-1689148019667.png)
2. Select Assignee and Notify users, then click Send for Approval. System will send out waiting for approval notifications to relevant users.
3. Approve option will be provided at the top right page for users who have the access right to approve quotations. [](http://wiki.cuteinfocomm.com/uploads/images/gallery/2023-07/image-1689148826503.png)
- Other useful options :
- [](http://wiki.cuteinfocomm.com/uploads/images/gallery/2023-07/image-1689148599507.png)-if user click this icon, a notification of closing enquiry will be prompt and the enquiry will be closed upon confirmation, and the status will change to "Closed Enquiry".
- [ ](http://wiki.cuteinfocomm.com/uploads/images/gallery/2023-07/image-1689148620973.png)-user can click this icon to update assignee.
- [](http://wiki.cuteinfocomm.com/uploads/images/gallery/2023-07/image-1689148644296.png)-user can click this icon to add comment about the enquiry to specific users
- [](http://wiki.cuteinfocomm.com/uploads/images/gallery/2023-07/image-1689148670054.png)-user can click this icon to attach relevant documents
- [ ](http://wiki.cuteinfocomm.com/uploads/images/gallery/2023-07/image-1689148686743.png)-click this icon, system will open a new enquiry page.
- [ ](http://wiki.cuteinfocomm.com/uploads/images/gallery/2023-07/image-1689148739236.png)-click this icon, page will be redirected to sales enquiry list page.
4. To approve a quotation, click [](http://wiki.cuteinfocomm.com/uploads/images/gallery/2023-07/image-1689148826503.png)the approve icon, and a notification window will open as below [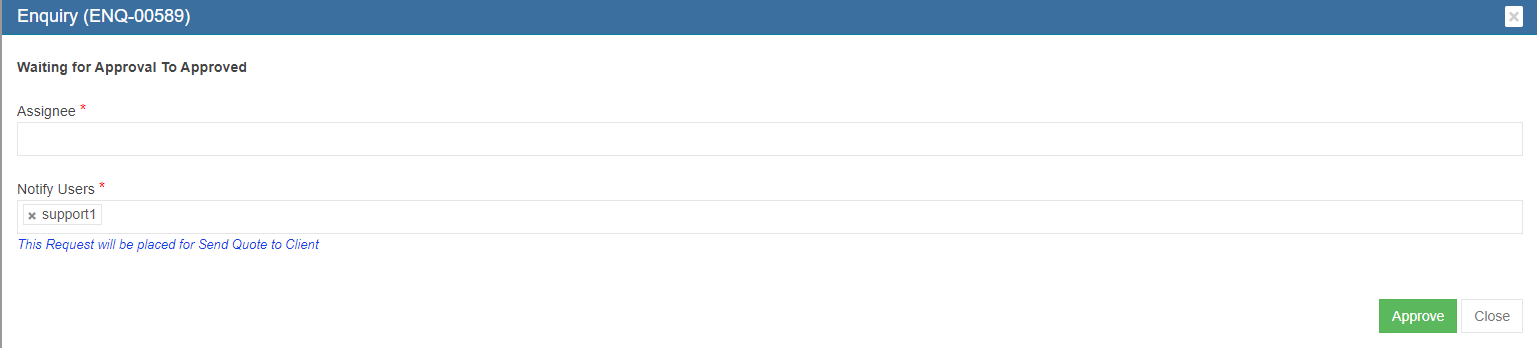](http://wiki.cuteinfocomm.com/uploads/images/gallery/2023-07/image-1689148778175.png)
5. Select Assignee and Notify users, then click Approve. System will send out approved notifications to relevant users.
### Send Quotation to Client
After quotation is approved. Sales users can send approved quotation to client. And the Send Quote To Client icon will blink for action. Click[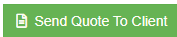, ](http://wiki.cuteinfocomm.com/uploads/images/gallery/2023-07/image-1689148929509.png)below window opens, and there are two ways to send quotation.
[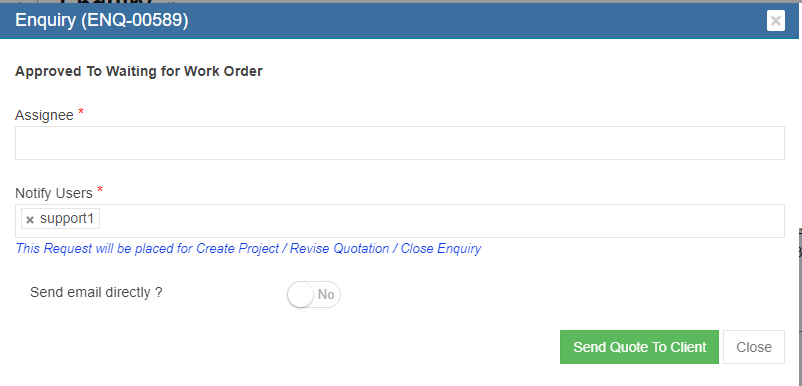](http://wiki.cuteinfocomm.com/uploads/images/gallery/2023-07/image-1689149545935.png)
1. Send email directly from cuteOffice system: click to enable "Send email directly?" to **Yes,** and below emailing window opens. User shall fill up all required information and click **Send Quote to Client** at the end. [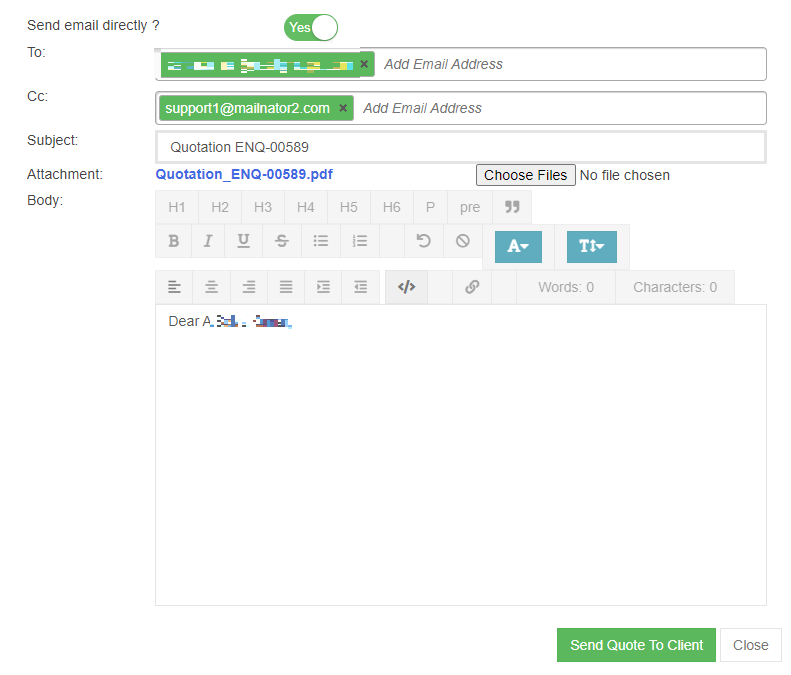](http://wiki.cuteinfocomm.com/uploads/images/gallery/2023-07/image-1689317844543.png)
2. Print Quotation and email as attachment to suppliers: enable the "Send email directly?" to **NO,** then click Send Quote to Client so system will update quotation status. The page will be redirected to enquiry detail page, user can click download icon in quotation information section to download as pdf, and then use sales email to send to suppliers.
#### Settings to upload letter head for Quotation
1. Click Admin
2. Click company menu
3. Edit company
4. Click Logo Upload
5. Choose Letter Pad in the image type
6. Click choose file and upload the letter pad
7. Click save to save the file
8. Click Settings tab
9. Click add
10. Enter "enquiryQuoteFormat" in the name
11. Enter value as "format12", "format13" etc., based on the client request. [](https://wiki.cuteinfocomm.com/uploads/images/gallery/2025-05/image-1746439418214.png)
12. Click save to save the data
13. Click add to enter header size "salesHeaderSize" for adjusting the header size
14. Enter value based on adjustment in the report
15. Click add to enter footer size "salesFooterSize" for adjusting the footer size
16. Enter value based on adjustment in the report [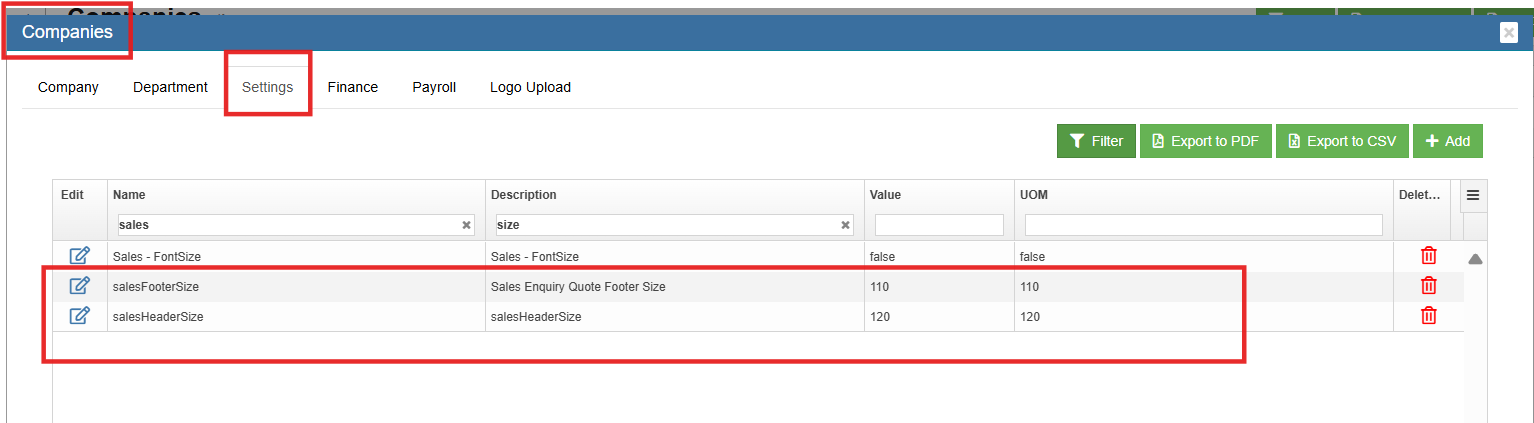](https://wiki.cuteinfocomm.com/uploads/images/gallery/2025-05/image-1746439250570.png)
Note : If client gave letter head in word doc, use the below converter tool to convert into png or jpeg image type file. [https://online2pdf.com/convert-word-to-png](https://online2pdf.com/convert-word-to-png "https://online2pdf.com/convert-word-to-png")
### Create Project
Once client agreed and confirmed quotation, user can create project against the enquiry. And the "Project Created" status will mark the completion of sales enquiry.
To create project, click[](http://wiki.cuteinfocomm.com/uploads/images/gallery/2023-07/image-1689319352691.png) , the project creation window opens,
[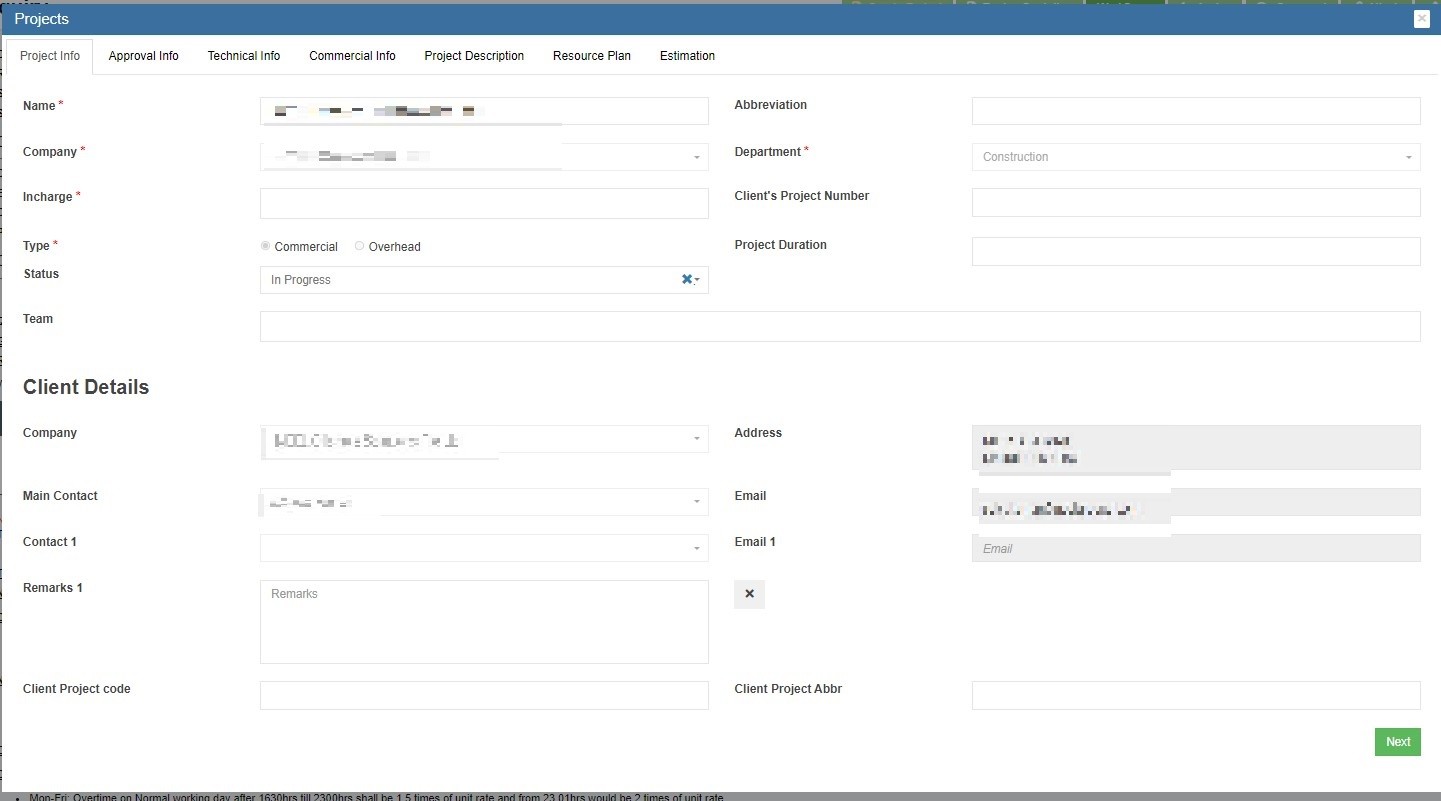](http://wiki.cuteinfocomm.com/uploads/images/gallery/2023-07/image-1689319491706.jpg)
**Project Info Tab**
1. In Name box, enter project name.
2. In Abbreviation box, enter project name abbreviation.
3. In Company box, select company name.
4. In Department box, select department name.
5. In Incharge box, select person in charge.
6. In Client's Project Number box, enter client side project number if available.
7. In Type box, click commercial or overhead to indicate project type.
8. In Project Duration box, click to select project start and end date from calendar.
9. In Status box, click to select status as In Progress/Closed/Terminated.
10. In Team box, enter team information.
11. Click Next to save project info and open Approval Info tab.
**Approval Info Tab**
[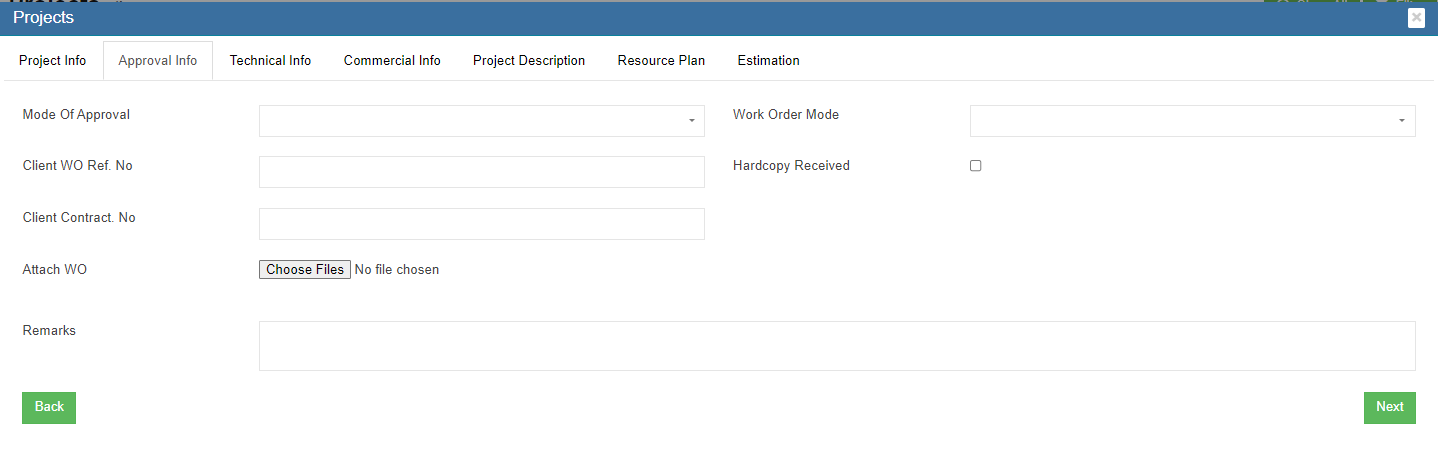](http://wiki.cuteinfocomm.com/uploads/images/gallery/2023-05/image-1684361455093.png)
1. In Mode of Approval box, click to select approval mode as Email/Hardcopy/Phone.
2. In Work Order Mode box, click to select work order mode as single or multiple.
3. In Client WO Ref No box, enter client work order reference number.
4. In Hardcopy Received box, tick to indicate received approval hardcopy document.
5. Client Contract No box, enter client contract number.
6. In Attach WO area, click [](http://wiki.cuteinfocomm.com/uploads/images/gallery/2023-05/image-1684361929100.png) to choose file to upload.
7. In Remarks box, enter remarks if any.
8. Click Next to save approval info and open Technical Info tab.
**Technical Info Tab**
[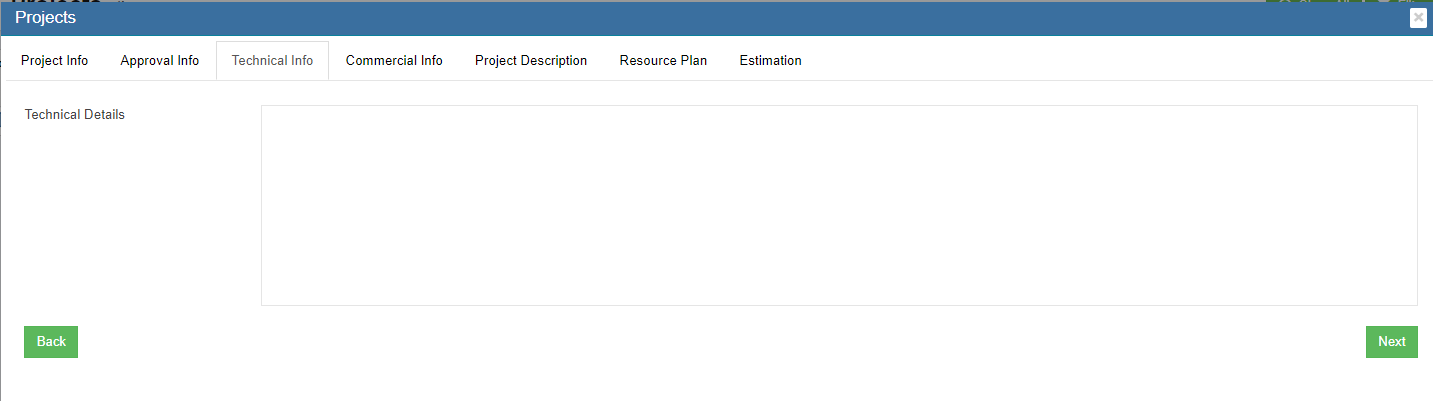](http://wiki.cuteinfocomm.com/uploads/images/gallery/2023-05/image-1684362145952.png)
1. In Technical Details box, enter project technical detail.
2. Click Next to save technical info and open Commercial Info tab.
**Commercial Info Tab**
[](http://wiki.cuteinfocomm.com/uploads/images/gallery/2023-05/image-1684362243414.png)
1. In Commercial Details box, enter project commercial detail.
2. Click Next to save commercial info and open Project Description tab.
**Project Description Tab**
[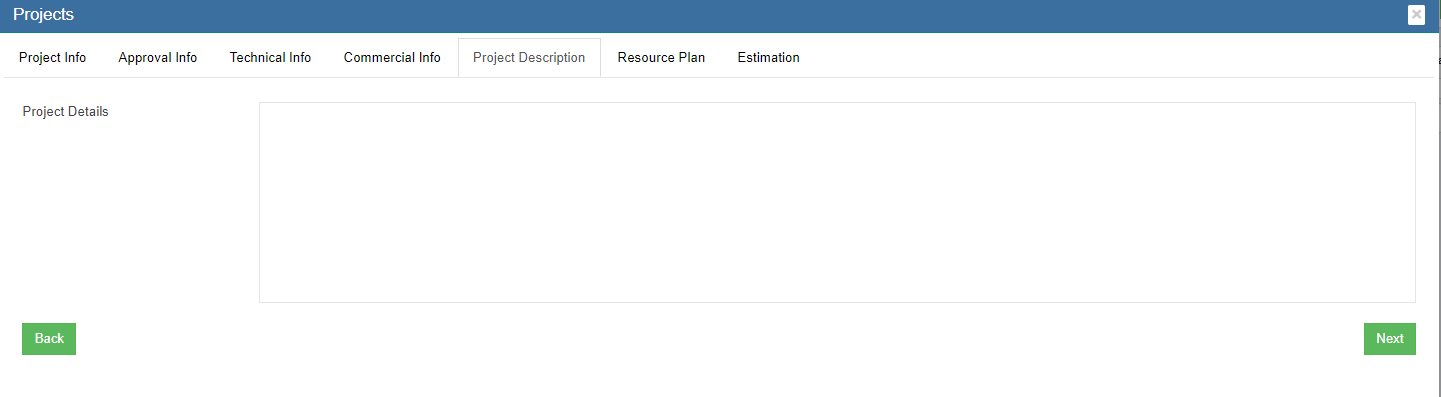](http://wiki.cuteinfocomm.com/uploads/images/gallery/2023-05/image-1684362413478.png)
1. In Project Description box, enter project description.
2. Click Next to save project description and open Resource Plan tab.
**Resource Plan Tab**
[](http://wiki.cuteinfocomm.com/uploads/images/gallery/2023-05/image-1684362887087.png)
1. In Minimum Manday box, enter minimum man days.
2. Click Next to save resource plan and open Estimation tab.
**Estimation Tab**
[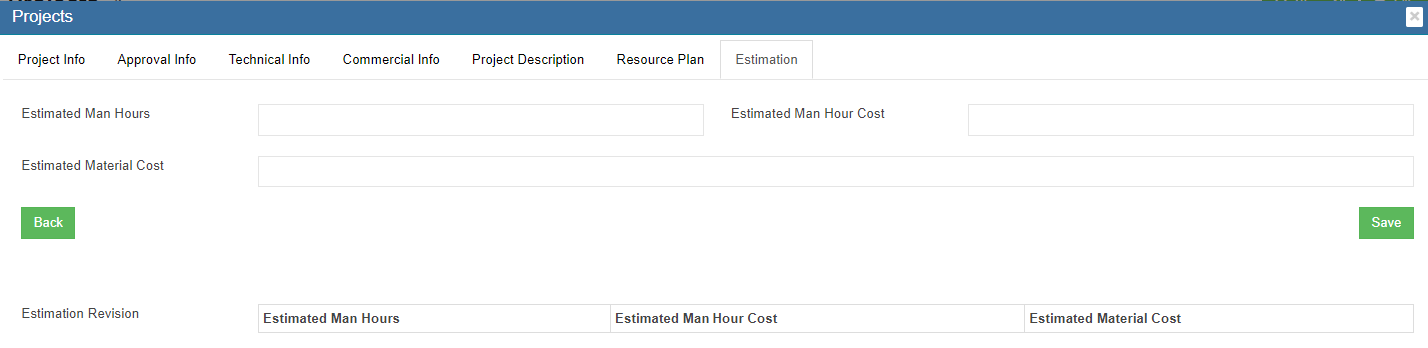](http://wiki.cuteinfocomm.com/uploads/images/gallery/2023-05/image-1684439130017.png)
1. 1. In Estimated Man Hours box, enter estimated man hours.
2. In Estimated Man Hour Cost box, enter estimated cost.
3. In Estimated Material Cost box, enter estimated material cost.
4. Click Save to save all data entered in project tabs, a project creation notification window opens as below,[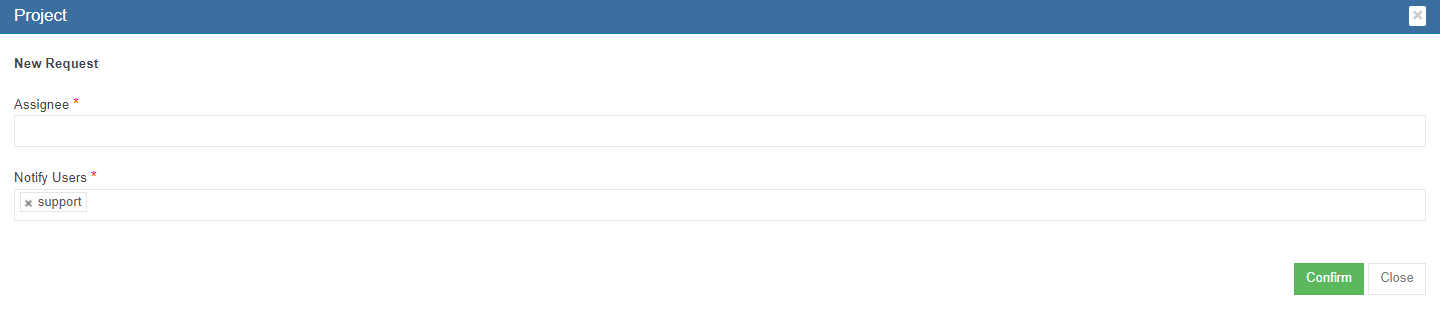](http://wiki.cuteinfocomm.com/uploads/images/gallery/2023-05/image-1684439354708.png)
5. Click Confirm to create project. And project data will be managed in project master page.
# Probability View
Probability View presents probability of an enquiry converting to a sales by month.
[](http://wiki.cuteinfocomm.com/uploads/images/gallery/2023-07/image-1689630493129.png)
# Finance
# Masters & Setup Company in Finance Module
***cuteOffice*** finance module helps accounts team to manage all activities related to the corporate finance effectively.
The key functionalities of the finance module are:
- Masters
- Voucher Entry
- Voucher Staging Entries
- Integration Staging
- Monthly Reports
- Customer Reports
- Supplier Reports
- Tax Reports
- Link Account Setup
**Finance** module greatly helps to manage financial data. The subsequent reports can be generated automatically without any manual intervention.
Click **Finance** tab in cuteOffice system, below is the screenshot of finance module home page.
[](http://wiki.cuteinfocomm.com/uploads/images/gallery/2022-08/image-1661450343517.png)
## Finance Module Prerequisites
The following set of information is required for the implementation of the Finance Module. The information could be provided in the form of Excel for upload to the system.
### Setup a financial year
Before start using the finance module, the company needs to be configured for a financial year so that the users can start to use the system. The administrator of ***cuteOffice*** can configure the financial year details of the company in **Admin** menu-**Company** submenu.
[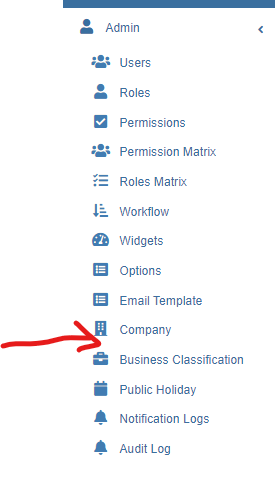](http://wiki.cuteinfocomm.com/uploads/images/gallery/2022-08/image-1661445527536.png)
1. Click **Company** in the **Admin** menu, the admin companies (holding companies or any affiliate companies registered in system will show, [](http://wiki.cuteinfocomm.com/uploads/images/gallery/2022-08/image-1661445987069.png)
2. Select the company and click[ ](http://wiki.cuteinfocomm.com/uploads/images/gallery/2022-08/image-1661446260641.png)edit button to open the company detail page as below, [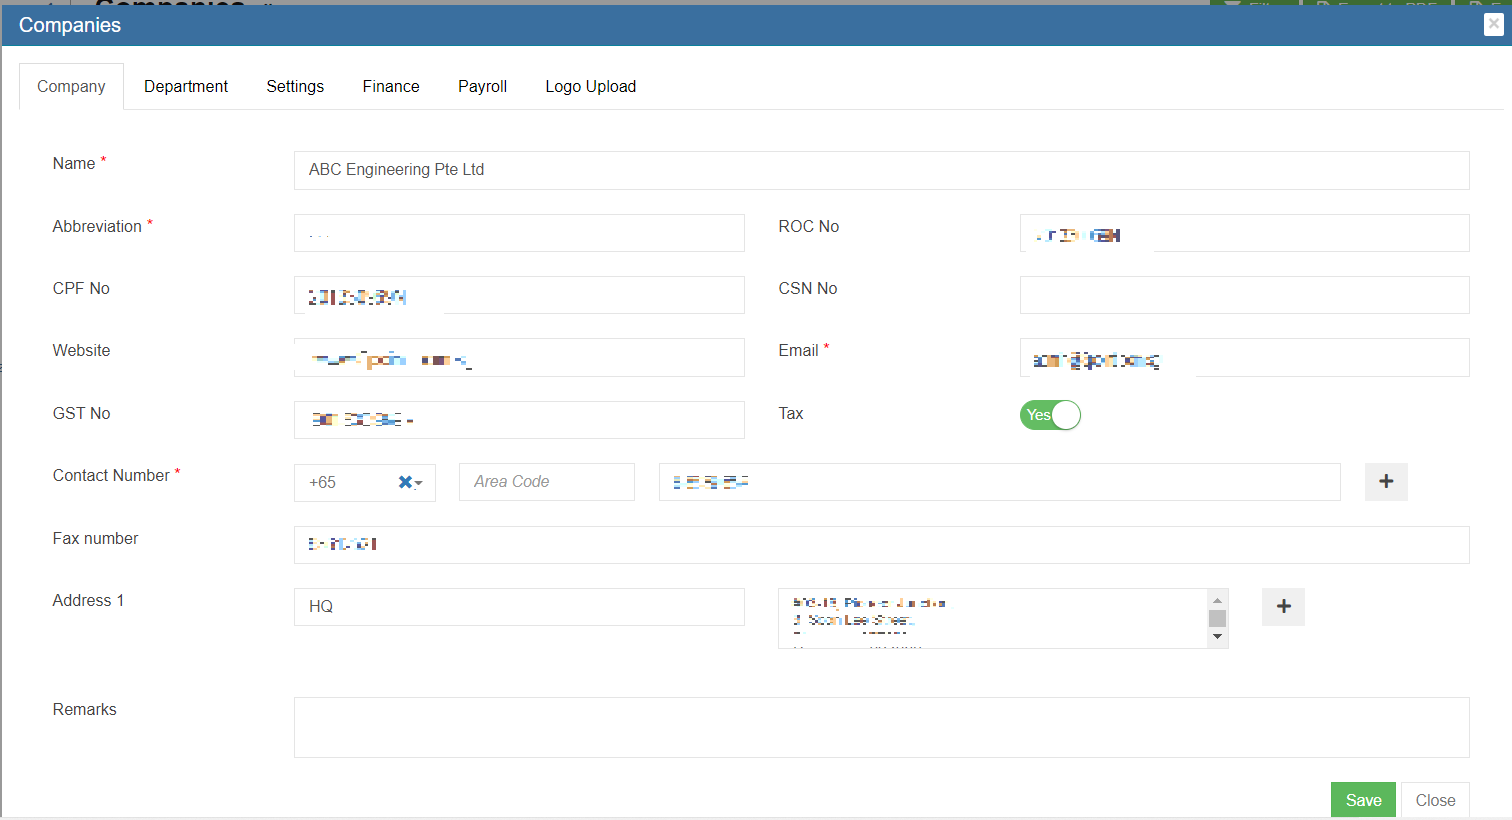](http://wiki.cuteinfocomm.com/uploads/images/gallery/2023-04/image-1682093312620.png)
3. Navigate to the **Finance** tab. Note: When there is no financial year setup currently, the list shows no record.
[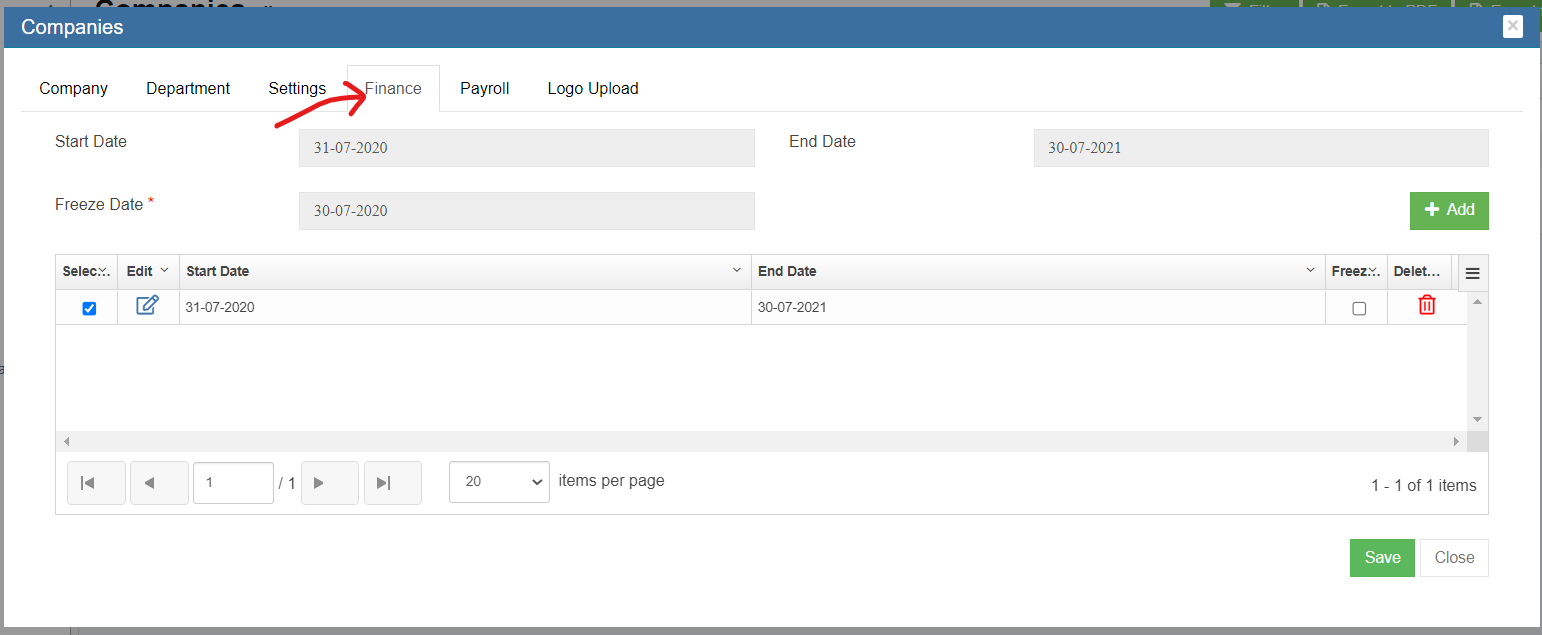](http://wiki.cuteinfocomm.com/uploads/images/gallery/2022-08/image-1661446416613.png)
4. To add a new financial year, Click [](http://wiki.cuteinfocomm.com/uploads/images/gallery/2022-08/image-1661446630355.png) to create a new financial year. The Add Financial Year window opens,
[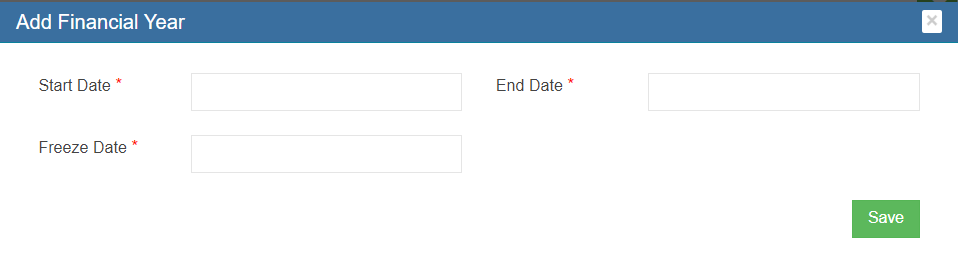](http://wiki.cuteinfocomm.com/uploads/images/gallery/2022-08/image-1661446578974.png)
5. Enter the start date, end date and freeze date of the financial year. **Note**: With this Freeze date setup, end users will not be able to do any transaction before this specified date.
6. Click **Save.** The financial year data will be saved.
#### Letterhead Upload
To view letter head in the sales invoice report, the below setting has to configured.
1. Go to Admin and Click Company
2. Click Logo Upload. Choose Letter Pad in the image type.
3. Click choose file and upload the company letter head. [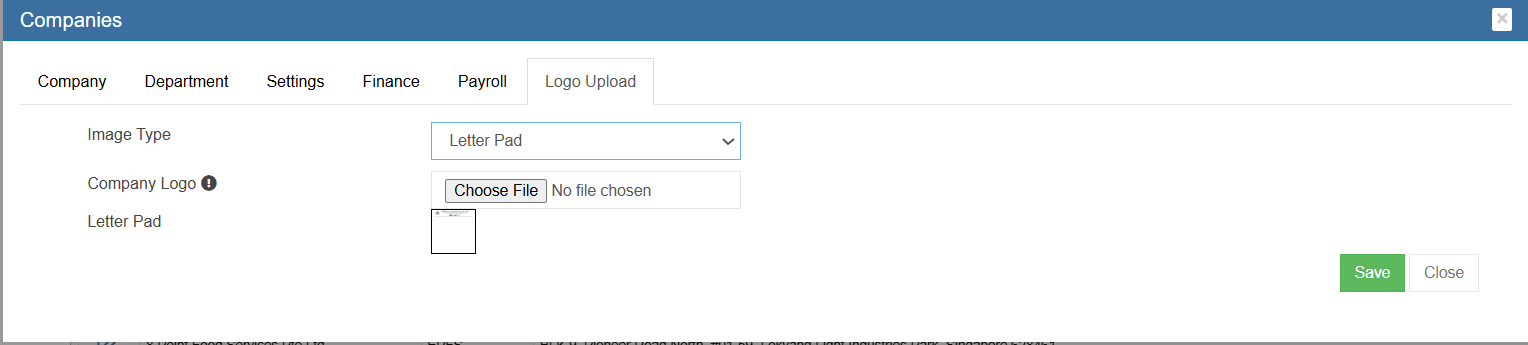](https://wiki.cuteinfocomm.com/uploads/images/gallery/2025-05/image-1746154739922.png)
4. Go to company settings and click add
5. Enter the name as " financeSalesInvoiceReportFormat". [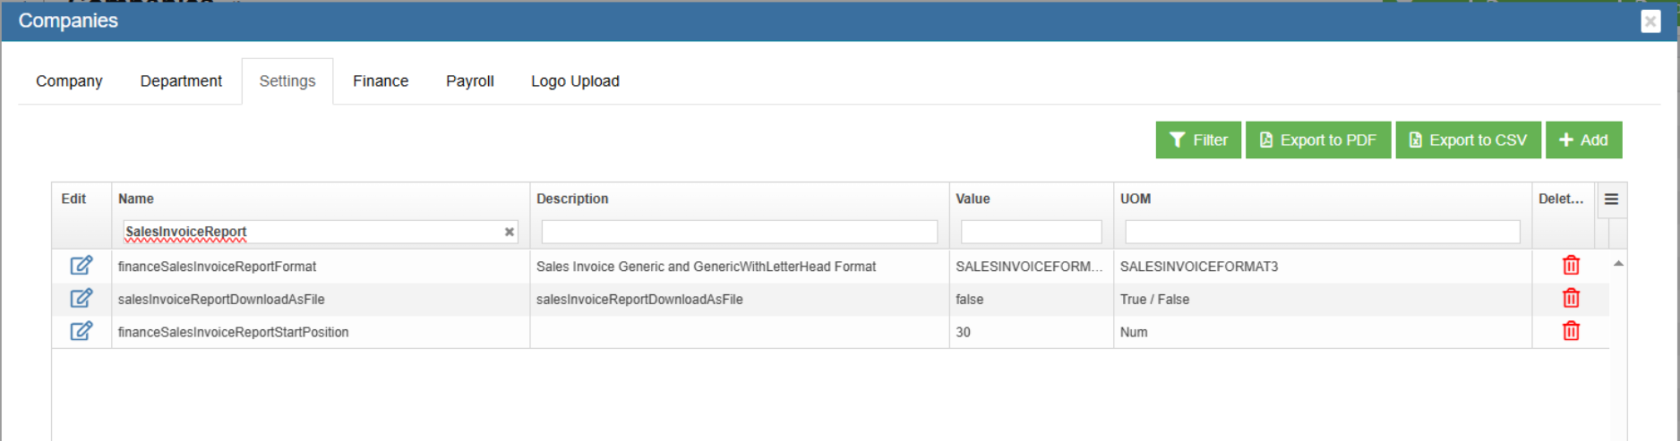](https://wiki.cuteinfocomm.com/uploads/images/gallery/2025-05/image-1746154609230.png)
6. Enter the value as "SALESINVOICEFORMAT3"
7. Click save to save the settings
8. Click add and enter name as " financeSalesInvoiceReportStartPosition"
9. Enter value starting from 20 to adjust the Invoice header in the report
10. Click save to save the position of the "Invoice" [](https://wiki.cuteinfocomm.com/uploads/images/gallery/2025-05/image-1746165493667.png)
### Chart of Accounts
This file will represent the Chart of Accounts that would be used in the Finance Module. The file would also contain the Opening Balance that needs to be considered for the individual Account lines.
**Fields Required**
Account Name : Name of the Account
Account Number : Account Number in Numeric
Opening Balance : Account Opening Balance
Account Type : Asset / Liability / Equity / Income / Expense / Other Income / Other Expense / Cost Of Sales
Account Sub Type : Fixed Asset / Current Asset / Current Liability / Income / Expense / Other Income / Other Expense
/ Cost Of Sales
Level : 1 - ASSET ,2 – Fixed Asset , 3 – Cash At Bank , 4 – Cheque Account
Type : Header / Detail (Ex: ASSET ->Fixed Asset – Header, Cheque Account - Detail)
Parent Account : Asset -> Fixed Asset - > Cash At Bank -> Cheque Account (Child Account))
### Customer Master
The file is to represent the list of Customers. The Customer Number will be generated by the Finance module
**Fields Required**
Customer Name : Name of the Customer
Country : Country where the customer belongs to Ex: Singapore / Australia / Malaysia etc..
Customer Type : Agent / Client / Sub Contractor etc..
Industry Type : IT / Automobile / Construction etc..
Sub Industry Type : Software / Medical / Cement Companies etc..
Currency : SGD / USD / AUD etc..
GST Number : Customer Registration Number
Payment Mode : Cheque / TT / Cash
Fax : Country Code – Area Code – Telephone Number
Website : Website URL of the customer
eMail : Customer eMail
Contact No : Country Code – Area Code – Telephone Number
Address : Customer Address
### Customer Receivables
This file would contain the Opening Balances of all Customer Invoices. As a control measure the sum of all the outstanding invoices should match with the Debtors Opening Balance provided as part of Chart of Accounts. If the Customer Balances are maintained at a multi-currency level, then the outstanding invoices should be the multi-currency level with the Balances tallying.
**Fields Required**
Invoice Number : Invoice Transaction ID
Invoice Date : Invoice Transaction Date
Customer Name : Name of the Customer (as provided in the Customer Master)
Currency : SGD / USD / AUD etc..
Tax Code : TX – 7, SR – 7, NT – 0 etc
Invoice Amount : Gross Total of the Invoice
Terms : 7 Days / 30 Days / COD etc
Memo : Invoice Description
### Supplier Master
The file is to represent the list of Suppliers. The Supplier Number will be generated by the Finance module.
**Fields Required**
Supplier Name : Name of the Supplier
Country : Country where the Supplier belongs to Ex: Singapore / Australia / Malaysia etc..
Supplier Type : Agent / Client / Sub Contractor etc..
Industry Type : IT / Automobile / Construction etc..
Sub Industry Type : Software / Medical / Cement Companies etc..
Currency : SGD / USD / AUD etc..
GST Number : Supplier Registration Number
Payment Mode : Cheque / TT / Cash
Fax : Country Code – Area Code – Telephone Number
Website : Website URL of the customer
eMail : Supplier eMail
Contact No : Country Code – Area Code – Telephone Number
Address : Supplier Address
### Supplier Payables
This file would contain the Opening Balances of all Supplier Purchase Invoices. As a control measure the sum of all the outstanding purchase invoices should match with the Creditors Opening Balance provided as part of Chart of Accounts. If the Supplier Balances are maintained at a multi-currency level, then the outstanding invoices should be the multi-currency level with the Balances tallying.
**Fields Required**
Invoice Number : Invoice Transaction ID
Invoice Date : Invoice Transaction Date
Supplier Name : Name of the Supplier (as provided in the Supplier Master)
Currency : SGD / USD / AUD etc..
Tax Code : TX – 7, SR – 7, NT – 0 etc
Invoice Amount : Gross Total of the Invoice
Terms : 7 Days / 30 Days / COD etc
Memo : Invoice Description
### Tax Codes
This file is required to store the Tax Codes in the System.
**Fields Required**
Tax Code : TX – 7, SR – 7, NT – 0 etc.
Tax Type : Goods & Service Tax
Tax Description : Description of the Tax, Standard Rate etc..
Percentage : 7 %
Terms : 7 Days / 30 Days / COD etc
Form Type : Sales / Purchase
### Exchange Rate (For Foreign Currency Transactions)
This file is required to store the Exchange Rate difference between the foreign currency & Base Currency in the System.
**Fields Required**
Base Currency : SGD
Foreign Currency : Foreign Currency Code
Rate : Exchange Rate
### Sales Linked Accounts
The following configuration parameters needs to be provided to setup the Finance module which are required for Sales related transactions. Client needs to provide the Account Number (from the Chart of Accounts provided) which would be configured in the application.
Asset Account for Tracking Receivable : Debtors Account
Bank Account for Customer Receipts : Primary Bank Account
Accounts for Goods & Service Tax : GST Receiving Account
Income Account for Freight : Freight Account
Contra Account : Contra Adjustment Sales Account
Customer Pre-payments : Pre-payment Customer Account
Income Account for Late Charges : Late Charges Collection Account
Foreign Currency Customer Account : Foreign Currency Customer Debtor Account. Ex for USD Currency Customer Account, use Trade Debtors – USD Account
Foreign Currency Exchange Difference : Foreign Currency Exchange Difference Account Customer Debtor Ex for USD Exchange difference, use Trade Debtors Foreign Exchange – USD Account
### Purchase Linked Accounts
The following configuration parameters needs to be provided to setup the Finance module which are required for Purchase related transactions. Client needs to provide the Account Number (from the Chart of Accounts provided) which would be configured in the application.
Liability Account for Tracking Payable : Creditors Account
Bank Account for Paying Bills : Primary Bank Account
Accounts for Goods & Service Tax : GST Paying Account
Contra Account : Contra Adjustment Purchase Account
Expense Account for Late Charges : Late Charges Payment Account
Foreign Currency Supplier Account : Foreign Currency Supplier Creditor Account. Ex for USD Currency Customer Account, use Trade Creditors – USD Account
Foreign Currency Exchange Difference : Foreign Currency Exchange Difference Account Supplier Creditor Ex for USD Exchange difference, use Trade Creditors Foreign Exchange – USD Account
### Accounts & Banking Linked Accounts
The following configuration parameters needs to be provided to setup the Finance module
Equity Account for Current Earnings : Current Year Earning Account
Equity Account for Retained Earnings : Retained Earnings Account
Equity Account for Historical Balancing : Historical Balancing Account
Account for Currency Gain / Loss : Foreign Currency Gain / Loss Account
## Master Data
Master Data in Finance module includes below data sets. Below are steps to add prerequisite data for finance module to run smoothly.
[](http://wiki.cuteinfocomm.com/uploads/images/gallery/2022-08/image-1661538602565.png)
### Chart of Accounts
The **Chart of Accounts** menu in the **Finance** is used to manage the chart of accounts.
A chart of accounts (COA) is a financial, organizational tool that provides an index of every account in an accounting system. This provides an insight into all the financial transactions of the company. Here, an account is a unique record for each type of asset, liability, equity, revenue and expense.
The chart of accounts is classified into eight major categories and stored in the company’s ledger. Each account in the chart of accounts is typically assigned a name and a unique number by which it can be identified.
| **Accounts Code**
| **Classification**
| **Accounts Type**
| **Remarks**
|
| **10000**
| **Asset**
| Account Receivables
Bank
Assets (Current, Fixed, Others)
| Cash, Accounts, Receivable, Land, Equipment
|
| **20000**
| **Liability**
| Accounts Payable
Credit Card
Liability (Current, Long Term, Others)
| Loans payable, Account payable
|
| **30000**
| **Equity**
| Equity
| Paid up capital
|
| **40000**
| **Income**
| Income
| Revenue from sales
|
| **50000**
| **Cost of Sales**
| Cost of Sales
| Purchases
|
| **60000**
| **Expense**
| Expense
| Other expenses of business
|
| **80000**
| **Other Income**
| Other Income
| Non-operating revenues and gains
|
| **90000**
| **Other Expense**
| Other Expense
| Non-operating expenses and losses
|
The chart of accounts lists the accounts that are available for recording transactions. In keeping with the double-entry system of accounting, a minimum of two accounts is needed for every transaction- at least one account is debited and at least one account is credited.
Some general rules about debiting and crediting the accounts are:
**Asset** accounts normally have debit balances
- To increase an asset account, debit the account
- To decrease an asset account, credit the account
**Liability** accounts normally have credit balances
- To increase a liability account, credit the account
- To decrease a liability account, debit the account
#### View Chart of Accounts
To navigate to **Chart of Accounts**, Click **Chart of Accounts** in the **Finance** The **Chart of Accounts** page opens.
[](http://wiki.cuteinfocomm.com/uploads/images/gallery/2023-04/image-1682093441472.png)
#### Add a New Account Code
You can add the accounts only in the starting of the financial year. In the middle of the financial year, you cannot add or change any account.
To add a new account code,
1. Click[](http://wiki.cuteinfocomm.com/uploads/images/gallery/2022-08/image-1661539189219.png)(**Add New** button) in the upper right-corner of the Chart of Accounts list page, the Add Account Code window opens, [](http://wiki.cuteinfocomm.com/uploads/images/gallery/2022-08/image-1661539268817.png)
2. Select the type of account code whether it's **Header** or **Detail**. **Header** - Header is used only for grouping. Transactions cannot be posted under this code.
**Detail** – All transactions can be posted under the detail account code.
3. If the account to be created is inactive account, enable the **Inactive Account**
4. In the **Parent Account** box, select parent account name.
5. In the **Account Type** box, the account type will automatically populated when parent account is selected.
6. In the **Currency** box, select the currency.
7. In the **Account Sub Type** box, select the account sub type.
8. In the **Account Number** box, enter the account number.
9. In the **Account Name** box, enter the name of the account.
10. In the **Opening Balance** box, enter the opening balance of the account.
11. In the **Current Balance** box, for new account it will default showing 0.
12. Click **Save**. The new account code will be created and listed in the Chart of Accounts page.
#### Edit Account Code
If you want to edit any added account code in the **Chart of Accounts** page, do the following page,
1. Click (Edit icon) of the **Account Code and Name** which you want to edit, the edit account code page opens, [](http://wiki.cuteinfocomm.com/uploads/images/gallery/2022-08/image-1661630073893.png)
2. Click any box where you want to edit the account details, and then edit the details in the respective box in the **Edit Account Code**
3. Click **Save** to save edits.
#### Export Chart of Accounts
User can use the print[](http://wiki.cuteinfocomm.com/uploads/images/gallery/2022-08/image-1661797263424.png) or export[](http://wiki.cuteinfocomm.com/uploads/images/gallery/2022-08/image-1661797283989.png) option to print or export the chart of accounts.
### Customers
Customers master manages all customer's company details so that sales activities and transactions can be recorded and entered in finance module.
To view all customers, click **Customers** submenu in **Master** menu,
[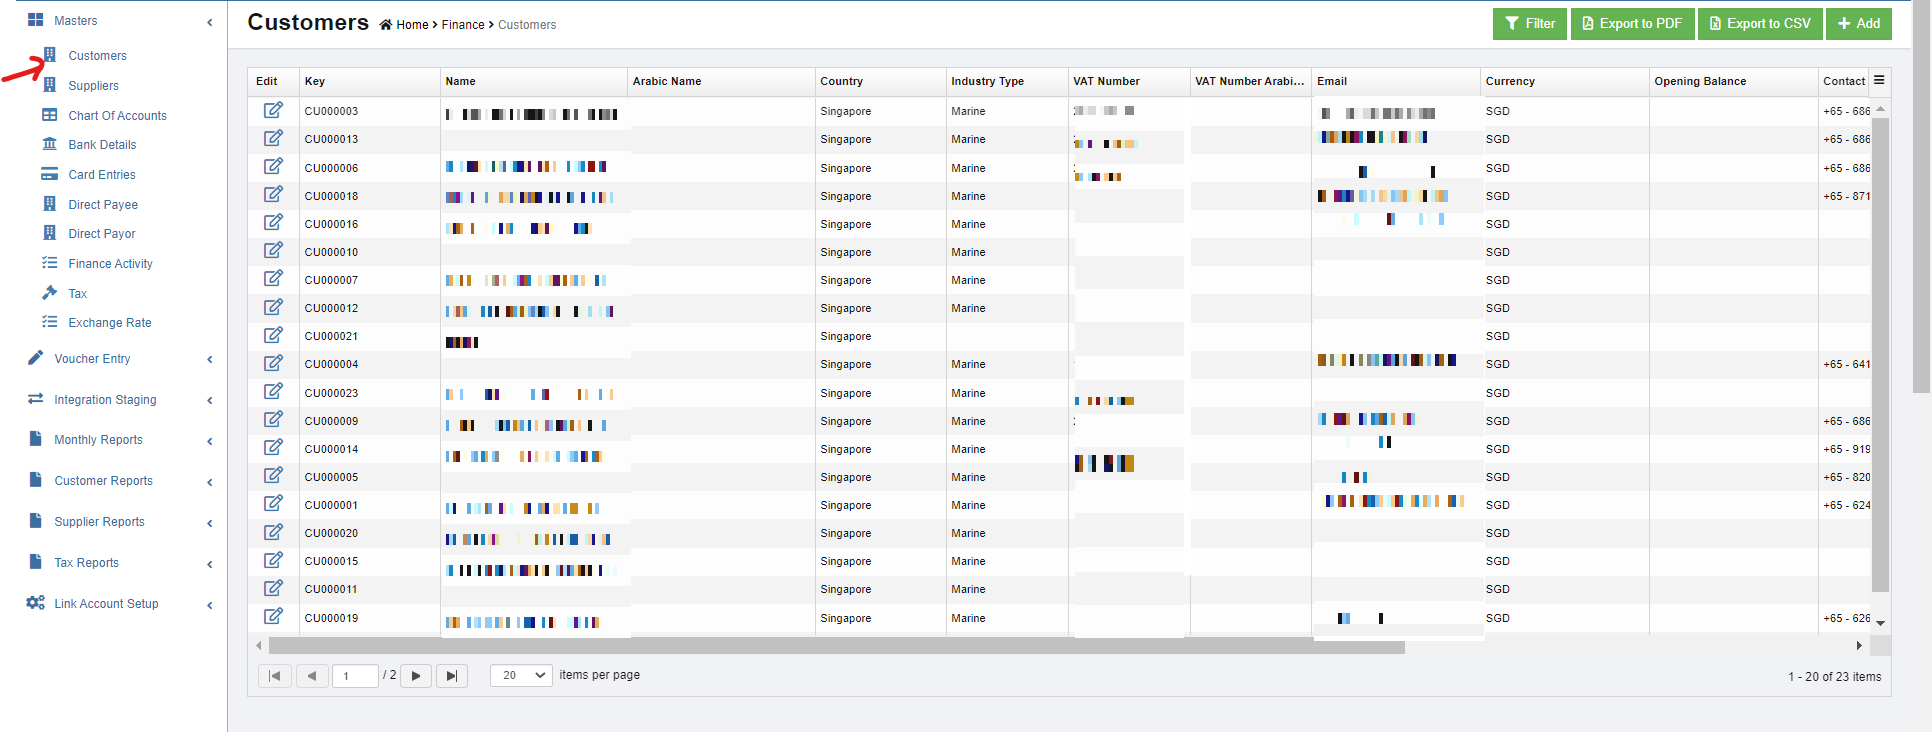](http://wiki.cuteinfocomm.com/uploads/images/gallery/2023-04/image-1682093552893.png)
#### Add A New Customer
To add a new customer,
1. click [](http://wiki.cuteinfocomm.com/uploads/images/gallery/2022-08/image-1661719044063.png)(add button) in the upper right corner of customer list page, the customer detail page open, [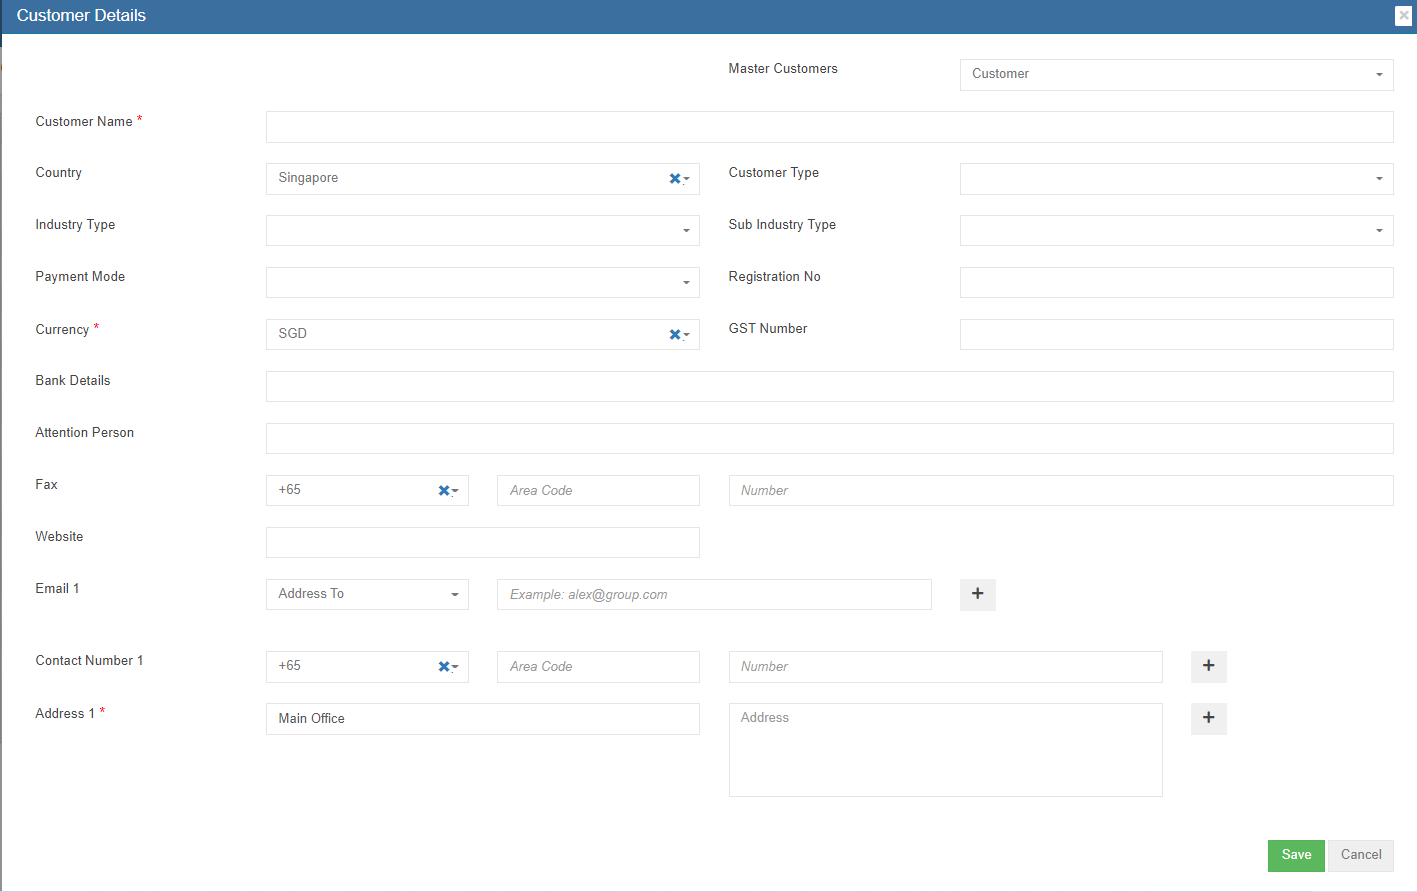](http://wiki.cuteinfocomm.com/uploads/images/gallery/2022-08/image-1661796075817.png)
2. Enter customer details in above page.
3. Click **Save.** The new customer master data is created and saved in system.
#### Edit Customer
To edit customer data,
1. Click[](http://wiki.cuteinfocomm.com/uploads/images/gallery/2022-08/image-1661796329657.png)(edit button) in the edit column of the customer that user wants to edit, the customer detail page opens,
2. Edit the fields where needed.
3. Click **Save** to save edits.
#### Delete Customer
If a customer is not yet in any transaction in system, user can use delete option to delete customer data,
1. click the [](http://wiki.cuteinfocomm.com/uploads/images/gallery/2022-08/image-1661797346300.png)(delete button) in the delete column of the customer that user wants to delete, a confirmation window opens,[](http://wiki.cuteinfocomm.com/uploads/images/gallery/2022-08/image-1661797476959.png)
2. Click **Yes** to confirm deletion. Note: if a customer is already in use/transaction, below error message will pop up in the bottom right corner and system will not allow deletion. [](http://wiki.cuteinfocomm.com/uploads/images/gallery/2022-08/image-1661797577168.png)
#### Export Customer
User can use the export option to export customer data. Select and click the format that user want to download.[](http://wiki.cuteinfocomm.com/uploads/images/gallery/2022-08/image-1661797706944.png)
### Suppliers
Suppliers master manages all suppliers' company details so that purchase activities and transactions can be recorded and entered in finance module.
To view all suppliers, click **Suppliers** submenu in **Master** menu,
[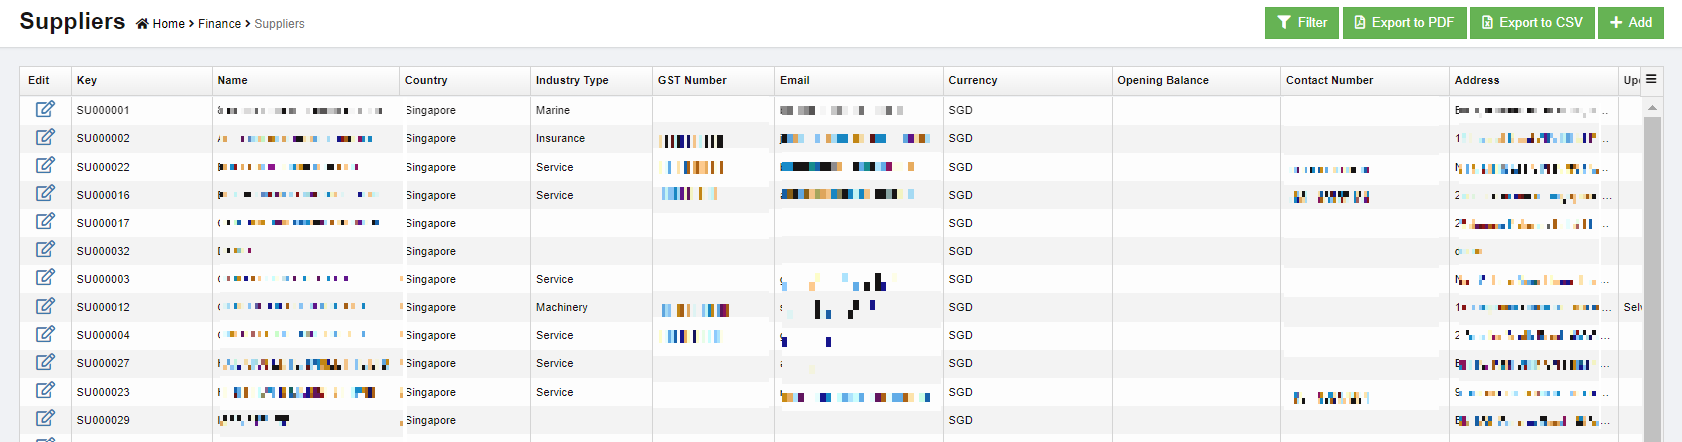](http://wiki.cuteinfocomm.com/uploads/images/gallery/2023-04/image-1682093631201.png)
#### Add A New Supplier
To add a new supplier,
1. Click [](http://wiki.cuteinfocomm.com/uploads/images/gallery/2022-08/image-1661719044063.png) add button in the upper right corner of the suppliers list page, the supplier detail page opens,[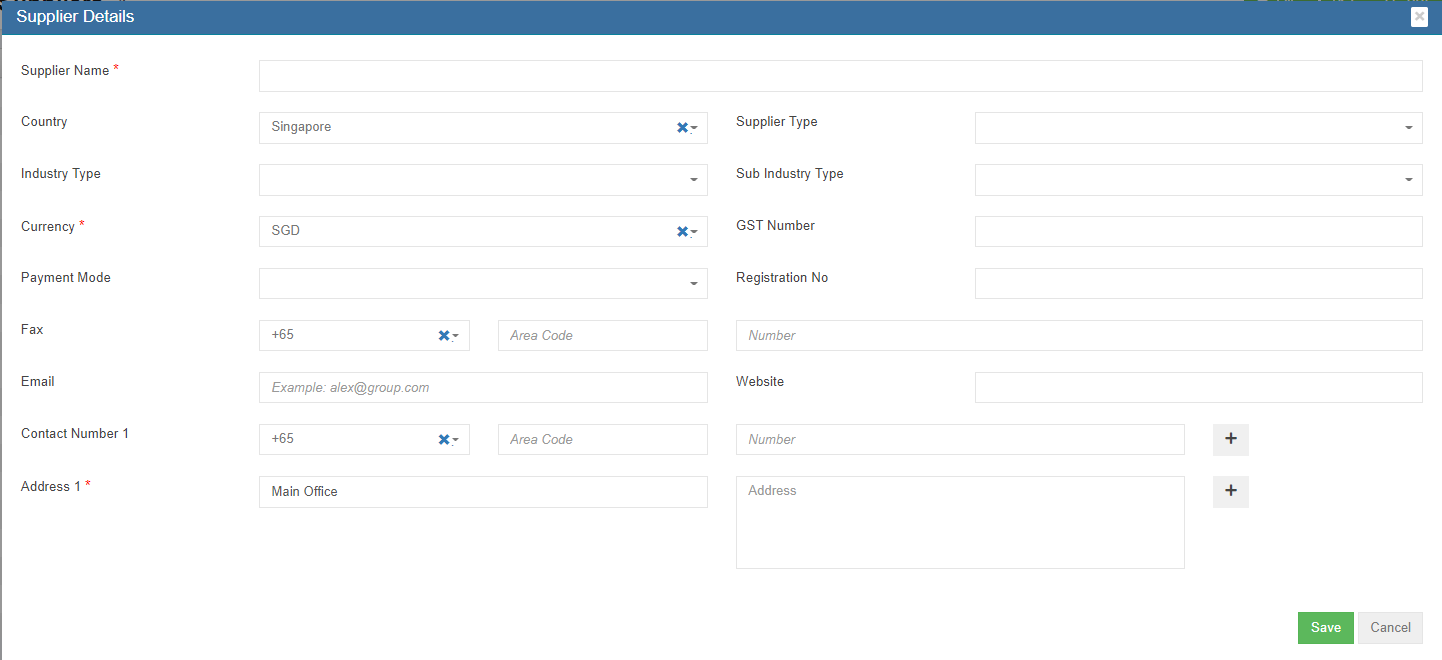](http://wiki.cuteinfocomm.com/uploads/images/gallery/2022-08/image-1661872592728.png)
2. Enter all details of the new supplier.
3. Click **Save**. The new supplier master data is created and saved in system.
#### Edit Supplier
To edit supplier data,
1. Click[](http://wiki.cuteinfocomm.com/uploads/images/gallery/2022-08/image-1661796329657.png)(edit button) in the edit column of the supplier that user wants to edit, the supplier detail page opens,
2. Edit the fields where needed.
3. Click **Save** to save edits.
#### Delete Supplier
If a supplier is not yet in any transaction in system, user can use delete option to delete supplier data,
1. click the [](http://wiki.cuteinfocomm.com/uploads/images/gallery/2022-08/image-1661797346300.png)(delete button) in the delete column of the supplier that user wants to delete, a confirmation window opens,[](http://wiki.cuteinfocomm.com/uploads/images/gallery/2022-08/image-1661797476959.png)
2. Click **Yes** to confirm deletion. Note: if a supplier is already in use/transaction, below error message will pop up in the bottom right corner and system will not allow deletion. [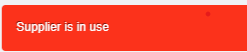](http://wiki.cuteinfocomm.com/uploads/images/gallery/2022-08/image-1661884892631.png)
#### Export Supplier
User can use the export option to export supplier data. Select and click the format that user want to download.[](http://wiki.cuteinfocomm.com/uploads/images/gallery/2022-08/image-1661797706944.png)
### Bank details
The **Bank Details** tab in the **Finance** menu used to manage all the bank account details of the company. The **Bank Details** data will be automatically synchronized is integrated with the **Sales Register** and **Purchase Register** pages.
To view all bank details, click **Bank Detail** in the **Master** menu, the bank details list open,
[](http://wiki.cuteinfocomm.com/uploads/images/gallery/2022-08/image-1661902049371.png)
#### Add A New Bank
To add a new bank,
1. Click**** (Add button) in the upper right-corner of the bank detail list page. The **Bank Details Add/Edit** window opens. [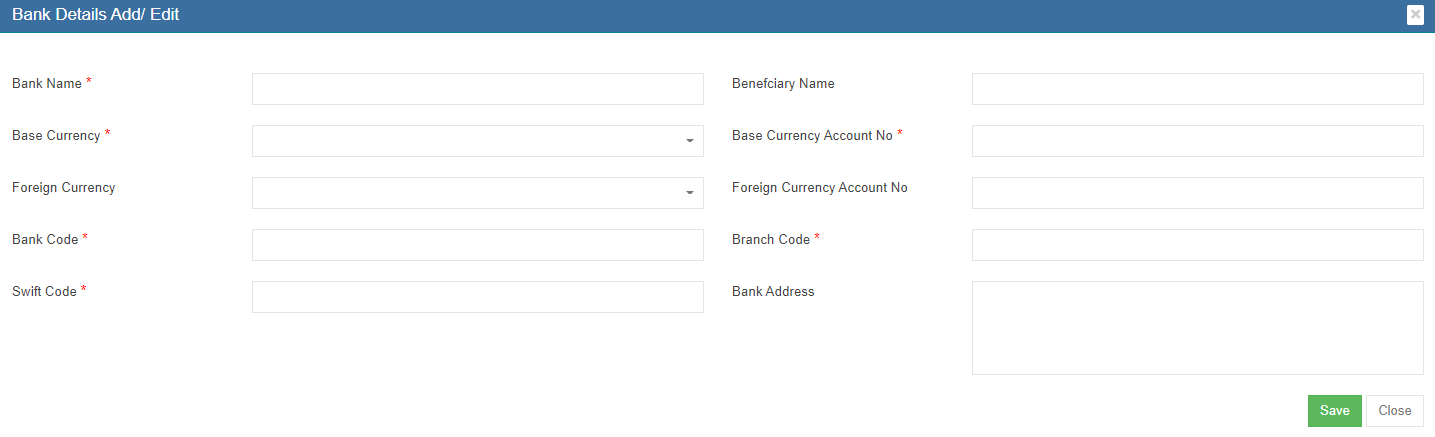](http://wiki.cuteinfocomm.com/uploads/images/gallery/2022-08/image-1661902243916.png)
2. Enter the bank details in the relevant fields.
3. Click **Save**. The bank account is added and saved in the Bank Details list page.
#### Edit Bank Account Details
To edit any added bank account details in the **Bank Details** page,
1. Click [](http://wiki.cuteinfocomm.com/uploads/images/gallery/2022-08/image-1661902458392.png)(Edit icon) in the **Edit** column for the respective bank account. The **Bank Details Add/Edit** window opens.
2. Click and edit any fields where user wants to edit the details
3. Click **Save** to save edits.
#### Delete A Bank Account Details
If a bank account is not yet in use, user can delete if needed. To delete,
1. click the [](http://wiki.cuteinfocomm.com/uploads/images/gallery/2022-08/image-1661797346300.png)(delete button) in the delete column of the bank account that user wants to delete, a confirmation window opens,
2. Click **Yes** to confirm deletion. Note: if a bank account is already in use/transaction, below error message will pop up in the bottom right corner and system will not allow deletion.
### Card Entries
Card entries helps to manage company bank cards details. Click **Card Entries** in the **Master** menu, all the bank cards saved in system will show as below,
[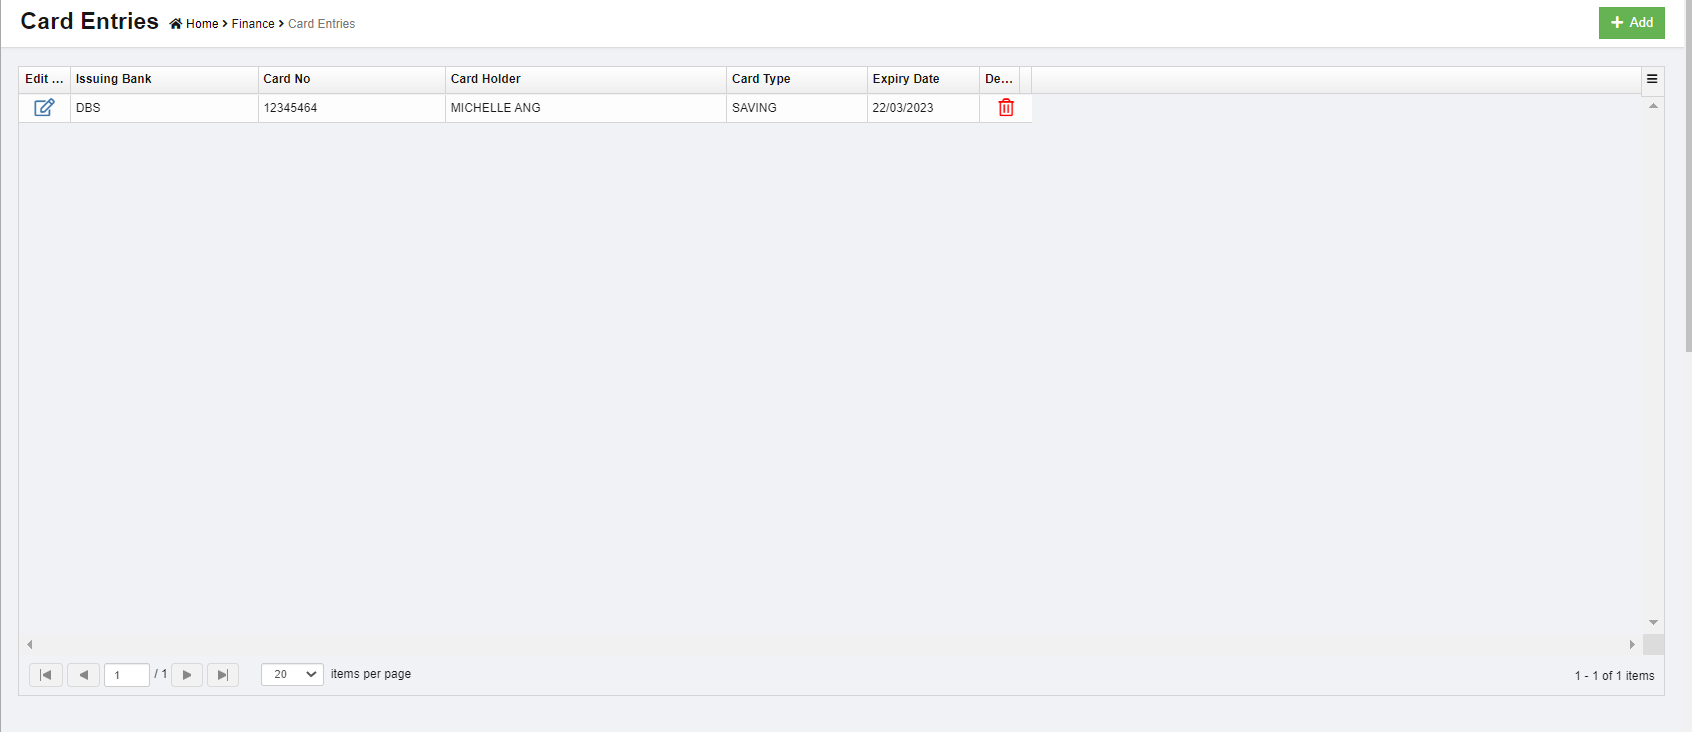](http://wiki.cuteinfocomm.com/uploads/images/gallery/2022-08/image-1661903681238.png)
#### Add A New Card
To add a new card,
1. Click**** (Add button) in the upper right-corner of the card detail list page. The **Card Entry** window opens,[](http://wiki.cuteinfocomm.com/uploads/images/gallery/2022-08/image-1661903854745.png)
2. Enter the card details.
3. Click S**ave** to save card entry. Card details will be saved and shown in the card entry list page.
#### Edit Card Details
To edit any added card details in the **Card Entries** page,
1. Click [](http://wiki.cuteinfocomm.com/uploads/images/gallery/2022-08/image-1661902458392.png)(Edit icon) in the **Edit** column for the respective card detail. The **Card Enrty** window opens.
2. Click and edit any fields where user wants to edit the details
3. Click **Save** to save edits.
#### Delete A Card
If a card is not yet in transaction record in system, user can delete if needed. To delete a card detail,
1. click the [](http://wiki.cuteinfocomm.com/uploads/images/gallery/2022-08/image-1661797346300.png)(delete button) in the delete column of the card number that user wants to delete, a confirmation window opens,
2. Click **Yes** to confirm deletion.
### Direct Payee
Each and every direct payee’s detail needs to be added before any of the transactions such as purchase details can be entered. Before adding a direct payee, the respective users must be assigned with the Payee permission. To assign permission,
1. Navigate to Admin>>Users.
2. Select the respective user and navigate to Permission.
3. Enable the permission of Payee.
4. Click Save. User will be able to add a direct payee.
#### Add A Direct Payee
To add a direct payee,
1. Navigate to **Master**, click **Direct Payee**. The **Direct Payee** page opens as below, [](http://wiki.cuteinfocomm.com/uploads/images/gallery/2023-04/image-1682093708876.png)
2. Click [](http://wiki.cuteinfocomm.com/uploads/images/gallery/2022-09/image-1663613688649.png) (**Add** button) in the top right corner. The **Direct Payee** window opens, [](http://wiki.cuteinfocomm.com/uploads/images/gallery/2022-09/image-1663607624164.png)
3. Enter the direct payee details.
4. Click **Save**. The direct payee will be added in the **Direct Payee** page. The added payee will be listed in the **Pay Bills Entry** page by selecting the **PAYMENT VOUCHER** option while adding the pay bill details. [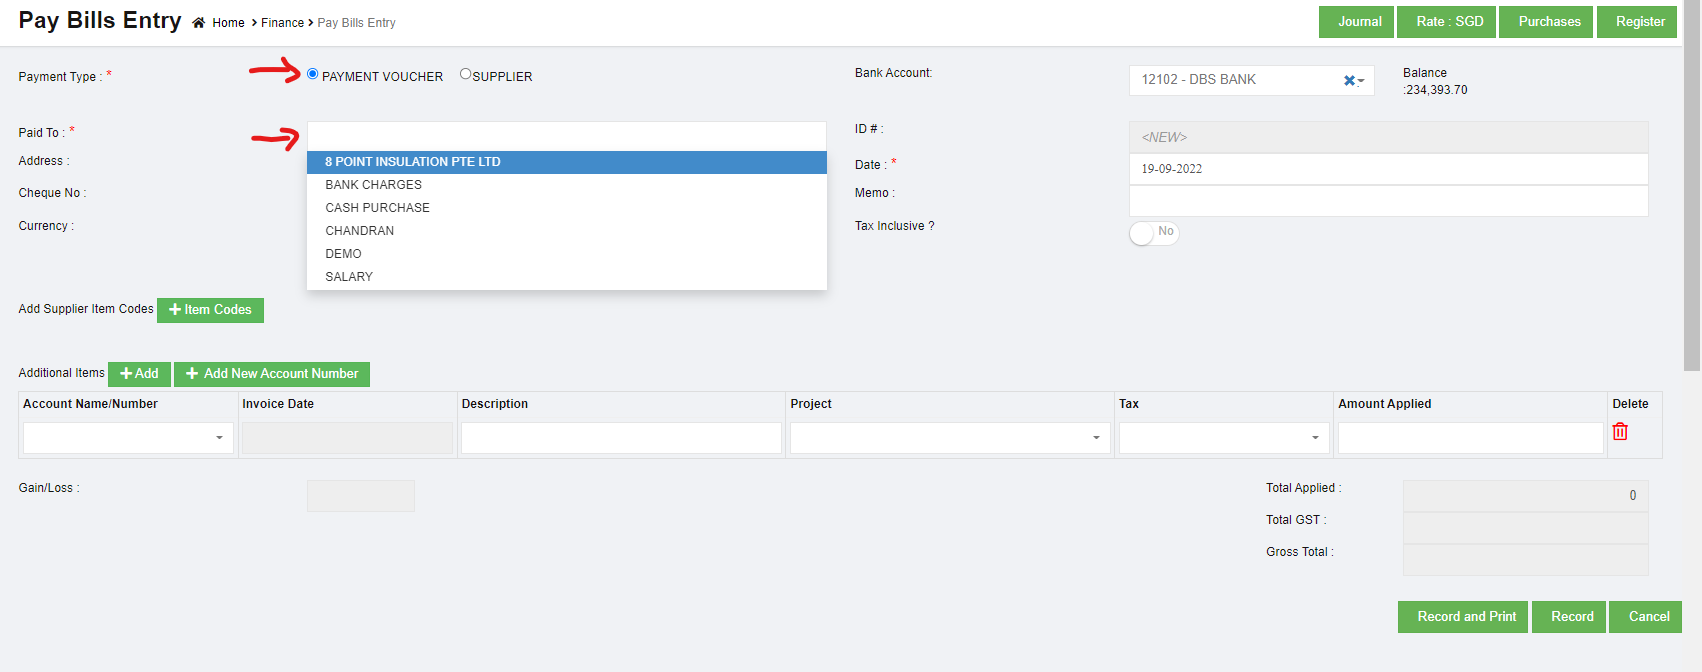](http://wiki.cuteinfocomm.com/uploads/images/gallery/2022-09/image-1663607792141.png)
#### Edit Direct Payee
To edit direct payee details,
1. Click [](http://wiki.cuteinfocomm.com/uploads/images/gallery/2022-08/image-1661902458392.png)(Edit icon) in the **Edit** column for the respective direct payee. The **direct payee details** window opens.
2. Click and edit any fields where user wants to edit the details
3. Click **Save** to save edits.
#### Delete A Direct Payee
If a direct payee is not yet in transaction record in system, user can delete if needed. To delete a card detail,
1. click the [](http://wiki.cuteinfocomm.com/uploads/images/gallery/2022-08/image-1661797346300.png)(delete button) in the delete column of the direct payee that user wants to delete, a confirmation window opens,
2. Click **Yes** to confirm deletion.
### Direct Payor
Each and every direct payor’s detail needs to be added before any of the transactions such as sales can be entered. Before adding a direct payor, the respective users must be assigned with the **Payor** permission. To assign permission,
1. Navigate to **Admin**>> Users
2. Select the respective user and navigate to **Permission**.
3. Enable the permission of **Payor**.
4. Click **Save**. User will be able to add a direct payor.
#### Add A Direct Payor
To add a direct payor,
1. Navigate to **Master**, click **Direct Payor**. The **Direct Payor** page opens. [](http://wiki.cuteinfocomm.com/uploads/images/gallery/2023-04/image-1682093759015.png)
2. Click [](http://wiki.cuteinfocomm.com/uploads/images/gallery/2022-09/image-1663613688649.png) (**Add** button) in the top right corner. The **Direct Payor** window opens. [](http://wiki.cuteinfocomm.com/uploads/images/gallery/2022-09/image-1663613724984.png)
3. Enter the direct payor details.
4. Click **Save.** The direct payor will be added in the **Direct Payor** page. The added payer will be listed in the **Receive Payment Entry** page by selecting the **RECEIPT VOUCHER** option while adding the payment details. [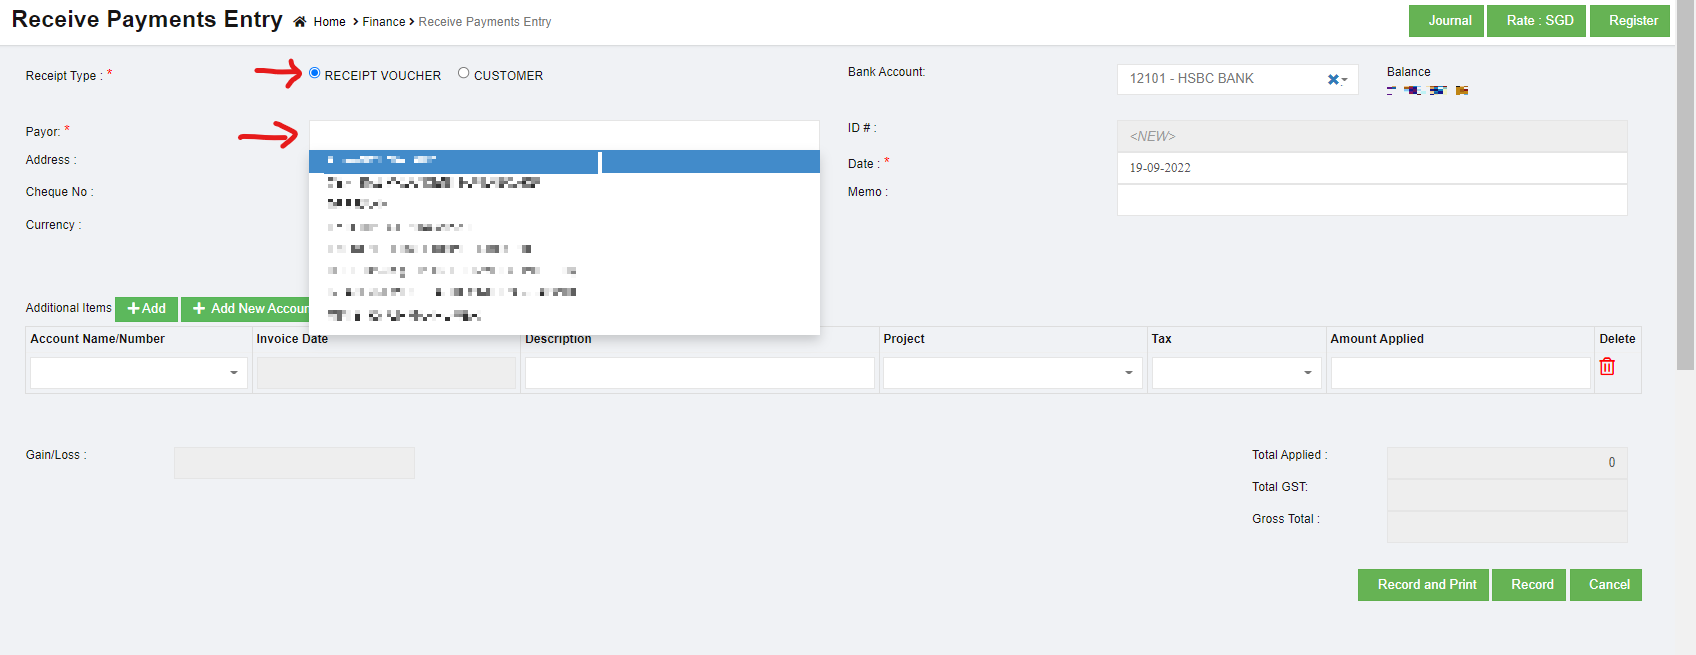](http://wiki.cuteinfocomm.com/uploads/images/gallery/2023-04/image-1682093871182.png)
#### Edit Direct Payor
To edit direct payor details,
1. Click [](http://wiki.cuteinfocomm.com/uploads/images/gallery/2022-08/image-1661902458392.png)(Edit icon) in the **Edit** column for the respective direct payee. The **direct payor details** window opens.
2. Click and edit any fields where user wants to edit the details
3. Click **Save** to save edits.
#### Delete A Direct Payor
If a direct payor is not yet in transaction record in system, user can delete if needed. To delete a card detail,
1. click the [](http://wiki.cuteinfocomm.com/uploads/images/gallery/2022-08/image-1661797346300.png)(delete button) in the delete column of the direct payor that user wants to delete, a confirmation window opens,
2. Click **Yes** to confirm deletion.
### Tax
Tax type, and percentage are managed in Tax master. Click Tax in Master menu, below list of tax master opens,
[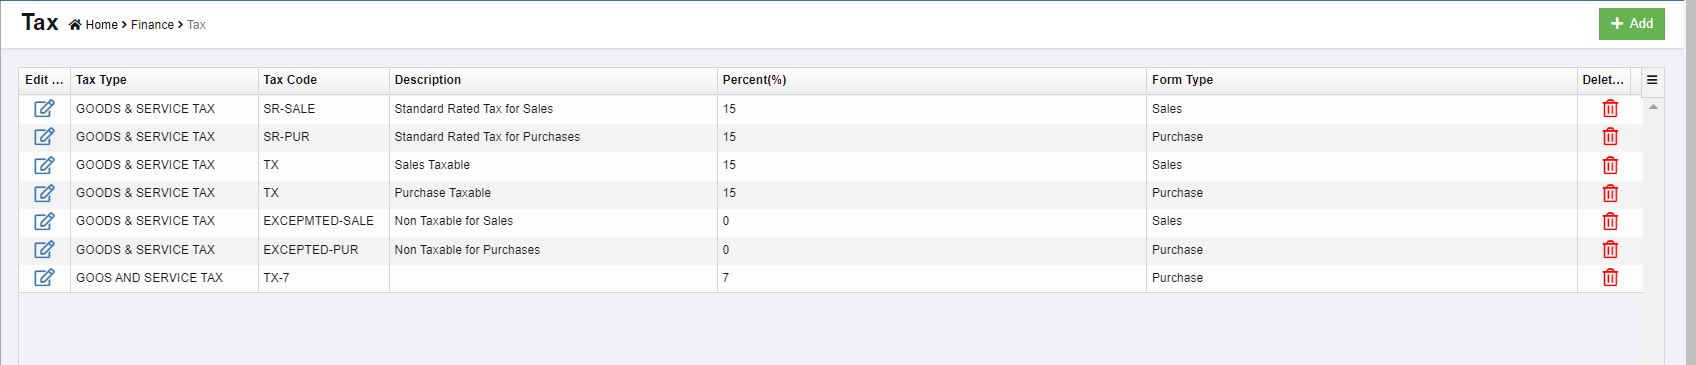](http://wiki.cuteinfocomm.com/uploads/images/gallery/2022-09/image-1664220209974.png)
#### Add Tax Type
To add a new tax type master,
1. Click [](http://wiki.cuteinfocomm.com/uploads/images/gallery/2022-09/image-1664220439960.png)add button in the top right corner in the tax master list page, the new tax detail page opens, [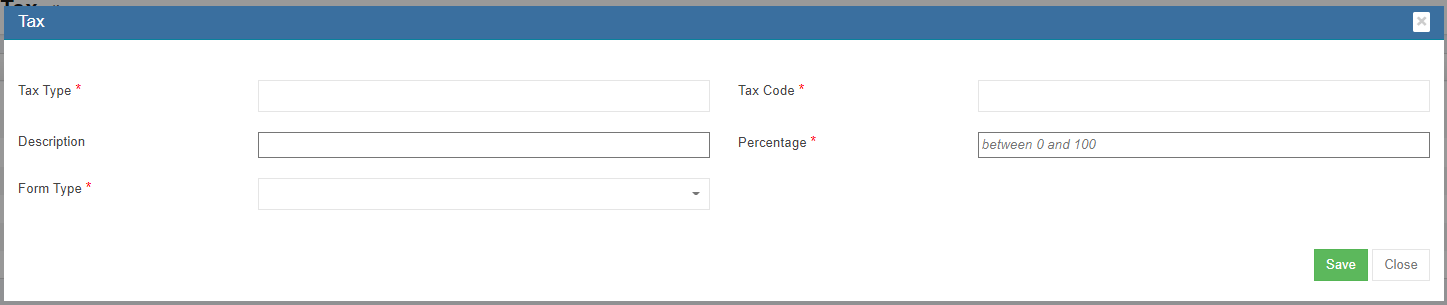](http://wiki.cuteinfocomm.com/uploads/images/gallery/2022-09/image-1664220688686.png)
2. Fill up the details of the tax master:
- In Tax Type box, enter tax type.
- In Tax Code box, enter the code.
- In Description box, enter description of the tax type.
- In Percentage box, enter the percentage between 0-100.
- In Form Type box, select the form type.
3. Click Save. A new tax type is created and saved in the tax master.
#### Edit Tax Type
To edit a tax type master,
1. Click[](http://wiki.cuteinfocomm.com/uploads/images/gallery/2022-09/image-1664220954241.png)edit button in front of the tax type that needs to be edited. The tax type details window opens, [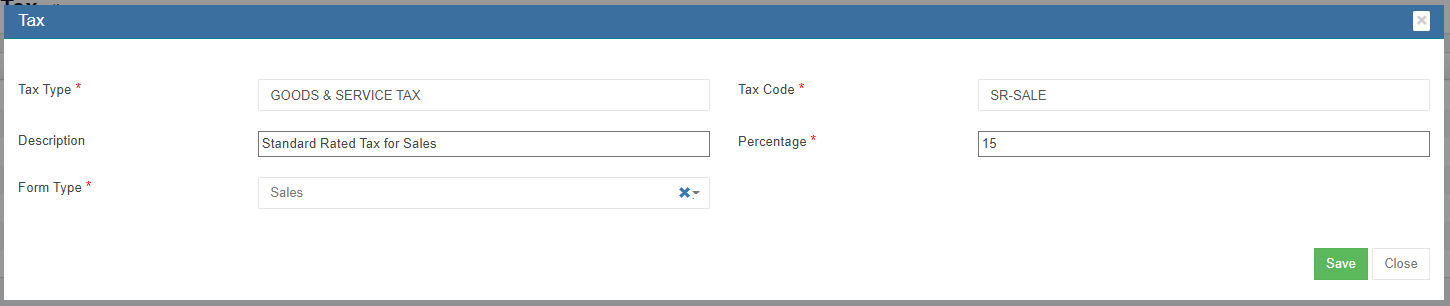](http://wiki.cuteinfocomm.com/uploads/images/gallery/2022-09/image-1664221024331.png)
2. Edit the details where suits.
3. Click Save to save edits.
#### Delete Tax Type
To delete a tax type master,
1. Click[](http://wiki.cuteinfocomm.com/uploads/images/gallery/2022-09/image-1664221091059.png)delete button in the delete column in the relevant tax type. A confirmation window will open as below, [](http://wiki.cuteinfocomm.com/uploads/images/gallery/2022-09/image-1664221175045.png)
2. Click Yes to confirm deletion. The tax type will be deleted.
### Invoice Number Configure
User can configure the invoice format and invoice number in Master-Invoice Number Config.
To configure invoice number,
1. Click Invoice Number Config in the finance master menu, below configure page opens,[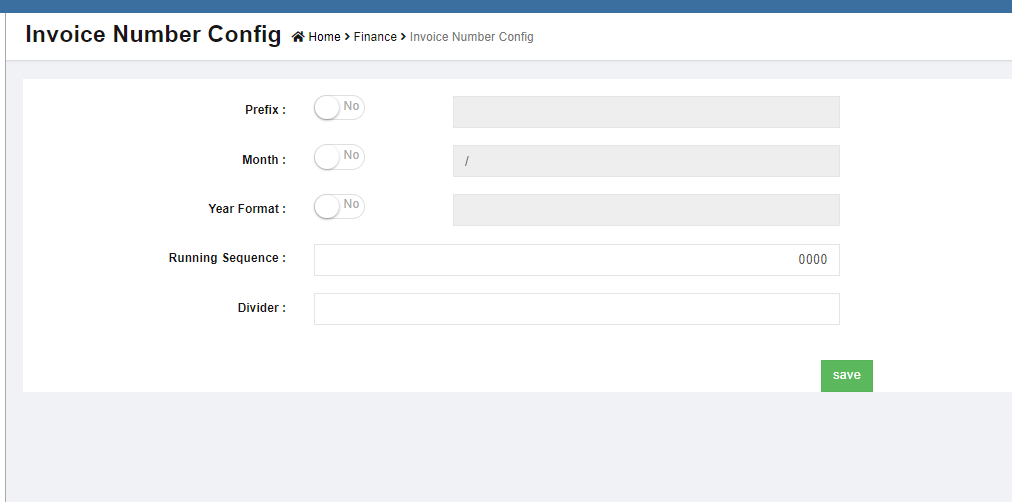](http://wiki.cuteinfocomm.com/uploads/images/gallery/2022-09/image-1664221313462.png)
2. Enter the details to configure:
- In Prefix box, if there is no prefix required, disable the flag to No; if there is prefix, enable the flag to Yes, then enter the prefix in the text field.[](http://wiki.cuteinfocomm.com/uploads/images/gallery/2022-09/image-1664221482605.png)
- In Month box, if there is no month info required, disable the flag to No; if there is, enable the flag to Yes, then enter the month format in the text field. [](http://wiki.cuteinfocomm.com/uploads/images/gallery/2022-09/image-1664221666535.png)
- In Year box, if there is year info required, disable the flag to No; if there is, enable the flag to Yes, then enter the year format in the text field. [](http://wiki.cuteinfocomm.com/uploads/images/gallery/2022-09/image-1664221729619.png)
- In Running Sequence, enter the first running number [](http://wiki.cuteinfocomm.com/uploads/images/gallery/2022-09/image-1664221792472.png)
- In Divider box, enter the divider if any[](http://wiki.cuteinfocomm.com/uploads/images/gallery/2022-09/image-1664221849950.png)
3. Click Save to save configuration details.
### Exchange Rate
The exchange rate used in finance module are managed in exchange rate master. Click Exchange Rate in master menu, below exchange rate list opens,
### [](http://wiki.cuteinfocomm.com/uploads/images/gallery/2022-09/image-1664221957106.png)
**Note:** Exchange rate fluctuate due to various factors, cuteOffice exchange rate master accommodate such changes in exchange rate. If an exchange rate is created for the first time in the system, the "to date" field will be open so it’s definite the "to date" is as of now; when a new rate is added or edited on existing exchange rate, the adding or editing date will become the "to date" of the previous rate, as such, exchange rate can be within a period which is defined as from date & to date. Whenever finance vouchers are entered for foreign exchange the rate is picked based on the voucher date
#### Add Exchange Rate
To add new exchange rate,
1. Click [](http://wiki.cuteinfocomm.com/uploads/images/gallery/2022-09/image-1664220439960.png)add button in the top right corner in exchange rate list page, the exchange rate add/edit window opens as below,[](http://wiki.cuteinfocomm.com/uploads/images/gallery/2022-09/image-1664303908025.png)
2. Enter the details of exchange rate:
- Base Currency box is default as SGD, this can be configured as other currency upon request.
- In Foreign currency box, select the foreign currency from dropdown list.
- In From Date box, the date will automatically take the end date of current active rate.
- In To Date box, if it's the first time to configure an exchange rate, this field will be open, no need to fill up.
- In Rate box, enter the exchange rate.
3. Click Save. A new exchange rate will be added.
#### Edit Exchange Rate
To edit exchange rate,
1. Click[](http://wiki.cuteinfocomm.com/uploads/images/gallery/2022-09/image-1664220954241.png)edit button in front of the exchange rate, the exchange rate detail window opens, [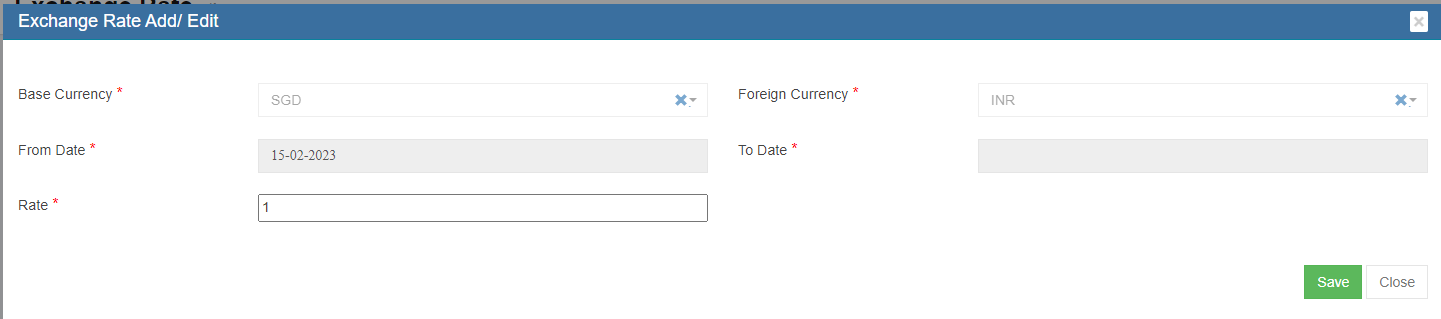](http://wiki.cuteinfocomm.com/uploads/images/gallery/2023-02/image-1676505704783.png)
2. In **Rate** box, enter the new exchange rate.
3. Click Save, a new exchange rate will be saved based on the current date and time.
# Voucher Entry
Voucher Entry manages all finance transactions. It contains below submenu:
- Sales Register
- Receive Payments
- Purchases Register
- Pay Bills
- Transactions Journal
- Bank Register
- Petty Cash Register
- Transfer Money
- Bank Reconciliation
- Remittance Advices
- Find Transactions
- Item Transactions
[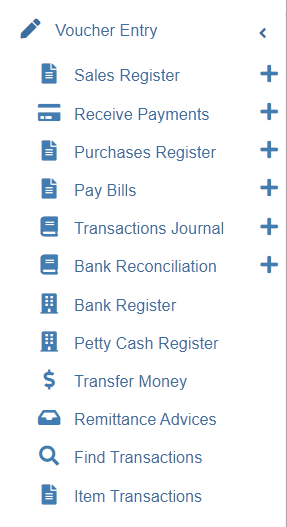](http://wiki.cuteinfocomm.com/uploads/images/gallery/2022-10/image-1666203675765.png)
## Sales Register
Sales Register helps to record and manage the sales and income from sales. The list of transactions pertaining to each month can be viewed by selecting that month, customer, and transaction status. Click **Sales Register** in the **Voucher Entry menu,** The **Sales Register** page opens.
[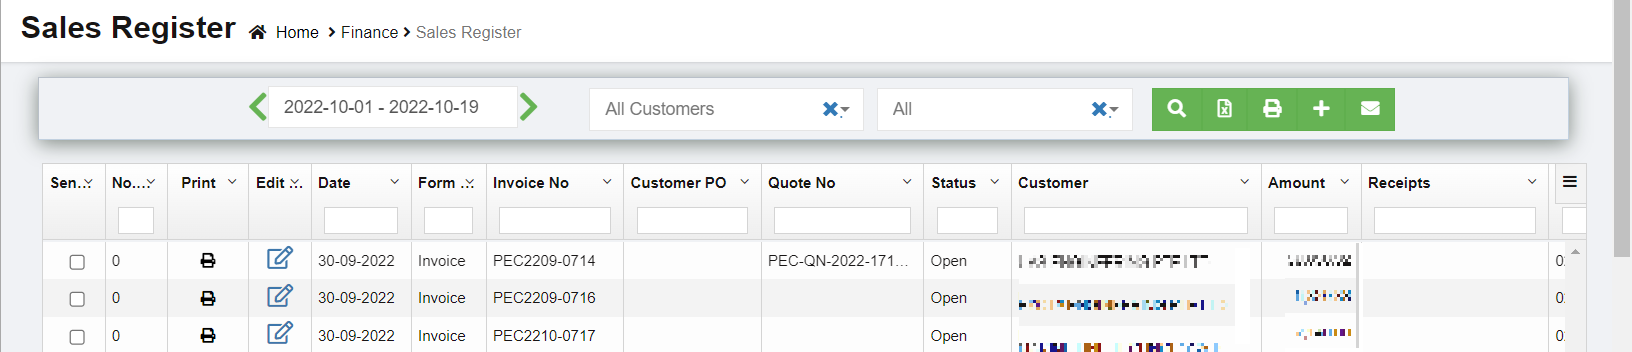](http://wiki.cuteinfocomm.com/uploads/images/gallery/2023-04/image-1682094034908.png)
### View Sales Entry
If you want to view the sales entry details of a particular customer, you can use the filters to search
[](http://wiki.cuteinfocomm.com/uploads/images/gallery/2022-10/image-1666207318498.png)
1. In the Calendar field, select the period for which you want to view the sales entry details.
2. In the Customer box, select a customer.
3. In the Status box, select the status for you want to view the sales entry details.
4. Click [](http://wiki.cuteinfocomm.com/uploads/images/gallery/2022-10/image-1666207536064.png). The sales entry detail opens for the selected customer and period.
### Enable Permission for Sales Recurring Transaction
If you want to add a new sales entry by using the transaction details of an existing invoice number, you need to enable permission for accessing the Sales recurring transaction option. To enable the permission for sales recurring transaction, search for permission name "**SalesRecurring"** in user 's permission page and enable both read and write permissions. Once you have enabled this permission, the sale recurring transaction related option will be appeared while adding a new sales entry.
[](http://wiki.cuteinfocomm.com/uploads/images/gallery/2022-10/image-1666208012032.png)
### Add a New Sales Entry
To add a sales entry,
Click[](http://wiki.cuteinfocomm.com/uploads/images/gallery/2022-10/image-1666241439740.png) (Add icon) provided in the upper right-corner of the Sales Register page, the Sales Entry page opens as below, [](http://wiki.cuteinfocomm.com/uploads/images/gallery/2022-10/image-1666241535572.png)[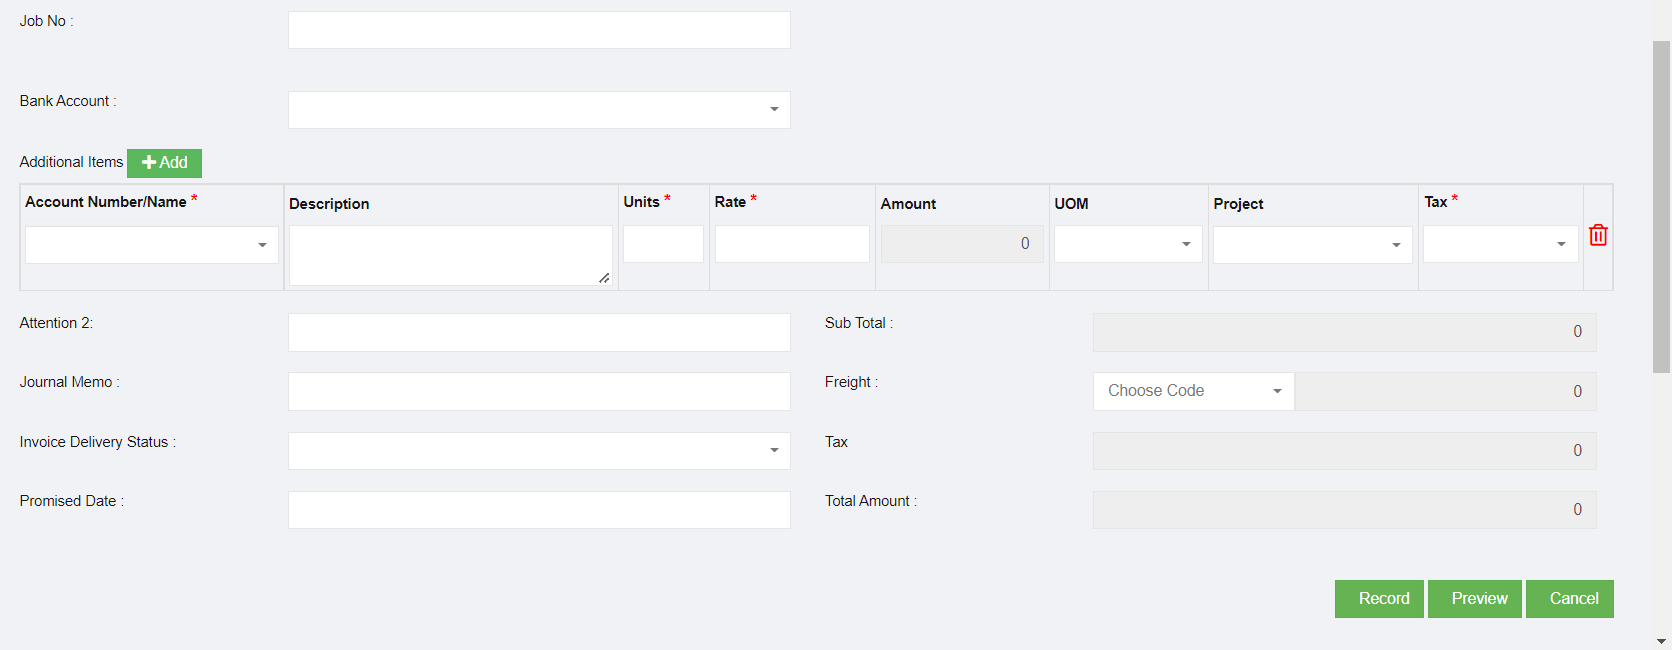](http://wiki.cuteinfocomm.com/uploads/images/gallery/2022-10/image-1666241559159.png)
**Note: useful navigation options**
- [](http://wiki.cuteinfocomm.com/uploads/images/gallery/2022-10/image-1666241702853.png)(Journal button)-You can use the Journal option to view the sales journal entry. Sales journal entry records a cash or credit sale to a customer. Sales journal entries also reflect changes to accounts such as Cost of Goods Sold, Inventory, and Sales Tax Payable accounts.
- [](http://wiki.cuteinfocomm.com/uploads/images/gallery/2022-10/image-1666241795080.png)(Payment button) – used to navigate into the Receive Payments Entry page.
- [](http://wiki.cuteinfocomm.com/uploads/images/gallery/2022-10/image-1666241838365.png)(Register button) – used to navigate into the Sales Register page.
#### Add Sales Entry using Recurring Option
If you want to add a sales entry by using the sales recurring option,
1. Click[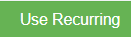](http://wiki.cuteinfocomm.com/uploads/images/gallery/2022-10/image-1666242173987.png) (use recurring button), all the saved recurring transactions page will open as below, [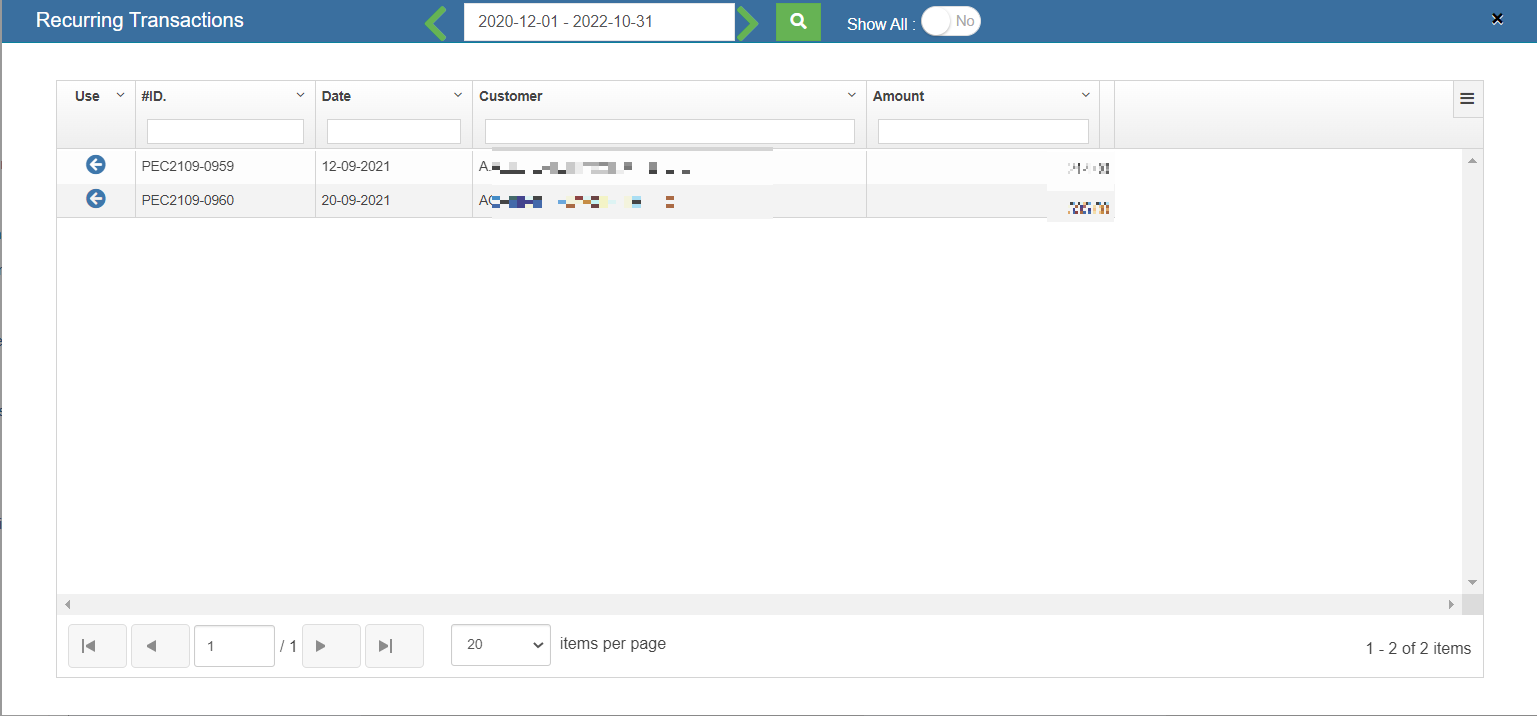](http://wiki.cuteinfocomm.com/uploads/images/gallery/2023-04/image-1682094093619.png)
2. Select an invoice number from the recurring transactions list. Click the use icon. Once the invoice number is selected, it will retrieve the respective transaction details saved successfully in cuteOffice. All the input fields will be automatically filled up according to the selection of invoice number.
**Note:** to save a sale entry as Recurring, enable the "Save As Recurring" flag to Yes when register a sales entry. Once saved as recurring entry, it will be shown in the recurring transaction page when use "Use Recurring" option to register sales entry.
[](http://wiki.cuteinfocomm.com/uploads/images/gallery/2022-10/image-1666242591995.png)
#### Add Sales Entry Manually
To add a sales entry manually,
1. In the **Sales Form Type** field, select the sales form type you want to add. [](http://wiki.cuteinfocomm.com/uploads/images/gallery/2022-10/image-1666377540813.png)
2. If the tax is inclusive for the sales entry, enable **Yes** in the in the Tax Inclusive option.
3. In the **Customer** box, select a customer from customer dropdown list. Note: If you can't find the customer in the list, and want to add as a new customer, you can click the add button near the Customer box. [](http://wiki.cuteinfocomm.com/uploads/images/gallery/2022-11/image-1667601667741.png)
4. In the **Terms** box, select the terms. Terms refers to the payment period of the customer. For example, if you select the terms as **COD**, then the customer needs to pay cash on delivery. If you select **30 Days**, then the customer needs to pay the amount within the 30 days of delivery.
5. In the **Ship to** box, select the shipping location. Note: once you have selected the shipping location, the shipping address will be automatically updated in the Address box.
6. In the **Destination Country** box, enter the destination country detail.
7. In the **Invoice** box, the invoice number will be updated automatically. Note: If you want to edit the invoice number, click [](http://wiki.cuteinfocomm.com/uploads/images/gallery/2022-11/image-1667602387078.png) (Edit button) and change the invoice number.
8. In the **Customer Purchase Order (PO)** box, enter the customer PO number.
9. In the **Date** box, select the date (click in the field and select from the calendar).
10. In the **Bank Account** box, select the bank account to receive payment from the customer.
11. In the **Account Number/Name** box, select the appropriate chart of account from the list of chart of accounts. Note: If you want to add additional account number, click (Add button) and add the account and item details by following the below steps. Once you have selected the account number and name, the Description box shows the description for the corresponding selected account.
12. In the **Period of Work** box, select the number of days spent for this work.
13. In the **Units** box, enter the number of items purchased by the customer.
14. In the **Rate** box, enter the rate of each item.
15. Once you have entered the units and rate of the item, the total amount will be calculated and displayed in the **Amount** box.
16. In the **Project** box, select for which project, the items are purchased.
17. In the **Tax** box, select a tax code from the given tax codes. The total amount for the items will be automatically updated in the Sub Total box. Tax Codes:
**Zero Rated (ZR) – 0%** **GST**– Export of goods to overseas.
**Standard Rated (SR) -7% GST**– Most local sales falls under this category.
**Exempt Supplies (EX)** - GST is not applicable – Sale of unfurnished residential property, Importation and local supply of investment precious metals.
18. In the **Sales Person** box, enter the name of the sales person.
19. In the **Invoice Delivery Status** box, select the invoice delivery status from the list.
20. In the **Promised Date** box, select the date when the item will be delivered.
21. In the **Fright** box, select the tax percentage for the freight charges.
22. The tax amount will be automatically updated in the **Tax** box.
23. Click **Record** to complete sales register.
### Add/Change Exchange Rate (Need team's input re this section)
Make sure that you cannot edit the exchange rate of the base currency Singapore Dollar (SGD).
Once you have added the sales amount details, if you want to change the USD exchange rate, do the following steps,
1. Click (**Rate** button) provided in the **Sales Entry,** The **Exchange Rate Add/Edit** window opens.
2. In the **Base Currency** box, select the base currency.
3. In the **Foreign Currency** box, select the foreign currency.
4. In the **Rate** box, enter the exchange rate.
5. Click **Save**.
The exchange rate will be changed and the total amount will be calculated according to the selected exchange rate.
### Send Invoice to Customers through Email
If you want to send the invoices to the specific customer,
[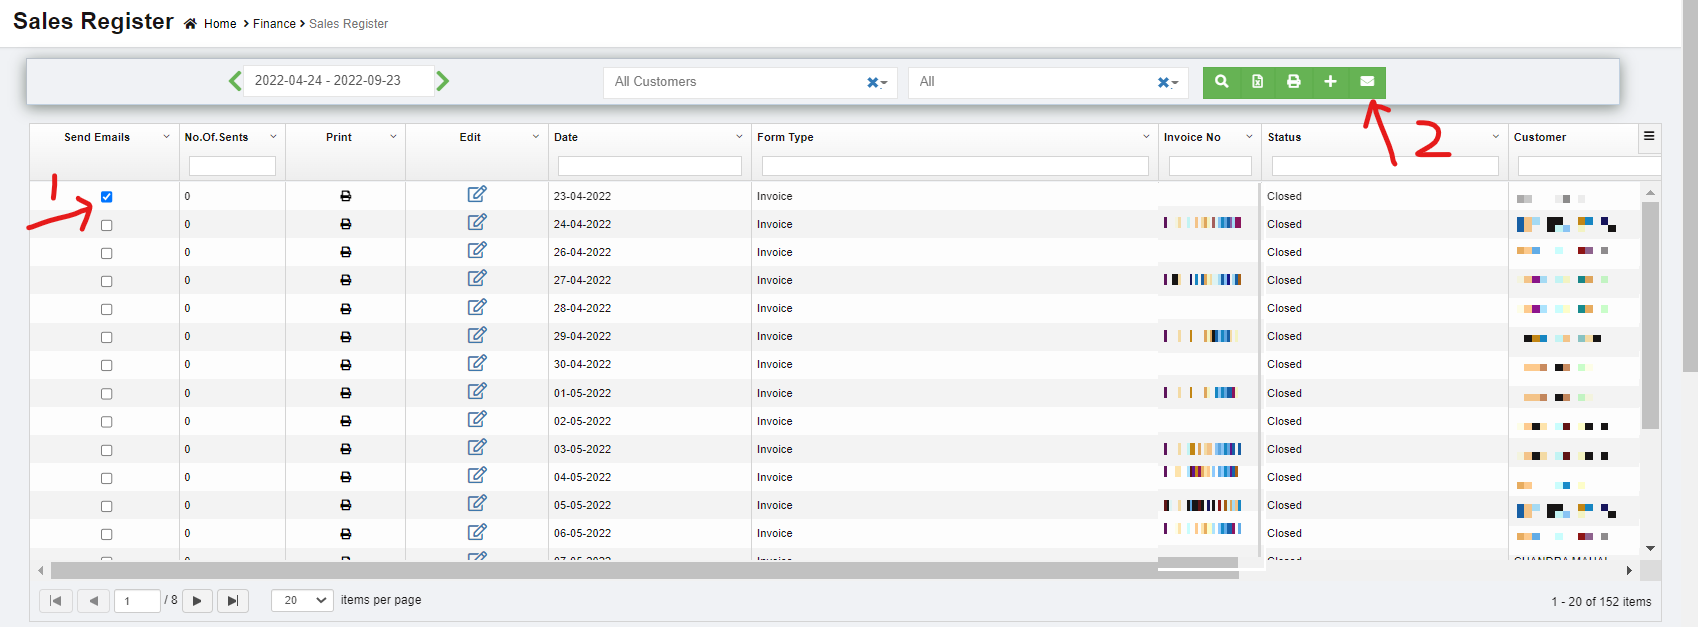](http://wiki.cuteinfocomm.com/uploads/images/gallery/2023-04/image-1682094159145.png)
1. Select the checkbox provided in the **Send Emails** column for the invoices which you want to send to the customer.
2. Click(E-Mail icon) provided in the **Sales Register.** The selected invoices will be sent to the respective email address.
### Add Purchase Details Against a Sales Invoice (need team's input)
### Edit the Sales Entry Details
If you want to edit any added sales entry details in the **Sales Entry** page, navigate to sales register list view page,
[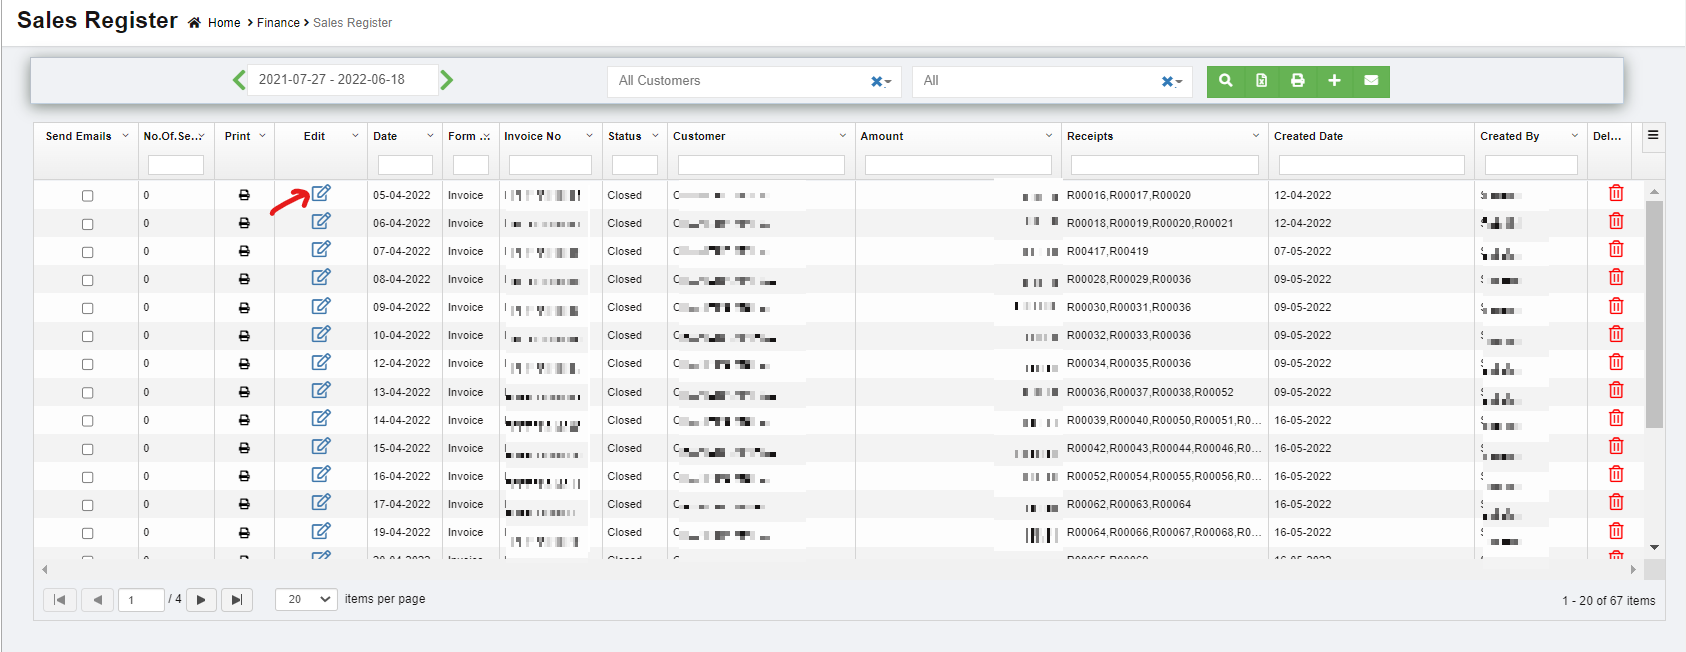](http://wiki.cuteinfocomm.com/uploads/images/gallery/2023-04/image-1682094227092.png)
1. Click [](http://wiki.cuteinfocomm.com/uploads/images/gallery/2022-11/image-1668025713960.png)(Edit icon) in the **Edit** column for the respective sales entry. The **Sales Entry** page opens and shows the added sales details.
2. Click and edit where needed.
3. Click **Record** to save edits. The Changed sales entry details will be updated.
### Delete Any Added Sales Entry
If you want to delete any added sales entry, you can use delete option provided in the **Delete** column of the **Sales Register** page,
1. Click [](http://wiki.cuteinfocomm.com/uploads/images/gallery/2022-11/image-1668025897554.png)(Delete icon) for the corresponding sales entry. You receive a notification message “**Are you sure to delete a record**?” [](http://wiki.cuteinfocomm.com/uploads/images/gallery/2022-11/image-1668025932541.png)
2. Click **Yes**. The selected sales entry will be deleted.
### Print the Invoice Details
If you want to print the invoice details of the particular sales entry, click (Print icon) provided in the **Print** column for the corresponding sales entry.
#### Settings Configuration to Print Invoice
1. Click [](http://wiki.cuteinfocomm.com/uploads/images/gallery/2022-11/image-1668025713960.png)(Edit icon) in the **Edit** column for the respective company. The **company** page opens and go to settings tabs. Use filter and enter "financeSalesInvoiceReportFormat".
2. Click edit and enter "SALESINVOICEFORMAT3" in the value.
3. Click Save to save details.
4. Go to Logo upload tab and choose "Letter Pad" in the image type.
5. Click choose file and add Company Letterhead.
6. Click Show Preview and Save the details.
[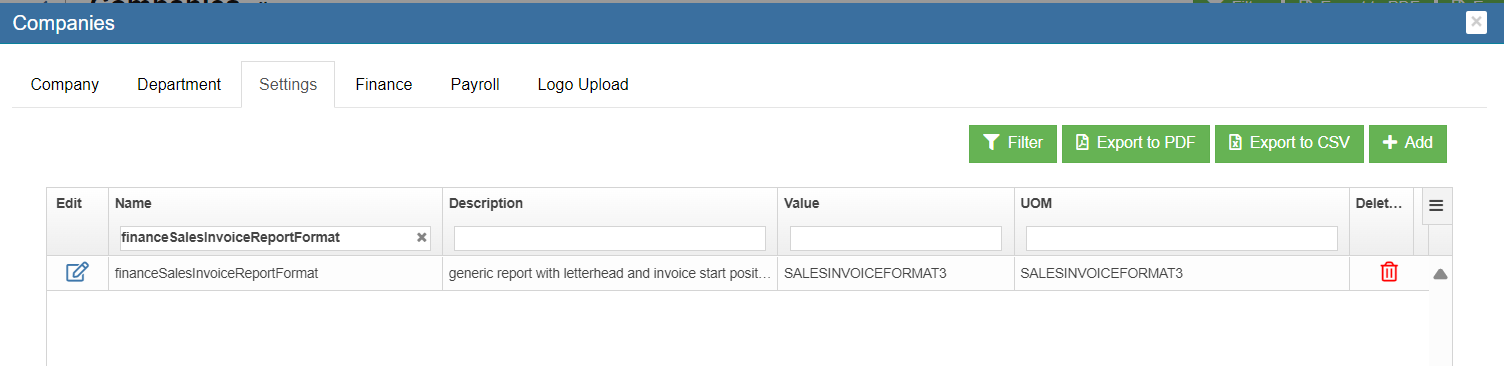](https://wiki.cuteinfocomm.com/uploads/images/gallery/2024-04/image-1713518419864.png)
Note : Use setting "financeSalesInvoiceReportStartPosition" to adjust the space between header and "Tax Invoice" in the report
[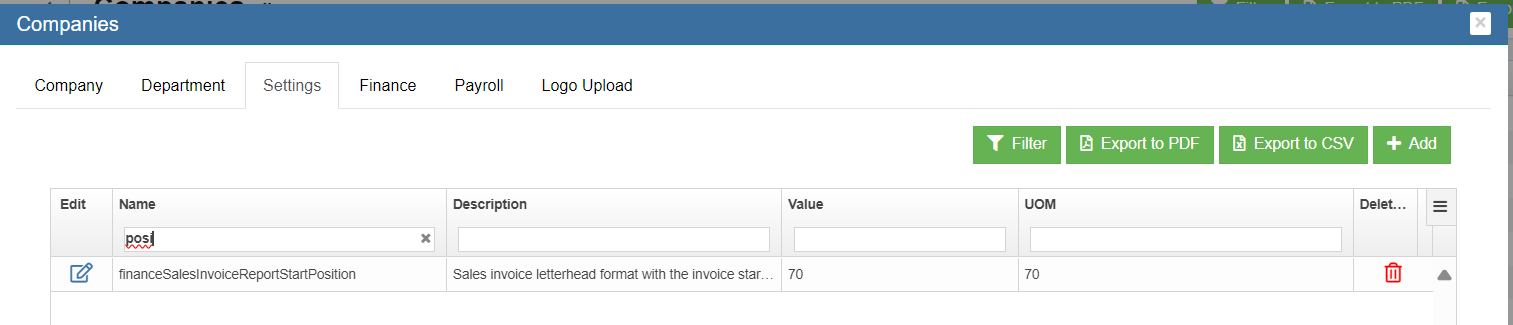](https://wiki.cuteinfocomm.com/uploads/images/gallery/2024-04/image-1713518918691.png)
[](https://wiki.cuteinfocomm.com/uploads/images/gallery/2024-04/image-1713519135338.png)
### Export the Sales Register
If you want to export the added sales entries in the **Sales Register** page in the excel format, you can click (Excel icon). The added sales entries will be downloaded in the excel format.
## Receive Payments
The **Receive Payments** tab in the **Finance** menu helps you to add the details of the payment received from the customer. Click **Receive Payments** in the **Finance**, the **Receive Payments Register** page opens as below,
[](http://wiki.cuteinfocomm.com/uploads/images/gallery/2022-12/image-1669918201394.png)
### View Received Payments
If you want to view the received payment entry details of the particular bank account, you can use below filter to search,
[](http://wiki.cuteinfocomm.com/uploads/images/gallery/2022-12/image-1669918363721.png)
1. In the Calendar field, select the period for which you want to view the received payment entry details.
2. In the **Account** box, select a bank account.
3. Click [, ](http://wiki.cuteinfocomm.com/uploads/images/gallery/2022-12/image-1669918498677.png)the received payment entry detail opens for the selected bank account and period.
### Add a Received Payment Entry
To add a received payment details,
1. Click[](http://wiki.cuteinfocomm.com/uploads/images/gallery/2022-12/image-1670382846981.png)(Add icon) provided in the upper right-corner of the Receive Payments Register. The Receive Payments Entry page opens.[](http://wiki.cuteinfocomm.com/uploads/images/gallery/2022-12/image-1670384489058.png)
2. In the **Receipt Type** field, if you want to add the details of payment received from any buyer other than the customers, select the **RECEIPT VOUCHER,** Once you select the **RECEIPT VOUCHER** option, the **Receive Payments Entry** page shows the following fields to be filled.[](http://wiki.cuteinfocomm.com/uploads/images/gallery/2022-12/image-1670394395833.png)
- In the **Bank Account** box, select a bank account.
- In the **Payor** box, select a payor from a drop-down list.
- In the **Address** box, enter the address of the person or company who has made payment.
- In the **Date** box, select the date of payment.
- In the **Payment Method** box, select the mode of payment.
- In the **Currency** box, select the currency type.
- In the **Account Name**/**Number** box, select any one of appropriate chart of account from the list of charts of accounts.
- If you want to add additional account number, click (Add button) and add the account details.
- If you want to add a new account number, click (Add New Account Number button) and add the account details.
**Note**: Once you have selected the account number and name, the Invoice Date box shows the invoice date and the Description box shows the description for the corresponding selected account.
- In the **Tax** box, select a tax code from the given tax codes.
- In the **Amount applied** box, enter the amount. Once you have selected the tax code and entered the amount, the GST and gross total will be automatically updated. The gain/loss amount will be automatically updated in the **Gain/Loss** box.
- Click **Record** to save the received payments details. The added payment details will be saved and listed in the **Receive Payments Register** page. **Note**: If you want to print the received payments details, click [ ](http://wiki.cuteinfocomm.com/uploads/images/gallery/2022-12/image-1670395538811.png)(**Record and Print** button).
3. In the **Receipt Type** field, if you want to add the details of payment received from any customers, select the **CUSTOMER.** Once you select the **CUSTOMER** option, the **Receive Payments Entry** page shows the following fields to be filled. [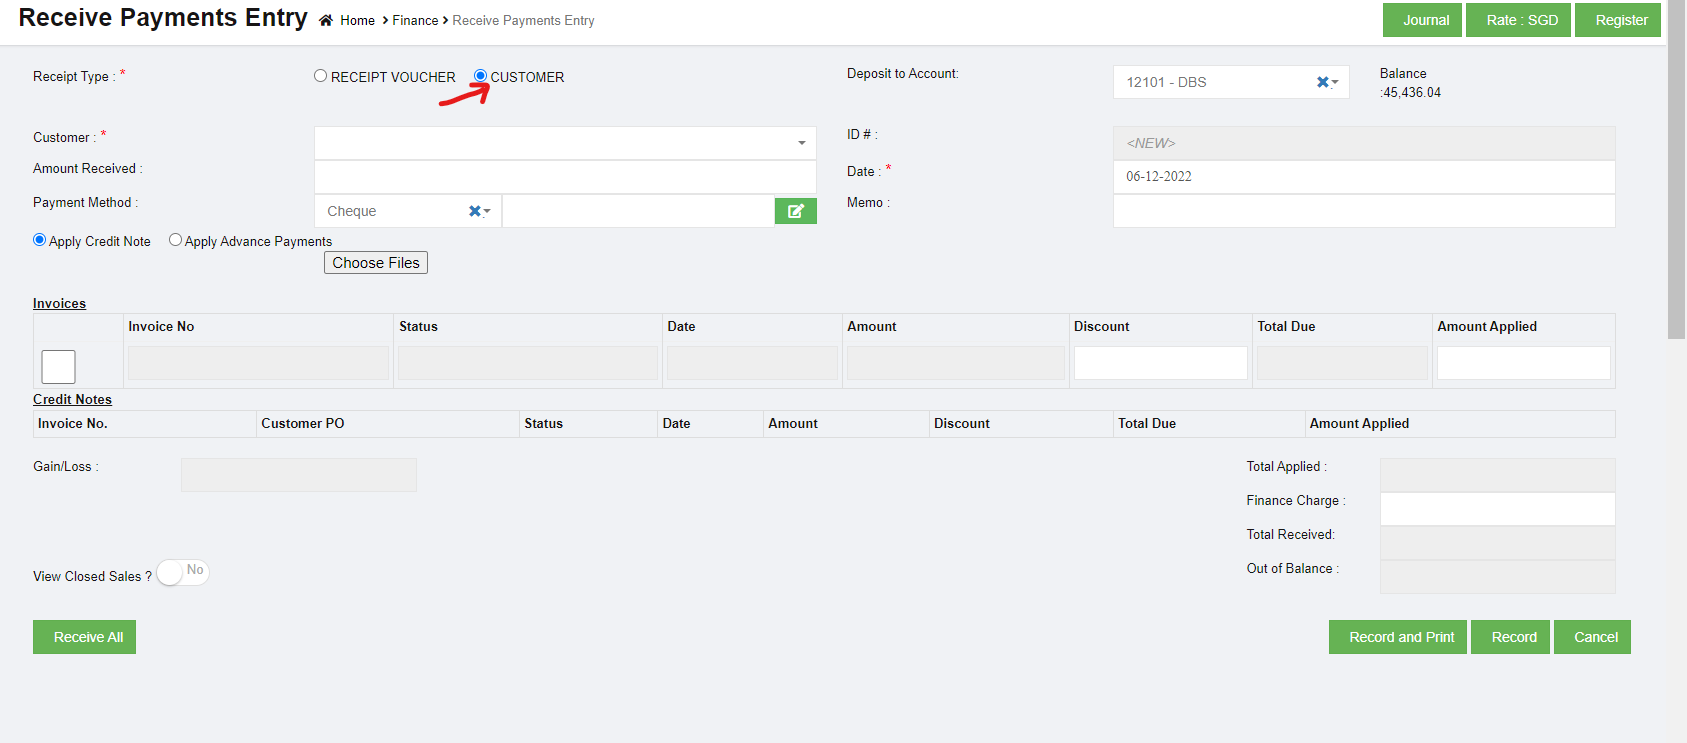](http://wiki.cuteinfocomm.com/uploads/images/gallery/2022-12/image-1670395973031.png)
- In the **Deposit to Account** box, select the amount deposit account.
- In the **Customer** box, select a customer from the list of customers. Once you have selected the customer, the list of invoices created for the respective customer open.
- In the **Amount Received** box, enter the received amount from the customer.
- In the **Date** box, select the date of payment.
- In the **Payment Method** box, select the mode of payment.
- If you want to add any credit note or credit memo, select the **Apply Credit Note.** Credit Note is a way of refunding an invoice that has already been issued or paid. It can be for part of or the whole amount of an invoice. Once select Apply Credit Note option, the Credit Note fields will be displayed as below,
[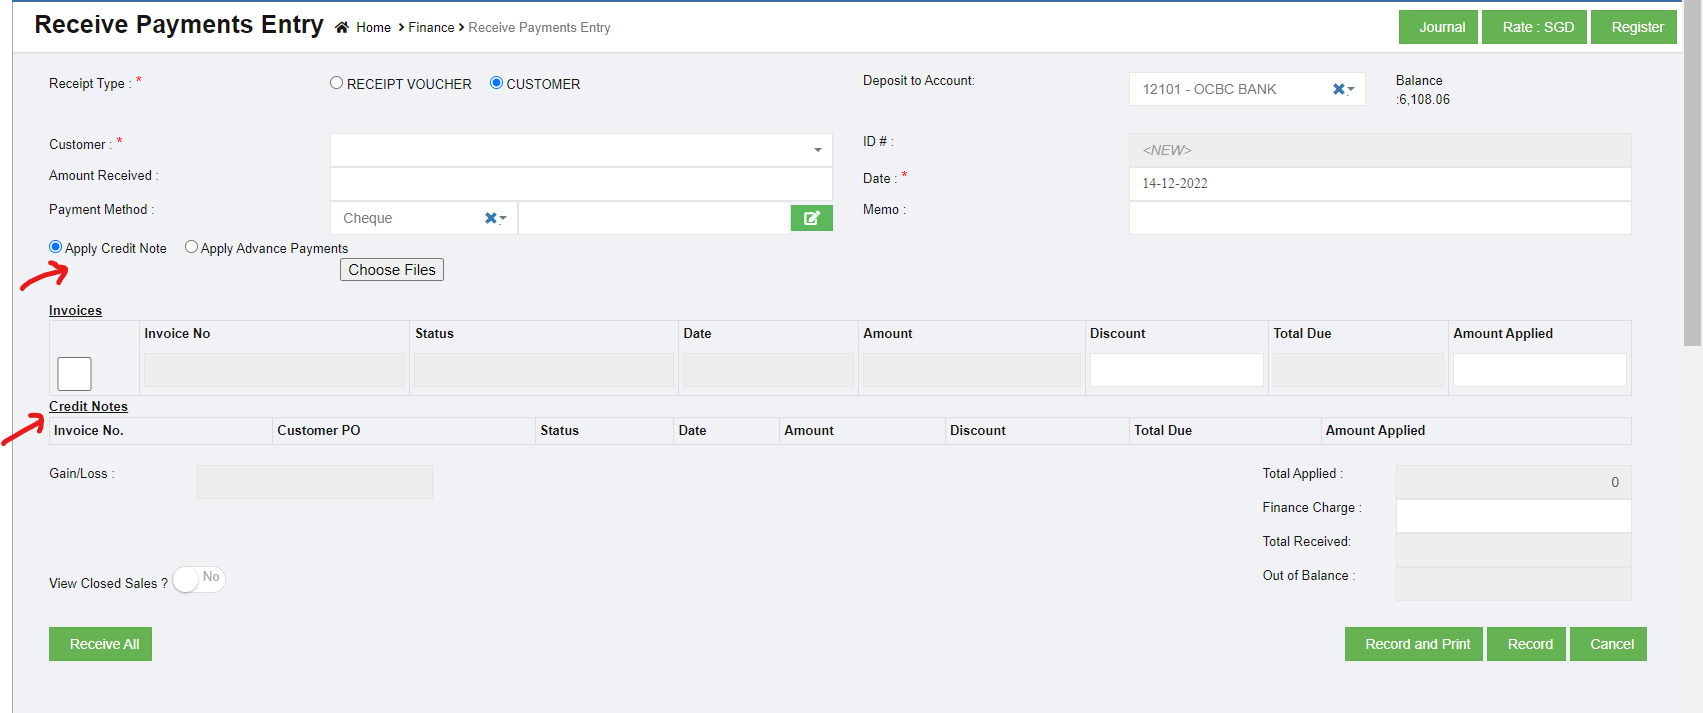](http://wiki.cuteinfocomm.com/uploads/images/gallery/2022-12/image-1671086443155.png)
- If you want to receive the payment from any overpayments, Select the **Apply Overpayments** option.
Overpayment is a liability as it consists of money due back to the customer. Scenario 1 - Customer may pay an advance payment and park that amount for later adjusting against the invoice. Scenario 2 - Customer may pay extra amount and park that amount for later use. Once select Apply Overpayments option, the overpayment Confirm dialog box opens and shows the following notification,
[](http://wiki.cuteinfocomm.com/uploads/images/gallery/2023-04/image-1682094351533.png)
Click Yes. The Over Payments fields will be displayed as below:
[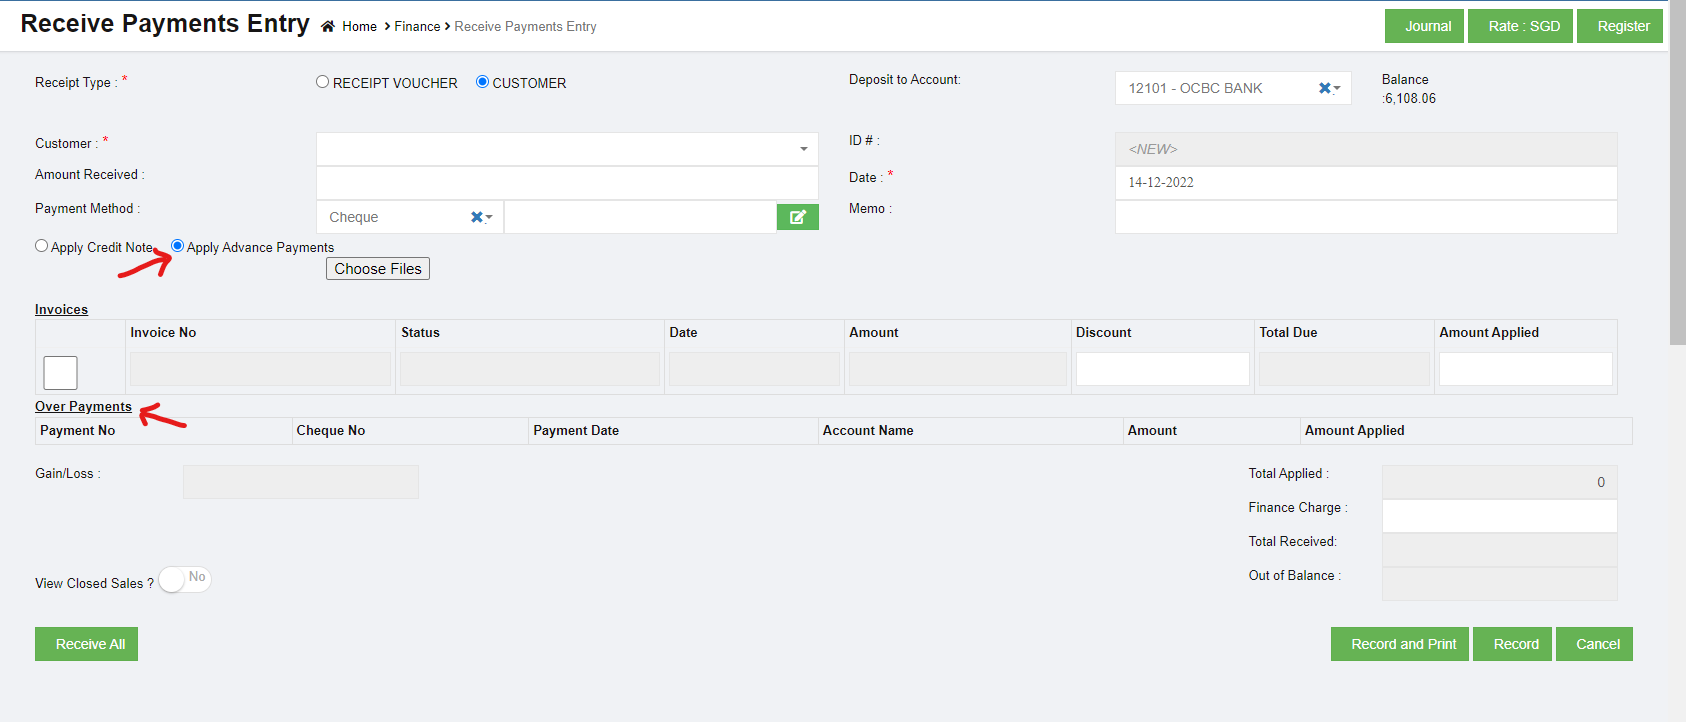](http://wiki.cuteinfocomm.com/uploads/images/gallery/2022-12/image-1671086393547.png)
The system will display the information of over payment if available. The Amount box in the Over Payments field shows the balance amount of the over payment. If you want to receive the amount from the customer’s over payment, enter the amount in the Amount Applied box in the Over Payments field. The total amount will be adjusted from the applied over payment amount.
**Note:** If you want to attach any file regarding credit note or overpayments, click  (Choose Files button) and attach the file.
- In the **Invoices** field, enter the discount amount in the Discount box.
Note: To manually enter the amount in the Invoices field, the respective users must be assigned with the **Manual Amount Filling** permission.
4. If you want to enter the amount manually,
- In the **Amount Applied** box, enter the paid amount. Once you have entered the paid amount, the total applied, finance charge, total received and out of balance will be automatically updated. The gain/loss amount will be automatically updated in the **Gain/Loss** box.
- If you want to view the closed sales details, enable **Yes** in the **View Closed Sales**
- If you want to view all the payment details, click (**Receive All** button).
- Click **Record** to save the received payments details. The added payment details will be saved and listed in the **Receive Payments Register** page. **Note**: If you want to print the received payments details, click (**Record and Print** button).
#### Receive USD customer payment in SDD account.
If a customer is invoiced in USD and received payment in SGD, then use the below method to update the receive payment in system.
Example: Customer AlMansoori was invoiced with 7058 USD. The payment received in SGD account is SGD 9076.95
[](https://wiki.cuteinfocomm.com/uploads/images/gallery/2025-05/image-1748669605108.png)
So the exchange rate calculated in 9076.95 / 7058 = 1.286051
Go to Receive payment entry screen and enter the USD amount in amount received textbox.
[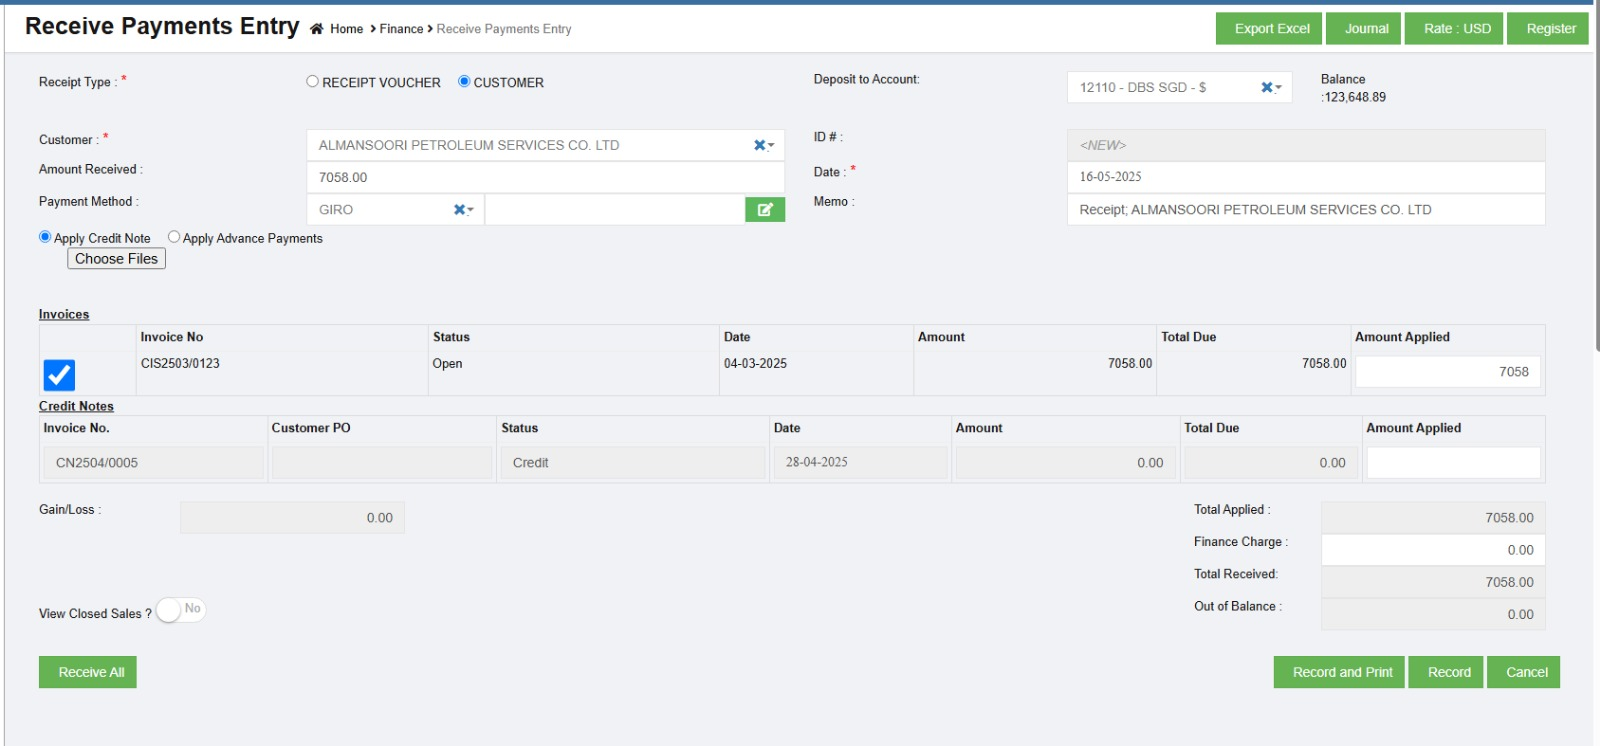](https://wiki.cuteinfocomm.com/uploads/images/gallery/2025-05/image-1748669527782.png)
Click on Rate: USD and enter the exchange rate
[](https://wiki.cuteinfocomm.com/uploads/images/gallery/2025-05/image-1748669583721.png)
Now Record the receipt.
The journal shows the actual receipt of 9076.95 in the SGD account as required.
[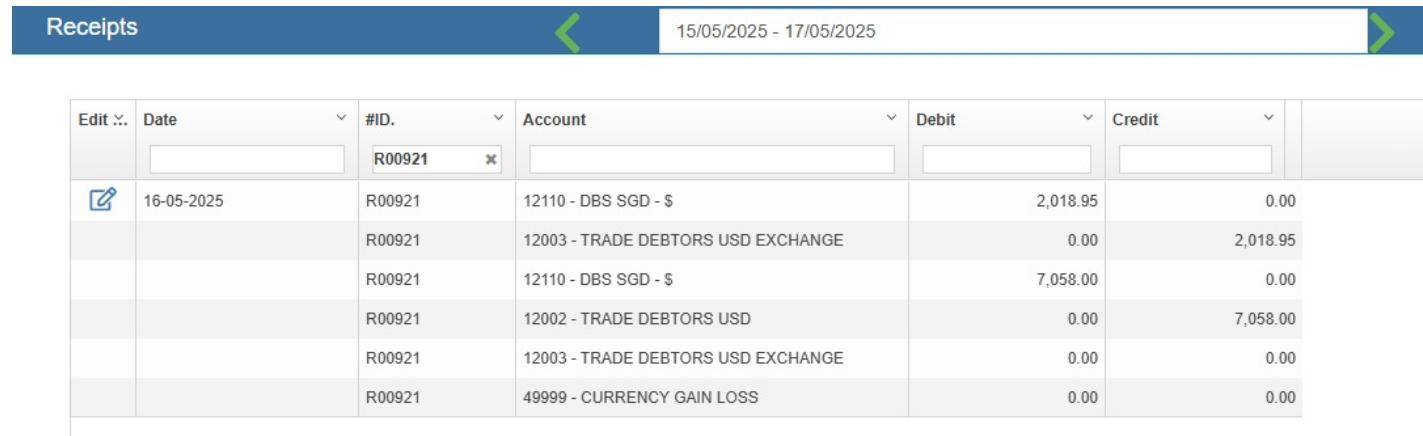](https://wiki.cuteinfocomm.com/uploads/images/gallery/2025-05/image-1748669775941.png)
### Edit the Receive Payment Entry Details
If you want to edit any added receive payment entry details in the **Receive Payments Entry** page, do the following steps,
1. Click [](http://wiki.cuteinfocomm.com/uploads/images/gallery/2022-11/image-1668025713960.png)(Edit icon) in the **Edit** column for the respective receive payment entry. The **Receive Payments Entry** page opens and shows the added received payment details.
2. Click any box where you want to edit the details, and then edit the details in the respective box in the window.
3. Click **Record**. The changed receive payment entry details will be updated.
### Delete Any Added Receive Payment Entry
If you want to delete any added receive payment entry, you can use (Delete icon) provided in the **Delete** column of the **Receive Payments Register** page,
1. Click [](http://wiki.cuteinfocomm.com/uploads/images/gallery/2022-11/image-1668025897554.png)(Delete icon) for the corresponding receive payments entry. You receive a notification message “**Are you sure to delete a record**?”.
2. Click **Yes**. The selected receive payments entry will be deleted.
### Print the Receipt Voucher
If you want to print the receipt voucher of the particular received payment entry, click  (Print icon) provided in the **Print** column for the corresponding payment entry.
### Export the Receive Payments Register
If you want to export the added received payments entry in the **Receive Payments Register** page in the excel format, you can click (Excel icon). The added receive payments entries will be downloaded in the excel format.
## Purchase Register
**Purchase Register** is a record of your company's purchases from suppliers. Each time when a purchase is made, the Purchase Invoice received from the Supplier should be recorded in the Purchase register page. Click Purchases Register in the Finance menu.
The Purchases Register page opens.
[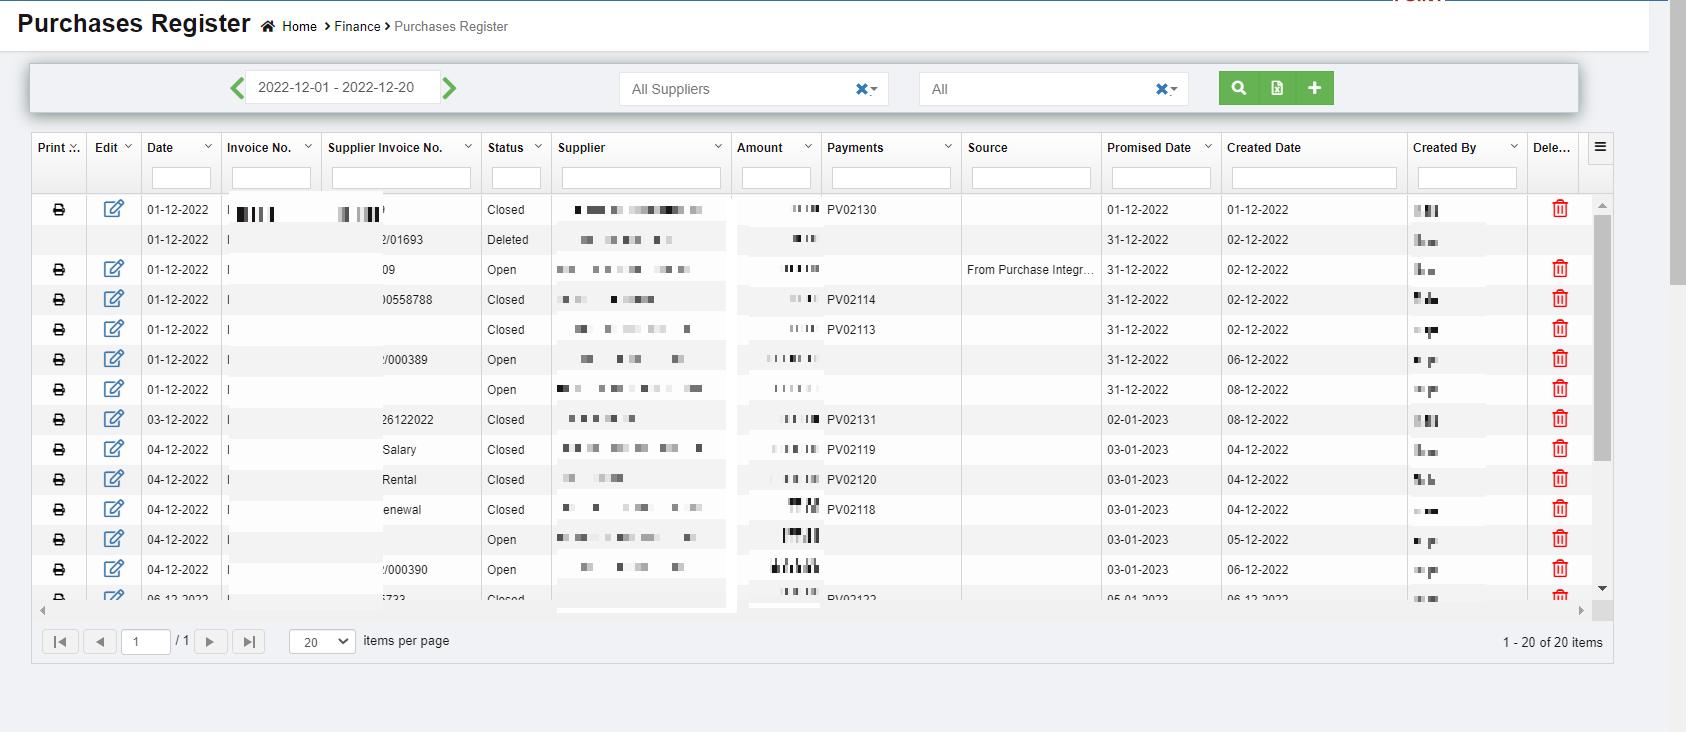](http://wiki.cuteinfocomm.com/uploads/images/gallery/2023-04/image-1682094417373.png)
### View Purchase Register
If you want to view the purchase entry details of the particular supplier,
[](http://wiki.cuteinfocomm.com/uploads/images/gallery/2023-01/image-1672815891746.png)
1. In the Calendar, select the period for which you want to view the purchase entry details.
2. In the Supplier box, select a supplier.
3. In the Status box, select the status to view the purchase entry details.
4. Click . The purchase entry detail opens for the selected supplier and period.
### Enable Permission for Purchase Recurring Transaction
If you want to add a new purchase entry by using the transaction details of an existing invoice number, you need to enable permission for accessing the Purchase recurring transaction option. To enable the permission for purchase recurring transaction, search for permission name "**Purchase Recurring"** in user 's permission page and enable both read and write permissions. Once you have enabled this permission, the purchase recurring transaction related option will be appeared while adding a new purchase entry.
### Add a Purchase Entry
If you want to add a purchase entry, click (Add icon) provided in the upper right-corner of the **Purchases Register.** The **Purchases Entry** page opens.
[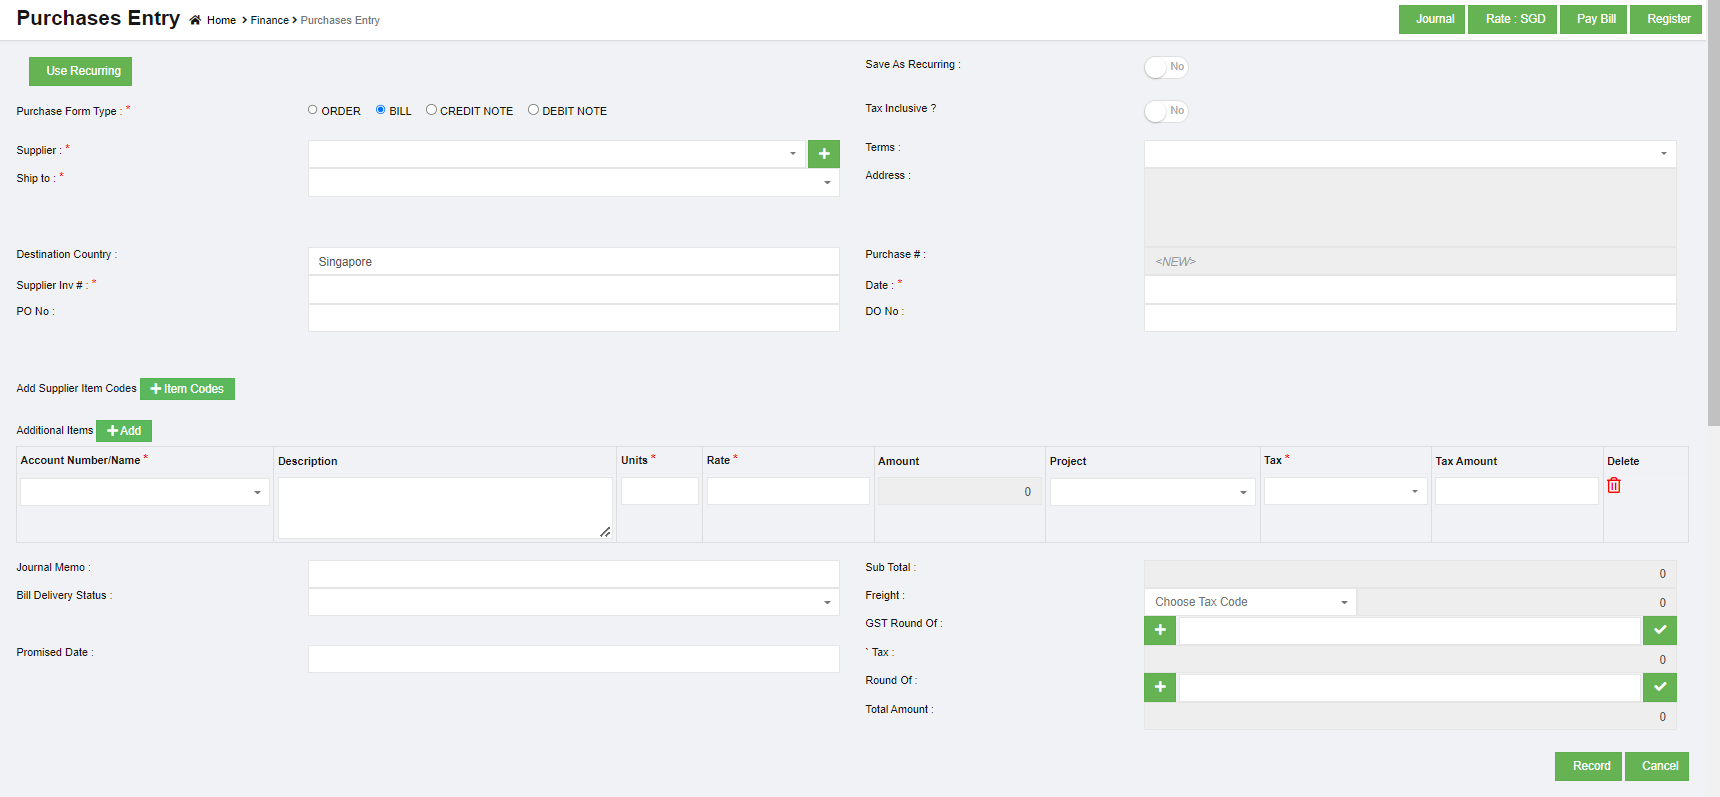](http://wiki.cuteinfocomm.com/uploads/images/gallery/2023-01/image-1672816930168.png)
**Note: useful navigation options**
- [](http://wiki.cuteinfocomm.com/uploads/images/gallery/2022-10/image-1666241702853.png)(Journal button)-You can use the Journal option to view the purchase journal entry. Purchase Credit Journal Entry is the journal entry passed by the company in the purchase journal of the date when the company purchases any goods from the supplier on the terms of credit, where the purchases account will be debited.
- (Pay Bill button) – used to navigate into the Pay Bills Entry page.
- [](http://wiki.cuteinfocomm.com/uploads/images/gallery/2022-10/image-1666241838365.png)(Register button) – used to navigate into the Purchases Entry page.
#### Add a Purchase Entry Using the Purchase Recurring Option
If you want to add a purchase entry by using the purchase recurring option,
1. 1. Click[](http://wiki.cuteinfocomm.com/uploads/images/gallery/2022-10/image-1666242173987.png) (use recurring button), all the saved recurring transactions page will open as below, [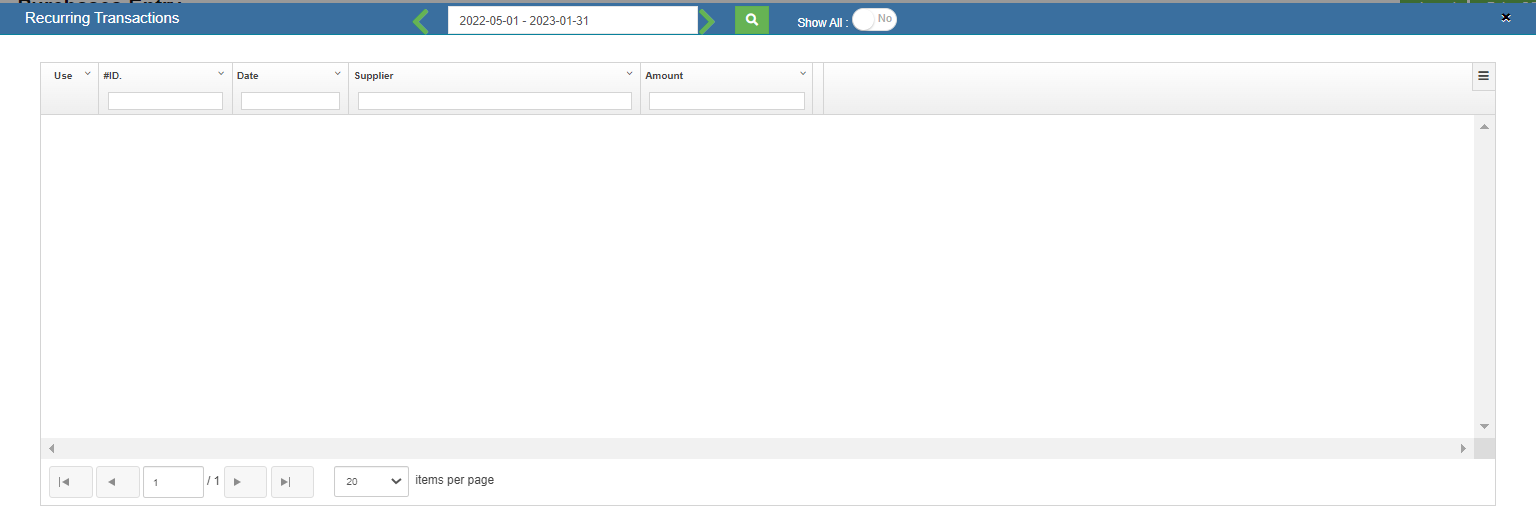](http://wiki.cuteinfocomm.com/uploads/images/gallery/2023-01/image-1672817751954.png)
2. Select an invoice number from the recurring transactions list. Click the use icon. Once the invoice number is selected, it will retrieve the respective transaction details saved successfully in cuteOffice. All the input fields will be automatically filled up according to the selection of invoice number.
**Note:** to save a purchase entry as Recurring, enable the "Save As Recurring" flag to Yes when register a purchase entry. Once saved as recurring entry, it will be shown in the recurring transaction page when use "Use Recurring" option to register purchase entry.
[](http://wiki.cuteinfocomm.com/uploads/images/gallery/2022-10/image-1666242591995.png)
#### Add a Purchase Entry Manually
If you want to add a purchase entry manually, click [](http://wiki.cuteinfocomm.com/uploads/images/gallery/2022-12/image-1670382846981.png) add button in the purchase register page, the purchase entry page will open as below,
[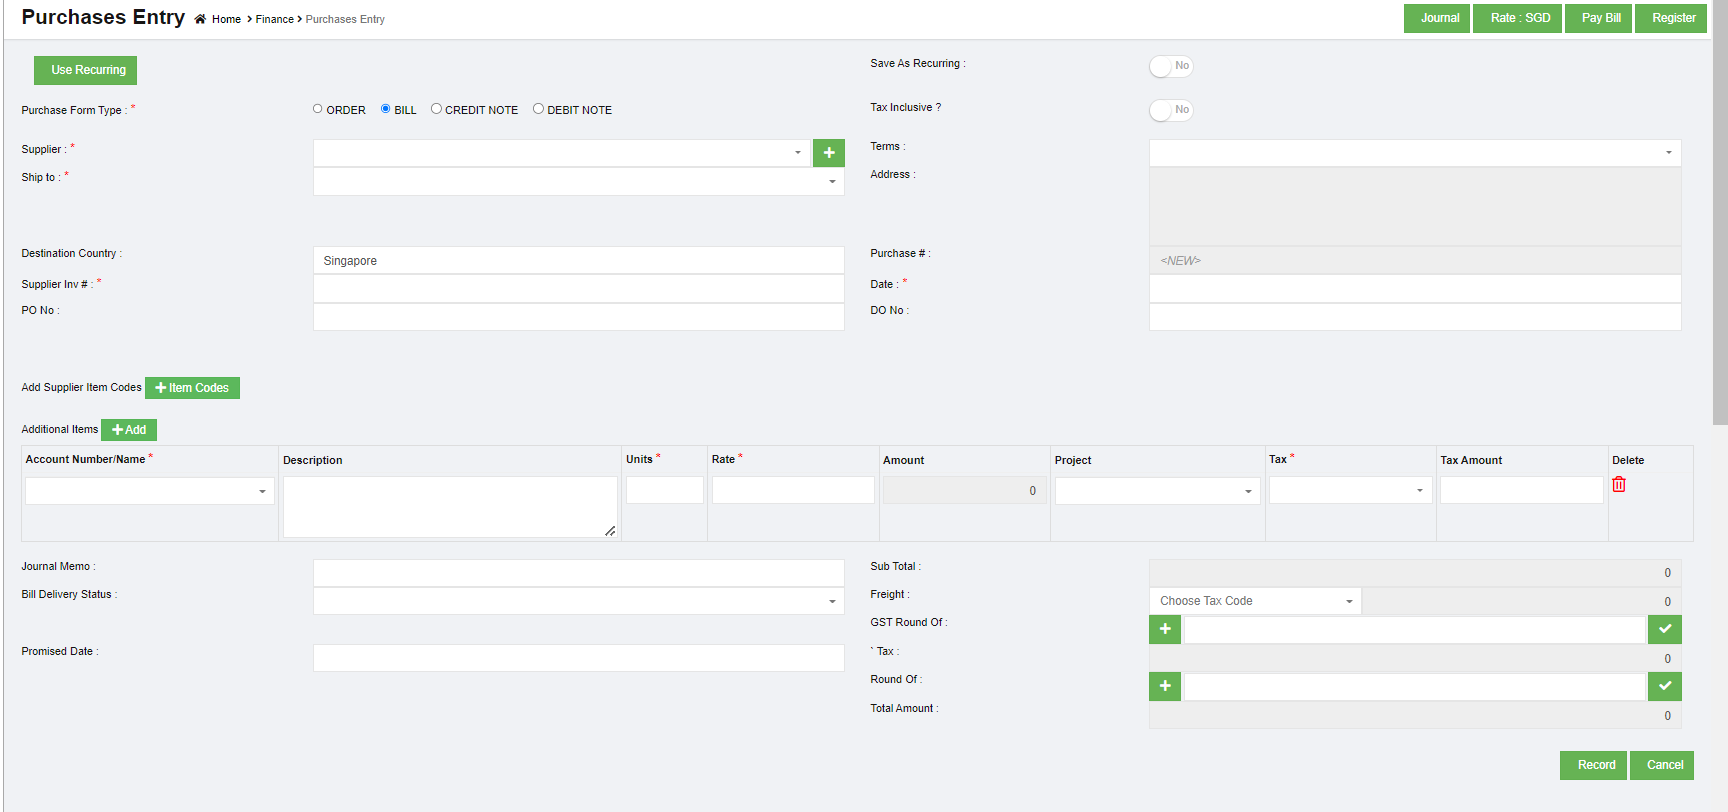](http://wiki.cuteinfocomm.com/uploads/images/gallery/2023-01/image-1673331856445.png)
1. In the **Purchase Form Type** field, select the purchase form type from the given types.
2. In the in the **Tax Inclusive** field, If the tax is inclusive for the purchase entry, enable to Yes; or else, No.
3. In the **Supplier** box, select a supplier from drop down list from suppliers' master. Note: If you want to add a new supplier, you can add a new supplier by clicking[ ](http://wiki.cuteinfocomm.com/uploads/images/gallery/2023-01/image-1673332293135.png)(Add icon) near the Supplier box.
4. In the **Terms** box, select the terms. Terms – Terms refers to the payment period. For example, if you select the terms as COD, then you need to pay cash on delivery. If you select 30 Days, then you need to pay the purchase amount within the 30 days of delivery.
5. In the **Ship to** box, select the shipping location. Note: once you have selected the shipping location, the shipping address will be automatically updated in the Address box.
6. In the **Destination Country** box, enter the destination country name.
7. In the **Supplier Inv#** box, enter the invoice number received from the supplier.
8. In the **Date** box, select the purchase date.
9. In the **Account Number/Name** box, select any one of appropriate chart of account from the list of charts of accounts.
10. Once you have selected the account number and name, the **Description** box shows the description for the corresponding selected account.
11. In the **Units** box, enter the number of items purchased by you.
12. In the **Rate** box, enter the rate of one item.
13. Once you have entered the units and rate of the item, the total amount will be calculated and displayed in the **Amount** box.
14. In the **Project** box, select for which project, the items are purchased.
15. In the **Tax** box, select a tax code from the given tax codes. The total amount for the items will be automatically updated in the **Sub Total** box.
16. In the **Bill Delivery Status** box, select the bill delivery status from the list.
17. In the **Promised Date** box, select the date when the payment will be made.
18. In the **Freight** box, select the tax percentage for the freight charges. The tax amount will be automatically updated in the Tax box.
19. In the **GST Round Of** box, user can use this option to round of GST amount. If need to round down the GST amount, click area 1 to show as "-", then enter round down amount, then click area 2 to enable round of; if need to round up the GST amount, click area 1 to show as "+", then enter round up amount, then click area 2 to enable round of. [](http://wiki.cuteinfocomm.com/uploads/images/gallery/2023-01/image-1673334081596.png)
20. In the **Round Of** box, user can use this option to round of the total amount. Refer to above point of GST round of.
21. Click **Record**. The purchase entry will be added and listed in the Purchases Register page.
### Edit the Purchase Entry Details
If you want to edit any added purchase entry details in the **Purchases Entry** page, do the following steps,
1. Click [](http://wiki.cuteinfocomm.com/uploads/images/gallery/2023-01/image-1673334575459.png)(Edit icon) in the **Edit** column for the respective purchase entry. The **Purchases Entry** page opens and shows the added purchase details.
2. Click any box where you want to edit the details, and then edit the details in the respective box in the window.
3. Click **Record**. The changed purchase entry details will be updated.
### Delete Any Added Purchase Entry
If you want to delete any added purchase entry, you can use delete option provided in the **Delete** column of the **Purchases Register** page,
1. Click[](http://wiki.cuteinfocomm.com/uploads/images/gallery/2022-11/image-1668025897554.png) (Delete icon) for the corresponding purchase entry. You receive a notification message “**Are you sure to delete a record**?”.
2. Click **Yes**. The selected purchase entry will be deleted.
### Print the Invoice Details
If you want to print the invoice details of the particular purchase entry, click  (Print icon) provided in the **Print** column for the corresponding purchase entry.
### Export the Purchase Register
If you want to export the added purchase entries in the **Purchases Register** page in the excel format, click  (Excel icon). The added purchase entries will be downloaded in the excel format.
## Pay Bills
**Pay Bills** is a statement specifying the amount of money paid to the supplier for the purchase. The **Pay Bills** tab in the **Finance** menu helps you to add the details of the amount paid to the supplier. Navigate to finance module, and click **Pay Bills** in the **Voucher Entry menu**, the **Pay Bills Register** page opens as below,
[](http://wiki.cuteinfocomm.com/uploads/images/gallery/2023-04/image-1682094494999.png)
### View Paid Bills
If you want to view the paid bill details of a particular bank account, go to the pay bills register page,
1. In the Calendar, select the period for which you want to view the paid bill details.
2. In the **Account** box, select a bank account.
3. Click [](http://wiki.cuteinfocomm.com/uploads/images/gallery/2023-01/image-1673506656851.png) search icon. The page shows the paid bill details for the selected bank account and period.
### Add a Pay Bill Entry
To add paid bill details,
1. Click [](http://wiki.cuteinfocomm.com/uploads/images/gallery/2023-01/image-1673506751553.png) (Add icon) provided in the upper right-corner of the **Pay Bill Register.** The **Pay Bills Entry** page opens.[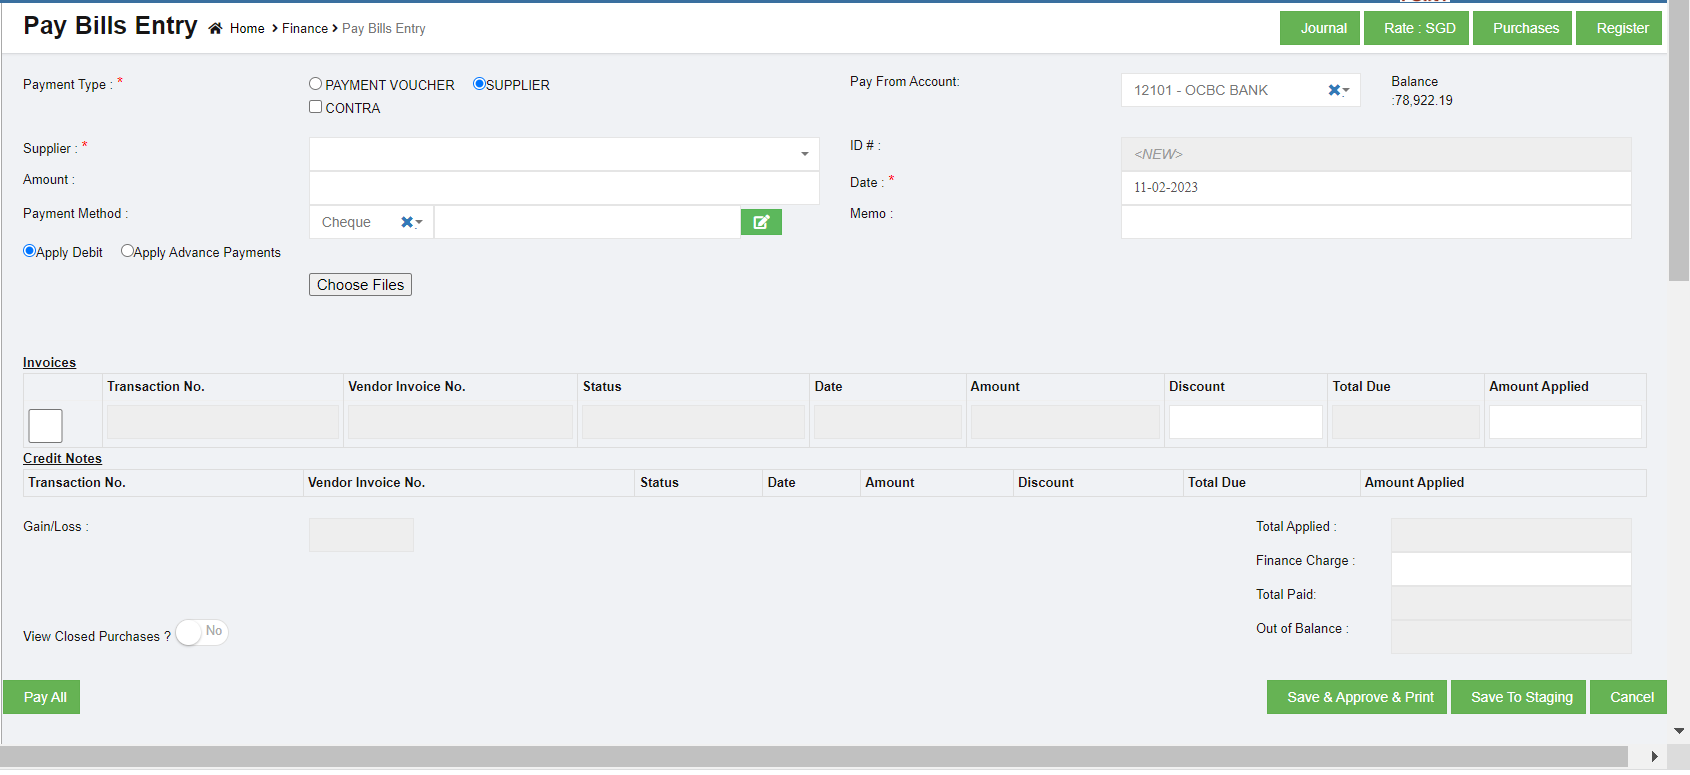](http://wiki.cuteinfocomm.com/uploads/images/gallery/2023-02/image-1676102791799.png)
**Note: useful navigation options**
- [](http://wiki.cuteinfocomm.com/uploads/images/gallery/2022-10/image-1666241702853.png)(Journal button)-You can use the Journal option to used to view the pay bills journal entry. Purchase Credit Journal Entry is the journal entry passed by the company in the purchase journal of the date when the company purchases any goods from the supplier on the terms of credit, where the purchases account will be debited.
- (Pay Bill button) – used to navigate into the Pay Bills Entry page.
- [](http://wiki.cuteinfocomm.com/uploads/images/gallery/2022-10/image-1666241838365.png)(Register button) – used to navigate into the Purchases Entry page.
2. In the **Payment Type** field, there are three types, namely Payment Voucher and Contra. Payments can be made in two scenarios: payments against an Invoice or Advance payment; Payments made without a Supplier Invoice.
- Type 1 PAYMENT VOUCHER-Payment Voucher option will be selected when the User intends to make a payment without an invoice. When this option is selected, User has to select the Supplier (which is a mandatory field) and the Supplier information will be picked from the Direct Payee Master. For such cases, User needs to create the details in the Direct Payee master, before raising the Pay Bill transaction. . Once you select the **PAYMENT VOUCHER** option in payment type, the **Pay Bills Entry** page shows the following fields need to be filled.
[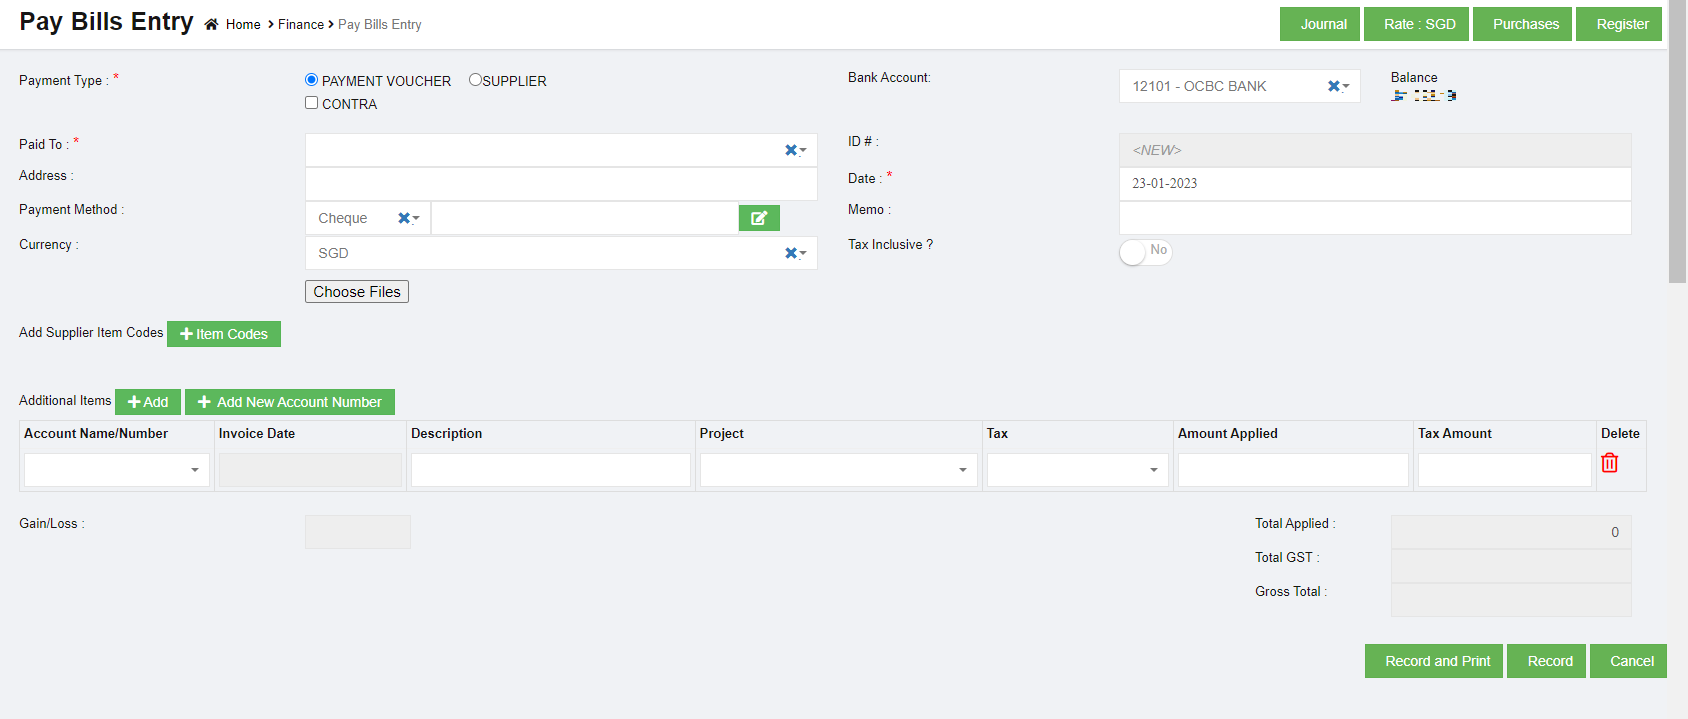](http://wiki.cuteinfocomm.com/uploads/images/gallery/2023-04/image-1682094546028.png)
- In the **Bank Account** box, select the debited bank account.
- In the **Paid To** box, enter the bank name to which the amount has been transferred.
- In the **Address** box, enter the address of the supplier who has received payment.
- In the **Date** box, select the date of payment.
- In the **Payment Method** box, select the mode of payment.
- In the **Currency** box, select the currency type.
- In the **Account Name**/**Number** box, select any one of appropriate chart of account from the list of charts of accounts. If you want to add additional account number, click (**Add** button) and add the account details. If you want to add a new account number, click (**Add** **New Account Number** button) and add the account details.
- Once you have selected the account number and name, the **Invoice Date** box shows the invoice date and the **Description** box shows the description for the corresponding selected account.
- In the **Tax** box, select a tax code from the given tax codes.
- In the **Amount applied** box, enter the amount. Once you have selected the tax code and entered the amount, the GST and gross total will be automatically updated. The gain/loss amount will be automatically updated in the Gain/Loss box.
- Click **Record** to save the paid amount details. The added payment details will be saved and listed in the **Pay Bills Register** page. **Note**: If you want to print the received payments details, click (**Record and Print** button).
- Type 2 Supplier-supplier option will be selected when the User intends to pay / settle an outstanding invoice to the Supplier. When this option is selected, User has to select the Supplier (which is a mandatory field) from the Supplier Master. User will enter the Payment amount and apply the amount against the Outstanding invoices by entering the Applied Amount field. While doing so, the Outstanding Invoice is adjusted against the Applied amount, and the Supplier Total Outstanding amount is thus calculated. If the Amount paid to the Supplier is to be treated as Advance, then user need to select the Apply Advance Payment and the amount will be treated as Advance Amount, Once you select the **SUPPLIER** option, the **Pay Bills Entry** page shows the following fields need to be filled.
[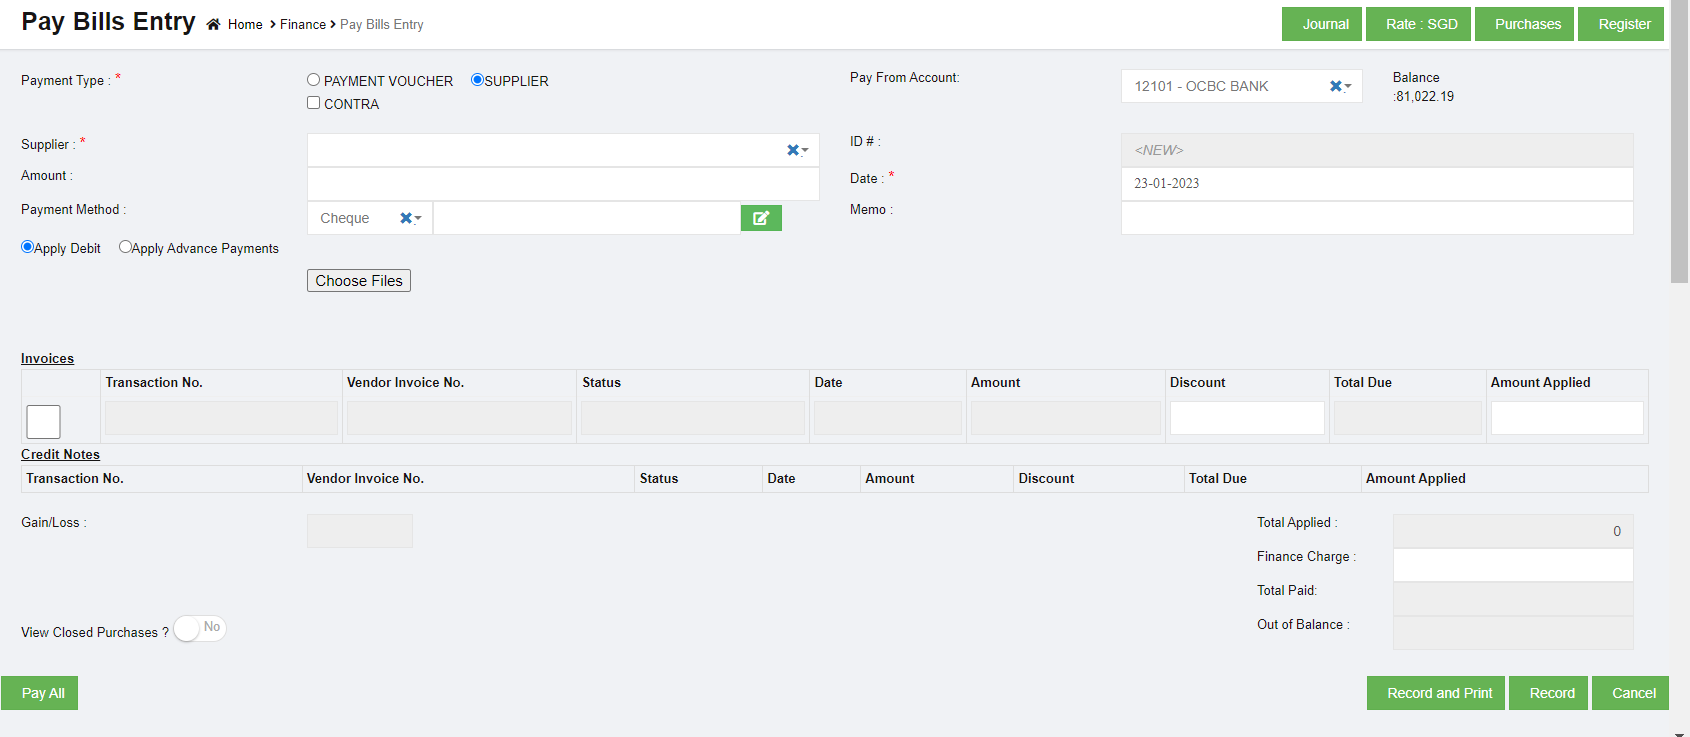](http://wiki.cuteinfocomm.com/uploads/images/gallery/2023-01/image-1674544154513.png)
- In the **Pay From Account** box, select the debited bank account.
- In the **Supplier** box, select a supplier from the list of suppliers. Once you have selected the supplier, the list of vendor invoices created for the respective supplier open.
- In the **Amount** box, enter the amount paid to the supplier.
- In the **Date** box, select the date of payment.
- In the **Payment Method** box, select the mode of payment.
a. If you want to add any credit note or credit memo, select the **Apply Debit** option.
b. If you want to pay from any over payments, select the **Apply Advance Payments** option. A confirm dialog box opens and shows the following notification. Click Yes. The Over Payments field will be displayed below the Invoices field. The system will display the information of over payment if available. The Amount box in the Over Payments field shows the balance amount of the over payment. If you want to pay the amount from your over payment, enter the amount in the Amount Applied box in the Over Payments field. The total amount will be adjusted from the applied over payment amount.
**Note:** If you want to attach any file regarding credit note or overpayments, click  (Choose Files button) and attach the file. [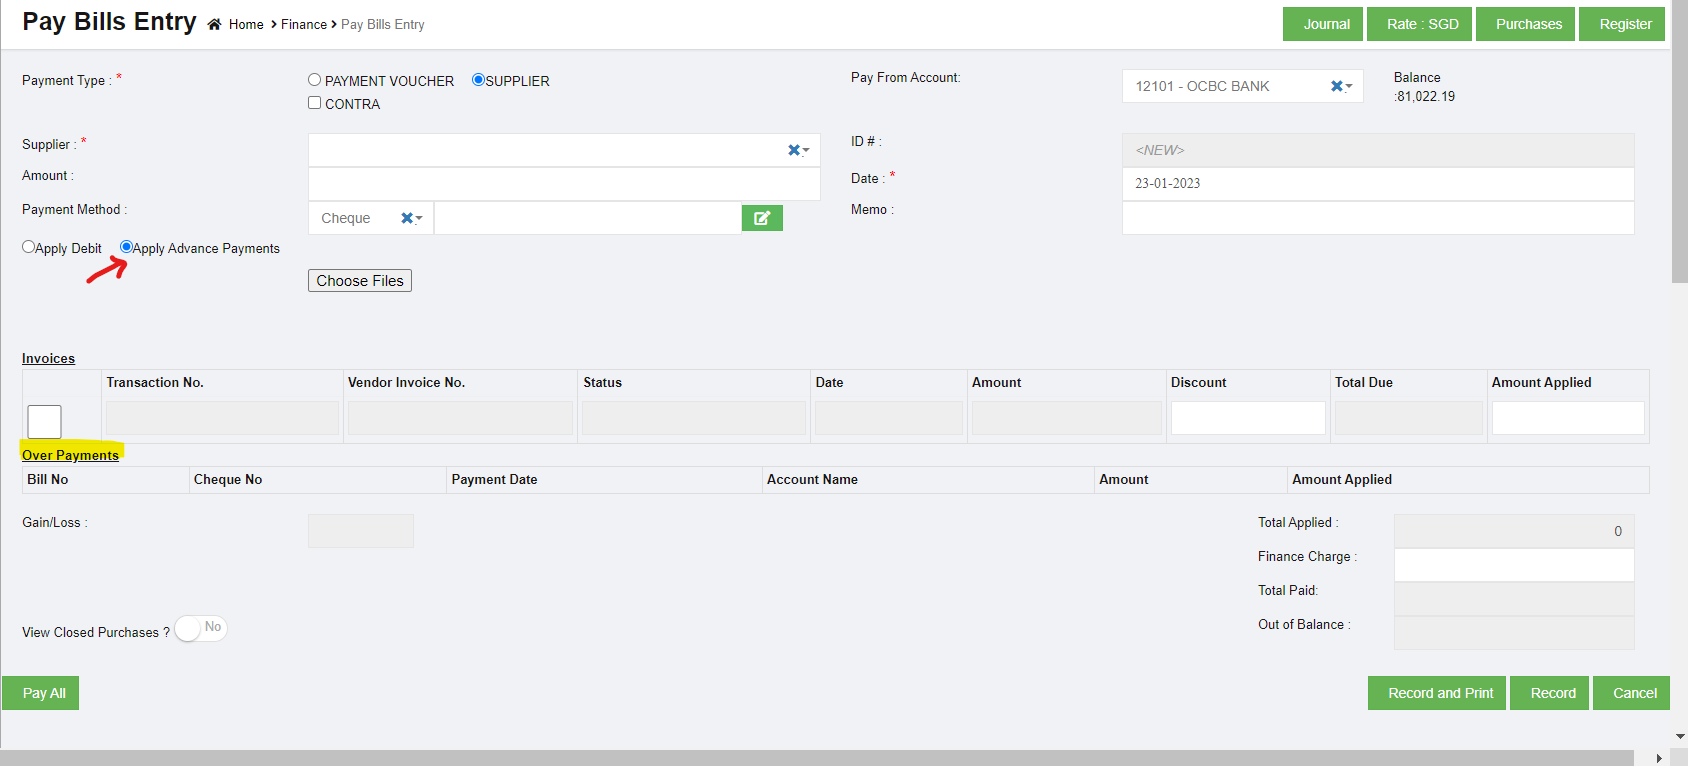](http://wiki.cuteinfocomm.com/uploads/images/gallery/2023-01/image-1674544701098.png)
- In the **Invoices** field, enter the discount amount in the **Discount** box. Note: To manually enter the amount in the Invoices field, the respective users must be assigned with the Manual Amount Filling permission.
- In the **Amount Applied** box, enter the paid amount. Once you have entered the paid amount, the total applied, finance charge, total received and out of balance will be automatically updated. The gain/loss amount will be automatically updated in the Gain/Loss box.
- If you want to view the closed purchases details, enable to **Yes** in the View Closed Purchases option. [](http://wiki.cuteinfocomm.com/uploads/images/gallery/2023-01/image-1674545072665.png)
If you want to view all the paid details, click  (Pay All button).
- Click **Record** to save the paid bill details. The added bill details will be saved and listed in the Pay Bills Register page. Note: If you want to print the paid bill details, click  (Record and Print button).
- Type 3 CONTRA-Contra Payments in Cuteoffice Application is to settle the outstanding Invoices between the same Supplier & Customer. Please refer the Contra Entry voucher documentation for this. Select Supplier, and if the supplier is same as customer, click to select Contra.
Once you select the S**upplier and Contra** option in payment type, the **Pay Bills Entry** page shows the following fields need to be filled.[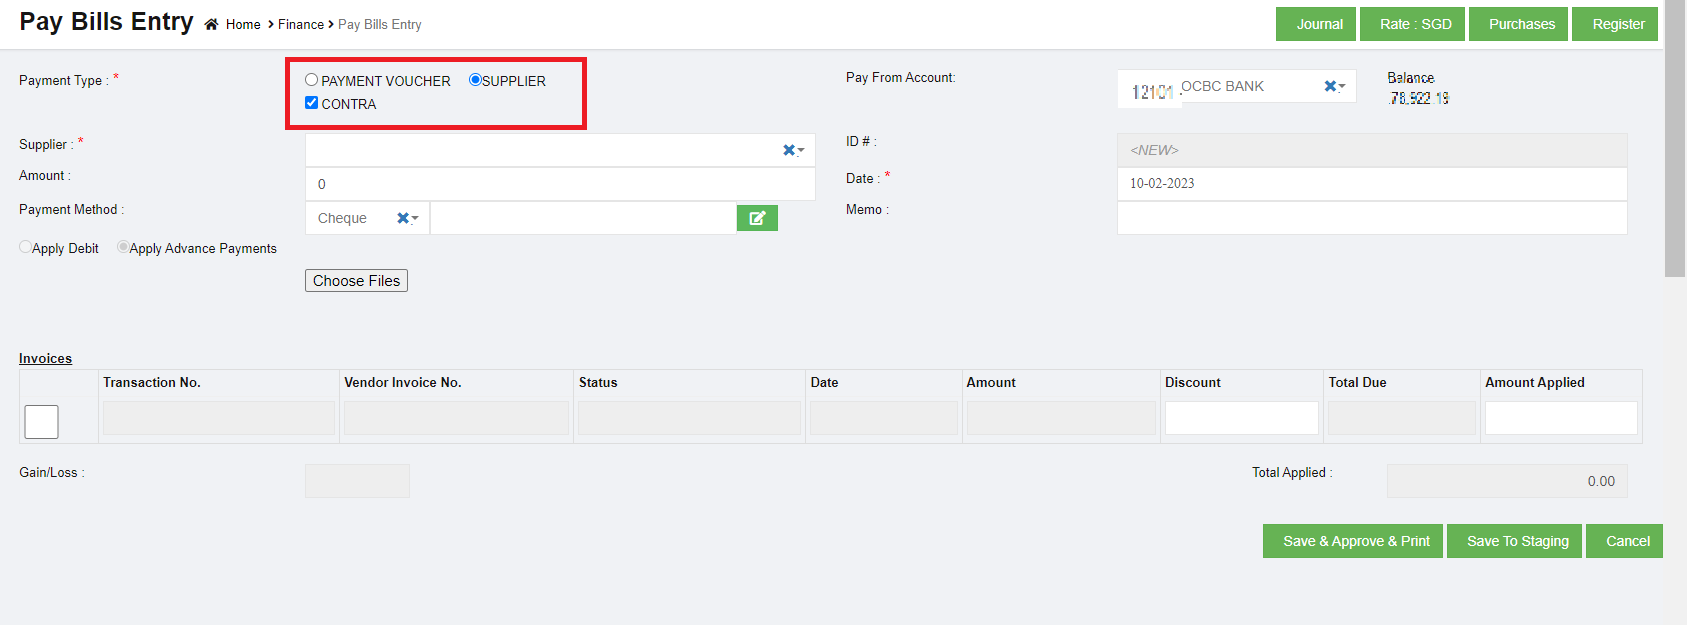](http://wiki.cuteinfocomm.com/uploads/images/gallery/2023-02/image-1676102131457.png)
- - In the **Pay From Account** box, select the debited bank account.
- In the **Supplier** box, select a supplier from the list of suppliers. Once you have selected the supplier, the list of vendor invoices created for the respective supplier open.
- In the **Amount** box, enter the amount paid to the supplier.
- In the **Date** box, select the date of payment.
- In the **Payment Method** box, select the mode of payment.
a. If you want to add any credit note or credit memo, select the Apply Debit option.
b. If you want to pay from any over payments, select the Apply Advance Payments option. A confirm dialog box opens and shows the following notification. Click Yes. The Over Payments field will be displayed below the Invoices field. The system will display the information of over payment if available. The Amount box in the Over Payments field shows the balance amount of the over payment. If you want to pay the amount from your over payment, enter the amount in the Amount Applied box in the Over Payments field. The total amount will be adjusted from the applied over payment amount.
Note: If you want to attach any file regarding credit note or overpayments, click (Choose Files button) and attach the file.
- - In the **Invoices** field, select the invoice of the transaction and enter the discount amount in the **Discount** box. Note: To manually enter the amount in the Invoices field, the respective users must be assigned with the Manual Amount Filling permission.
- In the **Amount Applied** box, enter the paid amount. Once you have entered the paid amount, the total applied, finance charge, total received and out of balance will be automatically updated. The gain/loss amount will be automatically updated in the Gain/Loss box.
- If you want to view the closed purchases details, enable to **Yes** in the View Closed Purchases option. [](http://wiki.cuteinfocomm.com/uploads/images/gallery/2023-01/image-1674545072665.png)
If you want to view all the paid details, click  (Pay All button).
- Click [](http://wiki.cuteinfocomm.com/uploads/images/gallery/2023-02/image-1676102626914.png) to approve, or click [](http://wiki.cuteinfocomm.com/uploads/images/gallery/2023-02/image-1676102709644.png)to save to staging. The added bill details will be saved and listed in the Pay Bills Register page.
### Contra Voucher Entry
Contra Function in Cuteoffice Application is to settle the outstanding Invoices between the same Supplier & Customer.
#### Contra voucher entry Scenario
Group companies can have multiple companies and Buy / Sell functions can have within these companies. In such scenarios Buy & Sell function happens raising the Purchase Invoices and Sales Invoice through the normal Purchase Register and Sales Register entry through our Cuteoffice Application. However these companies within the group do not make payments to each other, instead for such cases Contra Voucher entry in Pay Bills can be used.
#### Prerequisites
To raise a Contra Voucher the following conditions should be met
1. Supplier Name (Supplier Code) & the Customer Name (Customer code) should be the same
2. Contra Amount Entered should be Less Than Purchase Applied Amount in Pay Bill
3. After the Pay Bill data is entered and Record Button is clicked, Application Control will navigate to Customer Receipts Payment. If the client cancels the Customer Receipt Payment entry then the associated Pay Bills entry entered will be deleted by the application automatically. In other words, for Contra Entry Pay Bills and Customer Receipts should be done immediately without a break
4. In Customer Receipts Entry, Contra Amount that is displayed should be allowed to Edit
#### Contra voucher entry Examples
**Example 1 – Contra Amount = 0 ; Purchase Invoice Amount Applied = 1000**
The above example means that the Client wants to pay $1000 to a Purchase Invoice and have the Sales Invoice Pay $1000.
GL Entry for the above will be:
Pay Bills
Dr Sundry Creditors - $1000
Cr Contra Account - $1000 (Contra Account code is configured in Account Link Menu)
Customer Receipts
Dr Contra Account - $1000 (Contra Account code is configured in Account Link Menu)
Cr Sundry Debtors - $1000
**Example 2 – Contra Amount = 600 ; Purchase Invoice Amount Applied = 1000**
The above example means that the Client wants to pay $1000 to a Purchase Invoice and have the Sales Invoice Pay $600. The balance $400 will be paid from the Bank Account as mentioned in the Pay Bill entry
Pay Bills
Dr Sundry Creditors - $1000
Cr Contra Account - $1000 (Contra Account code is configured in Account Link Menu)
Cr Bank A/c - $400
Customer Receipts
Dr Contra Account - $1000 (Contra Account code is configured in Account Link Menu)
Cr Sundry Debtors - $1000
#### Steps to Operate
- In Pay Bills screen Select Contra Option and proceed the Pay Bill Transaction as usual
- Enter the Contra Amount Example 600
- Enter the Purchase Amount Applied – Example 1000
- Click Record Button
- Application will automatically load the Customer Receipt and allow to complete the transaction with Applied Amount as $1000
- If the Amount applied entered is not equal to $1000, application will display an error and proceed only if the amount entered is $1000
- GL entries will be created as mentioned above
The following bug will be fixed and a GIT issue has been raised:
1. Customer Name (Customer code) in Customer Receipts screen will not be allowed to change. This is controlled through a configuration allowing Customer Name change, will be set to False
2. Contra Amount Entered should be Less Than Purchase Applied Amount in Pay Bill
3. In Customer Receipts Entry, Contra Amount that is displayed should be allowed to Edit.
#### **Contra Voucher against Receive Payment**
**Example 3 : Contra Account in Pay bill -** $1080 **Purchase Invoice -** $1080 **Sales Invoice -** $100000 **Receive Payment (Normal) -** $98920 **Contra Receive Payment -** $1080
**To raise a Contra Voucher against Receive Payment the following steps to operate.**
1. Supplier Name (Supplier Code) & the Customer Name (Customer code) should be the same.
2. Raising Sales Invoice in Sales register (ex: $ 100000)
3. Raising Purchase Invoice in Purchase register (ex: $ 1080)
4. Normal receive payment entry in Bank with offset contra amount (ex: Amount received $ 98920)
5. Contra Pay bill entry for the amount $1080 . Choose Contra Account code in Pay from Account [](http://wiki.cuteinfocomm.com/uploads/images/gallery/2024-02/image-1709183778348.png)
6. Contra Receive payment entry to Offset Paybill . Choose Contra Account code is configured in Account Link Menu[](http://wiki.cuteinfocomm.com/uploads/images/gallery/2024-02/image-1709183778348.png)
7. The Customer Receipt Payment entry entered in Contra then the associated Pay Bills entry entered in Contra will be cancelled by the application automatically.
**Output of the Scenario**
1. Sale Invoice entry
[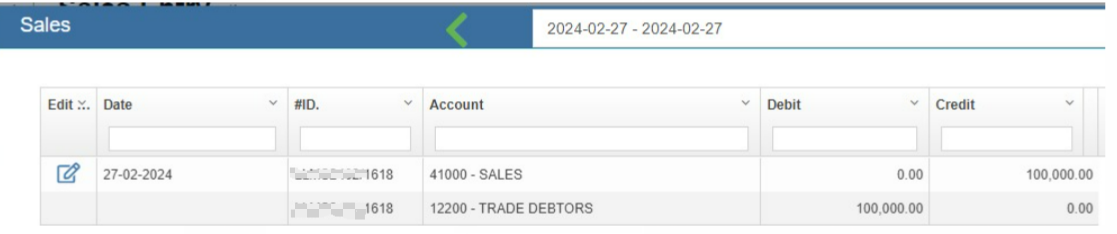](http://wiki.cuteinfocomm.com/uploads/images/gallery/2024-02/image-1709182671362.png)
2. Purchase Invoice entry
[](http://wiki.cuteinfocomm.com/uploads/images/gallery/2024-02/image-1709183234521.png)
3. Contra Pay bill entry
[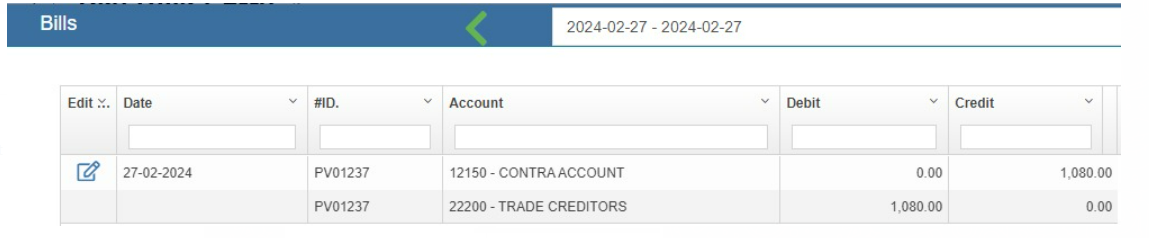](http://wiki.cuteinfocomm.com/uploads/images/gallery/2024-02/image-1709183299452.png)
4. Normal Receive Payment entry
[](http://wiki.cuteinfocomm.com/uploads/images/gallery/2024-02/image-1709183519803.png)
5. Contra Receive Payment entry
[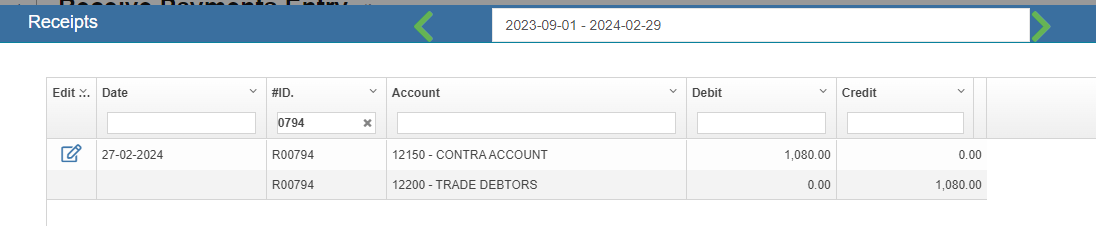](http://wiki.cuteinfocomm.com/uploads/images/gallery/2024-02/image-1709183612919.png)
- GL entries will be created as mentioned above.
### Edit the Pay Bills
If you want to edit any added purchase entry details in the **Pay Bills** page, do the following steps,
1. Click [](http://wiki.cuteinfocomm.com/uploads/images/gallery/2023-01/image-1673334575459.png)(Edit icon) in the **Edit** column for the respective pay bill. The **Pay Bill Entry** page opens and shows the added payment details.
2. Click any box where you want to edit the details, and then edit the details in the respective box in the window.
3. Click[](http://wiki.cuteinfocomm.com/uploads/images/gallery/2023-02/image-1676102626914.png). The changed pay bill entry details will be updated.
### Delete Any Added Pay Bills Entry
If you want to delete any added pay bill entry, you can use delete option provided in the **Delete** column of the **Pay Bills** page,
1. Click[](http://wiki.cuteinfocomm.com/uploads/images/gallery/2022-11/image-1668025897554.png) (Delete icon) for the corresponding pay bills entry. You receive a notification message “**Are you sure to delete a record**?”.
2. Click **Yes**. The selected pay bill entry will be deleted.
### Print the Pay Bills Details
If you want to print the invoice details of the particular pay bills entry, click  (Print icon) provided in the **Print** column for the corresponding pay bills entry.
### Export the Pay Bills
If you want to export the pay bills records in the **Pay Bills** page in the excel format, click  (Excel icon). The pay bills entry will be downloaded in the excel format.
## Transactions Journal
In Transactions Journal page, user can search for any financial transaction entered in cuteOffice finance module.
### View Transactions Journal Entry
To view transaction journal,
1. Click Transactions Journal in Finance menu, the Transaction Journal page opens as below,[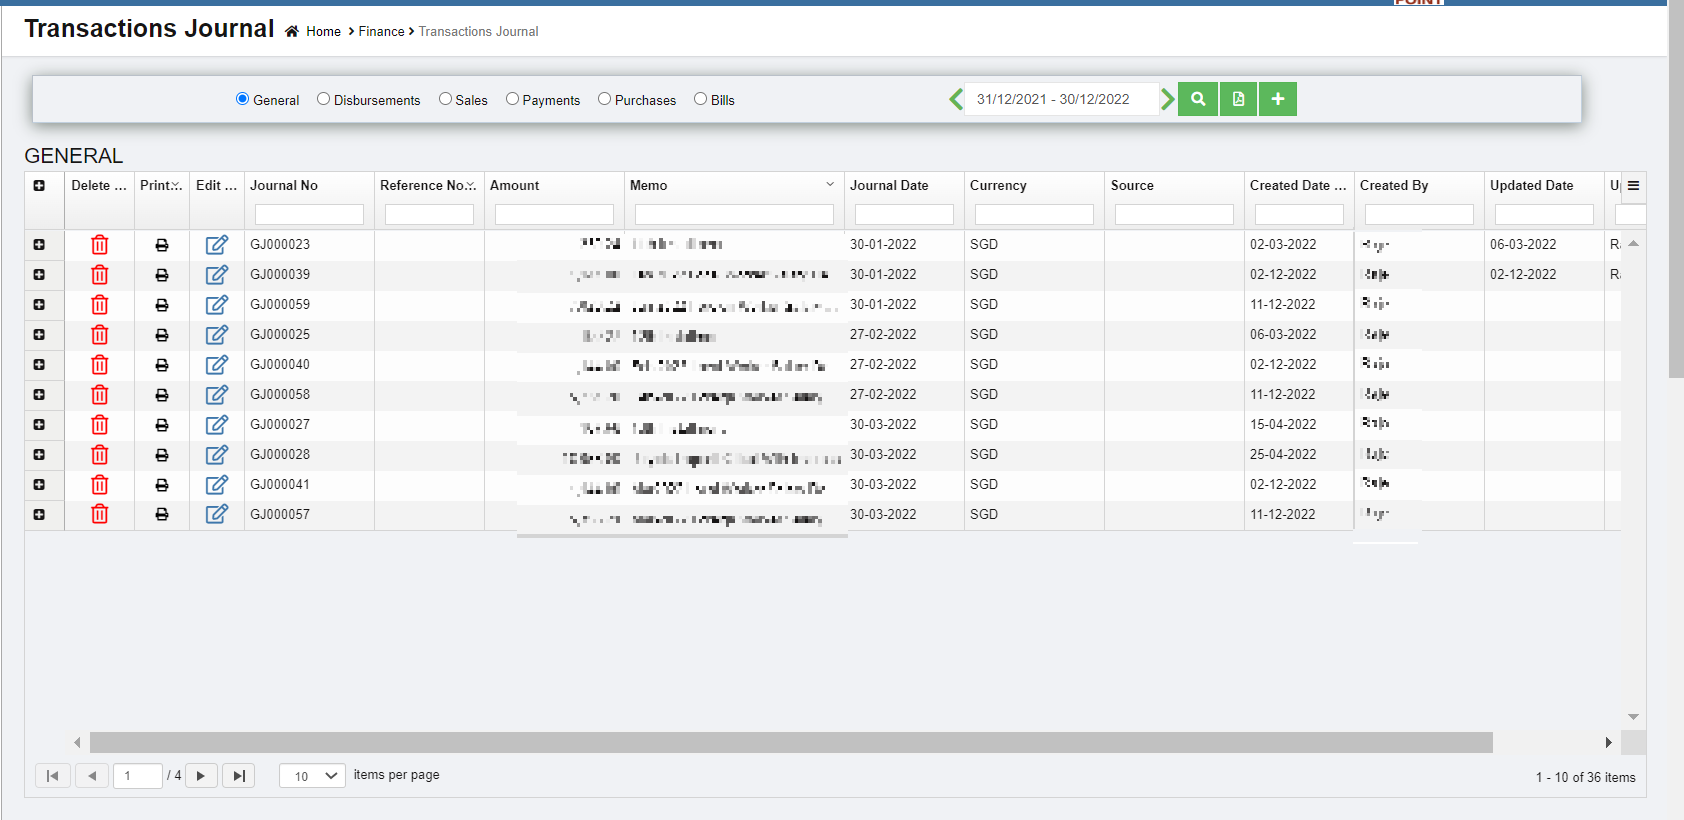](http://wiki.cuteinfocomm.com/uploads/images/gallery/2023-02/image-1676355716003.png)
2. In the Transactions Journal page, select any one transaction journal type from the given types. [](http://wiki.cuteinfocomm.com/uploads/images/gallery/2023-02/image-1676356040580.png)
3. In the Calendar, select the date range. [](http://wiki.cuteinfocomm.com/uploads/images/gallery/2023-02/image-1676356056649.png)
4. Click [](http://wiki.cuteinfocomm.com/uploads/images/gallery/2023-02/image-1676356076591.png)(Search icon). All qualified transactions journal will be shown in the page.
### Edit Transaction Journal Entry
To edit any transaction journal entry in the **Transaction Journal** page,
1. Click [](http://wiki.cuteinfocomm.com/uploads/images/gallery/2023-01/image-1673334575459.png)(Edit icon) in the **Edit** column for the respective transaction journal entry. The respective page opens and shows the journal entry details. [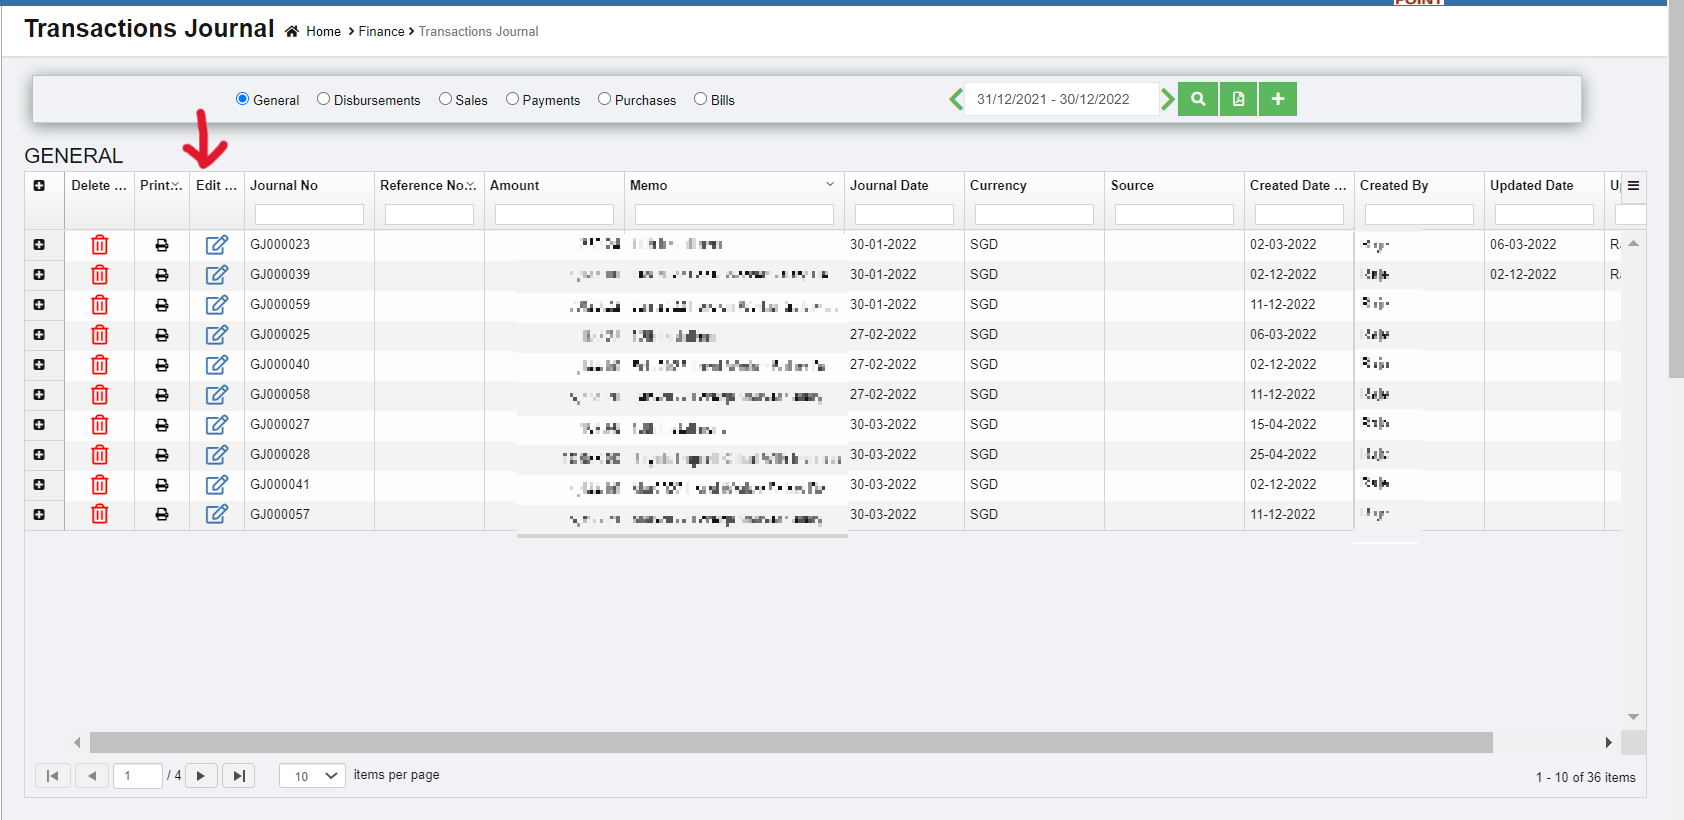](http://wiki.cuteinfocomm.com/uploads/images/gallery/2023-02/image-1676356483986.png)
2. Click any box where you want to edit the details, and then edit the details in the respective box in the window. [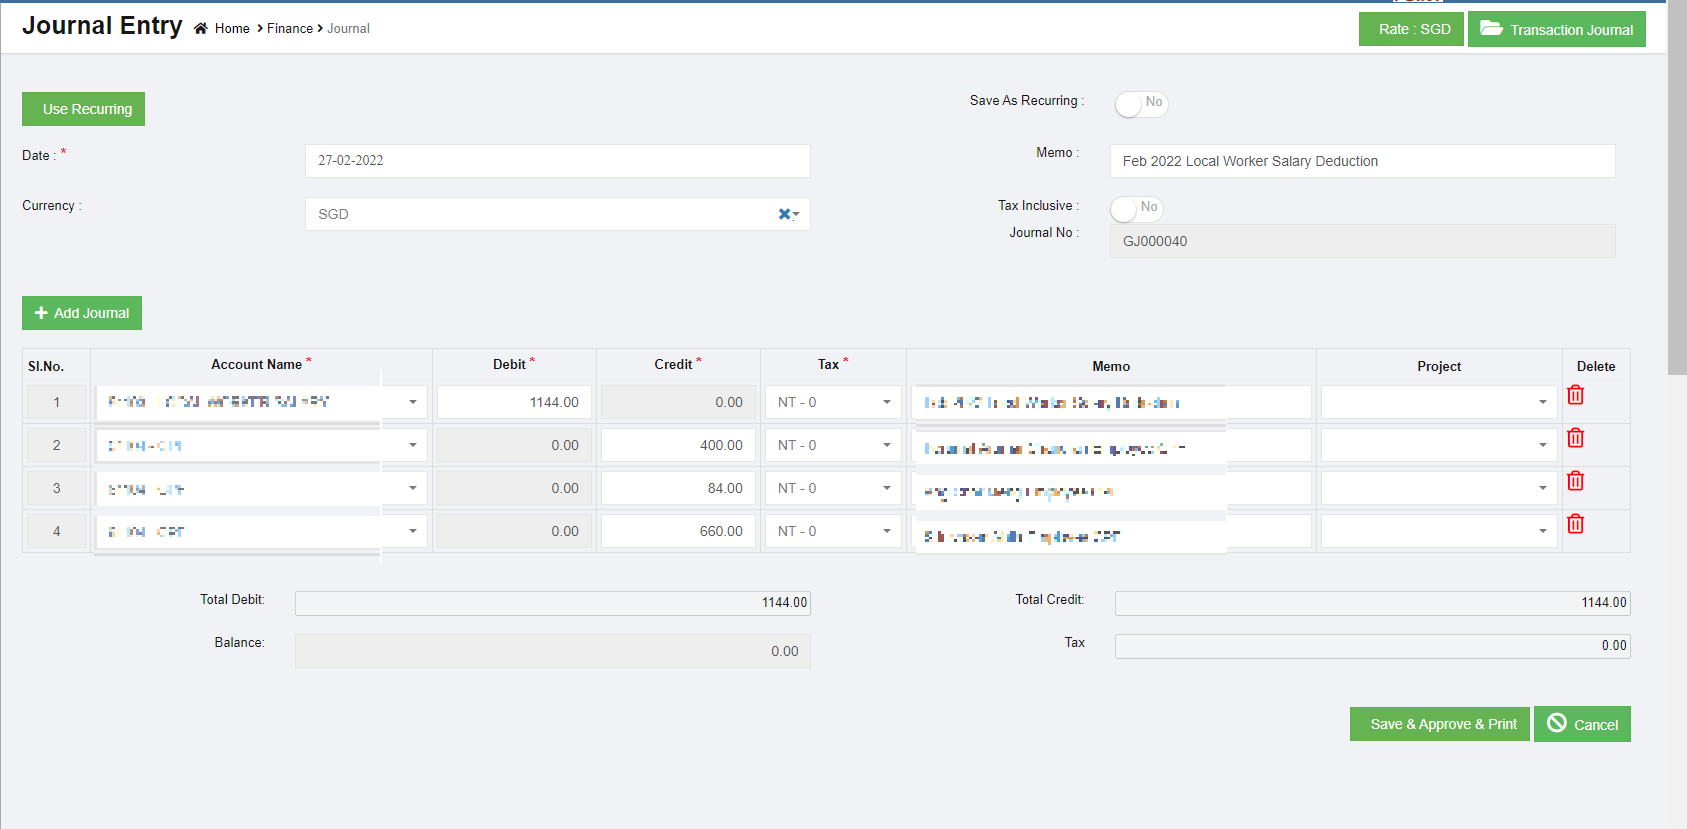](http://wiki.cuteinfocomm.com/uploads/images/gallery/2023-02/image-1676356628311.png)
3. Click[](http://wiki.cuteinfocomm.com/uploads/images/gallery/2023-02/image-1676102626914.png). The transaction journal entry details will be updated.
### Delete Any Transaction Journal Entry
If you want to delete any transaction journal entry, you can use delete option provided in the **Delete** column of the **Transactions Journal** page, click[](http://wiki.cuteinfocomm.com/uploads/images/gallery/2022-11/image-1668025897554.png) (Delete icon) for the corresponding transaction journal entry. The selected transaction journal entry will be deleted. to confirm with sekar if need to prompt confirmation notification
### Print the Transaction Journal Entry
If you want to print the particular transaction journal entry, click  (Print icon) provided in the **Print** column for the corresponding transaction journal entry.
### Export the Transaction Journal Entry
If you want to export the added transaction journal entry in the **Transactions Journal** page in the excel format, click (Excel icon). The added transaction journal entries will be downloaded in the excel format.
## Bank Register
Bank Register are reports that is generated based on the entries made through the various vouchers. The selection for these reports would be Bank as defined in the Chart of Accounts master. The **Bank Register** tab in the **Finance** menu used to view the transaction statement of the particular bank account.
### View Bank Register
To view the transaction statement,
1. Click **Bank Register** in the **Finance**, the **Bank Register** page opens. [](http://wiki.cuteinfocomm.com/uploads/images/gallery/2023-02/image-1676357375442.png)
2. In the **Account** box, select an account from the list of bank accounts.
3. In the Calendar, select the date range from the current financial year.
4. Click [](http://wiki.cuteinfocomm.com/uploads/images/gallery/2023-02/image-1676356076591.png)(search icon). The **Bank Register** page shows the transaction detail of the selected account.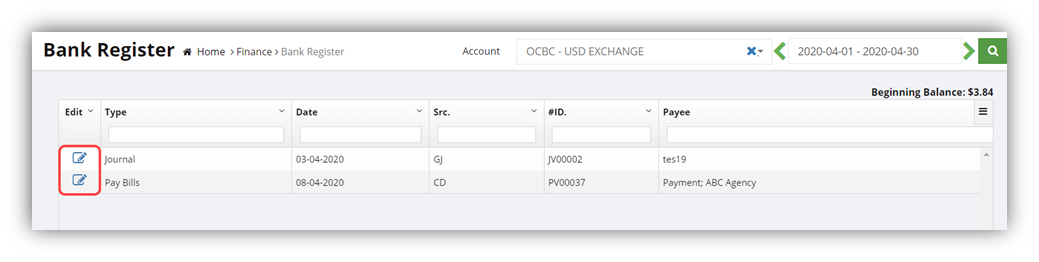
### Edit the Transaction Detail
To edit any transaction detail listed in the **Bank Register** page,
1. click [](http://wiki.cuteinfocomm.com/uploads/images/gallery/2023-01/image-1673334575459.png)(Edit icon) provided in the **Edit** column for the respective transaction. The selected transaction page opens. You can edit the transaction detail if you want.[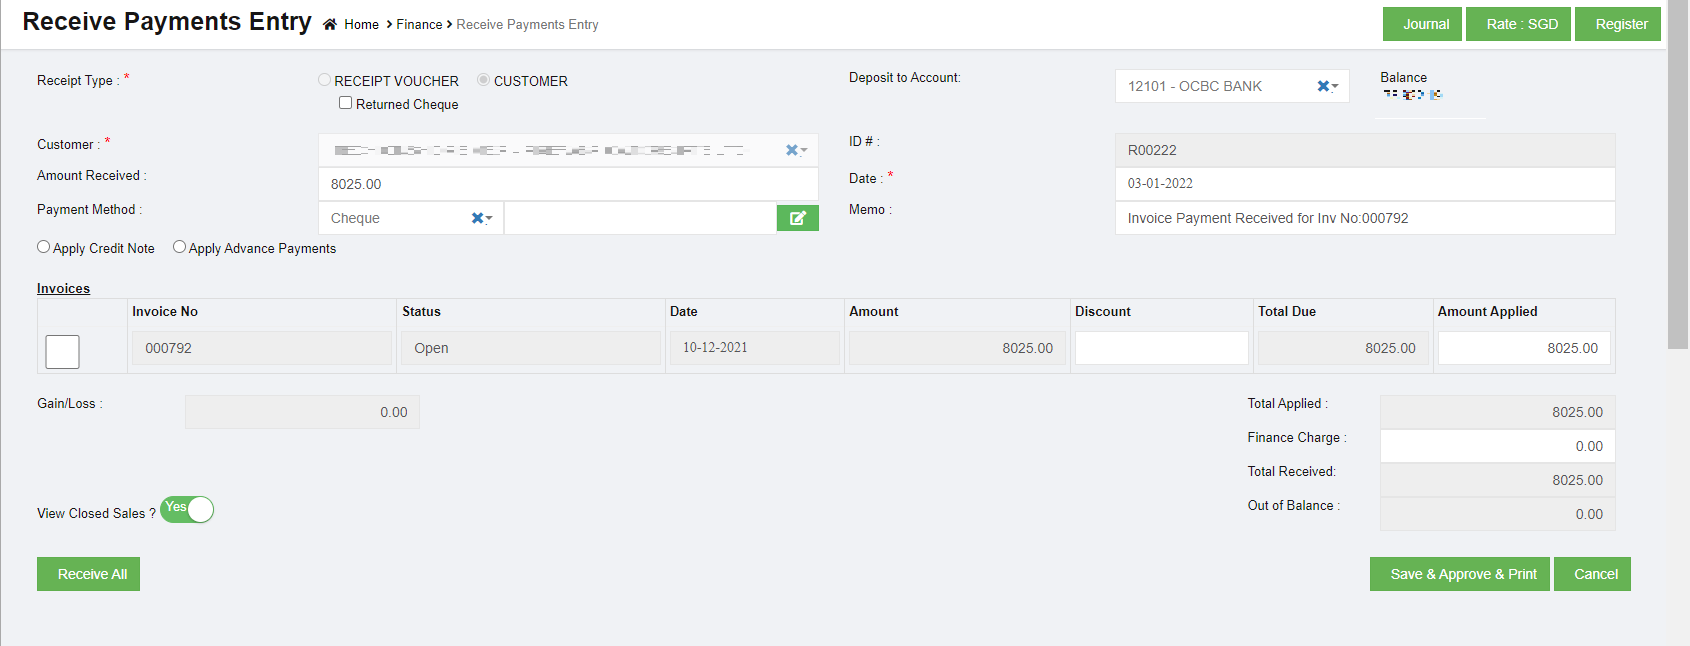](http://wiki.cuteinfocomm.com/uploads/images/gallery/2023-02/image-1676357635369.png)
2. Click[](http://wiki.cuteinfocomm.com/uploads/images/gallery/2023-02/image-1676102626914.png). The transaction details will be updated.
## Transfer Money
The **Transfer Money** tab in the **Finance** menu is used to record transfer money from one bank account to another bank account. Finance users can transfer the money with multi foreign currency banks.
To transfer money,
1. Click **Transfer Money** in the **Finance**, the **Transfer Money** page opens, [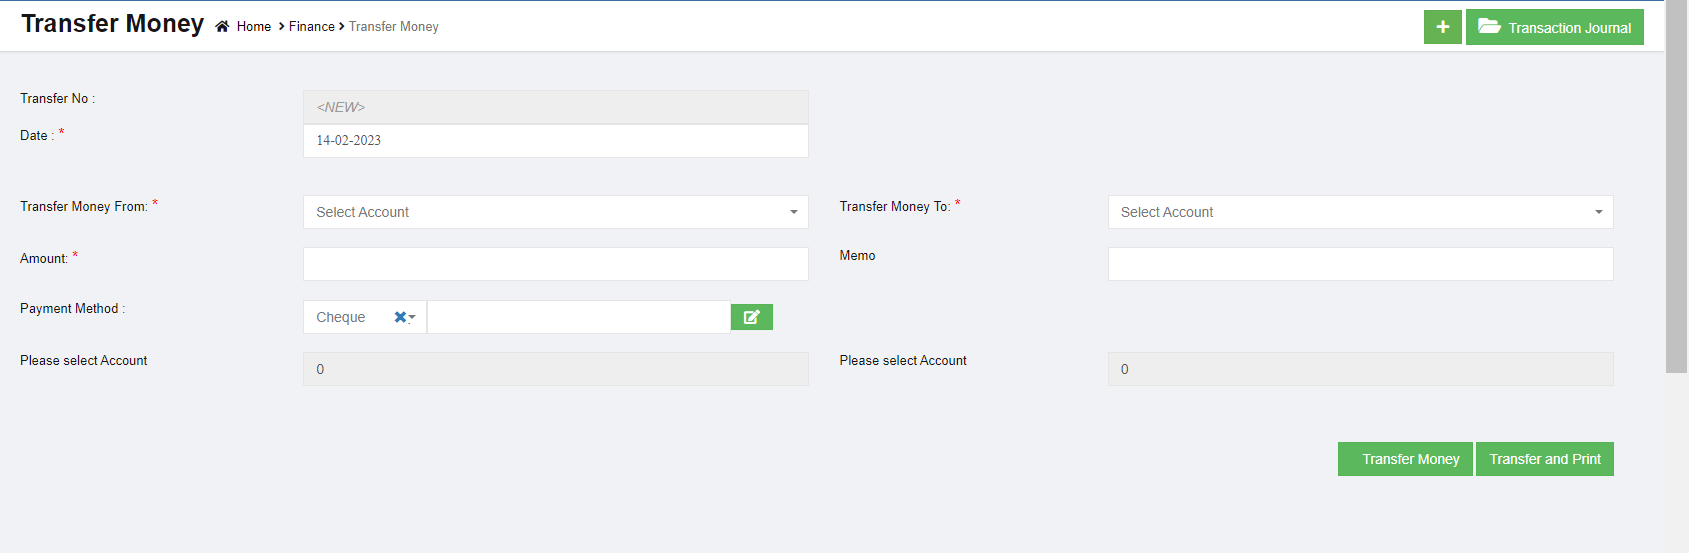](http://wiki.cuteinfocomm.com/uploads/images/gallery/2023-02/image-1676422324882.png)
2. In the **Transfer No** box, the transfer number will be updated automatically.
3. In the **Date** box, select the date of money transfer.
4. In the **Transfer Money From** box, select an account where you want to transfer money from. **Note**: Once you select the debit account, the **Transfer Money** page shows the account balance of the selected account.
5. In the **Transfer Money To** box, select an account where you want to transfer money to. **Note**: Once you select the credit account, the **Transfer Money** page shows the account balance of the selected account.
6. In the **Amount** box, enter the amount you want to transfer.
7. In the **Payment Method** box, select the payment method.
8. Click [](http://wiki.cuteinfocomm.com/uploads/images/gallery/2023-02/image-1676422501414.png)(Transfer Money icon). The entered amount will be transferred to the respective selected account. The transfer money detail will be moved and listed in the **Transaction Journal** page. **Note**: If you want to print the transferred money details, click [](http://wiki.cuteinfocomm.com/uploads/images/gallery/2023-02/image-1676422547098.png) (Transfer and Print icon).
## Petty Cash Register
Petty cash register helps companies ensure that the funds are used appropriately and the transactions are properly documented. Having such a system in place serves as an internal control to protect the business against theft and fraud, and it supports the larger, general ledger reconciliation process. Petty Cash Register are reports that is generated based on the entries made through the various vouchers. The selection for these reports would be Cash as defined in the Chart of Accounts master. This report is to list down the transaction made from these nature of accounts with a running balance.
[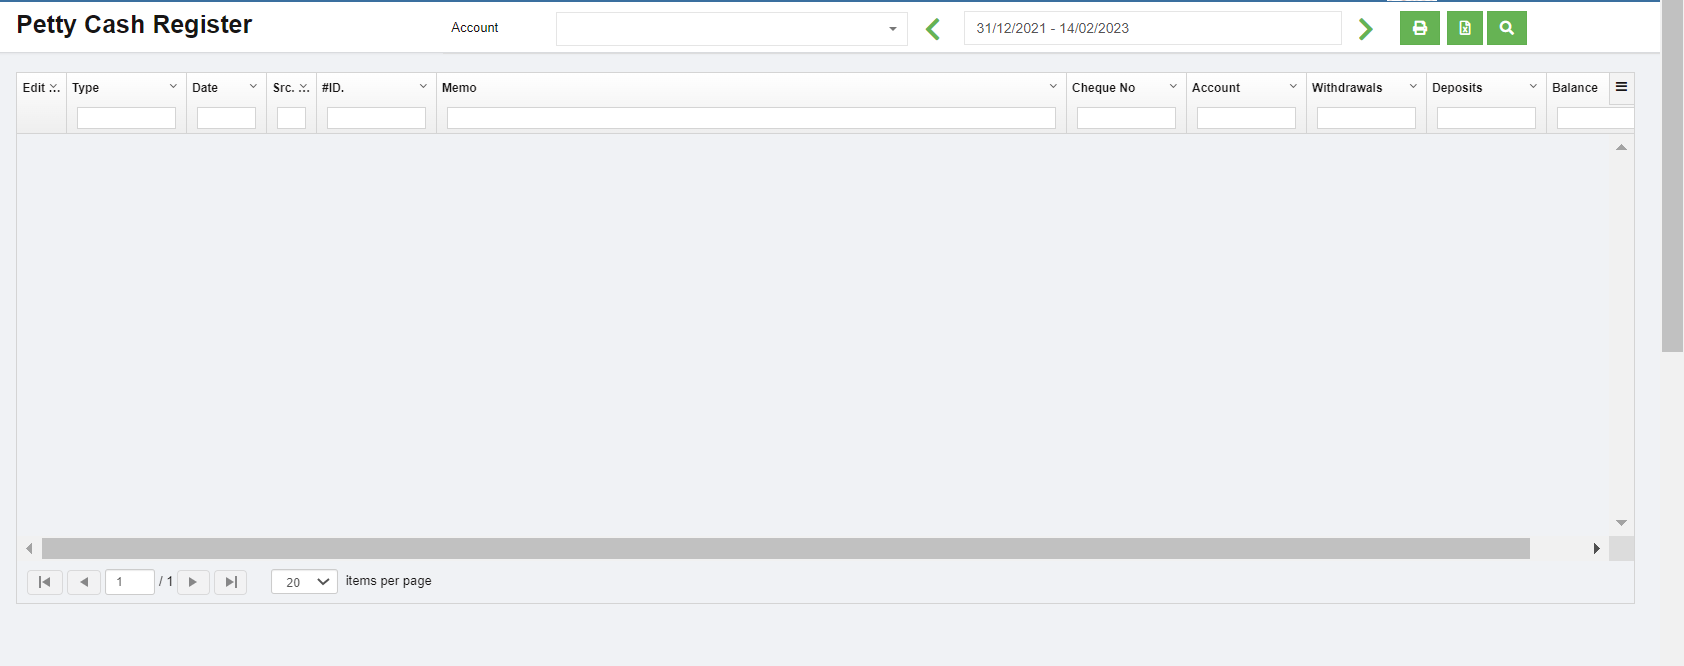](http://wiki.cuteinfocomm.com/uploads/images/gallery/2023-02/image-1676423024159.png)
## Bank Reconciliation Register
**Bank Reconciliation** is the process of verifying the bank statement with the reconciliation report to ensure that the records such as check register, general ledger account, and balance sheet, are correct. This is done by comparing the company's recorded amounts with the amounts shown on the bank statement.
Any differences must be justified. When there are no unexplained differences, you must state that the bank statement has been reconciled. Once you have reconciled the bank statement, the reconciled bank statement will be shown in bank reconciliation report and the general ledger.
Click **Bank Reconciliation** tab in the **Finance** menu, the Bank Reconciliation Register page opens as below,
[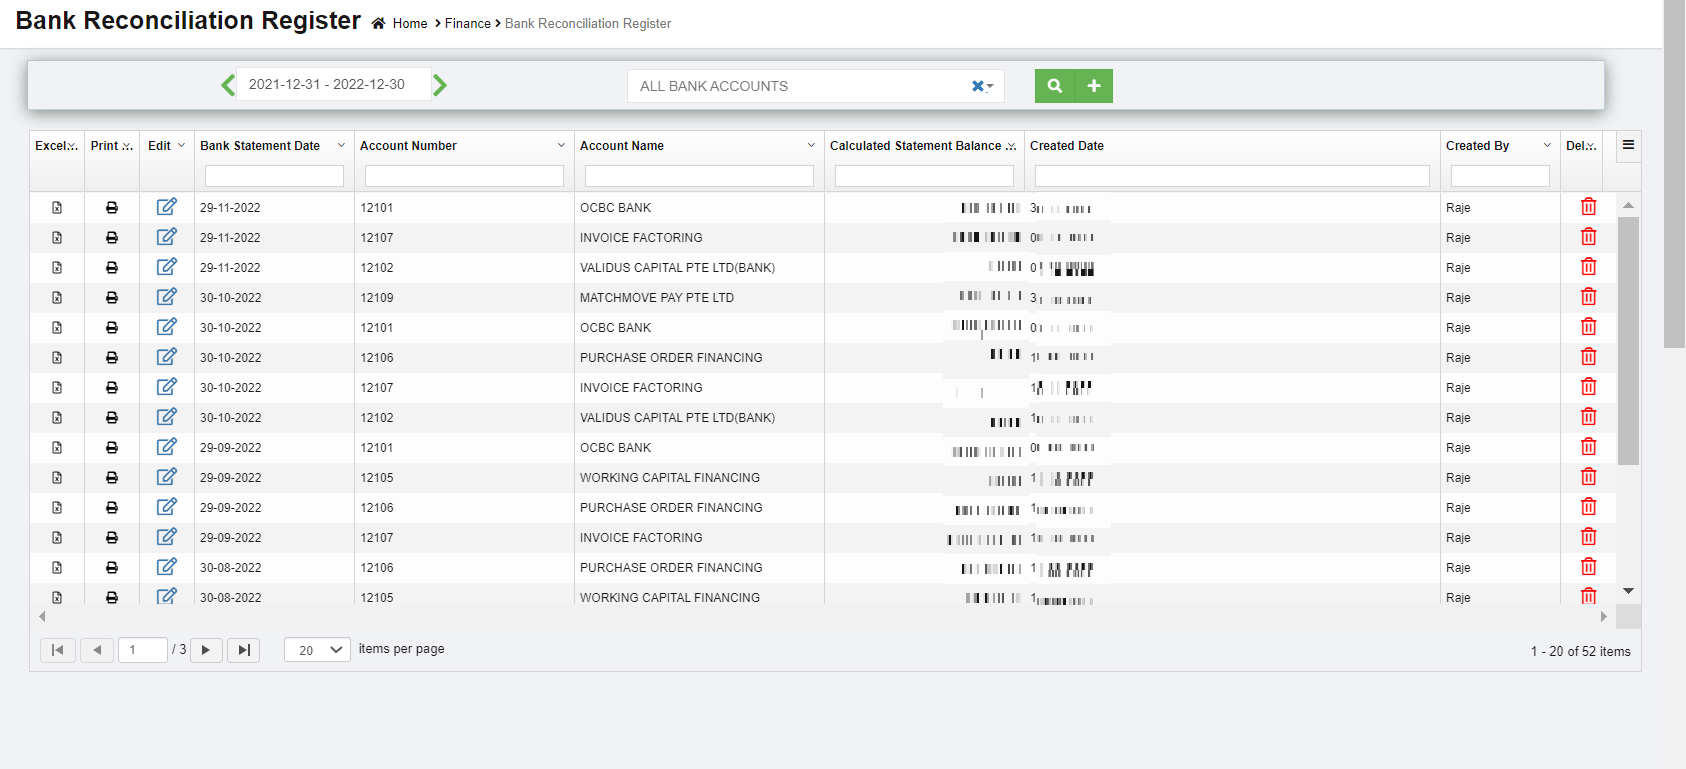](http://wiki.cuteinfocomm.com/uploads/images/gallery/2023-02/image-1677120015563.png)
### View A Bank Reconciliation Details
To view the bank reconciliation details of the particular bank account,
1. In the Calendar box, select the period for which you want to view the bank reconciliation details.
2. In the **Account Name** box, select an account.
3. Click [](http://wiki.cuteinfocomm.com/uploads/images/gallery/2023-02/image-1676356076591.png)(search icon). The bank reconciliation detail opens for the selected account and period.
### Reconcile Any Bank Statement
To reconcile any bank statement,
1. Click[](http://wiki.cuteinfocomm.com/uploads/images/gallery/2022-12/image-1670382846981.png) (Add icon) provided in the upper right-corner of the **Bank Reconciliation Register,** the **Bank Reconciliation** page opens. [](http://wiki.cuteinfocomm.com/uploads/images/gallery/2023-02/image-1677120341224.png)
2. In the **Account** box, select an account from the list of accounts.
3. In the **Bank Statement Balance** box, enter the balance of the selected account.
4. In the **Bank Statement Date** box, select the bank statement date.
5. Click [](http://wiki.cuteinfocomm.com/uploads/images/gallery/2023-02/image-1677120562047.png)(search icon). The list of job numbers opens including date and cheque number.
6. Select the job number.
7. Click [](http://wiki.cuteinfocomm.com/uploads/images/gallery/2023-02/image-1677120475671.png), the selected bank account is reconciled. Click [](http://wiki.cuteinfocomm.com/uploads/images/gallery/2023-02/image-1677120676563.png) to reconcile and print report. Click[](http://wiki.cuteinfocomm.com/uploads/images/gallery/2023-02/image-1677120744513.png) to save as draft.
### Edit Any Reconciled Bank Statement
To edit any reconciled bank statement in the **Bank Reconciliation Register** page,
1. Click[](http://wiki.cuteinfocomm.com/uploads/images/gallery/2023-01/image-1673334575459.png) (edit icon) in the **Edit** column for the respective reconciled bank statement. The page opens and shows the respective reconciled bank statement. [](http://wiki.cuteinfocomm.com/uploads/images/gallery/2023-02/image-1677121072516.png)
2. Click any box where you want to edit the details, and then edit the details in the respective box in the window.
3. Click **Record**. The changed reconciled bank statement details will be updated.
### Delete Any Added Reconciled Bank Statement
If you want to delete any added reconciled bank statement, you can use delete option provided in the **Delete** column of the **Bank Reconciliation Register** page,
[](http://wiki.cuteinfocomm.com/uploads/images/gallery/2023-02/image-1677121620526.png)
1. Click [](http://wiki.cuteinfocomm.com/uploads/images/gallery/2022-11/image-1668025897554.png)(Delete icon) for the corresponding reconciled bank statement. You receive a notification message. [](http://wiki.cuteinfocomm.com/uploads/images/gallery/2023-02/image-1677121652639.png)
2. Click **Yes** to confirm deletion of the selected reconciled bank statement.
### Print the Reconciled Bank Statement
If you want to print the reconciled bank statement, click  (Print icon) provided in the **Print** column in the **Bank Reconciliation Register** page.
### Export the Reconciled Bank Statement
If you want to export the added reconciled bank statement in the **Bank Reconciliation Register** page in the excel format, you can use export to excel option in the **Excel** column. Click (Excel icon) of the respective reconciled bank statement. The reconciled bank statement will be downloaded in the excel format.
## Remittance Advices
A remittance advice is an acknowledge sent by a customer to a supplier, informing the supplier that an invoice has been paid. The purpose of the remittance advice is to match a customer's payment with the invoice. The remittance advice is also sent to the supplier to inform that the payment has been received against the payment voucher. Click Remittance Advices tab in Voucher menu, the remittance page opens as below,
[](http://wiki.cuteinfocomm.com/uploads/images/gallery/2023-02/image-1677209770140.png)
### View Remittance Advices
to view the remittance advices,
1. Click Remittance Advices tab in Voucher menu to open the Remittance page
2. In the **Payment Type** box, select the payment type from **Pay Bills** or **Payment Vouchers**.
3. In the Calendar box, select the date range you want to view the remittance advices.
4. Click[](http://wiki.cuteinfocomm.com/uploads/images/gallery/2023-02/image-1676356076591.png) (search icon), the page shows the remittance advices for the selected payment type and period.
### Edit Any Remittance Advice
To edit any remittance advice in the **Remittance Advices** page,
1. Click [](http://wiki.cuteinfocomm.com/uploads/images/gallery/2023-01/image-1673334575459.png)(edit icon) in the **Edit** column for the respective remittance advice. The respective page opens and shows details of the remittance advice. [](http://wiki.cuteinfocomm.com/uploads/images/gallery/2023-02/image-1677210227650.png)
2. Edit the details in the respective box as needed.
3. Click[. ](http://wiki.cuteinfocomm.com/uploads/images/gallery/2023-02/image-1677210294241.png)The changed remittance advice details will be updated.
### Print Any Remittance Advice
If you want to print the remittance advice, click  (Print icon) provided in the **Print** column in the **Remittance Advices** page.
## Find Transactions
The **Find Transactions** tab in the **Finance** menu is used to view the details of the transactions such as sales and purchase transactions of both customer and supplier. Click **Find Transactions** in the **Finance**, the **Find Transactions** page opens.[](http://wiki.cuteinfocomm.com/uploads/images/gallery/2023-02/image-1677210952474.png)
to view the transaction details of particular customer/supplier
1. In **Filter** box, click to select **Customer/Supplier.**
2. In the **Search By** box, select **Customer** or **Supplier**.
3. In the **Name** box, select the name of the customer or supplier.
4. In the Calendar, select the date range.
5. Click[](http://wiki.cuteinfocomm.com/uploads/images/gallery/2023-02/image-1676356076591.png) (search icon), the transaction details for the selected customer/supplier opens.
to view the transaction details for the particular sales invoice,
1. In Filter box, click to select **Sales Invoice.**
2. In the **Sales Invoice** box, select the sales invoice number.
3. In the **Customer** box, the customer will be updated automatically.
4. Click [](http://wiki.cuteinfocomm.com/uploads/images/gallery/2023-02/image-1676356076591.png) (search icon), the transaction details for the selected sales invoice opens.
to view the transaction details for the particular purchase invoice,
1. In **Filter** box, click to select **Bill.**
2. In the **Purchase Invoice** box, select the purchase invoice number.
3. In the **Supplier** box, the supplier will be updated automatically.
4. Click [](http://wiki.cuteinfocomm.com/uploads/images/gallery/2023-02/image-1676356076591.png) (search icon), the transaction details for the selected purchase invoice opens.
## Item Transactions
The **Item Transactions** tab in the **Finance** menu is used to view the item details of the transactions of sales and purchases of both customer and supplier. Click **Item Transactions** in the **Finance**, the **Item Transactions** page opens as below,
[](http://wiki.cuteinfocomm.com/uploads/images/gallery/2023-02/image-1677524609886.png)
User can use the column filters to search for specific item sales/purchase details,
[](http://wiki.cuteinfocomm.com/uploads/images/gallery/2023-02/image-1677619329788.png)
#### Bad Debt Write-Off transaction
**Step 1: Check your aging accounts receivable**
Review other invoices or receivables that should be considered as bad debt using the Accounts Receivable Aging Detail report.
1. Go to **Reports**
2. Find and open an **Accounts Receivable Aging Detail** report.
3. Check which outstanding accounts receivable should be written off.
**Step 2: Create a bad debts expense account**
If you haven't already, create a "bad debts" expense account.
1. Go to Master and select **Chart of accounts**
2. Click add to create a new account.
3. Choose Detail account
4. From the Parent **Account Type** ▼ dropdown, select **Expenses**.
5. From the Parent **Account Sub Type** ▼ dropdown, select **Expenses**
6. Enter **Account Number**
7. Enter Account name as **Bad debts in Account Name** field.
8. Select **Save and Close**.
**Step 3: Create a Credit Note Invoice**
1. Go to Voucher entry and Select Sales Register
2. Select **+ icon**.
3. Choose Sales form type as **Credit Note**
4. Under Customers, select **Customer name**.
5. Choose **Bad Debts from Account Number/Name.**
6. Enter the write off amount.
7. Select **Save and Close**.
**Step 4: Apply the credit note against invoice**
1. Go to Voucher entry and Select Receive Payment
2. Select **+ icon**.
3. Under Customers, select **Customer Name**
4. **Outstanding Transactions** and **Credit Note available** in the section,
5. Enter **Credit amount** against the **invoice number** under **Amount Applied.**
6. Enter Credit amount value under Amount Applied.
7. Check **Out of Balance** should be **Zero.**
8. Select **Save and Close**.
The uncollectible receivable now appears on your Profit and Loss report under the Bad Debts expense account.
#### **Bad Debt Write-Off for Journal Entry**
##### **Step 1: Check your Opening Balance in the Accounting records (COA) to write off**
1. Go to **COA**
2. Check which accounts to be written off.
3. Find the amount in accounting to write off.
##### **Step 2: Create a bad debts expense account**
If you haven't already, create a "bad debts" expense account.
1. Go to Master and select **Chart of accounts**
2. Click add to create a new account.
3. Choose Detail account
4. From the Parent **Account Type** ▼ dropdown, select **Expenses**.
5. From the Parent **Account Sub Type** ▼ dropdown, select **Expenses**
6. Enter **Account Number**
7. Enter Account name as **Bad debts in Account Name** field.
8. Select **Save and Close**.
##### **Step 3: Create a Journal to write off**
1. Go to Transaction Journal under Voucher Entry
2. Select **+ icon**.
3. 1st Line item a) Choose Outstanding Account name
b) Enter the amount on the credit side for Asset
c) Enter the amount on the debit side for Liability
4. 2nd Line item a) Choose Bad debt from the Account Name
b) Enter the write off amount on the debit side for Asset
c) Enter the write off amount on the credit side for Liability
5. Select **Save and Close**.
The uncollectible or payable amount now appears on your Bad debt Expense, and they are removed as assets/Liability from the balance sheet.
This results the total expense either increase or decrease in the Profit and Loss statement.
# Voucher Staging Entries
CuteOffice provides finance voucher staging feature if client company wants to apply approve workflow for voucher entries. Finance vouchers entered in finance module in Voucher Staging Entries menu will be moved into financial transactions only after vouchers are approved. The vouchers will not be reflected in any financial reports or the balances will not be affected until the vouchers are approved.
## Enable Finance Approval Option
### Step1: To enable Approval Option to Accounts at Company Level
1. In Cute Office, navigate to Admin module, click Company menu and click [](http://wiki.cuteinfocomm.com/uploads/images/gallery/2023-03/image-1678227237400.png) edit icon in selected company.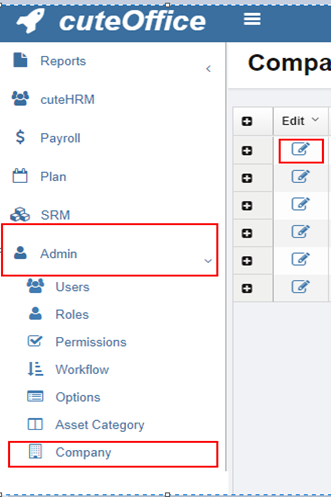
2. Navigate to **Setting** page, search for setting configuration name ****Finance - Approval option for Account Vouchers,[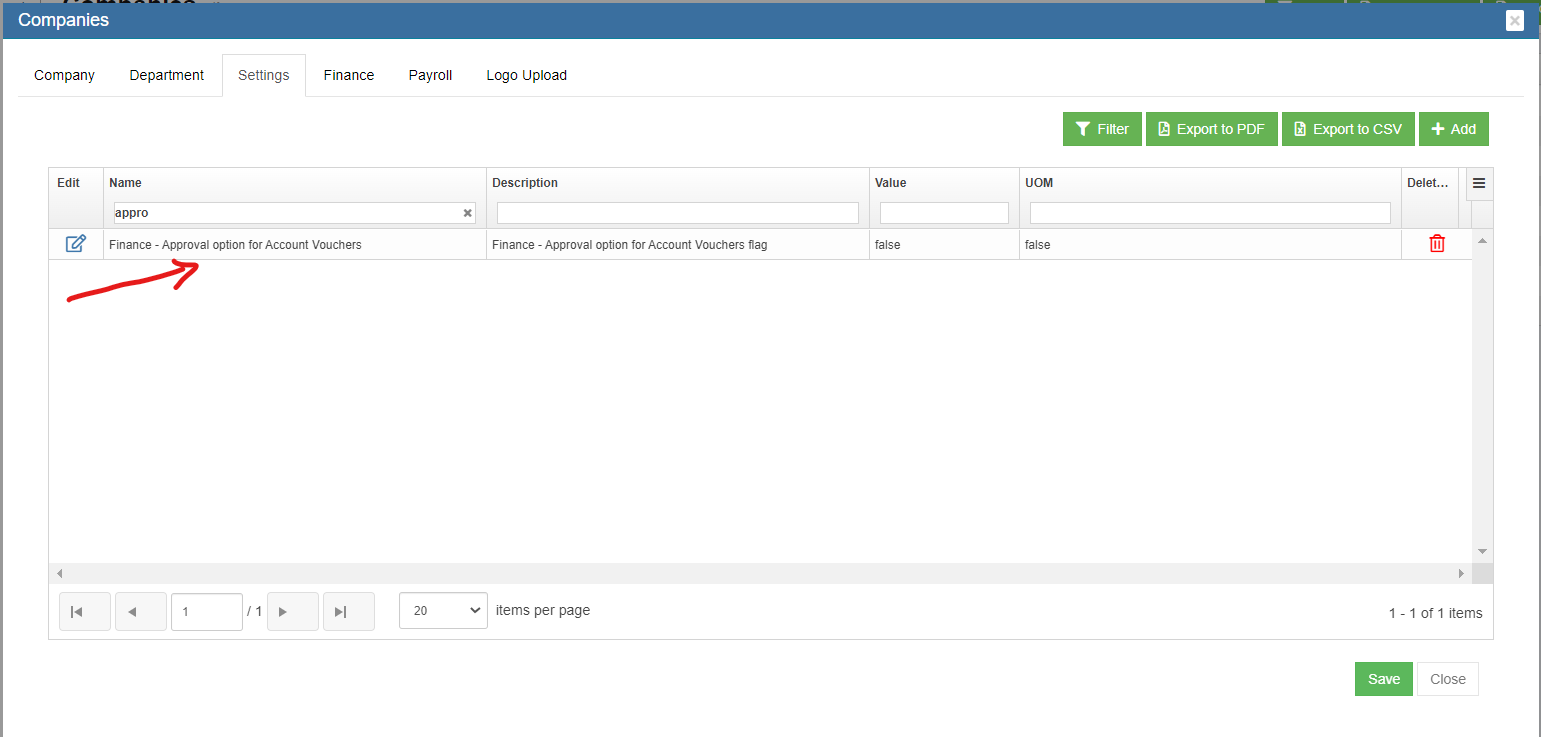](http://wiki.cuteinfocomm.com/uploads/images/gallery/2023-03/image-1678226961159.png)****
3. Click [](http://wiki.cuteinfocomm.com/uploads/images/gallery/2023-03/image-1678227237400.png)edit icon, change setting Value as **true** (Note: by default the value is false) [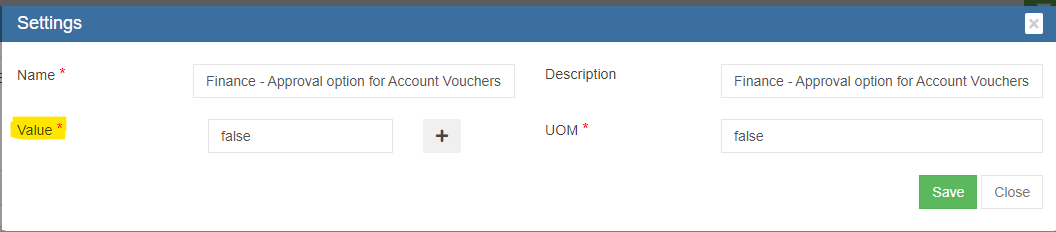](http://wiki.cuteinfocomm.com/uploads/images/gallery/2023-03/image-1678227196145.png)
4. Click Save to save setting for finance approval.
### Step 2: Enable Permission to View Approval Option & Staging Menu’s at User Level
1. In Cute Office, navigate to Admin module, click Users menu and click [](http://wiki.cuteinfocomm.com/uploads/images/gallery/2023-03/image-1678227237400.png) edit icon in selected user.
2. Navigate to Permissions tab. To view **Save & Approve Button** in Voucher Entry screens and to view Voucher Staging Menu, in user's permission page, enable below Read & Write permissions (click filter and filter "approvalstaging"). [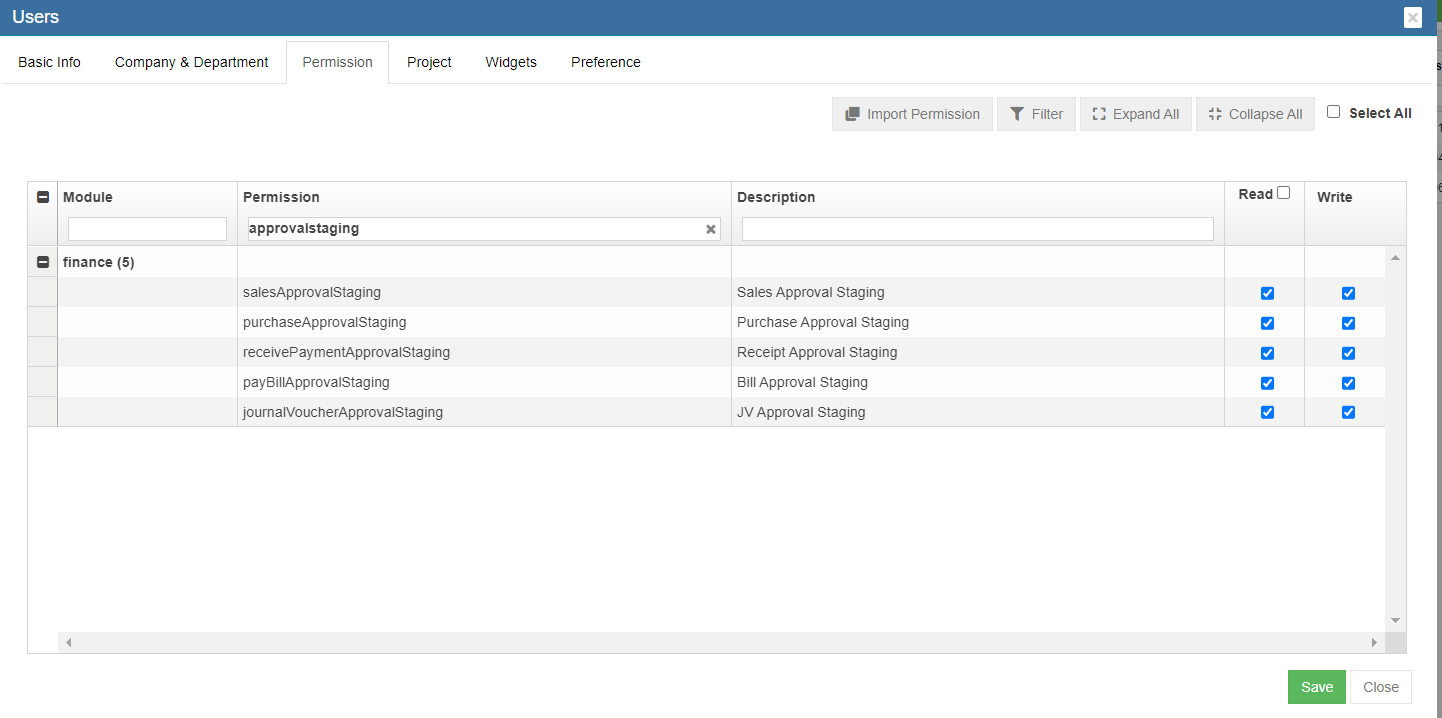](http://wiki.cuteinfocomm.com/uploads/images/gallery/2023-03/image-1678228154456.png)
3. Click Save to save permissions.
If finance approval functionality is enabled through Step 1 at the company level and Step 2 at the User level. All Voucher Entry screens will show **Save To Staging Button** by default
[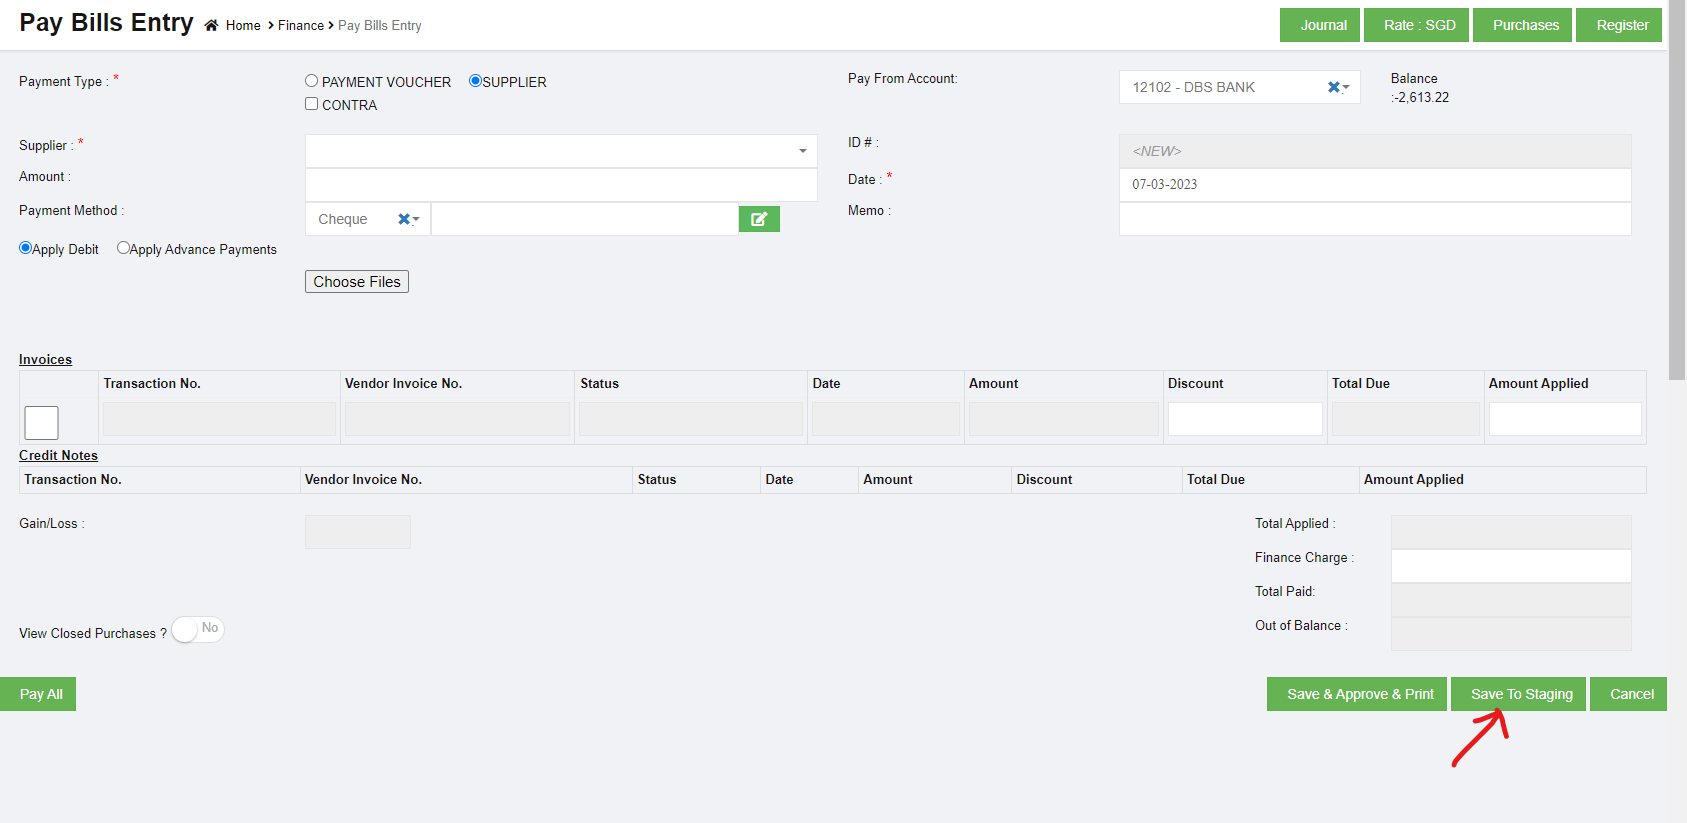](http://wiki.cuteinfocomm.com/uploads/images/gallery/2023-03/image-1678227971407.png)
### Step 3: Approve the Staging Vouchers
Once voucher entries are saved to staging, user with permission to approve staging voucher entries can review all staging vouchers in Voucher Staging Entries menu as below. Click to review specific vouchers and click Approve button to approve. After approval, vouchers will be integrated to financial transactions.
[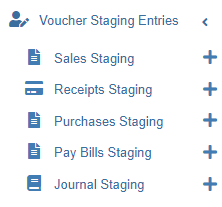](http://wiki.cuteinfocomm.com/uploads/images/gallery/2023-02/image-1677619467448.png)
# Integration Staging
This document briefs the steps that needs to be done for implementing the purchase module and payroll module integration to financial accounting module.
## Purchase Module Integration
From Purchase module, customers can opt for integrating below data
1. Stock value of items purchased to Accounting module (at Purchase Cost)
2. Invoices created in purchase module against the Purchase Order raised
As part of Integration, the vouchers will be generated for the above 2 scenarios (as selected by the customer) and linked to the Financial Module Staging location. Subsequently, customer need to approve the vouchers in the Staging location which will then reflect in the Accounting entries as per the configuration created.
Please follow the below steps to post entries from the Purchase Module to Financial Module Staging location.
### Step 1: To enable Purchase Module Integration to Accounts at Company Level
1. In Cute Office, navigate to Admin module, click Company menu and click [](http://wiki.cuteinfocomm.com/uploads/images/gallery/2023-03/image-1678227237400.png) edit icon in selected company. [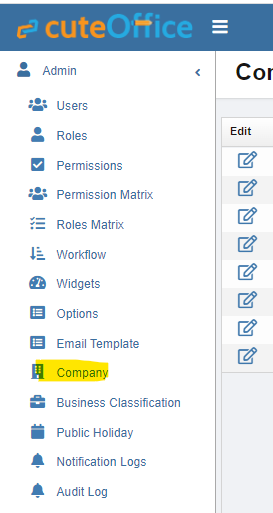](http://wiki.cuteinfocomm.com/uploads/images/gallery/2023-03/image-1679353543792.png)
2. Navigate to **Setting** page, search for setting configuration name ****Purchase Module Linked To Finance,**** this setting is to define whether the user wants to Link Purchase module to Finance module. [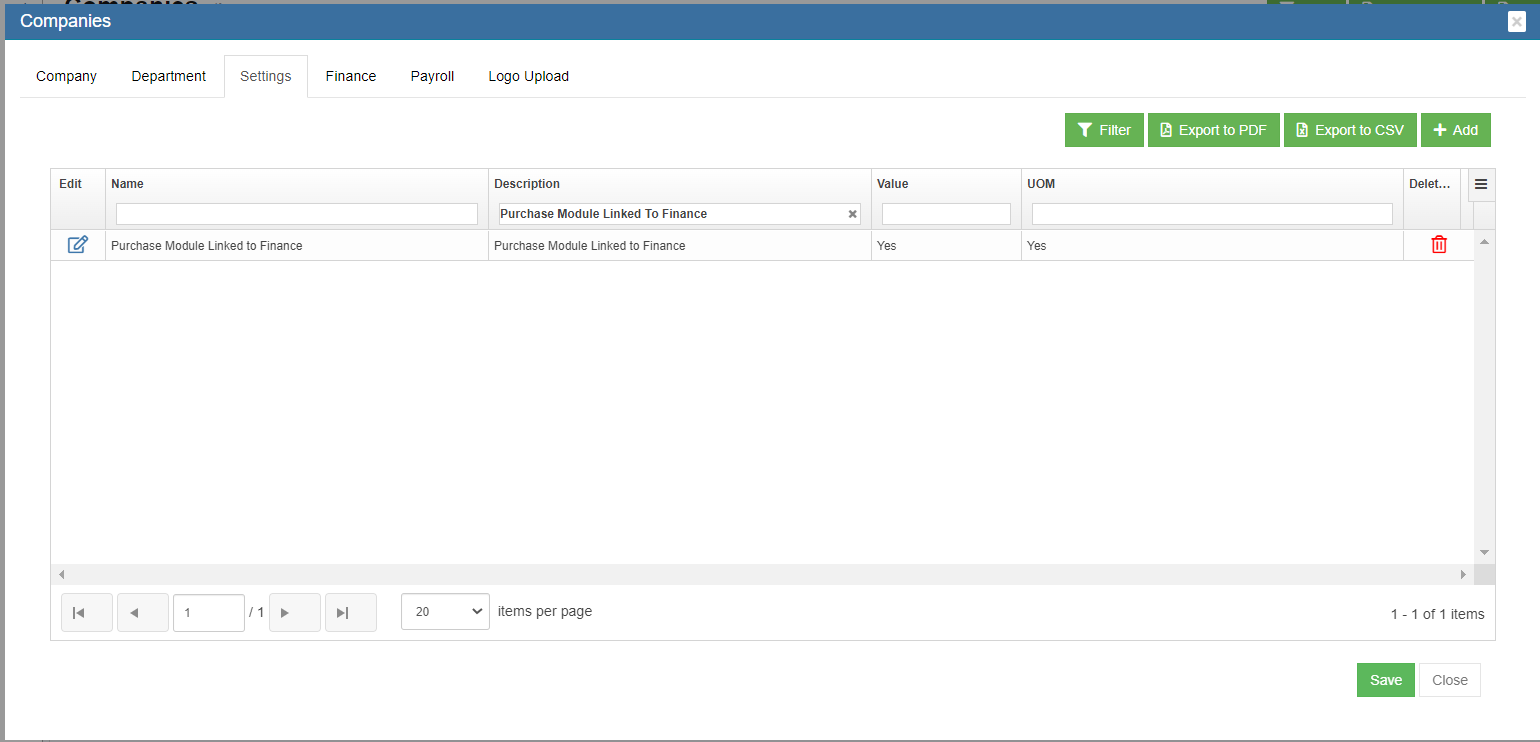](http://wiki.cuteinfocomm.com/uploads/images/gallery/2023-03/image-1678987892370.png)
3. Click [](http://wiki.cuteinfocomm.com/uploads/images/gallery/2023-03/image-1678227237400.png)edit icon, change setting Value as **Yes** (Note: by default the value is No), and click Save to save setting. [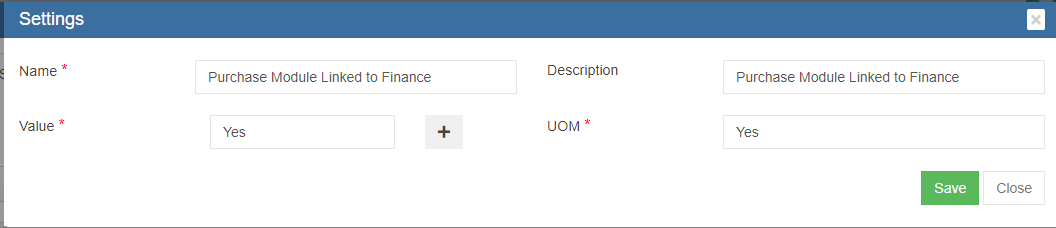](http://wiki.cuteinfocomm.com/uploads/images/gallery/2023-03/image-1678987963435.png)
4. And if user wants to integrate purchase module through item stock, then navigate to **Setting** page, search for setting configuration name **ItemLinking,**** and change setting Value as **Yes,** the Post to Accounts option will be available after item inspected and the stock value can be posted to Finance module in the Receiving Entry table of the Purchase Order; If user do not want to integrate through item stock, set value as No, user can integrated purchase module to finance module via invoices created in Purchase Orders. [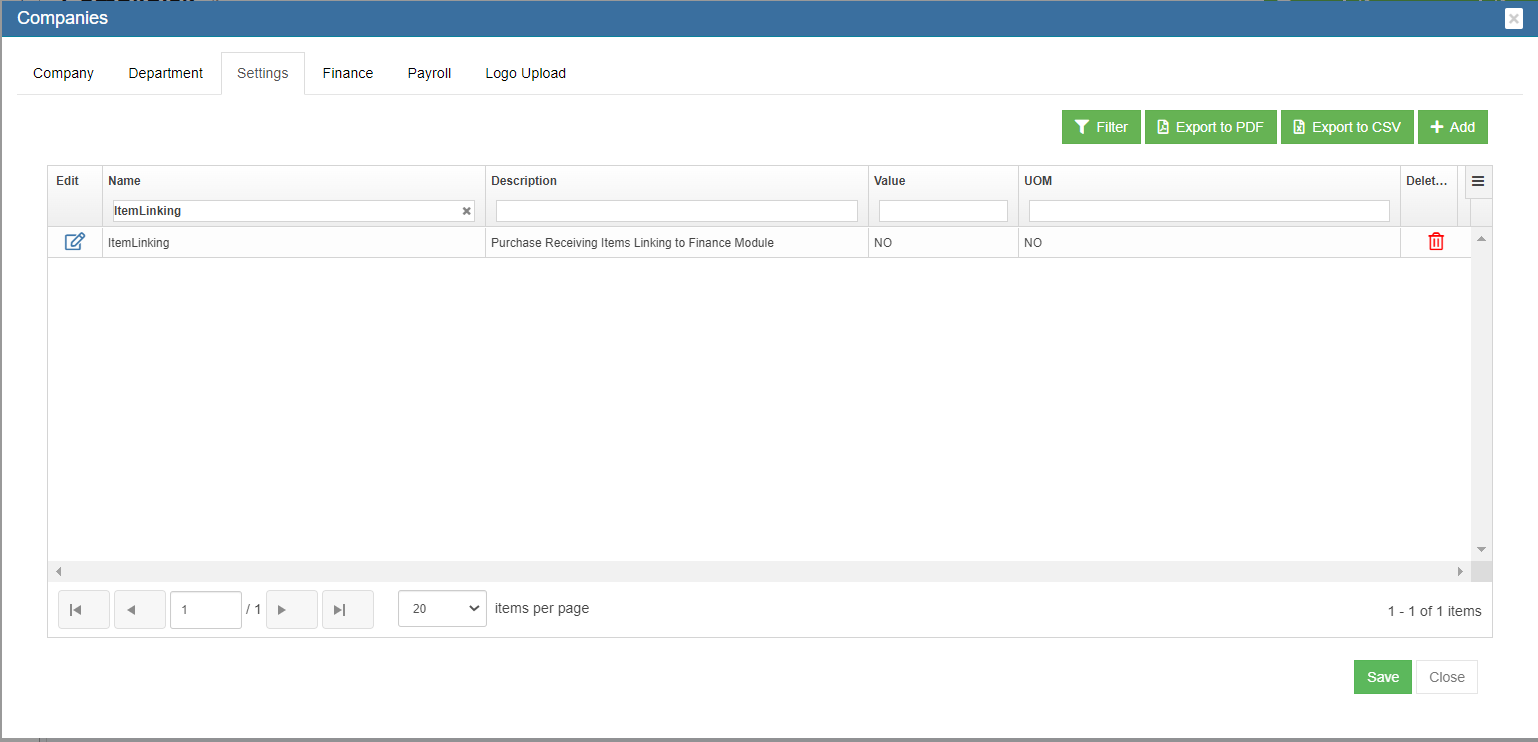](http://wiki.cuteinfocomm.com/uploads/images/gallery/2023-03/image-1678988291462.png)[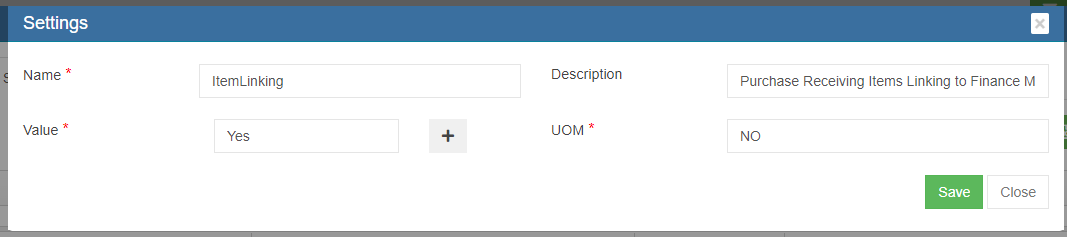](http://wiki.cuteinfocomm.com/uploads/images/gallery/2023-03/image-1678988387733.png)
### Step 2: Enable Permission to Configure GL Accounts Codes to be linked to Accounting Module at User Level
Note: It is highly recommended to define permission in user role and then assign user roles to a specific user account, so that users who perform same duty in cuteOffice will have same permissions. Roles are defined by a set of permissions to different functionalities in cuteOffice system. Based on company operation needs or organization structure, system admin user can create finance roles, such as finance manager etc., and give required permission to these roles and assign role to user.
#### To define permission in user role,
1. Click Roles tab, all existing roles created in system will be displayed as below.[](http://wiki.cuteinfocomm.com/uploads/images/gallery/2023-02/image-1675410080712.png)
2. Click [](http://wiki.cuteinfocomm.com/uploads/images/gallery/2023-02/image-1675458981860.png)(add icon), the adding new role window open as below,[](http://wiki.cuteinfocomm.com/uploads/images/gallery/2023-02/image-1675459129692.png)
3. In **Name** box, enter the new role name, such as "Finance Manager"
4. In **Description** box, enter description of the new role.
5. Based on the function of the new role, search for relevant module and permissions.
6. Search and enable below Read & Write permission (click filter and filter "**inventoryLinkedAccounts**").
7. Click **Save** to save the new role.
8. To assign role to user, click Users menu and click [](http://wiki.cuteinfocomm.com/uploads/images/gallery/2023-03/image-1678227237400.png) edit icon in selected user.
9. Navigate to user's Basic Info tab, in Role box, search and select "Finance Manager" role. [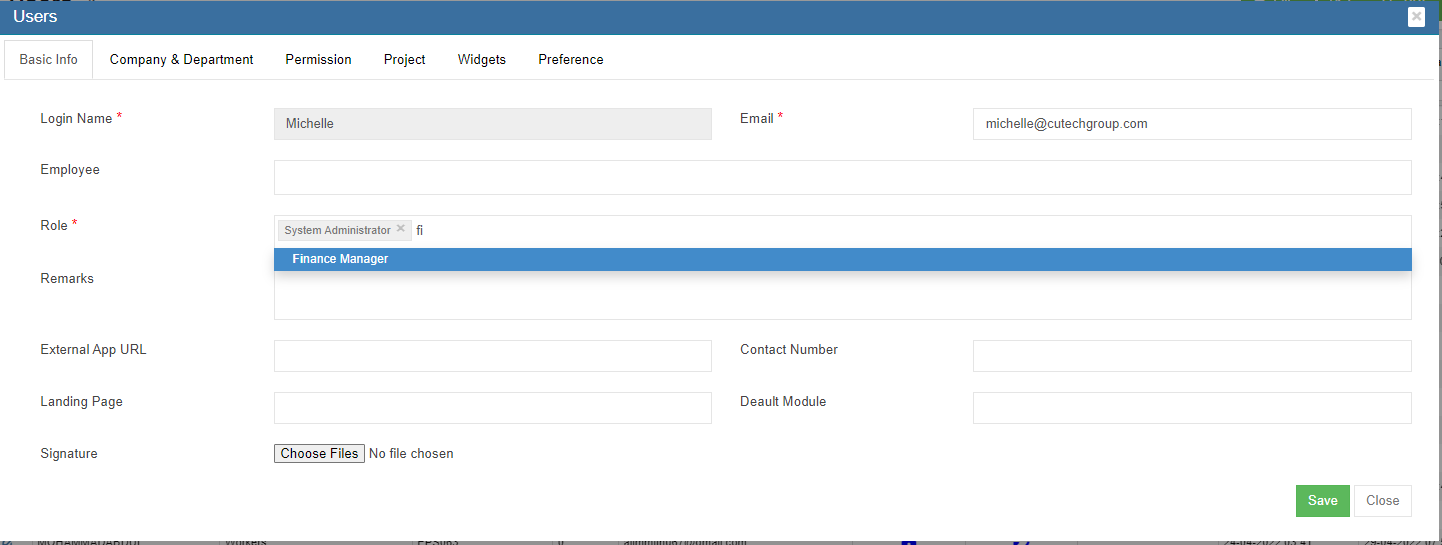](http://wiki.cuteinfocomm.com/uploads/images/gallery/2023-03/image-1679432567293.png)
10. Click Save. The new permission assigned to role "Finance Manager" will be granted to user.
#### To enable permission to a specific user
1. In Cute Office, navigate to Admin module, click Users menu and click [](http://wiki.cuteinfocomm.com/uploads/images/gallery/2023-03/image-1678227237400.png) edit icon in selected user.
2. Navigate to Permissions tab. To be enable to configure GL accounts codes to be linked to Accounting module, in user's permission page, enable below Read & Write permission (click filter and filter "**inventoryLinkedAccounts**").[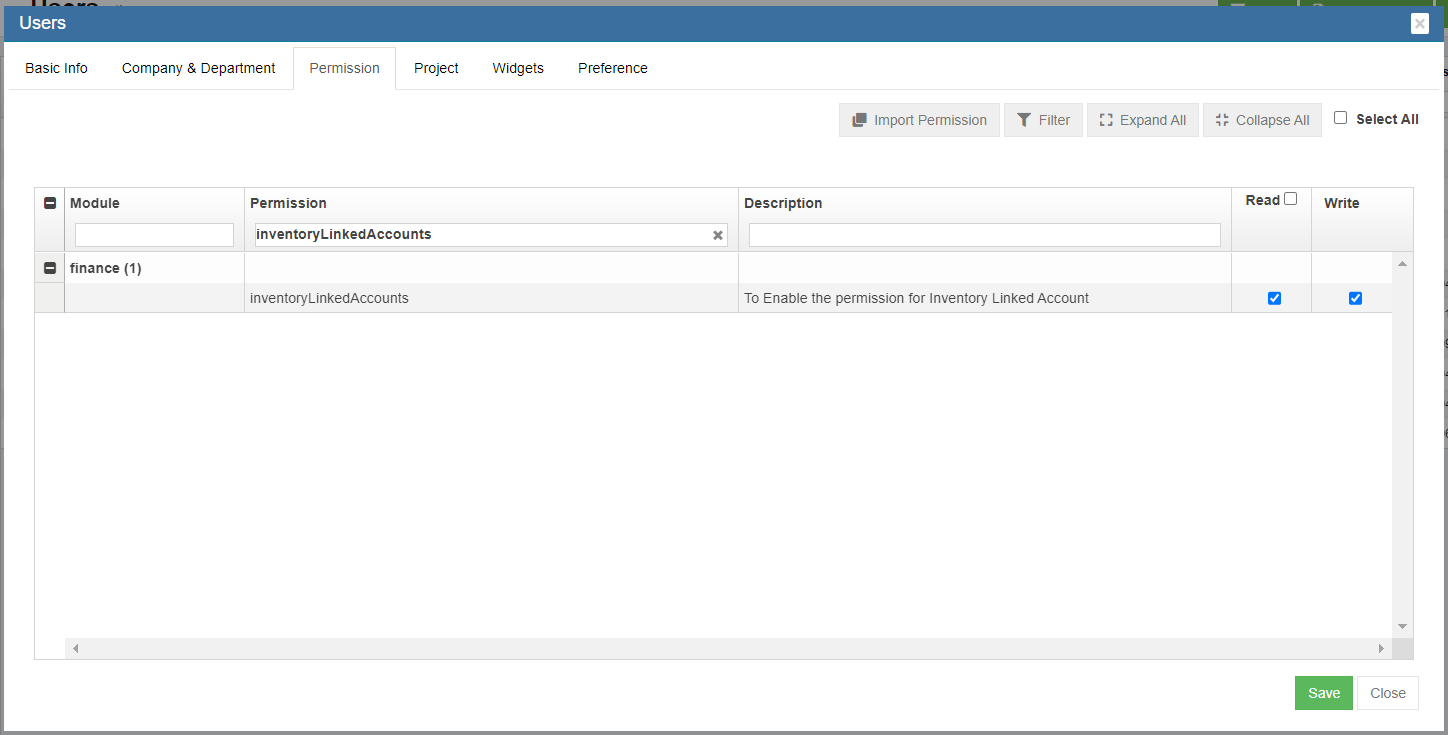](http://wiki.cuteinfocomm.com/uploads/images/gallery/2023-03/image-1678989177470.png)
3. Click Save to save user's permission configuration.
### Step 3: Linking GL Account Code to Items
Note: The Link Account Setup Menu will be available only if Permission is granted through Step 2.
1. Navigate to Finance module, click Link Account Setup menu, [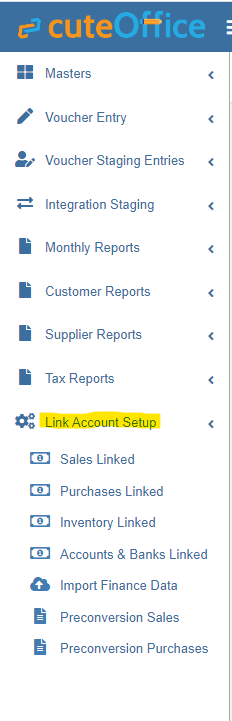](http://wiki.cuteinfocomm.com/uploads/images/gallery/2023-03/image-1678989892873.png)
2. Click Inventory Linked submenu, the inventory link account page opens as below, [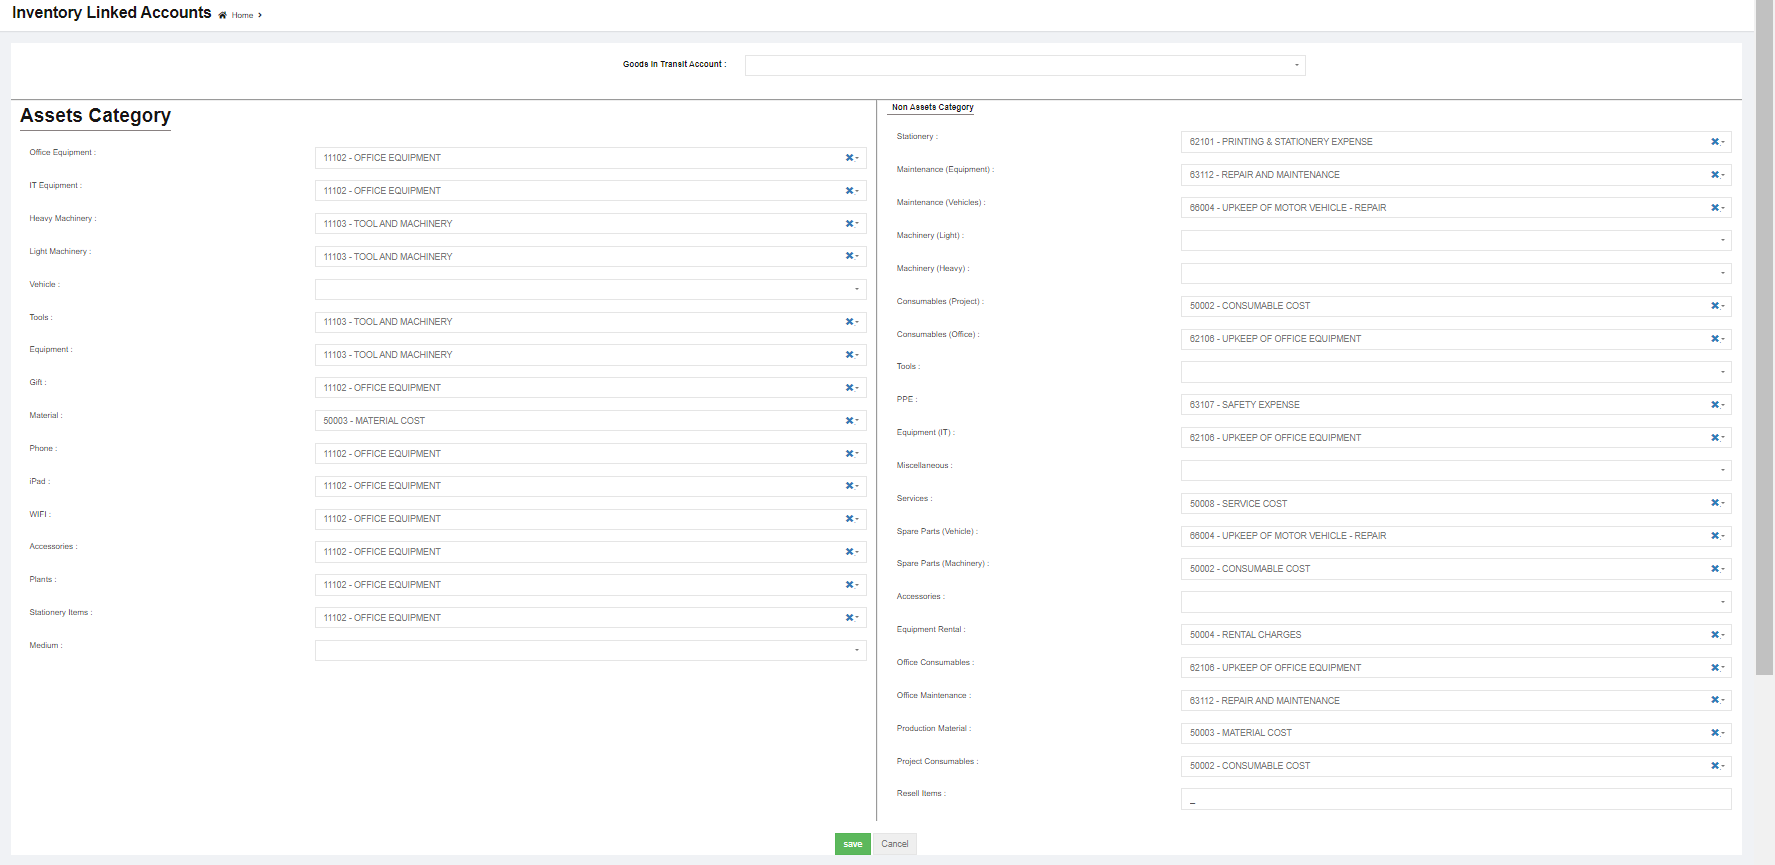](http://wiki.cuteinfocomm.com/uploads/images/gallery/2023-03/image-1678990161020.png)
3. In each of the category box, click and select to link accounts for Asset Category and Non-Asset Category and Goods In Transit Account.
4. Click Save to save updates.
### Step 4: Posting Purchase Orders to Financial Accounting Module
Note: Posting PO to finance function will be available only if setting configurations in Step 1 setting configuration name **Purchase Module Linked To Finance** is enabled as **Yes** at the company level.
To post PO to accounts,
1. Navigate to Procurement module, click Purchase Order menu.
2. Click the PO key to open PO details,
3. Post To Accounts tab will be available in both Receiving Entry (if ItemLinking setting is configured as Yes at company level) & Invoice Entry Table.
- If user chooses to Post to Accounts via item stock value, after item inspected in PO, the [](http://wiki.cuteinfocomm.com/uploads/images/gallery/2023-03/image-1679006266616.png) option will show in Receiving Entry table as below,[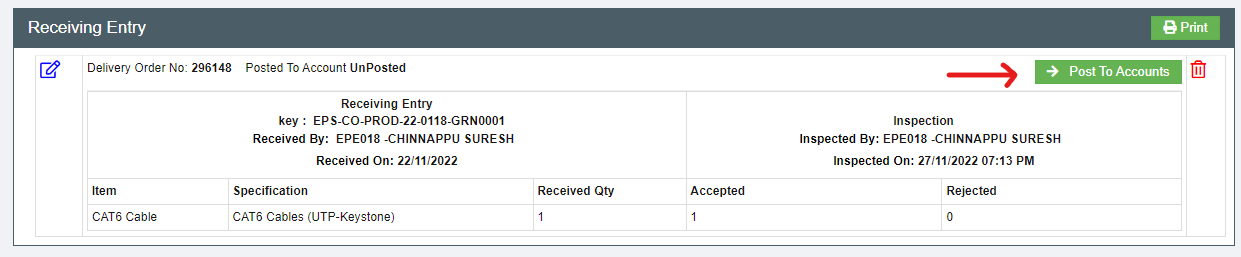](http://wiki.cuteinfocomm.com/uploads/images/gallery/2023-03/image-1679006110494.png)
- If user chooses to Post to Accounts via invoices, after invoice details are entered in Invoice Entry, the [](http://wiki.cuteinfocomm.com/uploads/images/gallery/2023-03/image-1679006266616.png) option will show in Invoice Entry table as below,[](http://wiki.cuteinfocomm.com/uploads/images/gallery/2023-03/image-1679005977345.png)
4. Click [](http://wiki.cuteinfocomm.com/uploads/images/gallery/2023-03/image-1679006266616.png), a confirmation notification will prompt, [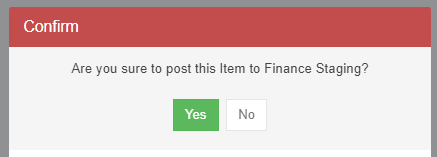](http://wiki.cuteinfocomm.com/uploads/images/gallery/2023-03/image-1679006250632.png)
5. Click Yes to confirm posting PO to finance staging.
### Step 5: Enable Permission to View / Post Vouchers in Staging Location
1. In Cute Office, navigate to Admin module, click Users menu and click [](http://wiki.cuteinfocomm.com/uploads/images/gallery/2023-03/image-1678227237400.png) edit icon in selected user.
2. Navigate to Permissions tab. To view staging menu in Finance, in user's permission page, enable below Read & Write permissions (click filter and filter "stagingPurchaseInvoice" and "stagingPurchaseItemReceiving"). [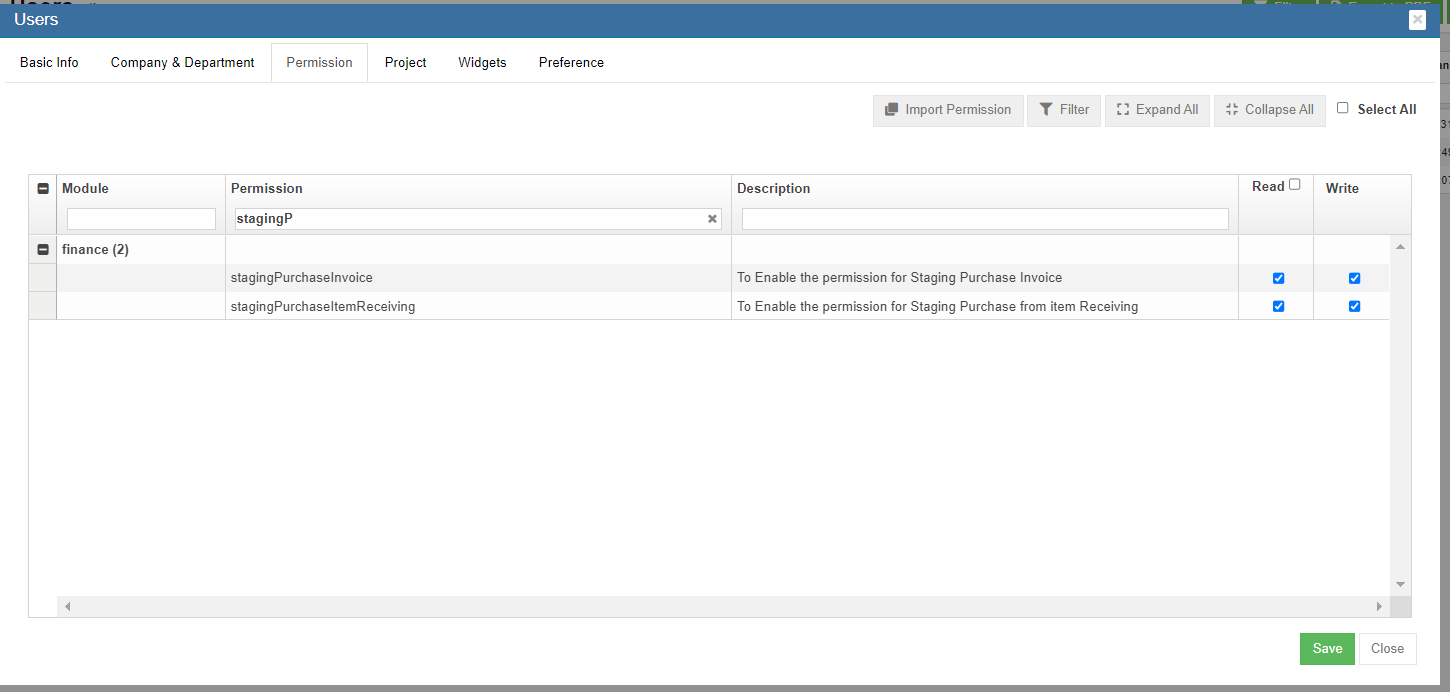](http://wiki.cuteinfocomm.com/uploads/images/gallery/2023-03/image-1679006823953.png)
3. Click Save to save permissions.
### Step 6: To Approve the Purchase Integration Staging in Finance Module
1. Navigate to Integration Staging menu, [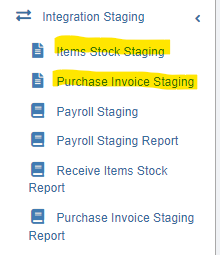](http://wiki.cuteinfocomm.com/uploads/images/gallery/2023-03/image-1679010364260.png)
2. To view and approve posted Receiving Item stock value or Invoices from Purchase module,
- If user posted via item stock value in Receiving Entry table in PO, click Items Stock Staging tab, select relevant vouchers and click [](http://wiki.cuteinfocomm.com/uploads/images/gallery/2023-03/image-1679032501132.png) to approve, [](http://wiki.cuteinfocomm.com/uploads/images/gallery/2023-03/image-1679034871351.png)
- If user posted via invoices, click Purchase Invoice Staging tab, select relevant vouchers and click [](http://wiki.cuteinfocomm.com/uploads/images/gallery/2023-03/image-1679032501132.png) to approve, [](http://wiki.cuteinfocomm.com/uploads/images/gallery/2023-03/image-1679034904594.png)
## Payroll Module Integration
Follow the below steps to post entries from Payroll to Finance module Integration Staging.
### Step 1: Configure Payroll Admin Settings
1. Go to Payroll module, navigate to Admin menu, click Settings to open settings page as below,[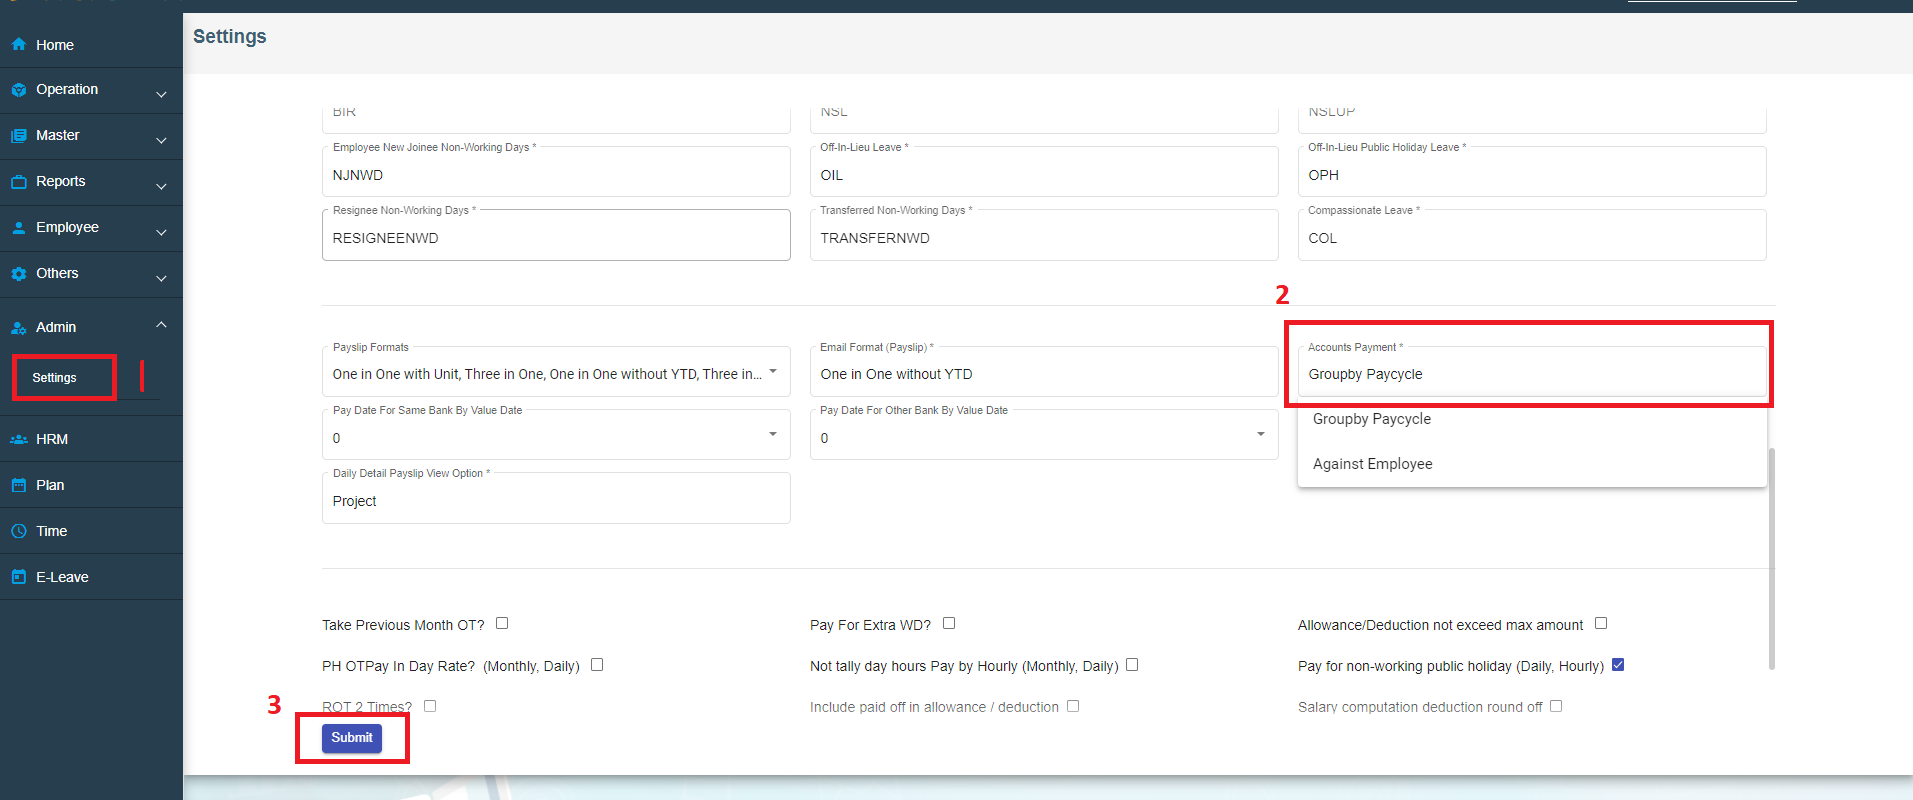](http://wiki.cuteinfocomm.com/uploads/images/gallery/2023-03/image-1679433795631.png)
2. Scroll down the page to find **Account Payment** box, and select "Groupby Paycycle" as account payment setting.
3. Click Submit to save payroll setting configuration.
### Step 2: Configure Admin Company Settings at Company Level
1. In Cute Office, navigate to Admin module, click Company menu and click [](http://wiki.cuteinfocomm.com/uploads/images/gallery/2023-03/image-1678227237400.png) edit icon in selected company. [](http://wiki.cuteinfocomm.com/uploads/images/gallery/2023-03/image-1679353543792.png)
2. Navigate to **Setting** page, search for setting configuration name ****Financial Groups,****[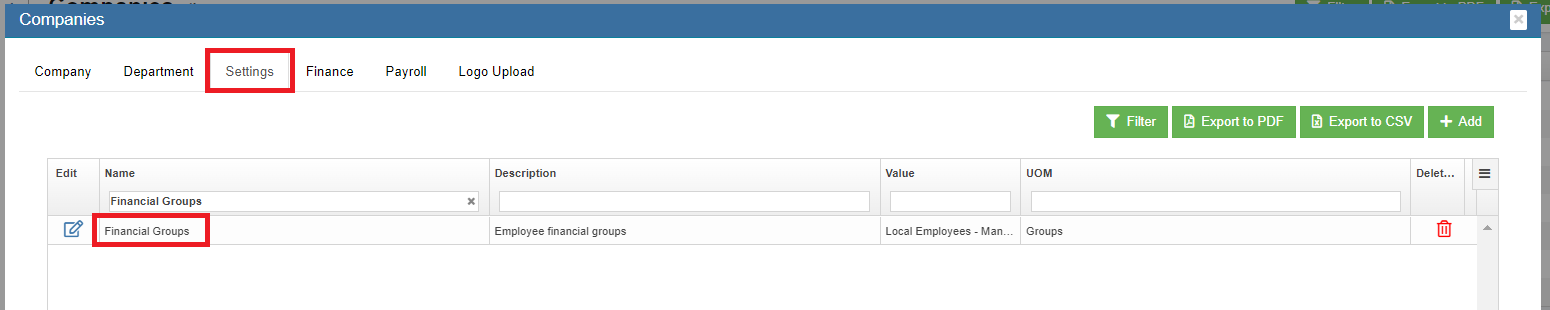](http://wiki.cuteinfocomm.com/uploads/images/gallery/2023-03/image-1679436141056.png)
3. Click [](http://wiki.cuteinfocomm.com/uploads/images/gallery/2023-03/image-1678227237400.png)icon of Financial Groups setting name, [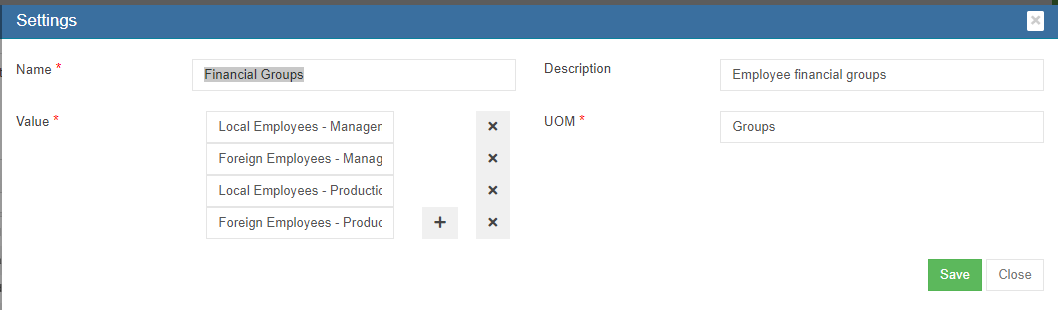](http://wiki.cuteinfocomm.com/uploads/images/gallery/2023-03/image-1679435969941.png)
4. Check and edit Value box if needed.
5. Click Save to save company settings.
### Step 3: Enable Permission to View Project Costing and Post Payroll to Accounts at User Level
Note: It is highly recommended to define permission in user role and then assign user roles to a specific user account, so that users who perform same duty in cuteOffice will have same permissions. Roles are defined by a set of permissions to different functionalities in cuteOffice system. Based on company operation needs or organization structure, system admin user can create finance roles, such as finance manager etc., and give required permission to these roles and assign role to user.
#### To define permission in user role,
1. Click Roles tab, all existing roles created in system will be displayed as below.[](http://wiki.cuteinfocomm.com/uploads/images/gallery/2023-02/image-1675410080712.png)
2. Click [](http://wiki.cuteinfocomm.com/uploads/images/gallery/2023-02/image-1675458981860.png)(add icon), the adding new role window open as below,[](http://wiki.cuteinfocomm.com/uploads/images/gallery/2023-02/image-1675459129692.png)
3. In **Name** box, enter the new role name, such as "Finance Manager"
4. In **Description** box, enter description of the new role.
5. Based on the function of the new role, search for relevant module and permissions.
6. Search and enable below Read & Write permissions (click filter and filter permission names **"projectCosting","payrollJournal", "payrollJournalReport"**).
- projectCosting - To Enable Project Payroll Costing menu in Payroll
- payrollJournal - To Enable Staging Journal Resgister in Finance
- payrollJournalReport - To Enable Payroll Journal Report in Finance [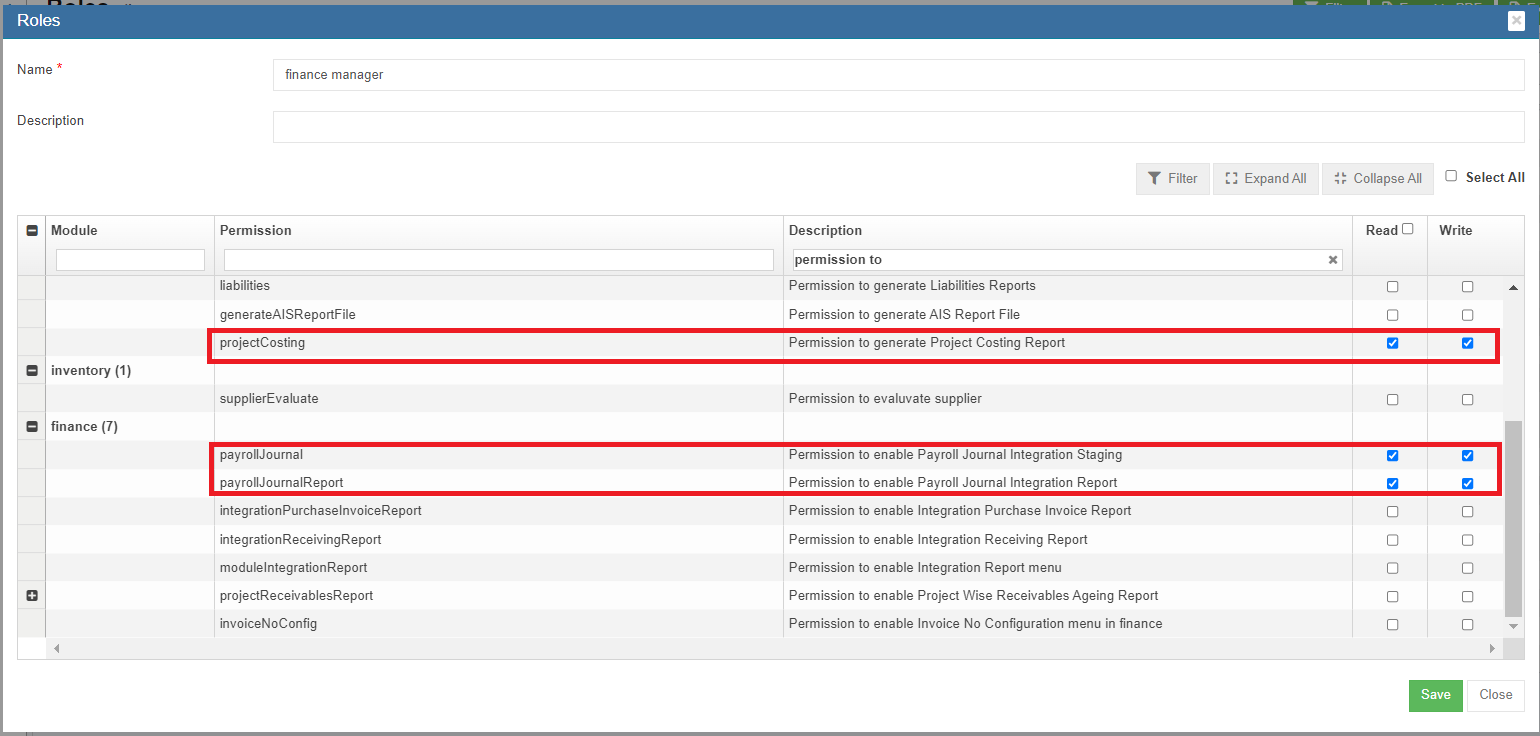](http://wiki.cuteinfocomm.com/uploads/images/gallery/2023-03/image-1679637815604.png)
7. Click **Save** to save the new role.
8. To assign role to user, click Users menu and click [](http://wiki.cuteinfocomm.com/uploads/images/gallery/2023-03/image-1678227237400.png) edit icon in selected user.
9. Navigate to user's Basic Info tab, in Role box, search and select "Finance Manager" role. [](http://wiki.cuteinfocomm.com/uploads/images/gallery/2023-03/image-1679432567293.png)
10. Click Save. The new permission assigned to role "Finance Manager" will be granted to user.
#### To enable permission to a specific user
1. In Cute Office, navigate to Admin module, click Users menu and click [](http://wiki.cuteinfocomm.com/uploads/images/gallery/2023-03/image-1678227237400.png) edit icon in selected user.
2. Navigate to Permissions tab. To be enable to configure GL accounts codes to be linked to Accounting module, in user's permission page, enable below Read & Write
3. permissions (click filter and filter permission names **"projectCosting","payrollJournal", "payrollJournalReport"**)
4. Click Save to save user's permission configuration.
### Step 4: Configure Employee's Finance Group in HRM Employee's Salary Configuration
1. Go to HRM module, navigate to Employee menu, click view all to open employee list.
2. Search for an specific employee and click to open the HRM details, and navigate to Payroll Salary Information page as below. In Others section, Finance Groups box, click to choose Finance Group for the specific employee.[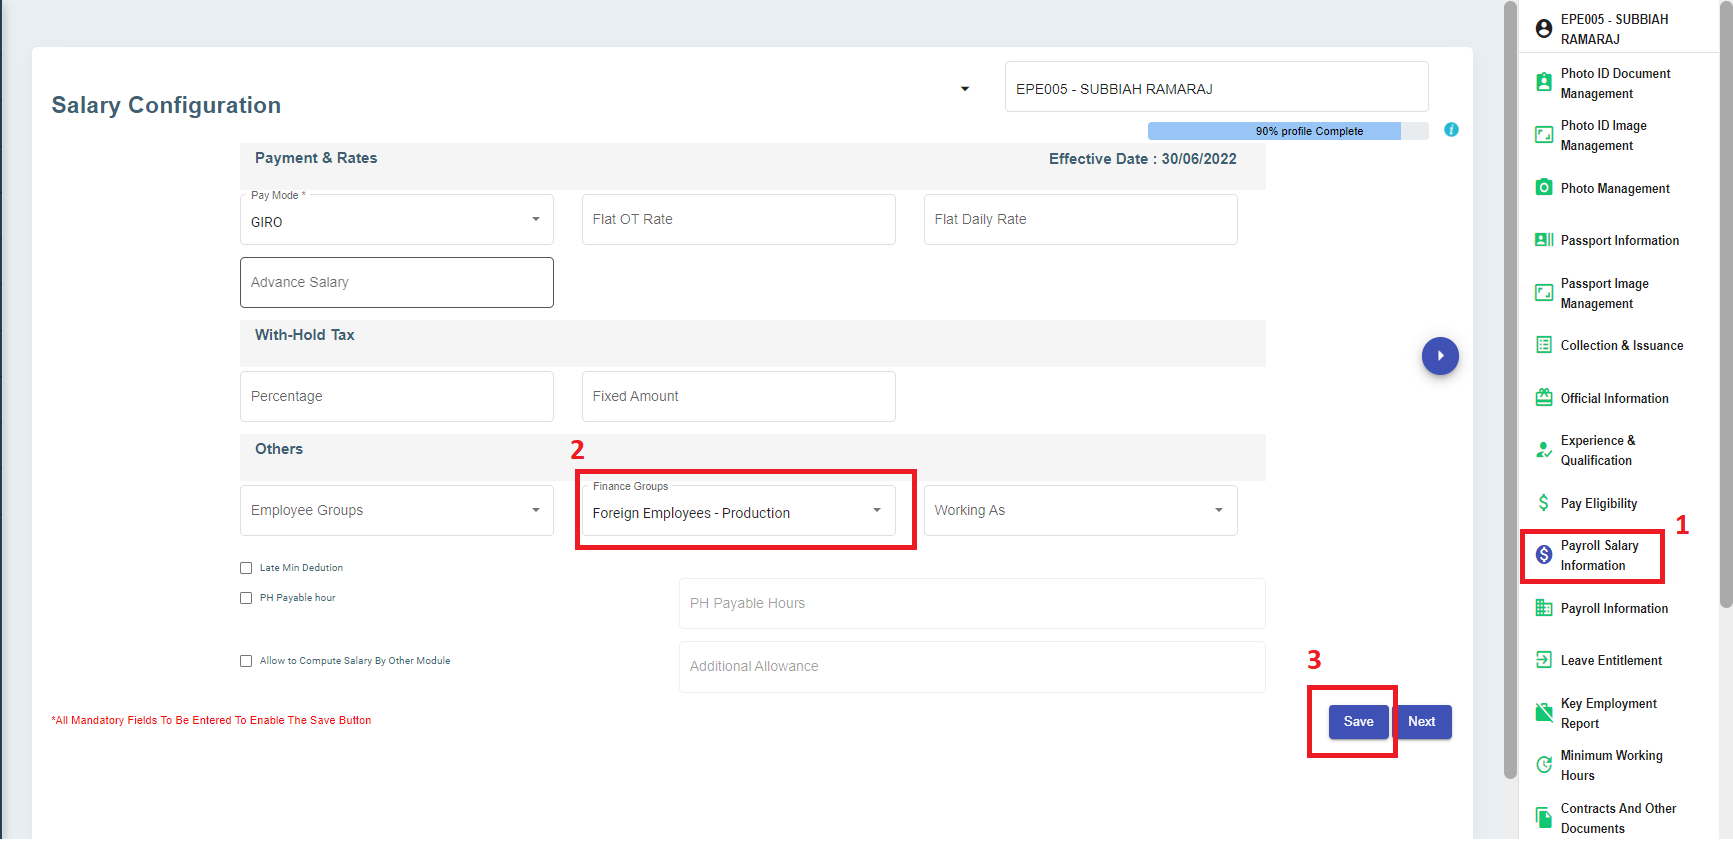](http://wiki.cuteinfocomm.com/uploads/images/gallery/2023-03/image-1679436575006.png)
3. Click Save to save employee's finance group information.
### Step 5: Map G/L Debit or Credit Account to Pay Code Payroll Master
1. Go to HRM-Payroll module, navigate to Master menu, click to open pay code master list. [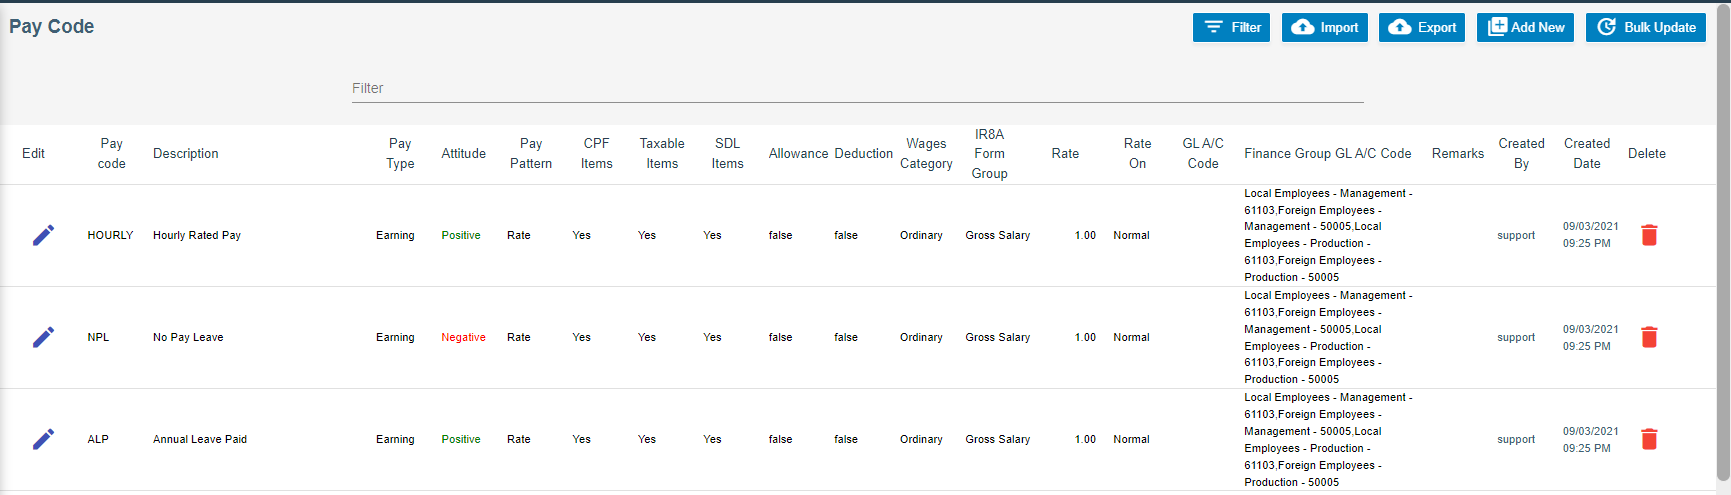](http://wiki.cuteinfocomm.com/uploads/images/gallery/2023-03/image-1679437363351.png)
2. Select a pay code, and click [](http://wiki.cuteinfocomm.com/uploads/images/gallery/2023-03/image-1678227237400.png) edit icon, To map Single Debit Account Code Against Finance Group or Single Credit Account Code or Against Finance Group
[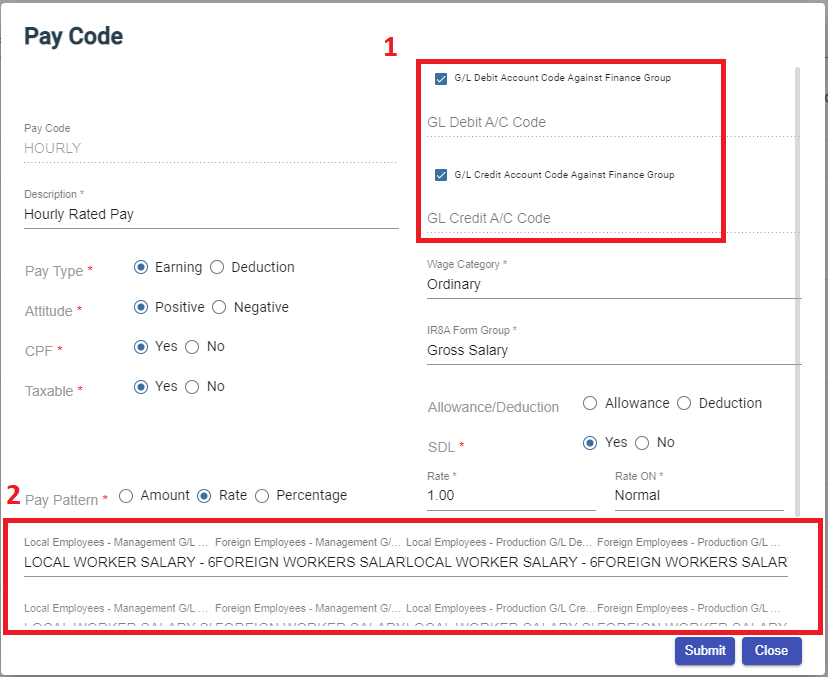](http://wiki.cuteinfocomm.com/uploads/images/gallery/2023-03/image-1679519067743.png)
- Tick relevant box in area 1 in above screenshot.
- If [](http://wiki.cuteinfocomm.com/uploads/images/gallery/2023-03/image-1679519177101.png) or [](http://wiki.cuteinfocomm.com/uploads/images/gallery/2023-03/image-1679519237091.png)is/are ticked, the employee finance group details will be shown in area 2, and user need to select G/L debit or credit account code in each of the employee finance group in area 2.
- Click Submit to save account mapping information.
3. To map account code in one stretch, use the bulk update option of G/L Account Code for multiple pay codes, click[ ](http://wiki.cuteinfocomm.com/uploads/images/gallery/2023-03/image-1679438279451.png), the GL Account Code Bulk Update window opens as below, [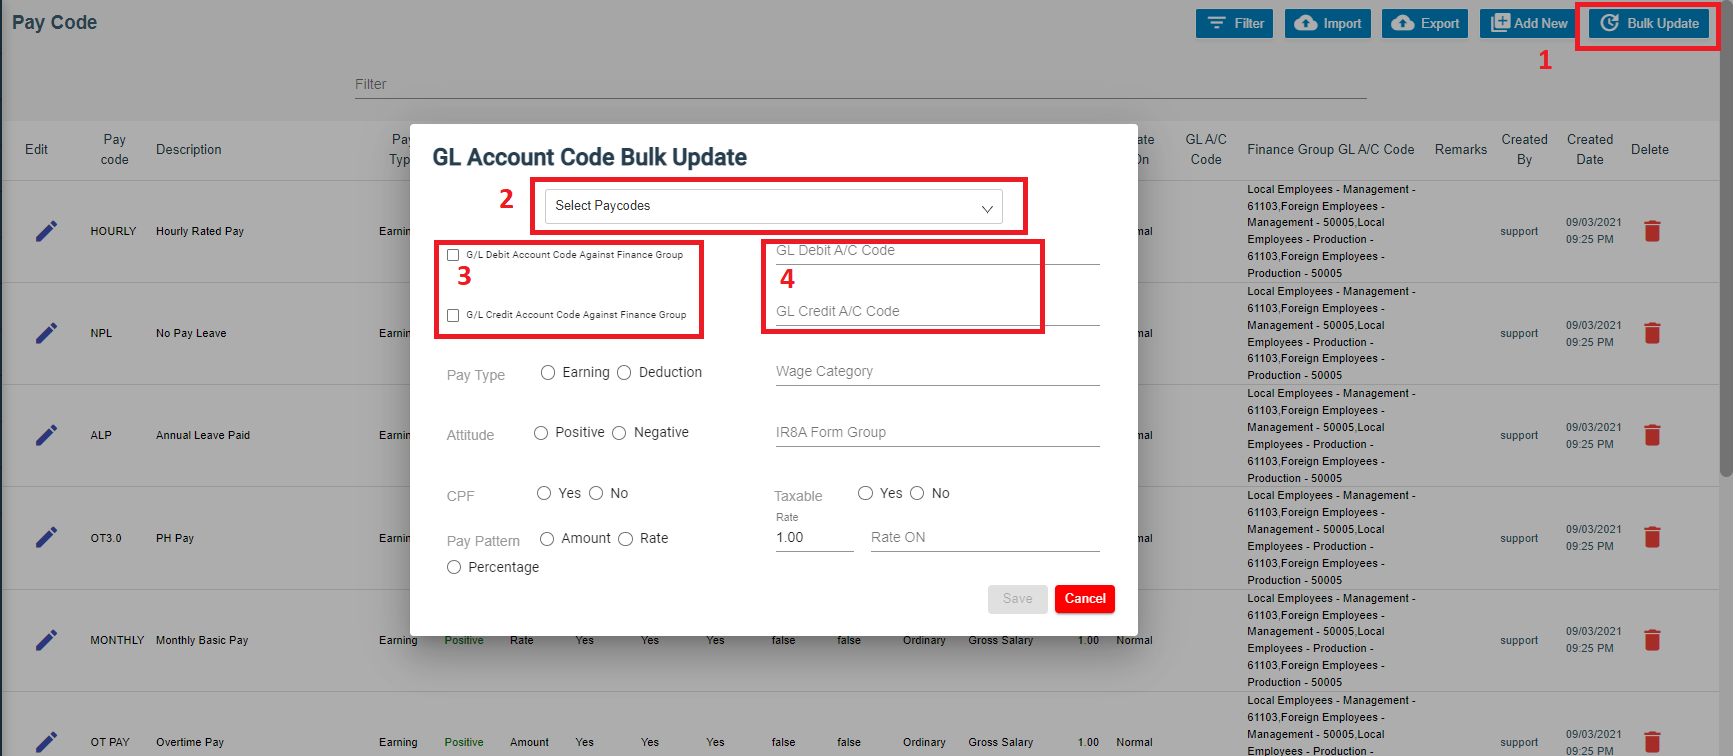](http://wiki.cuteinfocomm.com/uploads/images/gallery/2023-03/image-1679519520475.png)
- Select a pay code in area 2 in above screenshot,
- If user wants to map G/L account code against finance group, tick relevant box in area 3, and select G/L account code to map to each finance group as shown in below yellow highlight area,[](http://wiki.cuteinfocomm.com/uploads/images/gallery/2023-03/image-1679519748588.png)
- Or if user want to map G/L account code, select relevant G/L account code in area 4.
- Fill up rest of the details and click Save to save mapping details.
### Step 6: To Generate & Print Project Payroll Costing
1. Go to HRM-payroll module, navigate to Reports menu, click Project Payroll Costing submenu, [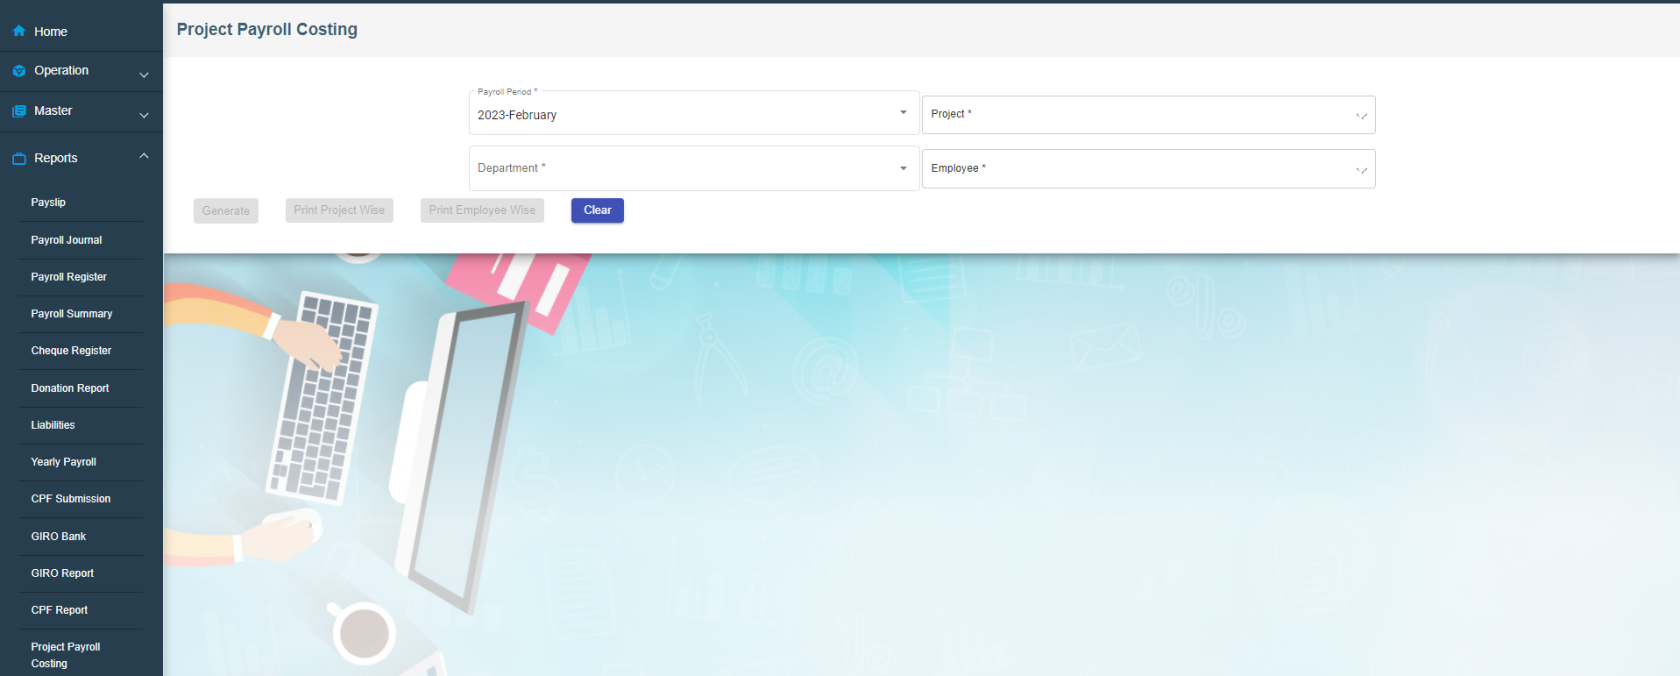](http://wiki.cuteinfocomm.com/uploads/images/gallery/2023-03/image-1679639507318.png)
2. Select relevant information in Payroll Period/Project/Department/Employees fields, [](http://wiki.cuteinfocomm.com/uploads/images/gallery/2023-03/image-1679640014013.png)
3. Click[](http://wiki.cuteinfocomm.com/uploads/images/gallery/2023-03/image-1679639895857.png) to generate project payroll costing report; Click[](http://wiki.cuteinfocomm.com/uploads/images/gallery/2023-03/image-1679639960794.png) or[ ](http://wiki.cuteinfocomm.com/uploads/images/gallery/2023-03/image-1679639970789.png)to download reports.
### Step 7: Post Payroll to Accounts
Once above four steps are configured, user will be able to integrate payroll to finance module (Post payroll to finance staging).
1. Go to Payroll module, navigate to Operation menu, click to open Payroll history (Note: only approved payroll details will be shown in Payroll History page). [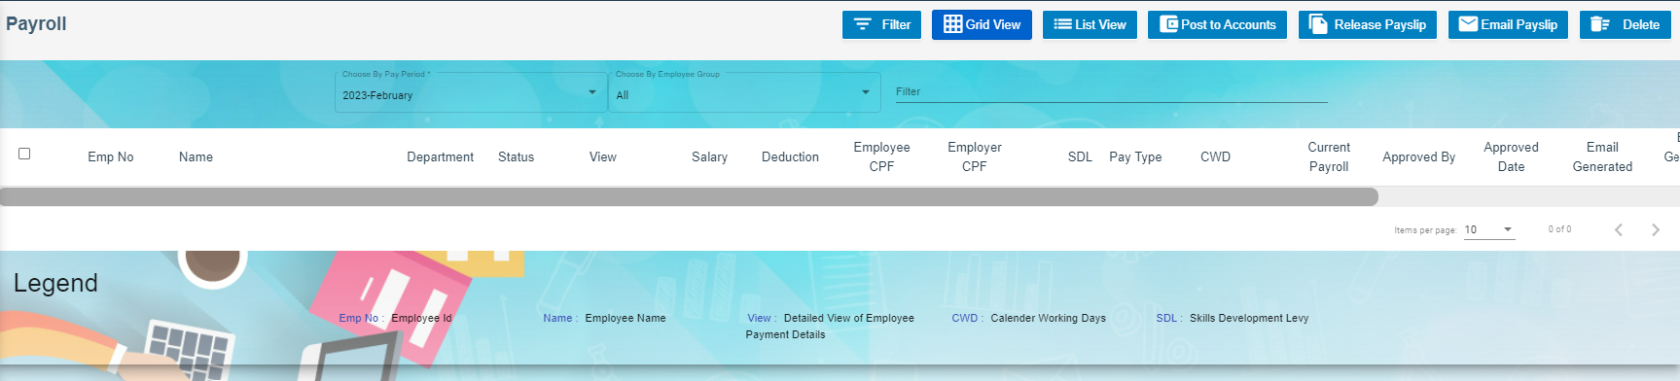](http://wiki.cuteinfocomm.com/uploads/images/gallery/2023-03/image-1679520225822.png)
2. In Choose Pay Period box, select pay period to post in accounts, all approved employees' payroll for selected pay period will be displayed, [](http://wiki.cuteinfocomm.com/uploads/images/gallery/2023-03/image-1679520519223.png)
3. Tick the box in front of employees' name to select employee(s) to post to accounts, [](http://wiki.cuteinfocomm.com/uploads/images/gallery/2023-03/image-1679521629359.png)
4. Click [](http://wiki.cuteinfocomm.com/uploads/images/gallery/2023-03/image-1679521645888.png)Post to Accounts Button at the top right corner of the payroll history page, a confirmation notification window will prompt up as below, [](http://wiki.cuteinfocomm.com/uploads/images/gallery/2023-03/image-1679521714668.png)
5. Click Yes to confirm posting to accounts. Note: once employees' payroll are posted to accounts, the payroll history records will be disabled from further action such as deletion. [](http://wiki.cuteinfocomm.com/uploads/images/gallery/2023-03/image-1679640167640.png)
### Step 8: To View/Approve Staging Payroll Journal in Finance Integration Staging
1. Navigate to Finance module, go to Integration Staging menu, click Payroll Staging to open the staging payroll journal page as below, [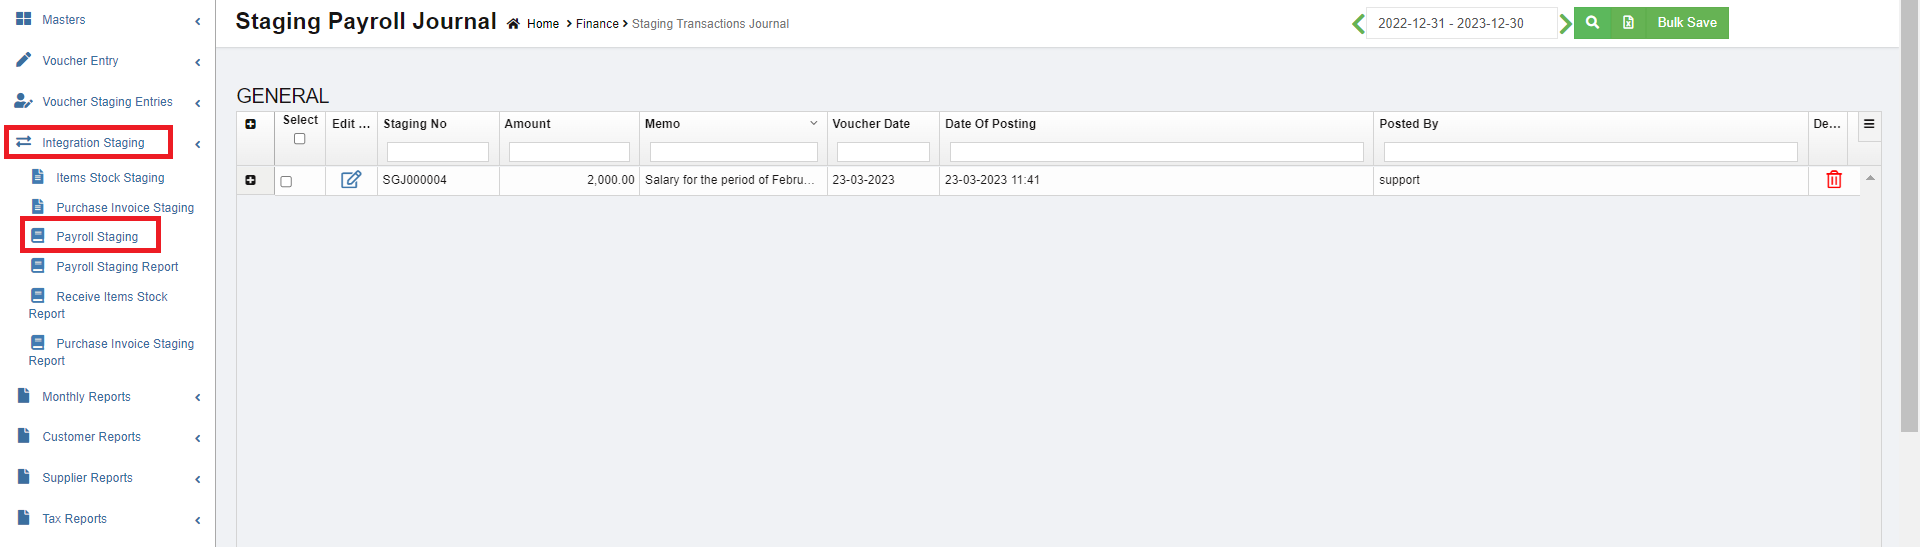](http://wiki.cuteinfocomm.com/uploads/images/gallery/2023-03/image-1680155488120.png)
2. In the date field, select period then click search icon to show staging voucher.
3. To view staging payroll journal details, click[](http://wiki.cuteinfocomm.com/uploads/images/gallery/2023-03/image-1680155769440.png) icon to expand payroll payment details, [](http://wiki.cuteinfocomm.com/uploads/images/gallery/2023-03/image-1680155649754.png)
4. To edit staging payroll journal, click[](http://wiki.cuteinfocomm.com/uploads/images/gallery/2023-03/image-1678227237400.png) edit icon, the payroll staging journal will open as below, edit fields where needed, then click [](http://wiki.cuteinfocomm.com/uploads/images/gallery/2023-03/image-1680156245792.png) to save & approve staging payroll journal. [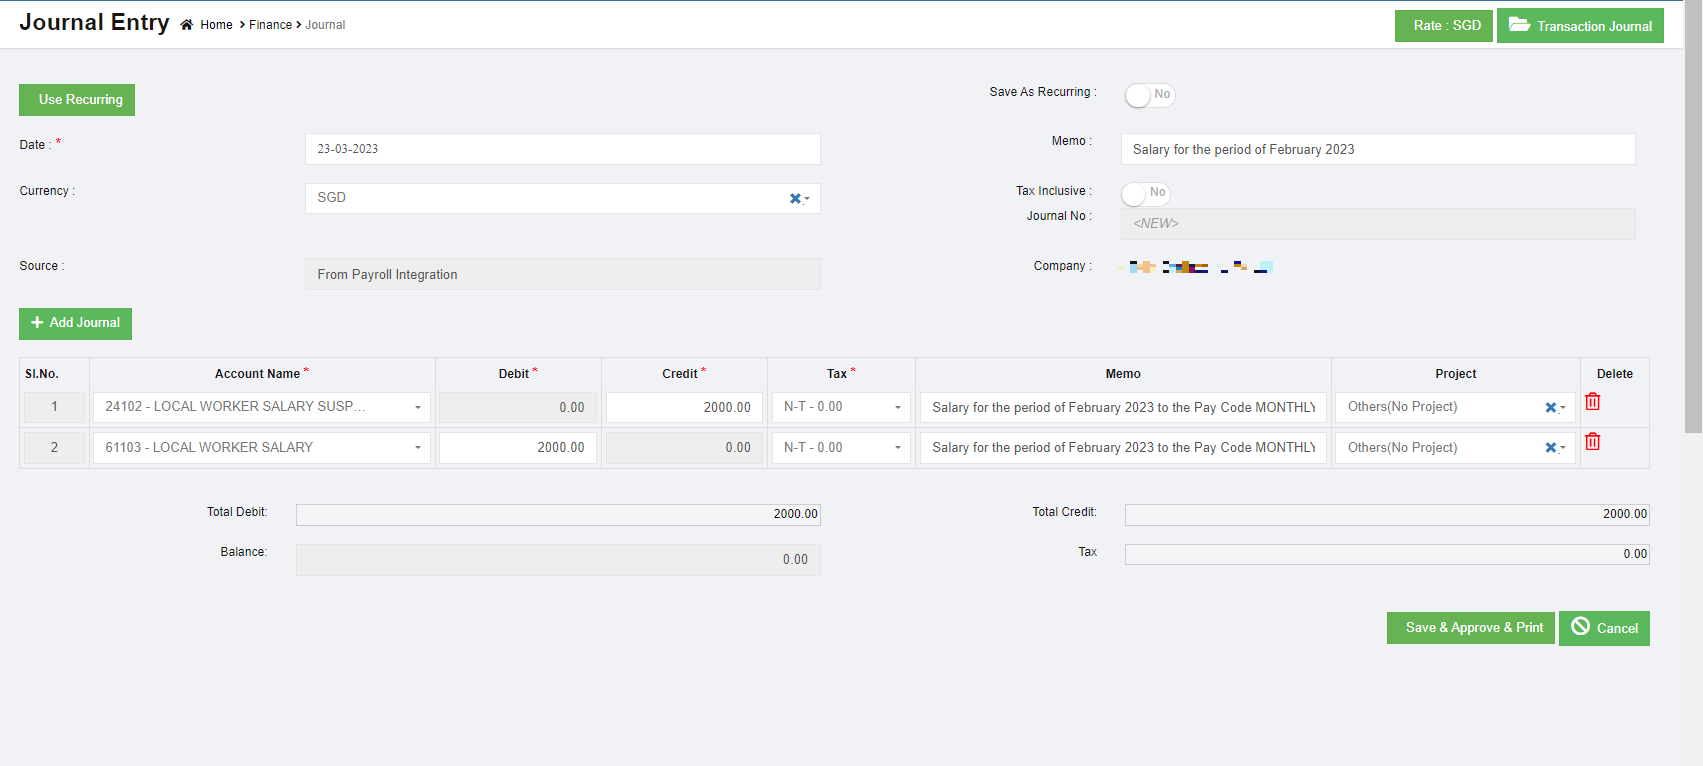](http://wiki.cuteinfocomm.com/uploads/images/gallery/2023-03/image-1680155919134.png)
##### Configuration and Journal details :
[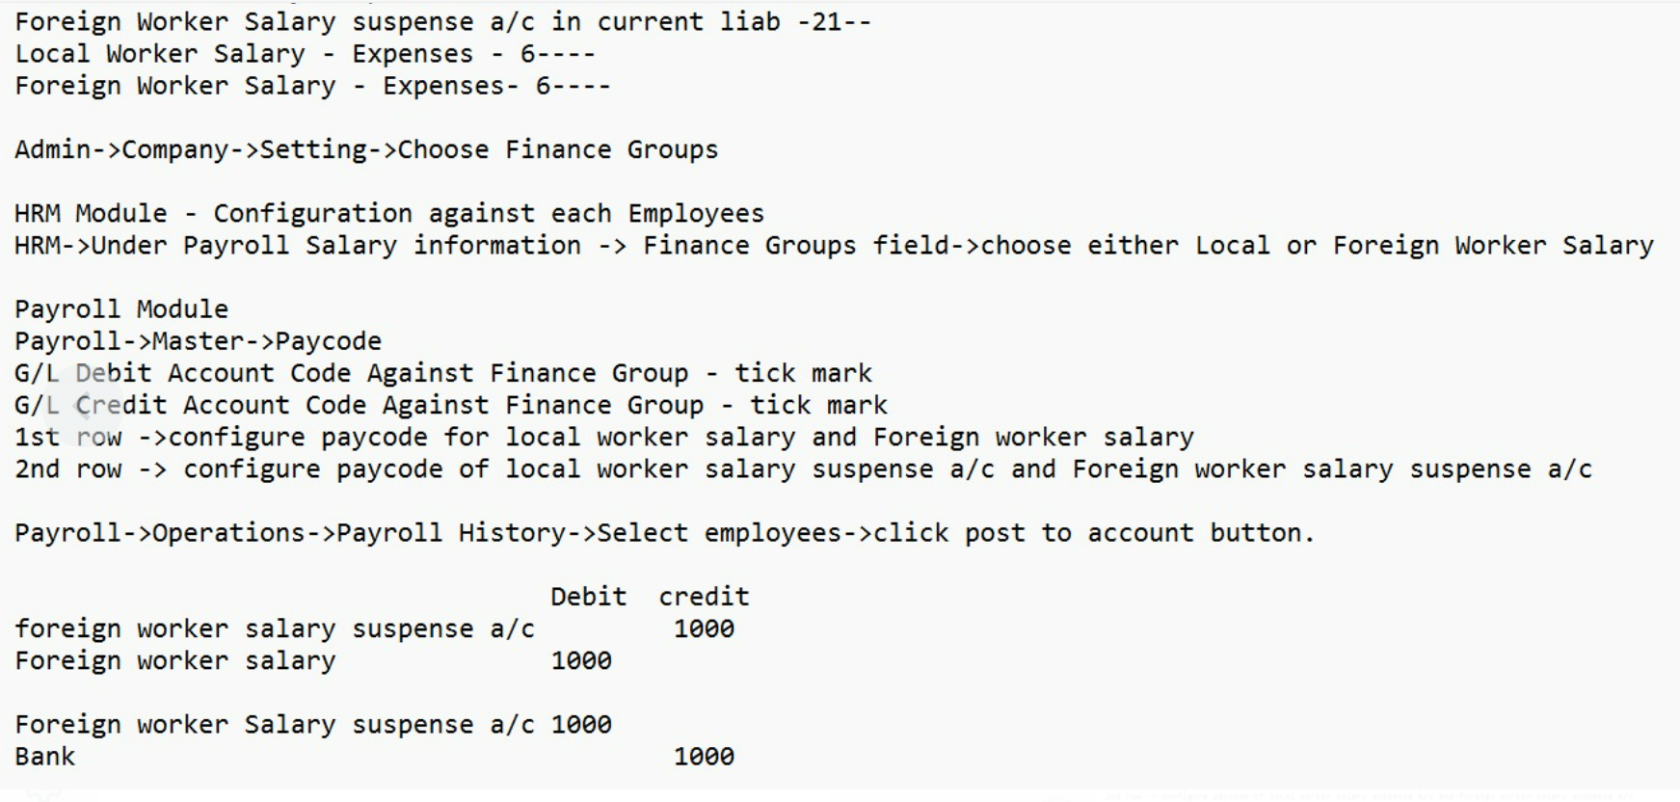](https://wiki.cuteinfocomm.com/uploads/images/gallery/2024-08/image-1723700474260.png)
# Monthly Reports
Monthly finance reports include below reports: Trial Balance, Trial Balance YTD, General Ledger(Detail), Profit and Loss, Project P&L, Project P&L Transpose, Multi Period P&L, Balance Sheet, Transactional Journal, Transactional Profit, Accounts Journal, Transaction Report.
[](http://wiki.cuteinfocomm.com/uploads/images/gallery/2023-03/image-1679954482085.png)
## Trial Balance Report
To generate trial balance report,
1. Navigate to Monthly Reports menu in finance module, click **Trial Balance** to open trial balance report page.
2. user can select period from calendar field 1, or if user wants to generate report by calendar month, tick Show monthly box. [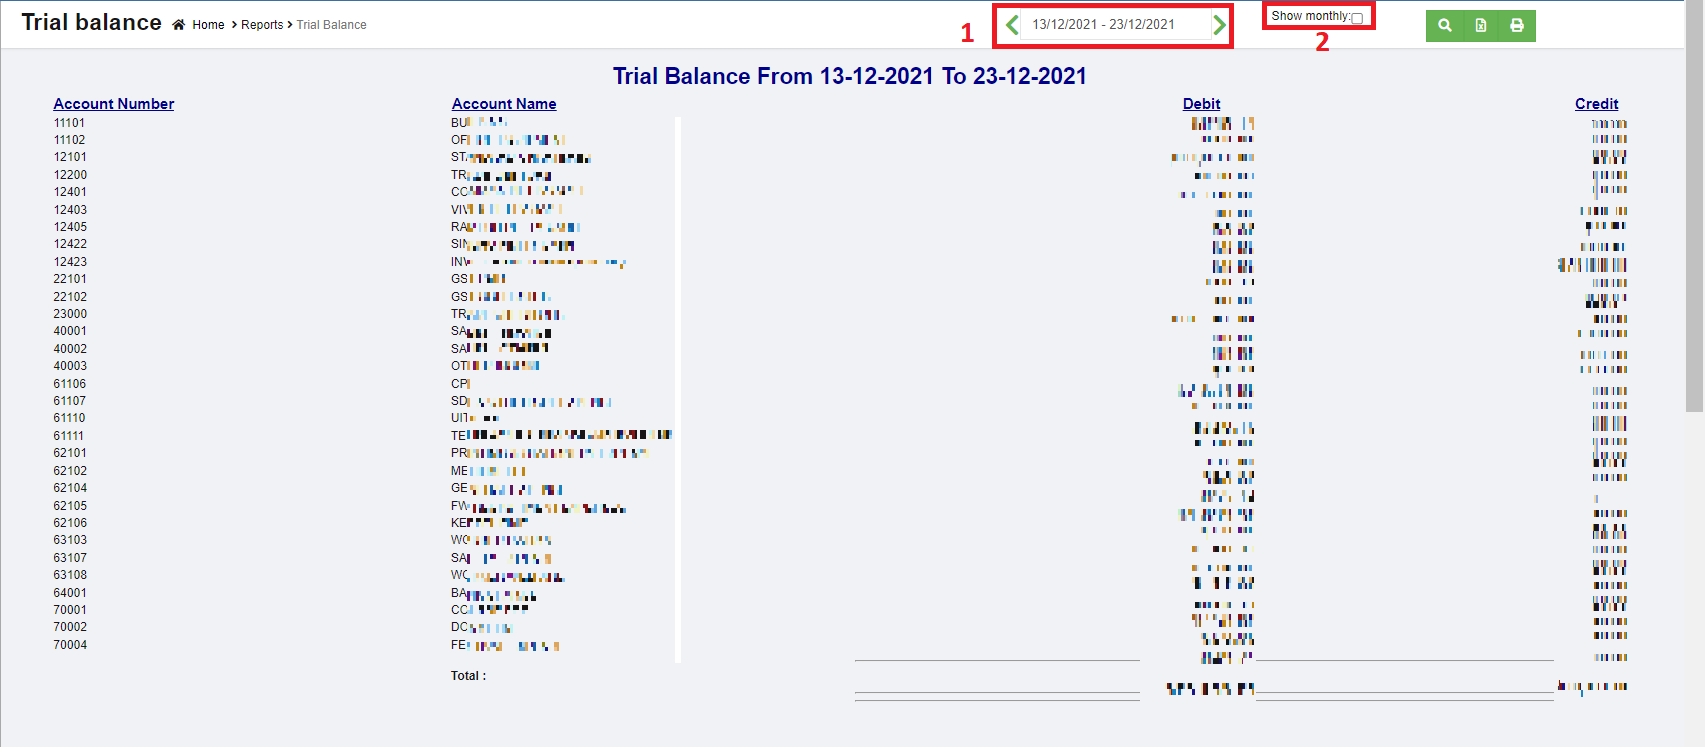](http://wiki.cuteinfocomm.com/uploads/images/gallery/2023-04/image-1682094779867.png)
3. Click [](http://wiki.cuteinfocomm.com/uploads/images/gallery/2023-03/image-1679955186159.png)search icon, the trial balance report for selected period will show in screen.
4. Click[](http://wiki.cuteinfocomm.com/uploads/images/gallery/2023-03/image-1679955198941.png) to download report in xlsx format, click[](http://wiki.cuteinfocomm.com/uploads/images/gallery/2023-03/image-1679955209790.png) to download report in PDF format.
## Trial Balance YTD (Year-to-date) Report
To generate trial balance YTD report,
1. Navigate to Monthly Reports menu in finance module, click **Trial Balance YTD** to open trial balance YTD report page.
2. user can select date period from calendar field 1, or if user wants to generate report by calendar month, tick Show monthly box. [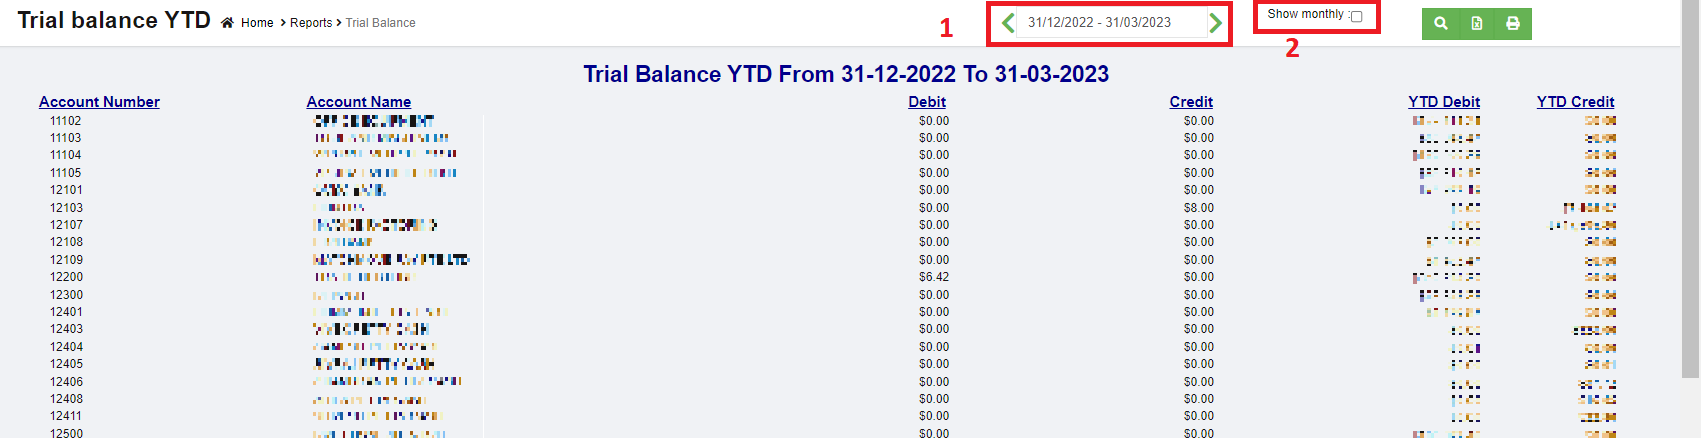](http://wiki.cuteinfocomm.com/uploads/images/gallery/2023-03/image-1680038628060.png)
3. Click [](http://wiki.cuteinfocomm.com/uploads/images/gallery/2023-03/image-1679955186159.png)search icon, the trial balance YTD report for selected period will show in screen.
4. Click[](http://wiki.cuteinfocomm.com/uploads/images/gallery/2023-03/image-1679955198941.png) to download report in xlsx format, click[](http://wiki.cuteinfocomm.com/uploads/images/gallery/2023-03/image-1679955209790.png) to download report in PDF format.
## General Ledger (Detail) Report
To generate general ledger detail report,
1. Navigate to Monthly Reports menu in finance module, click **General Ledger (Detail)** to open report page.
2. user can select date period from calendar field.[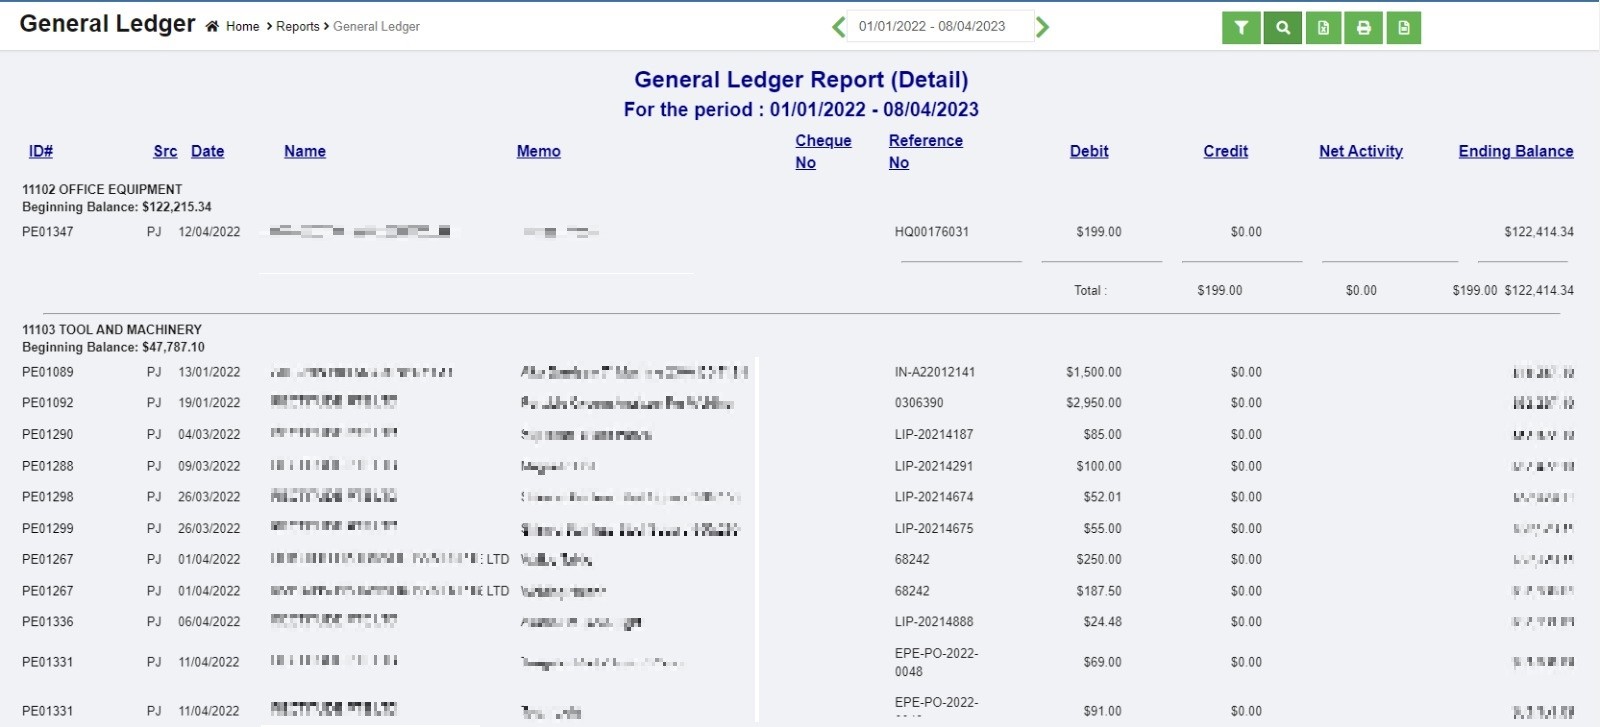](http://wiki.cuteinfocomm.com/uploads/images/gallery/2023-04/image-1681142900496.jpg)
3. Click [](http://wiki.cuteinfocomm.com/uploads/images/gallery/2023-03/image-1679955186159.png)search icon, the general ledger detail report for selected period will show in screen.
4. Click[](http://wiki.cuteinfocomm.com/uploads/images/gallery/2023-03/image-1679955198941.png) to download report in xlsx format, click[](http://wiki.cuteinfocomm.com/uploads/images/gallery/2023-03/image-1679955209790.png) to download report in PDF format.
## Profit And Loss Report
To generate profit and loss report,
1. Navigate to Monthly Reports menu in finance module, click **Profit and Loss** to open report page.
2. user can select date period from calendar field 1 to generate profit and loss report for selected date range.
3. In field 2, select account type to generate report (user can select all accounts or accounts with value). [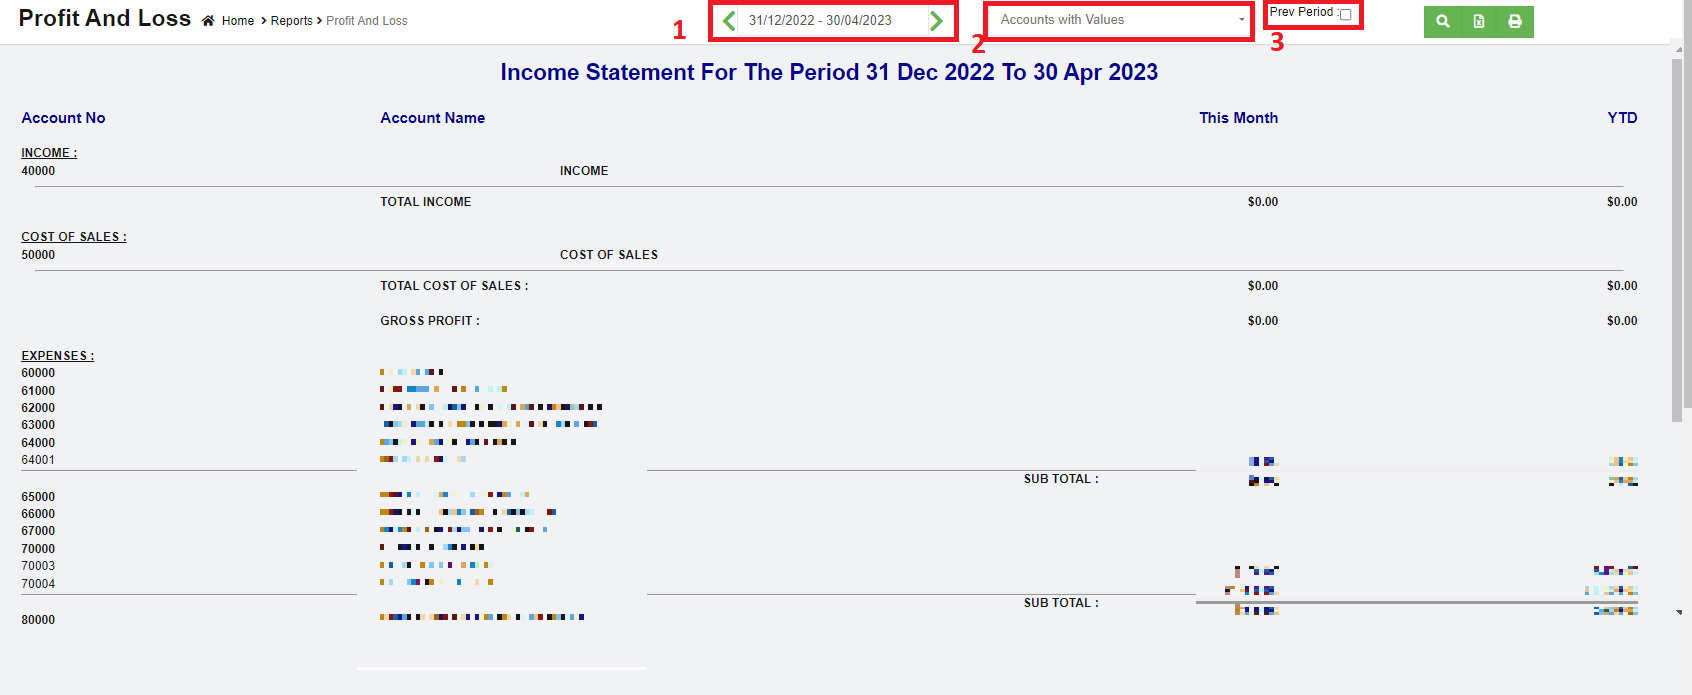](http://wiki.cuteinfocomm.com/uploads/images/gallery/2023-04/image-1681163605404.png)
4. Or if user wants to view and compare variance between current month and the previous period, tick the Pre Period box in field 3. Then select month & year. [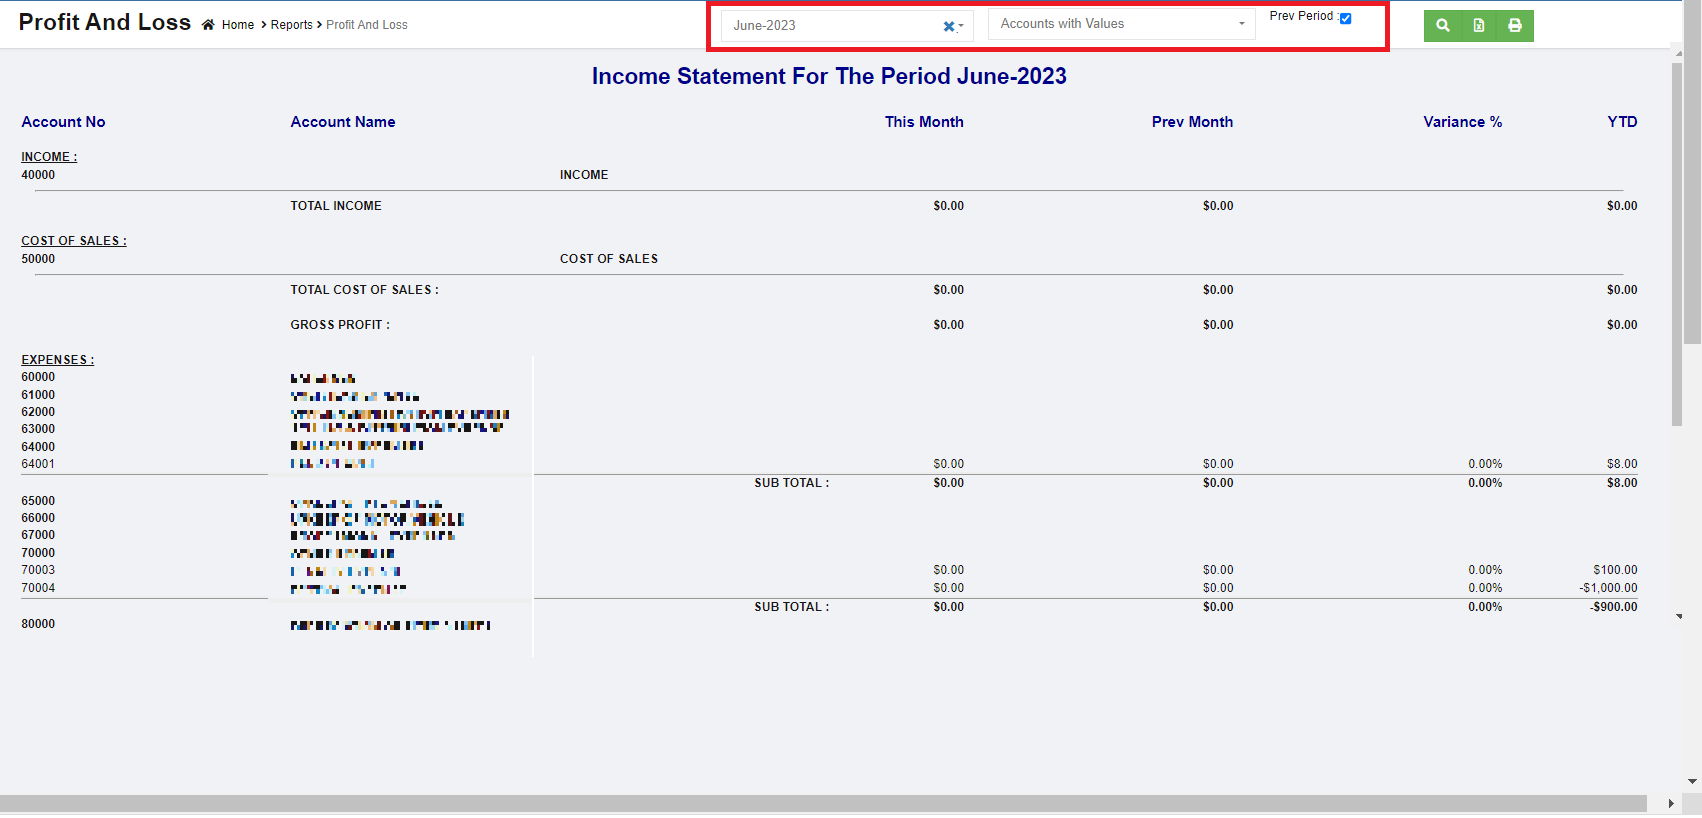](http://wiki.cuteinfocomm.com/uploads/images/gallery/2023-04/image-1681163815487.png)
5. Once month and year are selected, click [](http://wiki.cuteinfocomm.com/uploads/images/gallery/2023-03/image-1679955186159.png)search icon, the profit and loss report for selected period and previous month and the variance will show in screen.
6. Click[](http://wiki.cuteinfocomm.com/uploads/images/gallery/2023-03/image-1679955198941.png) to download report in xlsx format, click[](http://wiki.cuteinfocomm.com/uploads/images/gallery/2023-03/image-1679955209790.png) to download report in PDF format.
## Project P&L
To generate project profit and loss report,
1. Navigate to Monthly Reports menu in finance module, click **Project P&L** to open report page.
2. In project field, click to select project.
3. In calendar field, select date range.
4. In report type, select summary or detail report. [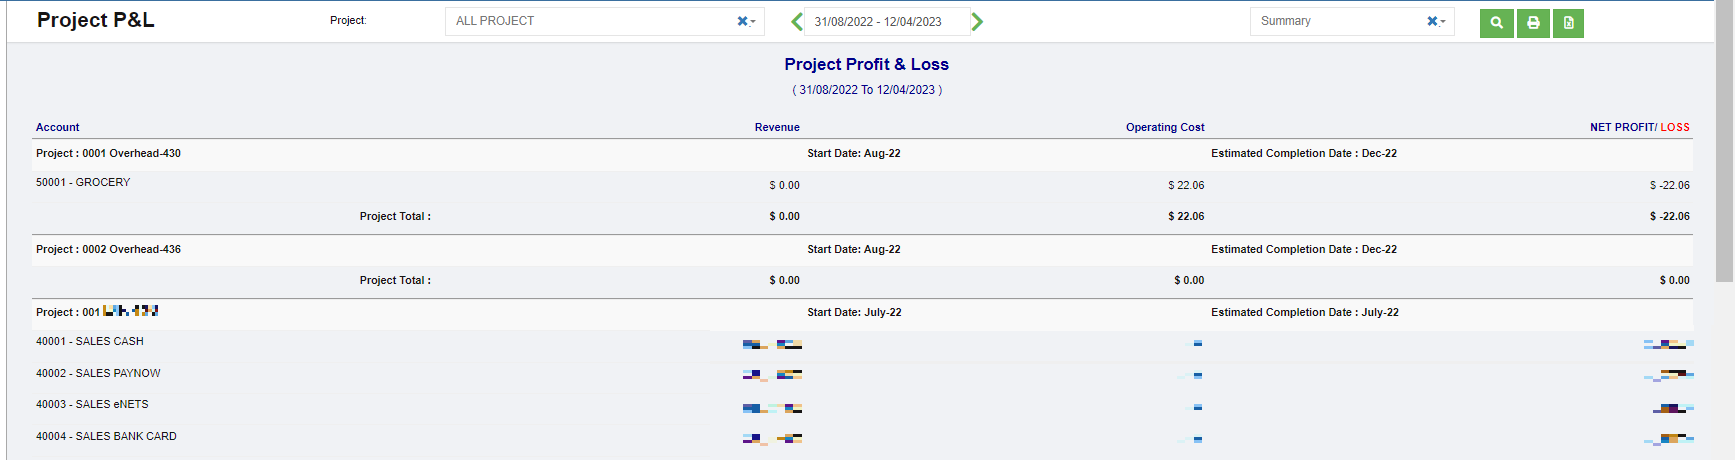](http://wiki.cuteinfocomm.com/uploads/images/gallery/2023-04/image-1681361473891.png)
5. Click [](http://wiki.cuteinfocomm.com/uploads/images/gallery/2023-03/image-1679955186159.png)search icon, the project P&L report for selected period will show in screen.
6. Click[](http://wiki.cuteinfocomm.com/uploads/images/gallery/2023-03/image-1679955198941.png) to download report in xlsx format, click[](http://wiki.cuteinfocomm.com/uploads/images/gallery/2023-03/image-1679955209790.png) to download report in PDF format.
## Project P&L Transpose
To generate project profit and loss report transpose,
1. Navigate to Monthly Reports menu in finance module, click **Project P&L Transpose** to open report page.
2. In project field, click to select project.
3. In calendar field, select date range.[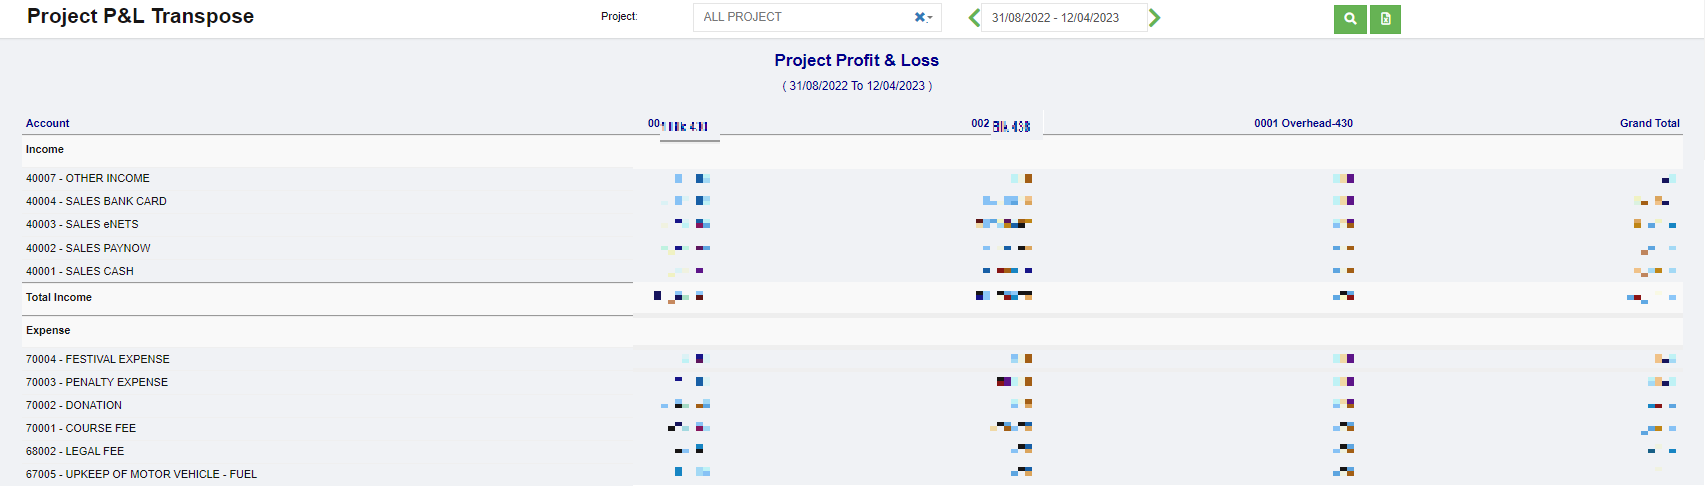](http://wiki.cuteinfocomm.com/uploads/images/gallery/2023-04/image-1681361613570.png)
4. Click [](http://wiki.cuteinfocomm.com/uploads/images/gallery/2023-03/image-1679955186159.png)search icon, the project P&L transpose report for selected period will show in screen.
5. Click[](http://wiki.cuteinfocomm.com/uploads/images/gallery/2023-03/image-1679955198941.png) to download report in xlsx format.
## Multi Period P&L
To generate multi period profit and loss report,
1. Navigate to Monthly Reports menu in finance module, click **Multi Period P&L** to open report page.
2. In calendar field, click to select date range to view P&L report.[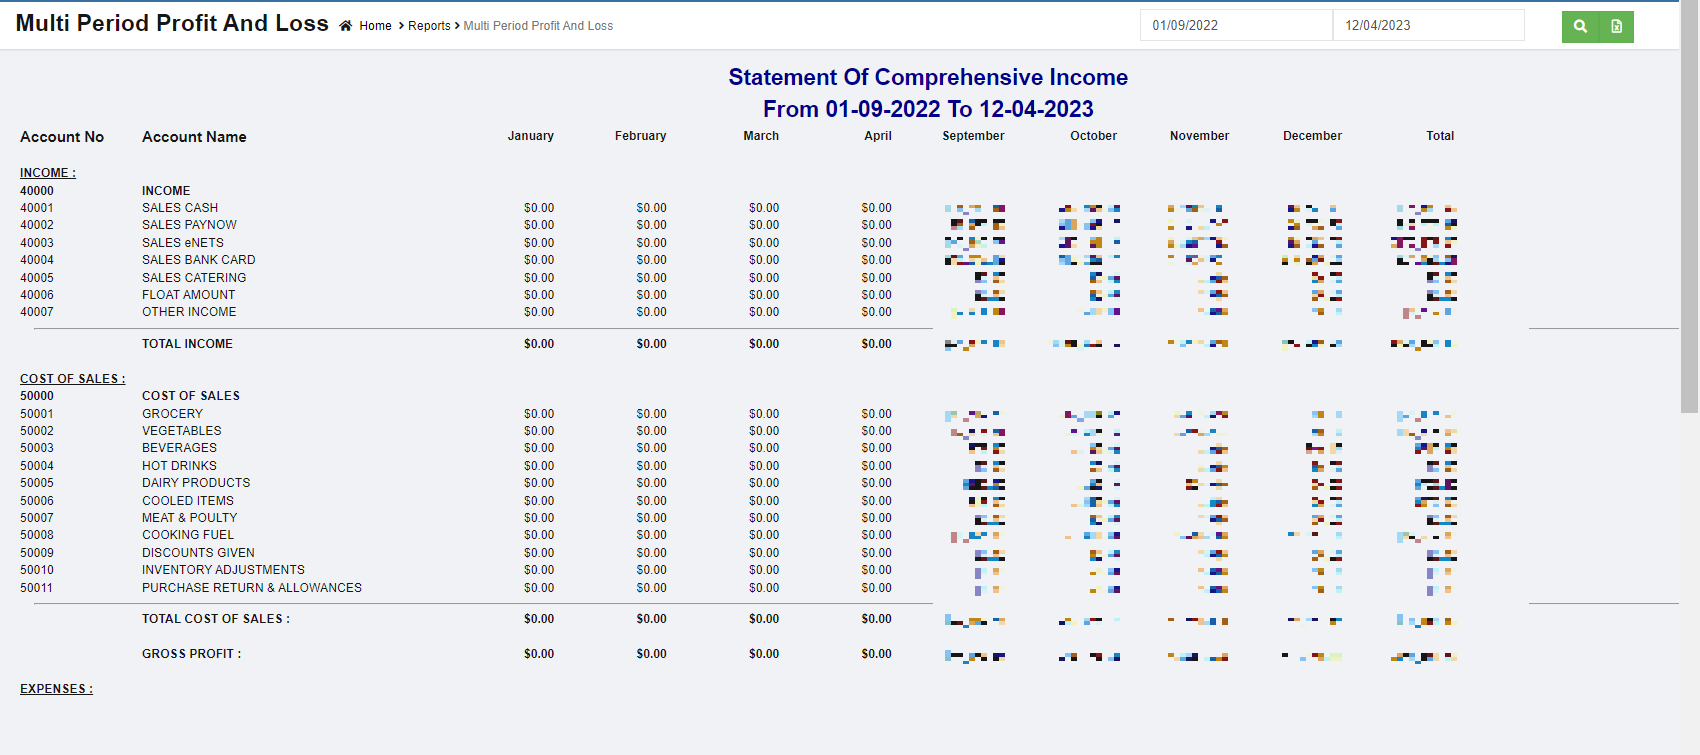](http://wiki.cuteinfocomm.com/uploads/images/gallery/2023-04/image-1681360988435.png)
3. Click [](http://wiki.cuteinfocomm.com/uploads/images/gallery/2023-03/image-1679955186159.png)search icon, the multi period P&L report for selected period will show details of income, cost of sales, expense, other income, other expenses and net profits by month as in above screenshot.
4. Click[](http://wiki.cuteinfocomm.com/uploads/images/gallery/2023-03/image-1679955198941.png) to download report in xlsx format. not working check
## Balance Sheet
To generate balance sheet report,
1. Navigate to Monthly Reports menu in finance module, click **Balance Sheet** to open report page.
2. In calendar field, select date and year.
3. Click [](http://wiki.cuteinfocomm.com/uploads/images/gallery/2023-03/image-1679955186159.png)search icon, the balance sheet report for selected period will show in screen. [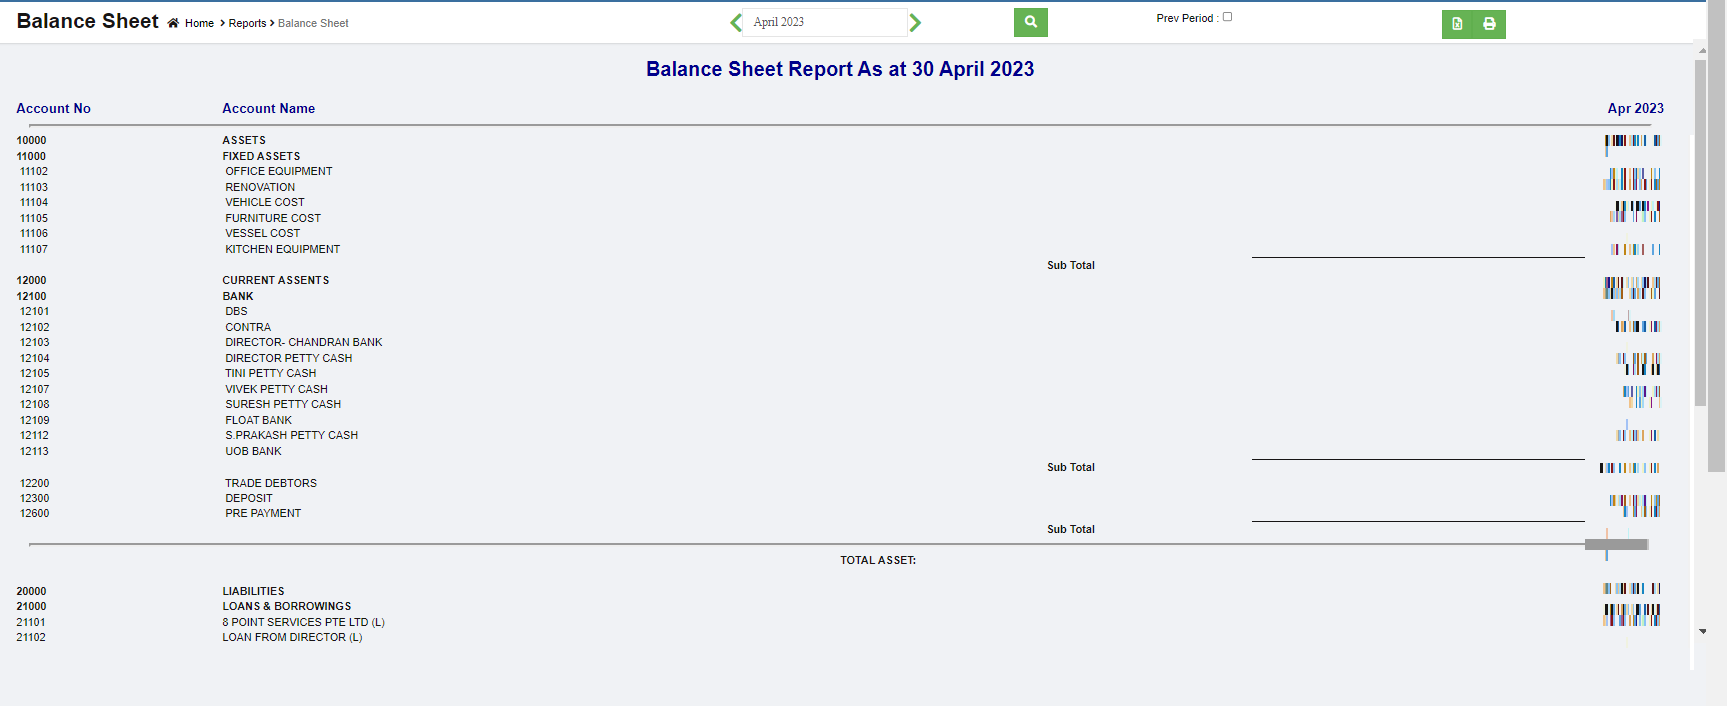](http://wiki.cuteinfocomm.com/uploads/images/gallery/2023-04/image-1681362893908.png)
4. Or if user wants to view previous month balance sheet and the variance, tick the Pre Period box, the selected month and previous month and variance data will show as below, [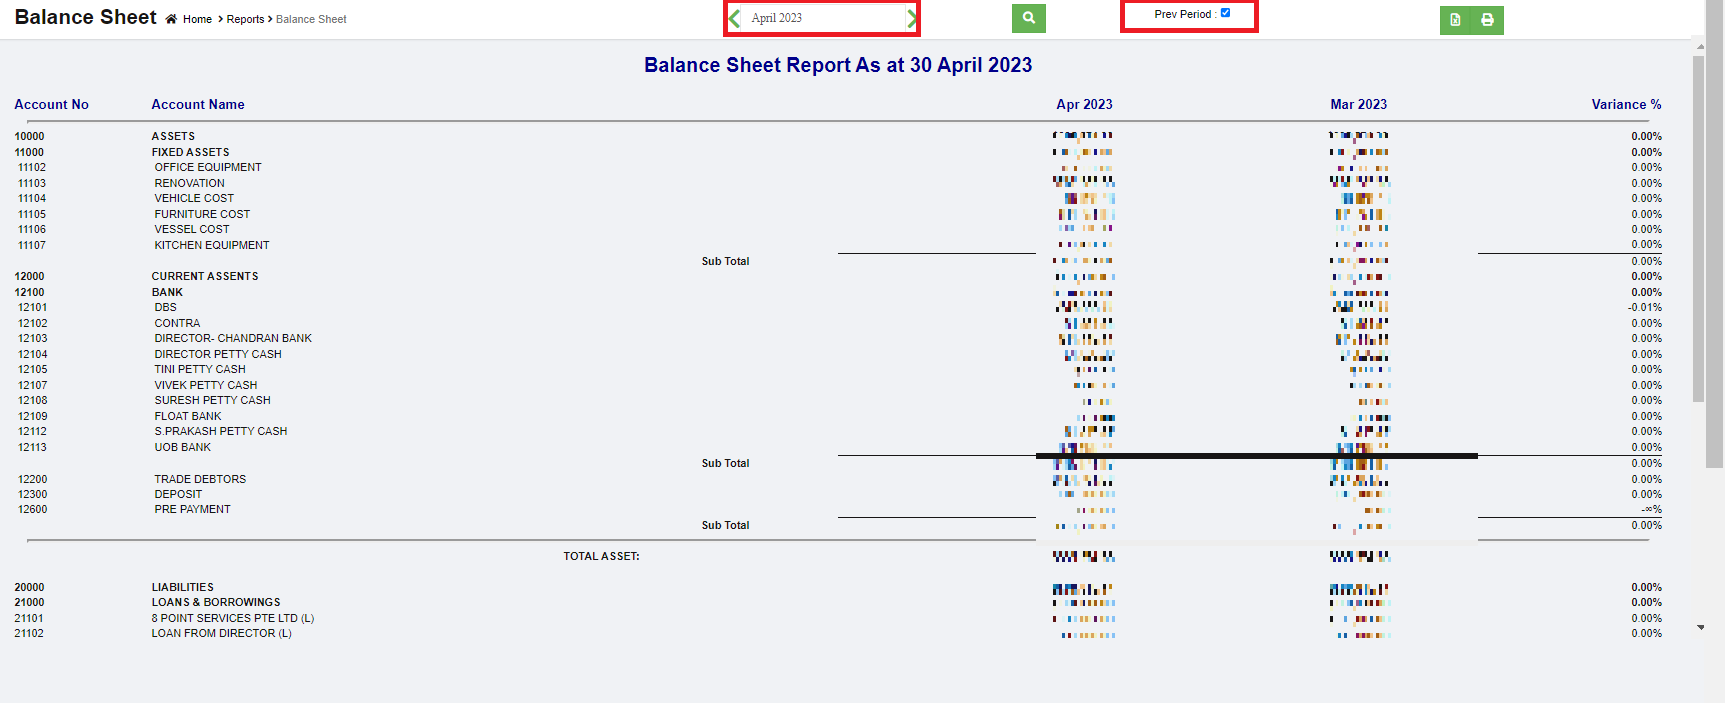](http://wiki.cuteinfocomm.com/uploads/images/gallery/2023-04/image-1681363071486.png)
5. Click[](http://wiki.cuteinfocomm.com/uploads/images/gallery/2023-03/image-1679955198941.png) to download report in xlsx format, click[](http://wiki.cuteinfocomm.com/uploads/images/gallery/2023-03/image-1679955209790.png) to download report in PDF format.
## Transaction Journal
The Transaction Journal Report **shows debits and credits for each transaction** and provides a more focused view of amounts and accounts.
To generate transaction journal report,
1. Navigate to Monthly Reports menu in finance module, click **Transaction Journal** to open report page.
2. In calendar field, select date range,
3. In transaction type field, select type of transaction to view.[](http://wiki.cuteinfocomm.com/uploads/images/gallery/2023-04/image-1681363317475.png)
4. Click [](http://wiki.cuteinfocomm.com/uploads/images/gallery/2023-03/image-1679955186159.png)search icon, the transaction journal that meets criteria will show in screen. [](http://wiki.cuteinfocomm.com/uploads/images/gallery/2023-04/image-1681364087269.png)
5. Or user can use filters to customize the transaction journal report(filter options including name, Txn number, report type), [](http://wiki.cuteinfocomm.com/uploads/images/gallery/2023-04/image-1681364157852.png)
6. Click[](http://wiki.cuteinfocomm.com/uploads/images/gallery/2023-03/image-1679955198941.png) to download report in xlsx format, click[](http://wiki.cuteinfocomm.com/uploads/images/gallery/2023-03/image-1679955209790.png) to download report in PDF format.
## Transactional Profit Report
To generate transaction profit report,
1. Navigate to Monthly Reports menu in finance module, click **Transaction Profit** to open report page. [](http://wiki.cuteinfocomm.com/uploads/images/gallery/2023-04/image-1681536994021.png)
2. In calendar field, select date range.
3. In Job Code, click to select project.
4. Click [](http://wiki.cuteinfocomm.com/uploads/images/gallery/2023-03/image-1679955186159.png)search icon, the transaction profit report for selected period and project will show in screen.
5. Click[](http://wiki.cuteinfocomm.com/uploads/images/gallery/2023-03/image-1679955198941.png) to download report in xlsx format, click[](http://wiki.cuteinfocomm.com/uploads/images/gallery/2023-03/image-1679955209790.png) to download report in PDF format.
## Accounts Journal
To generate accounts journal report,
1. Navigate to Monthly Reports menu in finance module, click **Accounts Journal** to open report page.
2. In calendar field, select date range,
3. In Accounts field, select account or all accounts,
4. Click [](http://wiki.cuteinfocomm.com/uploads/images/gallery/2023-03/image-1679955186159.png)search icon, the accounts journal report for selected period will show details of income, cost of sales, expense, other income, other expenses and net profits by month as in below screenshot.[](http://wiki.cuteinfocomm.com/uploads/images/gallery/2023-04/image-1681365536398.png)
5. Click[](http://wiki.cuteinfocomm.com/uploads/images/gallery/2023-03/image-1679955198941.png) to download report in xlsx format, click[](http://wiki.cuteinfocomm.com/uploads/images/gallery/2023-03/image-1679955209790.png) to download report in PDF format.
## Transaction Report
To generate transaction report,
1. Navigate to Monthly Reports menu in finance module, click **Transaction Report** to open report page. [](http://wiki.cuteinfocomm.com/uploads/images/gallery/2023-04/image-1681537537020.png)
2. In calendar field 1, select date range,
3. Or user can click filter icon in area 2 to open report filter page, and select column filters, then click Show to show selected filters,[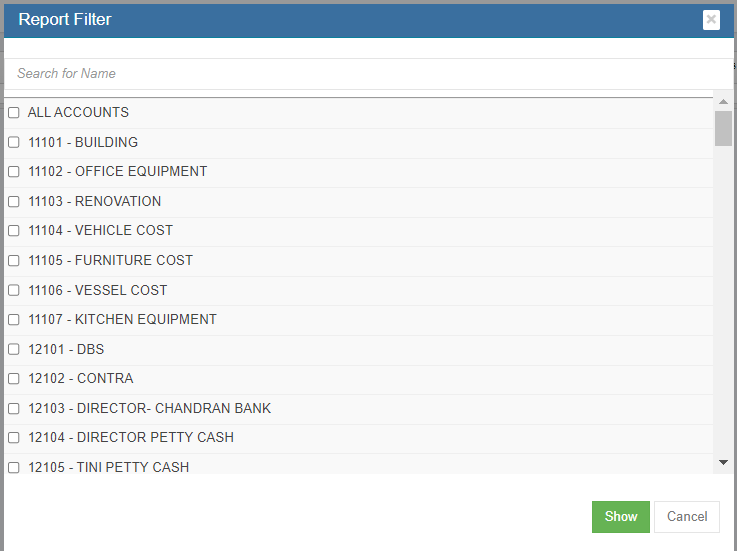](http://wiki.cuteinfocomm.com/uploads/images/gallery/2023-04/image-1681537487776.png)
4. Click [](http://wiki.cuteinfocomm.com/uploads/images/gallery/2023-03/image-1679955186159.png)search icon, the transaction report for selected period will show, click[](http://wiki.cuteinfocomm.com/uploads/images/gallery/2023-03/image-1679955198941.png) to download report in xlsx format, click[](http://wiki.cuteinfocomm.com/uploads/images/gallery/2023-03/image-1679955209790.png) to download report in PDF format.
# Customer Reports
Customer reports include below reports: Receivables Ageing, Receivables Ageing Detail, Receivables Ageing Detail (Portrait), SOA-Sales, Customer Ledger, Customer Summary, Sales Report MonthWise, Project Receivables Ageing.
[](http://wiki.cuteinfocomm.com/uploads/images/gallery/2023-04/image-1681537866849.png)
## Receivables Ageing Summary Report
To generate receivables ageing report,
1. Navigate to Customer Reports menu in finance module, click **Receivables Ageing** to open report page.[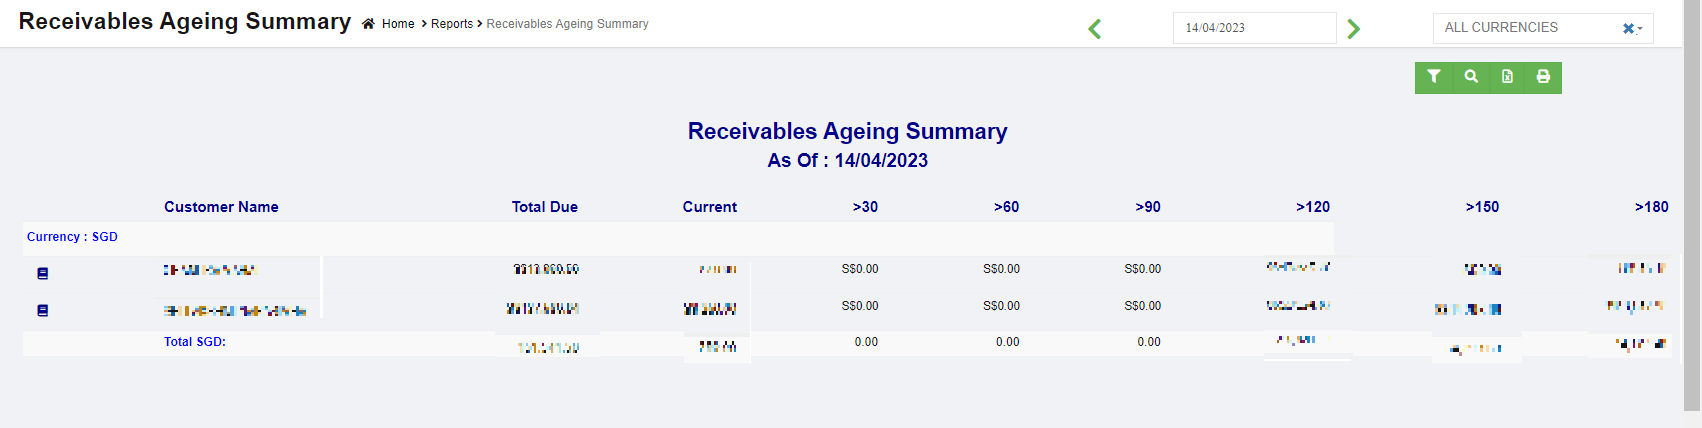](http://wiki.cuteinfocomm.com/uploads/images/gallery/2023-04/image-1681538264366.png)
2. In calendar field, click to select a date as ageing report by date.
3. In Currency type field, select all currencies or a specific currency type.
4. Click [ ](http://wiki.cuteinfocomm.com/uploads/images/gallery/2023-03/image-1679955186159.png)search icon, the receivables ageing report for selected period will show in screen, click[](http://wiki.cuteinfocomm.com/uploads/images/gallery/2023-03/image-1679955198941.png) to download report in xlsx format, click[](http://wiki.cuteinfocomm.com/uploads/images/gallery/2023-03/image-1679955209790.png) to download report in PDF format.
5. Click[](http://wiki.cuteinfocomm.com/uploads/images/gallery/2023-04/image-1681538625102.png) filter icon to open customer filter, and select customer name, then click show, the selected customer(s)' receivables ageing report will show.
## Receivables Ageing Detail Report
To generate receivables ageing detail report,
1. Navigate to Customer Reports menu in finance module, click **Receivables Ageing Detail** to open report page.
2. In calendar field, click to select a date as ageing report by date.
3. In Currency type field, select all currencies or a specific currency type.
4. Click [ ](http://wiki.cuteinfocomm.com/uploads/images/gallery/2023-03/image-1679955186159.png)search icon, the receivables ageing report for selected period will show in screen, click[](http://wiki.cuteinfocomm.com/uploads/images/gallery/2023-03/image-1679955198941.png) to download report in xlsx format, click[](http://wiki.cuteinfocomm.com/uploads/images/gallery/2023-03/image-1679955209790.png) to download report in PDF format. [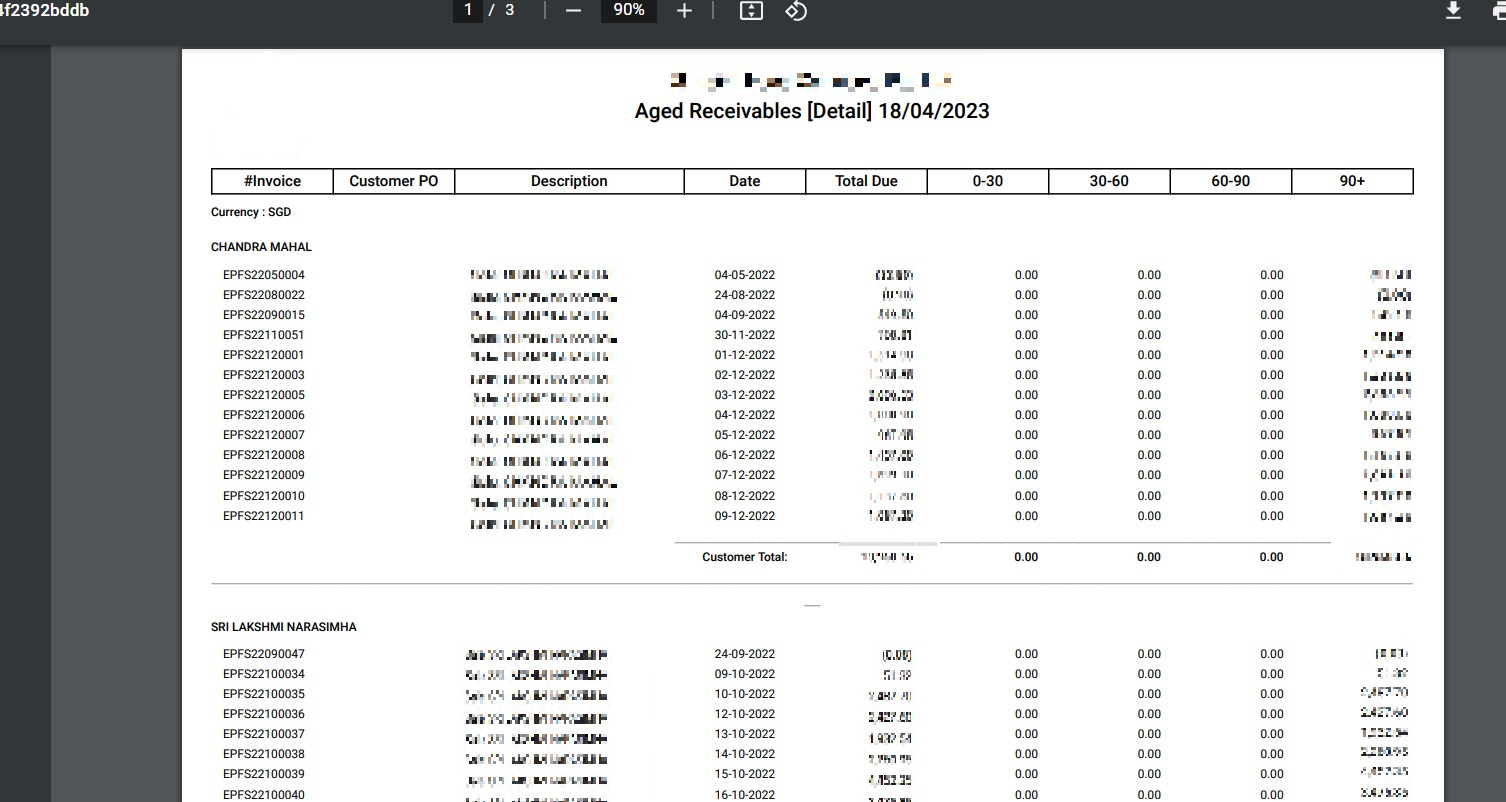](http://wiki.cuteinfocomm.com/uploads/images/gallery/2023-04/image-1681943121177.png)
5. Click[](http://wiki.cuteinfocomm.com/uploads/images/gallery/2023-04/image-1681538625102.png) filter icon to open customer filter, and select customer name, then click show, the selected customer(s)' receivables ageing detail report will show.
## Receivables Ageing Detail Portrait Report
To generate receivables ageing detail report in portrait format,
1. Navigate to Customer Reports menu in finance module, click **Receivables Ageing Detail (Portrait)** to open report page.
2. In calendar field, click to select a date as ageing report by date.
3. In Currency type field, select all currencies or a specific currency type.
4. Click [ ](http://wiki.cuteinfocomm.com/uploads/images/gallery/2023-03/image-1679955186159.png)search icon, the receivables ageing report for selected period will show in screen, click[](http://wiki.cuteinfocomm.com/uploads/images/gallery/2023-03/image-1679955198941.png) to download report in xlsx format, click[](http://wiki.cuteinfocomm.com/uploads/images/gallery/2023-03/image-1679955209790.png) to download report in PDF format. [](http://wiki.cuteinfocomm.com/uploads/images/gallery/2023-04/image-1681943236069.jpg)
5. Click[](http://wiki.cuteinfocomm.com/uploads/images/gallery/2023-04/image-1681538625102.png) filter icon to open customer filter, and select customer name, then click show, the selected customer(s)' receivables ageing detail portrait report will show.
## Statement of Account (SOA)-Sales Report
To generate SOA-Sales report,
1. Navigate to Customer Reports menu in finance module, click **SOA-Sales** to open report page.[](http://wiki.cuteinfocomm.com/uploads/images/gallery/2023-04/image-1681759687232.png)
2. In calendar field, click to select a date as report by date.
3. Click [ ](http://wiki.cuteinfocomm.com/uploads/images/gallery/2023-03/image-1679955186159.png)search icon, the sales report for selected period will show in screen, click[](http://wiki.cuteinfocomm.com/uploads/images/gallery/2023-03/image-1679955198941.png) to download report in xlsx format, click[](http://wiki.cuteinfocomm.com/uploads/images/gallery/2023-03/image-1679955209790.png) to download report in PDF format.
4. Click[](http://wiki.cuteinfocomm.com/uploads/images/gallery/2023-04/image-1681538625102.png) filter icon to open customer filter, and select customer name, then click show, the selected customer(s)' SOA-sales report will show.
## Customer Ledger
To generate customer ledger report,
1. Navigate to Customer Reports menu in finance module, click **Customer Ledger** to open report page. [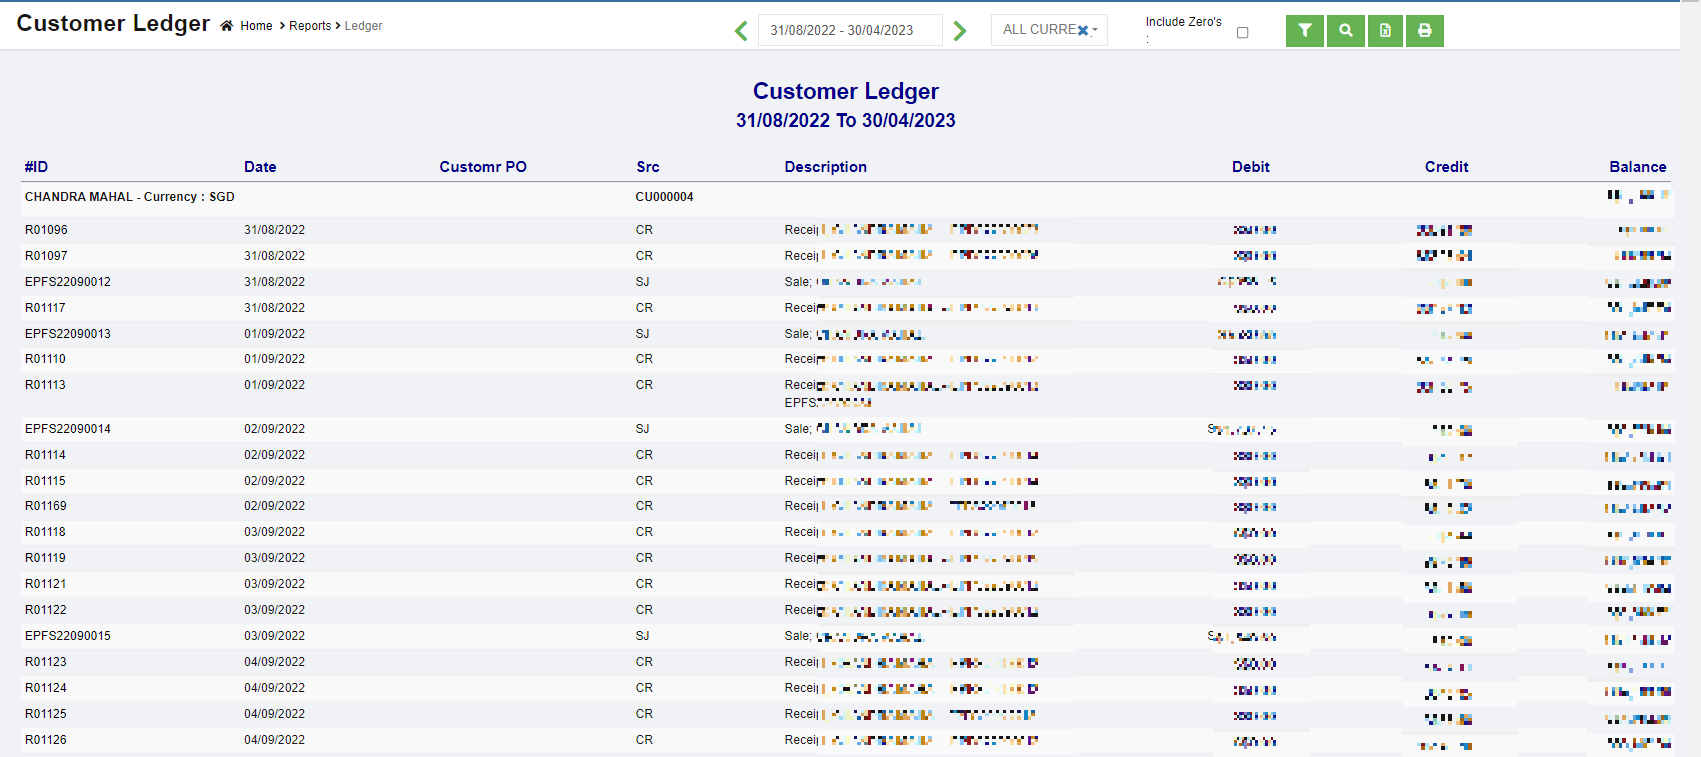](http://wiki.cuteinfocomm.com/uploads/images/gallery/2023-04/image-1681759933771.png)
2. In calendar field, click to select date range to view customer ledger.
3. In Currency type field, select all currencies or a specific currency type.
4. If user wants to view customer ledger that includes zero value accounts, tick the Include Zero's box.
5. Click [ ](http://wiki.cuteinfocomm.com/uploads/images/gallery/2023-03/image-1679955186159.png)search icon, the customer ledger report for selected period will show in screen, click[](http://wiki.cuteinfocomm.com/uploads/images/gallery/2023-03/image-1679955198941.png) to download report in xlsx format, click[](http://wiki.cuteinfocomm.com/uploads/images/gallery/2023-03/image-1679955209790.png) to download report in PDF format.
6. Click[](http://wiki.cuteinfocomm.com/uploads/images/gallery/2023-04/image-1681538625102.png) filter icon to open customer filter, and select customer name, then click show, the selected customer(s)' ledger report will show.
## Customer Summary Report
To generate customer summary report,
1. Navigate to Customer Reports menu in finance module, click **Customer Summary** to open report page. [](http://wiki.cuteinfocomm.com/uploads/images/gallery/2023-04/image-1681760208136.png)
2. In calendar field, click to select date range to view customer ledger.
3. In report type field, select summary or detail report type.
4. Click [ ](http://wiki.cuteinfocomm.com/uploads/images/gallery/2023-03/image-1679955186159.png)search icon, the customer summary report for selected period will show in screen, click[](http://wiki.cuteinfocomm.com/uploads/images/gallery/2023-03/image-1679955198941.png) to download report in xlsx format, click[](http://wiki.cuteinfocomm.com/uploads/images/gallery/2023-03/image-1679955209790.png) to download report in PDF format.
## Sales Report MonthWise Report
To sales month wise report,
1. Navigate to Customer Reports menu in finance module, click **Sales Report MonthWise** to open report page. [](http://wiki.cuteinfocomm.com/uploads/images/gallery/2023-04/image-1681853419125.png)
2. In Multi Period box, tick if user wants to view sales report for selected period; untick if user wants to view by month.
3. In With Ex-Rate box, tick if want to include exchange rate.
4. In calendar field, if multi period is ticked, user will be able to select a date range; if multi period is not ticked, user will be able to select month and year to generate report.
5. In Currency type field, select all currencies or a specific currency type.
6. Click [ ](http://wiki.cuteinfocomm.com/uploads/images/gallery/2023-03/image-1679955186159.png)search icon, the sales report for selected period will show in screen, click[](http://wiki.cuteinfocomm.com/uploads/images/gallery/2023-03/image-1679955198941.png) to download report in xlsx format, click[](http://wiki.cuteinfocomm.com/uploads/images/gallery/2023-03/image-1679955209790.png) to download report in PDF format.
7. Click[](http://wiki.cuteinfocomm.com/uploads/images/gallery/2023-04/image-1681538625102.png) filter icon to open customer filter, and select customer name, then click show, the selected customer(s)' sales month wise report will show.
## Project Receivables Ageing Report
To generate Project Receivables Ageing report,
1. Navigate to Customer Reports menu in finance module, click **Project Receivables Ageing** to open report page. [](http://wiki.cuteinfocomm.com/uploads/images/gallery/2023-04/image-1681853982648.png)
2. In Project field, click to select all project or a specific project.
3. In calendar field, click to select a date as ageing report by date.
4. In Currency type field, select all currencies or a specific currency type.
5. Click [ ](http://wiki.cuteinfocomm.com/uploads/images/gallery/2023-03/image-1679955186159.png)search icon, the receivables ageing report for selected period will show in screen, click[](http://wiki.cuteinfocomm.com/uploads/images/gallery/2023-03/image-1679955198941.png) to download report in xlsx format.
6. Click[](http://wiki.cuteinfocomm.com/uploads/images/gallery/2023-04/image-1681538625102.png) filter icon to open customer filter, and select customer name, then click show, the selected customer(s)' receivables ageing detail portrait report will show.
# Supplier Reports
Supplier reports include below reports: Payables Ageing, Payables Ageing Detail, Payables Ageing Detail (Portrait), SOA-Purchases, Supplier Ledger, Supplier Summary.
[](http://wiki.cuteinfocomm.com/uploads/images/gallery/2023-04/image-1681854201300.png)
## Payables Ageing Summary Report
To generate payables ageing report,
1. Navigate to Supplier Reports menu in finance module, click **Payables Ageing** to open report page. [](http://wiki.cuteinfocomm.com/uploads/images/gallery/2023-04/image-1681943492773.png)
2. In calendar field, click to select a date as ageing report by date.
3. In Currency type field, select all currencies or a specific currency type.
4. Click [ ](http://wiki.cuteinfocomm.com/uploads/images/gallery/2023-03/image-1679955186159.png)search icon, the payables ageing report for selected period will show in screen, click[](http://wiki.cuteinfocomm.com/uploads/images/gallery/2023-03/image-1679955198941.png) to download report in xlsx format, click[](http://wiki.cuteinfocomm.com/uploads/images/gallery/2023-03/image-1679955209790.png) to download report in PDF format.
5. Click[](http://wiki.cuteinfocomm.com/uploads/images/gallery/2023-04/image-1681538625102.png) filter icon to open suppliers filter, and select supplier's name, then click show, the selected supplier(s)' payables ageing report will show.
## Payables Ageing Detail Report
To generate payables ageing detail report,
1. Navigate to Supplier Reports menu in finance module, click **Payables Ageing Detail** to open report page. [](http://wiki.cuteinfocomm.com/uploads/images/gallery/2023-04/image-1681943710606.png)
2. In calendar field, click to select a date as ageing report by date.
3. In Currency type field, select all currencies or a specific currency type.
4. Click [ ](http://wiki.cuteinfocomm.com/uploads/images/gallery/2023-03/image-1679955186159.png)search icon, the payables ageing report for selected period will show in screen, click[](http://wiki.cuteinfocomm.com/uploads/images/gallery/2023-03/image-1679955198941.png) to download report in xlsx format, click[](http://wiki.cuteinfocomm.com/uploads/images/gallery/2023-03/image-1679955209790.png) to download report in PDF format.
5. Click[](http://wiki.cuteinfocomm.com/uploads/images/gallery/2023-04/image-1681538625102.png) filter icon to open suppliers filter, and select supplier's name, then click show, the selected supplier(s)' payables ageing detail report will show.
## Payables Ageing Detail Portrait Report
To generate payables ageing detail report in portrait format,
1. Navigate to Supplier Reports menu in finance module, click **Payables Ageing Detail (Portrait)** to open report page. [](http://wiki.cuteinfocomm.com/uploads/images/gallery/2023-04/image-1681943793020.png)
2. In calendar field, click to select a date as ageing report by date.
3. In Currency type field, select all currencies or a specific currency type.
4. Click [ ](http://wiki.cuteinfocomm.com/uploads/images/gallery/2023-03/image-1679955186159.png)search icon, the payables ageing report for selected period will show in screen, click[](http://wiki.cuteinfocomm.com/uploads/images/gallery/2023-03/image-1679955198941.png) to download report in xlsx format, click[](http://wiki.cuteinfocomm.com/uploads/images/gallery/2023-03/image-1679955209790.png) to download report in PDF format.
5. Click[](http://wiki.cuteinfocomm.com/uploads/images/gallery/2023-04/image-1681538625102.png) filter icon to open suppliers filter, and select supplier's name, then click show, the selected supplier(s)' payables ageing detail portrait report will show.
## Statement of Account (SOA)-Purchases Report
To generate SOA-Purchases report,
1. Navigate to Supplier Reports menu in finance module, click **SOA-Purchases** to open report page. [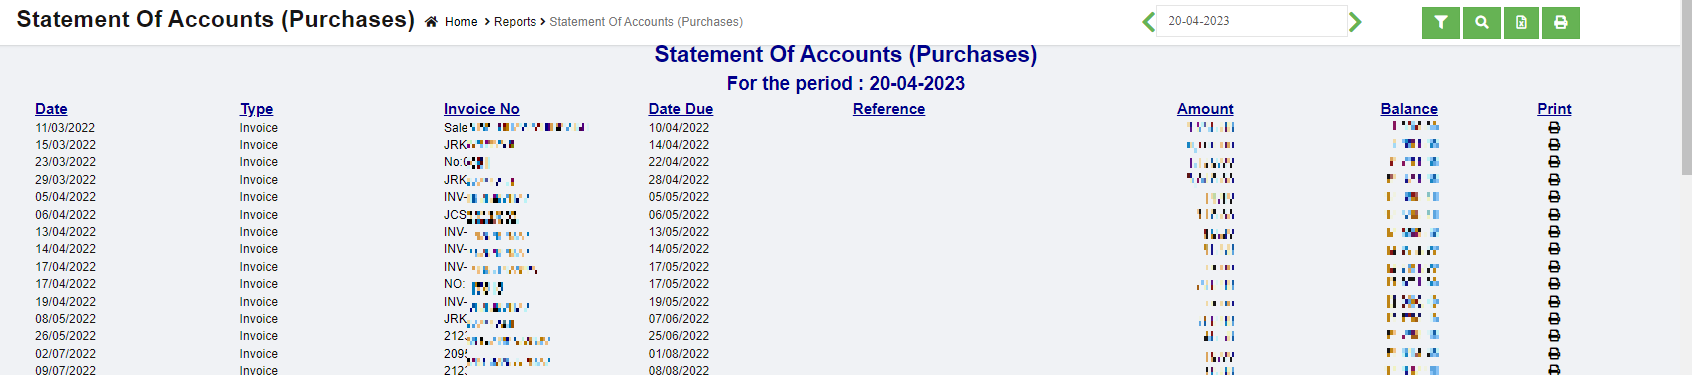](http://wiki.cuteinfocomm.com/uploads/images/gallery/2023-04/image-1682025783476.png)
2. In calendar field, click to select a date as report by date.
3. Click [ ](http://wiki.cuteinfocomm.com/uploads/images/gallery/2023-03/image-1679955186159.png)search icon, the SOA purchases report for selected period will show in screen, click[](http://wiki.cuteinfocomm.com/uploads/images/gallery/2023-03/image-1679955198941.png) to download report in xlsx format, click[](http://wiki.cuteinfocomm.com/uploads/images/gallery/2023-03/image-1679955209790.png) to download report in PDF format.
4. Click[](http://wiki.cuteinfocomm.com/uploads/images/gallery/2023-04/image-1681538625102.png) filter icon to open supplier filter, and select supplier name, then click show, the selected supplier(s)' SOA-purchases report will show.
## Supplier Ledger
To generate supplier ledger report,
1. Navigate to Supplier Reports menu in finance module, click **Supplier Ledger** to open report page. [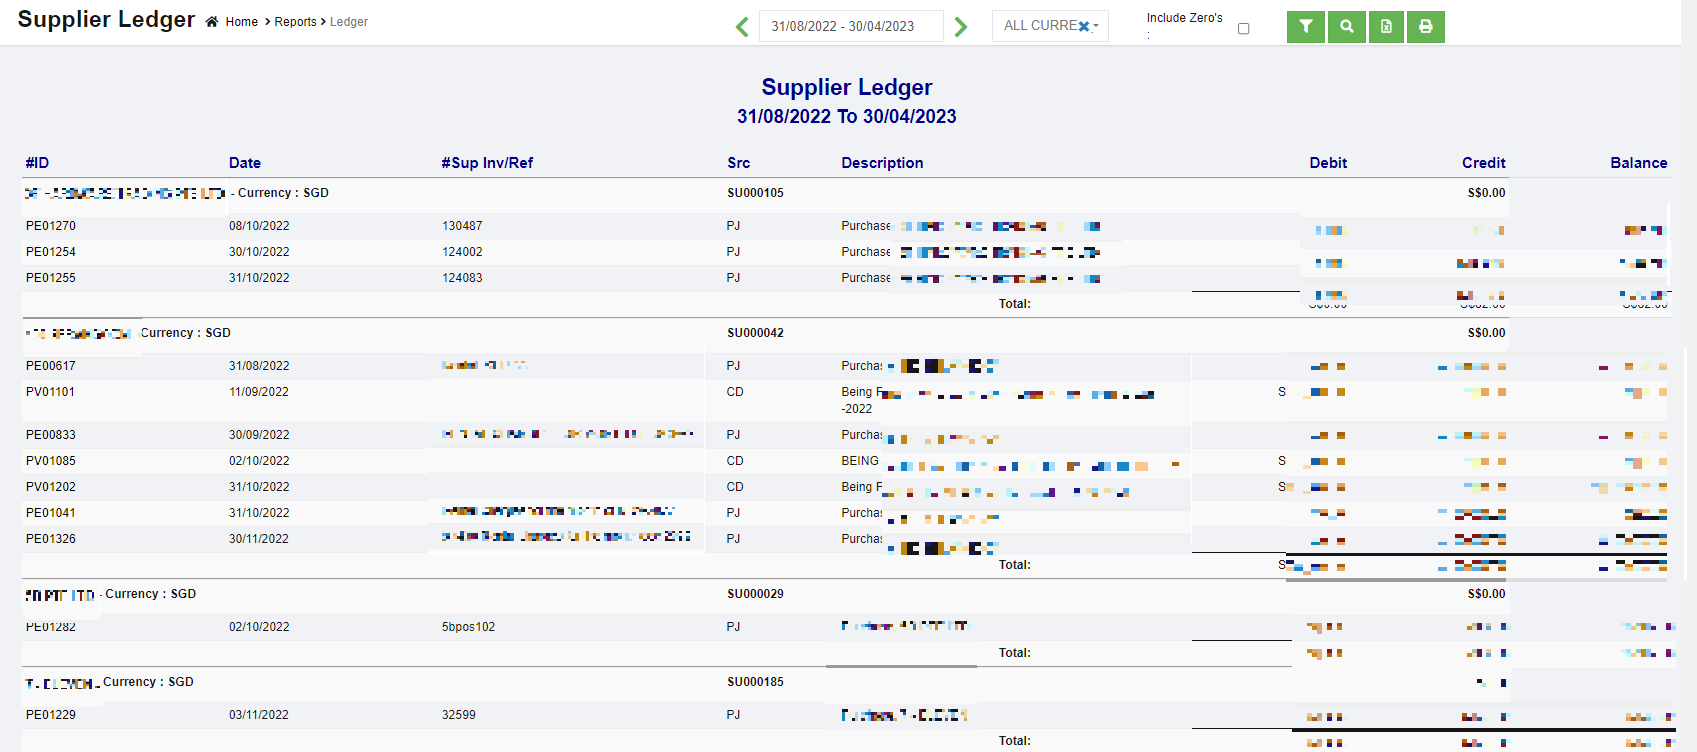](http://wiki.cuteinfocomm.com/uploads/images/gallery/2023-04/image-1682026209882.png)
2. In calendar field, click to select date range to view supplier ledger.
3. In Currency type field, select all currencies or a specific currency type.
4. If user wants to view supplier ledger that includes zero value accounts, tick the Include Zero's box.
5. Click [ ](http://wiki.cuteinfocomm.com/uploads/images/gallery/2023-03/image-1679955186159.png)search icon, the supplier ledger report for selected period will show in screen, click[](http://wiki.cuteinfocomm.com/uploads/images/gallery/2023-03/image-1679955198941.png) to download report in xlsx format, click[](http://wiki.cuteinfocomm.com/uploads/images/gallery/2023-03/image-1679955209790.png) to download report in PDF format.
6. Click[](http://wiki.cuteinfocomm.com/uploads/images/gallery/2023-04/image-1681538625102.png) filter icon to open supplier filter, and select supplier name, then click show, the selected supplier(s)' ledger report will show.
## Supplier Summary Report
To generate supplier summary report,
1. Navigate to Supplier Reports menu in finance module, click **Supplier Summary** to open report page. [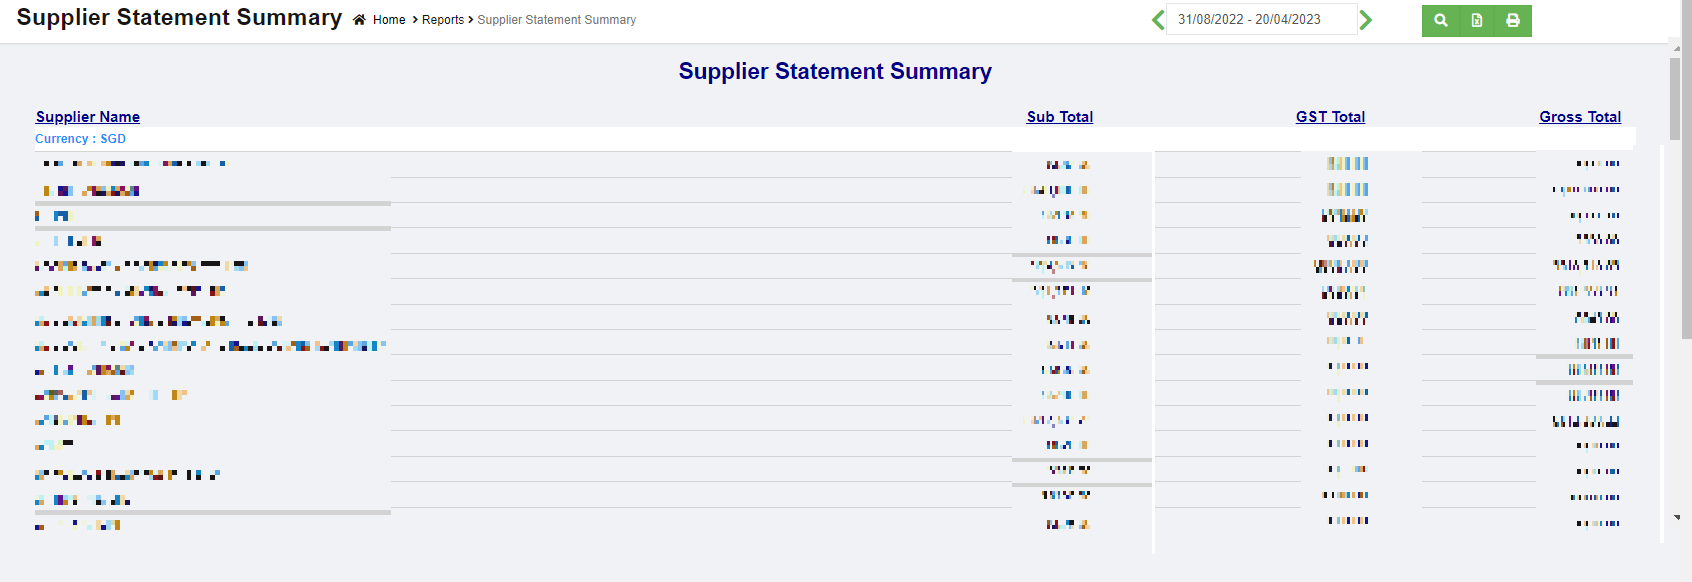](http://wiki.cuteinfocomm.com/uploads/images/gallery/2023-04/image-1682026439880.png)
2. In calendar field, click to select date range to view supplier ledger.
3. Click [ ](http://wiki.cuteinfocomm.com/uploads/images/gallery/2023-03/image-1679955186159.png)search icon, the supplier statement summary report for selected period will show in screen, click[](http://wiki.cuteinfocomm.com/uploads/images/gallery/2023-03/image-1679955198941.png) to download report in xlsx format, click[](http://wiki.cuteinfocomm.com/uploads/images/gallery/2023-03/image-1679955209790.png) to download report in PDF format.
# Tax Reports
Tax reports include below reports: GST F5 Return, Sales Tax Analysis, Receipt Tax Analysis, Purchase Tax Analysis, Payment Tax Analysis, Journal Tax Analysis.
[](http://wiki.cuteinfocomm.com/uploads/images/gallery/2023-04/image-1682026501100.png)
## GST F5 Return
Authorized user can generate GST F5 return report which includes details of: **the sale of goods and services to customers**. **purchases made from the GST registered businesses**. **amount of GST collected**.
1. Navigate to Tax Reports menu in finance module, click **GST F5 Return** to open report page. [](http://wiki.cuteinfocomm.com/uploads/images/gallery/2023-05/image-1684182638608.png)
2. In calendar field, click to select date range to generate GST F5 return.
3. In Report type field, click to select report type as **Summary** or **Detail** report.
4. Click [ ](http://wiki.cuteinfocomm.com/uploads/images/gallery/2023-03/image-1679955186159.png)search icon, the GST F5 Return report for selected period will show in screen, click[](http://wiki.cuteinfocomm.com/uploads/images/gallery/2023-03/image-1679955198941.png) to download report in xlsx format, click[](http://wiki.cuteinfocomm.com/uploads/images/gallery/2023-03/image-1679955209790.png) to download report in PDF format. [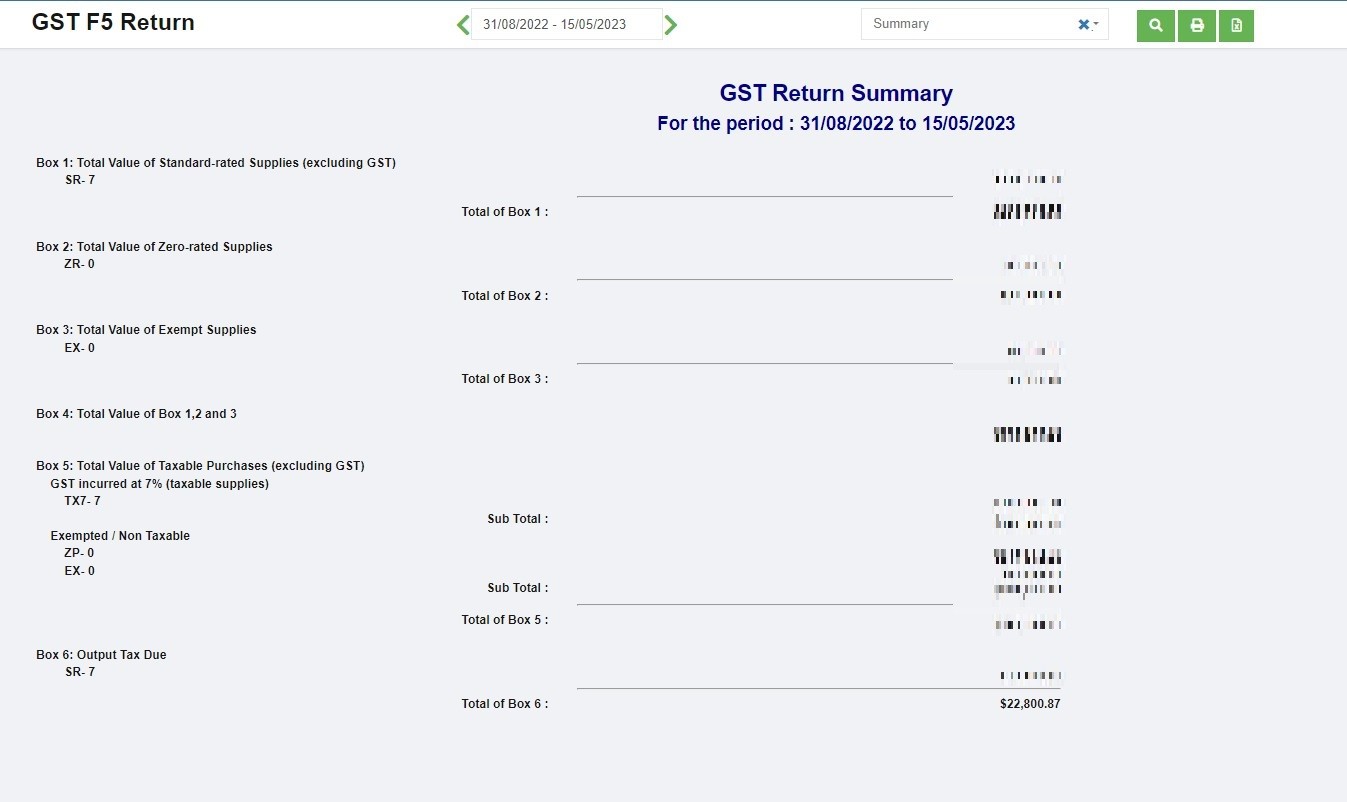](http://wiki.cuteinfocomm.com/uploads/images/gallery/2023-05/image-1684182855222.jpg)
1. Navigate to Tax Reports menu in finance module, click **Sales Tax Analysis** to open report page. [](http://wiki.cuteinfocomm.com/uploads/images/gallery/2023-05/image-1684183597419.png)
2. In calendar field, click to select date range to generate sales tax analysis.
3. Click [ ](http://wiki.cuteinfocomm.com/uploads/images/gallery/2023-03/image-1679955186159.png)search icon, the Sales Tax Analysis report for selected period will show in screen, click[](http://wiki.cuteinfocomm.com/uploads/images/gallery/2023-03/image-1679955198941.png) to download report in xlsx format, click[](http://wiki.cuteinfocomm.com/uploads/images/gallery/2023-03/image-1679955209790.png) to download report in PDF format.
1. Navigate to Tax Reports menu in finance module, click **Receipt Tax Analysis** to open report page. [](http://wiki.cuteinfocomm.com/uploads/images/gallery/2023-05/image-1684184133884.png)
2. In calendar field, click to select date range to generate receipt tax analysis.
3. Click [ ](http://wiki.cuteinfocomm.com/uploads/images/gallery/2023-03/image-1679955186159.png)search icon, the Receipt Tax Analysis report for selected period will show in screen, click[](http://wiki.cuteinfocomm.com/uploads/images/gallery/2023-03/image-1679955198941.png) to download report in xlsx format, click[](http://wiki.cuteinfocomm.com/uploads/images/gallery/2023-03/image-1679955209790.png) to download report in PDF format.
1. Navigate to Tax Reports menu in finance module, click **Purchase Tax Analysis** to open report page. [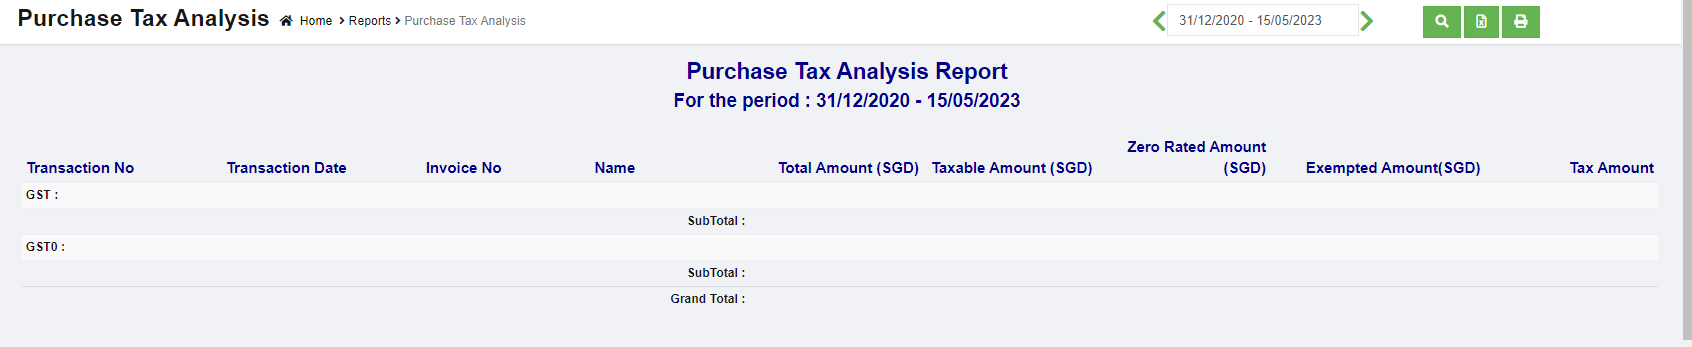](http://wiki.cuteinfocomm.com/uploads/images/gallery/2023-05/image-1684184806981.png)
2. In calendar field, click to select date range to generate purchase tax analysis.
3. Click [ ](http://wiki.cuteinfocomm.com/uploads/images/gallery/2023-03/image-1679955186159.png)search icon, the Purchase Tax Analysis report for selected period will show in screen, click[](http://wiki.cuteinfocomm.com/uploads/images/gallery/2023-03/image-1679955198941.png) to download report in xlsx format, click[](http://wiki.cuteinfocomm.com/uploads/images/gallery/2023-03/image-1679955209790.png) to download report in PDF format.
1. Navigate to Tax Reports menu in finance module, click **Payment Tax Analysis** to open report page. [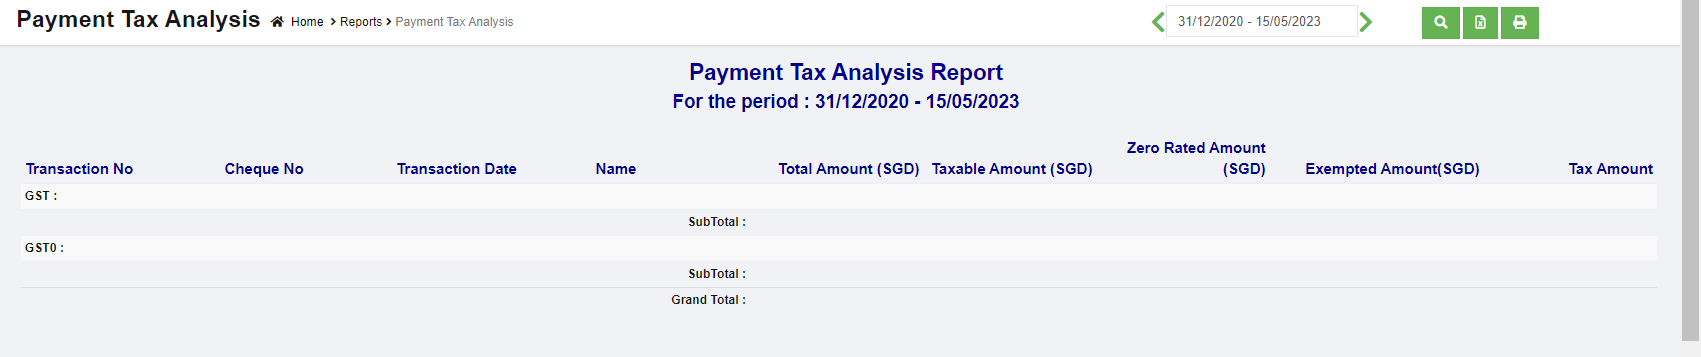](http://wiki.cuteinfocomm.com/uploads/images/gallery/2023-05/image-1684185006259.png)
2. In calendar field, click to select date range to generate payment tax analysis.
3. Click [ ](http://wiki.cuteinfocomm.com/uploads/images/gallery/2023-03/image-1679955186159.png)search icon, the Payment Tax Analysis report for selected period will show in screen, click[](http://wiki.cuteinfocomm.com/uploads/images/gallery/2023-03/image-1679955198941.png) to download report in xlsx format, click[](http://wiki.cuteinfocomm.com/uploads/images/gallery/2023-03/image-1679955209790.png) to download report in PDF format.
1. Navigate to Tax Reports menu in finance module, click **Journal Tax Analysis** to open report page. [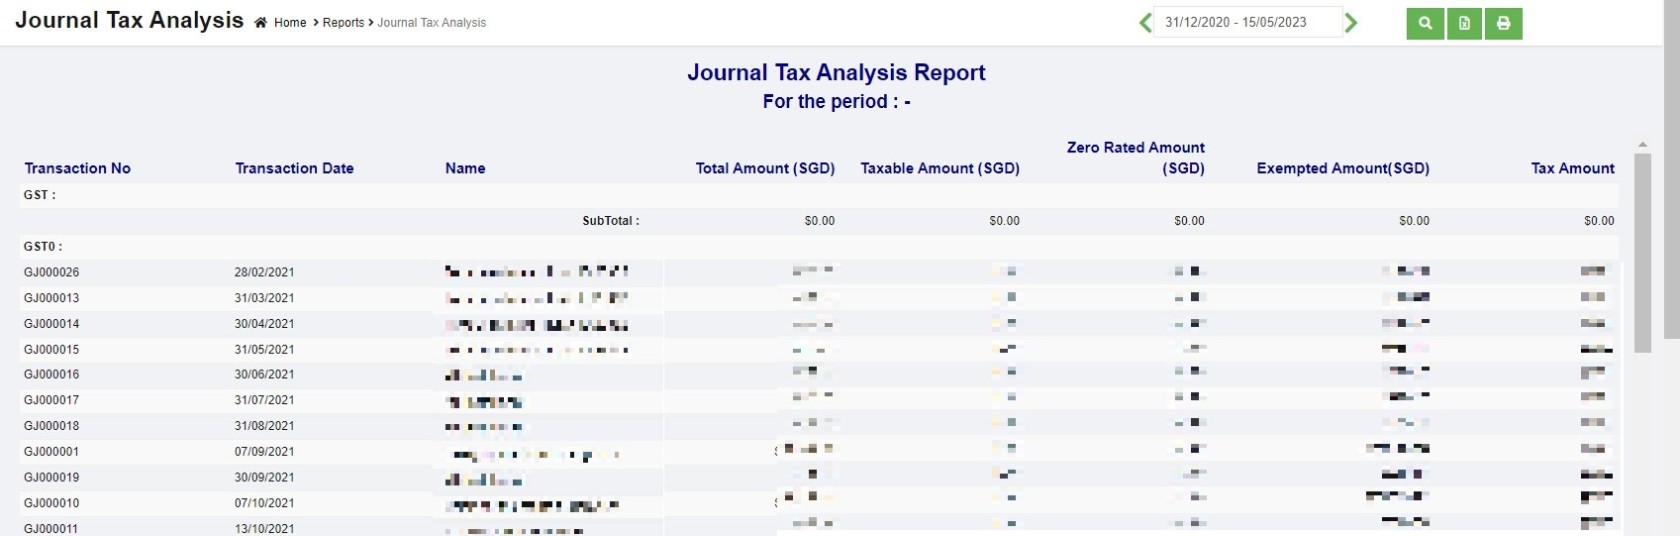](http://wiki.cuteinfocomm.com/uploads/images/gallery/2023-05/image-1684185823222.jpg)
2. In calendar field, click to select date range to generate journal tax analysis.
3. Click [ ](http://wiki.cuteinfocomm.com/uploads/images/gallery/2023-03/image-1679955186159.png)search icon, the Journal Tax Analysis report for selected period will show in screen, click[](http://wiki.cuteinfocomm.com/uploads/images/gallery/2023-03/image-1679955198941.png) to download report in xlsx format, click[](http://wiki.cuteinfocomm.com/uploads/images/gallery/2023-03/image-1679955209790.png) to download report in PDF format.
Scaffolding is a temporary structure that helps workers manage materials during construction or maintenance work. The workers perform erection and dismantle with the use of tags differentiate by colors to indicate the status of the scaffolding.
## Master
There are two types of master data in Scaffolding module:
**Item Master**-The list of items data that will be used in Scaffold module. They are managed centrally so that duplicate items are not entered into the system.
**Site Master**-The list of sites data that will be used in Scaffold module. They are managed centrally to use Client site code for various project.
### Item Master
To view items master, click **Item Master** submenu in the Master, the item master list page opens as below,
To create a new item in item master,
1. Click button on the top left corner in the Scaffold item Master list view page, the add item page opens as below,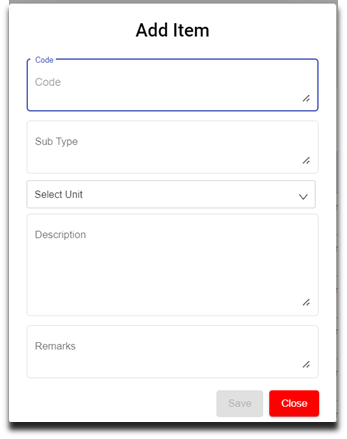
2. Enter details in the below fields,
- Code (Mandatory)
- Sub Type (Mandatory)
- Select unit - UOM (mandatory)
- Description (Optional)
- Remarks (Optional)
3. Click to save the item in the item Master. The new added item will be saved to item master list page.
4. Once new item is added to master, user shall add cost details of the item. Navigate to the item name in the item master page, and Click [](http://wiki.cuteinfocomm.com/uploads/images/gallery/2024-02/image-1707806504232.png) cost icon. [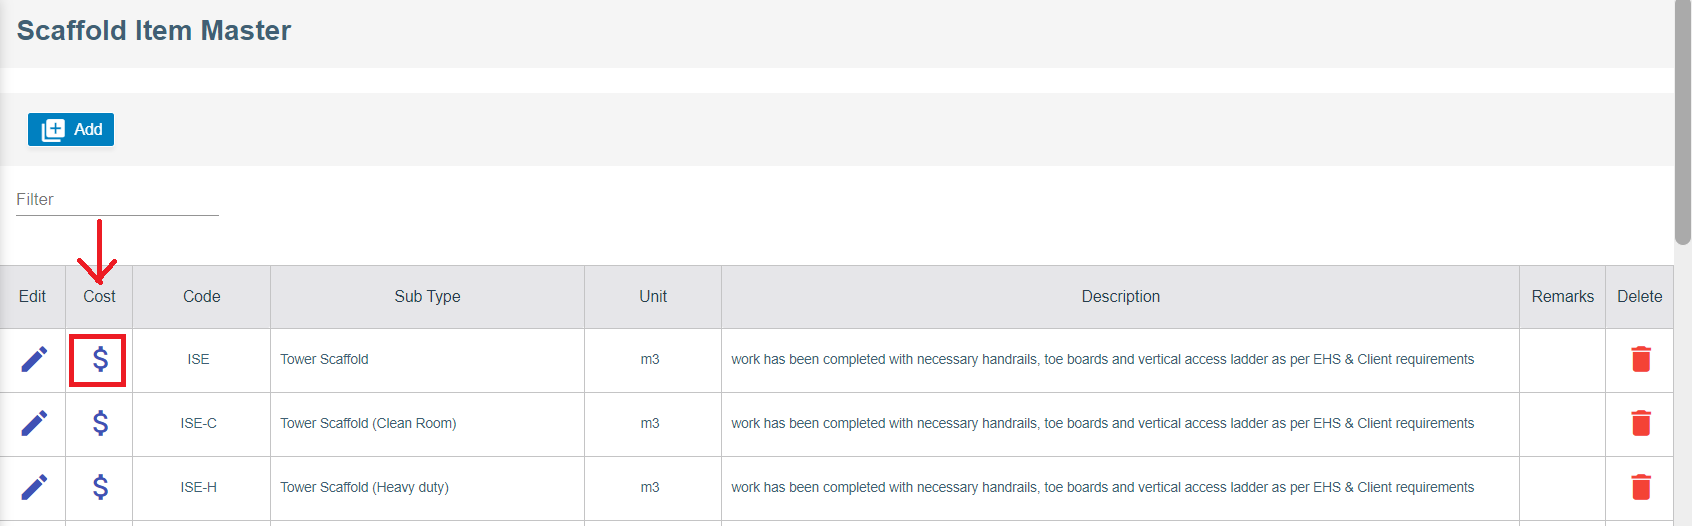](http://wiki.cuteinfocomm.com/uploads/images/gallery/2024-02/image-1707806473826.png)
5. The item cost page opens as below and enter the following details,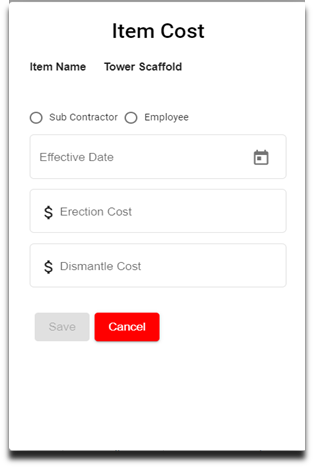
6. Click to select Sub Contractor to add item cost for work assigned to sub contractor workers, enter details in below fields,
- Choose Effective Date
- Select Sub Contractor
- Enter Erection Cost
- Enter Dismantle Cost
- Click Save. Item cost will be saved, and user can scroll down and view in the cost page.
To edit item,
1. Click[](http://wiki.cuteinfocomm.com/uploads/images/gallery/2024-02/image-1707807574072.png)edit icon on the main page to update Item fields.
2. Update the respective fields.
3. Click S**ave** button to save edit.
#### Delete Item
To delete Item record from the Item Master,
1. Click [](http://wiki.cuteinfocomm.com/uploads/images/gallery/2024-02/image-1707807679842.png)delete icon in the delete column in item master list page.
2. A confirmation window opens, click Yes and the Item record will be deleted. [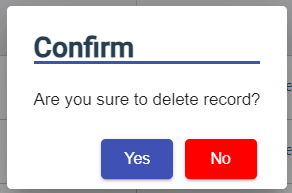](http://wiki.cuteinfocomm.com/uploads/images/gallery/2024-02/image-1707808182702.png)
### Site Master
To view Site master, click **Site Master** submenu in the Master, the Site master list page opens as below,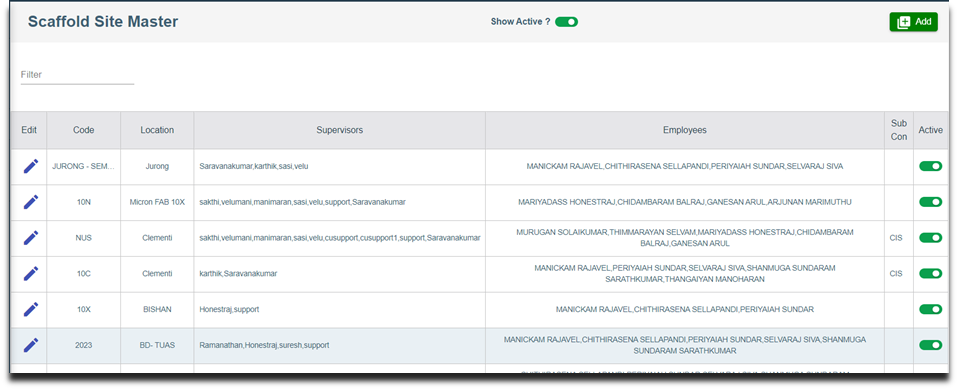
#### Add New Site
To create a new Site in Site Master,
1. Click  button on the top right corner in the Scaffold Site Master view page, the add Site page opens as below, [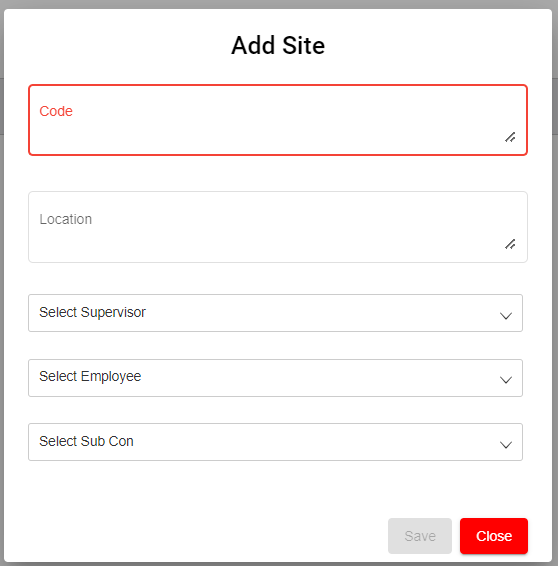](http://wiki.cuteinfocomm.com/uploads/images/gallery/2024-02/image-1708067900020.png)
2. Enter details in below fields,
- Code (Mandatory)
- Location (Mandatory)
- Select Supervisor (Optional)
- Select Employee (Optional)
- Select Sub Con (Optional)
3. Click **Save** to save the Site details in the Site Master. **Important notes:** 1) Only selected supervisor and selected employees can view and access projects associated with this Site Code.
4. Only project configured with Client Site code will be available in the scaffold module to create request. To configure client site code in projects,
- First, in Admin Settings, check and make sure showSiteCodeConfig setting value is True, so that in project master, client site code field will be enabled. [](http://wiki.cuteinfocomm.com/uploads/images/gallery/2024-02/image-1708069754030.png)
- Second, navigate to the project in Projects Master in Operation, in the Client Site Code field, click to select [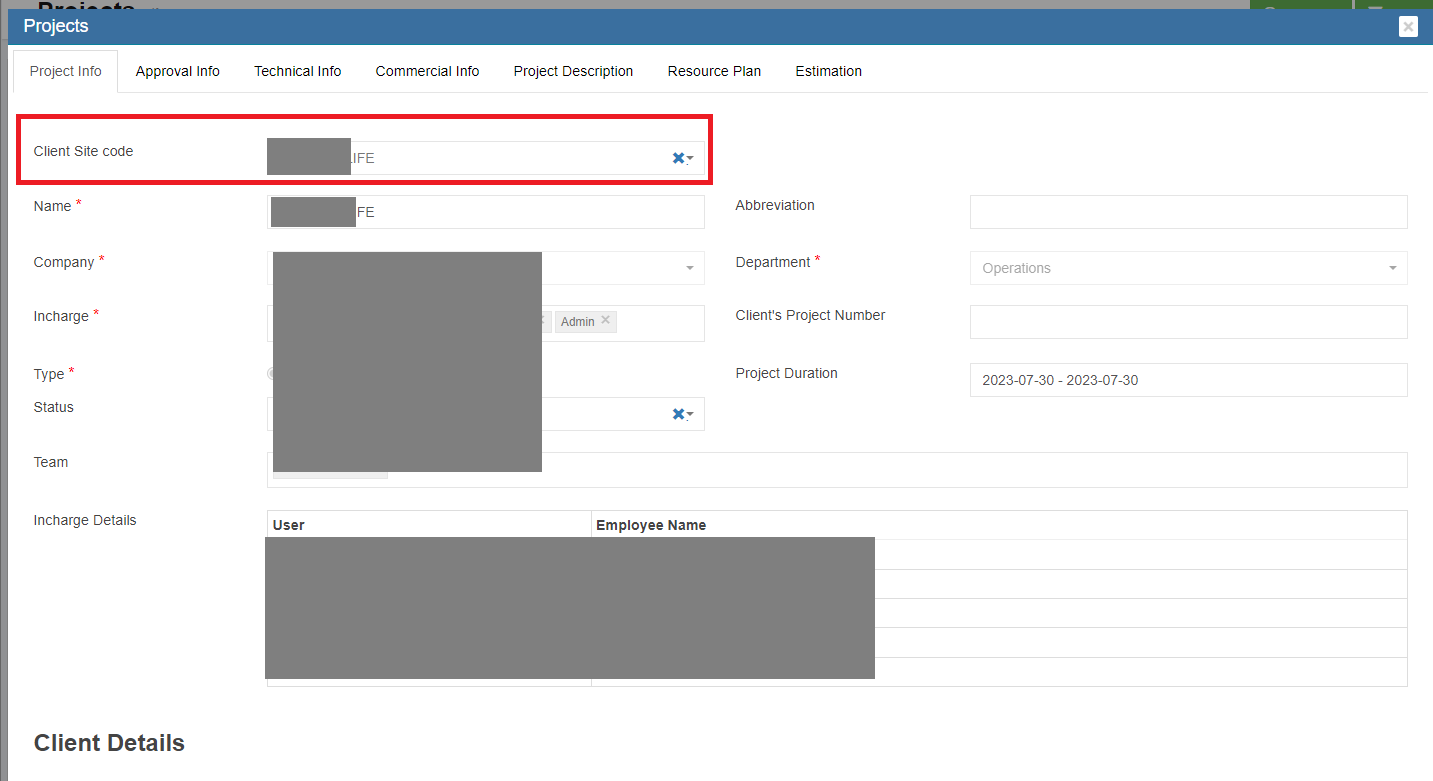](http://wiki.cuteinfocomm.com/uploads/images/gallery/2024-02/image-1708069990761.png)
5. Note: Site can be active or inactive, in the Active Column in site master list page, user can click to set to active or inactive  . [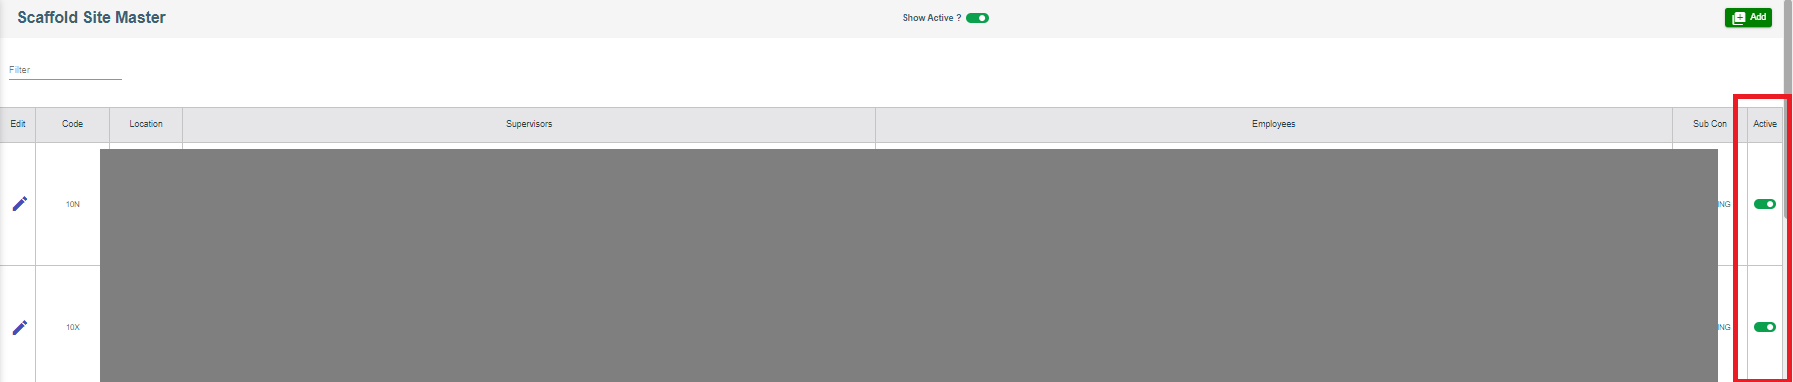](http://wiki.cuteinfocomm.com/uploads/images/gallery/2024-02/image-1708070384389.png)
#### Edit Site
To edit site,
1. Click[](http://wiki.cuteinfocomm.com/uploads/images/gallery/2024-02/image-1707807574072.png)edit icon on the main page to update site fields.
2. Update the respective fields.
3. Click S**ave** button to save edit.
To delete Site record from the Site Master,
1. Click [](http://wiki.cuteinfocomm.com/uploads/images/gallery/2024-02/image-1707807679842.png)delete icon in the delete column in site master list page.
2. A confirmation window opens, click Yes and the Item record will be deleted. [](http://wiki.cuteinfocomm.com/uploads/images/gallery/2024-02/image-1707808182702.png)
A Scaffold Request shall be raised against Site code and Project to start the scaffolding procedure. The user can add the Scaffold request to create Temporary tag, Permanent tag and Internal size for scaffolding Erection, Dismantle, Modification and Rental days. They perform checklists like Construction Checklist, Monthly Checklist and Weekly Checklist to abide by safety rules and regulations. To view Scaffold Request, click **Scaffold Request** submenu in the Request, the Scaffold Request page opens as below,
To create a new Scaffold Request,
1. Click  button on the top right corner in the scaffold request page, the add Scaffold Request window opens as below, [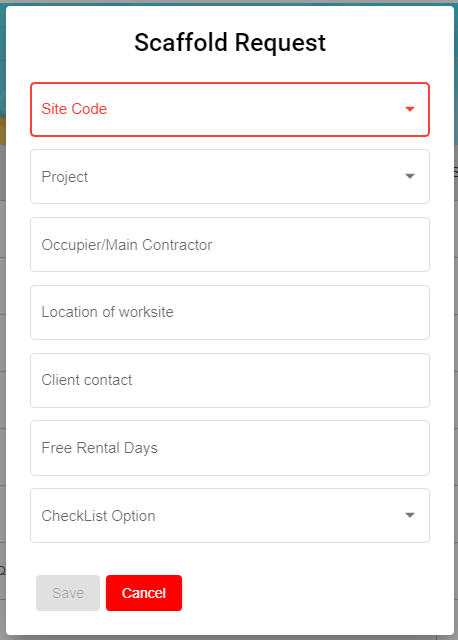](http://wiki.cuteinfocomm.com/uploads/images/gallery/2024-02/image-1708126669202.png)
2. Enter details in below fields,
- In Site Code field, click to choose site code.
- In Project field, click to select project.
- In Occupier/Main Contractor field, enter Main Contractor name.
- In Location of Worksite field, enter worksite location.
- In Client Contact field, enter client contact number.
- In Free Rental Days field, enter number of free rental days.
- In Checklist field, click to select checklist option.
3. Click **Save** to save the Request in the Scaffold Request page. And a unique Scaffold request Key will be generated against the new added Scaffold Request.
#### Temporary Tag Creation
Based on the client request, admin user will create a few temporary tags against a new scaffold request.
To Create Temporary Tag,
1. Click (Tag icon) to create temporary tags for the new Scaffold request , the Scaffold Request page opens as below,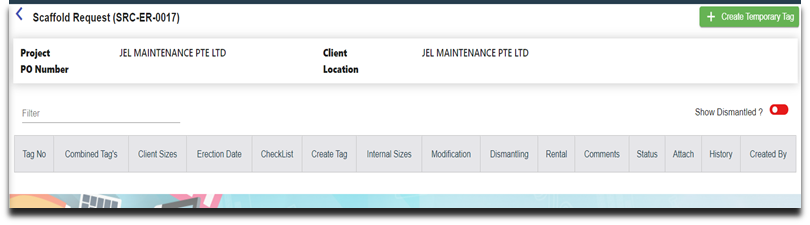
2. Click [(](https://wiki.cuteinfocomm.com/uploads/images/gallery/2024-07/image-1721082458802.jpg)Create Temporary tag icon) , the below page opens,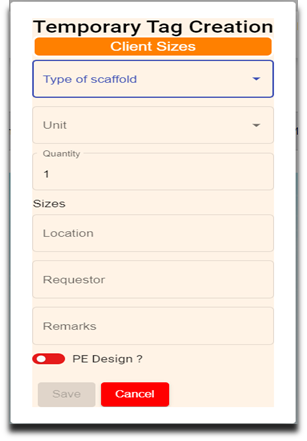
3. Enter details in below fields,
- Type of Scaffold
- Unit
- Quantity
- Sizes
- Location
- Requestor
- Remarks
- PE Design (click to enable if applicable)
4. Click **Save** to save the Temporary tag. Once saved successfully, on the scaffold main page, the Tag’s Count Column “T” changes from 0 to 1 and L changes from 0 to 1.
Note: T – Temporary
P – Permanent
M – Modify
D – Dismantle
R – Rental
L – Total Line numbers
#### Combined Tag Creation
If Client request to create combined tag creation against the temporary tag, user can create combined tag.
To Create Combined Tag Creation
1. Click (Combined Tag icon) in the combined Tag’s column, the Combined Tag Creation page opens as below,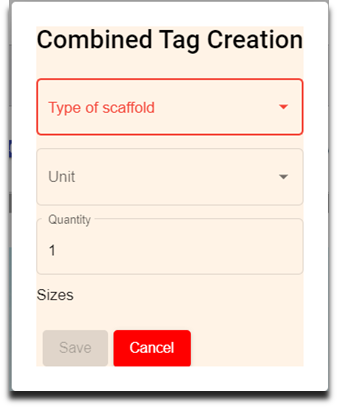
2. Enter details in below fields,
- Type of Scaffold
- Unit
- Quantity
- Sizes
3. Click **Save** to save the Combined tag. Note: Client Size column in the scaffold request consists of size details of the Scaffold Type.
### Checklist
Checklist will be performed after Temporary Tag Creation.
#### Perform Construction Checklist
To perform construction checklist,
1. Click (Checklist icon) in the scaffold request, the Scaffold Request Checklist page opens to perform Construction Checklist. 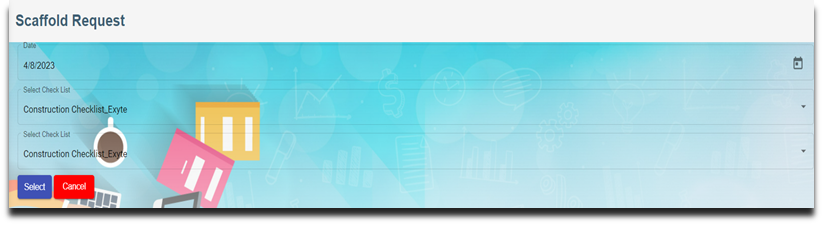
2. Choose Date and Construction Checklist. Note: Date can be modified based on the checklist activity performed date.
3. Click Select icon.
4. Enter Height of Erection,
5. Click Next, the Construction Checklist opens to perform the checklist.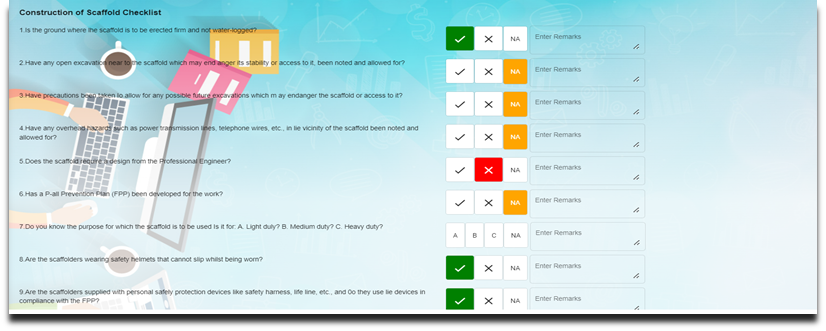
6. Click to choose from any of the three   or **NA** for all the line items in the checklist and enter remarks if required.
7. Click **Next** , the below page opens with e-Signature, 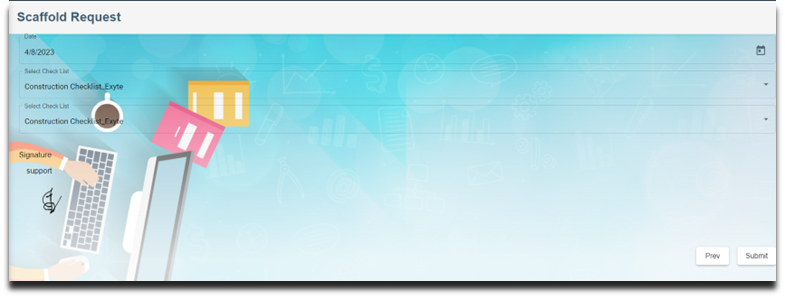
8. Enter signature, and click **Submit**. Note: Once construction checklist is completed, the Checklist icon color will change from blue to green.
9. Click [](https://wiki.cuteinfocomm.com/uploads/images/gallery/2024-07/image-1721084820800.png)Print icon in the checklist to print the checklist performed, the Checklist screen opens. Click **Print.**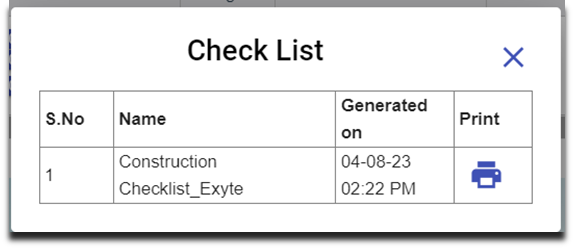
#### Perform Weekly Checklist
Every week, the employee performs Weekly checklist to cross check the scaffold tag no(s) maintained properly in the site.
1. Click (Checklist icon) and perform weekly checklist.
2. Choose Date and Weekly Checklist to perform.
3. Click (Select icon).
4. Enter Location Work Site.
5. Click **Next**, the Weekly Checklist opens to perform the checklist.
6. Click **Next** , the below page opens with e-Signature
7. Enter signature, and Click **Submit.**
- Number changes from 0 to 1 indicates a weekly checklist performed for the scaffold tag numbers in the line item 1(L-1).
- The orange colour of the Checklist indicates the lapse of the weekly checklist.
- Summary of the Checklist available in the Print icon.
### Create Permanent Tag
In the Create Tag page,  icon is used to create permanent tag size against the temporary tag size. The salary will be computed for the workers based on the permanent tag size.
To Create Tag,
1. Click  (create tag icon), the below Permanent Tag Creation window opens, 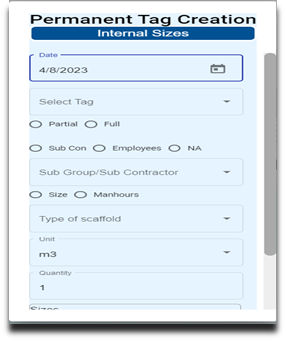
2. Enter details in the following fields,
- Date
- Select Tag (Drop-down list of Temporary Tag(s))
- Choose Partial or Full
- Choose Sub Con, Employees or NA (Choose from drop-down list)
- Size/Manhours
- Type of Scaffold (open to choose anything from the drop-down list)
3. Click **Save** to save the internal size.
#### Modifying Tag
Tag can be modified based on additional size request or to modify the request itself by using Tag Modification Request.
To Create Tag Modification Request,
1. Click (Tag Modification icon), the below Tag Modification Request window opens,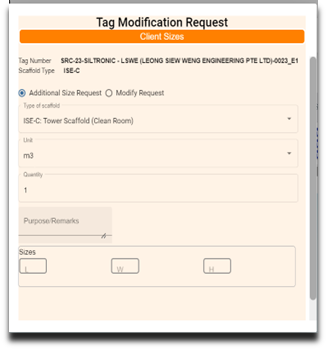
2. Enter the following details Option 1:
- - Choose Addition size Request
- Type of Scaffold (open to choose anything from the drop-down list)
- Purpose/Remarks
- Sizes
Option:2
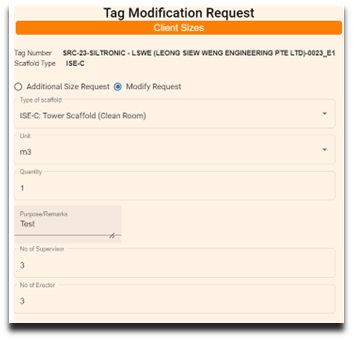
- - Choose Modify Request
- Type of Scaffold (open to choose anything from the drop-down list)
- Purpose/Remarks
- No of Supervisors
- No of Erectors
- Click from Date & time
- Click To Date & time
- Click
3. Click **Save** to save the Modification Tag.
- Modification tag available in the Tag No column.
- Create tag appears to create internal size for the worker. If internal size is not required for the modification tag, choose NA inside the Permanent Tag creation
.
### Rental Request
Users shall raise Rental Request after the free rental days get over.
To Create Rental Request,
1. Click  (Rental Request icon), the below Rental Request window opens.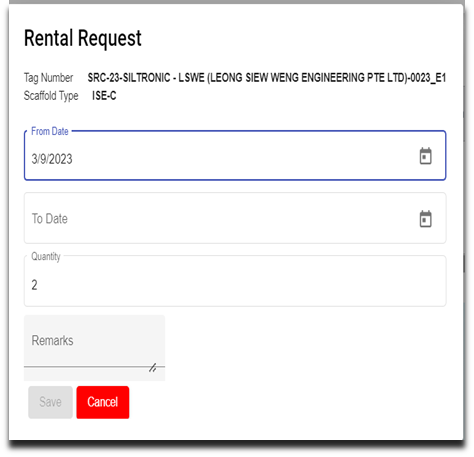
2. Choose From date and To date.
3. Enter remarks in the Remarks field if any.
4. Click **Save** to save the Rental Request.
- Rental Request available in the Tag No column in freeze status. As it is redirected to the pending billing tag.
- The tag no in blue colour can modify at any stage. If it changes to white colour, it cannot be modified (freeze for billing)
### Dismantling Request
The user raises dismantling Request for internal sizes when the process beings to scaffold dismantling.
To Create Dismantling Request,
1. Click  (Dismantling Request icon), the below Dismantling Request window opens.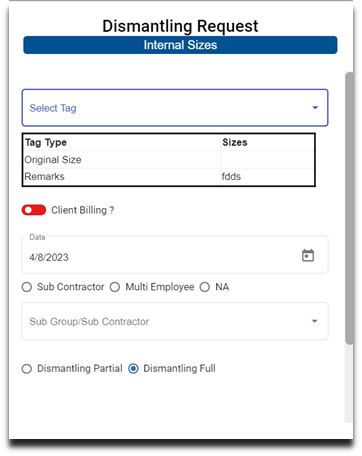
2. Enter details in the following fields,
- Select Tag
- Client Billing? ( ”Yes” /  “No”)
- Date
- Choose Sub Contractor/ Employee/ NA
- Choose Dismantling Partial/Full
- Choose Rental Chargeable? “Yes” or “No”
3. Click **Save** to save the Dismantling Request.
### Comment
The user can add comments against the Tag Number for the Scaffold request.
1. Click (Comment icon), the below Comment Update window opens, 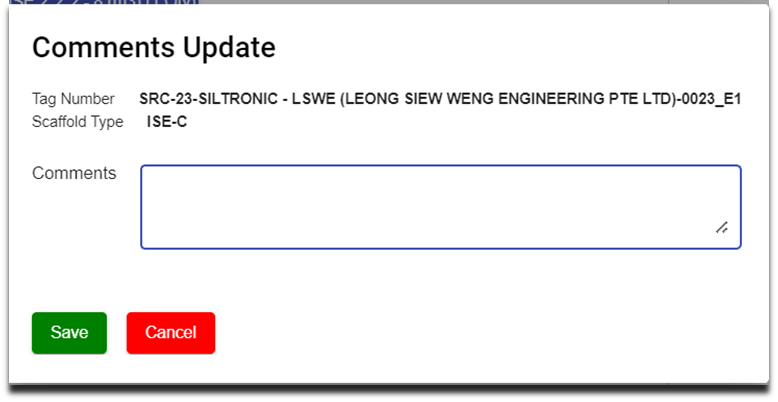
2. Enter comments.
3. Click **Save** to save the comments.
### Status
The user can change the status of the Tag number either active or inactive.
To inactive Status,
1. Slide the toggle button from Green to Red.
### Attachment
The supporting documents can be attached against the Tag Number using attachment available under attach column.
To Attach supporting documents,
1. Click (attach icon), the below screen open to choose file to attach against the Tag Number.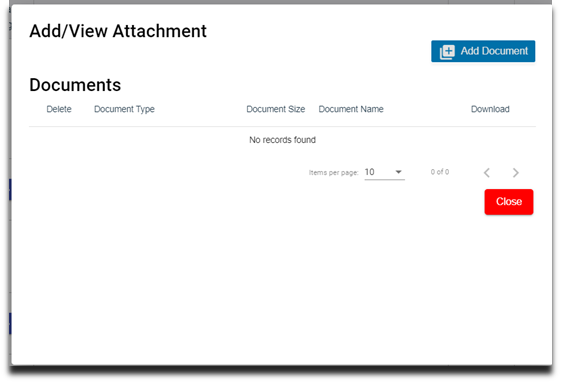
2. Click Add Document and Choose file to upload the document.
3. Click **Upload**. The attached document is available under Documents.
4. Click **Close.**
### History
History gives details about the Client size, Internal size and Created by against Tag Number. Click History and view Client size and Internal size details of the Tag Number.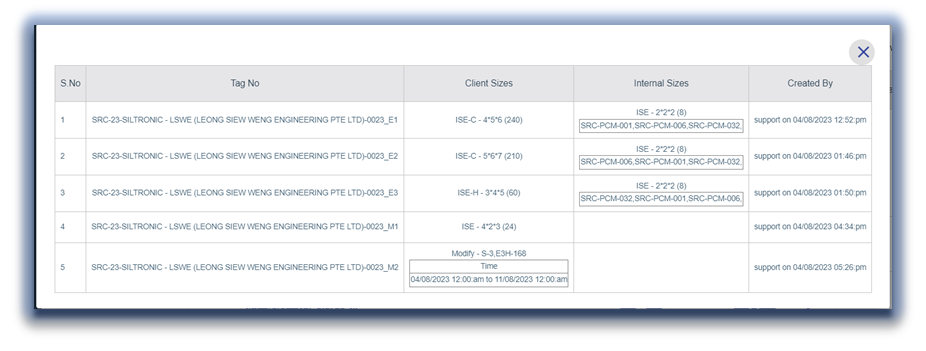
# PTW - Permit To Work
Permit to Work are special authorization documentation used within an organization to control selected work activities and ensure their safe execution on-site.
Users can make request for permit to work with required documents and checklist. The request will go through the approval process before the work commences. The permit can be closed or cancelled as per the requirements.
[](https://wiki.cuteinfocomm.com/uploads/images/gallery/2025-06/image-1749437258213.png)
**PTW Applicant**
The user who has PTW Applicant role can create PTW Request for the projects which are assigned to him. If no projects assigned to the user, user can create PTW Request for all projects of his company and department.
By default last generated PTW request data (created by particular user) will be populated for add.
Based upon Type, Capturing data will be differ for adding PTW Request. After save PTW request, PTW request No will be generated based on below criteria
There are 5 parts in request no. For example **LE-NPARKS/N/110/2017-LLC1-13.03.24**
**Part 1:** LE- for all requests (**LE-**)
**Part 2:** Selected project abbreviation (**NPARKS/N/110/2017**)
**Part 3:** This will be differ for each type as follows **(LLC)**
Type is Lifting Operation and Type of Crane is Lorry Crane – LLC
Type is Lifting Operation and Type of Crane is Mobile Crane – LMC
Type is Lifting Operation and Type of Crane is Crawler Crane – LCC
Type is Lifting Operation and Type of Crane is Overhead Crane – LOC
Type is Lifting Operation and Type of Crane is Using Excavator – EXC
Type is Pilling Works and Type of Pilling is Vibro – Vibro
Type is Pilling Works and Type of Pilling is Piler – Piler
Type is Work at Height and Type of Work is Scaffold – SCAF
Type is Work at Height and Type of Work is Mobile elevated working platform – MEWP
Type is Work at Height and Type of Work is LADD – LADD
Type is Work at Height and Type of Work is Others – OTHS
Type is Excavation – EX
Type is Hot Work – HW
Type is General – GEN
Type is Demolition Work – DW
**Part 4:** Running Number for the particular date (PTW request From Date) and type **(1)**
**Part 5:** PTW request From Date (**13.03.24**)
PTW Applicant can view his project’s request only in the list
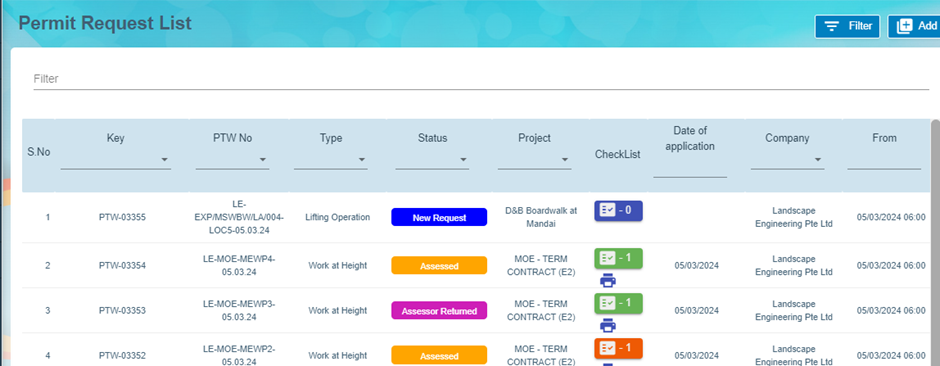
After adding request, user can view the request. This screen will be different for each type.
**Lifting Operation**
Lifting Operation has the following segments
1. Workers
2. LM / Lifting Plan
3. Lifting Operation
4. Lifting Equipment
5. Checklist
6. Sketch Document
7. Supporting document
8. Comments
**General**
General has the following segments
1. Part A - Application by Supervisor-in-charge
2. Part E(tick one)\* - Notification of Work Completion / cessation of Work
3. Checklist
4. Supporting document
**Work at Height**
1. Workers
2. Safety Conditions for night work
3. Checklist
4. Sketch Document
5. Supporting document
**Excavation**
1. Workers
2. Checklist
3. Sketch Document
4. Supporting document
**Hot Work**
1. Workers
2. Safety Conditions for night work
3. Checklist
4. Sketch Document
5. Supporting document
**Piling Work**
1. Workers
2. Checklist
3. Sketch Document
4. Supporting document
**Demolition Work**
1. Checklist
2. Supporting document
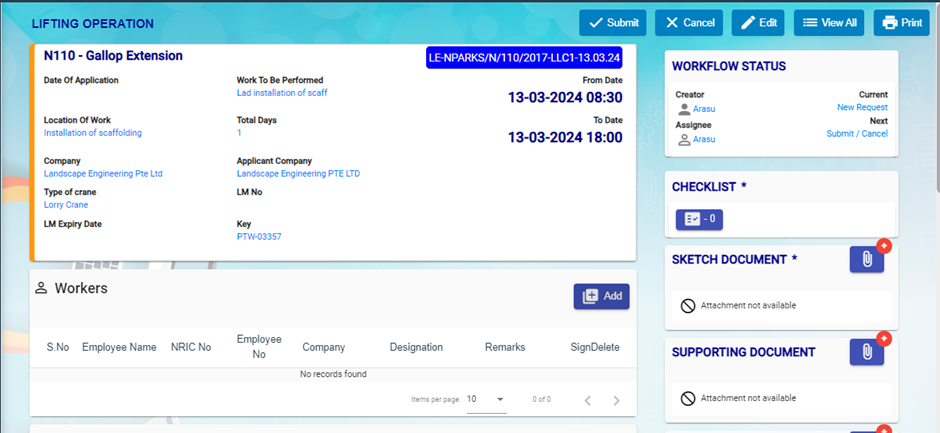
**Workers**
User can add internal workers and external workers
If internal worker toggle set to No, then user can add already added external workers from External worker drop down (multiple selection) OR user can add the details of external worker and save.
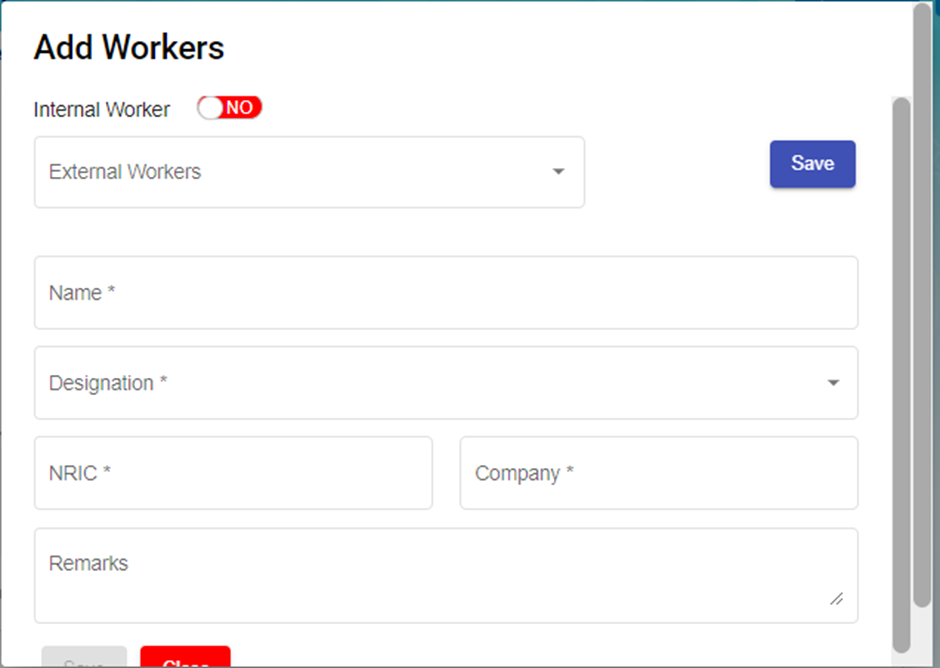
If internal worker toggle set to Yes, user can add multiple internal worker (Employees who has designation contains Worker)
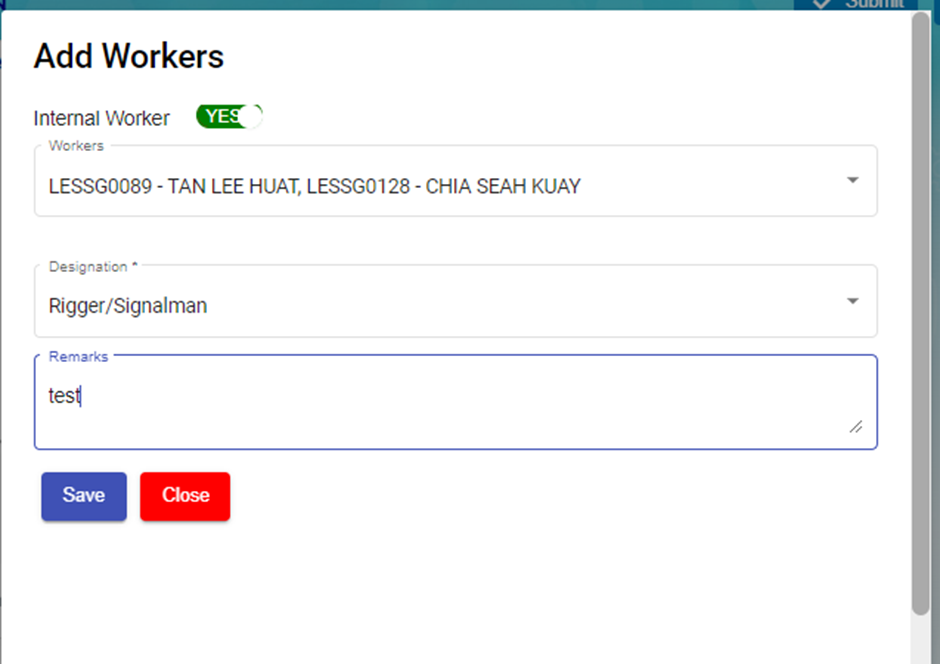
After adding Workers, Workers can sign against his/her name.

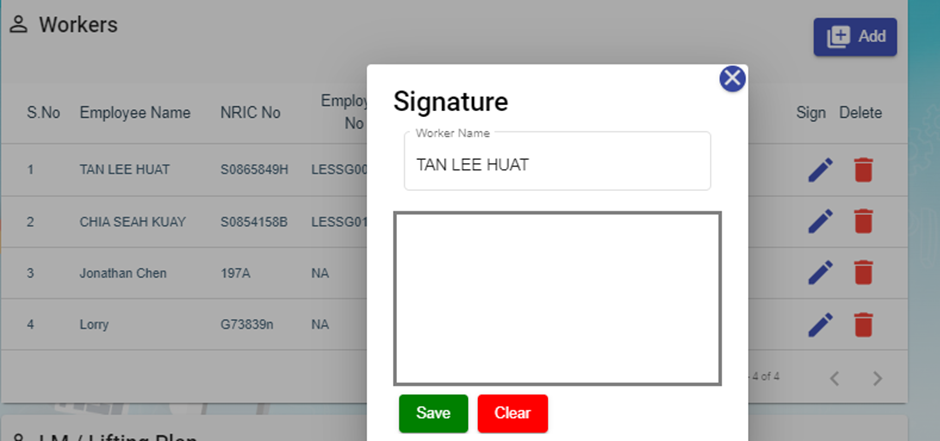
**Checklist**
Checklist will be different for each Type.
User can add checklist by clicking on Checklist button in the view screen OR checklist button in the list screen.
Multiple checklist can be added against each PTW Request at any status.
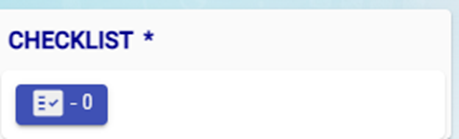
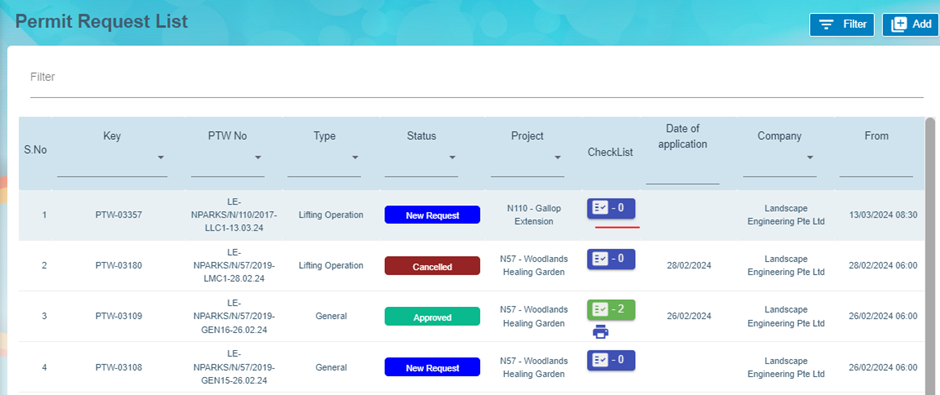
When clicking on Checklist button, Checklist screen will be displayed with 3 levels
First level, user can enter checklist name and give next
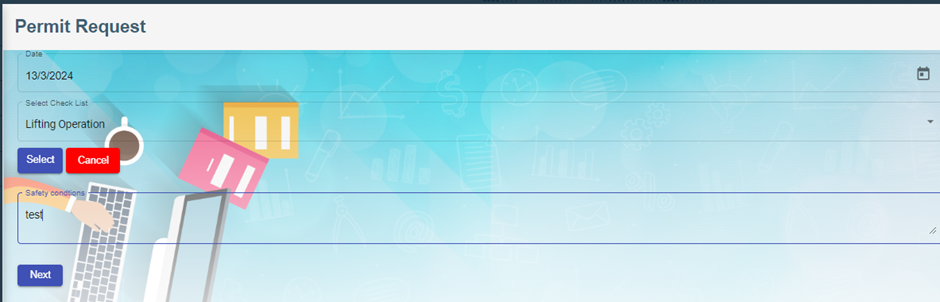
Second Level, Enter checklist of particular type and give next
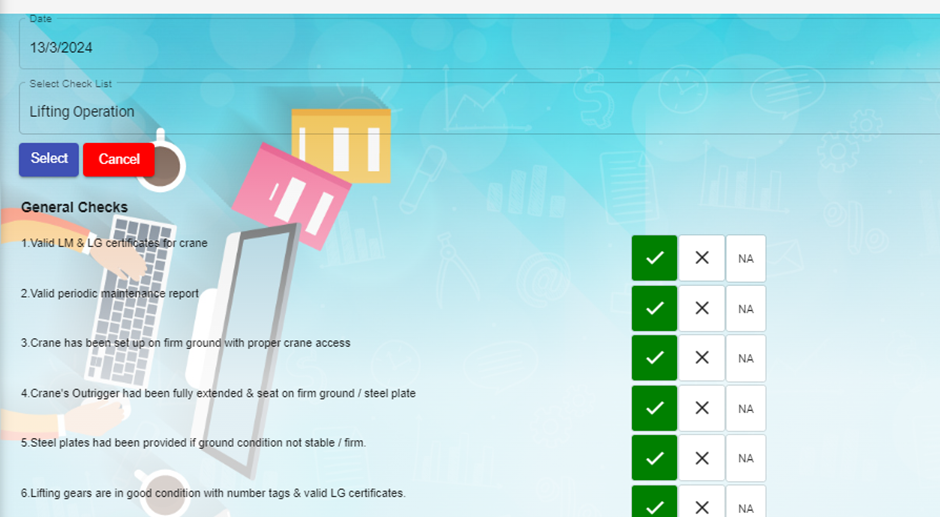
Third Level is Signature. If user has signed in my Profile screen, then in this level signature will displayed. Otherwise user has to sign here and give submit.
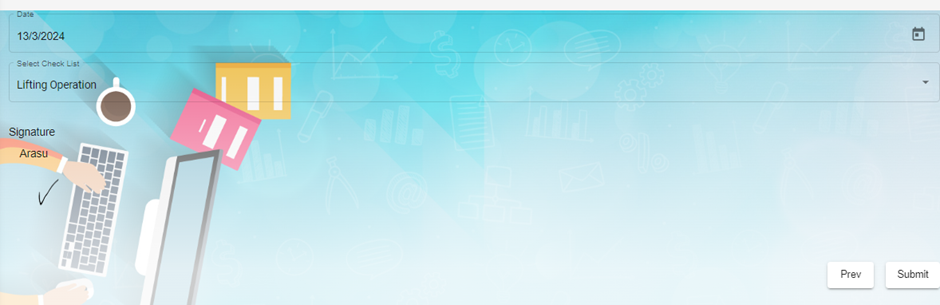
User can print the checklist either in view screen or list screen
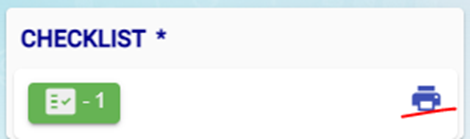
On clicking this report icon, popup will displayed with all the checklist details and user can get report for each checklist.
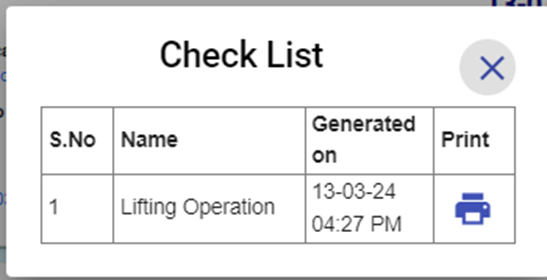
PTW Applicant role user can Submit the request to the users who has role as PTW Notifier.
After submit Email will send the users who has role as PTW Notifier and has access to the project of PTW request
And also mobile push notification will be send to them. Mobile push notification will send only when the user has minimized/closed PTW application.
Now the status of request is Applied.
**PTW Notifier**
Users who has role as PTW Notifier and has access to the project of PTW request can view the request and send for Assessor (Users who has role as PTW Assessor and has access to the project of request)
PTW Notifier also can return the request to the PTW Applicant.
After send for Assessor Email will send the users who has role as PTW Assessor and has access to the project of PTW request
And also mobile push notification will be send to them. Mobile push notification will send only when the user has minimized/closed PTW application
Now the status of request is Reviewed. `
**PTW Assessor**
Users who has role as PTW Assessor and has access to the project of PTW request can view the request and send for Approval (Users who has role as PTW Approver and has access to the project of request)
PTW Assessor also can return the request to the PTW Notifier.
After send for Approval Email will send the users who has role as PTW Approver and has access to the project of PTW request
And also mobile push notification will be send to them. Mobile push notification will send only when the user has minimized/closed PTW application
Now the status of request is Accessed.
**PTW Approver**
Users who has role as PTW Approver and has access to the project of PTW request can view the request and approve the request
PTW Approver also can return the request to the PTW Assessor.
Email will send to all the users involved in the particular request.
And also mobile push notification will be send to them. Mobile push notification will send only when the user has minimized/closed PTW application
Now the status of request is Approved.
# HSE Module
**Health Safety Environment**
HSE refers to a set of principles, strategies, and best practices that organizations implement to create a safe and healthy work environment.
**Role:**
1.HSE Creator - To create offence against employee
2.HSE Reviewer - To Review offence
3.HSE Approver - To Approve offence
Screen Shot 1
User list:
Screen Shot 2
Go to user list and choose company and department. For this company and department based employee data load to create/review/approve offence.
Screen Shot 3
**Dashboard :**
Can see Waiting for approval list based on user company and department.
Screen Shot 4
**Master:**
**Non-Compliance Charges**
Non compliance charges list.
Screen Shot 5
**Offence Type:**
Type of offence master.
Screen Shot 6
**Merit/Demerit**
Action List:**
Screen Shot 7
Action Detail - can review / approve and edit the details.
Screen Shot 8
**Add Action :**
Logged in HSE creator role employee department, company based load employee details and choose offence type and charges.
Screen Shot 9
**Search:**
Based on employee can see the offence with history
Screen Shot 10
Mobile search based on employee qrcode find the offence detail.
Screen Shot 11
**QR Print** : Generate QRcode for employee to view employee offence.
Screen Shot 12
Generated QR code. Scan this qrcode from any scanner and link ill open and scanned employee offence details.
Screen Shot 13
# SRM - Service Request Management for Jetting Companies
cuteOffice has SRM functionality as well as both client and technician self-service access. SRM functionality includes adding a service job request, assigning the job to technician, verifying the completed job, invoice generation, and payment process.
Reporting functionality is available with the SRM module. In SRM, service request metrics can be analyzed and reported on through customizable dashboards and reporting features.
- Master Data Management
- User Access Management
- Service Job Request Management
- Verification after Job Completion
- Invoice and Payment Management
- Reporting
## User Access Matrix
In the ***cuteOffice-SRM*** application, users can be assigned with different roles. Depending on the roles, the users can access the various functionalities included in the application. The following are the various roles to be assigned to the user including their permission details,
| **Roles** | **Access Permissions** |
| Administrator | - Dashboard
- Master
- Service Request
- add Service Job Requests
- assign technician and vehicle
- verify the completed job record
- assign rework for the technician
- add and view AdHoc Service Requests
- generate and view the invoices
- do service payment
- Report
|
| Technician | - Service Request
- view their assigned service jobs and indicate starting and ending of jobs
- send the Verification Form to the respective admins to verify the completed job
- add and view AdHoc Service
Reques
|
The **SRM** module in the ***cuteOffice*** application helps admins in managing the service based job functionalities. To navigate to the **SRM** module, click the **SRM** menu in the menu bar, the **SERVICE REQUEST MANAGEMENT** page opens as below.
[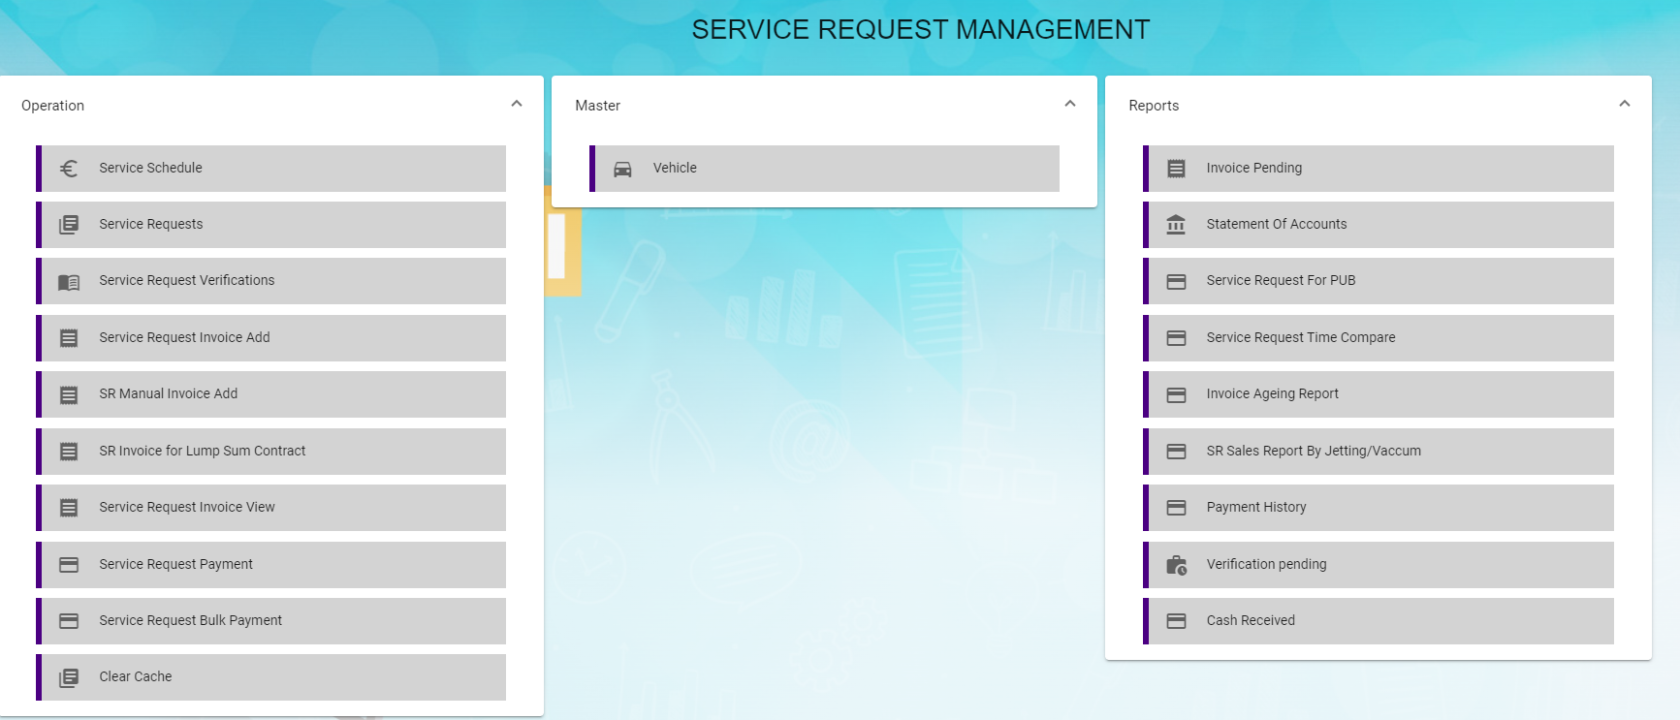](http://wiki.cuteinfocomm.com/uploads/images/gallery/2024-02/image-1709195725565.png)
The **SERVICE REQUEST MANAGEMENT** page consists the following sub menus:
**OPERATIONS -** Allows admin to add the service job requests, assign the jobs to technicians, generate invoice for completed job, and so
**MASTER -** Allows SRM admin to add the vehicle master
**REPORTS -** Helps admin to view the various reports corresponding to the service request
## Master
The **Master** submenu in the **SRM** menu manages the master data such as details of vehicle including vehicle insurance, Housing and Development Board (HDB) season parking, and other details.
The **Master** submenu contains the following tab,
- Vehicle-Users assigned with srm\_admin role can only have access to this Master submenu and add the master data.
The **Vehicle** tab in the **Master** submenu helps you to add the information of a vehicle to be used as a master data in the further request process. Click the **Vehicle** tab in the **Master** submenu, the **Vehicle** page opens.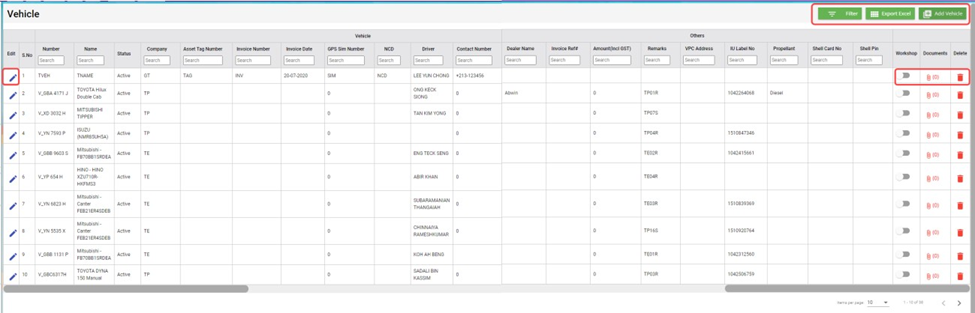
### Add a Vehicle
If you want to add a vehicle,
1. Click (**Add Vehicle** button) in the **Vehicle**, the **Add Vehicle** window opens. (Note: The fields highlighted with red color are mandatory. You must enter the relevant details in that fields before saving.)
2. In the **Vehicle** section, enter the following details,
- In the **Number** box, enter the vehicle number.
- In the **Name** box, enter the vehicle name.
- In the **Company** box, select a company from a drop-down list.
- In the **Asset Tag Number** box, enter the asset tag number.
- In the **Invoice Number** box, enter the invoice number.
- In the **Invoice Date** box, select the invoice date.
- In the **GPS Sim Number** box, enter the GPS sim number.
- In the **No-Claim Discount (NCD)** box, enter the NCD number.
- In the **Driver** box, select a driver from a drop-down list.
- In the **IDD Code** box, select the IDD code.
- In the **Area Code** box, enter the area code.
- In the **Contact Number** box, enter the contact number.
- In the **Parking Location** box, enter the parking location name.
- In the **Vehicle Description** box, enter the description for the vehicle.
3. In the **Insurance** section, enter the following details,
- In the **Number** box, enter the insurance number.
- In the **Next Due Date** box, select the due date for the insurance.
- In the **Vendor** box, enter the insurance vendor name.
- In the **Agency** box, enter the agency name.
4. In the **Next Due Date** section, enter the following,
- In the **Maintenance** box, select the due date for maintenance.
- In the **Parking Coupon** box, select the due date for parking coupon.
- In the **Road Tax** box, select the due date for road tax.
- In the **Inspection** box, select the due date for vehicle inspection.
- In the **Vehicle Parking Certificate (VPC)** box, select the due date for VPC.
- In the **LG** box, select the due date for LG.
- In the **LM** box, select the due date for LM.
- In the **Certificate of Entitlement (COE) Expiry Date** box, select the expiry date for COE.
5. In the **HDB Season Parking** field, enter the following,
- In the **Next Due Date** box, select the due date for HDB season parking.
- In the **Payment Mode** box, select a payment mode from a drop-down list.
- In the **Address** box, enter the address where the vehicle has parked.
6. In the Others field, enter the following,
- In the **Dealer Name** box, enter the dealer name.
- In the **Invoice Ref** box, enter the invoice reference number.
- In the **Amount** box, enter the invoice amount including GST.
- In the **In-vehicle Unit** (**IU) Label Number** box, enter the IU label number.
- In the **Propellant** box, enter the propellant name.
- In the **Shell Card Number** box, enter the shell card number.
- In the **Shell Pin** box, enter the shell pin.
- In the **Vehicle Preparation Center (VPC) Address** box, enter the VPC address.
- In the **Remarks** box, enter your remarks if any.
7. Click **Save**. The vehicle is added and listed in the **Vehicle** page.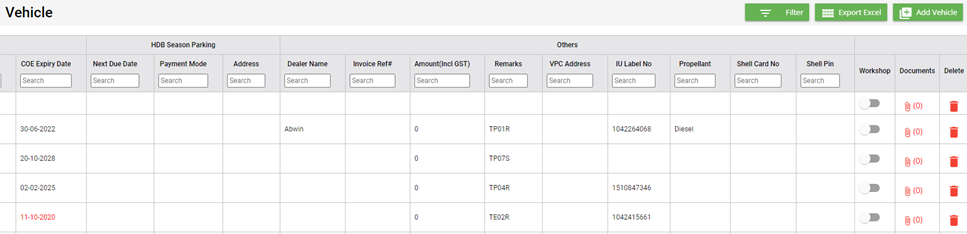
8. If your vehicle is in the workshop, you need to click to enable (Radio button) in the **Workshop** column for the respective vehicle. The **Confirmation** dialog box opens. Click Yes to confirm. 
### Edit a Vehicle
You can edit the details of the added vehicle by using  (Edit icon) provided in the **Edit** column of the **Vehicle** page. To edit the added vehicle details,
1. Click (Edit icon) of the respective vehicle, the **Add Vehicle** window opens with the added vehicle details.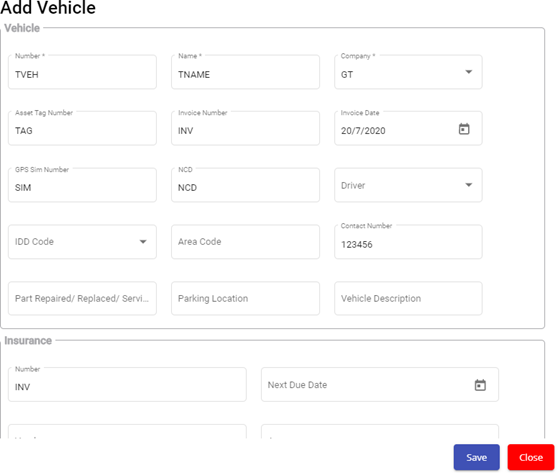
2. Edit the vehicle details where suits.
3. Click **Save**.
### Attach/View a Document into a Vehicle
If you want to add a new document with the vehicle, do the following steps,
1. Click (Attachment icon) of the respective vehicle for which you want to add, the **Add/ View Attachment** window opens.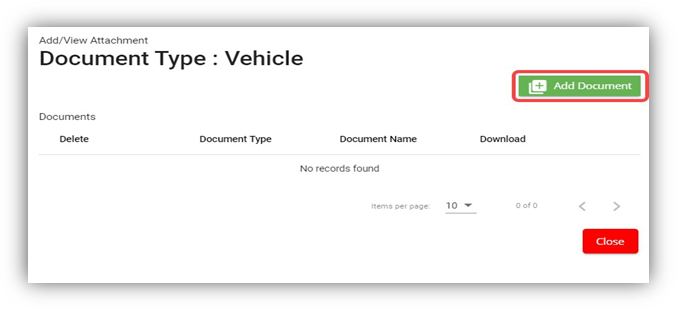
2. Click (**Add Document** button).The file choosing and uploading option will be enabled.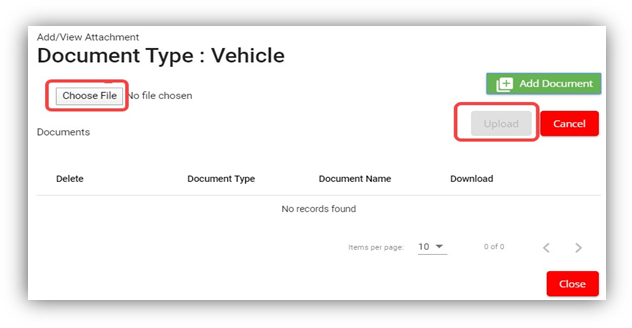
3. Click (**Choose File** button) and select the document which you want to upload.
4. Click **Upload**, The selected document will be uploaded and displayed in the **Add/View Attachment** window.
If you want to view any attached document with a vehicle,
1. Click (Attachment icon), the **Add/ View Attachment** window opens with a list of attached documents. (Note: The subscript number displays with attachment icon shows the total number of attached documents with the vehicle..
2. If you want to download the attached document, click (Download icon) in the **Download** column. The document will be downloaded.
### Delete a Vehicle
You can delete the added vehicle by using delete option provided in the **Delete** column of the **Vehicle** page. To delete any added vehicle,
1. Click (Delete icon) of the respective, the **Confirmation** dialogue box opens with the following notification: “**Are you sure you want to delete record?**”.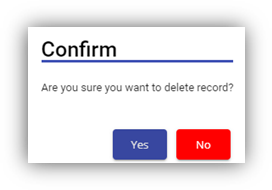
2. If you want to delete the vehicle, click **Yes** otherwise click **No**.
3. The deleted vehicle will be removed from the **Vehicle** page.
### Filter a Vehicle
If you want to view any specific vehicle details among multiple vehicles listed in the **Vehicle** page, you can use the filter option provided in the upper left corner of the **Vehicle** page. To filter any vehicle you want,
1. Click (Filter button). A filter box opens in each column of the **Vehicle** page.
2. Enter the relevant data in any column filter. The vehicle(s) that qualifies will be filtered and display in vehicle page.
### Export a Vehicle List
The application has a feature to download the added vehicle list in an excel format. You can use export option to download the added vehicle list. To download the added vehicle list, click  (**Export Excel** button). The vehicles added in the **Vehicle** page will be downloaded as an excel file.
## Service Request
The **Service Request** submenu in the **SRM** page helps you to add and manage the functionalities related with the service schedule and the service request.
The **Service Request** submenu contains the following tabs,
- Service Schedule
- Service Request View
- Service Request Verification
- Add Invoice
- Manual Invoice
- Lump Sum Invoice
- Invoice View
- Payment
- Bulk Payment
- Clear Cache
### Service Schedule
The **Service Schedule** tab in the **Service Request** submenu helps you to add a service schedule. Click Service Schedule in the Service Request submenu, the Service Schedule page opens.
[](http://wiki.cuteinfocomm.com/uploads/images/gallery/2023-10/image-1698638003553.png)
#### View Service Schedule
If you want to view any specific service schedule among the list of service schedules, you can use column filter to select the respective data such as Schedule No, Customer, Location, and Date Range in the respective fields given in the Service Schedule page. You can click the page expand icon at the top right corner to expand the filters.
[](http://wiki.cuteinfocomm.com/uploads/images/gallery/2023-10/image-1698638156539.png)
If you want to view the scheduled schedule of any customer,
1. Select a customer from the Customer field.
2. Click [](http://wiki.cuteinfocomm.com/uploads/images/gallery/2023-10/image-1698638301357.png) ( print Schedule button), the schedule details for the selected customer will be downloaded as a pdf. [](http://wiki.cuteinfocomm.com/uploads/images/gallery/2023-10/image-1697782130744.jpg)
#### Add a Service Schedule
To add a service schedule, do the following steps,
1. Click  (Add button) in the Service Schedule page, the **Add Service Schedule** window opens (Note: The fields highlighted with red color are mandatory. You must enter the relevant details in that fields before saving). [](http://wiki.cuteinfocomm.com/uploads/images/gallery/2023-10/image-1698130270983.png)
2. In the **Project List** box, select a project list from a drop-down list. Once you have selected a project, the customer, the customer location and contact number of the selected project will be automatically populated.
3. Note: If you want to select all projects, click to enable the All checkbox provided with the Project List box. And then select relevant details in customer, customer location and contact number box. [](http://wiki.cuteinfocomm.com/uploads/images/gallery/2023-10/image-1697781055715.png)
4. In the **Start Date** and **End Date** boxes, select the schedule’s start and end dates.
5. In the **Frequency** box, select the frequency of doing service based on the customer requirement. For example, if the customer expects to do the service for three times in a month, select **3 x Monthly.** Note: If you want to view the location in the map, click  (Location Map icon) provided with the Frequency box.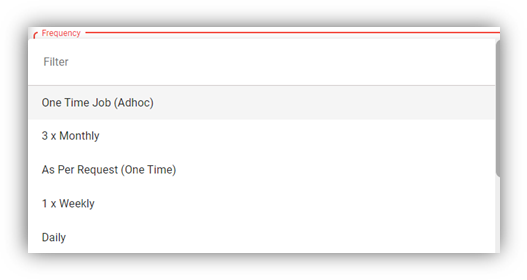
6. In the **Type** box, select a type of medium.
7. In the **Service Description** box, enter the service description.
8. In the **Invoice Description** box, enter the invoice description.
9. In the **Effective Date** box, select the effective date of the service schedule.
10. In the **Invoice Due Days** box, enter the due days for invoice.
11. In the **Term Days** box, enter the term days.
12. In the **Plan Schedule** box, select the plan schedule whether Day Job or Night Job.
13. In the **Tanker Size** box, select the tanker size whether small or big.
14. If the service is jetting, select Jetting or if the service is PUB, select the PUB. [](http://wiki.cuteinfocomm.com/uploads/images/gallery/2023-10/image-1697781749216.png)
15. In the **Grease Trap Size** box, enter the grease trap size.
16. In the **Total Grease** box, enter the total grease value.
17. In the **Manpower** box, enter the required manpower.
18. In the **Price** box, enter the price for the service.
19. In the **Service Note** box, enter the service note.
20. In the **Invoice Note** box, enter the invoice note.
21. In the **Private Note for Internal** box, enter the note for internal.
22. In the **Effective Time** box, select the effective time. The calendar will be displayed based on the selection of frequency.
23. In **Old SRM Sales Contract No** box, enter the old SRM sale contract number associated with the service schedule.
24. Click **Save**. The service schedule will be added and listed in the Service Schedule page.
#### Activate/Cancel a Service Schedule
To activate a service schedule, do the following steps,
1. Click  (Active icon) that is provided in the Action column in the service schedule page. The Service Request List window opens and shows the list of service requests added against the selected service schedule number.
2. Click **Ok**. The Remarks box opens.
3. Enter your remarks and click **Save**. The service schedule will be activated. The remarks you have entered will be saved in the Status Remarks column of the Service Schedule page.
To cancel a service schedule,
1. Click  (Cancel icon) that is provided in the Action column, of the service schedule. The Service Request List window opens and shows the list of service requests added against the selected service schedule number.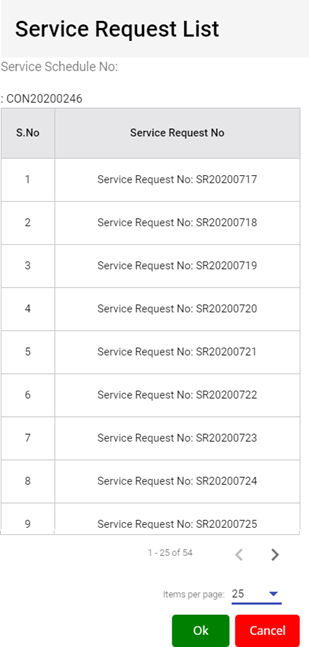
2. Click **Ok**. The Remarks box opens.
3. Enter your remarks and click **Save**. The service schedule will be cancelled. The remarks you have entered will be saved in the Status Remarks column of the Service Schedule page.
#### Edit a Service Schedule
You can edit the details of the added service schedule by using edit option provided in the
Edit column of the Vehicle page. To edit the added service schedule details,
1. Click  (Edit icon) of the respective service schedule you have added, the Add Service Schedule window opens with the added service schedule details.[](http://wiki.cuteinfocomm.com/uploads/images/gallery/2023-10/image-1697783400078.png)
2. Edit the service schedule details where you want.
3. Click **Save**.
#### Delete a Service Schedule
You can delete the added service schedule by using  (Delete icon) provided in the Delete column of the Service Schedule page.
#### Export a Service Schedule List
If you want to export all the service schedules in the Service Schedule page in an excel format, you can use the export option provided in the Service Schedule page. To know how to export, follow the procedures given in the topic, “Export a Vehicle List”.
### Service Request View
The **Service Request View** tab in the **Service Request** submenu helps you to add a service request. Users assigned with **srm\_admin** and **srm\_technician** roles can have access to view this **Service Request View** page. Click **Service Request View** in the **Service Request,** the **Service Request View** page opens.
[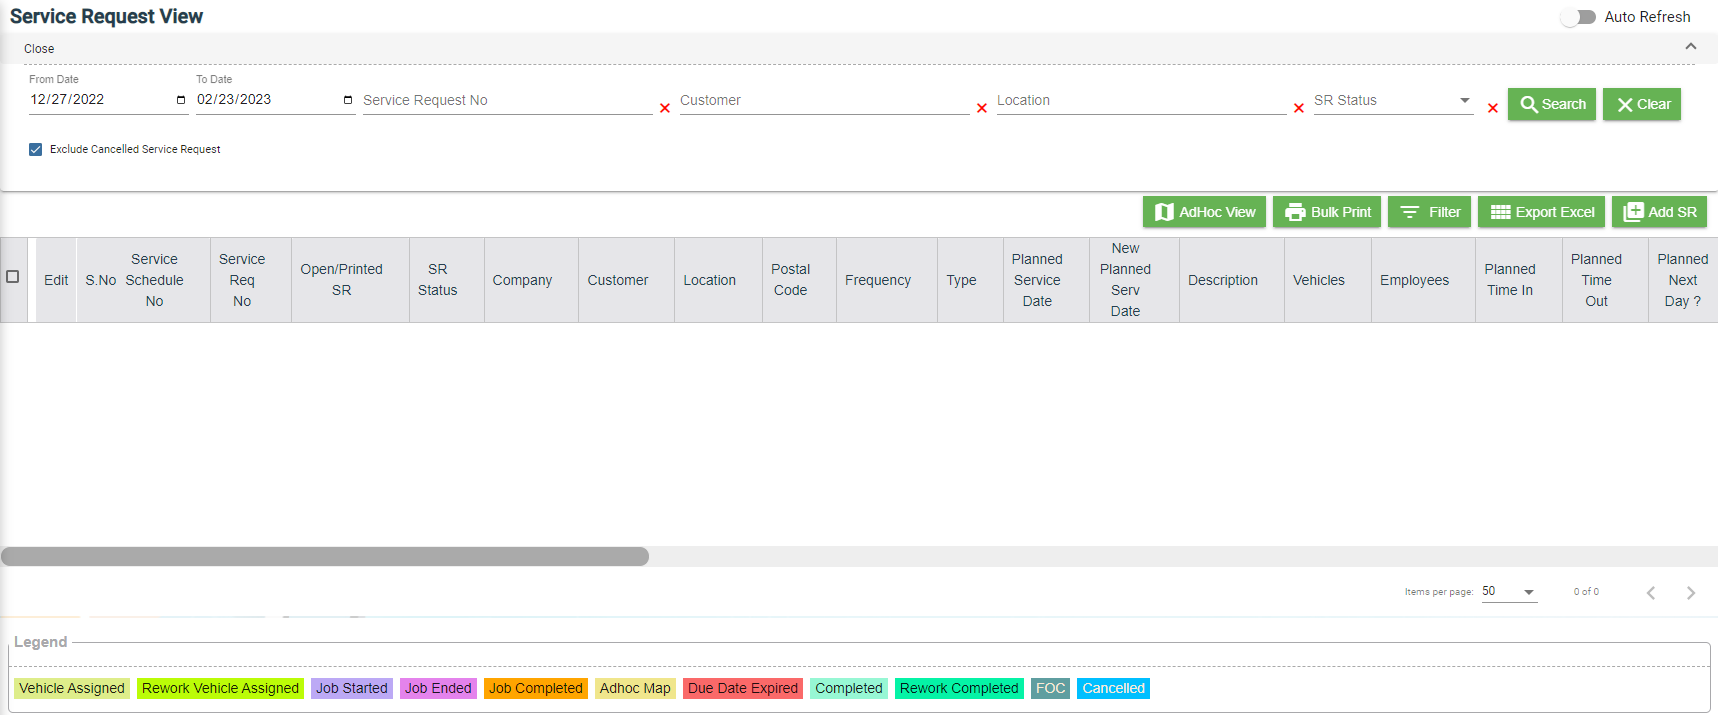](http://wiki.cuteinfocomm.com/uploads/images/gallery/2023-10/image-1698130148290.png)
- You can configure displaying of the number of service request items per page by selecting **50**, **100**, **250, 500,** or **1000**,
- If you want to view any specific service request among the list of service requests, you can select the respective data such as Service Request No, Customer, Location, and Date Range in the respective fields given in the **Service Request View**
- The service request displayed in different color explains their status:
#### Add a Contract Service Request
To add a contract service request, do the following steps,
1. Click [](http://wiki.cuteinfocomm.com/uploads/images/gallery/2023-10/image-1698129828567.png)(**Add** button) in the **Service Request View page,** the **Service Request** window opens, click to select **Contract SR** (**Note**: The fields highlighted with red color are mandatory. You must enter the relevant details in that fields before saving.). [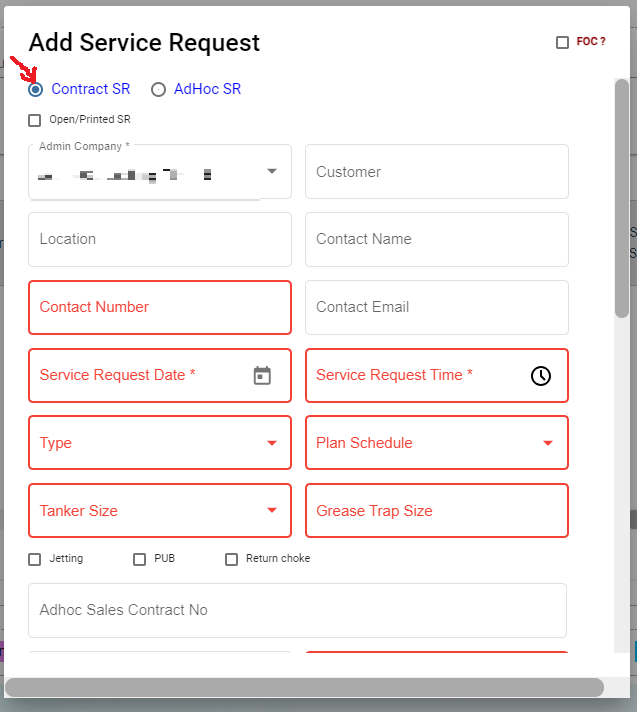](http://wiki.cuteinfocomm.com/uploads/images/gallery/2023-10/image-1698130642389.png)
2. In the **Admin Company** box, select admin company.
3. In **Customer** box, select customer company name.
4. In **Location** box, select location.
5. In **Contact Name** box, select contact name.
6. In **Contact Number** box, if contact name is selected, the associated contact number and email address will automatically populated.
7. In **Contact Email** box, if contact name is selected, the associated email address will automatically populated.
8. In **Service Request Date** box, click to select date.
9. In **Service Request Time** box, click to select time.
10. In **Type** box, click to select service type.
11. In **Plan Schedule** box, click to select plan schedule as Day Job or Night Job.
12. In **Tanker Size** box, click to select tanker size.
13. In **Grease Trap Size** box, enter or select grease trap size.
14. In **Jetting, PUB, Return Choke** options, click to select relevant option(s).
15. In **Adhoc Sales Contract No** box, enter adhoc sales contract number if any.
16. In **Quotation No** box, enter quotation number.
17. In **Total Grease** box, enter the total grease value.
18. In **Manpower** box, enter the required manpower.
19. In **Price** /**Visit** box, enter the price for the service request.
20. In **Payment Mode** box, select payment mode.
21. In **Billing** flag, click to enable if applicable.
22. In **Service Description** box, enter service description.
23. In **Invoice Description** box, enter invoice description.
24. In **Invoice Note** box, enter the invoice note.
25. In **Private Note for Internal** box, enter the note for internal.
26. In **Service Note** box, enter the service note.
27. In **Show All Vehicle/Technician** flag, click to enable if applicable. When this flag is ticked, vehicle and technician selection list will include all technician and vehicle. Else Jetting Service Request will show only jetting vehicle and technicians in jetting department only.
28. In **New Planned Service Date** box, click to select planned date.
29. In **Planned Time In** box, click to select planned time in.
30. In **Planned Time Out** box, click to select planned time out.
31. In **Vehicle** box, select vehicle.
32. In **Technician** box, select technician.
33. For **Assignment History** option, it is used to check all existing assignments of selected technician, so that user can unassign the technician from some assignments to make him available for the job on this new service request date.
34. Click **Save**. The service request is added and listed in the **Service Request View** page.
#### Edit a Service Request
You can edit the details of the added service request by using edit option provided in the **Edit** column of the **Service Request View** page. To edit the added service request details,
1. Click (Edit icon) of the respective service request, the **Service Request** window opens,
2. Edit the service request details where needed.
3. Click **Save** to save edits.
#### Assign Technician and Vehicle for a Service Request
Users assigned with **srm\_admin** role only can have access to assign the technician and vehicle for an added service request.
Users assigned with **srm\_technician** role can only view the assigned details.
To assign the technician and vehicle for an added service request, do the following steps,
1. Click[](http://wiki.cuteinfocomm.com/uploads/images/gallery/2023-10/image-1698645946491.png) (Assign icon) in the assign column of the respective service, the **Assign Technician** window opens. [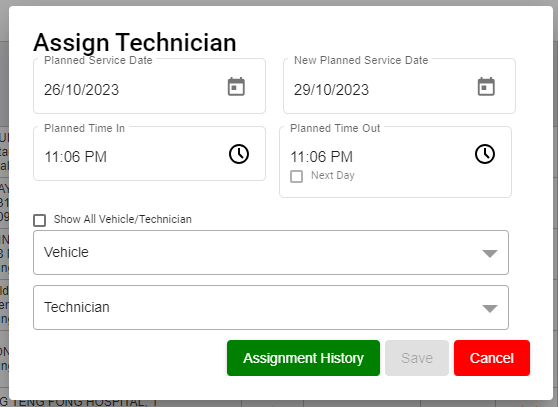](http://wiki.cuteinfocomm.com/uploads/images/gallery/2023-10/image-1698645988734.png)
2. In **Planned Service Date** box, the planned date will show automatically.
3. In **New Planned Service Date** box, click to select new date if needed.
4. In **Planned Time In** and **Planned Time Out** boxes, select the planned in and out times.
5. In **Vehicle** box, select a vehicle from a list. **Note**: You can select multiple vehicles.
6. In **Technician** box, select a technician from a list. **Note**: You can select multiple technicians.
7. Click **Save,** the service request is assigned. For **Assignment History** option, it is used to check all existing assignments of selected technician, so that user can unassign the technician from some assignments to make him available for the job on this new service request date. After assigning the vehicle and technician, the SR record will be changed to yellow color. The service request will be moved to the respective technicians and the  (Job Starts icon) will be appeared in the **Verification** column as below,
#### Indicate Starting and Ending of Job
Once the service request is added and assigned for the respective technician and vehicle by the client, the technician can login and view job details assigned to them.
**To indicate that the job was started,**
1. Click on (Job Starts icon) appeared in the **Verification** column, the job started status will be updated successfully and the SR record will be changed to Blue color.
**To indicate that the job was ended,**
1. Click on (Job Ends icon) appeared in the **Verification** column, the job ended status will be updated successfully and the SR record will be changed to Purple color.
Once the job has completed, the verification process begins.
**Note**: When you click  (Assign icon) of this service request, the vehicle and technicians which are assigned already will not be shown in list.
#### Verify the Service Request Completion
In general, once the job is done by the technician, the respective SR record will be moved for verification that needs to be done by the admin. This **Verification** functionality is provided for the technician on the job to print the Service Verification Form for client to verify the job done by technician and sign off.
1. Click (Verification icon) provided in the **Verification** column**,** the **Service Request Verification** window opens. [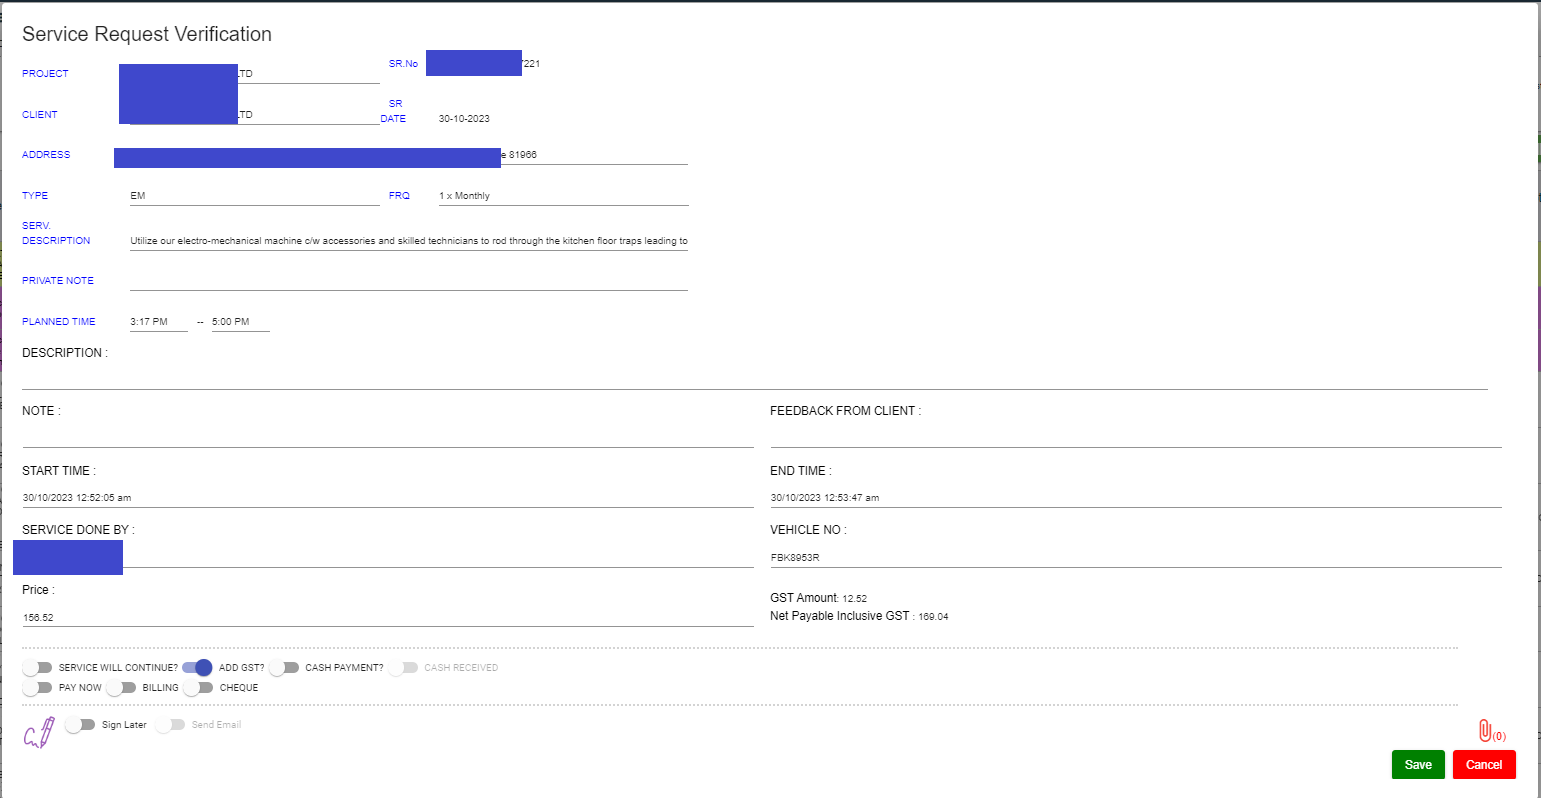](http://wiki.cuteinfocomm.com/uploads/images/gallery/2023-10/image-1698702122999.png)
2. In **DESCRIPTION** box, enter the description.
3. In **NOTE** box, enter your note if any.
4. In **FEEDBACK FROM CLIENT** box, enter client feedback.
5. In **START TIME** and **END TIME** boxes, verify start and end time, if any changes, select the started and ended time of the assigned job.
6. In **SERVICE DONE BY** box, verify technician assigned, if any changes, click to select technician name.
7. In **VEHICLE NO** box, verify vehicle number, if any changes, click to select vehicle number.
8. In **Price** box, verify the price, enter updated price if any changes.
9. In other payment details section, click to enable if applicable. [](http://wiki.cuteinfocomm.com/uploads/images/gallery/2023-10/image-1698702625434.png)
- If you go for cash payment, select the checkbox of the CASH PAYMENT? option.
- If you want to add the GST amount, select the checkbox of the ADD GST? option. The price will be added with the GST amount.
- If you want the service to be continued, select the checkbox of the SERVICE WILL CONTINUE? option. Once you selected the SERVICE WILL CONTINUE? option, the system will indicate "Continue" in the Job column for the select service request. And another SR request will be created as shown below, [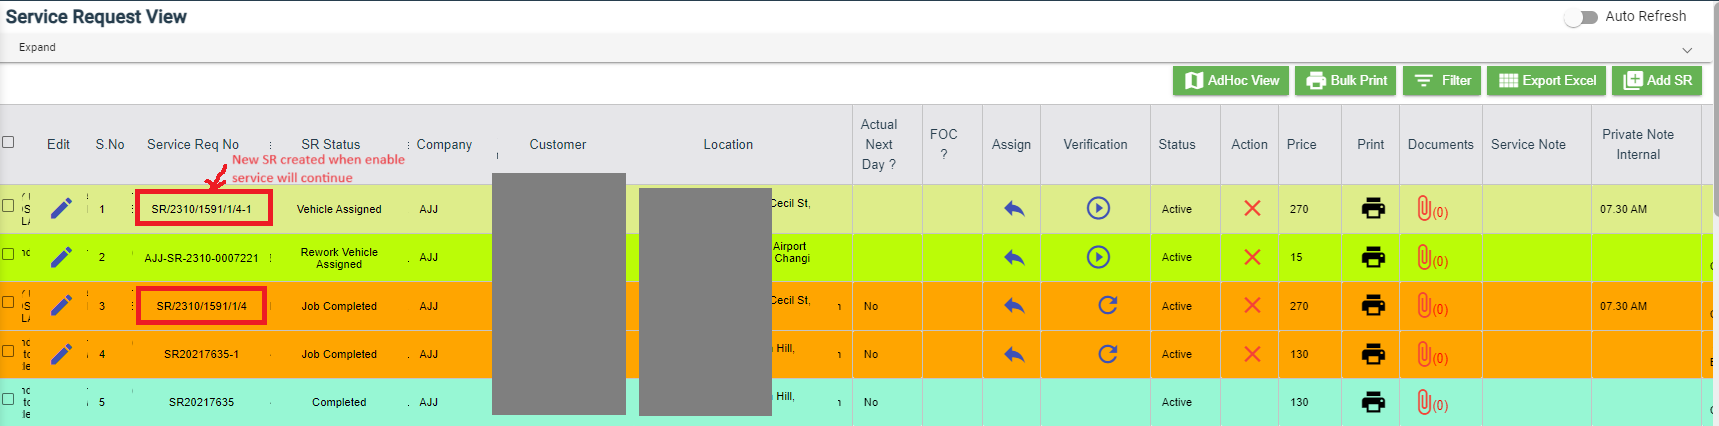](http://wiki.cuteinfocomm.com/uploads/images/gallery/2023-11/image-1699942088800.png)
10. Click (Sign icon) to add your signature, the **Signature** window opens.
- In the **Sign By** box, enter you name.
- Add you signature.
- Verify the date.
- Click **Save**.
[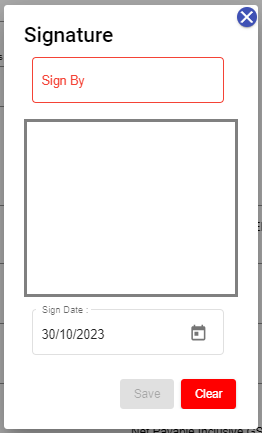](http://wiki.cuteinfocomm.com/uploads/images/gallery/2023-10/image-1698702700462.png)
11. To attach any file, click (Attach icon) and attach the file.
12. Click **SAVE** to save verification of the service requestion record.
#### Rework
When the job completed by the technician does not meet the expectations of client, the client can assign for the rework. Users assigned with **srm\_admin** role only can have access to start rework by using reset option.
To start the rework,
1. Navigate to verification column of the respective service request, [](http://wiki.cuteinfocomm.com/uploads/images/gallery/2023-11/image-1699423693251.png)
2. Click (Reset icon). A new service request will be added for rework and the job status will be updated as **Rework** in the **Job** column.
#### Print a Service Record
To print any SR record, do the following steps, click the respective  (Print icon) in the **Print** column. The SR record will be downloaded as a pdf file with customizable format.
#### Attach/View a Document into a Service Request
**To add a new document with the service request**,
1. Click  (Attachment icon) in the **Documents** column of the respective service request for which you want to add attachment, the **Add/ View Attachment** window opens. [](http://wiki.cuteinfocomm.com/uploads/images/gallery/2023-11/image-1699425158846.png)
2. Click [](http://wiki.cuteinfocomm.com/uploads/images/gallery/2023-11/image-1699425181609.png)(**Add Document** button), the file choosing and uploading option will be enabled. [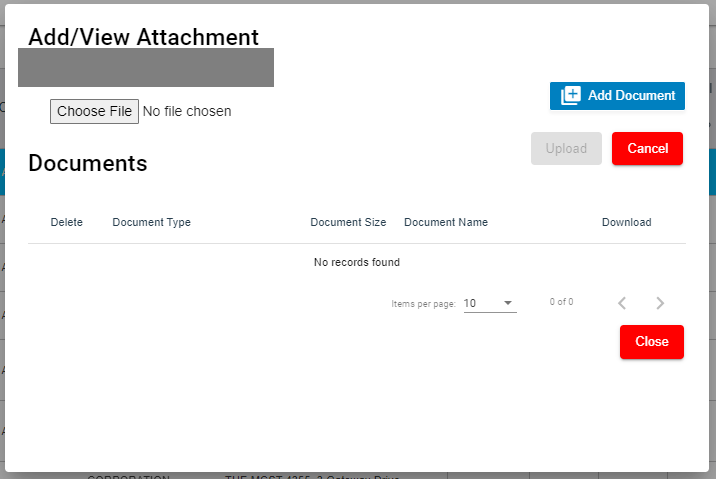](http://wiki.cuteinfocomm.com/uploads/images/gallery/2023-11/image-1699425274177.png)
3. Click (**Choose File** button) and select the document which you want to upload.
4. Click **Upload.** The selected document will be uploaded and displayed in the **Add/View Attachment** window.
**To view any attached document with a service request,**
1. Click (Attachment icon) in the **Documents** column, the **Add/ View Attachment** window opens with a list of attached documents. Note: The subscript number displays with attachment icon shows the total number of attached documents with the vehicle. [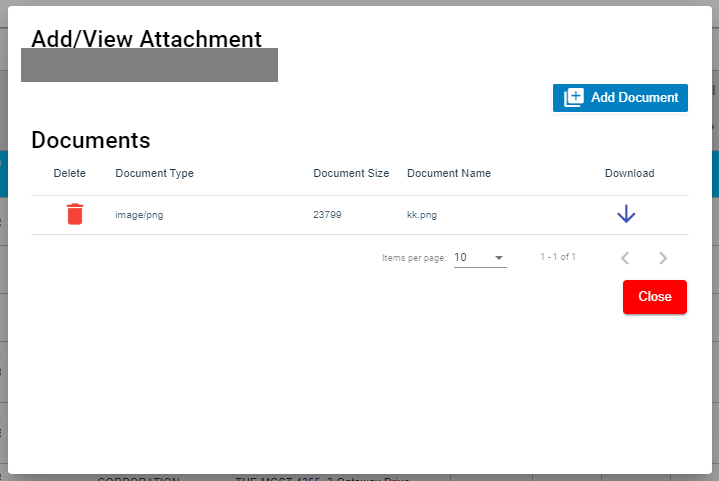](http://wiki.cuteinfocomm.com/uploads/images/gallery/2023-11/image-1699425401496.png)
2. If you want to download the attached document, click (Download icon) in the **Download** column. The document will be downloaded.
#### Activate/Cancel a Service Request
If you want to activate or cancel a service request, do the following steps,
**To activate a service request,**
1. Click (Active icon) that is provided in the **Action** column of the service request, the **Remarks** box opens.
2. Enter your remarks and click **Save**. The service request will be activated. The remarks you have entered will be saved in the **Action Remarks** column of the **Service Request View** page.
**To cancel a service request,**
1. Click (Cancel icon) that is provided in the **Action** column of the service request. The **Remarks** box opens.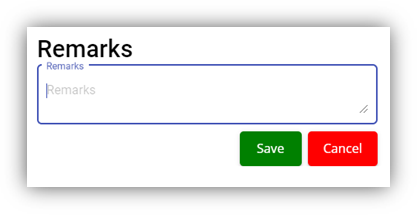
2. Enter your remarks and click **Save**. The service request will be cancelled. The remarks you have entered will be saved in the **Action Remarks** column of the **Service Request View** page.
#### Delete a Service Request
You can delete the added service request by using delete option provided in the **Delete** column of the **Service Request View** page.
#### Add an AdHoc Service Request
When a service request is not a planned one, you can add the request as an Adhoc SR. Project details are not mandatory to add the Adhoc SR. Users assigned with **srm\_admin** and **srm\_technician** roles can have access to add and view the AdHoc service requests.
To add an adhoc SR,
1. Click [](http://wiki.cuteinfocomm.com/uploads/images/gallery/2023-10/image-1698129828567.png)(**Add** button) in the **Service Request View page,** the **Service Request** window opens, click to select **AdHoc SR** (**Note**: The fields highlighted with red color are mandatory. You must enter the relevant details in that fields before saving.). [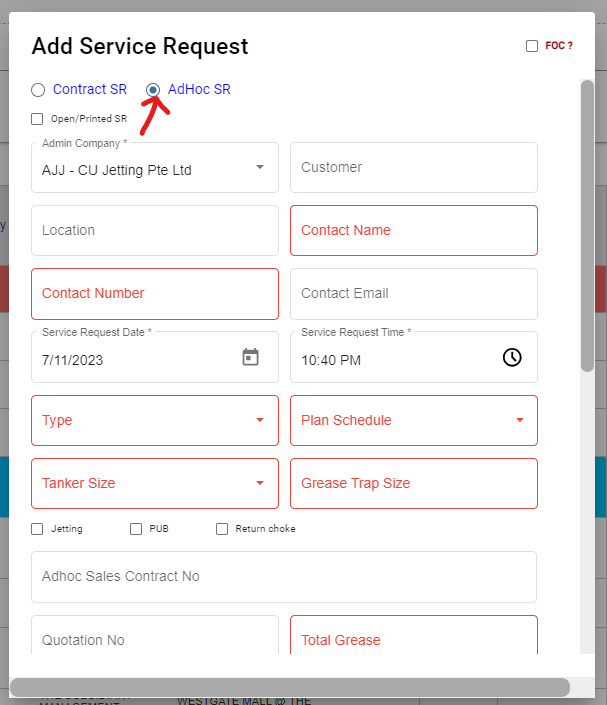](http://wiki.cuteinfocomm.com/uploads/images/gallery/2023-11/image-1699425708907.png)
2. Fill up the mandatory fields as below.
3. In **Contact Name** box, select contact name.
4. In **Contact Number** box, if contact name is selected, the associated contact number and email address will automatically populated.
5. In **Contact Email** box, if contact name is selected, the associated email address will automatically populated.
6. In **Service Request Date** box, click to select date.
7. In **Service Request Time** box, click to select time.
8. In **Type** box, click to select service type.
9. In **Plan Schedule** box, click to select plan schedule as Day Job or Night Job.
10. In **Tanker Size** box, click to select tanker size.
11. In **Grease Trap Size** box, enter or select grease trap size.
12. In **Total Grease** box, enter the total grease value.
13. In **Manpower** box, enter the required manpower.
14. In **Price** /**Visit** box, enter the price for the service request.
15. In **Payment Mode** box, select payment mode.
16. In **Billing** flag, click to enable if applicable.
17. In **Service Description** box, enter service description.
18. In **New Planned Service Date** box, click to select planned date.
19. In **Planned Time In** box, click to select planned time in.
20. In **Planned Time Out** box, click to select planned time out.
21. Click **Save**. The service request is added and listed in the **Service Request View** page.
#### View Adhoc Service Requests
If you want to view the added adhoc service requests, click  (**AdHoc View** button) in the **Service Request View** page. The Adhoc service requests opens as below,
[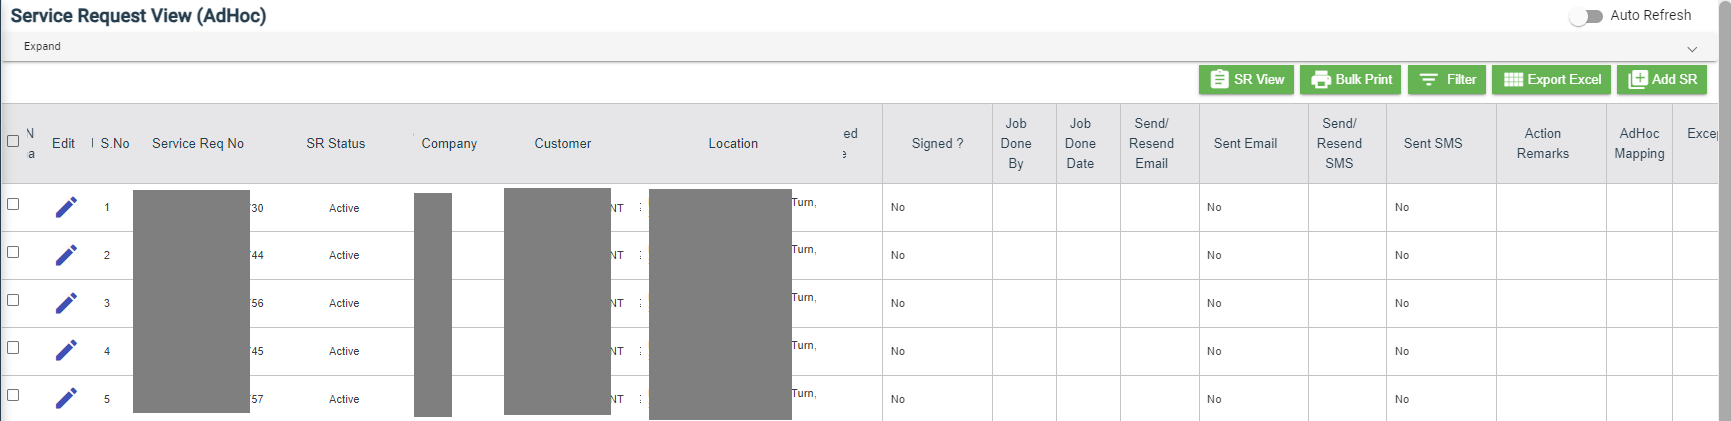](http://wiki.cuteinfocomm.com/uploads/images/gallery/2023-11/image-1699943447634.png)
Filter a Service Request
If you want to filter a specific service request in the **Service Request View** page, you can use the filter option provided in the **Service Request View** page.
#### Export a Service Request list
If you want to export all the service requests in the **Service Request View** page in an excel format, you can use the export option provided in the **Service Request View** page.
#### Bulk Print
If you want to print multiple SR record,
1. Select the checkbox of the respective service
2. Click (**Bulk Print** button). The selected SR records will be downloaded in a pdf file.
### Service Request Verification
Users can verify the signed Service Verification Forms and to proceed to the next stage of invoice generation in the **Service Request Verification** tab in the **Service Request** submenu.
Users assigned with **srm\_admin** role have access to view this **Service Verification** page and verify the Service Verification Form sent by the Technician.
Click **Verification** in the **Service Request,** the **Service Verification** page opens.
[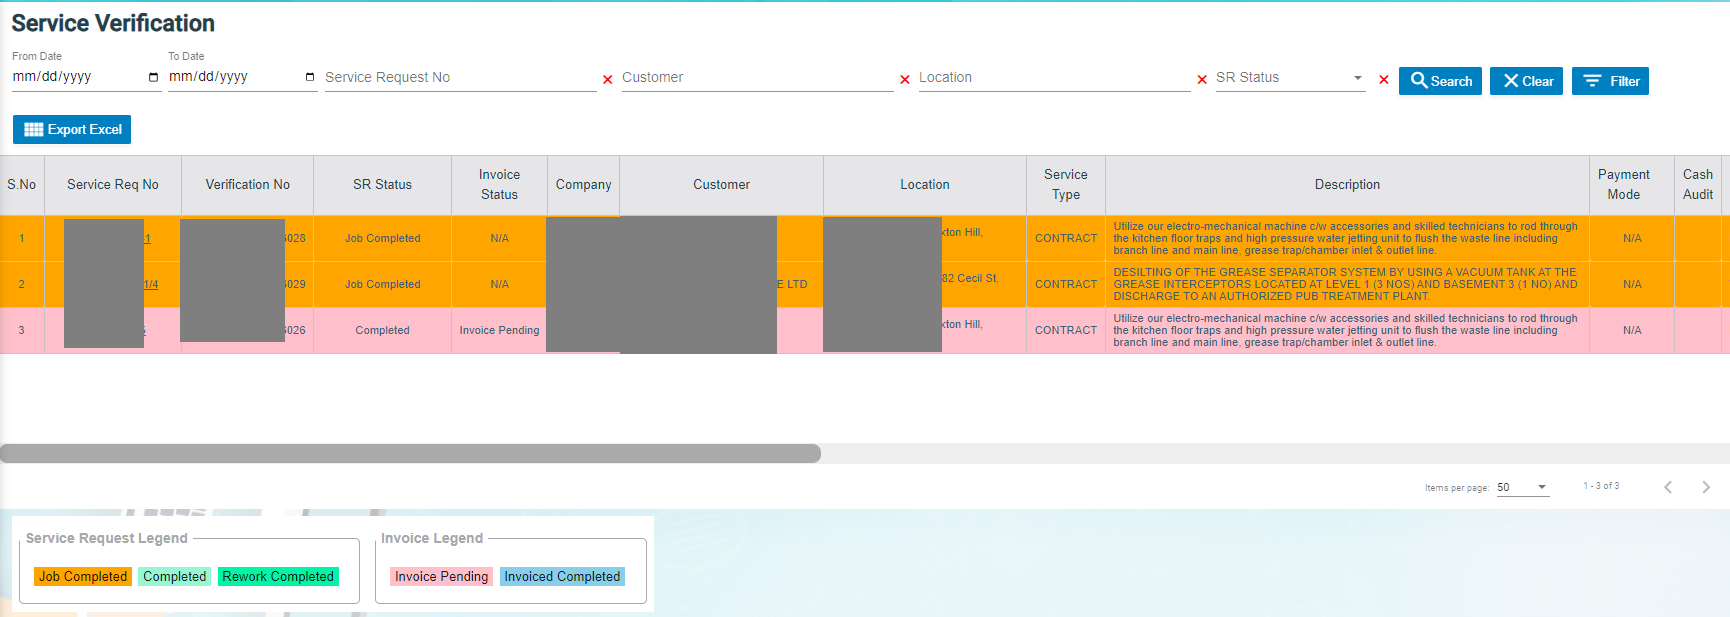](http://wiki.cuteinfocomm.com/uploads/images/gallery/2023-11/image-1701152316199.png)
- If you want to view any specific service request among the list of service requests, you can use the select the respective filters provided in the Service Verification search bar.
- The legend at the bottom of page denotes different status of a service request.
#### Verify the Service Verification Form
Once the service verification form is signed and submitted by the technician, the verification form will be sent for verification. After the service request verification form is verified, the request will be moved for invoice generation.
To verify the service verification form,
1. Navigate to the respective service request you want to verify,
2. Click the checkbox provided in the **Verified**,[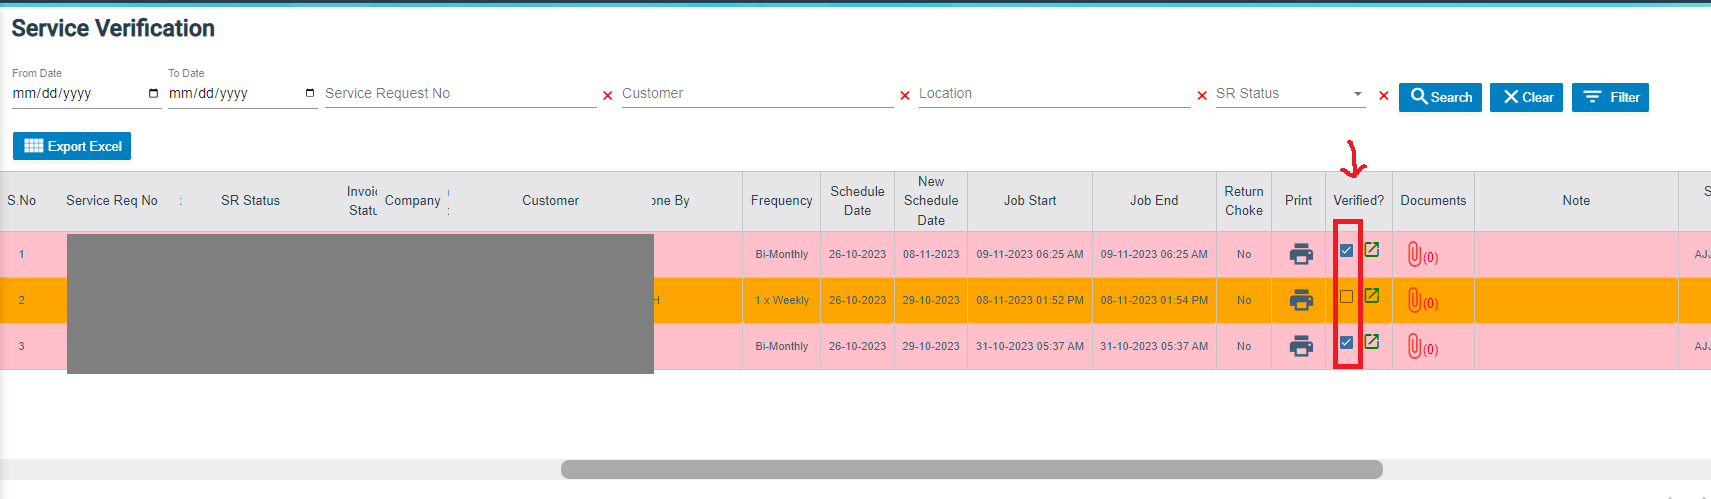](http://wiki.cuteinfocomm.com/uploads/images/gallery/2023-11/image-1701153976265.png)
3. The **Confirm** dialog box opens and shows the following message [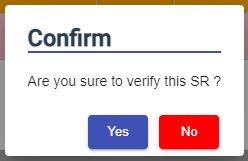](http://wiki.cuteinfocomm.com/uploads/images/gallery/2023-11/image-1701154064033.png)
4. Click Yes, a verified successful notification will display, and the selected request will be moved to the Invoice Generation page to generate invoice for the payment.[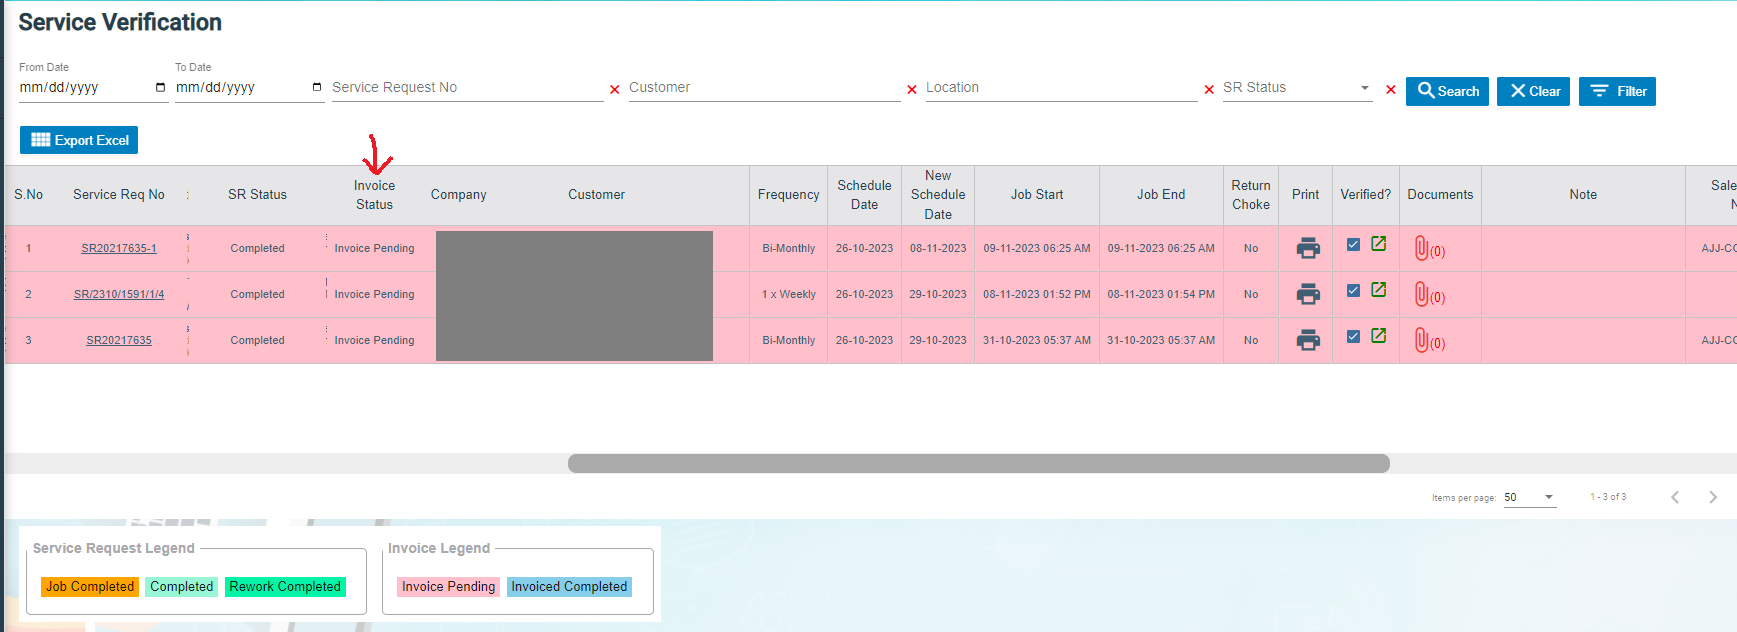](http://wiki.cuteinfocomm.com/uploads/images/gallery/2023-11/image-1701154348963.png)
#### Print a Service Record
To print any SR record, click[](http://wiki.cuteinfocomm.com/uploads/images/gallery/2023-11/image-1701154968718.png) (print icon) of respective service request in the Print column in the service verification page. The SR record will be downloaded as a pdf file.
[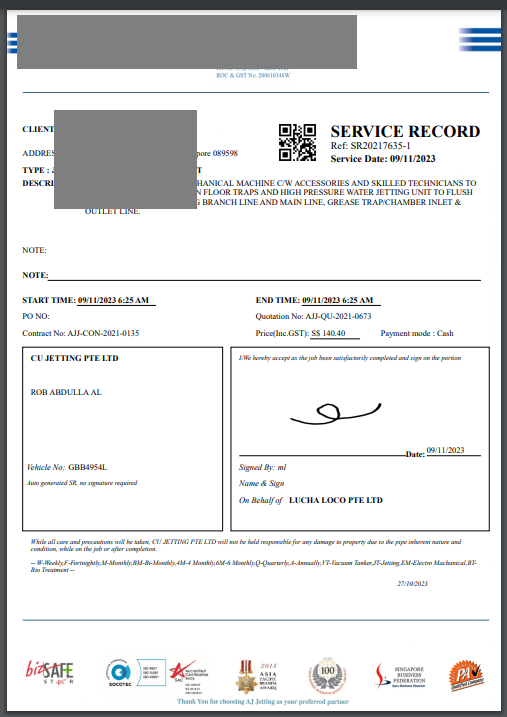](http://wiki.cuteinfocomm.com/uploads/images/gallery/2023-11/image-1701155184690.png)
#### Attach/View a Document into a Service Request
**To add a new document with the service request,**
1. Click (Attachment icon) of the respective service request, the **Add/ View Attachment** window opens. [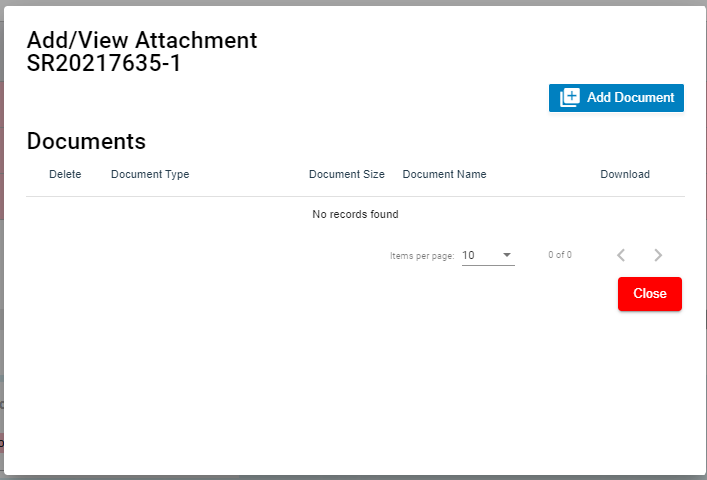](http://wiki.cuteinfocomm.com/uploads/images/gallery/2023-11/image-1701155358555.png)
2. Click [ ](http://wiki.cuteinfocomm.com/uploads/images/gallery/2023-11/image-1701155395780.png) (add document icon), The file choosing and uploading option will be enabled, [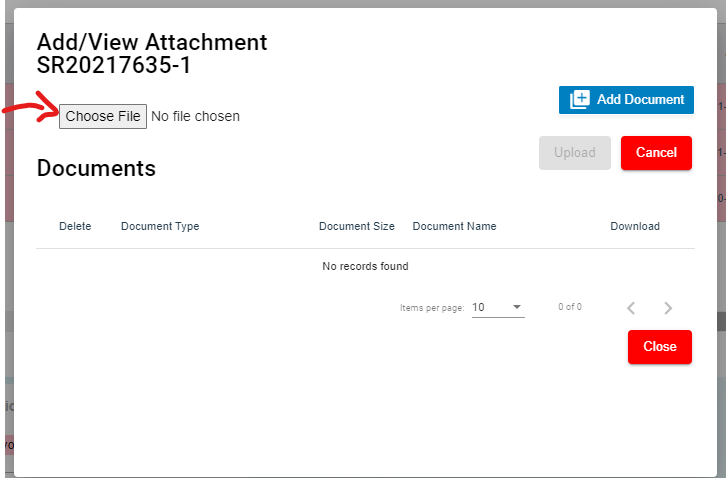](http://wiki.cuteinfocomm.com/uploads/images/gallery/2023-11/image-1701155549462.png)
3. Click  (Choose File icon) and select the document which you want to upload.
4. Click Upload. The selected document will be uploaded and displayed in the Add/View Attachment window.
**To view any attached document with a service request,**
1. Click (Attachment icon) in the **Documents** column, the **Add/ View Attachment** window opens with a list of attached documents. Note: The subscript number displays with attachment icon shows the total number of attached documents with the vehicle. [](http://wiki.cuteinfocomm.com/uploads/images/gallery/2023-11/image-1699425401496.png)
2. If you want to download the attached document, click (Download icon) in the **Download** column. The document will be downloaded.
#### Filter a Service Request
If you want to filter a specific service request in the **Service Verification** page, you can use the filter option provided in the **Service Verification** page.
#### Export a Service Request List
If you want to export all the service requests in the **Service Verification** page in an excel format, you can use the export option provided in the **Service Verification** page.
### Invoice Generation
Once the service request verification process has completed, the request will be moved for invoice generation. There are three ways to generate invoice:
1. Add Invoice - Users can generate invoice in the **Add Invoice** tab.
2. Manual Invoice - Users can generate invoice manually in the Manual Invoice tab. Click **Manual Invoice** in the **Service Request,** the **Manual Invoice** page opens. [](http://wiki.cuteinfocomm.com/uploads/images/gallery/2023-12/image-1702364885548.png)
3. Lump Sum Invoice - Users can generate lump sum invoice per customer in the **Lump Sum Invoice** tab. Click **Lump Sum Invoice** in the **Service Request,** the **Lump Sum Invoice** page opens.
- If you want to view any specific service request among the list of service requests, you can user the respective filters such as Customer, Location, Verified and SR Date Ranges in the **Invoice Generation page.**
#### Add Invoice
To generate an invoice automatically,
1. Click **Add Invoice** in the **Service Request** menu**,** the **Invoice Generation** page opens. [](http://wiki.cuteinfocomm.com/uploads/images/gallery/2023-11/image-1701156127923.png)
2. Click the checkbox of the respective service request for which you want to generate an invoice, [](http://wiki.cuteinfocomm.com/uploads/images/gallery/2023-11/image-1701326198639.png)
3. Click [](http://wiki.cuteinfocomm.com/uploads/images/gallery/2023-11/image-1701326038764.png)(**Generate Invoice** button).The **Generate Service Invoice** window opens (**Note**: The fields highlighted with red color are mandatory. You must enter the relevant details in that fields before saving). [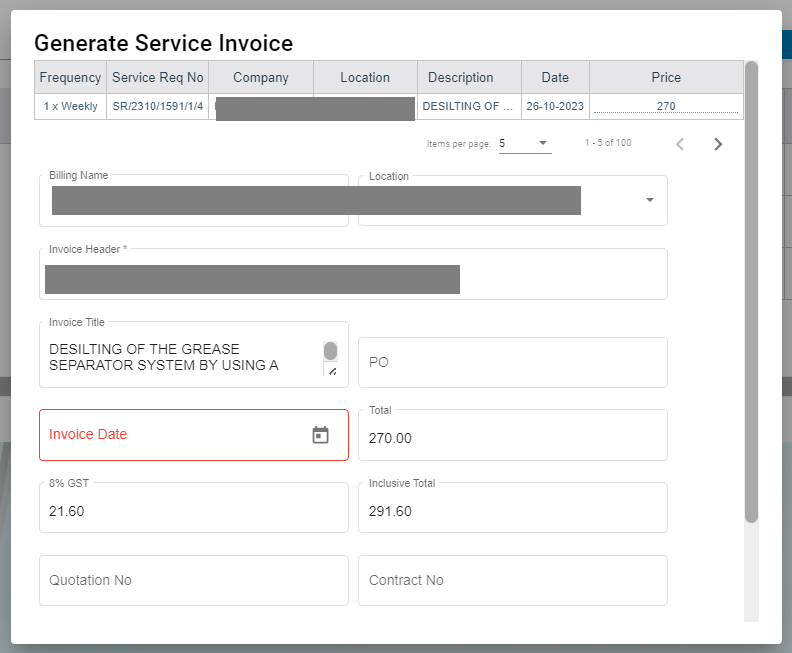](http://wiki.cuteinfocomm.com/uploads/images/gallery/2023-11/image-1701326314428.png)
4. In the **Invoice Title** box, enter the invoice title.
5. In the **PO** box, enter the PO number.
6. In the **Invoice Date** box, select the invoice date.
7. In the **Note** box, enter note if any.
8. In the **Private Note** box, enter private note for internal reference if any.
9. Click **Save**. The generated invoice will be saved and moved to the **Invoice View** page.
#### Manual Invoice
To generate an invoice manually,
1. Click Manual Invoice in the **Service Request** menu**,** the **Manual Invoice** page opens,
2. Select customer type, i.e.. Contract Customer or Adhoc Customer.
3. In the **Customer** box, select customer.
4. In the **Billing Name** box, billing name will auto populate customer name, user can edit billing name if billing name is different from customer name.
5. In the **Location** box, select location.
6. In the **Invoice Header** box, enter invoice header.
7. In the **Invoice Title** box, enter invoice title.
8. In the PO box, enter PO number.
9. In the Invoice Date box, select invoice date.
10. In the Total box, enter invoice total amount.
11. In the 9%GST box, the gst amount will be automatically calculated.
12. In the Inclusive Total box, the inclusive total will be automatically calculated.
13. In the Quotation No box, enter quotation number.
14. In the Contract No box, enter contract number.
15. In the Note box, enter note if any.
16. In the Private Note box, enter any private note for internal reference if any.
17. In the Invoice Details section, click [](http://wiki.cuteinfocomm.com/uploads/images/gallery/2024-01/image-1705515350298.png), then enter invoice details. The total amounts in manual invoice must tally with total of all detailed invoices before user press "save" button, else this validation will always show up and block the data saving. [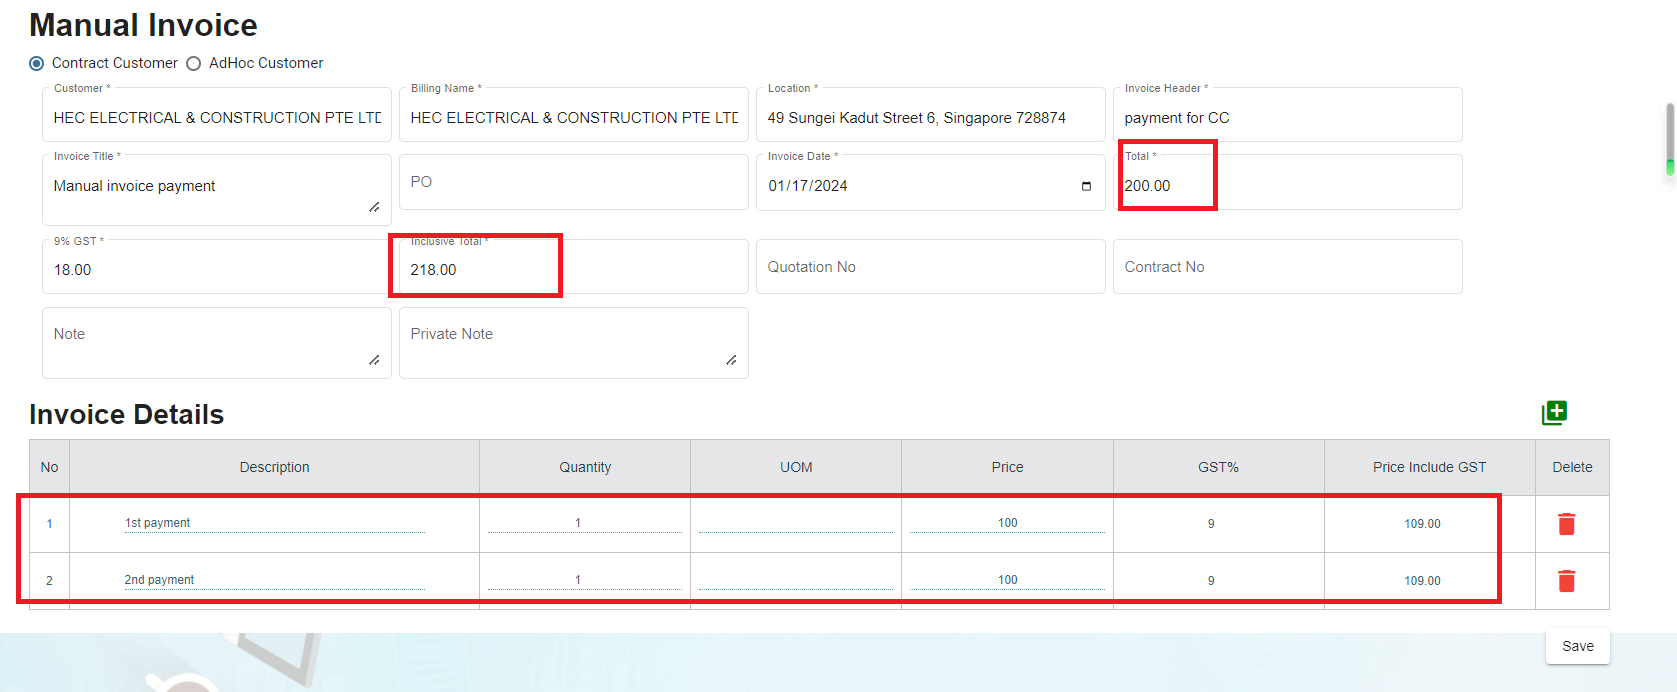](http://wiki.cuteinfocomm.com/uploads/images/gallery/2024-01/image-1705515437719.png)
18. Click Save, the manual invoice will be saved. And the details can be viewed in the Invoice View tab. [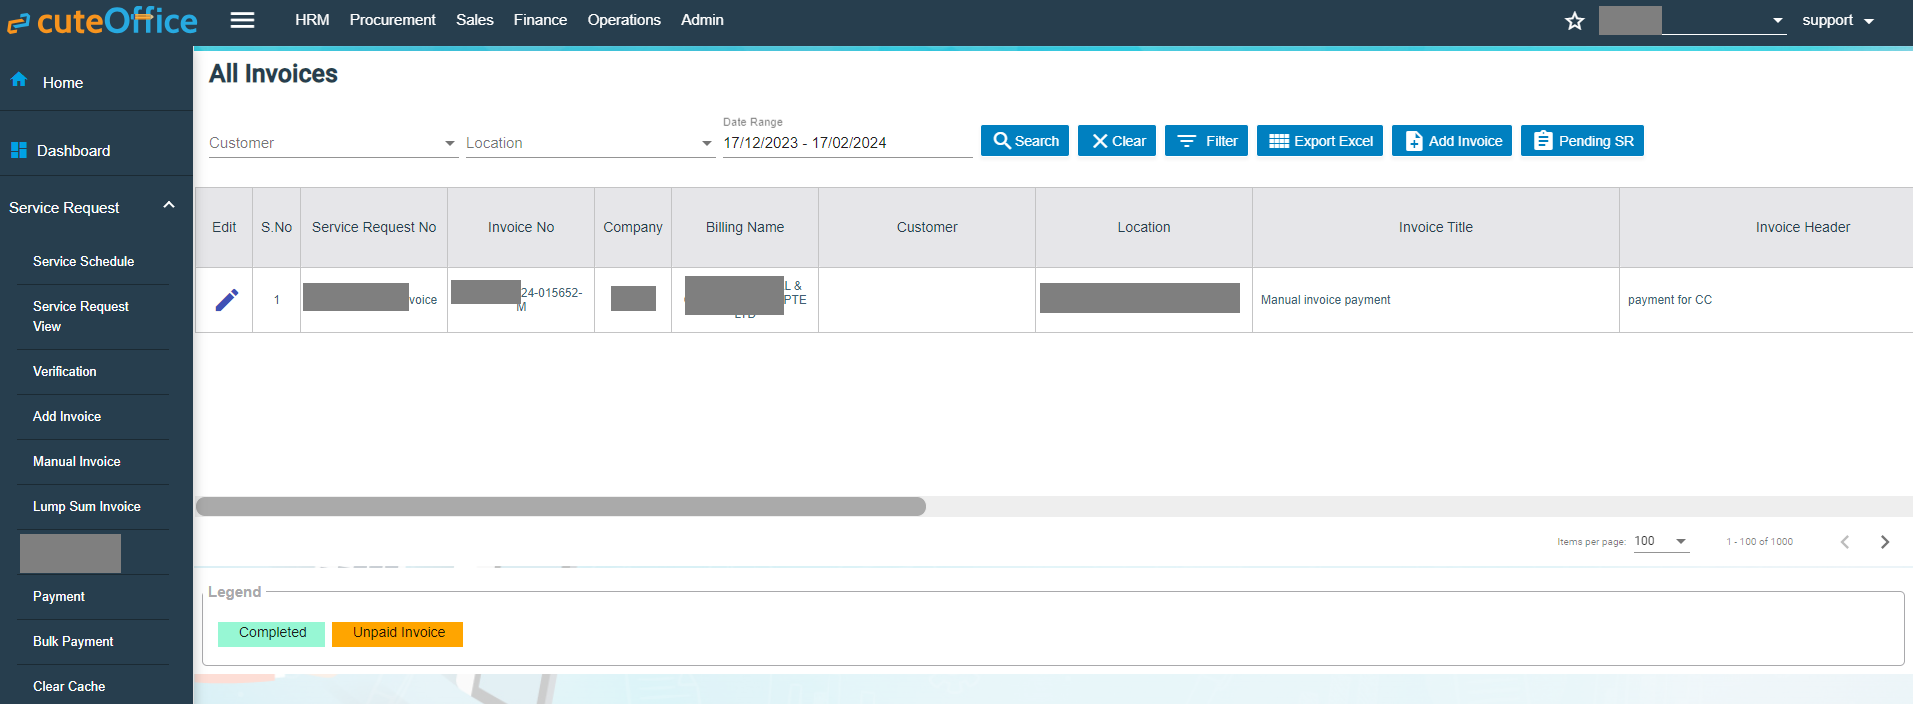](http://wiki.cuteinfocomm.com/uploads/images/gallery/2024-01/image-1705515927628.png)
### Lump Sum Invoice
Lump sum invoice is used to generate lump sum invoices for lump sum sales contract. The business scenario is as below: Once any lump sum sales contract is created from sales enquiry (by enabling lump sum contract option when creating sales contract), user can create service schedule based on the sales contract, and after the service job is completed, user will be able to generate lump sum invoice in the Lump Sum Invoice tab.
To generate lump sum invoice,
1. Click Lump Sum Invoice tab, the lump sum invoice generation page opens as below, [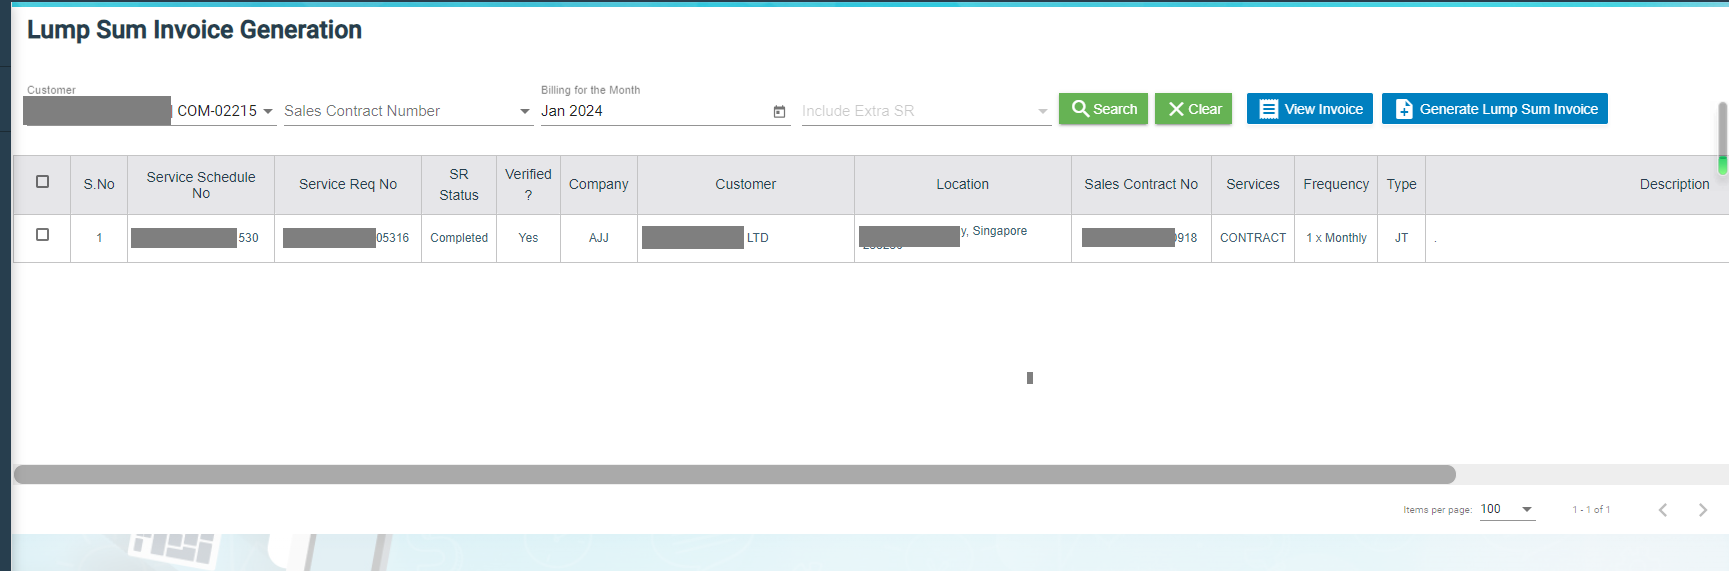](http://wiki.cuteinfocomm.com/uploads/images/gallery/2024-01/image-1705962684607.png)
2. Click to select the service schedule, then click "Generate Lump Sum Invoice" button, [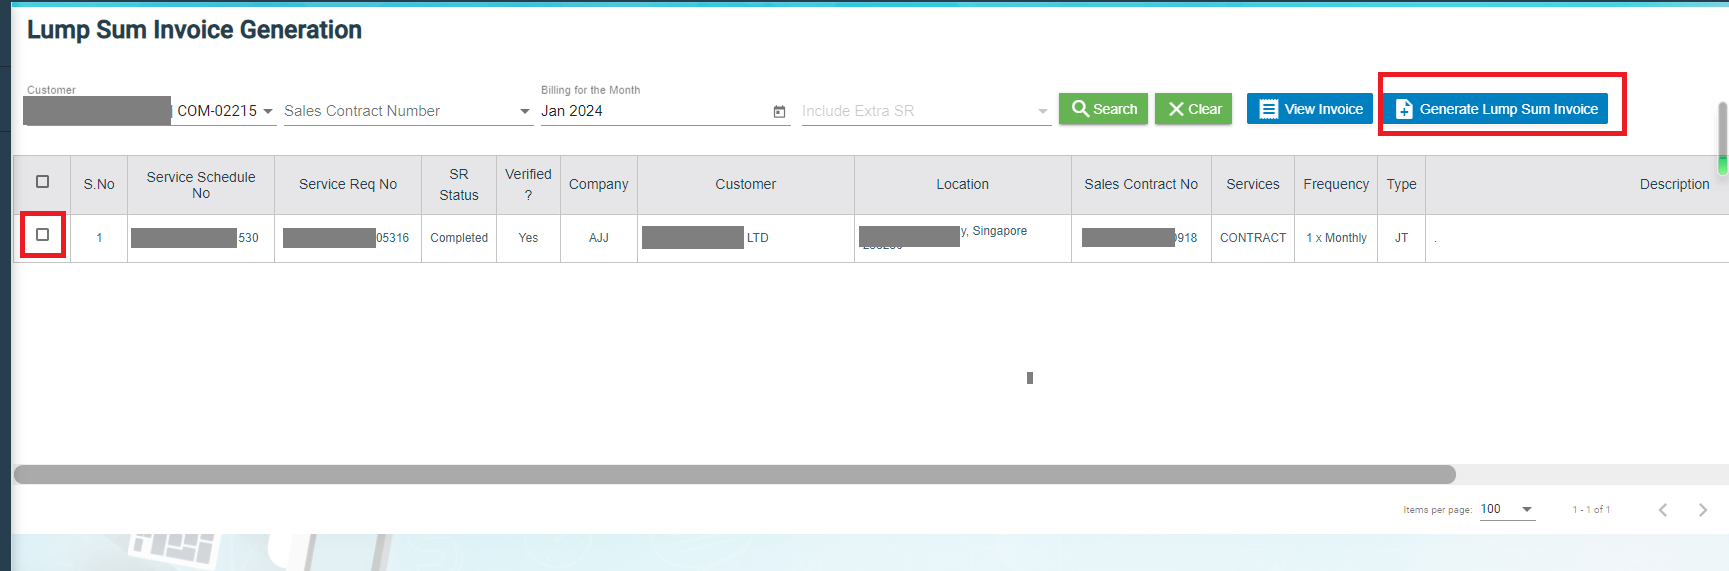](http://wiki.cuteinfocomm.com/uploads/images/gallery/2024-01/image-1705962758456.png)
3. The Invoice Generation for Lump Sum Contract screen opens as below,[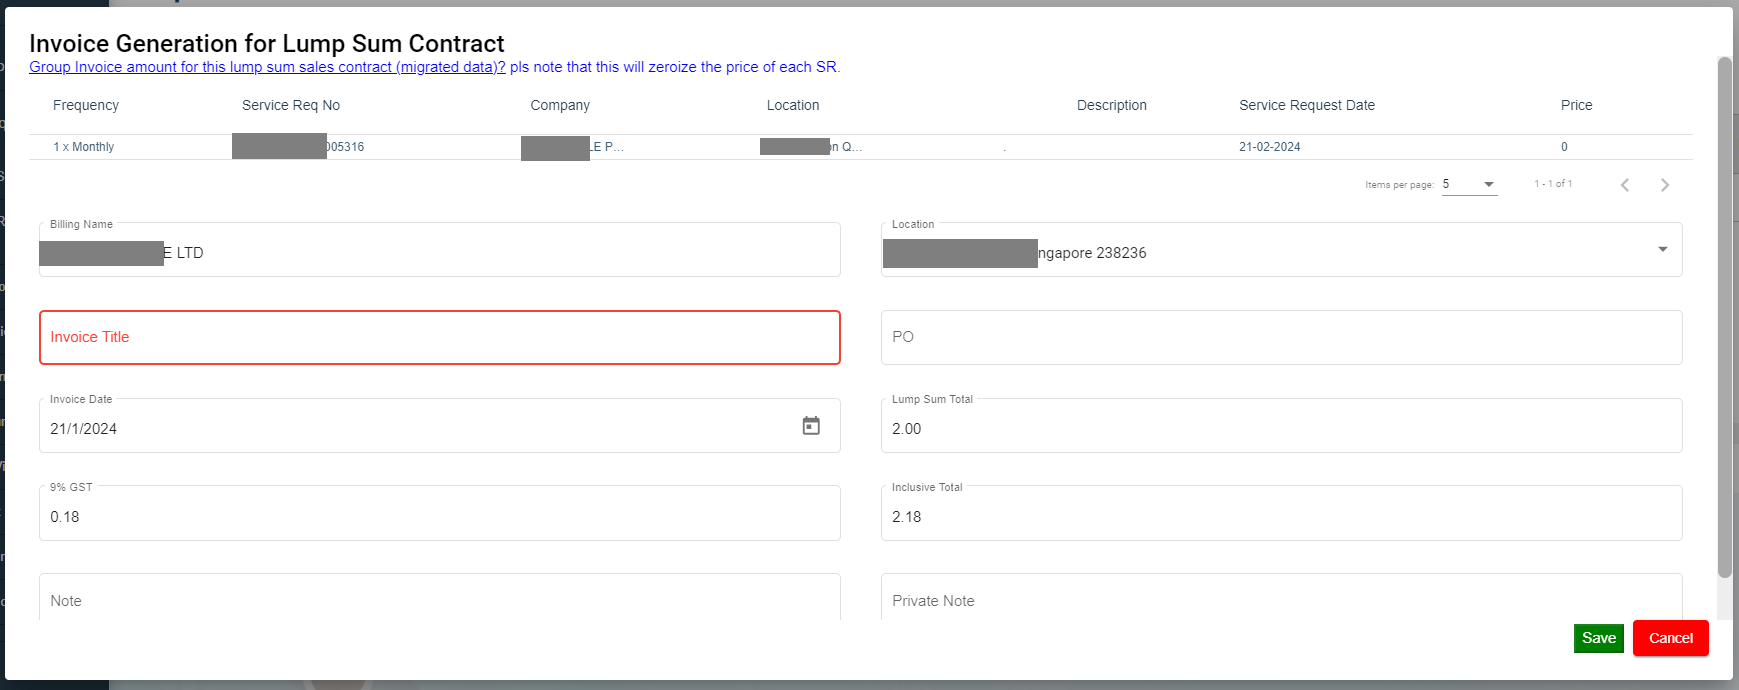](http://wiki.cuteinfocomm.com/uploads/images/gallery/2024-01/image-1705962885144.png)
4. Enter Invoice title and other details.
5. Click Save, the generated lump sum invoice will be saved and user can view it in the Invoice View page. [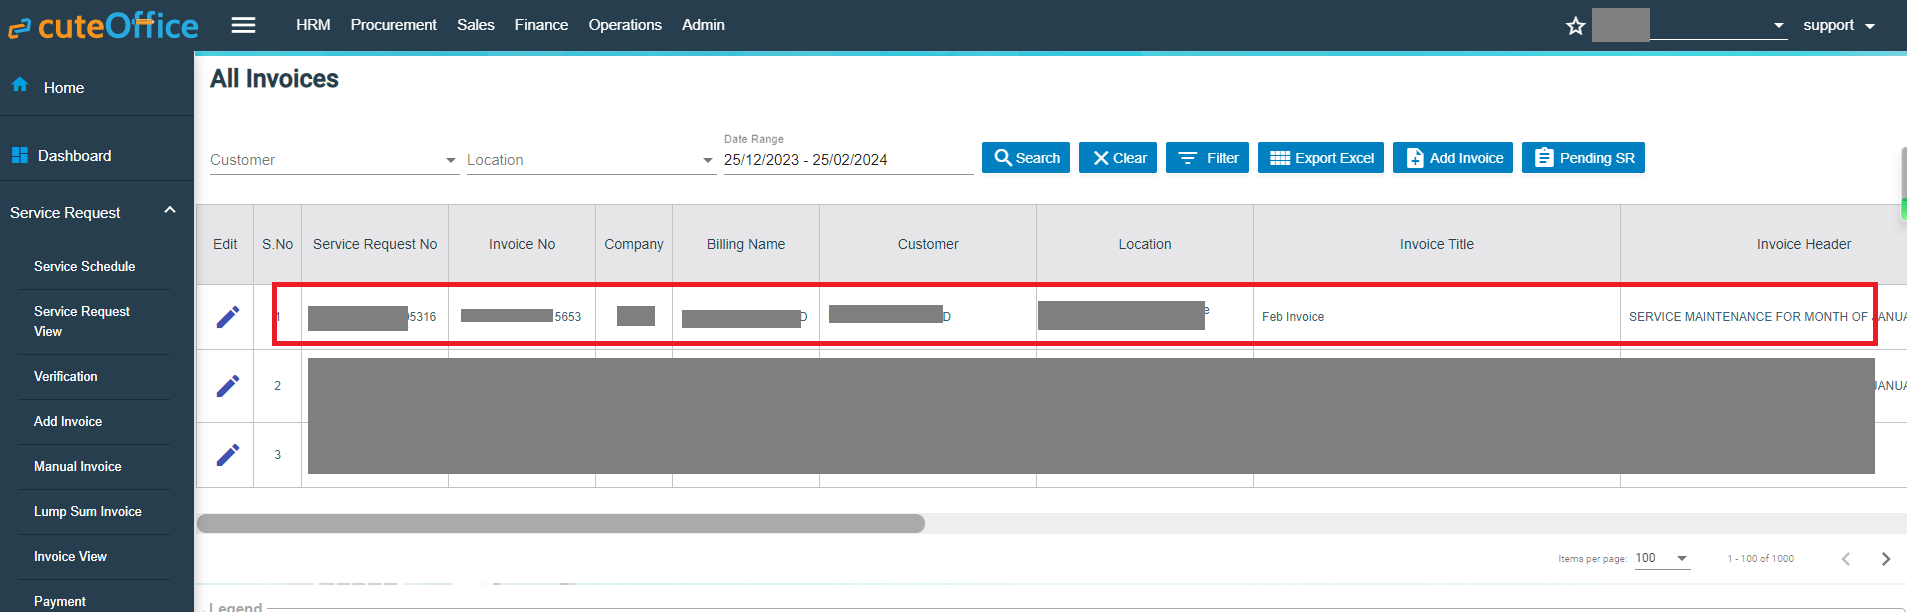](http://wiki.cuteinfocomm.com/uploads/images/gallery/2024-01/image-1706245844148.png)
### Invoice View
The **Invoice View** tab in the **Service Request** submenu manages all the generated invoice details. Click **Invoice View** in the **Service Request.** The **All Invoices** page opens as below,[](http://wiki.cuteinfocomm.com/uploads/images/gallery/2023-11/image-1701326879130.png)
If you want to view any specific invoice among the list of invoices, you can select the respective Customer, Location, Date Range in the field given in the All Invoices page.
The invoices displayed in different color denotes their status, i.e., Completed payment or Unpaid Invoice.
#### Process an Invoice
To process an invoice,
1. 1. Click to select the checkbox provided in the ****Is Invoiced?**** column, [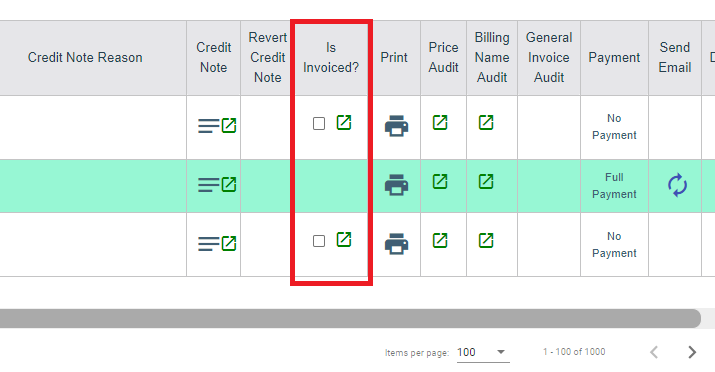](http://wiki.cuteinfocomm.com/uploads/images/gallery/2023-12/image-1701756225911.png)
2. The **Confirm** dialog box open and shows the following message. [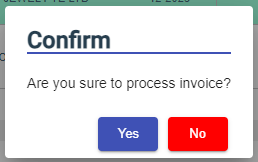](http://wiki.cuteinfocomm.com/uploads/images/gallery/2023-12/image-1701756737942.png)
3. Click **Yes**. The invoice record will be changed to green color and as Completed.
#### Set Printing options for Invoices
To set the printing options of the invoices,
1. Click [](http://wiki.cuteinfocomm.com/uploads/images/gallery/2023-12/image-1701756866782.png)(Print Option icon) provided in the **Print Option** column**,** the **Invoice PDF options** window opens [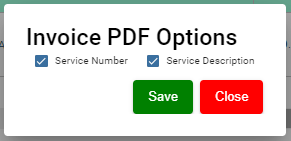](http://wiki.cuteinfocomm.com/uploads/images/gallery/2023-12/image-1701756915418.png)
2. Select the checkbox of the **Service Number** and **Service Description** options based on user's request.
3. Click **Save**.
#### Print an Invoice
To print an invoice,
1. Click the respective  (Print icon) in the **Print** column.
2. The invoice will be downloaded as a pdf file. [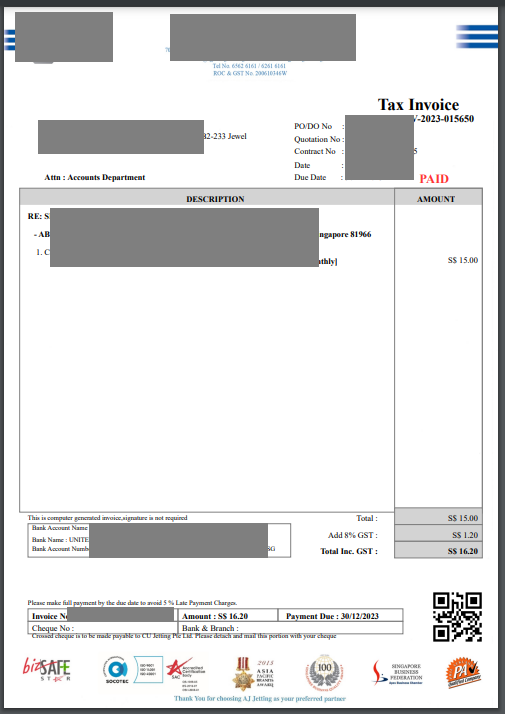](http://wiki.cuteinfocomm.com/uploads/images/gallery/2023-12/image-1701757613930.png)
#### Delete an Invoice
You can delete the invoice by using  (Delete icon) provided in the **Delete** column of the **All Invoices** page.
#### Filter an Invoice
If you want to filter an invoice in the **All Invoices** page, you can use the [ ](http://wiki.cuteinfocomm.com/uploads/images/gallery/2023-12/image-1701757753997.png)filter option provided in the **All Invoices** page.
#### Export an Invoice List
If you want to export all the invoices in the **All Invoices** page in an excel format, you can use the [](http://wiki.cuteinfocomm.com/uploads/images/gallery/2023-12/image-1701757713901.png)export option provided in the **All Invoices** page.
### Payment
The **Payment** tab in the **Service Request** submenu allows user to add the service payment details against the related invoice. Users who are assigned with srm\_admin role will have access to view this Service Payment page. Click **Payment** in the **Service Request,** the **Service Payment** page opens, user can configure the number of invoices per page displaying by selecting 50, 100, 250, 500, or 1000 at the bottom of page.
[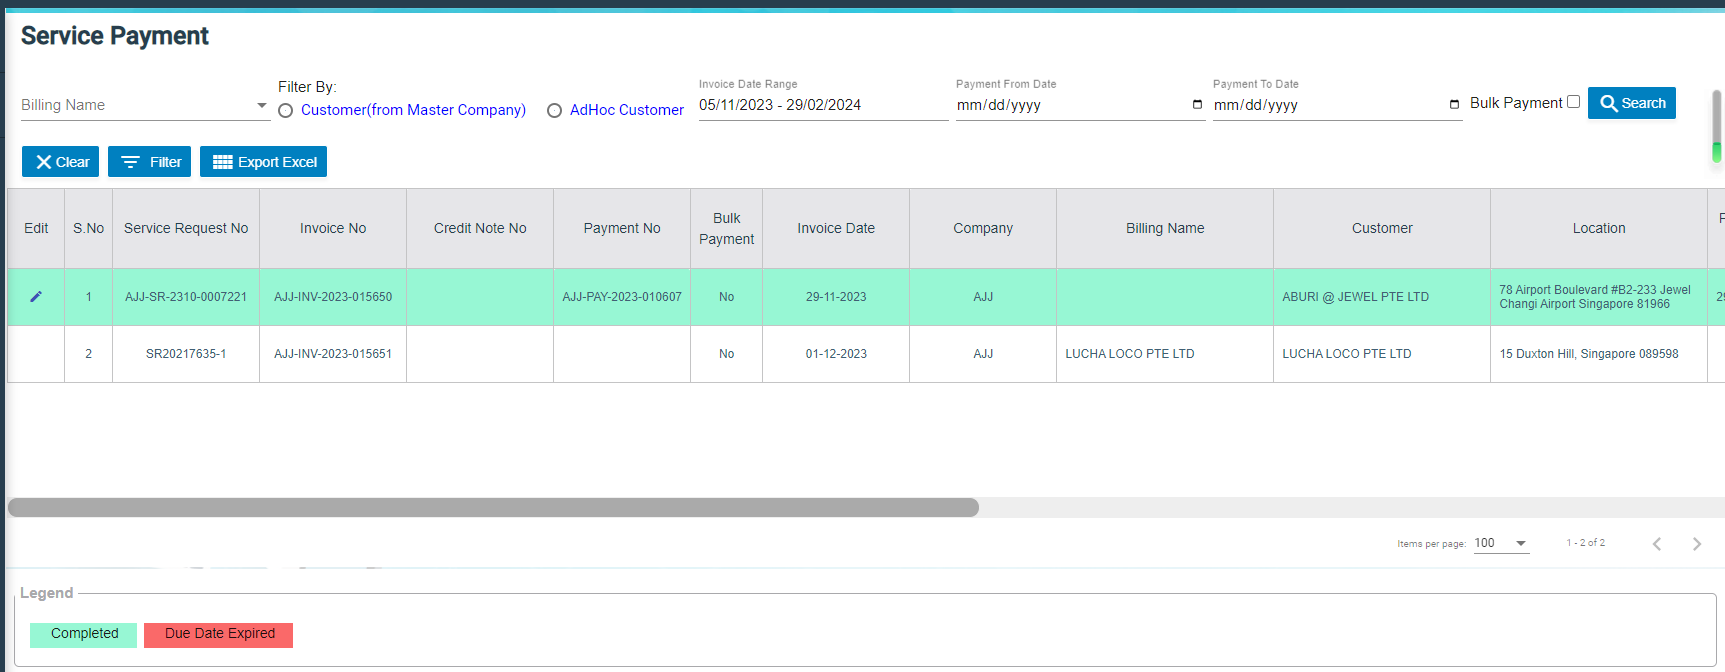](http://wiki.cuteinfocomm.com/uploads/images/gallery/2024-01/image-1706683344310.png)
- User can use filter options to view any specific invoice among the list of invoices, filter options including Billing Name, Customer, Location, Date Range in the field given in the **Service Payment** page.
- The invoices displayed in different color explains their status as described in legend.
#### Add Payment Details
To add the payment details,
1. Click (Payment icon) in the Payment column, The **Service Payment** window opens. [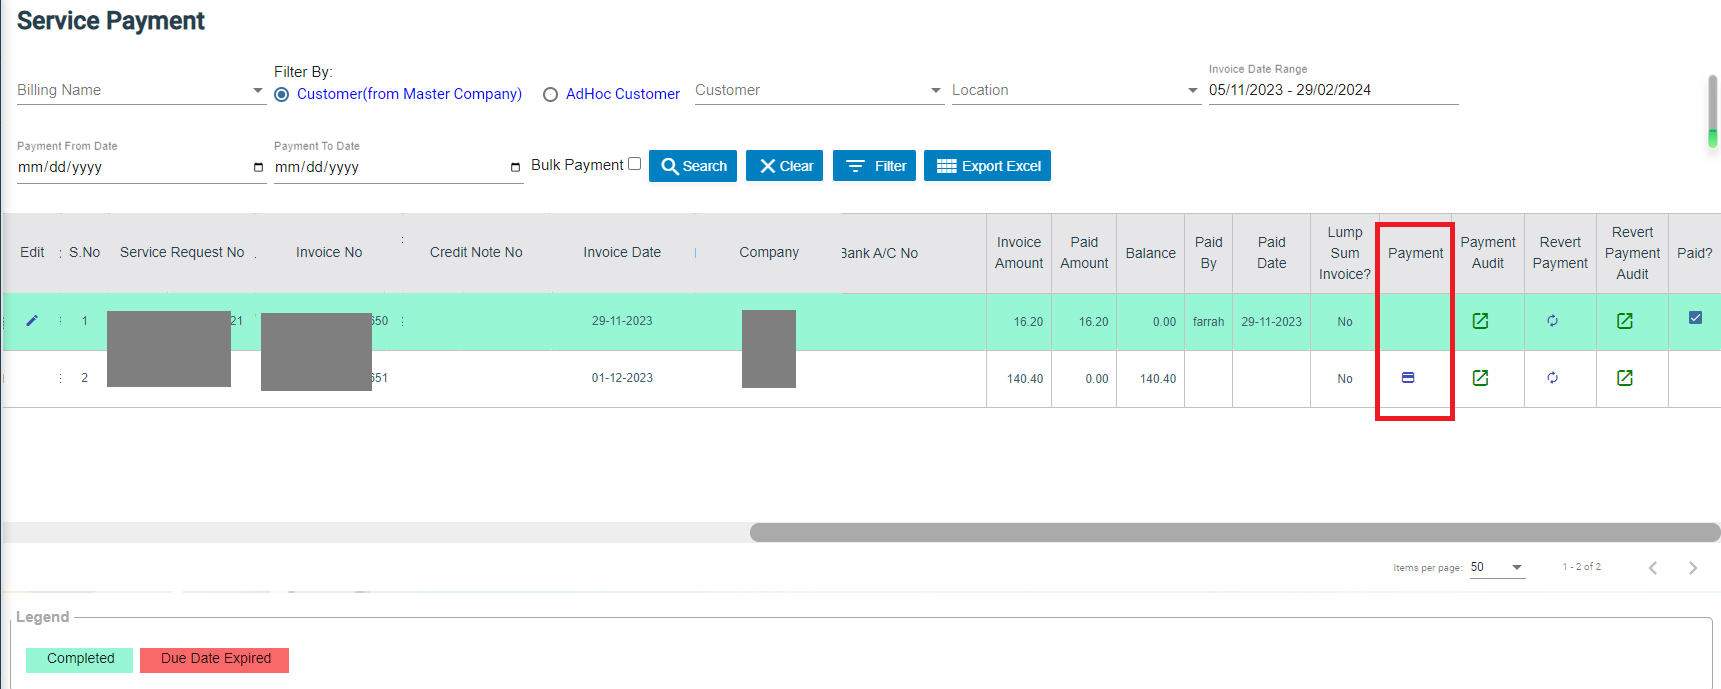](http://wiki.cuteinfocomm.com/uploads/images/gallery/2024-01/image-1706683993730.png)
2. The fields highlighted with red color in payment detail page are mandatory. You must enter the relevant details in that fields before saving. [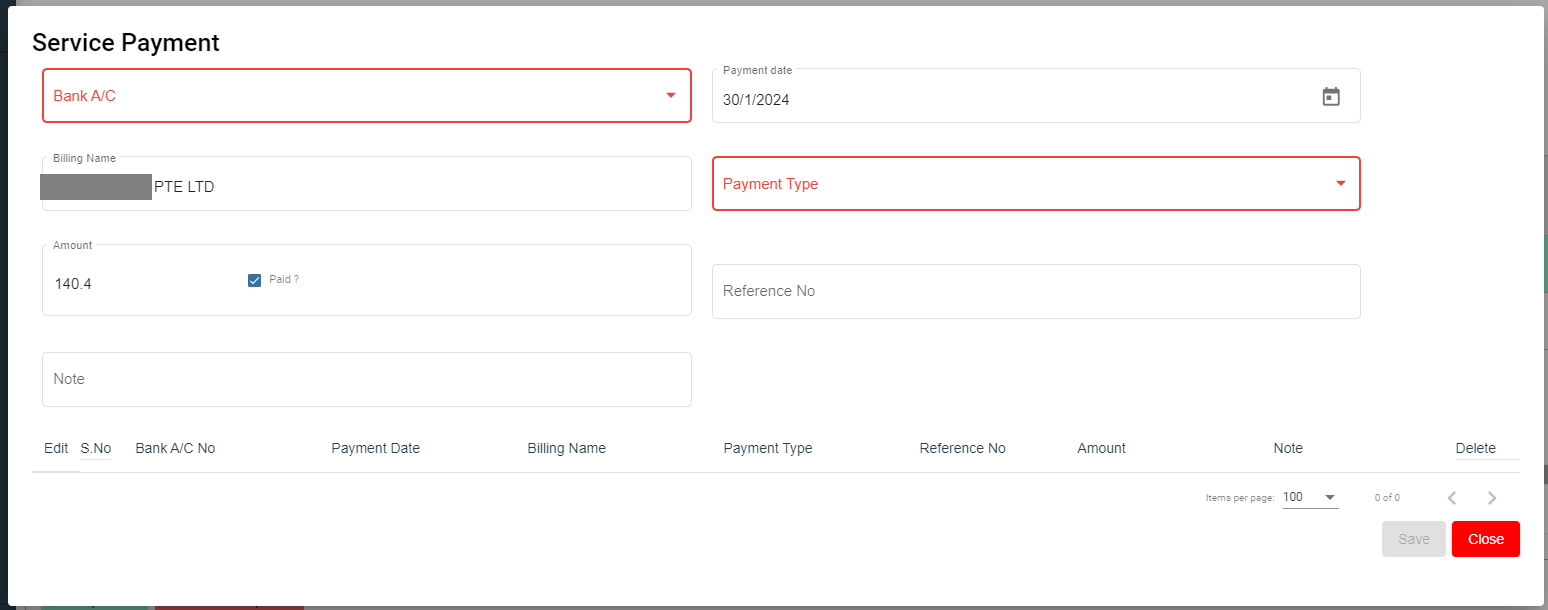](http://wiki.cuteinfocomm.com/uploads/images/gallery/2024-01/image-1706684120433.png)
3. In the **Bank A/C** box, select a bank account from a drop-down list.
4. In the **Payment Date** box, select the payment date.
5. In the **Billing Name** box, enter billing name (if billing name is same as company name, company name will auto fill as billing name).
6. In the **Payment Type** box, select a payment type.
7. In the **Amount** box, enter the amount if it's different from invoice amount. The **Paid?** box will be
8. In the **Reference No** box, enter reference number.
9. In the **Note** box, enter your note if any.
10. Click **Save**. The invoice record will be changed to Green color and as completed.
#### Filter an Invoice
If you want to filter an invoice in the **Service Payment** list, you can use the filter option provided in the **Service Payment** page such as SR number, invoice number etc..
[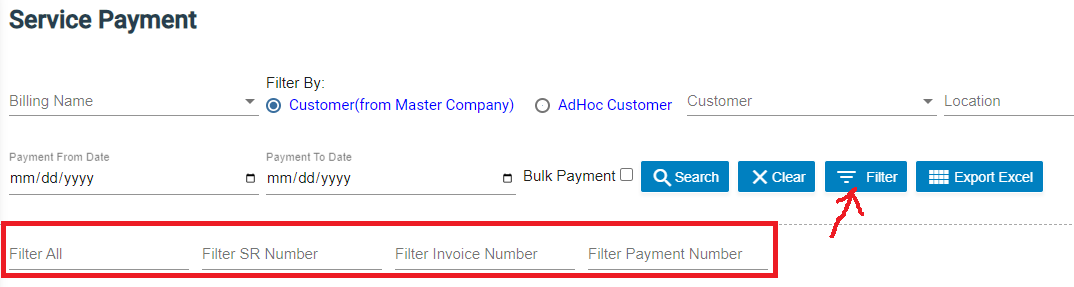](http://wiki.cuteinfocomm.com/uploads/images/gallery/2024-01/image-1706685109822.png)
#### Export an Payment List
If you want to export all the invoices in the **Service Payment** page in an excel format, you can use the export option [](http://wiki.cuteinfocomm.com/uploads/images/gallery/2024-01/image-1706685195077.png)provided in the **Service Payment** page.
### Bulk Payment
The **Bulk Payment** tab in the **Service Request** submenu allows user to enter multiple invoice payments that belongs to a same billing name in bulk. Click Bulk Payment tab, the bulk payment for service payment page opens as below,
[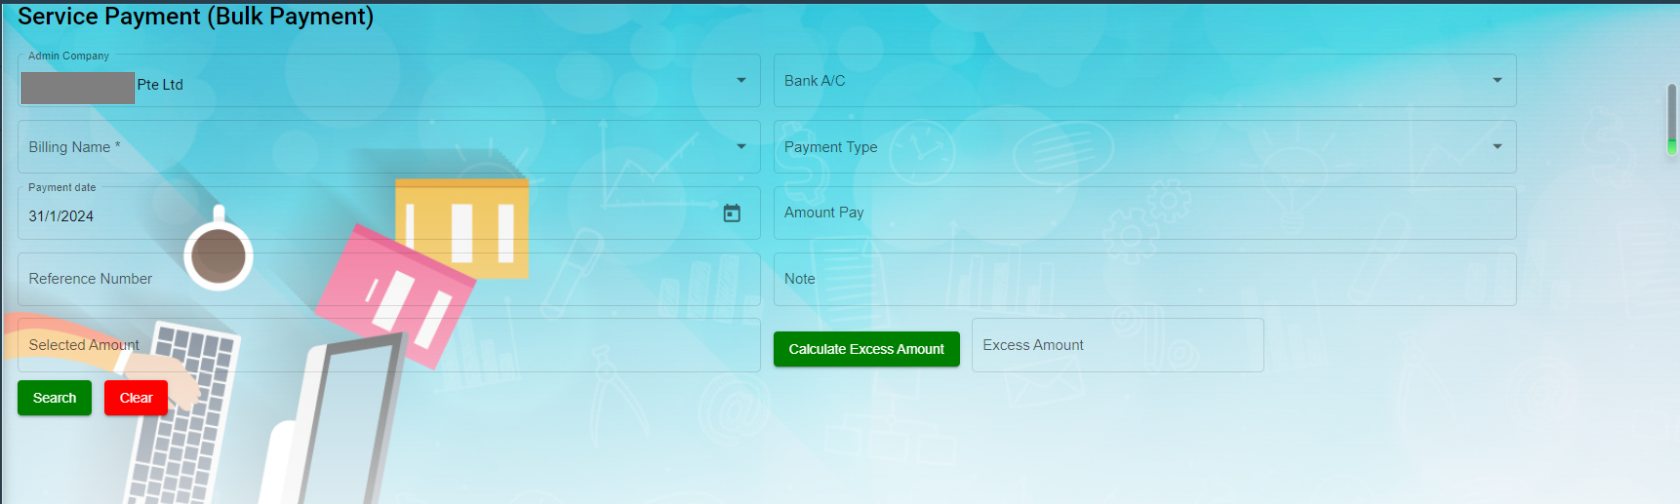](http://wiki.cuteinfocomm.com/uploads/images/gallery/2024-02/image-1706769997474.png)
To do bulk payment,
1. In Admin-Company box, select Admin company from a list of admin companies which the payment shall be paid to.
2. In Bank A/C box, select bank account name to receive payments,
3. In Billing Name box, select invoice billing name.
4. In Payment Type box, select payment type from list such as cash, online transfer, paynow etc..
5. In Payment Date box, click to select payment date.
6. In Amount Pay box, enter amount paid.
7. In Reference Number box, enter reference number if any.
8. Click [](http://wiki.cuteinfocomm.com/uploads/images/gallery/2024-02/image-1706770025125.png)Search button, a list of unpaid invoice belong to selected billing name will display in the screen, and **Bulk Pay** button will be enabled. [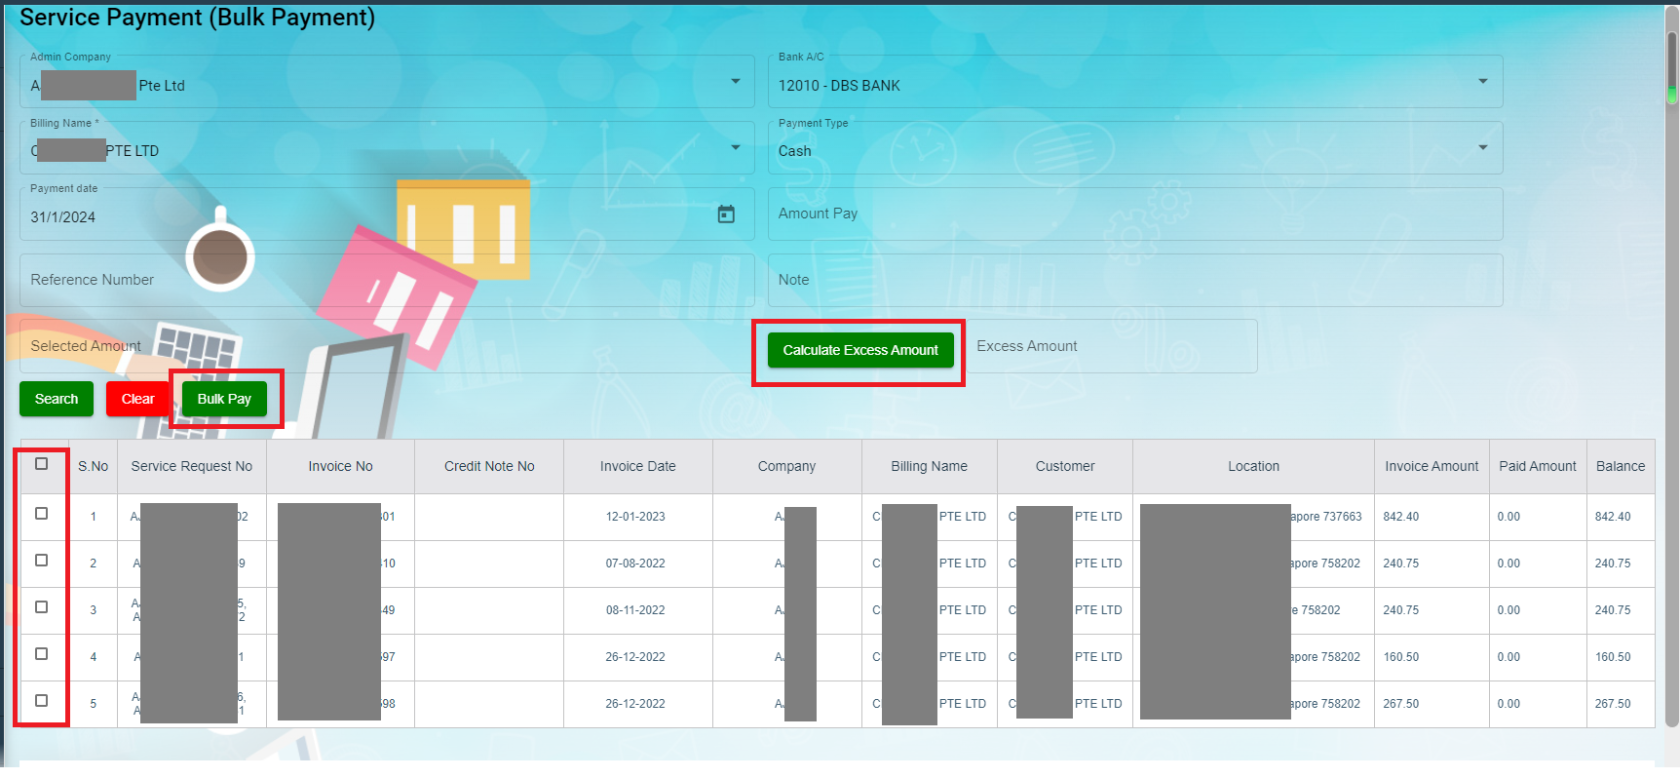](http://wiki.cuteinfocomm.com/uploads/images/gallery/2024-02/image-1706770333086.png)
9. Click to select invoices from the list of unpaid invoices in the screen, and the selected invoice amount will be calculated and displayed in **Selected Amount** box.
10. If Selected amount box differs from Amount pay box, user can click Calculate Excess Amount button, and system will show payment confirmation notification as below, [](http://wiki.cuteinfocomm.com/uploads/images/gallery/2024-02/image-1706770892673.png)
11. Click Yes to confirm bulk payment, upon successful creation, a bulk payment number will be displayed in the payment No box in the search area as below. [](http://wiki.cuteinfocomm.com/uploads/images/gallery/2024-02/image-1706771556584.png)
12. And the bulk payment details will be saved in the Payment tab. User can search by bulk payment number in payment page, [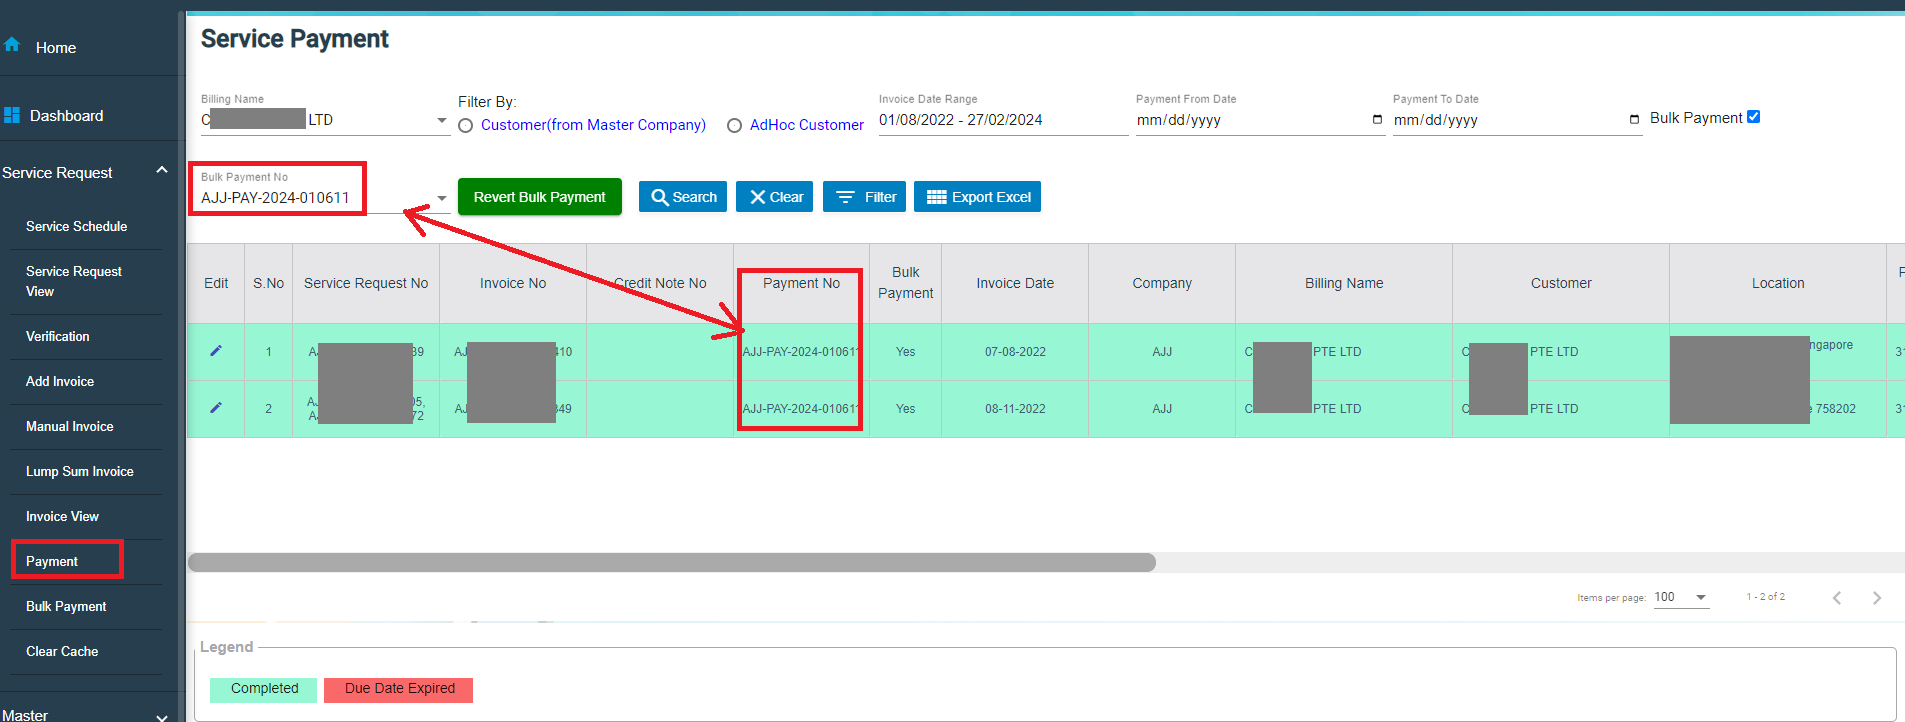](http://wiki.cuteinfocomm.com/uploads/images/gallery/2024-02/image-1706772031026.png)
Note: User with permissions will be able to revert bulk payment if needed. After clicking search button, authorized user can click Revert Bulk Payment button, and a confirmation notification will show as below. Click Yes to confirm reverting bulk payment for selected bulk payment number. And the associated invoices will be reverted to unpaid status. [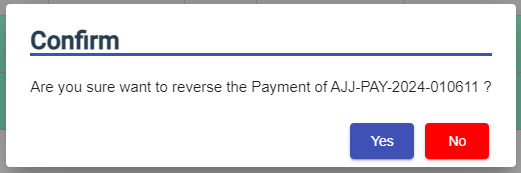](http://wiki.cuteinfocomm.com/uploads/images/gallery/2024-02/image-1706772129481.png)
### Clear Cache
Clear cache tab is used to clear search caches in Service Request and Service Schedule menu screens. Click Clear Cache, the clear cache page opens as below, click Proceed to confirm clearing cache.
[](http://wiki.cuteinfocomm.com/uploads/images/gallery/2024-02/image-1706772544252.png)
## Report
The Report submenu in the SRM page helps user view the various reports related with the service request management.
The Report submenu contains the following tabs,
- Invoice Pending
- Statement Of Accounts
- Request For PUB
- Invoice Ageing Report
- SR Sales Report By Jetting/Vacuum
- Payment History
- Verification Pending
- Cash Received
### Invoice Pending
The **Invoice Pending** tab in the **Report** submenu helps you to view the pending invoice details. Click **Invoice Pending** in the **Report** submenu. The **Invoice Pending** page opens and shows the list of invoices which are pending (number of items display per page can be configured by select number in the item per page box that located at the bottom of page).
[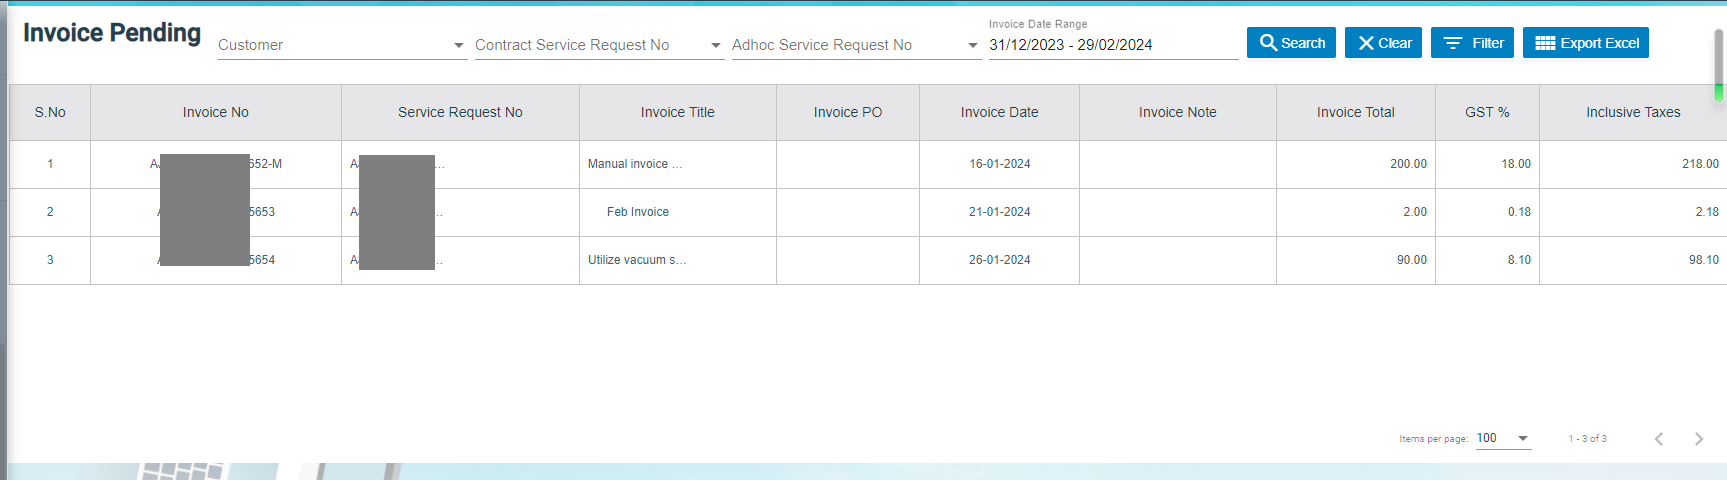](http://wiki.cuteinfocomm.com/uploads/images/gallery/2024-02/image-1706773059212.png)
If user want to view any specific pending invoice among the list of pending invoices, you can select the respective Date Range in **or click Filter** option provided in the Invoice Pending page.
#### Export a Pending Invoice List
If you want to export all the invoices in the **Invoice Pending** page in an excel format, you can use the [](http://wiki.cuteinfocomm.com/uploads/images/gallery/2024-01/image-1706685195077.png)export option provided in the **Invoice Pending** page.
### Statement Of Accounts
Statement of accounts reports help user view all transactions with a particular customer. Click Statement of Accounts, the statement of accounts report page opens, user can select SR customer name or billing name, and As of Date, and then click Search, the report will show as below (number of items display per page can be configured by select number in the item per page box that located at the bottom of page),
[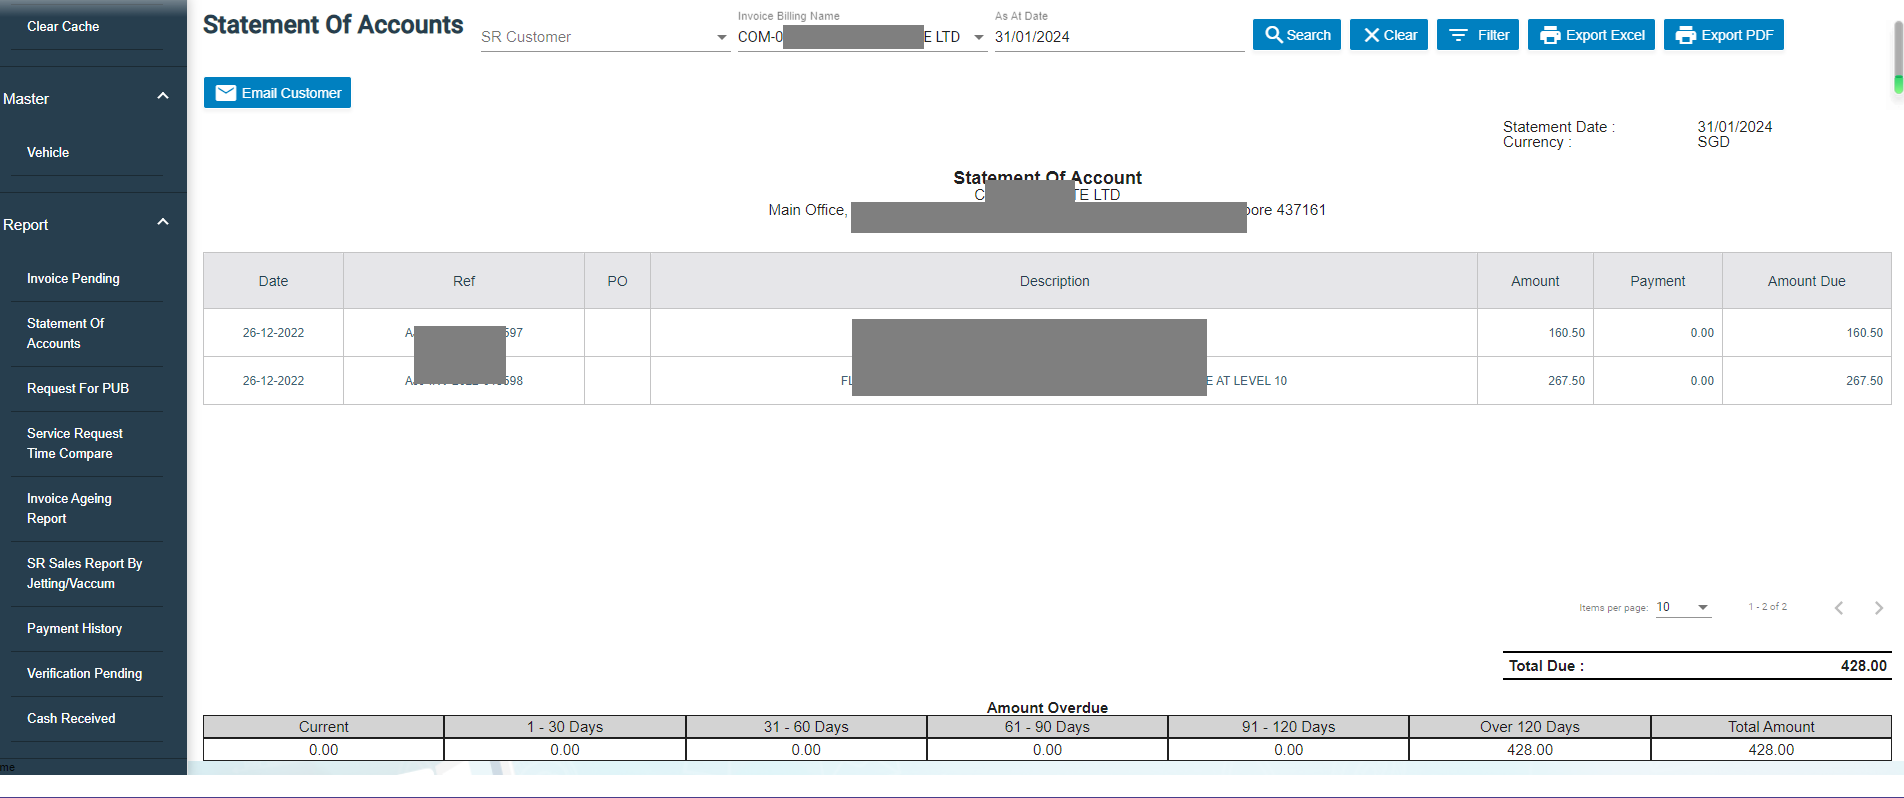](http://wiki.cuteinfocomm.com/uploads/images/gallery/2024-02/image-1706773724609.png)
#### Export a Statement of Accounts
If you want to export statement of accounts, you can use the[](http://wiki.cuteinfocomm.com/uploads/images/gallery/2024-02/image-1707200431612.png) to export report in excel format, or use [](http://wiki.cuteinfocomm.com/uploads/images/gallery/2024-02/image-1707200410941.png) to export report in PDF format.
#### Email a Statement of Account to Customer
If you want to email a statement of account to customer,
1. Click [](http://wiki.cuteinfocomm.com/uploads/images/gallery/2024-02/image-1707200683660.png) email customer button at the top left corner, a confirmation notification will pop up as below, [](http://wiki.cuteinfocomm.com/uploads/images/gallery/2024-02/image-1707201376973.png)
2. Click **Yes**, system emailing window will open as below, user can configure email template, once email template is created, relevant information will be automatically populated. [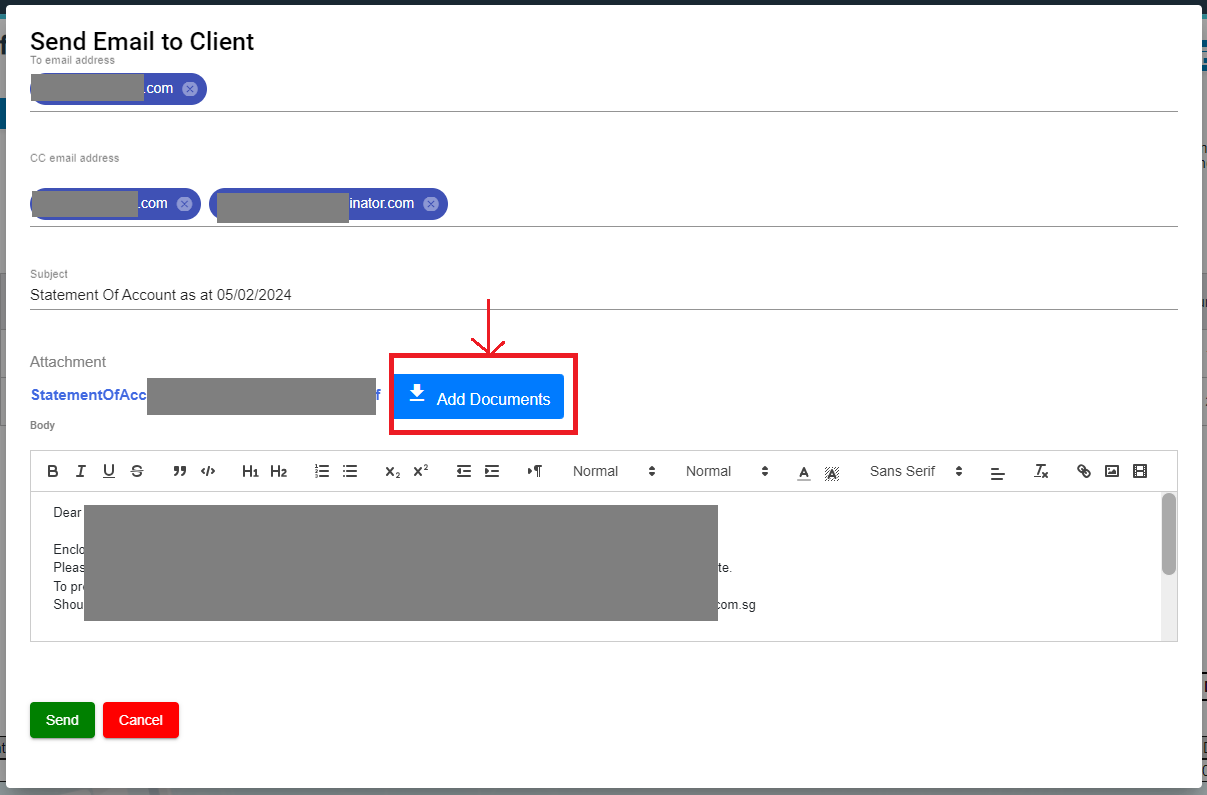](http://wiki.cuteinfocomm.com/uploads/images/gallery/2024-02/image-1707200995550.png)
3. Review information in above, and if needed, user can attach file using **Add Documents** option.
4. Click **Send**. System will send email to customer.
### Request For PUB
Request for PUB report allows user to view all service request details for PUB in selected period of time.
1. Click Request For PUB tab, the service request for pub report page opens as below, [](http://wiki.cuteinfocomm.com/uploads/images/gallery/2024-02/image-1707203398696.png)
2. Select a date range and then click **Search**, request for PUB report opens as below (number of items display per page can be configured by select number in the item per page box that located at the bottom of page),[](http://wiki.cuteinfocomm.com/uploads/images/gallery/2024-02/image-1707201941498.png)
#### Export Request for PUB report
If you want to export all the service request for PUB report in an excel format, you can use the [](http://wiki.cuteinfocomm.com/uploads/images/gallery/2024-01/image-1706685195077.png)export option provided in the Request for PUB page.
### Invoice Aging Report
Invoice ageing report helps user analyze the cash flow of all unpaid invoices. This report provides information about invoice payments due within time periods user specified in the Aging Periods window.
1. Click **Invoice Ageing Report** tab, the invoice ageing report page opens as below,[](http://wiki.cuteinfocomm.com/uploads/images/gallery/2024-02/image-1707202808986.png)
2. In As Of Date box, click to select as of date.
3. Click Search, all ageing invoices that meet search criteria will display as below, [](http://wiki.cuteinfocomm.com/uploads/images/gallery/2024-02/image-1707203709076.png)
#### Export Invoice Ageing Report
User can export report in two types (summary report or detail report) by choosing Print Summary or Print Details. Report format can be configured based on user requirement.
[](http://wiki.cuteinfocomm.com/uploads/images/gallery/2024-02/image-1707203825798.png)
1. Select report type to be exported, i.e. Print Summary or Print Details.
2. If user want to export statement of accounts, click the[](http://wiki.cuteinfocomm.com/uploads/images/gallery/2024-02/image-1707200431612.png) to export report in excel format, or click [](http://wiki.cuteinfocomm.com/uploads/images/gallery/2024-02/image-1707200410941.png) to export report in PDF format.
### SR Sales Report By Jetting/Vacuum
SR sales report by jetting/vacuum provides detail information by jetting/vacuum during selected period of time.
1. Click **SR Sales Report By Jetting/Vacuum** tab, the report page opens as below, [](http://wiki.cuteinfocomm.com/uploads/images/gallery/2024-02/image-1707289374685.png)
2. In SR date box, click to select a date range.
3. As for service type, click to choose Jetting or Vacuum.
4. Click Search, SR sales details that meet search criteria will display as below (number of items display per page can be configured by select number in the item per page box that located at the bottom of page), [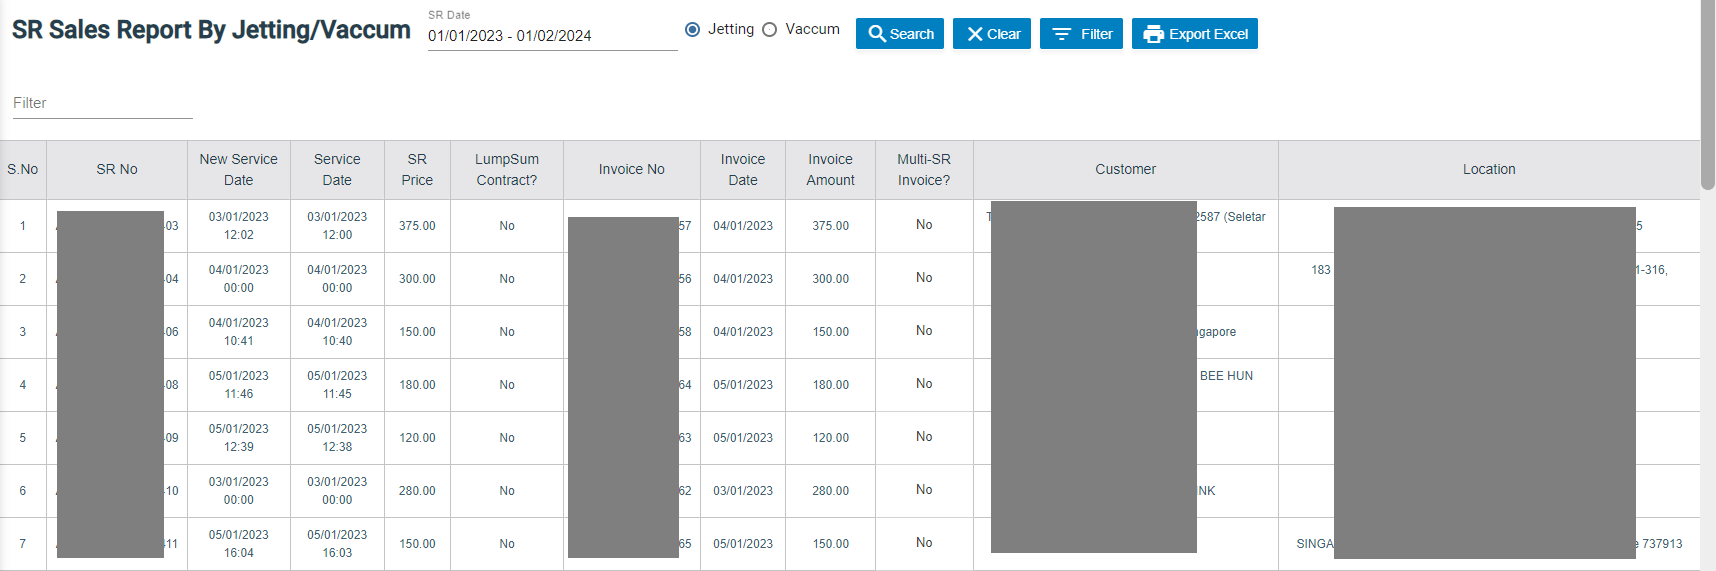](http://wiki.cuteinfocomm.com/uploads/images/gallery/2024-02/image-1707290306942.png)
#### Export SR sales report by jetting/vacuum
If you want to export the SR sales report in an excel format, you can use the [](http://wiki.cuteinfocomm.com/uploads/images/gallery/2024-01/image-1706685195077.png)export option provided in the report page.
### Payment History Report
Payment history report provides detail information of payment history in specific payment period by billing name or bank account.
1. Click **Payment History** tab, the report page opens as below,[](http://wiki.cuteinfocomm.com/uploads/images/gallery/2024-02/image-1707290471846.png)
2. In List By box, click to select by Billing Name or Bank Account.
3. Select the billing name or bank account to view payment history.
4. In Payment From Date & Payment To Date boxes, click to select dates.
5. Click Search, payment history that meet search criteria will display as below (number of items display per page can be configured by select number in the item per page box that located at the bottom of page), [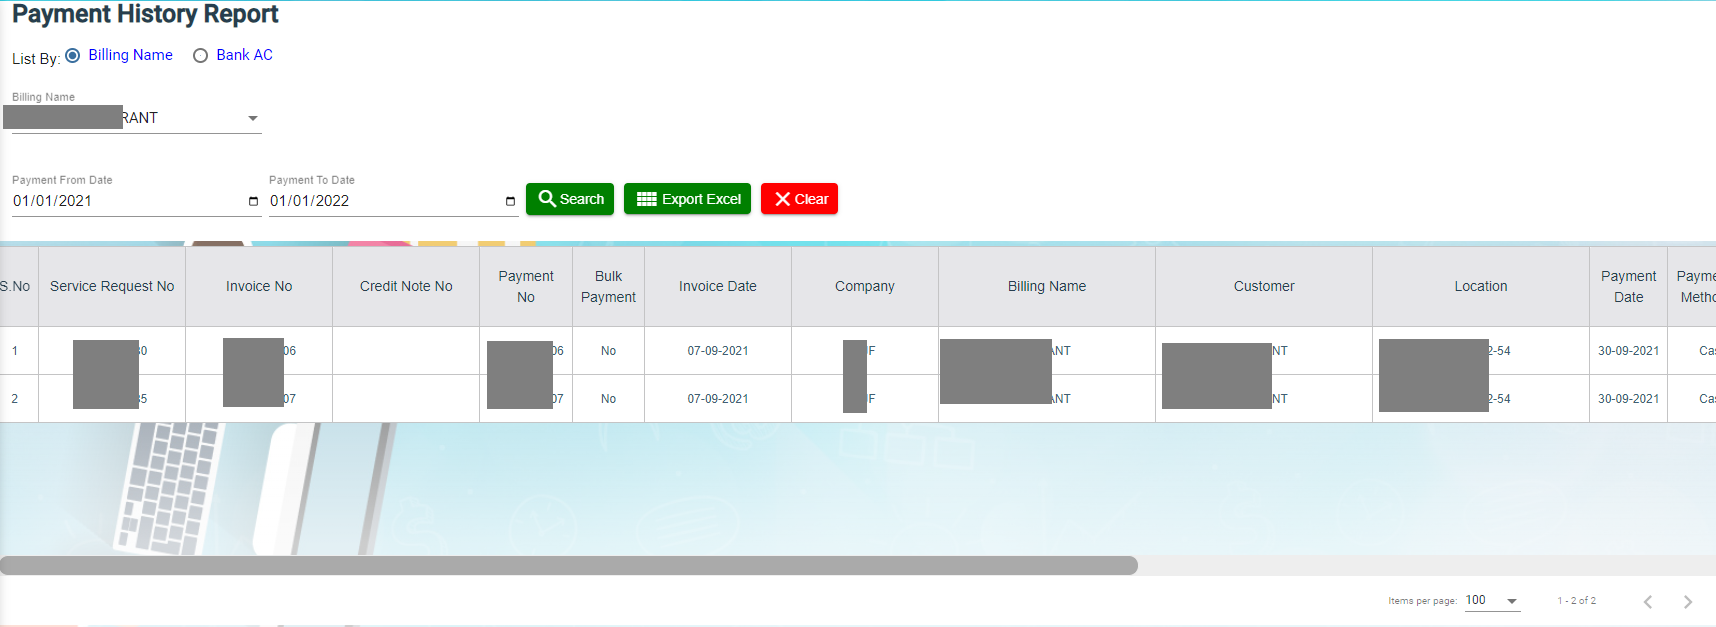](http://wiki.cuteinfocomm.com/uploads/images/gallery/2024-02/image-1707291704926.png)
#### Export Payment History
If you want to export the payment history report in an excel format, you can use the [](http://wiki.cuteinfocomm.com/uploads/images/gallery/2024-01/image-1706685195077.png)export option provided in the report page.
### Verification Pending Report
Verification pending report allows user to view all service requests that need to be verified by month wise.
1. Click **Verification Pending** tab, the report page opens as below, [](http://wiki.cuteinfocomm.com/uploads/images/gallery/2024-02/image-1707374884903.png)
2. In Select Month box, click to select month/year.
3. Click Search, service requests that is pending for verification as per selected month will display as below (number of items display per page can be configured by select number in the item per page box that located at the bottom of page), [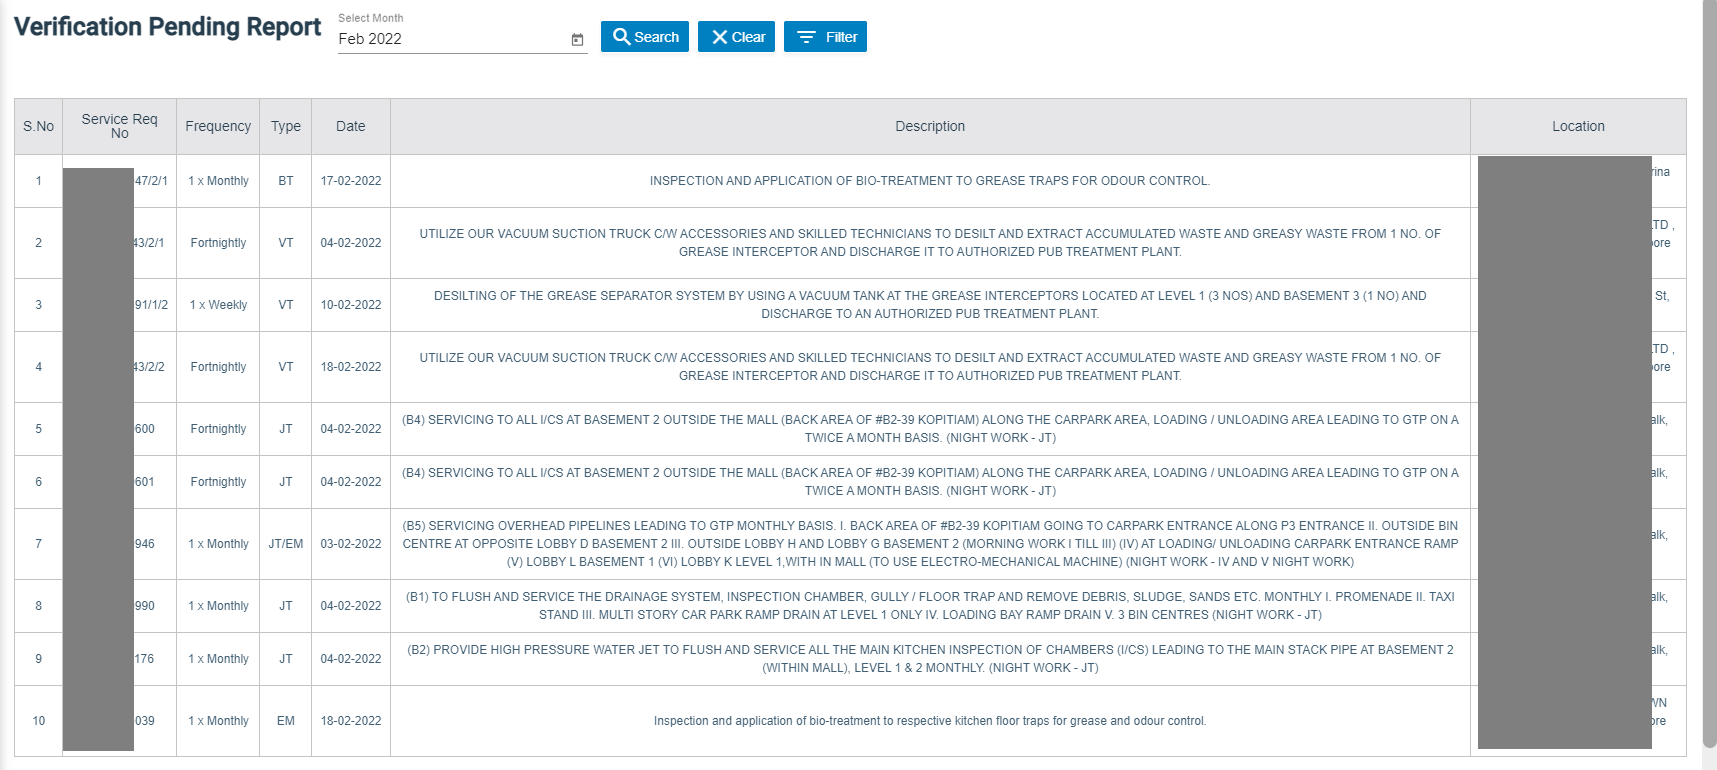](http://wiki.cuteinfocomm.com/uploads/images/gallery/2024-02/image-1707375647430.png)
### Cash Received Report
Cash received report provides information about cash payment received in specific date range and by technician wise.
1. Click **Cash Received** tab, the report page opens as below, [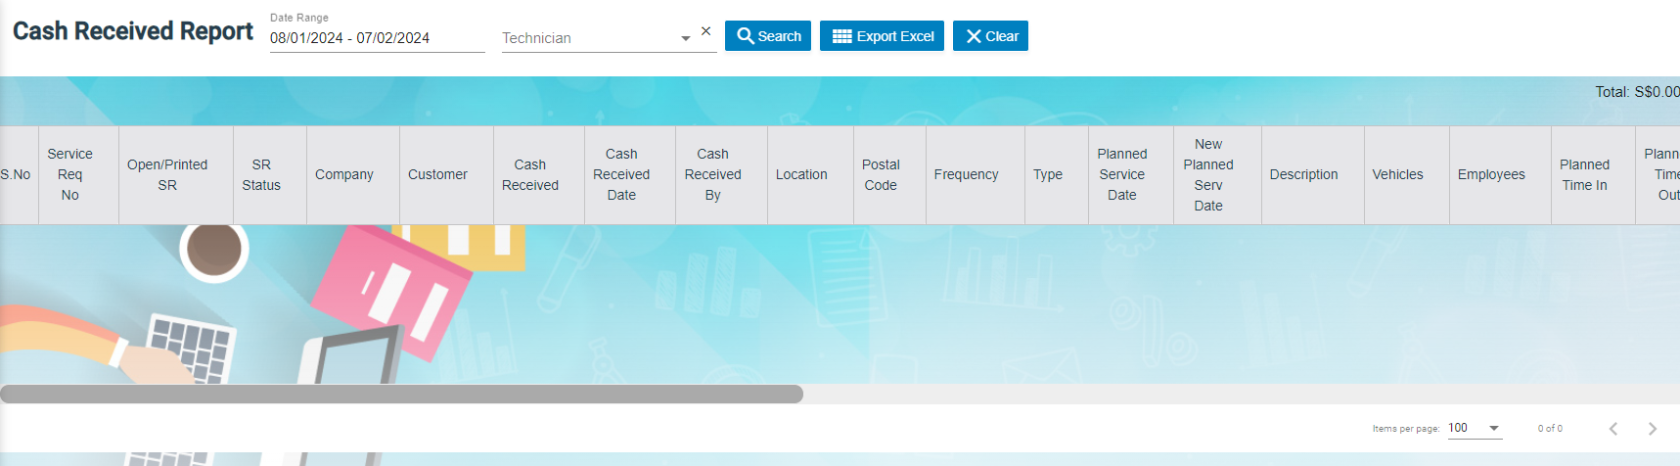](http://wiki.cuteinfocomm.com/uploads/images/gallery/2024-02/image-1707376140674.png)
2. In Date Range box, click to select date range if user wants to view cash received by date range.
3. In Technician box, click to select technician if user wants to view cash received by technician.
4. Click Search, Service requests with cash payment received will display as below (number of items display per page can be configured by select number in the item per page box that located at the bottom of page), [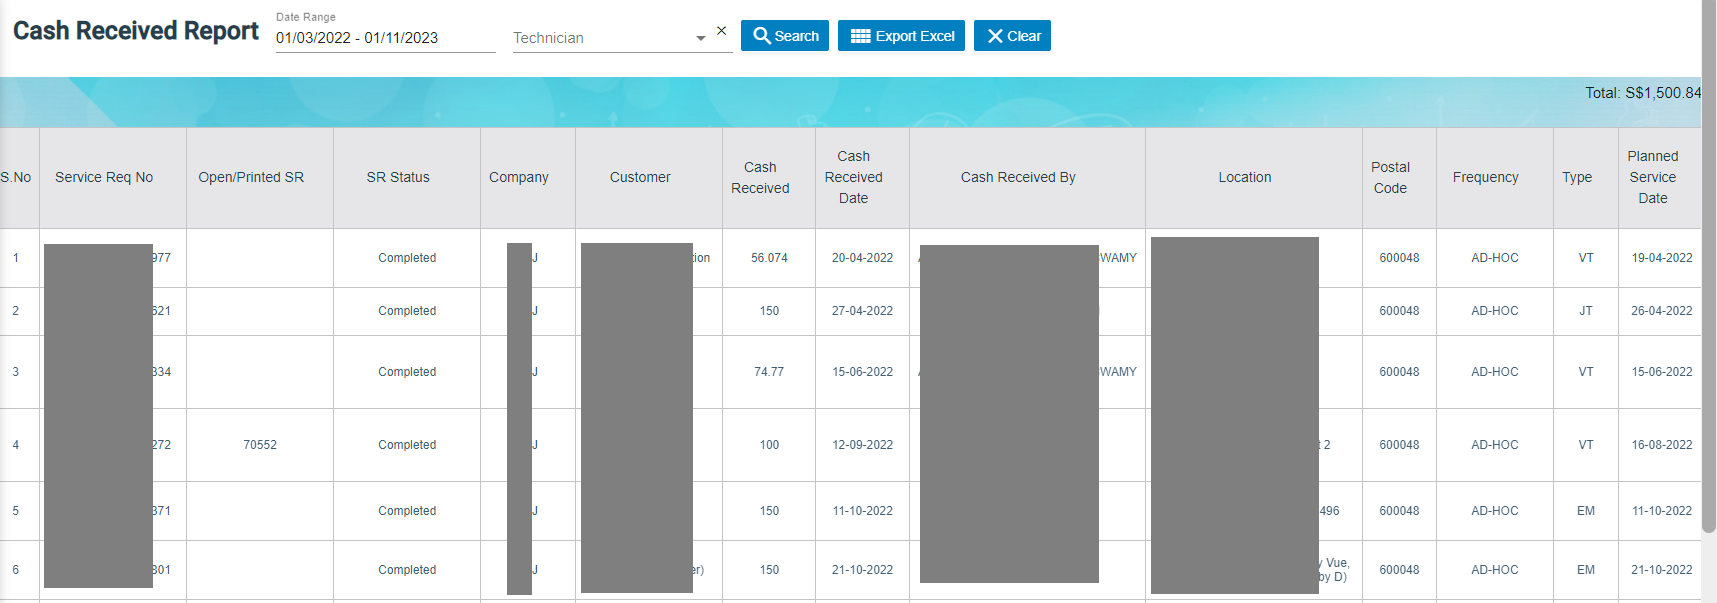](http://wiki.cuteinfocomm.com/uploads/images/gallery/2024-02/image-1707378455265.png)
- Master Data Management
- User Access Management
- Service Job Request Management
- Verification after Job Completion
- Invoice and Payment Management
- Reporting
## User Access Matrix
In the ***cuteOffice-SRM*** application, users can be assigned with different roles. Depending on the roles, the users can access the various functionalities included in the application. The following are the various roles to be assigned to the user including their permission details,
| **Roles** | **Access Permissions** |
| Administrator | - Dashboard
- Master
- Service Request
- add Service Job Requests
- assign technician and vehicle
- verify the completed job record
- assign rework for the technician
- add and view AdHoc Service Requests
- generate and view the invoices
- do service payment
- Report
|
| Technician | - Service Request
- view their assigned service jobs and indicate starting and ending of jobs
- send the Verification Form to the respective admins to verify the completed job
- add and view AdHoc Service
Reques
|
The **SRM** module in the ***cuteOffice*** application helps admins in managing the service based job functionalities. To navigate to the **SRM** module, click the **SRM** menu in the menu bar, the **SERVICE REQUEST MANAGEMENT** page opens as below.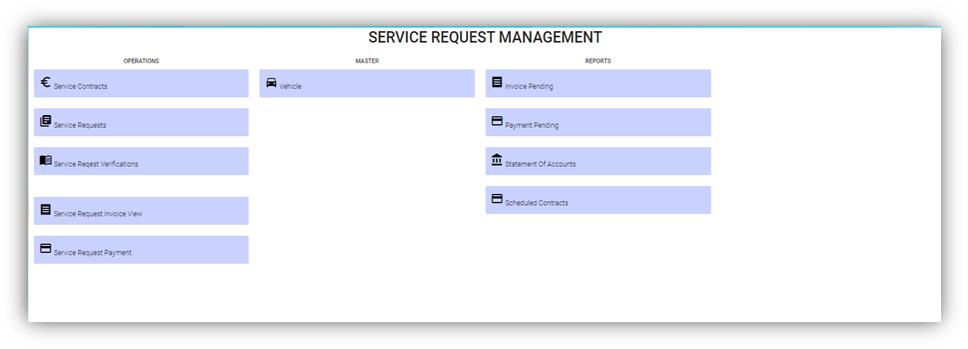
The **SERVICE REQUEST MANAGEMENT** page consists the following sub menus:
**OPERATIONS -** Allows admin to add the service job requests, assign the jobs to technicians, generate invoice for completed job, and so
**MASTER -** Allows SRM admin to add the vehicle master
**REPORTS -** Helps admin to view the various reports corresponding to the service request
## Master
The **Master** submenu in the **SRM** menu manages the master data such as details of vehicle including vehicle insurance, Housing and Development Board (HDB) season parking, and other details.
The **Master** submenu contains the following tab,
- Vehicle-Users assigned with srm\_admin role can only have access to this Master submenu and add the master data.
The **Vehicle** tab in the **Master** submenu helps you to add the information of a vehicle to be used as a master data in the further request process. Click the **Vehicle** tab in the **Master** submenu, the **Vehicle** page opens.
### Add a Vehicle
If you want to add a vehicle,
1. Click (**Add Vehicle** button) in the **Vehicle**, the **Add Vehicle** window opens. (Note: The fields highlighted with red color are mandatory. You must enter the relevant details in that fields before saving.)
2. In the **Vehicle** section, enter the following details,
- In the **Number** box, enter the vehicle number.
- In the **Name** box, enter the vehicle name.
- In the **Company** box, select a company from a drop-down list.
- In the **Asset Tag Number** box, enter the asset tag number.
- In the **Invoice Number** box, enter the invoice number.
- In the **Invoice Date** box, select the invoice date.
- In the **GPS Sim Number** box, enter the GPS sim number.
- In the **No-Claim Discount (NCD)** box, enter the NCD number.
- In the **Driver** box, select a driver from a drop-down list.
- In the **IDD Code** box, select the IDD code.
- In the **Area Code** box, enter the area code.
- In the **Contact Number** box, enter the contact number.
- In the **Parking Location** box, enter the parking location name.
- In the **Vehicle Description** box, enter the description for the vehicle.
3. In the **Insurance** section, enter the following details,
- In the **Number** box, enter the insurance number.
- In the **Next Due Date** box, select the due date for the insurance.
- In the **Vendor** box, enter the insurance vendor name.
- In the **Agency** box, enter the agency name.
4. In the **Next Due Date** section, enter the following,
- In the **Maintenance** box, select the due date for maintenance.
- In the **Parking Coupon** box, select the due date for parking coupon.
- In the **Road Tax** box, select the due date for road tax.
- In the **Inspection** box, select the due date for vehicle inspection.
- In the **Vehicle Parking Certificate (VPC)** box, select the due date for VPC.
- In the **LG** box, select the due date for LG.
- In the **LM** box, select the due date for LM.
- In the **Certificate of Entitlement (COE) Expiry Date** box, select the expiry date for COE.
5. In the **HDB Season Parking** field, enter the following,
- In the **Next Due Date** box, select the due date for HDB season parking.
- In the **Payment Mode** box, select a payment mode from a drop-down list.
- In the **Address** box, enter the address where the vehicle has parked.
6. In the Others field, enter the following,
- In the **Dealer Name** box, enter the dealer name.
- In the **Invoice Ref** box, enter the invoice reference number.
- In the **Amount** box, enter the invoice amount including GST.
- In the **In-vehicle Unit** (**IU) Label Number** box, enter the IU label number.
- In the **Propellant** box, enter the propellant name.
- In the **Shell Card Number** box, enter the shell card number.
- In the **Shell Pin** box, enter the shell pin.
- In the **Vehicle Preparation Center (VPC) Address** box, enter the VPC address.
- In the **Remarks** box, enter your remarks if any.
7. Click **Save**. The vehicle is added and listed in the **Vehicle** page.
8. If your vehicle is in the workshop, you need to click to enable (Radio button) in the **Workshop** column for the respective vehicle. The **Confirmation** dialog box opens. Click Yes to confirm. 
### Edit a Vehicle
You can edit the details of the added vehicle by using  (Edit icon) provided in the **Edit** column of the **Vehicle** page. To edit the added vehicle details,
1. Click (Edit icon) of the respective vehicle, the **Add Vehicle** window opens with the added vehicle details.
2. Edit the vehicle details where suits.
3. Click **Save**.
### Attach/View a Document into a Vehicle
If you want to add a new document with the vehicle, do the following steps,
1. Click (Attachment icon) of the respective vehicle for which you want to add, the **Add/ View Attachment** window opens.
2. Click (**Add Document** button).The file choosing and uploading option will be enabled.
3. Click (**Choose File** button) and select the document which you want to upload.
4. Click **Upload**, The selected document will be uploaded and displayed in the **Add/View Attachment** window.
If you want to view any attached document with a vehicle,
1. Click (Attachment icon), the **Add/ View Attachment** window opens with a list of attached documents. (Note: The subscript number displays with attachment icon shows the total number of attached documents with the vehicle..
2. If you want to download the attached document, click (Download icon) in the **Download** column. The document will be downloaded.
### Delete a Vehicle
You can delete the added vehicle by using delete option provided in the **Delete** column of the **Vehicle** page. To delete any added vehicle,
1. Click (Delete icon) of the respective, the **Confirmation** dialogue box opens with the following notification: “**Are you sure you want to delete record?**”.
2. If you want to delete the vehicle, click **Yes** otherwise click **No**.
3. The deleted vehicle will be removed from the **Vehicle** page.
### Filter a Vehicle
If you want to view any specific vehicle details among multiple vehicles listed in the **Vehicle** page, you can use the filter option provided in the upper left corner of the **Vehicle** page. To filter any vehicle you want,
1. Click (Filter button). A filter box opens in each column of the **Vehicle** page.
2. Enter the relevant data in any column filter. The vehicle(s) that qualifies will be filtered and display in vehicle page.
### Export a Vehicle List
The application has a feature to download the added vehicle list in an excel format. You can use export option to download the added vehicle list. To download the added vehicle list, click  (**Export Excel** button). The vehicles added in the **Vehicle** page will be downloaded as an excel file.
## Service Request
The **Service Request** submenu in the **SRM** page helps you to add and manage the functionalities related with the service schedule and the service request.
The **Service Request** submenu contains the following tabs,
- Service Schedule
- Service Request View
- Service Request Verification
- Add Invoice
- Manual Invoice
- Lump Sum Invoice
- Invoice View
- Payment
- Bulk Payment
- Clear Cache
### Service Schedule
The **Service Schedule** tab in the **Service Request** submenu helps you to add a service schedule. Click Service Schedule in the Service Request submenu, the Service Schedule page opens.
[](http://wiki.cuteinfocomm.com/uploads/images/gallery/2023-10/image-1698638003553.png)
#### View Service Schedule
If you want to view any specific service schedule among the list of service schedules, you can use column filter to select the respective data such as Schedule No, Customer, Location, and Date Range in the respective fields given in the Service Schedule page. You can click the page expand icon at the top right corner to expand the filters.
[](http://wiki.cuteinfocomm.com/uploads/images/gallery/2023-10/image-1698638156539.png)
If you want to view the scheduled schedule of any customer,
1. Select a customer from the Customer field.
2. Click [](http://wiki.cuteinfocomm.com/uploads/images/gallery/2023-10/image-1698638301357.png) ( print Schedule button), the schedule details for the selected customer will be downloaded as a pdf. [](http://wiki.cuteinfocomm.com/uploads/images/gallery/2023-10/image-1697782130744.jpg)
#### Add a Service Schedule
To add a service schedule, do the following steps,
1. Click  (Add button) in the Service Schedule page, the **Add Service Schedule** window opens (Note: The fields highlighted with red color are mandatory. You must enter the relevant details in that fields before saving). [](http://wiki.cuteinfocomm.com/uploads/images/gallery/2023-10/image-1698130270983.png)
2. In the **Project List** box, select a project list from a drop-down list. Once you have selected a project, the customer, the customer location and contact number of the selected project will be automatically populated.
3. Note: If you want to select all projects, click to enable the All checkbox provided with the Project List box. And then select relevant details in customer, customer location and contact number box. [](http://wiki.cuteinfocomm.com/uploads/images/gallery/2023-10/image-1697781055715.png)
4. In the **Start Date** and **End Date** boxes, select the schedule’s start and end dates.
5. In the **Frequency** box, select the frequency of doing service based on the customer requirement. For example, if the customer expects to do the service for three times in a month, select **3 x Monthly.** Note: If you want to view the location in the map, click  (Location Map icon) provided with the Frequency box.
6. In the **Type** box, select a type of medium.
7. In the **Service Description** box, enter the service description.
8. In the **Invoice Description** box, enter the invoice description.
9. In the **Effective Date** box, select the effective date of the service schedule.
10. In the **Invoice Due Days** box, enter the due days for invoice.
11. In the **Term Days** box, enter the term days.
12. In the **Plan Schedule** box, select the plan schedule whether Day Job or Night Job.
13. In the **Tanker Size** box, select the tanker size whether small or big.
14. If the service is jetting, select Jetting or if the service is PUB, select the PUB. [](http://wiki.cuteinfocomm.com/uploads/images/gallery/2023-10/image-1697781749216.png)
15. In the **Grease Trap Size** box, enter the grease trap size.
16. In the **Total Grease** box, enter the total grease value.
17. In the **Manpower** box, enter the required manpower.
18. In the **Price** box, enter the price for the service.
19. In the **Service Note** box, enter the service note.
20. In the **Invoice Note** box, enter the invoice note.
21. In the **Private Note for Internal** box, enter the note for internal.
22. In the **Effective Time** box, select the effective time. The calendar will be displayed based on the selection of frequency.
23. In **Old SRM Sales Contract No** box, enter the old SRM sale contract number associated with the service schedule.
24. Click **Save**. The service schedule will be added and listed in the Service Schedule page.
#### Activate/Cancel a Service Schedule
To activate a service schedule, do the following steps,
1. Click  (Active icon) that is provided in the Action column in the service schedule page. The Service Request List window opens and shows the list of service requests added against the selected service schedule number.
2. Click **Ok**. The Remarks box opens.
3. Enter your remarks and click **Save**. The service schedule will be activated. The remarks you have entered will be saved in the Status Remarks column of the Service Schedule page.
To cancel a service schedule,
1. Click  (Cancel icon) that is provided in the Action column, of the service schedule. The Service Request List window opens and shows the list of service requests added against the selected service schedule number.
2. Click **Ok**. The Remarks box opens.
3. Enter your remarks and click **Save**. The service schedule will be cancelled. The remarks you have entered will be saved in the Status Remarks column of the Service Schedule page.
#### Edit a Service Schedule
You can edit the details of the added service schedule by using edit option provided in the
Edit column of the Vehicle page. To edit the added service schedule details,
1. Click  (Edit icon) of the respective service schedule you have added, the Add Service Schedule window opens with the added service schedule details.[](http://wiki.cuteinfocomm.com/uploads/images/gallery/2023-10/image-1697783400078.png)
2. Edit the service schedule details where you want.
3. Click **Save**.
#### Delete a Service Schedule
You can delete the added service schedule by using  (Delete icon) provided in the Delete column of the Service Schedule page.
#### Export a Service Schedule List
If you want to export all the service schedules in the Service Schedule page in an excel format, you can use the export option provided in the Service Schedule page. To know how to export, follow the procedures given in the topic, “Export a Vehicle List”.
### Service Request View
The **Service Request View** tab in the **Service Request** submenu helps you to add a service request. Users assigned with **srm\_admin** and **srm\_technician** roles can have access to view this **Service Request View** page. Click **Service Request View** in the **Service Request,** the **Service Request View** page opens.
[](http://wiki.cuteinfocomm.com/uploads/images/gallery/2023-10/image-1698130148290.png)
- You can configure displaying of the number of service request items per page by selecting **50**, **100**, **250, 500,** or **1000**,
- If you want to view any specific service request among the list of service requests, you can select the respective data such as Service Request No, Customer, Location, and Date Range in the respective fields given in the **Service Request View**
- The service request displayed in different color explains their status:
#### Add a Contract Service Request
To add a contract service request, do the following steps,
1. Click [](http://wiki.cuteinfocomm.com/uploads/images/gallery/2023-10/image-1698129828567.png)(**Add** button) in the **Service Request View page,** the **Service Request** window opens, click to select **Contract SR** (**Note**: The fields highlighted with red color are mandatory. You must enter the relevant details in that fields before saving.). [](http://wiki.cuteinfocomm.com/uploads/images/gallery/2023-10/image-1698130642389.png)
2. In the **Admin Company** box, select admin company.
3. In **Customer** box, select customer company name.
4. In **Location** box, select location.
5. In **Contact Name** box, select contact name.
6. In **Contact Number** box, if contact name is selected, the associated contact number and email address will automatically populated.
7. In **Contact Email** box, if contact name is selected, the associated email address will automatically populated.
8. In **Service Request Date** box, click to select date.
9. In **Service Request Time** box, click to select time.
10. In **Type** box, click to select service type.
11. In **Plan Schedule** box, click to select plan schedule as Day Job or Night Job.
12. In **Tanker Size** box, click to select tanker size.
13. In **Grease Trap Size** box, enter or select grease trap size.
14. In **Jetting, PUB, Return Choke** options, click to select relevant option(s).
15. In **Adhoc Sales Contract No** box, enter adhoc sales contract number if any.
16. In **Quotation No** box, enter quotation number.
17. In **Total Grease** box, enter the total grease value.
18. In **Manpower** box, enter the required manpower.
19. In **Price** /**Visit** box, enter the price for the service request.
20. In **Payment Mode** box, select payment mode.
21. In **Billing** flag, click to enable if applicable.
22. In **Service Description** box, enter service description.
23. In **Invoice Description** box, enter invoice description.
24. In **Invoice Note** box, enter the invoice note.
25. In **Private Note for Internal** box, enter the note for internal.
26. In **Service Note** box, enter the service note.
27. In **Show All Vehicle/Technician** flag, click to enable if applicable. When this flag is ticked, vehicle and technician selection list will include all technician and vehicle. Else Jetting Service Request will show only jetting vehicle and technicians in jetting department only.
28. In **New Planned Service Date** box, click to select planned date.
29. In **Planned Time In** box, click to select planned time in.
30. In **Planned Time Out** box, click to select planned time out.
31. In **Vehicle** box, select vehicle.
32. In **Technician** box, select technician.
33. For **Assignment History** option, it is used to check all existing assignments of selected technician, so that user can unassign the technician from some assignments to make him available for the job on this new service request date.
34. Click **Save**. The service request is added and listed in the **Service Request View** page.
#### Edit a Service Request
You can edit the details of the added service request by using edit option provided in the **Edit** column of the **Service Request View** page. To edit the added service request details,
1. Click (Edit icon) of the respective service request, the **Service Request** window opens,
2. Edit the service request details where needed.
3. Click **Save** to save edits.
#### Assign Technician and Vehicle for a Service Request
Users assigned with **srm\_admin** role only can have access to assign the technician and vehicle for an added service request.
Users assigned with **srm\_technician** role can only view the assigned details.
To assign the technician and vehicle for an added service request, do the following steps,
1. Click[](http://wiki.cuteinfocomm.com/uploads/images/gallery/2023-10/image-1698645946491.png) (Assign icon) in the assign column of the respective service, the **Assign Technician** window opens. [](http://wiki.cuteinfocomm.com/uploads/images/gallery/2023-10/image-1698645988734.png)
2. In **Planned Service Date** box, the planned date will show automatically.
3. In **New Planned Service Date** box, click to select new date if needed.
4. In **Planned Time In** and **Planned Time Out** boxes, select the planned in and out times.
5. In **Vehicle** box, select a vehicle from a list. **Note**: You can select multiple vehicles.
6. In **Technician** box, select a technician from a list. **Note**: You can select multiple technicians.
7. Click **Save,** the service request is assigned. For **Assignment History** option, it is used to check all existing assignments of selected technician, so that user can unassign the technician from some assignments to make him available for the job on this new service request date. After assigning the vehicle and technician, the SR record will be changed to yellow color. The service request will be moved to the respective technicians and the  (Job Starts icon) will be appeared in the **Verification** column as below,
#### Indicate Starting and Ending of Job
Once the service request is added and assigned for the respective technician and vehicle by the client, the technician can login and view job details assigned to them.
**To indicate that the job was started,**
1. Click on (Job Starts icon) appeared in the **Verification** column, the job started status will be updated successfully and the SR record will be changed to Blue color.
**To indicate that the job was ended,**
1. Click on (Job Ends icon) appeared in the **Verification** column, the job ended status will be updated successfully and the SR record will be changed to Purple color.
Once the job has completed, the verification process begins.
**Note**: When you click  (Assign icon) of this service request, the vehicle and technicians which are assigned already will not be shown in list.
#### Verify the Service Request Completion
In general, once the job is done by the technician, the respective SR record will be moved for verification that needs to be done by the admin. This **Verification** functionality is provided for the technician on the job to print the Service Verification Form for client to verify the job done by technician and sign off.
1. Click (Verification icon) provided in the **Verification** column**,** the **Service Request Verification** window opens. [](http://wiki.cuteinfocomm.com/uploads/images/gallery/2023-10/image-1698702122999.png)
2. In **DESCRIPTION** box, enter the description.
3. In **NOTE** box, enter your note if any.
4. In **FEEDBACK FROM CLIENT** box, enter client feedback.
5. In **START TIME** and **END TIME** boxes, verify start and end time, if any changes, select the started and ended time of the assigned job.
6. In **SERVICE DONE BY** box, verify technician assigned, if any changes, click to select technician name.
7. In **VEHICLE NO** box, verify vehicle number, if any changes, click to select vehicle number.
8. In **Price** box, verify the price, enter updated price if any changes.
9. In other payment details section, click to enable if applicable. [](http://wiki.cuteinfocomm.com/uploads/images/gallery/2023-10/image-1698702625434.png)
- If you go for cash payment, select the checkbox of the CASH PAYMENT? option.
- If you want to add the GST amount, select the checkbox of the ADD GST? option. The price will be added with the GST amount.
- If you want the service to be continued, select the checkbox of the SERVICE WILL CONTINUE? option. Once you selected the SERVICE WILL CONTINUE? option, the system will indicate "Continue" in the Job column for the select service request. And another SR request will be created as shown below, [](http://wiki.cuteinfocomm.com/uploads/images/gallery/2023-11/image-1699942088800.png)
10. Click (Sign icon) to add your signature, the **Signature** window opens.
- In the **Sign By** box, enter you name.
- Add you signature.
- Verify the date.
- Click **Save**.
[](http://wiki.cuteinfocomm.com/uploads/images/gallery/2023-10/image-1698702700462.png)
11. To attach any file, click (Attach icon) and attach the file.
12. Click **SAVE** to save verification of the service requestion record.
#### Rework
When the job completed by the technician does not meet the expectations of client, the client can assign for the rework. Users assigned with **srm\_admin** role only can have access to start rework by using reset option.
To start the rework,
1. Navigate to verification column of the respective service request, [](http://wiki.cuteinfocomm.com/uploads/images/gallery/2023-11/image-1699423693251.png)
2. Click (Reset icon). A new service request will be added for rework and the job status will be updated as **Rework** in the **Job** column.
#### Print a Service Record
To print any SR record, do the following steps, click the respective  (Print icon) in the **Print** column. The SR record will be downloaded as a pdf file with customizable format.
#### Attach/View a Document into a Service Request
**To add a new document with the service request**,
1. Click  (Attachment icon) in the **Documents** column of the respective service request for which you want to add attachment, the **Add/ View Attachment** window opens. [](http://wiki.cuteinfocomm.com/uploads/images/gallery/2023-11/image-1699425158846.png)
2. Click [](http://wiki.cuteinfocomm.com/uploads/images/gallery/2023-11/image-1699425181609.png)(**Add Document** button), the file choosing and uploading option will be enabled. [](http://wiki.cuteinfocomm.com/uploads/images/gallery/2023-11/image-1699425274177.png)
3. Click (**Choose File** button) and select the document which you want to upload.
4. Click **Upload.** The selected document will be uploaded and displayed in the **Add/View Attachment** window.
**To view any attached document with a service request,**
1. Click (Attachment icon) in the **Documents** column, the **Add/ View Attachment** window opens with a list of attached documents. Note: The subscript number displays with attachment icon shows the total number of attached documents with the vehicle. [](http://wiki.cuteinfocomm.com/uploads/images/gallery/2023-11/image-1699425401496.png)
2. If you want to download the attached document, click (Download icon) in the **Download** column. The document will be downloaded.
#### Activate/Cancel a Service Request
If you want to activate or cancel a service request, do the following steps,
**To activate a service request,**
1. Click (Active icon) that is provided in the **Action** column of the service request, the **Remarks** box opens.
2. Enter your remarks and click **Save**. The service request will be activated. The remarks you have entered will be saved in the **Action Remarks** column of the **Service Request View** page.
**To cancel a service request,**
1. Click (Cancel icon) that is provided in the **Action** column of the service request. The **Remarks** box opens.
2. Enter your remarks and click **Save**. The service request will be cancelled. The remarks you have entered will be saved in the **Action Remarks** column of the **Service Request View** page.
#### Delete a Service Request
You can delete the added service request by using delete option provided in the **Delete** column of the **Service Request View** page.
#### Add an AdHoc Service Request
When a service request is not a planned one, you can add the request as an Adhoc SR. Project details are not mandatory to add the Adhoc SR. Users assigned with **srm\_admin** and **srm\_technician** roles can have access to add and view the AdHoc service requests.
To add an adhoc SR,
1. Click [](http://wiki.cuteinfocomm.com/uploads/images/gallery/2023-10/image-1698129828567.png)(**Add** button) in the **Service Request View page,** the **Service Request** window opens, click to select **AdHoc SR** (**Note**: The fields highlighted with red color are mandatory. You must enter the relevant details in that fields before saving.). [](http://wiki.cuteinfocomm.com/uploads/images/gallery/2023-11/image-1699425708907.png)
2. Fill up the mandatory fields as below.
3. In **Contact Name** box, select contact name.
4. In **Contact Number** box, if contact name is selected, the associated contact number and email address will automatically populated.
5. In **Contact Email** box, if contact name is selected, the associated email address will automatically populated.
6. In **Service Request Date** box, click to select date.
7. In **Service Request Time** box, click to select time.
8. In **Type** box, click to select service type.
9. In **Plan Schedule** box, click to select plan schedule as Day Job or Night Job.
10. In **Tanker Size** box, click to select tanker size.
11. In **Grease Trap Size** box, enter or select grease trap size.
12. In **Total Grease** box, enter the total grease value.
13. In **Manpower** box, enter the required manpower.
14. In **Price** /**Visit** box, enter the price for the service request.
15. In **Payment Mode** box, select payment mode.
16. In **Billing** flag, click to enable if applicable.
17. In **Service Description** box, enter service description.
18. In **New Planned Service Date** box, click to select planned date.
19. In **Planned Time In** box, click to select planned time in.
20. In **Planned Time Out** box, click to select planned time out.
21. Click **Save**. The service request is added and listed in the **Service Request View** page.
#### View Adhoc Service Requests
If you want to view the added adhoc service requests, click  (**AdHoc View** button) in the **Service Request View** page. The Adhoc service requests opens as below,
[](http://wiki.cuteinfocomm.com/uploads/images/gallery/2023-11/image-1699943447634.png)
Filter a Service Request
If you want to filter a specific service request in the **Service Request View** page, you can use the filter option provided in the **Service Request View** page.
#### Export a Service Request list
If you want to export all the service requests in the **Service Request View** page in an excel format, you can use the export option provided in the **Service Request View** page.
#### Bulk Print
If you want to print multiple SR record,
1. Select the checkbox of the respective service
2. Click (**Bulk Print** button). The selected SR records will be downloaded in a pdf file.
### Service Request Verification
Users can verify the signed Service Verification Forms and to proceed to the next stage of invoice generation in the **Service Request Verification** tab in the **Service Request** submenu.
Users assigned with **srm\_admin** role have access to view this **Service Verification** page and verify the Service Verification Form sent by the Technician.
Click **Verification** in the **Service Request,** the **Service Verification** page opens.
[](http://wiki.cuteinfocomm.com/uploads/images/gallery/2023-11/image-1701152316199.png)
- If you want to view any specific service request among the list of service requests, you can use the select the respective filters provided in the Service Verification search bar.
- The legend at the bottom of page denotes different status of a service request.
#### Verify the Service Verification Form
Once the service verification form is signed and submitted by the technician, the verification form will be sent for verification. After the service request verification form is verified, the request will be moved for invoice generation.
To verify the service verification form,
1. Navigate to the respective service request you want to verify,
2. Click the checkbox provided in the **Verified**,[](http://wiki.cuteinfocomm.com/uploads/images/gallery/2023-11/image-1701153976265.png)
3. The **Confirm** dialog box opens and shows the following message [](http://wiki.cuteinfocomm.com/uploads/images/gallery/2023-11/image-1701154064033.png)
4. Click Yes, a verified successful notification will display, and the selected request will be moved to the Invoice Generation page to generate invoice for the payment.[](http://wiki.cuteinfocomm.com/uploads/images/gallery/2023-11/image-1701154348963.png)
#### Print a Service Record
To print any SR record, click[](http://wiki.cuteinfocomm.com/uploads/images/gallery/2023-11/image-1701154968718.png) (print icon) of respective service request in the Print column in the service verification page. The SR record will be downloaded as a pdf file.
[](http://wiki.cuteinfocomm.com/uploads/images/gallery/2023-11/image-1701155184690.png)
#### Attach/View a Document into a Service Request
**To add a new document with the service request,**
1. Click (Attachment icon) of the respective service request, the **Add/ View Attachment** window opens. [](http://wiki.cuteinfocomm.com/uploads/images/gallery/2023-11/image-1701155358555.png)
2. Click [ ](http://wiki.cuteinfocomm.com/uploads/images/gallery/2023-11/image-1701155395780.png) (add document icon), The file choosing and uploading option will be enabled, [](http://wiki.cuteinfocomm.com/uploads/images/gallery/2023-11/image-1701155549462.png)
3. Click  (Choose File icon) and select the document which you want to upload.
4. Click Upload. The selected document will be uploaded and displayed in the Add/View Attachment window.
**To view any attached document with a service request,**
1. Click (Attachment icon) in the **Documents** column, the **Add/ View Attachment** window opens with a list of attached documents. Note: The subscript number displays with attachment icon shows the total number of attached documents with the vehicle. [](http://wiki.cuteinfocomm.com/uploads/images/gallery/2023-11/image-1699425401496.png)
2. If you want to download the attached document, click (Download icon) in the **Download** column. The document will be downloaded.
#### Filter a Service Request
If you want to filter a specific service request in the **Service Verification** page, you can use the filter option provided in the **Service Verification** page.
#### Export a Service Request List
If you want to export all the service requests in the **Service Verification** page in an excel format, you can use the export option provided in the **Service Verification** page.
### Invoice Generation
Once the service request verification process has completed, the request will be moved for invoice generation. There are three ways to generate invoice:
1. Add Invoice - Users can generate invoice in the **Add Invoice** tab.
2. Manual Invoice - Users can generate invoice manually in the Manual Invoice tab. Click **Manual Invoice** in the **Service Request,** the **Manual Invoice** page opens. [](http://wiki.cuteinfocomm.com/uploads/images/gallery/2023-12/image-1702364885548.png)
3. Lump Sum Invoice - Users can generate lump sum invoice per customer in the **Lump Sum Invoice** tab. Click **Lump Sum Invoice** in the **Service Request,** the **Lump Sum Invoice** page opens.
- If you want to view any specific service request among the list of service requests, you can user the respective filters such as Customer, Location, Verified and SR Date Ranges in the **Invoice Generation page.**
#### Add Invoice
To generate an invoice automatically,
1. Click **Add Invoice** in the **Service Request** menu**,** the **Invoice Generation** page opens. [](http://wiki.cuteinfocomm.com/uploads/images/gallery/2023-11/image-1701156127923.png)
2. Click the checkbox of the respective service request for which you want to generate an invoice, [](http://wiki.cuteinfocomm.com/uploads/images/gallery/2023-11/image-1701326198639.png)
3. Click [](http://wiki.cuteinfocomm.com/uploads/images/gallery/2023-11/image-1701326038764.png)(**Generate Invoice** button).The **Generate Service Invoice** window opens (**Note**: The fields highlighted with red color are mandatory. You must enter the relevant details in that fields before saving). [](http://wiki.cuteinfocomm.com/uploads/images/gallery/2023-11/image-1701326314428.png)
4. In the **Invoice Title** box, enter the invoice title.
5. In the **PO** box, enter the PO number.
6. In the **Invoice Date** box, select the invoice date.
7. In the **Note** box, enter note if any.
8. In the **Private Note** box, enter private note for internal reference if any.
9. Click **Save**. The generated invoice will be saved and moved to the **Invoice View** page.
#### Manual Invoice
To generate an invoice manually,
1. Click Manual Invoice in the **Service Request** menu**,** the **Manual Invoice** page opens,
2. Select customer type, i.e.. Contract Customer or Adhoc Customer.
3. In the **Customer** box, select customer.
4. In the **Billing Name** box, billing name will auto populate customer name, user can edit billing name if billing name is different from customer name.
5. In the **Location** box, select location.
6. In the **Invoice Header** box, enter invoice header.
7. In the **Invoice Title** box, enter invoice title.
8. In the PO box, enter PO number.
9. In the Invoice Date box, select invoice date.
10. In the Total box, enter invoice total amount.
11. In the 9%GST box, the gst amount will be automatically calculated.
12. In the Inclusive Total box, the inclusive total will be automatically calculated.
13. In the Quotation No box, enter quotation number.
14. In the Contract No box, enter contract number.
15. In the Note box, enter note if any.
16. In the Private Note box, enter any private note for internal reference if any.
17. In the Invoice Details section, click [](http://wiki.cuteinfocomm.com/uploads/images/gallery/2024-01/image-1705515350298.png), then enter invoice details. The total amounts in manual invoice must tally with total of all detailed invoices before user press "save" button, else this validation will always show up and block the data saving. [](http://wiki.cuteinfocomm.com/uploads/images/gallery/2024-01/image-1705515437719.png)
18. Click Save, the manual invoice will be saved. And the details can be viewed in the Invoice View tab. [](http://wiki.cuteinfocomm.com/uploads/images/gallery/2024-01/image-1705515927628.png)
### Lump Sum Invoice
Lump sum invoice is used to generate lump sum invoices for lump sum sales contract. The business scenario is as below: Once any lump sum sales contract is created from sales enquiry (by enabling lump sum contract option when creating sales contract), user can create service schedule based on the sales contract, and after the service job is completed, user will be able to generate lump sum invoice in the Lump Sum Invoice tab.
To generate lump sum invoice,
1. Click Lump Sum Invoice tab, the lump sum invoice generation page opens as below, [](http://wiki.cuteinfocomm.com/uploads/images/gallery/2024-01/image-1705962684607.png)
2. Click to select the service schedule, then click "Generate Lump Sum Invoice" button, [](http://wiki.cuteinfocomm.com/uploads/images/gallery/2024-01/image-1705962758456.png)
3. The Invoice Generation for Lump Sum Contract screen opens as below,[](http://wiki.cuteinfocomm.com/uploads/images/gallery/2024-01/image-1705962885144.png)
4. Enter Invoice title and other details.
5. Click Save, the generated lump sum invoice will be saved and user can view it in the Invoice View page. [](http://wiki.cuteinfocomm.com/uploads/images/gallery/2024-01/image-1706245844148.png)
### Invoice View
The **Invoice View** tab in the **Service Request** submenu manages all the generated invoice details. Click **Invoice View** in the **Service Request.** The **All Invoices** page opens as below,[](http://wiki.cuteinfocomm.com/uploads/images/gallery/2023-11/image-1701326879130.png)
If you want to view any specific invoice among the list of invoices, you can select the respective Customer, Location, Date Range in the field given in the All Invoices page.
The invoices displayed in different color denotes their status, i.e., Completed payment or Unpaid Invoice.
#### Process an Invoice
To process an invoice,
1. 1. Click to select the checkbox provided in the **Is Invoiced?** column, [](http://wiki.cuteinfocomm.com/uploads/images/gallery/2023-12/image-1701756225911.png)
2. The **Confirm** dialog box open and shows the following message. [](http://wiki.cuteinfocomm.com/uploads/images/gallery/2023-12/image-1701756737942.png)
3. Click **Yes**. The invoice record will be changed to green color and as Completed.
#### Set Printing options for Invoices
To set the printing options of the invoices,
1. Click [](http://wiki.cuteinfocomm.com/uploads/images/gallery/2023-12/image-1701756866782.png)(Print Option icon) provided in the **Print Option** column**,** the **Invoice PDF options** window opens [](http://wiki.cuteinfocomm.com/uploads/images/gallery/2023-12/image-1701756915418.png)
2. Select the checkbox of the **Service Number** and **Service Description** options based on user's request.
3. Click **Save**.
#### Print an Invoice
To print an invoice,
1. Click the respective  (Print icon) in the **Print** column.
2. The invoice will be downloaded as a pdf file. [](http://wiki.cuteinfocomm.com/uploads/images/gallery/2023-12/image-1701757613930.png)
#### Delete an Invoice
You can delete the invoice by using  (Delete icon) provided in the **Delete** column of the **All Invoices** page.
#### Filter an Invoice
If you want to filter an invoice in the **All Invoices** page, you can use the [ ](http://wiki.cuteinfocomm.com/uploads/images/gallery/2023-12/image-1701757753997.png)filter option provided in the **All Invoices** page.
#### Export an Invoice List
If you want to export all the invoices in the **All Invoices** page in an excel format, you can use the [](http://wiki.cuteinfocomm.com/uploads/images/gallery/2023-12/image-1701757713901.png)export option provided in the **All Invoices** page.
### Payment
The **Payment** tab in the **Service Request** submenu allows user to add the service payment details against the related invoice. Users who are assigned with srm\_admin role will have access to view this Service Payment page. Click **Payment** in the **Service Request,** the **Service Payment** page opens, user can configure the number of invoices per page displaying by selecting 50, 100, 250, 500, or 1000 at the bottom of page.
[](http://wiki.cuteinfocomm.com/uploads/images/gallery/2024-01/image-1706683344310.png)
- User can use filter options to view any specific invoice among the list of invoices, filter options including Billing Name, Customer, Location, Date Range in the field given in the **Service Payment** page.
- The invoices displayed in different color explains their status as described in legend.
#### Add Payment Details
To add the payment details,
1. Click (Payment icon) in the Payment column, The **Service Payment** window opens. [](http://wiki.cuteinfocomm.com/uploads/images/gallery/2024-01/image-1706683993730.png)
2. The fields highlighted with red color in payment detail page are mandatory. You must enter the relevant details in that fields before saving. [](http://wiki.cuteinfocomm.com/uploads/images/gallery/2024-01/image-1706684120433.png)
3. In the **Bank A/C** box, select a bank account from a drop-down list.
4. In the **Payment Date** box, select the payment date.
5. In the **Billing Name** box, enter billing name (if billing name is same as company name, company name will auto fill as billing name).
6. In the **Payment Type** box, select a payment type.
7. In the **Amount** box, enter the amount if it's different from invoice amount. The **Paid?** box will be
8. In the **Reference No** box, enter reference number.
9. In the **Note** box, enter your note if any.
10. Click **Save**. The invoice record will be changed to Green color and as completed.
#### Filter an Invoice
If you want to filter an invoice in the **Service Payment** list, you can use the filter option provided in the **Service Payment** page such as SR number, invoice number etc..
[](http://wiki.cuteinfocomm.com/uploads/images/gallery/2024-01/image-1706685109822.png)
#### Export an Payment List
If you want to export all the invoices in the **Service Payment** page in an excel format, you can use the export option [](http://wiki.cuteinfocomm.com/uploads/images/gallery/2024-01/image-1706685195077.png)provided in the **Service Payment** page.
### Bulk Payment
The **Bulk Payment** tab in the **Service Request** submenu allows user to enter multiple invoice payments that belongs to a same billing name in bulk. Click Bulk Payment tab, the bulk payment for service payment page opens as below,
[](http://wiki.cuteinfocomm.com/uploads/images/gallery/2024-02/image-1706769997474.png)
To do bulk payment,
1. In Admin-Company box, select Admin company from a list of admin companies which the payment shall be paid to.
2. In Bank A/C box, select bank account name to receive payments,
3. In Billing Name box, select invoice billing name.
4. In Payment Type box, select payment type from list such as cash, online transfer, paynow etc..
5. In Payment Date box, click to select payment date.
6. In Amount Pay box, enter amount paid.
7. In Reference Number box, enter reference number if any.
8. Click [](http://wiki.cuteinfocomm.com/uploads/images/gallery/2024-02/image-1706770025125.png)Search button, a list of unpaid invoice belong to selected billing name will display in the screen, and **Bulk Pay** button will be enabled. [](http://wiki.cuteinfocomm.com/uploads/images/gallery/2024-02/image-1706770333086.png)
9. Click to select invoices from the list of unpaid invoices in the screen, and the selected invoice amount will be calculated and displayed in **Selected Amount** box.
10. If Selected amount box differs from Amount pay box, user can click Calculate Excess Amount button, and system will show payment confirmation notification as below, [](http://wiki.cuteinfocomm.com/uploads/images/gallery/2024-02/image-1706770892673.png)
11. Click Yes to confirm bulk payment, upon successful creation, a bulk payment number will be displayed in the payment No box in the search area as below. [](http://wiki.cuteinfocomm.com/uploads/images/gallery/2024-02/image-1706771556584.png)
12. And the bulk payment details will be saved in the Payment tab. User can search by bulk payment number in payment page, [](http://wiki.cuteinfocomm.com/uploads/images/gallery/2024-02/image-1706772031026.png)
Note: User with permissions will be able to revert bulk payment if needed. After clicking search button, authorized user can click Revert Bulk Payment button, and a confirmation notification will show as below. Click Yes to confirm reverting bulk payment for selected bulk payment number. And the associated invoices will be reverted to unpaid status. [](http://wiki.cuteinfocomm.com/uploads/images/gallery/2024-02/image-1706772129481.png)
### Clear Cache
Clear cache tab is used to clear search caches in Service Request and Service Schedule menu screens. Click Clear Cache, the clear cache page opens as below, click Proceed to confirm clearing cache.
[](http://wiki.cuteinfocomm.com/uploads/images/gallery/2024-02/image-1706772544252.png)
## Report
The Report submenu in the SRM page helps user view the various reports related with the service request management.
The Report submenu contains the following tabs,
- Invoice Pending
- Statement Of Accounts
- Request For PUB
- Invoice Ageing Report
- SR Sales Report By Jetting/Vacuum
- Payment History
- Verification Pending
- Cash Received
### Invoice Pending
The **Invoice Pending** tab in the **Report** submenu helps you to view the pending invoice details. Click **Invoice Pending** in the **Report** submenu. The **Invoice Pending** page opens and shows the list of invoices which are pending (number of items display per page can be configured by select number in the item per page box that located at the bottom of page).
[](http://wiki.cuteinfocomm.com/uploads/images/gallery/2024-02/image-1706773059212.png)
If user want to view any specific pending invoice among the list of pending invoices, you can select the respective Date Range in **or click Filter** option provided in the Invoice Pending page.
#### Export a Pending Invoice List
If you want to export all the invoices in the **Invoice Pending** page in an excel format, you can use the [](http://wiki.cuteinfocomm.com/uploads/images/gallery/2024-01/image-1706685195077.png)export option provided in the **Invoice Pending** page.
### Statement Of Accounts
Statement of accounts reports help user view all transactions with a particular customer. Click Statement of Accounts, the statement of accounts report page opens, user can select SR customer name or billing name, and As of Date, and then click Search, the report will show as below (number of items display per page can be configured by select number in the item per page box that located at the bottom of page),
[](http://wiki.cuteinfocomm.com/uploads/images/gallery/2024-02/image-1706773724609.png)
#### Export a Statement of Accounts
If you want to export statement of accounts, you can use the[](http://wiki.cuteinfocomm.com/uploads/images/gallery/2024-02/image-1707200431612.png) to export report in excel format, or use [](http://wiki.cuteinfocomm.com/uploads/images/gallery/2024-02/image-1707200410941.png) to export report in PDF format.
#### Email a Statement of Account to Customer
If you want to email a statement of account to customer,
1. Click [](http://wiki.cuteinfocomm.com/uploads/images/gallery/2024-02/image-1707200683660.png) email customer button at the top left corner, a confirmation notification will pop up as below, [](http://wiki.cuteinfocomm.com/uploads/images/gallery/2024-02/image-1707201376973.png)
2. Click **Yes**, system emailing window will open as below, user can configure email template, once email template is created, relevant information will be automatically populated. [](http://wiki.cuteinfocomm.com/uploads/images/gallery/2024-02/image-1707200995550.png)
3. Review information in above, and if needed, user can attach file using **Add Documents** option.
4. Click **Send**. System will send email to customer.
### Request For PUB
Request for PUB report allows user to view all service request details for PUB in selected period of time.
1. Click Request For PUB tab, the service request for pub report page opens as below, [](http://wiki.cuteinfocomm.com/uploads/images/gallery/2024-02/image-1707203398696.png)
2. Select a date range and then click **Search**, request for PUB report opens as below (number of items display per page can be configured by select number in the item per page box that located at the bottom of page),[](http://wiki.cuteinfocomm.com/uploads/images/gallery/2024-02/image-1707201941498.png)
#### Export Request for PUB report
If you want to export all the service request for PUB report in an excel format, you can use the [](http://wiki.cuteinfocomm.com/uploads/images/gallery/2024-01/image-1706685195077.png)export option provided in the Request for PUB page.
### Invoice Aging Report
Invoice ageing report helps user analyze the cash flow of all unpaid invoices. This report provides information about invoice payments due within time periods user specified in the Aging Periods window.
1. Click **Invoice Ageing Report** tab, the invoice ageing report page opens as below,[](http://wiki.cuteinfocomm.com/uploads/images/gallery/2024-02/image-1707202808986.png)
2. In As Of Date box, click to select as of date.
3. Click Search, all ageing invoices that meet search criteria will display as below, [](http://wiki.cuteinfocomm.com/uploads/images/gallery/2024-02/image-1707203709076.png)
#### Export Invoice Ageing Report
User can export report in two types (summary report or detail report) by choosing Print Summary or Print Details. Report format can be configured based on user requirement.
[](http://wiki.cuteinfocomm.com/uploads/images/gallery/2024-02/image-1707203825798.png)
1. Select report type to be exported, i.e. Print Summary or Print Details.
2. If user want to export statement of accounts, click the[](http://wiki.cuteinfocomm.com/uploads/images/gallery/2024-02/image-1707200431612.png) to export report in excel format, or click [](http://wiki.cuteinfocomm.com/uploads/images/gallery/2024-02/image-1707200410941.png) to export report in PDF format.
### SR Sales Report By Jetting/Vacuum
SR sales report by jetting/vacuum provides detail information by jetting/vacuum during selected period of time.
1. Click **SR Sales Report By Jetting/Vacuum** tab, the report page opens as below, [](http://wiki.cuteinfocomm.com/uploads/images/gallery/2024-02/image-1707289374685.png)
2. In SR date box, click to select a date range.
3. As for service type, click to choose Jetting or Vacuum.
4. Click Search, SR sales details that meet search criteria will display as below (number of items display per page can be configured by select number in the item per page box that located at the bottom of page), [](http://wiki.cuteinfocomm.com/uploads/images/gallery/2024-02/image-1707290306942.png)
#### Export SR sales report by jetting/vacuum
If you want to export the SR sales report in an excel format, you can use the [](http://wiki.cuteinfocomm.com/uploads/images/gallery/2024-01/image-1706685195077.png)export option provided in the report page.
### Payment History Report
Payment history report provides detail information of payment history in specific payment period by billing name or bank account.
1. Click **Payment History** tab, the report page opens as below,[](http://wiki.cuteinfocomm.com/uploads/images/gallery/2024-02/image-1707290471846.png)
2. In List By box, click to select by Billing Name or Bank Account.
3. Select the billing name or bank account to view payment history.
4. In Payment From Date & Payment To Date boxes, click to select dates.
5. Click Search, payment history that meet search criteria will display as below (number of items display per page can be configured by select number in the item per page box that located at the bottom of page), [](http://wiki.cuteinfocomm.com/uploads/images/gallery/2024-02/image-1707291704926.png)
#### Export Cash Received Report
If you want to export the cash payment received report in an excel format, you can use the [](http://wiki.cuteinfocomm.com/uploads/images/gallery/2024-01/image-1706685195077.png)export option provided in the report page.
# ACS - Accounting and Corporate Services
Document History
Sl No Description Version Prepared By Reviewed & Updated By Date
1 Requirement Specification Ver 1 Chandra Sekar 7-Mar-2022
2 Document Updated
(Highlighted in Color) Ver 2 Pavithra 11-Mar-2022
3 Document Updated
(Highlighted in Color) Ver 3 Chandra Sekar 15-Mar-2022
1.0 Overview
Morrison Management Pte Ltd, a Singapore based Consulting firm provides various Management Consultancy solutions such as Corporate Secretarial services, Taxation related services, Accountancy services, Corporate Advisory services and other Corporate Management consulting suite of services.
Morrison Management has engaged with Cutech Infocomm Solutions Pte Ltd to provide them software solutions that could be an enabler to automate their processes and leverage them from the manual operations on their secretarial and consulting related activities. The solution that would be offered to Morrison Management comprises of:
HRM
Sales Prospects
Sales Enquiry
Sales Quotation
Letter of Engagement
Client Master List
Project Master Creation
Project Planning
Project Daily Planning & Execution
Reports for Project Monitoring & Tracking (Should include recurring email reminders and follow ups to clients)
Project Billing (Raise Invoices)
Collection of Receivables (We are working on the details)
Dashboard
Cutech Infocomm would be developing customized solutions for Sales Prospects, Project Planning, Project Monitoring & Tracking and Billing while Morrison Management would the cuteOffice ERP Software suite 2.0 for the other modules listed above.
This functional specification document is prepared based on the various discussions Cutech Infocomm consulting team had with Morrison Management team
2.0 HRM
2.1 Payroll for Morrison Management
2.1.1 Scanner to clock in and clock out
Finger and face scanner installed by CuteOffice at MM premise on 7 March February 2022 and all staffs record completely updated in the scanner by 8 March 2022.
2.1.2 GeoPunch device
Staff will be able to clock in and clock out without using the scanner installed in MM’s office. However, this device will only be active when staff is reporting directly to the client office. They are able to clock in and clock out when they visit client office upon the assigning of the administrator to avoid them clocking in using the software when they are physically present in the office.
2.1.3 Payroll Report
Morrison Management will adapt the ready module offered by cuteOffice ERP. Cutech will integrate the staff details provided by Morrison Management into the software and conduct a training to the staffs involved on 09 March 2022.
Jan and Feb clock in and clock out details will be uploaded by MM’s staff and payroll report will be generated from cuteOffice so as to test the software’s capability to produce an accurate report. From March onwards, real data will be inputted to the software through the scanner installed at the office and will get real time reports will be auto-generated. MM wants to rely completely on HRM software from May 2022.
2.2 Payroll for Morrison Management’s clients
MM staff should be able to upload the attendance details provided by the clients manually and the software should generate payroll report for the clients.
Sales Prospect
Sales Prospects module will be used by Morrison Management to market their Business services to the clients in the Region. Clients would be maintained as part of Company Master available in cuteOffice. Morrison Management would conduct their Marketing activities through various methods such as email Marketing Flyers to Prospects, Personnel reach out to Prospects verbally, Through References etc.
Sales Enquiry
CuteOffice should have a master prospective client list separate from the client master list to keep track of each prospect the organisation comes across regardless of success rate. This master list should have the following details:
Name of enquirer
Contact details of enquirer
Their enquiry
MM’s reply to the enquiry based on date
Marketing Flyers Repository Master
Morrison Management would create Marketing flyers for each of their Services and the same image would be stored in this Repository Master. Morrison Management would always be updating their Flyers for a Service and hence the last flyer updated will be treated as Active, which will be sent to clients. However, the previous Flyers would be stored in the Repository with the Date Range – Active From & To Date
Marketing Flyer email Template
Morrison Management would design an email Template for sending the Marketing Flyers. The template can be a common template for all Services or if Morrison Management wishes to create Templates across each service, then this would be made possible. Please note for such scenarios, Clients would be receiving multiple emails from Morrison Management based on the Marketing Flyers send criteria.
Marketing Flyer Data Creation
Design the screen for Morrison Management to select & input data for sending Marketing Flyers
The fields to be captured are
Display all the Flyers for each Services in the Screen
Allow user to select the Flyers for sending the Mailers
For each Flyer selected, option to select
All clients, remove existing customers who has availed this service in the past
All clients
Selected Clients
Based on the above criteria if Selected Clients, display Client selection for Selection – Multiple / Individual
Morrison Management should have an option of choosing various combination of the above
Once the above information is captured, display the Client – Flyer list for confirmation by the user
Generate the email threads as per the above select criteria, for sending the emails
Create a Sales Prospects database to store the emails sent which should contain
Client Name
Service Description
Marketing Flyer Identifier
Email id
Date & Time Sent
View Marketing Flyer Sent Information
Design a View screen to showcase the details on the email Notifications sent. This functionality should have a filter option for the user to select a given criteria
Provide a View option of the flyers sent for a given period, with Client filter. Client wise it’s preferred to provide with the pictorial representation of the flyer sent.
Sales Quotation
The software should generate an email for the prospective client based on the templates of services selected by the staff. The quotation template have been furnished to Cutech on 21 February 2022 via email. This template will also serve as the basis for preparation of marketing flyer. The software should be able to track the multiple quotes given to the clients
There should be a drop down option for the price quoted for each service based on the category of clients. These price details can be obtained from the sample price master list as per Table A below. The complete price list will be provided by MM. The administrator should be able to amend the price and add on new services and categories based on request in future.
Services Category Price (S$)
Secretarial A XXXX
B XXX
C XX
D X
Tax A XXXX
B XXX
C XX
D X
TABLE A: SAMPLE PRICE MASTER LIST
Letter Of Engagement
Once quotation is agreed by both parties, letter of engagement should be prepared and sent to clients. The software should be able to convert the agreed quotation to the LOE format which will be provided by MM. The software should also be sending reminders and follow ups to both staff and client until the signed document is received.
4.0 Client Master
All the clients of Morrison would be stored in the Company master. The contact information of the clients namely Contact Name, email address, Contact numbers are to be maintained as mandatory. The sample master list have been furnished by MM. We are working on the improvements of the client master.
5.0 Project Master Creation
In addition to the Masters designed and made available in the Cuteoffice ERP suite, the following Masters will be made available as part of the solution
Service Master
Service Master briefs the major services Morrison Management would offer to their customers. The following services would form part of this master
Incorporation
Company name availability check
Registration of the company
Full company kit (minutes/register books, share certificates and 4 copies of Constitution)
Secretarial
Registered Office
Nominee Director
Bank Account Opening
Accounting Work
Monthly Management Review
GST
Compilation
Tax
Payroll
Adhoc
As the above services would form part of Sales Enquiry & Sales Quotation modules, Cuteoffice would configure the above services as Items in the Item Master and each Services will be configured as a Quotation Template, with the Job types.
As part of the Services Master the following fields will be accepted
Service Code
Service Name
Service Short Code
Service Description
Automatic email Trigger – Yes / No
If Yes Period when to send (in Days prior to the start date of the Project) , to create a Job Type and associated Job Task automatically in the system, as the first job type for this service if Job created, should be display in the Project Planning Job Type & Job Task list)
Though the above services are listed currently, Morrison Management would also have an option to add new services depending on their business needs.
5.2 Job Type
Job Type details the various operations that needs to be performed for fulfilling the services listed. Each Service would have the various Job Type and this would be defined as part of the Job Type Master.
*The job type listed under S/N 1-12 are inaccurate. We will furnish you with a complete and detailed workflow for each job type under the respective services once the refinement is done by our assigned staffs.
Sl No Services Job Type Remark
1 Incorporation
(Sheryl) Company name availability check
Registration of the company
Full company kit (minutes/register books, share certificates and 4 copies of Constitution)
2 Secretarial
(Sheryl) Provision of Company Secretary
Preparing Directors’ Resolution for opening of bank accounts
Preparing Directors’ Resolution for Resignation/ Appointment of directors
Preparing Directors’ Resolution for Change of registered address
Preparation of minutes of Annual General Meeting (AGM)
Preparation of Annual Returns and other statutory returns to be lodged with ACRA
Safe custody and updating of the statutory books and register as required by Companies Act
Any other routine work.
ACRA Compliance Alert & Reminders Most of the services under secretarial will have annual retainer fee where the job done will be charged against the fee that will be paid in advance by clients in a bulk. Thus, the end of workflow for these jobs will not be raising of billing instructions. This job type should be categorised as billable work but under a category called retainer fee. We will still rely on the software to calculate the profitability of the work done based on time spent against the retainer fee.
3Registered Office (Sheryl)Register Address Services
4Nominee Director (Sheryl)Nominee Director Service
5 Bank Account Opening (Sheryl) Preparation of relevant documents
Submission of the documents to the Bank
Bank Account opening
6 Accounting Work (Jaine) Data entry of all transactions using MYOB software;
Update all cheque or cash payments;
Update all deposits in bank accounts;
Reconcile all bank accounts;
Pass any general adjustments, where necessary;
Print and maintain the following reports:-
General Ledger Listing
Trial Balance
Profit & Loss Statement
Balance Sheet
Receivables and Payables Reconciliation
7 Monthly Management Review (Jaine) Review of sampling of Sales entries into Accounting software;
Review of sampling of Purchase entries into Accounting software;
Review of sampling of updated transactions of cheque or cash payments;
Review of sampling of updated deposits in bank accounts;
Review all bank reconciliation;
Review of any general adjustment passed;
Preparation of Observation
8 GST (JX) Review GST Declarations for Financial Year
Select GST Return (s) for Review
Perform Checks for the Selected GST Return(s)
Check the Standard-rated Supplies and Output Tax [review tax invoices, receipts, credit notes to customers and debit notes from customers]
Check the Zero-rated Supplies [review export documents, delivery notes, packing list, etc]
Check the Exempt Supplies [NA as your company do not have exempt supplies]
Check Input Tax and Refunds Claims (for local purchases, imports with GST Paid and Bad Debt Relief) [review dates of transactions, invoice or import permits, check if expenses claimed are for business purpose and are claimable]
Check Imports with GST Suspended (for MES)
Review Financial Statements or Management Accounts for the Same Financial Year
Quantify Errors (if any) and Submit findings to IRAS for review
9 Compilation (Jhonas) Preparation of Director's Statement
Preparation of Statement of Financial Performance
Preparation of Statement of Changes in Equity
Preparation of Statement of Cashflow
Preparation of Notes to Financial Statements
Preparation of Detailed Comprehensive Income
10 Tax (Jhonas) Preparation and submission of Estimated Chargeable Income (ECI)
Preparation and submission of Form C/ Form C-S
Tax Computation
Tax Filing with IRAS
11 Payroll (Pavi) Computing monthly payroll as per the information provided by the company
Providing breakdown of salary for disbursement to staff by company
Issuing payslips to staffs
Providing CPF Contribution for issuance of payment to CPF Board by company
Year-end preparation of IR*A for Auto-Inclusion Scheme (AIS) submission
Preparation and submission of IR21 to inform IRAS in the event a foreign employee has tendered resignation
12Adhoc (Pavi)Adhoc
As part of the Job Type Master the following fields will be accepted
Service Code (Should be available in Services Master)
Job Type Code
Job Type Name
Job Type Short Code
Job Type Description
Billable Yes / No
Estimate Time & Cost at Skill set level – Yes / No
If No, following fields will be entered
Estimated Time in Hours required to complete this task
Cost Estimated Hourly Rate required to complete this task
If Yes, the following fields will be stored in an Array or a Child collection table
Skill Set (to be linked with HRM Employee table)
Estimated Time in Hours required to complete this task
Cost Estimated Hourly Rate required to complete this task
The Estimated Time & Cost stored above for each Job Type would be used to produce the Budget vs Actual analysis. As part of the MIS, Morrison Management requires to prepare various MIS reports of the actual time & cost spent for each project against the normal budgeted figures. To prepare such reports the above data would be used. These job types also should be differentiated between billable and non-billable. However, this system should have the ability to help us calculate the time spent on the non-billable work for us to plan accordingly in future.
Though the above Job Types have been defined for each Services, Morrison Management would also have an option to add Job Types for the Services created depending on their business needs. This is explained with an example below.
Let us consider to define the Job Type for Service Code – Tax.
The below table briefs 4 Job Types that form part of delivering the Tax Services to customers. Based on the Quotation the Customer might select all 4 Job Types or less and accordingly the project would be created.
Sl No Services Job Types
10 Tax Preparation and submission of Estimated Chargeable Income (ECI)
Preparation and submission of Form C/ Form C-S
Tax Computation
Tax Filing with IRAS
However, for fulfilling the above 4 tasks, firstly, Morrison Management have to perform 3 tasks which would be used for all 4 above deliverables.
Task 1 – Obtain the required Documents from Customer
Bank Statements
Sales Invoices / Sales Tax Invoices
Vendor Invoices
Receipts
CPF Statements
Salary Schedule include Pay slip
Task 2 – Morrison Management staff would enter the information from these reports into their accounting software and prepare the following reports
Balance Sheet
Profit & Loss
Aged Receivables (Reconciliation)
Aged Payables (Reconciliation)
Trial Balance
General Ledger (Detail)
Bank Reconciliation Report
Task 3 – Preparation of the Draft Management Report and obtain approvals within Morrison Management and from Customer
Once the above 3 tasks are completed, Morrison Management would proceed in preparing the mentioned 4 Job types under the Tax Service Master. So, the above table can be reframed by Morrison Management as below.
Sl No Services Job Types
10 Tax Obtain the required documents from Customer
Enter the information in accounting software and prepare required reports
Prepare Draft Management report and obtain approvals within Morrison Management and from Customer
Preparation and submission of Estimated Chargeable Income (ECI)
Preparation and submission of Form C/ Form C-S
Tax Computation
Tax Filing with IRAS
Such common Job Type can be created across various services at different steps based on the need and processes.
5.3 Job Tasks
Job Tasks briefs the various tasks that needs to be performed for a given Job Type. Each Job Type would have the various Job Tasks and this would be defined as part of the Job Tasks Master.
Sl No Services Job Type Job Tasks
10 Tax Obtain the required documents from Customer
Inform Client to provide the required documents – Have Radio Button option – eMail or Phone (By Hand)
email template to be attached for this task
Documents Obtained
10 Tax Enter the information in accounting software and prepare required reports
Confirm completion of data entry in the accounting software and preparation of required reports
10 Tax Prepare Draft Management report and obtain approvals within Morrison Management and from Customer
Preparation of Draft Report
Send Approval email within Morrison Management
Approval Received
Send email to Customer
Approval Received
Raise Billing Instruction
As part of the Job Tasks master the following fields will be created
Service Code (Should be available in Job Type Master)
Job Type Code (Should be available in Job Type Master
Job Task Code
Job Task Name
Job Task Short Code
Job Task Description
Approval required within Morrison Management for this task
If Yes
Approval Email Notification to Employees defined
Upload email Template
Email required to be sent for this task – Yes/No
If Yes, Upload email Template
Reminder required to be sent for this task – Yes/No
If Yes
Reminder to be sent in days xx (reminder to be sent in the xx days mentioned multiple times till email reply task complete)
Upload Reminder Template
5.4 Activity Code
Activity Code Master is created to maintain the carious activities that would be performed by users across projects. Activity code does not have any referential identify with Service, Job Type, Job Task as they are independent activities which can be used across any scenarios. Some of the examples of Activity codes are
Preparing File Notes
Draft email / letter preparation
Administrative work
Lunch Break
Prepare Quotation
As part of the Activity Code master the following fields will be created
Activity Code
Activity Code Name
Activity Short Code
Activity Description
6.0 Project Planning Module
Project Planning would be done for Projects created once Sales Quotation is approved and the job order is received from the Client. The process in cuteOffice ERP Software suite 2.0 is,
Sales Quotation is approved by Morrison Management and sent to Client
Client approves the Quotation and issues the Job Order to Morrison Management
Morrison Management would edit the specific Sales Quotation and click Create Project Button, to create the Project
This enables the Project (or the Job Order) to be created
Project Planning is required to be done to review the master data for the Service of a Project created and accordingly update the master data for the specific Project. Please note this updated data will not be updated in the respective Masters, but will be updated and monitored for the specific Project.
Morrison Management allocates each Project to one user, who is responsible for the Project. As per the process, the activities for a Project would commence only after allocating the Responsibility of a Project to a resource. This activity of allocating the Responsibility for a Job, will be done by Morrison Management as part of this Project Planning exercise.
For Project Planning updation, screen to be designed with the following fields
Project Code : xxxxxxxxxxxxxxxxxxxxx
Project Description :
Project Start Date : xx/xx/xxxx Project End Date : xx/xx/xxxx
Project Amount : xxxxxx.xx
Recurring Project : Yes / No (If Yes Create a Separate Work Flow as briefed in Point 6.2)
Item Details (Service)
Estimated from MasterRevised
Job Type Job Description Select Yes/No Project
Amount Estimated Man Hours Estimated Man Hour Rate Revised Man Hours Revised Man Hour Rate
Project Allocated To : xxxxxxxxxxxxxxxxxxxxx
The above Entry would also have an Approval Process.
As briefed earlier, each Service, is further classified with multiple Job Types. Though all the available Job Types are displayed in the Sales Quotation for a Service, the Client might opt for certain Job Types only. Similarly, Morrison Management might have to perform certain tasks, which might not be displayed in the Sales Quotation or Client not opted for. Morrison Management team would identify the Job types that needs to be carried out for a Service and the same would be selected in the above table.
Revision of the Estimated Hours & Rate would be updated as per the definition in the Job Type master, i.e. defined across Skill set or not.
Please note, Users would not be allowed to add a New Job Type or provided Revised data information overriding the master data config i.e. if the Job Type master is defined with Skill set then the Revised data should also be provided with the skill set bifurcation only. Any changes on these should be done at the Master level only.
6.1 Project Daily Planning & Execution
Morrison Management does a Daily Planning for the Projects that have commenced execution. Tasks are assigned to individual users on a daily basis and these tasks are monitored on a daily basis for its closure.
6.1.1 Project Daily Planning
This Planning activity is done for each employee for a given day.
The Daily Planning meeting screen input would require the following information to be data entered
Planning for the Date: xx/xx/xxxx
Emp
No Emp Name Project
Code Service Job Type Job Tasks Activity Code
(not mandatory) Allocate Hours
In the above screen in the tabular form, display the fields with a Dropdown option. The Service will be displayed form the Project and cannot be edited.
The Job Type will be selected based on the Project and Job Tasks for the Job Type. If user selects a completed Job Type / Job Task, display a message informing the task is complete with details and on confirmation reallocate the same task.
Activity Code may be entered by the user if required, to brief the task, the user needs to perform.
User will input the Allocate Hours for the day.
For each Employee, please provide the View button to display the status of
Tasks completed by the Employee for the Previous Day (suggest to provide a date range defaulting with yesterday’s date (from the system date)
Overall Project status
6.1.2 Project Execution
The functionality here is to input the actual tasks done by the employees on a daily basis. Each employee would enter the activities completed / in progress for the day. This includes updating the status of the completed tasks.
Fields to be captured are
Date of Task Entry (will be defaulted to the system date, with option to modify)
Emp No (will be defaulted from User Login)
Emp Name (will be displayed)
Once the above information is entered by the user, system will validate with the Project Daily Planning record and display the tasks that the user needs to perform in a tabular form (as there can be more than one tasks).
User will just enter the Start Time & End Time and save the record if the user has performed those tasks. If User has performed some other tasks, please provide a Add New task and accept the details
Date of Task Entry : xx/xx/xxxx
Employee No : xxxxxxx Employee Name : xxxxxxxxxxxxxxxxxxxxxxxxx
Project
Code Service Job Type Job Tasks Activity Code Start Time End Time Job Task
Closed
Project
Code Service Job Type Job Tasks Activity Code Start Time End Time Job Task
Closed
User will enter the status of the Job Task whether it’s closed or not.
Once all the Job Task for a Job Task is closed (as per above such entries), then Job Type would be closed automatically.
The above information would be referred to prepare the Project Status reports
6.2 Recurring Jobs Work Flow
For certain Services, Morrison Management would identify as Recurring Jobs, which implies the system need to create a Job Order record and conduct Job Monitoring tasks. For Example, Morrison Management would obtain a Job Order for conducting Secretarial Service for a Year starting from 01-Jan-2022 to 31-Dec-2022. As per Morrison Management this Job order could be a Recurring Job order which means system should be able to handle this Job for the period 01-Jan-2023 to 31-Dec-2023. System should be designed to handle such scenarios automatically. The following process workflow to be considered for Recurring Jobs
Have a Dashboard to display all the Recurring Jobs that would get expired based on a given date or in Days
Allow User to Edit the Job Record. The following information will be displayed and allowing the user to Edit certain fields
Project Code : xxxxxxxxxxxxxxxxxxxxx
Project Description :
Project Start Date : xx/xx/xxxx Project End Date : xx/xx/xxxx
Project Amount : xxxxxx.xx
Recurring Project : Yes / No (If Yes Create a Separate Work Flow as briefed in Point 6.2)
Item Details (Service)
Job Type Job Description Select Yes/No Existing Project Fees Revised Fees
In the above screen, User will be allowed to change the following fields
Project Start Date& Project End Date
Revised Fees for each of the Job Type, default with the existing fees and user can modify
Store the above Information in Draft Mode
Approve the above Job Draft Creation
Send Email to the Client for Renewing the Job for the next year (To obtain the email Template from Morrison Management) =- Not Mandatory, but if Price is changed email needs to be triggered. Also raise a quotation internally for the revised fee
Approve for Job Order creation
Create a Job Order with the above details and the process will commence as before
6.3 Reports for Project Monitoring & Tracking
CuteOffice should be able to do recurring follow ups to client for request of documents based on the filing date filled or updated at the client master list.
The software should also be able to send reminders to staffs and their superiors on upcoming tasks or pending tasks based on the due date fixed for the particular job that is being handled.
There should be a document tracker master for all mails and documents sent to clients.
File tracker should also be maintained by the software where all files records are updated into the master based on its ref number and location either in office, storage or destroyed.
7.0 Project Billing (Raise Invoices)
This option is provided to raise the Invoice for the projects created. The Invoice scope would be
Data Entry for Generating the Invoice by the User
Approval option for the Invoice
Generate the Invoice as per the defined format from Morrison Management
Store the Invoice data information
Following functionality will be provided to raise the Invoice
Please display the Projects that needs to be Invoiced in the below Tabular column i.e. Total Invoice Amount raised < Project Amount
Project
Code Project Description Client name Budgeted Hours Budgeted Amount Total Hours Utilized Invoiced So Far Balance to Invoice
For each Project provide a View option to display the following information is a
Project Code : xxxxxxxxx Project Description : xxxxxxxxxxxxxxxxx
Start Date : xx/xx/xxxx End Date : xx/xx/xxxx
Project Amount : xxxxxx.xx Status : xxxxxxx
Project Owner : xxxxxxxxxxxx Department : xxxxxxxxxxx
Client : xxxxxxxxxxx
Estimated Hours : xxx Estimated Amount : xxxxxxx
Utilized Hours : xxx
Invoiced So Far: xxxxxxxx
Invoice Details
Please furnish the Invoice details in tabular form
Add Invoice Data Entry will accept the Invoice details entry
Invoices for Approval will display the invoices where approval is pending
Invoices raised so far will display the invoices raised, will also have an option to select Client
# Billing
Billing Systems helps to process successful invoices and charging the customers.
### Billing Master Data
#### 1.0 Billing Master Data
The **Masters** submenu in the **Billing** page helps you to add the master data like details of Customer list, Job list, Task list, Tag list and Holiday list.
The **Masters** submenu contains the following tabs,
#### [](http://wiki.cuteinfocomm.com/uploads/images/gallery/2024-02/image-1709029004112.png)
#### 1.1 Customer List
Customer list helps to view customer details so that billing activities can be recorded and entered in the billing system.
To view Customer list, Click Customer submenu in the Master, the customer list page opens as below.
[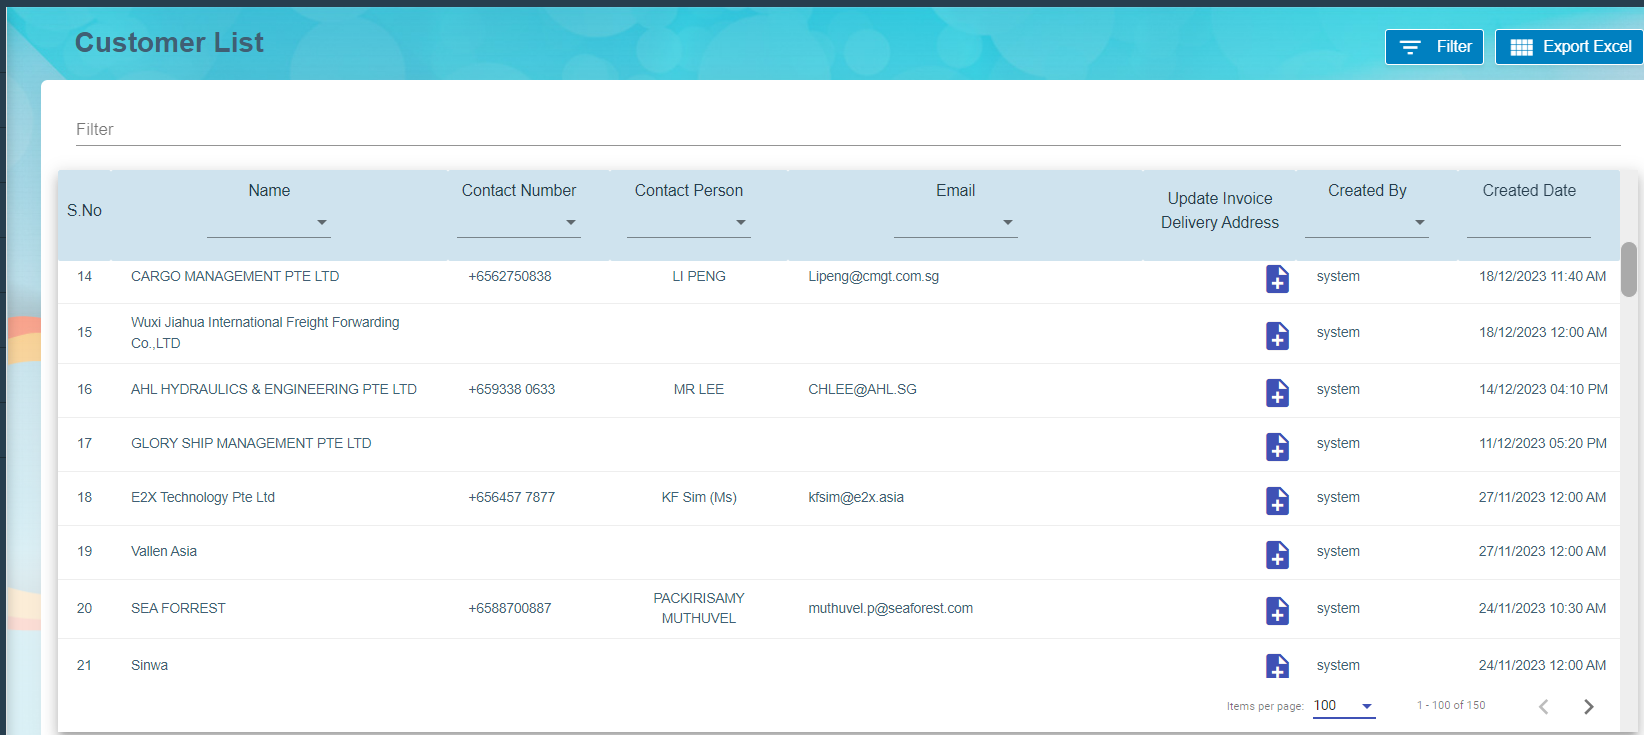](http://wiki.cuteinfocomm.com/uploads/images/gallery/2024-02/image-1709192407833.png)
Click add button [](http://wiki.cuteinfocomm.com/uploads/images/gallery/2024-02/image-1709201030288.png) to update Invoice Delivery Address and Save it.
#### 1.2 Job List
Job list viewed to maintain both completed and in progress job details in the system.
[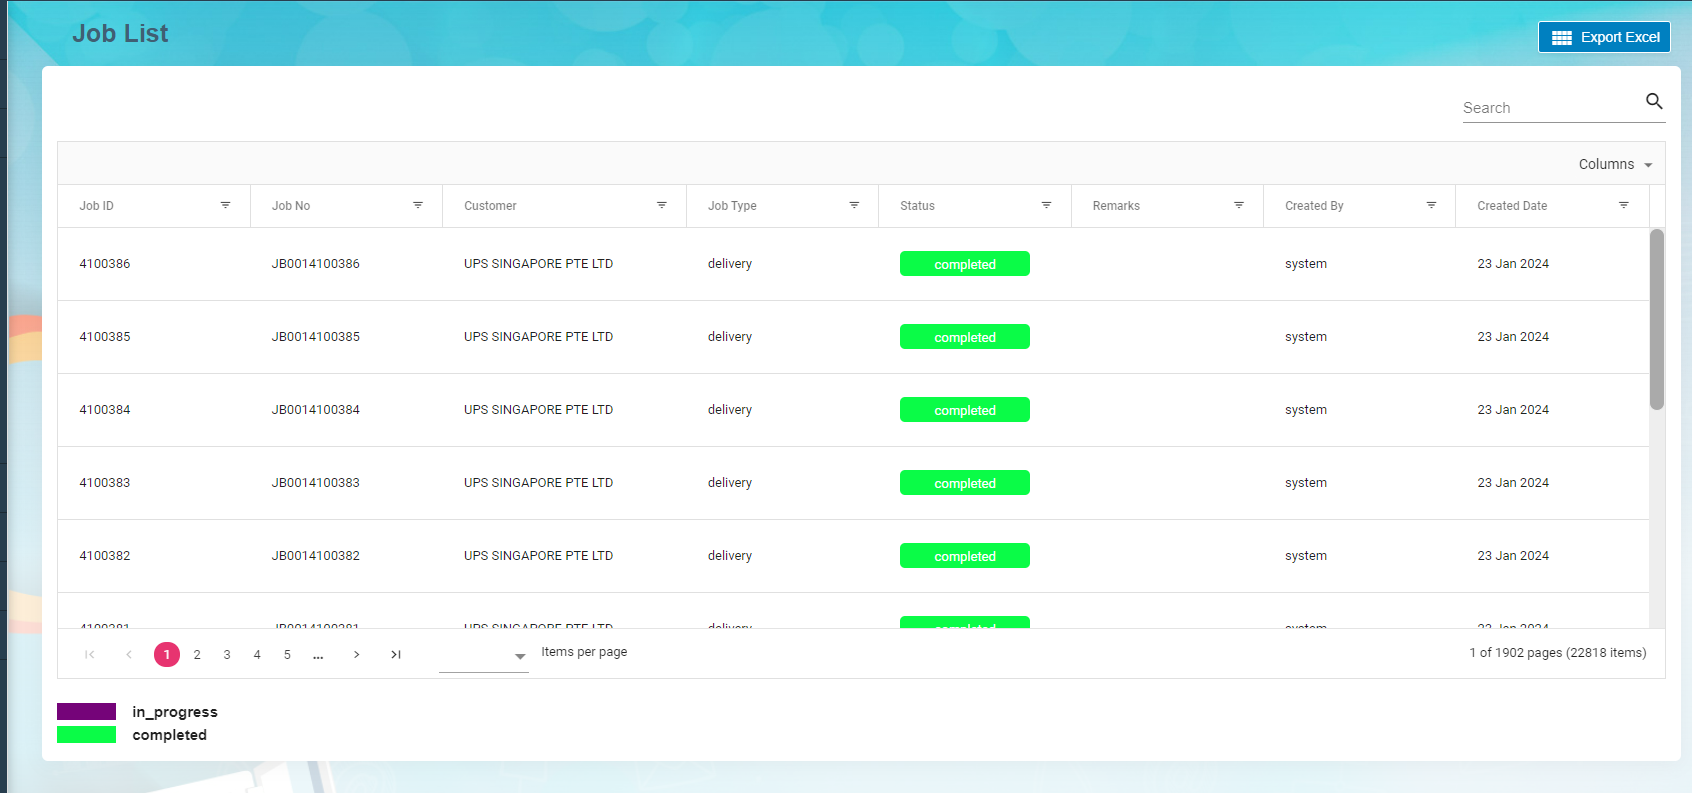](http://wiki.cuteinfocomm.com/uploads/images/gallery/2024-02/image-1709201410747.png)
#### 1.3 Task List
Task list viewed to contain assigned, waiting for acknowledgment, acknowledged and successful tasks.
Click Details icon [](http://wiki.cuteinfocomm.com/uploads/images/gallery/2024-03/image-1709268414834.png) to view Task details, Tags, Job details and Task Assignment. All the details come from the Network linked (Versa Fleet) to cuteOffice. Tags may contain single or multiple tag codes to process against each Task and Job number. The tasks which have successful status are ready to process Invoice.
[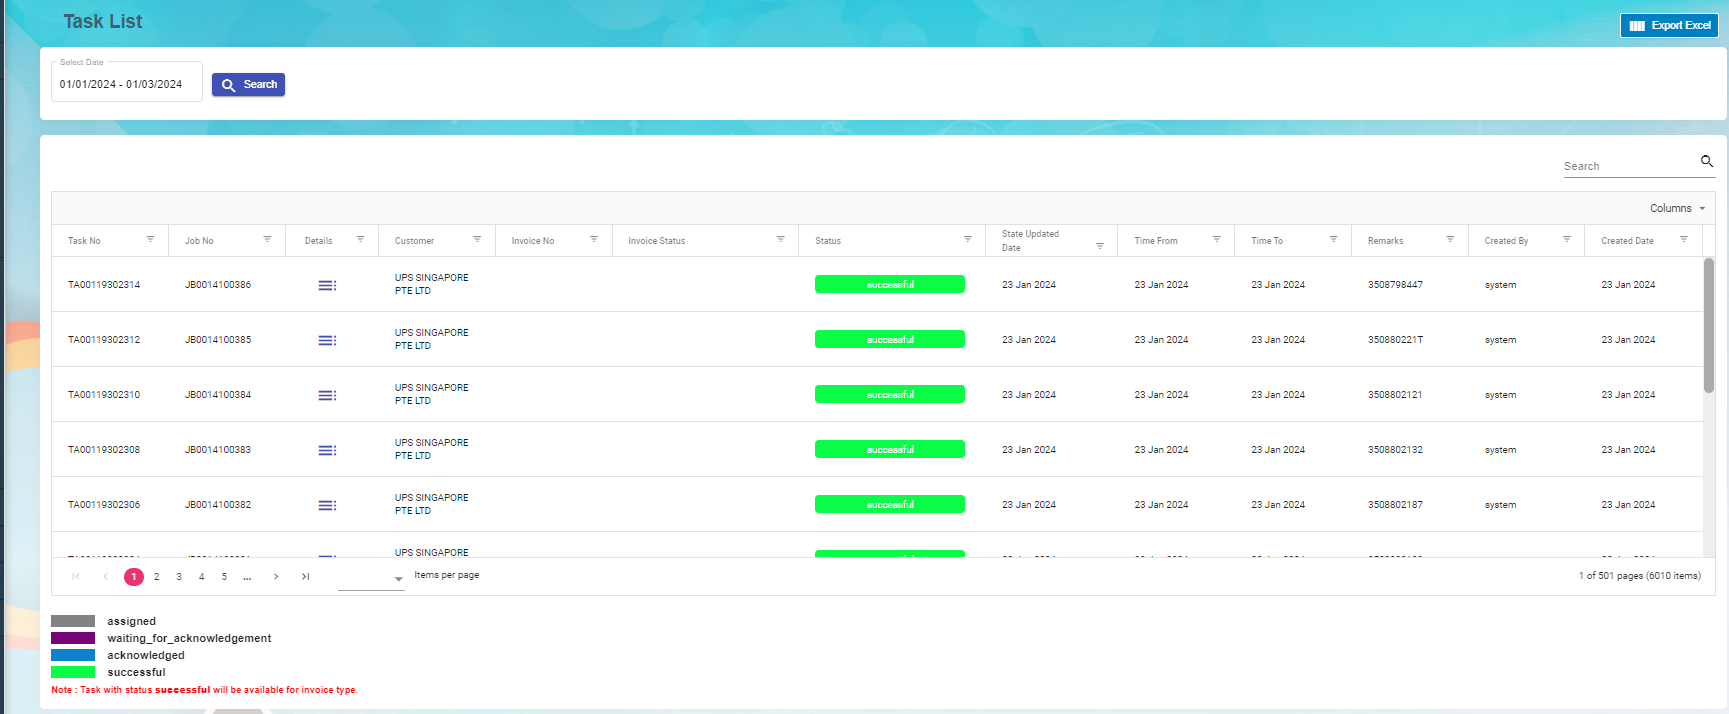](http://wiki.cuteinfocomm.com/uploads/images/gallery/2024-03/image-1709269280914.png)
#### 1.4 Tag
Tags Master contains Tag list. Based on the tag availability against each task in the Task list, the invoice will process in the billing system.
##### 1.4.1 Add A New Tag
Click add Tag, Billing Tag window open to add the tag and description. If the tag is miscellaneous tag, enable Miscellaneous in the Billing Tag.
##### 1.4.2 Edit Tag
To edit Task tag
Click [](http://wiki.cuteinfocomm.com/uploads/images/gallery/2024-03/image-1710161603201.png) edit button in the edit column of the Tag list that user want to edit any details about Tag name or Miscellaneous Tag Name and their description.
##### 1.4.3 Import Excel
Import Excel functionality[](http://wiki.cuteinfocomm.com/uploads/images/gallery/2024-03/image-1709269910587.png) is available to import the Tag details. Download the template to add all the Tag details and import into the system.
##### 1.4.4 Export Excel
Export Excel [](http://wiki.cuteinfocomm.com/uploads/images/gallery/2024-03/image-1709269952287.png)helps to download the tag list in the Master.
[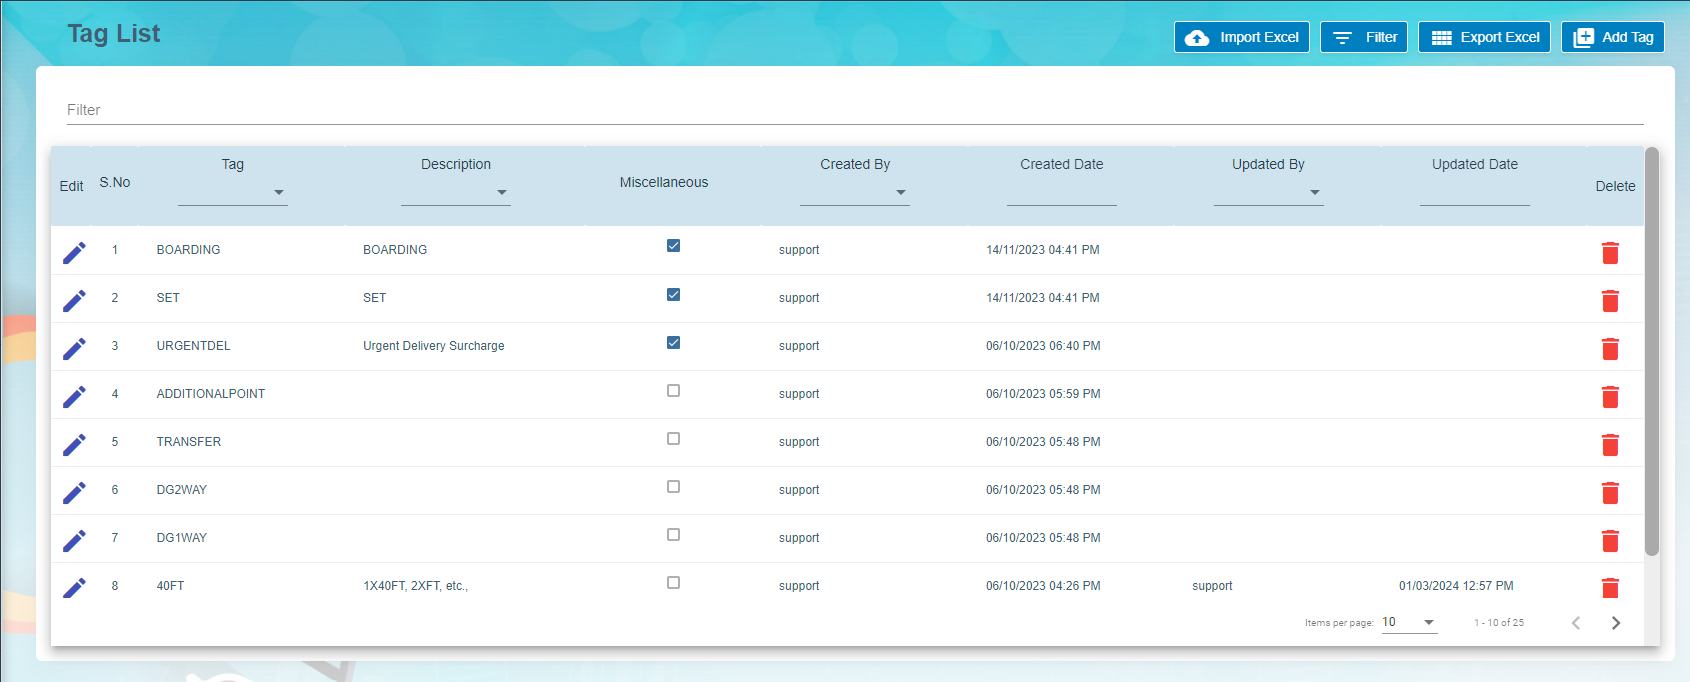](http://wiki.cuteinfocomm.com/uploads/images/gallery/2024-03/image-1709270030267.png)
#### 1.5 Holiday List
Holiday list viewed to maintain the holidays based on the Group Name and the Year. Group Name contains the country name such as Singapore, Malaysia etc.,
Main page contains Group Name, Event Name, Event date and Remark.
Excel export available to download the holiday list.
[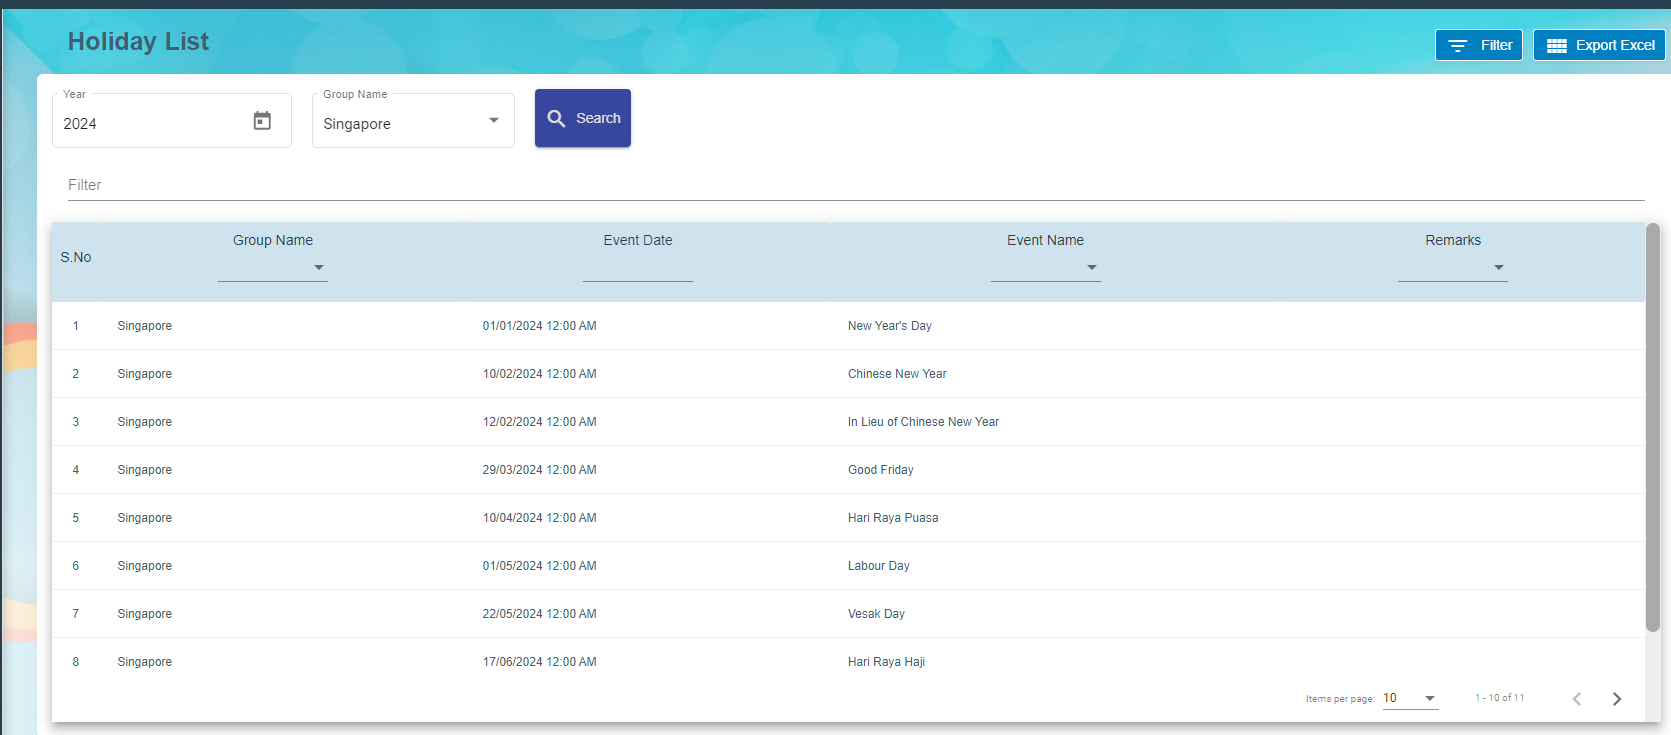](http://wiki.cuteinfocomm.com/uploads/images/gallery/2024-03/image-1709270373776.png)
### Billing System
#### 2.0 Billing System
Billing System is the processes that help to create invoices against completed tasks for the customers. The system receives tasks from various networks to process invoice. Each task is associated with rates and available in the rate card. Successful task and job are ready to process invoice in the system. New invoices are approved by the approver before sending the invoices to the customer. Once payment received from the customer, it has been updated in the system to close the transaction.
Billing System is a digital platform or solution that facilitates the electronic generation, dispatch, and tracking of invoices, eliminating the need for traditional paper-based billing methods.
#### 2.1 Task Ready to Invoice
Task Ready to invoice submenu available under Billing menu. Successful Task are ready for creating Invoice to the customer.
- Choose Customer in the Task ready to invoice and the date range. Select Type either Day, Month or Ad-Hoc.
- Click search button, list of tasks available on the page for invoice creation.
[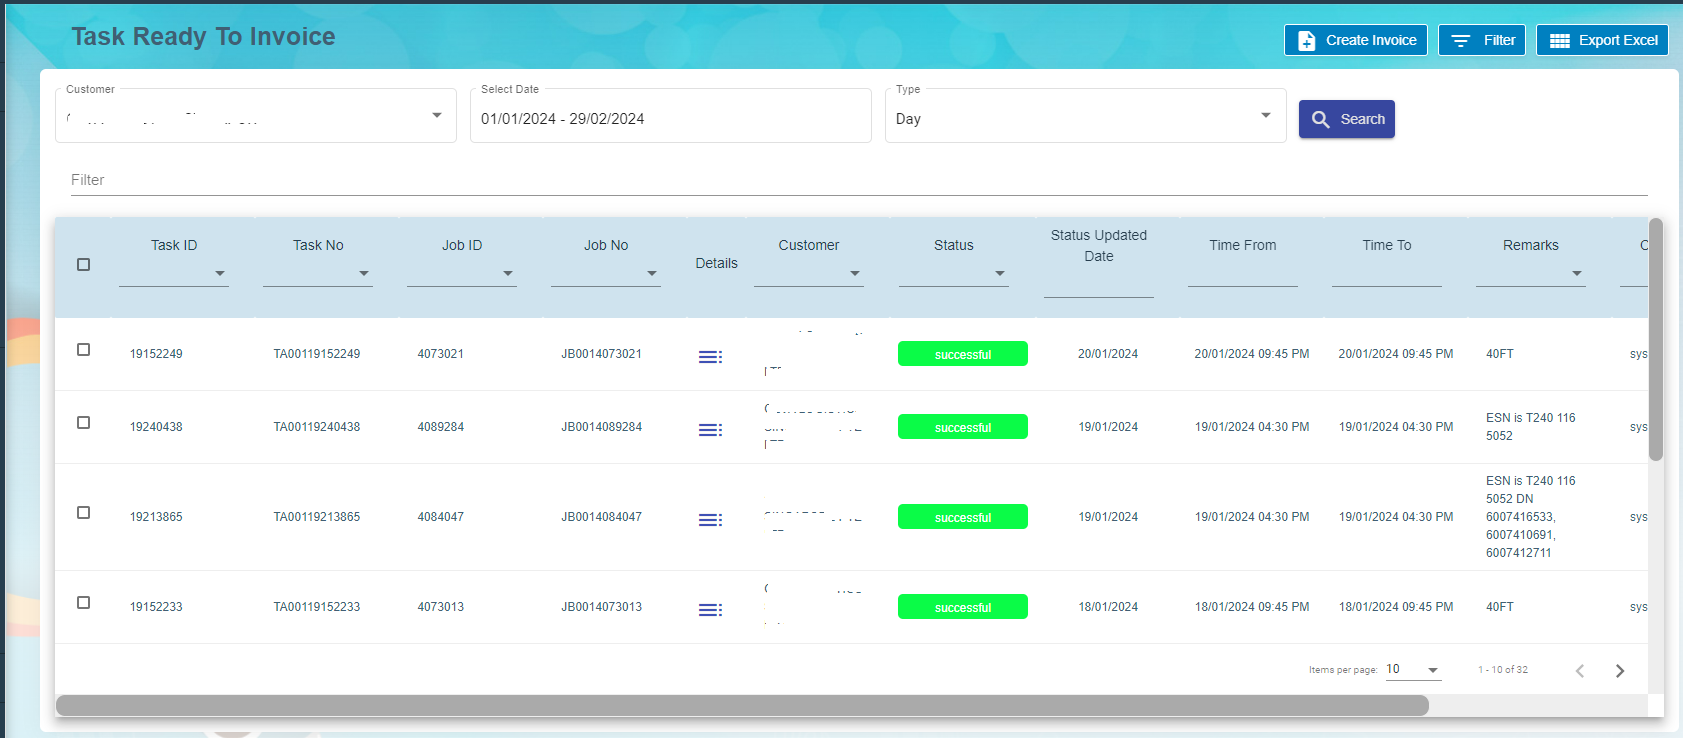](http://wiki.cuteinfocomm.com/uploads/images/gallery/2024-03/image-1710162821688.png)
Click detail[](http://wiki.cuteinfocomm.com/uploads/images/gallery/2024-03/image-1710163070486.png)icon against the task to view the task details , job details, task assignment and Tag details. User can modify the tag code and save it.
1. Click single or multiple check box [](http://wiki.cuteinfocomm.com/uploads/images/gallery/2024-03/image-1710163421698.png)against the task id to create invoice.
2. Click create invoice [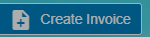](http://wiki.cuteinfocomm.com/uploads/images/gallery/2024-03/image-1710163544920.png)
3. Choose the payment terms from the drop-down list and staff name.
4. Click create invoice [](http://wiki.cuteinfocomm.com/uploads/images/gallery/2024-03/image-1710163544920.png)
The new invoice available to process in the Invoice List.
#### 2.2 Invoice
Choose Invoice submenu under Billing menu. Invoice list page contains invoice numbers to process billing for the activities.
[](http://wiki.cuteinfocomm.com/uploads/images/gallery/2024-03/image-1710164279844.png)
- Click Invoice number to view Invoice details.
[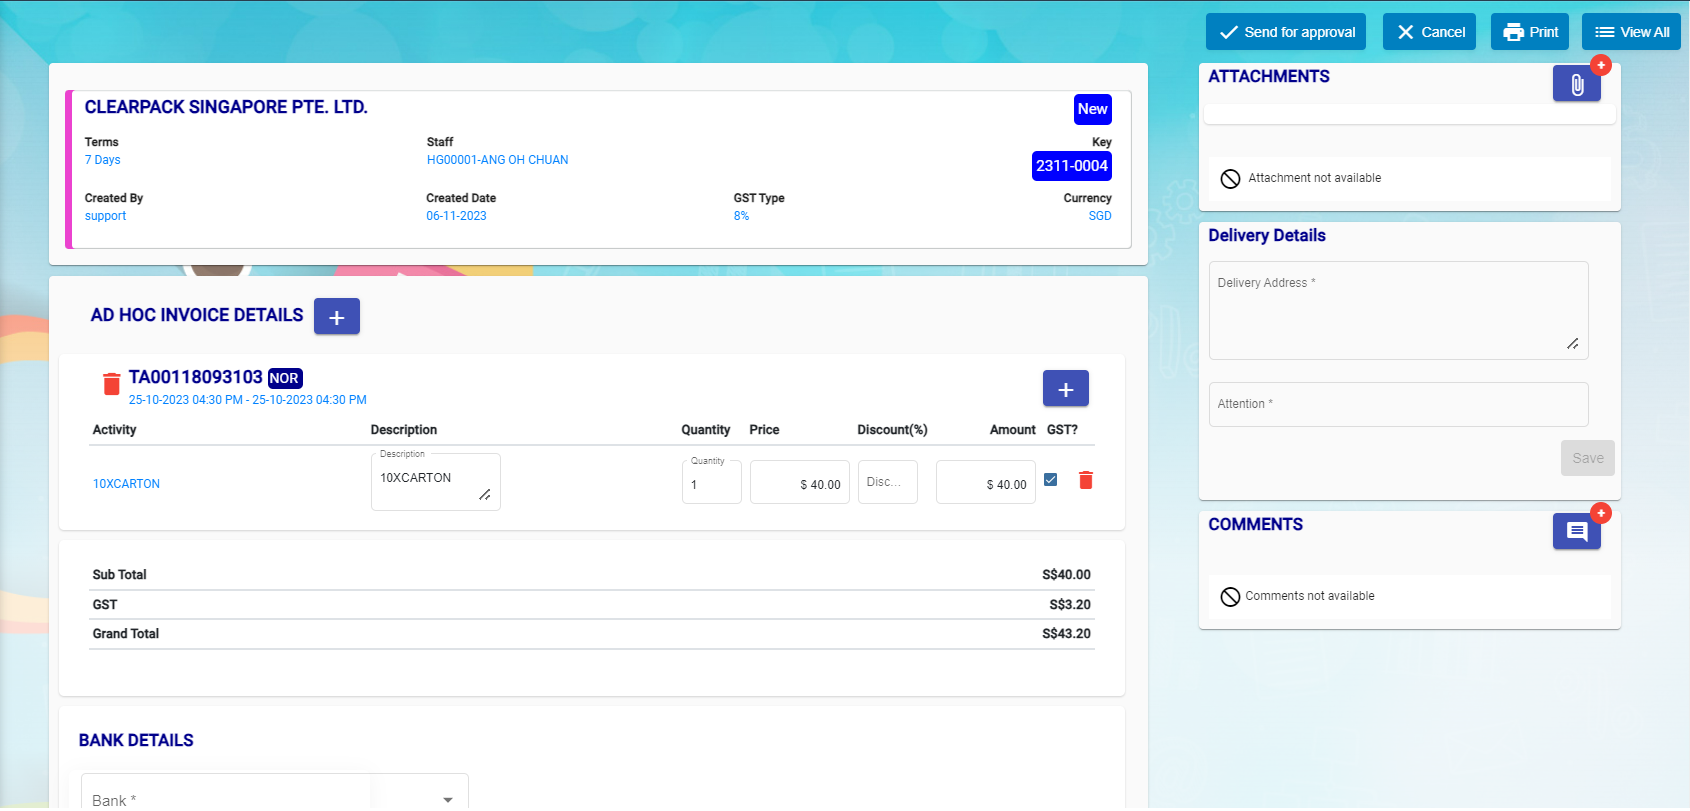](http://wiki.cuteinfocomm.com/uploads/images/gallery/2024-03/image-1710164190061.png)
- New task can be added along with the previous task.
- Click add button beside to Ad-Hoc Invoice details.
- New window open to choose the task numbers.
- Click add.
[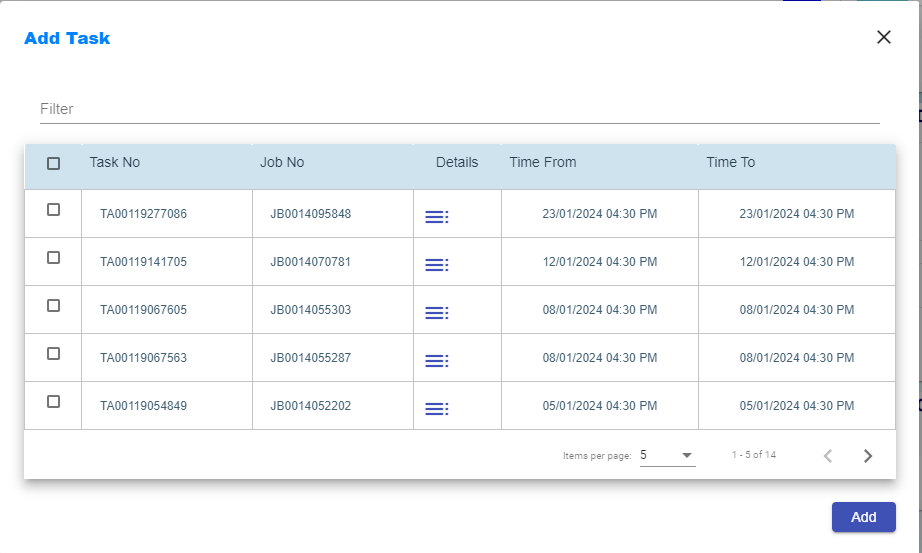](http://wiki.cuteinfocomm.com/uploads/images/gallery/2024-03/image-1710164919046.png)
- Choose Bank details and Save it.
- Click send for approval button available on the top right corner.
- Assignee and Notify window open to choose the approver and notify users.
- Click confirm.
- Approver will receive email notification to approve the invoice before sending the invoice to the customer.
- Dashboard contains waiting for approval for the approver to choose it.
- Click Approve button at the top right corner.
- Assignee and Notify window open to intimate the user proceed to send the invoice to the customer.
- Approved Invoice report available to send to the customer. Click Print and email as attachment to customer.
- Click send to customer button.
- New window open to intimate Assignee and Notify Users.
- Click confirm button.
- Invoice status change to waiting for payment.
- Click Paid button after payment received from the customer.
- Eventually Assignee and Notify window open to intimate the users and confirm it.
#### 2.3 Rate Card
Rate card submenu available under Billing System. Entire customers' rate cards are managed under the Rate Card list.
[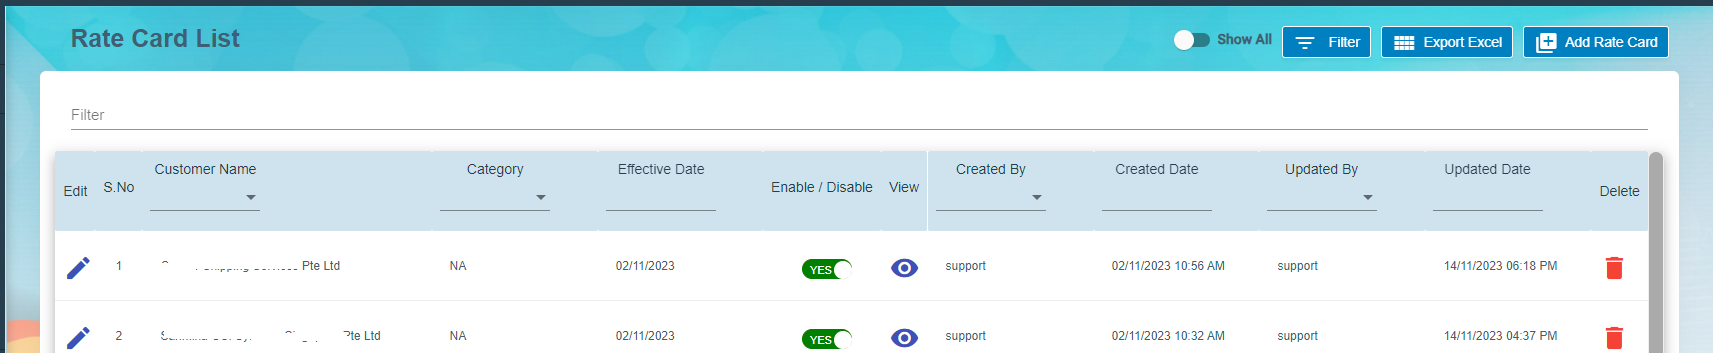](http://wiki.cuteinfocomm.com/uploads/images/gallery/2024-03/image-1710166308604.png)
1. Click rate card to add all the activities details against the customer.
2. Click Save to save the rate card details.
[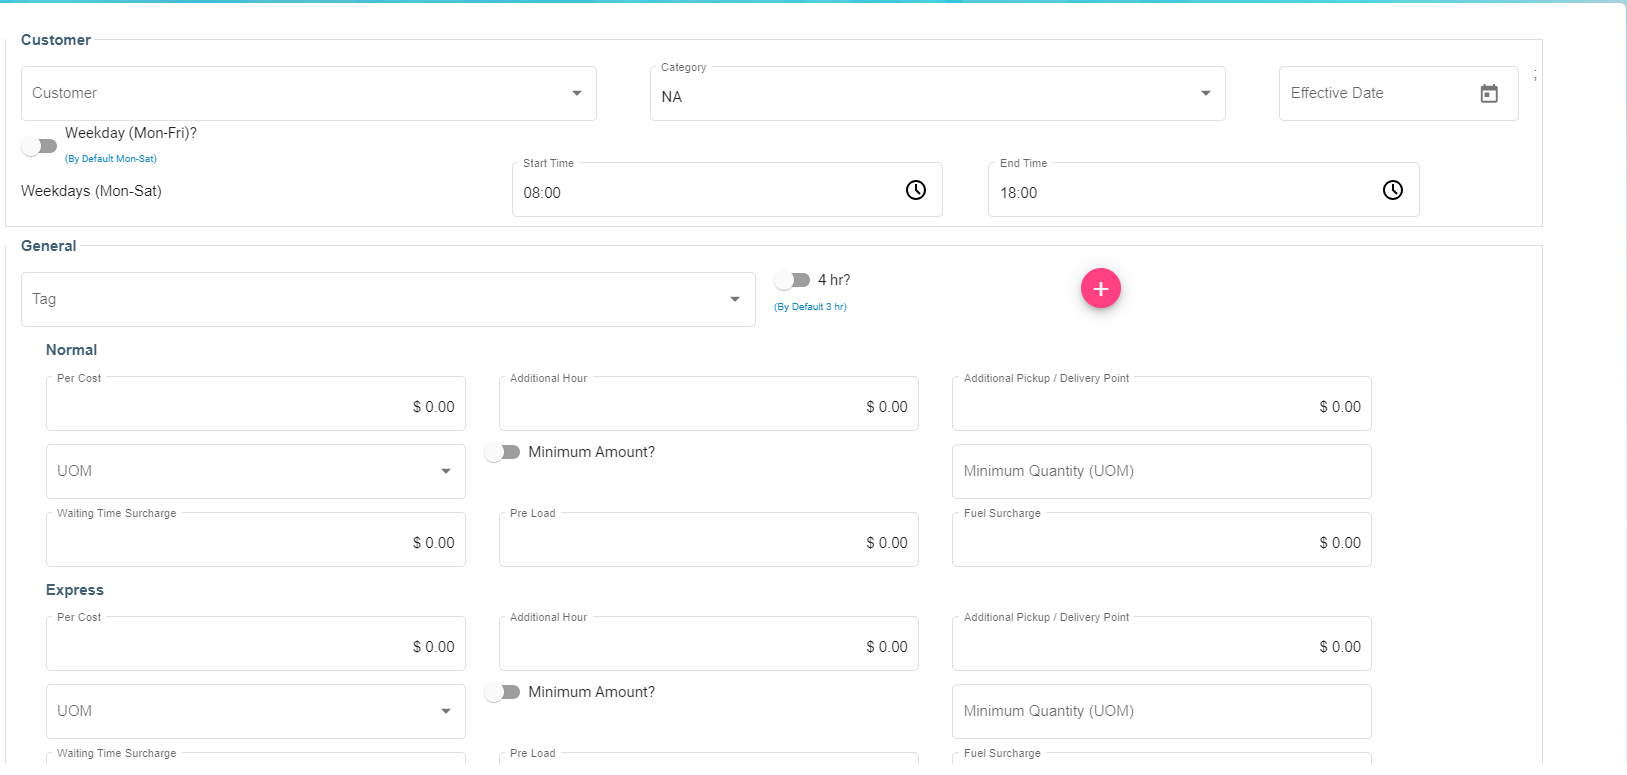](http://wiki.cuteinfocomm.com/uploads/images/gallery/2024-03/image-1710166448197.png)
# Work Completion
# Admin
# Admin
The settings tab in the Admin submenu allows system admin user to create user accounts and assign proper permissions to each user account. The purpose of admin settings is to ensure the correct access to different functions in the cuteOffice system. The Admin menu contains below submenus:
- **Users**-system admin user can create user account, assign role, and link user account to admin company.
- **Roles**-system admin user can create roles, and define access right of each role based on organization structure/operation management.
- **Permissions**-permissions are managed by cuteOffice team, permissions are linked to different modules in the system.
- **Permission Matrix**-System admin user can check and export user-permission matrix by department in this tab.
- **Role Matrix**-System admin user can check and export user-role matrix in this tab.
- **Options-**option data manages all predefined value of categorical variable such as employee type, working mode etc.
- **Company-**System admin user need to add companies details.
- **Public Holiday-**System admin user can add public holiday dates.
- **Notification Logs-**System admin user can view all notifications processed by system (email, SMS, App)
- **Audit Log-**System admin user can audit all activities in system.
## Users
In Admin user tab, system admin user shall create user accounts for people who need access to cuteOffice system. When create user account, system admin role user shall assign correct roles and proper access to company and department. Click Users tab, the users page opens as below,
[](http://wiki.cuteinfocomm.com/uploads/images/gallery/2023-02/image-1675405267155.png)
### Create User Account
To create user account, click [](http://wiki.cuteinfocomm.com/uploads/images/gallery/2023-02/image-1675405296762.png) (add icon) in the top right corner of the users page, the add new user window opens,[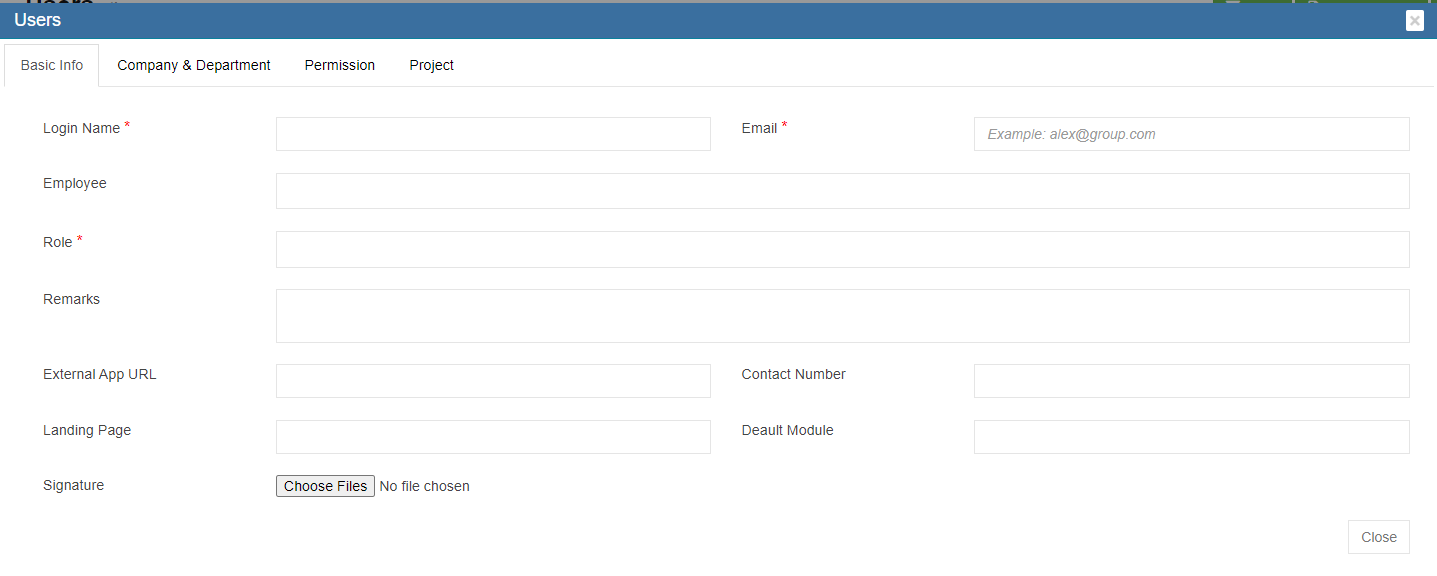](http://wiki.cuteinfocomm.com/uploads/images/gallery/2023-02/image-1675405380904.png)
**Basic Info Tab**
1. In **Login Name** box, enter the user account login name.
2. In **Email** box, enter user email address. All system emails/notifications to the new user will be sent to this email address, e.g. password info.
3. In **Employee** box, click the box and select employee name/ID of the user account so that new user login name is linked to his/her name/employee ID.
4. In **Role** box, click and select role(s) for the user account based on user's activities in system. E.g. if create user account for purchasing, system admin shall select "purchaser" role.
5. In **Remarks**, enter remarks if any.
6. In **Contact Number** box, enter contact number of the new user.
7. **External App URL** box, Landing Page box, Default Module box can be configured to customize user login landing page.
8. If user wants to add digital signature to the system, click[](http://wiki.cuteinfocomm.com/uploads/images/gallery/2023-02/image-1675406458470.png) and upload digital signature.
**Company &Department Tab**
1. Click Company &Department Tab to assign company and department access to new user. [](http://wiki.cuteinfocomm.com/uploads/images/gallery/2023-02/image-1676098861696.png)
2. Click [](http://wiki.cuteinfocomm.com/uploads/images/gallery/2023-02/image-1675407070791.png)to expand company departments.
3. In the second empty column, click to tick company and department access. [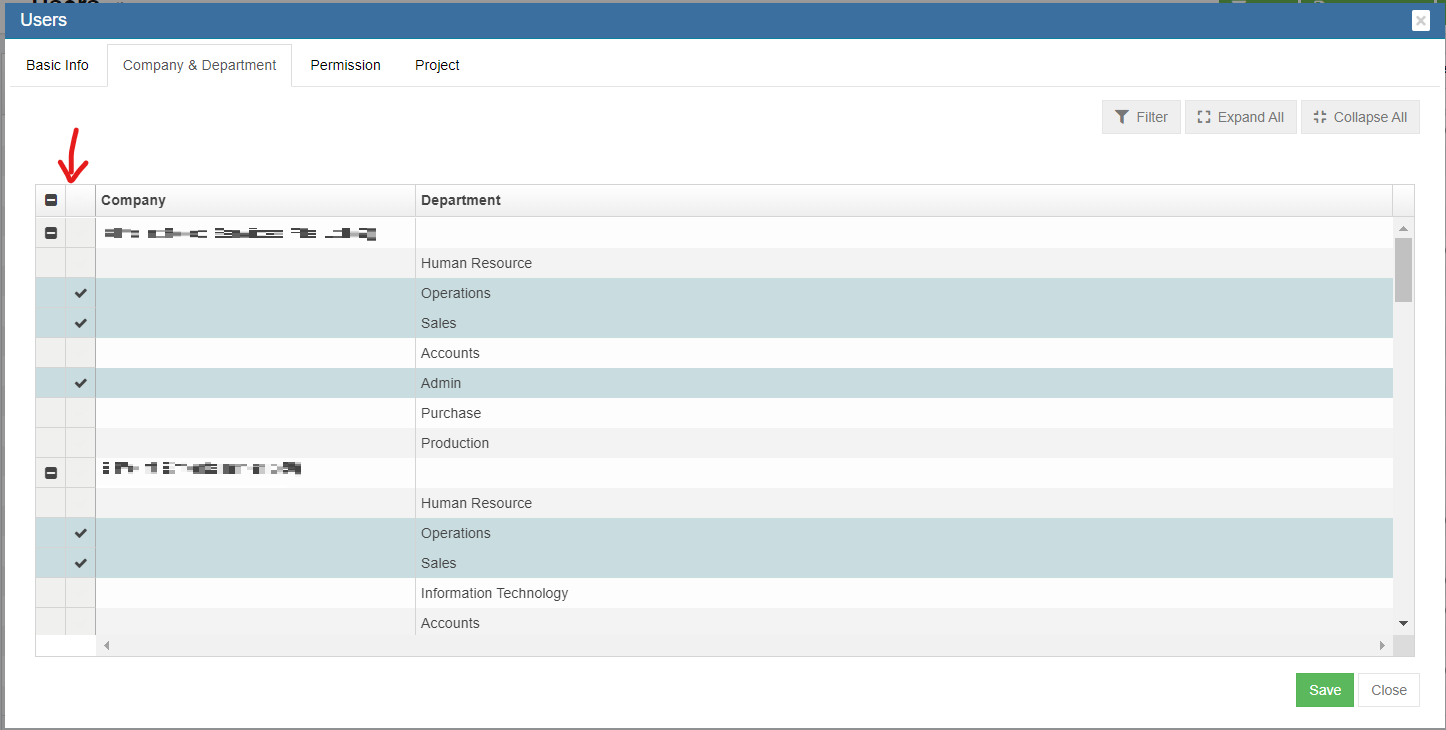](http://wiki.cuteinfocomm.com/uploads/images/gallery/2023-02/image-1676098952405.png)
4. Click Save to save company and department access.
**Permission Tab**
When select roles for new user account in basic info tab, the permissions associated with the roles being selected will be automatically given in the permission. If additional permission is required, system admin user can assign read/write permission. To assign additional permission, system admin user should check with Cutech support team for the permission name, and do the following steps,
[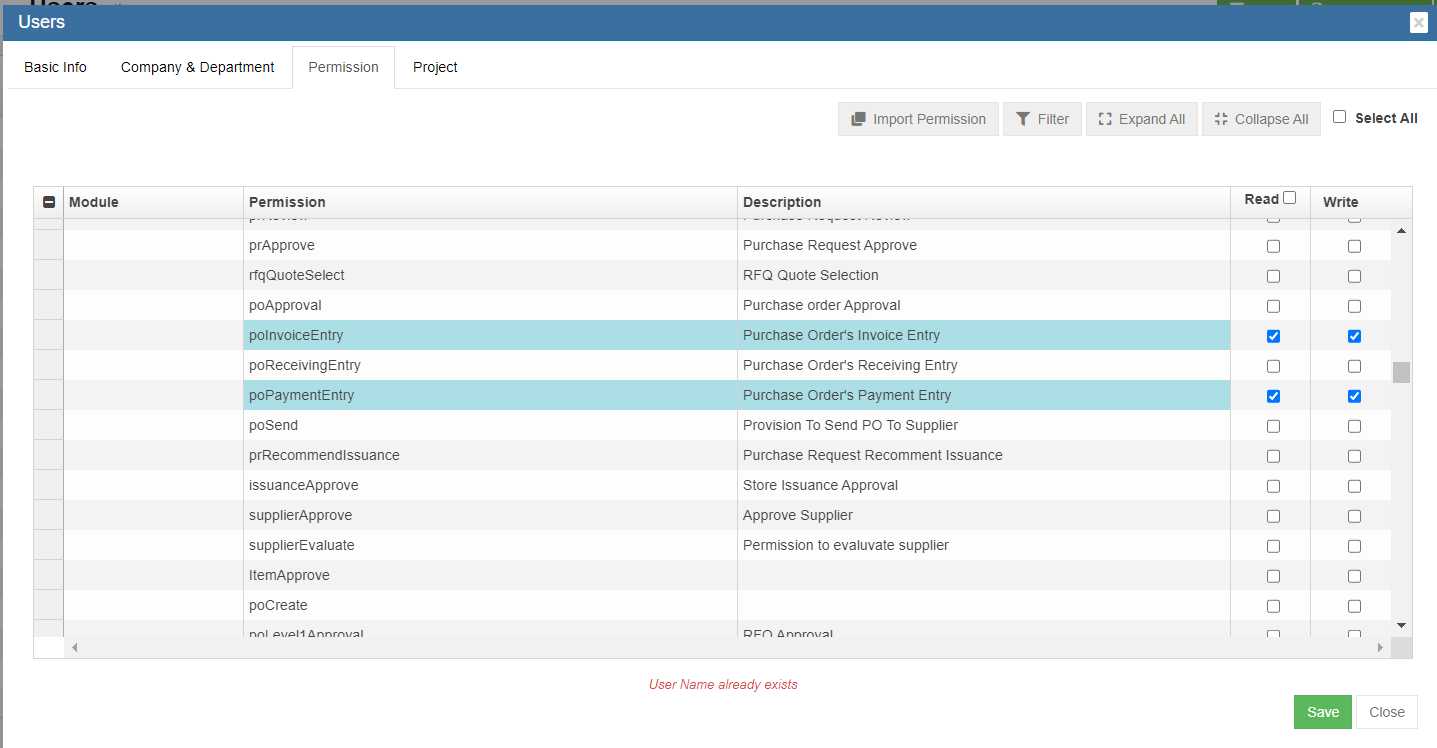](http://wiki.cuteinfocomm.com/uploads/images/gallery/2023-02/image-1675407406695.png)
1. System admin user can use filter to search and find the permission name.
2. In the Read/Write column, click to tick permission. Read means user can only view the data in the corresponding module/function; write means user can enter/edit data.
3. Click Save to save permission access.
**Project Tab**
[](http://wiki.cuteinfocomm.com/uploads/images/gallery/2023-02/image-1675408342722.png)
### Edit User Account
System admin user can edit all user account detail except user login name.
[](http://wiki.cuteinfocomm.com/uploads/images/gallery/2023-02/image-1675408567298.png)
1. Click the[(](http://wiki.cuteinfocomm.com/uploads/images/gallery/2023-02/image-1675408585326.png)edit icon) of the user account name to be edited, the user detail window will open, [](http://wiki.cuteinfocomm.com/uploads/images/gallery/2023-02/image-1675408685504.png)
2. Edit details as needed.
3. Click Save to save edits.
### Lock/Unlock User Account
To temporarily revoke user account access to system, system admin user can lock a particular user account. Or if an user account is locked due to e.g. multiple attempts of wrong passwords, system admin can unlock user account. In users page, if the lock icon in lock status is red, it means user account is locked; if the lock icon is blue, it means user account is normal.
[](http://wiki.cuteinfocomm.com/uploads/images/gallery/2023-02/image-1675409045683.png)
To lock/unlock user account,
1. Click the lock icon, system will prompt a confirmation notification for lock/unlock. [](http://wiki.cuteinfocomm.com/uploads/images/gallery/2023-02/image-1675409210042.png)
2. Click **Yes** to confirm lock/unlock an user account.
### Reset Password
System admin user can reset password for user account when required. To reset password,
1. click the reset icon in the Reset Password column.[](http://wiki.cuteinfocomm.com/uploads/images/gallery/2023-02/image-1675409480217.png)
2. System will prompt a confirmation notification as below[](http://wiki.cuteinfocomm.com/uploads/images/gallery/2023-02/image-1675409621707.png),
3. Click **Yes** to confirm reset password. System will send a new password to the user account's email address.
### Delete User Account
System admin user can delete user account when required. Click [](http://wiki.cuteinfocomm.com/uploads/images/gallery/2023-02/image-1675409772727.png) delete icon in the delete column, system will prompt confirmation notification. Click Yes to confirm deletion of an user account.
[](http://wiki.cuteinfocomm.com/uploads/images/gallery/2023-02/image-1675409836009.png)
### Export User Accounts List
System admin user can also export user account list to PDF or CSV format by using the[(](http://wiki.cuteinfocomm.com/uploads/images/gallery/2023-02/image-1675567819676.png)export icons) on the top right corner in the page.
## Roles
Roles are defined by a set of permissions to different functionalities in cuteOffice system. Based on company operation needs or organization structure, system admin user can create roles, and define read/write access of required permissions. Click Roles tab, all existing roles created in system will be displayed as below.
[](http://wiki.cuteinfocomm.com/uploads/images/gallery/2023-02/image-1675410080712.png)
### Add a New Role
To add a new role,
1. Click [](http://wiki.cuteinfocomm.com/uploads/images/gallery/2023-02/image-1675458981860.png)(add icon), the adding new role window open as below, [](http://wiki.cuteinfocomm.com/uploads/images/gallery/2023-02/image-1675459129692.png)
2. In **Name** box, enter the new role name.
3. In **Description** box, enter description of the new role.
4. Based on the function of the new role, search for relevant module and permissions.
5. In the **Read/Write** columns, click to tick read/write permissions.
6. Click **Save** to save the new role
### Edit Role
System admin user can edit the permissions access of the role.
[](http://wiki.cuteinfocomm.com/uploads/images/gallery/2023-02/image-1675459657917.png)
1. Click the[(](http://wiki.cuteinfocomm.com/uploads/images/gallery/2023-02/image-1675408585326.png)edit icon) of role to be edited, the role detail page will open,
2. Edit details as needed.
3. Click Save to save edits.
### Delete Role
System admin user can delete role when required. Click [](http://wiki.cuteinfocomm.com/uploads/images/gallery/2023-02/image-1675409772727.png) delete icon in the delete column, system will prompt confirmation notification. Click **Yes** to confirm deletion of a role.
### Export Roles List
System admin user can also export roles list to PDF or CSV format by using the[(](http://wiki.cuteinfocomm.com/uploads/images/gallery/2023-02/image-1675567819676.png)export icons) on the top right corner in the page.
## Permissions
Permissions are grouped by modules in the system. Click permissions tab, the permission list page opens as below screenshot. The permission name and function are development and managed by Cutech team.
[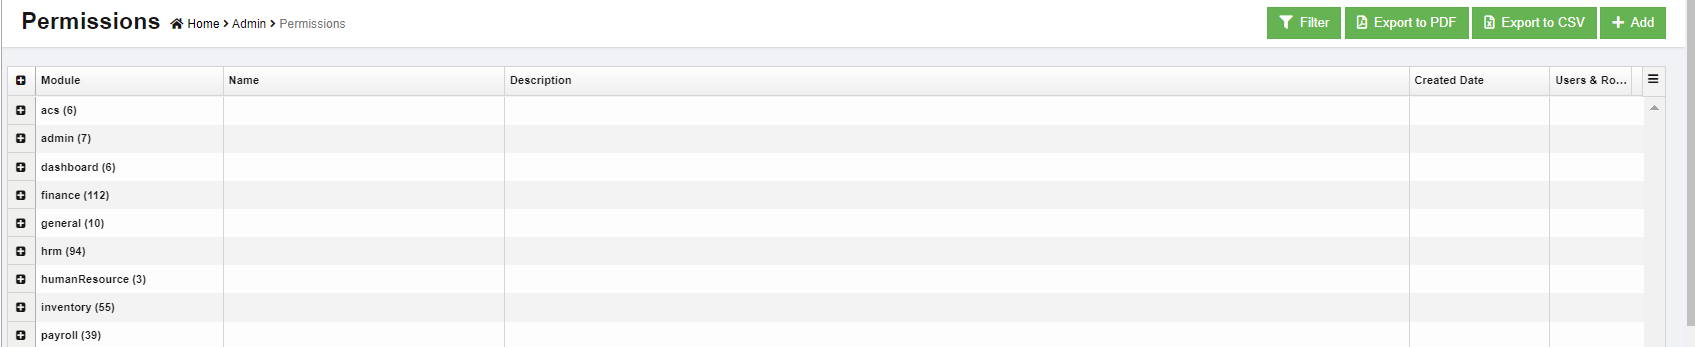](http://wiki.cuteinfocomm.com/uploads/images/gallery/2023-02/image-1675494207783.png)
### View Permissions
To view permissions, system admin user can click[](http://wiki.cuteinfocomm.com/uploads/images/gallery/2023-02/image-1675495324900.png) (filter icon), the filters will show as below yellow highlight area. User can use filters to search and view a particular permission.
[](http://wiki.cuteinfocomm.com/uploads/images/gallery/2023-02/image-1675495274494.png)
### Add Permission
To add a new permission,
1. Click [](http://wiki.cuteinfocomm.com/uploads/images/gallery/2023-02/image-1675458981860.png)(add icon), the adding new permission window open as below,[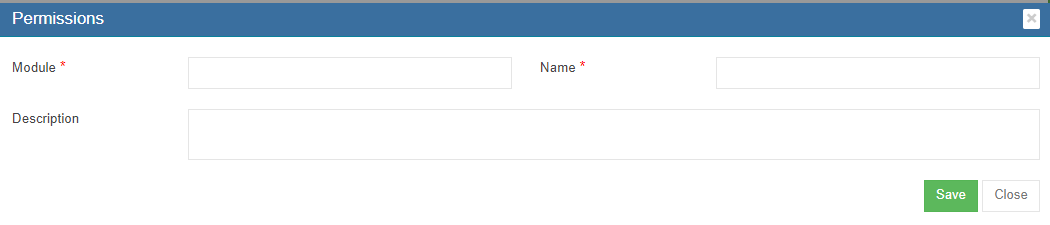](http://wiki.cuteinfocomm.com/uploads/images/gallery/2023-02/image-1675494509333.png)
2. In **Module** box, enter module name.
3. In **Name** box, enter permission name.
4. In **Description** box, enter description of the permission and the functionality of it.
5. Click **Save** to save permission.
### Export Permissions List
System admin user can also export permissions list to PDF or CSV format by using the[(](http://wiki.cuteinfocomm.com/uploads/images/gallery/2023-02/image-1675567819676.png)export icons) on the top right corner in the page.
## Permission Matrix
System admin user can export user-permission matrix to check all users' permissions granted to the cuteOffice system.
1. Click Permission Matrix tab, below page opens.[](http://wiki.cuteinfocomm.com/uploads/images/gallery/2023-02/image-1675495880670.png)
2. In the company and department filters, select company and department.
3. Click [](http://wiki.cuteinfocomm.com/uploads/images/gallery/2023-02/image-1675496454297.png) to export to CSV format. [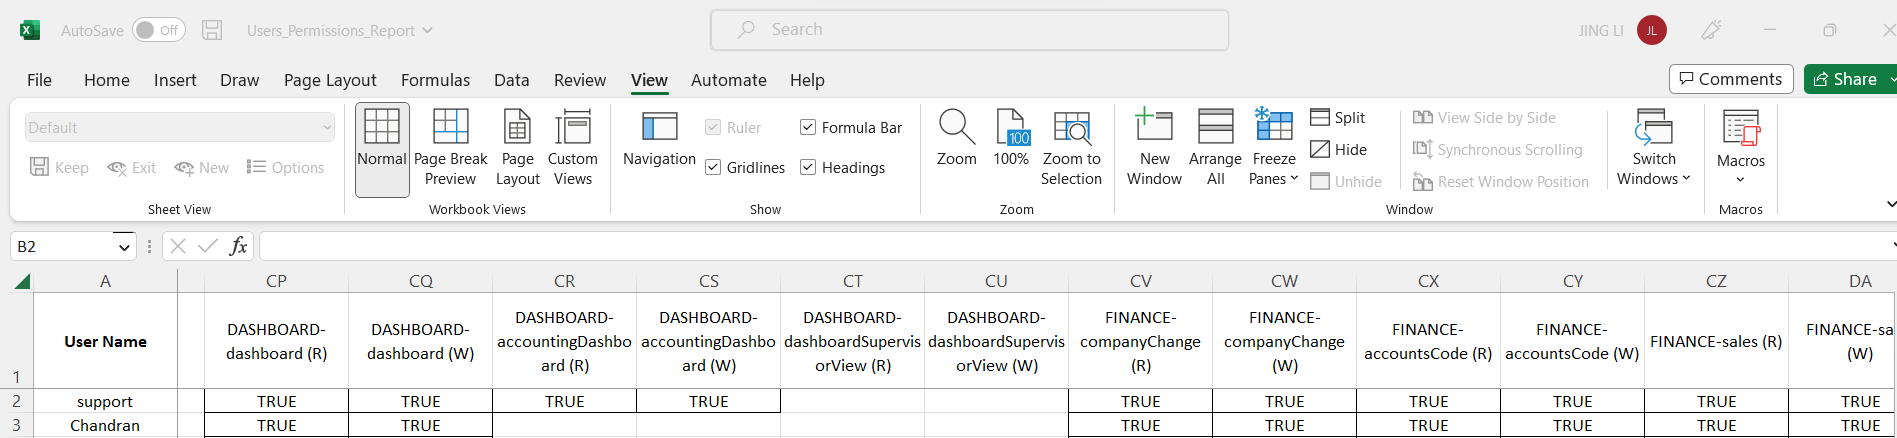](http://wiki.cuteinfocomm.com/uploads/images/gallery/2023-02/image-1675567300339.png)
## Role Matrix
System admin user can check and export user-role matrix in this tab.
1. Click Role Matrix tab, below page opens.[](http://wiki.cuteinfocomm.com/uploads/images/gallery/2023-02/image-1675567209360.png)
2. Click [](http://wiki.cuteinfocomm.com/uploads/images/gallery/2023-02/image-1675496454297.png) to export to CSV format. [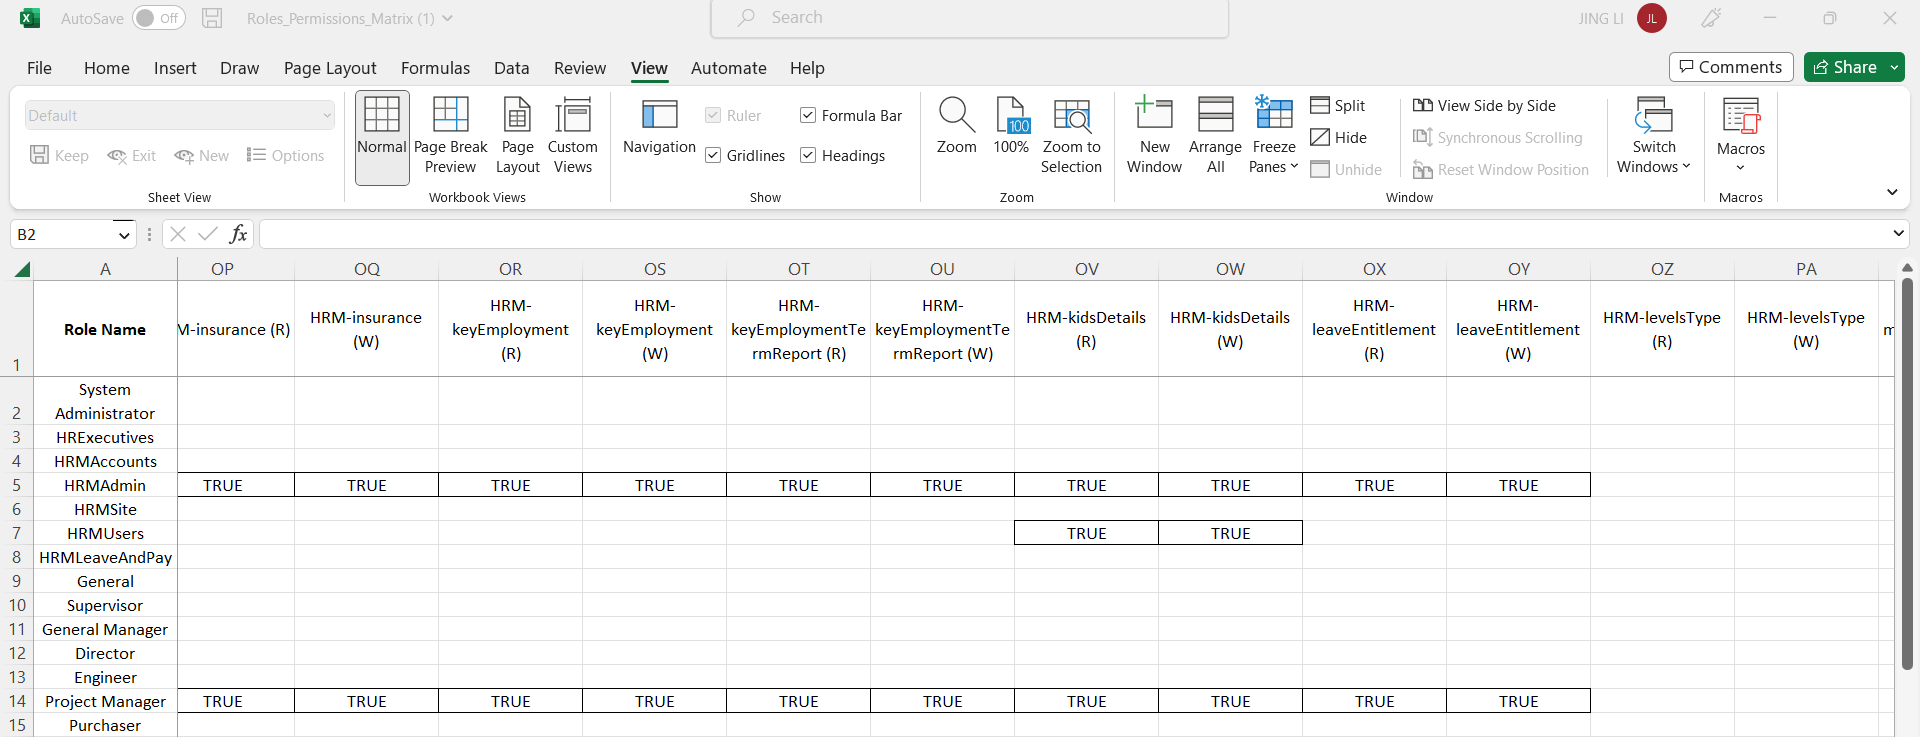](http://wiki.cuteinfocomm.com/uploads/images/gallery/2023-02/image-1675567552961.png)
## Option
Option data manages all predefined value of categorical variable such as employee type, working mode, public holiday groups etc. Click Option tab, the option page opens as below,
[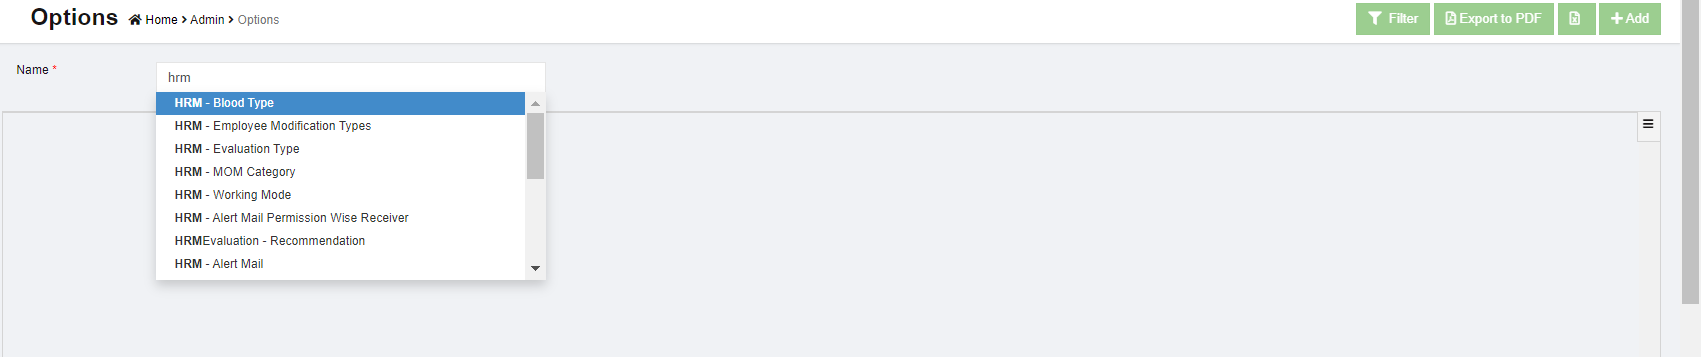](http://wiki.cuteinfocomm.com/uploads/images/gallery/2023-02/image-1675570396118.png)
1. To view option value, in Name box, click to select option name, the select option details will show as below. E.g. select working mode, [](http://wiki.cuteinfocomm.com/uploads/images/gallery/2023-02/image-1675570669808.png)
2. To add more value to option, click [](http://wiki.cuteinfocomm.com/uploads/images/gallery/2023-02/image-1675458981860.png) (add icon) on the top right corner, the add option value window opens as below, [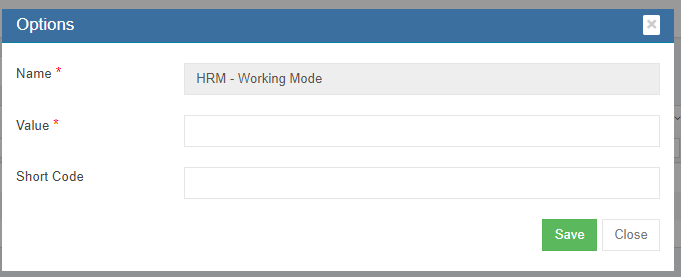](http://wiki.cuteinfocomm.com/uploads/images/gallery/2023-02/image-1675570970086.png)
3. In **Value** box, enter new option value, e.g if we need to add "Contract" as a new working mode, we can enter "Contract" in the Value box. [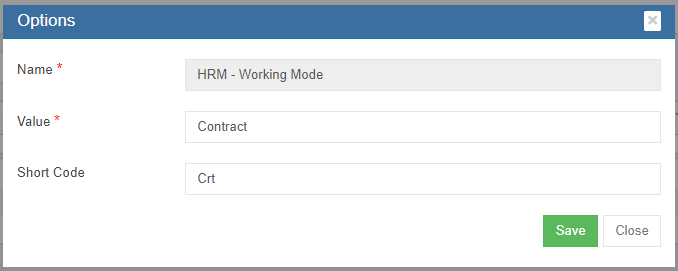](http://wiki.cuteinfocomm.com/uploads/images/gallery/2023-02/image-1675571048770.png)
4. In **Short Code** box, enter short code of the new option value if any.
5. Click **Save**. The new option value will be added and saved in option details, and will be synchronized to relevant modules in the system automatically.
## Company
System admin user can add details of the company and its affiliated companies. Click company tab, the list of admin companies will be displayed as below in company list page,
[](http://wiki.cuteinfocomm.com/uploads/images/gallery/2023-02/image-1676099129416.png)
## Add Admin Company
To add a new admin company, click [](http://wiki.cuteinfocomm.com/uploads/images/gallery/2023-02/image-1675405296762.png) (add icon) in the top right corner of the admin company page, the add new company window opens,
[](http://wiki.cuteinfocomm.com/uploads/images/gallery/2023-02/image-1675797659997.png)
**Company Tab**
1. In Name box, enter company name.
2. In Abbreviation box, enter company name abbreviation.
3. In ROC No box, enter the company registration number.
4. In CPF No box, enter company CPF payment code.
5. In CSN No box, enter CSN number. CPF Submission Number (CSN) is **a unique identifier used by employers to transact with CPF Board**.
6. In Website box, enter company website link.
7. In Email box, enter company email address.
8. In Contact Number box, select correct IDD and enter company contact number. If system admin user wants to add multiple contact number, click [](http://wiki.cuteinfocomm.com/uploads/images/gallery/2023-02/image-1675798511548.png) (add icon) in the end of contact number line. A new line of contact number will be shown as below. Click [](http://wiki.cuteinfocomm.com/uploads/images/gallery/2023-02/image-1675799165250.png) (delete icon) to remove contact details. [](http://wiki.cuteinfocomm.com/uploads/images/gallery/2023-02/image-1675798861700.png)
9. In Fax Number, enter company fax number.
10. In Address 1 box, enter company address name and address details. Address name e.g., main office, warehouse. If system admin user wants to add multiple addresses, click [](http://wiki.cuteinfocomm.com/uploads/images/gallery/2023-02/image-1675798511548.png) (add icon) in the end of address line. A new line of address will be shown as below. Click [](http://wiki.cuteinfocomm.com/uploads/images/gallery/2023-02/image-1675799165250.png) (delete icon) to remove address.[](http://wiki.cuteinfocomm.com/uploads/images/gallery/2023-02/image-1675800387502.png)
11. In Remarks box, enter remarks if any.
12. Click Next to save company details and open department tab.
**Department Tab**
System admin user can set up departments of the company by selecting from available departments in the system, or creating new departments if can not find in available departments list.
1. Click the Available Departments tab, the available departments list will open as below, [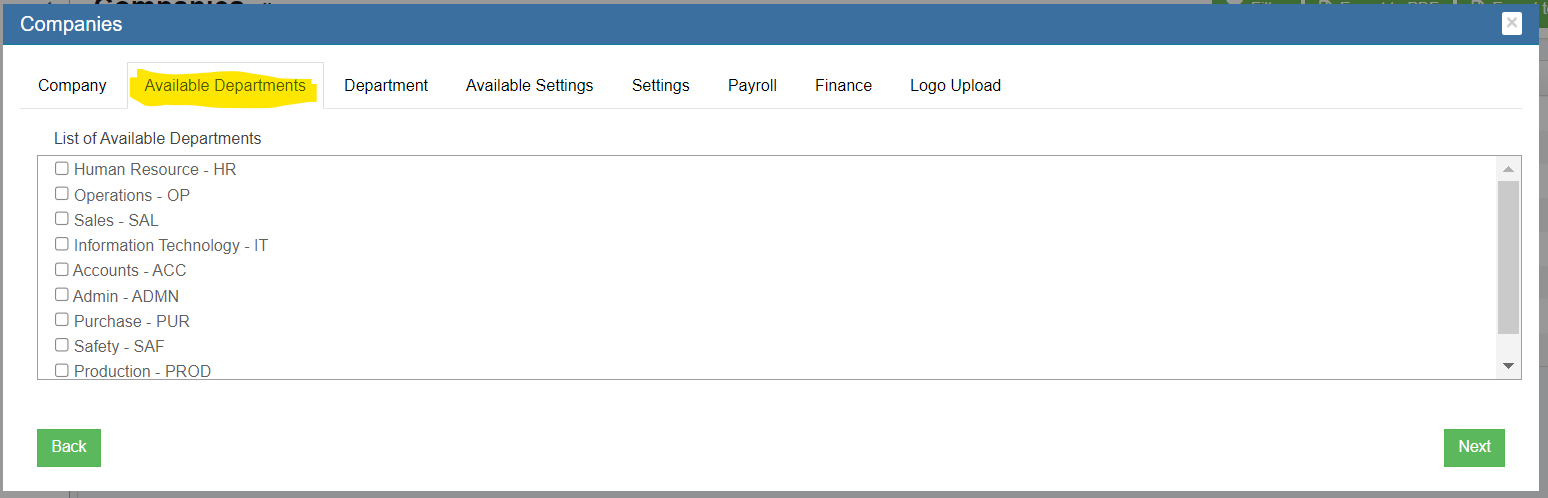](http://wiki.cuteinfocomm.com/uploads/images/gallery/2023-02/image-1675800637969.png)
2. Click the tick boxes in front of the departments to add departments to the admin company. [](http://wiki.cuteinfocomm.com/uploads/images/gallery/2023-02/image-1675834927125.png)
3. Click Next to enter Department tab, the selected departments from available departments in previous step will be displayed in Department tab [](http://wiki.cuteinfocomm.com/uploads/images/gallery/2023-02/image-1675834881188.png)
4. click [](http://wiki.cuteinfocomm.com/uploads/images/gallery/2023-02/image-1675798511548.png) (add icon) in the end of departments, a new department creation table will open as below, [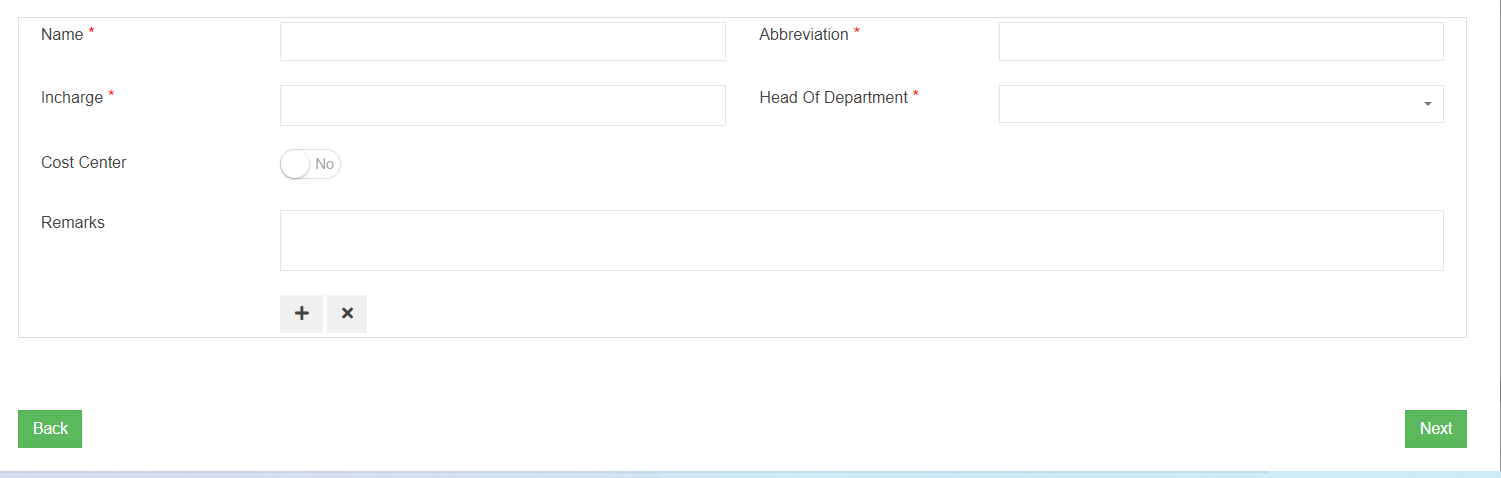](http://wiki.cuteinfocomm.com/uploads/images/gallery/2023-02/image-1675835451127.png)
- In Name box, enter department name.
- In Abbreviation box, enter department abbreviation.
- In Incharge box, click to select user in charge of the department.
- In Head of Department box, click to select user who is the head of department.
- Cost Center flag, if the department needs to be available for for sale inquiry module. E.g. we shall set sales department as cost center.
- In Remarks box, enter remark of the department if any.
5. Click Next to save department details and open settings tab.
**Settings Tab**
In settings tab, system admin user can set up details such as timezone, leave policy, country, system numbering for different modules etc. In the initial implementation of cuteOffice system, cutech team will do the settings. When adding new admin company, system admin user can copy from existing company settings by select company in available setting Click Next to open Payroll tab.
[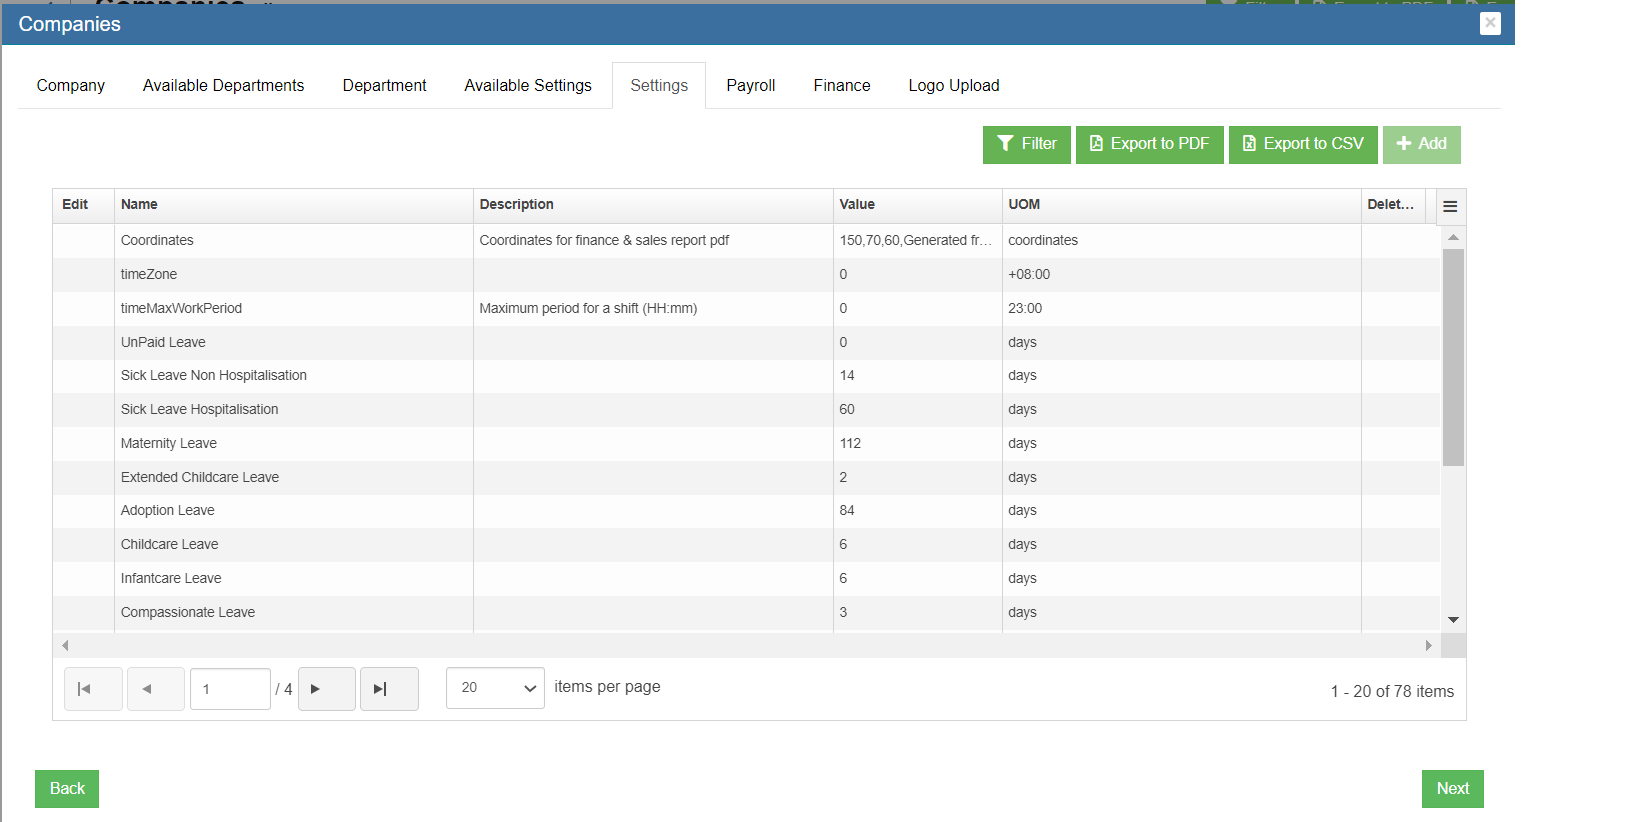](http://wiki.cuteinfocomm.com/uploads/images/gallery/2023-02/image-1675841657944.png)
**Payroll Tab**
In the payroll tab, system admin user can set bank giro code, and tax declaration details.
[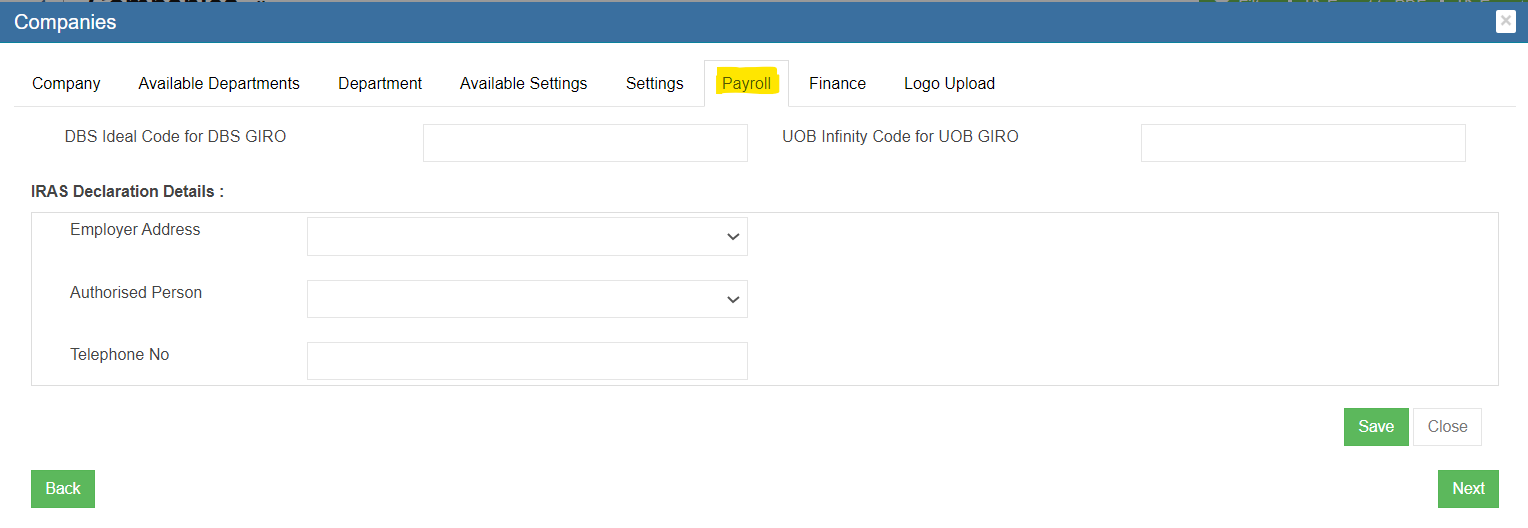](http://wiki.cuteinfocomm.com/uploads/images/gallery/2023-02/image-1675841899858.png)
1. In bank giro code line, if company bank is with DBS, enter DBS Ideal Code for DBS GIRO; if company bank is with UOB, enter UOB Infinity Code fir UOB GIRO;
2. In IRAS Declaration Details,
- In Employer Address, select address from list of company addresses.
- In Authorized Person, select from authorized person.
- In Telephone No, enter telephone number.
3. Click Save to save details.
4. Click Next to enter Finance Tab.
**Finance Tab**
In finance tab, system admin user should set financial year start date, end date, and freeze date to use finance module. The financial year need to be created by the system admin/financial person in charge every year before entering the voucher for the financial year.
[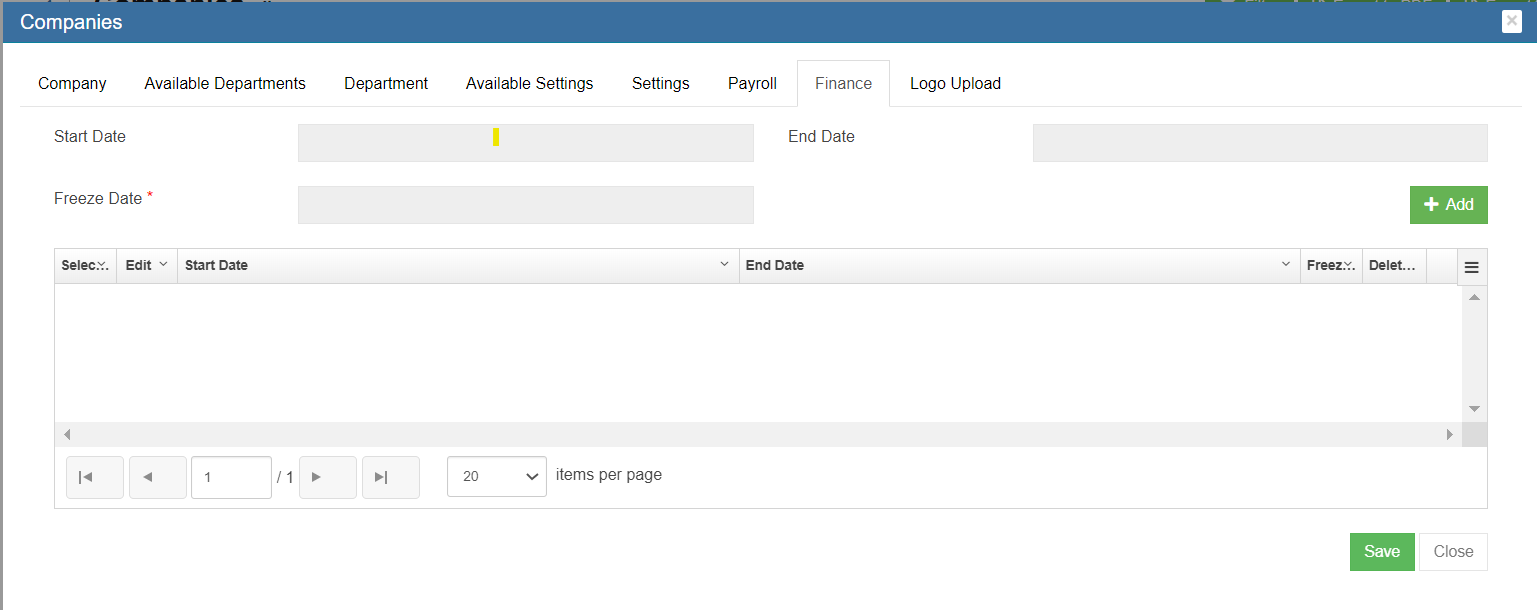](http://wiki.cuteinfocomm.com/uploads/images/gallery/2023-02/image-1675842915409.png)
1. Before a new financial year starts, click [](http://wiki.cuteinfocomm.com/uploads/images/gallery/2023-02/image-1675405296762.png) (add icon) to add new financial year date information, the add new financial year window opens as below, [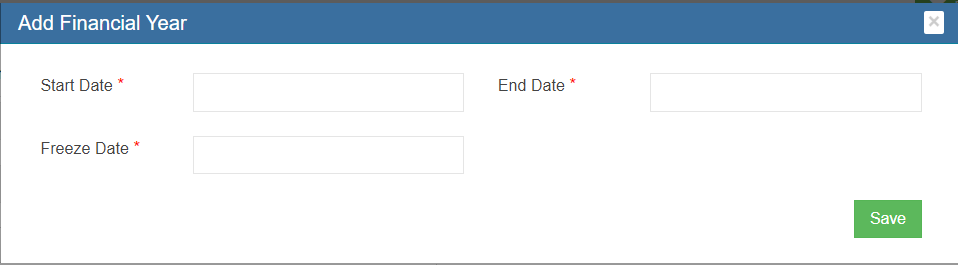](http://wiki.cuteinfocomm.com/uploads/images/gallery/2023-02/image-1675877354639.png)
2. In Start Date box, click to select financial year start date from calendar.
3. In End Date box, click to select financial year end date from calendar.
4. In Freeze Date box, click to select freeze date from calendar, note that freeze date must be earlier than start date.
5. Click Save to save dates. The new financial year dates will be saved in the financial year list table. [](http://wiki.cuteinfocomm.com/uploads/images/gallery/2023-02/image-1675910799931.png)
**Logo Upload Tab**
System admin user can upload company logo in this tab, so that the logo will appear in company profile and other printing formats such as quotations etc.
[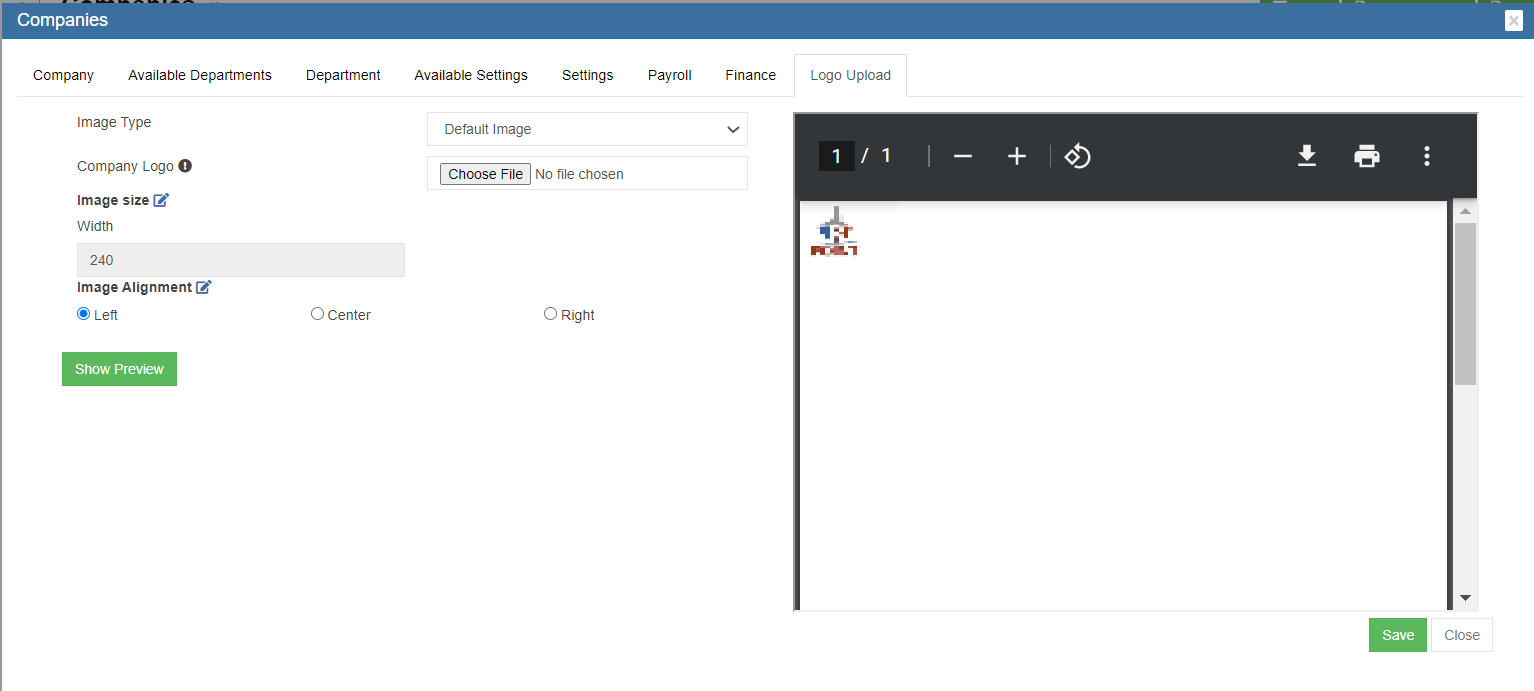](http://wiki.cuteinfocomm.com/uploads/images/gallery/2023-02/image-1676099236623.png)
1. In Image Type box, select from list of image type from Default Image, Image with Letter Pad, Letter Pad.
2. In Company Logo, click [](http://wiki.cuteinfocomm.com/uploads/images/gallery/2023-02/image-1675911393086.png)to choose logo file to upload. The logo image will be displayed in the right side of the page for view.
3. In Width box, enter the width value for the desired look & feel.
4. In Image Alignment, select the alignment.
5. Click Show Preview, to view uploaded logo.
6. Click Save to save all details of company.
### Edit Company
System admin user can edit amin companies' details. Click the[(](http://wiki.cuteinfocomm.com/uploads/images/gallery/2023-02/image-1675408585326.png)edit icon) in front of the company name. The company details will open. Edit the details and click Save to save updates.
### Delete Company
System admin user can delete company when required. Click [](http://wiki.cuteinfocomm.com/uploads/images/gallery/2023-02/image-1675409772727.png) delete icon in the delete column, system will prompt confirmation notification. Click Yes to confirm deletion of a company.
### Export Company List
System admin user can also export company list to PDF or CSV format by using the[(](http://wiki.cuteinfocomm.com/uploads/images/gallery/2023-02/image-1675567819676.png)export icons) on the top right corner in the page.
## Public Holiday
System admin user can set up public holiday dates in Public Holiday menu. System admin user shall update public holiday dates before new calendrer year starts.
[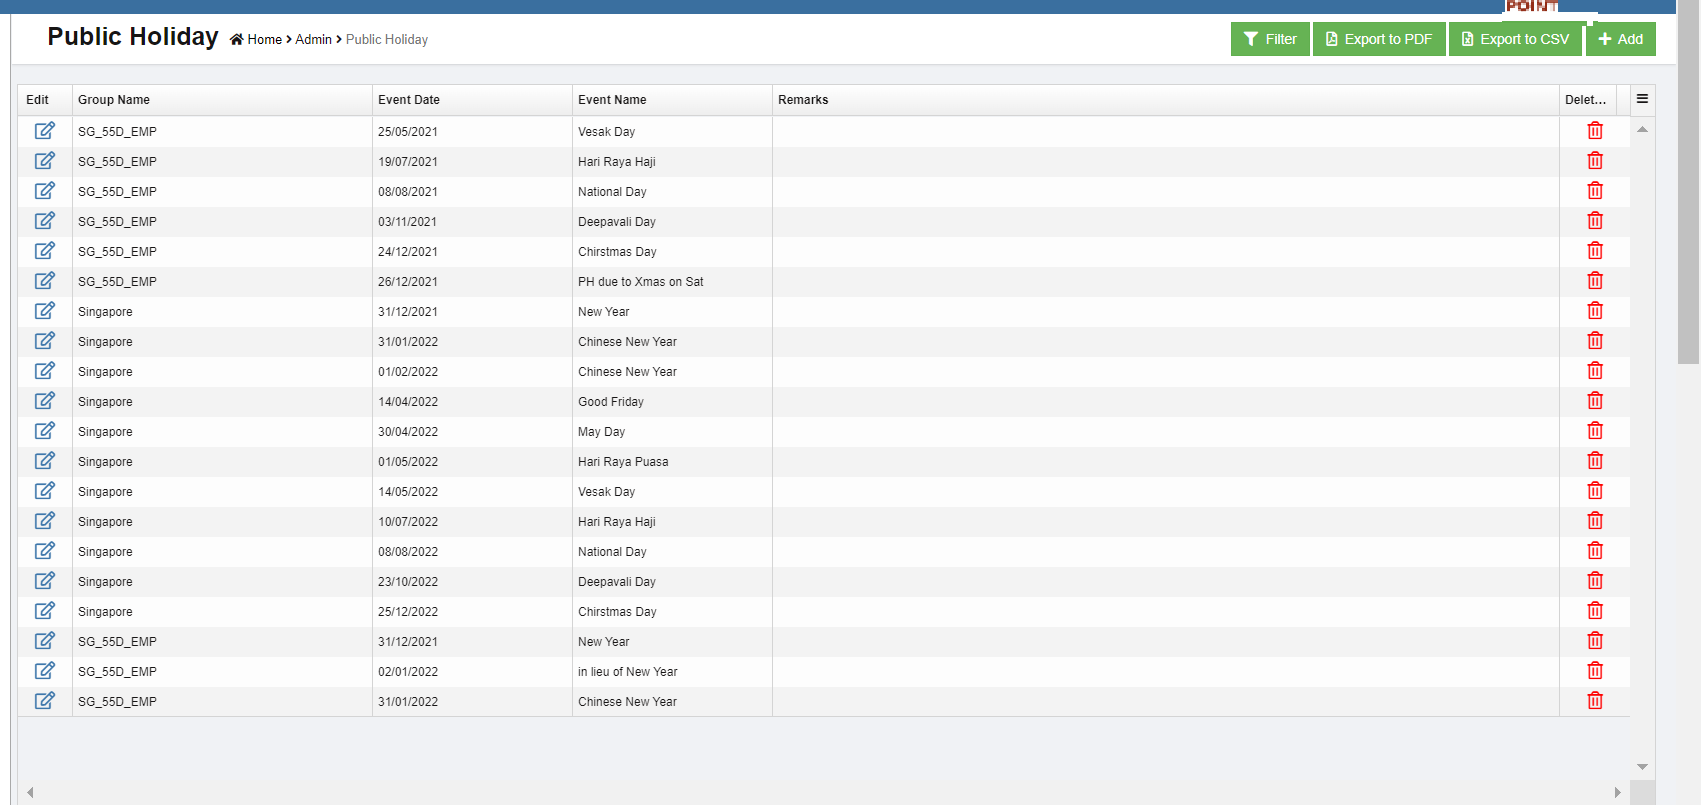](http://wiki.cuteinfocomm.com/uploads/images/gallery/2023-02/image-1676099291514.png)
### Add Public Holiday
To add a new public holiday,
1. click [](http://wiki.cuteinfocomm.com/uploads/images/gallery/2023-02/image-1675405296762.png) (add icon) in the top right corner of the public holiday list page, the new Public Holiday window opens as below,[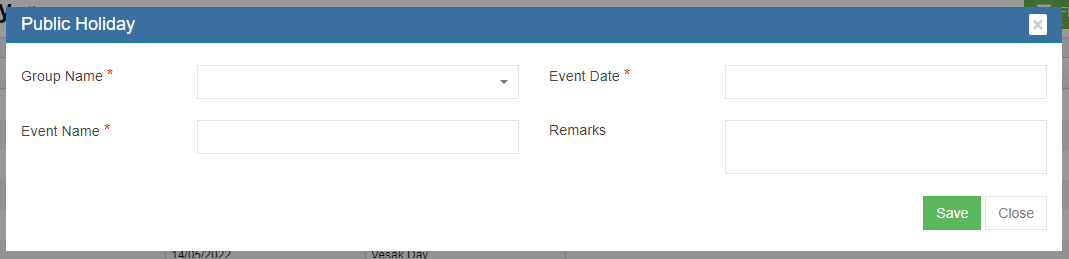](http://wiki.cuteinfocomm.com/uploads/images/gallery/2023-02/image-1676011913861.png)
2. In Group Name, select public holiday group from dropdown list (Note, system admin user can add new group name in Option menu),
3. In Event Date box, click and select date from calendar.
4. In Event Name box, enter the public holiday name,
5. In Remarks, enter remarks if any.
6. Click Save to save public holiday.
### Edit Public Holiday
System admin user can edit public holiday' details except holiday group name. Click the[(](http://wiki.cuteinfocomm.com/uploads/images/gallery/2023-02/image-1675408585326.png)edit icon) in front of the public holiday name. The public holiday details will open. Edit the details and click Save to save updates.
[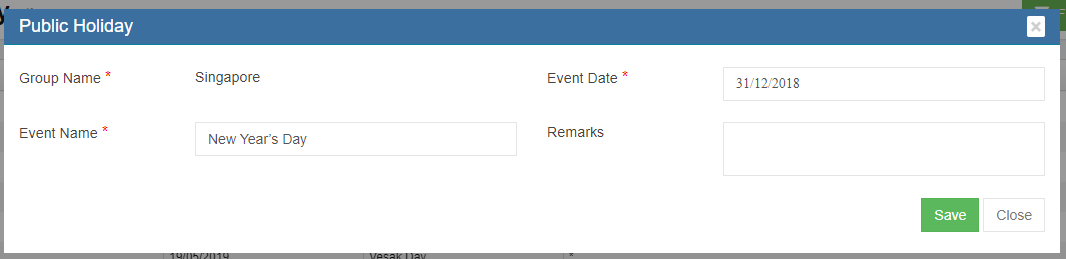](http://wiki.cuteinfocomm.com/uploads/images/gallery/2023-02/image-1676012649512.png)
### Delete Public Holiday
System admin user can delete public holiday when required. Click [](http://wiki.cuteinfocomm.com/uploads/images/gallery/2023-02/image-1675409772727.png) delete icon in the delete column, system will prompt confirmation notification. Click Yes to confirm deletion of a public holiday.
### Export Public Holiday List
System admin user can also export public holiday list to PDF or CSV format by using the[](http://wiki.cuteinfocomm.com/uploads/images/gallery/2023-02/image-1675567819676.png)(export icons) on the top right corner in the page.
## Notification Logs
Notification logs manages all notification messages (emails, SMS, App) that are processed by cuteOffice system. Click Notification Logs tab, it opens as below,
[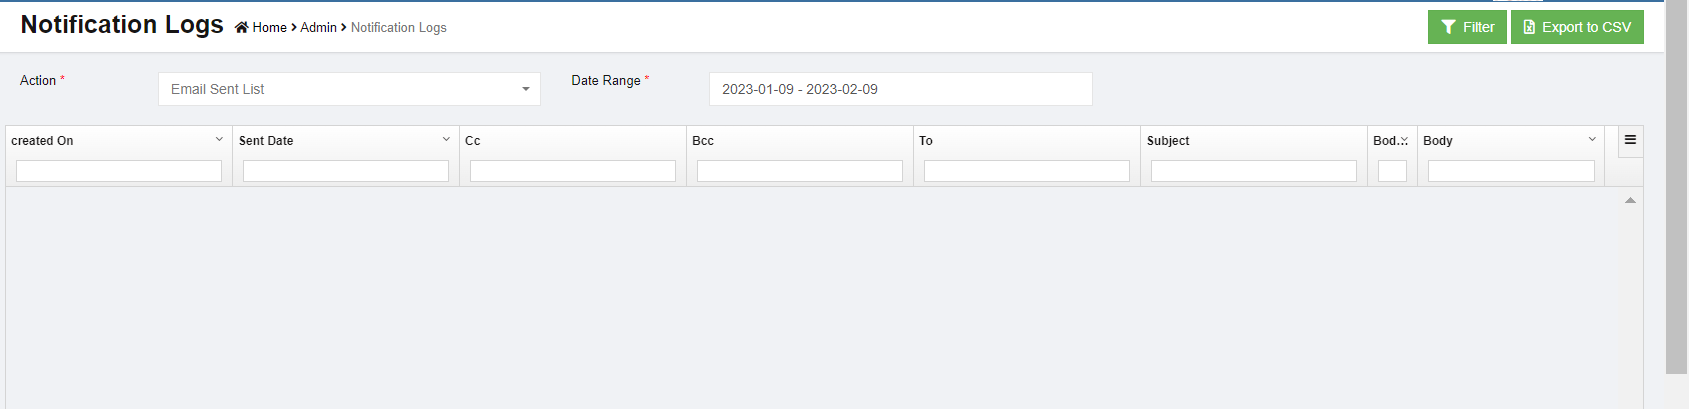](http://wiki.cuteinfocomm.com/uploads/images/gallery/2023-02/image-1676012910539.png)
### View Notification Logs
System admin user can view notification logs using search option or filter.
1. In Action box, select action item from dropdown list, [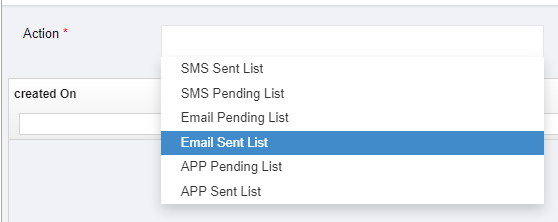](http://wiki.cuteinfocomm.com/uploads/images/gallery/2023-02/image-1676013301499.png)
2. In Date Range box, select date range to view all notification logs in selected period.
3. Or user can click [](http://wiki.cuteinfocomm.com/uploads/images/gallery/2023-02/image-1676013884330.png) (filter icon) in the top right corner and enter key words in the column filter to search for a particular message.
### Export Notification Logs List
System admin user can also export notifications list to CSV format by using the [ (](http://wiki.cuteinfocomm.com/uploads/images/gallery/2023-02/image-1676014165620.png)export icons) on the top right corner in the page.
## Audit Logs
Audit logging is the process of **documenting activity within the cuteOffice systems used across your organization**. Audit logs record the occurrence of an event, the time at which it occurred, the responsible user or service, and the impacted entity in each module by page. Click Audit log, it opens as below,
[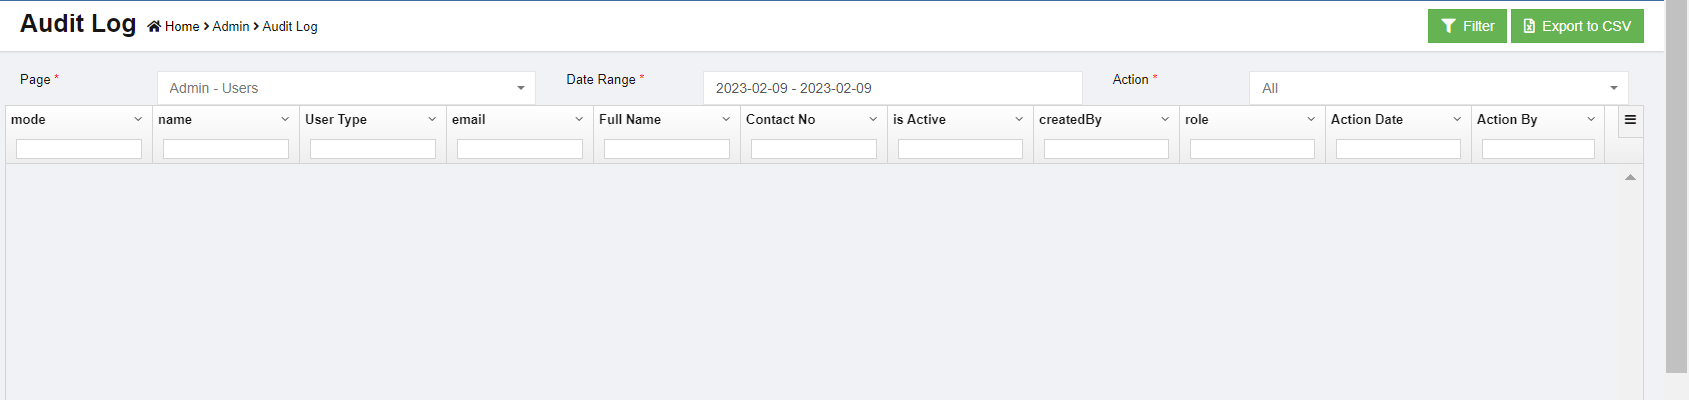](http://wiki.cuteinfocomm.com/uploads/images/gallery/2023-02/image-1676013544934.png)
### View Audit Logs
System admin user can view audit logs using search option or filter.
1. In Page box, select the page of which system admin user wants to audit, [](http://wiki.cuteinfocomm.com/uploads/images/gallery/2023-02/image-1676013646401.png)
2. In Date Range box, select date range.
3. In Action box, select action item from dropdown list, [](http://wiki.cuteinfocomm.com/uploads/images/gallery/2023-02/image-1676013739155.png)
4. All audit logs will display during selected period. [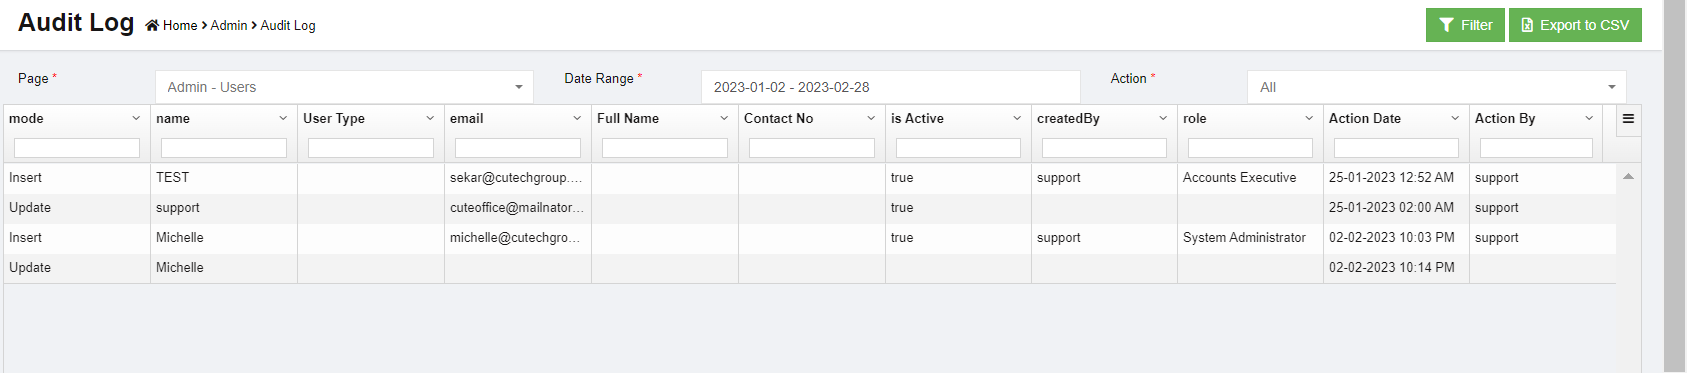](http://wiki.cuteinfocomm.com/uploads/images/gallery/2023-02/image-1676013855227.png)
5. Or user can click [](http://wiki.cuteinfocomm.com/uploads/images/gallery/2023-02/image-1676013884330.png) (filter icon) in the top right corner, and enter key words in the column filter to search for a particular action audit logs.
### Export Audit Logs List
System admin user can also export audit logs list to CSV format by using the [ (](http://wiki.cuteinfocomm.com/uploads/images/gallery/2023-02/image-1676014165620.png)export icons) on the top right corner in the page.