# Procurement
Raise material request, send RFQ, generate PO, receive materials and manage inventory.
# New Page
# Purchase Module Overview
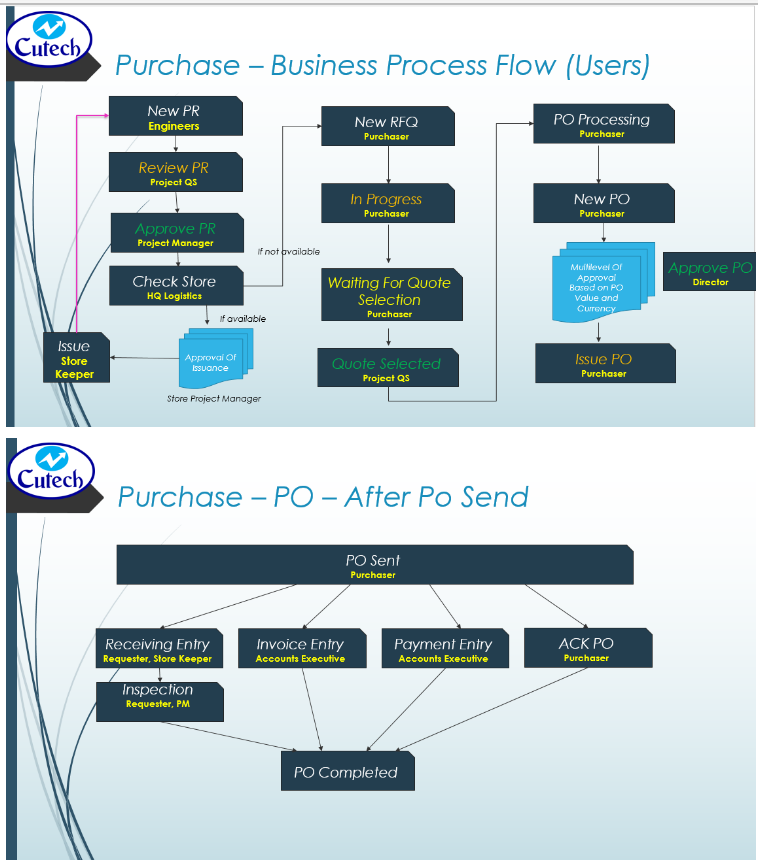
**CuteOffice** purchase module is designed to streamline the business process of purchasing starting from material request. When a material request(**MR**) is raised, cuteOffice system will check available stock of requested material: if there are available stock, system will recommend to issuance from store; if there is no available stock, system will recommend to purchase or petty cash option. The material request will be reviewed/approved, and requests for quotation (**RFQ**s) can be created and sent to suppliers from system. System will record and compare quotations from multiple suppliers and highlight lowest cost combination for user's reference. Purchase manager need to review and approve RFQ. Then relevant purchase order(s) (**PO**s) will be generated from system automatically, and user can email **PO** to suppliers from system or download **PO** to send to suppliers separately. User can record item receive entries and inspections against each **PO**.
The workflow of purchase module in cuteOffice is as below:
**Note: all master data must be entered/imported before the workflow starts-please refer to the Master Data section for more details.**
[](http://wiki.cuteinfocomm.com/uploads/images/gallery/2022-07/image-1657900453010.png)
[](http://wiki.cuteinfocomm.com/uploads/images/gallery/2022-09/image-1663903389288.png)
# Material Request
Material Request (**MR**) is the starting point of purchasing. Users shall add material requests when any materials are required by projects (in cuteOffice, materials refers to **items**-item is part of master data in procurement as prerequisite).
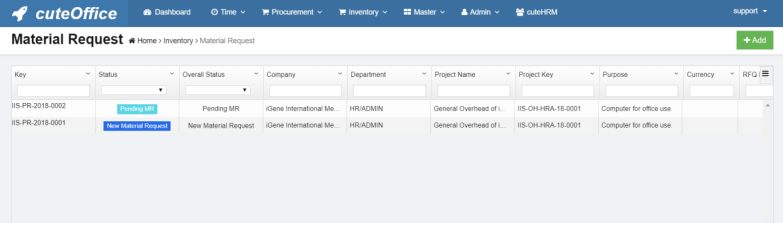
Click **Material Request** submenu in **Purchase** tab, you can view all material requests,
[](http://wiki.cuteinfocomm.com/uploads/images/gallery/2022-07/image-1658175247076.png)
### Add Material Request (MR)
To create a new material request (**MR**),
1\. Click [ ](http://wiki.cuteinfocomm.com/uploads/images/gallery/2022-07/image-1658175556486.png)(Add button) from the menu or click [](http://wiki.cuteinfocomm.com/uploads/images/gallery/2022-07/image-1658175505931.png) Add button in the material requests list
window. The below material request window opens,
[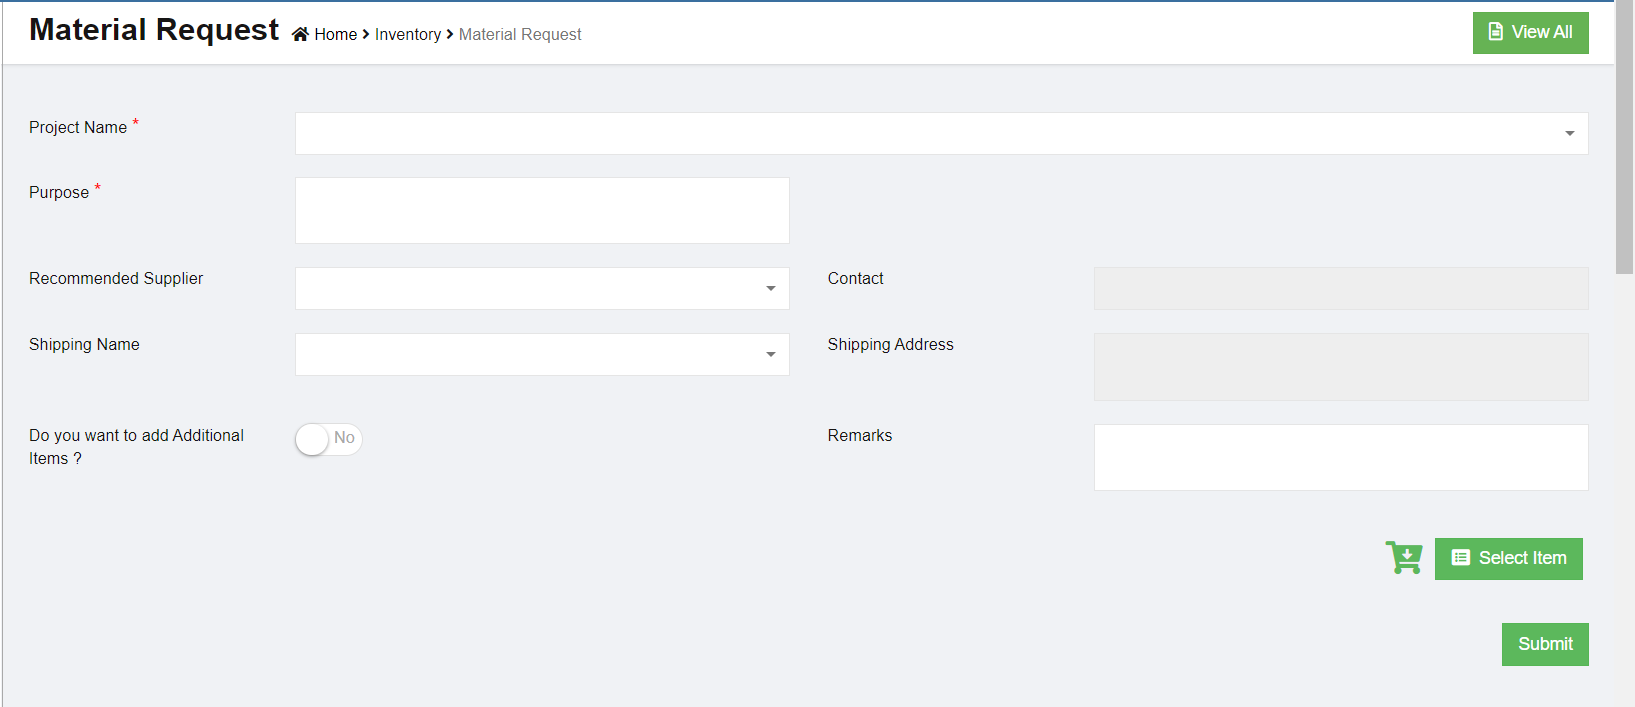](http://wiki.cuteinfocomm.com/uploads/images/gallery/2022-07/image-1658175483035.png)
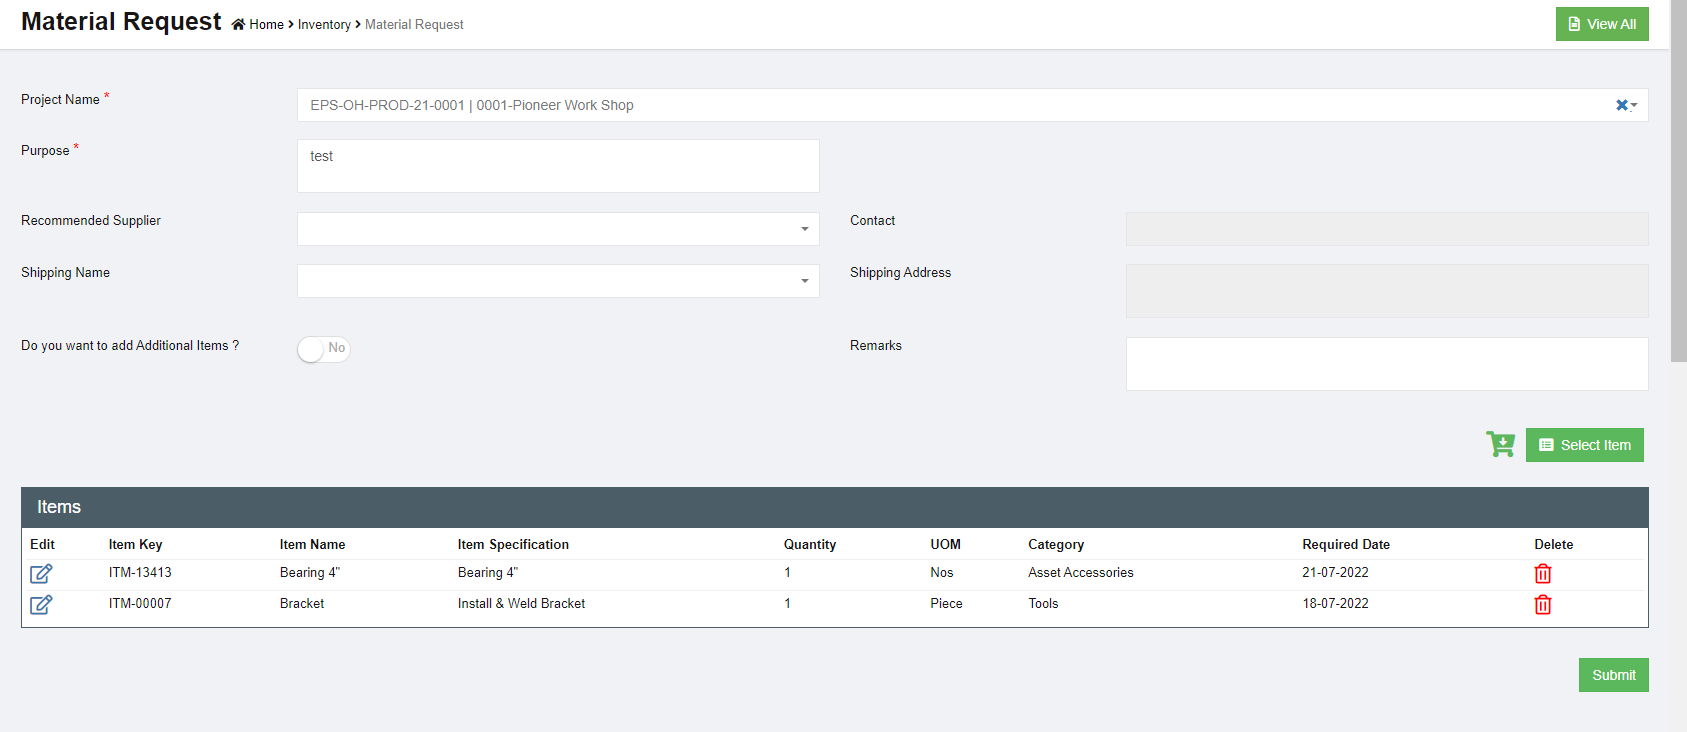
2\. In **Project Name** field, select a project for which for this material request is for.
3\. In **Purpose** field, enter the purpose of the material request.
4\. In **Recommend Supplier** field, Select the supplier from the list if known. Please note only approved suppliers will be listed here. If the supplier is not known leave it empty and the purchase officer will decide which supplier to purchase the item.
5\. To add items in material request, you can use below either **a** or **b** option:
- **a**. Click [(](http://wiki.cuteinfocomm.com/uploads/images/gallery/2022-07/image-1658187649615.png)Select Item button) to add items to the request. The below dialog opens,[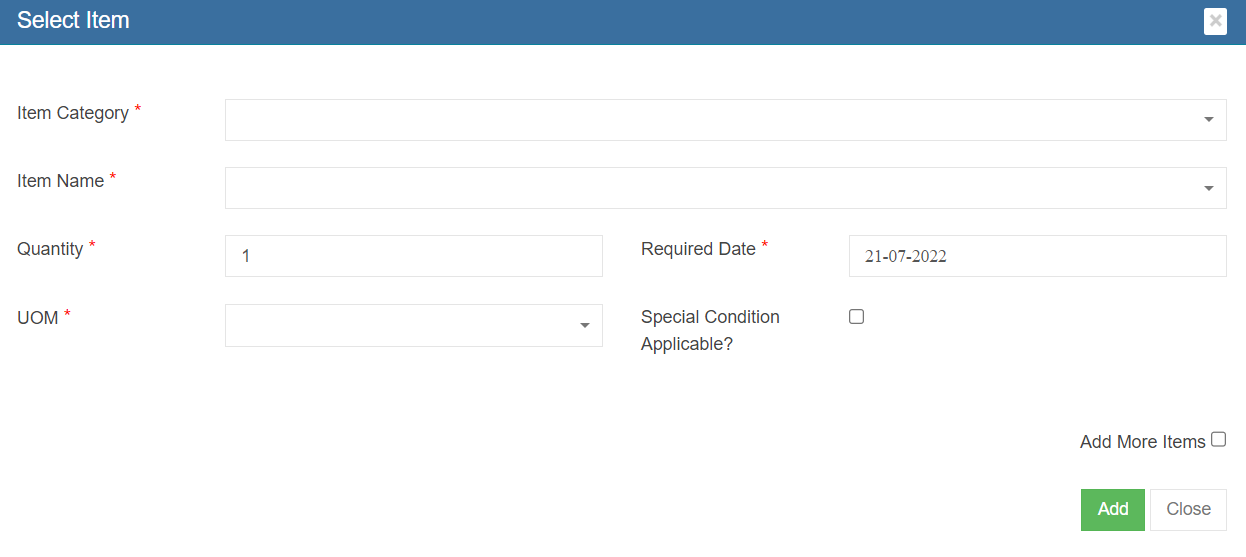](http://wiki.cuteinfocomm.com/uploads/images/gallery/2022-07/image-1658187725390.png)
Users need to fill up all mandatory fields, such as **Item Category, Item Name, Quantity, Required Date, unit of measurement (UOM).** If any special conditions to be specified, select and enter the details. If only one item is required in the material request, user can click [, the item will be added to the material request. If more items to be added and to keep the above select window open, user shall select “Add more items” check box before clicking ](http://wiki.cuteinfocomm.com/uploads/images/gallery/2022-07/image-1658188109612.png)[.More items can be added for the same request.](http://wiki.cuteinfocomm.com/uploads/images/gallery/2022-07/image-1658188109612.png)
- **b**. Or click[(Shopping Cart icon)](http://wiki.cuteinfocomm.com/uploads/images/gallery/2022-07/image-1658188365706.png), the below card view item list window opens,[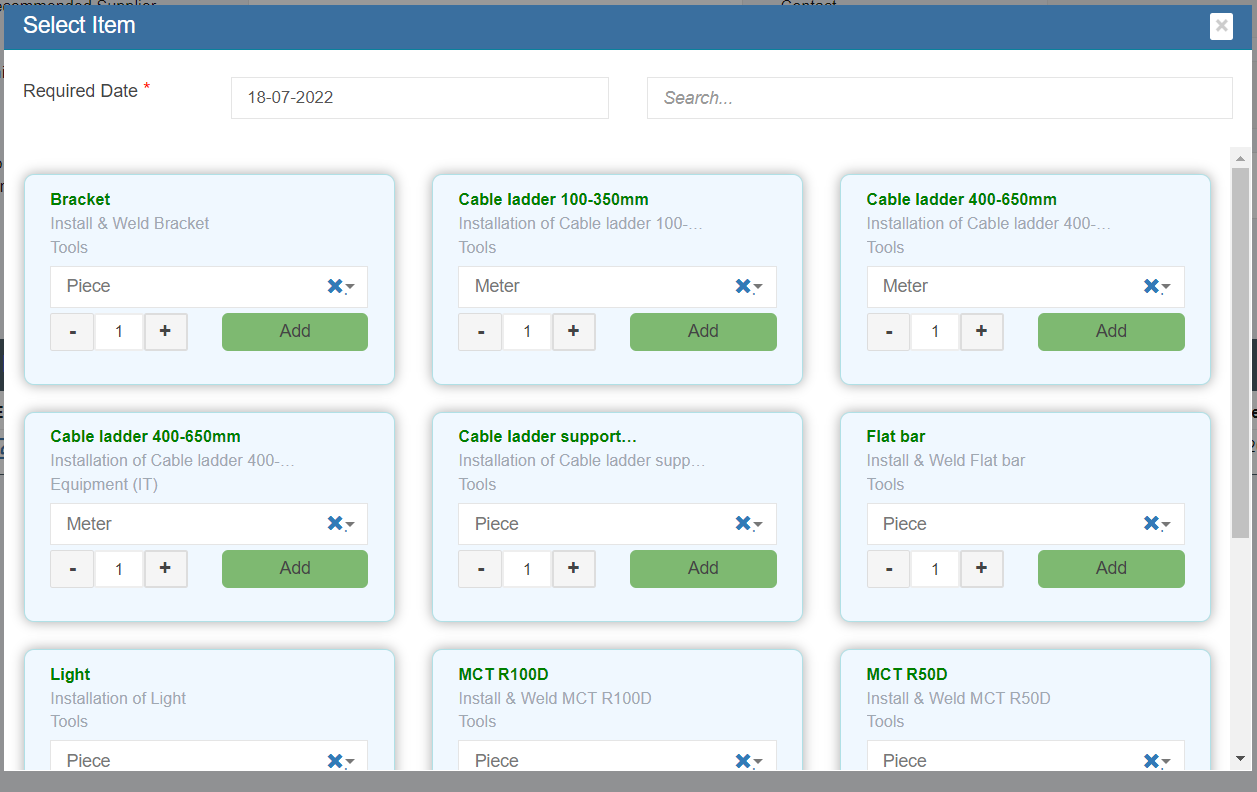](http://wiki.cuteinfocomm.com/uploads/images/gallery/2022-07/image-1658188491349.png)
user need to select Required Date, and user "Search" field to search for requested items, and in the item card, user can enter quantity and select UOM.
6\. After all required items are added to the material request, user can submit the request by clicking [(](http://wiki.cuteinfocomm.com/uploads/images/gallery/2022-07/image-1658189964589.png)Submit icon) in material request page.
[](http://wiki.cuteinfocomm.com/uploads/images/gallery/2022-07/image-1658190177525.png)
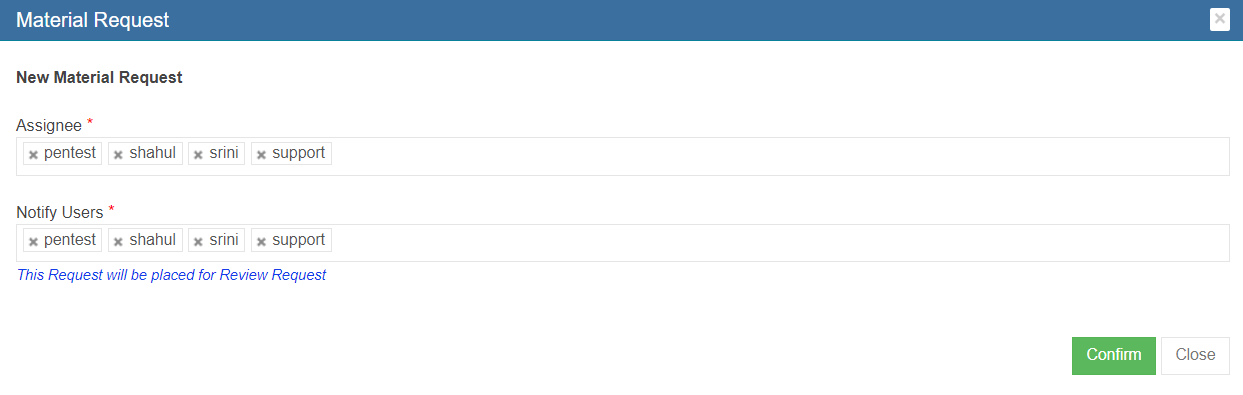
7\. Once a new material request is submitted, the notification email will be trigger to selected users. You need to confirm right users are selected in below notification window and click **Confirm.** The material request submission is completed and page will redirect to the material request list page. And an unique key will be assigned to the material request and the status will change to **"New Material Request". Note:** The next step for a new material request is waiting for approval for issuance from store or purchase from the authorized suppliers.
[](http://wiki.cuteinfocomm.com/uploads/images/gallery/2022-07/image-1658346604183.png)
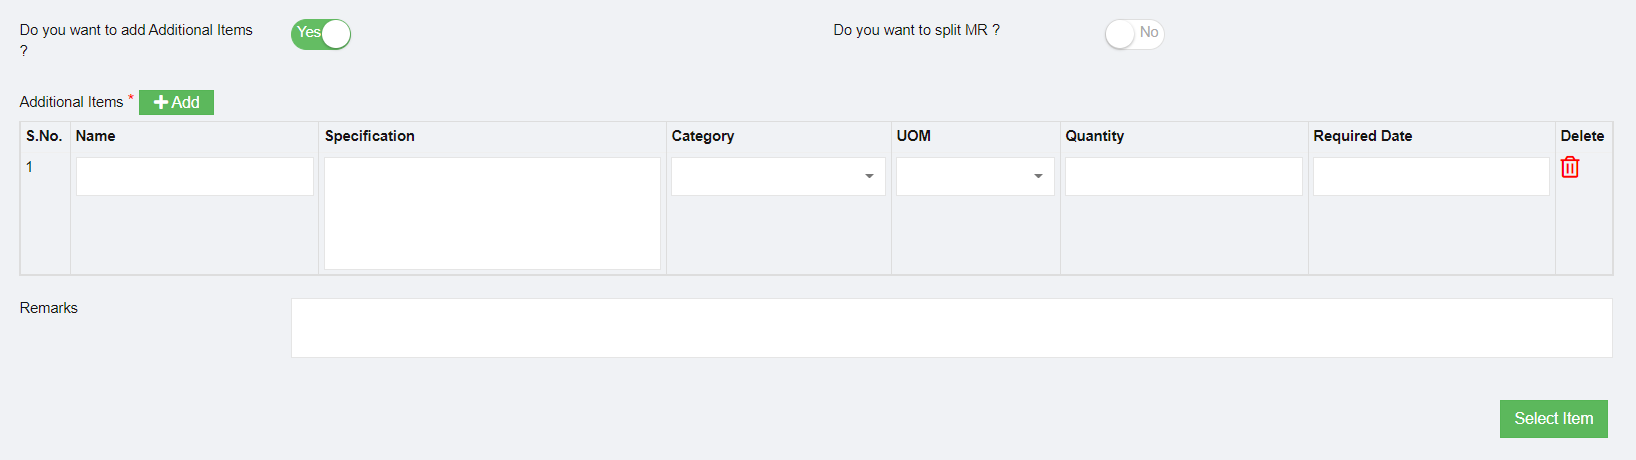
#### Add additional items that are not registered in item master
If the requested item is not found in the item list in material request (means that the item is not registered in item master database), user can use this add additional item option.
[](http://wiki.cuteinfocomm.com/uploads/images/gallery/2022-07/image-1658346053143.png)
- Click and enable the above option and the below additional items option appears:
[](http://wiki.cuteinfocomm.com/uploads/images/gallery/2022-07/image-1658346018762.png)
- Enter item name and specification and other details as required.
- Add more items by clicking the[](http://wiki.cuteinfocomm.com/uploads/images/gallery/2022-07/image-1658345883099.png) (Add button)
- If you want to create two different MR for approved items (items from list) and new items (additional items added in material request) , please enable option to **Yes** in the "Do you want to split MR?" option.
- When submitted, the below message is shown and user need to confirm splitting MR by clicking ****Yes.****[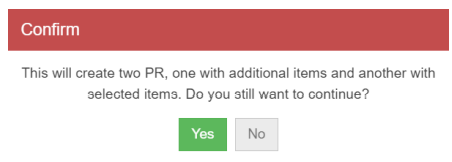](http://wiki.cuteinfocomm.com/uploads/images/gallery/2022-07/image-1658358967231.png)
- The below notification screen appears and click Confirm.
- Please note that there are two separate requests are created and one has a status of “New
Material Request” and the other is “Pending MR”. Note: The next step for a Pending MR is waiting for the purchase team to correct or map the additional items added using "Do you want to add additional item" option, as the additional info entered by user may or may not match the company item standard so review and approved is needed by purchase team. [](http://wiki.cuteinfocomm.com/uploads/images/gallery/2022-07/image-1658359073640.png)
#### Pending MR-Actions to Take
As mentioned above, for material requests that include additional items not from item master, the status will be **Pending MR.** For MR with Pending MR status, purchase team need to take below action to correct or map the additional items:
[](http://wiki.cuteinfocomm.com/uploads/images/gallery/2022-07/image-1658530837663.png)
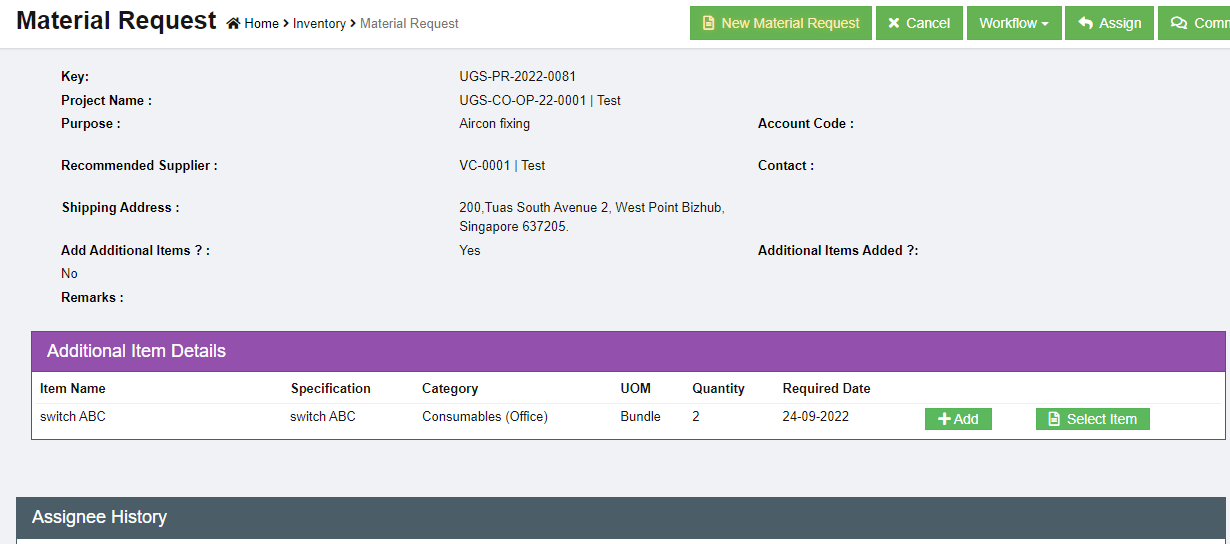
1\. Click the material key of the Pending MR status. The material request detail page will open and Additional Item Details table is shown in purple color.
[](http://wiki.cuteinfocomm.com/uploads/images/gallery/2022-09/image-1663733015022.png)
2\. There are two options for each item: [(](http://wiki.cuteinfocomm.com/uploads/images/gallery/2022-07/image-1658531052566.png)Add as New Item) or [(](http://wiki.cuteinfocomm.com/uploads/images/gallery/2022-07/image-1658531085097.png)Select to match from exiting item).
**Option 1 Add as New Item**
If we know that additional item requested is not existing in the item master database and we will need to use this add option to create a new item in the database.
- Clicking **[](http://wiki.cuteinfocomm.com/uploads/images/gallery/2022-07/image-1658531052566.png)**Add icon, system will launch the add item dialog as below:
[](http://wiki.cuteinfocomm.com/uploads/images/gallery/2022-09/image-1663733075291.png)
- Click Next. The add item details window opens, see below:
[](http://wiki.cuteinfocomm.com/uploads/images/gallery/2022-09/image-1663733250735.png)
- Check and enter the correct item details, then click **Submit**. A new item is created and saved in item master database. [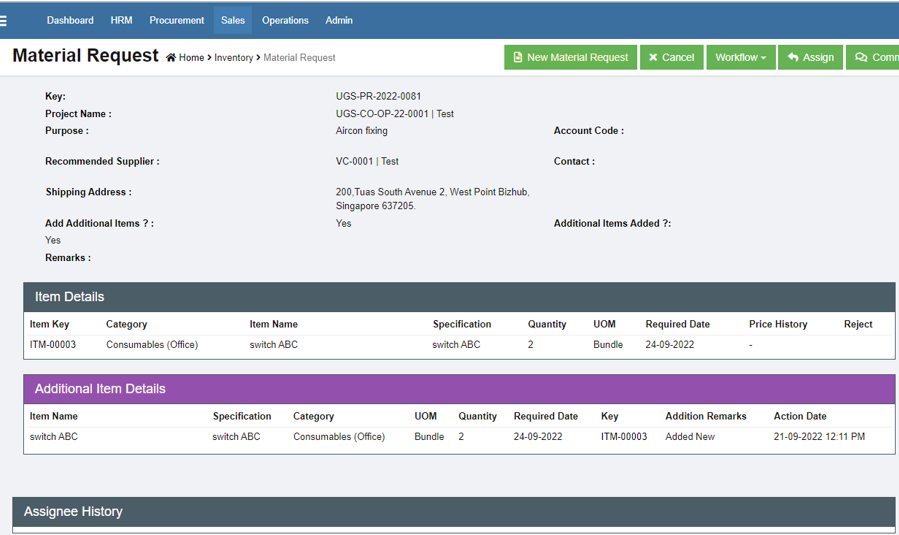](http://wiki.cuteinfocomm.com/uploads/images/gallery/2022-09/image-1663734312869.png)
**Option 2 Select Item (Existing)**
For items that can be mapped or categorized under existing item from item master, we can use this select item option to map this item to existing item category.
- Click[(Select Item icon), the below window opens,](http://wiki.cuteinfocomm.com/uploads/images/gallery/2022-07/image-1658531733054.png)
[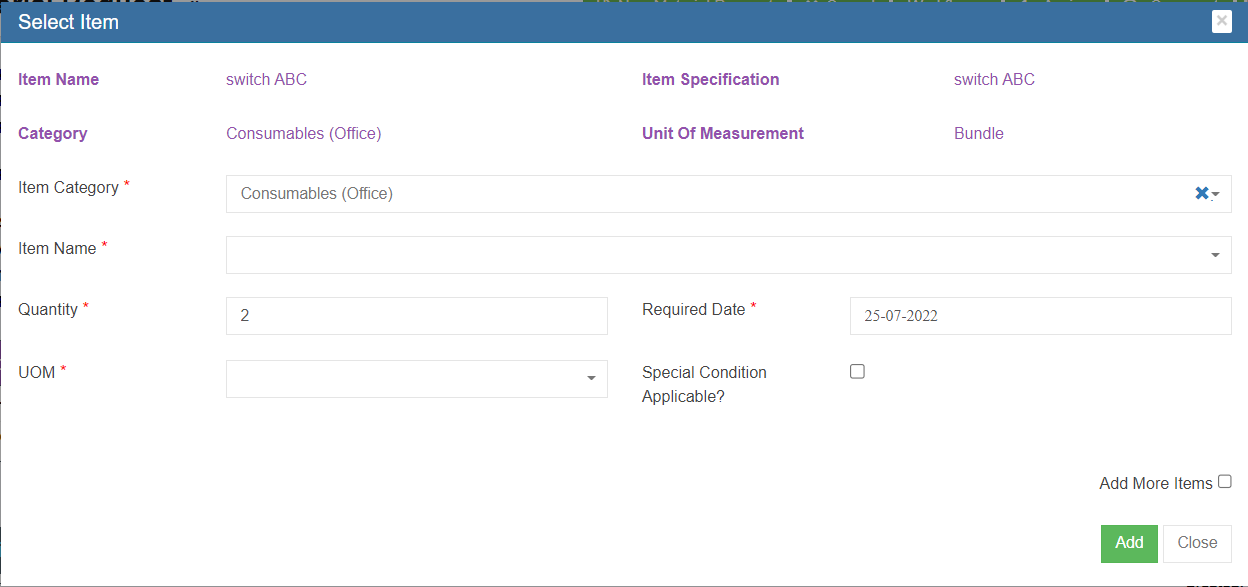](http://wiki.cuteinfocomm.com/uploads/images/gallery/2022-07/image-1658531848312.png)
- Select the correct Item category and item name from the list and select UOM.
- Click Add to map the item. With this both items are now mapped with appropriate items master and it is now ready for approval.
3\. Click New Material Request[](http://wiki.cuteinfocomm.com/uploads/images/gallery/2022-09/image-1663972341806.png), a notification window will open as below showing "Pending MR to New Material Request".
[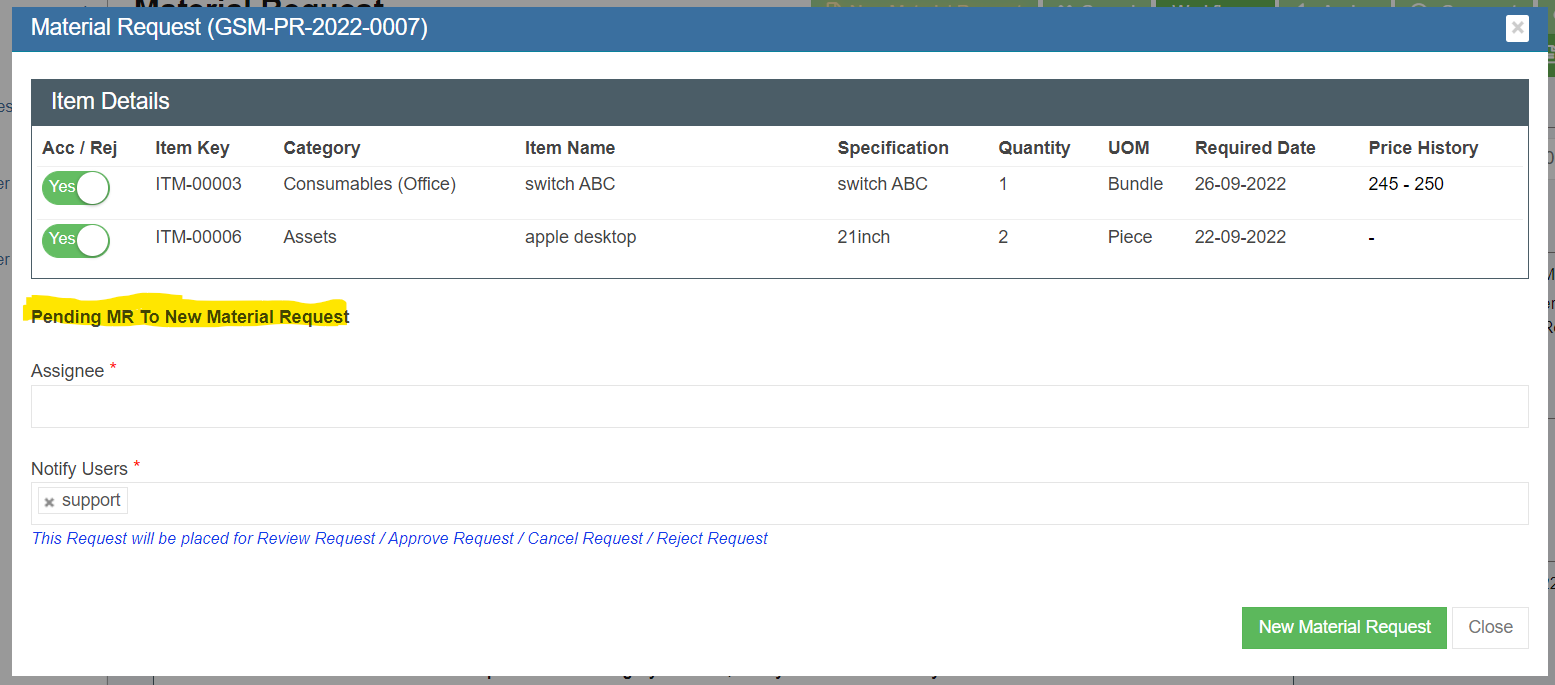](http://wiki.cuteinfocomm.com/uploads/images/gallery/2022-09/image-1663972478466.png)
4\. Click New Material Request button in above screen, the status of the pending MR will be changed to New Material Request, and redirected to material request page that allows for next action-review or approve (review is optional, depends on company policy).
[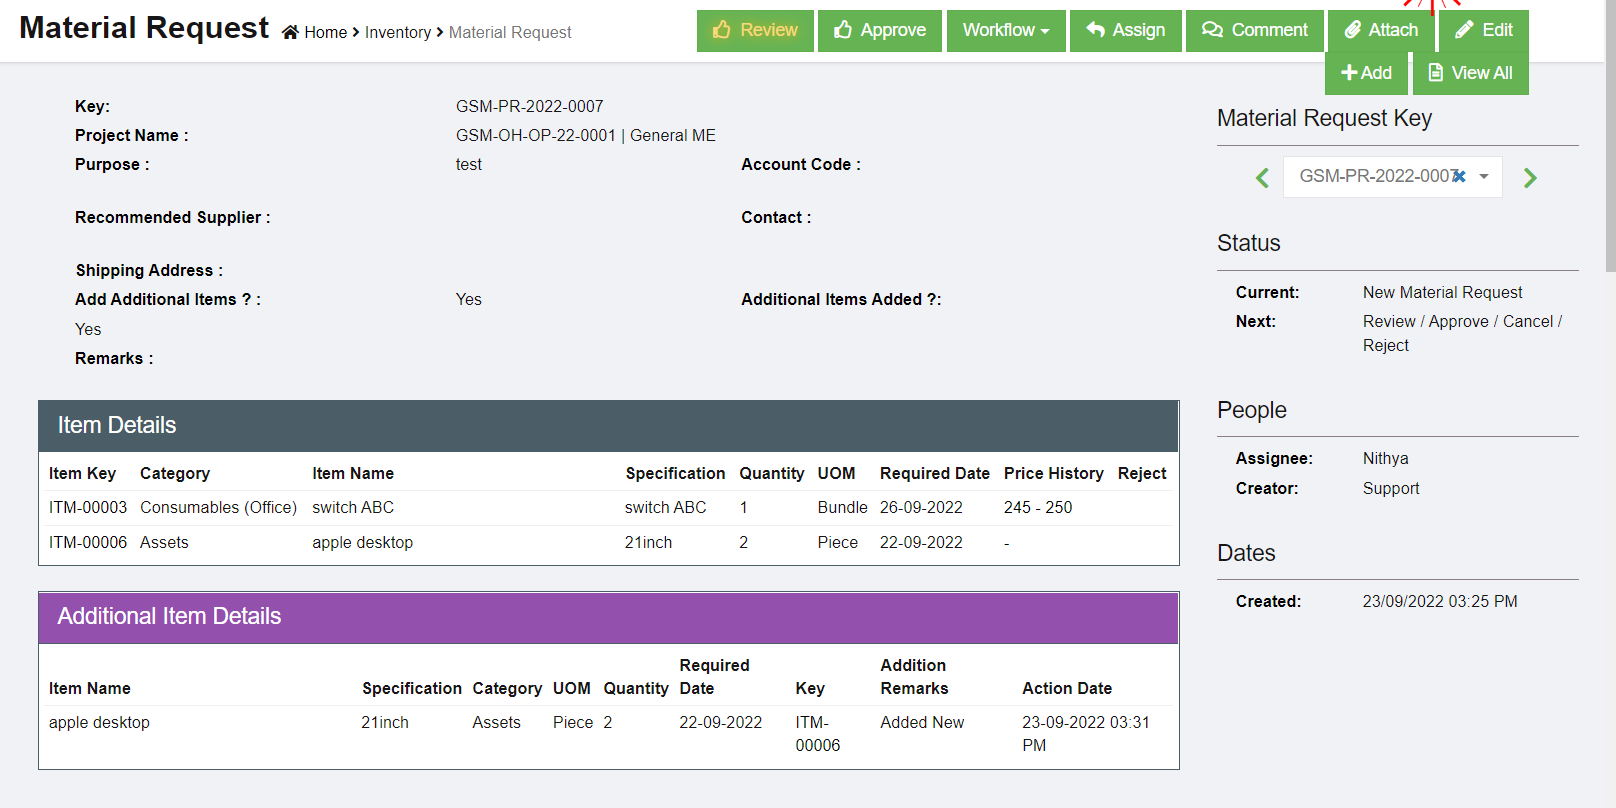](http://wiki.cuteinfocomm.com/uploads/images/gallery/2022-09/image-1663972705677.png)
5\. Click Review or Approve button, a notification window opens, user need to select Assignees to review or approve the requested reviewed MR.
6\. Once the new material request is approved. The next step will be Petty Cash/Recommended to Purchase.
[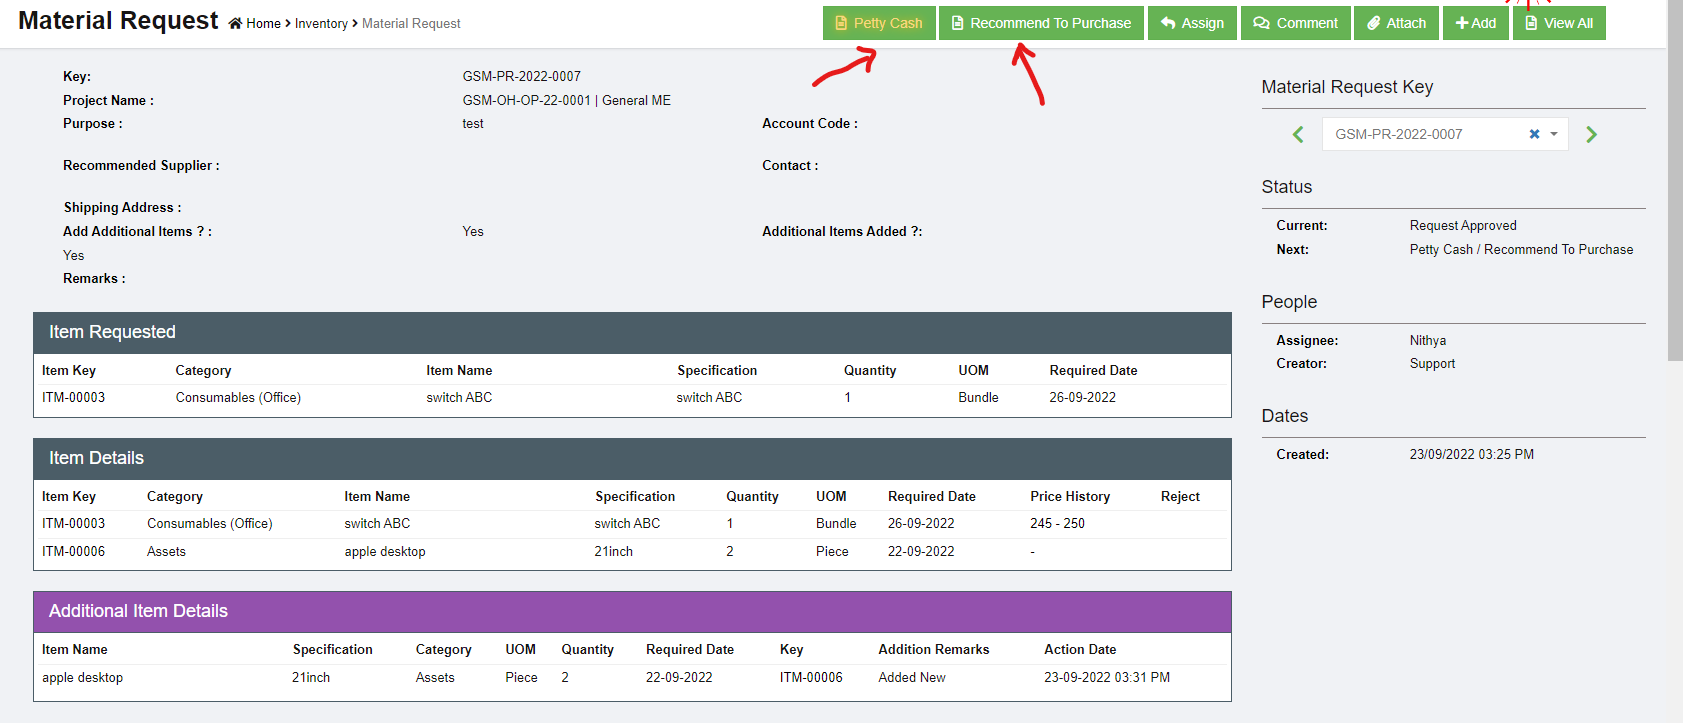](http://wiki.cuteinfocomm.com/uploads/images/gallery/2022-09/image-1663973265735.png)
### Edit MR
For new material request, before it is reviewed/approved, user can edit the material request, e.g. adding more items.
1. Click the material request key to open the material request detail page, see below.[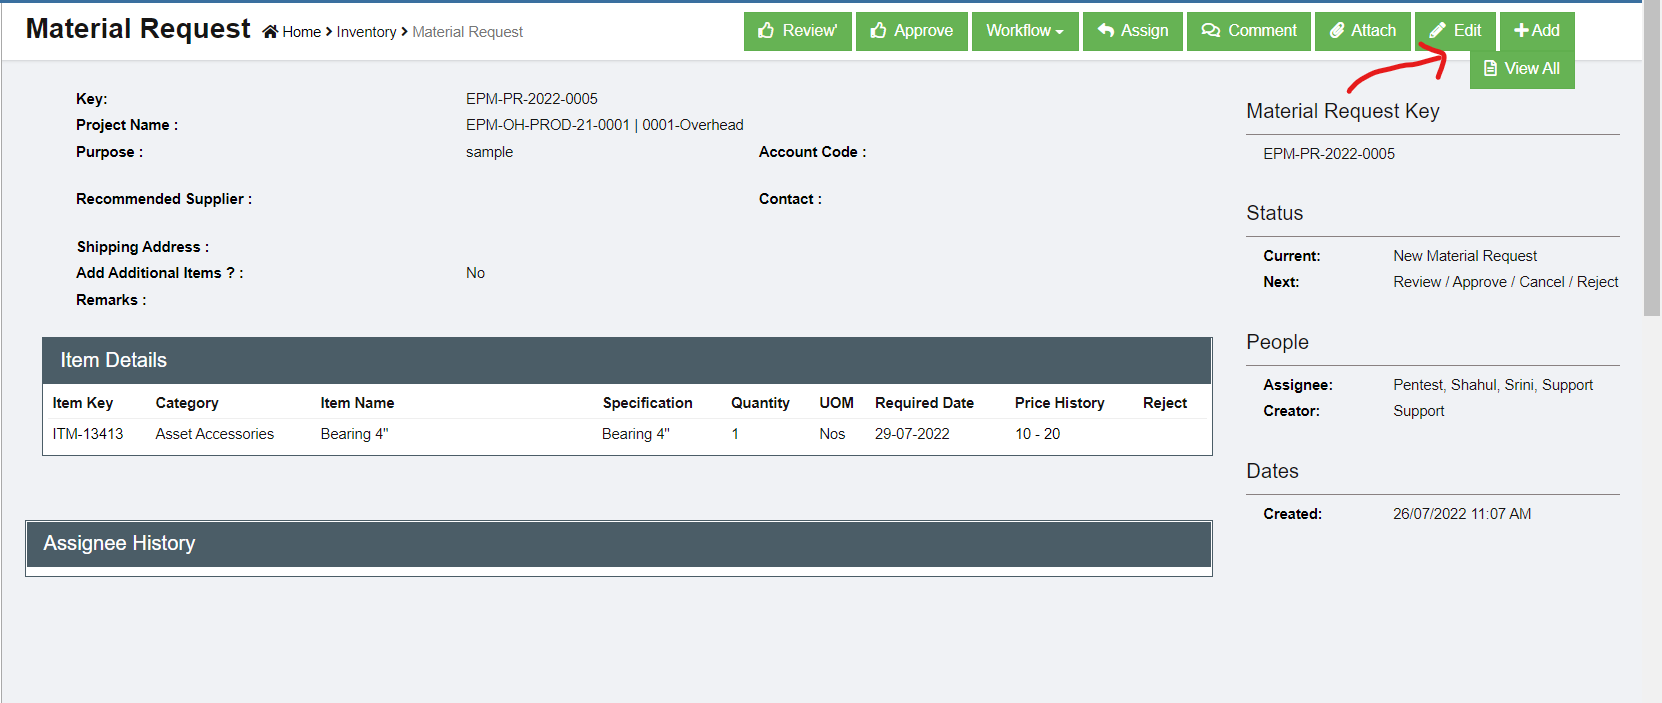](http://wiki.cuteinfocomm.com/uploads/images/gallery/2022-07/image-1658858884891.png)
2. Click edit icon[, the material request edit window opens,](http://wiki.cuteinfocomm.com/uploads/images/gallery/2022-07/image-1658859174910.png)[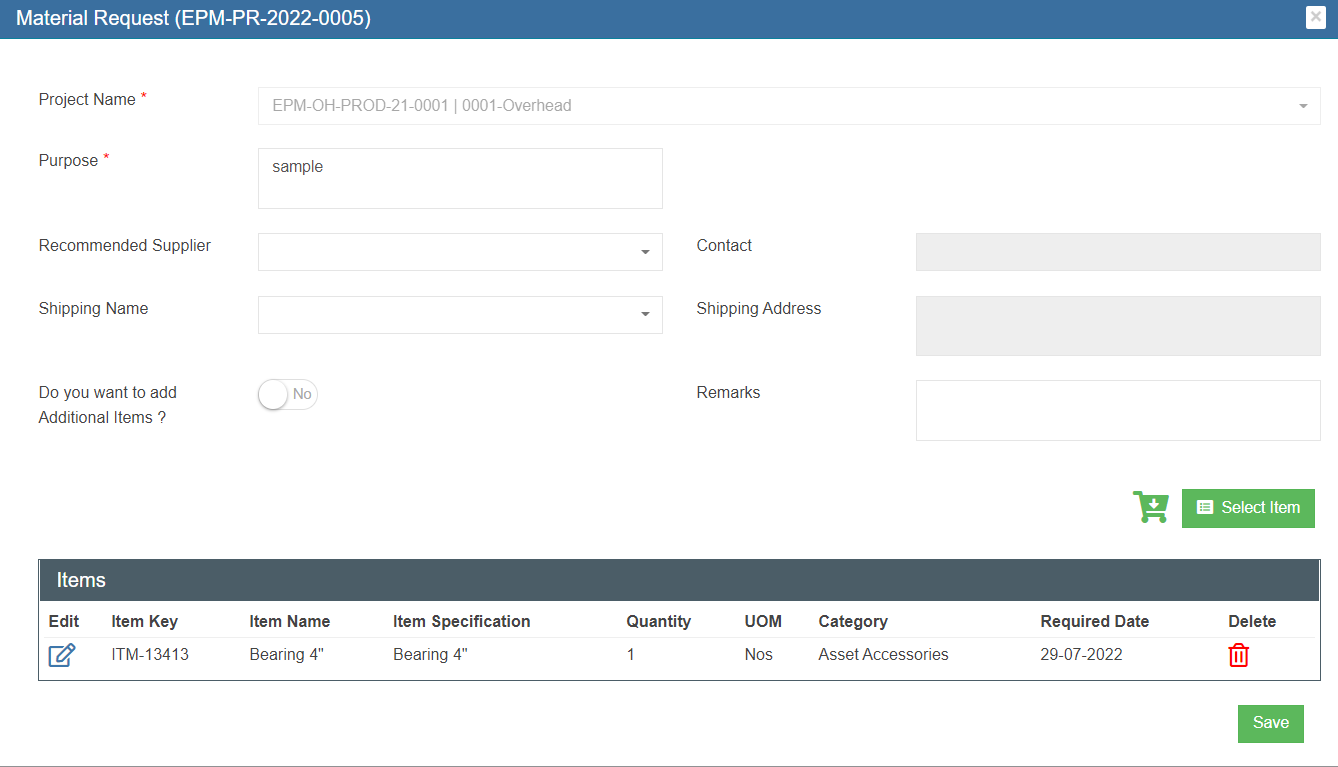](http://wiki.cuteinfocomm.com/uploads/images/gallery/2022-07/image-1658859300248.png)
3. Edit the material request where needs, then click [(save icon) to save edits.](http://wiki.cuteinfocomm.com/uploads/images/gallery/2022-07/image-1658859378476.png)
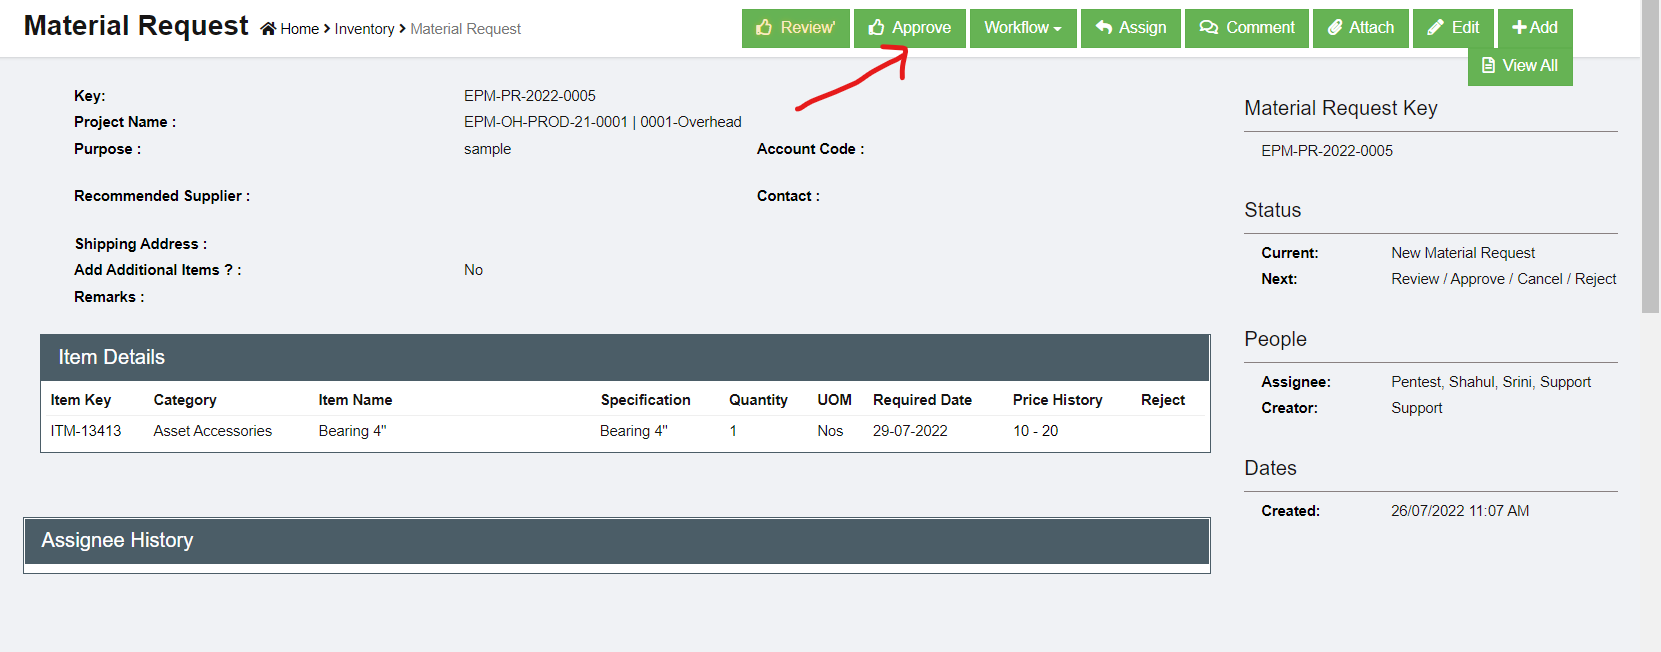
### Review/ Approve MR
Each MR needs to be approved and optionally reviewed. Only authorized personnel will have access to review/approve the MR.
If the logged in user has the authority to approve, the Approve option is available in the MR detail page, see below.
[](http://wiki.cuteinfocomm.com/uploads/images/gallery/2022-07/image-1658859904974.png)
To review/approve,
1. Click the[(Approve icon), the approve window opens,](http://wiki.cuteinfocomm.com/uploads/images/gallery/2022-07/image-1658859972707.png)[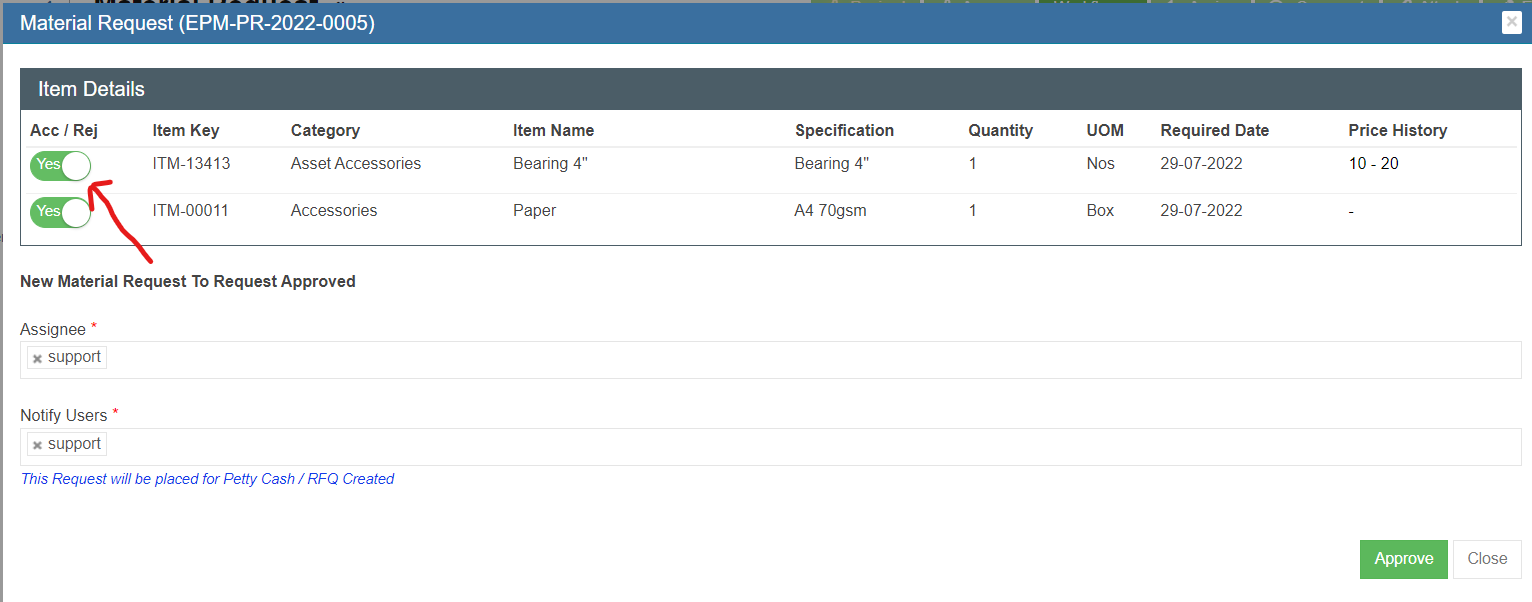](http://wiki.cuteinfocomm.com/uploads/images/gallery/2022-07/image-1658860426584.png)
2. In the item detail table, the first column Acc/Rej default to Yes , means item approved. If user want to reject item, click flag to change to Reject. Once all items reviewed/approved. Click[](http://wiki.cuteinfocomm.com/uploads/images/gallery/2022-07/image-1658860642594.png) to approve.
3. The status of the MR changes to Request Approved and ready for next action. [](http://wiki.cuteinfocomm.com/uploads/images/gallery/2022-07/image-1658860838871.png)
### Cancel Request / Reject Request
The request can be cancelled by the same user who requested it. The request can be rejected by the approval if the MR is not acceptable or required.
1. Click "Workflow", the **Cancel, Reject** option will show.
[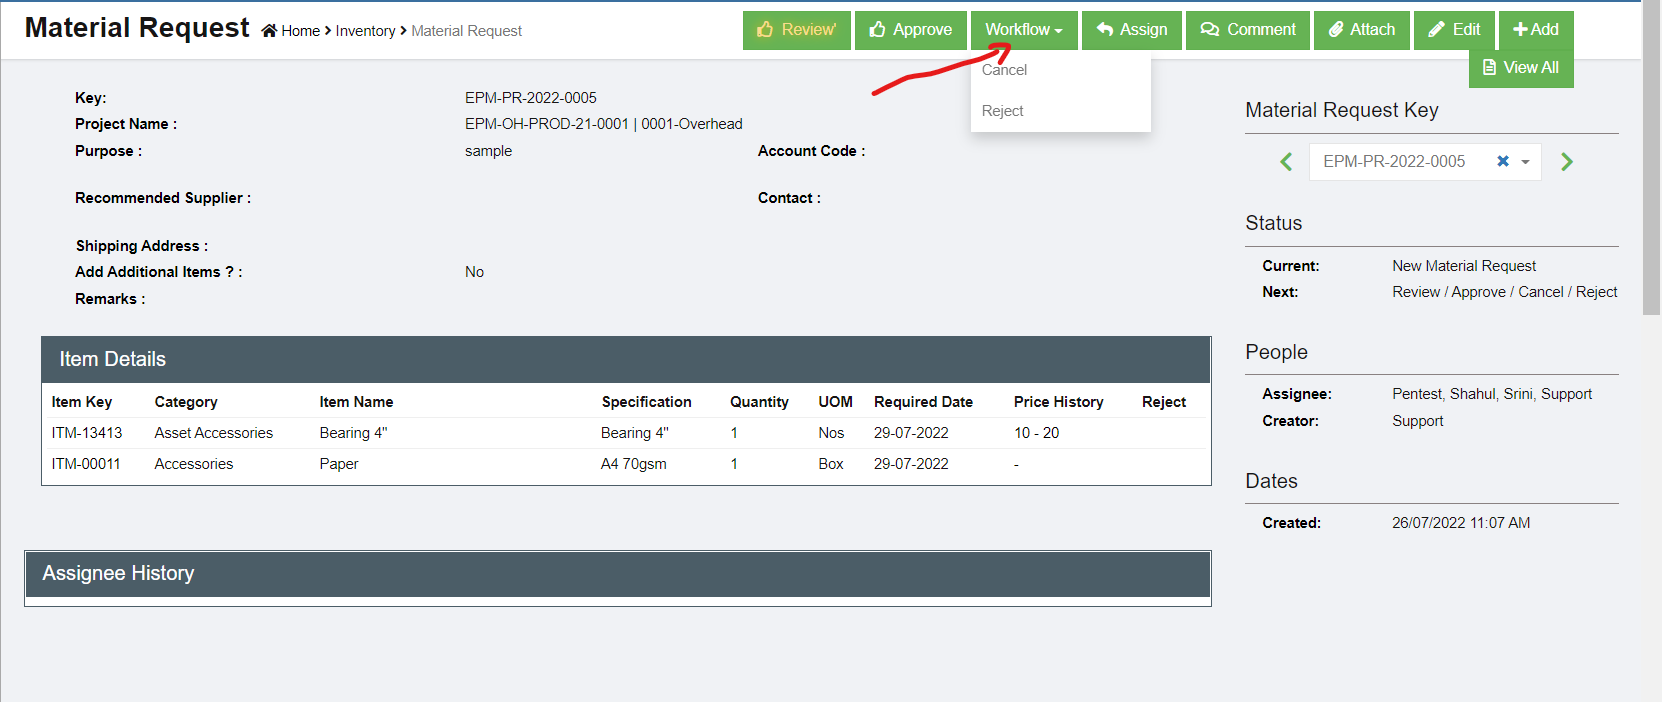](http://wiki.cuteinfocomm.com/uploads/images/gallery/2022-07/image-1658860743340.png)
2. To cancel MR, click **Cancel** from the option menu, below window opens, click[ to confirm cancellation of the MR.](http://wiki.cuteinfocomm.com/uploads/images/gallery/2022-07/image-1658879768613.png)[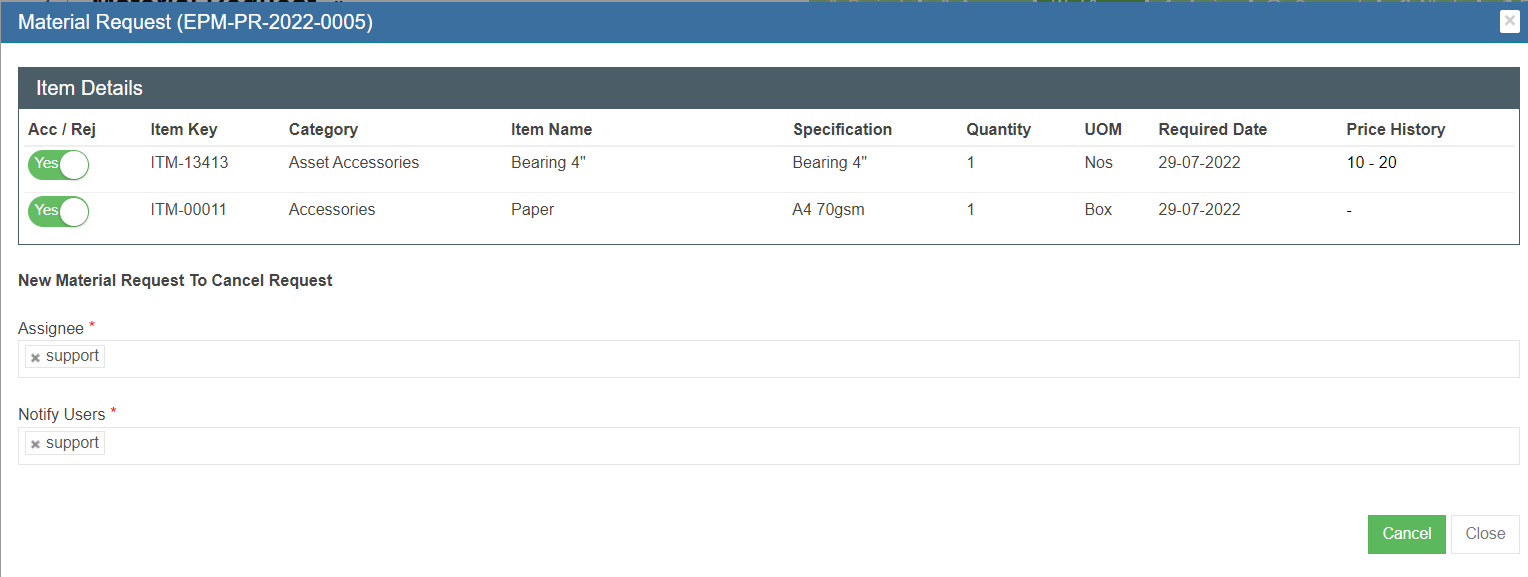](http://wiki.cuteinfocomm.com/uploads/images/gallery/2022-07/image-1658879655467.png)
3. To reject MR, click Reject from the option menu, below window opens, click [](http://wiki.cuteinfocomm.com/uploads/images/gallery/2022-07/image-1658879959068.png)to reject theMR. [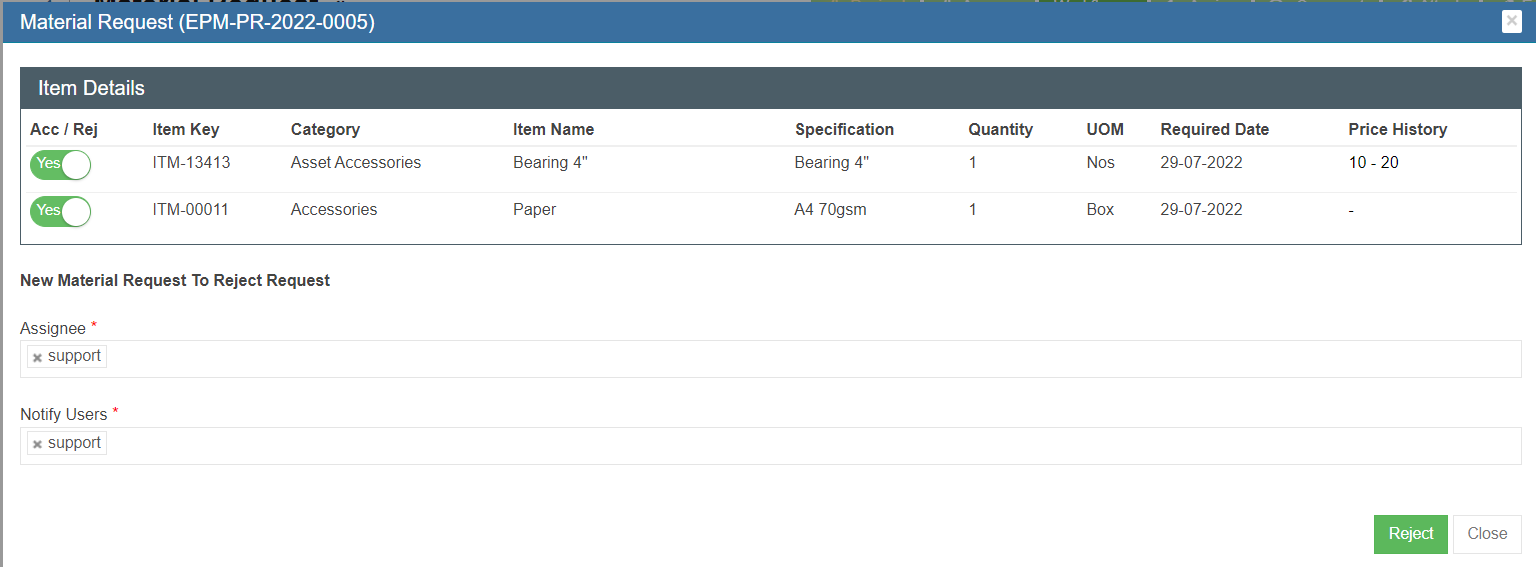](http://wiki.cuteinfocomm.com/uploads/images/gallery/2022-07/image-1658879929797.png)
### Next Steps for Approved MR
Once a MR is approved by authorized personnel, it should be further processed. There are three options:
[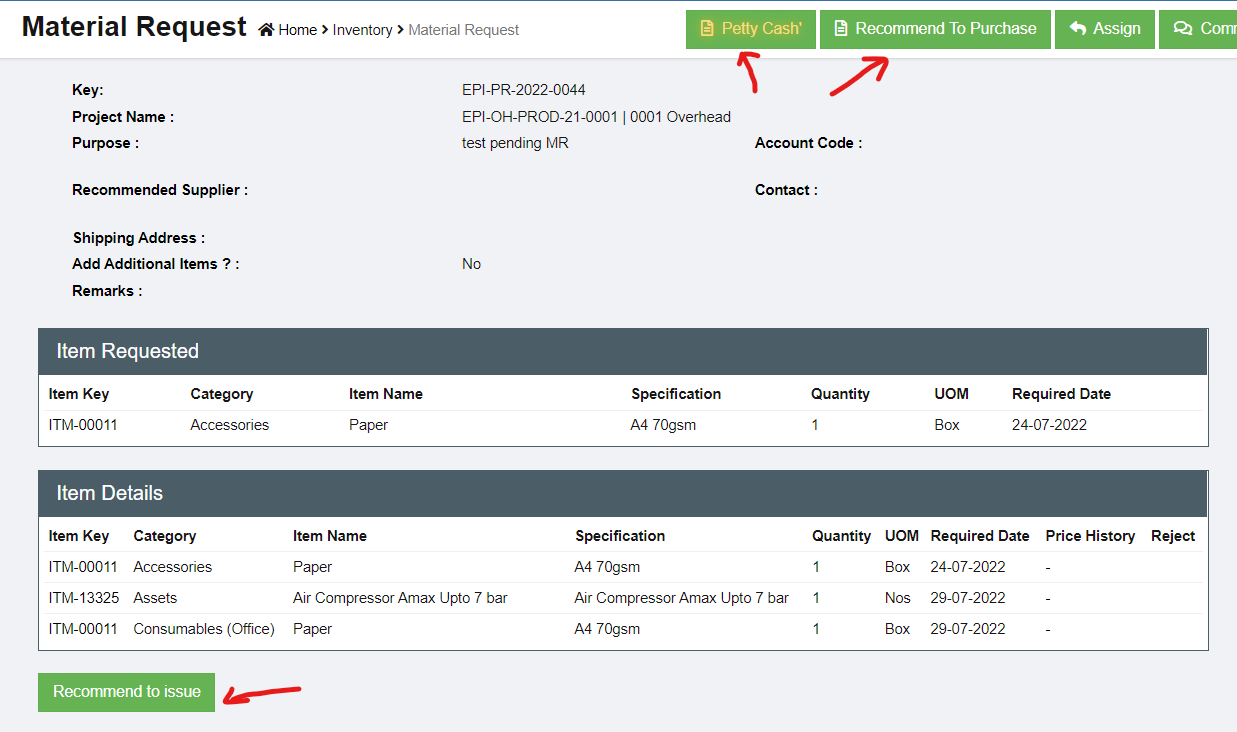](http://wiki.cuteinfocomm.com/uploads/images/gallery/2022-07/image-1658881150986.png)
- **Recommend to issuance.** If there are existing stock available, authorized person can choose to recommend to issuance instead of new purchasing. See "Issuance" in Stock Management user manual. [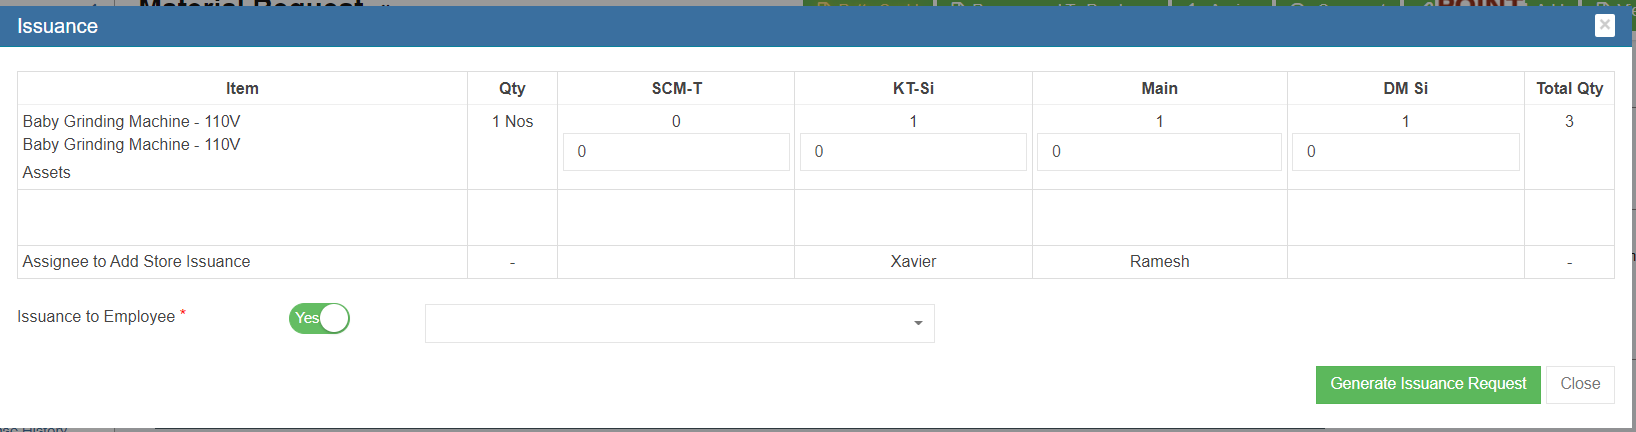](http://wiki.cuteinfocomm.com/uploads/images/gallery/2022-07/image-1659025426602.png)
- **Petty Cash.** If the requested item are small amount, user can use petty cash option to register. [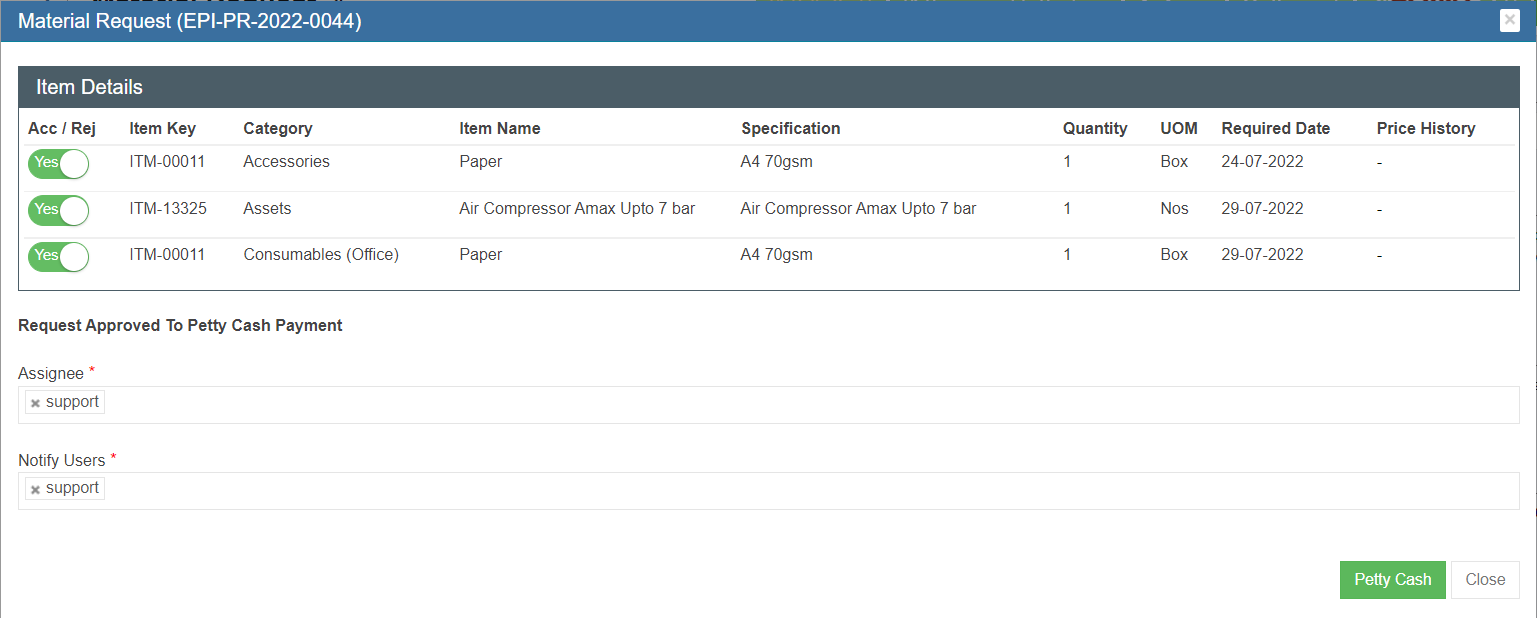](http://wiki.cuteinfocomm.com/uploads/images/gallery/2022-07/image-1658959319285.png)
- **or Recommend to Purchase.** [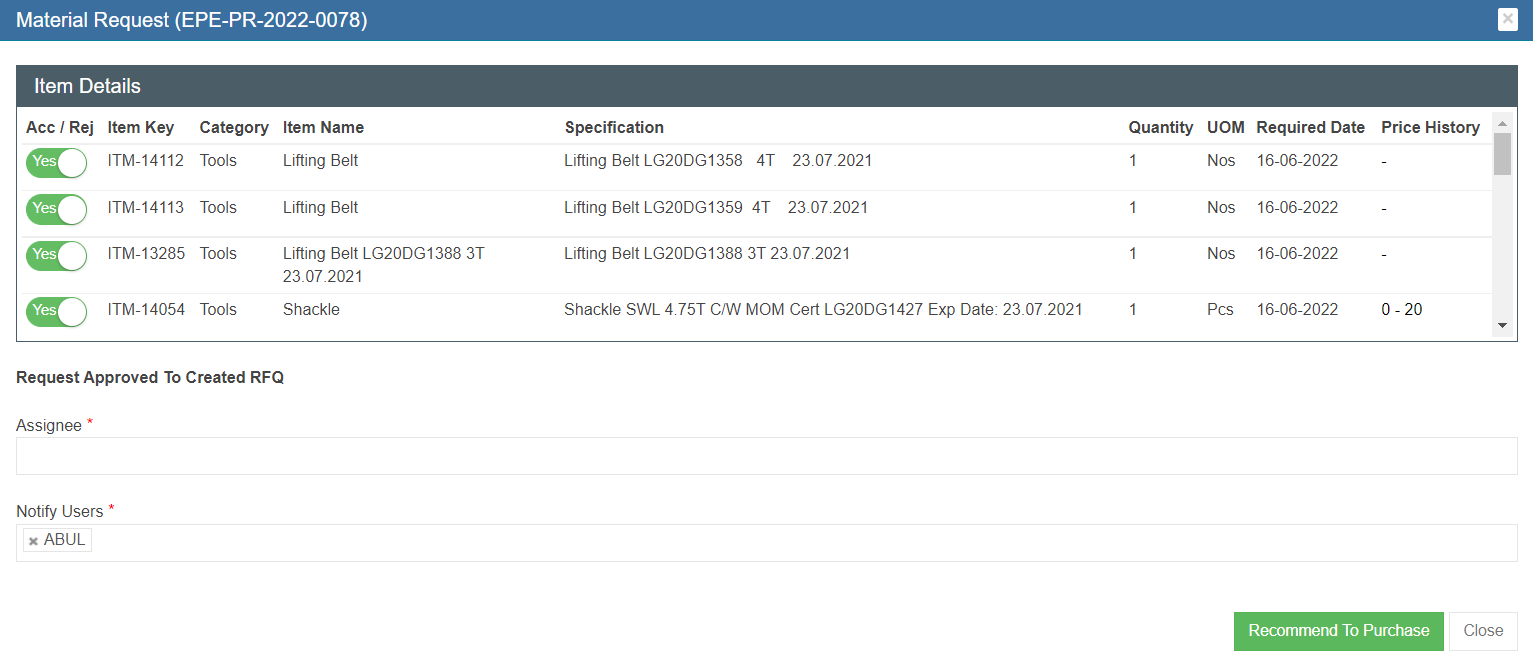](http://wiki.cuteinfocomm.com/uploads/images/gallery/2022-07/image-1659025228492.png)
#### Petty Cash
A petty cash fund is a small amount of company cash, often kept on hand (e.g., in a locked drawer or box), to pay for minor or incidental expenses, such as office supplies or employee reimbursements. Sometimes the material requested item can be recommend to use petty cash to purchase instead of going thru purchase workflow.
1. Click the Petty Cash button in the material request detail page, [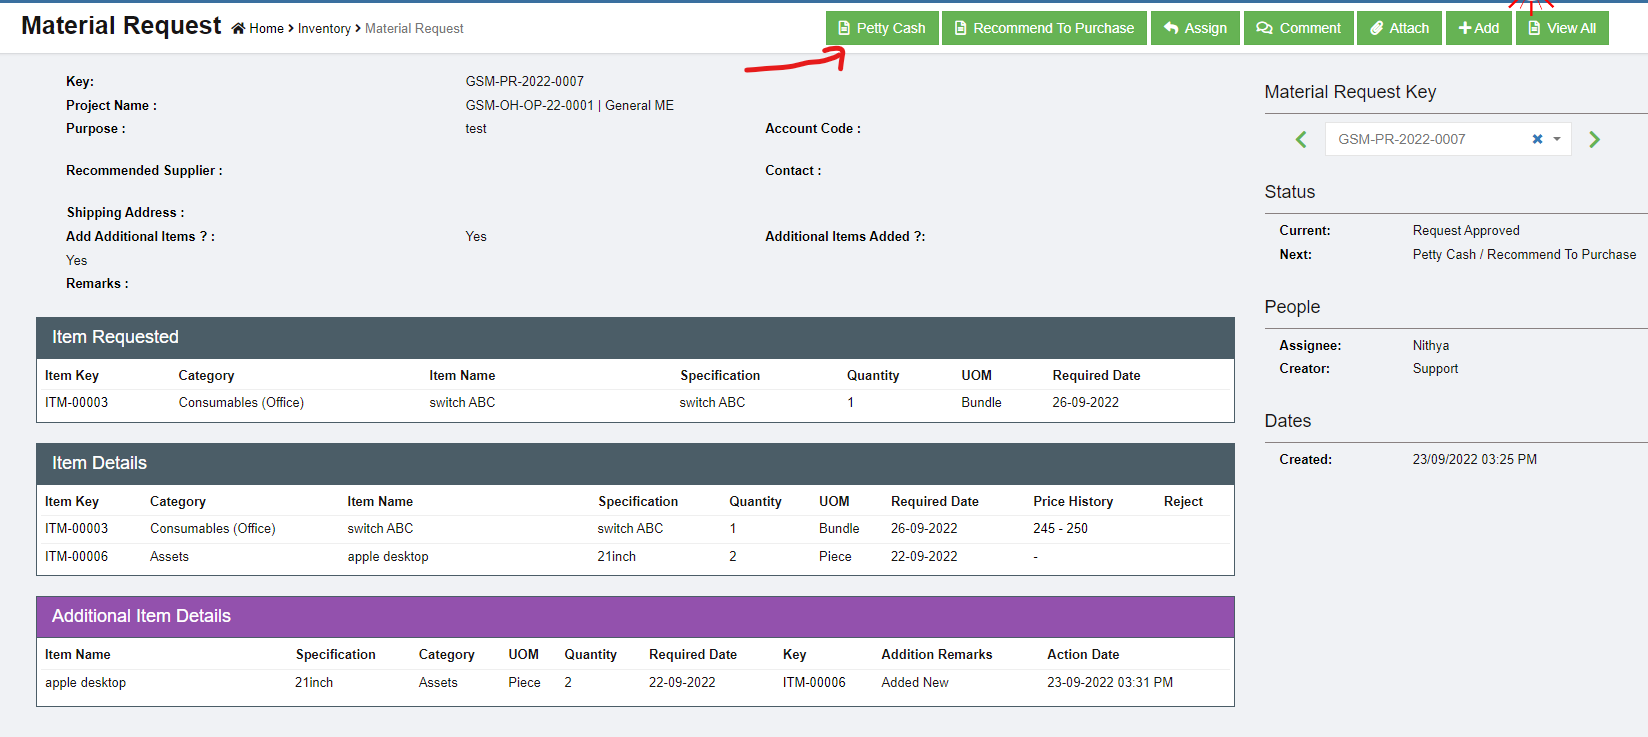](http://wiki.cuteinfocomm.com/uploads/images/gallery/2022-09/image-1663973515801.png)
2. A new notification window opens to confirm petty cash. Click Petty Cash button to confirm.[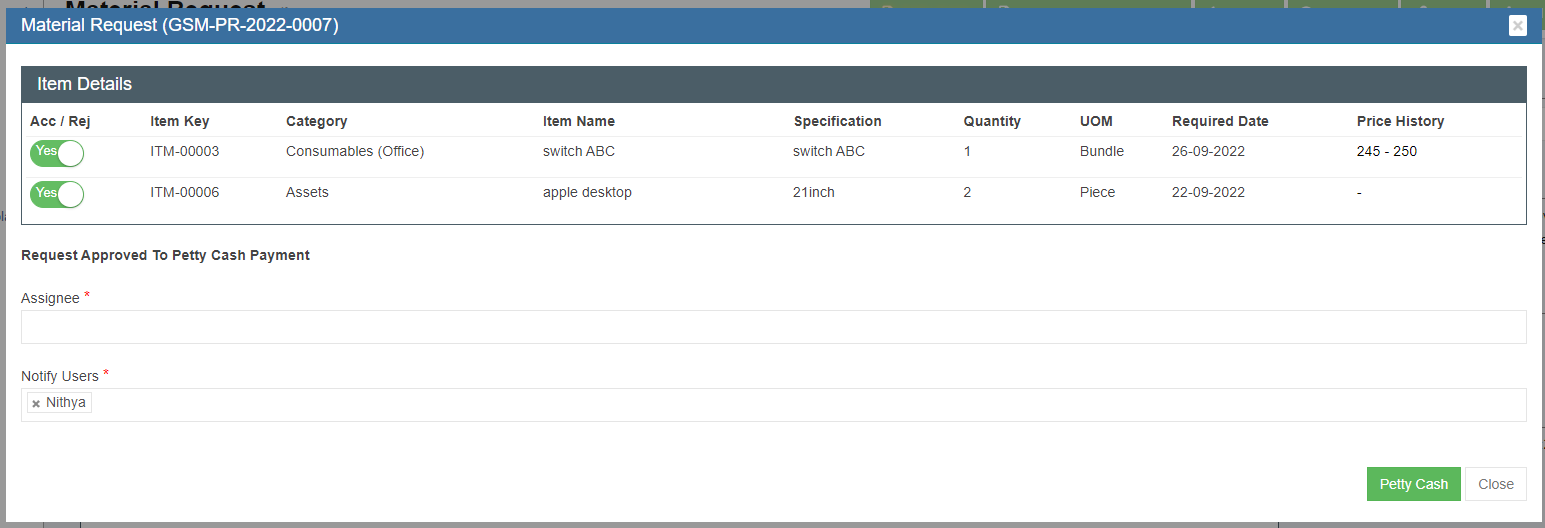](http://wiki.cuteinfocomm.com/uploads/images/gallery/2022-09/image-1663973332679.png)
3. A receiving entry will appear once confirmed petty cash option. User can enter the petty cash purchase details in the receiving entry section. [](http://wiki.cuteinfocomm.com/uploads/images/gallery/2022-09/image-1663973682219.png)
4. Click Add button to enter Receiving entry- Material Request for petty cash payment[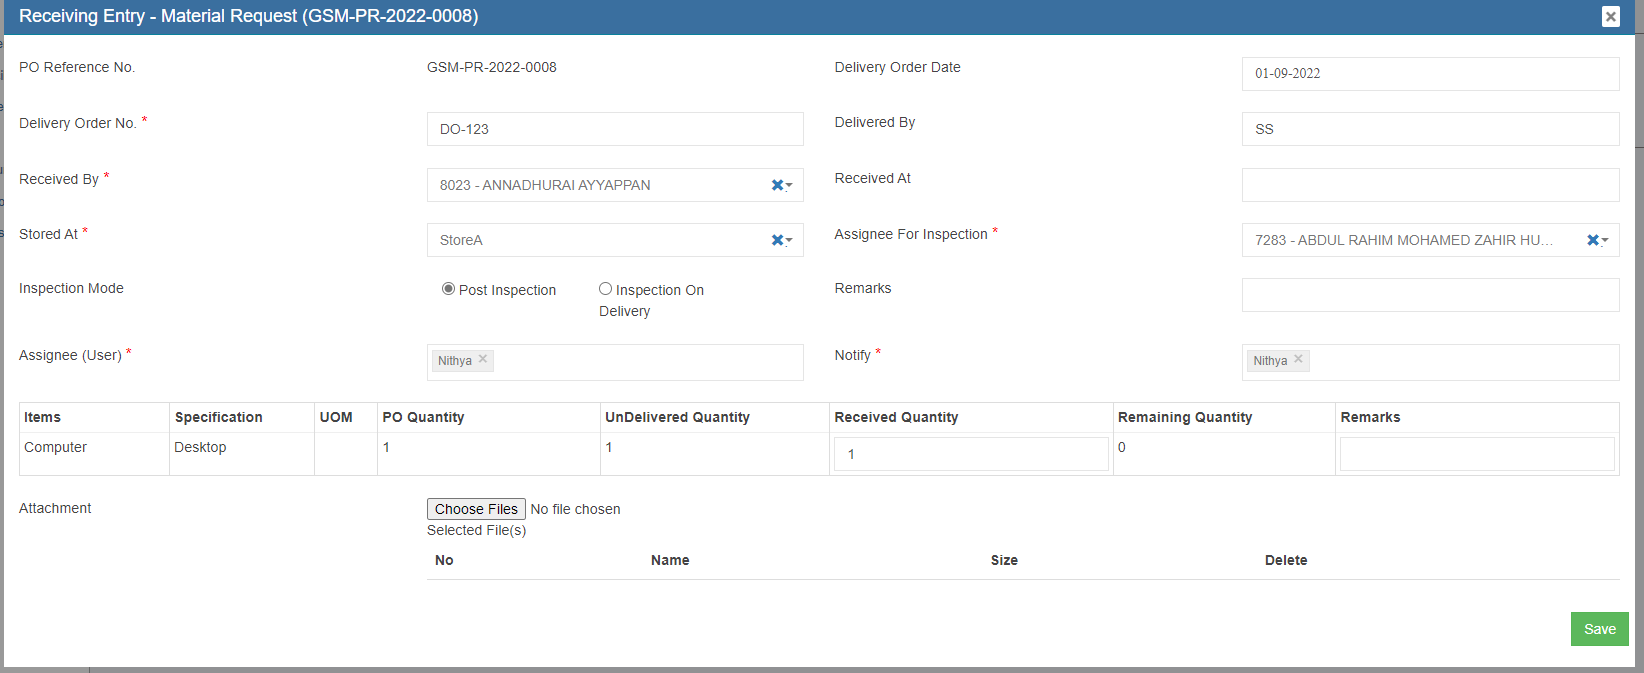](http://wiki.cuteinfocomm.com/uploads/images/gallery/2022-09/image-1664532848411.png)
5. Enter all required details in above receive entry page, and in Attachment, use Choose Files to upload invoice receipt.
# Request for Quotation (RFQ)
Once the Material Request is approved, and authorized to purchase, it should be recommended to purchase.
1. Click [](http://wiki.cuteinfocomm.com/uploads/images/gallery/2022-07/image-1659118109177.png)to proceed to next action of creating Request for Quotation (RFQ) from approved suppliers. [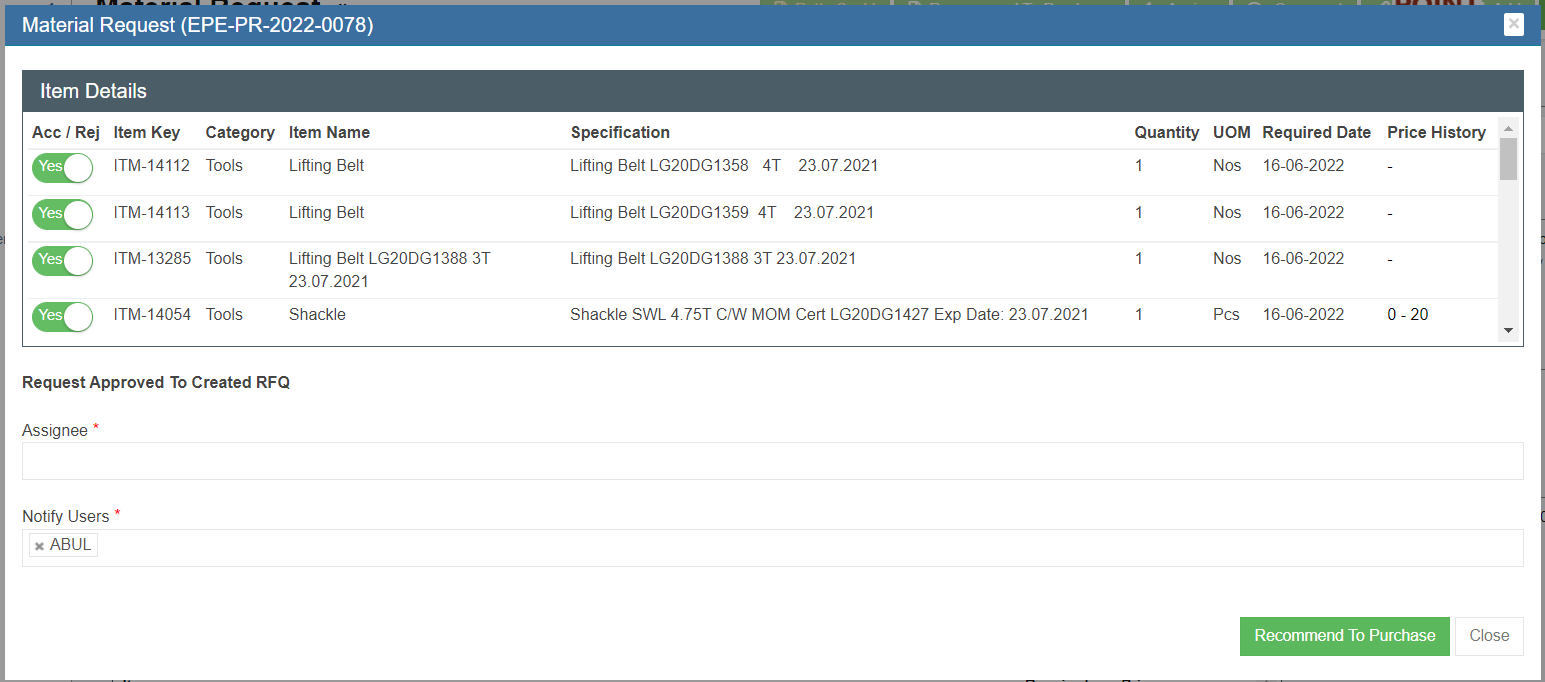](http://wiki.cuteinfocomm.com/uploads/images/gallery/2022-07/image-1659118325073.png)
2. Click to confirm Recommended To Purchase, a RFQ with unique key for tracking will be created automatically for the MR. See below RFQ table. [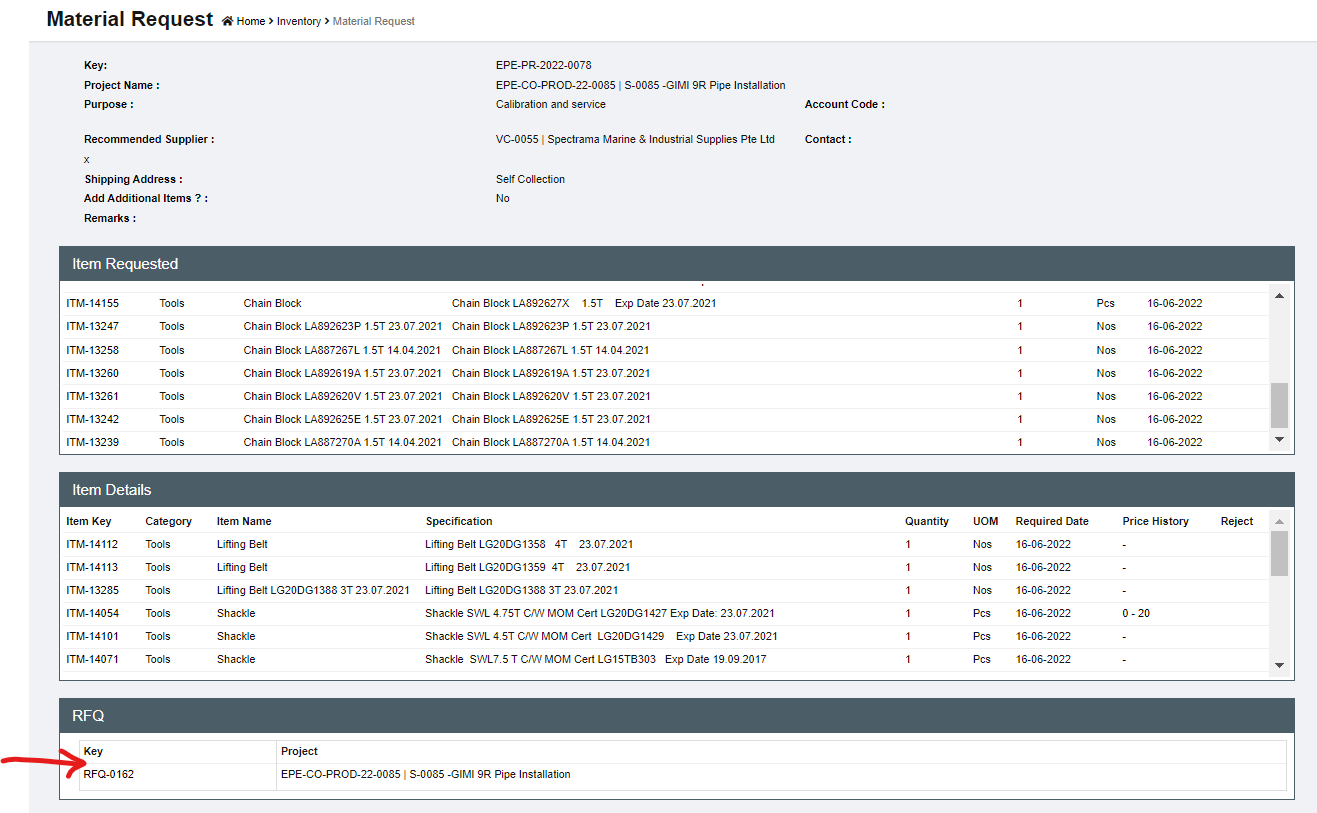](http://wiki.cuteinfocomm.com/uploads/images/gallery/2022-07/image-1659118591415.png)
3. The status of the MR is changed to “Created RFQ". [](http://wiki.cuteinfocomm.com/uploads/images/gallery/2022-07/image-1659118742205.png)
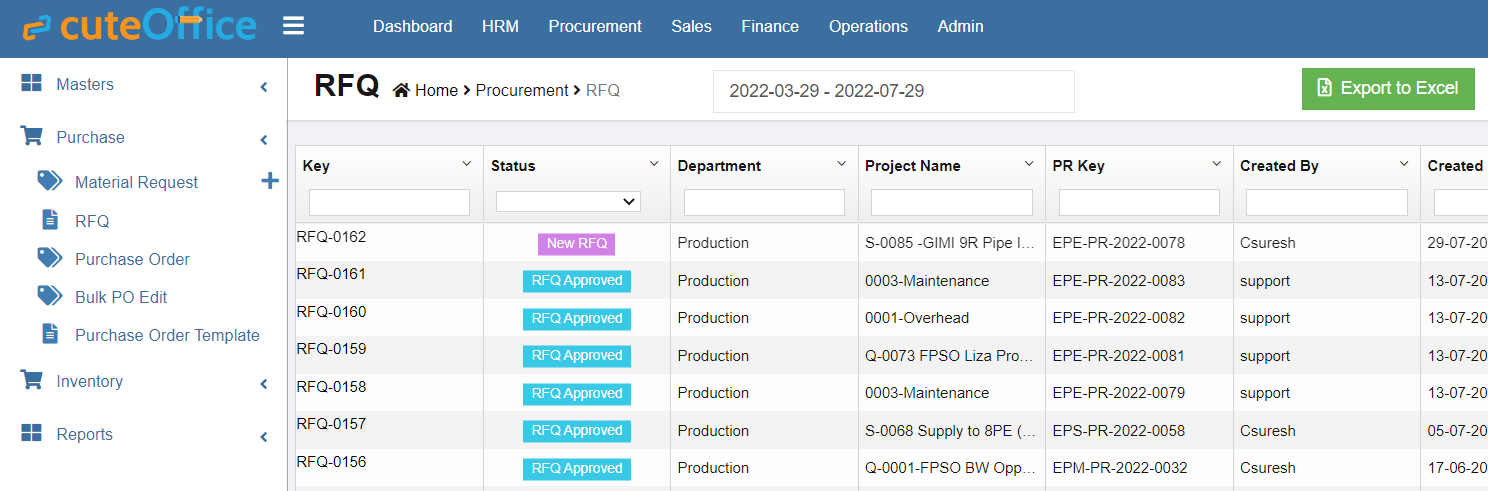
### Request for Quotation (RFQ)
Once RFQ is created, it can be accessed in the MR detail page or thru Procurement - > RFQ where all RFQs are listed. In RFQ, the purchase officer will send all the appropriate suppliers with a request for quotation. The quotation requests will be managed in this section.
[](http://wiki.cuteinfocomm.com/uploads/images/gallery/2022-07/image-1659119362593.png)
1. Click the RFQ key in the RFQ list page or in the MR detail page RFQ table, the RFQ detail page opens, see below:[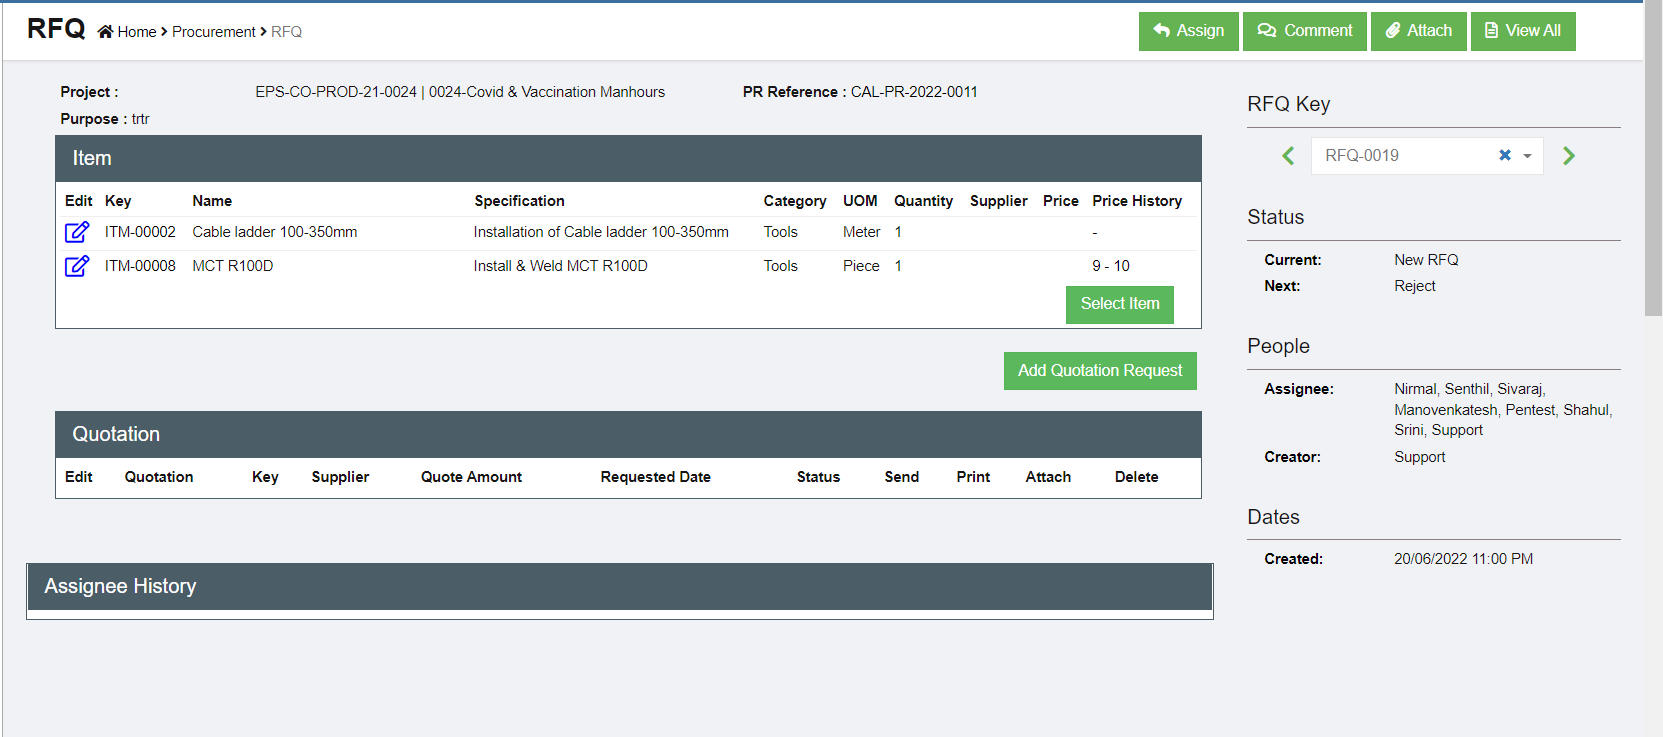](http://wiki.cuteinfocomm.com/uploads/images/gallery/2022-07/image-1659119696019.png)
2. Click[](http://wiki.cuteinfocomm.com/uploads/images/gallery/2022-07/image-1659119944809.png) (Add Quotation Request button) and the below window opens. [](http://wiki.cuteinfocomm.com/uploads/images/gallery/2022-07/image-1659120178625.png)
3. Select a supplier from the supplier dropdown list.
4. Select the items that we want to ask for quotation from the supplier. By default all the items in the
MR are selected. Company can request for quotation for different items from different suppliers.
5. Click[](http://wiki.cuteinfocomm.com/uploads/images/gallery/2022-07/image-1659120607001.png) to create the RFQ for the supplier. The below quotations for different suppliers are created.[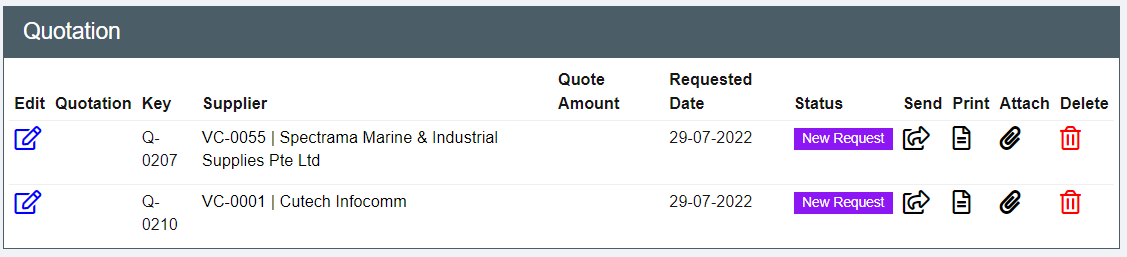](http://wiki.cuteinfocomm.com/uploads/images/gallery/2022-07/image-1659120779405.png)
6. The RFQ can be sent to suppliers by two ways:
- Click the[](http://wiki.cuteinfocomm.com/uploads/images/gallery/2022-07/image-1659121120075.png)(print button) to generate the RFQ which can be saved as PDF and sent to the supplier (make sure the Pop up is not blocked by web browser so that it can be viewed in the browser. If blocked click
on the red cross icon in the browser to allow opining the pdf RFQ) [](http://wiki.cuteinfocomm.com/uploads/images/gallery/2022-07/image-1659121588110.png)
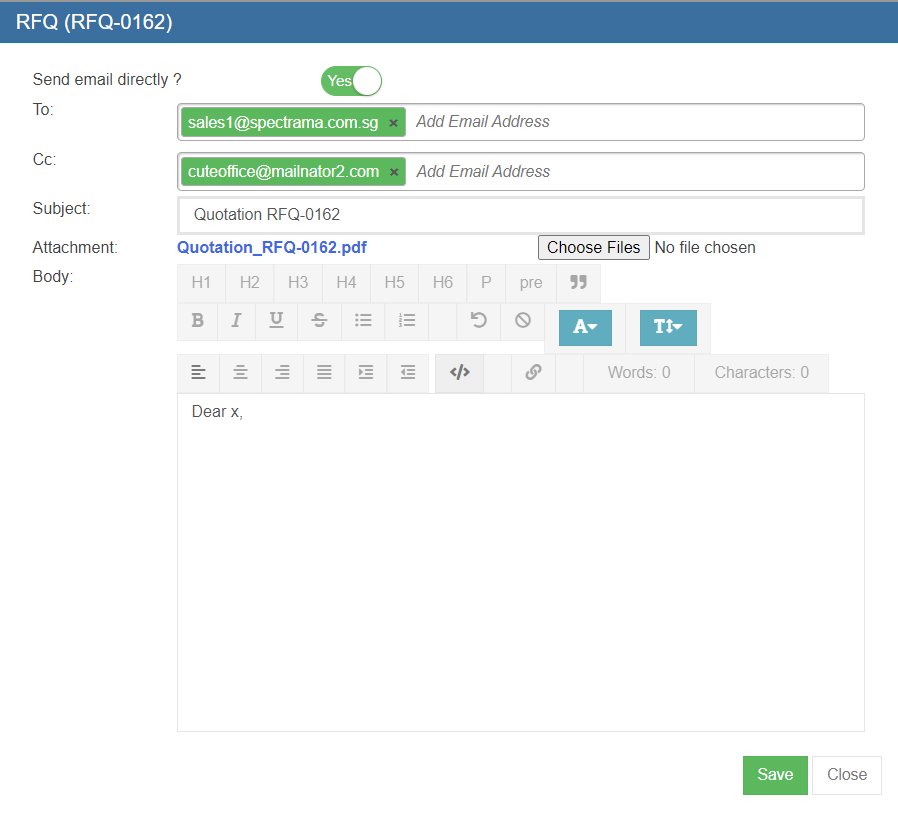
- Click[ ](http://wiki.cuteinfocomm.com/uploads/images/gallery/2022-07/image-1659121201329.png)to email the RFQ to suppliers directly from cuteOffice system (make sure to inform Cutech team to configure sender email address). Click to enable "Send email directly?", and the email template will open. Check and fill up required information and click [](http://wiki.cuteinfocomm.com/uploads/images/gallery/2022-07/image-1659122304476.png) to send email. [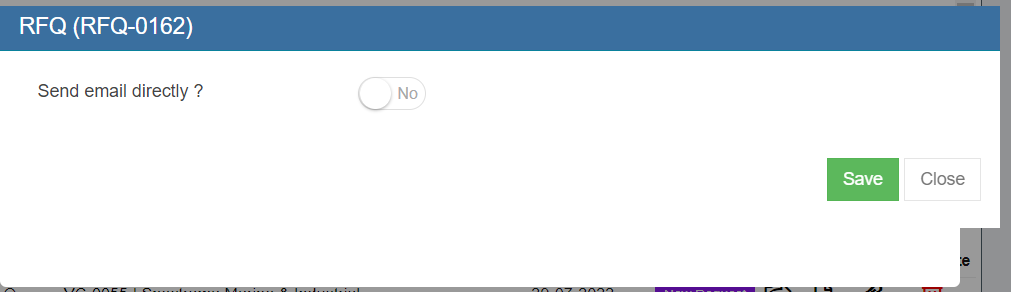](http://wiki.cuteinfocomm.com/uploads/images/gallery/2022-07/image-1659121721740.png)
[](http://wiki.cuteinfocomm.com/uploads/images/gallery/2022-07/image-1659121785016.png)
7. Once sent, the status of the RFQ is changed to Sent to Supplier. Once we receive quotation details from suppliers, we can enter the details in quotation.
[](http://wiki.cuteinfocomm.com/uploads/images/gallery/2022-07/image-1659122449306.png)
8. Click [ ](http://wiki.cuteinfocomm.com/uploads/images/gallery/2022-07/image-1659122563716.png)to open quotation page to enter details received from suppliers.
[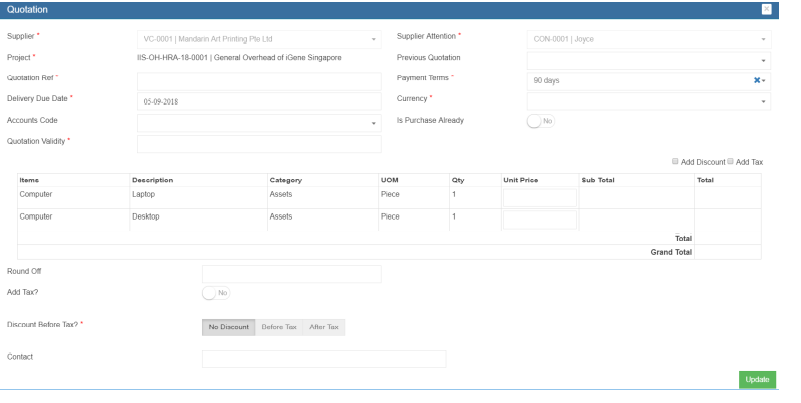](http://wiki.cuteinfocomm.com/uploads/images/gallery/2022-07/image-1659122655723.png)
9. Enter Quotation reference number, Quotation validity. The Payment terms, contact details are will appear automatically. Enter the price quoted and other details such as tax, discount etc. Click Update to save quotation details entered.
10. Once all the quotations are received and entered in the system, the purchaser will request the
Quote selection authorized personnel to select the Quote. This can be done by clicking [](http://wiki.cuteinfocomm.com/uploads/images/gallery/2022-07/image-1659122784062.png)the Request to Select Quotation button. The below dialog opens up. [](http://wiki.cuteinfocomm.com/uploads/images/gallery/2022-07/image-1659122828388.png)
11. Click Confirm. This action creates a new **RFQ Quote Selection** section in the RFQ see below.[](http://wiki.cuteinfocomm.com/uploads/images/gallery/2022-07/image-1659122932772.png)
12. The authorized persons who can do the selection of quotes can perform this action will see this
button. Click [ ](http://wiki.cuteinfocomm.com/uploads/images/gallery/2022-07/image-1659123048393.png)the selection button and the below window opens up. [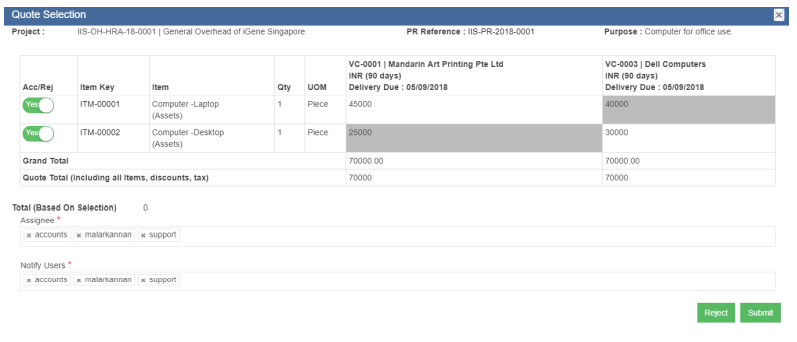](http://wiki.cuteinfocomm.com/uploads/images/gallery/2022-07/image-1659123107974.png)
13. The suppliers price along with the delivery due date are shown. The lowest price will be highlighted in
grey color. Click the supplier of choice for each item. The color will change to green
color. Click Submit to confirm the selection of vendors for purchasing. [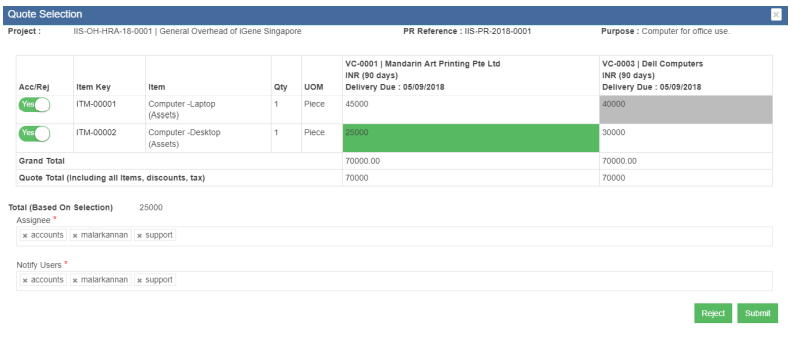](http://wiki.cuteinfocomm.com/uploads/images/gallery/2022-07/image-1659127790432.png)
[](http://wiki.cuteinfocomm.com/uploads/images/gallery/2022-10/image-1665545008903.png)
**Note: Added the above screen shot from Qa3.**
14. Click Yes when the confirmation message is prompted. This will trigger the notification to the
approver.
[](http://wiki.cuteinfocomm.com/uploads/images/gallery/2022-07/image-1659127833608.png)
15. The status of the RFQ is **Quote Selected**. Click the[](http://wiki.cuteinfocomm.com/uploads/images/gallery/2022-07/image-1659123048393.png) to approve the quote selection. [](http://wiki.cuteinfocomm.com/uploads/images/gallery/2022-07/image-1659127910894.png)
16. Once the quote selection is approved, the system gets updated as below and shown in transaction.
Also the status in the RFQ list is changed to Quote Selected. [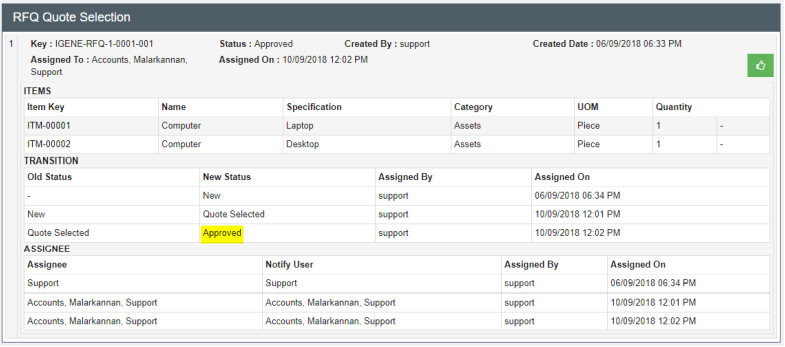](http://wiki.cuteinfocomm.com/uploads/images/gallery/2022-07/image-1659128005414.png)
[](http://wiki.cuteinfocomm.com/uploads/images/gallery/2022-07/image-1659128044890.png)
17. And a PO will be created automatically with **Pending PO status** and shown in the RFQ page as below. And it is ready for PO preparation. [](http://wiki.cuteinfocomm.com/uploads/images/gallery/2022-07/image-1659128139778.png)
# Purchase Order (PO)
After the RFQ is completed and approved, system will create PO (Status is **Pending PO**) and generate unique tracking key automictically. And the next step is preparing the Purchase Order (PO). In Purchase Order section, the purchase officer will prepare the final purchase order and send it to the suppliers.
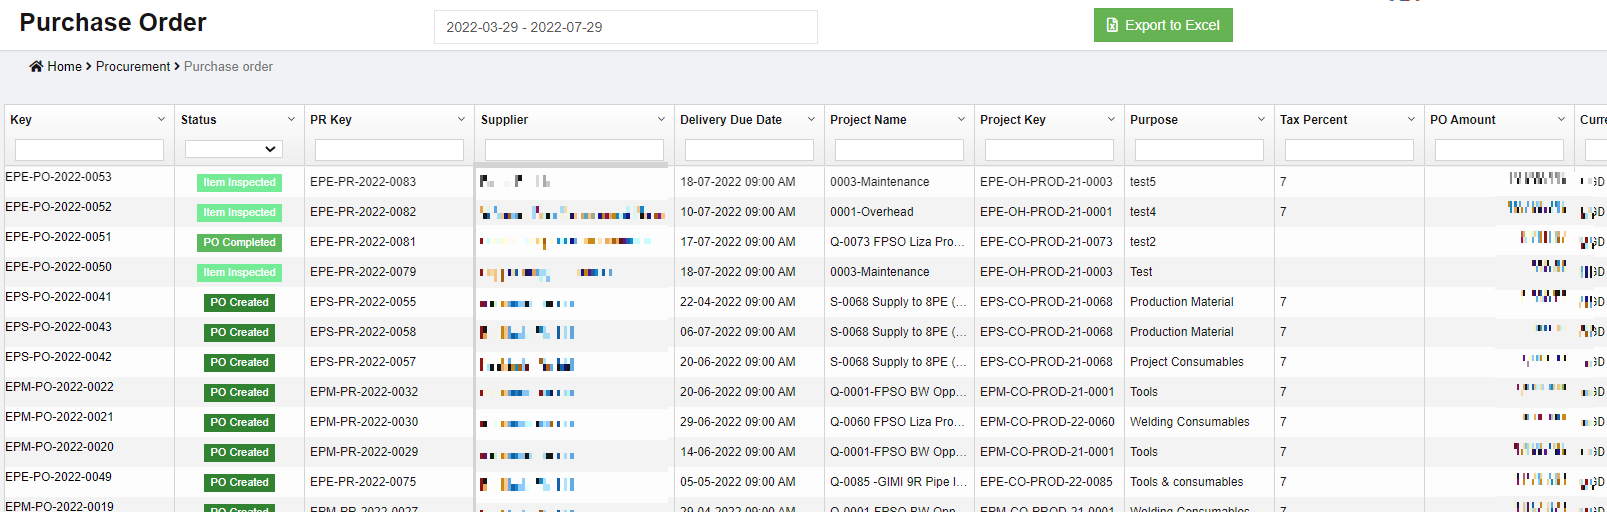
Click Procurement - > Purchase Order to open PO lists.
[](http://wiki.cuteinfocomm.com/uploads/images/gallery/2022-07/image-1659128576710.png)
### Create PO
The Purchase Orders can be reached by clicking the PO key from the PO list.
[](http://wiki.cuteinfocomm.com/uploads/images/gallery/2023-04/image-1682107210616.png)
Or the PO can be accessed directly from the RFQ details screen **Purchase Order** table,[](http://wiki.cuteinfocomm.com/uploads/images/gallery/2022-07/image-1659131478080.png)
1. Click the PO key of the selected PO, the PO screen opens as below and the status of the PO is “Pending PO” [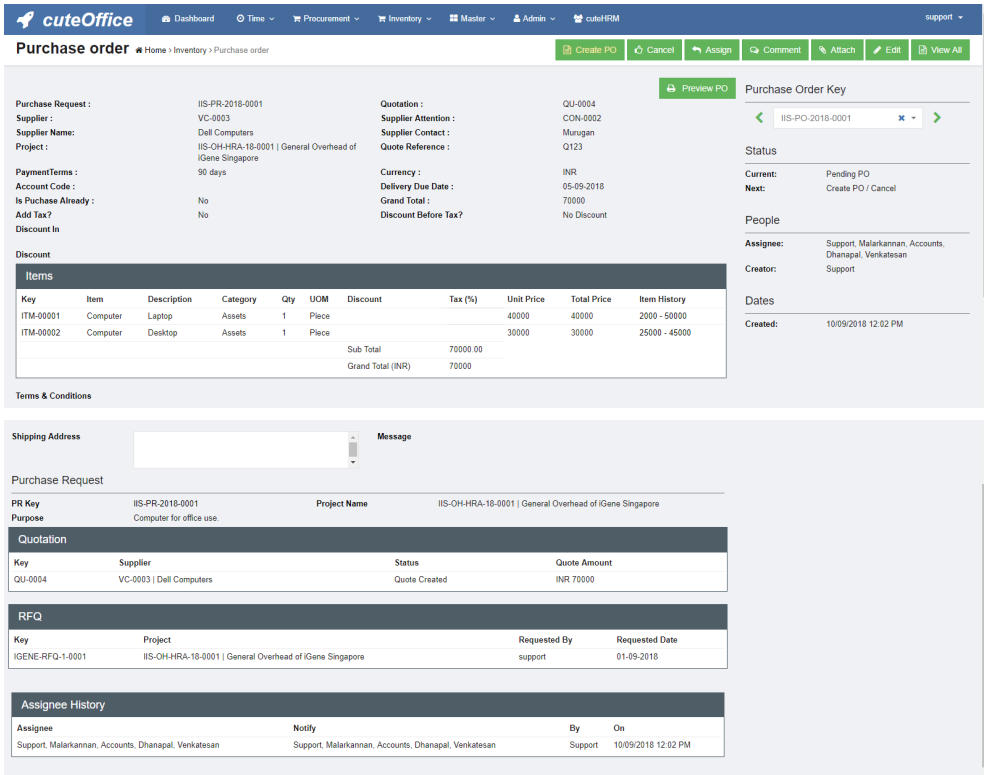](http://wiki.cuteinfocomm.com/uploads/images/gallery/2022-07/image-1659132254507.png)
2. There are many options available in PO page for the purchasing officer[](http://wiki.cuteinfocomm.com/uploads/images/gallery/2022-07/image-1659132325582.png)
3. Click [](http://wiki.cuteinfocomm.com/uploads/images/gallery/2022-07/image-1659132742449.png) edit icon, the PO detail page opens and purchase staff shall update the necessary additional information. [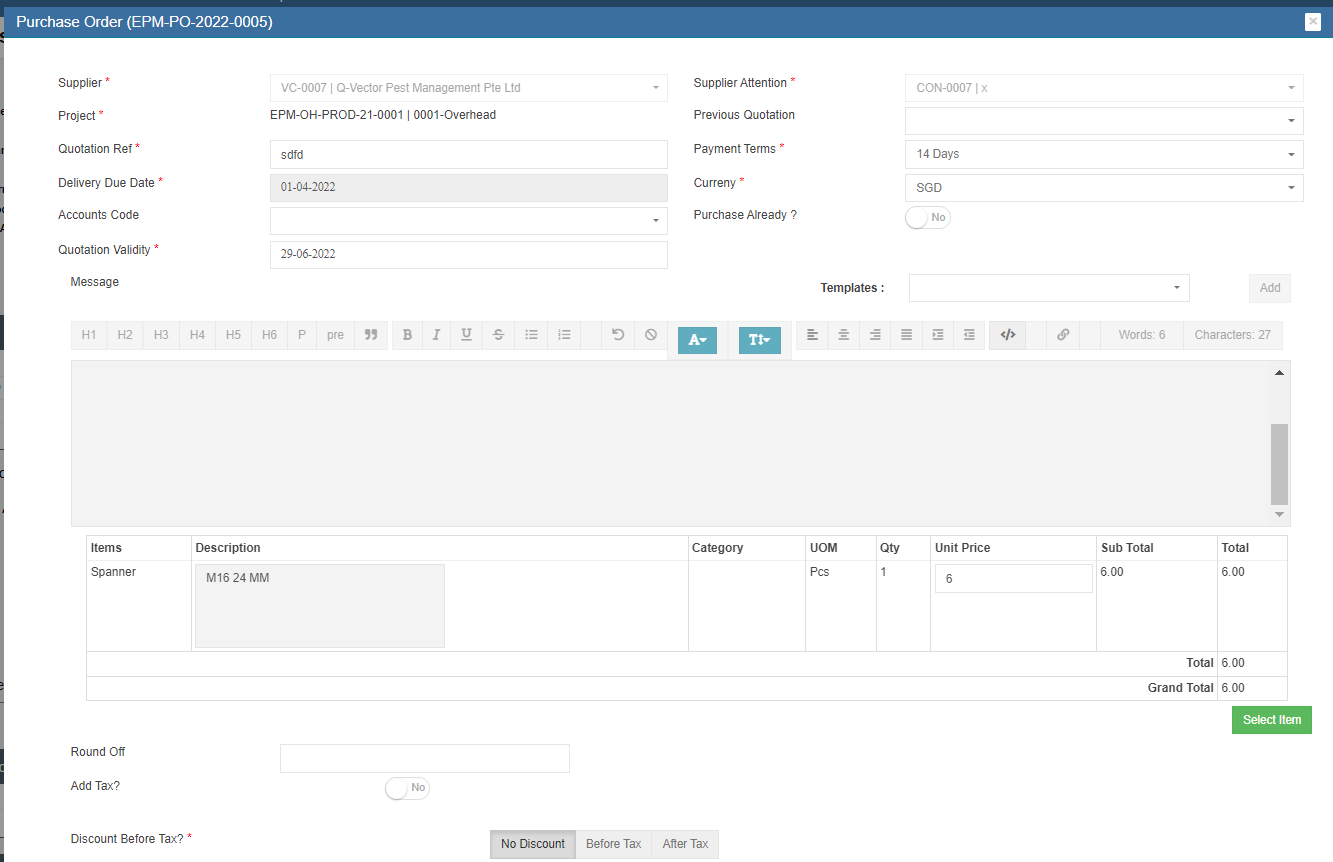](http://wiki.cuteinfocomm.com/uploads/images/gallery/2022-07/image-1659133105727.png)
[](http://wiki.cuteinfocomm.com/uploads/images/gallery/2022-07/image-1659133135678.png)
4. The payment terms and currency are all automatically filled from supplier master if it is available and
configured earlier. The item with its approved price is shown here. If any changes in price, purchasing officer shall edit the price.
5. Click Add Discount / Add Tax check boxes above to show more options. These options enables
additional columns and tax and discount can be applied.
- The discount can be entered in value such as 1500 in full number or in percentage such as 5%.
- The Tax can be entered against individual item as in many countries, there are different tax for different
items. Use this Tax text box if different values of taxes are required. Tax information are all captured in the RFQ stage itself and can’t be changed during PO
creation [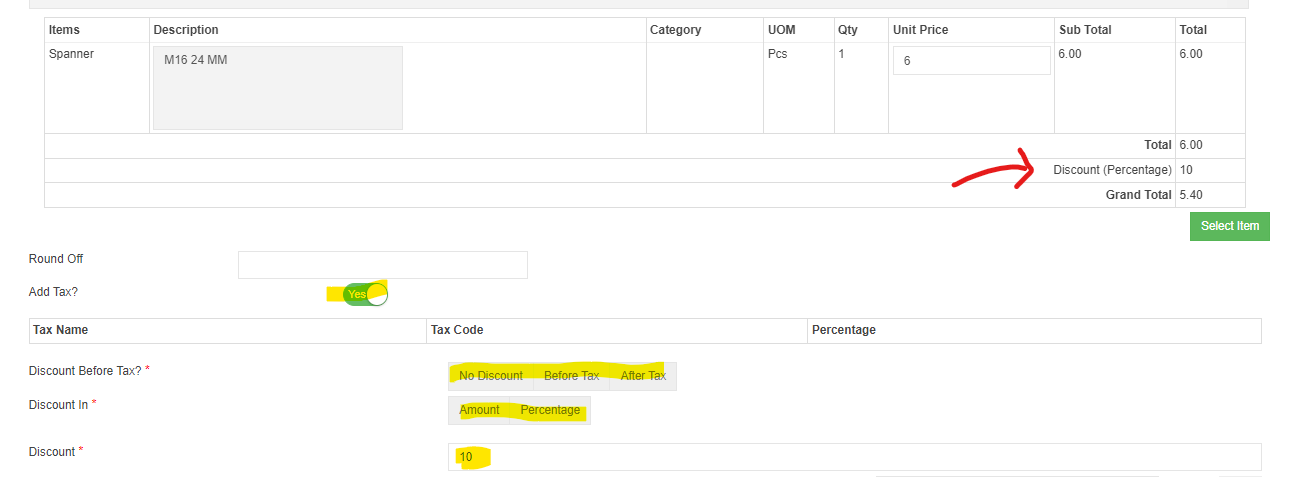](http://wiki.cuteinfocomm.com/uploads/images/gallery/2022-07/image-1659133374952.png)
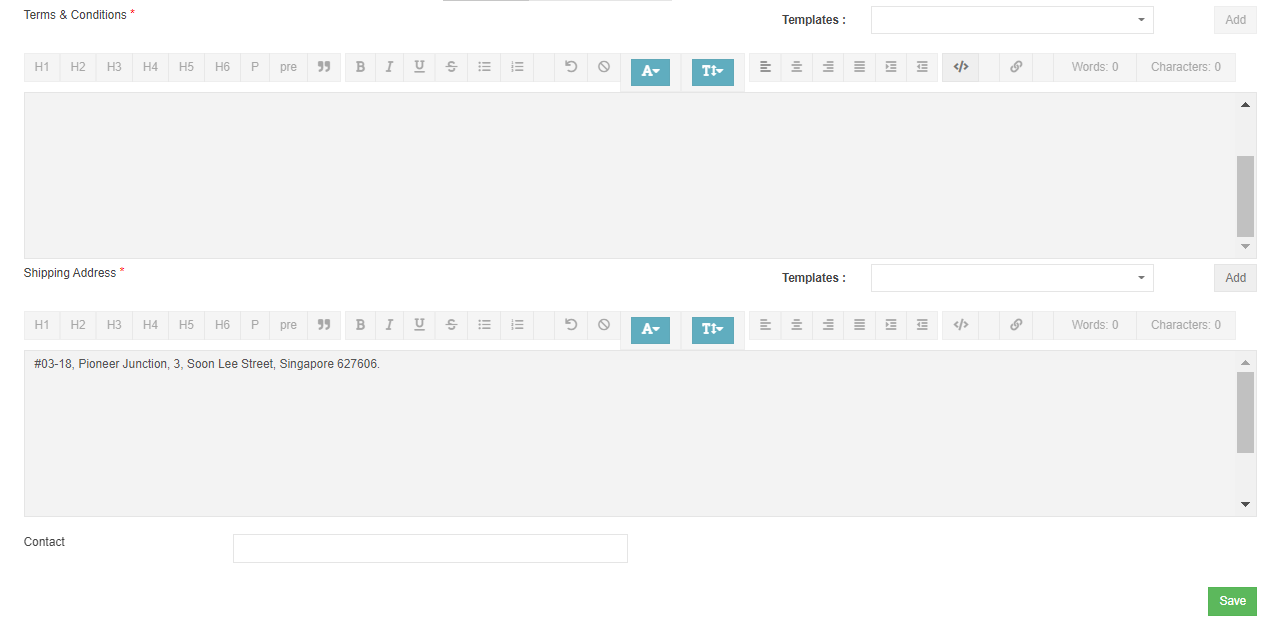
6. Terms and Conditions. Select the Terms and Condition from the templates available.
[](http://wiki.cuteinfocomm.com/uploads/images/gallery/2022-07/image-1659133921719.png)
7. Shipping Address and contact. Select the shipping address. The list of addresses are configured in the
company master. [](http://wiki.cuteinfocomm.com/uploads/images/gallery/2022-07/image-1659134021478.png)
8. Click [](http://wiki.cuteinfocomm.com/uploads/images/gallery/2022-07/image-1659134145661.png)save button to save edits. Edit window will be closed and return to the PO detail page.
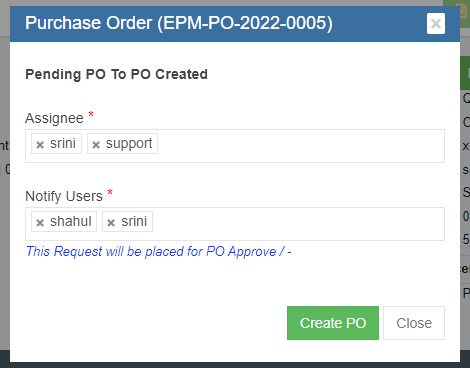
9. Click[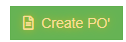](http://wiki.cuteinfocomm.com/uploads/images/gallery/2022-07/image-1659134269281.png)create PO button to create the PO. Below PO creation notification window opens, check and confirm then click create PO. Notifications will be send to selected users and PO is created and ready for approval.
[](http://wiki.cuteinfocomm.com/uploads/images/gallery/2022-07/image-1659134383217.png)
10. PO is created and ready for approval. User can preview PO before approval.[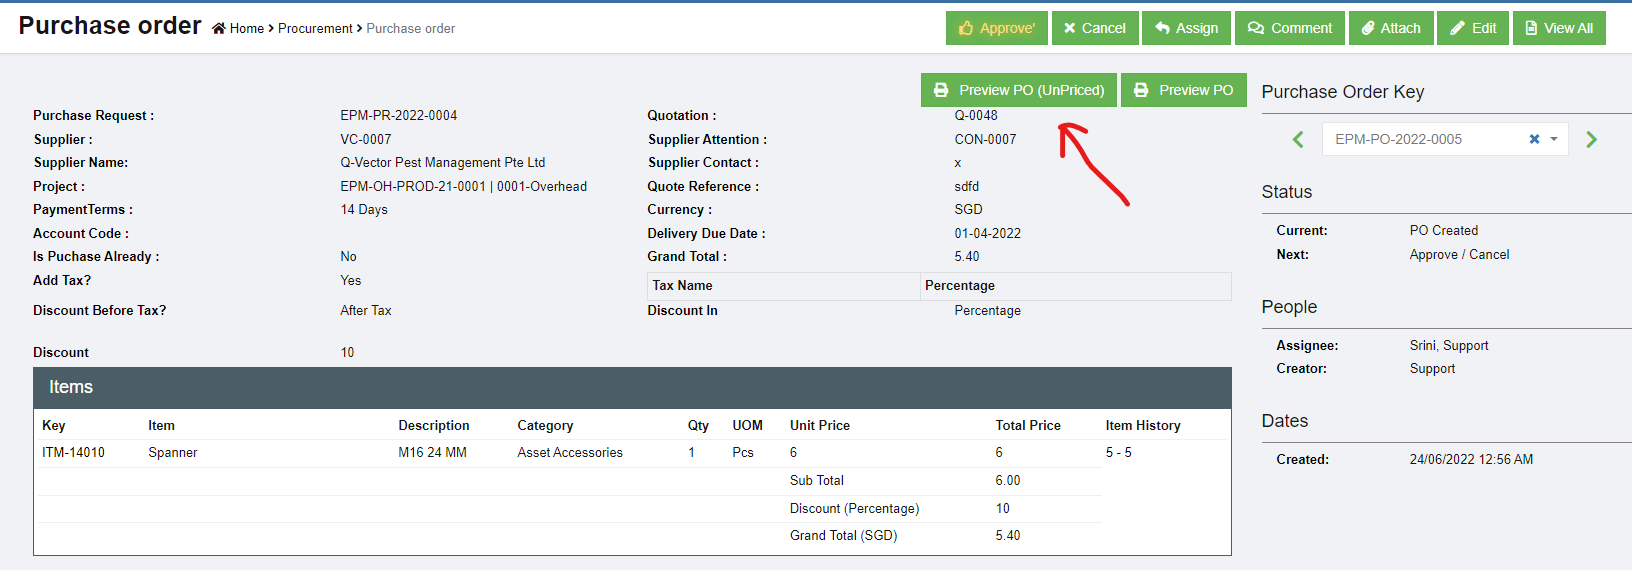](http://wiki.cuteinfocomm.com/uploads/images/gallery/2022-07/image-1659134626980.png)
### Approve PO
Only authorized users can approve PO. If user is granted with the permission to approve, user can click[](http://wiki.cuteinfocomm.com/uploads/images/gallery/2022-07/image-1659135013049.png) button to approve PO. After PO is approved, Preview PO will change to Print PO means that the PO is finalized and approved, user can print and send to suppliers.
[](http://wiki.cuteinfocomm.com/uploads/images/gallery/2022-07/image-1659135057081.png)
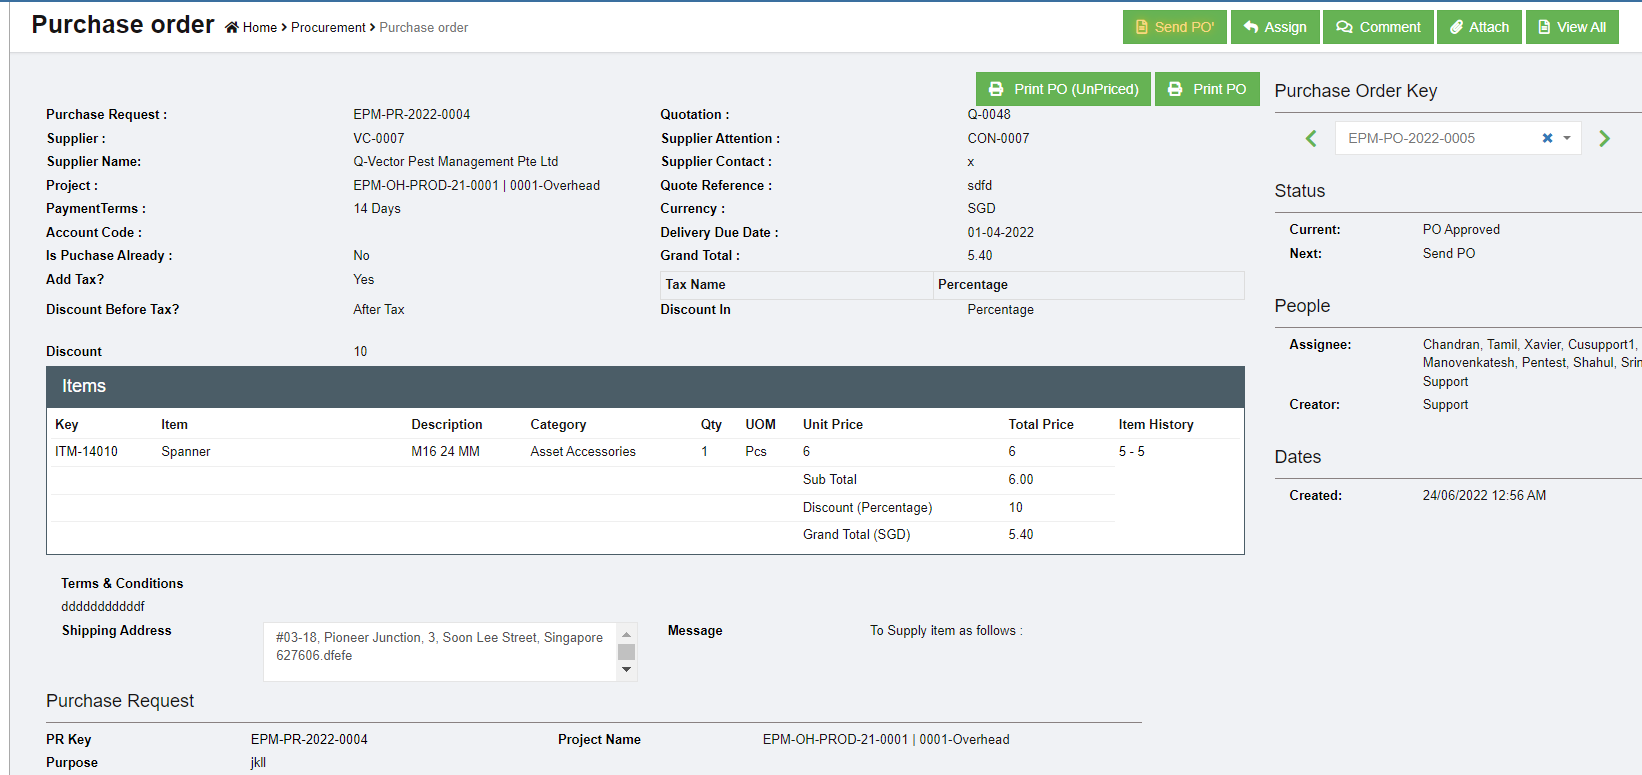
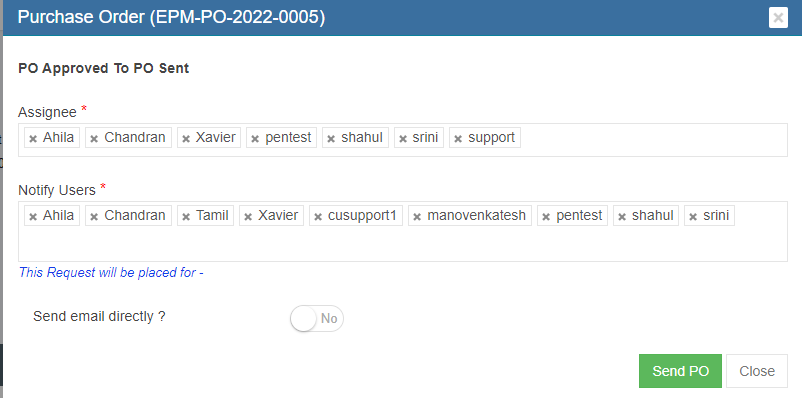
### Send PO
After PO is approved. Purchaser need to send it to that PO supplier. And the Send PO icon will blink for action.
Click [](http://wiki.cuteinfocomm.com/uploads/images/gallery/2022-07/image-1659135386853.png) , below window opens, and there are two ways to send PO.
[](http://wiki.cuteinfocomm.com/uploads/images/gallery/2022-07/image-1659135229112.png)
1. Send email directly from cuteOffice system: click to enable "Send email directly?" to **Yes,** and below emailing window opens. User shall fill up all required information and click **Send PO** at the end. [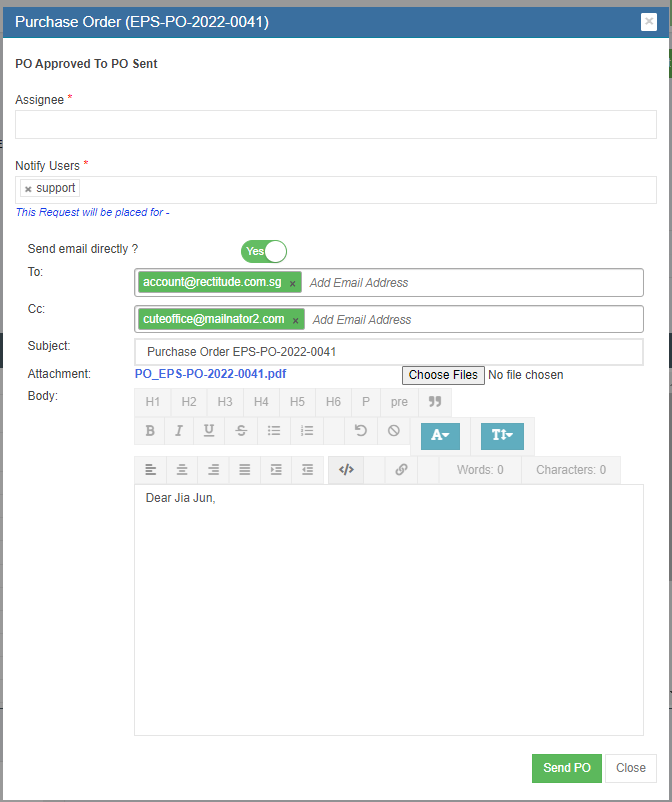](http://wiki.cuteinfocomm.com/uploads/images/gallery/2022-08/image-1659377820626.png)
2. Print PO and email as attachment to suppliers: enable the "Send email directly?" to **NO,** then click send PO to update status. The send PO window will close and redirected to PO detail page, user can click Print PO and download as pdf, and email to suppliers. [](http://wiki.cuteinfocomm.com/uploads/images/gallery/2022-08/image-1659378292491.png)
### Amend PO
If there are any changes agreed by both company and suppliers after PO is sent to suppliers (e.g. supplier side price increase, company side add more quantities etc. ), user can use the **Amend PO** option to amend. After PO is amended, authorized user need to approve the amended PO.
[](http://wiki.cuteinfocomm.com/uploads/images/gallery/2022-08/image-1659378406220.png)
### PO Acknowledgement
After PO is sent to supplier and supplier has acknowledged it, **purchaser** need to upload the signed acknowledgement along with date and other details.
1. To upload PO acknowledgement, click Add button in ‘Acknowledgement PO’ section under PO detail view page.[](http://wiki.cuteinfocomm.com/uploads/images/gallery/2022-08/image-1659378792940.png)
2. The acknowledgement window opens, user shall fill up details and choose acknowledgement file to upload.[](http://wiki.cuteinfocomm.com/uploads/images/gallery/2022-08/image-1659378842601.png)
3. Click **Save** to complete PO acknowledgement, the details will be saved in the acknowledgement PO section. [](http://wiki.cuteinfocomm.com/uploads/images/gallery/2022-08/image-1659379054846.png)
### Receiving Entry
Store keeper role users need to fill up delivery order details and attach delivery order copy to system once items received from suppliers. System allows for multiple receive entry against each PO. The Receiving Entry section is in the PO detail view page, see below,
[](http://wiki.cuteinfocomm.com/uploads/images/gallery/2022-08/image-1659379297770.png)
1. To register receive entry, click Add button in Receiving Entry section, below receive entry window opens, [](http://wiki.cuteinfocomm.com/uploads/images/gallery/2022-08/image-1659379411707.png)
2. Store keepers shall fill up all details and the correct quantities received, then click **Save** to save details entered. [](http://wiki.cuteinfocomm.com/uploads/images/gallery/2022-08/image-1659379526038.png)
### Inspection
Every receiving entry need to inspected to ensure quality purchasing. Inspection is usually done by PR creator or Project Manager. The Inspect button is located in the receiving entry section, see below,
[](http://wiki.cuteinfocomm.com/uploads/images/gallery/2022-08/image-1659379746286.png)
1. To inspect, click the Inspect button, below inspection window opens,[](http://wiki.cuteinfocomm.com/uploads/images/gallery/2022-08/image-1659379716508.png)
2. User need to enter the accepted quantity and click **Save**. After click the save button then system will increase/add the quantity into store’s stock. And the inspection section will be updated with inspection details, [](http://wiki.cuteinfocomm.com/uploads/images/gallery/2022-08/image-1659379941355.png)
### Invoice Entry
Account Executive role user shall do the Invoice Entry which means enter supplier’s invoice into the system. Attachment is compulsory for invoice entry. System allow multiple invoice entries for each PO. The Invoice Entry is located in PO detail view page, see below,
[](http://wiki.cuteinfocomm.com/uploads/images/gallery/2022-08/image-1659381313579.png)
1. To do invoice entry, click the Add button, the invoice entry window opens, [](http://wiki.cuteinfocomm.com/uploads/images/gallery/2022-08/image-1659381423811.png)
2. check and fill up the invoice amount and other details, attach invoice copy and click **Save**. The details of invoice entered will be save and updated in invoice entry section, [](http://wiki.cuteinfocomm.com/uploads/images/gallery/2022-08/image-1659381610163.png)
### Payment Entry
Account Executive role users shall do payment entry once invoice is cleared. Payment entry can be done against entire PO or against multiple invoices for this PO. The Payment entry is located in the PO detail view page, see below,
[](http://wiki.cuteinfocomm.com/uploads/images/gallery/2022-08/image-1659381743991.png)
1. To entry payment record, click Add button in payment section, below payment window opens, [](http://wiki.cuteinfocomm.com/uploads/images/gallery/2022-08/image-1659381854637.png)
2. User can do either payment against Invoice, or against PO,
- Payment against Invoice: click and choose Invoice as entry method, and enter details in invoice payment window[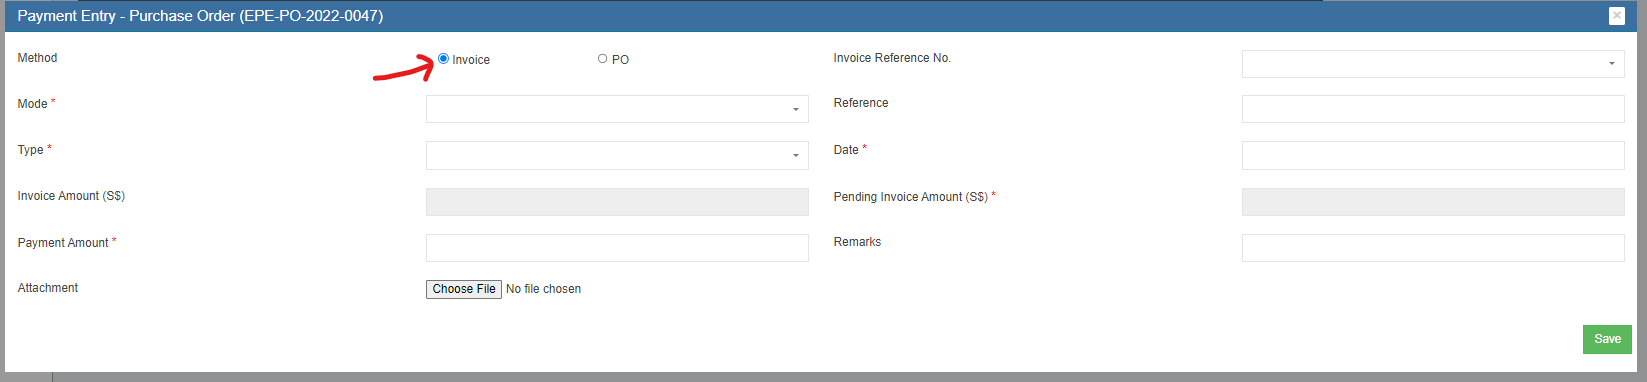](http://wiki.cuteinfocomm.com/uploads/images/gallery/2022-08/image-1659382022335.png)
- Payment against PO, click and choose PO as entry method, and enter detail in PO payment window [](http://wiki.cuteinfocomm.com/uploads/images/gallery/2022-08/image-1659382130968.png)
3. Click **Save.** The payment details entered will be saved. [](http://wiki.cuteinfocomm.com/uploads/images/gallery/2022-08/image-1659382248404.png)
**Note: Once PO Acknowledgement, Receiving entry, inspection, invoice, payment entry are completed in the system, the Po**
**status will automatically change to ‘PO Completed’**
#### **Purchase module Integration to Financial Accounting module**
As part of Integration, invoices created in Purchase module against the Purchase Order raised and linked to the Financial Module Staging location. Subsequently, customer need to approve the vouchers in the Staging location which will then reflect in the accounting entries as per the below configuration created.
Please follow the below steps to post entries from the Purchase Module to Financial Module Staging location.
**Step1: To enable Purchase Module Integration to Accounts for a Company**
**In Cute Office, Admin -> Company -> Select Edit.**
[](https://wiki.cuteinfocomm.com/uploads/images/gallery/2024-04/image-1713258686904.png)
Settings ->
**Step 1: Configuration Name - Purchase Module Linked To Finance**
-> Select Edit -> Make Value as **Yes.** *By default this value will be No*
**[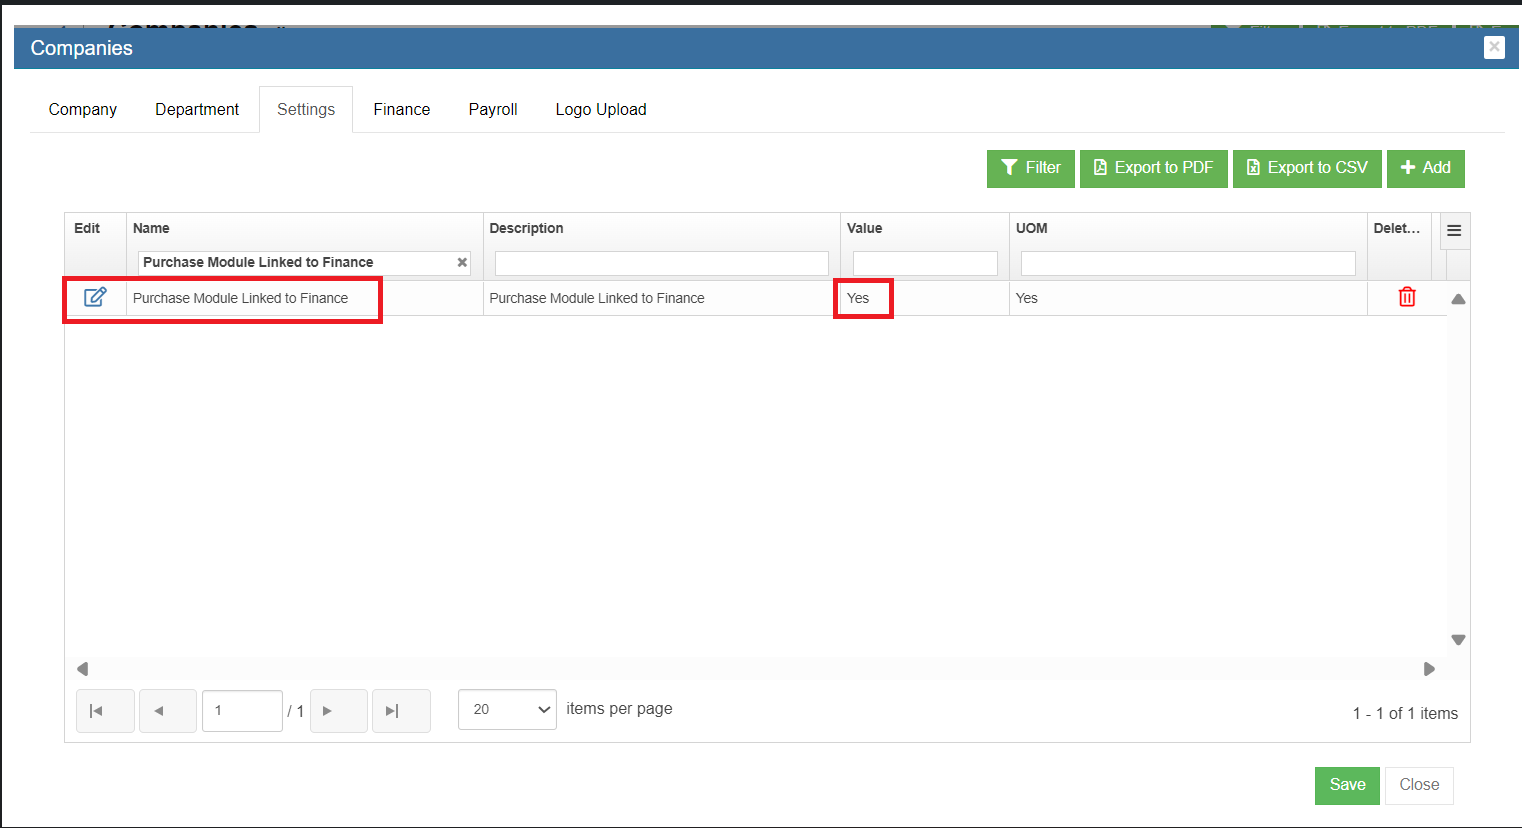](https://wiki.cuteinfocomm.com/uploads/images/gallery/2024-04/image-1713259099378.png)**
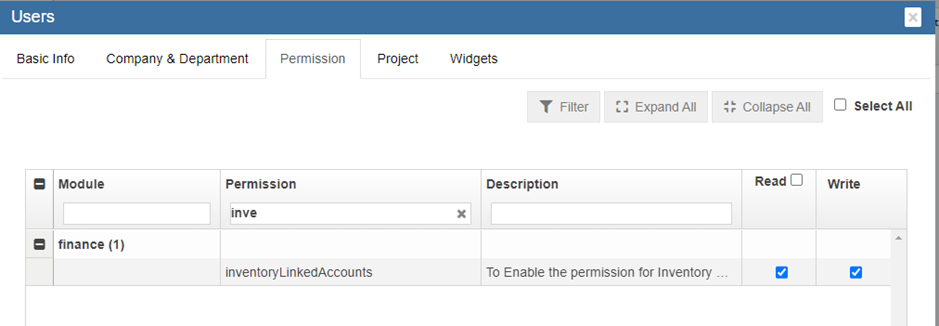
Step 2: Enable Permission to the User to Configure GL Accounts Codes to be linked to Accounting Module**
**Permission Name - InventoryLinkAccount**
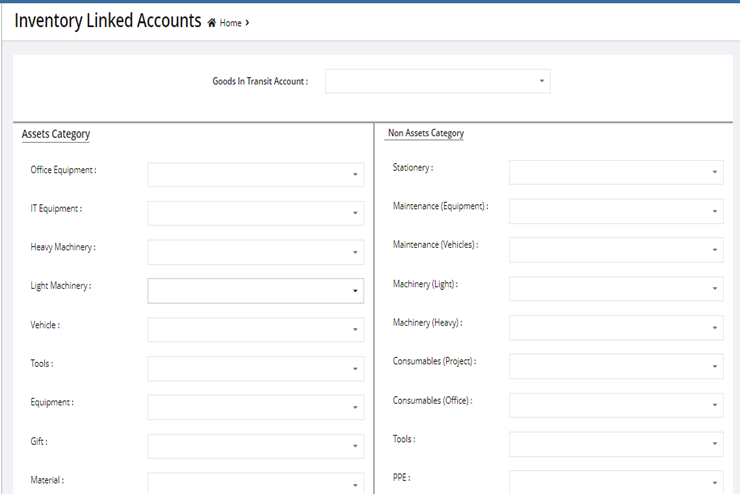
Step 3: Linking GL Account Code to Items (will be available only if Permission is provided through Step 2 is enabled)**
-> **Go To Finance -> Link Account Setup -> Inventory Linked Menu option**
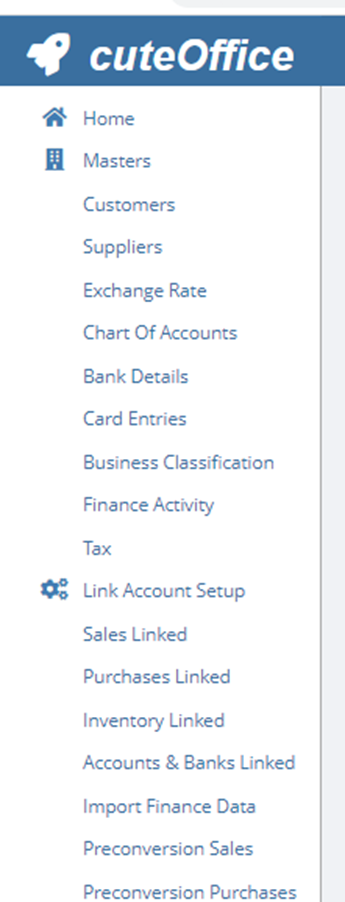
-> **Setup All Asset Category and Non-Asset Category and Goods In Transit Account for GL Insert**
**Step 4: Posting Purchase Orders to Financial Accounting Module**
Go to Procurement-> Purchase Order-> View any PO.
**Post To Accounts** Tab Will be Available In **Invoice Entry Table**
**Click Post To Account** to post the invoice to Accounting Module
[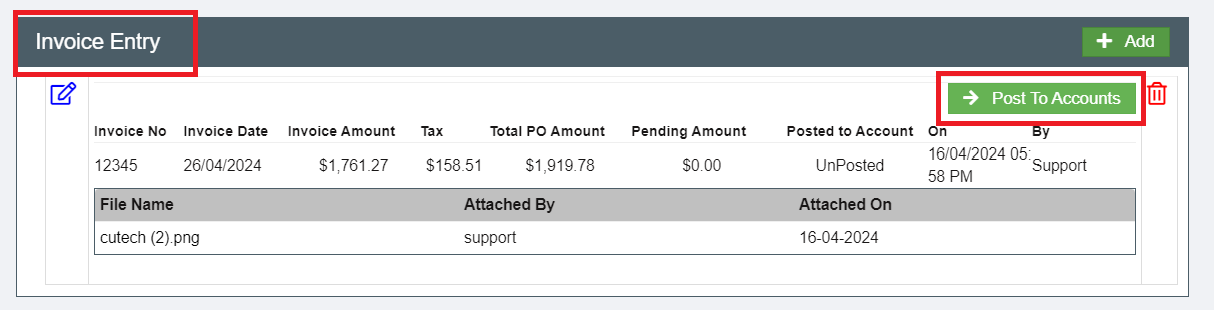](https://wiki.cuteinfocomm.com/uploads/images/gallery/2024-04/image-1713261643957.png)
**Step 5: Enable Permission to View / Post Vouchers in Staging Location**
Go To-> Admin -> Users -> Permissions Tab
- To View Staging Menu In Finance -> Enable the Permission.
[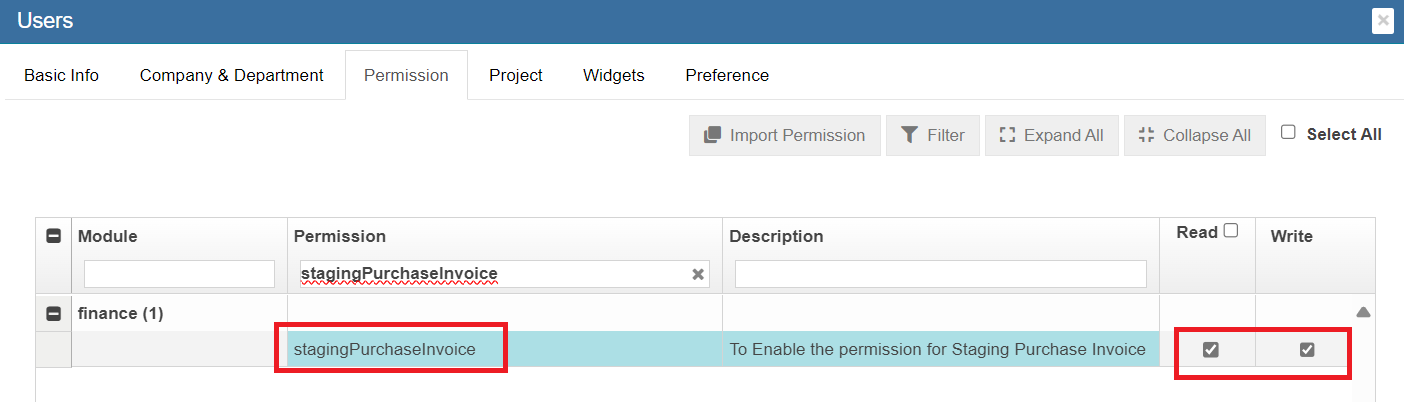](https://wiki.cuteinfocomm.com/uploads/images/gallery/2024-04/image-1713261058618.png)
**Step 6: To Approve the Vouchers to Accounting Module**
Go To -> Finance - > Module Integration Staging
1. Staging Purchase Invoice
[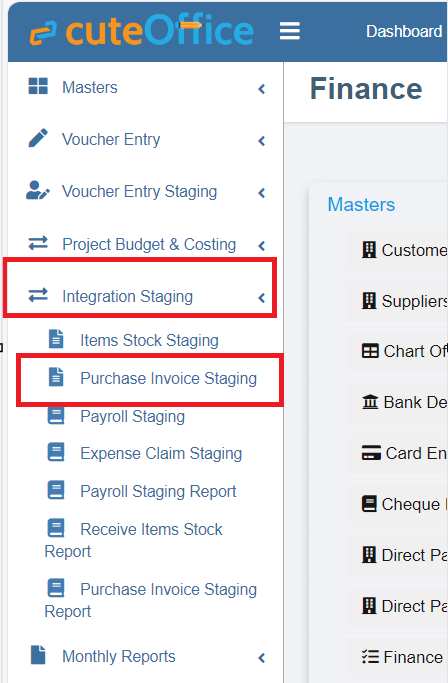](https://wiki.cuteinfocomm.com/uploads/images/gallery/2024-04/image-1713261327450.png)
- To View and Approve the Posted Invoices In Staging Area.
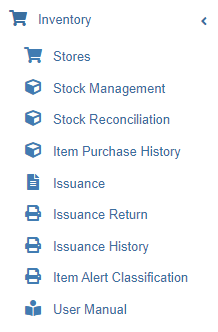
# Inventory
Inventory module provides systematic way to record items received from purchasing, inspect, store and stock management, asset management, write-off, issuance and returns. Inventory module includes below submenus:
[ ](http://wiki.cuteinfocomm.com/uploads/images/gallery/2022-08/image-1659389119106.png)
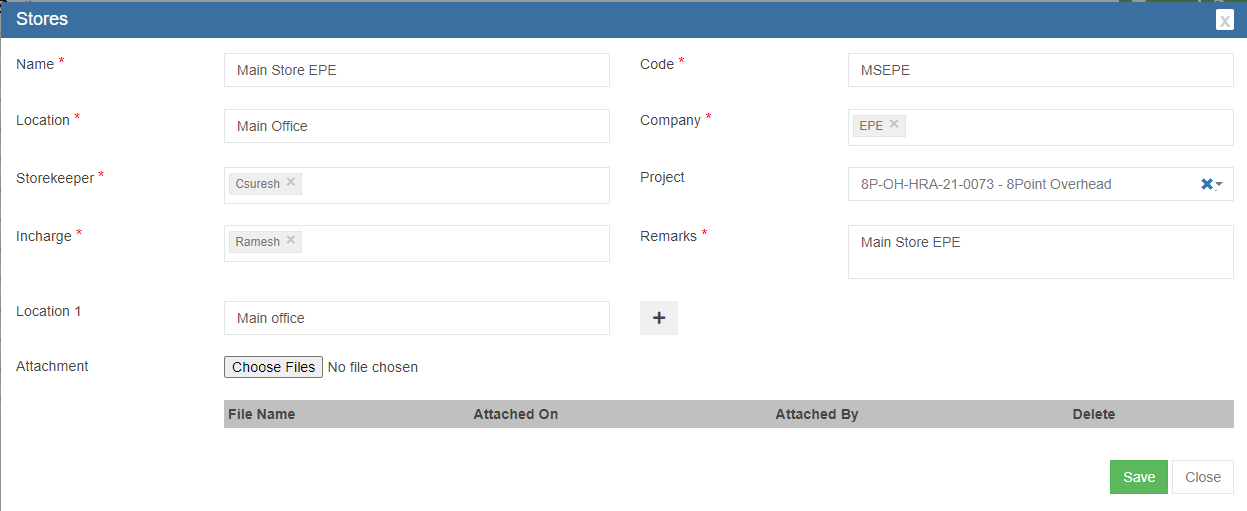
## Stores
Store master contains the list of stores. System allows to add store with person in charge and project.
### View Stores
Click **Stores** in Inventory module menu, the list of stores added in system will show as below,
[](http://wiki.cuteinfocomm.com/uploads/images/gallery/2023-04/image-1682107336046.png)
To view individual store details, click the key of the store, the store detail page opens,
[](http://wiki.cuteinfocomm.com/uploads/images/gallery/2022-08/image-1659396342876.png)
### Add/Edit Store
If store’s in charge person have project manager role in user profile, then the user has permission to approve this store’s issuance requests. System allows for multiple locations for each store.
To add store,
1. click [](http://wiki.cuteinfocomm.com/uploads/images/gallery/2022-08/image-1659396560874.png) button in store list view page, below store detail page opens,[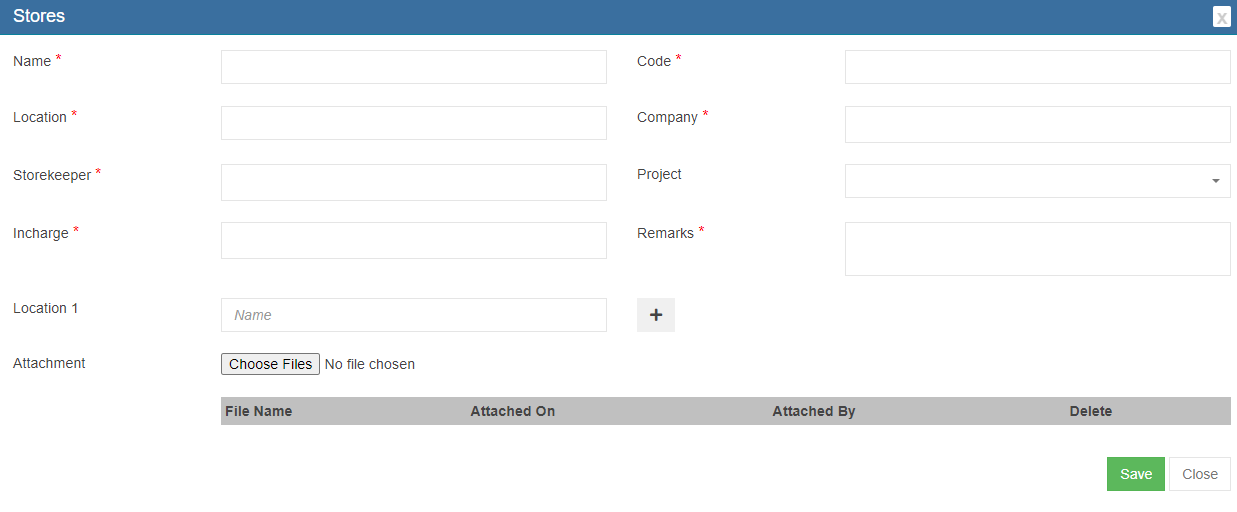](http://wiki.cuteinfocomm.com/uploads/images/gallery/2022-08/image-1659396521317.png)
2. Fill up all required details. If the store has multiple locations, click the[](http://wiki.cuteinfocomm.com/uploads/images/gallery/2022-08/image-1659396661533.png) icon after the location 1 and enter location details.
3. Click **Save**. The store is added in system.
To edit store,
1. Click[](http://wiki.cuteinfocomm.com/uploads/images/gallery/2022-08/image-1659396878886.png)in front of the store in store list view, the store detail page opens.
2. Edit with updated information, then click **Save** to save edits.
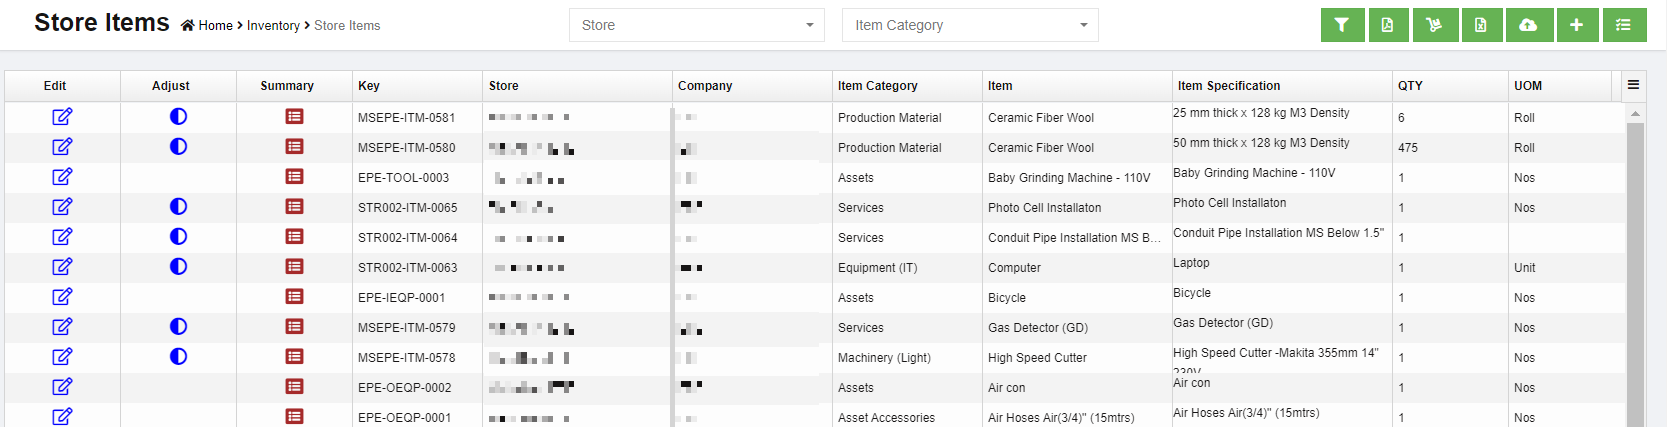
## Stock Management
**Note:** The quantity of item that categorized as ‘Asset’ and/or ‘Asset Accessories’ is always 1. The rest of item's quantity
is always greater than 1.
To view the stores' stock, click ‘Stock Management’ submenu in the Inventory menu. The stock management (Store Items) page opens as below,
[](http://wiki.cuteinfocomm.com/uploads/images/gallery/2023-04/image-1682107396779.png)
#### Filter Store Item
Users can filter store item using filters as below:
[](http://wiki.cuteinfocomm.com/uploads/images/gallery/2022-08/image-1659545291770.png)
- Select store from dropdown list
- Select item category from dropdown list
- Or click the[](http://wiki.cuteinfocomm.com/uploads/images/gallery/2022-08/image-1659545356466.png) button to enable more filters [](http://wiki.cuteinfocomm.com/uploads/images/gallery/2022-08/image-1659545434168.png)
#### Store Item Summary
In item summary page, users can view the purchase history, store stock details, adjustment history, issuance and return
history of the item.
Click [](http://wiki.cuteinfocomm.com/uploads/images/gallery/2022-08/image-1659545655946.png)(Summary icon), the summary details of the item will show as below,
[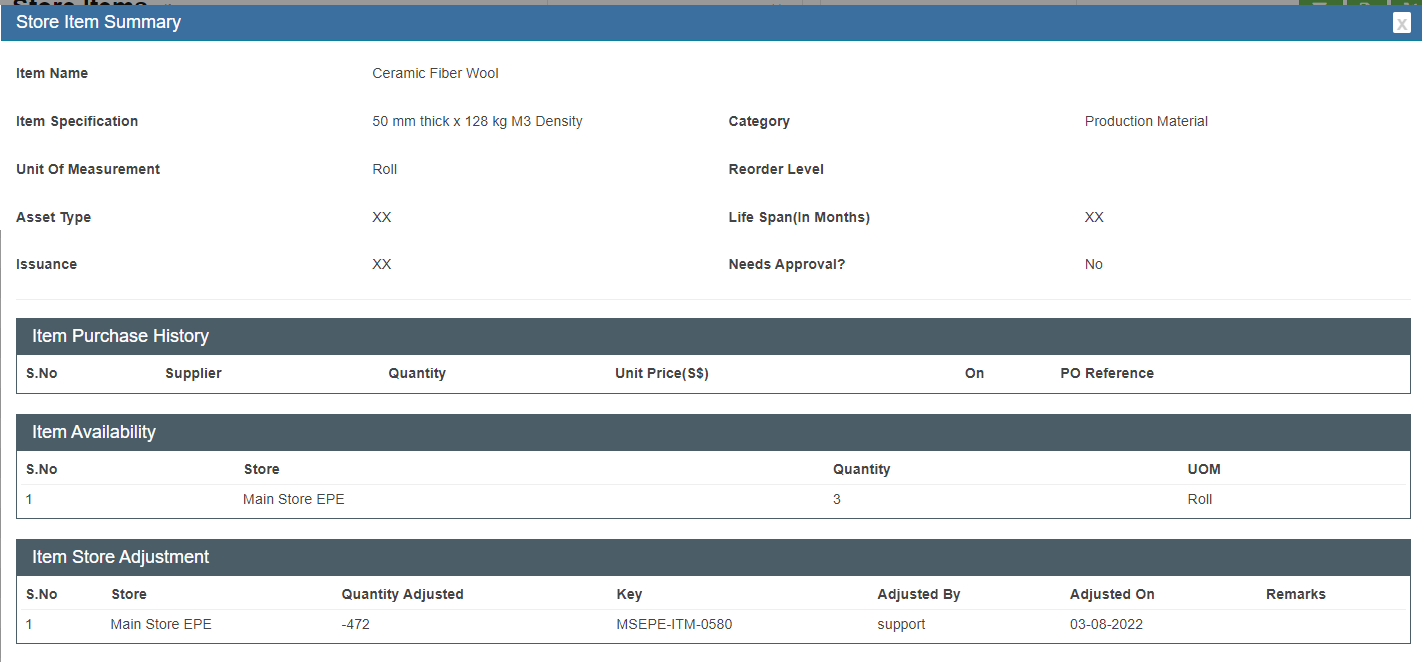](http://wiki.cuteinfocomm.com/uploads/images/gallery/2022-08/image-1659545599905.png)
#### Item Quantity Adjustment
Users can adjust the item quantity manually. System will record the history of adjustments. Store item quantity adjustment can only be done for items that are not categorized as ‘Asset’ and ‘Asset Accessories’
Click[](http://wiki.cuteinfocomm.com/uploads/images/gallery/2022-08/image-1659545983153.png) (adjustment button), the item quantity adjustment window opens. In **New Quantity** field, enter the updated quantity figure. E.g. if enter as 3, then the total quantity of the item becomes 3.
[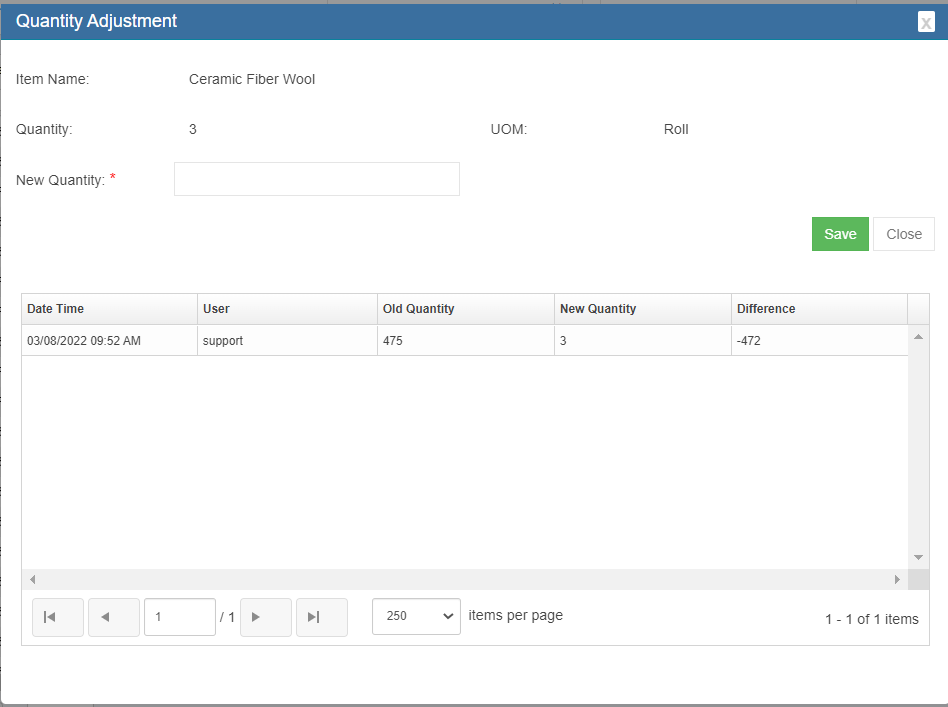](http://wiki.cuteinfocomm.com/uploads/images/gallery/2022-08/image-1659546088294.png)
#### Calibration, Maintenance, License, Warranty of Asset
The stock management also provides options to manage assets items. If there is any change in asset calibration, maintenance, license and warranty details, user can[](http://wiki.cuteinfocomm.com/uploads/images/gallery/2022-08/image-1659546566123.png)edit button of an asset item, and navigate to the relevant tabs, and fill up with updated information. Then click **Save**.
[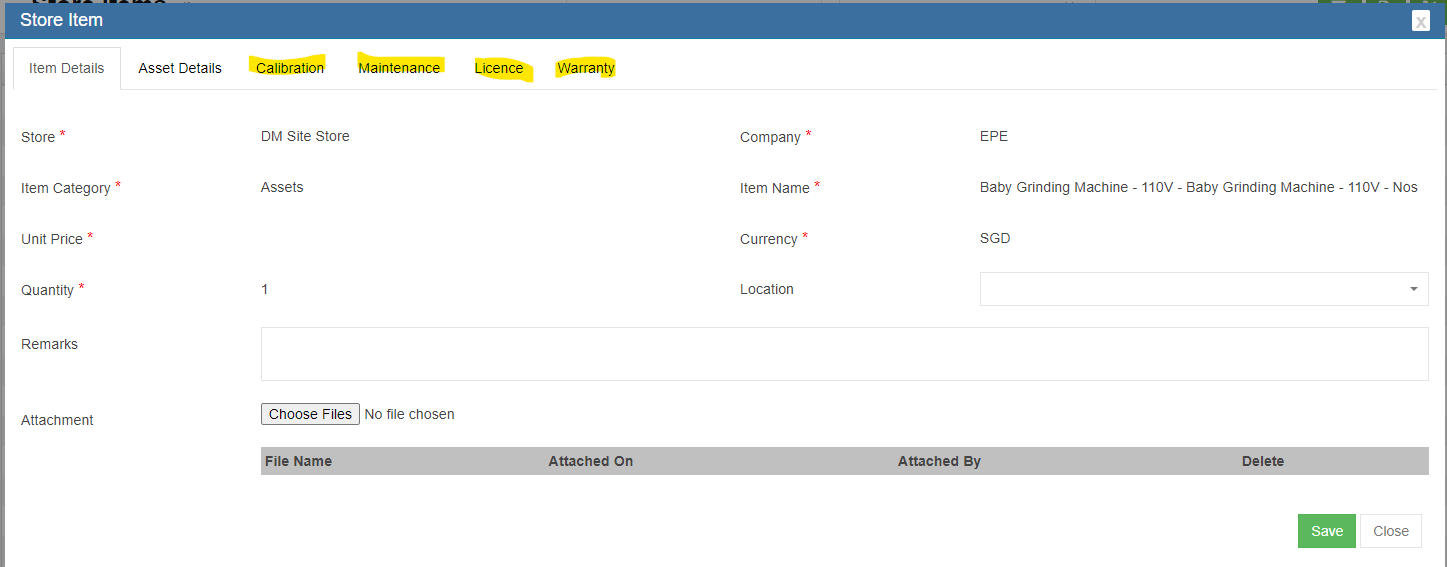](http://wiki.cuteinfocomm.com/uploads/images/gallery/2022-08/image-1659546660696.png)
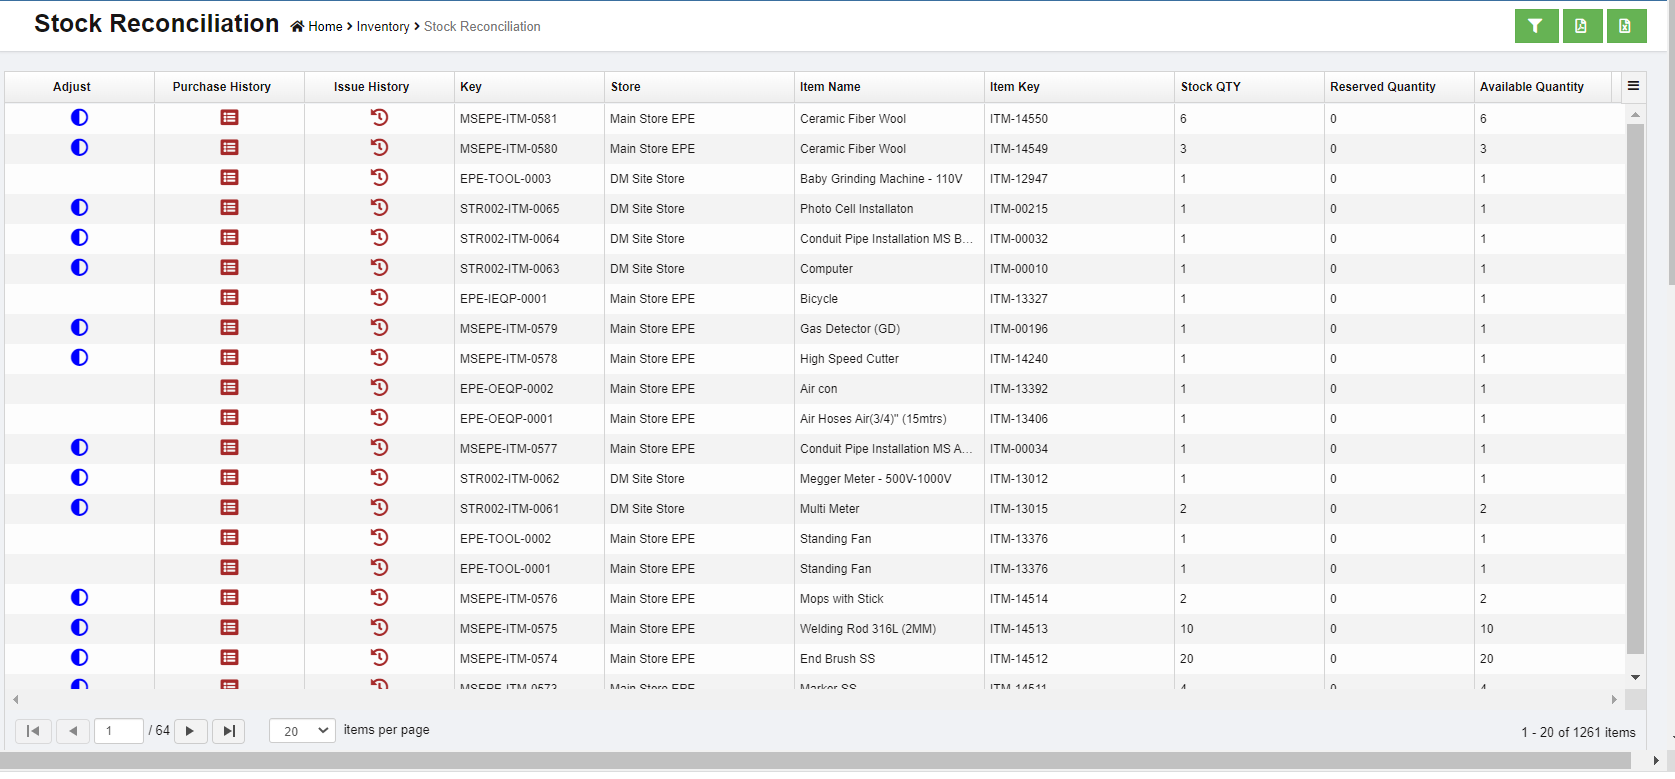
### Stock Reconciliation
Stock reconciliation provides all information of the items recorded in system such as purchase history, issuance, adjustment etc.., this is to help companies reconcile inventory periodically to find any discrepancies in stock that need to be addressed.
User can filter, and/or export details to excel or PDF file.
[](http://wiki.cuteinfocomm.com/uploads/images/gallery/2022-08/image-1659546794767.png)
### Item Purchase History
Item purchase history provides both item wise purchase history against **PO**.
[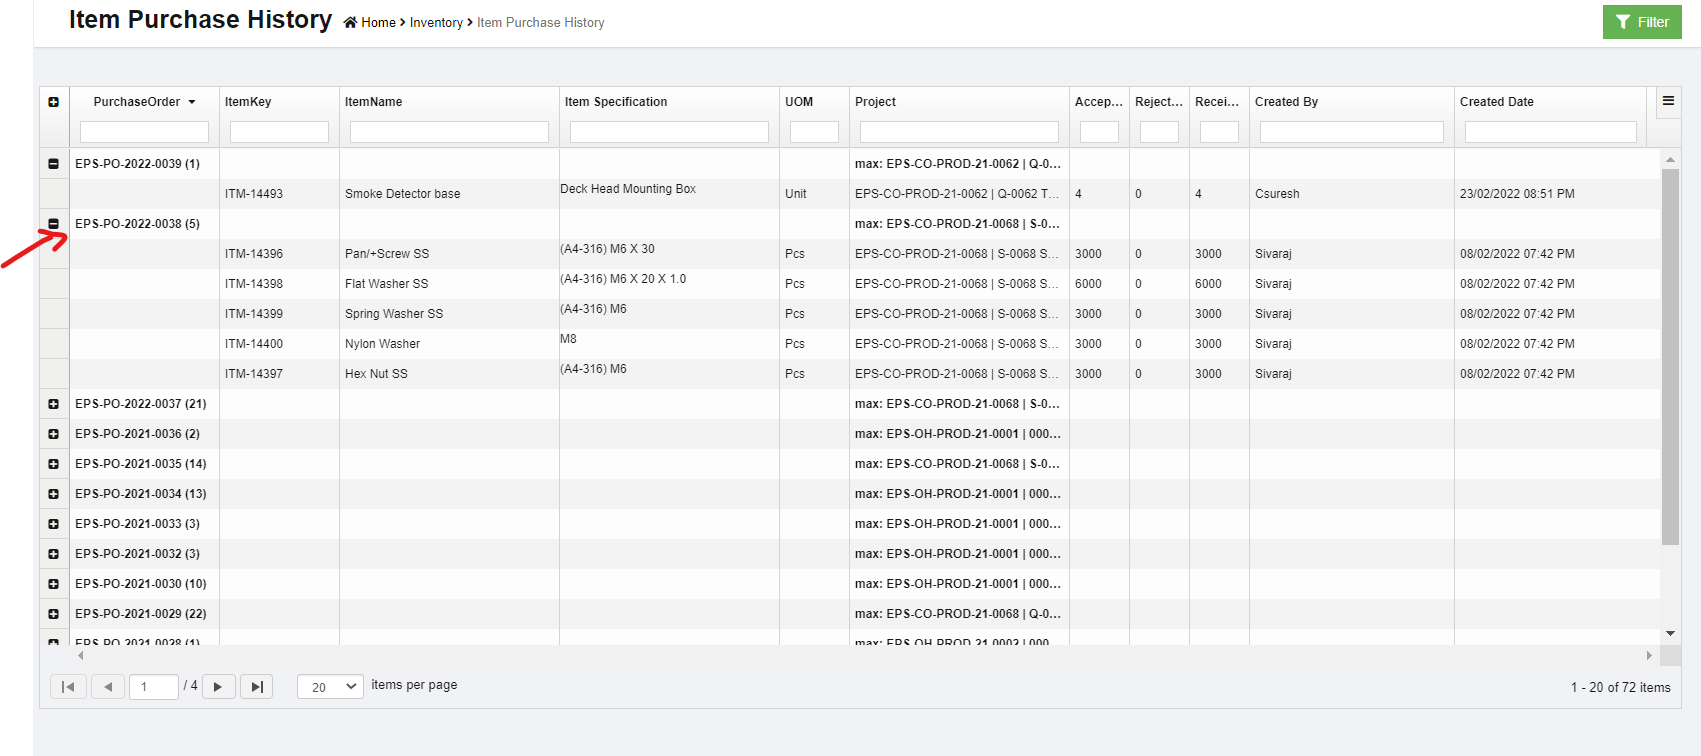](http://wiki.cuteinfocomm.com/uploads/images/gallery/2022-08/image-1659568138983.png)
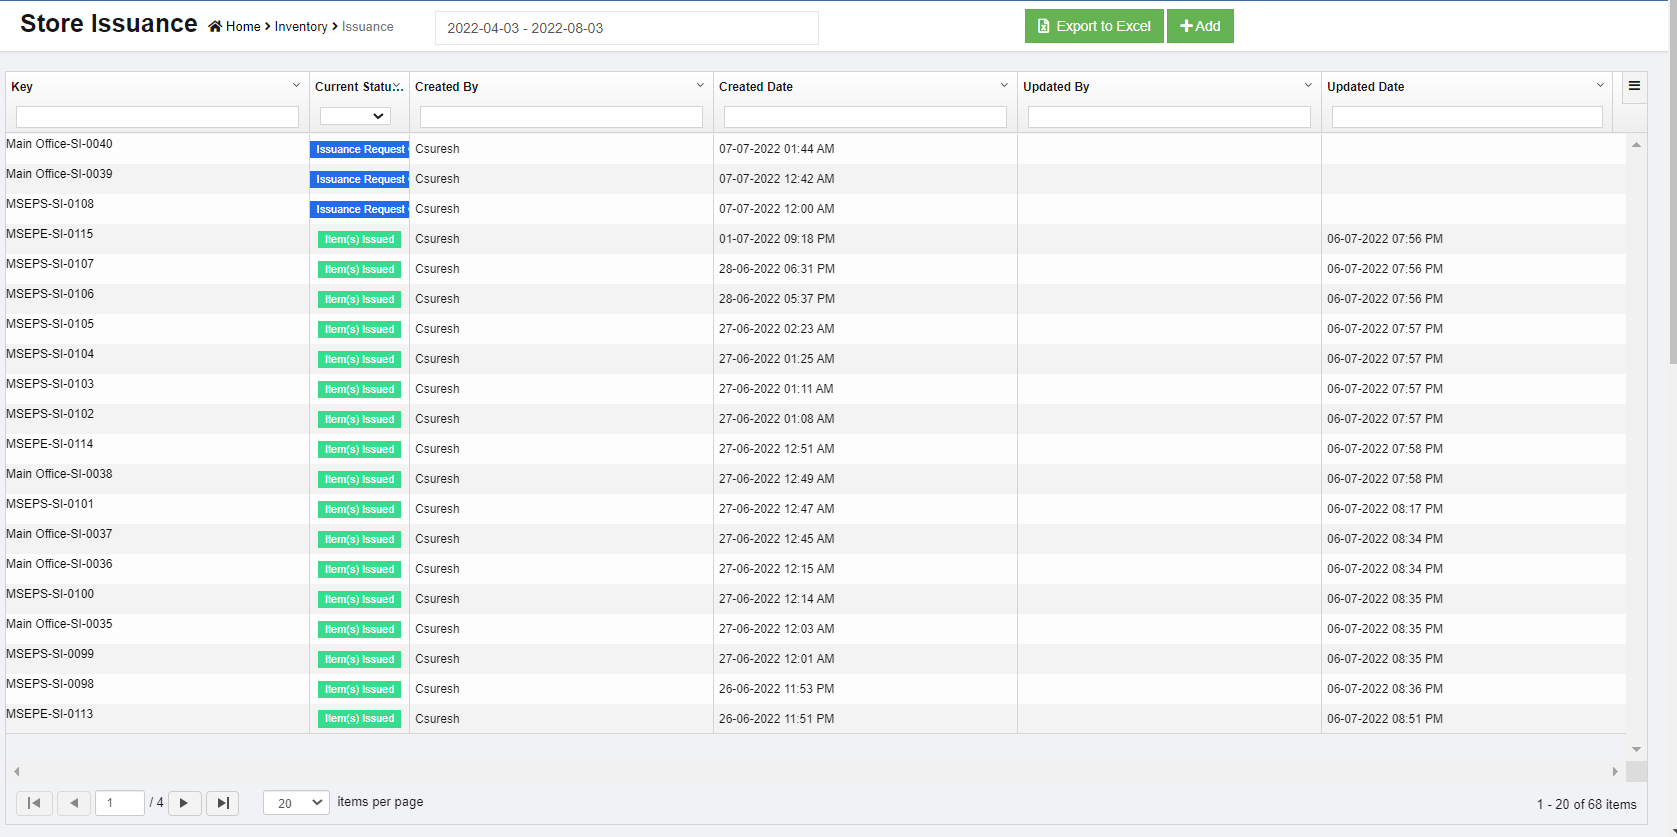
### Issuance
The item inventory shall always be issued from a warehouse and recorded in system when it is required in the production activities. Or when there is available stock for the item that is requested in MR, system will provide option to **"Recommend to Issuance"**.
Click **Issuance** in Inventory menu, the store issuance page opens, it will list all history records of issuance.
[](http://wiki.cuteinfocomm.com/uploads/images/gallery/2022-08/image-1659568559988.png)
#### Add Issuance Request
When any item is requested to issue from store stock, user shall add new issuance request.
1. Click [](http://wiki.cuteinfocomm.com/uploads/images/gallery/2022-08/image-1659573901031.png) in issuance list view page, below issuance window opens, [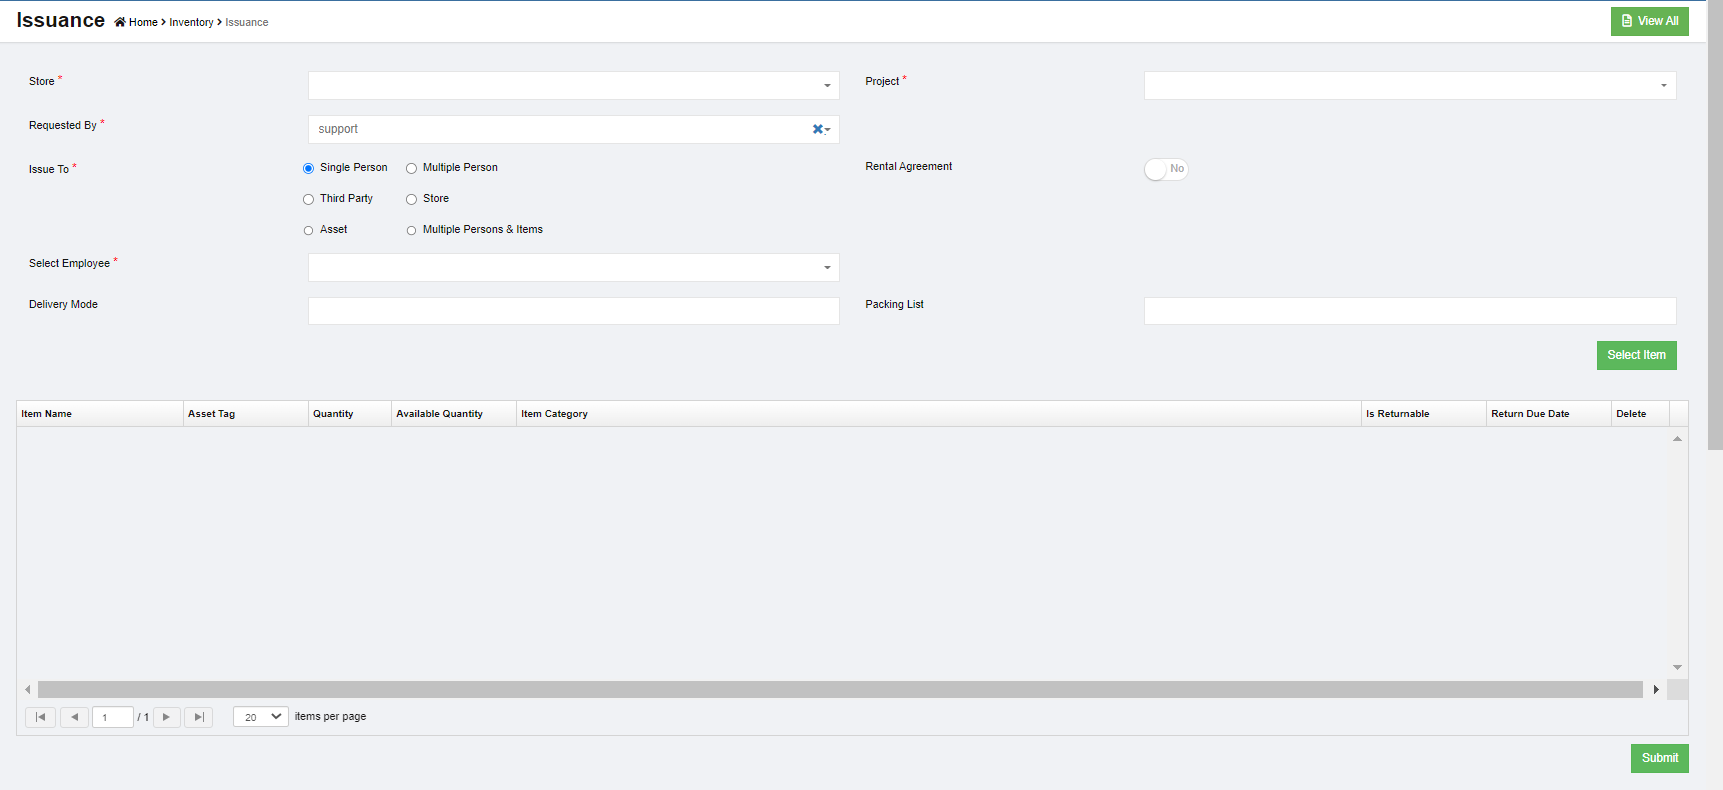](http://wiki.cuteinfocomm.com/uploads/images/gallery/2022-08/image-1659895450115.png)
2. Fill up all mandatory information in above window:
- Store-select issuance store from dropdown list
- Project-select project name to issue items
- Request By-the login username will automatically populated as request by user.
- Rental agreement-if issuance is for rental, click to enable to **yes**, then click "Rental Agreement" to enter rental and delivery order details, and **Save.**[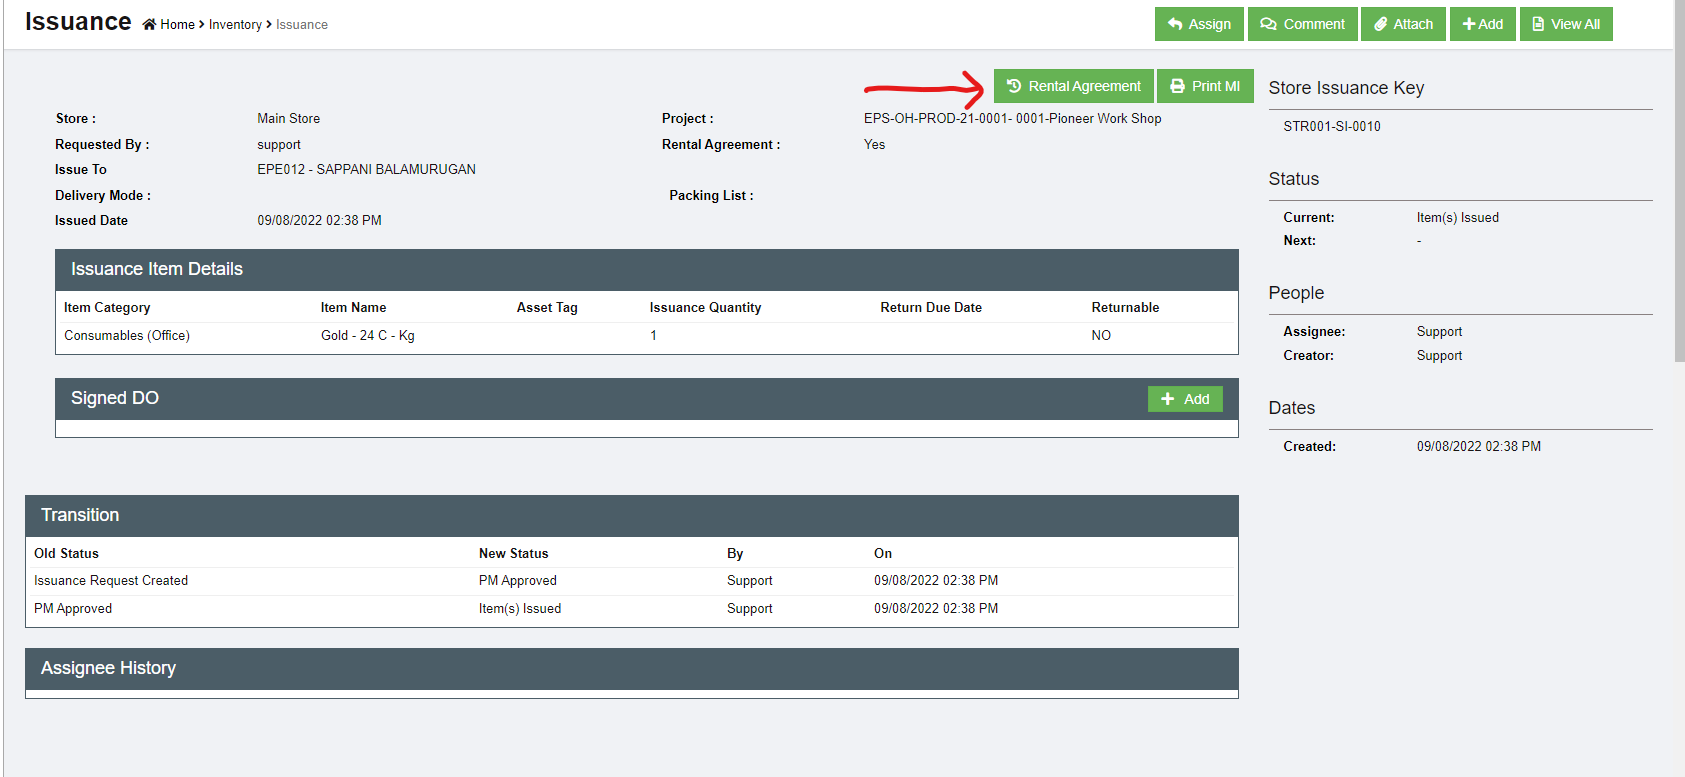](http://wiki.cuteinfocomm.com/uploads/images/gallery/2022-08/image-1660081277541.png)
[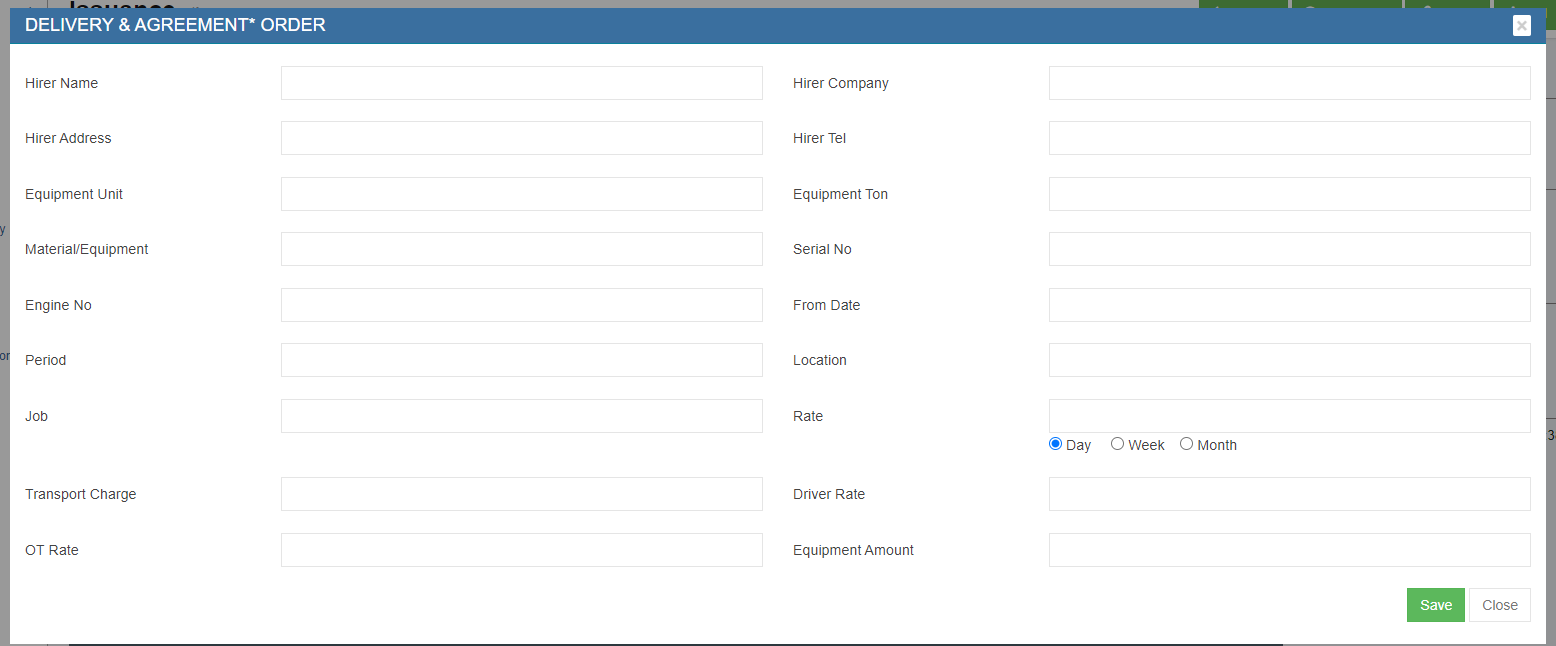](http://wiki.cuteinfocomm.com/uploads/images/gallery/2022-08/image-1660081242577.png)
- Issue To-system provides below options, each option will populate different information table for user to fill up:
- Single Person-select an employee from dropdown list [](http://wiki.cuteinfocomm.com/uploads/images/gallery/2022-08/image-1659895706347.png)
- Multiple Persons-select multiple employees from dropdown list [](http://wiki.cuteinfocomm.com/uploads/images/gallery/2022-08/image-1659895733681.png)
- Third Party-enter third party company, contact ,and other details [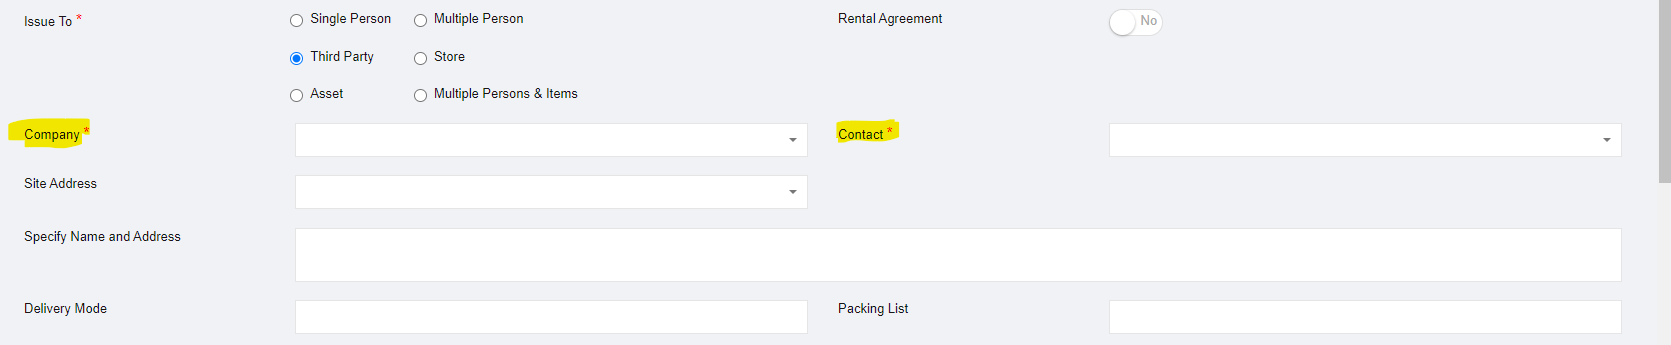](http://wiki.cuteinfocomm.com/uploads/images/gallery/2022-08/image-1659895763424.png)
- Store-select store to receive issuance [](http://wiki.cuteinfocomm.com/uploads/images/gallery/2022-08/image-1659895796636.png)
- Asset-select asset and [](http://wiki.cuteinfocomm.com/uploads/images/gallery/2022-08/image-1659895836764.png)
- Multiple persons & items [](http://wiki.cuteinfocomm.com/uploads/images/gallery/2022-08/image-1659897124914.png)
3. Then click **Select Item,** and select items in the popup window as below [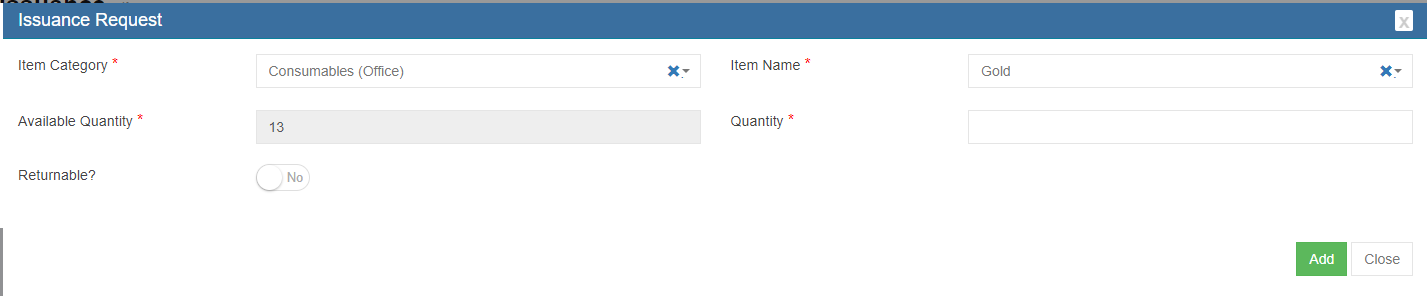](http://wiki.cuteinfocomm.com/uploads/images/gallery/2022-08/image-1659897446182.png)
4. Click **Submit** to submit issuance request, the issuance notification window opens, check and select assignee and notify users and click **Confirm**. [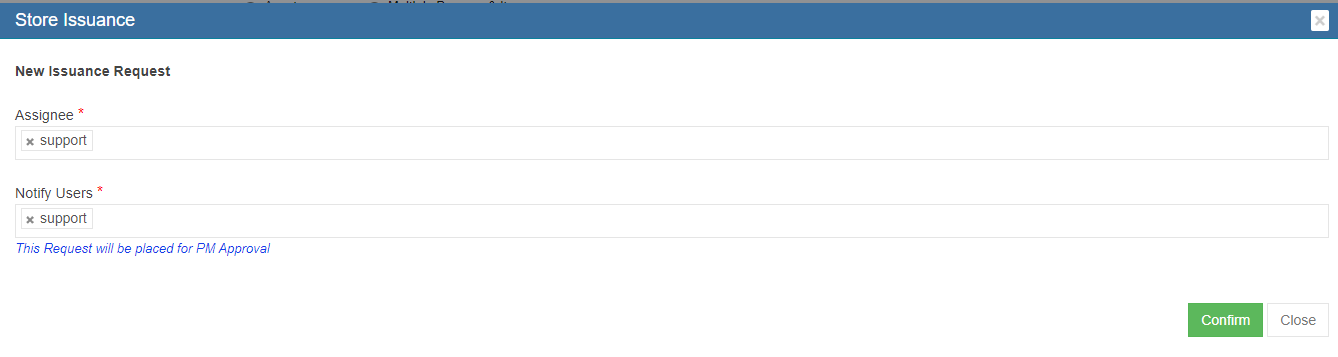](http://wiki.cuteinfocomm.com/uploads/images/gallery/2022-08/image-1659897512081.png)
5. An unique key will be generated and assigned to the issuance request, and page will be redirected to issuance request detail page as below screenshot. There are multiple action buttons in issuance detail page.[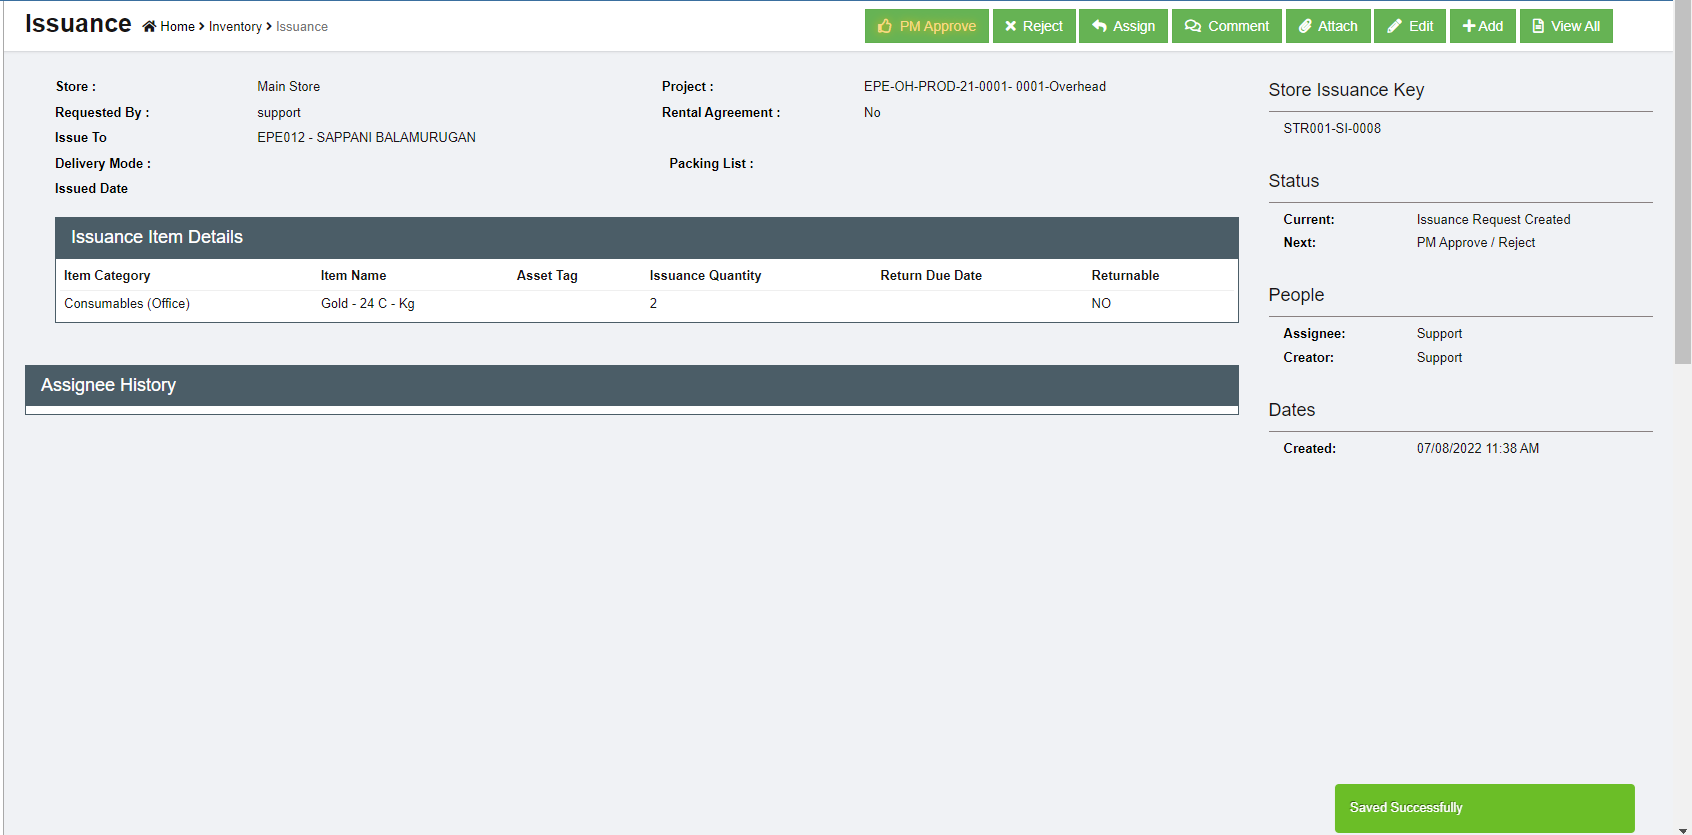](http://wiki.cuteinfocomm.com/uploads/images/gallery/2022-08/image-1659897552694.png)
#### Approve/Reject Issuance Request
Project manager shall approve the issuance request before store keeper issue items.
- To approve issuance request,
1. click[](http://wiki.cuteinfocomm.com/uploads/images/gallery/2022-08/image-1659980723498.png) in the issuance detail page, the issuance notification window pop up, [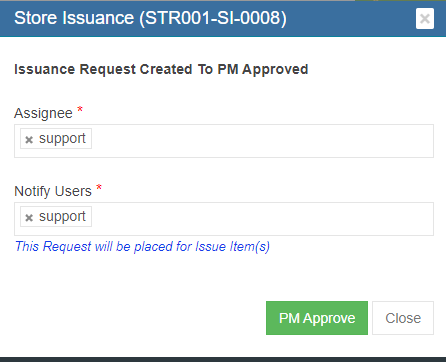](http://wiki.cuteinfocomm.com/uploads/images/gallery/2022-08/image-1659981039237.png)
2. Click PM approve in the notification window, the issuance request status will be **PM approved**, and is ready for issue. [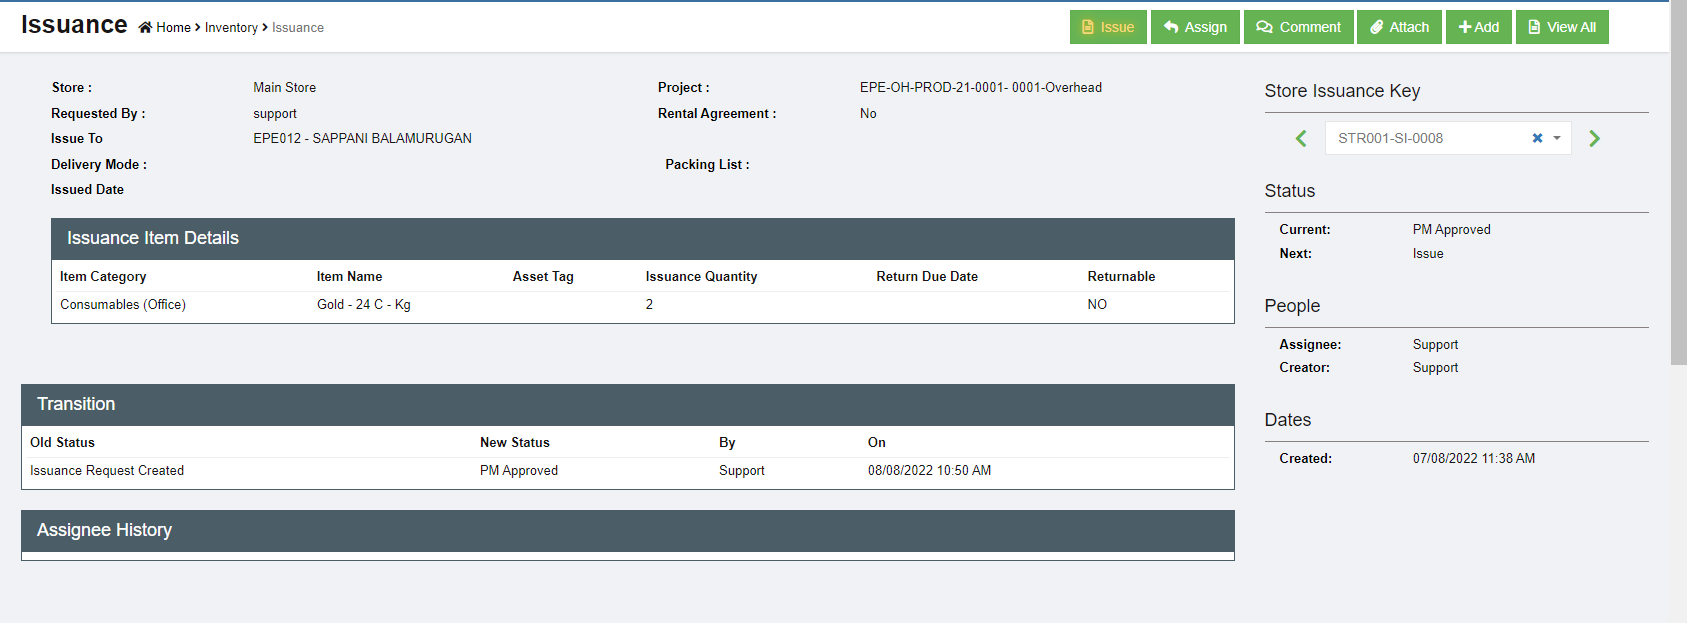](http://wiki.cuteinfocomm.com/uploads/images/gallery/2022-08/image-1659981071066.png)
- To reject issuance request,
1. Click [](http://wiki.cuteinfocomm.com/uploads/images/gallery/2022-08/image-1660074905141.png) icon in the issuance request detail page, the rejection notification window pop up, [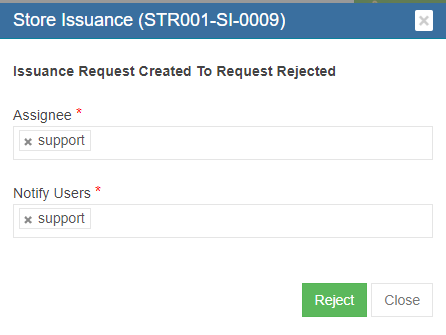](http://wiki.cuteinfocomm.com/uploads/images/gallery/2022-08/image-1660074956523.png)
2. Click **Reject** button in the notification window, the issuance request is rejected, the status will change to **Request Rejected.**
- Other Options in Issuance
- Comment-to enter comments or remarks about the request
- Attach-to upload any files/documents about the request
#### Issue Items
Store keepers can proceed to issue items to material requestor after project manager approves it.
To issue items,
1. Click the Issue button, below notification window opens, click[](http://wiki.cuteinfocomm.com/uploads/images/gallery/2022-08/image-1659991584740.png) to complete issuance in system and proceed to issue physical items from store(warehouse). The issuance request status will change to **Item(s) Issued.**
[](http://wiki.cuteinfocomm.com/uploads/images/gallery/2022-08/image-1659981120101.png)
2. A Material Issuance report will be automatically generated. User can click the Print MI button to print the Material Issuance report (MI) as pdf file.[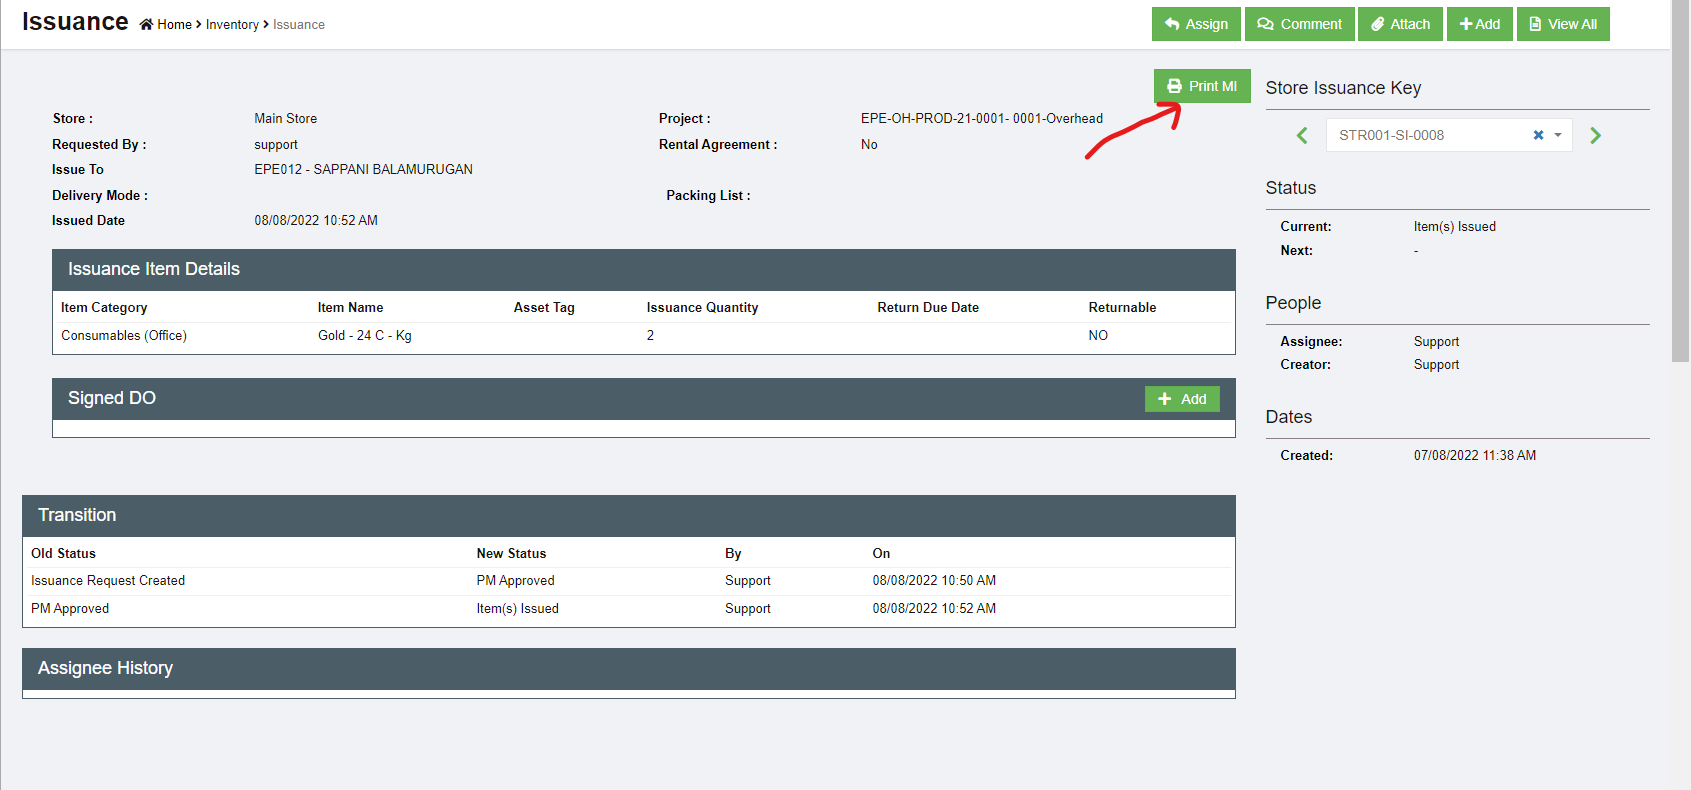](http://wiki.cuteinfocomm.com/uploads/images/gallery/2022-08/image-1659981163381.png)
3. After the physical items delivered to project, store keepers shall upload the signed delivery order (DO). Click Add button in the Signed DO section in issuance detail page. [](http://wiki.cuteinfocomm.com/uploads/images/gallery/2022-08/image-1659993409694.png)
4. Fill up DO details and upload signed DO copy, click **Save.** The issuance request status will change to **Item(s) Delivered.** This is the complete status of an issuance request.
### Issuance Return
### Issuance History
[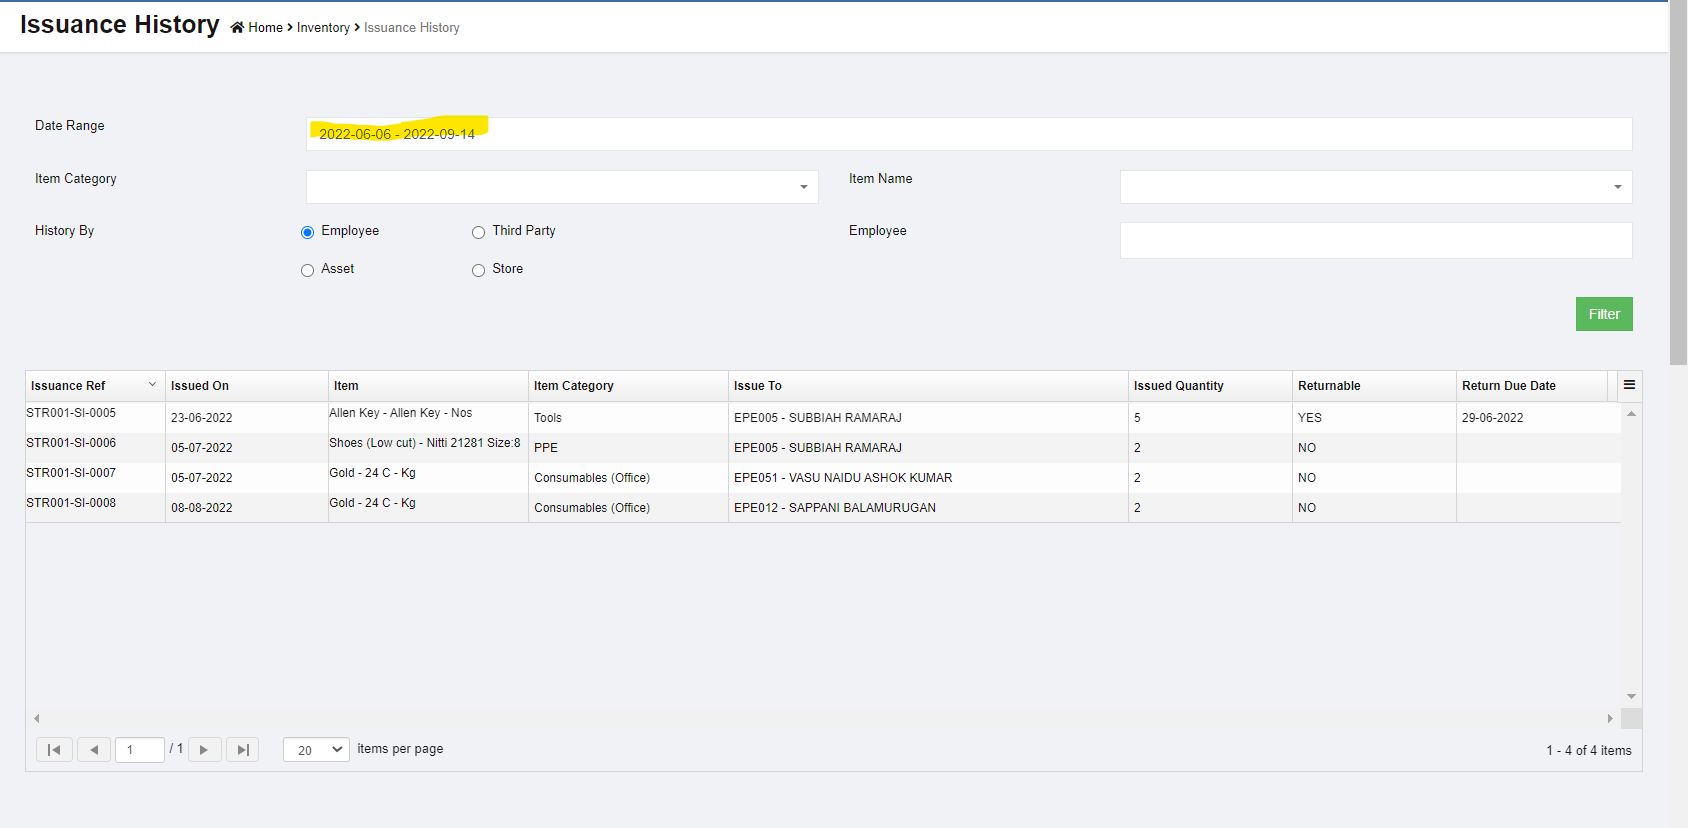](http://wiki.cuteinfocomm.com/uploads/images/gallery/2022-08/image-1660080985144.png)
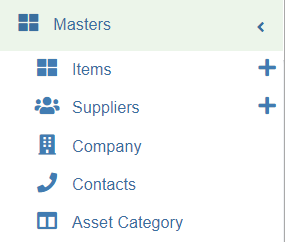
# Master Data
The **Masters** menu in the procurement module helps to define and manage the master data like items detail, suppliers, company, contact, and asset category.
[](http://wiki.cuteinfocomm.com/uploads/images/gallery/2022-08/image-1660169861349.png)
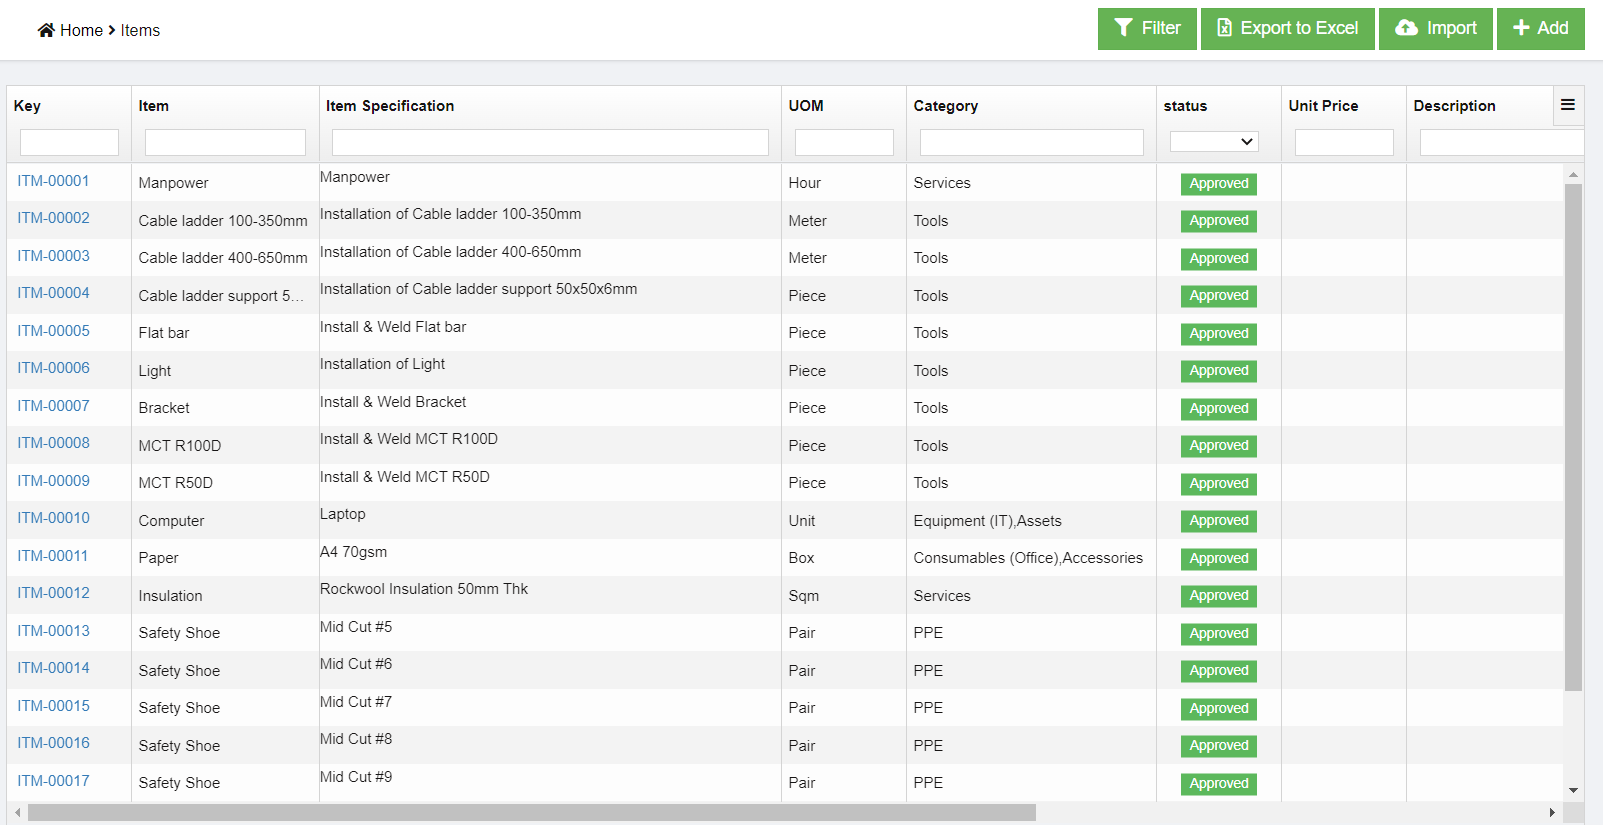
## Items
The list of items that will be used in procurement module is managed in cuteOffice Items master. They are managed centrally so that duplicate items are not entered into the system.
To view items master, click **Items** submenu in the **Masters,** the item master list page opens as below,
[](http://wiki.cuteinfocomm.com/uploads/images/gallery/2022-08/image-1660170744605.png)
### Add a New Item
To create a new item as item master,
1. click [ ](http://wiki.cuteinfocomm.com/uploads/images/gallery/2022-08/image-1660171564547.png)button in the top right corner in item list view page, the add item page opens as below, [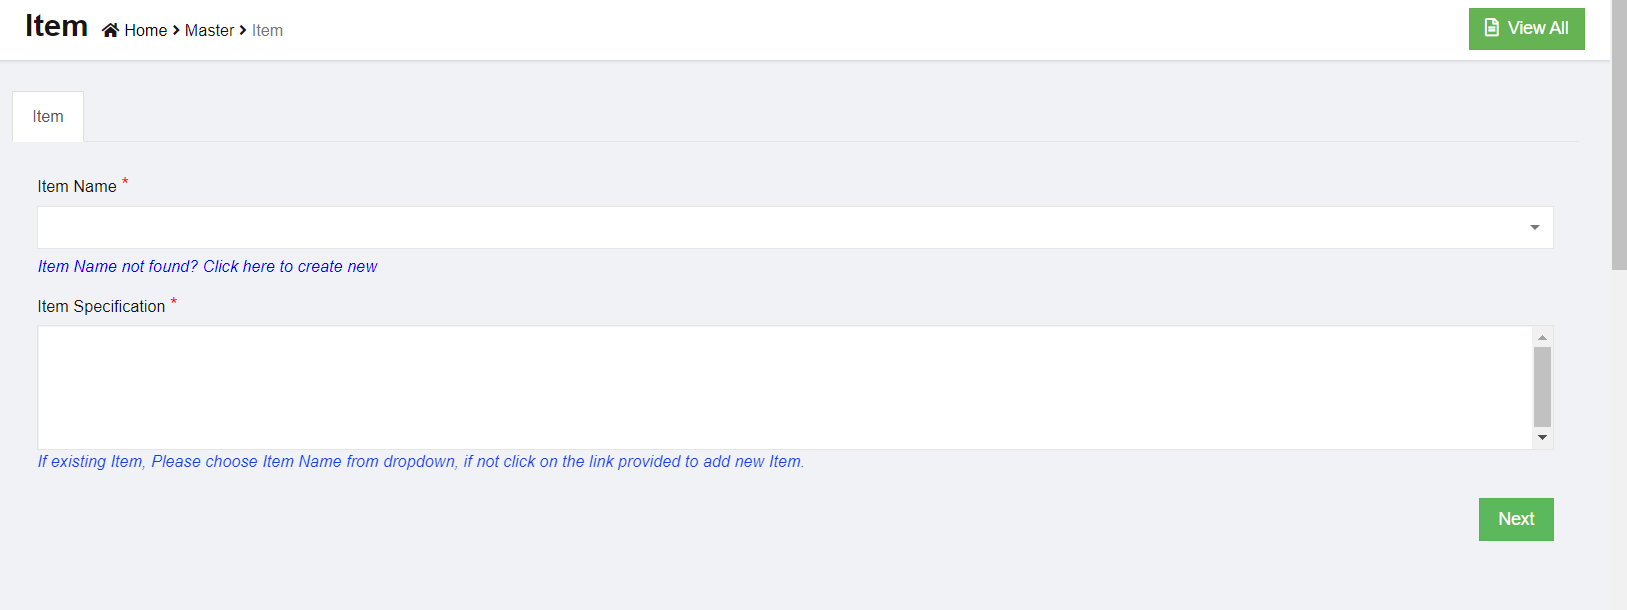](http://wiki.cuteinfocomm.com/uploads/images/gallery/2022-08/image-1660171744060.png)
2. There are two mandatory information to be filled up. For example, we want to buy a desktop computer. So we have decided classify Computer as **item name** and Desktop as **item specification**
- Item Name
- Item Specification
3. Select the Item from list. If you can’t find the item, then click “Item Name not found? Click here to create new” link below the text box, [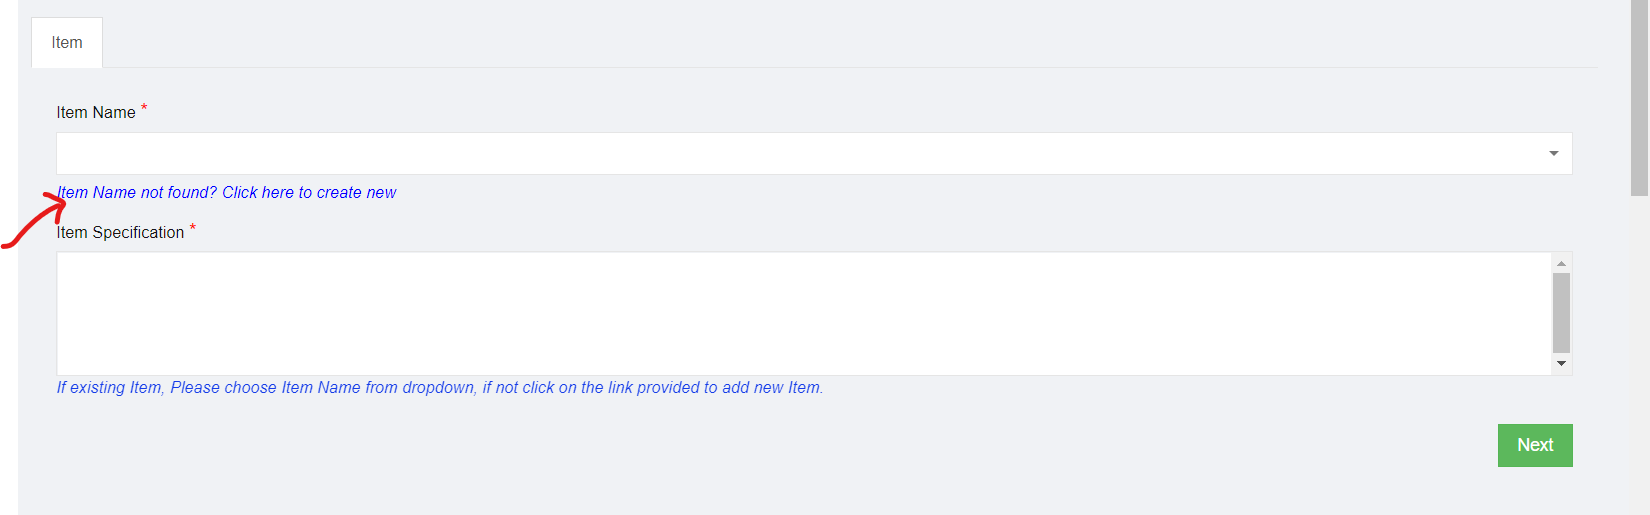](http://wiki.cuteinfocomm.com/uploads/images/gallery/2022-08/image-1660172078595.png)
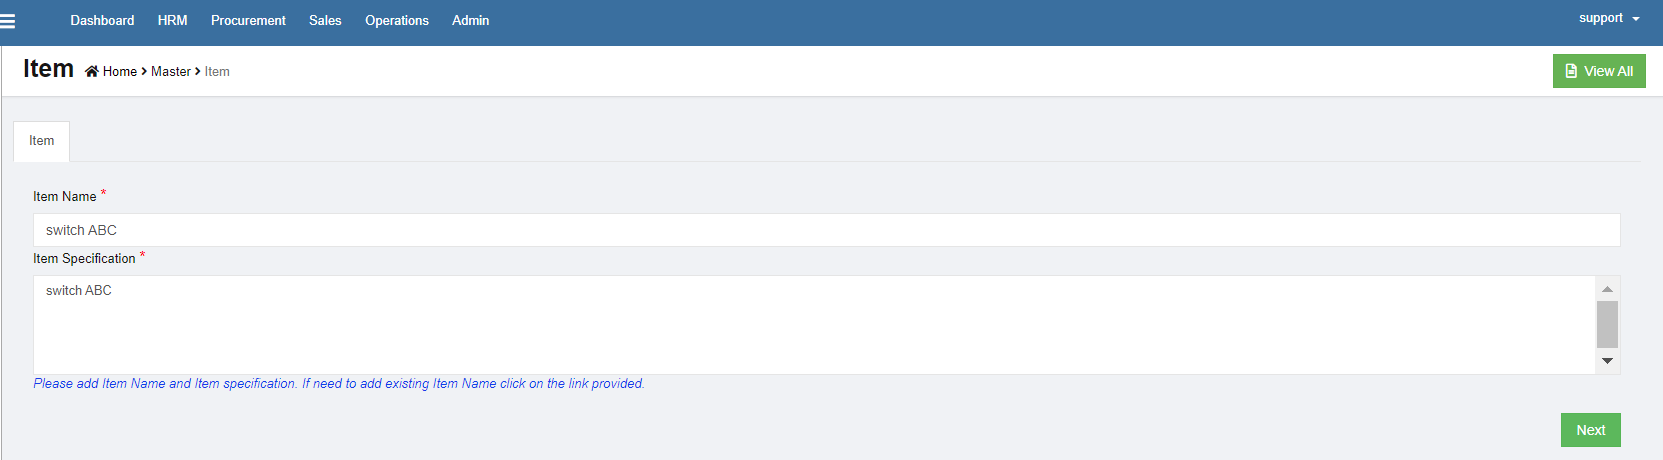
4. Enter item name as computer, and the item specification as desktop.[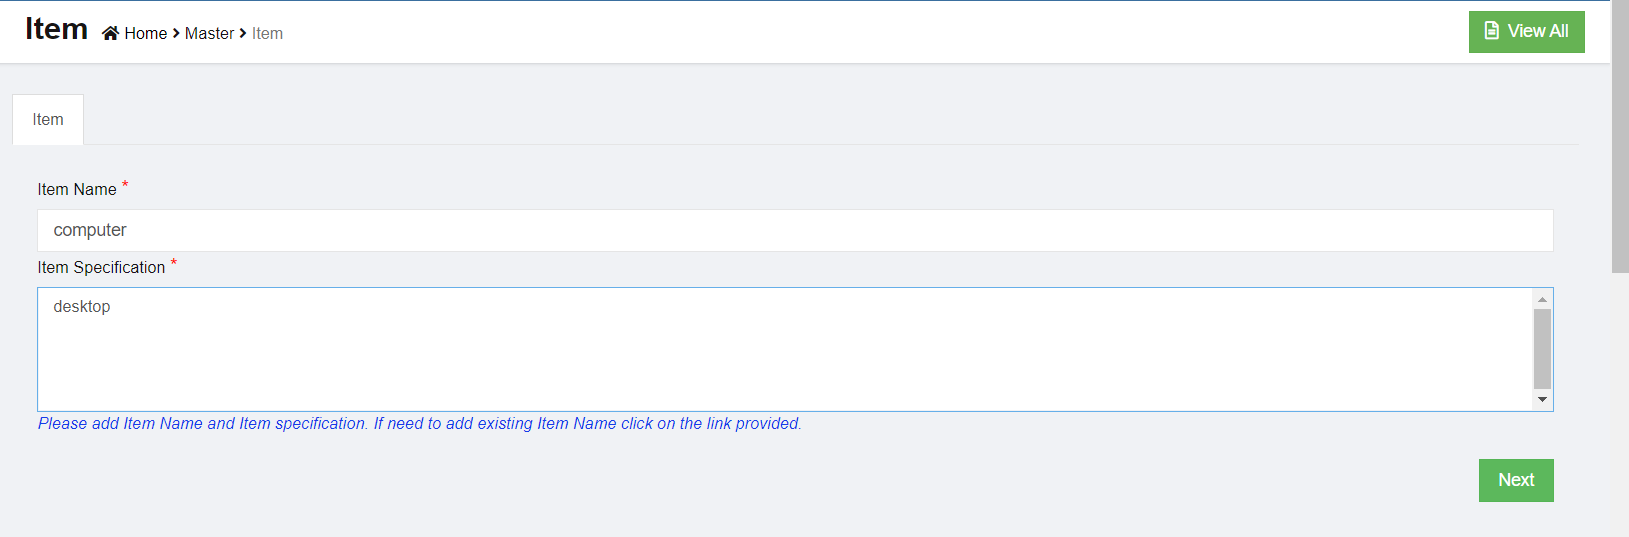](http://wiki.cuteinfocomm.com/uploads/images/gallery/2022-08/image-1660172214959.png)
5. Click Next. The below dialog appears,
[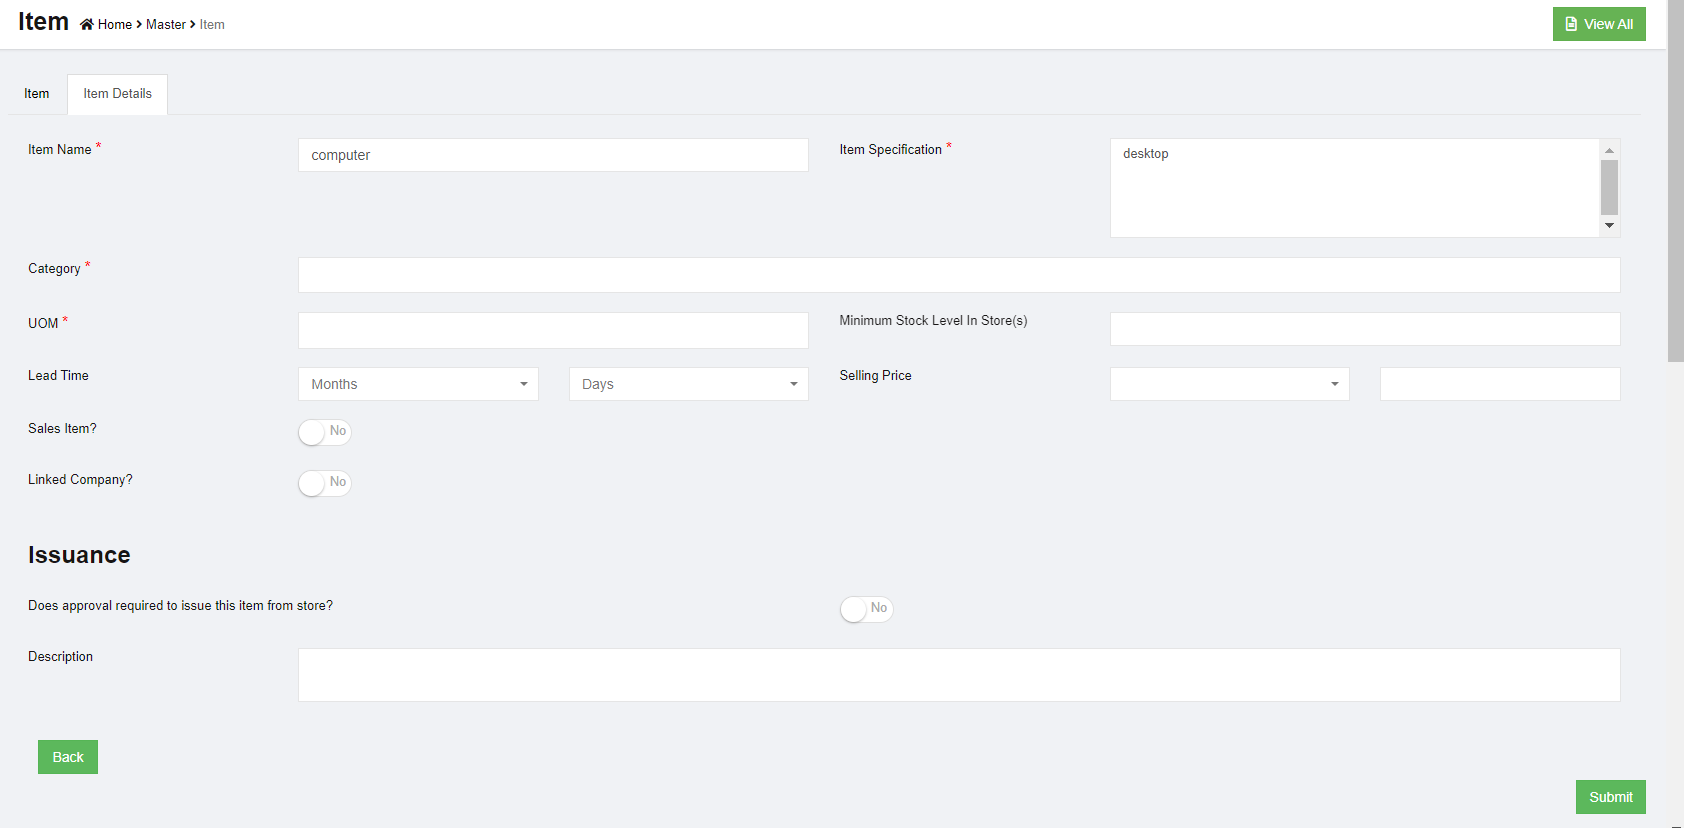](http://wiki.cuteinfocomm.com/uploads/images/gallery/2022-08/image-1660172319942.png)
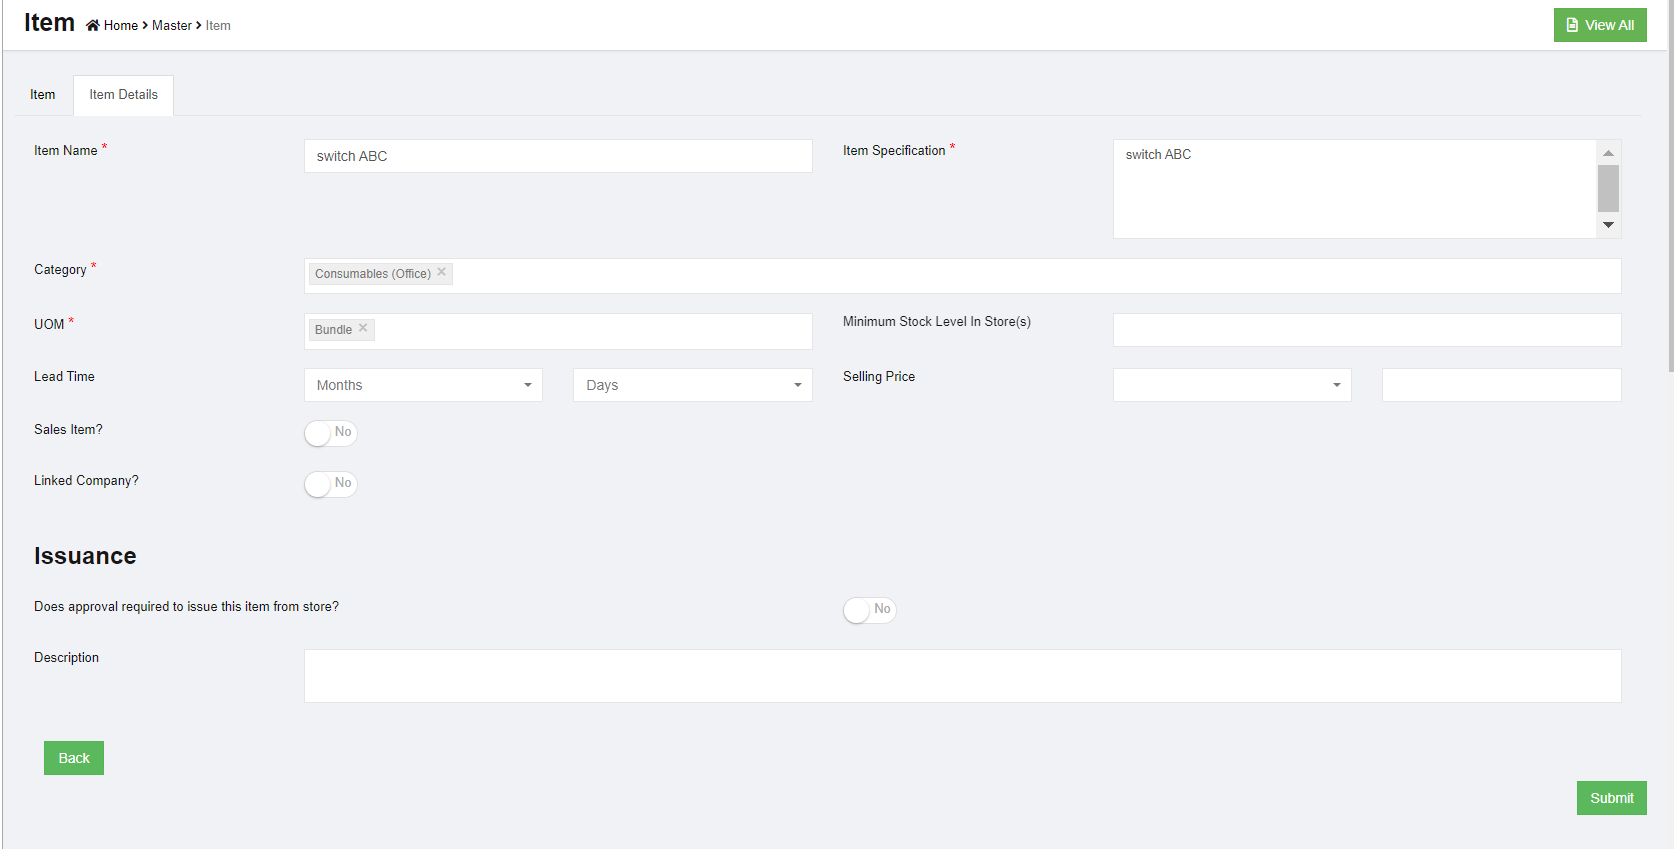
- Choose a category for the item. Select Assets and Equipment (IT). Each item can be classified into more than one category. The category classification is defined by the administrator in Admin Settings.
- Select UOM. (Unit of Measurement). Choose Piece. The UOM is defined by the administrator in Admin Settings.
- Enter minimum stock level alert quantity.
- Enter lead time required to buy this item
- When issue this item, if it requires approval, click to enable flag as **Yes**, or default as **No,**
- Enter any additional description for the item.
6. Click **Submit**. Each item newly added to item master needs to be approved before it can be used in system. If item master auto approval is configured, the below dialog appears to approve immediately upon submit. [](http://wiki.cuteinfocomm.com/uploads/images/gallery/2022-08/image-1660182615861.png)
7. Click **Confirm,** item will be approved and appear in item list for system use. Page will be redirected to the below screen. [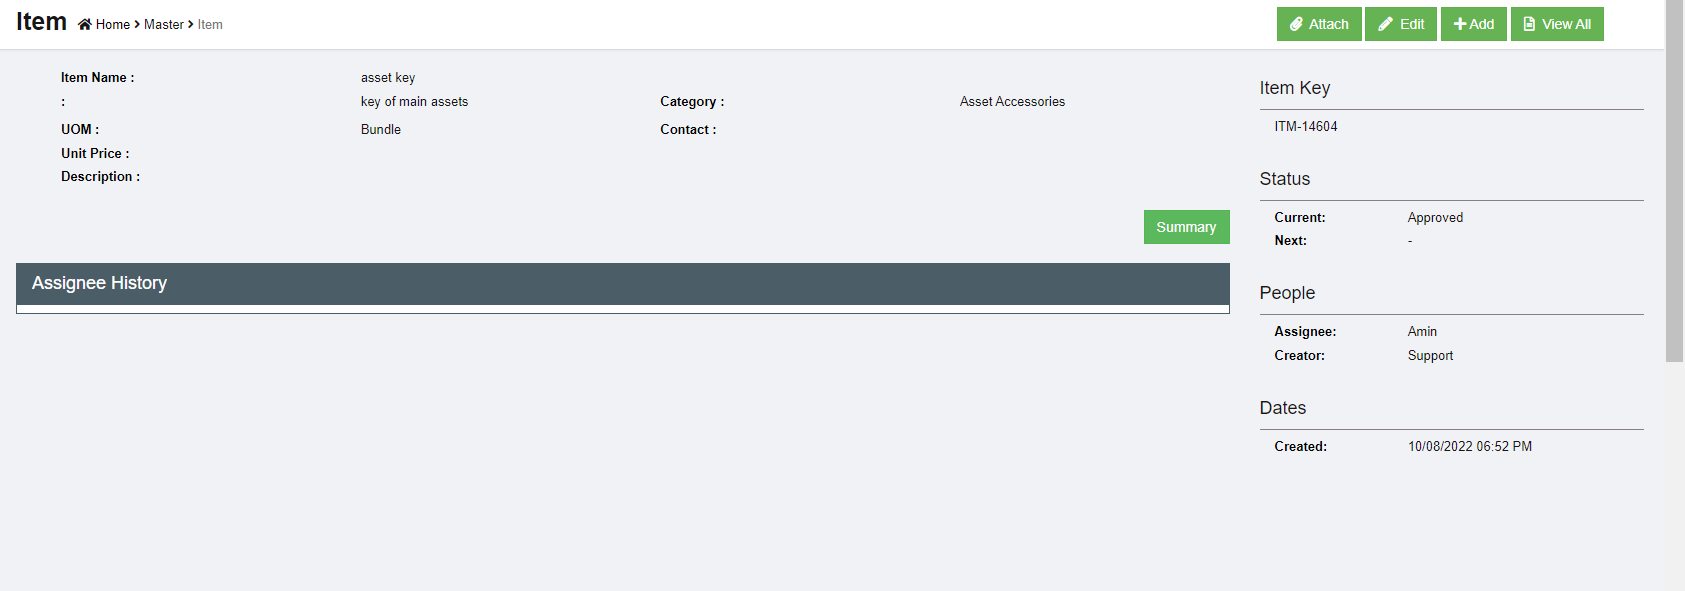](http://wiki.cuteinfocomm.com/uploads/images/gallery/2022-08/image-1660182897699.png)
### Edit Item
To edit item master, go to the item list page,
1. click the item key and open the item detail page as below, [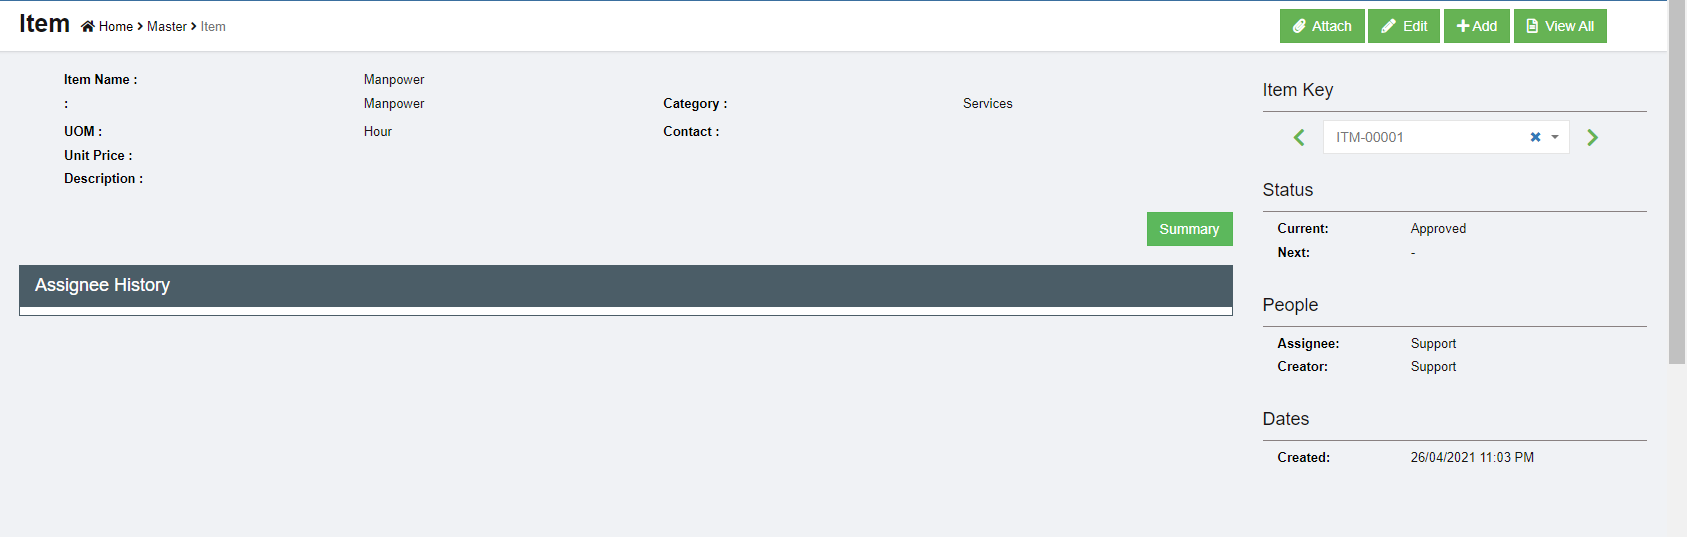](http://wiki.cuteinfocomm.com/uploads/images/gallery/2022-08/image-1660183101408.png)
2. Click[](http://wiki.cuteinfocomm.com/uploads/images/gallery/2022-08/image-1660183134928.png) Edit button, the edit window opens up, [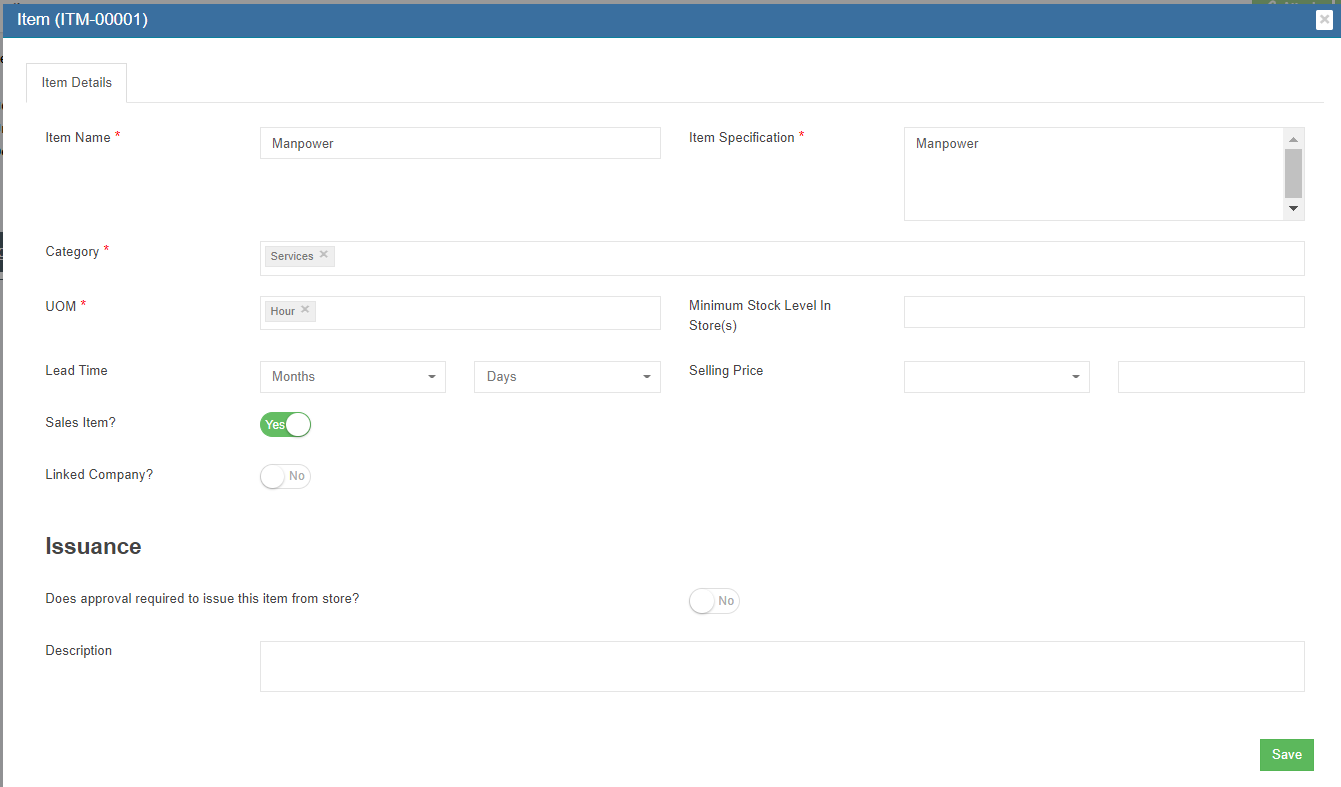](http://wiki.cuteinfocomm.com/uploads/images/gallery/2022-08/image-1660183214012.png)
3. Update details, and click **Save** to save edits.
### Attach
Any photos and additional documents can be uploaded against the item.
1. Click[](http://wiki.cuteinfocomm.com/uploads/images/gallery/2022-08/image-1660187936089.png) Attach button, the attach window opens up, [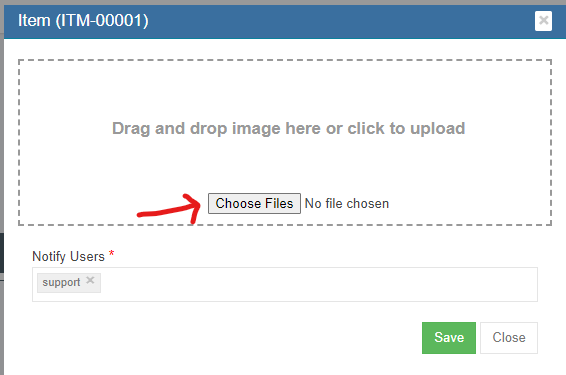](http://wiki.cuteinfocomm.com/uploads/images/gallery/2022-08/image-1660187985936.png)
2. Click **Choose Files** and browse the file to attach.
3. The added item is shown below, [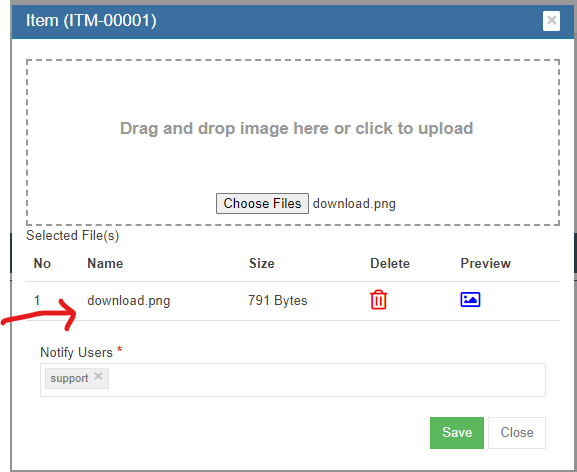](http://wiki.cuteinfocomm.com/uploads/images/gallery/2022-08/image-1660188035082.png)
4. Click[(](http://wiki.cuteinfocomm.com/uploads/images/gallery/2022-08/image-1660188056241.png)preview button) to view attached file,
5. Click **Save** to store the attachment against the item.
### Export Items
User can export all items master data use the export option. Click [](http://wiki.cuteinfocomm.com/uploads/images/gallery/2022-08/image-1661796864622.png) the items master data will be export and downloaded.
## Suppliers
Suppliers are managed centrally as master data in cuteOffice. All suppliers needs approval to be qualified as supplier, and system provides ranking and evaluation options.
To view all suppliers, click **Suppliers** submenu in the **Masters** menu,
[](http://wiki.cuteinfocomm.com/uploads/images/gallery/2022-08/image-1660338120837.png)
### Add New Supplier
All supplier companies shall be registered in company master data first, then add as suppliers master.
To add new supplier,
1. click Add button[](http://wiki.cuteinfocomm.com/uploads/images/gallery/2022-08/image-1660338813842.png) or [](http://wiki.cuteinfocomm.com/uploads/images/gallery/2022-08/image-1660338837754.png), the new supplier page will open as below, [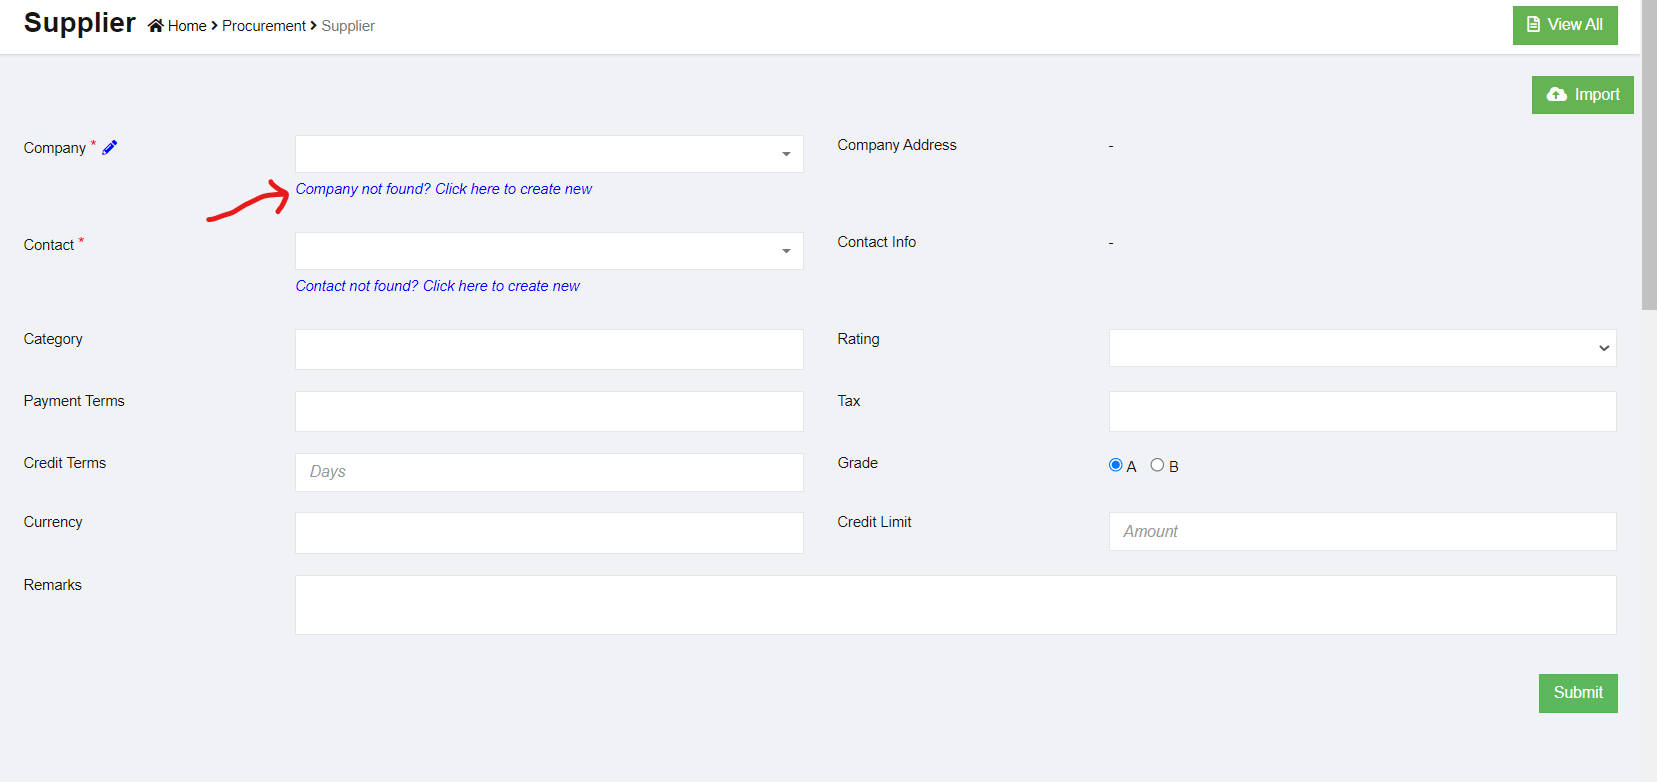](http://wiki.cuteinfocomm.com/uploads/images/gallery/2022-08/image-1660338933048.png)
2. Select a company from the dropdown list as supplier. If the company is not available, click the link-"**Company not found? Click here to create new"** below the company dropdown and create a new company. The selected company details are shown in the right side.
- Please check user manual on how to create company master data.
3. Select contact from contact master dropdown. The contact details will show. If the contact is not in the dropdown list, click the link "**Contact not found? Click here to create new**" to create new contact in master data.
- Please check user manual on how to create contact master data.
4. Select rating. The ratings value are managed in Admin Options
5. Select Payment Terms. The terms are maintained in Admin Options
6. Select Currency. The currencies are maintained in Admin Options
7. Choose Grade. If A means the supplier needs evaluation. Grade B customers does not require
evaluation. For example, if we buy Amazon, do we need to evaluate them? No. so we choose B.
However, if we need to buy a computer from a supplier they need to be checked and evaluated
before making an order.
8. Click Submit to create the supplier. The below dialog opens up. [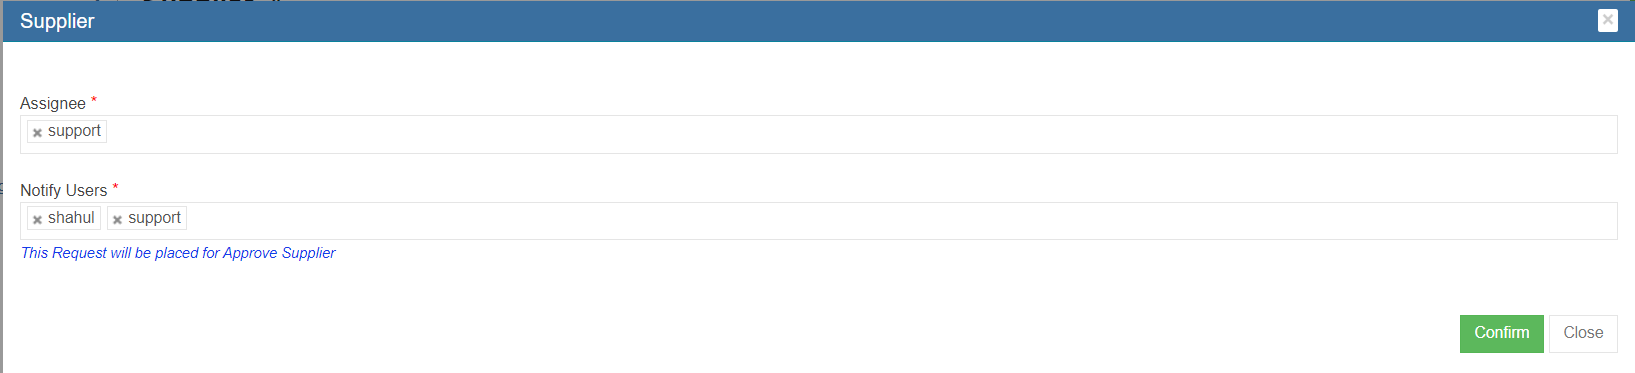](http://wiki.cuteinfocomm.com/uploads/images/gallery/2022-08/image-1660339858019.png)
9. Click Confirm, a new supplier is created and directed to below new supplier detail page, [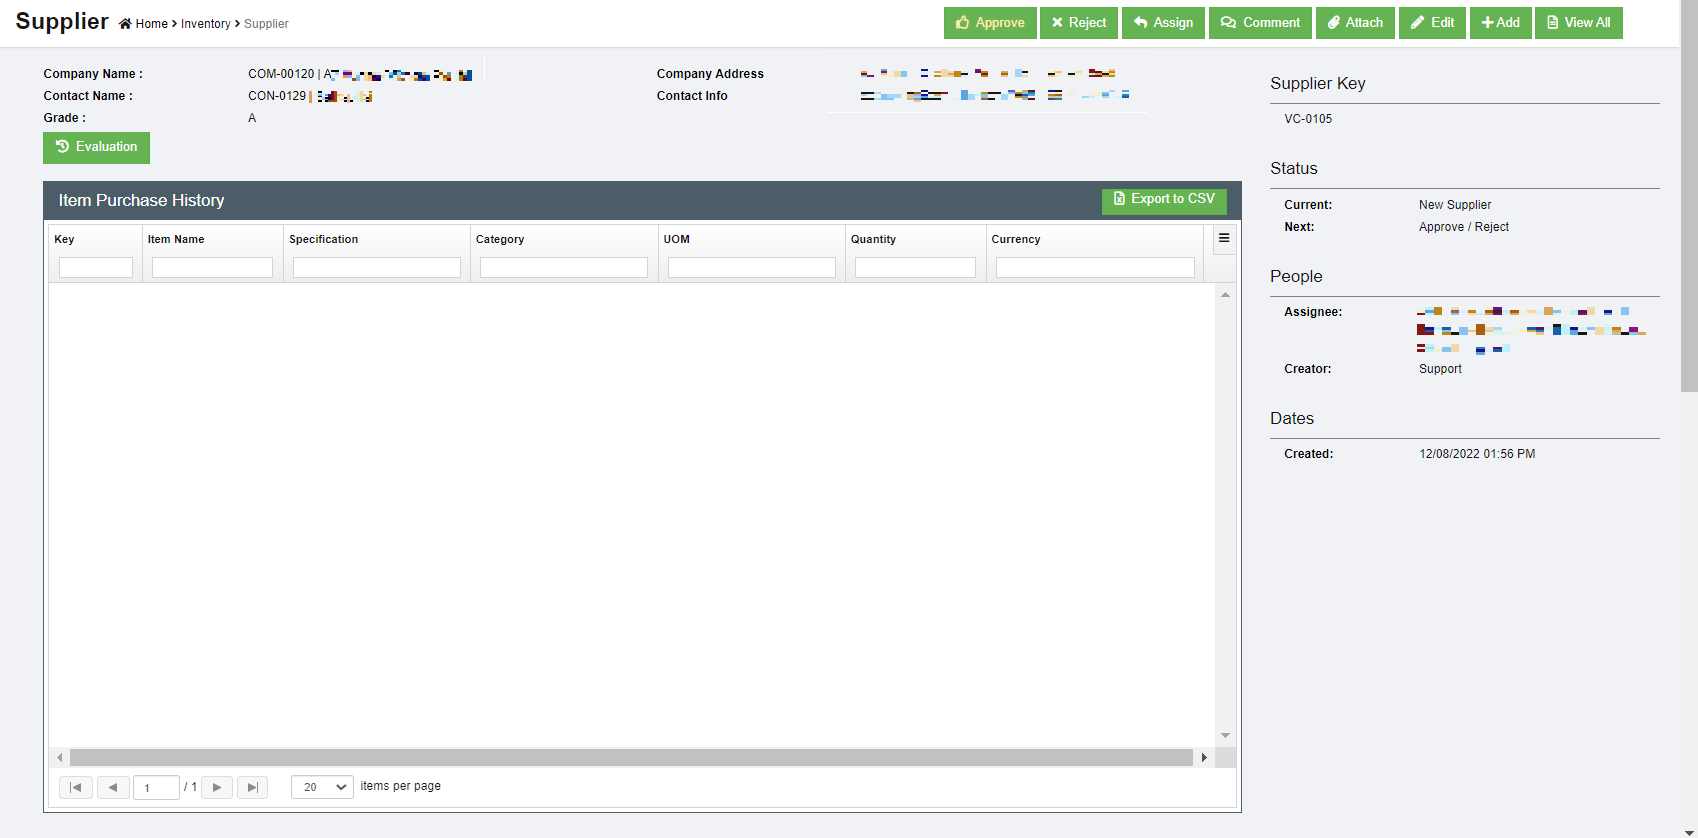](http://wiki.cuteinfocomm.com/uploads/images/gallery/2023-04/image-1682107587596.png)
10. All new suppliers created in system need to be approved unless auto approval is configured. To approve, click the **Approve** button in above supplier detail page, below dialog opens, [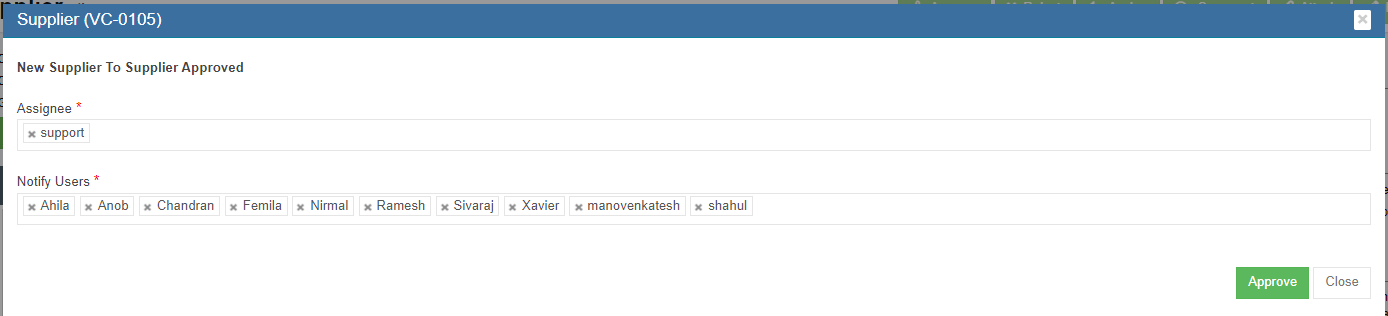](http://wiki.cuteinfocomm.com/uploads/images/gallery/2022-08/image-1660337950542.png)
11. Click **Approve.** The supplier status will change to supplier approved. [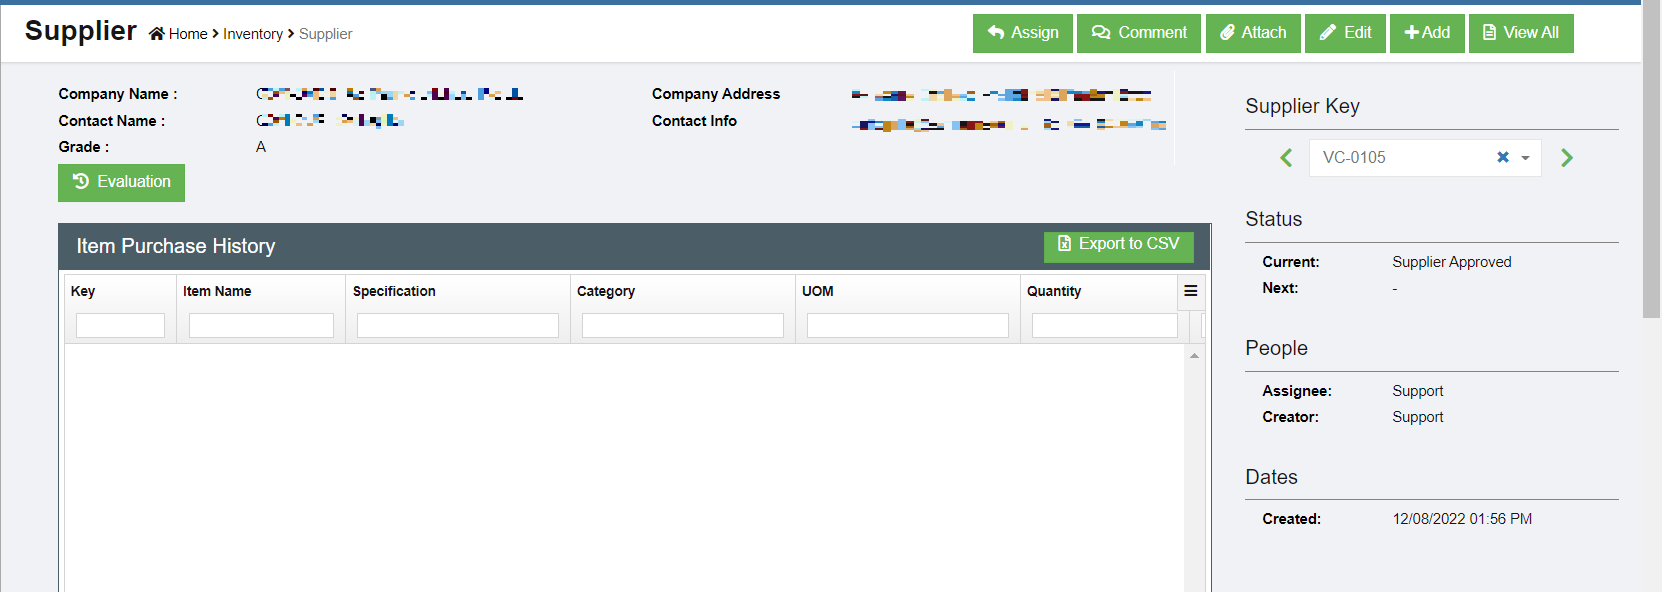](http://wiki.cuteinfocomm.com/uploads/images/gallery/2023-04/image-1682107639602.png)
[](http://wiki.cuteinfocomm.com/uploads/images/gallery/2022-08/image-1660338011056.png)
12. To evaluate supplier, click the [ ](http://wiki.cuteinfocomm.com/uploads/images/gallery/2022-08/image-1660340184962.png)button, below evaluation window opens. Complete the evaluation and click **Save.** [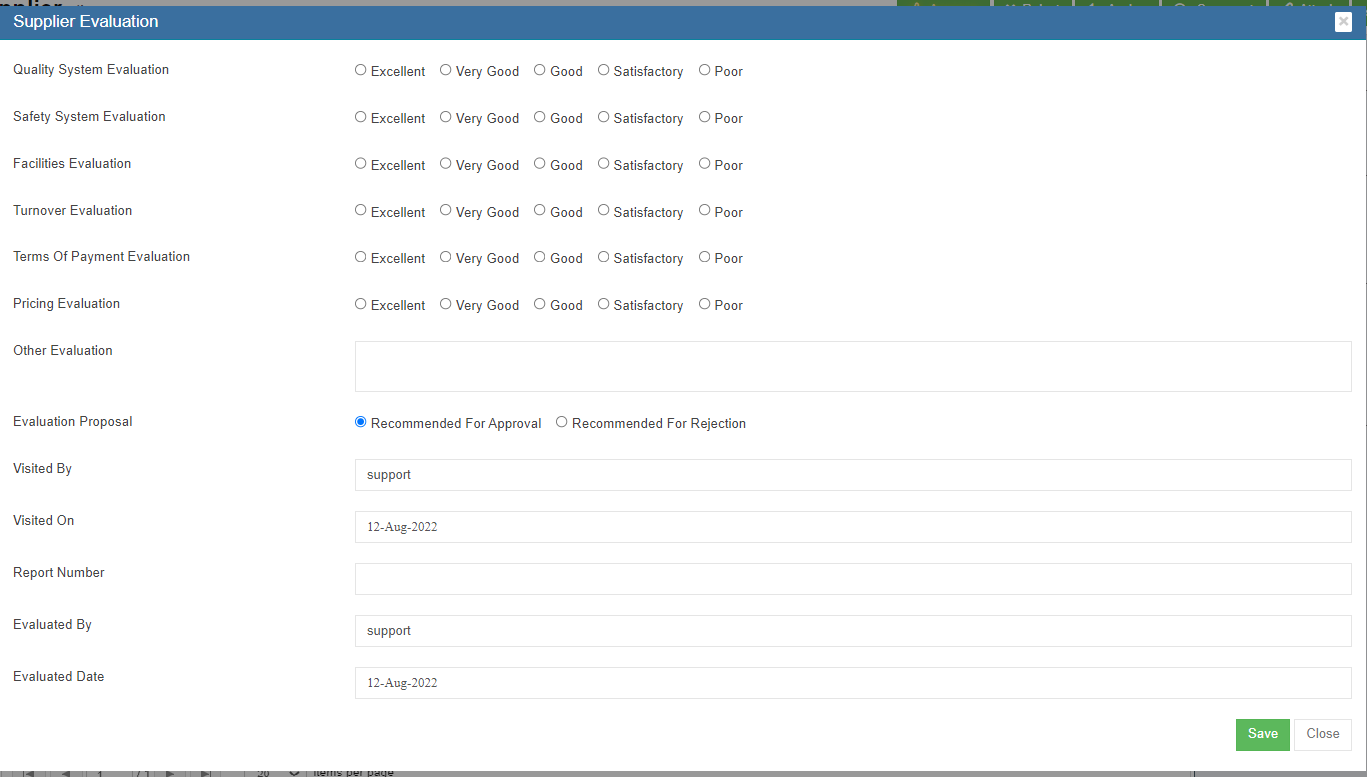](http://wiki.cuteinfocomm.com/uploads/images/gallery/2022-08/image-1660337933652.png)
### Other Options in Supplier
[](http://wiki.cuteinfocomm.com/uploads/images/gallery/2022-08/image-1660686461535.png)
There are other options available in supplier master data management.
Attach-Any related documents such as their ACRA document or any other document can be added as reference using the Attach function. Click attach button, and choose the file to upload and save.
Comment-Authorized users can make comment on the supplier for future reference by clicking the Comment button.
### Export Supplier
User can export all suppliers data use the export option. Click [](http://wiki.cuteinfocomm.com/uploads/images/gallery/2022-08/image-1661796864622.png) the supplier master data will be export and downloaded.
## Company
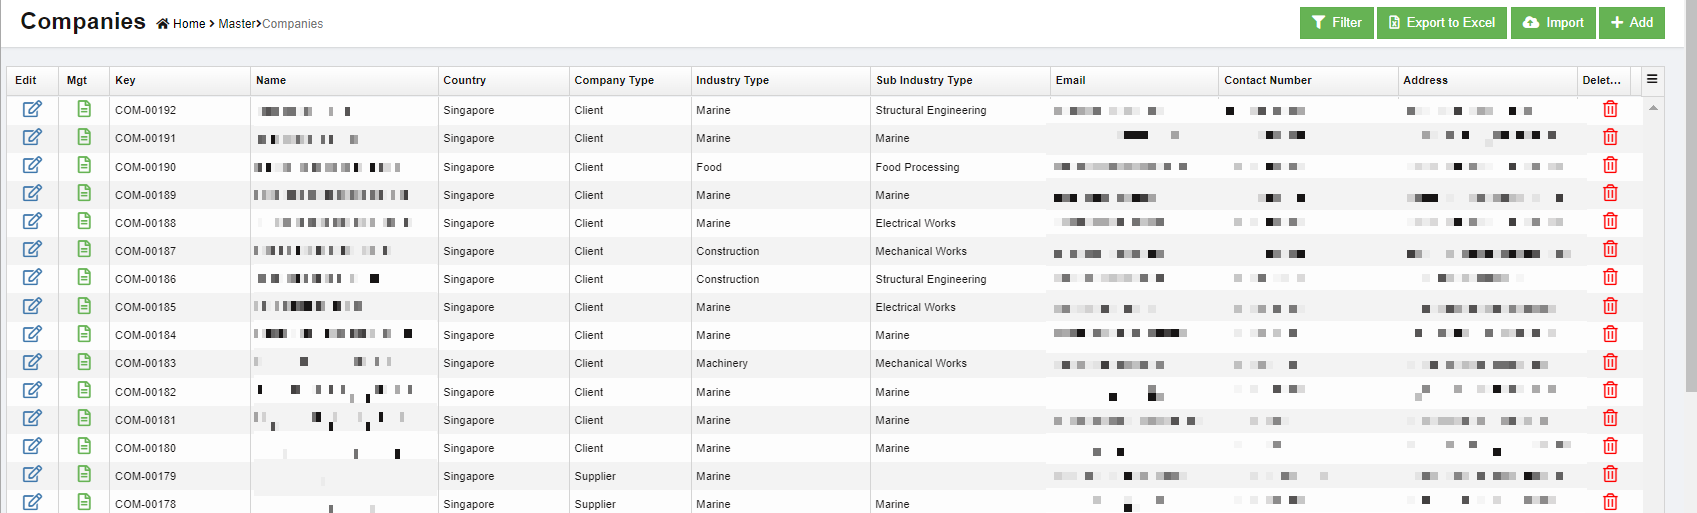
Company master data manages all clients company, supplier company or any third party companies. To view company master list, click **Company** in the Master menu.
[](http://wiki.cuteinfocomm.com/uploads/images/gallery/2023-04/image-1682107686155.png)
### Add New Company
To add a new company,
1. Click [](http://wiki.cuteinfocomm.com/uploads/images/gallery/2022-08/image-1660687295634.png) (Add button) and the new company window opens up, [](http://wiki.cuteinfocomm.com/uploads/images/gallery/2022-08/image-1660687616739.png)
2. Enter the company name and click **Next**. The below window opens, [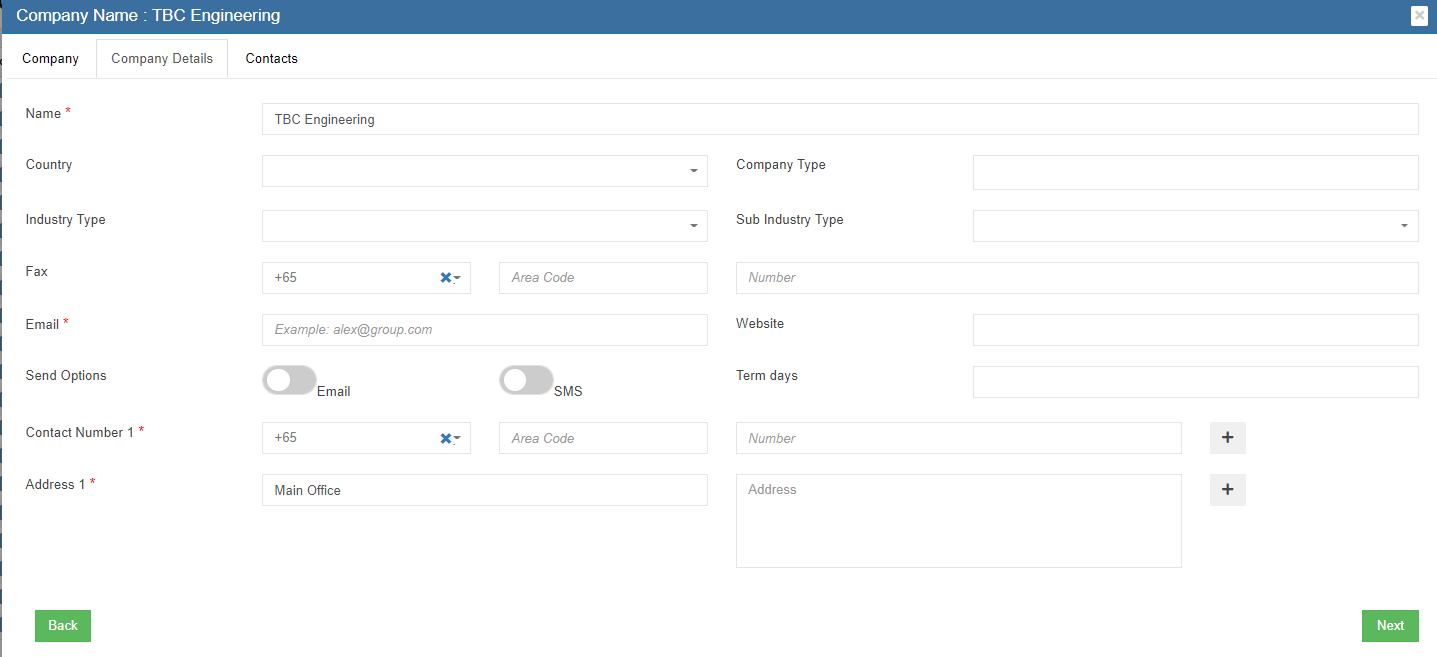](http://wiki.cuteinfocomm.com/uploads/images/gallery/2022-08/image-1660687658096.png)
3. Select the country
4. Enter the email address of the company
5. Enter contact number. Click + to add more contact numbers.
6. Enter Address. Click + to add more address for the same company.
7. Click **Next** and the below contacts information dialog opens up [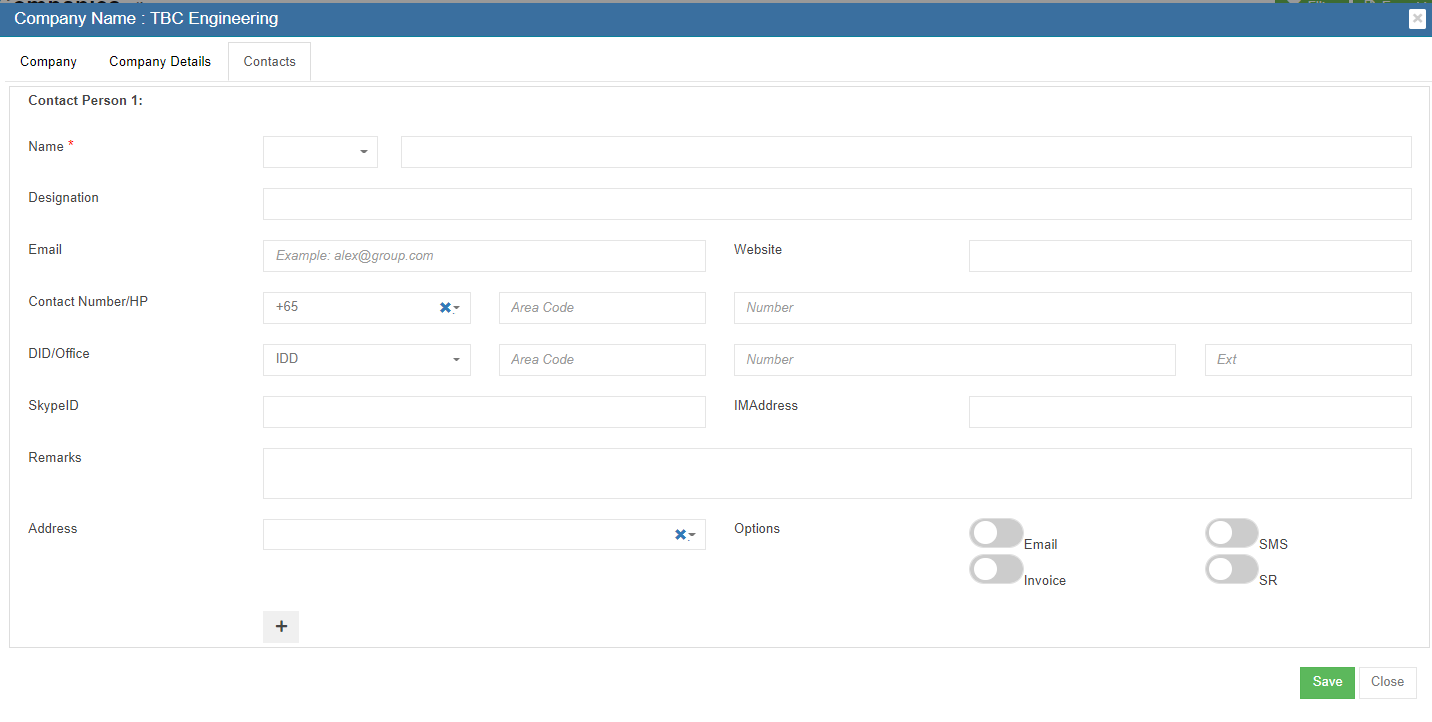](http://wiki.cuteinfocomm.com/uploads/images/gallery/2022-08/image-1660687891893.png)
8. Select person salutation and enter the name of the contact.
9. Enter designation.
10. Enter email address of the contact.
11. Enter phone number, direct phone number etc.
12. Click **Save** to create the company and the contact under the company.
### Edit Company
1. In the company list page, click[](http://wiki.cuteinfocomm.com/uploads/images/gallery/2022-08/image-1660688476953.png) the edit icon against the company, the company detail page will open, [](http://wiki.cuteinfocomm.com/uploads/images/gallery/2023-04/image-1682107732935.png)
2. Edit the company details and click **Save**.
### Delete Company
1. Click[](http://wiki.cuteinfocomm.com/uploads/images/gallery/2022-08/image-1660688625741.png)Delete icon against the company that user wants to delete, [](http://wiki.cuteinfocomm.com/uploads/images/gallery/2023-04/image-1682107787324.png)
2. A confirmation window opens as below, click **Yes** and the company will be deleted. [](http://wiki.cuteinfocomm.com/uploads/images/gallery/2022-08/image-1660688707678.png)
### Export Company
User can export all company data use the export option. Click [](http://wiki.cuteinfocomm.com/uploads/images/gallery/2022-08/image-1661796864622.png) the company master data will be export and downloaded.
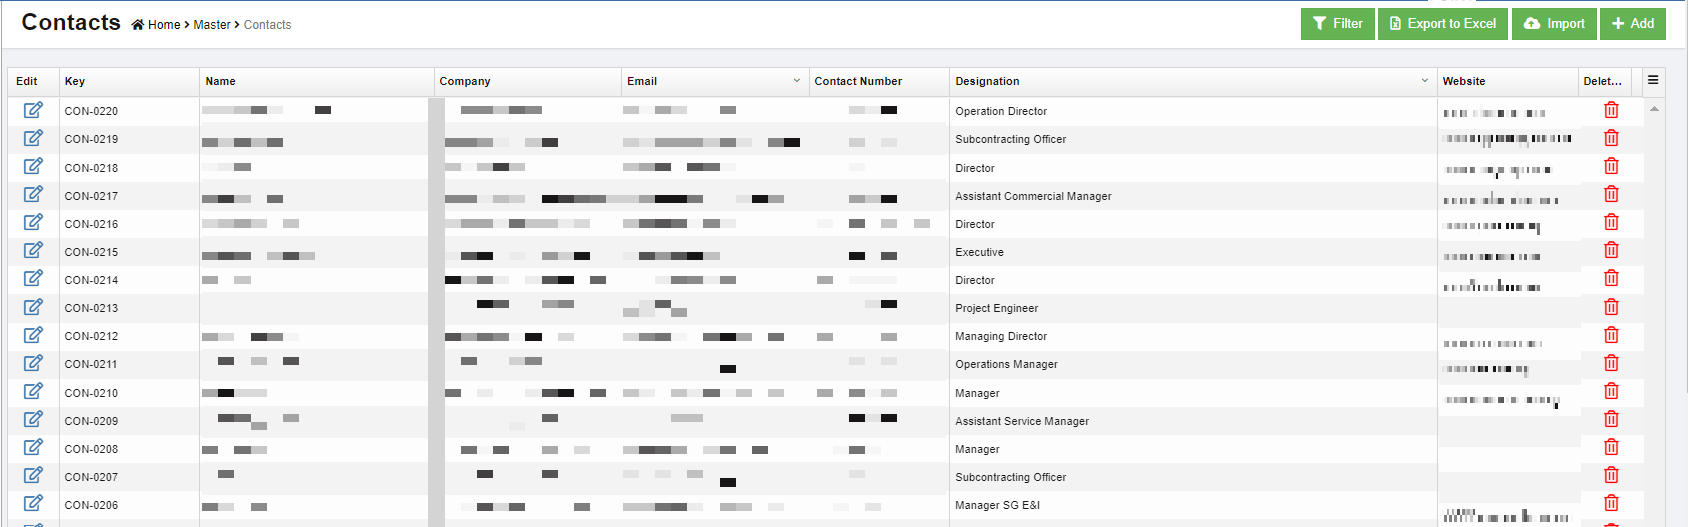
## Contacts
Contacts master contains all contacts data from company master. Contacts master can be added in company master contact tab as well as contact master. To view contact master list, click **Contacts** in the Master menu,
[](http://wiki.cuteinfocomm.com/uploads/images/gallery/2023-04/image-1682107852099.png)
### Add New Contact
To add new contact,
1. Click [(](http://wiki.cuteinfocomm.com/uploads/images/gallery/2022-08/image-1660338813842.png)Add button) and the new contact window opens up,[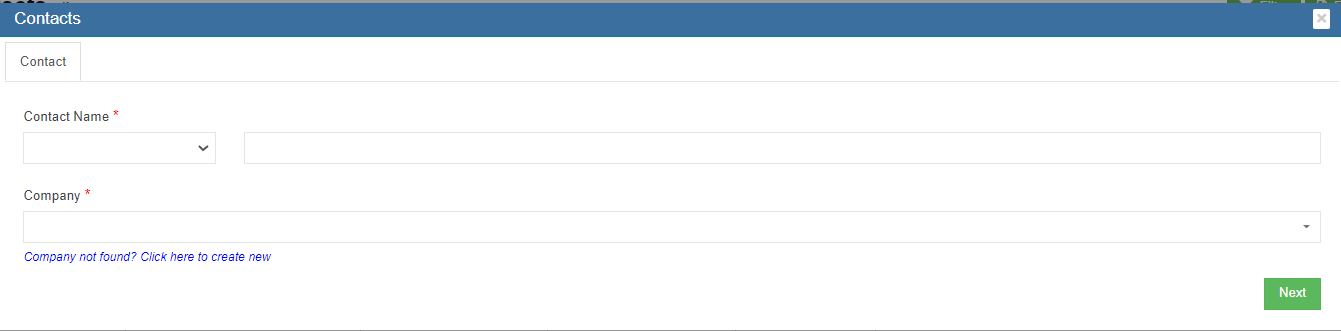](http://wiki.cuteinfocomm.com/uploads/images/gallery/2022-08/image-1660696628700.png)
2. Select the salutation and enter the contact name.
3. Click and select company name, then click **Next,** the contact detail window opens, [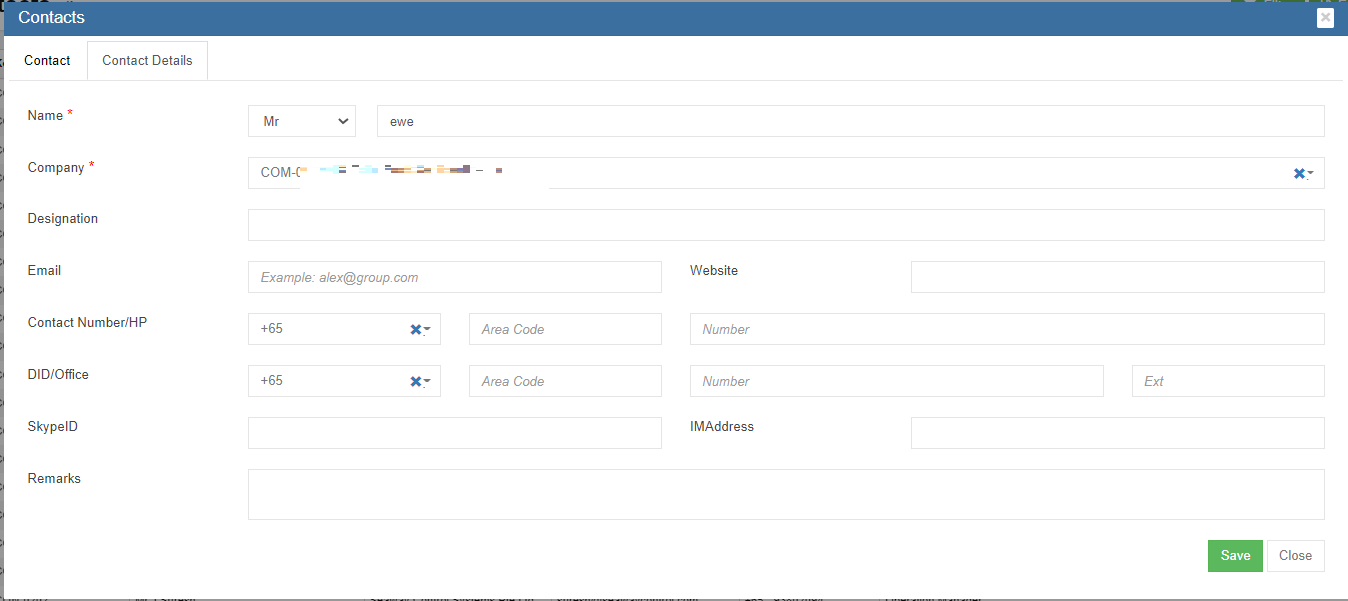](http://wiki.cuteinfocomm.com/uploads/images/gallery/2023-04/image-1682107905508.png)
- If the company already exists in company master, it will appear in the company dropdown list
- If the company not exist in company master yet, click the link "Company not found? Click here to create new" to add company in master data.
4. Select person salutation and enter the name of the person
5. Enter designation
6. Enter email address of the person
7. Enter phone, direct phone number etc.
8. Click **Save** to create the contact and it is created under the company.
Or alternatively, create contact under company master:
1. Click Company in Master menu, select the company from which the new contact come, [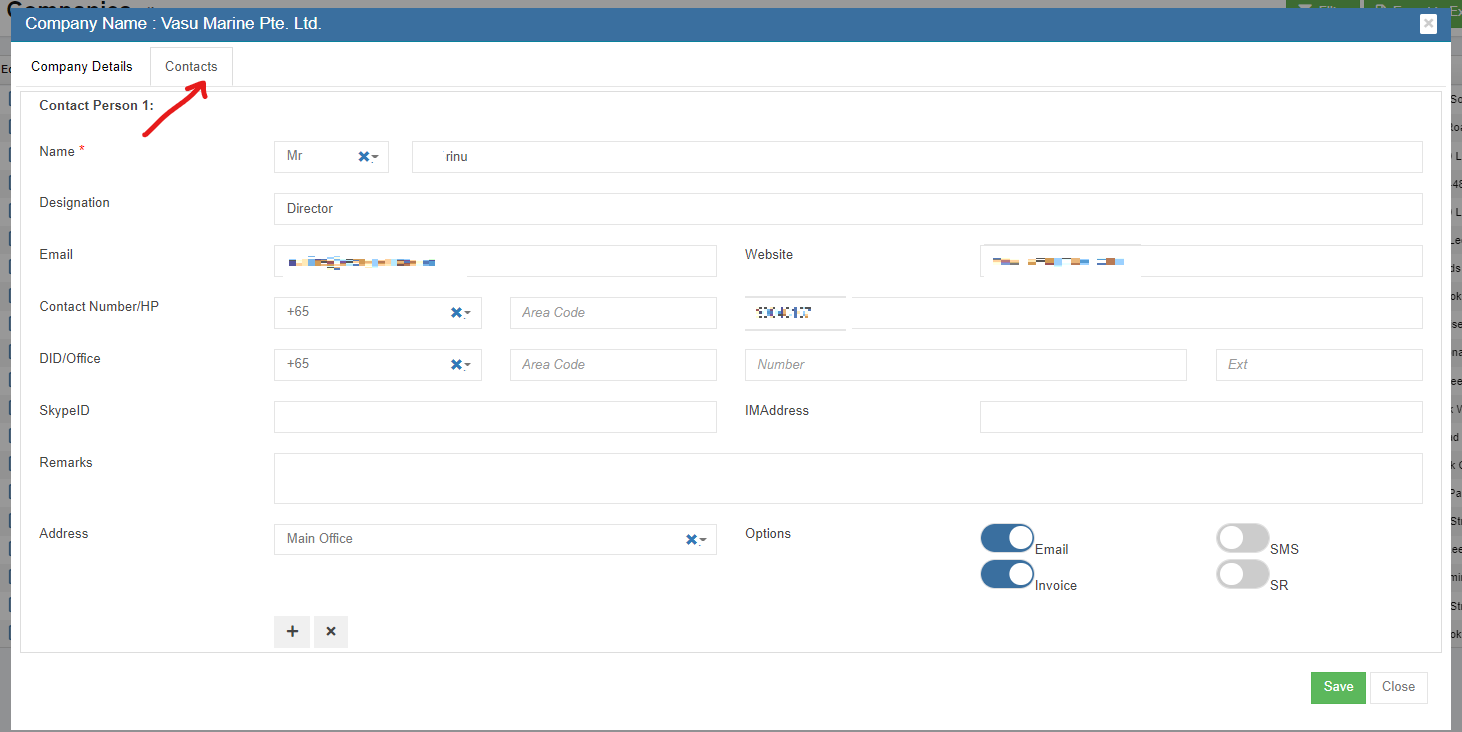](http://wiki.cuteinfocomm.com/uploads/images/gallery/2023-04/image-1682107967744.png)
2. Click the contact tab as in above screenshot, the contact detail page opens.
3. Click [](http://wiki.cuteinfocomm.com/uploads/images/gallery/2022-08/image-1660697382240.png)icon at the bottom left side to add new contact. The new contact page will open.
4. Select person salutation and enter the name of the contact.
5. Enter designation
6. Enter email address
7. Enter phone, direct phone number etc.
8. Click **Save** to create the contact under the company. The contact data will be saved in contact master as well.
### Edit Contact
1. In the contact list page, click[](http://wiki.cuteinfocomm.com/uploads/images/gallery/2022-08/image-1660688476953.png) the edit icon against the contact, the contact detail page will open.
2. Edit the contact details and click **Save**.
### Delete Contact
1. Click[](http://wiki.cuteinfocomm.com/uploads/images/gallery/2022-08/image-1660688625741.png)Delete icon against the contact that user wants to delete,
2. Click Yes to confirm deletion. [](http://wiki.cuteinfocomm.com/uploads/images/gallery/2022-08/image-1660697761656.png)
### Export Contact
User can export all contact data use the export option. Click [](http://wiki.cuteinfocomm.com/uploads/images/gallery/2022-08/image-1661796864622.png) the contact master data will be export and downloaded.
## Asset Category
To view all current asset category, click **Asset Category** in Master menu,
[](http://wiki.cuteinfocomm.com/uploads/images/gallery/2022-08/image-1660697926132.png)
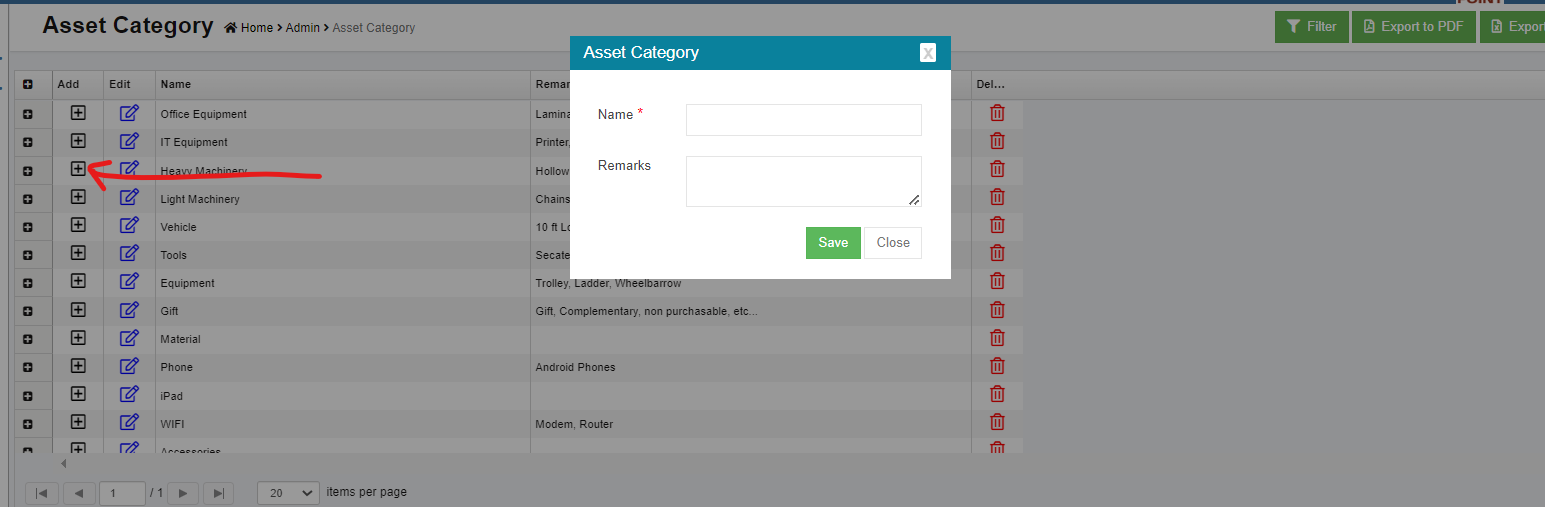
### Add New Asset Category
To add new asset category,
1. click [](http://wiki.cuteinfocomm.com/uploads/images/gallery/2022-08/image-1660338813842.png)in the asset category list view page. The new asset category window opens, [](http://wiki.cuteinfocomm.com/uploads/images/gallery/2022-08/image-1660698093565.png)
2. Enter category name and abbreviation, or any remarks.
3. Click **Save**. A new asset category is added.
### Edit Asset Category
1. In the asset category list page, click[](http://wiki.cuteinfocomm.com/uploads/images/gallery/2022-08/image-1660688476953.png) the edit icon against the category, the asset category detail page will open.
2. Edit the details and click **Save**.
### Delete Contact
1. Click[](http://wiki.cuteinfocomm.com/uploads/images/gallery/2022-08/image-1660688625741.png)Delete icon against the asset category that user wants to delete,
2. Click **Yes** to confirm deletion in the confirmation window.
### Add Sub-category under Asset Category
To add sub category of an asset category, click the add icon in the Add column against each asset category.
[](http://wiki.cuteinfocomm.com/uploads/images/gallery/2022-08/image-1660698463076.png)
### Export Asset Category
User can export all asset category data use the export option. Select and click[ ](http://wiki.cuteinfocomm.com/uploads/images/gallery/2022-08/image-1661797100437.png) the asset category master data will be export and downloaded in selected format.
# Stock Reports
Manage Stocks
# Suppliers Management
Suppliers can register in the client's supplier portal and once approved they get RFQ in the system and quotes can be submitted online. Approved PO are sent through the system and invoices can be submitted online.
## Supplier Registration in cuteOffice
Suppliers' representative user shall register as user in cuteOffice system. Contact your Client for URL to register as supplier. New supplier shall follow below steps to create user account and navigate supplier portal in cuteOffice:
### Supplier Self Registration
1. In cuteOffice user login page of supplier portal, click "Register as new supplier",[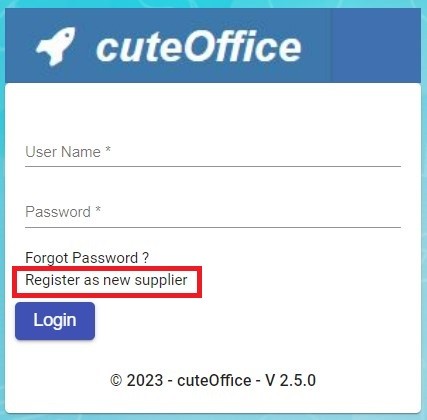](http://wiki.cuteinfocomm.com/uploads/images/gallery/2023-05/image-1685570852978.jpg)
2. The new supplier registration page opens as below, which includes three parts of information: General Company Information, Authorised Representative Information, Attachment:
- **General Company Information**[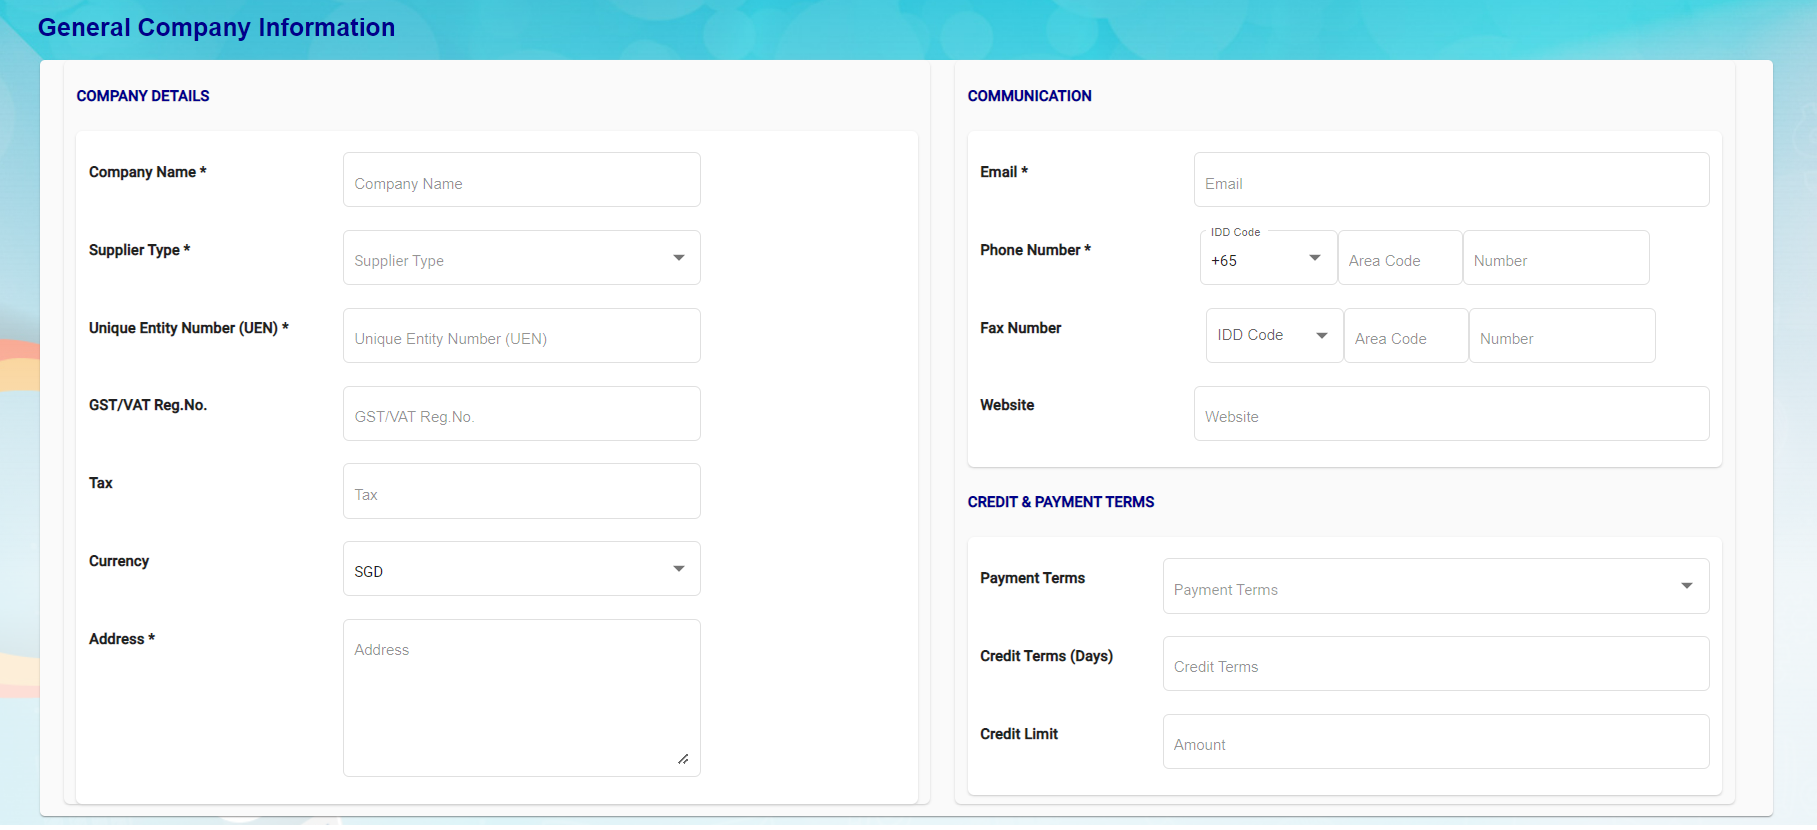](http://wiki.cuteinfocomm.com/uploads/images/gallery/2023-05/image-1685571181753.png)
Company Details
- - - In Company Name box, enter supplier company name.
- In Supplier Type box, select supplier type as local or overseas.
- In UEN box, enter company UEN number.
- In GST/VAT Reg No. box, enter GST/VAT registration number.
- In Tax box, enter Yes or No.
- In Currency box, select currency
- In Address box, enter company address.
Communication
- - - In Email box, enter company email address.
- In Phone Number, select IDD code and enter company phone number.
- In Fax Number, select IDD code and enter company fax number.
- In Website box, enter company website URL.
Credit & Payment Terms
- - - In Payment Terms box, select payment terms,
- In Credit Term box, select credit terms.
- In Credit Limit box, enter credit limit amount.
1. - **Authorised Representative Information**[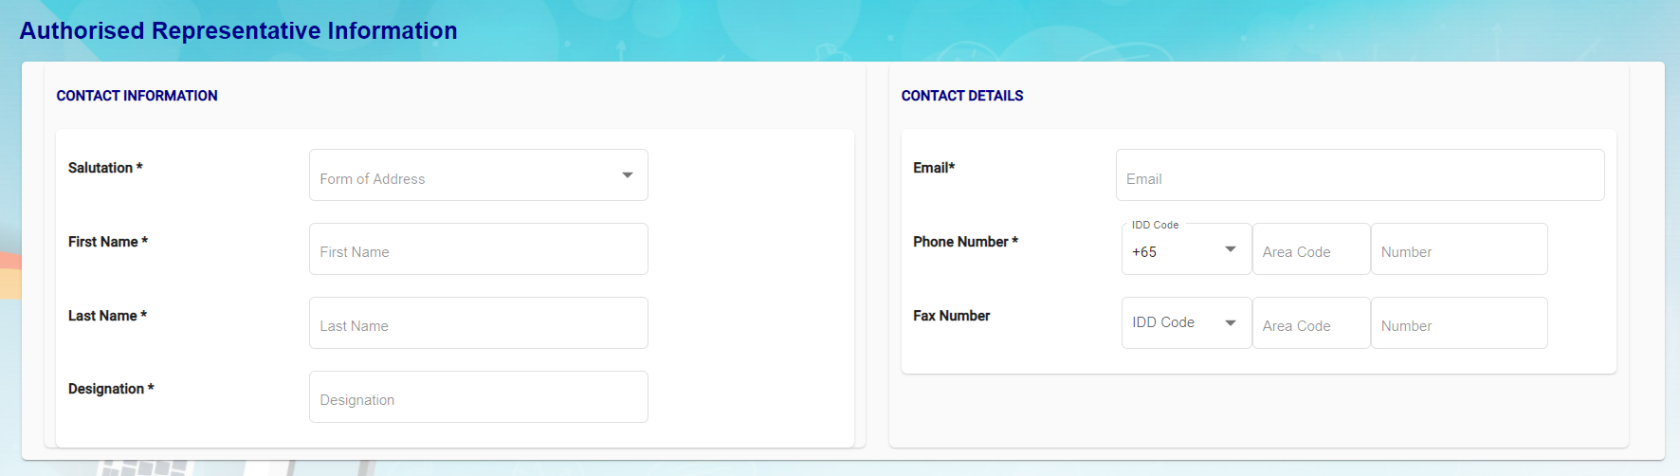](http://wiki.cuteinfocomm.com/uploads/images/gallery/2023-05/image-1685571196088.png)
- In Salutation box, select relevant salutation.
- In First Name box, enter user first name.
- In Last Name box, enter user last name,
- In Designation box, enter user designation.
- In Email box, enter user email address,
- In Phone Number, select IDD code and enter user phone number.
- In Fax Number, select IDD code and enter user fax number.
2. - **Attachment-**supplier user can upload required documents in attachment. Click "Select your file" and select files to upload:[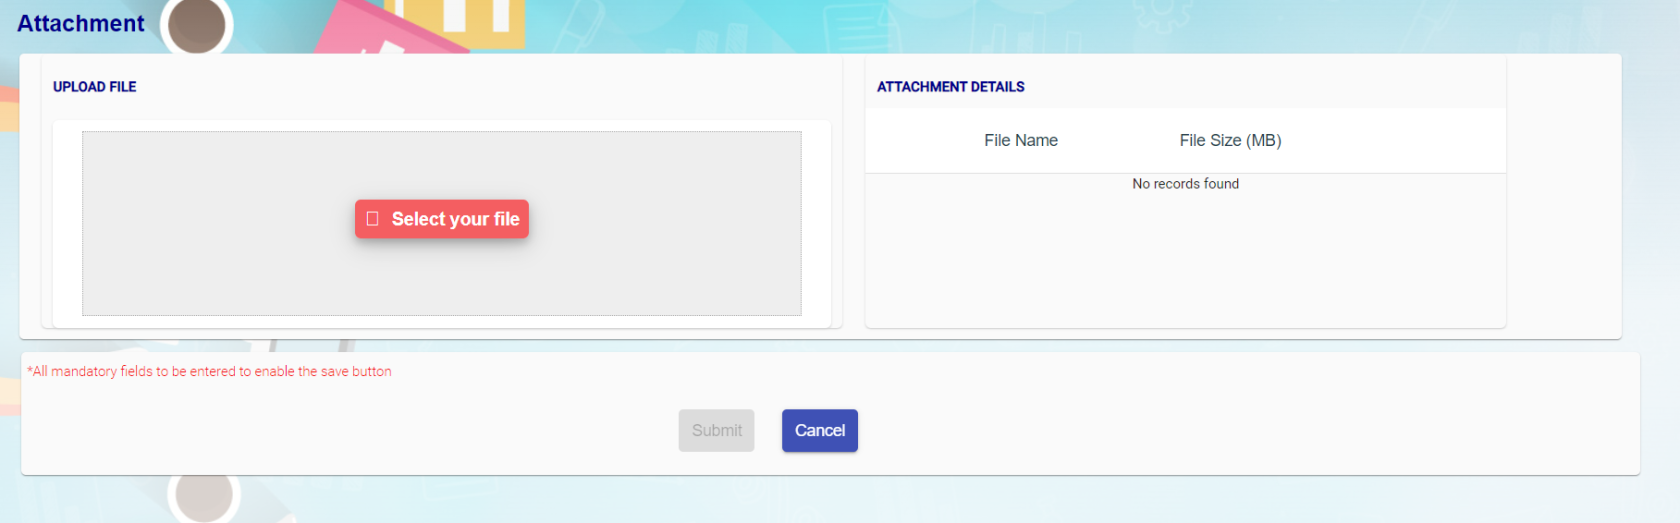](http://wiki.cuteinfocomm.com/uploads/images/gallery/2023-05/image-1685571210372.png)
3. Once all mandatory information are filled up, the submit button will be enabled. Click Submit, a registration success confirmation message will show as below. [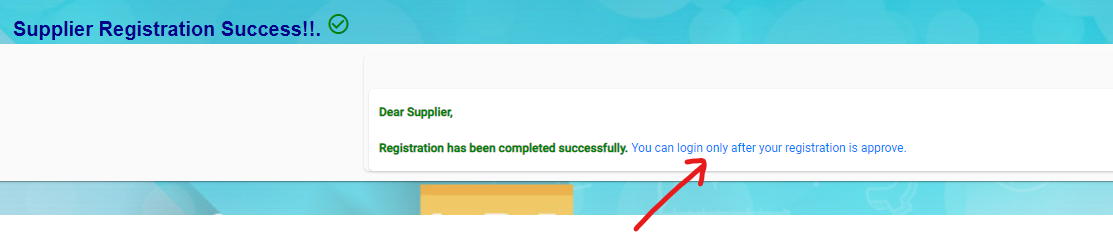](http://wiki.cuteinfocomm.com/uploads/images/gallery/2023-07/image-1690237806485.png)
### Approving New Suppliers (Client)(Not Suppliers)
Once new suppliers registered in cuteOffice, client company need to approve the new supplier to allow suppliers appearing in procurement module.
1. Navigate to cuteOffice version 2, and click Supplier from the main page.[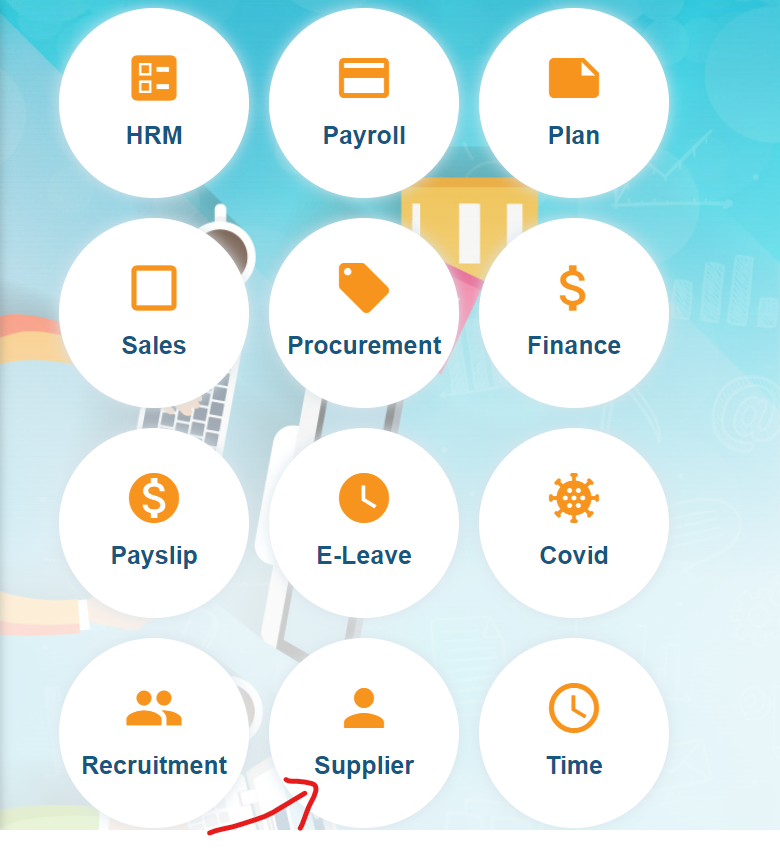](http://wiki.cuteinfocomm.com/uploads/images/gallery/2023-07/image-1690237512766.png)
2. Click [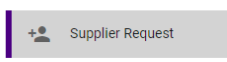 ](http://wiki.cuteinfocomm.com/uploads/images/gallery/2023-07/image-1690237999638.png)Supplier Request, the new suppliers requests list page opens as below, all new registered suppliers will show status as "New Supplier". [](http://wiki.cuteinfocomm.com/uploads/images/gallery/2023-07/image-1690237945822.png)
3. Click the key of the new supplier name to open new supplier review page,
[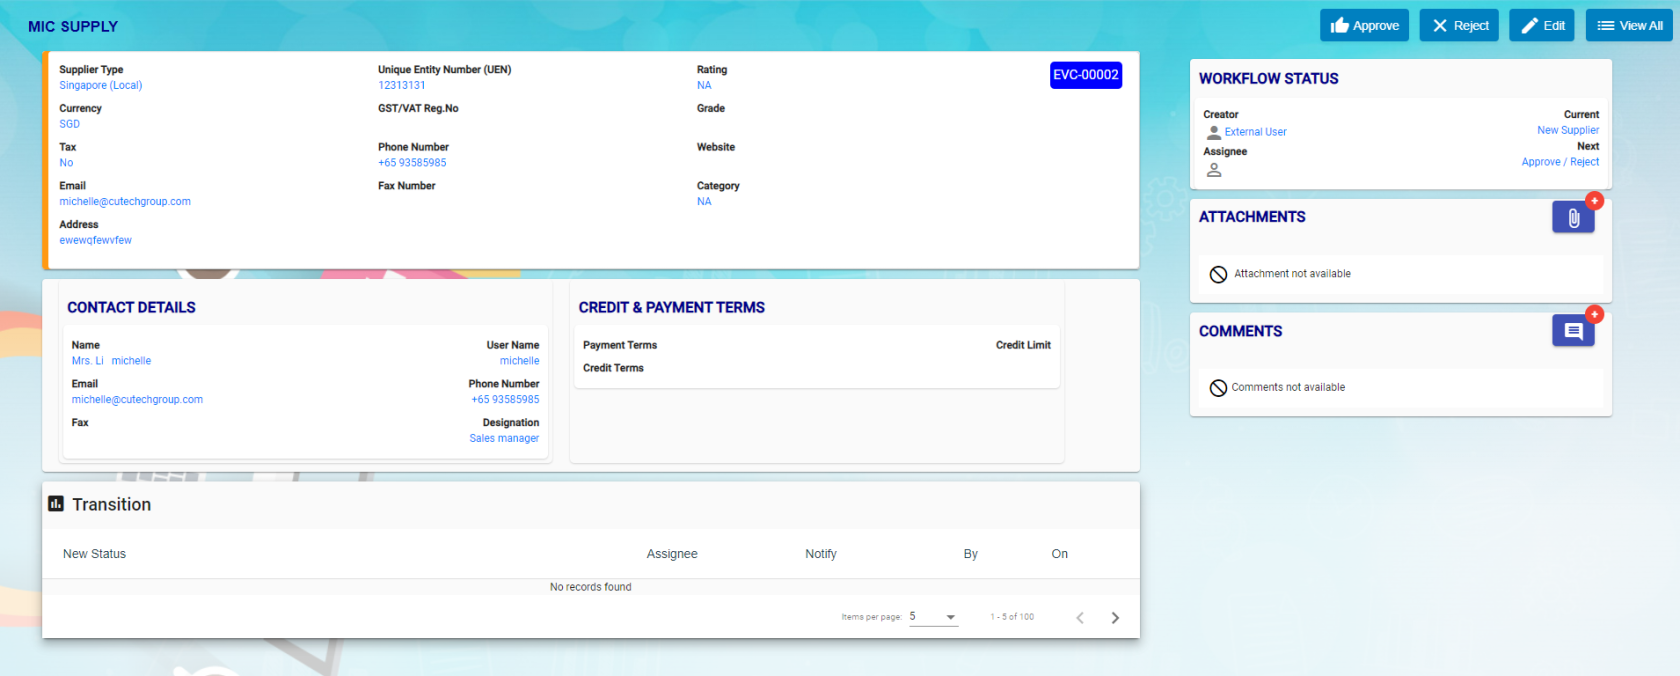](http://wiki.cuteinfocomm.com/uploads/images/gallery/2023-07/image-1690238153295.png)
4. To Approve supplier, click [ ](http://wiki.cuteinfocomm.com/uploads/images/gallery/2023-07/image-1690238240009.png), the notification window opens,
[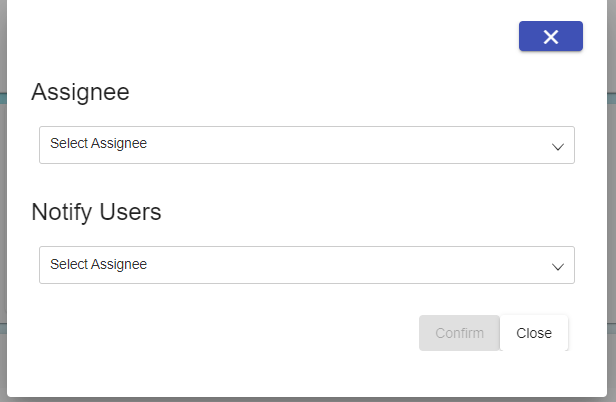](http://wiki.cuteinfocomm.com/uploads/images/gallery/2023-07/image-1690238320627.png)
5. Select respective users to receive supplier approval notifications, and click Confirm button to approve supplier. Or click Reject to reject new supplier. A notification will be sent to the respective user of the company.
6. Once company approved new suppliers, the status of the supplier request will be changed to approved automatically in the supplier portal.
## Supplier Login
In supplier portal, suppliers can view Dashboard (Quotation Request vs Quotation Approved), Quotation /PO and Invoice menu. New quotations created in procurement module will be available in the supplier portal. Quotation number is the same as in RFQ.
[](http://wiki.cuteinfocomm.com/uploads/images/gallery/2023-08/image-1692080867522.png)
**Note:** External Supplier will be available in the user list. External supplier will login to the supplier portal.

## Supplier Management
### Quotation management
1. Click Quotation/PO menu in Supplier portal.[](http://wiki.cuteinfocomm.com/uploads/images/gallery/2023-08/image-1692082023458.png)
2. Click edit icon of the new quotation where status = Waiting for quotation submission, the new quotation opens as below for supplier to fill up details.[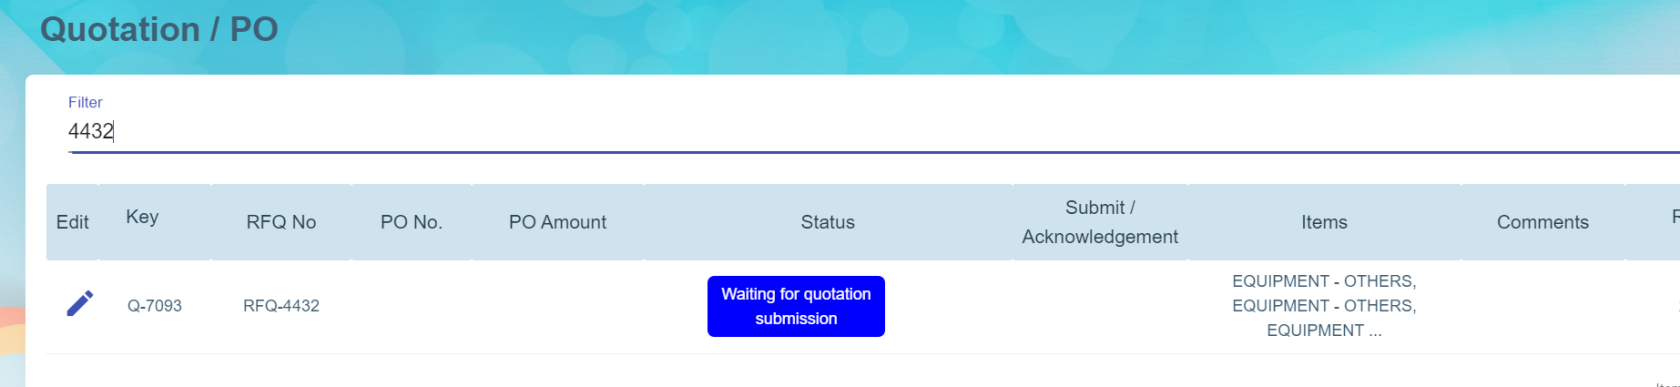](https://wiki.cuteinfocomm.com/uploads/images/gallery/2024-07/image-1721877467943.png)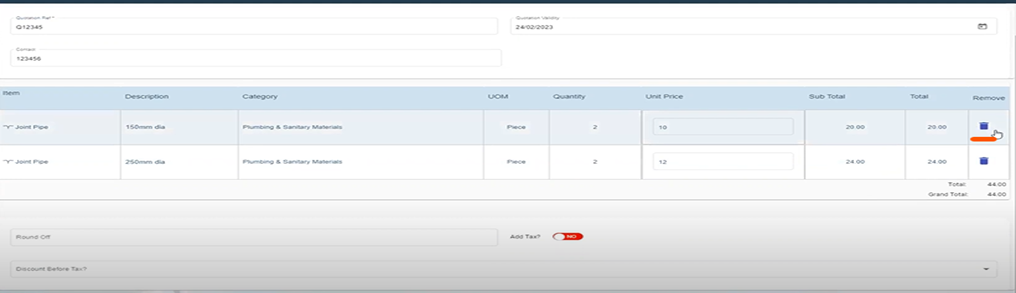
3. Enter quotation reference number, validity date, contact number and enter unit price, add TAX and Discount (optional) if required. (Item can be delete from quotation from procurement module , if it is not applicable).
4. Click save to save quotation details. **Note:** Suppliers can edit and modify the quotation until it gets submit.[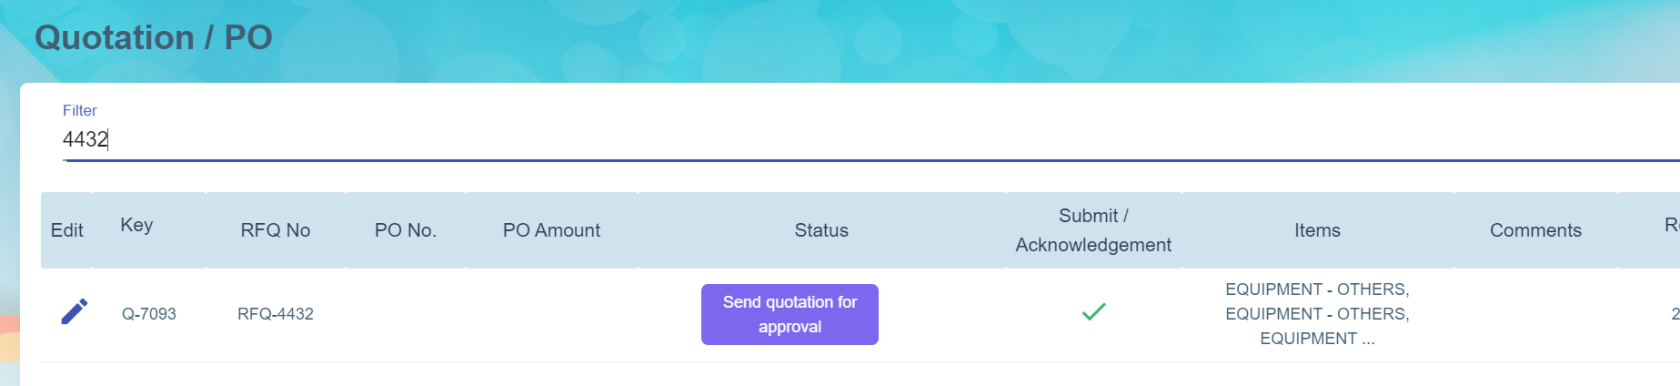](https://wiki.cuteinfocomm.com/uploads/images/gallery/2024-07/image-1721878085143.png)
5. Once suppliers confirmed the details entered are correct, click submit, the status of new quotation will be changed to Waiting for quotation approval.[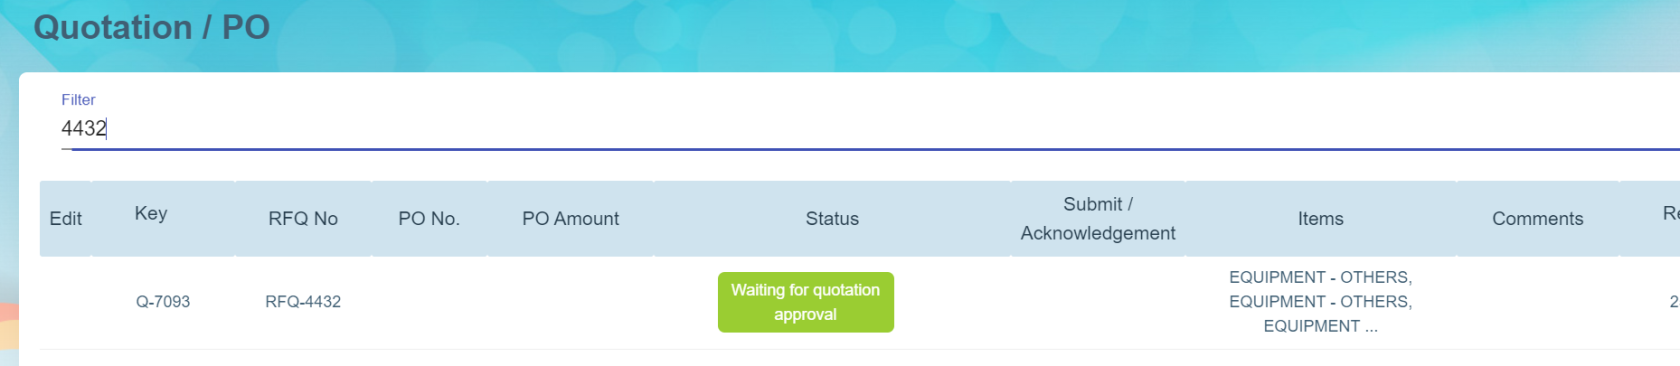](https://wiki.cuteinfocomm.com/uploads/images/gallery/2024-07/image-1721878279831.png)
6. And in procurement module RFQ list, the status of relevant quotation table in the RFQ will automatically updated as quotation created (As Procurement module and supplier module are interlinked). 
7. Then company will be able to select and confirm quotation and proceed to create PO and send PO to relevant suppliers.
### PO management
Once PO is sent to suppliers, supplier users can login to the supplier portal to manage relevant PO.
1. Click Quotation/PO menu in Supplier portal. The status of PO will be "Quotation approved" in Supplier portal with the PO number.[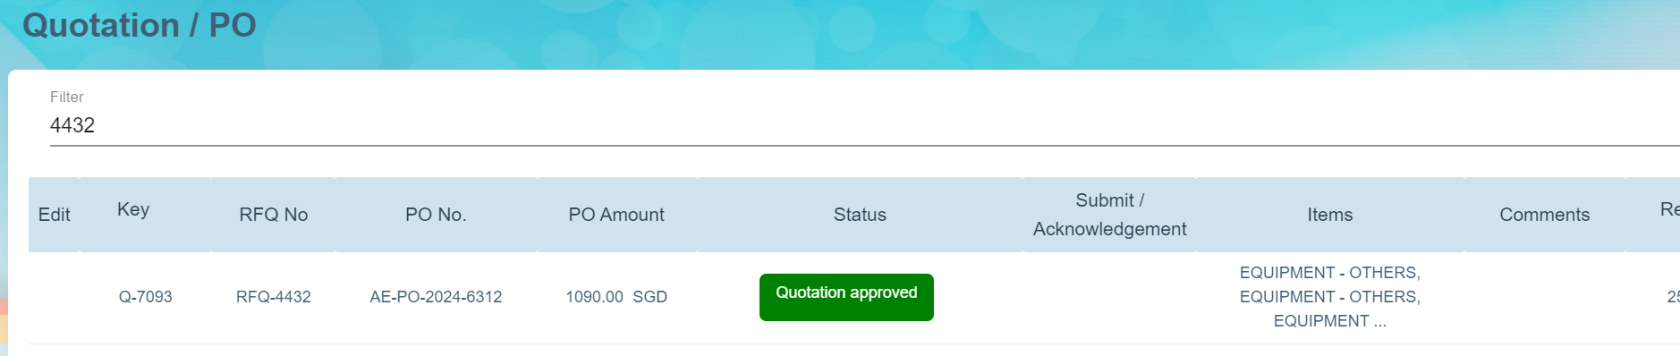](https://wiki.cuteinfocomm.com/uploads/images/gallery/2024-07/image-1721879096834.png)
2. Supplier user shall click the Quotation key to open PO detail page, 
3. Suppliers can acknowledge PO (optional step). Supplier will submit invoice and delivery order.
4. After client company received items against the PO, client company will add receiving entry details.
5. Supplier will enter invoice details in supplier portal. Supplier can also enter Partial payment in the invoice amount.[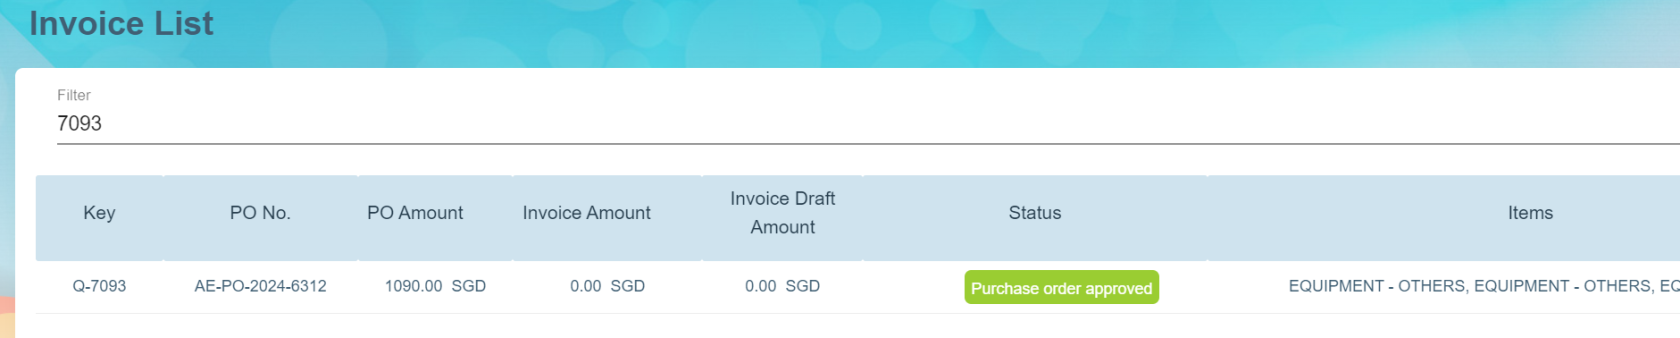](https://wiki.cuteinfocomm.com/uploads/images/gallery/2024-07/image-1721879844781.png)
6. Click on the quotation key i.e. Q-7093 in the Invoice List page and click Add Invoice button at the Invoice Page to add invoice.[](https://wiki.cuteinfocomm.com/uploads/images/gallery/2024-07/image-1721880030579.png)
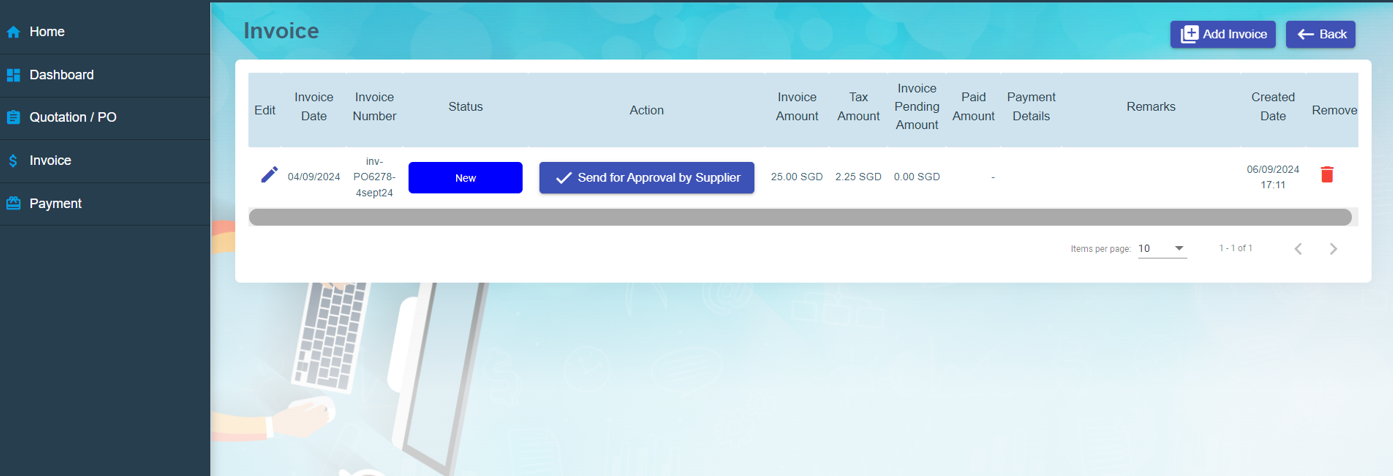
7. Based on the above selected key, system will show the list of item(s) of the quotation/PO approved record in the invoice details page where user can select which item to invoice. Supplier needs to enter the Invoice Date, Invoice Number and Remarks (optional) and it is compulsory to upload the invoice as attachment to this invoice details record.

8. Below sample shows the status = New when you save the invoice and the icon "Send for Approval by Supplier" in the Action column means that this invoice is still in draft mode.
[](https://wiki.cuteinfocomm.com/uploads/images/gallery/2024-09/image-1726711073612.png)
Once invoice is final then you may click on the icon [](https://wiki.cuteinfocomm.com/uploads/images/gallery/2024-09/image-1726711358047.png) in the Action column to submit for the client’s approval with system prompting Yes or No to submit.
[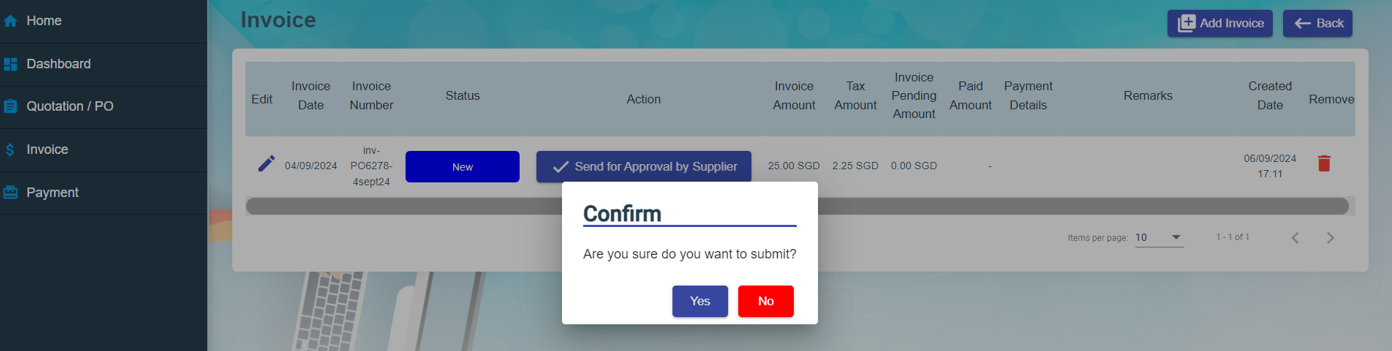](https://wiki.cuteinfocomm.com/uploads/images/gallery/2024-09/image-1726711255974.png)
Once clicked Yes to confirm to submit, the status of the invoice will be changed to Submitted and icon is changed to
"Wating for Approval by Client" in the Action column (refer below screenshot) and this will reflect in the client’s procurement module that the invoice is final and can review to proceed to approve for payment if everything is in order.
[](https://wiki.cuteinfocomm.com/uploads/images/gallery/2024-09/image-1726711405468.png)
9. The invoice data entered by suppliers in supplier portal where invoice status = Submitted, will be automatically synchronized to the invoice draft in client's procurement portal as shown in the below example.[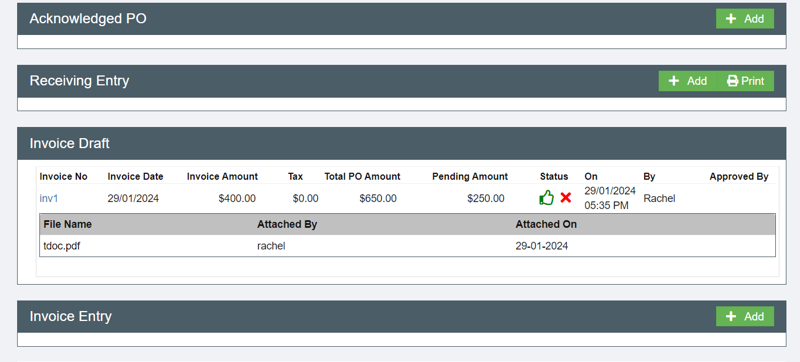](https://wiki.cuteinfocomm.com/uploads/images/gallery/2024-07/image-1721881387218.png)
10. If invoice details are all correct and approved by the client company, it will automatically load in Invoice Entry when client user clicks on the thumbs up icon at the Invoice Draft section to approve the invoice. [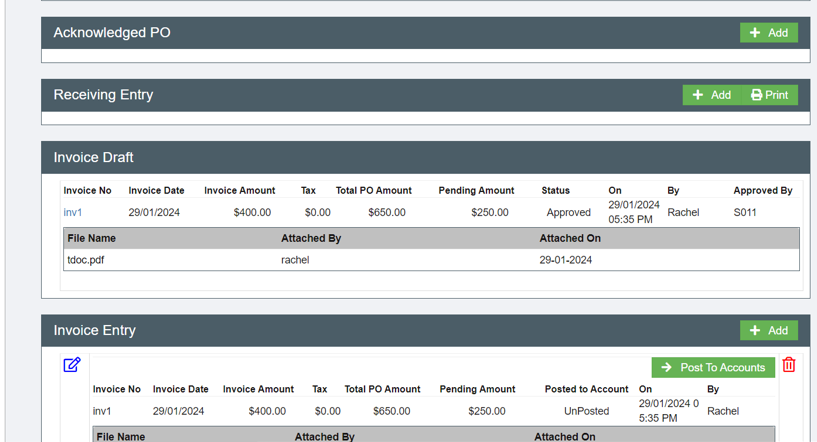](https://wiki.cuteinfocomm.com/uploads/images/gallery/2024-07/image-1721881696159.png)
Based on the client company configuration, if there is a link between the Procurement module and the Finance module, the client user can click on Post to Accounts button at the Invoice Entry to integrate this invoice to the Finance module for payment.
11. Final stage is payment entry. Payment amount and pending invoice amount are entered against either invoice reference number or purchase order key as shown in the below example. [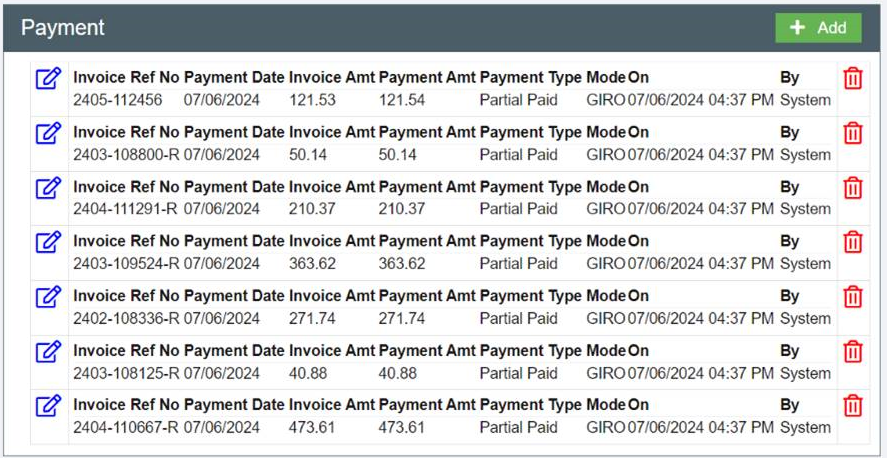](https://wiki.cuteinfocomm.com/uploads/images/gallery/2024-09/image-1726711649998.png)
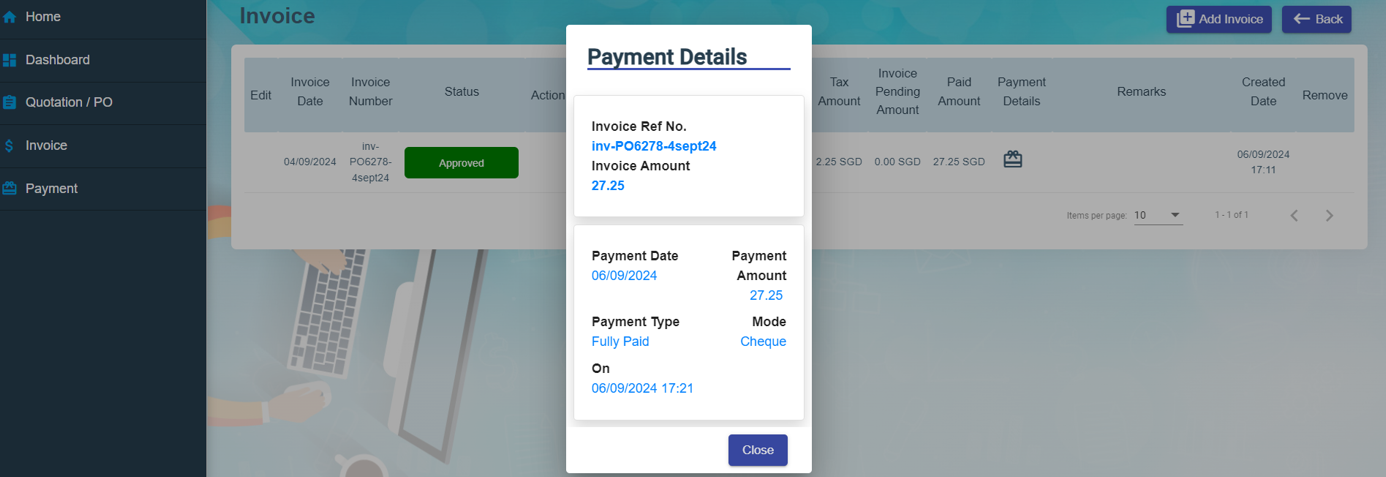
12. Once invoice is approved by client and payment is generated for the invoice in the client finance module, the invoice in the supplier portal will be shown as Approved status and there will be an icon in the Payment Details column and system will show the payment details in Payment Details pop up window. [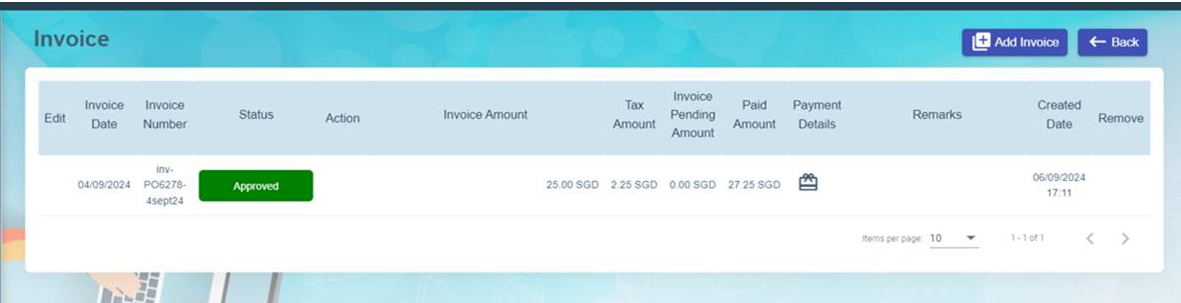](https://wiki.cuteinfocomm.com/uploads/images/gallery/2024-09/image-1726711730930.png)
[](https://wiki.cuteinfocomm.com/uploads/images/gallery/2024-09/image-1726712170320.png)
To view all payments in the supplier portal, click on the left hand side menu "Payment" and system will display all payments as shown in the below screenshot. [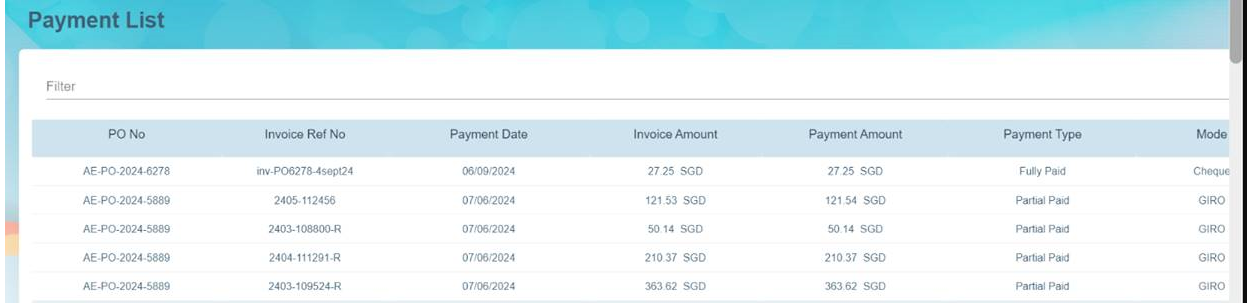](https://wiki.cuteinfocomm.com/uploads/images/gallery/2024-09/image-1726712236489.png)