# Operations
# Project Master
User can manage project data in project master page. Click Operation tab in system main menu, then click Project to open prject master page as below,
[](http://wiki.cuteinfocomm.com/uploads/images/gallery/2023-05/image-1684360357998.png)
## Add New Project
To add a new project, click [](http://wiki.cuteinfocomm.com/uploads/images/gallery/2023-02/image-1675405296762.png) (add icon) in the top right corner of the project master page, the add new project window opens,
**Project Info Tab[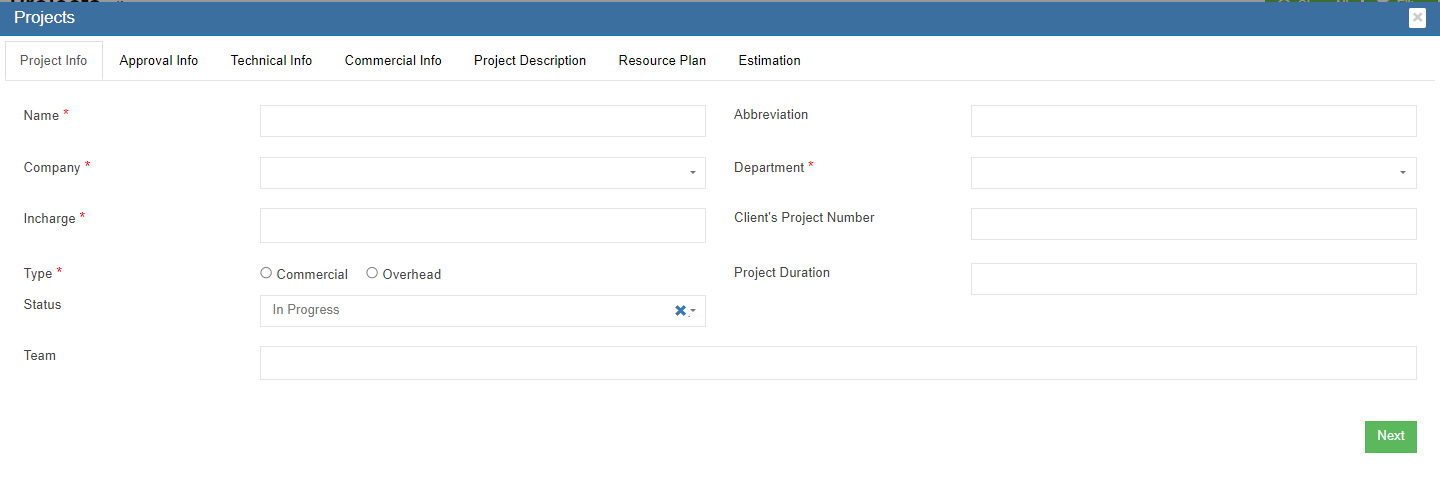](http://wiki.cuteinfocomm.com/uploads/images/gallery/2023-05/image-1684360764241.png)**
1. In Name box, enter project name.
2. In Abbreviation box, enter project name abbreviation.
3. In Company box, select company name.
4. In Department box, select department name.
5. In Incharge box, select person in charge.
6. In Client's Project Number box, enter client side project number if available.
7. In Type box, click commercial or overhead to indicate project type.
8. In Project Duration box, click to select project start and end date from calendar.
9. In Status box, click to select status as In Progress/Closed/Terminated.
10. In Team box, enter team information.
11. Click Next to save project info and open Approval Info tab.
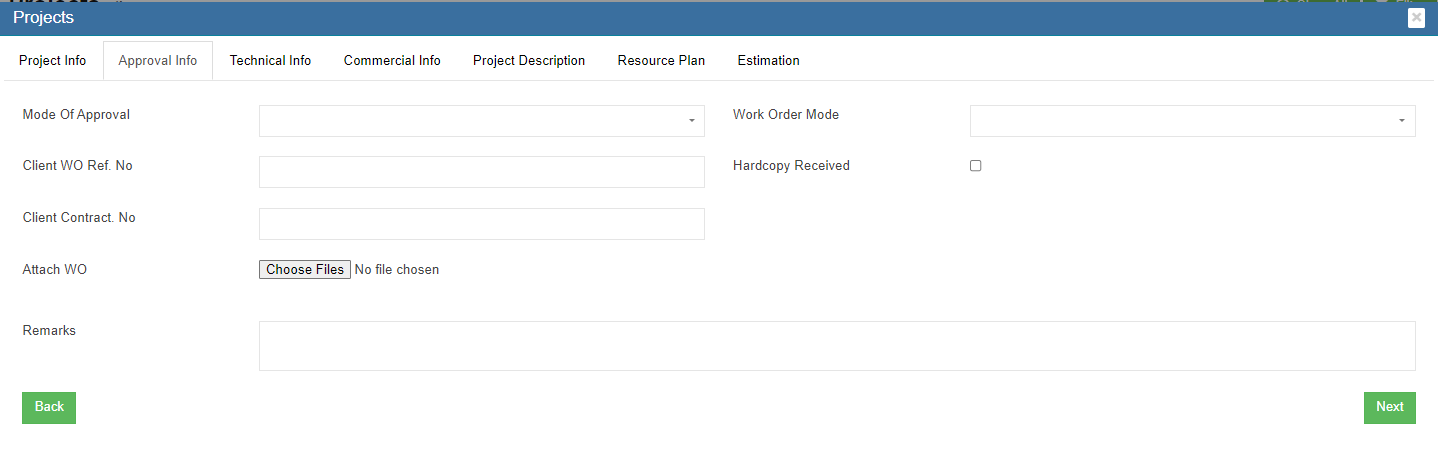
**Approval Info Tab**
[](http://wiki.cuteinfocomm.com/uploads/images/gallery/2023-05/image-1684361455093.png)
1. In Mode of Approval box, click to select approval mode as Email/Hardcopy/Phone.
2. In Work Order Mode box, click to select work order mode as single or multiple.
3. In Client WO Ref No box, enter client work order reference number.
4. In Hardcopy Received box, tick to indicate received approval hardcopy document.
5. Client Contract No box, enter client contract number.
6. In Attach WO area, click [](http://wiki.cuteinfocomm.com/uploads/images/gallery/2023-05/image-1684361929100.png) to choose file to upload.
7. In Remarks box, enter remarks if any.
8. Click Next to save approval info and open Technical Info tab.
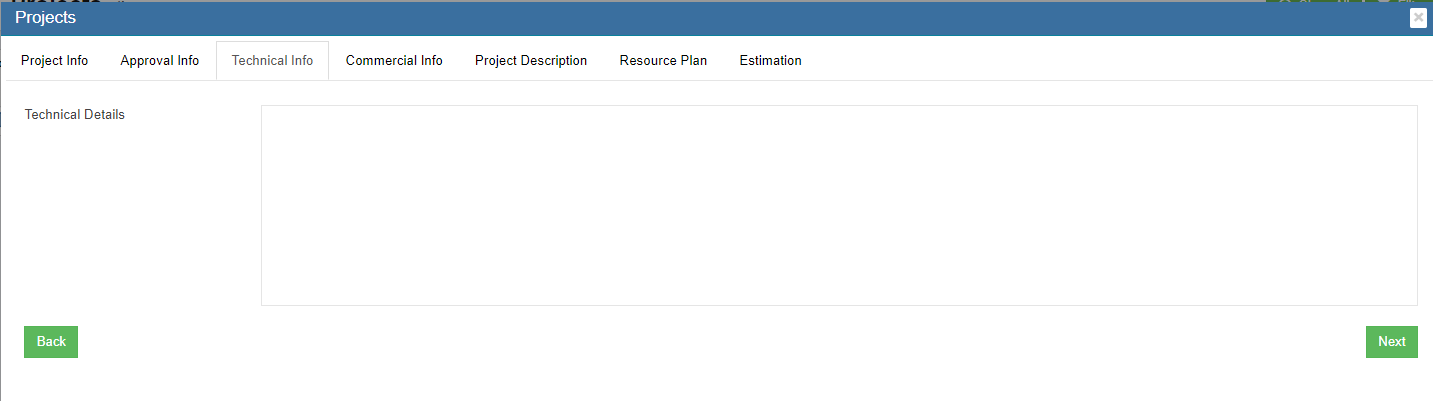
**Technical Info Tab**
[](http://wiki.cuteinfocomm.com/uploads/images/gallery/2023-05/image-1684362145952.png)
1. In Technical Details box, enter project technical detail.
2. Click Next to save technical info and open Commercial Info tab.
**Commercial Info Tab**
[](http://wiki.cuteinfocomm.com/uploads/images/gallery/2023-05/image-1684362243414.png)
1. In Commercial Details box, enter project commercial detail.
2. Click Next to save commercial info and open Project Description tab.
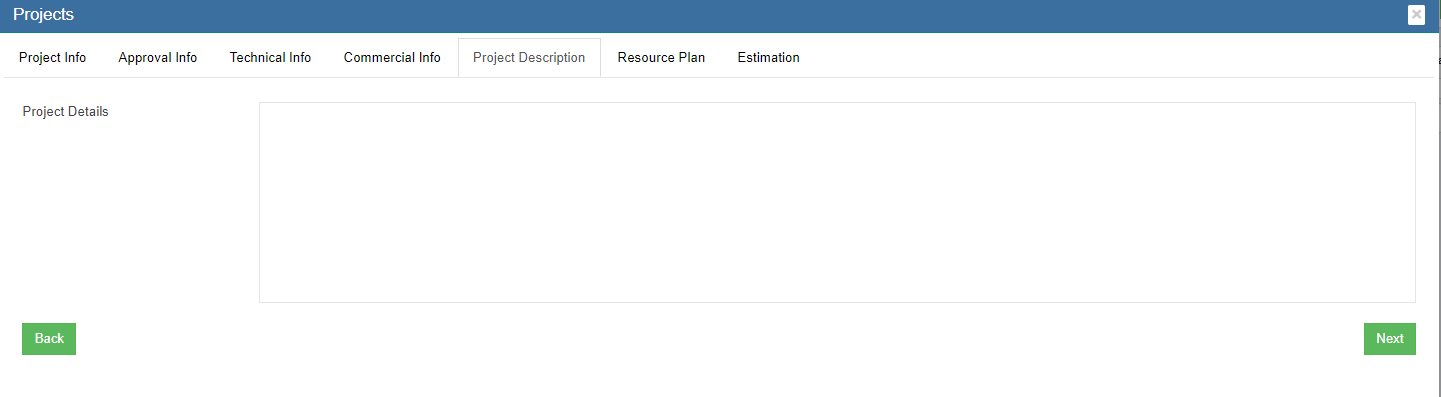
**Project Description Tab**
[](http://wiki.cuteinfocomm.com/uploads/images/gallery/2023-05/image-1684362413478.png)
1. In Project Description box, enter project description.
2. Click Next to save project description and open Resource Plan tab.
**Resource Plan Tab**
[](http://wiki.cuteinfocomm.com/uploads/images/gallery/2023-05/image-1684362887087.png)
1. In Minimum Manday box, enter minimum man days.
2. Click Next to save resource plan and open Estimation tab.
**Estimation Tab**
[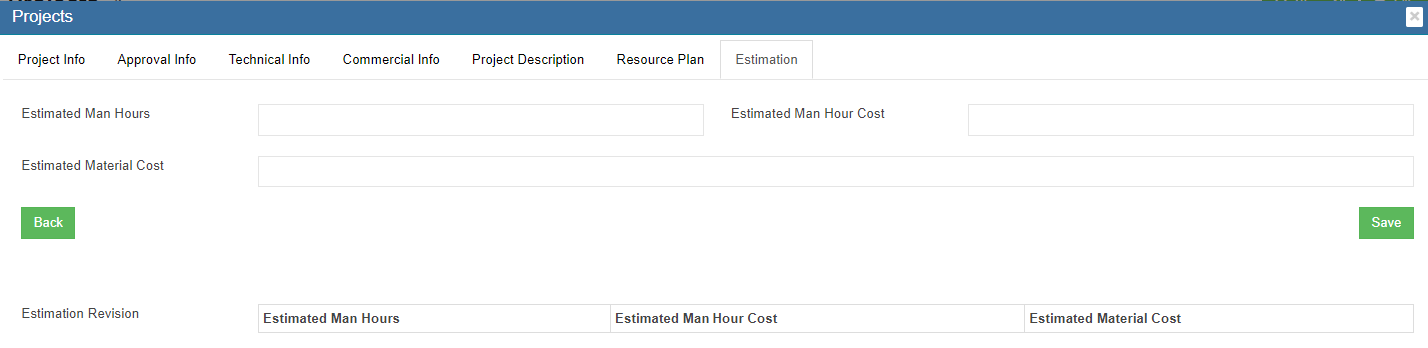](http://wiki.cuteinfocomm.com/uploads/images/gallery/2023-05/image-1684439130017.png)
1. In Estimated Man Hours box, enter estimated man hours.
2. In Estimated Man Hour Cost box, enter estimated cost.
3. In Estimated Material Cost box, enter estimated material cost.
4. Click Save to save all data entered in project tabs, a project creation notification window opens as below,[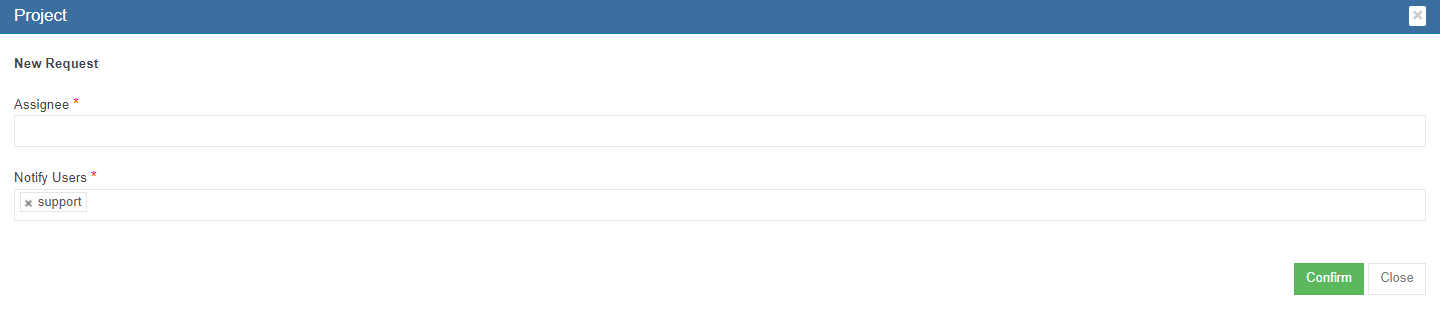](http://wiki.cuteinfocomm.com/uploads/images/gallery/2023-05/image-1684439354708.png)
5. Click Confirm to create project.
**Project Status**
Once project is completed, the status can be changed from "In Progress" to "Closed" . Edit functionality will not be available for the project to edit further.
[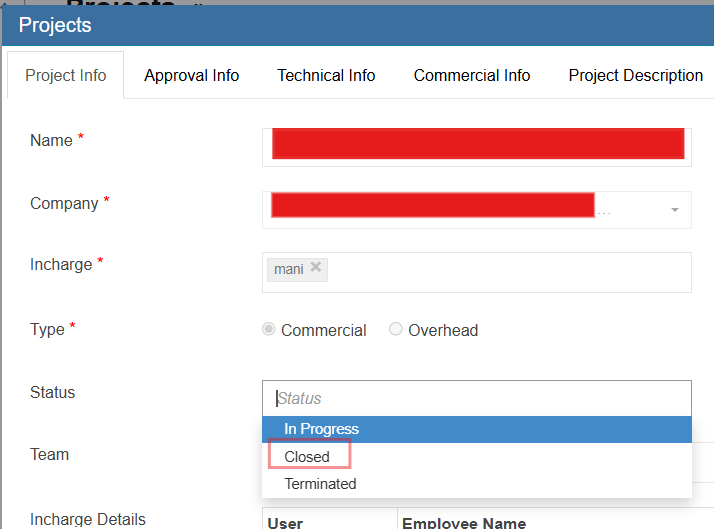](https://wiki.cuteinfocomm.com/uploads/images/gallery/2025-07/image-1752220693046.png)
Special permission "projectSplEditforNonActive" available to edit "Closed" status project.
## Edit Project
[](http://wiki.cuteinfocomm.com/uploads/images/gallery/2023-05/image-1684529311104.jpg)
Click the[(](http://wiki.cuteinfocomm.com/uploads/images/gallery/2023-02/image-1675408585326.png)edit icon) in front of the project name. The project details window will open. Edit the details and click Save to save updates.
## Project Management
[](http://wiki.cuteinfocomm.com/uploads/images/gallery/2023-05/image-1684529273357.jpg)
1. Click [](http://wiki.cuteinfocomm.com/uploads/images/gallery/2023-05/image-1684785673487.png)icon, the project management page opens as below, [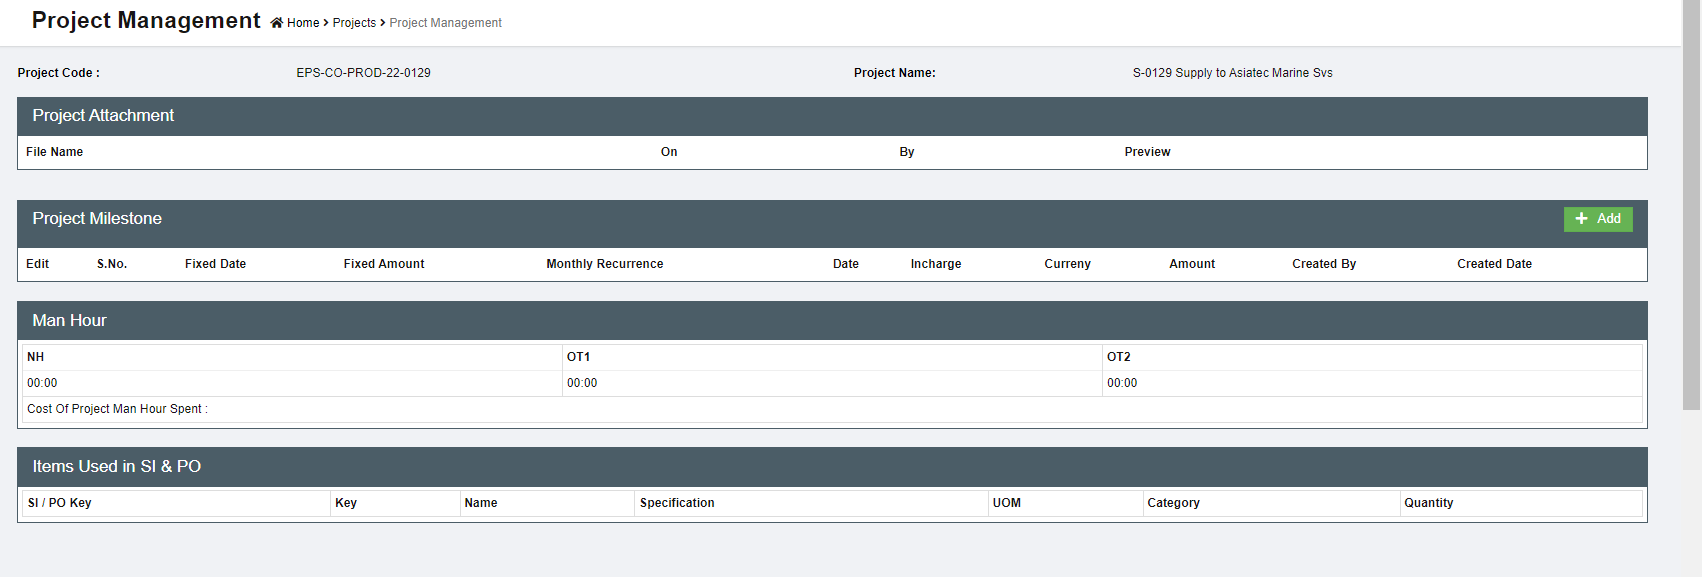](http://wiki.cuteinfocomm.com/uploads/images/gallery/2023-05/image-1684530702759.png)
2. User can view all relevant project information and also add project milestones.
### Project Site
Project site is used to define single or multiple site locations for a project. Each site will have geolocation (latitude & longitude) and shift name.
To establish geofence, allowing employees to perform Geopunch within the defined or default radius after accurate latitude and longitude coordinates enabled or radius can be drawn directly on the map.
[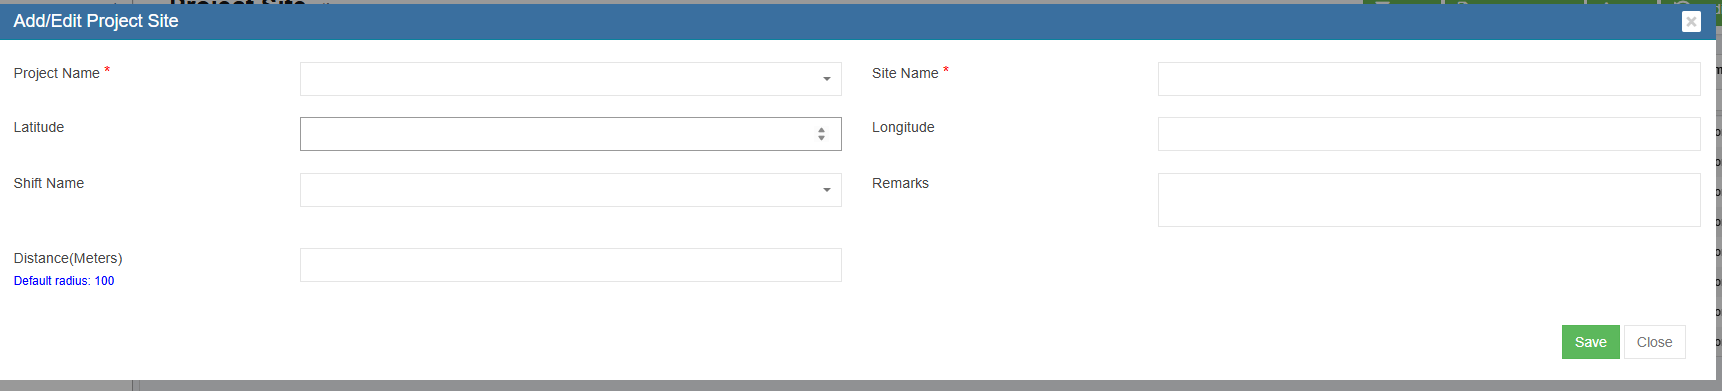](https://wiki.cuteinfocomm.com/uploads/images/gallery/2025-12/image-1765270668539.png)
1. Click Project Name and choose the project. \*
2. Enter Site name \*
3. Enter Latitude and Longitude of the location
4. Enter Shift name
5. Change the distance (default radius), if required.
6. Save the record.
7. Go to main page and click Geo icon. [](https://wiki.cuteinfocomm.com/uploads/images/gallery/2025-12/image-1765271113535.png)
8. Click search and enter the pin code.
9. Click Polygon to draw radius to define the boundary to perform geopunch. (Enable the geofence under global settings to true. Within the boundary, user can perform clock in & clock out. Beyond that, it is not possible )
[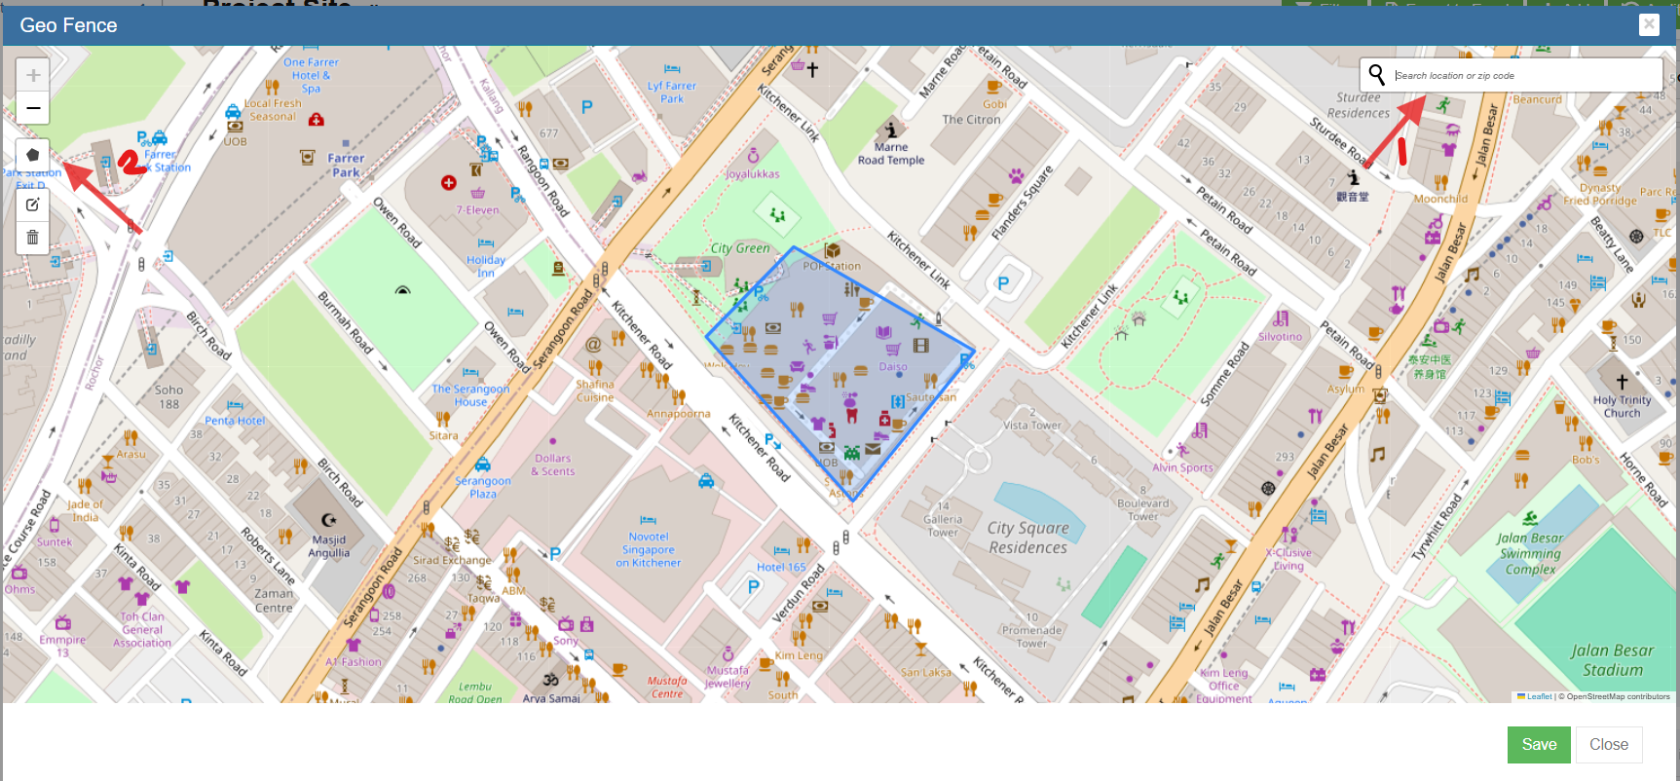](https://wiki.cuteinfocomm.com/uploads/images/gallery/2025-12/image-1765271345683.png)
Settings
[](https://wiki.cuteinfocomm.com/uploads/images/gallery/2025-12/image-1765272268673.png)
[](https://wiki.cuteinfocomm.com/uploads/images/gallery/2025-12/image-1765272314416.png)
\* Mandatory fields
## Project Milestone
The Project Milestone is to brief the various important milestones of the project. Entry of the Milestones for a Project is mandatory and the following validation needs to be implemented.
- The Start date of the Milestone (for Sno 1) should be the start date of the Project and the
last Milestone End Date should the Project End Date created
- Milestone to be identified whether they are Payment Milestone Yes/No
- If the Payment Milestone is Yes, Milestone Amount is mandatory
- Total Milestone Amount should be equal to the Project Amount
- Linking Project Quotations to Milestone Yes/No
- In the Quotation field for the Milestone creation, validate the Quotation selected to be the same company. Also provide a dropdown of Quotation for this project. If no quotation is not there for this project in Enquiry, then display all the quotation for the company
- If there is only one quotation display instead of selection
- Once the Milestone Status is complete, 100%, Edit to be not provided for the Milestone. For milestones which has quantifiable output(for eg: 100m insulation of pipes) must have a field to enter the final output of the respective milestone. There can be multiple records as output. To capture Item Name, description. UOM and Quantity if output is selected
• . Change the below UI accordingly
[](http://wiki.cuteinfocomm.com/uploads/images/gallery/2023-05/image-1684529962542.jpg)
1. Click[](http://wiki.cuteinfocomm.com/uploads/images/gallery/2023-05/image-1684785720033.png) icon, [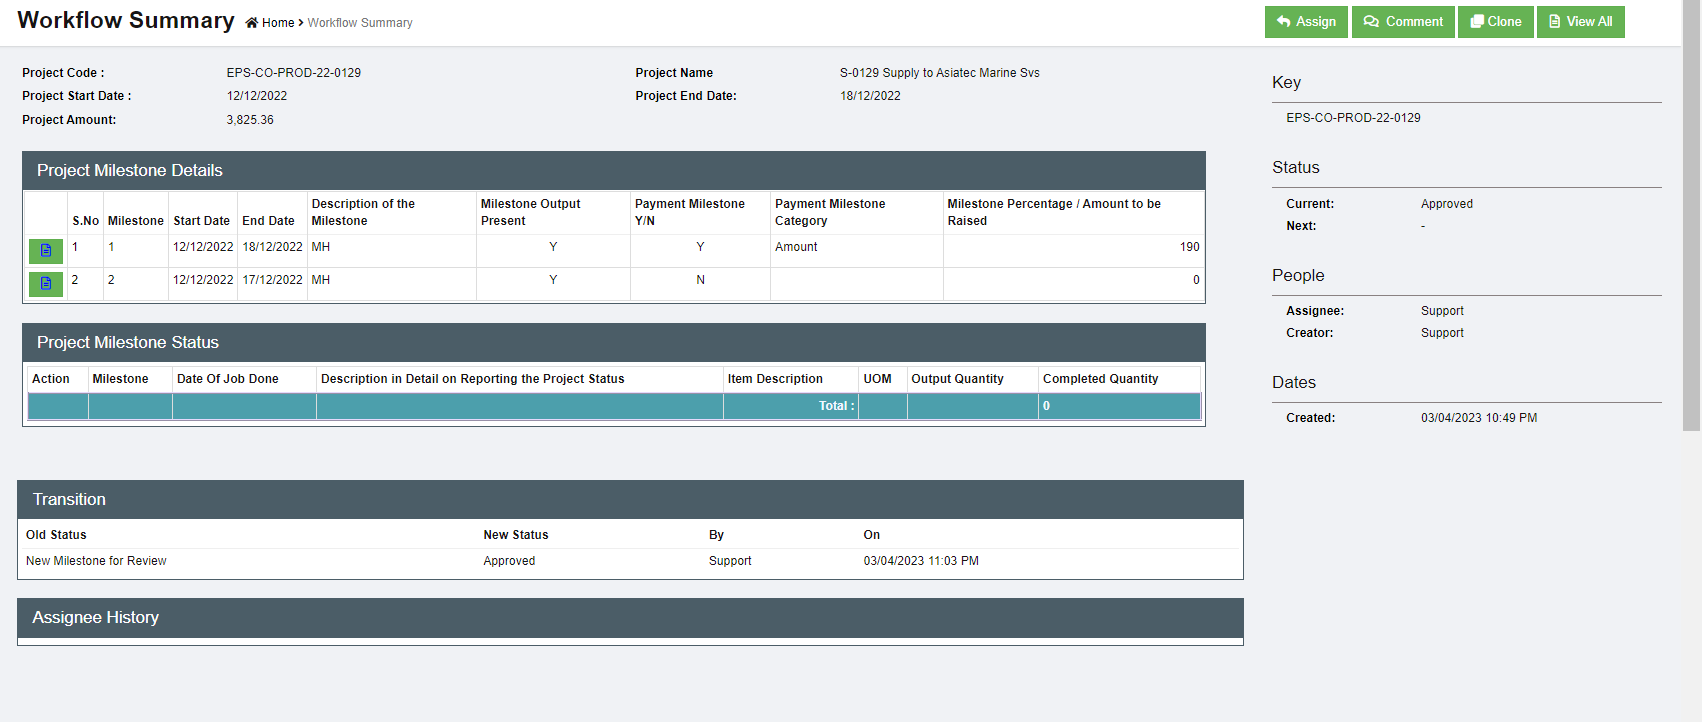](http://wiki.cuteinfocomm.com/uploads/images/gallery/2023-05/image-1684785836165.png)
2.
## Project Billing
[](http://wiki.cuteinfocomm.com/uploads/images/gallery/2023-05/image-1684529341293.jpg)
1. Click[](http://wiki.cuteinfocomm.com/uploads/images/gallery/2023-05/image-1684785923262.png) icon, the project billing page opens as below, [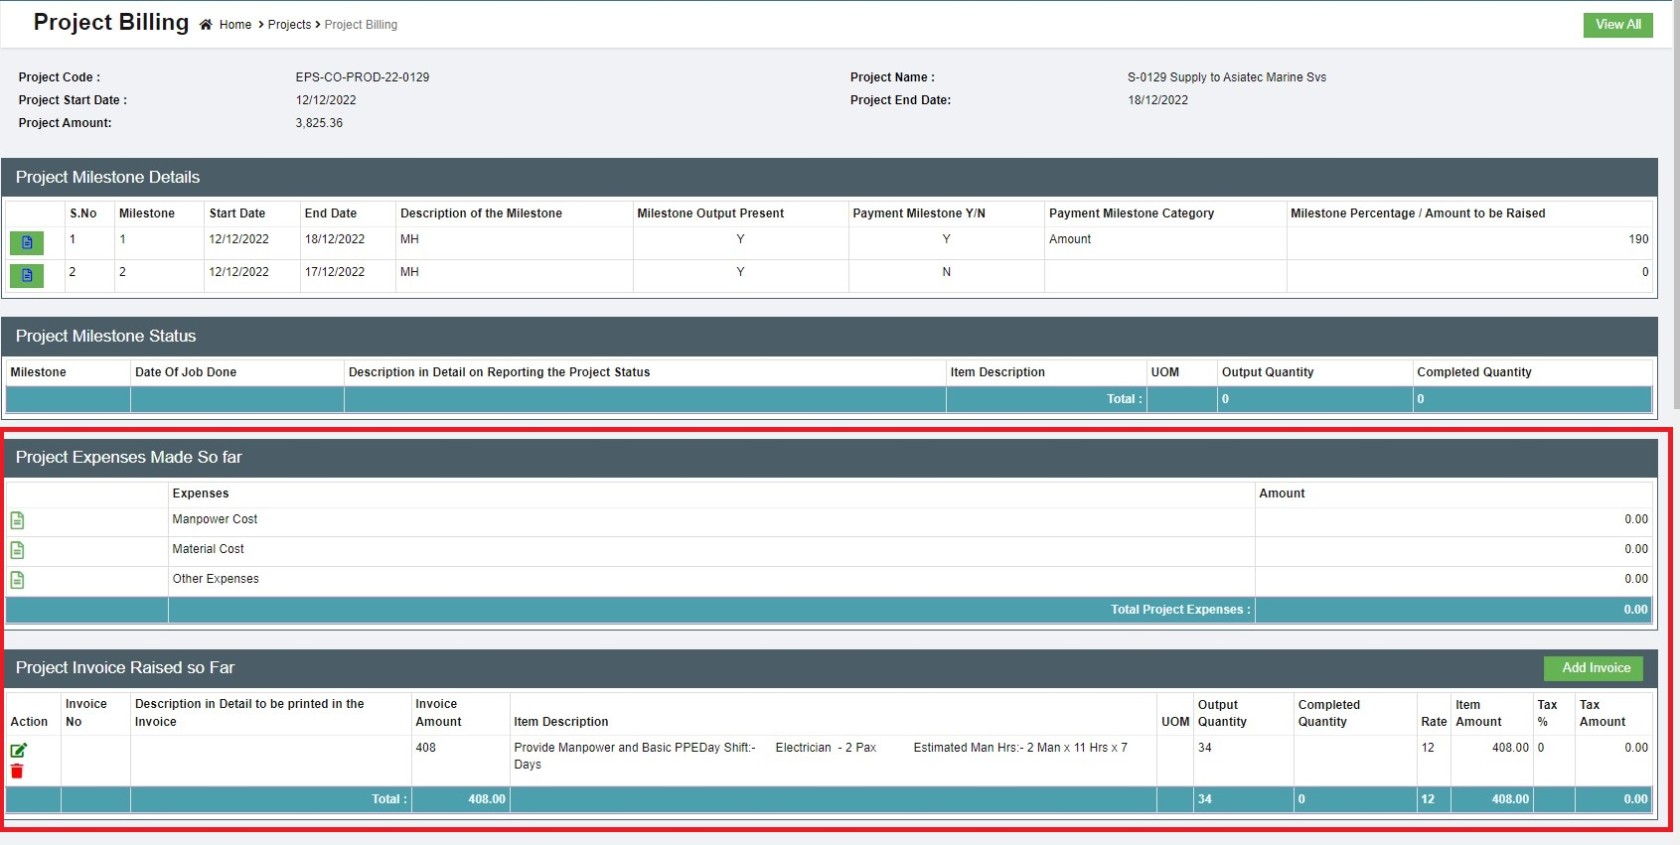](http://wiki.cuteinfocomm.com/uploads/images/gallery/2023-05/image-1684786119119.jpg)
2. User can manage project expenses and project invoices in this page.
3. To a
## Project Attachment
[](http://wiki.cuteinfocomm.com/uploads/images/gallery/2023-05/image-1684529983713.jpg)
1. Click[](http://wiki.cuteinfocomm.com/uploads/images/gallery/2023-05/image-1684786656101.png) icon, the project attachment page opens, [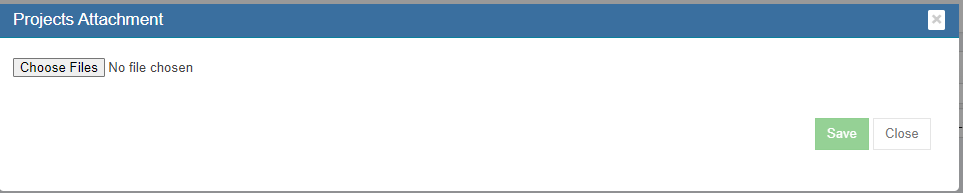](http://wiki.cuteinfocomm.com/uploads/images/gallery/2023-05/image-1684786698872.png)
2. Click Choose Files to open file upload window.
3. Click Save to confirm uploading selected file as project attachment.
## Project Renewal
[](http://wiki.cuteinfocomm.com/uploads/images/gallery/2023-05/image-1684530054760.jpg)
1. Click[](http://wiki.cuteinfocomm.com/uploads/images/gallery/2023-05/image-1684786972600.png) icon, the project renewal page opens, [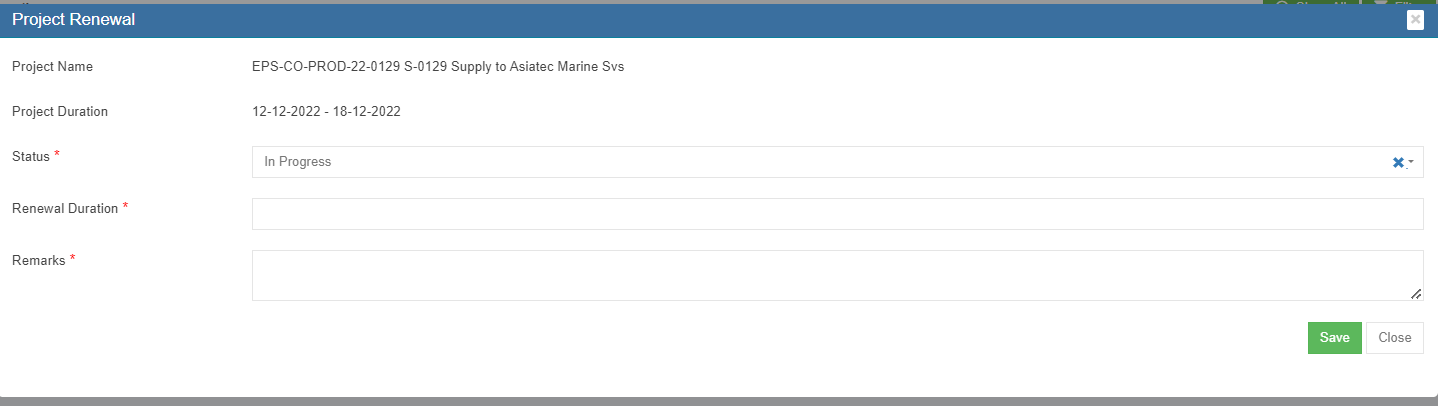](http://wiki.cuteinfocomm.com/uploads/images/gallery/2023-05/image-1684786956855.png)
2. Enter project renewal status, renewal duration, remarks etc..
3. Click Save to save renewal updates.
## Delete Project
Click [](http://wiki.cuteinfocomm.com/uploads/images/gallery/2023-02/image-1675409772727.png) delete icon in the delete column, system will prompt confirmation notification. Click Yes to confirm deletion of a project.
## Settings
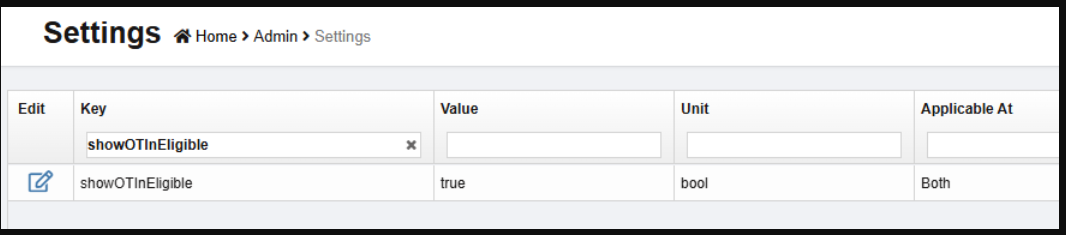
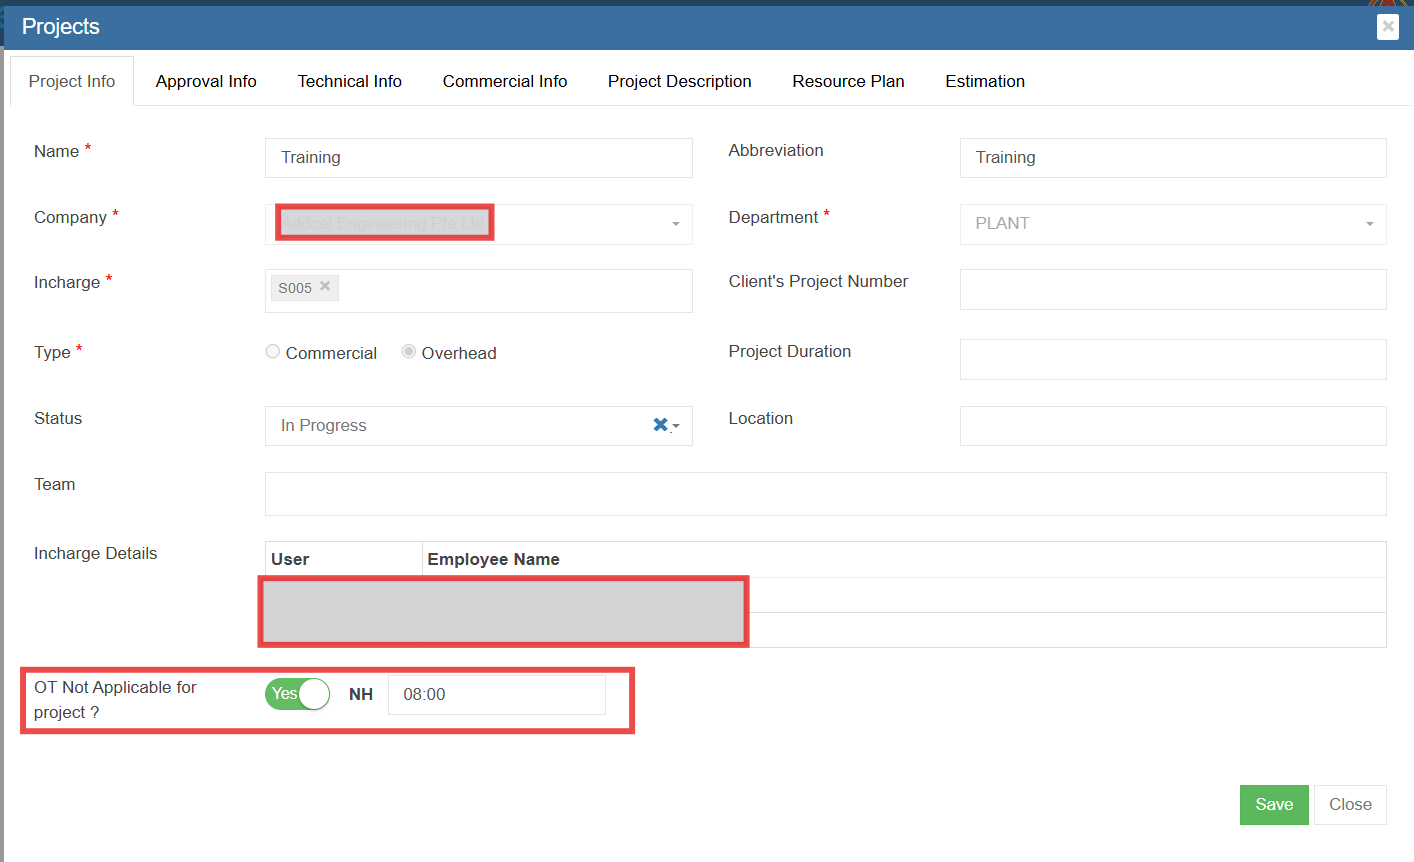
##### **OT Not Applicable for Project**
In the project, when "OT Not Applicable for Project" setting is enabled with normal hrs, the system will display only normal hours in the time log without OT1 & OT2 hrs.
[](https://wiki.cuteinfocomm.com/uploads/images/gallery/2025-10/image-1759556076993.png)
[](https://wiki.cuteinfocomm.com/uploads/images/gallery/2025-10/image-1759556293387.png)
Note : If NH is 00:00, the system will use the actual NH calculation; otherwise, it will update the configured value.
[](https://wiki.cuteinfocomm.com/uploads/images/gallery/2025-10/image-1759558178328.png)
## Other View Options
[](http://wiki.cuteinfocomm.com/uploads/images/gallery/2023-05/image-1684530127345.png)
- Click [](http://wiki.cuteinfocomm.com/uploads/images/gallery/2023-05/image-1685048133256.png) icon to show active projects.
- Click [ ](http://wiki.cuteinfocomm.com/uploads/images/gallery/2023-05/image-1685048188784.png)icon to show column filters.
- Click [](http://wiki.cuteinfocomm.com/uploads/images/gallery/2023-05/image-1685048287359.png) icon to export project list to excel file.
# Scaffolding
Scaffolding is a temporary structure that helps workers manage materials during construction or maintenance work. The workers perform erection and dismantle with the use of tags differentiate by colors to indicate the status of the scaffolding.
## Master
There are two types of master data in Scaffolding module:
**Item Master**-The list of items data that will be used in Scaffold module. They are managed centrally so that duplicate items are not entered into the system.
**Site Master**-The list of sites data that will be used in Scaffold module. They are managed centrally to use Client site code for various project.
### Item Master
To view items master, click **Item Master** submenu in the Master, the item master list page opens as below,
To create a new item in item master,
1. Click button on the top left corner in the Scaffold item Master list view page, the add item page opens as below,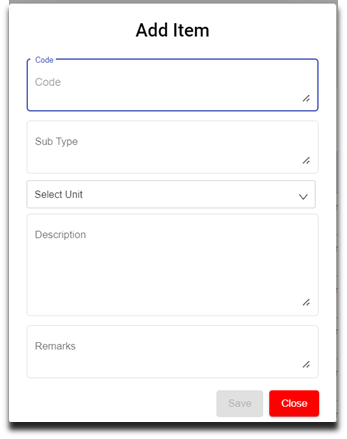
2. Enter details in the below fields,
- Code (Mandatory)
- Sub Type (Mandatory)
- Select unit - UOM (mandatory)
- Description (Optional)
- Remarks (Optional)
3. Click to save the item in the item Master. The new added item will be saved to item master list page.
4. Once new item is added to master, user shall add cost details of the item. Navigate to the item name in the item master page, and Click [](http://wiki.cuteinfocomm.com/uploads/images/gallery/2024-02/image-1707806504232.png) cost icon. [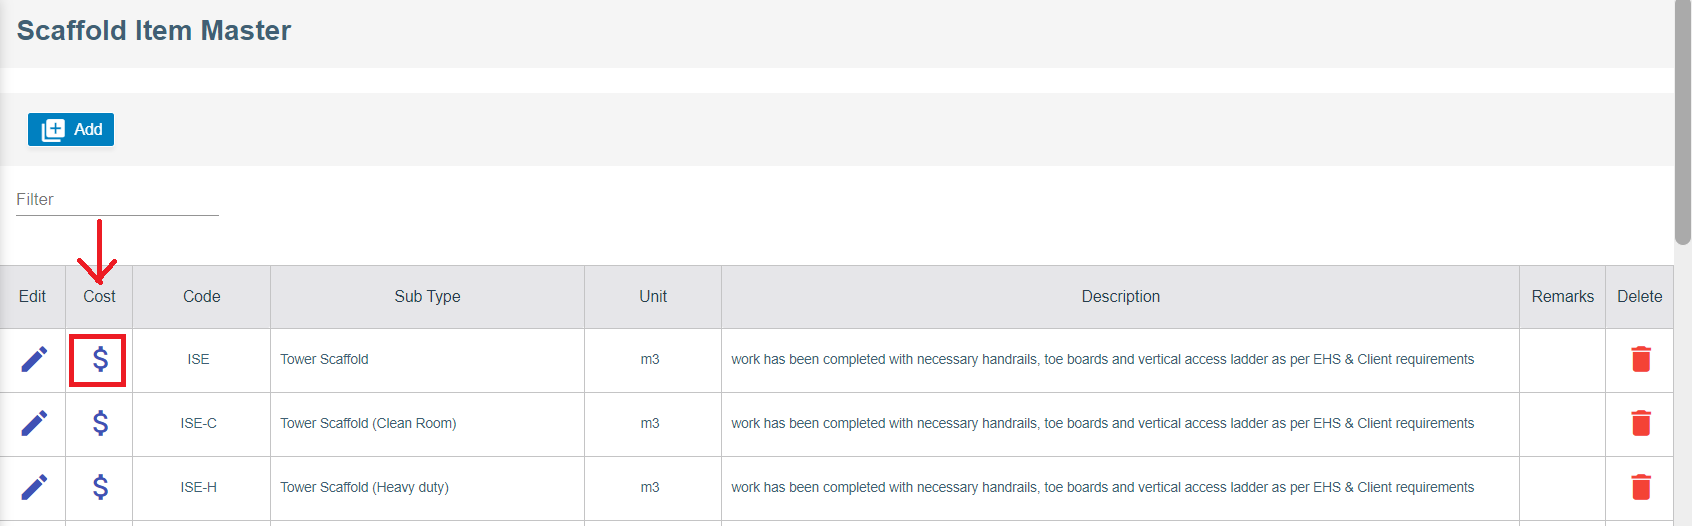](http://wiki.cuteinfocomm.com/uploads/images/gallery/2024-02/image-1707806473826.png)
5. The item cost page opens as below and enter the following details,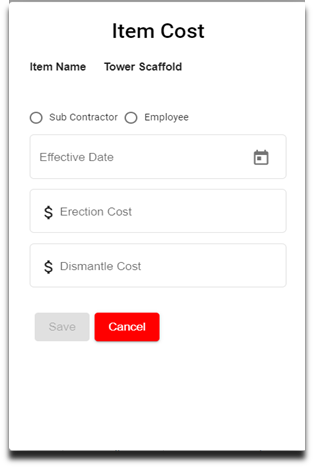
6. Click to select Sub Contractor to add item cost for work assigned to sub contractor workers, enter details in below fields,
- Choose Effective Date
- Select Sub Contractor
- Enter Erection Cost
- Enter Dismantle Cost
- Click Save. Item cost will be saved, and user can scroll down and view in the cost page.
To edit item,
1. Click[](http://wiki.cuteinfocomm.com/uploads/images/gallery/2024-02/image-1707807574072.png)edit icon on the main page to update Item fields.
2. Update the respective fields.
3. Click S**ave** button to save edit.
#### Delete Item
To delete Item record from the Item Master,
1. Click [](http://wiki.cuteinfocomm.com/uploads/images/gallery/2024-02/image-1707807679842.png)delete icon in the delete column in item master list page.
2. A confirmation window opens, click Yes and the Item record will be deleted. [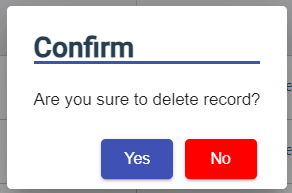](http://wiki.cuteinfocomm.com/uploads/images/gallery/2024-02/image-1707808182702.png)
### Site Master
To view Site master, click **Site Master** submenu in the Master, the Site master list page opens as below,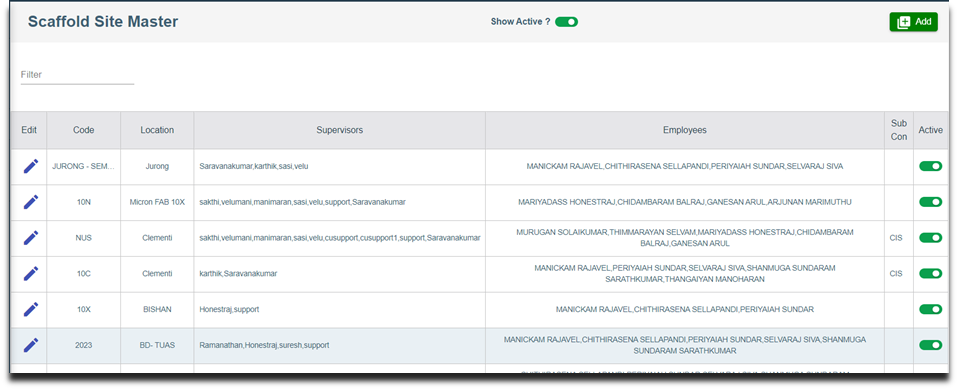
#### Add New Site
To create a new Site in Site Master,
1. Click  button on the top right corner in the Scaffold Site Master view page, the add Site page opens as below, [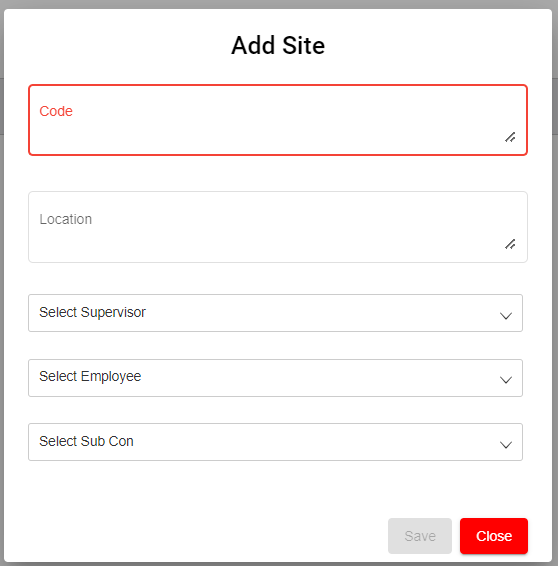](http://wiki.cuteinfocomm.com/uploads/images/gallery/2024-02/image-1708067900020.png)
2. Enter details in below fields,
- Code (Mandatory)
- Location (Mandatory)
- Select Supervisor (Optional)
- Select Employee (Optional)
- Select Sub Con (Optional)
3. Click **Save** to save the Site details in the Site Master. **Important notes:** 1) Only selected supervisor and selected employees can view and access projects associated with this Site Code.
4. Only project configured with Client Site code will be available in the scaffold module to create request. To configure client site code in projects,
- First, in Admin Settings, check and make sure showSiteCodeConfig setting value is True, so that in project master, client site code field will be enabled. [](http://wiki.cuteinfocomm.com/uploads/images/gallery/2024-02/image-1708069754030.png)
- Second, navigate to the project in Projects Master in Operation, in the Client Site Code field, click to select [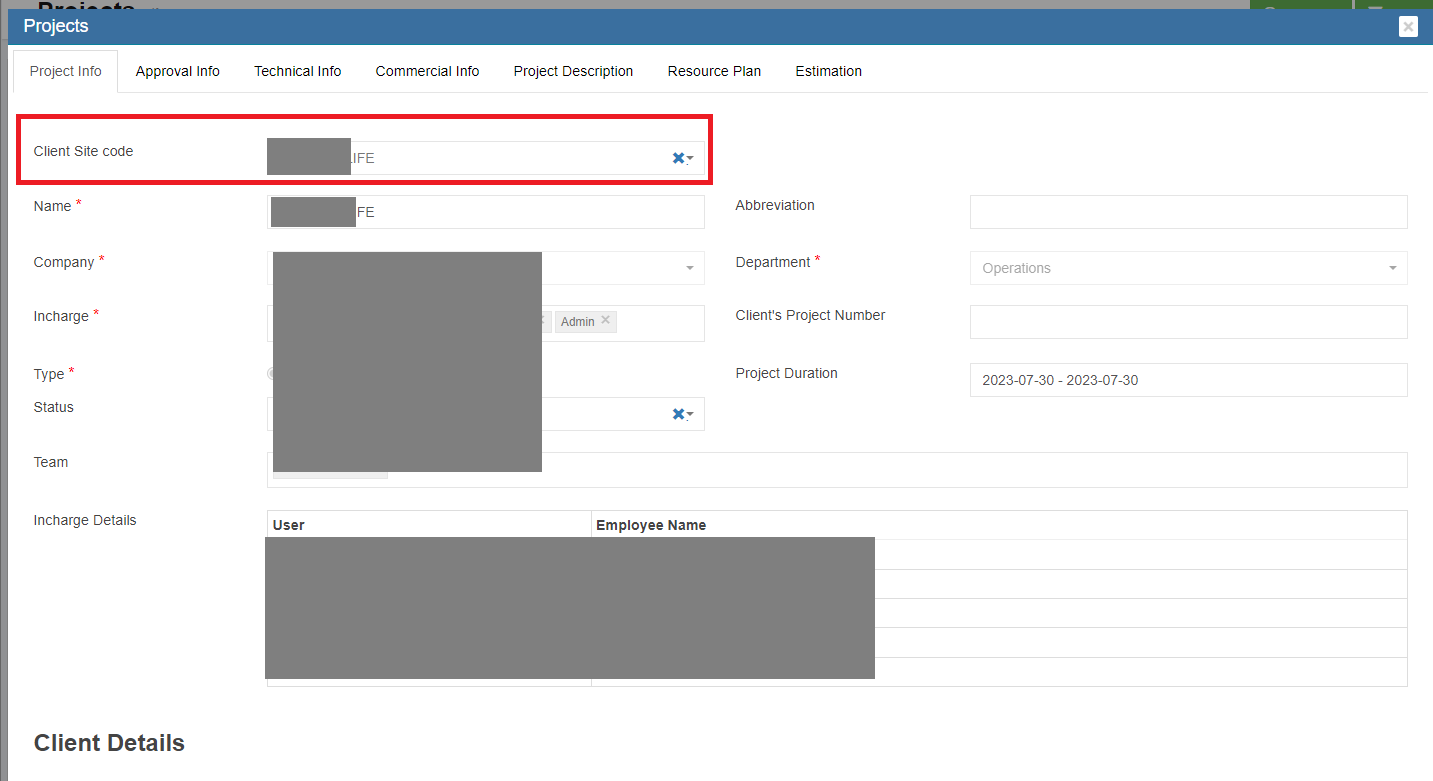](http://wiki.cuteinfocomm.com/uploads/images/gallery/2024-02/image-1708069990761.png)
5. Note: Site can be active or inactive, in the Active Column in site master list page, user can click to set to active or inactive  . [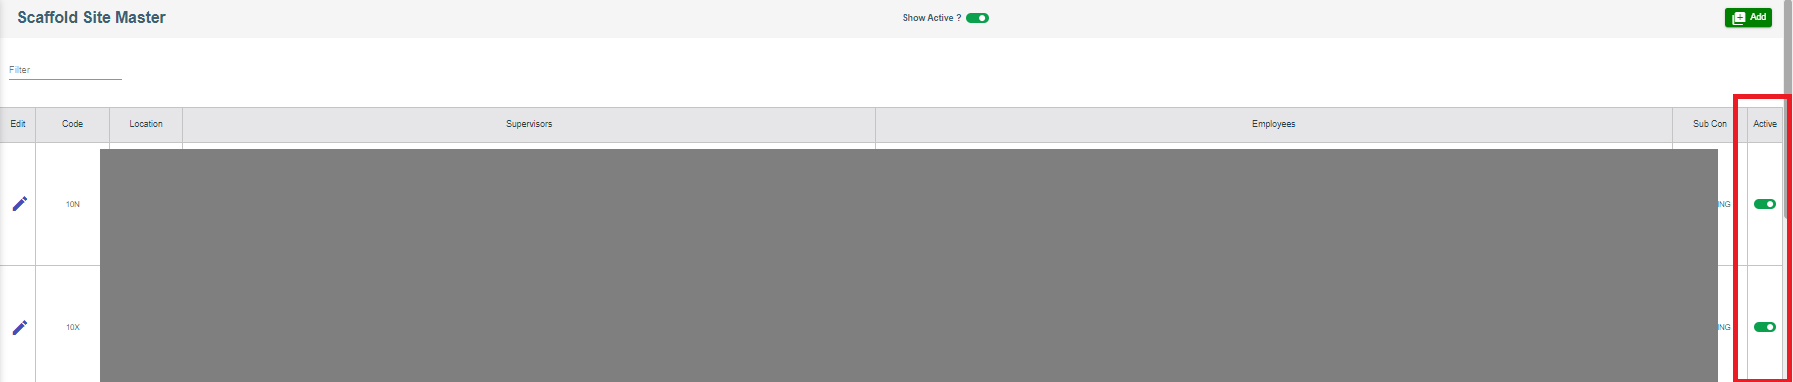](http://wiki.cuteinfocomm.com/uploads/images/gallery/2024-02/image-1708070384389.png)
#### Edit Site
To edit site,
1. Click[](http://wiki.cuteinfocomm.com/uploads/images/gallery/2024-02/image-1707807574072.png)edit icon on the main page to update site fields.
2. Update the respective fields.
3. Click S**ave** button to save edit.
To delete Site record from the Site Master,
1. Click [](http://wiki.cuteinfocomm.com/uploads/images/gallery/2024-02/image-1707807679842.png)delete icon in the delete column in site master list page.
2. A confirmation window opens, click Yes and the Item record will be deleted. [](http://wiki.cuteinfocomm.com/uploads/images/gallery/2024-02/image-1707808182702.png)
A Scaffold Request shall be raised against Site code and Project to start the scaffolding procedure. The user can add the Scaffold request to create Temporary tag, Permanent tag and Internal size for scaffolding Erection, Dismantle, Modification and Rental days. They perform checklists like Construction Checklist, Monthly Checklist and Weekly Checklist to abide by safety rules and regulations. To view Scaffold Request, click **Scaffold Request** submenu in the Request, the Scaffold Request page opens as below,
To create a new Scaffold Request,
1. Click  button on the top right corner in the scaffold request page, the add Scaffold Request window opens as below, [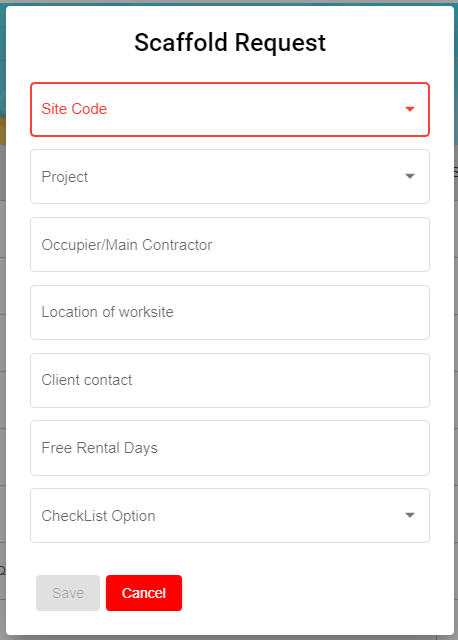](http://wiki.cuteinfocomm.com/uploads/images/gallery/2024-02/image-1708126669202.png)
2. Enter details in below fields,
- In Site Code field, click to choose site code.
- In Project field, click to select project.
- In Occupier/Main Contractor field, enter Main Contractor name.
- In Location of Worksite field, enter worksite location.
- In Client Contact field, enter client contact number.
- In Free Rental Days field, enter number of free rental days.
- In Checklist field, click to select checklist option.
3. Click **Save** to save the Request in the Scaffold Request page. And a unique Scaffold request Key will be generated against the new added Scaffold Request.
#### Temporary Tag Creation
Based on the client request, admin user will create a few temporary tags against a new scaffold request.
To Create Temporary Tag,
1. Click (Tag icon) to create temporary tags for the new Scaffold request , the Scaffold Request page opens as below,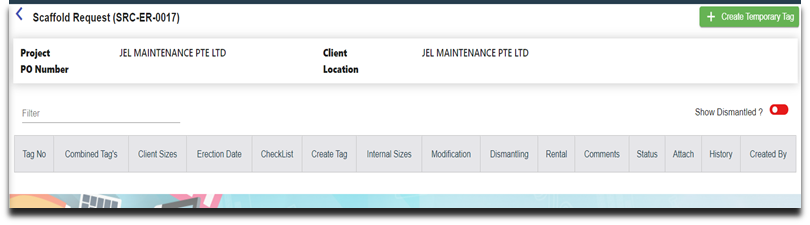
2. Click [(](https://wiki.cuteinfocomm.com/uploads/images/gallery/2024-07/image-1721082458802.jpg)Create Temporary tag icon) , the below page opens,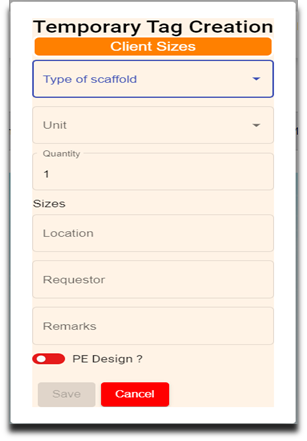
3. Enter details in below fields,
- Type of Scaffold
- Unit
- Quantity
- Sizes
- Location
- Requestor
- Remarks
- PE Design (click to enable if applicable)
4. Click **Save** to save the Temporary tag. Once saved successfully, on the scaffold main page, the Tag’s Count Column “T” changes from 0 to 1 and L changes from 0 to 1.
Note: T – Temporary
P – Permanent
M – Modify
D – Dismantle
R – Rental
L – Total Line numbers
#### Combined Tag Creation
If Client request to create combined tag creation against the temporary tag, user can create combined tag.
To Create Combined Tag Creation
1. Click (Combined Tag icon) in the combined Tag’s column, the Combined Tag Creation page opens as below,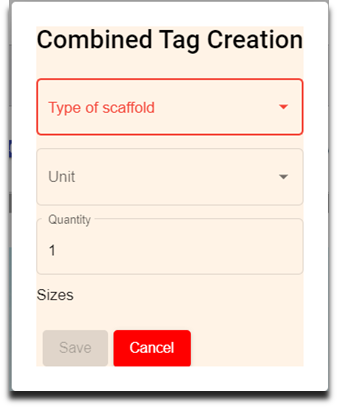
2. Enter details in below fields,
- Type of Scaffold
- Unit
- Quantity
- Sizes
3. Click **Save** to save the Combined tag. Note: Client Size column in the scaffold request consists of size details of the Scaffold Type.
### Checklist
Checklist will be performed after Temporary Tag Creation.
#### Perform Construction Checklist
To perform construction checklist,
1. Click (Checklist icon) in the scaffold request, the Scaffold Request Checklist page opens to perform Construction Checklist. 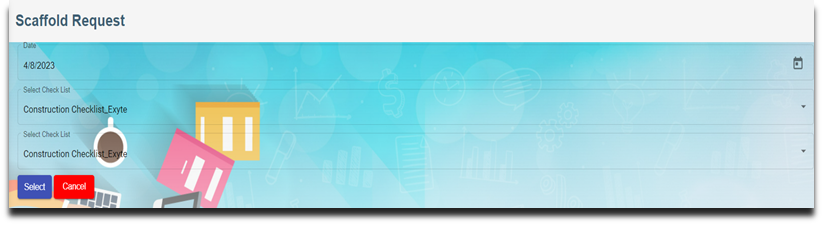
2. Choose Date and Construction Checklist. Note: Date can be modified based on the checklist activity performed date.
3. Click Select icon.
4. Enter Height of Erection,
5. Click Next, the Construction Checklist opens to perform the checklist.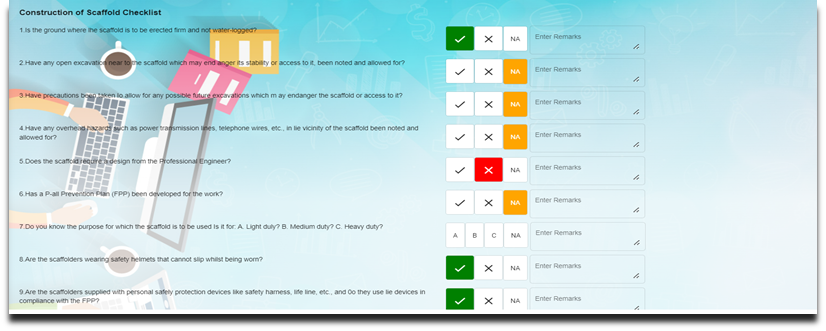
6. Click to choose from any of the three   or **NA** for all the line items in the checklist and enter remarks if required.
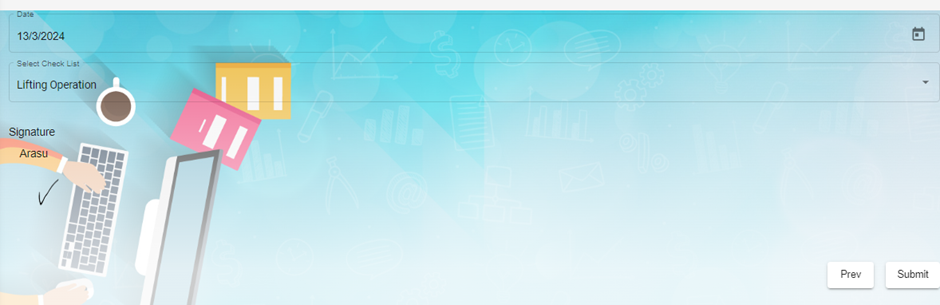
7. Click **Next** , the below page opens with e-Signature, 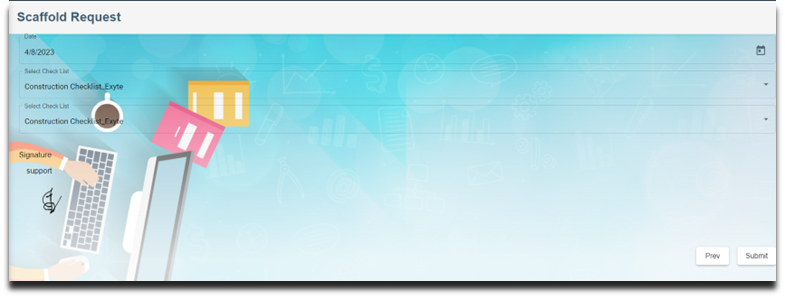
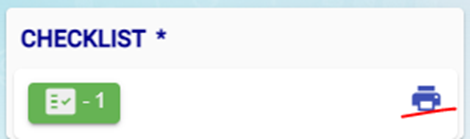
8. Enter signature, and click **Submit**. Note: Once construction checklist is completed, the Checklist icon color will change from blue to green.
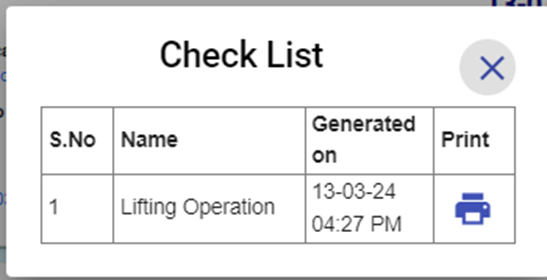
9. Click [](https://wiki.cuteinfocomm.com/uploads/images/gallery/2024-07/image-1721084820800.png)Print icon in the checklist to print the checklist performed, the Checklist screen opens. Click **Print.**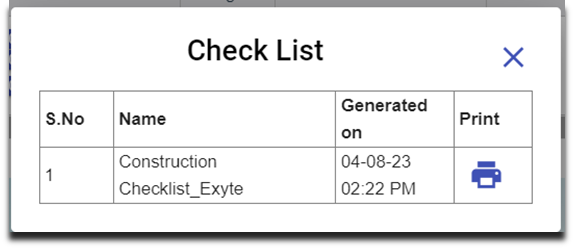
#### Perform Weekly Checklist
Every week, the employee performs Weekly checklist to cross check the scaffold tag no(s) maintained properly in the site.
1. Click (Checklist icon) and perform weekly checklist.
2. Choose Date and Weekly Checklist to perform.
3. Click (Select icon).
4. Enter Location Work Site.
5. Click **Next**, the Weekly Checklist opens to perform the checklist.
6. Click **Next** , the below page opens with e-Signature
7. Enter signature, and Click **Submit.**
- Number changes from 0 to 1 indicates a weekly checklist performed for the scaffold tag numbers in the line item 1(L-1).
- The orange colour of the Checklist indicates the lapse of the weekly checklist.
- Summary of the Checklist available in the Print icon.
### Create Permanent Tag
In the Create Tag page,  icon is used to create permanent tag size against the temporary tag size. The salary will be computed for the workers based on the permanent tag size.
To Create Tag,
1. Click  (create tag icon), the below Permanent Tag Creation window opens, 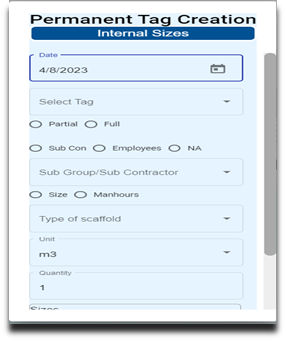
2. Enter details in the following fields,
- Date
- Select Tag (Drop-down list of Temporary Tag(s))
- Choose Partial or Full
- Choose Sub Con, Employees or NA (Choose from drop-down list)
- Size/Manhours
- Type of Scaffold (open to choose anything from the drop-down list)
3. Click **Save** to save the internal size.
#### Modifying Tag
Tag can be modified based on additional size request or to modify the request itself by using Tag Modification Request.
To Create Tag Modification Request,
1. Click (Tag Modification icon), the below Tag Modification Request window opens,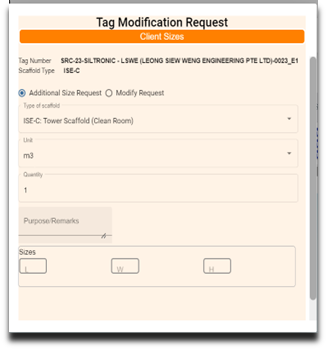
2. Enter the following details Option 1:
- - Choose Addition size Request
- Type of Scaffold (open to choose anything from the drop-down list)
- Purpose/Remarks
- Sizes
Option:2
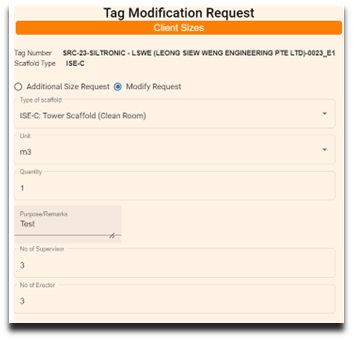
- - Choose Modify Request
- Type of Scaffold (open to choose anything from the drop-down list)
- Purpose/Remarks
- No of Supervisors
- No of Erectors
- Click from Date & time
- Click To Date & time
- Click
3. Click **Save** to save the Modification Tag.
- Modification tag available in the Tag No column.
- Create tag appears to create internal size for the worker. If internal size is not required for the modification tag, choose NA inside the Permanent Tag creation
.
### Rental Request
Users shall raise Rental Request after the free rental days get over.
To Create Rental Request,
1. Click  (Rental Request icon), the below Rental Request window opens.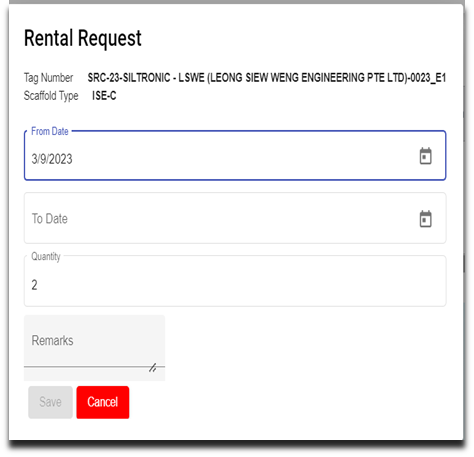
2. Choose From date and To date.
3. Enter remarks in the Remarks field if any.
4. Click **Save** to save the Rental Request.
- Rental Request available in the Tag No column in freeze status. As it is redirected to the pending billing tag.
- The tag no in blue colour can modify at any stage. If it changes to white colour, it cannot be modified (freeze for billing)
### Dismantling Request
The user raises dismantling Request for internal sizes when the process beings to scaffold dismantling.
To Create Dismantling Request,
1. Click  (Dismantling Request icon), the below Dismantling Request window opens.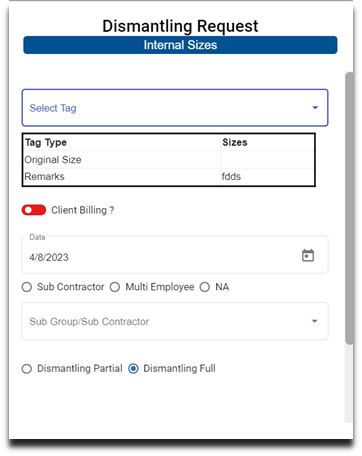
2. Enter details in the following fields,
- Select Tag
- Client Billing? ( ”Yes” /  “No”)
- Date
- Choose Sub Contractor/ Employee/ NA
- Choose Dismantling Partial/Full
- Choose Rental Chargeable? “Yes” or “No”
3. Click **Save** to save the Dismantling Request.
### Comment
The user can add comments against the Tag Number for the Scaffold request.
1. Click (Comment icon), the below Comment Update window opens, 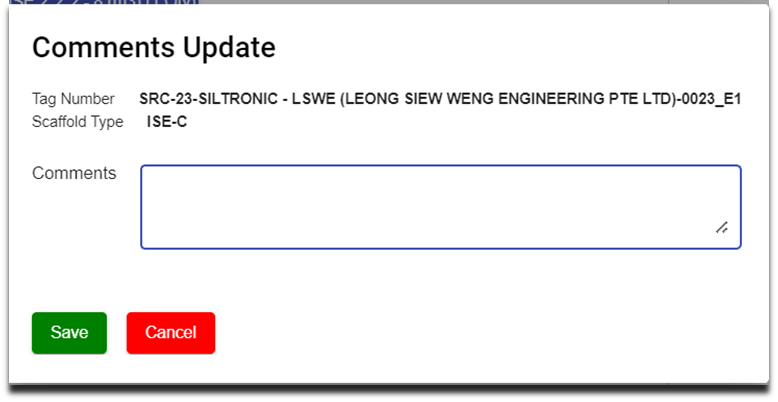
2. Enter comments.
3. Click **Save** to save the comments.
### Status
The user can change the status of the Tag number either active or inactive.
To inactive Status,
1. Slide the toggle button from Green to Red.
### Attachment
The supporting documents can be attached against the Tag Number using attachment available under attach column.
To Attach supporting documents,
1. Click (attach icon), the below screen open to choose file to attach against the Tag Number.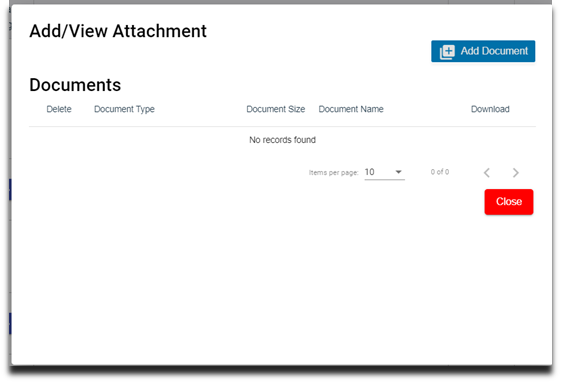
2. Click Add Document and Choose file to upload the document.
3. Click **Upload**. The attached document is available under Documents.
4. Click **Close.**
### History
History gives details about the Client size, Internal size and Created by against Tag Number. Click History and view Client size and Internal size details of the Tag Number.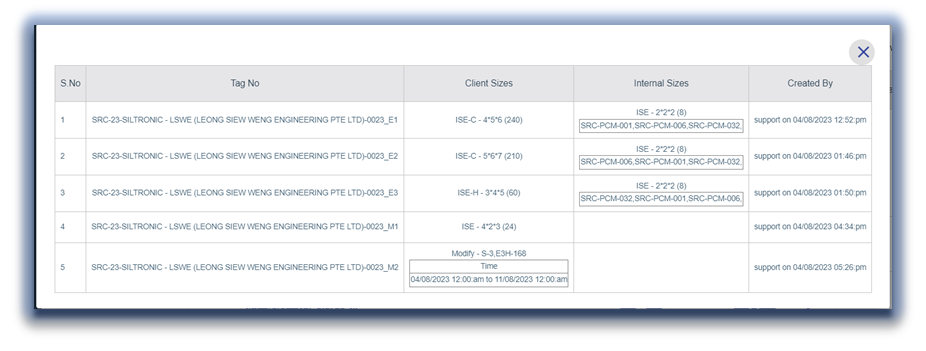
# PTW - Permit To Work
Permit to Work are special authorization documentation used within an organization to control selected work activities and ensure their safe execution on-site.
Users can make request for permit to work with required documents and checklist. The request will go through the approval process before the work commences. The permit can be closed or cancelled as per the requirements.
[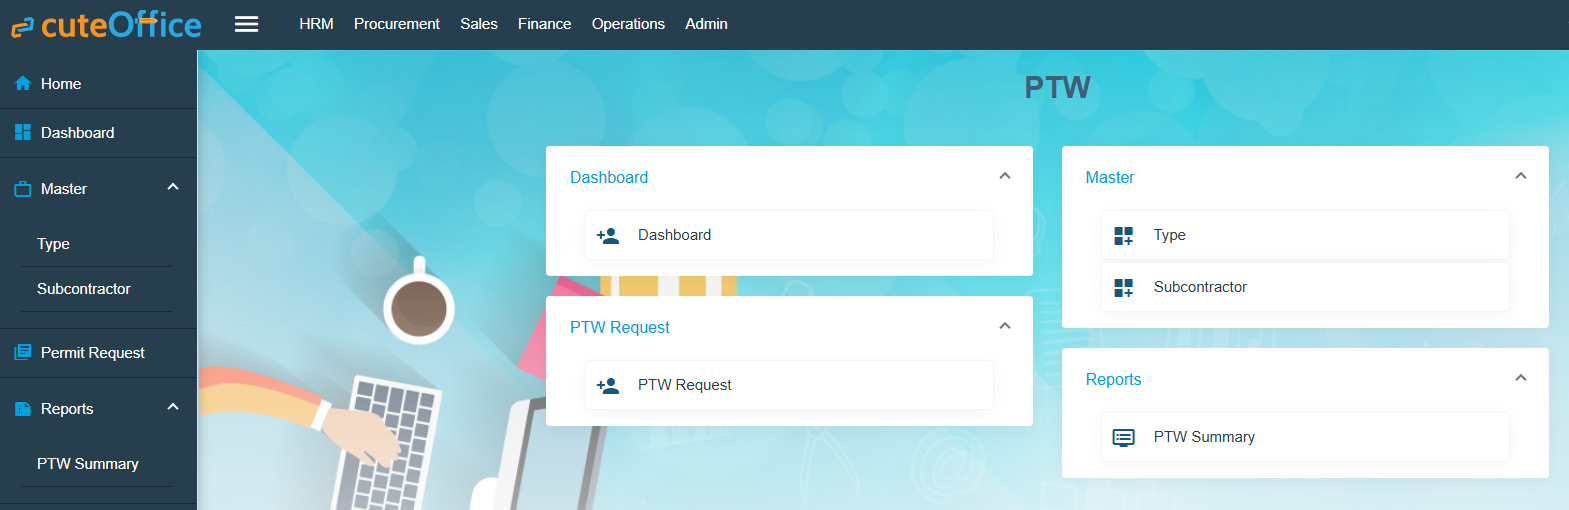](https://wiki.cuteinfocomm.com/uploads/images/gallery/2025-06/image-1749437258213.png)
**PTW Applicant**
The user who has PTW Applicant role can create PTW Request for the projects which are assigned to him. If no projects assigned to the user, user can create PTW Request for all projects of his company and department.
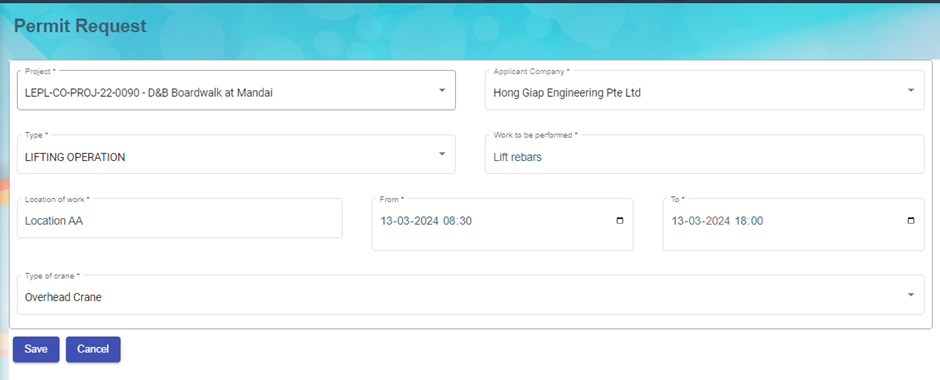
By default last generated PTW request data (created by particular user) will be populated for add.
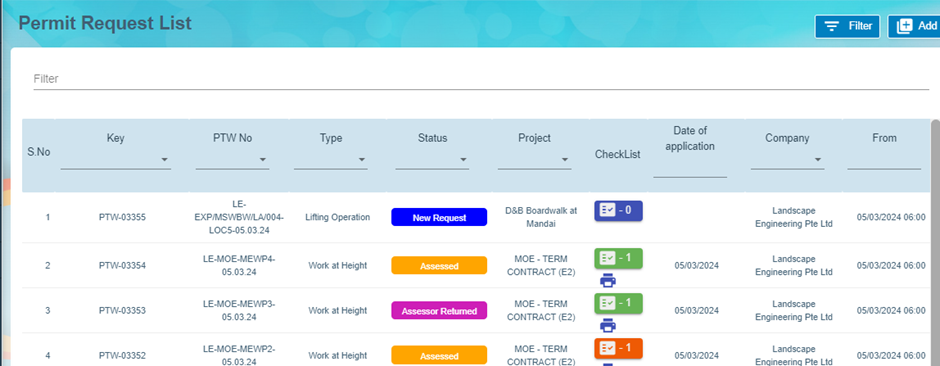
Based upon Type, Capturing data will be differ for adding PTW Request. After save PTW request, PTW request No will be generated based on below criteria
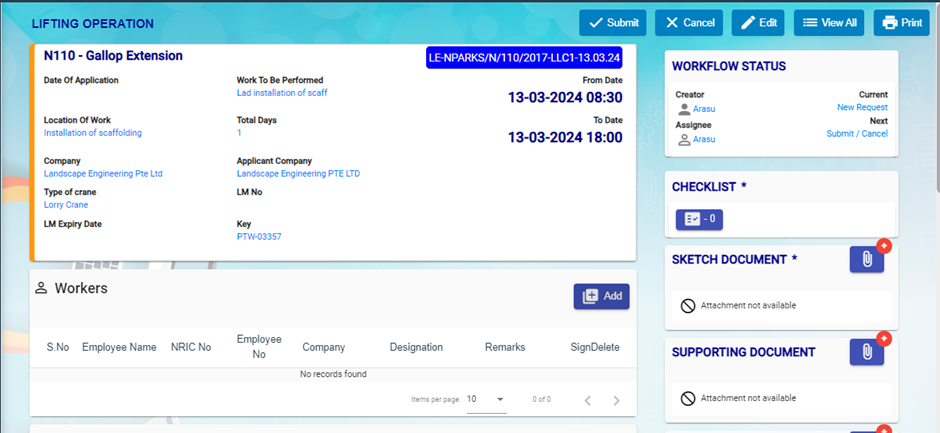
There are 5 parts in request no. For example **LE-NPARKS/N/110/2017-LLC1-13.03.24**
**Part 1:** LE- for all requests (**LE-**)
**Part 2:** Selected project abbreviation (**NPARKS/N/110/2017**)
**Part 3:** This will be differ for each type as follows **(LLC)**
Type is Lifting Operation and Type of Crane is Lorry Crane – LLC
Type is Lifting Operation and Type of Crane is Mobile Crane – LMC
Type is Lifting Operation and Type of Crane is Crawler Crane – LCC
Type is Lifting Operation and Type of Crane is Overhead Crane – LOC
Type is Lifting Operation and Type of Crane is Using Excavator – EXC
Type is Pilling Works and Type of Pilling is Vibro – Vibro
Type is Pilling Works and Type of Pilling is Piler – Piler
Type is Work at Height and Type of Work is Scaffold – SCAF
Type is Work at Height and Type of Work is Mobile elevated working platform – MEWP
Type is Work at Height and Type of Work is LADD – LADD
Type is Work at Height and Type of Work is Others – OTHS
Type is Excavation – EX
Type is Hot Work – HW
Type is General – GEN
Type is Demolition Work – DW
**Part 4:** Running Number for the particular date (PTW request From Date) and type **(1)**
**Part 5:** PTW request From Date (**13.03.24**)
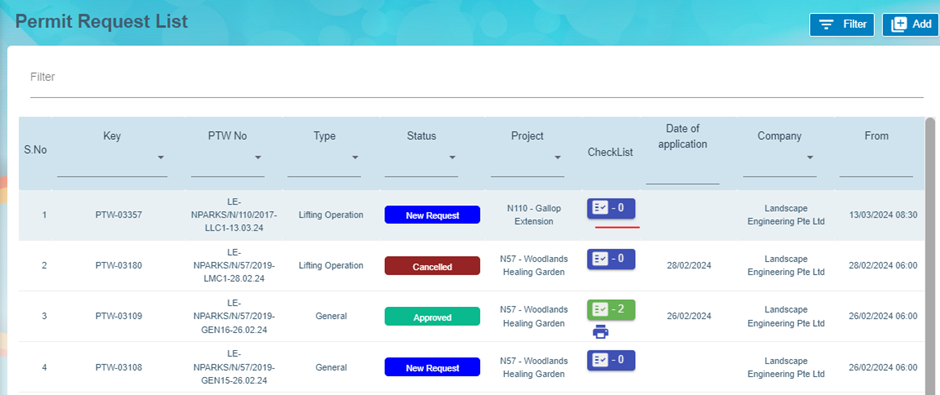
PTW Applicant can view his project’s request only in the list
After adding request, user can view the request. This screen will be different for each type.
**Lifting Operation**
Lifting Operation has the following segments
1. Workers
2. LM / Lifting Plan
3. Lifting Operation
4. Lifting Equipment
5. Checklist
6. Sketch Document
7. Supporting document
8. Comments
**General**
General has the following segments
1. Part A - Application by Supervisor-in-charge
2. Part E(tick one)\* - Notification of Work Completion / cessation of Work
3. Checklist
4. Supporting document
**Work at Height**
1. Workers
2. Safety Conditions for night work
3. Checklist
4. Sketch Document
5. Supporting document
**Excavation**
1. Workers
2. Checklist
3. Sketch Document
4. Supporting document
**Hot Work**
1. Workers
2. Safety Conditions for night work
3. Checklist
4. Sketch Document
5. Supporting document
**Piling Work**
1. Workers
2. Checklist
3. Sketch Document
4. Supporting document
**Demolition Work**
1. Checklist
2. Supporting document
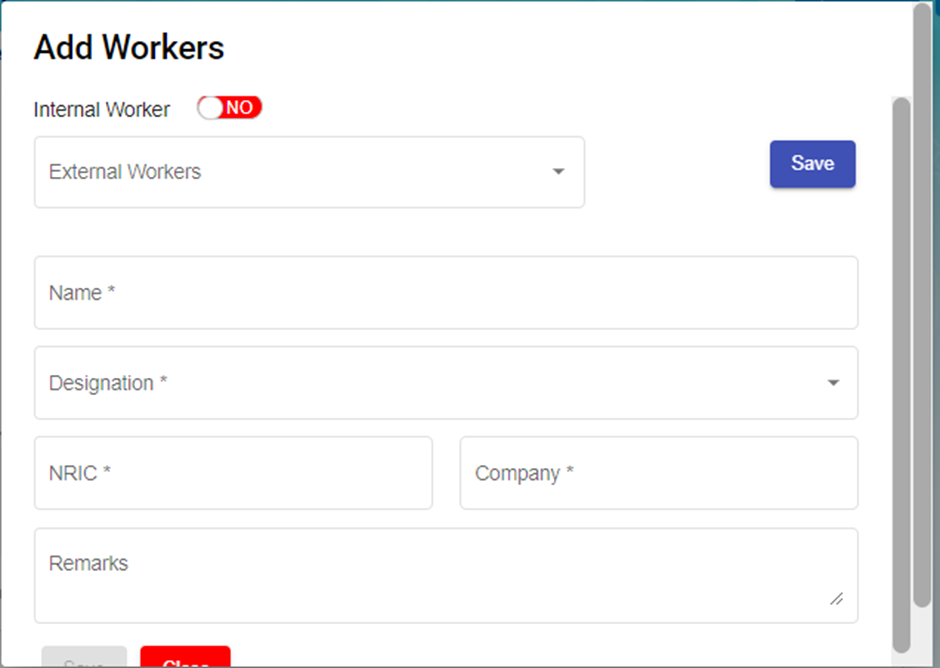
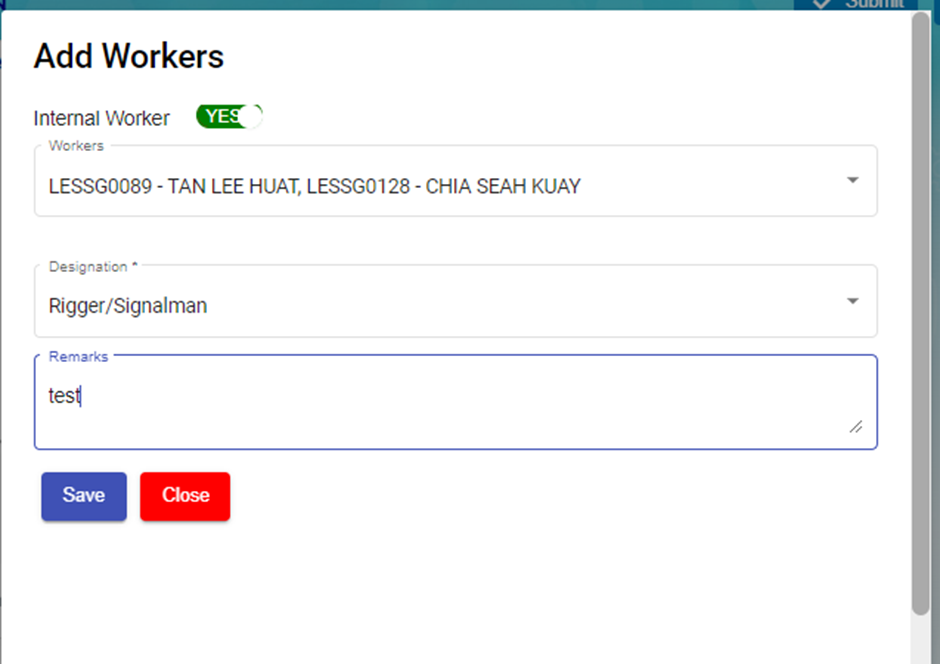
**Workers**
User can add internal workers and external workers
If internal worker toggle set to No, then user can add already added external workers from External worker drop down (multiple selection) OR user can add the details of external worker and save.
If internal worker toggle set to Yes, user can add multiple internal worker (Employees who has designation contains Worker)
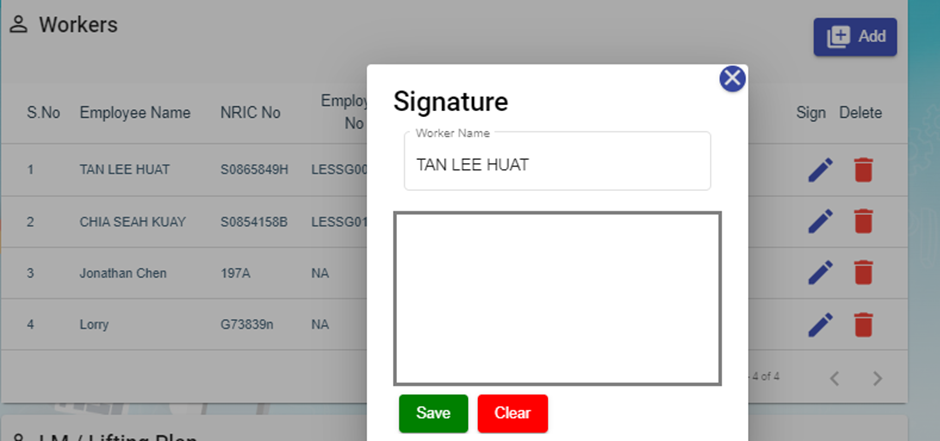
After adding Workers, Workers can sign against his/her name.

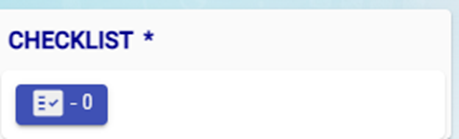
**Checklist**
Checklist will be different for each Type.
User can add checklist by clicking on Checklist button in the view screen OR checklist button in the list screen.
Multiple checklist can be added against each PTW Request at any status.
When clicking on Checklist button, Checklist screen will be displayed with 3 levels
First level, user can enter checklist name and give next
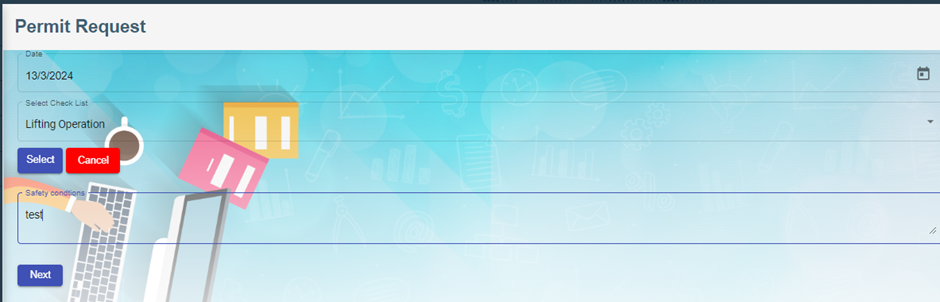
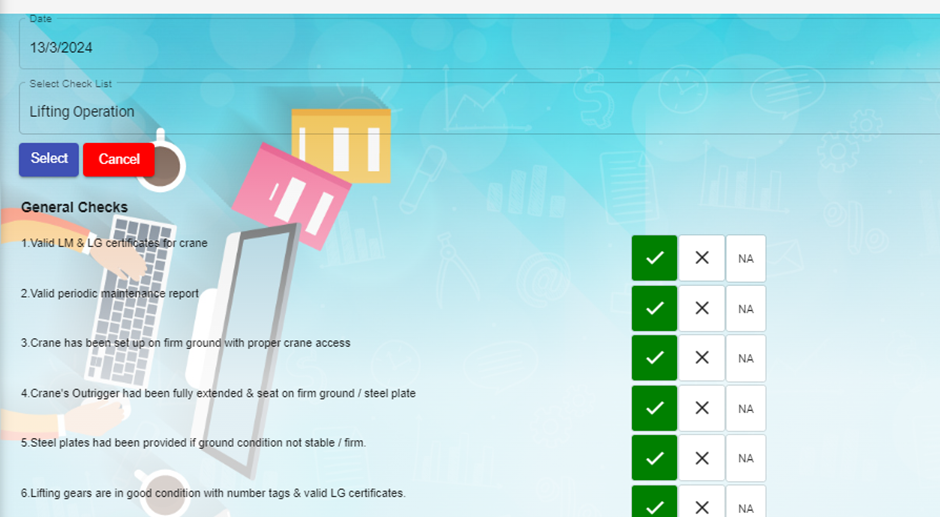
Second Level, Enter checklist of particular type and give next
Third Level is Signature. If user has signed in my Profile screen, then in this level signature will displayed. Otherwise user has to sign here and give submit.
User can print the checklist either in view screen or list screen
On clicking this report icon, popup will displayed with all the checklist details and user can get report for each checklist.
PTW Applicant role user can Submit the request to the users who has role as PTW Notifier.
After submit Email will send the users who has role as PTW Notifier and has access to the project of PTW request
And also mobile push notification will be send to them. Mobile push notification will send only when the user has minimized/closed PTW application.
Now the status of request is Applied.
**PTW Notifier**
Users who has role as PTW Notifier and has access to the project of PTW request can view the request and send for Assessor (Users who has role as PTW Assessor and has access to the project of request)
PTW Notifier also can return the request to the PTW Applicant.
After send for Assessor Email will send the users who has role as PTW Assessor and has access to the project of PTW request
And also mobile push notification will be send to them. Mobile push notification will send only when the user has minimized/closed PTW application
Now the status of request is Reviewed. `
**PTW Assessor**
Users who has role as PTW Assessor and has access to the project of PTW request can view the request and send for Approval (Users who has role as PTW Approver and has access to the project of request)
PTW Assessor also can return the request to the PTW Notifier.
After send for Approval Email will send the users who has role as PTW Approver and has access to the project of PTW request
And also mobile push notification will be send to them. Mobile push notification will send only when the user has minimized/closed PTW application
Now the status of request is Accessed.
**PTW Approver**
Users who has role as PTW Approver and has access to the project of PTW request can view the request and approve the request
PTW Approver also can return the request to the PTW Assessor.
Email will send to all the users involved in the particular request.
And also mobile push notification will be send to them. Mobile push notification will send only when the user has minimized/closed PTW application
Now the status of request is Approved.
# HSE Module
**Health Safety Environment**
HSE refers to a set of principles, strategies, and best practices that organizations implement to create a safe and healthy work environment.
**Role:**
1.HSE Creator - To create offence against employee
2.HSE Reviewer - To Review offence
3.HSE Approver - To Approve offence
Screen Shot 1
User list:
Screen Shot 2
Go to user list and choose company and department. For this company and department based employee data load to create/review/approve offence.
Screen Shot 3
**Dashboard :**
Can see Waiting for approval list based on user company and department.
Screen Shot 4
**Master:**
**Non-Compliance Charges**
Non compliance charges list.
Screen Shot 5
**Offence Type:**
Type of offence master.
Screen Shot 6
**Merit/Demerit**
Action List:**
Screen Shot 7
Action Detail - can review / approve and edit the details.
Screen Shot 8
**Add Action :**
Logged in HSE creator role employee department, company based load employee details and choose offence type and charges.
Screen Shot 9
**Search:**
Based on employee can see the offence with history
Screen Shot 10
Mobile search based on employee qrcode find the offence detail.
Screen Shot 11
**QR Print** : Generate QRcode for employee to view employee offence.
Screen Shot 12
Generated QR code. Scan this qrcode from any scanner and link ill open and scanned employee offence details.
Screen Shot 13
# SRM - Service Request Management for Jetting Companies
cuteOffice has SRM functionality as well as both client and technician self-service access. SRM functionality includes adding a service job request, assigning the job to technician, verifying the completed job, invoice generation, and payment process.
Reporting functionality is available with the SRM module. In SRM, service request metrics can be analyzed and reported on through customizable dashboards and reporting features.
- Master Data Management
- User Access Management
- Service Job Request Management
- Verification after Job Completion
- Invoice and Payment Management
- Reporting
## User Access Matrix
In the ***cuteOffice-SRM*** application, users can be assigned with different roles. Depending on the roles, the users can access the various functionalities included in the application. The following are the various roles to be assigned to the user including their permission details,
| **Roles** | **Access Permissions** |
| Administrator | - Dashboard
- Master
- Service Request
- add Service Job Requests
- assign technician and vehicle
- verify the completed job record
- assign rework for the technician
- add and view AdHoc Service Requests
- generate and view the invoices
- do service payment
- Report
|
| Technician | - Service Request
- view their assigned service jobs and indicate starting and ending of jobs
- send the Verification Form to the respective admins to verify the completed job
- add and view AdHoc Service
Reques
|
The **SRM** module in the ***cuteOffice*** application helps admins in managing the service based job functionalities. To navigate to the **SRM** module, click the **SRM** menu in the menu bar, the **SERVICE REQUEST MANAGEMENT** page opens as below.
[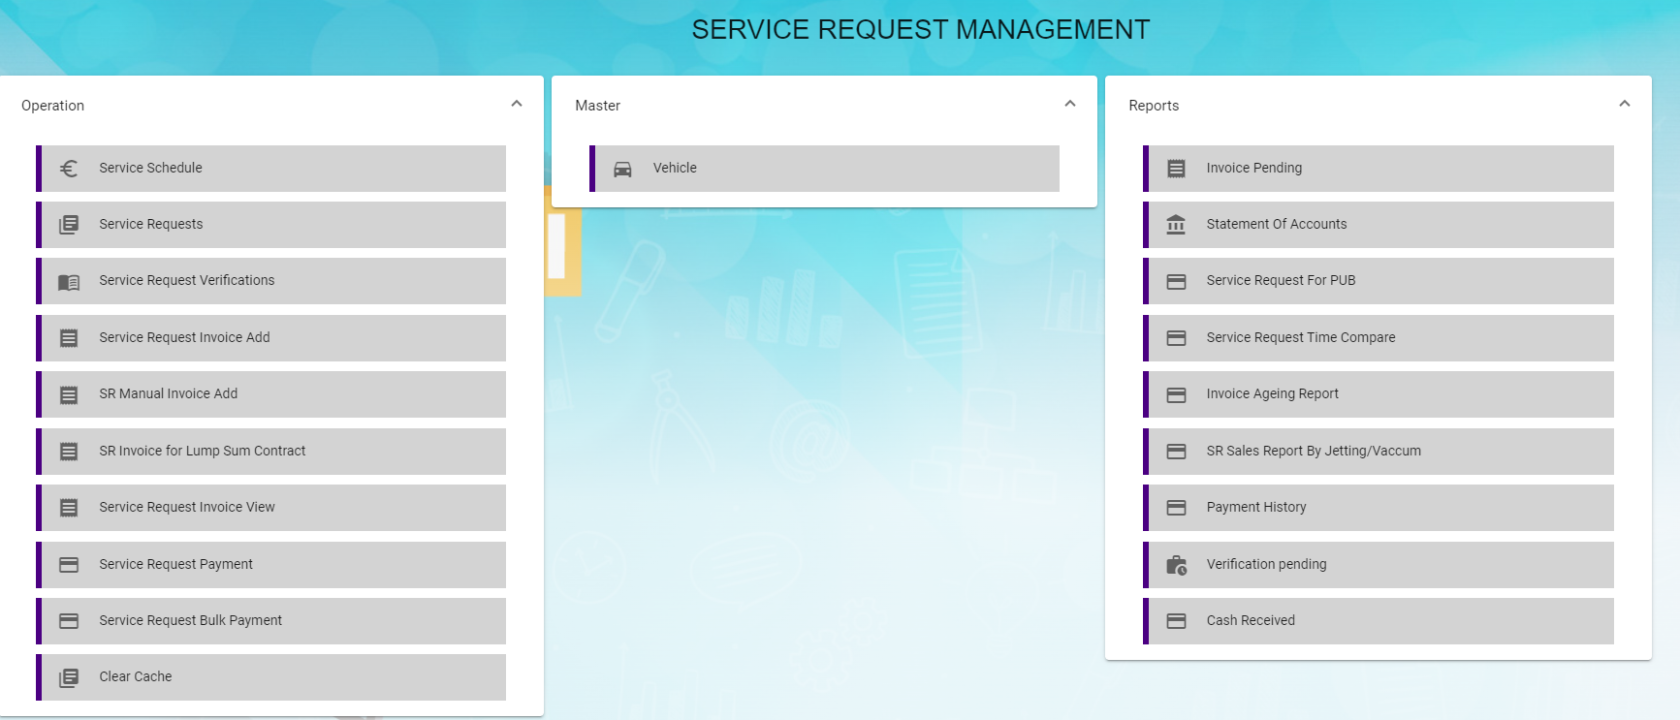](http://wiki.cuteinfocomm.com/uploads/images/gallery/2024-02/image-1709195725565.png)
The **SERVICE REQUEST MANAGEMENT** page consists the following sub menus:
**OPERATIONS -** Allows admin to add the service job requests, assign the jobs to technicians, generate invoice for completed job, and so
**MASTER -** Allows SRM admin to add the vehicle master
**REPORTS -** Helps admin to view the various reports corresponding to the service request
## Master
The **Master** submenu in the **SRM** menu manages the master data such as details of vehicle including vehicle insurance, Housing and Development Board (HDB) season parking, and other details.
The **Master** submenu contains the following tab,
- Vehicle-Users assigned with srm\_admin role can only have access to this Master submenu and add the master data.
The **Vehicle** tab in the **Master** submenu helps you to add the information of a vehicle to be used as a master data in the further request process. Click the **Vehicle** tab in the **Master** submenu, the **Vehicle** page opens.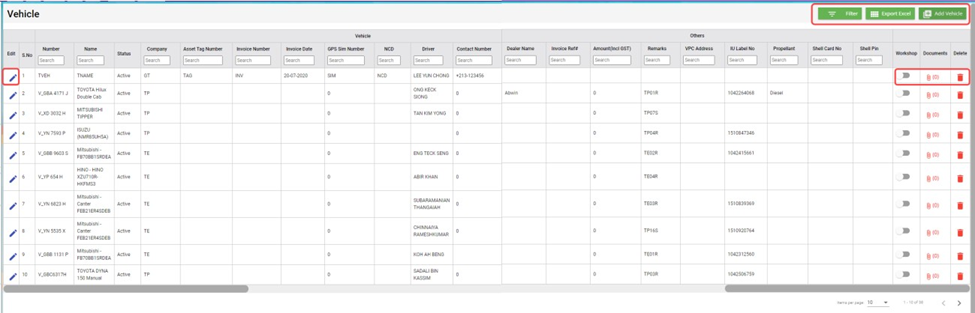
### Add a Vehicle
If you want to add a vehicle,
1. Click (**Add Vehicle** button) in the **Vehicle**, the **Add Vehicle** window opens. (Note: The fields highlighted with red color are mandatory. You must enter the relevant details in that fields before saving.)
2. In the **Vehicle** section, enter the following details,
- In the **Number** box, enter the vehicle number.
- In the **Name** box, enter the vehicle name.
- In the **Company** box, select a company from a drop-down list.
- In the **Asset Tag Number** box, enter the asset tag number.
- In the **Invoice Number** box, enter the invoice number.
- In the **Invoice Date** box, select the invoice date.
- In the **GPS Sim Number** box, enter the GPS sim number.
- In the **No-Claim Discount (NCD)** box, enter the NCD number.
- In the **Driver** box, select a driver from a drop-down list.
- In the **IDD Code** box, select the IDD code.
- In the **Area Code** box, enter the area code.
- In the **Contact Number** box, enter the contact number.
- In the **Parking Location** box, enter the parking location name.
- In the **Vehicle Description** box, enter the description for the vehicle.
3. In the **Insurance** section, enter the following details,
- In the **Number** box, enter the insurance number.
- In the **Next Due Date** box, select the due date for the insurance.
- In the **Vendor** box, enter the insurance vendor name.
- In the **Agency** box, enter the agency name.
4. In the **Next Due Date** section, enter the following,
- In the **Maintenance** box, select the due date for maintenance.
- In the **Parking Coupon** box, select the due date for parking coupon.
- In the **Road Tax** box, select the due date for road tax.
- In the **Inspection** box, select the due date for vehicle inspection.
- In the **Vehicle Parking Certificate (VPC)** box, select the due date for VPC.
- In the **LG** box, select the due date for LG.
- In the **LM** box, select the due date for LM.
- In the **Certificate of Entitlement (COE) Expiry Date** box, select the expiry date for COE.
5. In the **HDB Season Parking** field, enter the following,
- In the **Next Due Date** box, select the due date for HDB season parking.
- In the **Payment Mode** box, select a payment mode from a drop-down list.
- In the **Address** box, enter the address where the vehicle has parked.
6. In the Others field, enter the following,
- In the **Dealer Name** box, enter the dealer name.
- In the **Invoice Ref** box, enter the invoice reference number.
- In the **Amount** box, enter the invoice amount including GST.
- In the **In-vehicle Unit** (**IU) Label Number** box, enter the IU label number.
- In the **Propellant** box, enter the propellant name.
- In the **Shell Card Number** box, enter the shell card number.
- In the **Shell Pin** box, enter the shell pin.
- In the **Vehicle Preparation Center (VPC) Address** box, enter the VPC address.
- In the **Remarks** box, enter your remarks if any.
7. Click **Save**. The vehicle is added and listed in the **Vehicle** page.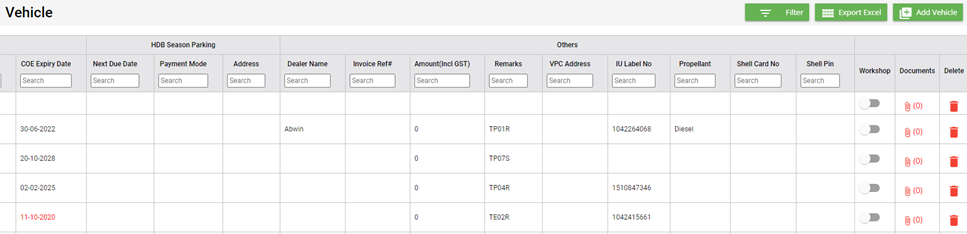
8. If your vehicle is in the workshop, you need to click to enable (Radio button) in the **Workshop** column for the respective vehicle. The **Confirmation** dialog box opens. Click Yes to confirm. 
### Edit a Vehicle
You can edit the details of the added vehicle by using  (Edit icon) provided in the **Edit** column of the **Vehicle** page. To edit the added vehicle details,
1. Click (Edit icon) of the respective vehicle, the **Add Vehicle** window opens with the added vehicle details.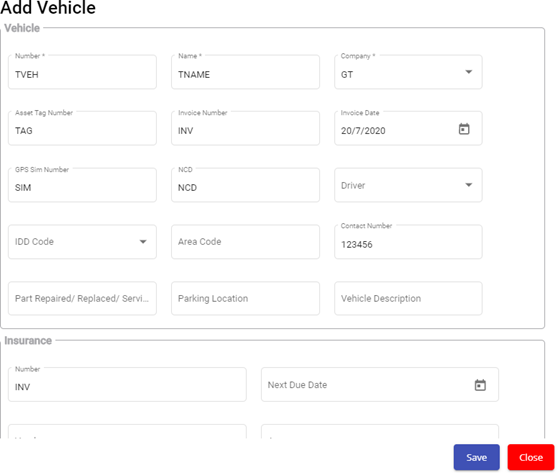
2. Edit the vehicle details where suits.
3. Click **Save**.
### Attach/View a Document into a Vehicle
If you want to add a new document with the vehicle, do the following steps,
1. Click (Attachment icon) of the respective vehicle for which you want to add, the **Add/ View Attachment** window opens.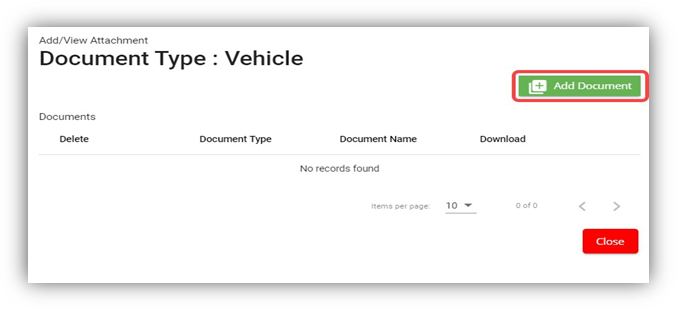
2. Click (**Add Document** button).The file choosing and uploading option will be enabled.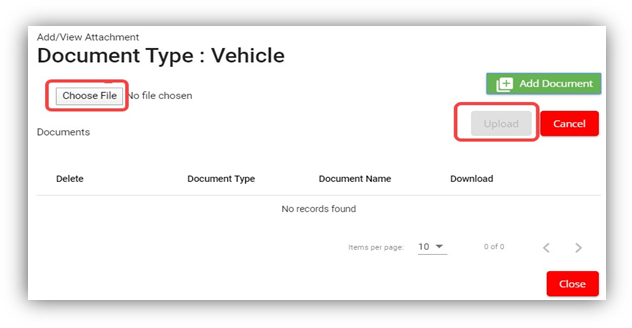
3. Click (**Choose File** button) and select the document which you want to upload.
4. Click **Upload**, The selected document will be uploaded and displayed in the **Add/View Attachment** window.
If you want to view any attached document with a vehicle,
1. Click (Attachment icon), the **Add/ View Attachment** window opens with a list of attached documents. (Note: The subscript number displays with attachment icon shows the total number of attached documents with the vehicle..
2. If you want to download the attached document, click (Download icon) in the **Download** column. The document will be downloaded.
### Delete a Vehicle
You can delete the added vehicle by using delete option provided in the **Delete** column of the **Vehicle** page. To delete any added vehicle,
1. Click (Delete icon) of the respective, the **Confirmation** dialogue box opens with the following notification: “**Are you sure you want to delete record?**”.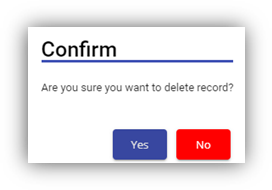
2. If you want to delete the vehicle, click **Yes** otherwise click **No**.
3. The deleted vehicle will be removed from the **Vehicle** page.
### Filter a Vehicle
If you want to view any specific vehicle details among multiple vehicles listed in the **Vehicle** page, you can use the filter option provided in the upper left corner of the **Vehicle** page. To filter any vehicle you want,
1. Click (Filter button). A filter box opens in each column of the **Vehicle** page.
2. Enter the relevant data in any column filter. The vehicle(s) that qualifies will be filtered and display in vehicle page.
### Export a Vehicle List
The application has a feature to download the added vehicle list in an excel format. You can use export option to download the added vehicle list. To download the added vehicle list, click  (**Export Excel** button). The vehicles added in the **Vehicle** page will be downloaded as an excel file.
## Service Request
The **Service Request** submenu in the **SRM** page helps you to add and manage the functionalities related with the service schedule and the service request.
The **Service Request** submenu contains the following tabs,
- Service Schedule
- Service Request View
- Service Request Verification
- Add Invoice
- Manual Invoice
- Lump Sum Invoice
- Invoice View
- Payment
- Bulk Payment
- Clear Cache
### Service Schedule
The **Service Schedule** tab in the **Service Request** submenu helps you to add a service schedule. Click Service Schedule in the Service Request submenu, the Service Schedule page opens.
[](http://wiki.cuteinfocomm.com/uploads/images/gallery/2023-10/image-1698638003553.png)
#### View Service Schedule
If you want to view any specific service schedule among the list of service schedules, you can use column filter to select the respective data such as Schedule No, Customer, Location, and Date Range in the respective fields given in the Service Schedule page. You can click the page expand icon at the top right corner to expand the filters.
[](http://wiki.cuteinfocomm.com/uploads/images/gallery/2023-10/image-1698638156539.png)
If you want to view the scheduled schedule of any customer,
1. Select a customer from the Customer field.
2. Click [](http://wiki.cuteinfocomm.com/uploads/images/gallery/2023-10/image-1698638301357.png) ( print Schedule button), the schedule details for the selected customer will be downloaded as a pdf. [](http://wiki.cuteinfocomm.com/uploads/images/gallery/2023-10/image-1697782130744.jpg)
#### Add a Service Schedule
To add a service schedule, do the following steps,
1. Click  (Add button) in the Service Schedule page, the **Add Service Schedule** window opens (Note: The fields highlighted with red color are mandatory. You must enter the relevant details in that fields before saving). [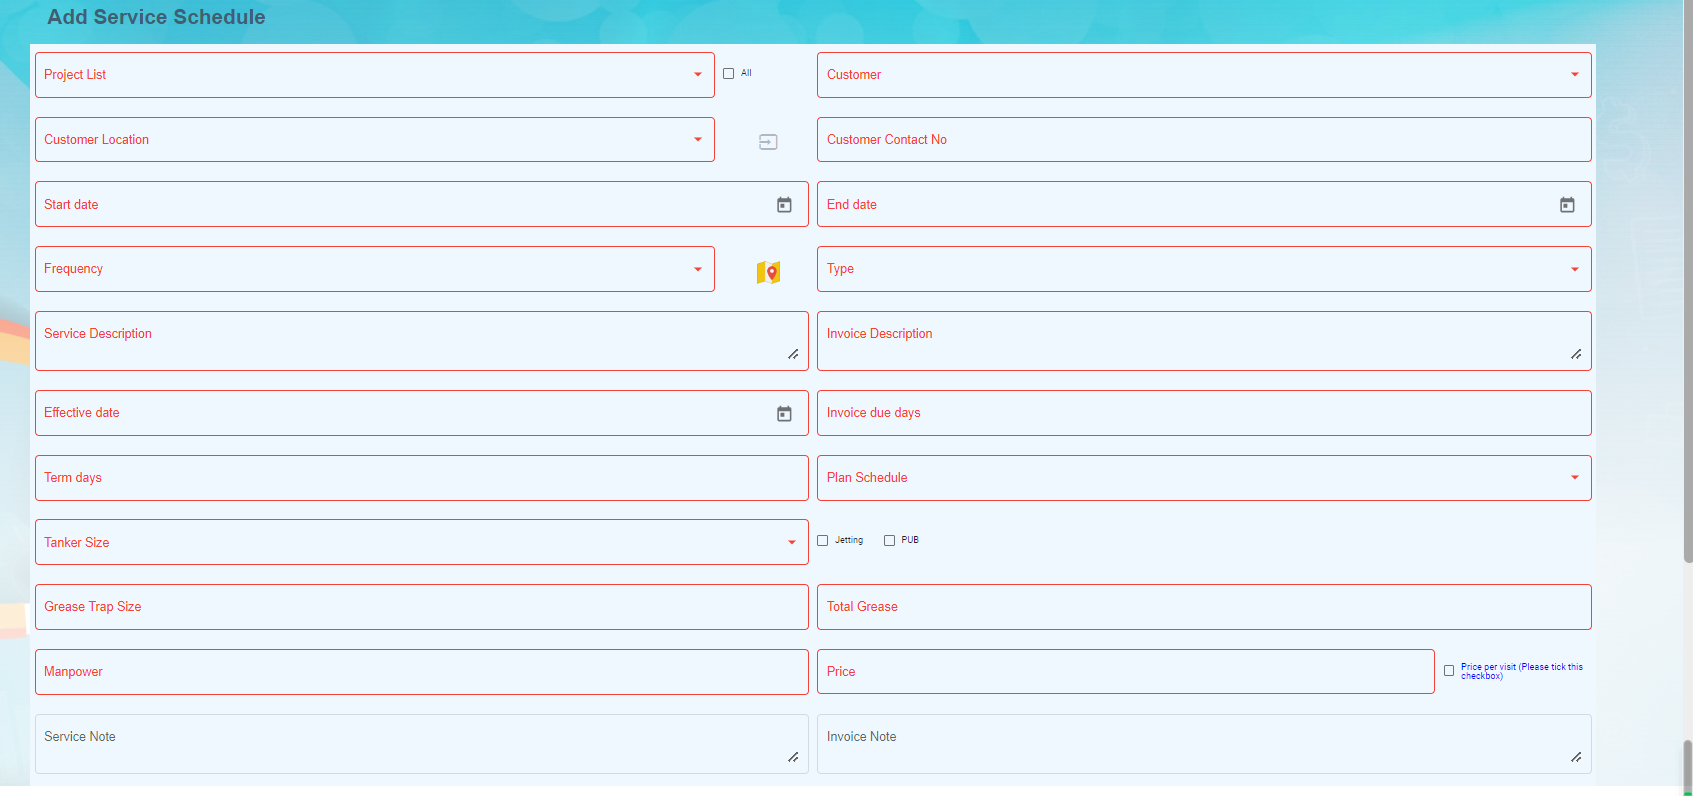](http://wiki.cuteinfocomm.com/uploads/images/gallery/2023-10/image-1698130270983.png)
2. In the **Project List** box, select a project list from a drop-down list. Once you have selected a project, the customer, the customer location and contact number of the selected project will be automatically populated.
3. Note: If you want to select all projects, click to enable the All checkbox provided with the Project List box. And then select relevant details in customer, customer location and contact number box. [](http://wiki.cuteinfocomm.com/uploads/images/gallery/2023-10/image-1697781055715.png)
4. In the **Start Date** and **End Date** boxes, select the schedule’s start and end dates.
5. In the **Frequency** box, select the frequency of doing service based on the customer requirement. For example, if the customer expects to do the service for three times in a month, select **3 x Monthly.** Note: If you want to view the location in the map, click  (Location Map icon) provided with the Frequency box.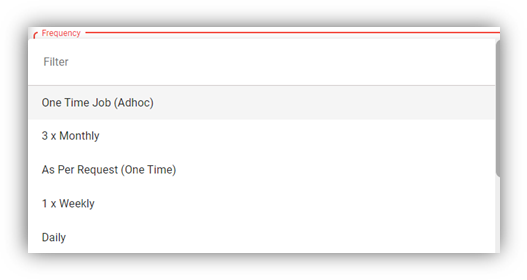
6. In the **Type** box, select a type of medium.
7. In the **Service Description** box, enter the service description.
8. In the **Invoice Description** box, enter the invoice description.
9. In the **Effective Date** box, select the effective date of the service schedule.
10. In the **Invoice Due Days** box, enter the due days for invoice.
11. In the **Term Days** box, enter the term days.
12. In the **Plan Schedule** box, select the plan schedule whether Day Job or Night Job.
13. In the **Tanker Size** box, select the tanker size whether small or big.
14. If the service is jetting, select Jetting or if the service is PUB, select the PUB. [](http://wiki.cuteinfocomm.com/uploads/images/gallery/2023-10/image-1697781749216.png)
15. In the **Grease Trap Size** box, enter the grease trap size.
16. In the **Total Grease** box, enter the total grease value.
17. In the **Manpower** box, enter the required manpower.
18. In the **Price** box, enter the price for the service.
19. In the **Service Note** box, enter the service note.
20. In the **Invoice Note** box, enter the invoice note.
21. In the **Private Note for Internal** box, enter the note for internal.
22. In the **Effective Time** box, select the effective time. The calendar will be displayed based on the selection of frequency.
23. In **Old SRM Sales Contract No** box, enter the old SRM sale contract number associated with the service schedule.
24. Click **Save**. The service schedule will be added and listed in the Service Schedule page.
#### Activate/Cancel a Service Schedule
To activate a service schedule, do the following steps,
1. Click  (Active icon) that is provided in the Action column in the service schedule page. The Service Request List window opens and shows the list of service requests added against the selected service schedule number.
2. Click **Ok**. The Remarks box opens.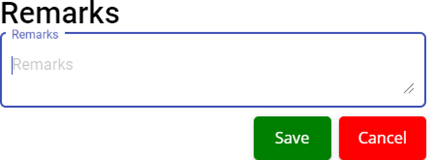
3. Enter your remarks and click **Save**. The service schedule will be activated. The remarks you have entered will be saved in the Status Remarks column of the Service Schedule page.
To cancel a service schedule,
1. Click  (Cancel icon) that is provided in the Action column, of the service schedule. The Service Request List window opens and shows the list of service requests added against the selected service schedule number.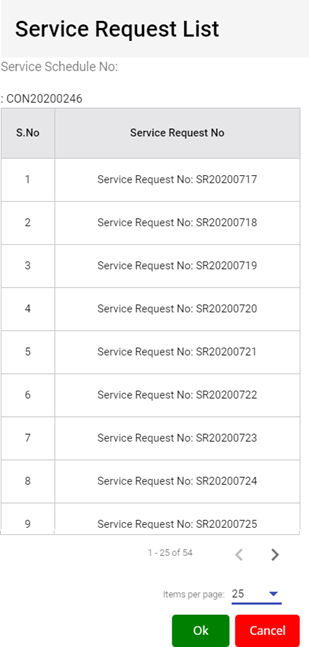
2. Click **Ok**. The Remarks box opens.
3. Enter your remarks and click **Save**. The service schedule will be cancelled. The remarks you have entered will be saved in the Status Remarks column of the Service Schedule page.
#### Edit a Service Schedule
You can edit the details of the added service schedule by using edit option provided in the
Edit column of the Vehicle page. To edit the added service schedule details,
1. Click  (Edit icon) of the respective service schedule you have added, the Add Service Schedule window opens with the added service schedule details.[](http://wiki.cuteinfocomm.com/uploads/images/gallery/2023-10/image-1697783400078.png)
2. Edit the service schedule details where you want.
3. Click **Save**.
#### Delete a Service Schedule
You can delete the added service schedule by using  (Delete icon) provided in the Delete column of the Service Schedule page.
#### Export a Service Schedule List
If you want to export all the service schedules in the Service Schedule page in an excel format, you can use the export option provided in the Service Schedule page. To know how to export, follow the procedures given in the topic, “Export a Vehicle List”.
### Service Request View
The **Service Request View** tab in the **Service Request** submenu helps you to add a service request. Users assigned with **srm\_admin** and **srm\_technician** roles can have access to view this **Service Request View** page. Click **Service Request View** in the **Service Request,** the **Service Request View** page opens.
[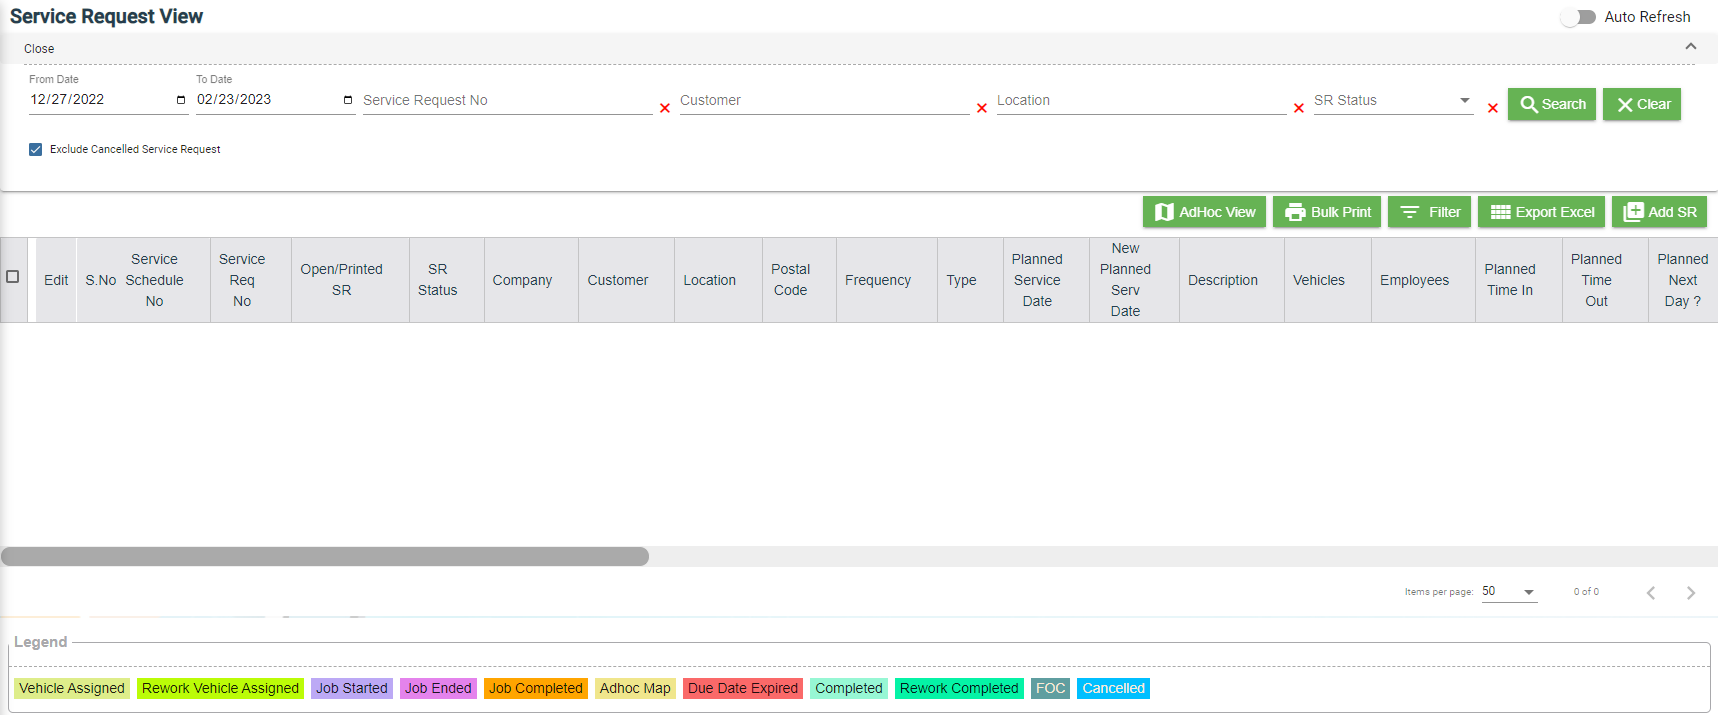](http://wiki.cuteinfocomm.com/uploads/images/gallery/2023-10/image-1698130148290.png)
- You can configure displaying of the number of service request items per page by selecting **50**, **100**, **250, 500,** or **1000**,
- If you want to view any specific service request among the list of service requests, you can select the respective data such as Service Request No, Customer, Location, and Date Range in the respective fields given in the **Service Request View**
- The service request displayed in different color explains their status:
#### Add a Contract Service Request
To add a contract service request, do the following steps,
1. Click [](http://wiki.cuteinfocomm.com/uploads/images/gallery/2023-10/image-1698129828567.png)(**Add** button) in the **Service Request View page,** the **Service Request** window opens, click to select **Contract SR** (**Note**: The fields highlighted with red color are mandatory. You must enter the relevant details in that fields before saving.). [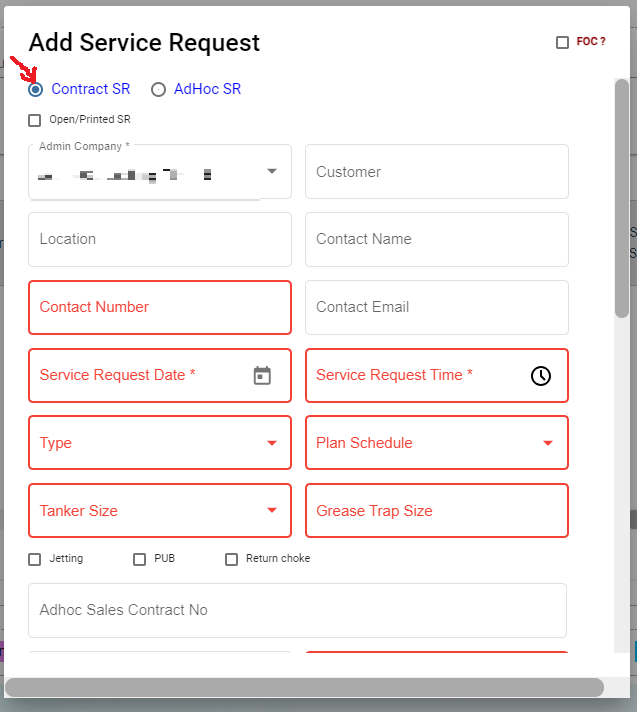](http://wiki.cuteinfocomm.com/uploads/images/gallery/2023-10/image-1698130642389.png)
2. In the **Admin Company** box, select admin company.
3. In **Customer** box, select customer company name.
4. In **Location** box, select location.
5. In **Contact Name** box, select contact name.
6. In **Contact Number** box, if contact name is selected, the associated contact number and email address will automatically populated.
7. In **Contact Email** box, if contact name is selected, the associated email address will automatically populated.
8. In **Service Request Date** box, click to select date.
9. In **Service Request Time** box, click to select time.
10. In **Type** box, click to select service type.
11. In **Plan Schedule** box, click to select plan schedule as Day Job or Night Job.
12. In **Tanker Size** box, click to select tanker size.
13. In **Grease Trap Size** box, enter or select grease trap size.
14. In **Jetting, PUB, Return Choke** options, click to select relevant option(s).
15. In **Adhoc Sales Contract No** box, enter adhoc sales contract number if any.
16. In **Quotation No** box, enter quotation number.
17. In **Total Grease** box, enter the total grease value.
18. In **Manpower** box, enter the required manpower.
19. In **Price** /**Visit** box, enter the price for the service request.
20. In **Payment Mode** box, select payment mode.
21. In **Billing** flag, click to enable if applicable.
22. In **Service Description** box, enter service description.
23. In **Invoice Description** box, enter invoice description.
24. In **Invoice Note** box, enter the invoice note.
25. In **Private Note for Internal** box, enter the note for internal.
26. In **Service Note** box, enter the service note.
27. In **Show All Vehicle/Technician** flag, click to enable if applicable. When this flag is ticked, vehicle and technician selection list will include all technician and vehicle. Else Jetting Service Request will show only jetting vehicle and technicians in jetting department only.
28. In **New Planned Service Date** box, click to select planned date.
29. In **Planned Time In** box, click to select planned time in.
30. In **Planned Time Out** box, click to select planned time out.
31. In **Vehicle** box, select vehicle.
32. In **Technician** box, select technician.
33. For **Assignment History** option, it is used to check all existing assignments of selected technician, so that user can unassign the technician from some assignments to make him available for the job on this new service request date.
34. Click **Save**. The service request is added and listed in the **Service Request View** page.
#### Edit a Service Request
You can edit the details of the added service request by using edit option provided in the **Edit** column of the **Service Request View** page. To edit the added service request details,
1. Click (Edit icon) of the respective service request, the **Service Request** window opens,
2. Edit the service request details where needed.
3. Click **Save** to save edits.
#### Assign Technician and Vehicle for a Service Request
Users assigned with **srm\_admin** role only can have access to assign the technician and vehicle for an added service request.
Users assigned with **srm\_technician** role can only view the assigned details.
To assign the technician and vehicle for an added service request, do the following steps,
1. Click[](http://wiki.cuteinfocomm.com/uploads/images/gallery/2023-10/image-1698645946491.png) (Assign icon) in the assign column of the respective service, the **Assign Technician** window opens. [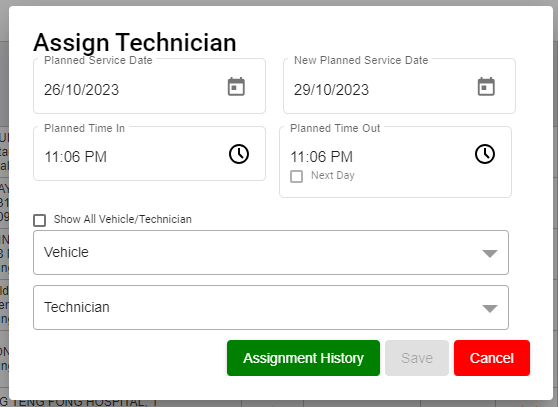](http://wiki.cuteinfocomm.com/uploads/images/gallery/2023-10/image-1698645988734.png)
2. In **Planned Service Date** box, the planned date will show automatically.
3. In **New Planned Service Date** box, click to select new date if needed.
4. In **Planned Time In** and **Planned Time Out** boxes, select the planned in and out times.
5. In **Vehicle** box, select a vehicle from a list. **Note**: You can select multiple vehicles.
6. In **Technician** box, select a technician from a list. **Note**: You can select multiple technicians.
7. Click **Save,** the service request is assigned. For **Assignment History** option, it is used to check all existing assignments of selected technician, so that user can unassign the technician from some assignments to make him available for the job on this new service request date. After assigning the vehicle and technician, the SR record will be changed to yellow color. The service request will be moved to the respective technicians and the  (Job Starts icon) will be appeared in the **Verification** column as below,
#### Indicate Starting and Ending of Job
Once the service request is added and assigned for the respective technician and vehicle by the client, the technician can login and view job details assigned to them.
**To indicate that the job was started,**
1. Click on (Job Starts icon) appeared in the **Verification** column, the job started status will be updated successfully and the SR record will be changed to Blue color.
**To indicate that the job was ended,**
1. Click on (Job Ends icon) appeared in the **Verification** column, the job ended status will be updated successfully and the SR record will be changed to Purple color.
Once the job has completed, the verification process begins.
**Note**: When you click  (Assign icon) of this service request, the vehicle and technicians which are assigned already will not be shown in list.
#### Verify the Service Request Completion
In general, once the job is done by the technician, the respective SR record will be moved for verification that needs to be done by the admin. This **Verification** functionality is provided for the technician on the job to print the Service Verification Form for client to verify the job done by technician and sign off.
1. Click (Verification icon) provided in the **Verification** column**,** the **Service Request Verification** window opens. [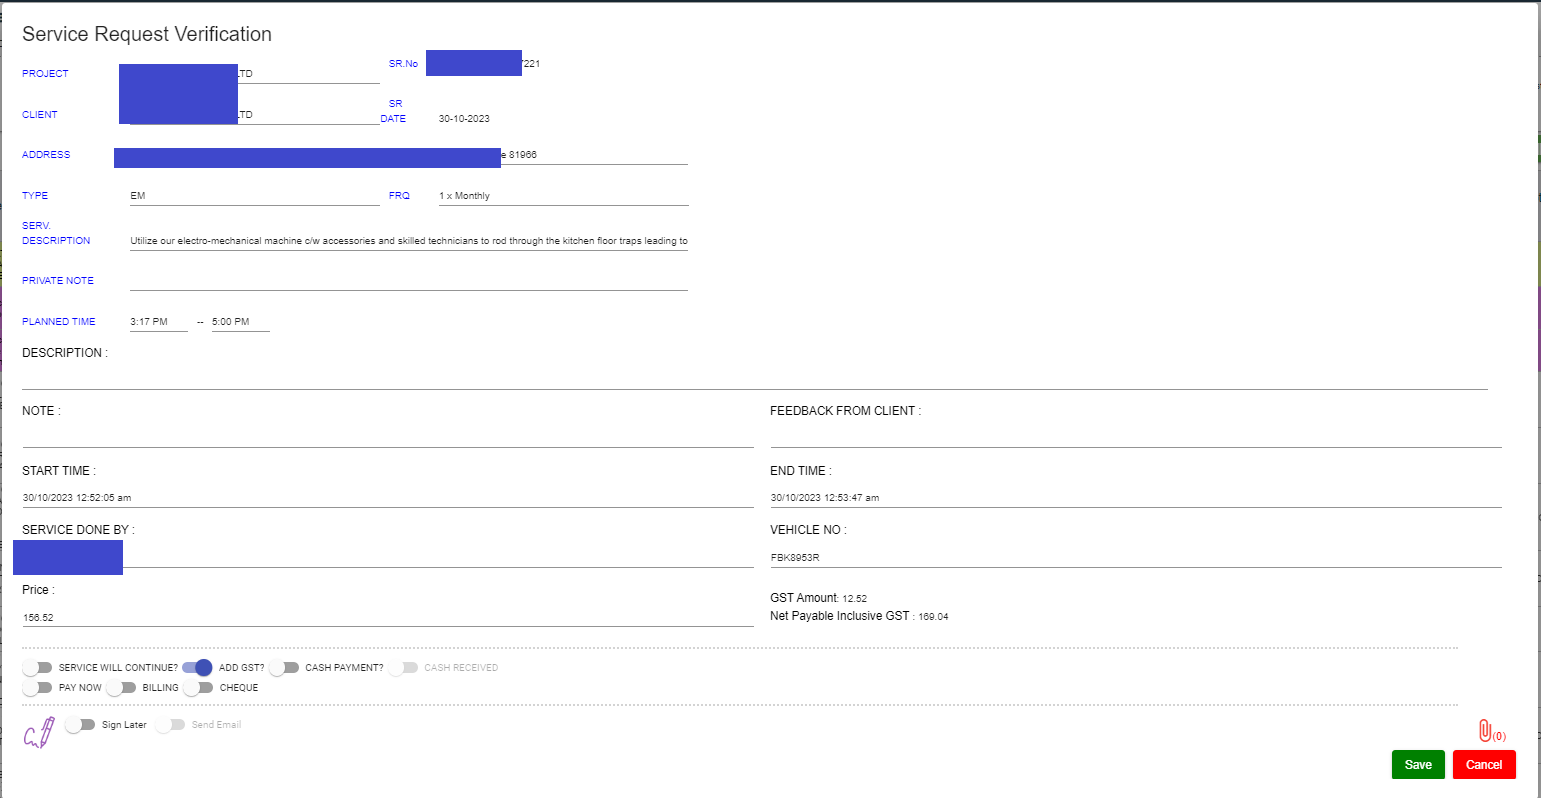](http://wiki.cuteinfocomm.com/uploads/images/gallery/2023-10/image-1698702122999.png)
2. In **DESCRIPTION** box, enter the description.
3. In **NOTE** box, enter your note if any.
4. In **FEEDBACK FROM CLIENT** box, enter client feedback.
5. In **START TIME** and **END TIME** boxes, verify start and end time, if any changes, select the started and ended time of the assigned job.
6. In **SERVICE DONE BY** box, verify technician assigned, if any changes, click to select technician name.
7. In **VEHICLE NO** box, verify vehicle number, if any changes, click to select vehicle number.
8. In **Price** box, verify the price, enter updated price if any changes.
9. In other payment details section, click to enable if applicable. [](http://wiki.cuteinfocomm.com/uploads/images/gallery/2023-10/image-1698702625434.png)
- If you go for cash payment, select the checkbox of the CASH PAYMENT? option.
- If you want to add the GST amount, select the checkbox of the ADD GST? option. The price will be added with the GST amount.
- If you want the service to be continued, select the checkbox of the SERVICE WILL CONTINUE? option. Once you selected the SERVICE WILL CONTINUE? option, the system will indicate "Continue" in the Job column for the select service request. And another SR request will be created as shown below, [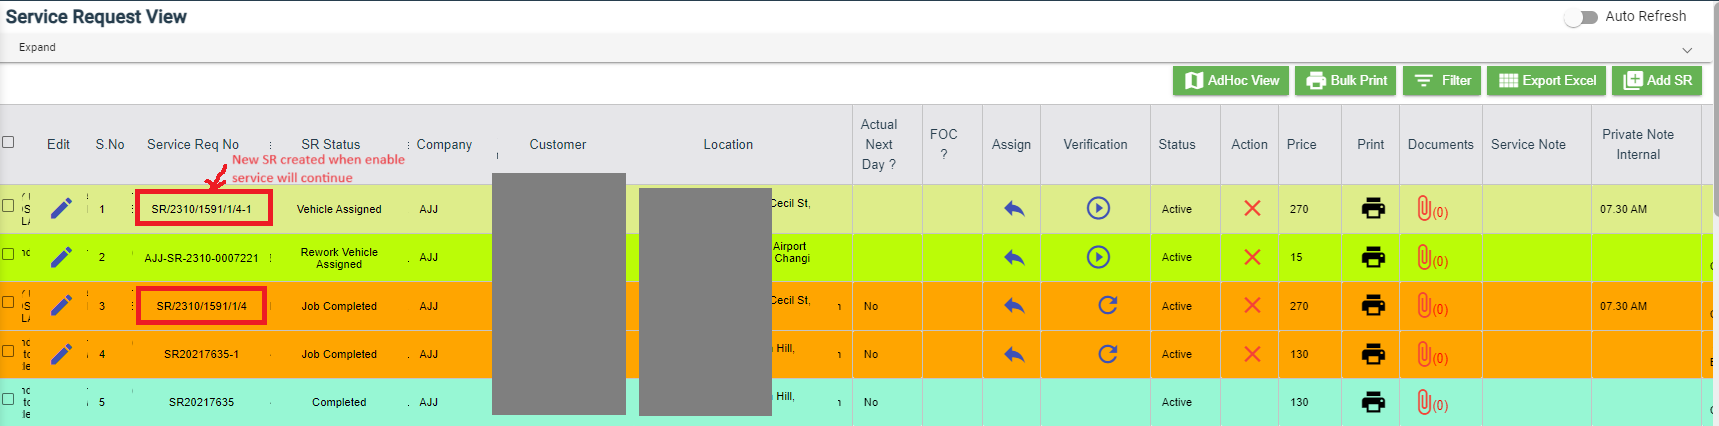](http://wiki.cuteinfocomm.com/uploads/images/gallery/2023-11/image-1699942088800.png)
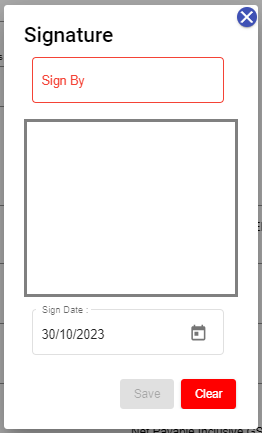
10. Click (Sign icon) to add your signature, the **Signature** window opens.
- In the **Sign By** box, enter you name.
- Add you signature.
- Verify the date.
- Click **Save**.
[](http://wiki.cuteinfocomm.com/uploads/images/gallery/2023-10/image-1698702700462.png)
11. To attach any file, click (Attach icon) and attach the file.
12. Click **SAVE** to save verification of the service requestion record.
#### Rework
When the job completed by the technician does not meet the expectations of client, the client can assign for the rework. Users assigned with **srm\_admin** role only can have access to start rework by using reset option.
To start the rework,
1. Navigate to verification column of the respective service request, [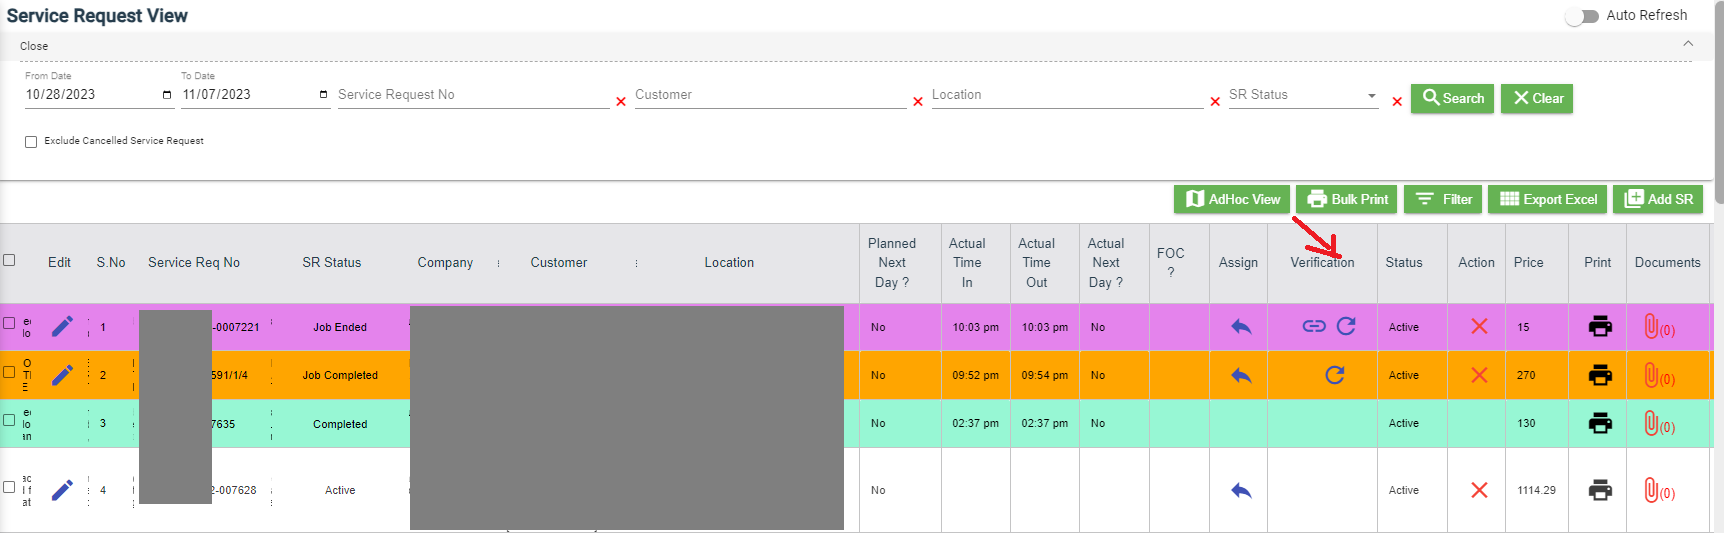](http://wiki.cuteinfocomm.com/uploads/images/gallery/2023-11/image-1699423693251.png)
2. Click (Reset icon). A new service request will be added for rework and the job status will be updated as **Rework** in the **Job** column.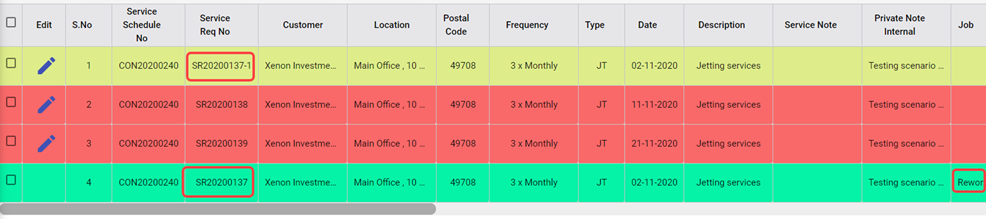
#### Print a Service Record
To print any SR record, do the following steps, click the respective  (Print icon) in the **Print** column. The SR record will be downloaded as a pdf file with customizable format.
#### Attach/View a Document into a Service Request
**To add a new document with the service request**,
1. Click  (Attachment icon) in the **Documents** column of the respective service request for which you want to add attachment, the **Add/ View Attachment** window opens. [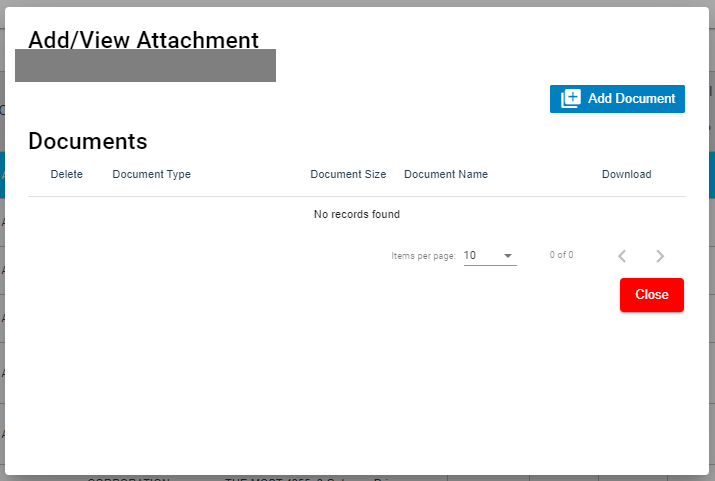](http://wiki.cuteinfocomm.com/uploads/images/gallery/2023-11/image-1699425158846.png)
2. Click [](http://wiki.cuteinfocomm.com/uploads/images/gallery/2023-11/image-1699425181609.png)(**Add Document** button), the file choosing and uploading option will be enabled. [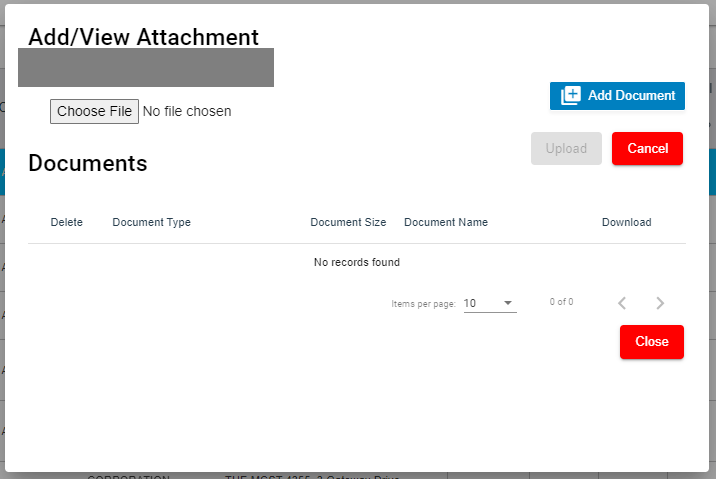](http://wiki.cuteinfocomm.com/uploads/images/gallery/2023-11/image-1699425274177.png)
3. Click (**Choose File** button) and select the document which you want to upload.
4. Click **Upload.** The selected document will be uploaded and displayed in the **Add/View Attachment** window.
**To view any attached document with a service request,**
1. Click (Attachment icon) in the **Documents** column, the **Add/ View Attachment** window opens with a list of attached documents. Note: The subscript number displays with attachment icon shows the total number of attached documents with the vehicle. [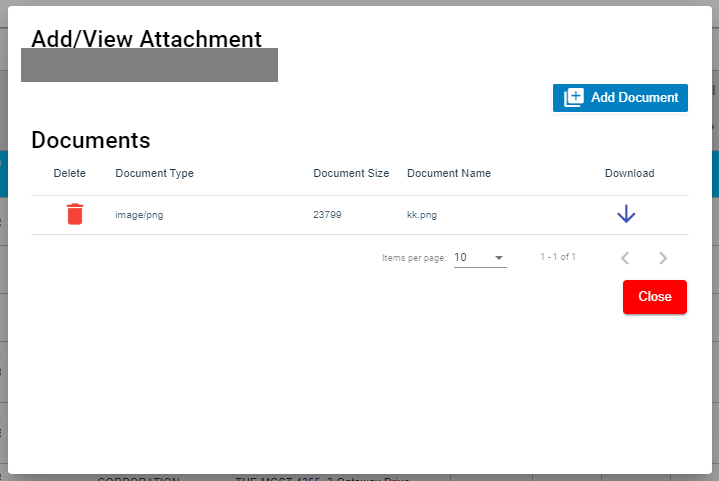](http://wiki.cuteinfocomm.com/uploads/images/gallery/2023-11/image-1699425401496.png)
2. If you want to download the attached document, click (Download icon) in the **Download** column. The document will be downloaded.
#### Activate/Cancel a Service Request
If you want to activate or cancel a service request, do the following steps,
**To activate a service request,**
1. Click (Active icon) that is provided in the **Action** column of the service request, the **Remarks** box opens.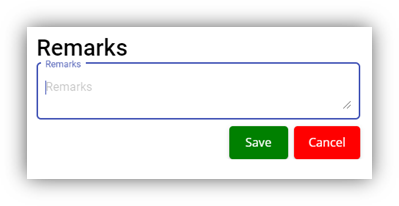
2. Enter your remarks and click **Save**. The service request will be activated. The remarks you have entered will be saved in the **Action Remarks** column of the **Service Request View** page.
**To cancel a service request,**
1. Click (Cancel icon) that is provided in the **Action** column of the service request. The **Remarks** box opens.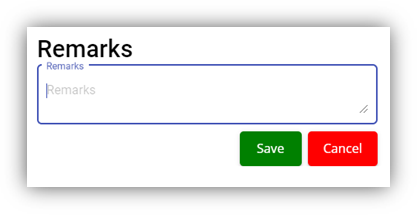
2. Enter your remarks and click **Save**. The service request will be cancelled. The remarks you have entered will be saved in the **Action Remarks** column of the **Service Request View** page.
#### Delete a Service Request
You can delete the added service request by using delete option provided in the **Delete** column of the **Service Request View** page.
#### Add an AdHoc Service Request
When a service request is not a planned one, you can add the request as an Adhoc SR. Project details are not mandatory to add the Adhoc SR. Users assigned with **srm\_admin** and **srm\_technician** roles can have access to add and view the AdHoc service requests.
To add an adhoc SR,
1. Click [](http://wiki.cuteinfocomm.com/uploads/images/gallery/2023-10/image-1698129828567.png)(**Add** button) in the **Service Request View page,** the **Service Request** window opens, click to select **AdHoc SR** (**Note**: The fields highlighted with red color are mandatory. You must enter the relevant details in that fields before saving.). [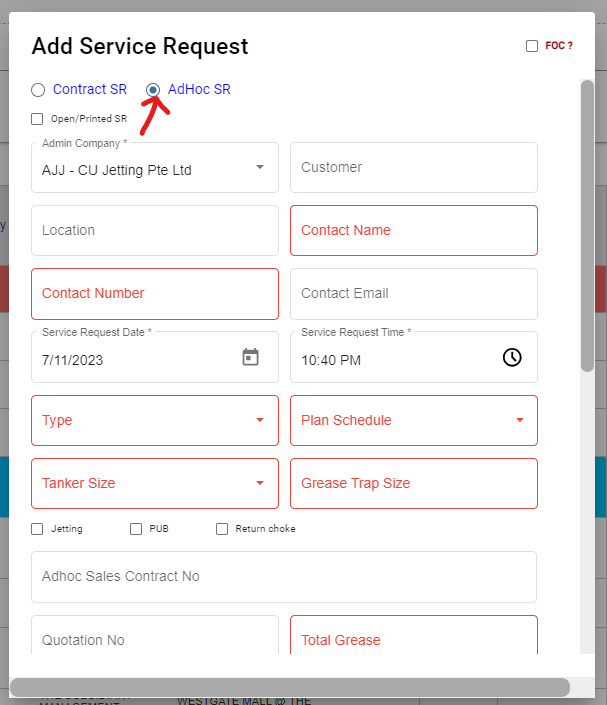](http://wiki.cuteinfocomm.com/uploads/images/gallery/2023-11/image-1699425708907.png)
2. Fill up the mandatory fields as below.
3. In **Contact Name** box, select contact name.
4. In **Contact Number** box, if contact name is selected, the associated contact number and email address will automatically populated.
5. In **Contact Email** box, if contact name is selected, the associated email address will automatically populated.
6. In **Service Request Date** box, click to select date.
7. In **Service Request Time** box, click to select time.
8. In **Type** box, click to select service type.
9. In **Plan Schedule** box, click to select plan schedule as Day Job or Night Job.
10. In **Tanker Size** box, click to select tanker size.
11. In **Grease Trap Size** box, enter or select grease trap size.
12. In **Total Grease** box, enter the total grease value.
13. In **Manpower** box, enter the required manpower.
14. In **Price** /**Visit** box, enter the price for the service request.
15. In **Payment Mode** box, select payment mode.
16. In **Billing** flag, click to enable if applicable.
17. In **Service Description** box, enter service description.
18. In **New Planned Service Date** box, click to select planned date.
19. In **Planned Time In** box, click to select planned time in.
20. In **Planned Time Out** box, click to select planned time out.
21. Click **Save**. The service request is added and listed in the **Service Request View** page.
#### View Adhoc Service Requests
If you want to view the added adhoc service requests, click  (**AdHoc View** button) in the **Service Request View** page. The Adhoc service requests opens as below,
[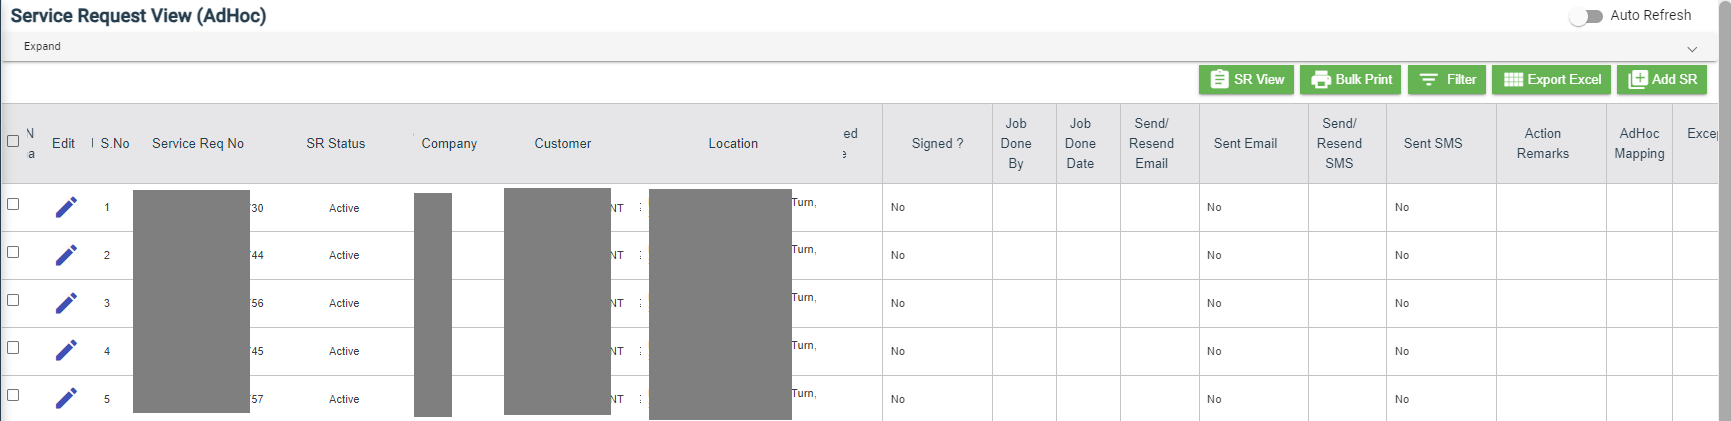](http://wiki.cuteinfocomm.com/uploads/images/gallery/2023-11/image-1699943447634.png)
Filter a Service Request
If you want to filter a specific service request in the **Service Request View** page, you can use the filter option provided in the **Service Request View** page.
#### Export a Service Request list
If you want to export all the service requests in the **Service Request View** page in an excel format, you can use the export option provided in the **Service Request View** page.
#### Bulk Print
If you want to print multiple SR record,
1. Select the checkbox of the respective service
2. Click (**Bulk Print** button). The selected SR records will be downloaded in a pdf file.
### Service Request Verification
Users can verify the signed Service Verification Forms and to proceed to the next stage of invoice generation in the **Service Request Verification** tab in the **Service Request** submenu.
Users assigned with **srm\_admin** role have access to view this **Service Verification** page and verify the Service Verification Form sent by the Technician.
Click **Verification** in the **Service Request,** the **Service Verification** page opens.
[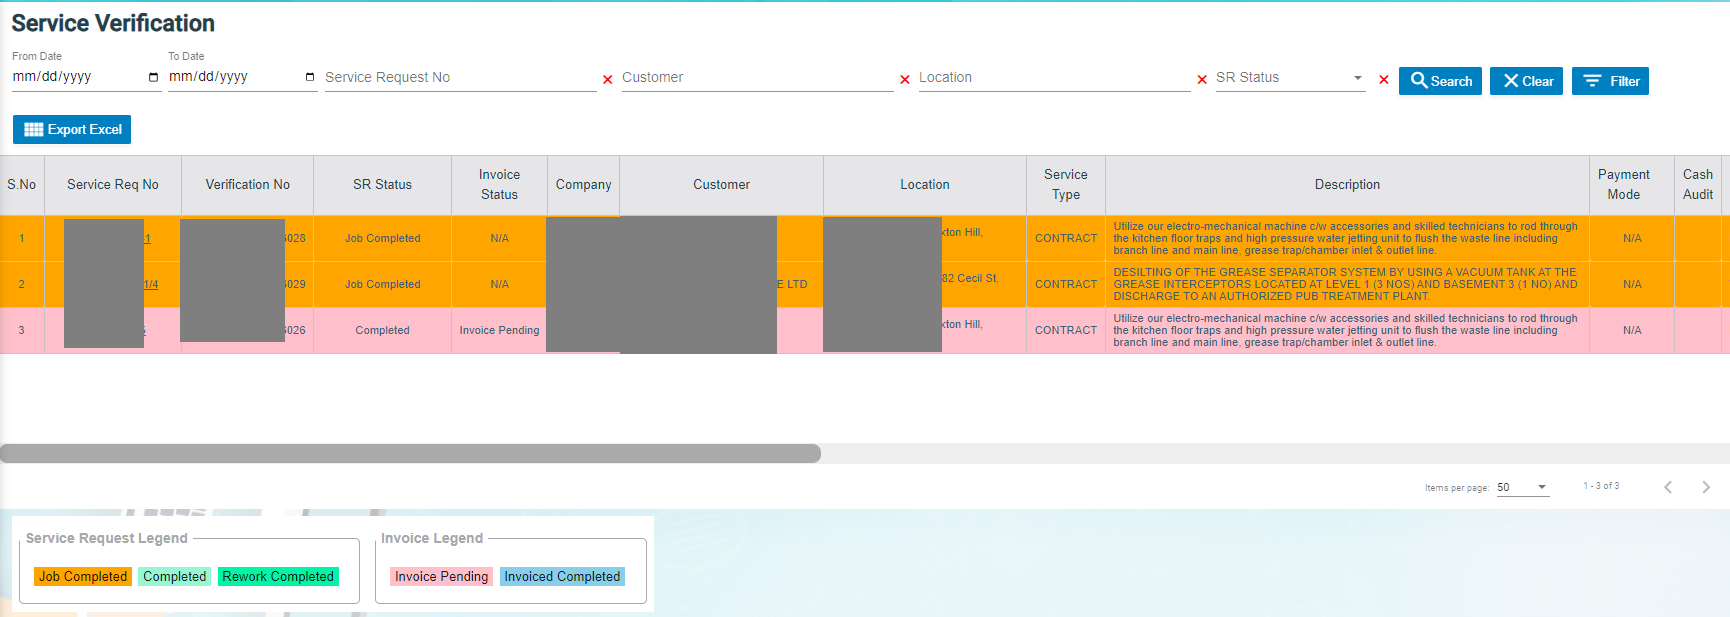](http://wiki.cuteinfocomm.com/uploads/images/gallery/2023-11/image-1701152316199.png)
- If you want to view any specific service request among the list of service requests, you can use the select the respective filters provided in the Service Verification search bar.
- The legend at the bottom of page denotes different status of a service request.
#### Verify the Service Verification Form
Once the service verification form is signed and submitted by the technician, the verification form will be sent for verification. After the service request verification form is verified, the request will be moved for invoice generation.
To verify the service verification form,
1. Navigate to the respective service request you want to verify,
2. Click the checkbox provided in the **Verified**,[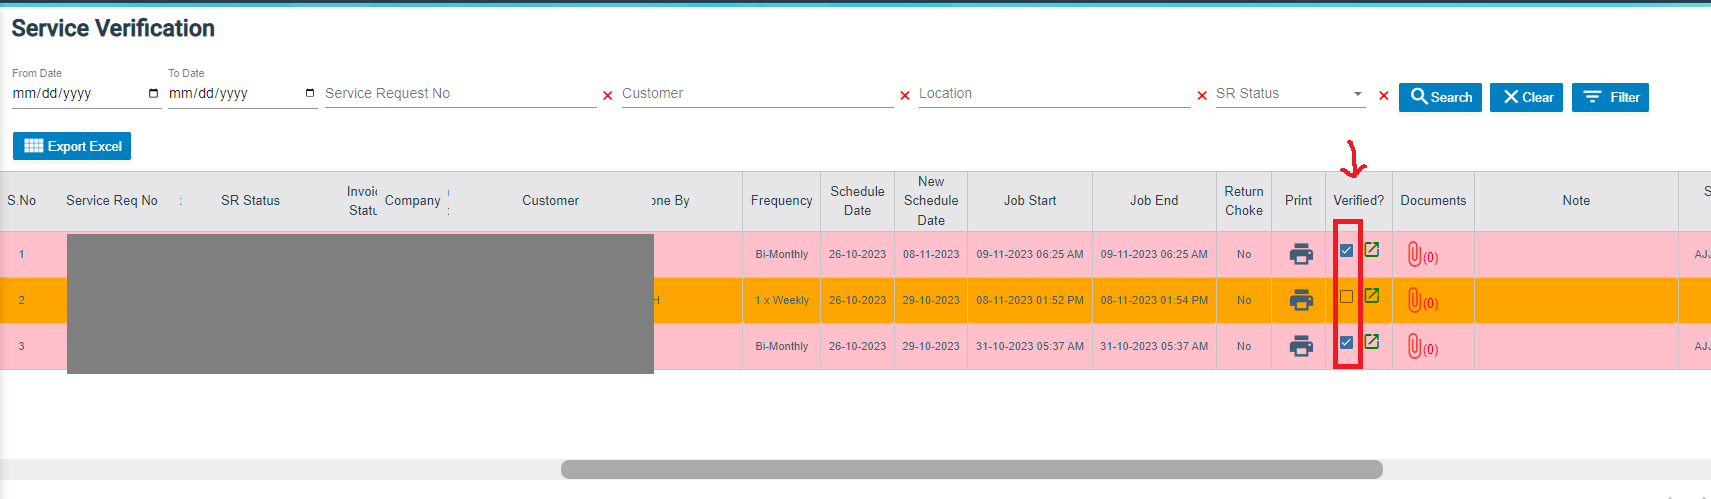](http://wiki.cuteinfocomm.com/uploads/images/gallery/2023-11/image-1701153976265.png)
3. The **Confirm** dialog box opens and shows the following message [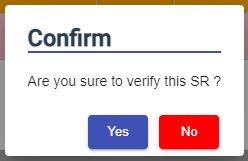](http://wiki.cuteinfocomm.com/uploads/images/gallery/2023-11/image-1701154064033.png)
4. Click Yes, a verified successful notification will display, and the selected request will be moved to the Invoice Generation page to generate invoice for the payment.[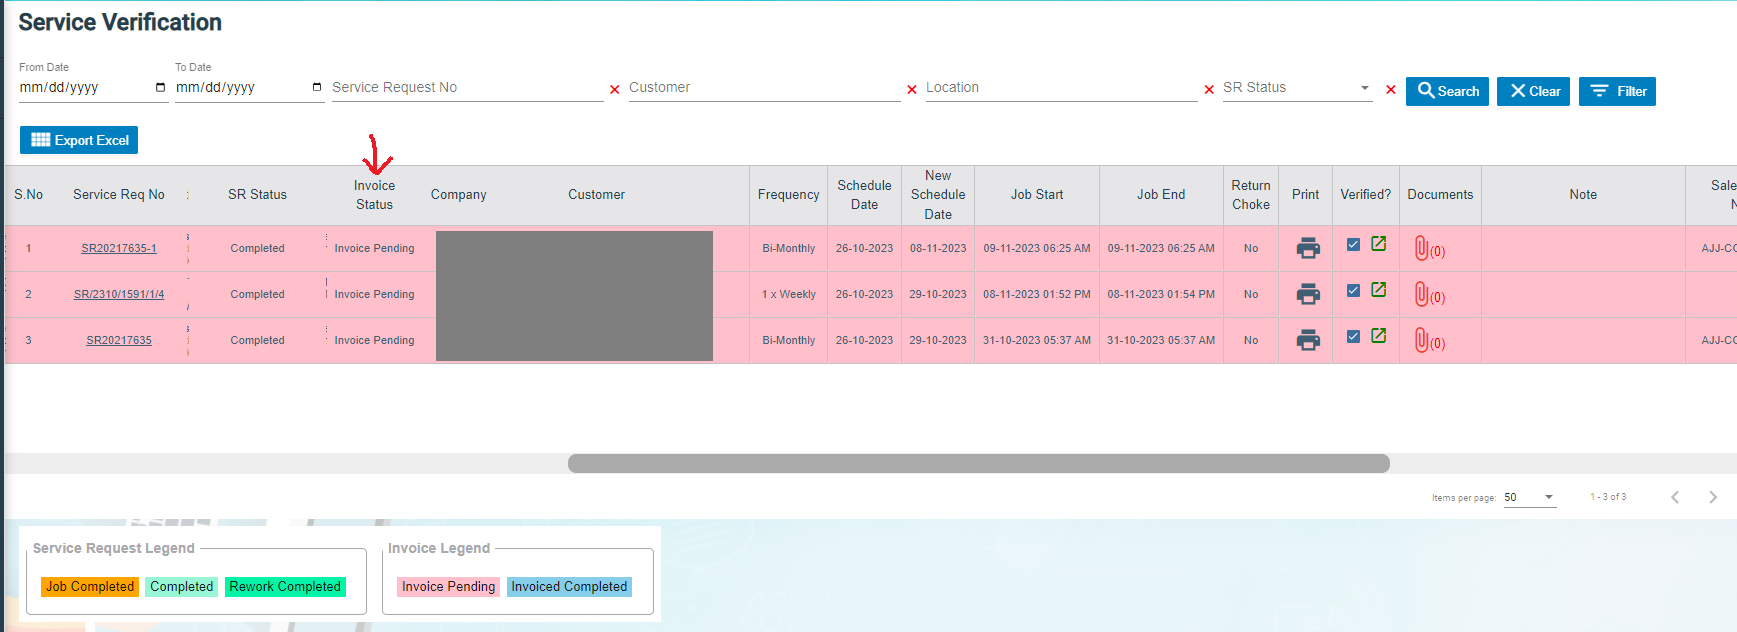](http://wiki.cuteinfocomm.com/uploads/images/gallery/2023-11/image-1701154348963.png)
#### Print a Service Record
To print any SR record, click[](http://wiki.cuteinfocomm.com/uploads/images/gallery/2023-11/image-1701154968718.png) (print icon) of respective service request in the Print column in the service verification page. The SR record will be downloaded as a pdf file.
[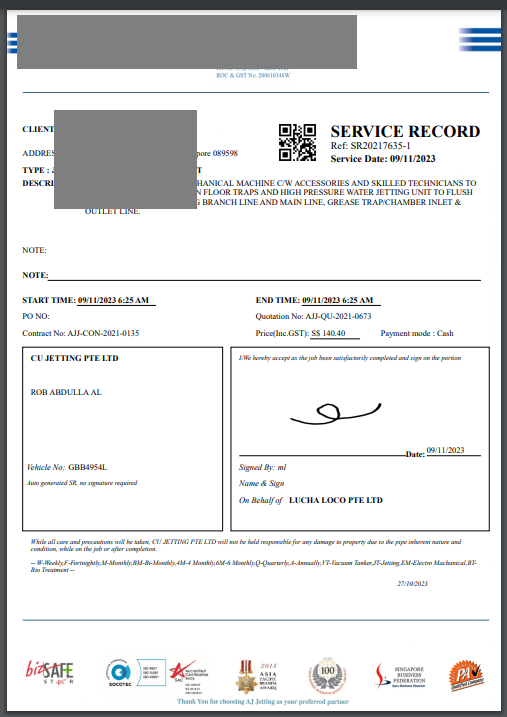](http://wiki.cuteinfocomm.com/uploads/images/gallery/2023-11/image-1701155184690.png)
#### Attach/View a Document into a Service Request
**To add a new document with the service request,**
1. Click (Attachment icon) of the respective service request, the **Add/ View Attachment** window opens. [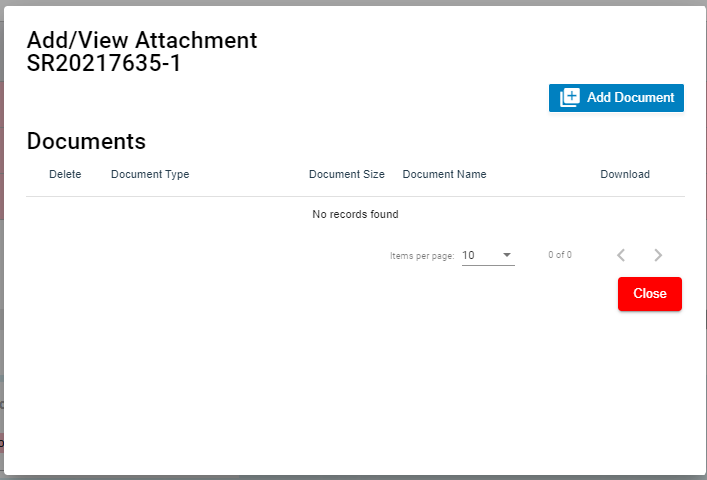](http://wiki.cuteinfocomm.com/uploads/images/gallery/2023-11/image-1701155358555.png)
2. Click [ ](http://wiki.cuteinfocomm.com/uploads/images/gallery/2023-11/image-1701155395780.png) (add document icon), The file choosing and uploading option will be enabled, [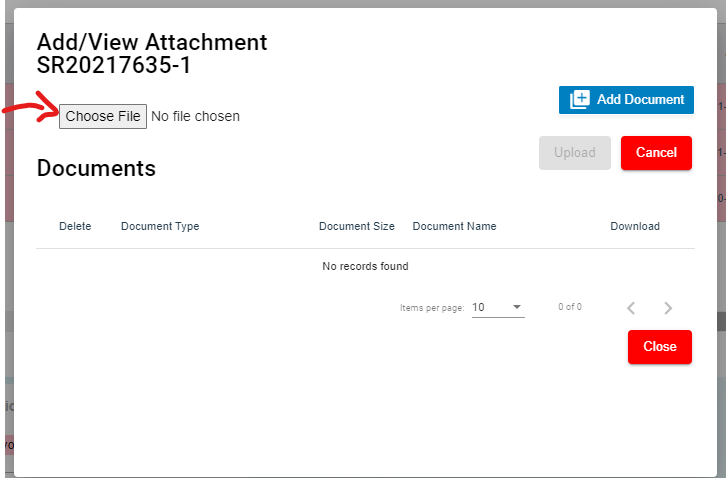](http://wiki.cuteinfocomm.com/uploads/images/gallery/2023-11/image-1701155549462.png)
3. Click  (Choose File icon) and select the document which you want to upload.
4. Click Upload. The selected document will be uploaded and displayed in the Add/View Attachment window.
**To view any attached document with a service request,**
1. Click (Attachment icon) in the **Documents** column, the **Add/ View Attachment** window opens with a list of attached documents. Note: The subscript number displays with attachment icon shows the total number of attached documents with the vehicle. [](http://wiki.cuteinfocomm.com/uploads/images/gallery/2023-11/image-1699425401496.png)
2. If you want to download the attached document, click (Download icon) in the **Download** column. The document will be downloaded.
#### Filter a Service Request
If you want to filter a specific service request in the **Service Verification** page, you can use the filter option provided in the **Service Verification** page.
#### Export a Service Request List
If you want to export all the service requests in the **Service Verification** page in an excel format, you can use the export option provided in the **Service Verification** page.
### Invoice Generation
Once the service request verification process has completed, the request will be moved for invoice generation. There are three ways to generate invoice:
1. Add Invoice - Users can generate invoice in the **Add Invoice** tab.
2. Manual Invoice - Users can generate invoice manually in the Manual Invoice tab. Click **Manual Invoice** in the **Service Request,** the **Manual Invoice** page opens. [](http://wiki.cuteinfocomm.com/uploads/images/gallery/2023-12/image-1702364885548.png)
3. Lump Sum Invoice - Users can generate lump sum invoice per customer in the **Lump Sum Invoice** tab. Click **Lump Sum Invoice** in the **Service Request,** the **Lump Sum Invoice** page opens.
- If you want to view any specific service request among the list of service requests, you can user the respective filters such as Customer, Location, Verified and SR Date Ranges in the **Invoice Generation page.**
#### Add Invoice
To generate an invoice automatically,
1. Click **Add Invoice** in the **Service Request** menu**,** the **Invoice Generation** page opens. [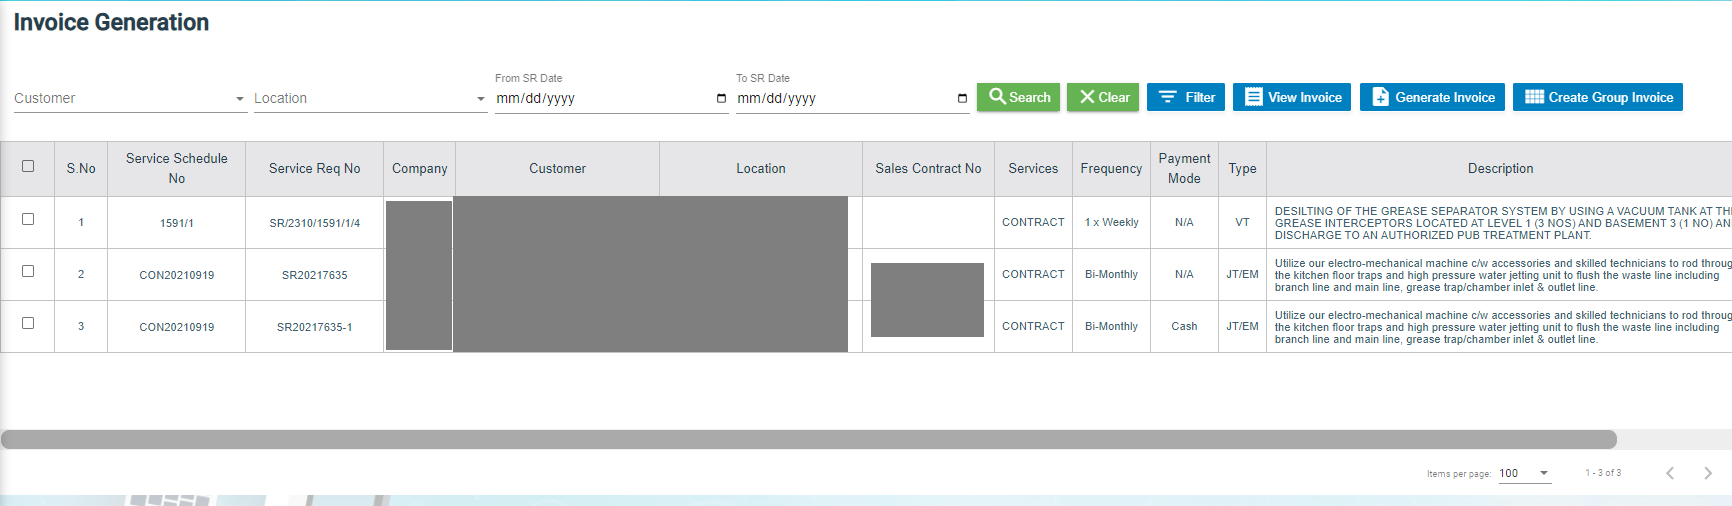](http://wiki.cuteinfocomm.com/uploads/images/gallery/2023-11/image-1701156127923.png)
2. Click the checkbox of the respective service request for which you want to generate an invoice, [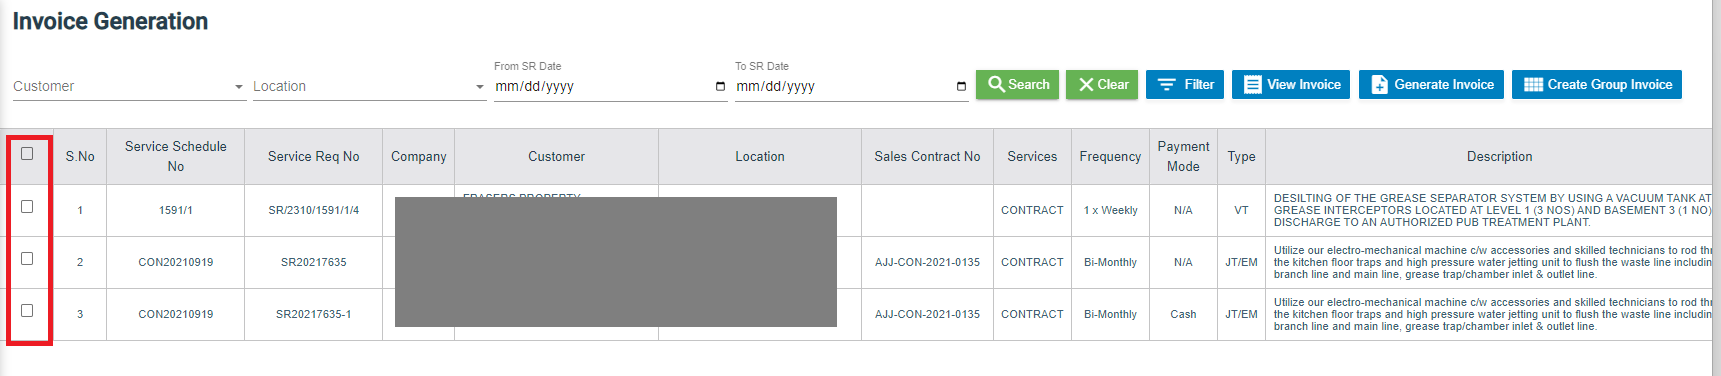](http://wiki.cuteinfocomm.com/uploads/images/gallery/2023-11/image-1701326198639.png)
3. Click [](http://wiki.cuteinfocomm.com/uploads/images/gallery/2023-11/image-1701326038764.png)(**Generate Invoice** button).The **Generate Service Invoice** window opens (**Note**: The fields highlighted with red color are mandatory. You must enter the relevant details in that fields before saving). [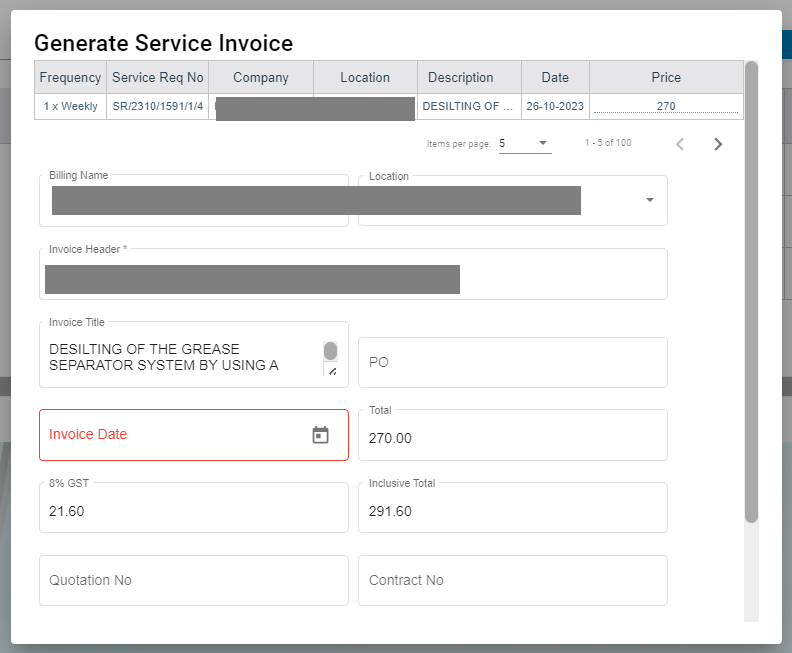](http://wiki.cuteinfocomm.com/uploads/images/gallery/2023-11/image-1701326314428.png)
4. In the **Invoice Title** box, enter the invoice title.
5. In the **PO** box, enter the PO number.
6. In the **Invoice Date** box, select the invoice date.
7. In the **Note** box, enter note if any.
8. In the **Private Note** box, enter private note for internal reference if any.
9. Click **Save**. The generated invoice will be saved and moved to the **Invoice View** page.
#### Manual Invoice
To generate an invoice manually,
1. Click Manual Invoice in the **Service Request** menu**,** the **Manual Invoice** page opens,
2. Select customer type, i.e.. Contract Customer or Adhoc Customer.
3. In the **Customer** box, select customer.
4. In the **Billing Name** box, billing name will auto populate customer name, user can edit billing name if billing name is different from customer name.
5. In the **Location** box, select location.
6. In the **Invoice Header** box, enter invoice header.
7. In the **Invoice Title** box, enter invoice title.
8. In the PO box, enter PO number.
9. In the Invoice Date box, select invoice date.
10. In the Total box, enter invoice total amount.
11. In the 9%GST box, the gst amount will be automatically calculated.
12. In the Inclusive Total box, the inclusive total will be automatically calculated.
13. In the Quotation No box, enter quotation number.
14. In the Contract No box, enter contract number.
15. In the Note box, enter note if any.
16. In the Private Note box, enter any private note for internal reference if any.
17. In the Invoice Details section, click [](http://wiki.cuteinfocomm.com/uploads/images/gallery/2024-01/image-1705515350298.png), then enter invoice details. The total amounts in manual invoice must tally with total of all detailed invoices before user press "save" button, else this validation will always show up and block the data saving. [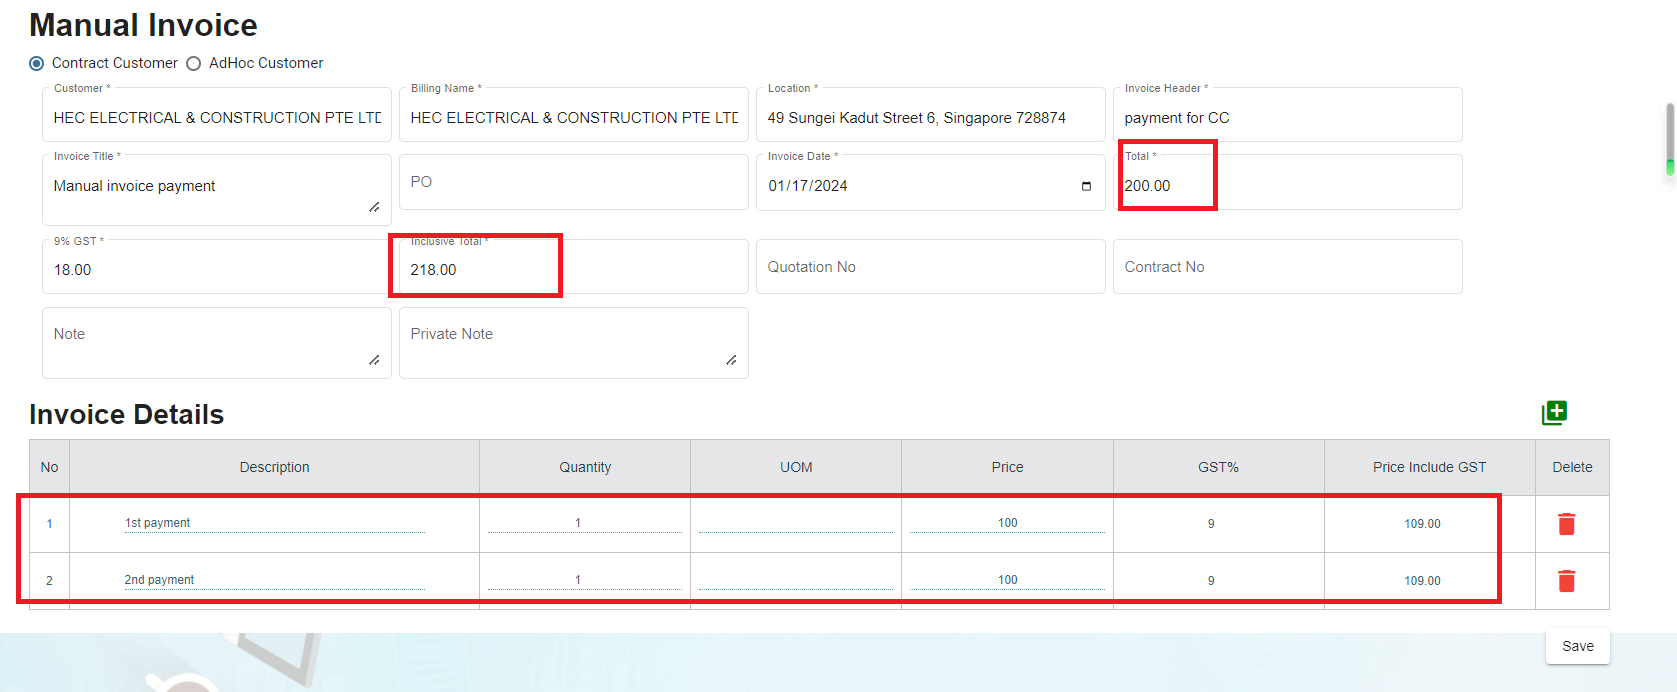](http://wiki.cuteinfocomm.com/uploads/images/gallery/2024-01/image-1705515437719.png)
18. Click Save, the manual invoice will be saved. And the details can be viewed in the Invoice View tab. [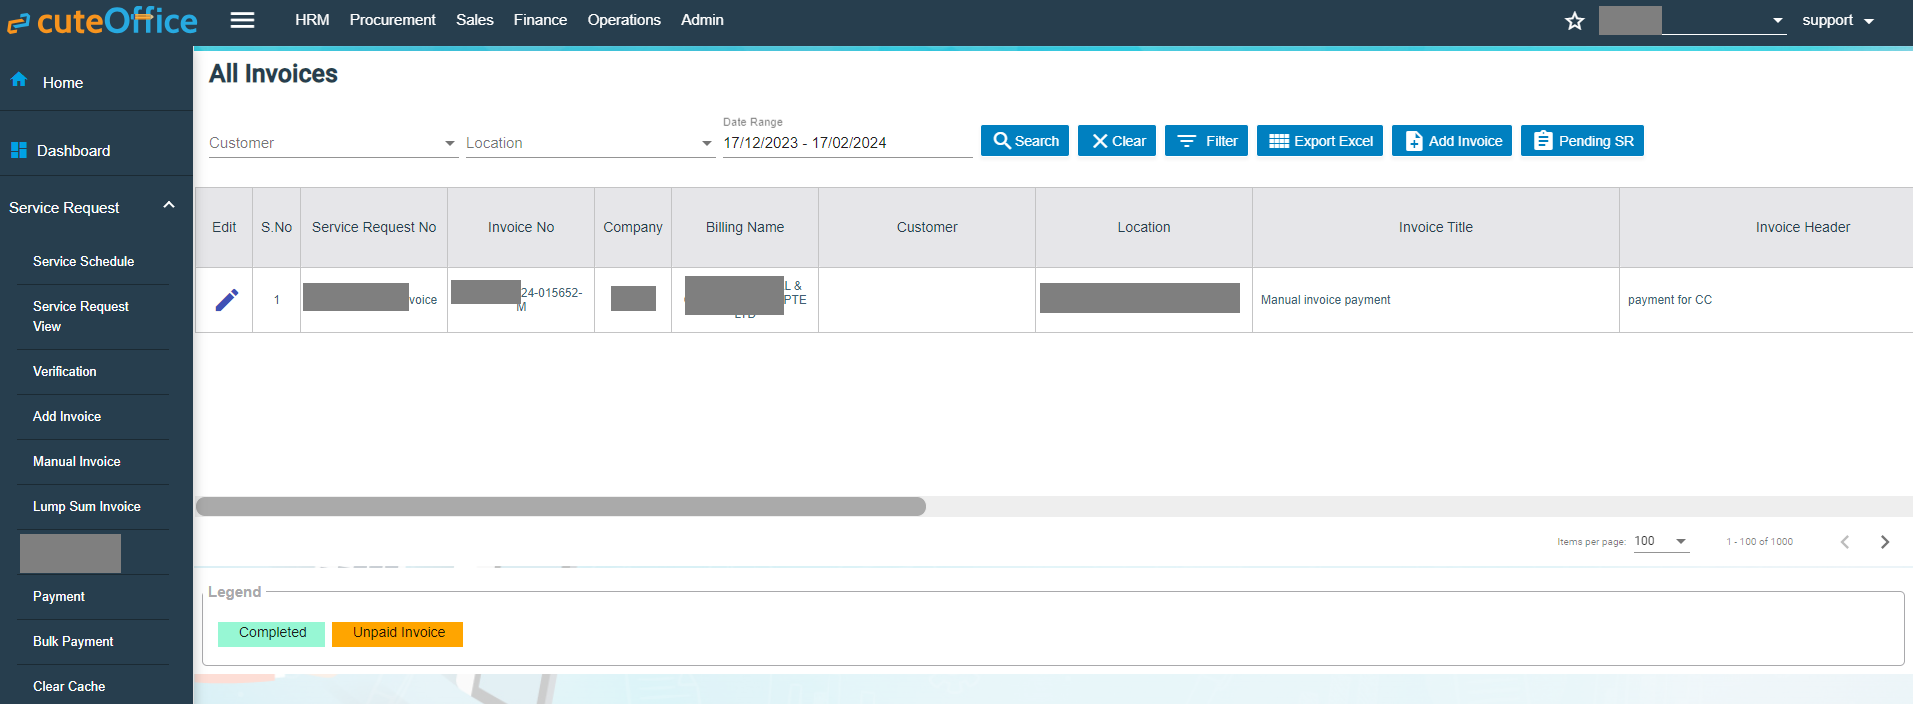](http://wiki.cuteinfocomm.com/uploads/images/gallery/2024-01/image-1705515927628.png)
### Lump Sum Invoice
Lump sum invoice is used to generate lump sum invoices for lump sum sales contract. The business scenario is as below: Once any lump sum sales contract is created from sales enquiry (by enabling lump sum contract option when creating sales contract), user can create service schedule based on the sales contract, and after the service job is completed, user will be able to generate lump sum invoice in the Lump Sum Invoice tab.
To generate lump sum invoice,
1. Click Lump Sum Invoice tab, the lump sum invoice generation page opens as below, [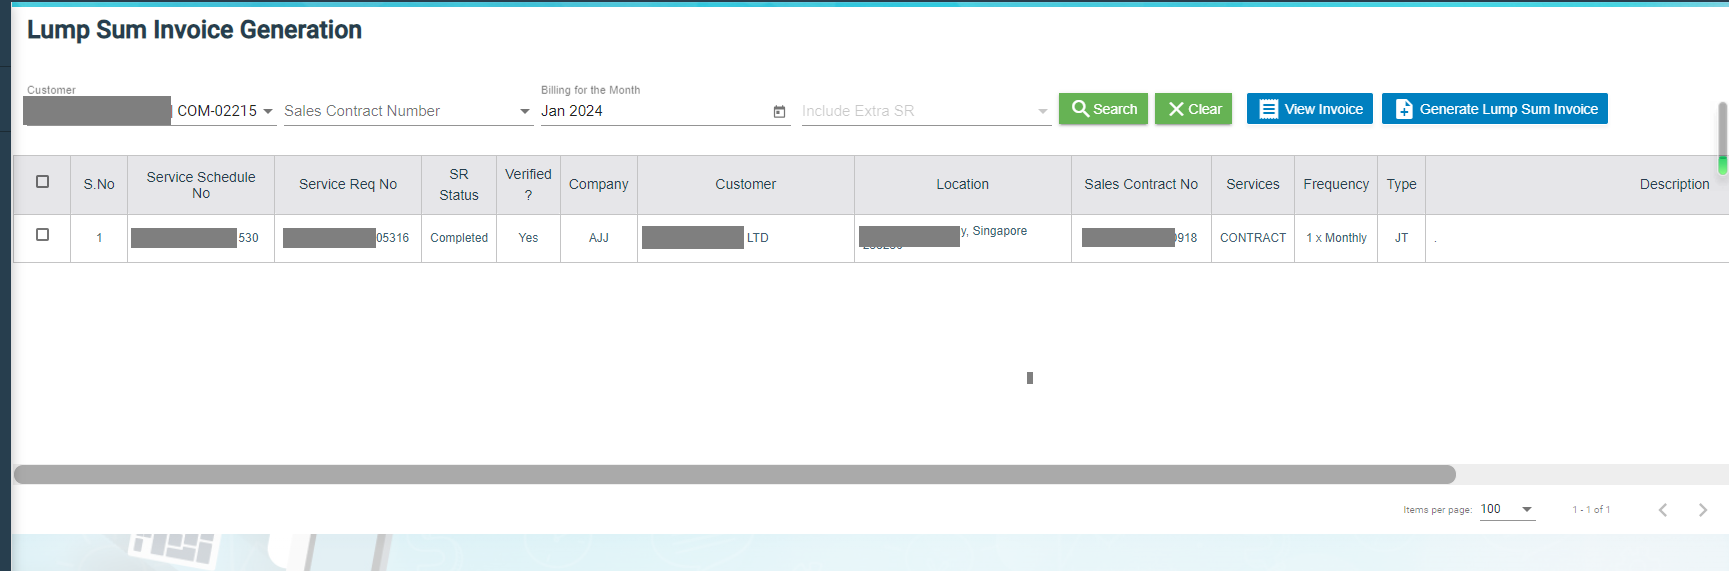](http://wiki.cuteinfocomm.com/uploads/images/gallery/2024-01/image-1705962684607.png)
2. Click to select the service schedule, then click "Generate Lump Sum Invoice" button, [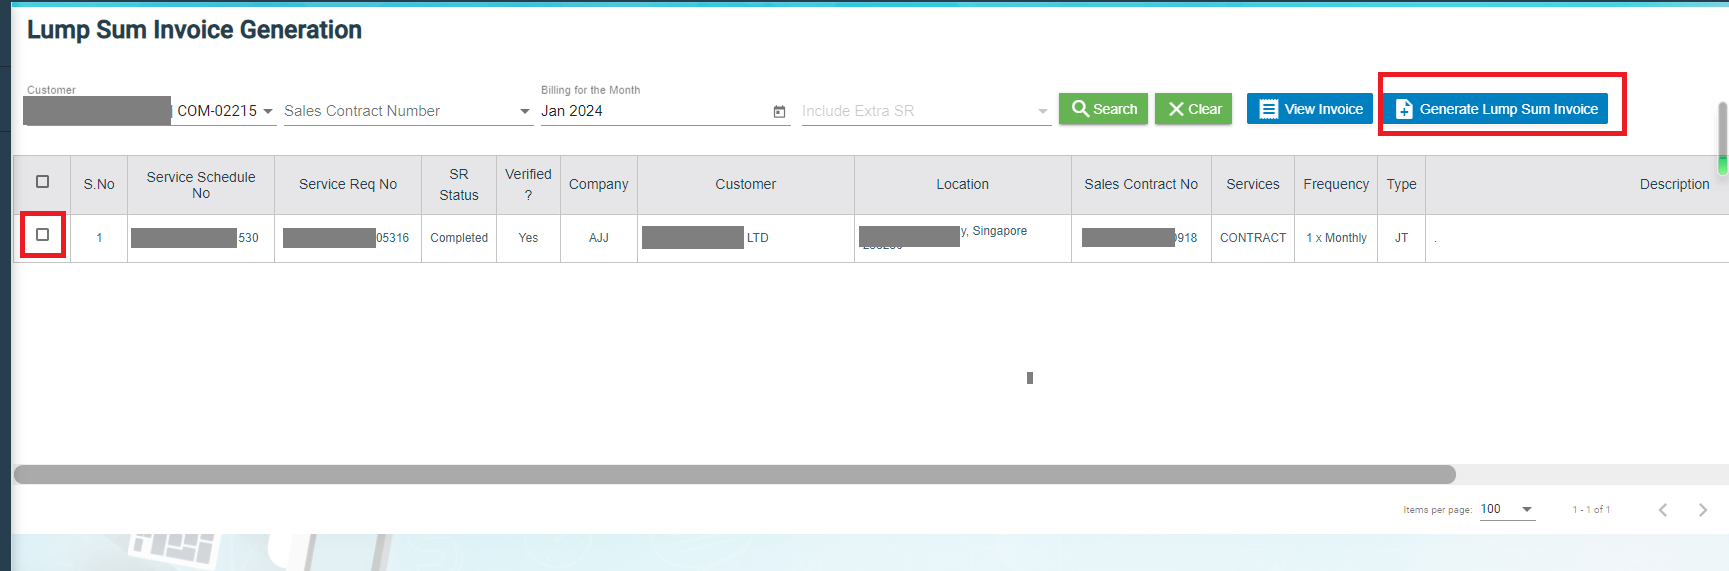](http://wiki.cuteinfocomm.com/uploads/images/gallery/2024-01/image-1705962758456.png)
3. The Invoice Generation for Lump Sum Contract screen opens as below,[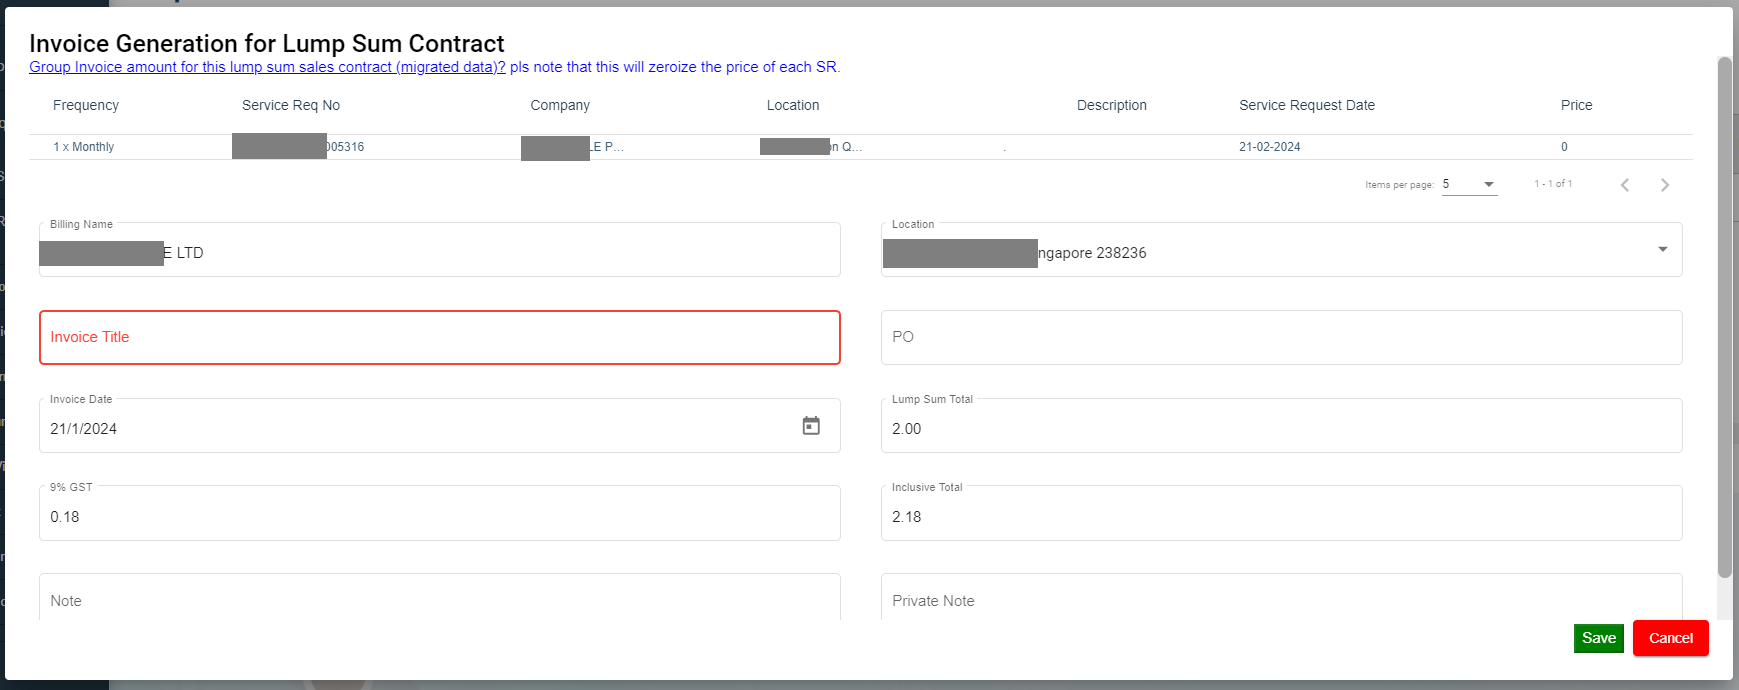](http://wiki.cuteinfocomm.com/uploads/images/gallery/2024-01/image-1705962885144.png)
4. Enter Invoice title and other details.
5. Click Save, the generated lump sum invoice will be saved and user can view it in the Invoice View page. [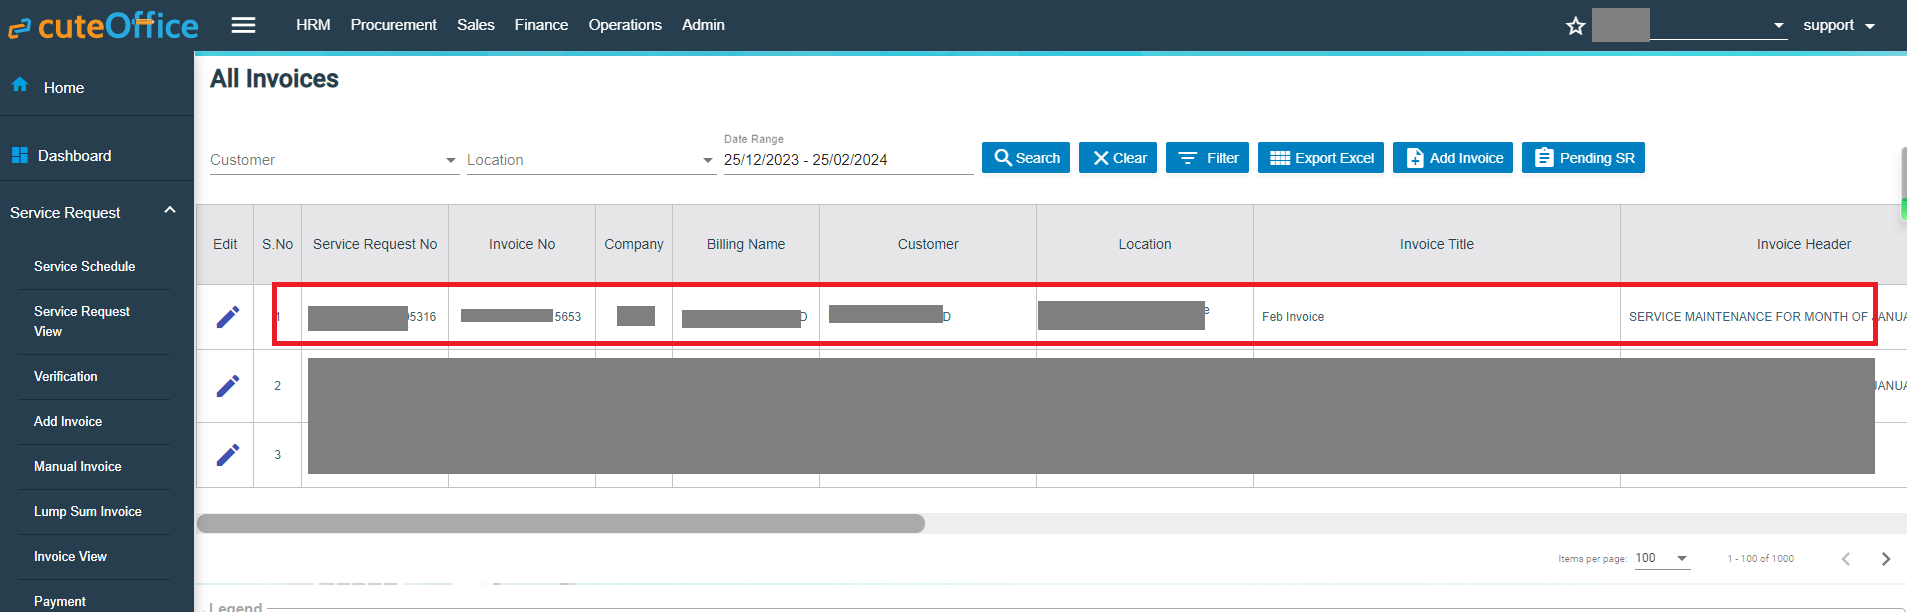](http://wiki.cuteinfocomm.com/uploads/images/gallery/2024-01/image-1706245844148.png)
### Invoice View
The **Invoice View** tab in the **Service Request** submenu manages all the generated invoice details. Click **Invoice View** in the **Service Request.** The **All Invoices** page opens as below,[](http://wiki.cuteinfocomm.com/uploads/images/gallery/2023-11/image-1701326879130.png)
If you want to view any specific invoice among the list of invoices, you can select the respective Customer, Location, Date Range in the field given in the All Invoices page.
The invoices displayed in different color denotes their status, i.e., Completed payment or Unpaid Invoice.
#### Process an Invoice
To process an invoice,
1. 1. Click to select the checkbox provided in the ****Is Invoiced?**** column, [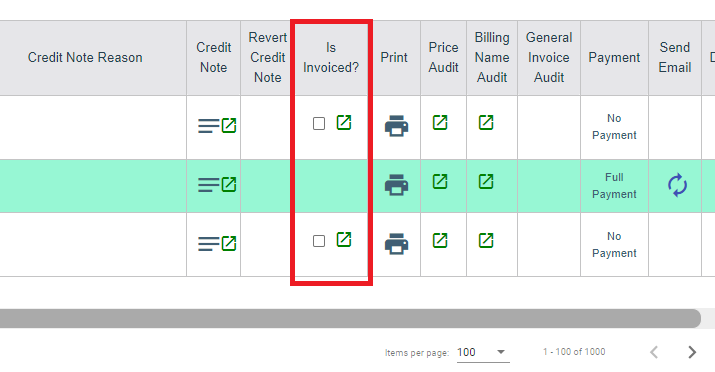](http://wiki.cuteinfocomm.com/uploads/images/gallery/2023-12/image-1701756225911.png)
2. The **Confirm** dialog box open and shows the following message. [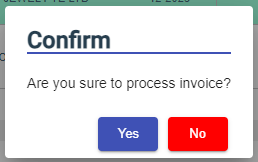](http://wiki.cuteinfocomm.com/uploads/images/gallery/2023-12/image-1701756737942.png)
3. Click **Yes**. The invoice record will be changed to green color and as Completed.
#### Set Printing options for Invoices
To set the printing options of the invoices,
1. Click [](http://wiki.cuteinfocomm.com/uploads/images/gallery/2023-12/image-1701756866782.png)(Print Option icon) provided in the **Print Option** column**,** the **Invoice PDF options** window opens [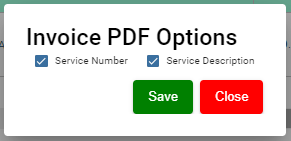](http://wiki.cuteinfocomm.com/uploads/images/gallery/2023-12/image-1701756915418.png)
2. Select the checkbox of the **Service Number** and **Service Description** options based on user's request.
3. Click **Save**.
#### Print an Invoice
To print an invoice,
1. Click the respective  (Print icon) in the **Print** column.
2. The invoice will be downloaded as a pdf file. [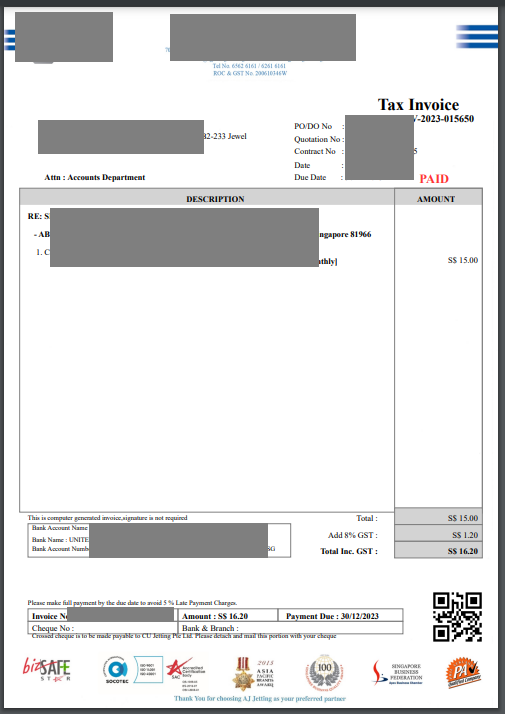](http://wiki.cuteinfocomm.com/uploads/images/gallery/2023-12/image-1701757613930.png)
#### Delete an Invoice
You can delete the invoice by using  (Delete icon) provided in the **Delete** column of the **All Invoices** page.
#### Filter an Invoice
If you want to filter an invoice in the **All Invoices** page, you can use the [ ](http://wiki.cuteinfocomm.com/uploads/images/gallery/2023-12/image-1701757753997.png)filter option provided in the **All Invoices** page.
#### Export an Invoice List
If you want to export all the invoices in the **All Invoices** page in an excel format, you can use the [](http://wiki.cuteinfocomm.com/uploads/images/gallery/2023-12/image-1701757713901.png)export option provided in the **All Invoices** page.
### Payment
The **Payment** tab in the **Service Request** submenu allows user to add the service payment details against the related invoice. Users who are assigned with srm\_admin role will have access to view this Service Payment page. Click **Payment** in the **Service Request,** the **Service Payment** page opens, user can configure the number of invoices per page displaying by selecting 50, 100, 250, 500, or 1000 at the bottom of page.
[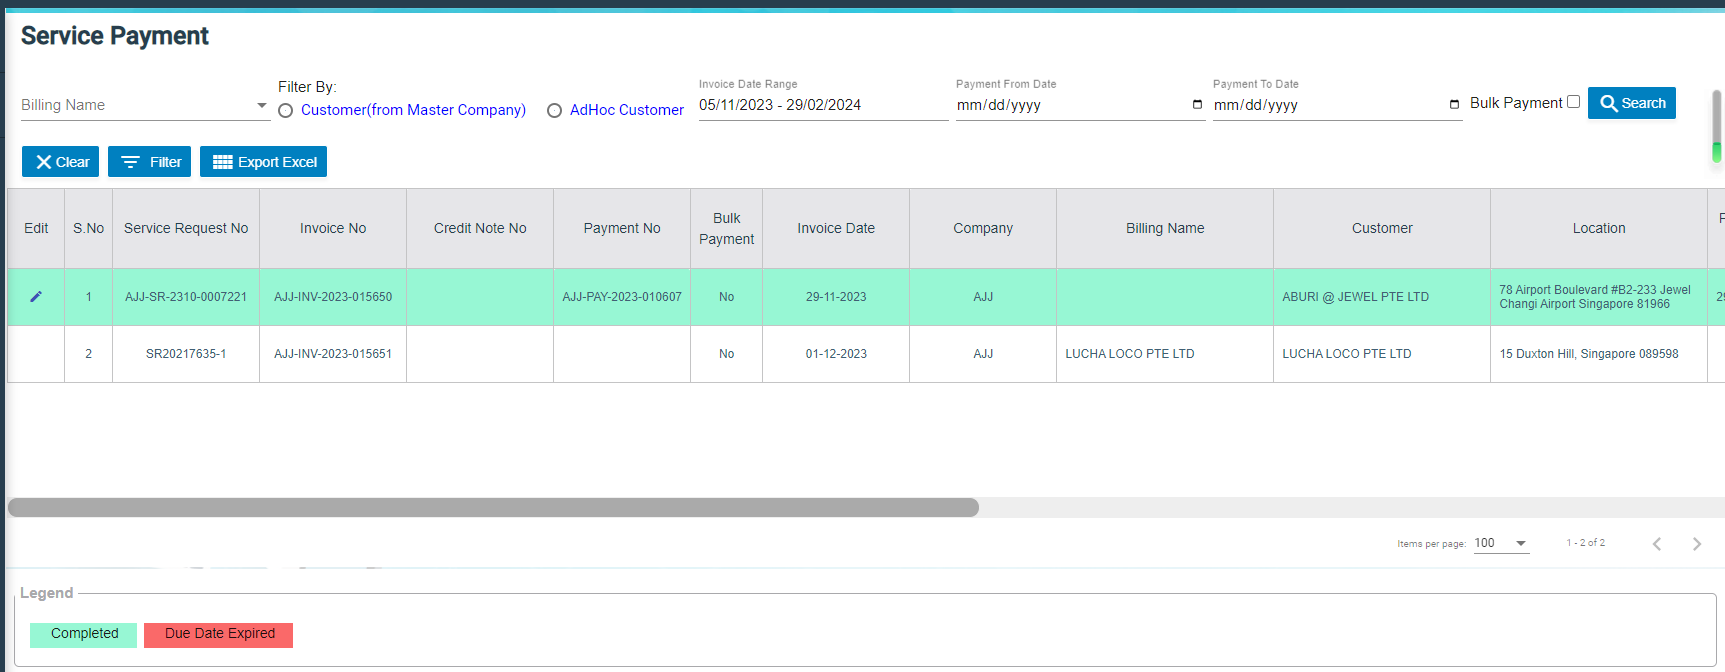](http://wiki.cuteinfocomm.com/uploads/images/gallery/2024-01/image-1706683344310.png)
- User can use filter options to view any specific invoice among the list of invoices, filter options including Billing Name, Customer, Location, Date Range in the field given in the **Service Payment** page.
- The invoices displayed in different color explains their status as described in legend.
#### Add Payment Details
To add the payment details,
1. Click (Payment icon) in the Payment column, The **Service Payment** window opens. [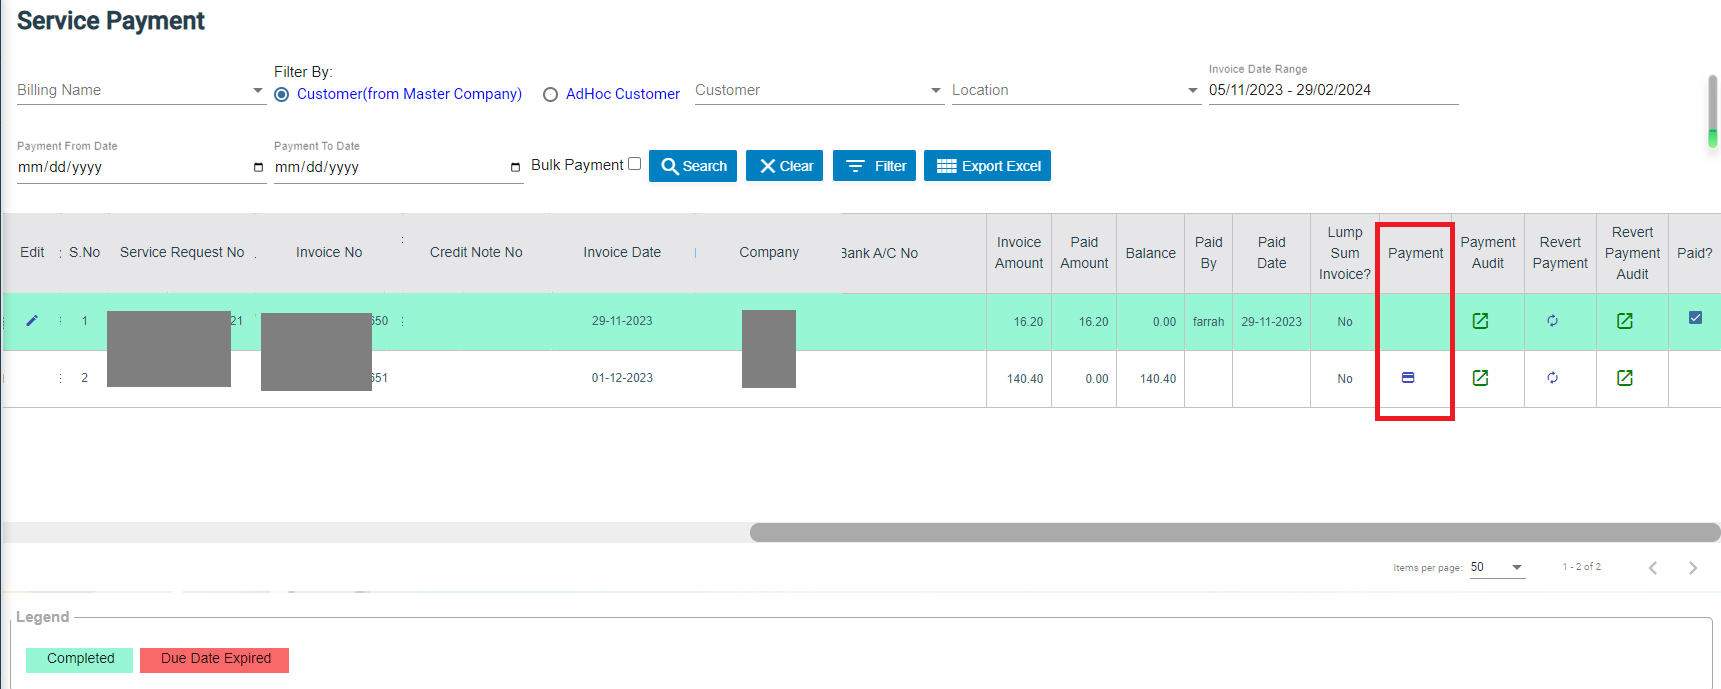](http://wiki.cuteinfocomm.com/uploads/images/gallery/2024-01/image-1706683993730.png)
2. The fields highlighted with red color in payment detail page are mandatory. You must enter the relevant details in that fields before saving. [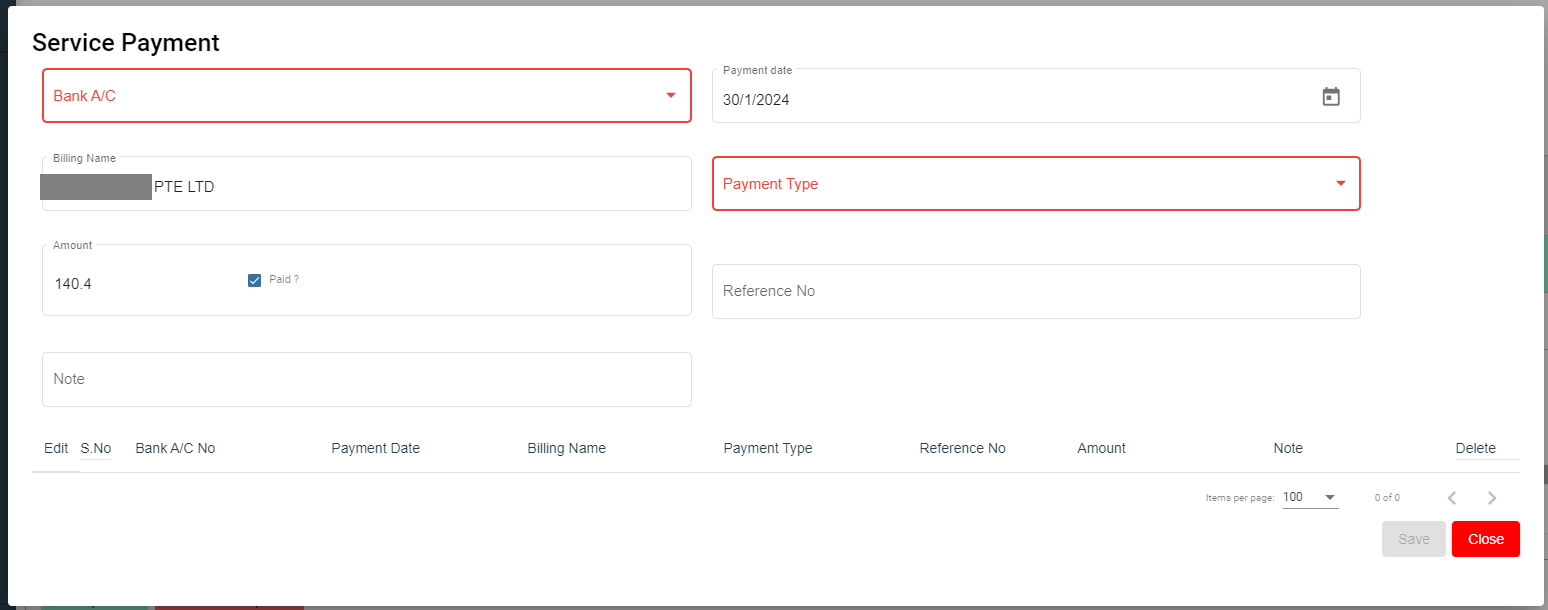](http://wiki.cuteinfocomm.com/uploads/images/gallery/2024-01/image-1706684120433.png)
3. In the **Bank A/C** box, select a bank account from a drop-down list.
4. In the **Payment Date** box, select the payment date.
5. In the **Billing Name** box, enter billing name (if billing name is same as company name, company name will auto fill as billing name).
6. In the **Payment Type** box, select a payment type.
7. In the **Amount** box, enter the amount if it's different from invoice amount. The **Paid?** box will be
8. In the **Reference No** box, enter reference number.
9. In the **Note** box, enter your note if any.
10. Click **Save**. The invoice record will be changed to Green color and as completed.
#### Filter an Invoice
If you want to filter an invoice in the **Service Payment** list, you can use the filter option provided in the **Service Payment** page such as SR number, invoice number etc..
[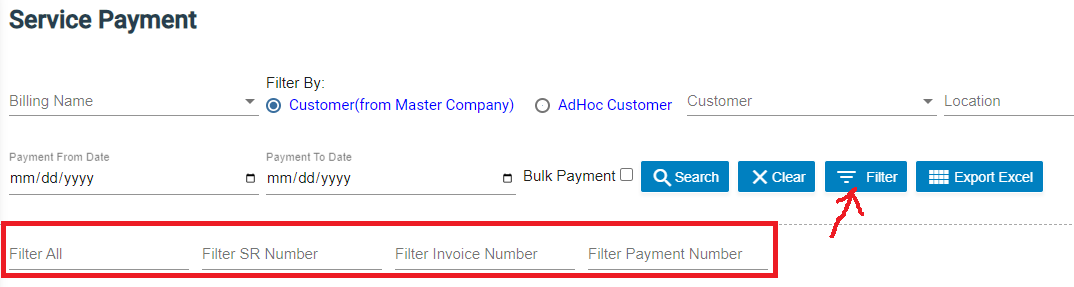](http://wiki.cuteinfocomm.com/uploads/images/gallery/2024-01/image-1706685109822.png)
#### Export an Payment List
If you want to export all the invoices in the **Service Payment** page in an excel format, you can use the export option [](http://wiki.cuteinfocomm.com/uploads/images/gallery/2024-01/image-1706685195077.png)provided in the **Service Payment** page.
### Bulk Payment
The **Bulk Payment** tab in the **Service Request** submenu allows user to enter multiple invoice payments that belongs to a same billing name in bulk. Click Bulk Payment tab, the bulk payment for service payment page opens as below,
[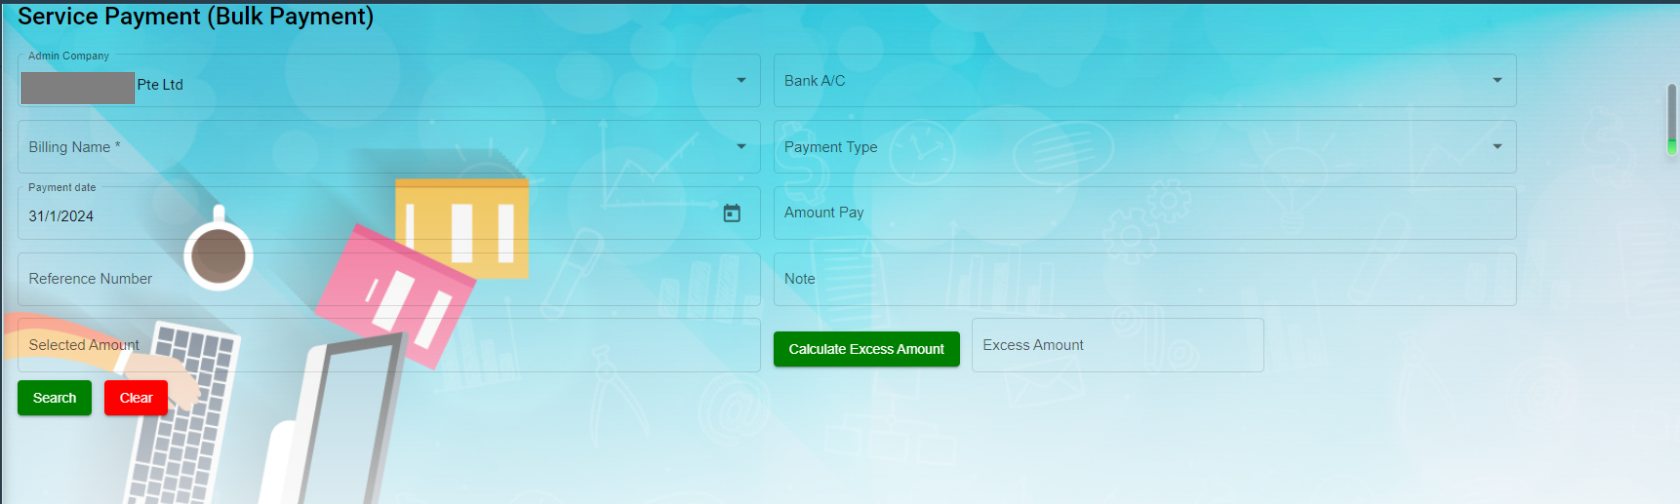](http://wiki.cuteinfocomm.com/uploads/images/gallery/2024-02/image-1706769997474.png)
To do bulk payment,
1. In Admin-Company box, select Admin company from a list of admin companies which the payment shall be paid to.
2. In Bank A/C box, select bank account name to receive payments,
3. In Billing Name box, select invoice billing name.
4. In Payment Type box, select payment type from list such as cash, online transfer, paynow etc..
5. In Payment Date box, click to select payment date.
6. In Amount Pay box, enter amount paid.
7. In Reference Number box, enter reference number if any.
8. Click [](http://wiki.cuteinfocomm.com/uploads/images/gallery/2024-02/image-1706770025125.png)Search button, a list of unpaid invoice belong to selected billing name will display in the screen, and **Bulk Pay** button will be enabled. [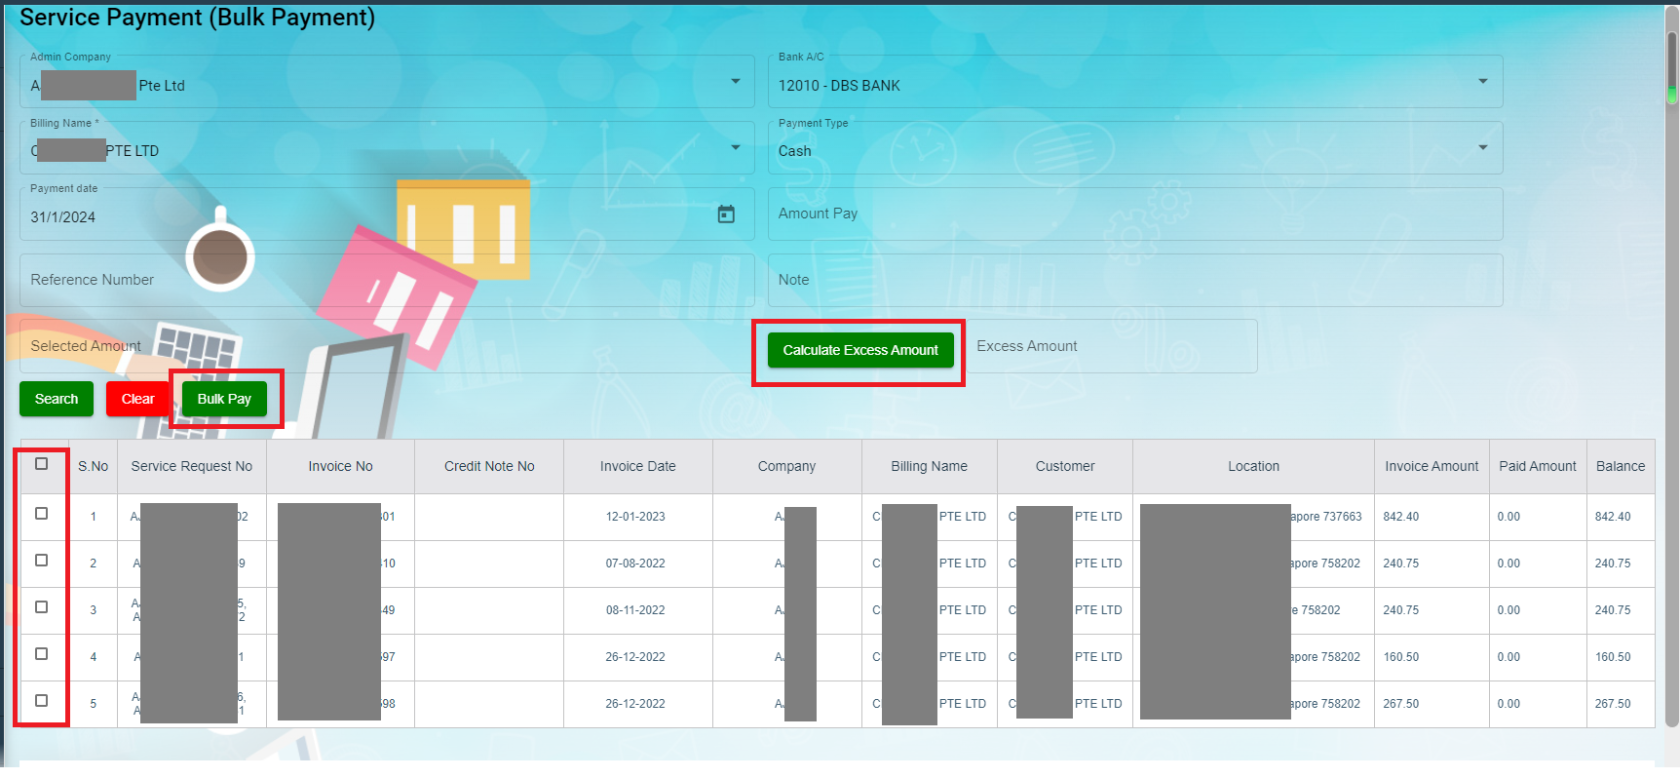](http://wiki.cuteinfocomm.com/uploads/images/gallery/2024-02/image-1706770333086.png)
9. Click to select invoices from the list of unpaid invoices in the screen, and the selected invoice amount will be calculated and displayed in **Selected Amount** box.
10. If Selected amount box differs from Amount pay box, user can click Calculate Excess Amount button, and system will show payment confirmation notification as below, [](http://wiki.cuteinfocomm.com/uploads/images/gallery/2024-02/image-1706770892673.png)
11. Click Yes to confirm bulk payment, upon successful creation, a bulk payment number will be displayed in the payment No box in the search area as below. [](http://wiki.cuteinfocomm.com/uploads/images/gallery/2024-02/image-1706771556584.png)
12. And the bulk payment details will be saved in the Payment tab. User can search by bulk payment number in payment page, [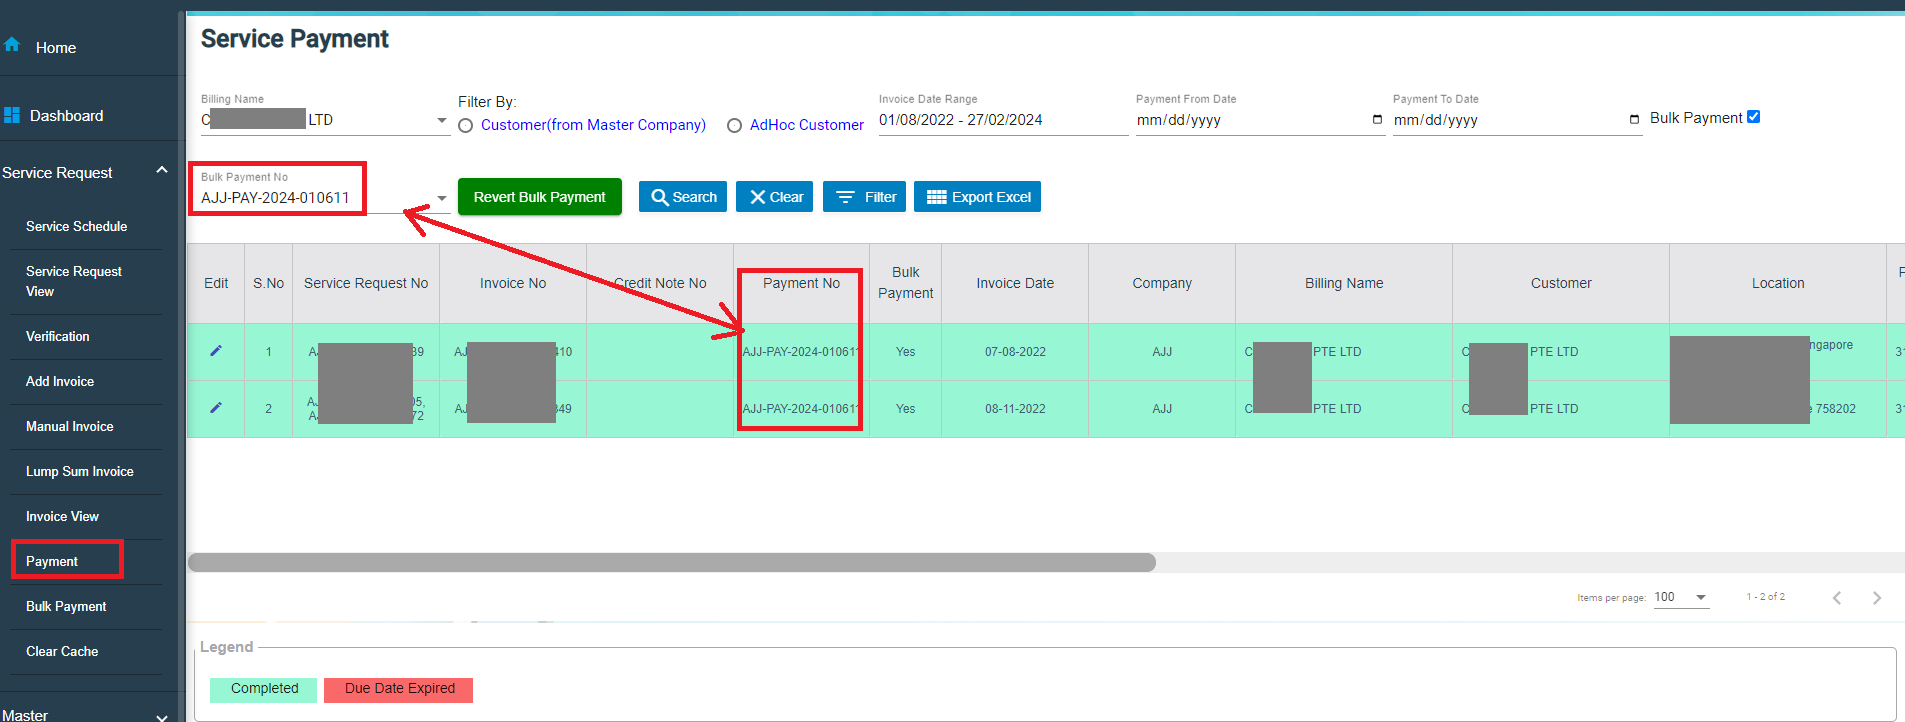](http://wiki.cuteinfocomm.com/uploads/images/gallery/2024-02/image-1706772031026.png)
Note: User with permissions will be able to revert bulk payment if needed. After clicking search button, authorized user can click Revert Bulk Payment button, and a confirmation notification will show as below. Click Yes to confirm reverting bulk payment for selected bulk payment number. And the associated invoices will be reverted to unpaid status. [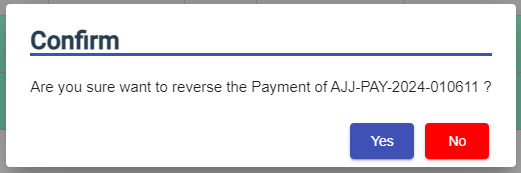](http://wiki.cuteinfocomm.com/uploads/images/gallery/2024-02/image-1706772129481.png)
### Clear Cache
Clear cache tab is used to clear search caches in Service Request and Service Schedule menu screens. Click Clear Cache, the clear cache page opens as below, click Proceed to confirm clearing cache.
[](http://wiki.cuteinfocomm.com/uploads/images/gallery/2024-02/image-1706772544252.png)
## Report
The Report submenu in the SRM page helps user view the various reports related with the service request management.
The Report submenu contains the following tabs,
- Invoice Pending
- Statement Of Accounts
- Request For PUB
- Invoice Ageing Report
- SR Sales Report By Jetting/Vacuum
- Payment History
- Verification Pending
- Cash Received
### Invoice Pending
The **Invoice Pending** tab in the **Report** submenu helps you to view the pending invoice details. Click **Invoice Pending** in the **Report** submenu. The **Invoice Pending** page opens and shows the list of invoices which are pending (number of items display per page can be configured by select number in the item per page box that located at the bottom of page).
[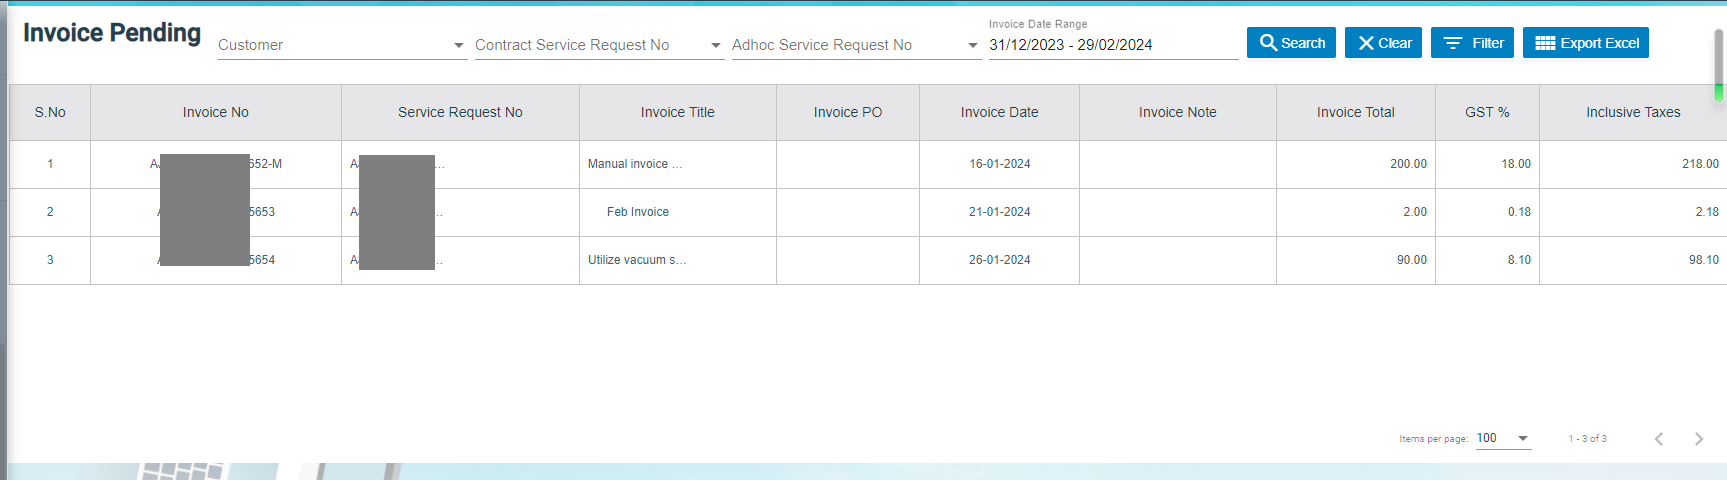](http://wiki.cuteinfocomm.com/uploads/images/gallery/2024-02/image-1706773059212.png)
If user want to view any specific pending invoice among the list of pending invoices, you can select the respective Date Range in **or click Filter** option provided in the Invoice Pending page.
#### Export a Pending Invoice List
If you want to export all the invoices in the **Invoice Pending** page in an excel format, you can use the [](http://wiki.cuteinfocomm.com/uploads/images/gallery/2024-01/image-1706685195077.png)export option provided in the **Invoice Pending** page.
### Statement Of Accounts
Statement of accounts reports help user view all transactions with a particular customer. Click Statement of Accounts, the statement of accounts report page opens, user can select SR customer name or billing name, and As of Date, and then click Search, the report will show as below (number of items display per page can be configured by select number in the item per page box that located at the bottom of page),
[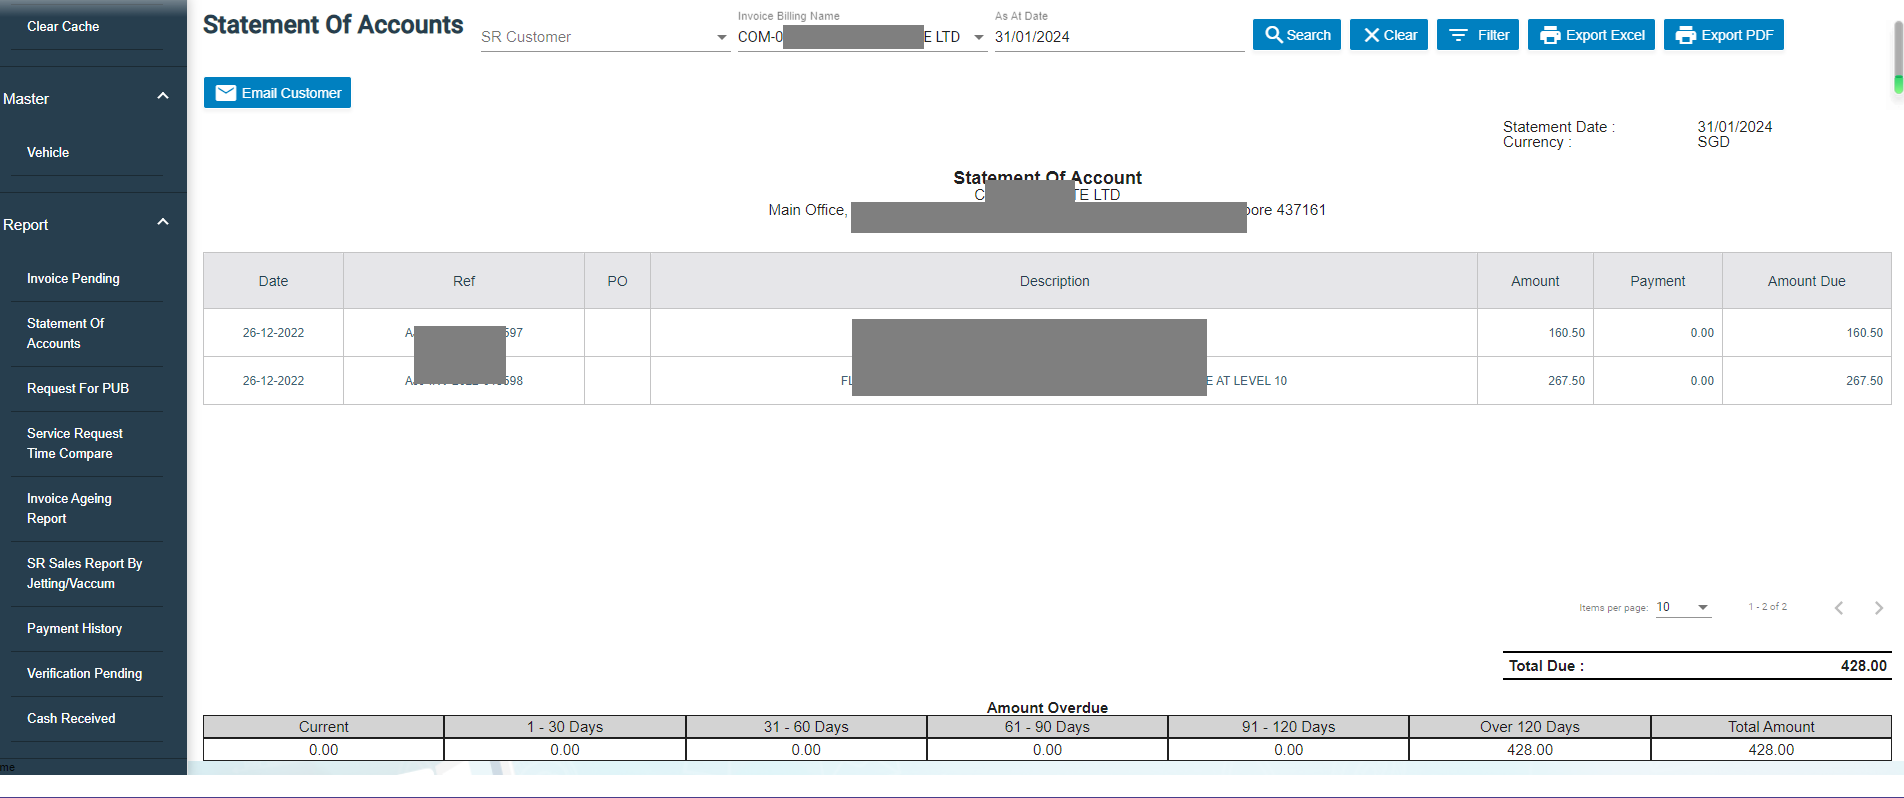](http://wiki.cuteinfocomm.com/uploads/images/gallery/2024-02/image-1706773724609.png)
#### Export a Statement of Accounts
If you want to export statement of accounts, you can use the[](http://wiki.cuteinfocomm.com/uploads/images/gallery/2024-02/image-1707200431612.png) to export report in excel format, or use [](http://wiki.cuteinfocomm.com/uploads/images/gallery/2024-02/image-1707200410941.png) to export report in PDF format.
#### Email a Statement of Account to Customer
If you want to email a statement of account to customer,
1. Click [](http://wiki.cuteinfocomm.com/uploads/images/gallery/2024-02/image-1707200683660.png) email customer button at the top left corner, a confirmation notification will pop up as below, [](http://wiki.cuteinfocomm.com/uploads/images/gallery/2024-02/image-1707201376973.png)
2. Click **Yes**, system emailing window will open as below, user can configure email template, once email template is created, relevant information will be automatically populated. [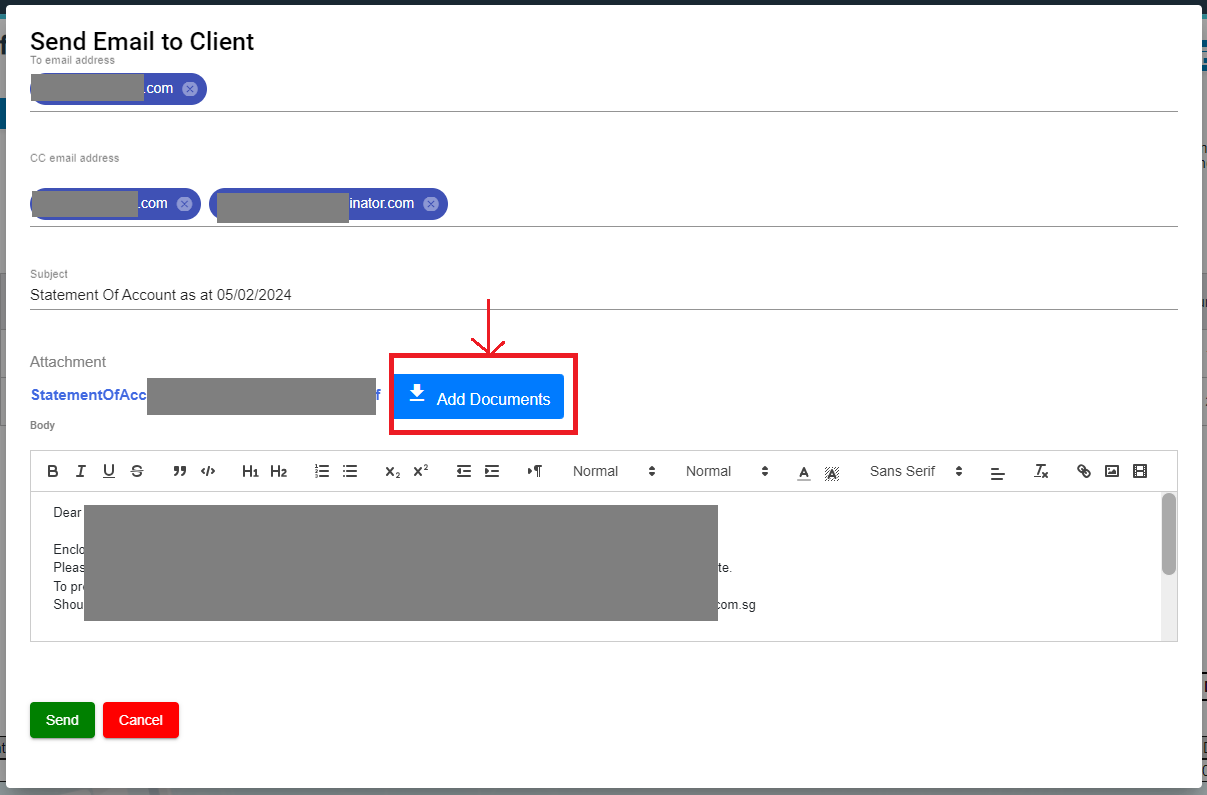](http://wiki.cuteinfocomm.com/uploads/images/gallery/2024-02/image-1707200995550.png)
3. Review information in above, and if needed, user can attach file using **Add Documents** option.
4. Click **Send**. System will send email to customer.
### Request For PUB
Request for PUB report allows user to view all service request details for PUB in selected period of time.
1. Click Request For PUB tab, the service request for pub report page opens as below, [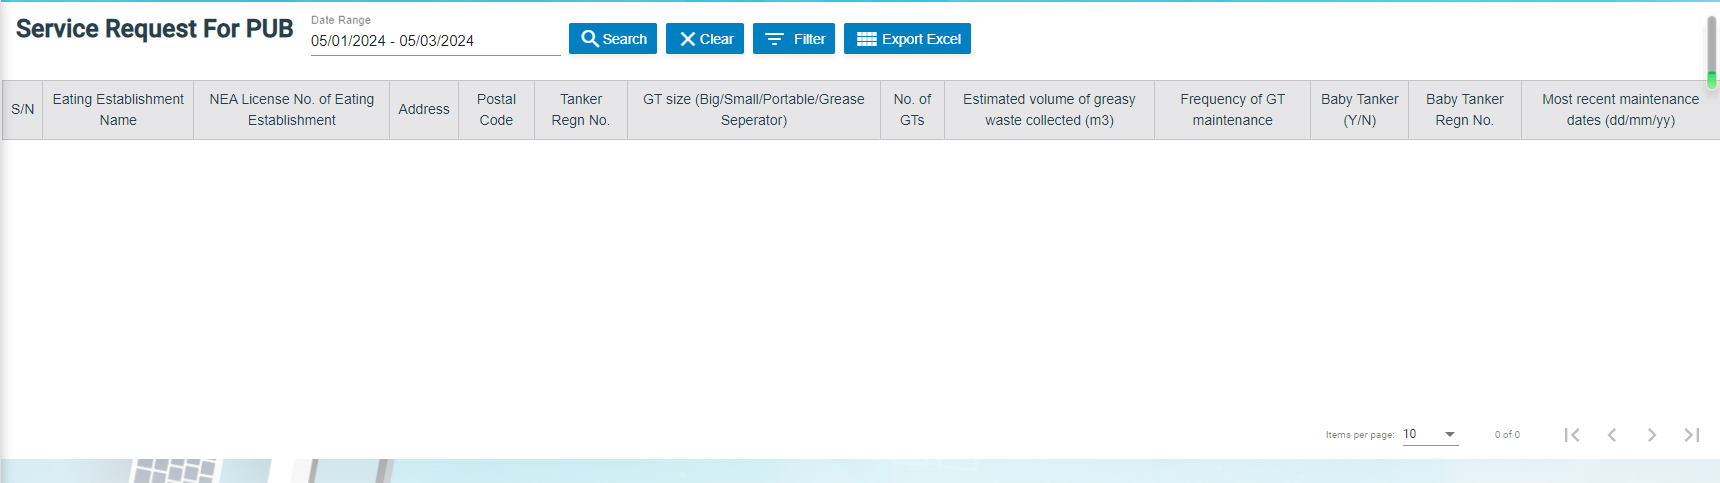](http://wiki.cuteinfocomm.com/uploads/images/gallery/2024-02/image-1707203398696.png)
2. Select a date range and then click **Search**, request for PUB report opens as below (number of items display per page can be configured by select number in the item per page box that located at the bottom of page),[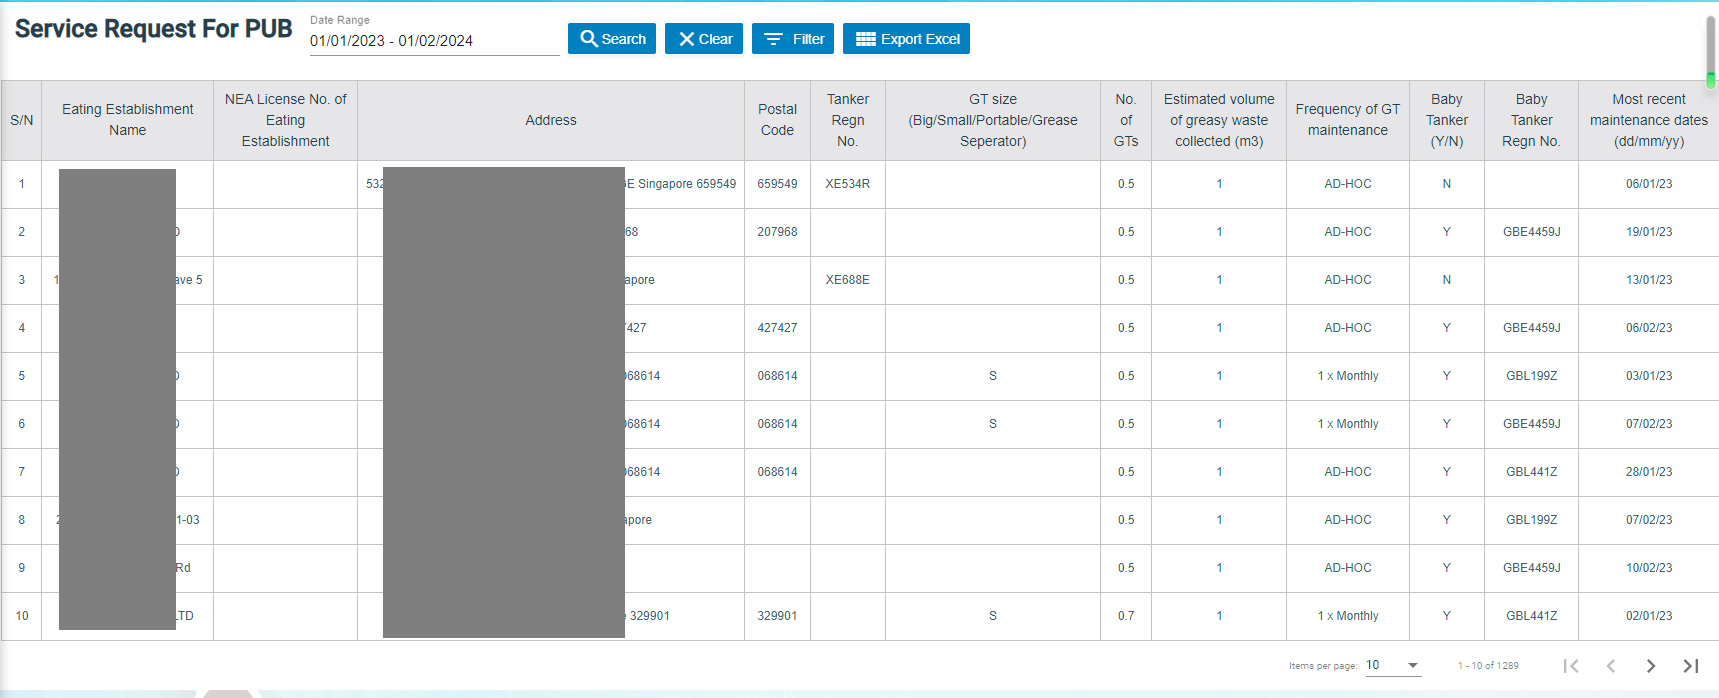](http://wiki.cuteinfocomm.com/uploads/images/gallery/2024-02/image-1707201941498.png)
#### Export Request for PUB report
If you want to export all the service request for PUB report in an excel format, you can use the [](http://wiki.cuteinfocomm.com/uploads/images/gallery/2024-01/image-1706685195077.png)export option provided in the Request for PUB page.
### Invoice Aging Report
Invoice ageing report helps user analyze the cash flow of all unpaid invoices. This report provides information about invoice payments due within time periods user specified in the Aging Periods window.
1. Click **Invoice Ageing Report** tab, the invoice ageing report page opens as below,[](http://wiki.cuteinfocomm.com/uploads/images/gallery/2024-02/image-1707202808986.png)
2. In As Of Date box, click to select as of date.
3. Click Search, all ageing invoices that meet search criteria will display as below, [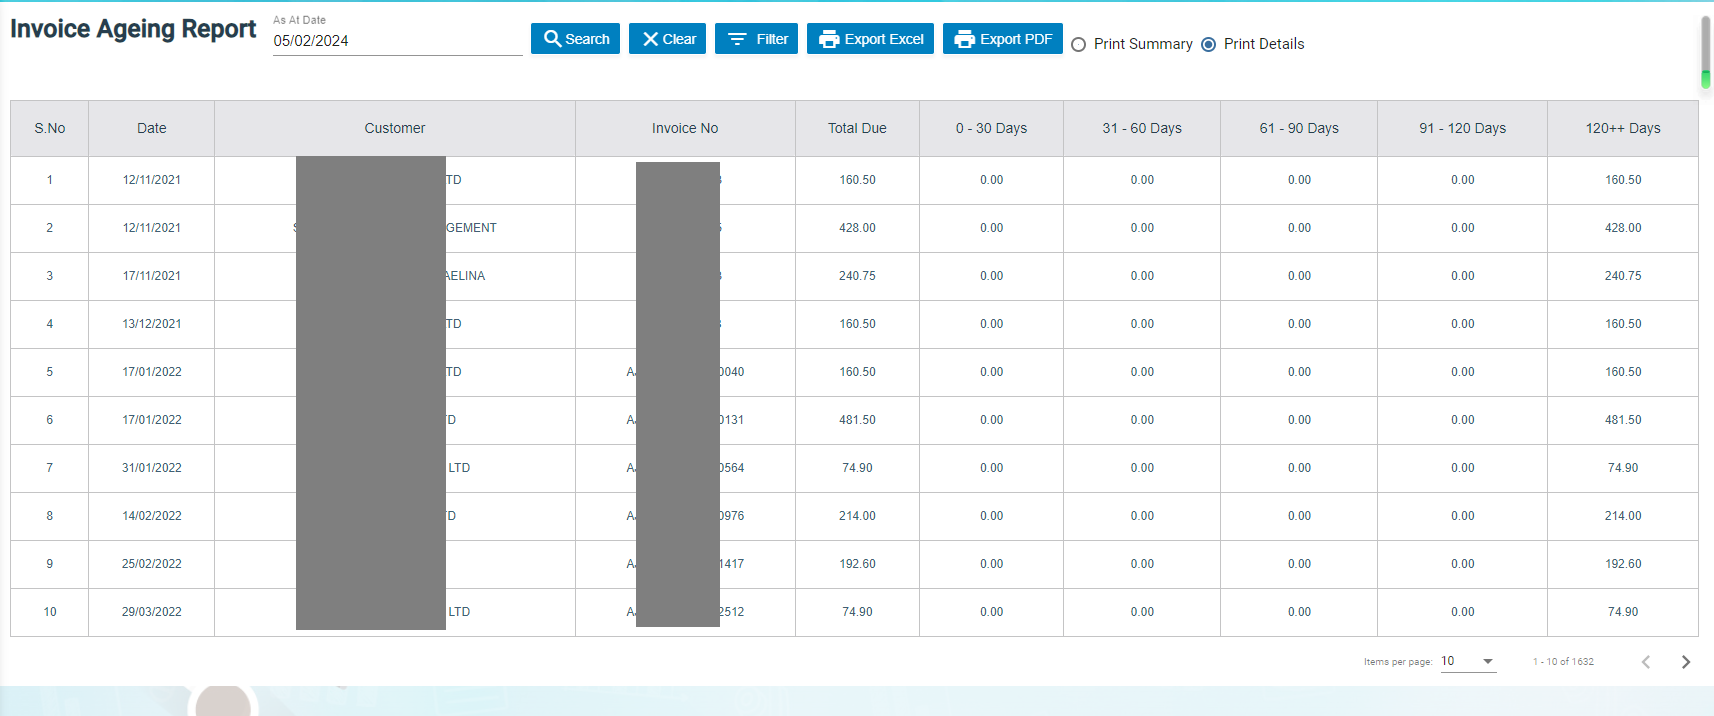](http://wiki.cuteinfocomm.com/uploads/images/gallery/2024-02/image-1707203709076.png)
#### Export Invoice Ageing Report
User can export report in two types (summary report or detail report) by choosing Print Summary or Print Details. Report format can be configured based on user requirement.
[](http://wiki.cuteinfocomm.com/uploads/images/gallery/2024-02/image-1707203825798.png)
1. Select report type to be exported, i.e. Print Summary or Print Details.
2. If user want to export statement of accounts, click the[](http://wiki.cuteinfocomm.com/uploads/images/gallery/2024-02/image-1707200431612.png) to export report in excel format, or click [](http://wiki.cuteinfocomm.com/uploads/images/gallery/2024-02/image-1707200410941.png) to export report in PDF format.
### SR Sales Report By Jetting/Vacuum
SR sales report by jetting/vacuum provides detail information by jetting/vacuum during selected period of time.
1. Click **SR Sales Report By Jetting/Vacuum** tab, the report page opens as below, [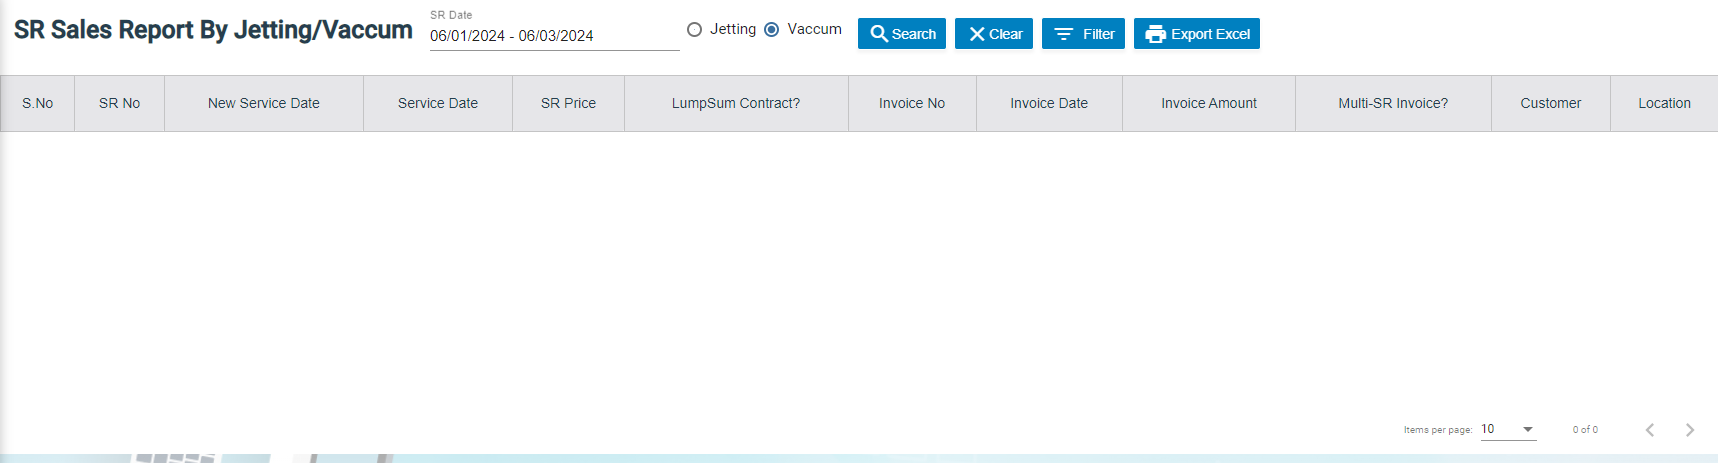](http://wiki.cuteinfocomm.com/uploads/images/gallery/2024-02/image-1707289374685.png)
2. In SR date box, click to select a date range.
3. As for service type, click to choose Jetting or Vacuum.
4. Click Search, SR sales details that meet search criteria will display as below (number of items display per page can be configured by select number in the item per page box that located at the bottom of page), [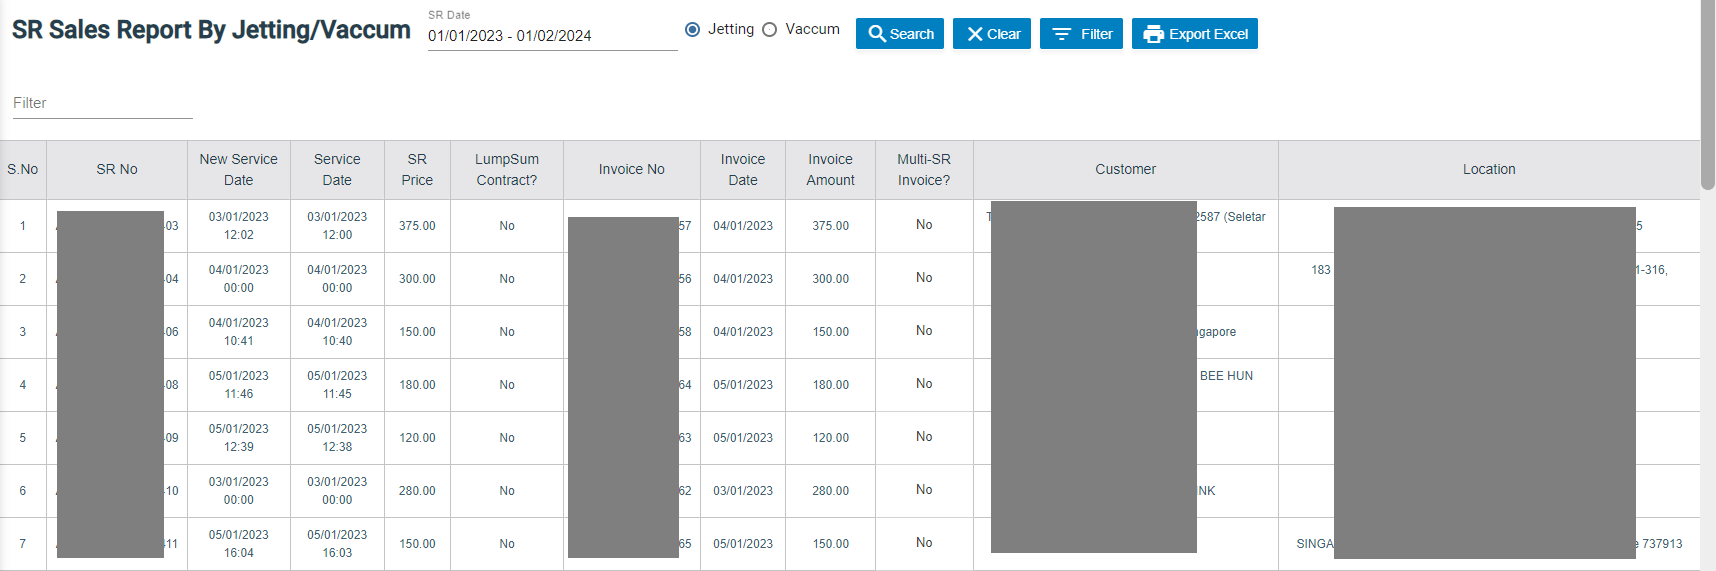](http://wiki.cuteinfocomm.com/uploads/images/gallery/2024-02/image-1707290306942.png)
#### Export SR sales report by jetting/vacuum
If you want to export the SR sales report in an excel format, you can use the [](http://wiki.cuteinfocomm.com/uploads/images/gallery/2024-01/image-1706685195077.png)export option provided in the report page.
### Payment History Report
Payment history report provides detail information of payment history in specific payment period by billing name or bank account.
1. Click **Payment History** tab, the report page opens as below,[](http://wiki.cuteinfocomm.com/uploads/images/gallery/2024-02/image-1707290471846.png)
2. In List By box, click to select by Billing Name or Bank Account.
3. Select the billing name or bank account to view payment history.
4. In Payment From Date & Payment To Date boxes, click to select dates.
5. Click Search, payment history that meet search criteria will display as below (number of items display per page can be configured by select number in the item per page box that located at the bottom of page), [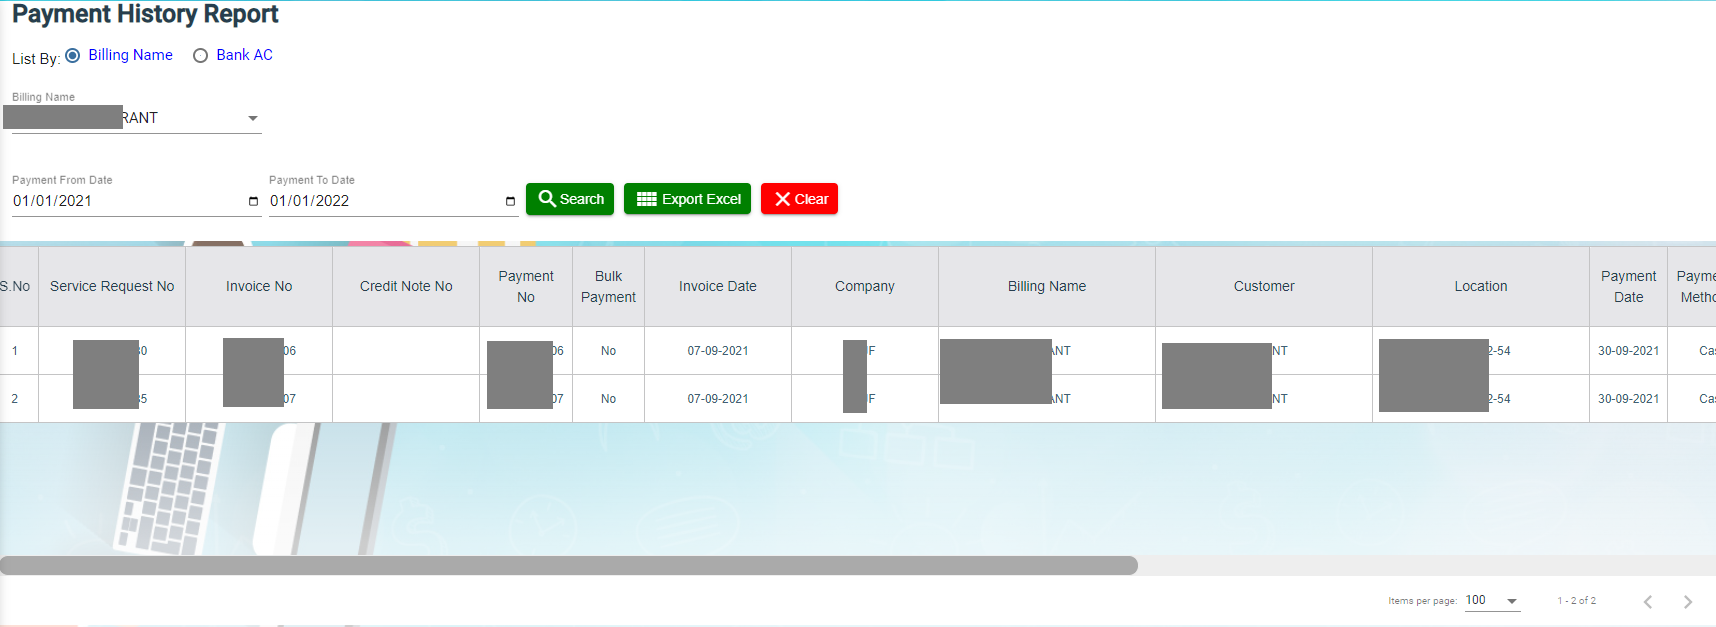](http://wiki.cuteinfocomm.com/uploads/images/gallery/2024-02/image-1707291704926.png)
#### Export Payment History
If you want to export the payment history report in an excel format, you can use the [](http://wiki.cuteinfocomm.com/uploads/images/gallery/2024-01/image-1706685195077.png)export option provided in the report page.
### Verification Pending Report
Verification pending report allows user to view all service requests that need to be verified by month wise.
1. Click **Verification Pending** tab, the report page opens as below, [](http://wiki.cuteinfocomm.com/uploads/images/gallery/2024-02/image-1707374884903.png)
2. In Select Month box, click to select month/year.
3. Click Search, service requests that is pending for verification as per selected month will display as below (number of items display per page can be configured by select number in the item per page box that located at the bottom of page), [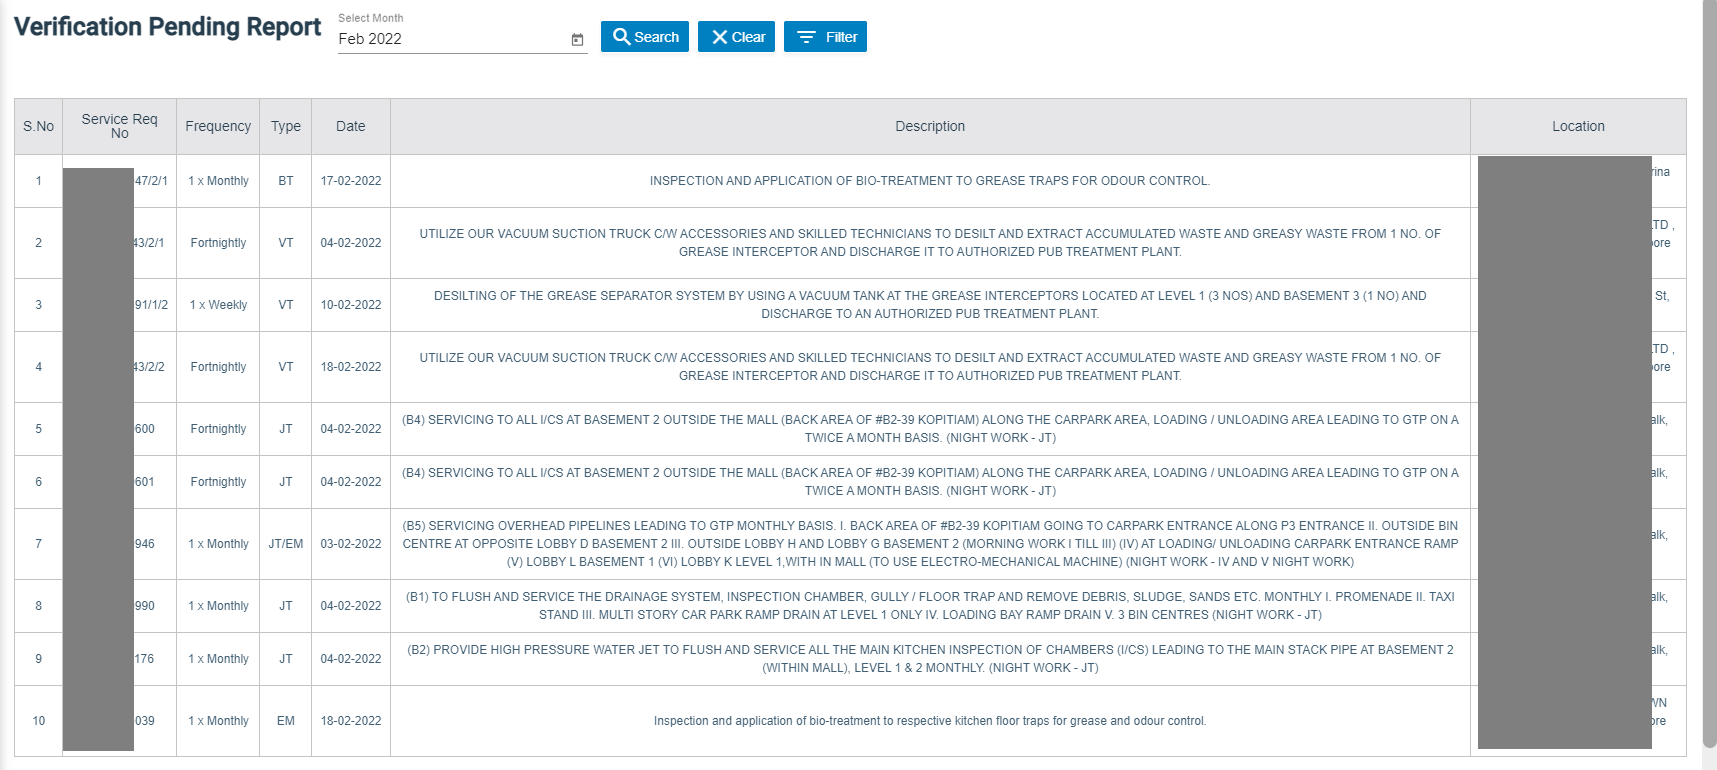](http://wiki.cuteinfocomm.com/uploads/images/gallery/2024-02/image-1707375647430.png)
### Cash Received Report
Cash received report provides information about cash payment received in specific date range and by technician wise.
1. Click **Cash Received** tab, the report page opens as below, [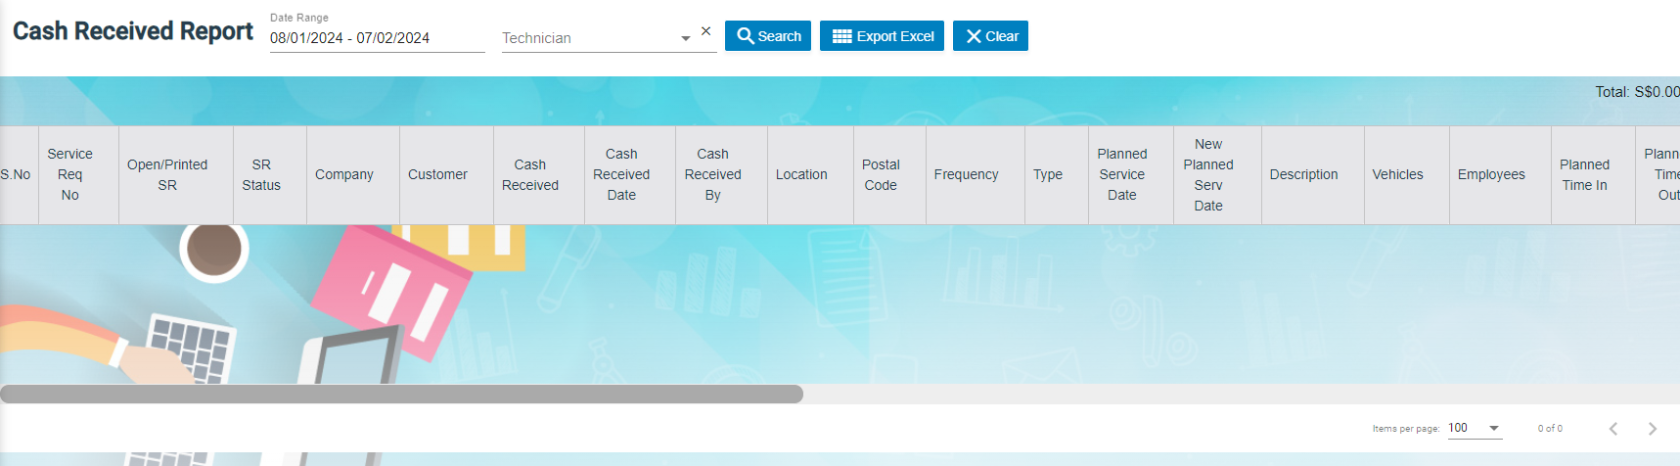](http://wiki.cuteinfocomm.com/uploads/images/gallery/2024-02/image-1707376140674.png)
2. In Date Range box, click to select date range if user wants to view cash received by date range.
3. In Technician box, click to select technician if user wants to view cash received by technician.
4. Click Search, Service requests with cash payment received will display as below (number of items display per page can be configured by select number in the item per page box that located at the bottom of page), [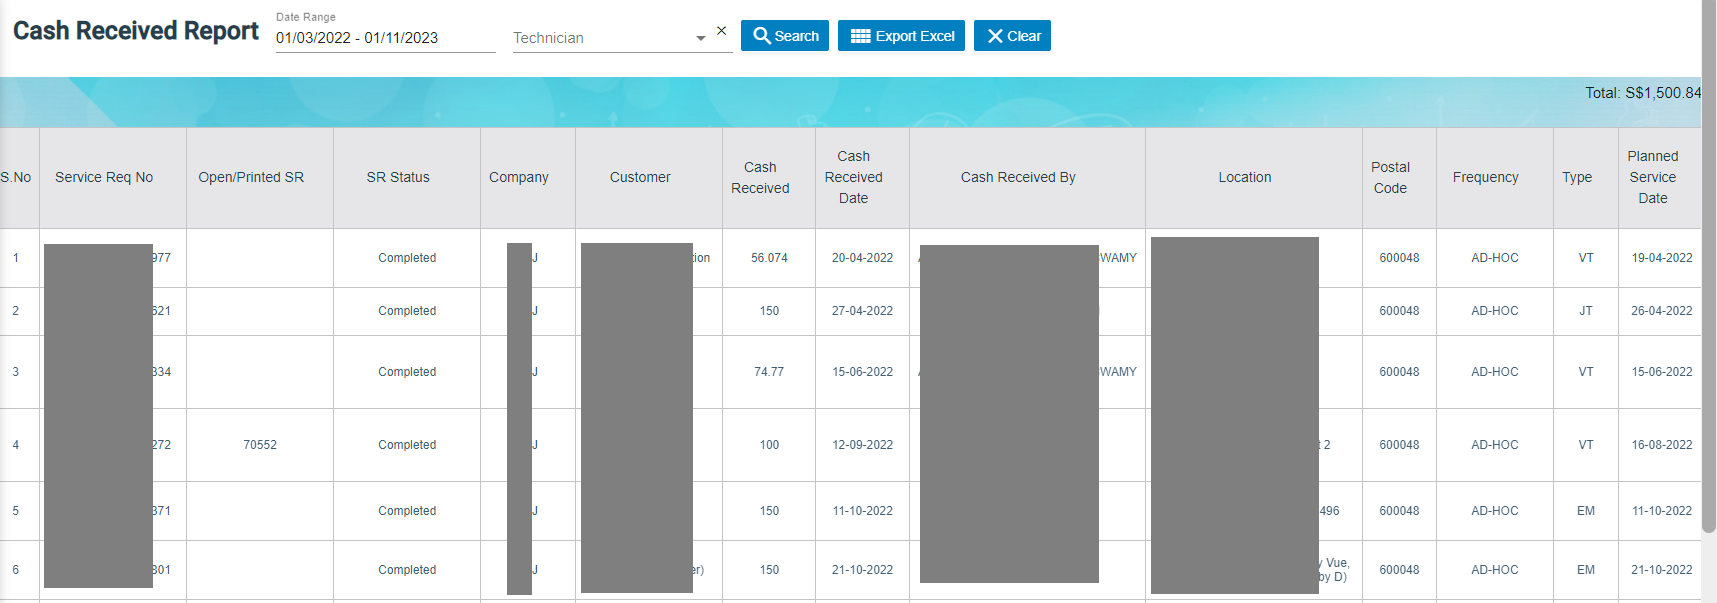](http://wiki.cuteinfocomm.com/uploads/images/gallery/2024-02/image-1707378455265.png)
- Master Data Management
- User Access Management
- Service Job Request Management
- Verification after Job Completion
- Invoice and Payment Management
- Reporting
## User Access Matrix
In the ***cuteOffice-SRM*** application, users can be assigned with different roles. Depending on the roles, the users can access the various functionalities included in the application. The following are the various roles to be assigned to the user including their permission details,
| **Roles** | **Access Permissions** |
| Administrator | - Dashboard
- Master
- Service Request
- add Service Job Requests
- assign technician and vehicle
- verify the completed job record
- assign rework for the technician
- add and view AdHoc Service Requests
- generate and view the invoices
- do service payment
- Report
|
| Technician | - Service Request
- view their assigned service jobs and indicate starting and ending of jobs
- send the Verification Form to the respective admins to verify the completed job
- add and view AdHoc Service
Reques
|
The **SRM** module in the ***cuteOffice*** application helps admins in managing the service based job functionalities. To navigate to the **SRM** module, click the **SRM** menu in the menu bar, the **SERVICE REQUEST MANAGEMENT** page opens as below.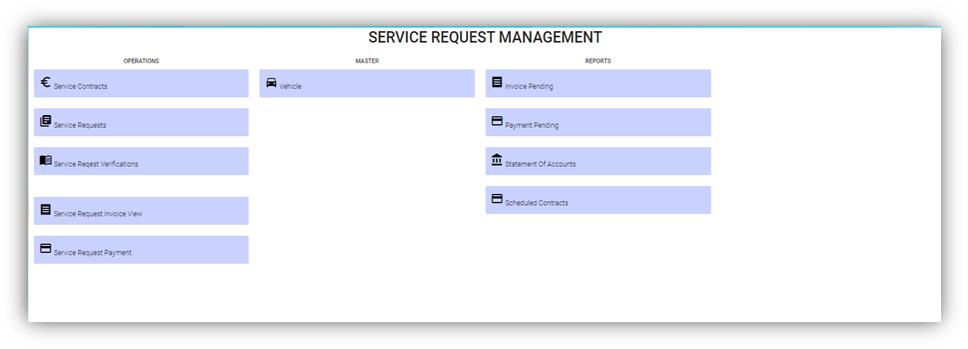
The **SERVICE REQUEST MANAGEMENT** page consists the following sub menus:
**OPERATIONS -** Allows admin to add the service job requests, assign the jobs to technicians, generate invoice for completed job, and so
**MASTER -** Allows SRM admin to add the vehicle master
**REPORTS -** Helps admin to view the various reports corresponding to the service request
## Master
The **Master** submenu in the **SRM** menu manages the master data such as details of vehicle including vehicle insurance, Housing and Development Board (HDB) season parking, and other details.
The **Master** submenu contains the following tab,
- Vehicle-Users assigned with srm\_admin role can only have access to this Master submenu and add the master data.
The **Vehicle** tab in the **Master** submenu helps you to add the information of a vehicle to be used as a master data in the further request process. Click the **Vehicle** tab in the **Master** submenu, the **Vehicle** page opens.
### Add a Vehicle
If you want to add a vehicle,
1. Click (**Add Vehicle** button) in the **Vehicle**, the **Add Vehicle** window opens. (Note: The fields highlighted with red color are mandatory. You must enter the relevant details in that fields before saving.)
2. In the **Vehicle** section, enter the following details,
- In the **Number** box, enter the vehicle number.
- In the **Name** box, enter the vehicle name.
- In the **Company** box, select a company from a drop-down list.
- In the **Asset Tag Number** box, enter the asset tag number.
- In the **Invoice Number** box, enter the invoice number.
- In the **Invoice Date** box, select the invoice date.
- In the **GPS Sim Number** box, enter the GPS sim number.
- In the **No-Claim Discount (NCD)** box, enter the NCD number.
- In the **Driver** box, select a driver from a drop-down list.
- In the **IDD Code** box, select the IDD code.
- In the **Area Code** box, enter the area code.
- In the **Contact Number** box, enter the contact number.
- In the **Parking Location** box, enter the parking location name.
- In the **Vehicle Description** box, enter the description for the vehicle.
3. In the **Insurance** section, enter the following details,
- In the **Number** box, enter the insurance number.
- In the **Next Due Date** box, select the due date for the insurance.
- In the **Vendor** box, enter the insurance vendor name.
- In the **Agency** box, enter the agency name.
4. In the **Next Due Date** section, enter the following,
- In the **Maintenance** box, select the due date for maintenance.
- In the **Parking Coupon** box, select the due date for parking coupon.
- In the **Road Tax** box, select the due date for road tax.
- In the **Inspection** box, select the due date for vehicle inspection.
- In the **Vehicle Parking Certificate (VPC)** box, select the due date for VPC.
- In the **LG** box, select the due date for LG.
- In the **LM** box, select the due date for LM.
- In the **Certificate of Entitlement (COE) Expiry Date** box, select the expiry date for COE.
5. In the **HDB Season Parking** field, enter the following,
- In the **Next Due Date** box, select the due date for HDB season parking.
- In the **Payment Mode** box, select a payment mode from a drop-down list.
- In the **Address** box, enter the address where the vehicle has parked.
6. In the Others field, enter the following,
- In the **Dealer Name** box, enter the dealer name.
- In the **Invoice Ref** box, enter the invoice reference number.
- In the **Amount** box, enter the invoice amount including GST.
- In the **In-vehicle Unit** (**IU) Label Number** box, enter the IU label number.
- In the **Propellant** box, enter the propellant name.
- In the **Shell Card Number** box, enter the shell card number.
- In the **Shell Pin** box, enter the shell pin.
- In the **Vehicle Preparation Center (VPC) Address** box, enter the VPC address.
- In the **Remarks** box, enter your remarks if any.
7. Click **Save**. The vehicle is added and listed in the **Vehicle** page.
8. If your vehicle is in the workshop, you need to click to enable (Radio button) in the **Workshop** column for the respective vehicle. The **Confirmation** dialog box opens. Click Yes to confirm. 
### Edit a Vehicle
You can edit the details of the added vehicle by using  (Edit icon) provided in the **Edit** column of the **Vehicle** page. To edit the added vehicle details,
1. Click (Edit icon) of the respective vehicle, the **Add Vehicle** window opens with the added vehicle details.
2. Edit the vehicle details where suits.
3. Click **Save**.
### Attach/View a Document into a Vehicle
If you want to add a new document with the vehicle, do the following steps,
1. Click (Attachment icon) of the respective vehicle for which you want to add, the **Add/ View Attachment** window opens.
2. Click (**Add Document** button).The file choosing and uploading option will be enabled.
3. Click (**Choose File** button) and select the document which you want to upload.
4. Click **Upload**, The selected document will be uploaded and displayed in the **Add/View Attachment** window.
If you want to view any attached document with a vehicle,
1. Click (Attachment icon), the **Add/ View Attachment** window opens with a list of attached documents. (Note: The subscript number displays with attachment icon shows the total number of attached documents with the vehicle..
2. If you want to download the attached document, click (Download icon) in the **Download** column. The document will be downloaded.
### Delete a Vehicle
You can delete the added vehicle by using delete option provided in the **Delete** column of the **Vehicle** page. To delete any added vehicle,
1. Click (Delete icon) of the respective, the **Confirmation** dialogue box opens with the following notification: “**Are you sure you want to delete record?**”.
2. If you want to delete the vehicle, click **Yes** otherwise click **No**.
3. The deleted vehicle will be removed from the **Vehicle** page.
### Filter a Vehicle
If you want to view any specific vehicle details among multiple vehicles listed in the **Vehicle** page, you can use the filter option provided in the upper left corner of the **Vehicle** page. To filter any vehicle you want,
1. Click (Filter button). A filter box opens in each column of the **Vehicle** page.
2. Enter the relevant data in any column filter. The vehicle(s) that qualifies will be filtered and display in vehicle page.
### Export a Vehicle List
The application has a feature to download the added vehicle list in an excel format. You can use export option to download the added vehicle list. To download the added vehicle list, click  (**Export Excel** button). The vehicles added in the **Vehicle** page will be downloaded as an excel file.
## Service Request
The **Service Request** submenu in the **SRM** page helps you to add and manage the functionalities related with the service schedule and the service request.
The **Service Request** submenu contains the following tabs,
- Service Schedule
- Service Request View
- Service Request Verification
- Add Invoice
- Manual Invoice
- Lump Sum Invoice
- Invoice View
- Payment
- Bulk Payment
- Clear Cache
### Service Schedule
The **Service Schedule** tab in the **Service Request** submenu helps you to add a service schedule. Click Service Schedule in the Service Request submenu, the Service Schedule page opens.
[](http://wiki.cuteinfocomm.com/uploads/images/gallery/2023-10/image-1698638003553.png)
#### View Service Schedule
If you want to view any specific service schedule among the list of service schedules, you can use column filter to select the respective data such as Schedule No, Customer, Location, and Date Range in the respective fields given in the Service Schedule page. You can click the page expand icon at the top right corner to expand the filters.
[](http://wiki.cuteinfocomm.com/uploads/images/gallery/2023-10/image-1698638156539.png)
If you want to view the scheduled schedule of any customer,
1. Select a customer from the Customer field.
2. Click [](http://wiki.cuteinfocomm.com/uploads/images/gallery/2023-10/image-1698638301357.png) ( print Schedule button), the schedule details for the selected customer will be downloaded as a pdf. [](http://wiki.cuteinfocomm.com/uploads/images/gallery/2023-10/image-1697782130744.jpg)
#### Add a Service Schedule
To add a service schedule, do the following steps,
1. Click  (Add button) in the Service Schedule page, the **Add Service Schedule** window opens (Note: The fields highlighted with red color are mandatory. You must enter the relevant details in that fields before saving). [](http://wiki.cuteinfocomm.com/uploads/images/gallery/2023-10/image-1698130270983.png)
2. In the **Project List** box, select a project list from a drop-down list. Once you have selected a project, the customer, the customer location and contact number of the selected project will be automatically populated.
3. Note: If you want to select all projects, click to enable the All checkbox provided with the Project List box. And then select relevant details in customer, customer location and contact number box. [](http://wiki.cuteinfocomm.com/uploads/images/gallery/2023-10/image-1697781055715.png)
4. In the **Start Date** and **End Date** boxes, select the schedule’s start and end dates.
5. In the **Frequency** box, select the frequency of doing service based on the customer requirement. For example, if the customer expects to do the service for three times in a month, select **3 x Monthly.** Note: If you want to view the location in the map, click  (Location Map icon) provided with the Frequency box.
6. In the **Type** box, select a type of medium.
7. In the **Service Description** box, enter the service description.
8. In the **Invoice Description** box, enter the invoice description.
9. In the **Effective Date** box, select the effective date of the service schedule.
10. In the **Invoice Due Days** box, enter the due days for invoice.
11. In the **Term Days** box, enter the term days.
12. In the **Plan Schedule** box, select the plan schedule whether Day Job or Night Job.
13. In the **Tanker Size** box, select the tanker size whether small or big.
14. If the service is jetting, select Jetting or if the service is PUB, select the PUB. [](http://wiki.cuteinfocomm.com/uploads/images/gallery/2023-10/image-1697781749216.png)
15. In the **Grease Trap Size** box, enter the grease trap size.
16. In the **Total Grease** box, enter the total grease value.
17. In the **Manpower** box, enter the required manpower.
18. In the **Price** box, enter the price for the service.
19. In the **Service Note** box, enter the service note.
20. In the **Invoice Note** box, enter the invoice note.
21. In the **Private Note for Internal** box, enter the note for internal.
22. In the **Effective Time** box, select the effective time. The calendar will be displayed based on the selection of frequency.
23. In **Old SRM Sales Contract No** box, enter the old SRM sale contract number associated with the service schedule.
24. Click **Save**. The service schedule will be added and listed in the Service Schedule page.
#### Activate/Cancel a Service Schedule
To activate a service schedule, do the following steps,
1. Click  (Active icon) that is provided in the Action column in the service schedule page. The Service Request List window opens and shows the list of service requests added against the selected service schedule number.
2. Click **Ok**. The Remarks box opens.
3. Enter your remarks and click **Save**. The service schedule will be activated. The remarks you have entered will be saved in the Status Remarks column of the Service Schedule page.
To cancel a service schedule,
1. Click  (Cancel icon) that is provided in the Action column, of the service schedule. The Service Request List window opens and shows the list of service requests added against the selected service schedule number.
2. Click **Ok**. The Remarks box opens.
3. Enter your remarks and click **Save**. The service schedule will be cancelled. The remarks you have entered will be saved in the Status Remarks column of the Service Schedule page.
#### Edit a Service Schedule
You can edit the details of the added service schedule by using edit option provided in the
Edit column of the Vehicle page. To edit the added service schedule details,
1. Click  (Edit icon) of the respective service schedule you have added, the Add Service Schedule window opens with the added service schedule details.[](http://wiki.cuteinfocomm.com/uploads/images/gallery/2023-10/image-1697783400078.png)
2. Edit the service schedule details where you want.
3. Click **Save**.
#### Delete a Service Schedule
You can delete the added service schedule by using  (Delete icon) provided in the Delete column of the Service Schedule page.
#### Export a Service Schedule List
If you want to export all the service schedules in the Service Schedule page in an excel format, you can use the export option provided in the Service Schedule page. To know how to export, follow the procedures given in the topic, “Export a Vehicle List”.
### Service Request View
The **Service Request View** tab in the **Service Request** submenu helps you to add a service request. Users assigned with **srm\_admin** and **srm\_technician** roles can have access to view this **Service Request View** page. Click **Service Request View** in the **Service Request,** the **Service Request View** page opens.
[](http://wiki.cuteinfocomm.com/uploads/images/gallery/2023-10/image-1698130148290.png)
- You can configure displaying of the number of service request items per page by selecting **50**, **100**, **250, 500,** or **1000**,
- If you want to view any specific service request among the list of service requests, you can select the respective data such as Service Request No, Customer, Location, and Date Range in the respective fields given in the **Service Request View**
- The service request displayed in different color explains their status:
#### Add a Contract Service Request
To add a contract service request, do the following steps,
1. Click [](http://wiki.cuteinfocomm.com/uploads/images/gallery/2023-10/image-1698129828567.png)(**Add** button) in the **Service Request View page,** the **Service Request** window opens, click to select **Contract SR** (**Note**: The fields highlighted with red color are mandatory. You must enter the relevant details in that fields before saving.). [](http://wiki.cuteinfocomm.com/uploads/images/gallery/2023-10/image-1698130642389.png)
2. In the **Admin Company** box, select admin company.
3. In **Customer** box, select customer company name.
4. In **Location** box, select location.
5. In **Contact Name** box, select contact name.
6. In **Contact Number** box, if contact name is selected, the associated contact number and email address will automatically populated.
7. In **Contact Email** box, if contact name is selected, the associated email address will automatically populated.
8. In **Service Request Date** box, click to select date.
9. In **Service Request Time** box, click to select time.
10. In **Type** box, click to select service type.
11. In **Plan Schedule** box, click to select plan schedule as Day Job or Night Job.
12. In **Tanker Size** box, click to select tanker size.
13. In **Grease Trap Size** box, enter or select grease trap size.
14. In **Jetting, PUB, Return Choke** options, click to select relevant option(s).
15. In **Adhoc Sales Contract No** box, enter adhoc sales contract number if any.
16. In **Quotation No** box, enter quotation number.
17. In **Total Grease** box, enter the total grease value.
18. In **Manpower** box, enter the required manpower.
19. In **Price** /**Visit** box, enter the price for the service request.
20. In **Payment Mode** box, select payment mode.
21. In **Billing** flag, click to enable if applicable.
22. In **Service Description** box, enter service description.
23. In **Invoice Description** box, enter invoice description.
24. In **Invoice Note** box, enter the invoice note.
25. In **Private Note for Internal** box, enter the note for internal.
26. In **Service Note** box, enter the service note.
27. In **Show All Vehicle/Technician** flag, click to enable if applicable. When this flag is ticked, vehicle and technician selection list will include all technician and vehicle. Else Jetting Service Request will show only jetting vehicle and technicians in jetting department only.
28. In **New Planned Service Date** box, click to select planned date.
29. In **Planned Time In** box, click to select planned time in.
30. In **Planned Time Out** box, click to select planned time out.
31. In **Vehicle** box, select vehicle.
32. In **Technician** box, select technician.
33. For **Assignment History** option, it is used to check all existing assignments of selected technician, so that user can unassign the technician from some assignments to make him available for the job on this new service request date.
34. Click **Save**. The service request is added and listed in the **Service Request View** page.
#### Edit a Service Request
You can edit the details of the added service request by using edit option provided in the **Edit** column of the **Service Request View** page. To edit the added service request details,
1. Click (Edit icon) of the respective service request, the **Service Request** window opens,
2. Edit the service request details where needed.
3. Click **Save** to save edits.
#### Assign Technician and Vehicle for a Service Request
Users assigned with **srm\_admin** role only can have access to assign the technician and vehicle for an added service request.
Users assigned with **srm\_technician** role can only view the assigned details.
To assign the technician and vehicle for an added service request, do the following steps,
1. Click[](http://wiki.cuteinfocomm.com/uploads/images/gallery/2023-10/image-1698645946491.png) (Assign icon) in the assign column of the respective service, the **Assign Technician** window opens. [](http://wiki.cuteinfocomm.com/uploads/images/gallery/2023-10/image-1698645988734.png)
2. In **Planned Service Date** box, the planned date will show automatically.
3. In **New Planned Service Date** box, click to select new date if needed.
4. In **Planned Time In** and **Planned Time Out** boxes, select the planned in and out times.
5. In **Vehicle** box, select a vehicle from a list. **Note**: You can select multiple vehicles.
6. In **Technician** box, select a technician from a list. **Note**: You can select multiple technicians.
7. Click **Save,** the service request is assigned. For **Assignment History** option, it is used to check all existing assignments of selected technician, so that user can unassign the technician from some assignments to make him available for the job on this new service request date. After assigning the vehicle and technician, the SR record will be changed to yellow color. The service request will be moved to the respective technicians and the  (Job Starts icon) will be appeared in the **Verification** column as below,
#### Indicate Starting and Ending of Job
Once the service request is added and assigned for the respective technician and vehicle by the client, the technician can login and view job details assigned to them.
**To indicate that the job was started,**
1. Click on (Job Starts icon) appeared in the **Verification** column, the job started status will be updated successfully and the SR record will be changed to Blue color.
**To indicate that the job was ended,**
1. Click on (Job Ends icon) appeared in the **Verification** column, the job ended status will be updated successfully and the SR record will be changed to Purple color.
Once the job has completed, the verification process begins.
**Note**: When you click  (Assign icon) of this service request, the vehicle and technicians which are assigned already will not be shown in list.
#### Verify the Service Request Completion
In general, once the job is done by the technician, the respective SR record will be moved for verification that needs to be done by the admin. This **Verification** functionality is provided for the technician on the job to print the Service Verification Form for client to verify the job done by technician and sign off.
1. Click (Verification icon) provided in the **Verification** column**,** the **Service Request Verification** window opens. [](http://wiki.cuteinfocomm.com/uploads/images/gallery/2023-10/image-1698702122999.png)
2. In **DESCRIPTION** box, enter the description.
3. In **NOTE** box, enter your note if any.
4. In **FEEDBACK FROM CLIENT** box, enter client feedback.
5. In **START TIME** and **END TIME** boxes, verify start and end time, if any changes, select the started and ended time of the assigned job.
6. In **SERVICE DONE BY** box, verify technician assigned, if any changes, click to select technician name.
7. In **VEHICLE NO** box, verify vehicle number, if any changes, click to select vehicle number.
8. In **Price** box, verify the price, enter updated price if any changes.
9. In other payment details section, click to enable if applicable. [](http://wiki.cuteinfocomm.com/uploads/images/gallery/2023-10/image-1698702625434.png)
- If you go for cash payment, select the checkbox of the CASH PAYMENT? option.
- If you want to add the GST amount, select the checkbox of the ADD GST? option. The price will be added with the GST amount.
- If you want the service to be continued, select the checkbox of the SERVICE WILL CONTINUE? option. Once you selected the SERVICE WILL CONTINUE? option, the system will indicate "Continue" in the Job column for the select service request. And another SR request will be created as shown below, [](http://wiki.cuteinfocomm.com/uploads/images/gallery/2023-11/image-1699942088800.png)
10. Click (Sign icon) to add your signature, the **Signature** window opens.
- In the **Sign By** box, enter you name.
- Add you signature.
- Verify the date.
- Click **Save**.
[](http://wiki.cuteinfocomm.com/uploads/images/gallery/2023-10/image-1698702700462.png)
11. To attach any file, click (Attach icon) and attach the file.
12. Click **SAVE** to save verification of the service requestion record.
#### Rework
When the job completed by the technician does not meet the expectations of client, the client can assign for the rework. Users assigned with **srm\_admin** role only can have access to start rework by using reset option.
To start the rework,
1. Navigate to verification column of the respective service request, [](http://wiki.cuteinfocomm.com/uploads/images/gallery/2023-11/image-1699423693251.png)
2. Click (Reset icon). A new service request will be added for rework and the job status will be updated as **Rework** in the **Job** column.
#### Print a Service Record
To print any SR record, do the following steps, click the respective  (Print icon) in the **Print** column. The SR record will be downloaded as a pdf file with customizable format.
#### Attach/View a Document into a Service Request
**To add a new document with the service request**,
1. Click  (Attachment icon) in the **Documents** column of the respective service request for which you want to add attachment, the **Add/ View Attachment** window opens. [](http://wiki.cuteinfocomm.com/uploads/images/gallery/2023-11/image-1699425158846.png)
2. Click [](http://wiki.cuteinfocomm.com/uploads/images/gallery/2023-11/image-1699425181609.png)(**Add Document** button), the file choosing and uploading option will be enabled. [](http://wiki.cuteinfocomm.com/uploads/images/gallery/2023-11/image-1699425274177.png)
3. Click (**Choose File** button) and select the document which you want to upload.
4. Click **Upload.** The selected document will be uploaded and displayed in the **Add/View Attachment** window.
**To view any attached document with a service request,**
1. Click (Attachment icon) in the **Documents** column, the **Add/ View Attachment** window opens with a list of attached documents. Note: The subscript number displays with attachment icon shows the total number of attached documents with the vehicle. [](http://wiki.cuteinfocomm.com/uploads/images/gallery/2023-11/image-1699425401496.png)
2. If you want to download the attached document, click (Download icon) in the **Download** column. The document will be downloaded.
#### Activate/Cancel a Service Request
If you want to activate or cancel a service request, do the following steps,
**To activate a service request,**
1. Click (Active icon) that is provided in the **Action** column of the service request, the **Remarks** box opens.
2. Enter your remarks and click **Save**. The service request will be activated. The remarks you have entered will be saved in the **Action Remarks** column of the **Service Request View** page.
**To cancel a service request,**
1. Click (Cancel icon) that is provided in the **Action** column of the service request. The **Remarks** box opens.
2. Enter your remarks and click **Save**. The service request will be cancelled. The remarks you have entered will be saved in the **Action Remarks** column of the **Service Request View** page.
#### Delete a Service Request
You can delete the added service request by using delete option provided in the **Delete** column of the **Service Request View** page.
#### Add an AdHoc Service Request
When a service request is not a planned one, you can add the request as an Adhoc SR. Project details are not mandatory to add the Adhoc SR. Users assigned with **srm\_admin** and **srm\_technician** roles can have access to add and view the AdHoc service requests.
To add an adhoc SR,
1. Click [](http://wiki.cuteinfocomm.com/uploads/images/gallery/2023-10/image-1698129828567.png)(**Add** button) in the **Service Request View page,** the **Service Request** window opens, click to select **AdHoc SR** (**Note**: The fields highlighted with red color are mandatory. You must enter the relevant details in that fields before saving.). [](http://wiki.cuteinfocomm.com/uploads/images/gallery/2023-11/image-1699425708907.png)
2. Fill up the mandatory fields as below.
3. In **Contact Name** box, select contact name.
4. In **Contact Number** box, if contact name is selected, the associated contact number and email address will automatically populated.
5. In **Contact Email** box, if contact name is selected, the associated email address will automatically populated.
6. In **Service Request Date** box, click to select date.
7. In **Service Request Time** box, click to select time.
8. In **Type** box, click to select service type.
9. In **Plan Schedule** box, click to select plan schedule as Day Job or Night Job.
10. In **Tanker Size** box, click to select tanker size.
11. In **Grease Trap Size** box, enter or select grease trap size.
12. In **Total Grease** box, enter the total grease value.
13. In **Manpower** box, enter the required manpower.
14. In **Price** /**Visit** box, enter the price for the service request.
15. In **Payment Mode** box, select payment mode.
16. In **Billing** flag, click to enable if applicable.
17. In **Service Description** box, enter service description.
18. In **New Planned Service Date** box, click to select planned date.
19. In **Planned Time In** box, click to select planned time in.
20. In **Planned Time Out** box, click to select planned time out.
21. Click **Save**. The service request is added and listed in the **Service Request View** page.
#### View Adhoc Service Requests
If you want to view the added adhoc service requests, click  (**AdHoc View** button) in the **Service Request View** page. The Adhoc service requests opens as below,
[](http://wiki.cuteinfocomm.com/uploads/images/gallery/2023-11/image-1699943447634.png)
Filter a Service Request
If you want to filter a specific service request in the **Service Request View** page, you can use the filter option provided in the **Service Request View** page.
#### Export a Service Request list
If you want to export all the service requests in the **Service Request View** page in an excel format, you can use the export option provided in the **Service Request View** page.
#### Bulk Print
If you want to print multiple SR record,
1. Select the checkbox of the respective service
2. Click (**Bulk Print** button). The selected SR records will be downloaded in a pdf file.
### Service Request Verification
Users can verify the signed Service Verification Forms and to proceed to the next stage of invoice generation in the **Service Request Verification** tab in the **Service Request** submenu.
Users assigned with **srm\_admin** role have access to view this **Service Verification** page and verify the Service Verification Form sent by the Technician.
Click **Verification** in the **Service Request,** the **Service Verification** page opens.
[](http://wiki.cuteinfocomm.com/uploads/images/gallery/2023-11/image-1701152316199.png)
- If you want to view any specific service request among the list of service requests, you can use the select the respective filters provided in the Service Verification search bar.
- The legend at the bottom of page denotes different status of a service request.
#### Verify the Service Verification Form
Once the service verification form is signed and submitted by the technician, the verification form will be sent for verification. After the service request verification form is verified, the request will be moved for invoice generation.
To verify the service verification form,
1. Navigate to the respective service request you want to verify,
2. Click the checkbox provided in the **Verified**,[](http://wiki.cuteinfocomm.com/uploads/images/gallery/2023-11/image-1701153976265.png)
3. The **Confirm** dialog box opens and shows the following message [](http://wiki.cuteinfocomm.com/uploads/images/gallery/2023-11/image-1701154064033.png)
4. Click Yes, a verified successful notification will display, and the selected request will be moved to the Invoice Generation page to generate invoice for the payment.[](http://wiki.cuteinfocomm.com/uploads/images/gallery/2023-11/image-1701154348963.png)
#### Print a Service Record
To print any SR record, click[](http://wiki.cuteinfocomm.com/uploads/images/gallery/2023-11/image-1701154968718.png) (print icon) of respective service request in the Print column in the service verification page. The SR record will be downloaded as a pdf file.
[](http://wiki.cuteinfocomm.com/uploads/images/gallery/2023-11/image-1701155184690.png)
#### Attach/View a Document into a Service Request
**To add a new document with the service request,**
1. Click (Attachment icon) of the respective service request, the **Add/ View Attachment** window opens. [](http://wiki.cuteinfocomm.com/uploads/images/gallery/2023-11/image-1701155358555.png)
2. Click [ ](http://wiki.cuteinfocomm.com/uploads/images/gallery/2023-11/image-1701155395780.png) (add document icon), The file choosing and uploading option will be enabled, [](http://wiki.cuteinfocomm.com/uploads/images/gallery/2023-11/image-1701155549462.png)
3. Click  (Choose File icon) and select the document which you want to upload.
4. Click Upload. The selected document will be uploaded and displayed in the Add/View Attachment window.
**To view any attached document with a service request,**
1. Click (Attachment icon) in the **Documents** column, the **Add/ View Attachment** window opens with a list of attached documents. Note: The subscript number displays with attachment icon shows the total number of attached documents with the vehicle. [](http://wiki.cuteinfocomm.com/uploads/images/gallery/2023-11/image-1699425401496.png)
2. If you want to download the attached document, click (Download icon) in the **Download** column. The document will be downloaded.
#### Filter a Service Request
If you want to filter a specific service request in the **Service Verification** page, you can use the filter option provided in the **Service Verification** page.
#### Export a Service Request List
If you want to export all the service requests in the **Service Verification** page in an excel format, you can use the export option provided in the **Service Verification** page.
### Invoice Generation
Once the service request verification process has completed, the request will be moved for invoice generation. There are three ways to generate invoice:
1. Add Invoice - Users can generate invoice in the **Add Invoice** tab.
2. Manual Invoice - Users can generate invoice manually in the Manual Invoice tab. Click **Manual Invoice** in the **Service Request,** the **Manual Invoice** page opens. [](http://wiki.cuteinfocomm.com/uploads/images/gallery/2023-12/image-1702364885548.png)
3. Lump Sum Invoice - Users can generate lump sum invoice per customer in the **Lump Sum Invoice** tab. Click **Lump Sum Invoice** in the **Service Request,** the **Lump Sum Invoice** page opens.
- If you want to view any specific service request among the list of service requests, you can user the respective filters such as Customer, Location, Verified and SR Date Ranges in the **Invoice Generation page.**
#### Add Invoice
To generate an invoice automatically,
1. Click **Add Invoice** in the **Service Request** menu**,** the **Invoice Generation** page opens. [](http://wiki.cuteinfocomm.com/uploads/images/gallery/2023-11/image-1701156127923.png)
2. Click the checkbox of the respective service request for which you want to generate an invoice, [](http://wiki.cuteinfocomm.com/uploads/images/gallery/2023-11/image-1701326198639.png)
3. Click [](http://wiki.cuteinfocomm.com/uploads/images/gallery/2023-11/image-1701326038764.png)(**Generate Invoice** button).The **Generate Service Invoice** window opens (**Note**: The fields highlighted with red color are mandatory. You must enter the relevant details in that fields before saving). [](http://wiki.cuteinfocomm.com/uploads/images/gallery/2023-11/image-1701326314428.png)
4. In the **Invoice Title** box, enter the invoice title.
5. In the **PO** box, enter the PO number.
6. In the **Invoice Date** box, select the invoice date.
7. In the **Note** box, enter note if any.
8. In the **Private Note** box, enter private note for internal reference if any.
9. Click **Save**. The generated invoice will be saved and moved to the **Invoice View** page.
#### Manual Invoice
To generate an invoice manually,
1. Click Manual Invoice in the **Service Request** menu**,** the **Manual Invoice** page opens,
2. Select customer type, i.e.. Contract Customer or Adhoc Customer.
3. In the **Customer** box, select customer.
4. In the **Billing Name** box, billing name will auto populate customer name, user can edit billing name if billing name is different from customer name.
5. In the **Location** box, select location.
6. In the **Invoice Header** box, enter invoice header.
7. In the **Invoice Title** box, enter invoice title.
8. In the PO box, enter PO number.
9. In the Invoice Date box, select invoice date.
10. In the Total box, enter invoice total amount.
11. In the 9%GST box, the gst amount will be automatically calculated.
12. In the Inclusive Total box, the inclusive total will be automatically calculated.
13. In the Quotation No box, enter quotation number.
14. In the Contract No box, enter contract number.
15. In the Note box, enter note if any.
16. In the Private Note box, enter any private note for internal reference if any.
17. In the Invoice Details section, click [](http://wiki.cuteinfocomm.com/uploads/images/gallery/2024-01/image-1705515350298.png), then enter invoice details. The total amounts in manual invoice must tally with total of all detailed invoices before user press "save" button, else this validation will always show up and block the data saving. [](http://wiki.cuteinfocomm.com/uploads/images/gallery/2024-01/image-1705515437719.png)
18. Click Save, the manual invoice will be saved. And the details can be viewed in the Invoice View tab. [](http://wiki.cuteinfocomm.com/uploads/images/gallery/2024-01/image-1705515927628.png)
### Lump Sum Invoice
Lump sum invoice is used to generate lump sum invoices for lump sum sales contract. The business scenario is as below: Once any lump sum sales contract is created from sales enquiry (by enabling lump sum contract option when creating sales contract), user can create service schedule based on the sales contract, and after the service job is completed, user will be able to generate lump sum invoice in the Lump Sum Invoice tab.
To generate lump sum invoice,
1. Click Lump Sum Invoice tab, the lump sum invoice generation page opens as below, [](http://wiki.cuteinfocomm.com/uploads/images/gallery/2024-01/image-1705962684607.png)
2. Click to select the service schedule, then click "Generate Lump Sum Invoice" button, [](http://wiki.cuteinfocomm.com/uploads/images/gallery/2024-01/image-1705962758456.png)
3. The Invoice Generation for Lump Sum Contract screen opens as below,[](http://wiki.cuteinfocomm.com/uploads/images/gallery/2024-01/image-1705962885144.png)
4. Enter Invoice title and other details.
5. Click Save, the generated lump sum invoice will be saved and user can view it in the Invoice View page. [](http://wiki.cuteinfocomm.com/uploads/images/gallery/2024-01/image-1706245844148.png)
### Invoice View
The **Invoice View** tab in the **Service Request** submenu manages all the generated invoice details. Click **Invoice View** in the **Service Request.** The **All Invoices** page opens as below,[](http://wiki.cuteinfocomm.com/uploads/images/gallery/2023-11/image-1701326879130.png)
If you want to view any specific invoice among the list of invoices, you can select the respective Customer, Location, Date Range in the field given in the All Invoices page.
The invoices displayed in different color denotes their status, i.e., Completed payment or Unpaid Invoice.
#### Process an Invoice
To process an invoice,
1. 1. Click to select the checkbox provided in the **Is Invoiced?** column, [](http://wiki.cuteinfocomm.com/uploads/images/gallery/2023-12/image-1701756225911.png)
2. The **Confirm** dialog box open and shows the following message. [](http://wiki.cuteinfocomm.com/uploads/images/gallery/2023-12/image-1701756737942.png)
3. Click **Yes**. The invoice record will be changed to green color and as Completed.
#### Set Printing options for Invoices
To set the printing options of the invoices,
1. Click [](http://wiki.cuteinfocomm.com/uploads/images/gallery/2023-12/image-1701756866782.png)(Print Option icon) provided in the **Print Option** column**,** the **Invoice PDF options** window opens [](http://wiki.cuteinfocomm.com/uploads/images/gallery/2023-12/image-1701756915418.png)
2. Select the checkbox of the **Service Number** and **Service Description** options based on user's request.
3. Click **Save**.
#### Print an Invoice
To print an invoice,
1. Click the respective  (Print icon) in the **Print** column.
2. The invoice will be downloaded as a pdf file. [](http://wiki.cuteinfocomm.com/uploads/images/gallery/2023-12/image-1701757613930.png)
#### Delete an Invoice
You can delete the invoice by using  (Delete icon) provided in the **Delete** column of the **All Invoices** page.
#### Filter an Invoice
If you want to filter an invoice in the **All Invoices** page, you can use the [ ](http://wiki.cuteinfocomm.com/uploads/images/gallery/2023-12/image-1701757753997.png)filter option provided in the **All Invoices** page.
#### Export an Invoice List
If you want to export all the invoices in the **All Invoices** page in an excel format, you can use the [](http://wiki.cuteinfocomm.com/uploads/images/gallery/2023-12/image-1701757713901.png)export option provided in the **All Invoices** page.
### Payment
The **Payment** tab in the **Service Request** submenu allows user to add the service payment details against the related invoice. Users who are assigned with srm\_admin role will have access to view this Service Payment page. Click **Payment** in the **Service Request,** the **Service Payment** page opens, user can configure the number of invoices per page displaying by selecting 50, 100, 250, 500, or 1000 at the bottom of page.
[](http://wiki.cuteinfocomm.com/uploads/images/gallery/2024-01/image-1706683344310.png)
- User can use filter options to view any specific invoice among the list of invoices, filter options including Billing Name, Customer, Location, Date Range in the field given in the **Service Payment** page.
- The invoices displayed in different color explains their status as described in legend.
#### Add Payment Details
To add the payment details,
1. Click (Payment icon) in the Payment column, The **Service Payment** window opens. [](http://wiki.cuteinfocomm.com/uploads/images/gallery/2024-01/image-1706683993730.png)
2. The fields highlighted with red color in payment detail page are mandatory. You must enter the relevant details in that fields before saving. [](http://wiki.cuteinfocomm.com/uploads/images/gallery/2024-01/image-1706684120433.png)
3. In the **Bank A/C** box, select a bank account from a drop-down list.
4. In the **Payment Date** box, select the payment date.
5. In the **Billing Name** box, enter billing name (if billing name is same as company name, company name will auto fill as billing name).
6. In the **Payment Type** box, select a payment type.
7. In the **Amount** box, enter the amount if it's different from invoice amount. The **Paid?** box will be
8. In the **Reference No** box, enter reference number.
9. In the **Note** box, enter your note if any.
10. Click **Save**. The invoice record will be changed to Green color and as completed.
#### Filter an Invoice
If you want to filter an invoice in the **Service Payment** list, you can use the filter option provided in the **Service Payment** page such as SR number, invoice number etc..
[](http://wiki.cuteinfocomm.com/uploads/images/gallery/2024-01/image-1706685109822.png)
#### Export an Payment List
If you want to export all the invoices in the **Service Payment** page in an excel format, you can use the export option [](http://wiki.cuteinfocomm.com/uploads/images/gallery/2024-01/image-1706685195077.png)provided in the **Service Payment** page.
### Bulk Payment
The **Bulk Payment** tab in the **Service Request** submenu allows user to enter multiple invoice payments that belongs to a same billing name in bulk. Click Bulk Payment tab, the bulk payment for service payment page opens as below,
[](http://wiki.cuteinfocomm.com/uploads/images/gallery/2024-02/image-1706769997474.png)
To do bulk payment,
1. In Admin-Company box, select Admin company from a list of admin companies which the payment shall be paid to.
2. In Bank A/C box, select bank account name to receive payments,
3. In Billing Name box, select invoice billing name.
4. In Payment Type box, select payment type from list such as cash, online transfer, paynow etc..
5. In Payment Date box, click to select payment date.
6. In Amount Pay box, enter amount paid.
7. In Reference Number box, enter reference number if any.
8. Click [](http://wiki.cuteinfocomm.com/uploads/images/gallery/2024-02/image-1706770025125.png)Search button, a list of unpaid invoice belong to selected billing name will display in the screen, and **Bulk Pay** button will be enabled. [](http://wiki.cuteinfocomm.com/uploads/images/gallery/2024-02/image-1706770333086.png)
9. Click to select invoices from the list of unpaid invoices in the screen, and the selected invoice amount will be calculated and displayed in **Selected Amount** box.
10. If Selected amount box differs from Amount pay box, user can click Calculate Excess Amount button, and system will show payment confirmation notification as below, [](http://wiki.cuteinfocomm.com/uploads/images/gallery/2024-02/image-1706770892673.png)
11. Click Yes to confirm bulk payment, upon successful creation, a bulk payment number will be displayed in the payment No box in the search area as below. [](http://wiki.cuteinfocomm.com/uploads/images/gallery/2024-02/image-1706771556584.png)
12. And the bulk payment details will be saved in the Payment tab. User can search by bulk payment number in payment page, [](http://wiki.cuteinfocomm.com/uploads/images/gallery/2024-02/image-1706772031026.png)
Note: User with permissions will be able to revert bulk payment if needed. After clicking search button, authorized user can click Revert Bulk Payment button, and a confirmation notification will show as below. Click Yes to confirm reverting bulk payment for selected bulk payment number. And the associated invoices will be reverted to unpaid status. [](http://wiki.cuteinfocomm.com/uploads/images/gallery/2024-02/image-1706772129481.png)
### Clear Cache
Clear cache tab is used to clear search caches in Service Request and Service Schedule menu screens. Click Clear Cache, the clear cache page opens as below, click Proceed to confirm clearing cache.
[](http://wiki.cuteinfocomm.com/uploads/images/gallery/2024-02/image-1706772544252.png)
## Report
The Report submenu in the SRM page helps user view the various reports related with the service request management.
The Report submenu contains the following tabs,
- Invoice Pending
- Statement Of Accounts
- Request For PUB
- Invoice Ageing Report
- SR Sales Report By Jetting/Vacuum
- Payment History
- Verification Pending
- Cash Received
### Invoice Pending
The **Invoice Pending** tab in the **Report** submenu helps you to view the pending invoice details. Click **Invoice Pending** in the **Report** submenu. The **Invoice Pending** page opens and shows the list of invoices which are pending (number of items display per page can be configured by select number in the item per page box that located at the bottom of page).
[](http://wiki.cuteinfocomm.com/uploads/images/gallery/2024-02/image-1706773059212.png)
If user want to view any specific pending invoice among the list of pending invoices, you can select the respective Date Range in **or click Filter** option provided in the Invoice Pending page.
#### Export a Pending Invoice List
If you want to export all the invoices in the **Invoice Pending** page in an excel format, you can use the [](http://wiki.cuteinfocomm.com/uploads/images/gallery/2024-01/image-1706685195077.png)export option provided in the **Invoice Pending** page.
### Statement Of Accounts
Statement of accounts reports help user view all transactions with a particular customer. Click Statement of Accounts, the statement of accounts report page opens, user can select SR customer name or billing name, and As of Date, and then click Search, the report will show as below (number of items display per page can be configured by select number in the item per page box that located at the bottom of page),
[](http://wiki.cuteinfocomm.com/uploads/images/gallery/2024-02/image-1706773724609.png)
#### Export a Statement of Accounts
If you want to export statement of accounts, you can use the[](http://wiki.cuteinfocomm.com/uploads/images/gallery/2024-02/image-1707200431612.png) to export report in excel format, or use [](http://wiki.cuteinfocomm.com/uploads/images/gallery/2024-02/image-1707200410941.png) to export report in PDF format.
#### Email a Statement of Account to Customer
If you want to email a statement of account to customer,
1. Click [](http://wiki.cuteinfocomm.com/uploads/images/gallery/2024-02/image-1707200683660.png) email customer button at the top left corner, a confirmation notification will pop up as below, [](http://wiki.cuteinfocomm.com/uploads/images/gallery/2024-02/image-1707201376973.png)
2. Click **Yes**, system emailing window will open as below, user can configure email template, once email template is created, relevant information will be automatically populated. [](http://wiki.cuteinfocomm.com/uploads/images/gallery/2024-02/image-1707200995550.png)
3. Review information in above, and if needed, user can attach file using **Add Documents** option.
4. Click **Send**. System will send email to customer.
### Request For PUB
Request for PUB report allows user to view all service request details for PUB in selected period of time.
1. Click Request For PUB tab, the service request for pub report page opens as below, [](http://wiki.cuteinfocomm.com/uploads/images/gallery/2024-02/image-1707203398696.png)
2. Select a date range and then click **Search**, request for PUB report opens as below (number of items display per page can be configured by select number in the item per page box that located at the bottom of page),[](http://wiki.cuteinfocomm.com/uploads/images/gallery/2024-02/image-1707201941498.png)
#### Export Request for PUB report
If you want to export all the service request for PUB report in an excel format, you can use the [](http://wiki.cuteinfocomm.com/uploads/images/gallery/2024-01/image-1706685195077.png)export option provided in the Request for PUB page.
### Invoice Aging Report
Invoice ageing report helps user analyze the cash flow of all unpaid invoices. This report provides information about invoice payments due within time periods user specified in the Aging Periods window.
1. Click **Invoice Ageing Report** tab, the invoice ageing report page opens as below,[](http://wiki.cuteinfocomm.com/uploads/images/gallery/2024-02/image-1707202808986.png)
2. In As Of Date box, click to select as of date.
3. Click Search, all ageing invoices that meet search criteria will display as below, [](http://wiki.cuteinfocomm.com/uploads/images/gallery/2024-02/image-1707203709076.png)
#### Export Invoice Ageing Report
User can export report in two types (summary report or detail report) by choosing Print Summary or Print Details. Report format can be configured based on user requirement.
[](http://wiki.cuteinfocomm.com/uploads/images/gallery/2024-02/image-1707203825798.png)
1. Select report type to be exported, i.e. Print Summary or Print Details.
2. If user want to export statement of accounts, click the[](http://wiki.cuteinfocomm.com/uploads/images/gallery/2024-02/image-1707200431612.png) to export report in excel format, or click [](http://wiki.cuteinfocomm.com/uploads/images/gallery/2024-02/image-1707200410941.png) to export report in PDF format.
### SR Sales Report By Jetting/Vacuum
SR sales report by jetting/vacuum provides detail information by jetting/vacuum during selected period of time.
1. Click **SR Sales Report By Jetting/Vacuum** tab, the report page opens as below, [](http://wiki.cuteinfocomm.com/uploads/images/gallery/2024-02/image-1707289374685.png)
2. In SR date box, click to select a date range.
3. As for service type, click to choose Jetting or Vacuum.
4. Click Search, SR sales details that meet search criteria will display as below (number of items display per page can be configured by select number in the item per page box that located at the bottom of page), [](http://wiki.cuteinfocomm.com/uploads/images/gallery/2024-02/image-1707290306942.png)
#### Export SR sales report by jetting/vacuum
If you want to export the SR sales report in an excel format, you can use the [](http://wiki.cuteinfocomm.com/uploads/images/gallery/2024-01/image-1706685195077.png)export option provided in the report page.
### Payment History Report
Payment history report provides detail information of payment history in specific payment period by billing name or bank account.
1. Click **Payment History** tab, the report page opens as below,[](http://wiki.cuteinfocomm.com/uploads/images/gallery/2024-02/image-1707290471846.png)
2. In List By box, click to select by Billing Name or Bank Account.
3. Select the billing name or bank account to view payment history.
4. In Payment From Date & Payment To Date boxes, click to select dates.
5. Click Search, payment history that meet search criteria will display as below (number of items display per page can be configured by select number in the item per page box that located at the bottom of page), [](http://wiki.cuteinfocomm.com/uploads/images/gallery/2024-02/image-1707291704926.png)
#### Export Cash Received Report
If you want to export the cash payment received report in an excel format, you can use the [](http://wiki.cuteinfocomm.com/uploads/images/gallery/2024-01/image-1706685195077.png)export option provided in the report page.
# ACS - Accounting and Corporate Services
Document History
Sl No Description Version Prepared By Reviewed & Updated By Date
1 Requirement Specification Ver 1 Chandra Sekar 7-Mar-2022
2 Document Updated
(Highlighted in Color) Ver 2 Pavithra 11-Mar-2022
3 Document Updated
(Highlighted in Color) Ver 3 Chandra Sekar 15-Mar-2022
1.0 Overview
Morrison Management Pte Ltd, a Singapore based Consulting firm provides various Management Consultancy solutions such as Corporate Secretarial services, Taxation related services, Accountancy services, Corporate Advisory services and other Corporate Management consulting suite of services.
Morrison Management has engaged with Cutech Infocomm Solutions Pte Ltd to provide them software solutions that could be an enabler to automate their processes and leverage them from the manual operations on their secretarial and consulting related activities. The solution that would be offered to Morrison Management comprises of:
HRM
Sales Prospects
Sales Enquiry
Sales Quotation
Letter of Engagement
Client Master List
Project Master Creation
Project Planning
Project Daily Planning & Execution
Reports for Project Monitoring & Tracking (Should include recurring email reminders and follow ups to clients)
Project Billing (Raise Invoices)
Collection of Receivables (We are working on the details)
Dashboard
Cutech Infocomm would be developing customized solutions for Sales Prospects, Project Planning, Project Monitoring & Tracking and Billing while Morrison Management would the cuteOffice ERP Software suite 2.0 for the other modules listed above.
This functional specification document is prepared based on the various discussions Cutech Infocomm consulting team had with Morrison Management team
2.0 HRM
2.1 Payroll for Morrison Management
2.1.1 Scanner to clock in and clock out
Finger and face scanner installed by CuteOffice at MM premise on 7 March February 2022 and all staffs record completely updated in the scanner by 8 March 2022.
2.1.2 GeoPunch device
Staff will be able to clock in and clock out without using the scanner installed in MM’s office. However, this device will only be active when staff is reporting directly to the client office. They are able to clock in and clock out when they visit client office upon the assigning of the administrator to avoid them clocking in using the software when they are physically present in the office.
2.1.3 Payroll Report
Morrison Management will adapt the ready module offered by cuteOffice ERP. Cutech will integrate the staff details provided by Morrison Management into the software and conduct a training to the staffs involved on 09 March 2022.
Jan and Feb clock in and clock out details will be uploaded by MM’s staff and payroll report will be generated from cuteOffice so as to test the software’s capability to produce an accurate report. From March onwards, real data will be inputted to the software through the scanner installed at the office and will get real time reports will be auto-generated. MM wants to rely completely on HRM software from May 2022.
2.2 Payroll for Morrison Management’s clients
MM staff should be able to upload the attendance details provided by the clients manually and the software should generate payroll report for the clients.
Sales Prospect
Sales Prospects module will be used by Morrison Management to market their Business services to the clients in the Region. Clients would be maintained as part of Company Master available in cuteOffice. Morrison Management would conduct their Marketing activities through various methods such as email Marketing Flyers to Prospects, Personnel reach out to Prospects verbally, Through References etc.
Sales Enquiry
CuteOffice should have a master prospective client list separate from the client master list to keep track of each prospect the organisation comes across regardless of success rate. This master list should have the following details:
Name of enquirer
Contact details of enquirer
Their enquiry
MM’s reply to the enquiry based on date
Marketing Flyers Repository Master
Morrison Management would create Marketing flyers for each of their Services and the same image would be stored in this Repository Master. Morrison Management would always be updating their Flyers for a Service and hence the last flyer updated will be treated as Active, which will be sent to clients. However, the previous Flyers would be stored in the Repository with the Date Range – Active From & To Date
Marketing Flyer email Template
Morrison Management would design an email Template for sending the Marketing Flyers. The template can be a common template for all Services or if Morrison Management wishes to create Templates across each service, then this would be made possible. Please note for such scenarios, Clients would be receiving multiple emails from Morrison Management based on the Marketing Flyers send criteria.
Marketing Flyer Data Creation
Design the screen for Morrison Management to select & input data for sending Marketing Flyers
The fields to be captured are
Display all the Flyers for each Services in the Screen
Allow user to select the Flyers for sending the Mailers
For each Flyer selected, option to select
All clients, remove existing customers who has availed this service in the past
All clients
Selected Clients
Based on the above criteria if Selected Clients, display Client selection for Selection – Multiple / Individual
Morrison Management should have an option of choosing various combination of the above
Once the above information is captured, display the Client – Flyer list for confirmation by the user
Generate the email threads as per the above select criteria, for sending the emails
Create a Sales Prospects database to store the emails sent which should contain
Client Name
Service Description
Marketing Flyer Identifier
Email id
Date & Time Sent
View Marketing Flyer Sent Information
Design a View screen to showcase the details on the email Notifications sent. This functionality should have a filter option for the user to select a given criteria
Provide a View option of the flyers sent for a given period, with Client filter. Client wise it’s preferred to provide with the pictorial representation of the flyer sent.
Sales Quotation
The software should generate an email for the prospective client based on the templates of services selected by the staff. The quotation template have been furnished to Cutech on 21 February 2022 via email. This template will also serve as the basis for preparation of marketing flyer. The software should be able to track the multiple quotes given to the clients
There should be a drop down option for the price quoted for each service based on the category of clients. These price details can be obtained from the sample price master list as per Table A below. The complete price list will be provided by MM. The administrator should be able to amend the price and add on new services and categories based on request in future.
Services Category Price (S$)
Secretarial A XXXX
B XXX
C XX
D X
Tax A XXXX
B XXX
C XX
D X
TABLE A: SAMPLE PRICE MASTER LIST
Letter Of Engagement
Once quotation is agreed by both parties, letter of engagement should be prepared and sent to clients. The software should be able to convert the agreed quotation to the LOE format which will be provided by MM. The software should also be sending reminders and follow ups to both staff and client until the signed document is received.
4.0 Client Master
All the clients of Morrison would be stored in the Company master. The contact information of the clients namely Contact Name, email address, Contact numbers are to be maintained as mandatory. The sample master list have been furnished by MM. We are working on the improvements of the client master.
5.0 Project Master Creation
In addition to the Masters designed and made available in the Cuteoffice ERP suite, the following Masters will be made available as part of the solution
Service Master
Service Master briefs the major services Morrison Management would offer to their customers. The following services would form part of this master
Incorporation
Company name availability check
Registration of the company
Full company kit (minutes/register books, share certificates and 4 copies of Constitution)
Secretarial
Registered Office
Nominee Director
Bank Account Opening
Accounting Work
Monthly Management Review
GST
Compilation
Tax
Payroll
Adhoc
As the above services would form part of Sales Enquiry & Sales Quotation modules, Cuteoffice would configure the above services as Items in the Item Master and each Services will be configured as a Quotation Template, with the Job types.
As part of the Services Master the following fields will be accepted
Service Code
Service Name
Service Short Code
Service Description
Automatic email Trigger – Yes / No
If Yes Period when to send (in Days prior to the start date of the Project) , to create a Job Type and associated Job Task automatically in the system, as the first job type for this service if Job created, should be display in the Project Planning Job Type & Job Task list)
Though the above services are listed currently, Morrison Management would also have an option to add new services depending on their business needs.
5.2 Job Type
Job Type details the various operations that needs to be performed for fulfilling the services listed. Each Service would have the various Job Type and this would be defined as part of the Job Type Master.
*The job type listed under S/N 1-12 are inaccurate. We will furnish you with a complete and detailed workflow for each job type under the respective services once the refinement is done by our assigned staffs.
Sl No Services Job Type Remark
1 Incorporation
(Sheryl) Company name availability check
Registration of the company
Full company kit (minutes/register books, share certificates and 4 copies of Constitution)
2 Secretarial
(Sheryl) Provision of Company Secretary
Preparing Directors’ Resolution for opening of bank accounts
Preparing Directors’ Resolution for Resignation/ Appointment of directors
Preparing Directors’ Resolution for Change of registered address
Preparation of minutes of Annual General Meeting (AGM)
Preparation of Annual Returns and other statutory returns to be lodged with ACRA
Safe custody and updating of the statutory books and register as required by Companies Act
Any other routine work.
ACRA Compliance Alert & Reminders Most of the services under secretarial will have annual retainer fee where the job done will be charged against the fee that will be paid in advance by clients in a bulk. Thus, the end of workflow for these jobs will not be raising of billing instructions. This job type should be categorised as billable work but under a category called retainer fee. We will still rely on the software to calculate the profitability of the work done based on time spent against the retainer fee.
3Registered Office (Sheryl)Register Address Services
4Nominee Director (Sheryl)Nominee Director Service
5 Bank Account Opening (Sheryl) Preparation of relevant documents
Submission of the documents to the Bank
Bank Account opening
6 Accounting Work (Jaine) Data entry of all transactions using MYOB software;
Update all cheque or cash payments;
Update all deposits in bank accounts;
Reconcile all bank accounts;
Pass any general adjustments, where necessary;
Print and maintain the following reports:-
General Ledger Listing
Trial Balance
Profit & Loss Statement
Balance Sheet
Receivables and Payables Reconciliation
7 Monthly Management Review (Jaine) Review of sampling of Sales entries into Accounting software;
Review of sampling of Purchase entries into Accounting software;
Review of sampling of updated transactions of cheque or cash payments;
Review of sampling of updated deposits in bank accounts;
Review all bank reconciliation;
Review of any general adjustment passed;
Preparation of Observation
8 GST (JX) Review GST Declarations for Financial Year
Select GST Return (s) for Review
Perform Checks for the Selected GST Return(s)
Check the Standard-rated Supplies and Output Tax [review tax invoices, receipts, credit notes to customers and debit notes from customers]
Check the Zero-rated Supplies [review export documents, delivery notes, packing list, etc]
Check the Exempt Supplies [NA as your company do not have exempt supplies]
Check Input Tax and Refunds Claims (for local purchases, imports with GST Paid and Bad Debt Relief) [review dates of transactions, invoice or import permits, check if expenses claimed are for business purpose and are claimable]
Check Imports with GST Suspended (for MES)
Review Financial Statements or Management Accounts for the Same Financial Year
Quantify Errors (if any) and Submit findings to IRAS for review
9 Compilation (Jhonas) Preparation of Director's Statement
Preparation of Statement of Financial Performance
Preparation of Statement of Changes in Equity
Preparation of Statement of Cashflow
Preparation of Notes to Financial Statements
Preparation of Detailed Comprehensive Income
10 Tax (Jhonas) Preparation and submission of Estimated Chargeable Income (ECI)
Preparation and submission of Form C/ Form C-S
Tax Computation
Tax Filing with IRAS
11 Payroll (Pavi) Computing monthly payroll as per the information provided by the company
Providing breakdown of salary for disbursement to staff by company
Issuing payslips to staffs
Providing CPF Contribution for issuance of payment to CPF Board by company
Year-end preparation of IR*A for Auto-Inclusion Scheme (AIS) submission
Preparation and submission of IR21 to inform IRAS in the event a foreign employee has tendered resignation
12Adhoc (Pavi)Adhoc
As part of the Job Type Master the following fields will be accepted
Service Code (Should be available in Services Master)
Job Type Code
Job Type Name
Job Type Short Code
Job Type Description
Billable Yes / No
Estimate Time & Cost at Skill set level – Yes / No
If No, following fields will be entered
Estimated Time in Hours required to complete this task
Cost Estimated Hourly Rate required to complete this task
If Yes, the following fields will be stored in an Array or a Child collection table
Skill Set (to be linked with HRM Employee table)
Estimated Time in Hours required to complete this task
Cost Estimated Hourly Rate required to complete this task
The Estimated Time & Cost stored above for each Job Type would be used to produce the Budget vs Actual analysis. As part of the MIS, Morrison Management requires to prepare various MIS reports of the actual time & cost spent for each project against the normal budgeted figures. To prepare such reports the above data would be used. These job types also should be differentiated between billable and non-billable. However, this system should have the ability to help us calculate the time spent on the non-billable work for us to plan accordingly in future.
Though the above Job Types have been defined for each Services, Morrison Management would also have an option to add Job Types for the Services created depending on their business needs. This is explained with an example below.
Let us consider to define the Job Type for Service Code – Tax.
The below table briefs 4 Job Types that form part of delivering the Tax Services to customers. Based on the Quotation the Customer might select all 4 Job Types or less and accordingly the project would be created.
Sl No Services Job Types
10 Tax Preparation and submission of Estimated Chargeable Income (ECI)
Preparation and submission of Form C/ Form C-S
Tax Computation
Tax Filing with IRAS
However, for fulfilling the above 4 tasks, firstly, Morrison Management have to perform 3 tasks which would be used for all 4 above deliverables.
Task 1 – Obtain the required Documents from Customer
Bank Statements
Sales Invoices / Sales Tax Invoices
Vendor Invoices
Receipts
CPF Statements
Salary Schedule include Pay slip
Task 2 – Morrison Management staff would enter the information from these reports into their accounting software and prepare the following reports
Balance Sheet
Profit & Loss
Aged Receivables (Reconciliation)
Aged Payables (Reconciliation)
Trial Balance
General Ledger (Detail)
Bank Reconciliation Report
Task 3 – Preparation of the Draft Management Report and obtain approvals within Morrison Management and from Customer
Once the above 3 tasks are completed, Morrison Management would proceed in preparing the mentioned 4 Job types under the Tax Service Master. So, the above table can be reframed by Morrison Management as below.
Sl No Services Job Types
10 Tax Obtain the required documents from Customer
Enter the information in accounting software and prepare required reports
Prepare Draft Management report and obtain approvals within Morrison Management and from Customer
Preparation and submission of Estimated Chargeable Income (ECI)
Preparation and submission of Form C/ Form C-S
Tax Computation
Tax Filing with IRAS
Such common Job Type can be created across various services at different steps based on the need and processes.
5.3 Job Tasks
Job Tasks briefs the various tasks that needs to be performed for a given Job Type. Each Job Type would have the various Job Tasks and this would be defined as part of the Job Tasks Master.
Sl No Services Job Type Job Tasks
10 Tax Obtain the required documents from Customer
Inform Client to provide the required documents – Have Radio Button option – eMail or Phone (By Hand)
email template to be attached for this task
Documents Obtained
10 Tax Enter the information in accounting software and prepare required reports
Confirm completion of data entry in the accounting software and preparation of required reports
10 Tax Prepare Draft Management report and obtain approvals within Morrison Management and from Customer
Preparation of Draft Report
Send Approval email within Morrison Management
Approval Received
Send email to Customer
Approval Received
Raise Billing Instruction
As part of the Job Tasks master the following fields will be created
Service Code (Should be available in Job Type Master)
Job Type Code (Should be available in Job Type Master
Job Task Code
Job Task Name
Job Task Short Code
Job Task Description
Approval required within Morrison Management for this task
If Yes
Approval Email Notification to Employees defined
Upload email Template
Email required to be sent for this task – Yes/No
If Yes, Upload email Template
Reminder required to be sent for this task – Yes/No
If Yes
Reminder to be sent in days xx (reminder to be sent in the xx days mentioned multiple times till email reply task complete)
Upload Reminder Template
5.4 Activity Code
Activity Code Master is created to maintain the carious activities that would be performed by users across projects. Activity code does not have any referential identify with Service, Job Type, Job Task as they are independent activities which can be used across any scenarios. Some of the examples of Activity codes are
Preparing File Notes
Draft email / letter preparation
Administrative work
Lunch Break
Prepare Quotation
As part of the Activity Code master the following fields will be created
Activity Code
Activity Code Name
Activity Short Code
Activity Description
6.0 Project Planning Module
Project Planning would be done for Projects created once Sales Quotation is approved and the job order is received from the Client. The process in cuteOffice ERP Software suite 2.0 is,
Sales Quotation is approved by Morrison Management and sent to Client
Client approves the Quotation and issues the Job Order to Morrison Management
Morrison Management would edit the specific Sales Quotation and click Create Project Button, to create the Project
This enables the Project (or the Job Order) to be created
Project Planning is required to be done to review the master data for the Service of a Project created and accordingly update the master data for the specific Project. Please note this updated data will not be updated in the respective Masters, but will be updated and monitored for the specific Project.
Morrison Management allocates each Project to one user, who is responsible for the Project. As per the process, the activities for a Project would commence only after allocating the Responsibility of a Project to a resource. This activity of allocating the Responsibility for a Job, will be done by Morrison Management as part of this Project Planning exercise.
For Project Planning updation, screen to be designed with the following fields
Project Code : xxxxxxxxxxxxxxxxxxxxx
Project Description :
Project Start Date : xx/xx/xxxx Project End Date : xx/xx/xxxx
Project Amount : xxxxxx.xx
Recurring Project : Yes / No (If Yes Create a Separate Work Flow as briefed in Point 6.2)
Item Details (Service)
Estimated from MasterRevised
Job Type Job Description Select Yes/No Project
Amount Estimated Man Hours Estimated Man Hour Rate Revised Man Hours Revised Man Hour Rate
Project Allocated To : xxxxxxxxxxxxxxxxxxxxx
The above Entry would also have an Approval Process.
As briefed earlier, each Service, is further classified with multiple Job Types. Though all the available Job Types are displayed in the Sales Quotation for a Service, the Client might opt for certain Job Types only. Similarly, Morrison Management might have to perform certain tasks, which might not be displayed in the Sales Quotation or Client not opted for. Morrison Management team would identify the Job types that needs to be carried out for a Service and the same would be selected in the above table.
Revision of the Estimated Hours & Rate would be updated as per the definition in the Job Type master, i.e. defined across Skill set or not.
Please note, Users would not be allowed to add a New Job Type or provided Revised data information overriding the master data config i.e. if the Job Type master is defined with Skill set then the Revised data should also be provided with the skill set bifurcation only. Any changes on these should be done at the Master level only.
6.1 Project Daily Planning & Execution
Morrison Management does a Daily Planning for the Projects that have commenced execution. Tasks are assigned to individual users on a daily basis and these tasks are monitored on a daily basis for its closure.
6.1.1 Project Daily Planning
This Planning activity is done for each employee for a given day.
The Daily Planning meeting screen input would require the following information to be data entered
Planning for the Date: xx/xx/xxxx
Emp
No Emp Name Project
Code Service Job Type Job Tasks Activity Code
(not mandatory) Allocate Hours
In the above screen in the tabular form, display the fields with a Dropdown option. The Service will be displayed form the Project and cannot be edited.
The Job Type will be selected based on the Project and Job Tasks for the Job Type. If user selects a completed Job Type / Job Task, display a message informing the task is complete with details and on confirmation reallocate the same task.
Activity Code may be entered by the user if required, to brief the task, the user needs to perform.
User will input the Allocate Hours for the day.
For each Employee, please provide the View button to display the status of
Tasks completed by the Employee for the Previous Day (suggest to provide a date range defaulting with yesterday’s date (from the system date)
Overall Project status
6.1.2 Project Execution
The functionality here is to input the actual tasks done by the employees on a daily basis. Each employee would enter the activities completed / in progress for the day. This includes updating the status of the completed tasks.
Fields to be captured are
Date of Task Entry (will be defaulted to the system date, with option to modify)
Emp No (will be defaulted from User Login)
Emp Name (will be displayed)
Once the above information is entered by the user, system will validate with the Project Daily Planning record and display the tasks that the user needs to perform in a tabular form (as there can be more than one tasks).
User will just enter the Start Time & End Time and save the record if the user has performed those tasks. If User has performed some other tasks, please provide a Add New task and accept the details
Date of Task Entry : xx/xx/xxxx
Employee No : xxxxxxx Employee Name : xxxxxxxxxxxxxxxxxxxxxxxxx
Project
Code Service Job Type Job Tasks Activity Code Start Time End Time Job Task
Closed
Project
Code Service Job Type Job Tasks Activity Code Start Time End Time Job Task
Closed
User will enter the status of the Job Task whether it’s closed or not.
Once all the Job Task for a Job Task is closed (as per above such entries), then Job Type would be closed automatically.
The above information would be referred to prepare the Project Status reports
6.2 Recurring Jobs Work Flow
For certain Services, Morrison Management would identify as Recurring Jobs, which implies the system need to create a Job Order record and conduct Job Monitoring tasks. For Example, Morrison Management would obtain a Job Order for conducting Secretarial Service for a Year starting from 01-Jan-2022 to 31-Dec-2022. As per Morrison Management this Job order could be a Recurring Job order which means system should be able to handle this Job for the period 01-Jan-2023 to 31-Dec-2023. System should be designed to handle such scenarios automatically. The following process workflow to be considered for Recurring Jobs
Have a Dashboard to display all the Recurring Jobs that would get expired based on a given date or in Days
Allow User to Edit the Job Record. The following information will be displayed and allowing the user to Edit certain fields
Project Code : xxxxxxxxxxxxxxxxxxxxx
Project Description :
Project Start Date : xx/xx/xxxx Project End Date : xx/xx/xxxx
Project Amount : xxxxxx.xx
Recurring Project : Yes / No (If Yes Create a Separate Work Flow as briefed in Point 6.2)
Item Details (Service)
Job Type Job Description Select Yes/No Existing Project Fees Revised Fees
In the above screen, User will be allowed to change the following fields
Project Start Date& Project End Date
Revised Fees for each of the Job Type, default with the existing fees and user can modify
Store the above Information in Draft Mode
Approve the above Job Draft Creation
Send Email to the Client for Renewing the Job for the next year (To obtain the email Template from Morrison Management) =- Not Mandatory, but if Price is changed email needs to be triggered. Also raise a quotation internally for the revised fee
Approve for Job Order creation
Create a Job Order with the above details and the process will commence as before
6.3 Reports for Project Monitoring & Tracking
CuteOffice should be able to do recurring follow ups to client for request of documents based on the filing date filled or updated at the client master list.
The software should also be able to send reminders to staffs and their superiors on upcoming tasks or pending tasks based on the due date fixed for the particular job that is being handled.
There should be a document tracker master for all mails and documents sent to clients.
File tracker should also be maintained by the software where all files records are updated into the master based on its ref number and location either in office, storage or destroyed.
7.0 Project Billing (Raise Invoices)
This option is provided to raise the Invoice for the projects created. The Invoice scope would be
Data Entry for Generating the Invoice by the User
Approval option for the Invoice
Generate the Invoice as per the defined format from Morrison Management
Store the Invoice data information
Following functionality will be provided to raise the Invoice
Please display the Projects that needs to be Invoiced in the below Tabular column i.e. Total Invoice Amount raised < Project Amount
Project
Code Project Description Client name Budgeted Hours Budgeted Amount Total Hours Utilized Invoiced So Far Balance to Invoice
For each Project provide a View option to display the following information is a
Project Code : xxxxxxxxx Project Description : xxxxxxxxxxxxxxxxx
Start Date : xx/xx/xxxx End Date : xx/xx/xxxx
Project Amount : xxxxxx.xx Status : xxxxxxx
Project Owner : xxxxxxxxxxxx Department : xxxxxxxxxxx
Client : xxxxxxxxxxx
Estimated Hours : xxx Estimated Amount : xxxxxxx
Utilized Hours : xxx
Invoiced So Far: xxxxxxxx
Invoice Details
Please furnish the Invoice details in tabular form
Add Invoice Data Entry will accept the Invoice details entry
Invoices for Approval will display the invoices where approval is pending
Invoices raised so far will display the invoices raised, will also have an option to select Client
# Billing
Billing Systems helps to process successful invoices and charging the customers.
### Billing Master Data
#### 1.0 Billing Master Data
The **Masters** submenu in the **Billing** page helps you to add the master data like details of Customer list, Job list, Task list, Tag list and Holiday list.
The **Masters** submenu contains the following tabs,
#### [](http://wiki.cuteinfocomm.com/uploads/images/gallery/2024-02/image-1709029004112.png)
#### 1.1 Customer List
Customer list helps to view customer details so that billing activities can be recorded and entered in the billing system.
To view Customer list, Click Customer submenu in the Master, the customer list page opens as below.
[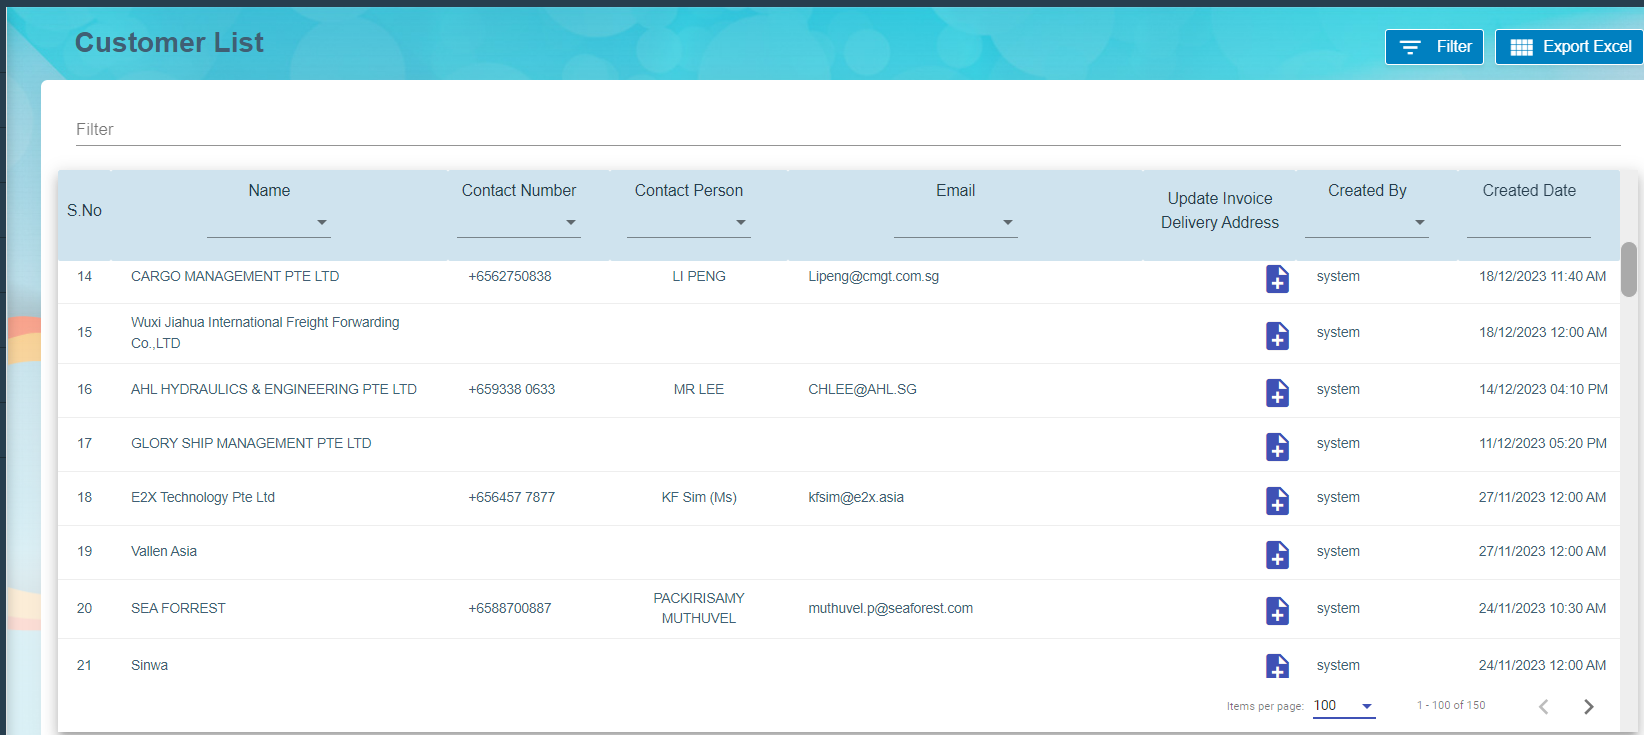](http://wiki.cuteinfocomm.com/uploads/images/gallery/2024-02/image-1709192407833.png)
Click add button [](http://wiki.cuteinfocomm.com/uploads/images/gallery/2024-02/image-1709201030288.png) to update Invoice Delivery Address and Save it.
#### 1.2 Job List
Job list viewed to maintain both completed and in progress job details in the system.
[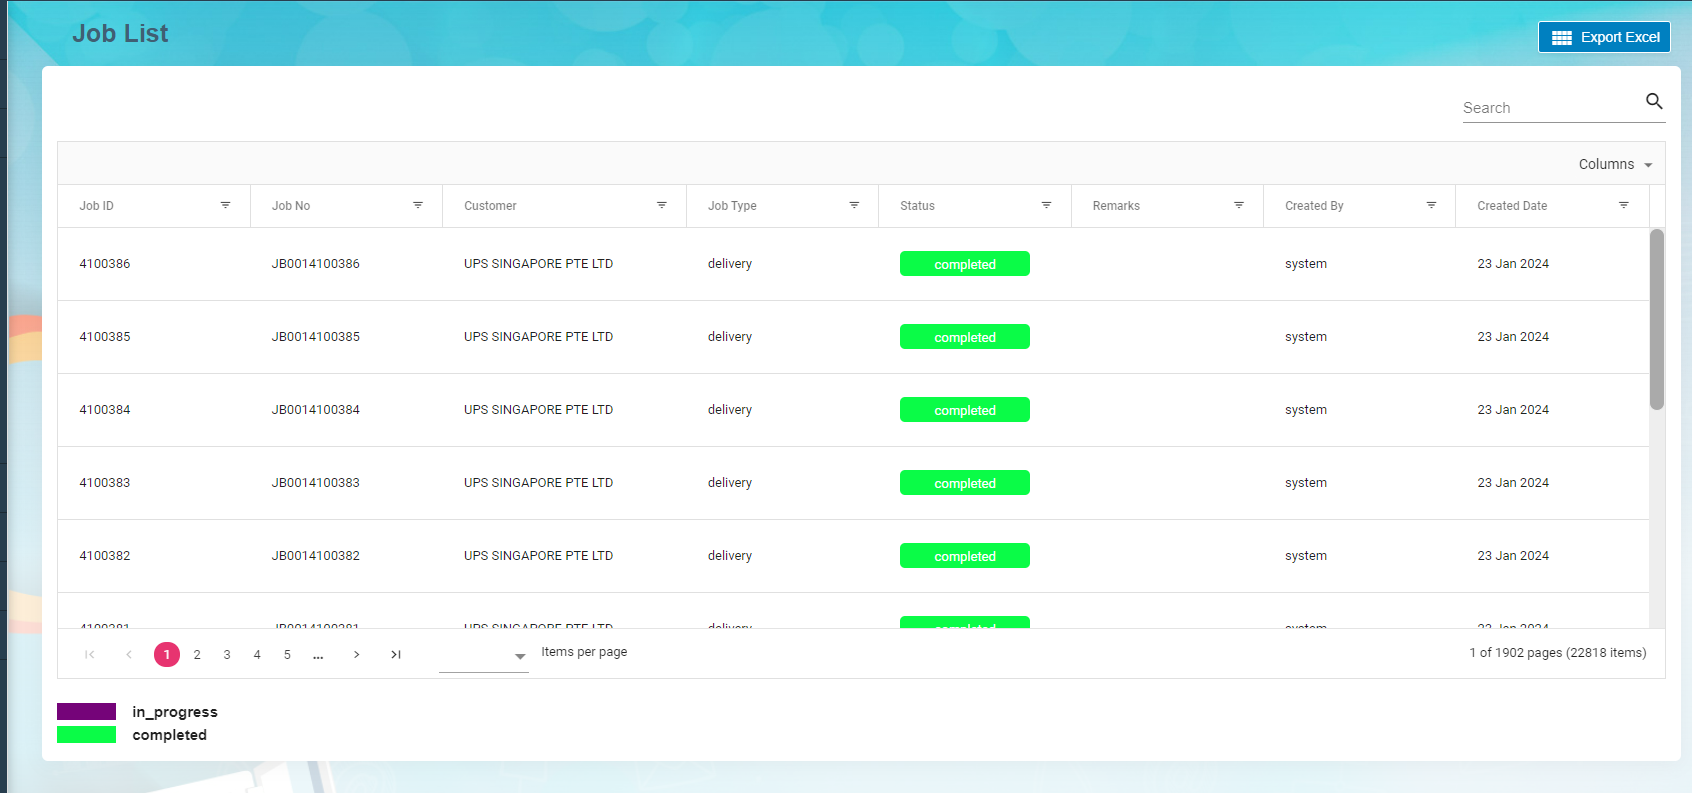](http://wiki.cuteinfocomm.com/uploads/images/gallery/2024-02/image-1709201410747.png)
#### 1.3 Task List
Task list viewed to contain assigned, waiting for acknowledgment, acknowledged and successful tasks.
Click Details icon [](http://wiki.cuteinfocomm.com/uploads/images/gallery/2024-03/image-1709268414834.png) to view Task details, Tags, Job details and Task Assignment. All the details come from the Network linked (Versa Fleet) to cuteOffice. Tags may contain single or multiple tag codes to process against each Task and Job number. The tasks which have successful status are ready to process Invoice.
[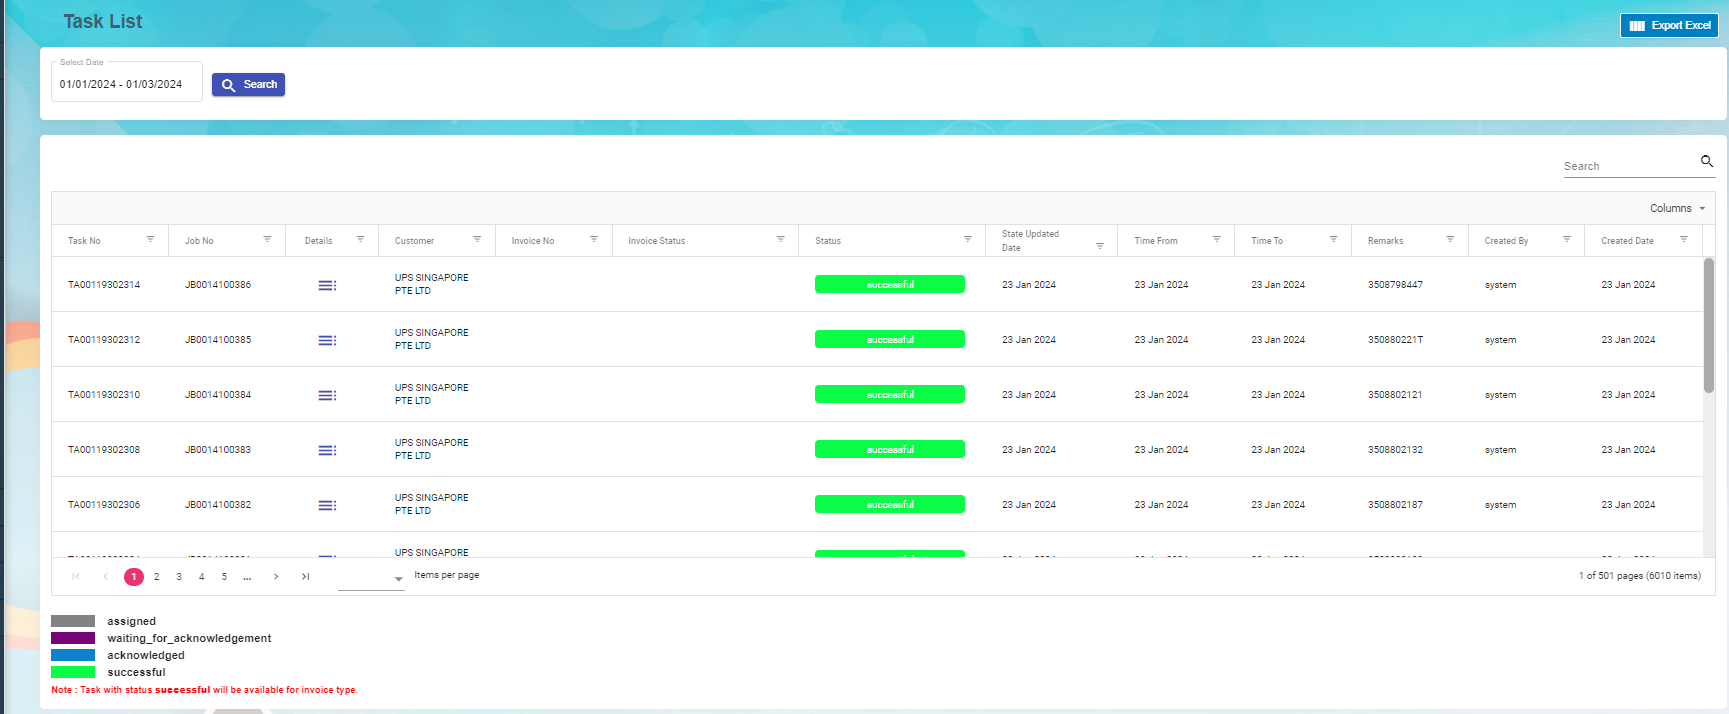](http://wiki.cuteinfocomm.com/uploads/images/gallery/2024-03/image-1709269280914.png)
#### 1.4 Tag
Tags Master contains Tag list. Based on the tag availability against each task in the Task list, the invoice will process in the billing system.
##### 1.4.1 Add A New Tag
Click add Tag, Billing Tag window open to add the tag and description. If the tag is miscellaneous tag, enable Miscellaneous in the Billing Tag.
##### 1.4.2 Edit Tag
To edit Task tag
Click [](http://wiki.cuteinfocomm.com/uploads/images/gallery/2024-03/image-1710161603201.png) edit button in the edit column of the Tag list that user want to edit any details about Tag name or Miscellaneous Tag Name and their description.
##### 1.4.3 Import Excel
Import Excel functionality[](http://wiki.cuteinfocomm.com/uploads/images/gallery/2024-03/image-1709269910587.png) is available to import the Tag details. Download the template to add all the Tag details and import into the system.
##### 1.4.4 Export Excel
Export Excel [](http://wiki.cuteinfocomm.com/uploads/images/gallery/2024-03/image-1709269952287.png)helps to download the tag list in the Master.
[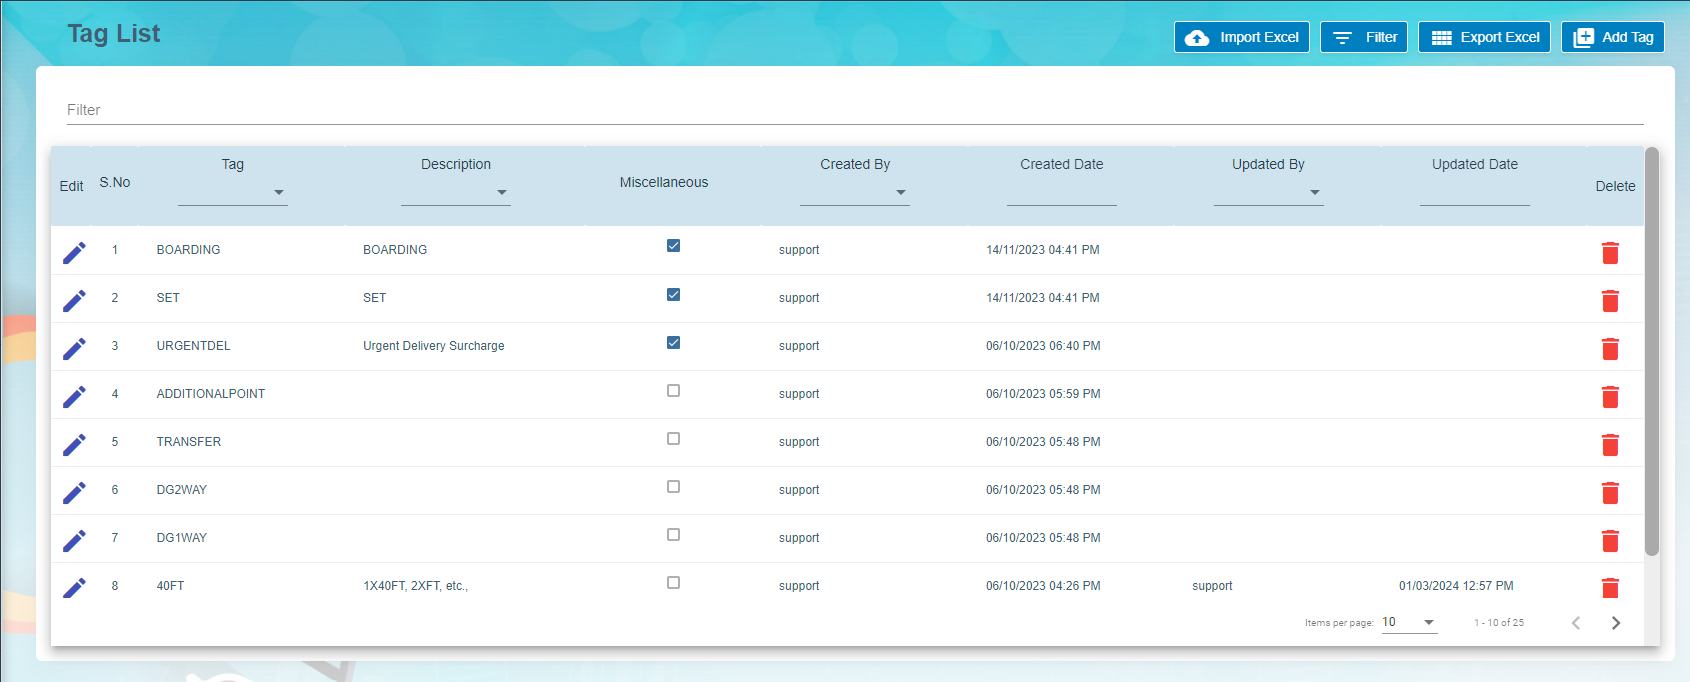](http://wiki.cuteinfocomm.com/uploads/images/gallery/2024-03/image-1709270030267.png)
#### 1.5 Holiday List
Holiday list viewed to maintain the holidays based on the Group Name and the Year. Group Name contains the country name such as Singapore, Malaysia etc.,
Main page contains Group Name, Event Name, Event date and Remark.
Excel export available to download the holiday list.
[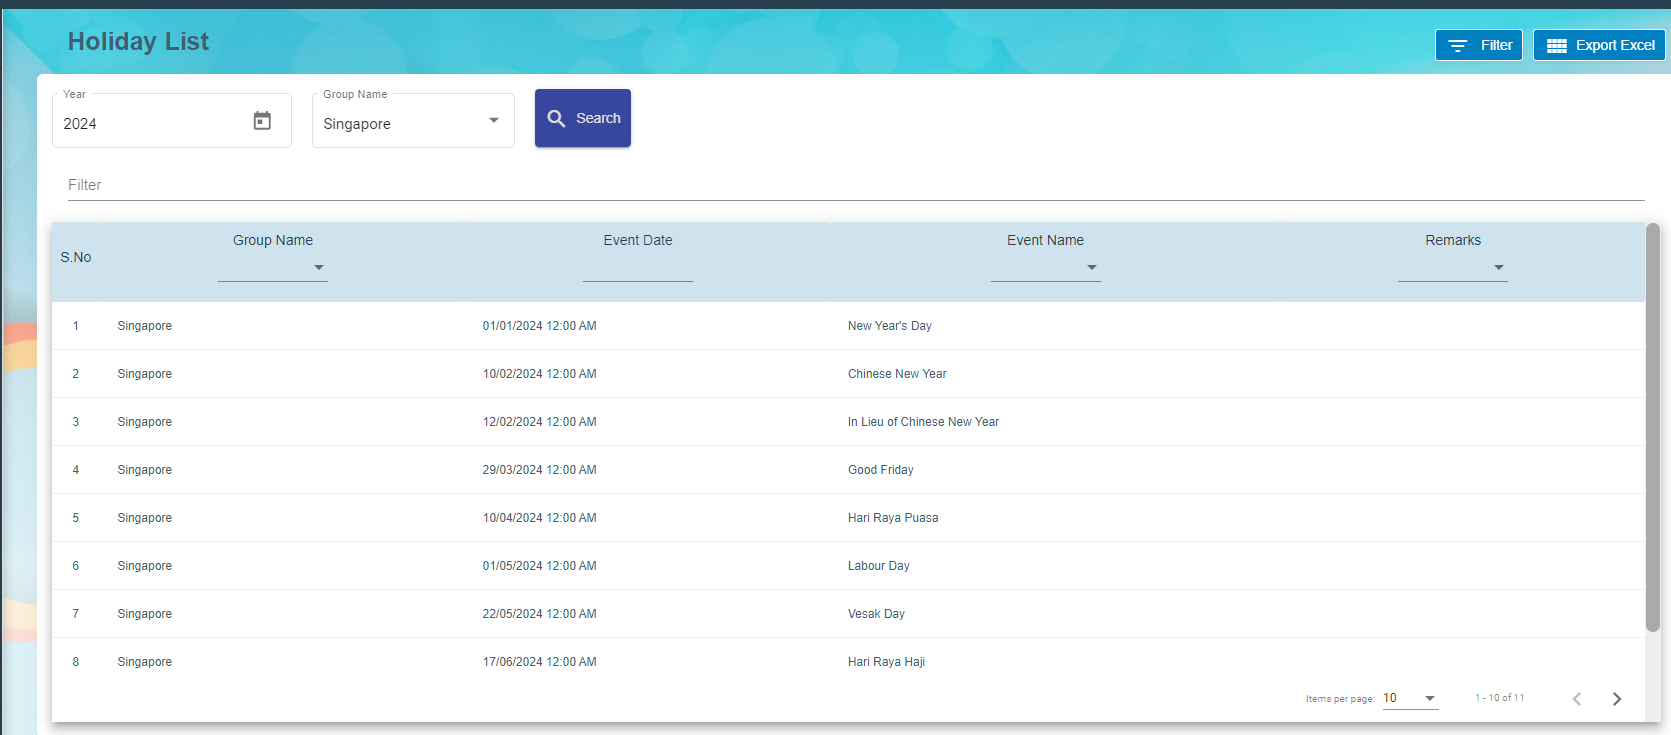](http://wiki.cuteinfocomm.com/uploads/images/gallery/2024-03/image-1709270373776.png)
### Billing System
#### 2.0 Billing System
Billing System is the processes that help to create invoices against completed tasks for the customers. The system receives tasks from various networks to process invoice. Each task is associated with rates and available in the rate card. Successful task and job are ready to process invoice in the system. New invoices are approved by the approver before sending the invoices to the customer. Once payment received from the customer, it has been updated in the system to close the transaction.
Billing System is a digital platform or solution that facilitates the electronic generation, dispatch, and tracking of invoices, eliminating the need for traditional paper-based billing methods.
#### 2.1 Task Ready to Invoice
Task Ready to invoice submenu available under Billing menu. Successful Task are ready for creating Invoice to the customer.
- Choose Customer in the Task ready to invoice and the date range. Select Type either Day, Month or Ad-Hoc.
- Click search button, list of tasks available on the page for invoice creation.
[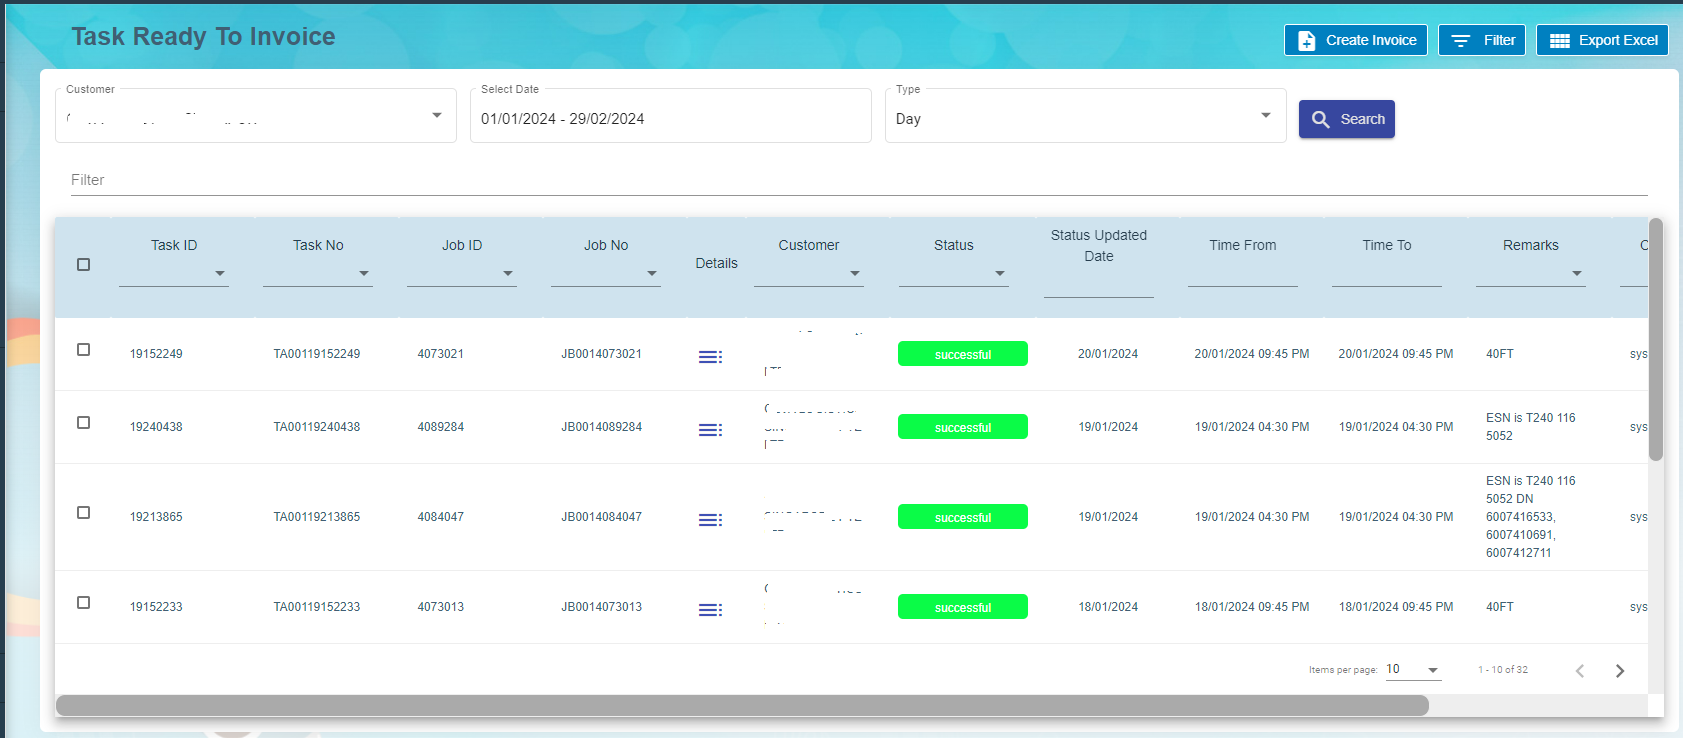](http://wiki.cuteinfocomm.com/uploads/images/gallery/2024-03/image-1710162821688.png)
Click detail[](http://wiki.cuteinfocomm.com/uploads/images/gallery/2024-03/image-1710163070486.png)icon against the task to view the task details , job details, task assignment and Tag details. User can modify the tag code and save it.
1. Click single or multiple check box [](http://wiki.cuteinfocomm.com/uploads/images/gallery/2024-03/image-1710163421698.png)against the task id to create invoice.
2. Click create invoice [](http://wiki.cuteinfocomm.com/uploads/images/gallery/2024-03/image-1710163544920.png)
3. Choose the payment terms from the drop-down list and staff name.
4. Click create invoice [](http://wiki.cuteinfocomm.com/uploads/images/gallery/2024-03/image-1710163544920.png)
The new invoice available to process in the Invoice List.
#### 2.2 Invoice
Choose Invoice submenu under Billing menu. Invoice list page contains invoice numbers to process billing for the activities.
[](http://wiki.cuteinfocomm.com/uploads/images/gallery/2024-03/image-1710164279844.png)
- Click Invoice number to view Invoice details.
[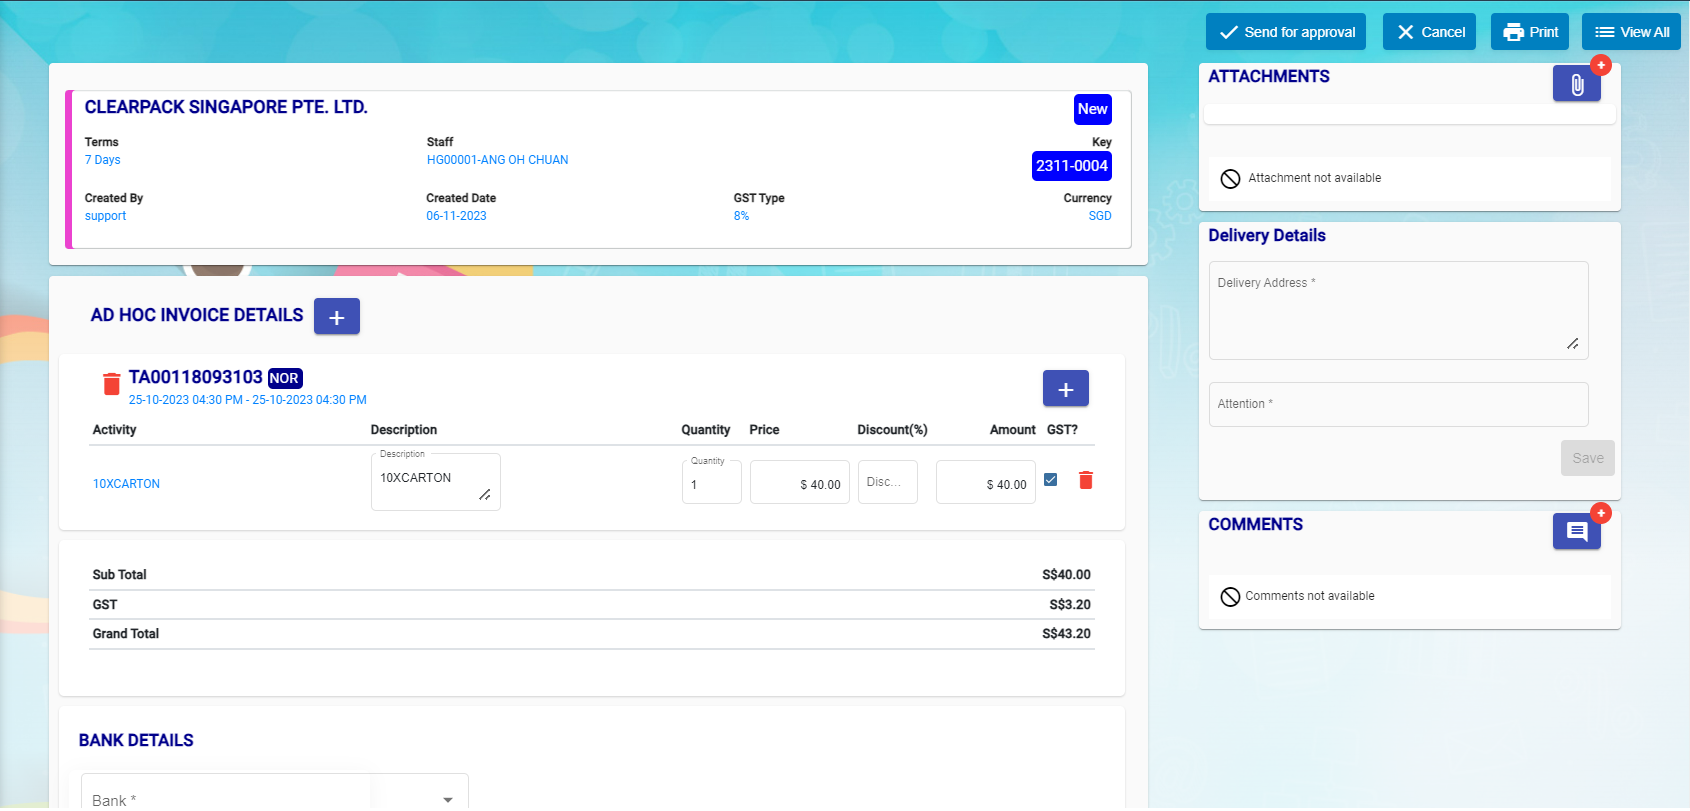](http://wiki.cuteinfocomm.com/uploads/images/gallery/2024-03/image-1710164190061.png)
- New task can be added along with the previous task.
- Click add button beside to Ad-Hoc Invoice details.
- New window open to choose the task numbers.
- Click add.
[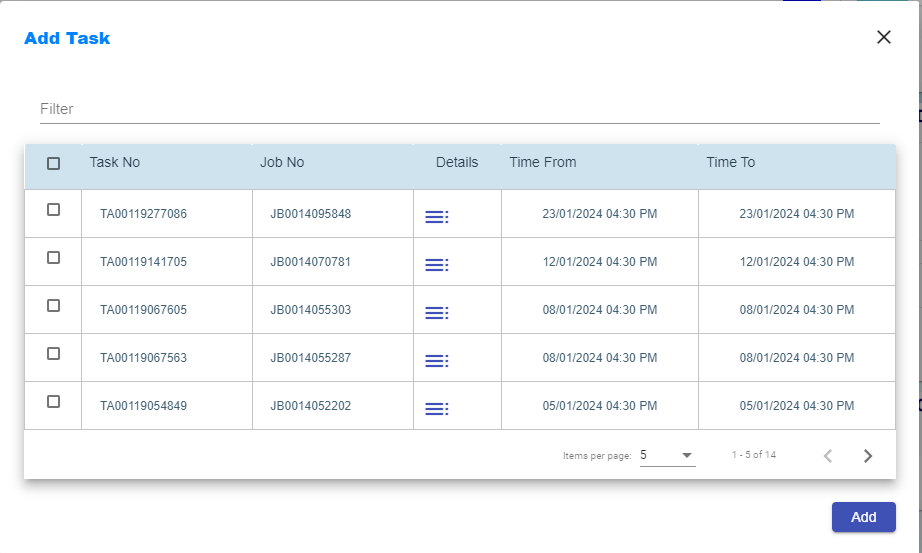](http://wiki.cuteinfocomm.com/uploads/images/gallery/2024-03/image-1710164919046.png)
- Choose Bank details and Save it.
- Click send for approval button available on the top right corner.
- Assignee and Notify window open to choose the approver and notify users.
- Click confirm.
- Approver will receive email notification to approve the invoice before sending the invoice to the customer.
- Dashboard contains waiting for approval for the approver to choose it.
- Click Approve button at the top right corner.
- Assignee and Notify window open to intimate the user proceed to send the invoice to the customer.
- Approved Invoice report available to send to the customer. Click Print and email as attachment to customer.
- Click send to customer button.
- New window open to intimate Assignee and Notify Users.
- Click confirm button.
- Invoice status change to waiting for payment.
- Click Paid button after payment received from the customer.
- Eventually Assignee and Notify window open to intimate the users and confirm it.
#### 2.3 Rate Card
Rate card submenu available under Billing System. Entire customers' rate cards are managed under the Rate Card list.
[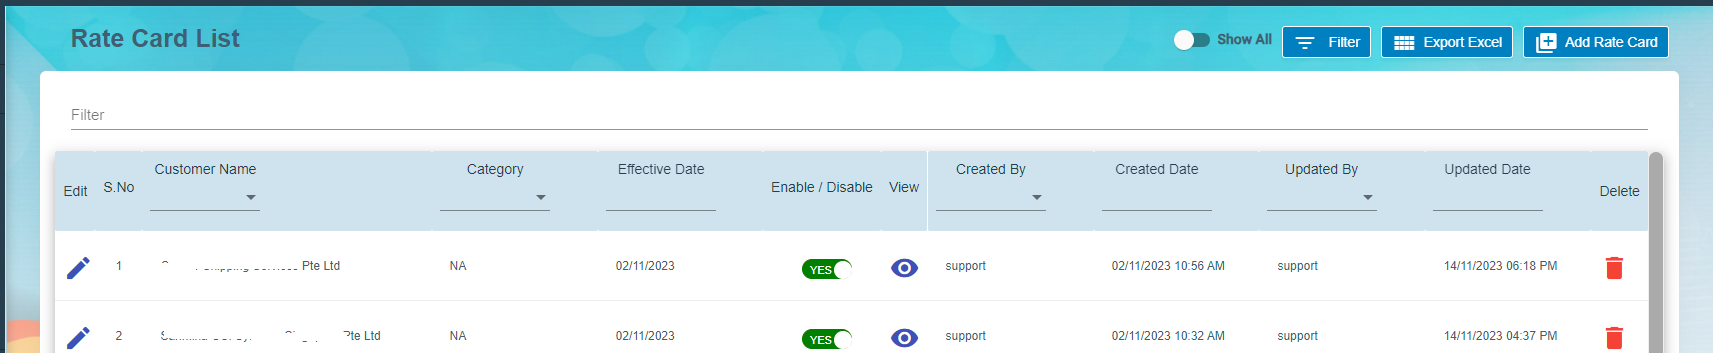](http://wiki.cuteinfocomm.com/uploads/images/gallery/2024-03/image-1710166308604.png)
1. Click rate card to add all the activities details against the customer.
2. Click Save to save the rate card details.
[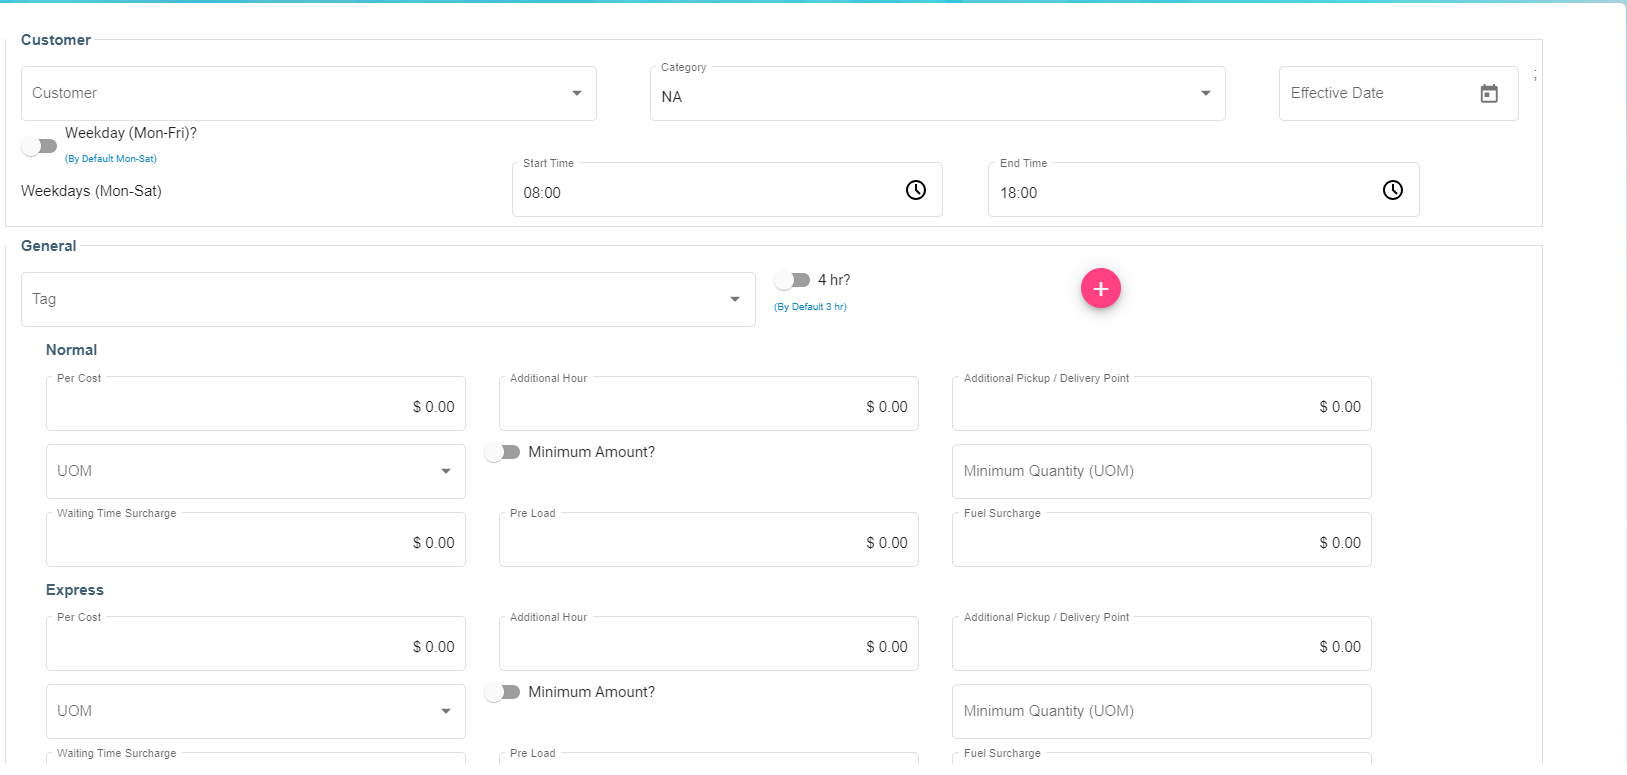](http://wiki.cuteinfocomm.com/uploads/images/gallery/2024-03/image-1710166448197.png)
# Work Completion