Operations
- Project Master
- Scaffolding
- PTW - Permit To Work
- HSE Module
- SRM - Service Request Management for Jetting Companies
- ACS - Accounting and Corporate Services
- Billing
- Work Completion
Project Master
User can manage project data in project master page. Click Operation tab in system main menu, then click Project to open prject master page as below,

Add New Project
To add a new project, click ![]() (add icon) in the top right corner of the project master page, the add new project window opens,
(add icon) in the top right corner of the project master page, the add new project window opens,
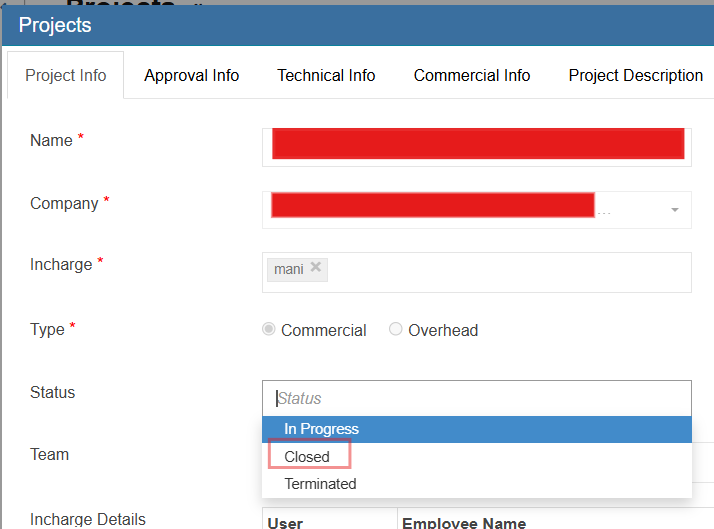
Project Info Tab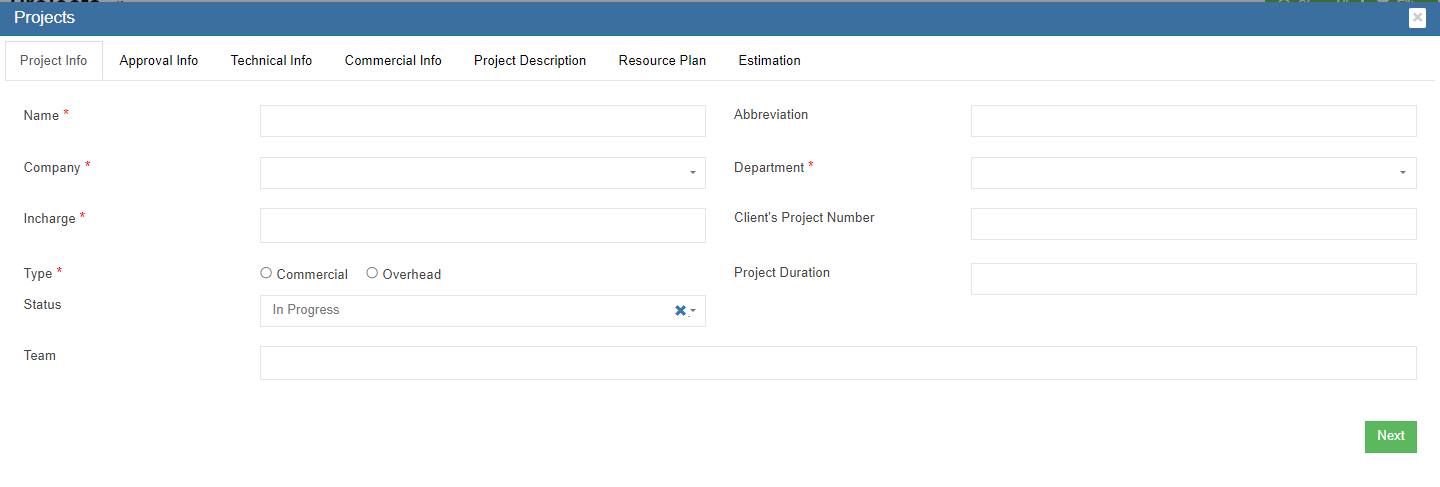
- In Name box, enter project name.
- In Abbreviation box, enter project name abbreviation.
- In Company box, select company name.
- In Department box, select department name.
- In Incharge box, select person in charge.
- In Client's Project Number box, enter client side project number if available.
- In Type box, click commercial or overhead to indicate project type.
- In Project Duration box, click to select project start and end date from calendar.
- In Status box, click to select status as In Progress/Closed/Terminated.
- In Team box, enter team information.
- Click Next to save project info and open Approval Info tab.
Approval Info Tab
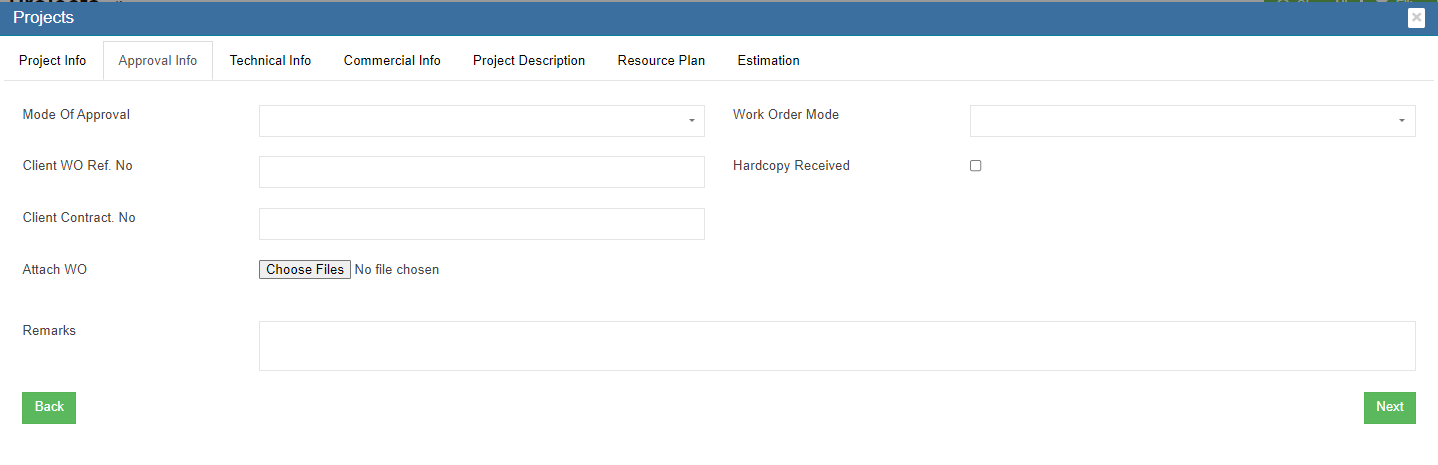
- In Mode of Approval box, click to select approval mode as Email/Hardcopy/Phone.
- In Work Order Mode box, click to select work order mode as single or multiple.
- In Client WO Ref No box, enter client work order reference number.
- In Hardcopy Received box, tick to indicate received approval hardcopy document.
- Client Contract No box, enter client contract number.
- In Attach WO area, click
 to choose file to upload.
 - In Remarks box, enter remarks if any.
- Click Next to save approval info and open Technical Info tab.
Technical Info Tab
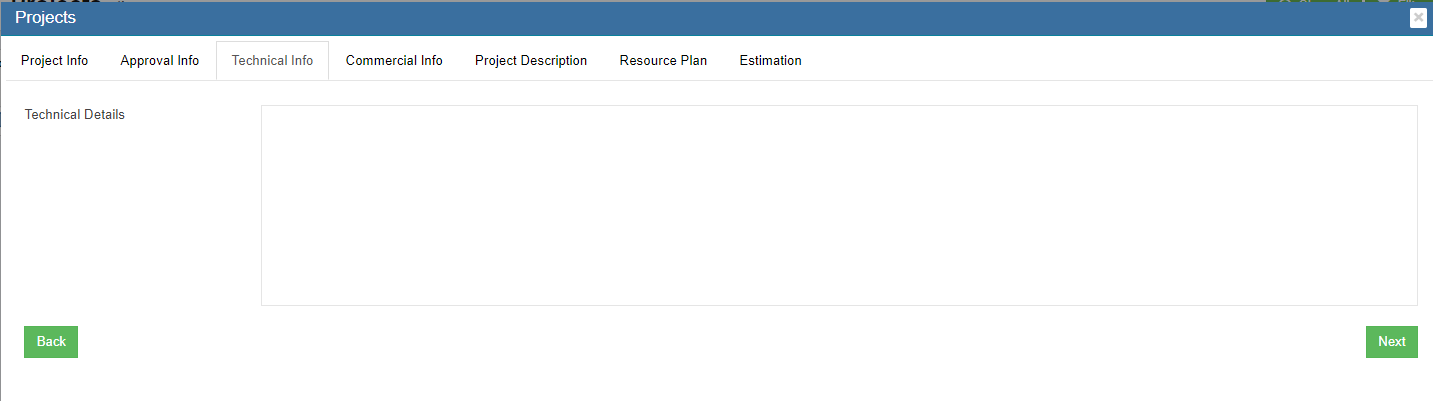
- In Technical Details box, enter project technical detail.
- Click Next to save technical info and open Commercial Info tab.
Commercial Info Tab
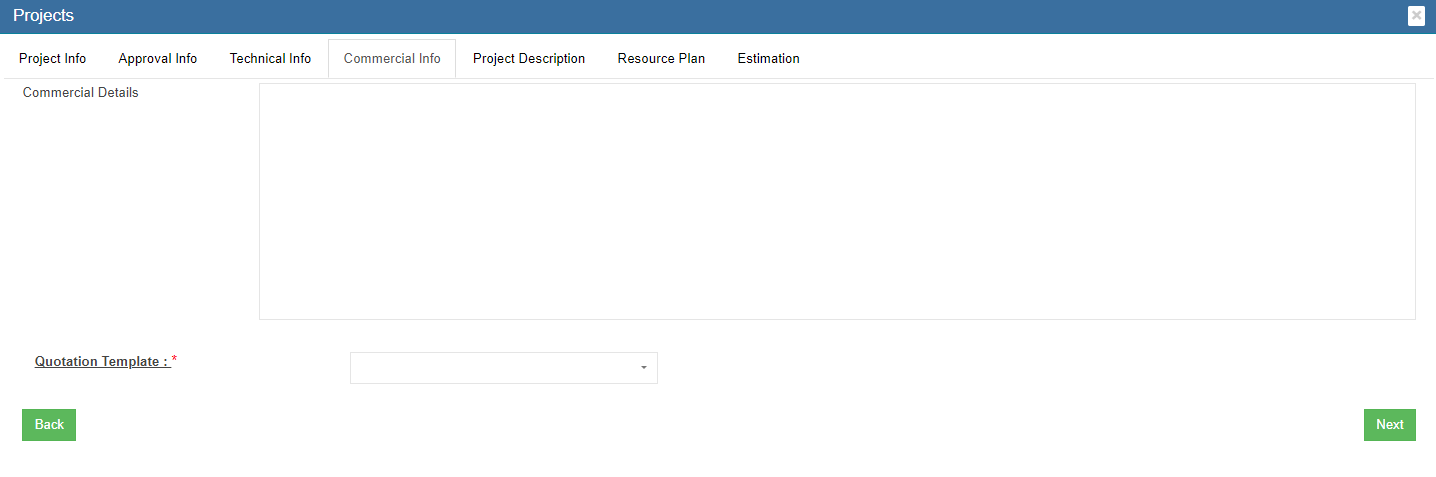
- In Commercial Details box, enter project commercial detail.
- Click Next to save commercial info and open Project Description tab.
Project Description Tab
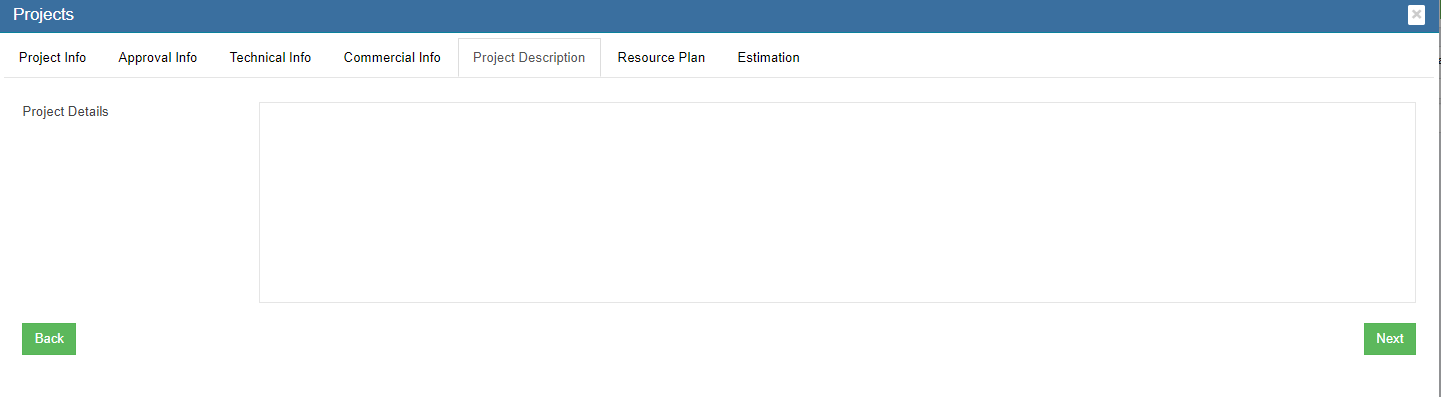
- In Project Description box, enter project description.
- Click Next to save project description and open Resource Plan tab.
Resource Plan Tab

- In Minimum Manday box, enter minimum man days.
- Click Next to save resource plan and open Estimation tab.
Estimation Tab
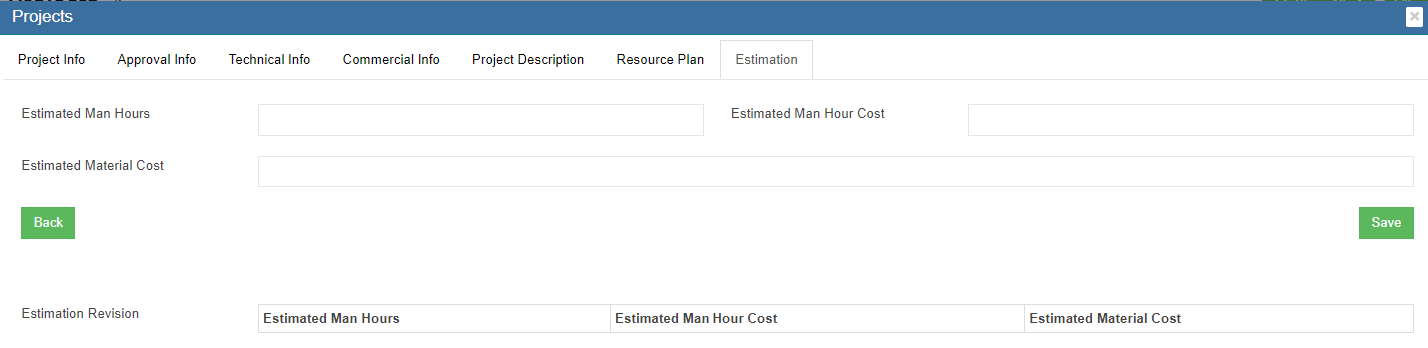
- In Estimated Man Hours box, enter estimated man hours.
- In Estimated Man Hour Cost box, enter estimated cost.
- In Estimated Material Cost box, enter estimated material cost.
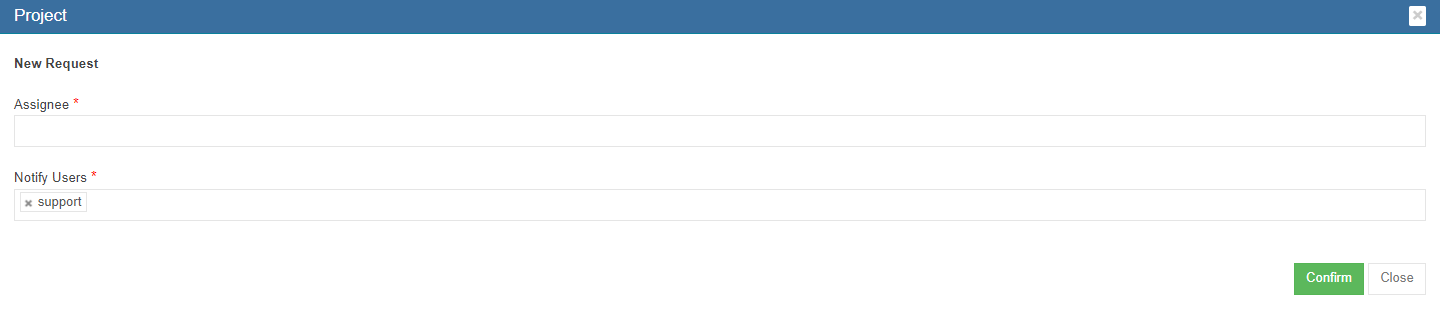
- Click Save to save all data entered in project tabs, a project creation notification window opens as below,

- Click Confirm to create project.
Project Status
Once project is completed, the status can be changed from "In Progress" to "Closed" . Edit functionality will not be available for the project to edit further.
Special permission "projectSplEditforNonActive" available to edit "Closed" status project.
Edit Project

Click the (edit icon) in front of the project name. The project details window will open. Edit the details and click Save to save updates.
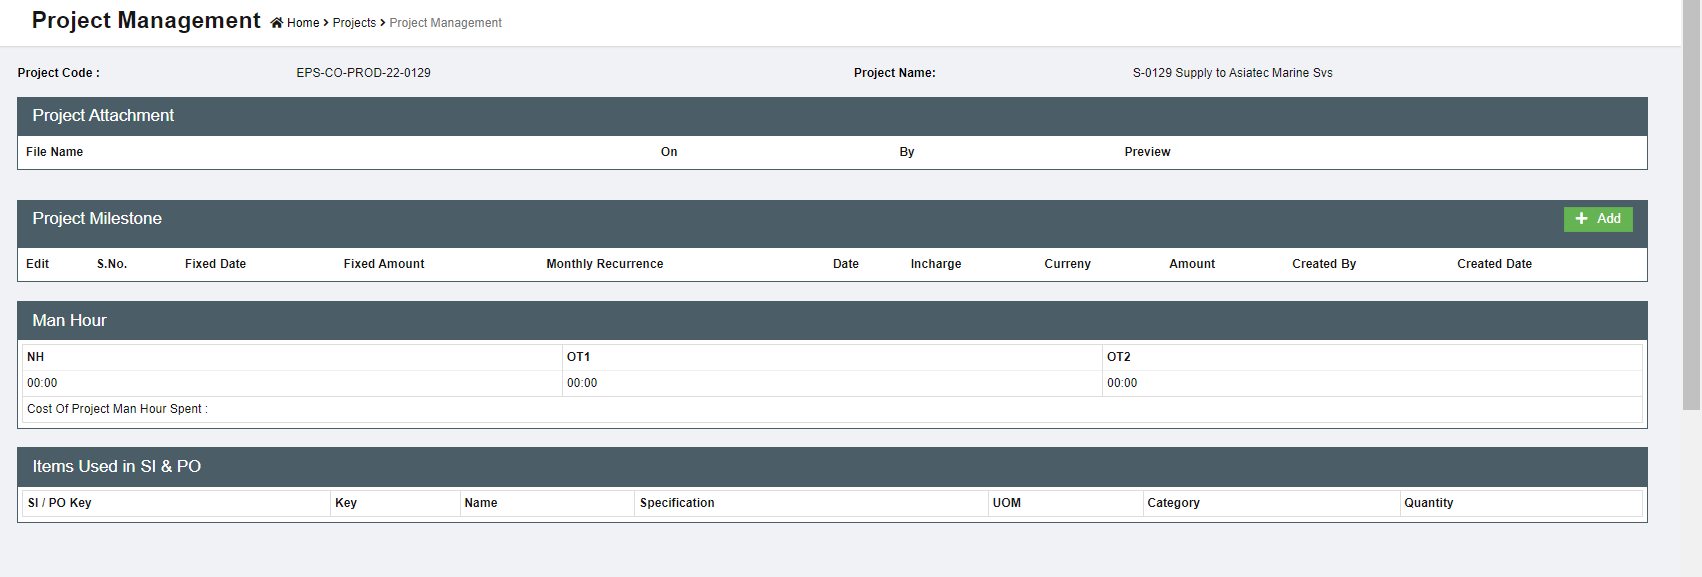
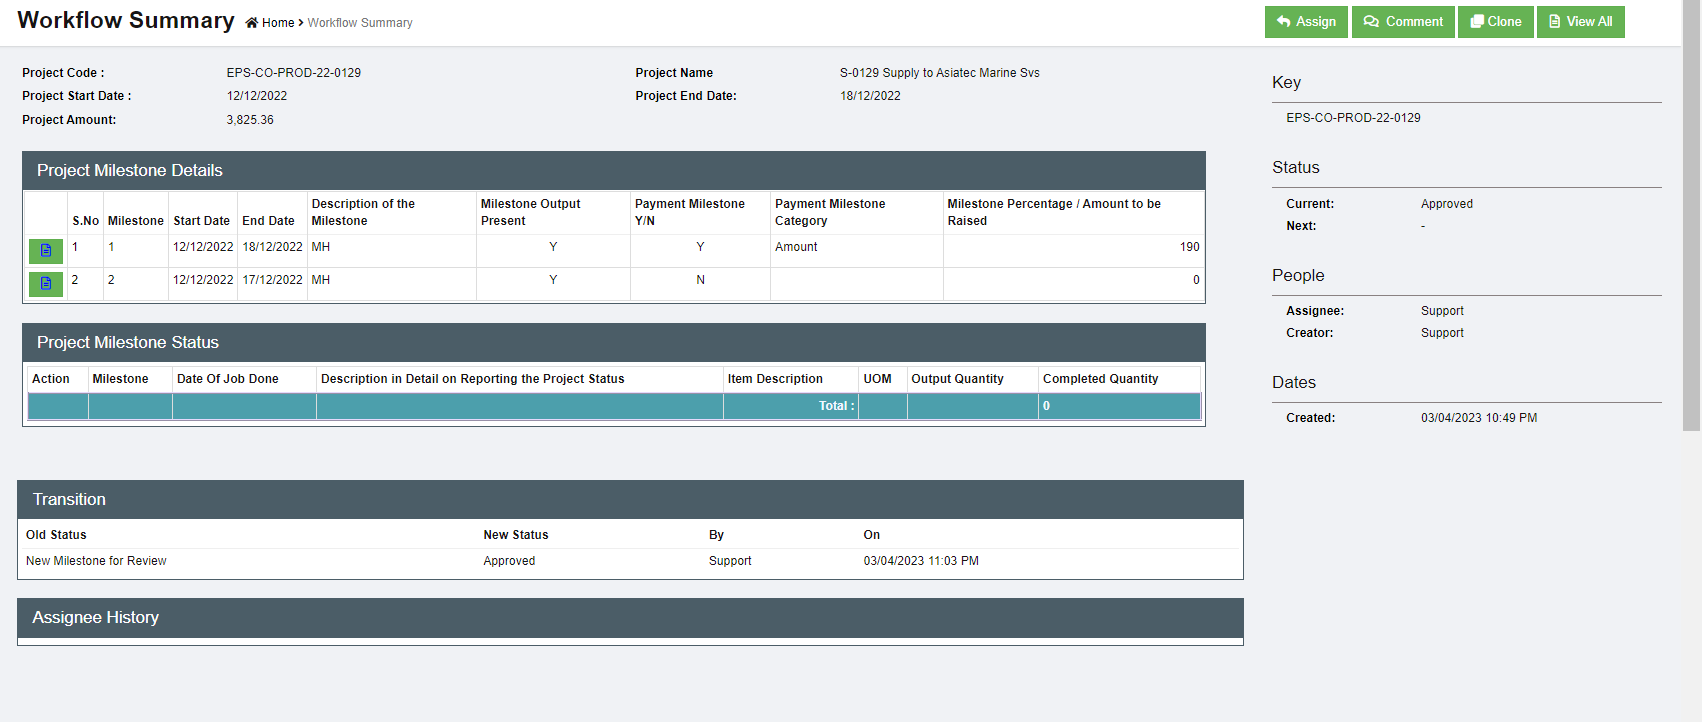
Project Management

- Click
 icon, the project management page opens as below,

- User can view all relevant project information and also add project milestones.
Project Site
Project site is used to define single or multiple site locations for a project. Each site will have geolocation (latitude & longitude) and shift name.
To establish geofence, allowing employees to perform Geopunch within the defined or default radius after accurate latitude and longitude coordinates enabled or radius can be drawn directly on the map.
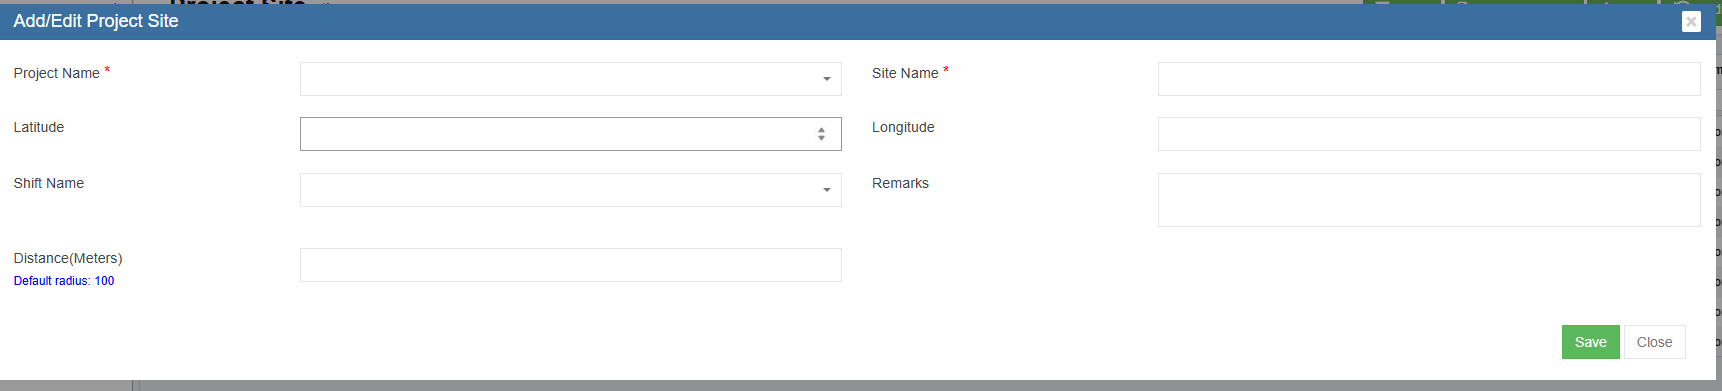
- Click Project Name and choose the project. *
- Enter Site name *
- Enter Latitude and Longitude of the location
- Enter Shift name
- Change the distance (default radius), if required.
- Save the record.
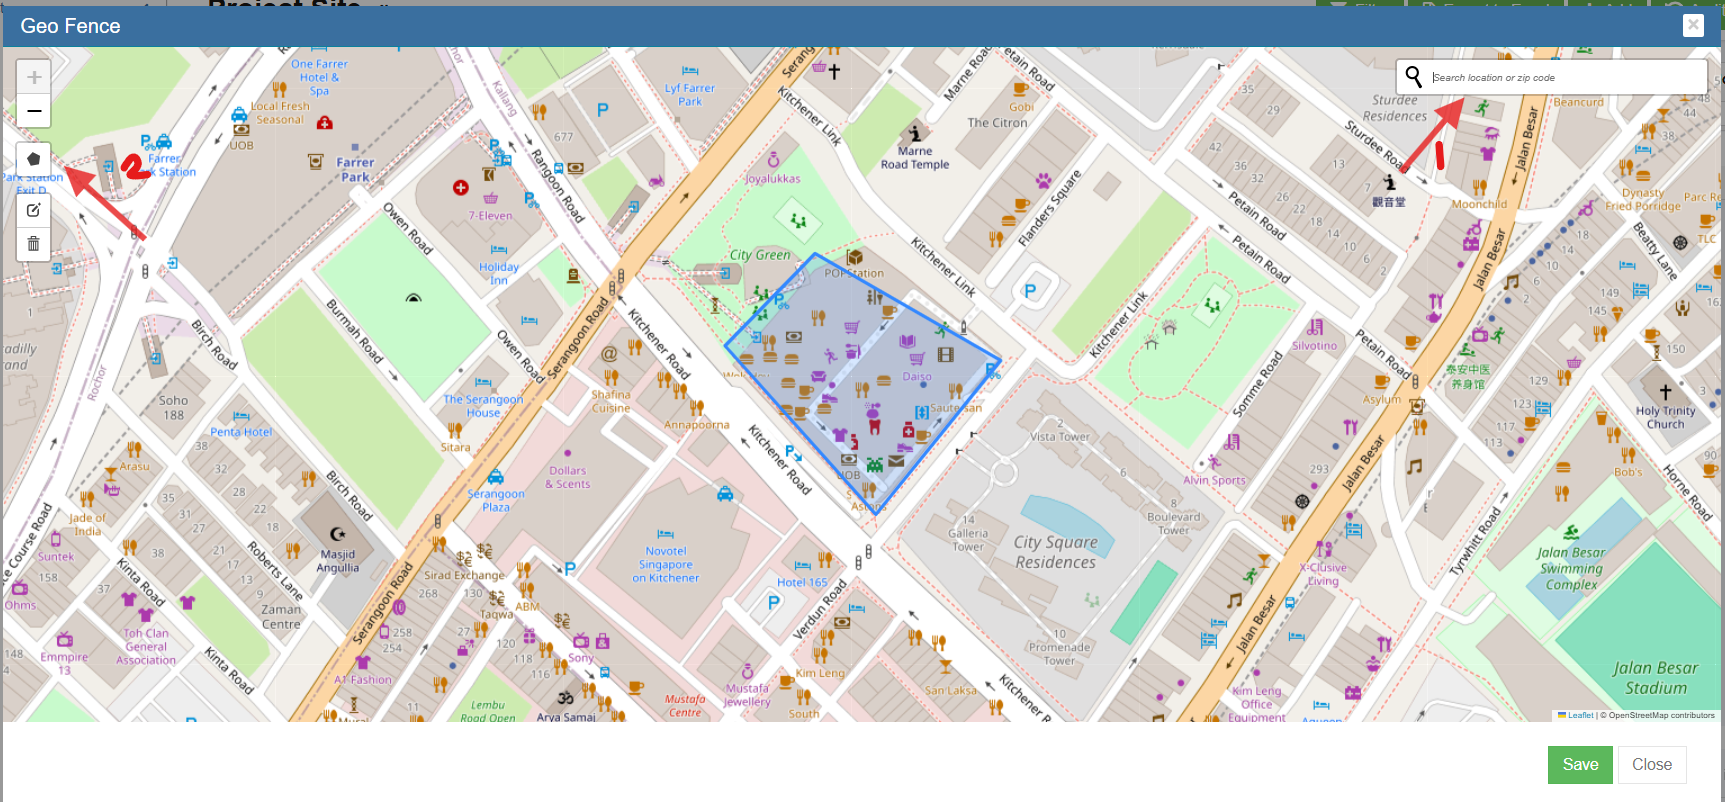
- Go to main page and click Geo icon.

- Click search and enter the pin code.
- Click Polygon to draw radius to define the boundary to perform geopunch. (Enable the geofence under global settings to true. Within the boundary, user can perform clock in & clock out. Beyond that, it is not possible )

Settings


* Mandatory fields
Project Milestone
The Project Milestone is to brief the various important milestones of the project. Entry of the Milestones for a Project is mandatory and the following validation needs to be implemented.
- The Start date of the Milestone (for Sno 1) should be the start date of the Project and the
last Milestone End Date should the Project End Date created - Milestone to be identified whether they are Payment Milestone Yes/No
- If the Payment Milestone is Yes, Milestone Amount is mandatory
- Total Milestone Amount should be equal to the Project Amount
- Linking Project Quotations to Milestone Yes/No
- In the Quotation field for the Milestone creation, validate the Quotation selected to be the same company. Also provide a dropdown of Quotation for this project. If no quotation is not there for this project in Enquiry, then display all the quotation for the company
- If there is only one quotation display instead of selection
- Once the Milestone Status is complete, 100%, Edit to be not provided for the Milestone. For milestones which has quantifiable output(for eg: 100m insulation of pipes) must have a field to enter the final output of the respective milestone. There can be multiple records as output. To capture Item Name, description. UOM and Quantity if output is selected
• . Change the below UI accordingly

- Click
 icon,
icon,

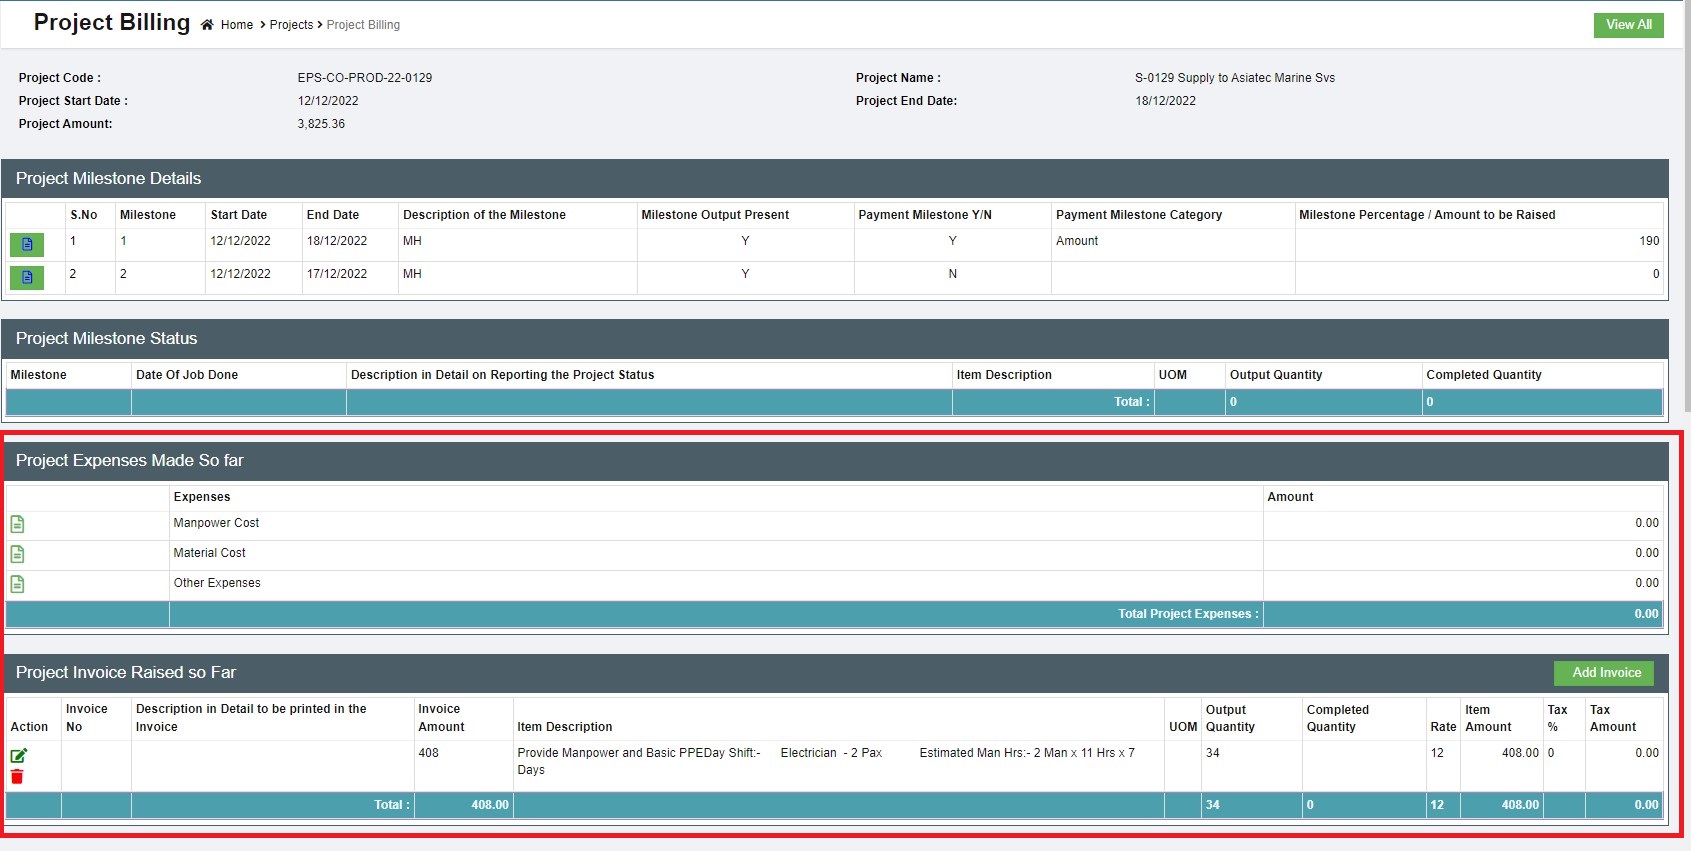
Project Billing

- Click
 icon, the project billing page opens as below,

- User can manage project expenses and project invoices in this page.
- To a
Project Attachment

- Click
 icon, the project attachment page opens,
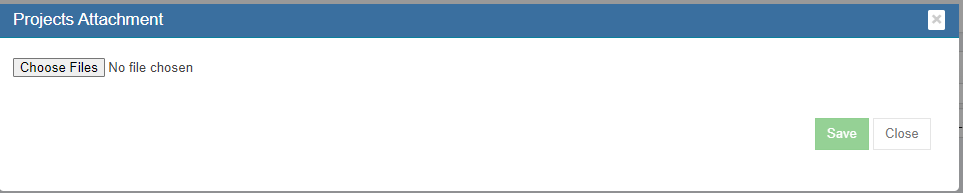
- Click Choose Files to open file upload window.
- Click Save to confirm uploading selected file as project attachment.

Project Renewal

- Click
 icon, the project renewal page opens,
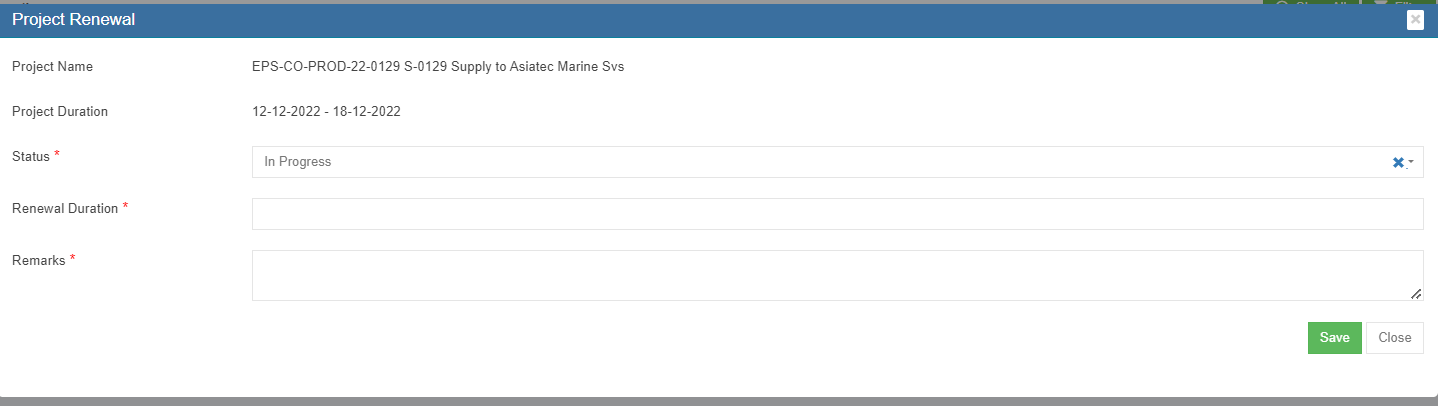
- Enter project renewal status, renewal duration, remarks etc..
- Click Save to save renewal updates.


Delete Project
Click  delete icon in the delete column, system will prompt confirmation notification. Click Yes to confirm deletion of a project.
Settings
OT Not Applicable for Project
In the project, when "OT Not Applicable for Project" setting is enabled with normal hrs, the system will display only normal hours in the time log without OT1 & OT2 hrs.
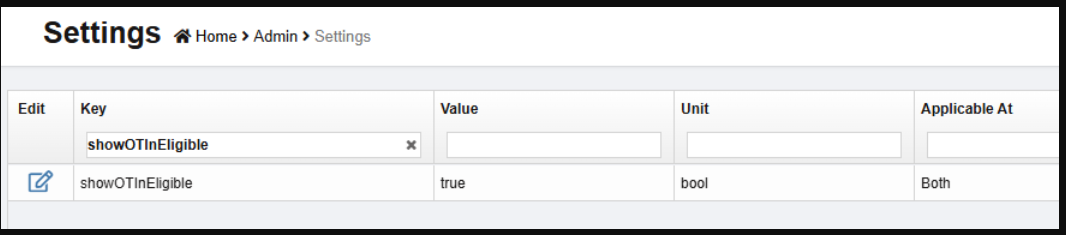
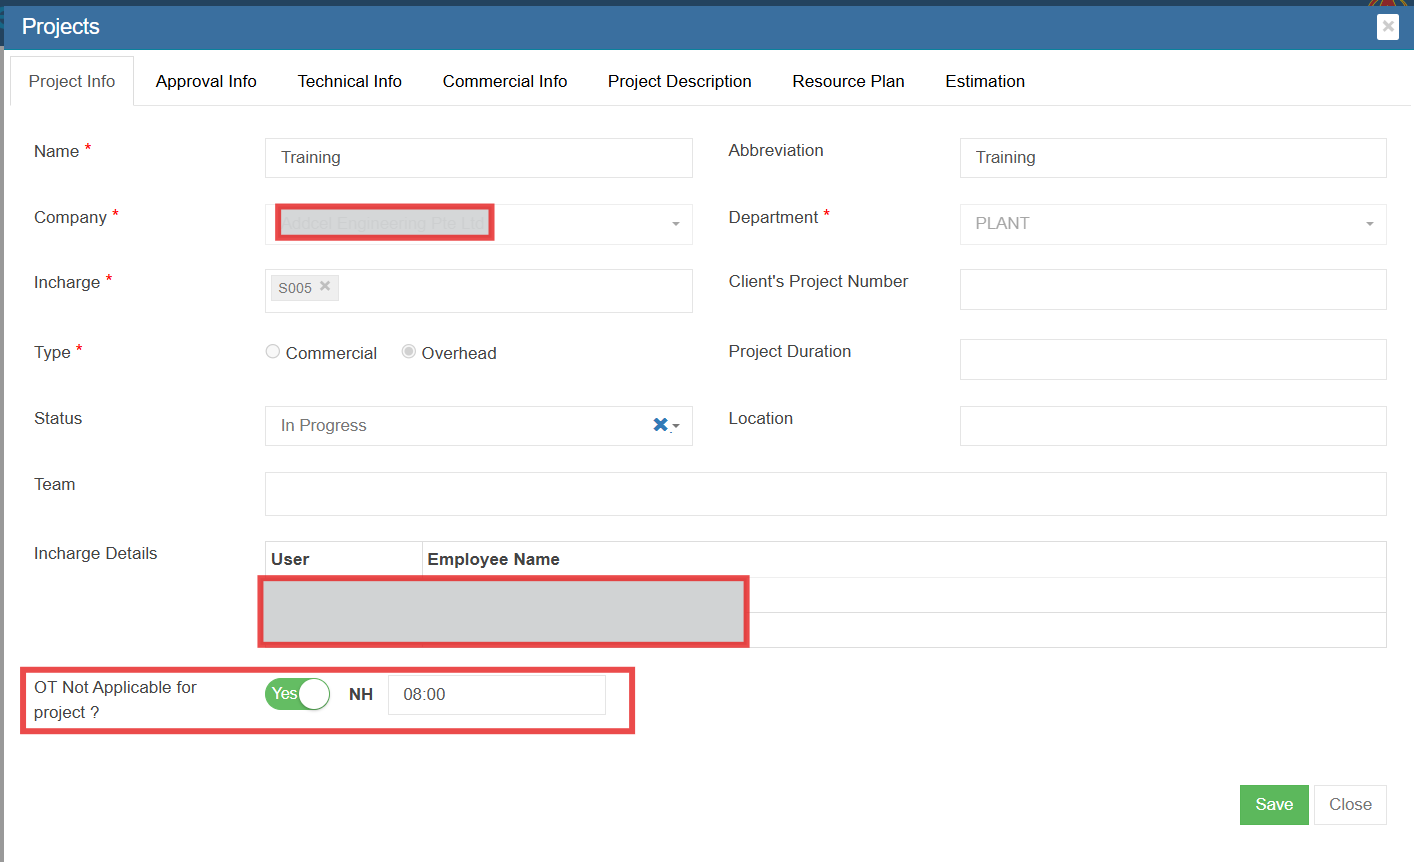
Note : If NH is 00:00, the system will use the actual NH calculation; otherwise, it will update the configured value.

Other View Options

-
Click
 icon to show active projects.
 -
Click
 icon to show column filters.
 - Click
 icon to export project list to excel file.
Scaffolding
Master
There are two types of master data in Scaffolding module:
Item Master-The list of items data that will be used in Scaffold module. They are managed centrally so that duplicate items are not entered into the system.
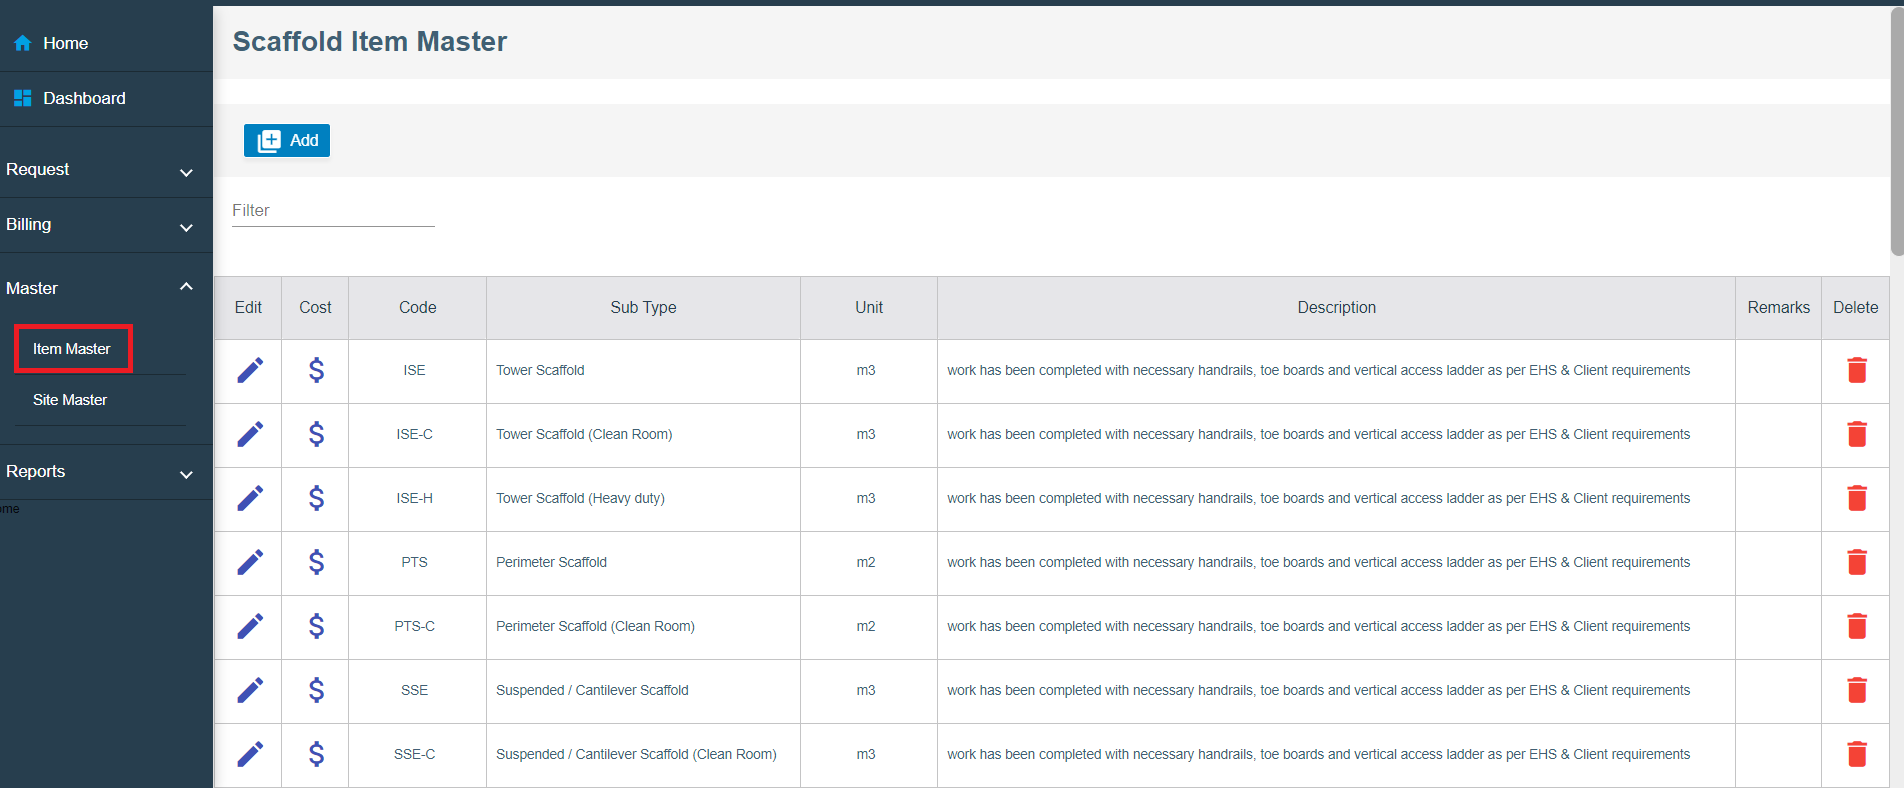
Item Master
Add New Item
- Click
 button on the top left corner in the Scaffold item Master list view page, the add item page opens as below,
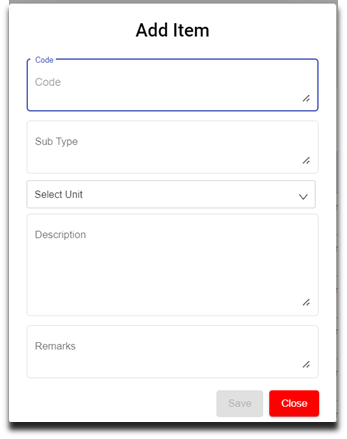
- Enter details in the below fields,
- Code (Mandatory)
- Sub Type (Mandatory)
- Select unit - UOM (mandatory)
- Description (Optional)
- Remarks (Optional)
- Click
 to save the item in the item Master. The new added item will be saved to item master list page.
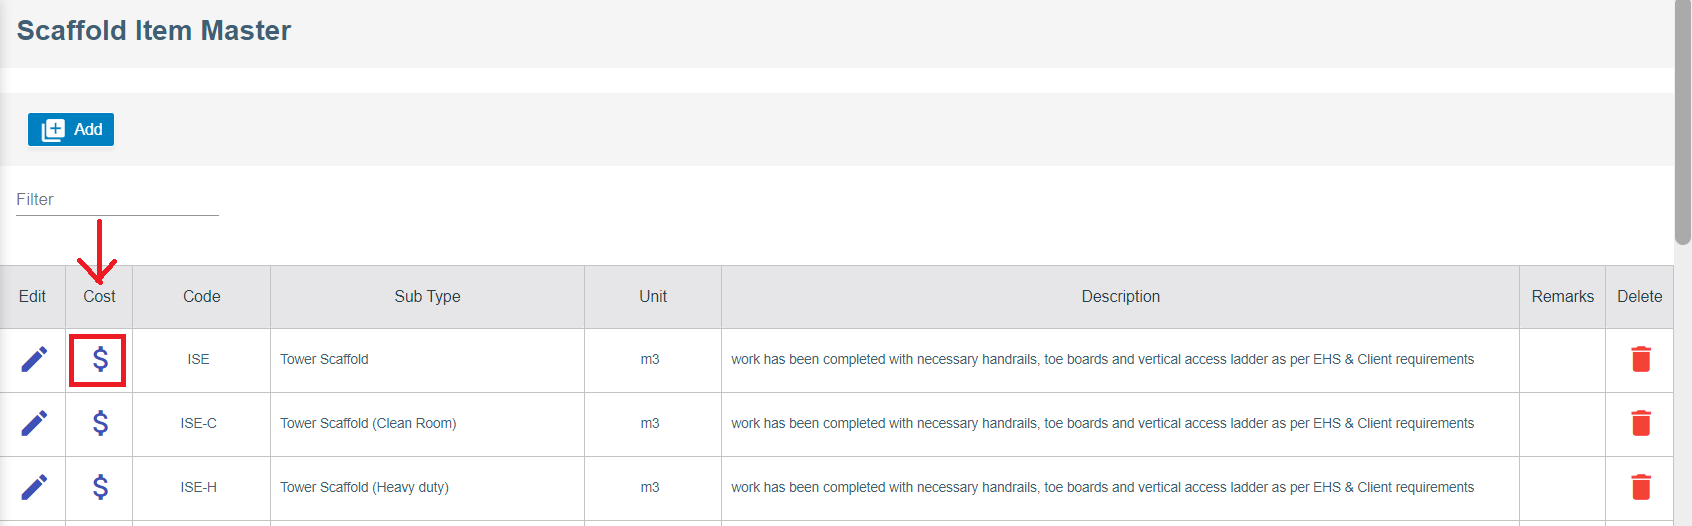
 - Once new item is added to master, user shall add cost details of the item. Navigate to the item name in the item master page, and Click
 cost icon.

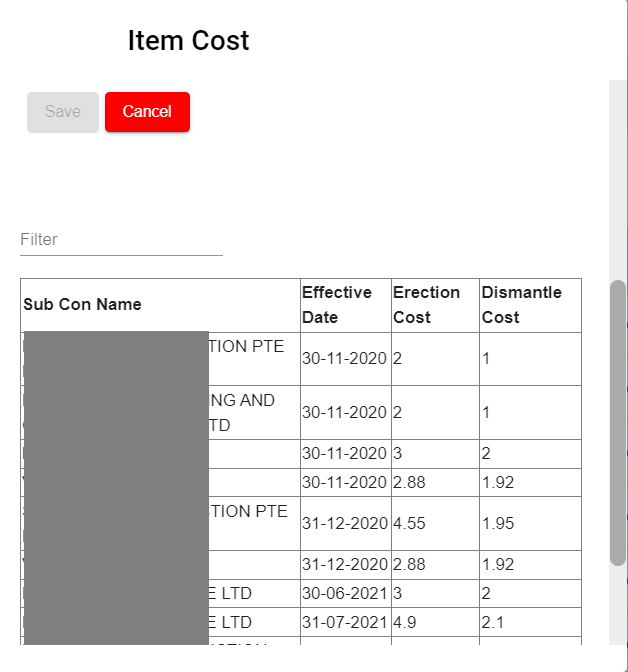
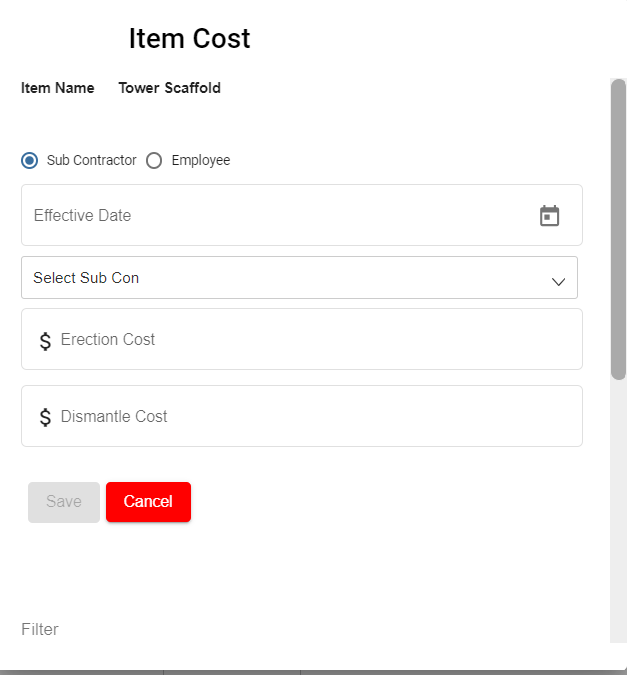
- The item cost page opens as below and enter the following details,
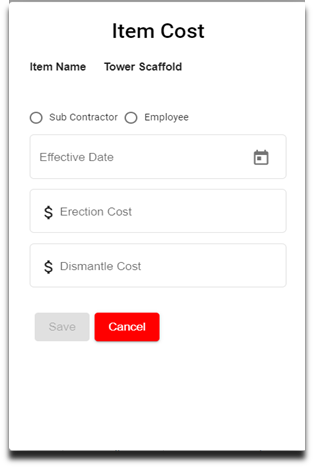
- Click to select Sub Contractor to add item cost for work assigned to sub contractor workers, enter details in below fields,
-
Choose Effective Date
-
Select Sub Contractor
-
Enter Erection Cost
-
Enter Dismantle Cost
-
Click Save. Item cost will be saved, and user can scroll down and view in the cost page.

-
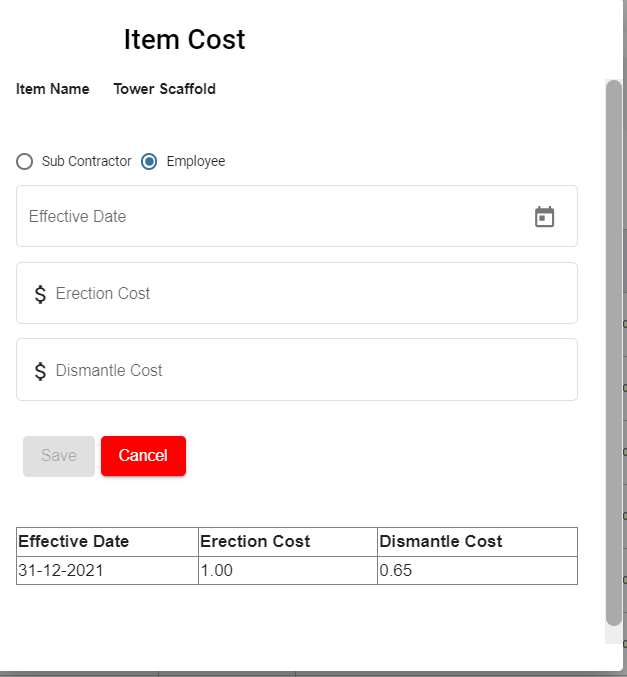
- Click to select Employee to add item cost for work assigned to employees, enter details in below fields
- Choose Effective Date
- Enter Erection Cost
- Enter Dismantle Cost
- Click Save. Item cost will be saved, and user can scroll down and view in the cost page.


Edit Item
- Click
 edit icon on the main page to update Item fields.
-
Update the respective fields.
-
Click Save button to save edit.
Delete Item
- Click
 delete icon in the delete column in item master list page.
 - A confirmation window opens, click Yes and the Item record will be deleted.


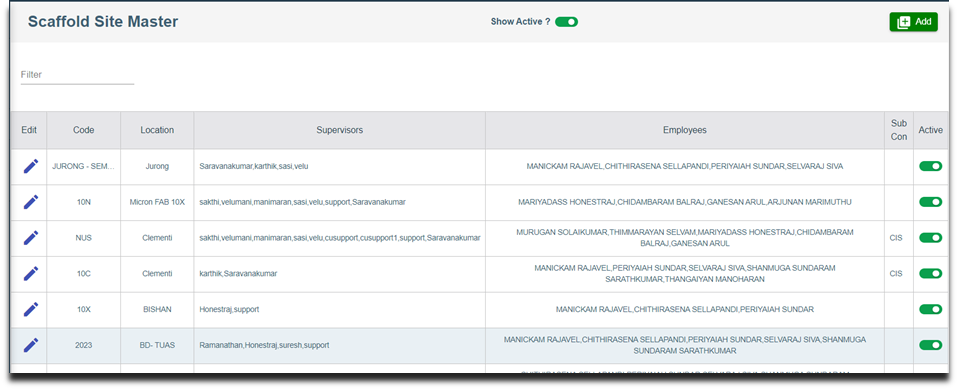
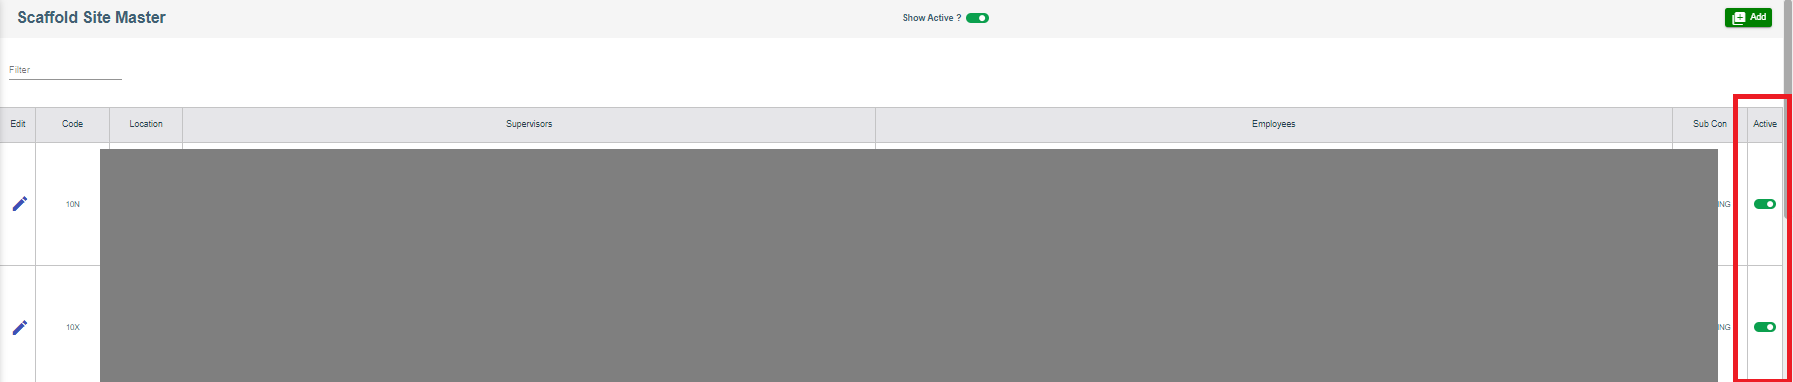
Site Master
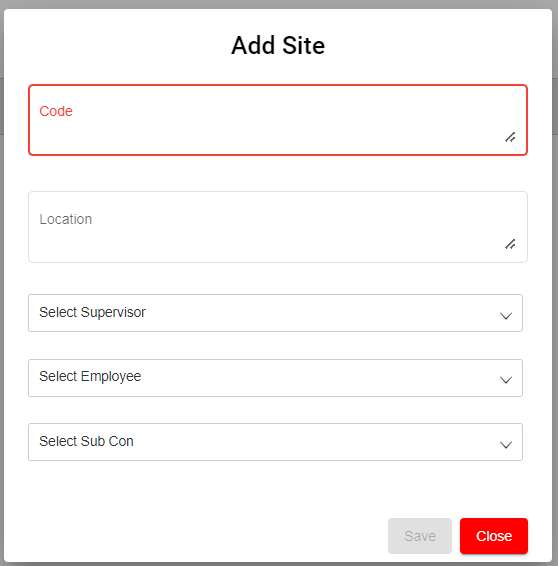
Add New Site
- Click
 button on the top right corner in the Scaffold Site Master view page, the add Site page opens as below,

- Enter details in below fields,
- Code (Mandatory)
- Location (Mandatory)
- Select Supervisor (Optional)
- Select Employee (Optional)
- Select Sub Con (Optional)
- Click Save to save the Site details in the Site Master. Important notes: 1) Only selected supervisor and selected employees can view and access projects associated with this Site Code.
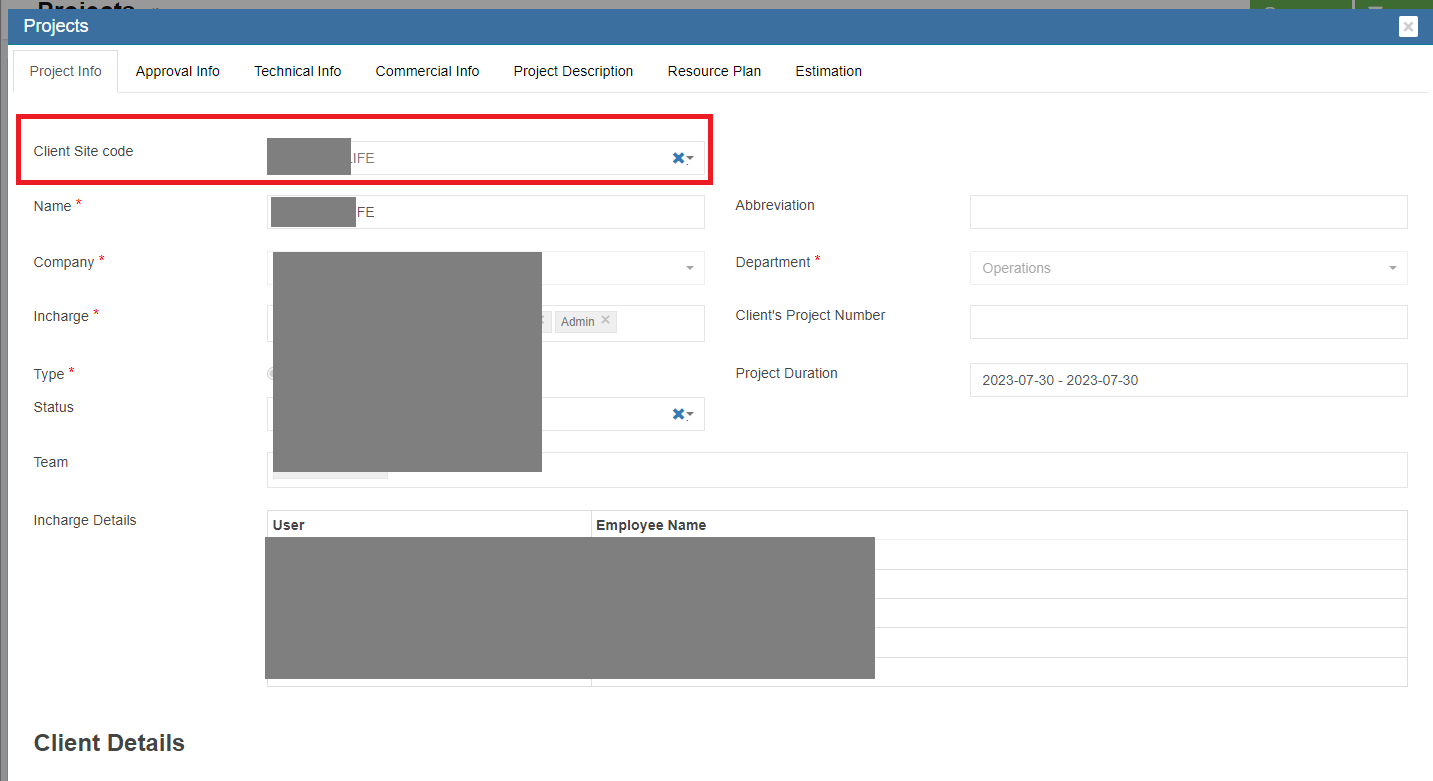
- Only project configured with Client Site code will be available in the scaffold module to create request. To configure client site code in projects,
- First, in Admin Settings, check and make sure showSiteCodeConfig setting value is True, so that in project master, client site code field will be enabled.

- Second, navigate to the project in Projects Master in Operation, in the Client Site Code field, click to select

- First, in Admin Settings, check and make sure showSiteCodeConfig setting value is True, so that in project master, client site code field will be enabled.
- Note: Site can be active or inactive, in the Active Column in site master list page, user can click to set to active
 or inactive
  .
.


Edit Site
- Clickedit icon on the main page to update site fields.
-
Update the respective fields.
-
Click Save button to save edit.
Delete Site
- Click delete icon in the delete column in site master list page.
- A confirmation window opens, click Yes and the Item record will be deleted.
Request
Scaffold Request
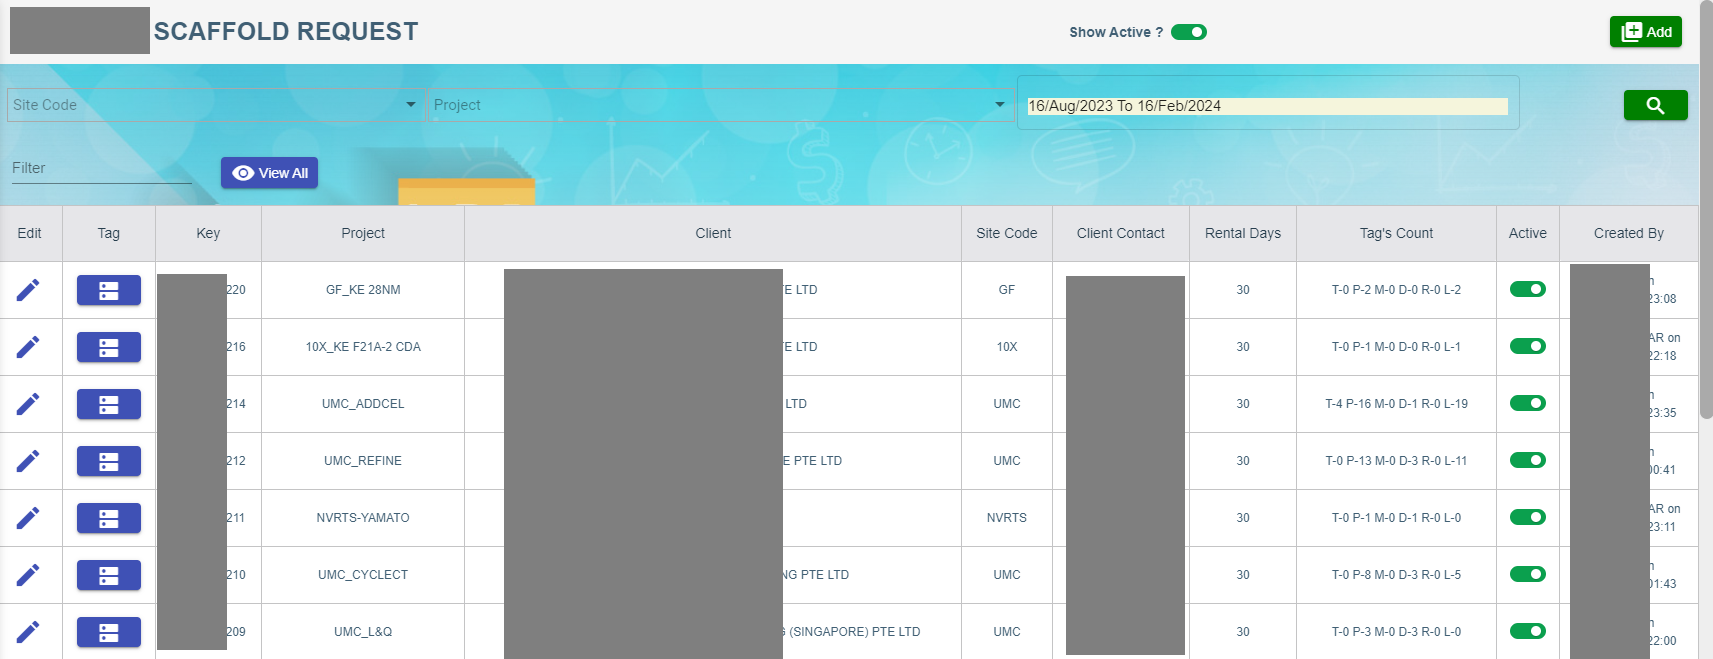
Add New Scaffold Request
- Click
 button on the top right corner in the scaffold request page, the add Scaffold Request window opens as below,
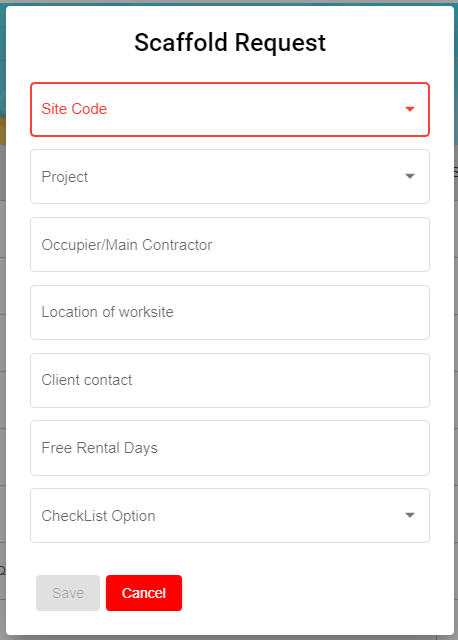
- Enter details in below fields,
- In Site Code field, click to choose site code.
- In Project field, click to select project.
- In Occupier/Main Contractor field, enter Main Contractor name.
- In Location of Worksite field, enter worksite location.
- In Client Contact field, enter client contact number.
- In Free Rental Days field, enter number of free rental days.
- In Checklist field, click to select checklist option.
- Click Save to save the Request in the Scaffold Request page. And a unique Scaffold request Key will be generated against the new added Scaffold Request.

Temporary Tag Creation
- Click
 (Tag icon) to create temporary tags for the new Scaffold request , the Scaffold Request page opens as below,
- Click
 (Create Temporary tag icon) , the below page opens,
- Enter details in below fields,
- Type of Scaffold
- Unit
- Quantity
- Sizes
- Location
- Requestor
- Remarks
- PE Design (click to enable if applicable)
- Click Save to save the Temporary tag. Once saved successfully, on the scaffold main page, the Tag’s Count Column “T” changes from 0 to 1 and L changes from 0 to 1.
Combined Tag Creation
- Click
 (Combined Tag icon) in the combined Tag’s column, the Combined Tag Creation page opens as below,
- Enter details in below fields,
- Type of Scaffold
- Unit
- Quantity
- Sizes
- Click Save to save the Combined tag. Note: Client Size column in the scaffold request consists of size details of the Scaffold Type.
Checklist
Perform Construction Checklist
To perform construction checklist,
- Click
 (Checklist icon) in the scaffold request, the Scaffold Request Checklist page opens to perform Construction Checklist.
- Choose Date and Construction Checklist. Note: Date can be modified based on the checklist activity performed date.
- Click
 Select icon.
 - Enter Height of Erection,

- Click Next, the Construction Checklist opens to perform the checklist.

- Click to choose from any of the three

 or NA for all the line items in the checklist and enter remarks if required.
 - Click Next , the below page opens with e-Signature,

- Enter signature, and click Submit. Note: Once construction checklist is completed, the Checklist icon color will change from blue to green.
- Click
 Print icon in the checklist to print the checklist performed, the Checklist screen opens. Click Print.

Perform Weekly Checklist
- Click
 (Checklist icon) and perform weekly checklist.
 - Choose Date and Weekly Checklist to perform.
- Click (Select icon).
- Enter Location Work Site.
- Click Next, the Weekly Checklist opens to perform the checklist.
- Click Next , the below page opens with e-Signature
- Enter signature, and Click Submit.
 Number changes from 0 to 1 indicates a weekly checklist performed for the scaffold tag numbers in the line item 1(L-1).
  The orange colour of the Checklist indicates the lapse of the weekly checklist.
- Summary of the Checklist available in the Print icon.
Create Permanent Tag
- Click
 (create tag icon), the below Permanent Tag Creation window opens,
- Enter details in the following fields,
- Date
- Select Tag (Drop-down list of Temporary Tag(s))
- Choose Partial or Full
- Choose Sub Con, Employees or NA (Choose from drop-down list)
- Size/Manhours
- Type of Scaffold (open to choose anything from the drop-down list)
- Click Save to save the internal size.
Modifying Tag
- Click
 (Tag Modification icon), the below Tag Modification Request window opens,
- Enter the following details
Option 1:
-
- Choose Addition size Request
- Type of Scaffold (open to choose anything from the drop-down list)
- Purpose/Remarks
- Sizes
Option:2
-
- Choose Modify Request
- Type of Scaffold (open to choose anything from the drop-down list)
- Purpose/Remarks
- No of Supervisors
- No of Erectors
- Click from Date & time
- Click To Date & time
- Click

-
- Click Save to save the Modification Tag.
- Modification tag available in the Tag No column.
- Create tag appears to create internal size for the worker. If internal size is not required for the modification tag, choose NA inside the Permanent Tag creation
.![]()
Rental Request
- Click
 (Rental Request icon), the below Rental Request window opens.
- Choose From date and To date.
- Enter remarks in the Remarks field if any.
- Click Save to save the Rental Request.
- Rental Request available in the Tag No column in freeze status. As it is redirected to the pending billing tag.
- The tag no in blue colour can modify at any stage. If it changes to white colour, it cannot be modified (freeze for billing)
Dismantling Request
- Click
 (Dismantling Request icon), the below Dismantling Request window opens.
- Enter details in the following fields,
- Select Tag
- Client Billing? (
 ”Yes” /
  “No”)
“No”) - Date
- Choose Sub Contractor/ Employee/ NA
- Choose Dismantling Partial/Full
- Choose Rental Chargeable? “Yes” or “No”
- Click Save to save the Dismantling Request.
Comment
- Click
 (Comment icon), the below Comment Update window opens,
- Enter comments.
- Click Save to save the comments.
Status
- Slide the toggle button from Green to Red.
Attachment
- Click
 (attach icon), the below screen open to choose file to attach against the Tag Number.
- Click
 Add Document and Choose file to upload the document.
 - Click Upload. The attached document is available under Documents.
- Click Close.
History

PTW - Permit To Work
Permit to Work are special authorization documentation used within an organization to control selected work activities and ensure their safe execution on-site.
Users can make request for permit to work with required documents and checklist. The request will go through the approval process before the work commences. The permit can be closed or cancelled as per the requirements.
PTW Applicant
The user who has PTW Applicant role can create PTW Request for the projects which are assigned to him. If no projects assigned to the user, user can create PTW Request for all projects of his company and department.

By default last generated PTW request data (created by particular user) will be populated for add.
Based upon Type, Capturing data will be differ for adding PTW Request. After save PTW request, PTW request No will be generated based on below criteria
There are 5 parts in request no. For example LE-NPARKS/N/110/2017-LLC1-13.03.24
Part 1: LE- for all requests (LE-)
Part 2: Selected project abbreviation (NPARKS/N/110/2017)
Part 3: This will be differ for each type as follows (LLC)
Type is Lifting Operation and Type of Crane is Lorry Crane – LLC
Type is Lifting Operation and Type of Crane is Mobile Crane – LMC
Type is Lifting Operation and Type of Crane is Crawler Crane – LCC
Type is Lifting Operation and Type of Crane is Overhead Crane – LOC
Type is Lifting Operation and Type of Crane is Using Excavator – EXC
Type is Pilling Works and Type of Pilling is Vibro – Vibro
Type is Pilling Works and Type of Pilling is Piler – Piler
Type is Work at Height and Type of Work is Scaffold – SCAF
Type is Work at Height and Type of Work is Mobile elevated working platform – MEWP
Type is Work at Height and Type of Work is LADD – LADD
Type is Work at Height and Type of Work is Others – OTHS
Type is Excavation – EX
Type is Hot Work – HW
Type is General – GEN
Type is Demolition Work – DW
Part 4: Running Number for the particular date (PTW request From Date) and type (1)
Part 5: PTW request From Date (13.03.24)
PTW Applicant can view his project’s request only in the list

After adding request, user can view the request. This screen will be different for each type.
Lifting Operation
Lifting Operation has the following segments
- Workers
- LM / Lifting Plan
- Lifting Operation
- Lifting Equipment
- Checklist
- Sketch Document
- Supporting document
- Comments
General
General has the following segments
- Part A - Application by Supervisor-in-charge
- Part E(tick one)* - Notification of Work Completion / cessation of Work
- Checklist
- Supporting document
Work at Height
- Workers
- Safety Conditions for night work
- Checklist
- Sketch Document
- Supporting document
Excavation
- Workers
- Checklist
- Sketch Document
- Supporting document
Hot Work
- Workers
- Safety Conditions for night work
- Checklist
- Sketch Document
- Supporting document
Piling Work
- Workers
- Checklist
- Sketch Document
- Supporting document
Demolition Work
- Checklist
- Supporting document

Workers
User can add internal workers and external workers
If internal worker toggle set to No, then user can add already added external workers from External worker drop down (multiple selection) OR user can add the details of external worker and save.

If internal worker toggle set to Yes, user can add multiple internal worker (Employees who has designation contains Worker)

After adding Workers, Workers can sign against his/her name.


Checklist
Checklist will be different for each Type.
User can add checklist by clicking on Checklist button in the view screen OR checklist button in the list screen.
Multiple checklist can be added against each PTW Request at any status.


When clicking on Checklist button, Checklist screen will be displayed with 3 levels
First level, user can enter checklist name and give next

Second Level, Enter checklist of particular type and give next

Third Level is Signature. If user has signed in my Profile screen, then in this level signature will displayed. Otherwise user has to sign here and give submit.

User can print the checklist either in view screen or list screen

On clicking this report icon, popup will displayed with all the checklist details and user can get report for each checklist.

PTW Applicant role user can Submit the request to the users who has role as PTW Notifier.
After submit Email will send the users who has role as PTW Notifier and has access to the project of PTW request
And also mobile push notification will be send to them. Mobile push notification will send only when the user has minimized/closed PTW application.
Now the status of request is Applied.
PTW Notifier
Users who has role as PTW Notifier and has access to the project of PTW request can view the request and send for Assessor (Users who has role as PTW Assessor and has access to the project of request)
PTW Notifier also can return the request to the PTW Applicant.
After send for Assessor Email will send the users who has role as PTW Assessor and has access to the project of PTW request
And also mobile push notification will be send to them. Mobile push notification will send only when the user has minimized/closed PTW application
Now the status of request is Reviewed. `
PTW Assessor
Users who has role as PTW Assessor and has access to the project of PTW request can view the request and send for Approval (Users who has role as PTW Approver and has access to the project of request)
PTW Assessor also can return the request to the PTW Notifier.
After send for Approval Email will send the users who has role as PTW Approver and has access to the project of PTW request
And also mobile push notification will be send to them. Mobile push notification will send only when the user has minimized/closed PTW application
Now the status of request is Accessed.
PTW Approver
Users who has role as PTW Approver and has access to the project of PTW request can view the request and approve the request
PTW Approver also can return the request to the PTW Assessor.
Email will send to all the users involved in the particular request.
And also mobile push notification will be send to them. Mobile push notification will send only when the user has minimized/closed PTW application
Now the status of request is Approved.
HSE Module
Health Safety Environment
HSE refers to a set of principles, strategies, and best practices that organizations implement to create a safe and healthy work environment.
Role:
1.HSE Creator - To create offence against employee
2.HSE Reviewer - To Review offence
3.HSE Approver - To Approve offence
Screen Shot 1
User list:
Screen Shot 2
Go to user list and choose company and department. For this company and department based employee data load to create/review/approve offence.
Screen Shot 3
Dashboard :
Can see Waiting for approval list based on user company and department.
Screen Shot 4
Master:
Non-Compliance Charges
Non compliance charges list.
Screen Shot 5
Offence Type:
Type of offence master.
Screen Shot 6
Merit/Demerit
Action List:
Screen Shot 7
Action Detail - can review / approve and edit the details.
Screen Shot 8
Add Action :
Logged in HSE creator role employee department, company based load employee details and choose offence type and charges.
Screen Shot 9
Search:
Based on employee can see the offence with history
Screen Shot 10
Mobile search based on employee qrcode find the offence detail.
Screen Shot 11
QR Print : Generate QRcode for employee to view employee offence.
Screen Shot 12
Generated QR code. Scan this qrcode from any scanner and link ill open and scanned employee offence details.
Screen Shot 13
SRM - Service Request Management for Jetting Companies
cuteOffice has SRM functionality as well as both client and technician self-service access. SRM functionality includes adding a service job request, assigning the job to technician, verifying the completed job, invoice generation, and payment process.
Reporting functionality is available with the SRM module. In SRM, service request metrics can be analyzed and reported on through customizable dashboards and reporting features.
- Master Data Management
- User Access Management
- Service Job Request Management
- Verification after Job Completion
- Invoice and Payment Management
- Reporting
User Access Matrix
In the cuteOffice-SRM application, users can be assigned with different roles. Depending on the roles, the users can access the various functionalities included in the application. The following are the various roles to be assigned to the user including their permission details,
| Roles | Access Permissions |
| Administrator |
|
| Technician |
|
The SRM module in the cuteOffice application helps admins in managing the service based job functionalities. To navigate to the SRM module, click the SRM menu in the menu bar, the SERVICE REQUEST MANAGEMENT page opens as below.
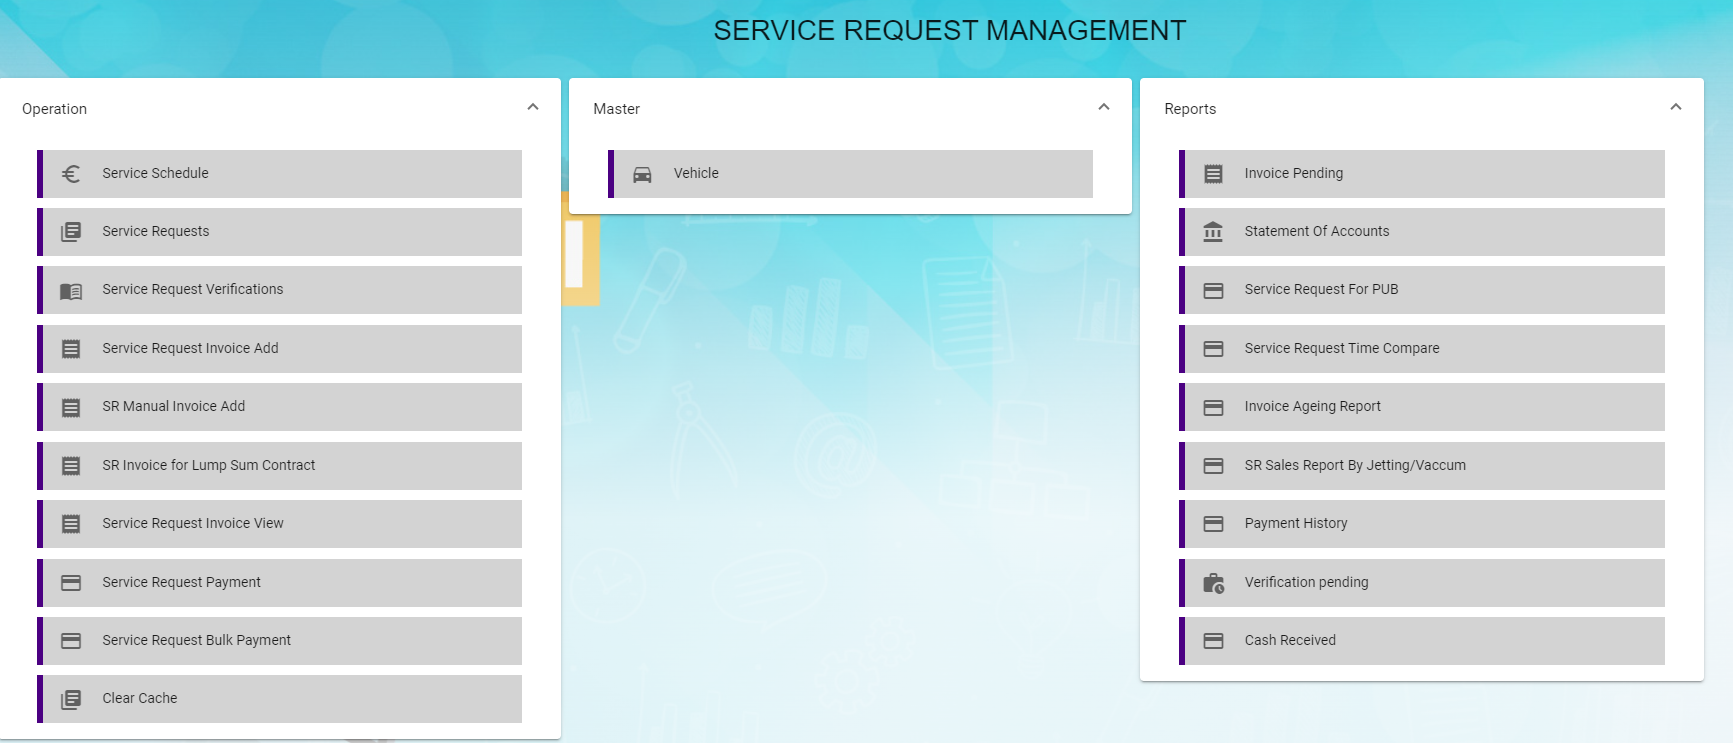
The SERVICE REQUEST MANAGEMENT page consists the following sub menus:
OPERATIONS - Allows admin to add the service job requests, assign the jobs to technicians, generate invoice for completed job, and so
MASTER - Allows SRM admin to add the vehicle master
REPORTS - Helps admin to view the various reports corresponding to the service request
Master
- Vehicle-Users assigned with srm_admin role can only have access to this Master submenu and add the master data.
The Vehicle tab in the Master submenu helps you to add the information of a vehicle to be used as a master data in the further request process. Click the Vehicle tab in the Master submenu, the Vehicle page opens.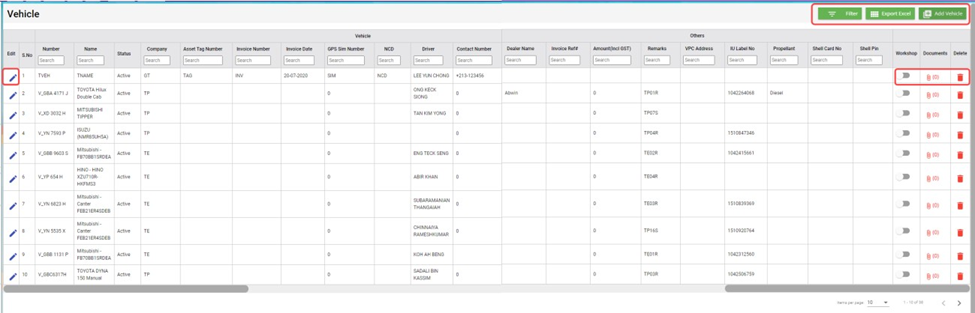
Add a Vehicle
If you want to add a vehicle,
- Click (Add Vehicle button) in the Vehicle, the Add Vehicle window opens. (Note: The fields highlighted with red color are mandatory. You must enter the relevant details in that fields before saving.)

- In the Vehicle section, enter the following details,
- In the Number box, enter the vehicle number.
- In the Name box, enter the vehicle name.
- In the Company box, select a company from a drop-down list.
- In the Asset Tag Number box, enter the asset tag number.
- In the Invoice Number box, enter the invoice number.
- In the Invoice Date box, select the invoice date.
- In the GPS Sim Number box, enter the GPS sim number.
- In the No-Claim Discount (NCD) box, enter the NCD number.
- In the Driver box, select a driver from a drop-down list.
- In the IDD Code box, select the IDD code.
- In the Area Code box, enter the area code.
- In the Contact Number box, enter the contact number.
- In the Parking Location box, enter the parking location name.
- In the Vehicle Description box, enter the description for the vehicle.
- In the Insurance section, enter the following details,
- In the Number box, enter the insurance number.
- In the Next Due Date box, select the due date for the insurance.
- In the Vendor box, enter the insurance vendor name.
- In the Agency box, enter the agency name.
- In the Next Due Date section, enter the following,
- In the Maintenance box, select the due date for maintenance.
- In the Parking Coupon box, select the due date for parking coupon.
- In the Road Tax box, select the due date for road tax.
- In the Inspection box, select the due date for vehicle inspection.
- In the Vehicle Parking Certificate (VPC) box, select the due date for VPC.
- In the LG box, select the due date for LG.
- In the LM box, select the due date for LM.
- In the Certificate of Entitlement (COE) Expiry Date box, select the expiry date for COE.
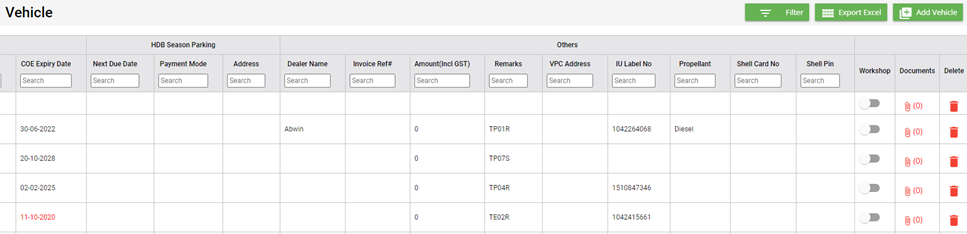
- In the HDB Season Parking field, enter the following,
- In the Next Due Date box, select the due date for HDB season parking.
- In the Payment Mode box, select a payment mode from a drop-down list.
- In the Address box, enter the address where the vehicle has parked.
- In the Others field, enter the following,
- In the Dealer Name box, enter the dealer name.
- In the Invoice Ref box, enter the invoice reference number.
- In the Amount box, enter the invoice amount including GST.
- In the In-vehicle Unit (IU) Label Number box, enter the IU label number.
- In the Propellant box, enter the propellant name.
- In the Shell Card Number box, enter the shell card number.
- In the Shell Pin box, enter the shell pin.
- In the Vehicle Preparation Center (VPC) Address box, enter the VPC address.
- In the Remarks box, enter your remarks if any.
- Click Save. The vehicle is added and listed in the Vehicle page.
- If your vehicle is in the workshop, you need to click to enable
 (Radio button) in the Workshop column for the respective vehicle. The Confirmation dialog box opens. Click Yes to confirm.
Edit a Vehicle
You can edit the details of the added vehicle by using  (Edit icon) provided in the Edit column of the Vehicle page. To edit the added vehicle details,
- Click
 (Edit icon) of the respective vehicle, the Add Vehicle window opens with the added vehicle details.
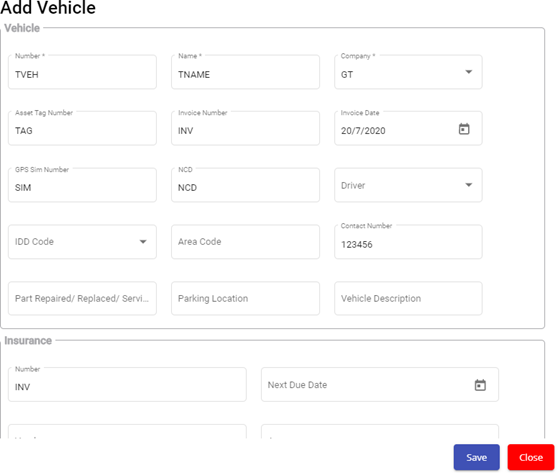
- Edit the vehicle details where suits.
- Click Save.
Attach/View a Document into a Vehicle
If you want to add a new document with the vehicle, do the following steps,
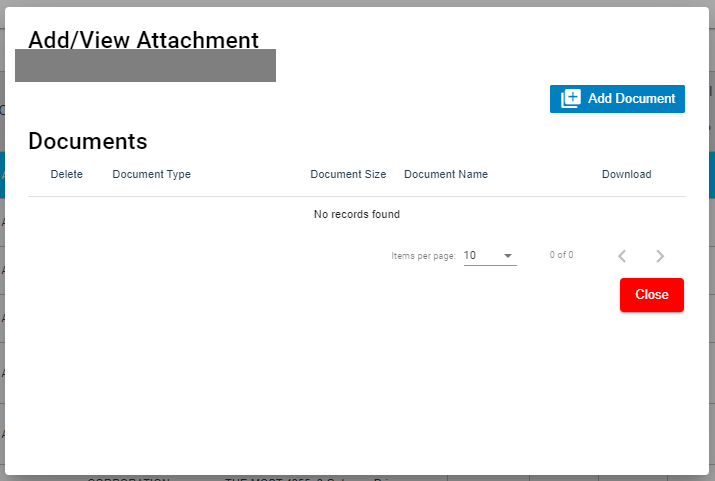
- Click
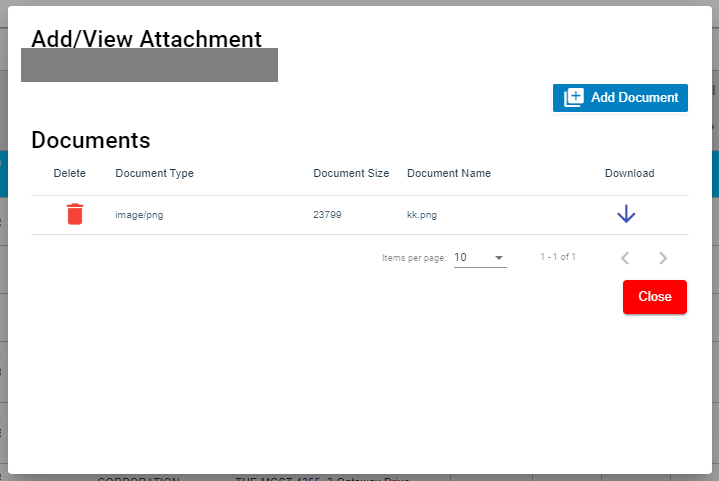
 (Attachment icon) of the respective vehicle for which you want to add, the Add/ View Attachment window opens.
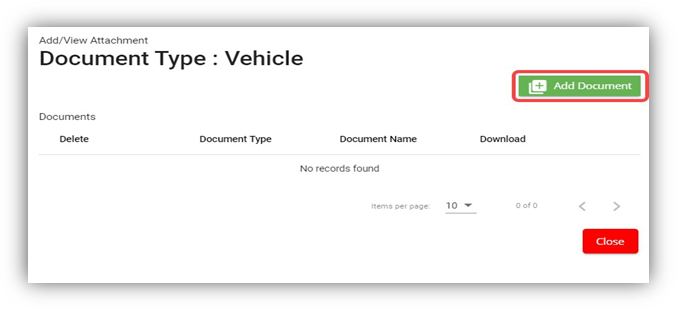
- Click
 (Add Document button).The file choosing and uploading option will be enabled.
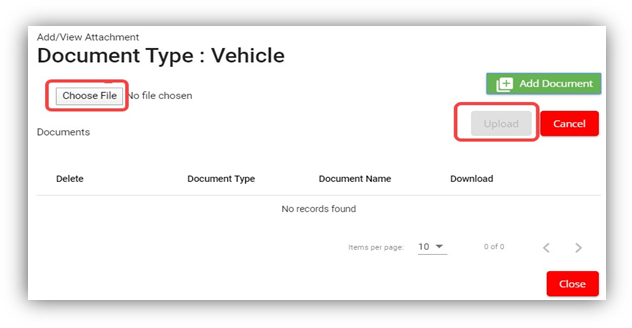
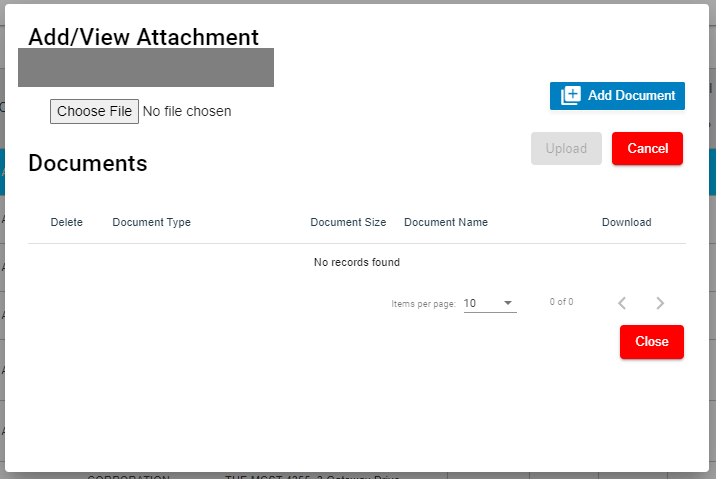
- Click
 (Choose File button) and select the document which you want to upload.
 - Click Upload, The selected document will be uploaded and displayed in the Add/View Attachment window.
If you want to view any attached document with a vehicle,
- Click
 (Attachment icon), the Add/ View Attachment window opens with a list of attached documents. (Note: The subscript number displays with attachment icon shows the total number of attached documents with the vehicle..
 - If you want to download the attached document, click
 (Download icon) in the Download column. The document will be downloaded.
Delete a Vehicle
You can delete the added vehicle by using delete option provided in the Delete column of the Vehicle page. To delete any added vehicle,
- Click
 (Delete icon) of the respective, the Confirmation dialogue box opens with the following notification: “Are you sure you want to delete record?”.
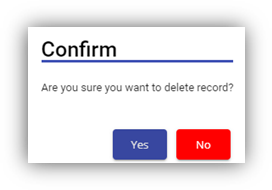
- If you want to delete the vehicle, click Yes otherwise click No.
- The deleted vehicle will be removed from the Vehicle page.
Filter a Vehicle
If you want to view any specific vehicle details among multiple vehicles listed in the Vehicle page, you can use the filter option provided in the upper left corner of the Vehicle page. To filter any vehicle you want,
- Click
 (Filter button). A filter box opens in each column of the Vehicle page.
- Enter the relevant data in any column filter. The vehicle(s) that qualifies will be filtered and display in vehicle page.
Export a Vehicle List
The application has a feature to download the added vehicle list in an excel format. You can use export option to download the added vehicle list. To download the added vehicle list, click ![]() (Export Excel button). The vehicles added in the Vehicle page will be downloaded as an excel file.
(Export Excel button). The vehicles added in the Vehicle page will be downloaded as an excel file.
Service Request
The Service Request submenu in the SRM page helps you to add and manage the functionalities related with the service schedule and the service request.
The Service Request submenu contains the following tabs,
- Service Schedule
- Service Request View
- Service Request Verification
- Add Invoice
- Manual Invoice
- Lump Sum Invoice
- Invoice View
- Payment
- Bulk Payment
- Clear Cache
Service Schedule
The Service Schedule tab in the Service Request submenu helps you to add a service schedule. Click Service Schedule in the Service Request submenu, the Service Schedule page opens.
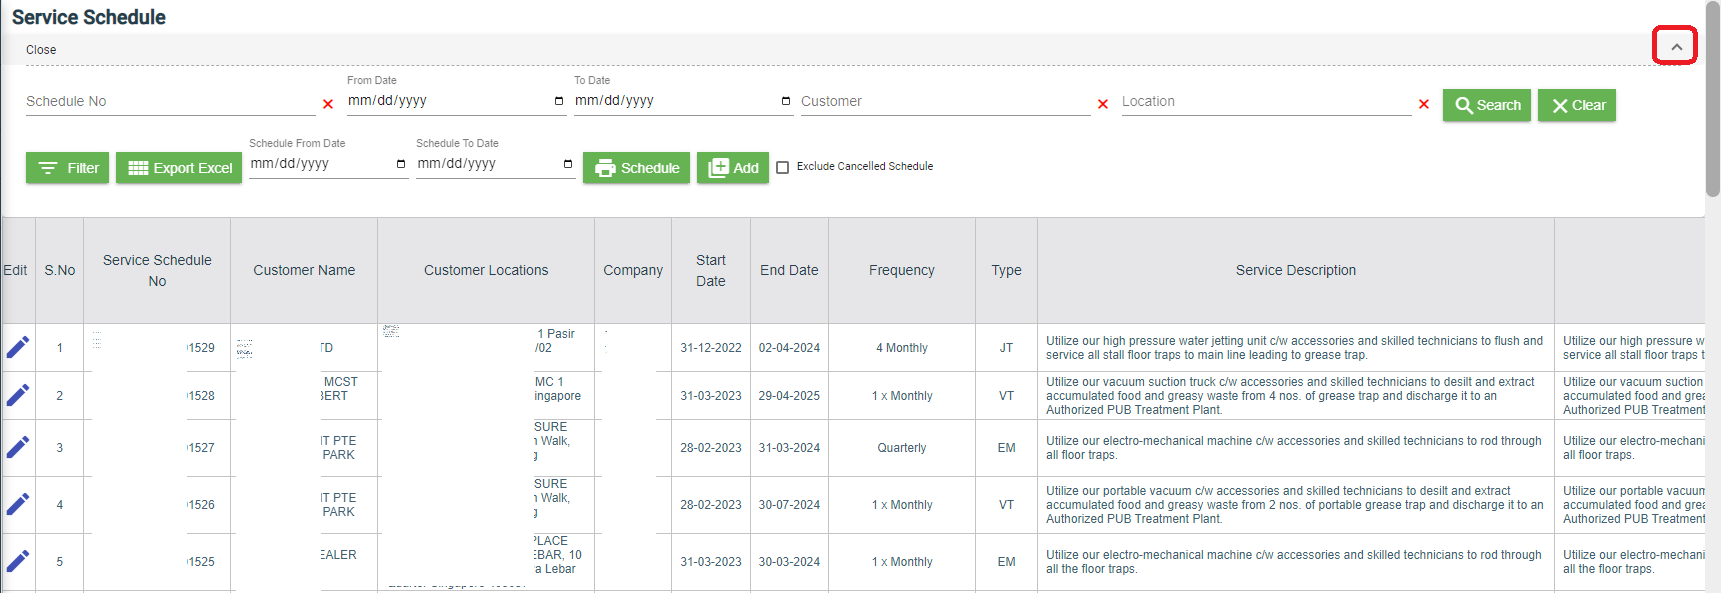
View Service Schedule
If you want to view any specific service schedule among the list of service schedules, you can use column filter to select the respective data such as Schedule No, Customer, Location, and Date Range in the respective fields given in the Service Schedule page. You can click the page expand icon at the top right corner to expand the filters.

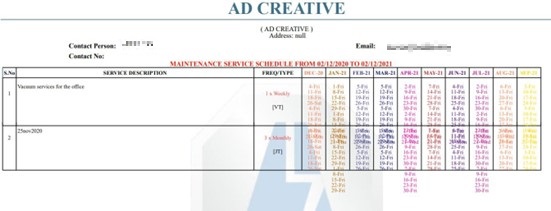
If you want to view the scheduled schedule of any customer,
- Select a customer from the Customer field.
- Click
 ( print Schedule button), the schedule details for the selected customer will be downloaded as a pdf.

Add a Service Schedule
To add a service schedule, do the following steps,
- Click
 (Add button) in the Service Schedule page, the Add Service Schedule window opens (Note: The fields highlighted with red color are mandatory. You must enter the relevant details in that fields before saving).
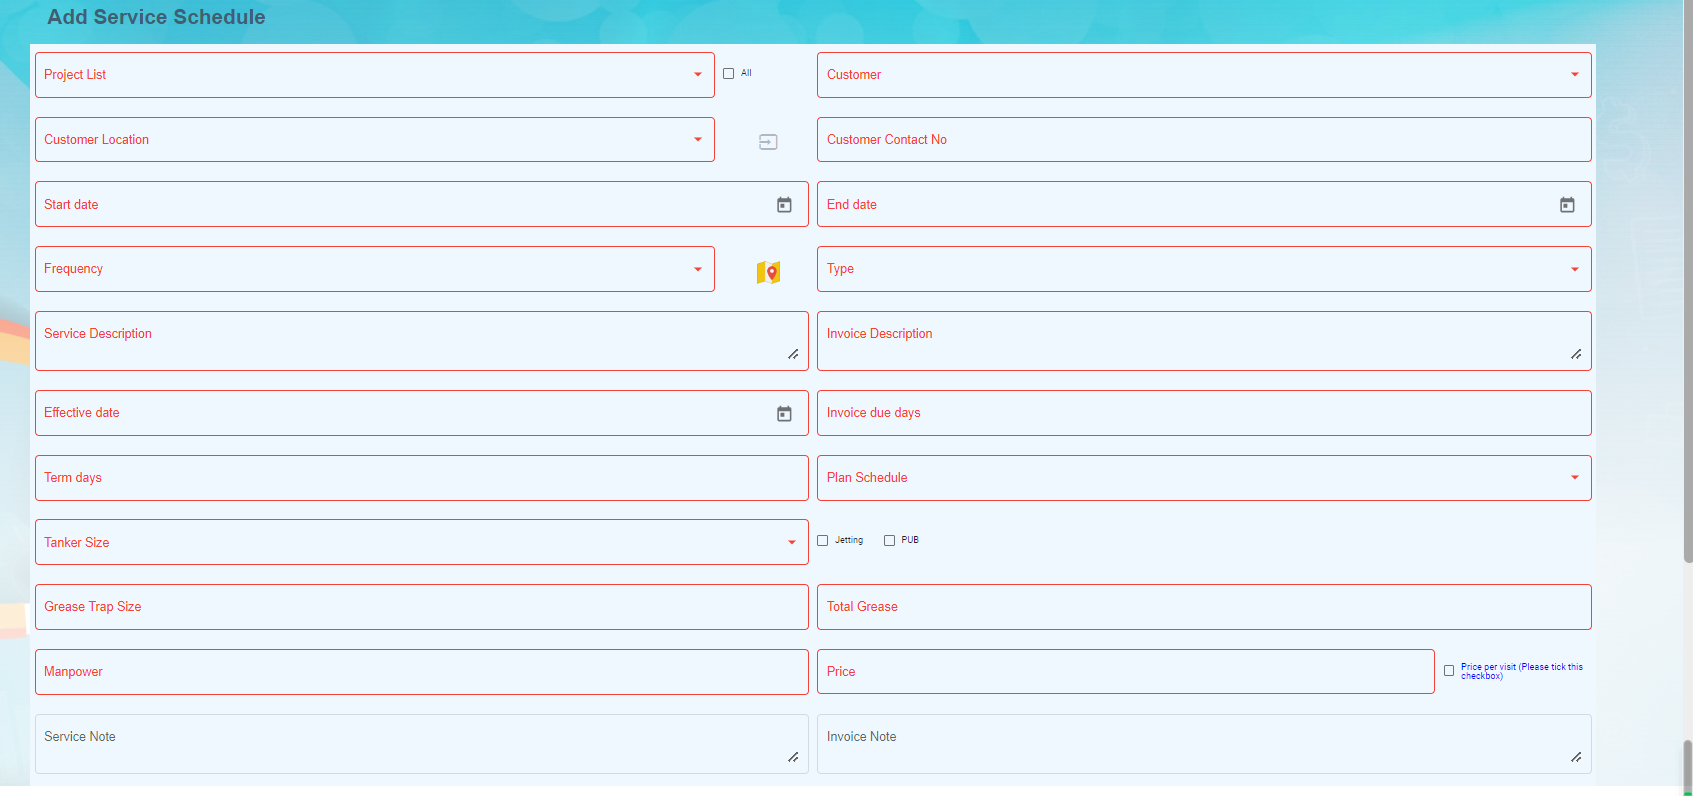
- In the Project List box, select a project list from a drop-down list. Once you have selected a project, the customer, the customer location and contact number of the selected project will be automatically populated.
- Note: If you want to select all projects, click to enable the All checkbox provided with the Project List box. And then select relevant details in customer, customer location and contact number box.

- In the Start Date and End Date boxes, select the schedule’s start and end dates.
- In the Frequency box, select the frequency of doing service based on the customer requirement. For example, if the customer expects to do the service for three times in a month, select 3 x Monthly. Note: If you want to view the location in the map, click
 (Location Map icon) provided with the Frequency box.
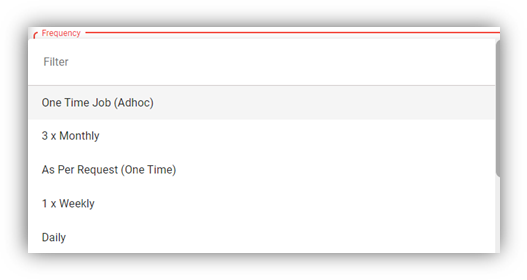
- In the Type box, select a type of medium.
- In the Service Description box, enter the service description.
- In the Invoice Description box, enter the invoice description.
- In the Effective Date box, select the effective date of the service schedule.
- In the Invoice Due Days box, enter the due days for invoice.
- In the Term Days box, enter the term days.
- In the Plan Schedule box, select the plan schedule whether Day Job or Night Job.
- In the Tanker Size box, select the tanker size whether small or big.
- If the service is jetting, select Jetting or if the service is PUB, select the PUB.

- In the Grease Trap Size box, enter the grease trap size.
- In the Total Grease box, enter the total grease value.
- In the Manpower box, enter the required manpower.
- In the Price box, enter the price for the service.
- In the Service Note box, enter the service note.
- In the Invoice Note box, enter the invoice note.
- In the Private Note for Internal box, enter the note for internal.
- In the Effective Time box, select the effective time. The calendar will be displayed based on the selection of frequency.
- In Old SRM Sales Contract No box, enter the old SRM sale contract number associated with the service schedule.
- Click Save. The service schedule will be added and listed in the Service Schedule page.


Activate/Cancel a Service Schedule
To activate a service schedule, do the following steps,
- Click
 (Active icon) that is provided in the Action column in the service schedule page. The Service Request List window opens and shows the list of service requests added against the selected service schedule number.
- Click Ok. The Remarks box opens.
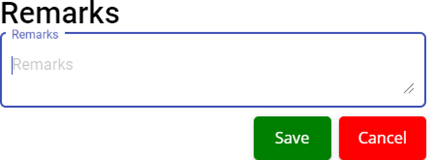
- Enter your remarks and click Save. The service schedule will be activated. The remarks you have entered will be saved in the Status Remarks column of the Service Schedule page.
To cancel a service schedule,
- Click
 (Cancel icon) that is provided in the Action column, of the service schedule. The Service Request List window opens and shows the list of service requests added against the selected service schedule number.
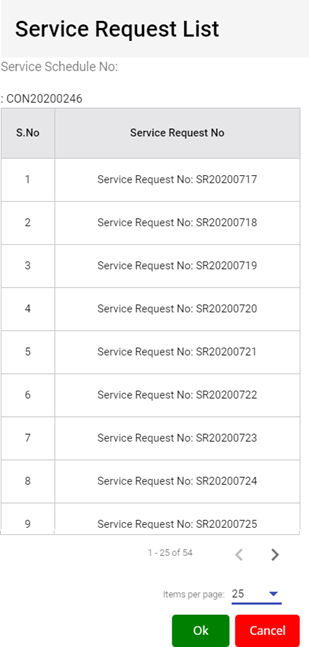
- Click Ok. The Remarks box opens.

- Enter your remarks and click Save. The service schedule will be cancelled. The remarks you have entered will be saved in the Status Remarks column of the Service Schedule page.
Edit a Service Schedule
You can edit the details of the added service schedule by using edit option provided in the
Edit column of the Vehicle page. To edit the added service schedule details,
- Click
 (Edit icon) of the respective service schedule you have added, the Add Service Schedule window opens with the added service schedule details.
- Edit the service schedule details where you want.
- Click Save.

Delete a Service Schedule
You can delete the added service schedule by using  (Delete icon) provided in the Delete column of the Service Schedule page.
Export a Service Schedule List
If you want to export all the service schedules in the Service Schedule page in an excel format, you can use the export option provided in the Service Schedule page. To know how to export, follow the procedures given in the topic, “Export a Vehicle List”.
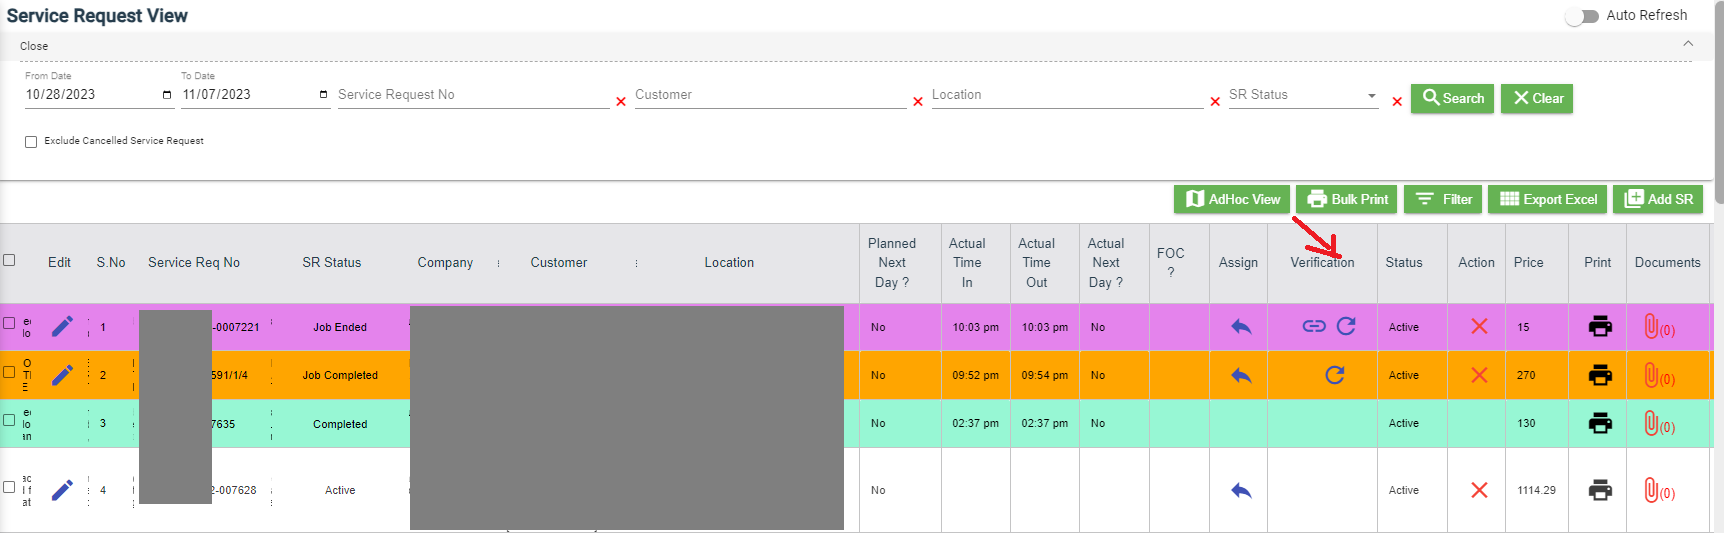
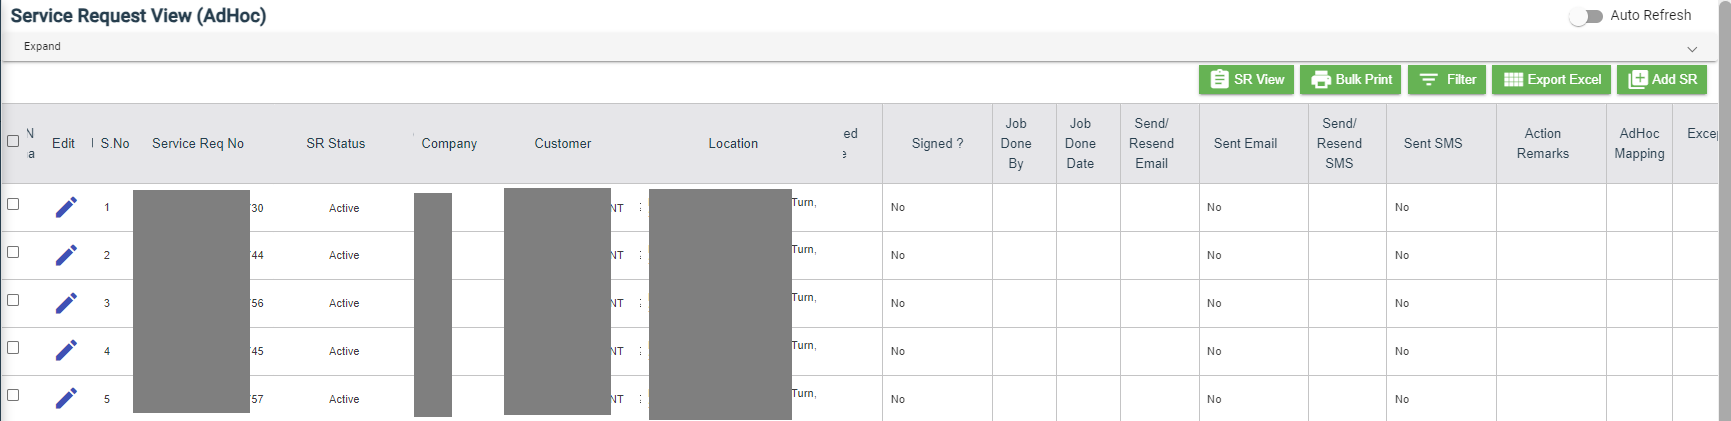
Service Request View
The Service Request View tab in the Service Request submenu helps you to add a service request. Users assigned with srm_admin and srm_technician roles can have access to view this Service Request View page. Click Service Request View in the Service Request, the Service Request View page opens.
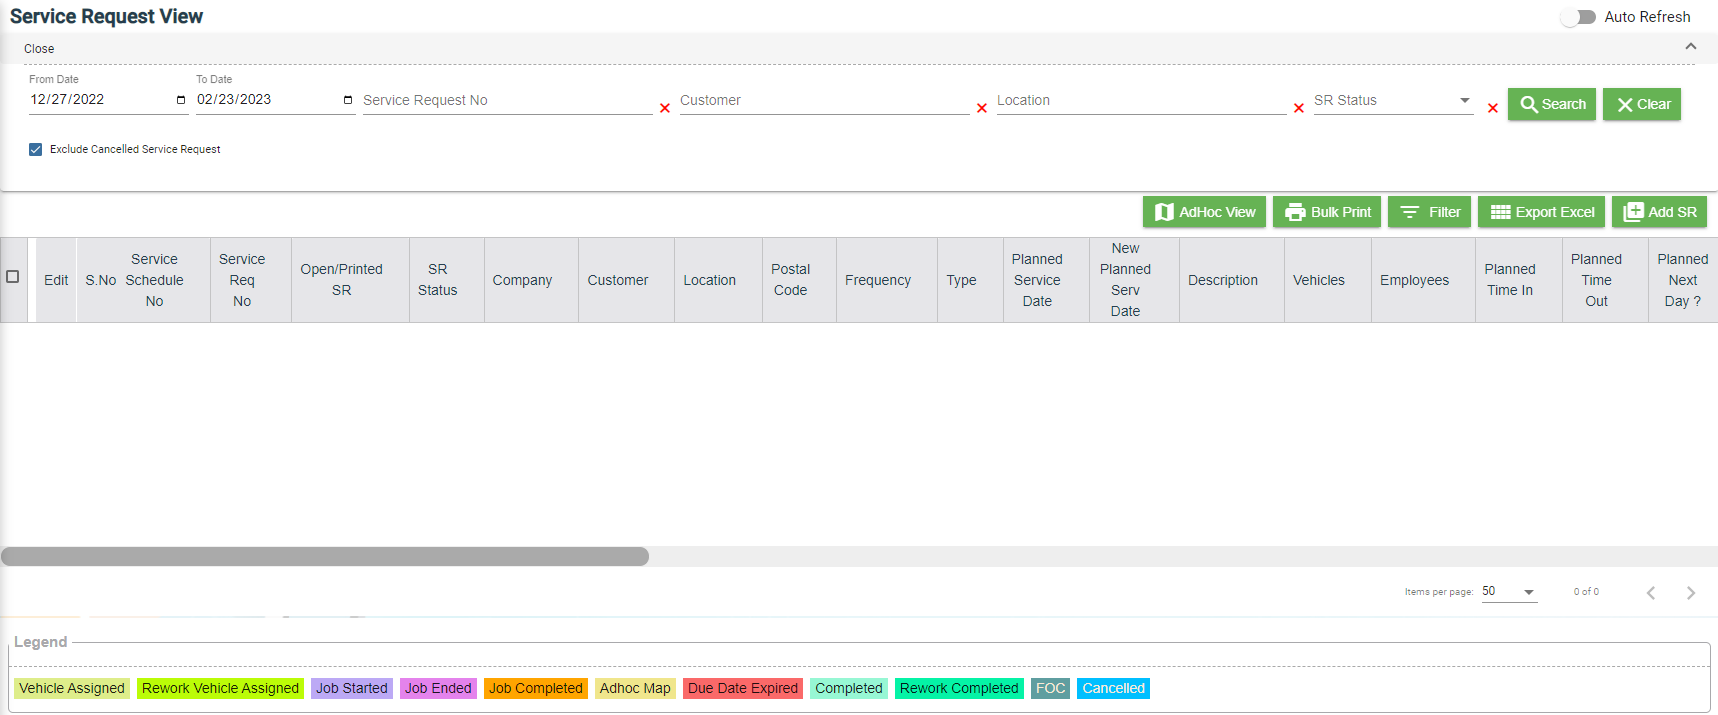
- You can configure displaying of the number of service request items per page by selecting 50, 100, 250, 500, or 1000,
- If you want to view any specific service request among the list of service requests, you can select the respective data such as Service Request No, Customer, Location, and Date Range in the respective fields given in the Service Request View
- The service request displayed in different color explains their status:
Add a Contract Service Request
To add a contract service request, do the following steps,
- Click
 (Add button) in the Service Request View page, the Service Request window opens, click to select Contract SR (Note: The fields highlighted with red color are mandatory. You must enter the relevant details in that fields before saving.).
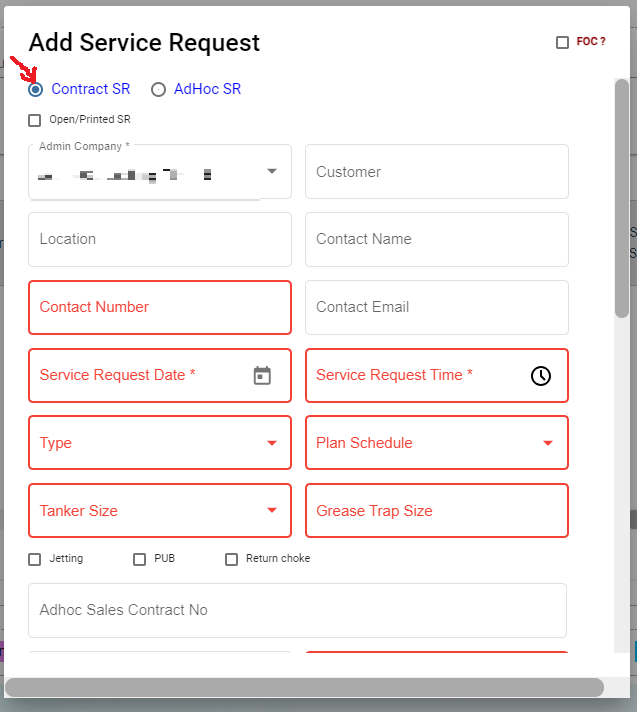
- In the Admin Company box, select admin company.
- In Customer box, select customer company name.
- In Location box, select location.
- In Contact Name box, select contact name.
- In Contact Number box, if contact name is selected, the associated contact number and email address will automatically populated.
- In Contact Email box, if contact name is selected, the associated email address will automatically populated.
- In Service Request Date box, click to select date.
- In Service Request Time box, click to select time.
- In Type box, click to select service type.
- In Plan Schedule box, click to select plan schedule as Day Job or Night Job.
- In Tanker Size box, click to select tanker size.
- In Grease Trap Size box, enter or select grease trap size.
- In Jetting, PUB, Return Choke options, click to select relevant option(s).
- In Adhoc Sales Contract No box, enter adhoc sales contract number if any.
- In Quotation No box, enter quotation number.
- In Total Grease box, enter the total grease value.
- In Manpower box, enter the required manpower.
- In Price /Visit box, enter the price for the service request.
- In Payment Mode box, select payment mode.
- In Billing flag, click to enable if applicable.
- In Service Description box, enter service description.
- In Invoice Description box, enter invoice description.
- In Invoice Note box, enter the invoice note.
- In Private Note for Internal box, enter the note for internal.
- In Service Note box, enter the service note.
- In Show All Vehicle/Technician flag, click to enable if applicable. When this flag is ticked, vehicle and technician selection list will include all technician and vehicle. Else Jetting Service Request will show only jetting vehicle and technicians in jetting department only.
- In New Planned Service Date box, click to select planned date.
- In Planned Time In box, click to select planned time in.
- In Planned Time Out box, click to select planned time out.
- In Vehicle box, select vehicle.
- In Technician box, select technician.
- For Assignment History option, it is used to check all existing assignments of selected technician, so that user can unassign the technician from some assignments to make him available for the job on this new service request date.
- Click Save. The service request is added and listed in the Service Request View page.

Edit a Service Request
You can edit the details of the added service request by using edit option provided in the Edit column of the Service Request View page. To edit the added service request details,
- Click
 (Edit icon) of the respective service request, the Service Request window opens,
 - Edit the service request details where needed.
- Click Save to save edits.
Assign Technician and Vehicle for a Service Request
Users assigned with srm_admin role only can have access to assign the technician and vehicle for an added service request.
Users assigned with srm_technician role can only view the assigned details.
To assign the technician and vehicle for an added service request, do the following steps,
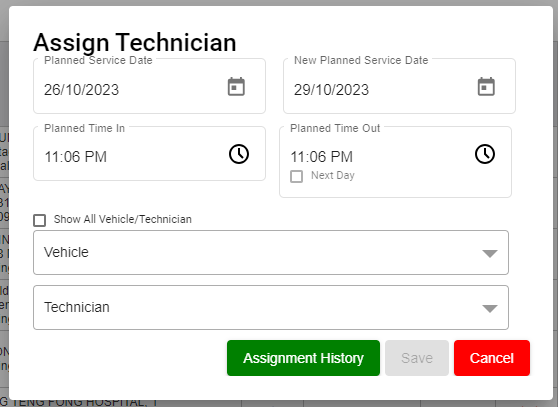
- Click
 (Assign icon) in the assign column of the respective service, the Assign Technician window opens.

- In Planned Service Date box, the planned date will show automatically.
- In New Planned Service Date box, click to select new date if needed.
- In Planned Time In and Planned Time Out boxes, select the planned in and out times.
- In Vehicle box, select a vehicle from a list. Note: You can select multiple vehicles.
- In Technician box, select a technician from a list. Note: You can select multiple technicians.
- Click Save, the service request is assigned. For Assignment History option, it is used to check all existing assignments of selected technician, so that user can unassign the technician from some assignments to make him available for the job on this new service request date. After assigning the vehicle and technician, the SR record will be changed to yellow color. The service request will be moved to the respective technicians and the
 (Job Starts icon) will be appeared in the Verification column as below,
Indicate Starting and Ending of Job
Once the service request is added and assigned for the respective technician and vehicle by the client, the technician can login and view job details assigned to them.
To indicate that the job was started,
- Click on
 (Job Starts icon) appeared in the Verification column, the job started status will be updated successfully and the SR record will be changed to Blue color.
To indicate that the job was ended,
- Click on
 (Job Ends icon) appeared in the Verification column, the job ended status will be updated successfully and the SR record will be changed to Purple color.
Once the job has completed, the verification process begins.
Note: When you click ![]() (Assign icon) of this service request, the vehicle and technicians which are assigned already will not be shown in list.
(Assign icon) of this service request, the vehicle and technicians which are assigned already will not be shown in list.
Verify the Service Request Completion
In general, once the job is done by the technician, the respective SR record will be moved for verification that needs to be done by the admin. This Verification functionality is provided for the technician on the job to print the Service Verification Form for client to verify the job done by technician and sign off.
- Click
 (Verification icon) provided in the Verification column, the Service Request Verification window opens.
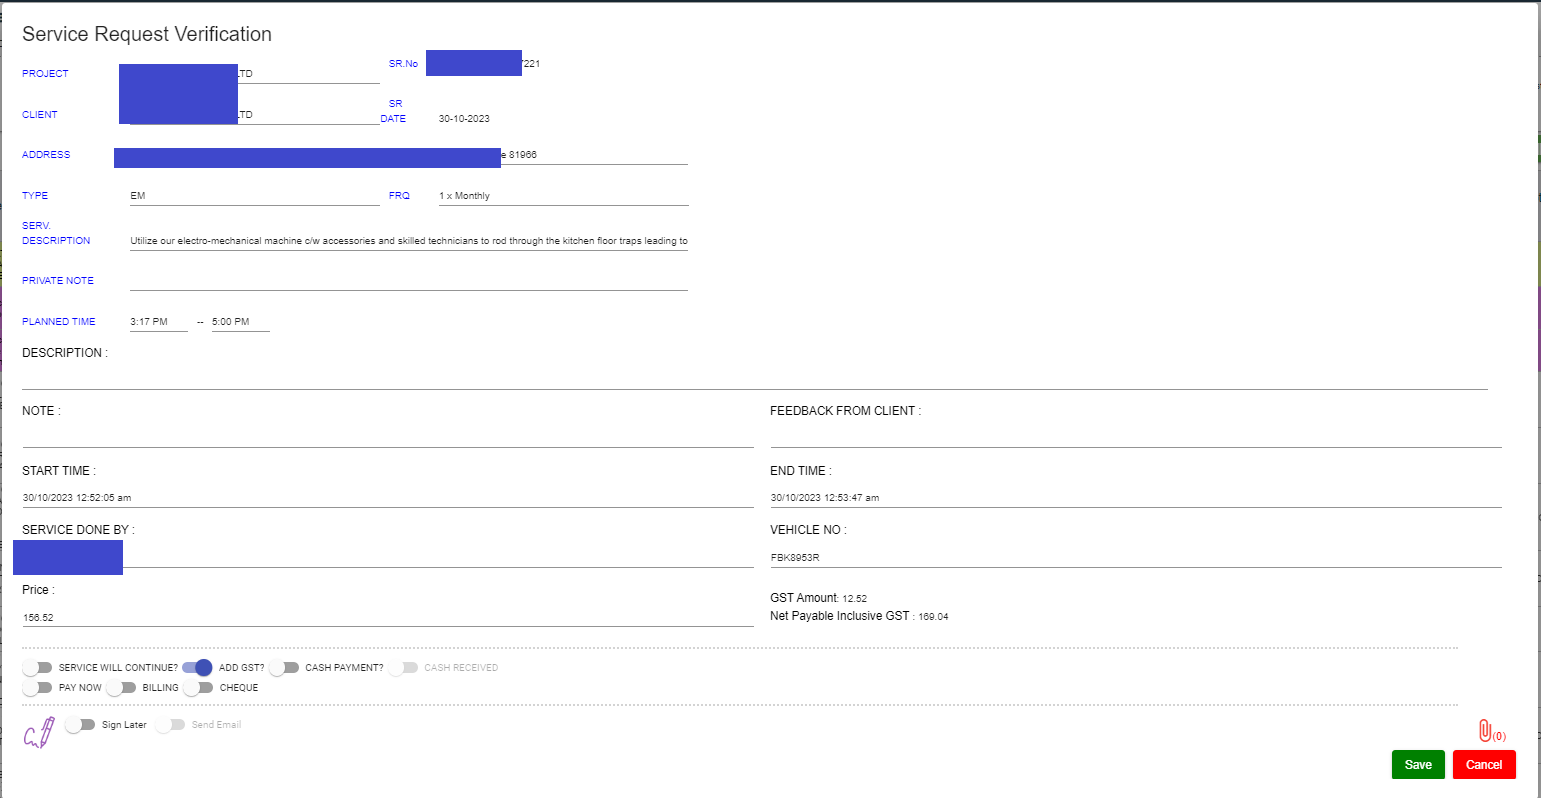
- In DESCRIPTION box, enter the description.
- In NOTE box, enter your note if any.
- In FEEDBACK FROM CLIENT box, enter client feedback.
- In START TIME and END TIME boxes, verify start and end time, if any changes, select the started and ended time of the assigned job.
- In SERVICE DONE BY box, verify technician assigned, if any changes, click to select technician name.
- In VEHICLE NO box, verify vehicle number, if any changes, click to select vehicle number.
- In Price box, verify the price, enter updated price if any changes.
- In other payment details section, click to enable if applicable.

- If you go for cash payment, select the checkbox of the CASH PAYMENT? option.
- If you want to add the GST amount, select the checkbox of the ADD GST? option. The price will be added with the GST amount.
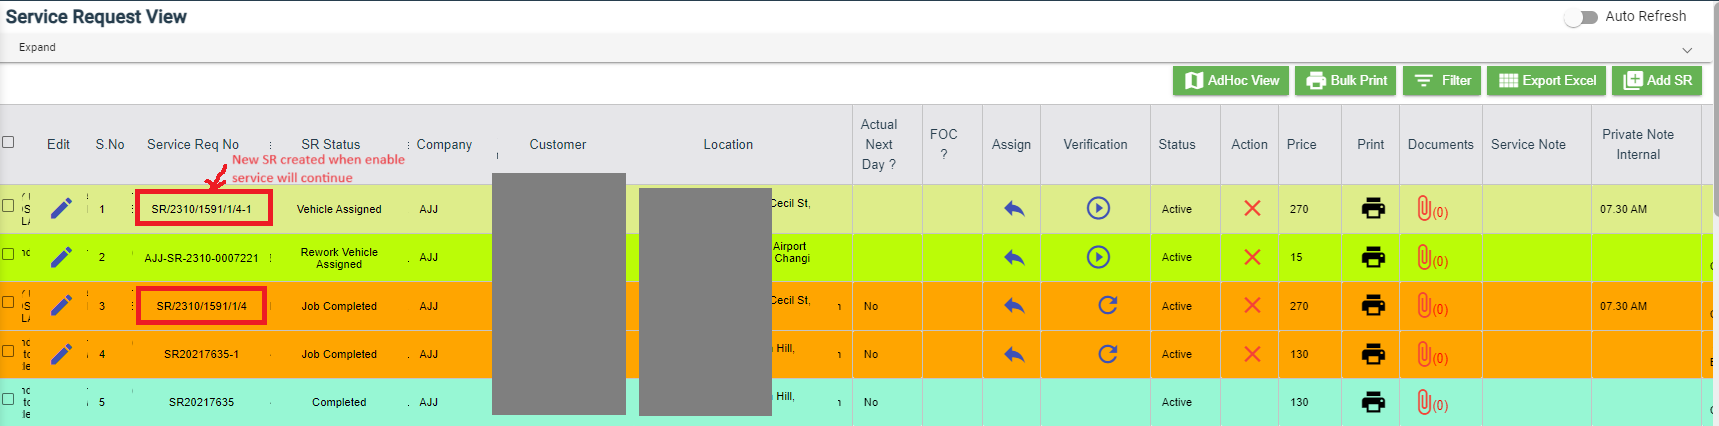
- If you want the service to be continued, select the checkbox of the SERVICE WILL CONTINUE? option. Once you selected the SERVICE WILL CONTINUE? option, the system will indicate "Continue" in the Job column for the select service request. And another SR request will be created as shown below,
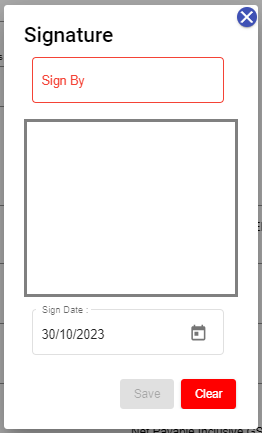
- Click
 (Sign icon) to add your signature, the Signature window opens.
- In the Sign By box, enter you name.
- Add you signature.
- Verify the date.
- Click Save.
-
To attach any file, click
 (Attach icon) and attach the file.
 - Click SAVE to save verification of the service requestion record.


Rework
When the job completed by the technician does not meet the expectations of client, the client can assign for the rework. Users assigned with srm_admin role only can have access to start rework by using reset option.
To start the rework,
- Navigate to verification column of the respective service request,
- Click
 (Reset icon). A new service request will be added for rework and the job status will be updated as Rework in the Job column.
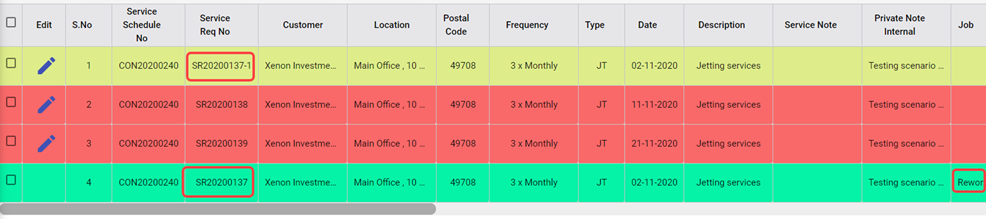

Print a Service Record
To print any SR record, do the following steps, click the respective ![]() (Print icon) in the Print column. The SR record will be downloaded as a pdf file with customizable format.
(Print icon) in the Print column. The SR record will be downloaded as a pdf file with customizable format.
Attach/View a Document into a Service Request
To add a new document with the service request,
- Click
 (Attachment icon) in the Documents column of the respective service request for which you want to add attachment, the Add/ View Attachment window opens.
- Click
 (Add Document button), the file choosing and uploading option will be enabled.

- Click
 (Choose File button) and select the document which you want to upload.
 - Click Upload. The selected document will be uploaded and displayed in the Add/View Attachment window.

To view any attached document with a service request,
- Click
 (Attachment icon) in the Documents column, the Add/ View Attachment window opens with a list of attached documents. Note: The subscript number displays with attachment icon shows the total number of attached documents with the vehicle.
- If you want to download the attached document, click
 (Download icon) in the Download column. The document will be downloaded.

Activate/Cancel a Service Request
If you want to activate or cancel a service request, do the following steps,
To activate a service request,
- Click
 (Active icon) that is provided in the Action column of the service request, the Remarks box opens.
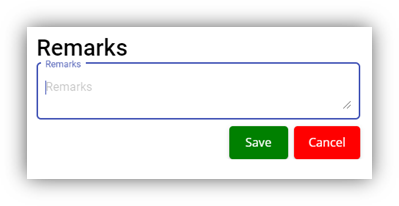
- Enter your remarks and click Save. The service request will be activated. The remarks you have entered will be saved in the Action Remarks column of the Service Request View page.
To cancel a service request,
- Click
 (Cancel icon) that is provided in the Action column of the service request. The Remarks box opens.
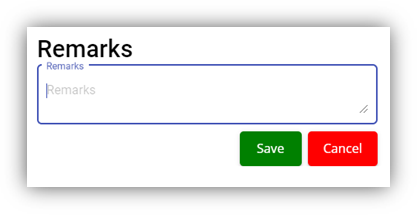
- Enter your remarks and click Save. The service request will be cancelled. The remarks you have entered will be saved in the Action Remarks column of the Service Request View page.
Delete a Service Request
You can delete the added service request by using delete option provided in the Delete column of the Service Request View page.
Add an AdHoc Service Request
When a service request is not a planned one, you can add the request as an Adhoc SR. Project details are not mandatory to add the Adhoc SR. Users assigned with srm_admin and srm_technician roles can have access to add and view the AdHoc service requests.
To add an adhoc SR,
- Click (Add button) in the Service Request View page, the Service Request window opens, click to select AdHoc SR (Note: The fields highlighted with red color are mandatory. You must enter the relevant details in that fields before saving.).
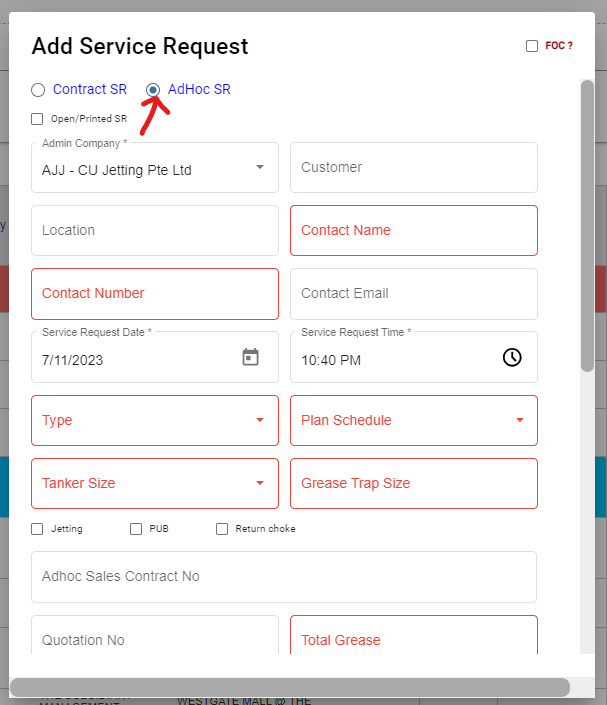
- Fill up the mandatory fields as below.
- In Contact Name box, select contact name.
- In Contact Number box, if contact name is selected, the associated contact number and email address will automatically populated.
- In Contact Email box, if contact name is selected, the associated email address will automatically populated.
- In Service Request Date box, click to select date.
- In Service Request Time box, click to select time.
- In Type box, click to select service type.
- In Plan Schedule box, click to select plan schedule as Day Job or Night Job.
- In Tanker Size box, click to select tanker size.
- In Grease Trap Size box, enter or select grease trap size.
- In Total Grease box, enter the total grease value.
- In Manpower box, enter the required manpower.
- In Price /Visit box, enter the price for the service request.
- In Payment Mode box, select payment mode.
- In Billing flag, click to enable if applicable.
- In Service Description box, enter service description.
- In New Planned Service Date box, click to select planned date.
- In Planned Time In box, click to select planned time in.
- In Planned Time Out box, click to select planned time out.
- Click Save. The service request is added and listed in the Service Request View page.

View Adhoc Service Requests
If you want to view the added adhoc service requests, click ![]() (AdHoc View button) in the Service Request View page. The Adhoc service requests opens as below,
(AdHoc View button) in the Service Request View page. The Adhoc service requests opens as below,
Filter a Service Request
If you want to filter a specific service request in the Service Request View page, you can use the filter option provided in the Service Request View page.
Export a Service Request list
If you want to export all the service requests in the Service Request View page in an excel format, you can use the export option provided in the Service Request View page.
Bulk Print
If you want to print multiple SR record,
- Select the checkbox of the respective service
- Click
 (Bulk Print button). The selected SR records will be downloaded in a pdf file.
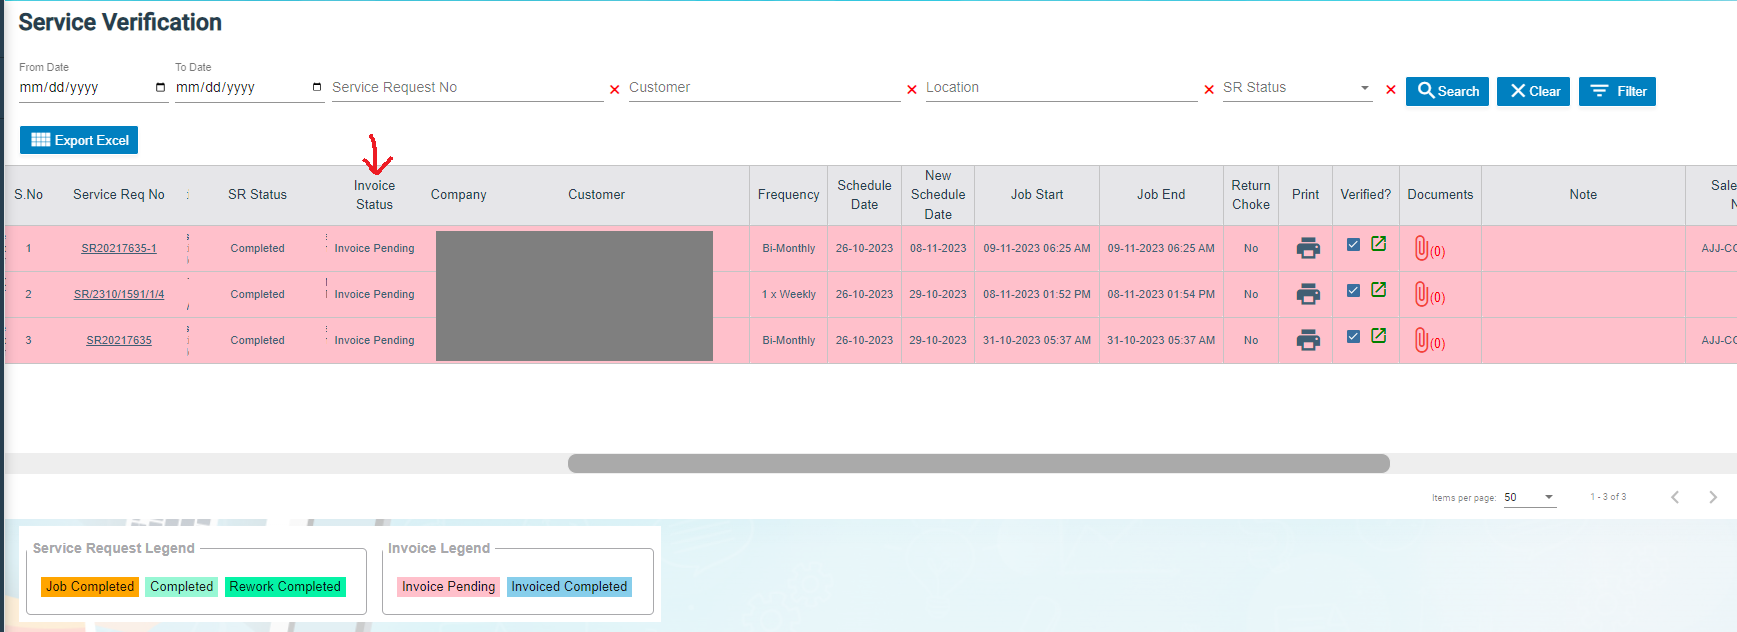
Service Request Verification
Users can verify the signed Service Verification Forms and to proceed to the next stage of invoice generation in the Service Request Verification tab in the Service Request submenu.
Users assigned with srm_admin role have access to view this Service Verification page and verify the Service Verification Form sent by the Technician.
Click Verification in the Service Request, the Service Verification page opens.
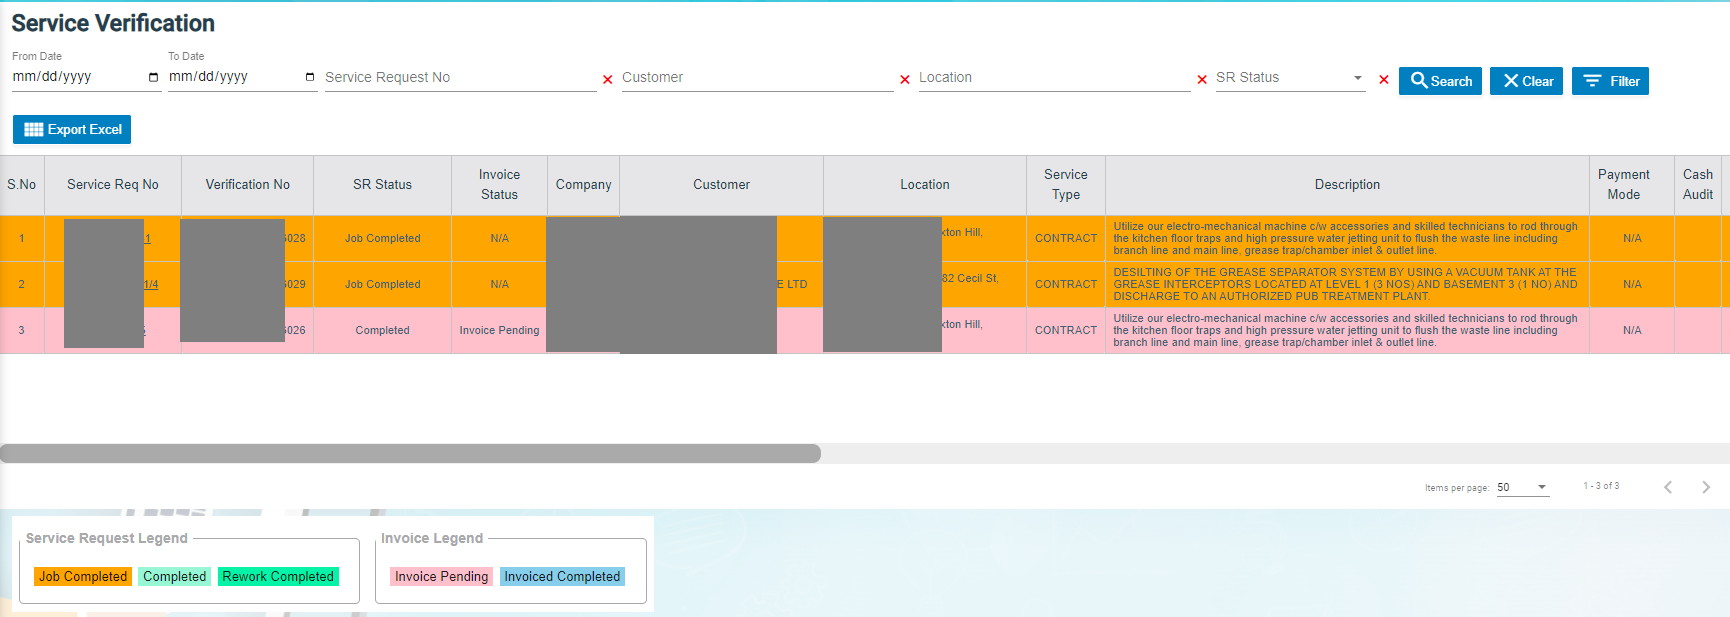
- If you want to view any specific service request among the list of service requests, you can use the select the respective filters provided in the Service Verification search bar.
- The legend at the bottom of page denotes different status of a service request.
Verify the Service Verification Form
Once the service verification form is signed and submitted by the technician, the verification form will be sent for verification. After the service request verification form is verified, the request will be moved for invoice generation.
To verify the service verification form,
- Navigate to the respective service request you want to verify,
- Click the checkbox provided in the Verified,
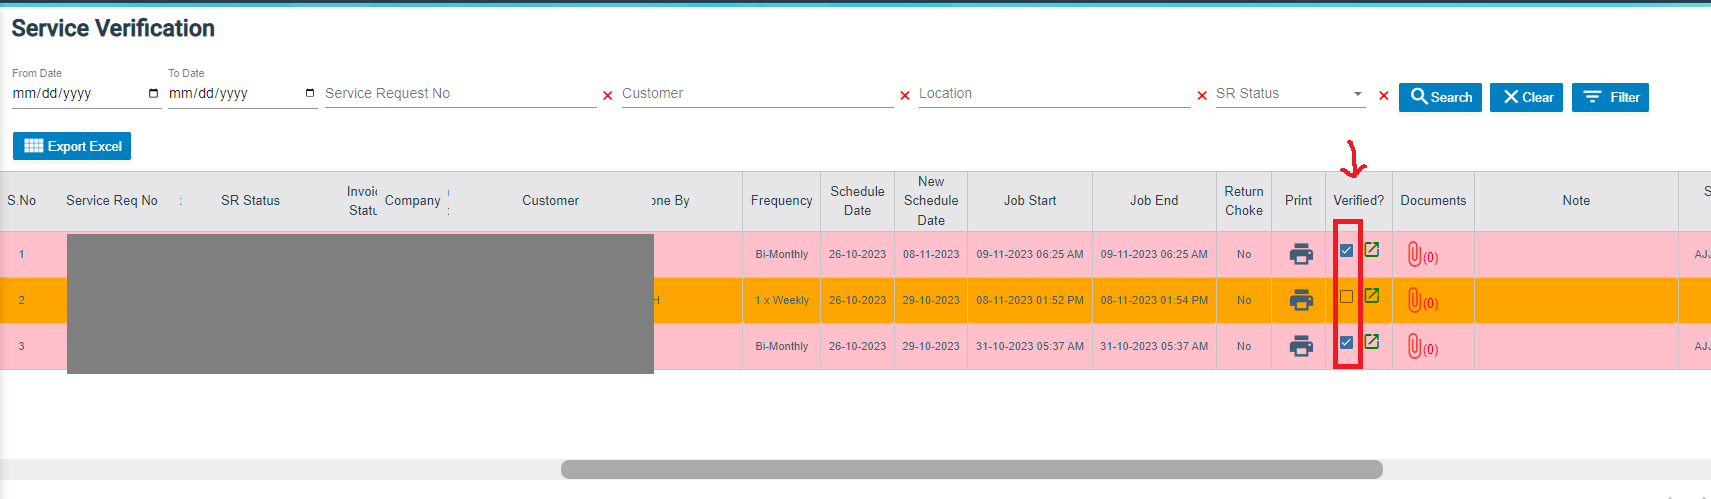
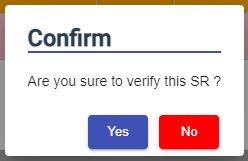
- The Confirm dialog box opens and shows the following message
-
Click Yes, a verified successful notification will display, and the selected request will be moved to the Invoice Generation page to generate invoice for the payment.


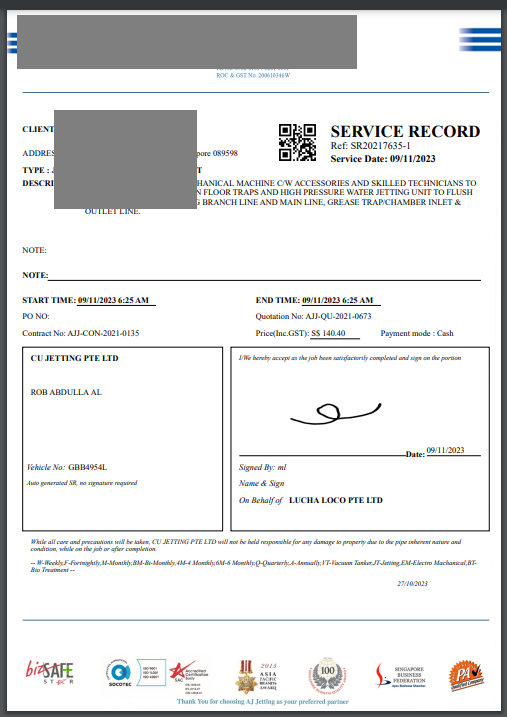
Print a Service Record
To print any SR record, click![]() (print icon) of respective service request in the Print column in the service verification page. The SR record will be downloaded as a pdf file.
(print icon) of respective service request in the Print column in the service verification page. The SR record will be downloaded as a pdf file.
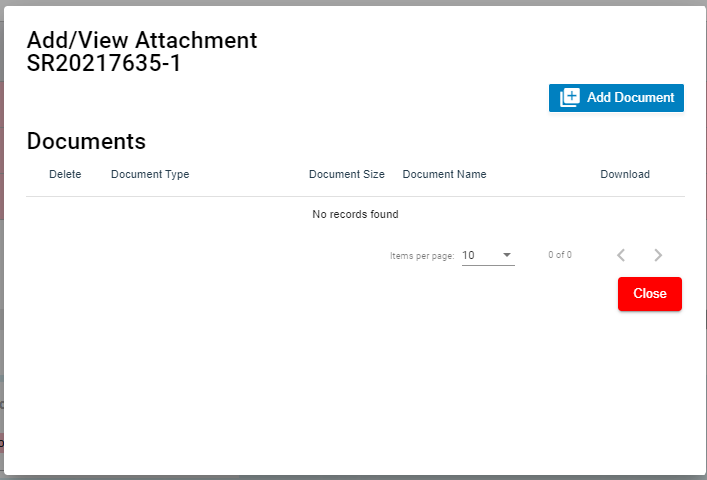
Attach/View a Document into a Service Request
To add a new document with the service request,
- Click
 (Attachment icon) of the respective service request, the Add/ View Attachment window opens.
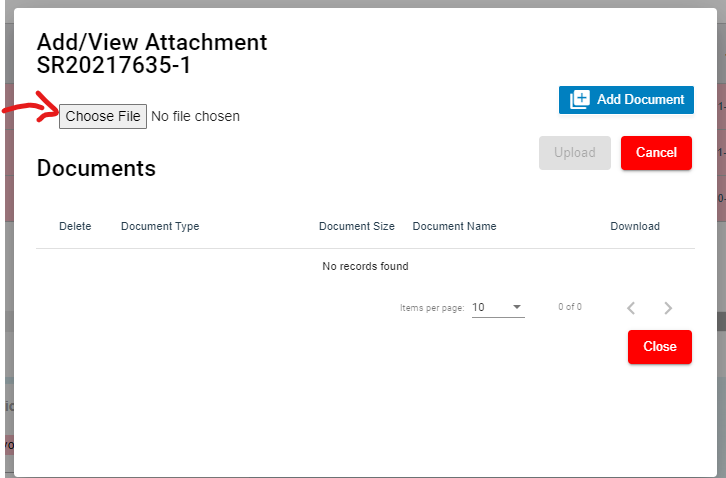
- Click
 (add document icon), The file choosing and uploading option will be enabled,

-
Click
 (Choose File icon) and select the document which you want to upload.
 -
Click Upload. The selected document will be uploaded and displayed in the Add/View Attachment window.

To view any attached document with a service request,
- Click (Attachment icon) in the Documents column, the Add/ View Attachment window opens with a list of attached documents. Note: The subscript number displays with attachment icon shows the total number of attached documents with the vehicle.
- If you want to download the attached document, click (Download icon) in the Download column. The document will be downloaded.
Filter a Service Request
If you want to filter a specific service request in the Service Verification page, you can use the filter option provided in the Service Verification page.
Export a Service Request List
If you want to export all the service requests in the Service Verification page in an excel format, you can use the export option provided in the Service Verification page.
Invoice Generation
Once the service request verification process has completed, the request will be moved for invoice generation. There are three ways to generate invoice:
- Add Invoice - Users can generate invoice in the Add Invoice tab.
- Manual Invoice - Users can generate invoice manually in the Manual Invoice tab. Click Manual Invoice in the Service Request, the Manual Invoice page opens.

- Lump Sum Invoice - Users can generate lump sum invoice per customer in the Lump Sum Invoice tab. Click Lump Sum Invoice in the Service Request, the Lump Sum Invoice page opens.
- If you want to view any specific service request among the list of service requests, you can user the respective filters such as Customer, Location, Verified and SR Date Ranges in the Invoice Generation page.
Add Invoice
To generate an invoice automatically,
- Click Add Invoice in the Service Request menu, the Invoice Generation page opens.
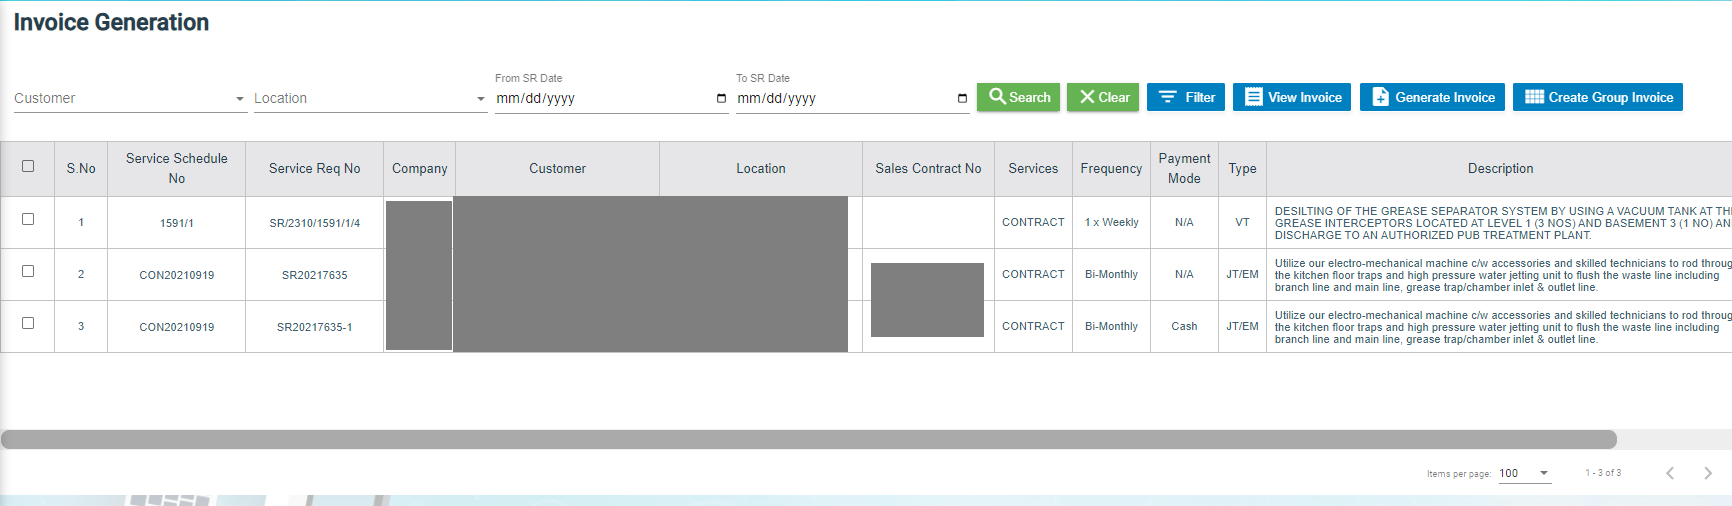
- Click the checkbox of the respective service request for which you want to generate an invoice,
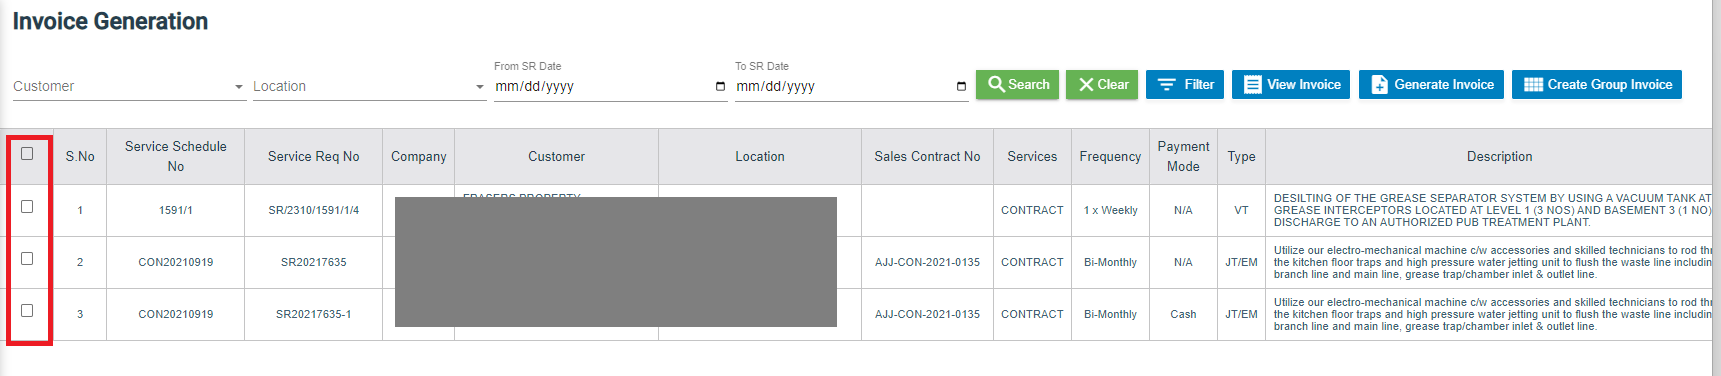
- Click
 (Generate Invoice button).The Generate Service Invoice window opens (Note: The fields highlighted with red color are mandatory. You must enter the relevant details in that fields before saving).
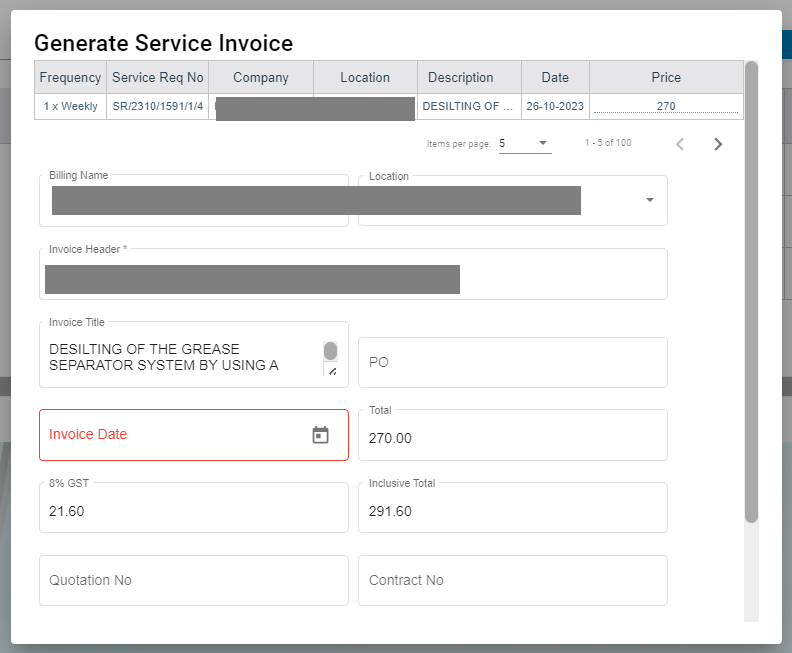
- In the Invoice Title box, enter the invoice title.
- In the PO box, enter the PO number.
- In the Invoice Date box, select the invoice date.
- In the Note box, enter note if any.
- In the Private Note box, enter private note for internal reference if any.
- Click Save. The generated invoice will be saved and moved to the Invoice View page.


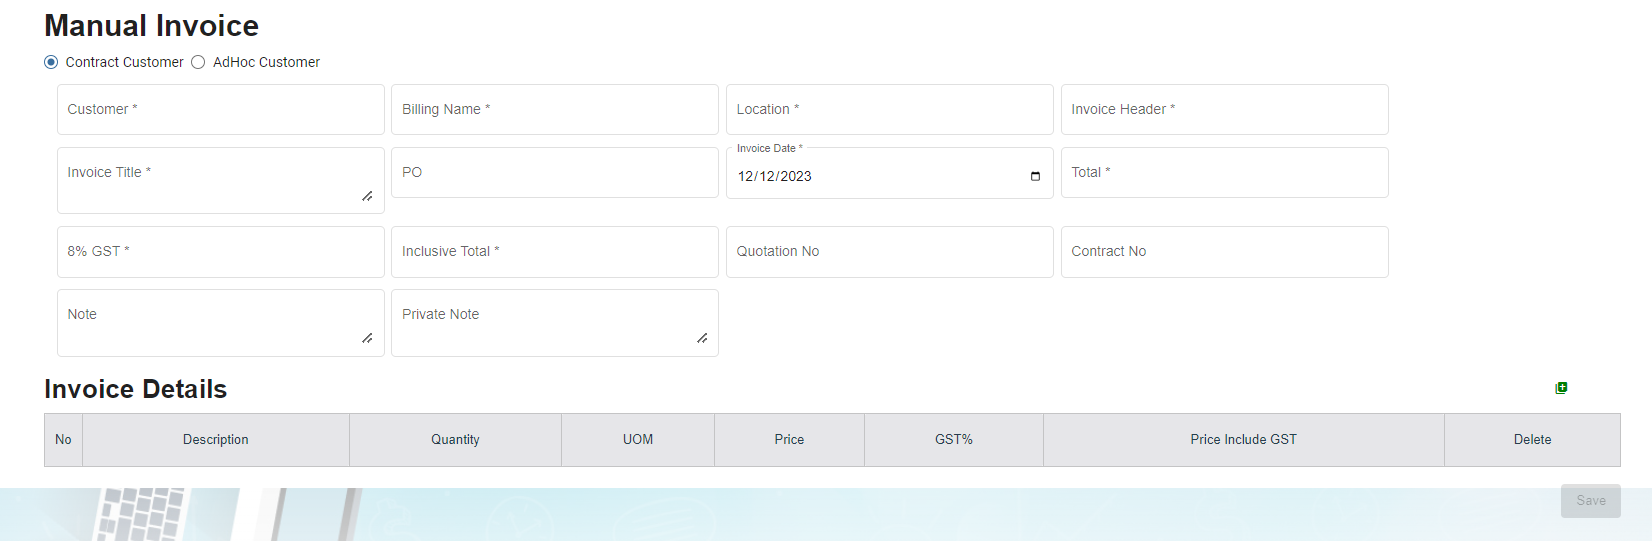
Manual Invoice
To generate an invoice manually,
- Click Manual Invoice in the Service Request menu, the Manual Invoice page opens,
- Select customer type, i.e.. Contract Customer or Adhoc Customer.
- In the Customer box, select customer.
- In the Billing Name box, billing name will auto populate customer name, user can edit billing name if billing name is different from customer name.
- In the Location box, select location.
- In the Invoice Header box, enter invoice header.
- In the Invoice Title box, enter invoice title.
- In the PO box, enter PO number.
- In the Invoice Date box, select invoice date.
- In the Total box, enter invoice total amount.
- In the 9%GST box, the gst amount will be automatically calculated.
- In the Inclusive Total box, the inclusive total will be automatically calculated.
- In the Quotation No box, enter quotation number.
- In the Contract No box, enter contract number.
- In the Note box, enter note if any.
- In the Private Note box, enter any private note for internal reference if any.
- In the Invoice Details section, click
 , then enter invoice details. The total amounts in manual invoice must tally with total of all detailed invoices before user press "save" button, else this validation will always show up and block the data saving.
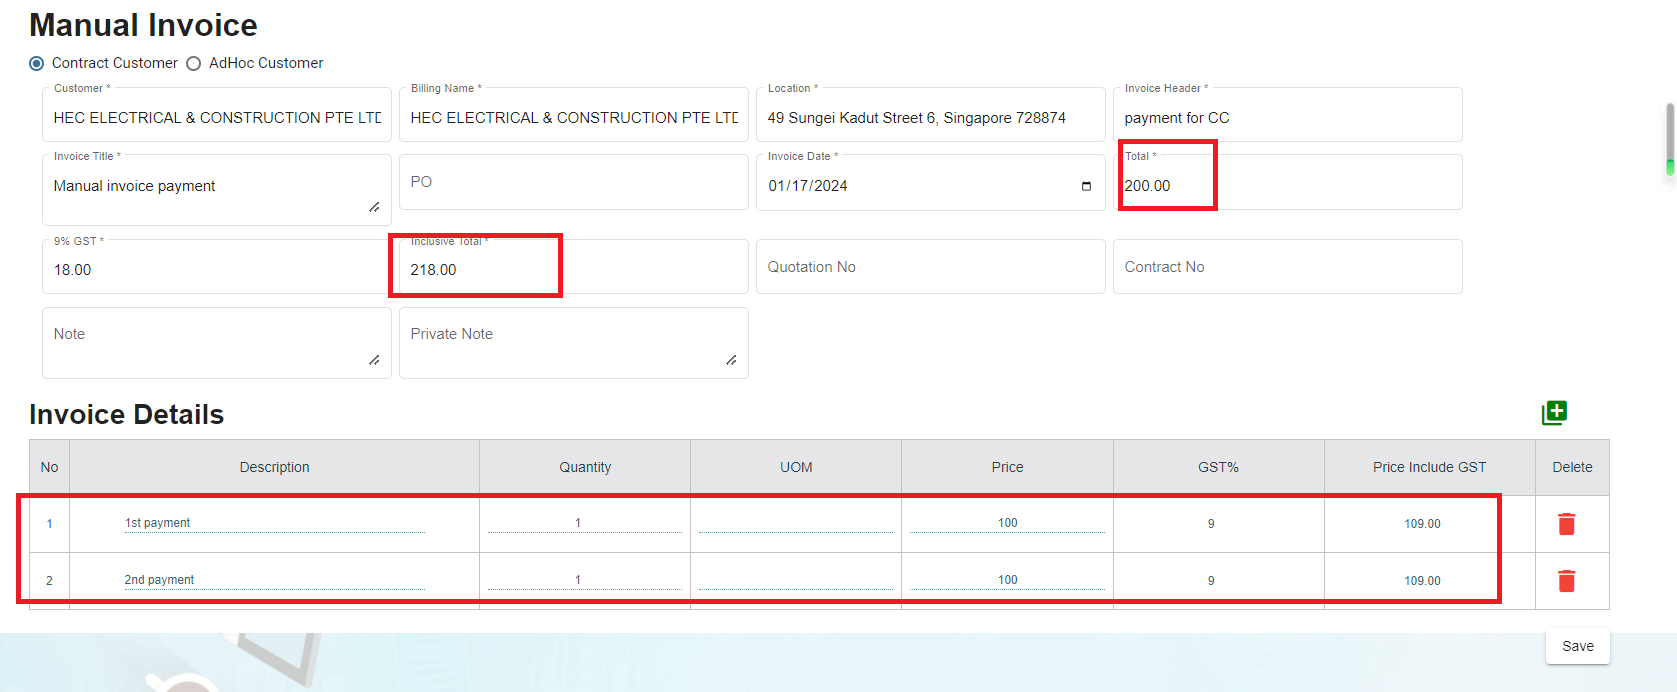
- Click Save, the manual invoice will be saved. And the details can be viewed in the Invoice View tab.

Lump Sum Invoice
Lump sum invoice is used to generate lump sum invoices for lump sum sales contract. The business scenario is as below: Once any lump sum sales contract is created from sales enquiry (by enabling lump sum contract option when creating sales contract), user can create service schedule based on the sales contract, and after the service job is completed, user will be able to generate lump sum invoice in the Lump Sum Invoice tab.
To generate lump sum invoice,
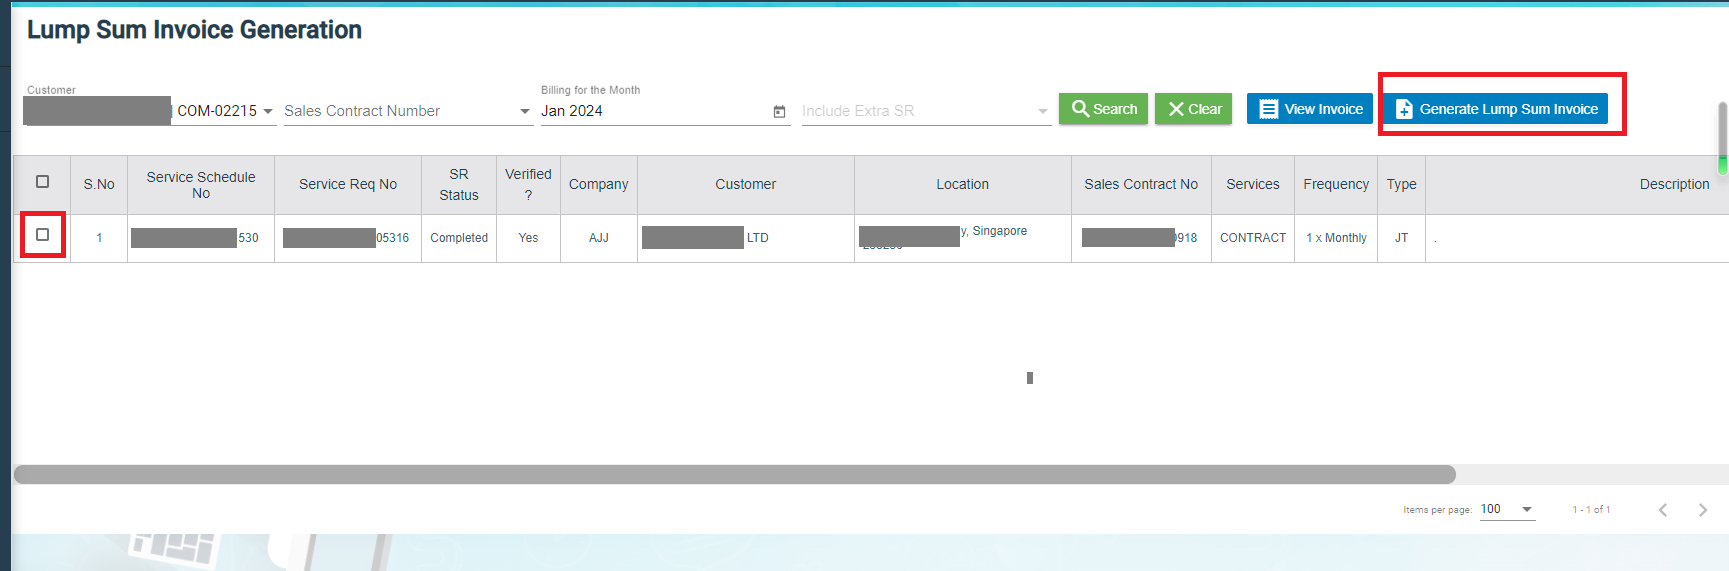
- Click Lump Sum Invoice tab, the lump sum invoice generation page opens as below,
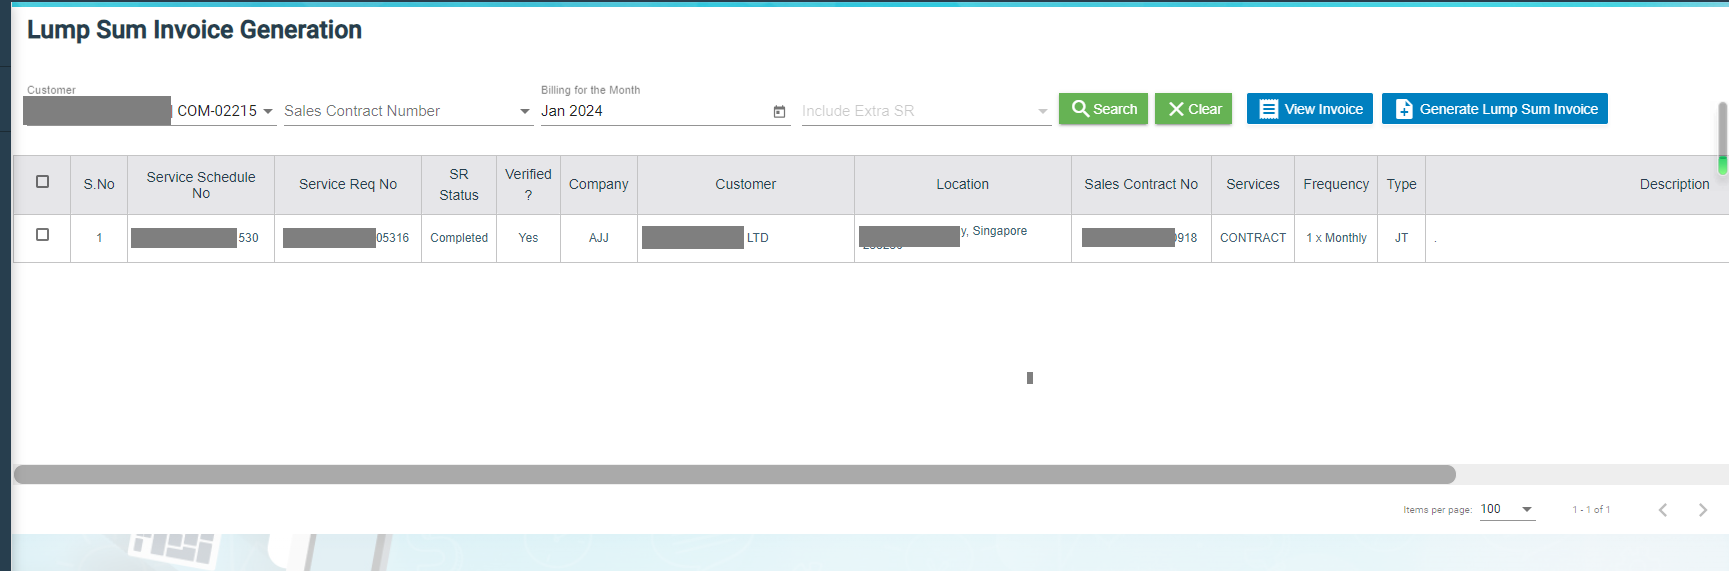
- Click to select the service schedule, then click "Generate Lump Sum Invoice" button,

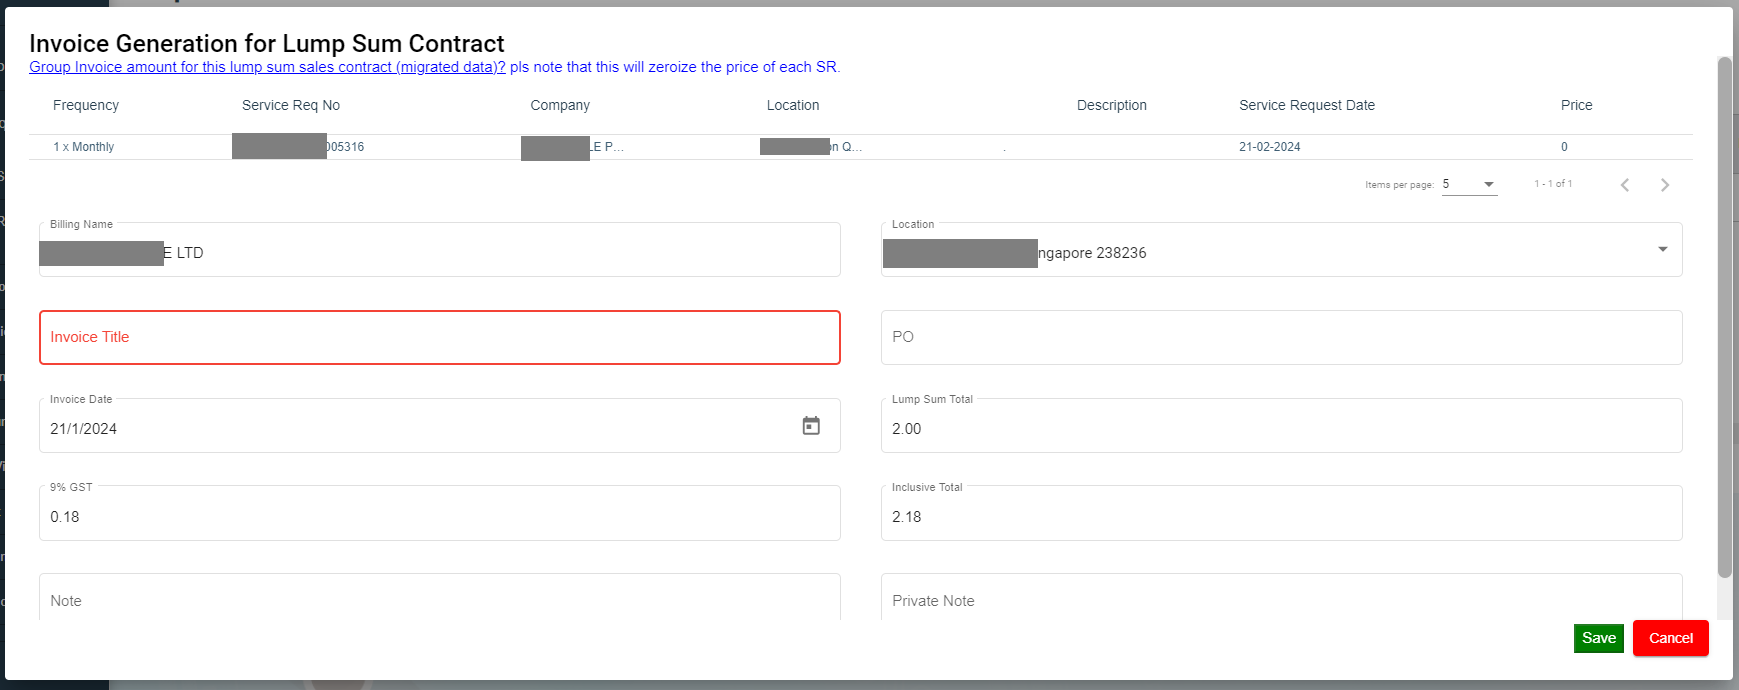
- The Invoice Generation for Lump Sum Contract screen opens as below,

- Enter Invoice title and other details.
- Click Save, the generated lump sum invoice will be saved and user can view it in the Invoice View page.
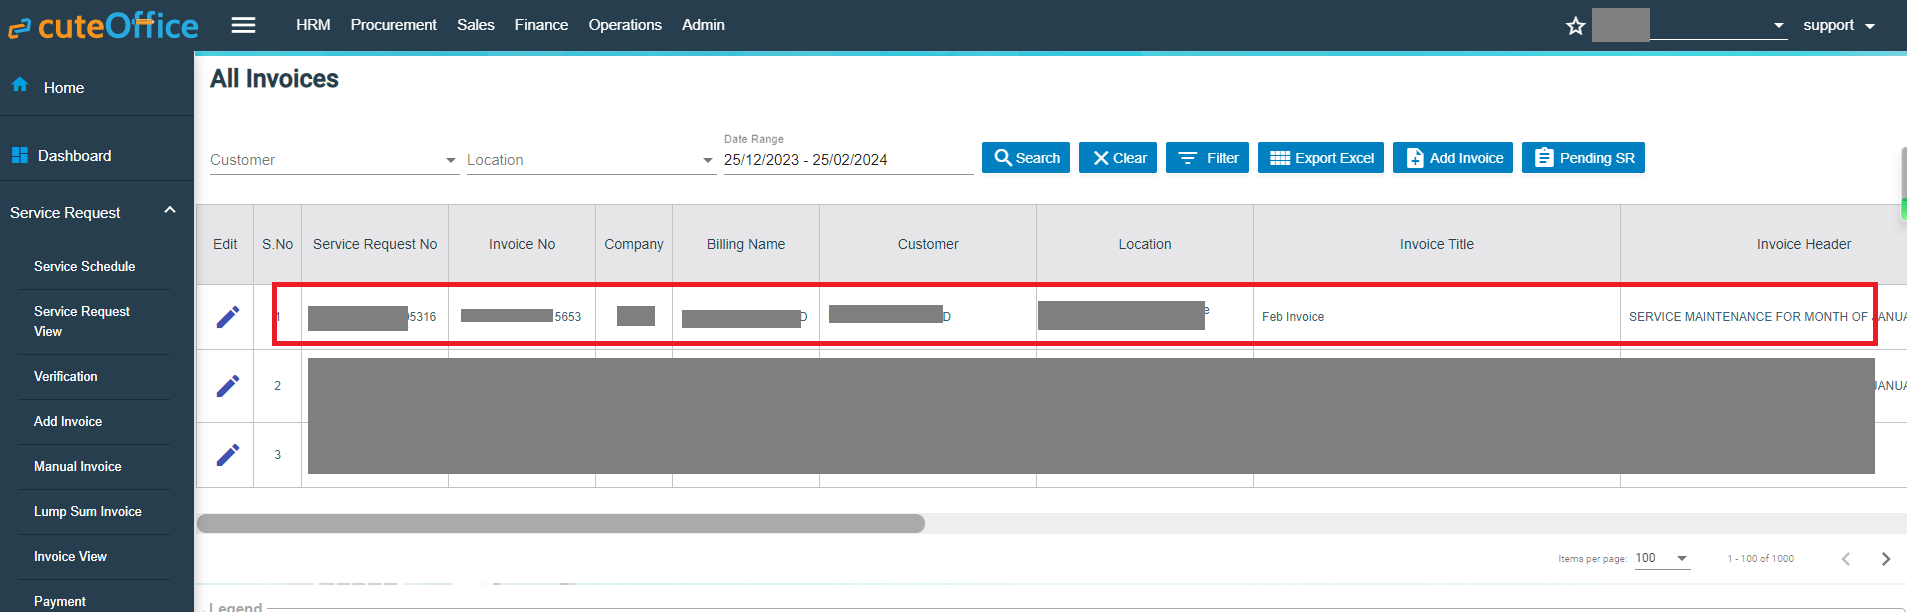


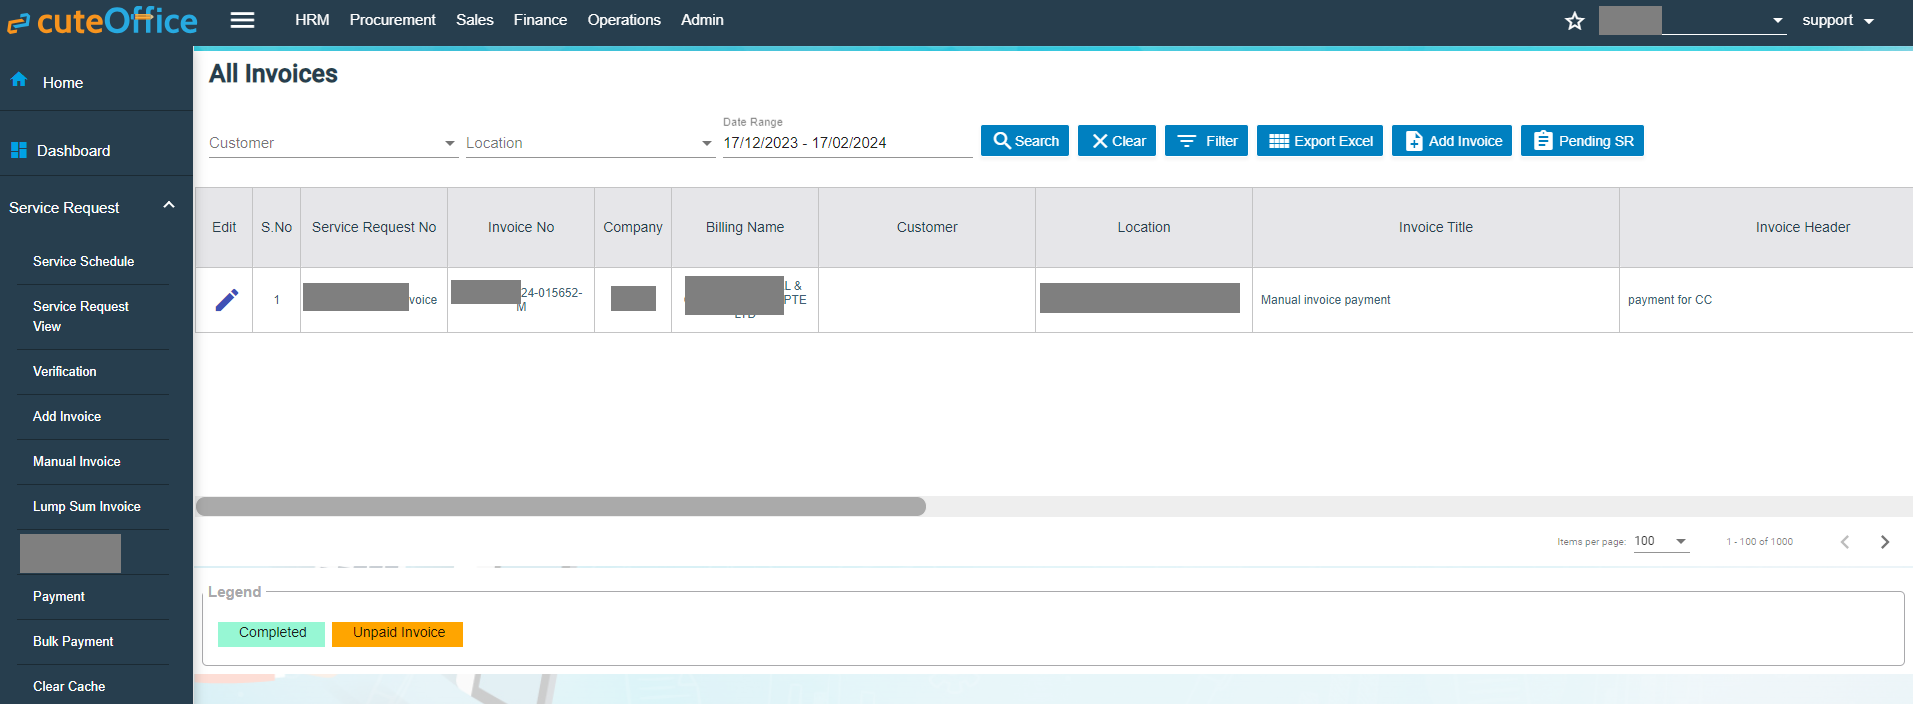
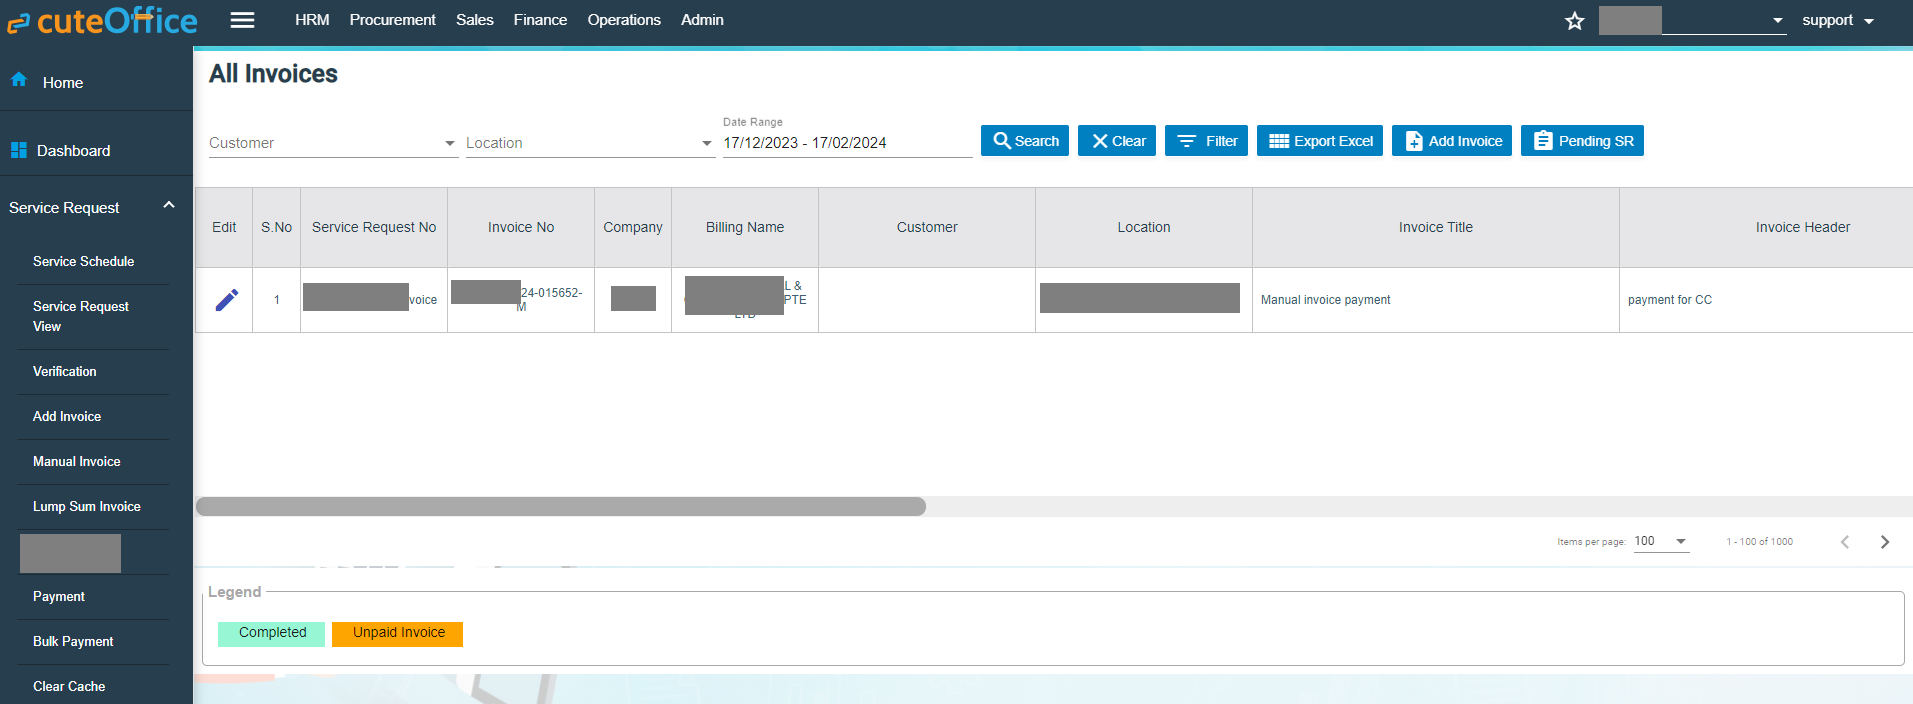
Invoice View
The Invoice View tab in the Service Request submenu manages all the generated invoice details. Click Invoice View in the Service Request. The All Invoices page opens as below,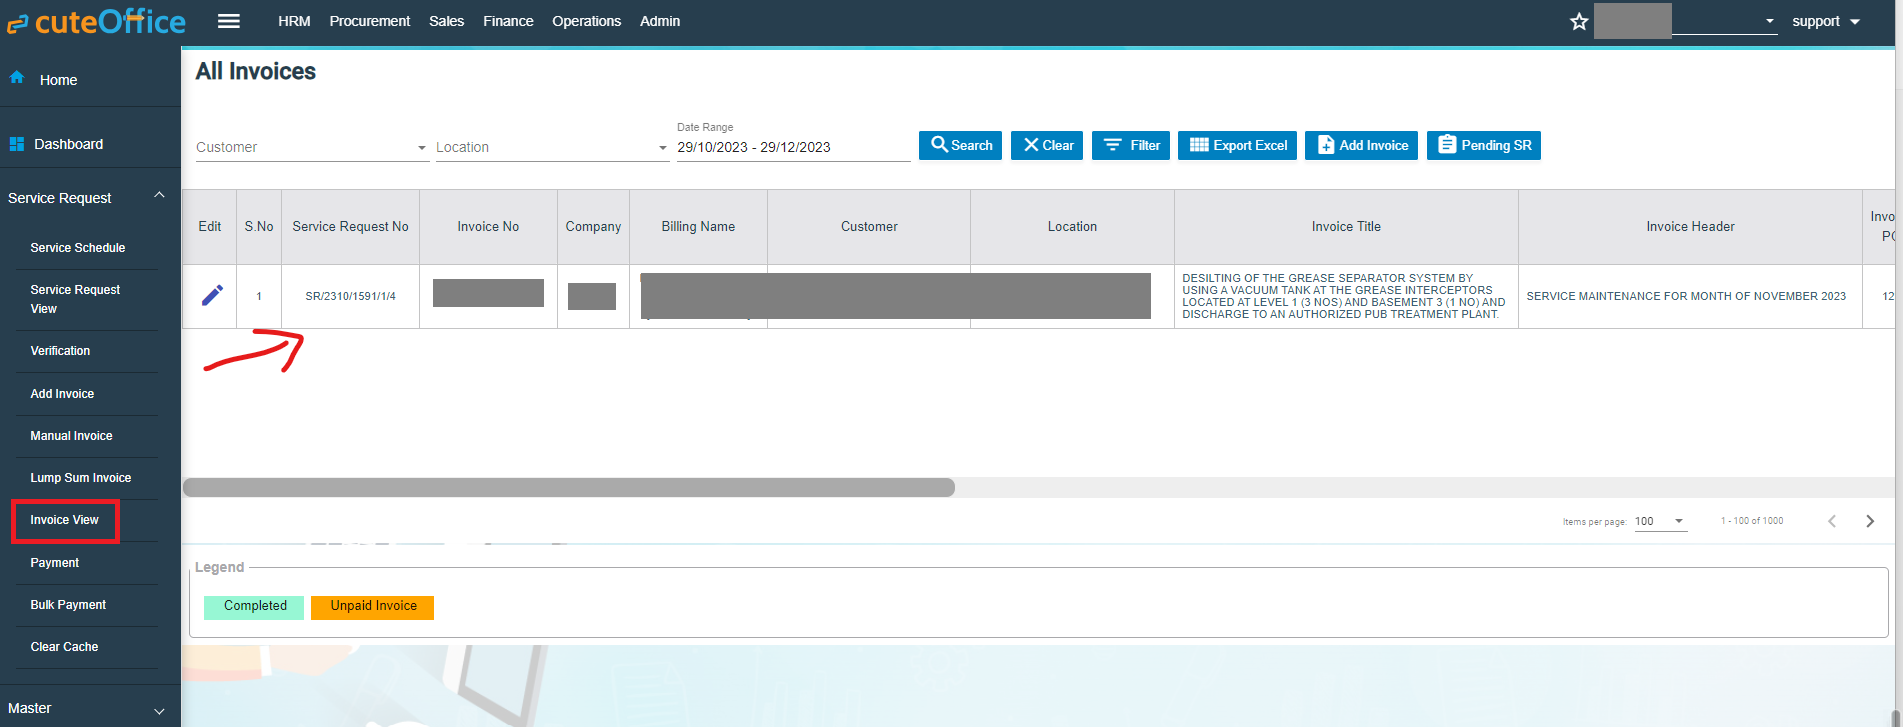
If you want to view any specific invoice among the list of invoices, you can select the respective Customer, Location, Date Range in the field given in the All Invoices page.
The invoices displayed in different color denotes their status, i.e., Completed payment or Unpaid Invoice.
Process an Invoice
To process an invoice,
-
- Click to select the checkbox provided in the Is Invoiced? column,
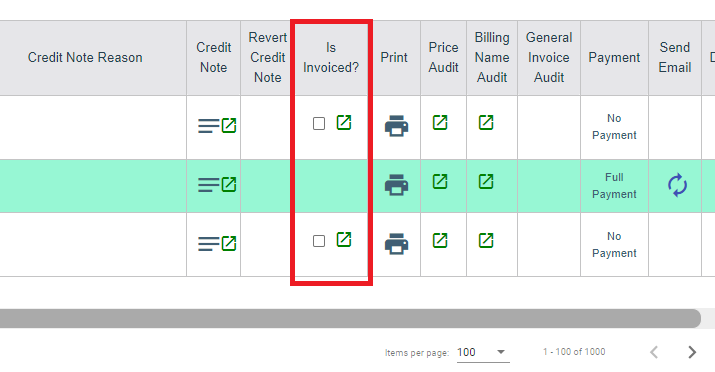
- The Confirm dialog box open and shows the following message.
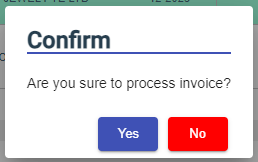
- Click Yes. The invoice record will be changed to green color and as Completed.
- Click to select the checkbox provided in the Is Invoiced? column,


Set Printing options for Invoices
To set the printing options of the invoices,
- Click
 (Print Option icon) provided in the Print Option column, the Invoice PDF options window opens
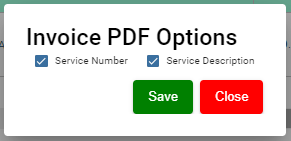
- Select the checkbox of the Service Number and Service Description options based on user's request.
- Click Save.


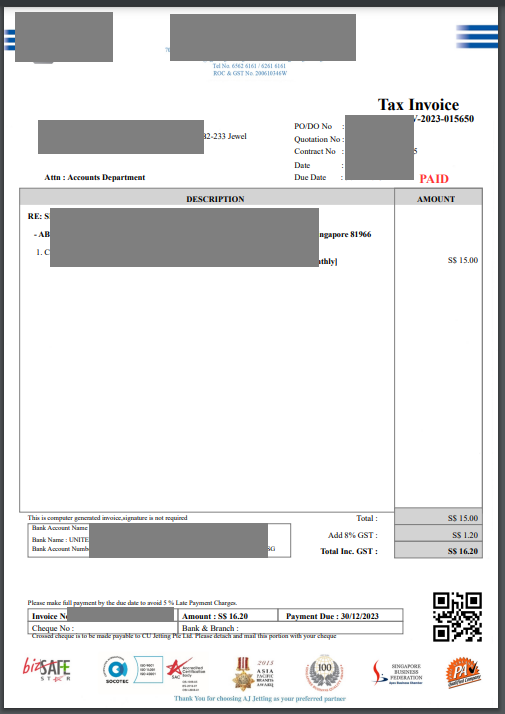
Print an Invoice
To print an invoice,
- Click the respective
 (Print icon) in the Print column.
 - The invoice will be downloaded as a pdf file.

Delete an Invoice
You can delete the invoice by using ![]() (Delete icon) provided in the Delete column of the All Invoices page.
(Delete icon) provided in the Delete column of the All Invoices page.
Filter an Invoice
If you want to filter an invoice in the All Invoices page, you can use the ![]() filter option provided in the All Invoices page.
filter option provided in the All Invoices page.
Export an Invoice List
If you want to export all the invoices in the All Invoices page in an excel format, you can use the ![]() export option provided in the All Invoices page.
export option provided in the All Invoices page.
Payment
The Payment tab in the Service Request submenu allows user to add the service payment details against the related invoice. Users who are assigned with srm_admin role will have access to view this Service Payment page. Click Payment in the Service Request, the Service Payment page opens, user can configure the number of invoices per page displaying by selecting 50, 100, 250, 500, or 1000 at the bottom of page.
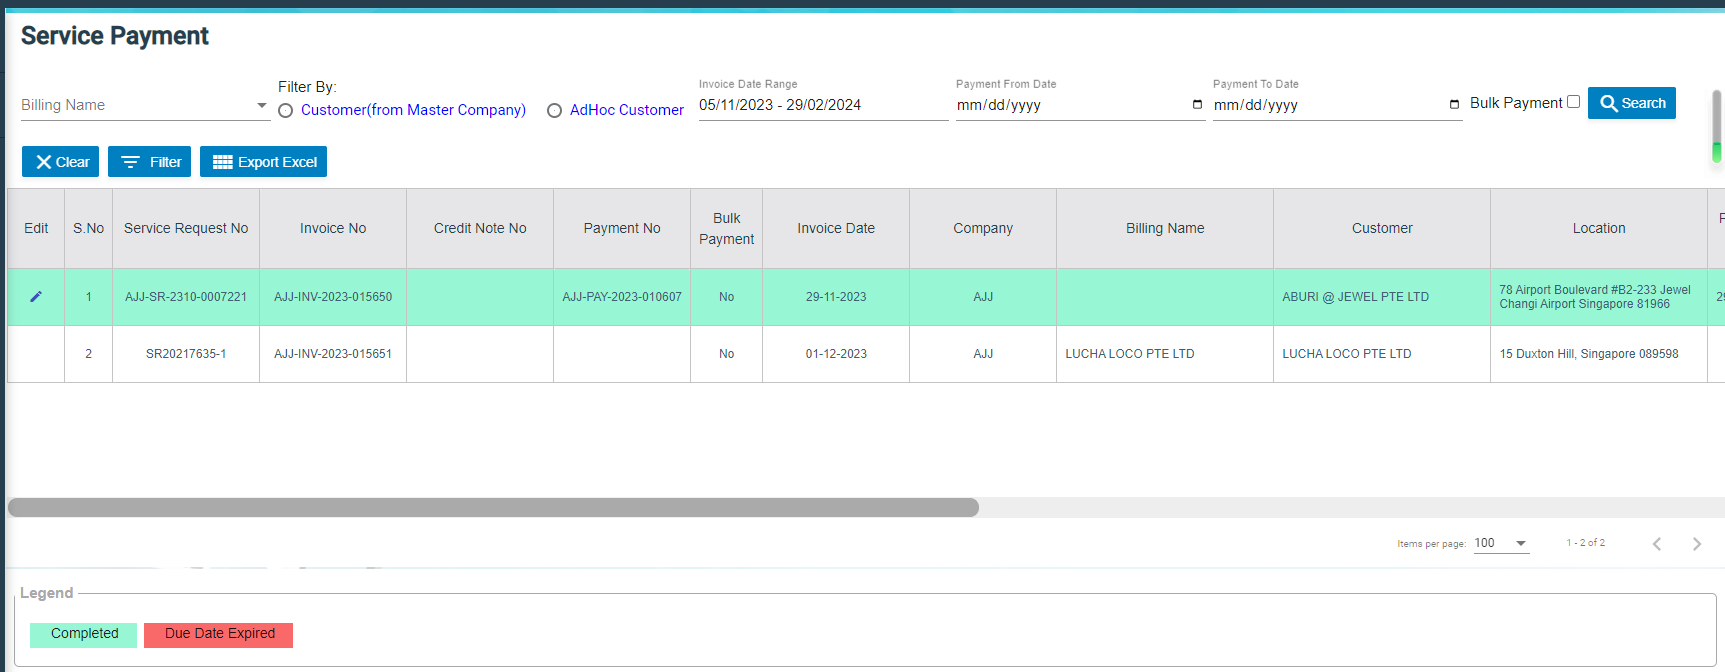
- User can use filter options to view any specific invoice among the list of invoices, filter options including Billing Name, Customer, Location, Date Range in the field given in the Service Payment page.
- The invoices displayed in different color explains their status as described in legend.
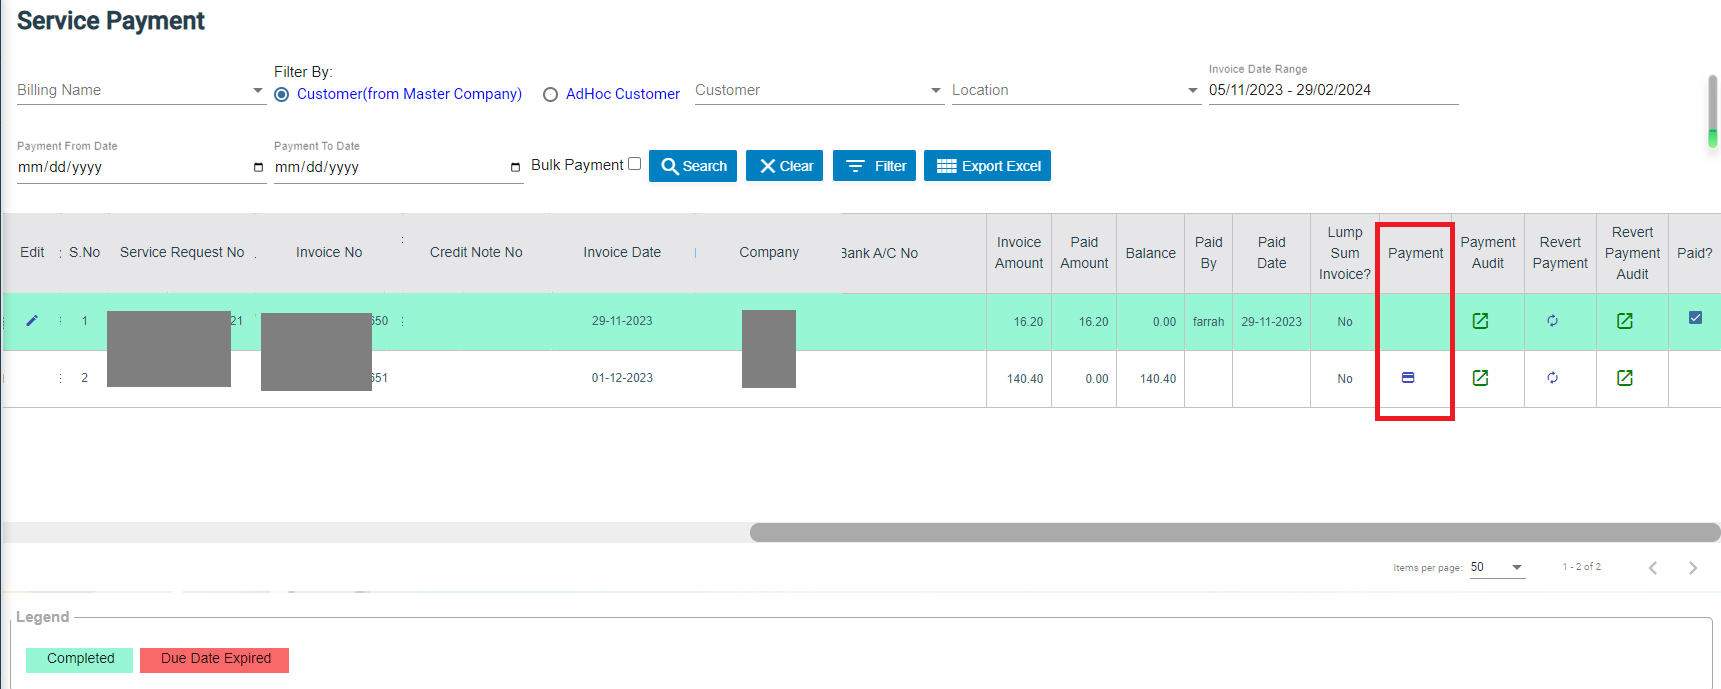
Add Payment Details
To add the payment details,
- Click
 (Payment icon) in the Payment column, The Service Payment window opens.
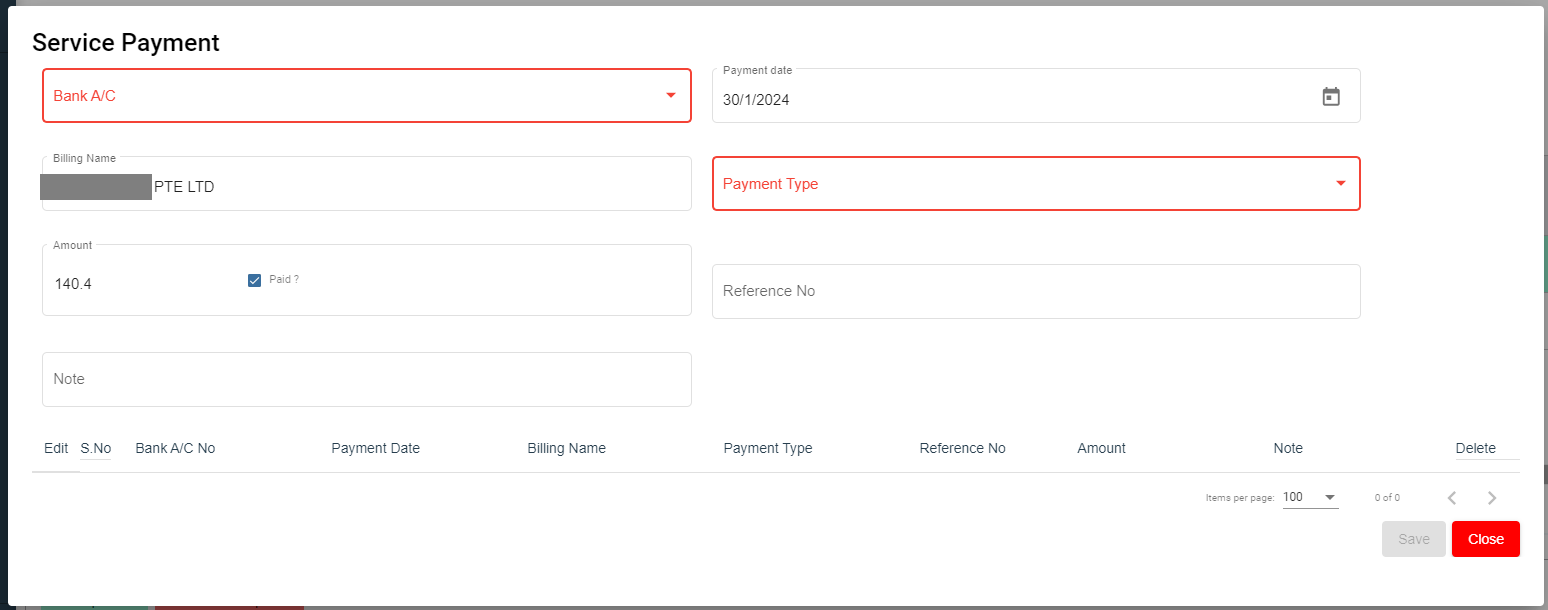
- The fields highlighted with red color in payment detail page are mandatory. You must enter the relevant details in that fields before saving.

- In the Bank A/C box, select a bank account from a drop-down list.
- In the Payment Date box, select the payment date.
- In the Billing Name box, enter billing name (if billing name is same as company name, company name will auto fill as billing name).
- In the Payment Type box, select a payment type.
- In the Amount box, enter the amount if it's different from invoice amount. The Paid? box will be
- In the Reference No box, enter reference number.
- In the Note box, enter your note if any.
- Click Save. The invoice record will be changed to Green color and as completed.

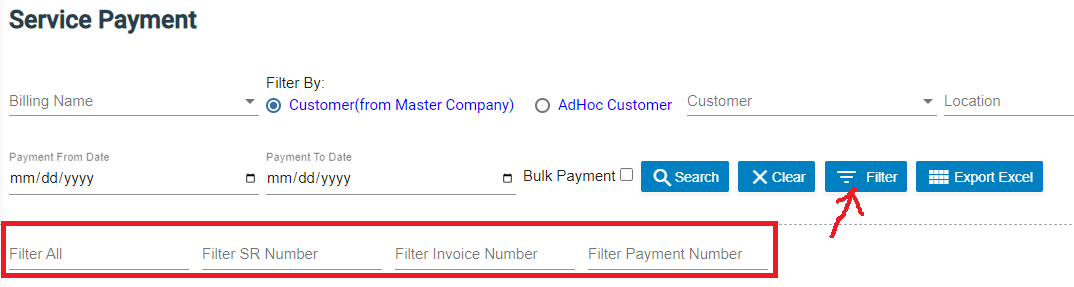
Filter an Invoice
If you want to filter an invoice in the Service Payment list, you can use the filter option provided in the Service Payment page such as SR number, invoice number etc..
Export an Payment List
If you want to export all the invoices in the Service Payment page in an excel format, you can use the export option ![]() provided in the Service Payment page.
provided in the Service Payment page.
Bulk Payment
The Bulk Payment tab in the Service Request submenu allows user to enter multiple invoice payments that belongs to a same billing name in bulk. Click Bulk Payment tab, the bulk payment for service payment page opens as below,
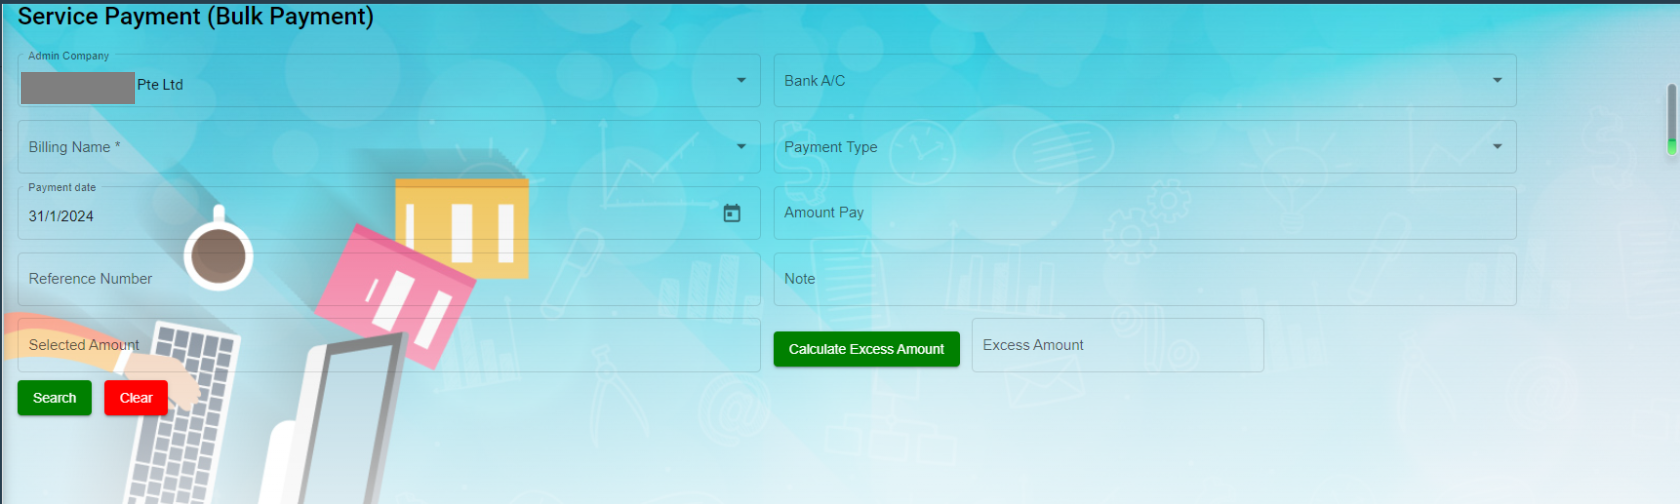
To do bulk payment,
- In Admin-Company box, select Admin company from a list of admin companies which the payment shall be paid to.
- In Bank A/C box, select bank account name to receive payments,
- In Billing Name box, select invoice billing name.
- In Payment Type box, select payment type from list such as cash, online transfer, paynow etc..
- In Payment Date box, click to select payment date.
- In Amount Pay box, enter amount paid.
- In Reference Number box, enter reference number if any.
- Click
 Search button, a list of unpaid invoice belong to selected billing name will display in the screen, and Bulk Pay button will be enabled.
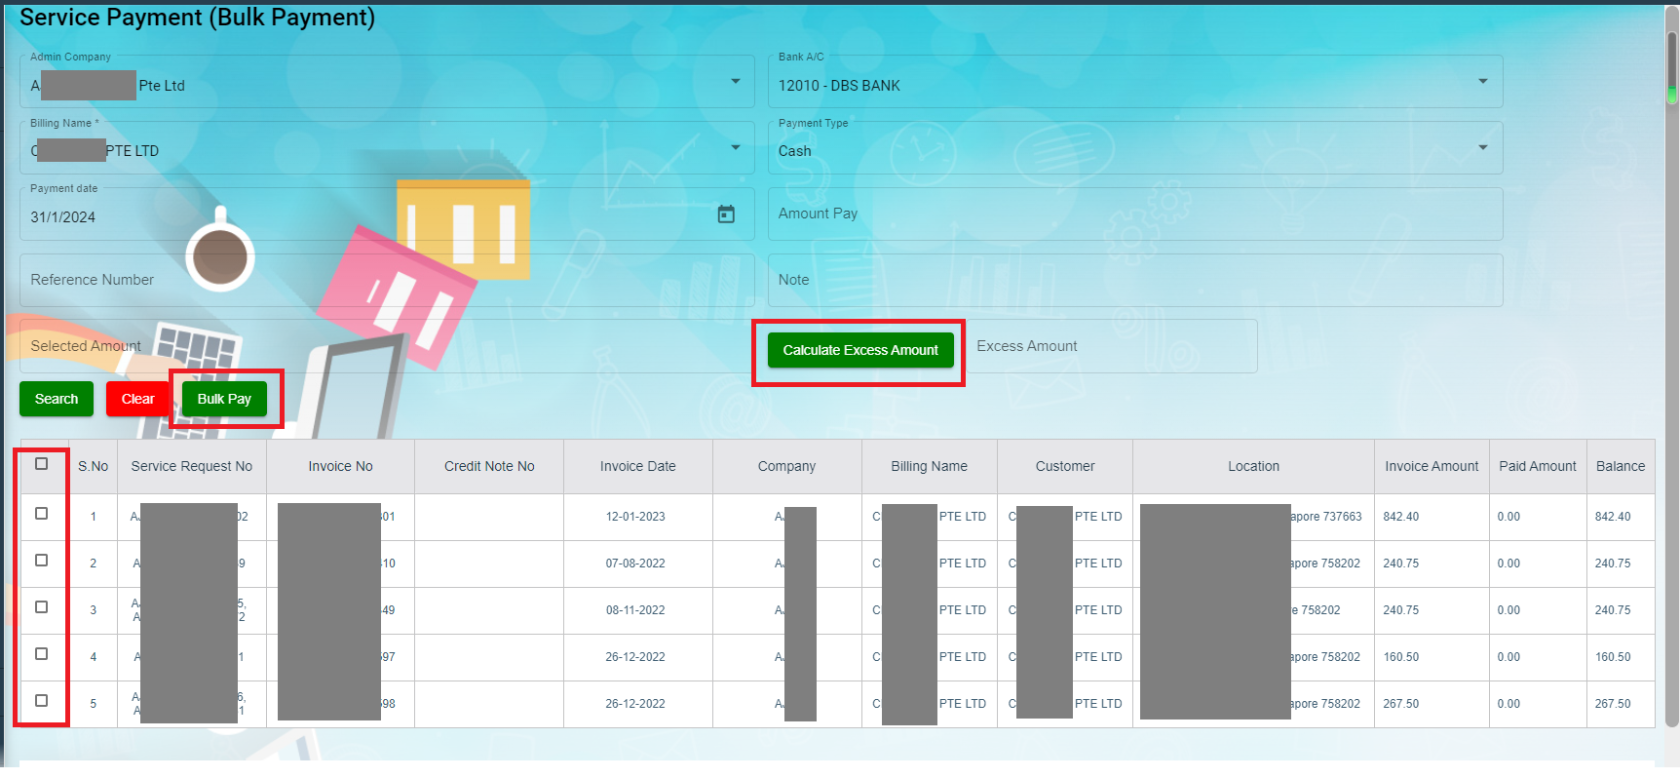
- Click to select invoices from the list of unpaid invoices in the screen, and the selected invoice amount will be calculated and displayed in Selected Amount box.
- If Selected amount box differs from Amount pay box, user can click Calculate Excess Amount button, and system will show payment confirmation notification as below,

- Click Yes to confirm bulk payment, upon successful creation, a bulk payment number will be displayed in the payment No box in the search area as below.

- And the bulk payment details will be saved in the Payment tab. User can search by bulk payment number in payment page,
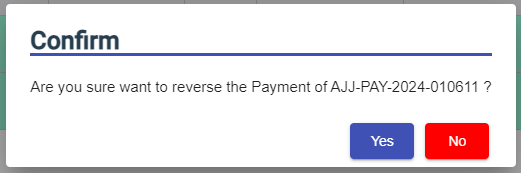
Note: User with permissions will be able to revert bulk payment if needed. After clicking search button, authorized user can click Revert Bulk Payment button, and a confirmation notification will show as below. Click Yes to confirm reverting bulk payment for selected bulk payment number. And the associated invoices will be reverted to unpaid status.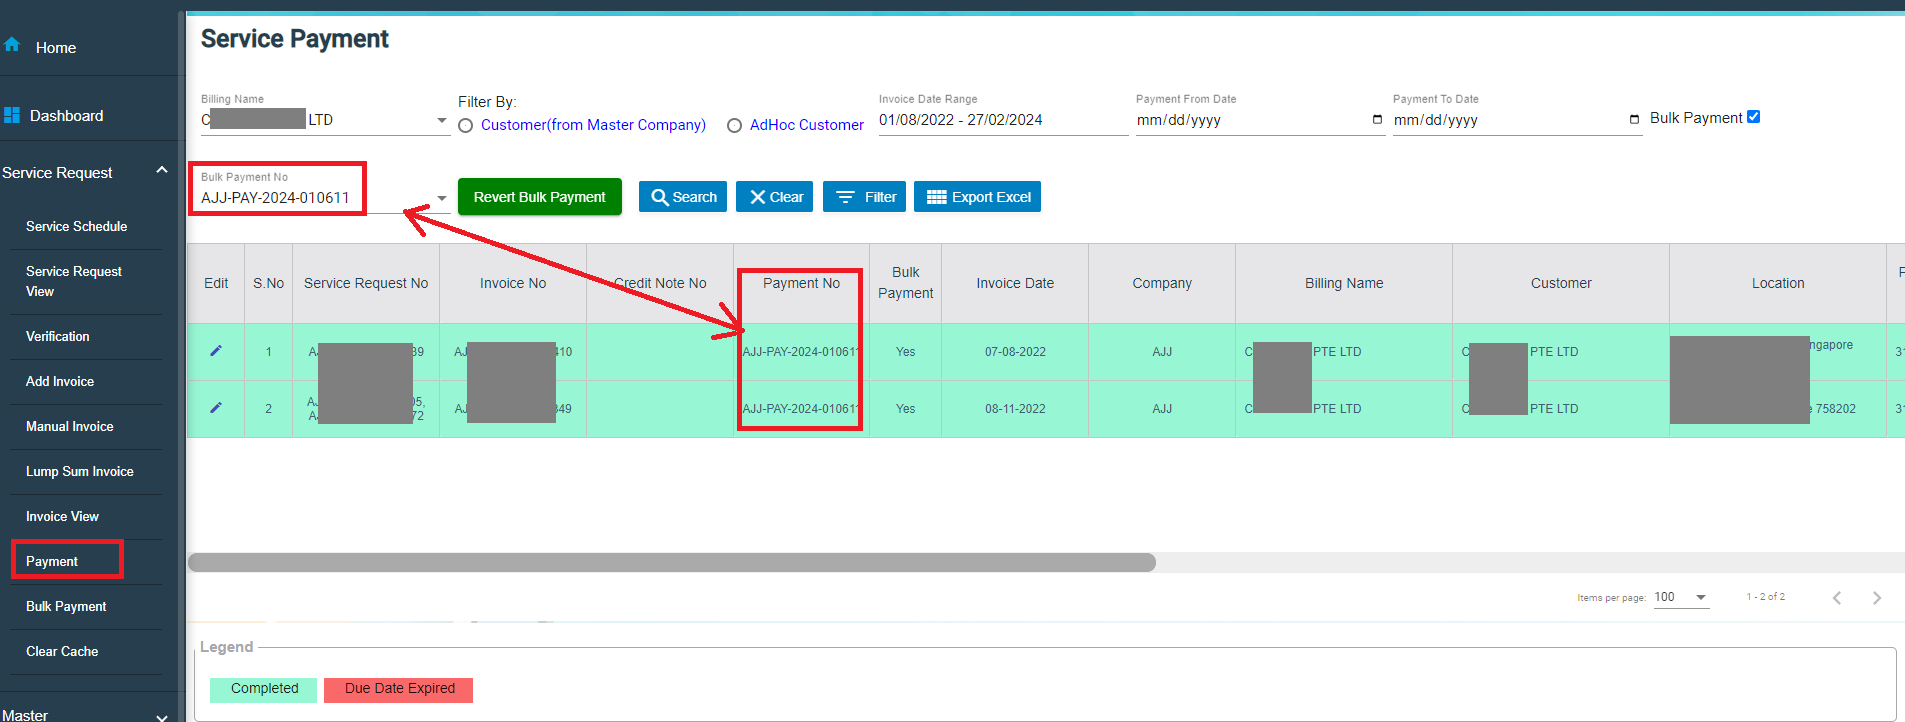


Clear Cache
Clear cache tab is used to clear search caches in Service Request and Service Schedule menu screens. Click Clear Cache, the clear cache page opens as below, click Proceed to confirm clearing cache.

Report
- Invoice Pending
- Statement Of Accounts
- Request For PUB
- Invoice Ageing Report
- SR Sales Report By Jetting/Vacuum
- Payment History
- Verification Pending
- Cash Received
Invoice Pending
The Invoice Pending tab in the Report submenu helps you to view the pending invoice details. Click Invoice Pending in the Report submenu. The Invoice Pending page opens and shows the list of invoices which are pending (number of items display per page can be configured by select number in the item per page box that located at the bottom of page).
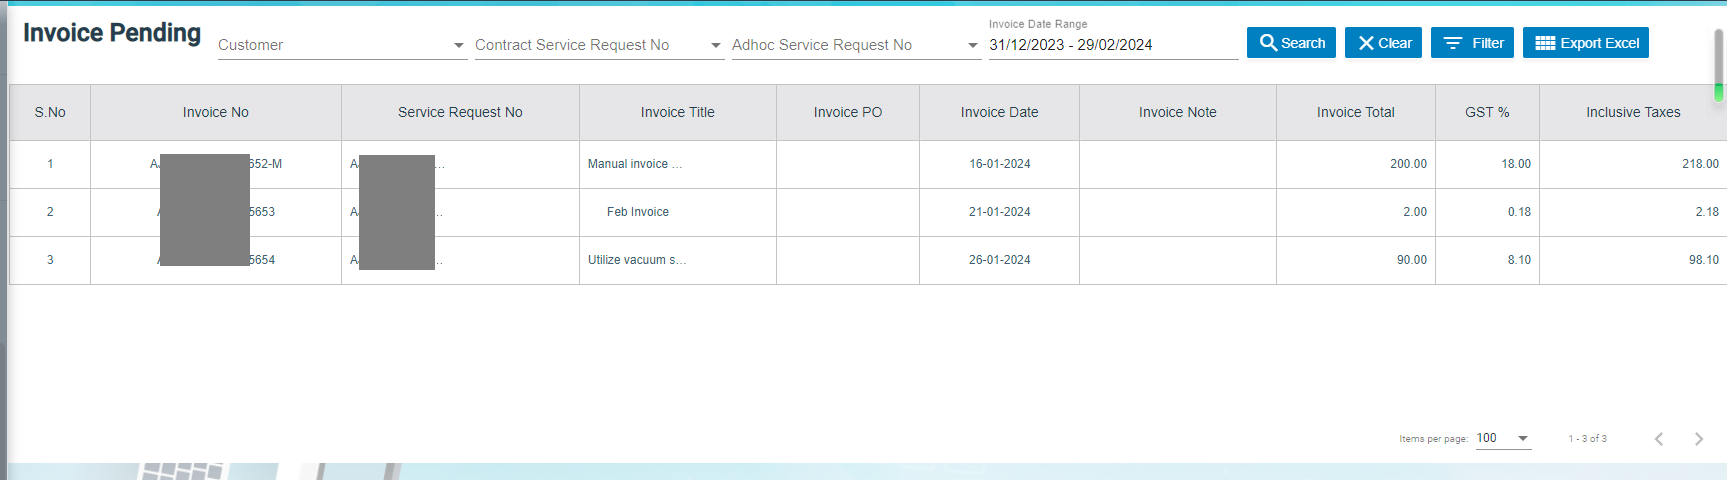
If user want to view any specific pending invoice among the list of pending invoices, you can select the respective Date Range in or click Filter option provided in the Invoice Pending page.
Export a Pending Invoice List
If you want to export all the invoices in the Invoice Pending page in an excel format, you can use the ![]() export option provided in the Invoice Pending page.
export option provided in the Invoice Pending page.
Statement Of Accounts
Statement of accounts reports help user view all transactions with a particular customer. Click Statement of Accounts, the statement of accounts report page opens, user can select SR customer name or billing name, and As of Date, and then click Search, the report will show as below (number of items display per page can be configured by select number in the item per page box that located at the bottom of page),

Export a Statement of Accounts
If you want to export statement of accounts, you can use the![]() to export report in excel format, or use
to export report in excel format, or use ![]() to export report in PDF format.
to export report in PDF format.
Email a Statement of Account to Customer
If you want to email a statement of account to customer,
- Click
 email customer button at the top left corner, a confirmation notification will pop up as below,

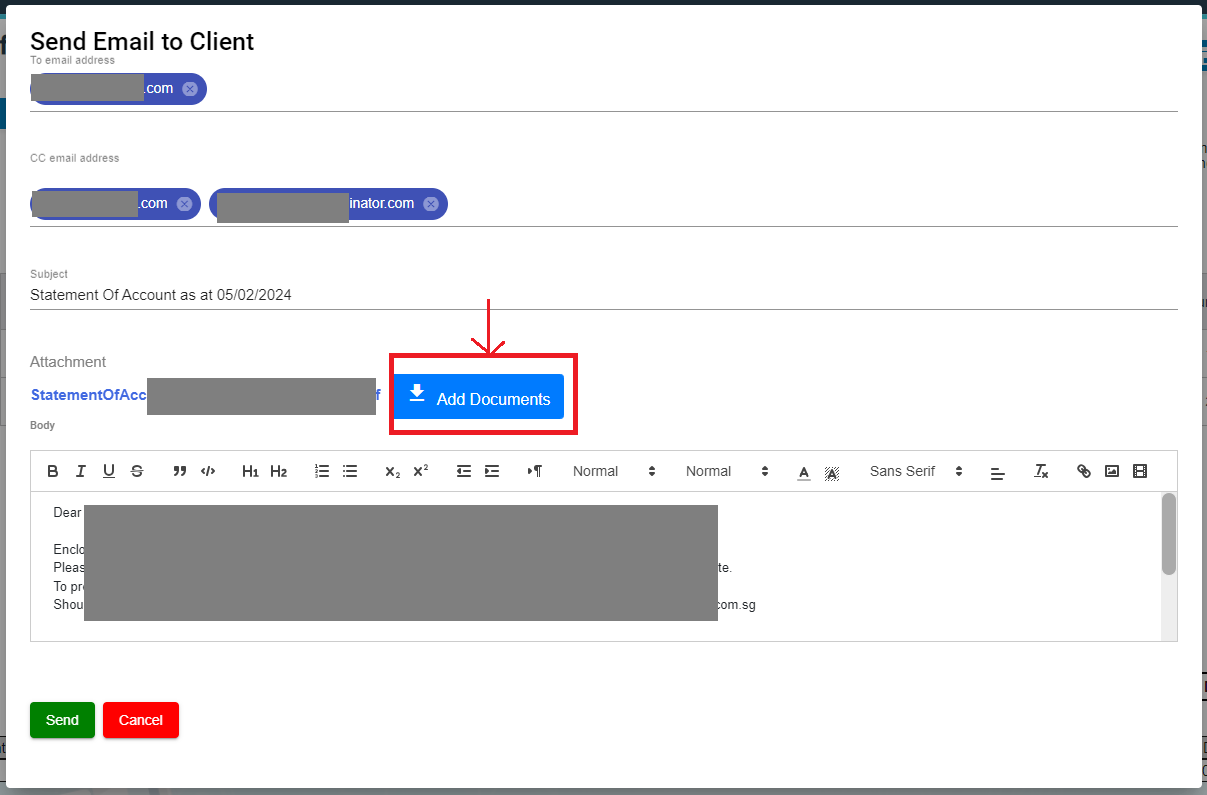
- Click Yes, system emailing window will open as below, user can configure email template, once email template is created, relevant information will be automatically populated.

- Review information in above, and if needed, user can attach file using Add Documents option.
- Click Send. System will send email to customer.
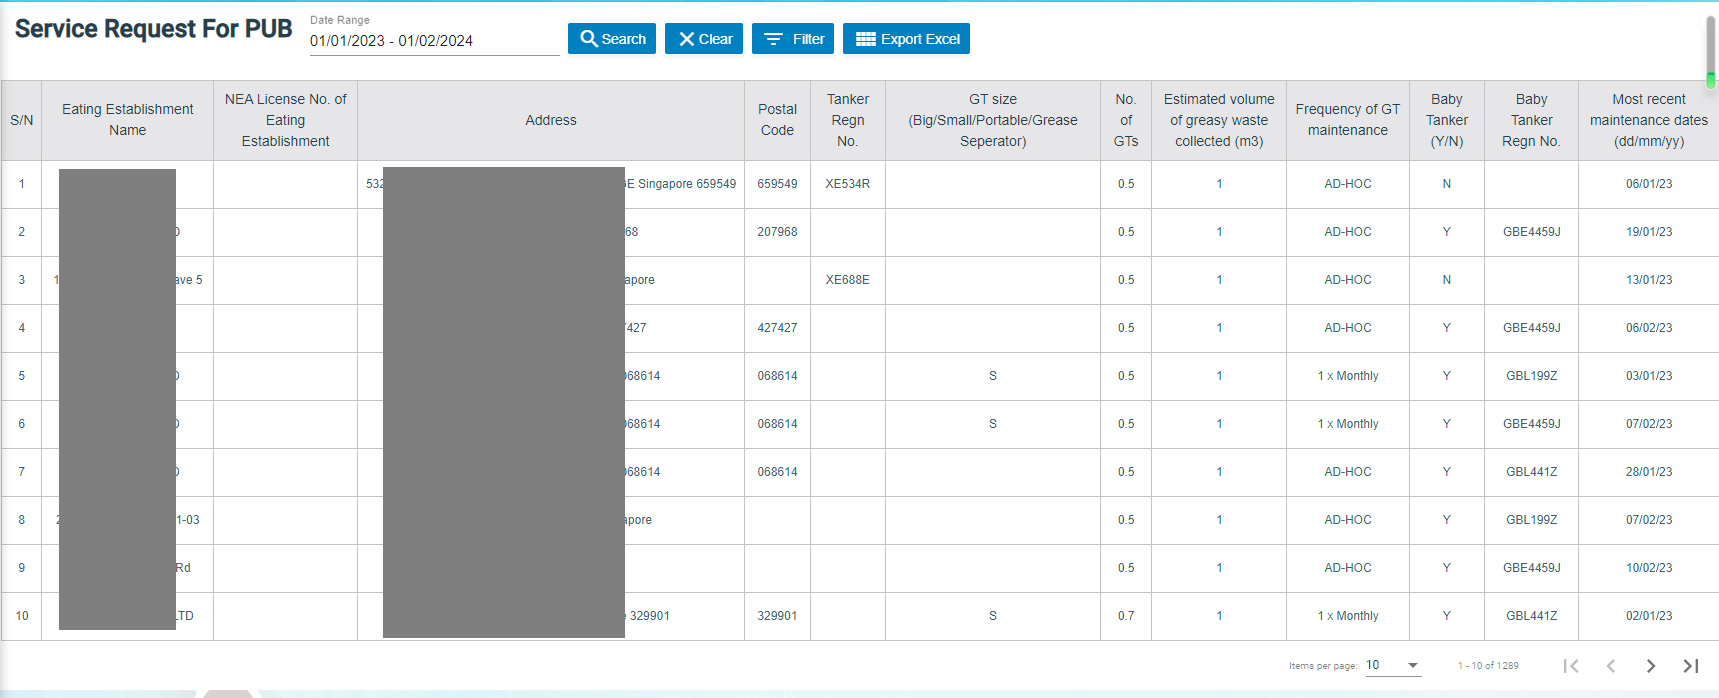
Request For PUB
Request for PUB report allows user to view all service request details for PUB in selected period of time.
- Click Request For PUB tab, the service request for pub report page opens as below,
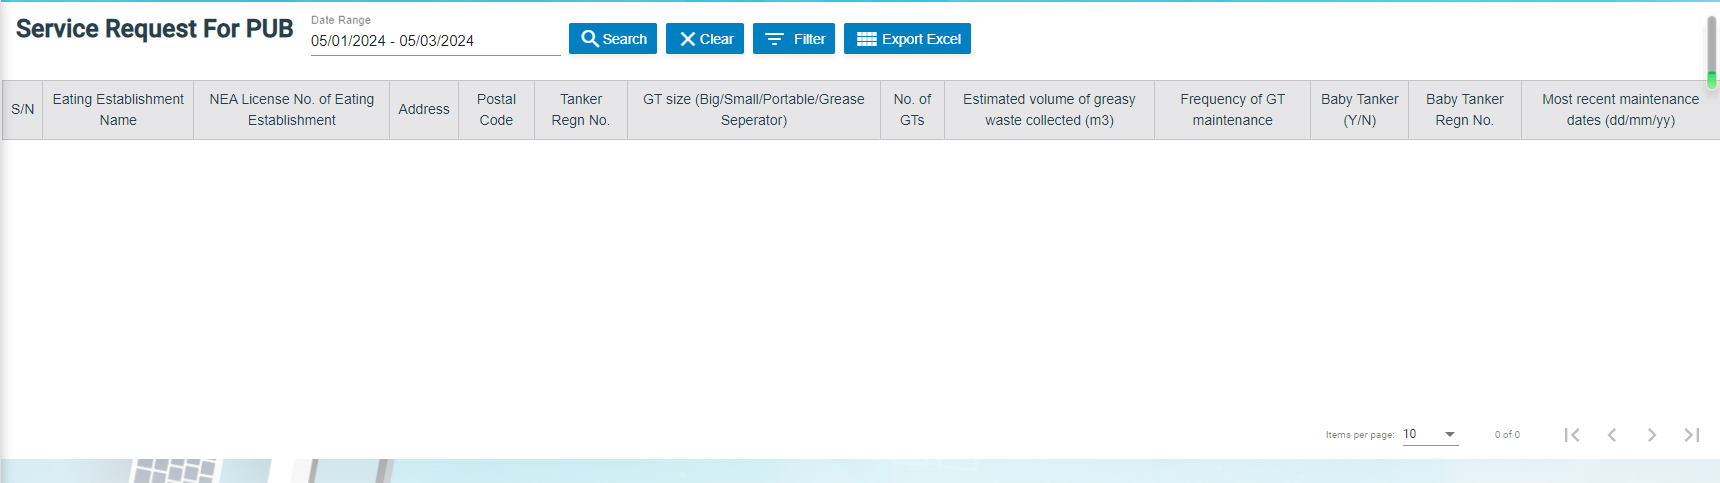
- Select a date range and then click Search, request for PUB report opens as below (number of items display per page can be configured by select number in the item per page box that located at the bottom of page),


Export Request for PUB report
If you want to export all the service request for PUB report in an excel format, you can use the ![]() export option provided in the Request for PUB page.
export option provided in the Request for PUB page.
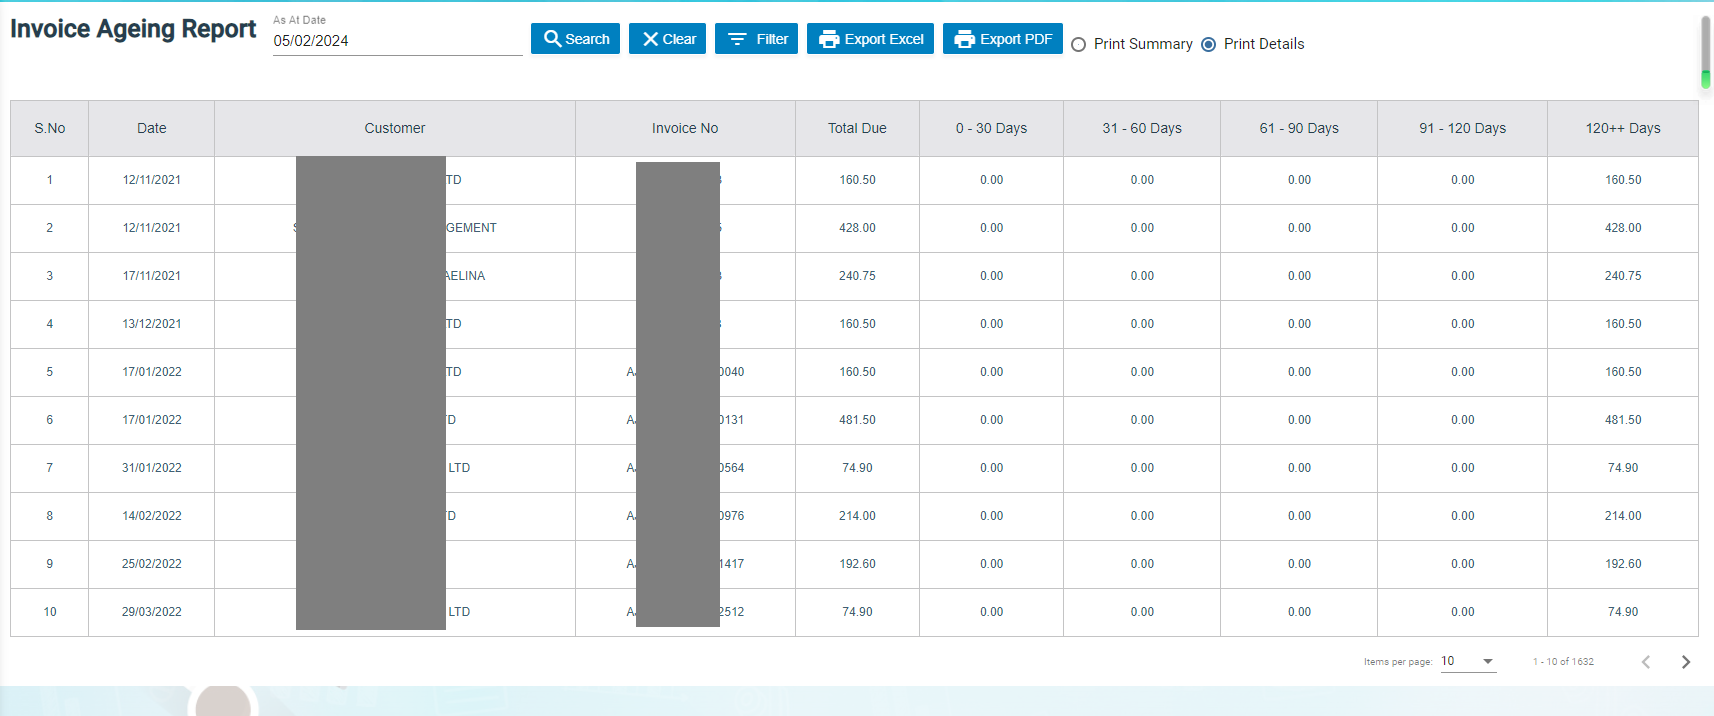
Invoice Aging Report
Invoice ageing report helps user analyze the cash flow of all unpaid invoices. This report provides information about invoice payments due within time periods user specified in the Aging Periods window.
- Click Invoice Ageing Report tab, the invoice ageing report page opens as below,

- In As Of Date box, click to select as of date.
- Click Search, all ageing invoices that meet search criteria will display as below,


Export Invoice Ageing Report
User can export report in two types (summary report or detail report) by choosing Print Summary or Print Details. Report format can be configured based on user requirement.

- Select report type to be exported, i.e. Print Summary or Print Details.
- If user want to export statement of accounts, click the
 to export report in excel format, or click
  to export report in PDF format.
SR Sales Report By Jetting/Vacuum
SR sales report by jetting/vacuum provides detail information by jetting/vacuum during selected period of time.
- Click SR Sales Report By Jetting/Vacuum tab, the report page opens as below,

- In SR date box, click to select a date range.
- As for service type, click to choose Jetting or Vacuum.
- Click Search, SR sales details that meet search criteria will display as below (number of items display per page can be configured by select number in the item per page box that located at the bottom of page),

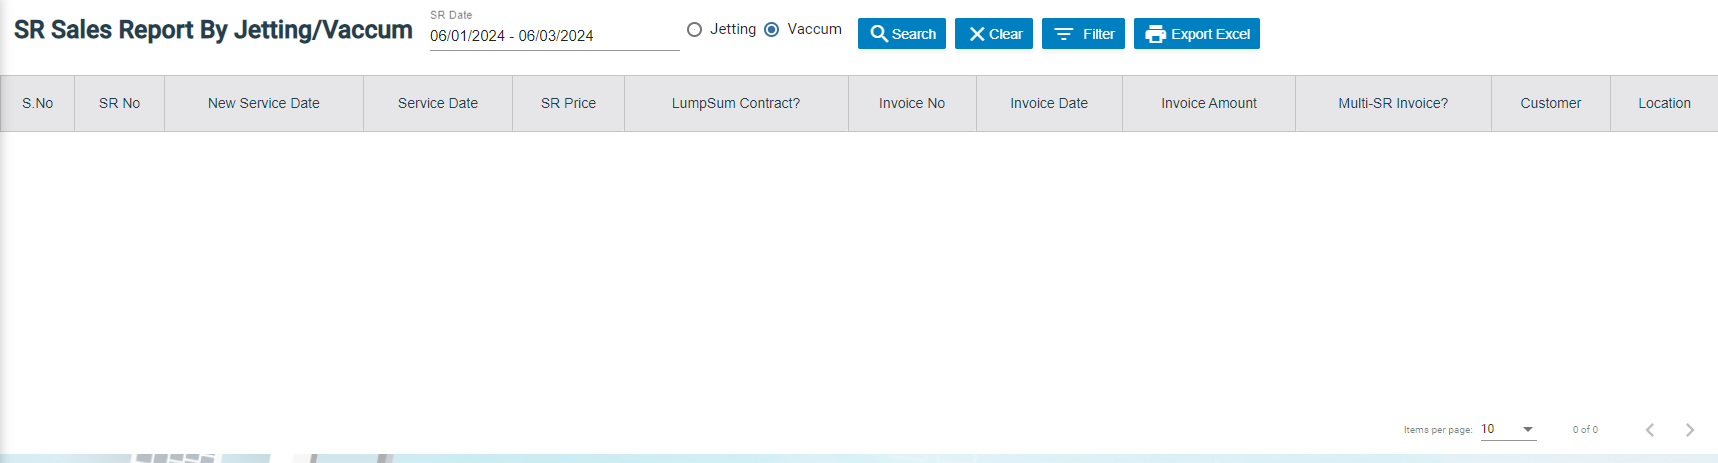
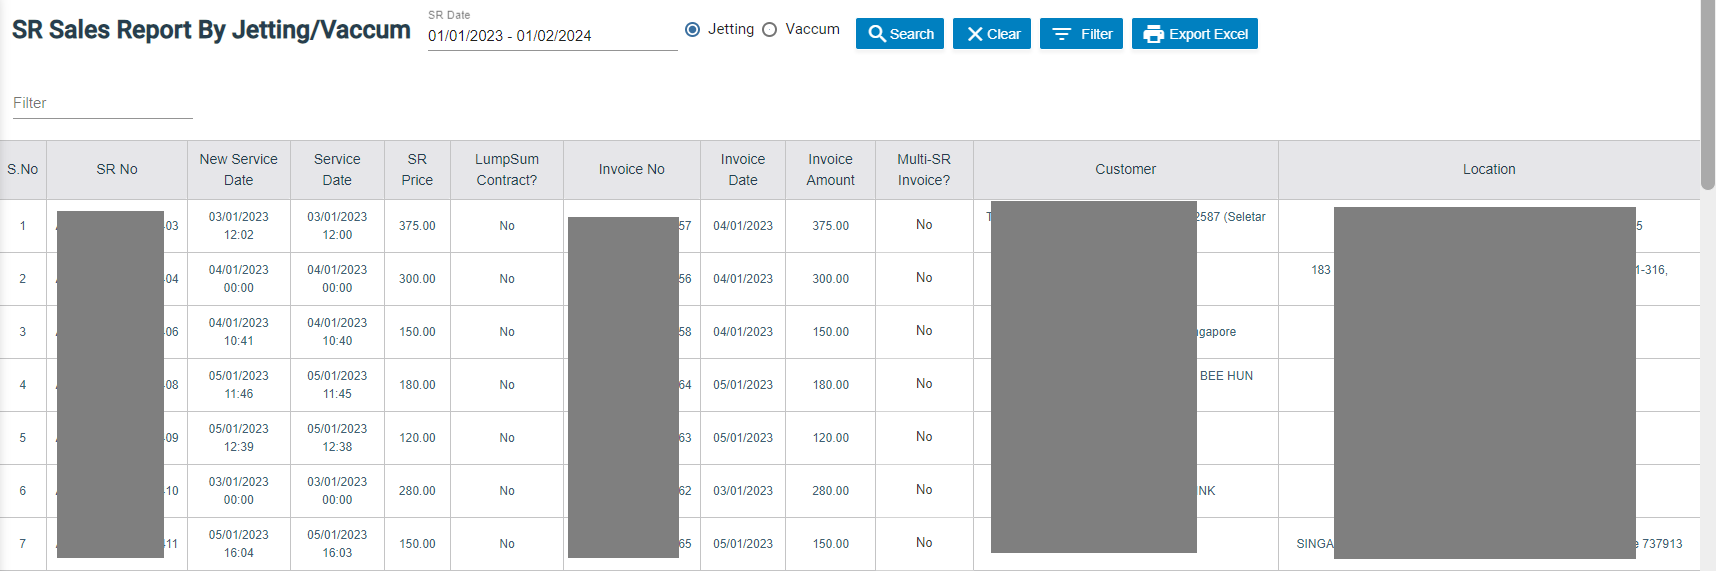
Export SR sales report by jetting/vacuum
If you want to export the SR sales report in an excel format, you can use the ![]() export option provided in the report page.
export option provided in the report page.
Payment History Report
Payment history report provides detail information of payment history in specific payment period by billing name or bank account.
- Click Payment History tab, the report page opens as below,

- In List By box, click to select by Billing Name or Bank Account.
- Select the billing name or bank account to view payment history.
- In Payment From Date & Payment To Date boxes, click to select dates.
- Click Search, payment history that meet search criteria will display as below (number of items display per page can be configured by select number in the item per page box that located at the bottom of page),
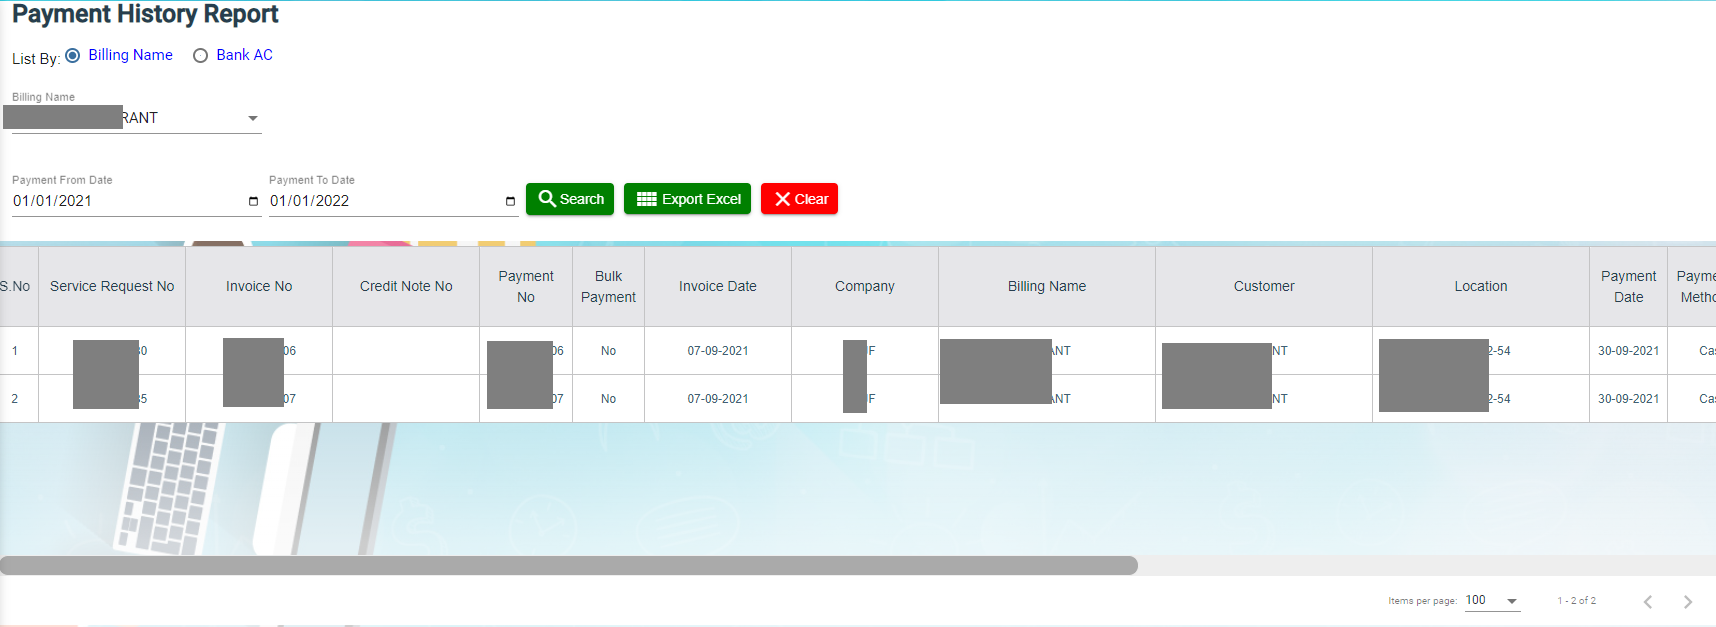


Export Payment History
If you want to export the payment history report in an excel format, you can use the ![]() export option provided in the report page.
export option provided in the report page.
Verification Pending Report
Verification pending report allows user to view all service requests that need to be verified by month wise.
- Click Verification Pending tab, the report page opens as below,

- In Select Month box, click to select month/year.
- Click Search, service requests that is pending for verification as per selected month will display as below (number of items display per page can be configured by select number in the item per page box that located at the bottom of page),
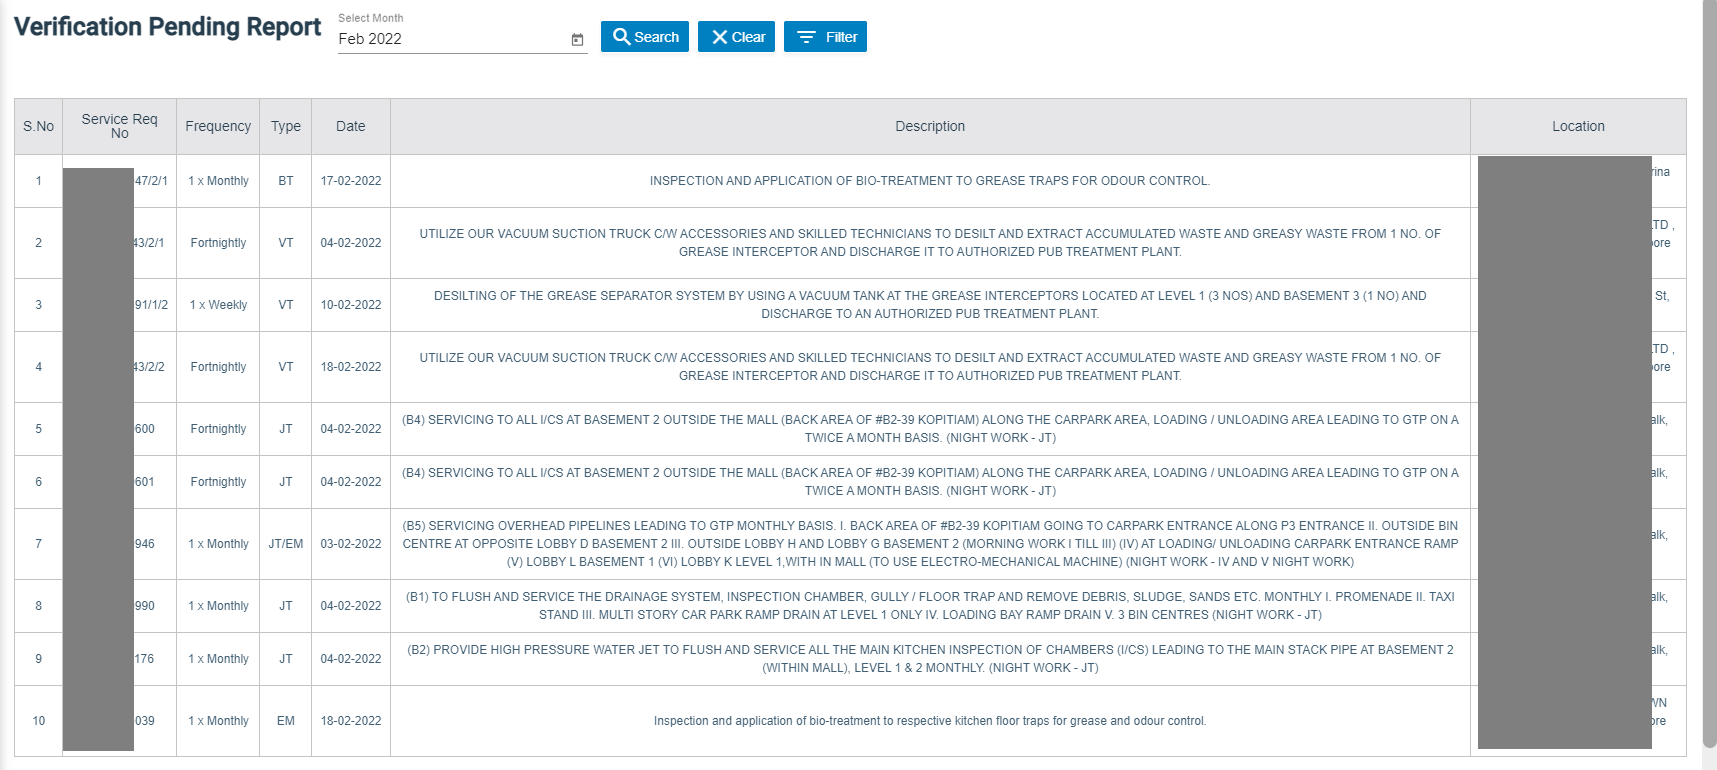


Cash Received Report
Cash received report provides information about cash payment received in specific date range and by technician wise.
- Click Cash Received tab, the report page opens as below,
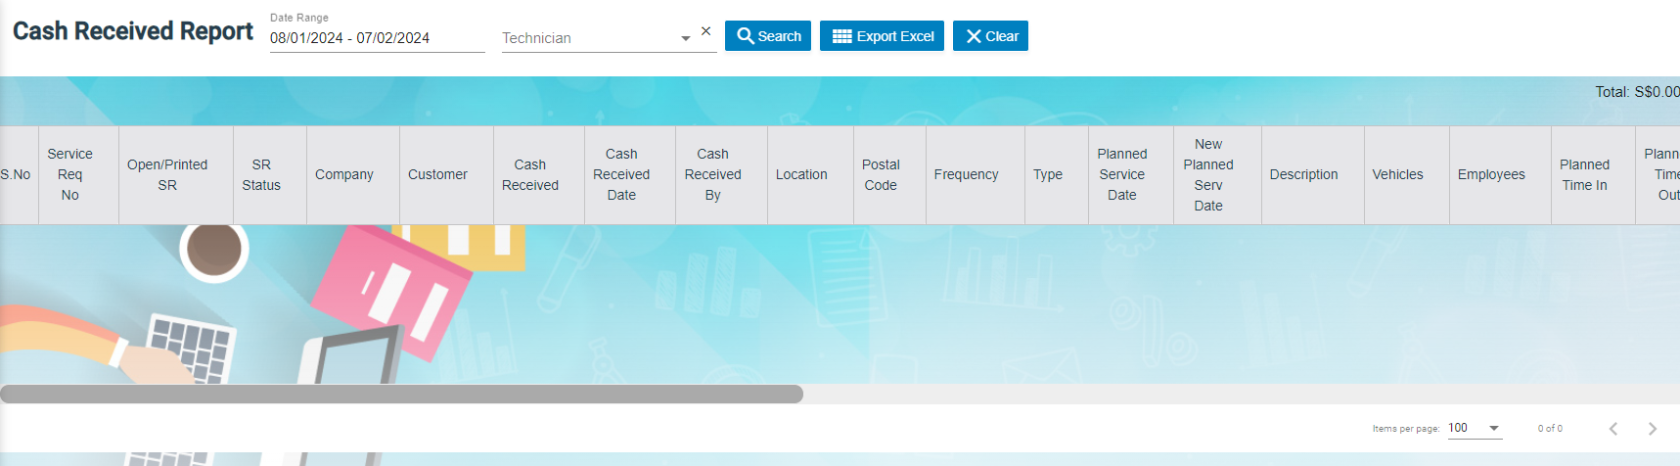
- In Date Range box, click to select date range if user wants to view cash received by date range.
- In Technician box, click to select technician if user wants to view cash received by technician.
- Click Search, Service requests with cash payment received will display as below (number of items display per page can be configured by select number in the item per page box that located at the bottom of page),


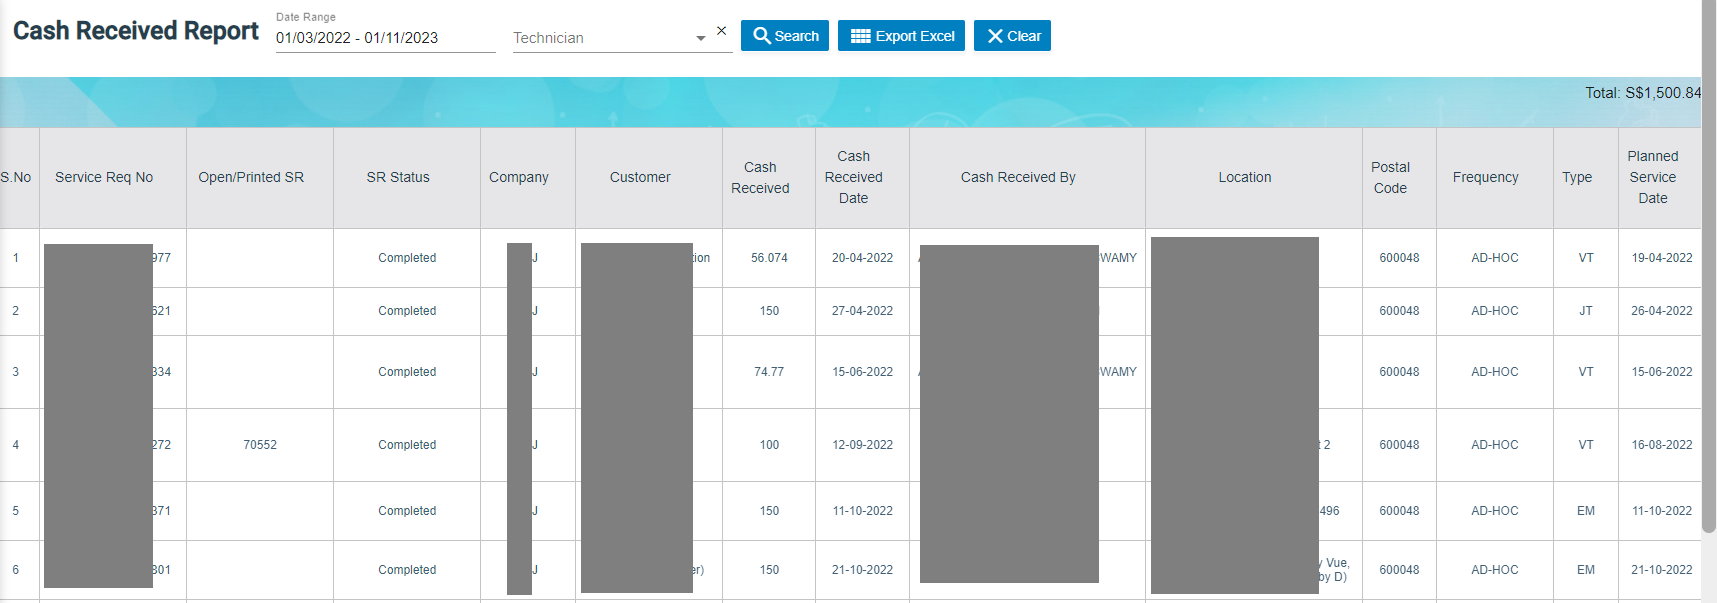
- Master Data Management
- User Access Management
- Service Job Request Management
- Verification after Job Completion
- Invoice and Payment Management
- Reporting
User Access Matrix
In the cuteOffice-SRM application, users can be assigned with different roles. Depending on the roles, the users can access the various functionalities included in the application. The following are the various roles to be assigned to the user including their permission details,
| Roles | Access Permissions |
| Administrator |
|
| Technician |
|
The SRM module in the cuteOffice application helps admins in managing the service based job functionalities. To navigate to the SRM module, click the SRM menu in the menu bar, the SERVICE REQUEST MANAGEMENT page opens as below.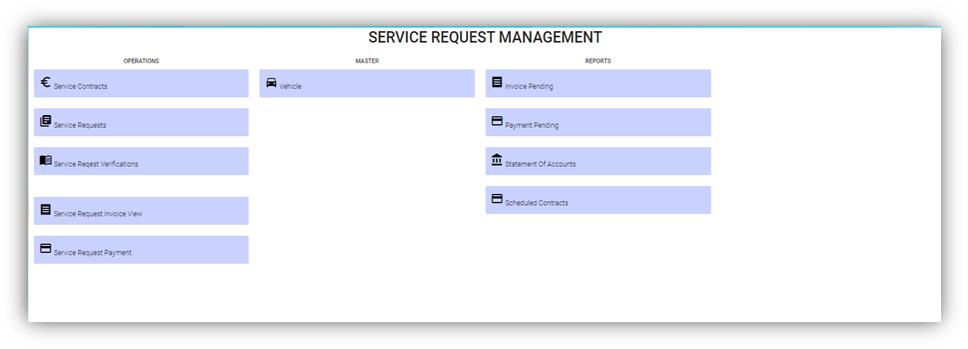
The SERVICE REQUEST MANAGEMENT page consists the following sub menus:
OPERATIONS - Allows admin to add the service job requests, assign the jobs to technicians, generate invoice for completed job, and so
MASTER - Allows SRM admin to add the vehicle master
REPORTS - Helps admin to view the various reports corresponding to the service request
Master
- Vehicle-Users assigned with srm_admin role can only have access to this Master submenu and add the master data.
The Vehicle tab in the Master submenu helps you to add the information of a vehicle to be used as a master data in the further request process. Click the Vehicle tab in the Master submenu, the Vehicle page opens.
Add a Vehicle
If you want to add a vehicle,
- Click (Add Vehicle button) in the Vehicle, the Add Vehicle window opens. (Note: The fields highlighted with red color are mandatory. You must enter the relevant details in that fields before saving.)
- In the Vehicle section, enter the following details,
- In the Number box, enter the vehicle number.
- In the Name box, enter the vehicle name.
- In the Company box, select a company from a drop-down list.
- In the Asset Tag Number box, enter the asset tag number.
- In the Invoice Number box, enter the invoice number.
- In the Invoice Date box, select the invoice date.
- In the GPS Sim Number box, enter the GPS sim number.
- In the No-Claim Discount (NCD) box, enter the NCD number.
- In the Driver box, select a driver from a drop-down list.
- In the IDD Code box, select the IDD code.
- In the Area Code box, enter the area code.
- In the Contact Number box, enter the contact number.
- In the Parking Location box, enter the parking location name.
- In the Vehicle Description box, enter the description for the vehicle.
- In the Insurance section, enter the following details,
- In the Number box, enter the insurance number.
- In the Next Due Date box, select the due date for the insurance.
- In the Vendor box, enter the insurance vendor name.
- In the Agency box, enter the agency name.
- In the Next Due Date section, enter the following,
- In the Maintenance box, select the due date for maintenance.
- In the Parking Coupon box, select the due date for parking coupon.
- In the Road Tax box, select the due date for road tax.
- In the Inspection box, select the due date for vehicle inspection.
- In the Vehicle Parking Certificate (VPC) box, select the due date for VPC.
- In the LG box, select the due date for LG.
- In the LM box, select the due date for LM.
- In the Certificate of Entitlement (COE) Expiry Date box, select the expiry date for COE.
- In the HDB Season Parking field, enter the following,
- In the Next Due Date box, select the due date for HDB season parking.
- In the Payment Mode box, select a payment mode from a drop-down list.
- In the Address box, enter the address where the vehicle has parked.
- In the Others field, enter the following,
- In the Dealer Name box, enter the dealer name.
- In the Invoice Ref box, enter the invoice reference number.
- In the Amount box, enter the invoice amount including GST.
- In the In-vehicle Unit (IU) Label Number box, enter the IU label number.
- In the Propellant box, enter the propellant name.
- In the Shell Card Number box, enter the shell card number.
- In the Shell Pin box, enter the shell pin.
- In the Vehicle Preparation Center (VPC) Address box, enter the VPC address.
- In the Remarks box, enter your remarks if any.
- Click Save. The vehicle is added and listed in the Vehicle page.
- If your vehicle is in the workshop, you need to click to enable (Radio button) in the Workshop column for the respective vehicle. The Confirmation dialog box opens. Click Yes to confirm.
Edit a Vehicle
You can edit the details of the added vehicle by using (Edit icon) provided in the Edit column of the Vehicle page. To edit the added vehicle details,
- Click (Edit icon) of the respective vehicle, the Add Vehicle window opens with the added vehicle details.
- Edit the vehicle details where suits.
- Click Save.
Attach/View a Document into a Vehicle
If you want to add a new document with the vehicle, do the following steps,
- Click (Attachment icon) of the respective vehicle for which you want to add, the Add/ View Attachment window opens.
- Click (Add Document button).The file choosing and uploading option will be enabled.
- Click (Choose File button) and select the document which you want to upload.
- Click Upload, The selected document will be uploaded and displayed in the Add/View Attachment window.
If you want to view any attached document with a vehicle,
- Click (Attachment icon), the Add/ View Attachment window opens with a list of attached documents. (Note: The subscript number displays with attachment icon shows the total number of attached documents with the vehicle..
- If you want to download the attached document, click (Download icon) in the Download column. The document will be downloaded.
Delete a Vehicle
You can delete the added vehicle by using delete option provided in the Delete column of the Vehicle page. To delete any added vehicle,
- Click (Delete icon) of the respective, the Confirmation dialogue box opens with the following notification: “Are you sure you want to delete record?”.
- If you want to delete the vehicle, click Yes otherwise click No.
- The deleted vehicle will be removed from the Vehicle page.
Filter a Vehicle
If you want to view any specific vehicle details among multiple vehicles listed in the Vehicle page, you can use the filter option provided in the upper left corner of the Vehicle page. To filter any vehicle you want,
- Click (Filter button). A filter box opens in each column of the Vehicle page.
- Enter the relevant data in any column filter. The vehicle(s) that qualifies will be filtered and display in vehicle page.
Export a Vehicle List
The application has a feature to download the added vehicle list in an excel format. You can use export option to download the added vehicle list. To download the added vehicle list, click ![]() (Export Excel button). The vehicles added in the Vehicle page will be downloaded as an excel file.
(Export Excel button). The vehicles added in the Vehicle page will be downloaded as an excel file.
Service Request
The Service Request submenu in the SRM page helps you to add and manage the functionalities related with the service schedule and the service request.
The Service Request submenu contains the following tabs,
- Service Schedule
- Service Request View
- Service Request Verification
- Add Invoice
- Manual Invoice
- Lump Sum Invoice
- Invoice View
- Payment
- Bulk Payment
- Clear Cache
Service Schedule
The Service Schedule tab in the Service Request submenu helps you to add a service schedule. Click Service Schedule in the Service Request submenu, the Service Schedule page opens.
View Service Schedule
If you want to view any specific service schedule among the list of service schedules, you can use column filter to select the respective data such as Schedule No, Customer, Location, and Date Range in the respective fields given in the Service Schedule page. You can click the page expand icon at the top right corner to expand the filters.
If you want to view the scheduled schedule of any customer,
- Select a customer from the Customer field.
- Click ( print Schedule button), the schedule details for the selected customer will be downloaded as a pdf.
Add a Service Schedule
To add a service schedule, do the following steps,
- Click (Add button) in the Service Schedule page, the Add Service Schedule window opens (Note: The fields highlighted with red color are mandatory. You must enter the relevant details in that fields before saving).
- In the Project List box, select a project list from a drop-down list. Once you have selected a project, the customer, the customer location and contact number of the selected project will be automatically populated.
- Note: If you want to select all projects, click to enable the All checkbox provided with the Project List box. And then select relevant details in customer, customer location and contact number box.
- In the Start Date and End Date boxes, select the schedule’s start and end dates.
- In the Frequency box, select the frequency of doing service based on the customer requirement. For example, if the customer expects to do the service for three times in a month, select 3 x Monthly. Note: If you want to view the location in the map, click (Location Map icon) provided with the Frequency box.
- In the Type box, select a type of medium.
- In the Service Description box, enter the service description.
- In the Invoice Description box, enter the invoice description.
- In the Effective Date box, select the effective date of the service schedule.
- In the Invoice Due Days box, enter the due days for invoice.
- In the Term Days box, enter the term days.
- In the Plan Schedule box, select the plan schedule whether Day Job or Night Job.
- In the Tanker Size box, select the tanker size whether small or big.
- If the service is jetting, select Jetting or if the service is PUB, select the PUB.
- In the Grease Trap Size box, enter the grease trap size.
- In the Total Grease box, enter the total grease value.
- In the Manpower box, enter the required manpower.
- In the Price box, enter the price for the service.
- In the Service Note box, enter the service note.
- In the Invoice Note box, enter the invoice note.
- In the Private Note for Internal box, enter the note for internal.
- In the Effective Time box, select the effective time. The calendar will be displayed based on the selection of frequency.
- In Old SRM Sales Contract No box, enter the old SRM sale contract number associated with the service schedule.
- Click Save. The service schedule will be added and listed in the Service Schedule page.
Activate/Cancel a Service Schedule
To activate a service schedule, do the following steps,
- Click (Active icon) that is provided in the Action column in the service schedule page. The Service Request List window opens and shows the list of service requests added against the selected service schedule number.
- Click Ok. The Remarks box opens.
- Enter your remarks and click Save. The service schedule will be activated. The remarks you have entered will be saved in the Status Remarks column of the Service Schedule page.
To cancel a service schedule,
- Click (Cancel icon) that is provided in the Action column, of the service schedule. The Service Request List window opens and shows the list of service requests added against the selected service schedule number.
- Click Ok. The Remarks box opens.
- Enter your remarks and click Save. The service schedule will be cancelled. The remarks you have entered will be saved in the Status Remarks column of the Service Schedule page.
Edit a Service Schedule
You can edit the details of the added service schedule by using edit option provided in the
Edit column of the Vehicle page. To edit the added service schedule details,
- Click (Edit icon) of the respective service schedule you have added, the Add Service Schedule window opens with the added service schedule details.
- Edit the service schedule details where you want.
- Click Save.
Delete a Service Schedule
You can delete the added service schedule by using (Delete icon) provided in the Delete column of the Service Schedule page.
Export a Service Schedule List
If you want to export all the service schedules in the Service Schedule page in an excel format, you can use the export option provided in the Service Schedule page. To know how to export, follow the procedures given in the topic, “Export a Vehicle List”.
Service Request View
The Service Request View tab in the Service Request submenu helps you to add a service request. Users assigned with srm_admin and srm_technician roles can have access to view this Service Request View page. Click Service Request View in the Service Request, the Service Request View page opens.
- You can configure displaying of the number of service request items per page by selecting 50, 100, 250, 500, or 1000,
- If you want to view any specific service request among the list of service requests, you can select the respective data such as Service Request No, Customer, Location, and Date Range in the respective fields given in the Service Request View
- The service request displayed in different color explains their status:
Add a Contract Service Request
To add a contract service request, do the following steps,
- Click (Add button) in the Service Request View page, the Service Request window opens, click to select Contract SR (Note: The fields highlighted with red color are mandatory. You must enter the relevant details in that fields before saving.).
- In the Admin Company box, select admin company.
- In Customer box, select customer company name.
- In Location box, select location.
- In Contact Name box, select contact name.
- In Contact Number box, if contact name is selected, the associated contact number and email address will automatically populated.
- In Contact Email box, if contact name is selected, the associated email address will automatically populated.
- In Service Request Date box, click to select date.
- In Service Request Time box, click to select time.
- In Type box, click to select service type.
- In Plan Schedule box, click to select plan schedule as Day Job or Night Job.
- In Tanker Size box, click to select tanker size.
- In Grease Trap Size box, enter or select grease trap size.
- In Jetting, PUB, Return Choke options, click to select relevant option(s).
- In Adhoc Sales Contract No box, enter adhoc sales contract number if any.
- In Quotation No box, enter quotation number.
- In Total Grease box, enter the total grease value.
- In Manpower box, enter the required manpower.
- In Price /Visit box, enter the price for the service request.
- In Payment Mode box, select payment mode.
- In Billing flag, click to enable if applicable.
- In Service Description box, enter service description.
- In Invoice Description box, enter invoice description.
- In Invoice Note box, enter the invoice note.
- In Private Note for Internal box, enter the note for internal.
- In Service Note box, enter the service note.
- In Show All Vehicle/Technician flag, click to enable if applicable. When this flag is ticked, vehicle and technician selection list will include all technician and vehicle. Else Jetting Service Request will show only jetting vehicle and technicians in jetting department only.
- In New Planned Service Date box, click to select planned date.
- In Planned Time In box, click to select planned time in.
- In Planned Time Out box, click to select planned time out.
- In Vehicle box, select vehicle.
- In Technician box, select technician.
- For Assignment History option, it is used to check all existing assignments of selected technician, so that user can unassign the technician from some assignments to make him available for the job on this new service request date.
- Click Save. The service request is added and listed in the Service Request View page.
Edit a Service Request
You can edit the details of the added service request by using edit option provided in the Edit column of the Service Request View page. To edit the added service request details,
- Click (Edit icon) of the respective service request, the Service Request window opens,
- Edit the service request details where needed.
- Click Save to save edits.
Assign Technician and Vehicle for a Service Request
Users assigned with srm_admin role only can have access to assign the technician and vehicle for an added service request.
Users assigned with srm_technician role can only view the assigned details.
To assign the technician and vehicle for an added service request, do the following steps,
- Click (Assign icon) in the assign column of the respective service, the Assign Technician window opens.
- In Planned Service Date box, the planned date will show automatically.
- In New Planned Service Date box, click to select new date if needed.
- In Planned Time In and Planned Time Out boxes, select the planned in and out times.
- In Vehicle box, select a vehicle from a list. Note: You can select multiple vehicles.
- In Technician box, select a technician from a list. Note: You can select multiple technicians.
- Click Save, the service request is assigned. For Assignment History option, it is used to check all existing assignments of selected technician, so that user can unassign the technician from some assignments to make him available for the job on this new service request date. After assigning the vehicle and technician, the SR record will be changed to yellow color. The service request will be moved to the respective technicians and the (Job Starts icon) will be appeared in the Verification column as below,
Indicate Starting and Ending of Job
Once the service request is added and assigned for the respective technician and vehicle by the client, the technician can login and view job details assigned to them.
To indicate that the job was started,
- Click on (Job Starts icon) appeared in the Verification column, the job started status will be updated successfully and the SR record will be changed to Blue color.
To indicate that the job was ended,
- Click on (Job Ends icon) appeared in the Verification column, the job ended status will be updated successfully and the SR record will be changed to Purple color.
Once the job has completed, the verification process begins.
Note: When you click ![]() (Assign icon) of this service request, the vehicle and technicians which are assigned already will not be shown in list.
(Assign icon) of this service request, the vehicle and technicians which are assigned already will not be shown in list.
Verify the Service Request Completion
In general, once the job is done by the technician, the respective SR record will be moved for verification that needs to be done by the admin. This Verification functionality is provided for the technician on the job to print the Service Verification Form for client to verify the job done by technician and sign off.
- Click (Verification icon) provided in the Verification column, the Service Request Verification window opens.
- In DESCRIPTION box, enter the description.
- In NOTE box, enter your note if any.
- In FEEDBACK FROM CLIENT box, enter client feedback.
- In START TIME and END TIME boxes, verify start and end time, if any changes, select the started and ended time of the assigned job.
- In SERVICE DONE BY box, verify technician assigned, if any changes, click to select technician name.
- In VEHICLE NO box, verify vehicle number, if any changes, click to select vehicle number.
- In Price box, verify the price, enter updated price if any changes.
- In other payment details section, click to enable if applicable.
- If you go for cash payment, select the checkbox of the CASH PAYMENT? option.
- If you want to add the GST amount, select the checkbox of the ADD GST? option. The price will be added with the GST amount.
- If you want the service to be continued, select the checkbox of the SERVICE WILL CONTINUE? option. Once you selected the SERVICE WILL CONTINUE? option, the system will indicate "Continue" in the Job column for the select service request. And another SR request will be created as shown below,
- Click (Sign icon) to add your signature, the Signature window opens.
- In the Sign By box, enter you name.
- Add you signature.
- Verify the date.
- Click Save.
-
To attach any file, click
(Attach icon) and attach the file. - Click SAVE to save verification of the service requestion record.
Rework
When the job completed by the technician does not meet the expectations of client, the client can assign for the rework. Users assigned with srm_admin role only can have access to start rework by using reset option.
To start the rework,
- Navigate to verification column of the respective service request,
- Click (Reset icon). A new service request will be added for rework and the job status will be updated as Rework in the Job column.
Print a Service Record
To print any SR record, do the following steps, click the respective ![]() (Print icon) in the Print column. The SR record will be downloaded as a pdf file with customizable format.
(Print icon) in the Print column. The SR record will be downloaded as a pdf file with customizable format.
Attach/View a Document into a Service Request
To add a new document with the service request,
- Click (Attachment icon) in the Documents column of the respective service request for which you want to add attachment, the Add/ View Attachment window opens.
- Click (Add Document button), the file choosing and uploading option will be enabled.
- Click (Choose File button) and select the document which you want to upload.
- Click Upload. The selected document will be uploaded and displayed in the Add/View Attachment window.
To view any attached document with a service request,
- Click (Attachment icon) in the Documents column, the Add/ View Attachment window opens with a list of attached documents. Note: The subscript number displays with attachment icon shows the total number of attached documents with the vehicle.
- If you want to download the attached document, click (Download icon) in the Download column. The document will be downloaded.
Activate/Cancel a Service Request
If you want to activate or cancel a service request, do the following steps,
To activate a service request,
- Click (Active icon) that is provided in the Action column of the service request, the Remarks box opens.
- Enter your remarks and click Save. The service request will be activated. The remarks you have entered will be saved in the Action Remarks column of the Service Request View page.
To cancel a service request,
- Click (Cancel icon) that is provided in the Action column of the service request. The Remarks box opens.
- Enter your remarks and click Save. The service request will be cancelled. The remarks you have entered will be saved in the Action Remarks column of the Service Request View page.
Delete a Service Request
You can delete the added service request by using delete option provided in the Delete column of the Service Request View page.
Add an AdHoc Service Request
When a service request is not a planned one, you can add the request as an Adhoc SR. Project details are not mandatory to add the Adhoc SR. Users assigned with srm_admin and srm_technician roles can have access to add and view the AdHoc service requests.
To add an adhoc SR,
- Click (Add button) in the Service Request View page, the Service Request window opens, click to select AdHoc SR (Note: The fields highlighted with red color are mandatory. You must enter the relevant details in that fields before saving.).
- Fill up the mandatory fields as below.
- In Contact Name box, select contact name.
- In Contact Number box, if contact name is selected, the associated contact number and email address will automatically populated.
- In Contact Email box, if contact name is selected, the associated email address will automatically populated.
- In Service Request Date box, click to select date.
- In Service Request Time box, click to select time.
- In Type box, click to select service type.
- In Plan Schedule box, click to select plan schedule as Day Job or Night Job.
- In Tanker Size box, click to select tanker size.
- In Grease Trap Size box, enter or select grease trap size.
- In Total Grease box, enter the total grease value.
- In Manpower box, enter the required manpower.
- In Price /Visit box, enter the price for the service request.
- In Payment Mode box, select payment mode.
- In Billing flag, click to enable if applicable.
- In Service Description box, enter service description.
- In New Planned Service Date box, click to select planned date.
- In Planned Time In box, click to select planned time in.
- In Planned Time Out box, click to select planned time out.
- Click Save. The service request is added and listed in the Service Request View page.
View Adhoc Service Requests
If you want to view the added adhoc service requests, click ![]() (AdHoc View button) in the Service Request View page. The Adhoc service requests opens as below,
(AdHoc View button) in the Service Request View page. The Adhoc service requests opens as below,
Filter a Service Request
If you want to filter a specific service request in the Service Request View page, you can use the filter option provided in the Service Request View page.
Export a Service Request list
If you want to export all the service requests in the Service Request View page in an excel format, you can use the export option provided in the Service Request View page.
Bulk Print
If you want to print multiple SR record,
- Select the checkbox of the respective service
- Click (Bulk Print button). The selected SR records will be downloaded in a pdf file.
Service Request Verification
Users can verify the signed Service Verification Forms and to proceed to the next stage of invoice generation in the Service Request Verification tab in the Service Request submenu.
Users assigned with srm_admin role have access to view this Service Verification page and verify the Service Verification Form sent by the Technician.
Click Verification in the Service Request, the Service Verification page opens.
- If you want to view any specific service request among the list of service requests, you can use the select the respective filters provided in the Service Verification search bar.
- The legend at the bottom of page denotes different status of a service request.
Verify the Service Verification Form
Once the service verification form is signed and submitted by the technician, the verification form will be sent for verification. After the service request verification form is verified, the request will be moved for invoice generation.
To verify the service verification form,
- Navigate to the respective service request you want to verify,
- Click the checkbox provided in the Verified,
- The Confirm dialog box opens and shows the following message
-
Click Yes, a verified successful notification will display, and the selected request will be moved to the Invoice Generation page to generate invoice for the payment.
Print a Service Record
To print any SR record, click![]() (print icon) of respective service request in the Print column in the service verification page. The SR record will be downloaded as a pdf file.
(print icon) of respective service request in the Print column in the service verification page. The SR record will be downloaded as a pdf file.
Attach/View a Document into a Service Request
To add a new document with the service request,
- Click (Attachment icon) of the respective service request, the Add/ View Attachment window opens.
- Click (add document icon), The file choosing and uploading option will be enabled,
-
Click
(Choose File icon) and select the document which you want to upload. -
Click Upload. The selected document will be uploaded and displayed in the Add/View Attachment window.
To view any attached document with a service request,
- Click (Attachment icon) in the Documents column, the Add/ View Attachment window opens with a list of attached documents. Note: The subscript number displays with attachment icon shows the total number of attached documents with the vehicle.
- If you want to download the attached document, click (Download icon) in the Download column. The document will be downloaded.
Filter a Service Request
If you want to filter a specific service request in the Service Verification page, you can use the filter option provided in the Service Verification page.
Export a Service Request List
If you want to export all the service requests in the Service Verification page in an excel format, you can use the export option provided in the Service Verification page.
Invoice Generation
Once the service request verification process has completed, the request will be moved for invoice generation. There are three ways to generate invoice:
- Add Invoice - Users can generate invoice in the Add Invoice tab.
- Manual Invoice - Users can generate invoice manually in the Manual Invoice tab. Click Manual Invoice in the Service Request, the Manual Invoice page opens.
- Lump Sum Invoice - Users can generate lump sum invoice per customer in the Lump Sum Invoice tab. Click Lump Sum Invoice in the Service Request, the Lump Sum Invoice page opens.
- If you want to view any specific service request among the list of service requests, you can user the respective filters such as Customer, Location, Verified and SR Date Ranges in the Invoice Generation page.
Add Invoice
To generate an invoice automatically,
- Click Add Invoice in the Service Request menu, the Invoice Generation page opens.
- Click the checkbox of the respective service request for which you want to generate an invoice,
- Click (Generate Invoice button).The Generate Service Invoice window opens (Note: The fields highlighted with red color are mandatory. You must enter the relevant details in that fields before saving).
- In the Invoice Title box, enter the invoice title.
- In the PO box, enter the PO number.
- In the Invoice Date box, select the invoice date.
- In the Note box, enter note if any.
- In the Private Note box, enter private note for internal reference if any.
- Click Save. The generated invoice will be saved and moved to the Invoice View page.
Manual Invoice
To generate an invoice manually,
- Click Manual Invoice in the Service Request menu, the Manual Invoice page opens,
- Select customer type, i.e.. Contract Customer or Adhoc Customer.
- In the Customer box, select customer.
- In the Billing Name box, billing name will auto populate customer name, user can edit billing name if billing name is different from customer name.
- In the Location box, select location.
- In the Invoice Header box, enter invoice header.
- In the Invoice Title box, enter invoice title.
- In the PO box, enter PO number.
- In the Invoice Date box, select invoice date.
- In the Total box, enter invoice total amount.
- In the 9%GST box, the gst amount will be automatically calculated.
- In the Inclusive Total box, the inclusive total will be automatically calculated.
- In the Quotation No box, enter quotation number.
- In the Contract No box, enter contract number.
- In the Note box, enter note if any.
- In the Private Note box, enter any private note for internal reference if any.
- In the Invoice Details section, click , then enter invoice details. The total amounts in manual invoice must tally with total of all detailed invoices before user press "save" button, else this validation will always show up and block the data saving.
- Click Save, the manual invoice will be saved. And the details can be viewed in the Invoice View tab.
Lump Sum Invoice
Lump sum invoice is used to generate lump sum invoices for lump sum sales contract. The business scenario is as below: Once any lump sum sales contract is created from sales enquiry (by enabling lump sum contract option when creating sales contract), user can create service schedule based on the sales contract, and after the service job is completed, user will be able to generate lump sum invoice in the Lump Sum Invoice tab.
To generate lump sum invoice,
- Click Lump Sum Invoice tab, the lump sum invoice generation page opens as below,
- Click to select the service schedule, then click "Generate Lump Sum Invoice" button,
- The Invoice Generation for Lump Sum Contract screen opens as below,
- Enter Invoice title and other details.
- Click Save, the generated lump sum invoice will be saved and user can view it in the Invoice View page.
Invoice View
The Invoice View tab in the Service Request submenu manages all the generated invoice details. Click Invoice View in the Service Request. The All Invoices page opens as below,
If you want to view any specific invoice among the list of invoices, you can select the respective Customer, Location, Date Range in the field given in the All Invoices page.
The invoices displayed in different color denotes their status, i.e., Completed payment or Unpaid Invoice.
Process an Invoice
To process an invoice,
-
- Click to select the checkbox provided in the Is Invoiced? column,
- The Confirm dialog box open and shows the following message.
- Click Yes. The invoice record will be changed to green color and as Completed.
- Click to select the checkbox provided in the Is Invoiced? column,
Set Printing options for Invoices
To set the printing options of the invoices,
- Click (Print Option icon) provided in the Print Option column, the Invoice PDF options window opens
- Select the checkbox of the Service Number and Service Description options based on user's request.
- Click Save.
Print an Invoice
To print an invoice,
- Click the respective (Print icon) in the Print column.
- The invoice will be downloaded as a pdf file.
Delete an Invoice
You can delete the invoice by using ![]() (Delete icon) provided in the Delete column of the All Invoices page.
(Delete icon) provided in the Delete column of the All Invoices page.
Filter an Invoice
If you want to filter an invoice in the All Invoices page, you can use the ![]() filter option provided in the All Invoices page.
filter option provided in the All Invoices page.
Export an Invoice List
If you want to export all the invoices in the All Invoices page in an excel format, you can use the ![]() export option provided in the All Invoices page.
export option provided in the All Invoices page.
Payment
The Payment tab in the Service Request submenu allows user to add the service payment details against the related invoice. Users who are assigned with srm_admin role will have access to view this Service Payment page. Click Payment in the Service Request, the Service Payment page opens, user can configure the number of invoices per page displaying by selecting 50, 100, 250, 500, or 1000 at the bottom of page.
- User can use filter options to view any specific invoice among the list of invoices, filter options including Billing Name, Customer, Location, Date Range in the field given in the Service Payment page.
- The invoices displayed in different color explains their status as described in legend.
Add Payment Details
To add the payment details,
- Click (Payment icon) in the Payment column, The Service Payment window opens.
- The fields highlighted with red color in payment detail page are mandatory. You must enter the relevant details in that fields before saving.
- In the Bank A/C box, select a bank account from a drop-down list.
- In the Payment Date box, select the payment date.
- In the Billing Name box, enter billing name (if billing name is same as company name, company name will auto fill as billing name).
- In the Payment Type box, select a payment type.
- In the Amount box, enter the amount if it's different from invoice amount. The Paid? box will be
- In the Reference No box, enter reference number.
- In the Note box, enter your note if any.
- Click Save. The invoice record will be changed to Green color and as completed.
Filter an Invoice
If you want to filter an invoice in the Service Payment list, you can use the filter option provided in the Service Payment page such as SR number, invoice number etc..
Export an Payment List
If you want to export all the invoices in the Service Payment page in an excel format, you can use the export option ![]() provided in the Service Payment page.
provided in the Service Payment page.
Bulk Payment
The Bulk Payment tab in the Service Request submenu allows user to enter multiple invoice payments that belongs to a same billing name in bulk. Click Bulk Payment tab, the bulk payment for service payment page opens as below,
To do bulk payment,
- In Admin-Company box, select Admin company from a list of admin companies which the payment shall be paid to.
- In Bank A/C box, select bank account name to receive payments,
- In Billing Name box, select invoice billing name.
- In Payment Type box, select payment type from list such as cash, online transfer, paynow etc..
- In Payment Date box, click to select payment date.
- In Amount Pay box, enter amount paid.
- In Reference Number box, enter reference number if any.
- Click Search button, a list of unpaid invoice belong to selected billing name will display in the screen, and Bulk Pay button will be enabled.
- Click to select invoices from the list of unpaid invoices in the screen, and the selected invoice amount will be calculated and displayed in Selected Amount box.
- If Selected amount box differs from Amount pay box, user can click Calculate Excess Amount button, and system will show payment confirmation notification as below,
- Click Yes to confirm bulk payment, upon successful creation, a bulk payment number will be displayed in the payment No box in the search area as below.
- And the bulk payment details will be saved in the Payment tab. User can search by bulk payment number in payment page,
Note: User with permissions will be able to revert bulk payment if needed. After clicking search button, authorized user can click Revert Bulk Payment button, and a confirmation notification will show as below. Click Yes to confirm reverting bulk payment for selected bulk payment number. And the associated invoices will be reverted to unpaid status.
Clear Cache
Clear cache tab is used to clear search caches in Service Request and Service Schedule menu screens. Click Clear Cache, the clear cache page opens as below, click Proceed to confirm clearing cache.
Report
- Invoice Pending
- Statement Of Accounts
- Request For PUB
- Invoice Ageing Report
- SR Sales Report By Jetting/Vacuum
- Payment History
- Verification Pending
- Cash Received
Invoice Pending
The Invoice Pending tab in the Report submenu helps you to view the pending invoice details. Click Invoice Pending in the Report submenu. The Invoice Pending page opens and shows the list of invoices which are pending (number of items display per page can be configured by select number in the item per page box that located at the bottom of page).
If user want to view any specific pending invoice among the list of pending invoices, you can select the respective Date Range in or click Filter option provided in the Invoice Pending page.
Export a Pending Invoice List
If you want to export all the invoices in the Invoice Pending page in an excel format, you can use the ![]() export option provided in the Invoice Pending page.
export option provided in the Invoice Pending page.
Statement Of Accounts
Statement of accounts reports help user view all transactions with a particular customer. Click Statement of Accounts, the statement of accounts report page opens, user can select SR customer name or billing name, and As of Date, and then click Search, the report will show as below (number of items display per page can be configured by select number in the item per page box that located at the bottom of page),
Export a Statement of Accounts
If you want to export statement of accounts, you can use the![]() to export report in excel format, or use
to export report in excel format, or use ![]() to export report in PDF format.
to export report in PDF format.
Email a Statement of Account to Customer
If you want to email a statement of account to customer,
- Click email customer button at the top left corner, a confirmation notification will pop up as below,
- Click Yes, system emailing window will open as below, user can configure email template, once email template is created, relevant information will be automatically populated.
- Review information in above, and if needed, user can attach file using Add Documents option.
- Click Send. System will send email to customer.
Request For PUB
Request for PUB report allows user to view all service request details for PUB in selected period of time.
- Click Request For PUB tab, the service request for pub report page opens as below,
- Select a date range and then click Search, request for PUB report opens as below (number of items display per page can be configured by select number in the item per page box that located at the bottom of page),
Export Request for PUB report
If you want to export all the service request for PUB report in an excel format, you can use the ![]() export option provided in the Request for PUB page.
export option provided in the Request for PUB page.
Invoice Aging Report
Invoice ageing report helps user analyze the cash flow of all unpaid invoices. This report provides information about invoice payments due within time periods user specified in the Aging Periods window.
- Click Invoice Ageing Report tab, the invoice ageing report page opens as below,
- In As Of Date box, click to select as of date.
- Click Search, all ageing invoices that meet search criteria will display as below,
Export Invoice Ageing Report
User can export report in two types (summary report or detail report) by choosing Print Summary or Print Details. Report format can be configured based on user requirement.
- Select report type to be exported, i.e. Print Summary or Print Details.
- If user want to export statement of accounts, click the to export report in excel format, or click to export report in PDF format.
SR Sales Report By Jetting/Vacuum
SR sales report by jetting/vacuum provides detail information by jetting/vacuum during selected period of time.
- Click SR Sales Report By Jetting/Vacuum tab, the report page opens as below,
- In SR date box, click to select a date range.
- As for service type, click to choose Jetting or Vacuum.
- Click Search, SR sales details that meet search criteria will display as below (number of items display per page can be configured by select number in the item per page box that located at the bottom of page),
Export SR sales report by jetting/vacuum
If you want to export the SR sales report in an excel format, you can use the ![]() export option provided in the report page.
export option provided in the report page.
Payment History Report
Payment history report provides detail information of payment history in specific payment period by billing name or bank account.
- Click Payment History tab, the report page opens as below,
- In List By box, click to select by Billing Name or Bank Account.
- Select the billing name or bank account to view payment history.
- In Payment From Date & Payment To Date boxes, click to select dates.
- Click Search, payment history that meet search criteria will display as below (number of items display per page can be configured by select number in the item per page box that located at the bottom of page),
Export Cash Received Report
If you want to export the cash payment received report in an excel format, you can use the ![]() export option provided in the report page.
export option provided in the report page.
ACS - Accounting and Corporate Services
Billing
Billing Systems helps to process successful invoices and charging the customers.
Billing Master Data
1.0 Billing Master Data
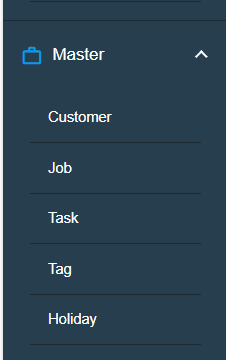
1.1 Customer List
Customer list helps to view customer details so that billing activities can be recorded and entered in the billing system.
To view Customer list, Click Customer submenu in the Master, the customer list page opens as below.
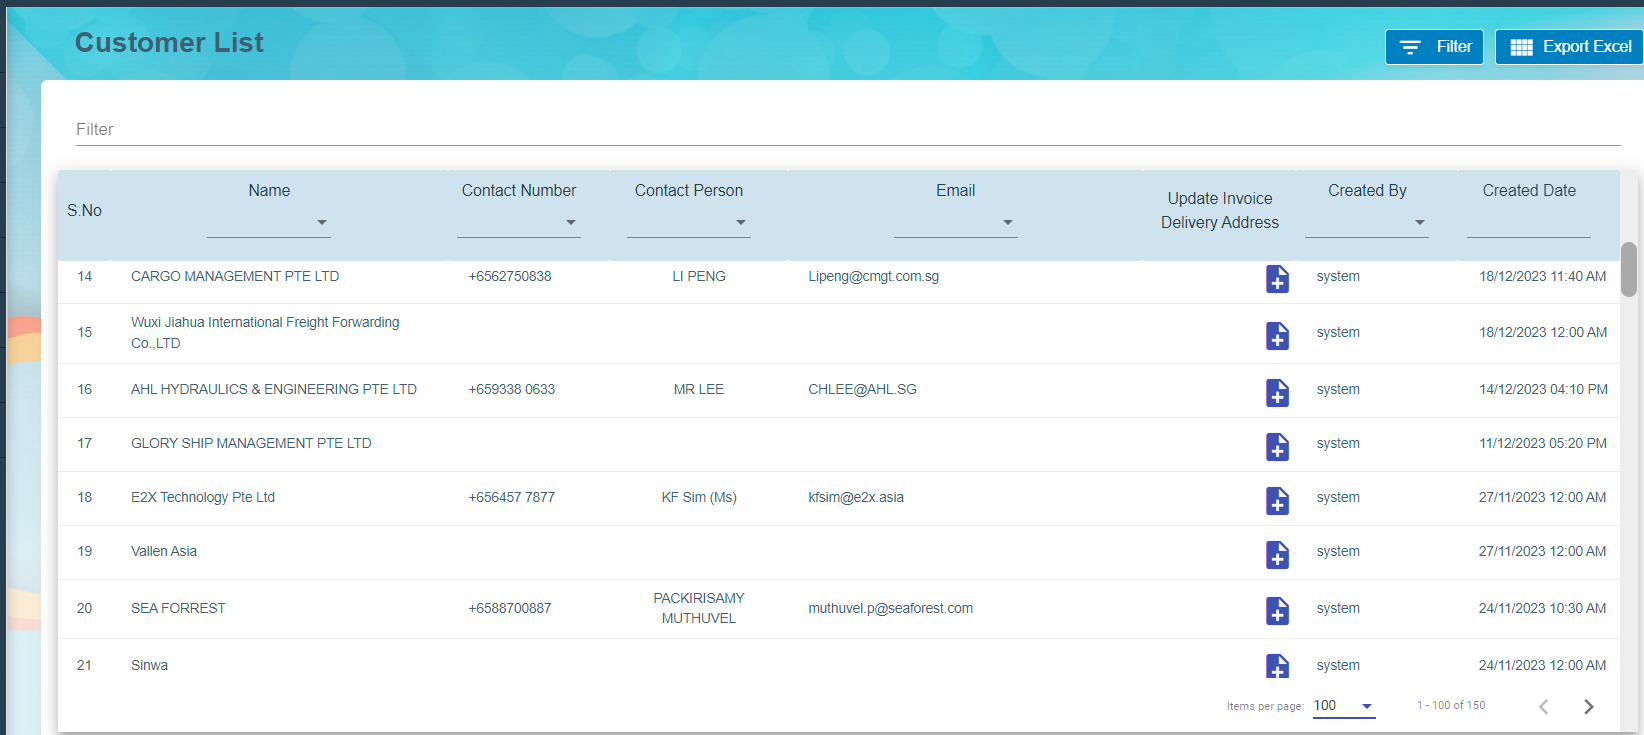
Click add button ![]() to update Invoice Delivery Address and Save it.
to update Invoice Delivery Address and Save it.
1.2 Job List
Job list viewed to maintain both completed and in progress job details in the system.
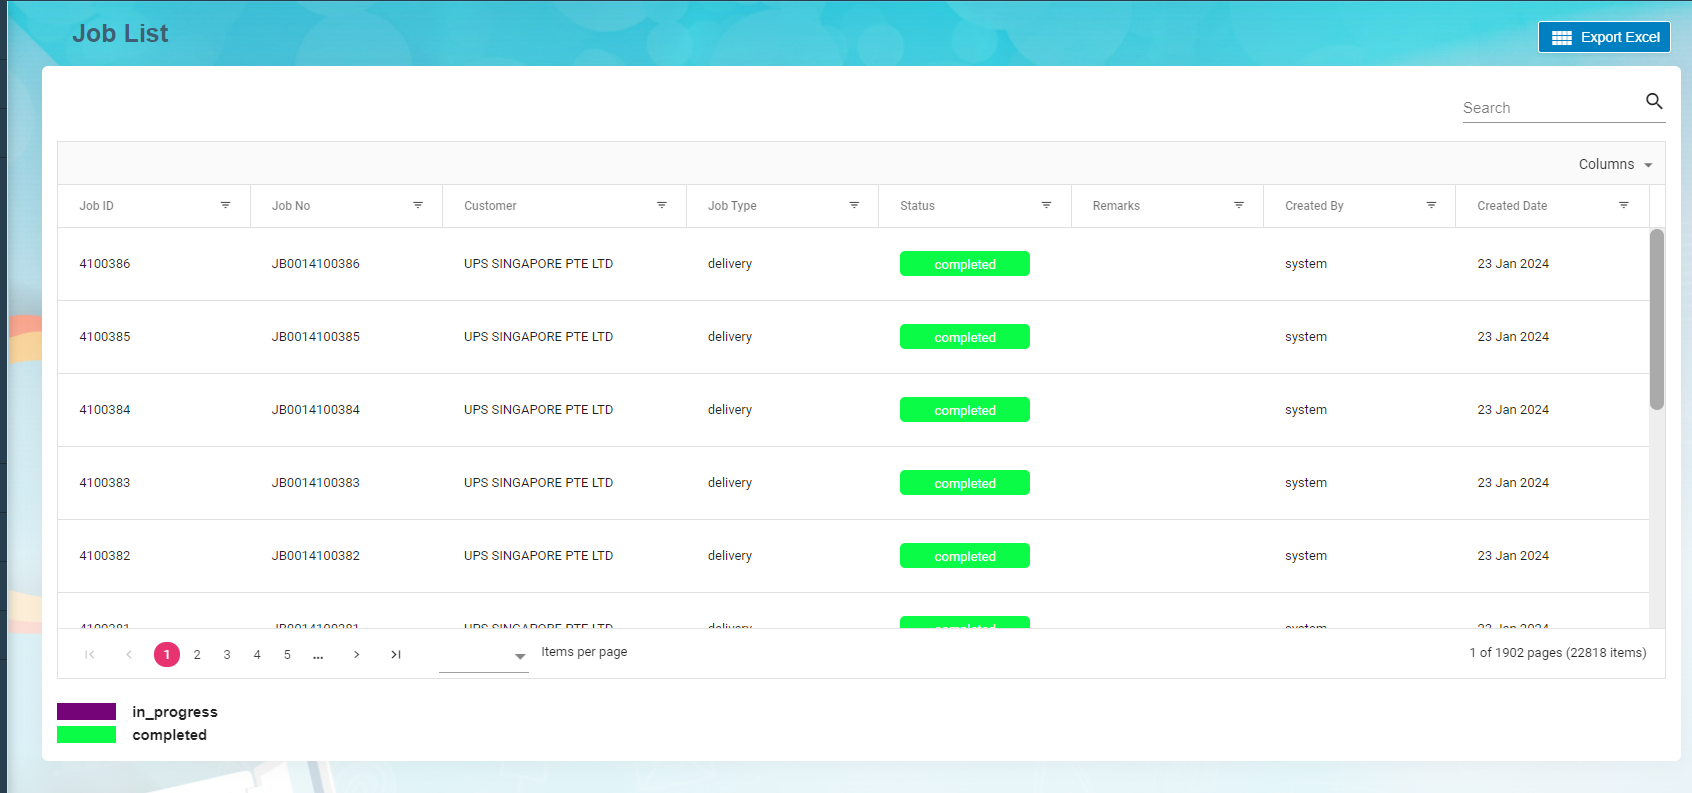
1.3 Task List
Task list viewed to contain assigned, waiting for acknowledgment, acknowledged and successful tasks.
Click Details icon ![]() to view Task details, Tags, Job details and Task Assignment. All the details come from the Network linked (Versa Fleet) to cuteOffice. Tags may contain single or multiple tag codes to process against each Task and Job number. The tasks which have successful status are ready to process Invoice.
to view Task details, Tags, Job details and Task Assignment. All the details come from the Network linked (Versa Fleet) to cuteOffice. Tags may contain single or multiple tag codes to process against each Task and Job number. The tasks which have successful status are ready to process Invoice.

1.4 Tag
1.4.1 Add A New Tag
Click add Tag, Billing Tag window open to add the tag and description. If the tag is miscellaneous tag, enable Miscellaneous in the Billing Tag.
1.4.2 Edit Tag
To edit Task tag
Click  edit button in the edit column of the Tag list that user want to edit any details about Tag name or Miscellaneous Tag Name and their description.
1.4.3 Import Excel
Import Excel functionality![]() is available to import the Tag details. Download the template to add all the Tag details and import into the system.
is available to import the Tag details. Download the template to add all the Tag details and import into the system.
1.4.4 Export Excel
Export Excel ![]() helps to download the tag list in the Master.
helps to download the tag list in the Master.
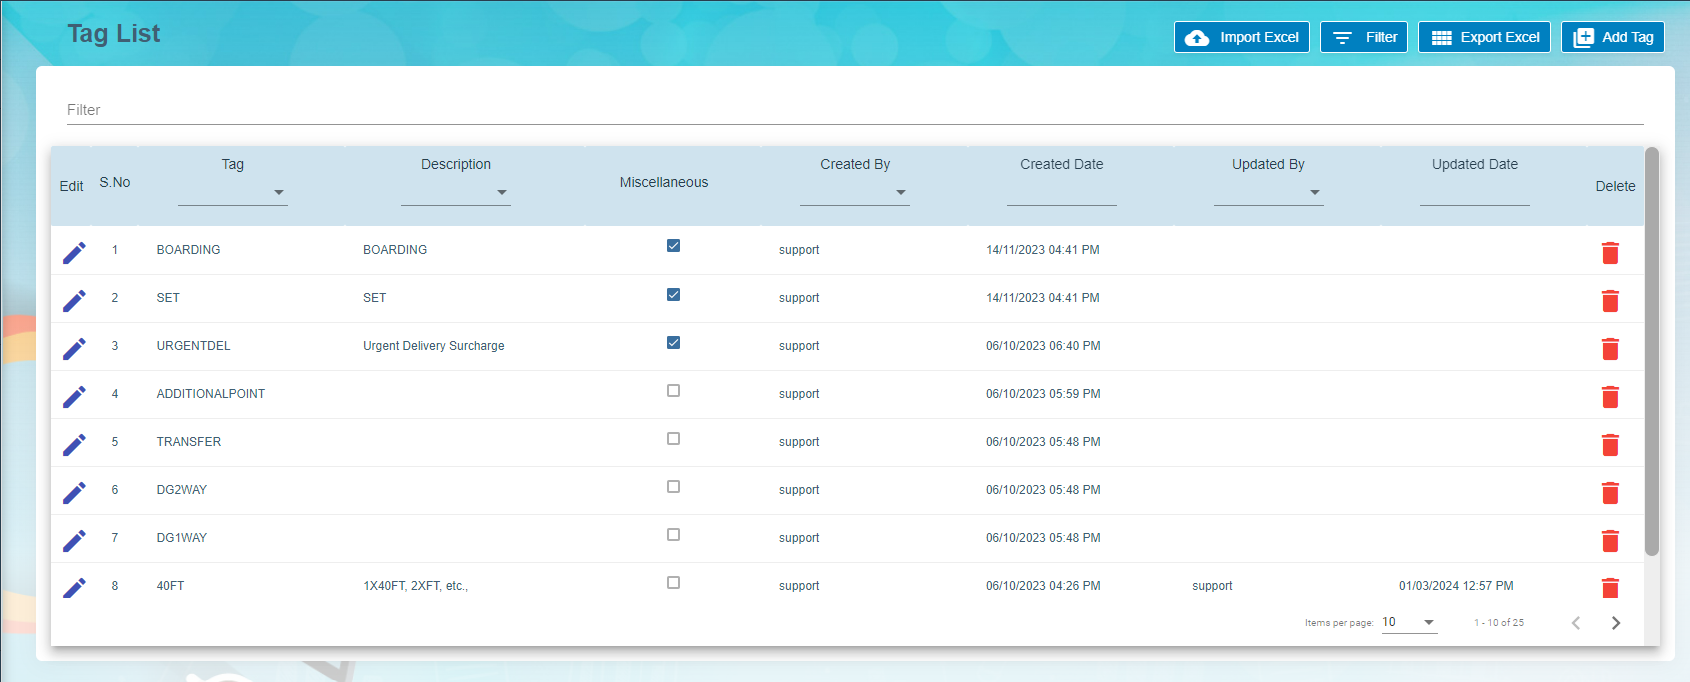
1.5 Holiday List
Holiday list viewed to maintain the holidays based on the Group Name and the Year. Group Name contains the country name such as Singapore, Malaysia etc.,
Main page contains Group Name, Event Name, Event date and Remark.
Excel export available to download the holiday list.
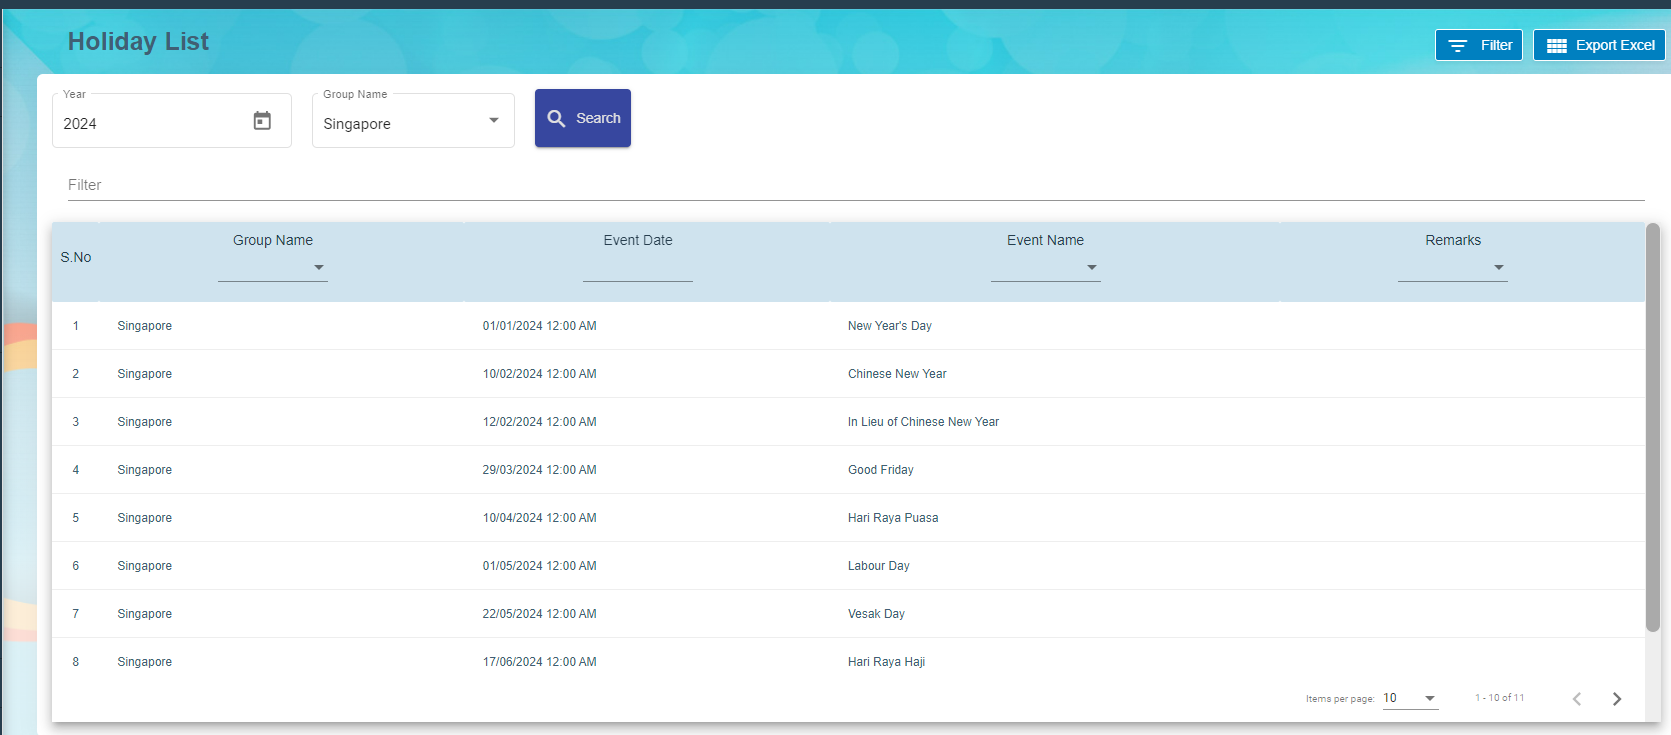
Billing System
2.0 Billing System
Billing System is the processes that help to create invoices against completed tasks for the customers. The system receives tasks from various networks to process invoice. Each task is associated with rates and available in the rate card. Successful task and job are ready to process invoice in the system. New invoices are approved by the approver before sending the invoices to the customer. Once payment received from the customer, it has been updated in the system to close the transaction.
Billing System is a digital platform or solution that facilitates the electronic generation, dispatch, and tracking of invoices, eliminating the need for traditional paper-based billing methods.
2.1 Task Ready to Invoice
Task Ready to invoice submenu available under Billing menu. Successful Task are ready for creating Invoice to the customer.
- Choose Customer in the Task ready to invoice and the date range. Select Type either Day, Month or Ad-Hoc.
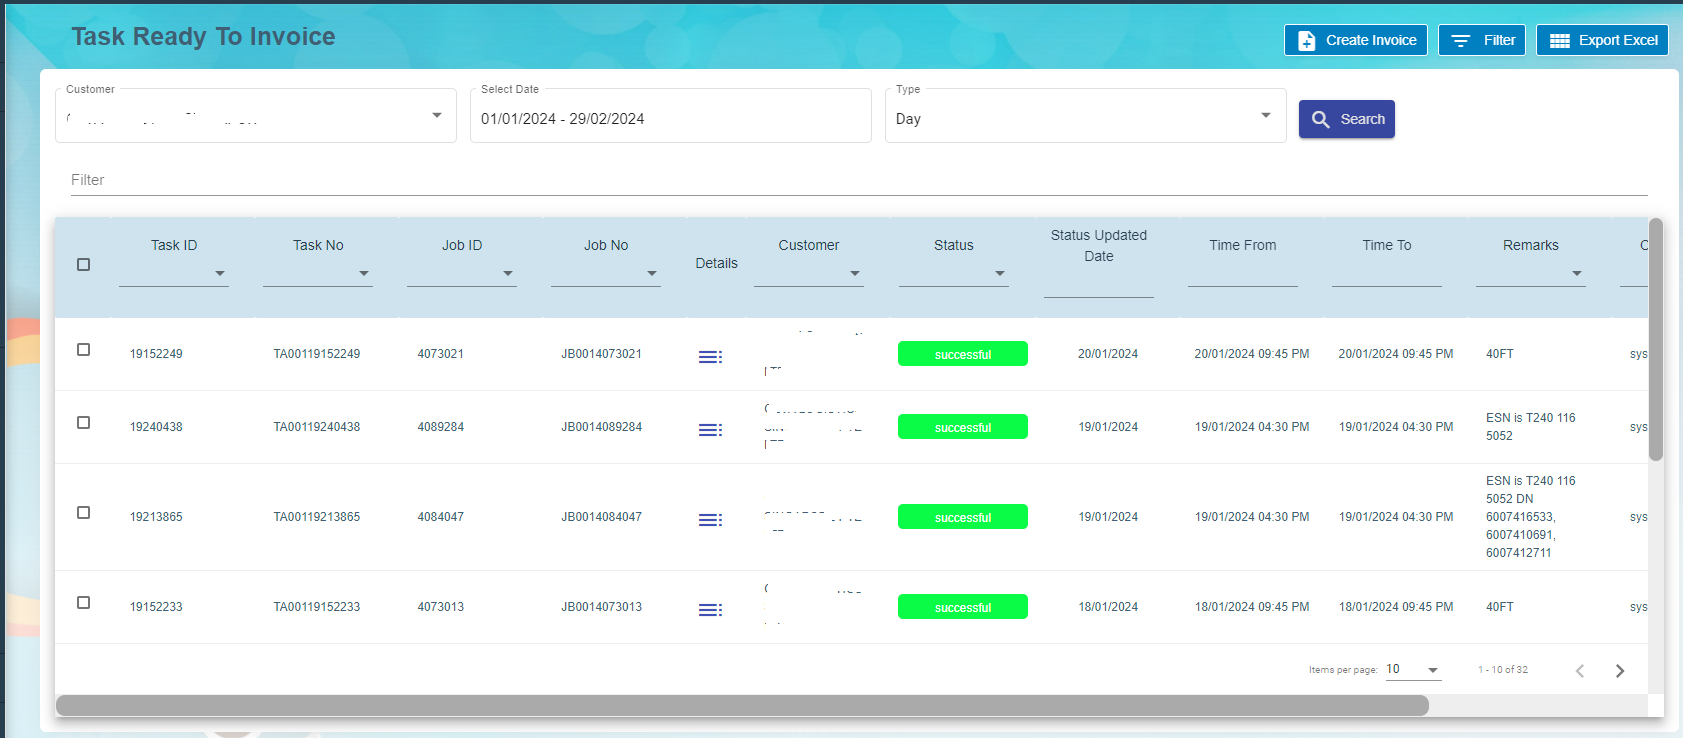
Click detail icon against the task to view the task details , job details, task assignment and Tag details. User can modify the tag code and save it.
- Click single or multiple check box
 against the task id to create invoice.
 - Click create invoice

- Choose the payment terms from the drop-down list and staff name.
- Click create invoice

The new invoice available to process in the Invoice List.
2.2 Invoice
Choose Invoice submenu under Billing menu. Invoice list page contains invoice numbers to process billing for the activities.

- Click Invoice number to view Invoice details.
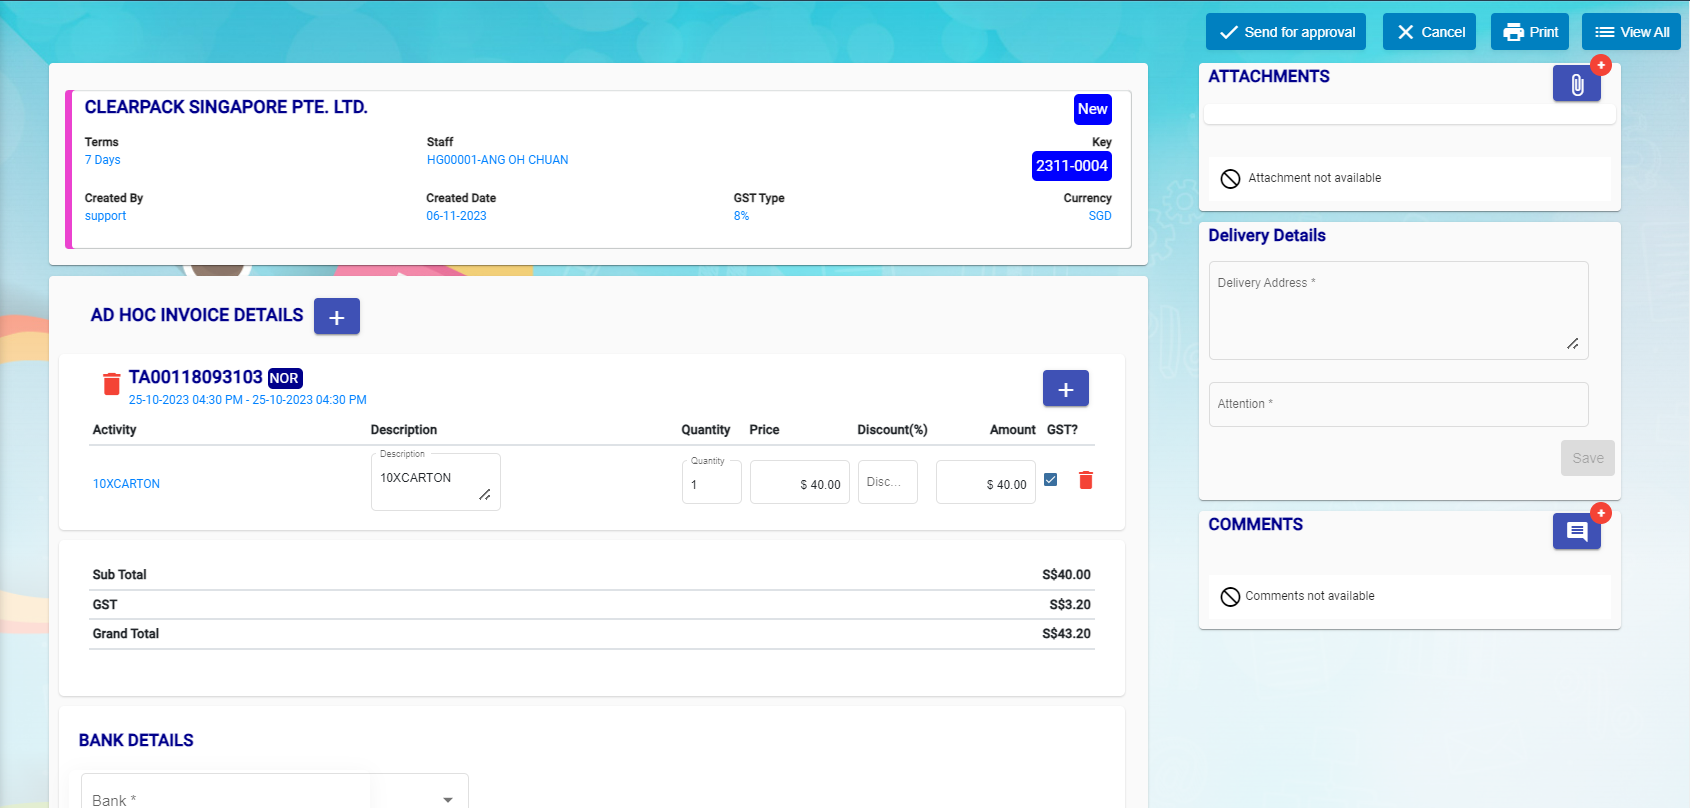
- New task can be added along with the previous task.
- Click add button beside to Ad-Hoc Invoice details.
- New window open to choose the task numbers.
- Click add.
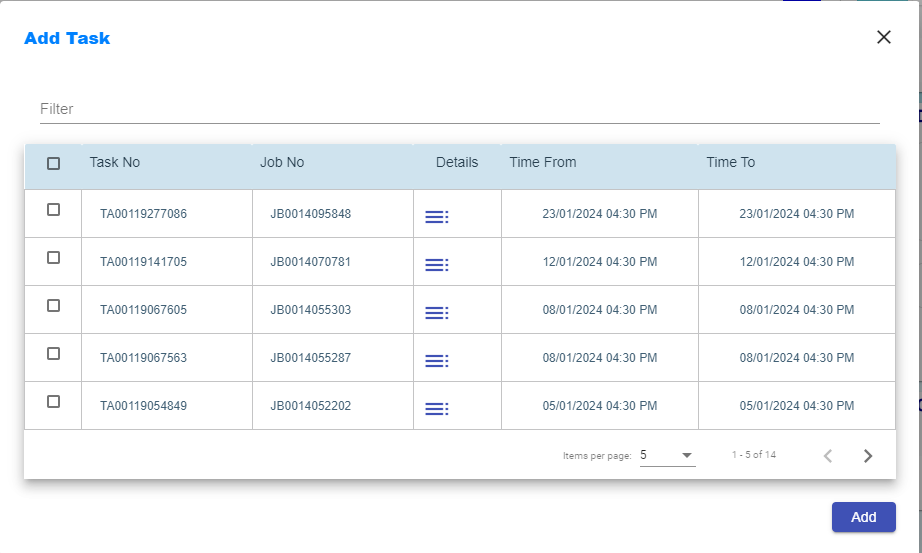
- Choose Bank details and Save it.
- Click send for approval button available on the top right corner.
- Assignee and Notify window open to choose the approver and notify users.
- Click confirm.
- Approver will receive email notification to approve the invoice before sending the invoice to the customer.
- Dashboard contains waiting for approval for the approver to choose it.
- Click Approve button at the top right corner.
- Assignee and Notify window open to intimate the user proceed to send the invoice to the customer.
- Approved Invoice report available to send to the customer. Click Print and email as attachment to customer.
- Click send to customer button.
- New window open to intimate Assignee and Notify Users.
- Click confirm button.
- Invoice status change to waiting for payment.
- Click Paid button after payment received from the customer.
- Eventually Assignee and Notify window open to intimate the users and confirm it.
2.3 Rate Card
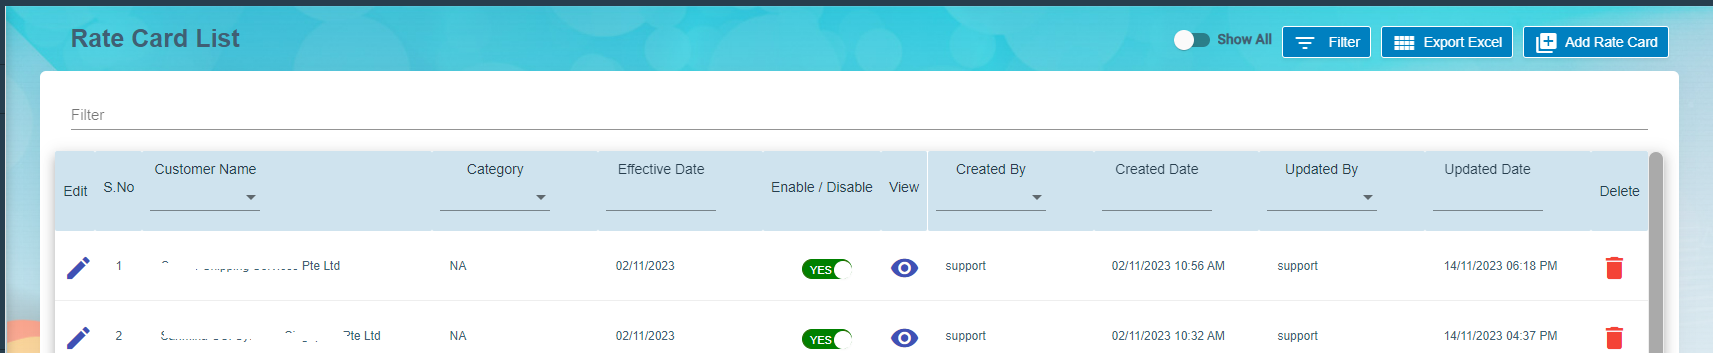
- Click rate card to add all the activities details against the customer.
- Click Save to save the rate card details.