# Human Resource
Human Resource (HRM) management. Employee data, leave details, attendance, planning, performance appraisal, expense claim are all part of HR module.
# Employee Data
The HRM module in the ***cuteOffice*** application helps HR admins in streamlining the entire functions within an organization like managing the employee related information and company related information. Functionality present in the HRM module helps you to add employee’s basic data, employee’s and company’s master data, and company’s property details.
If you want to navigate to the **HRM** module, do the following,
Click the **HRM** menu in the menu bar. The **HUMAN RESOURCES** page opens.
[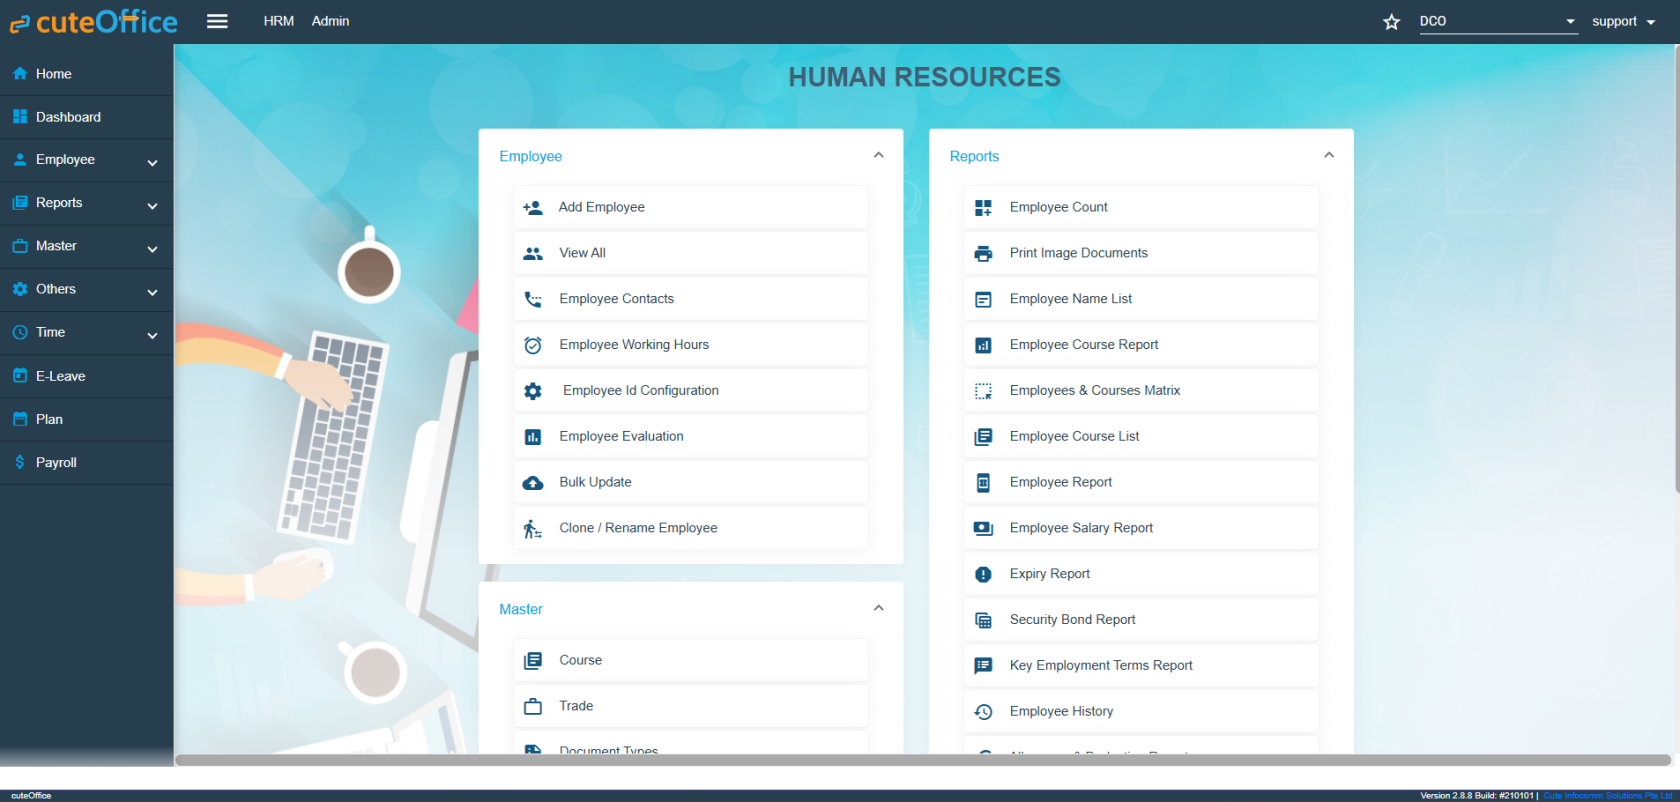](https://wiki.cuteinfocomm.com/uploads/images/gallery/2026-05/image-1778224644440.png)
Humane Resource Menu Page
The **HUMAN RESOURCES** page consists the following sub menus:
- **Employee -** Allows HR admin to add employee’s basic details such as Name, DOB, Employee Type, Nationality and so on.
- **Reports –** Helps HR admin to view the various reports corresponding to the employee’s data.
- **Master** - Allows HR admin to add master data details of employee and company.
- **Others** - Allows HR admin to add the details of vehicles belongs to company, insurance details of employees, and salary addition and deduction details.
## Employee
The **Employee** submenu in the **HRM** menu helps you to add the employee details that is both personal and professional details. The **Employee** submenu contains the following tabs,
- Employee ID config
- Add Employee
- View All
- View Employee Contacts
- Employee Working Hours
### Employee ID Configuration
When creating the new employees in the system, the employee ID is automatically generated. How the employee number to be generated is configurable by the administrator.
- Click and select the company in the **Employee ID Configuration** page, it shows the current settings for the ID generator. [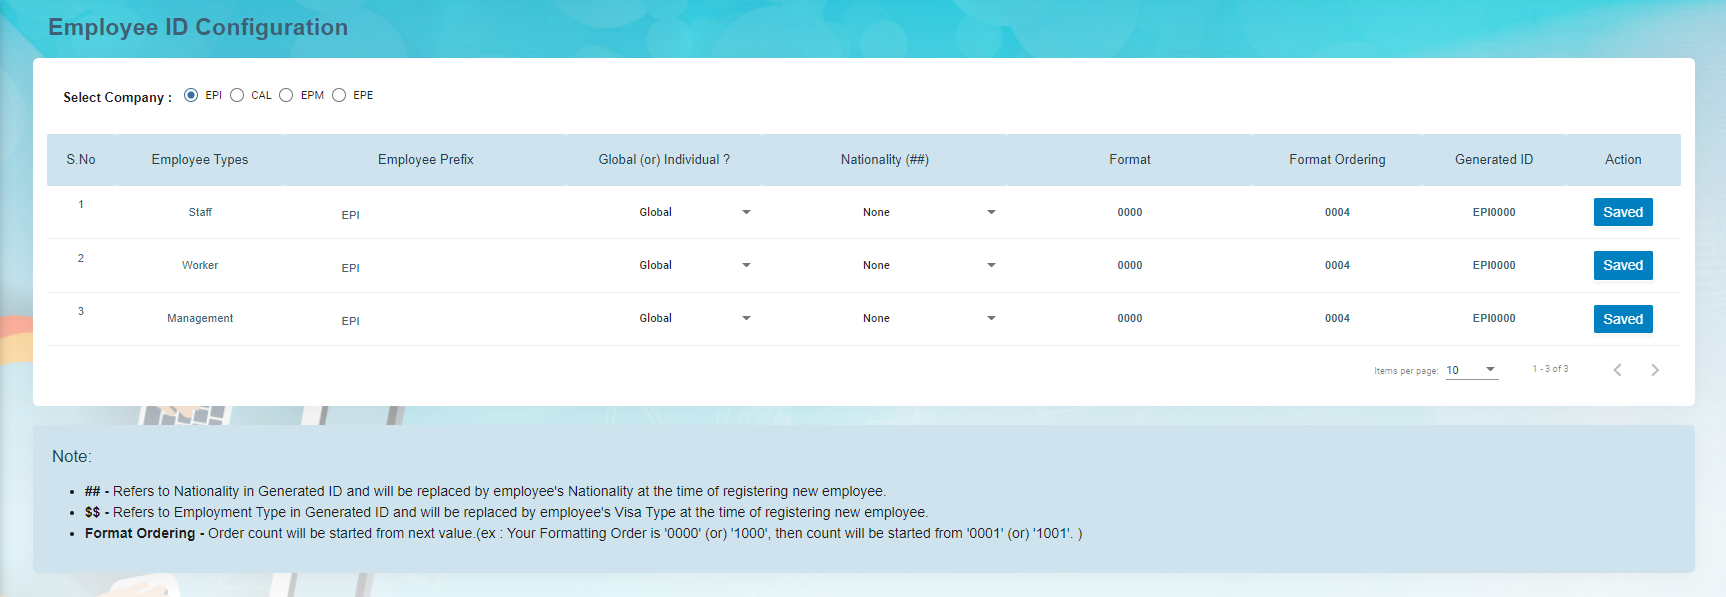](http://wiki.cuteinfocomm.com/uploads/images/gallery/2022-09/image-1662065090441.png)
- The following are the currently supported variables that can be used for the ID generator.
1. 1. Employee Type – Based on the Over-all Type configured for the company
2. Employee Prefix – Defaulted to company abbreviation and can be changed.
3. Global/Individual – Employee Number is globally increased by Employee Type or Individually managed by employee type
- - Global means the number will be global for the company irrespective of the employee type.
- Individual means, the employee ID running number will be maintained individually for each employee type.
4. Nationality None / Before Employee ID / After Employee ID – If the nationality to be as part of the employee number where it should be appearing. Choose None if the employee ID does not have the country code.
5. Set the number with which the employee ID should be incremented next when a new employee is created. The current number shown is already used for the previous employee created in the system.
**Note:** For new company, complete the initial employee id configuration before importing or adding the employees records.
### Add Employee Data
The **View All** tab in the **Employee** submenu helps you to add the details of a new employee and view the added employee details including their profile percentage. The profile percentage of the employee lets you easily identify the incomplete details of employee.
To add a new employee, do the following steps,
1. Click the **View All** tab in the **Employee** . The **View All Employee page** opens. [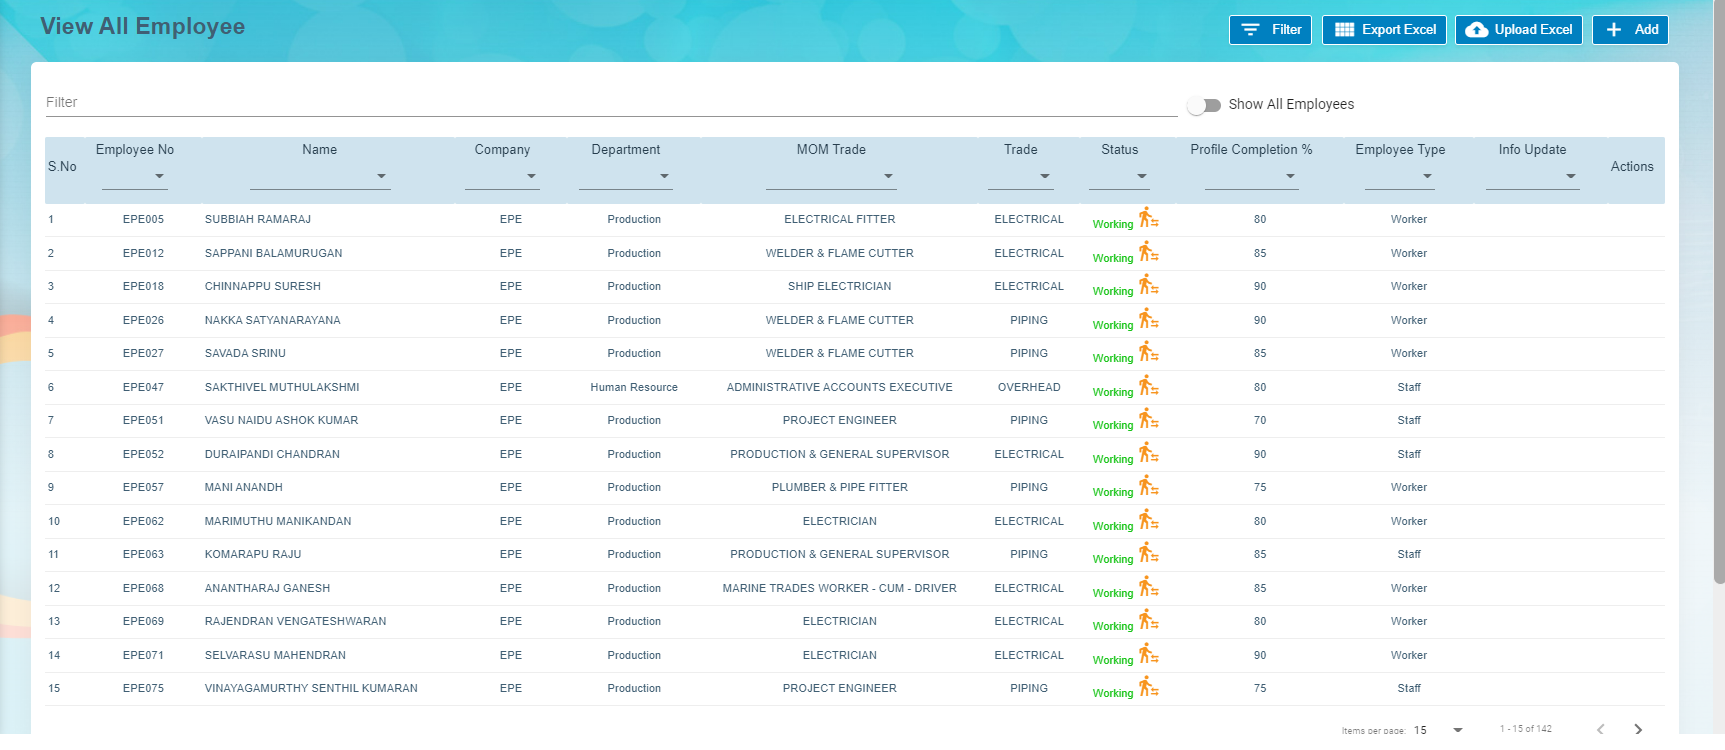](http://wiki.cuteinfocomm.com/uploads/images/gallery/2022-09/image-1662065050636.png)
2. Click (**Add** button) in the **View All Employee**. The **Add Employee** window opens. [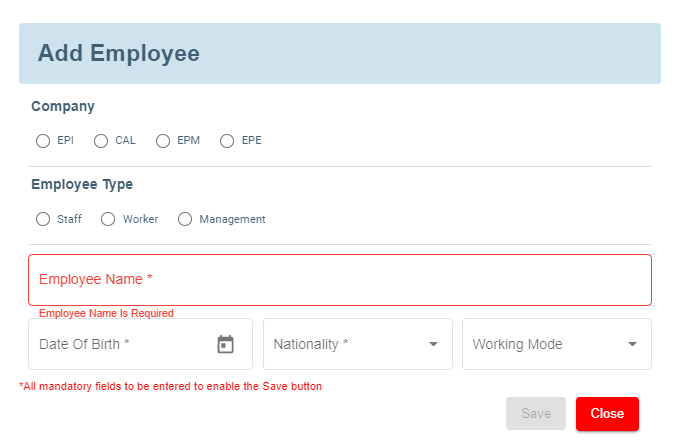](http://wiki.cuteinfocomm.com/uploads/images/gallery/2022-09/image-1662065171103.png)
**Note**: The fields notified with a symbol (\*) are mandatory. You must enter the relevant details in that fields before saving.
3. In the **Company** field, select a company from the given list of companies.
4. In the **Employee Type** field, select the employee type.
5. In the **Employee Name** box, enter the employee name.
6. In the **Date of Birth** box, enter the birth date of the employee.
7. In the **Nationality** box, select the nationality of the employee.
8. Click **Save**. The employee is created and a new employee ID is assigned to the employee. The **Photo ID Document Management** page opens.
#### Add Photo ID Information of Employee
In the **Photo ID Document Management** page, you can enter the employee’s information according to the photo ID given by the employee.
**Note**: Before adding the employee’s photo ID information, make sure that the company you have selected using the [**Company**](#company) field is in Singapore or other country.
If the selected company is in Singapore, the **Photo ID Document Management** page contains the **Singapore Photo ID Management** field. See below figure.
[](http://wiki.cuteinfocomm.com/uploads/images/gallery/2022-09/image-1662071606998.png)
If the selected company is in other country, the **Photo ID Document Management** page contains the **Other Photo ID Management** field. See below figure. (Note: In Company Settings, change the default value "N/A" to the company’s country name (other than Singapore)).
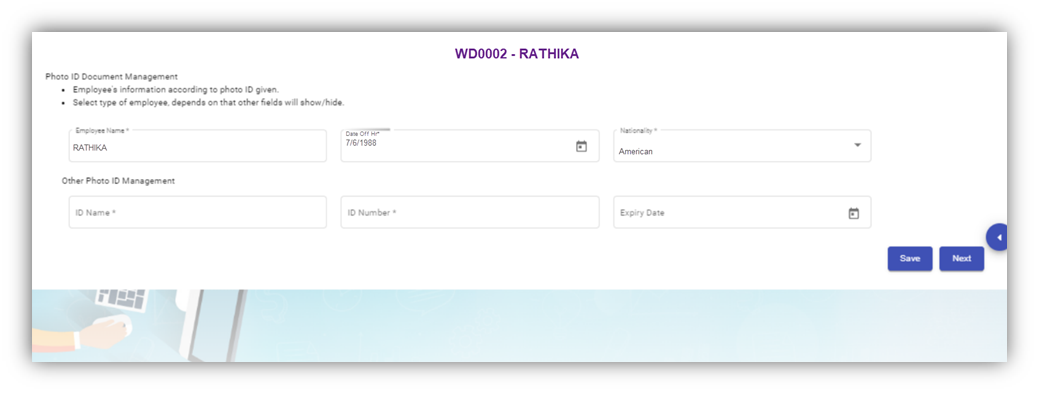
Photo ID Management (Non-Singapore)
##### **Singapore Photo ID Management**
Do one of the following steps to enter the relevant details in the **Singapore Photo ID Management** field based on the selection of type of employee in the **Employee Type** box.
- If the employee is citizen of Singapore, select the **Citizen** option in the **Employee Type.** The **Singapore Photo ID Management** field shows the following boxes based on the selected **Citizen** option. Fill the relevant information in the following boxes,[](http://wiki.cuteinfocomm.com/uploads/images/gallery/2022-09/image-1662071606998.png)
- 1. In the **NRIC/FIN Number** box, enter the NRIC/FIN number.
2. In the **Photo Id Barcode**, enter the barcode scanned result.
3. In the **Issued Date** box, select the issued date of citizenship.
4. In the **Sector** box, select the sector from a drop-down list.
5. Click **Save**. The employee’s photo ID information will be added successfully in the system.
- If the employee is permanent resident of Singapore, select the **Permanent Resident** option in the **Employee Type.** The **Singapore Photo ID Management** field shows the following boxes based on the selected **Permanent Resident** option. Fill the relevant information in the following boxes,
1. In the **NRIC/FIN Number** box, enter the NRIC/FIN number.
2. In the **Photo Id Barcode**, enter the barcode scanned result.
3. In the **Issued Date** box, select the issued date of permanent resident.
4. In the **Sector** box, select the sector from a drop-down list.
5. Click **Save**. The employee’s photo ID information will be added successfully in the system.
- If the employee is an employment pass holder, select the **Employment Pass** option in the **Employee Type.** The **Singapore Photo ID Management** field shows the following boxes based on the selected **Employment Pass** option. Fill the relevant information in the following boxes,
1. In the **NRIC/FIN Number** box, enter the NRIC/FIN number.
2. In the **Photo Id Barcode**, enter the barcode scanned result.
3. In the **Issued Date** box, select the issued date of employment pass.
4. In the **Sector** box, select the sector from a drop-down list.
5. In the **Date of Application** box, select the applied date of employment pass.
6. In the **ID Expiry Date** box, select the expiry date of the employment pass ID.
7. Click **Save**. The employee’s photo ID information will be added successfully in the system.
- If the employee is a S pass holder, select the **S Pass** option in the **Employee Type.** The **Singapore Photo ID Management** field shows the following boxes based on the selected **S Pass** option. Fill the relevant information in the following boxes,
1. In the **NRIC/FIN Number** box, enter the NRIC/FIN number.
2. In the **Photo Id Barcode**, enter the barcode scanned result.
3. In the **Issued Date** box, select the issued date of S pass.
4. In the **Sector** box, select the sector from a drop-down list.
5. In the **Date of Application** box, select the applied date of S pass.
6. In the **ID Expiry Date** box, select the expiry date of the S pass ID.
7. In the **Levy Type** box, select the levy type from a drop-down list.
8. In the **Levy Amount Type** box, select the levy amount type from a drop-down list.
9. In the **Levy Amount** box, enter the levy amount.
10. Click **Save**. The employee’s photo ID information will be added successfully in the system.
- If the employee is a student pass holder, select the **Student Pass** option in the **Employee Type.** The **Singapore Photo ID Management** field shows the following boxes based on the selected **Student Pass** option. Fill the relevant information in the following boxes,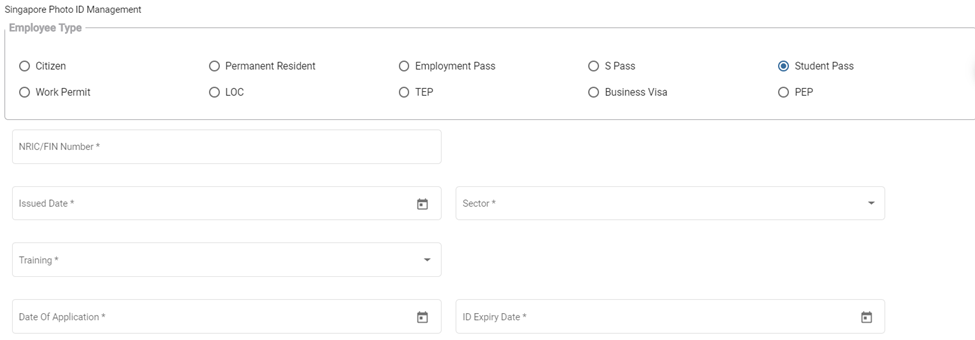
1. In the **NRIC/FIN Number** box, enter the NRIC/FIN number.
2. In the **Photo Id Barcode**, enter the barcode scanned result.
3. In the **Issued Date** box, select the issued date of student pass.
4. In the **Sector** box, select the sector from a drop-down list.
5. In the **Training** box, select the training type from a drop-down list.
6. In the **Date of Application** box, select the applied date of student pass.
7. In the **ID Expiry Date** box, select the expiry date of the student pass ID.
8. Click **Save**. The employee’s photo ID information will be added successfully in the system.
- If the employee is a work permit holder, select the **Work Permit** option in the **Employee Type.** The **Singapore Photo ID Management** field shows the following boxes based on the selected **Work Permit** option. Fill the relevant information in the following boxes,
1. In the **NRIC/FIN Number** box, enter the NRIC/FIN number.
2. In the **Photo Id Barcode**, enter the barcode scanned result.
3. In the **Issued Date** box, select the issued date of work permit.
4. In the **Sector** box, select the sector from a drop-down list.
5. In the **Date of Application** box, select the applied date of work permit.
6. In the **ID Expiry Date** box, select the expiry date of the work permit ID.
7. In the **Levy Type** box, select the levy type from a drop-down list.
8. In the **Levy Amount Type** box, select the levy amount type from a drop-down list.
9. In the **Levy Amount** box, enter the levy amount.
10. In the **Security Bond Expiry** box, select the expiry date of security bond.
11. In the **Security Bond Guarantee Number** box, enter the guarantee number of security bond.
12. In the **Sum Insured** box, enter the insured amount.
13. In the **Insurer** box, enter the name of insurer.
14. In the **Number of Years** box, enter insurance coverage years.
15. In the **Duration** box, enter the duration of the insurance.
16. In the **Start Date** and **End Date** boxes, select the start and end date of the insurance.
17. If the indemnity is received, select the checkbox of the **Is Indemnity Received** option.
18. If the indemnity is postre, select the checkbox of the **Is Indemnity Postre** option.
19. If the discharge status is available, select the checkbox of the **Discharge status** option.
20. Click **Save**. The employee’s photo ID information will be added successfully in the system.
- If the employee is a LOC holder, select the **LOC** option in the **Employee Type.** The **Singapore Photo ID Management** field shows the following boxes based on the selected **LOC** option. Fill the relevant information in the following boxes,
1. In the **NRIC/FIN Number** box, enter the NRIC/FIN number.
2. In the **Photo Id Barcode**, enter the barcode scanned result.
3. In the **Issued Date** box, select the issued date of LOC.
4. In the **Sector** box, select the sector from a drop-down list.
5. In the **Date of Application** box, select the applied date of LOC.
6. In the **ID Expiry Date** box, select the expiry date of the LOC ID.
7. Click **Save**. The employee’s photo ID information will be added successfully in the system.
- If the employee is a TEP holder, select the **TEP** option in the **Employee Type.** The **Singapore Photo ID Management** field shows the following boxes based on the selected **TEP** option. Fill the relevant information in the following boxes,
1. In the **NRIC/FIN Number** box, enter the NRIC/FIN number.
2. In the **Photo Id Barcode**, enter the barcode scanned result.
3. In the **Issued Date** box, select the issued date of TEP.
4. In the **Sector** box, select the sector from a drop-down list.
5. In the **Training** box, select the training type from a drop-down list.
6. In the **Date of Application** box, select the applied date of TEP.
7. In the **ID Expiry Date** box, select the expiry date of the TEP ID.
8. Click **Save**. The employee’s photo ID information will be added successfully in the system.
- If the employee is a business visa holder, select the **Business Visa** option in the **Employee Type.** The **Singapore Photo ID Management** field shows the following boxes based on the selected **Business Visa** option. Fill the relevant information in the following boxes,
1. In the **Issued Date** box, select the issued date of business visa.
2. In the **Sector** box, select the sector from a drop-down list.
3. In the **Type of Visa** box, enter the visa type.
4. In the **Sponsorship Particulars** box, enter the sponsorship details.
5. In the **Training** box, select the training type from a drop-down list.
6. In the **Date of Application** box, select the applied date of business visa.
7. In the **Expiry Date** box, select the expiry date of the business visa.
8. In the **Purpose** box, enter the purpose of getting business visa.
9. In the **Remarks** box, enter your remarks if any.
10. Click **Save**. The employee’s photo ID information will be added successfully in the system.
- If the employee is a PEP holder, select the **PEP** option in the **Employee Type.** The **Singapore Photo ID Management** field shows the following boxes based on the selected **PEP** option. Fill the relevant information in the following boxes,
1. In the **NRIC/FIN Number** box, enter the NRIC/FIN number.
2. In the **Photo Id Barcode**, enter the barcode scanned result.
3. In the **Issued Date** box, select the issued date of PEP.
4. In the **Sector** box, select the sector from a drop-down list.
5. In the **Date of Application** box, select the applied date of PEP.
6. In the **ID Expiry Date** box, select the expiry date of the PEP ID.
7. Click **Save**. The employee’s photo ID information will be added successfully in the system.
##### **Other Photo ID Management (Non-Singapore)**
To add employee’s photo ID information in the Other Photo ID Management field
Enter the relevant details in the Other Photo ID Management field based on the selection of type of employee in the Employee Type box.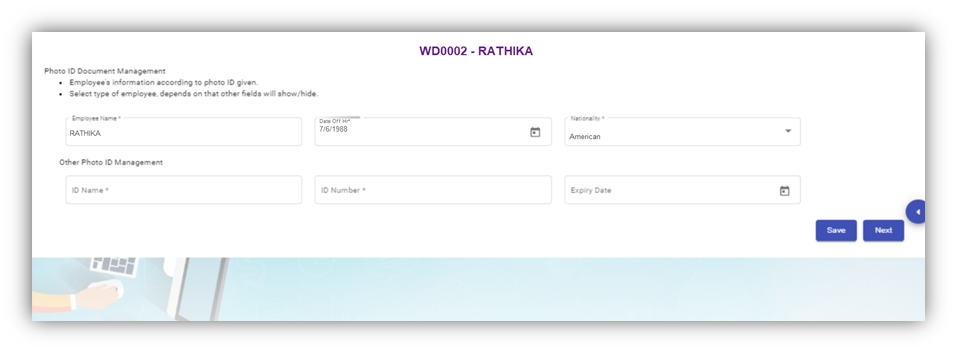
- 1. In the **ID Name** box, enter the name of the employee ID.
2. In the **ID Number** box, enter the number of the employee ID.
3. In the **Expiry Date** box, select the expiry date of the employee ID.
4. Click **Save**. The employee’s photo ID information related with the company located in other country is successfully added.
5. Click **Next**. The **photo ID Image Management** page opens.
#### Add Photo ID Image of Employee
In the **Photo ID Image Management** page, you can upload the image of the photo ID which is the national identification card given to the employee. You can upload both the front and back side images of the photo ID, and the Singapore SGWorkPass images.
**Note**: The photo ID image you want to upload should be in PNG or JPEG format. The image size should not be more than 1 MB.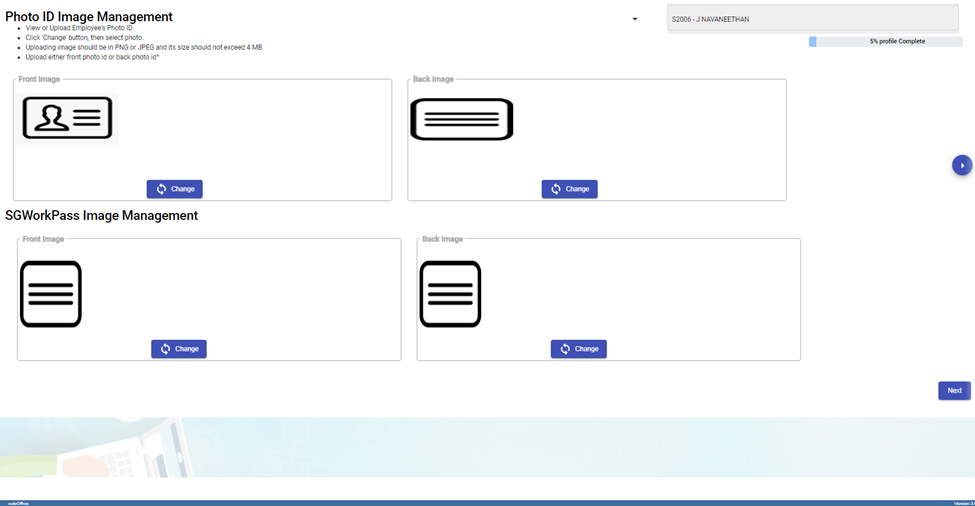
1. Click (**Change** button) in the **Front Image** field and select a front image of the phot ID or drag and drop the image.

There is an option provided to trim the image as required. Click Save. The selected front image of the photo ID will be displayed in the **Front Image** field.
2. Click (**Change** button) in the **Back-Image** field and select a back image of the phot ID and do the same operations. The selected back image of the photo ID will be displayed in the **Back-Image** field.
3. Click **Next**. The **Photo Management** page opens.
#### Add Photo of Employee
In the **Photo Management** page, you can upload an image of the employee.
**Note**: The image you want to upload should be in PNG or JPEG format. The image size should not be more than 1 MB.
1. Click (**Change** button) in the **Employee Image** field and select an image of the employee. The selected image of the employee will be displayed in the **Employee** **Image** field.
2. Click **Next**. The **Passport Information** page opens.
#### Add Passport Information of Employee
In the **Passport Information** page, you can add information of the employee’s passport.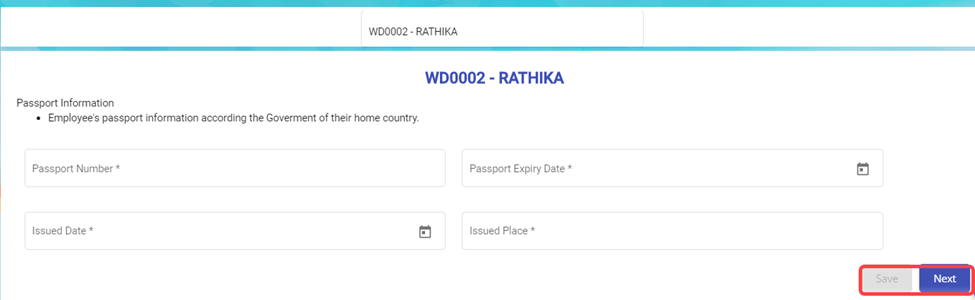
1. In the Passport Number box, enter the number of the employee’s passport.
2. In the Passport Expiry Date box, enter the expiry date of the passport.
3. In the Issued Date box, select the passport issued date.
4. In the Issued Place box, enter the passport issued place.
5. Click **Save**. The added passport information is successfully saved.
6. Click **Next**. The **Passport Image Management** page opens.
#### Add Image of Employee’s Passport
In the **Passport Image Management** page, you can add an image of the employee’s passport. You can upload both the front and back side images of the passport.
**Note**: The passport image you want to upload should be in PNG or JPEG format. The image size should not be more than 200 KB.
1. Click (**Change** button) in the **Front Image** field and select a front image of the passport. The selected front image of the passport will be displayed in the **Front Image** field.
2. Click (**Change** button) in the **Back-Image** field and select a back image of the passport. The selected back image of the passport will be displayed in the **Back-Image** field.
3. Click **Next**. The **Passport Collection and Issuance** page opens.
#### Add Collection and Issuance Details of Employee’s Passport
In the **Passport Collection and Issuance** page, you can add the collection and issuance details of the employee passport. If you have added the collection and issuance details like collection date and issuance date, you can track the employee’s passport issuance and return history.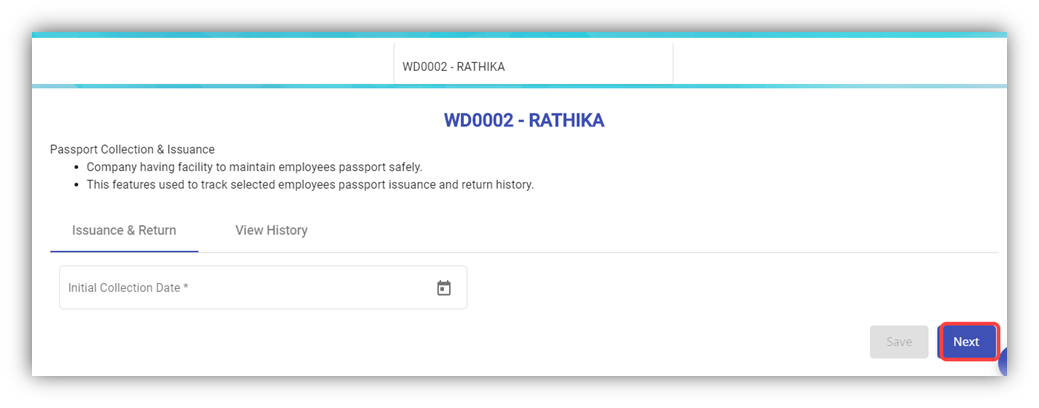
1. In the **Initial Collection Date** box, select the date when the passport has collected from the employee.
2. Click **Next**. The **Employee Passport Issuance Details** field opens.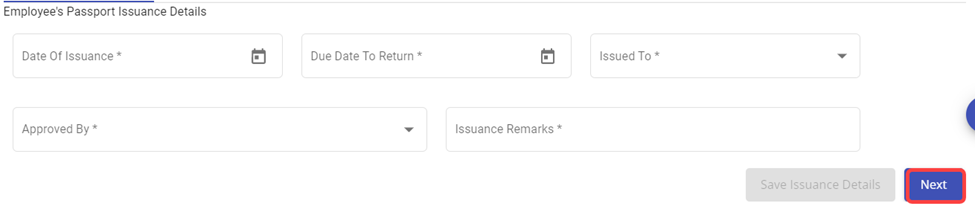
3. In the **Date of Issuance** box, select the date when the passport to be issued to the employee.
4. In the **Due Date to Return** box, select the due date to return the passport.
5. In the **Issued To** box, select the name of a person to whom the passport should be issued.
6. In the **Approved By** box, select the name of a person who should approve the issuance of passport.
7. In the **Issuance Remarks** box, enter your remarks if any.
8. Once issued, it can be returned back for safe keeping again.
9. Click **Next**. The **Official Information** page opens.
#### Add Official Information of Employee
In the **Official Information** page, you can add the official information of the employee.
1. In the **Official Information** field,
- In the **Working Mode** box, select the working mode of the employee from a drop-down list.
- In the **Department** box, select a department which the employee belongs to.
- In the **Designation** box, select the designation of the employee.
- In the **Date of Join** box, select the date of joining of the employee.
- In the **Supervisor** box, select the supervisor of the employee from a drop-down list.
- In the **First DOJ** box, select the first date of joining.
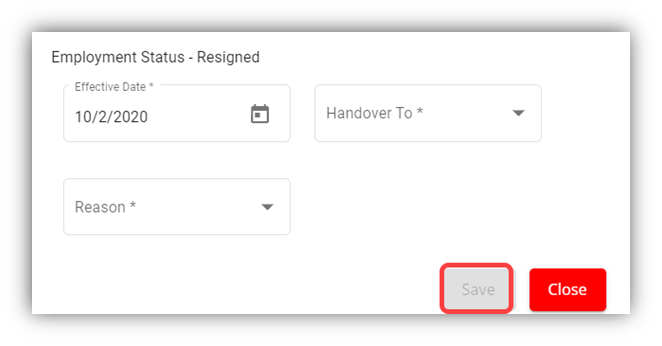
- In the **Employment Status** box:
- **Resigned Staff.** If the employee has resigned, select the **Resigned** option in the **Employment Status.** A new pop-up window opens to enter the resignation details while saving the added official information. In the Effective Date box, enter the date of relieving; In the Handover To box, select an employee to handover the resigned employee work; In the Reason box, select the reason of relieving. Click Save.
- - - Waiting for Clearance
- Deleted
- Terminated
**Note**: If you have selected **Resigned**, **Deleted**, and **Terminated** options in the **Employment Status** of the employee, you cannot add more details about employee and edit the added details of the employee.
1. -
- In the **Employment Type** box, select the type of employment whether **Permanent** or **Term Contract**.
- **Note**: If you have selected **Term Contract**, enter the duration of employment in the **Duration of Employment** box.
- In the **Probation Days** box, enter the probation period detail.
- In the **ARE Trade** box, select the trade of the employee from a drop-down list.
- **Note**: The **ARE Trade** may change according to the company.
- In the **Contract Expiry** box, select the contract expiry date.
- if you want to exclude the employee from cuteTime, select the checkbox of the **Exclude from cuteTime?**
- In the **MOM Trade** box, select the MOM trade from a drop-down list.
- In the **Official Email Id** box, enter the official email id of the employee.
- In the **Attendance Id** box, enter the attendance id of the employee.
- In the **Public Holiday Group** box, select the country you want to follow the holidays of the same.
- In the **Is NS eligible?** Box, select **Yes** if the employee is eligible to serve NS otherwise select
- In the **Grade** box, enter the grade number of the employee.
- In the **Batch** box, enter the batch number of the employee.
- In the **Supplier Company** box, select the supplier company from a drop-down list.
- In the **Before Probation** box, enter the notice period days for termination of employee before completing the probation period.
- In the **After-Probation** box, enter the notice period days for termination of employee after completing the probation period.
- If the employee is working under the employment act, select the checkbox of the **Is Under Employment Act**
2. In the **PPE and Size** field,
- In the **PPE Size** box, select the required size of PPE.
- In the **Shoe Size** box, select the shoe size of the employee.
- In the **PPE and Shoe Remarks** box, enter your remarks if any.
3. In the **Bank Information** field, enter the bank account information of employee.
- In the **Bank Name** box, enter the bank name.
- In the **Bank Account Number** box, enter the bank account number.
- In the **Bank Account Type** box, enter the type of bank account.
4. If you want to attach any file to add extra information about the employee, click **Choose File** and select the respective file.
5. Click **Save**.
6. Click **Next**. The **Experience and Qualification** page opens with the **Experience** and **Educational Qualification** options.
#### Add Experience and Qualification Details of Employee
In the **Experience and Qualification** page, you can add working experience and educational qualification details of the employee.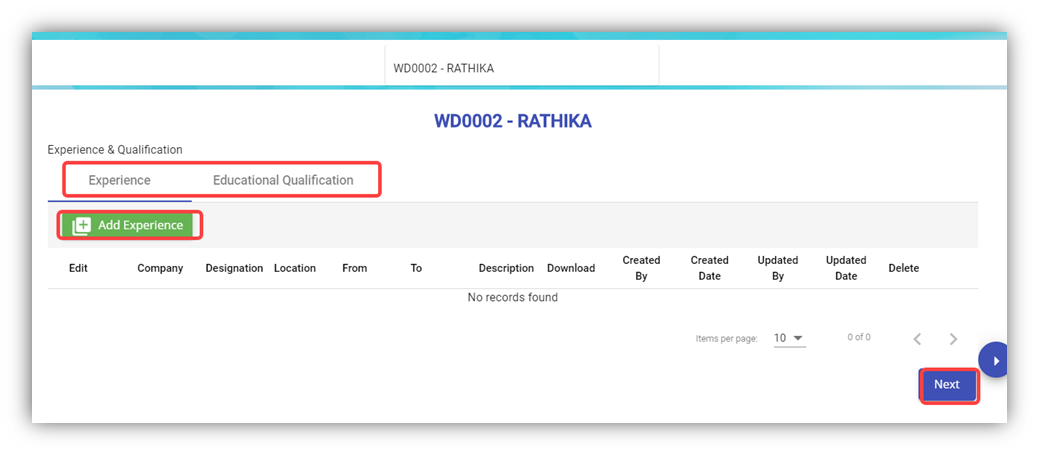
- To add work experience details of the employee, click (**Add Experience** button). The Add Experience window opens.
1. In the **Company** box, enter the company name.
2. In the **Designation** box, enter the designation of the employee.
3. In the **From** and **To** boxes, select the working period of the employee.
4. In the **Location** box, enter the location of the company.
5. In the **Description** box, enter the description about the job nature.
6. If you want to attach any file to add extra information about the work experience, click **Choose File** and select the respective file.
7. Click **Save**. The work experience details of the employee are successfully added and listed in the **Experience and Qualification** page.
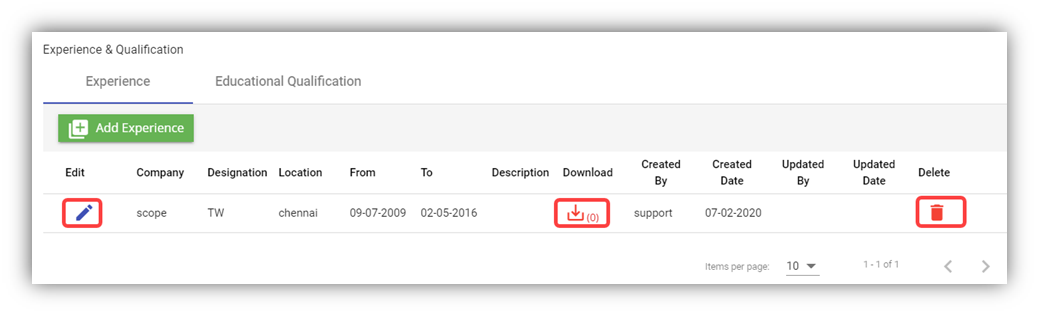**Note**: If you want to edit the added work experience details, click (Edit icon). If you want to download the added work experience details, click (Download icon). If you want to delete the added work experience details, click  (Delete icon).
- To add the educational qualification of the employee, click the **Educational Qualification** option in the upper of the **Experience and Qualification**
1. 1. Click (**Add Qualification** button). The **Add Qualification** Window opens.
2. In the **Qualification** box, enter the educational qualification of the employee.
3. In the **Specialization** box, enter the specialization in education.
4. In the **University** box, enter the name of the university.
5. In the **Country** box, enter the country name.
6. In the **Year of Graduation** box, select the year when the employee gets graduated.
7. In the **Description** box, enter the description about the employee’s education.
8. If you want to attach any file to add extra information about the educational qualification, click **Choose File** and select the respective file.
9. Click **Save**. The educational qualification details of the employee are successfully added and listed in the **Experience and Qualification** page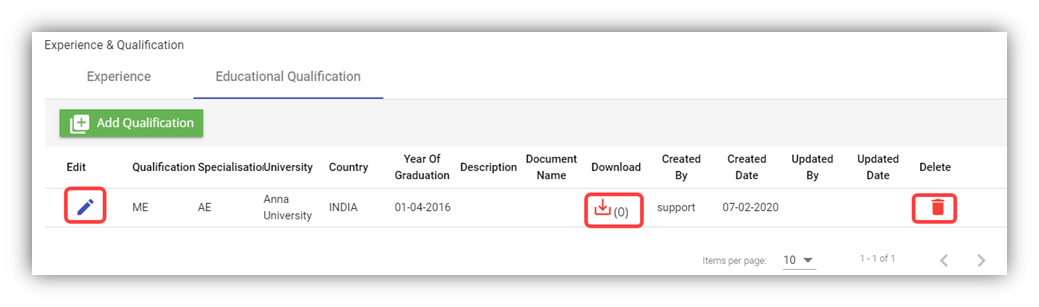**Note**: If you want to edit the added educational qualification details, click (Edit icon). If you want to download the added educational qualification details, click (Download icon). If you want to delete the added educational qualification details, click  (Delete icon).
10. Click **Next**. The **Pay Eligibility** page opens including the **Salary Details** and **View History** options.
#### Add Pay Eligibility Details of Employee
In the **Pay Eligibility** page, you can add the salary details of the employee.
[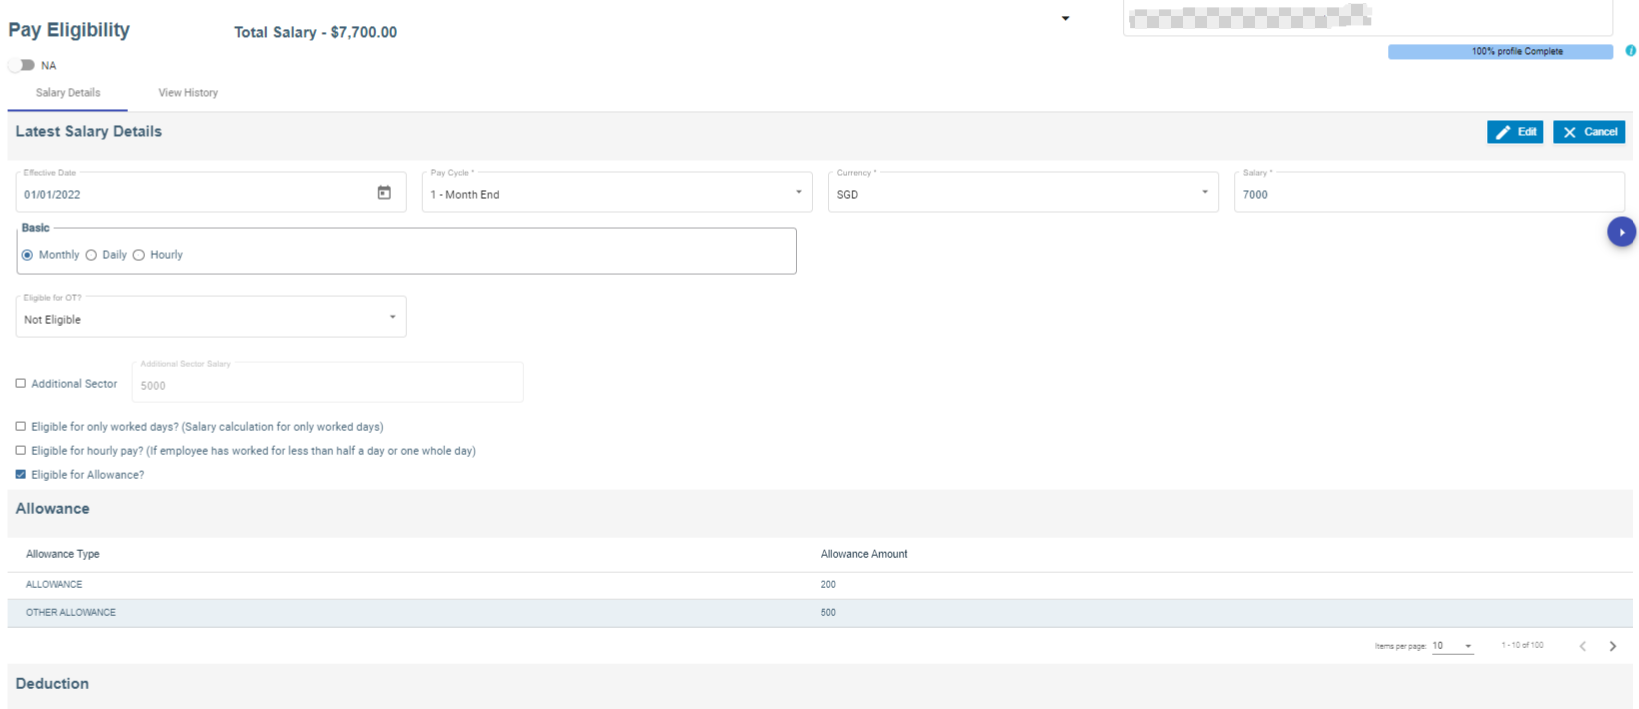](http://wiki.cuteinfocomm.com/uploads/images/gallery/2024-02/image-1708494832932.png)
1. In the **Effective Date** box, select the effective date for calculating salary for the employee.
2. In the **Pay Cycle** box, select the pay cycle type.
3. In the **Currency** box, select the currency from a drop-down list.
4. In the **Salary** box, enter the salary amount.
5. In the **Basic** box, select the basic pay method that is whether **Monthly**, **Daily** or **Hourly**
6. If the employee is eligible to get pay only for worked days, select the checkbox of the **Eligible for only worked days?**
7. If the employee is eligible to get hourly pay, select the checkbox of the **Eligible for hourly pay?**
8. In the **Eligible for OT?** Box, select the OT option from a drop-down list.
9. If the employee is eligible to get allowance, select the checkbox of the **Eligible for Allowance?**
10. If an employee holding either PR or citizenship pass type and have additional salary, enable additional sector box with salary amount. (We have to configure Additional CPF account in the payroll information page).
11. In the **Remarks** box, enter your remarks if any.
12. If you want to attach any file to add extra information about the salary details, click **Choose File** and select the respective file.
13. Click **Save**. The salary details are added successfully.
14. Click **Next**. The **Payroll information** page opens.
#### Add Payroll Salary Configuration details of an employee
Salary Configuration page is meant to add pay mode, advance salary, withhold tax in percentage or fixed amount etc.,
1. Under Payment & Rates, choose Pay mode from the drop-down list
2. Add Advance Salary amount, if required. (To pay a portion of basic salary as an advance)
3. Under With-Hold Tax, either add percentage or fixed amount.
4. Enable check box to enter capping amount for tax.
5. Under Others, employee groups, finance groups and working as available to configure.
6. Enable check box for late minimum deduction, PH payable hrs and allow to compute salary from other Modules (ex : Scaffold module) along with that add addition allowance if necessary.
7. Save button enabled automatically after all the mandatory fields are entered.
##### Settings to add Pay Mode, Employee Groups and Finance Groups
Pay Mode
1. Click Admin
2. Click options
3. In the name field, choose mode of payment
4. Click add button to add pay mode
5. Click Save to save the record.
Employee Groups
1. Click Admin
2. Click Company menu
3. Edit Company and click Settings tab
4. Click add to add "EmpGroups" in the name field
5. Enter Employee groups value
6. Click "+" icon to add multiple Employee groups
7. Click Save to save the data. [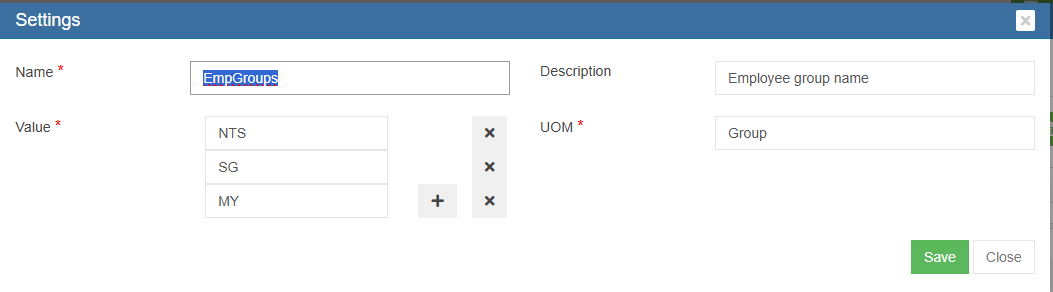](https://wiki.cuteinfocomm.com/uploads/images/gallery/2025-05/image-1746432048537.png)
Finance Groups
1. Click Admin
2. Click Company menu
3. Edit Company and click Settings tab
4. Click add to add "Financial Groups" in the name field
5. Enter Finance groups value
6. Click "+" icon to add multiple Finance groups
7. Click Save to save the data. [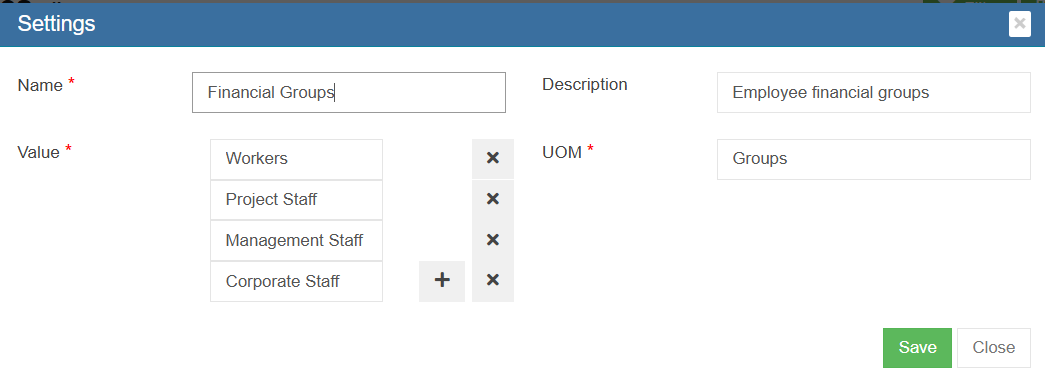](https://wiki.cuteinfocomm.com/uploads/images/gallery/2025-05/image-1746432250364.png)
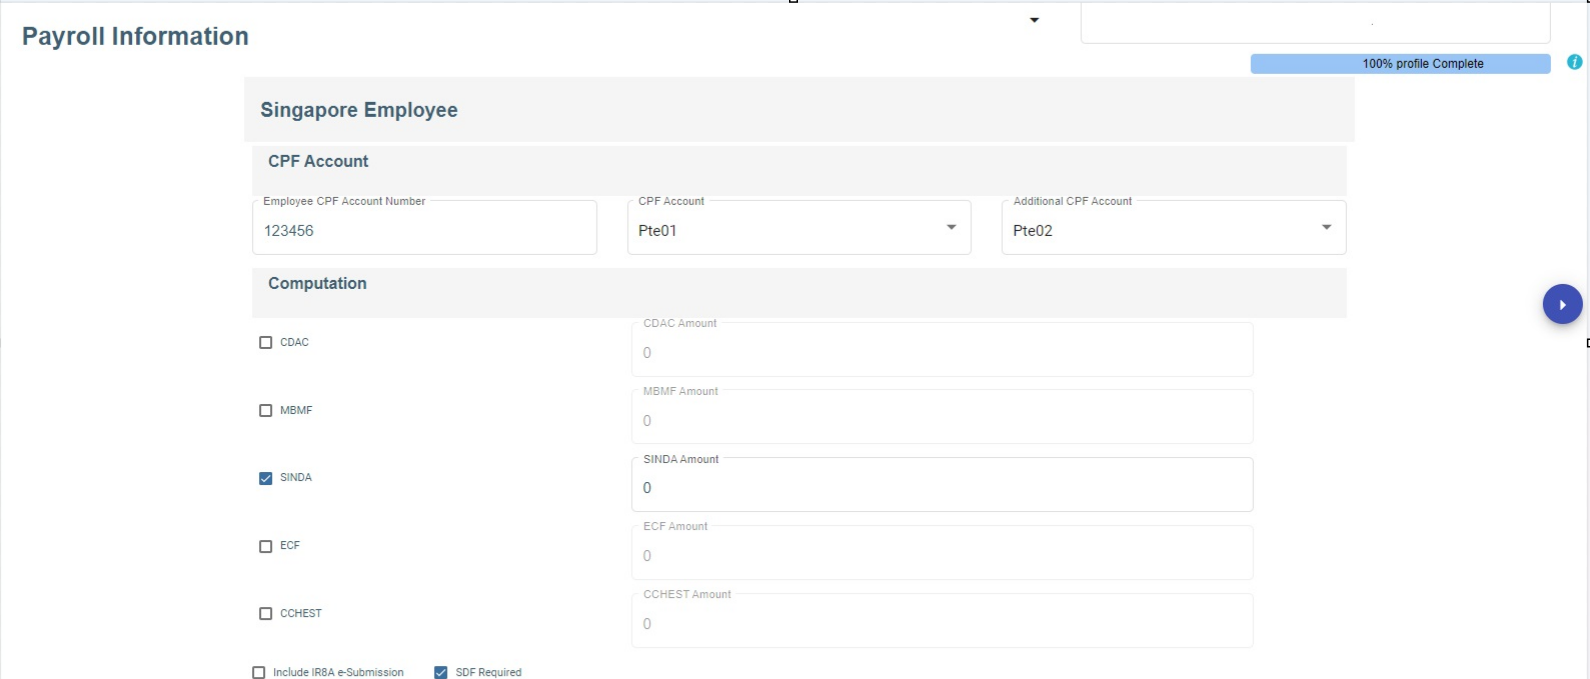
#### Add Payroll information details of an employee
In the payroll information page, you can add the Singapore Employee CPF account information, Donation such as SINDA, CDAC, etc., and Personal Particulars.
1. In the employee CPF account number, enter the account number.
2. In CPF account, select CPF account from the drop-down list.
3. In the Additional CPF account, choose the additional CPF account from the drop down list
4. In computation, choose the donation and enter the amount or it has auto deduction of the amount.
5. If required, enable IRAS e-submission and SDF,
6. In the personal particular, enter the address details.
7. Enable email payslip to send the payslip via email.
8. Click **Save.** The payroll information details are added successfully.
9. Click **Next.** The Leave details of employee page opens.
[](http://wiki.cuteinfocomm.com/uploads/images/gallery/2024-02/image-1708493624581.png)
[](http://wiki.cuteinfocomm.com/uploads/images/gallery/2024-02/image-1708493693782.png)
#### Add Leave Details of Employee
In the **Employee Leave Details** page, you can add the annual leave entitlement details of the employee.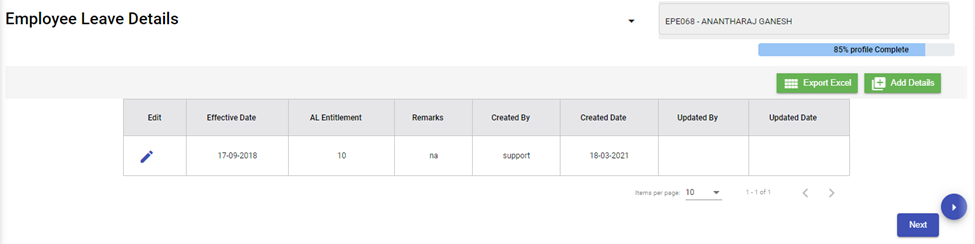
1. Click (**Add** button) in the **Employee Leave Details.** The Leave Details window opens.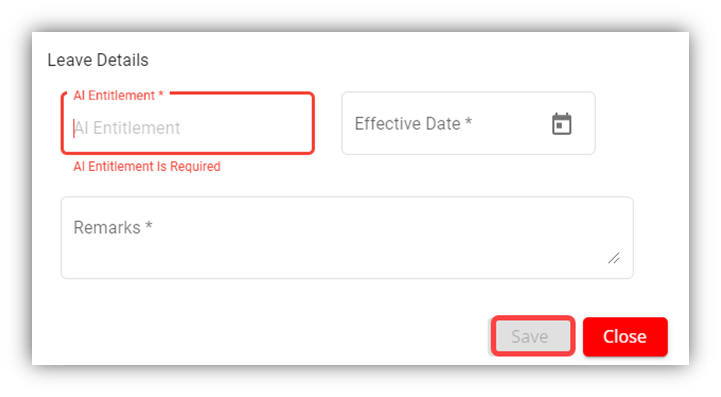
2. In the **AL Entitlement** box, enter the number of annual leave.
3. In the **Effective Date** box, select the effective date of the annual leave.
4. In the **Remarks** box, enter your remarks if any.
5. Click **Save**.
6. Click **Next**. The **Key Employment Report** page opens.
#### Add Key Employment Report for Employee
In the **Key Employment Report** page, you can add key employment details such as sick leave and paid medical examination details of the employee.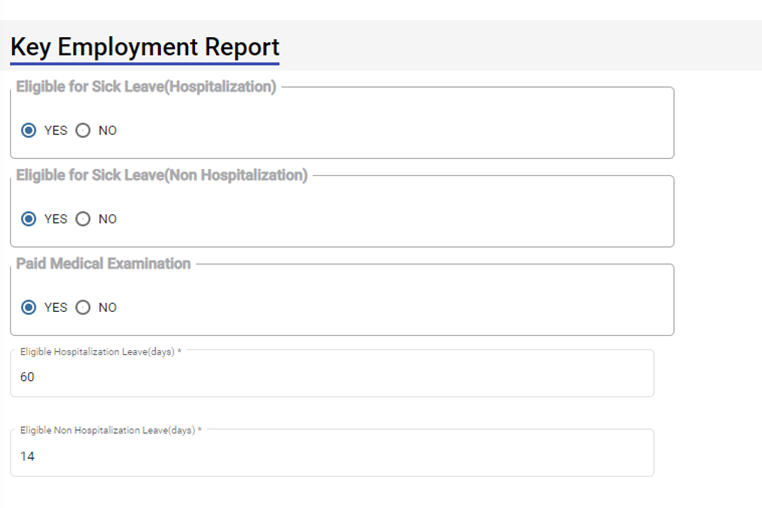
1. If the employee is eligible to take sick leave even in case of non-hospitalization, select **YES** in the **Eligible for Sick Leave (Non-Hospitalization)** option otherwise select **NO**.
2. If the employee is eligible to avail the paid medical examination, select **YES** in the **Paid Medical Examination** option otherwise select **NO**.
3. In the **Eligible Hospitalization Leave (days)** box, enter the number of eligible hospitalization leaves.
4. In the **Eligible Non-Hospitalization Leave (days)** box, enter the number of eligible non-hospitalization leaves.
5. In the **Exclude Time and Leave** box, select the option based on the employee’s leave and permission status.
6. Click **Save**.
7. Click **Next**. The **Employee Minimum Working Hours** page opens.
#### Add Minimum Working Hours of Employee
In the **Employee Minimum Working Hours** page, you can add the minimum working hours details of the employee.
[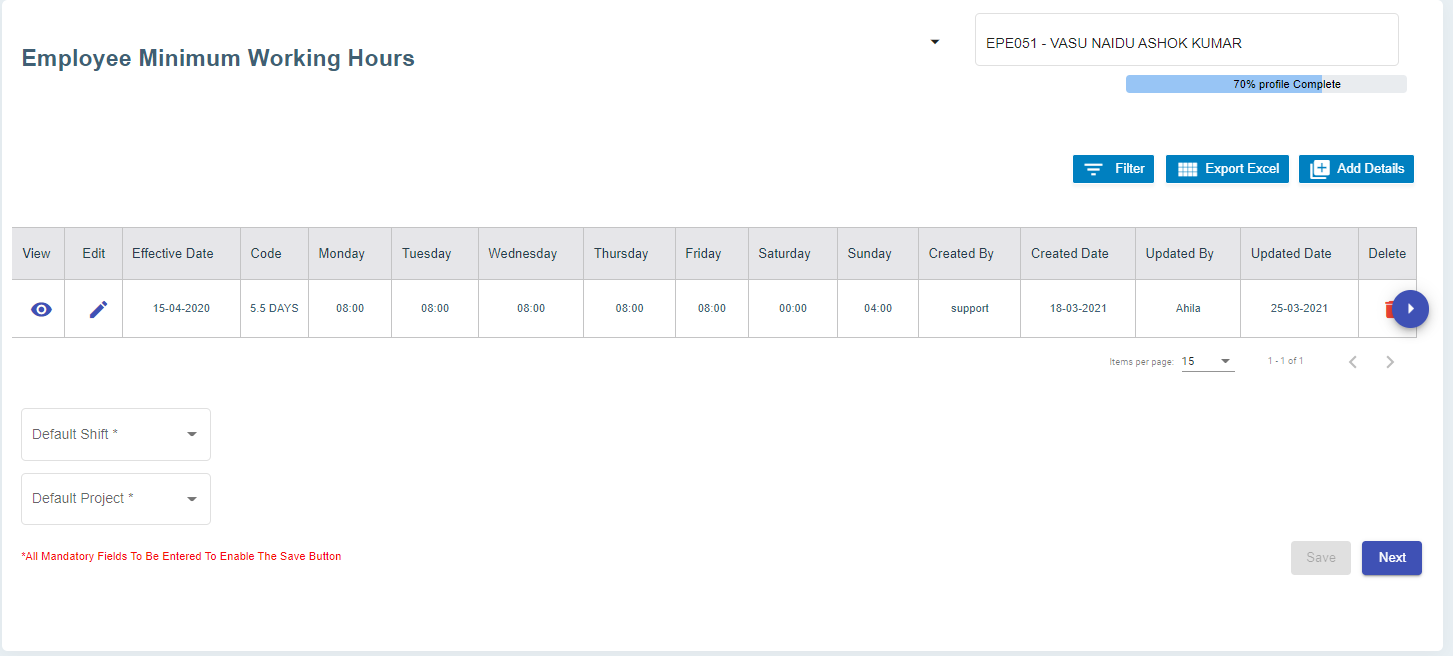](http://wiki.cuteinfocomm.com/uploads/images/gallery/2022-09/image-1662072519478.png)
1. Click (Add Details button). The **Minimum Working Hours** window opens. [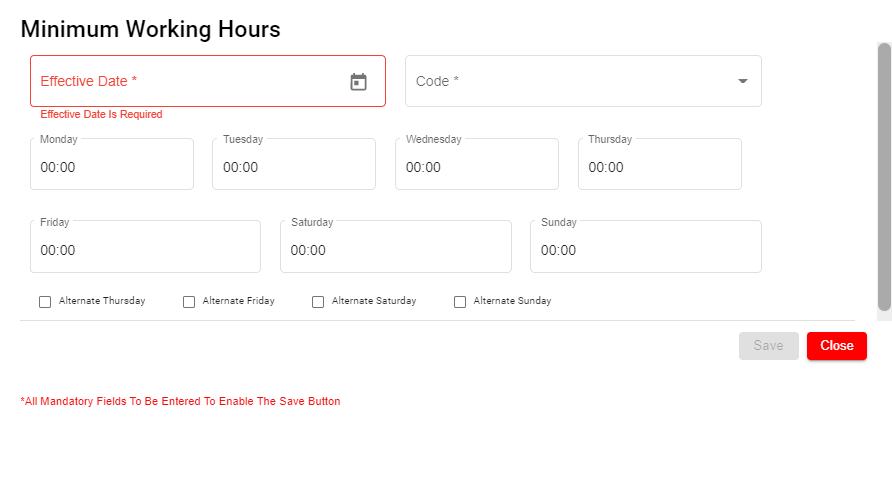](http://wiki.cuteinfocomm.com/uploads/images/gallery/2022-09/image-1662072541484.png)
2. In the **Effective Date** box, select the effective date to follow the minimum working hours by the employee.
3. In the **Code** box, select relevant working day code.
4. In the **Monday** to **Sunday** boxes, for each day, select the minimum hours to be worked by the employee.
5. If the setting **Off day** is enabled, it helps to calculate the rest day in OT1. [](http://wiki.cuteinfocomm.com/uploads/images/gallery/2024-03/image-1709278145553.png)
#### Add Contracts and Other Document of Employee
In the **Contracts and Other Document** page, you can add the contract document or other document of the employee.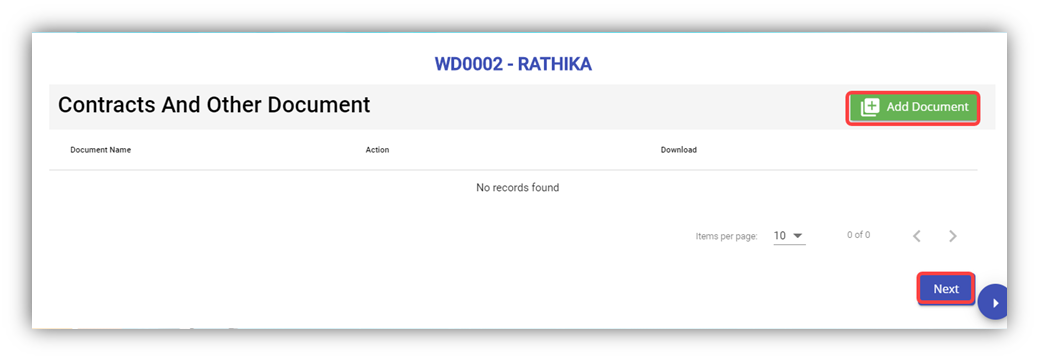
1. Click (**Add Document** button) in the **Contracts and Other Document.** The **Contracts and Other Document** window opens.
2. In the **Document Type** box, select the document type from a drop-down list.
3. In the **Document** **Name** box, enter the document name.
4. Click the **Choose File** option to select the document you want to add.
5. Click **Save.** The selected document is successfully uploaded and listed in the **Contracts and Other Document** page. **Note**: If you want to download the added document details, click[](http://wiki.cuteinfocomm.com/uploads/images/gallery/2022-05/download.png) (Download icon).
If you want to delete the added document details, click [](http://wiki.cuteinfocomm.com/uploads/images/gallery/2022-05/delete.png) (Delete icon).
6. Click **Next**. The **Courses, Certificates, and Other Documents** page opens.
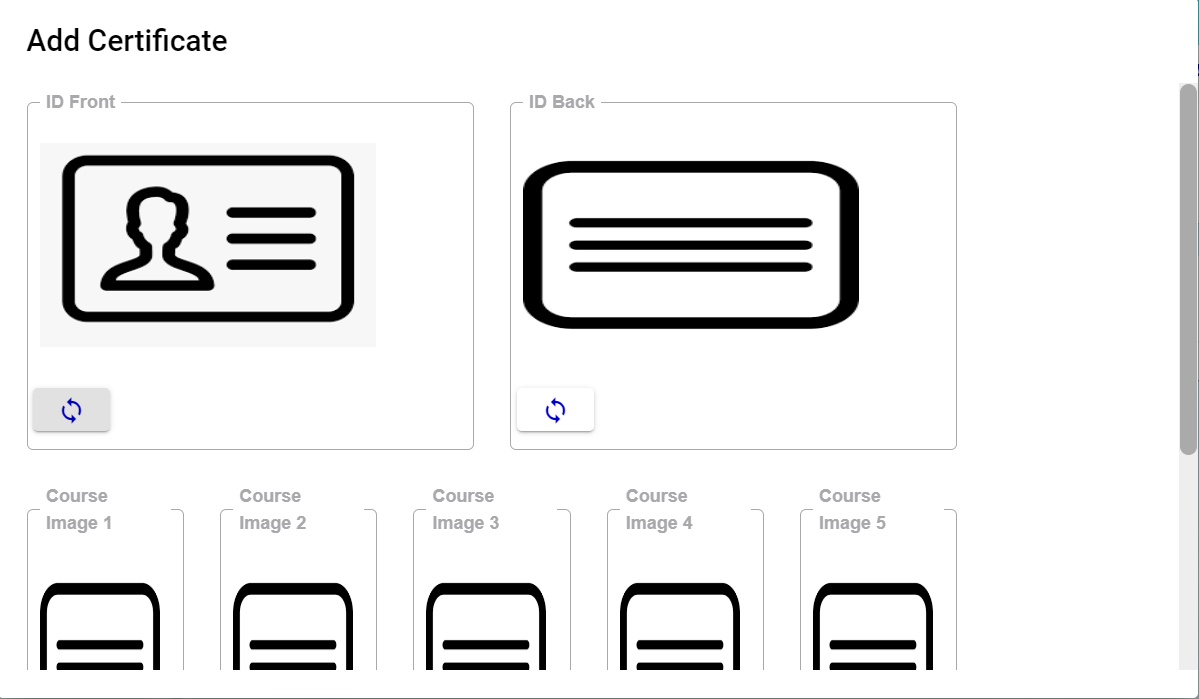
#### Add Courses, Certificates, and Other Documents of Employee
In the **Courses, Certificates, and Other Documents** page, you can add the details of courses, certificates, and other documents of the employee. The **Courses, Certificates, and Other Documents** page shows the **Courses and Certificates** and **Other Documents** options.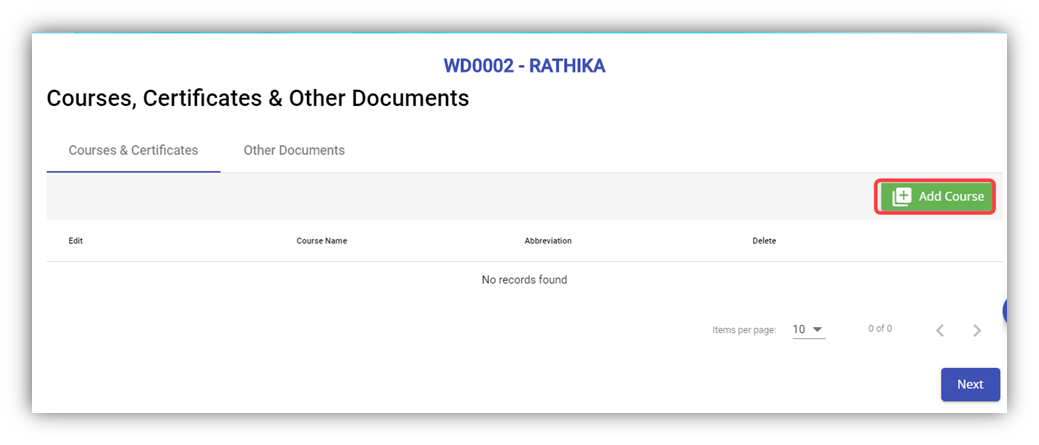
1. To add courses and certificates details of the employee, click (**Add Course** button).
2. In the **Select Course/Certificate** box, select the course/certificate from a drop-down list.
3. In the **Certificate Number** box, enter the course/certificate number.
4. In the **Expiry Date** box, select the expiry date of the added course/certificate.
5. In the **Date Attended** box, select the attended date of the course.
6. If you want to view the employee’s course certificate in the landscape format, select the checkbox of the **Landscape**
7. In the **Remarks** box, enter your remarks if any.
8. Click
9. Navigate to the **Other Documents** option to add documents other than courses and certificates, and then click (**Add Documents** button). The **Add Document** window opens.
10. In the Document Name box, enter the name of the document.
11. If you want to attach the document, click **Choose File,** and select the respective document.
12. Click Save. The selected document is successfully uploaded and listed in the **Courses, Certificates, and Other Documents** page. **Note**: If you want to download the added document details, click[](http://wiki.cuteinfocomm.com/uploads/images/gallery/2022-05/download.png) (Download icon).
If you want to delete the added document details, click [](http://wiki.cuteinfocomm.com/uploads/images/gallery/2022-05/delete.png) (Delete icon).
13. Click **Next**. The **Personal Particulars** page opens.
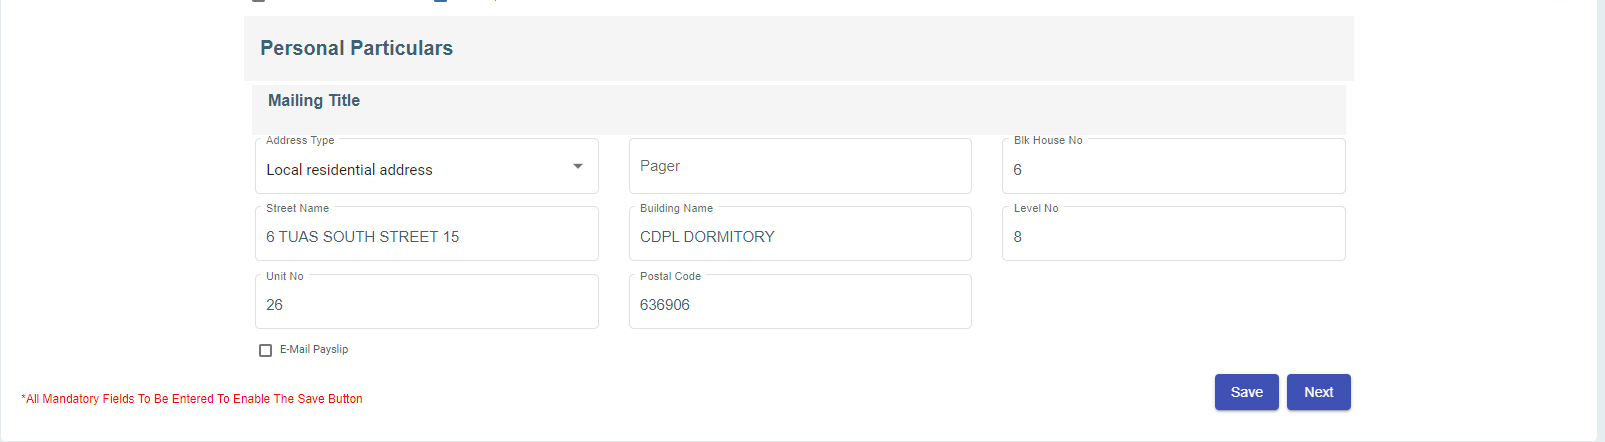
#### Add Personal Particulars of Employee
In the **Personal Particulars** page, you can add the personal details of the employee.
[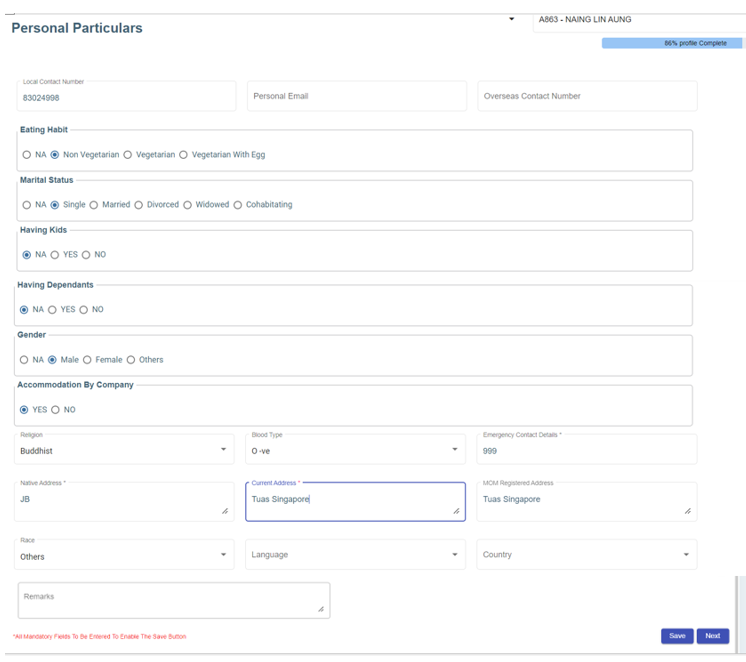](http://wiki.cuteinfocomm.com/uploads/images/gallery/2024-03/image-1709624449366.png)
1. In the **Local Contact Number** box, enter the local contact number of employee.
2. In the **Personal Email** box, enter the personal email of the employee.
3. In the **Overseas Contact Number** box, enter the overseas contact number of the employee.
4. In the **Eating Habit** box, select the eating habit of the employee.
5. In the **Marital Status** box, select the marital status of the employee.
6. In the **Having Kids** box, select **YES** if the employee is having kids otherwise select **NO**.
7. In the **Having Dependants** box, select **YES** if the employee is having any dependants otherwise select **NO**.
8. In the **Gender** box, select the gender of the employee.
9. In the **Accommodation By Company** box, select **Yes** if the company provides accommodation to the employee.
10. In the **Religion** box, select the religion of the employee from a drop-down list.
11. In the **Blood Type** box, select the blood group of the employee.
12. In the **Emergency Contact Details** box, enter the emergency contact details of the employee.
13. In the **Native Address** box, enter the native address of the employee.
14. In the **Current Address** box, enter the present address of the employee.
15. In the **MOM Registered Address** box, enter the address that is registered on MOM.
16. In the **Remarks** box, enter your remarks if any.
17. Click **Save**. The employee’s personal details are successfully added.
18. Click **Next**. If you have selected **YES** in the [**Having Kids**](#Kid) box, the **Kids Details** page opens or If you have selected **YES** in the [**Having Dependants**](#Dependent) box, the [**Dependant Details**](#_Add_Dependent_Details) page opens. Otherwise, the [**Visa Details**](#_Add_Visa_Details) page opens.
#### Add Kids Details of Employee
In the **Kids Details** page, you can add the details employee’s kids. You can add multiple kids details by repeating the following procedure.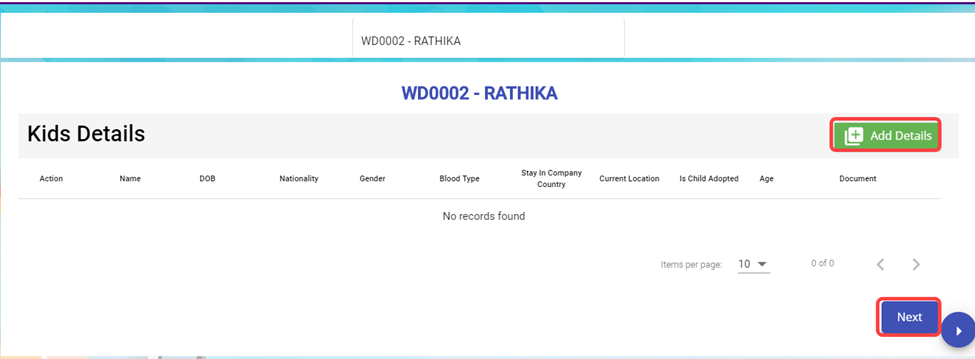
1. Click (**Add Details** button). The **Kids Details** window opens.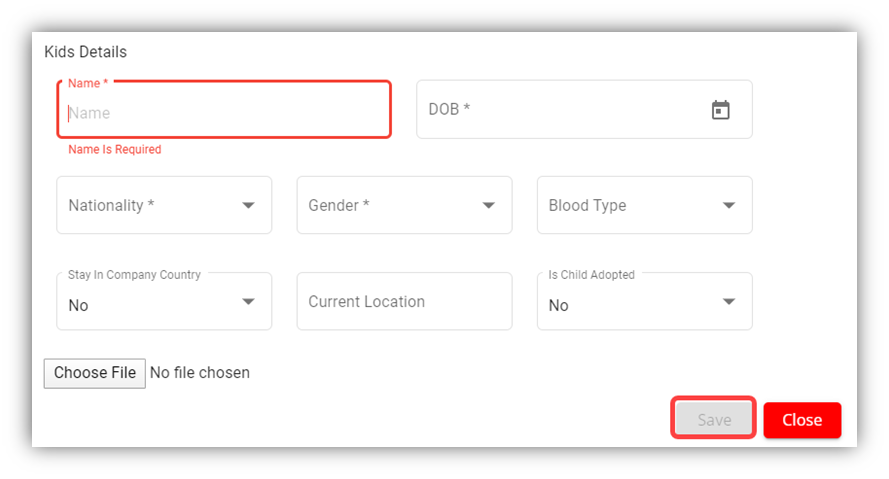
2. In the **Name** box, enter the name of a kid.
3. In the **DOB** box, select the birth date of the kid.
4. In the **Nationality** box, select the nationality of the kid.
5. In the **Gender** box, select the gender of the kid.
6. In the **Blood Type** box, select the blood group of the kid.
7. In the **Stay in Company Country** box, If the kid is residing at the country where the company located, select **Yes** otherwise select **No**.
8. In the **Current Location** box, enter the current location of the kid.
9. In the **Is Child Adopted** box, if the kid is an adopted one, select **Yes** otherwise select **No**.
10. If you want to attach any document to add extra information about the kid, click **Choose File,** and select and attach the respective document.
11. Click **Save**. The kid’s details are successfully added.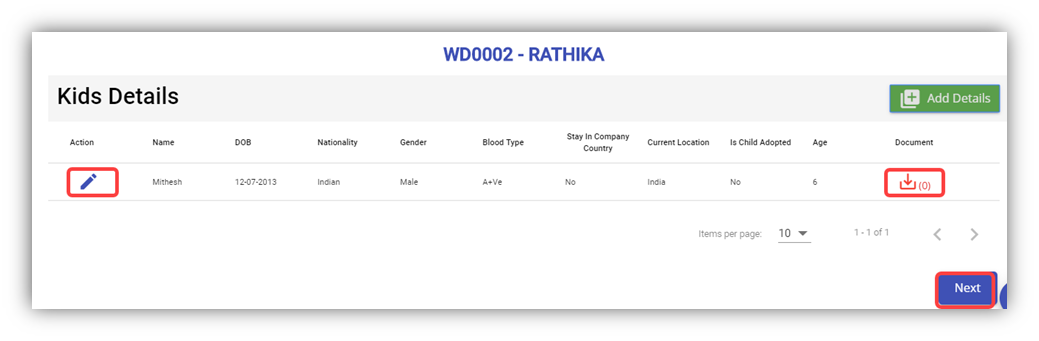**Note**: If you want to edit the added kid’s details, click  (Edit icon). If you want to download the added kid’s details, click  (Download icon).
12. Click **Next**.
#### Add Dependant Details of Employee
In the **Dependant Details** page, you can add the details of the dependants of the employee. 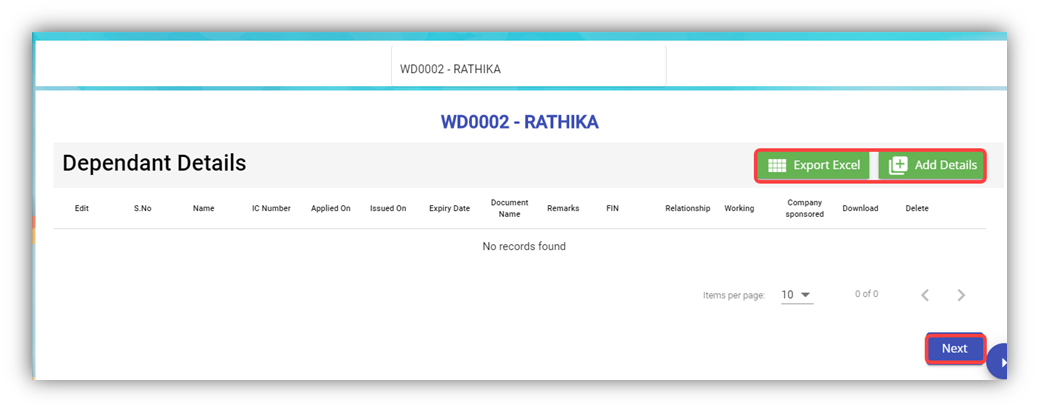
1. Click (**Add Details** button). The **Dependent Details** window opens.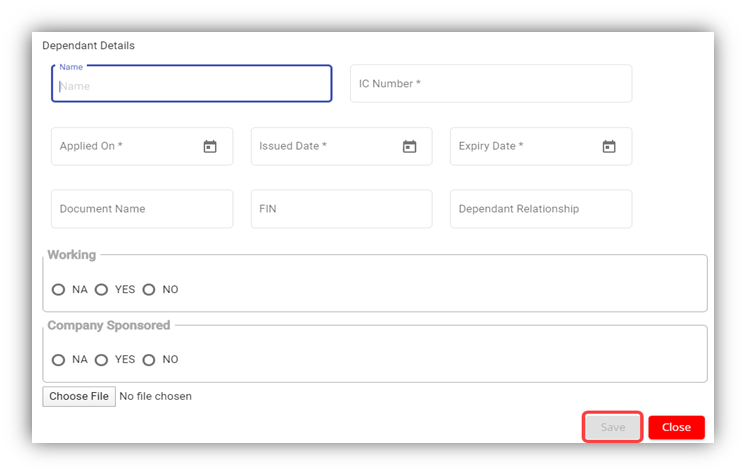
2. In the **Name** box, enter the name of the dependant.
3. In the **IC Number** box, enter the IC number of the dependant.
4. In the **Applied-On** box, select the applied date for the dependant pass.
5. In the **Issued Date** box, select the issued date of the dependant pass.
6. In the **Expiry Date** box, select the expiry date of the independent pass.
7. In the **Document Name** box, enter the name of the document.
8. In the **FIN** box, enter the FIN number.
9. In the **Dependant Relationship** box, enter the relationship of dependant with the employee.
10. In the **Working** box, if the dependant is working select **YES** otherwise select **NO**.
11. In the **Company Sponsored** box, if the dependant pass has sponsored by the company means select **YES** otherwise select **NO**. If the dependant pass is not applicable, select **NA**.
12. If you want to attach any document to add extra information about the dependant, click **Choose File,** and select the respective document.
13. Click **Save**. The dependant’s details are successfully added.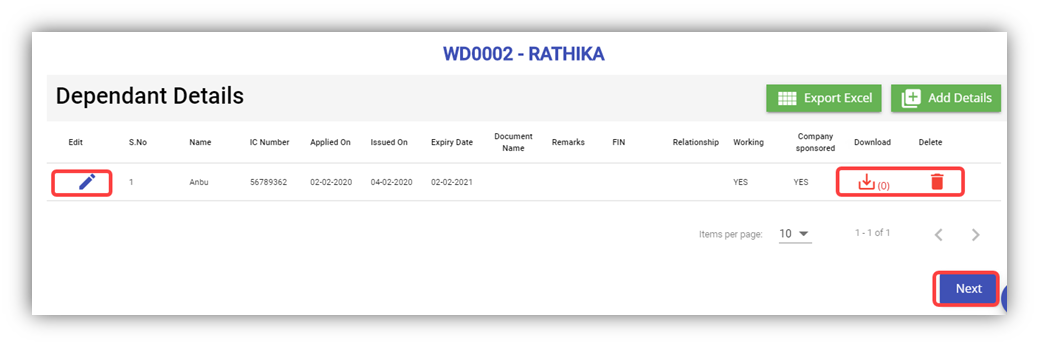**Note**: If you want to edit the added dependant’s details, click  (Edit icon). If you want to download the added dependant’s details, click (Download icon). If you want to delete the added dependant’s details, click  (Delete icon). If you want to download the added dependant’s details as an excel file, click  (Export Excel button). The dependant details are downloaded as an excel file.
14. Click **Next**. The **Visa Details** page opens.
#### Add Visa Details of Employee
In the **Visa Details** page, you can add the visa details of the employee.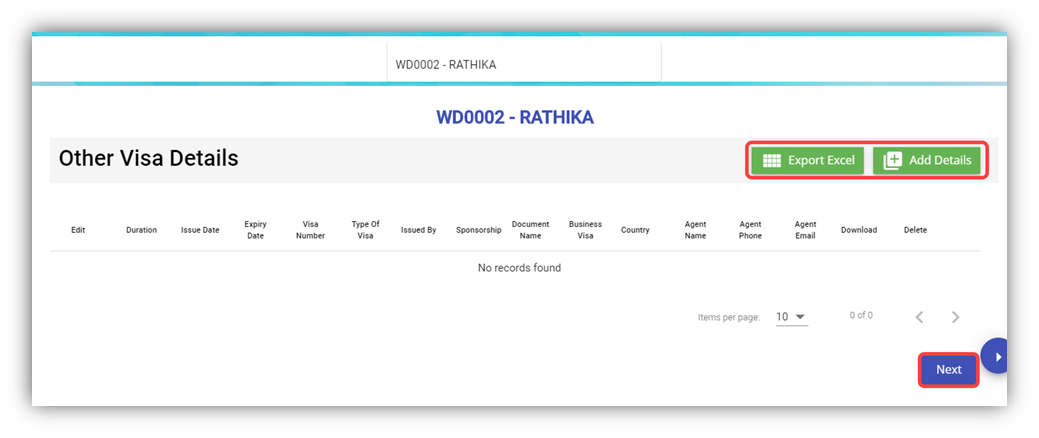
1. Click (**Add Details** button). The **Other Visa Details** window opens.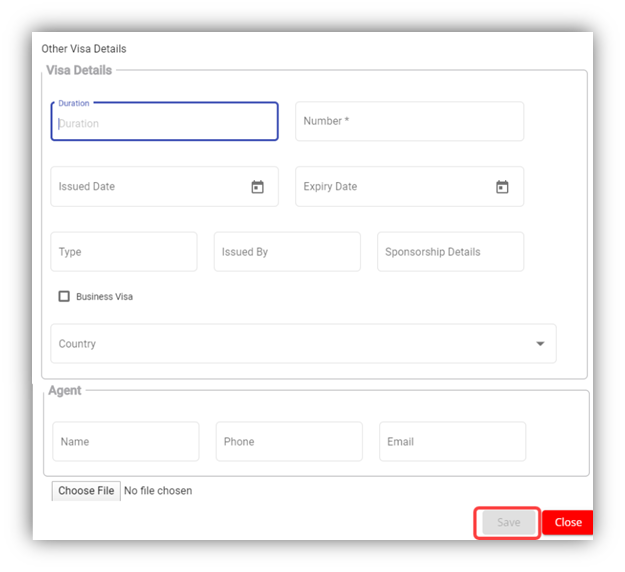
2. In the **Duration** box, enter the duration of visa.
3. In the **Number** box, enter the visa number.
4. In the **Issued Date** box, select the issued date of visa.
5. In the **Expiry Date** box, select the expiry date of visa.
6. In the **Type** box, enter the type of visa.
7. In the **Issued By** box, enter the detail of visa issued authority.
8. In the **Sponsorship Details** box, enter the detail of sponsorship.
9. If the visa is business type of visa, select the checkbox of the **Business Visa**
10. In the **Country** box, select the country from a drop-down list.
11. In the **Agent** box, enter the name, phone number, and email of the agent.
12. If you want to attach any document to add extra information about the visa, click **Choose File,** and select the respective document.
13. Click **Save**. The visa details are added successfully.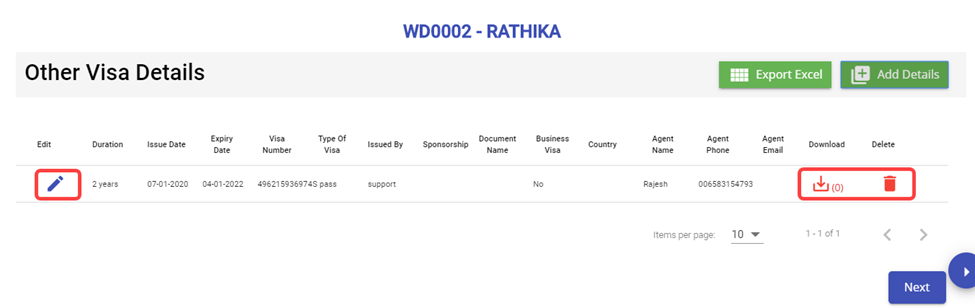
**Note**: If you want to edit the added visa details, click  (Edit icon). If you want to download the added visa details, click  (Download icon). If you want to delete the added visa details, click  (Delete icon). If you want to download the added visa details as an excel file, click  (Export Excel button). The visa details are downloaded as an excel file.
14. Click **Next**. The employee details are successfully added and listed in the **View All Employee** page.
### View Employee Data
#### View All Employees
Once you have added the employee details, the added employee data will be available in the **View All Employee** page. You can view the added employee details in the **View All Employee** page.
[](http://wiki.cuteinfocomm.com/uploads/images/gallery/2022-09/image-1662065614373.png)
**Note**: To view and edit the added employee details, click the respective employee in the list.
#### Transfer Employee
**Transfer Staff.** In employee-view all page, there is an option to transfer employee to another company.
1. Click[](http://wiki.cuteinfocomm.com/uploads/images/gallery/2022-09/image-1662065916245.png)(transfer icon), a new pop-up window opens to enter the transfer details, [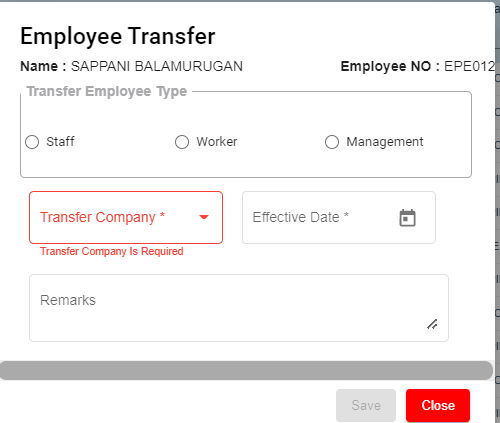](http://wiki.cuteinfocomm.com/uploads/images/gallery/2022-09/image-1662072701471.png)
- - In the **Transferred Employee Type** box, select the type of transferred employee.
- In the **Transfer Company** box, select the company where the employee is going to be transferred.
- In the **Effective Date** box, select the effective date of the transfer.
- In the **Remarks** box, enter your remarks if any.
- Click **Save**.
**Note**: When **Transferred** the employee, all the data also will be transferred from old employee ID to new employee ID.
#### Export Employees Data
The application has a feature to download the added employee details as an excel file. You can click  (**Export Excel** button). The employee details in the **View All Employee** page will be downloaded as an excel file.
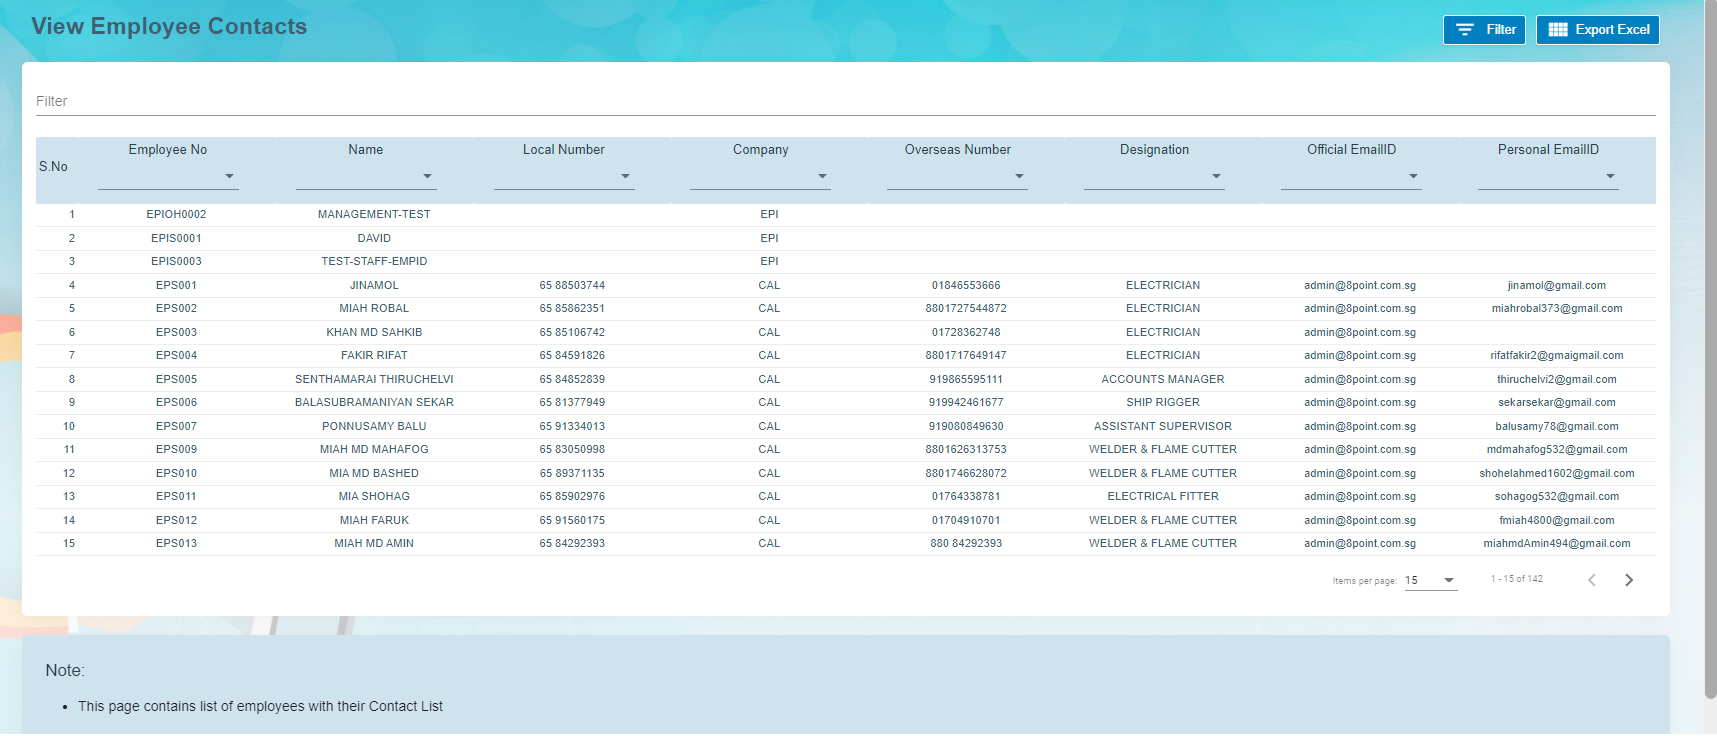
### View Employee Contacts
The **View** **Employee Contacts** tab in the **Employee** submenu helps you to view the employee contact details. To view the employee contact details, click the **View** **Employee Contacts** tab in the **Employee.** The **View** **Employee Contacts** page shows the contact details of the added employees.
[](http://wiki.cuteinfocomm.com/uploads/images/gallery/2022-09/image-1662092941716.png)
- **Export Employee Contacts**
The application has a feature to download the employee contacts details as an excel file. You can click  (Export Excel button). The contact details in the View Employee Contacts page will be downloaded as an excel file.
- **Filter Employee Contact**
If you want to view the contact details of any specific employee, click  (Filter button) provided in the upper side of the View Employee Contacts page.
The Filter option will be enabled in the View Employee Contacts page to filter the specific contact detail.
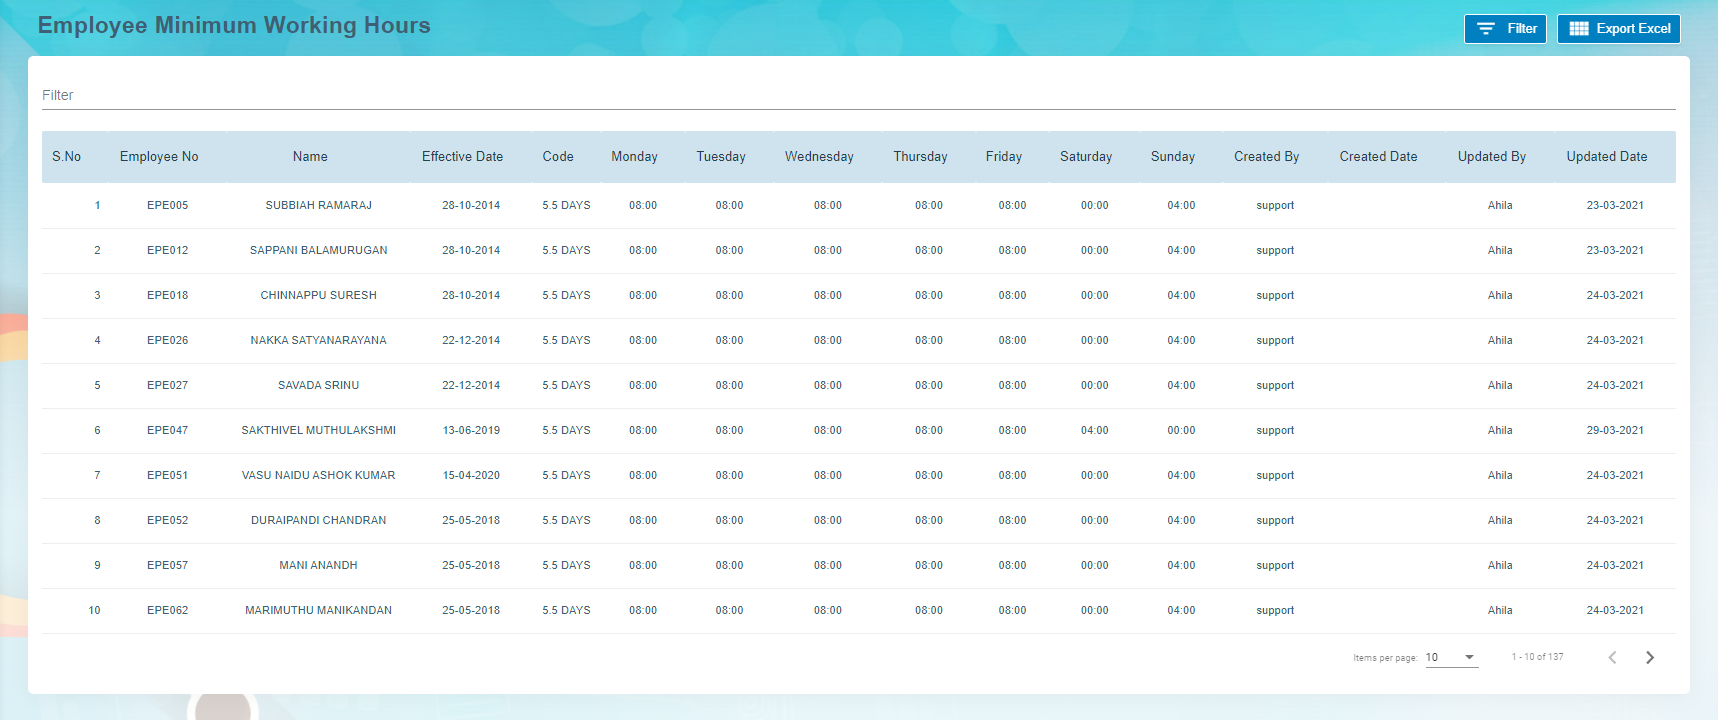
### View Employee Minimum Working Hours
The **Employee Working Hours** tab in the **Employee** submenu helps you to view the employee’s minimum working hours. To view the employee’s minimum working hours, click the **Employee Working Hours** tab in the **Employee.** The **Employee Minimum Working Hours** page shows the minimum working hours details of the added employees.
[](http://wiki.cuteinfocomm.com/uploads/images/gallery/2022-09/image-1662092919543.png)
- **Export Employee Minimum Working Hour Details**The application has a feature to download the employee’s minimum working hour details as an excel file. You can click (**Export Excel** button) to download the minimum working hour details. The minimum working hour details in the **Employee Minimum Working Hours** page will be downloaded as an excel file.
- **Filter Minimum Working Hour Details of Any Employee**If you want to view the minimum working hour details of any specific employee among multiple employees listed in the **Employee** **Minimum Working Hours** page, click[(Filter button) provided in the upper side of the Employee Minimum Working Hours page. The Filter option will be enabled in the Employee Minimum Working Hours page to filter the specific minimum working hour detail.](http://wiki.cuteinfocomm.com/uploads/images/gallery/2022-05/image-1652207986748.png)
### Pay Revision
In Pay Revision, authorized user can revise employee's pay in this section. Click **Pay Revision** in the **Reports** menu, employees' pay revisions records with status will show in list as below,[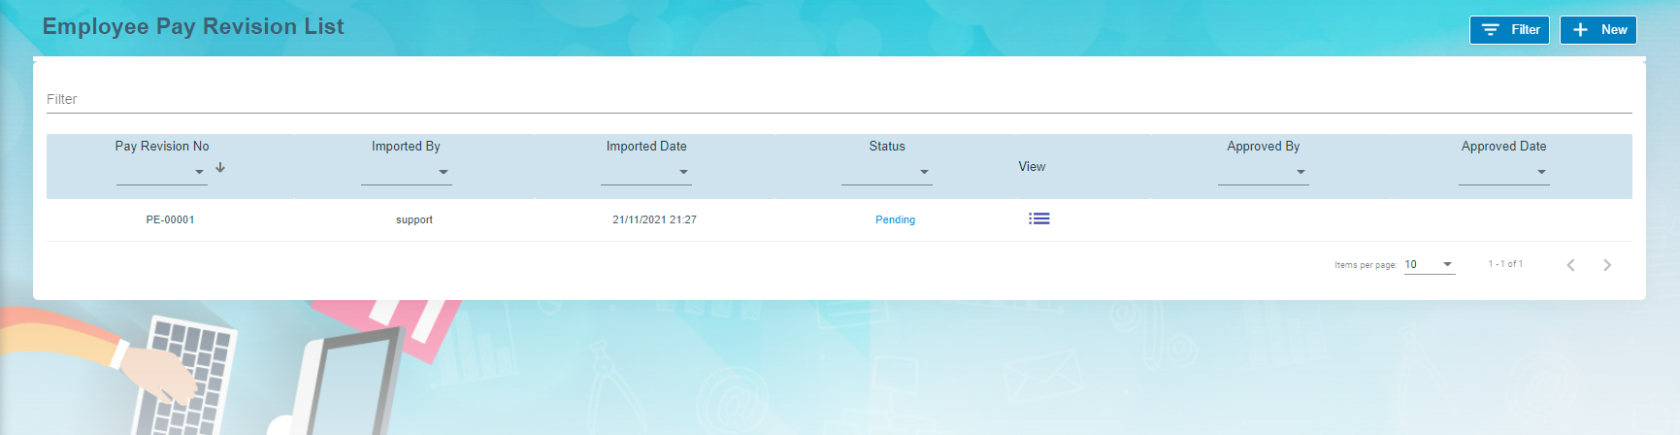](http://wiki.cuteinfocomm.com/uploads/images/gallery/2022-09/image-1662073192791.png)
To add a new pay revision,
1. Click[](http://wiki.cuteinfocomm.com/uploads/images/gallery/2022-09/image-1662073580758.png) add new button in the up right corner of the employee pay revision list page,
2. Click **Filter** and select employees that need to revise pay,[](http://wiki.cuteinfocomm.com/uploads/images/gallery/2022-09/image-1662073606376.png)
3. Then click **Download the template** for the above selected employee we are going to do pay revision. The pay revision excel template will be downloaded.
4. Fill up all the column in downloaded excel and Save the file. **Note: user must enter new effective date**.
5. Then click **Import** button to import above excel file. Pay revision is uploaded against the employee.
6. Click Back [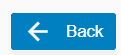](http://wiki.cuteinfocomm.com/uploads/images/gallery/2022-09/image-1664268372878.png)button in View all Employee.
7. In Employee Pay Revision List window , click View icon[ ](http://wiki.cuteinfocomm.com/uploads/images/gallery/2022-09/image-1664269246085.png) to view the changes against the employee. [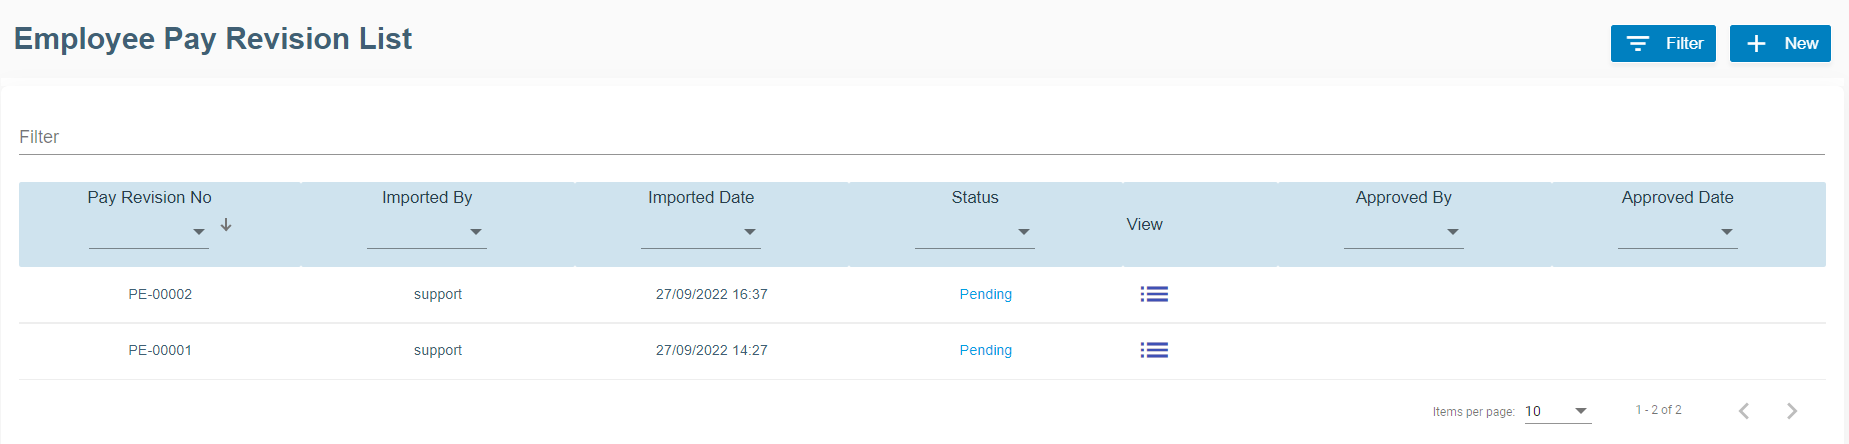](http://wiki.cuteinfocomm.com/uploads/images/gallery/2022-09/image-1664269507284.png)
8. New window open with Pay Revision No. [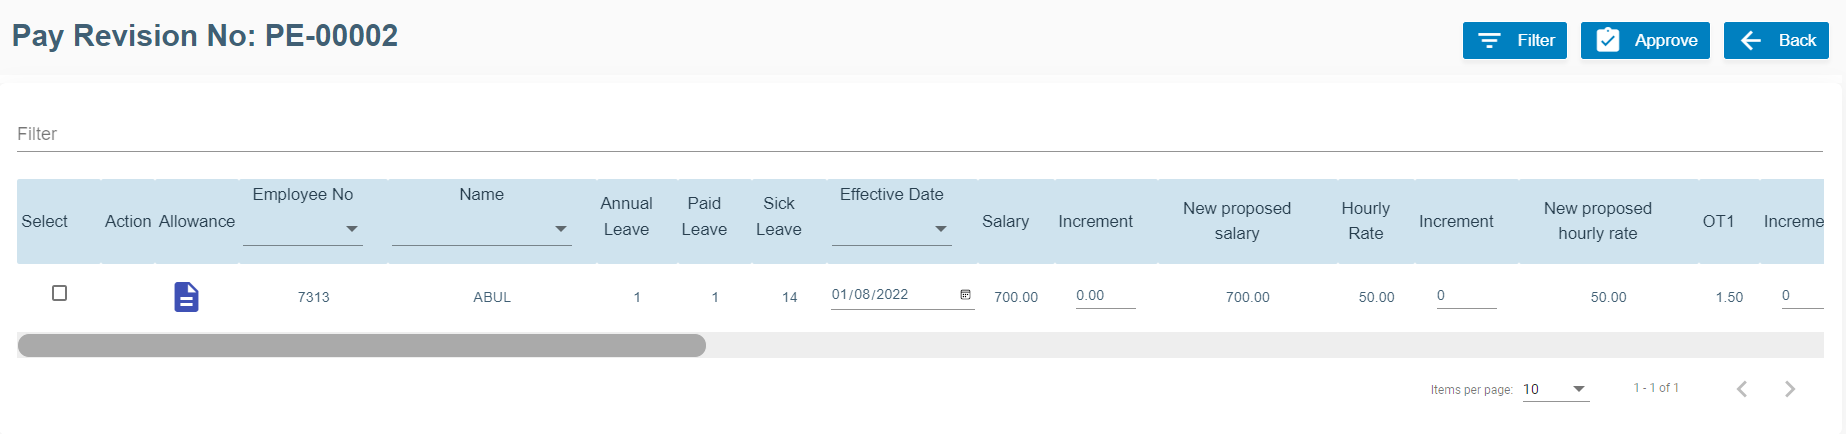](http://wiki.cuteinfocomm.com/uploads/images/gallery/2022-09/image-1664268931845.png)
[](http://wiki.cuteinfocomm.com/uploads/images/gallery/2022-09/image-1664270072295.png)
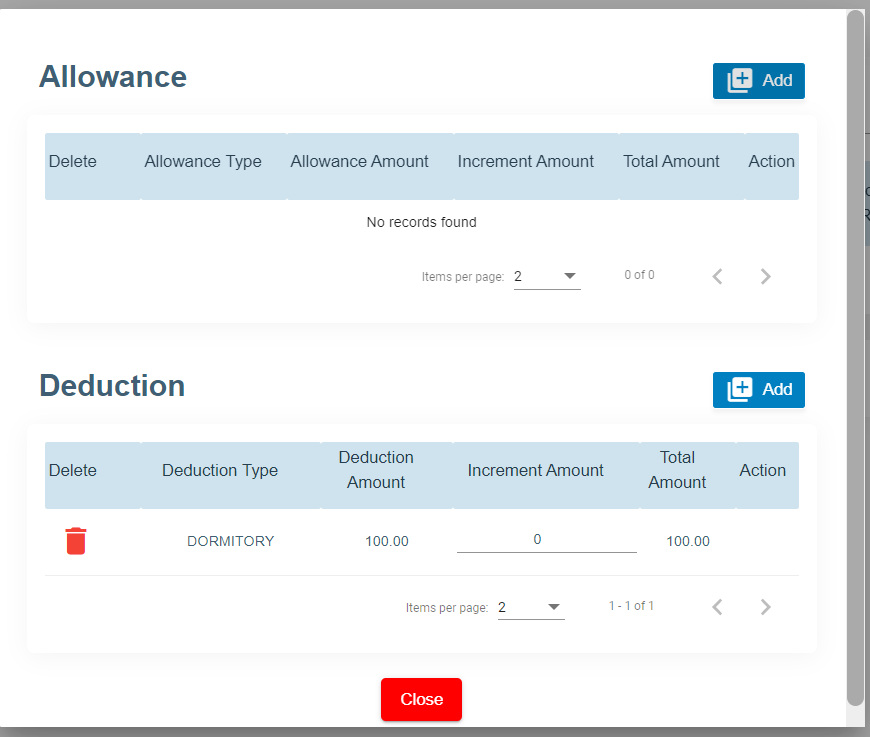
9. Click Action Allowance [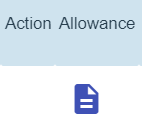 ](http://wiki.cuteinfocomm.com/uploads/images/gallery/2022-09/image-1664270149565.png)to add new allowance and deduction items and amounts.
[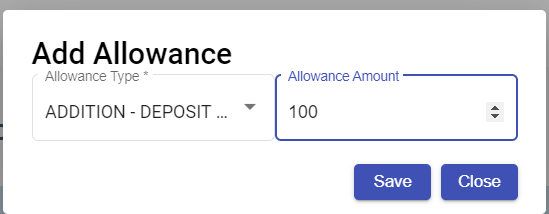](http://wiki.cuteinfocomm.com/uploads/images/gallery/2022-09/image-1664270369274.png)
10. Click Save for each items added for allowance and deduction.
11. Delete option[](http://wiki.cuteinfocomm.com/uploads/images/gallery/2022-09/image-1664270991221.png)available to delete the previously added allowance and deduction.
12. Click Close button at the end.
13. Now click **Approve[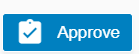](http://wiki.cuteinfocomm.com/uploads/images/gallery/2022-09/image-1664271138712.png)** button at the top right corner to approve it.
14. The confirmation window will open as below when user clicks **Approve**, click **Yes** to confirm approval of pay revision. [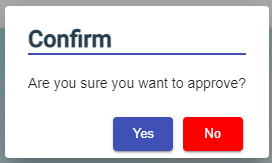](http://wiki.cuteinfocomm.com/uploads/images/gallery/2022-09/image-1663094058782.png)
15. Eventually, the pay revision will be effective from the new date mentioned.
### Employee Evaluation
Employee evaluation page manages evaluation for all employees. Click Evaluation tab in Employee menu, the employee evaluation list page shows as below
#### Add A New Evaluation
To add a new evaluation,
1. Click [](http://wiki.cuteinfocomm.com/uploads/images/gallery/2022-10/image-1664824676986.png)Add button. Add New Employee Evaluation window opens, [](http://wiki.cuteinfocomm.com/uploads/images/gallery/2022-09/image-1663580391250.png)
2. Select Employee No from the drop down list, select the Period of Evaluation from the drop down list. The period of evaluation corresponds to the employee's trade.
3. Click Save. The add evaluation page will be redirect to evaluation list page. A new evaluation request will be created for selected employee.
4. Click the key of the new evaluation request, the evaluation detail page will open, [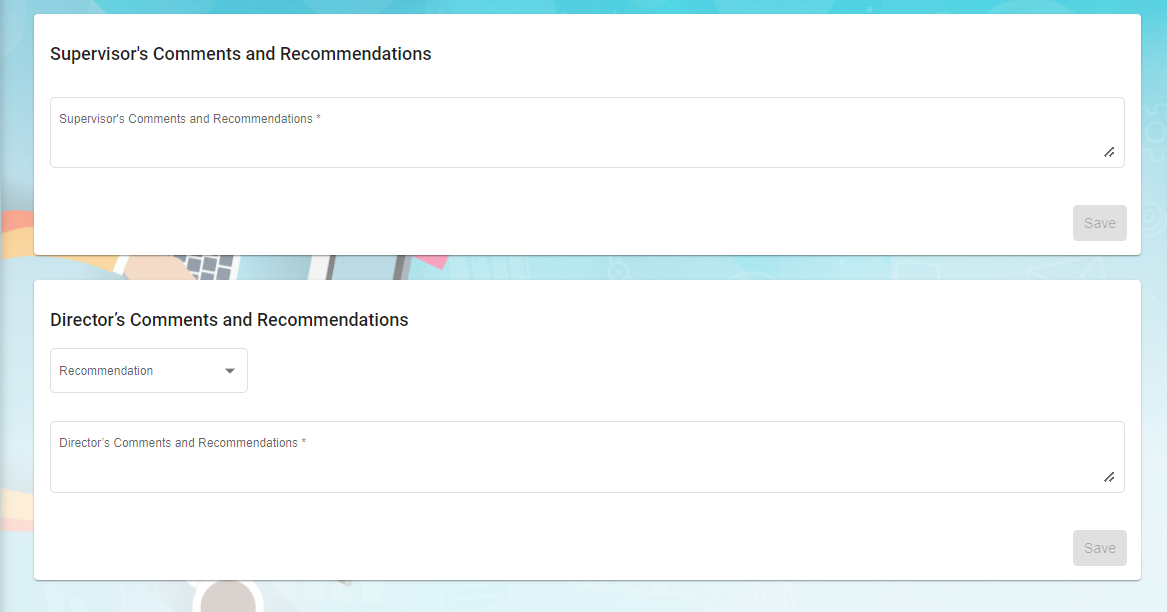](http://wiki.cuteinfocomm.com/uploads/images/gallery/2022-10/image-1664832391707.png)
- In evaluation form, employee and manager can enter the rating details
- In supervisor's comments and recommendations, enter comment if any
- In director's comments and recommendations, enter comment if any
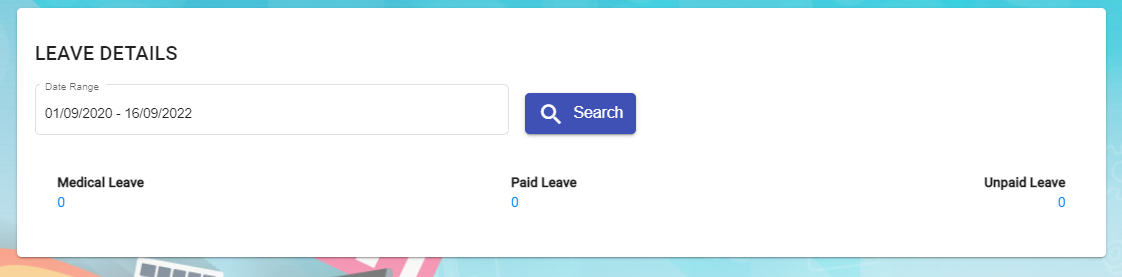
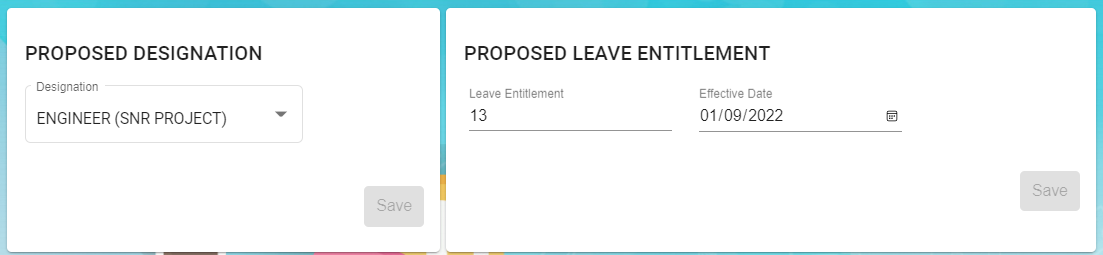
5\. Users can also update below employee's details based on evaluation: Leave details, Proposed Designation, Proposed Leave Entitlement, Latest Salary Details and Learning & Development. Note: these are optional to update.
[](http://wiki.cuteinfocomm.com/uploads/images/gallery/2022-09/image-1663322070039.png)
[](http://wiki.cuteinfocomm.com/uploads/images/gallery/2022-09/image-1663322103137.png)
[](http://wiki.cuteinfocomm.com/uploads/images/gallery/2022-09/image-1663322142772.png)
[](http://wiki.cuteinfocomm.com/uploads/images/gallery/2022-09/image-1663322177585.png)
#### Add Evaluations in Bulk
To add evaluations in bulk,
1. Click[](http://wiki.cuteinfocomm.com/uploads/images/gallery/2022-10/image-1664833503135.png)add in bulk button, below window opens,
2. Select employees by ticking the box in front of the employee names. Note: please check the color code in the top right corner of the page for those employees that are not in selection list.
3. Click Save. The add evaluation page will be redirect to evaluation list page. New evaluation requests will be created for selected employees.
4. Click the key of each new evaluation request added, and fill up the the evaluation details in the evaluation request detail page. (Note: follow the same steps of adding details in single evaluation request)
##### Evaluation Request Approval -pending for update
### Learning and Development
Learning and development manage employees' learning and development plans. Click Learning & Development tab in Employee menu, below page opens,
#### Add New Course Plan
To add a new course plan,
1. Click [](http://wiki.cuteinfocomm.com/uploads/images/gallery/2022-09/image-1664352774264.png) Add Course Plan icon in Learning and Development request list page, a new window opens, [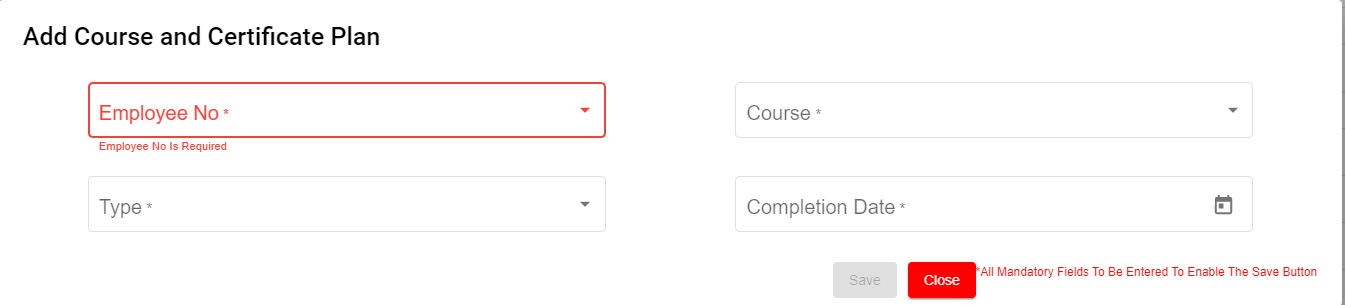](http://wiki.cuteinfocomm.com/uploads/images/gallery/2022-09/image-1664352638622.png)
2. Fill up details in add course and certificate plan page:
- In Employee No. box, select Employee No from the drop down list.
- In Course box, Choose one course or multiple courses from course list.
- In Type box, select Mandatory or Non-Mandatory based on the course requirement.
- In Completion Date box, select expected completion date of the course in the calendar selection.
3. Click Save. A new learning and development request is created, and the page will be directed to learning and development list page,
4. Click the request Key to view employee course details.
5. Click edit button in the Course Details section as shown in above screenshot. A Course detail page open as below, [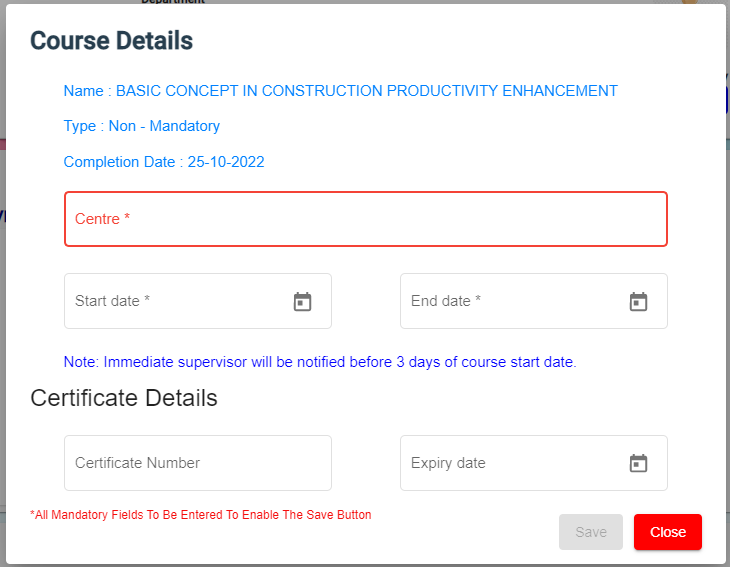](http://wiki.cuteinfocomm.com/uploads/images/gallery/2022-10/image-1664841046897.png)
6. Enter course conduction centre name, start date and end date of course. And click Save. Once request is approved, Immediate Supervisor will be notified before 3 days of course start date.
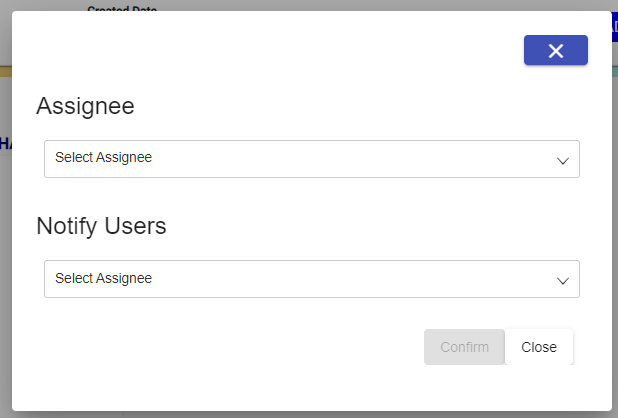
7. Click [](http://wiki.cuteinfocomm.com/uploads/images/gallery/2022-09/image-1664357163504.png) Submit button at the top right corner. The notification confirm window opens to enter Assignee and Notify users.
[](http://wiki.cuteinfocomm.com/uploads/images/gallery/2022-10/image-1664841314457.png)
8. Click Confirm[](http://wiki.cuteinfocomm.com/uploads/images/gallery/2022-09/image-1664357955969.png) to confirm submission of learning and development request.
9. After course got completed by the employee, Supervisor/Worker will enter certificate number and expiry date.
10.
11. To be updated
12\. After course got completed by the employee, Supervisor/Worker will enter certificate number and expiry date.
9\.
12\.
13\. Click Save and Close
14\. Click attachment to attach the course certificate
[](http://wiki.cuteinfocomm.com/uploads/images/gallery/2022-09/image-1664366544017.png)
14\. Click Close
15\. If applicable enter Training Bond Details of the employee in the Bond Details. Bond details have a link to Offboard checklist. For instance, If the employee resigned before the Training bond, Offboard will throw alert message for refusal of the resignation.
16\. Click Sent for HR on the top right corner of the page
[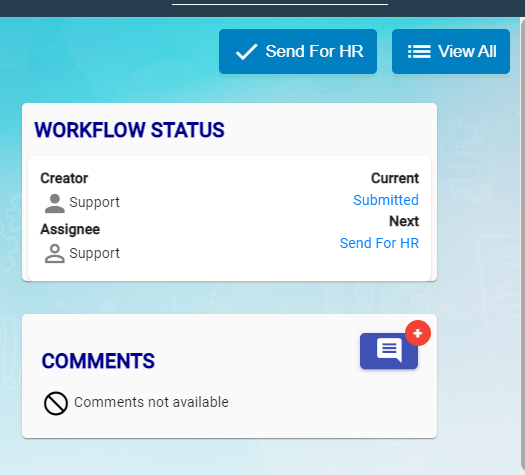](http://wiki.cuteinfocomm.com/uploads/images/gallery/2022-09/image-1664367537696.png)
17\. Next Window opens to enter Assignee and Notify user
[](http://wiki.cuteinfocomm.com/uploads/images/gallery/2022-09/image-1664367639710.png)
18.Click Confirm button
19\. HR will check and he will either Approve or Return
20.Click approve icon to approve.
[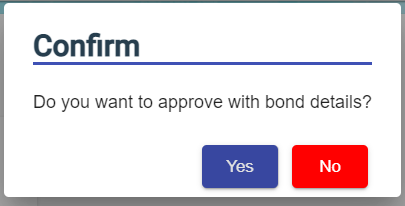](http://wiki.cuteinfocomm.com/uploads/images/gallery/2022-09/image-1664367945687.png)
21\. Confirmation Box open to approve with bond details or not.
22\. Click Yes or No
[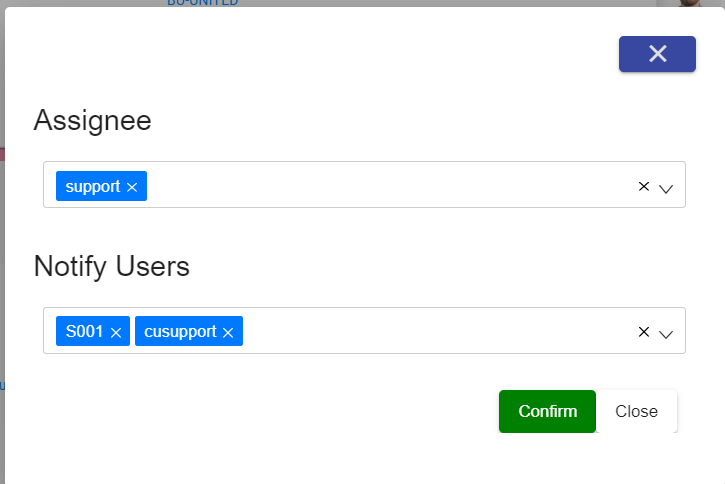](http://wiki.cuteinfocomm.com/uploads/images/gallery/2022-09/image-1664368064372.png)
23\. Enter Assignee and Notify User and Confirm.
24\. LAD status Approved against the employee.
### Onboard/Offboard
The Onboard / Offboard Checklist module is used to manage employee onboarding and offboarding activities through a structured checklist process. It ensures that all required tasks are completed, tracked, and documented for every employee joining or leaving the organization.
##### Onboard/Offboard Checklist
All the employees are listed to perform either onboarding or offboarding checklist process.
[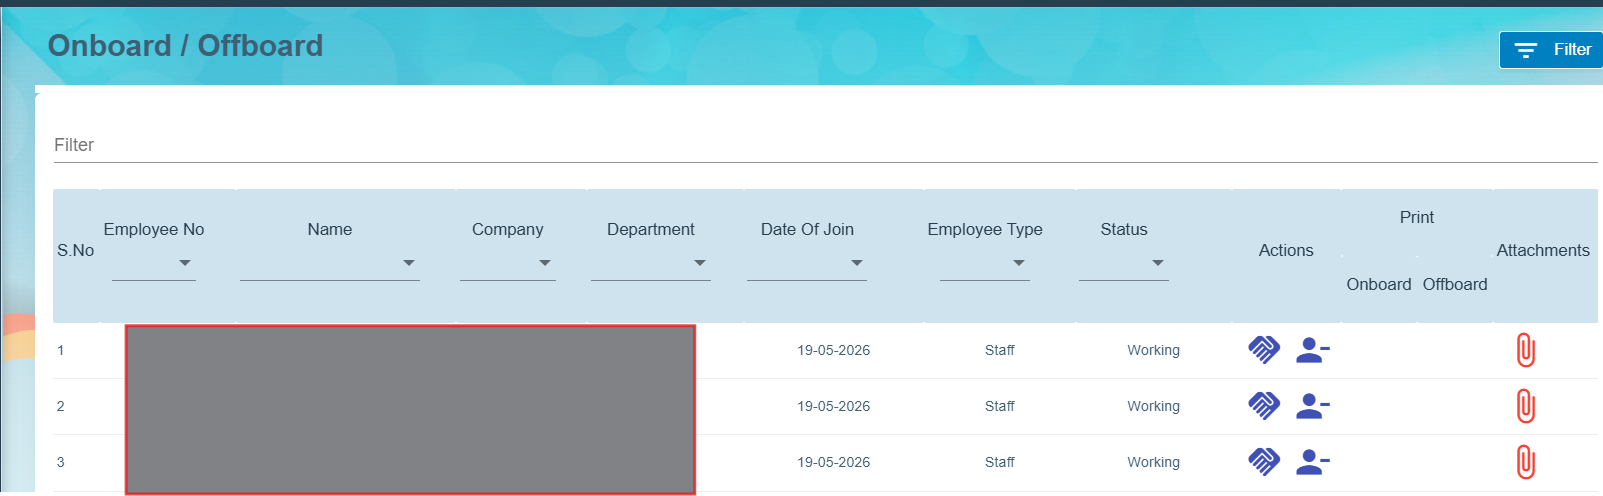](https://wiki.cuteinfocomm.com/uploads/images/gallery/2026-05/image-1778827926095.png)
1. Action column contains two icons to perform Onboard [](https://wiki.cuteinfocomm.com/uploads/images/gallery/2026-05/image-1778828135612.png)or Offboard [](https://wiki.cuteinfocomm.com/uploads/images/gallery/2026-05/image-1778828336198.png)
2. Click Onboard and perform the Pre-Onboarding checklist
3. Click Save to store checklist updates
4. Print Column contains Print icon [](https://wiki.cuteinfocomm.com/uploads/images/gallery/2026-05/image-1778829530156.png)to take print out
5. Click Offboard and perform offboard checklist.
6. Click Save to store checklist updates
7. Based on checklist completion, the color code of the Onboard/Offboard displayed. [](https://wiki.cuteinfocomm.com/uploads/images/gallery/2026-05/image-1778833690638.png)
#### Settings
##### HRM Alert mail - Disable menus settings
##### Revoke birthday menu
- Go to global settings and choose **disableBirthdayInHRMAlertEmail**
- Set the value to true to hide the birthday portion in **HRM\_Alert\_Mail**
##### Revoke course menu
- Go to global settings and choose **courseEmailAlertResponsibleBy**
- Set the value to true to hide the course portion in **HRM\_Alert\_Mail**
# HRM Reports
## Reports
The **Reports** submenu in the **HUMAN RESOURCES** page helps you to view the added details of employee as a report.
The **Reports** submenu contains the following tabs,
[](http://wiki.cuteinfocomm.com/uploads/images/gallery/2022-09/image-1662091255945.png)
### View Employee Count
The **Employee Count** tab in the **Reports** submenu helps you to view the employee count based on the employee’s mode of working and status of working.
1. Click the **Employee Count** tab in the **Reports.** The **Employee Count** page opens. [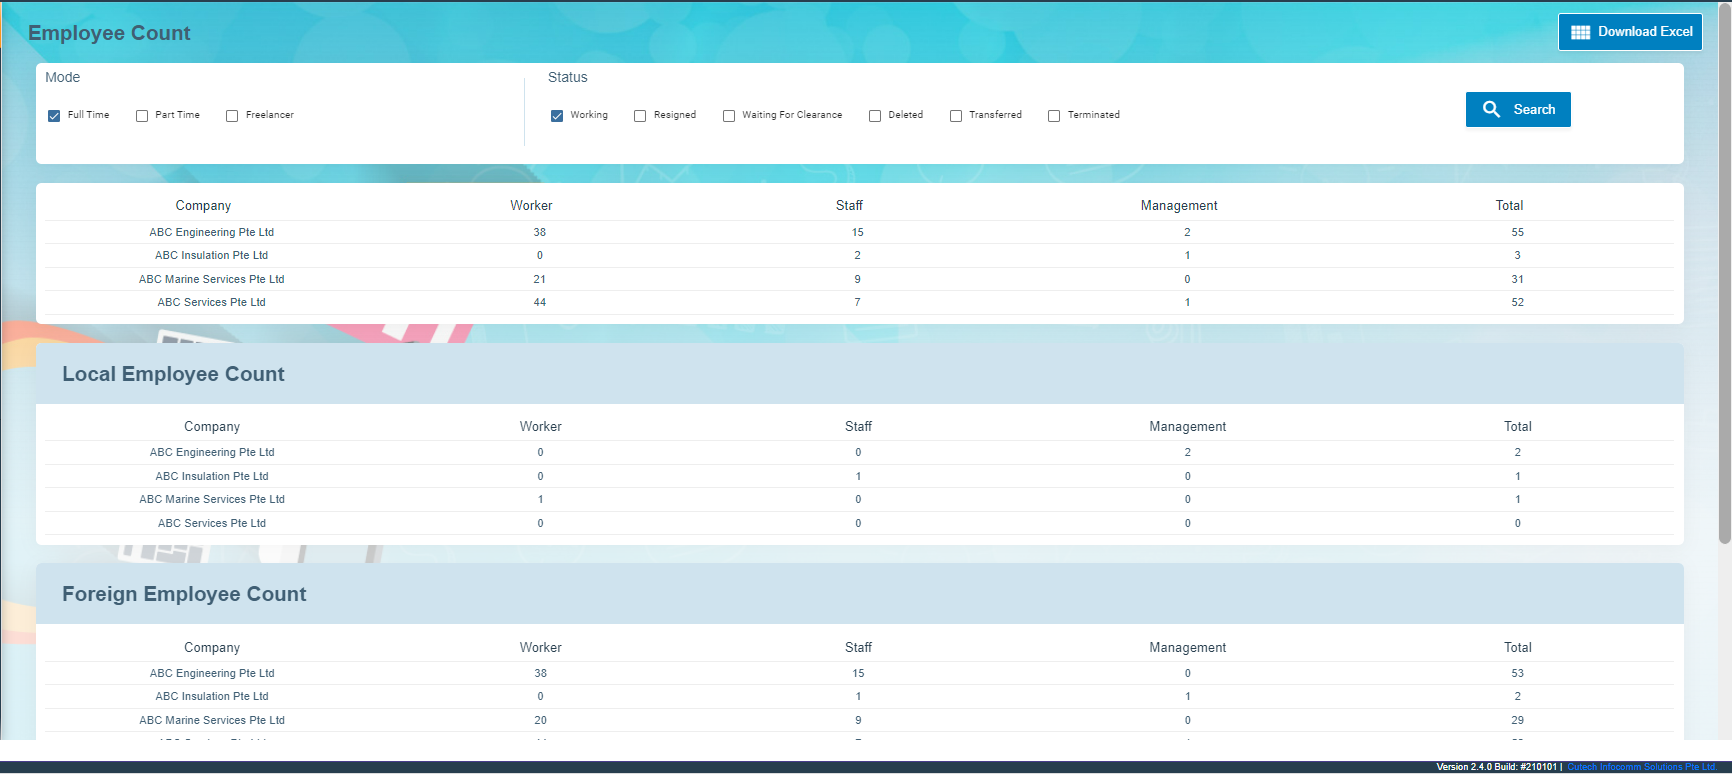](http://wiki.cuteinfocomm.com/uploads/images/gallery/2022-09/image-1662093000429.png)
2. In the **Mode** box, select the working mode of the employee whether **Full Time**, **Part-Time** or **Freelancer**.
3. In the **Status** box, select the working status of the employee whether **Working**, **Resigned**, or others from the given options.
**Note**: You can select more than one working mode and working status to view the combined employee count.
4. Click **Search**. The **Employee Count** page shows the employee count based on the selected working mode and status. [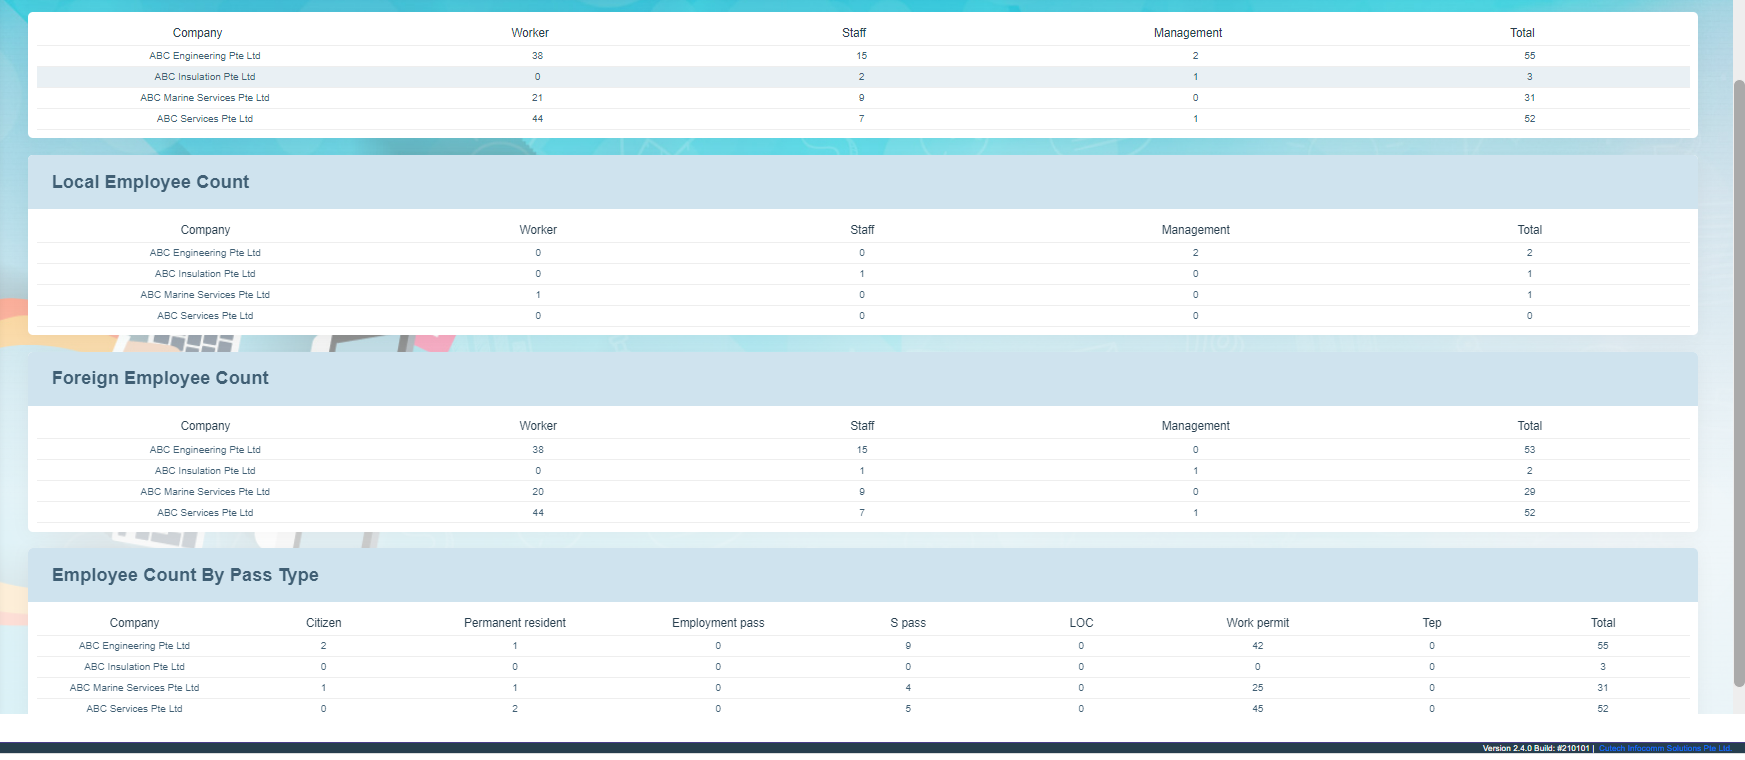](http://wiki.cuteinfocomm.com/uploads/images/gallery/2022-09/image-1662093052146.png)
### Print Image Documents
The **Print Image Documents** tab in the **Reports** submenu helps you to generate and view the employee’s photo, ID document, passport document, course ID, and certificates. To print the image documents,
1. Click the **Print Image Documents** tab in the **Reports.** The **Employee Document Download** page opens. [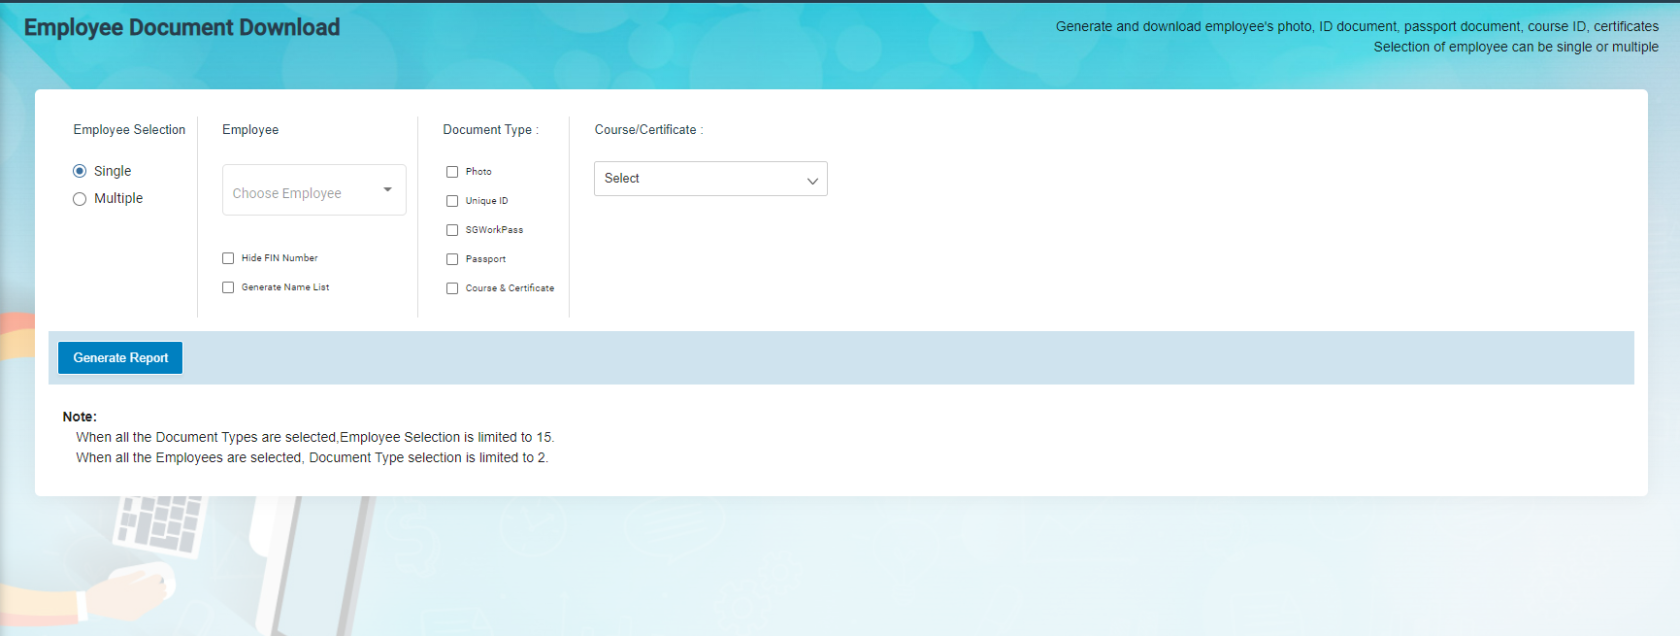](http://wiki.cuteinfocomm.com/uploads/images/gallery/2022-09/image-1662090787623.png)
2. In the **Employee** **selection** box,
- If you want single employee, choose single in employee selection, then search and select an employee from employee dropdown list.
- If you want to see multiple employees, choose multiple in the employee selection and select multiple employees in the check box. Or else you can click select all employee to show all employees print image documents.
3. Select the document type to be printed. If select course/certificate, then specify the course title from the course dropdown list.
4. Click **Generate Report**.
### View Course Report
You can view the course details of any particular employee or all employees by using this **Course Report** tab. To view the employee course report,
1. Click the **Course Report** tab in the **Reports**. The **Course Report** page opens. [](http://wiki.cuteinfocomm.com/uploads/images/gallery/2022-09/image-1662093089092.png)
2. If you want to view the course details for any particular employee, in the **Employee** box, select the employee from a drop-down list. Or If you want to view the course details for all employees, select the checkbox of the **Show All Employee**
3. Click **Search**. The employee course report opens. [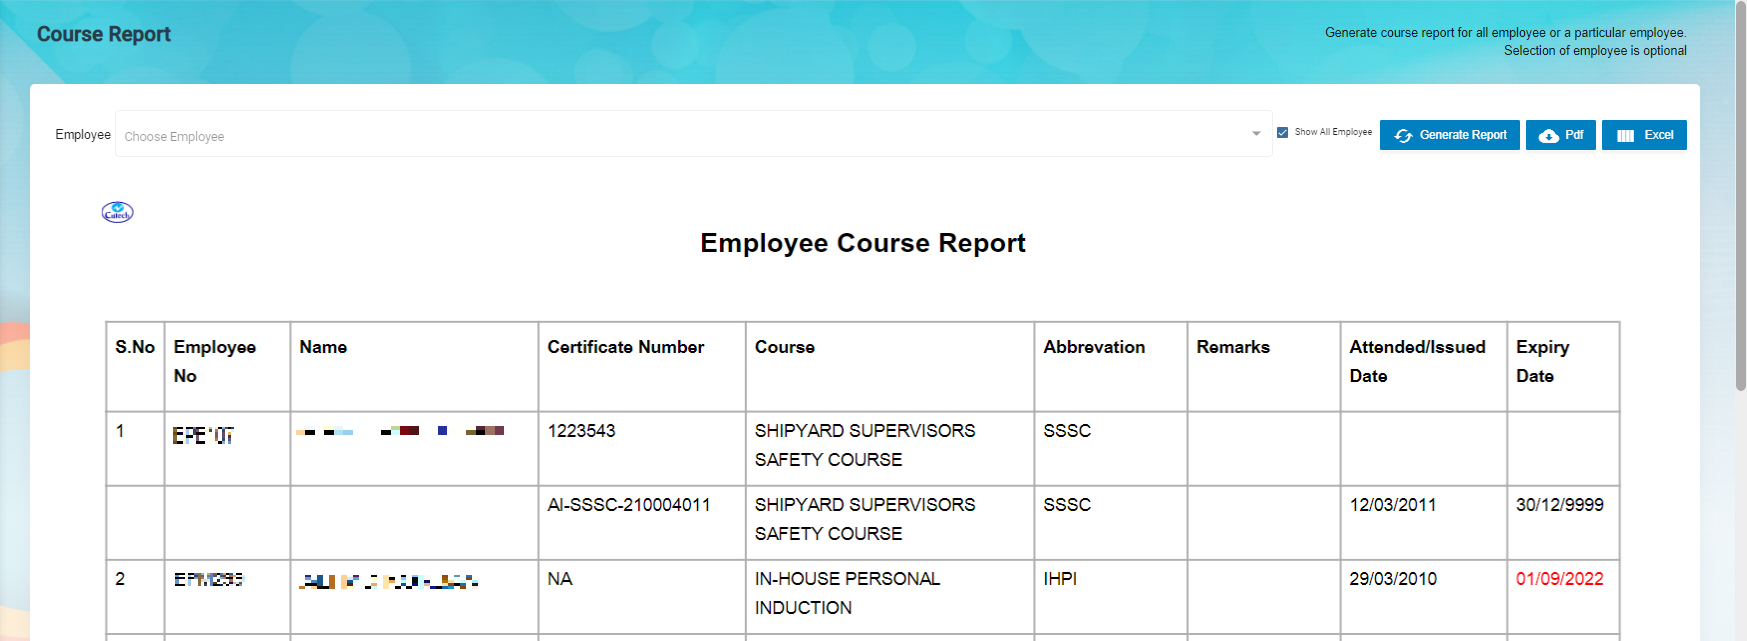](http://wiki.cuteinfocomm.com/uploads/images/gallery/2023-04/image-1682095648070.png)
**Note**: If you want to download the employee course report in pdf format, click 
(**PDF download** button). The pdf report will be downloaded.
### View Courses Matrix
The **Courses Matrix** tab in the **Reports** submenu helps you to generate and view the employee’s course attendance report. To view the course attendance report,
1. Click the **Courses Matrix** tab in the **Reports**. The **Courses Matrix** page opens. [](http://wiki.cuteinfocomm.com/uploads/images/gallery/2022-09/image-1662093188842.png)
2. In the **Select Employees** box, select the employees for whom you want to view the course attendance report.
3. In the **Select Courses** box, select the courses.
**Note**: The maximum number of selection of employees is 10. You cannot select the more than 10 employees.
4. Click **Submit**. The employee’s course matrix report opens. [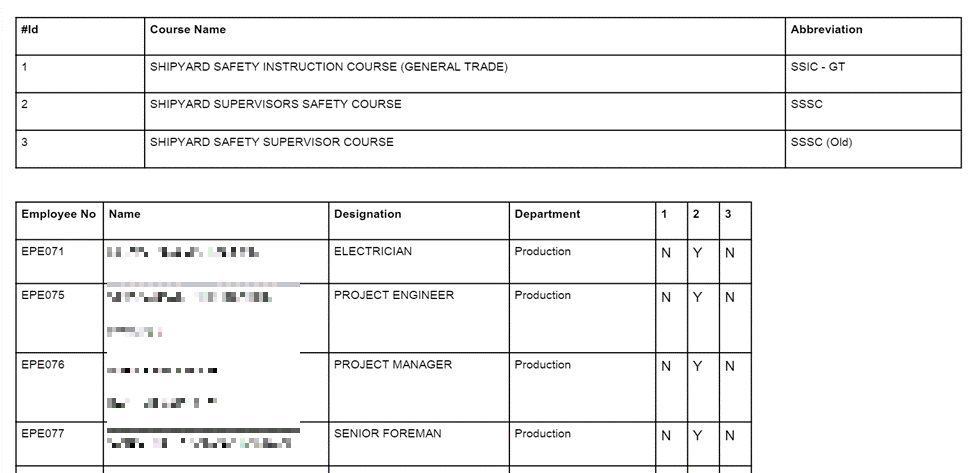](http://wiki.cuteinfocomm.com/uploads/images/gallery/2023-04/image-1682095691372.png)
**Note**: If you want to download the employee course and matrix report in pdf format, click  (**PDF download** button). The pdf report will be downloaded.
### View Employee Course List
The **Employee Course List** tab in the **Reports** submenu helps you to view the courses which are completed by the employees. To view the course list,
1. Click the **Employee Course List** tab in the **Reports.** The **Employee Course List** page opens, [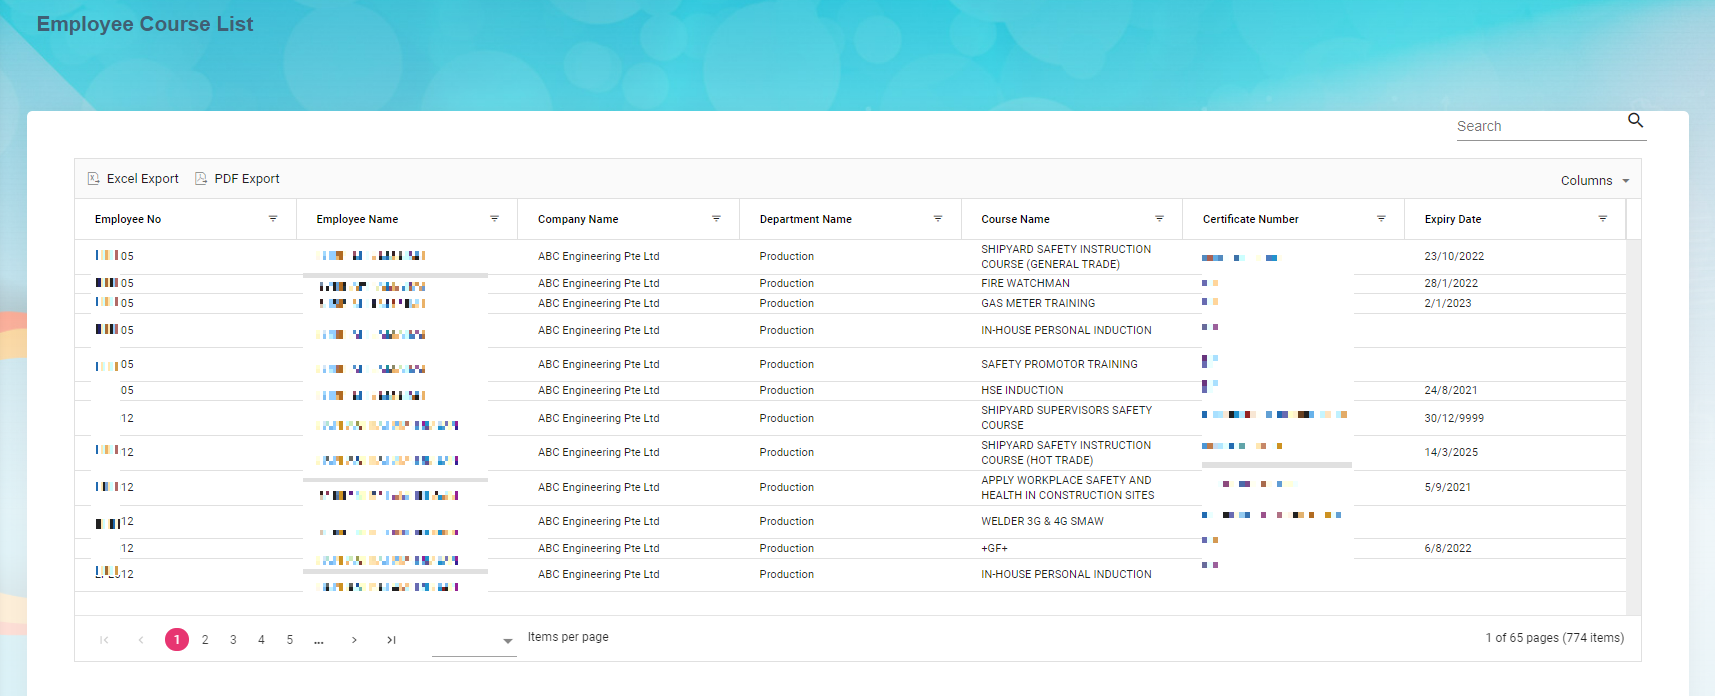](http://wiki.cuteinfocomm.com/uploads/images/gallery/2023-04/image-1682095753850.png)
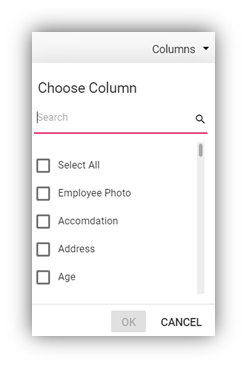
**To Customize the** **Employee Course List** **page**:
You can customize the **Employee Course List** page by using the **Columns** option. In the **Columns** option, select the columns which you want to add in the **Employee Course List.** The selected columns will be added the Employee Course List page.

2. In the **Course Name** box, select a course from the list of courses added using the [Course Master](#_Course). The page shows a list of employees who has completed the selected course.
- **Export course list**
The application has a feature to download the course list as an excel file. You can use (**Export Excel** button) to download the course list details. To download the course list details, select the desired format and click[](http://wiki.cuteinfocomm.com/uploads/images/gallery/2022-09/image-1662091449802.png)(**Export Excel** or **PDF** button). The course list in the **Employee Course List** page will be downloaded.
- **Filter Course List**
If you want to view any specific course completed details among multiple completed courses listed in the **Employee** **Course List** page, you can use the filter option provided below each column in the **Employee** **Course List** page.
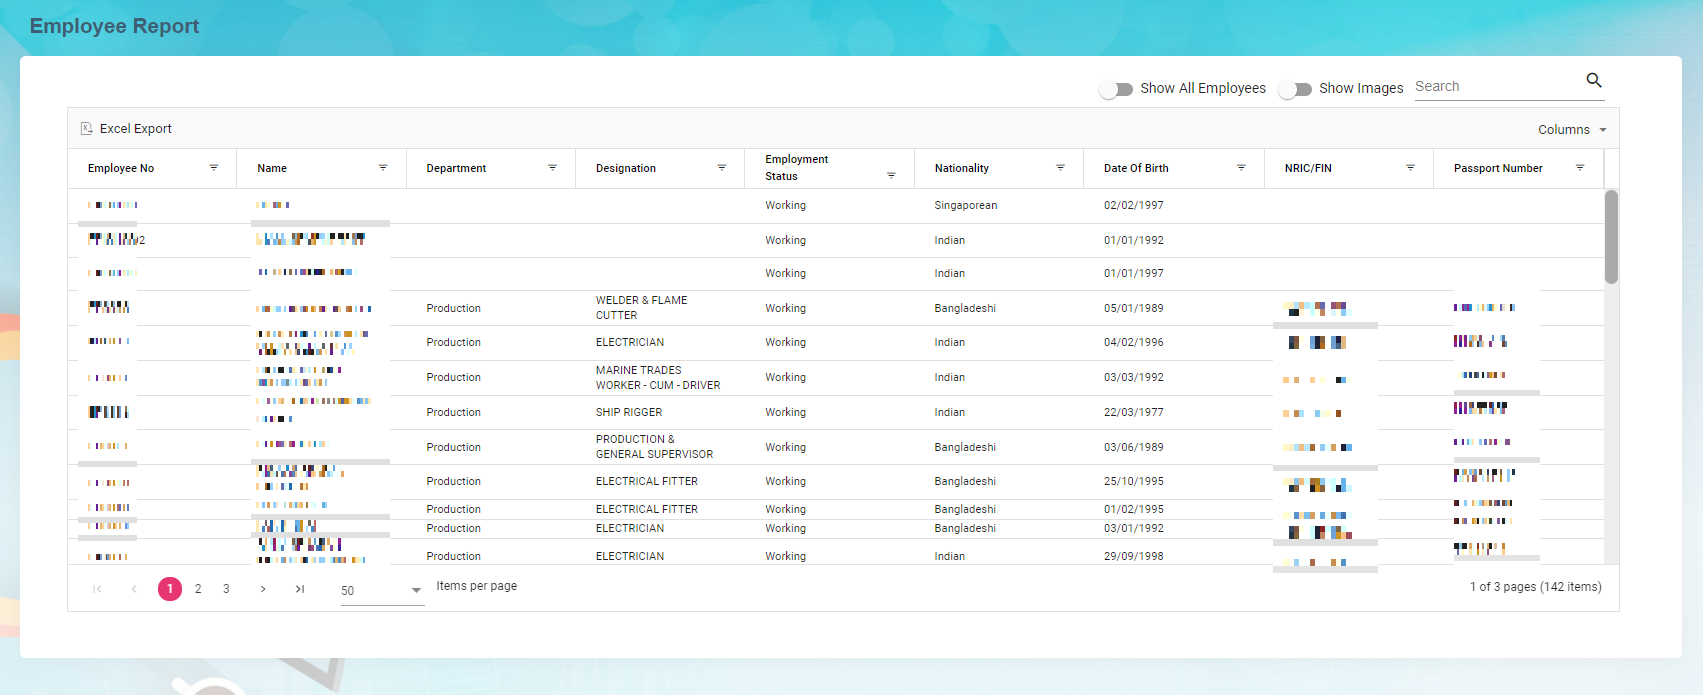
### View Employee Report
You can view the list of added employees including their details such as employee number, company, and so on by using the **Employee Report** tab in the **Reports** submenu. Click the **Employee Report** tab in the **Reports**. The **Employee Report** page opens with a list of added employees including their details.
[](http://wiki.cuteinfocomm.com/uploads/images/gallery/2023-04/image-1682095806683.png)
**To Customize the** **Employee Report** **page**:
You can customize the **Employee Report** page by using the **Columns** option. In the **Columns** option, select the columns which you want to add in the **Employee Report.** The selected columns will be added the Employee Report page.
- **Export Employee Report**
The application has a feature to download the employee report as an excel file. You can use (**Export Excel** button) to download the employee report. To download the employee report, select the desired format and click[](http://wiki.cuteinfocomm.com/uploads/images/gallery/2022-09/image-1662091449802.png)(**Export Excel** or **PDF** button). The employee details in the **Employee Report** page will be downloaded.
- **Filter Employee Report**
If you want to view any specific employee details among multiple employees listed in the **Employee** **Report** page, you can use the filter option provided below each column in the **Employee** **Report** page.
### View Employee’s Security Bond Report
The **Security Bond Report** tab in the **Reports** menu used to generate and view the security bond (work permit) report of the employee. To view the security bond report,
1. Click the **Security Bond Report** tab in the **Reports.** The **Employee’s (Work Permit) Security Bond Report** page opens. [](http://wiki.cuteinfocomm.com/uploads/images/gallery/2022-09/image-1662091589178.png)
2. In the **Employee** box, select an employee from a drop-down list. Or if you want to view the security bond report for all the employees, click the checkbox of the **Show All Employee**
3. Click **Generate Report**. The security bond report for the selected employee opens. [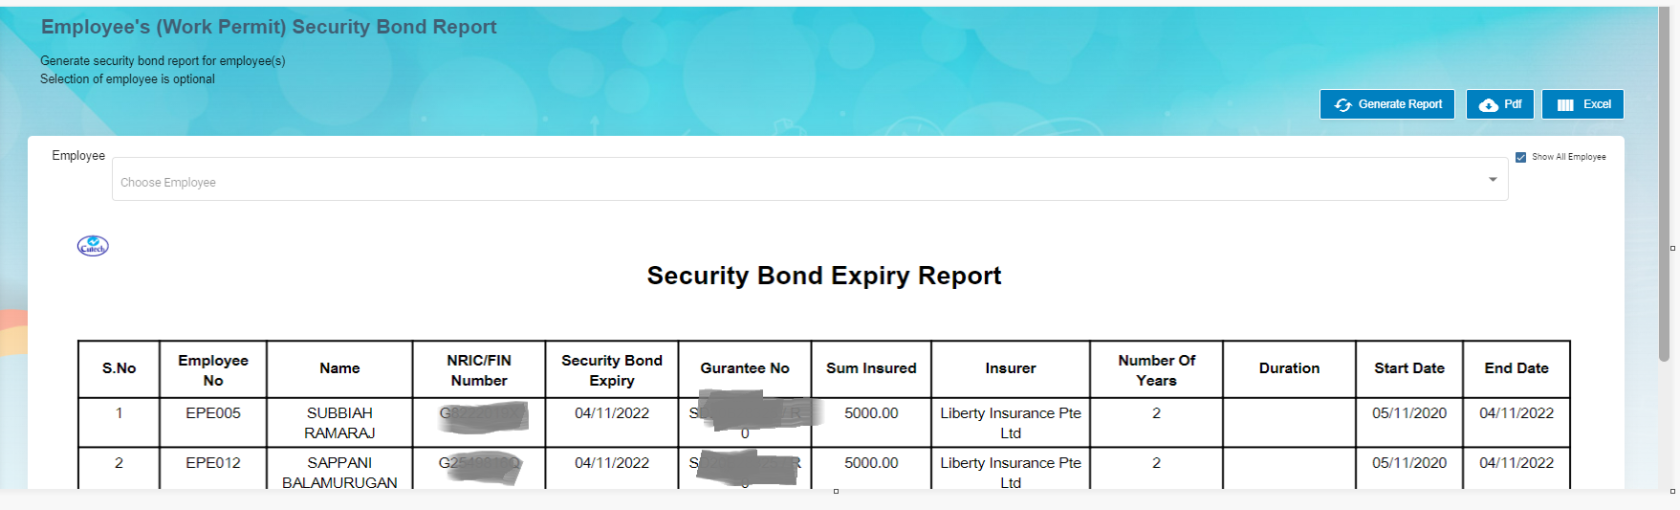](http://wiki.cuteinfocomm.com/uploads/images/gallery/2022-09/image-1662093468267.png)
**Note**: If you want to download the employee’s security bond report in pdf format, click[](http://wiki.cuteinfocomm.com/uploads/images/gallery/2022-09/image-1662093519391.png)(**PDF download** button). The pdf report will be downloaded.
### View Employee’s Key Employment Terms Report
The **Key Employment Terms Report** tab in the **Reports** menu used to view the key employment terms report of the employee. To view the key employment terms report,
1. Click the **Key Employment Terms Report** tab in the **Reports.** The **Employee’s Key Employment Terms Report** page opens. [](http://wiki.cuteinfocomm.com/uploads/images/gallery/2022-09/image-1662093552003.png)
2. In the **Employee** box, select an employee from a drop-down list.
3. Click **Generate Report**. The key employment terms report for the selected employee opens, [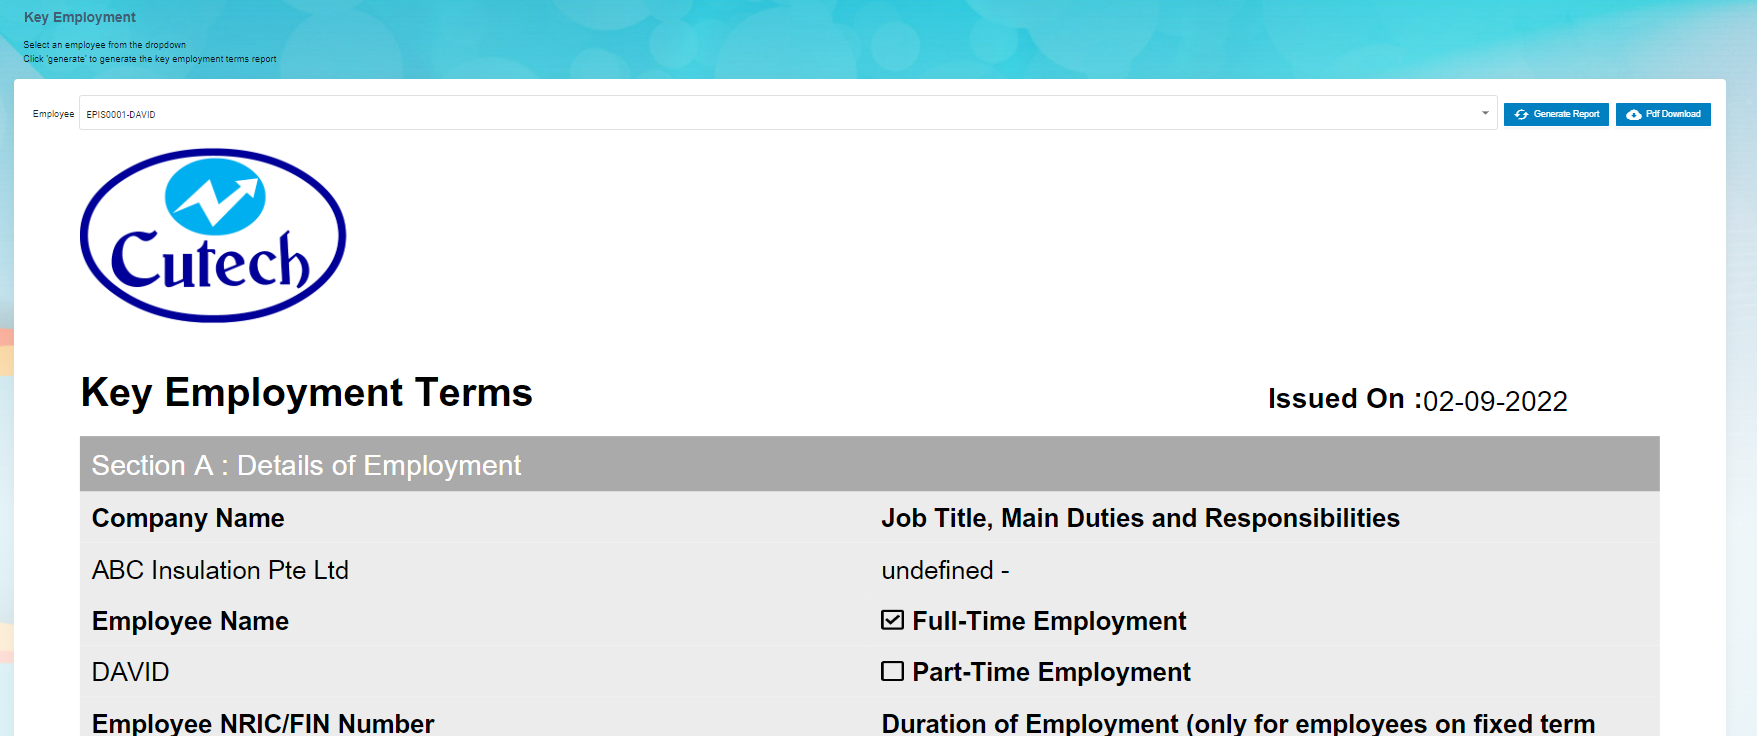](http://wiki.cuteinfocomm.com/uploads/images/gallery/2022-09/image-1662093626807.png)
**Note**: If you want to download the employee’s key employment terms report in pdf format, click [](http://wiki.cuteinfocomm.com/uploads/images/gallery/2022-09/image-1662093519391.png) (**PDF download** button). The pdf report will be downloaded.
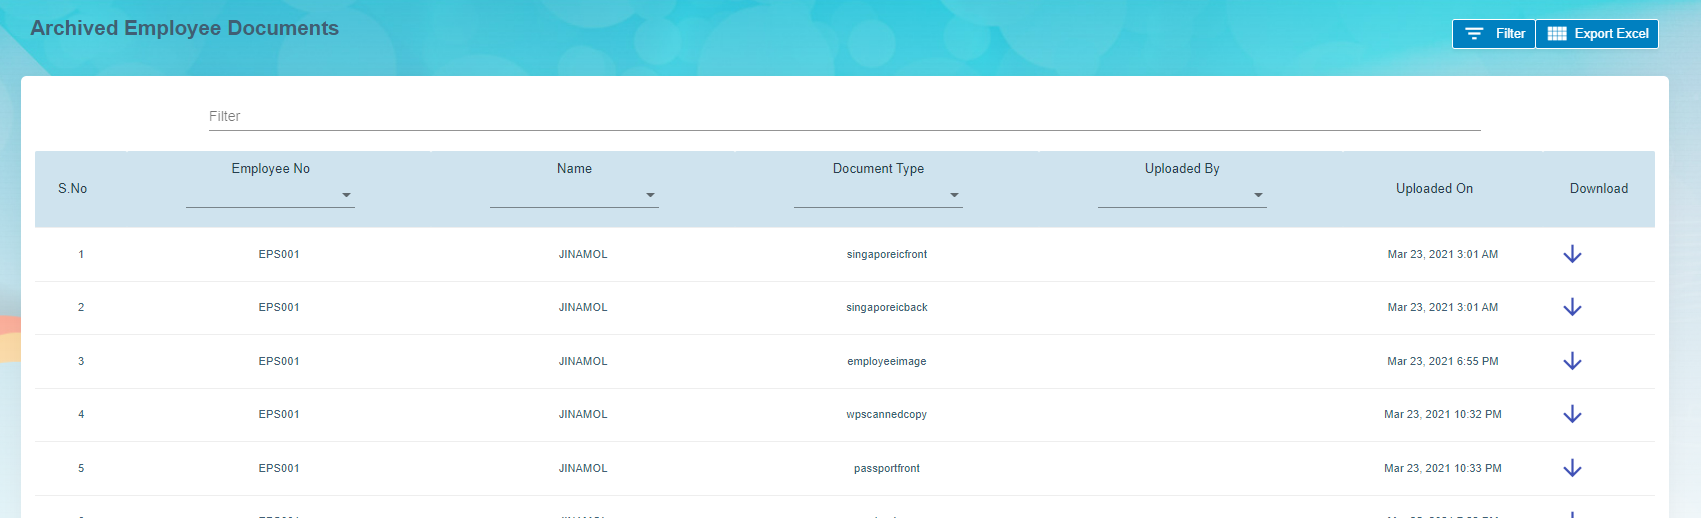
### View Archived Documents
The **Archive Documents** in the **Reports** submenu used to view the archived documents of the employee. To view the archived documents of the employee, click the **Archive Documents** tab in the **Reports.** The **Archived Employee Documents** page opens with a list of archived documents of the employees.
[](http://wiki.cuteinfocomm.com/uploads/images/gallery/2022-09/image-1662093691058.png)
- **Download an Archived Document of Employee**
If you want to download the detail of the archived document of any employee, click  (Download icon provided in the **Download** column) of the respective employee. The archived document of the selected employee will be downloaded.
- **Export Archived Employee Documents**
The application has a feature to download the archived employee documents list as an excel file. You can click[](http://wiki.cuteinfocomm.com/uploads/images/gallery/2022-09/image-1663356992223.png) (**Export Excel** button) to download the documents list. The archived document list in the **Archived** **Employee Documents** page will be downloaded as an excel file.
- **Filter Archived Document of Employee**
If you want to view the archived document of any specific employee among multiple employees listed in the **Archived** **Employee** **Documents** page, click[](http://wiki.cuteinfocomm.com/uploads/images/gallery/2022-09/image-1663357019209.png)(**Filter** button) provided in the upper side of the **Archived** **Employee** **Documents** page. The **Filter** option will be enabled in the **Archived** **Employee** **Documents** page to filter the specific archived document.
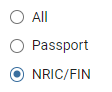
### Employee ID Expiry
This report allows user to check passport/NRIC expiry date. Click **Employee ID Expiry** in **Reports** menu, below page opens,
[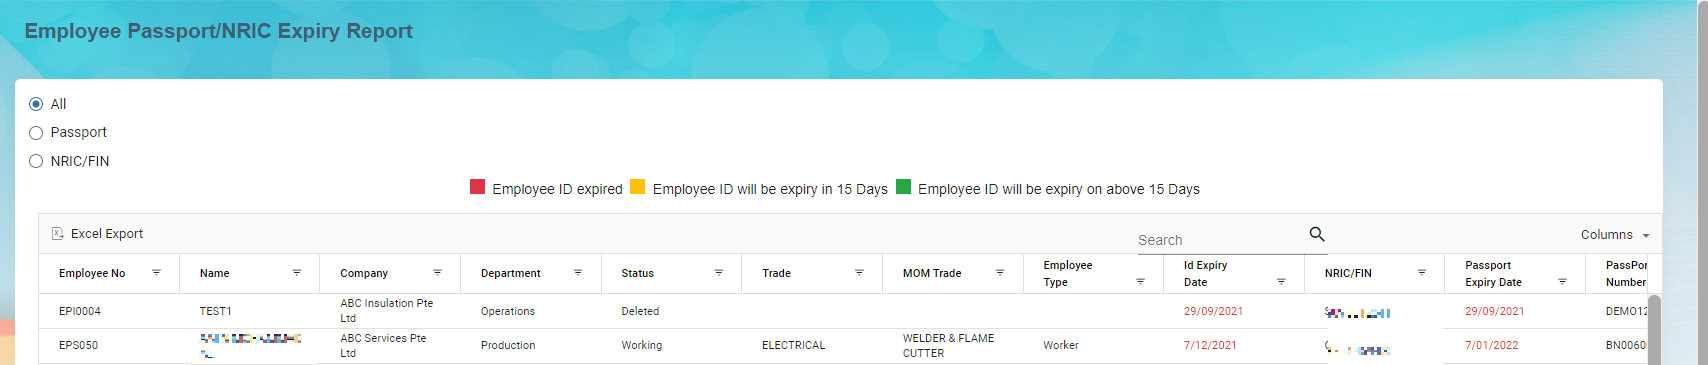](http://wiki.cuteinfocomm.com/uploads/images/gallery/2023-04/image-1682095928241.png)
To generate report, select below option to generate relevant report,
[](http://wiki.cuteinfocomm.com/uploads/images/gallery/2022-09/image-1663097946870.png)
Or you can use the search option to search for particular record,
[](http://wiki.cuteinfocomm.com/uploads/images/gallery/2022-09/image-1663098099433.png)
To export the report, you can use the export button located on the up left corner of the report page.
[](http://wiki.cuteinfocomm.com/uploads/images/gallery/2022-09/image-1663107739432.png)
### Expiry Report
Expiry report allows user to generate all kinds of expiry reports such as employee passport expiry, employee contract expiry, probation expiry report etc.. Click Expiry Report, below page opens,
[](http://wiki.cuteinfocomm.com/uploads/images/gallery/2022-09/image-1662093786271.png)
To generate expiry report,
1. In **Report Type** field, select the type from dropdown list, [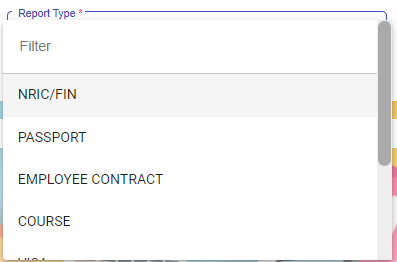](http://wiki.cuteinfocomm.com/uploads/images/gallery/2022-09/image-1663108091496.png)
2. In Expires In field, select the expiring period, [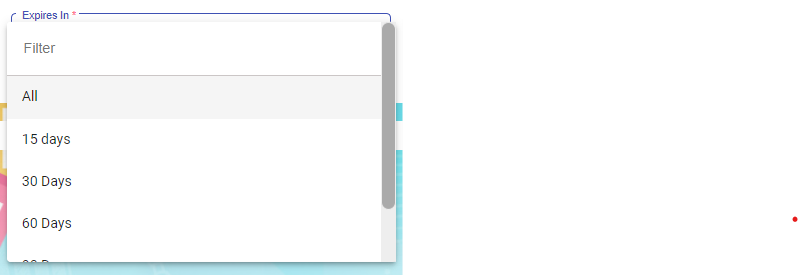](http://wiki.cuteinfocomm.com/uploads/images/gallery/2022-09/image-1663108139289.png)
3. In Company field, select the company name. [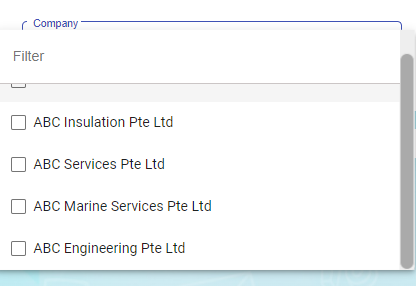](http://wiki.cuteinfocomm.com/uploads/images/gallery/2022-09/image-1663108166958.png)
4. Click[](http://wiki.cuteinfocomm.com/uploads/images/gallery/2022-09/image-1663108186010.png) button to generate report.
5. To download report, click the download icon. [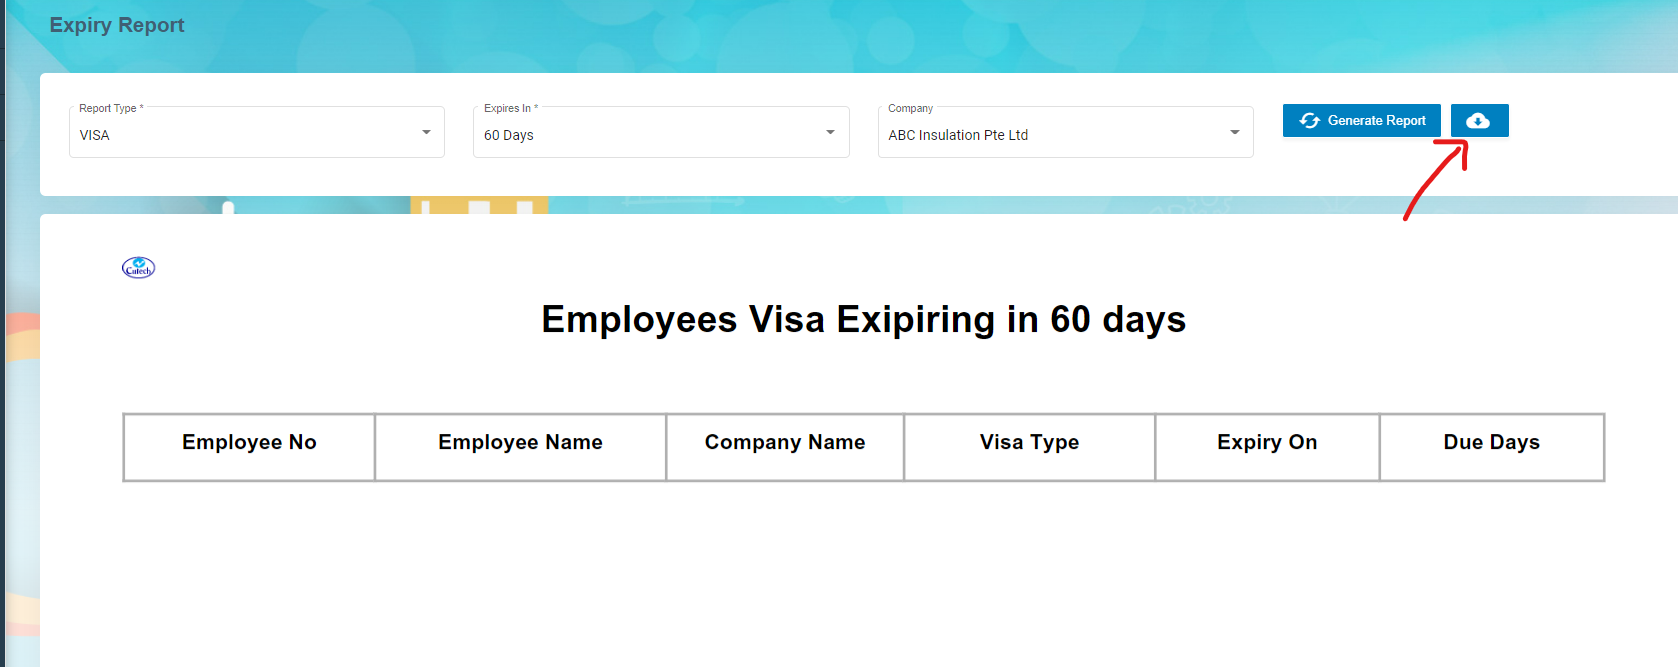](http://wiki.cuteinfocomm.com/uploads/images/gallery/2022-09/image-1663108289105.png)
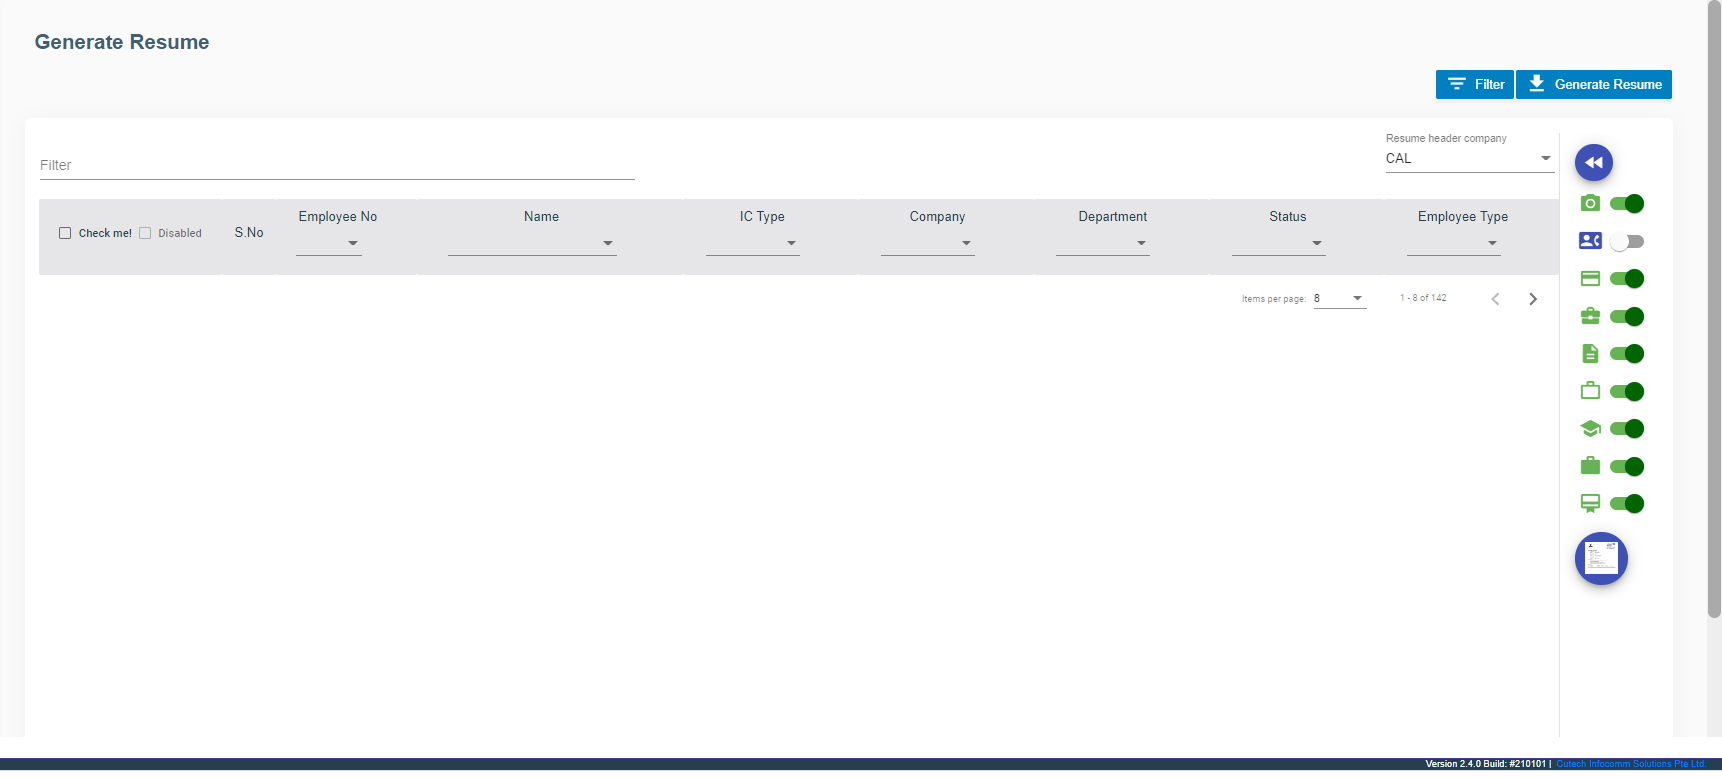
### Generate Resume
User can generate employee resume in this section. Click Generate Resume submenu,
[](http://wiki.cuteinfocomm.com/uploads/images/gallery/2022-09/image-1662093819289.png)
### Organization Chart
[](http://wiki.cuteinfocomm.com/uploads/images/gallery/2022-09/image-1662093868981.png)
.
# HRM Master Data
## Masters
The **Masters** submenu in the **HUMAN RESOURCES** page helps you to add the master data like details of employee’s skill set, job categories, and allowances, and company’s general document.
The **Masters** submenu contains the following tabs,
[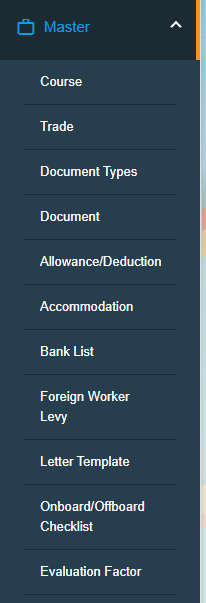](http://wiki.cuteinfocomm.com/uploads/images/gallery/2022-09/image-1663313292019.png)
- Course
- Trade
- Document Type
- Document
- Addition/Deduction
- Bank list
- Foreign Worker Levy
- Letter Template
- Onboard/Offboard Checklist
- Evaluation Factor
### Course
The **Course** tab in the **Masters** submenu helps you to add the course details. Once you have added the course, you can assign the added course for the for the respective employees while adding the employee course details. Click the Course tab in the Masters submenu. The Course Master page opens. [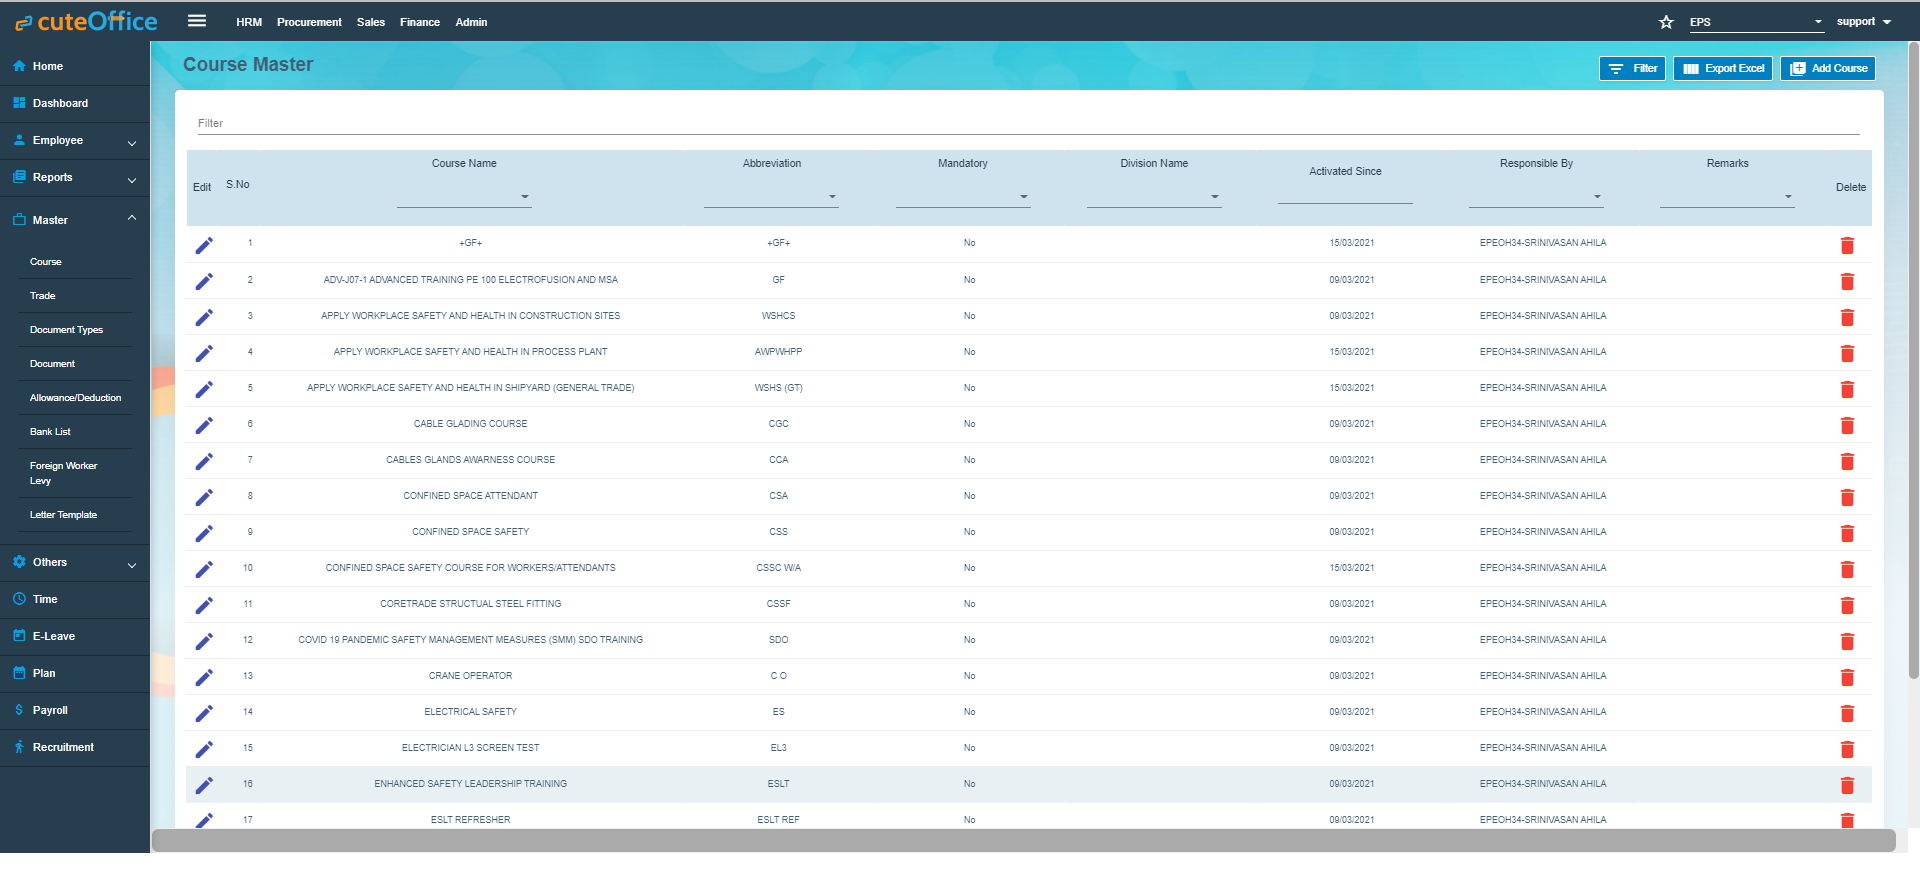](http://wiki.cuteinfocomm.com/uploads/images/gallery/2022-09/image-1662112456589.png)
#### Add Course.
To add a new course,
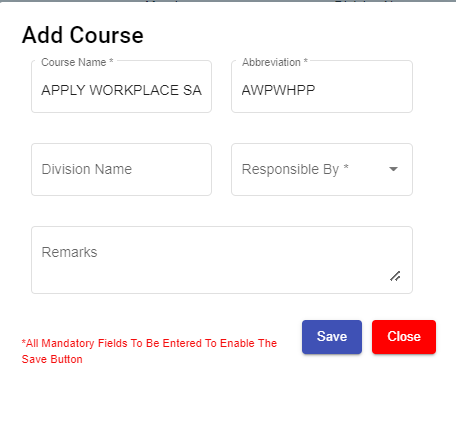
1. Click (**Add Course** button) in the **Course Master.** The **Add Course** window opens. [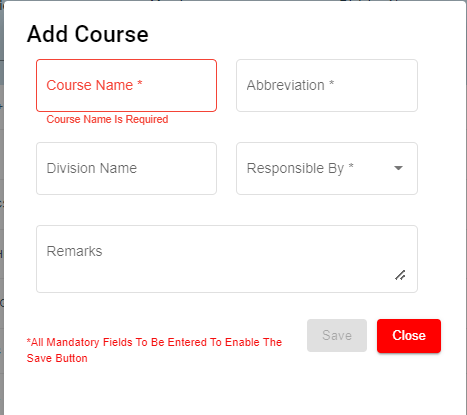](http://wiki.cuteinfocomm.com/uploads/images/gallery/2022-09/image-1662093911337.png)
**Note**: The fields notified with a symbol (\*) are mandatory. You must enter the relevant details in that fields before saving.
2. In the **Course** **Name** box, enter the name of course.
3. In the **Abbreviation** box, enter the abbreviation for the course name.
4. In the **Division Name** box, enter the division name.
5. In the **Responsible By** box, select the name of a person who is responsible for the course.
6. In the **Remarks** box, enter your remarks if any.
7. Click **Save**. The course is successfully added and listed in the **Course Master** page.
#### Edit Course
You can edit the details of the added course by using (Edit icon) provided in the **Edit** column of the **Course Master** page. Click (Edit icon) of the respective course you have added. The **Add Course** window opens with the added course details. Edit the course details where you want. Then click **Save**.
[](http://wiki.cuteinfocomm.com/uploads/images/gallery/2022-09/image-1662093937047.png)
#### Delete Course
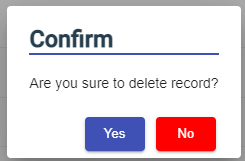
You can delete the added course by using (Delete icon) provided in the **Delete** column of the **Course Master** page. Click (Delete icon) of the respective course. The **Confirm** dialogue box opens with the following notification: “**Are you sure to delete record?**”. If you want to delete the course, click **Yes** otherwise click **No**.
[](http://wiki.cuteinfocomm.com/uploads/images/gallery/2022-09/image-1662093999766.png)
#### Filter Course
If you want to view any specific course details among multiple courses listed in the **Course Master** page, you can use the filter option provided in the upper left corner of the **Course Master** page. Click (Filter button). The filter option opens. Type any one of the details of course name, abbreviation, division name, active date, responsible by, and remarks which you know. The course which you want to view is filtered now.
#### Export Course
The application has a feature to download the added course details as an excel file. You can use (**Export Excel** button) to download the added course details. Click (**Export Excel** button). The course details in the **Course Master** page will be downloaded as an excel file.
### Trade
The **Trade** tab in the **Masters** submenu helps you to add the trade (Job category of employee) details. Once you have added the trade, you can assign the added trade for the respective employees while adding the employee details. If you want to add a trade, click the **Trade** tab in the **Masters** submenu. The **Trade Master** page opens.
[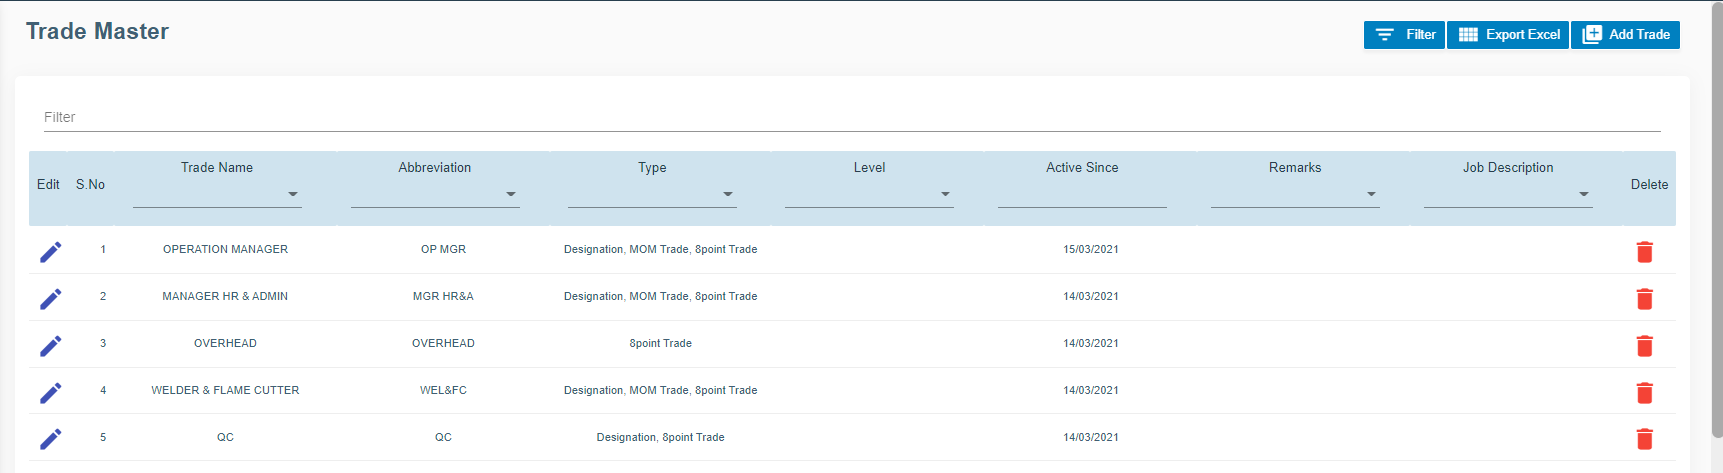](http://wiki.cuteinfocomm.com/uploads/images/gallery/2022-09/image-1662094037340.png)
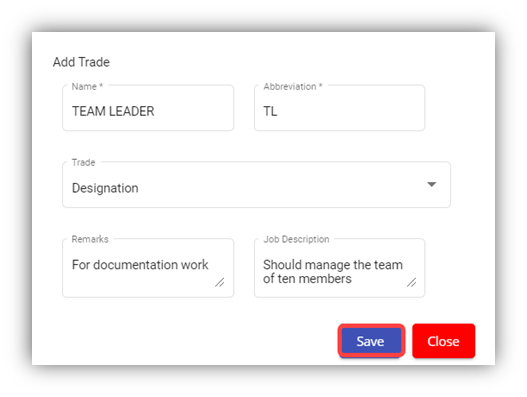
#### Add Trade
To add a new trade,
1. Click (**Add Trade** button) in the **Trade Master.** The **Add Trade** window opens.
**Note**: The fields notified with a symbol (\*) are mandatory. You must enter the relevant details in that fields before saving.
2. In the **Name** box, enter the name of trade.
3. In the **Abbreviation** box, enter the abbreviation for the trade name.
4. In the **Trade** box, select the type of trade from a drop-down list.
5. In the **Remarks** box, enter your remarks if any.
6. In the **Job Description** box, enter the job description detail.
7. Click **Save**. The trade is successfully added and listed in the **Trade Master** page.
#### Edit Trade
You can edit the details of the added trade by using (Edit icon) provided in the **Edit** column of the **Trade Master** page. Click (Edit icon) of the respective trade you have added. The **Add Trade** window opens with the trade details. Edit the trade details where you want. Click **Save**.
#### Delete Trade
You can click the  (Delete icon) in the **Delete** column of the **Trade Master** page. The Confirm dialogue box opens with the following notification: “Are you sure to delete record?”. If you want to delete the trade, click **Yes** otherwise click **No**.
#### Filter Trade
If you want to view any specific trade details among multiple trades listed in the **Trade Master** page, you can use the filter option provided in the upper left corner of the **Trade Master** page. Click (Filter button). The filter option opens.
#### Export Trade
The application has a feature to download the added trade details as an excel file. You can click  (**Export Excel** button) to download the added trade details. The trade details in the **Trade Master** page will be downloaded as an excel file.
### Document Types
Document types manages the types of documents to be added to system. Click Document Types in the Master menu, the document types opens,
[](http://wiki.cuteinfocomm.com/uploads/images/gallery/2022-09/image-1662596033703.png)
#### Add Document Type
To add a new document type,
1. Click[](http://wiki.cuteinfocomm.com/uploads/images/gallery/2022-09/image-1662094737267.png), the document type window opens, [](http://wiki.cuteinfocomm.com/uploads/images/gallery/2022-09/image-1662094780149.png)
2. Enter document type name and any remarks if necessary.
3. Click **Save**. A new document type will be created and saved.
#### Edit Document Type
You can edit the details of a document type by using edit option provided in the **Edit** column of the **Document Types** page. Click [](http://wiki.cuteinfocomm.com/uploads/images/gallery/2022-09/image-1662094942497.png)(Edit icon) of the respective document type. The **Add Document** window opens with the document details. Edit the document type details where you want. Click **Save**.
#### Delete Document Type
You can delete a document type by using (Delete icon) provided in the **Delete** column of the **Document Types** page. If you want to delete the document type, click **Yes** otherwise click **No**.
#### Filter Document Type
If you want to view any specific document type details among multiple document types listed in the **Document Types** page, you can use the filter option provided in the upper left corner of the **Document Types** page. Click (Filter button). The filter option opens.
#### Export Document Type
The application has a feature to download the added document type details as an excel file. You can use (**Export Excel** button) to download the added document type details. Click (**Export Excel** button). The document details in the **Document Types** page will be downloaded as an excel file.
### Document
The **Document** tab in the **Masters** submenu helps you to add the type of company’s general documents like ISO certificates, product certificates and so on. The added document type will be used while adding the document name. Click the **Document Master** tab in the **Masters.** The **Document Master** page opens.
[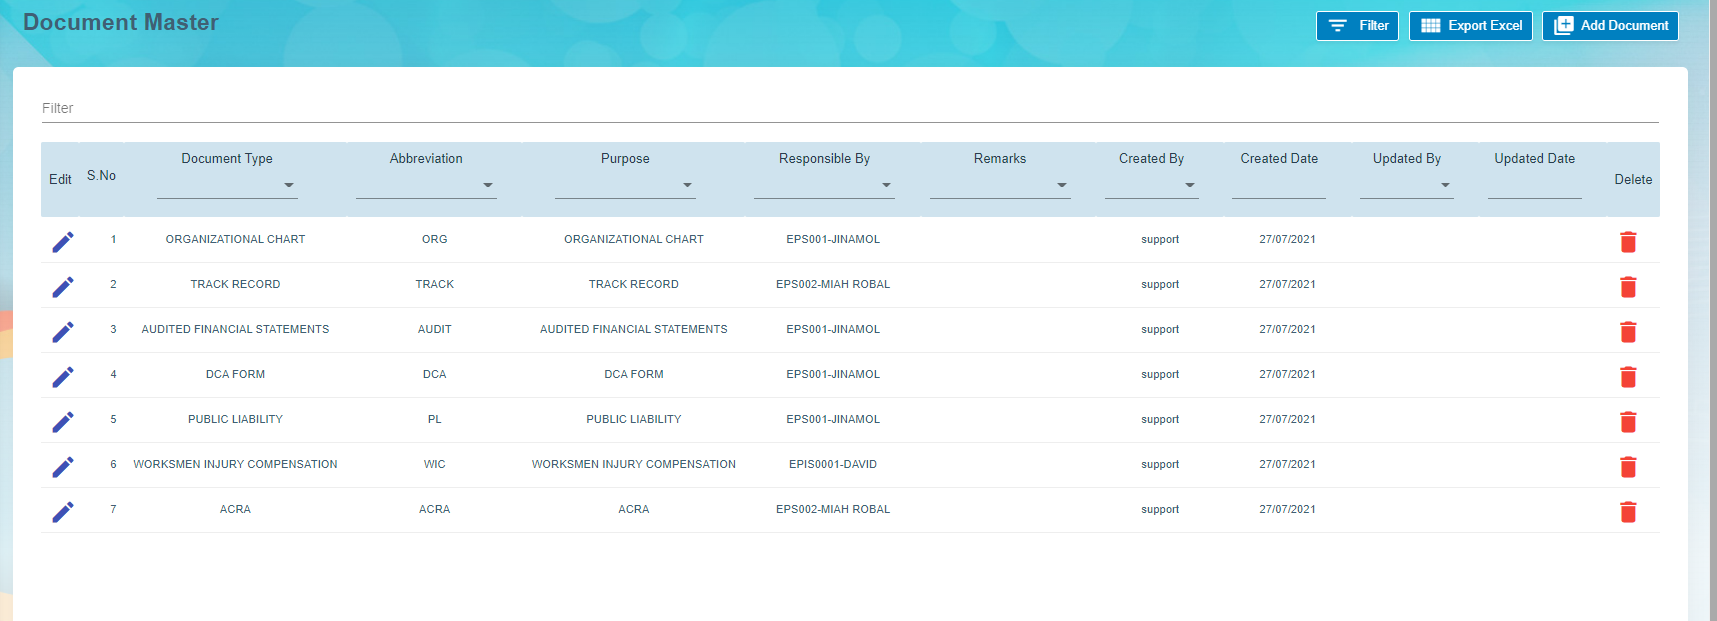](http://wiki.cuteinfocomm.com/uploads/images/gallery/2022-09/image-1662596005861.png)
#### Add Document
To add any document,
1. Click (**Add Document** button) in the **Document Master.** The **Add Document** window opens.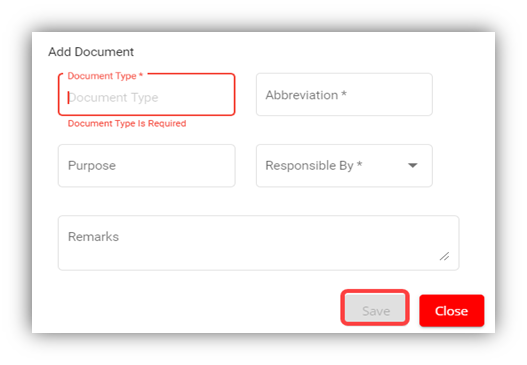
**Note**: The fields notified with a symbol (\*) are mandatory. You must enter the relevant details in that fields before saving.
2. In the **Document Type** box, select the type of document.
3. In the **Abbreviation** box, enter the abbreviation for the document type.
4. In the **Purpose** box, enter the purpose of adding the document.
5. In the **Responsible By** box, enter the name of a person who is responsible for the document.
6. In the **Remarks** box, enter your remarks if any.
7. Click **Save**. The document type is successfully added and listed in the **Document Master** page.
#### Edit Document
You can edit the details of the added document type by using (Edit icon) provided in the **Edit** column of the **Document Master** page. Click (Edit icon) of the respective document type you have added. The **Add Document** window opens with the document details. Edit the document type details where you want. Click **Save**.
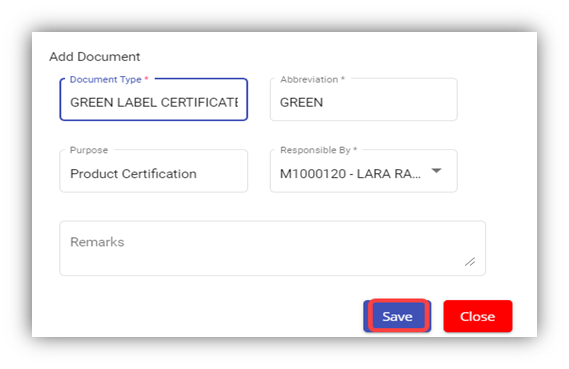
#### Delete Document
You can delete the added document by using (Delete icon) provided in the **Delete** column of the **Document Master** page. If you want to delete the document type, click **Yes** otherwise click **No**.
#### Filter Document
If you want to view any specific document type details among multiple document types listed in the **Document Master** page, you can use the filter option provided in the upper left corner of the **Document Master** page. Click (Filter button). The filter option opens.
#### Export Document
The application has a feature to download the added document type details as an excel file. You can use (**Export Excel** button) to download the added document type details. Click (**Export Excel** button). The document details in the **Document Master** page will be downloaded as an excel file.
### Allowance/Deduction Master
The **Allowance/Deduction Master** tab in the **Masters** submenu helps you to add the allowance, addition, or deduction type master data. Click the **Allowance/Deduction Master** tab in the **Masters.** The **Allowance/Deduction Type Master** page opens.
[](http://wiki.cuteinfocomm.com/uploads/images/gallery/2022-09/image-1662596114277.png)
#### Add Allowance/Addition/Deduction Master
If you want to add allowance/deduction master, do the following steps,
1. Click (**Add Allowance/Deduction Type** button) in the **Allowance/Deduction Type Master**. The **Add Allowance/Deduction Type** window opens. [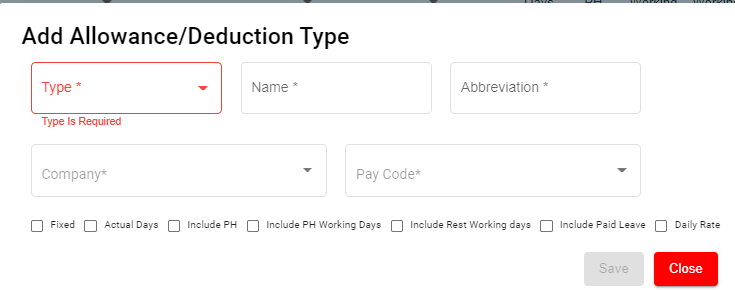](http://wiki.cuteinfocomm.com/uploads/images/gallery/2022-09/image-1662596144102.png)
**Note**: The fields notified with a symbol (\*) are mandatory. You must enter the relevant details in that fields before saving.
1. In the **Type** box, select the type of master data you want to add whether Allowance, Addition, or Deduction.
2. In the **Name** box, enter the name of the master type.
3. In the **Abbreviation** box, enter the abbreviation for the added master type.
4. In the **Company** box, select a company.
5. In the **Pay Code** box, select the pay code from a drop-down list.
6. If creating allowance master data, user must select one of the following option of pay period where applicable ,
- - - If the allowance is fixed one, select the checkbox of the **Fixed**
- If the allowance is paid only for actual working days, select the checkbox of the **Actual Days**
- If the allowance is paid for Public Holidays, select the checkbox of the **Include PH**
- If the allowance is paid when employee works in PH, select **Include PH Working Days**
- If the allowance is paid when employee works during rest days, select **Include Rest Working days**
- If the allowance is paid when employee on paid leave, select **Include Paid Leave**
- If the allowance is daily rate, select **Daily rate.**
7. Click **Save**. The added master type is successfully added and listed in the Allowance/Deduction Type Master page.
#### Edit Allowance/Addition/Deduction Master
You can edit the details of the added master type by using edit option provided in the **Edit** column of the **Allowance/Deduction Master** page. Click  (Edit icon) of the respective allowance type you have added. The **Add Allowance/Deduction** window opens with the added details. Edit the master details where you want. Click **Save**.
#### Delete Allowance/Addition/Deduction Master
You can delete the added master type by using  (Delete icon) provided in the **Delete** column of the **Allowance/Deduction Master** page. If you want to delete the Allowance/Addition/Deduction, click **Yes** otherwise click **No**.
#### Filter Allowance/Addition/Deduction Master
If you want to view any specific master type details listed in the **Allowance/Deduction Master** page, you can use the filter option provided in the upper left corner of the **Allowance/Deduction Master** page. Click (Filter button). The filter option opens.
#### Export Allowance/Addition/Deduction Master
The application has a feature to download the added master type details as an excel file. You can use (**Export Excel** button) to download the added master details. Click (**Export Excel** button). The allowance type details in the **Allowance/Deduction Master** page will be downloaded as an excel file.
### Bank List
The **Bank List** tab in the HRM **Masters** menu helps you to add all the bank details of employees that are used to receive salary payment. Click **Bank List** in the **Masters,** the **Banks List** page opens.[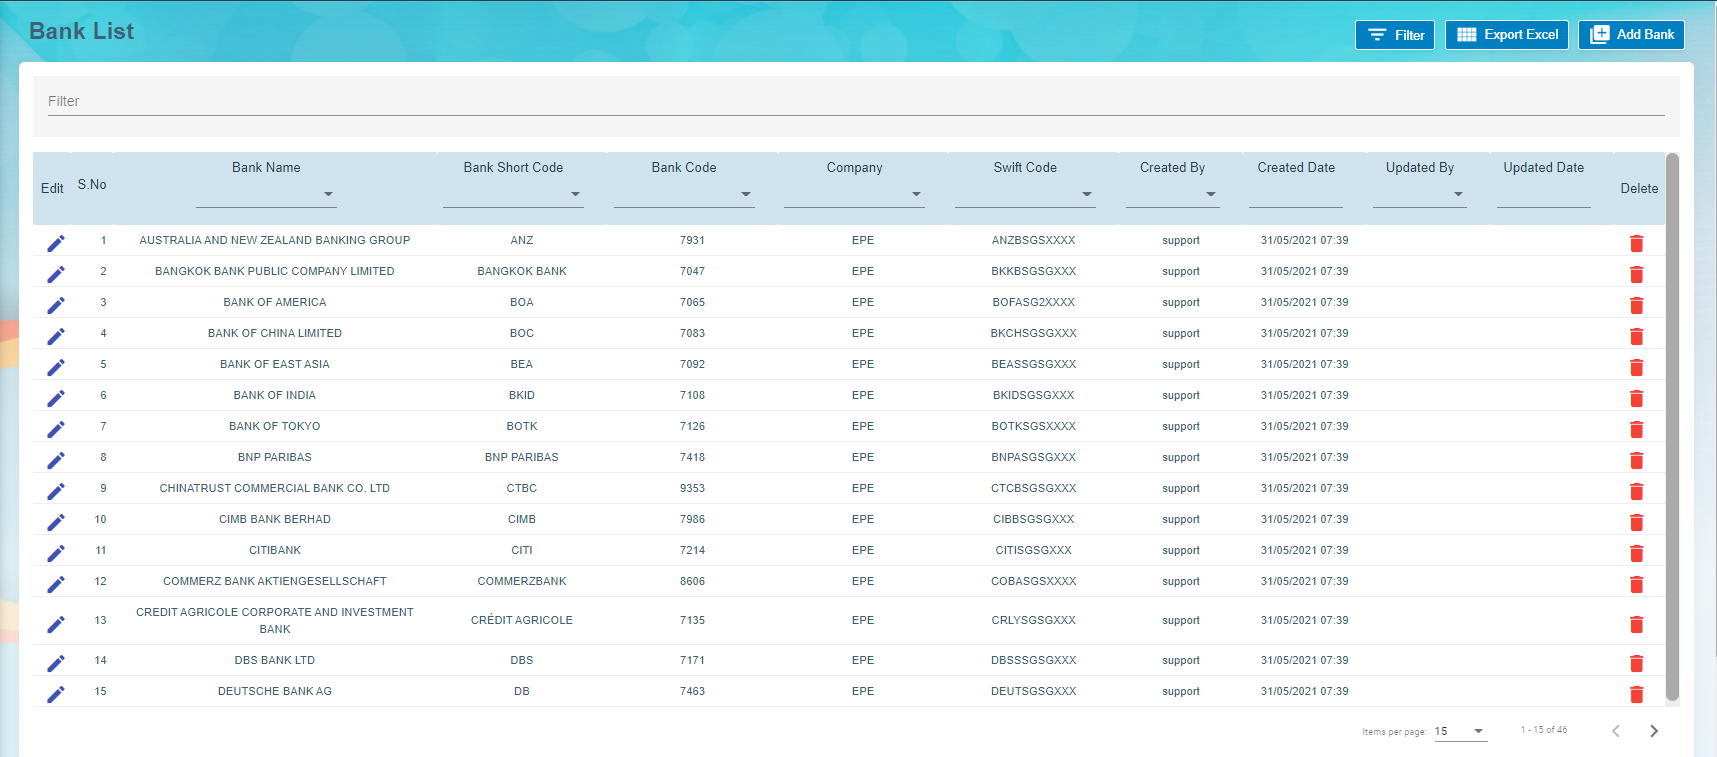](http://wiki.cuteinfocomm.com/uploads/images/gallery/2022-09/image-1663094930977.png)
#### Add a Bank Account
To add a new bank account,
1. Click[](http://wiki.cuteinfocomm.com/uploads/images/gallery/2022-09/image-1663095073003.png)(**Add New Bank** button) in the **Banks List, t**he **Bank** window opens. [](http://wiki.cuteinfocomm.com/uploads/images/gallery/2022-09/image-1663095181971.png)
- **Note**: The fields notified with a symbol (\*) are mandatory. You must enter the relevant details in that fields before saving.
2. In the **Bank Name** box, enter the bank name.
3. In the **Bank Short Code** box, enter the short code for the added bank.
4. In the **Bank Code** box, enter the bank code.
5. In the **Swift Code** box, enter the bank swift code.
6. Click **Save**. The Bank Name is successfully added and listed in the Bank List Master page.
#### Edit the Bank Account Details
You can edit the details of the added bank account by using edit option provided in the **Edit** column of the **Bank List** page. To edit the added bank account details,
1. Click (Edit icon) of the respective bank account you have added. The **Bank** window shows the added bank account details.
[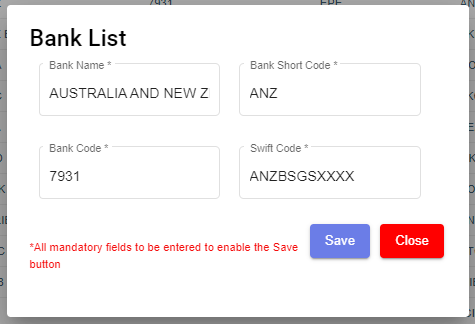](http://wiki.cuteinfocomm.com/uploads/images/gallery/2022-09/image-1663095296856.png)
2. Edit the bank account details where you want.
3. Click **Save**.
#### Delete a Bank Account
You can delete any added bank account by using (Delete icon) provided in the **Delete** column of the **Bank List** page.
#### Filter a Bank Account
If you want to filter any bank account in the **Bank List** page, you can use[ ](http://wiki.cuteinfocomm.com/uploads/images/gallery/2022-09/image-1663095417308.png)(**filter** button) on the **Bank List** page.
#### Export to Excel
If you want to export the **Bank List** page, you can use[](http://wiki.cuteinfocomm.com/uploads/images/gallery/2022-09/image-1663095384875.png) (**export** button) on the **Bank List** page.
### Foreign Worker Levy
Foreign Worker Levy is a mechanism to regulate the number of foreign workers in Singapore. The employer need not to pay CPF contributions for their foreign workers. However, they must pay a monthly levy for Work Permit and S Pass holders to government.
The **Foreign Worker Levy** tab in the **Masters** submenu used to add a foreign worker levy code. The added foreign worker levy code will be used in the further payroll process. Click **Foreign Worker Levy** in the **Masters,** the **Foreign Worker Levy** page opens.
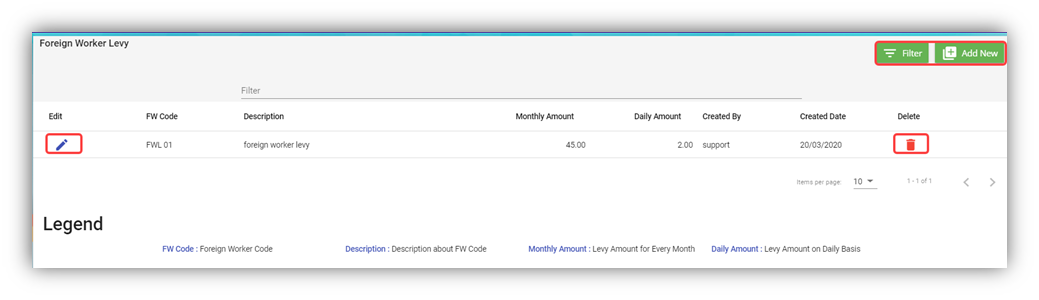
#### Add a Foreign Worker Levy Code
If you want to add a foreign worker levy code,
1. Click (**Add New** button) in the **Foreign Worker Levy.** The **Foreign Worker Levy Information** window opens.
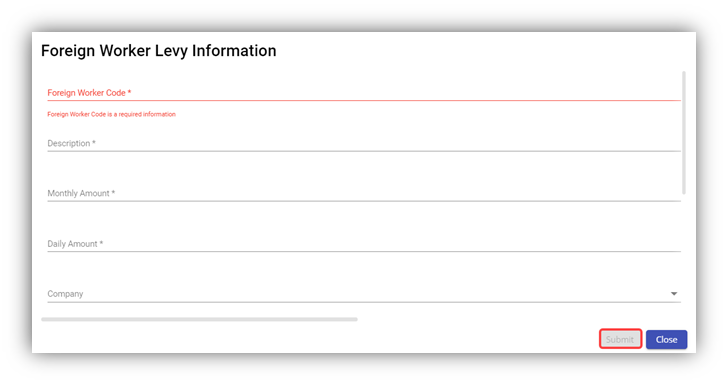
**Note**: The fields notified with a symbol (\*) are mandatory. You must enter the relevant details in that fields before saving.
2. In the **Foreign Worker Code** box, enter the code for the foreign worker levy you want to create.
3. In the **Description** box, enter the description for the added foreign worker levy code.
4. In the **Monthly Amount** box, enter the monthly amount to be paid for the foreign worker levy.
5. In the **Daily Amount** box, enter the daily amount to be paid for the foreign worker levy.
6. In the **Company** box, select a company from a drop-down list.
**Note**: If you want to select all the companies in the list, select the checkbox of the **ALL**.
7. Click **Submit**. The foreign worker levy code is added and listed in the **Foreign Worker Levy** page.
#### Edit the Foreign Worker Levy Code
You can edit the details of the added foreign worker levy code by using edit option provided in the **Edit** column of the **Foreign Worker Levy** page. To edit the added foreign worker levy code details,
1. Click (Edit icon) of the respective foreign worker levy code you have added. The **Foreign Worker Levy Information** window shows the added foreign worker levy code details.
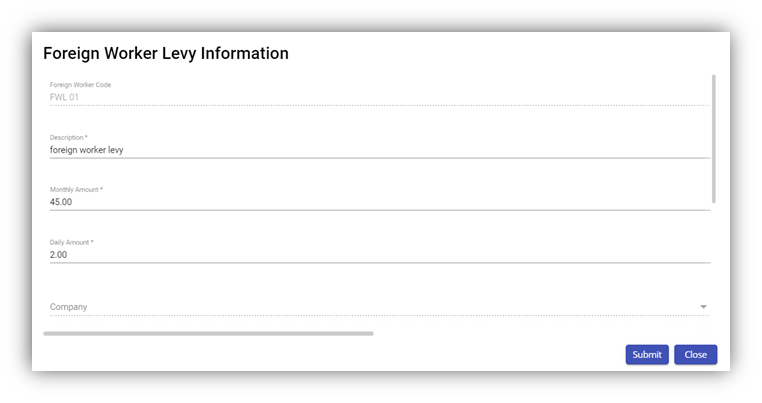
2. Edit the foreign worker levy code details where you want.
3. Click **Save**.
#### Delete a Foreign Worker Levy Code
You can delete the foreign worker levy code by using (Delete icon) provided in the **Delete** column of the **Foreign Worker Levy** page.
#### Filter Foreign Worker Levy Code
If you want to filter any foreign worker levy code in the **Foreign Worker Levy** page, you can use  (**FILTER** button) located on the **Generate Payroll** page.
### Letter Template
All HR and admin related letter templates can be configured and managed in this section. Click **Letter Template** in **Master** menu, the current templates will show as below,
[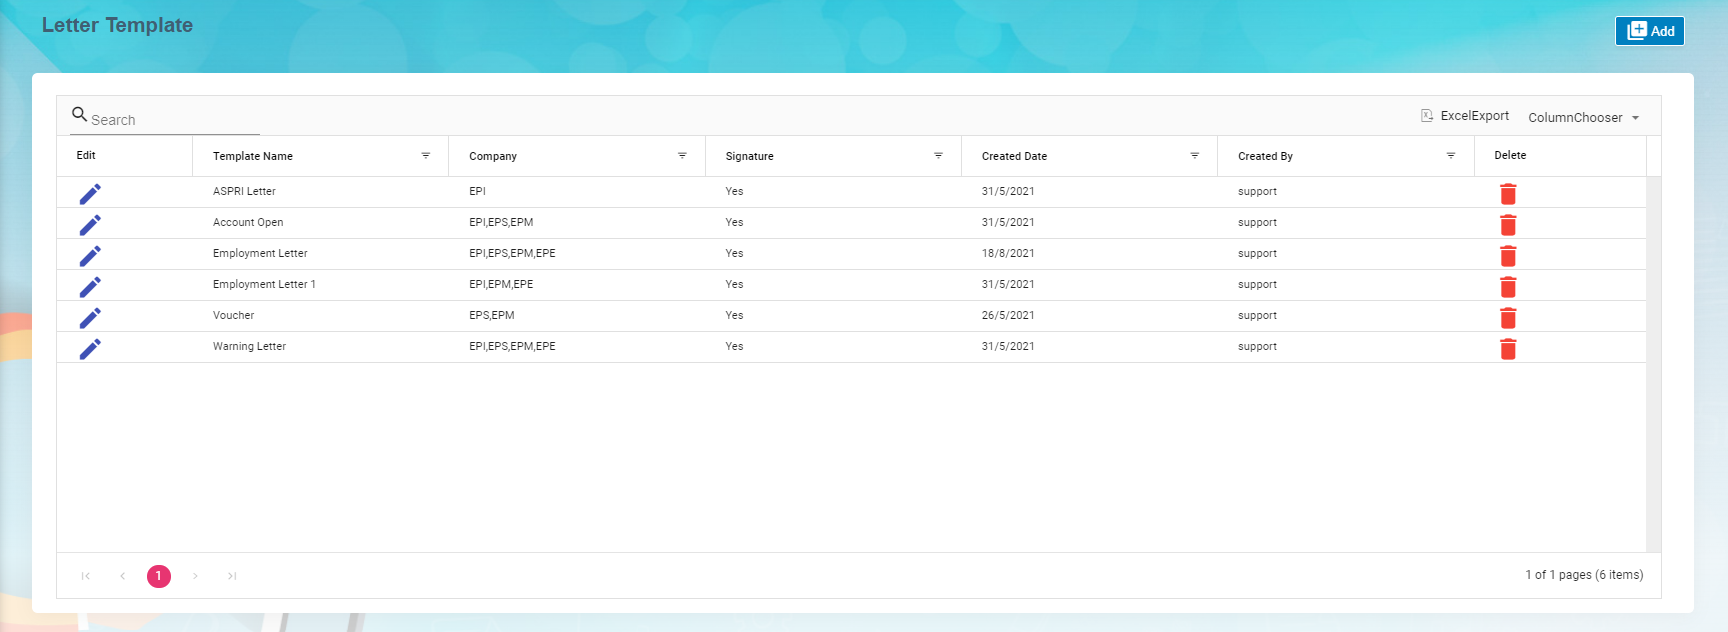](http://wiki.cuteinfocomm.com/uploads/images/gallery/2022-09/image-1662601030622.png)
#### View Letter Template
To view current letter templates,
1. Click[ ](http://wiki.cuteinfocomm.com/uploads/images/gallery/2022-09/image-1662690942077.png)edit icon of the template that user wants to view, the template will open,
2. Click Preview button or Download button in the top right corner to view or download the template as pdf file. [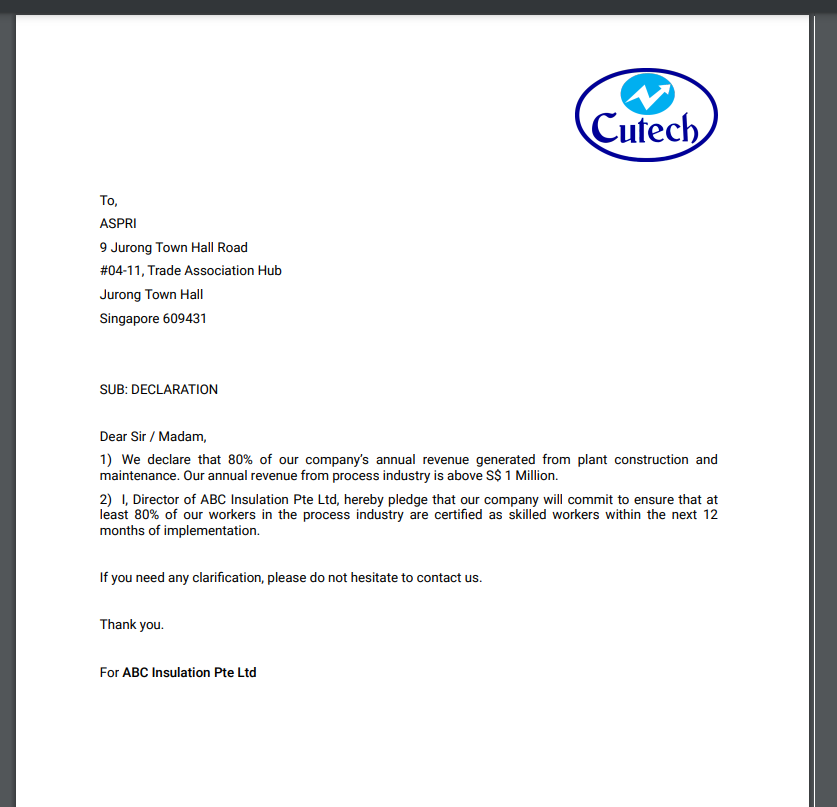](http://wiki.cuteinfocomm.com/uploads/images/gallery/2022-09/image-1662691076281.png)
#### Add A New Letter Template
To add a new letter template,
1. Click [](http://wiki.cuteinfocomm.com/uploads/images/gallery/2022-09/image-1662604025739.png) add button in the top right corner in the template list page, the template creation page opens,[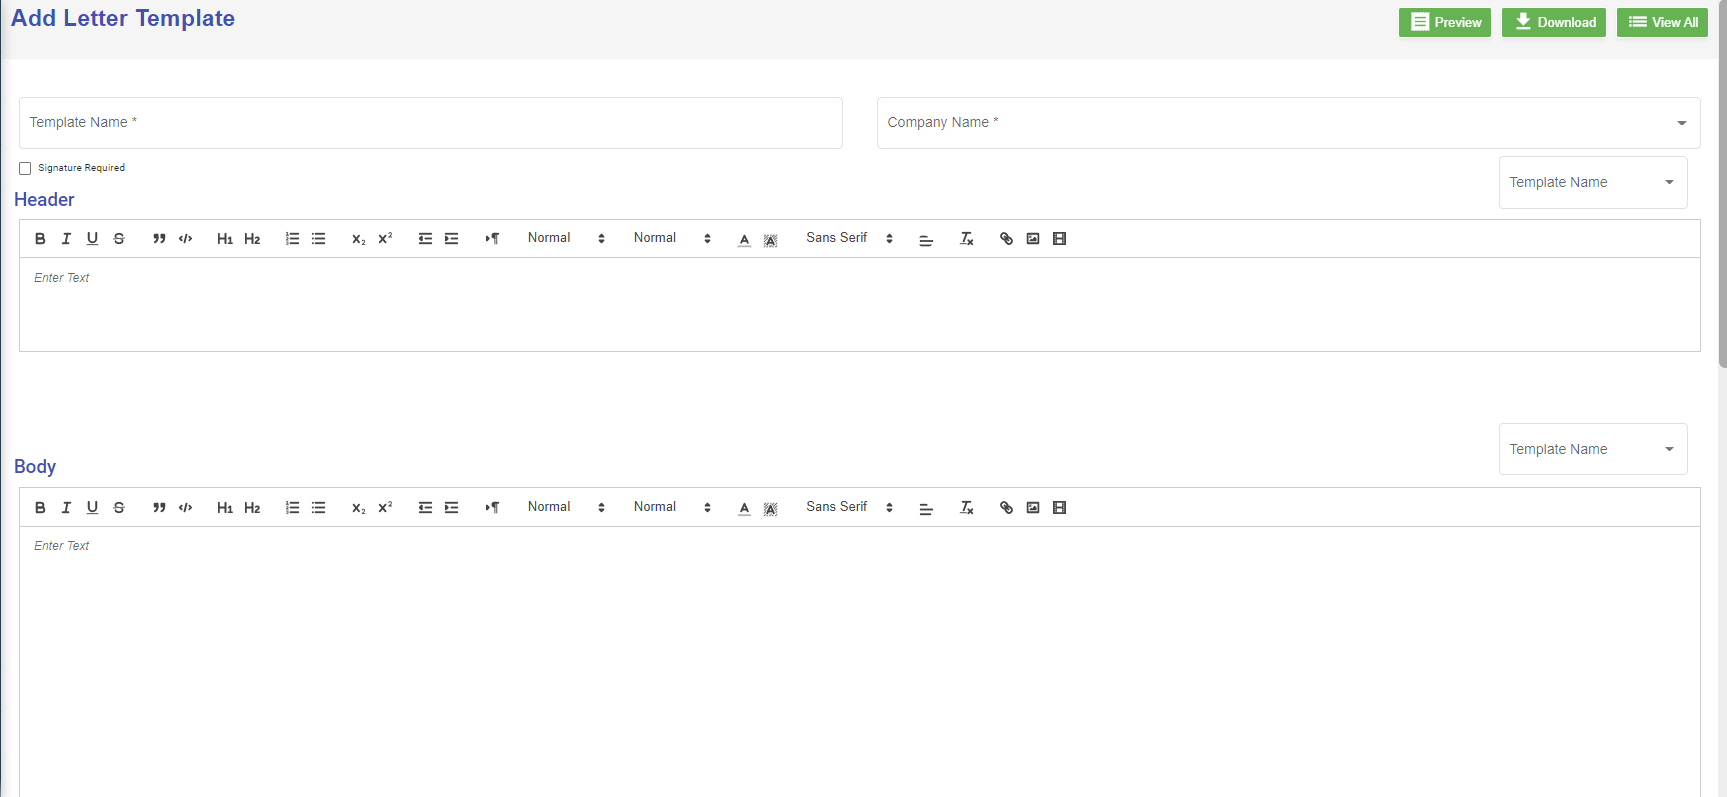](http://wiki.cuteinfocomm.com/uploads/images/gallery/2022-09/image-1662691308170.png)
2. Enter the details of the new letter template:
- In **Template Name**, enter the letter template name
- In **Company Name**, select company name from dropdown list
- If letter require signature, tick the **Signature Required** checkbox
- In **Header** section, enter the letter header content, or you can copy from existing template-select the template name, the header content of the selected template will automatically populated,
- In **Body** section, enter the body content, or you can copy from existing template-select the template name, the body content of the selected template will automatically populated,
- In **Footer** section, enter the footer content, or you can copy from existing template-select the template name, the footer content of the selected template will automatically populated,
- In **Signature** section, enter the signature format or you can copy from existing template-select the template name, the signature format of the selected template will automatically populated,
3. Click **Save** to create and save new letter template.
#### Edit Letter Template
To edit letter template,
1. Click[ ](http://wiki.cuteinfocomm.com/uploads/images/gallery/2022-09/image-1662690942077.png)edit icon of the template that user wants to view, the template will open as below, [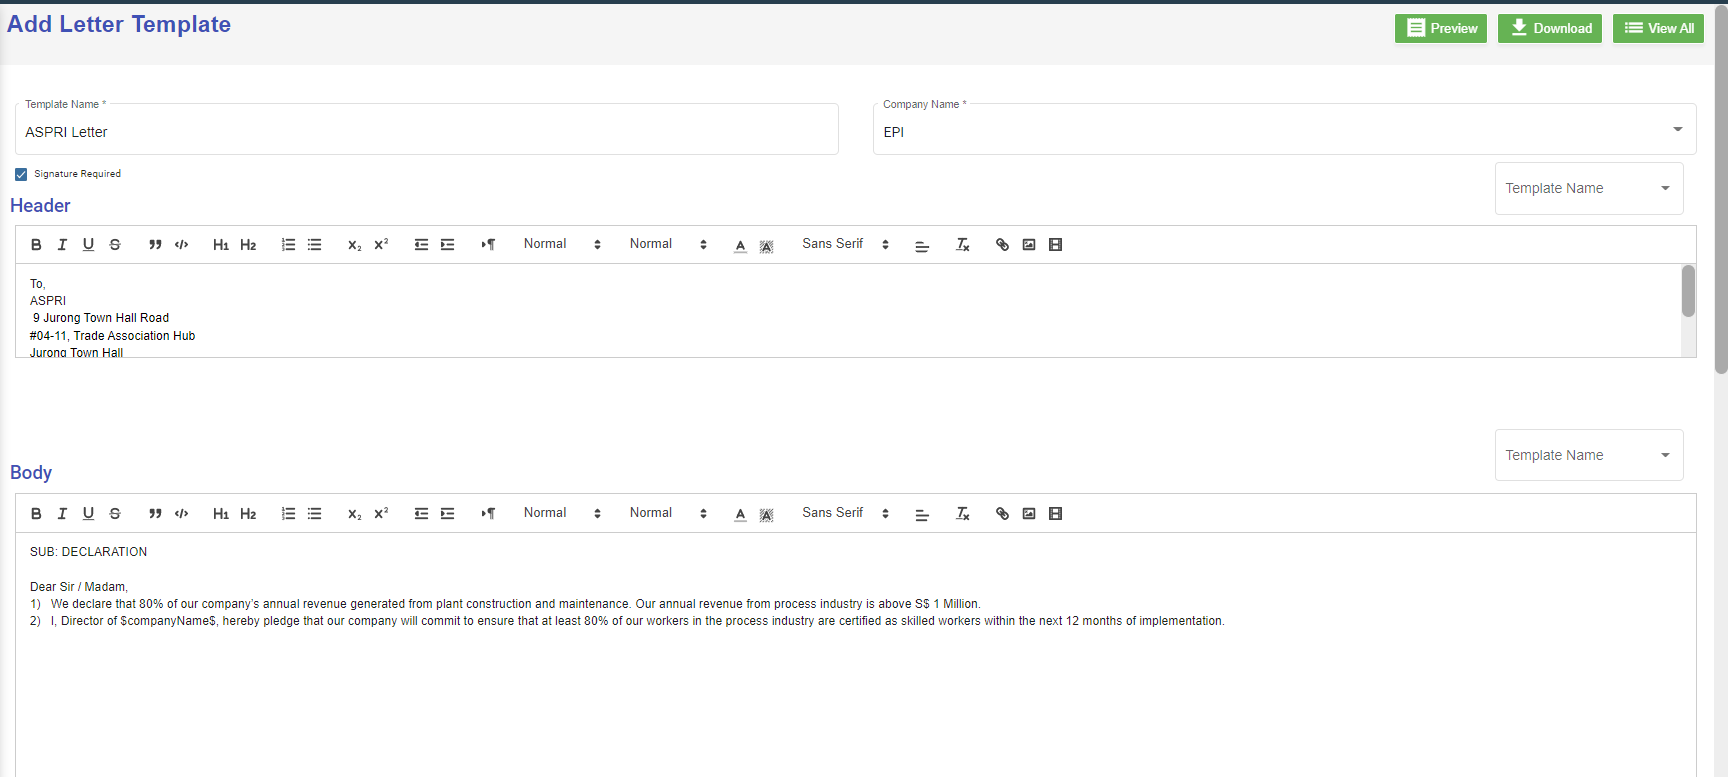](http://wiki.cuteinfocomm.com/uploads/images/gallery/2022-09/image-1662690921723.png)
2. Edit the details where needed.
3. Click **Save** to save edits.
#### Delete Letter Template
User can use the delete option to delete letter template that is no longer in use or need to remove. Click [](http://wiki.cuteinfocomm.com/uploads/images/gallery/2022-09/image-1662695579815.png) in the delete column of the template. The template will be removed.
### Onboard/Offboard Checklist
Onboard/Offboard Checklist master manages different type of checklist which contains list of task that the employee needs to perform before onboarding process/offboarding process.
#### Add Onboard Checklist
1. Click [](http://wiki.cuteinfocomm.com/uploads/images/gallery/2022-09/image-1662604025739.png) add button in the top right corner in the Onboard Checklist page, the Edit category page opens to enter questions in checklist template.[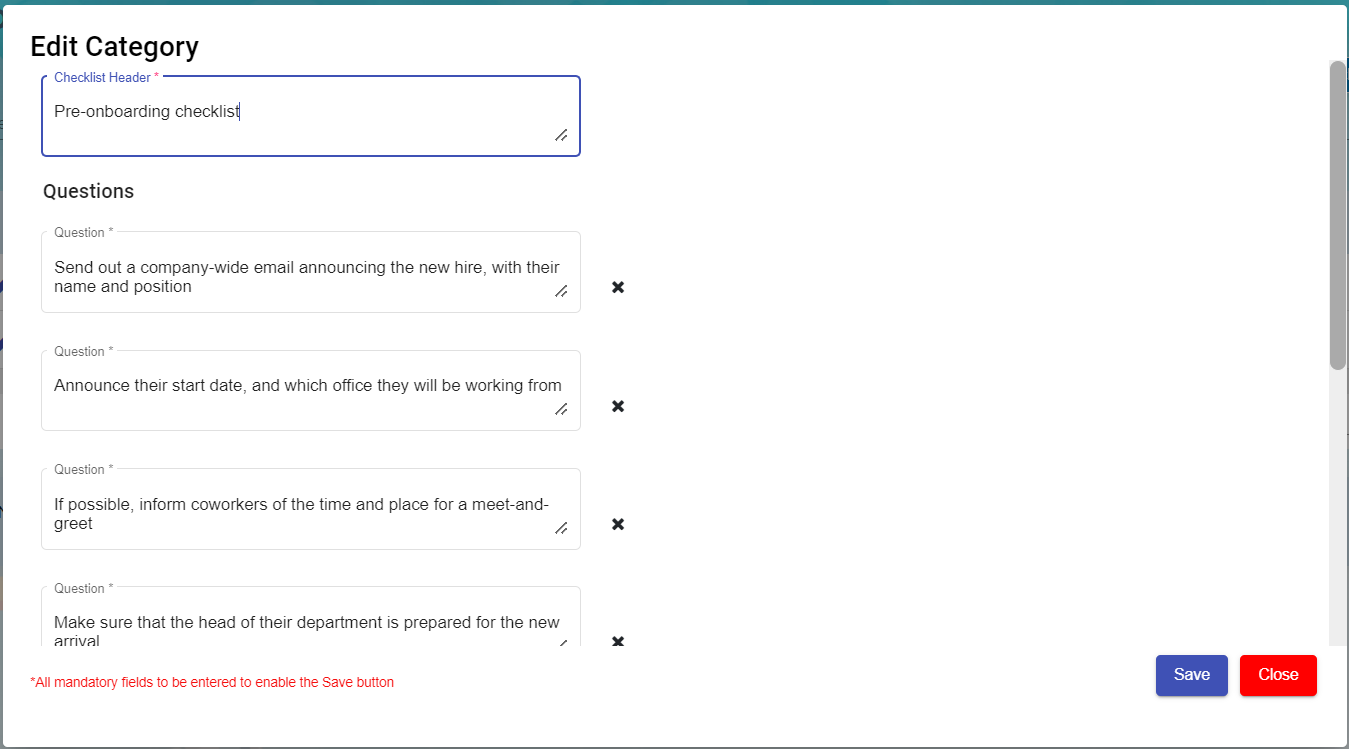](http://wiki.cuteinfocomm.com/uploads/images/gallery/2022-09/image-1663306419297.png)
2. Enter Checklist Header
3. Add or Delete the mandatory questions to be asked during Onboard processing.
4. Click save to create new Onboard checklist template.
#### Add Offboard Checklist
1. Click [](http://wiki.cuteinfocomm.com/uploads/images/gallery/2022-09/image-1662604025739.png) add button in the top right corner in the Offboard Checklist page, the Edit category page opens to enter questions in checklist template.[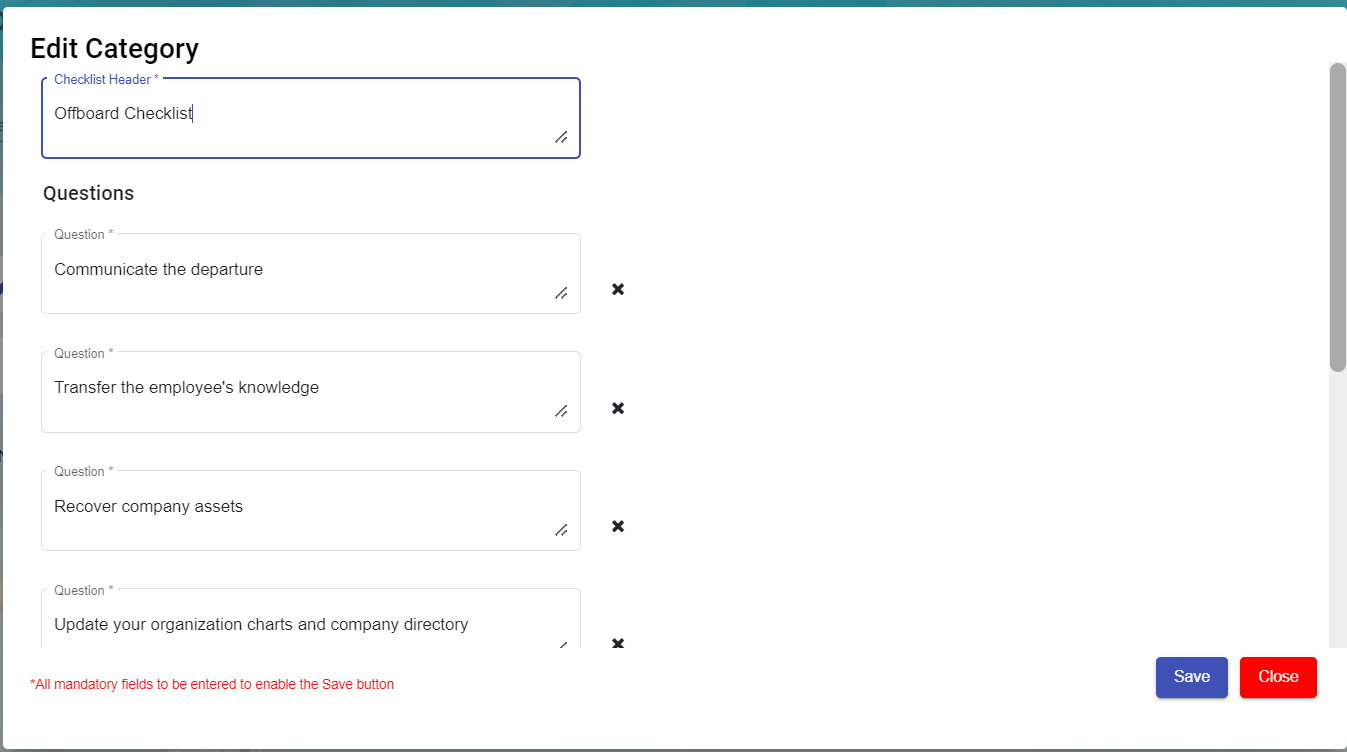](http://wiki.cuteinfocomm.com/uploads/images/gallery/2022-09/image-1663306374492.png)
2. Enter Checklist Header
3. Add or Delete the mandatory questions to be asked during Offboard processing.
4. Click save to create new Offboard checklist template.
#### Edit the Checklist
To edit the checklist, click[ ](http://wiki.cuteinfocomm.com/uploads/images/gallery/2022-09/image-1662690942077.png)edit icon of the checklist to edit the questions in the edit category page. Then click **Save** to save edits.
[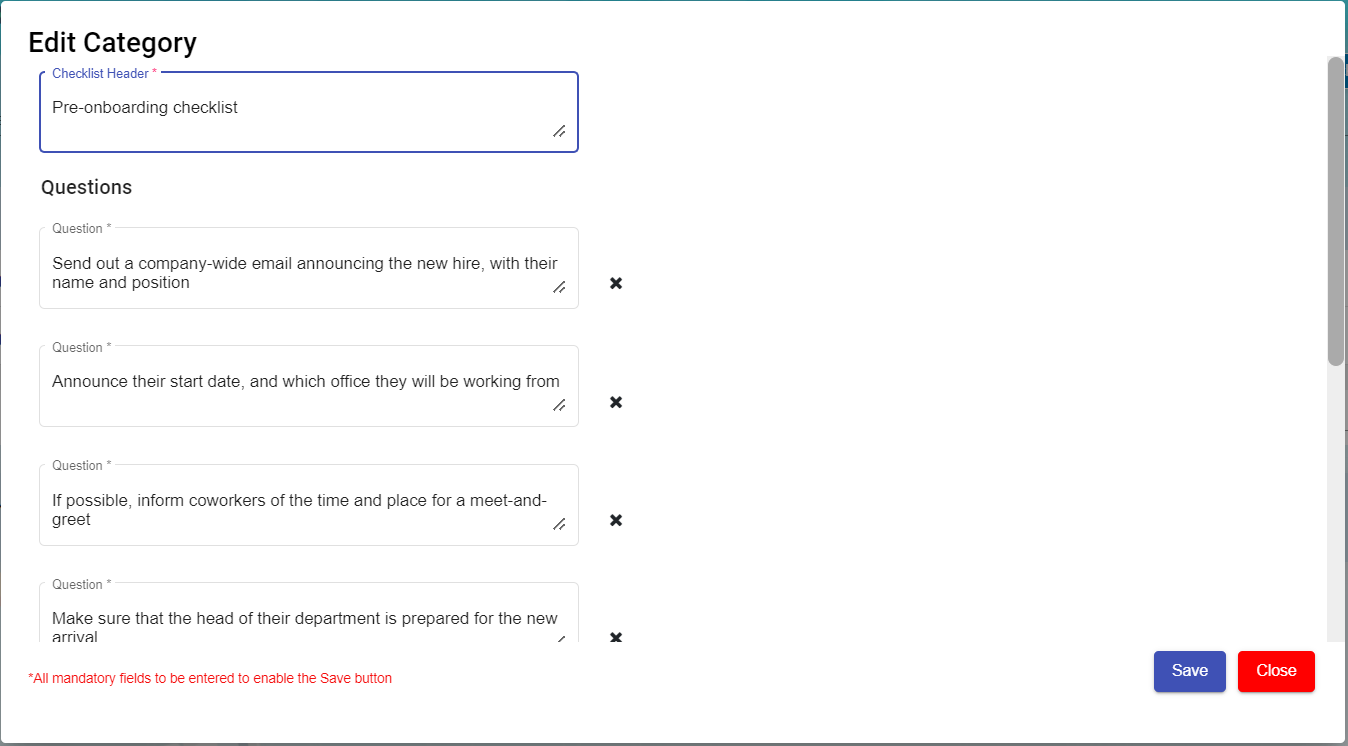](http://wiki.cuteinfocomm.com/uploads/images/gallery/2022-09/image-1663311260051.png)
#### Delete Checklist
User can use the delete option to delete the Onboard/Offboard checklist which is not in use or need to remove. Click [](http://wiki.cuteinfocomm.com/uploads/images/gallery/2022-09/image-1662695579815.png) in the delete column of the checklist. The checklist will be removed.
#### Filter a Onboard/Offboard Checklist
If you want to filter any checklist in the Onboard/Offboard Checklist page, you can use[ ](http://wiki.cuteinfocomm.com/uploads/images/gallery/2022-09/image-1663095417308.png)(**filter** button) on the page.
### Evaluation Factor
Evaluation Factor master manages all the different evaluation factors based on period, type and trade. Click Evaluation factor, the created list will open as below,
[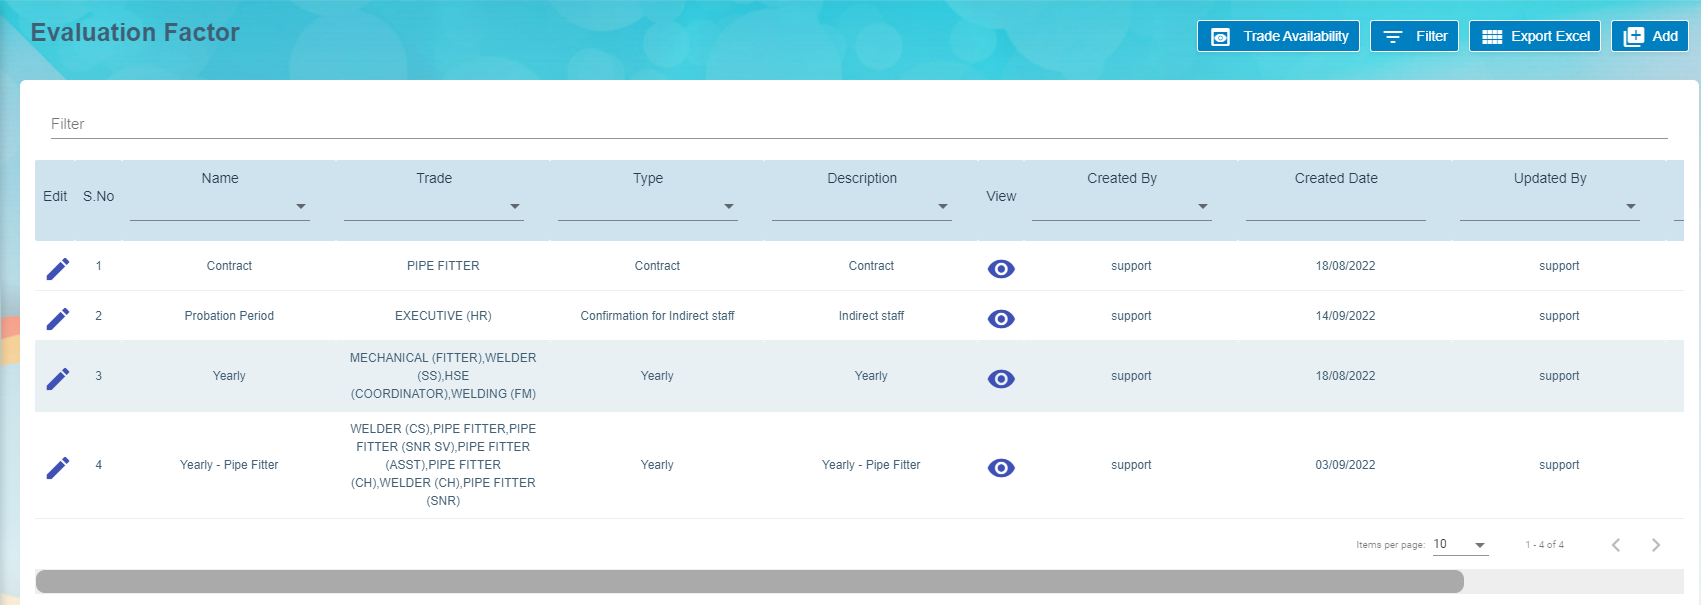](http://wiki.cuteinfocomm.com/uploads/images/gallery/2022-09/image-1663314194284.png)
#### Add A New Evaluation Factor
To add a new evaluation template,
1. Click the [](http://wiki.cuteinfocomm.com/uploads/images/gallery/2022-09/image-1662604025739.png), a new evaluation factor details window opens,
[](http://wiki.cuteinfocomm.com/uploads/images/gallery/2022-10/image-1666651774377.png)
2. Enter all the details of the new evaluation factor:
- At Name field, type the name of this new evaluation template.
- At Employee Type, select from the dropdown list i.e. Staff, Worker, Management
- At Trade field, select from the dropdown list of which trade is applicable for this new evaluation
template. User can also use filter to search for the trade name. User can select more than 1 trade by ticking the given checkbox beside the trade.
- At Type field, select the type for this new evaluation template. This list is setup at Admin ->
Options -> HRM - Evaluation Type.
[](http://wiki.cuteinfocomm.com/uploads/images/gallery/2022-10/image-1666652325245.png)
1. - At Description field, type a brief description for this new evaluation template. [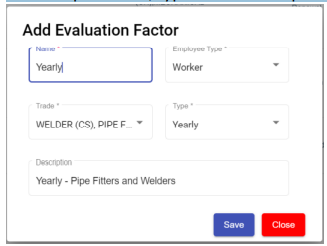](http://wiki.cuteinfocomm.com/uploads/images/gallery/2022-10/image-1666652423855.png)
2. Click **Save** button to create the new evaluation template and it will be shown as below, [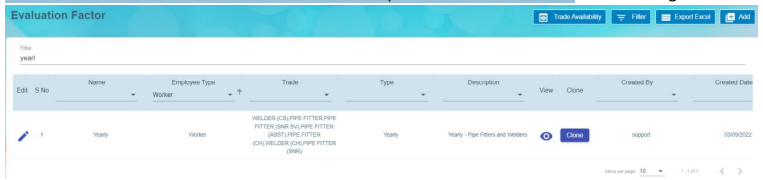](http://wiki.cuteinfocomm.com/uploads/images/gallery/2022-10/image-1666652551302.png)
3. The New Evaluation factor added on the main page. Click[](http://wiki.cuteinfocomm.com/uploads/images/gallery/2022-09/image-1663315743260.png)view icon to add details in Part I, Part II, Part III, Designation & Skill Level and Rating. **Note:** Part II and Part III are optional.
#### Add Details in New Evaluation Template
##### Part I of Evaluation Factor
Click on Part I tab, the part I detail page opens.
[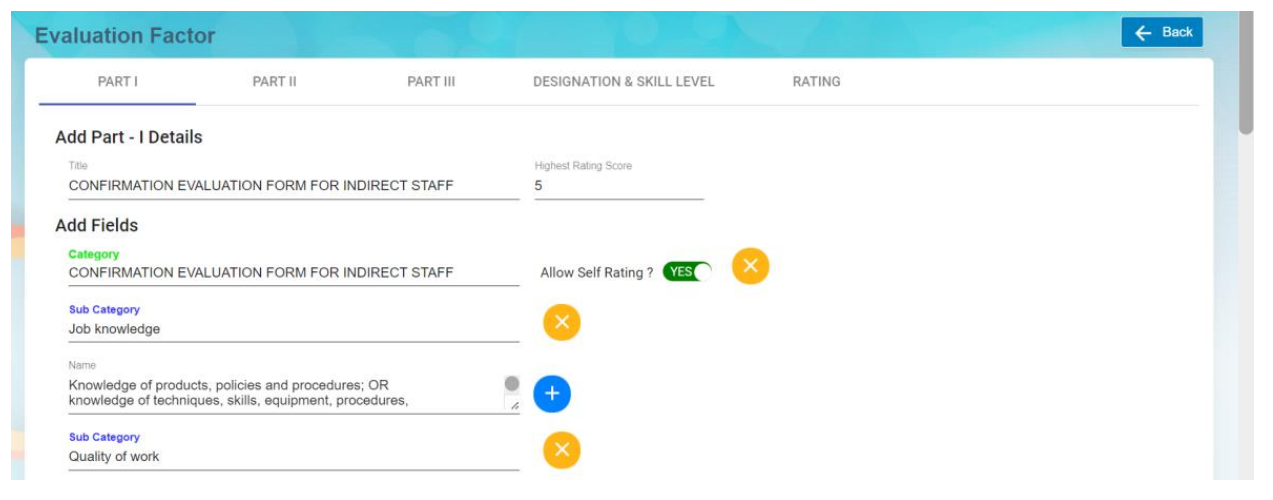](http://wiki.cuteinfocomm.com/uploads/images/gallery/2022-10/image-1666731836689.png)
1. In **Add Part I Details,** enter the Title and Highest Rating Score of this evaluation,
- **Title** – enter the title and this will display at the beginning of the evaluation form as
shown in the below screenshot highlighted in yellow of an employee evaluation form
using this evaluation factor template. [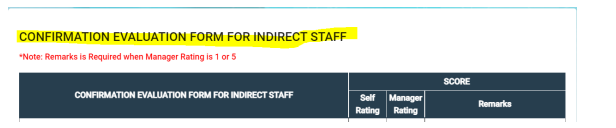](http://wiki.cuteinfocomm.com/uploads/images/gallery/2022-10/image-1666731803557.png)
- **Highest Rating Score** – enter the number score columns in the evaluation form.
2. In **Add Fields,** enter details as below:
- **Category**, it will be the column header in the evaluation table.
- **Sub Category,** it will be the sub Header of criteria setup in the evaluation form
- **Name**, it will be the detailed perspectives of each criteria under the sub category.
- **Allow Self Rating,** if set to Yes, it means employee needs to do self rating. **Note:** Users can click [](http://wiki.cuteinfocomm.com/uploads/images/gallery/2022-09/image-1663562038610.png) **add** icon to add (category, subcategory and, name). If click add icon at the Category level, system will create a new category with new sub category and new name under this new category. If click add icon at sub category level, system will create a new sub category including the name that falls under this new sub category. If click add icon at name level, then system will create a new name.
Users can click [](http://wiki.cuteinfocomm.com/uploads/images/gallery/2022-10/image-1664858181194.png) **delete** icon to remove (category, subcategory and, name). If click the delete icon at the Category level, system will delete the entire category including
the sub category and name belonging to this category. If click the delete icon at sub category level, system will delete this sub category including the name that falls under this sub category. If click the delete icon at name level, then system will delete only this name.
3. Click **Save** to save the Part I details.
##### Part II of Evaluation Factor
Click on Part II tab, it opens as below. If the "Add Part-II Details" is set to ON, system will display this Part II details as part of the
employee evaluation; If it's set to OFF, then the Part II details will be omitted from the employee evaluation form.
[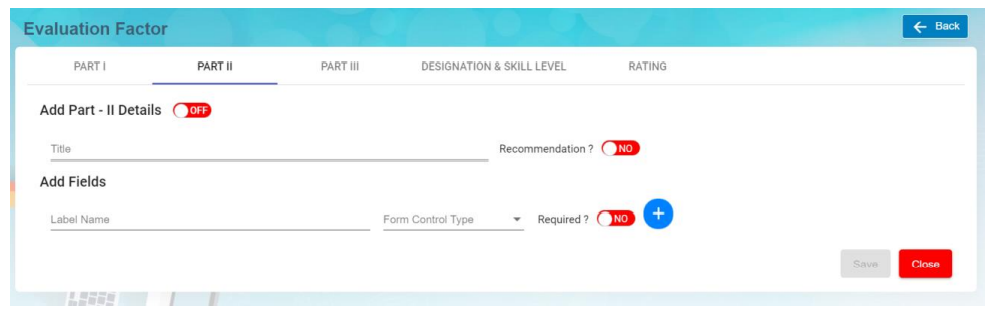](http://wiki.cuteinfocomm.com/uploads/images/gallery/2022-10/image-1666735475830.png)
1. In **Add Part – II Details** section, enter below details. Note: The flag "**OFF"** next to Part II details need to set to **ON** hence this Part II will be displayed in the employee evaluation form.
- **Title** – Input the title and this will be displayed as the header of the section in the employee
evaluation form as shown below. [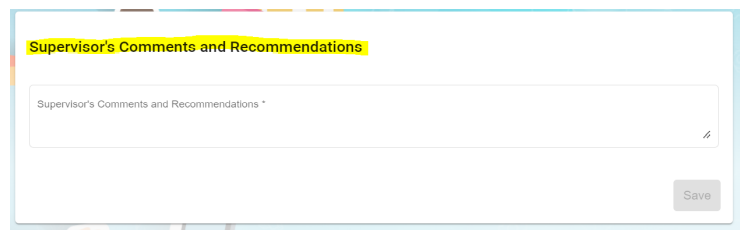](http://wiki.cuteinfocomm.com/uploads/images/gallery/2022-10/image-1666736290274.png)
- When **"Recommendation?"** icon is set to YES, system will display this Recommendation with a list of dropdown values for user to select as shown below, [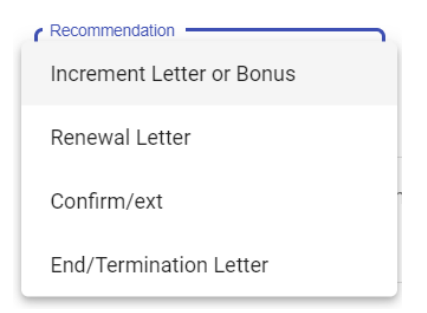](http://wiki.cuteinfocomm.com/uploads/images/gallery/2022-10/image-1666837488254.png)
2. In **Add Felids,** enter below details,
- **Label Name**-enter the label name.
- **Form control type**-choose type of control (Text/Text Area/Checkbox) for this Label Name
- **Required?**- if this icon is set to YES, it is mandatory for user to select or type some text into this form control
field.
- Click [ ](http://wiki.cuteinfocomm.com/uploads/images/gallery/2022-09/image-1663562038610.png)icon to add more label name field if needed. **Note:** Users can click [](http://wiki.cuteinfocomm.com/uploads/images/gallery/2022-09/image-1663562038610.png) **add** icon to add (category, subcategory and, name). If click add icon at the Category level, system will create a new category with new sub category and new name under this new category. If click add icon at sub category level, system will create a new sub category including the name that falls under this new sub category. If click add icon at name level, then system will create a new name.
Users can click [](http://wiki.cuteinfocomm.com/uploads/images/gallery/2022-10/image-1664858181194.png) **delete** icon to remove (category, subcategory and, name). If click the delete icon at the Category level, system will delete the entire category including
the sub category and name belonging to this category. If click the delete icon at sub category level, system will delete this sub category including the name that falls under this sub category. If click the delete icon at name level, then system will delete only this name.
3. Click **Save** to save the Part II details.
##### Part III of Evaluation Factor
Click on Part III tab, it opens as below. If the "Add Part- III Details" is set to ON, system will display this Part III details as part of the
employee evaluation; If it's set to OFF, then the Part III details will be omitted from the employee evaluation form.
[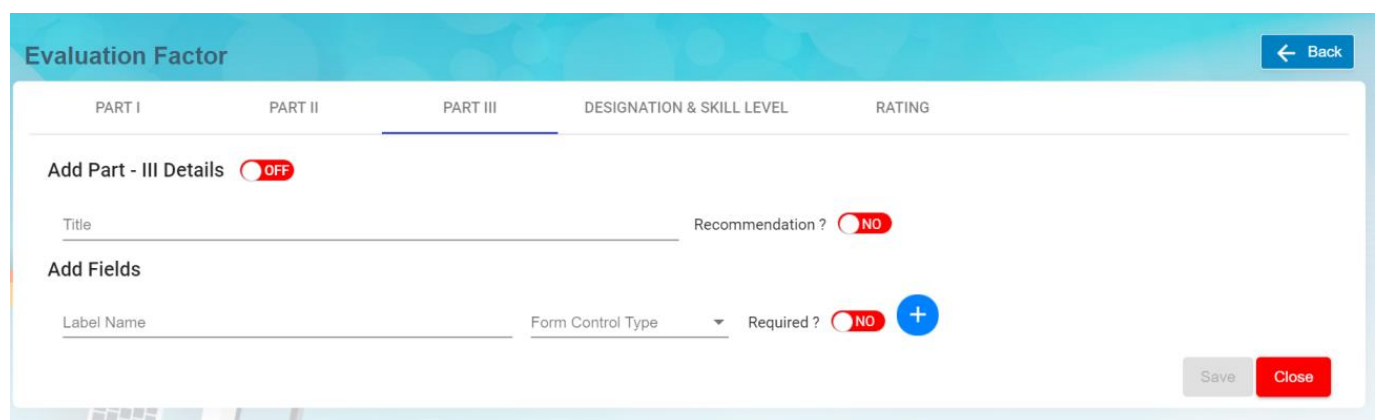](http://wiki.cuteinfocomm.com/uploads/images/gallery/2022-10/image-1666838712207.png)
1. In **Add Part- III Details** section, enter below details. Note: The flag "**OFF"** next to Part III details need to set to **ON** hence this Part III will be displayed in the employee evaluation form.
- **Title** – Input the title and this will be displayed as the header of the section in the employee evaluation form as shown below. [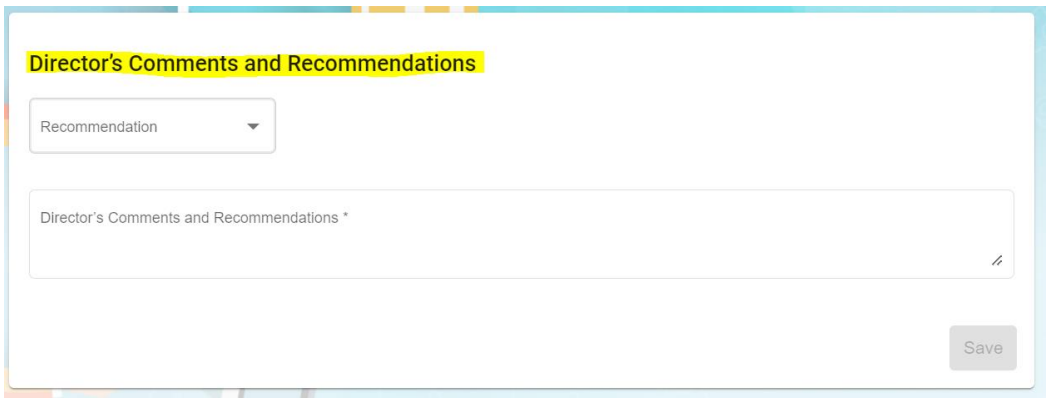](http://wiki.cuteinfocomm.com/uploads/images/gallery/2022-10/image-1666898672606.png)
- When **"Recommendation?"** icon is set to YES, system will display this Recommendation with a list of dropdown values for user to select as shown below, [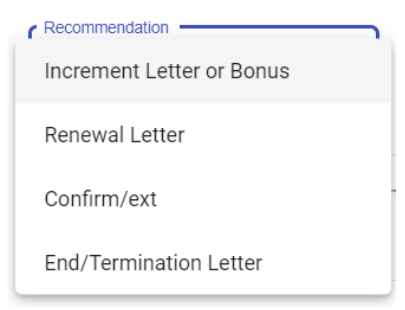](http://wiki.cuteinfocomm.com/uploads/images/gallery/2022-10/image-1666898726651.png)
2. In **Add Felids,**
- **Label Name**-enter the label name.
- **Form control type**-choose type of control (Text/Text Area/Checkbox) for this Label Name
- **Required?**- if this icon is set to YES, it is mandatory for user to select or type some text into this form control
field.
- Click [ ](http://wiki.cuteinfocomm.com/uploads/images/gallery/2022-09/image-1663562038610.png)icon to add more label name field if needed. **Note:** Users can click [](http://wiki.cuteinfocomm.com/uploads/images/gallery/2022-09/image-1663562038610.png) **add** icon to add (category, subcategory and, name). If click add icon at the Category level, system will create a new category with new sub category and new name under this new category. If click add icon at sub category level, system will create a new sub category including the name that falls under this new sub category. If click add icon at name level, then system will create a new name.
Users can click [](http://wiki.cuteinfocomm.com/uploads/images/gallery/2022-10/image-1664858181194.png) **delete** icon to remove (category, subcategory and, name). If click the delete icon at the Category level, system will delete the entire category including
the sub category and name belonging to this category. If click the delete icon at sub category level, system will delete this sub category including the name that falls under this sub category. If click the delete icon at name level, then system will delete only this name.
3. Click **Save** to save the Part III details.
##### Designation & Skill Level
The Designation & Skill Level section is to show the salary guide and job description of the selected trade(s) and this will serve as a benchmark when supervisors conduct employee evaluations. Click on DESIGNATION & SKILL LEVEL tab, it opens as below,
[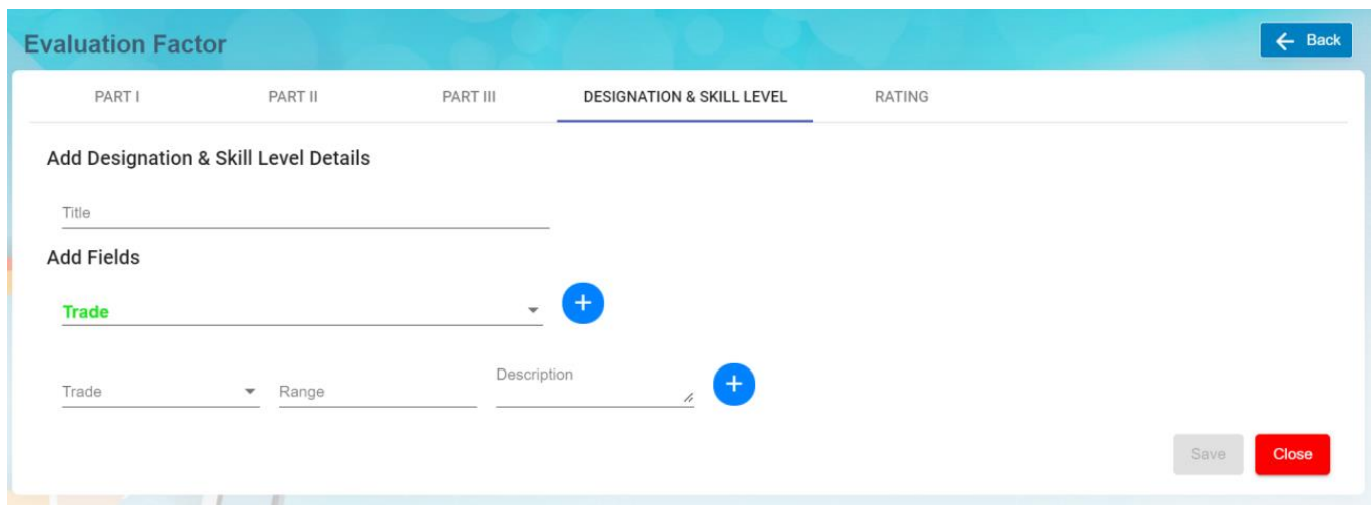](http://wiki.cuteinfocomm.com/uploads/images/gallery/2022-10/image-1666898957434.png)
1. In **Add Designation & Skill Level Details** section,
- **Title** – enter the title and this will be displayed as the header of this Designation & Skill Level
section in the employee evaluation form.
2. In **Add Fields** section, enter below details,
- ****Trade[](http://wiki.cuteinfocomm.com/uploads/images/gallery/2022-10/image-1666899946456.png)****-Click on the field to select trades in the dropdown list. Users can select multiple trades. Tick on the checkbox as shown in the below screenshot,
[](http://wiki.cuteinfocomm.com/uploads/images/gallery/2022-10/image-1666899834308.png)
- After the above trade selection, you need to select each individual trade and input the
salary range for this selected trade and job description of this selected trade. Refer to
below screenshot, [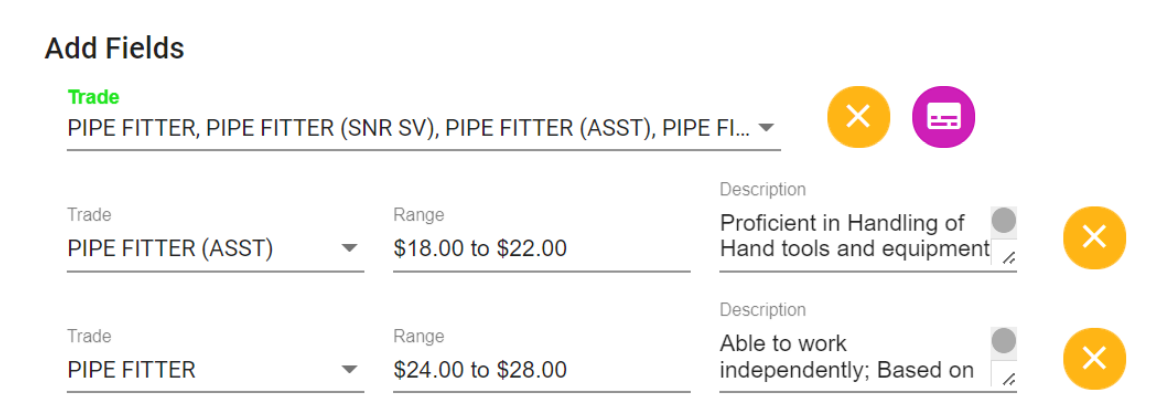](http://wiki.cuteinfocomm.com/uploads/images/gallery/2022-10/image-1666900049792.png)
**Note:** Users can click [](http://wiki.cuteinfocomm.com/uploads/images/gallery/2022-09/image-1663562038610.png) **add** icon to add more trades is required.
Users can click [](http://wiki.cuteinfocomm.com/uploads/images/gallery/2022-10/image-1664858181194.png) **delete** icon to remove trade. If click the delete icon at the **[](http://wiki.cuteinfocomm.com/uploads/images/gallery/2022-10/image-1666899946456.png)**level, system will delete whole section within this Trade field. If click the delete icon at trade after this Trade , then system will delete this selected trade.
- User can[](http://wiki.cuteinfocomm.com/uploads/images/gallery/2022-10/image-1666900364286.png)icon to clone a trade as shown in the below screenshot. Note that the dropdown list at this Clone Trade is based on the selected trades shown at the Evaluation Factor list page. This Clone Trade option is basically to duplicate the whole section of this selected**[](http://wiki.cuteinfocomm.com/uploads/images/gallery/2022-10/image-1666899946456.png)** and its sub trades (salary scale and job description). Once selected, click[ ](http://wiki.cuteinfocomm.com/uploads/images/gallery/2022-10/image-1666900541340.png)icon to save this clone trade and you will notice that system create another separate section
[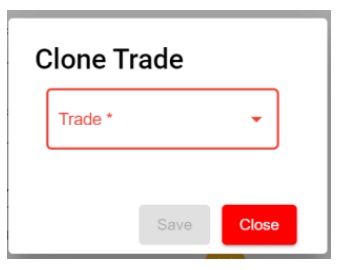](http://wiki.cuteinfocomm.com/uploads/images/gallery/2022-10/image-1666900448965.png)
3. Click **Save** to save this Part of the evaluation factor.
##### Rating
The Rating section is optional to be setup. Based on your evaluation form format, if rating is required to be shown in the evaluation form then it can be setup as per below. Click on Rating tab, Rating details window opens,
[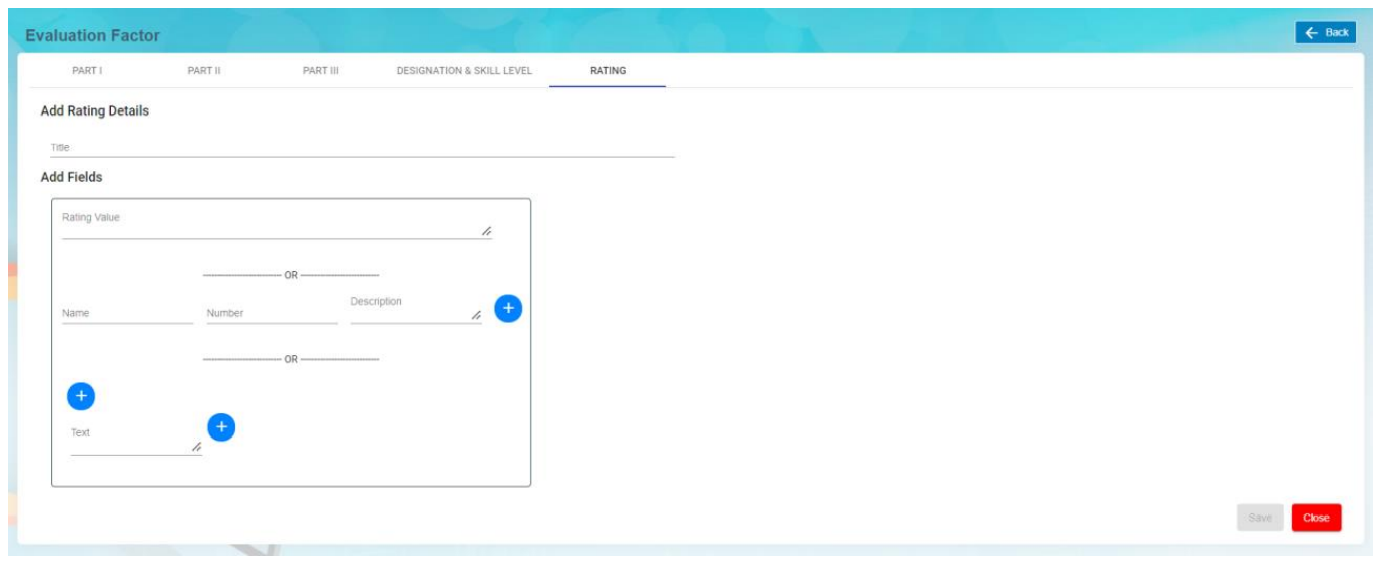](http://wiki.cuteinfocomm.com/uploads/images/gallery/2022-10/image-1666900907041.png)
1. In **Add Rating Details** section,
- **Title** – enter the title and this will be displayed as the header of this Rating section in the
employee evaluation form.
2. In **Add Fields** section, there are three options to creating the rating section to be displayed in the
employee evaluation form.
- **Option 1**: **Rating Value** – Input text to describe this rating value.[](http://wiki.cuteinfocomm.com/uploads/images/gallery/2022-10/image-1666901144339.png)
- ****Option 2****[](http://wiki.cuteinfocomm.com/uploads/images/gallery/2022-10/image-1666901229373.png)
- **Name** – enter text to describe this name.
- **Number** – enter a numeric value.
- **Description** – enter long description to describe this name.
Click on [](http://wiki.cuteinfocomm.com/uploads/images/gallery/2022-09/image-1663562038610.png)add icon to add if a different name, number and description is required
1. - ****Option 3****[](http://wiki.cuteinfocomm.com/uploads/images/gallery/2022-10/image-1666901321736.png)
- Click on [](http://wiki.cuteinfocomm.com/uploads/images/gallery/2022-09/image-1663562038610.png) icon before the Text field to add column horizontally.
Click on [](http://wiki.cuteinfocomm.com/uploads/images/gallery/2022-09/image-1663562038610.png) icon after the Text field to add column vertically.
Click on [](http://wiki.cuteinfocomm.com/uploads/images/gallery/2022-10/image-1664858181194.png) icon above the Text field will delete the column horizontally.
Click on [](http://wiki.cuteinfocomm.com/uploads/images/gallery/2022-10/image-1664858181194.png) icon beside the Text field will delete the column vertically. [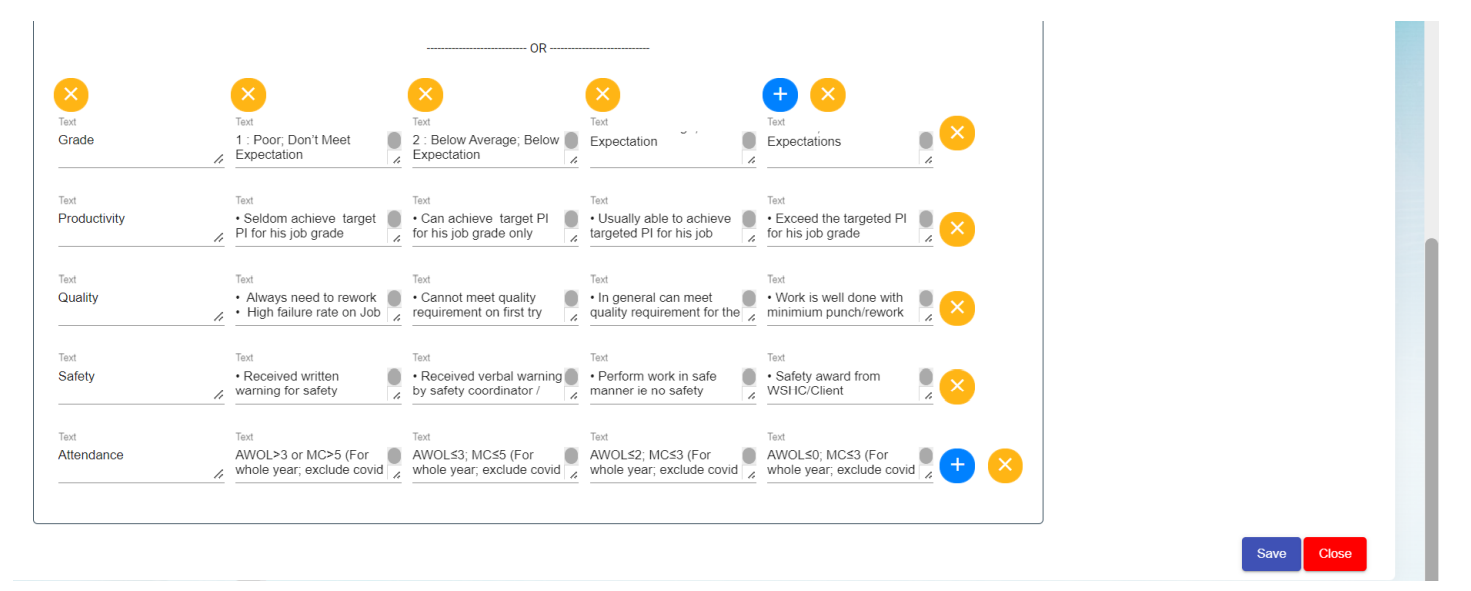](http://wiki.cuteinfocomm.com/uploads/images/gallery/2022-10/image-1666901449416.png)
2. Click **Save** to save the rating setup of the evaluation factor.
#### View Trade Availability
User can view the available trades used in evaluation by clicking on the Trade Availability icon in the Evaluation Factor page.
[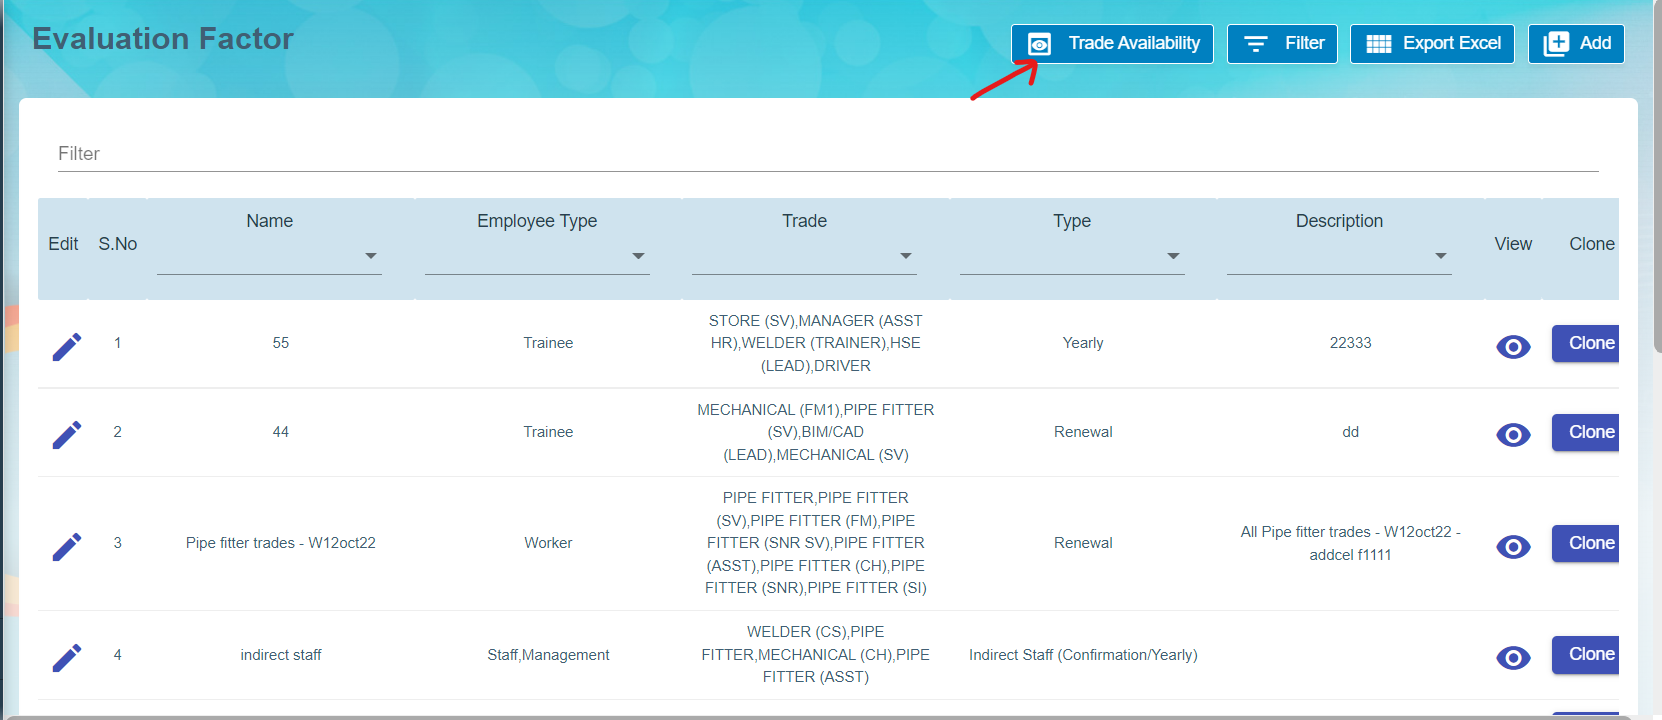](http://wiki.cuteinfocomm.com/uploads/images/gallery/2022-10/image-1666901811821.png)
Click [](http://wiki.cuteinfocomm.com/uploads/images/gallery/2022-10/image-1666901951872.png), below page opens for view,
[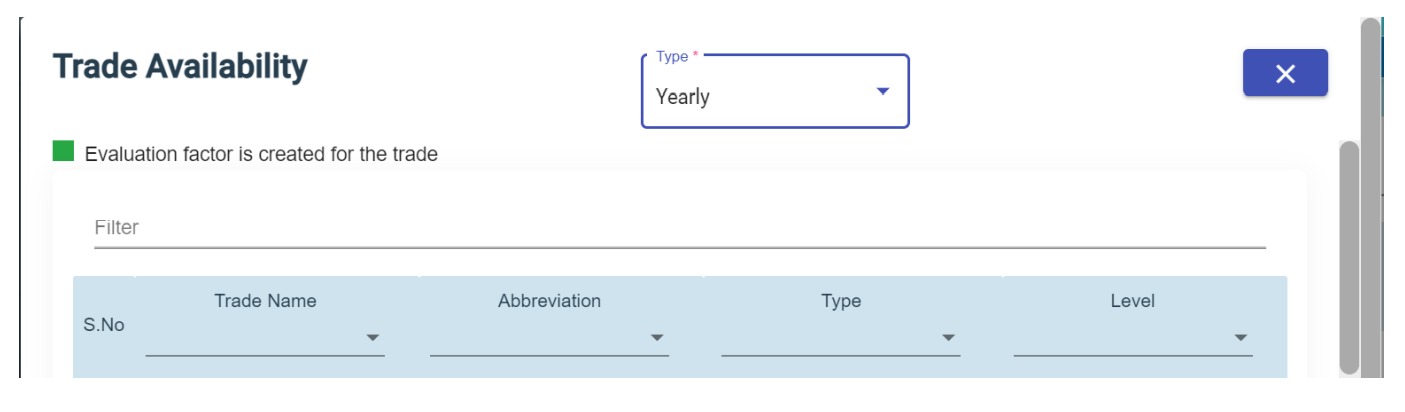](http://wiki.cuteinfocomm.com/uploads/images/gallery/2022-10/image-1666901926753.png)
#### Filter Evaluation Factor
User can click [](http://wiki.cuteinfocomm.com/uploads/images/gallery/2022-10/image-1666902066314.png) icon in the evaluation factor page to filter evaluation factor on different columns.
#### Export Evaluation Factor
User can click [](http://wiki.cuteinfocomm.com/uploads/images/gallery/2022-10/image-1666902547424.png)icon to export this list of Evaluation Factor into an excel file.
# HRM Others
The **Others** submenu in the **HUMAN RESOURCES** page helps you to manage the details of vehicles belongs to the company, insurance details of company and employees, salary addition/deduction details of employees for each month and various documents that company needs to keep track of along with MOM OED submissions too.
[](https://wiki.cuteinfocomm.com/uploads/images/gallery/2025-03/image-1741838058117.png)
The **Others** submenu contains the following tabs,
- Vehicle
- Insurance
- Addition/Deduction
- Document List
- Letter Generation
- Broadcast
- MOM OED Submissions
- User Manual
- Scheduler Subscription
### Vehicle
The **Vehicle** tab in the **Others** submenu helps you to add the details of vehicles belongs to the company including vehicle type, vehicle insurance, maintenance, and season parking pass details. Click the **Vehicle** tab in the **Others.** The **Vehicle** page opens.
[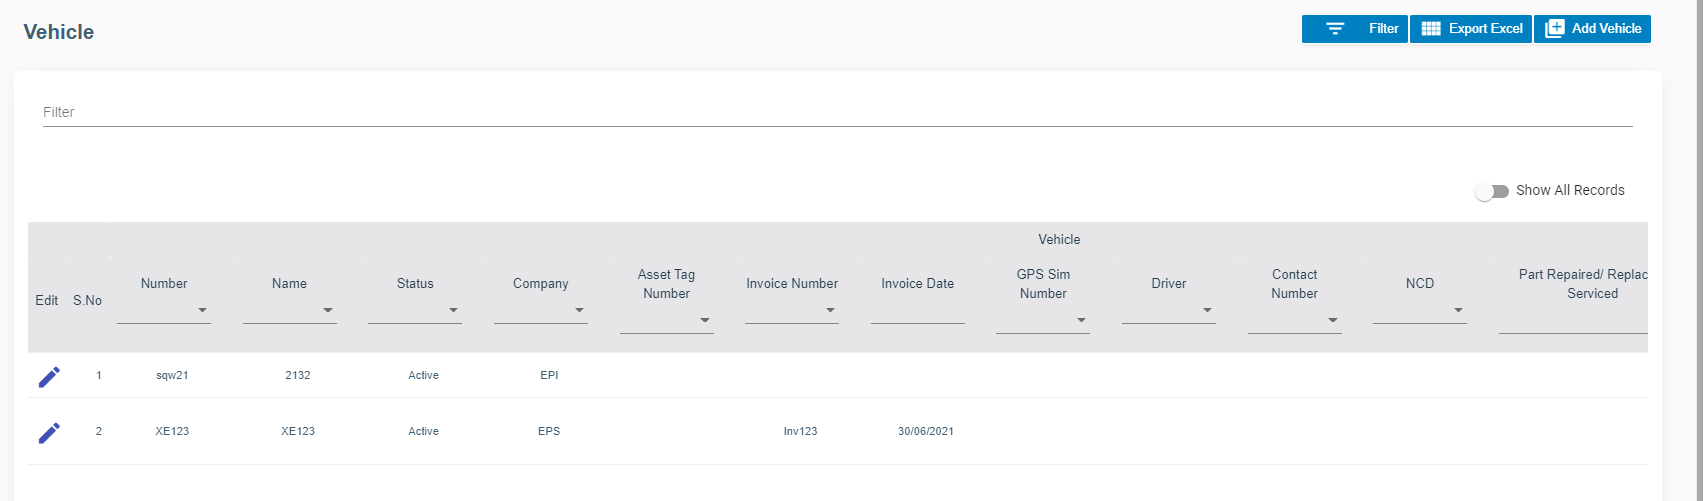](http://wiki.cuteinfocomm.com/uploads/images/gallery/2022-09/image-1662095291430.png)
#### Add Vehicle
If you want to add vehicle, do the following steps,
1. Click (**Add Vehicle** button) in the **Vehicle.** The **Vehicle Information** window opens.
2. In the **Vehicle** tab, fill up the following details, [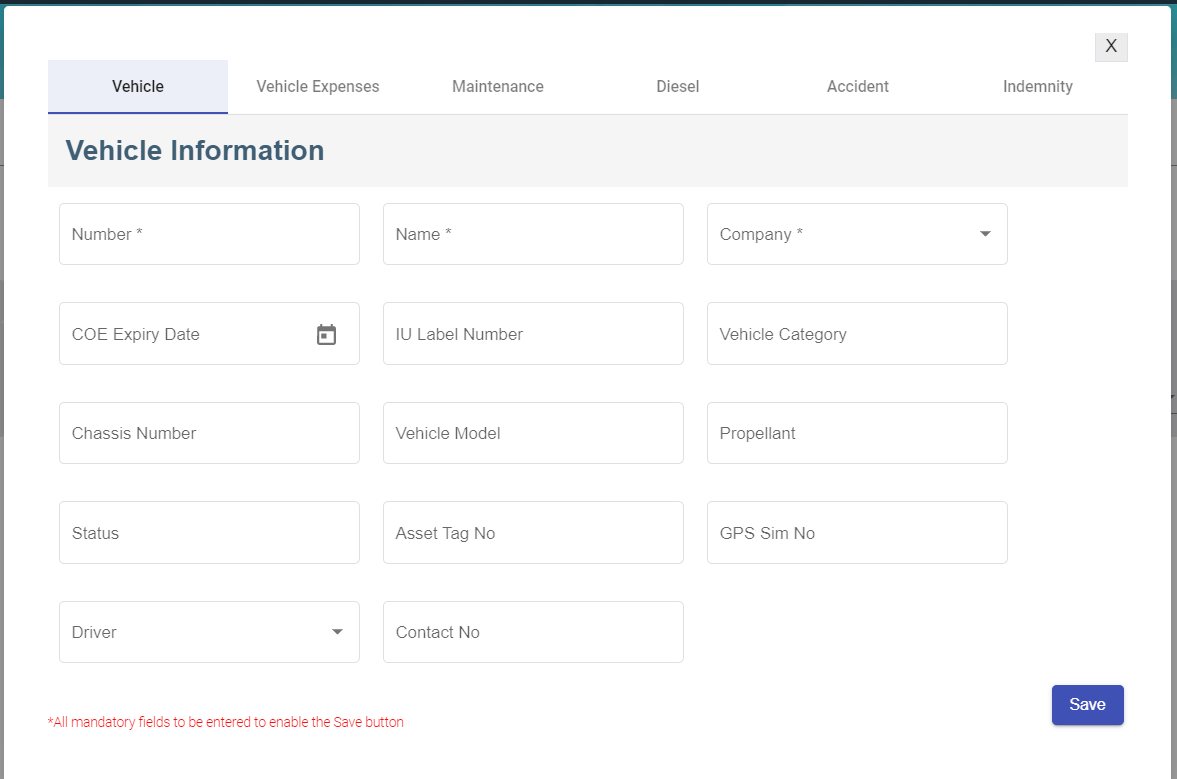](http://wiki.cuteinfocomm.com/uploads/images/gallery/2022-09/image-1663644517500.png)
- - In the **Number** box, enter the vehicle number.
- In the **Name** box, enter the name of the vehicle.
- In the **Company** box, select company name from dropdown list.
- In the **COE Expiry Date** box, enter COE expiry date.
- In the **IU label Number** box, enter the IU number.
- In the **Vehicle Category** box, enter the vehicle category.
- In the **Chassis Number** box, enter the car identification number
- In the **Vehicle Model** box, enter the vehicle model.
- In the **Propellant** box, enter the propellant information.
- In the **Status** box, enter the status of the vehicle
- In **Asset Tag No** box, enter the company asset tag number.
- In **GPS Sim No** box, enter the GPS Sim attached to the vehicle if any
- In **Driver** box, select the driver name from company employee list.
- In **Contact No** box, enter the contact number.
- Click **Save** then click **Next**, the vehicle expenses tab will open.
3. In the **Vehicle Expenses** tab, fill up the following details, [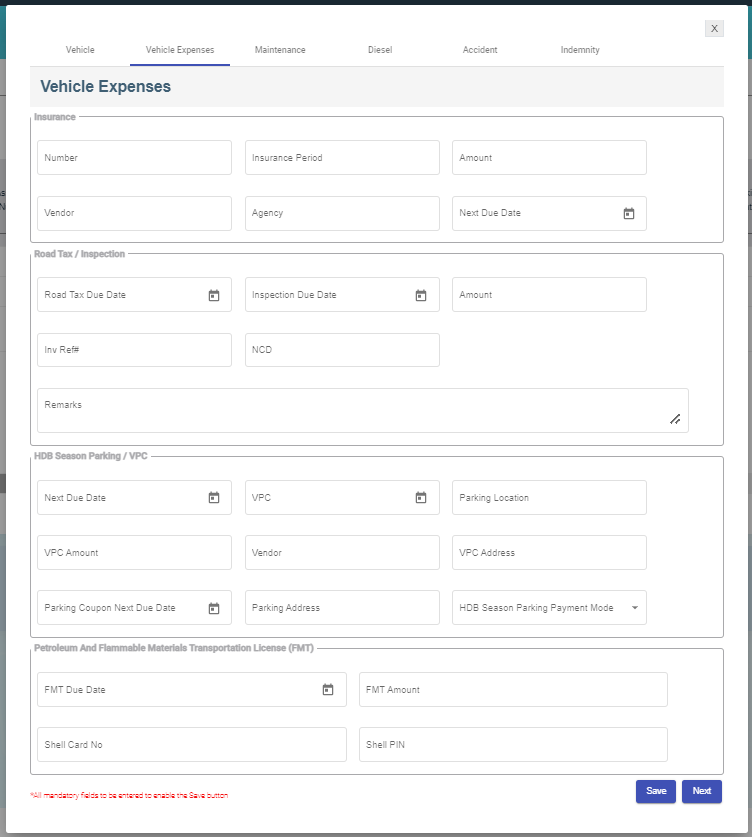](http://wiki.cuteinfocomm.com/uploads/images/gallery/2022-09/image-1663261822494.png)
- Insurance section
- In the **Number** box, enter the vehicle insurance number.
- In the **Insurance Period** box, enter the current insurance period,
- In the **Vendor** box, enter the name of the vendor.
- In the **Agency** box, enter the name of the agency.
- In the **Next Due Date** box, select the due date of the vehicle insurance.
- Road Tax/Inspection section
- In the **Road Tax Due Date** box, select the due date of the road tax.
- In the **Inspection Due Date** box, select the due date of the inspection.
- In the **Amount** box, enter the inspection amount.
- In the **Inv Ref#** box, enter invoice reference number.
- In the **NCD** box, enter no claims discount.
- HDB Season Parking/VPC section
- In the **Next Due Date** box, select the due date for HDB season parking.
- In the **Vehicle Parking Certificate (VPC)** box, select the VPC due date.
- In the **Parking Location** box, enter the parking address.
- In the **VPC Amount** box, enter the VPC amount.
- In the **Vendor** box, enter the vendor name.
- In the **VPC Address** box, enter the VPC address.
- In the **Parking Coupon Next Due Date** box, select the next due date of the parking coupon.
- In the **Parking Address** box, enter parking address.
- In the **HDB Season Parking Payment Mode** box, select the payment mode.
- Petroleum And Flammable Materials Transportation License (FMT) section
- In the **FMT Due Date** box, enter the due date of the FMT.
- In the **FMT Amount** box, enter the FMT amount.
- In the **Shell Card No** box, enter the shell card number.
- In the **Shell Pin** box, enter the shell pin number.
- Click **Save**, then click **Next**, the Vehicle Maintenance tab will open.
4. In the **Vehicle Maintenance** tab, fill up the following details, [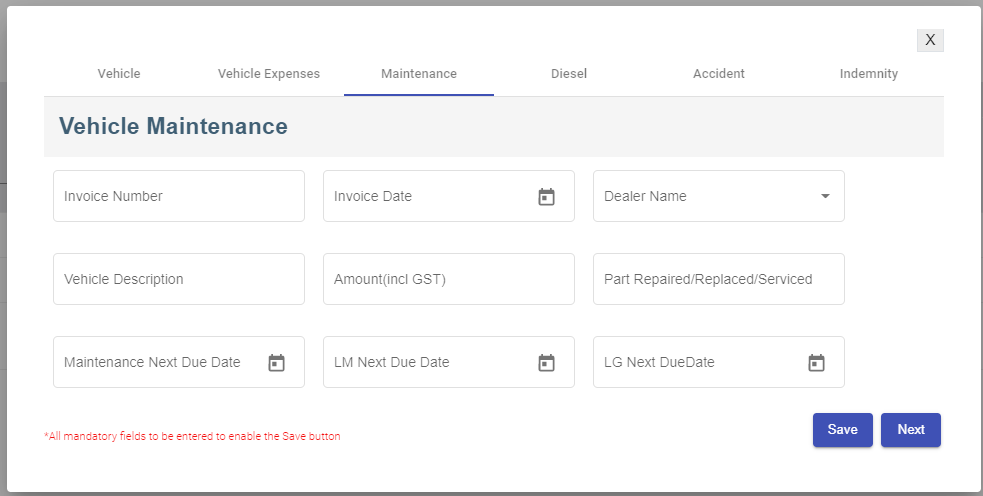](http://wiki.cuteinfocomm.com/uploads/images/gallery/2022-09/image-1663263840925.png)
- - In the **Invoice Number** box, enter the invoice number.
- In the **Invoice Date** box, select the date of the invoice.
- In the **Dealer Name** box, select the dealer name.
- In the **Vehicle Description** box, enter the maintenance description.
- In the **Amount (incl GST)** box, enter the maintenance amount.
- In the **Part Repaired/Replaced/Serviced** box, enter the part name.
- In the **Maintenance Next Due Date** box, select the next due date of maintenance.
- In the **LM Next Due Date** box, select the next due date of LM.
- In the **LG Next Due** box, select the next due date of LG.
- Click **Save**, then click **Next**, the Vehicle Diesel tab will open.
5. In the **Vehicle Diesel** tab, fill up details of each record. [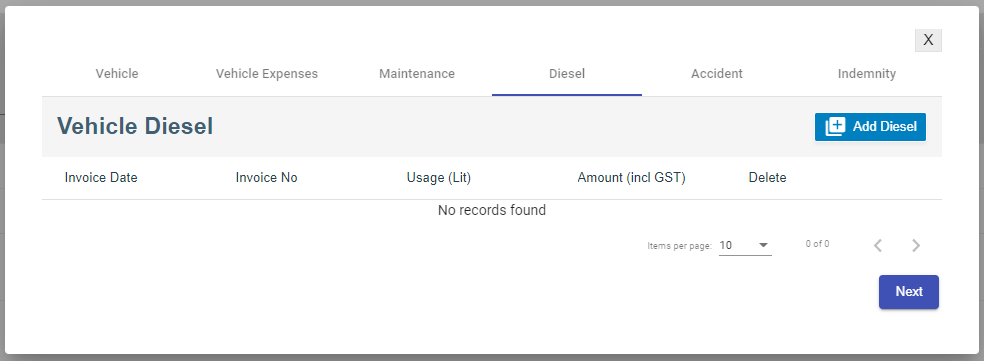](http://wiki.cuteinfocomm.com/uploads/images/gallery/2022-09/image-1663264329106.png)
- Click [](http://wiki.cuteinfocomm.com/uploads/images/gallery/2022-09/image-1663352493239.png)add diesel icon, below window opens, enter the diesel details, [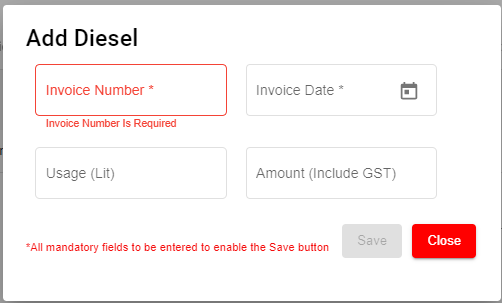](http://wiki.cuteinfocomm.com/uploads/images/gallery/2022-09/image-1663264465471.png)
- Click **Save**, then click **Next**, the Accident tab will open.
6. In the **Accident** tab, fill up the following details, [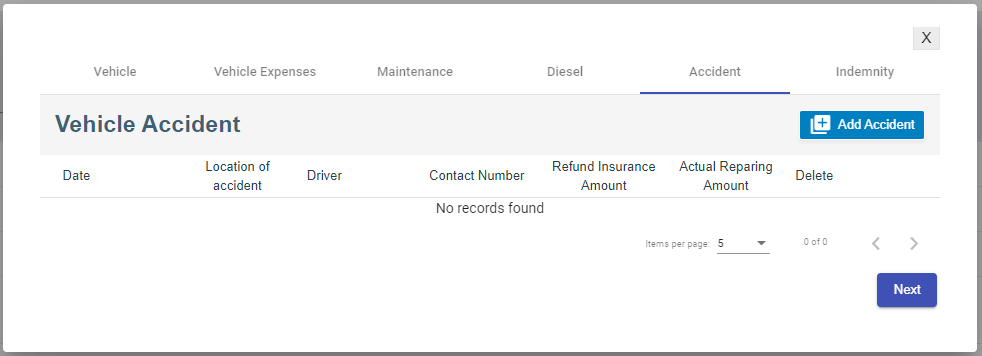](http://wiki.cuteinfocomm.com/uploads/images/gallery/2022-09/image-1663352451233.png)
- Click[](http://wiki.cuteinfocomm.com/uploads/images/gallery/2022-09/image-1663352538043.png) add accident icon, below window opens, enter the details of the accident [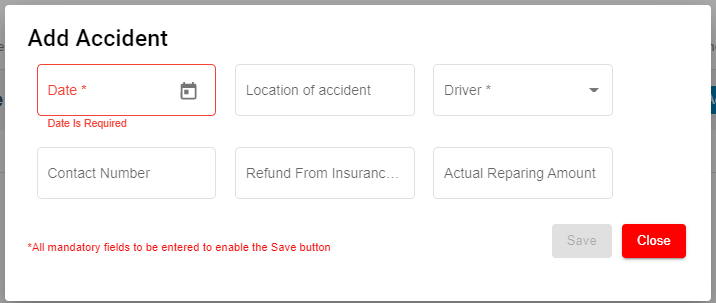](http://wiki.cuteinfocomm.com/uploads/images/gallery/2022-09/image-1663352813437.png)
- Click **Save** and then click **Next**, the Indemnity tab will open.
7. In the **Indemnity** tab, fill up the following details, [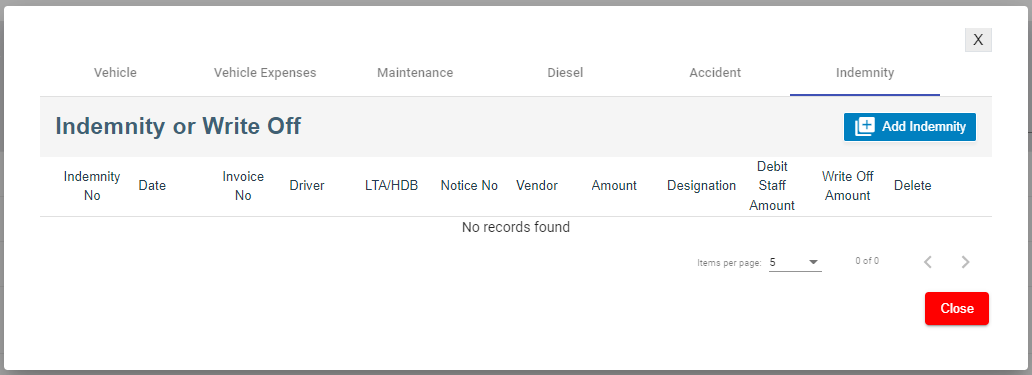](http://wiki.cuteinfocomm.com/uploads/images/gallery/2022-09/image-1663353086440.png)
- Click[](http://wiki.cuteinfocomm.com/uploads/images/gallery/2022-09/image-1663353135029.png) add indemnity icon, below window opens, enter the details of the indemnity. [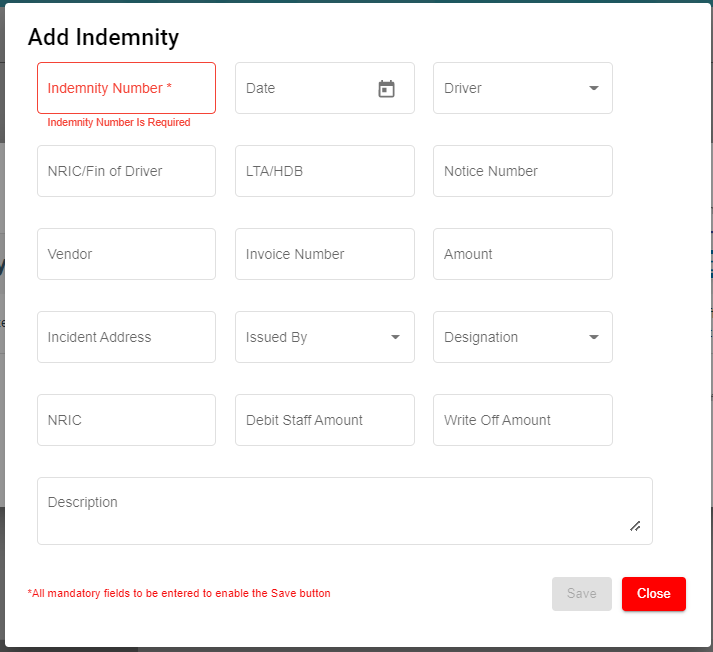](http://wiki.cuteinfocomm.com/uploads/images/gallery/2022-09/image-1663353228245.png)
- Click **Save.**
#### Edit Vehicle
You can edit the details of the added vehicle by using edit option provided in the **Edit** column of the **Vehicle** page. Click  (Edit icon) of the respective vehicle you have added. The **Add vehicle** window opens with the added vehicle details. Edit the vehicle details where you want. Click **Save**.
[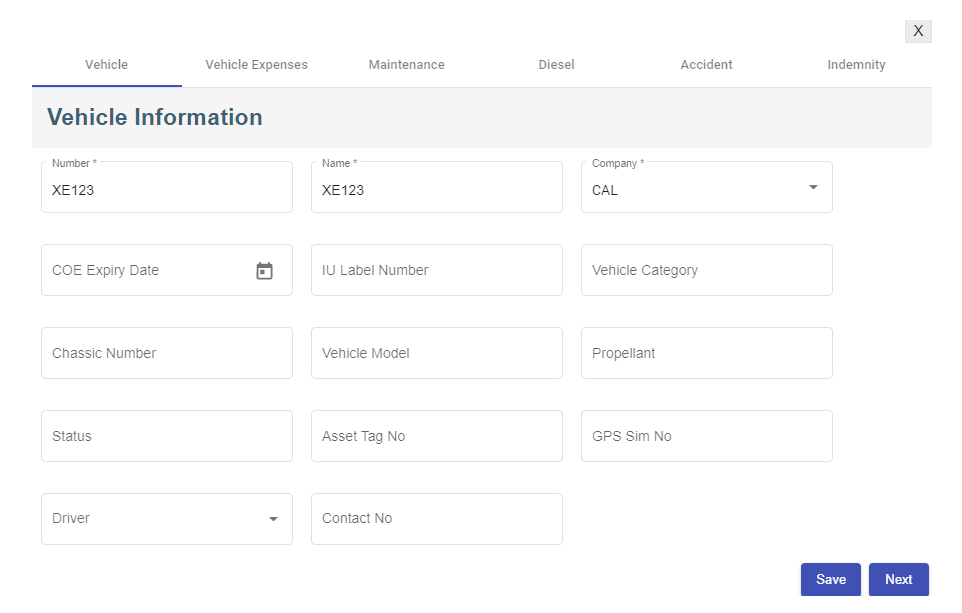](http://wiki.cuteinfocomm.com/uploads/images/gallery/2022-09/image-1662095366866.png)
#### Add/ View Attachment for Vehicle
If you want to add any new attachment for the vehicle or view any added attachment,
1. click (Attachment icon) of the respective vehicle for which you want to add or view the attachment. The **Add/ View Attachment** window opens. [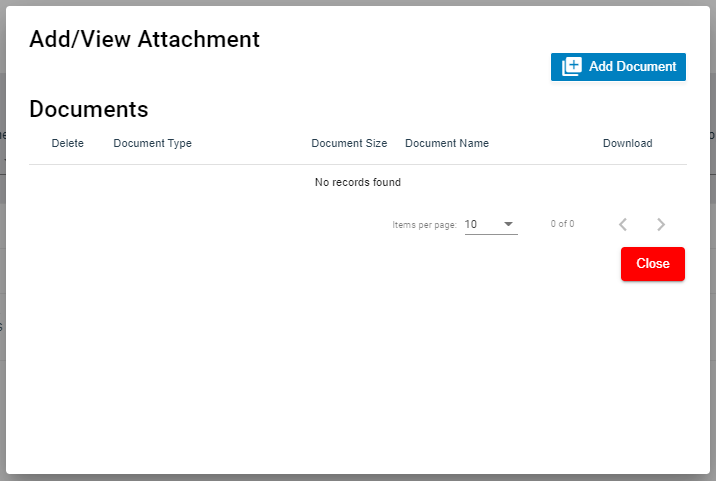](http://wiki.cuteinfocomm.com/uploads/images/gallery/2022-09/image-1663353629149.png)
2. Click [](http://wiki.cuteinfocomm.com/uploads/images/gallery/2022-09/image-1663353642362.png)(Add Document button). The file choosing and uploading option will be enabled. Click (Choose File button) and select the file which you want to upload. [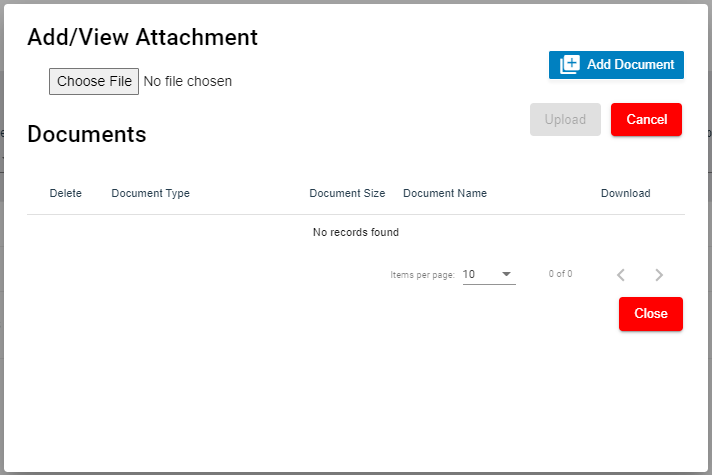](http://wiki.cuteinfocomm.com/uploads/images/gallery/2022-09/image-1663353963695.png)
3. Click **Upload.** The selected file will be uploaded and displayed in the **Add/View Attachment** window.
#### Delete Vehicle
You can delete the added vehicle by using[ ](http://wiki.cuteinfocomm.com/uploads/images/gallery/2022-09/image-1663353518509.png)(Delete icon) provided in the **Delete** column of the **Vehicle** page. If you want to delete the Vehicle Type, click **Yes** otherwise click **No**.
[](http://wiki.cuteinfocomm.com/uploads/images/gallery/2022-09/image-1663353560071.png)
#### Filter Vehicle
If you want to view any specific vehicle details among multiple vehicles listed in the **Vehicle** page, you can use the filter option provided in the upper right corner of the **Vehicle** page. Click[ ](http://wiki.cuteinfocomm.com/uploads/images/gallery/2022-09/image-1663353587313.png)(Filter button). The filter option opens.
#### Export Vehicle
The application has a feature to download the added vehicle details as an excel file. You can use (**Export Excel** button) to download the added vehicle details. Click[](http://wiki.cuteinfocomm.com/uploads/images/gallery/2022-09/image-1663354003972.png)(**Export Excel** button). The vehicle details in the **Vehicle** page will be downloaded as an excel file.
### Insurance
The **Insurance** tab in the **Others** submenu helps you to add the details of various insurance policy that is taken by the company. If you want to add an insurance, click the **Insurance** tab in the **Others.** The **Insurance** page opens.
[](http://wiki.cuteinfocomm.com/uploads/images/gallery/2022-09/image-1663139258801.png)
#### Add Insurance
To add insurances,
1. Click[](http://wiki.cuteinfocomm.com/uploads/images/gallery/2022-09/image-1663354158316.png)(**Add Insurance** button) in the **Insurance,** the **Add New Insurance Policy Details** window opens, [](http://wiki.cuteinfocomm.com/uploads/images/gallery/2022-09/image-1663354129765.png)**Note**: The fields notified with a symbol (\*) are mandatory. You must enter the relevant details in that fields before saving.
2. - In the **Insurance Type** box, enter the type of insurance.
- In the **Policy Number** box, enter the insurance policy number.
- In the **Period of Insurance** box, enter the total insurance period.
- In the **Start Date** box, select the insurance starting period.
- In the **End Date** box, select the insurance end date.
- In the **Sum Insured** box, enter the insurance amount.
- In the **Class** box, enter the class of insurance.
- In the **Purpose** box, enter the purpose of taking insurance.
- In the **Abbreviation** box, enter the abbreviation for the class.
- In the **Responsible By** box, select the name of a person who is responsible for the insurance.
- In the **Vendor Name** box, enter the vendor name.
- In the **Agency Name** box, enter the agency name.
- In the **IDD Code** box, enter the IDD code.
- In the **Area Code** box, enter the area code.
- In the **Contact Number** box, enter the contact number.
- In the **Email ID** box, enter the email id of the employee.
- In the **Address** box, enter the address of the employee.
- In the **Employee List** box, select the employees from the given list. **Tip**: You can select all the employees if you have insured for multiple employees.
- In the **Remarks** box, enter your remarks if any.
3. Click **Save**. The insurance is successfully added and listed in the **Insurance** page.
#### Edit Insurance
You can edit the details of the added insurance by using[](http://wiki.cuteinfocomm.com/uploads/images/gallery/2022-09/image-1663354671200.png)(Edit icon) provided in the **Edit** column of the **Insurance** page. To edit the added insurance details,
1. Click (Edit icon) of the respective insurance you have added. The Insurance Policy Details window opens with the added insurance details.
2. Edit the insurance details where you want.
3. Click **Save**.
#### Add/ View Attachment for Insurance
If you want to add any new attachment for the insurance or view any added attachment, you can use[](http://wiki.cuteinfocomm.com/uploads/images/gallery/2022-09/image-1663354754354.png)(Attachment icon) provided in the **Documents** column of the **Insurance** page.
#### Delete Insurance
You can delete the added insurance by using [](http://wiki.cuteinfocomm.com/uploads/images/gallery/2022-09/image-1663353518509.png)(Delete icon) provided in the **Delete** column of the **Insurance** page.
#### Filter Insurance
If you want to view any specific insurance details among multiple insurances listed in the **Insurance** page, you can use the [](http://wiki.cuteinfocomm.com/uploads/images/gallery/2022-09/image-1663353587313.png)filter option provided in the upper right corner of the **Insurance** page.
#### Export Insurance
The application has a feature to download the added insurance details as an excel file. You can use (**Export Excel** button) to download the added insurance details. Click [](http://wiki.cuteinfocomm.com/uploads/images/gallery/2022-09/image-1663354003972.png)(**Export Excel** button), the insurance details in the **Insurance** page will be downloaded as an excel file.
### Employee Salary Addition/Deduction
**Note**: This section is linked with **Payroll**.
The **Salary Addition/Deduction** tab in the **Others** submenu helps you to add the details of any addition or deduction in the employee’s salary for each month. This data is synchronized with the employee salary and automatically processed for each month. To add the salary addition/deduction details, click the **Salary Addition/Deduction** tab in the **Others**. The **Employees Addition/Deduction History** page opens.
[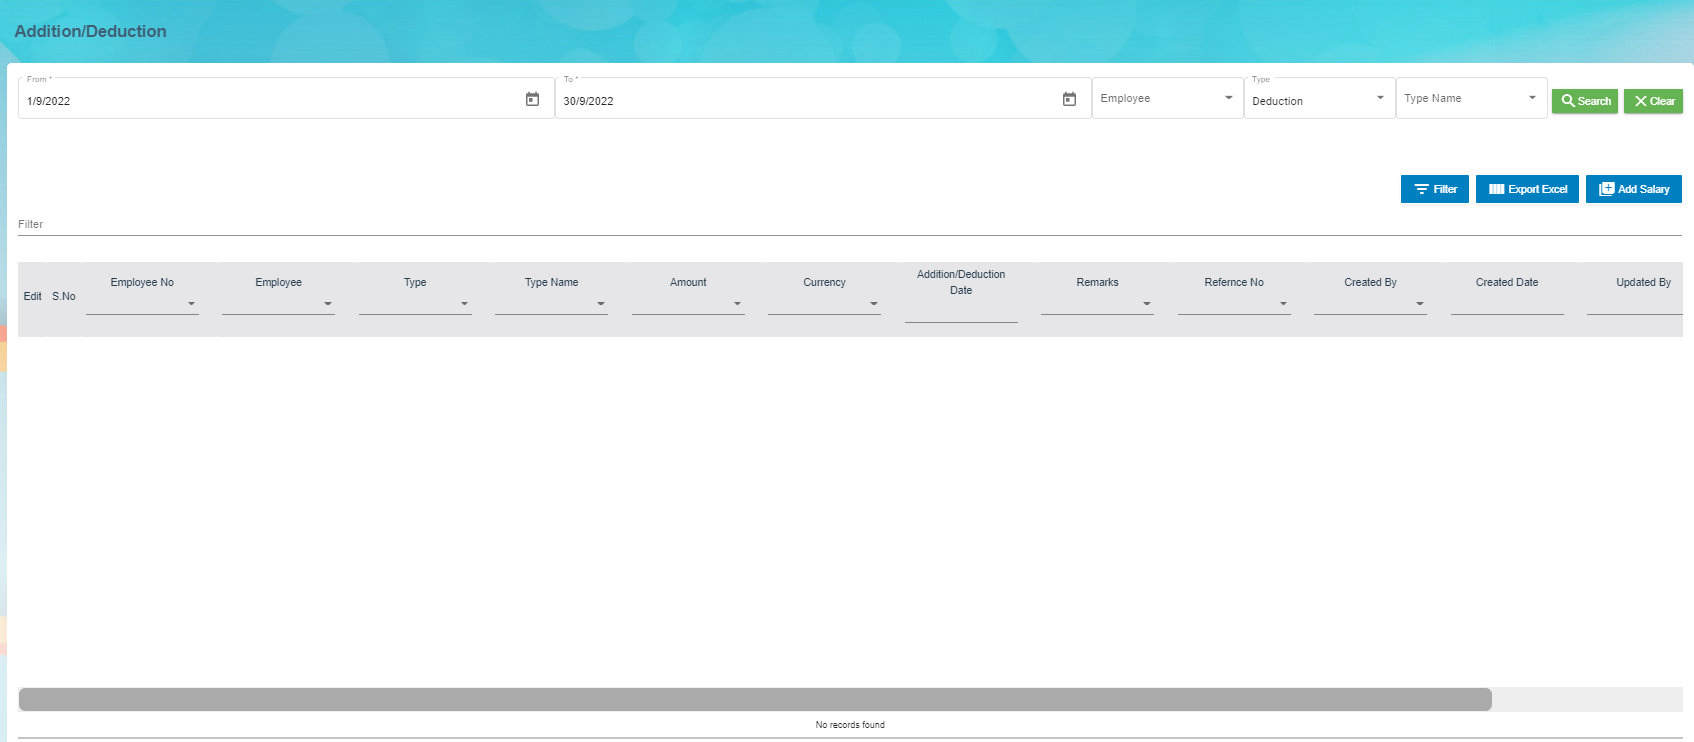](http://wiki.cuteinfocomm.com/uploads/images/gallery/2022-09/image-1663139472695.png)
#### Add Salary Addition/Deduction
If you want to add employee’s salary addition/deduction details, do the following steps,
1. Click [](http://wiki.cuteinfocomm.com/uploads/images/gallery/2022-09/image-1663354967344.png)(Add Salary Addition/Deduction button) in the Employees Addition/Deduction History, a new page for adding the details of salary addition/deduction open. [](http://wiki.cuteinfocomm.com/uploads/images/gallery/2022-09/image-1663139619963.png)
**Note**: The fields notified with a symbol (\*) are mandatory. You must enter the relevant details in that fields before saving.
2. In the **Employee selection** field:
- If you want to add the salary addition/deduction details for one employee, select the **Single**;
- If you want to add the salary addition/deduction details for more than one employee, select the **Multiple**
3. In the **Type** field:
- If you want add the salary addition details, select the **Addition**;
- If you want to deduct the salary deduction details, select the **Deduction**
4. In the **Employee** box:
- If you have selected the **Single** option in the **Employee selection** field, you can add only one employee from a drop-down list;
- If you have selected the **Multiple** option in the **Employee selection** field, you can add multiple employees by selecting the checkbox of the respective employees.
5. To select the **Addition Type**/**Deduction Type**, do one of the following steps,
**Note**: If you have selected the **Addition** option in the **Type** field, the **Addition Type** box will be enabled. If you have selected the **Deduction** option, the **Deduction Type** box will be enabled.
- In the **Addition Type** box, select the type of addition from a drop-down list.
- In the **Deduction Type** box, select the type of deduction from a drop-down list.
6. In the Currency box, select the currency type.
7. In the Amount box, enter the amount to be added or deducted.
8. To select the **Addition Date**/**Deduction Date**, do one of the following steps,
**Note**: If you have selected the **Addition** option in the **Type** field, the **Addition Date** box will be enabled. If you have selected the **Deduction** option, the **Deduction Date** box will be enabled.
- In the **Addition Date** box, select the date of addition from a drop-down list.
- In the **Deduction Date** box, select the date of deduction from a drop-down list.
9. In the **Remarks** box, enter your remarks if any.
10. Click **Next**.
11. Click **Confirm**. The salary addition/deduction details of employee are successfully added.
#### Delete Salary Addition/Deduction
You can delete the added salary addition/deduction details by using (Delete icon) provided in the **Delete** column of the **Employees Addition/Deduction History** page.
#### Filter Salary Addition/Deduction
There are two type of filter options provided in the **Employees Addition/Deduction History** page to view the detail of specific salary addition/deduction of employee.
**Filter option 1**
The **Employees Addition/Deduction History** page contains a filter option in the upper side of the page. To view the salary addition/deduction of the particular employee,
1. In the **From** and **To** boxes, select the from and to dates.
2. In the **Employee** box, select the employee you want to view the details.
3. In the **Type** box, select whether the addition or deduction.
4. In the **Type Name** box, enter the type of addition/deduction.
5. Click **Search**. The salary addition/deduction details of the employee you have selected will be filtered.
**Filter option 2**
If you want to view any specific salary addition/deduction details among multiple entries listed in the **Employees Addition/Deduction History** page, you can use this filter option[](http://wiki.cuteinfocomm.com/uploads/images/gallery/2022-09/image-1663355063095.png)provided in the upper right corner of the **Employees Addition/Deduction History** page.
#### Export Salary Addition/Deduction
The application has a feature to download the added salary addition/deduction details as an excel file. You can click [](http://wiki.cuteinfocomm.com/uploads/images/gallery/2022-09/image-1663354003972.png)(**Export Excel** button) to download the added salary addition/deduction details. The salary addition/deduction details in the **Employees Addition/Deduction History** page will be downloaded as an excel file.
### Document List
The **Document List** tab in the **Others** submenu helps you to add any documents that company needs to maintain with or without expiry date like ISO 9001:2015 certification and company’s product certification etc. To add a document, click the **Document List** tab in the **Others.** The Document List page opens.
[](http://wiki.cuteinfocomm.com/uploads/images/gallery/2022-09/image-1663139741261.png)
#### Add Document
If you want to add a document,
1. Click [](http://wiki.cuteinfocomm.com/uploads/images/gallery/2022-09/image-1663355137131.png)(Add Document) button in the Document List. The Add Document window opens. [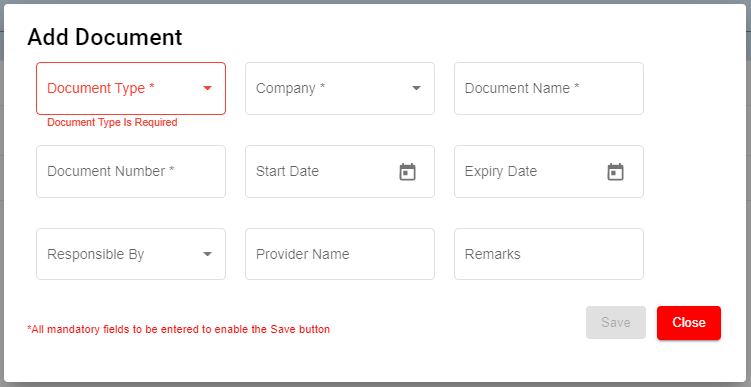](http://wiki.cuteinfocomm.com/uploads/images/gallery/2022-09/image-1663355175983.png)
- In the **Document Type** box, select the document type from a drop-down list. ( Selecting the '**Public**' document type will make the document available under the '**View Document**' page. The **"Public"** document type is added by default)
- In the **Company** box, select a company from a drop-down list.
- In the **Document Name** box, enter the name of a document you want to add.
- In the **Document Number** box, enter the document number.
- In the **Start Date** box, enter the validity starting date of the document.
- In the **Expiry Date** box, enter the validity expiry date of the document.
- In the **Responsible** By box, select the name of a person responsible for the document.
- In the **Provider Name** box, enter the document provider name.
- In the **Remarks** box, enter your remarks if any.
2. Click **Save**. The document is successfully added and listed in the **Document List** page.
#### Edit Document
You can edit the details of the added document by using (Edit icon) provided in the **Edit** column of the **Document List** page. To edit the added document details, click (Edit icon) of the respective document you have added. The **Add Document** window opens with the added details. Edit the document details where you want. Click **Save**.
[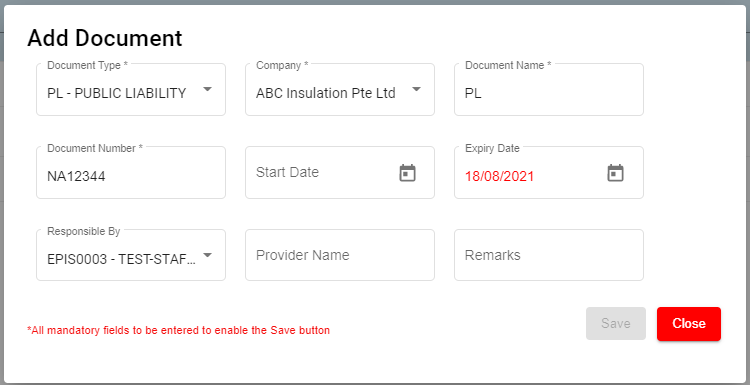](http://wiki.cuteinfocomm.com/uploads/images/gallery/2022-09/image-1663355227328.png)
#### Add/ View Attachment for Document
If you want to add any new attachment for the document or view any added attachment, you can use (Attachment icon) provided in the **Documents** column of the **Document List** page.
#### Delete Document
You can delete the added document by using (Delete icon) provided in the **Delete** column of the **Document List** page. If you want to delete the Document, click **Yes** otherwise click **No**.
#### Filter Document
If you want to view any specific document details among multiple documents listed in the **Document List** page, you can use the filter option [](http://wiki.cuteinfocomm.com/uploads/images/gallery/2022-09/image-1663355063095.png)provided in the upper right corner of the **Document List** page.
#### Export Document
The application has a feature to download the added document details as an excel file. Click [](http://wiki.cuteinfocomm.com/uploads/images/gallery/2022-09/image-1663354003972.png) (**Export Excel** button) to download the added document details. The document details in the **Document List** page will be downloaded as an excel file.
**Note**: The documents with expiry dates will be tracked for its expiry date in **HRM dashboard** and in **weekly emails** alerts.
### Letter Generation
User can generate all different letters here that are defined in letter template master. Click Letter Generation, the history record of letter generated are listed as below,
[](http://wiki.cuteinfocomm.com/uploads/images/gallery/2022-09/image-1663355632688.png)
#### Generate A New Letter
To generate a new letter,
1. Click[](http://wiki.cuteinfocomm.com/uploads/images/gallery/2022-09/image-1663356302980.png) add icon, below add letter page opens,[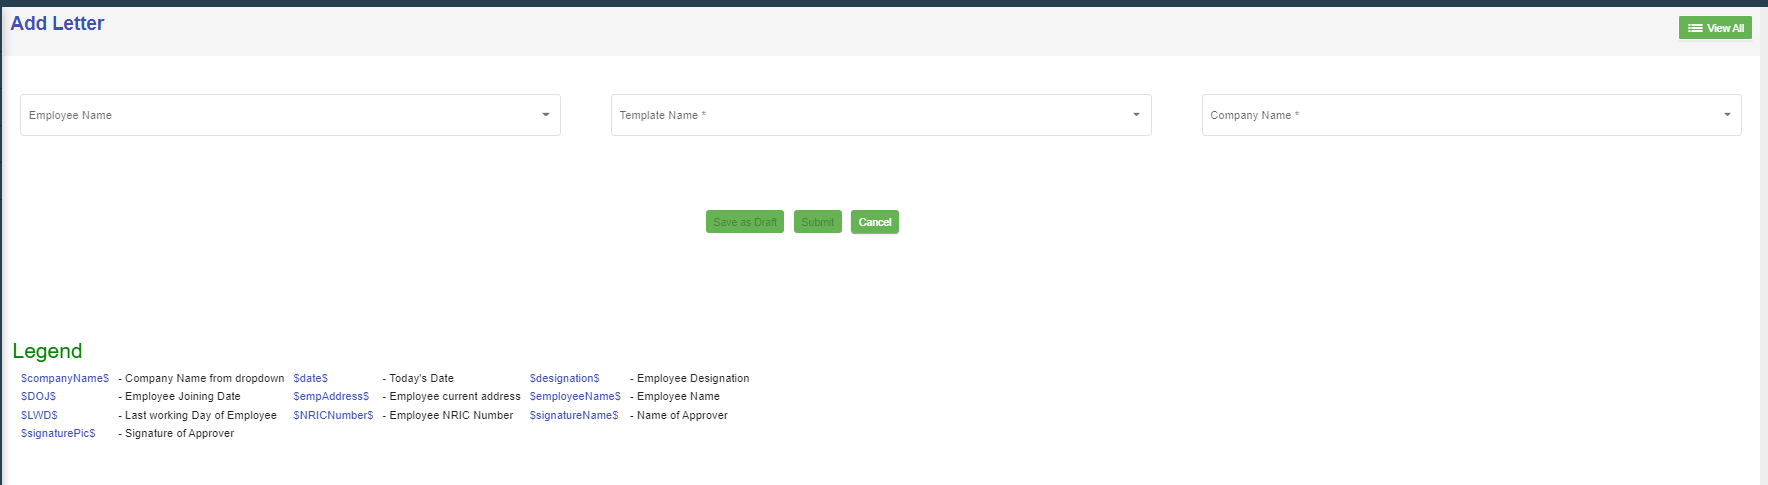](http://wiki.cuteinfocomm.com/uploads/images/gallery/2022-09/image-1663147497713.png)
2. Select employee name, letter template name, and company name, the selected letter template will opens as below,[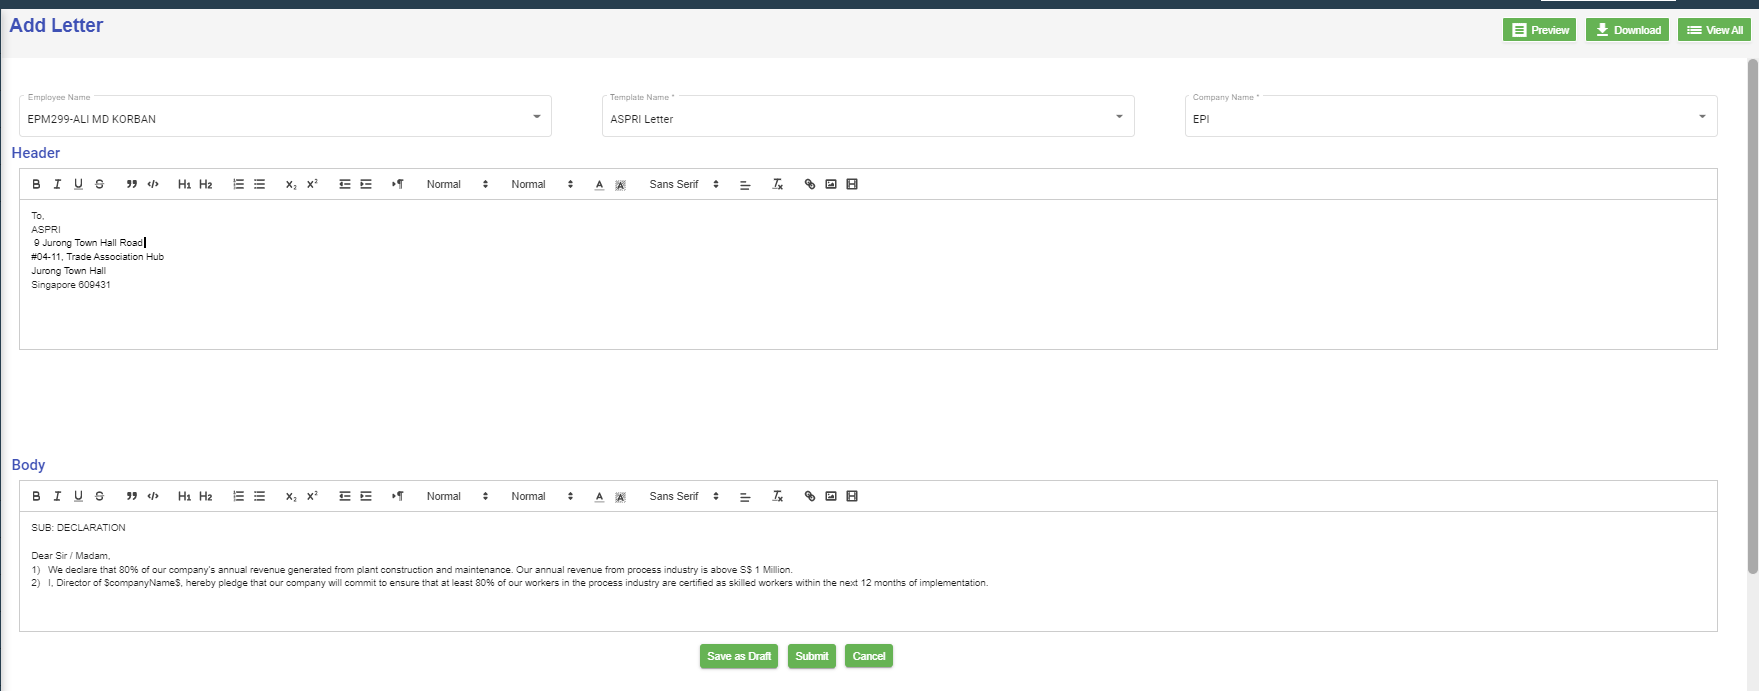](http://wiki.cuteinfocomm.com/uploads/images/gallery/2022-09/image-1663148099362.png)
3. Check and edit the content if needed,
4. Click **Submit,** below notification confirmation window opens,[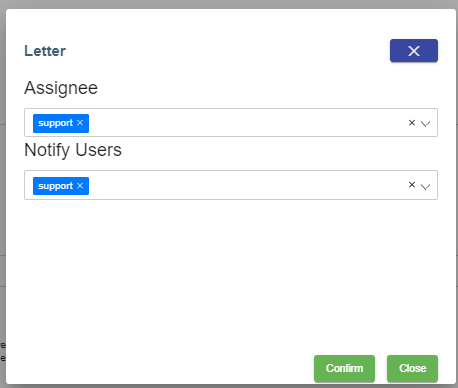](http://wiki.cuteinfocomm.com/uploads/images/gallery/2022-09/image-1663148594519.png)
5. Click **Confirm**, the letter will be generated and ready for preview and approve. Note: before approval, there will be watermark as draft.[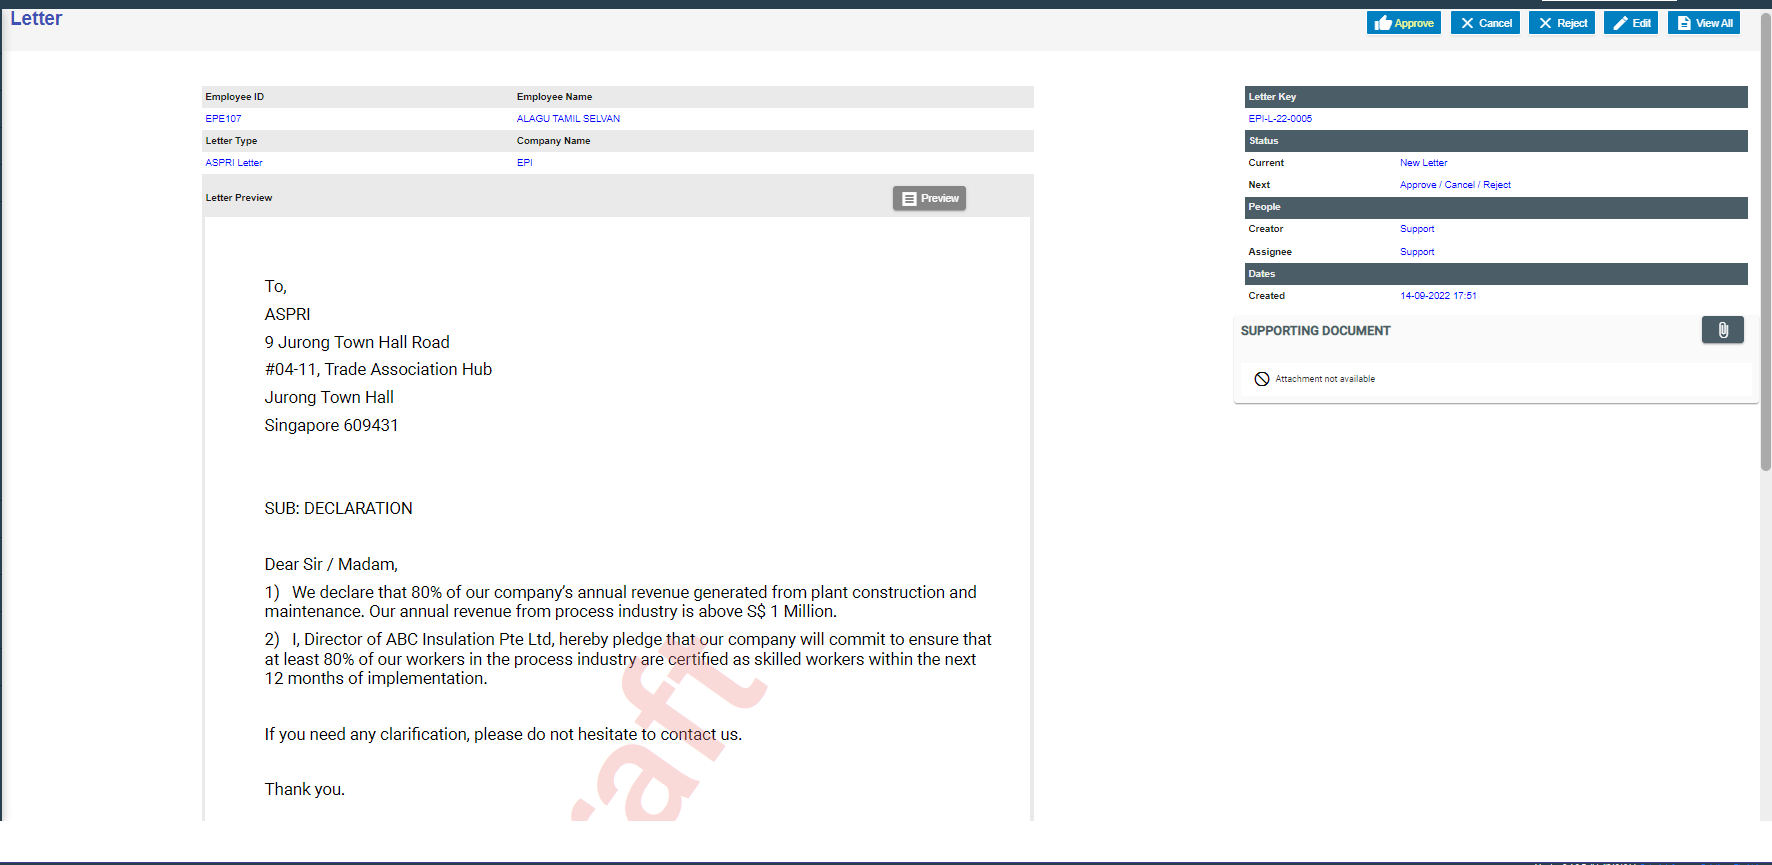](http://wiki.cuteinfocomm.com/uploads/images/gallery/2022-09/image-1663149301264.png)
6. To approve letter generation, click [](http://wiki.cuteinfocomm.com/uploads/images/gallery/2022-09/image-1663356632984.png), below notification opens,[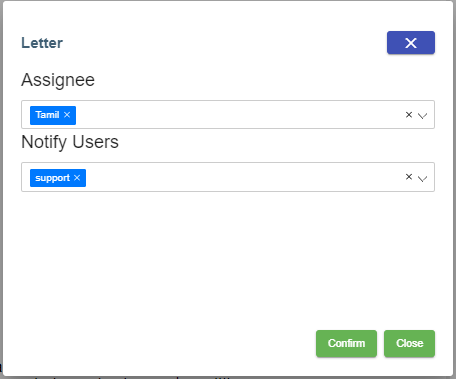](http://wiki.cuteinfocomm.com/uploads/images/gallery/2022-09/image-1663149647712.png)
Click **Confirm**, the letter is generated and approved. User can download for use.[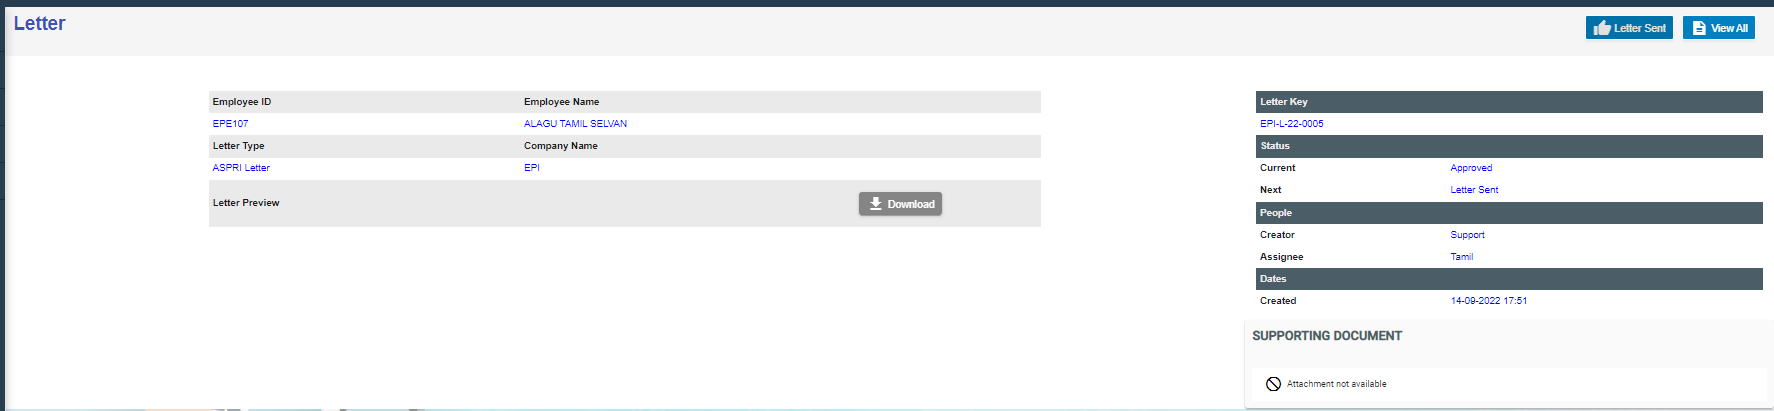](http://wiki.cuteinfocomm.com/uploads/images/gallery/2022-09/image-1663149928458.png)
### Broadcast
User can create broadcast message to a group of selected employees within the company. To view the screen, enable "menuNotification", "hrmNotificationCreator" and "hrmNotificationApprover" permission under HRM module.
[](https://wiki.cuteinfocomm.com/uploads/images/gallery/2025-03/image-1741845781877.png)
1\. Click [](https://wiki.cuteinfocomm.com/uploads/images/gallery/2025-03/image-1741845945971.png) to create new broadcast message.
[](https://wiki.cuteinfocomm.com/uploads/images/gallery/2025-03/image-1741850372638.png)
- Change the toggle button [](https://wiki.cuteinfocomm.com/uploads/images/gallery/2025-03/image-1741846272692.png)to change to select All Employee.
- Select Company in the Company field.
- Select Department in the Department field.
- Select Designation in the Designation field.
- Select Race in the Race field (optional).
- Select Religion in the Religion field (optional).
- Select Employee in the Employees field and this is mandatory to select which employee(s) for this broadcast message.
- Select the date and time in the Date field using the [](https://wiki.cuteinfocomm.com/uploads/images/gallery/2025-03/image-1741850786207.png)calendar icon and this is mandatory to set the broadcast message to be delivered.
- Input the subject of this broadcast message in this mandatory Title field.
- Type the body text of this message in this mandatory Notification field.
- Click on the [](https://wiki.cuteinfocomm.com/uploads/images/gallery/2025-03/image-1741851522485.png) button if an image is required to be attached to the broadcast message. Note on the recommended file size of image file when uploading.
- Tick on the checkbox [](https://wiki.cuteinfocomm.com/uploads/images/gallery/2025-03/image-1741851688794.png) if the broadcast message notification needs to be sent to the selected employee(s) once the broadcast message is approved. Once broadcast message is approved, a notification will be sent to the selected employee(s)mobile. When the notification is clicked on a mobile device, it will open the cuteOffice 2B application's home page and the notification log will appear in the system in the Admin -> Notification Logs
Once done and the mandatory fields (marked with \*) are entered/selected, you will be able to see the Save button. Click on the Save button to record the broadcast message.
Below sample record with status = New
[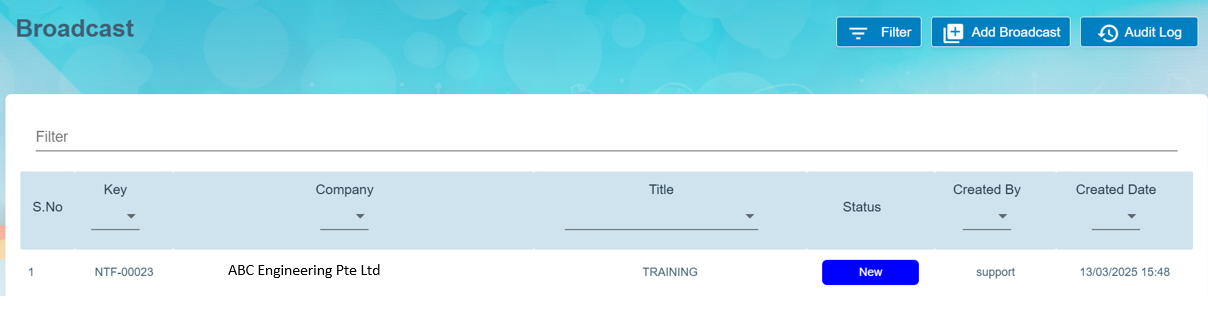](https://wiki.cuteinfocomm.com/uploads/images/gallery/2025-03/image-1741852342381.png)
2\. Click on the key of the broadcast message (as shown in above pt 1) and click on the [ ](https://wiki.cuteinfocomm.com/uploads/images/gallery/2025-03/image-1741852911263.png)button to send to the required authorised person to approve this broadcast message before sending to the selected employee(s). The status will change from [](https://wiki.cuteinfocomm.com/uploads/images/gallery/2025-03/image-1741853161818.png)to [](https://wiki.cuteinfocomm.com/uploads/images/gallery/2025-03/image-1741853088376.png)in the View All page of the Broadcast page.
[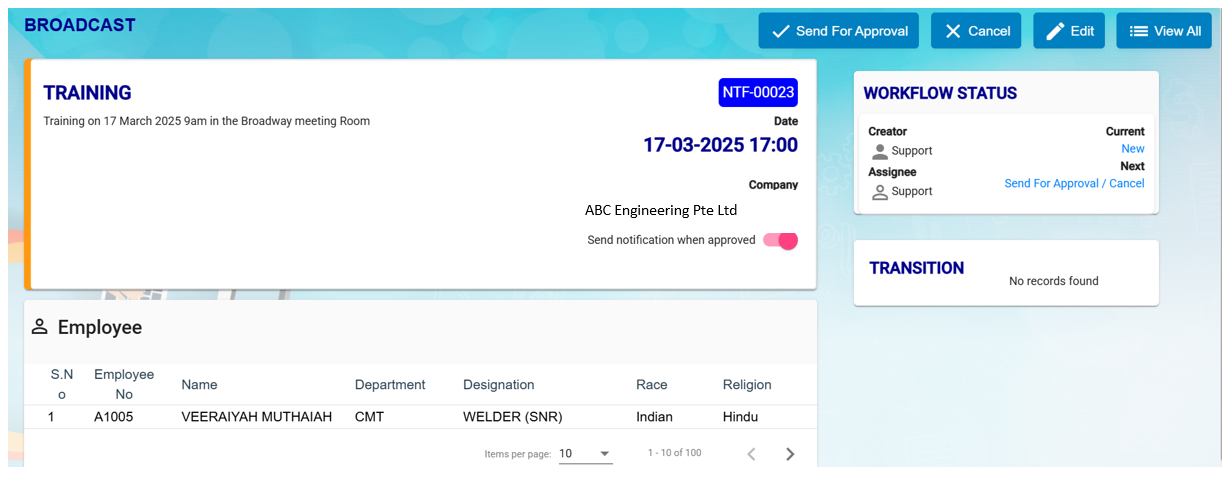](https://wiki.cuteinfocomm.com/uploads/images/gallery/2025-03/image-1741852783428.png)
[](https://wiki.cuteinfocomm.com/uploads/images/gallery/2025-03/image-1741853246902.png)
3\. To approve the broadcast message, click on [](http://wiki.cuteinfocomm.com/uploads/images/gallery/2022-09/image-1663356632984.png) button. You can click on the [](https://wiki.cuteinfocomm.com/uploads/images/gallery/2025-03/image-1741853461683.png) button any amendment and then send for approval again. Once Approved, status will show this [](https://wiki.cuteinfocomm.com/uploads/images/gallery/2025-03/image-1741853568431.png) of this broadcast message in the View All of the Broadcast page.
[](https://wiki.cuteinfocomm.com/uploads/images/gallery/2025-03/image-1741853614834.png)
#### MOM OED Submissions
The Occupational Employment Dataset (OED) is an ongoing registry where organisations in Singapore are required to provide the job and work location details of all employees. The below URL is usually used to submit the OED data.
[https://stats.mom.gov.sg/laboursurvey](https://stats.mom.gov.sg/laboursurvey)
Now with the help of cuteOffice, the data can be submitted with ease to MOM.
Enable the permission "HRM -> oedSubmissionMOM" to submit OED.
Click on MOM - OED MOM Submission menu to submit
You can also view the video on the process of submitting OED data here. [https://www.youtube.com/watch?v=pjiHbK\_gRFs](https://www.youtube.com/watch?v=pjiHbK_gRFs "Submit MOM OED data")
[](https://wiki.cuteinfocomm.com/uploads/images/gallery/2025-04/image-1743559298487.png)
[](https://wiki.cuteinfocomm.com/uploads/images/gallery/2025-04/image-1743561435519.png)
However, before submitting the data to mom from cuteOffice, we need to take few actions
There are certain mandatory data which should be sent to MOM and there are some optional data.
The mandatory data are
1. Full Name
2. Pass Type
3. NRIC/FIN
4. PW Job Title
5. Main Job Title
6. Standard Hours Work
7. Job Type
8. Date of Join
9. Date of Leaving (for resigned staff)
10. Total Working Days of Month
11. Actual Working Days of Month
Other than the above the below optional data can be sent which you can control whether to send or not.
1. Highest Education
2. Main Job Duties
3. Is Employee HR Role
4. Primary HR Role
5. Secondary HR Role
6. HR Job Level
7. Occupation Group
8. Employee Type
9. Department
10. Paid OT Hours
11. Payment Mode
12. Basic Wage
13. Gross Wage
14. Annual Leaves
15. Premise Type
16. Postal Code
17. Street Name
18. mode of Leaving
Trade Master has few important data that is required for OED submissions
[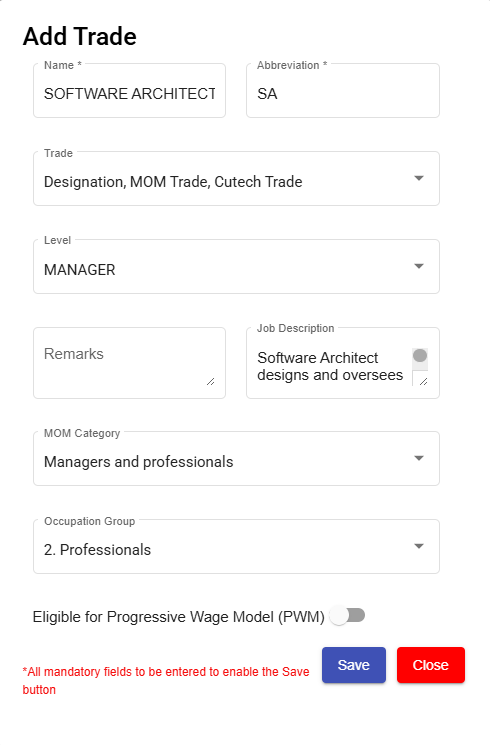](https://wiki.cuteinfocomm.com/uploads/images/gallery/2025-04/image-1743560219844.png)
**MOM Category** - For every one of your designation shall be mapped to MOM category.
Similarly Map the **Occupation group** with the trade.
**Job description** is optional data for **Main Job Duties**
**Note**: Only after approving the timesheet, you can submit the OED data as worked day is part of the data to submit.
The Highest education is sent from employee data. To update go to Educational Qualifications tab of experience
[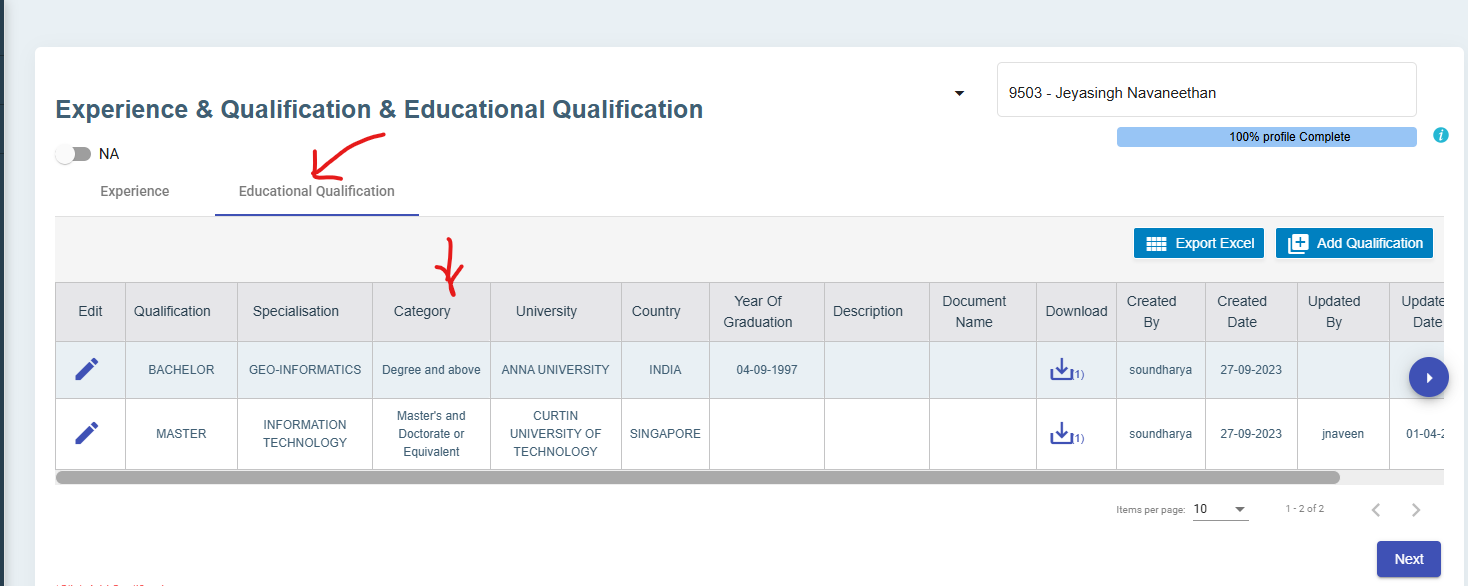](https://wiki.cuteinfocomm.com/uploads/images/gallery/2025-04/image-1743560657471.png)
Edit the highest education record and mark as highest an also make sure to select the category of education such as master , bachelor etc
[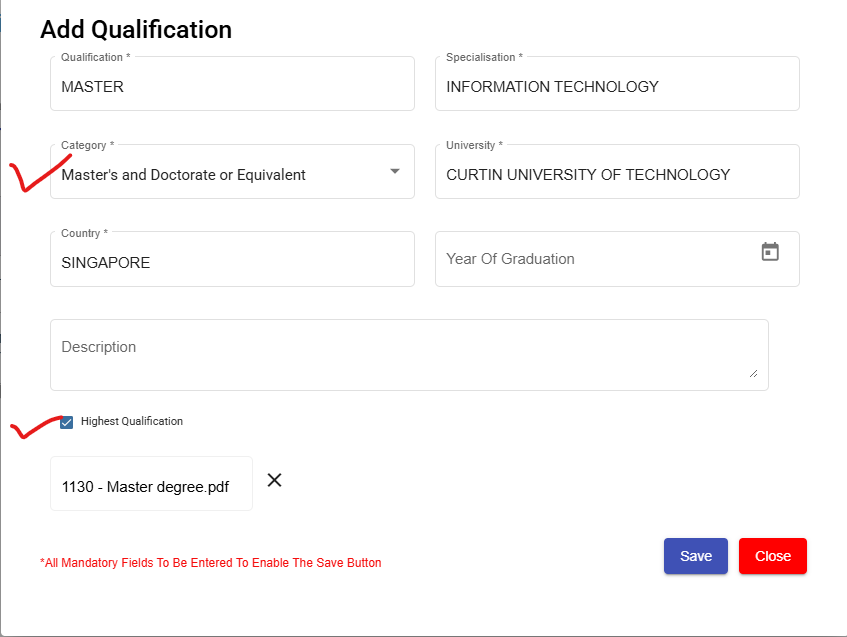](https://wiki.cuteinfocomm.com/uploads/images/gallery/2025-04/image-1743560774697.png)
In official information page, select the place of working Premise Type and also update whether the employee is in HRM role or not.
[](https://wiki.cuteinfocomm.com/uploads/images/gallery/2025-04/image-1743561027850.png)
If Employee is in HR role, select additional fields such as
1. Primary HR Role
2. Secondary HR Role and
3. HR Job Level
All are drop down data as per MOM and choose from the list.
[](https://wiki.cuteinfocomm.com/uploads/images/gallery/2025-04/image-1743561068852.png)
In -OED View All Submissions page, select New Submission to send data
[](https://wiki.cuteinfocomm.com/uploads/images/gallery/2025-04/image-1743561418603.png)
The new submissions window opens up.
[](https://wiki.cuteinfocomm.com/uploads/images/gallery/2025-04/image-1743561511749.png)
Click on Settings icon on the right to choose which fields of data that you are planning to send to MOM
[](https://wiki.cuteinfocomm.com/uploads/images/gallery/2025-04/image-1743560028272.png)
Mandatory data fields cant be unselected.
Choose the company and period for which you want to submit the records. Click Search
All the employees with data that will be submitted will be showing here.
[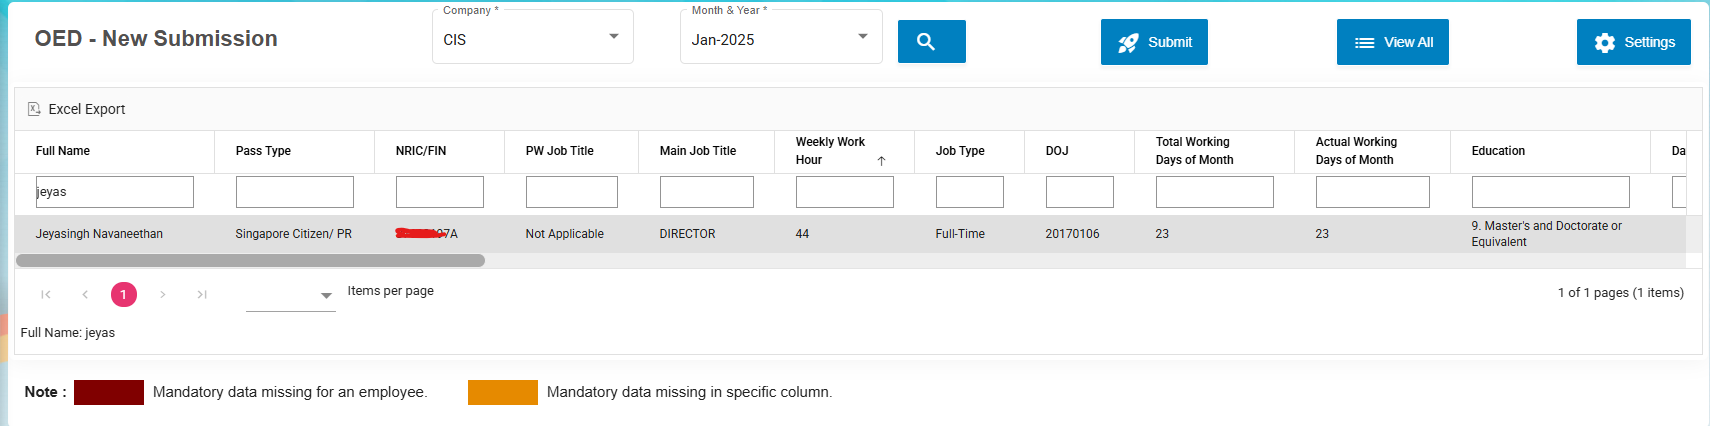](https://wiki.cuteinfocomm.com/uploads/images/gallery/2025-04/image-1743563206485.png)
If any data is not available, it will be highlighted. Do the necessary corrections in respective places.
Click the button[.](https://wiki.cuteinfocomm.com/uploads/images/gallery/2025-04/image-1743563414764.png)
The summary is shown and Click Agree & Proceed to login with SingPass and submit the OED data to MOM.
[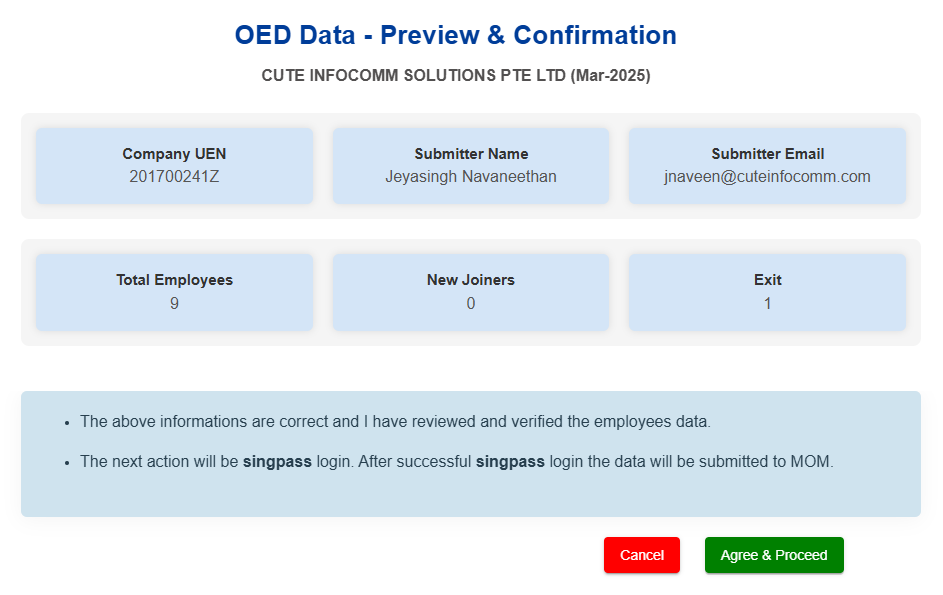](https://wiki.cuteinfocomm.com/uploads/images/gallery/2025-04/image-1743572933376.png)
Once authorised and selected the correct company name, Click Allow for cuteOffice to submit the data on your behalf.
[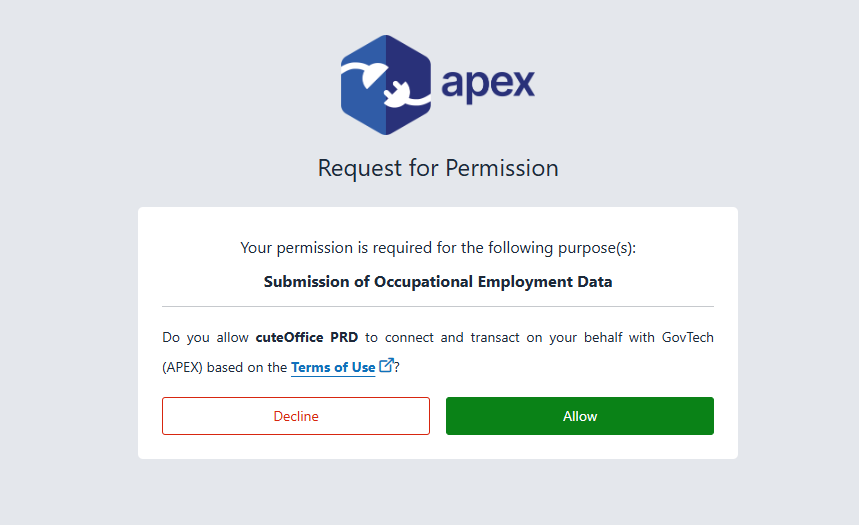](https://wiki.cuteinfocomm.com/uploads/images/gallery/2025-04/image-1743563524368.png)
The data will be submitted and it will show a confirmation message.
[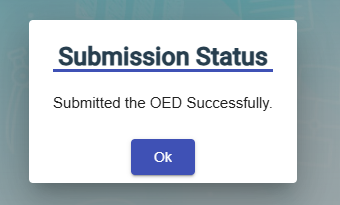](https://wiki.cuteinfocomm.com/uploads/images/gallery/2025-04/image-1743586885057.png)
The list of submitted data will be available for review along with the submission status.
[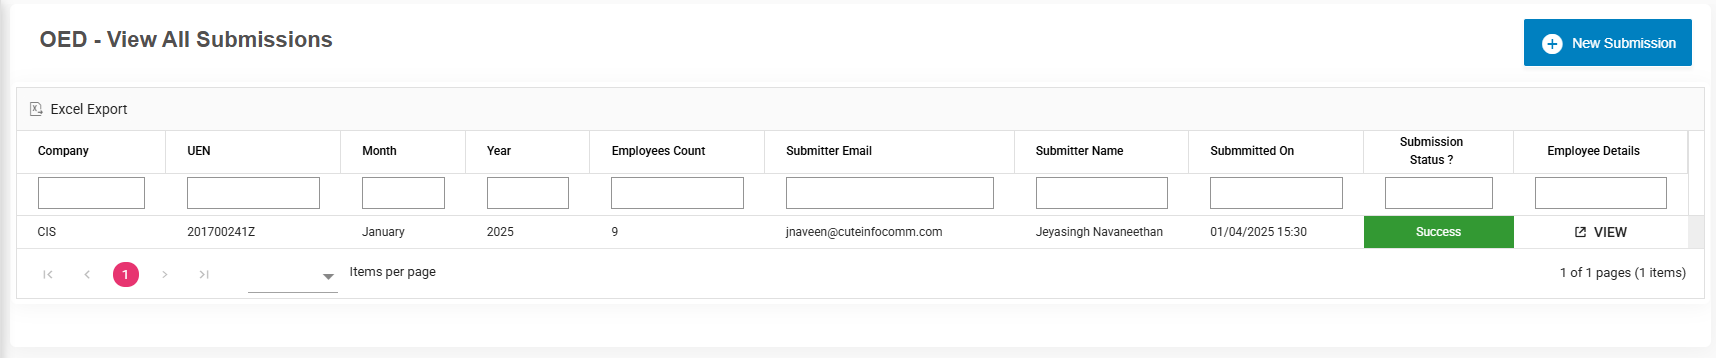](https://wiki.cuteinfocomm.com/uploads/images/gallery/2025-04/image-1743563676787.png)
#### L&D Course Calendar
1\. Enter Month to view Learning and development calendar for the employee
2\. Hover the cursor near to employee, tool tip open to show L&D Course details
[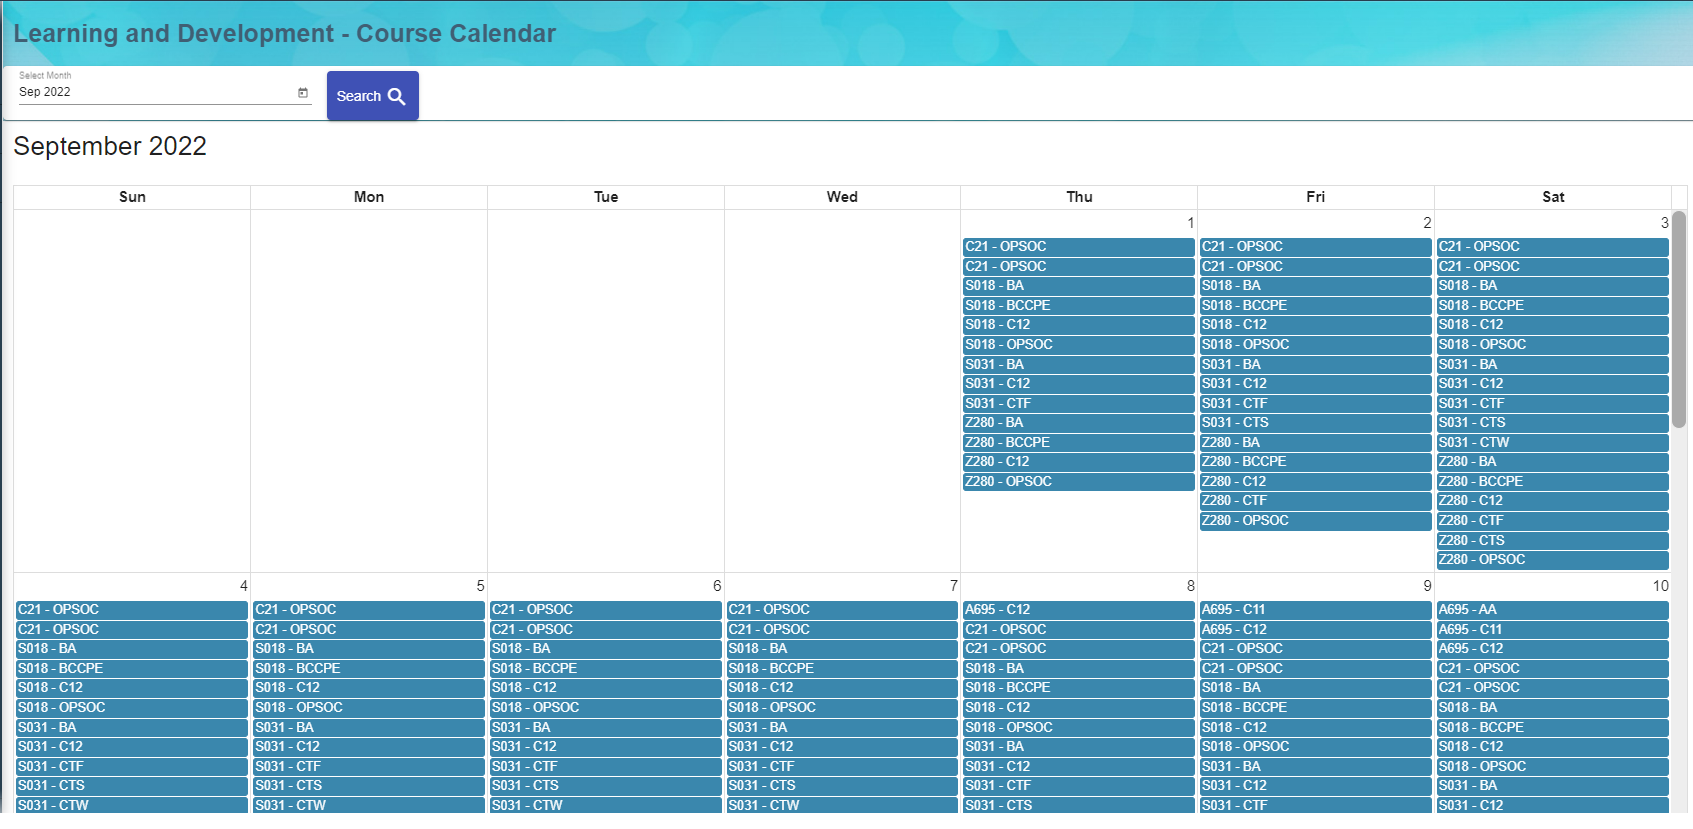](http://wiki.cuteinfocomm.com/uploads/images/gallery/2022-09/image-1664352090534.png)
### View Document
User can view the document which was created for public view within the company. Click on the title e.g. Worker Handbook.pdf to trigger download of the document for viewing.
[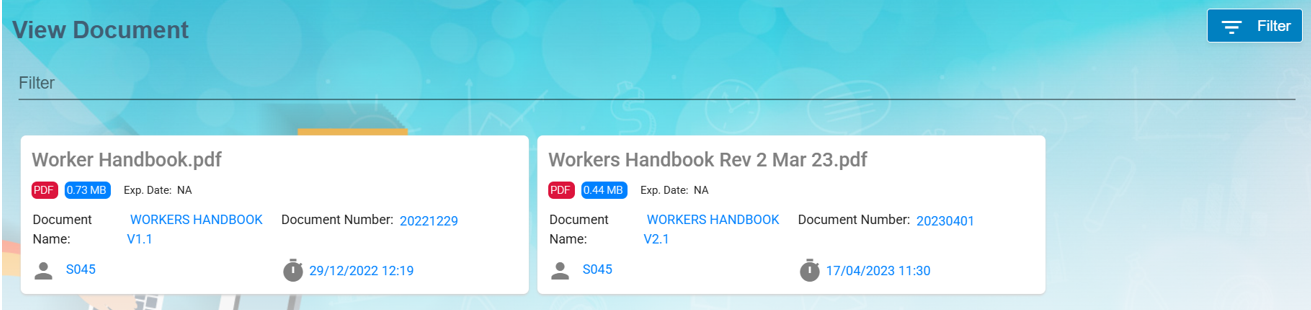](https://wiki.cuteinfocomm.com/uploads/images/gallery/2025-03/image-1741844860131.png)
#### Filter Document
If you want to view any specific document details among multiple documents listed in the **View Document** page, you can use the filter option [](http://wiki.cuteinfocomm.com/uploads/images/gallery/2022-09/image-1663355063095.png)provided in the upper right corner of the **View Document** page to search.
### Scheduler Subscription
To configure scheduler, enable "menuSchedulerSubscription" permission.
[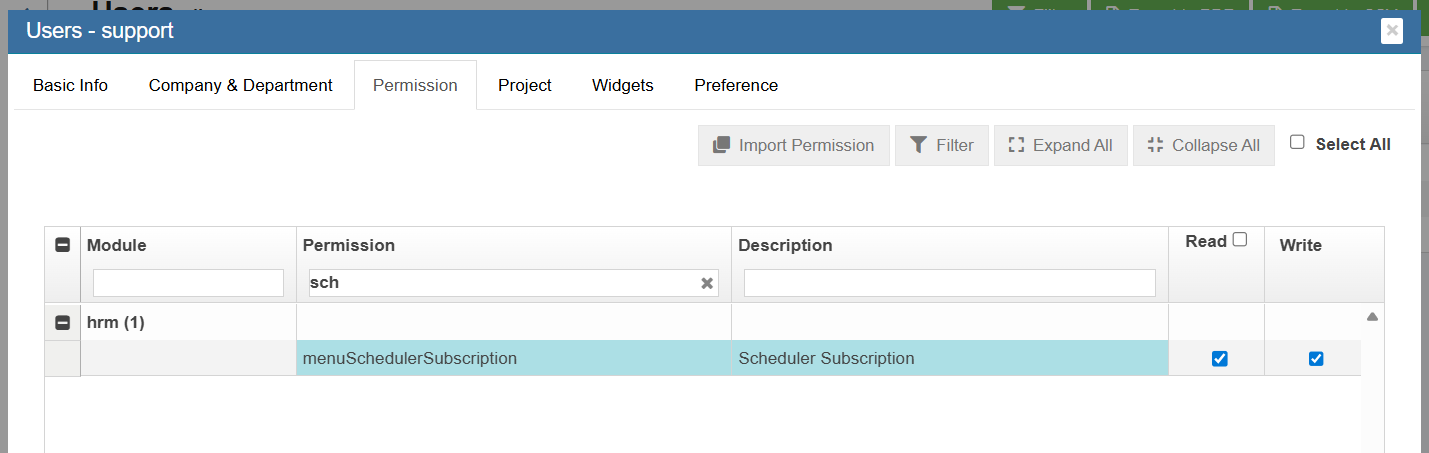](https://wiki.cuteinfocomm.com/uploads/images/gallery/2025-12/image-1766048811799.png)
User can view the menu under HRM->Others.
[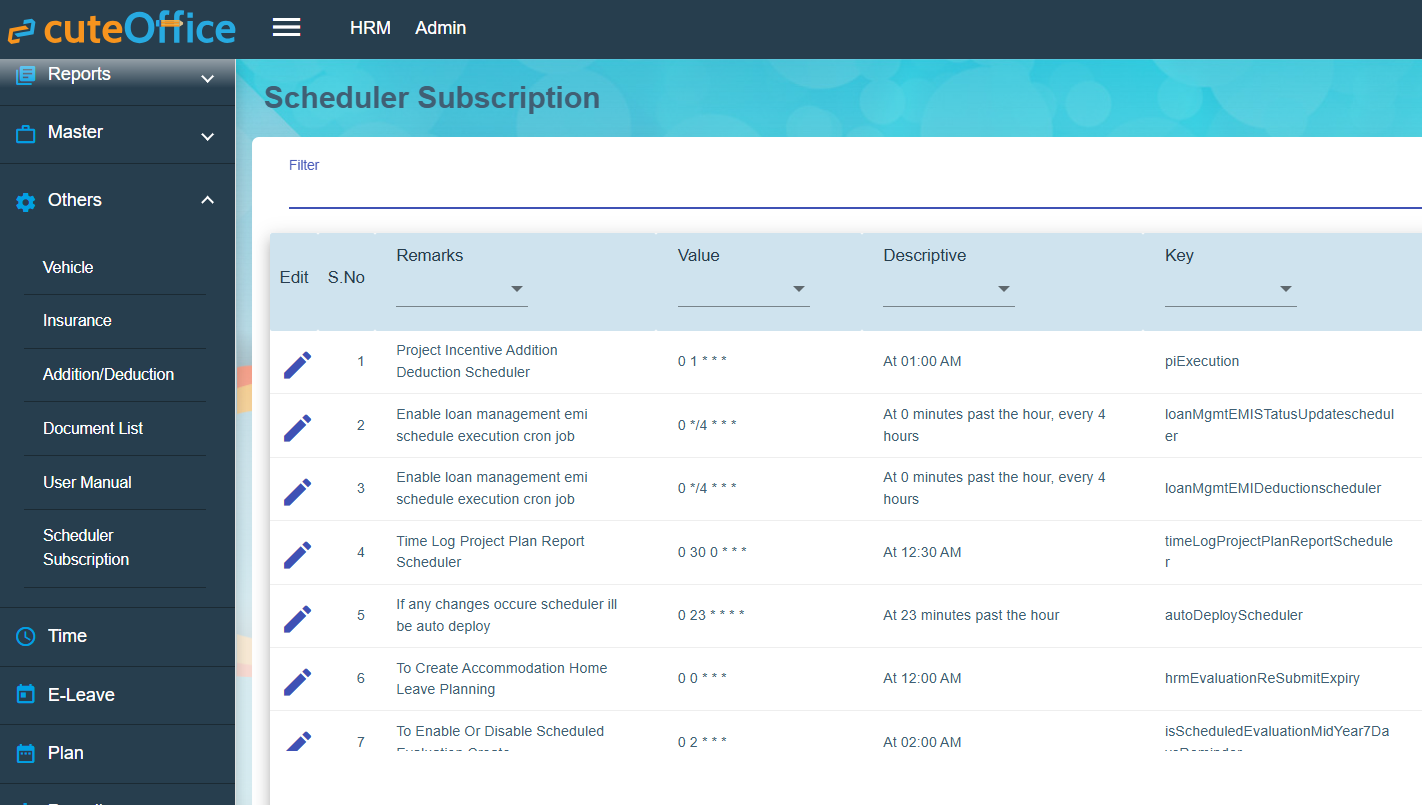](https://wiki.cuteinfocomm.com/uploads/images/gallery/2025-12/image-1766049516209.png)
Click edit and change the scheduler ( Hours, minutes and seconds) and save the record.
# HRM Accommodation
The **Accommodation** submenu in the **HUMAN RESOURCES** page helps to track and forecast the company's dormitory vacancies i.e. to help the HR team to better manage the dormitory accommodation provided to the foreign employees.
The Accommodation submenu consists of the following pages
- Accommodation
- Rooms/Beds
- Employee's Dormitory Accommodation
- Room Occupancy Report
- Room Availability Report
- Forecasting Report
- Forecasting Detailed Report
- Workers Accommodation Report
- Accommodation Expiring List
### Accommodation
The Accommodation page in the Accommodation submenu helps you to create the master data of the dormitory accommodation. Click on this page to add or update the accommodation provided by the respective dormitory operator/vendor.
[](http://wiki.cuteinfocomm.com/uploads/images/gallery/2024-03/image-1709632230460.png)
#### Add Accommodation
Click [](http://wiki.cuteinfocomm.com/uploads/images/gallery/2024-03/image-1709632392811.png)to create new dormitory vendor record.
[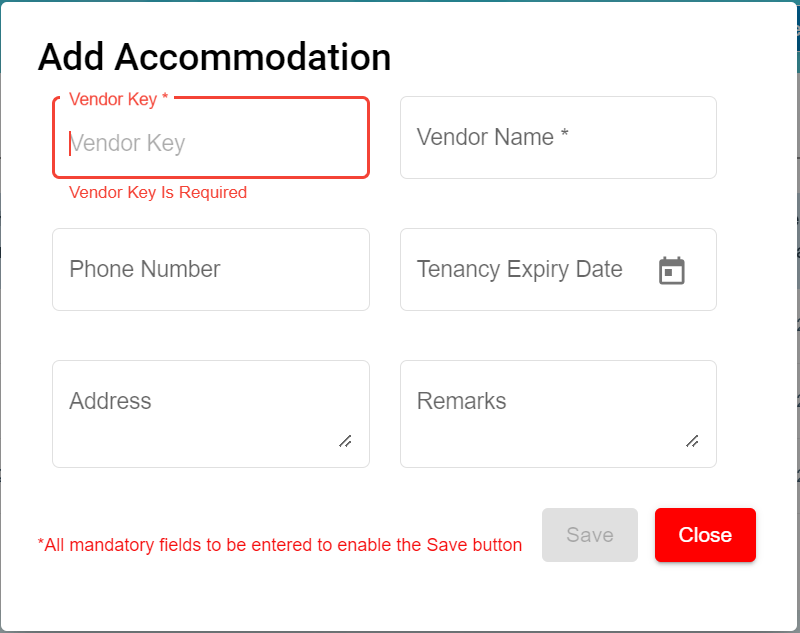](http://wiki.cuteinfocomm.com/uploads/images/gallery/2024-03/image-1709632487867.png)
To Add new accommodation of the new dormitory vendor, do the following steps
1\. In the **Vendor Key** field, enter the Vendor Key to identify this dormitory vendor record.
2\. In the **Vendor Name** field, enter the name of this dormitory vendor record.
3\. In the **Phone Number** field, enter the phone number of this dormitory vendor record.
4\. In the **Tenancy Expiry Date** field, enter this tenancy expiry date of this dormitory vendor record.
5\. In the **Address** field, enter the address of this dormitory.
6\. In the **Remarks** field, enter the remarks.
Click **Save** button to save the above details for this dormitory vendor record.
#### Edit Accommodation
You can edit the details of the added accommodation record by using the edit option provided in the Edit column of the Accommodation page. Click [](http://wiki.cuteinfocomm.com/uploads/images/gallery/2024-03/image-1709708413181.png) (Edit icon) of the respective accommodation you have added. Edit the accommodation details where you want. Click **Save**.
[](http://wiki.cuteinfocomm.com/uploads/images/gallery/2024-03/image-1709708835107.png)
#### Delete Accommodation
You can delete the added accommodation by using [](http://wiki.cuteinfocomm.com/uploads/images/gallery/2024-03/image-1709711221708.png)(Delete icon) provided in the Delete column of the Accommodation page. If you want to delete the Accommodation, click **Yes** otherwise click **No**.
You can delete the added manage rooms record by using [](http://wiki.cuteinfocomm.com/uploads/images/gallery/2024-03/image-1709711221708.png)(Delete icon) provided in the Delete column of the Manage Rooms page. If you want to delete the accommodation details record, click **Yes** otherwise click **No**.
If you want to view a specific accommodation record on rooms and beds, you can use the filter option provided in the upper right corner of the **Manage Rooms** page. Click [](http://wiki.cuteinfocomm.com/uploads/images/gallery/2024-03/image-1709711118552.png) (Filter button). The filter option opens and input the text to filter.
Export Manage Rooms
Advance Payment
We have customized to generate advance Salary based on client requirements
General configuration steps
• Navigate to system Admin -> Users->Permissions, in payroll module, search and enable both write and read permission "advanceSalary" for the user who needs to process advance salary. This step will enable user's permission to view advance salary in Payroll.
• Add Advance cut-off date in the global settings to process advance salary after the cut-off date.
Scenario 1:
• Navigate to HRM module, search for employee who needs to advance a portion of the salary, and navigate to the employee's HRM salary configuration page, in Advance Salary field, enter the amount of advance salary, click Save.
Advance Salary (Ex) : $ 800
• Total working days for the month (Eg: 24)
Per day rate = 800/24 = 33.33
Non-working days (Ex: 2 days – unpaid leave based on time log records of the month)
Total Advance = 800 - (33.3*2) = 733.33
• Navigate to Payroll module, go to operation -> Generate Advance to open generate advance page as below,
• Choose relevant search criteria such as payroll year and month, paycycle or department, then click search. A list of employees who have configured advance salary in HRM and meet search criteria will display,
• User can either tick to select all employee or specific employees and click Generate Advance Salary button at the top right corner in the generate advance page.
• Generated advance salary data will be moved to Advance In staging section. Where user can regenerate/delete/ approve for advance salary in staging in bulk or individually. User can also use the edit option to edit existing detail pay data.
Once advance salary in staging is approved, advance salary data will move to Advance in History section,
Scenario 2:
Use Basic Salary as Advance Pay
• Go to Payroll settings under Payroll-> Admin -> Settings.
Click checkbox “Use Basic Salary as Advance Pay”.
Note:
In this case, the basic salary amount under HRM Pay Eligibility page is considered as an Advance Salary. User need not to enter amount in the Advance Salary field under HRM ->Payroll Salary configuration page.
Check advance salary in HRM -> Payroll Salary information screen (Ex: 0)
Get Basic salary from Pay eligibility (Ex: 3000)
If an employee has” exclude time/leave” as “time or both” , the generated advance salary will have default $ 1 value for changing it manually.
Per day rate = 3000/24 = 125
If 2 non-working days of the month (Ex: 2 – unpaid leave), the Total Advance = 3000 - (125*2) = $ 2750
• Navigate to Payroll module, go to operation -> Generate Advance to open generate advance page.
• Select all employee or specific employees and click Generate Advance Salary button at the top right corner in the generate advance page.
• Generated advance salary data will be moved to Advance In staging section. Where user can regenerate/delete/ approve for advance salary in staging in bulk or individually.
• Once advance salary in staging is approved, advance salary data will move to Advance in History section
Scenario 3:
Fixed Advance Salary?
• Add advance salary in HRM -> Payroll Salary information screen (Ex: 800)
• No Computation for Total Advance based on absent or unpaid leave
• Total Advance = 800
## Reports
The **Reports** submenu in the **Payroll** module used to generate and view various reports related to the employee’s payroll such as pay slip, payroll journal, payroll register, and so on. The **Reports** submenu contains the following reports,
- Pay Slip
- Payroll Journal Report
- Payroll Register Report
- Payroll Summary Report
- Cheque Register Report
- Donation Report
- Liabilities Report
- Yearly Payroll Report
- Generate CPF Submission File
- Generate GIRO Bank File
- AIS submission
### Pay Slip
The **Pay Slip** tab in the **Reports** submenu used to generate and view the pay slip of employee.
To generate the pay slip,
1. Click **Pay Slip** in the **Reports.** The **Pay Slip** page opens.
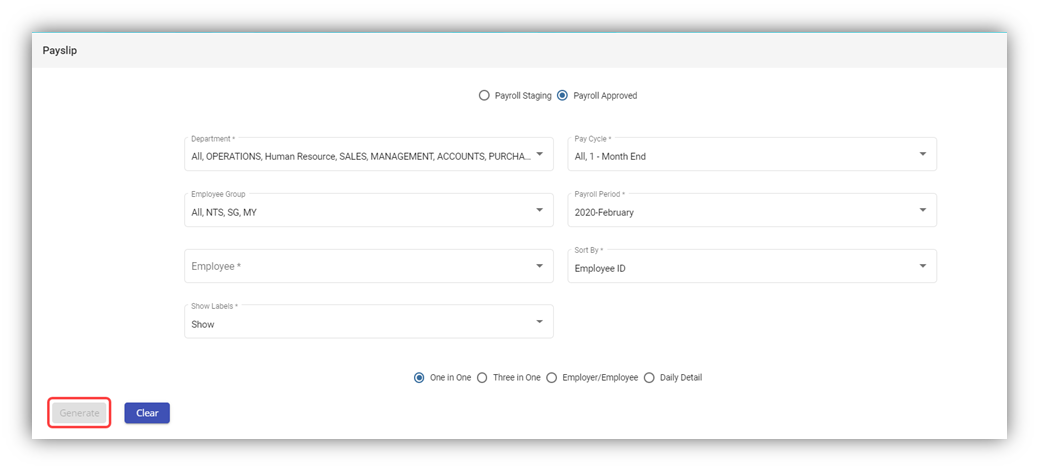
**Note:** You can generate the pay slip of any employee in both the **Payroll in Staging** and **Payroll history** (Approved) stages.
2. On top of pay slip window, select any one of **Payroll in Staging** or **Payroll Approved**.
3. In the **Department** box, select a department from a drop-down list.
**Note**: If you want to select all the departments in the list, select the checkbox of the **ALL**.
4. In the **Pay Cycle** box, select a pay cycle from a drop-down list.
**Note**: If you want to select all the pay cycles in the list, select the checkbox of the **ALL**.
5. In the **Employee Group** box, select an employee group from a drop-down list.
**Note**: If you want to select all the employee groups in the list, select the checkbox of the **ALL**.
6. In the **Payroll Period** box, select a payroll period from a drop-down list.
**Note**: If you want to select all the payroll periods in the list, select the checkbox of the **ALL**.
7. In the **Employee** box, select an employee from a drop-down list.
**Note**: If you want to select all the employees in the list, select the checkbox of the **ALL**.
8. If you want to generate the pay slip based on the **Employee ID** or **Employee Name**, select the respective option in the **Sort By** box.
9. If you want to show the labels, select **Show** otherwise select **Hide** from the **Show Labels** box.
**Note**: You can generate the pay slip in four type of formats.
10. Select the respective format in which you want to generate the pay slip, e.g. one in one, three in one
11. Click **Generate**. The pay slip will be generated and downloaded as a PDF file in the selected format, see below as an example.
[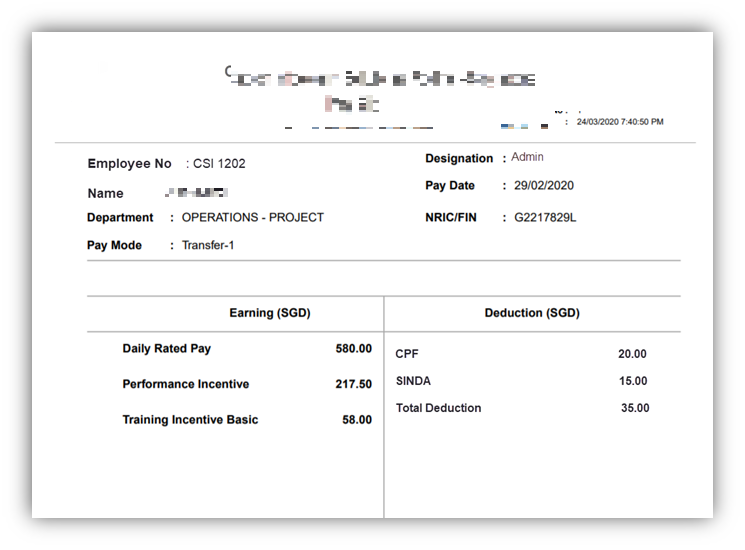](https://wiki.cuteinfocomm.com/uploads/images/gallery/2023-04/image-1682096693397.png)
**Note**: If you are using the Epson Printer to print the generated pay slip, you need do set the printer settings. To know how to do setup, refer the document, “**Epson Printer Setup to Print a Pay Slip**”.
### Payroll Journal Report
The **Payroll Journal** tab in the **Reports** submenu used to generate and view the payroll journal report of the employee. The payroll journal summary report used to check the payroll process of the employee.
To generate and view the payroll journal summary report,
1. Click **Payroll Journal** in the **Reports,** the **Payroll Journal** page opens.
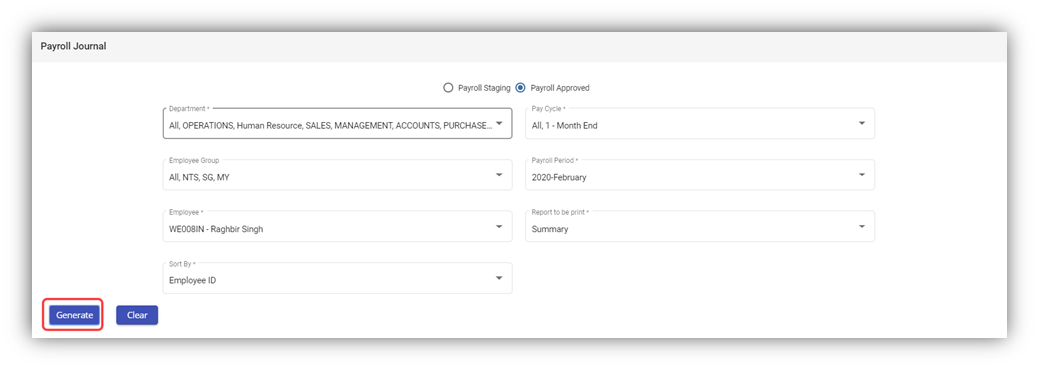
**Note:** You can generate the payroll journal for any employee in both the Payroll in Staging and Payroll Approved stages.
2. Select any one of **Payroll in Staging** or **Payroll Approved**.
3. In the **Department** box, select a department from a drop-down list.
**Note**: If you want to select all the departments in the list, select the checkbox of the **ALL**.
4. In the **Pay Cycle** box, select a pay cycle from a drop-down list.
**Note**: If you want to select all the pay cycles in the list, select the checkbox of the **ALL**.
5. In the **Employee Group** box, select an employee group from a drop-down list.
**Note**: If you want to select all the employee groups in the list, select the checkbox of the **ALL**.
6. In the **Payroll Period** box, select a payroll period from a drop-down list.
**Note**: If you want to select all the payroll periods in the list, select the checkbox of the **ALL**.
7. In the **Employee** box, select an employee from a drop-down list.
**Note**: If you want to select all the employees in the list, select the checkbox of the **ALL**.
8. In the **Report to be print** box, if you want to generate the payroll journal as a summary report, select **Summary** or if you want to generate the payroll journal as a detail report, select **Detail**.
9. If you want to generate the payroll journal summary report based on the **Employee ID** or **Employee Name**, select the respective option in the **Sort By**
10. Click **Generate**. The payroll journal report will be generated and downloaded as a PDF file. See below as an example. [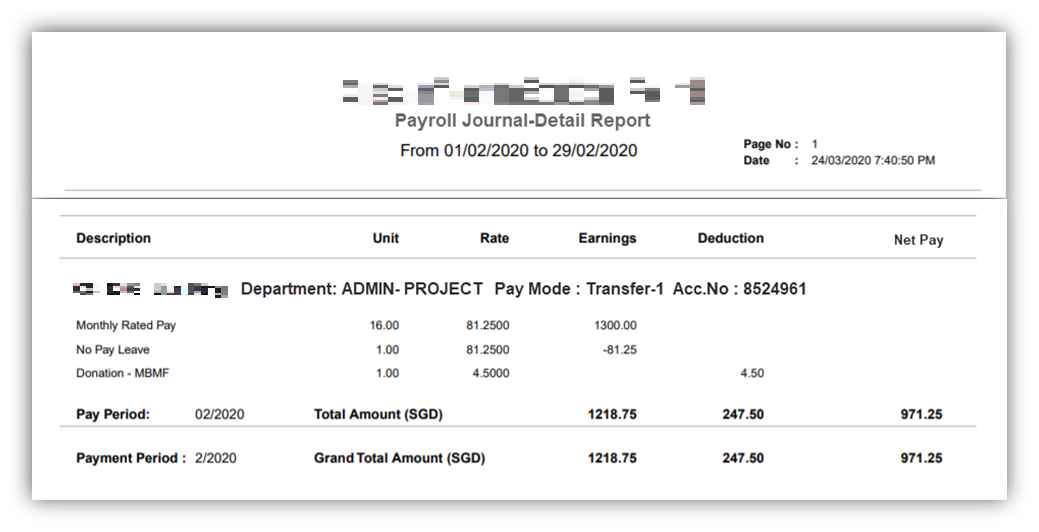](https://wiki.cuteinfocomm.com/uploads/images/gallery/2023-04/image-1682096755323.png)
### Payroll Register Report
The **Payroll Register t**ab in the **Reports** submenu used to generate and view the payroll register report of the employee. The payroll register report shows the CPF detail of the local employee.
To generate and view the payroll register report,
1. Click **Payroll Register** in the **Reports,** the **Payroll Register** page opens.

**Note:** You can generate the payroll register for any employee in both the Payroll in Staging and Payroll Approved stages.
2. Select any one of **Payroll in Staging** or **Payroll Approved**.
3. In the **Department** box, select a department from a drop-down list.
**Note**: If you want to select all the departments in the list, select the checkbox of the **ALL**.
4. In the **Pay Cycle** box, select a pay cycle from a drop-down list.
**Note**: If you want to select all the pay cycles in the list, select the checkbox of the **ALL**.
5. In the **Employee Group** box, select an employee group from a drop-down list.
**Note**: If you want to select all the employee groups in the list, select the checkbox of the **ALL**.
6. In the **Payroll Period** box, select a payroll period from a drop-down list.
**Note**: If you want to select all the payroll periods in the list, select the checkbox of the **ALL**.
7. In the **Employee** box, select an employee from a drop-down list.
**Note**: If you want to select all the employees in the list, select the checkbox of the **ALL**.
8. If you want to generate the payroll journal summary report based on the **Employee ID** or **Employee Name**, select the respective option in the **Sort By** box.
9. Click **Generate**. The payroll register report will be generated and downloaded as a PDF file. See below as an example. [](https://wiki.cuteinfocomm.com/uploads/images/gallery/2023-04/image-1682096802587.png)
### Payroll Summary Report
The **Payroll Summary t**ab in the **Reports** submenu used to generate and view the payroll summary report of the employee. The payroll summary report shows the CPF detail of the local employee.
To generate and view the payroll summary report,
1. Click **Payroll Summary** in the **Reports,** the **Payroll Summary** page opens.
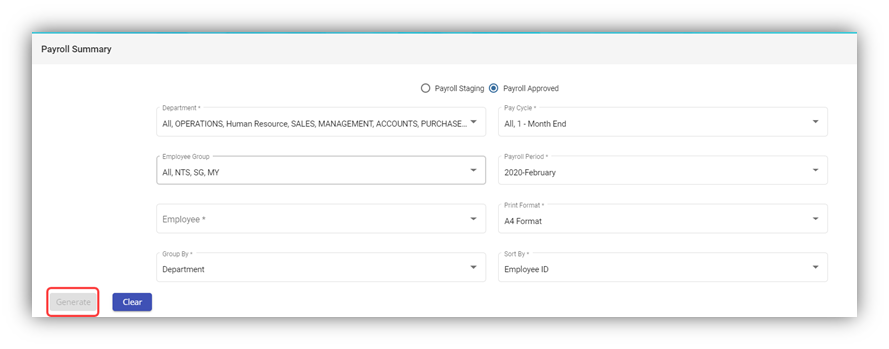**Note:** You can generate the payroll summary for any employee in both the Payroll in Staging and Payroll Approved stages.
2. Select any one of **Payroll in Staging** or **Payroll Approved**.
3. In the **Department** box, select a department from a drop-down list.
**Note**: If you want to select all the departments in the list, select the checkbox of the **ALL**.
4. In the **Pay Cycle** box, select a pay cycle from a drop-down list.
**Note**: If you want to select all the pay cycles in the list, select the checkbox of the **ALL**.
5. In the **Employee Group** box, select an employee group from a drop-down list.
**Note**: If you want to select all the employee groups in the list, select the checkbox of the **ALL**.
6. In the **Payroll Period** box, select a payroll period from a drop-down list.
**Note**: If you want to select all the payroll periods in the list, select the checkbox of the **ALL**.
7. In the **Employee** box, select an employee from a drop-down list.
**Note**: If you want to select all the employees in the list, select the checkbox of the **ALL**.
8. In the **Print Format** box, select the print format from the given list.
9. In the **Group by** box, select the grouping mode of employees from the options such as **Department**, **Employee Group**, and **Pay Mode**.
**Note**: The grouping mode options such as **Pay Mode** and **Employee Group** are reflected from the **Employee** submenu.
10. If you want to generate the payroll journal summary report based on the **Employee ID** or **Employee Name**, select the respective option in the **Sort By** box.
11. Click **Generate**. The payroll summary report will be generated and downloaded as a PDF file. See below as an example. [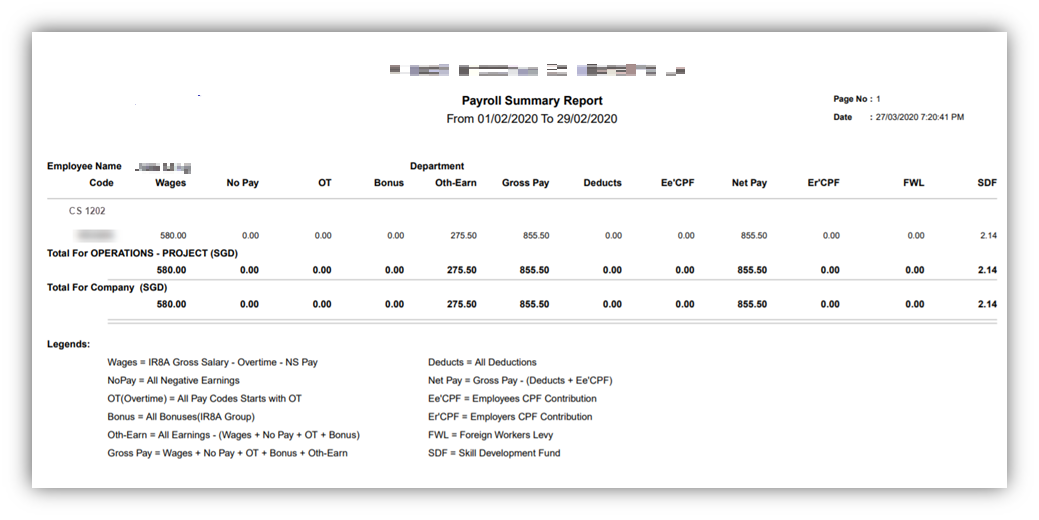](https://wiki.cuteinfocomm.com/uploads/images/gallery/2023-04/image-1682096860974.png)
### Cheque Register Report
The **Cheque Register t**ab in the **Reports** submenu used to generate and view the cheque register report of the employee. The cheque register report shows the issued cheque detail of the employee.
To generate and view the cheque register report,
1. Click **Cheque Register** in the **Reports,** the **Cheque Register** page opens.
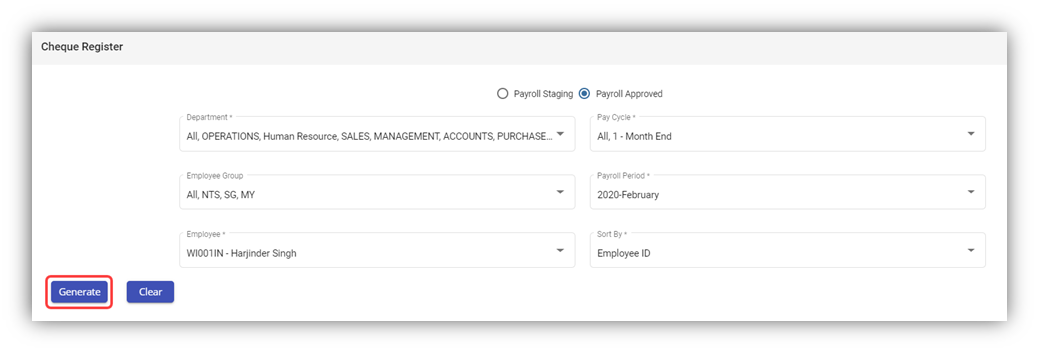**Note:** You can generate the cheque register report for any employee in both the Payroll in Staging and Payroll Approved stages.
2. Select any one from **Payroll in Staging** or **Payroll Approved**.
3. In the **Department** box, select a department from a drop-down list.
**Note**: If you want to select all the departments in the list, select the checkbox of the **ALL**.
4. In the **Pay Cycle** box, select a pay cycle from a drop-down list.
**Note**: If you want to select all the pay cycles in the list, select the checkbox of the **ALL**.
5. In the **Employee Group** box, select an employee group from a drop-down list.
**Note**: If you want to select all the employee groups in the list, select the checkbox of the **ALL**.
6. In the **Payroll Period** box, select a payroll period from a drop-down list.
**Note**: If you want to select all the payroll periods in the list, select the checkbox of the **ALL**.
7. In the **Employee** box, select an employee from a drop-down list.
**Note**: If you want to select all the employees in the list, select the checkbox of the **ALL**.
8. If you want to generate the payroll journal summary report based on the **Employee ID** or **Employee Name**, select the respective option in the **Sort By** box.
9. Click **Generate**. The cheque register report will be generated and downloaded as a PDF file. See below as an example.
[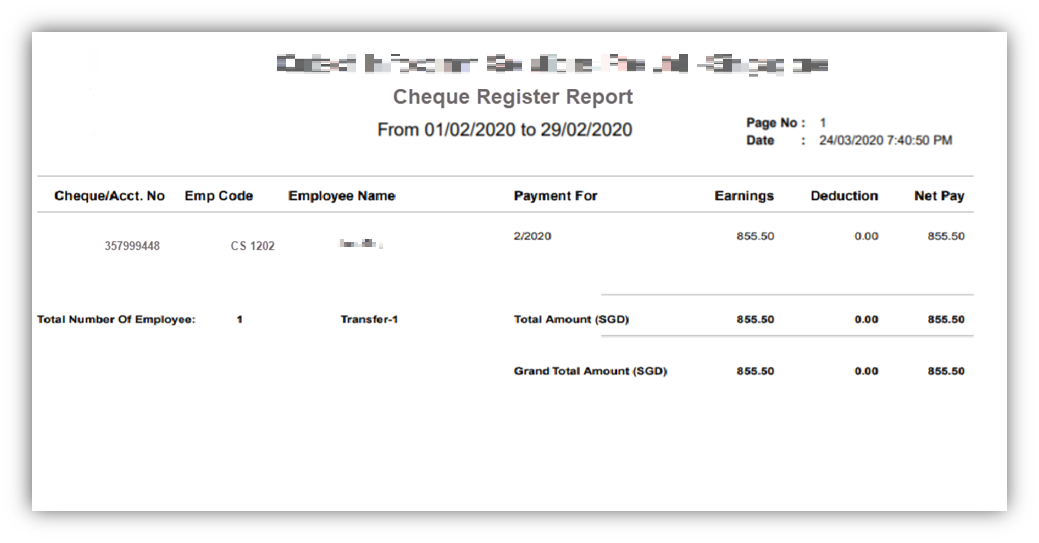](https://wiki.cuteinfocomm.com/uploads/images/gallery/2023-04/image-1682096933162.png)
### Donation Report
The **Donation Report** tab in the **Reports** submenu used to generate and view the donation report of the employee. The donation report shows the amount deducted for donation given by the employee.
To generate and view the donation report,
1. Click **Donation Report** in the **Reports,** the **Donation Report** page opens.
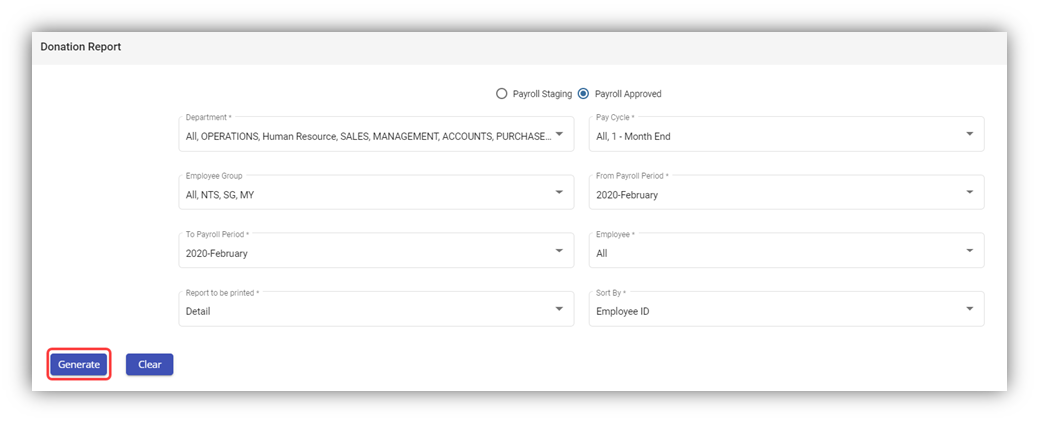**Note:** You can generate the donation report for any employee in both the Payroll in Staging and Payroll Approved stages.
2. Select any one from **Payroll in Staging** or **Payroll Approved**.
3. In the **Department** box, select a department from a drop-down list.
**Note**: If you want to select all the departments in the list, select the checkbox of the **ALL**.
4. In the **Pay Cycle** box, select a pay cycle from a drop-down list.
**Note**: If you want to select all the pay cycles in the list, select the checkbox of the **ALL**.
5. In the **Employee Group** box, select an employee group from a drop-down list.
**Note**: If you want to select all the employee groups in the list, select the checkbox of the **ALL**.
6. In the **From** **Payroll Period** and **To Payroll Period** boxes, select the from and to payroll periods.
7. In the **Employee** box, select an employee from a drop-down list.
**Note**: If you want to select all the employees in the list, select the checkbox of the **ALL**.
8. In the **Report to be print** box, if you want to generate the donation report as a summary report, select **Summary** or if you want to generate the donation report as a detail report, select **Detail**.
9. If you want to generate the payroll journal summary report based on the **Employee ID** or **Employee Name**, select the respective option in the **Sort By** box.
10. Click **Generate**. The donation report will be generated and downloaded as a PDF file. See below as an example. [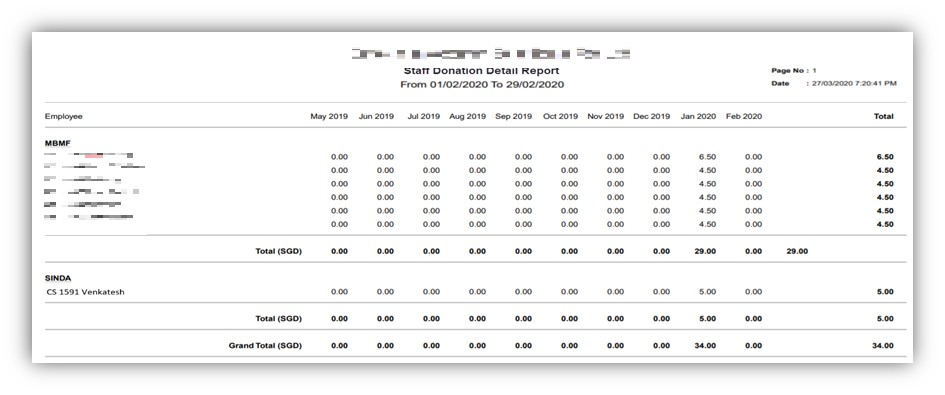](https://wiki.cuteinfocomm.com/uploads/images/gallery/2023-04/image-1682096982419.png)
### Liabilities Report
The **Liabilities** tab in the **Reports** submenu used to generate and view the liabilities report of the employee. The liabilities report shows the details Skill Development Levy (SDL) paid by the company for the particular employee. To generate and view the liabilities report,
1. Click **Liabilities** in the **Reports,** the **Liabilities** page opens.
**Note:** You can generate the liabilities report for any employee in both the Payroll in Staging and Payroll Approved stages.
2. Select any one from **Payroll in Staging** or **Payroll Approved**.
3. In the **Department** box, select a department from a drop-down list.
**Note**: If you want to select all the departments in the list, select the checkbox of the **ALL**.
4. In the **Pay Cycle** box, select a pay cycle from a drop-down list.
**Note**: If you want to select all the pay cycles in the list, select the checkbox of the **ALL**.
5. In the **Employee Group** box, select an employee group from a drop-down list.
**Note**: If you want to select all the employee groups in the list, select the checkbox of the **ALL**.
6. In the **Payroll Period** **From** and **Payroll Period** **To** boxes, select the from and to payroll periods.
7. In the **Employee** box, select an employee from a drop-down list.
**Note**: If you want to select all the employees in the list, select the checkbox of the **ALL**.
8. In the **Report to be print** box, if you want to generate the donation report as a summary report, select **Summary** or if you want to generate the donation report as a detail report, select **Detail**.
9. If you want to generate the payroll journal summary report based on the **Employee ID** or **Employee Name**, select the respective option in the **Sort By** box.
10. Click Generate. The liabilities report will be generated and downloaded as a PDF file. See below as an example.
[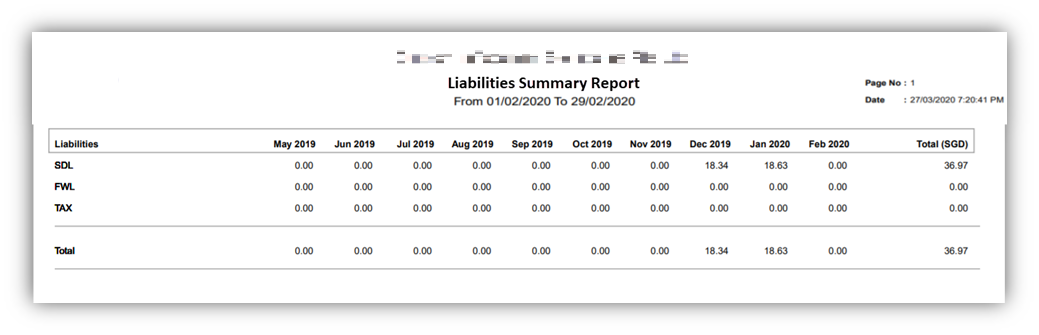](https://wiki.cuteinfocomm.com/uploads/images/gallery/2023-04/image-1682100861122.png)
### Yearly Payroll Report
The Yearly Payroll Report tab in the Reports submenu used to generate and view the yearly payroll report of the employee. The yearly payroll report shows the details of the yearly payroll paid by the company for the particular employee.
To generate and view the yearly payroll report,
1. Click **Yearly Payroll Report** in the **Reports,** the **Yearly Payroll Report** page opens.
**Note:** You can generate the yearly payroll report for any employee in both the Payroll in Staging and Payroll Approved stages.
2. Select any one from **Payroll in Staging** or **Payroll Approved**.
3. In the **Department** box, select a department from a drop-down list.
**Note**: If you want to select all the departments in the list, select the checkbox of the **ALL**.
4. In the **Pay Cycle** box, select a pay cycle from a drop-down list.
**Note**: If you want to select all the pay cycles in the list, select the checkbox of the **ALL**.
5. In the **Employee Group** box, select an employee group from a drop-down list.
**Note**: If you want to select all the employee groups in the list, select the checkbox of the **ALL**.
6. In the **From** **Payroll Period** and **To** **Payroll Period** boxes, select the from and to payroll periods.
7. In the **Employee** box, select an employee from a drop-down list.
**Note**: If you want to select all the employees in the list, select the checkbox of the **ALL**.
8. In the **Report to be print** box, if you want to generate the donation report as a summary report, select **Summary** or if you want to generate the donation report as a detail report, select **Detail**.
9. If you want to generate the payroll journal summary report based on the **Employee ID** or **Employee Name**, select the respective option in the **Sort By** box.
10. Click **Generate**. The yearly payroll report will be generated and downloaded as a PDF file. See below as an example.
[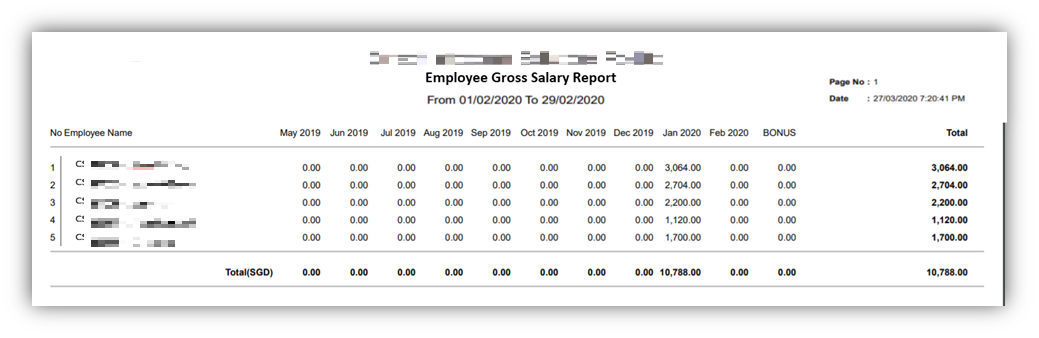](https://wiki.cuteinfocomm.com/uploads/images/gallery/2023-04/image-1682101066508.png)
### Generate CPF Submission File
The **Generate CPF Submission File** tab in the **Reports** submenu used to generate and view the CPF submission file of the employee. The CPF submission file shows the details of the CPF submission file for the particular employee.
To generate and view the CPF submission file,
1. Click **Generate CPF Submission File** in the **Reports,** the **Generate CPF Submission File** page opens.
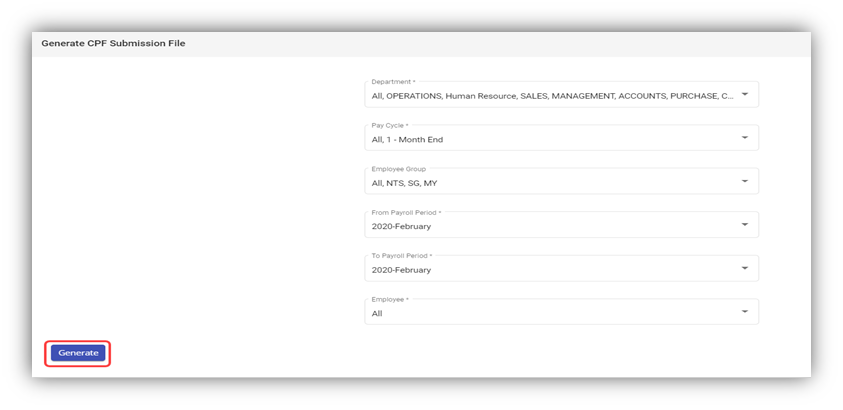
2. In the **Department** box, select a department from a drop-down list.
**Note**: If you want to select all the departments in the list, select the checkbox of the **ALL**.
3. In the **Pay Cycle** box, select a pay cycle from a drop-down list.
**Note**: If you want to select all the pay cycles in the list, select the checkbox of the **ALL**.
4. In the **Employee Group** box, select an employee group from a drop-down list.
**Note**: If you want to select all the employee groups in the list, select the checkbox of the **ALL**.
5. In the **From** **Payroll Period** and **To** **Payroll Period** boxes, select the from and to payroll periods.
6. In the **Employee** box, select an employee from a drop-down list.
**Note**: If you want to select all the employees in the list, select the checkbox of the **ALL**.
7. Click **Generate**. The CPF submission file will be generated and downloaded as a .txt file. User can use it to upload to CPF portal.
Instead of going to the cpf portal, you can submit the data directly from cuteOffice.
[https://www.youtube.com/watch?v=HSdC2jrwPU4](https://www.youtube.com/watch?v=HSdC2jrwPU4 "Submit to CPF board from cuteOffice") Use the video to see how easily we can submit to CPF Board directly.
Upon generating the file, click on Submit CPF buttton.
[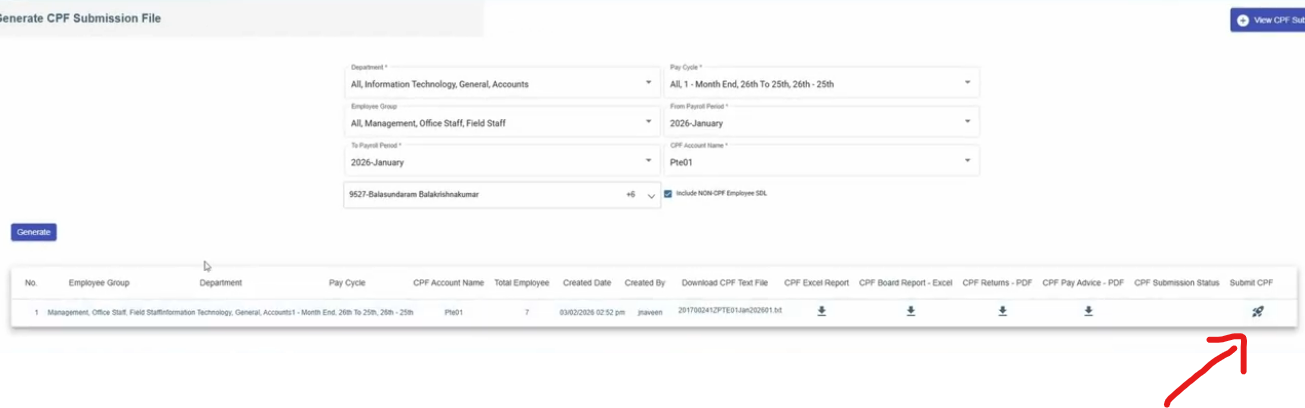](https://wiki.cuteinfocomm.com/uploads/images/gallery/2026-02/image-1772108520303.png)
Select the second tab.
[](https://wiki.cuteinfocomm.com/uploads/images/gallery/2026-02/image-1772108575715.png)
Select Direct Debit and choose Date of payment. Click acceptance for declaration and click proceed to submit.
[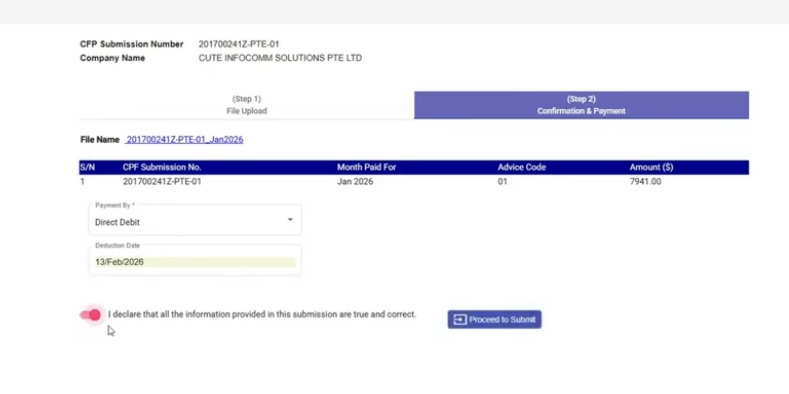](https://wiki.cuteinfocomm.com/uploads/images/gallery/2026-02/image-1772108589443.png)
Login with Singpass.
[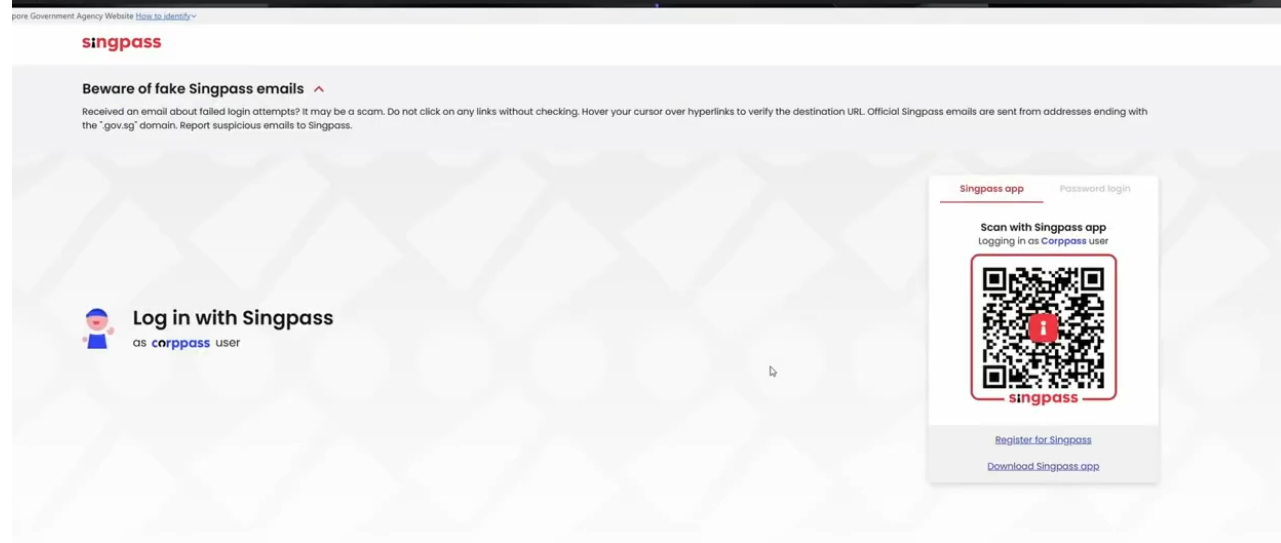](https://wiki.cuteinfocomm.com/uploads/images/gallery/2026-02/image-1772108619936.png)
Allow to submit from cuteOffice for your behalf.
[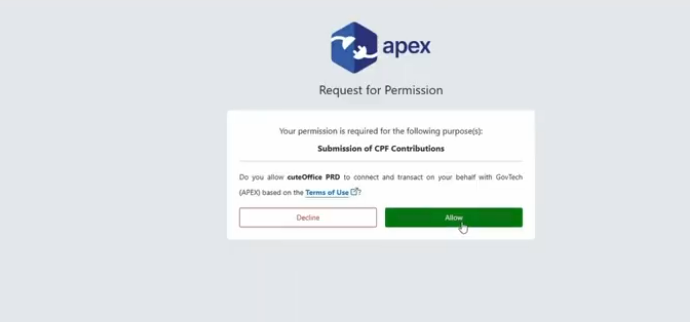](https://wiki.cuteinfocomm.com/uploads/images/gallery/2026-02/image-1772108641558.png)
Status will be displayed, Click Ok.
[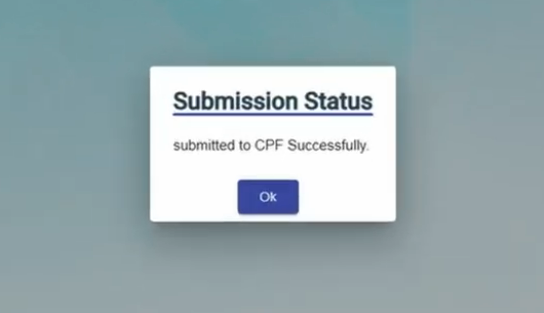](https://wiki.cuteinfocomm.com/uploads/images/gallery/2026-02/image-1772108677416.png)
The submission status is shown for reference. You will receive the email confirmation from CPF board.
[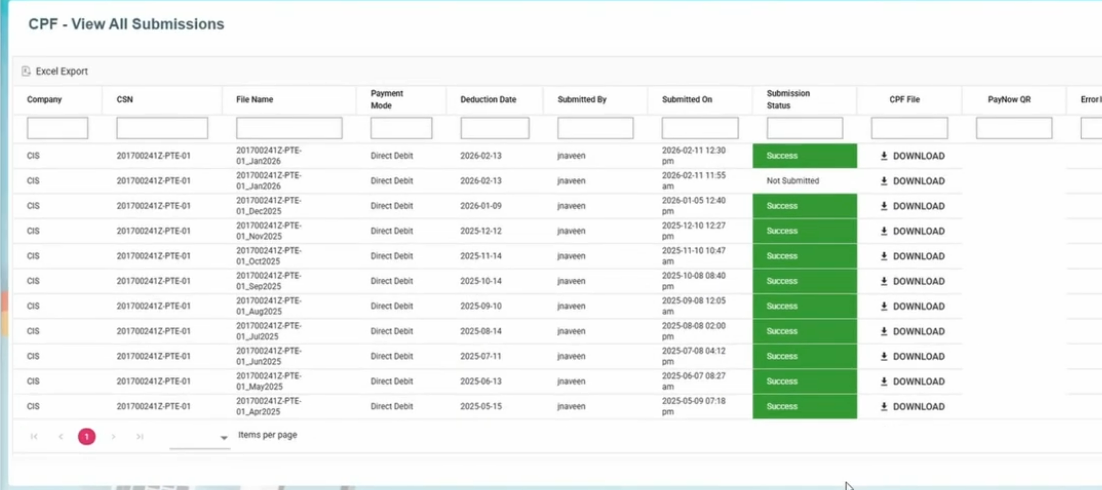](https://wiki.cuteinfocomm.com/uploads/images/gallery/2026-02/image-1772108692281.png)
Alternatively, if you want to submit in the CPF portal, below option can be chosen.
[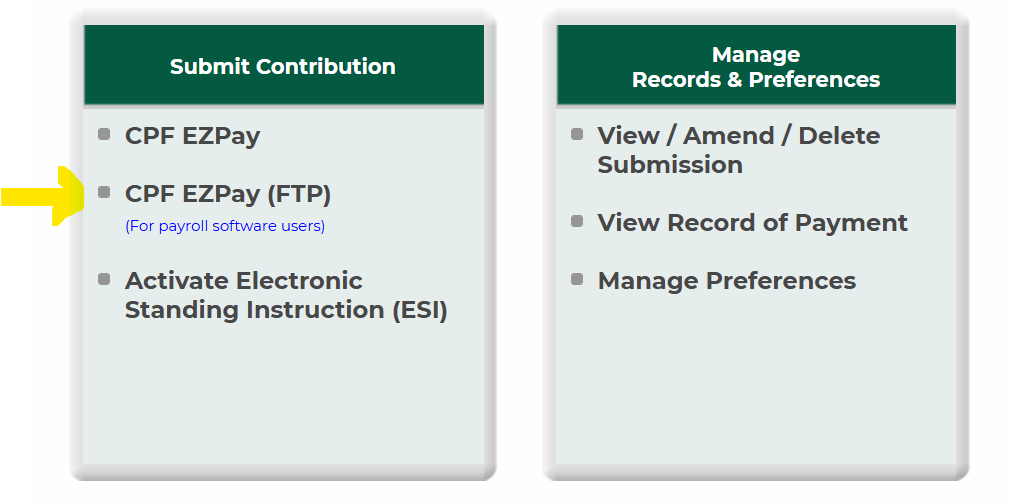](https://wiki.cuteinfocomm.com/uploads/images/gallery/2024-11/image-1730519612176.png)
[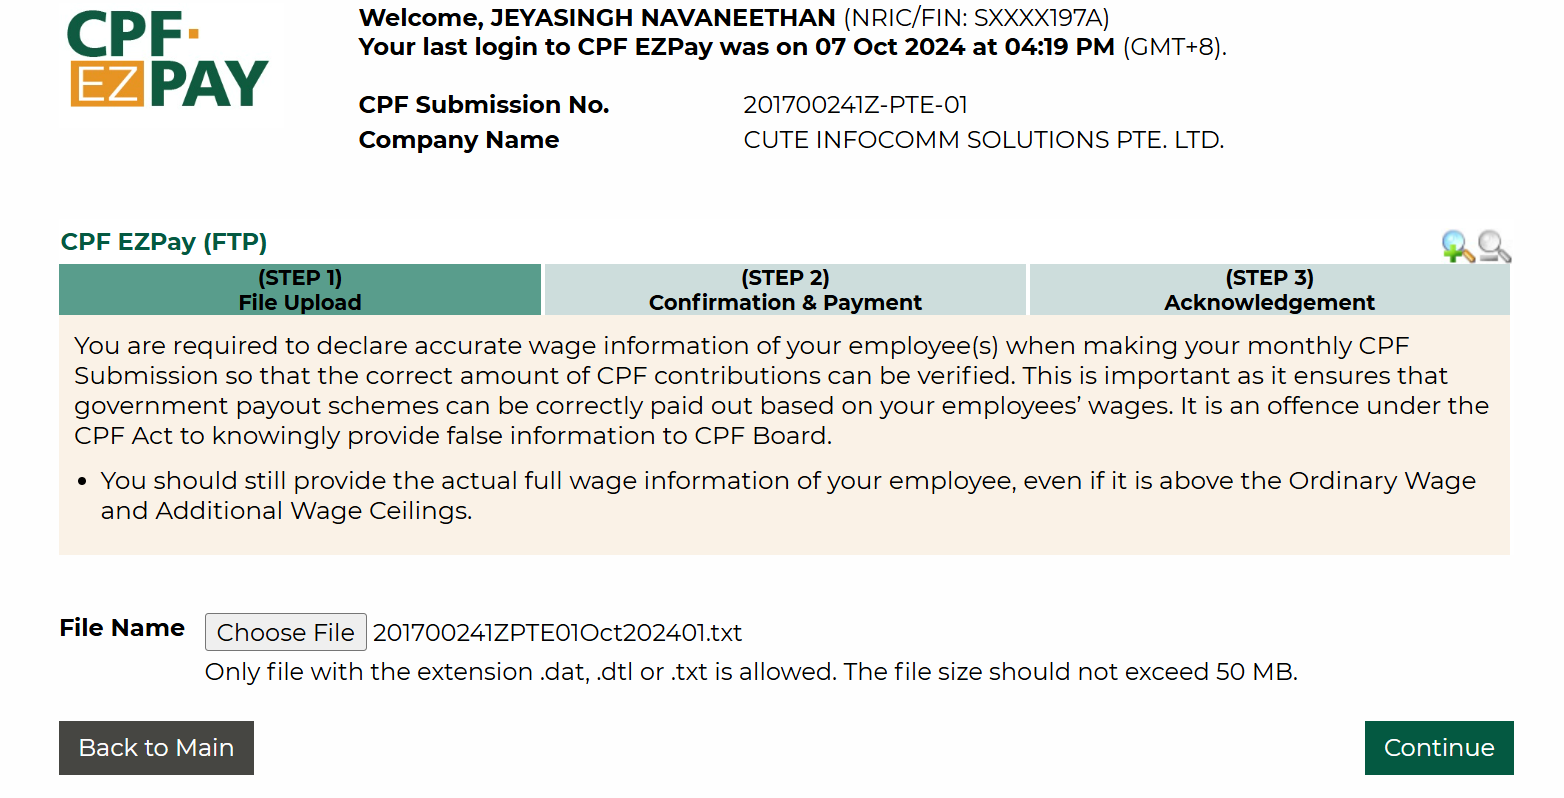](https://wiki.cuteinfocomm.com/uploads/images/gallery/2024-11/image-1730519646966.png)
In the next screen, select the date of deduction and select method of payment and proceed.
[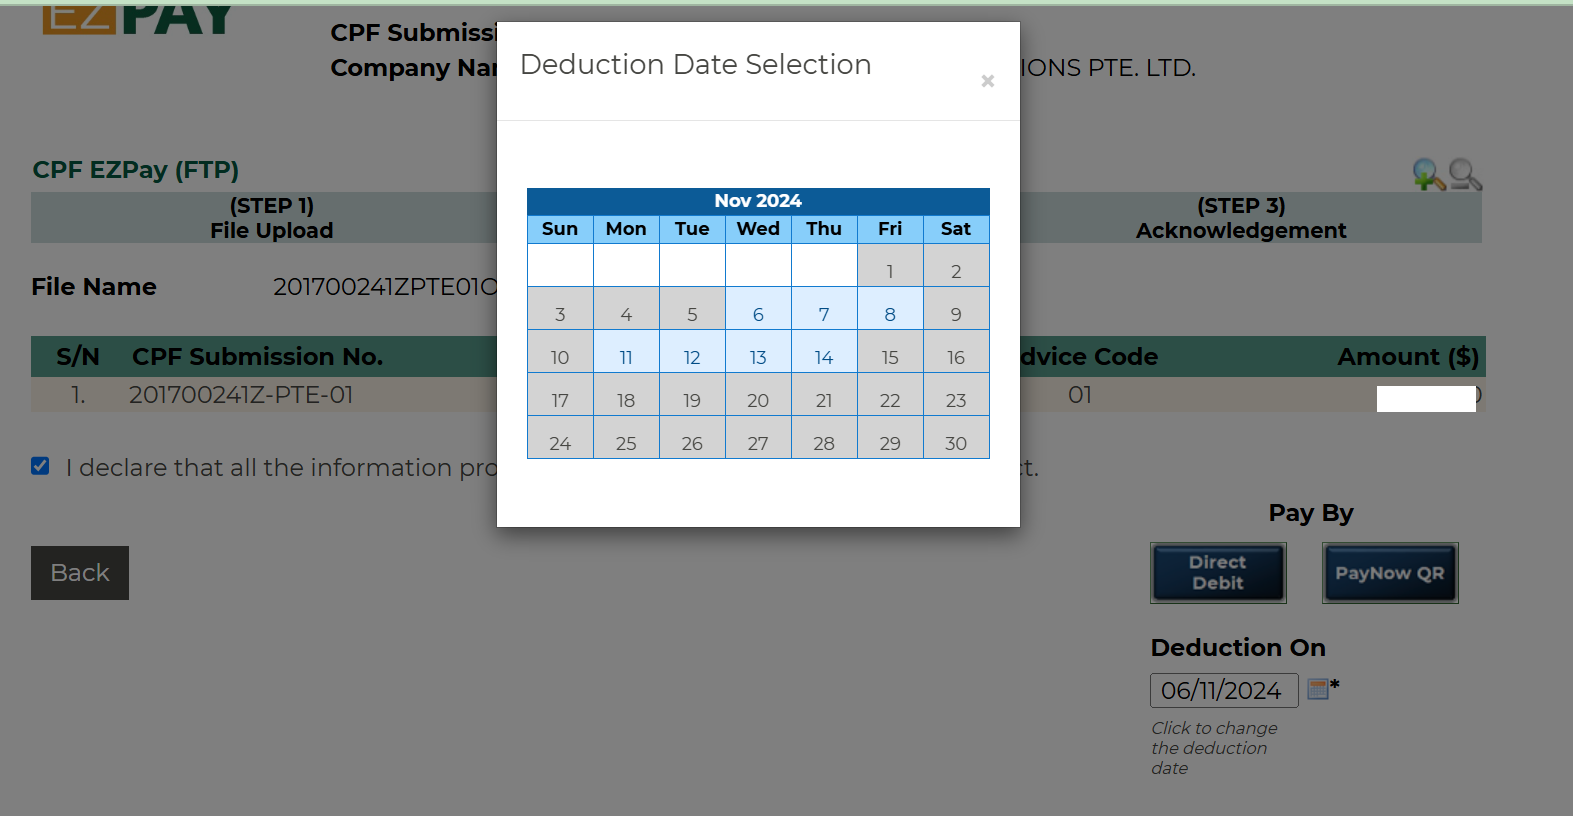](https://wiki.cuteinfocomm.com/uploads/images/gallery/2024-11/image-1730519784321.png)
[](https://wiki.cuteinfocomm.com/uploads/images/gallery/2024-11/image-1730519850252.png)
Download and keep the acknowledge slip if required.
cuteOffice has "One Stop Payroll" to submit OED , CPF and AIS submission.
The permission for AIS submission is "payroll - > aisSubmission"
### Generate General Interbank Recurring Order (GIRO) Bank File
The **Generate GIRO Bank File** tab in the **Reports** submenu used to generate and view the GIRO bank file of the employee. The GIRO is used to make monthly payment to the billing organization (BO) from your account directly. The GIRO bank file shows the details of the GIRO.
Check the youTube video link for same details
[https://youtu.be/kz7YNF3nR\_M](https://youtu.be/kz7YNF3nR_M "How to upload a bank Giro file from DBS")
To generate and view the GIRO bank file,
1. Click **Generate GIRO Bank File** in the **Reports,** the **Generate GIRO Bank File** page opens.
[](https://wiki.cuteinfocomm.com/uploads/images/gallery/2022-07/image-1657407137538.png)
2. In the **Department** box, select a department from a drop-down list.
**Note**: If you want to select all the departments in the list, select the checkbox of the **ALL**.
3. In the **Pay Cycle** box, select a pay cycle from a drop-down list.
**Note**: If you want to select all the pay cycles in the list, select the checkbox of the **ALL**.
4. In the **Employee Group** box, select an employee group from a drop-down list.
**Note**: If you want to select all the employee groups in the list, select the checkbox of the **ALL**.
5. In the **Payroll Period** box, select the payroll period.
6. In the **Origin Bank** box, select the origin bank from the drop-down list.
7. In the **Employee** box, select an employee from a drop-down list.
**Note**: If you want to select all the employees in the list, select the checkbox of the **ALL**.
8. Click **Generate**. The generate GIRO bank file will be generated and downloaded as a .txt file. User can upload to bank portal.
**Note:** For DBS bank, when uploading GIRO bank file, kindly ensure you have selected the correct format in IDEAL as “New Interbank Giro Format” in DBS file upload portal.
- - - - - Upload the GIRO bank file
- Choose Payment Type as Payroll
- Select Payroll - New Inter Bank GIRO
- Approval Option
- Amend Payment date
- Choose either confidential file or Test File
- Click confirm upload
#### **Giro Bank file submission in OCBC Portal**
##### Generate GIRO Bank file
- Click **GIRO Bank** in the **Reports,** the **Generate GIRO Bank File** page opens.
- In the clearing method field, choose either FAST or GIRO method.
- If you choose FAST, the value date change to the date of generating GIRO bank file.
- Click **Generate & Download GIRO Bank File**. The GIRO bank file generated and downloaded as a .txt file. User can upload to OCBC portal.

##### File Submission in OCBC Portal
- Click Transaction on the header
- Select Upload file
- Click file format
- Select file format as **GIROFASTWITHINV**
[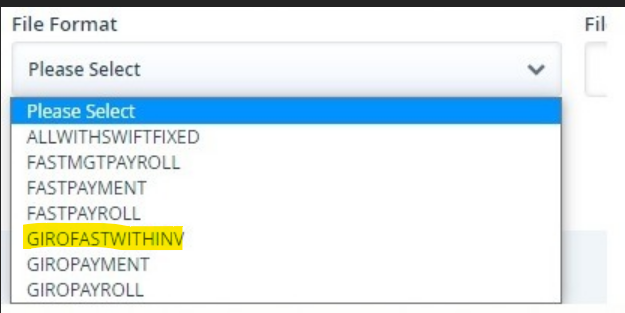](https://wiki.cuteinfocomm.com/uploads/images/gallery/2024-07/image-1720423810782.png)
- Click upload and check the file upload status for uploaded successfully.
Note: If the upload file failed, check the error message and rectify it.
#### **Giro Bank file submission in UOB Portal**
##### File Submission in UOB Portal
- Click “Pay & Transfer”
- Select Upload bulk file
- Proceed to click on “Upload New Bulk Files”
- Click “file type”
- Select “Fast/GIRO Payroll (Employee)” as the file type
- Upload GIRO bank text file generated via payroll's GIRO Bank
- Click submit and check the file upload status for uploaded successfully.
### Generate GIRO Report
CuteOffice payroll allows user to view two GIRO reports before posting GIRO file to the bank: GIRO payment checklist, and GIRO payment summary report.
To generate above reports,
1. Click **GIRO Report** in the **Reports,** the **GIRO report** page opens,[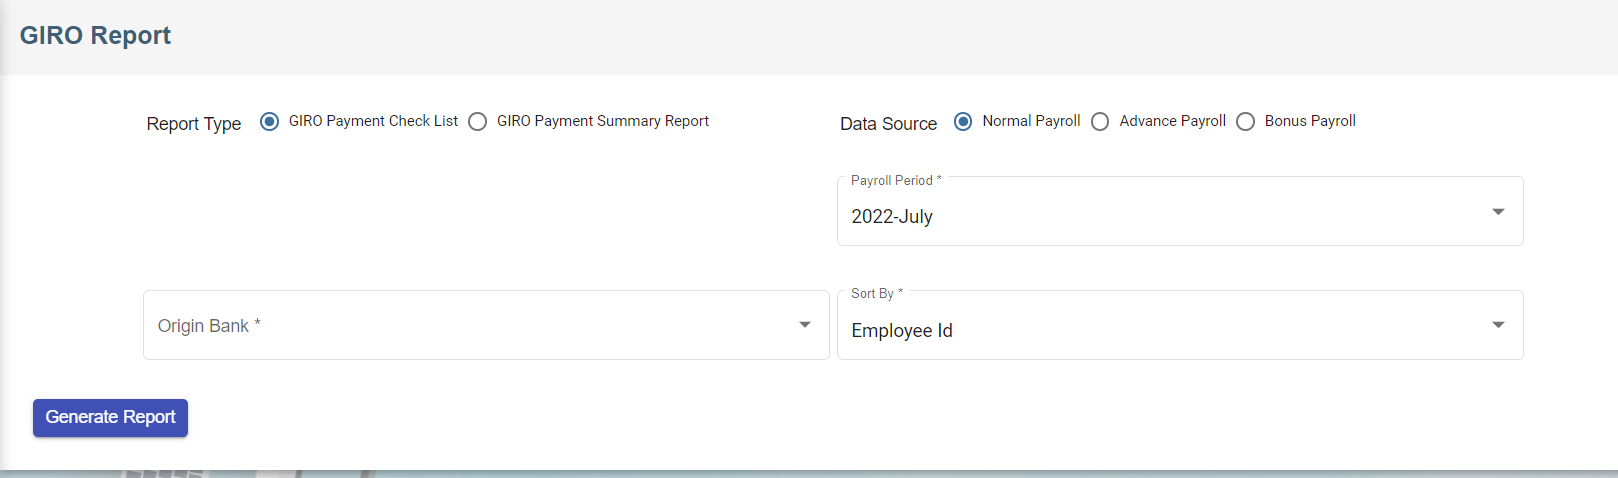](https://wiki.cuteinfocomm.com/uploads/images/gallery/2022-07/image-1657568315695.png)
2. Select report type
3. Select data source
4. Select origin bank
5. Select payroll period
6. Select sort by method
7. Click[ (](https://wiki.cuteinfocomm.com/uploads/images/gallery/2022-07/image-1657568677505.png)Generate Report Icon), the selected report type will be downloaded.
### AIS Submission
The cuteOffice payroll system allows the generation of IR8A file and allow employers to submit the data to IRAS.
Before submitting to IRAS, please make sure your company is registered for Auto inclusion scheme, otherwise the submission cant be done. ([https://www.iras.gov.sg/taxes/individual-income-tax/employers/auto-inclusion-scheme-(ais)-for-employment-income/join-the-auto-inclusion-scheme-(ais)-for-employment-income](https://www.iras.gov.sg/taxes/individual-income-tax/employers/auto-inclusion-scheme-(ais)-for-employment-income/join-the-auto-inclusion-scheme-(ais)-for-employment-income "IRAS Auto inclusion"))
[https://www.youtube.com/watch?v=iTrSy1L8INI](https://www.youtube.com/watch?v=iTrSy1L8INI "Submit to IRAS AIS from cuteOffice") Follow the video for a quick guide on the submission.
Enable the permission "payroll - > aisSubmission" against the role to view the menu.
The below menu will be available
[ ](https://wiki.cuteinfocomm.com/uploads/images/gallery/2026-01/image-1769500323228.png)
[](https://wiki.cuteinfocomm.com/uploads/images/gallery/2026-01/image-1769500347610.png)
To generate IR8A
1. Click **Generate AIS - IRAS** in the **Others,** the **Generate AIS Submissions File** page opens.
[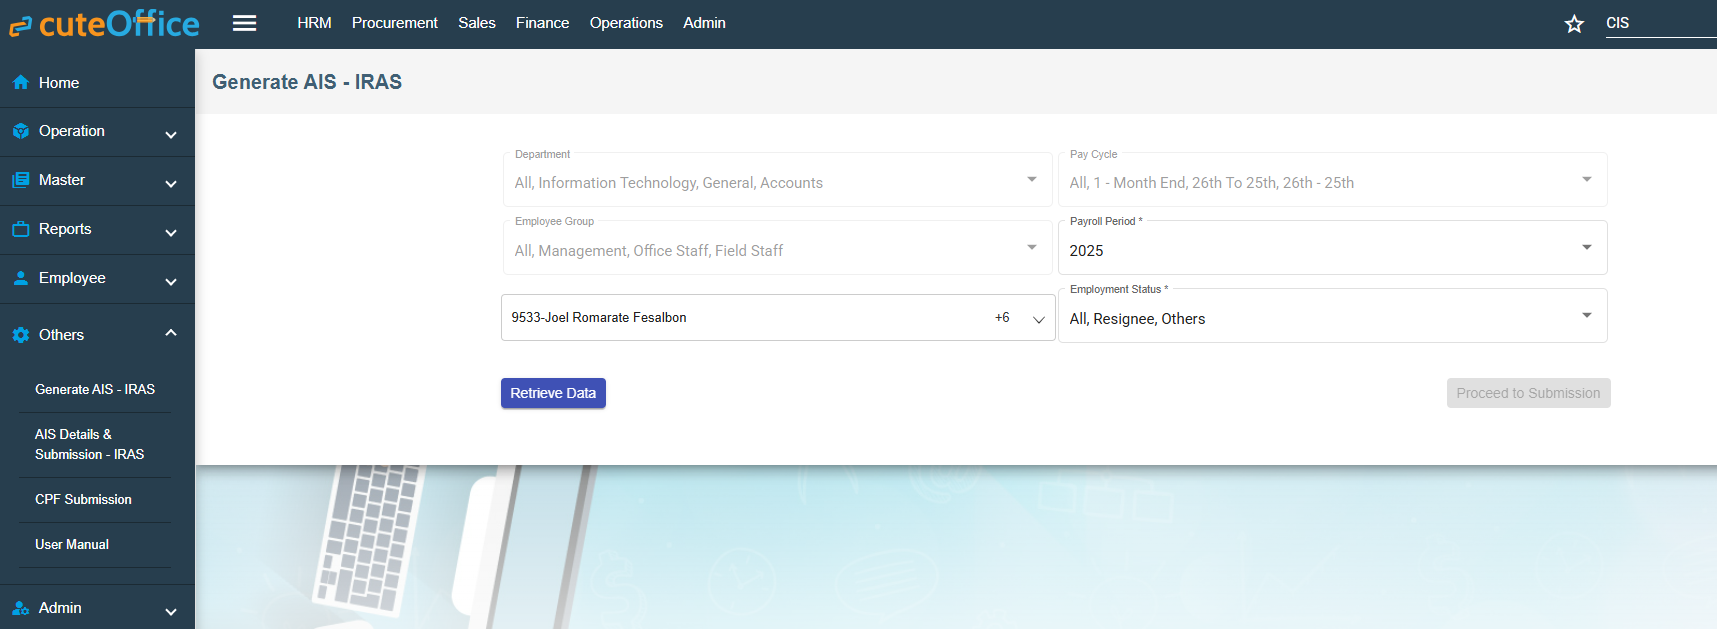](https://wiki.cuteinfocomm.com/uploads/images/gallery/2026-01/image-1769500492701.png)
2. All the **Department** and **Pay Cycle** will be selected.
3. In the **Employee** box, select all employees from a drop-down list. The list is populated based on the last dropdown of employment status.
4. Click Retrieve Data. The below table will be shown. [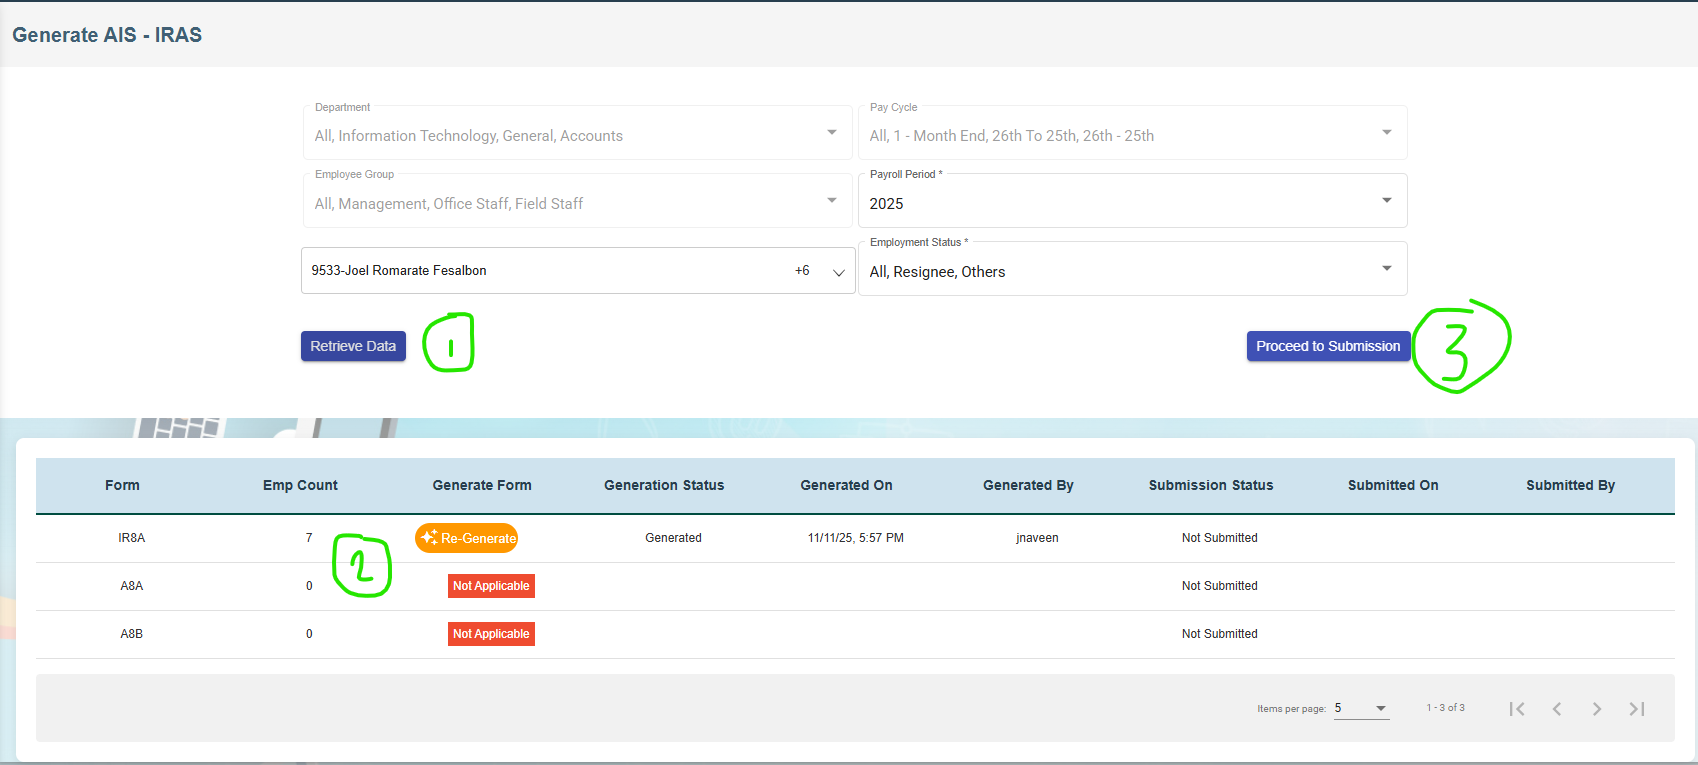](https://wiki.cuteinfocomm.com/uploads/images/gallery/2026-01/image-1769500742435.png)
5. In the **Form Type** IA8A click Generate. If already generated earlier, click Regenerate.
6. Click **Generate**. The success message will appear.
7. Click **Proceed to Submission** button.
[](https://wiki.cuteinfocomm.com/uploads/images/gallery/2026-01/image-1769500907859.png)
11. Click [ (Print ](https://wiki.cuteinfocomm.com/uploads/images/gallery/2022-07/image-1657255085239.png)icon) to generate the IR8A form for each employee to download if required.
12. Before approving, the data can be edited if required.
13. [Select all employees and click Approve submission button. ](https://wiki.cuteinfocomm.com/uploads/images/gallery/2026-01/image-1769501135579.png)
14. Once approved the summary will be shown and ready for submission.
15. [](https://wiki.cuteinfocomm.com/uploads/images/gallery/2026-01/image-1769502368420.png)
16. Click Proceed to IRAS - AIS Submission and authenticate using CorpPass.
17. [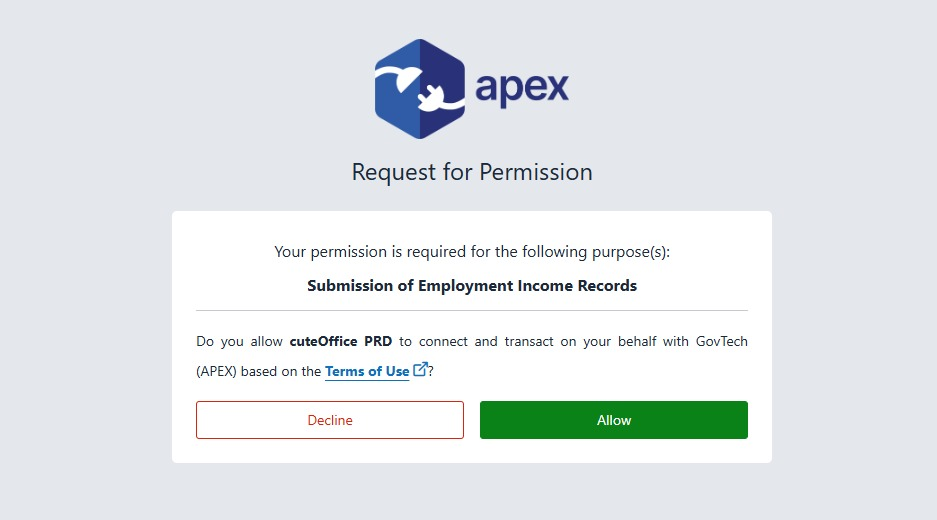](https://wiki.cuteinfocomm.com/uploads/images/gallery/2026-01/image-1769502431001.png)
18. Click Allow to confirm to submit the data to IRAS.
19. The data successfully submitted message will appear.
20. The submitted data can always be checked and verified. [](https://wiki.cuteinfocomm.com/uploads/images/gallery/2026-01/image-1769502607159.png)
Note: If there is a prompt asking to enter Authorised person, ask the administrator to enter the authorised person details in Company->Payroll tab.
[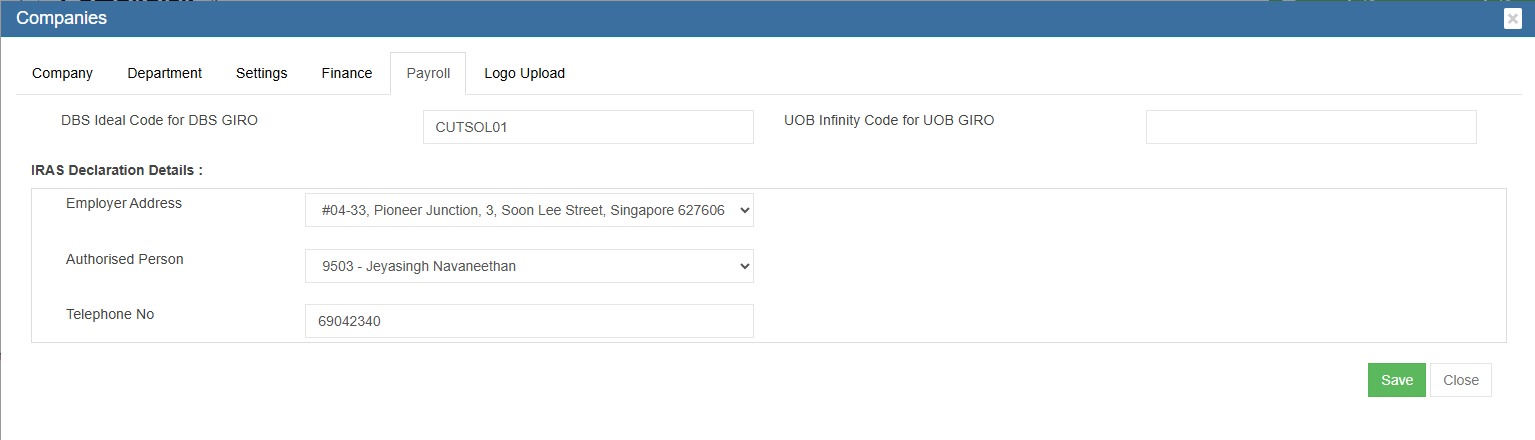](https://wiki.cuteinfocomm.com/uploads/images/gallery/2026-02/image-1770378469101.jpeg)
Note : To import IRAS (manually maintained), enable global settings "enableIRASImport".
Any revision and amendment submission, the below document contains the steps to follow.
[quick-guide-on-making-ais-amendments-at-mytax-portal-(online-application).pdf](https://www.iras.gov.sg/media/docs/default-source/uploadedfiles/pdf/quick-guide-on-making-ais-amendments-at-mytax-portal-(online-application).pdf?sfvrsn=cbdfa153_14)
# Expense Claims
Employees shall submit expense claim forms along with the necessary supporting documents. The system allows expense claims to be saved and maintained as drafts for future completion. Claim can be verified and approved by the management, and the entire workflow is fully customized by client requirement.
#### New Claim
To add new expense claim, the below steps as to be followed.
1. Click Expense menu
2. Click Expense Claim [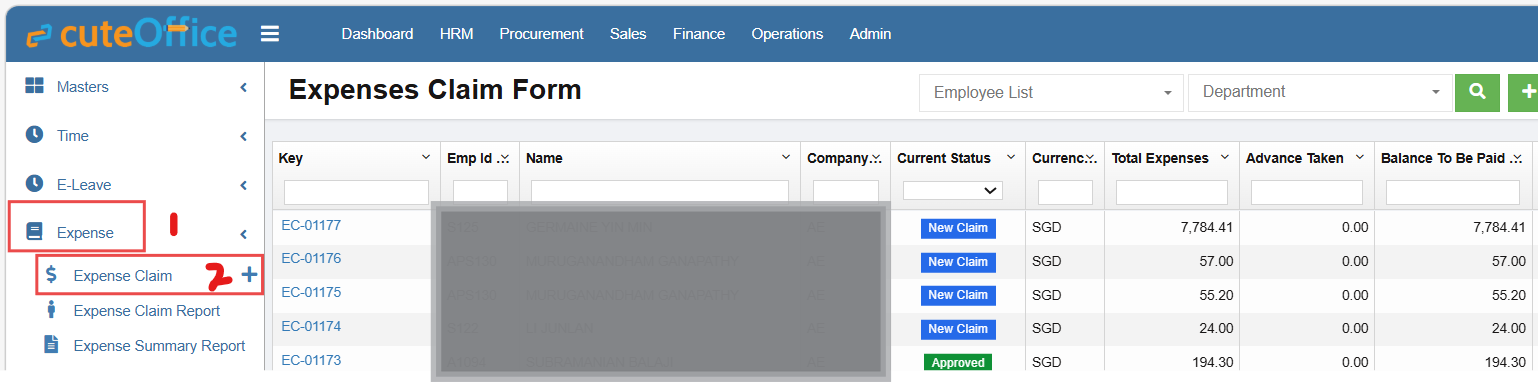](https://wiki.cuteinfocomm.com/uploads/images/gallery/2026-05/image-1778741715500.png)
3. Click add button on the top right corner [ ](https://wiki.cuteinfocomm.com/uploads/images/gallery/2026-05/image-1778741821794.png)[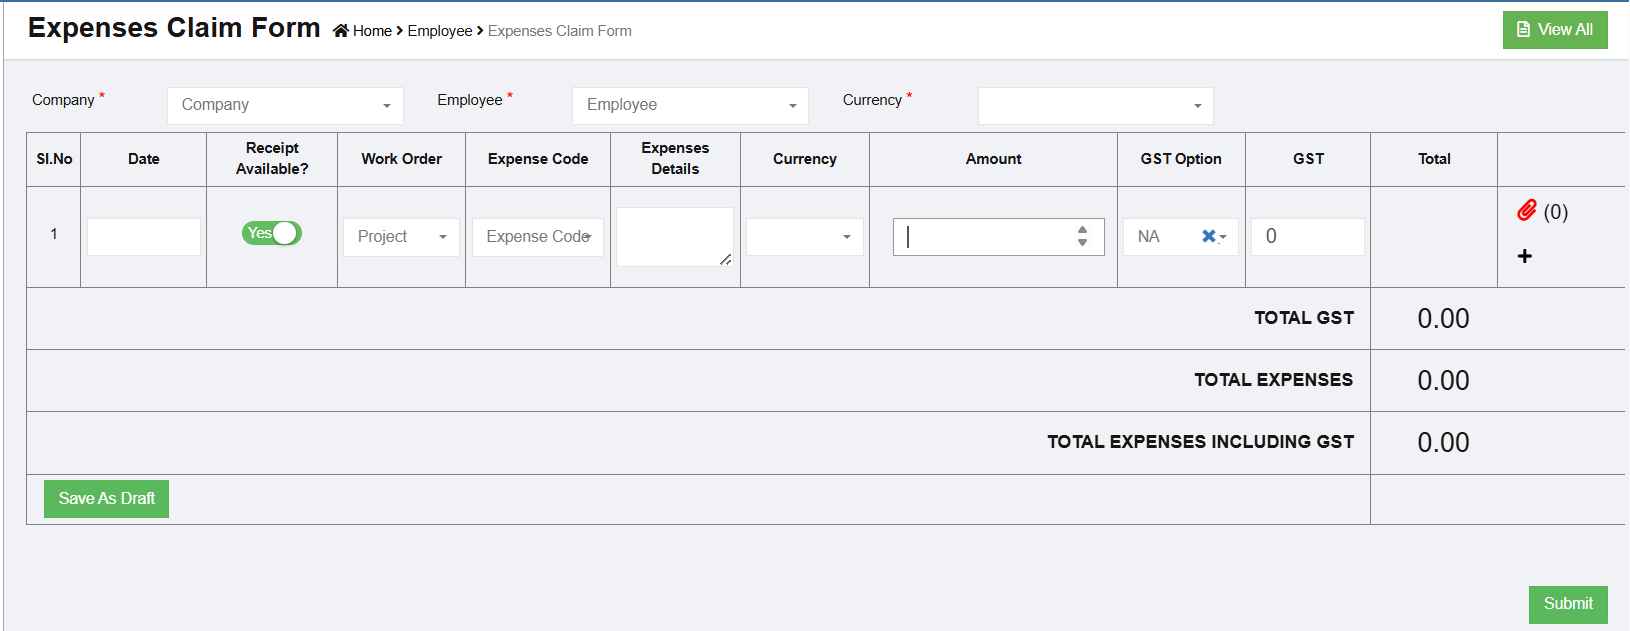](https://wiki.cuteinfocomm.com/uploads/images/gallery/2026-05/image-1778741974664.png)
4. Choose Company, Employee name, Currency, Date, Work Order (Project), Expense Code (integrated with Finance Claim code Master), Expenses details (open text), currency, Amount, GST Option and Attachment.
5. Click Add icon beside to attachment icon to add next line item.
6. Click Save as Draft
7. Click Submit [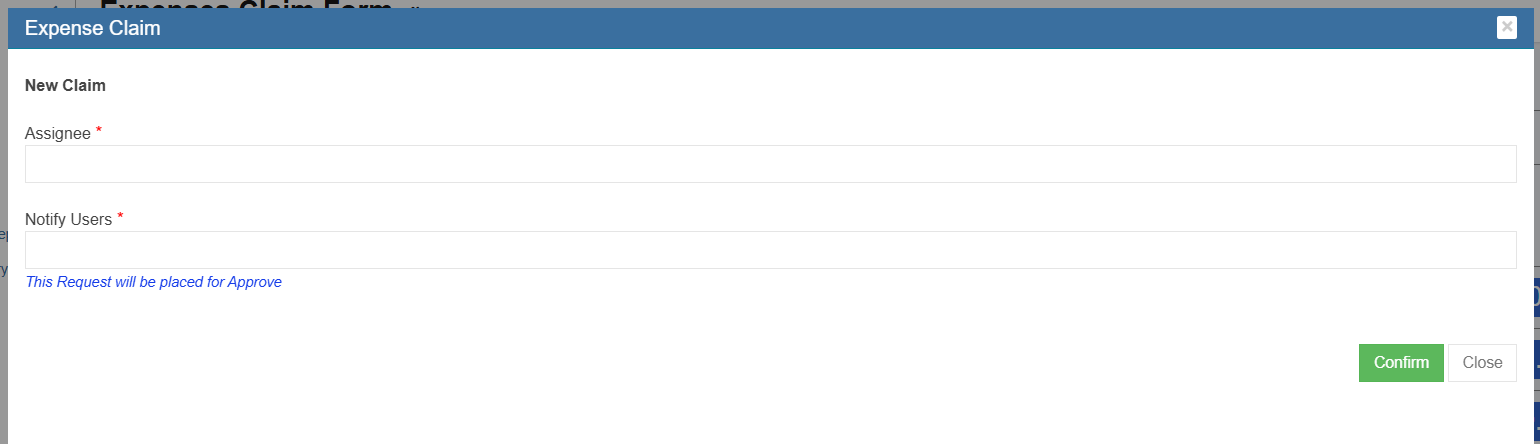](https://wiki.cuteinfocomm.com/uploads/images/gallery/2026-05/image-1778742781910.png)
8. Add Assignee and Notify Users for Approval.
9. Click Confirm
10. Assignee can verify and approve/return/reject/cancel the record. [](https://wiki.cuteinfocomm.com/uploads/images/gallery/2026-05/image-1778753506950.png)
11. The status change from "New Claim" to "Approved" in the view all page. [](https://wiki.cuteinfocomm.com/uploads/images/gallery/2026-05/image-1778743111278.png)
12. Click "Post to Account" to post the record in Finance "Expense Claim Staging".
13. Navigate to Finance Module
14. Click Integration Staging
15. Click Expense Claim Staging
16. Click edit and save the record. [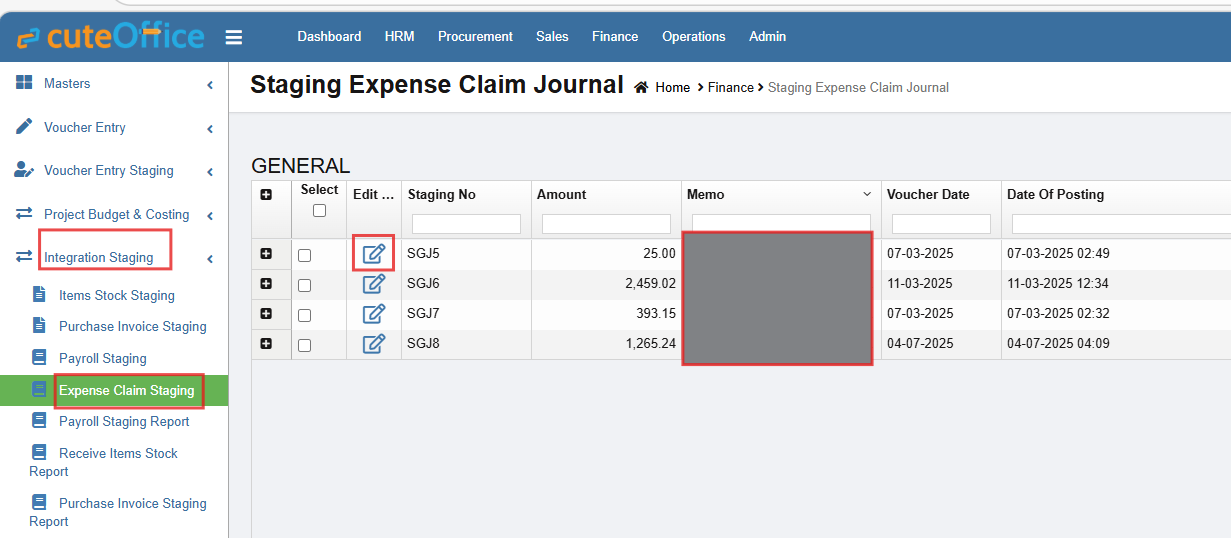 ](https://wiki.cuteinfocomm.com/uploads/images/gallery/2026-05/image-1778744062347.png)
[](https://wiki.cuteinfocomm.com/uploads/images/gallery/2026-05/image-1778744157106.png)